LG Electronics USA 9QKE00711 HD Cable DVR STB User Manual 1
LG Electronics USA HD Cable DVR STB 1
manual
Dual Tuner DVR STB Users Manual (Draft Version)
( Model : LSK279-8TZM )
Author : DTV Research Lab D1 Group
November. 14, 2007
1/12
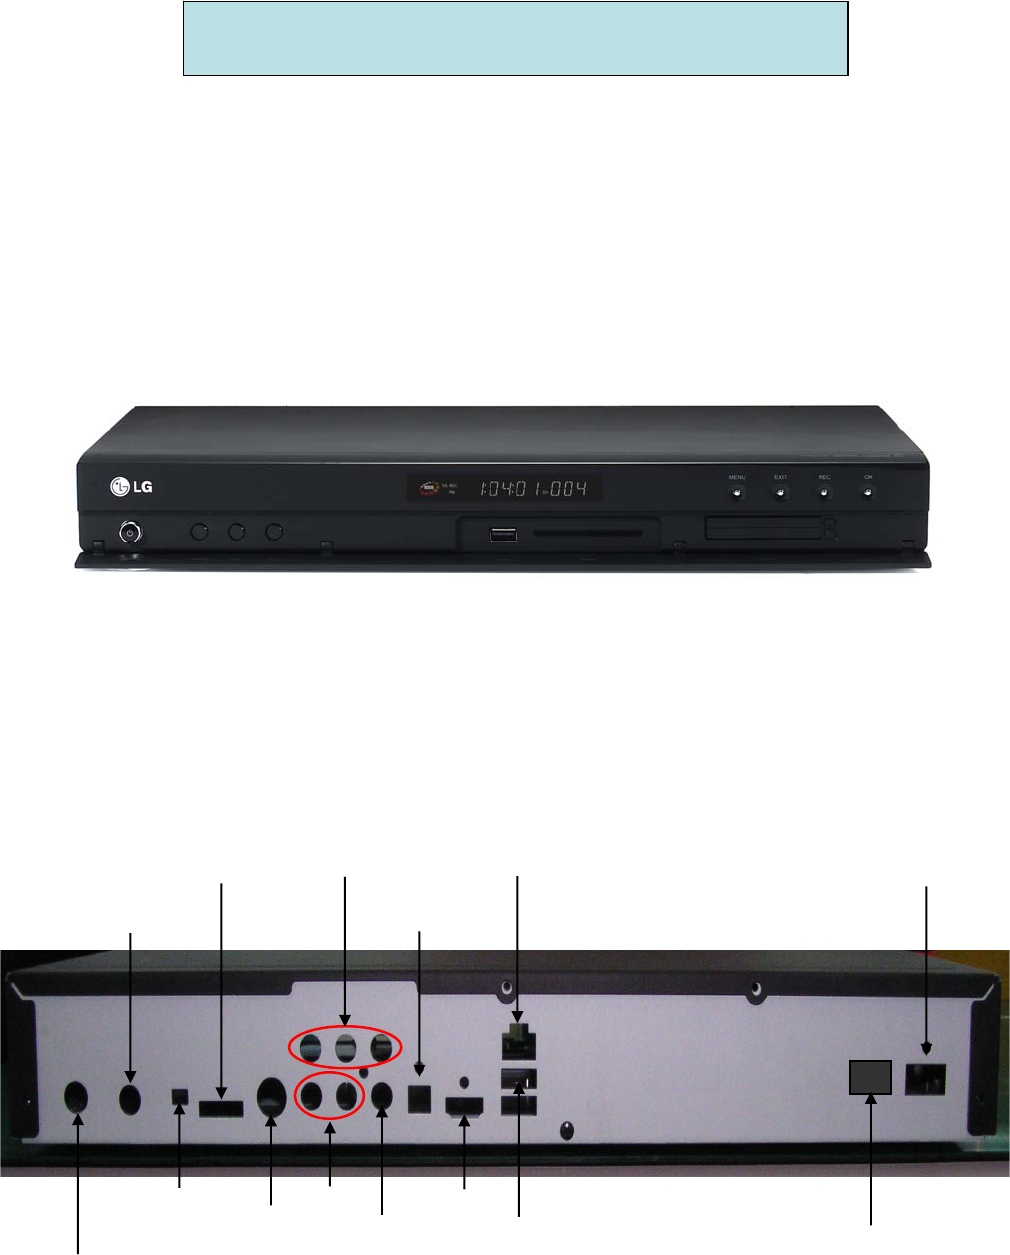
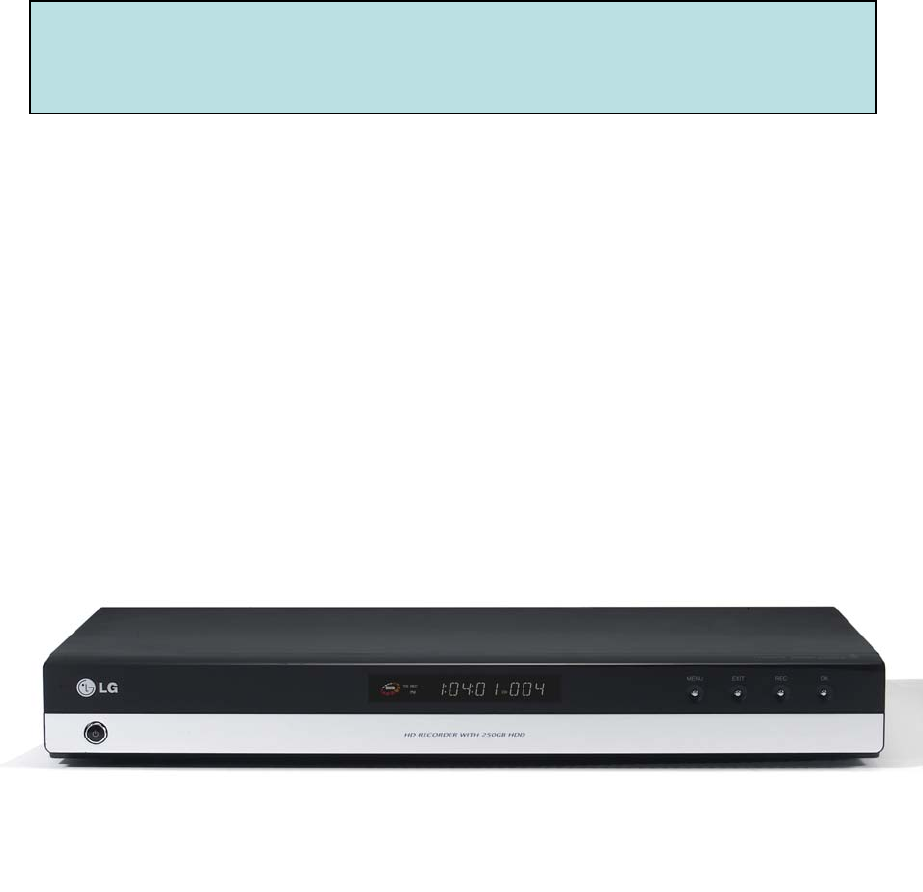
Front & Rear Panel Specification
[ Front Panel Layout ]
[ Rear Panel Layout ]
2/12
Cable In
Cable Out
(loop-through)
Ethernet
S-Video Composite
Component
SPDIF
(Optical)
HDMI
AC Accessory
Outlet
Audio (L/R)
USB
iEEE-1394
External
SATA
AC Inlet

NOTE: This equipment has been tested and found to comply with the limits for a Class B digital device,
pursuant to part 15 of the FCC Rules. These limits are designed to provide reasonable
protection against harmful interference in a residential installation. This equipment generates
uses and can radiate radio frequency energy and, if not in-stalled and used in accordance
with the instructions, may cause harmful interference to radio communications.
However, there is no guarantee that interference will not occur in a particular installation.
If this equipment does cause harmful interference to radio or television reception,
which can be determined by turning the equipment off and on, the user is encouraged to try to
correct the interference by one or more of the following measures:
—Reorient or relocate the receiving antenna.
—Increase the separation between the equipment and receiver.
—Connect the equipment into an outlet on a circuit different from that to which
the receiver is connected.
—Consult the dealer or an experienced radio/ TV technician for help.
FCC Rules
“Changes or modifications not expressly approved by the party responsible
for compliance could void the user’s authority to operate the equipment.”
Remote Control Lay-out
Basic Function + Hot Key
Navigation Key
Number + Character Input Key
Picture in Picture
Layout
Remote Controller
Remote Control Lay-out
* Requirement : ALL Classes of NGSTB's shall be able to receive signal transmitted by Motorola DRC800
and Philips RC1445301 remote controls and correctly interpret the IR code transmitted.
* Remote Control IR Codes
REMOTE control Key /IR code Mapping shall conform to the following table:
Key Name IR code
00
11
22
33
44
55
66
77
88
99
POWER 0A
CHAN + 0B
CHAN - 0C
V
OL + 0D
V
OL - 0E
MUTE 0F
SELECT/OK 11
EXIT 12
LAST CHANNEL 13
INPUT/RF BYPASS 14
FAVORITE 15
A (Y ellow T rian gle) 17
MENU 19
V
OD 1A
PLAY 1B
STOP 1C
FAST FORWARD 1D
REWIND 1E
PAUSE 1F
PiP ON/OFF 22
PiP SWAP 23
B (Blue Square) 27
C (Red Circle) 28
D (Green Diamond) 29
GUIDE 30
RECORD 31
IN F O 33
UP 34
DOWN 35
LEFT 36
RIGHT 37
REPLAY 3C
LIS T (D IG IT AL REC O RD IN G S) 3D
SK IP F O RW AR D 3F
A
SPECT 40
FiOS TV 41
Options 42
Widgets 43
*/CC 44
Remote Controller

Feature Description Method
OpenCable
Compliant
HD STB
A standard Interface
between OpenCable HD
STB and CableCARD
Module that handles CAS.
Creation of a bidirectional
OpenCable HD STB that satisfies
digital cable broadcast standard
using Broadcom Cable Chip
(BCM7400)
M-CARD UDCP Verification
Digital Cable
Signal
Transmission/Re
ception
In-Band Channel:
Reception of 64/256 QAM
signal
Communication between
STB and Head-End:
Down channel : Legacy
OOB,
Up channel : MoCA
MR-DVR Connectivity between
Home Devices
Home
Networking
Over Coaxial
Cable
Inter-compatibility and
Contents sharing between
CE, PC and Mobile Devices
via wired/wireless
networking,
Receiving 64/256 Digital cable QAM
signal via Cable in the home
For bidirectional communication
between cable Head-End and STB,
Legacy OOB (down channel) and
MoCA (up channel) are used.
Creation of On-board MoCA Module in
order to utilize MoCA in the home
Cable Network.
Creation of DLNA/UPnP stack for the
intercommunication between Consumer
devices in the home.
Participation in Plug Fest, Certification
and DLNA Logo program.
AV streaming via MoCA Network with
DLNA/UPnP stack
Viewing of saved server Contents using
media Player
Connectivity of Home Network Devices
Contents Up/Download feature
Link Protection (DTCP-IP)
Mobile Device Connectivity support
(HID)
- MIU: Media Interoperability
- M-NCF: Network Connectivity
New function introduction
3/12
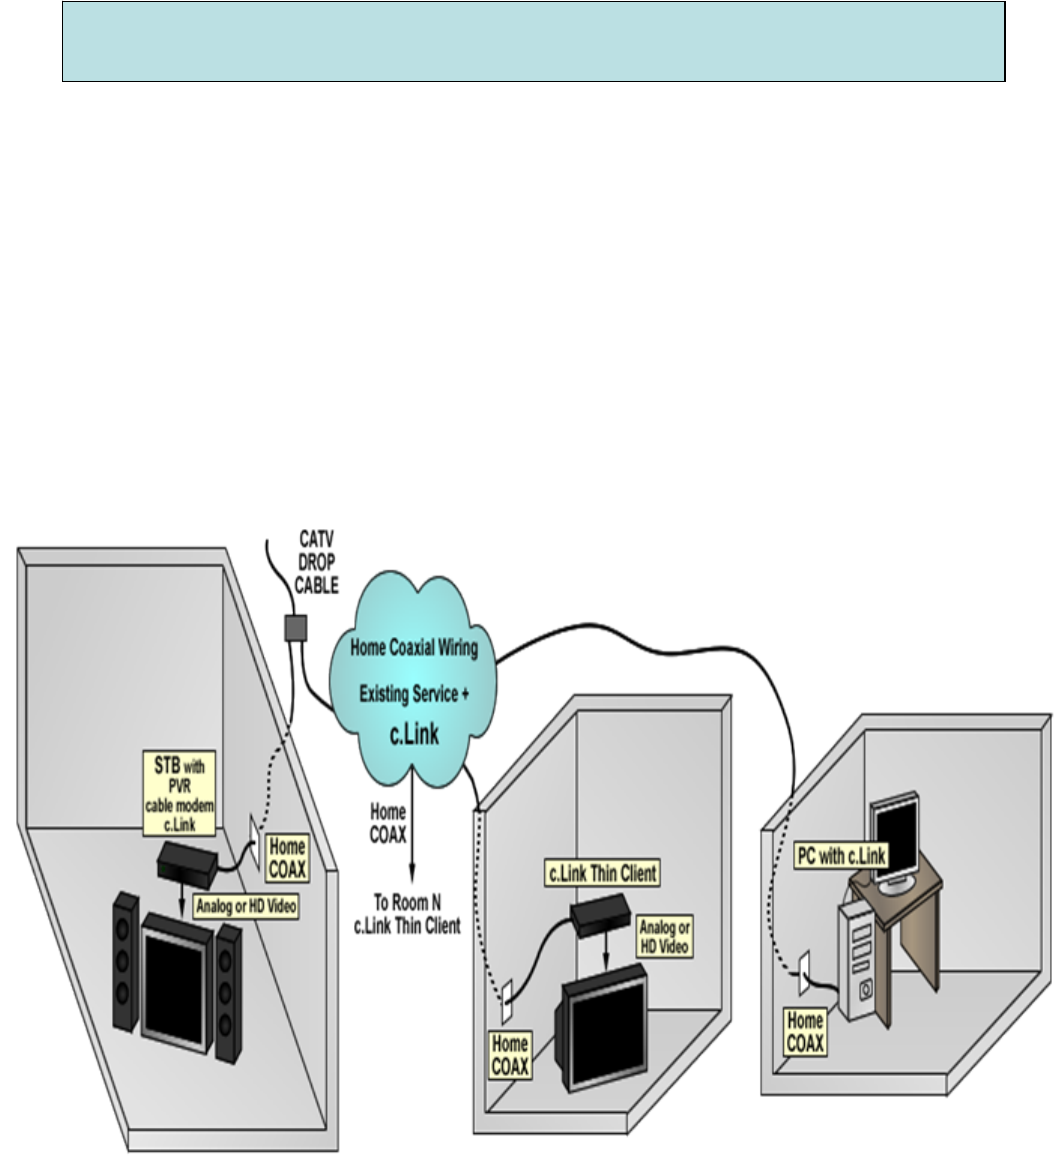
In-home Networking and MR-DVR Through MoCA
•Entropic’s “c.LINK”enables cable STB with integrated PVR
or cable modem to be a whole-house solution extending
–PVR & IPTV services to all TVs
–Ethernet directly to a PC
•No consumer adoption or education issues
–Consumer is not aware of the presence of any network.
No new wires, connections, or behavior
5/12

MPEG-2
Stream
Multiplexer
Combine
/Splitter
OOB
Modulator
MPEG
Stream
Spooler Digital
Modulator Up-
converter
Cable Head-end (Signal Lab)
PSIP
Server
(In-band)
AV Channel
PSIP Table
CableCARD
PC ECB
Ethernet c.Link
[64/256 QAM Channel]
♦For the A/V Channel Tuning test, the existing QAM signal set up at the AV Business Dept.
will be used.
♦Verify A/V output and channel change with basic channel tuning.
[OOB Channel]
♦Produce random signals from the OOB Modulator and verify Tuning status.
[MoCA Channel]
♦Verify MoCA Network communication with Ethernet connection between the PC and ECB.
[CableCARD]
♦Verify CableCARD Operation.
[Home Networking]
♦Verify connectivity between STBs (Server/Client).
♦Verify Media Interoperability and Network Connectivity.
LGE Native UI App
OOB SI Table
Broadcom STB API
LG STB API
Operational Concept
Home
Networking
¾QAM/IP STB Operational Concept
6/12
1. In-band tuner tuned A/V channel Navigation
1) Without a cable card, turn the power on.
After the system boots, it will tune to a
preset channel like the screen on the left.
(Note) The first channel is tuned using saved
Channel information from the clear QAM
signal that is currently broadcasted from
the research lab.
(note) The banner OSD is setup to display the
currently tuned channel number.
2) If the remote control or front panel’s CH UP
or CH DN key is pressed, the A/V will mute and
tune to the next channel.
At this time the currently tuned channel number
will be displayed on the banner OSD. The
channel banner will automatically disappear
after 3 seconds.
3) If the channel change is complete, the
banner OSD will disappear and A/V will output.
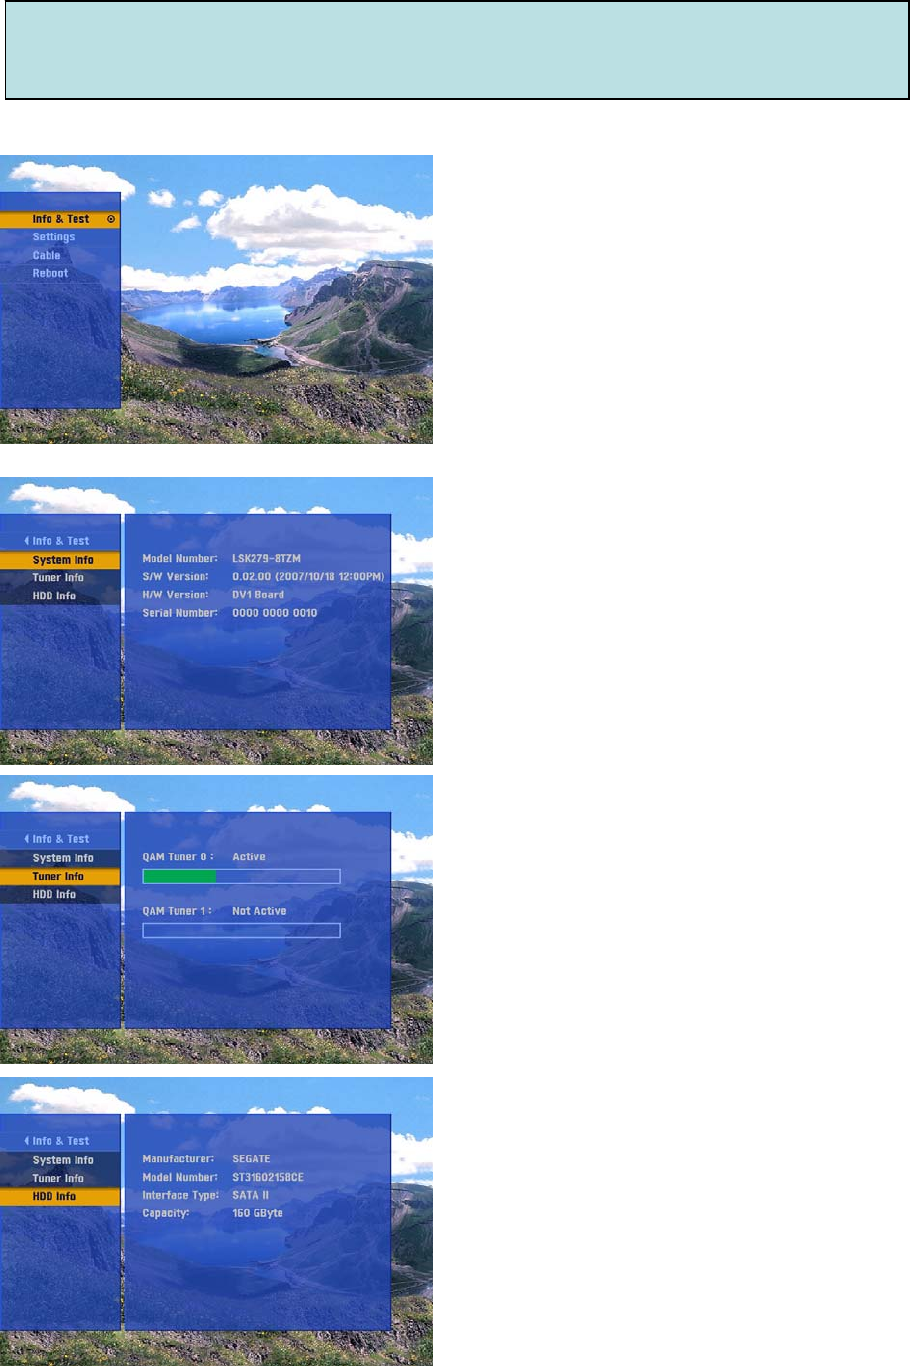
2. Basic Set-top Box Functionality Verification
using the menu
1) MAIN MENU
If the MENU key is pressed, the Menu OSD will
be displayed like the screen on the left.
(Note) Basic MENU Navigation can be
performed using the UP, DOWN, LEFT, RIGHT
and SELECT (OK) keys.
(Note) Menu items will increase for future
functionality tests.
2) SYSTEM INFO
If the SELECT (OK) key is pressed at the Info &
Test menu, the Info & Test drop down menu
will be displayed.
Like the picture on the left, the System Info
menu item will display the Set-top Box’s basic
information (Model Number, S/W Information,
H/W Information, etc).
3) TUNER INFO
Tuner Info will show signal strength information
for the set-top’s 2 tuners in the form of simple
bars.
4) HDD INFO
HDD Info will show the set-top internal SATA
HDD’s basic information.
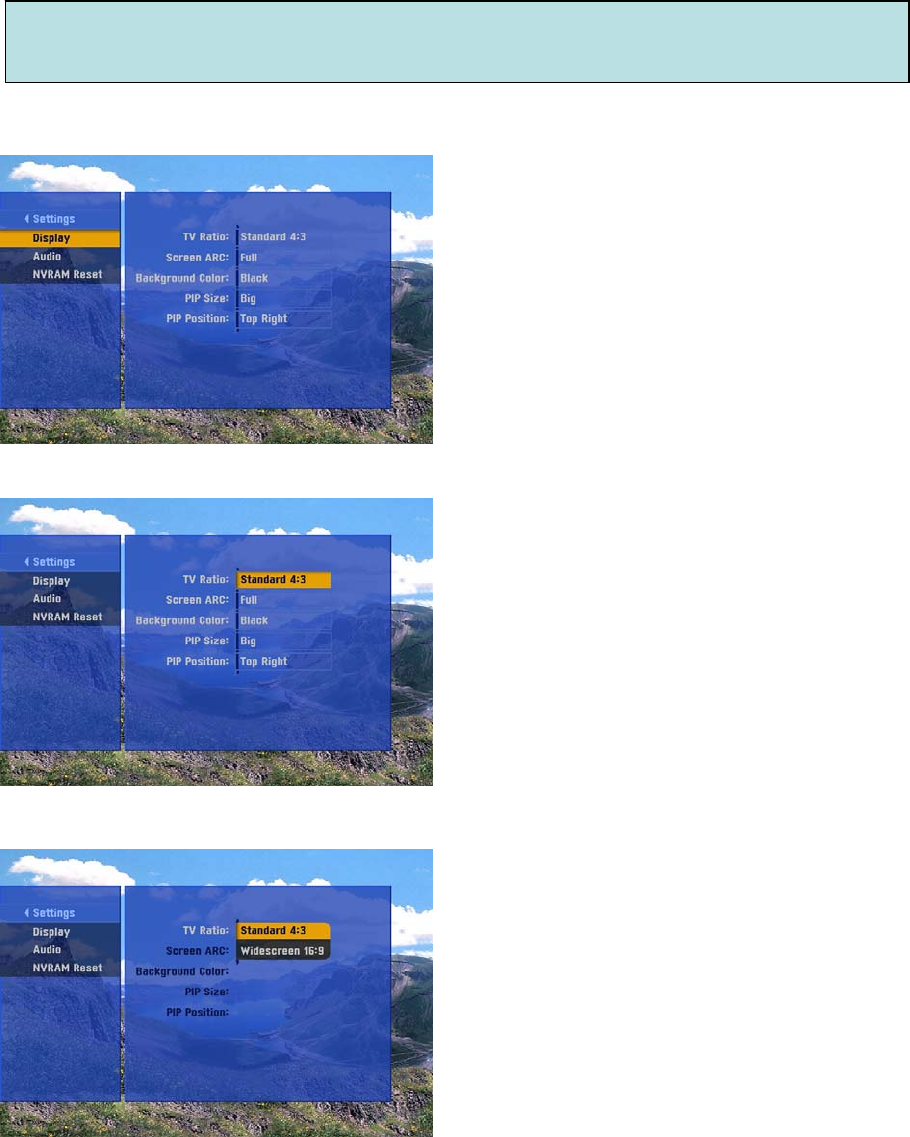
3. Display Menu
2) DISPLAY
This screen is showing the menu where the key
focus has been moved to the Display item.
To move between menu items, use the UP, DOWN
or PAGE UP, PAGE DN keys.
If the SELECT (OK) key is pressed, the setting can
be changed to like a window’s combo box.
3) DISPLAY -> TV Ratio
The menu sets the type of the Set-top Box’s
connected TV.
If the SELECT (OK) key is pressed, the item entry will
be completed and a screen similar to 2) will be
displayed.
If the LEFT key is pressed, the item entry will be
canceled and a screen similar to 2) will be displayed.
Menu Item
•Standard 4:3 - when connected to a 4:3 TV
•Widescreen 16:9 –when connected to a 16 :9 TV
1) DISPLAY
This screen is displaying the Display menu items.
The Display menu items provides various menus to
control or change display settings.
If the SELECT (OK) or RIGHT key is pressed, the
focus will shift to the Display menu OSD.
3. Display Menu
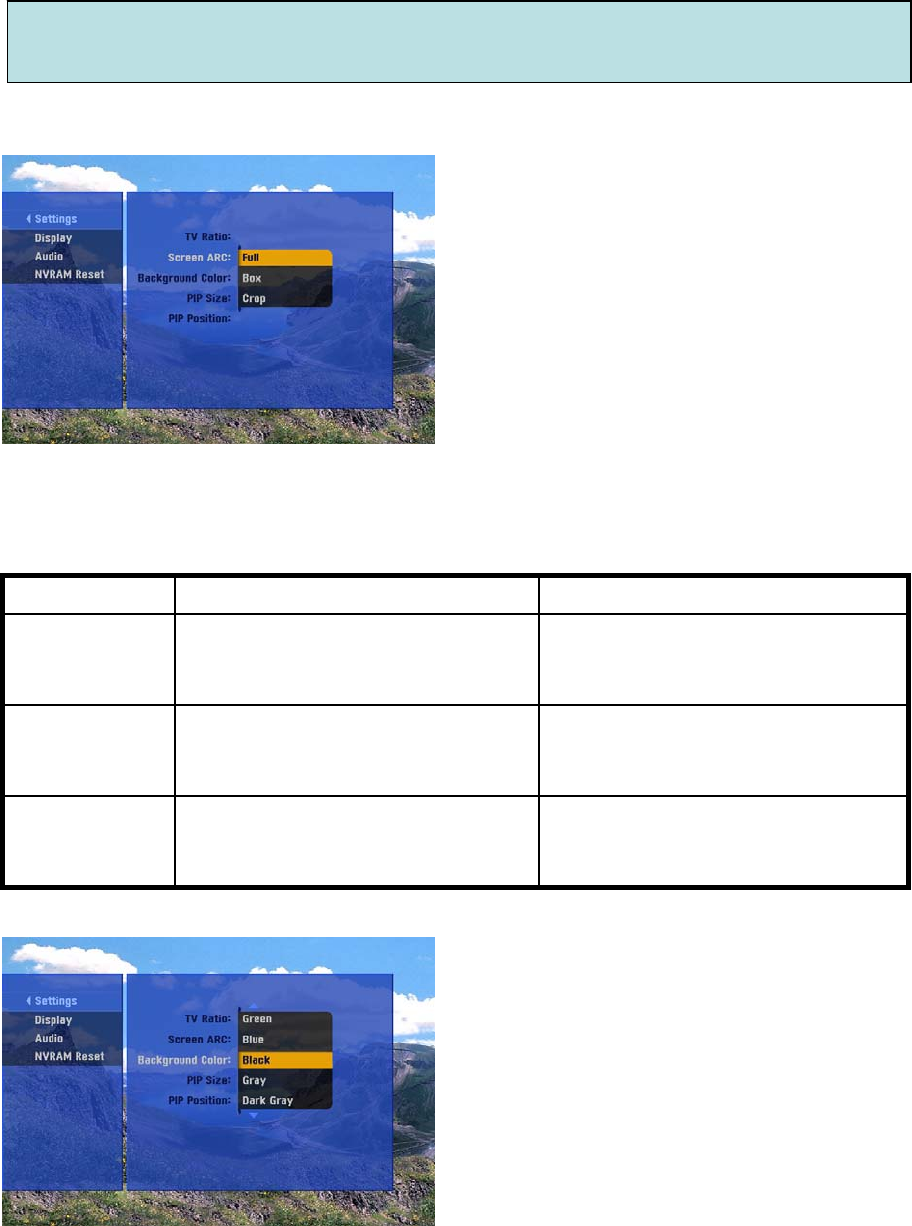
4) DISPLAY -> Screen ARC
Change input video’s aspect ratio.
Menu Item
•Full –Display full screen irregardless of input
video format.
•Box –Display Letter Box or Pillar Box.
•Crop –Display Pan Scan or Zoom.
(note) In the case of Live TV the remote
control’s ASPECT key can also be used.
Item 4:3 TV 16:9 TV
Full 16:9 stream will be vertically
stretched to fill up the display.
16:9 stream will produce top and
bottom bar while preserving stream
ratio. (Letter Box)
16:9 stream’s left and right section
will be cut to fill up the display.
( Pan Scan )
4:3 stream will be horizontally
stretched to fill up the display.
Box 4:3 stream will produce left and
right bar while preserving stream
ratio. (Pillar Box)
Crop 4:3 stream’s top and bottom section
will be cut to fill up the display.
( Zoom )
5) DISPLAY -> Background Color
Change color of all regions excluding video, i.e.
non active region.
Menu Item : Black, Gray, Dark Gray, Red,
Green, Blue
(note) If the video is covering the whole display,
the color change cannot be seen, unless PIP or
aspect ratio is also on.
3. Display Menu
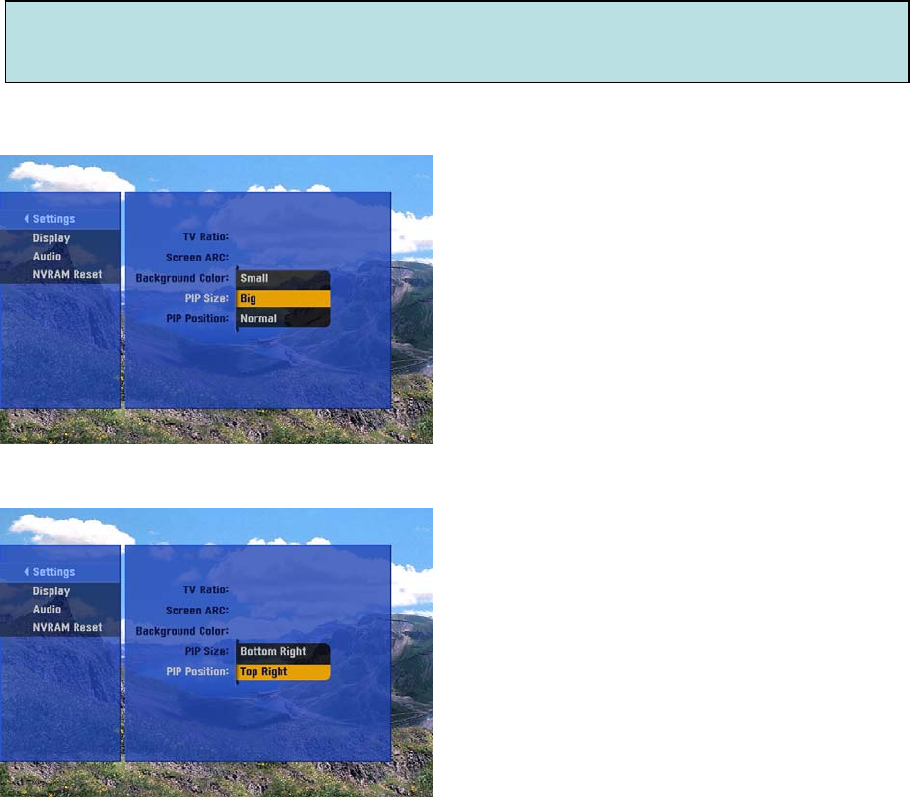
6) DISPLAY -> PIP Size
Set PIP size.
Menu Item : Big, Normal, Small
(note) To see actual PIP, press the remote
control’s PIP key during Live TV.
6) DISPLAY -> PIP Position
Set PIP position.
Menu Item : Bottom Right, Top Right
(note) Press remote control’s PIP MOVE key
during Live TV.
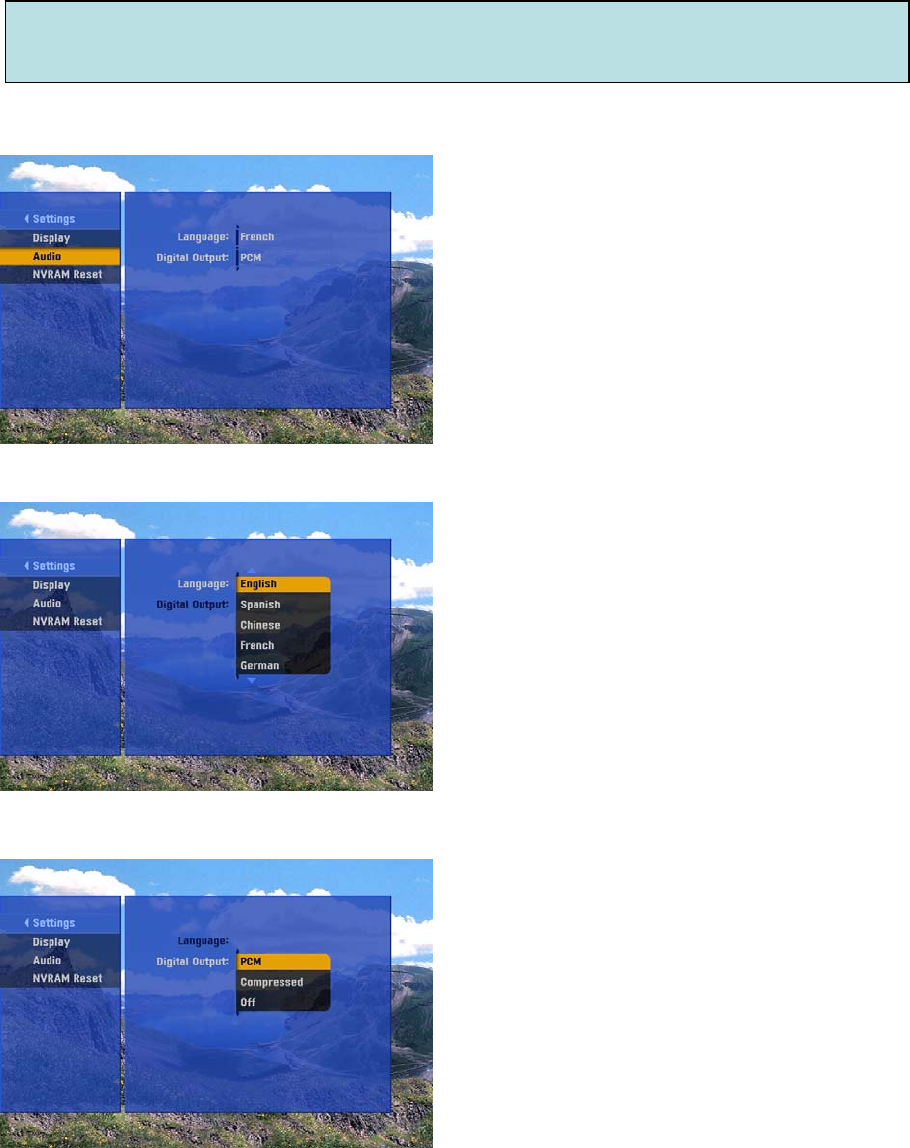
4. Audio Menu
1) AUDIO
This screen is displaying the Audio menu items.
The Audio menu items provides various menus
to control or change audio settings.
If the SELECT (OK) or RIGHT key is pressed,
the focus will shift to the Audio menu OSD.
2) AUDIO -> Language
Choose audio setting for broadcasts in other
languages.
Menu Item : English, Spanish, Chinese, French,
German, Italian, Japanese, Korean
(note) Currently not operational.
3) AUDIO -> Digital Output
Control digital audio output.
Menu Item : Compressed(AC3), PCM, Off

5. NVRAM Reset Menu
1) NVRAM RESET
This screen is displaying the NVRAM Reset
menu items.
If the SELECT (OK) or RIGHT key is pressed at
this menu, the NVRAM will initialize.
(note) If this menu is launched, all settings will
revert back to default.
2) If the SELECT (OK) or RIGHT key is pressed
at the above menu, the current operation status
and after that the result will be displayed.
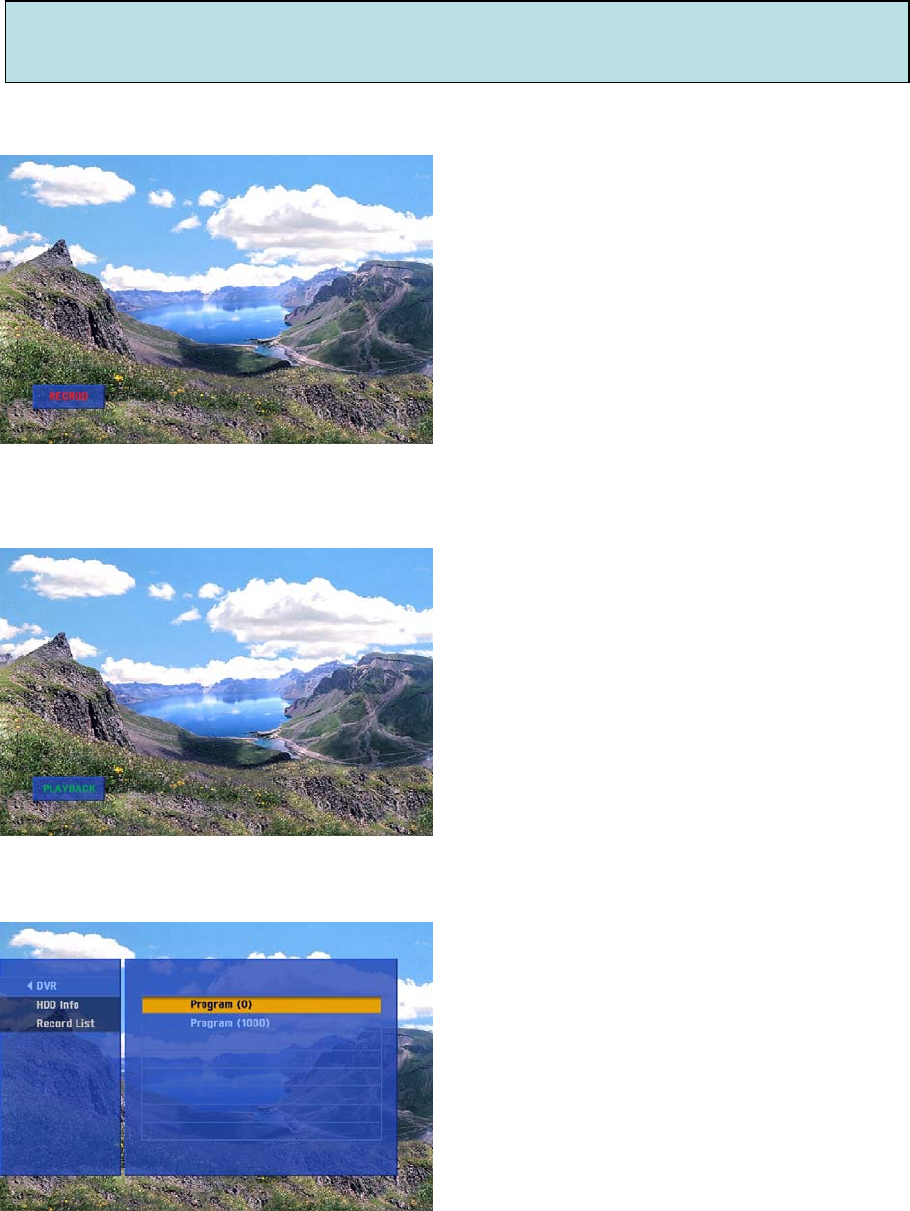
6. PVR Test
1) If the RECORD key is pressed during a
viewing, recording will start and the OSD will be
displayed on the screen.
Press the STOP key to stop (end) the recording.
2) If the PLAY key is pressed during a viewing,
the most current recorded program will be
played.
Press the STOP key to stop the play.
If the STOP key is pressed, the previously
viewed channel will be shown.
2) Recorded items can be verified at the DVR -
> Record List menu.
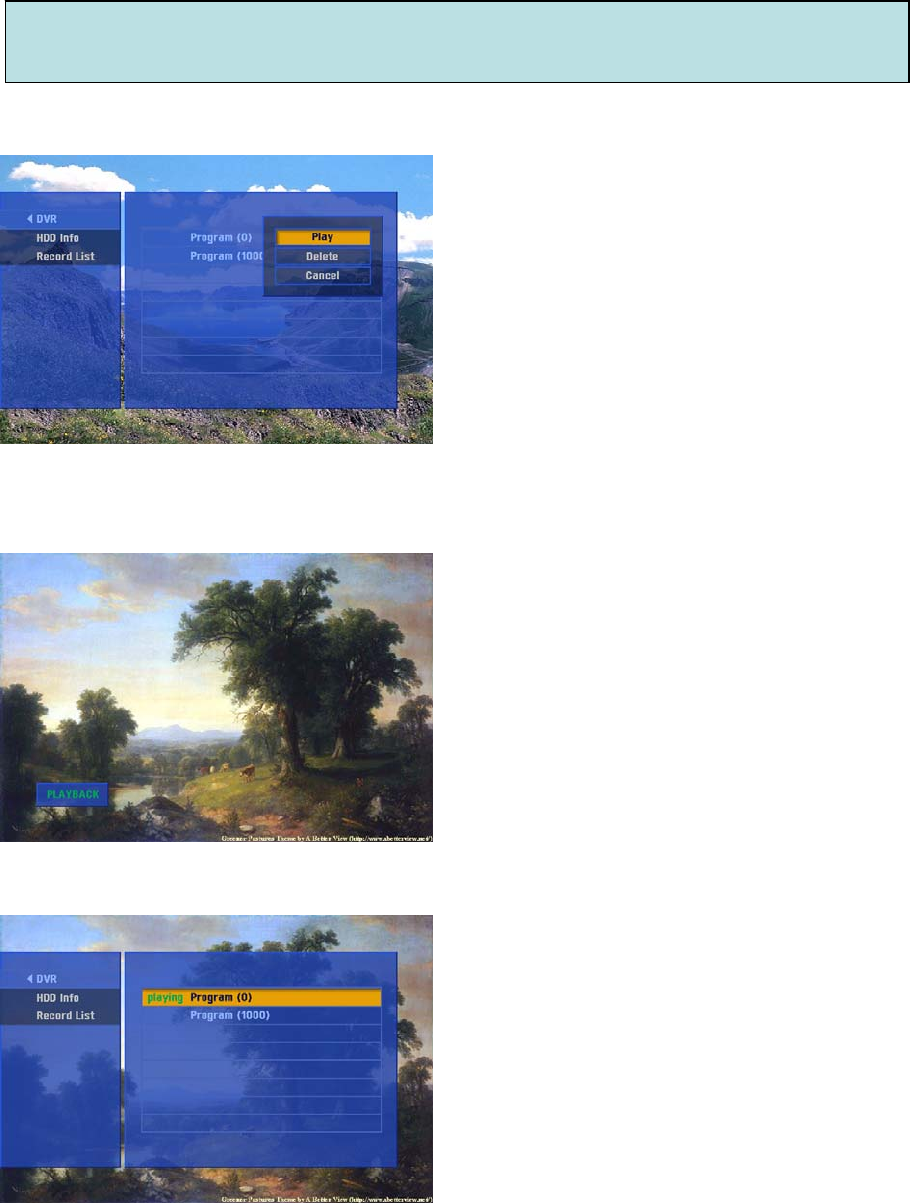
6. PVR Test
4) After selecting a program from the list and
pressing the ENTER key, a popup menu will
appear to allow “Play”, “Delete”or “Cancel”.
If “Play”is selected, the selected program will
be played.
If “Delete”is selected, the selected program will
be deleted.
5) If “Play”is pressed at the previous screen,
the program will play on the screen.
From here, other programs can be played by
moving back to 4).
6) The program that is currently being played
can be verified at the Record List.
(note) The program that is currently being
played cannot be deleted.

7. PIP Test
1) If the PIP key is pressed, PIP can be turned
on or off.
If PIP is turned on, the last viewed channel or
the first channel will be displayed.
(note) PIP size can be adjusted at the PIP Size
menu.
(note) PIP position can be adjusted at the PIP
Position menu.
(note) PIP channel can be changed using the
PIP CH UP or PIP CH DOWN key. PIP channel
change scenario is the same as the main
display.
(note) PIP activation is independent of the
main display, i.e. PIP will still work even if the
main display is performing RECORD or
PLAYBACK.
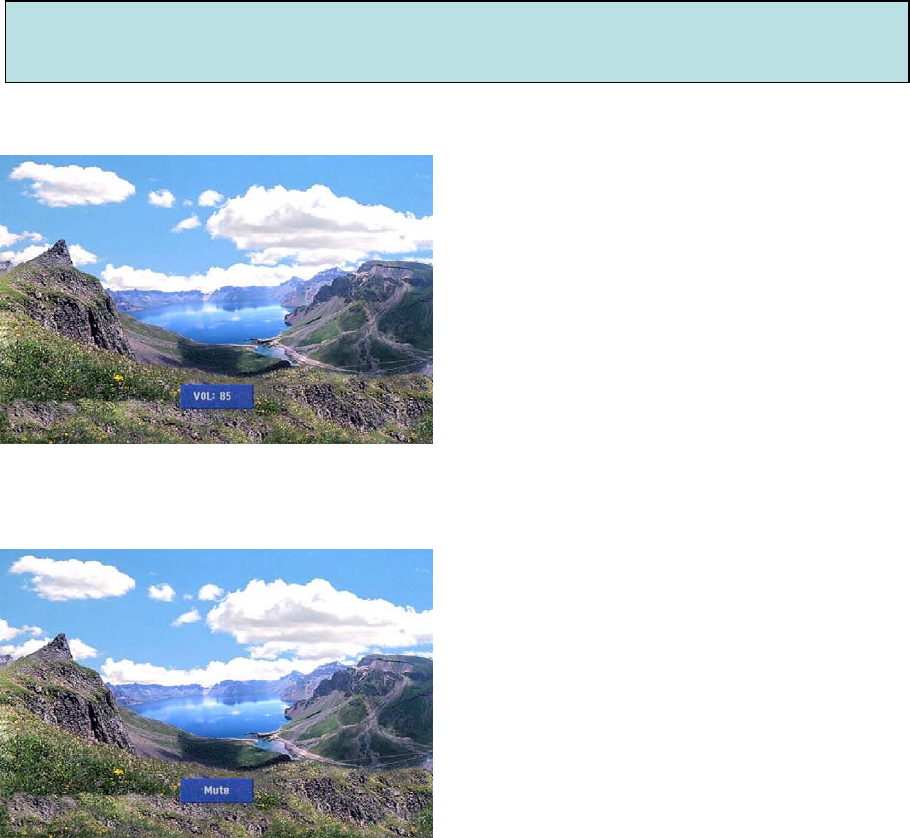
8. Volume Control Test
1) The Set-top Box’s volume can be adjusted
using the VOL UP or VOL DOWN key.
2) If the MUTE key is pressed, Audio output will
be blocked.
(note) At this time, if the VOL UP or VOL DOWN
key is pressed, the volume will revert back to
the previous setting.
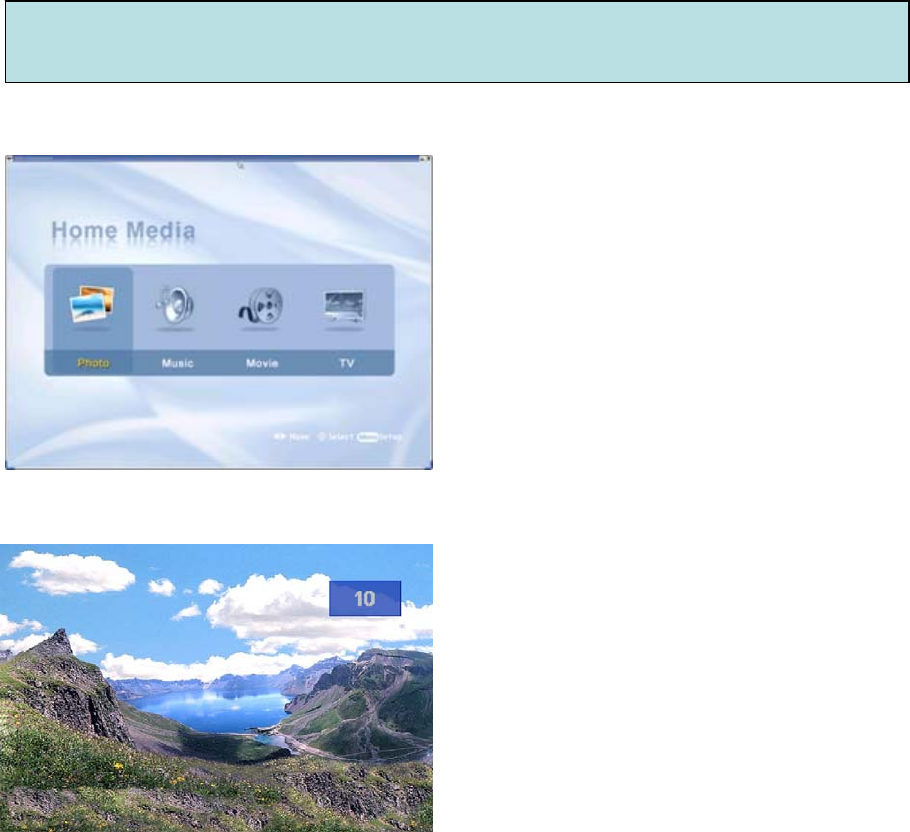
9. DLNA Test
1) If the VOD key is pressed during a viewing,
the DLNA test screen will appear.
(note) Audio/video decoding will be stopped
upon loading of the DLNA screen.
(note) For DLNA related detailed test scenario,
please refer to the relevant document.
2) At anytime during the DLNA test, press the
VOD key again or select TV from the menu to
go back to TV viewing mode.