LG Electronics USA 9QKE40230 Video Cassette Recorder User Manual DC596M OM Zenith
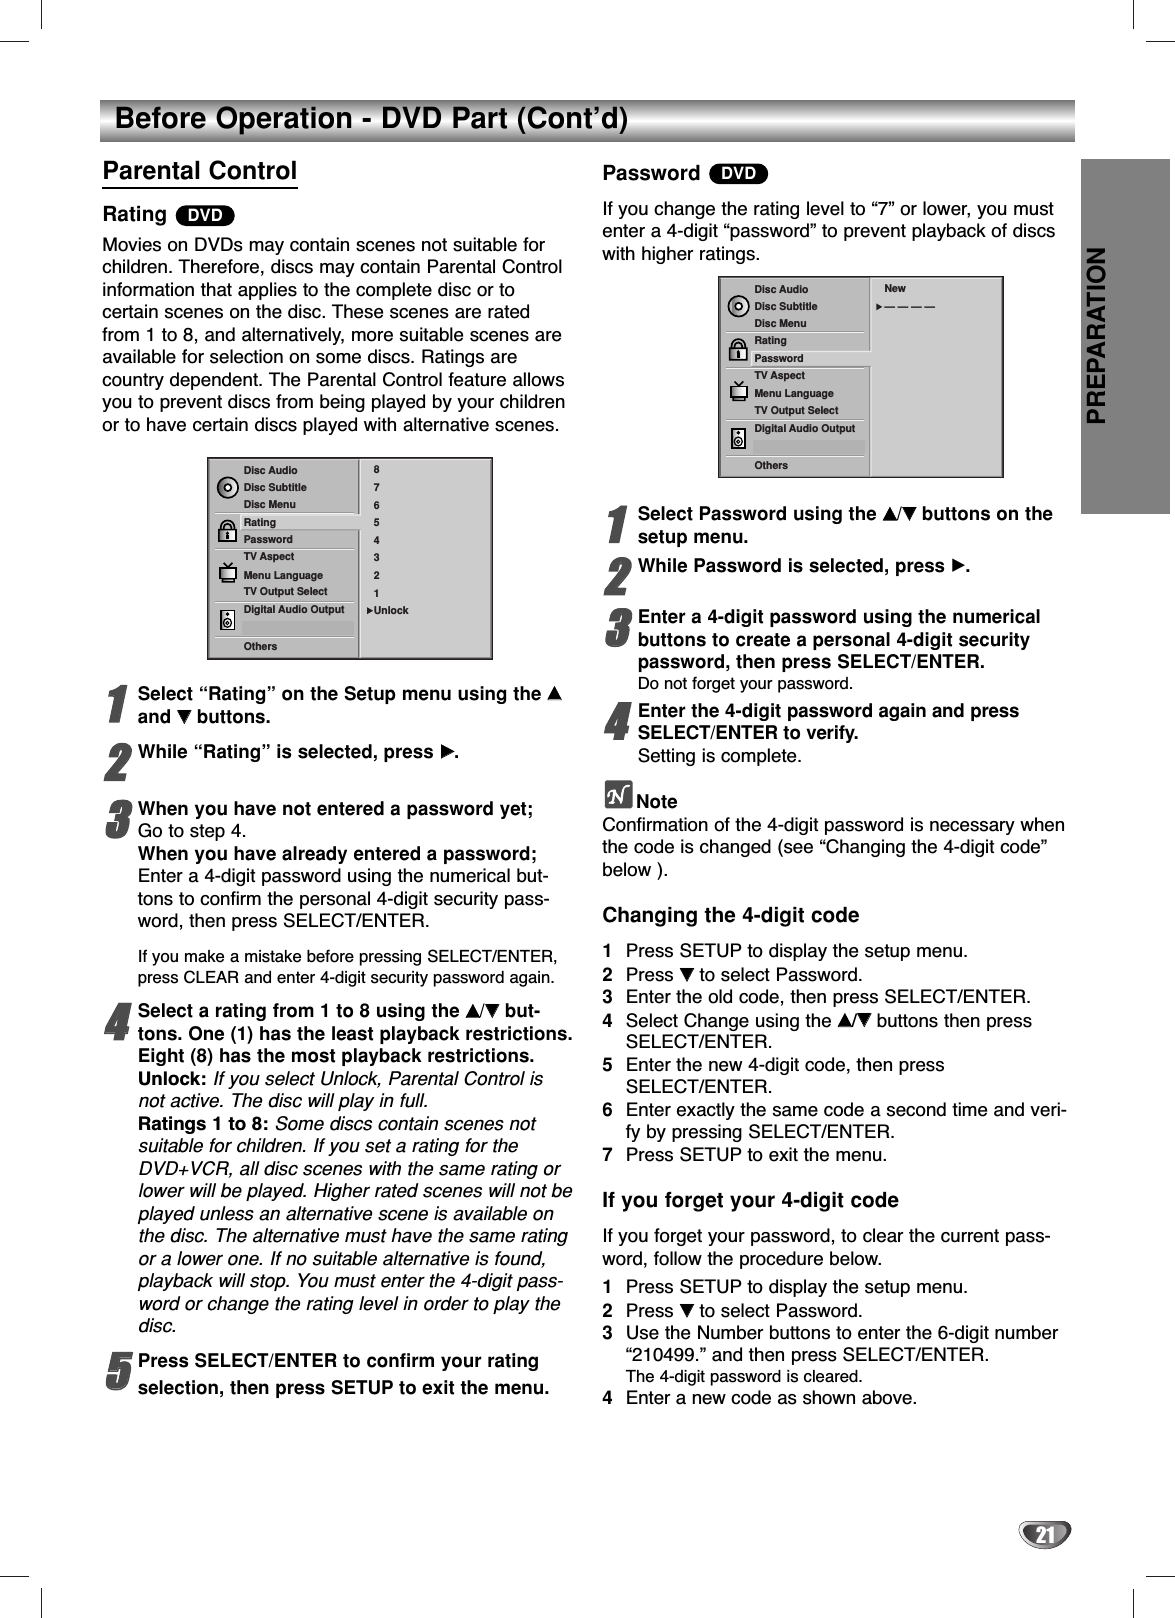
LG Electronics USA Video Cassette Recorder DC596M OM Zenith
UserManual.wiki
>
LG Electronics USA
>
9QKE40230 User Manual
ownwers manual
Navigation menu
Upload a User Manual
Namespaces
Wiki Guide
HTML
PDF
Info
Views
User Manual
Discussion / Help
Navigation
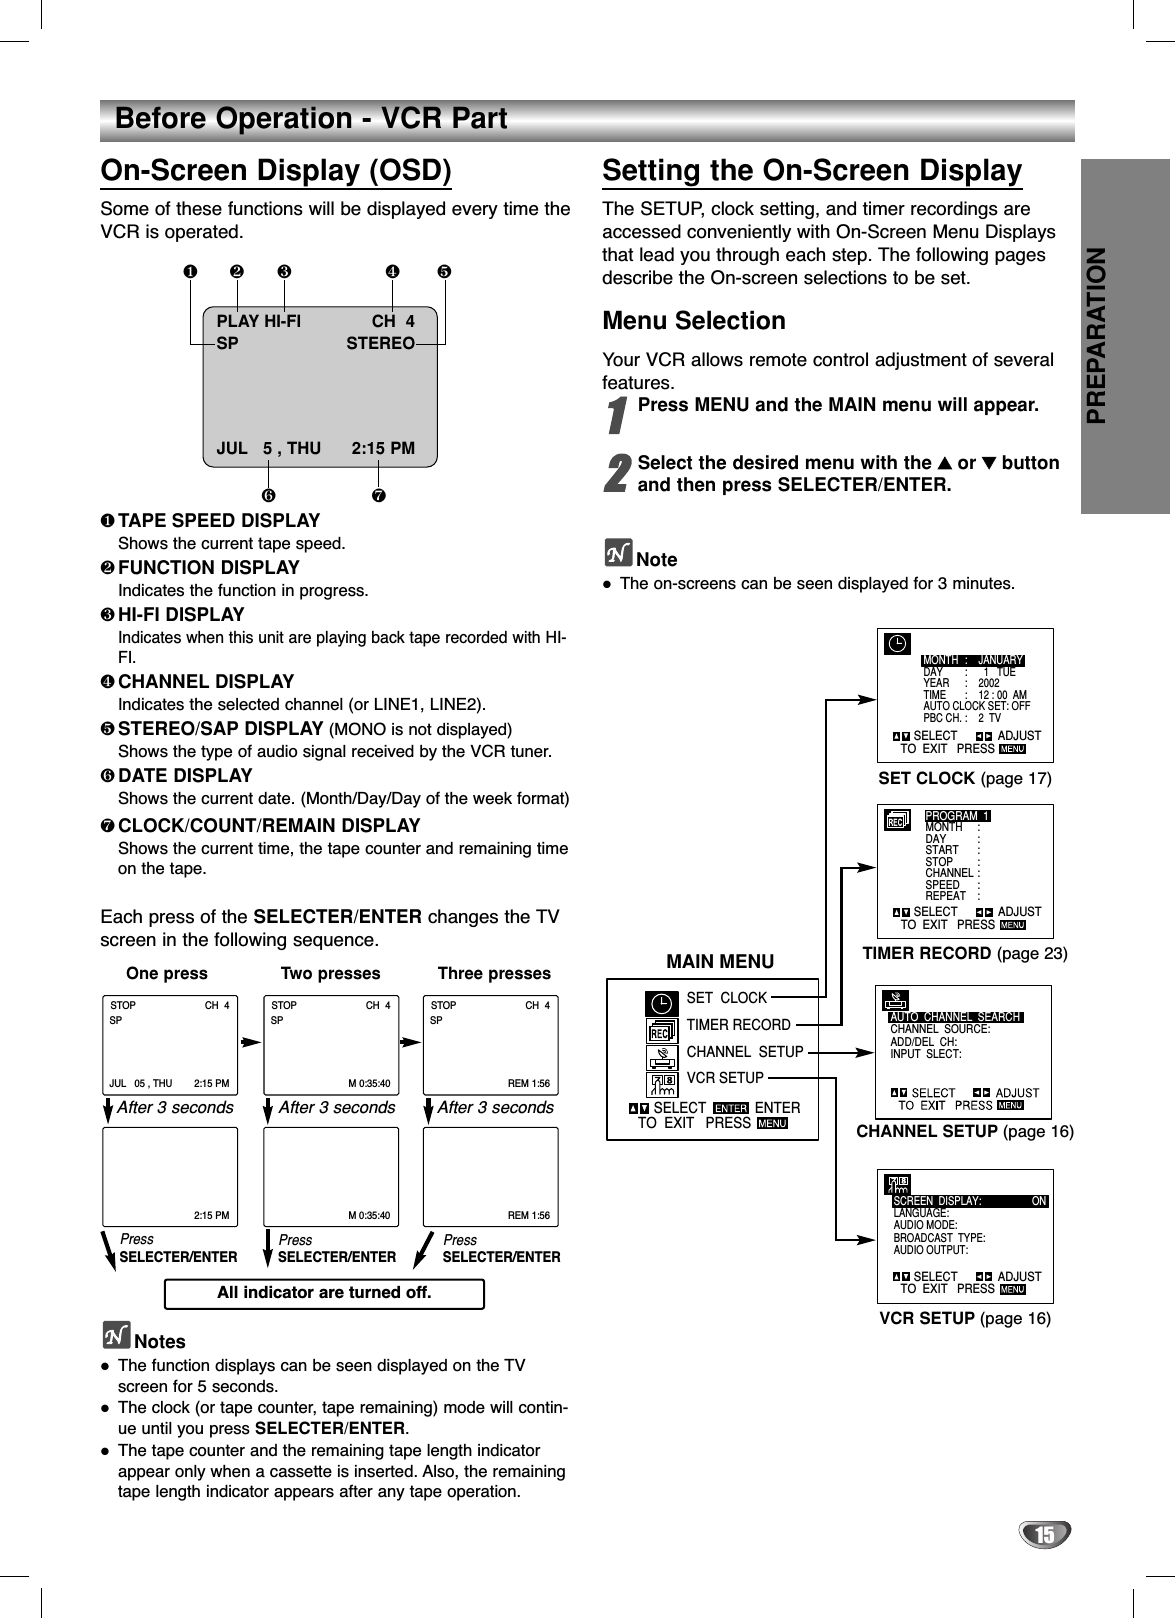
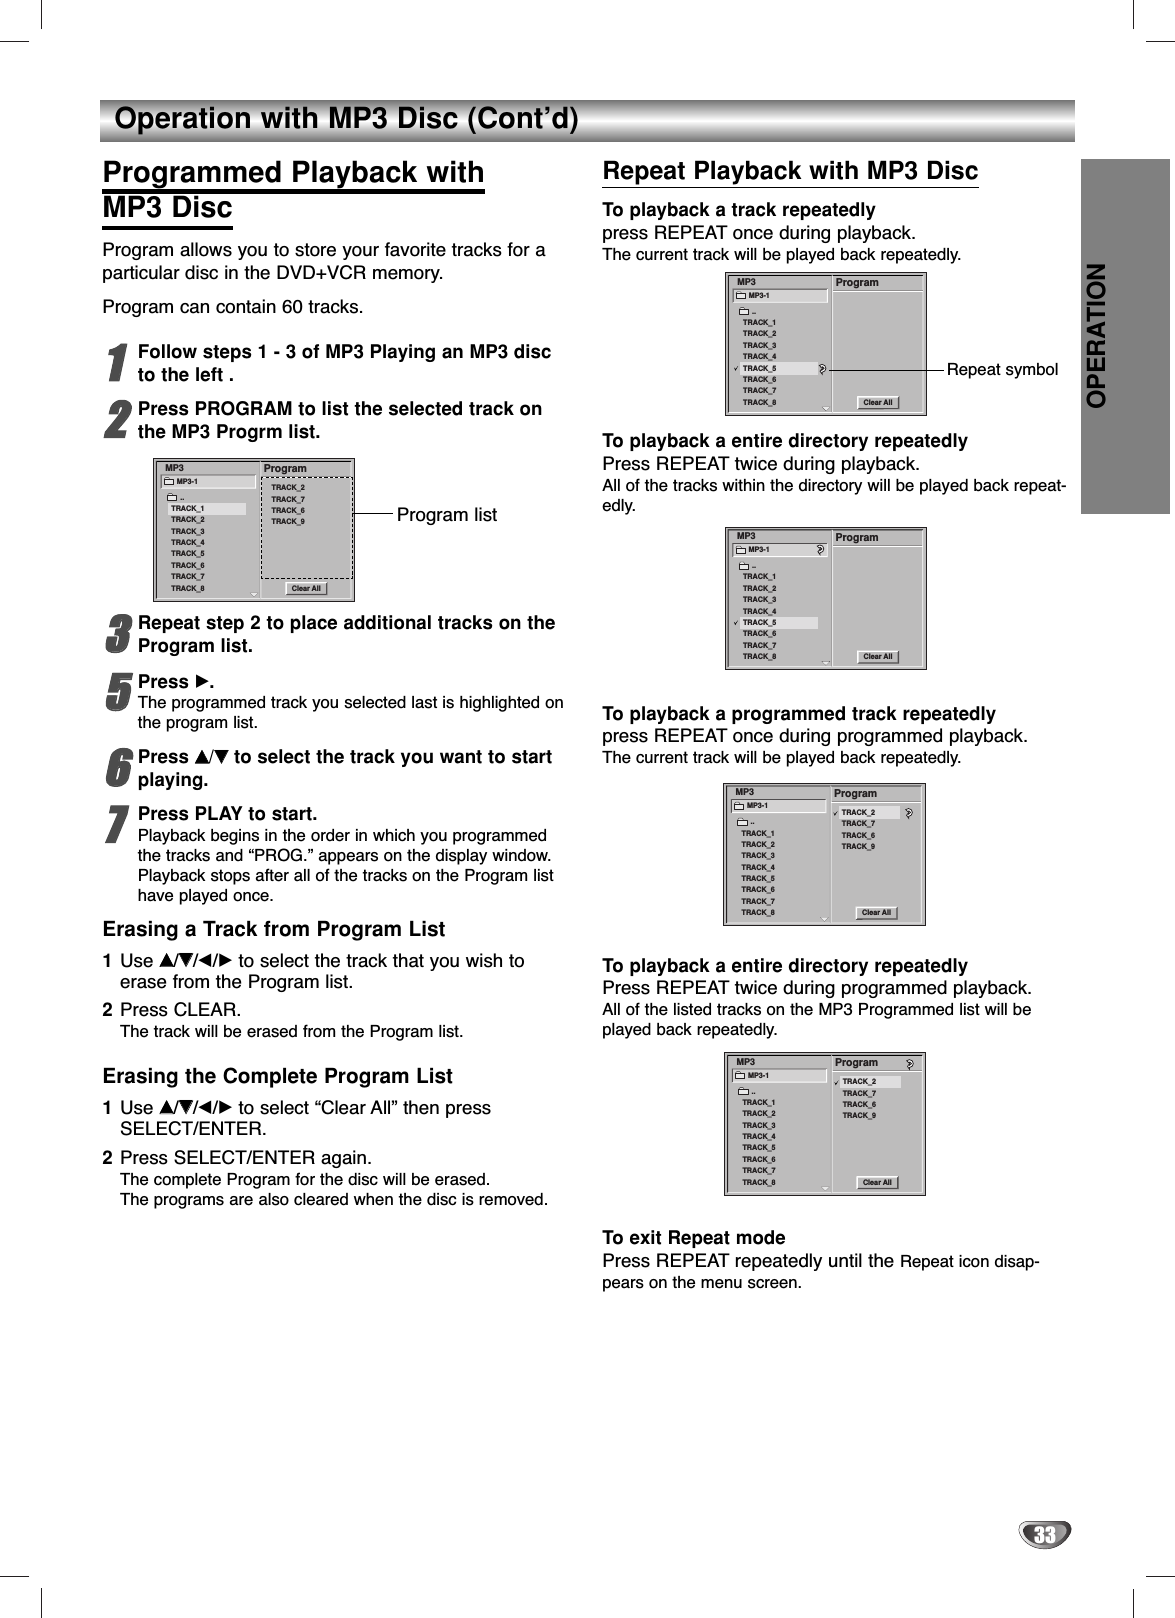
![Before Operation - VCR Part (Cont’d)Setting the VCR Setup Menu11Press MENU and the MAIN menu will appear.22Press 33or 44to select the VCR SETUP menu,then press SELECTER/ENTER. The VCR SETUP menu will appear.33Press 33or 44to choose a desired item on theVCR SETUP menu. Then press 11or 22to choosea desired setting.SCREEN DISPLAYThe on-screen display of this VCR can be turned on or off.The SCREEN DISPLAY is switched between ON and OFFby pressing 11or 22.LANGUAGEThe on-screen programming of this VCR can display in eitherEnglish, Spanish, or French.The LANGUAGE is switched among ENGLISH, SPANISHand FRENCH by pressing 11or 22.AUDIO MODEThe VCR has two separate audio playback systems, the highquality VHS Hi-Fi system and standard NORMAL mono sys-tem. The same audio is generally recorded on both systems.The VHS Hi-Fi system plays on separate (left and right) chan-nels, and the NORMAL system plays monaural sound. Thenormal track is always played so the cassette can be playedon a VCR that does not have VHS Hi-Fi.The AUDIO MODE is switched between HI-FI and NORMALby pressing 11or 22.BROADCAST TYPE (STEREO/SAP/MONO)Multichannel Television Sound (MTS) carries stereo and/orSecond Audio Program (SAP) bilingual signals. Set this displayto the desired position when both MTS stereo and SAP signalsare received. When only one of the MTS signal is received, theVCR automatically selects the corresponding receiving mode(Stereo or SAP) regardless of the selected position. For normaloperation, the display should be in the STEREO position. TheVCR will then record a STEREO program when available, andrecord a mono program IF the program NOT IN STEREO.For weak STEREO and/or SAP broadcasting, changing thedisplay to mono may give clearer sound.The BROADCAST TYPE is switched among STEREO, SAP,and MONO by pressing 11or 22.AUDIO OUTPUT (STEREO/LEFT/RIGHT)Used during playback [when AUDIO MODE (HI-FI/ NORMAL)is in HI-FI position] for selecting the audio output signals fromthe AUDIO OUT terminals (L ch and R ch), andVHF/UHF/CATV.This display setting should normally be left in the stereo posi-tion, so that when a stereo tape is played, the stereo sound willbe heard through the left and right channels. If a mono tape isplayed and the audio output is set to stereo, the same monosound will be heard from both left and right channels.The AUDIO OUTPUT is switched among STEREO, LEFT, andRIGHT by pressing 11or 22.Channel SelectionThis VCR is equipped with a frequency synthesizedtuner capable of receiving up to 181 channels. Theseinclude VHF channels 2-13, UHF channels 14-69 andCATV channels 1-125. Preparation:Connect the VCR to the desired type of antenna or cable TVsystem, as shown in ANTENNA TO VCR CONNECTIONS .AUTO CHANNEL PROGRAMMING11Press MENU and the MAIN menu will appear.22Press 33or 44to select the CHANNEL SETUPmenu, then press SELECTER/ENTER. The CHANNEL SETUP menu will appear.33Press 44to choose the CHANNEL SOURCE item,then press 11or 22to select TUNER.Press 11or 22repeatedly to switch between TUNER,LINE1 and LINE2.44Press 33or 44to choose the AUTO CHANNEL SEARCHitem, then press 11or 22to set the channel.The tuner will automatically cycle through all available channels in the area and place them inthe tuner’s memory.55After the AUTO CHANNEL SEARCH PROCEED-ING is complete, make sure the CHANNELSOURCE is set appropriately (TV or CATV) bypressing 33or 44and choosing the correctCHANNEL SOURCE (TV or CATV) by pressing 11or 22using the CHANNEL SETUP menu.Remember, TV is for the air antenna reception,CATV is for cable or wireless cable connection.66Press MENU to return to the TV screen.77Use CH/TRACK (▲/▼) or CHANNEL (▲/▼) on thefront panel to cycle the VCR through the chan-nels in memory. TO ADD OR ERASE CHANNELS FROM MEMORYThis feature allows you to add or erase channels frommemory manually.1Press 44to choose the ADD/DEL CH item on theCHANNEL SETUP menu. Press 11or 22to select achannel to add or erase.2Press SELECTER/ENTER to add or erase the channel.Repeat steps 1 and 2 to add or erase channels.3Press MENU to return to the TV screen.16SELECTTO EXIT PRESSENTERSET CLOCKTIMER RECORDCHANNEL SETUPVCR SETUPSELECTTO EXIT PRESSADJUSTSCREEN DISPLAY: ONLANGUAGE:AUDIO MODE:BROADCAST TYPE:AUDIO OUTPUT:SET CLOCKTIMER RECORDCHANNEL SETUPVCR SETUPSELECTTO EXIT PRESSENTERAUTO CHANNEL SEARCHCHANNEL SOURCE:ADD/DEL CH:INPUT SLECT:](https://usermanual.wiki/LG-Electronics-USA/9QKE40230/User-Guide-224327-Page-16.png)
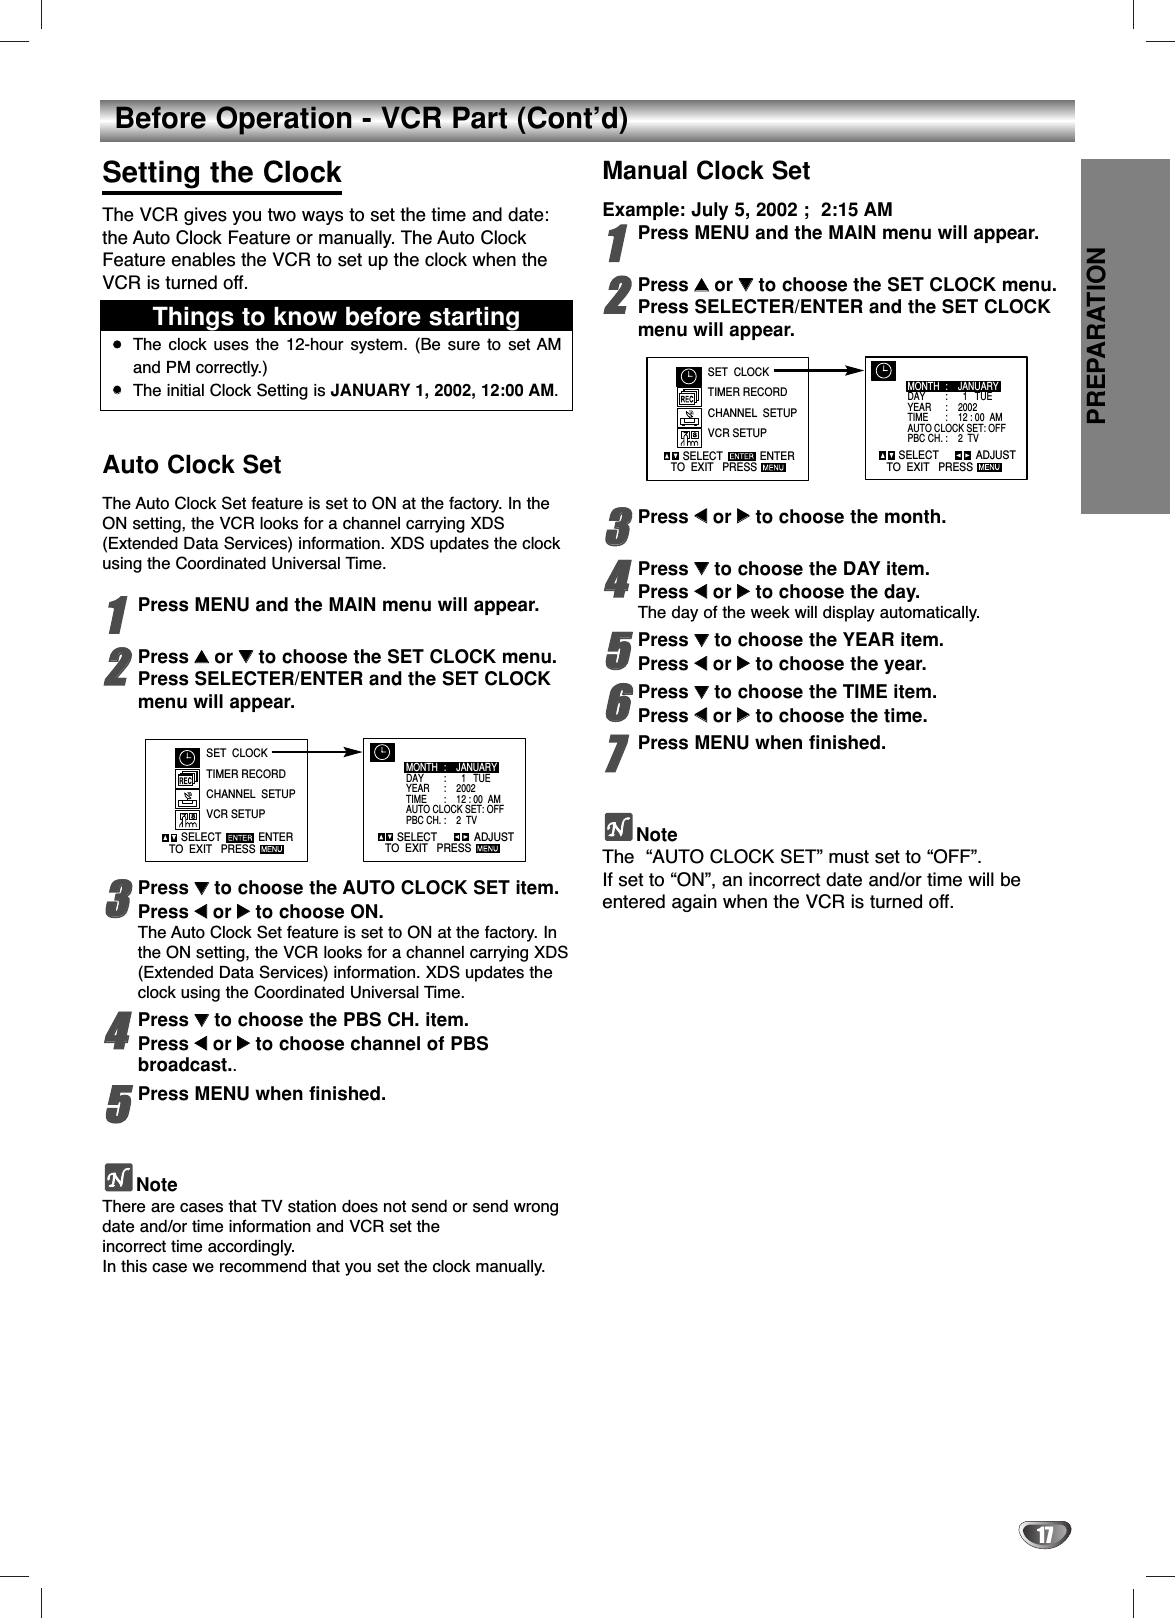

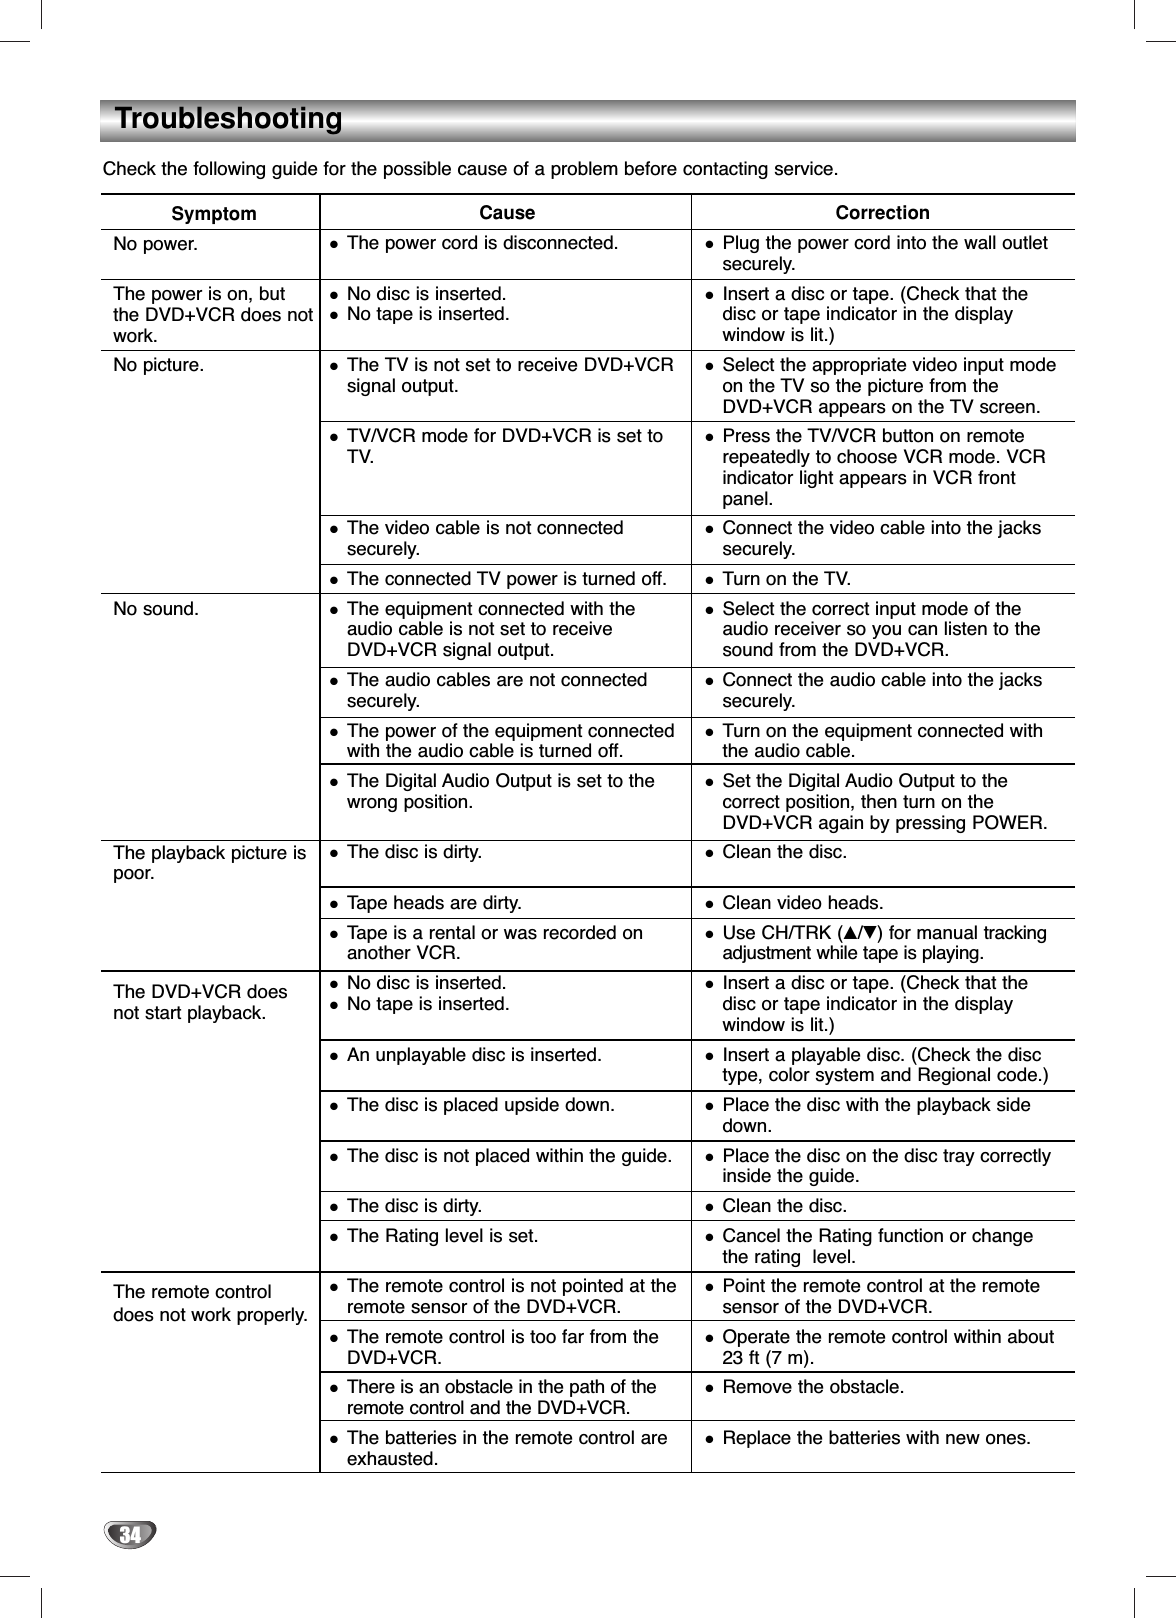
![32Operation with MP3 DiscNotes on MP3 DiscsAbout MP3An MP3 file is audio data compressed by usingMPEG1, the audio layer-3 file-coding scheme. We callfiles that have the “.mp3” file extension “MP3 files”.The DVD+VCR can not read an MP3 file that has afile extension other than “.mp3”.The DVD+VCR can not read a fake MP3 file that hasa file extension “.mp3”.MP3 disc compatible with this DVD+VCR islimited as follows:1. Sampling Frequency / only at 44.1kHz2. Bit rate / within 32 - 320kbps3. CD-R physical format should be “ISO 9660”4. If you record MP3 files using the software whichcannot create a FILE SYSTEM, for example “Direct-CD” etc., it is impossible to playback MP3 files. Wetherefore recommend that you use “Easy-CDCreator”, which creates an ISO9660 file system.5. A single session disc requires MP3 files in the firsttrack. If there is no MP3 file in the 1st track, it can-not playback MP3 files. If you wish to playback MP3files, format all the data in the disc or use a newone.6. We do not recommend using CD-RW discs. Pleaseuse finished CD-R discs only.7. File names should be named using 8 letters or lessand must incorporate “.mp3” extension e.g. “********.MP3”.8. Do not use special letters such as “_?!><+*}{`[@]:;\/.,” etc.9. Total number of files on the disc should be less than256.10. Use 74 minute CD-R discs (650M), Do not use 80minute CD-R (700M) softwareThis DVD+VCR requires discs/recordings to meet certain technical standards in order to achieve optimalplayback quality. Pre-recorded DVDs are automaticallyset to these standards. There are many different typesof recordable disc formats (including CD-R containingMP3 files).Customers should also note that permission is requiredin order to download MP3 files and music from theInternet. Our company has no right to grant such per-mission. Permission should always be sought from thecopyright owner.Playing an MP3 discThe DVD+VCR can play MP3 format recordings on CD-ROM, CD-R or CD-RW discs.Before playing MP3 recordings, read the notes on MP3Recordings to the left.11Insert an MP3 disc and close the tray.The MP3 menu appears on the TV screen.MP3 menu22Press vv/VVto select the directory containing thetrack that you want to play.33Press SELECT/ENTER and press vv/VVto selectthe desird track. 44Press SELECT/ENTER or PLAY.Playback starts. During playback, the current track’s elapsed playingtime will appear on the display window.Playback will stop after playback the last track with-in the directory.To return to the previous MP3 menuPress RETURN.To move to the first MP3 menuPress DISC MENU.To return to the top of the page within the directoryPress TITLE.Each time you press the button, the pages within directory will change in rotating.To pause playbackPress PAUSE/STEP during playback. To return to playback, press PLAY or PAUSE/STEP again.To skip to another track during playbackPress BACKWARD .or FORWARD >briefly during playback. ProgramMP3MP3-1MP3-2MP3-3MP3-4MP3-5MP3-6MP3-7MP3-8MP3-9 Clear AllABCD](https://usermanual.wiki/LG-Electronics-USA/9QKE40230/User-Guide-224327-Page-32.png)