LG Electronics USA 9QKE40320 DVD Player + Video Cassette Recorder User Manual VB603M OM TOSHIBA
LG Electronics USA DVD Player + Video Cassette Recorder VB603M OM TOSHIBA
UserManual.wiki
>
LG Electronics USA
>
9QKE40320 User Manual
users manual
Navigation menu
Upload a User Manual
Namespaces
Wiki Guide
HTML
PDF
Info
Views
User Manual
Discussion / Help
Navigation
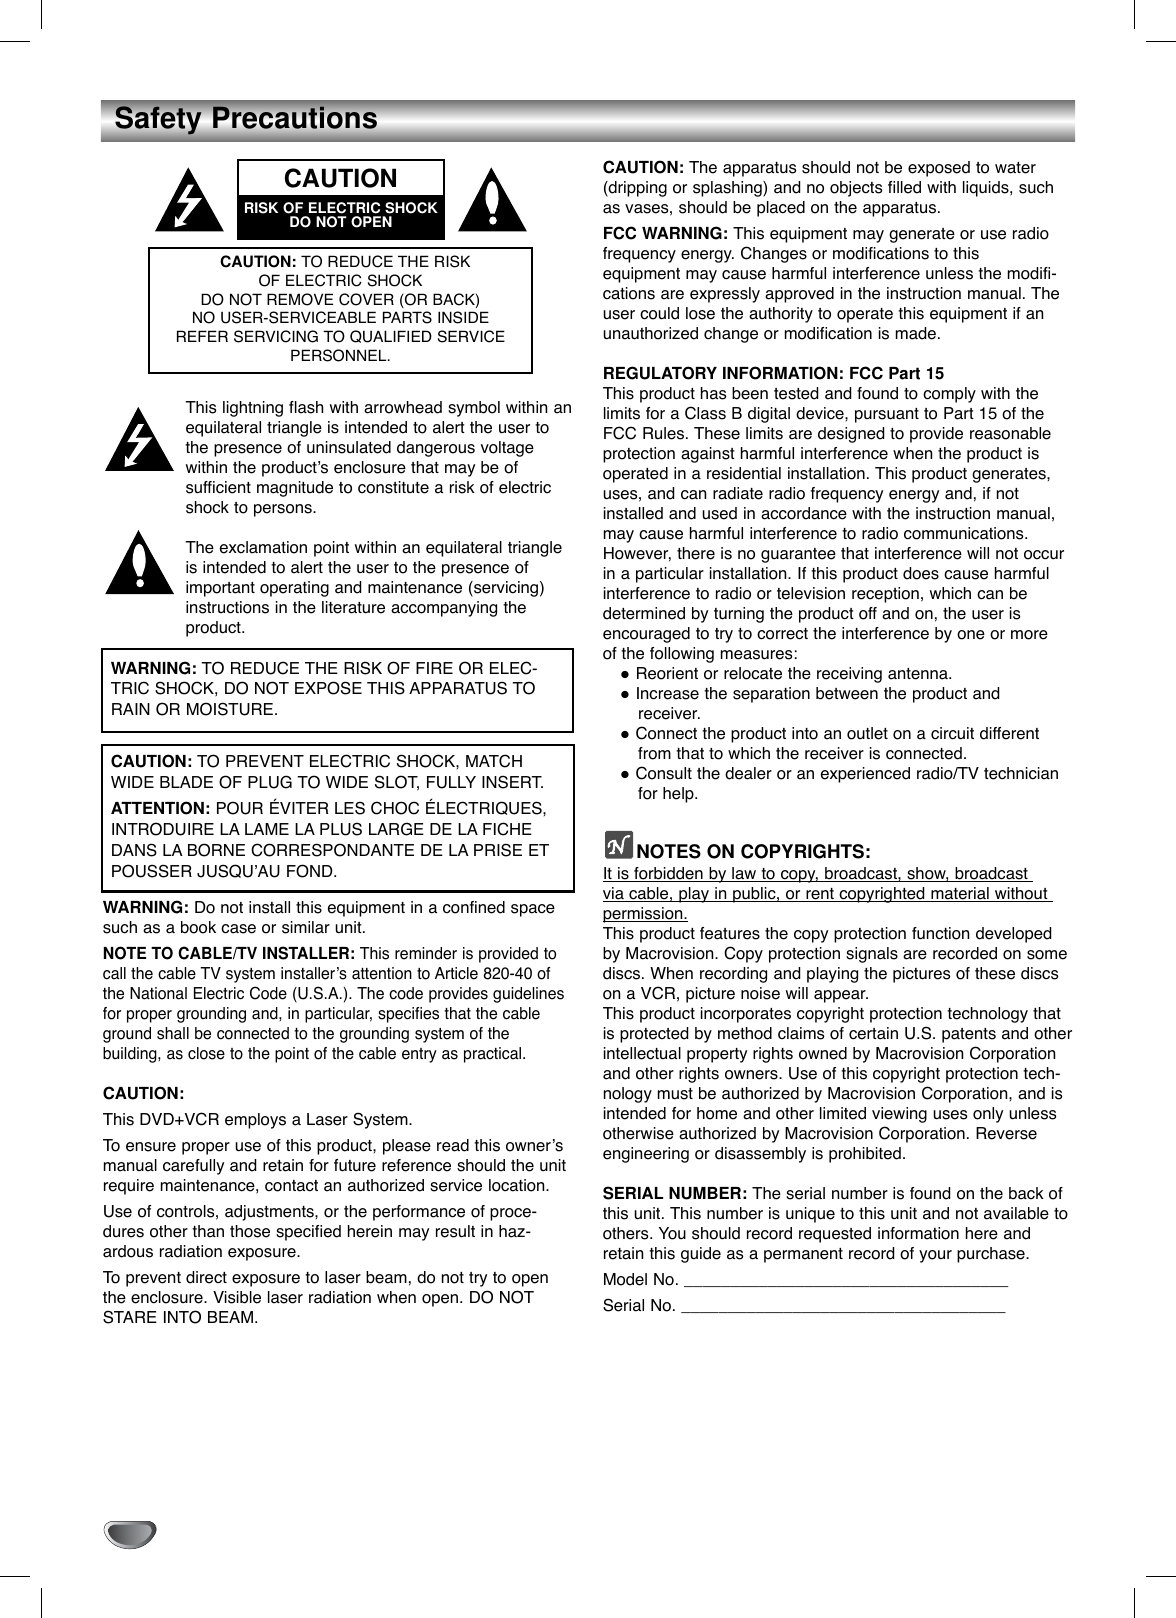
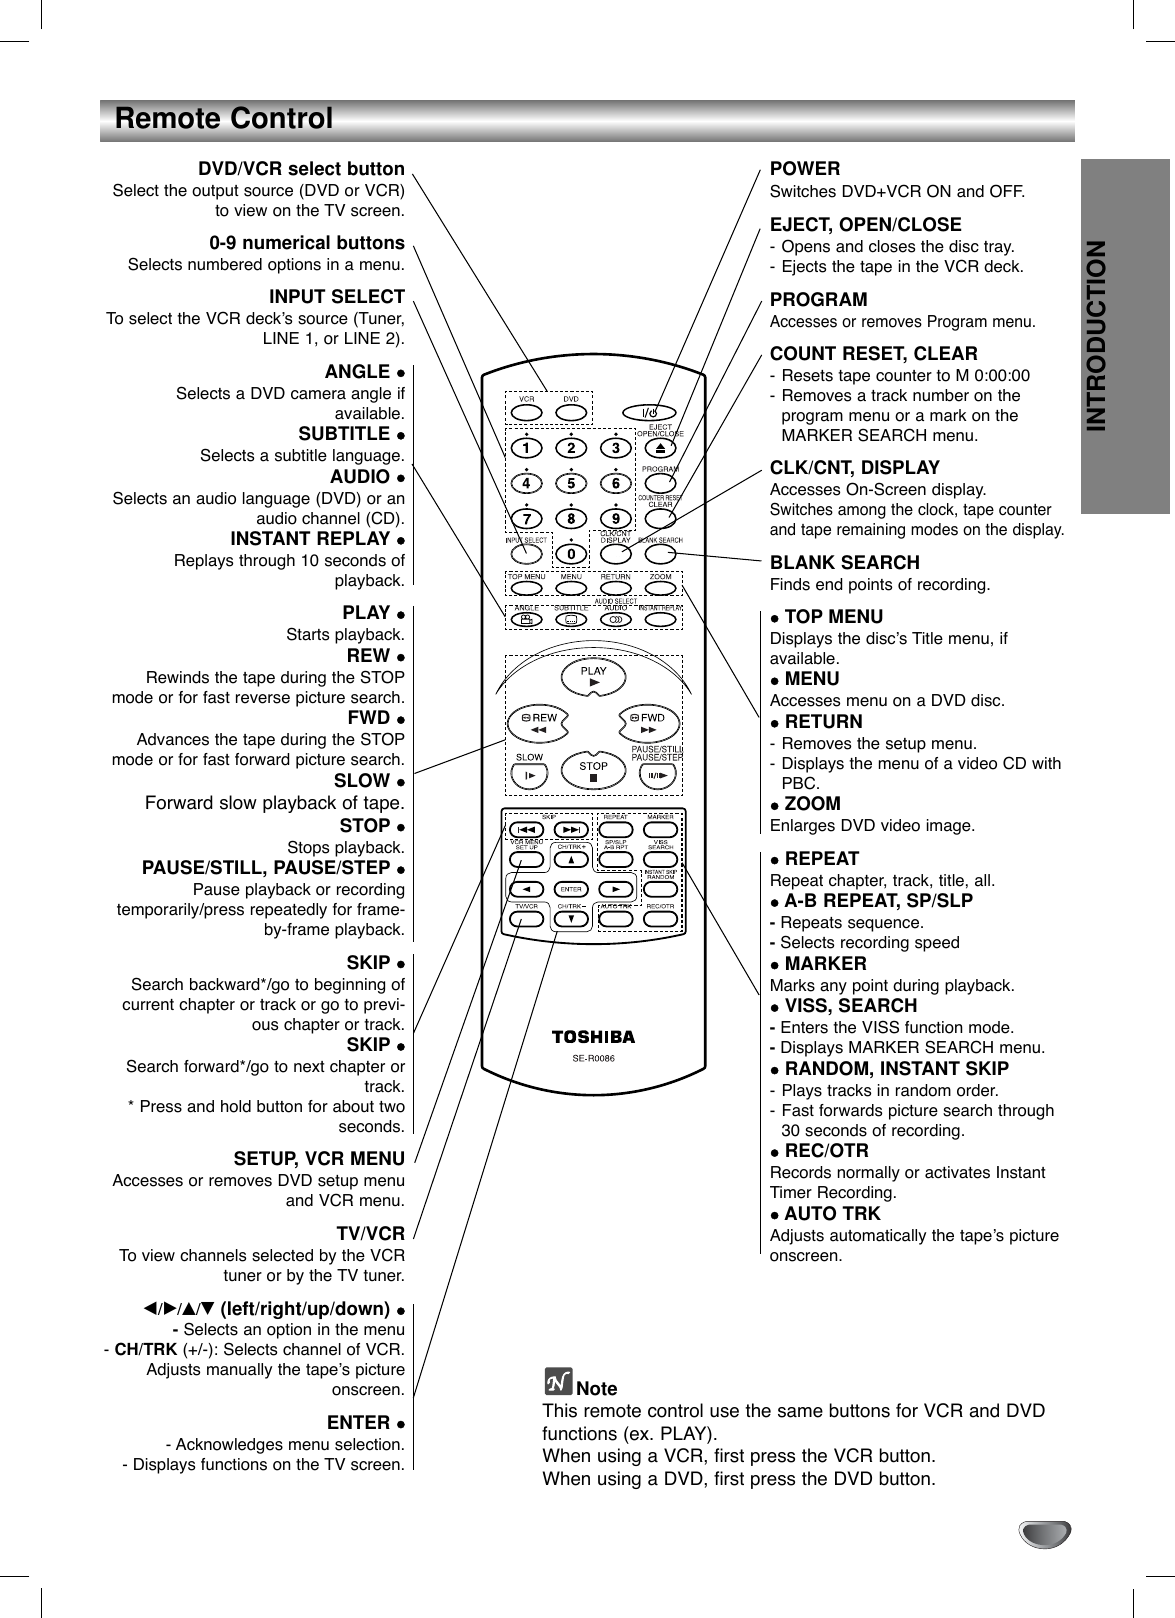
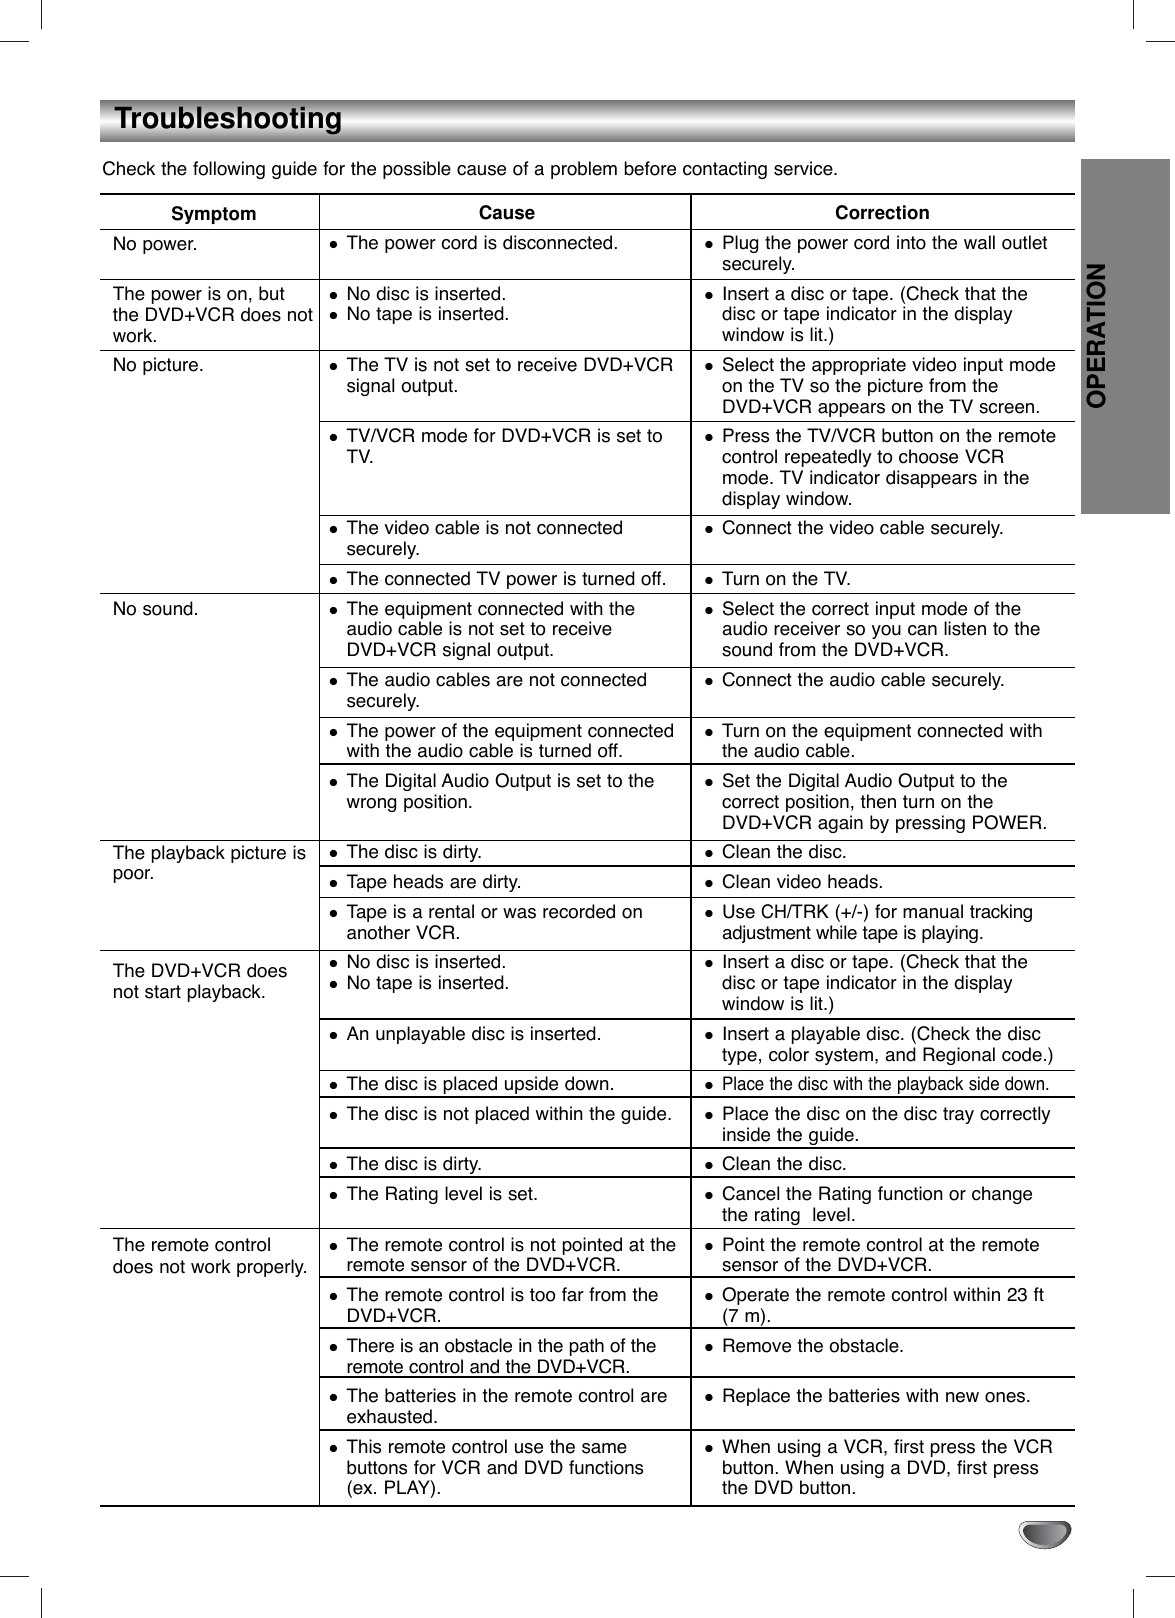
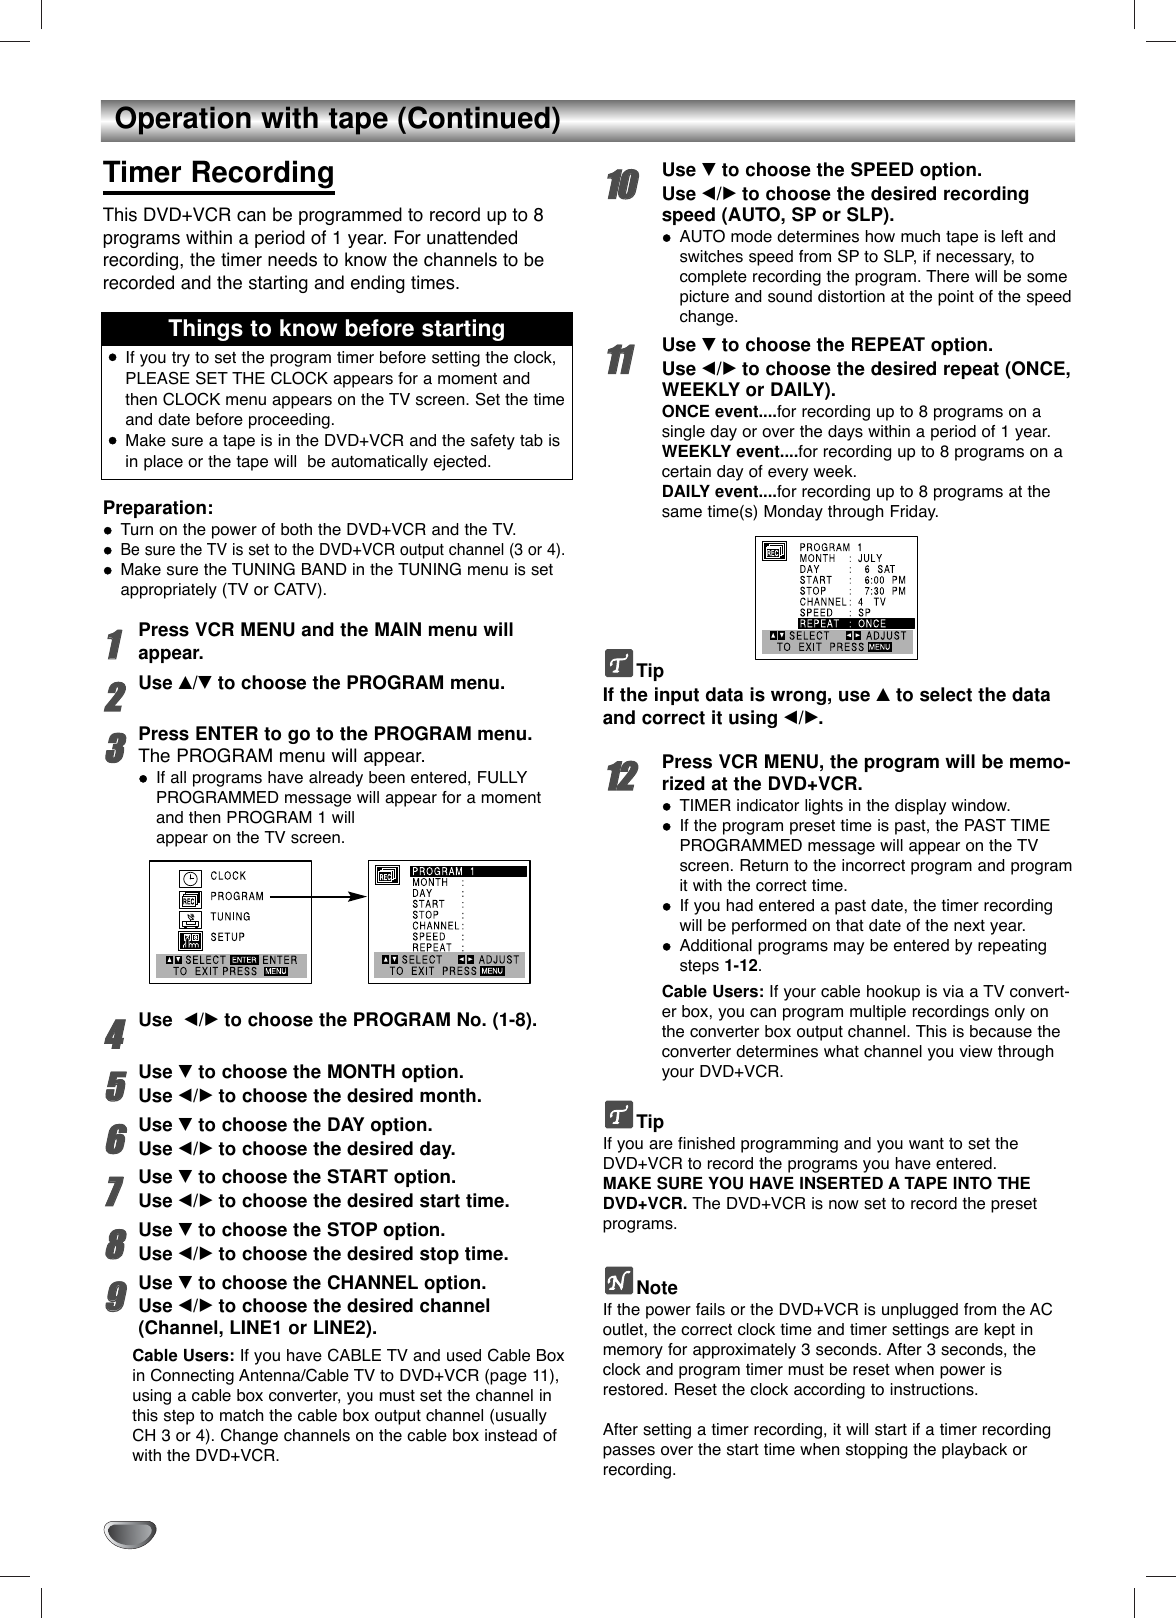
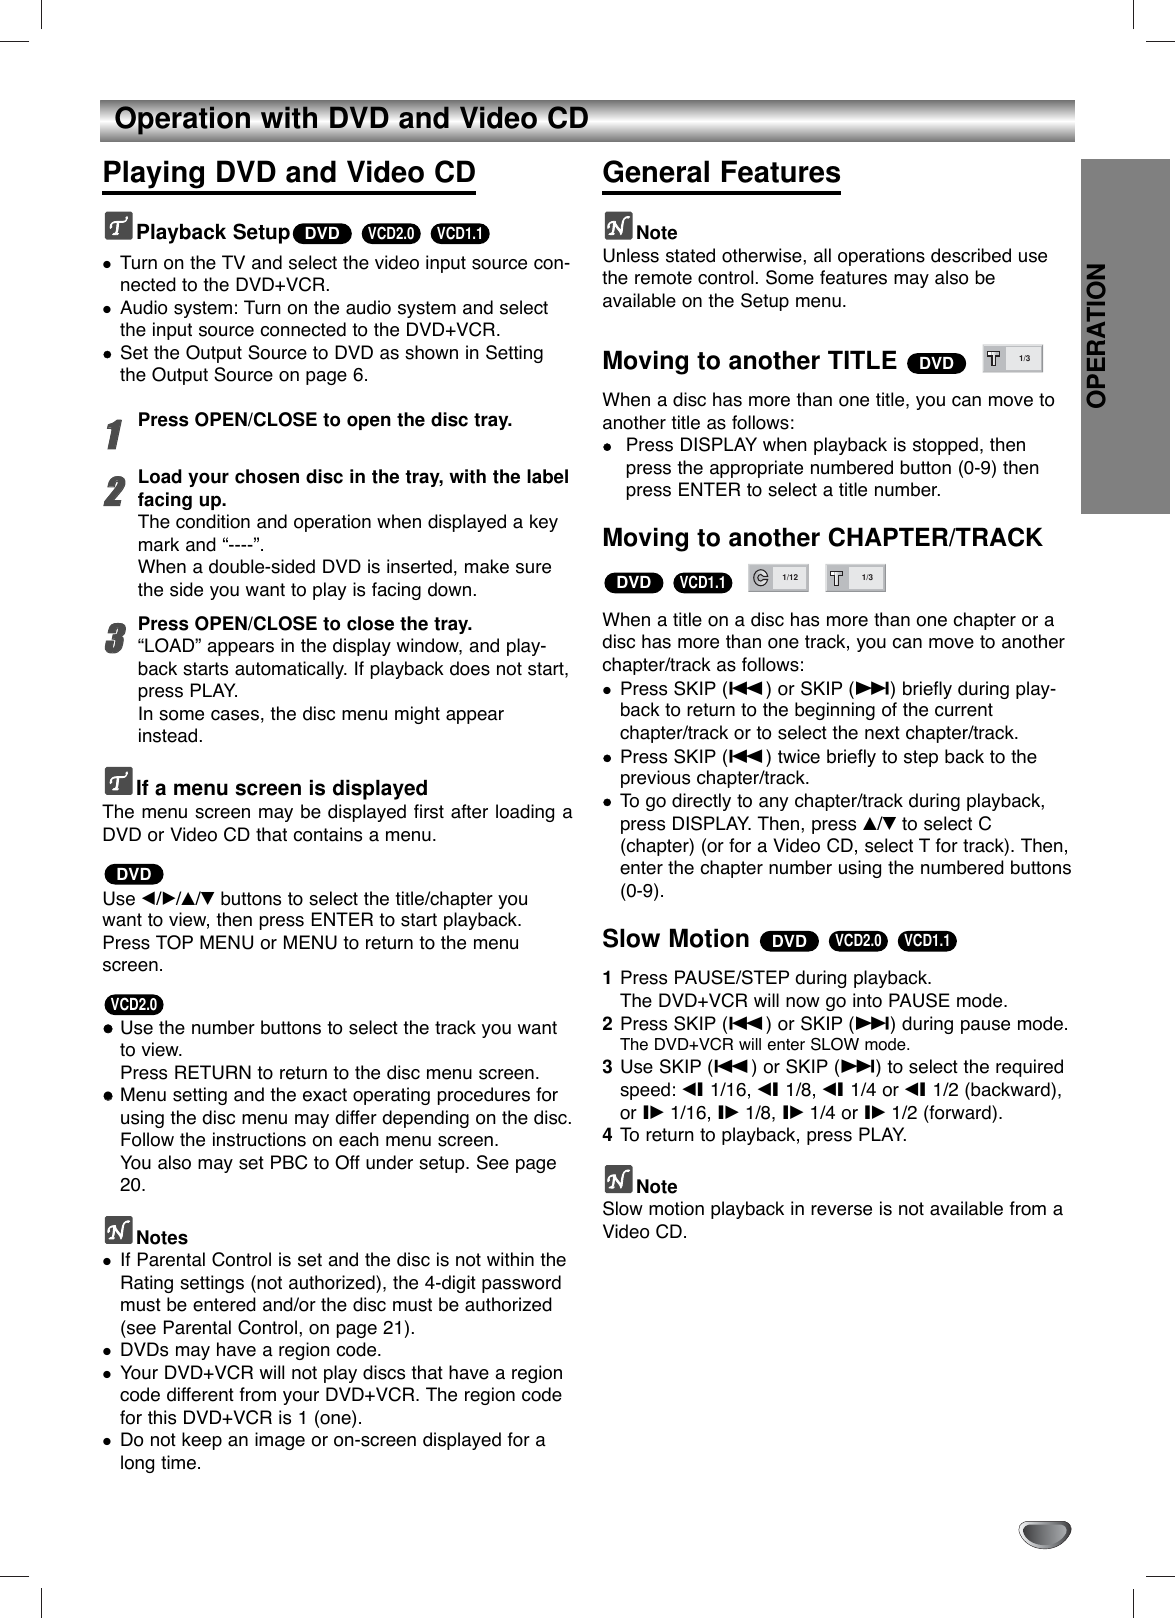
![Before Operation - VCR Part (Continued)Setting the VCR Setup Menu11Press VCR MENU and the MAIN menu willappear.22Press v/Vto select the SETUP menu, thenpress ENTER. The SETUP menu will appear.33Press v/Vto choose a desired option on theSETUP menu. Then press b/Bto choose adesired setting.FUNCTION OSDThe on-screen display of this DVD+VCR can be turned on or off.FUNCTION OSD can be switched between ON and OFF bypressing b/B.LANGUAGE SELECTThe on-screen programming of this DVD+VCR can be displayed in either English, Spanish, or French.LANGUAGE SELECT can be switched among ENGLISH,SPANISH and FRENCH by pressing b/B.AUDIO MODEThe DVD+VCR has two separate audio playback systems, thehigh quality VHS Hi-Fi system and standard NORMAL mono sys-tem. The same audio is generally recorded on both systems. TheVHS Hi-Fi system plays on separate (left and right) channels, andthe NORMAL system plays monaural sound. The normal track isalways played so the cassette can be played on a DVD+VCR thatdoes not have VHS Hi-Fi.AUDIO MODE can be switched between HI-FI and NORMAL by pressing b/B.BROADCAST TYPE (STEREO/SAP/MONO)Multichannel Television Sound (MTS) carries stereo and/orSecond Audio Program (SAP) bilingual signals. Set this display tothe desired position when both MTS stereo and SAP signals arereceived. When only one of the MTS signal is received, theDVD+VCR automatically selects the corresponding receivingmode (Stereo or SAP) regardless of the selected position. For normal operation, the display should be in the STEREO position.The DVD+VCR will then record a STEREO program when available,and record a mono program IF the program is NOT IN STEREO.For weak STEREO and/or SAP broadcasts, changing the dis-play to mono may give clearer sound.BROADCAST TYPE can be switched among STEREO, SAP,and MONO by pressing b/B.AUDIO OUTPUT (STEREO/LEFT/RIGHT)Used during playback [when AUDIO MODE (HI-FI/NORMAL) isin HI-FI position] for selecting the audio output signals from theAUDIO OUT terminals (L ch and R ch), and RF.OUT.This display setting should normally be left in the stereo posi-tion, so that when a stereo tape is played, the stereo sound willbe heard through the left and right channels. If a mono tape isplayed and the audio output is set to stereo, the same monosound will be heard from both left and right channels.AUDIO OUTPUT can be switched among STEREO, LEFT,and RIGHT by pressing b/B.44Press MENU when finished.Channel SelectionThis DVD+VCR is equipped with a frequency synthesized tuner capable of receiving up to 181 channels. These include VHF channels 2-13, UHFchannels 14-69 and CATV channels 1-125. Preparation:Connect the DVD+VCR to the desired type of antenna orcable TV system, as shown in Connecting Antenna/Cable TVto DVD+VCR on page 11.AUTO CHANNEL PROGRAMMING11Press VCR MENU and the MAIN menu willappear.22Press v/Vto select the TUNING menu, thenpress ENTER. The TUNING menu will appear.33Press Vto choose the SOURCE SELECT option,then press b/Bto select TUNER.Press b/Brepeatedly to switch among TUNER, LINE1and LINE2.44Press v/Vto choose the AUTO CHANNEL SEToption, then press b/Bto set the channel.The tuner will automatically cycle through all available channels in the area and place them inthe tuner’s memory.55After the AUTO CHANNEL SET PROCEEDING iscomplete, make sure the TUNING BAND is setappropriately (TV or CATV) by pressing v/Vandchoosing the correct TUNING BAND (TV orCATV) by pressing b/Busing the TUNINGmenu.Remember, TV is for the air antenna reception,CATV is for cable or wireless cable connection.66Press VCR MENU to return to the TV screen.77Use CH/TRK (+/-) or CHANNEL (v/V) on thefront panel to cycle the DVD+VCR through thechannels in memory. TO ADD OR ERASE CHANNELS FROM MEMORYThis feature allows you to add or erase channels frommemory manually.1Press Vto choose the CH. ADD/DEL option on theTUNING menu. Press b/Bto select a channel toadd or erase.2Press ENTER to add or erase the channel.Repeat steps 1 and 2 to add or erase channels.3Press VCR MENU to return to the TV screen.](https://usermanual.wiki/LG-Electronics-USA/9QKE40320/User-Guide-284230-Page-16.png)


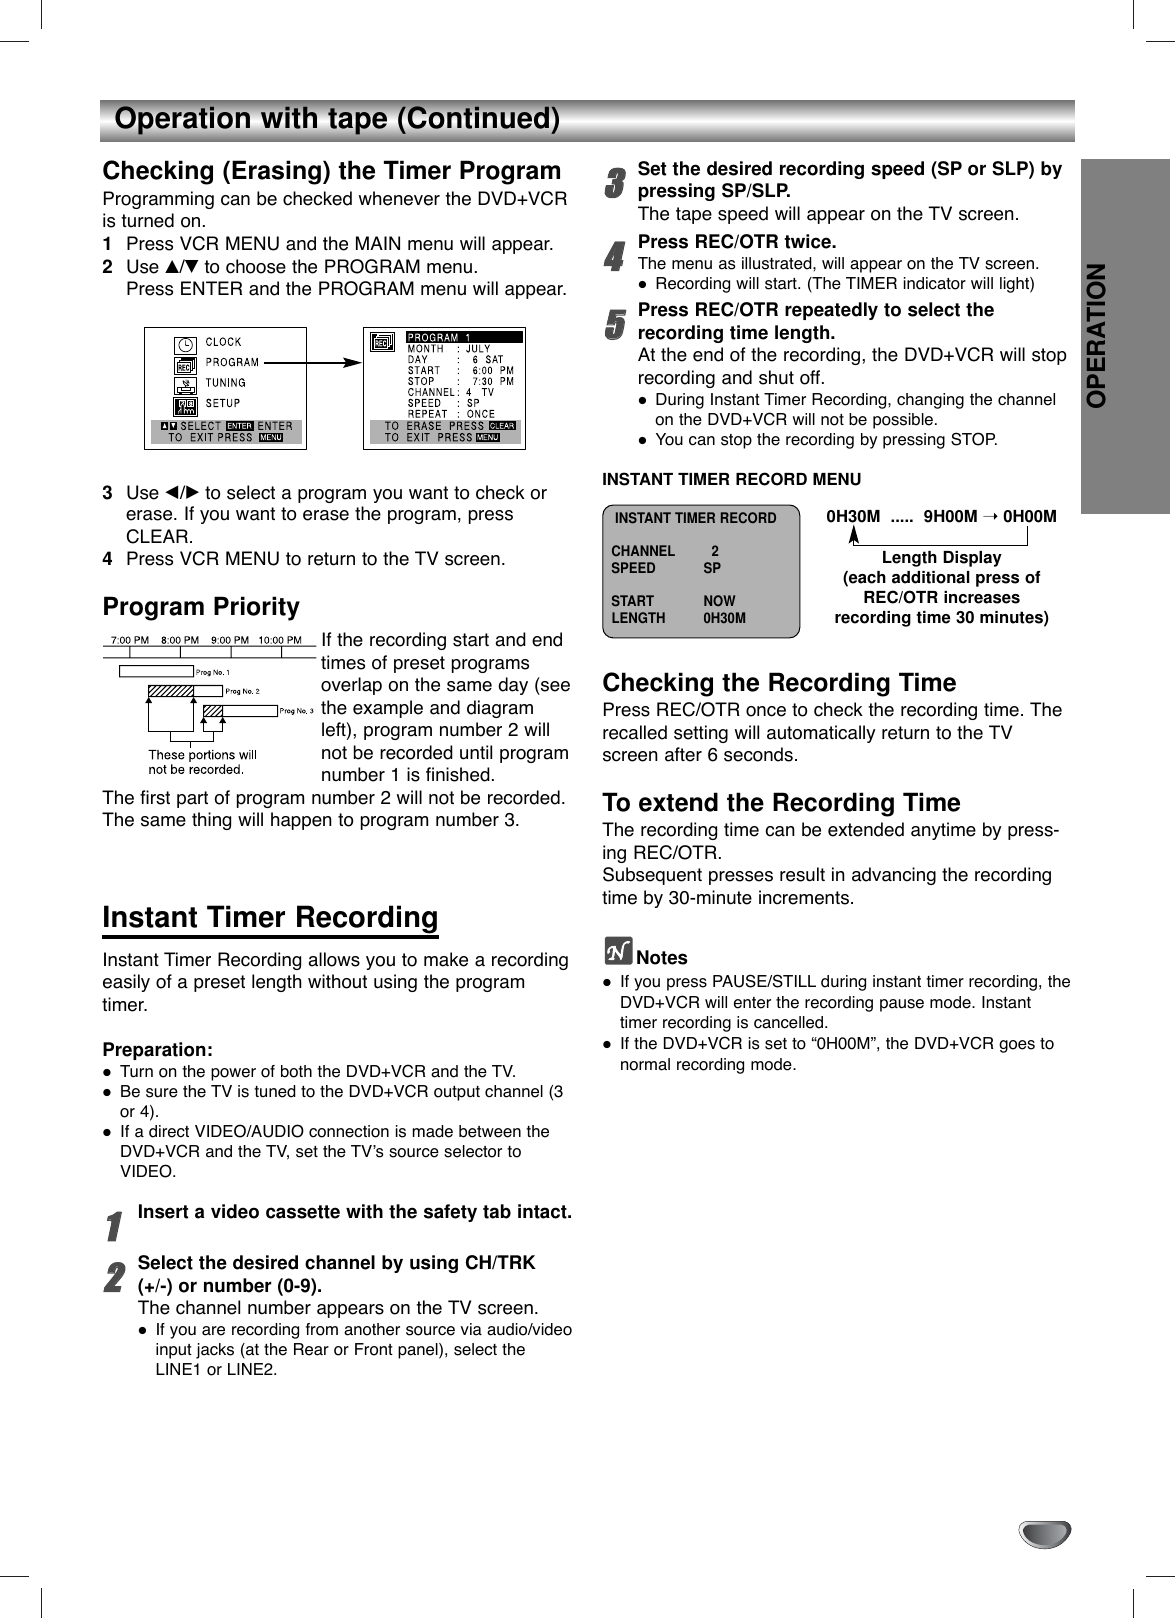

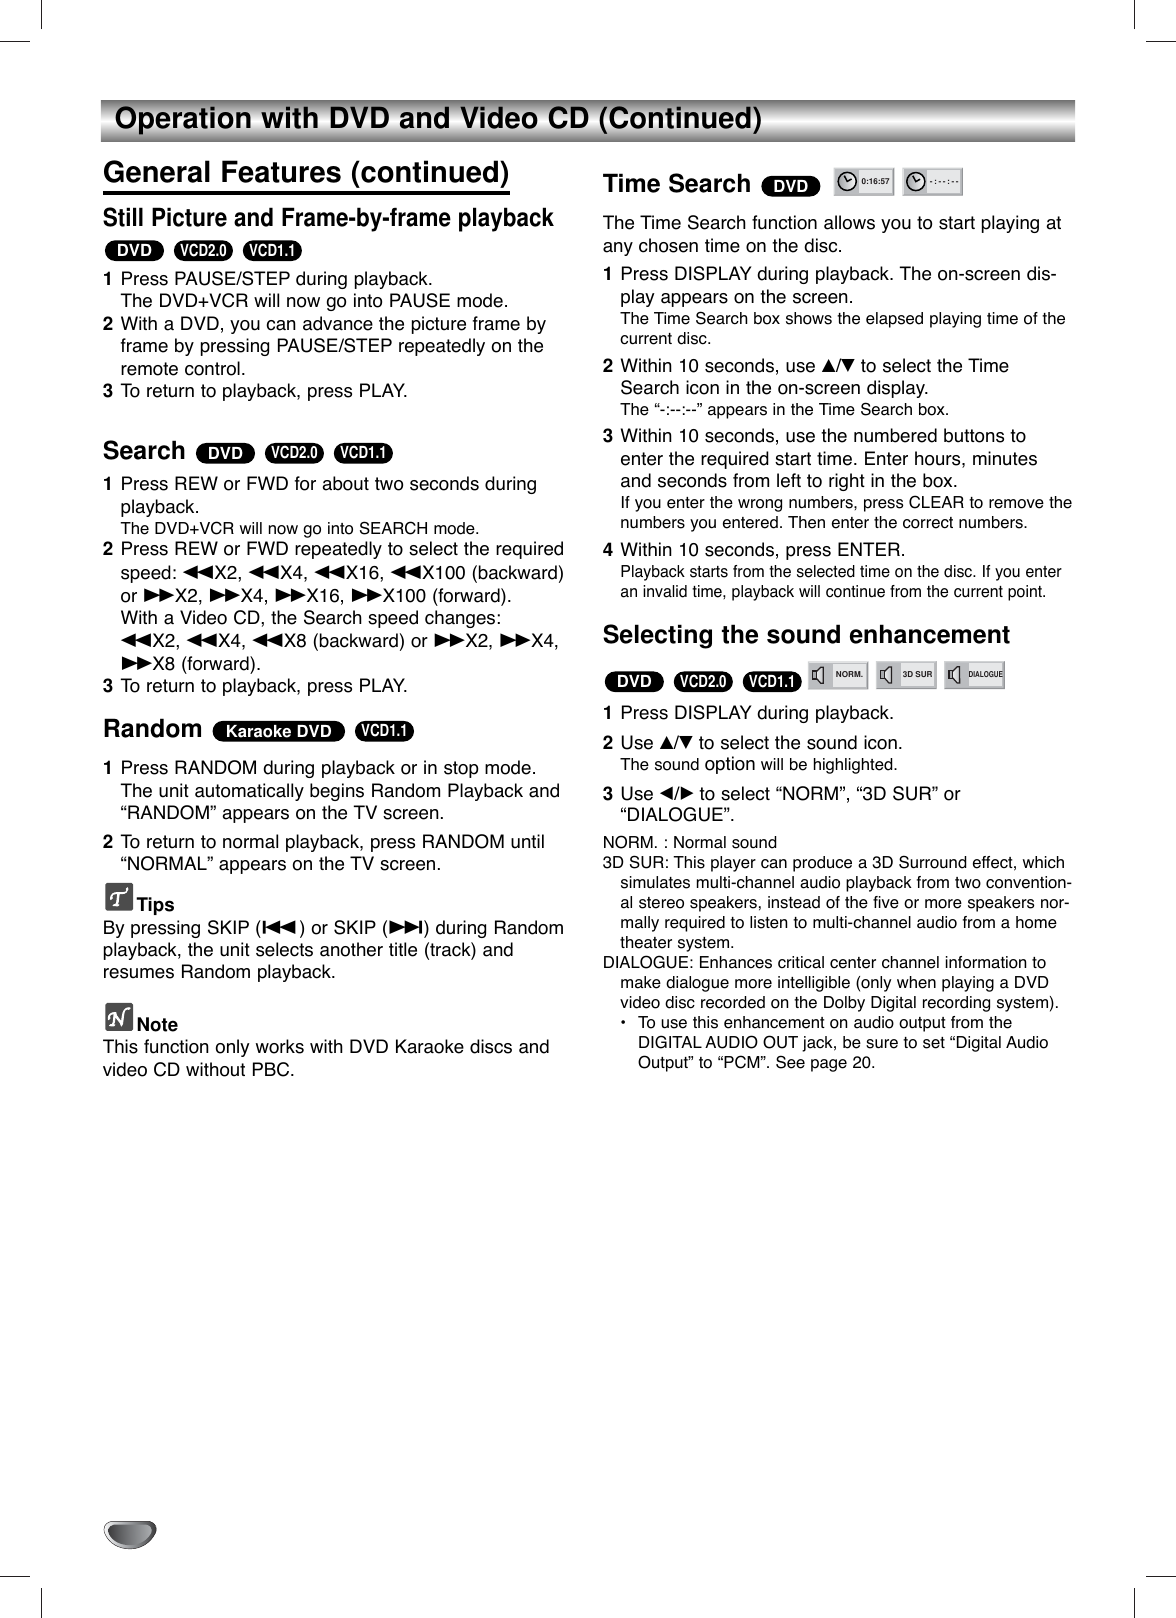
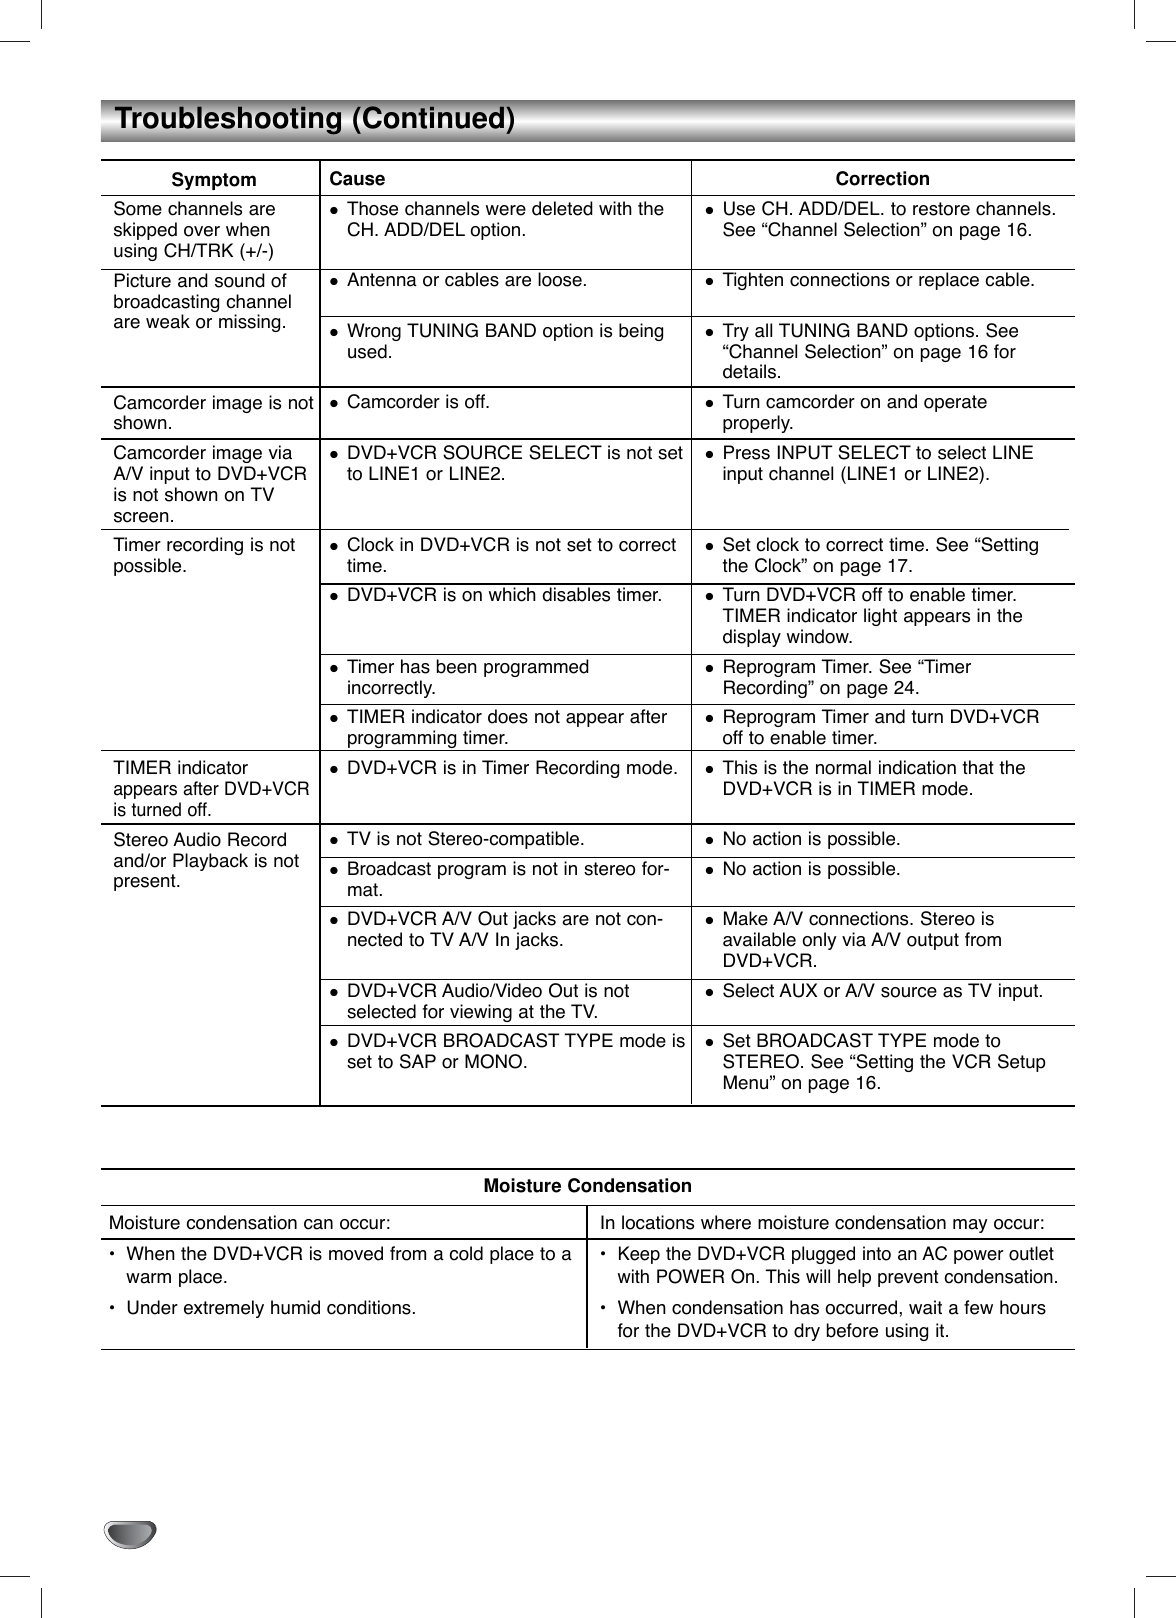
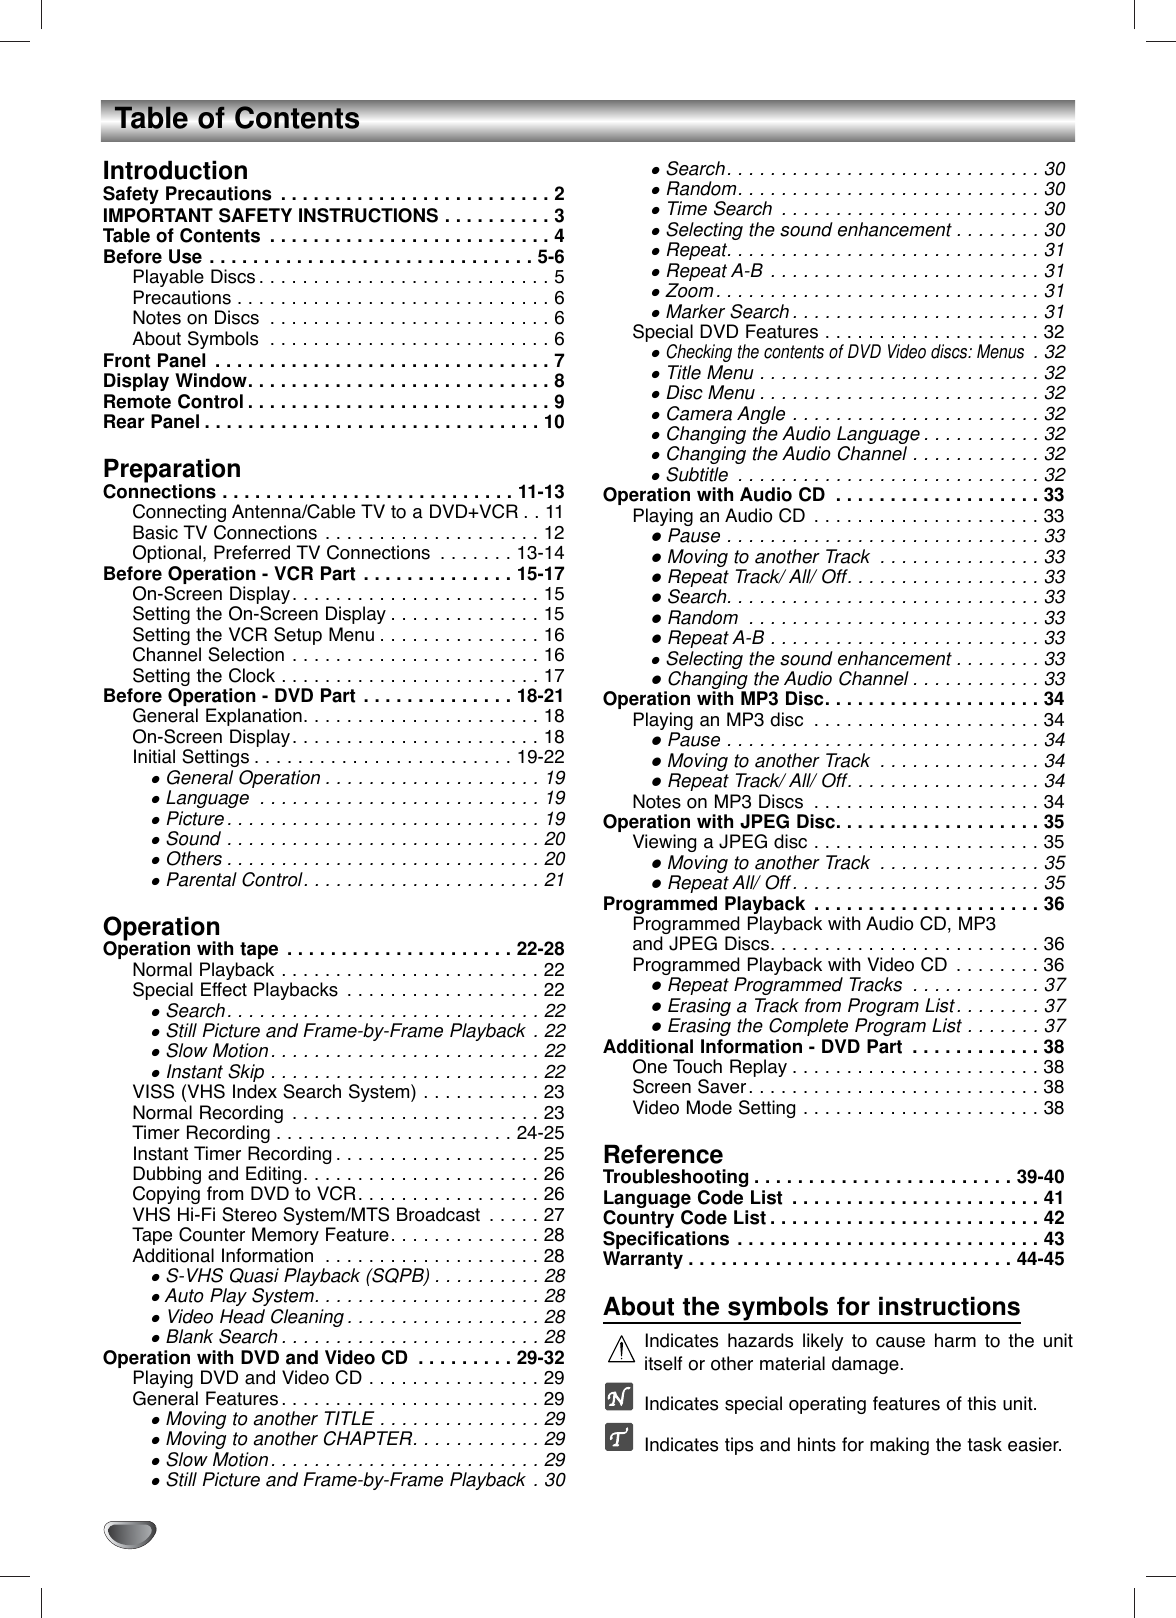
![Operation with MP3 DiscPlaying an MP3 discThe DVD Player can play MP3 formatted recordings onCD-ROM, CD-R or CD-RW discs.Before playing MP3 recordings, read the notes on MP3Recordings on right.11Insert a disc and close the tray.The MP3/JPEG choice menu appears on the TVscreen.22Press v/Vto select the MP3 then press ENTER. The MP3 menu appears on the TV screen.MP3 menu33Press v/Vto select a track then press PLAY. Playback starts. During playback, the current track’s elapsed playingtime will appear on the display.Playback will stop at the end of the disc.Press TOP MENU to move to he next page.Press MENU to move to the previous page.44To stop playback at any other time, press STOP.Pause1Press PAUSE/STEP during playback.2To return to playback, press PLAY or pressPAUSE/STEP again.Moving to another Track Press SKIP (.) or SKIP (>) once during play-back to advance to the next track or to return to thebeginning of the current track.Press SKIP (.) twice briefly to step back to theprevious track.Repeat Track/All/Off 1To repeat the track currently playing, press REPEAT.The Repeat Track icon appears on the menu screen.2To repeat all tracks on a disc, press REPEAT twotimes.The Repeat All icon appears on the menu screen.3To cancel Repeat mode, press REPEAT repeatedly untilthe Repeat Off icon appears on the menu screen.NoteThe REPEAT button is not available when the mark appear. Press PROGRAM to disappear the mark.If you press SKIP (.) twice or SKIP (>) duringRepeat Track playback, the repeat playback cancels.Notes on MP3 DiscsAbout MP3An MP3 file is audio data compressed by using theMPEG1 audio layer-3 file-coding scheme. We callfiles that have the “.mp3” file extension “MP3 files”.The player can not read an MP3 file that has a fileextension other than “.mp3”.The player can not read a non MP3 encoded file thathas a file extension “.mp3”.MP3 Disc compatibility with this player is limit-ed as follows:1. Sampling Frequency / only at 44.1kHz2. Bit rate / within 32 - 320kbps3. CD-R physical format should be “ISO 9660”4. If you record MP3 files using the software whichcannot create a FILE SYSTEM, for example “Direct-CD” etc., it is impossible to playback MP3 files. Werecommend that you use “Easy-CD Creator”, whichcreates an ISO9660 file system.5. A single session disc requires MP3 files in the firsttrack. If there is no MP3 file in the 1st track, it can-not playback MP3 files. If you wish to playback MP3files, format all the data in the disc or use a newone.6. We do not recommend using CD-RW discs. Pleaseuse finished CD-R discs only.7. File names should be named using 8 letters or lessand must incorporate “.mp3” extension e.g. “********.MP3”.8. Do not use special letters such as “_?!><+*}{`[@]:;\/.,” etc.9. Total number of files on the disc should be less than200.10. Use 74 minute CD-R discs (650M), Do not use 80minute CD-R (700M) softwareThis DVD player requires discs/recordings to meet certain technical standards in order to achieve optimalplayback quality. Pre-recorded DVDs are automaticallyset to these standards. There are many different typesof recordable disc formats (including CD-R containingMP3 files). That require certain pre-existing conditions(see above) to insure compatible playback.Customers should also note that permission isrequired in order to download MP3 files and musicfrom the Internet. TOSHIBA cannot grant such permission. Permission should always be soughtfrom the copyright owner.EEMP3MP3MP3MP3ProgramMP3Clear AllTRACK 1.MP3TRACK 2.MP3TRACK 3.MP3TRACK 4.MP3TRACK 5.MP3TRACK 6.MP3TRACK 7.MP3TRACK 8.MP356:35 1 OFFMP3JPEG](https://usermanual.wiki/LG-Electronics-USA/9QKE40320/User-Guide-284230-Page-34.png)