LG Electronics USA 9QKE40540 DVD Player / Recorder User Manual DR7923CMC HA1ULL 63E 0408
LG Electronics USA DVD Player / Recorder DR7923CMC HA1ULL 63E 0408
UserManual.wiki
>
LG Electronics USA
>
9QKE40540 User Manual
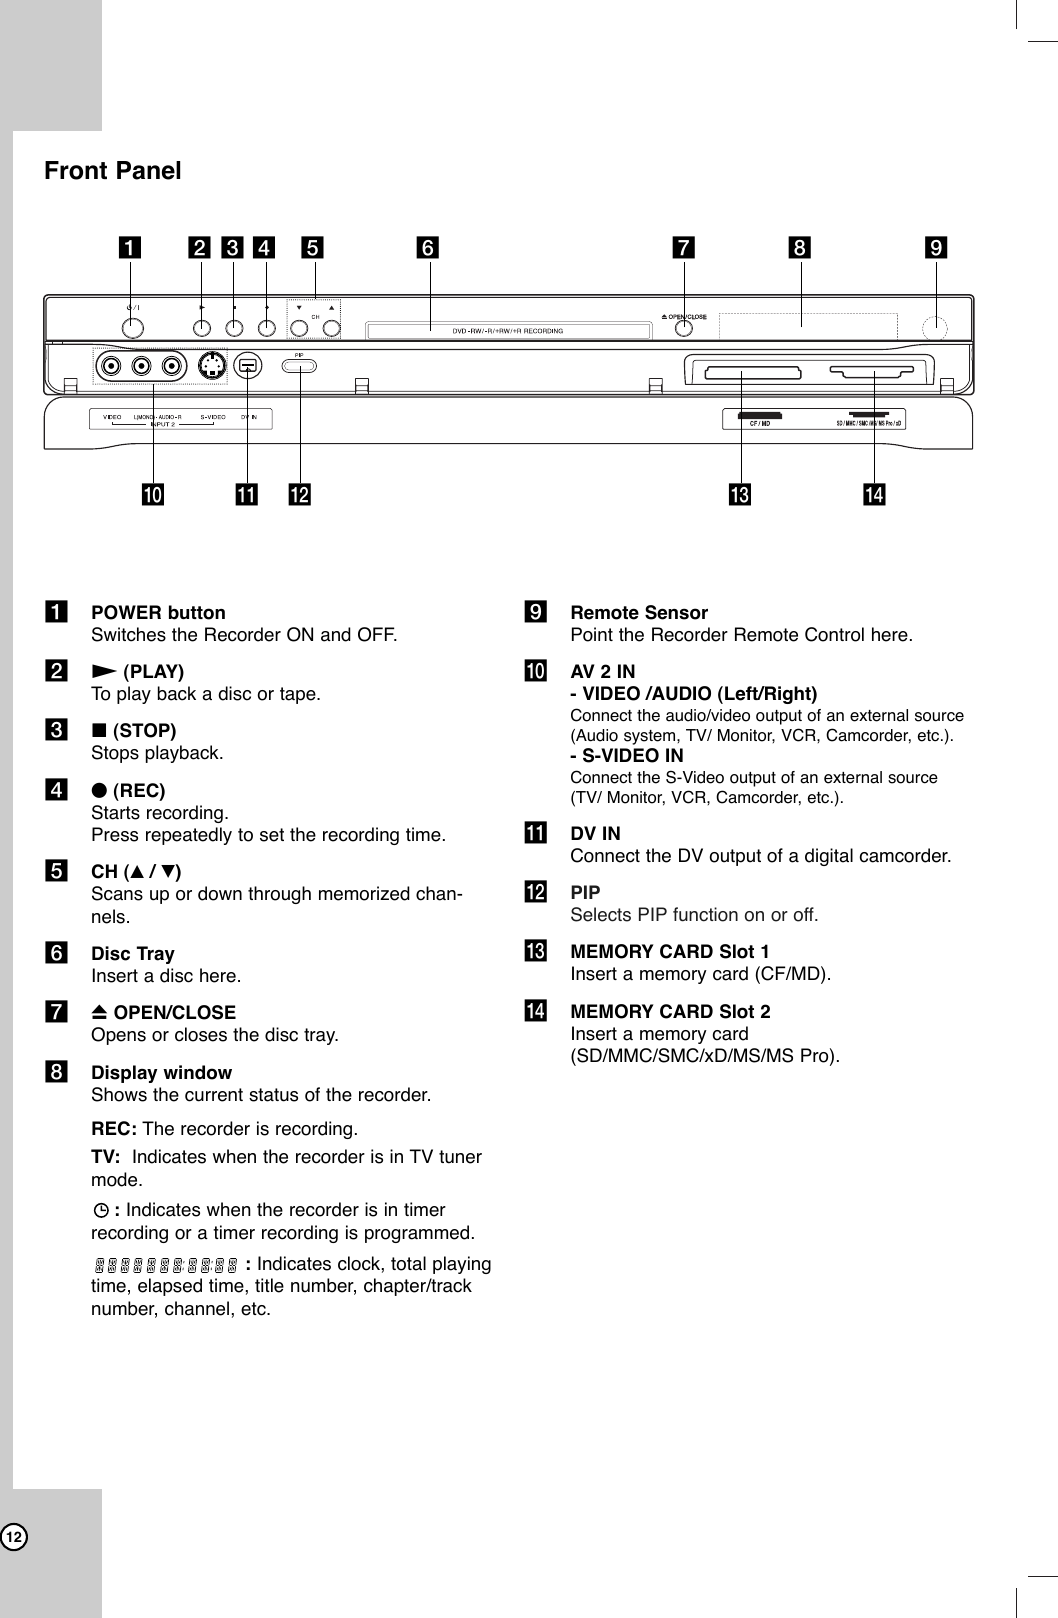
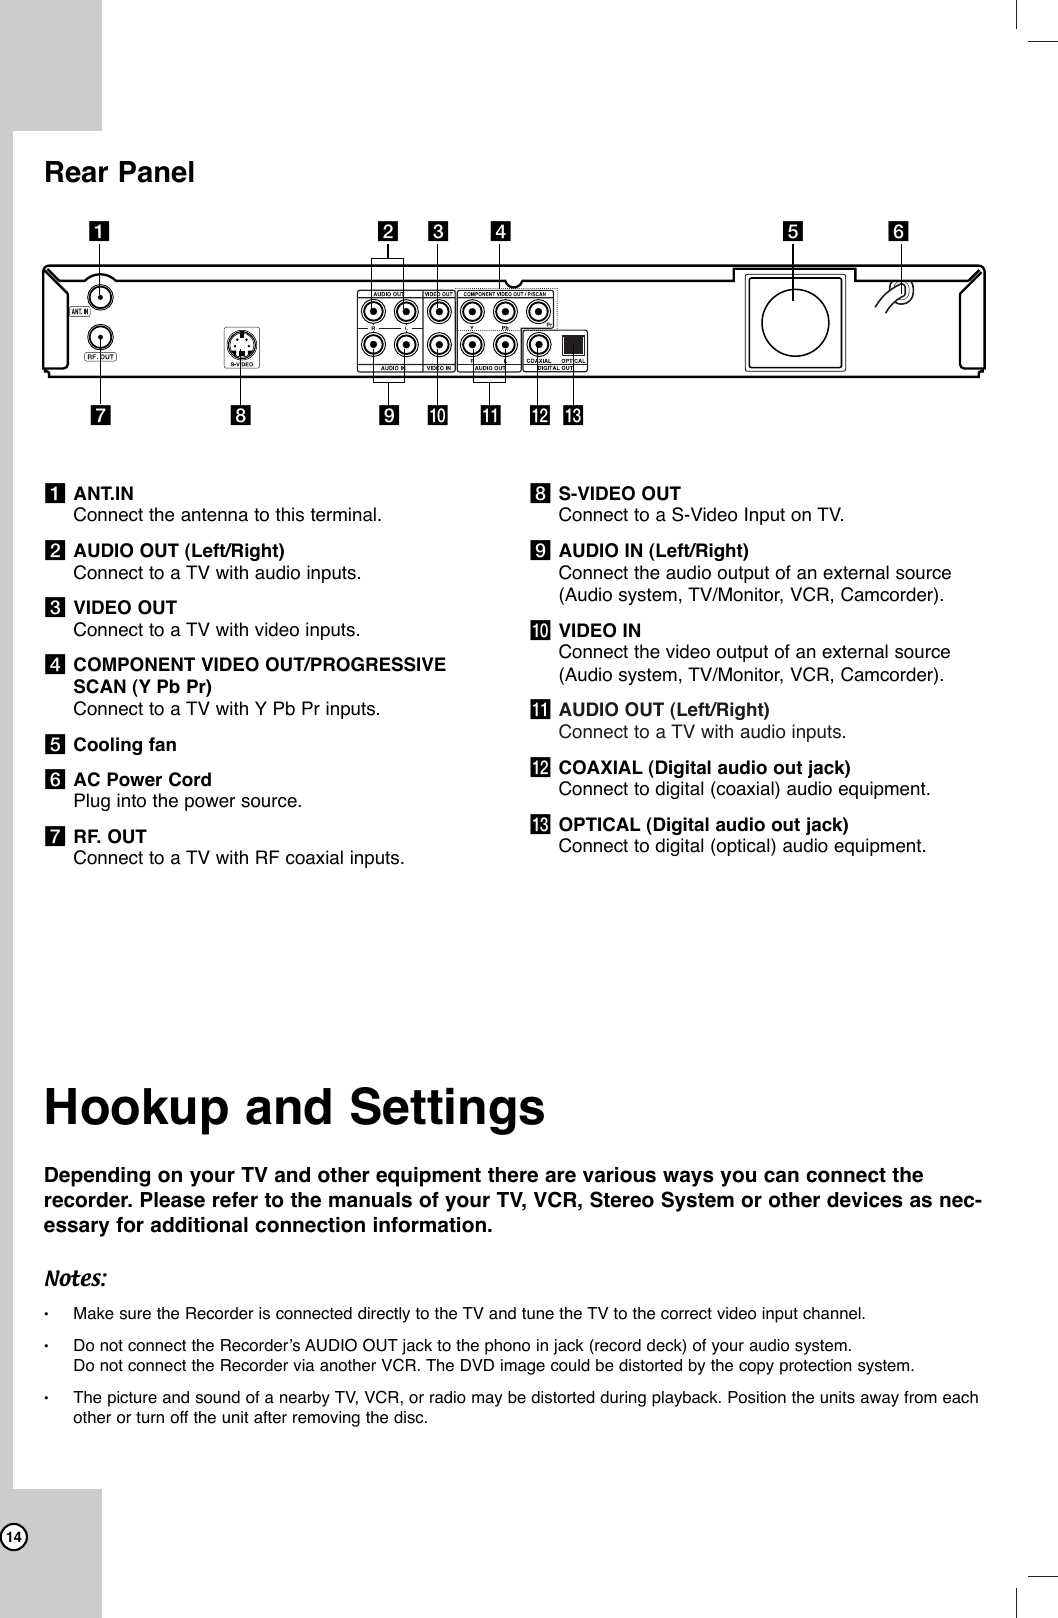
Users Manual
Navigation menu
Upload a User Manual
Namespaces
Wiki Guide
HTML
PDF
Info
Views
User Manual
Discussion / Help
Navigation
![7Recordable and Playable DiscsDVD-RW (DVD - ReWritable)DVD-RW discs can be formatted for VR mode recording or Video mode recording.These Discs can be recorded on repeatedly. Recordings can be erased, then you can record again on thesame Disc.[VR mode]Recordings can be extensively editedPlayable only on VR mode compatible players (after finalization)[Video mode]Playable on regular DVD players (after finalization)Limited editing featuresDVD-R (DVD - Recordable)These Discs can be recorded only once. After you finalize a DVD-R, you cannot record on it or edit it.DVD-R discs can be only formatted to Video mode.Playable on regular DVD players (after finalization)Limited editing featuresDVD+RW (DVD+ ReWritable) These Discs can be recorded on repeatedly. Recordings can be erased, then you can record again on thesame Disc.Playable on DVD+RW compatible players (automatically finalization)The edited contents are playable on DVD+RW compatible players only after finalization.Recordings can be edited the title/chapterDVD+R (DVD + Recordable)These Discs can be recorded only once. After you finalize a DVD+R, you cannot record on it or edit it anymore.Playable on DVD+R compatible players (after finalization)Any edited contents are not be compatible on DVD+R compatible players. (Hide, chapter combine, addedchapter mark, etc.)Limited title/chapter editing features.DVD+R DL (DVD + Recordable; Double Layer)These Discs can be recorded only once. After you finalize a DVD+R DL, you cannot record on it or edit it anymore.Storage space is nearly doubled with double layer DVD+R media, allowing consumers to record up to 8.5GBof video on a single DVD+R DL disc.Playable on DVD+R compatible players (after finalization)Any edited contents are not be compatible on DVD+R DL compatible players. (Hide, chapter combine, addedchapter mark, etc.)Limited title/chapter editing features.Recommended recordable DVD discsDVD-R DVD+R DVD-RW DVD+RW DVD+R(DL)SONY (8x, 16x) SONY (2.4x, 4x, 8x, 16x) Victor (1x, 4x) SONY (2.4x) Mitsubishi (2.4x)TDK (4x, 8x) TDK (4x) Maxell (1x, 2x, 4x) TDK (2.4x) Maxell (2.4x)Verbatim (4x, 8x) Mitsubishi (4x, 8x) VerbatimTDK (2x) Ricoh (2.4x) -Panasonic (2x, 4x) Ricoh (2x, 4x, 8x) Mitsubishi (2x) HP (2.4x, 4x) ----Philips (4x) -Introduction](https://usermanual.wiki/LG-Electronics-USA/9QKE40540/User-Guide-533993-Page-7.png)

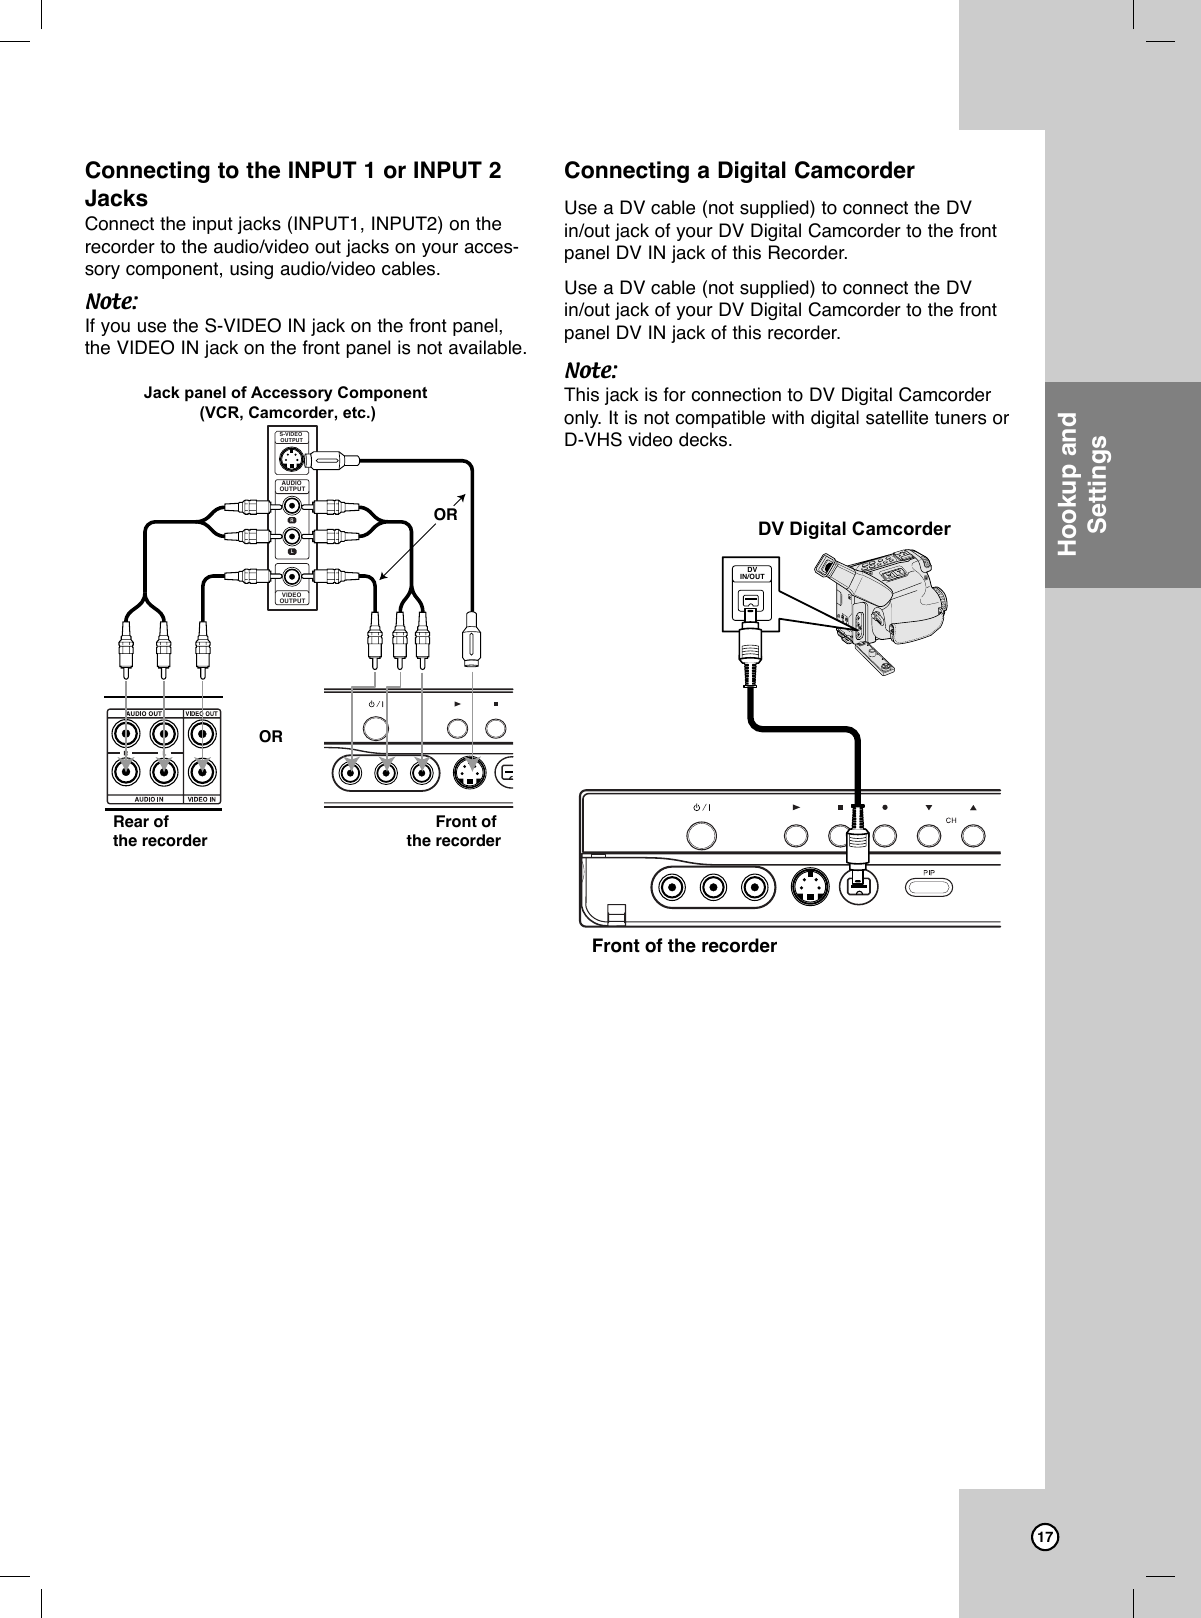
![15Connecting an Connecting an Antenna Antenna or Cable TVor Cable TVaaAntenna:Disconnect the antenna from the rear of the TV andidentify the antenna cable. If it is a round 75 ohmcoaxial cable connect it directly to the jack markedANT.IN on your Recorder. If your antenna cable is flatconnect it to a 300-ohm to 75-ohm antenna adaptor(not supplied) and slip the adaptor over the ANT.INjack. Don’t attempt to screw it into to the Recorder.bbCable TV:If your cable connection has no converter ordescrambler, unscrew the cable from your TV andattach it to the ANT.IN jack on the Recorder. If a con-verter is required connect a coaxial cable from thewall jack to the IN connector on the converter, and acoaxial cable from the OUT connector on the convert-er to the ANT.IN on your Recorder. This cable hookuppermits both TV and Recorder operation. To view or record a CATV channel1. Tune the TV to the Recorder output channel (CH3 or 4).2. Set the Recorder channel selector to the cableoutput channel. (Example: CH3)3. Select a channel using the cable converter.Notes:•With this connection, you cannot record one programwhile viewing another.•If you are using a cable box to tune channels, it is notnecessary to do Auto Channel Set.Connections to your TVConnections to your TVMake one of the following connections, depending onthe capabilities of your TV.RF coaxial connectionConnect the RF.OUT jack on the Recorder to theantenna in jack on the TV using the supplied 75-ohmCoaxial Cable (R).How to set the Recorder’s RF output channel1. When the Recorder is turned off, press and holdCH (V/v) on the front panel for more than fiveseconds. [ch03] or [ch04] appears in the displaywindow.2. Press CH (V/v) to change the RF output channel(ch03 or ch04). 3. Tune the TV to this channel.Video connection Connect the VIDEO OUT jack on the Recorder to thevideo in jack on the TV using the video cable sup-plied (V).Note:If you use this connection, set the TV’s source selector toVIDEO.S-Video connection Connect the S-VIDEO OUT jack on the Recorder tothe S-Video in jack on the TV using the optional S-Video cable (S).Antenna AntennaOR ORabRear of the recorderLRAUDIO INPUT VIDEO INPUTPrPbYRear of TVA V CCOMPONENT/PROGRESSIVE SCANVIDEO INPUTSS-VIDEO INPUTHookup andSettings](https://usermanual.wiki/LG-Electronics-USA/9QKE40540/User-Guide-533993-Page-15.png)
![16Component Video / Progressive Scan connectionIf your television is a high-definition or “digital ready”television, you may take advantage of the Recorder’sprogressive scan output for the highest video resolu-tion possible. Connect the COMPONENT/PROGRESSIVE SCANVIDEO OUT jacks on the Recorder to the correspon-ding in jacks on the TV using an optional Y Pb Prcable (C).Notes:•Set Progressive Scan option to [ON] in the setup menu,see page 20.•Progressive Scan does not work with the RF,Audio/Video or S-Video connections.•If your TV does not accept the Progressive Scan format,the picture will appear scrambled.•When you use Component Video signal, set theProgressive Scan to [OFF] on the setup menu.Audio connection Connect the Left and Right AUDIO OUT jacks on theRecorder to the audio left/right in jacks on the TVusing the supplied audio cables (A).Connection to an Connection to an AmplifierAmplifierConnecting to an amplifier equipped with twochannel analog stereo or Dolby Pro Logic II/ProLogicConnect the Left and Right AUDIO OUT jacks on theRecorder to the audio left and right in jacks on youramplifier, receiver, or stereo system using the audiocables (A) supplied.Connecting to an amplifier equipped with two chan-nel digital stereo (PCM) or to an Audio/Video receiv-er equipped with a multi-channel decoder (DolbyDigital™, MPEG 2, or DTS)1. Connect one of the Recorder’s DIGITAL AUDIOOUT jacks ( OPTICAL O, COAXIAL X) to the cor-responding in jack on your amplifier. Use anoptional digital (OPTICAL O, COAXIAL X) audiocable.2. You will need to activate the Recorder ’s digitaloutput. (See [Audio Settings] on page 22).Digital Multi-channel soundAdigital multi-channel connection provides the bestsound quality. For this you need a multi-channelAudio/Video receiver that supports one or more of theaudio formats supported by your Recorder (MPEG 2,Dolby Digital and DTS). Check the receiver manualand the logos on the front of the receiver.Caution:Due to the DTS Licensing agreement, the digital output will be in DTS digital out when DTS audiostream is selected.Notes:•If the audio format of the digital output does not matchthe capabilities of your receiver, the receiver will pro-duce a strong, distorted sound or no sound at all. •Six Channel Digital Surround Sound via digital connec-tion can only be obtained if your receiver is equippedwith a Digital Multi-channel decoder. •To see the audio format of the current DVD in the on-screen display, press AUDIO.•This Recorder does not perform internal (2 channel)decoding of a DTS sound track. To enjoy DTS multichannel surround, you must connect this Recorder to aDTS compatible receiver via one of this Recorder’s digi-tal audio outputs.Manufactured under license from DolbyLaboratories. “Dolby”, “Pro Logic”, and thedouble-D symbol are trademarks of DolbyLaboratories.DTS and DTS Digital Out are trademarks ofDigital Theater Systems, Inc. Rear of the recorderRLAUDIO INPUT DIGITAL INPUTCOAXIALDIGITAL INPUTOPTICALAmplifier (Receiver)AXO](https://usermanual.wiki/LG-Electronics-USA/9QKE40540/User-Guide-533993-Page-16.png)
![18Initial SettingsInitial SettingsIn this menu system, there are several ways to cus-tomize the settings provided. Most menus consist ofthree levels to set up the options, but some requiregreater depth for the variety of settings.General Operation1. Press SETUP and the Setup menu appears. 2. Use v / V to select the desired option.3. While the desired item is selected, press Btomove to the second level.4. Use v / V to select the second desired option.5. Press Bto move to the third level.6. Use v / V to select the desired setting then pressENTER to confirm your selection.Some items require additional steps.7. Press SETUP to exit the Setup menu.Note:Press bto go back to the previous level.General SettingsTuning Band Select1. Select the [Tuning Band] option then press B.2. Use v / V to select the tuning band (TV orCATV) option then press ENTER.TV: If you are using a standard antenna toreceive channels. CATV: If you are using basic cable to receivechannels.Auto Channel SetConnect the Recorder to the desired type of antennaor cable TV system as shown on page 15.This Recorder is equipped with a frequency synthe-sized tuner capable of receiving up to 181 channels.These include VHF channels 2-13, UHF channels 14-69 and CATV channels 1-125. 1. Select the [Tuning Band] option.2. Use B/ v /Vto select the [Start] icon.3. Press ENTER to begin the channel search.The tuner will automatically cycle through all available channels in the area and place them inthe tuner’s memory.Note:After the Auto Channel Set proceeding is complete,make sure the Tuning Band is set appropriately (TVor CATV) on tuning band, follow steps 1~3 as shownprevious (Tuning Band Select) to choose the correctTuning Band (TV or CATV).](https://usermanual.wiki/LG-Electronics-USA/9QKE40540/User-Guide-533993-Page-18.png)
![19To Add or Erase Channels from MemoryThis feature allows you to add to or erase channelsfrom memory manually.1. Select the [Ch. Edit] option.2. Press Bto move to the third level.[Edit] icon is highlighted.3. Press ENTER and the Channel Edit menuappears.4. Use v / V or number buttons to select a channelto add or delete then press B.[Add] or [Delete] icon is highlighted.5. Press ENTER to confirm your setting.6. Repeat steps 4-5 to add or erase additional channels.7. Press SETUP or RETURN (O)to exit the menu.Clock Set1. Select the [Clock Set] option.2. Press Bto move to the third level.AutoThe Auto option is set at the factory. In the Auto option,the Recorder looks for a channel carrying XDS(Extended Data Services) information. XDS updates theclock using the Coordinated Universal Time. 1. Use b/B to choose the option and use v/V tochange the setting. [Band] Select the band.[PBS Ch.] Select the channel. [Time Zn.] Choose your time zone.When Timezone is set to Auto, the Recorderwill use XDS information to determine the prop-er setting.[Daylight Saving] Choose the Daylight Savings.When it is set to Auto, the Recorder will useXDS information to determine the proper set-ting.2. Press ENTER to confirm your setting.Note :The Auto Clock Feature enables the Recorder to set upthe clock when the Recorder is turned off.ManualIf your local TV station does not send date and timeinformation, or sends incorrect information, you can setthe clock manually.1. Enter the necessary information for year, date andtime.b / B (left/right): Moves the cursor to the previousor next column.v / V (up/down): Changes the setting at the currentcursor position.2. Press ENTER to confirm your setting.3. Press SETUP to exit the Setup menu.Hookup andSettings](https://usermanual.wiki/LG-Electronics-USA/9QKE40540/User-Guide-533993-Page-19.png)
![20TV AspectSelects the aspect ratio of the connected TV (4:3standard or wide).[4:3] Select this when connecting to a 4:3 screenTV. When you select [4:3], set [Display Mode]below.[16:9] Select this when connecting to a wide-screenTV or TV with a wide mode function.Display ModeSelects how to display a wide picture on the screenwhen [4:3] is selected in [TV Aspect].[Letter Box] Displays a wide picture with bands onthe upper and lower portions of the screen.[Pan Scan] Automatically displays a wide picture onthe entire screen and cuts off the portions that donot fit.Progressive ScanProgressive Scan Video provides the highest qualitypictures with less flickering.[ON] :Using the COMPONENT/PROGRESSIVESCAN VIDEO OUT jacks for connection toa TV or monitor that is compatible with aprogressive scan signal.[OFF] :Using the COMPONENT/PROGRESSIVESCAN VIDEO OUT jacks, but are con-necting the Recorder to a standard (ana-log) television.CautionOnce the setting for Progressive Scan output isentered, an image will only be visible on aProgressive Scan compatible TV or monitor. If youset Progressive Scan to [ON] in error, you must resetthe Recorder. First, remove the disc in the Recorder.Next, press STOP (x) and hold it for five secondsbefore releasing it. The video output will be restoredto the standard setting, and a picture will once againbe visible on a conventional analog TV or monitor.PBCPBC stands for Playback Control and refers to spe-cial menus and navigation features that are availableon some Video CDs.[ON] Video CDs are played according to the PBC,if available.[OFF] Video CDs are played the same way asAudio CDs.](https://usermanual.wiki/LG-Electronics-USA/9QKE40540/User-Guide-533993-Page-20.png)
![21Power Save ModeSet Power Save Mode to [ON] to place yourRecorder into an economic power save mode.Factory SetYou can reset the Recorder to its original factory settings. Some options cannot be reset (Rating,Password and Area Code) 1. Select the [Factory Setting] option.2. Press Bto select [SET] then press ENTER.The Initialize menu will appear. 3. Select [OK] and press ENTER.Language SettingsLanguage SettingsDisplay MenuSelect a language for the Setup menu and informa-tion display. Disc Menu/Audio/Subtitle[Original]Refers to the original language in whichthe disc was recorded.[Others] To select another language, press numberbuttons then ENTER to enter the corresponding 4-digit number according to the language code listin the reference chapter (see page 51). If you enterthe wrong language code, press CLEAR.[OFF] (for Disc Subtitle) : Turn off Subtitle.Hookup andSettings](https://usermanual.wiki/LG-Electronics-USA/9QKE40540/User-Guide-533993-Page-21.png)
![22Audio SettingsAudio SettingsEach DVD disc has a variety of audio output options.Set the recorder’s Audio Output according to the typeof audio system you use. Dolby Digital / DTS / MPEG[Bitstream]: Select “Bitstream” if you connect therecorder’s DIGITAL AUDIO OUT jack to an amplifi-er or other equipment with a Dolby Digital, DTS orMPEG decoder.[PCM] (for Dolby Digital / MPEG): Select when con-nected to a two-channel digital stereo amplifier.DVDs encoded in Dolby Digital or MPEG will beautomatically downmixed to two-channel PCMaudio.[OFF] (for DTS): If you select [OFF], the DTS signalis not output through the DIGITAL AUDIO OUTjack.Sampling FrequencyIf your receiver or amplifier is NOT capable of han-dling 96 kHz signals, select [48 kHz]. When thischoice is made, this unit will automatically convertany 96 kHz signals to 48 kHz so your system candecode them. If your receiver or amplifier is capable of handling 96 kHz signals, select [96 kHz]. When this choice ismade, this unit will pass each type of signal throughwithout any further processing. DRC (Dynamic Range Control) With the DVD format, you can hear a program’ssoundtrack in the most accurate and realistic presen-tation possible, thanks to digital audio technology.However, you may wish to compress the dynamicrange of the audio output (the difference between theloudest sounds and the quietest ones). Then, youmay listen to a movie at a lower volume without los-ing clarity of sound. Set DRC to [ON] for this effect.VocalSet Vocal to [ON] only when a multi-channel karaokeDVD is playing. The karaoke channels on the disc willmix into normal stereo sound.](https://usermanual.wiki/LG-Electronics-USA/9QKE40540/User-Guide-533993-Page-22.png)
![23Lock (Parental Control) Settings RatingSome movies contain scenes that may not be suit-able for children to view. Many of these discs containparental control information that applies to the com-plete disc or to certain scenes on the disc. Moviesand scenes are rated from 1 to 8, depending on thearea. DVD video discs may or may not respond tothe parental control setting if the Area code of thedisc is set wrongly. Some discs offer more suitablescenes as an alternative. Ratings are area depend-ent. The parental control feature allows you to blockaccess to scenes below the rating you input, therebypreventing your children from being able to viewmaterial you believe is unsuitable. 1. Select [Rating] option then press B.2. To access the Rating, Password and Area Codefeatures, you must input the 4-digit security codeyou created. If you have not yet entered a security code you areprompted to do so. Input a 4-digit code and pressENTER. Enter it again and press ENTER to verify.If you make a mistake before pressing ENTER,press CLEAR.3. Select a rating from 1 to 8 using the v/Vbuttons. [1]-[8] : Rating one (1) has the most restrictionsand rating eight (8) is the least restrictive.[No Limit] : If you select [No Limit], parental control is not active and the disc plays in full.4. Press ENTER to confirm your rating selection,then press SETUP to exit the menu.5. Press OPEN/CLOSE (Z)to activate parental control.Note:If you set a rating for the recorder, all disc scenes with thesame rating or lower are played. Higher rated scenes arenot played unless an alternate scene is available on thedisc. The alternative must have the same rating or a lowerone. If no suitable alternative is found, playback stops. Youmust enter the 4-digit password or change the rating level inorder to play the disc.Set PasswordYou can enter or change password.1. Select [Set Password] option then press B. 2. Follow step 2 as shown [Rating]. To change the password, select the [Change],press ENTER and input the new 4-digit code thenpress ENTER. Input it again to verify.3. Press SETUP to exit the menu.If you forget your passwordIf you forget your password you can clear it using thefollowing steps:1. Press SETUP to display the Setup menu.2. Input the 6-digit number [210499]. The messageappears, select [OK] then press ENTER. Thesecurity code is cleared. 3. Enter a new code as described above.Area Code Enter the Area Code whose standards were used torate the DVD video disc, based on the list in the reference chapter (see p. 54).1. Select [Area Code] option then press B.2. Follow step 2 as shown [Rating].3. Select the first character using v/Vbuttons.4. Shift the cursor using Bbuttons and select thesecond character using v/ Vbuttons.5. Press ENTER to confirm your area code selection, then press SETUP to exit the menu.Hookup andSettings](https://usermanual.wiki/LG-Electronics-USA/9QKE40540/User-Guide-533993-Page-23.png)
![24DivX Registration CodeWe provide you the DivX®VOD (Video On Demandregistration code that allows you to rent and purchasevideos using the DivX®VOD service. For more information, visit www.divx.com/vod.1. Select [DivX(R) VOD] option then press B.2. Press ENTER while [Enter] is selected and theregistration code will appear.3. Use the registration code to purchase or rent thevideos from Divx®VOD service atwww.divx.com/vod. Follow the instructions anddownload the video onto a disc for playback onthis unit.Note:All the downloaded videos from DivX®VOD can onlybe played back on this unit.Recording SettingsRecording SettingsRecord Mode SetYou can set the picture quality for recording; HQ (High Quality), SQ (Standard Quality), LQ (Low Quality), EQ (Extend Quality).1. Select [Rec Mode Set] option then press B.2. Use v/ Vto select a desired Record Mode (HQ,SQ, LQ or EQ).3. Press ENTER to confirm your selection, thenpress SETUP to exit the menu.Record AspectWhen DVD recording, you can set the recordingaspect ratio to suit the material you’re recording (16:9or 4:3).DV Recording AudioYou need to set this if you have a camcorder using32kHz/12-bit sound connected to the front panel DVIN jack.Some digital camcorders have two stereo tracks foraudio. One is recorded at the time of shooting; theother is for overdubbing after shooting.On the Audio 1 setting, the sound that was recordedwhile shooting is used. On the Audio 2 setting, the overdubbed sound isused.Auto ChapterDuring recording, chapter markers are added auto-matically at fixed intervals. You can set this interval to5 minutes, 10 minutes or 15 minutes. To turn off auto-matic chapter marking, select [None].DivX](https://usermanual.wiki/LG-Electronics-USA/9QKE40540/User-Guide-533993-Page-24.png)
![25Disc SettingsDisc FormatIf you load a completely blank disc, the recorder willinitialize the disc. •DVD-R: The recorder initialize the disc to Video mode.The recording mode will always be Video mode.•DVD-RW: The Initialize menu will appear. Select [VRMode] or [Video Mode] then press ENTER.•DVD+R(DL): The Initialize menu will appears. Select[Yes] then press ENTER. •DVD+RW: The recorder initialize the disc to DVD+RWmode. Also, you can reformat the DVD-RW/DVD+RW fromthe Setup menu as below.1Select the [Disc Format] option then press B. [Start] icon is highlighted.2Press ENTER.•In case of DVD-RW, use b / B to select adesired Disc Initialize Mode (VR Mode or VideoMode) then press ENTER.•In case of DVD+RW, use b / B to select [OK],and press ENTER.It takes a few moments to format the disc.CautionIf you want to change the disc format, everythingrecorded on the disc will be erased.FinalizeFinalizing ‘fixes’ the recordings in place so that thedisc can be played on a regular DVD player or com-puter equipped with a suitable DVD-ROM drive.Finalizing a Video mode disc creates a menu screenfor navigating the disc. This is accessed by pressingMENU/LIST or TITLE.CautionOnce you have finalized a DVD-R and DVD+R disc,you cannot edit or record anything else on that discexcept DVD+RW. However, you can record and edita DVD-RW disc by choosing [Unfinalize] option.1. Select [Finalize] option then press B.2. Press ENTER while [Finalize] is selected.Finalize menu appears.3. Select [OK] then press ENTER.The recorder starts finalizing the disc.Notes:•Finalization can take up to 3-4 minutes or more depend-ing on the type of disc, how much is recorded on thedisc, and the number of titles on the disc.•DVD+R DL disc can take up to 30 minutes to finalize.Tips•If you load a DVD-RW that has already been finalized,you can ‘Unfinalize’ it by choosing Unfinalize from theFinalize menu. After doing this, you can edit and re-record onto the disc.•You cannot unfinalize a DVD-R and DVD+R disc.•If [Disc Protect] option is set to [ON], the finalize is notavailable. To finalize, set [Disc Protect] option to [OFF].Hookup andSettings](https://usermanual.wiki/LG-Electronics-USA/9QKE40540/User-Guide-533993-Page-25.png)
![26Disc LabelUse the Disc Label feature to enter a name for thedisc. This name appears when you load the disc andwhen you display disc information on-screen.The disc label can be up to 32 characters long.For discs formatted on a different recorder, you willsee only a limited character set.1. Select the [Disc Label] option then press B.[Edit] icon is highlighted.2. Press ENTER.Keyboard menu appears.To enter characters, see page 46.Disc ProtectWhen recording in DVD+RW / +R disc or VR modeformatted DVD-RW disc, set to [ON] to prevent accidental recording, editing or deleting of the discloaded. If you need to unlock the disc to make edits,select [OFF].](https://usermanual.wiki/LG-Electronics-USA/9QKE40540/User-Guide-533993-Page-26.png)
![27General Explanation ofGeneral Explanation ofOn-Screen DisplayOn-Screen DisplaySome DVDs require specific operation or allow onlylimited operation during playback. When this occurs,is displayed, action prohibited or not available.Displaying Information While Watching TVWhile watching TV, press DISPLAY to display/remove the information displayed on-screen.Changing TV Audio ChannelSome TV programs are broadcast with both a mainand a Secondary Audio Program (SAP). You canchange the TV audio.Press AUDIO repeatedly to change the TV audio,according to Broadcast audio signal as shown below. •STEREO+SAP Audio Signal Stereo →SAP →Mono →Stereo•STEREO Audio Signal Stereo →L→R →Mono →Stereo•SAP Audio Signal Mono →SAP →Mono•MONO Audio Signal MonoThe current audio channel is displayed on-screen.•If SAP is selected, but there is no SAP channelbeing broadcast, you will still hear the main audio(Mono or Stereo) channel.•If the sound is poor quality when set to Stereo,you can often improve it by changing to Mono.•When an external input is selected, the audiochannel can be switched only to Stereo.Displaying Disc Information on-screenYou can display various information about the disc ortape loaded on-screen. Some items can be changedusing the menu.1. Press DISPLAY to show various playback infor-mation.The items displayed differ depending on the disctype or playing status. 2. You can select an item by pressing v/ Vandchange or select the setting by pressing b/ B.For details about each item, see the pages inparentheses.[Title]: Current title (or track) number/total number of titles (or tracks) (page 28)[Chapter]: Current chapter number/total numberof chapters (page 28)[Time]: Elapsed playing time (page 29)[Audio]: Selected audio language (DVD VIDEOonly) or audio channel (page 30)[Subtitle]: Selected subtitle (page 30)[Angle]: Selected angle/total number of angles(page 30)[Sound]: Selected sound mode (page 30)Note:If no button is pressed for 10 seconds, the on-screen dis-play disappears.Hookup andSettingsIndicates channel number and audiosignal (STEREO, MONO) receivedby the tuner.Indicates current date and time.](https://usermanual.wiki/LG-Electronics-USA/9QKE40540/User-Guide-533993-Page-27.png)
![28Playing a DVD or VPlaying a DVD or Video CD ideo CD Playback Setup1. Press OPEN/CLOSE (Z) to open the disc tray.Load your chosen disc in the tray, with the play-back side down. 2. Press OPEN/CLOSE (Z) to close the tray.Playback starts automatically. If playback doesnot start, press PLAY (N). In some cases, the disc menu might appearinstead. Use the bB v Vbuttons to select the title/chap-ter you want to view, then press ENTER to start.Press TITLE or MENU/LIST to return to the menuscreen.Use the number buttons to select the track youwant to view and press RETURN to return to themenu screen. Menu settings and operating proce-dures may differ. Follow the instructions on eachmenu screen. You may also set PBC to Off (Seepage 20).3. To stop the playback, press STOP (x).The unit records the stopped point, depending onthe disc. “Xx” appears on the screen briefly.Press PLAY (N)to resume playback (from thescene point). If you press STOP (x)again orunload the disc (“x” appears on the screen.), theunit will clear the stopped point.Press OPEN/CLOSE (Z) to remove the disc.Press OPEN/CLOSE (Z) to close disc tray orpress POWER (1), the disc tray closes automati-cally and unit turns off.Notes:•If parental control is set and the disc is not within therating settings you must input the password. (See [Rating]on page 20).•DVDs may have a region code. Your Recorder will notplay discs that have a region code different from yourRecorder. The region code for this player is 4 (four).•Unless stated otherwise, all operations described usethe Remote Control. Some features may also be avail-able on the Setup menu. Moving to another TITLE When a disc has more than one title, you can moveto another title:Press DISPLAY then use v/ Vto select the title icon.Then, press the appropriate numbered button (0-9) or b/ Bto select a title number.Moving to another CHAPTER / TRACK When a title on a disc has more than one chapter ora disc has more than one track, you can move toanother chapter/track as follows:•Press SKIP (>or .) briefly during playbackto select the next chapter/track or to return to thebeginning of the current chapter/track.•Press SKIP (.)twice in quick successions tostep back to the previous chapter/track.•To go directly to any chapter/track during playback, press DISPLAY twice and use v/Vtoselect the chapter or track (for Video CD) icon.Input the chapter/track number or use b/B.Note:On a Video CD with PBC, you must set PBC to Off in theSetup menu to use this function (See page 20). Search 1. Press SCAN (mor M)during playback.2. Press SCAN (mor M)to select the requiredspeed. (forward and backward) ;DivX, DVD ; 4 steps Video CD; 3 steps3. To exit SEARCH mode, press PLAY (N).Still Picture and Frame-by-FramePlayback1. Press PAUSE/STEP (X) during playback.Advance the picture frame-by-frame by pressingPAUSE/STEP (X) repeatedly.2. To exit still motion mode, press PLAY (N).Tips:•You can advance or back up the picture frame-by-frame by pressing b/ Brepeatedly duringPAUSE mode. •The picture frame-by-frame in reverse is not avail-able for Video CD.DVD+R-R+RW-RWVideo-RWVRVCDDVDPlayback](https://usermanual.wiki/LG-Electronics-USA/9QKE40540/User-Guide-533993-Page-28.png)
![29Slow Motion1. Press SCAN (mor M) during pause mode.2. Use the SCAN (mor M) to select the requiredspeed.DVD; 4 steps (forward and backward)DivX; 4 steps (forward only)Video CD; 3 steps (forward only)3. To exit Slow Motion mode, press PLAY (N).Repeat Press REPEAT to select a desired repeat mode.[Chapter] repeats the current chapter. (DVD only)[Title] repeats the current title. (DVD only)[All] repeats the all titles/tracks (Video CD, DivXdisc or VR mode DVD-RW).[Track]: repeats the current track. (Video CD, DivXdisc only)[OFF] does not play repeatedly.Note:On a Video CD with PBC, you must set PBC to [OFF]in the Setup menu to use the this function. See page20.Repeat A-B To repeat a sequence during playback. 1. Press A-B at your chosen starting point. [A - ]appears briefly on the TV screen. 2. Press A-B again at your chosen end point. [A - B] appears briefly on the TV screen and therepeat sequence begins. 3. Press A-B again to cancel.Time SearchTo start playing at any chosen time on the disc:1. Press DISPLAY during playback. The time searchbox shows the elapsed playing time.2. Press v/Vto select the time clock icon and [-:--:--] appears.3. Input the required start time in hours, minutes,and seconds from left to right. If you enter the wrong numbers, press CLEAR.Then enter the correct numbers.4. Press ENTER to confirm. Playback starts from theselected time.ZoomUse zoom to enlarge the video image.1. Press ZOOM during playback or still playback toactivate the Zoom function.2. Each press of the ZOOM button changes the TVscreen in the sequence.x1 size →x2 size →x4 size →x1 size (normal size)3. Use the b/ B/ v/ Vbuttons to move through thezoomed picture.4. To resume normal playback, press ZOOM repeat-edly or CLEAR button.Note:The zoom function may not work on some DVDs.Marker SearchTo enter a MarkerYou can start playback from up to nine memorizedpoints. To enter a marker, press MARKER at thedesired point on the disc. The Marker icon appearson the TV screen briefly. Repeat to enter up to ninemarkers.To Recall or Clear a Marked Scene1. During disc playback, press SEARCH. The mark-er search menu appears on the screen.2. Within 10 seconds, press b/ Bto select a markernumber that you want to recall or clear.3. Press ENTER and playback starts from themarked scene. Or, Press CLEAR and the markernumber is erased from the list.4. You can play any marker by inputting its numberon the marker search menu.VCDDVD+R-R+RW-RWVideo-RWVRPlayback](https://usermanual.wiki/LG-Electronics-USA/9QKE40540/User-Guide-533993-Page-29.png)
![30Checking the Contents of DVDVideo Discs: MenusDVDs may contain menus that allow you to access special features. To open the disc menu, pressMENU/LIST. Then, press the appropriate number but-ton to select an option. Or, use the b/ B/ v/ Vbut-tons to highlight your selection, then press ENTER.Title Menu 1. Press TITLE.If the current title has a menu, the menu appearson the screen. Otherwise, the disc menu may notappear.2. The menu offers features such as camera angles,spoken language and subtitle options, and chap-ters for the title.Disc Menu 1. Press MENU/LIST and the disc menu is displayed.2. Press MENU/LIST again to exit.Camera Angle If the disc contains scenes recorded at different cam-era angles, you can change to a different cameraangle during playback.1. Press DISPLAY during playback. The On-ScreenDisplay appears on the TV screen.2. Use v/ Vto select the Angle icon in the On-Screen Display.3. Use b/ Bto select the desired angle.The number of the current angle appears on theTV screen.Tip:The Camera Angle icon is displayed on the TV screen whenalternate angles are available.Changing the Audio Soundtrack Press AUDIO then press b/ Brepeatedly duringplayback to hear a different audio language or audiosoundtrack if available.Note:Some discs feature both Dolby Digital and DTSsoundtracks. There is no analog audio output whenDTS is selected. To listen to the DTS soundtrack,connect this recorder to a DTS decoder via one ofthe digital outputs. See page 16 for connectiondetails.Changing the Audio ChannelPress AUDIO then press b/ Brepeatedly duringplayback to hear a different audio channel;With DVD-RW discs recorded in VR mode and HDDthat have both a main and a Bilingual audio channel,you can switch among Main (L), Sub (R), orMain+sub (L+R) by pressing AUDIO.3D SurroundThis unit can produce a 3D Surround effect, which simulates multi-channel audio playback from two conventional stereo speakers, instead of the five ormore speakers normally required to listen to multi-channel audio from a home theater system. 1. Press DISPLAY then use v/ Vto select thesound icon. Then, use b/ Bto select [3D Sound].2. To turn off the 3D Surround effect, select[Normal].Subtitles Press SUBTITLE then press b/ Brepeatedly duringplayback to see the different subtitle languages.Instant SkipEach press INSTANT SKIP skips forward 15 sec-onds.Note:If appears, the feature is not available on the disc.Last Scene Memory This Recorder memorizes last scene from the lastdisc that is viewed. The last scene remains in memo-ry even if you remove the disc from the Recorder orswitch off the Recorder. If you load a disc that hasthe scene memorized, the scene is automaticallyrecalled.Notes:•Settings are stored in memory for use any time.•This Recorder does not memorize settings of a disc ifyou switch off the Recorder before commencing to playit.•The Last Scene Memory function may not work onsome DVDs.•Last Scene Memory function for a previous DVD title iserased once a different DVD title is played.DVDDVD+R-R+RW-RWVideo-RWVRDivXDVDVCD+R-R+RW-RWVideo-RWVRDVDDVDDVDDVD](https://usermanual.wiki/LG-Electronics-USA/9QKE40540/User-Guide-533993-Page-30.png)
![32Playing a DivX Movie FilePlaying a DivX Movie FileThe Recorder can play Divx files on CD-R/RW orDVD±R/RW discs. Before playing DivX files, read“About DivX movie files” on the right colum. 1. Use v/Vto select a folder, and press ENTERtwice. A list of files in the folder appears.2. Use v/Vto select a file then press PLAY (N).Playback starts. You can use variable playbackfunctions. Refer to pages 28-31.3. Press STOP (x)to stop the playback. The Moviemenu appears.Note:This recorder cannot play back the DivX file(s) in theMemory card.Notice for displaying the DivX subtitlePlease refer to following notice when the DivXsubtitle does not display properly.1. Press SETUP.The Setup menu appears.2. Use v/ V / b/ Bto select [LANGUAGE] b [DiscSubtitle] then find a suitable language for the DivXsubtitle.Refer to [Disc Menu/Audio/Subtitle] on page 22.About DivX movie filesDivX disc compatibility with this recorder is limit-ed as follows:Available resolution size of the DivX file is under720x576 (W x H) pixel.The file name of the DivX subtitle is limited to char-acters. If there is impossible code to express in the DivXfile, it may be displayed as “_” mark on the display.The total number of files and folders on the discare free but the total number of files and folders onthe folder should be less than 1999.If the number of the screen frame is over 29.97frames per second, this unit may not operatenormally.If the video and audio structure of recorded fileis not interleaved, returns to the menu screen.If the file is recorded with GMC, the unit sup-ports only 1-point of the record level.* GMC?GMC is the acronym for Global MotionCompensation. It is an encoding tool specified inMPEG4 standard. Some MPEG4 encoders, likeDivX or Xvid, have this option.There are different levels of GMC encoding, usuallycalled 1-point, 2-point, or 3-point GMC.Playable DivX file“.avi”, “.divx”Playable DivX subtitle“.smi”, “.srt”, “.sub (Micro DVD format only)”,“.txt (Micro DVD format only)”,DivX subtitle except those listed above is not displayed on the TV screen.Playable Codec format“DIV3”, “MP43”, “DIVX”, “XVID”, “DX50”. Playable Audio format“AC3”, “PCM”, “MP2”, “MP3”, “WMA”.Sampling frequency: within 8 - 48 kHz (MP3), within 32 - 48kHz (WMA)Bit rate: within 8 - 320kbps (MP3), 32 - 192kbps (WMA)](https://usermanual.wiki/LG-Electronics-USA/9QKE40540/User-Guide-533993-Page-32.png)
![33Playing an Playing an Audio CD or MP3Audio CD or MP3/ WMA/ WMA filesfilesThe Recorder can play Audio CDs and MP3/WMAfiles on CD-ROM, CD-R/RW, DVD+R/RW, DVD-R/RW discs or Memory Card.Before playing MP3/WMA files, read [Notes onMP3/WMA Recordings] on page 34.Audio CD Once you insert an audio CD a menu appears on theTV screen. Use v/Vto select a track then pressPLAY (N)and playback starts. MP3 / WMA1. Use v/Vto select a folder, and press ENTERtwice. A list of files in the folder appears.2. Use v/Vto select a track then press PLAY (N)and Playback starts.Tips:•You can view TV channel or video input source bypressing RETURN (O). If you want to return to theMusic menu, press MENU/LIST.•Press DISPLAY to view ID3-Tag information for the MP3file. If ID3-Tag information is not present, [ID3-Tag:None]will appear. If you select a folder, the number ofsubfolders and number of MP3/WMA files in the folderare displayed. Press DISPLAY again to remove theinformation screen.•On the Music menu, you can display the folders on thedisc. Use vVbBto select the “Folder” icon on theMusic menu then press ENTER twice. •On CDs, DVDs or Memory Card with mixed content(Audio tracks, MP3/WMA files, DivX files or JPEG files),you can select among the Music menu, Movie menuand Photo menu by pressing TITLE repeatedly.•If you are in a file list and want to return to the Folderlist, use the v/Vto highlight and press ENTER toreturn to the previous menu screen.Additional options for memory card:Deletes the selected file form the memorycard.:Deletes all files form the memory card.Audio CD and MP3 / WMA file FeaturesPause 1. Press PAUSE/STEP (X) during playback.2. To return to playback, press PLAY (N) or pressPAUSE/STEP (X) again.Moving to another Track •Press SKIP (> or .) briefly during playbackto go to the next track or to return to the begin-ning of the current track.•Press SKIP (.) twice in quick successions togo back to the previous track.•You can play any track by inputting its number.Repeat Track/All/Off Press REPEAT to select a desired repeat mode.•[TRACK] repeats the current track.•[ALL] repeats all the tracks on a disc.•[Off] (No display): does not play repeatedly.Repeat A-B1. To repeat a sequence during disc playback.Press A-B at your chosen starting point. The Repeat icon and [A] appear on the menuscreen.2. Press A-B again at your chosen end point. TheRepeat icon and [A-B] appear on the menuscreen, and the sequence begins to play repeat-edly. 3. Press A-B again to cancel.Search 1. Press SCAN (mor M) during playback. 2. Press SCAN (mor M) to select the requiredspeed (3 steps).3. To exit SEARCH mode, press PLAY (N).ACDPlayback](https://usermanual.wiki/LG-Electronics-USA/9QKE40540/User-Guide-533993-Page-33.png)
![34Program Playback with Program Playback with AudioAudioCD and MP3/WMACD and MP3/WMA filesfilesThe program function enables you to store yourfavourite tracks from any disc in the player memory. Program can contain 99 tracks (Audio CD) or 256tracks (MP3/WMA).1. Insert a disc.Audio CD and MP3/WMA Discs: Audio CD or MP3/WMA menu appears.2. Select a track on the List.3. Select “ ” icon then press ENTER to place theselected track on the Program list. Repeat toplace additional tracks on the list.You can add all tracks in the disc. Select “” icon then press ENTER.4. Select the track you want to start playing on theProgram list. Press and hold v/Vto move to thenext / previous page.Example) Audio CD5. Press N(PLAY) or ENTER to start. Playback begins in the order in which you programmed the tracks.Playback stops after playing the last programmedtrack on the program list.Repeat Programmed Tracks Press REPEAT to select a desired repeat mode.• [TRACK] repeats the current track• [ALL] repeats all the tracks on programmed list.• [Off] (No display): does not play repeatedly.Note :If you press SKIP (>) once during Repeat Trackplayback, the repeat playback cancels.Erasing a Track from Program List1. Use vVbBto select the track that you wish toerase from the Program list.2. Press CLEAR. Or, select “ ” icon then pressENTER to erase the selected track on theProgram list. Repeat to erase additional tracks onthe list.Erasing the Complete Program ListSelect “ ”, then press ENTER. The completeProgram for the disc is erased.Note:The programs are also cleared when the disc isremoved.Notes on MP3/WMA RecordingsMP3/WMA disc compatibility with this unit islimited as follows:•Sampling frequency: within 8 - 48 kHz (MP3),within 32 - 48 kHz (WMA)•Bit rate: within 8 - 320 kbps (MP3), 32 - 192 kbps (WMA)•This unit cannot read an MP3/WMA file that hasa file extension other than “.mp3” / “.wma”.•CD-R physical format should be “ISO 9660” and“JOLIET”.•DVD±R/RW physical format should be “ISO9660 (UDF Bridge format)”. •If you record MP3 / WMA files using softwarethat cannot create a file system (eg. Direct-CD)it is impossible to playback MP3 / WMA files.We recommend that you use Easy-CD Creator,which creates an ISO 9660 file system.•The total number of files and folders on the discare free but the total number of files and folderson the folder should be less than 1999.This unit requires discs and recordings to meet cer-tain technical standards in order to achieve optimalplayback quality. Pre-recorded DVDs are automati-cally set to these standards. There are many differ-ent types of recordable disc formats (including CD-Rcontaining MP3 or WMA files) and these require cer-tain pre-existing conditions (see above) to ensurecompatible playback.Customers should note that permission isrequired in order to download MP3/WMA filesand music from the Internet. Our company hasno right to grant such permission. Permissionshould always be sought from the copyrightowner.](https://usermanual.wiki/LG-Electronics-USA/9QKE40540/User-Guide-533993-Page-34.png)
![35Viewing a JPEG DiscUsing this Recorder you can view JPEG files on theCD-R/RW or DVD±R/RW. Before playing JPEG files,read [About JPEG image files] on page 36.Also, you can view JPEG files in the memory card.(To use memory card, see page 10.) 1. Insert a disc and close the tray. The JPEG menuappears on the TV screen.2. Press v/Vto select a folder, then press ENTER.Alist of files in the folder appears. If you are in afile list and want to return to the previous Folderlist, use the v/Vbuttons on the remote to high-light then press ENTER.3. If you want to view a particular file, press v/Vto highlight a file then press ENTER or N(PLAY). The selected image is displayed infull screen.4. To stop viewing at any time, press STOP.The menu screen appears.Tip:•If you are in a file list and want to return to theFolder list, use the v/Vto highlight and pressENTER to return to the previous menu screen.•Press and hold v/ Vto go to the next / previouspage.•On a disc with mixed content (MP3/WMA, JPEG,and DivX files), you can select menu screen. PressTITLE a word on top on the menu is highlighted.Then, use b/ Bto select MP3/WMA, JPEG, orDivX then press ENTER.•You can view TV channel or video input source bypressing RETURN (O). If you want to return to themenu, press MENU/LIST.Slide Show Use v V b B to highlight the (Slide Show) on theJPEG menu then press ENTER. Slide Show starts from the selected file if Speedoption is not II (Off). While viewing a file, you canpress STOP to move to the previous menu (JPEGmenu).•There are four Slide Speed options ( ) : >>>(Fast), >> (Normal), > (Slow) and II (Off). Use v V b B to highlight the Speed options ( ).Then, use b/Bto select the option you want touse then press ENTER. Still Picture 1. Press PAUSE/STEP during slide show. The recorder will now go into PAUSE mode. 2. To return to the slide show, press N(PLAY) orpress PAUSE/STEP again.Moving to another File Press SKIP (.or >) or cursor (bor B) oncewhile viewing a picture to advance to the next or pre-vious file.JPEGJPEGJPEGPlaybackPress ENTER to appear or disappear this menu.](https://usermanual.wiki/LG-Electronics-USA/9QKE40540/User-Guide-533993-Page-35.png)
![39TTimer Recordingimer RecordingThe Timer Recording function allows you to record upto 8 programs within a period of one month.1. Press TIMER REC. The Timer Record menu will appear.•[Ch] – Choose a channel (2-69 or 1-125 forantenna or cable channels respectively,excluding skip channels), or one of the exter-nal inputs from which to record (AV1 or AV2).•[Date] – Choose a date up to 1 month inadvance, or select a daily or weekly program.•[Start Time] – Set the recording start time.•[End Time] – Set the recording end time.•[Mode] – Choose a record mode.HQ, SQ, LQ or EQ or AT (Auto)AT(Auto) mode determines how much time is avail-able on the disc or tape and switches record mode,if necessary, to complete recording the program.2. Enter the necessary information for your timerrecording(s).•b / B (left/right) – Move the cursor left/right•v / V (up/down) – Change the setting at the current cursor position•Press RETURN (O) to exit the Timer Recordmenu.•Press TIMER REC to display Timer RecordList.3. Press ENTER to save the program.The Timer Record List will appear.4. Press RETURN (O) to exit the Timer RecordList.Notes:•The Timer indicator lights on the front panel display.•The Recorder will record the audio according to the cur-rent TV tuner setting (Stereo, Mono or SAP). Use theAUDIO button to set the audio before switching theRecorder to Standby mode.•The Recorder will automatically power off when theTimer Recording ends. •There is a short delay when a timer recording finishes to confirm the recorded program. If two timerrecordings are set to record sequentially (one right afterthe other), the very beginning of the later program maynot be recorded.•You must press STOP (x) to stop the Timer RecordingChecking Timer Recording DetailsProgramming can be checked whenever theRecorder is turned on. Press TIMER REC twice.•Use v / V to select a timer recording.•Press ENTER to edit the selected program.Timer Record menu appears.Canceling a Timer RecordingYou can clear a timer setting anytime before therecording actually starts.•Use v / V to select a program you want to eraseon the Timer Recorder List, then press CLEARand select [OK] than press ENTER.Recording](https://usermanual.wiki/LG-Electronics-USA/9QKE40540/User-Guide-533993-Page-39.png)
![40Timer Recording TroubleshootingEven though the timer is set, the recorder will notrecord when:•There is no disc (or tape) loaded.•Anon-recordable disc (or tape) is loaded.•[Disc Protect] is set to [ON] in the Disc menu(see page 26).•There are already 99 titles (DVD-RW, DVD-R)or 49 titles (DVD+RW, DVD+R(DL)) recordedon the disc.You cannot enter a timer program when:•Arecording is already underway.•The time you’re trying to set has alreadypassed.•There are already 8 timer programs set.If two or more timer programs overlap:•The earlier program takes priority.•When the earlier program finishes, the laterprogram starts.•If two programs are set to start at exactly thesame time, the program entered first takes pri-ority.If the disc is damaged, the recording may not com-plete successfully. In this case even though theCheck field shows [Rec. OK], it may not be.Recording from ExternalRecording from ExternalComponentsComponentsYou can record from an external component, such asa camcorder or VCR, connected to any of theRecorder’s external inputs.1. Make sure that the component you want to recordfrom is connected properly to the Recorder. Seepage 17.2. Press INPUT repeatedly to select the externalinput to record from.•AV1: Audio/Video Input mounted on backpanel.•AV2: Audio/Video Input mounted on frontpanel.•DV: DV Input mounted on front panel.3. Load a recordable disc or tape.4. Set a recording mode as necessary by pressingREC MODE repeatedly (HQ, SQ, LQ, EQ).5. Press zREC once to start recording.The REC indicator lights in the display window.6. Press STOP (x) to stop recording.Notes:•Check that the Audio In settings [DV RecordingAudio] are as you want them. See page 24.•If your source is copy-protected using CopyGuard,you will not be able to record it using this recorder.See Copyright on page 9 for more details.•Recording continues until you press STOP (x) orthe disc is full.•To record for a fixed length of time, see InstantTimer Recording on page 38.](https://usermanual.wiki/LG-Electronics-USA/9QKE40540/User-Guide-533993-Page-40.png)
![41Recording from DV InputRecording from DV InputBefore DV dubbingYou can connect a DV-equipped camcorder to thisrecorder using a single DV cable for input and outputof audio, video, data and control signals.This recorder is only compatible with DV-format(DVC-SD, DV25) camcorders. Digital satellitetuners and Digital VHS video recorders are notcompatible.You cannot connect more than one DV camcorderat a time to this recorder.You cannot control this recorder from externalequipment connected via the DV IN jack (includingtwo recorders).It may not always be possible to control the con-nected camcorder via the DV IN jack.Digital camcorders can usually record audio asstereo 16-bit/48kHz, or twin stereo tracks of 12-bit/32kHz. This recorder can only record one stereoaudio track. Set [DV Recording Audio] option toAudio 1 or Audio 2 as required (see page 24).Audio input to the DV IN jack should be 32 or48kHz (not 44.1kHz).Picture disturbance on the recording may occur ifthe source component pauses playback or plays anunrecorded section of tape, or if the power fails inthe source component, or the DV cable becomesdisconnected.Recording from a Digital CamcorderYou can record from a digital camcorder connected tothe DV IN jack on the front panel of this recorder.Using the recorder’s remote, you can control both thecamcorder and this recorder.Before recording, make sure that the audio input forthe DV IN jack is set up (see page 24).Tips:•The source signal must be DVC-SD format.•Some camcorders cannot be controlled using thisrecorder’s remote.•If you connect a second recorder using a DVcable, you cannot control the second DVD fromthis one.•You cannot control this unit remotely from a com-ponent connected to the DV IN jack.•You cannot record date and time information froma DV cassette.1. Make sure your digital camcorder is connected tothe front panel DV IN jack. See page 17.2. Check that the DV audio input is as you require.You can choose between Audio 1 (original audio)and Audio 2 (overdubbed audio).DV Input is set from the DV Rec Audio in sub-menu of the Setup menu. See [DV RecordingAudio] on page 24 for more information.3. Press INPUT repeatedly to select the DV input.DV appears in the display window and on the TVscreen.4. Find the place on the camcorder tape that youwant to the recording to start from.For best results, pause playback at the point fromwhich you want to record.Depending on your camcorder, you can usethis recorder’s remote to control the camcorderusing the STOP, PLAY and PAUSE functions.5. Press zREC once to start recording. Recording is automatically stopped if therecorder detects no signal.You can pause or stop the recording by press-ing PAUSE/STEP (X) or STOP (x). You cannot control the camcorder from thisRemote Control during recording.In Video mode, the final frame of the recordingmay remain displayed on screen for a whileafter recording stops.TroubleshootingIf you cannot get a picture and/or audio through theDV IN jack, check the bullet points:Make sure the DV cable is properly connected.Try switching off the connected equipment thenswitch back on.Try switching the audio input.Note:Depending on the connected camcorder, you may not be able to control it using the Remote Controlsupplied with this recorder.Recording](https://usermanual.wiki/LG-Electronics-USA/9QKE40540/User-Guide-533993-Page-41.png)
![42Title List and Chapter List MenuOverview Using the Title List menu you can edit video content.The editing features available in the Title List menudepend on whether you are editing video on DVD,and whether you’re editing Original content, or aPlaylist.There are two ways to edit VR mode DVD-RW discs.You can directly edit the Original content of the disc,or you can create and edit a Playlist. The Playlistdoesn’t actually change any of the content on thedisc, but just controls how the content is played back.1. Press MENU/LIST to display the Title List menu.Playback should be stopped when you do this.When selecting titles, use the v/ Vbuttons todisplay the previous/next page if there are morethan six titles.If you are editing a VR mode disc, press MENU/LIST to switch between Original andPlaylist menu.On the left side of the screen are the menuoptions. The main part of the screen showsthumbnails of the titles (or chapter) on the DVD.You can change these thumbnails using theTHUMBNAIL button. (see [Changing TitleThumbnails] on page 43.)Press DISPLAY to display the information ofselected title on the Title List menu.After selecting a title or chapter on the Title Listof Chapter List menu, then press ENTER. Themenu options on the left side of the menu. Usev/ Vto select a option then press ENTER toconfirm your selection. 2. To exit the Title List menu, press RETURN (O)repeatedly.1. Menu options: To display menu option, select atitle or chapter then press ENTER. The optionsdisplayed differ depending on the disc type.•[Play] Start playback of the selected title or chapter.The hidden titles and chapters on the DVD+R/RWcannot be play back.•[Chapter] Displays Chapter List of the Title.•[Delete] Deletes the title or chapter. (page 45)•[Move] Moves chapter position on [Chapter List-Playlist] menu (page 46).•[Protect] Protects accidental recording, editing ordeleting of the title. •[Edit] Edits or Deletes a part of the title.•[Title Name] Edits the title name. (page 46)•[Delete Part] Deletes a part of the Title (page 45).•[Playlist Add] Adds the title or chapter to the Playlist.(page 44)•[Title] Displays Title List of the chapter.•[Combine] Combines two titles or chapters into one(page 47).•[Divide] Divides a title into two (page 47).•[Full Play] Starts playback of the selected title includ-ing the hidden chapters.•[Hide (Show)] Hides (or Shows) the selected chapter.(page 48)2. Indicates the record mode, free space, andelapsed time progress bar.3. Current media.4. Currently selected title.5. Thumbnail.6. Shows the selected title number and total numberof titles.7. Shows the title name, recorded date, and record-ing length.123 4 5 6 7Editing](https://usermanual.wiki/LG-Electronics-USA/9QKE40540/User-Guide-533993-Page-42.png)
![43VR Mode: Original andVR Mode: Original andPlaylist EditingPlaylist EditingTitles, Chapters and PartsTitles in the disc’s original content contain one ormore chapters. When you insert a disc’s title into thePlaylist, all the chapters within that title also appear.In other words, chapters in the Playlist behave exact-ly as chapters on a DVD-Video disc do. Parts aresections of Original or Playlist titles. From the Originaland Playlist menu you can add or delete parts.Adding a chapter or title to the Playlist creates a newtitle made up of a section (ie., chapter) of an Originaltitle. Deleting a part removes part of a title from theOriginal or Playlist menu.CautionWhen editing using the Delete, Add and Move func-tions, the start and end frames may not be exactlyas set in the start and end point display.During Playlist playback, you may notice a momen-tary pause between edits. This is not a malfunction.Is editing a DVD like editing a videotape?No. When you edit a video tape you need one videodeck to play the original tape and another to recordthe edits. With DVD, you edit by making a ‘Playlist’ ofwhat to play and when to play it. On playback, theRecorder plays the disc according to the Playlist.About word ‘Original’ and ‘Playlist’Throughout this manual, you will often see the wordsOriginal and Playlist to refer to the actual content andthe edited version.Original: content refers to what’s actually recordedon the disc.Playlist: content refers to the edited version of thedisc — how the Original content is to be played.Adding Chapter Markers You can create chapters within a title by insertingchapter marks at the desired points.Note:Chapter markers are inserted at regular intervalsautomatically. You can change this interval from theInitial Setup menu (see [Auto Chapter] on page 24).During recording or playing back, at the point youwant to start a new chapter, press CHP. ADD.Achapter marker icon appears on the TV screen.Changing Title ThumbnailsEach title displayed in the Title List menu is repre-sented by a thumbnail picture taken from the start ofthat title or chapter.If you prefer, select a different still picture from withina title.Press THUMBNAIL to make the currently displayedpicture the one that appears in the Title List menu.The still picture that you choose appears in both theOriginal or Playlist menu.Tip:You can also change the thumbnail picture of the titleon the Chapter List menu. Select a chapter on theChapter List menu then press THUMBNAIL. Thethumbnail picture of the title that includes the chapteris changed.+R+RW-RWVR+R+RW-RWVR-RWVREditting](https://usermanual.wiki/LG-Electronics-USA/9QKE40540/User-Guide-533993-Page-43.png)
![44Making a New Playlist Making a New Playlist Use this function to add an Original title or chapter tothe Playlist. When you do this, the whole title is putinto the Playlist (you can delete bits you don’t needlater - see [Deleting an Original or Playlist title/chap-ter] on page 45).The title appears in the Playlist complete with thechapter markers that appear in the Original. However,if you add more chapter markers to the Original later,these are not automatically copied over into thePlaylist title.1. Choose a title or chapter on the [Title List-Original]menu or [Chapter List-Original] menu to put intothe Playlist, then press ENTER.The menu options appears on the left side of themenu.2. Use v/ Vto select [Playlist Add] option thenpress ENTER.3. Select [New Playlist] then press ENTER.The new title appears in the updated Playlist. Allchapters of the title are added to the Playlist.Adding Adding Additional TAdditional Title /itle /Chapters to the PlaylistChapters to the PlaylistYou can add an Original title or chapter to add to aPlaylist title even if it is already registered.1. Choose a title or chapter on the [Title List-Original]menu or [Chapter List-Original] menu to put intothe Playlist, then press ENTER.The menu options appears on the left side of thescreen.2. Use v/ Vto select [Playlist Add] from menuoptions then press ENTER.3. Choose a Title List-Playlist that is already regis-tered to insert a title or chapter, then pressENTER.4. Repeat steps 1-3 to add additional title or chapteron the Playlist.You can view the added chapters on the [ChapterList-Playlist] menu.5. Press RETURN (O) to exit, or MENU/LIST to goback to the [Title List-Original] menu.-RWVR-RWVR](https://usermanual.wiki/LG-Electronics-USA/9QKE40540/User-Guide-533993-Page-44.png)
![45Deleting an Original orDeleting an Original orPlaylist TPlaylist Title / Chapter itle / Chapter When you erase a title or chapter from the Playlistmenu, you only remove it from the Playlist; thetitle/chapter remains in the Original menu.If you choose to delete a title or chapter from theOriginal (title/chapter) menu, the title or chapter isactually deleted from the disc and the remaining timeavailable for recording increases. Titles/chaptersdeleted from the Original are also removed from thePlaylist.Note:It may not be possible to delete chapters that are lessthan 5 seconds long.1. Use b/ B/ v/ Vto choose a chapter or title youwant to delete on the [Title List] or [Chapter List]menu then press ENTER.The menu options appears on the left side of thescreen.2. Select [Delete] option from the options on themenu.Example: Title List (DVD-VR)3. Press ENTER to confirm.The confirm message for deleting will appear.4. Use b/ Bto select [OK] then press ENTER.The selected chapter or title is deleted.After pressing ENTER, the new, updated menu isdisplayed.5. Repeat steps 1 - 4 to continue to delete from themenu.6. Press RETURN (O) repeatedly to exit the menu.Notes:•When DVD+RW recording, the deleted title’sname is changed to [Deleted Title].•If more than two titles are repeatedly deleted, thetitles are combined into one.•When you are deleting a title or chapter, only thelast one on DVD+R/RW increases remainingrecording time.Deleting a PartDeleting a PartYou can delete a part which you do not want in thetitle.1. Use b/ B/ v/ Vto choose a title you want todelete on the Title List menu then press ENTER.The options appears on the left side of the menu.2. Select [Delete Part] option then press ENTER.[Title Edit (Delete Part)] menu appears on the TVscreen.[Start Point] icon is highlighted.Example: Title Edit (Delete Part) (DVD-VR)3. Starts playback and use pause step, search andslow-motion to find the starting point.4. Press ENTER at the starting point of the sectionyou want to delete. [End Point] icon is highlighted.The part is indicated on the Progress Bar. 5. Use pause step, search and slow-motion to findthe ending point.6. Press ENTER at the ending point of the sectionyou want to delete.You can cancel the selected point, use v/Vtoselect [Cancel] icon then press ENTER.7. If you finish to edit, select [Done] icon then pressENTER.The confirm message for deleting will appear. Use b/ Bto select [OK] then press ENTER.The selected part is deleted from the title and TitleList menu appears.Notes:•It may not be possible to delete parts that are less than3 seconds long.•If you select [Cancel] then press ENTER, the Recorderwill go to previous option and into Pause mode.-RWVREditting](https://usermanual.wiki/LG-Electronics-USA/9QKE40540/User-Guide-533993-Page-45.png)
![46Naming a TNaming a Title itle You can name Original and Playlist titles independ-ently.1. Choose the title you want to name on the Title Listmenu, then press ENTER.The menu options appears on the left side of themenu.2. Use v/Vto select [Title Name] option then pressENTER. Keyboard menu appears.3. Enter a name for the title. Use b/ B/ v/ Vtoselect a character then press ENTER to confirmyour selection.•Language : Selects a keyboard type.•Space: Inserts a space at the cursor position.•Delete: Deletes the character to the left of thecursor position.•b / B: Moves the cursor left or right.•OK: Confirms the name you have entered.•Cancel: Deletes all characters and exits theKeyboard menu.4. Choose OK then press ENTER to fix the nameand return to the previous menu screen.5. Press RETURN (O) repeatedly to exit the menu.Notes:•Names can be up to 32 characters long.•For discs formatted on a different recorder, youwill see only a limited character set.•When recording on DVD-R, DVD+R or DVD+RWdiscs, the entered name is displayed on the DVDplayer only after finalization.Moving a Playlist ChapteMoving a Playlist ChapterUse this function to re-arrange the playing order ofPlaylist chapters on the [Chapter List-Playlist] menu.Note:This function is not available if there is only onechapter.1. Select a chapter on the Chapter List-Playlistmenu.2. Press ENTER.The menu options appears on the left side of themenu.3. Use v/ Vto select [Move] option from Playlist options then press ENTER.4. Use b/ B/ v/ Vto choose the place you want tomove the chapter then press ENTER.After pressing ENTER, the updated menu is dis-played.-RWVR](https://usermanual.wiki/LG-Electronics-USA/9QKE40540/User-Guide-533993-Page-46.png)
![47Divide One TDivide One Title Into Title Into TwowoUse this command to split a title up into two newtitles.1. On the Title List menu, select a title you want todivide then press ENTER.The menu options appears on the left side of thescreen.2. Select [Divide] option.Example: Title List (DVD+RW)3. Press ENTER.[Title divide (Title Edit)] menu appears. [Divide] option is highlighted.4. Use play, pause step, search and slow-motion tofind the point you want to divide the title.5. Select [Divide] option then press ENTER at thepoint. To reset the point, select [Cancel] option thenpress ENTER. Repeat from step 3.6. Choose [Done] option then press ENTER to fixthe dividing point.The title is divided into two new titles. It take up to 4 minutes to divide.Note:You cannot select dividing point less than 3 seconds.Combining TCombining Two Chapterswo ChaptersInto OneInto OneUse this function to combine two adjacent chaptersinto one.1. On the Chapter List menu, select the secondchapter of the two chapters you want to combinethen press ENTERThe menu options appears on the left side of thescreen.2. Use v/ Vto select [Combine] option.The combine indicator appears between the twochapters you want to combine.Example: Title List (DVD+RW)4. Repeat steps 1 - 2 to continue to combine fromthe menu.5. Press RETURN ( O) repeatedly to exit themenu.Notes:This function cannot operate listed as below;•If there is only one chapter within the title.•If you select first chapter.•If two chapters created by erasing a part from an original title.•If two chapters created from different titles.•If two chapters created by moving an order from an original title.+R+RW-RWVR+RWEdittingThe first title’sthumbnailCurrent pictureThe secondtitle’s thumbnail](https://usermanual.wiki/LG-Electronics-USA/9QKE40540/User-Guide-533993-Page-47.png)
![48Hide a Hide a ChapterChapterYou can skip playing chapters or titles without delet-ing from the disc.1. Use vVbBto choose a chapter you want tohide on the [Chapter List] menu, then pressENTER.Options appear on the left side of the screen.2. Select [Hide] option.Example: Title List (DVD+RW)3. Press ENTER to confirm.The chapter’s thumbnail will dim.Tip:If you select a hidden chapter on the [Chapter List]menu, you can ‘show’ it by choosing [Show] option onthe menu. After doing that, you are able to see thechapter or title.Protect a TProtect a TitleitleUse this function to protect against accidental record-ing, editing or deleting of the title.1. Press MENU/LIST to display the [Title List] menu.2. Use vVbBto choose a title you want to protectthen press ENTER.Options appear on the left side of the screen.3. Select [Protect] from the options.Example: Title List (DVD+RW)4. Press ENTER to confirm.The lock mark will appears on the title’s thumbnail.Tip:If you select a title that has already been protectedon the Title List menu, you can ‘unprotect’ it bychoosing [Unprotect] option from the Title List menuoptions. After doing that, you can edit and delete thetitle.-RWVR+R+RW+R+RW](https://usermanual.wiki/LG-Electronics-USA/9QKE40540/User-Guide-533993-Page-48.png)
![49Overwriting RecordingOverwriting RecordingTo overwrite a new video recording on a previouslyrecorded title, follow these steps. This feature is notavailable for DVD+Rs, that always record at the endof the Disc.1. Select input source you want to record (TV chan-nel, AV1-2, DV). 2. Press MENU/LIST to display the Title List menu.3. Use vVbBto choose a title you want to over-write.4. Press zREC to start overwrite recording.Overwrite recording starts from the start point ofthe title.5. Press STOP (x) to stop the overwrite recording.The new title is created and updated menu is dis-played.Notes:•This function is not available for a protected title. •If the overwrite is longer than the recordinglength of the current title, the next title is over-written. But if next title is protected, the over-writing stops at the starting point of the title.•If the selected title’s recording length is less than10 seconds, the next title is overwritten. But if thenext title is protected, overwriting stops.VViewing Tiewing Title List menu itle List menu displayed on other DVDdisplayed on other DVDRecorders or PlayersRecorders or PlayersYou can view the Title List menu displayed on theother DVD player that is capable of playing DVD+RWor DVD+R discs. 1. Insert DVD+R or DVD+RW disc recorded already.2. Press TITLE in Play mode or DVD tuner mode.Title List menu will appear as shown below.3. To play back a title, select the title you want thenpress ENTER or PLAY (N).Tip:You can remove the Title List menu by pressingSTOP (x).Playing Playing YYour Recordings onour Recordings onOther DVD PlayersOther DVD Players(Finalizing a Disc)(Finalizing a Disc)Most regular DVD players can play finalized discsrecorded in Video mode, finalized DVD+R orDVD+RWs. A small number of players can also playDVD-RW discs recorded in VR mode, finalized or not.Check the manual that came with the other player tocheck what formats of discs it will play.Finalizing ‘fixes’ the recordings and editings in placeso that the disc can be played on a regular DVD play-er or computer equipped with a suitable DVD-ROMdrive.Finalizing a Video mode disc creates a menu screenfor navigating the disc. The menu can be accessedby pressing MENU/LIST or TITLE. To finalize a disc, refer to [Finalize]on page 25.Notes:•Unfinalized DVD+RW is playable on regular DVDplayers.•The edited contents of a DVD+RW disc is com-patible on regular DVD players only after finaliza-tion.•Any edited contents of the DVD+R disc are not compatible on regular DVD players. (Hide, chapter combine, added chapter mark, etc.)•How long finalization takes depends on the typeof disc, how much is recorded on the disc, andthe number of titles on the disc.•DVD+R DL disc can take up to 30 minutes to finalize.+R+RW+RWEditting](https://usermanual.wiki/LG-Electronics-USA/9QKE40540/User-Guide-533993-Page-49.png)
![53ReferenceSymptomCannot play a discrecorded using thisrecorder on anotherplayer.Cannot record or didnot record successfully.Timer recording is notpossible.Stereo Audio Recordand/or Playback is notpresent.The remote controldoes not work properly.CauseThe disc was recorded in Video mode.Some players will not play even a final-ized disc recorded in Video mode.The disc was recorded in VR mode.Discs recorded with copy-once materialcannot be played on other players.The remaining blank space on the discis insufficient.The source you are trying to record iscopy protected.When setting the recording channel, thechannel is tuned on the TV’s own tuner.When recording to a Video mode disc,programs that are copy-once protectedcannot be recorded.Clock in recorder is not set to correcttime.Timer has been programmed incorrectly.(Timer record) indicator light doesnot appear after programming timer.TV is not Stereo-compatible.Broadcast program is not in stereo for-mat.The recorder A/V Out jacks are notconnected to TV A/V In jacks.The recorder Audio/Video Out is notselected for viewing at the TV.The recorder’s TV audio channel is setto mono.The remote control is not pointed atthe remote sensor of the recorder.The remote control is too far from therecorder.There is an obstacle in the path of theremote control and the recorder.The batteries in the remote control areexhausted.SolutionFinalize the disc. (page 25)No solution.The other player must be RW com-patible in order to play it.No solution.Use another disc.You cannot record the source.Select the channel on the recorder’sbuilt-in TV tuner.Use a VR mode formatted disc forcopy-once material.Set clock to correct time.Reprogram Timer. Reprogram Timer.No solution.No solution.Make A/V connections. Stereo is available only via A/V output from therecorder.Select AUX or A/V source as TVinput.Set TV audio channel mode toStereo. See [Changing TV audiochannel] on page 27.Point the remote control at theremote sensor of the recorder.Operate the remote control within 7 m.Remove the obstacle.Replace the batteries with new ones.Reset the RecorderIf you observe any of the following symptoms...When the Recorder is plugged in, but thepower will not turn on or off.When the display window does not working.When the Recorder does not operate normally.You can reset the Recorder as follows :Press and hold the POWER button for morethan five seconds. This will force the Recorderto power off.Press the POWER button again to turn theRecorder back on.Unplug the power cord and then plug thepower cord again after more than five sec-onds.](https://usermanual.wiki/LG-Electronics-USA/9QKE40540/User-Guide-533993-Page-53.png)