LG Electronics USA BX503JD DLP PROJECTOR User Manual G User s manual
LG Electronics USA DLP PROJECTOR G User s manual
UserManual.wiki
>
LG Electronics USA
>
BX503JD User Manual
Users Manual
Navigation menu
Upload a User Manual
Namespaces
Wiki Guide
HTML
PDF
Info
Views
User Manual
Discussion / Help
Navigation


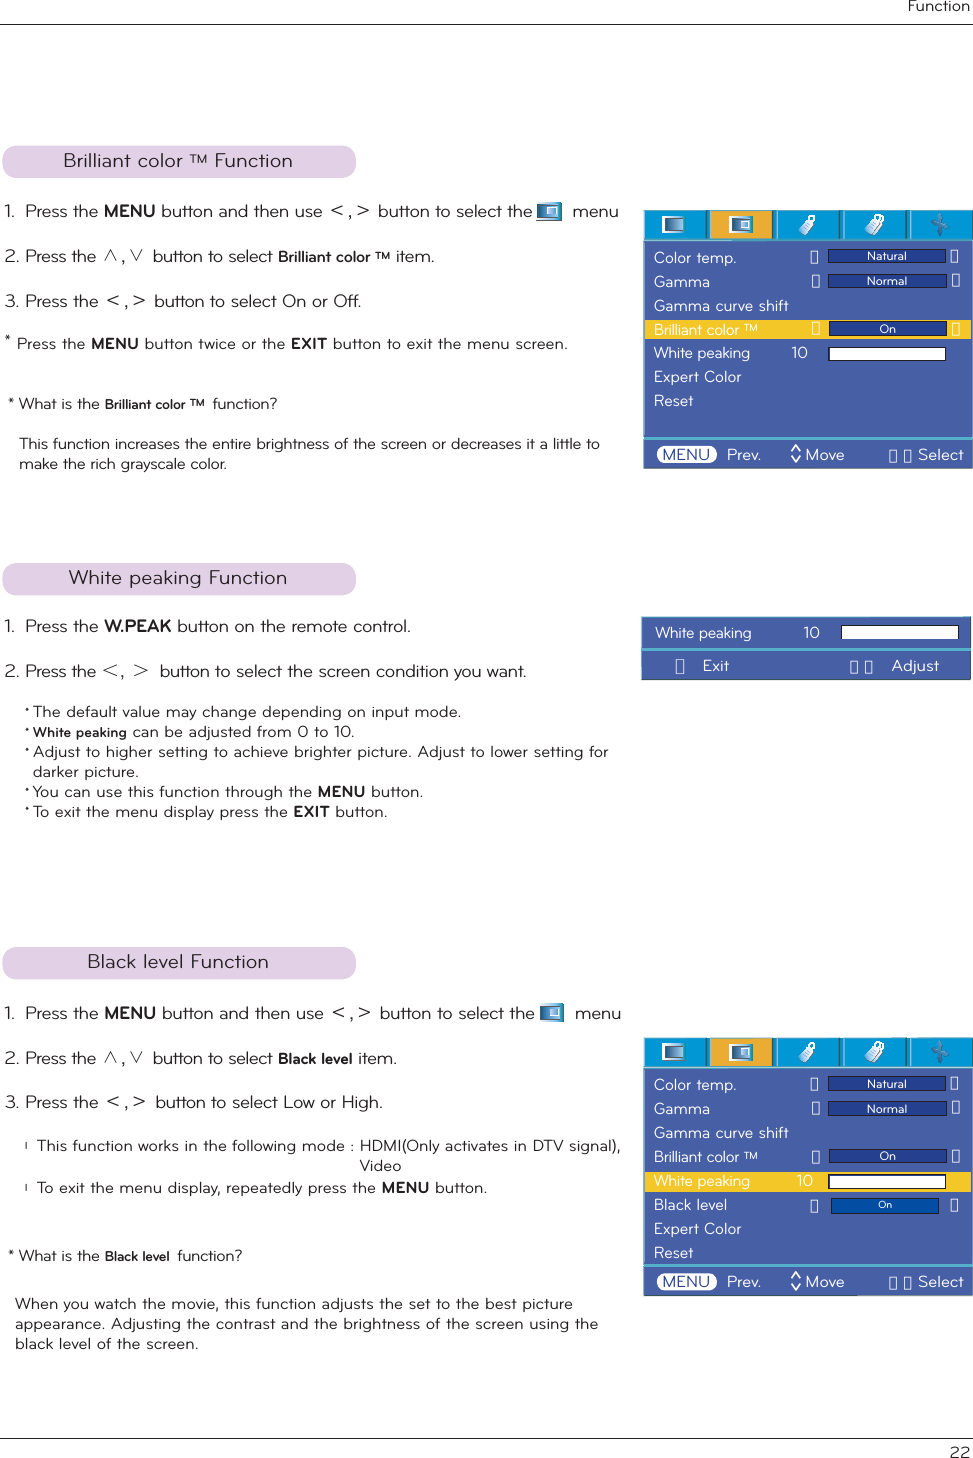
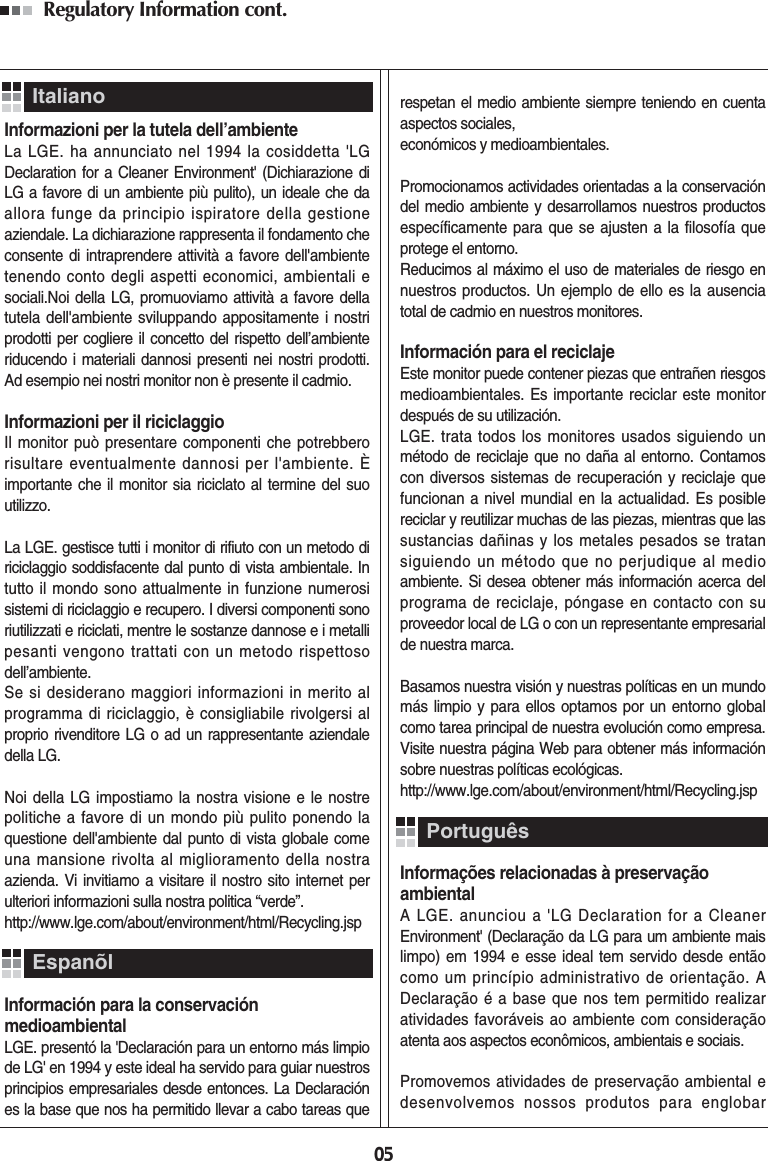
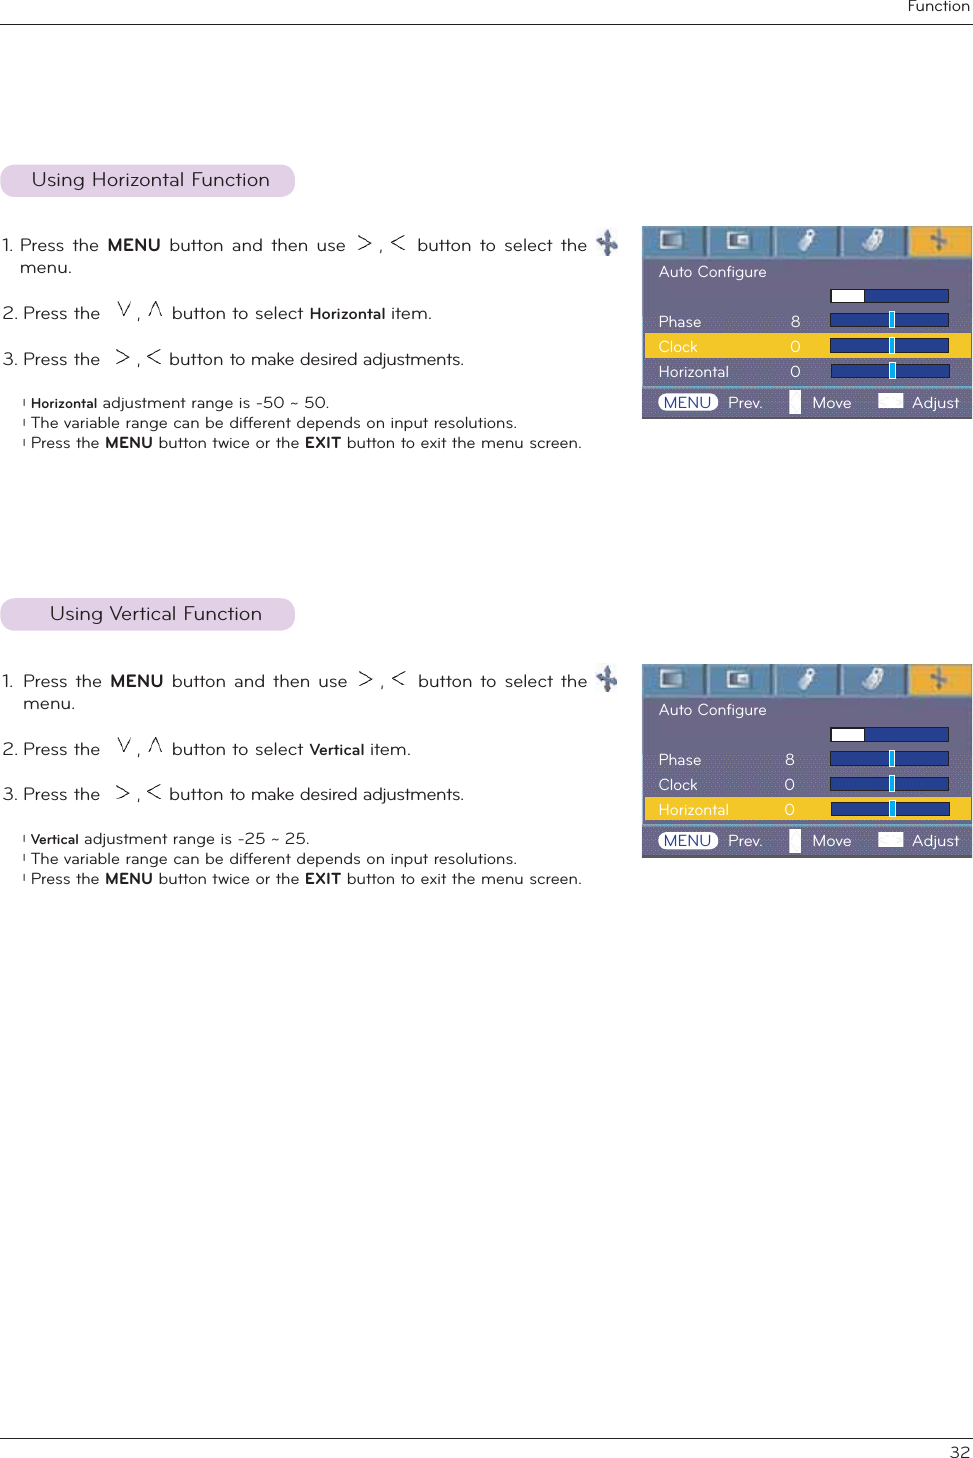
![Function231. Press the MENU button and then use ˘/#˚ button to select the #menu.2. Press the 䯁/䯂#button to select Expert Color item.3. Press the OK button.Expert color Functionl To return to the factory default settings, select [Reset] with 䯁/䯂 buttons and press OK button.Reset - This function allows a user to adjust the Gain, Saturation and Hue for Red, Green, Blue, Cyan, Magenta and Yellow individually.4. When the window above appears, press 䰽/䰿#button.5. Press the 䯁/䯂# button to move between the items and the 䰽/䰿#buttons to adjust the screen as you want. l Red, Green, Blue, Cyan, Magenta and Yellow Gain can be adjusted between 0 and 100. l Saturation-Red, Green, Blue, Cyan, Magenta and Yellow can be adjusted between 0 and 100. l Hue-Red, Green, Blue, Cyan, Magenta and Yellow can be adjusted between -50 and 50. l Press the MENU button twice or the EXIT button to exit the menu screen. l An advanced settings function is possible to be saved according to an image mode.Red Gain 50Green Gain 50Blue Gain 50Cyan Gain 50Mgt Gain 50Yellow Gain 50Saturation-Red 50Saturation-Green 50Saturation-Blue 50Saturation-Cyan 50Saturation-Mgt 50Saturation-Yellow 50Hue-Red 0Hue-Green 0Hue-Blue 0Hue-Cyan 0Hue-Mgt 0Hue-Yellow 0Reset#Prev. Move <> AdjustᱺᱻColor temp.GammaGamma curve shift Brilliant color TMWhite peaking 10Expert ColorResetNaturalNormalOnMENU Prev. Move <>Selectᱺᱻ><><><###Exit################Move###########<>####AdjustRed Gain 50ᱺᱻ](https://usermanual.wiki/LG-Electronics-USA/BX503JD/User-Guide-1280295-Page-23.png)
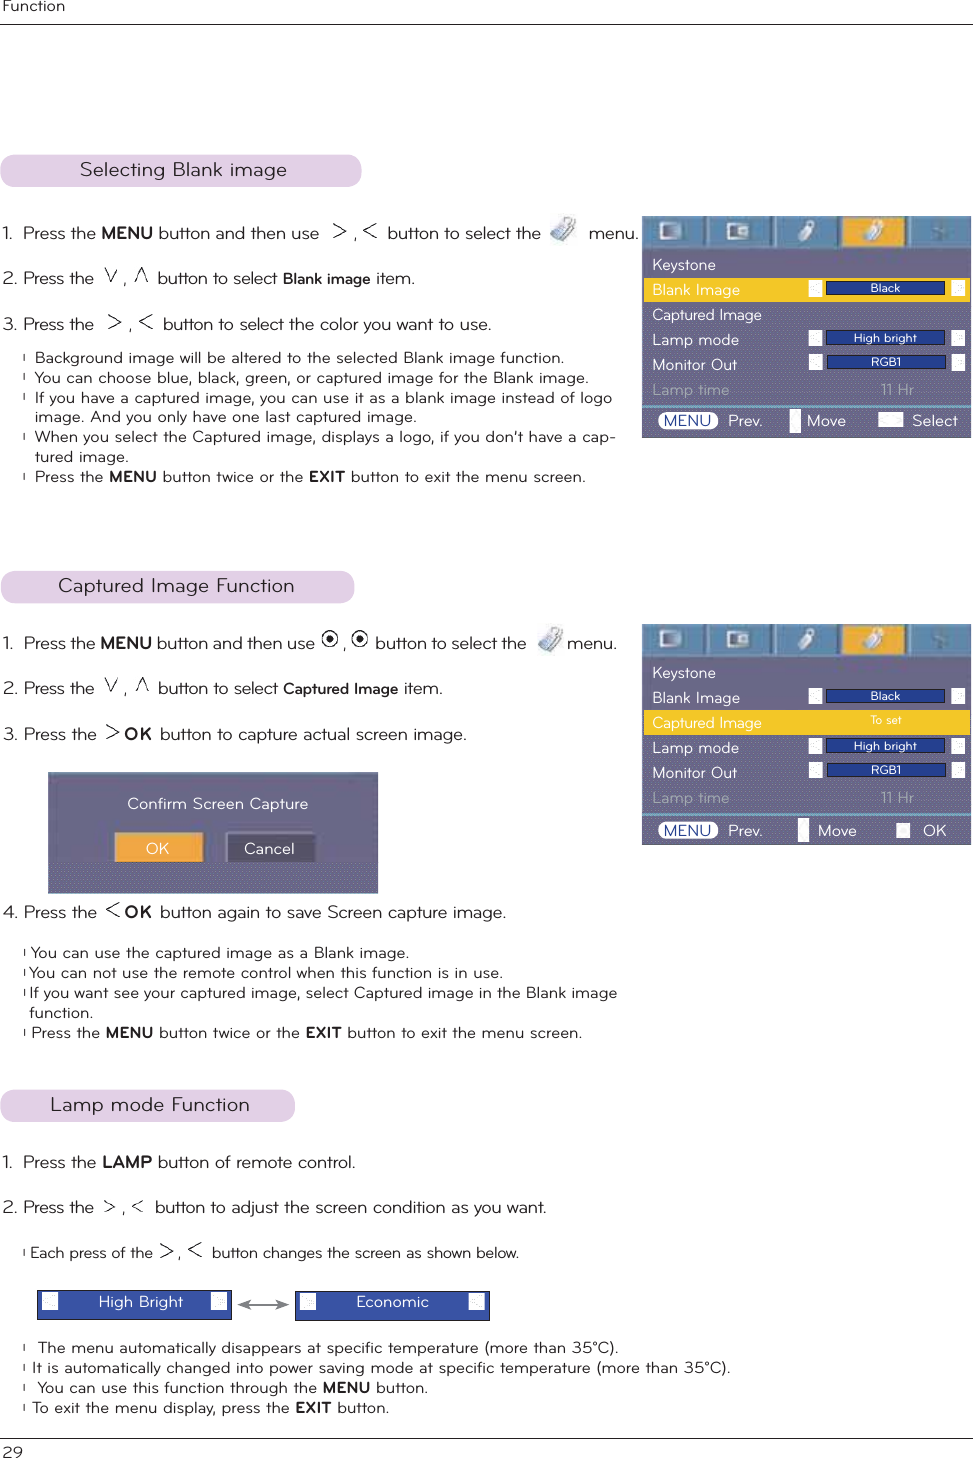
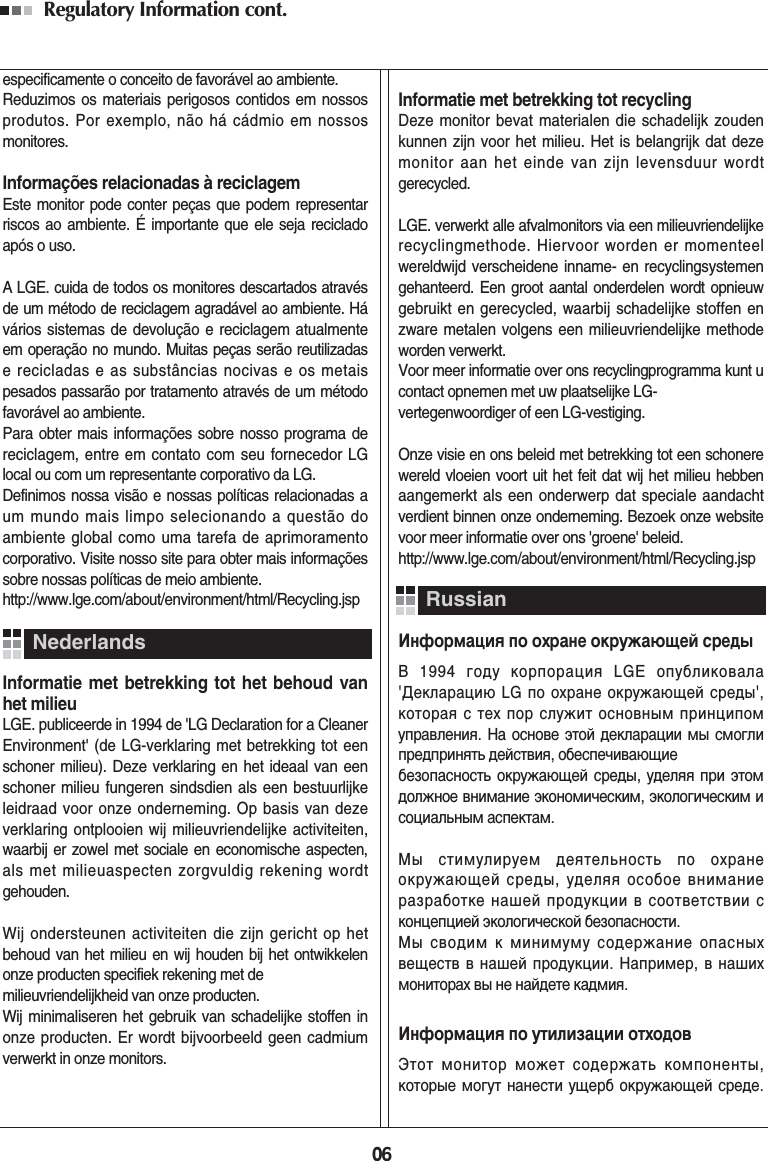
![RS-232C34Command Reference List* Refer to the detailed information for data with [*] mark.q Communication Protocol Command1 Command2 Data (Hexadecimal)01. Power k a 0 ~ 1 02. Aspect Ratio k c 1 ~ 203. Screen Mute k d 0 ~ 1 04. Contrast k g 0 ~ 6405. Brightness k h 0 ~ 6406. Color k i 0 ~ 6407. Tint k j 0 ~ 6408. Sharpness k k 0 ~ 6409. OSD Select k l 0 ~ 110. Remote Control Lock / Key Lock k m 0 ~ 1 11. Color Temperature k u 0 ~ 312. Red ADC gain adjustment j w 0 ~ 6413. Green ADC gain adjustment j y 0 ~ 6414. Blue ADC gain adjustment j z 0 ~ 6415. Low Power j q 0 ~ 1 * Real data mapping 1* Real data mapping 2](https://usermanual.wiki/LG-Electronics-USA/BX503JD/User-Guide-1280295-Page-34.png)
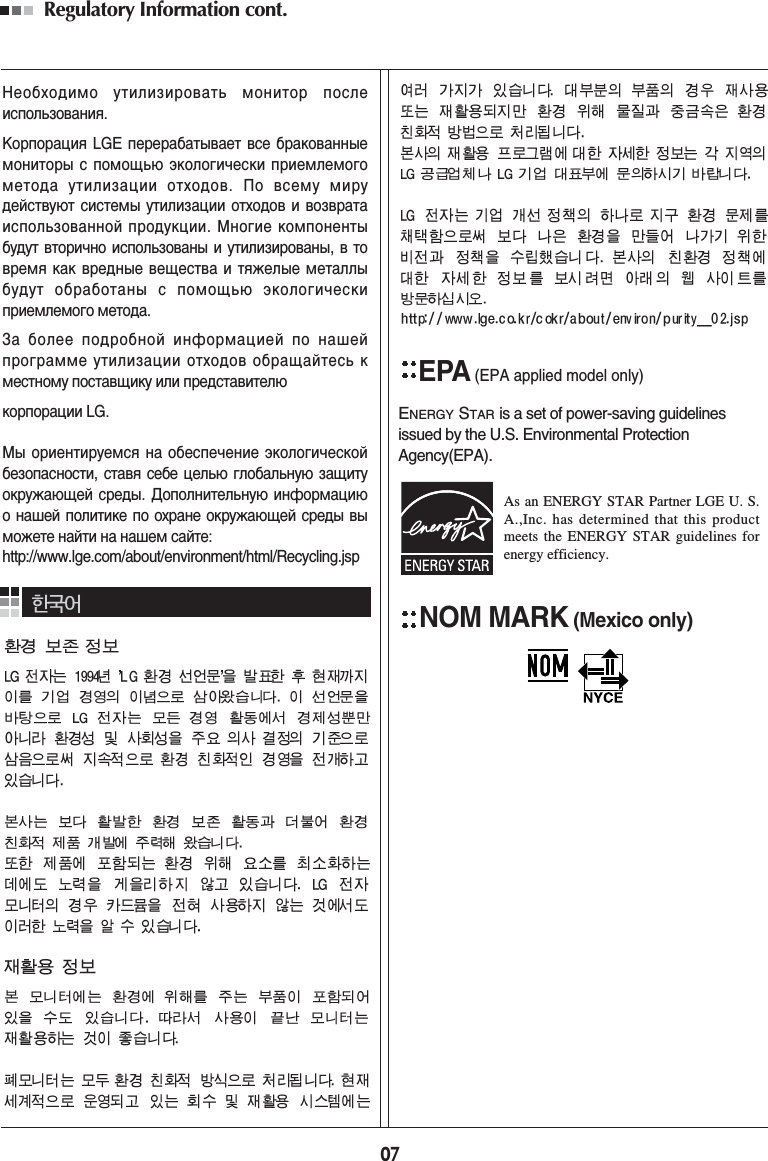
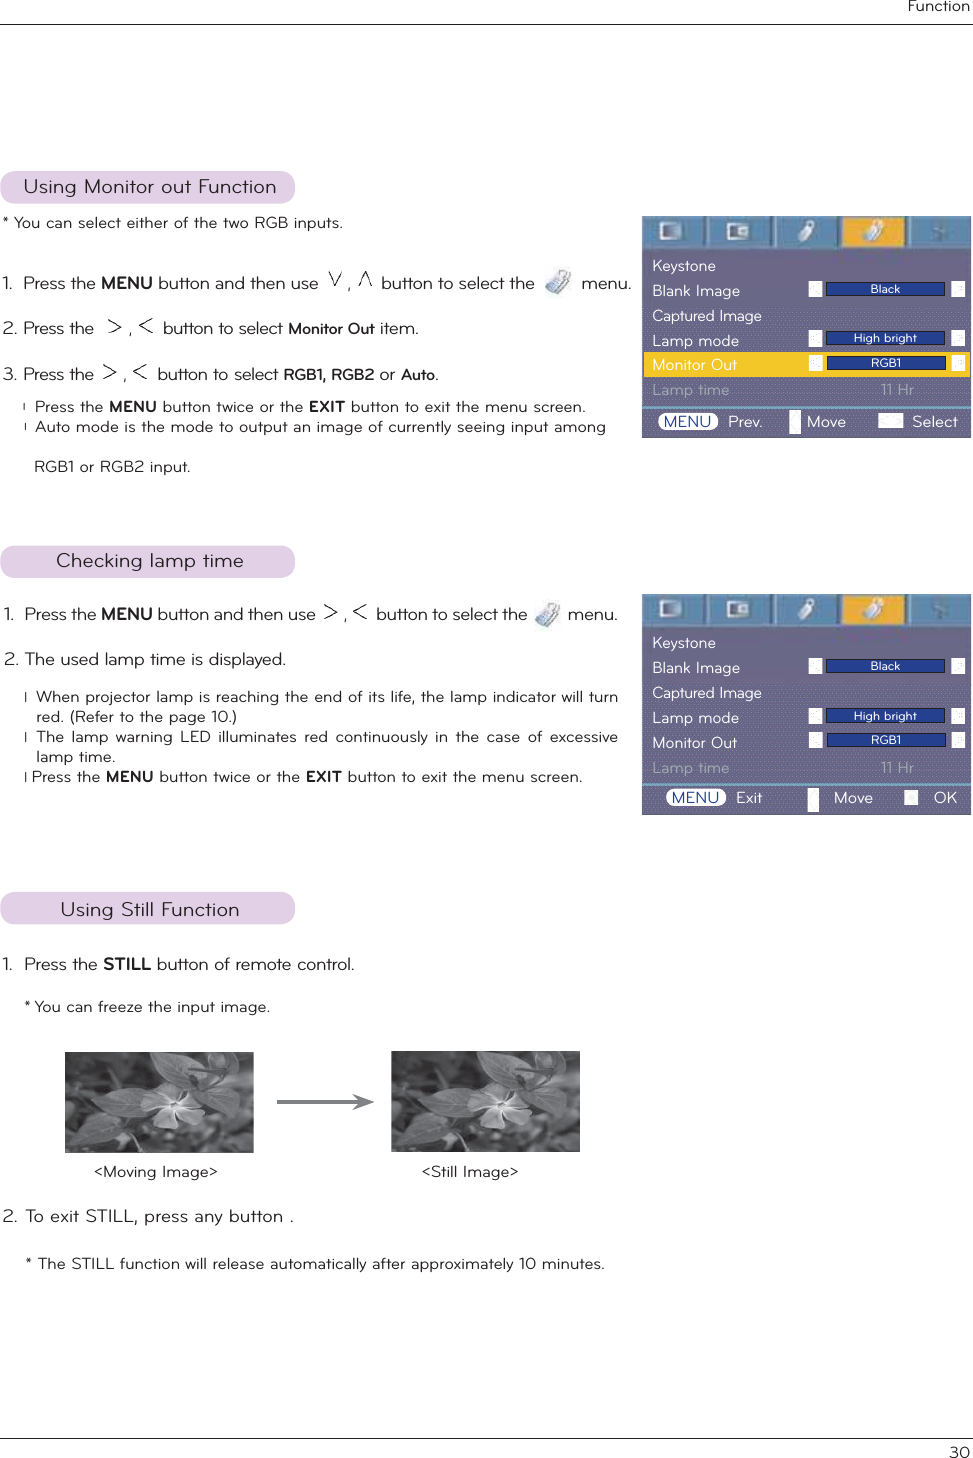
![RS-232C35External control device setup01. Power (Command:ka)‹ To control Power On/Off of the Projector.TransmissionData 0 : Power Off 1 : Power On [k] [a] [ ] [Set ID] [ ] [Data] [Cr] [k] [a] [ ] [Set ID] [ ] [FF] [Cr] [a] [ ] [Set ID] [ ] [OK] [Data] [x] [a] [ ] [Set ID] [ ] [OK] [Data] [x]AckAckData 0 : Power Off 1 : Power On ‹ To show Power On/Off status.TransmissionData 0 : Power Off 1 : Power On* In like manner, if other functions transmit ‘0xFF’ data based on this format, Acknowledgement data feed back presents status about each function.02. Aspect Ratio (Command:kc)‹ To adjust the screen format.TransmissionData 1 : 4:3 2 : 16:9Data 1 : 4:3 2 : 16:9 [k] [c] [ ] [Set ID] [ ] [Data] [Cr] [c] [ ] [Set ID] [ ] [OK] [Data] [x]Ack1. Transmission* [Command 1] : First command to control the set.(k, j, x, ASCII code, 1 Character)* [Command 2] : Second command to control the set..(ASCII code, 1 Character)* [Set ID] : You can adjust the set ID to choose desired projector ID number in special menu. See previous page. Adjustment range is 1 ~ 99. When selecting Set ID ‘0’, every connected projector set is controlled. Refer to ‘Real data mapping 1’.* [DATA] : To transmit command data. Transmit 2 character when organized ASCII code. * Transmit ‘FF’ data to read status of command.* [Cr] : Carriage Return ASCII code ‘0x0D’* [ ] : ASCII code character correspond to “Space Bar” which is in order to classify command, set ID and Data.[Command1][Command2][ ][Set ID][ ][Data][Cr]* The Projector transmits ACK (acknowledgement) based on this format when receiving normal data. At this time, if the data is data read mode, it indicates present status data. If the data is data write mode, it returns the data of the PC computer.[Command2] [ ] [Set ID] [ ] [OK] [Data] [x][Command2] [ ] [Set ID] [ ] [NG] [Data] [x]3. Error Acknowledgement2. OK Acknowledgement* The Projector transmits ACK (acknowledgement) based on this format when receiving abnormal data from non-viable functions or communication errors.Data : [1] : illegal code(This command is not supported.) [2] : not support function(This function doesn’t work.) [3] : wait and retry(Try again a few minute later.)](https://usermanual.wiki/LG-Electronics-USA/BX503JD/User-Guide-1280295-Page-35.png)
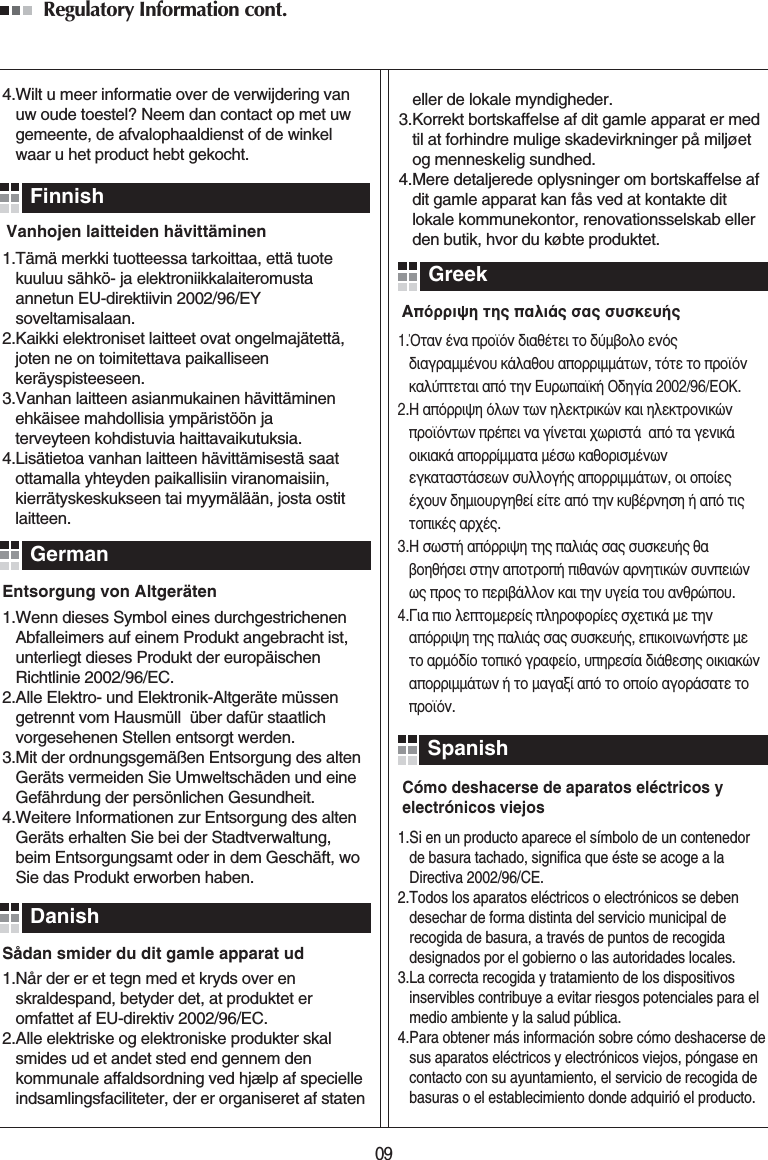
![RS-232C3603. Screen Mute (Command:kd)‹ To select screen mute on/off.TransmissionData 0 : Screen Mute Off (Picture On) 1 : Screen Mute On (Picture Off)Data 0 : Screen Mute Off (Picture On) 1 : Screen Mute On (Picture Off) [k] [d] [ ] [Set ID] [ ] [Data] [Cr] [d] [ ] [Set ID] [ ] [OK] [Data] [x]Ack06. Color (Command:ki)‹ To adjust the screen color. (Video/Component)TransmissionData Min : 0 ~ Max : 64* Refer to ‘Real data mapping 1’.Data Min : 0 ~ Max : 64 [k] [ i ] [ ] [Set ID] [ ] [Data] [Cr] [ i ] [ ] [Set ID] [ ] [OK] [Data] [x]Ack07. Tint (Command:kj)‹ To adjust the screen tint.(Video/Component 60Hz or NTSC signal) TransmissionData Red : 0 ~ Green : 64* Refer to ‘Real data mapping2’.Data Red : 0 ~ Green : 64 [k] [ j ] [ ] [Set ID] [ ] [Data] [Cr] [ j ] [ ] [Set ID] [ ] [OK] [Data] [x]Ack08. Sharpness (Command:kk)‹ To adjust the screen sharpness.(Video/Component)TransmissionData Min : 0 ~ Max : 64* Refer to ‘Real data mapping 1’.Data Min : 0 ~ Max : 64 [k] [k] [ ] [Set ID] [ ] [Data] [Cr] [k] [ ] [Set ID] [ ] [OK] [Data] [x]Ack09. OSD Select (Command:kl)‹ To select OSD On/Off.TransmissionData 0 : OSD Select Mode Off 1 : OSD Select Mode OnData 0 : OSD Select Mode Off 1 : OSD Select Mode On [k] [ l ] [ ] [Set ID] [ ] [Data] [Cr] [ l ] [ ] [Set ID] [ ] [OK] [Data] [x]Ack10. Remote Control Lock/Key Lock (Command:km)‹ To lock the front panel controls on the projector and remote control.TransmissionData 0 : Lock Off 1 : Lock OnData 0 : Lock Off 1 : Lock On [k] [m] [ ] [Set ID] [ ] [Data] [Cr] [m] [ ] [Set ID] [ ] [OK] [Data] [x]Ack* If you're not using the remote control, use this mode. When main power is On/Off, external control lock is released.11. Color Temperature (Command:ku)‹ Adjust the color temperature.TransmissionData 0 : Normal 1 : Cool 2:Warm 3 : NaturalData 0 : Normal 1 : Cool 2:Warm 3 : Natural [k] [u] [ ] [Set ID] [ ] [Data] [Cr] [u] [ ] [Set ID] [ ] [OK] [Data] [x]Ack04. Contrast (Command:kg)‹ To adjust screen contrast. TransmissionData Min : 0 ~ Max : 64* Refer to ‘Real data mapping 1’.Data Min : 0 ~ Max : 64 [k] [g] [ ] [Set ID] [ ] [Data] [Cr] [g] [ ] [Set ID] [ ] [OK] [Data] [x]Ack05. Brightness (Command:kh)‹ To adjust screen brightness.TransmissionData Min : 0 ~ Max : 64* Refer to ‘Real data mapping 1’.Data Min : 0 ~ Max : 64 [k] [h] [ ] [Set ID] [ ] [Data] [Cr] [h] [ ] [Set ID] [ ] [OK] [Data] [x]Ack](https://usermanual.wiki/LG-Electronics-USA/BX503JD/User-Guide-1280295-Page-36.png)
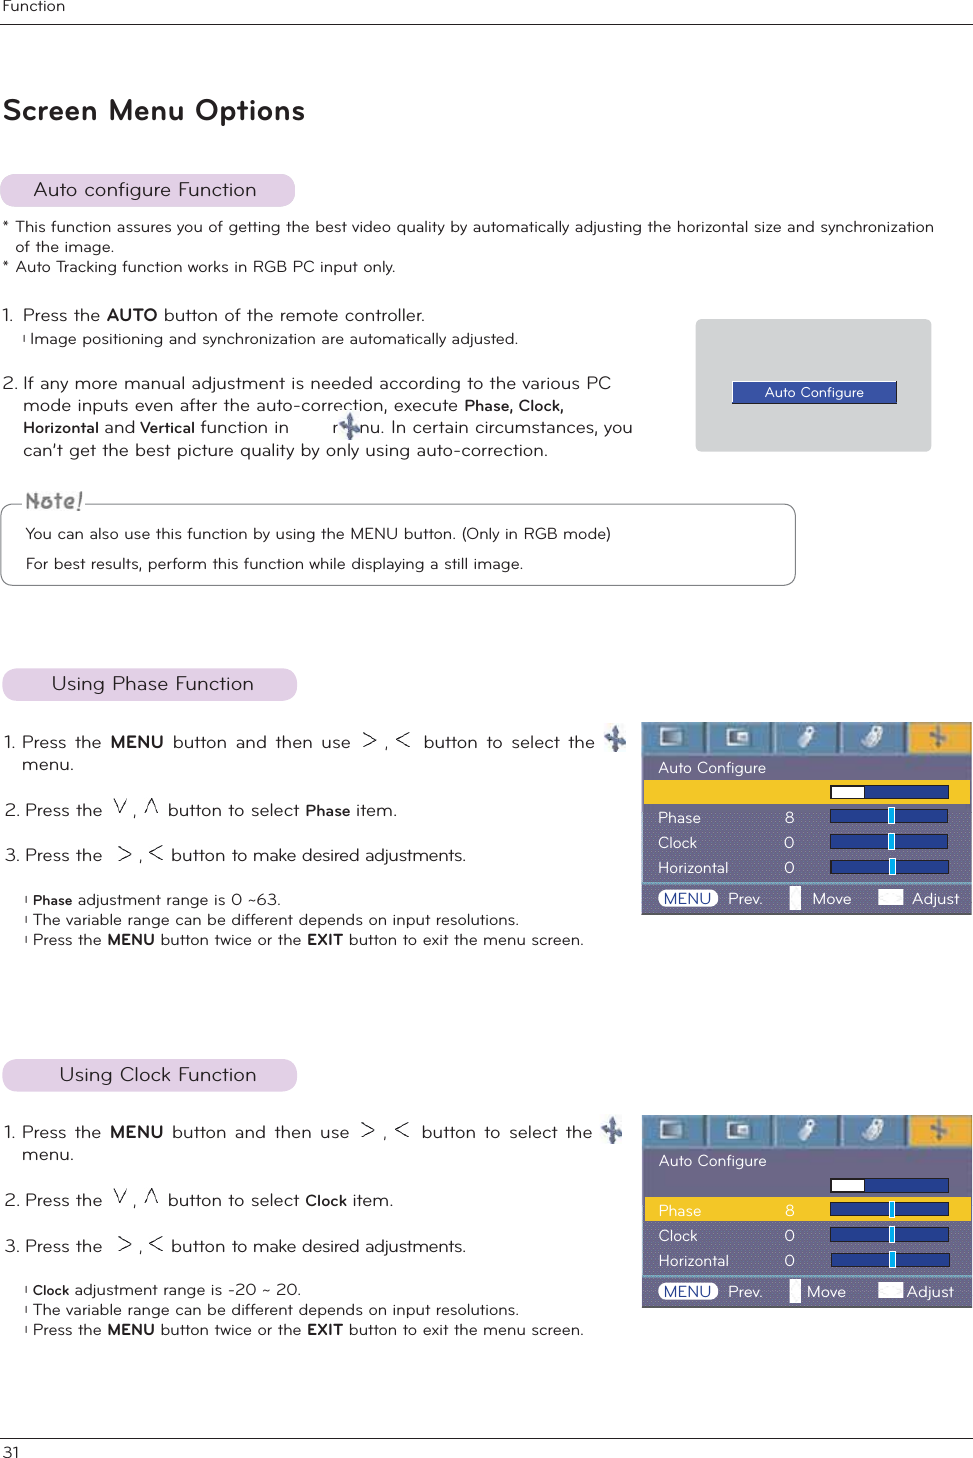
![Button Key code Button Key RS-232C3714. Blue ADC gain Adjustment (Color B) (Command:jz)‹ Adjust the Blue gain of ADC part.(RGB)TransmissionData Min : 0 ~ Max : 64* Refer to ‘Real data mapping 1’.Data Min : 0 ~ Max : 64 [ j ] [z] [ ] [Set ID] [ ] [Data] [Cr] [z] [ ] [Set ID] [ ] [OK] [Data] [x]Ack15. Low Power (Command:jq)‹ To reduce the power consumption of the projector.TransmissionData 0 : Low Power Off 1 : Low Power OnData 0 : Low Power Off 1 : Low Power On [ j ] [q] [ ] [Set ID] [ ] [Data] [Cr] [q] [ ] [Set ID] [ ] [OK] [Data] [x]Ack16. Auto Configure (Command:ju)‹ To adjust picture position and minimize image shaking automatically. It works only in RGB mode.TransmissionData 1 : To setData 1 : To set [ j ] [u] [ ] [Set ID] [ ] [Data] [Cr] [u] [ ] [Set ID] [ ] [OK] [Data] [x]Ack17. Input Select (Command:xb)‹ To select input source for the Set. TransmissionData 20 : Video 60 : RGB1 61 : RGB2 80 : HDMIData 20 : Video 60 : RGB1 61 : RGB2 80 : HDMI [x] [b] [ ] [Set ID] [ ] [Data] [Cr] [b] [ ] [Set ID] [ ] [OK] [Data] [x]AckExternal control device setup18. Key (Command:mc)‹ To send Key code of IR romote control. TransmissionData Key codeKey code [m] [c] [ ] [Set ID] [ ] [Data] [Cr] [b] [ ] [Set ID] [ ] [OK] [Data] [x]Ack12. Red ADC gain Adjustment (Color R) (Command:jw)‹ Adjust the Red gain of ADC part.(RGB)TransmissionData Min : 0 ~ Max : 64* Refer to ‘Real data mapping 1’.Data Min : 0 ~ Max : 64 [ j ] [w] [ ] [Set ID] [ ] [Data] [Cr] [w] [ ] [Set ID] [ ] [OK] [Data] [x]Ack13. Green ADC gain Adjustment (Color G) (Command:jy)‹ Adjust the Green gain of ADC part.(RGB)TransmissionData Min : 0 ~ Max : 64* Refer to ‘Real data mapping 1’.Data Min : 0 ~ Max : 64 [ j ] [y] [ ] [Set ID] [ ] [Data] [Cr] [y] [ ] [Set ID] [ ] [OK] [Data] [x]Ack POWERSOURCEMENUEXITOKBLANKTIMERW.PEAKKEYSTONEGAMMAMODEZOOMLAMP MODESLEEPAUTO40410203ADEF435B44BC79842669A46E4D4F4E5C680E92](https://usermanual.wiki/LG-Electronics-USA/BX503JD/User-Guide-1280295-Page-37.png)