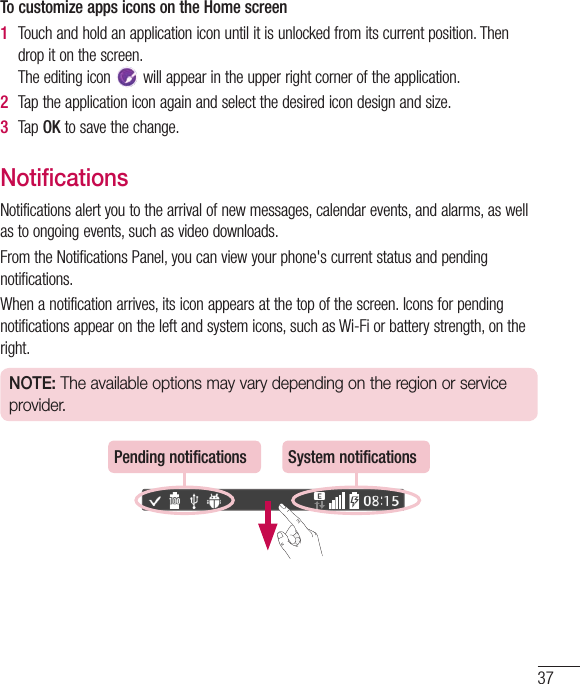
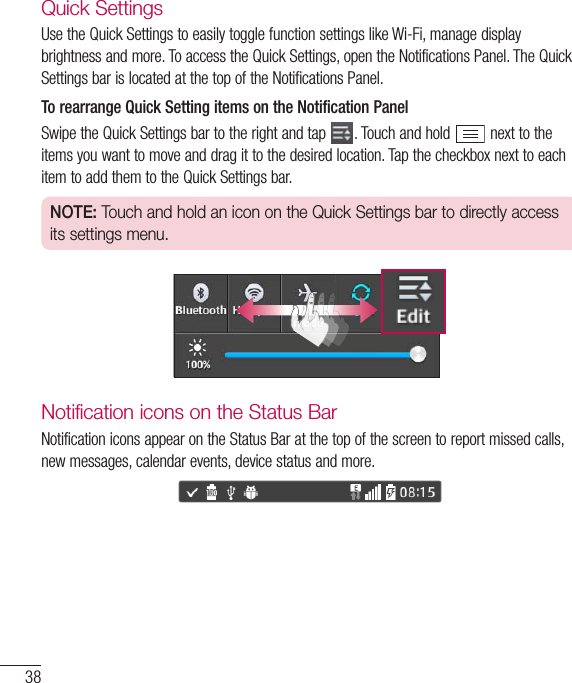
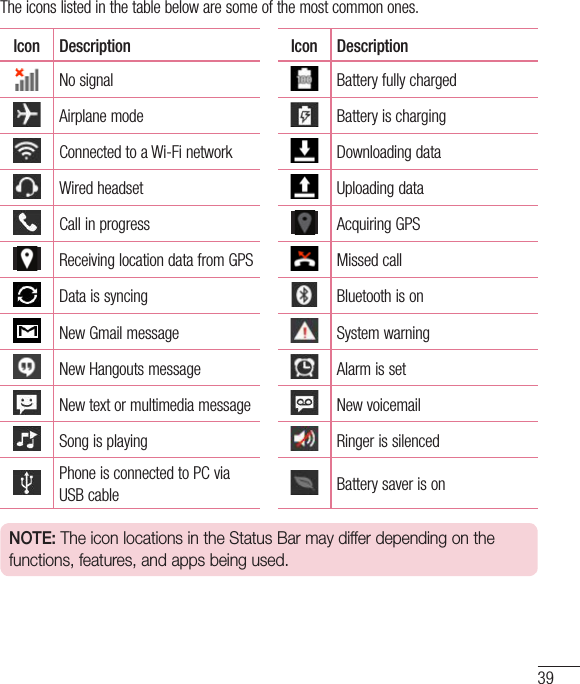
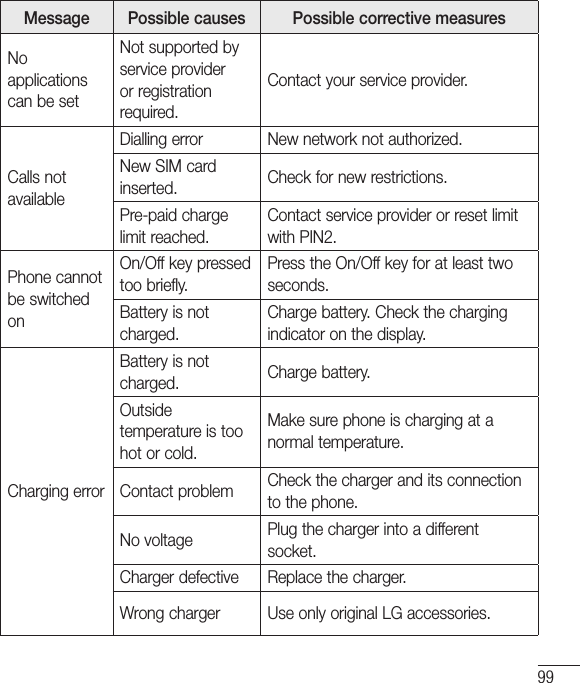
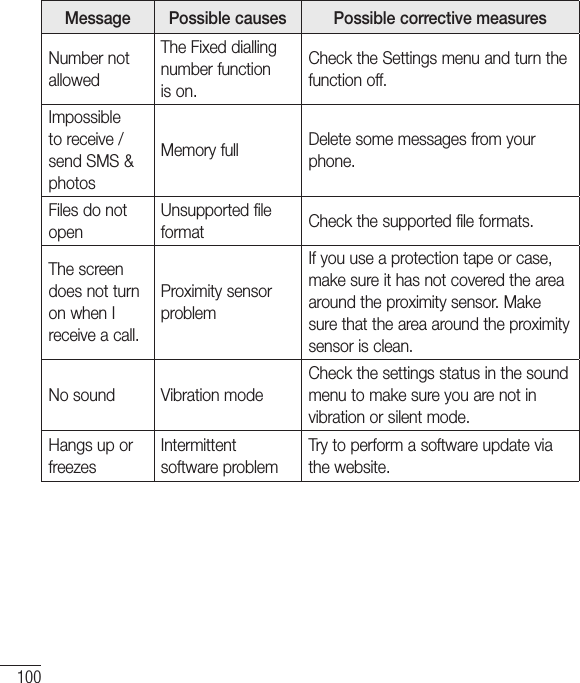
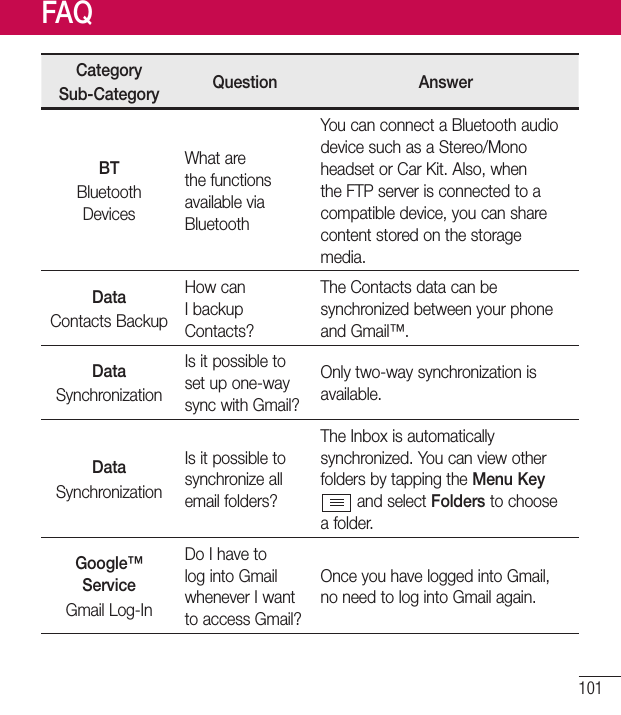
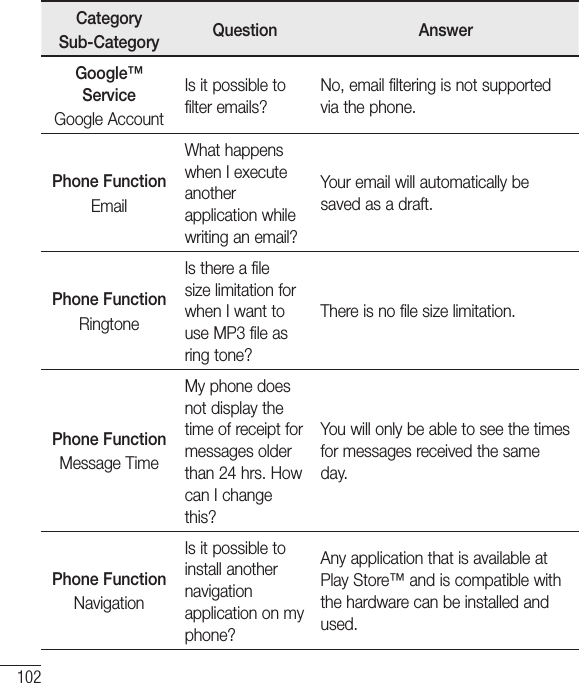
LG Electronics USA D213CJ Cellular/PCS GSM and PCS WCDMA Phone with WLAN and Bluetooth User Manual

LG Electronics MobileComm USA, Inc. Cellular/PCS GSM and PCS WCDMA Phone with WLAN and Bluetooth Users Manual

Users Manual

1ENGLISHMFL00000000 (1.0)User GuideLG-D213cjwww.lg.com
User GuideENGLISH•Screendisplaysandillustrationsmaydifferfromthoseyouseeonactualphone.•Someofthecontentsofthisguidemaynotapplytoyourphone,dependingonthesoftwareandyourserviceprovider.Allinformationinthisdocumentissubjecttochangewithoutnotice.•Thishandsetisnotsuitableforpeoplewhohaveavisualimpairmentduetothetouchscreenkeyboard.•Copyright©2014LGElectronics,Inc.Allrightsreserved.LGandtheLGlogoareregisteredtrademarksofLGGroupanditsrelatedentities.Allothertrademarksarethepropertyoftheirrespectiveowners.•Google™,GoogleMaps™,Gmail™,YouTube™,Hangouts™andGooglePlay™aretrademarksofGoogle,Inc.
2Guidelines for safe and efficient use .... 5Important notice .................................. 14Getting to know your phone ................ 19Phone overview..................................... 19Installing the SIM card and battery ........ 21Charging the phone ............................... 23Using the memory card ......................... 24Locking and unlocking the screen ......... 25Knock Code ........................................... 25KnockOn ............................................... 26Switching between and exiting  applications........................................... 26Your Home screen ................................ 27Touch screen tips .................................. 27Home screen ......................................... 28CustomizingtheHomescreen............. 29Notifications .......................................... 30QuickSettings..................................... 31NoticationiconsontheStatusBar...... 31On-screen keyboard.............................. 33Enteringspecialcharacters.................. 33Google account setup .......................... 34Creating your Google account ............... 34Signing in to your Google account ......... 34Connecting to Networks and Devices . 35Wi-Fi ..................................................... 35ConnectingtoWi-Finetworks.............. 35TurningWi-FionandconnectingtoaWi-Finetwork..................................... 35Bluetooth .............................................. 36PC connections with a USB cable .......... 38Calls ..................................................... 39Making a call ........................................ 39Calling your contacts ............................. 39Answering and rejecting a call .............. 39Whenthescreenislocked/unlocked.... 39Adjusting the in-call volume .................. 40Making a second call ............................ 40Viewing your call logs ........................... 40Call settings .......................................... 41Contacts ............................................... 42Searching for a contact ......................... 42Adding a new contact ........................... 42Favorite contacts ................................... 42Creating a group ................................... 43Messaging ............................................ 44Sending a message .............................. 44View mode  ........................................... 45Changing your message settings .......... 45Table of contents
3E-mail ................................................... 46Managing an email account .................. 46Working with account folders ................ 46Composing and sending email .............. 47Multimedia ........................................... 48Camera ................................................. 48Gettingtoknowtheviewnder............. 48Usingtheadvancedsettings................ 49Takingaquickphoto.......................... 50Onceyou'vetakenaphoto.................. 50Viewingyoursavedphotos.................. 51Video camera ........................................ 52Gettingtoknowtheviewnder............. 52Usingtheadvancedsettings................ 53Recordingaquickvideo...................... 54Afterrecordingavideo........................ 54Watchingyoursavedvideos................ 54Adjustingthevolumewhenviewingavideo.................................................. 54Gallery................................................... 55Viewingpictures.................................. 55Playingvideos..................................... 55Editingphotos/videos.......................... 56Deletingimages.................................. 56Settingaphotoasthewallpaper.......... 56Videos ................................................... 56Playingavideo.................................... 56Music .................................................... 58Playingasong.................................... 58Utilities ................................................. 60Alarm/Clock .......................................... 60Using your calculator ............................ 61Adding an event to your calendar .......... 61Voice Recorder ...................................... 62ThinkFree Viewer .................................. 63Google+ ................................................ 63Guest Mode ........................................... 64Voice Search ......................................... 64Downloads ............................................ 64QuickMemo........................................... 64FM radio ................................................ 66Searching for stations ........................... 66LG SmartWorld ...................................... 67The Web ............................................... 68Internet ................................................. 68Usingthewebtoolbar.......................... 68Viewingwebpages.............................. 68Openingapage.................................. 69Searchingthewebbyvoice................. 69Bookmarks......................................... 69History................................................ 69Chrome ................................................. 69Viewingwebpages.............................. 69Openingapage.................................. 70Searchingthewebbyvoice................. 70Syncingwithotherdevices.................. 70Addingandviewingbookmarks........... 70
4Settings ................................................ 71Access the Settings menu ..................... 71WIRELESS & NETWORKS ...................... 71DEVICE .................................................. 75PERSONAL ............................................ 79SYSTEM ................................................ 81PC software (LG PC Suite) ................... 84Phone software update ....................... 87About this user guide .......................... 89About this user guide ............................ 89Trademarks ........................................... 90Accessories .......................................... 91Troubleshooting ................................... 92FAQ ....................................................... 95
5Important InformationThisuser’sguidecontainsimportantinformationabouttheuseandoperationofthisphone.Readallinformationcarefullyforoptimalperformanceandtoavoidanydamageormisuseofthephone.Anychangesormodificationsnotexpresslyapprovedinthisuser’sguidecouldvoidyourwarrantyforthisequipment.Before you beginSafety Guidelines WARNING! To reduce the possibility of electric shock, do not expose your product to high humidity areas, such as bathroom or swimming pool.Keepthephoneawayfromheat.Neverstoreyourphoneinenvironmentthatmayexposeittotemperaturesbelow0°Corabove40°C,suchasoutdoorduringsnowstorm,orinyourcarinhotdays.Exposuretocoldorheatwillresultinmalfunction,damageorpermanentfailure.Becarefulwhenusingyourphonenearotherelectronicdevices.TheRFemissionsfrommobilephonesmayaffectnearbyelectronicequipmentthatnotadequatelyshielded.Youshouldconsultmanufacturersofanypersonalmedicaldevices,asinthecaseofpacemakersandhearingaides,todeterminewhethertheyaresusceptibletointerferencefromcellphones.Turnoffyourphoneinmedicalfacilitiesoratgasstations.Neverplaceyourphoneinmicrowaves,asitwillcausethebatterytoexplode.Important! Before using your phone, please read the SAFETY INFORMATION OF THE TELECOMMUNICATIONS INDUSTRY ASSOCIATION (TIA).Guidelines for safe and efficient use
6Safety InformationReadthesesimpleguidelines.Breakingtherulesmaybeillegalordangerous.Moredetailedinformationisprovidedinthisuser’sguide.• Neveruseanunapprovedbatterythatcouldcausedamagestothephoneorthebatteryitself,orevenexplode.• Neverplaceyourphoneinamicrowaveoven,asthiswillresultinanexplosionofthebattery.• Donotdisposeofyourbatteryinfireorwithhazardousorflammablematerials.• Makesurethebatterydoesnotcomeintocontactwithsharp-edgeditems,suchasanimalteethorclaws.Thiscouldcauseafire.• Storethebatteryinaplaceoutofthereachofchildren.• Becarefulsothatchildrendonotswallowanypartsofthephone,suchasrubberplugs(earpiece,partsthatconnecttothephone,etc.).Thiscouldcauseasphyxiationorsuffocation.• Disconnecttheplugandchargerfromtheoutletwhenthephoneshowsthatthebatteryhasbeenfullycharged,becauseitmaycauseelectricshockorfirehazard.• Wheninthecar,donotleaveyourphone,orinstallahands-freekit,neartheairbag.Ifwirelessequipmentisimproperlyinstalled,youcanbeseriouslyinjurediftheairbagisdeployed.• Donotusemobilephonewhiledriving.• Donotusethephoneinareaswhereitsusageisprohibited.(Forexample:inairplanes).• Donotexposethebatterychargeroradaptertodirectsunlight,oruseitinplaceswithhighhumidity,suchasbathroom.• Neverstoreyourphoneintemperatureslowerthan-20°Corhigherthan50°C.• Donotuseharshchemicals(suchasalcohol,benzene,solvents,etc.)ordetergentstocleanthephone.Thiscouldcausefire.• Donotdropthephone,strikeit,orshakeithard.
7Suchactionsmayharmthephone’sinternalcircuitboards.• Donotuseyourphoneinhighexplosiveareas,asthismaygeneratesparks.• Donotdamagethepowercordbybending,twisting,pulling,orheatingit.Donotusetheplugifitislooseasitmaycausefireorelectricshock.• Donothandlethephonewithwethandswhileitischarging.Thiscancauseelectricshockorseriouslydamageyourphone.• Donotdisassemblethephone.• Donotmakeoranswercallswhilechargingthephone,whichcancauseashortcircuit,electricshock,orfire.• UseonlybatteriesandchargersprovidedbyLG.Thewarrantydoesnotapplytoproductsprovidedbyotherproviders.• Onlyauthorizedpersonnelshouldservicethephoneanditsaccessories.Installationorservicemayresultinaccidentsandconsequentlyinvalidatethewarranty.• Donotholdorlettheantennacomeincontactwithyourbodyduringacall.• Emergencycallscanbemadeonlywithinaservicearea.Tomakeanemergencycall,makesureyouarewithinaserviceareaandthephoneison.• Useyouraccessories,suchasheadphonesorheadsets,withcaution,ensuringthatthecablesarepluggedproperlyandthattheydonottouchtheantennaunnecessarily.Information about the RF exposure from FCC WARNING! Read this information before operating the phone.InAugust1996,theFederalCommunicationsCommission(FCC)oftheUnitedStates,withitsactioninReportandOrderFCC96-326,adoptedanupdatedsafetystandardforhumanexposuretoradiofrequency(RF)electromagneticenergyemittedbyFCCregulatedtransmitters.ThoseguidelinesareconsistentwiththesafetystandardpreviouslysetbybothinternationalandU.S.standards.
8ThehighestSARvalueforthisphoneFCCtestedforuseintheearis0.00W/kg,andwhenwornonthebodyis0.00W/kg.ThedesignofthisphonecomplieswithFCCguidelinesandtheseinternationalstandards.CautionUseonlythesuppliedantenna.Useofunauthorizedantennas,ormodifications,couldimpaircallquality,damagethephone,voidyourwarranty,orresultinaviolationofFCCregulations.Donotusethephonewithadamagedantenna.Adamagedantennaincontactwiththeskincouldcauseasinge.Contactyourlocaldealerforanantennareplacement.0.660.68
9Battery Precautions• Donotdisassemble.• Donotshort-circuit.• Donotexposetohightemperatures,over60°C(140°F).• Donotincinerate.Battery Disposal• Pleasedisposeofyourbatteryproperly,orbringittoyourwirelessproviderforrecycling.• Donotdisposeofyourbatteryinfireorwithhazardousorflammablematerials.
10Adapter Precautions (Charger)• Usingthewrongbatterychargercoulddamageyourphoneandvoidyourwarranty.• Theadapterorbatterychargerisonlydesignedforindooruse.• Donotexposethebatterychargeroradaptertodirectsunlight,oruseitinplaceswithhighhumidity,suchasthebathroom.Cautions for Battery• Donotdisassembleoropencrush,bendordeform,punctureorshred.• Donotmodifyorremanufacture,attempttoinsertforeignobjectsintothebattery,immerseorexposetowaterorotherliquids,exposetofire,explosionorotherhazard.• Onlyusethebatteryforthesystemforwhichitisspecified.• Onlyusethebatterywithachargingsystemthathasbeenqualifiedwiththesystemperthisstandard.Useofanunqualifiedbatteryorchargermaypresentariskoffire,explosion,leakage,orotherhazard.• Donotshortcircuitabatteryorallowmetallicconductiveobjectstocontactbatteryterminals.• Replacethebatteryonlywithanotherbatterythathasbeenqualifiedwiththesystemperthisstandard,IEEE-Std-1725-200x.Useofanunqualifiedbatterymaypresentariskoffire,explosion,leakageorotherhazard.• Promptlydisposeofusedbatteriesinaccordancewithlocalregulations.• Batteryusagebychildrenshouldbesupervised.• Avoiddroppingthephoneorbattery.Ifthephoneorbatteryisdropped,especiallyonahardsurface,andtheusersuspectsdamage,takeittoaservicecenterforinspection.• Improperbatteryusemayresultinafire,explosionorotherhazard.• ForthosehostdevicesthatutilizeaUSBportasachargingsource,thehostdevice'susermanualshallincludeastatementthatthephoneshallonlybeconnectedtoproductsthatbeartheUSB-IFlogoorhavecompletedtheUSB-IFcomplianceprogram.
11• Alwaysunplugthechargerfromthewallsocketafterthephoneisfullychargedtosaveunnecessarypowerconsumptionofthecharger.Avoid damage to your ear• Damagetoyourhearcanoccurduetoconstantexposuretoexcessivehighsound.We,therefore,recommendthatyoudonotturnonoroffthephonenearyourear.Wealsorecommendyoubereasonablewiththemusicandvolumelevel.• Ifyoulistentomusic,pleaseensurethatthevolumelevelisadequate,sothatyouareawareofyoursurroundings.Thisisparticularlyimportantwhenattemptingtocrossastreet.
12TIA's Safety InformationThisincludescompletesecurityinformationonwirelessphonesfromTIA(TelecommunicationsIndustryAssociation).It'srequired,forCTIACertification,theinclusionintheusermanualoftextcoveringpacemakers,hearingaidsandothermedicaldevices.It'sencouragedtheuseoftheremainingTIAlanguagewhenrelevant.Exposure to Radio Frequency SignalYourwirelesshandheldportabletelephoneisalowpowerradiotransmitterandreceiver.WhenitisON,itreceivesandalsosendsoutradiofrequency(RF)signals.InAugust,1996,theFederalCommunicationsCommissions(FCC)adoptedRFexposureguidelineswithsafetylevelsforhandheldwirelessphones.ThoseguidelinesareconsistentwiththesafetystandardspreviouslysetbybothU.S.andinternationalstandardsbodies:ANSIC95.1(1992)*NCRPReport86(1986)ICNIRP(1996)Thosestandardswerebasedoncomprehensiveandperiodicevaluationsoftherelevantscientificliterature.Forexample,over120scientists,engineers,andphysiciansfromuniversities,governmenthealthagencies,andindustryreviewedtheavailablebodyofresearchtodeveloptheANSIStandard(C95.1).*AmericanNationalStandardsInstitute;NationalCouncilonRadiationProtectionandMeasurements;InternationalCommissiononNon-IonizingRadiationProtection.ThedesignofyourphonecomplieswiththeFCCguidelines(andthosestandards).Safety instructions
13Antenna CareUseonlythesuppliedoranapprovedreplacementantenna.Unauthorizedantennas,modifications,orattachmentscoulddamagethephoneandmayviolateFCCregulations.Phone OperationNORMAL POSITION: Holdthephoneasyouwouldanyothertelephonewiththeantennapointedupandoveryourshoulder.Suggestions for a more efficient operationForyourphonetooperatemostefficiently:• Donottouchtheantennaunnecessarily,whenthephoneisinuse.Thecontactwiththeantennaaffectscallquality,andmaycausethephonetooperateatahigherpowerlevelthanotherwisewouldbeneed.DrivingCheckthelawsandregulationsrelatedtotheuseofwirelessphonesintheareaswhereyoudrive.Alwaysobeytheseregulations.Also,ifusingyourphonewhiledriving,makesureto:• Payfullattentiontodriving;drivingsafelyisyourfirstresponsibility;• Usehands-freeoperation,ifavailable;• Pullofftheroadandpark,beforemakingoransweringacall,ifdrivingconditionsdemandso.
14Electronic DevicesMostmodernelectronicequipmentisshieldedfromRFsignals.However,certainelectronicequipmentmaynotbeshieldedagainsttheRFsignalsfromyourwirelessphone.PacemakerTheMedicalIndustryManufacturersAssociationrecommendsaminimumdistanceoffifteen(15)centimeters,orsix(6)inches,betweenahandheldwirelessphoneandapacemaker,inordertoavoidpotentialinterferencebetweenthem.Theseadvicesareconsistentwithindependentresearches,andwithrecommendationsbasedonwirelesstechnologyresearch.Peoplewithpacemakersshould:• ALWAYSkeepthephoneatleastfifteencentimeters(sixinches)fromtheirpacemaker,wheneverthephoneisturnedon;• Notcarrythephoneinashirtpocket;• Usetheearoppositetothepacemaker,tominimizethepotentialinterference;• Ifyouhaveanyreasontosuspectthatinterferenceistakingplace,switchoffyourphoneimmediately.Hearing AidsSomedigitalwirelessphonesmayinterferewithsomehearingaids.Intheeventofsuchinterference,werecommendthatyoucontactyourserviceprovider.
15Other Medical DevicesIfyouuseanyotherpersonalmedicaldevices,consultyourdevicemanufacturertodetermineiftheyareadequatelyshieldedfromexternalRFenergy.Yourdoctorcanhelpyouobtainthisinformation.Health Care FacilitiesTurnoffyourphoneinhealthcarefacilities,whenevertherearesignsaskingyoutodoso.HospitalsorhealthcarefacilitiesmayuseequipmentthatcouldbesensitivetoexternalRFenergy.VehiclesRFsignalsmayaffectimproperlyinstalledorinadequatelyshieldeddevicesinmotorvehicles.Checkwiththemanufacturer,oritsrepresentative,regardingyourvehicle.Youshouldalsoconsultthemanufactureraboutanyequipmentthathasbeenaddedtoyourvehicle.Facilities with signsTurnoffthephoneinanyfacilitywherewarningsignsrequestyoutodoso.AirplanesFCCregulationsprohibittheuseofphoneswhileintheair.Turnoffyourphonebeforeboardinganairplane.
16Blasting AreasToavoidinterferingwithblastingoperations,turnyourphoneoffwhenina'blastingarea'orinareaswithsignsthatread:'Turnofftwo-wayradios'.Obeyallsignsandinstructions.Potentially Explosive AtmosphereTurnoffthephonewheninanareawithapotentiallyexplosiveatmosphere,andobeyallsignsandinstructions.Sparksinsuchareascouldcauseanexplosionorfirethatcouldresultinpersonalinjuryordeath.Areaswithapotentiallyexplosiveatmosphereareoftenclearlymarked,butnotalways.Amongthepotentiallydangerousareasare:Fuelingareas(suchasgasstations),areasbelowdeckonboats,facilitieswherechemicalproductsaretransferredorstored,vehiclesusingliquefiedpetroleumgas(aspropaneorbutane),areaswheretheaircontainschemicalsorparticles(suchasgrain,dustormetalpowders),andanyotherareaswhereyouwouldnormallybeadvisedtoturnoffyourvehicleengine.For vehicles equipped with air bags Airbagsinflatewithstrongforce.Donotplaceobjectsintheareaovertheairbagorinitsdeploymentarea,includingwirelessequipment,eitherinstalledorportable.Seriousinjuriescouldoccurifwirelessequipmentisimproperlyinstalledintothecarwhentheairbaginflates.
17Safety InformationReadandobservethefollowinginformationforthesafeandproperuseofyourphone,andtopreventanydamage.Also,keeptheuser'sguideinanaccessibleplaceatalltimesafterreadingit.Charger, Adapter and Battery Security• Thechargerandadapteraredesignedonlyforindooruse.• Disposeofyourbatteryproperly,orbringittoyourwirelessproviderforrecycling.• Thebatterydoesn’tneedtobefullydischargedbeforerecharging.• OnlyuseLGapprovedchargersthatarespecificallymadeforyourphonemodel,sincetheyaredesignedtomaximizethebatterylife.• Donotdisassembleorshort-circuitit.• Keepthemetalcontactsonthebatteryclean.• Replacethebatterywhenitnolongerprovidesacceptableperformance.Thebatterycanberechargedseveralhundredtimesbeforereplacement.• Chargethebatteryafterlongperiodswithoutusetomaximizeitslife.• Thebatterylifewillvarydependingonusagepatternsandenvironmentalconditions.• Intensiveuseofbacklighting,browser,andpacketdataconnectivityaffectbatterylifeandtalk/standbytimes.• Theroleofself-protectioninterruptsthephonewhenitsoperationisinanabnormalstate.Inthiscase,removethebatteryfromthephone,reinstallit,andturnonthephone.
18Explosion, Shock and Fire Danger• Donotplacethephoneinaplaceexposedtoexcessivedust,andkeeptheminimumrequireddistancebetweenthepowercordandheatsources.• Unplugthepowercordbeforecleaningthephone,andcleanthepowerplugwheneveritisdirty.• Whenusingthepowerplug,makesureitisfirmlyconnected.Otherwise,itcanoverheatorstartafire.• Placingthephoneinapocketorbagwithoutcoveringthereceptacle(powerplugpin),metallicarticles(suchasacoin,cliporpen)mayshort-circuitthephone.Alwayscoverthereceptaclewhennotinuse.• Donotshort-circuitthebattery.Metalitems,suchascoins,paperclips,orpens,inyourpocketorbagmaycauseashortcircuitbetweenthe+and-terminalsofthebattery(metalstripsonthebattery).Theshort-circuitoftheterminalsmaydamagethebatteryandcauseanexplosion.General Notice• Usingadamagedbattery,orinsertingitintothemouthcancauseseriousinjuries.• Donotplacethephoneinproximitytoitemscontainingmagneticcomponents,suchascreditcards,callingcards,bankbooks,orsubwaytickets.Thephonemagnetismmaydamagethedatastoredinthemagneticstrip.• Talkingonthephoneforalongperiodoftimemayreducecallquality,becauseoftheheatgeneratedduringuse.• Whenthephonehasnotbeeninuseforalongtime,storeitinasafeplace,withthepowercordunplugged.• Usingthephoneclosetoareceivingequipment(suchasTVorradio)maycauseinterference.
19• Donotusethephoneiftheantennaisdamaged.Ifadamagedantennacontactsskin,itmaycauseaslightsinge.ContactanLGAuthorizedServiceFacilitytoreplacethedamagedantenna.• Donotimmerseyourphoneinwater.Ifthishappens,immediatelyturnitoffandremovethebattery.Ifyourphonedoesnotwork,takeittoanLGAuthorizedServiceFacility.• Thepowersupplycontainselementsthatcouldbeharmfultoyourhealth,ifcomponentsarehandleddirectly.Ifthishappens,werecommendimmediatehand-washing.• Donotpaintthephone.• Datastoredinyourphonemightbedeletedduetocarelessuse,hardwarerepairorsoftwareupgrade.Pleasebackupyourimportantphonenumbers(ringtones,textorvoicemessages,images,andvideosmightalsogetdeleted).Themanufacturerisnotliablefordamagesduetolossofdata.• Whenusingthephoneinpublicplaces,youmaysettheringeronvibratetoavoiddisturbingothers.• Donotswitchthephoneon/offwhileitisinyourear.• Repairsunderwarranty,atLG’sdiscretion,mayincludereplacementpartsorboardsthatareeitherneworreconditioned,providedthattheyhavefunctionalityequaltothatofthepartsbeingreplaced.Ambient temperaturesUse your phone in temperatures between 0ºC and 40ºC, if possible. Exposing your phone to extremely low or high temperatures may result in damage, malfunction, or even explosion.Notice: Open Source SoftwareTo obtain the corresponding source code under GPL, LGPL, MPL and other open source licences, please visit http://opensource.lge.com/ All referred licence terms, disclaimers and notices are available for download with the source code.
20HOW TO UPDATE YOUR SMARTPHONEAccess to latest firmware releases, new software functions and improvements. •Update your smartphone without a PC. Select Update Center   > Software update.•Update your smartphone by connecting it to your PC.  For more information about using this function, please visit  http://www.lg.com/common/index.jsp select country and language.
21Important noticePlease read this before you start using your phone!Pleasechecktoseewhetheranyproblemsyouencounteredwithyourphonearedescribedinthissectionbeforetakingthephoneinforserviceorcallingaservicerepresentative.1.  Phone memoryWhenthereislessthan10%ofspaceavailableinyourphonememory,yourphonecannotreceivenewmessages.Youneedtocheckyourphonememoryanddeletesomedata,suchasapplicationsormessages,tomakemorememoryavailable.To uninstall applications:1  FromtheHomescreen,tap >Appstab(ifnecessary)>Settings>Apps.2  Onceallapplicationsappear,scrolltoandselecttheapplicationyouwanttouninstall.3  TapUninstall,thentapOKtoconfirm.2.  Optimizing battery lifeExtendyourbattery'slifebetweenchargesbyturningofffeaturesthatyoudon'tneedtohaverunningconstantlyinthebackground.Youcanmonitorhowapplicationsandsystemresourcesconsumebatterypower.Extending your phone's battery life:•Turnoffradiocommunicationswhenyou'renotusing.IfyouarenotusingWi-Fi,BluetoothorGPS,turnthemoff.•Reducescreenbrightnessandsetashorterscreentimeout.•TurnoffautomaticsyncingforGmail,Calendar,Contactsandotherapplications.•Someapplicationsyouhavedownloadedmayreducebatterypower.
22To check the battery power level:•FromtheHomescreen,tap >Appstab(ifnecessary)>Settings>About phone > Battery.Thebatterystatus(chargingordischarging)andbatterylevel(percentagecharged)isdisplayedatthetopofthescreen.To monitor and control how battery power is being used:•FromtheHomescreen,tap >Appstab(ifnecessary)>Settings>About phone > Battery>Battery use.Batteryusagetimeisdisplayedonthescreen.Ittellsyouhowlongithasbeensinceyoulastconnectedyourphonetoapowersourceor,ifcurrentlyconnected,howlongthephonewaslastrunningonbatterypower.Thescreenshowstheapplicationsorservicesusingbatterypower,listedinorderfromthegreatesttosmallestamountused.3.  Before installing an open source application and operating system (OS) WARNINGIf you install and use an OS other than the one provided by the manufacturer it may cause your phone to malfunction. In addition, your phone will no longer be covered by the warranty. WARNINGTo protect your phone and personal data, only download applications from trusted sources, such as Play Store. If there are improperly installed applications on your phone, the phone may not work normally or a serious error may occur. You must uninstall those applications and all associated data and settings from the phone.
234.  Using a screen lockSetascreenlocktosecureyourphoneandpreventunauthorizeduse.FromtheHomescreen,tap >Appstab(ifnecessary)>Settings>Lock screen>Select screen lock>None,Swipe,Knock Code, Face Unlock,Pattern,PIN,orPassword.IfyouchoosePattern,youwillbepromptedtocreateaBackupPINasasafetymeasureincaseyouforgetyourscreenlock.Caution: Create a Google account before setting a screen lock and remember the Backup PIN you created when creating your screen lock. WARNINGPrecautions to take when using a pattern lock.It is very important to remember the screen lock you set. You will not be able to access your phone if you use an incorrect screen lock 5 times. If you have used all 5 opportunities, you can try again after 30 seconds.When you can't recall your screen lock:< If you have forgotten your pattern >IfyouloggedintoyourGoogleaccountonthephonebutfailedtoenterthecorrectpattern5times,taptheForgot pattern?buttonatthebottomofthescreen.YouarethenrequiredtologinwithyourGoogleAccountorentertheBackupPINyoucreated.IfyouhavenotloggedintoaGoogleaccountonthephoneoryouforgotyourBackupPIN,youhavetoperformahardreset.< If you have forgotten your PIN or Password > IfyouforgetyourPINorPassword,youwillneedtoperformahardreset.Caution: If you perform a hard reset, all user applications and user data will be deleted.
245.  Using the Hard Reset (Factory reset) WARNINGIf you perform a Hard Reset, all user applications, user data and DRM licenses will be deleted. Please remember to backup any important data before performing a Hard Reset.1  Turnthephoneoff.2  PressandholdthePower/Lock Key+Volume Down Key .3  ReleasethePower/Lock KeywhentheLGlogoisdisplayed.4  PressthePower/Lock Keyagainwithin3seconds.5  WhentheFactorydataresetscreenappear,releaseallkeys.6  PressthePower/Lock Keytwomoretimesdisplayedonthescreeninthisstate,FactoryResetisperformed.7  IfwhenyoupresstheVolume Up KeyorVolume Down Key,FactoryResetisnotperformedandbootsNormally.6.  Opening and switching applicationsMulti-taskingiseasywithAndroidbecauseyoucankeepmorethanoneapplicationrunningatthesametime.Thereisnoneedtoquitanapplicationbeforeopeninganotherone.Useandswitchbetweenseveralopenapplications.Androidmanageseachapplication,stoppingandstartingthemasneededtoensurethatidleapplicationsdon'tconsumeresourcesunnecessarily.To stop applications:1  FromtheHomescreen,tap >Appstab(ifnecessary)>Settings>Apps>RUNNING.2  TapthedesiredapplicationandtapStoptostopit.
257.  Transferring music, photos and videos using Media sync (MTP)1  ConnectthephonetoyourPCusingtheUSBcableprovidedwithyourphone.2  AUSBconnectiontypelistwillappearonyourphonescreen.TaptheMedia sync (MTP)option.3  SelecttheOpen device to view filesoptiononyourPC.YoucanthenviewmediacontentsonyourPCandtransferthefiles.4  CopythefilesfromyourPCtothedrivefolderorviceversa.5  DragtheStatusBardownandtapUSB connected>Charge phone.6  DisconnecttheUSBcablefromyourphone.8.  Hold your phone uprightHoldyourcellphonevertically,asyouwouldaregularphone.Yourphonehasaninternalantenna.Becarefulnottoscratchordamagethebackofthephone,asthismayaffectperformance.Whenmaking/receivingcallsorsending/receivingdata,avoidholdingthelowerpartofthephonewheretheantennaislocated.Doingsomayaffectcallquality.
26Phone overviewProximity SensorEarpieceHome Key ReturntotheHomescreenfromanyscreen.Volume KeysBack Key Returntothepreviousscreen.Menu Key Displaytheavailableoptions.Power/Lock KeyTurnyourphoneon/off,restart,lock/unlockthescreen,turnairplanemodeonoroff,andchangetheringertype.Front-Facing Camera lensNOTE: Proximity sensorWhen receiving and making calls, the proximity sensor automatically turns the backlight off and locks the touch screen by sensing when the phone is near your ear. This extends battery life and prevents you from unintentionally activating the touch screen during calls. WARNINGPlacing a heavy object on the phone or sitting on it can damage the LCD and touch screen functions. Do not cover the LCD proximity sensor with protective film. This could cause the sensor to malfunction.Getting to know your phone
27Power/Lock KeyVolume Keys•On the Home screen: Controlringervolume.•During a call:Controlyourearpiecevolume.•When playing audio/video:Controlvolumecontinuously.Charger/USB PortMicrophoneEarphone JackNOTE: Please be careful not to block the microphone by your hand when you call.Back covermicroSD Card slotCamera LensFlashBatterySIM card slot
28Installing the SIM card and batteryBeforeyoucanstartexploringyournewphone,you'llneedtosetitup.1  Toremovethebackcover,holdthephonefirmlyinonehand.Withyourotherhand,liftoffthebackcoverwithyourthumbnailasshowninfigurebelow.2  SlidetheSIMcardintoitsslotasshowninthefigure.Makesurethegoldcontactareaonthecardisfacingdownwards.
293  Insertthebatteryintoplacebyaligningthegoldcontactsonthephoneandthebattery(1)andpressingitdownuntilitclicksintoplace(2).4  Alignthebackcoveroverthebatterycompartment(1)andpressitdownuntilitclicksintoplace(2).
30Charging the phoneTheCharger/USBPortisatthebottomofthephone.InsertoneendoftheUSBcableintothephoneandplugtheotherendintoanelectricaloutlet.NOTE:•The battery must be fully charged initially to improve battery lifetime.•Do not open the back cover while your phone is charging.
31Using the memory cardMakesuretounmounttheSDcardintheStoragemenubeforeremovingit.1  Removethebackcover.2  Insertthememorycardintotheslot.Makesurethegoldcontactareaisfacingdownwards.NOTE: Use only compatible memory cards with your phone. Using incompatible memory cards may damage the card and data stored on the card, as well as the phone.To format the memory card:Yourmemorycardmayalreadybeformatted.Ifitisn't,youmustformatitbeforeyoucanuseit.NOTE: All files on your memory card are deleted when it is formatted.1  Touch toopentheapplicationlist.2  ScrollandtouchSettings>Storage.
323  TouchUnmount SD card.4  TouchErase SD card>Erase SD card>Erase everything.5  Ifyouhavesetapatternlock,inputthepatternlockthenselectErase everything.Locking and unlocking the screenIfyoudonotusethephoneforawhile,thescreenwillbeautomaticallyturnedoffandlocked.Thishelpstopreventaccidentaltapsandsavesbatterypower.Whenyouarenotusingyourphone,pressthePower/Lock Keytolockyourphone.Ifthereareanyprogramsrunningwhenyoulockyourscreen,theymaybestillrunninginLockmode.ItisrecommendedthatyouexitallprogramsbeforeenteringLockmodetoavoidunnecessarycharges(e.g.phonecalls,webaccessanddatacommunications).Towakeupyourphone,pressthePower/Lock Key.TheLockscreenwillappear.TouchandslidetheLockscreeninanydirectiontounlockthescreen.Thelastscreenyouviewedwillopen.Knock CodeYoucanunlockthescreenwhenscreenisoffbytapingthecorrectareaandsequence.To activate Knock Code feature1  Press  > >Appstab>Settings>Lock screen>Select screen lock>Knock Code.2  Thisopensascreenthatwillguideyouthroughhowtoselecttheunlocksequence.YouhavetocreateaBackupPINasasafetymeasureincaseyouforgetyourunlocksequence.TIP: Double-tap to turn the screen on when Knock Code is not in use.
33KnockOnYoucanturnon/offthescreenbyjustdouble-tap.To activate KnockON feature1  Press  > >Appstab>Settings>Gestures.2  PlaceacheckmarkonScreen on/off.Double-tapthecenterscreenquicklytounlockthescreen.Tolockthescreen,double-tapthestatusbarinanyscreen(exceptonthecameraviewfinder)oremptyareaontheHomescreen.NOTE: When turning the screen on, make sure you do not cover the proximity sensor. Doing so will turn the screen off immediately after turning it on in order to prevent abnormal turning on in your pocket or bag.Switching between and exiting applicationsMulti-taskingiseasywithAndroidbecauseopenapplicationskeeprunningevenwhenyouopenanotherapplication.Thereisnoneedtoquitanapplicationbeforeopeninganother.Useandswitchamongseveralopenapplications.Androidmanageseachapplication,stoppingandstartingthemasneeded,toensurethatidleapplicationsdon’tconsumeresourcesunnecessarily.Switching between applications •TouchandholdtheMenu Key.Alistofrecentlyusedapplicationswillbedisplayed.Thentaptheapplicationyouwanttoaccess.•Toremoveanapplicationfromthelist,swipetheapppreviewtotheleftorright.To stop/exit an application 1  FromtheHomescreen,taptheMenu KeyandtapSystem settings>Apps.2  Taponeofthetabsatthetopofthescreen,choosethedesiredapplicationandtapForce stop(orStop)tostoptheapplication.
34Touch screen tipsHerearesometipsonhowtonavigateonyourphone.Touch or tap–Asinglefingertapselectsitems,links,shortcutsandlettersontheon-screenkeyboard.Touch and hold–Touchandholdanitemonthescreenbytouchingitandnotliftingyourfingeruntilanactionoccurs.Forexample,toopenacontact'savailableoptions,touchandholdthecontactintheContactslistuntilthecontextmenuopens.Drag–Touchandholdanitemforamomentandthen,withoutliftingyourfinger,moveyourfingeronthescreenuntilyoureachthetargetposition.YoucandragitemsontheHomescreentorepositionthem.Swipe or slide–Toswipeorslide,quicklymoveyourfingeracrossthesurfaceofthescreen,withoutpausingwhenyoufirsttouchit(soyoudon'tdraganiteminstead).Forexample,youcanslidethescreenupordowntoscrollthroughalistorbrowsethroughthedifferentHomescreensbyswipingfromlefttoright(andviceversa).Double-tap–Double-taptozoomonawebpageoramap.Forexample,quicklydouble-tapasectionofawebpagetoadjustthatsectiontofitthewidthofthescreen.Youcanalsodouble-taptozoominandoutwhenviewingapictureandwhenusingMaps.Pinch-to-Zoom–Useyourindexfingerandthumbinapinchingorspreadingmotiontozoominoroutwhenusingthebrowser,Mapsorwhenviewingpictures.Rotate the screen–Frommanyapplicationsandmenus,theorientationofthescreenadjuststothedevice'sphysicalorientation.Your Home screen
35NOTE:•To select an item, tap the center of the icon.•Do not press too hard; the touch screen is sensitive enough to pick up a light, yet firm tap.•Use the tip of your finger to tap the option you want. Be careful not to tap any other keys.Home screenSimplyswipeyourfingertotheleftorrighttoviewtheHomescreenpanels.Youcancustomizeeachpanelwithpre-loadedanddownloadedapps,widgets,andwallpapers.Status barShowsphone'sstatusinformationincludingthetime,signalstrength,batterystatus,andnotificationicons.WidgetWidgetsareself-containedapplicationsthatcanbeaccessedthroughtheAppsscreenorontheHomescreenoranextendedhomescreen.Unlikeashortcut,theWidgetappearsasanon-screenapplication.Application IconsTapanicon(application,folder,etc.)toopenanduseit.Location IndicatorIndicateswhichHomescreencanvasyouareviewing.Quick Key AreaProvidesone-touchaccesstothefunctioninanyhomescreencanvas.
36TheQuickKeysareavailableatthebottomoftheHomescreen.QuickKeysprovideeasyandone-tapaccesstothefunctionsyouusethemost.NOTE: To add an icon, drag it to the Quick Keys bar and release it. To remove an icon, drag it out of the Quick Keys bar.Customizing the Home screenYoucancustomizeyourHomescreenbyaddingapps,downloads,widgetsorwallpapers.Formoreconvenienceusingyourphone,addyourfavoriteappsandwidgetstotheHomescreen.To add items on your Home screen:1  TouchandholdtheemptypartoftheHomescreen.2  Tapthedesiredtab.ChoosefromAppsorWidget.3  Dragthedesiredappicontothepreferredlocationandliftyourfinger.To remove an item from the Home screen:•Touchandholdtheiconyouwanttoremove,thendragitto andreleaseit.TIP! To add an application icon to the Home screen from the Apps screen, touch and hold the application you want to add and drag it to the desired location.TIP! Using foldersYou can combine several app icons in a folder to help keep you organized. Drop one app icon over another one on a Home screen and a folder will be created with both icons in it.
37To customize apps icons on the Home screen1  Touchandholdanapplicationiconuntilitisunlockedfromitscurrentposition.Thendropitonthescreen.Theeditingicon willappearintheupperrightcorneroftheapplication.2  Taptheapplicationiconagainandselectthedesiredicondesignandsize.3  TapOKtosavethechange.NotificationsNotificationsalertyoutothearrivalofnewmessages,calendarevents,andalarms,aswellastoongoingevents,suchasvideodownloads.FromtheNotificationsPanel,youcanviewyourphone'scurrentstatusandpendingnotifications.Whenanotificationarrives,itsiconappearsatthetopofthescreen.Iconsforpendingnotificationsappearontheleftandsystemicons,suchasWi-Fiorbatterystrength,ontheright.NOTE: The available options may vary depending on the region or service provider.Pending notifications System notifications
38Quick SettingsUsetheQuickSettingstoeasilytogglefunctionsettingslikeWi-Fi,managedisplaybrightnessandmore.ToaccesstheQuickSettings,opentheNotificationsPanel.TheQuickSettingsbarislocatedatthetopoftheNotificationsPanel.To rearrange Quick Setting items on the Notification PanelSwipetheQuickSettingsbartotherightandtap .Touchandhold nexttotheitemsyouwanttomoveanddragittothedesiredlocation.TapthecheckboxnexttoeachitemtoaddthemtotheQuickSettingsbar.NOTE: Touch and hold an icon on the Quick Settings bar to directly access its settings menu.Notification icons on the Status BarNotificationiconsappearontheStatusBaratthetopofthescreentoreportmissedcalls,newmessages,calendarevents,devicestatusandmore.
39Theiconslistedinthetablebelowaresomeofthemostcommonones.Icon Description Icon DescriptionNosignal BatteryfullychargedAirplanemode BatteryischargingConnectedtoaWi-Finetwork DownloadingdataWiredheadset UploadingdataCallinprogress AcquiringGPSReceivinglocationdatafromGPS MissedcallDataissyncing BluetoothisonNewGmailmessage SystemwarningNewHangoutsmessage AlarmissetNewtextormultimediamessage NewvoicemailSongisplaying RingerissilencedPhoneisconnectedtoPCviaUSBcable BatterysaverisonNOTE: The icon locations in the Status Bar may differ depending on the functions, features, and apps being used.
40On-screen keyboardYoucanentertextusingtheon-screenkeyboard.Theon-screenkeyboardappearsautomaticallyonthescreenwhenyouneedtoentertext.Tomanuallydisplaythekeyboard,simplytapatextfieldwhereyouwanttoentertext.Using the keypad & entering textTaponcetocapitalizethenextletteryoutype.Double-tapforallcaps.Taptoswitchtothenumbersandsymbolskeyboard.Taptoenteraspace.Taptocreateanewlineinthemessagefield.Taptodeletethepreviouscharacter.Entering special charactersTheLGKeyboardallowsyoutoenterspecialcharacters(e.g.“á”)whenenteringtext.Forexample,toenter“á”,touchandholdthe“a”keyuntiltheadditionalcharactersaredisplayed.Thenselectthespecialcharacteryouwanttoenter.NOTE: A symbol at the top right corner of a key indicates that additional characters are available for that key.
41ThefirsttimeyouopenaGoogleapplicationonyourphone,youwillberequiredtosigninwithyourexistingGoogleaccount.IfyoudonothaveaGoogleaccount,youwillbepromptedtocreateone.Creating your Google account1  FromtheHomescreen,tap toopentheapplicationsscreen.2  TapSettings>Accounts & sync>Add account>Google>NewtostarttheGmailsetupwizard.3  TapatextfieldtoopenthekeyboardandenteryournameandusernameforyourGoogleaccount.Whenenteringtext,youcanmovetothenexttextfieldbytappingNextonthekeyboard.4  Whenyouhavefinishedenteringyournameandusername,tap .YourphonethencommunicateswithGoogleserversandchecksforusernameavailability.5  Enterandre-enteryourpassword.Thenfollowtheinstructionsandentertherequiredandoptionalinformationabouttheaccount.Waitwhiletheservercreatesyouraccount.Signing in to your Google account1  OntheGoogleAccountsetupscreen,tapExisting,enteryoure-mailaddressandpassword,thentap .2  Aftersigningin,youcanuseGmailandtakeadvantagesofGoogle3  OnceyouhavesetupyourGoogleaccountonyourphone,itwillbeautomaticallysynchronizedwithyourGoogleaccountontheweb(dependingonyoursynchronizationsettings).Aftersigningin,youcanuseGmail,andPlayStore;backupyoursettingstoGoogleservers;andtakeadvantageofotherGoogleservicesonyourphone.Google account setup
42Wi-FiWithWi-Fi,youcanusehigh-speedInternetaccesswithinthecoverageofthewirelessaccesspoint(AP).EnjoywirelessInternetusingWi-Fi,withoutextracharges.Connecting to Wi-Fi networksTouseWi-Fionyourphone,youneedtoaccessawirelessaccesspointor'hotspot'.Someaccesspointsareopenandyoucansimplyconnecttothem.Othersarehiddenorusesecurityfeatures,youmustconfigureyourphonetobeabletoconnecttothem.TurnoffWi-Fiwhenyou'renotusingittoextendthelifeofyourbattery.NOTE: If you are out of the Wi-Fi zone or have set Wi-Fi to off, additional charges may be applied by your mobile service provider for mobile data use.Turning Wi-Fi on and connecting to a Wi-Fi network1  FromtheHomescreen,tap >Appstab(ifnecessary)>Settings>Wi-Fi.2  Taptheswitch toturnWi-FionandstartscanningforavailableWi-Finetworks.•Securednetworksareindicatedbyalockicon.3  Tapanetworktoconnecttoit.•Ifthenetworkissecured,youarepromptedtoenterapasswordorothercredentials.(Askyournetworkadministratorfordetails)4  TheStatusBardisplaysiconsthatindicateyourWi-Fistatus.Connecting to Networks and Devices
43BluetoothBluetoothallowsyoutosharedatawithotherBluetooth-enableddevicesandconnecttoBluetoothheadsets.NOTE: •LG is not responsible for the loss, interception or misuse of data sent or received via the Bluetooth wireless feature.•Always ensure that you share and receive data with devices that are trusted and properly secured. If there are obstacles between the devices, the operating distance may be reduced.•Some devices, especially those that are not tested or approved by Bluetooth SIG, may be incompatible with your device.Turning on Bluetooth and pairing up your phone with a Bluetooth deviceYoumustpairyourphonewithanotherdevicebeforeyouconnecttoit.1  FromtheHomescreen,tap >Appstab(ifnecessary)>Settings >Bluetooth.2  Taptheswitch toturnBluetoothon.3  Tapthecheckboxnexttoyourphone'snametomakeyourphonevisibletootherBluetoothdevices.4  Alistofavailabledeviceswillbedisplayed.Choosethedeviceyouwanttopairwithfromthelist.5  Dependingonthetypeofdevice,youmayhavetoentermatchingcodes,confirmmatchingcodes,orthedeviceswillautomaticallypair.
44Oncetheparingissuccessful,yourdevicewillconnecttotheotherdevice.NOTE: Some devices, especially headsets or hands-free car kits, may have a fixed Bluetooth PIN, such as 0000. If the other device has a PIN, you will be asked to enter it.Send data using the Bluetooth wireless feature1  Selectafileoritem,suchasacontact,calendareventormediafile,fromanappropriateapplicationorfromtheDownloadsapp.2  SelecttheoptionforsendingdataviaBluetooth.NOTE: The method for selecting an option may vary by data type.3  SearchforandpairwithaBluetooth-enableddevice.Receive data using the Bluetooth wireless feature1  FromtheHomescreen,tap >Appstab(ifnecessary)>Settings >Bluetooth.2  Taptheswitch toturnBluetoothon.3  Tapthecheckboxnexttoyourphone'snametomakeyourphonevisibletootherBluetoothdevices.NOTE: To select the length of time that your device will be visible, tap the Menu Key  > Visibility timeout. 4  TapAccepttoconfirmthatyouarewillingtoreceivedatafromthedevice.
45PC connections with a USB cableLearntoconnectyourdevicetoaPCwithaUSBcableusingthedifferentUSBconnectionmodes.Transferring music, photos and videos using Media sync (MTP)1  ConnectyourphonetoaPCusingtheUSBcableprovidedwithyourphone.2  AUSBconnectiontypelistwillappearonyourphonescreen.YoucanalsogotoSystem settings>PC connection > Select USB connection method >Media sync (MTP).3  YoucannowviewmediacontentsonyourPCandtransferthefiles.Synchronize with Windows Media PlayerEnsurethatWindowsMediaPlayerisinstalledonyourPC.1  UsetheUSBcabletoconnectthephonetoaPConwhichWindowsMediaPlayerhasbeeninstalled.2  SelecttheMedia sync (MTP)option.Whenconnected,apop-upwindowwillappearonthePC.3  OpenWindowsMediaPlayertosynchronizemusicfiles.4  Editorenteryourdevice'snameinthepop-upwindow(ifnecessary).5  Selectanddragthemusicfilesyouwanttothesynclist.6  Startsynchronization.•ThefollowingrequirementsmustbesatisfiedtosynchronizewithWindowsMediaPlayer.Items RequirementOS MicrosoftWindowsXPSP2,VistaorhigherWindowMediaPlayerversion WindowsMediaPlayer10orhigher•IftheWindowsMediaPlayerversionislowerthan10,installversion10orhigher.
46Making a call1  FromtheHomescreen,tap toopenthedialpad.2  Enterthenumberusingthedialpad.Todeleteadigit,tap .3  Tap tomakeacall.4  Toendacall,tap .TIP! To enter “+” to make international calls, touch and hold  .Calling your contacts1  FromtheHomescreen,tap toopenyourcontactlist.2  ScrollthroughthecontactlistortaptheSearch contacts boxandenterthecontactsname.Youcanalsoscrollthealphabetbaralongtherightsideofthescreen.3  Inthelist,tap nexttothedesiredcontacttomakethecall.Answering and rejecting a callWhen the screen is locked/unlocked•Swipe inanydirectiontoanswertheincomingcall.•Swipe inanydirectiontodeclineanincomingcall.TIP! Decline with messageYou can send a message quickly using this function. This is useful if you need to reject a call with message during a meeting.Calls
47Adjusting the in-call volumeToadjustthein-callvolumeduringacall,usetheVolumeUpandVolumeDownKeysontheleft-handsideofthephone.Making a second call1  Duringyourfirstcall,tapMenu Key,touchAdd callanddialthenumber.Youcanalsogototherecentlydialednumberslistbytapping orsearchcontactsbytappingandselectingthecontactyouwanttocall.2  Tap tomakethecall.3  Yourinitialcallisplacedonhold.4  Tap ifyouwanttostartaconferencecall.5  Toendactivecalls,tap .NOTE: You are charged for each call you make.Viewing your call logsFromtheHomescreen,tap andchoosetheCall logstab .Acompletelistofalldialed,receivedandmissedcallsisdisplayed.TIP!•Tap any call log entry to view the date, time and duration of the call.•Tap the Menu Key  , then tap Delete all to delete all the recorded items or tap Delete to delete individual items.
48Call settingsYoucanconfigurephonecallsettingssuchascallforwarding,aswellasotherspecialfeaturesofferedbyyourcarrier.1  FromtheHomescreen,tap .2  TaptheMenu Key .3  TapCall settingsandchoosetheoptionsthatyouwishtoadjust.
49AddcontactstoyourphoneandsynchronizethemwiththecontactsinyourGoogleaccountorotheraccountsthatsupportcontactsyncing.Searching for a contact1  FromtheHomescreen,tap toopenyourcontactlist.2  TaptheSearch contacts boxandenterthecontactsname.Youcanalsoscrollthealphabetbaralongtherightsideofthescreen.Adding a new contact1  FromtheHomescreen,tap andenterthenewcontact'snumber.2  Tap>New contact.3  Ifyouwanttoaddapicturetothenewcontact,tap .ChoosefromTake photoorSelect from Gallery.4  Tap atthetopofthescreenandselecttheaccountyouwanttosavethecontactto.5  Tapacategoryofcontactinformationandenterthedetailsaboutyourcontact.6  TapSave.Favorite contactsYoucanclassifyfrequentlycalledcontactsasfavorites.Adding a contact to your favorites1  FromtheHomescreen,tap toopenyourcontactlist.2  Tapacontacttoviewitsdetails.3  Tapthestartotherightofthecontact'sname.Thestarwillturnyellowcolor.Contacts
50Removing a contact from your favorites list1  FromtheHomescreen,tap toopenyourcontactlist.2  Tapthe tabandchooseacontacttoviewitsdetails.3  Taptheyellowcolorstartotherightofthecontact'sname.Thestarturnsgreycolorandthecontactisremovedfromyourfavorites.Creating a group1  FromtheHomescreen,tap toopenyourcontactlist.2  TaptheGroupstab,thentaptheMenuKey>New group.3  Enteranameforthenewgroup.Youcanalsosetaringtoneforthenewlycreatedgroup.4  TapSavetosavethegroup.NOTE: If you delete a group, the contacts assigned to that group will not be lost. They will remain in your contacts.
51Yourphonecombinestextandmultimediamessagesintooneintuitive,easy-to-usemenu.NOTE: LG message should be set up to default SMS app. If not, some message functions will be limited.Sending a message1  Tap ontheHomescreenandtap tocomposeanewmessage.2  EnteracontactnameorcontactnumberintheTofield.Asyouenterthecontactname,matchingcontactswillappear.Youcantapasuggestedrecipient.Youcanaddmorethanonecontact.NOTE: You will be charged for a text message for every person you send the message to.3  Tapthetextfieldandbegincomposingyourmessage.4  TaptheMenu Keytoaccessthemessagingoptions.TIP! You can tap the   icon to attach a file you want to share.5  Tap Sendtosendyourmessage.6  Responseswillappearonthescreen.Asyouviewandsendadditionalmessages,amessagethreadiscreated.Messaging
52 WARNING•The 160-character limit may vary from country to country, depending on the language and how the text message is coded.•If an image, video or audio file is added to an text message, it is automatically converted into a multimedia message and you are charged accordingly.View mode Unreadmessagesarelocatedatthetop.Othermessagesexchangedwithanotherpartyaredisplayedinthreadsandinchronologicalordersothatyoucanconvenientlyseeanoverviewofyourconversation.Changing your message settingsYourphonemessagesettingsarepre-defined,soyoucansendmessagesimmediately.Youcanchangethesettingsaccordingtoyourpreferences.•OpentheMessagingappandtaptheMenu Key>Settings.
53E-mailYoucanusetheEmailapplicationtoreademailsfromserviceslikeGmail.TheEmailapplicationsupportsthefollowingaccounttypes:POP3,IMAPandExchange.Yourserviceproviderorsystemadministratorcanprovideyouwiththeaccountsettingsyouneed.Managing an email accountThefirsttimeyouopentheEmailapplication,aset-upwizardopenstohelpyoutosetupanemailaccount.Aftertheinitialset-up,theEmailapplicationdisplaysthecontentsofyourinbox.Ifyouhaveaddedmorethanoneaccount,youcanswitchamongaccounts.To add another email account:•OpentheEmailapplicationandtaptheMenu Key>Settings> Add account.To change an email account's settings:•OpentheEmailapplicationandtaptheMenu Key>Settings.ThentapGeneral settingstoconfiguresettingsforallaccountsortapanindividualaccounttoconfiguresettingsonlyforthatparticularaccount.To delete an email account:•OpentheEmailapplicationandtaptheMenu Key>Settings>Menu Key >Remove account>tapanaccount>Remove>Yes.Working with account foldersOpentheEmailapplicationandtaptheMenu Key>Folders.EachaccounthasanInbox,Outbox,SentandDraftsfolder.Dependingonthefeaturessupportedbyyouraccount'sserviceprovider,youmayhaveadditionalfolders.
54Composing and sending emailTo compose and send a message1  WhileintheEmailapplication,tap .2  Enteranaddressforthemessage'sintendedrecipient.Asyouentertext,matchingaddresseswillbeproposedfromyourContacts.Separatemultipleaddressesusingsemicolons.3  TaptheCc/Bccfieldtocopyrecipients.Tap toattachfiles,ifneeded.4  Tapthemessagefieldandenteryourmessage.5  Tap tosendtheemail.Ifyouaren'tconnectedtoanetwork,forexample,ifyou'reworkinginairplanemode,themessagesthatyousendwillbestoredinyourOutboxfolderuntilyouconnecttoanetworkagain.Ifitcontainsanypendingmessages,theOutboxwillbedisplayedontheAccountsscreen.TIP! When a new email arrives in your Inbox, you will be notified by a sound or vibration (depending on your sound and vibration settings).
55MultimediaCameraToopentheCameraapplication,tapCameraontheHomescreen.Getting to know the viewfinderFlash–ChoosefromOff,On,Auto.Swap camera–Switchbetweentherear–facingcameralensandthefront–facingcameralens. Shot  mode–ChoosefromNormal and Panorama. Settings–Tapthisicontoopenthesettingsmenu. Video  mode–Tapandslidedownthisicontoswitchtovideomode.Capture buttonGallery–Taptoviewthelastphotoyoucaptured.Thisenablesyoutoaccessyourgalleryandviewsavedphotoswhileincameramode.NOTE: The memory capacity may differ depending on the configured camera settings.
56Using the advanced settingsIntheviewfinder,tap toopentheadvancedoptions.Youcanchangethecamerasettingsbyscrollingthroughthelist.Afterselectingtheoption,taptheBackKey .Thisenablesyoutotakeapicturebysayingavoicecommand.SayCheese,Smile,Whiskey,Kimchi orLG totakeaphoto.Thisdefinesandcontrolstheamountofsunlightenteringtheimage.Youcanchoosetheimagesize.TheISOratingdeterminesthesensitivityofthecamera'slightsensor.ThehighertheISO,themoresensitivethecamera.Thisisusefulindarkerconditionswhenyoucannotusetheflash.Improveswhitebalanceinvariouslightingconditions.Appliescoloreffectstoyourpictures.SetsadelayaftertheCapturebuttonispressed.Thisisidealifyouwanttobeinthephoto.Activatethistouseyourphone'slocation-basedservices.Takepictureswhereveryouareandtagthemwiththelocation.Ifyouuploadtaggedpicturestoablogthatsupportsgeo-tagging,youcanseethepicturesdisplayedonamap.Selectsashuttersound.SelectwhatactiontotakewhenpressingtheVolumeKeys.ChoosefromCaptureorZoom.Selectthelocationwhereyouwanttosaveyourimages.Tapthiswheneveryouwanttoknowhowafunctionworks.Thisiconwillprovideyouwithaquickhelpguide.Restoreallcamerasettingsbacktodefault.
57TIP!•When you exit the camera, some settings return to their defaults, such as white balance, color effect, timer and scene mode. Check these before you take your next photo.•The setting menu is superimposed over the viewfinder, so when you change photo color or quality elements, you will see a preview of the changed image behind the Settings menu.Taking a quick photo 1  OpentheCameraapplication.2  Holdingthephonehorizontally,pointthelenstowardsthesubjectyouwanttophotograph.3  Tap tocapturethephoto.Once you've taken a photoTaptheimagepreviewatthebottomofthescreentoviewthelastphotoyoucaptured.ChoosetoviewthephotowiththeGallery.Taptotakeanotherphotoimmediately.Taptosendyourphototoothersorshareitviasocialnetworkservices.Taptodeletethephoto.TIP! If you have an social networking account set up on your phone, you can share your photo with your social networking community.
58NOTE: Additional charges may apply when multimedia messages are downloaded while roaming.TaptheMenu Keytoopenthefollowingadvancedoptions.Set image as–TaptousethephotoasaContact photo,Home screen wallpaper,Lock screen wallpaper,orWallpaper.Move–Taptomovethephototoanotheralbum.Copy–Taptocopytheselectedphotoandsaveittoanotheralbum.Rename–Taptoeditthenameoftheselectedphoto.Rotate left/right–Taptorotatethepicturetotheleftorright.Crop–Taptocropyourphoto.Edit–Taptoeditthephoto.Slideshow–Displaysaslideshowusingallofyourphotos.Add location–Addlocationinformationtoyourphoto.Details–Displaysinformationaboutthephoto.Viewing your saved photosYoucanaccessyoursavedphotoswhenincameramode.JusttaptheimagepreviewatthebottomofthescreenandyourGallerywillbedisplayed.•Toviewmorephotos,scrollleftorright.•Tozoominorout,double-tapthescreenorplacetwofingersandspreadthemapart(moveyourfingersclosertogethertozoomout).
59Video cameraToopenthevideocamera,tapCameraontheHomescreen,thentap toswitchtovideomode.Getting to know the viewfinderFlash–ChoosefromOff,On,Auto. Swap  camera–Switchbetweentherear–facingcameralensandthefront-facingcameralens. Settings–Tapthisicontoopenthesettingsmenu.Camera mode–Tapandslideupthisicontoswitchtocameramode. Start  recordingGallery–Taptoviewthelastvideoyourecorded.Thisenablesyoutoaccessyourgalleryandviewyoursavedvideoswhileinvideomode.NOTE: While recording a video, place two fingers on the screen and pinch to use the Zoom function.
60Using the advanced settingsUsingtheviewfinder,tap toopentheadvancedoptions.Afterselectingtheoption,taptheBack Key .Taptosetthesize(inpixels)ofthevideoyouarerecording.Thisdefinesandcontrolstheamountofsunlightenteringthevideo.Improveswhitebalanceinvariouslightingconditions.Chooseacoloreffecttouseforyourvideo.Activatethistouseyourphone'slocation-basedservicesforgeo-taggingpurposes.NOTE: This function is available when the GPS function is active or connected network.SelectwhatactiontotakewhenpressingtheVolumeKeys.ChoosefromRecordorZoom.Selectthelocationwhereyouwanttosaveyourvideos.Tapthiswheneveryouwanttoknowhowafunctionworks.Thisiconwillprovideyouwithaquickhelpguide.Restoreallvideocamerasettingsbacktodefault.
61Recording a quick video1  OpentheCameraapplicationandtaptheVideo modebutton .2  Thevideocameraviewfinderappearsonthescreen.3  Holdyourphone,pointthelenstowardsthesubjectyouwishtocaptureinyourvideo.4  Tap oncetostartrecording.5  Atimershowingthelengthofthevideoisdisplayed.6  Tap tostoprecording.After recording a videoTaptheimagepreviewatthebottomtoviewthelastvideoyourecorded.Taptorecordanothervideoimmediately.Taptosendyourvideotoothersorshareitviasocialnetworkservices.Taptodeletethevideo.Watching your saved videos1  Intheviewfinder,taptheimagepreviewatthebottomofthescreen.2  YourGallerywillappearonthescreen.3  Tapavideotoplayitautomatically.Adjusting the volume when viewing a videoToadjustthevolumeofavideowhileitisplaying,usetheVolumeKeysontheleftsideofthephone.
62GalleryYoucanstoremultimediafilesintheinternalandexternalmemoryforeasyaccesstoallyourmultimediafiles.Usethisapplicationtoviewmultimediafileslikepicturesandvideos.•FromtheHomescreen,tap >Appstab(ifnecessary)>Gallery  .NOTE: •Some file formats are not supported, depending on the software installed on the device.•Some files may not play properly, depending on how they are encoded.Viewing picturesOpentheGallerytodisplayyouravailablealbums.Whenanotherapplication,suchasEmail,savesapicture,thedownloadfolderisautomaticallycreatedtocontainthepicture.Likewise,capturingascreenshotautomaticallycreatestheScreenshotsfolder.Selectafoldertoopenit.Picturesaredisplayedbycreationdateinafolder.Selectapicturetoviewitfullscreen.Scrollleftorrighttoviewthenextorpreviousimage.Zooming in and outUseoneofthefollowingmethodstozoominonanimage:•Double-tapanywheretozoomin.•Spreadtwofingersapartonanyplacetozoomin.Pinchtozoomout,ordouble-taptoreturn.Playing videosVideofilesshowthe iconinthepreview.Selectavideotowatchitandtap .
63NOTE: •Some file formats are not supported, depending on the device software.•If the file size exceeds the available memory, an error can occur when you open files.Editing photos/videosWhenviewinganphoto/video,taptheMenuKeyandusetheadvancededitingoptions.Deleting imagesUseoneofthefollowingmethods:•Inanalbum,tap andselectphotos/videosbytappingthem,thentapDelete.•Whenviewingaphoto/video,tap .Setting a photo as the wallpaperWhenviewingaphoto,taptheMenuKeyandselectSet image astosettheimageastheHomescreenorLockscreenwallpaper.VideosYourphonehasavideoplayerthatletsyouplayallofyourfavoritevideos.Playing a video1  FromtheHomescreen,tap >Appstab(ifnecessary)>Videos  .2  Selectthevideoyouwanttoplay.
64  Touchtopause/resumevideoplayback.Touchtogo10secondsforward.Touchtogo10secondsbackward.Touchtomanagethevideovolume.    Touchtochangetheratioofthevideoscreen.Taptocaptureimageduringplayingavideo.  Touchtolock/unlockavideoscreen.Tochangethevolumewhilewatchingavideo,presstheVolumeKeysontheleftsideofthephone.Touchandholdavideointhelist.TheShare,DeleteandDetailsoptionswillbedisplayed.NOTE: While watching a video, slide the left side of the screen up and down to adjust the brightness. Slide the right side of the screen up and down to adjust the volume.
65MusicYourphonehasamusicplayerthatletsyouplayallyourfavoritetracks.Toaccessthemusicplayer,fromtheHomescreen,tap >Appstab(ifnecessary)>Music  .Playing a song1  FromtheHomescreen,tap >Appstab(ifnecessary)>Music  .2  TaptheSongstab.3  Selectthesongyouwanttoplay.TaptofindthesongonYouTube.Taptoseethecurrentplaylist.TaptoaddthesongtoyourFavoritesplaylist.Taptosetshufflemode.
66Taptosetrepeatmode.Taptoadjustthemusicvolume.Taptogobacktothebeginningofthesong.Taptwicetoreturntotheprevioussong.Touchandholdtorewindin3secondincrements.  Taptopause/resumeplayback.Taptoskiptothenexttrackonthealbumorintheplaylist.Touchandholdtofast-forwardin3secondincrements.Taptosetaudioeffects.Tochangethevolumewhilelisteningtomusic,presstheVolumeKeysontheleftsideofthephone.TouchandholdanysonginthelisttoaccessPlay,Add to playlist,Share,Set as ringtone,Delete,Details,andSearch.NOTE: Some file formats are not supported, depending on the device software.•If the file size exceeds the available memory, an error can occur when you open files.•Music file copyrights may be protected by international treaties and national copyright laws. Therefore, it may be necessary to obtain permission or a licence to reproduce or copy music.  In some countries, national laws prohibit private copying of copyrighted material. Before downloading or copying the file, check the national laws of the relevant country concerning the use of such material.
67UtilitiesAlarm/ClockSetting your alarm1  FromtheHomescreen,tap >Appstab(ifnecessary)>Alarm/Clock> .2  Setthedesiredalarmtime.3  SetRepeat,Snooze duration,Vibration,Alarm sound,Alarm volume,Auto app starter,Puzzle lockandMemo.4  Tap Savetosavethealarm.NOTE: To change alarm settings, tap the Menu Key  on the Alarms screen and select Settings.Setting the World ClockTheWorldclocktaballowsyoutosetupalistofcitiestoeasilycheckcurrenttimesinothertimezoneswithaquickglance.1  OpentheAlarm/Clockapplication,thenselecttheWorld clocktab .2  TaptheNew Cityicon (atthebottomofthescreen),searchthroughtheavailablecities,thentaptheoneyouwant.
68Using your calculator1  FromtheHomescreen,tap >Appstab(ifnecessary)>Calculator  .2  Tapthenumberkeystoenternumbers.3  Forsimplecalculations,tapthefunctionyouwanttoperform( , , or )followedby .NOTE: For more complex calculations, tap the Menu Key , select Scientific calculator, then choose the desired functions.NOTE: To check your previous calculation history, tap the Menu Key  , select Calculation history.Adding an event to your calendar1  FromtheHomescreen,tap >Appstab(ifnecessary)>Calendar  .2  Tap andchoosefromDay, Week, Month, Year,orAgendatochangethemonthview.3  Tapthedateforwhichyouwishtoaddaneventandtouch .4  TaptheEvent namefieldandentertheeventname.5  TaptheLocationfieldandenterthelocation.Checkthedateandenterthetimeyouwishyoureventtostartandfinish.6  Ifyouwishtoaddanotetoyourevent,taptheDescriptionfieldandenterthedetails.7  Ifyouwishtorepeatthealarm,setREPEATandsetREMINDERS,ifnecessary.8  Tap Savetosavetheeventinthecalendar.
69Voice RecorderUsethevoicerecordertorecordvoicememosorotheraudiofiles.Recording a sound or voice1  FromtheHomescreen,tap >Appstab(ifnecessary)>Voice Recorder  .2  Tap tobeginrecording.3  Tap toendtherecording.4  Tap tolistentotherecording.NOTE: Tap   to access the list of recordings. You can listen to the saved recording. The available recording time may differ from actual recording time.Sending the voice recording1  Onceyouhavefinishedrecording,youcansendtheaudioclipbytouching .2  Choosefromanyoftheavailablemethodsforsharing.Recording Mode IconTapheretochangetherecordingmode.Record ButtonTapheretostartrecordingavoicememo.List ButtonTapheretoviewalistofyourrecordings.
70ThinkFree ViewerThinkFreeViewerisaprofessionalmobileofficesolutionthatletsusersconvenientlyviewvarioustypesofofficedocuments,includingWord,ExcelandPowerPointfiles,anywhereoranytime,usingtheirmobiledevices.•FromtheHomescreen,tap >Appstab>ThinkFree Viewer.Viewing filesMobileuserscannoweasilyviewawidevarietyoffiletypes,includingMicrosoftOfficedocumentsandAdobePDF,rightontheirmobiledevices.WhenviewingdocumentsusingThinkFreeViewer,theobjectsandlayoutremainthesameasintheoriginaldocuments.Google+UsethisapplicationtostayconnectedwithpeopleviaGoogle’ssocialnetworkservice.•FromtheHomescreen,tap >Appstab(ifnecessary)>Google+  .NOTE: This application may not be available depending on the region or service provider.
71Guest ModeToprotectyourprivacyorlimitsomeapplicationstoyourchildren,youcanusetheGuestmode.Whenyoulendyourphonetoothers,youcanlimittheapplicationstobedisplayed.Inadvance,settheGuestmodeandcustomizetheoptions.NOTE: To use the Guest mode, the pattern lock should be set in advance.1  Tap >Appstab(ifnecessary)>Settings>Guest mode.2  TaptheGuestModeswitchtoenablethismode.Voice SearchUsethisapplicationtosearchwebpagesusingvoice.1  FromtheHomescreen,tap >Appstab(ifnecessary)>Voice Search  .2  SayakeywordorphrasewhenSpeak nowappearsonthescreen.Selectoneofthesuggestedkeywordsthatappear.NOTE: This application may not be available depending on the region or service provider.DownloadsUsethisapplicationtoseewhatfileshavebeendownloadedthroughtheapplications.•FromtheHomescreen,tap >Appstab(ifnecessary)>Downloads  .QuickMemoTheQuickMemofeatureallowsyoutocreatememosandcapturescreenshots.YoucanuseQuickMemotoeasilyandefficientlycreatememosduringacall,withasavedpictureoronthecurrentphonescreen.
721  AccesstheQuickMemofeaturebypressingbothVolumeKeysforonesecondonthescreenyouwanttocapture.OR OR2  DragtheStatusBardownandtap ontheQuickSettingsBar.Createamemousingthetoolbaroptions.3  Tap intheEditmenutosavethememototheQuickMemoalbuminyourGallery.NOTE: Please use a fingertip while using the QuickMemo function. Do not use your fingernail.
73Using the QuickMemo optionsThefollowingoptionsareavailablewhenusingQuickMemo.Allowsyoutochooseabackground.Undoorredopreviousactions.Selectsthepentype,pencolor,andcroppingtool.Erasesthememothatyoucreated.Taptosendyourmemotoothersorshareitviasocialnetworkservices.SavesthememointheGallery.Viewing the saved QuickMemo OpentheGalleryandselecttheQuickMemoalbum.FM radioYourphonehasabuilt-inFMradiosoyoucantuneintoyourfavoritestationsandlistenonthego.Tolistentotheradio,fromtheHomescreen,tap >Appstab(ifnecessary)>FM Radio  .Searching for stationsYoucantuneintoradiostationsbysearchingforthemmanuallyorautomatically.1  OpentheFMRadioapplication,thentap >Scan.2  Duringautoscanning,tapCancelifyouwanttostopscanning.Onlyscannedchannelsaresavedbeforeyoustopscanning.
74LG SmartWorldLGSmartWorldoffersanassortmentofexcitingcontent-fonts,themes,games,applications.How to Get to LG SmartWorld from Your Phone1  Press > >Appstab>tapthe icontoaccessLG SmartWorld.2  TapSigninandenterID/PWforLGSmartWorld.Ifyouhavenotsignedupyet,tapRegistertoreceiveyourLGSmartWorldmembership.3  Downloadthecontentyouwant.• WhenyouuseCellularnetwork,datafeecouldbechargedbydataplanthatyousigned-upwithcarrier.• LGSmartWorldmaynotbeavailablefromallcarriersorinallcountries.NOTE: What if there is no   icon? 1  Using a mobile Web browser, access LG SmartWorld (www.lgworld.com) and select your country. 2  Download the LG SmartWorld App. 3  Run and install the downloaded file.4  Access LG SmartWorld by tapping the   icon.Special benefit only in LG SmartWorld 1  Decorate your own style on your Smartphone, Use Home Theme & Keyboard Theme & Font that provided on LG SmartWorld. (However this service is available to specific device. please check in LG SmartWorld website whether it is feasible or not whether it is feasible or not)2  Enjoy LG SmartWorld's special service by joining promotion that consistently provided.
75InternetUsethisapplicationtobrowsetheInternet.TheInternetgivesyouafast,full-colorworldofgames,music,news,sports,entertainmentandmuchmore,rightonyourmobilephonewhereveryouareandwhateveryouenjoy.NOTE: Additional charges apply when connecting to these services and downloading content. Check data charges with your network provider.FromtheHomescreen,tap >Appstab(ifnecessary)>Internet  .Using the web toolbarTouchandholdthewebtoolbarandslideitupwardswithyourfingertoopenit.Taptogobackonepage.Taptogoforwardonepage,tothepageyouconnectedtoafterthecurrentone.ThisistheoppositeofwhathappenswhenyoutaptheBackKey,whichtakesyoutothepreviouspage.TaptogototheHomepage.Taptoaddanewwindow.Taptoaccessbookmarks.Viewing webpagesTaptheaddressfield,enterthewebaddressandtap onthekeyboard.The Web
76Opening a pageToopenanewpage,tap > .Togotoanopenpage,tap ,scrollupordown,andtapthepagetoselectit.Searching the web by voiceTaptheaddressfield,tap ,speakakeyword,andthenselectoneofthesuggestedkeywordsthatappear.NOTE: This feature may not be available depending on the region or service provider.BookmarksTobookmarkthecurrentwebpage,taptheMenu Key>Add to bookmarks>OK.Toopenabookmarkedwebpage,tap andselectone.HistoryToopenawebpagefromthelistofrecentlyvisitedwebpages,tap >Historytab.Toclearthehistory,taptheMenu Key>Clear all history.ChromeUseChrometosearchforinformationandbrowsewebpages.FromtheHomescreen,tap >Appstab(ifnecessary)>Chrome  .Viewing webpagesTaptheaddressfield,enterawebaddressorsearchcriteria,andtap onthekeyboard.
77Opening a pageToopenanewpage,tab >+ New tab.Togotoanopenpage,tap ,scrollupordownandtapthepagetoselectit.Searching the web by voiceTaptheaddressfield,tap ,speakakeywordandselectoneofthesuggestedkeywordsthatappear.NOTE: This feature may not be available depending on the region or service provider.Syncing with other devicesSyncopentabsandbookmarkstousewithChromefromotherdeviceswhenyouareloggedinwiththesameGoogleaccount.Toviewopentabsonotherdevices,tapthe Menu Key>Other devices.Selectawebpagetoopen.Adding and viewing bookmarksToaddbookmarks,taptheMenu Key> .Toopenabookmarkedwebpage,taptheMenu Key>Bookmarksandselectthedesiredpage.
78Access the Settings menu1  FromtheHomescreen,tap >Appstab(ifnecessary)>Settings  .OR FromtheHomescreen,taptheMenu Key>System settings.2  Selectasettingcategoryandconfigurethedesiredsettings.WIRELESS & NETWORKS< Wi-Fi >Wi-Fi–TurnsonWi-FitoconnecttoavailableWi-Finetworks.TIP! How to obtain the MAC addressTo set up a connection in some wireless networks with MAC filters, you may need to enter the MAC address of your phone in the router.You can find the MAC address in the following user interface: Access the Wi-Fi settings and tap the Menu Key  > Advanced Wi-Fi > MAC address.< Bluetooth >TurntheBluetoothwirelessfeatureonoroff.< Mobile data >Displaysthedatausageandallowsyoutosetamobiledatausagelimit.Settings
79< Call >Voicemail–Allowsyoutoselectyourcarrier’svoicemailservice.OUTGOING CALL   Fixed dialing numbers –Turnonandcompilealistofnumbersthatcanbecalledfromyourphone.You’llneedyourPIN2,whichisavailablefromyouroperator.Onlynumberswithinthefixeddiallistcanbecalledfromyourphone.INCOMING CALL   Incoming voice call pop-up–Ifyouselectthisfunction,theincomingvoicecallpop-upwillbedisplayedwhenanappisinuse.   Call  reject–Allowsyoutosetthecallrejectfunction.ChoosefromCall reject modeorReject calls from.   Decline with message–Whenyouwanttorejectacall,youcansendaquickmessageusingthisfunction.Thisisusefulifyouneedtorejectacallduringameeting.   Privacy  keeper–Hidesthecallernameandnumberforanincomingcall.   Call  forwarding–Choosewhethertodivertallcallswhenthelineisbusy,whenthereisnoanswerorwhenyouhavenosignal.   Auto  answer–AllowsyoutoenableordisableAutoanswerwithhandsfree.ONGOING CALL   Connection  vibration–Vibratesyourphonewhentheotherpartyanswersthecall.END CALL   Save unknown numbers–Addunknownnumberstoyourcontactlistafteracall.   Power button ends call–CheckmarktoallowyoutoendvoicecallsbypressingthePower/LockKey.
80OTHERS   Call  barring–Lockincoming,outgoingorinternationalcalls.   Call  duration–ViewthedurationofcallsincludingLastcall,Outgoingcalls,IncomingcallsandAllcalls.   Additional call settings–Allowsyoutochangethefollowingsettings:   Caller ID:Choosewhethertodisplayyournumberinanoutgoingcall.   Call waiting:Ifcallwaitingisactivated,thehandsetwillnotifyyouofanincomingcallwhileyouareonacall(dependingonyournetworkprovider).< Tethering & networks >TETHERINGWi-Fi hotspot–AllowsyoutosharemobilenetworkviaWi-FiandyoucanconfigureportableWi-Fihotspotsettings.   Bluetooth  tethering–AllowsyoutosetyourphonewhetheryouaresharingtheInternetconnectionornot. Help  –TaptoviewhelpinformationontheWi-FihotspotandBluetoothtetheringfunctions.NETWORKAirplane mode–AfterswitchingtoAirplanemode,allwirelessconnectionsaredisabled.   Mobile  networks  –Setoptionsfordataroaming,networkmode&operators,accesspointnames(APNs)etc.   Default message app–Allowsyoutochoosethedefaultmessagingapp.   VPN–DisplaysthelistofVirtualPrivateNetworks(VPNs)thatyou'vepreviouslyconfigured.AllowsyoutoadddifferenttypesofVPNs.
81DEVICE< Sound >SOUND PROFILE   Sound  profile–SetthesoundprofiletoSound,Vibrate only,orSilent.   Volumes–ManagethevolumeforRingtone,Notifications,Touch feedback & system,andMusic,video,games & other media.   Quiet  mode–Allowsyoutosetascheduletoconfigurethesoundprofiletosilent.Thismutesallsoundsexceptalarmsandmediaandallowsrepeatcallsorcallsfromcertaincontactstoring.RINGTONES & VIBRATIONS   Phone  ringtone–Allowsyoutosetyourincomingcallringtone.   Incoming call vibration–Allowsyoutosetyourincomingcallvibration.   Ringtone with vibration–Vibrationfeedbackforcalls.SYSTEM   Voice  notifications–Readoutincomingcallandmessageeventautomatically.   Notification  sound–Allowsyoutosetyournotificationsound.   Touch feedback & system–Setthetouchfeedback&systemforDial pad touch tones,Touch sounds,Screen lock soundandVibrate on touch.< Display >SCREEN   Brightness–Adjustthescreenbrightness.CheckmarkNightbrightnesstosetbrightnessat0%automaticallybetween12:00AM~06:00AM.   Screen  timeout–Settheamountoftimebeforethescreentimesout.   Screen-off  effect–Setthescreenoffeffectusedwhenthescreenturnsoff.
82   Auto-rotate  screen–Settoswitchorientationautomaticallywhenyourotatethephone.   Daydream–Selectthescreensavertodisplaywhenthephoneissleepingwhiledockedand/orcharging.FONT   Font  type–Changethetypedisplayfont.   Font  size–Changethesizeofthedisplayfont.< Home screen >Select Home–SetsyourHomescreenstyle.SelectEasyHometosimulateafeaturephoneexperience.SCREEN   Theme–Setsthescreenthemeforyourdevice.   Wallpaper–SetsthewallpapertouseonyourHomescreen.SelectitfromGallery,Live Wallpapers,Photos,orWallpaper gallery.   Screen swipe effect–Setstheeffectwhenyouswipetochangescreens.ChoosefromBasic,Breeze,Accordion,Panorama,Carousel,Layer,andDomino.   Allow Home screen looping–Checkmarktosetthescreenstoscrollcontinuously,eliminatingtheneedtoscrollbackintheoppositedirectionwhenyoureacheitherend.   Portrait view only–CheckmarktosettheHomescreenisalwaysdisplayedinportraitview.DATA   Home backup & restore–Backupandrestoretheapp,widget,andthemeconfigurations.TIPS   Help–DisplayssomeusefultipsfortheHomescreen.
83< Lock screen >SCREEN SECURITY   Select screen lock–Setascreenlocktypetosecureyourphone.SetNone,Swipe,Knock Code,Face Unlock,Pattern,PIN orPassword.   Wallpaper–SelectthewallpaperforyourlockscreenfromGalleryorWallpaper gallery.   Shortcuts–Customizetheshortcutsonthelockscreen.   Contact info for lost Phone–Showownerinfoonthelockscreenincaseyourphoneislost.LOCK TIME   Lock  timer–Setthelocktimeafterthescreentimesout.   Power button instantly locks–SetthescreenlockwhenthePower/LockKeyispressed.< Gestures >KNOCKONScreen on/off–CheckmarktoenableKnockONtoturnthescreenonandoff.Quicklydouble-tapcenterscreentoturniton.Double-taptheStatusBar,anemptyareaontheHomescreen,ortheLockscreentoturnthescreenoff.Forthebestresults,donotmovethephonewhileusingtheKnockONfeature.ANSWER ME   Silence incoming calls–Flipthedevicetosilenceincomingcalls.OTHERS   Snooze or turn off alarm–Flipthedevicetosnoozeorstopthealarm.   Pause  video–Flipthedevicetopausethevideo.   Help–TouchtogetinformationonusingtheGesturefunctionsofyourdevice.
84SENSOR   Motion sensor calibration–Improvetheaccuracyofthetiltandspeedofthesensor.< Storage >INTERNAL STORAGE–Viewtheinternalstorageusage.SD CARD–ChecktotalavailableSDcardspace.TapUnmount SD cardforsaferemoval.IfnoSDcardismounted,tapMount SD card.TapErase SDcardifyouwanttodeletealldatafromtheSDcard.< Battery >BATTERY INFORMATIONTheBatterychargeinformationisdisplayedonabatterygraphicalongwiththepercentageoftheremainingchargeanditsstatus.TaptheBatterychargeicontodisplaytheBatteryusescreentoseebatteryusagelevelandbatteryusedetails.Itdisplayswhichcomponentsandapplicationsareusingthemostbatterypower.Taponeoftheentriestoseemoredetailedinformation.   Battery percentage on status bar–CheckmarktodisplaythebatterylevelpercentageontheStatusBarnexttothebatteryicon.BATTERY SAVER   Battery  saver  –Taptheswitch totogglebetweenOnandOff.   TURN BATTERY SAVER ON     Turn Battery saver on–Choosetoturnbatterysaveronwhenthebatterychargegetstoacertainbatterylevel.ChoosefromImmediately,10% battery,20% battery,30% batteryor50% battery.   BATTERY SAVING ITEMS   Auto-sync–TurnsoffAuto-sync.   Wi-Fi–TurnsoffWi-Fiifdataisnotinuse.
85   Bluetooth–TurnsoffBluetoothifit'snotconnectedtoadevice.     Vibrate on touch–Turnsofftouchfeedback.   Brightness–Adjuststhebrightness.   Screen timeout–Adjuststhescreentimeout.   Help–Taptoviewhelpinformationonthebatterysavertips.< Apps >UsetheAppsmenutoviewdetailsabouttheapplicationsinstalledonyourphone,managetheirdata,andforcethemtostop.SwipeleftandrighttoselectoneofthethreetabsacrossthetopofthescreentoviewdetailedinformationforDOWNLOADED, RUNNING,andALLapplications.Tapanentrytoviewmoreinformation,tapStop(orForce stop),thenOKtostopitfromrunning.PERSONAL< Accounts & sync >Permitsapplicationstosynchronizedatainthebackground,whetherornotyouareactivelyworkinginthem.DeselectingtheAuto-sync datasettingcansavebatterypowerandlower(butnoteliminate)datausage.< Guest mode >UseGuestmodewhenyouletsomeoneelseuseyourphone.Theywillonlybeabletousetheapplicationsthatyou’veselected.Onceyousetitup,youcaneasilyputyourphoneinGuestmodebydrawingtheguestpatternontheLockscreenthatyouset,whichisdifferentfromyournormalunlockpattern.TapHelpformoreinformation.NOTE: To use Guest mode, set the Lock screen to pattern lock. Guest can also use apps not pre-selected but linked to preselected apps.
86< Location >MODE   High  accuracy–UseGPS,Wi-Fiandmobilenetworkstoestimatelocation.   Battery  saving–UseWi-Fiandmobilenetworkstoestimatelocation.   Device sensors only–UseGPStopinpointyourlocation.RECENT LOCATION REQUESTSDisplaysappsthathaverecentlyrequestedlocationinformation.LOCATION SERVICESAllowsyoutoviewyourGooglelocationsettings.< Security >ENCRYPTION   Encrypt  phone–Allowsyoutoencryptthephonetokeepitsecure.Afterencryption,aPINorpasswordneedstobeenteredeachtimeyoupowerthephoneon.   Encrypt SD card storage–AllowsyoutoencrypttheSDcarddatatokeepitsecure.Afterencryption,youwillnotbeabletouseitinotherdevices.Anydatathatiscreatedorupdatedafterdisablingencryptionwillnotbeencryptedbutthedatathathasbeenpreviouslyencryptedwillremainencrypted.PASSWORDS   Password typing visible–Showthelastcharacterofthehiddenpasswordasyoutype.PHONE ADMINISTRATION   Phone  administrators–Viewordeactivatephoneadministrators.   Unknown  sources–Defaultsettingtoinstallnon-PlayStoreapplications.   Verify  apps–Disalloworwarnbeforeinstallationofappsthatmaycauseharm.
87CREDENTIAL STORAGE   Storage  type–Displaysthestoragetype.   Trusted  credentials–DisplaytrustedCAcertificates.   Install from storage–Choosetoinstallencryptedcertificates.   Clear  credentials–Removeallcertificates.< Language & input >UsetheLanguage & inputsettingstoselectthelanguageforthetextonyourphoneandtoconfiguretheon-screenkeyboard,includingwordsyou'veaddedtoitsdictionary.< Backup & reset >BACKUP & RESTORE   Backup my data–Backupyourappdata,Wi-Fipasswords,andothersettingstoGoogleservers.   Backup  account–Allowsyoutosettheaccounttowhichyouwanttobackupdatato.   Automatic  restore–Whenreinstallinganapp,restorebackedupsettingsanddata.PERSONAL DATA   Factory data reset–Resetyoursettingstothefactorydefaultvaluesanddeleteallyourdata.SYSTEM< Date & time >UseDate & timesettingstosethowdateswillbedisplayed.Youcanalsousethesesettingstosetyourowntimeandtimezoneratherthanobtainingthecurrenttimefromthemobilenetwork.
88< Accessibility >UsetheAccessibilitysettingstoconfigureaccessibilityplug-insyouhaveinstalledonyourphone.< PC connection >USB CONNECTION   Select USB connection method–SetthedefaultmodeusedwhenconnectingthephonetoaPCviaaUSBcable.ChoosefromCharge phone,Media sync (MTP),Tethering,LG SoftwareandSend image (PTP).   Ask upon connecting–CheckmarktoconfirmtheUSBconnectiontypewhenyouconnecttoaPC.   Help–Displaysconnectionsettingsinformation.LG SOFTWARE   PC  Suite–CheckthistouseLGPCSuitewithyourWi-Ficonnection.PleasenotethatWi-FinetworkshouldbeconnectedtoLGPCSuiteviaaWi-Ficonnection.   Help–HelpforLGsoftware.< Printing >Allowsyoutoprintthecontentofcertainscreens(suchaswebpagesdisplayedinChrome)toaprinterconnectedtothesameWi-FinetworkasyourAndroiddevice.< About phone >Thismenuallowsyoutomanageyoursoftwareupdatesandviewvariousinformationrelatingtoyourdevice.Phone name–Allowsyoutochangeyourphonename.ThiswillbeyourphonenameforBluetooth,Wi-FiDirect,etc.Update Center–CheckupdatesforappsandsoftwareprovidedbyLGElectronics.
89Network–Allowyoutoviewyournetwork,networktypeandstrength,servicestate,roamingstatus,mobilenetworkstate,andIPaddress.Status–Allowyoutoviewyourphonenumber,MIN,PRLversion,ESN,MEIDHEX,MEIDDEC.Battery–Allowsyoutoviewthebatterystatus,batterylevel,andbatteryuseinformation.Hardware information–Allowsyoutoviewthemodelnumber,uptime,warrantydatecode,Wi-FiMACaddressandBluetoothaddress.Software information–AllowsyoutoviewtheAndroidversion,basebandversion,kernelversion,buildnumber,andsoftwareversion.Legal information–AllowyoutoviewLGappsrightsagreement,opensourcelicensesandGooglelegalinformation.
90"LGPCSuite"PCsoftwareisaprogramthathelpsyouconnectyourdevicetoaPCviaaUSBcableandWi-Fi.Onceconnected,youcanusethefunctionsofyourdevicefromyourPC.With your "LG PC Suite" PC Software, You Can...•Manageandplayyourmediacontents(music,movie,picture)onyourPC.•Sendmultimediacontentstoyourdevice.•Synchronizesdata(schedules,contacts,bookmarks)inyourdeviceandPC.•Backuptheapplicationsinyourdevice.•Updatethesoftwaresinyourdevice.•Backupandrestorethedevicedata.•PlaymultimediacontentsofyourPCfromyourdevice.•Backupandcreateandeditthememosinyourdevice.NOTE: You can use the Help menu from the application to find out how to use your "LG PC Suite" PC software.Installing "LG PC Suite" PC Software"LGPCSuite"PCsoftwarecanbedownloadedfromthewebpageofLG.1  Gotowww.lg.comandselectacountryofyourchoice.2  GotoSupport>MOBILE SUPPORT >LG Mobile Phones>Select the ModelorGotoSupport>Mobile>SelecttheModel.3  ClickPC SYNCfromMANUALS & DOWNLOADandclickDOWNLOADtodownload"LGPCSuite"PCsoftware.PC software (LG PC Suite)
91System Requirements for "LG PC Suite" PC software•OS:WindowsXP(Servicepack3)32bit,WindowsVista,Windows7,Windows8•CPU:1GHzorhigherprocessors•Memory:512MBorhigherRAMs•Graphiccard:1024x768resolution,32bitcolororhigher•HDD:500MBormorefreeharddiskspace(Morefreeharddiskspacemaybeneededdependingonthevolumeofdatastored.)•Requiredsoftware:LGintegrateddrivers,WindowsMediaPlayer10orlaterNOTE: LG Integrated USB DriverLG integrated USB driver is required to connect an LG device and PC and is installed automatically when you install "LG PC Suite" PC software application.Synchronizing your Device to a PCDatafromyourdeviceandPCcanbesynchronizedeasilywith"LGPCSuite"PCsoftwareforyourconvenience.Contacts,schedulesandbookmarkscanbesynchronized.Theprocedureisasfollows:1  ConnectyourdevicetoPC.(UseaUSBcableorWi-Ficonnection.)2  TheSelect USB connection methodwillappear,thenselectLG software.3  Afterconnection,runtheprogramandselectthedevicesectionfromthecategoryontheleftsideofthescreen.4  ClickPersonal informationtoselect.5  SelectthecheckboxofcontentstosynchronizeandclicktheSyncbutton.NOTE: To synchronize your phone with your PC, you need to install LG PC Suite onto your PC. Please refer to previous pages to install LG PC Suite.
92Moving contacts from your Old Device to your New Device1  ExportyourcontactsasaCSVfilefromyourolddevicetoyourPCusingaPCsyncprogram.2  Install"LGPCSuite"onthePCfirst.RuntheprogramandconnectyourAndroidmobilephonetothePCusingaUSBcable.3  Onthetopmenu,selectDevice>Import to device> Import contacts.4  Apopupwindowtoselectthefiletypeandafiletoimportwillappear.5  Onthepopup,clicktheSelect a fileandWindowsExplorerwillappear.6  SelectthecontactsfiletoimportinWindowsExplorerandclicktheOpen.7  ClickOK.8  AField mappingpopuptolinkthecontactsinyourdeviceandnewcontactsdatawillappear.9  IfthereisaconflictbetweenthedatainyourPCcontactsanddevicecontacts,makethenecessaryselectionsormodificationsinLGPCSuite.10ClickOK.
93Phone software updateLG Mobile phone software update from the InternetFormoreinformationaboutusingthisfunction,pleasevisithttp://www.lg.com/common/index.jsp selectyourcountryandlanguage.ThisfeatureallowsyoutoconvenientlyupdatethefirmwareonyourphonetoanewerversionfromtheInternetwithoutneedingtovisitaservicecenter.ThisfeaturewillonlybeavailableifandwhenLGmakesanewerfirmwareversionavailableforyourdevice.Becausethemobilephonefirmwareupdaterequirestheuser'sfullattentionforthedurationoftheupdateprocess,pleasemakesureyoucheckallinstructionsandnotesthatappearateachstepbeforeproceeding.PleasenotethatremovingtheUSBdatacableduringtheupgrademayseriouslydamageyourmobilephone.NOTE: LG reserves the right to make firmware updates available only for selected models at its own discretion and does not guarantee the availability of the newer version of the firmware for all handset models.LG Mobile Phone software update via Over-the-Air (OTA)Thisfeatureallowsyoutoconvenientlyupdateyourphone'ssoftwaretoanewerversionviaOTA,withoutconnectingusingaUSBdatacable.ThisfeaturewillonlybeavailableifandwhenLGmakesanewerfirmwareversionavailableforyourdevice.Youshouldfirstcheckthesoftwareversiononyourmobilephone:Settings>About phone>Update Center>Software Update>Check now for update.Phone software update
94NOTE: Your personal data from internal phone storage—including information about your Google account and any other accounts, your system/application data and settings, any downloaded applications and your DRM licence—might be lost in the process of updating your phone's software. Therefore, LG recommends that you backup your personal data before updating your phone's software. LG does not take responsibility for any loss of personal data.NOTE: This feature depends on your network service provider, region and country.
95About this user guide•Beforeusingyourdevice,pleasecarefullyreadthismanual.Thiswillensurethatyouuseyourphonesafelyandcorrectly.•Someoftheimagesandscreenshotsprovidedinthisguidemayappeardifferentlyonyourphone.•Yourcontentmaydifferfromthefinalproduct,orfromsoftwaresuppliedbyserviceprovidersorcarriers,Thiscontentmaybesubjecttochangewithoutpriornotice.Forthelatestversionofthismanual,pleasevisittheLGwebsiteatwww.lg.com.•Yourphone'sapplicationsandtheirfunctionsmayvarybycountry,region,orhardwarespecifications.LGcannotbeheldliableforanyperformanceissuesresultingfromtheuseofapplicationsdevelopedbyprovidersotherthanLG.•LGcannotbeheldliableforperformanceorincompatibilityissuesresultingfromregistrysettingsbeingeditedoroperatingsystemsoftwarebeingmodified.Anyattempttocustomizeyouroperatingsystemmaycausethedeviceoritsapplicationstonotworkastheyshould.•Software,audio,wallpaper,images,andothermediasuppliedwithyourdevicearelicensedforlimiteduse.Ifyouextractandusethesematerialsforcommercialorotherpurposesis,youmaybeinfringingcopyrightlaws.Asauser,youarefullyandentirelyresponsiblefortheillegaluseofmedia.•Additionalchargesmaybeappliedfordataservices,suchasmessaging,uploadinganddownloading,auto-syncing,orusinglocationservices.Toavoidadditionalcharges,selectadataplanthatissuitableforyourneeds.Contactyourserviceprovidertoobtainadditionaldetails.About this user guide
96Trademarks•LGandtheLGlogoareregisteredtrademarksofLGElectronics.•Allothertrademarksandcopyrightsarethepropertyoftheirrespectiveowners.Notice: Open Source SoftwareTo obtain the corresponding source code under GPL, LGPL, MPL and other open source licences, please visit http://opensource.lge.com/ All referred licence terms, disclaimers and notices are available for download with the source code.
97Theseaccessoriesareavailableforusewiththeyourphone.(Items described below may be optional.)Travel adaptor Stereo headsetBattery Quick Start GuideData cableNOTE: •Always use genuine LG accessories. •Failure to do this may void your warranty.•Accessories may vary in different regions.Accessories
98Thischapterlistssomeproblemsyoumightencounterwhenusingyourphone.Someproblemsrequireyoutocallyourserviceprovider,butmostareeasytofixyourself.Message Possible causes Possible corrective measuresSIM card errorThere is no SIM card in the phone or it is inserted incorrectly.Make sure that the SIM card is correctly inserted.No network connection/ Dropped networkSignal is weak or you are outside the carrier network.Move toward a window or into an open area. Check the network operator coverage map.Operator applied new services.Check whether the SIM card is more than 6~12 months old. If so, change your SIM card at your network provider's nearest branch. Contact your service provider.Codes do not matchTo change a security code, you will need to confirm the new code by re-entering it.If you forget the code, contact your service provider.The two codes you have entered do not match.Troubleshooting
99Message Possible causes Possible corrective measuresNo applications can be setNot supported by service provider or registration required.Contact your service provider.Calls not availableDialling error  New network not authorized.New SIM card inserted. Check for new restrictions.Pre-paid charge limit reached.Contact service provider or reset limit with PIN2.Phone cannot be switched onOn/Off key pressed too briefly.Press the On/Off key for at least two seconds.Battery is not charged.Charge battery. Check the charging indicator on the display.Charging errorBattery is not charged. Charge battery.Outside temperature is too hot or cold.Make sure phone is charging at a normal temperature.Contact problem Check the charger and its connection to the phone.No voltage Plug the charger into a different socket.Charger defective Replace the charger.Wrong charger Use only original LG accessories.
100Message Possible causes Possible corrective measuresNumber not allowedThe Fixed dialling number function is on.Check the Settings menu and turn the function off.Impossible to receive / send SMS & photosMemory full Delete some messages from your phone.Files do not openUnsupported file format Check the supported file formats.The screen does not turn on when I receive a call.Proximity sensor problemIf you use a protection tape or case, make sure it has not covered the area around the proximity sensor. Make sure that the area around the proximity sensor is clean.No sound Vibration modeCheck the settings status in the sound menu to make sure you are not in vibration or silent mode.Hangs up or freezesIntermittent software problemTry to perform a software update via the website.
101CategorySub-Category Question AnswerBTBluetooth DevicesWhat are the functions available via BluetoothYou can connect a Bluetooth audio device such as a Stereo/Mono headset or Car Kit. Also, when the FTP server is connected to a compatible device, you can share content stored on the storage media.DataContacts BackupHow can I backup Contacts?The Contacts data can be synchronized between your phone and Gmail™.DataSynchronizationIs it possible to set up one-way sync with Gmail?Only two-way synchronization is available.DataSynchronizationIs it possible to synchronize all email folders?The Inbox is automatically synchronized. You can view other folders by tapping the Menu Key  and select Folders to choose a folder.Google™ ServiceGmail Log-InDo I have to log into Gmail whenever I want to access Gmail?Once you have logged into Gmail, no need to log into Gmail again.FAQ
102CategorySub-Category Question AnswerGoogle™ ServiceGoogle AccountIs it possible to filter emails?No, email filtering is not supported via the phone.Phone FunctionEmailWhat happens when I execute another application while writing an email?Your email will automatically be saved as a draft.Phone FunctionRingtoneIs there a file size limitation for when I want to use MP3 file as ring tone?There is no file size limitation.Phone FunctionMessage TimeMy phone does not display the time of receipt for messages older than 24 hrs. How can I change this?You will only be able to see the times for messages received the same day.Phone FunctionNavigationIs it possible to install another navigation application on my phone?Any application that is available at Play Store™ and is compatible with the hardware can be installed and used.
103CategorySub-Category Question AnswerPhone FunctionSynchronisationIs it possible to synchronize my contacts from all my email accounts?Only Gmail and MS Exchange server (company email server) contacts can be synchronized.Phone FunctionWait and PauseIs it possible to save a contact with Wait and Pause in the numbers?If you transferred a contact with the W & P functions saved into the number, you will not be able to use those features. You will need to re-save each number.How to save with Wait and Pause:1.  From the Home screen, tap the Phone icon  .2.  Dial the number, then tap the Menu Key  .3.   Tap  Add 2-sec pause or Add wait.Phone FunctionSecurityWhat are the phone’s security functions?You are able to set the phone to require that an Unlock Pattern be entered before the phone can be accessed or used.
104CategorySub-Category Question AnswerPhone FunctionUnlock PatternHow do I create the Unlock Pattern?1.  From the Home screen, tap the Menu Key  .2.   Tap  System settings > Lock screen.3.   Tap  Select screen lock > Pattern. The first time you do this, a short tutorial about creating an Unlock Pattern will appear.4.  Set up by drawing your pattern once, and once again for confirmation.Precautions to take when using the pattern lock.It is very important to remember the unlock pattern you set. You will not be able to access your phone if you use an incorrect pattern five times. You have five chances to enter your unlock pattern, PIN or password. If you have used all 5 opportunities, you can try again after 30 seconds. (Or, if you preset the backup PIN, you can use the backup PIN code to unlock the pattern.)
105CategorySub-Category Question AnswerPhone FunctionUnlock PatternWhat should I do if I forget the unlock pattern and I didn’t create my Google account on the phone?If you have forgotten your pattern:If you logged into your Google account on the phone but failed to enter the correct pattern 5 times, tap the forgot pattern button. You are then required to log in with your Google account to unlock your phone. If you have not created a Google account on the phone or you have forgotten it, you will have to perform a hard reset.Caution: If you perform a factory reset, all user applications and user data will be deleted. Please remember to backup any important data before performing a factory reset.Phone FunctionMemoryWill I know when my memory is full?Yes, you will receive a notification.
106CategorySub-Category Question AnswerPhone FunctionLanguage SupportIs it possible to change my phone's language?The phone has multilingual capabilities.To change the language:1.  From the Home screen, tap the Menu Key  and tap System settings.2.   Tap  Language & input > Language.3.  Tap the desired language.Phone FunctionVPNHow do I set up a VPN?VPN access configuration is different for each company. To configure VPN access from your phone, you must obtain the details from your company’s network administrator.Phone FunctionScreen time outMy screen turns off after only 15 seconds. How can I change the amount of time for the backlight to turn off?1.  From the Home screen, tap the Menu Key  .2.   Tap  System settings > Display tab.3.   Tap  Screen timeout.4.  Tap the preferred screen backlight timeout time.
107CategorySub-Category Question AnswerPhone FunctionWi-Fi & mobile networkWhen Wi-Fi and mobile network are both available, which service will my phone use?When using data, your phone may default to the Wi-Fi connection (if Wi-Fi connectivity on your phone is set to On). However, there will be no notification when your phone switches from one to the other.To know which data connection is being used, view the mobile network or Wi-Fi icon at the top of your screen.Phone FunctionHome screenIs it possible to remove an application from the Home screen?Yes. Just touch and hold the icon until the dustbin icon appears at the top right hand side of the screen. Then, without lifting your finger, drag the icon to the trash can.Phone FunctionApplicationI downloaded an application and it causes a lot of errors. How do I remove it?1.  From the Home screen, tap the Menu Key  .2.   Tap  System settings > Apps > DOWNLOADED.3.  Tap the application, then tap Uninstall.
108CategorySub-Category Question AnswerPhone FunctionChargerIs it possible to charge my phone using a USB data cable without installing the necessary USB driver?Yes, the phone will be charged by the USB cable regardless of whether the necessary drivers are installed or not.Phone FunctionAlarmCan I use music files for my alarm?Yes. In the Alarm clock setting, select the song as the Alarm sound.Phone FunctionAlarmWill my alarm be audible if the phone is turned off?No, this is not supported.Phone FunctionAlarmIf my ringer volume is set to Off or Vibrate, will I hear my alarm?Your alarm is programmed to be audible even in these scenarios.Recovery SolutionHard Reset (Factory Reset)How can I perform a factory reset if I can’t access the phone’s setting menu?If your phone does not restore to its original condition, use a hard reset (factory reset) to initialize it.
Body-worn Operation  This device was tested for typical body-worn operations with the back of the phone kept 0.39 inches (1cm) from the body. To comply with FCC RF exposure requirements, a minimum separation distance of 0.39 inches (1cm) must be maintained between the user’s body and the back of the phone. Belt-clips, holsters and similar accessories containing metallic components may not be used. Body-worn accessories that cannot maintain 0.39 inch (1cm) separation distance between the user’s body and the back of the phone, and have not been tested for typical body-worn operations may not comply with FCC RF exposure limits and should be avoided.   FCC Part 15.19 statement   This device complies with part 15 of FCC rules. Operation is subject to the following two conditions: (1) This device may not cause harmful interference, and (2) this device must accept any interference received, including interference that may cause undesired operation.   FCC Part 15.21 statement  Changes or Modifications that are not expressly approved by the manufacturer could void the user's authority to operate the equipment.   FCC Part 15.105 statement  This equipment has been tested and found to comply with the limits for a class B digital device, pursuant to Part 15 of the FCC Rules. These limits are designed to provide reasonable protection against harmful interference in a residential installation. This equipment generates uses and can radiate radio frequency energy and, if not installed and used in accordance with the instructions, may cause harmful interference to radio communications.  However, there is no guarantee that interference will not occur in a particular installation.  If this equipment does cause harmful interference or television reception, which can be determined by turning the equipment off and on, the user is encouraged to try to correct the interference by one or more of the following measures:   - Reorient or relocate the receiving antenna.  - Increase the separation between the equipment and receiver.   - Connect the equipment into an outlet on a circuit different from that to which the receiver is  connected.   - Consult the dealer or an experienced radio/TV technician for help.

Navigation menu