LG Electronics USA D725 CDMA/LTE Phone + Bluetooth & DTS/UNII a/b/g/n + NFC User Manual 2
LG Electronics MobileComm USA, Inc. CDMA/LTE Phone + Bluetooth & DTS/UNII a/b/g/n + NFC Users Manual 2
Contents
Users Manual 2
26
Your Home screen
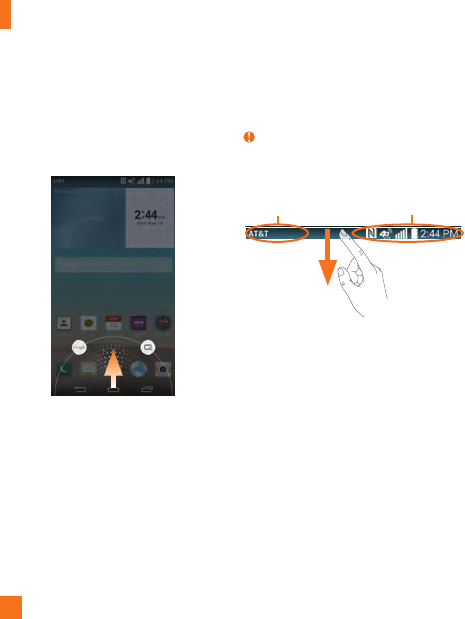
Quick access
To view the quick access items, tap anywhere
in the front key area and drag up. The
following options are available: Google Now,
and QuickMemo+.
Notifications
Notifications alert you to the arrival of new
messages, calendar events, and alarms, as
well as to ongoing events, such as video
downloads. From the Notifications panel,
you can view your phone’s current status and
pending notifications.
When a notification arrives, its icon appears
at the top of the screen. Icons for pending
notifications appear on the left, and system
icons showing things like Wi-Fi or battery
strength on the right.
NOTE
• The available options may vary depending on
the region or service provider.
Notification icons System icons
Accessing notifications
Swipe the Status Bar down to open the
Notifications panel to access notifications. To
close the Notifications panel, swipe the bar at
the bottom of the screen upwards.
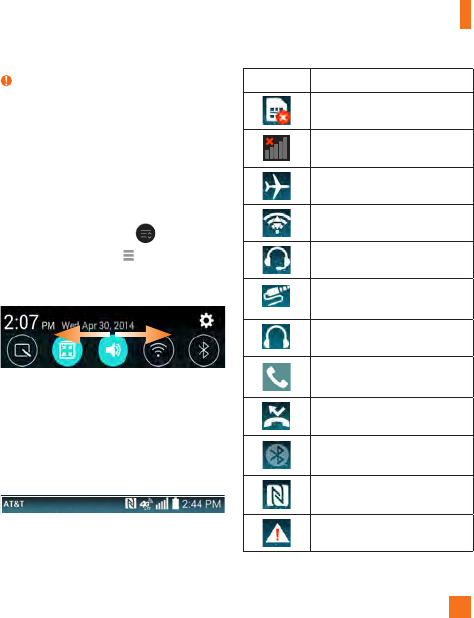
Quick Settings
Use the Quick Settings to easily toggle function
settings like Wi-Fi, manage display brightness
and more. To access the Quick Settings, swipe
the Status Bar down to open the Notifications
panel and select any of the available Quick
Setting apps at the top of the screen.
27
Your Home screen
NOTE
• Touch and hold an icon on the Quick Settings
menu to go directly to that setting's menu
screen.
Customizing the Quick Setting
items on the Notification panel
Open the Notifications panel, swipe the Quick
Settings to the left, and tap .
To rearrange items, drag to the desired
location. To add more icons, select the desired
functions.
Notification icons on the Status
Bar
Notification icons appear on the Status Bar at
the top of the screen to report missed calls,
new messages, calendar events, device status
and more.
The icons listed in the table below are some of
the most common ones.
Icon Description
No SIM card inserted
No network signal available
Airplane mode is on
Connected to a Wi-Fi network
Wired headset connected
Wired high impedance
headphone or AUX
Wired headphone (no mic)
Call in progress
Missed call
Bluetooth is on
NFC is on
System warning
28
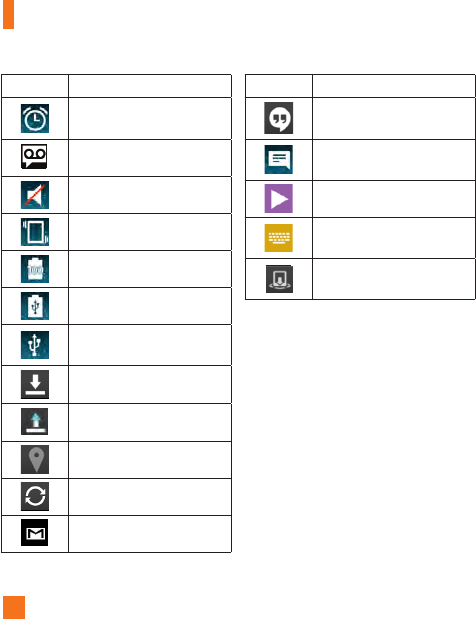
Icon Description
An alarm is set
New voicemail available
Ringer is silenced
Vibrate mode is on
Battery fully charged
Battery is charging
Phone is connected to PC via
USB cable
Downloading data
Uploading data
GPS is on
Data is synchronizing
New Gmail message available
Icon Description
New Hangouts message
available
New text or multimedia
message
A song is currently playing
Choose input method
DLNA content share
Your Home screen
29
On-screen Keyboard
You can enter text using the on-screen
keyboard. The on-screen keyboard displays
automatically on the screen when you need to
enter text. To manually display the keyboard,
simply tap a text field where you want to
enter text.
There are three types of keyboards that you
can use:
Google Keyboard
, Google voice
typing and LG Keyboard.
NOTE
• The different input methods must first be
activated in order to become available.
To select the keyboard:
1 Tap
> > Settings > General tab >
Language & input > Default (under the
KEYBOARD & INPUT METHODS section).
2 Select the default keyboard between
Google Keyboard
and LG Keyboard.
OR
1 While entering text, drag the Status Bar
down and tap Choose input method.
2 Select the desired input method from
Google Keyboard, Google voice
typing or LG Keyboard (default).
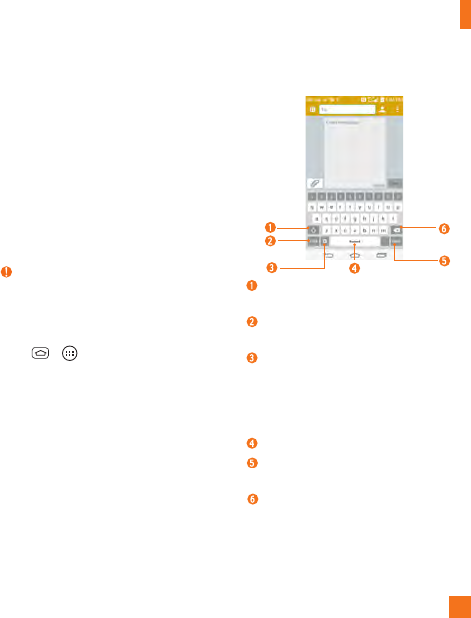
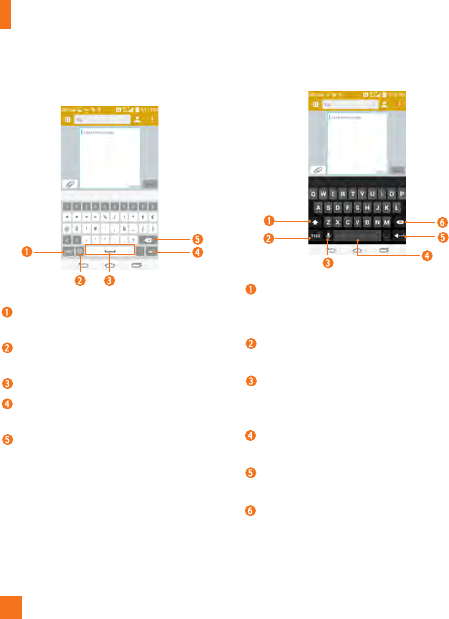
LG keyboard - Letters Entry
Shift Key - Tap once to capitalize the next
letter you type. Double-tap for all caps.
Symbols Key - Tap to change input to
number and symbol entry.
Settings/Voice
input/Clip Tray
Key - Tap
to access the keyboard settings. Touch and
hold to enter text by voice or enter items
copied to the Clip Tray. The default icon
displayed is Handwriting.
Space Key - Tap to enter a space.
Enter Key - Tap to move the cursor to the
next line.
Delete Key - Tap to delete characters to
the left of the cursor.
Your Home screen
30
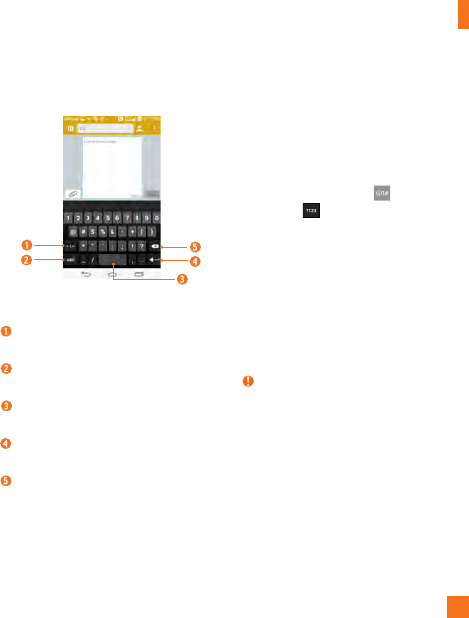
LG keyboard - Numbers and Symbols
Entry
Letters Key - Tap to change input to
letters entry.
Emoji Mode - Tap to enter emoji
characters.
Space Key - Tap to enter a space.
Enter Key - Tap to move the cursor to
the next line.
Delete Key - Tap to delete characters to
the left of the cursor.
Google Keyboard - Letters Entry
Shift Key - Tap once to capitalize the
next letter you type. Double-tap for all
caps.
Number and Symbols Key - Tap to
change input to number and symbol entry.
Voice to Text/Settings Key - Tap to
enter text by voice. Touch and hold to set
various keyboard settings.
Space Key - Tap to enter a space. Touch
and hold to change your input method.
Enter Key - Tap to move the cursor to
the next line.
Delete Key - Tap to delete characters to the
left of the cursor.
Your Home screen
31
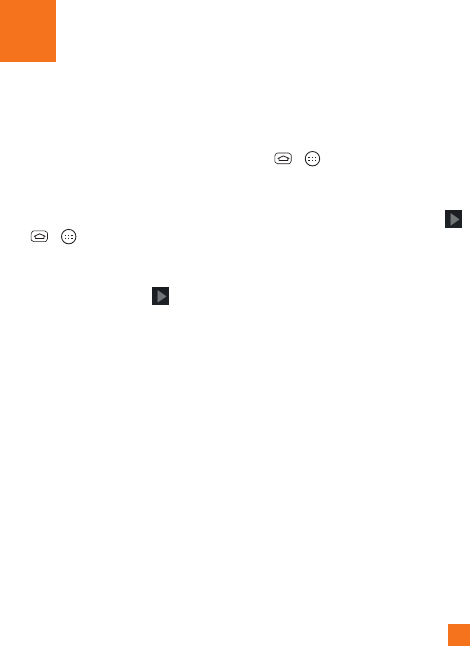
Google Keyboard -
Numbers and Symbols Entry
Alt Key - Tap to enter additional
symbols.
Letters Key - Tap to change input to
letters entry.
Space Key - Tap to enter a space. Touch
and hold to change your input method.
Enter Key - Tap to move the cursor to
the next line.
Delete Key - Tap to delete characters to
the left of the cursor.
123 Mode
This mode allows you to enter numbers in a
text message (a telephone number, for
example) more quickly. Tap the keys
corresponding to the required digits before
manually switching back to the appropriate
text entry mode by tapping on the LG
Keyboard or on the Google Keyborad.
Entering Special Characters
The on-screen keyboard allows you to enter
special characters (e.g., “á”).
To enter a special character, touch and hold the
desired key (touch the “a” key for example).
After the special character appears, slide your
finger over it and lift it off it to enter it.
NOTE
• A symbol at the top (or bottom) right corner
of a key indicates that additional characters
are available for that key.
Using Clip Tray
Easily access the contents you stored in the
Clip Tray whenever and wherever you want.
You can copy images or texts and keep them
in the Clip Tray. Then, you can paste them
whenever and wherever you want.
Your Home screen
32
1 Touch and hold text and images while eding
them and tap Clip Tray.
2 Touch and hold the text input field and select
Clip Tray. You can also access the Clip Tray
by touching and holding > .
NOTE
• You can save up to 20 items in the Clip Tray.
• Touch and hold an item in the Clip Tray and
tap to delete it.
• This function may not be supported in
downloaded apps.
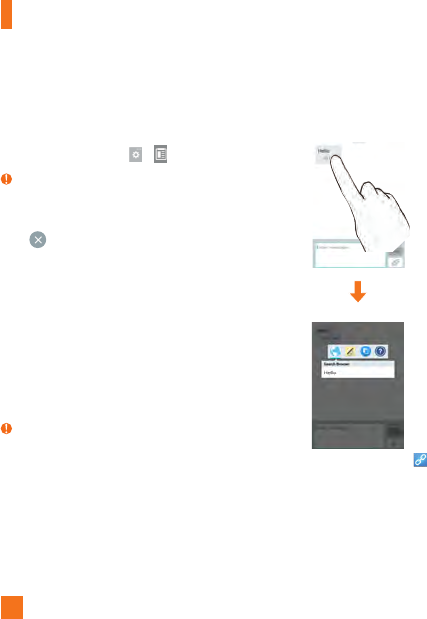
Text Link
Text Link recommends apps related to text in
messages or other selected text. It connects
directly to the Calendar, Contacts, Phone,
Messaging, Email, Browser, Maps, YouTube,
Calculator, and more.
NOTE
• If your phone is set to English or Korean, Text
Link performs more functions than in other
language settings.
• Overly long sentences are subject to
limitations.
• Arithmetic operators (such as +, -, * and /)
start the Calculator.
• If Text Link is not linked to an app, the
Browser can be used for searching.
To use Text Link:
► Tap a message bubble with the icon.
Text Link recommends apps related to the
message content.
Your Home screen
33
The first time you open a Google application on
your phone, you will be required to sign in with
your existing Google account. If you do not
have a Google account, you will be prompted
to create one.
Creating your Google account
1 Tap
>
.
2 Tap Settings > General tab > Accounts &
sync > Add account > Google > New.
3 Enter your username and tap . Your
phone will communicate with Google servers
and check for username availability.
4 Enter and re-enter your password. Then
follow the instructions and enter the
required and optional information about
the account. Wait while the server creates
your account.
Signing into your Google
account
1 Tap
>
.
2 Tap Settings > General tab > Accounts &
sync > Add account > Google > Existing.
3 Enter your email and password and tap .
4 Read the disclaimer about signing in and
checkmark if you want to keep updated with
news and offers from Google Play. Then
tap OK.
5 After signing in, you can use Gmail and take
advantage of Google services on your phone.
6 Once you have set up your Google
account, your phone will be automatically
synchronized with your Google account on
the web. (Depending on your synchronization
settings.)
After signing in, your phone will sync with
your Google services, such as Gmail, Contacts,
Google Calendar, and Picasa photo albums.
You can also use Maps, download applications
from Play Store, back up your settings to
Google servers, and take advantage of other
Google services on your phone.
IMPORTANT
• Some applications, such as Calendar,
Google Account Setup

34
work only with the first Google Account
you add. If you plan to use more than one
Google Account with your phone, be sure
to sign into the one you want to use with
such applications first. When you sign in,
your contacts, Gmail messages, Calendar
events, and other information from these
applications and services on the web are
synchronized with your phone. If you don’t
sign into a Google Account during setup,
you will be prompted to sign in or to create
a Google Account the first time you start an
application that requires one, such as Gmail
or Play Store.
• If you have an enterprise account through
your company or other organization, your IT
department may have special instructions on
how to sign into that account.
Google Account Setup
35
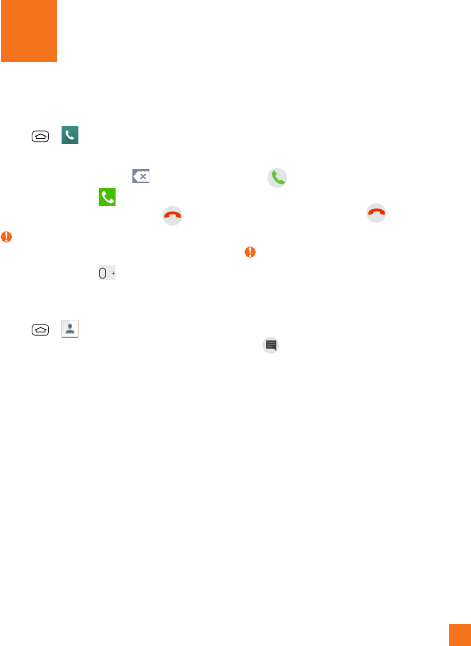
Making a call
1 Tap
>
to open the keypad.
2 Enter the number on the keypad. To delete a
digit, tap the
Clear
Key .
3 Tap the
Call
Key to make a call.
4 To end a call, tap the
End
Key .
TIP
►
To enter “+” to make international calls,
touch and hold .
Calling your contacts
1 Tap
>
to open your contacts.
2 Scroll through the contact list or tap the
Search
contacts field and enter the first
letter(s) of the contact you want to call. You
can also tap the letters at the right side of
the screen.
3 In the list that is displayed, tap the contact
you want to call.
4 In the Contact Info screen, tap the phone
number you wish to call.
Answering and rejecting a
call
When your phone rings, swipe the
Answer
icon in any direction to answer the
incoming call.
Swipe the
Decline
icon in any direction
to reject an incoming call.
NOTE
►
If the Answer an incoming call gesture
is activated, you can bring the phone up to
your ear to answer incoming calls.
►
Tap or swipe the Decline with message
if you want to send a message to
the caller. If the caller is unknown, the
Decline with message is not available.
Adjusting the in-call volume
To adjust the in-call volume during a call,
use the Volume Keys on the back side of the
phone.
Calls
36
Making a second call
1 During your initial call, tap and select Add
call.
2 Dial the number or search your contacts.
3 Tap the
Call
Key
to connect the call.
4 Both calls will be displayed on the call
screen. Your initial call will be put on hold.
5 Tap the Call entry on the screen to toggle
between active calls or tap Merge calls
to merge the calls.
TIP
►
Tap Manage members to end
individual calls or separate calls from a
conference call.
6 To end active calls, tap
the End Key
.
If there is no active call, it will end the call
on hold.
NOTE
►
You will be charged for each call you
make.
Viewing your call logs
Tap
>
> tab
Call logs
.
You can view a complete list of all dialed,
received, and missed voice calls.
TIP
►
Tap any single call log entry to view the
date, time, and duration of the call.
►
Tap , then tap Delete all to delete all
the recorded items or Delete to delete
individual or groups of entries.
Call settings
You can configure phone call settings, such
as call forwarding, and other special features
offered by your carrier.
1 Tap
> > Settings
.
2 Tap the Networks tab (if necessary) >
Call
.
3
Set any of the available options.
Calls
37
You can add contacts on your phone and
synchronize them with the contacts in your
Google Account or other accounts that
support syncing contacts.
Searching for a contact
Tap
> >
and tap Contacts
to open
your contacts.
OR
Tap
>
> Contacts tab.
1 Tap the Search contacts field and enter
the contact name using the keypad. You
can also tap the letters at the right side
of the screen.
Adding a new contact
1 Tap
>
and enter the new contact’s
number. Tap
> Add to Contacts >
New contact or Update contact.
2 Select the account where you want to
add the new contact. Locations depend on
the type of accounts you have added to
your device.
NOTE
►
The entry fields varies depending on
the account.
3 If you want to add a picture to the new
contact, tap
. Choose from Take photo
or Select from Gallery. Then browse for
an image and select it.
4 Tap to enter more specific name
information.
5 Enter the details about your contact.
6 Tap Save to save the contact entry.
Favorite Contacts
You can classify frequently called contacts
as favorites.
To add a contact to your favorites
1 Tap
>
> Contacts
to open your
contacts.
2 Tap a contact to view its details.
3 Tap the star to the right of the contact’s
name. The star turns gold and the contact
is added to your favorites.
Contacts

38
To remove a contact from your favorites
list
1 Tap
>
> Contacts
.
2 Tap the Favorites tab.
3 Tap a contact to view its details.
4 Tap the gold star to the right of the
contact’s name. The star turns grey
and the contact is removed from your
favorites.
Joining and Separating
Contacts
When you have two or more entries for
the same contact, you can join them into a
single entry. You can also separate contacts
that were joined.
1 Tap
>
> Contacts
.
2 Tap
> Join.
3 Select a tab at the top of the screen.
• Tap Joined contacts to select entries
to separate.
4 Checkmark the entry (or entries) you want
to join or separate, then tap the Join or
Separate button.
AT&T Address Book (AAB)
AT&T Address Book (AAB) is an application
that automatically syncs your contacts to an
online address book for safekeeping! When
you first turn on the phone or change your SIM
card and open Contacts, the AAB application
is displayed.
After signing up for this service, your
information is synced on a regular basis.
You can find more information on this service
and access your online address book at
www.att.com/addressbook. You can find
the synchronization menu for the service by
tapping the
> > Settings
> General
tab > Accounts & sync > AT&T Address
Book.
Contacts
39
Messaging
Your phone combines text and multimedia
messaging into one intuitive, easy-to-use
menu.
Conversation view
Messages exchanged with another party are
displayed in chronological order so that you
can conveniently see an overview of your
conversation.
Sending a message
1 Tap
>
>
to create a new
message.
2 Enter a contact name or phone number
in the
To
field. As you enter the contact
name, matching contacts appear. You can
tap a suggested recipient. You can also add
multiple contacts.
NOTE
►
You will be charged for a text message
for every person you send the message
to.
3 Tap the text field and start entering your
message.
4 Tap
to open the options menu. Choose
from
any of the available options.
5 Tap
Send
to send your message.
Warning
►
The 160-character limit may vary from
country to country depending on how
the text message is coded and the
language used in the message.
►
If an image, video, or audio file is
added to a text message, it will
be automatically converted into a
multimedia message and you will be
charged accordingly.
NOTE
►
When you get a text message during
a call, there will be an audible
notification.
Using smilies
Liven up your messages using smilies and
emojis.
When writing a new message,
tap
>
Insert
smiley. To access emojis, tap on the LG
keyboard and choose an emoji category to
view the available emojis.
Messaging/Email
40
Changing the conversation theme
Sets how your conversations are displayed.
1 Open the Messaging app and
tap
>
Settings > Conversation theme.
2 Tap the Wallpaper tab to choose the
conversation background. Choose from the 6
options provided, a photo from your Gallery,
or take a picture to use.
3 Tap the Bubble tab to choose the
conversation style. Choose from the 6
options provided.
Changing your message settings
Your phone's message settings are predefined,
so you can send messages immediately.
You can change the settings based on your
preferences.
• Tap
>
>
> Settings.
Email
You can use the
Email
application to read
email from providers other than Gmail. The
Email application supports the following
account types: POP3, IMAP and Microsoft
Exchange (for Enterprise users).
To open the Email application
• Tap
>
> Email.
The first time you open the
Email
application,
a setup wizard opens to help you add an email
account.
Microsoft Exchange Email Account
Email address – Enter the account email
address.
Password – Enter the account password.
Email address – Enter the server address.
Server address - Enter the outgoing email
server address.
Domain – Enter the account domain (optional).
Port number - Normally each account’s
default number will be displayed.
Username – Enter the account username.
Password - Enter the account password.
Use secure connection (SSL) – Choose
whether or not to use SSL for Microsoft
Exchange.
Client certificate – Allows you to add a
client certificate (if necessary).
Other (POP3 & IMAP4) Email
Account
Email address – Enter the account email
address.
Messaging/Email
41
Password – Enter the account password.
Incoming server settings
POP/IMAP server – Select protocol type,
either POP or IMAP.
Security type – Choose from Off, SSL, or TLS.
Port number – Normally each account’s
default number will be displayed.
Username – Enter the account username.
Password - Enter the account password.
Outgoing server settings
SMTP server – Enter the outgoing email
server address.
Security type – Choose from Off, SSL, or TLS.
Port number – Normally each account’s
default number will be displayed.
Require sign-in -
Username – Enter the account username.
Password - Enter the account password.
To open your Combined inbox
If you have configured email to send and
receive email from more than one account, you
can view all messages sent to all accounts in
your Combined inbox.
• Open the Email application and touch
. Then touch Combined inbox.
Messages in the Combined inbox are color
coded on the left, by account.
When a new email arrives in the Inbox, there
will be sound and/or vibration notification
(depending on your current sound and vibrate
settings).
Composing and Sending Email
1 In the Email application, tap Compose
.
2 Enter an address for the message’s intended
recipient. As you enter text, matching
addresses will be offered from your
contacts. Separate multiple addresses with
commas.
3 Tap the Cc/Bcc field to copy or blind copy
to other contacts/email addresses.
4 Tap the text field and enter your message.
5 Tap Attach to attach the file you want to
send with your message.
6 Tap Send to send the message.
If you are not ready to send the message,
tap Save to save it in a Drafts folder. Touch
a message in the Drafts folder to resume
working on it. Your message will also be saved
as a draft if you touch the Back Key
before sending it.
Tap Cancel to abandon and delete a message,
Messaging/Email
42
Messaging/Email
including any saved drafts. If you are not
connected to a network, for example if you’re
working in airplane mode, the messages you
send are stored in your Outbox folder until
you’re connected to a network. If it contains
any pending messages, the Outbox will be
displayed on the Accounts screen.
NOTE
►
The messages sent using an Exchange
account will not be stored on the phone;
they will be stored on the Exchange
server itself. If you want to see your sent
messages in the Sent folder, you may need
to open the Sent folder and select
from
the options menu.
Working with Account Folders
Each account has Inbox, Outbox, Sent,
Drafts and Trash folders. Depending on
the features your account service provider
supports, you may have additional folders.
Adding and Editing Email Accounts
To add an email account
1 Tap
>
> Email.
2 Select the desired email provider.
If an email account is already set up, the
wizard is not activated automatically.
In this case,
tap
> Settings > Add account
.
To change account settings
1 Open the Email application.
2 Tap
> Settings.
3 Tap General settings to adjust the settings
that affect all accounts. Or tap an individual
account to adjust settings only for that
account.
To delete an email account
1 Open the Email application.
2 Tap > Settings.
3 Select the account(s) you want to delete
and tap Remove account.
4 Tap Yes to confirm.
43
With your phone, you can enjoy social
networking and manage your micro-blog in
on-line communities. You can update your
current status, upload photos, and view your
friends’ status updates in real-time.
You can add your Facebook, Google+, and
Twitter accounts to your phone. If you don’t
have an account, you can visit their sites to
set one up.
NOTE
►
Additional costs may be incurred when
connecting and using online services.
Check your data charges with your
network provider.
Adding an account to your
phone
1 Tap
> > Settings >
General tab >
Accounts & sync.
2 Tap Add account.
3 Tap any social networking service you want
to use.
4 Enter your email address and password
that you set up for your social networking
account, then tap Sign in or
Log in
.
Adding a social networking
widget on the Home screen
If you add a social networking widget on
your Home screen, the widget will show
your status when your phone receives
updates from the network.
You can also access the social community
directly by tapping the widget.
1 Touch and hold an empty spot on the Home
screen.
NOTE
►
If there is no available space on a
particular Home screen panel, you won't
be able to add any widget; you must
delete or remove an item before you can
add another item. In this case, you have
the option of switching to another Home
screen panel.
2 Tap the Widgets tab and scroll to the right
or left until you see the social network you
want.
3 Tap the desired widget to add it to the Home
screen panel.
Social Networking
44
Viewing and updating your
status
1 Go to the Home screen panel where the
social networking widget is located. You can
see the current status of social applications
you set.
2 Tap the Status update icon or field to
update your status with comments or
upload pictures.
3 After entering comments and attachment
(if any), tap the Post icon.
TIP
►
You can use information about friends
only in your social network(s) or sync all
data to Contacts.
Syncing accounts on your
phone
You can sync information from your social
networking accounts with your Contacts and
other functions on your phone, if applicable.
1 Tap
> > Settings >
General tab >
Accounts & sync
.
2 Checkmark Auto-sync data to activate
automatic synchronization.
3 Tap the account you want to sync.
4 Check the desired options, such as Contacts.
A checkmark indicates that synchronization
has been enabled.
Removing accounts on your
phone
1 Tap
> > Settings >
General tab >
Accounts & sync
.
2 Tap the account(s) you want to delete, then
tap
>
Remove account
> OK.
Social Networking
45
Camera and Video
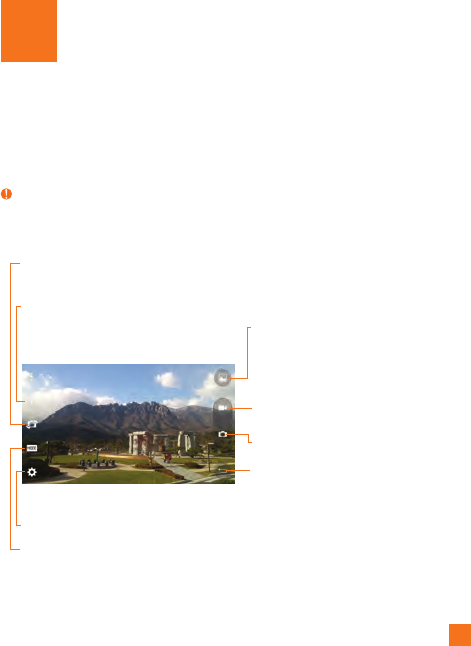
Getting to know the viewfinder
You can use the camera or camcorder to take and share pictures and videos. Your phone comes
with a 8 megapixel camera with an autofocus feature that lets you capture sharp pictures and
videos.
NOTE
►
Be sure to clean the protective lens cover with a microfiber cloth before taking pictures.
A lens cover with smudges from fingers can cause blurry pictures with a "halo" effect.
Swap camera
–
Allows you to swap between the rear camera lens and the front camera
lens.
Flash
–
Tap to turn the flash On, Off or set it to Auto.
Settings
– Tap to open the settings menu. See Using the advanced settings on page 46.
Mode
– Allows you select the shot mode from
Auto
,
Panorama
.
Gallery
– This enables you to access your
saved photos and videos within
the camera mode. Simply tap
and your Gallery will appear on
the screen.
Record
– Allows you to start recording.
Capture
– Allows you to take a photo.
Back
– Returns to the previous screen.