LG Electronics USA DT-FG Personal Computer User Manual 46475FC7A5C1F62E717864

LG Electronics USA Personal Computer 46475FC7A5C1F62E717864

users manual A

FG seriesFGseriesCopyright 2004LG Electronics, Inc., DigitalMate Co., Ltd.P/N:3828BPH011ARev.00                                                                                 P/N: 3828BPH011A(Rev.00)
ÞMicrosoft, MS, MS-DOS, and Windows are  trademarks of Microsoft Corporation.ÞIBM, IBM Personal Computer, PS/2 and PC AT are  trademarks of International BusinessMachine Corporation.Þis a trademark of LG.ÞCopyright 2004 LG Electronics, Inc., DigitalMate Co., Ltd.Thank you for using the LG product.LG has manufactured and tested this product to provide you with a reliable computingenvironment.Please read this manual carefully before using the computer.This User's guide is for FG model.Instructions may be different depending on models. Check your model before reading User's guide.Keep User's guide at a place where other users always can reachÞInformation in this manual may include technical inaccuracies or typographicalerrors. Images in this manual are for illustrative purposes only and may bedifferent from the actual product.ÞLG reserves the rights to make improvements and/or changes to the productwithout notice.ÞReproducing any or all of the information contained in this publication withoutwritten permission is prohibited.ÞThis computer complies with the radio frequency and safety standards of anycountry or region in which it has been approved for wireless use.1.Warning: Not following the instruction could result in death or serious injury.This sign calls attention to features and operations that may be dangerousto the user. Follow the instruction closely to reduce the risk of bodily harmor damage to the equipment2.Caution: Not following the instruction could result in minor or moderateinjury and/or damage to the product.
1ContentsContentsPackage Contents ..................................................................................................................... 1Important Safety Instructions .................................................................................................. 21-1 Package contents..................................................................................................................................... 91-2 Components........................................................................................................................................... 101-3 Installing the computer ........................................................................................................................... 151-4 Attaching external devices (customer purchased devices) .................................................................... 171. Installing the system2. Using the system3-1 Starting the system setup....................................................................................................................... 443-2 Booting with a USB device drive ............................................................................................................ 463-3 Setting a password................................................................................................................................. 473-4 Changing or removing the password ..................................................................................................... 483-5 Recovering the factory default settings .................................................................................................. 503-6 Setting up for boot method..................................................................................................................... 513-7 Using power saving function .................................................................................................................. 523-8 Using Hyper-Threading function ............................................................................................................ 533. System Setup4. System Recovery ................................................................................................................ 545. Reinstallation of DriversSpecifications . . . . . . . . . . . . . . . . . . . . . . . . . . . . . . . . . . . . . . . . . . . . . . . . . . . . . . . . . . . . . . . . . . . . . . . . . . . . . . . . . . . . . . . . . . . . . . . . . . . . . . . . . . . . . . . . . . . . .  8 26-1 Opening the computer case ................................................................................................................... 626-2 Main board ............................................................................................................................................. 636-3 Connectors............................................................................................................................................. 646-4 Replacing the CPU................................................................................................................................. 666-5 Increasing memory................................................................................................................................. 686-6 Adding a hard disk driver ....................................................................................................................... 726-7 Installing expansion cards...................................................................................................................... 805-1 Reinstalling the printer driver ................................................................................................................. 565-2 Reinstalling the sound driver.................................................................................................................. 605-3 Reinstalling the video driver ................................................................................................................... 612-1 Turning on the computer ........................................................................................................................ 182-2 Using Windows XP................................................................................................................................. 212-3 Turning off the computer ........................................................................................................................ 282-4 Restarting the computer......................................................................................................................... 292-5 Using Mouse .......................................................................................................................................... 302-6 Cleaning the mouse ............................................................................................................................... 322-7 Using keyboard ...................................................................................................................................... 332-8 Using the optical disk driver ................................................................................................................... 352-9 Using hard the disk driver ...................................................................................................................... 362-10 Computer virus..................................................................................................................................... 396. System Expansion
2 Important Safety InstructionsThese safety instructions will ensure many years of safe enjoyment from the prod-uct. Read this safety instructions carefully before installing the computer.Installing the computerImportant Safety InstructionsDo not operate your computer near water for example, in a bathroom. The computer may not function correctly, and there is the risk of electric shock.Operate the computer within a temperature range of 41 to 95ĕ(5Ë~35Ë) and 30 to 80% ofrelative humidity.Safely dispose of the packing materials, such as desiccant and plastic bags.Children may swallow desiccant or suffocate from plastic bags.Keep your computing environment clean and free of dust.There is a risk of dysfunction to the computer.Keep away from the moisture condensation.It may damage on the computer. If this happens, turn off the computer and make it drybefore power is on.Do not place any object within 15cm of the computer.The computer may overheat and result in fire or injuries.Keep your computer away from electromagnetic fields.Exposure to the electromagnetic field may result in loss of data in the hard disk drive and/ordamage to the monitor.
3Important Safety InstructionsDo not use loose or damaged power plugs.There is a risk of electric shock or fire.Use a correct voltage outlet.There is a risk of fire or electric shock.Use properly grounded outlet.Connecting the computer to an outlet without proper grounding may result in electric shockand damages to your computer.Use your computer at the proper voltage/current level indicated.There is a risk of fire or electric shock.Do not touch or grab the power plug with wet hands.There is a risk of fire or electric shock.If you hear a noise from the power cord or outlet, unplug the power cord imme-diately, and contact the customer service for help.There is a risk of fire or electric shock.Hold the plug body when removing the power cord from an outlet.There is a risk of fire and damages to the computer.Make sure the power plug fits snugly into the electrical outlet.Loose fit may result in fire.Keep near the power cable and power cord clean.There is a risk of fire.If an object or liquid enters the computer or an adaptor, remove power cord, battery, and any other cables from the computer, and contact the customer service for help.There is a risk of an electric shock, fire, or damage to the computer.Connecting to the power
4 Important Safety InstructionsUsing the computerUse properly grounded outlet.Connecting the computer to an outlet without proper grounding may result in electric shockand damages to your computer.Use your computer at the proper voltage/current level indicated outlet. There is a risk of fire or electric shock.Do not bend or place a heavy object on top of the power cord. Keep the chil-dren and pets from damaging the power cord.Damaged power cord may result in electric shock or fire.For cleaning your computer, use mild detergent or computer cleaning prod-ucts. Be sure to dry completely before using the computer.Using the computer without completely drying it may result in electric shock or fire.During a lightning storm, disconnect the power cord, telephone line, and LAN cable from the computer.There is a risk of electric shock or fire.Do not place water, chemicals, or liquid of any kind on the computer. Liquid of any kind entering inside the computer may result in an electric shock, fire, or dam-age to the computer.Do not connect the modem directly to a multi-line telephone. There is a risk of fire or damage to the computer.If you drop your computer, remove the power cord and battery pack, and then contact the customer service for check. There is a risk of electric shock or fire. Do not expose your computer to the direct sunlight. The computer may overheat and result in fire or injuries.
5Important Safety InstructionsDo not place a burning candle or cigarette on the computer.There is a risk of fire or damage to the computer.If you see or smell smoke from the computer or adaptor, turn off the computer,remove the power cord, and then contact the customer service for help.There is a risk of fire. Upon completion of any service or repairs, ask service technician to perform safety checks.Ignoring safety checks may result in electric shock or fire.Keep the computer away from heat.The computer may deform and there is a risk of fire.Turn on the external devices first and the system.There is a risk of damage to the computer.Turn off the external devices first and and the system.There is a risk of damage to the computer.Use only the proper devices to the connector.There is a risk of damage to the computer.Do not use any damaged CD or floppy disk.There is a risk of damage to the computer or injuries.Use the Wireless LAN at least 5 meters away from a microwave oven or plasma lamp. When using the Wireless LAN near a plasma lamp, use the channel 11, 12, or 13.The connection can be unavailable or slow.Do not press eject button while the CD-ROM or floppy drive is in use. Data can be lost and  there is a risk of injuries.Place the memory card in a correct position when inserting it.There is a risk of damage to the memory.Do not drop the parts of computer.There is a risk of injuries or damage to the computer.
6 Important Safety InstructionsCarrying and storing the computerBefore moving the computer, turn the power off and remove all the cables.You may trip over the loose cables and fall. Upgrading the computerKeep screws and other small parts away from children.Children may choke on a screw or other small part. If a child swallows a small part, receive amedical care.Do not disassemble the power supply devices.There is a risk of an electrical shock. Before disassembling the computer for upgraing purposes, turn off the power and remove the power cord, phone line and battery pack.There is a risk of electric shock or fire. If you need to open the computer cover, contact theTechnical support for help.Do not attempt to disassemble or modify the computer without consulting Technical support. If you need to open the computer cover, contact the Technical support for help.There is a risk of an electrical shock.Always refer to the User's guide.There is a risk of injury.Replace only with the parts approved by LG.There is a risk of fire or damage to the computer.Consult with the customer service before connecting and using the computerwith any non-LG product.There is a risk of damage to the computer.
7Important Safety InstructionsBe cautious when handling the hard disk drive.ÞThe hard disk drive is very delicate to any physical impact. Always make backups for your data.ÞLG is not responsible for the data lose caused by users.The data on the hard disk or the drive itself may be damaged in the following situations.ÞExposure to a physical shock during the disassembling or installing process.  ÞThe computer is reset (rebooted), for example by power outage, while the hard disk driveis operating.ÞExposure to computer virusÞThe computer is turned off during operation. To prevent data loss due to hard disk drive damages, always backup your data.LG is not responsible for the loss of data.Preventing data loss (handling hard disk drives)
8 Help and SupportⓞClick [Help and Support] to learn how to solve problems you may encounterwhile using the computer. Click [Start]⍛[Help and Support].ⓟThe following window appearsHelp and SupportYou can search foruseful Help and Supportinformation.Click to learn the fea-tures and troubleshoot-ing informationYou can connect to theInternet and ask forassistance online.You can setup andconfigure your computerto personalize yourcomputing environment
1. Installing the system9Installing the system3DFNDJHFRQWHQWVThe following items are included in this package. Match the items below with the items in your package. Some items may look different from the pictures.When cleaning your computer, use cleaning productsmanufactured specifically for computing equipment.Using abrasive chemicals, such as paint thinner, ben-zene, or alcohol, may damage your computer.Computer Mouse Keyboard Power cable7URXEOHVKRRWLQJJXLGHUser's guide            Trouble-shooting guide    LG Giljabi CD(Software installation CD) Recovery CDModem cable
10 Installing the system1-2. ComponentsFront viewℚℛ℘ℙℜ℡℟ℝ℞℠℘Power Button Turns on/off the computer.ℙPower Lamp and H/D Indication LampIndicates the power and the harddisk state when the computer isturned on. (When the hard disk isrunning, the lamp will blink. -However, this feature may notfunction in some systems.)ℚCD-ROM Drive ButtonInserts or ejects a CD in/from theCD-ROM drive.(The cover is opened and closedautomatically if the user presses thisbutton.) ℛCD-ROM DriveOperates a large-capacity data CDor video/audio CD as one of auxiliarymemory devices. (Depending onproduct model, CD-RW and DVD-ROM drives may be equipped.) ℜInput/Output Port CoverThe user can open the cover bypulling the cover as shown in thefigure.
11BasicsℝUSB (USB 20 Port) ConnectorConnects USB devices or hubs (including a USB mouse or digital camera).℞IEEE1394 ConnectorConnects IEEE 1394-4 4-pin devices (including a camcorder).℟Audio connectorHeadphone connectorA port for external earphones.Microphone ConnectorA port for external microphone.℠Multimedia Card Slot Hosts various portable memory cards - CF, MD, MS, MS-PRO, SD, MMC, SMCand others.℡SupportThe support of for stable installation of the main body of the computer.Each slot is marked with a symbol indicat-ing proper card types that can be accom-modated. Check the symbol and insert aright type of memory card in the directionas shown in the figure.Do not delete [Safely Remove Hardware](    ) 
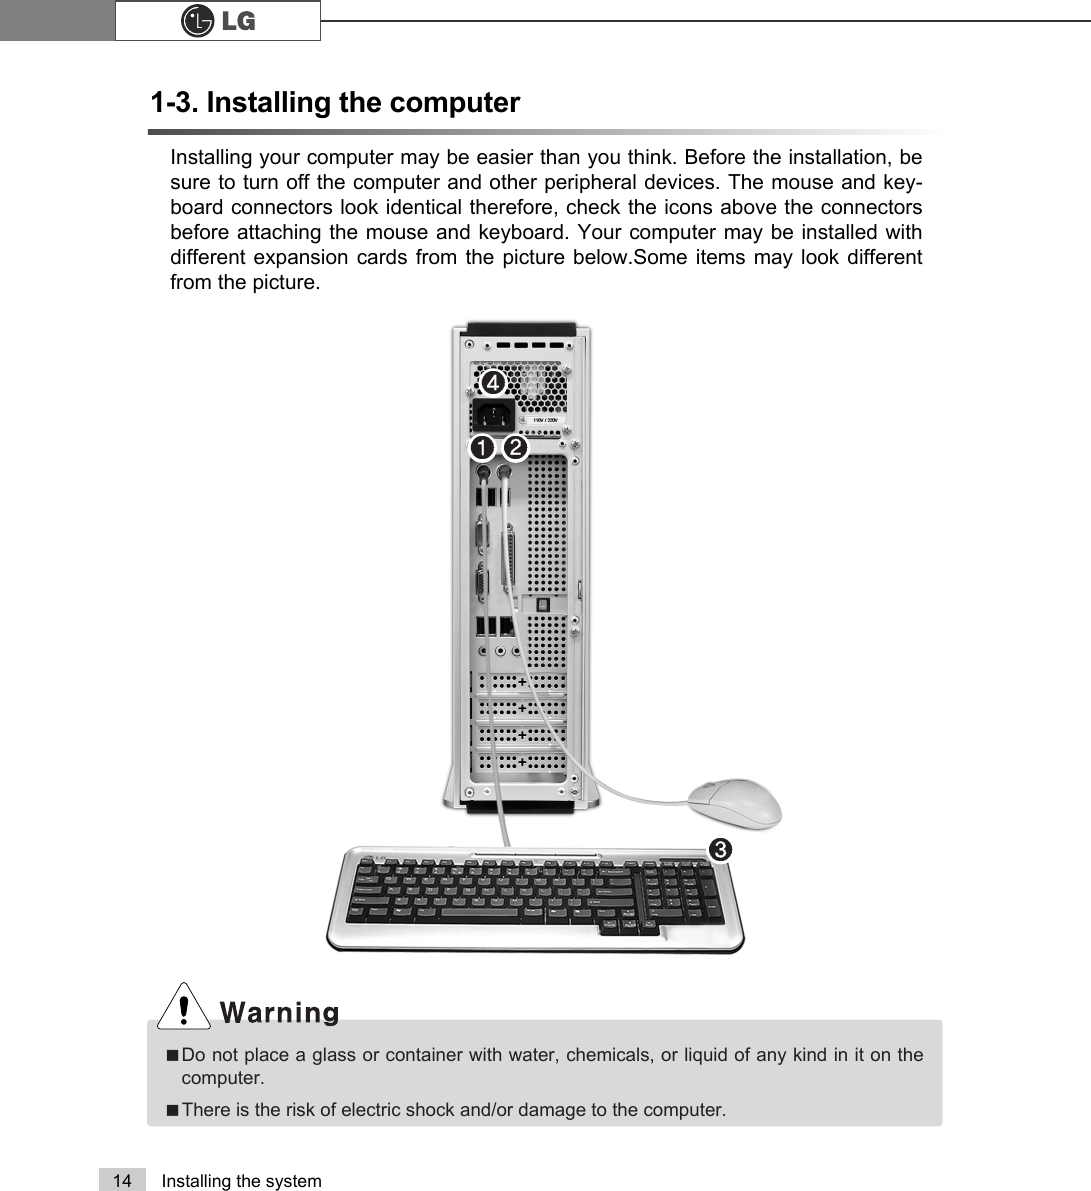
icon. Otherwise, the computer needsrebooting to use the memory card slot.ã6~9 are the options parts differ by product model. For more information about optionalparts, see Option Guide of Giljabi CD.NoteãRemove the support to use your computer laid down.ãTo use the computer with the body standing, install the support. Otherwise, the systemmay function unstably.
12 Installing the systemRear view℘ℙ ℚℜℝ℞℟℠ℛ⌅℡ãYour computer may have different features and configuration from the computersshown above.ãPower specifications may be different depending on the country or region, check the powerspecifications before use.Note
13Installing the system℘Power connectorConnects electrical power to the computer.ℙKeyboard connectorConnects PS/2 connector.ℚMouse connectorConnects PS/2 mouse.ℛUSB(USB 2.0 port) connectorConnects to USB devices or HUB(USB mouse or digital camera can be connected).ℜIEEE1394 connectorConnects to IEEE1394 6pin connector.ℝParallel connectorConnects to parallel devices such as printer or scanner.℞Serial connectorConnects to serial devices.℟Video connectorConnects to a monitor.℠LANEnables 10/100Mps network connection when connected as UTP with HUB.≕Digital audio output connector(S/PDIF)Connects to digital audio devices.⌅Audio connectorExteral speaker connectorConnects to external speaker connector.Line connectorConnects to external audio connector.Micro phone connectorConnects to external micro phone connector.Do not disassemble power supplies.There is a risk of electrical shock.ãModem cable is offered for models that support modem card.Note
14 Installing the system1-3. Installing the computerInstalling your computer may be easier than you think. Before the installation, besure to turn off the computer and other peripheral devices. The mouse and key-board connectors look identical therefore, check the icons above the connectorsbefore attaching the mouse and keyboard. Your computer may be installed withdifferent expansion cards from the picture below.Some items may look differentfrom the picture.ãDo not place a glass or container with water, chemicals, or liquid of any kind in it on thecomputer.ãThere is the risk of electric shock and/or damage to the computer.℘ ℙℚℛ
15Installing the systemThe round connector on the mouse cable fits into the PS/2 connectoron the rear of the computer. Be sure to align the 6 pins on the cablewith the corresponding holes on the connector.ℙConnecting a mouse Attach the power cord to the computer and then plug the power cordinto a wall socket.Power supply is 110V/220V (selection) or 220V only.ℚConnecting to powerAlign the pins and holes, and attach the keyboard cable to the computeras shown in the picture.The keyboard cable has a round connector with 6 pins.The mouse cable has a round connector with 6 pins.℘Connecting a keyboardãFor USB mouse users, USB connectors arelocated both the front and rear of the computer.NoteLift the stand to use the keyboard more comfortably.The keyboard stand is located at the bottom of the keyboard.ℛKeyboard standãOperate the product at the proper voltage when selecting 110Vor 220V power supply. Incorrect use of power supply maydamage on the product or fire.ãPower supply is 110V/220V (selection) or 220V only.ãCheck the location of the switching button when 110V/220V (selection) is used.220V use 110V use
16 Installing the system1-4. Attaching external devices(customer purchased devices)ℙℚℜℛℝ℟℞℘ãDo not connect too many cables to one extension cord. An electric shock may occur.ãDo not leave the power cord below the body.ãDo not touch the outlet when connecting or disconnecting the power cord. An electric shockmay occur.
17Installing the system℘Connect the monitor cable to the video card. Themoitor cable sends signals from the computer to themonitor.ℙConnect the power cord to the monitor and plug it intopower outlet. The power cord supplies power from theelectrical outlet  to the monitor. You must turn on andoff the monitor with the power button on the monitor.Check the power spec ification of the monitor beforeconnecting the power cord to the computer.The monitor cable and power cord are included with the monitor.For more details, refer to the User's manual that comes with the monitor.Connecting a monitor (customer purchased devices)ℚConnect the printer cable to the parallel connector on the computer.ℛConnect the other side of the cable to the printer.ℜConnect the power cable to the printerℝPlug the power cord into an electrical outletThe printer cable and power cord are included with the printer.For using the printer, refer to the user manual that comes with the printer.Connecting a printer (Customer purchased devices)℞Connect an optical cable to the speakers to use S/PDIF function.You can listen to the digital sound from an optical speakers by using S/PDIF function.Optical line-out: S/PDIF (Customer purchased devices)℟Connect a speaker cable to the spaker connector on the rear orthe computer.Speakers are not included in this package.You must connect an external speaker to output sound.Connecting a speaker (Customer purchased devices)Using a built-invideo cardUsing a video cardyou have installed
2. Using the system18 Using the systemMake sure if there is nothing in Floppy disk and see if the computer is well connectedto the power cable and other external device drivers. You should complete registrationprocess. Start registration process following the instruction after turning on the com-puter.2-1.Turning on the computerⓞPressing the power switch starts the self-diagnostic procedures; then Windows(R) XPstartup screen is displayed .In a moment, a dialogue box, saying "Welcome toMicrosoft Windows" appears on the screen. Then Click [Next].Registration processⓟAfter "Help protect your PC" message appears on the screen, select "Help protectmy PC by turning on Automatic Updates now" and then press [Next].
19Using the systemⓡIf you turn the power on the computer for the first time, you have to register yourcopy of Windows XP. The registration process may differ depending on the model,but the difference does not affect the use of your computer.ⓠInternet connection option screen appears, follow the instruction.ⓢ"Who will use this computer?" message appears on the screen. Type the namesof the users and click [Next].
20 Using the systemⓣ"Thank you!" message appears on the screen.Click [Finish] to complete the registration process.Windows Certificate includes the productnumber which proves your WindowsOperating System is original product. Please always keep this certificate withyou. The Windows Certificate you have maylook different from the picture.Windows Certificate
21Using the system2-2.Using Windows XPWindows XP is new, brilliant and easy-to-use. Background and title bar have beenrearranged concisely, and it became easier to access the application programs fromthe start menu. Also, it allows users with more diverse options to choose from whendecorating desktop's appearance.Click  [Start]⍛[Tour Windows XP] to explore the features and tools available inWindows XP.Windows XP is an operating system that runs a computer. Learning the basicsfeatures in Windows is recommended to utilize a computer effectively. Overview℘ℙℚ℘MinimizeℙMaximizeℚClose
22 Using the systemℙ℘ℚℛℜWindows XP desktopClick [Start] button to open the [Start] menu. Click [AllPrograms] to open the list of programs installed in thecomputer.[Start menu] shows everything you need to start work-ing in the Windows XP environment.Taskbar shows programs that are currently open andrunning.Taskbar icons show and let you configure ongoingactivities such as battery power status, display proper-ties, LAN settings, etcPut your unused items and files in the Recycle Bin.Right-click the Recycle Bin and select [Empty RecycleBin] to permanently delete the items inside the RecycleBin℘[Start] buttonℙ[Start] menuℚTaskbarℛTaskbar icons and clockℜRecycle Bin
23Using the systemStart menuClicking [Start] button enables you to easily accesscomputer programs.℘Pinned itemsℙRecently used itemsℚAll ProgramsℛControl Panel lets you change the settings in your computeℜMy computer shows the drive and network information foryour computer℘ℙℛℜℚChanging the look of the Start menuⓞRight click [Start] button and select [Properties].Choose from either Start menu orClassic Start menu.ⓟIf you want default start menu, click [Start menu] from Taskbar  [Start MenuProperties].ⓠClick [Classic Start menu] if you want to use the menu style from earlier versios ofWidow.ⓡClick [OK]. New start menu style appears on the desktop.
24 Using the systemFixeditemsControl Panel[Switch to Category View] is added to the Control panel to gather similar items ingroup. Classic view shows each item in window. You can choose either Classic orCategory view.Category View Classic ViewShowing the recently used items on the Start menuⓞRight-click on [Start] button and click [Properties].ⓟIn [Start Menu] tab, select [Start menu] and click[Customize].In [Advanced] tab, check [List my most recentlyopened documents] and click [OK].ⓠIn Taskbar and Start Menu Properties window, click[Apply]-[OK].If you click [Start] button the next time, recently useditems appear on the Start Menu.Changing the pinned items in the Start menuⓞRight-click the item you want to pin it to the Start menu.ⓟSelect [Pin To Start Menu].ⓠThe item is pinned at the top of the Start menu.ãTo delete recently opened documents, select [Clear list] from [Advanced] tab. The filesare not deleted in the system even if the lists are cleared.Note
25Using the systemUsing the Windows Classic ThemeUsing a different themeⓞClick [Start]⍛[Control Panel]⍛[Switch to Classic View]⍛[Display].ⓟClick [Themes] tab.ⓠSelect another theme from the [Theme] drop down menu.Changing the Themes and Desktop backgroundⓞClick [Start]⍛[Control Panel]⍛[Switch to Classic View]⍛[Display].ⓟClick [Themes] tab. ⓠSelect [Windows Classic] from the [Theme] drop down menu.You can customize the appearance of desktop by using Theme option such as desktop back-ground, screen saver, icon, window, mouse pointer or sound. For more than one user, each usercan use different theme.ãTo view display properties, click [Start]èè[Control Panel]è[Switch to Classic View]and double-click Display. After selecting Windows Classic, you can customize Windows elements such as windowborders, icons, and menus. Select Appearance tab, and click Advanced. Note
26 Using the systemChanging the desktop backgroundⓞClick  [Start]⍛[Control Panel]⍛[Switch to Classic View]⍛[Display].Click [Desktop] tab. (Or you can right click on the mousewhile in desktop background. When a short cut menupops up, choose [Properties].ⓟScroll down the [Background] drop down menu and selectan image for the background. You can also click [Browse]button and select an image you have saved.Setting the Screen SaverⓞClick [Start]⍛[Control Panel]⍛[Switch to Classic View]⍛[Display]. Click [Screen Saver] tab.ⓟSelect your choice from [Screen savers].Choose stand by time by using scroll bar. To protect important data from other users, select [On resume, password protect], it will ask users a password from the screensave mode.

Navigation menu