LG Electronics USA DT-FG Personal Computer User Manual 46475FC7A5C1F62E717864
LG Electronics USA Personal Computer 46475FC7A5C1F62E717864
Contents
- 1. users manual A
- 2. users manual B
- 3. users manual C
- 4. users manual D
users manual A
FG series
FGseries
Copyright 2004
LG Electronics, Inc., DigitalMate Co., Ltd.
P/N:3828BPH011A
Rev.00
P/N: 3828BPH011A(Rev.00)
ÞMicrosoft, MS, MS-DOS, and Windows are trademarks of Microsoft Corporation.
ÞIBM, IBM Personal Computer, PS/2 and PC AT are trademarks of International Business
Machine Corporation.
Þis a trademark of LG.
ÞCopyright 2004 LG Electronics, Inc., DigitalMate Co., Ltd.
Thank you for using the LG product.
LG has manufactured and tested this product to provide you with a reliable computing
environment.
Please read this manual carefully before using the computer.
This User's guide is for FG model.
Instructions may be different depending on models.
Check your model before reading User's guide.
Keep User's guide at a place where other users always can reach
ÞInformation in this manual may include technical inaccuracies or typographical
errors. Images in this manual are for illustrative purposes only and may be
different from the actual product.
ÞLG reserves the rights to make improvements and/or changes to the product
without notice.
ÞReproducing any or all of the information contained in this publication without
written permission is prohibited.
ÞThis computer complies with the radio frequency and safety standards of any
country or region in which it has been approved for wireless use.
1.Warning: Not following the instruction could result in death or serious injury.
This sign calls attention to features and operations that may be dangerous
to the user. Follow the instruction closely to reduce the risk of bodily harm
or damage to the equipment
2.Caution: Not following the instruction could result in minor or moderate
injury and/or damage to the product.

1Contents
Contents
Package Contents ..................................................................................................................... 1
Important Safety Instructions .................................................................................................. 2
1-1 Package contents..................................................................................................................................... 9
1-2 Components........................................................................................................................................... 10
1-3 Installing the computer ........................................................................................................................... 15
1-4 Attaching external devices (customer purchased devices) .................................................................... 17
1. Installing the system
2. Using the system
3-1 Starting the system setup....................................................................................................................... 44
3-2 Booting with a USB device drive ............................................................................................................ 46
3-3 Setting a password................................................................................................................................. 47
3-4 Changing or removing the password ..................................................................................................... 48
3-5 Recovering the factory default settings .................................................................................................. 50
3-6 Setting up for boot method..................................................................................................................... 51
3-7 Using power saving function .................................................................................................................. 52
3-8 Using Hyper-Threading function ............................................................................................................ 53
3. System Setup
4. System Recovery ................................................................................................................ 54
5. Reinstallation of Drivers
Specifications . . . . . . . . . . . . . . . . . . . . . . . . . . . . . . . . . . . . . . . . . . . . . . . . . . . . . . . . . . . . . . . . . . . . . . . . . . . . . . . . . . . . . . . . . . . . . . . . . . . . . . . . . . . . . . . . . . . . . 8 2
6-1 Opening the computer case ................................................................................................................... 62
6-2 Main board ............................................................................................................................................. 63
6-3 Connectors............................................................................................................................................. 64
6-4 Replacing the CPU................................................................................................................................. 66
6-5 Increasing memory................................................................................................................................. 68
6-6 Adding a hard disk driver ....................................................................................................................... 72
6-7 Installing expansion cards...................................................................................................................... 80
5-1 Reinstalling the printer driver ................................................................................................................. 56
5-2 Reinstalling the sound driver.................................................................................................................. 60
5-3 Reinstalling the video driver ................................................................................................................... 61
2-1 Turning on the computer ........................................................................................................................ 18
2-2 Using Windows XP................................................................................................................................. 21
2-3 Turning off the computer ........................................................................................................................ 28
2-4 Restarting the computer......................................................................................................................... 29
2-5 Using Mouse .......................................................................................................................................... 30
2-6 Cleaning the mouse ............................................................................................................................... 32
2-7 Using keyboard ...................................................................................................................................... 33
2-8 Using the optical disk driver ................................................................................................................... 35
2-9 Using hard the disk driver ...................................................................................................................... 36
2-10 Computer virus..................................................................................................................................... 39
6. System Expansion
2 Important Safety Instructions
These safety instructions will ensure many years of safe enjoyment from the prod-
uct. Read this safety instructions carefully before installing the computer.
Installing the computer
Important Safety Instructions
Do not operate your computer near water for example, in a bathroom.
The computer may not function correctly, and there is the risk of electric shock.
Operate the computer within a temperature range of 41 to 95ĕ(5Ë~35Ë) and 30 to 80% of
relative humidity.
Safely dispose of the packing materials, such as desiccant and plastic bags.
Children may swallow desiccant or suffocate from plastic bags.
Keep your computing environment clean and free of dust.
There is a risk of dysfunction to the computer.
Keep away from the moisture condensation.
It may damage on the computer. If this happens, turn off the computer and make it dry
before power is on.
Do not place any object within 15cm of the computer.
The computer may overheat and result in fire or injuries.
Keep your computer away from electromagnetic fields.
Exposure to the electromagnetic field may result in loss of data in the hard disk drive and/or
damage to the monitor.
3Important Safety Instructions
Do not use loose or damaged power plugs.
There is a risk of electric shock or fire.
Use a correct voltage outlet.
There is a risk of fire or electric shock.
Use properly grounded outlet.
Connecting the computer to an outlet without proper grounding may result in electric shock
and damages to your computer.
Use your computer at the proper voltage/current level indicated.
There is a risk of fire or electric shock.
Do not touch or grab the power plug with wet hands.
There is a risk of fire or electric shock.
If you hear a noise from the power cord or outlet, unplug the power cord imme-
diately, and contact the customer service for help.
There is a risk of fire or electric shock.
Hold the plug body when removing the power cord from an outlet.
There is a risk of fire and damages to the computer.
Make sure the power plug fits snugly into the electrical outlet.
Loose fit may result in fire.
Keep near the power cable and power cord clean.
There is a risk of fire.
If an object or liquid enters the computer or an adaptor, remove power cord,
battery, and any other cables from the computer, and contact the customer
service for help.
There is a risk of an electric shock, fire, or damage to the computer.
Connecting to the power

4 Important Safety Instructions
Using the computer
Use properly grounded outlet.
Connecting the computer to an outlet without proper grounding may result in electric shock
and damages to your computer.
Use your computer at the proper voltage/current level indicated outlet.
There is a risk of fire or electric shock.
Do not bend or place a heavy object on top of the power cord. Keep the chil-
dren and pets from damaging the power cord.
Damaged power cord may result in electric shock or fire.
For cleaning your computer, use mild detergent or computer cleaning prod-
ucts.
Be sure to dry completely before using the computer.
Using the computer without completely drying it may result in electric shock or fire.
During a lightning storm, disconnect the power cord, telephone line, and LAN
cable from the computer.
There is a risk of electric shock or fire.
Do not place water, chemicals, or liquid of any kind on the computer.
Liquid of any kind entering inside the computer may result in an electric shock, fire, or dam-
age to the computer.
Do not connect the modem directly to a multi-line telephone.
There is a risk of fire or damage to the computer.
If you drop your computer, remove the power cord and battery pack, and then
contact the customer service for check.
There is a risk of electric shock or fire.
Do not expose your computer to the direct sunlight.
The computer may overheat and result in fire or injuries.

5Important Safety Instructions
Do not place a burning candle or cigarette on the computer.
There is a risk of fire or damage to the computer.
If you see or smell smoke from the computer or adaptor, turn off the computer,
remove the power cord, and then contact the customer service for help.
There is a risk of fire.
Upon completion of any service or repairs, ask service technician to perform
safety checks.
Ignoring safety checks may result in electric shock or fire.
Keep the computer away from heat.
The computer may deform and there is a risk of fire.
Turn on the external devices first and the system.
There is a risk of damage to the computer.
Turn off the external devices first and and the system.
There is a risk of damage to the computer.
Use only the proper devices to the connector.
There is a risk of damage to the computer.
Do not use any damaged CD or floppy disk.
There is a risk of damage to the computer or injuries.
Use the Wireless LAN at least 5 meters away from a microwave oven or plasma
lamp. When using the Wireless LAN near a plasma lamp, use the channel 11, 12,
or 13.
The connection can be unavailable or slow.
Do not press eject button while the CD-ROM or floppy drive is in use.
Data can be lost and there is a risk of injuries.
Place the memory card in a correct position when inserting it.
There is a risk of damage to the memory.
Do not drop the parts of computer.
There is a risk of injuries or damage to the computer.
6 Important Safety Instructions
Carrying and storing the computer
Before moving the computer, turn the power off and remove all the cables.
You may trip over the loose cables and fall.
Upgrading the computer
Keep screws and other small parts away from children.
Children may choke on a screw or other small part. If a child swallows a small part, receive a
medical care.
Do not disassemble the power supply devices.
There is a risk of an electrical shock.
Before disassembling the computer for upgraing purposes, turn off the power
and remove the power cord, phone line and battery pack.
There is a risk of electric shock or fire. If you need to open the computer cover, contact the
Technical support for help.
Do not attempt to disassemble or modify the computer without consulting
Technical support. If you need to open the computer cover, contact the
Technical support for help.
There is a risk of an electrical shock.
Always refer to the User's guide.
There is a risk of injury.
Replace only with the parts approved by LG.
There is a risk of fire or damage to the computer.
Consult with the customer service before connecting and using the computer
with any non-LG product.
There is a risk of damage to the computer.
7Important Safety Instructions
Be cautious when handling the hard disk drive.
ÞThe hard disk drive is very delicate to any physical impact. Always make backups for your data.
ÞLG is not responsible for the data lose caused by users.
The data on the hard disk or the drive itself may be damaged in the following
situations.
ÞExposure to a physical shock during the disassembling or installing process.
ÞThe computer is reset (rebooted), for example by power outage, while the hard disk drive
is operating.
ÞExposure to computer virus
ÞThe computer is turned off during operation.
To prevent data loss due to hard disk drive damages, always backup your data.
LG is not responsible for the loss of data.
Preventing data loss (handling hard disk drives)
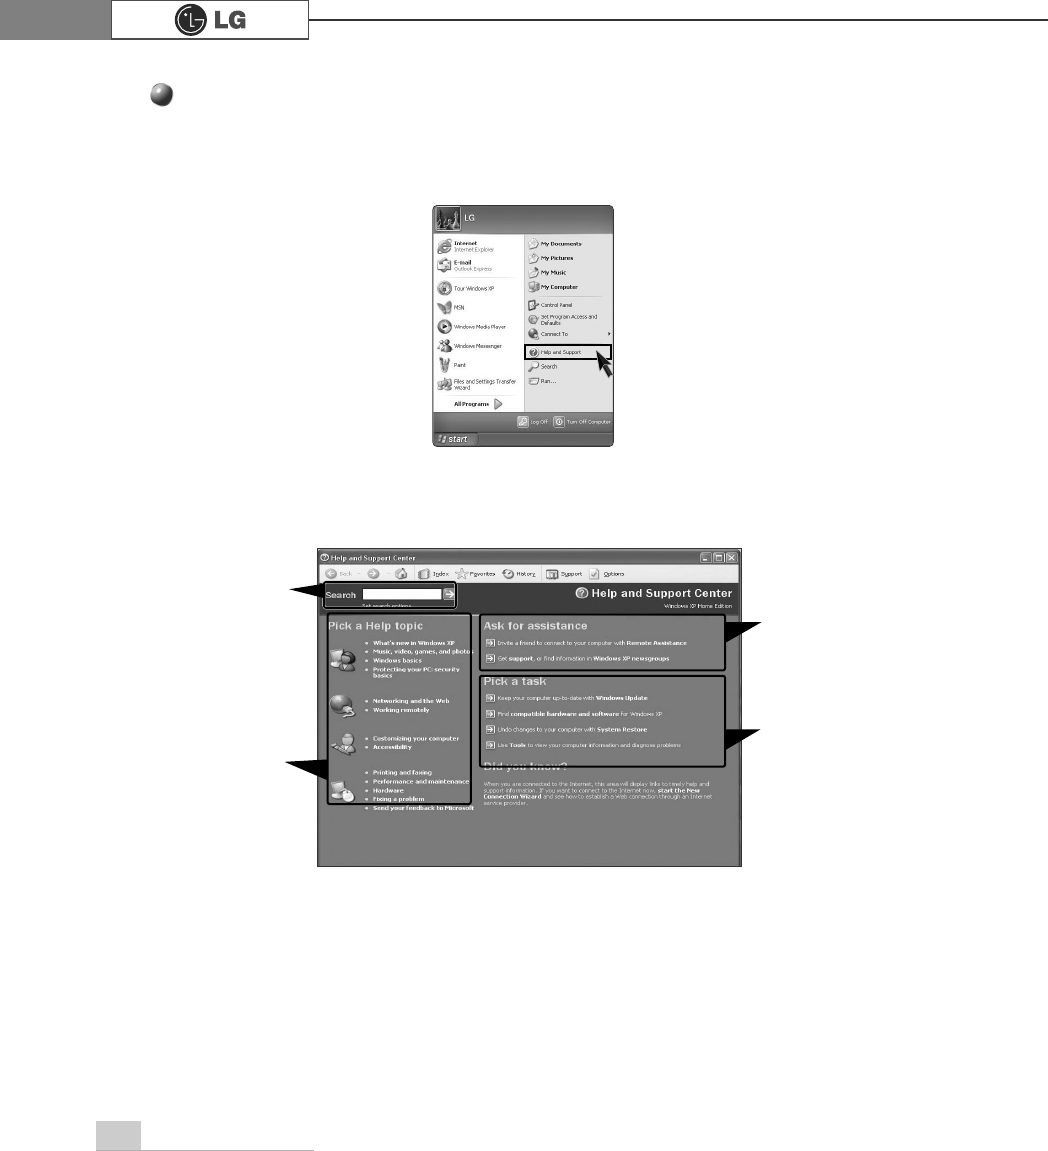
8 Help and Support
ⓞ
Click [Help and Support] to learn how to solve problems you may encounter
while using the computer. Click [Start]⍛[Help and Support].
ⓟ
The following window appears
Help and Support
You can search for
useful Help and Support
information.
Click to learn the fea-
tures and troubleshoot-
ing information
You can connect to the
Internet and ask for
assistance online.
You can setup and
configure your computer
to personalize your
computing environment
1. Installing the system
9Installing the system
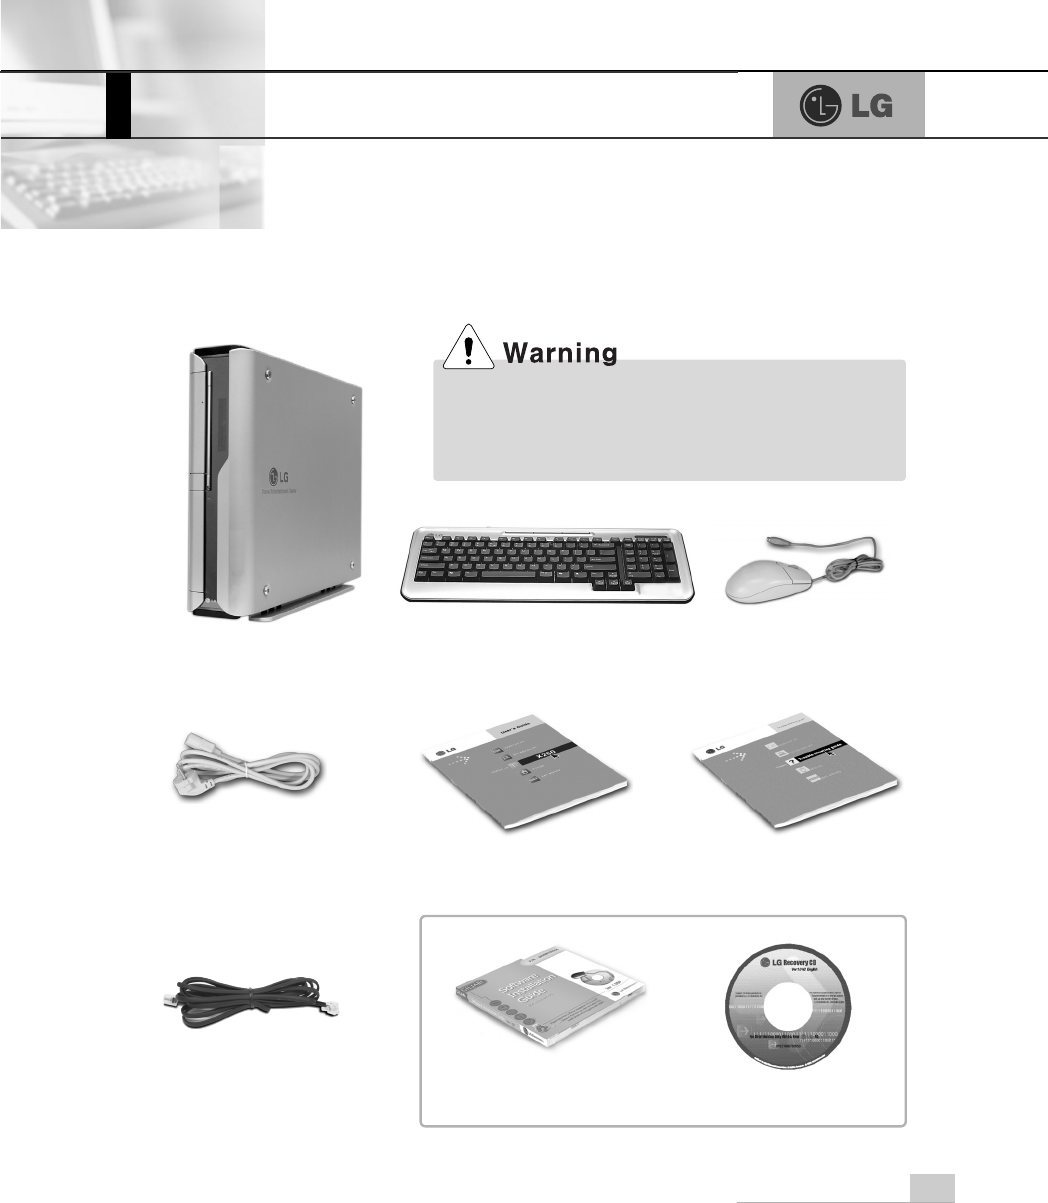
3DFNDJHFRQWHQWV
The following items are included in this package. Match the items below
with the items in your package. Some items may look different from the pictures.
When cleaning your computer, use cleaning products
manufactured specifically for computing equipment.
Using abrasive chemicals, such as paint thinner, ben-
zene, or alcohol, may damage your computer.
Computer Mouse
Keyboard
Power cable
7URXEOHVKRRWLQJJXLGH
User's guide Trouble-shooting guide
LG Giljabi CD
(Software installation CD) Recovery CD
Modem cable
10 Installing the system
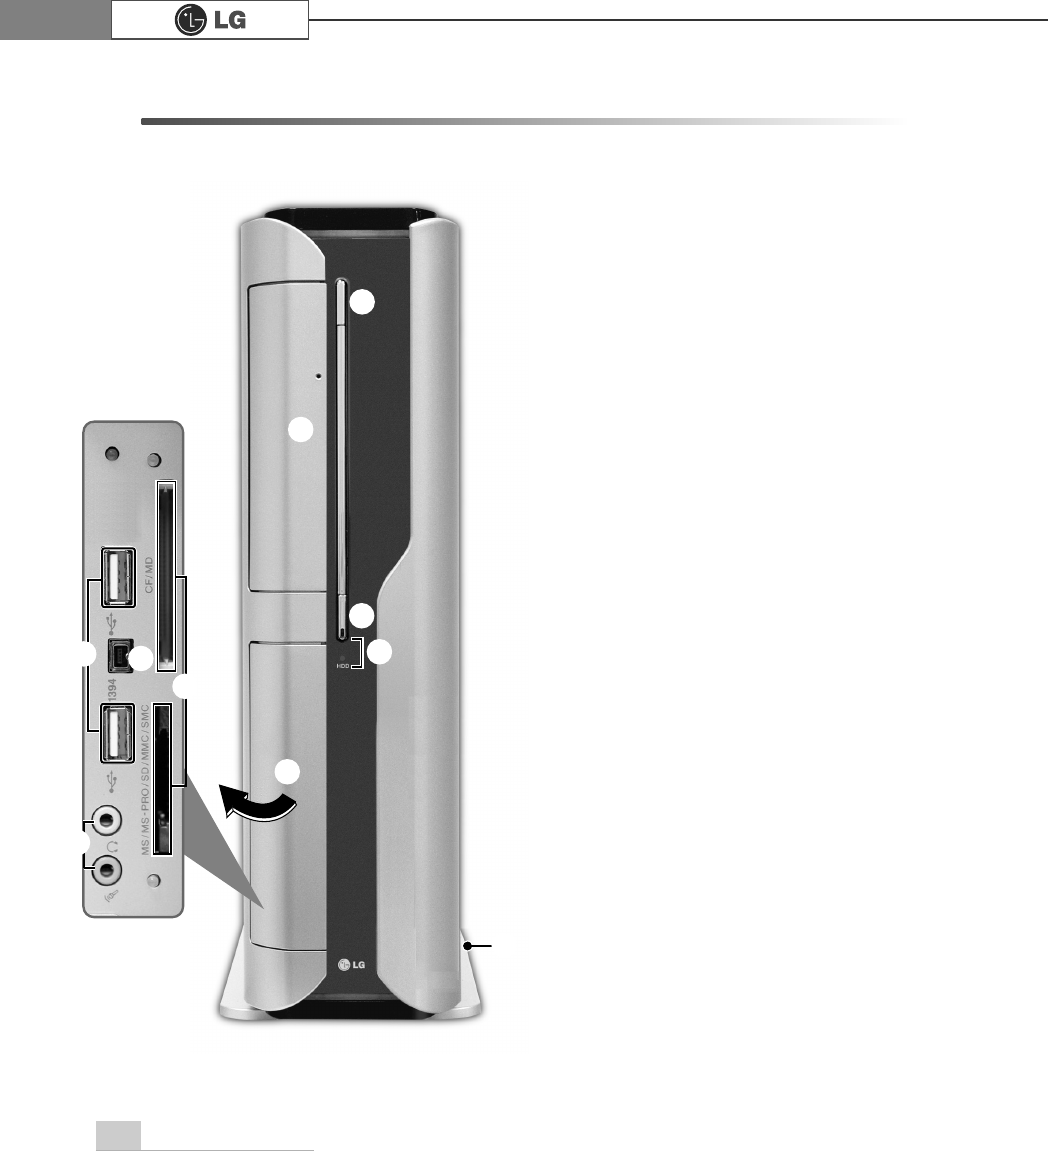
1-2. Components
Front view
ℚ
ℛ
℘
ℙ
ℜ
℡
℟
ℝ℞
℠
℘Power Button
Turns on/off the computer.
ℙPower Lamp and H/D Indication
Lamp
Indicates the power and the hard
disk state when the computer is
turned on. (When the hard disk is
running, the lamp will blink. -
However, this feature may not
function in some systems.)
ℚCD-ROM Drive Button
Inserts or ejects a CD in/from the
CD-ROM drive.
(The cover is opened and closed
automatically if the user presses this
button.)
ℛCD-ROM Drive
Operates a large-capacity data CD
or video/audio CD as one of auxiliary
memory devices. (Depending on
product model, CD-RW and DVD-
ROM drives may be equipped.)
ℜInput/Output Port Cover
The user can open the cover by
pulling the cover as shown in the
figure.
11
Basics
ℝUSB (USB 20 Port) Connector
Connects USB devices or hubs (including a USB mouse or digital camera).
℞IEEE1394 Connector
Connects IEEE 1394-4 4-pin devices (including a camcorder).
℟Audio connector
Headphone connector
A port for external earphones.
Microphone Connector
A port for external microphone.
℠Multimedia Card Slot
Hosts various portable memory cards - CF, MD, MS, MS-PRO, SD, MMC, SMC
and others.
℡Support
The support of for stable installation of the main body of the computer.
Each slot is marked with a symbol indicat-
ing proper card types that can be accom-
modated. Check the symbol and insert a
right type of memory card in the direction
as shown in the figure.
Do not delete [Safely Remove Hardware]
( ) icon. Otherwise, the computer needs
rebooting to use the memory card slot.
ã6~9 are the options parts differ by product model. For more information about optional
parts, see Option Guide of Giljabi CD.
Note
ãRemove the support to use your computer laid down.
ãTo use the computer with the body standing, install the support. Otherwise, the system
may function unstably.
12 Installing the system
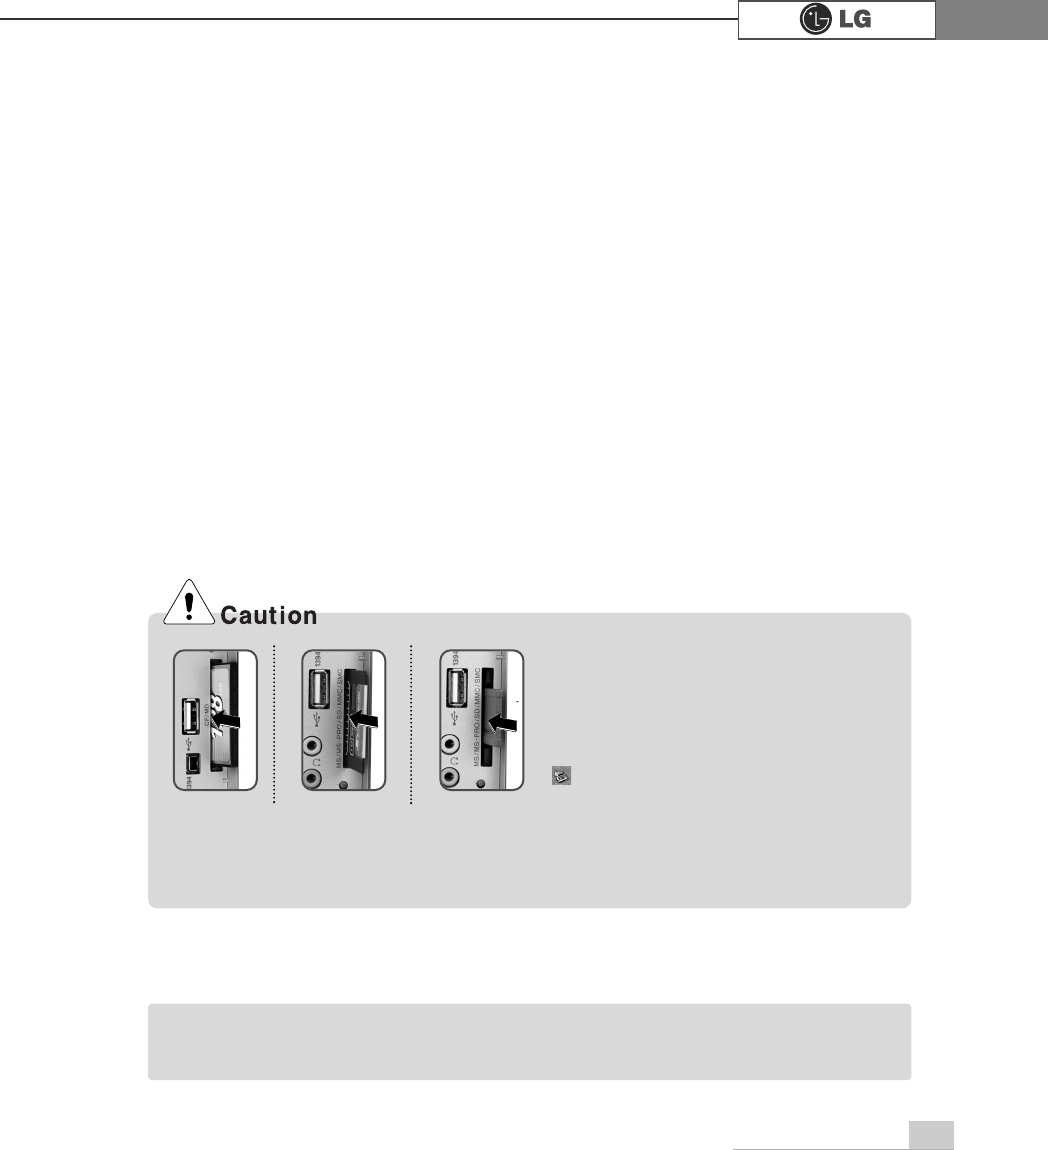
Rear view
℘
ℙ ℚ
ℜ
ℝ
℞
℟
℠
ℛ
⌅
℡
ãYour computer may have different features and configuration from the computers
shown above.
ãPower specifications may be different depending on the country or region, check the power
specifications before use.
Note

13Installing the system
℘Power connector
Connects electrical power to the computer.
ℙKeyboard connector
Connects PS/2 connector.
ℚMouse connector
Connects PS/2 mouse.
ℛUSB(USB 2.0 port) connector
Connects to USB devices or HUB(USB mouse or digital camera can be connected).
ℜIEEE1394 connector
Connects to IEEE1394 6pin connector.
ℝParallel connector
Connects to parallel devices such as printer or scanner.
℞Serial connector
Connects to serial devices.
℟Video connector
Connects to a monitor.
℠LAN
Enables 10/100Mps network connection when connected as UTP with HUB.
≕Digital audio output connector(S/PDIF)
Connects to digital audio devices.
⌅Audio connector
Exteral speaker connector
Connects to external speaker connector.
Line connector
Connects to external audio connector.
Micro phone connector
Connects to external micro phone connector.
Do not disassemble power supplies.
There is a risk of electrical shock.
ãModem cable is offered for models that support modem card.
Note
14 Installing the system
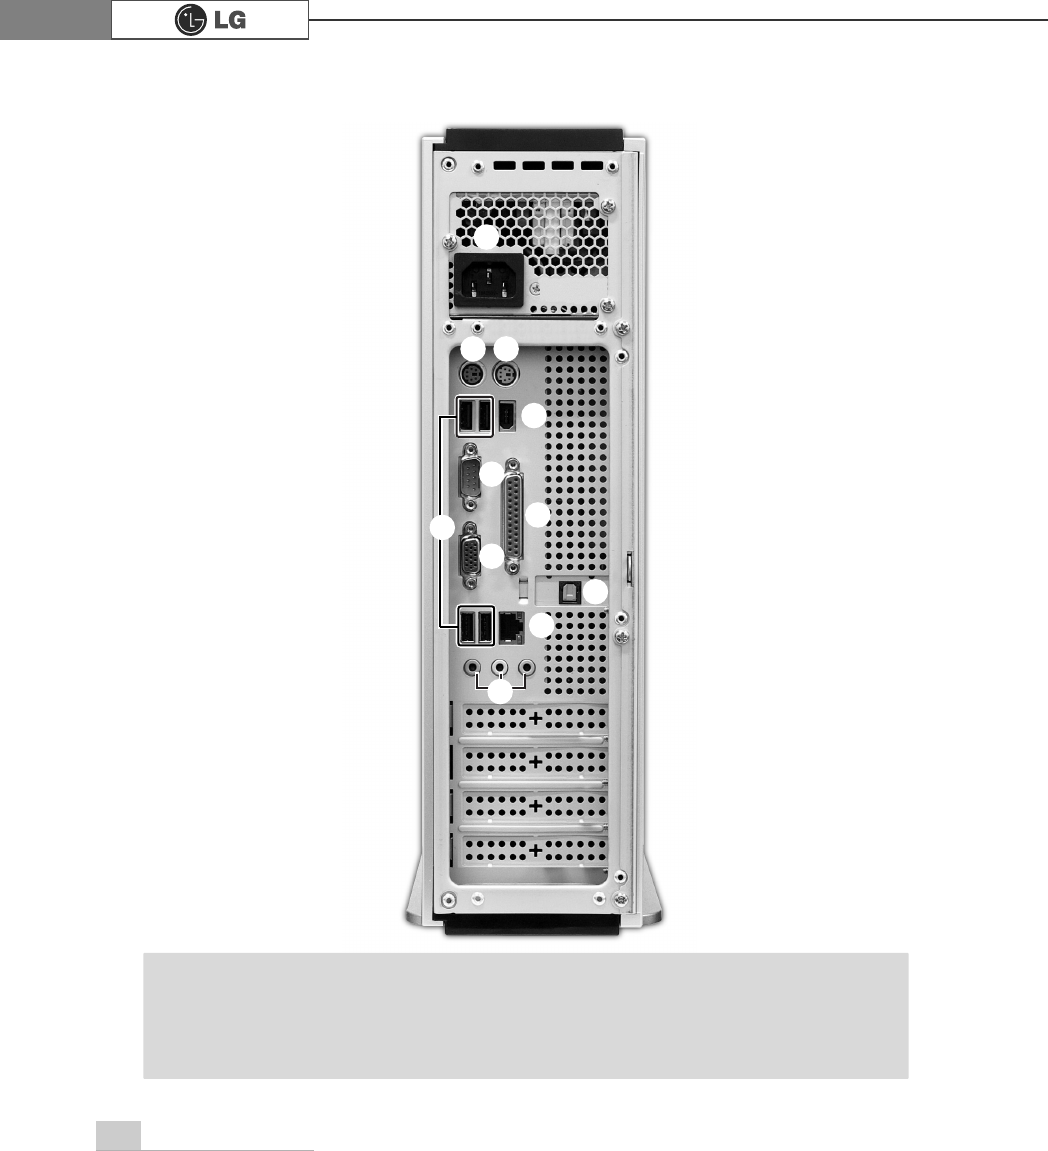
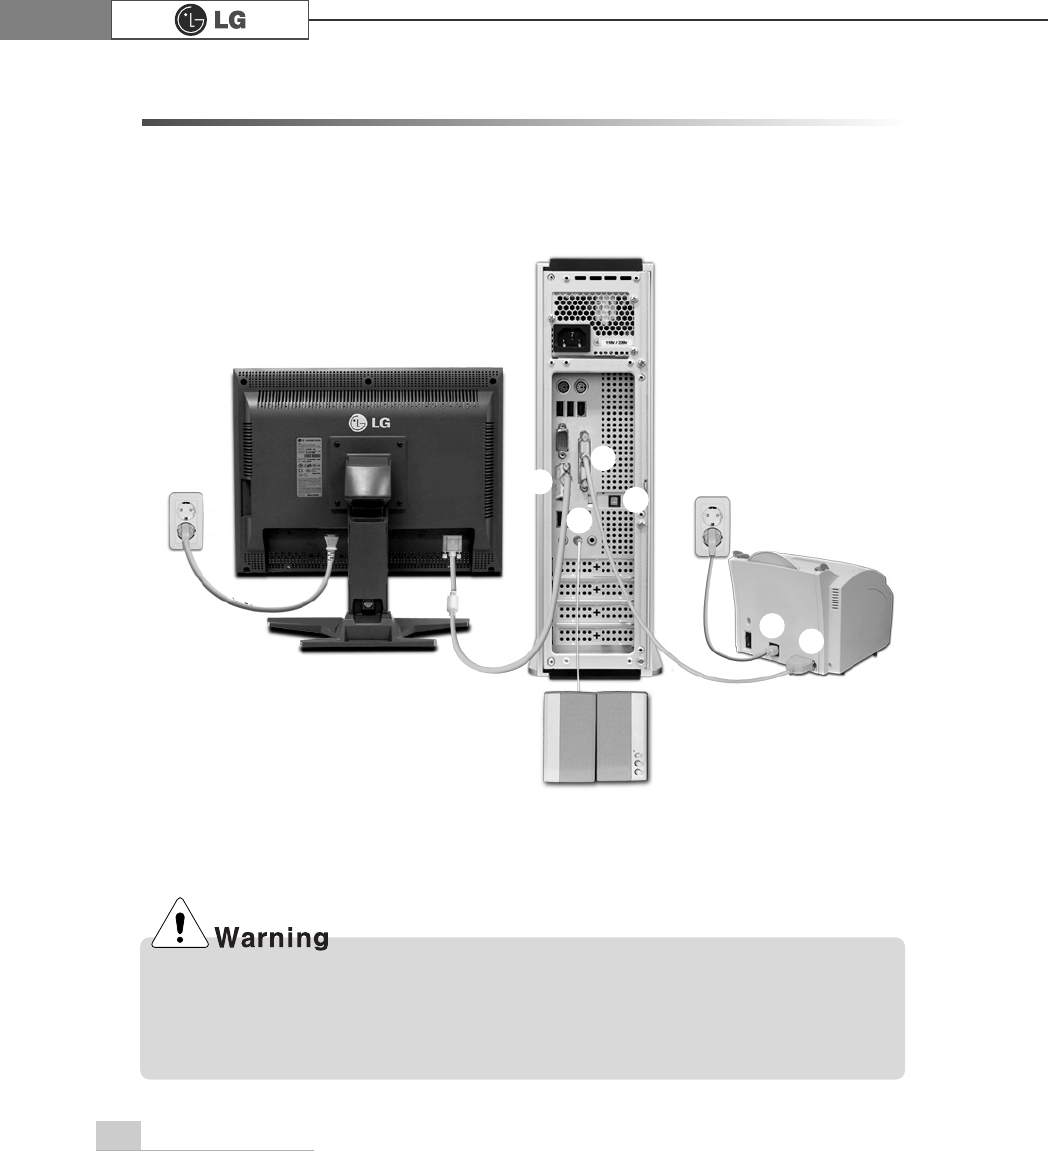
1-3. Installing the computer
Installing your computer may be easier than you think. Before the installation, be
sure to turn off the computer and other peripheral devices. The mouse and key-
board connectors look identical therefore, check the icons above the connectors
before attaching the mouse and keyboard. Your computer may be installed with
different expansion cards from the picture below.Some items may look different
from the picture.
ãDo not place a glass or container with water, chemicals, or liquid of any kind in it on the
computer.
ãThere is the risk of electric shock and/or damage to the computer.
℘ ℙ
ℚ
ℛ
15Installing the system
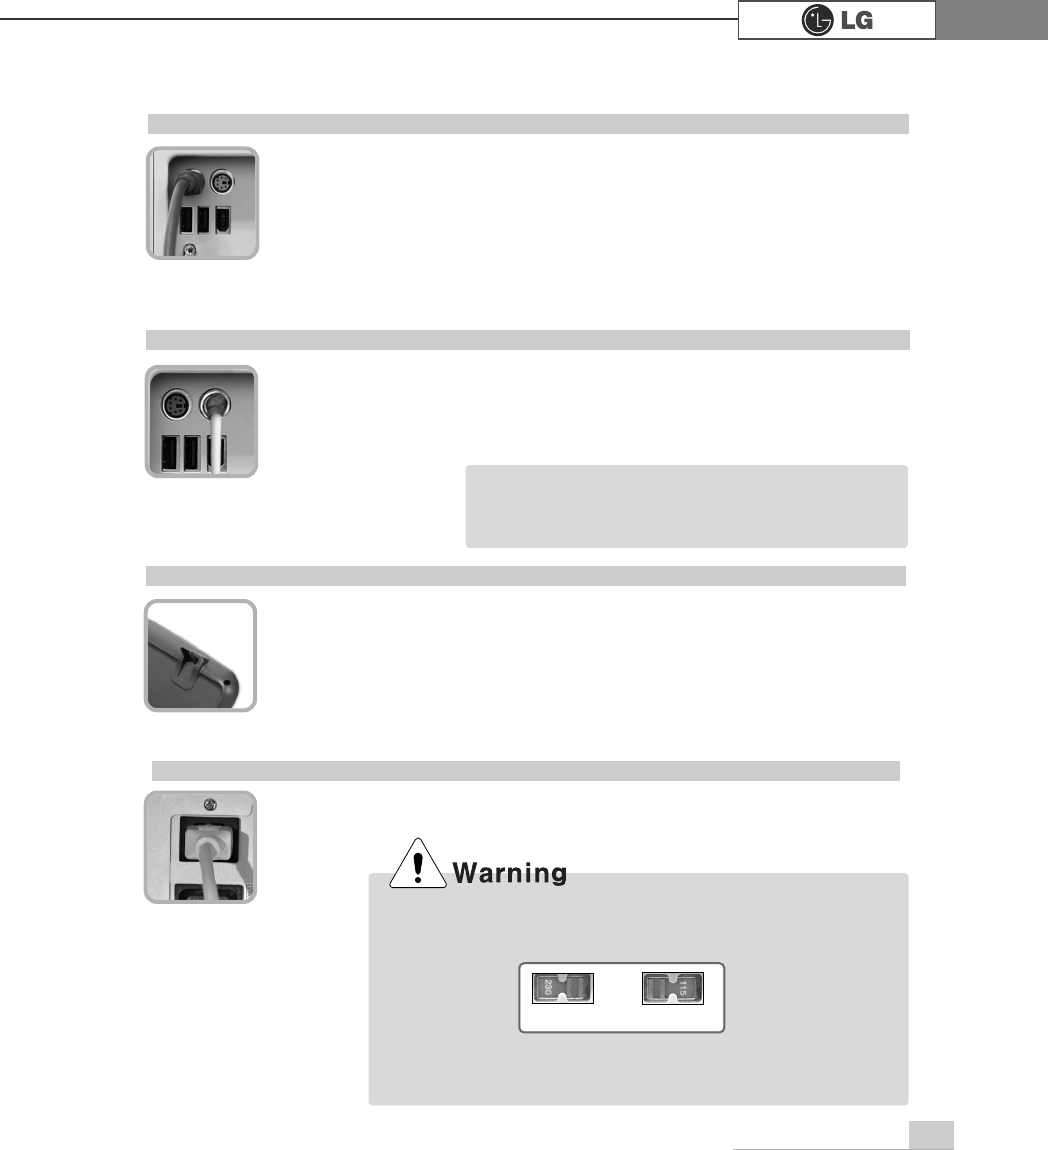
The round connector on the mouse cable fits into the PS/2 connector
on the rear of the computer. Be sure to align the 6 pins on the cable
with the corresponding holes on the connector.
ℙ
Connecting a mouse
Attach the power cord to the computer and then plug the power cord
into a wall socket.
Power supply is 110V/220V (selection) or 220V only.
ℚConnecting to power
Align the pins and holes, and attach the keyboard cable to the computer
as shown in the picture.
The keyboard cable has a round connector with 6 pins.
The mouse cable has a round connector with 6 pins.
℘
Connecting a keyboard
ãFor USB mouse users, USB connectors are
located both the front and rear of the computer.
Note
Lift the stand to use the keyboard more comfortably.
The keyboard stand is located at the bottom of the keyboard.
ℛKeyboard stand
ã
Operate the product at the proper voltage when selecting 110V
or 220V power supply. Incorrect use of power supply may
damage on the product or fire.
ã
Power supply is 110V/220V (selection) or 220V only.
ã
Check the location of the switching button when 110V/220V
(selection) is used.
220V use 110V use
16 Installing the system
1-4. Attaching external devices(customer purchased devices)
ℙℚ
ℜℛ
ℝ
℟℞
℘
ãDo not connect too many cables to one extension cord. An electric shock may occur.
ãDo not leave the power cord below the body.
ãDo not touch the outlet when connecting or disconnecting the power cord. An electric shock
may occur.
17Installing the system
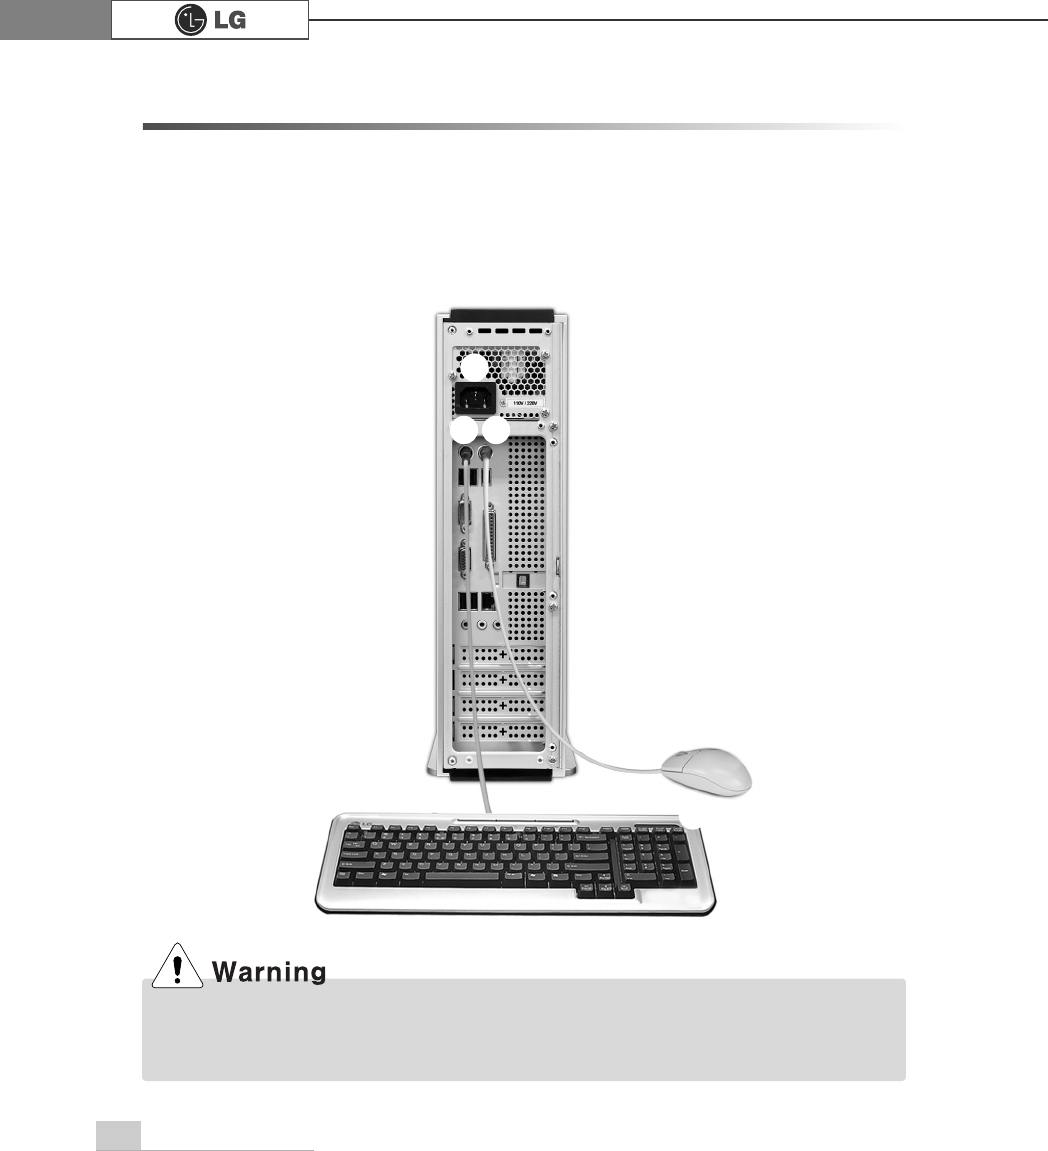
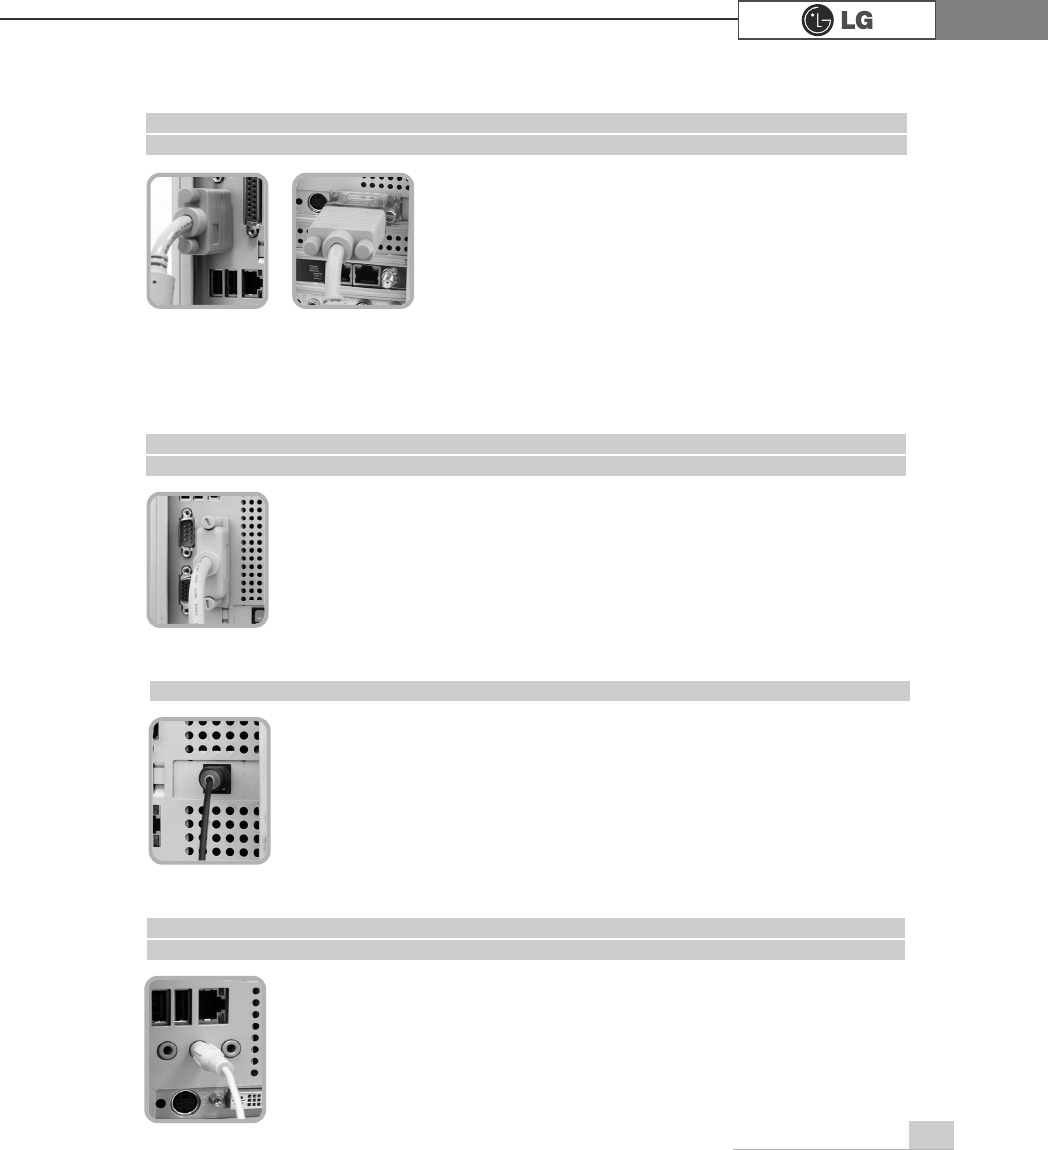
℘Connect the monitor cable to the video card. The
moitor cable sends signals from the computer to the
monitor.
ℙConnect the power cord to the monitor and plug it into
power outlet. The power cord supplies power from the
electrical outlet to the monitor. You must turn on and
off the monitor with the power button on the monitor.
Check the power spec ification of the monitor before
connecting the power cord to the computer.
The monitor cable and power cord are included with the monitor.
For more details, refer to the User's manual that comes with the monitor.
Connecting a monitor (customer purchased devices)
ℚConnect the printer cable to the parallel connector on the computer.
ℛConnect the other side of the cable to the printer.
ℜConnect the power cable to the printer
ℝPlug the power cord into an electrical outlet
The printer cable and power cord are included with the printer.
For using the printer, refer to the user manual that comes with the printer.
Connecting a printer (Customer purchased devices)
℞Connect an optical cable to the speakers to use S/PDIF function.
You can listen to the digital sound from an optical speakers by using S/PDIF function.
Optical line-out: S/PDIF (Customer purchased devices)
℟Connect a speaker cable to the spaker connector on the rear or
the computer.
Speakers are not included in this package.
You must connect an external speaker to output sound.
Connecting a speaker (Customer purchased devices)
Using a built-in
video card
Using a video card
you have installed
2. Using the system
18 Using the system
Make sure if there is nothing in Floppy disk and see if the computer is well connected
to the power cable and other external device drivers. You should complete registration
process. Start registration process following the instruction after turning on the com-
puter.
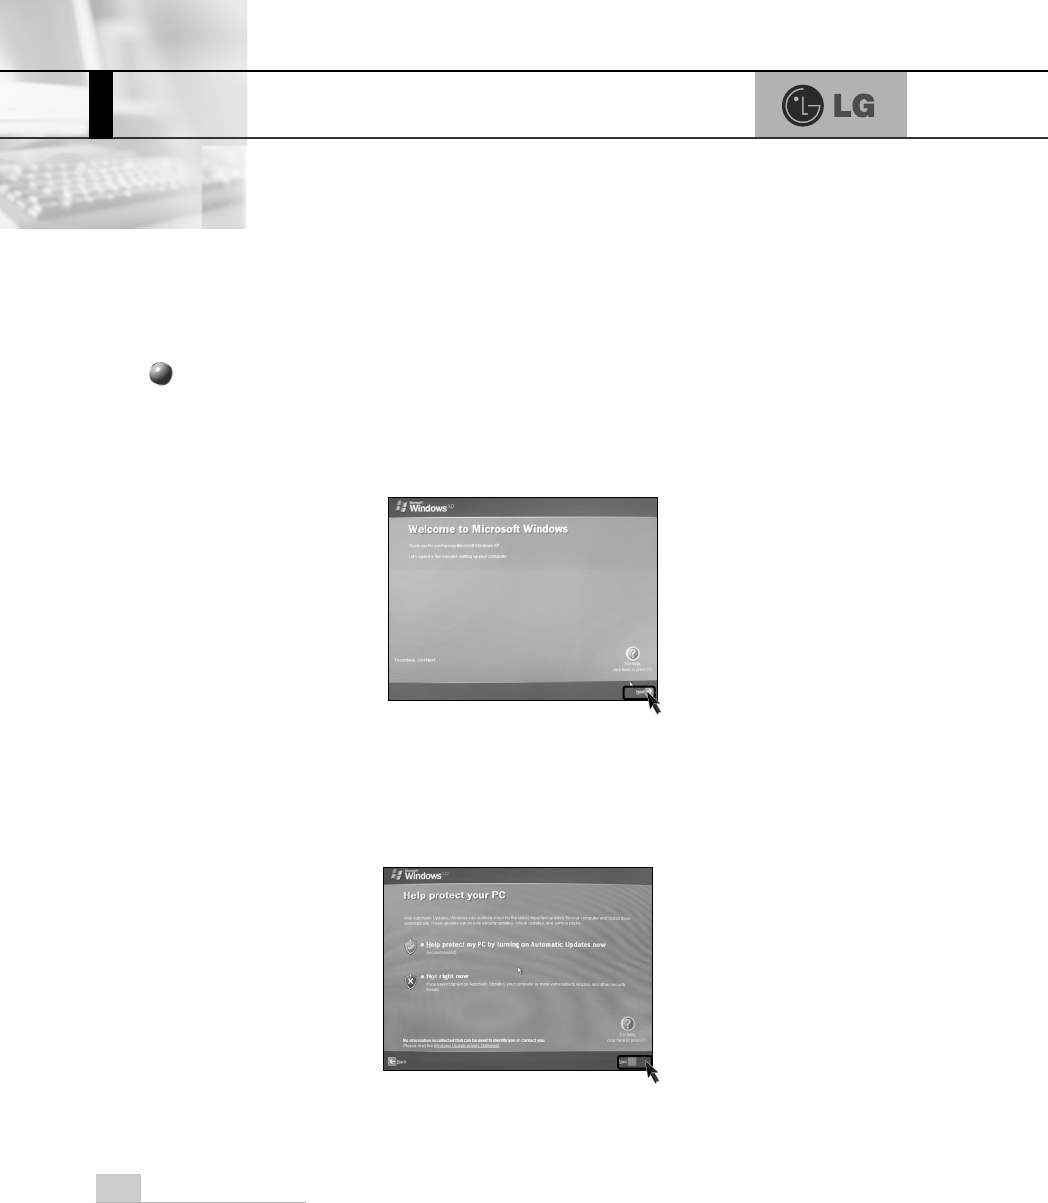
2-1.Turning on the computer
ⓞPressing the power switch starts the self-diagnostic procedures; then Windows(R) XP
startup screen is displayed .In a moment, a dialogue box, saying "Welcome to
Microsoft Windows" appears on the screen. Then Click [Next].
Registration process
ⓟAfter "Help protect your PC" message appears on the screen, select "Help protect
my PC by turning on Automatic Updates now" and then press [Next].
19Using the system
ⓡIf you turn the power on the computer for the first time, you have to register your
copy of Windows XP. The registration process may differ depending on the model,
but the difference does not affect the use of your computer.
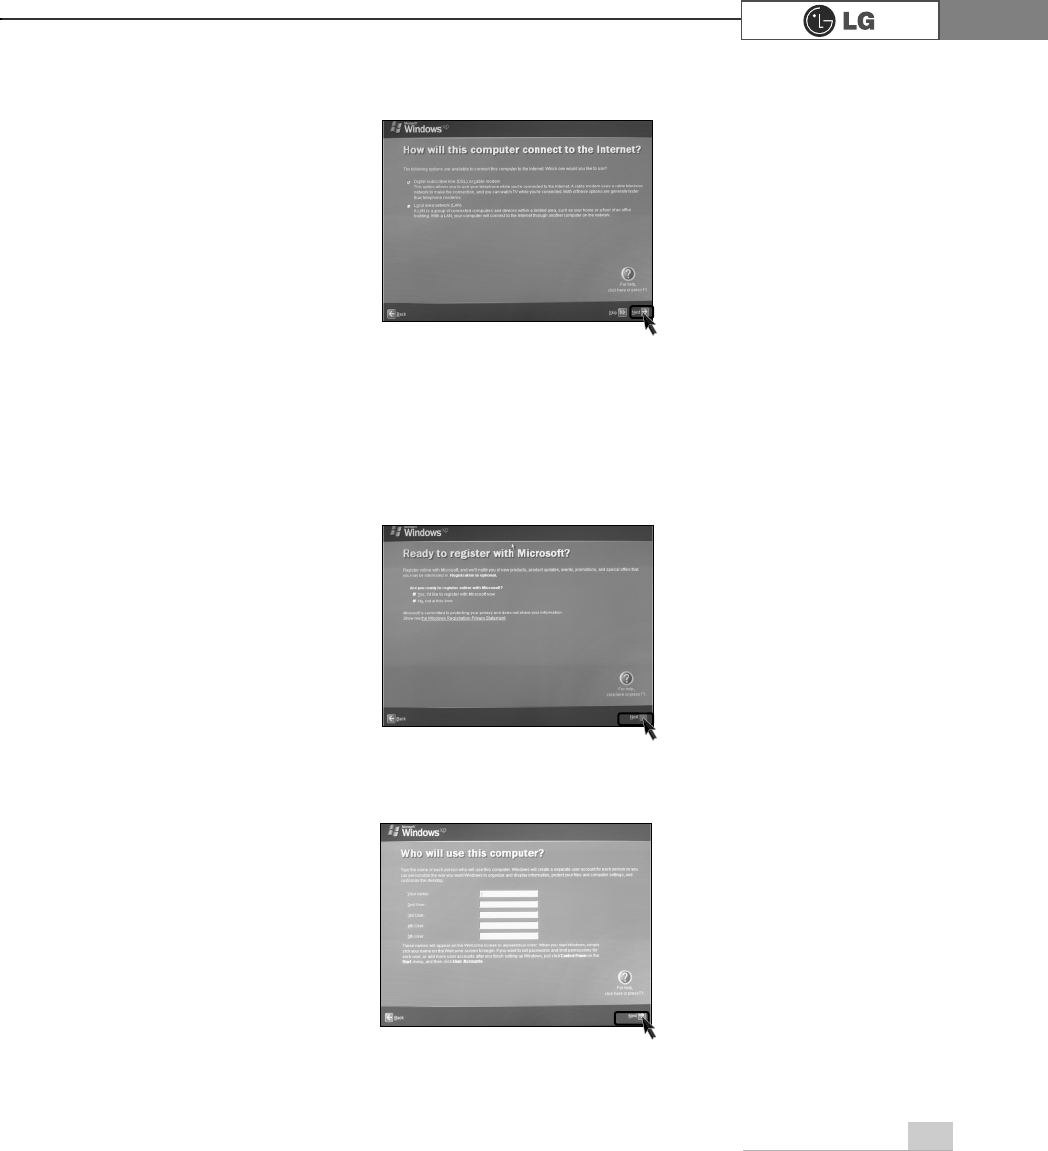
ⓠInternet connection option screen appears, follow the instruction.
ⓢ"Who will use this computer?" message appears on the screen. Type the names
of the users and click [Next].
20 Using the system
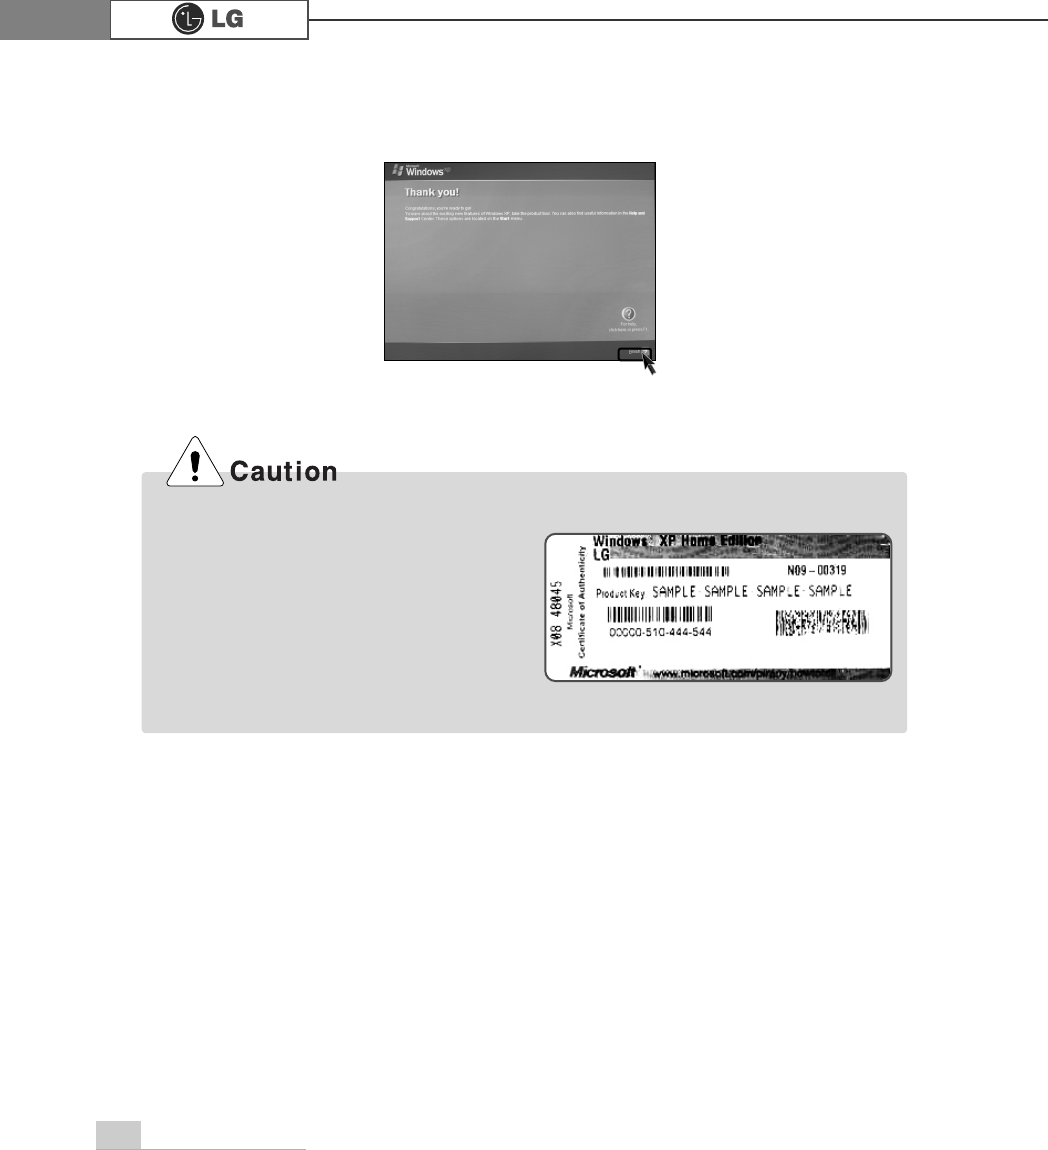
ⓣ"Thank you!" message appears on the screen.
Click [Finish] to complete the registration process.
Windows Certificate includes the product
number which proves your Windows
Operating System is original product.
Please always keep this certificate with
you.
The Windows Certificate you have may
look different from the picture.
Windows Certificate
21Using the system
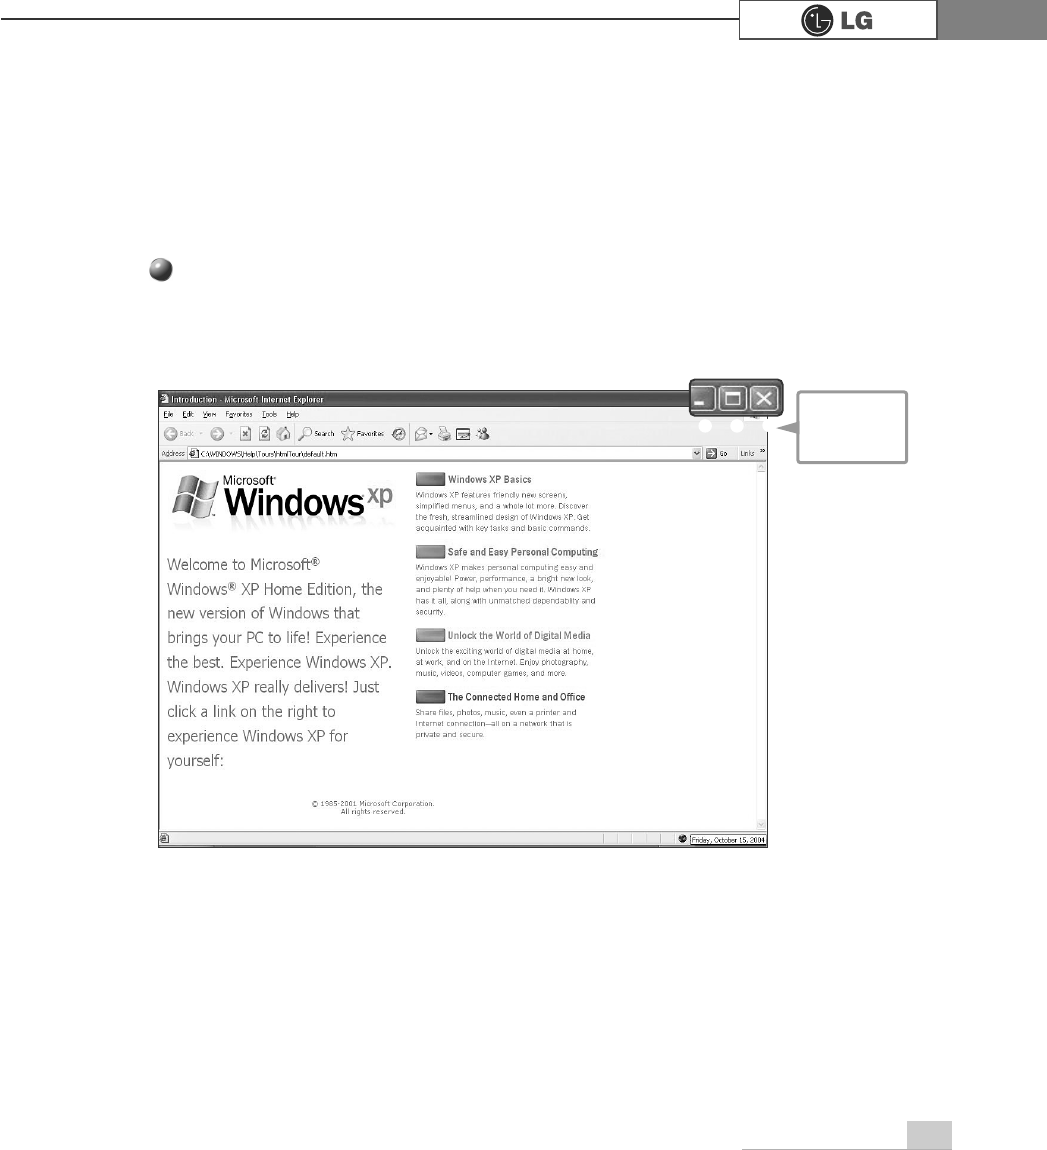
2-2.Using Windows XP
Windows XP is new, brilliant and easy-to-use. Background and title bar have been
rearranged concisely, and it became easier to access the application programs from
the start menu. Also, it allows users with more diverse options to choose from when
decorating desktop's appearance.
Click [Start]
⍛
[Tour Windows XP] to explore the features and tools available in
Windows XP.
Windows XP is an operating system that runs a computer. Learning the basics
features in Windows is recommended to utilize a computer effectively.
Overview
℘ℙℚ
℘Minimize
ℙMaximize
ℚClose
22 Using the system
ℙ
℘ℚℛ
ℜ
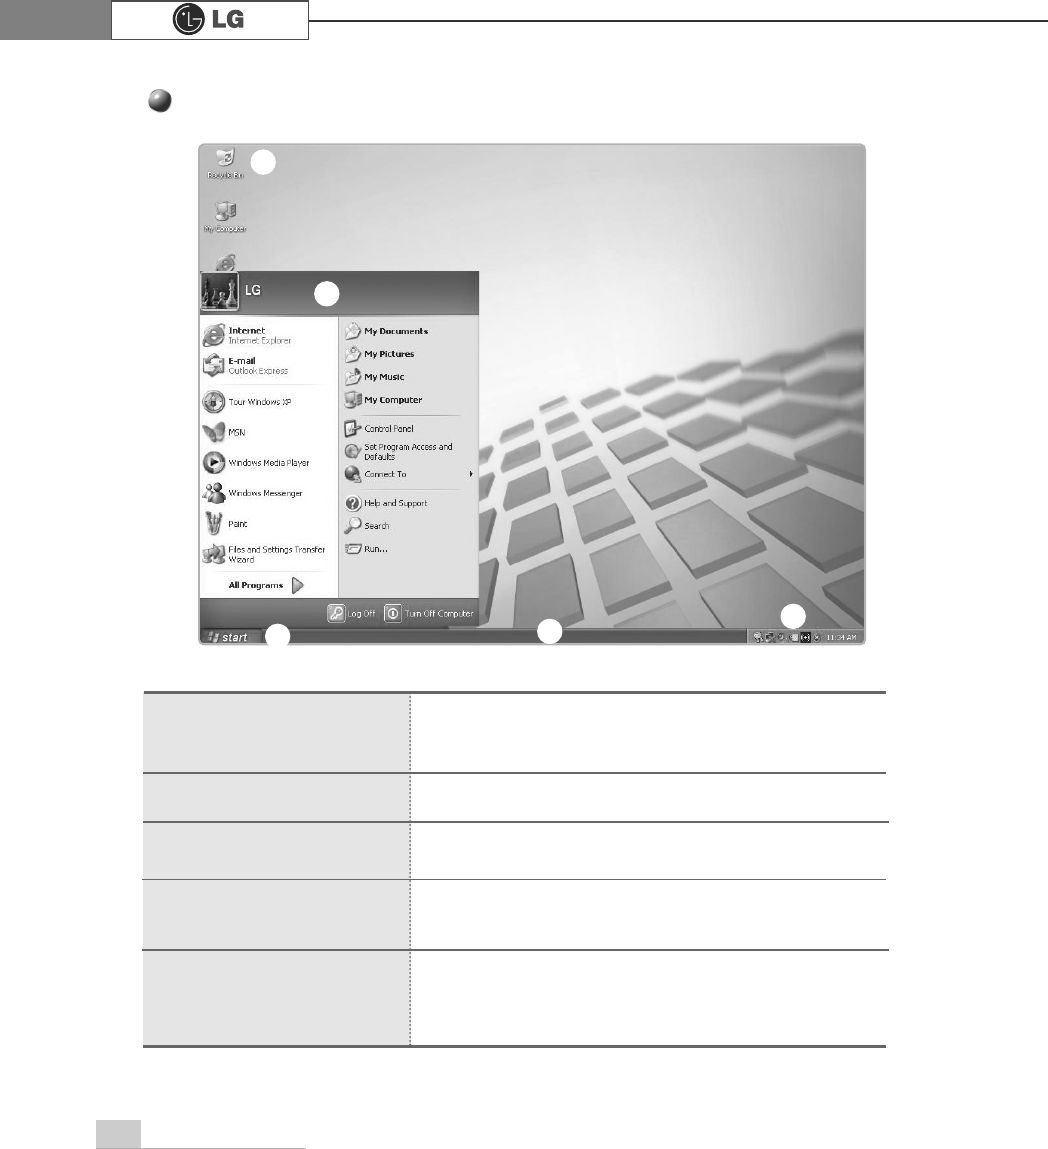
Windows XP desktop
Click [Start] button to open the [Start] menu. Click [All
Programs] to open the list of programs installed in the
computer.
[Start menu] shows everything you need to start work-
ing in the Windows XP environment.
Taskbar shows programs that are currently open and
running.
Taskbar icons show and let you configure ongoing
activities such as battery power status, display proper-
ties, LAN settings, etc
Put your unused items and files in the Recycle Bin.
Right-click the Recycle Bin and select [Empty Recycle
Bin] to permanently delete the items inside the Recycle
Bin
℘[Start] button
ℙ[Start] menu
ℚTaskbar
ℛTaskbar icons and clock
ℜRecycle Bin
23Using the system
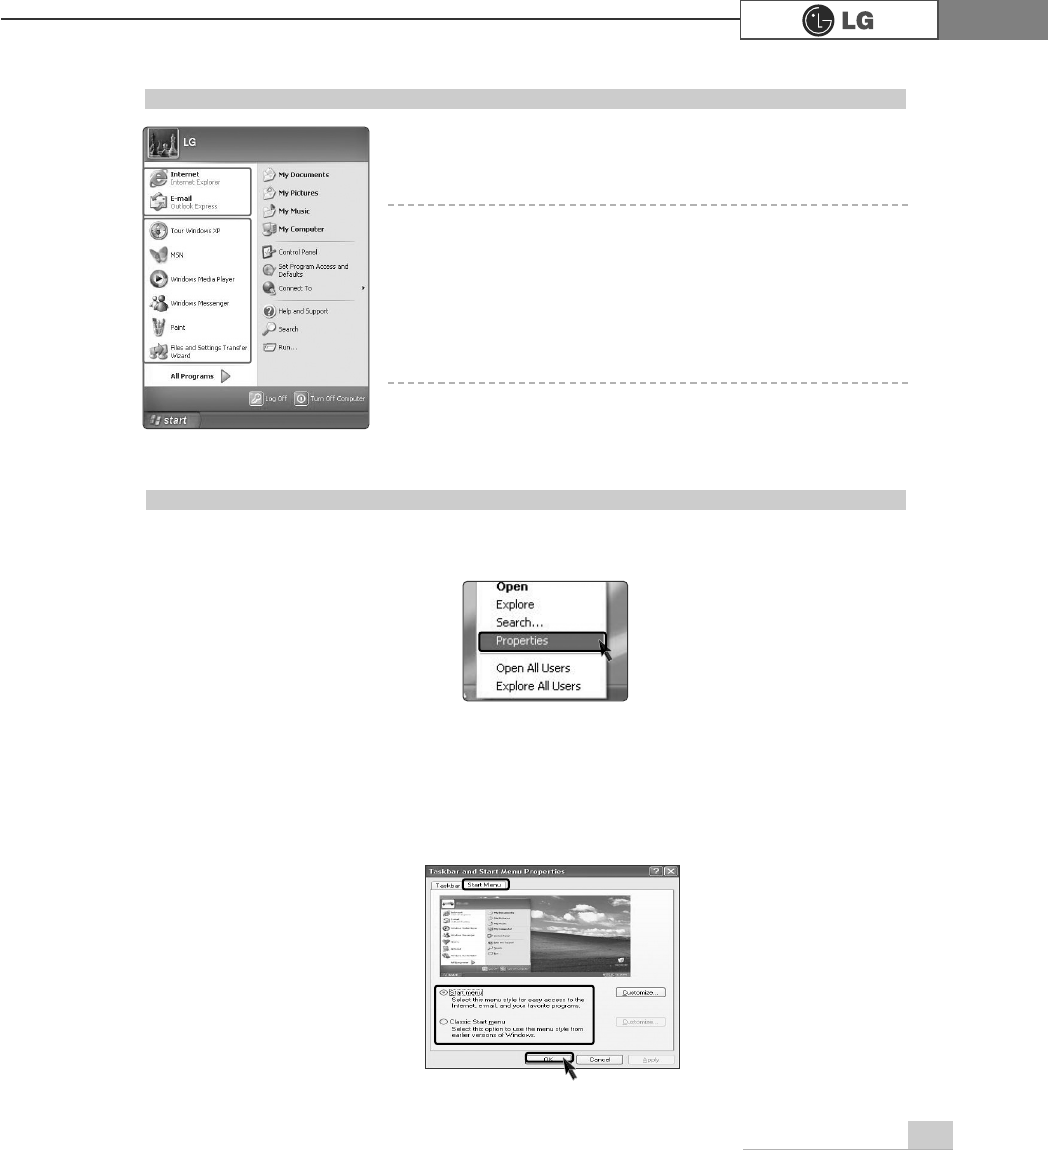
Start menu
Clicking [Start] button enables you to easily access
computer programs.
℘Pinned items
ℙRecently used items
ℚAll Programs
ℛControl Panel lets you change the settings in your compute
ℜMy computer shows the drive and network information for
your computer
℘
ℙℛ
ℜ
ℚ
Changing the look of the Start menu
ⓞRight click [Start] button and select [Properties].Choose from either Start menu or
Classic Start menu.
ⓟIf you want default start menu, click [Start menu] from Taskbar [Start Menu
Properties].
ⓠClick [Classic Start menu] if you want to use the menu style from earlier versios of
Widow.
ⓡClick [OK]. New start menu style appears on the desktop.
24 Using the system
Fixed
items
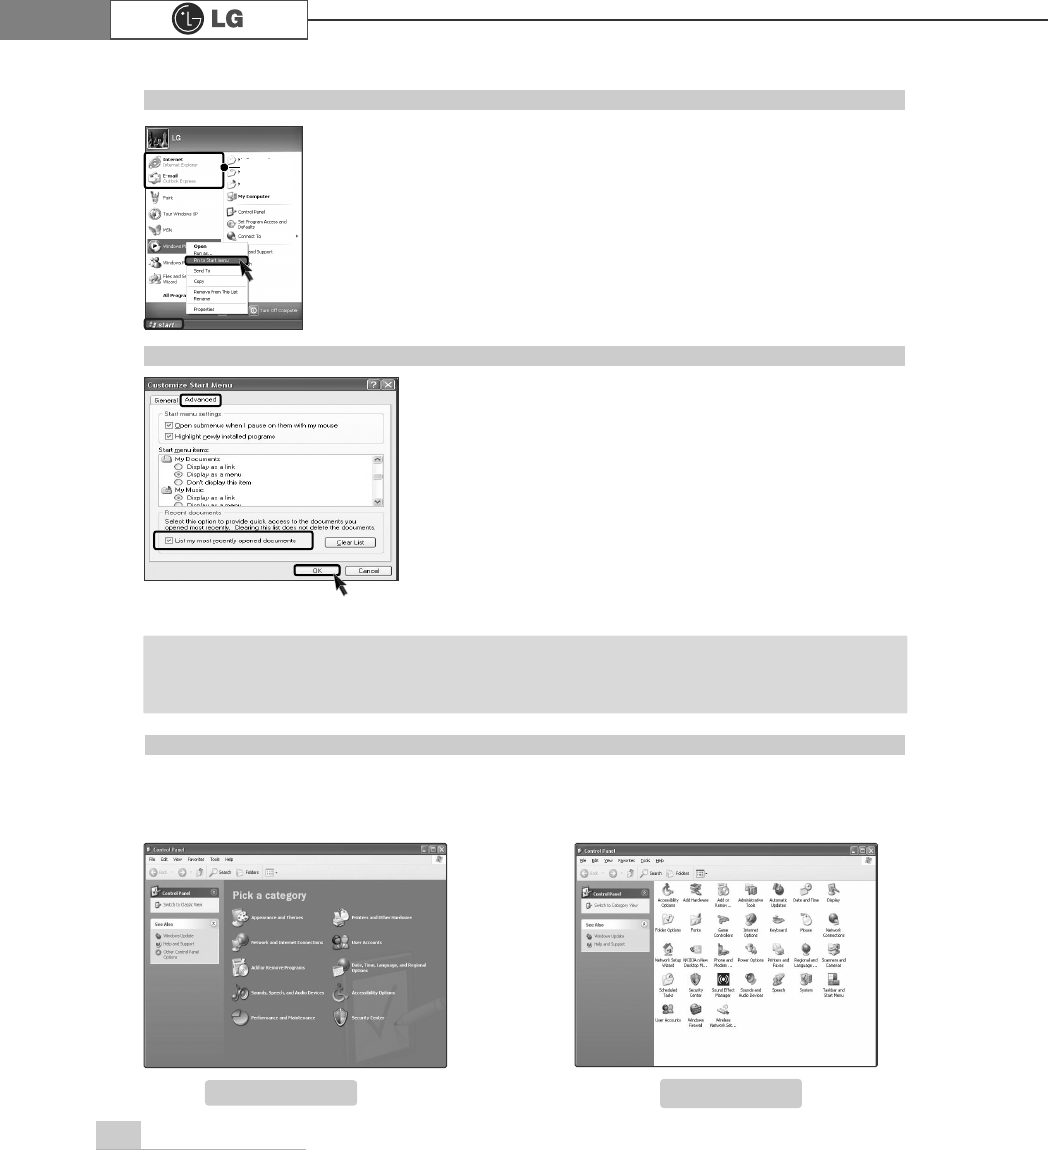
Control Panel
[Switch to Category View] is added to the Control panel to gather similar items in
group. Classic view shows each item in window. You can choose either Classic or
Category view.
Category View Classic View
Showing the recently used items on the Start menu
ⓞRight-click on [Start] button and click [Properties].
ⓟIn [Start Menu] tab, select [Start menu] and click
[Customize].
In [Advanced] tab, check [List my most recently
opened documents] and click [OK].
ⓠIn Taskbar and Start Menu Properties window, click
[Apply]-[OK].
If you click [Start] button the next time, recently used
items appear on the Start Menu.
Changing the pinned items in the Start menu
ⓞRight-click the item you want to pin it to the Start menu.
ⓟSelect [Pin To Start Menu].
ⓠThe item is pinned at the top of the Start menu.
ãTo delete recently opened documents, select [Clear list] from [Advanced] tab. The files
are not deleted in the system even if the lists are cleared.
Note
25Using the system
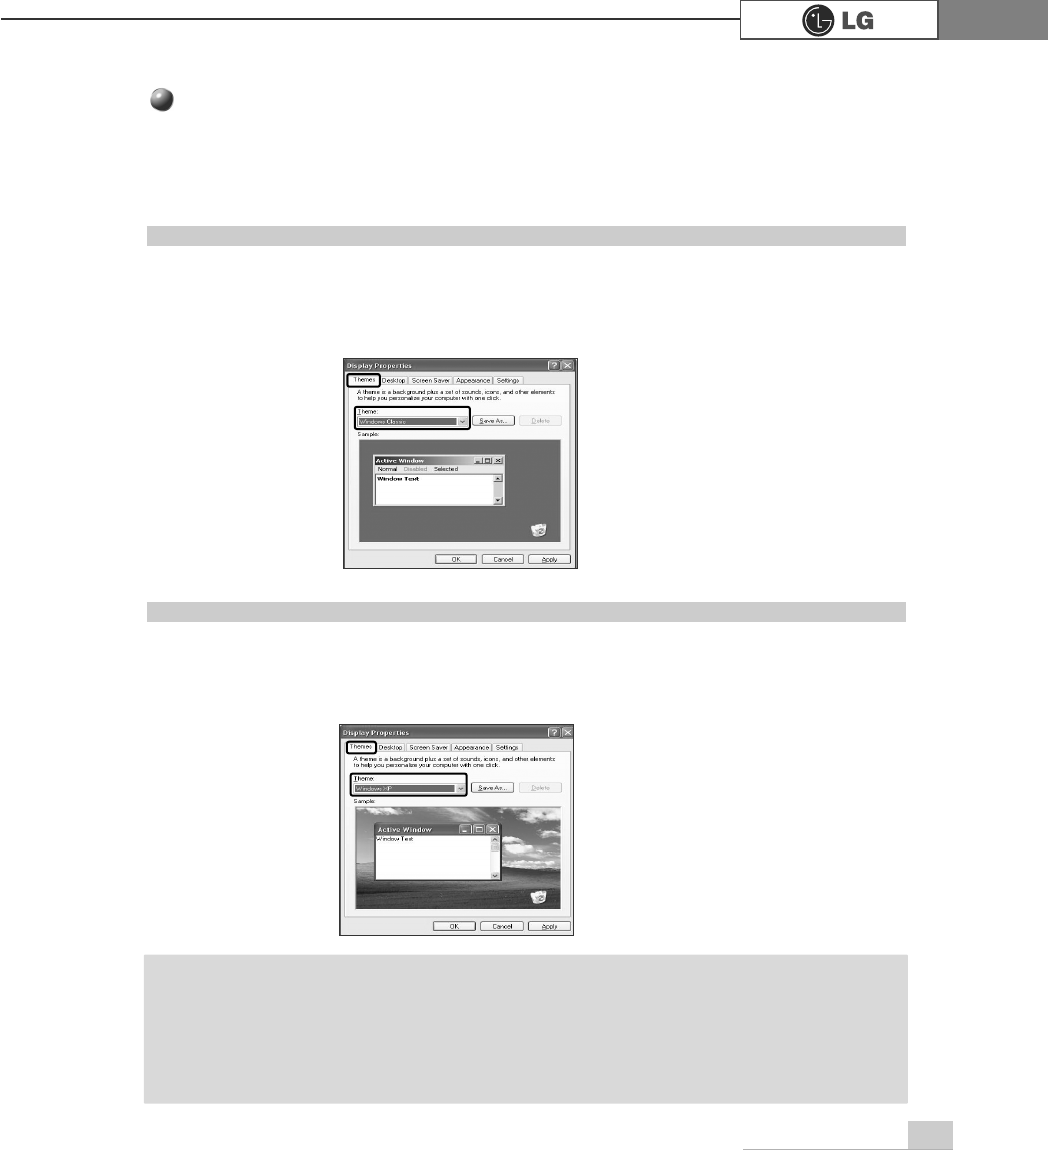
Using the Windows Classic Theme
Using a different theme
ⓞClick [Start]
⍛
[Control Panel]
⍛
[Switch to Classic View]
⍛
[Display].
ⓟClick [Themes] tab.
ⓠSelect another theme from the [Theme] drop down menu.
Changing the Themes and Desktop background
ⓞClick [Start]
⍛
[Control Panel]
⍛
[Switch to Classic View]
⍛
[Display].
ⓟClick [Themes] tab.
ⓠSelect [Windows Classic] from the [Theme] drop down menu.
You can customize the appearance of desktop by using Theme option such as desktop back-
ground, screen saver, icon, window, mouse pointer or sound. For more than one user, each user
can use different theme.
ãTo view display properties, click [Start]
èè
[Control Panel]
è
[Switch to Classic View]
and double-click Display.
After selecting Windows Classic, you can customize Windows elements such as window
borders, icons, and menus.
Select Appearance tab, and click Advanced.
Note
26 Using the system
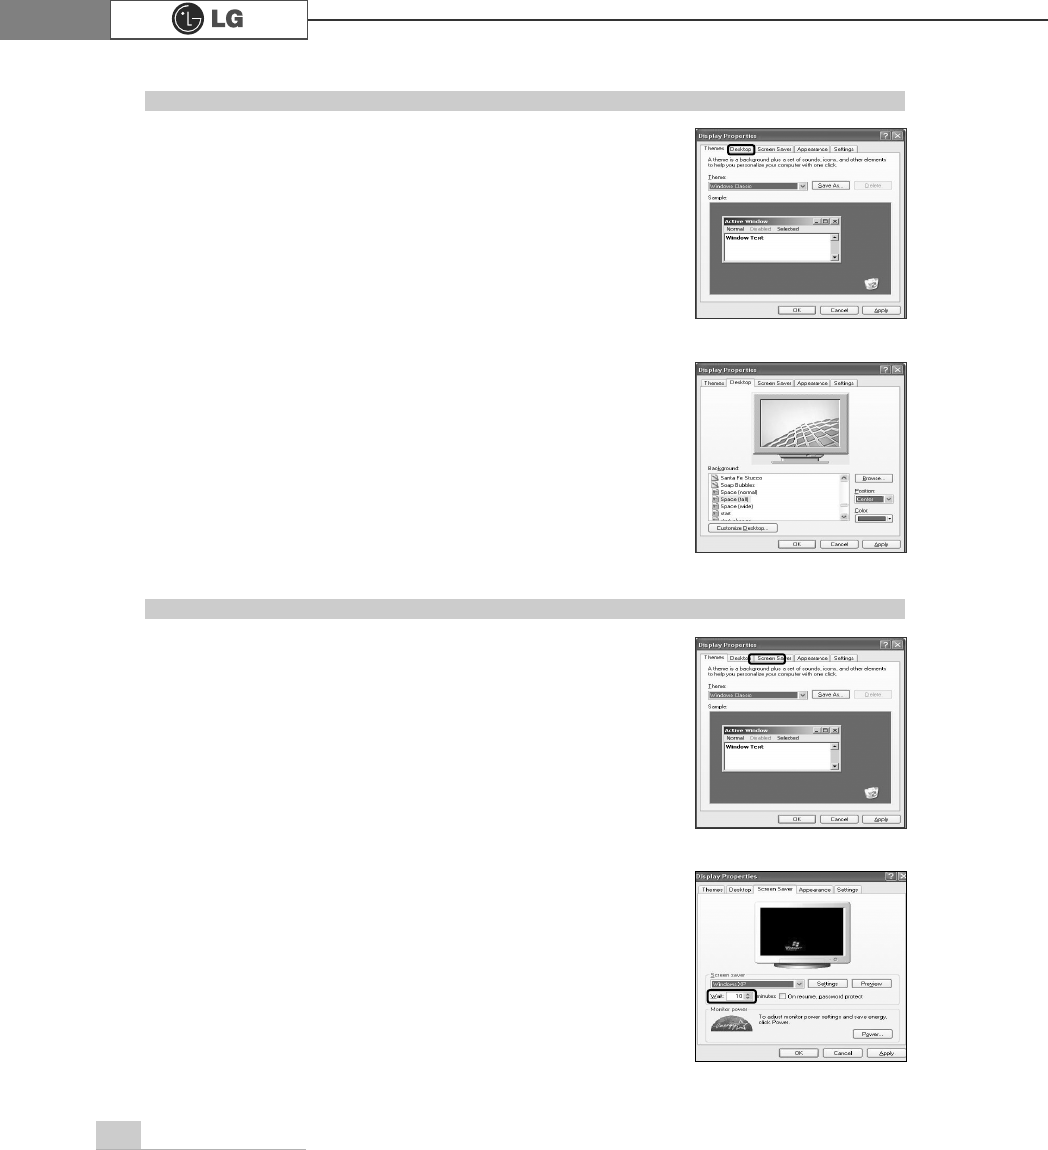
Changing the desktop background
ⓞClick [Start]
⍛
[Control Panel]
⍛
[Switch to Classic View]
⍛
[Display].
Click [Desktop] tab. (Or you can right click on the mouse
while in desktop background. When a short cut menu
pops up, choose [Properties].
ⓟScroll down the [Background] drop down menu and select
an image for the background. You can also click [Browse]
button and select an image you have saved.
Setting the Screen Saver
ⓞClick [Start]
⍛
[Control Panel]
⍛
[Switch to Classic View]
⍛
[Display]. Click [Screen Saver] tab.
ⓟSelect your choice from [Screen savers].
Choose stand by time by using scroll bar. To protect
important data from other users, select [On resume, pass
word protect], it will ask users a password from the screen
save mode.