LG Electronics USA DT-FG Personal Computer User Manual 46475FC7A5C1F62E717864
LG Electronics USA Personal Computer 46475FC7A5C1F62E717864
Contents
- 1. users manual A
- 2. users manual B
- 3. users manual C
- 4. users manual D
users manual B

27Using the system
Desktop cleanup
With Desktop Cleanup Wizard, you can delete hot icon paths that are not used on the
desktop. Desktop Cleanup Wizard will be automatically executed every 60 days, or you
can run this program when necessary.
To delete unused icons on the desktop, do the following
ⓞOpen [Control Panel]
⍛⍛
[Switch to Classic View]
⍛
[Display].
ⓟClick [Customize Desktop] under Background tab.
ⓠClick [Clean Desktop Now] under Desktop Cleanup tab.
ⓡFollow instructions of [Desktop Cleanup Wizard].
Taskbar
Taskbar displays programs and files that are currently open. If there are many programs running
on the computer, the Taskbar group together files from the same program to prevent taskbar
icons from cluttering up the Taskbar.
To personalize your desktop themes.
ⓞClick [Control pannel]
⍛⍛
[Switch to
classic view]
⍛
[Display]
ⓟSelect theme from the theme drop
down menu.
ⓠTheme changes.
ⓡAfter making a selection, click [Apply]
and then click [Save as].
ⓢEnter a theme name and press [OK].
ãTo open Display Properties, click [Start]
⍛⍛[Control pannels]⍛[Switch to classic
view] and then double-click [Display].
If you do not save the theme, the name
of the theme does not change.
The new theme is saved in My docu
ments folder. To open My document
folder, click [Start] and select [My docu
ments].
Note
28 Using the system
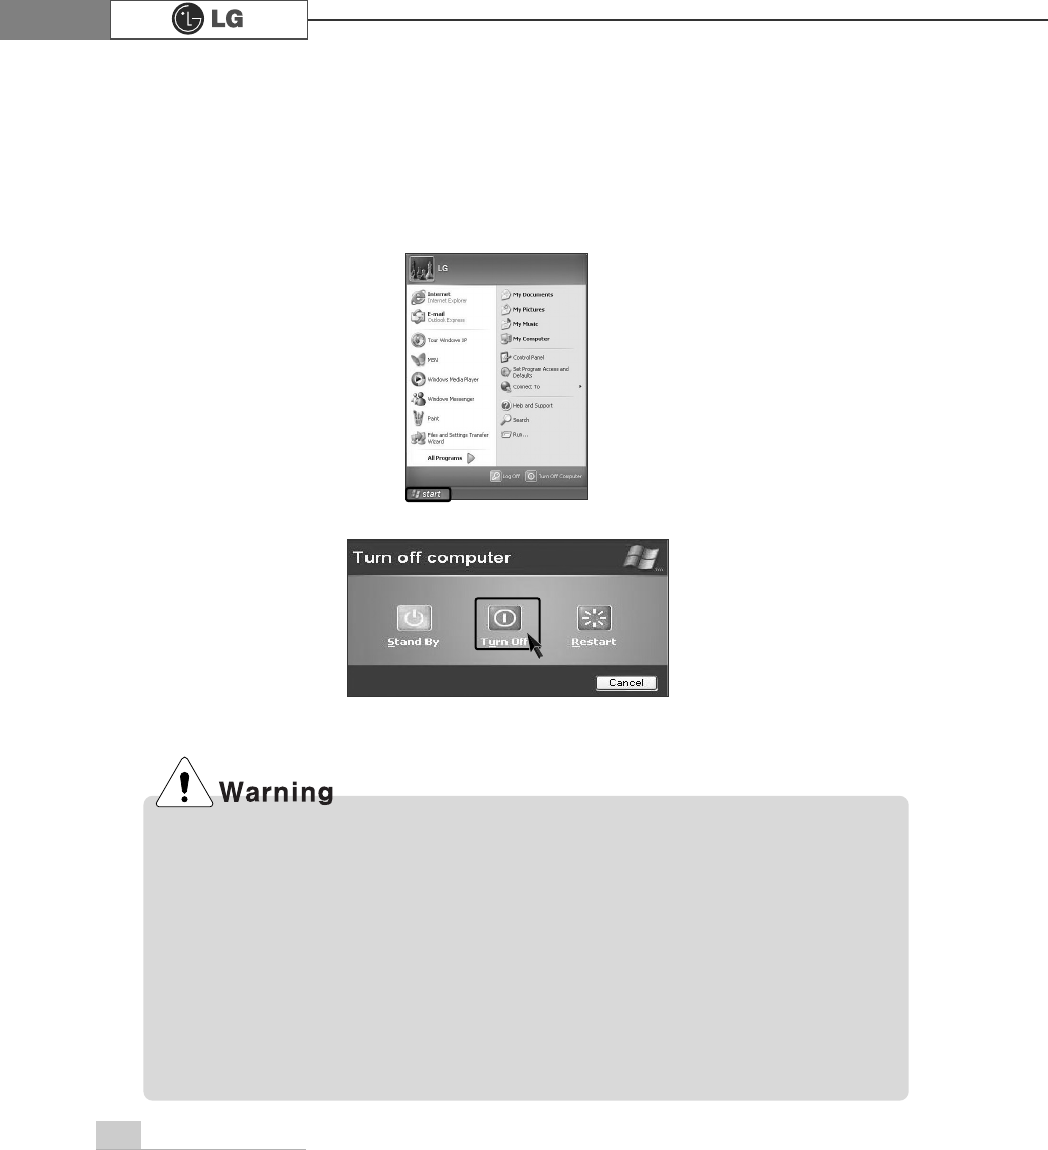
ⓞQuit all running applications; click [Start] and choose [Turn off computer] from
the start up menu.
ⓟIn the Turn off computer window, choose Turn off.
ⓠThe computer is turned off automatically.
2-3.Turning off the computer
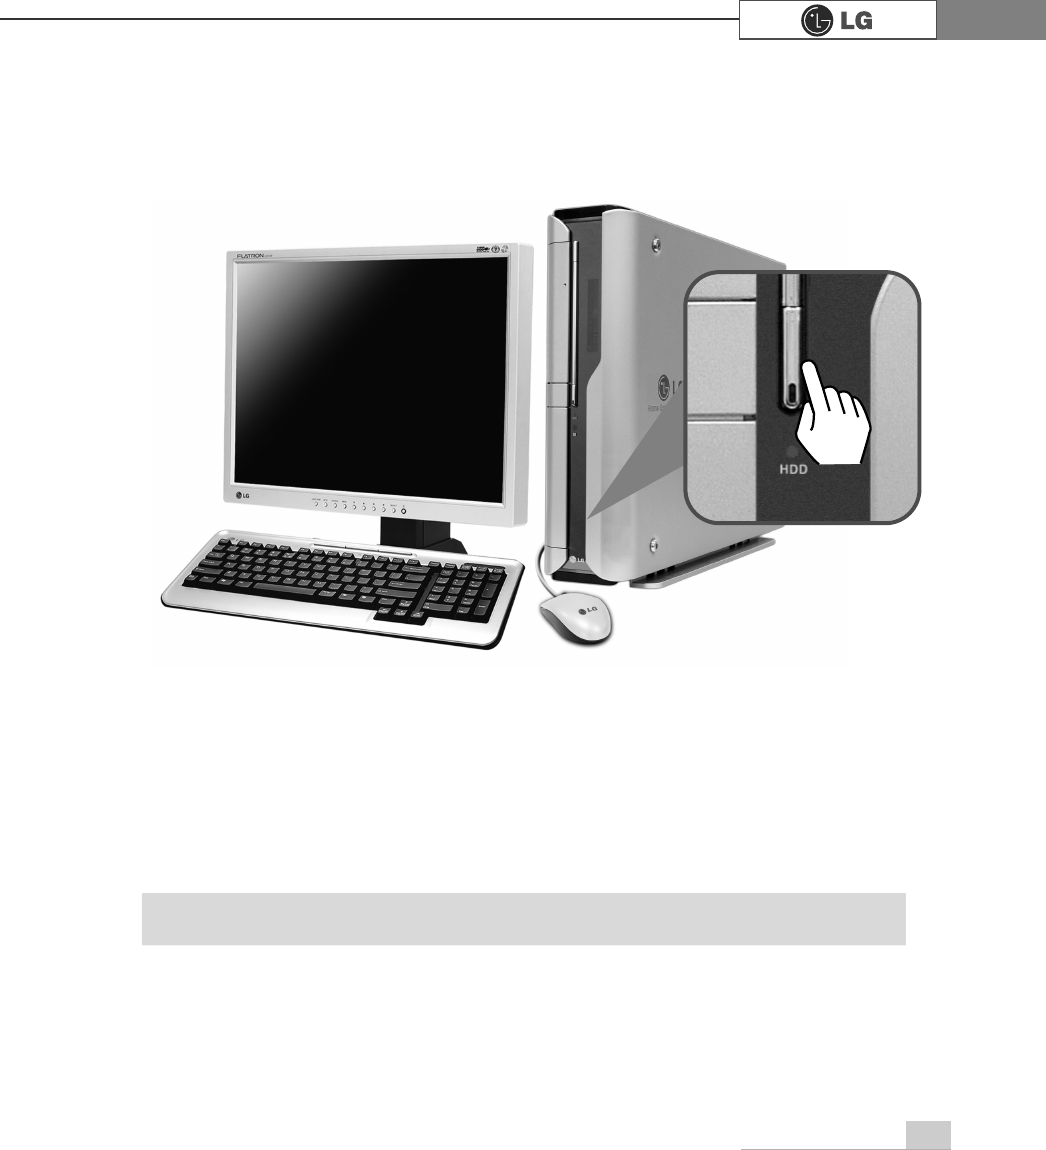
If the Drive in use indicator is on, do not turn off the computer, as doing so may damage the
data being read from or written to the drive.
ãYou may not be able to normally turn off the computer in Windows. When this happens,
press the Power button for five seconds.
However, this is an emergency measure and taking this measure may result in errors in the
system. It is recommended to click the [Start] button and select Turn off Computer menu on
Windows desktop to shut down the computer.
Abnormal turning-off of the computer may damage data stored in the hard disk.
ãWhen the program suddenly stops, click [Ctrl] + [Alt] + [Delete] keys and terminate the
program through Windows Task Manager or restart the system. If the some program files of
Windows has been damaged due to abnormal turning-off of the computer, reinstall dam-
aged programs. LG Electronics is not responsible for data loss caused by your mistakes
and negligence.
29Using the system
2-4. Restarting the computer
You can restart the computer as the instructions below, when the computer does
not function correctly or freeze out.
ãKeyboard and mouse may look different from the picture.
Note
ⓞQuit the program or restart by pressing combination of [Ctrl]+[Alt]+[Delete] key.
ⓟIn case the measure described above does not work, press the Power button for 5
seconds to turn off the computer. Then, restart the computer after 10 seconds.
30 Using the system
This chapter explains how to use mouse pointing device. You may have a different fea-
tures on your model. FG model supports an optical mouse with USB connection.
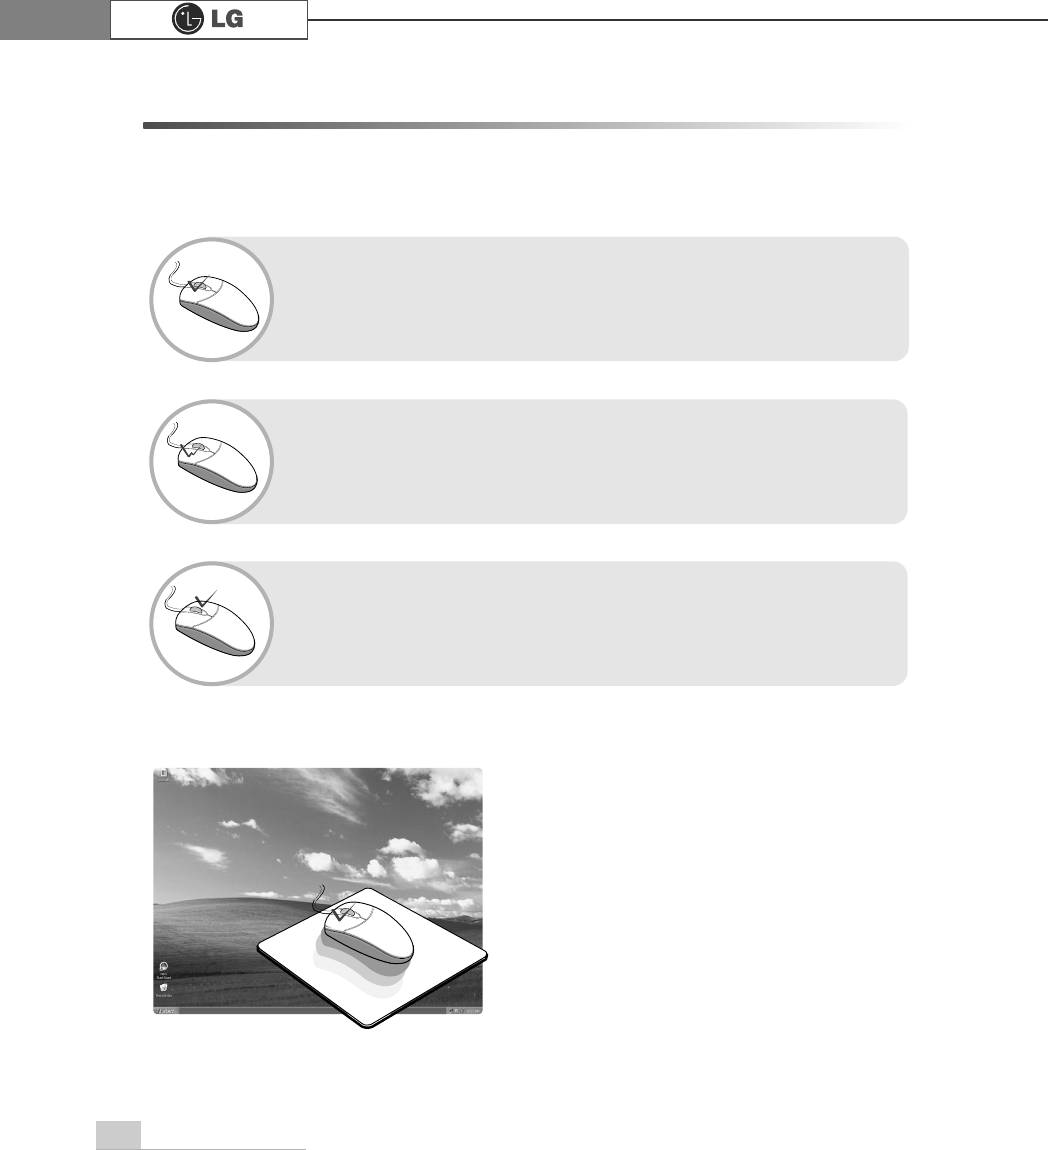
What is drag?
To move a pointing device while pressing
down on one of its buttons.
Drag
What is double click?
Pressing the left button twice in rapid succession in order to activate
a command or function represented graphically on a display screen.
What is Pop-up menu?
When using Windows, clicking the right button on the mouse opens
the pop-up menu. (Pop-up menu is to command a copy, send or
open/close functions to support an application program.)
What is click?
To press down and release a left button on a mouse pointing
device in order to select an item on a display screen or activate a
command or function.
2-5. Using Mouse
31Using the system
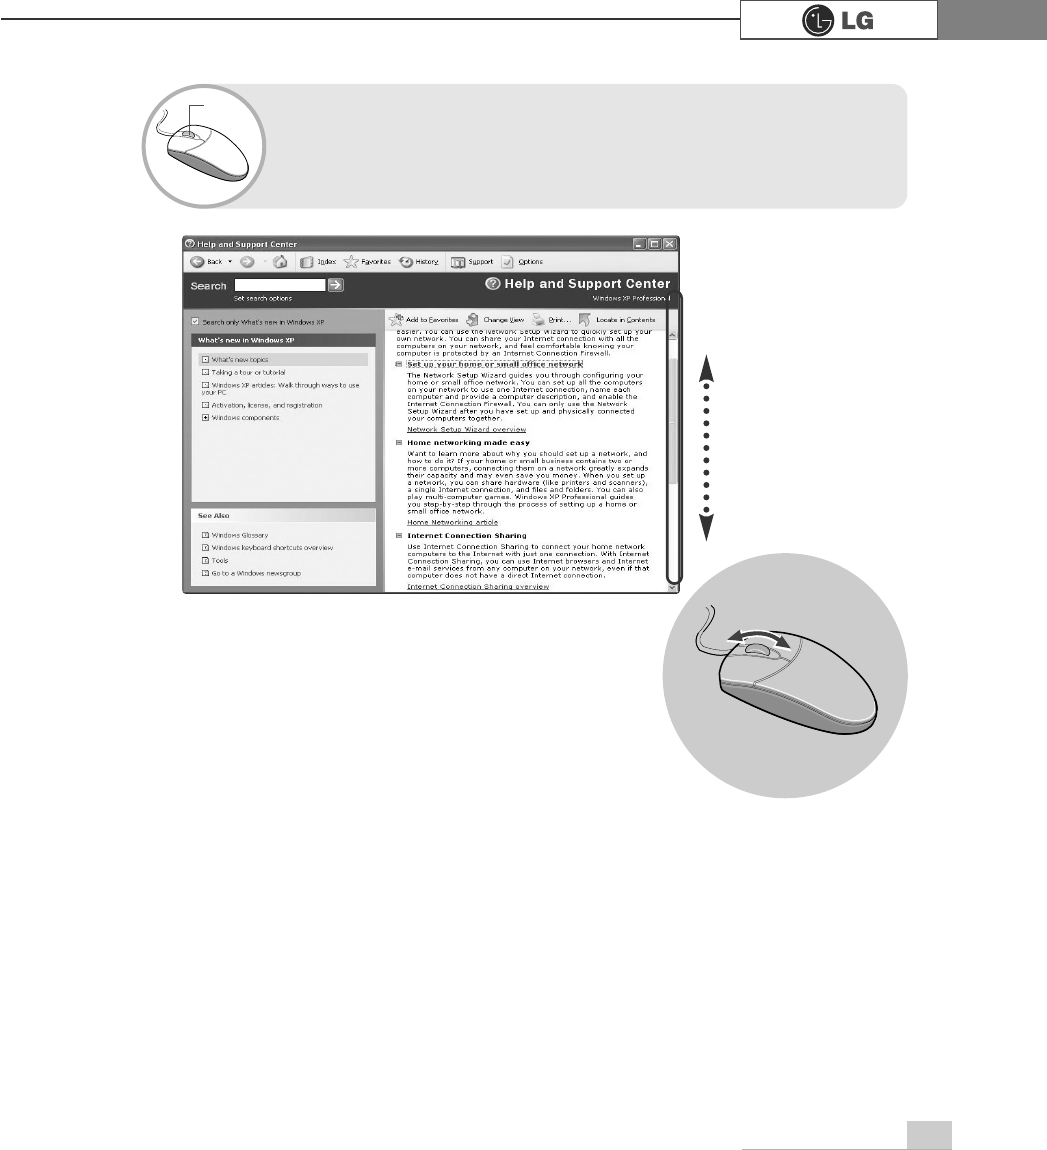
Using wheel?
To cause (displayed text or graphics) to move up, down, or across
the screen so that a line of text or graphics appears at one edge of
the screen for each line that moves off the opposite edge.
Wheel
32 Using the system
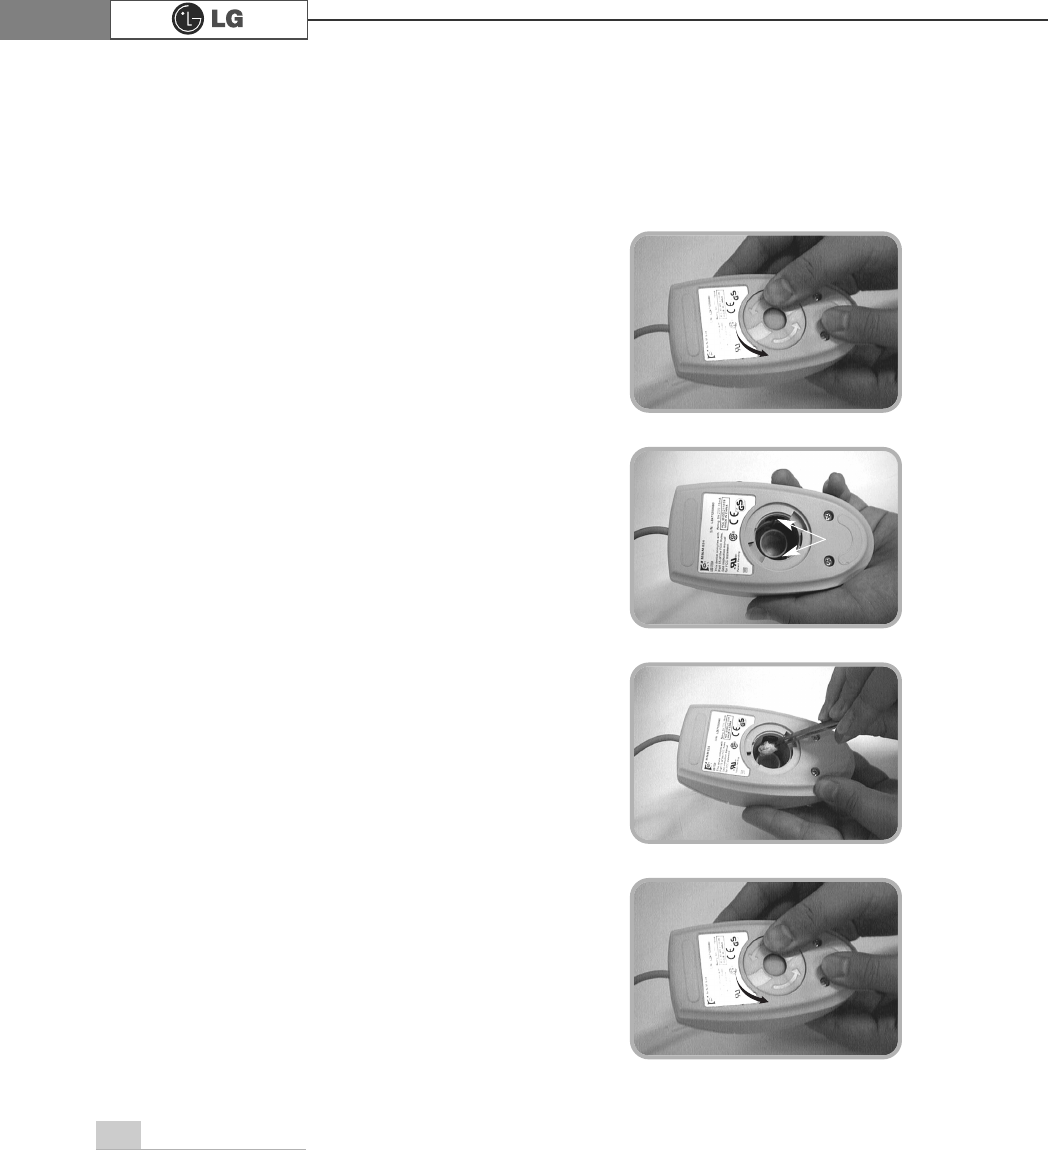
2-6.Cleaning the mouse
If the mouse pointer does not move well, you need to clean up the ball inside the
mouse. (The appearance of mouse may be different depending on models).
Clean up the mouse with cotton swap and alcohol as follows.
ⓞOpen up the cover in the direction of the arrow
as shown on the picture and take out the ball.
ⓡClose the cover in the direction of the arrow
and use the mouse.
ⓠClean with cotton swab and alcohol.
ⓟSee if inside of the mouse is filled with dust.
5ROOHU
33Using the system
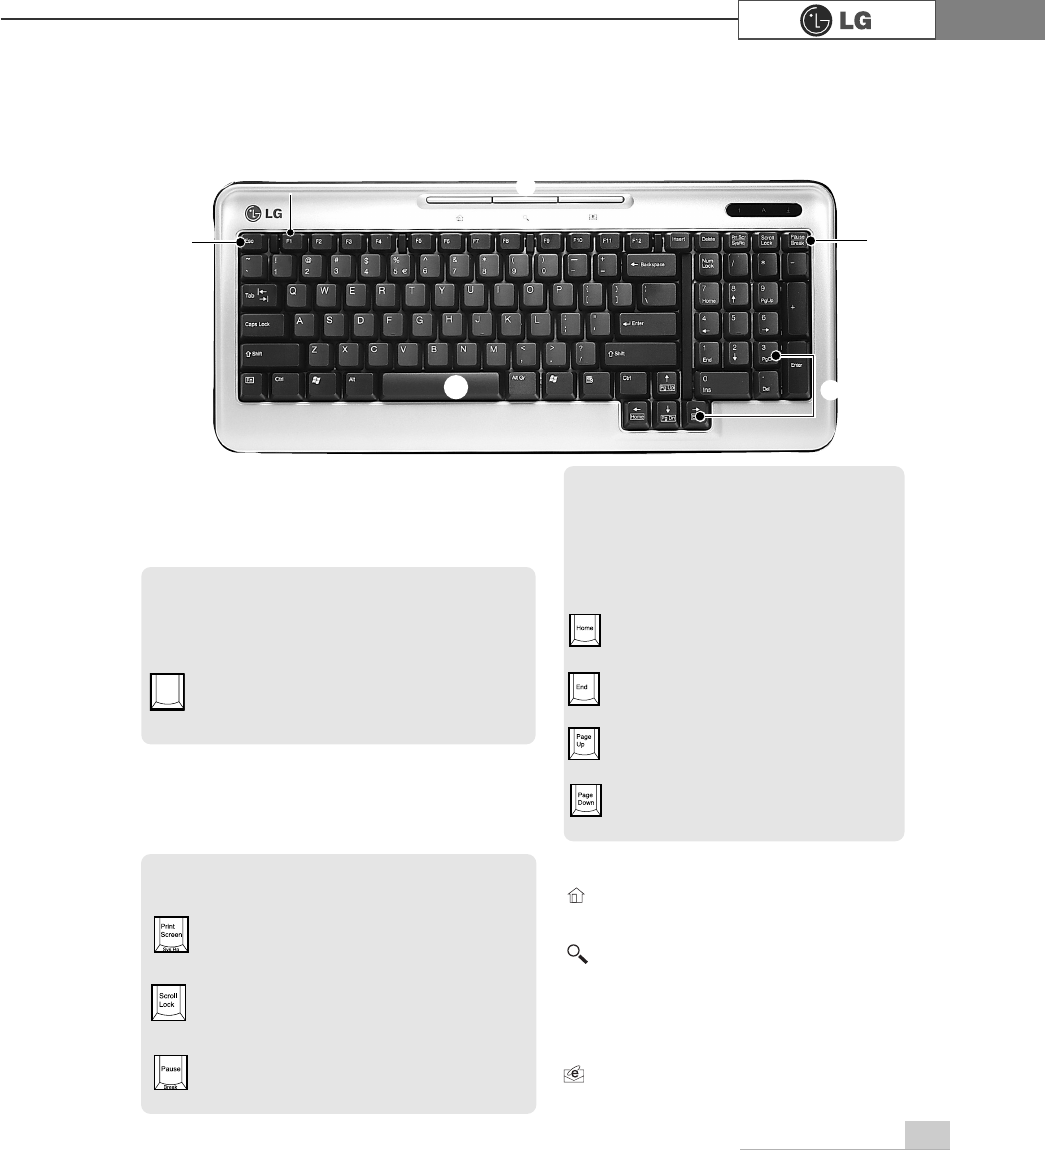
2-7. Using Keyboard
Keyboard is used for entering text and commands in the computer.
ℚTypewriter key pad
(refer to the User's guide p34)
℘ESC key
Used to command quit or cancel while
application program is running.
ℛModifier and special function keys
Scroll Lock
To move an entire image on the screen with-
out moving a cursor.
Print Screen
Press PrtSc key to take the snapshot image
on the screen.
Pause/Break
To stop movements for a specified time.
ℙFunction keys
Enable you to perform different opera-
tions depending on the operating system
and application program you use.
F1
In many cases, it starts help menu from most
application programs.
)
℘ℛ
ℙℝ
ℚ
ℝℝMultimedia/Internet function keys
ℜDirection keypad /
Numeric keypad
Direction keys mark the position at which
a cursor can be moved. Numeric keys
can be used as direction keys when
NumLock indicator is on.
End
End moves the cursor at the end of the
sentence.
Home
Home moves the cursor at the beginning
of the sentence.
Page Up
Page Up moves the cursor to the previ-
ous page.
Page Down
Page Downmoves the cursor to the next
page.
Home
Launches the Internet Explorer on your
system.
Search
Internet Explorer or Windows Explorer
must be launched to use this key to
access to the search engine in the Iternet
Explorer or search files in the Windows
Explorer.
E-mail
Launches the Outlook Express on your
system.
ℜ
34 Using the system
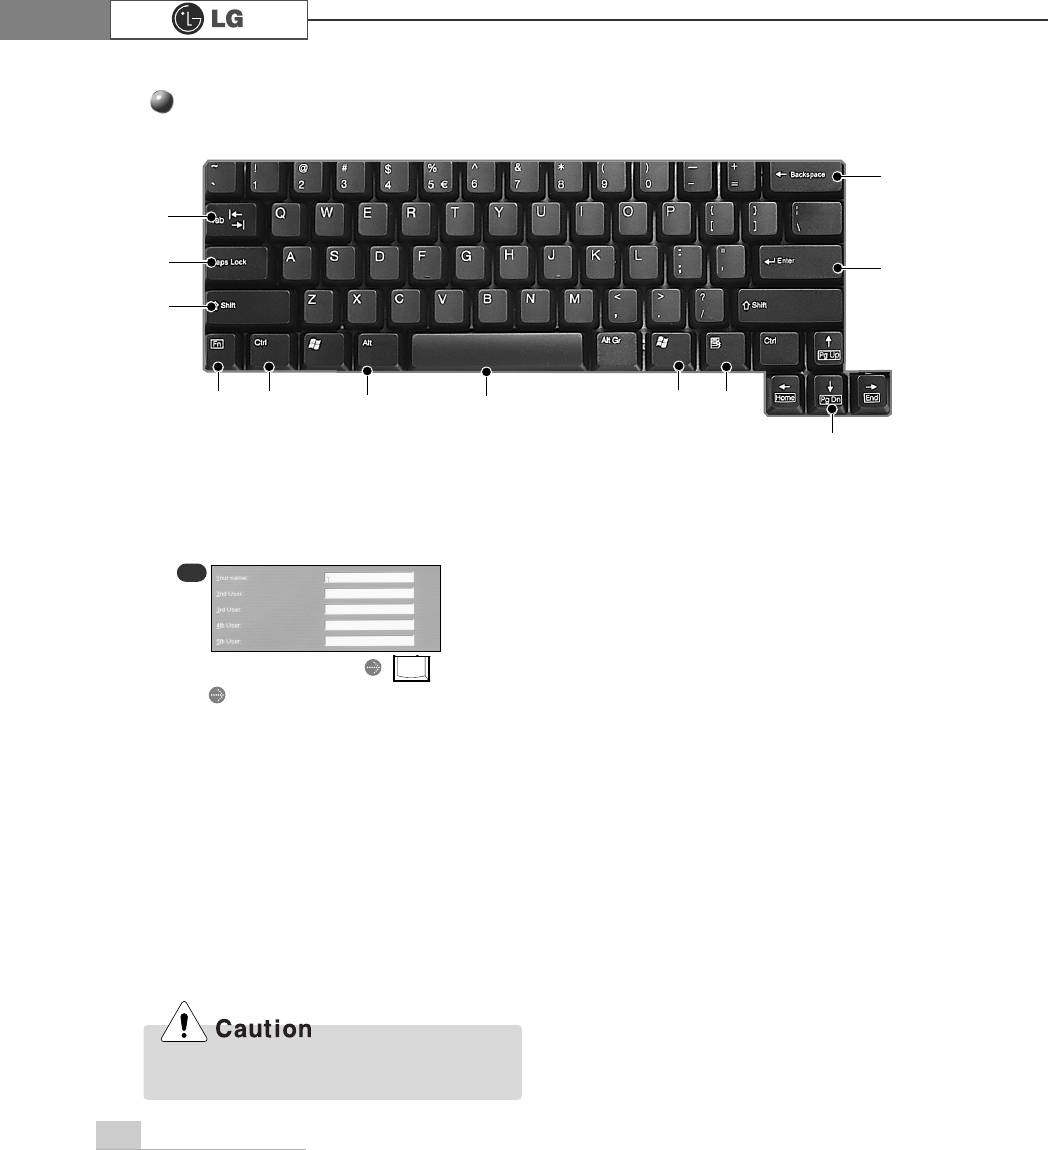
The keyboard is used for entering text and command.
Typewriter Keypad
⌆
ℚ
ℙ
℘
℟℡
ℛ⌅℞℠
ℝ
ℜ
ℝEnter key
Used at the end of each command to
move on to the next line.
℘Tab key
Used to input data in the data input
window and to move to the next data
input window.
ℜBackspace key
Moves a cursor to backward when
deleting letters.
℞Space key
Make a blank or empty area: the spaces
between words.
℠
Windows key
Opnes up the start menu when using
Windows operating system.
ℚShift key
Hold Shift key down and press another
key to enter the upper case letter.
ℛ,℟Clrt key or Alt key
Keys (shortcuts) are used in conjunc-
tion with Arlt key or Ctrl key to provide
shortcuts for some of the predefined
operations.
℡This key is used to view shortcuts for
the current program (Shortcut menu key
works the same as the right-clicking the
mouse button)
⌅⌆
This key is used in conjunction with
[Fn] key to move on to the next or previ-
ous page.
Inputting a name
Inputting initials of the name
Tab
LG
LG User
EX
Spilling the water on the keyboard causes
disfunction to the computer.
ℙCaps Lock key
Lock the keyboard in the upper case
position.

35Using the system
Turn on the computer, and press the
eject button on the CD-ROM drive.
Put the CD with its labeled side up,
and insert the CD in CD-ROM tray
without touching the playing part.
(ÚThe trademark must face upward.)
Different model types provide different optical disk drives. (Some models have
DVD-ROM drives and others have DVD/CD-RW COMBO/DVDÀROM COMBO
drives)
2-8.Using the optical disk drive
Inserting a CD
Note
ãAfter install CD on the tray, push the CD tray in
the direction shown on the picture, or press the
Eject button once.
ÚThis model adopted slim design for efficient use of
space and the CD-ROM (RW/DVD/COMBO) drive
is vertically installed. Therefore, a small-sized CD
titles (80mm) may not be properly inserted. If nec-
essary, lay down the product to insert such small-
sized CD titles.
Eject button : eject CD out of the computer.
Gently push the button only once.
(MHFWEXWWRQ
36 Using the system
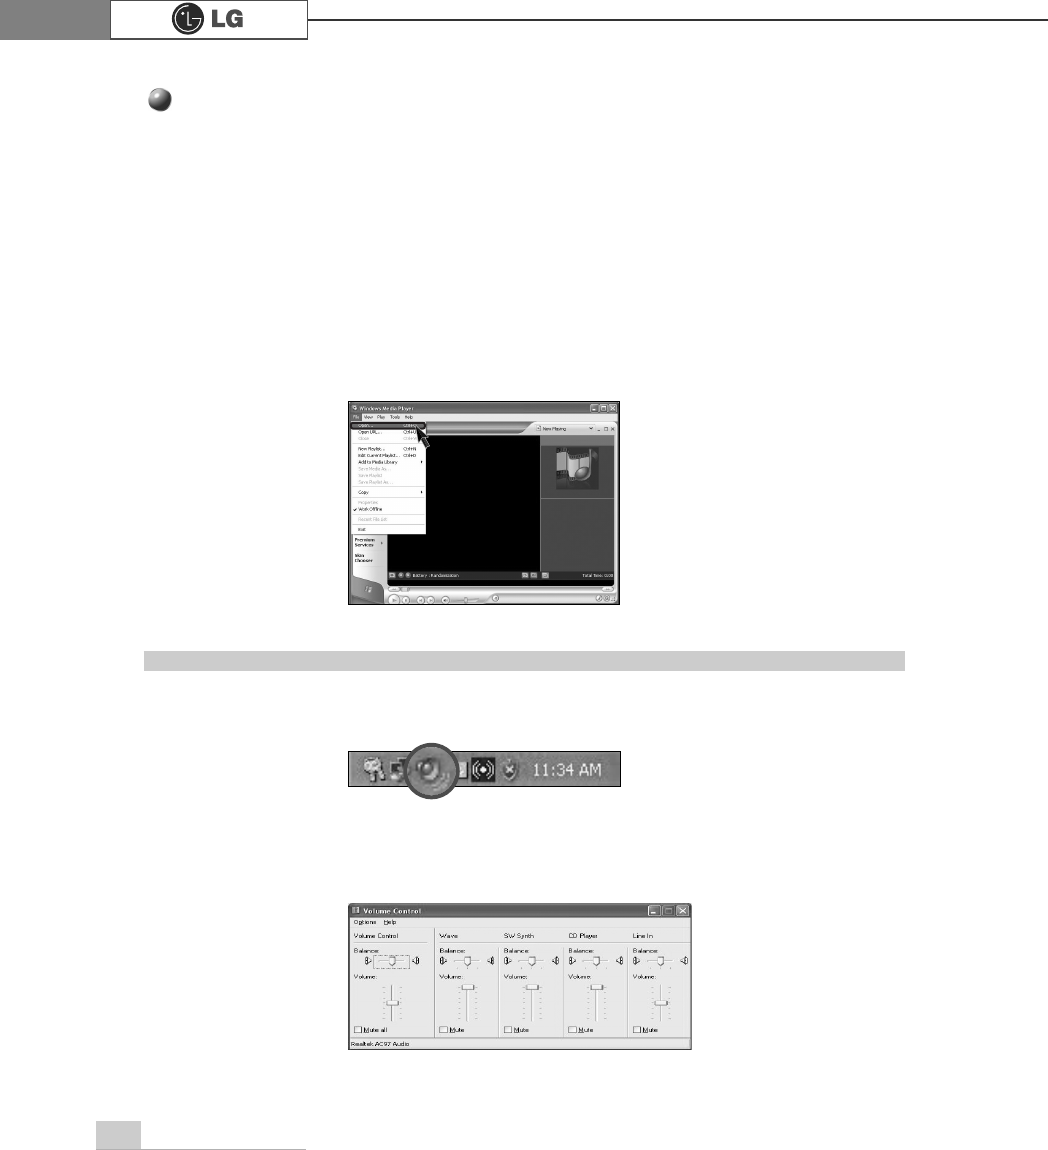
Using Windows Media Player
You can use Windows(R) Media Player to play various types of audio and video
files.You can play and make a copy of an audio CD, listen to the Internetradio
broadcast, play movie clips, and listen to music or watch a video on a web site. If
you have a DVD drive, you can play a DVD. If you have a CD-RW drive, you can
use Windows Media Player to make your own music CD.
ⓞ[Press Start]
⍛
[All Programs]
⍛
[Accessories]
⍛
[Entertainment]
⍛
[Windows Media Player].
ⓞClick [Volume Control] icon from the taskbar.
ⓟWhen Windows Media Player opens, press Open under File menu, and then
select an audio or video file you want to play.
ⓟDrag the mouse to move the slide bar to adjust the volume.
Adjusting volume
37Using the system
Hard disk drive is a storage device in the computer. Refer to the System setup for
setting up the computer system.
⍀Turn off the computer when disassembling the computer and see if the computer and
the power cable is correctly connected. Incorrect connection to the power cause the
damages to the computer.
⍀Do not use any other screws that are not approved.
⍀Set the computer on a flat surface.
Installing the computer
⍀Do not give excessive pressure on the computer.
⍀Do not place your computer to temperatures above (140 degrees F) (60 degrees C).
⍀Keep your computer away from electronic equipments that create strong radio waves.
⍀During a lightning storm, remove the power cord, telephone line, and LAN cable from
the computer.
Computing environment
⍀Do not give excessive pressure on the computer.
⍀When the computer is reset (rebooted), for example by power outage, while the
hard disk drive is operating.
⍀A computer virus is detected on your computer.
⍀Incorrect input of (BIOS) setup.
⍀When the necessary files are deleted or damaged.
⍀Turning off the computer when the system is operating.
The data on your hard disk itself may be damaged in the following situations
Using hard disk drive
Always make backup files for your important information. LG is not responsible for
data loss caused by users.
Damages to the computer data
2-9.Using disk drive
38 Using the system
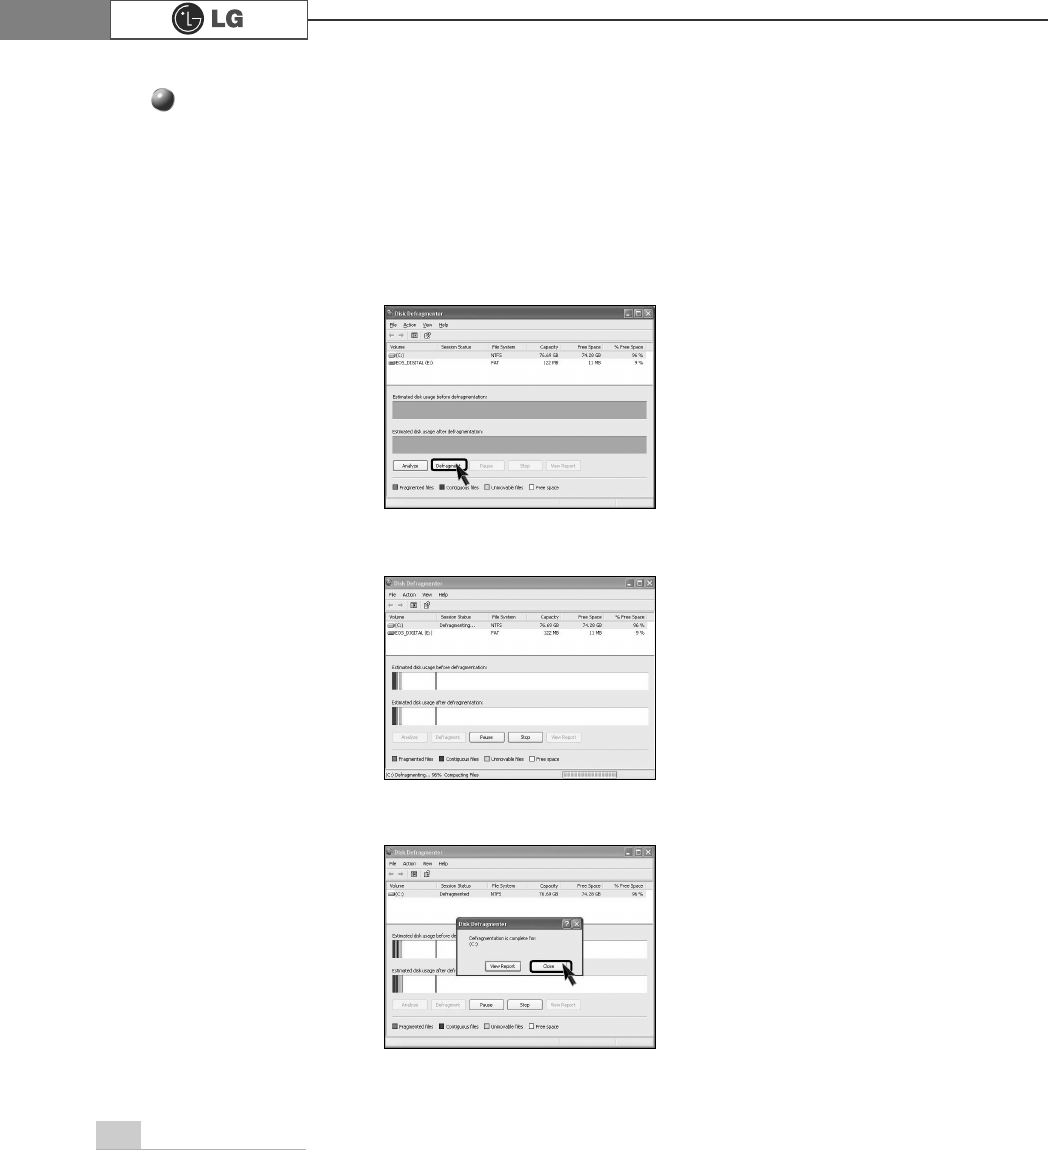
Gathers all the bad sectors on the disk. Quit all application programs before run-
ning Disk cleanup.
ⓞFrom the
[Start]
button, [Accessories]
⍛⍛
[
System tools]
⍛>>
Disk cleanup].
ⓟIf the following dialogue box appears, select a drive you want to claenup and
then click [Cleanup].
ⓠFollowing images appears.
Disk cleanup
ⓡClick [Press] after the Disk claenup process is complete.
39Using the system
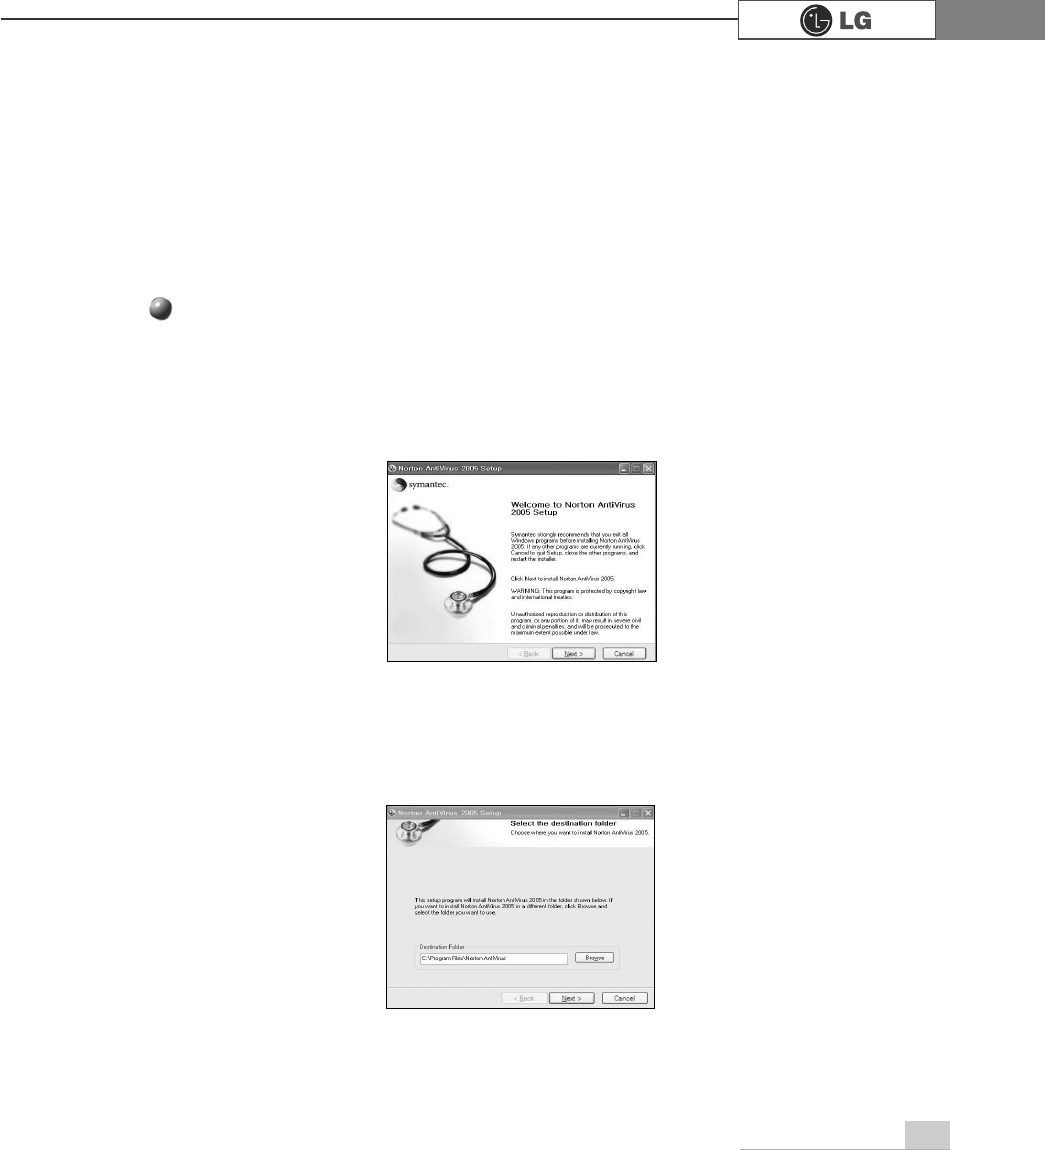
A small program that alters or destroys information stored in the computer.Norton
AntiVirus is offered to detect computer virus. For one year after installing windows
OS Norton AntiVirus is available to use.
2-10.Computer virus
ⓞClick the Norton Antivirus icon on the desktop.
ⓟFollowing windows appears. Click [Next].
ⓠClick [Next] to install Norton Antivirus.
Installing Norton Antivirus
40 Using the system
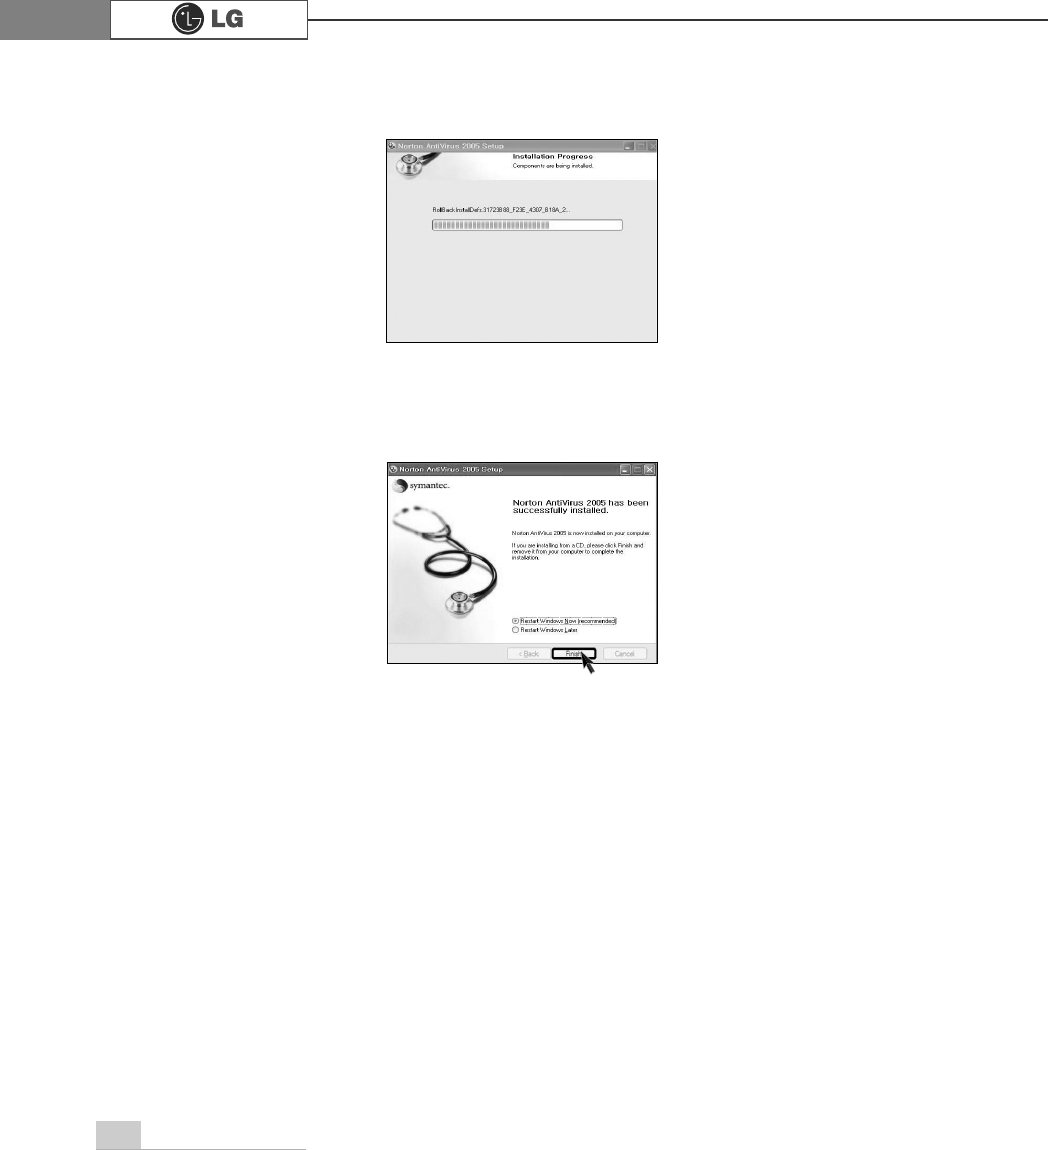
ⓡFollowing window appears.
ⓢ"Norton Antivirus installation is complete" message appears. Click [Finish].
41Using the system
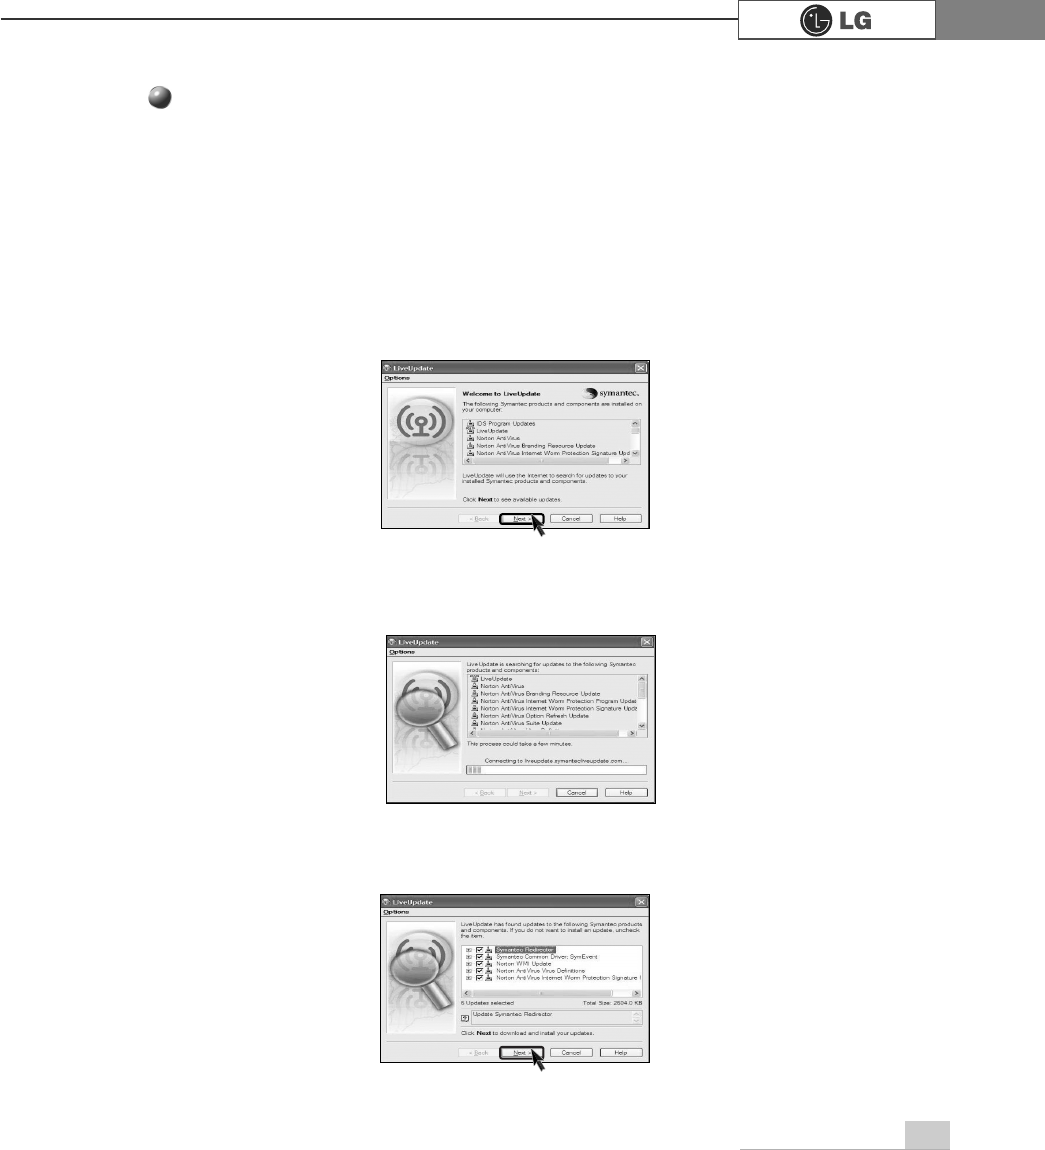
ⓞClick [Start] and [All programs]⍛[Norton Antivirus]⍛[LiveUpdate]⍛
[Norton AntiVirus].
ⓟClick [Next].
ⓠFollowing window appears.
You should have an internet access to process Norton Antivirus update.
Norton Antivirus update
ⓡClick [Next].
42 Using the system
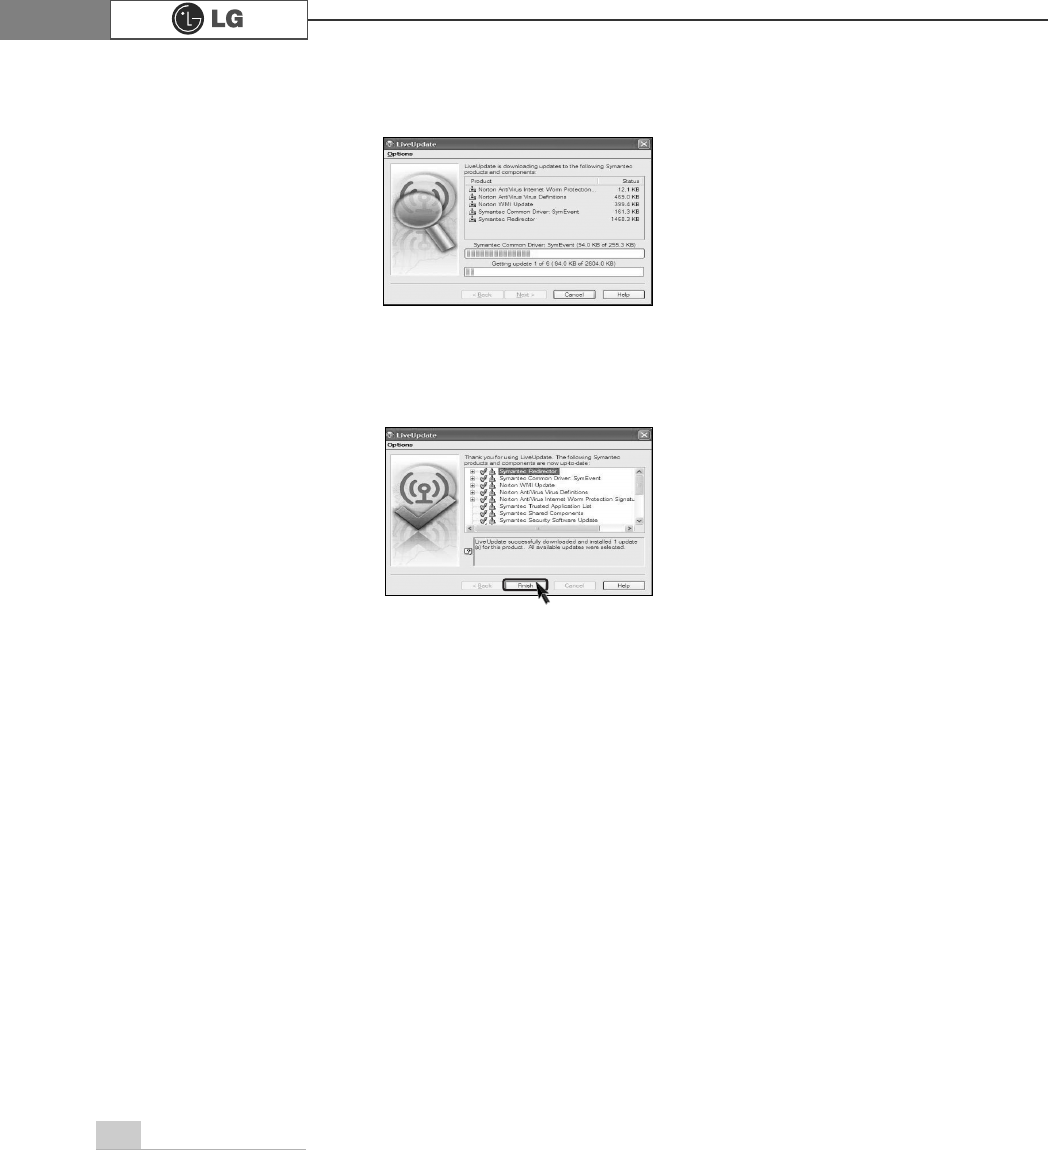
ⓢDownloading update-items online.
ⓣClick [Finish] . Norton Antivirus Update is complete.
43Using the system
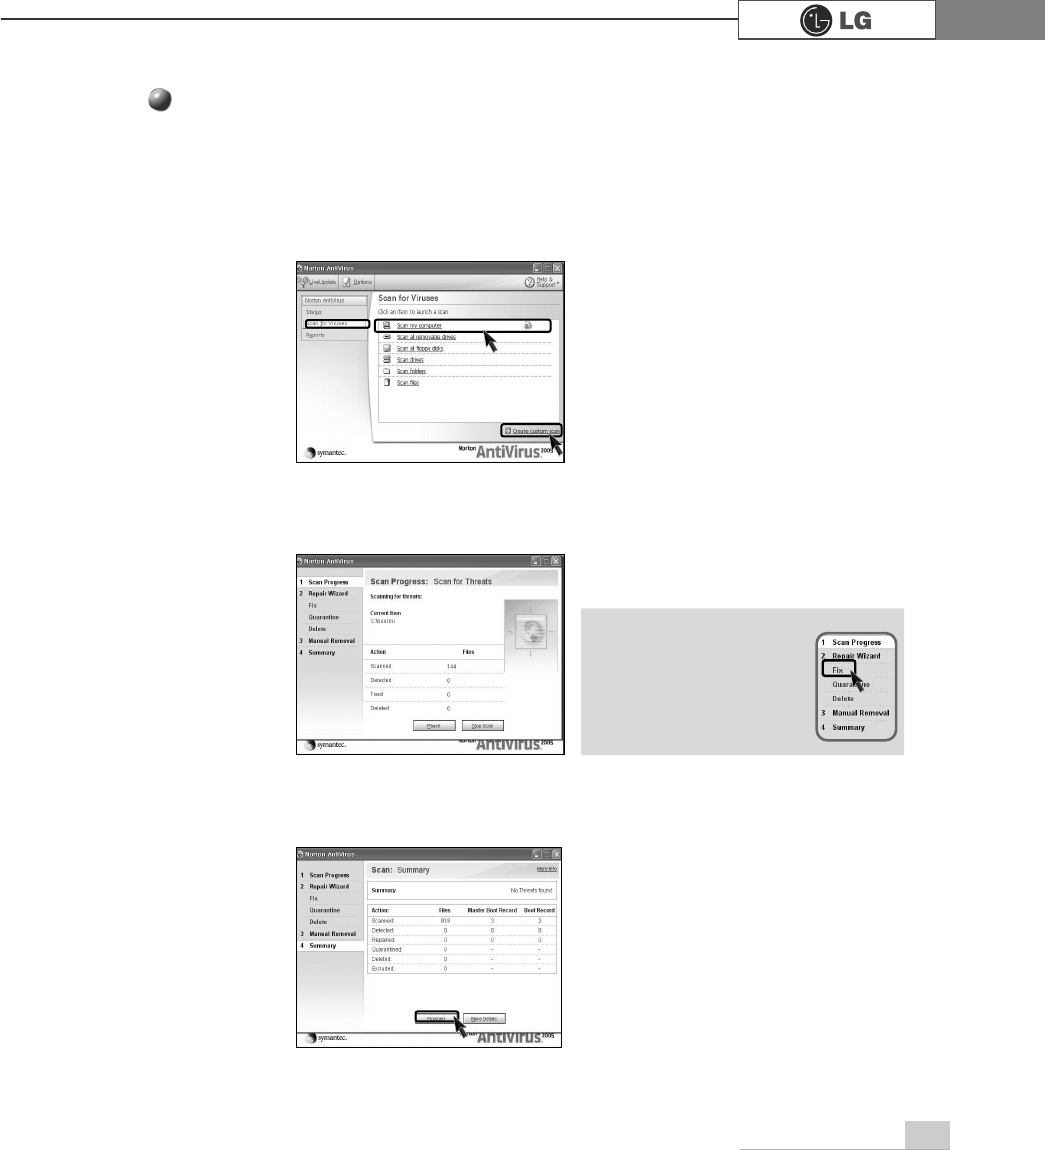
ⓞClick [Start]⍛[All programs]⍛[Norton Antivirus]⍛[Norton AntiVirus2004].
ⓟClick [Scan for virus] and select an item to scan.
ⓠNorton AntiVirus is scanning virus.
ⓡClick [Finish]. Virus scanning is complete.
Running Norton Antivirus
ãIf any virus is detected,
click [Fix] to repair.
Note
System setup
44
The system setup saves your computer’s hardware configurations in CMOS RAM.
The system setup provides you with information, such as the size and type of
your hard disk, size of the installed memory, date, and time.
3-1. Starting the system setup
You may want to use the CMOS Setup Utility in the following situations:
ãBooting with a USB device drive(Page 46).
ãSetting a password(Page 47).
ãChanging or removing the password(Page 48).
ãRecovering the factory default settings(Page 50).
ãSettig up for boot method(Page 51).
.H\V )XQWLRQ
Select the current item.
>(QWHU@
Close the current window or move to the previous window.
>(VF@
Move up, down, left, and right.
>Ⓑ@>Ⓒ@>⒵@>Ⓐ@
Increase or decrease the value
Increase or decrease the value.
Increase or decrease the value.
Save or exit the system setup.
>3DJH8S@
>3DJH'RZQ@
>)@
Keys used in the CMOS Setup Utility
3.System setup
Do not change the system setup arbitrarily. Incorrect system setup may result in errors
while using the computer.
The menu and default factory settings of the CMOS Setup Utility may look different from
this manual. They may have been changed to improve the performance of the system.
System setup 45
ⓞTurn on the computer and monitor.
ⓟ
When LG logo appears on the screen, press [Delete].
ⓠThe CMOS Setup Utility window appears.
Phoenix-Award BIOS CMOS Setup Utility
ĚStandard CMOS Features Ě
PC Health Status
ĚAdvanced BIOS Features ĚFrequency/Voltage Control
ĚAdvanced Chipset Features Load Optimized Defaults
ĚIntegrated Peripherals Set Password
ĚPower Management Setup Save & Exit Setup
ĚPnP/PCI Configurations Exit Without Saving
Esc : Quit êëè é : Select ltem
F10 : Save & Exit Setup
Time, Date, Hard Disk Type.....
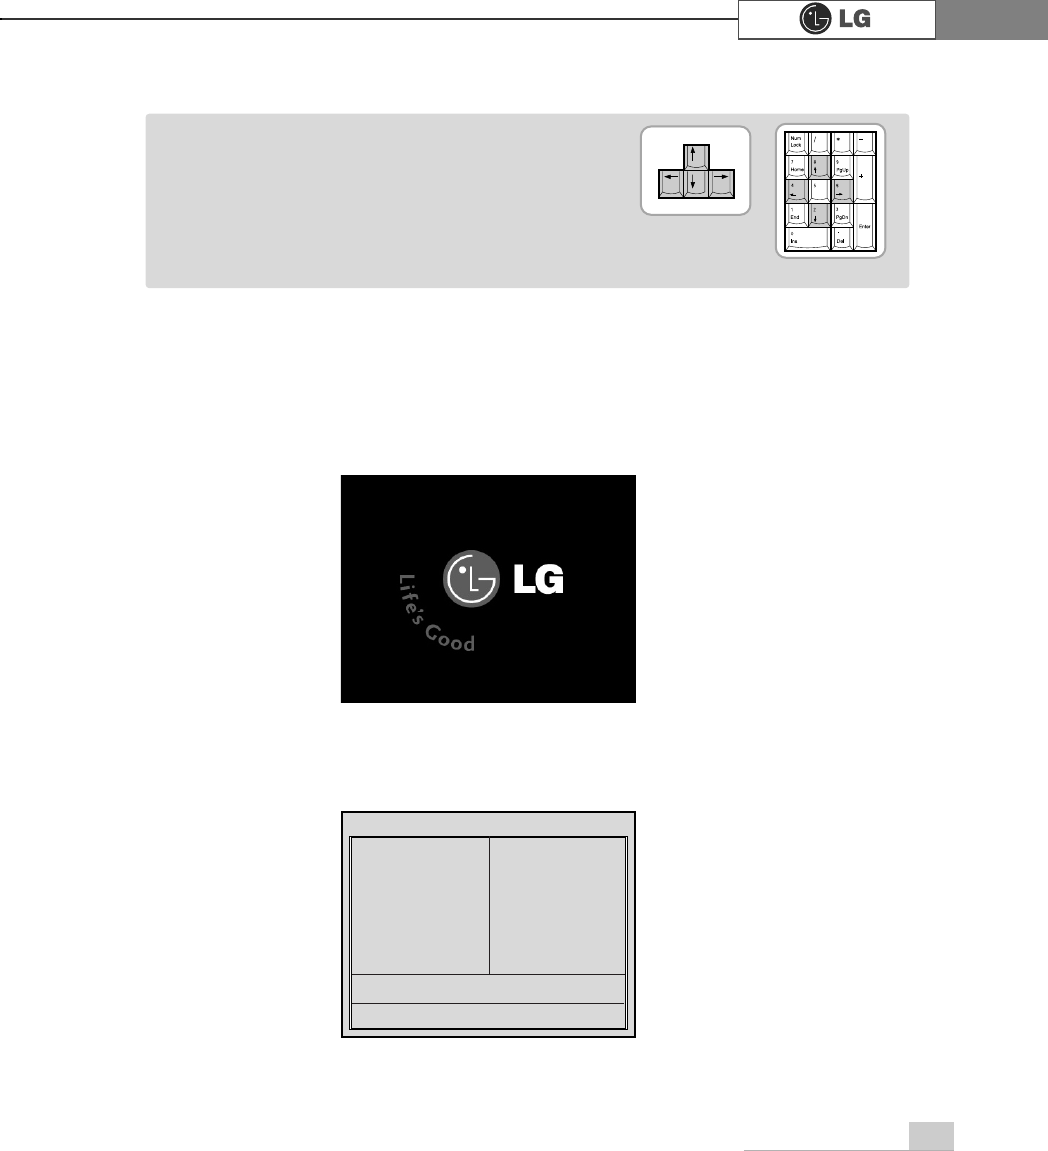
ã 'LUHFWLRQ keys (arrow keys) move the cursor up, down,
to the left and right. If Num Lock button is off, the
arrow keys in the numeric keypad can be used just
like the cursor control keys.
Note
<Cursor keypad>
<Numeric keypad>
System setup46
3-2. Booting with a USB device drive
Follow the instruction below to set the USB disk as start up disk.
ⓞ
Open the CMOS Setup Utility. Use the arrow keys to select Advanced BIOS
Features and press [Enter].
ⓟ
Use the arrow keys to select 1st Boot Device, and Use Page Up and Page
Down key to USB-FDD.
ⓠ
To save changes in System Setup, press the [F10] key.
ⓡ
When the following message appears, press [Enter]. The computer restarts.
SAVE to CMOS and EXIT(Y/N)? Y
Phoenix-Award BIOS CMOS Set up Utility
Advanced BIOS Features
êëèé:Move Enter:Select +/-/PU/PD:Value F10:Save ESC:Exit F1:General Help
F5:Previous Values F7:Optimized Defaults
Ě
Hard Disk Boot Priority Enabled
BIOS Virus Warning
Disabled
Hyper-Threding Technology Enabled
Quick Boot Disabled
1st Boot Device CDROM
2nd Boot Device Floppy
3nd Boot Device HDD-0
Boot Other Device Enabled
Swap Floppy Disabled
Floppy Seek Disabled
Boot Up Num-Lock LED On
Gate A20 Option Fast
Security Option System
Á
ÁAPIC Function Enabled
MPS Table Version 1.4
Hard Disk S.M.A.R.T Disabled
Full Screen LOGO Show Disabled
Summary Screen Show Enabled
Item Help
Memu Level Ě
Select Your Boot
Device Priority
1st Boot Device USB-FDD
47System setup
ⓟ
Use the arrow keys to select Security Option. Use the Page Up and Page
Down keys to select Setup or System, and then press [Esc].
ⓞ
Start the CMOS Setup Utility. Use the arrow keys to select Advanced BIOS
Features, and then press [Enter].
ⓠ
Use the arrow keys to select Set Password, and then press [Enter].
3-3. Setting a password
If you want to protect the system setup from unauthorized users, follow the
instruction below to set a password.
You can set a password in the CMOS Setup Utility program.
Phoenix-Award BIOS CMOS Set up Utility
Advanced BIOS Features
êëèé:Move Enter:Select +/-/PU/PD:Value F10:Save ESC:Exit F1:General Help
F5:Previous Values F7:Optimized Defaults
Ě
Hard Disk Boot Priority Enabled
BIOS Virus Warning
Disabled
Hyper-Threding Technology Enabled
Quick Boot Disabled
1st Boot Device CDROM
2nd Boot Device Floppy
3nd Boot Device HDD-0
Boot Other Device Enabled
Swap Floppy Disabled
Floppy Seek Disabled
Boot Up Num-Lock LED On
Gate A20 Option Fast
Security Option System
Á
ÁAPIC Function Enabled
MPS Table Version 1.4
Hard Disk S.M.A.R.T Disabled
Full Screen LOGO Show Disabled
Summary Screen Show Enabled
Item Help
Memu Level Ě
Select Your Boot
Device Priority
Setup
Security Option
If you forget the password, you cannot gain access to your system. Be sure to write down
the password in a safe place only you can refer to in case you forget the password.
ãIf you select Setup in the Security Option, the computer asks for a password next time
you try to enter the CMOS Setup Utility. If you select System, the computer asks for a
password next time you start the computer and also when you try to enter the CMOS
Setup Utility. Setting the System password prevents unauthorized users from using the
computer or changing the system setup.
Note
48 System setup
3-4. Changing or removing the password
You must know the password to change or remove it.
ⓞ
Start the CMOS Setup Utility, enter your password, and then press [Enter].
ⓢ
If the following message appears, enter the password again, and then press [Enter].
ⓣ
To save changes in System Setup, press the [F10] key.
ⓤ
If the following message appears, press Enter. The computer restarts.
ⓡ
If the following message appears, enter the new password and then press
[Enter]. A password must consist of characters A~Z and numbers 0~9, and has
the maximum length of 8.
SAVE to CMOS and EXIT(Y/N)? Y
Confirm Password :
Enter Password :
Phoenix-Award BIOS CMOS Setup Utility
ĚStandard CMOS Features ĚPC Health Status
ĚAdvanced BIOS Features ĚFrequency/Voltage Control
ĚAdvanced Chipset Features Load Optimized Defaults
ĚIntegrated Peripherals Set Password
ĚPower Management Setup Save & Exit Setup
ĚPnP/PCI Configurations Exit Without Saving
Esc : Quit êëè é : Select ltem
F10 : Save & Exit Setup
Change/Set/Disable/Password
Enter Password:
49System setup
ãTo change the password, follow the instructions on Setting a password.
ãTo remove the password, follow the instructions below.
ⓟ
Use arrow keys to select Set Password, and then press [Enter].
ⓠ
If the following message appears, press [Enter].
ⓡ
If the following message appears, press [Enter].
ⓢTo save changes in System Setup, press the [F10] key.
ⓣIf the following message appears, press [Y] key and [Enter]. The computer restarts.
PASSWORD DISABLD!!!
Press any key to continue...
Enter Password :
SAVE to CMOS and EXIT(Y/N)? Y
Phoenix-Award BIOS CMOS Setup Utility
ĚStandard CMOS Features Ě
PC Health Status
ĚAdvanced BIOS Features ĚFrequency/Voltage Control
ĚAdvanced Chipset Features Load Optimized Defaults
ĚIntegrated Peripherals Set Password
ĚPower Management Setup Save & Exit Setup
ĚPnP/PCI Configurations Exit Without Saving
Esc : Quit êëè é : Select ltem
F10 : Save & Exit Setup
Change/Set/Disable/Password
Set Password

50 System setup
3-5. Recovering the factory default settings
You can follow the instructions below to recover the factory default settings.
ⓞ
Start the CMOS Setup Utility. Use the arrow keys to select Load Optimized
Defaults and press [Enter].
ⓟ
If the following message appears, press Y key and then Enter. The factory
default settings have been recovered.
ⓠ
To save changes in System Setup, press the [F10] key.
ⓡ
If the following message appears, press [Enter]. The computer restarts.
SAVE to CMOS and EXIT(Y/N)? Y
Load Optimized Defaults (Y/N) ? Y

51System setup
This boot method does not effect the CMOS setup when start the system.
3-6. Settig up for boot method
ⓞTurn on the computer and the monitor.
ⓠSelect USB-FDD from the Boot menu, the computer restarts.
ⓟPress [F8] key while the LG logo appears.
ãUSB-ZIP, USB-HDD, or USB
CD-ROM may appears on the
Boot menu depending on the
specifications.
Note
52 System setup
You can use power saving function in Windows OS no matter how you set the
BIOS setup.
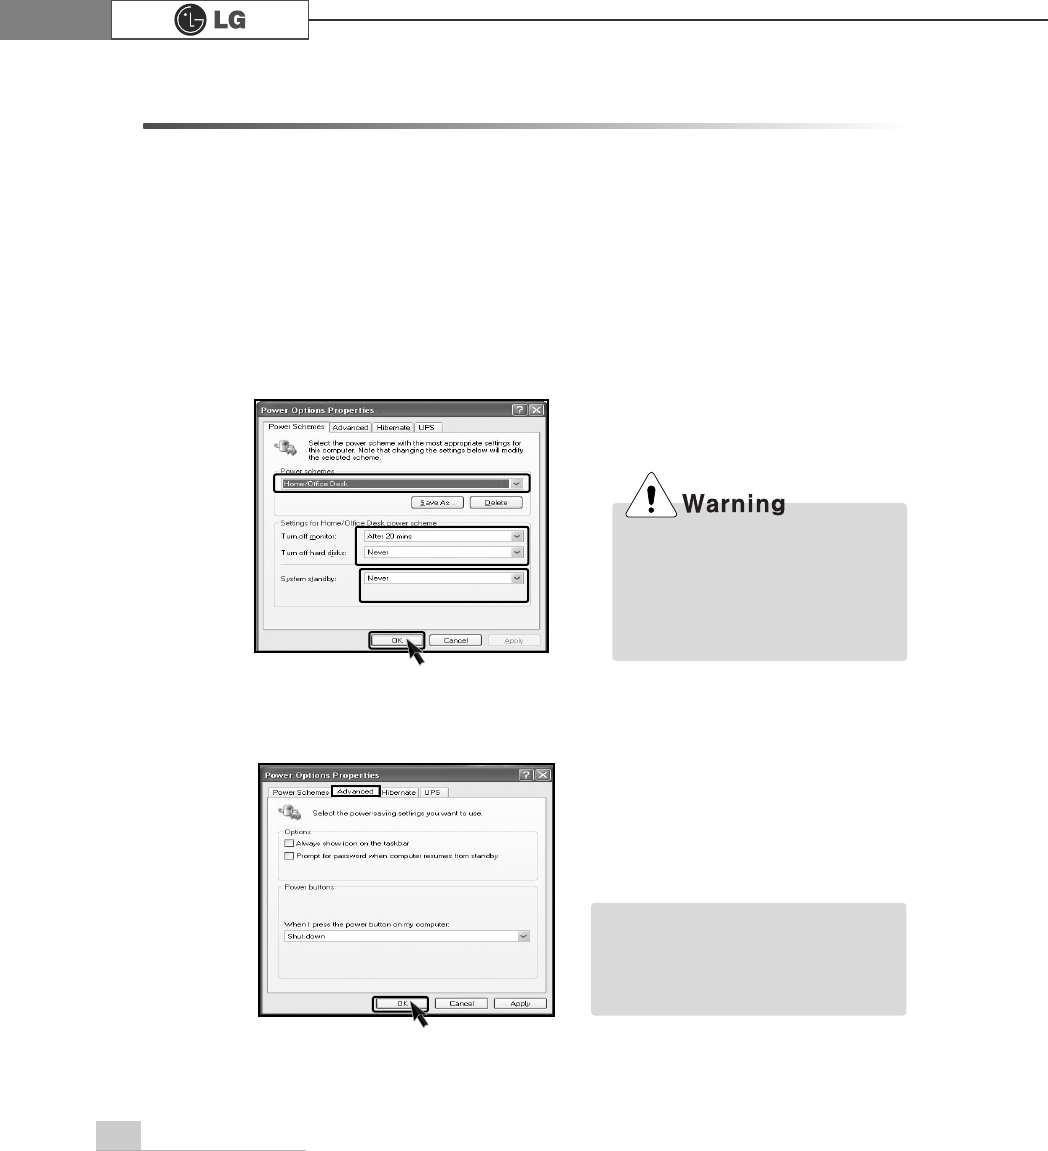
3-7. Using Power saving function
ⓡClick [Advanced] for setup if necessary and then click [OK].
ⓠSet the Power option properties and click [OK].
ⓞClick [Start]è
è[Control panel]è[Switch to classic view].
ⓟDouble click Power option icon from the control panel.
There are some devices which
do not support the power saving
function properly. If you have
installed such devices, you
should disable power saving
function.
ãHibernation mode: It saves data
and turns off the power and then
restores data until the system
starts again.
Note
53System setup
It improves the efficiency of the CPU as if one more CPU is working for the sys-
tem. It is more effective when playing games or multi-media work such as graphic
works. This function can be run by the CPU which supports HT (Hyper-
Threading). Check the Intel label with HT on it.
3-8. Using Hyper-Threading function
ⓞTurn on the computer and monitor.
ⓟPress [F8] key while the LG logo appears on the screen.
Phoenix-Award BIOS CMOS Set up Utility
Advanced BIOS Features
êëèé:Move Enter:Select +/-/PU/PD:Value F10:Save ESC:Exit F1:General Help
F5:Previous Values F7:Optimized Defaults
Ě
Hard Disk Boot Priority Enabled
BIOS Virus Warning
Disabled
Hyper-Threding Technology
Enabled
Quick Boot Disabled
1st Boot Device CDROM
2nd Boot Device Floppy
3nd Boot Device HDD-0
Boot Other Device Enabled
Swap Floppy Disabled
Floppy Seek Disabled
Boot Up Num-Lock LED On
Gate A20 Option Fast
Security Option System
Á
ÁAPIC Function Enabled
MPS Table Version 1.4
Hard Disk S.M.A.R.T Disabled
Full Screen LOGO Show Disabled
Summary Screen Show Enabled
Item Help
Memu Level Ě
Select Your Boot
Device Priority
Enabled
Hyper-Threding Technology
ⓡTo save changes in System Setup, press the [F10] key.
ⓢPress [Enter] if the following message appears on the screen. The computer
restarts.
SAVE to CMOS and EXIT(Y/N)? Y
ⓠIf the following screen appears, select [Hyper-Threading Technology] and
then select [Enabled].
ãHyper-Threading is only
available for Windows XP.
If an error occurs in other
softwares or games, set it
Disable.
Note
System Recovery
54
The system setup saves your computer’s hardware configurations in CMOS RAM.
The system setup provides you with information, such as the size and type of
your hard disk, size of the installed memory, date, and time.
4.System Recovery
ⓢAfter the Windows operating system installation is complete, install the LG GILJABI
CD (software installation CD) on your computer, and then you can use all application
programs and device drivers.
You can restore your computer system by using Recovery CD, shipped with your
Computer
You can select two options (Full Recovery without Format / Full Recovery after
Format)
Restoring the system by using Recovery CD
For Windows users
ⓞPlease make backup files from your Computer.
ⓟInsert the Restore CD in the CD-ROM drive. When "Press any key to boot
from CD..." message appears on the screen, press the [Enter] key.
ⓠFollow the instructions to install the Widows operating system.
ⓡAfter the installation is complete, remove the Recovery CD from your computer
and then restart the computer. Start the registration procedure by following instruc
tions on the screen.