LG Electronics USA DT-FK Personal Computer User Manual
LG Electronics USA Personal Computer Users Manual
UserManual.wiki
>
LG Electronics USA
>
DT FK User Manual
USERS MANUAL
Navigation menu
Upload a User Manual
Namespaces
Wiki Guide
HTML
PDF
Info
Views
User Manual
Discussion / Help
Navigation

![Click the "Help and Support" menu to learn Windows operation and troubleshooting,and receive technical supports. Please read the menu before using the computer. 8 Help and SupportⓞClick [Start] button, and then Help and Support.ⓟThen, the following screen will appear.Help and Support Suggested items, textsearch result, MicrosoftKnowledge Base andother contents areinvestigated. MicrosoftKnowledge Base issupported only when theInternet is connected.By selecting properitems, the user cancheck functions ofWindows XP and trou-bleshooting.Through the Internetconnection, the usercan ask others for ahelp and receive thetelephone number ofthe technical supportcenter.The user can configurethe optimal environmentfor computers.](https://usermanual.wiki/LG-Electronics-USA/DT-FK/User-Guide-538425-Page-10.png)
 icon. Otherwise, the computer needsrebooting to use the memory card slot.ãOptional parts differ by product model. For more information about optional parts, seeOption Guide of GILJABI CD.NoteãRemove the support to use your computer laid down.ãTo use the computer with the body standing, install the support. Otherwise, the systemmay function unstably.](https://usermanual.wiki/LG-Electronics-USA/DT-FK/User-Guide-538425-Page-13.png)

![18 Installing the system℟Connect the speaker connector to External Speaker ( ) connectoron the rear panel of the computer.This product is not equipped with speakers. To output sound, connect external speakers.Connecting the Speakers (To BE Separately Purchased)ãIn the case where sound is to low or mute, adjust the volume by clickingon the [Master Volume] icon on the right end of the Windows task bar.Note](https://usermanual.wiki/LG-Electronics-USA/DT-FK/User-Guide-538425-Page-20.png)
![2.Using the System20 Using the systemCheck if the floppy disk drive on the front part of the computer is empty and the powercord and the peripheral devices are connected to the computer on the rear panel.After installing the system, register user information. Turn on the power of the mainbody, and register user information by following the Windows screen instructions.2-1.Turning on the ComputerⓞPressing the power switch starts the self-diagnostic procedures; then Windows(R)XP startup screen is displayed .In a moment, a dialogue box, saying Welcome toMicrosoft Windows appears on the screen. Then Click [Next].Registration processⓟAfter Help protect your PC message appears on the screen, select Help protectmy PC by turning on Automatic Updates now and then press [Next].](https://usermanual.wiki/LG-Electronics-USA/DT-FK/User-Guide-538425-Page-22.png)
![21Using the systemⓡIf you turn the power on the computer for the first time, you have to register yourcopy of Windows XP. The registration process may differ depending on the model,but the difference does not affect the use of your computer.ⓠInternet connection option screen appears, follow the instruction.ⓢWho will use this computer? message appears on the screen. Type the namesofthe users and click [Next].](https://usermanual.wiki/LG-Electronics-USA/DT-FK/User-Guide-538425-Page-23.png)
![22 Using the systemThe certificate of authenticity includes theWindows product key. This certificate is theunique indication that proves your Windows isauthentic. Do not damage or remove thissticker (attached on the side of the product.). ÚThe certificate provided may be differentfrom this image.Certificate of Authenticityⓣ"Thank you!" message appears on the screen.Click [Finish] to complete the registration process.](https://usermanual.wiki/LG-Electronics-USA/DT-FK/User-Guide-538425-Page-24.png)
![23Using the system2-2.Using Windows XPWindows XP is brilliant, fresh, and easy to use. The desktop and task bar images are sim-plified, and you can easily access applications through the Start menu. There are more"Desktop" options for you to customize the environment.Click the [Start] button and click Windows XP Tour.Then, the window will appear. Select a feature of Windows XP to view detailed descrip-tion.Windows is an operation system of the computer. It is recommended to know basic func-tionality of Windows for better use of a computer. Windows XP Tour℘ℙℚ℘Minimize ℙMaximize ℚClose](https://usermanual.wiki/LG-Electronics-USA/DT-FK/User-Guide-538425-Page-25.png)
![24 Using the systemWindows XP Desktop Click the Start button to view Start menus. By clicking [All Programs] you can display a list of pro-grams currently installed on the computer.Include necessary applications to start Windows.Indicates currently running programs.You can set the screen resolution, color, audio, anddate/time by clicking icons.You can delete files and folders which will be saved auto-matically in the Recycle Bin. Running Empty Recycle Binwill delete files and folders permanently from your com-puter.℘[Start buttonℙStart MenuℚTaskbarℛTaskbar Icons andClockℜRecycle Binℛℚ℘ℙℜ](https://usermanual.wiki/LG-Electronics-USA/DT-FK/User-Guide-538425-Page-26.png)
![25Using the systemOverview of Start MenuClick the [Start] button to view menus that are most com-monly used on the computer℘Fixed TopicsℙRecently Used ProgramsℚAll ProgramsℛControl Panel: Enables to customize computer setting.ℜMy Computer: Displays information on drives and networks,and enables you to retrieve or run files and folders℘ℙℛℜℚTo Change Start Menu StyleⓞRight-click the [Start] button, and click [Properties]. Then, click an option under theStart menu tab.ⓟTo select the default start menu, click [Start Menu] on the [Taskbar and StartMenu Properties] tab.ⓠTo select the style in an older version of Windows, click the Classic Start Menu.ⓡClick [OK] to apply the new settings.](https://usermanual.wiki/LG-Electronics-USA/DT-FK/User-Guide-538425-Page-27.png)
![26 Using the systemFixeditemsControl PanelCategory View, a New View grouping similar topics, has been added to ControlPanel. Classic View displays all topics individually. You can select either CategoryView or Classic View according to your taste.To Display Recent Documents on Start MenuⓞRight-click the [Start] button, and click the [Properties].ⓟClick Start menu on the Start Menu tab, and click[Customize]. Select [List my most recently openeddocuments] on the Advanced tab, and click [OK].ⓠClick [Apply] èè[OK] in [Taskbar and Start MenuProperties] window to save the new settings. Then, clickthe Start button to display the Recently OpenedDocuments folder where recent documents and files aresaved will be displayed on the Start menu.To Display Programs at the top of Start MenuⓞSelect and right-click a program to display at the top of Start menu.ⓟClick [Pin to Start Menu].ⓠThe selected program will be displayed on the upper part of bound-ary as a fixed topic.ãTo empty My Recent Documents folder, click the Clear List on the Advanced tab.Although the list is cleared, the documents will not be deleted in the computer.NoteCategory View Classic View](https://usermanual.wiki/LG-Electronics-USA/DT-FK/User-Guide-538425-Page-28.png)
![27Using the systemTo Use Windows Classic ConfigurationTo Select an Other ThemeⓞClick [Control Panel] èè[Switch to Classic View] è[Display].ⓟClick [Windows XP] under Theme tab.Changing Desktop Appearance and ThemeⓞClick [Control Panel] èè[Switch to Classic View] è[Display].ⓟClick [Windows Classic] under Themes tab.ãTo view display properties, click [Start]èè[Control Panel]è[Switch to Classic View]and double-click Display. After selecting Windows Classic, you can customize Windows elements such as windowborders, icons, and menus. Select Appearance tab, and click Advanced. NoteWith Theme menu, you can customize the desktop including the background, thescreen saver, icons, windows, the mouse pointer, and sound. If there are multipleusers, each user can customize his/her own desktop using Theme menu.](https://usermanual.wiki/LG-Electronics-USA/DT-FK/User-Guide-538425-Page-29.png)
![28 Using the systemⓟSelect a screen saver from the list. Click the scroll button of Wait field and set the time towait till the screen saver is activated. Select PasswordProtected check box, then you will be requested to enterthe password when restarting Windows while the screensaver is running. This feature is convenient for prevent-ing others from accessing data and damaging them.To Change BackgroundⓞClick [Control Panel] èè[Switch to Classic View] è[Display], and select the Background tab. (Or locate themouse point on the Windows background, and right-clickit. Then, a popup menu will appear. Select [Properties]from the popup menu.)ⓟClick the scroll (triangle down) button, and check theimage list. Select an image to use it as the background,and click [Apply]. Then, the background will be changed.However, if there is no image that you would like to use asthe background, click [Browse] and select an image file.To Set Screen SaverⓞRun [Control Panel] èè[Switch to Classic View]è[Display]. And select [Screen Saver] tab.](https://usermanual.wiki/LG-Electronics-USA/DT-FK/User-Guide-538425-Page-30.png)
![29Using the systemDesktop CleanupWith Desktop Cleanup Wizard, you can delete hot icon paths that are not used on thedesktop. Desktop Cleanup Wizard will be automatically executed every 60 days, or youcan run this program when necessary.To delete unused icons on the desktop, do the followingⓞOpen [Control Panel]⍛⍛[Switch to Classic View] ⍛[Display].ⓟClick [Customize Desktop] under Background tab.ⓠClick [Clean Desktop Now] under Desktop Cleanup tab. ⓡFollow instructions of [Desktop Cleanup Wizard].TaskbarIf there are multiple documents and programs are running on the computer, the taskbar will grouptasks and display each group. For example, if there are three Word Pad documents are runningon the computer with other seven windows, three Word Pad tasks will be grouped under oneWord Pad button. To view a Word Pad document, click the Word Pad group button and select thecorresponding document.For simple display of the taskbar, icons that are not used for a long time and located next to theclock icon will be hidden. Click the arrow button to display hidden icons. Or click on the icon todisplay it again.To Customize BackgroundⓞRun [Control Panel] èè[Switch toClassic View] è[Display]ⓟClick the theme to change under[Themes] tab.ⓠChange the theme.ⓡAfter changing the theme, click[Apply] under Theme tab of DisplayProperties dialogue box and select[Save As].ⓢInput the name of the theme, andclick [OK].ãTo view display properties, click [Start] èè[Control Panel] è[Switch to ClassicView], and double-click on display.If you change the theme without inputtingthe theme name, the new theme will benamed previous name (modified).However, if you select another theme, thechanged theme will be deleted. The new theme will be saved under MyDocuments folder. To open My Documentsfolder, click Start and My Documents.Note](https://usermanual.wiki/LG-Electronics-USA/DT-FK/User-Guide-538425-Page-31.png)
![30 Using the systemⓞClick the [Start] button and select Turn Off Computer.ⓟWhen Shutdown screen appears, click [Turn Off].ãYou may not be able to normally turn off the computer in Windows. When this happens,press the Power button for five seconds. However, this is an emergency measure and taking this measure may result in errors in thesystem. It is recommended to click the [Start] button and select Turn off Computer menu onWindows desktop to shut down the computer.Abnormal turning-off of the computer may damage data stored in the hard disk. ãWhen the program suddenly stops, click [Ctrl] + [Alt] + [Delete] keys and terminate the pro-gram through Windows Task Manager or restart the system. If the some program files ofWindows has been damaged due to abnormal turning-off of the computer, reinstall damagedprograms. LG Electronics is not responsible for data loss caused by your mistakes and negli-gence.ⓠThe computer will be automatically turned off. 2-3.Turning Off Computer Abnormal turning-off of the computer may damage data stored in the hard disk.](https://usermanual.wiki/LG-Electronics-USA/DT-FK/User-Guide-538425-Page-32.png)
![31Using the system2-4. Rebooting the ComputerThe computer needs rebooting sometimes due to abnormal operation or incorrectuse. When this happens, reboot the program as described below.ⓞPress [Ctrl] + [Alt] + [Delete] keys to terminate the program or restart the computer.ⓟIn case the measure described above does not work, press the Power button for fiveseconds to turn off the computer. Then, restart the computer after 10 seconds.](https://usermanual.wiki/LG-Electronics-USA/DT-FK/User-Guide-538425-Page-33.png)
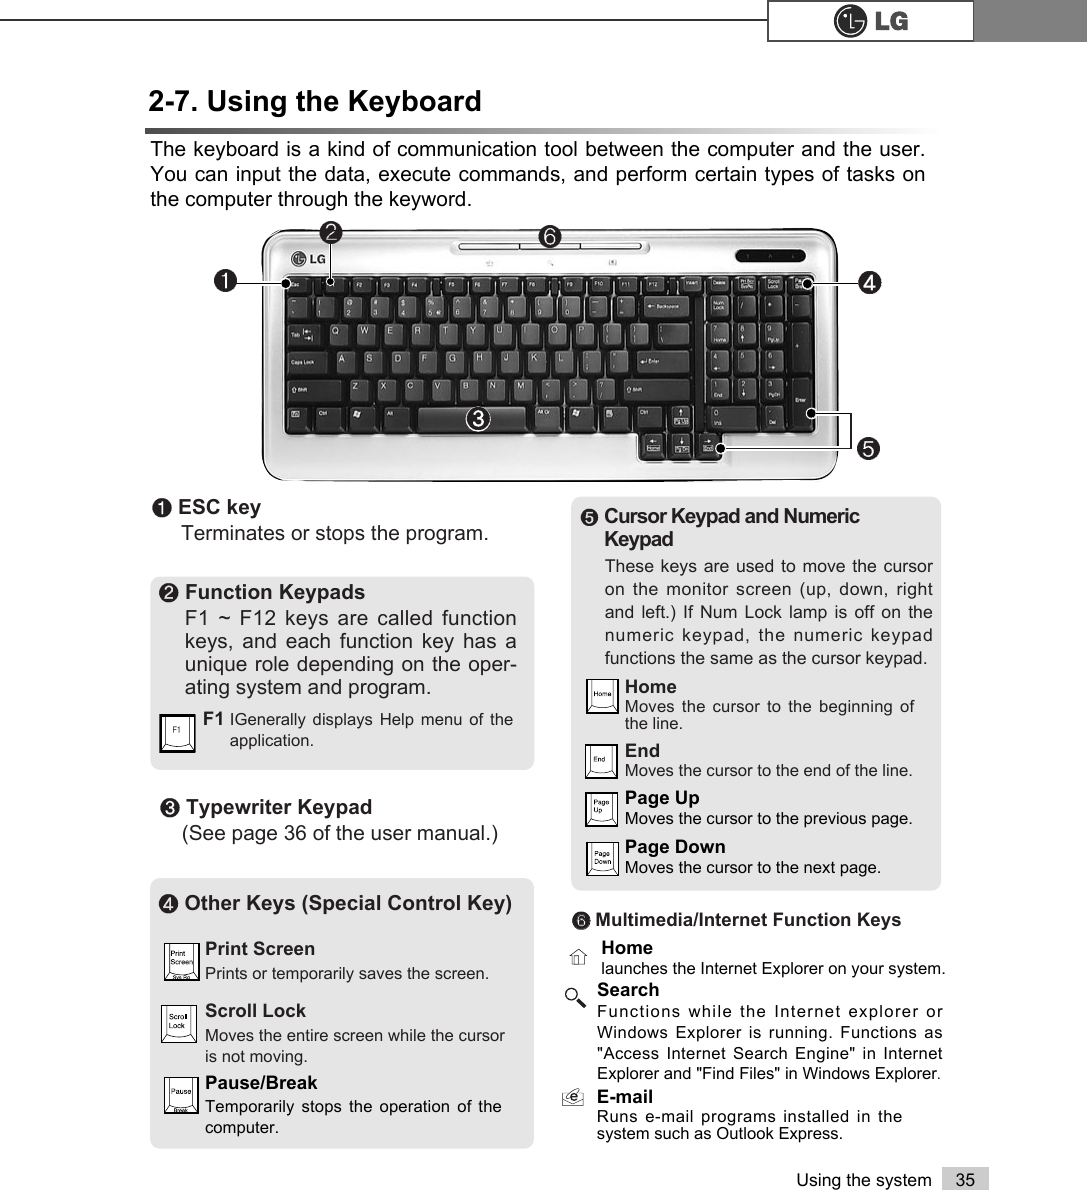
![36 Using the systemSpilling the water on the keyboard causesdisfunction to the computer.The typewriter keypad functions the same as keys on the typewriter. The typewriterkeypad includes alphabet, numeric, and Korean characters as well as [Shift] + [Alt] +[Backspace] keys.℘Tab keyUsed to input data in the data inputwindow and to move to the next datainput window.ℙCaps LockToggle cases.ℚShift keyUsed to input the upper characters ofkeys or capital English letters.ℛ,℟Ctrl and Alt KeysCtrl and Alt keys are not normally usedalone, but they are used with otherkeys in combination. They function dif-ferently for each program.Inputting a nameInputting initials of the name TabTypewriter KeypadLGLG User⌆ℚℙ℘℟℡ℛ⌅℞℠ℝℜℝEnterUsed to inform the computer of thecompletion of one command or tochange the lineℜBackspaceUsed to move the cursor to the leftplace by one column and delete eachcharacter.℞SpaceUsed to make a blank space on the right.℠WindowsUsed to select the Start menu withoutusing the mouse.℡Press Shortcut menu key to viewPress Shortcut menu key to view Shortcuts for the current porgram(Shortcut menukey works the same as the right-click ing the mouse button).⌅⌆ This key is used in conjunctionwith [Fn]key to move on to the next or previouspage.EX](https://usermanual.wiki/LG-Electronics-USA/DT-FK/User-Guide-538425-Page-38.png)

![38 Using the systemUsing the Windows Media PlayerThe Windows Media Player can play various kinds of audio and video files. You canplay and reproduce a CD. If the computer is equipped with a DVD driver, you can playthe DVD title, listen to Internet radio programs, play movie clips, and watch music videoon an Internet sites. You can also create his/her own music CD with the WindowsMedia Player.ⓞClick the [Start] button on the desktop, and select All Programs èèAccessories èEntertainment èèWindows Media Player.ⓞClick [Master Volume] icon from the taskbar.ⓟWhen the Windows Media Player is executed, click the [Open] button and select audio or video file to play.ⓟDrag the slide bar to adjust the sound of the corresponding device.Adjusting the Volume](https://usermanual.wiki/LG-Electronics-USA/DT-FK/User-Guide-538425-Page-40.png)

![40 Using the systemThe disk defragmenter will collect fragmented volumes so that the computer can operate effi-ciently and fast. Finish other application programs before running the Disk Defragmenter. ⓞClick the [Start] button on the desktop, and select AccessoriesèèSystemToolsèDisk Defragmenter.ⓟWhen the following screen appears, select the drive, and click the [Defragment]button.ⓠThe progress bar will appear.Disk DefragmenterⓡAfter the defragmentation is finished, click the [Close] button.](https://usermanual.wiki/LG-Electronics-USA/DT-FK/User-Guide-538425-Page-42.png)
![41Using the systemComputer viruses are programs that penetrate other programs and files. Computerviruses infect other files through replication, leaving the infected files and programsdamaged and unusable. We provide "Norton AntiVirus," a vaccine program, to fightviruses. Services and automatic upgrades of Norton AntiVirus through LiveUpdateare available for one year after initial installation. 2-10.Computer virusⓞClick the Norton Antivirus icon on the desktop.ⓟFollowing windows appears. Click [Next]. ⓠClick [Next] to install Norton Antivirus.Installing Norton Antivirus](https://usermanual.wiki/LG-Electronics-USA/DT-FK/User-Guide-538425-Page-43.png)
![42 Using the systemⓡFollowing window appears.ⓢNorton Antivirus installation is complete message appears. Click [Finish].](https://usermanual.wiki/LG-Electronics-USA/DT-FK/User-Guide-538425-Page-44.png)
![43Using the systemⓞClick [Start] and [All programs]⍛[Norton Antivirus]⍛[LiveUpdate]⍛[Norton AntiVirus].ⓟClick [Next].ⓠFollowing window appears.You should have an internet access to process Norton Antivirus update. Norton Antivirus updateⓡClick [Next].](https://usermanual.wiki/LG-Electronics-USA/DT-FK/User-Guide-538425-Page-45.png)
![44 Using the systemⓢDownloading update-items online.ⓣClick [Finish] . Norton Antivirus Update is complete.](https://usermanual.wiki/LG-Electronics-USA/DT-FK/User-Guide-538425-Page-46.png)
![45Using the systemⓞClick [Start]⍛[All programs]⍛[Norton Antivirus]⍛[Norton AntiVirus2005]. ⓟClick [Scan for virus] and select an item to scan.ⓠNorton AntiVirus is scanning virus.ⓡClick [Finish]. Virus scanning is complete.Running Norton AntivirusãIf any virus is detected, click[Fix] to repair.Note](https://usermanual.wiki/LG-Electronics-USA/DT-FK/User-Guide-538425-Page-47.png)
![System setup 47ⓞTurn on the computer and the monitor.ⓟWhile the LG logo screen is on, press [Delete] key.ⓠThe initial setup screen will appear.ãCursor PadThese keys are used to move the cursors on themonitor screen up, down, right, and left. When the Num Lock button is off on the numerickeypad, the numeric keypad functions the same asthe cursor keypad.Note<Cursor Keypad><Numeric Keypad>&0266HWXS8WLOLW\&RS\ULJKW&$ZDUG6RIWZDUHĚ 6WDQGDUG&026)HDWXUHV Ě 3&+HDOWK6WDWXVĚ $GYDQFHG%,26)HDWXUHV Ě )UHTXHQF\9ROWDJH&RQWUROĚ $GYDQFHG&KLSVHW)HDWXUHV /RDG2SWLPL]HG'HIDXOWVĚ ,QWHJUDWHG3HULSKHUDOV 6HW3DVVZRUGĚ 3RZHU0DQDJHPHQW6HWXS 6DYH([LW6HWXSĚ 3Q33&,&RQILJXUDWLRQV ([LW:LWKRXW6DYLQJ(VF4XLW êëè é 6HOHFWOWHP)4)ODVK )6DYH([LW6HWXS9LUXV3URWHFWLRQ%RRW6HTXHQFH](https://usermanual.wiki/LG-Electronics-USA/DT-FK/User-Guide-538425-Page-49.png)
![System setup483-2. Booting with a USB DriveA booting with a USB device (USB-FDD, USB-ZIP, USB-CD-ROM, or USB-HDD)proceeds as follows.ⓞExecute the initial screen of System Setup, and select Advance Bios Featuresby pressing >Ⓑ@>Ⓒ@>⒵@, and >Ⓐ@keys. Then, press [Enter] key.ⓟWhen the following screen appears, select First Boot Device by pressing>Ⓑ@>Ⓒ@>⒵@, and >Ⓐ@keys. Then, select the device and press [Enter] key.ⓠTo save changes in System Setup, press the [F10] key.ⓡWhen the following message appears on the screen, press the [Enter] key torestart the screen.SAVE to CMOS and EXIT(Y/N)? Y Bootable devices will be dis-played only when bootabledevices are equipped.CMOS Setup Utility-Copyright(C)1984-2004 Award SoftwareAdvanced BIOS Featuresêëèé:Move Enter:Select +/-/PU/PD:Value F10:Save ESC:Exit F1:General HelpF5:Previous Values F7:Optimized DefaultsĚHard Disk Boot Priority [Press Enter]BIOS Flash Protection [Auto]First Boot Device [CDROM]Second Boot Device [USB-FDD] Third Boot Device [Hard Disk]Boot Up Floppy Seek [Disabled]Boot Up Num-Loce [On]Passward Check [System]Interrupt Mode [APIC]Boot to OS2 or DR-DOS [Disabled]HDD S,M,A,R,T, Capability [Enabled]CPU Hyper-Threading [Enabled]Limit CPUID Max.to3 [Enabled]Full Screen LOGO Show [Enabled]Summary Screen Show [Disabled]Item HelpMemu Level ĚSelect Your Boot Device PriorityFirst Boot Device USB-FDDNote](https://usermanual.wiki/LG-Electronics-USA/DT-FK/User-Guide-538425-Page-50.png)
![49System setupⓟWhen the next screen appears, select Password Check by pressing>Ⓑ@>Ⓒ@>⒵@, and >Ⓐ@keys and the Setup or System by pressing the [Page Up]and [Page Down] keys. Then, press [Enter] key.ⓞExecute the initial screen of System Setup and select Advanced Bios Featuresby pressing >Ⓑ@>Ⓒ@>⒵@, and >Ⓐ@keys. Then, press [Enter] key.ⓠSelect Set Password by pressing >Ⓑ@>Ⓒ@>⒵@, and >Ⓐ@keys on the initial setup screen, and press [Enter].3-3. Setting a PasswordTo prevent other users from changing computer settings, you can register a pass-word. A password can be registered during booting or System Setup.Without the registered password, if any, access to the system will be denied. Write downand keep your password in a safe place.ãYou will be asked to input the password only when you select "Setup" in Security Option orwhen you select "Setup" by pressing [Delete] key on the initial screen. The password pro-tects the computer by stopping others from changing computer settings and system setup. NoteCMOS Setup Utility-Copyright(C)1984-2004 Award SoftwareAdvanced BIOS Featuresêëèé:Move Enter:Select +/-/PU/PD:Value F10:Save ESC:Exit F1:General HelpF5:Previous Values F7:Optimized DefaultsĚHard Disk Boot Priority [Press Enter]BIOS Flash Protection [Auto]First Boot Device [CDROM]Second Boot Device [USB-FDD] Third Boot Device [Hard Disk]Boot Up Floppy Seek [Disabled]Boot Up Num-Loce [On]Passward Check [System]Interrupt Mode [APIC]Boot to OS2 or DR-DOS [Disabled]HDD S,M,A,R,T, Capability [Enabled]CPU Hyper-Threading [Enabled]Limit CPUID Max.to3 [Enabled]Full Screen LOGO Show [Enabled]Summary Screen Show [Disabled]Item HelpMemu Level ĚSelect Your Boot Device PriorityPassward Check Setup](https://usermanual.wiki/LG-Electronics-USA/DT-FK/User-Guide-538425-Page-51.png)
![50 System setup3-4. Deleting or Changing a Password You can delete or change the password only after inputting the current password.ⓞExecute the initial screen of System Setup, enter the password, and press the[Enter] key.ⓢWhen asked to confirm the password, input the password again and press [Enter]key. ⓣTo save changes in System Setup, press [F10].ⓤWhen the following message appears, press [Enter] key to restart the computer. ⓡWhen the following message appears on the screen, input the password andpress [Enter] key. The password must be alphanumeric and not exceed eightdigits.SAVE to CMOS and EXIT(Y/N)? Y Confirm Password : Enter Password :&0266HWXS8WLOLW\&RS\ULJKW&$ZDUG6RIWZDUHĚ 6WDQGDUG&026)HDWXUHV Ě 3&+HDOWK6WDWXVĚ $GYDQFHG%,26)HDWXUHV Ě )UHTXHQF\9ROWDJH&RQWUROĚ $GYDQFHG&KLSVHW)HDWXUHV /RDG2SWLPL]HG'HIDXOWVĚ ,QWHJUDWHG3HULSKHUDOV 6HW3DVVZRUGĚ 3RZHU0DQDJHPHQW6HWXS 6DYH([LW6HWXSĚ 3Q33&,&RQILJXUDWLRQV ([LW:LWKRXW6DYLQJ(VF4XLW êëè é 6HOHFWOWHP)4)ODVK )6DYH([LW6HWXS9LUXV3URWHFWLRQ%RRW6HTXHQFH(QWHU3DVVZRUG](https://usermanual.wiki/LG-Electronics-USA/DT-FK/User-Guide-538425-Page-52.png)
![51System setupĚChanging the PasswordChange the password in the same procedure as that of password setting.ĚĚDeleting the PasswordⓟSelect Set Password by pressing >Ⓑ@>Ⓒ@>⒵@, and >Ⓐ@keys on the initial screenof the Setup menu, and press the [Enter] key.ⓠWhen the following message appears, press the [Enter] key.ⓡA message will appear saying that the password has been deleted.Press the [Enter] key.ⓢTo save the change in System Setup, press the [F10].ⓣWhen the following message appears on the screen, press the [Y] key and the[Enter] key. Then, the computer will restart. PASSWORD DISABLD!!!Press any key to continue...Enter Password : SAVE to CMOS and EXIT(Y/N)? Y CMOS Setup Utility-Copyright(C)1984-2004 Award SoftwareĚStandard CMOS Features ĚPC Health StatusĚAdvanced BIOS Features ĚFrequency/Voltage ControlĚAdvanced Chipset Features Load Optimized Defaults ĚIntegrated Peripherals Set PasswordĚPower Management Setup Save & Exit SetupĚPnP/PCI Configurations Exit Without SavingEsc : Quit êëè é : Select ltemF8: Q-Flash F10 : Save & Exit SetupVirus Protection, Boot Sequence...6HW3DVVZRUG](https://usermanual.wiki/LG-Electronics-USA/DT-FK/User-Guide-538425-Page-53.png)
![52 System setup3-5. Initializing System Setup If you changed the system setup by mistake, it can be recovered to the default set-ting.ⓞExecute the initial screen of System Setup, and select the Load OptimizedDefaults item by pressing arrow keys. Then, press [Enter].ⓟWhen the following message appears on the screen, press [Y] and [Enter].System setup will be return to the factory setting.ⓠTo save the change in System Setup, press [F10]. ⓡWhen the following message appears, press the [Enter] key to restart the com-puter.SAVE to CMOS and EXIT(Y/N)? Y Load Optimized Defaults (Y/N) ? Y](https://usermanual.wiki/LG-Electronics-USA/DT-FK/User-Guide-538425-Page-54.png)
![53System setupThe following instruction explains a way to decide the temporary booting orders with-out affecting CMO setup.3-6. Deciding the Temporary Booting OrdersⓞTurn on the computer and the monitor.ⓠSelect USB-FDD from the Boot Menu to restart the computer.ⓟWhile LG logo screen is on, press [F12]. ãThe menus may differ by product model :USB-FDD, USB-ZIP, USB-HDD, and USB-CD-ROM. Bootable devices will be dis-played only when they are equipped inbefore turning the computer onNote](https://usermanual.wiki/LG-Electronics-USA/DT-FK/User-Guide-538425-Page-55.png)
![54 System setupRegardless of BIOS setup, you can use the Power Saver mode in Windows as fol-lows.3-7. Setting the Power Saver ModeⓡPress the advanced tab and set options appropriately. Then, click the [OK] button.ⓠAfter setting Power Scheme items in the Power Schemes tab, click the [OK]button.ⓞSelect [Start] èè[Control Panel] è[Switch to Classic View].ⓟDouble-click the Power option icon on the Control Panel window.TWhen the device connected tothe computer does not supportPower Saver functions, theStandby mode or Hibernatemode may not be properly func-tion. In this case, deactivate PowerSaver feature.ãHibernate Mode :The currentwork states are saved intact on theH/D before the power goes off.The states will be recovered asthey were when the power is onlater.Note](https://usermanual.wiki/LG-Electronics-USA/DT-FK/User-Guide-538425-Page-56.png)
![55System setupThe Hyper-threading feature improves the performance of the CPU greatly as iftwo CPUs were running. This feature is especially efficient for multimedia taskssuch as games and graphic jobs. Hyper-threading is supported only by the CPUwith Hyper-Threading (HT) feature. Check the "Intel" sticker on the side of thecomputer to see if the CPU supports hyper-threading.3-8. Using Hyper-Threading FeatureⓞExecute the initial screen of System Setup, and select Advanced BiosFeatures by pressing >Ⓑ@>Ⓒ@>⒵@, and >Ⓐ@keys. Then, press the [Enter] key.ⓟWhen the following screen appears, select Hyper-Threading Technology andEnabled.ⓠTo save changes in System Setup, press [F10].ⓡWhen the following message appears, press the [Enter] key to restart the com-puter.SAVE to CMOS and EXIT(Y/N)? Y ãHyper-threading is supported only by Windows XP. If you execute software or gamesthat does not support hyper-threading, an error may occur. When this happens, disablethe "Hyper-Threading Technology" featuree.NoteCMOS Setup Utility-Copyright(C)1984-2004 Award SoftwareAdvanced BIOS Featuresêëèé:Move Enter:Select +/-/PU/PD:Value F10:Save ESC:Exit F1:General HelpF5:Previous Values F7:Optimized DefaultsĚHard Disk Boot Priority [Press Enter]BIOS Flash Protection [Auto]First Boot Device [CDROM]Second Boot Device [USB-FDD] Third Boot Device [Hard Disk]Boot Up Floppy Seek [Disabled]Boot Up Num-Loce [On]Passward Check [System]Interrupt Mode [APIC]Boot to OS2 or DR-DOS [Disabled]HDD S,M,A,R,T, Capability [Enabled]CPU Hyper-Threading [Enabled]Limit CPUID Max.to3 [Enabled]Full Screen LOGO Show [Enabled]Summary Screen Show [Disabled]Item HelpMemu Level ĚSelect Your Boot Device PriorityHyper-Threading Technology Enabled](https://usermanual.wiki/LG-Electronics-USA/DT-FK/User-Guide-538425-Page-57.png)
![System Recovery56You can restore the system in two ways depending on the current status of the sys-tem. However, to restore the hard disk, you need to back up necessary softwareand data files in advance. After completing Windows installation, you need to regis-ter the User Properties when booting the system as if you did your new computer.4.System RecoveryⓞBack up the data stored in the computer.ⓟInsert the Restore CD in the CD-ROM drive. When "Press any key to bootfrom CD..." message appears on the screen, press the [Enter] key. ⓠContinue installation by following instructions on the screen. ⓡAfter completing installation of Windows, remove the CD and restart the sys-tem. When the following screen appears, register the User Properties accordingto instructions on the screen. Installation with Recovery CDInstallationⓢAfter the Windows operating system installation is complete, install the LG GILJABICD (software installation CD) on your computer, and then you can use all applicationprograms and device drivers.](https://usermanual.wiki/LG-Electronics-USA/DT-FK/User-Guide-538425-Page-58.png)
![System Recovery 57For Windows usersIf Windows XP is already installed on the hard disk, you can upgrade existingWindows XP without formatting the hard diskIn the case that Windows XP is already running on the hard disk, upgradeWindows XP as follows.ⓟClick the [Start] and [Run] button.ⓠInsert the Restore CD, and input D:\i386\winnt32.exe/unattend. Then, click the[OK] button. (When the CD-ROM drive is D drive.)ⓞTurn on the system where Windows XP is installed.Installation of Windows XP UpgradeãTo execute "winnt32.exe" without using"Unattend" option, you must input theproduct key attached on the computer.You also need to have the computercertified within 30 days after thisNote](https://usermanual.wiki/LG-Electronics-USA/DT-FK/User-Guide-538425-Page-59.png)
![5. Reinstallation of Drivers58 Reinstallation of DriversYou must install the printer driver after connecting the printer. Windows XP canautomatically detect printer drivers. However, if Windows XP does not detect yourprinter driver, install the printer driver as follows.5-1.Reinstalling Printer DriverⓟDouble click the [Printer and Fax] on the Control Panel window.ⓠWhen the following screen appears, click the [Add Printer] button.ⓞSelect [Start] èè[Control Panel] è[Class Desktop].ⓡWhen the Add Printer Wizard appears, click the [Next] button.](https://usermanual.wiki/LG-Electronics-USA/DT-FK/User-Guide-538425-Page-60.png)
![59Reinstallation of DriversⓢWhen the following screen appears, check the connection type of the printer -local or network. Then, select a printer and click the [Next] button.ⓣNew Printer Detection screen will appear. Click the [Next] button.ⓤWhen Set Printer Port screen appears, select LPT1 or LPT2 before clicking the[Next] button.ⓥSelect the manufacturer and model of your printer on the Select Printer screen.If your printer came with an installation disk, click [Have Disk]. If not, just clickthe [Next] button.](https://usermanual.wiki/LG-Electronics-USA/DT-FK/User-Guide-538425-Page-61.png)
![60 Reinstallation of DriversⓧWhen Print Test Page screen appears, click the [Yes] and [Next].ⓦInsert the diskette or driver CD in the driver and click the [OK] button.ⓦName the printer, and click the [Next] button.When [Have Disk] is selected.When [Next] is selected](https://usermanual.wiki/LG-Electronics-USA/DT-FK/User-Guide-538425-Page-62.png)
![61Reinstallation of DriversⓨAfter the test page is properly printed out, click the [OK] button. ⓩWhen the following screen appears, check the printer and click the [Finish]button.⓪Now, the printer has been added. .](https://usermanual.wiki/LG-Electronics-USA/DT-FK/User-Guide-538425-Page-63.png)
![System Expansion 73Checking the Expanded MemoryTurn on the power after installing the memory. Then, the computer will detect the mem-ory so that you don't need to change the system setup. The capacity of the installedmemory is checked as follows.ⓞConnect the power cord and other cables, and turn on the computer and the moni-tor. Then, the initial screen to check the status of the computer will appear.ⓟWhen the following screen appears, press [Esc] key. Then, POST screen willappear.ⓠOn the next screen, press [Pause] to freeze the screen temporarily and to checkthe Memory Testing : XXXXXX OK part.ⓡAfter checking the memory, press the [Esc] key. Windows screen will proceed.ãIn the case that the logo screen is processed too fast to stop, press [Delete] key on theLG logo screen. Then, select Advanced BIOS Features ĚFull Screen Logo ShowSelectable, and change status from Enabled to Disabled.Note$ZDUG0RGXODU%,26Y;;;;;$Q(QHUJ\6WDU$OO\&RS\ULJKW&$ZDUG6RIWZDUH,QF%XLOG,'/*;;;;;;;;;;;;;;0DLQ3URFHVVRU,QWHO53HQWLXP5;3URFHVVRU;;;0+]0HPRU\7HVW;;;;;;2.3UHVV'(/WRHQWHU6(783;;;;;;;;;;;;;;;;;;;;;;;;;0HPRU\7HVWLQJ;;;;;;2.](https://usermanual.wiki/LG-Electronics-USA/DT-FK/User-Guide-538425-Page-75.png)
![System Expansion 75ⓟRemove the computer cover as described in [Cover Open] on Page 64. Removefour screws from the hard case, and lift the hard case as shown in the figure.ⓞAs shown in Figure ℘, open the CD-RI-ROM drive by inserting a thin and solidpin that is not bent in the emergency hold of the CD-RIM drive drawer. Then,push the CD-RIOM drive drawer and remove it as shown in Figure ℙ.ⓠInsert the additional hard case in the separated hard disk case as shown in thefigure.Turn off the system anddisconnect the cablebefore disassembling theproduct. Otherwise, anelectric shock may occur.Correctly connect the signalcable and the power cable.Otherwise, malfunctioning,product damage, or an elec-tric shock may occur. ℘ℙ](https://usermanual.wiki/LG-Electronics-USA/DT-FK/User-Guide-538425-Page-77.png)
![System Expansion 77ⓞTurn on the computer and the monitor.ⓟWhile the LG logo screen is on, press [Delete] key.ⓠThen, the initial screen of System Setup menu will appear. ⓡExecute the initial screen of the System Setup menu, and select StandardCMOS Features by pressing >Ⓑ@>Ⓒ@>⒵@, and >Ⓐ@keys. Then, press [Enter].Hard disk drive setup3KRHQL[$ZDUG%,26&0266HWXS8WLOLW\Ě 6WDQGDUG&026)HDWXUHV Ě3&+HDOWK6WDWXVĚ $GYDQFHG%,26)HDWXUHV Ě )UHTXHQF\9ROWDJH&RQWUROĚ $GYDQFHG&KLSVHW)HDWXUHV /RDG2SWLPL]HG'HIDXOWVĚ ,QWHJUDWHG3HULSKHUDOV 6HW3DVVZRUGĚ 3RZHU0DQDJHPHQW6HWXS 6DYH([LW6HWXSĚ 3Q33&,&RQILJXUDWLRQV ([LW:LWKRXW6DYLQJ(VF4XLW êëè é 6HOHFWOWHP)6DYH([LW6HWXS9LUXV3URWHFWLRQ%RRW6HTXHQFH](https://usermanual.wiki/LG-Electronics-USA/DT-FK/User-Guide-538425-Page-79.png)
![System Expansion78ⓢWhen the following appears, select IDE Channel 0 Salve by pressing>Ⓑ@>Ⓒ@>⒵@, and >Ⓐ@keys and press [Enter] key.ⓣPress [Enter] key on IDE Channel 0 Slave to set it as Auto, and press [Enter]key again on IDE HDD Auto-Detection to set it as Slave. Then, the additionallyinstalled hard disk will be automatically detected.ⓤTo save changes in System Setup, press the [F10] key.ⓥWhen the following message appears, press the [Enter] key to restart the computer.Phoenix-Award BIOS CMOS Set up UtilityStandard BIOS FeaturesData (mm:dd:yy) XXX, XXX, XXXXTime (hh:mm:ss) XX, XX, XXĚIDE Channel 0 Master Press EnterXXXXXMBĚIDE Channel 0 Slave Press Enter None ĚIDE Channel 1 Master Press Enter None ĚIDE Channel 1 Slave Press Enter None Drive A X.XXM, X.XinDrive B NoneVideo EGA/VGAHalt On All, But Keyboard.CPU Type X.XXX.XXX.XXBIOS Version Build ID :LG Video Memory X.XX KSystem Memory X.XX KTotal Memory X.XX KItem HelpMenu Level ĚTo auto-detect theHDD's size, head...onthis channelêëèé:Move Enter:Select +/-/PU/PD:Value F10:Save ESC:Exit F1:General HelpF5:Previous Values F7:Optimized Defaults3UHVV(QWHU1RQHĚ,'(&KDQQHO6ODYHIDE HDD Auto-DetectionPress EnterIDE Channel 0 Slave AutoAccess Mode AutoCapacity 0 MB Cylinder 0Head 0Precomp 0Lauding Zome 0Sector 0 Item HelpMenu Level ĚTo auto-detect theHDD's size, head...onthis channelêëèé:Move Enter:Select +/-/PU/PD:Value F10:Save ESC:Exit F1:General HelpF5:Previous Values F7:Optimized Defaults$XWR3UHVV(QWHU6$9(WR&026 DQG(;,7<1"<Phoenix-Award BIOS CMOS Set up UtilityIDE Channel 0 Slave](https://usermanual.wiki/LG-Electronics-USA/DT-FK/User-Guide-538425-Page-80.png)
![System Expansion 79Configuring the Hard Disk (in Factory Setting Status)ⓞSelect the [Start] button on the desk top, and click the [Execute].ⓟInput diskmgmt.msc, and click [OK].ⓠSelect Added Disk 1 on Disk Management screen.Right-click and select [New Loglcal Drive]. ⓡWhen New Partition Wizard screen appears, click the [Next] button.If you partition the hard disk using "diskmgmt.msc" existing data on the hard diskdriver will be deleted. You must carefully partition the hard disk when there is data onthe disk.](https://usermanual.wiki/LG-Electronics-USA/DT-FK/User-Guide-538425-Page-81.png)
![80 System ExpansionⓢWhen the partition type selection screen appears, select the main partition andclick the [Next] button.ⓣSelect the maximum size, and click the [Next] button.ⓤSelect the Drive Letter and click the [Next] button.You can use as muchspace as you select in theabove window.](https://usermanual.wiki/LG-Electronics-USA/DT-FK/User-Guide-538425-Page-82.png)
![81System ExpansionⓥWhen the partition format appears, set the file system, allocation unit, and vol-ume label suitable for the User Environment and click the [Next] button.ⓦThe Partition Wizard has been completed. Click the [Finish] button.ⓧAfter the completion, the additional hard disk will normally function.](https://usermanual.wiki/LG-Electronics-USA/DT-FK/User-Guide-538425-Page-83.png)
![87Product SpecificationsProduct Specifications *).0RGHOMouse PS/2 mouse or USB (ball / wheel)Sound Equipped in the main board (MIC connector, speaker connec-tor, line-in connector) and in the extension connector on therear part of the system.System memory128MB or higher. Differs depending on the model. (FK models allocate minimum 8MB or maximum 64MB as thelocal video memory [frame buffer] using a built-in VGA.)USB Equipped in the main board (four) and in the front (two).Serial I/O Installed in the main board. (one 9-pin connector).Parallel I/O One printer port (25pins)Extension slot One PCI-E 16x slot, One PCI-E 1x slot, Two PCI slots.Product size Width 100 x Height 365 x depth 460(mm)Power spec 100~127 / 200~240VAC, 5A / 4A, 50/60Hz or200~240VAC. 4A, 50/60HzFront I/O Two USB ports and audio ports (SPEAKER-OUT and MIC-IN)Video Equipped in PCI-E 16x video card (one 15-pin connector) or inthe main board.Keyboard PS/2 keyboard (104keys)Hard disk drive 40 GB or higher (Serial ATA type).Cache memory 256KB/512KB or 1024KB L2 cache is equipped in the CPU. CPUSupports Pentium4/ LGA775 2.8/3.0/3.2/3.4/3.6 GHz or higher (FSB:533/800MHz) Temperature:Average temperature:77ĕ(25ËOperating temperature:41ĕ~95ĕ(5~35ËStorage temperature:-4ĕ~131ĕ-25~55ËHumidity:Average humidity:60%(RH) Operating humidity:30%~80%(RH)/Storage humidity:30%~80%(RH)Environmental requirementÚÚSpecifications below differ depending on the models.](https://usermanual.wiki/LG-Electronics-USA/DT-FK/User-Guide-538425-Page-89.png)