LG Electronics USA DT-FK Personal Computer User Manual
LG Electronics USA Personal Computer Users Manual
USERS MANUAL
FK series
FKseries
Copyright 2005
LG Electronics, Inc., DigitalMate Co., Ltd.
P/N:3828BPH013A
Rev.00
P/N: 3828BPH013A(Rev.00)
Thank you for using the LG product.
LG has manufactured and tested this product to provide you with a reliable computing
environment.
Please read this manual carefully before using the computer.
This User's guide is for FK model.
Instructions may be different depending on models.
Check your model before reading User's guide.
Keep User's guide at a place where other users always can reach
ÞInformation in this manual may include technical inaccuracies or typographical
errors. Images in this manual are for illustrative purposes only and may be
different from the actual product.
ÞLG reserves the rights to make improvements and/or changes to the product
without notice.
ÞReproducing any or all of the information contained in this publication without
written permission is prohibited.
ÞThis computer complies with the radio frequency and safety standards of any
country or region in which it has been approved for wireless use.
1.Warning: Not following the instruction could result in death or serious injury.
This sign calls attention to features and operations that may be dangerous
to the user. Follow the instruction closely to reduce the risk of bodily harm
or damage to the equipment
2.Caution: Not following the instruction could result in minor or moderate
injury and/or damage to the product.
ÞMicrosoft, MS, MS-DOS, and Windows are trademarks of Microsoft Corporation.
ÞIBM, IBM Personal Computer, PS/2 and PC AT are trademarks of International Business
Machine Corporation.
ÞMemory Stick and are trademarks of Sony Corporation, and other company
names and product names are registered trademarks of legitimate owners.
Þis a trademark of LG.
ÞCopyright 2005 LG Electronics, Inc., DigitalMate Co., Ltd
Memory Stick

1Contents
Contents
Important Safety Instructions .................................................................................................. 2
1-1 Contents of the Product .......................................................................................................................... 9
1-2 Composition ........................................................................................................................................... 10
1-3 Installation .............................................................................................................................................. 15
1-4 Connecting Peripheral Devices (To Be Separately Purchased) ............................................................ 17
1. Installing the system
2. Using the system
3-1 Entering System Setup .......................................................................................................................... 46
3-2 Booting with a USB drive ....................................................................................................................... 48
3-3 Setting a Password ................................................................................................................................ 49
3-4 Deleting or Changing a Password ......................................................................................................... 50
3-5 Initializing System Setup ....................................................................................................................... 52
3-6 Deciding the Temporary Booting Orders................................................................................................ 53
3-7 Setting the Power Saver Mode .............................................................................................................. 54
3-8 Using Hyper-Threading Feature............................................................................................................. 55
3. System Setup
4. System Recovery................................................................................................................. 56
5. Reinstallation of Drivers
Product Specifications . . . . . . . . . . . . . . . . . . . . . . . . . . . . . . . . . . . . . . . . . . . . . . . . . . . . . . . . . . . . . . . . . . . . . . . . . . . . . . . . . . . . . . . . . . . . . . . . . . . . . . . 8 7
6-1 Opening the Computer Case ................................................................................................................. 64
6-2 Main Board ............................................................................................................................................ 65
6-3 Internal Connectors................................................................................................................................ 66
6-4 Replacing the CPU................................................................................................................................. 68
6-5 Expanding the Computer Memory ........................................................................................................ 70
6-6 Adding a Hard Disk ................................................................................................................................ 74
6-7 Installing an Expansion Card ................................................................................................................. 82
5-1 Reinstalling Printer driver ....................................................................................................................... 58
5-2 Reinstalling Sound driver ....................................................................................................................... 62
5-3 Reinstalling Video driver ........................................................................................................................ 63
2-1 Turning on the Computer ....................................................................................................................... 20
2-2 Using Windows XP................................................................................................................................. 23
2-3 Turning off the Computer ....................................................................................................................... 30
2-4 Rebooting the Computer ........................................................................................................................ 31
2-5 Using the Mouse .................................................................................................................................... 32
2-6 Cleaning the Mouse ............................................................................................................................... 34
2-7 Using the Keyboard................................................................................................................................ 35
2-8 Using the CD-ROM Drive....................................................................................................................... 37
2-9 Using the Disk Drive............................................................................................................................... 39
2-10 Computer Virus .................................................................................................................................... 41
6. System Expansion
2 Important Safety Instructions
Following instructions are to help users to use the product safely and properly and
to prevent any potential risk or damage. Please read the following instructions
carefully before using the product.
Installation
Important Safety Instructions
Do not use the product in damp places including a laundry room and bathroom.
The computer may not function correctly, and there is the risk of electric shock.
Operate the computer within a temperature range of 41 to 95ĕ(5Ë~35Ë) and 30 to 80% of
relative humidity
Dispose of its desiccating agent and vinyl packages properly.
A child may get suffocated by swallowing the desiccating agent or wearing the packages on
head.
Use the product in a dust-free environment.
Otherwise, the product may malfunction.
Do not place any mechanical interference within a 15cm radius of the computer.
The computer may be heated from inside and result in a burn.
Keep away from the moisture condensation.
It may damage on the computer. If this happens, turn off the computer and make it dry before
power is on
Operate the product in a place without electromagnetic interference.
Keep a proper distance between the computer and such electronic appliances as speakers
that generate strong magnetic fields. Otherwise, data stored on the hard disk may be lost or
the display color on the monitor may be impaired.
3Important Safety Instructions
Do not use loose plugs or damaged power cords.
An electric shock or fire may occur.
Operate the product at the proper voltage.
Excessive voltage may result in damage on the product, electric shock or fire.
Use a socket with an earth pin equipped.
If not earthed, the product may cause an electric shock and get damaged.
Use power outlets with an earth pin installed and proper supply of rated elec
tricity.
An electric leakage may cause an electric shock or fire.
Do not touch the power cord with your hands wet.
There is a possibility of an electric shock.
In the case that a strange noise is heard from the cord or plug, disconnect the
power cord from the outlet immediately and contact the service center.
A fire or electric shock may occur.
Tightly connect the power cord to the outlet.
Loose connection of the power cord could cause a fire.
Pull the plug, not the cord, to disconnect the power.
Otherwise, a fire may occur or the product may get damaged.
Always keep the power cord and the outlet clean.
A fire may occur.
In the case that a watery or other alien substance enters inside the computer,
disconnect the power and contact the service center.
Damaged parts may cause a fire or electric shock.
Power Connection
4 Important Safety Instructions
Using the Computer
Use a socket with an earth pin equipped.
If not earthed, the product may cause an electric shock and get damaged.
Use power outlets with an earth pin installed and proper supply of rated elec
tricity.
An electric leakage may cause an electric shock or fire.
Do not impair the cord by excessive bending or hard pressing. Keep the power
cord out of reach of children and pets.
A damaged power cord may cause an electric shock or fire.
Clean the computer with proper detergent and dry it completely before using it
again.
Otherwise, a fire or electric shock may occur.
Disconnect the power and the Internet line from the modem, the LAN card and
others in case of a lightning strike.
An electric shock or fire may occur.
Do not leave a cup or other containers filled with chemical or water near the
computer.
In the case that liquid is spilt inside the computer, a fire or electric shock may occur.
Do not connect a key-phone line to the modem.
A fire may occur or the product may get damaged.
In the case that the computer is dropped or get damaged, disconnect the
power and contact the service center.
If a damaged computer is used continuously, an electric shock or fire may occur.
Do not expose the computer to direct sunlight.
The product may be deformed or caught on fire due to a temperature rise.

5Important Safety Instructions
Do not put a lit candle or burning cigarette on the computer.
A fire may occur or the product may get damaged.
If you smell or see smoke from the computer, stop using the computer and dis
connect the power before contacting the service center.
A fire may occur.
Please ask one of our engineers to check the operational state after your com
puter has been repaired.
Otherwise, there exists a possibility of an electric shock or fire.
Leave the product away from heat-generating devices such as a heater.
The product may get deformed or catch on fire.
Before turning on the system, switch on peripheral devices.
Otherwise, the product may get damaged.
Turn off the system before switching off peripheral devices.
Otherwise, the product may get damaged.
Connect allowed devices only.
Otherwise, the product may get damaged.
Do not use a damaged CD-ROM disk or floppy disk.
Otherwise, the product may get damaged or an injury may occur.
It is recommended not to use a wireless LAN connection within a 5m radius of a
microwave or plasma light. If you have to use wireless LAN and a plasma bulb
within the range, however, do it through a channel between 11 and 13.
Still, the connection may not be made, or the transmission rate may drop.
Do not press "Eject" button while the Floppy/CD-ROM drive is running.
The data may be lost or the disk may spin out unexpectedly to cause an injury.
Insert a memory card in the correct direction.
A forceful insertion of the memory card may damage the product and the memory.
Do not drop a part or device of a computer when ejecting it.
If dropped, they may get damaged and cause an injury.
6 Important Safety Instructions
Storing and Moving the Computer
Before moving the computer, turn off the power and disconnect all cables.
If not, one may trip over the wire, damaging the computer and getting an injury.
Upgrading the Computer
When disassembling the computer, do not take out the power supply unit and
prevent children from swallowing nuts unscrewed.
If a child swallowed a nut, they may get suffocated. In that case, see the doctor immediately.
Do not disassemble the power supply unit.
You may get an electric shock.
Before disassembling the product, turn off the system and disconnect the
power cable. In case the telephone line is connected to the modem, disconnect
the telephone line also.
An electric shock or fire may occur.
Do not disassemble or moderate the computer arbitrarily.
An electric shock may occur.
When handling computer parts, follow the instructions included in the manual.
Soldered prickles on the board may cause an injury.
Please use parts certified by LG Electronics.
A fire may occur or the product may get damaged.
Please contact our service center before you connect an peripheral device not
manufactured by LG Electronics to your computer.
The product may get damaged.
7Important Safety Instructions
Handle the computer with care to prevent a data loss.
ÞSince the hard disk is sensitive to shocks, please make a back-up file of important data all the
time.
ÞThe manufacturer will not be responsible for any hard-disk data loss caused by a user's mis-
take.
Hard disk damage and data loss may occur when.
ÞExternal shocks are given on the computer while the computer is separated or installed.
ÞThe computer is reset (rebooted) due to a power failure while the hard disk is running.
ÞThe computer is infected with a virus, tainting the data recoverably.
ÞThe power is abruptly disconnected.
ÞMoving, shaking or pounding the computer while the hard disk is running, and thus causing
file damage or bad sectors.
It is recommended to back up the data to minimize damage caused by hard disk
damage.
The manufacturer is not responsible for any data loss.
Safety Notes to Prevent Data Loss (HDD Management)
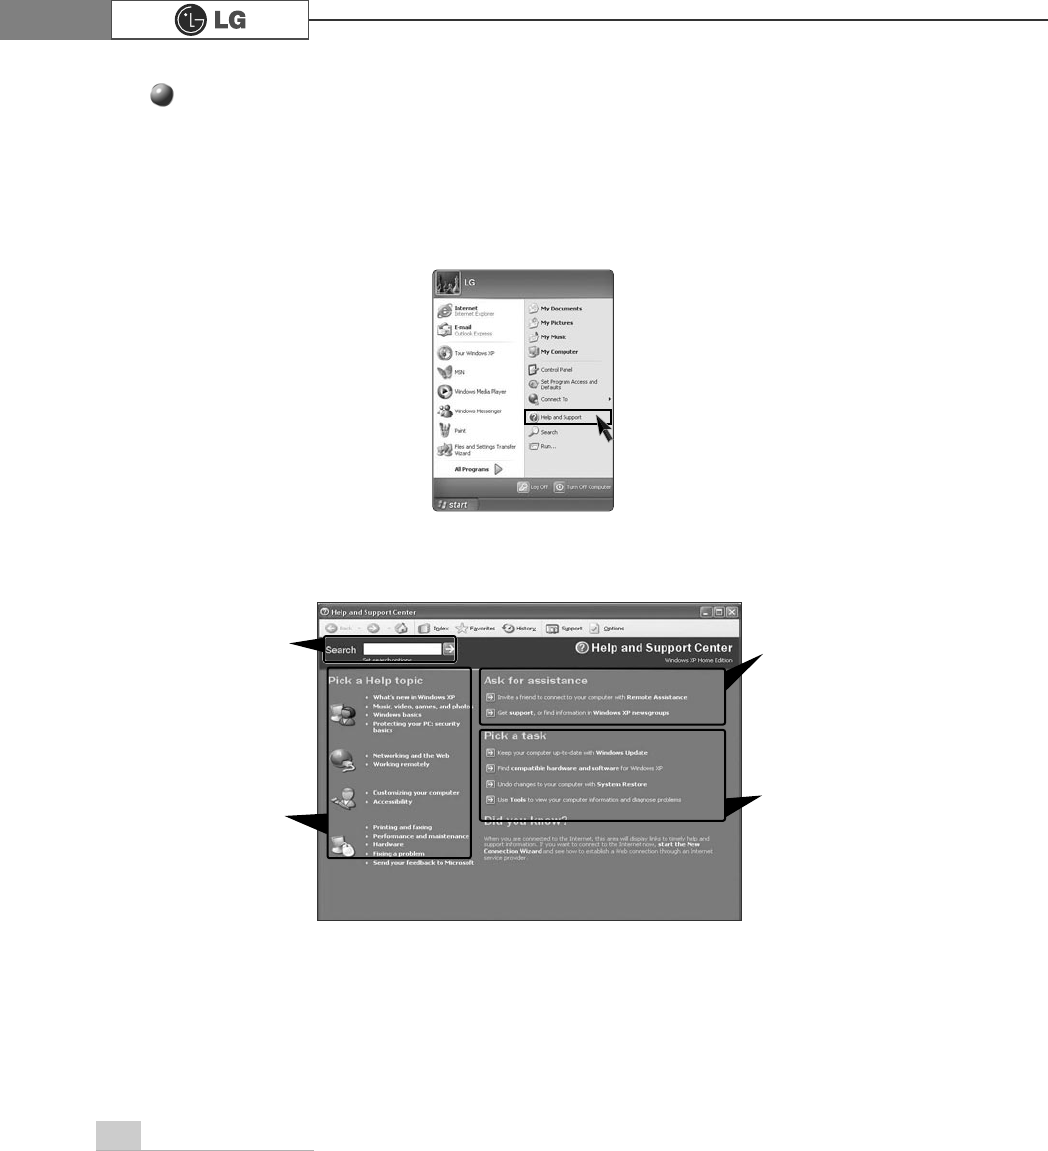
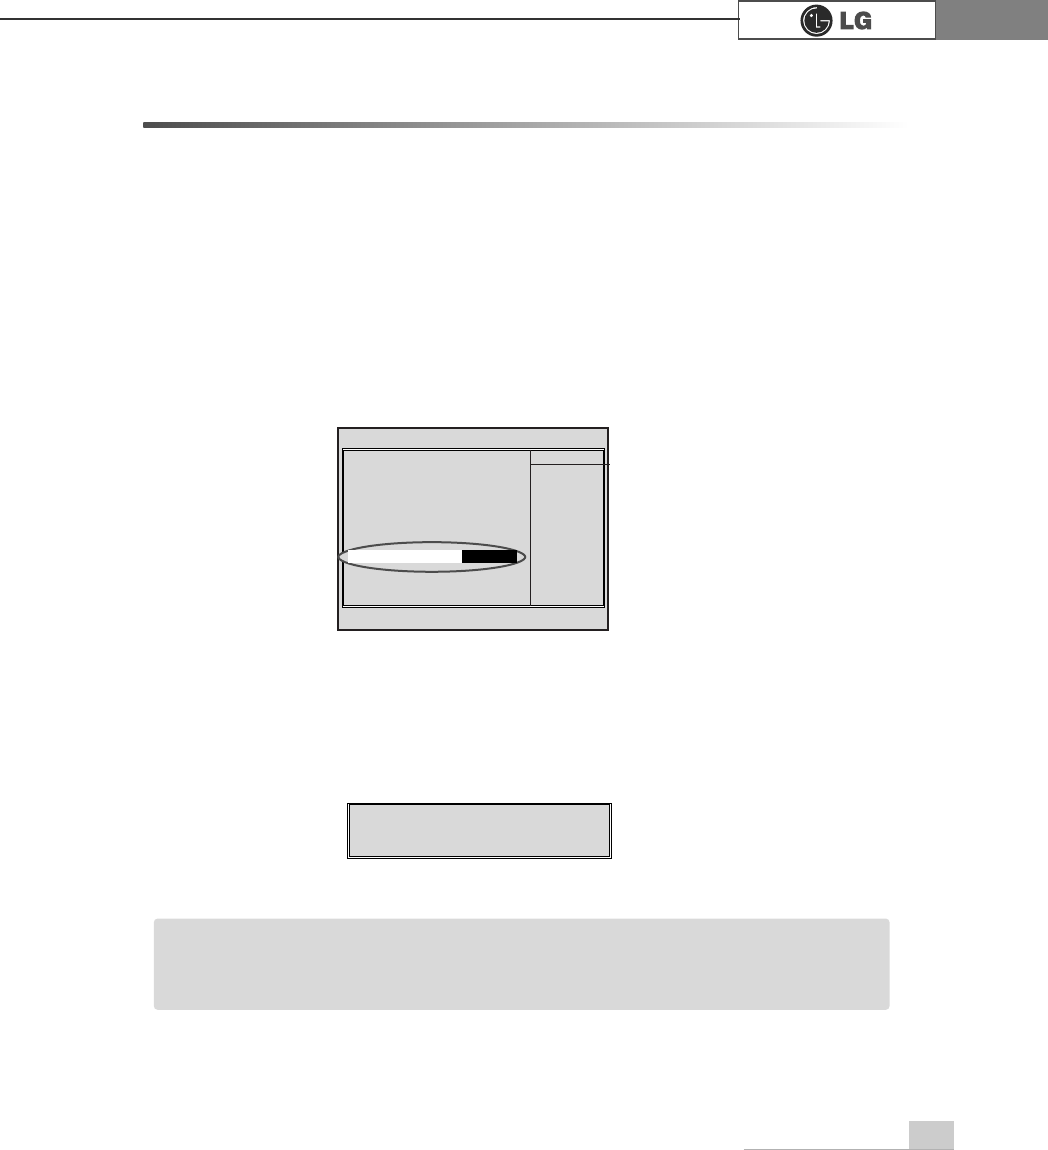
Click the "Help and Support" menu to learn Windows operation and troubleshooting,
and receive technical supports. Please read the menu before using the computer.
8 Help and Support
ⓞ
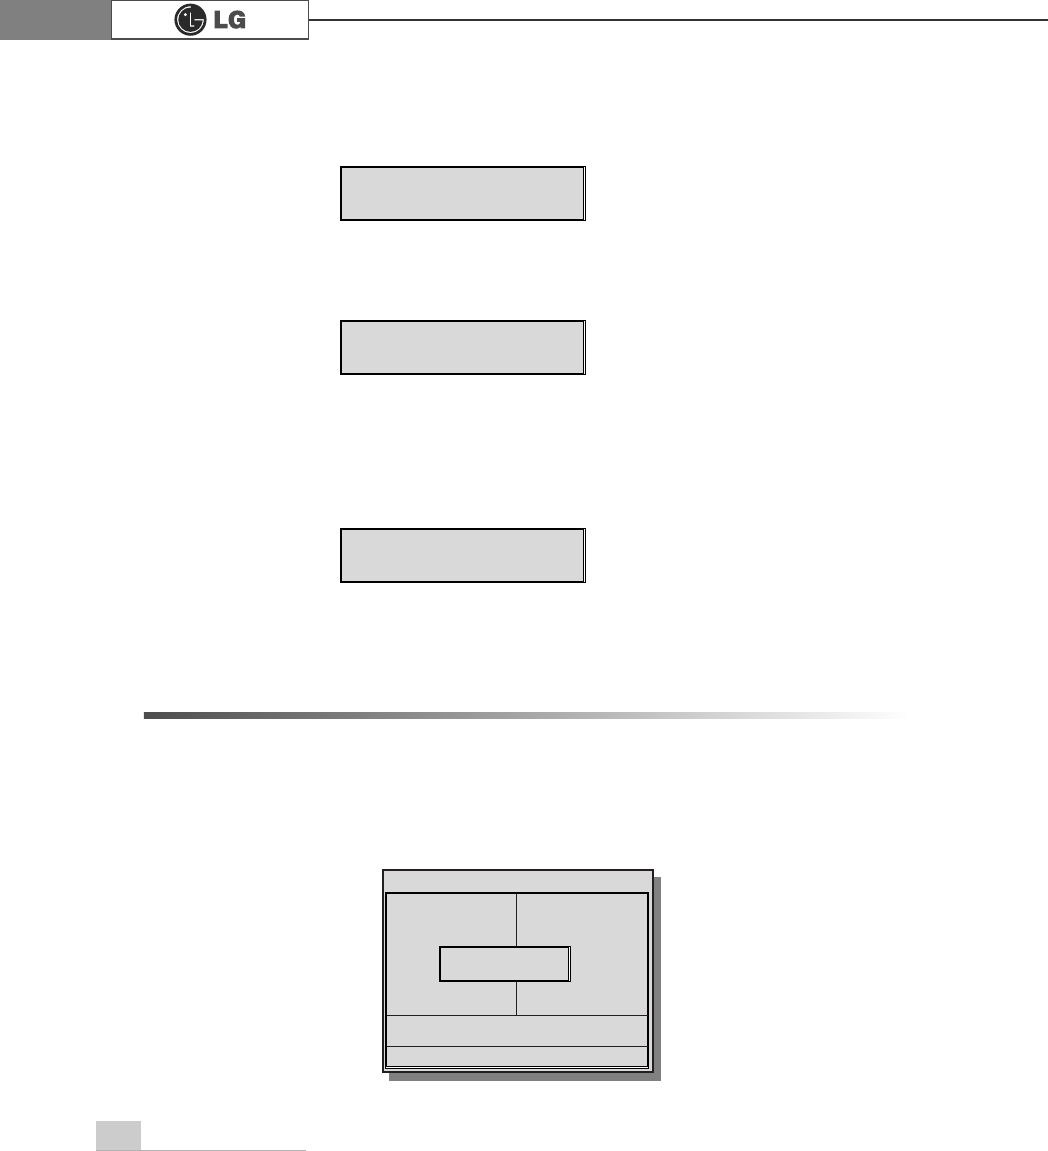
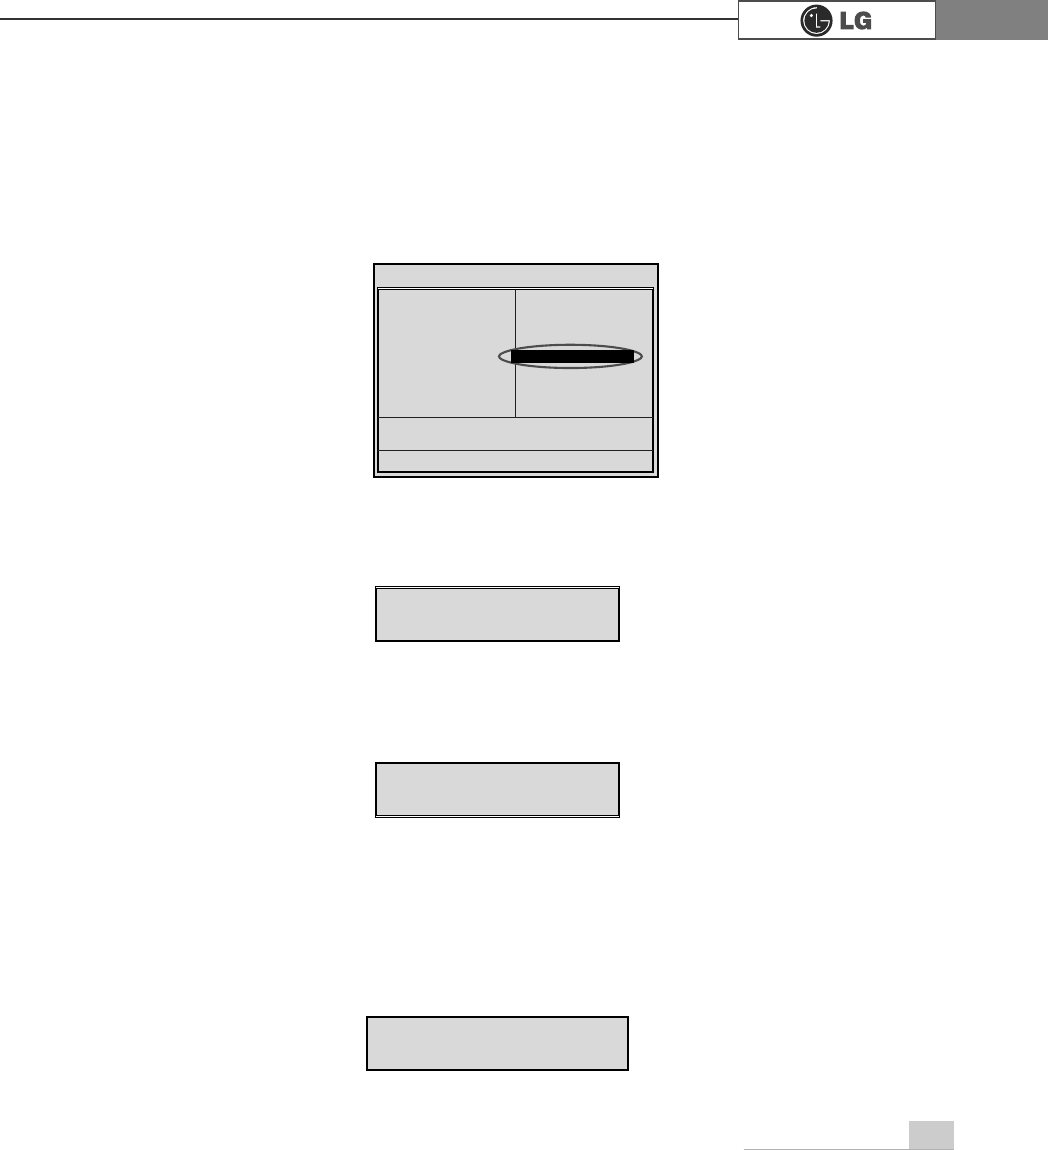
Click [Start] button, and then Help and Support.
ⓟ
Then, the following screen will appear.
Help and Support
Suggested items, text
search result, Microsoft
Knowledge Base and
other contents are
investigated. Microsoft
Knowledge Base is
supported only when the
Internet is connected.
By selecting proper
items, the user can
check functions of
Windows XP and trou-
bleshooting.
Through the Internet
connection, the user
can ask others for a
help and receive the
telephone number of
the technical support
center.
The user can configure
the optimal environment
for computers.
1.Installing the system
9Installing the system
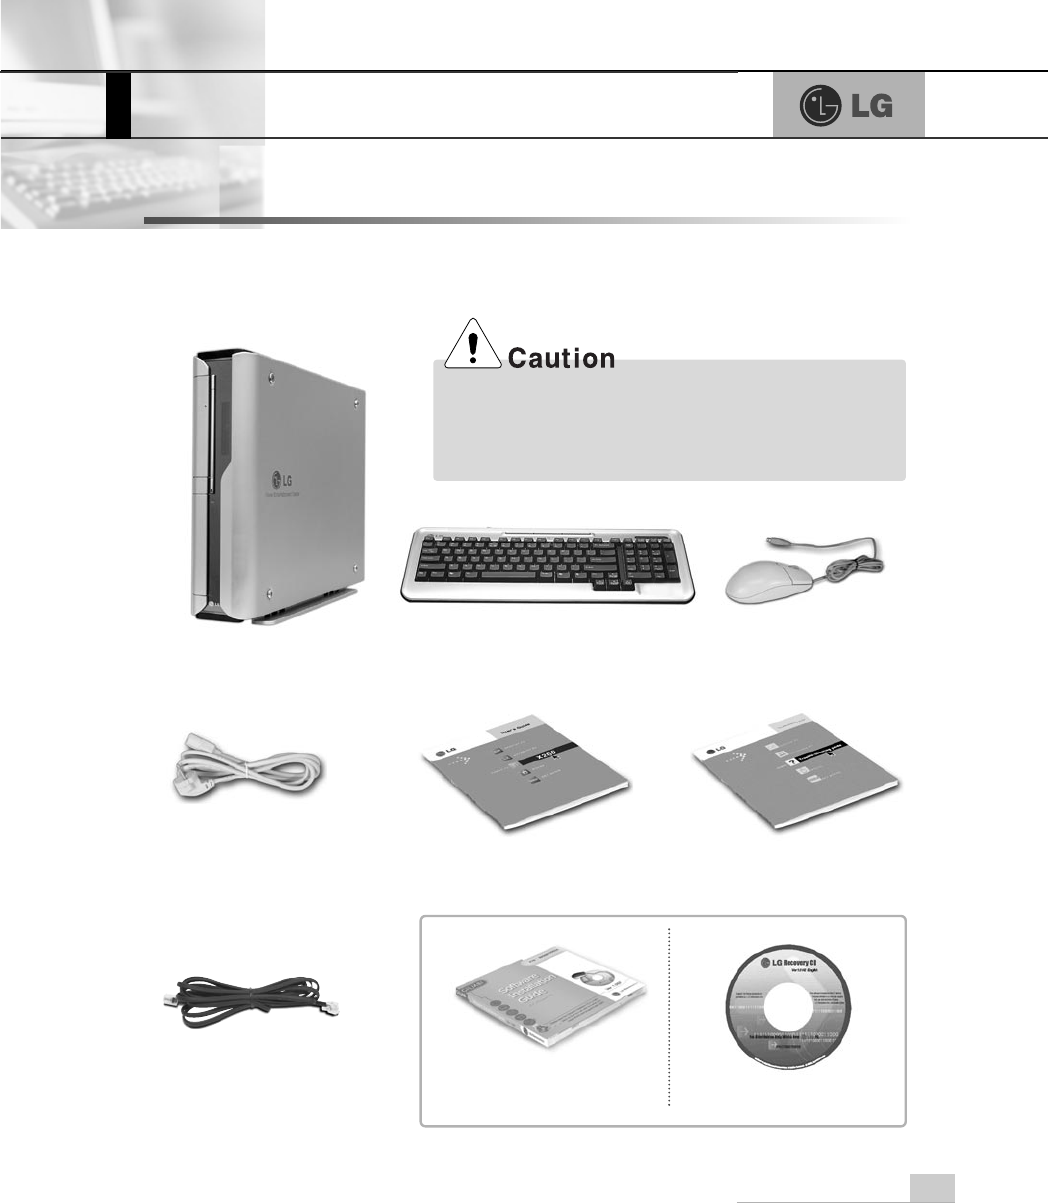
1-1. Contents of the Product
Contents and the front design of the product may differ by model.
Be sure to use designated cleaning chemicals to clean
your computer. Use of other chemicals such as thinner,
benzene or alcohol may cause damage or deformation
of the product.
Computer Mouse
Keyboard
Power Cord User's guidel Troubleshooting guide
LG GILJABI CD
(Software installation CD) Recovery CD
Modem cable
10 Installing the system
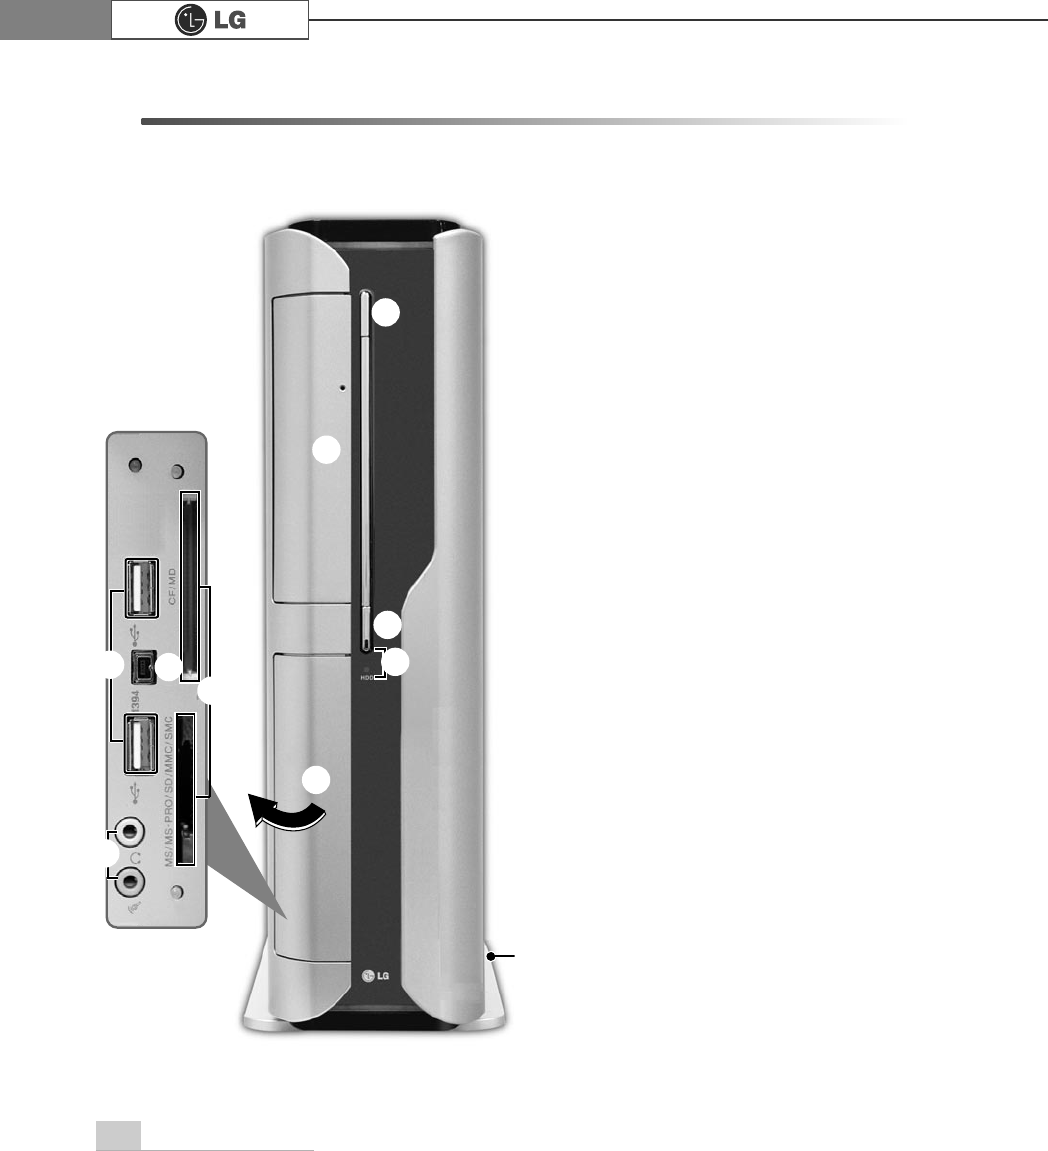
1-2. Composition
Front Part
℡
℘Power Button
Turns on/off the computer.
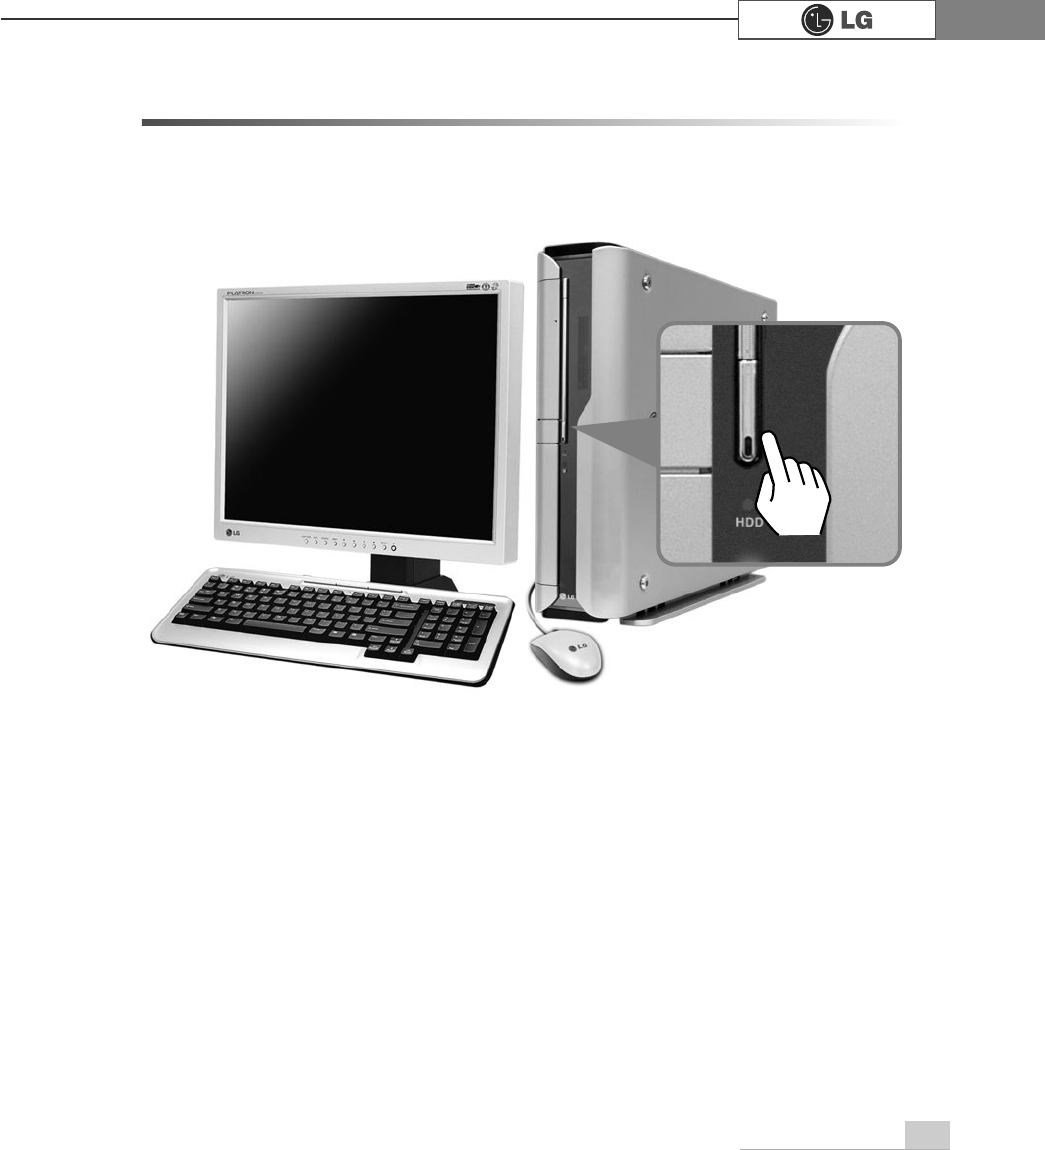
ℙPower Lamp and H/D Indication
Lamp
Indicates the power and the hard
disk state when the computer is
turned on. (When the hard disk is
running, the lamp will blink. -
However, this feature may not
function in some systems.)
ℚCD-ROM Drive Button
Inserts or ejects a CD in/from the
CD-ROM drive.
(The cover is opened and closed
automatically if the user presses this
button.)
ℛCD-ROM Drive
Operates a large-capacity data CD
or video/audio CD as one of auxiliary
memory devices. (Depending on
product model, CD-RW and DVD-
ROM drives may be equipped.)
ℜInput/Output Port Cover
The user can open the cover by
pulling the cover as shown in the
figure.
ℚ
℘
ℙ
ℛ
ℜ
℞
ℝ
℟
℠
11
Basics
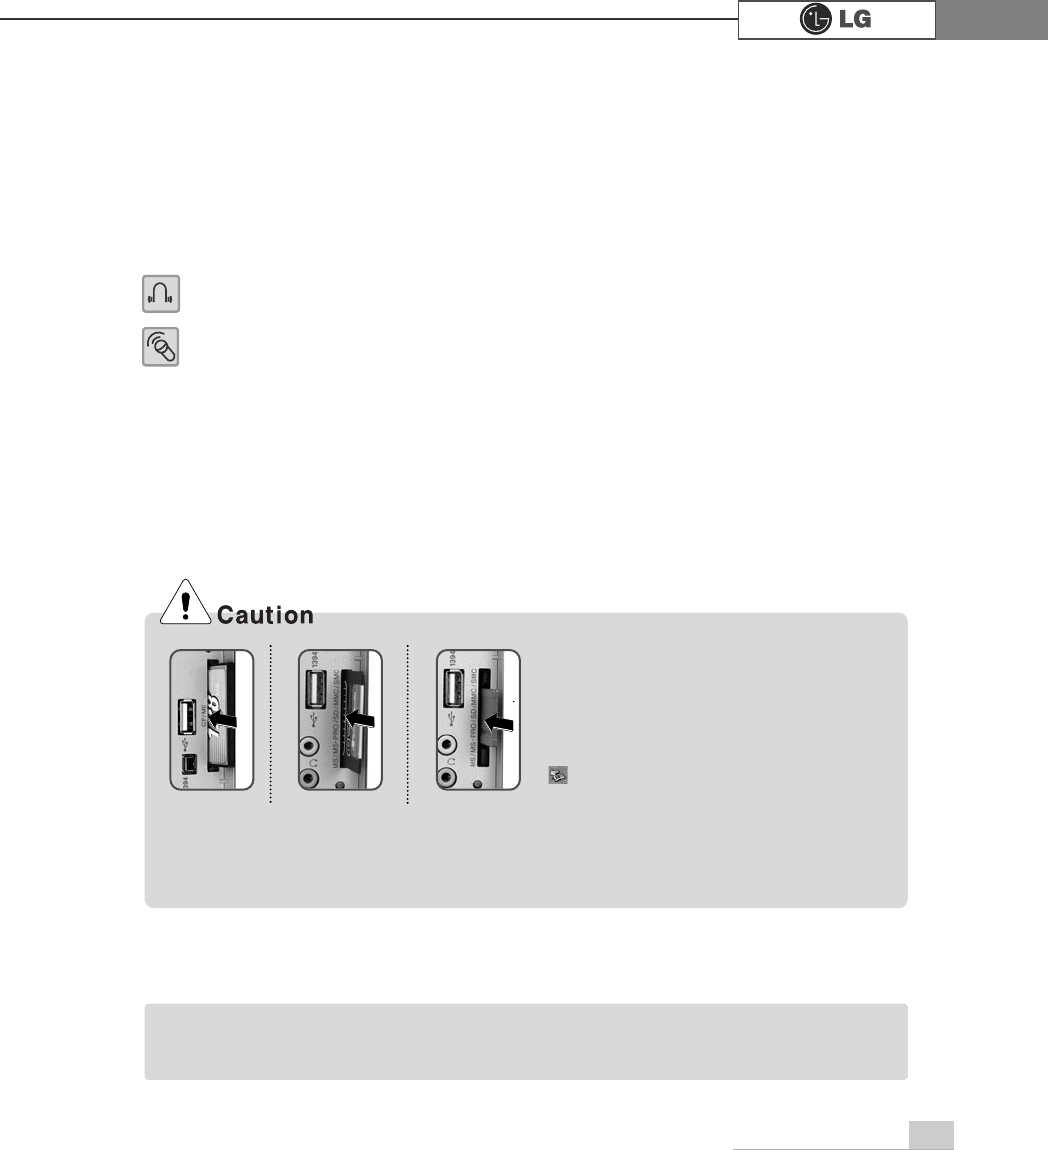
ℝUSB (USB 1.0 Port) Connector
Connects USB devices or hubs (including a USB mouse or digital camera).
℞IEEE1394 Connector
Connects IEEE 1394-4 4-pin devices (including a camcorder).
℟Sound Connector
Earphone Connector
A port for external earphones.
Microphone Connector
A port for external microphone.
℠Multimedia Card Slot
Hosts various portable memory cards - CF, MD, MS, MS-PRO, SD, MMC, SMC
and others.
℡Support
The support of for stable installation of the main body of the computer.
Each slot is marked with a symbol indicat-
ing proper card types that can be accom-
modated. Check the symbol and insert a
right type of memory card in the direction
as shown in the figure.
Do not delete [Safely Remove Hardware]
( ) icon. Otherwise, the computer needs
rebooting to use the memory card slot.
ãOptional parts differ by product model. For more information about optional parts, see
Option Guide of GILJABI CD.
Note
ãRemove the support to use your computer laid down.
ãTo use the computer with the body standing, install the support. Otherwise, the system
may function unstably.
12 Installing the system
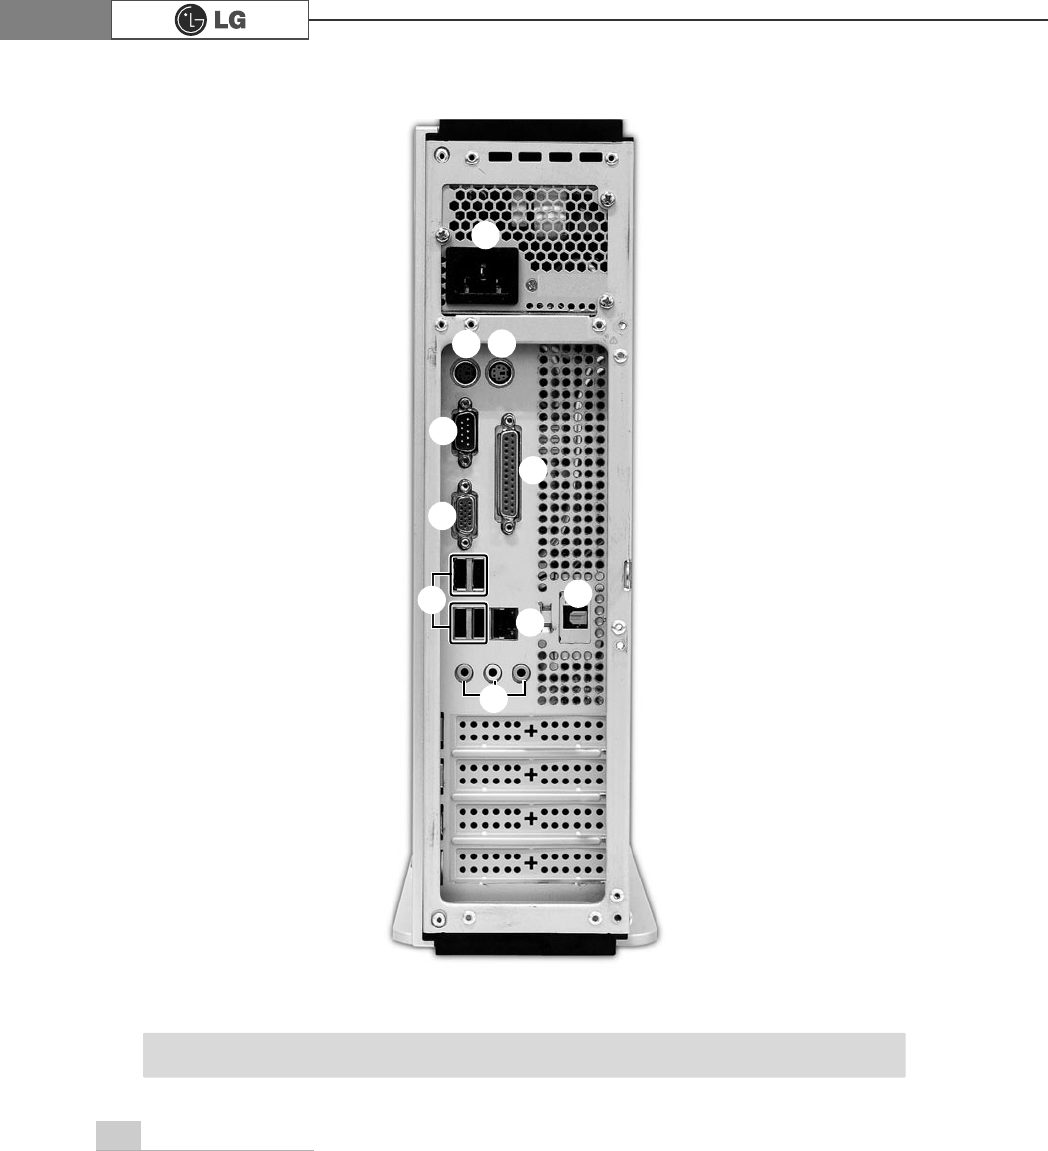
Rear Part
ãThe rear configuration may differ from the image depending on product model.
Note
℘
ℙℚ
ℛ
ℜ
ℝ
℟
℡
℞
℠
13Installing the system
℘Computer Power Connector
Connects the power cord to provide power to the computer.
ℙKeyboard Connector
Connects a PS/2 keyboard.
ℚMouse Connector
Connects a PS/2-type mouse.
ℛSerial Connector
A serial communication connector to exchange data between the computer and
external devices.
ℜVideo Connector
Connects the monitor cable to use a built-in video. Does not function when a
video card is installed.
ℝParallel Connector
Parallel communication connector to transmit data from the computer to external
devices, mostly to the printer.
℞USB (USB 2.0 Port) Connector
Connects USB devices or hubs such as USB mouse or digital cameras.
℟LAN
Connects other systems and hubs through the UTP at 10/100/1000 Mps.
℠Sound Connector
External Speaker Connector
Hosts an external speaker Connector.
Line Input Connector
Hosts an external audio Connector.
Microphone Connector
Hosts an external microphone Connector.
≕Digital Sound Output Port (S/PDIF)
An optic output port to produce digital sound.
ãModem cable is offered for models that support modem card.
Note
Do not disassemble power supplies.
There is a risk of electrical shock.
14 Installing the system
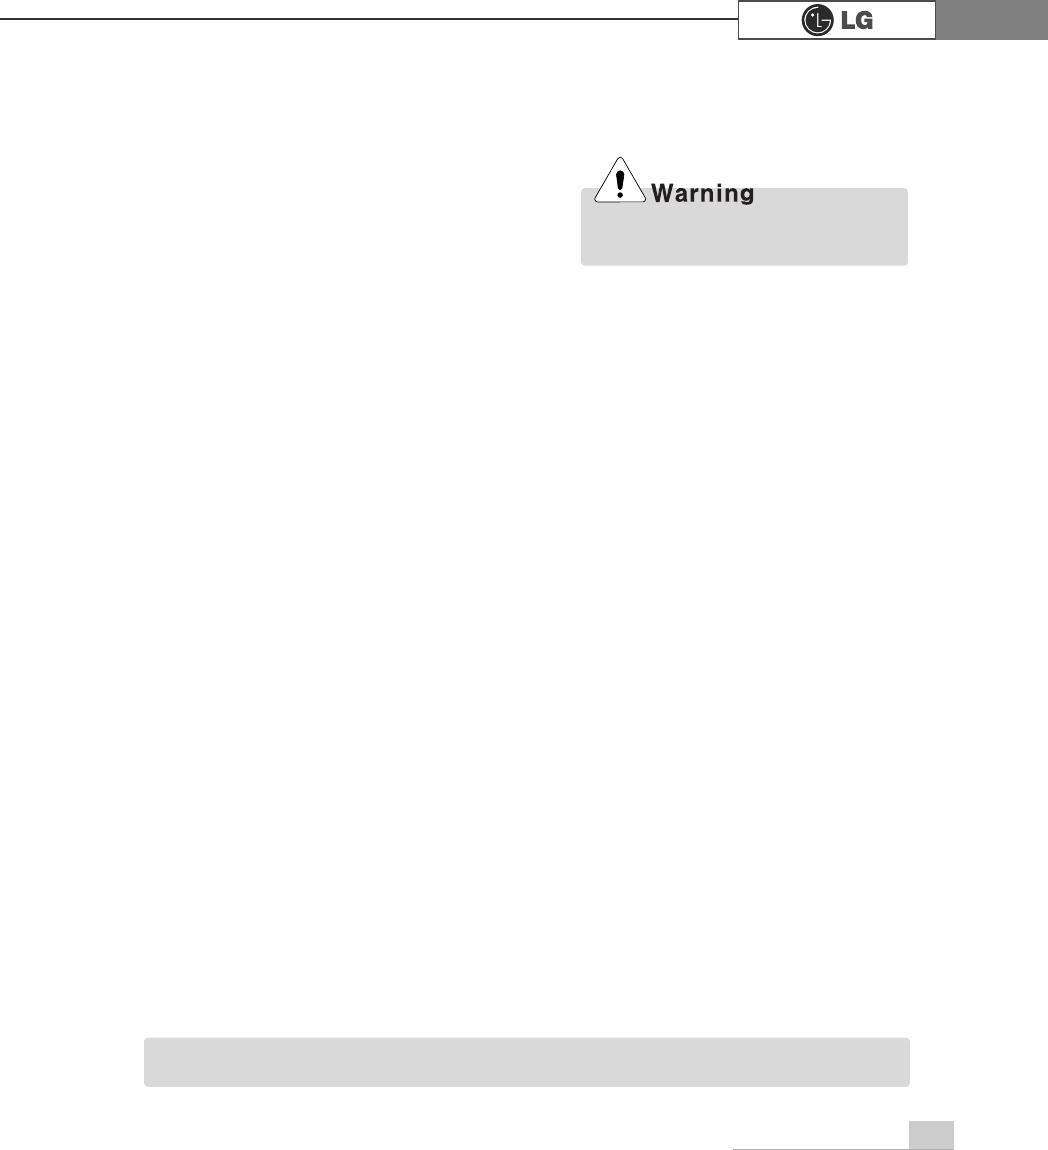
1-3. Installation
Installation is not difficult, and we recommend users to install by themselves.
Before installation, turn off the computer and all peripheral devices. As the key-
board and the mouse use same-shaped connectors, please check the symbols
next to the mouse connector hole and the keyboard connector hole. Card compo-
sition is different from product to product.
ãDo not leave a liquid container on the computer. An electric shock may occur and the sys-
tem could break downr.
ãKeep the ventilation hole of the power supply unit free of alien substances. Internal parts
of the computer may get damaged and an electric shock may occur.
℘ℙ
ℚ
ℛ
15Installing the system
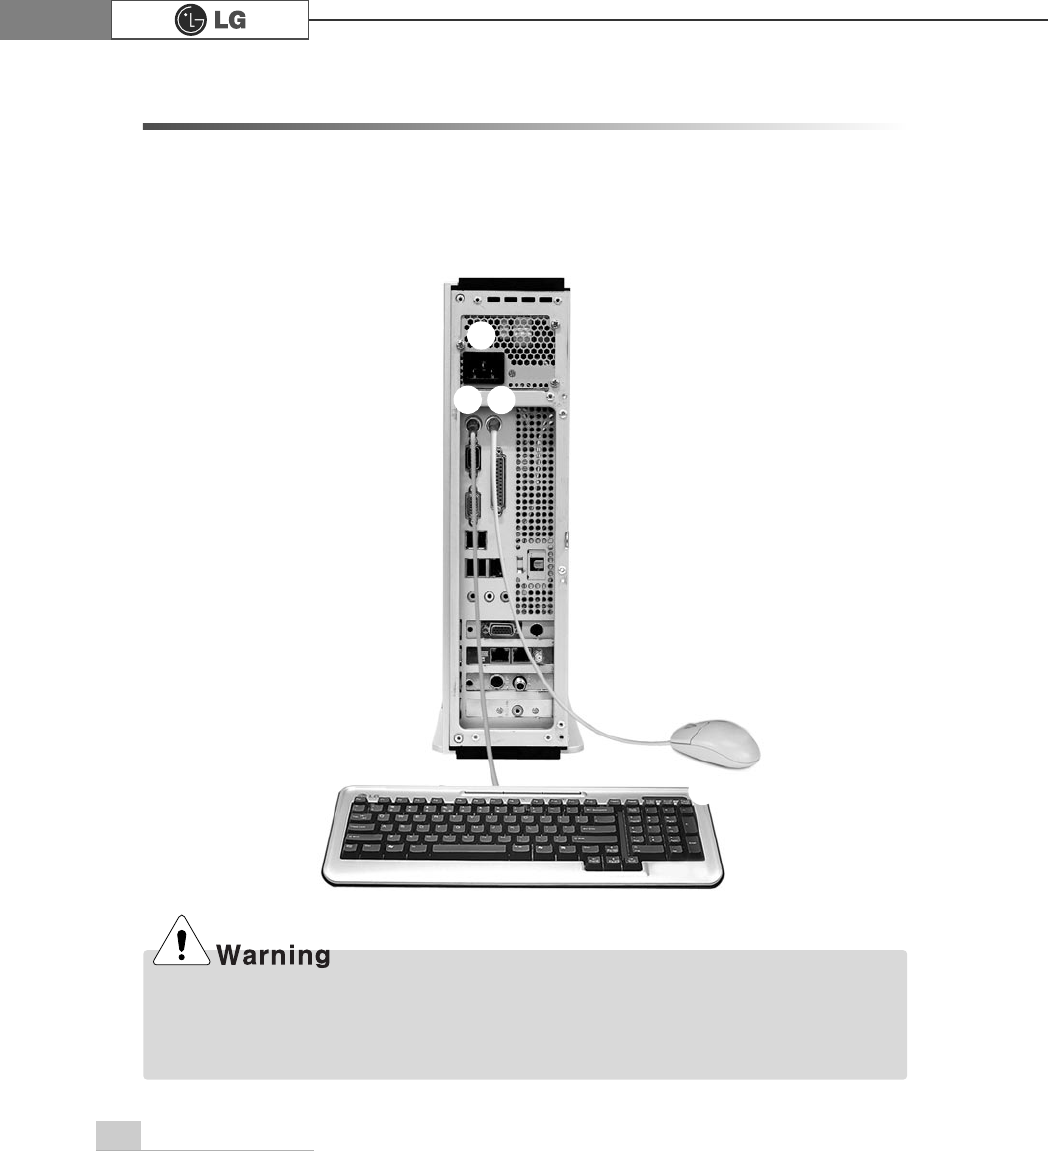
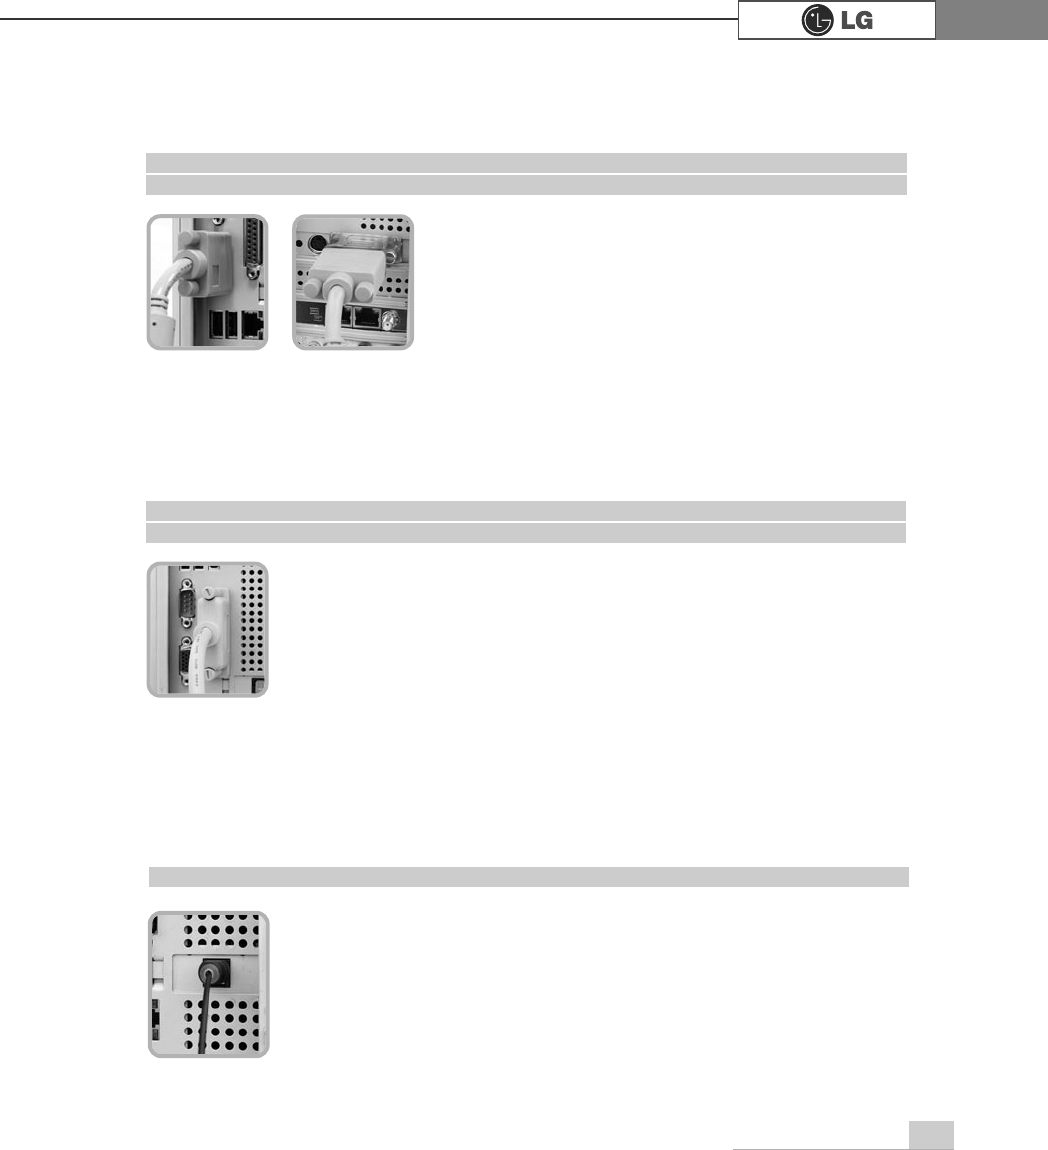
The round connector on the mouse cable fits into the PS/2 connector
on the rear of the computer. Be sure to align the 6 pins on the cable
with the corresponding holes on the connector.
ℙ
Connecting a Mouse
Raise the keyboard supports to relieve fatigue on the wrists.
Installed at the bottom of the keyboard.
ℚUsing the Keyboard Support
Connect the power cord to the computer and the outlet on the wall.
Power supply is 110V/220V (selection) or 220V only.
ℛConnecting Power
Insert the keyboard connector pin correctly in the keyboard connector
hole on the rear panel of the computer. Insert the keyboard cable con-
nector as shown in the figure.
The connector of the keyboard cable is round in shape and consists of 6 pins.
The mouse cable has a round connector with 6 pins.
℘Connecting the Keyboard
ã
Operate the product at the proper voltage when selecting
110V or 220V power supply. Incorrect use of power supply
may damage on the product or fire.
ã
Power supply is 110V/220V (selection) or 220V only.
ã
Check the location of the switching button when 110V/220V
(selection) is used.
220V use 110V use
16 Installing the system
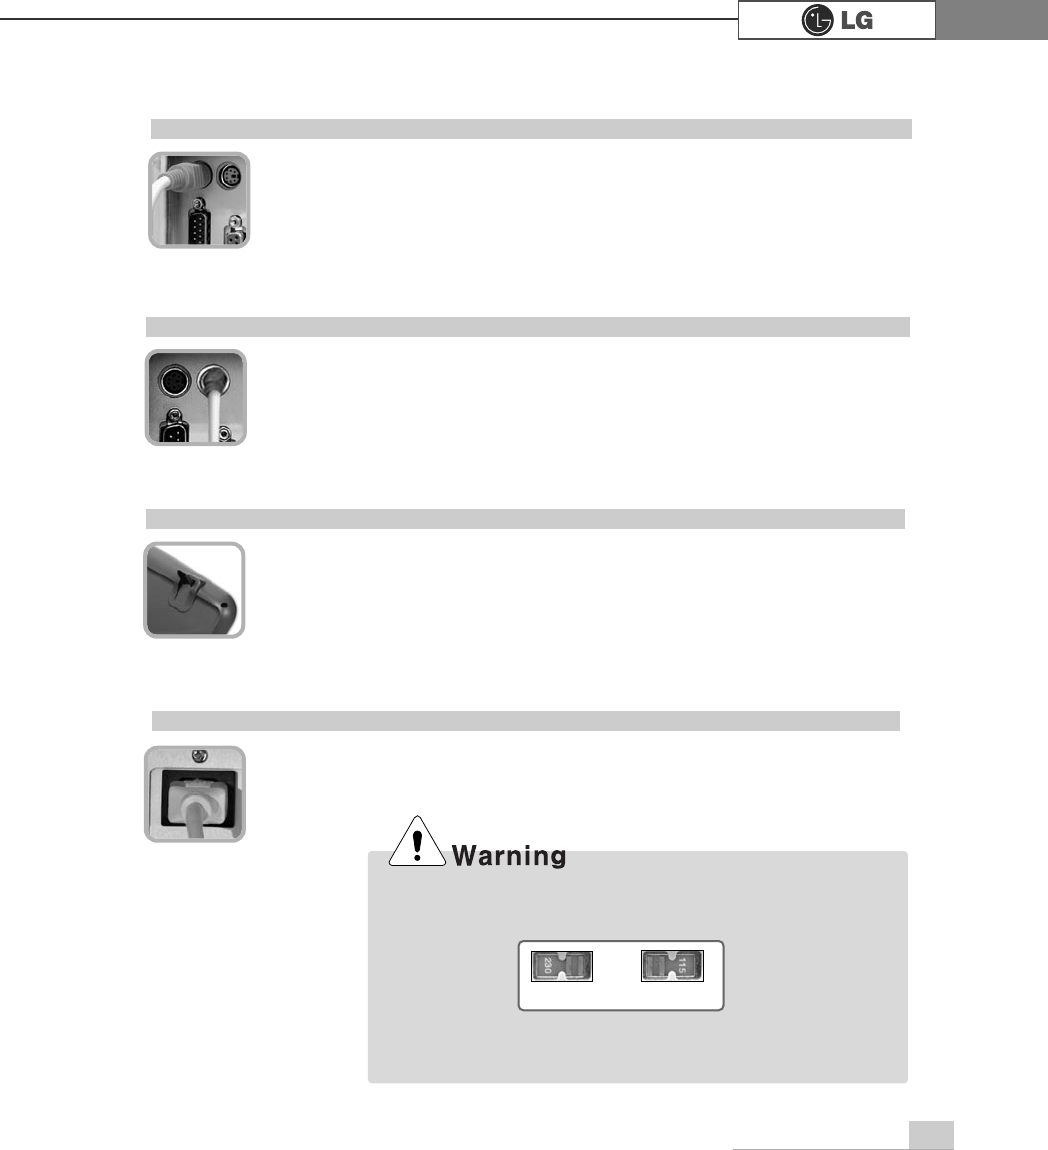
1-4.
Connecting Peripheral Devices (To Be Separately Purchased)
ℙ
ℝ
ãDo not connect too many cables to one extension cord. An electric shock may occur.
ãDo not leave the power cord below the body.
ãDo not touch the outlet when connecting or disconnecting the power cord. An electric shock
may occur.
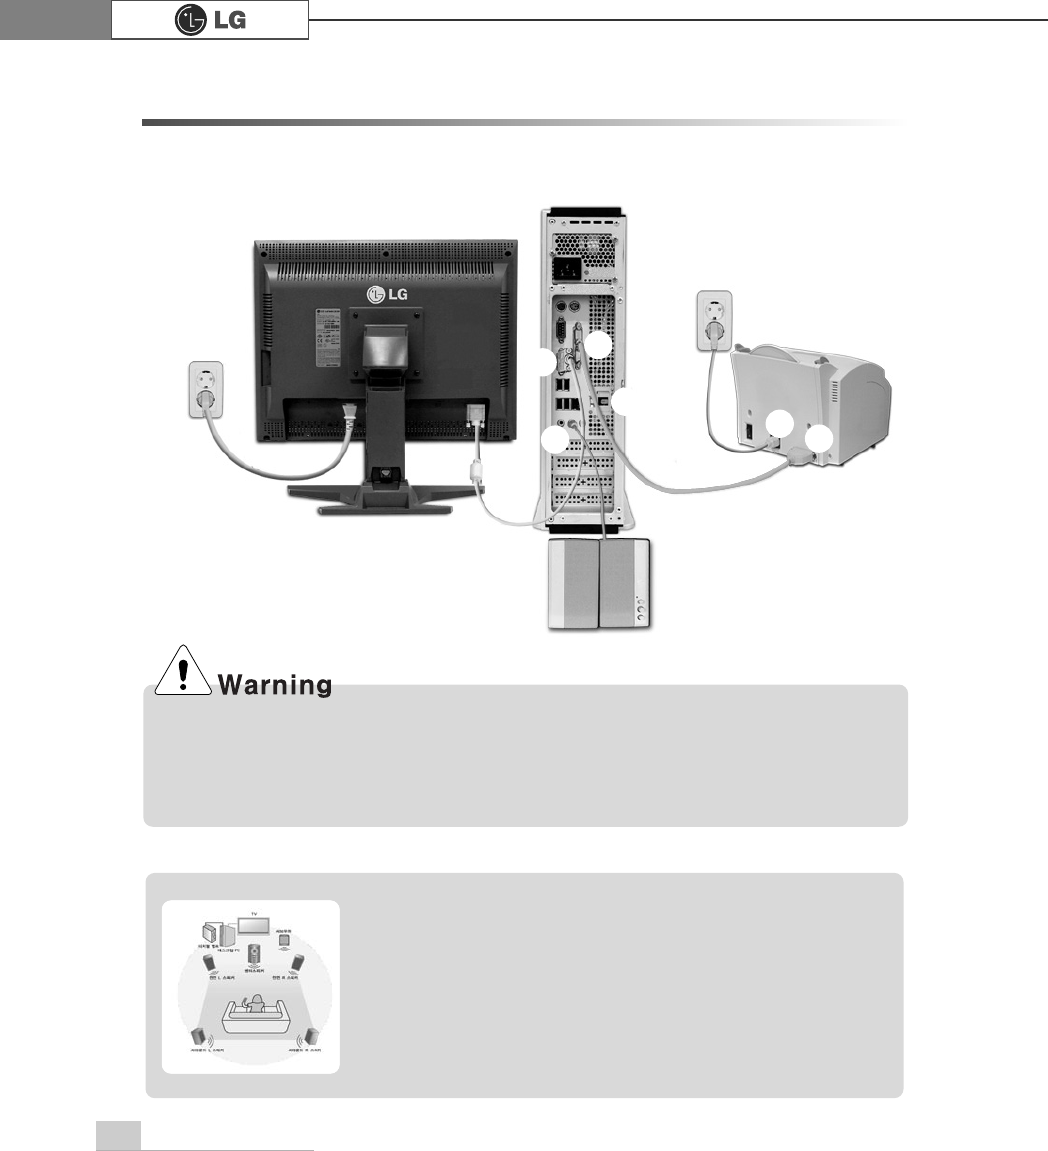
ãThe digital 5.1 channels require following environments.
- Title recorded at 5.1 channels (DVD titles with DTS or Dolby
Digital 5.1 marks)
- DVD-playing program supporting digital 5.1 channels (for
example, Power DVD 4.0 or higher)
- A/V receiver or digital speaker supporting digital 5.1 channels
(Only optic ports are supported.)
- Basic specification is 5.1CH 48KHz, and 7.1CH 96KHz is
optional.
Note
ℛ
ℜ
ℚ
℞
℟
℘
17Installing the system
℘Connect the monitor signal cable to the Video port
to transmit computer signals to the monitor.
ℙConnect the monitor power cable both to the mon-
itor and the power outlet to supply power to the
monitor. When turning on/off the computer, turn
on/off the monitor. When using the same power
supply unit for the computer and the monitor,
check the voltage of the monitor before turning on.
The monitor signal cable and the power cords are included in the package box.
For more information about using the monitor, see the monitor manual.
Connecting Monitor (To Be Separately Purchase)
ℚConnect the printer cable to a parallel connector of the computer.
(However if the printer supports USB ports, connect it to the USB
connector.)
ℛConnect the other end of the printer cable to the printer parallel
connector.
ℜConnect the power cord of the printer to the printer power con-
nector.
ℝConnect the power plug of the printer to the power outlet.
The printer cable and the power cords are included in the package box.
For more information about using the printer, see the printer manual.
Connecting the Printer (To Be Separately Purchased)
When using a
built-in video
When the video
card is installed
℞Connect the optical cable to speakers with optical output port
using S/PDIF function.
The user can listen to digital sound through optical output speakers using S/DIF function.
Connecting an Optical Output Port (To Be Separately Purchased)
18 Installing the system
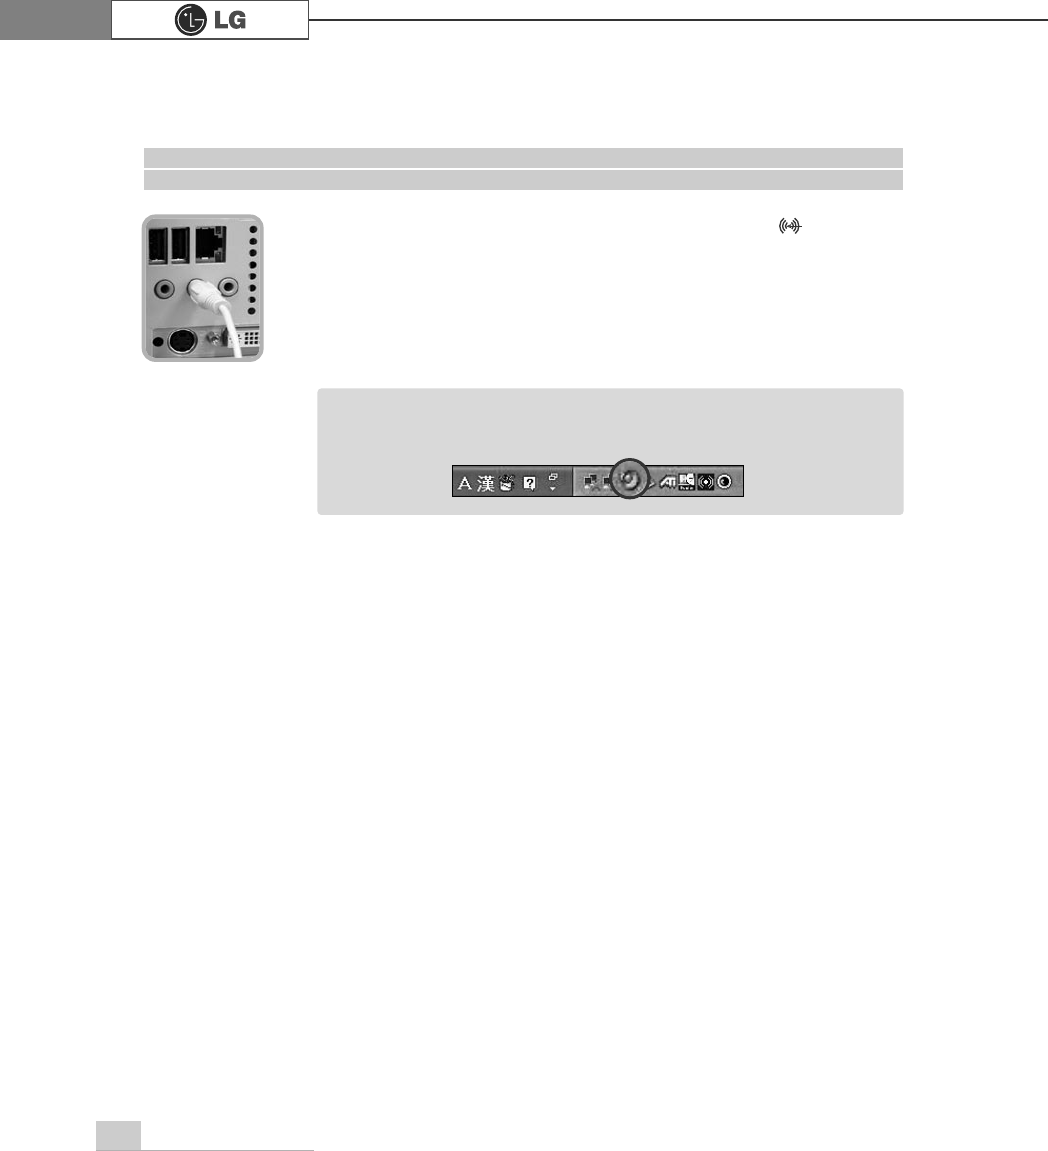
℟Connect the speaker connector to External Speaker ( ) connector
on the rear panel of the computer.
This product is not equipped with speakers.
To output sound, connect external speakers.
Connecting the Speakers (To BE Separately Purchased)
ãIn the case where sound is to low or mute, adjust the volume by clicking
on the [Master Volume] icon on the right end of the Windows task bar.
Note

19memo
PHPR
2.Using the System
20 Using the system
Check if the floppy disk drive on the front part of the computer is empty and the power
cord and the peripheral devices are connected to the computer on the rear panel.
After installing the system, register user information. Turn on the power of the main
body, and register user information by following the Windows screen instructions.
2-1.Turning on the Computer
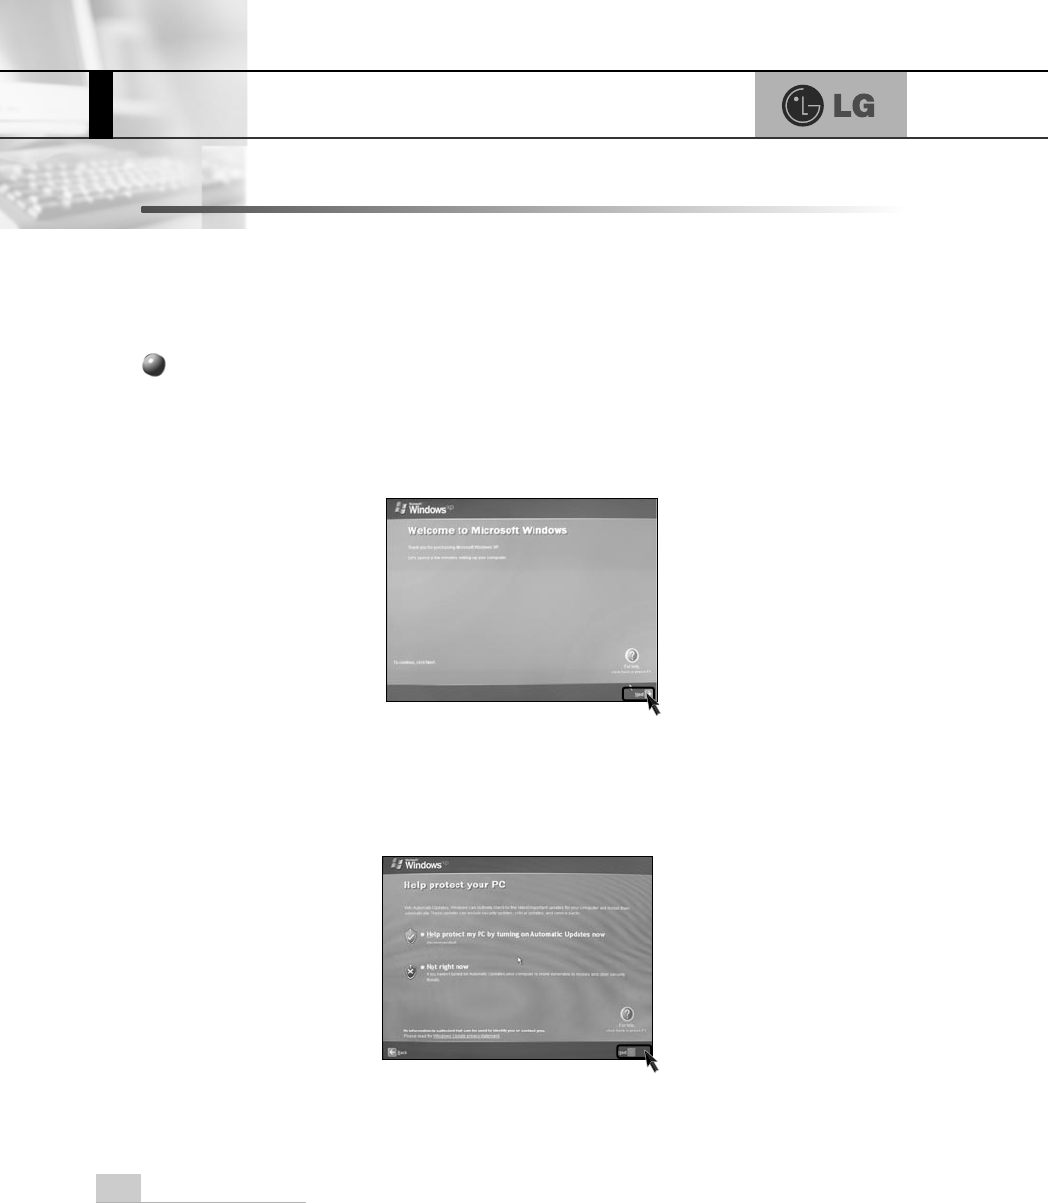
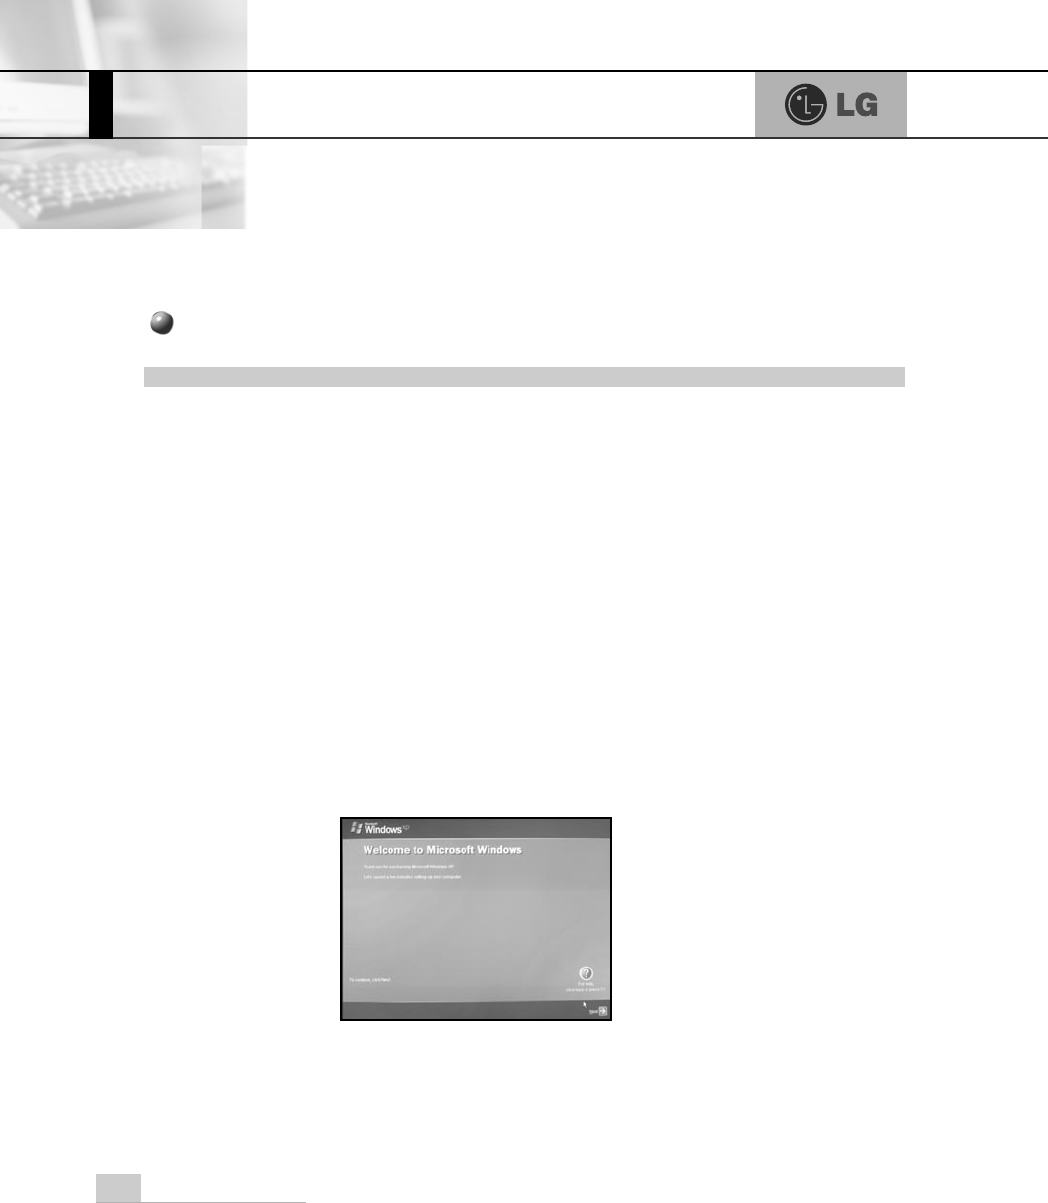
ⓞPressing the power switch starts the self-diagnostic procedures; then Windows(R)
XP startup screen is displayed .In a moment, a dialogue box, saying Welcome to
Microsoft Windows appears on the screen. Then Click [Next].
Registration process
ⓟAfter Help protect your PC message appears on the screen, select Help protect
my PC by turning on Automatic Updates now and then press [Next].
21Using the system
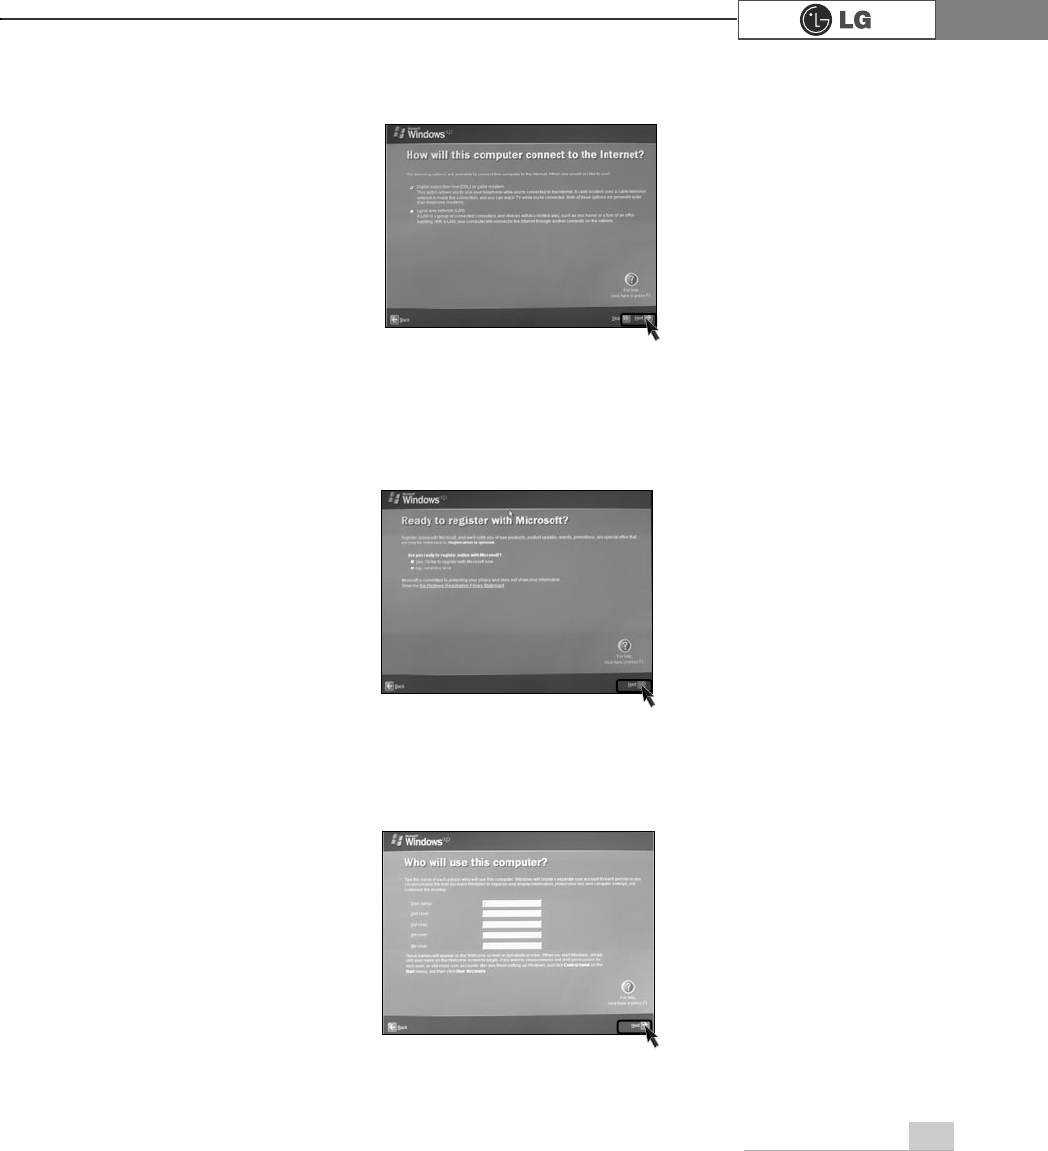
ⓡIf you turn the power on the computer for the first time, you have to register your
copy of Windows XP. The registration process may differ depending on the model,
but the difference does not affect the use of your computer.
ⓠInternet connection option screen appears, follow the instruction.
ⓢWho will use this computer? message appears on the screen. Type the namesof
the users and click [Next].
22 Using the system
The certificate of authenticity includes the
Windows product key. This certificate is the
unique indication that proves your Windows is
authentic. Do not damage or remove this
sticker (attached on the side of the product.).
ÚThe certificate provided may be different
from this image.
Certificate of Authenticity
ⓣ"Thank you!" message appears on the screen.
Click [Finish] to complete the registration process.
23Using the system
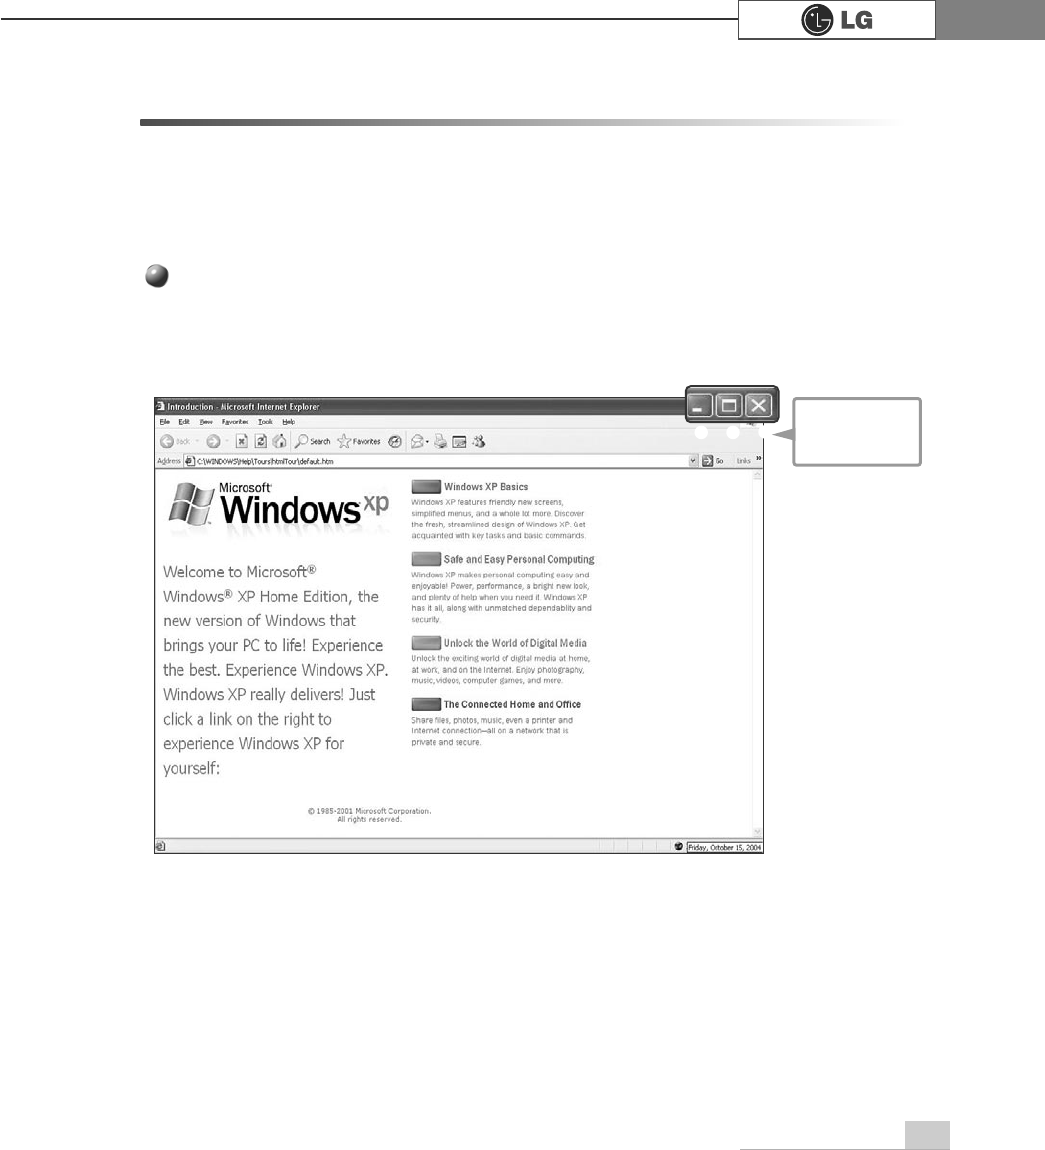
2-2.Using Windows XP
Windows XP is brilliant, fresh, and easy to use. The desktop and task bar images are sim-
plified, and you can easily access applications through the Start menu. There are more
"Desktop" options for you to customize the environment.
Click the [Start] button and click Windows XP Tour.
Then, the window will appear. Select a feature of Windows XP to view detailed descrip-
tion.
Windows is an operation system of the computer. It is recommended to know basic func-
tionality of Windows for better use of a computer.
Windows XP Tour
℘ℙℚ
℘Minimize
ℙMaximize
ℚClose
24 Using the system
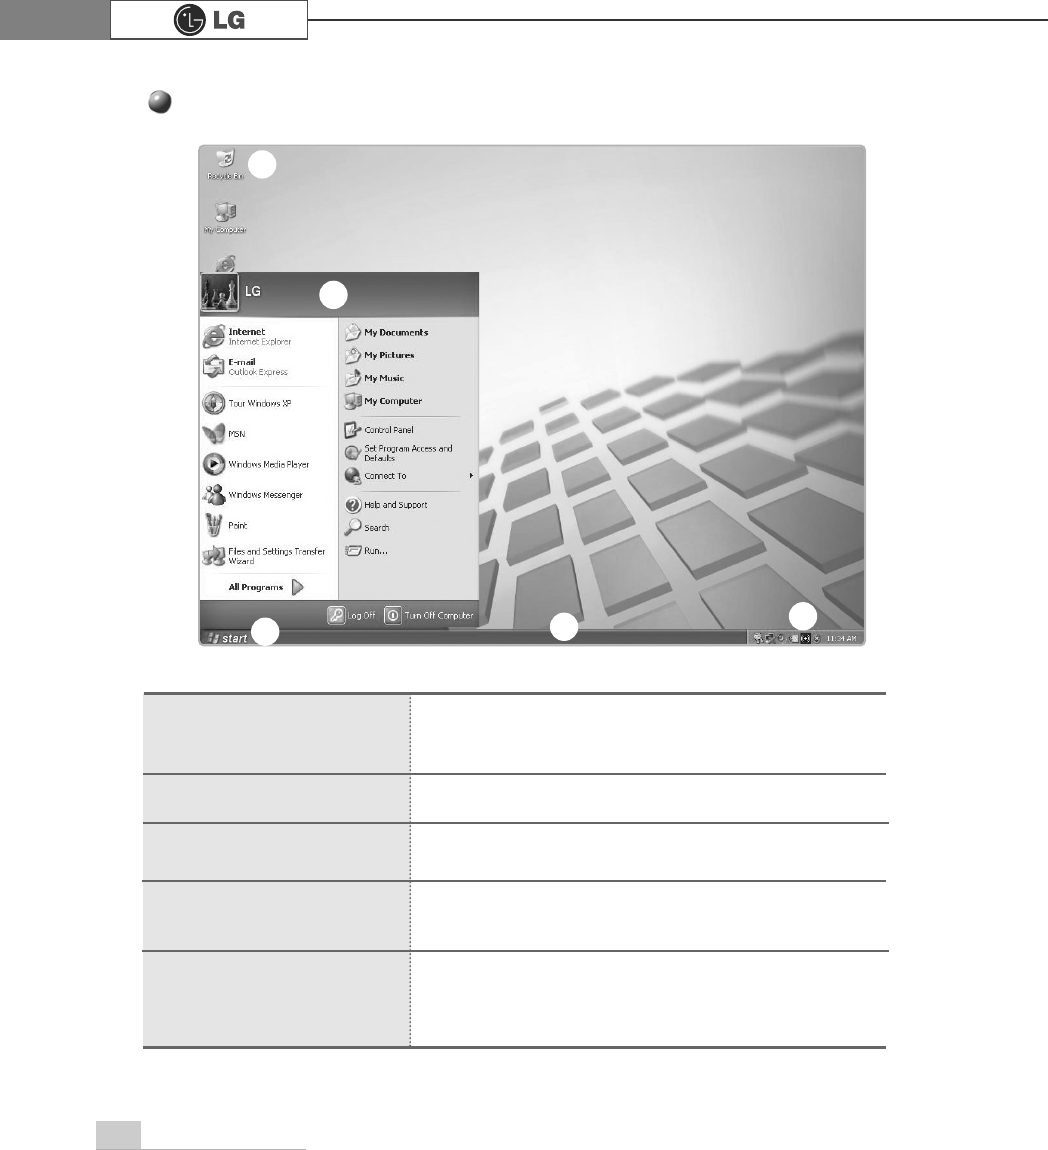
Windows XP Desktop
Click the Start button to view Start menus.
By clicking [All Programs] you can display a list of pro-
grams currently installed on the computer.
Include necessary applications to start Windows.
Indicates currently running programs.
You can set the screen resolution, color, audio, and
date/time by clicking icons.
You can delete files and folders which will be saved auto-
matically in the Recycle Bin. Running Empty Recycle Bin
will delete files and folders permanently from your com-
puter.
℘[Start button
ℙStart Menu
ℚTaskbar
ℛTaskbar Icons and
Clock
ℜRecycle Bin
ℛ
ℚ
℘
ℙ
ℜ
25Using the system
Overview of Start Menu
Click the [Start] button to view menus that are most com-
monly used on the computer
℘Fixed Topics
ℙRecently Used Programs
ℚAll Programs
ℛControl Panel: Enables to customize computer setting.
ℜMy Computer: Displays information on drives and networks,
and enables you to retrieve or run files and folders
℘
ℙℛ
ℜ
ℚ
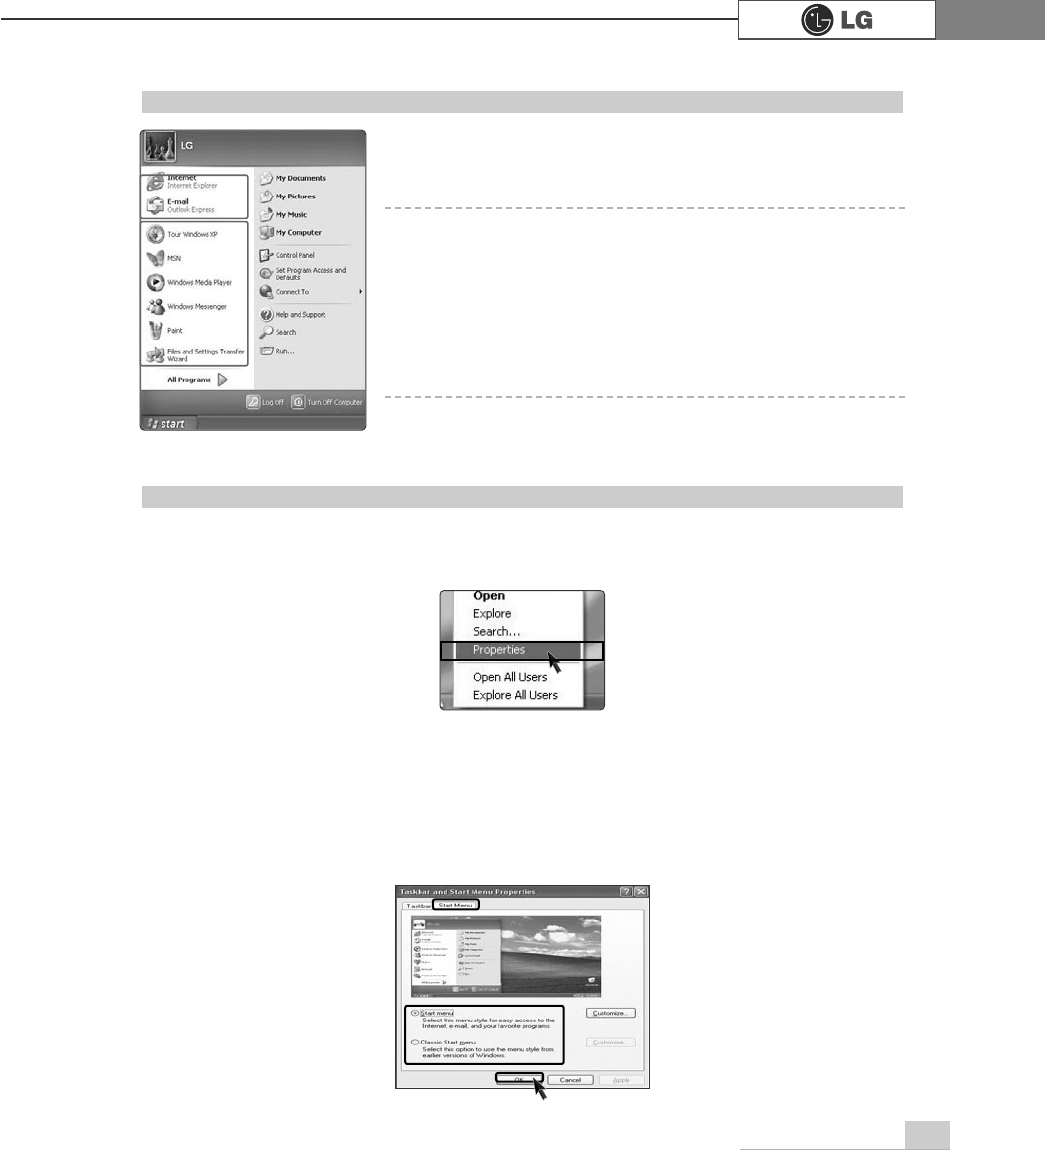
To Change Start Menu Style
ⓞRight-click the [Start] button, and click [Properties]. Then, click an option under the
Start menu tab.
ⓟTo select the default start menu, click [Start Menu] on the [Taskbar and Start
Menu Properties] tab.
ⓠTo select the style in an older version of Windows, click the Classic Start Menu.
ⓡClick [OK] to apply the new settings.
26 Using the system
Fixed
items
Control Panel
Category View, a New View grouping similar topics, has been added to Control
Panel. Classic View displays all topics individually. You can select either Category
View or Classic View according to your taste.
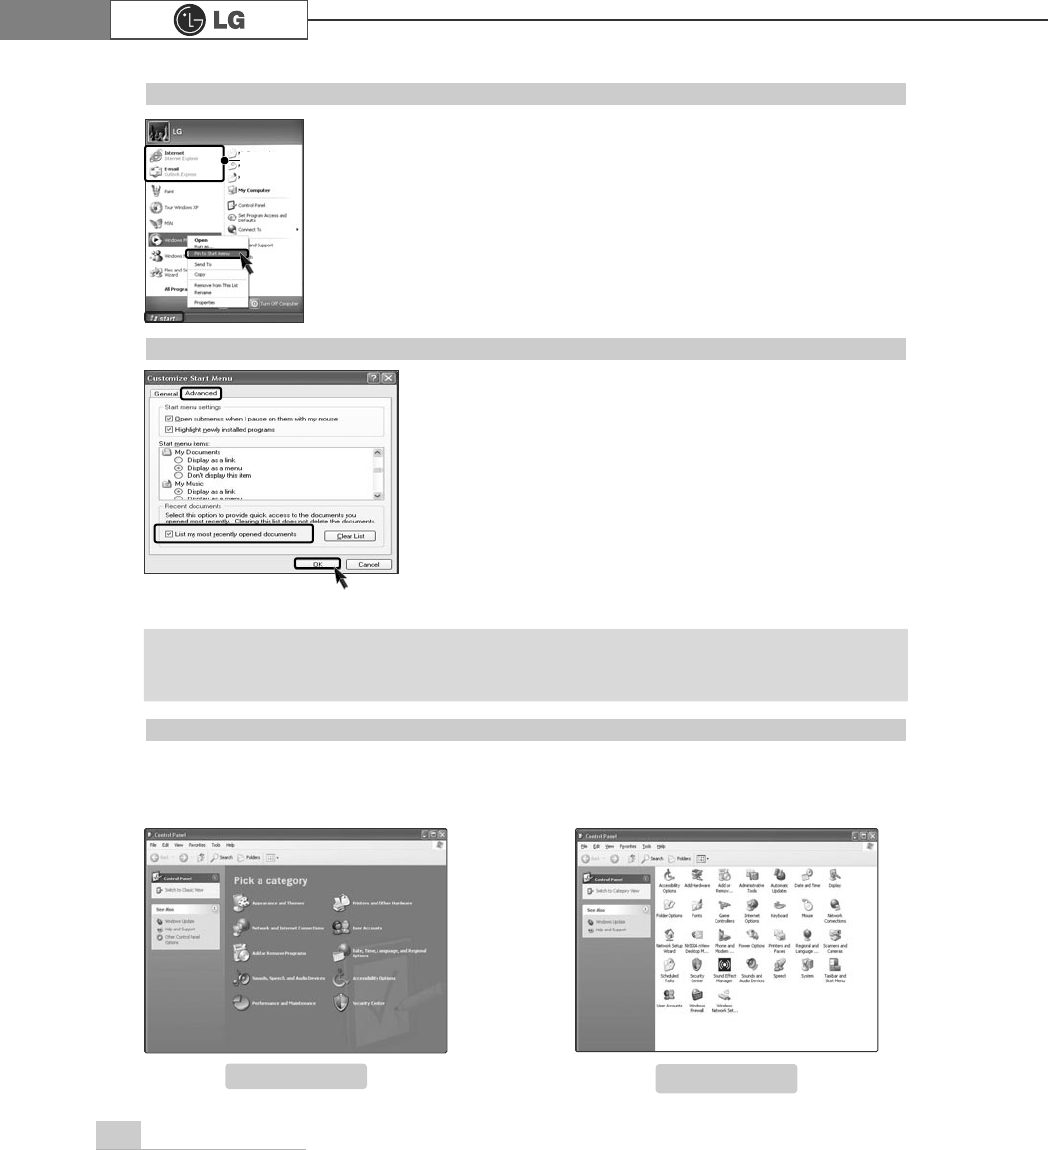
To Display Recent Documents on Start Menu
ⓞRight-click the [Start] button, and click the [Properties].
ⓟClick Start menu on the Start Menu tab, and click
[Customize]. Select [List my most recently opened
documents] on the Advanced tab, and click [OK].
ⓠClick [Apply]
èè
[OK] in [Taskbar and Start Menu
Properties] window to save the new settings. Then, click
the Start button to display the Recently Opened
Documents folder where recent documents and files are
saved will be displayed on the Start menu.
To Display Programs at the top of Start Menu
ⓞSelect and right-click a program to display at the top of Start menu.
ⓟClick [Pin to Start Menu].
ⓠThe selected program will be displayed on the upper part of bound-
ary as a fixed topic.
ãTo empty My Recent Documents folder, click the Clear List on the Advanced tab.
Although the list is cleared, the documents will not be deleted in the computer.
Note
Category View Classic View
27Using the system
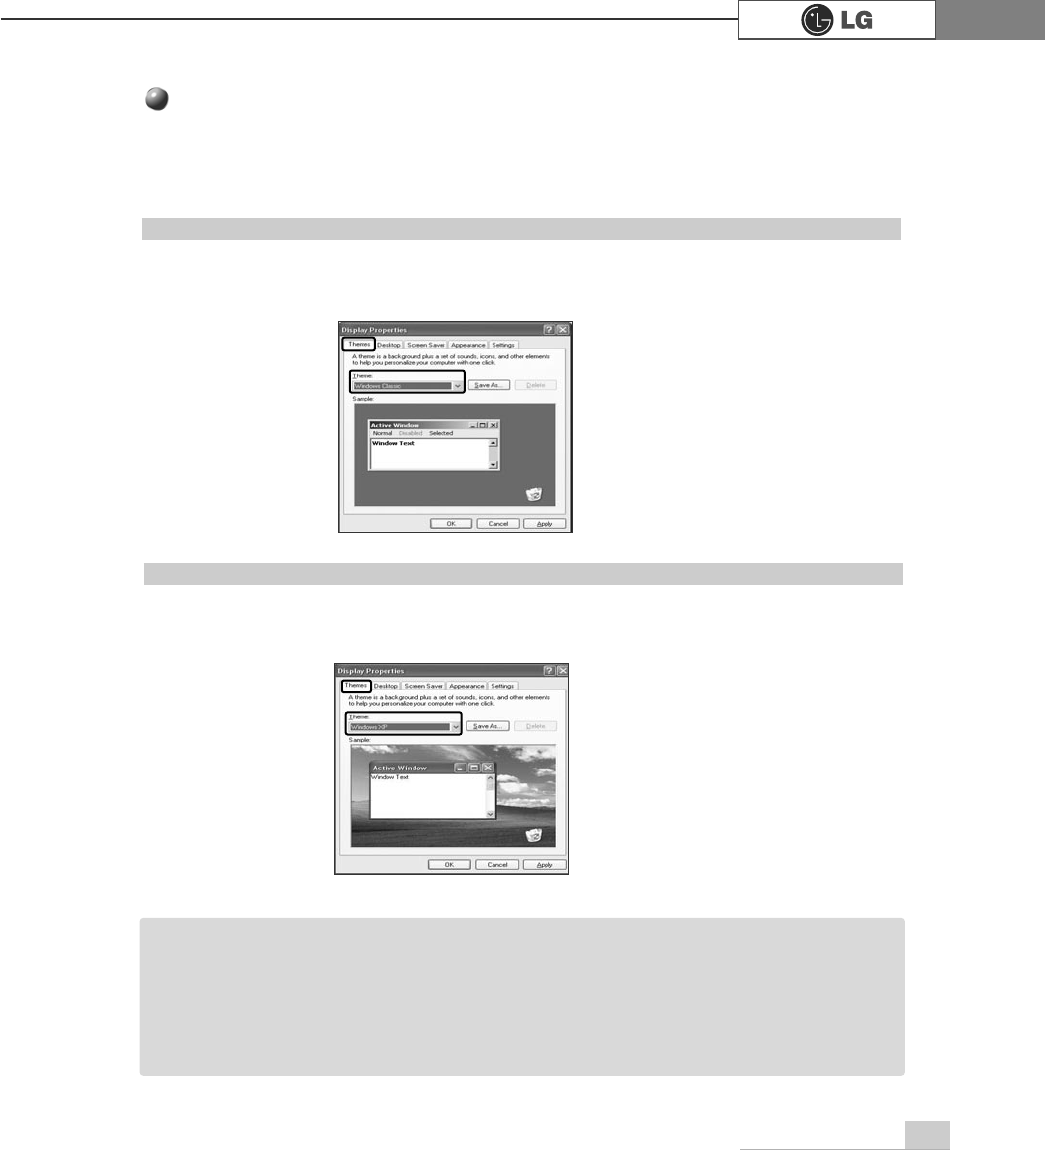
To Use Windows Classic Configuration
To Select an Other Theme
ⓞClick [Control Panel] èè[Switch to Classic View] è[Display].
ⓟClick [Windows XP] under Theme tab.
Changing Desktop Appearance and Theme
ⓞClick [Control Panel] èè[Switch to Classic View] è[Display].
ⓟClick [Windows Classic] under Themes tab.
ãTo view display properties, click [Start]
èè
[Control Panel]
è
[Switch to Classic View]
and double-click Display.
After selecting Windows Classic, you can customize Windows elements such as window
borders, icons, and menus.
Select Appearance tab, and click Advanced.
Note
With Theme menu, you can customize the desktop including the background, the
screen saver, icons, windows, the mouse pointer, and sound. If there are multiple
users, each user can customize his/her own desktop using Theme menu.
28 Using the system
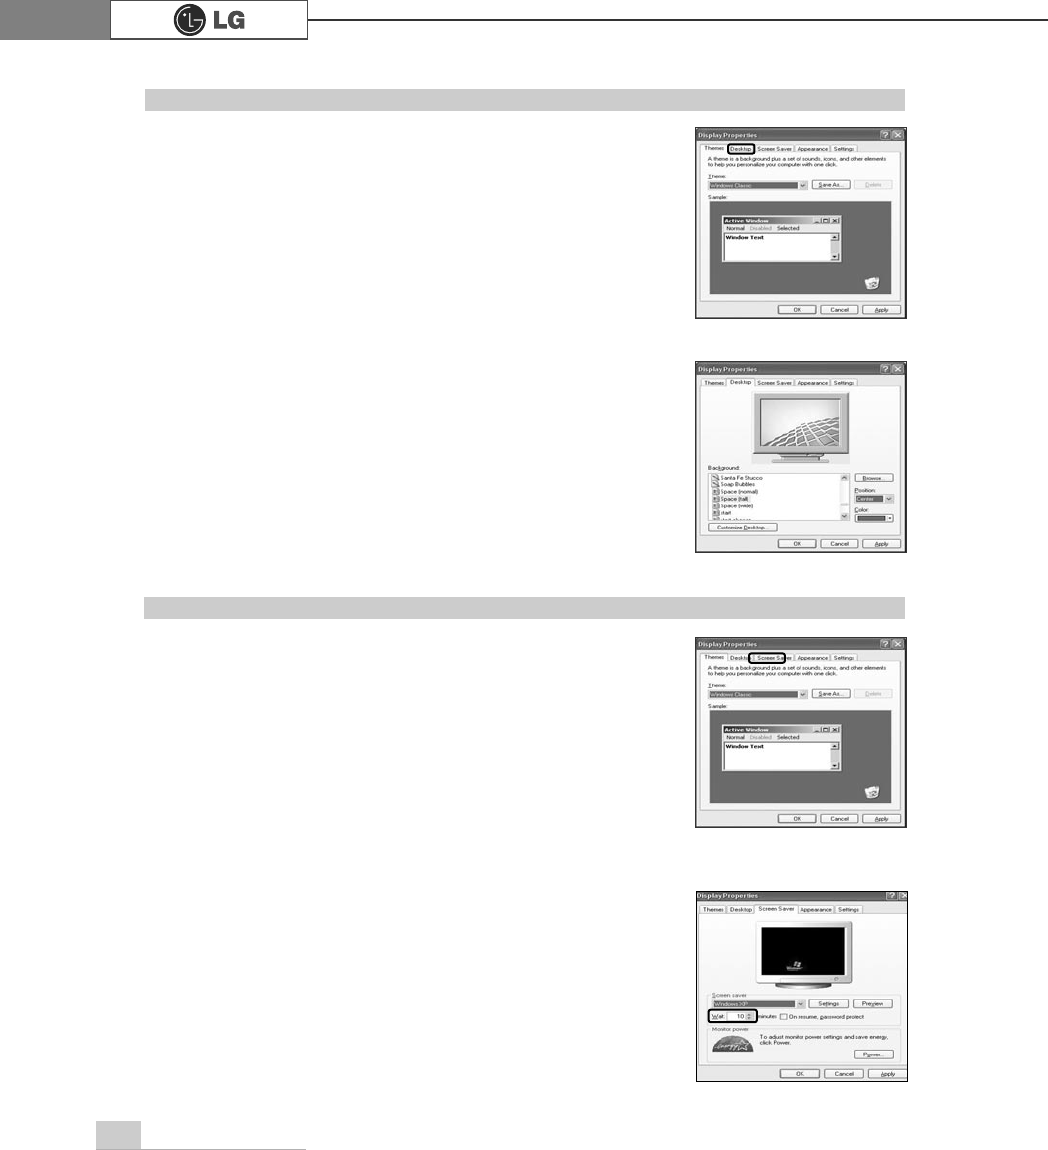
ⓟSelect a screen saver from the list.
Click the scroll button of Wait field and set the time to
wait till the screen saver is activated. Select Password
Protected check box, then you will be requested to enter
the password when restarting Windows while the screen
saver is running. This feature is convenient for prevent-
ing others from accessing data and damaging them.
To Change Background
ⓞ
Click [Control Panel]
èè
[Switch to Classic View]
è
[Display], and select the Background tab. (Or locate the
mouse point on the Windows background, and right-click
it. Then, a popup menu will appear. Select [Properties]
from the popup menu.)
ⓟClick the scroll (triangle down) button, and check the
image list. Select an image to use it as the background,
and click [Apply]. Then, the background will be changed.
However, if there is no image that you would like to use as
the background, click [Browse] and select an image file.
To Set Screen Saver
ⓞ
Run [Control Panel]
èè
[Switch to Classic View]
è
[Display]. And select [Screen Saver] tab.
29Using the system
Desktop Cleanup
With Desktop Cleanup Wizard, you can delete hot icon paths that are not used on the
desktop. Desktop Cleanup Wizard will be automatically executed every 60 days, or you
can run this program when necessary.
To delete unused icons on the desktop, do the following
ⓞOpen [Control Panel]
⍛⍛
[Switch to Classic View]
⍛
[Display].
ⓟClick [Customize Desktop] under Background tab.
ⓠClick [Clean Desktop Now] under Desktop Cleanup tab.
ⓡFollow instructions of [Desktop Cleanup Wizard].
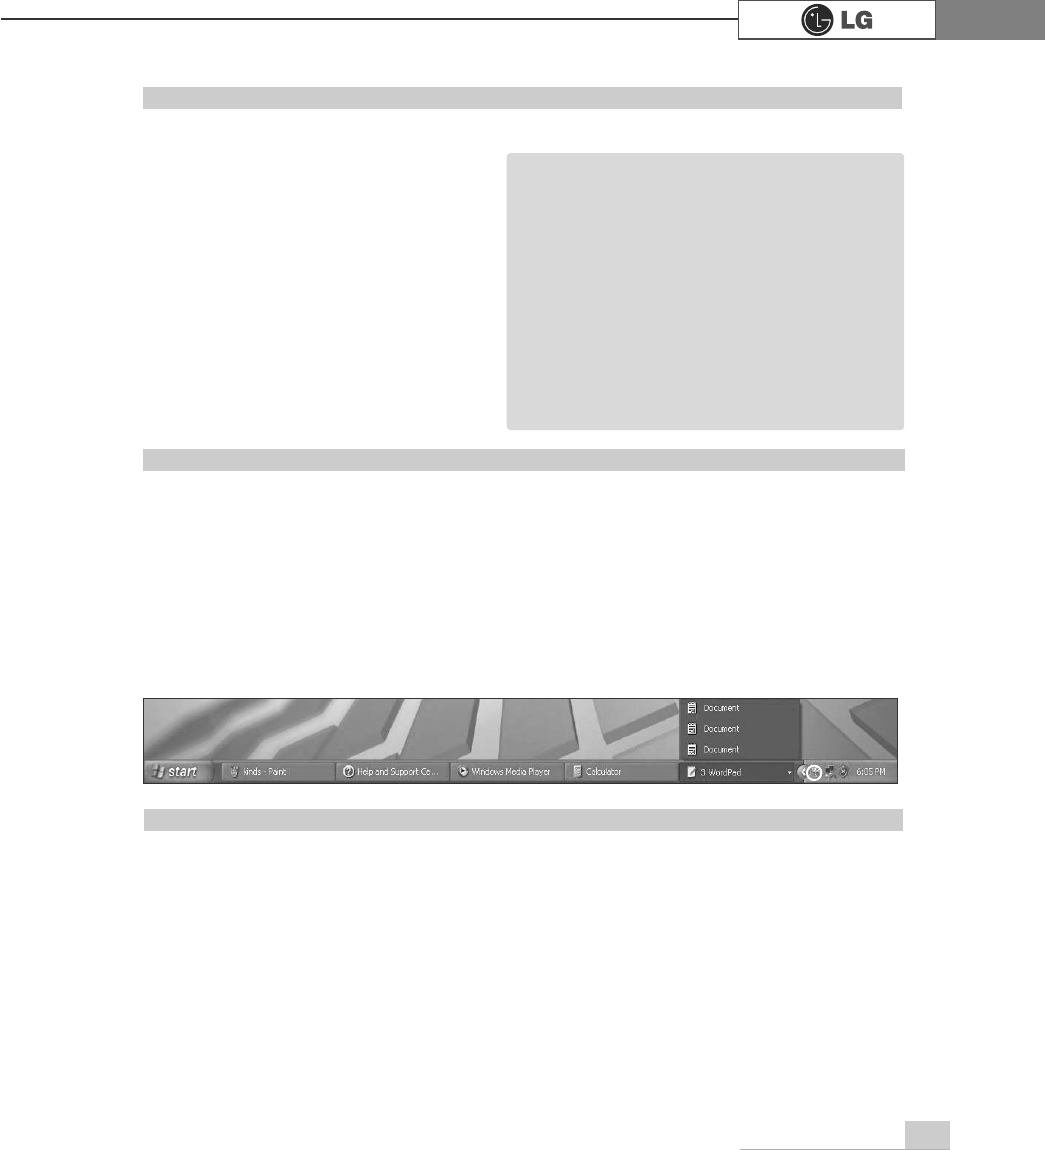
Taskbar
If there are multiple documents and programs are running on the computer, the taskbar will group
tasks and display each group. For example, if there are three Word Pad documents are running
on the computer with other seven windows, three Word Pad tasks will be grouped under one
Word Pad button. To view a Word Pad document, click the Word Pad group button and select the
corresponding document.
For simple display of the taskbar, icons that are not used for a long time and located next to the
clock icon will be hidden. Click the arrow button to display hidden icons. Or click on the icon to
display it again.
To Customize Background
ⓞRun [Control Panel] èè[Switch to
Classic View] è[Display]
ⓟClick the theme to change under
[Themes] tab.
ⓠChange the theme.
ⓡAfter changing the theme, click
[Apply] under Theme tab of Display
Properties dialogue box and select
[Save As].
ⓢInput the name of the theme, and
click [OK].
ãTo view display properties, click [Start]
èè
[Control Panel]
è
[Switch to Classic
View], and double-click on display.
If you change the theme without inputting
the theme name, the new theme will be
named previous name (modified).
However, if you select another theme, the
changed theme will be deleted.
The new theme will be saved under My
Documents folder. To open My Documents
folder, click Start and My Documents.
Note
30 Using the system
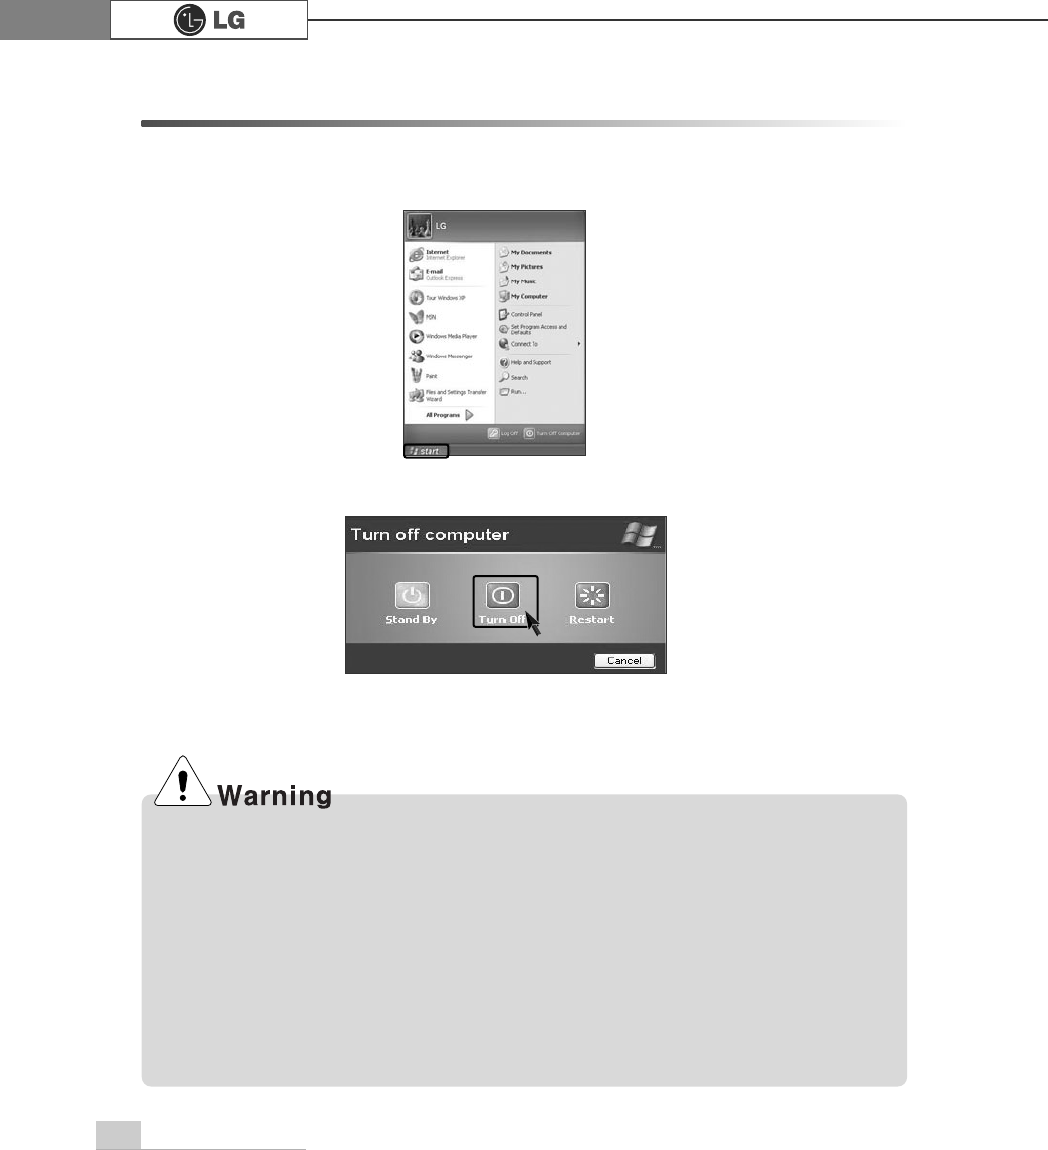
ⓞClick the [Start] button and select Turn Off Computer.
ⓟWhen Shutdown screen appears, click [Turn Off].
ãYou may not be able to normally turn off the computer in Windows. When this happens,
press the Power button for five seconds.
However, this is an emergency measure and taking this measure may result in errors in the
system. It is recommended to click the [Start] button and select Turn off Computer menu on
Windows desktop to shut down the computer.
Abnormal turning-off of the computer may damage data stored in the hard disk.
ãWhen the program suddenly stops, click [Ctrl] + [Alt] + [Delete] keys and terminate the pro-
gram through Windows Task Manager or restart the system. If the some program files of
Windows has been damaged due to abnormal turning-off of the computer, reinstall damaged
programs. LG Electronics is not responsible for data loss caused by your mistakes and negli-
gence.
ⓠThe computer will be automatically turned off.
2-3.Turning Off Computer
Abnormal turning-off of the computer may damage data stored in the hard disk.
31Using the system
2-4. Rebooting the Computer
The computer needs rebooting sometimes due to abnormal operation or incorrect
use. When this happens, reboot the program as described below.
ⓞPress [Ctrl] + [Alt] + [Delete] keys to terminate the program or restart the computer.
ⓟIn case the measure described above does not work, press the Power button for five
seconds to turn off the computer. Then, restart the computer after 10 seconds.
32 Using the system
This chapter describes functions of the generally used mouse. Depending on the
model, a different mouse is provided. For FK models, an optic mouse is provided.
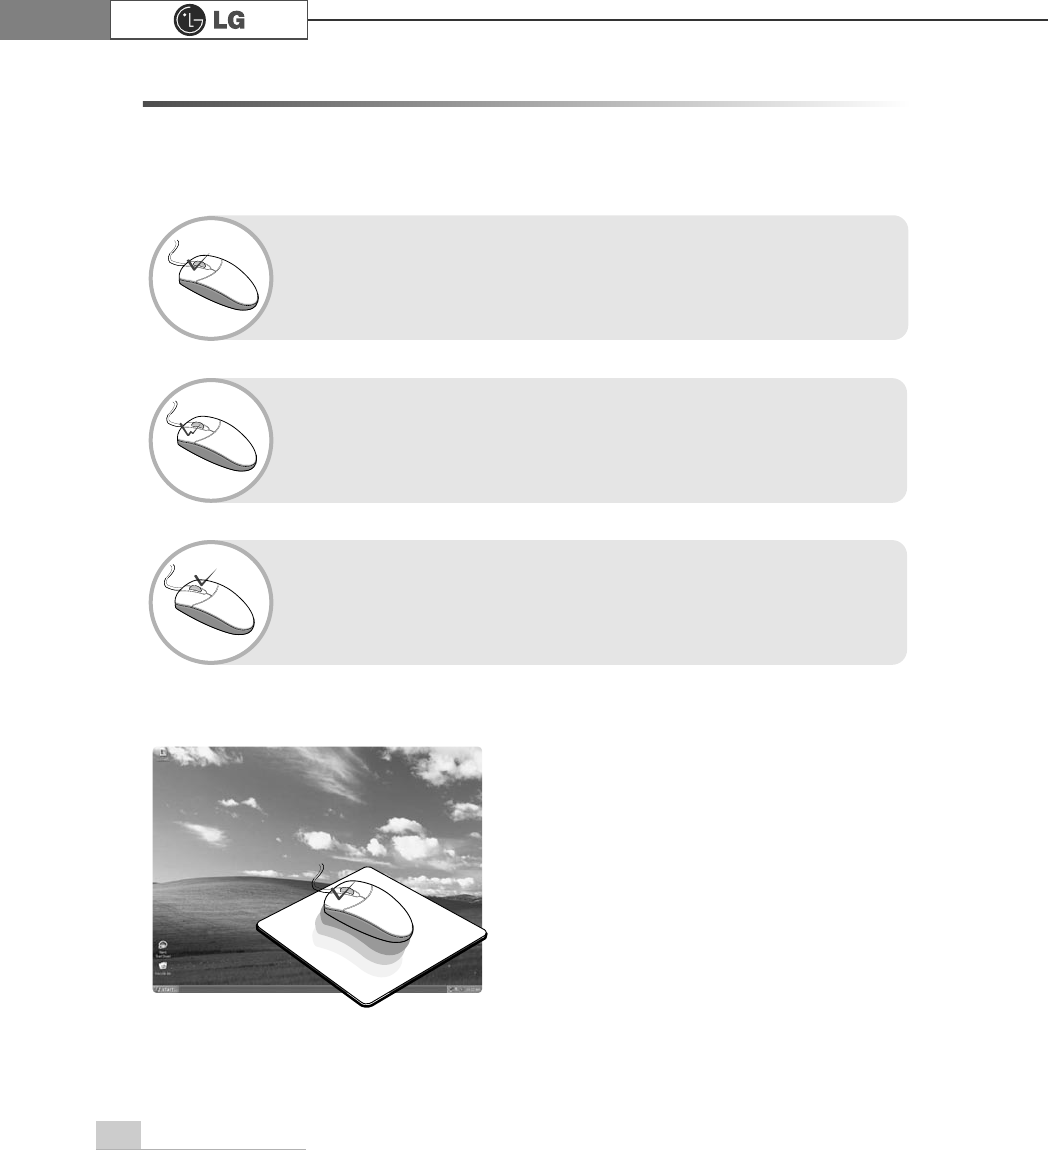
What Is Drag (Move while holding
down)?
You can move an icon or a window by
keeping pressing the left button and
dragging the mouse pointer to the intend-
ed destination. This is called Drag.
Drag
What Is Double-click (Run)?
You can run the program by clicking the left button of the mouse
twice consecutively on the program icon. This is called "Double-
click."
What Is Right-click (Undo/Popup Menu)?
By clicking the right button of the mouse, you can open the popup
menu that includes auxiliary functions of the corresponding program
such as Copy, Move, and Rename.
What Is Click (Select)?
You can select a program by clicking the left button of the mouse
on the program. The mouse enables you to select or run the pro-
gram by clicking on it without using the keyboard
2-5 Using the Mouse
33Using the system
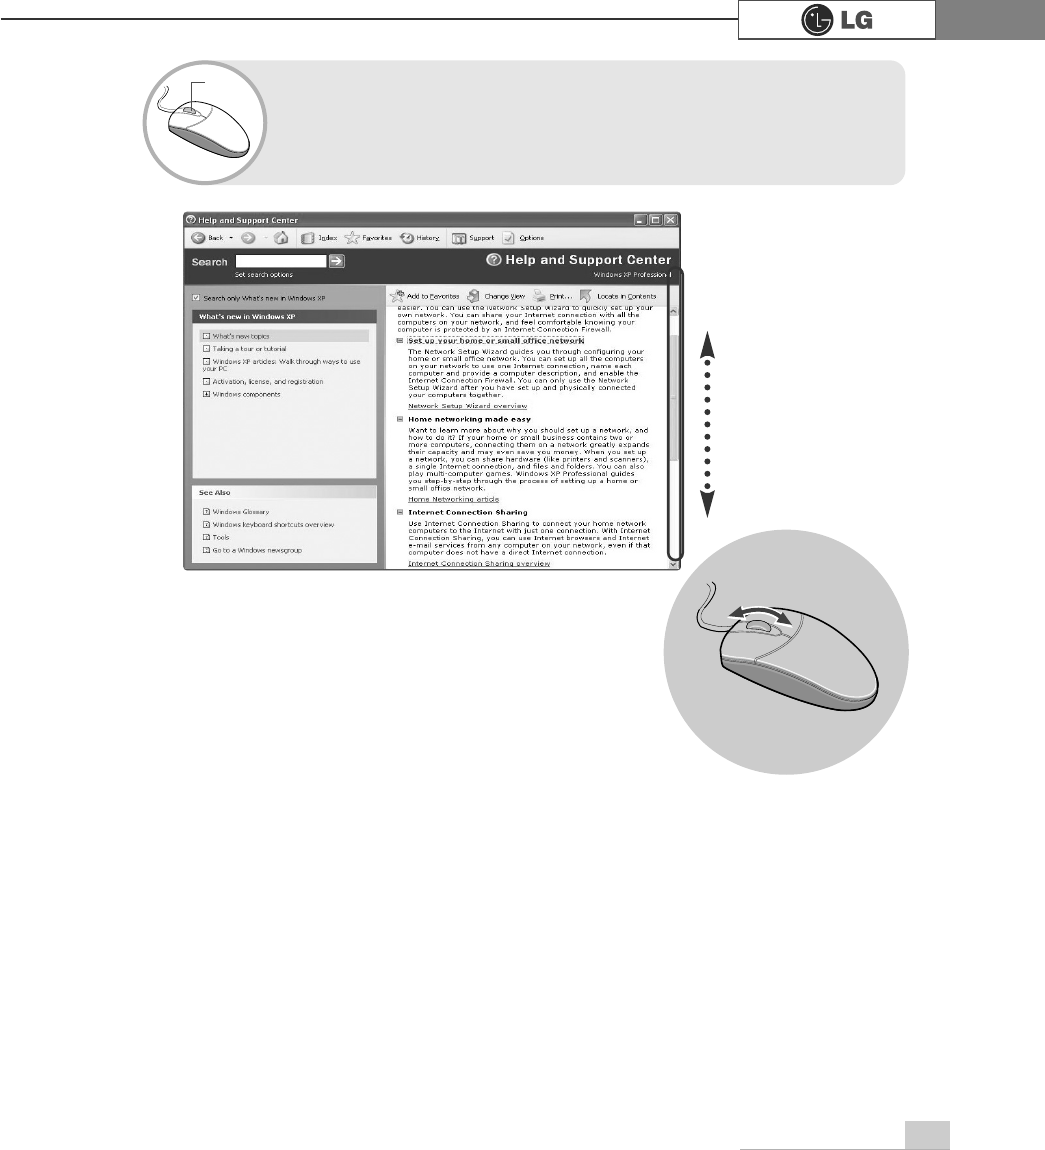
What is Wheel (Move by rolling the wheel)?
If the program is displayed with a scroll bar, you can view the
upper and the lower parts of the program by rolling the wheel of
the mouse.
Wheel
34 Using the system
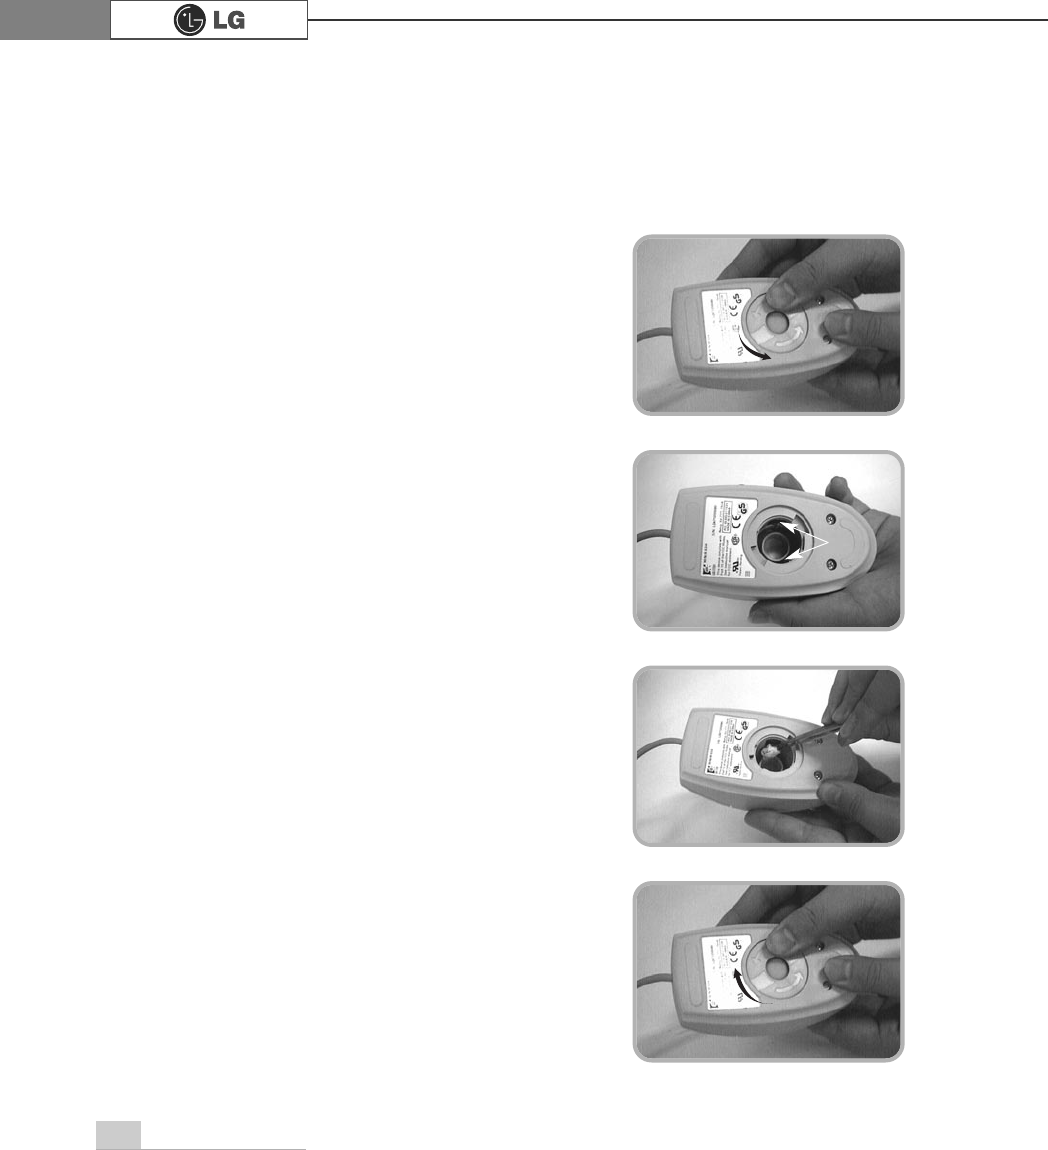
2-6.Cleaning the mouse
If the mouse does not work,clean up the mouse with cotton swap.
Do as follows.
ⓞOpen up the cover in the direction of the arrow
as shown on the picture and take out the ball.
ⓡClose the cover in the direction of the arrow
and use the mouse.
ⓠClean with cotton swab and alcohol.
ⓟSee if inside of the mouse is filled with dust.
5ROOHU
35Using the system
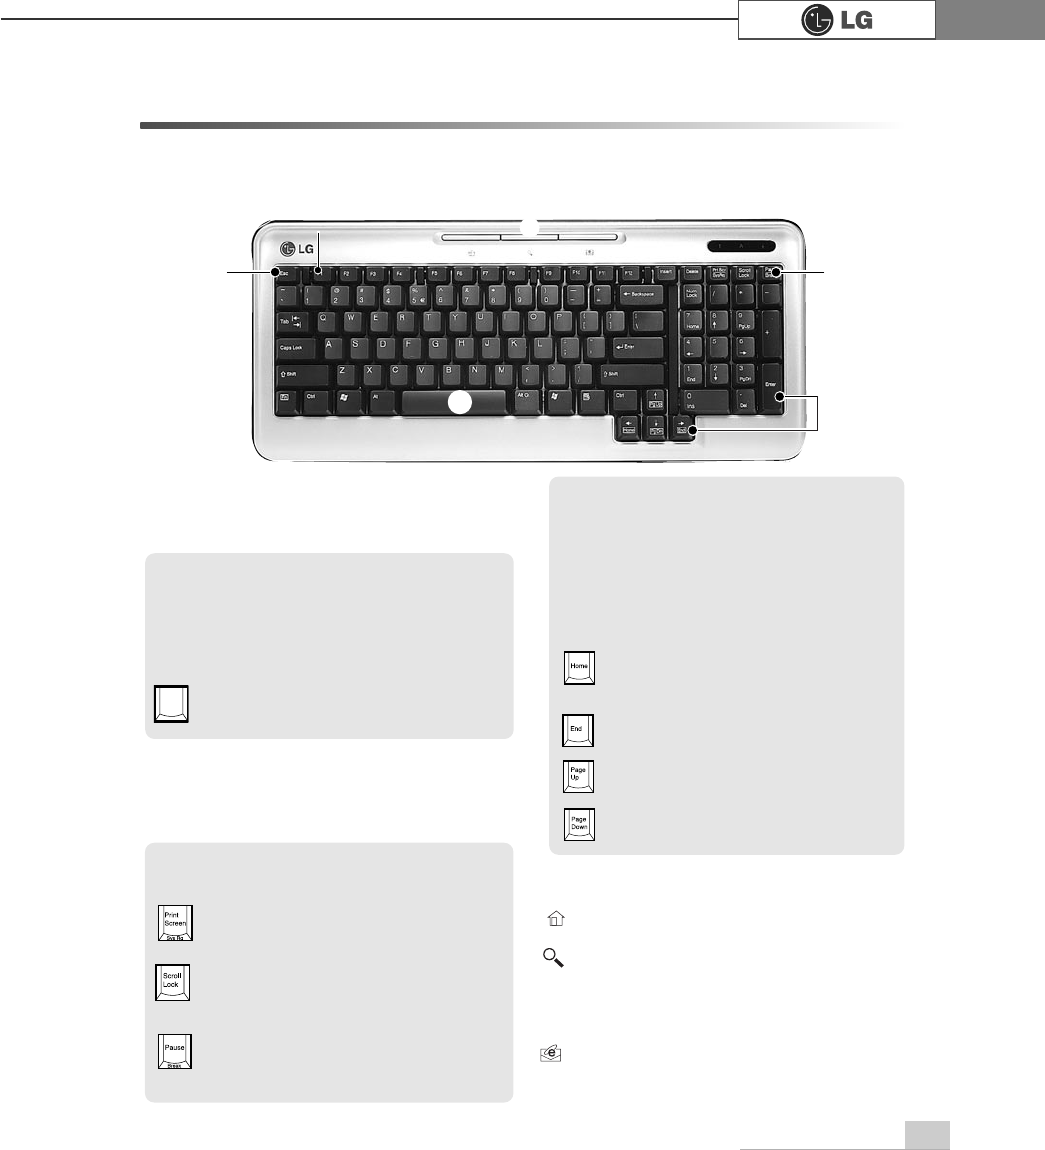
2-7. Using the Keyboard
The keyboard is a kind of communication tool between the computer and the user.
You can input the data, execute commands, and perform certain types of tasks on
the computer through the keyword.
ℚTypewriter Keypad
(See page 36 of the user manual.)
℘ESC key
Terminates or stops the program.
ℛOther Keys (Special Control Key)
Scroll Lock
Moves the entire screen while the cursor
is not moving.
Print Screen
Prints or temporarily saves the screen.
Pause/Break
Temporarily stops the operation of the
computer.
ℙFunction Keypads
F1 ~ F12 keys are called function
keys, and each function key has a
unique role depending on the oper-
ating system and program.
F1 IGenerally displays Help menu of the
application.
)
℘ℛ
ℙℝ
ℚ
ℝℝMultimedia/Internet Function Keys
ℜCursor Keypad and Numeric
Keypad
These keys are used to move the cursor
on the monitor screen (up, down, right
and left.) If Num Lock lamp is off on the
numeric keypad, the numeric keypad
functions the same as the cursor keypad.
End
Moves the cursor to the end of the line.
Home
Moves the cursor to the beginning of
the line.
Page Up
Moves the cursor to the previous page.
Page Down
Moves the cursor to the next page.
Home
launches the Internet Explorer on your system.
Search
Functions while the Internet explorer or
Windows Explorer is running. Functions as
"Access Internet Search Engine" in Internet
Explorer and "Find Files" in Windows Explorer.
E-mail
Runs e-mail programs installed in the
system such as Outlook Express.
ℜ
36 Using the system
Spilling the water on the keyboard causes
disfunction to the computer.
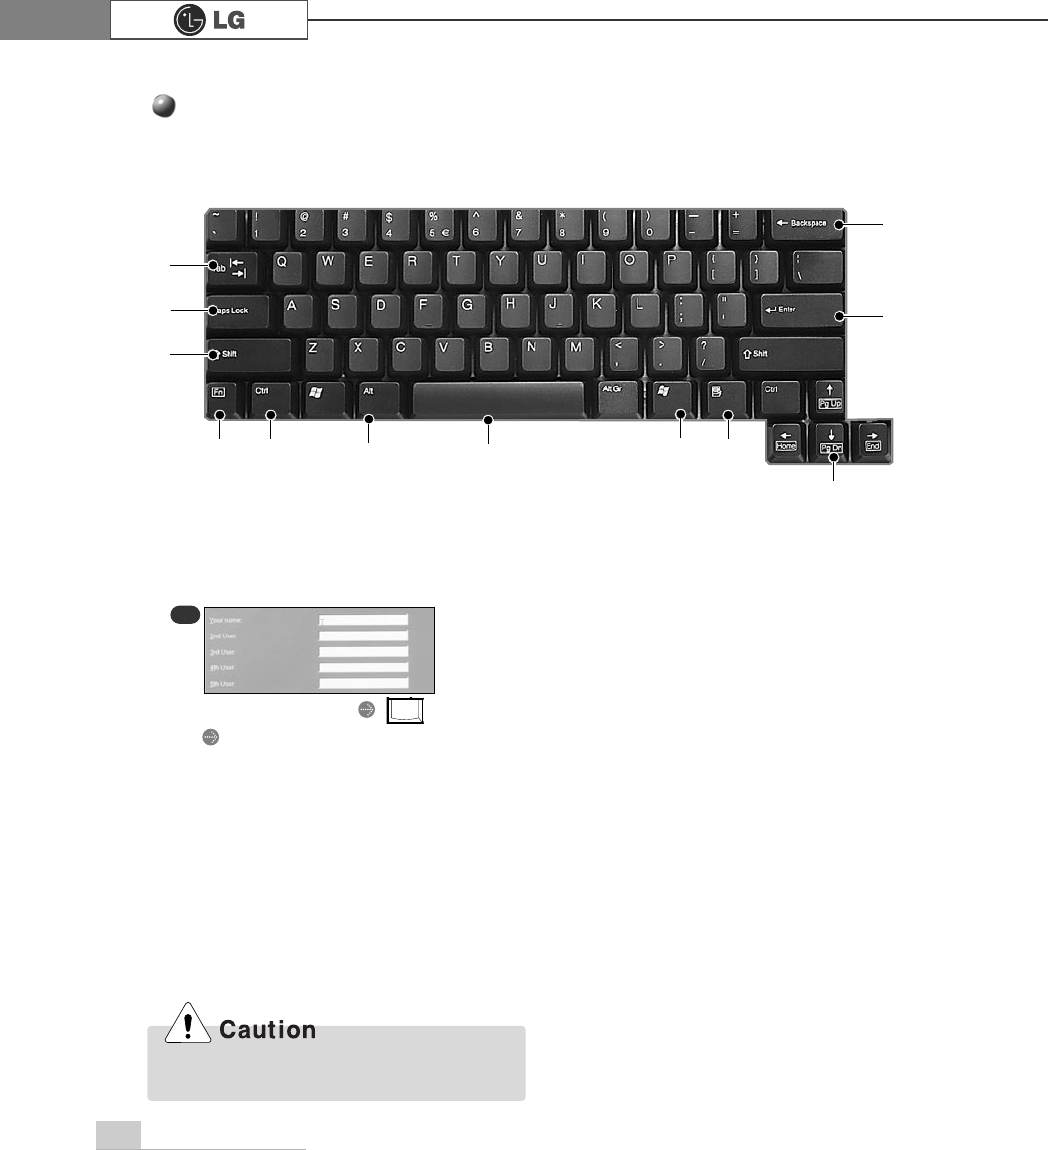
The typewriter keypad functions the same as keys on the typewriter. The typewriter
keypad includes alphabet, numeric, and Korean characters as well as [Shift] + [Alt] +
[Backspace] keys.
℘Tab key
Used to input data in the data input
window and to move to the next data
input window.
ℙCaps Lock
Toggle cases.
ℚShift key
Used to input the upper characters of
keys or capital English letters.
ℛ,℟Ctrl and Alt Keys
Ctrl and Alt keys are not normally used
alone, but they are used with other
keys in combination. They function dif-
ferently for each program.
Inputting a name
Inputting initials of the name
Tab
Typewriter Keypad
LG
LG User
⌆
ℚ
ℙ
℘
℟℡
ℛ⌅℞℠
ℝ
ℜ
ℝEnter
Used to inform the computer of the
completion of one command or to
change the line
ℜBackspace
Used to move the cursor to the left
place by one column and delete each
character.
℞Space
Used to make a blank space on the right.
℠Windows
Used to select the Start menu without
using the mouse.
℡Press Shortcut menu key to view
Press Shortcut menu key to view Shortcuts
for the current porgram(Shortcut menu
key works the same as the right-click
ing the mouse button).
⌅⌆ This key is used in conjunction
with [Fn]
key to move on to the next or previous
page.
EX
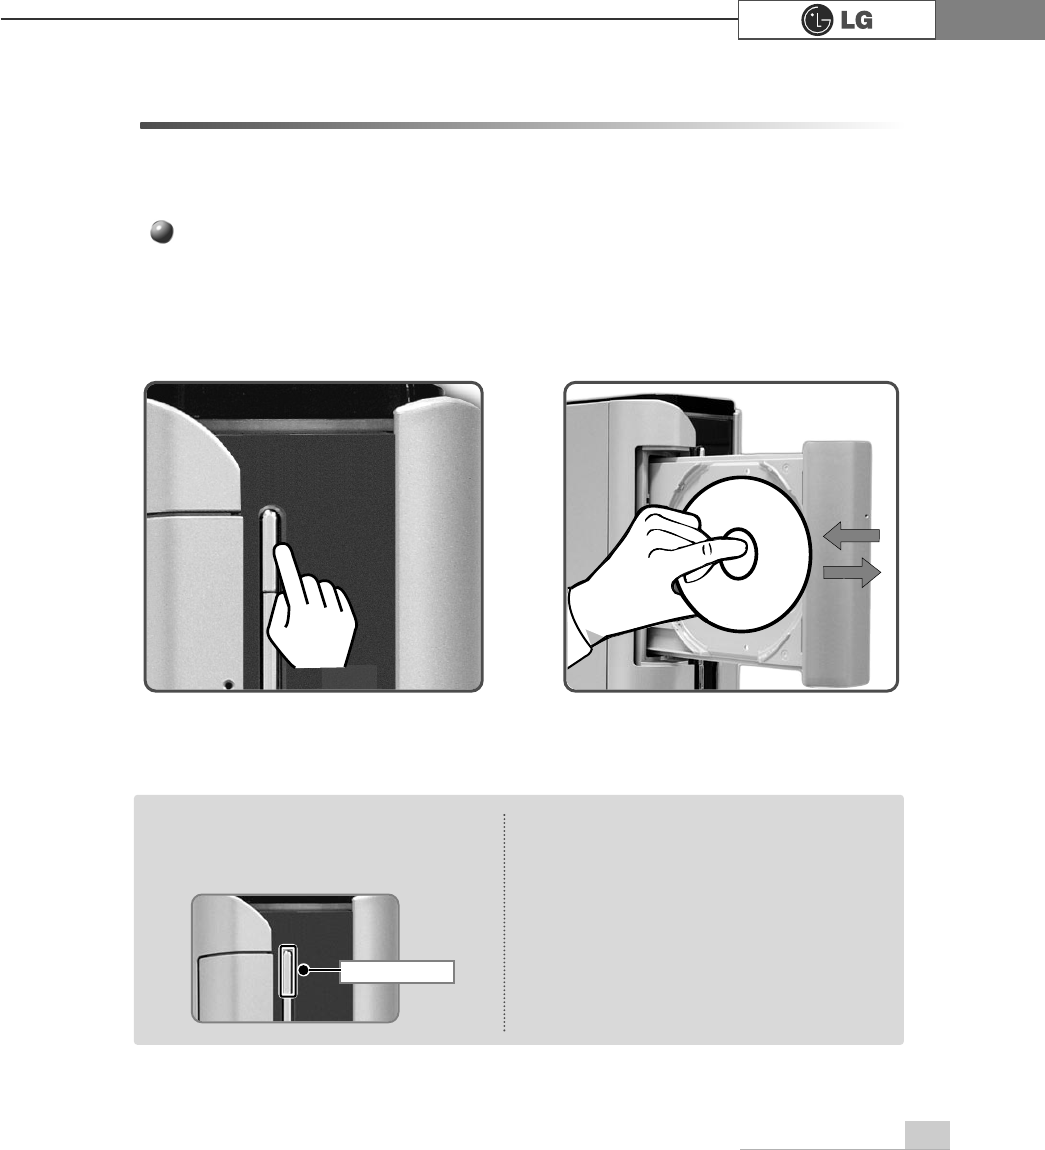
37Using the system
Turn on the computer, and press the
Open/Eject button.
Put the CD with its labeled side up,
and insert the CD in CD-ROM tray
without touching the playing part.
(ÚThe trademark must face upward.)
CD stands for Compact Disc, and ROM stands for Read Only Memory. Unlike other auxil-
iary devices, you cannot write or delete data on the CD-ROM but only can read the data.
The CD-ROM drive can read the CD and play audio and video CDs
2-8.Using the CD-ROM Drive
Using the CD-ROM
Note
ãAfter inserting a CD, press the CD-ROM
cover or press the Eject button again.
ÚThis model adopted slim design for effi-
cient use of space and the CD-ROM
(RW/DVD/COMBO) drive is vertically
installed. Therefore, a small-sized CD titles
(80mm) may not be properly inserted. If
necessary, lay down the product to insert
such small-sized CD titles.
Eject : Used to eject the CD. After pressing
Eject button, take the hand off away
from the CD-ROM drive.
Eject button
38 Using the system
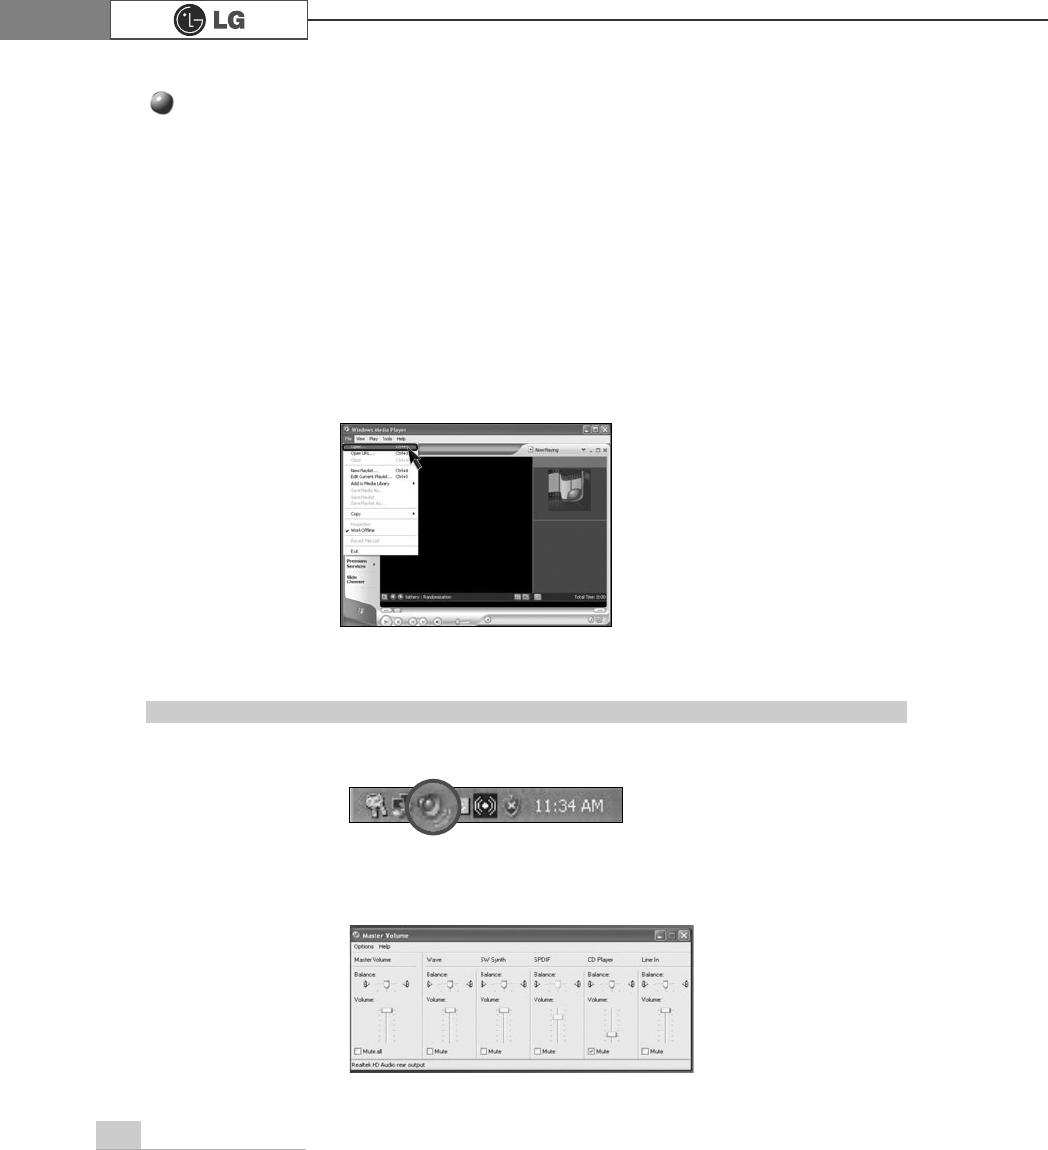
Using the Windows Media Player
The Windows Media Player can play various kinds of audio and video files. You can
play and reproduce a CD. If the computer is equipped with a DVD driver, you can play
the DVD title, listen to Internet radio programs, play movie clips, and watch music video
on an Internet sites. You can also create his/her own music CD with the Windows
Media Player.
ⓞ
Click the [Start] button on the desktop, and select All Programs èè
Accessories èEntertainment èèWindows Media Player.
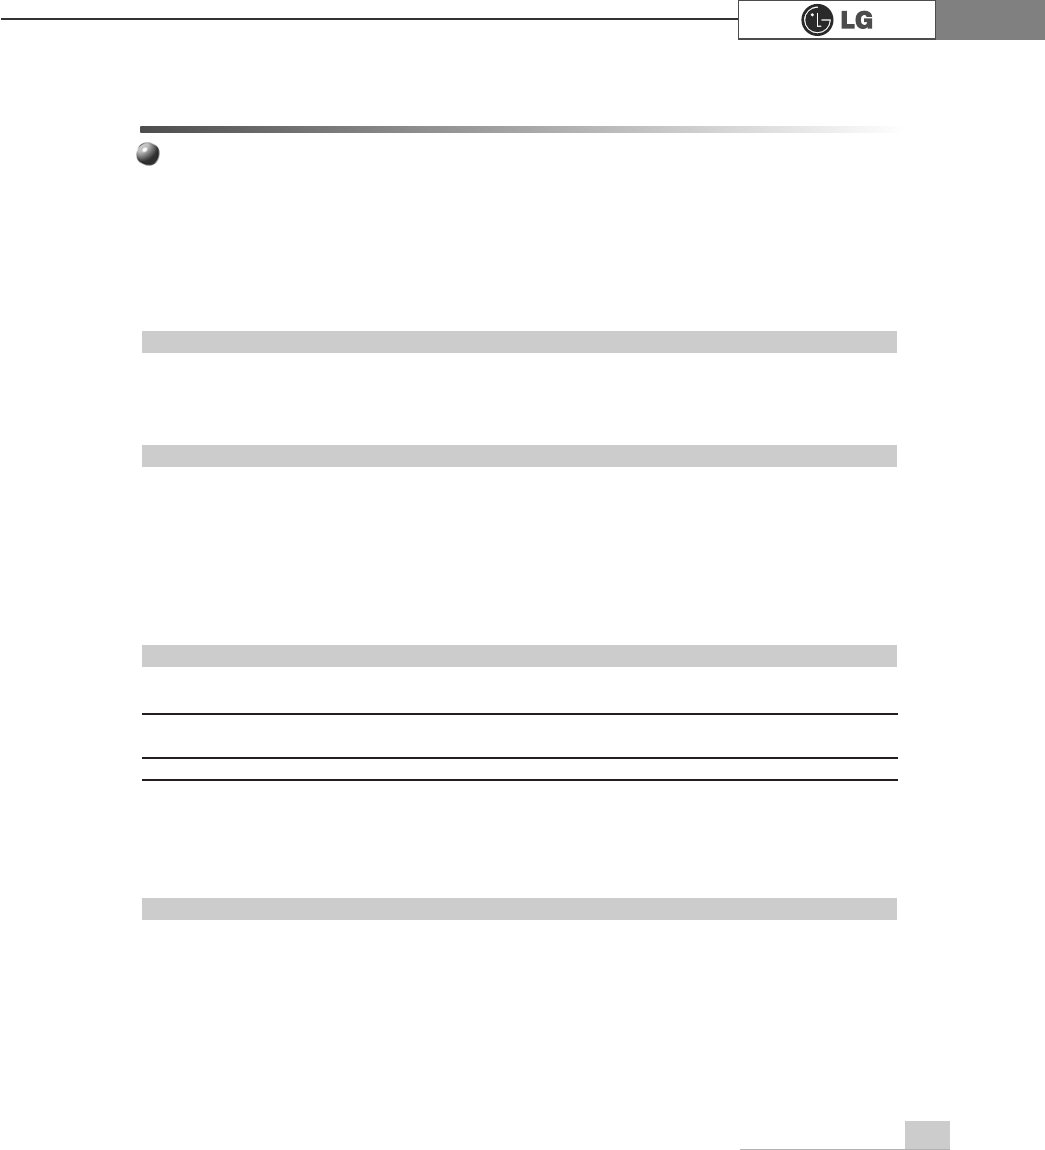
ⓞClick [Master Volume] icon from the taskbar.
ⓟWhen the Windows Media Player is executed, click the [Open] button and select
audio or video file to play.
ⓟDrag the slide bar to adjust the sound of the corresponding device.
Adjusting the Volume
39Using the system
The hard disk drive is an auxiliary memory installed in the computer. The hard disk drive
reads and writes data at a fast speed and saves large amount of data. As both the disk
and the disk drive are installed in the hard disk, the "hard disk" and the "hard disk drive"
are used as the same terms. After installing a new hard disk, set up the system and for-
mat the hard disk while referring to the "System Setup" part
⍀Before removing or installing a computer, turn off the computer and correctly connect
cables. In the case where cables are incorrectly linked, the hard disk may get damaged.
⍀When installing a hard disk, use designated nuts only. Otherwise, defects may occur on
the hard disk. If you uses thicker nuts than standard ones, critical damage may be done to
electronic parts.
⍀For stable use of the hard disk, fix the hard disk in the main body of the computer without
any gap or vibration.
Notes on Removal or Separation of the Computer
⍀The hard disk may get damaged by external shocks during transportation.
⍀Avoid direct sunlight and damp place because the hard disk is sensitive to high temperature
and humidity.
⍀Cover the hard disk with a static electricity-resistant envelope.
⍀Put the hard disk away from appliances with strong magnets such as TV and stereo set.
⍀The hard disk can get damaged by an electric shock from lightning. It is recommended,
therefore, not to use the computer during thunder and lightening, and disconnect the power
cord when not using the computer.
Notes on Operating Environment of the Computer
⍀Shocks on the hard disk during transportation may cause file damage or bad sectors.
⍀When the computer is abruptly reset (rebooted) due to power failure, the hard disk may get
damaged.
⍀The hard disk may get damaged when infected with computer viruses.
⍀BIO setup with wrong hard disk parameter values may damage the hard disk.
⍀If necessary files are deleted by your mistake, the computer may not properly function.
⍀Abrupt turning-off of the computer can damage the computer.
Notes on Operation of the Computer
2-9.Using the Disk Drive
A hard disk is sensitive to the external environments and shocks. The manufacturer is
not responsible for data loss or damage of the hard disk caused by errors. Therefore,
it is recommended to back up important data
Upon Data Damage in Hard Disk.
Using the Hard Disk Drive
40 Using the system
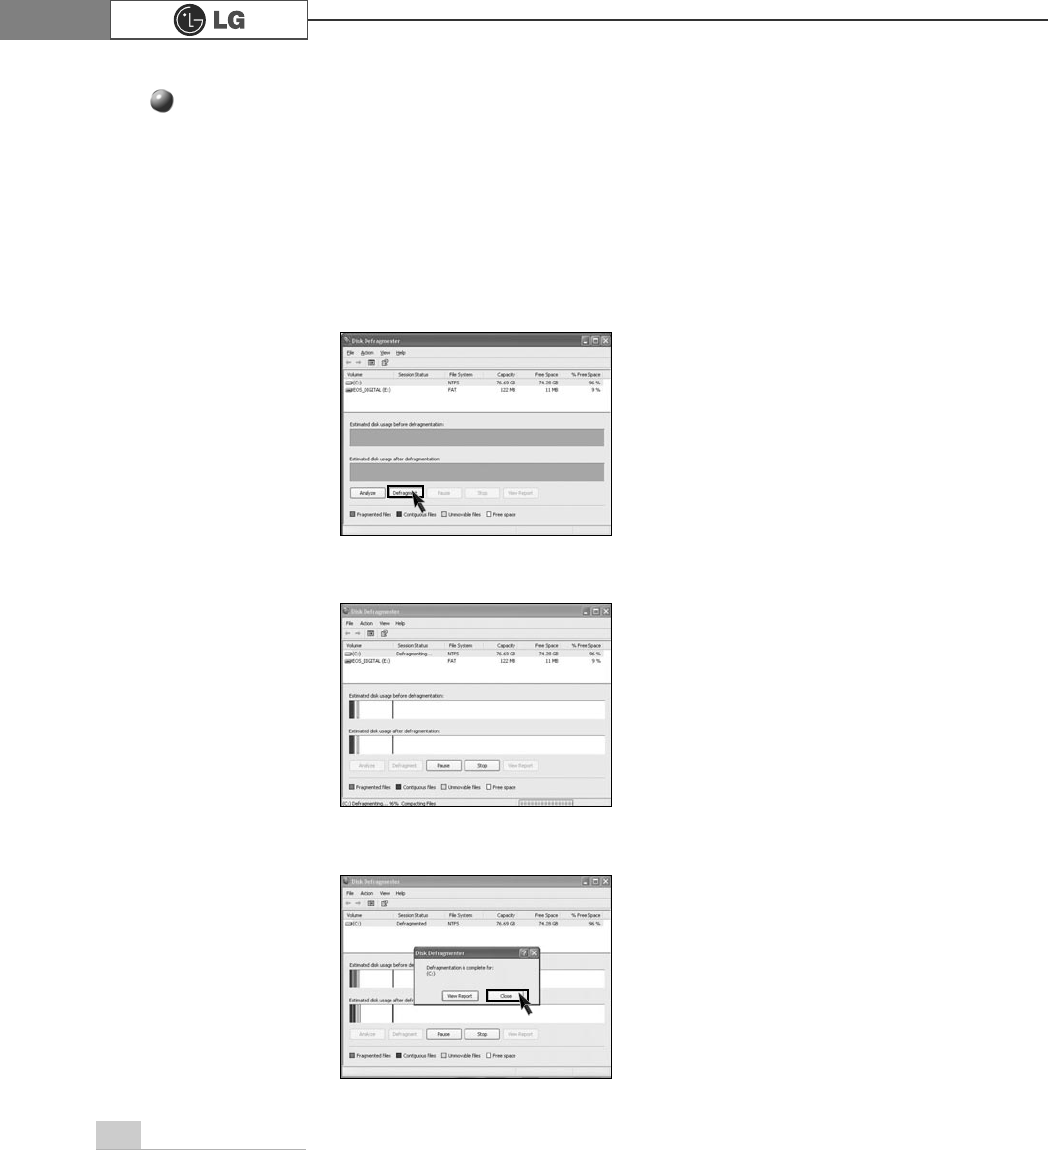
The disk defragmenter will collect fragmented volumes so that the computer can operate effi-
ciently and fast. Finish other application programs before running the Disk Defragmenter.
ⓞClick the [Start] button on the desktop, and select Accessories
èè
System
Tools
è
Disk Defragmenter.
ⓟWhen the following screen appears, select the drive, and click the [Defragment]
button.
ⓠThe progress bar will appear.
Disk Defragmenter
ⓡAfter the defragmentation is finished, click the [Close] button.
41Using the system
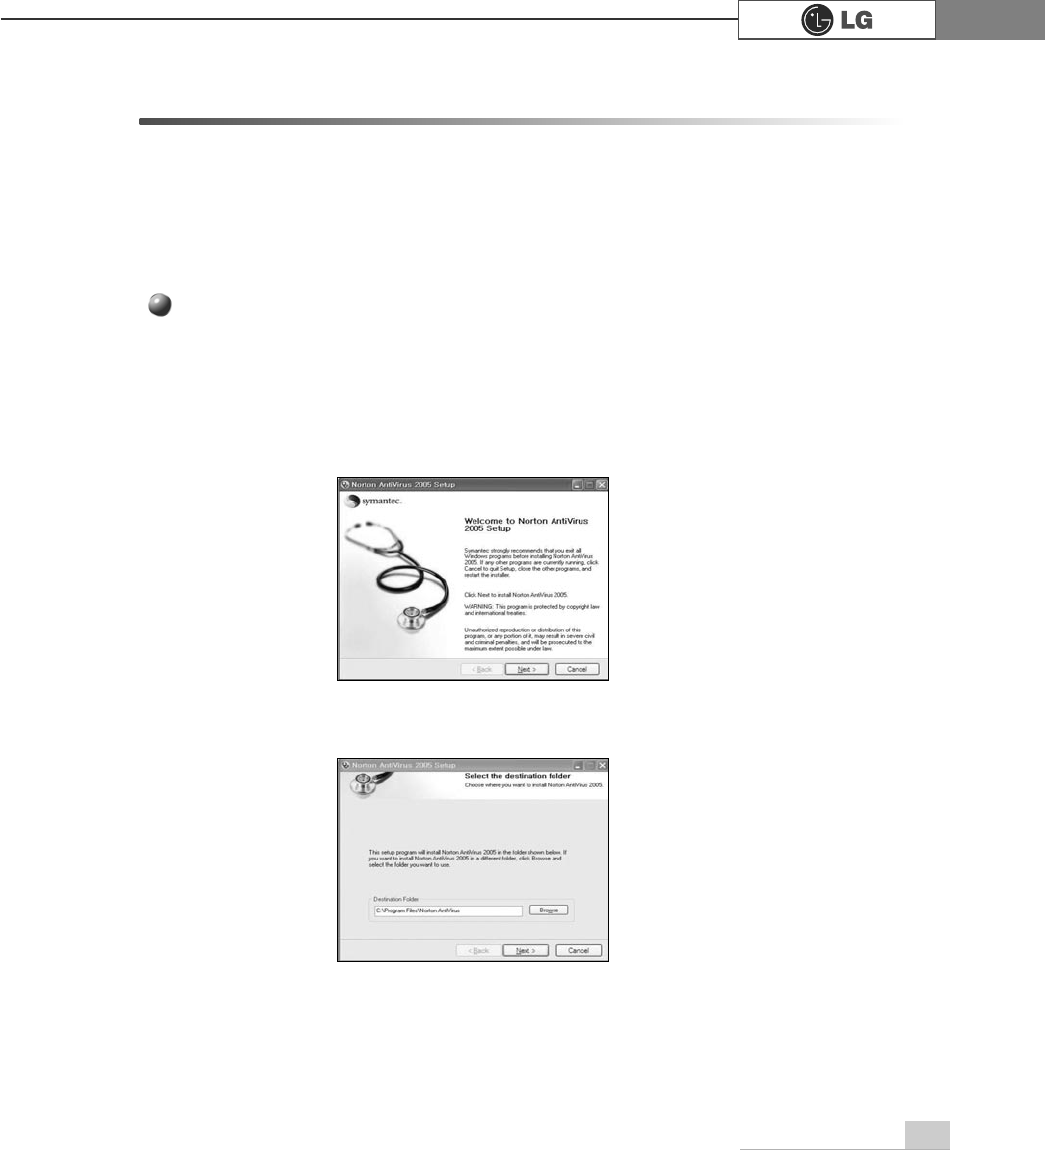
Computer viruses are programs that penetrate other programs and files. Computer
viruses infect other files through replication, leaving the infected files and programs
damaged and unusable. We provide "Norton AntiVirus," a vaccine program, to fight
viruses. Services and automatic upgrades of Norton AntiVirus through LiveUpdate
are available for one year after initial installation.
2-10.Computer virus
ⓞClick the Norton Antivirus icon on the desktop.
ⓟFollowing windows appears. Click [Next].
ⓠClick [Next] to install Norton Antivirus.
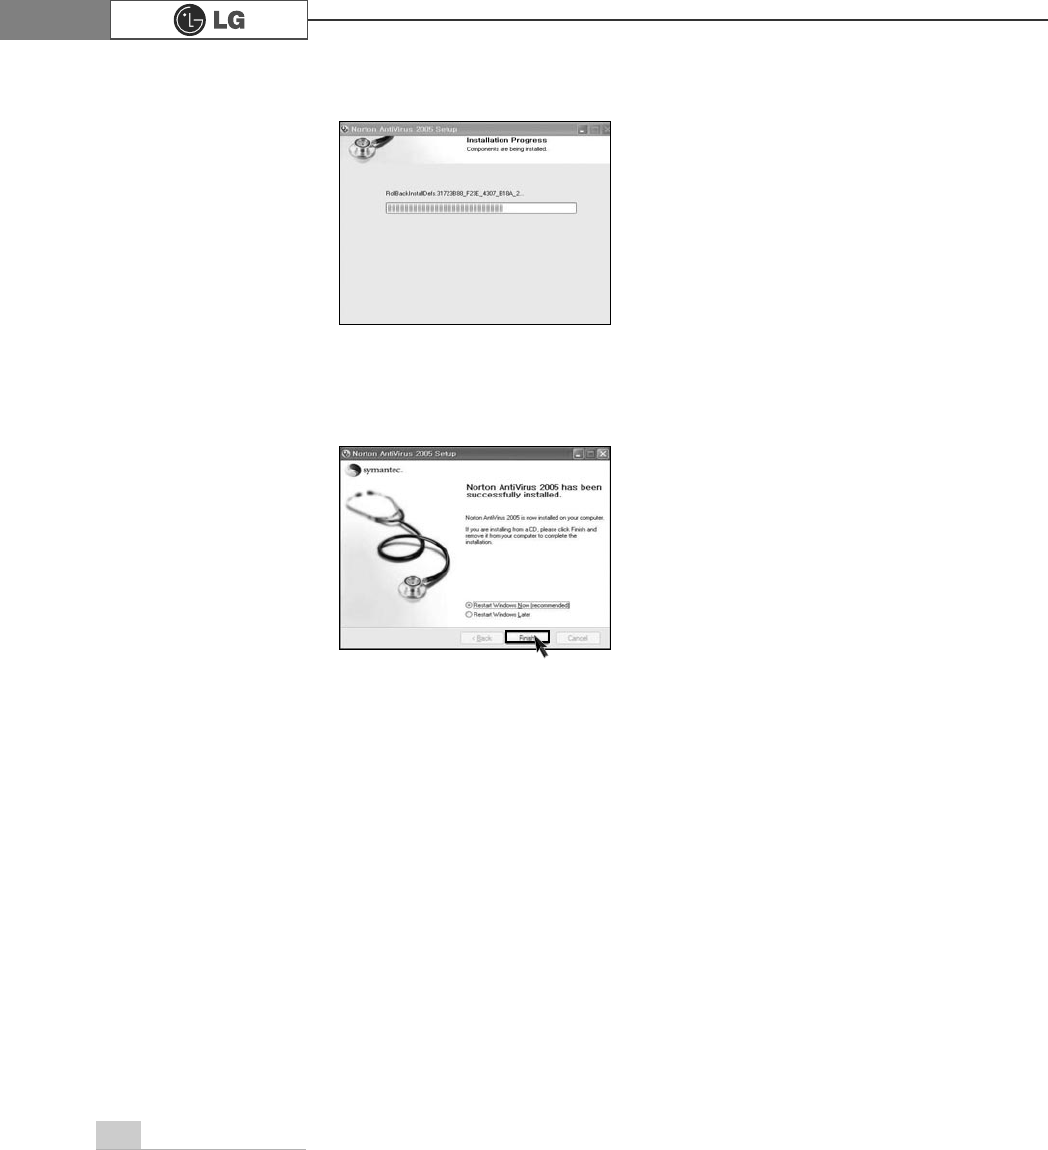
Installing Norton Antivirus
42 Using the system
ⓡFollowing window appears.
ⓢNorton Antivirus installation is complete message appears. Click [Finish].
43Using the system
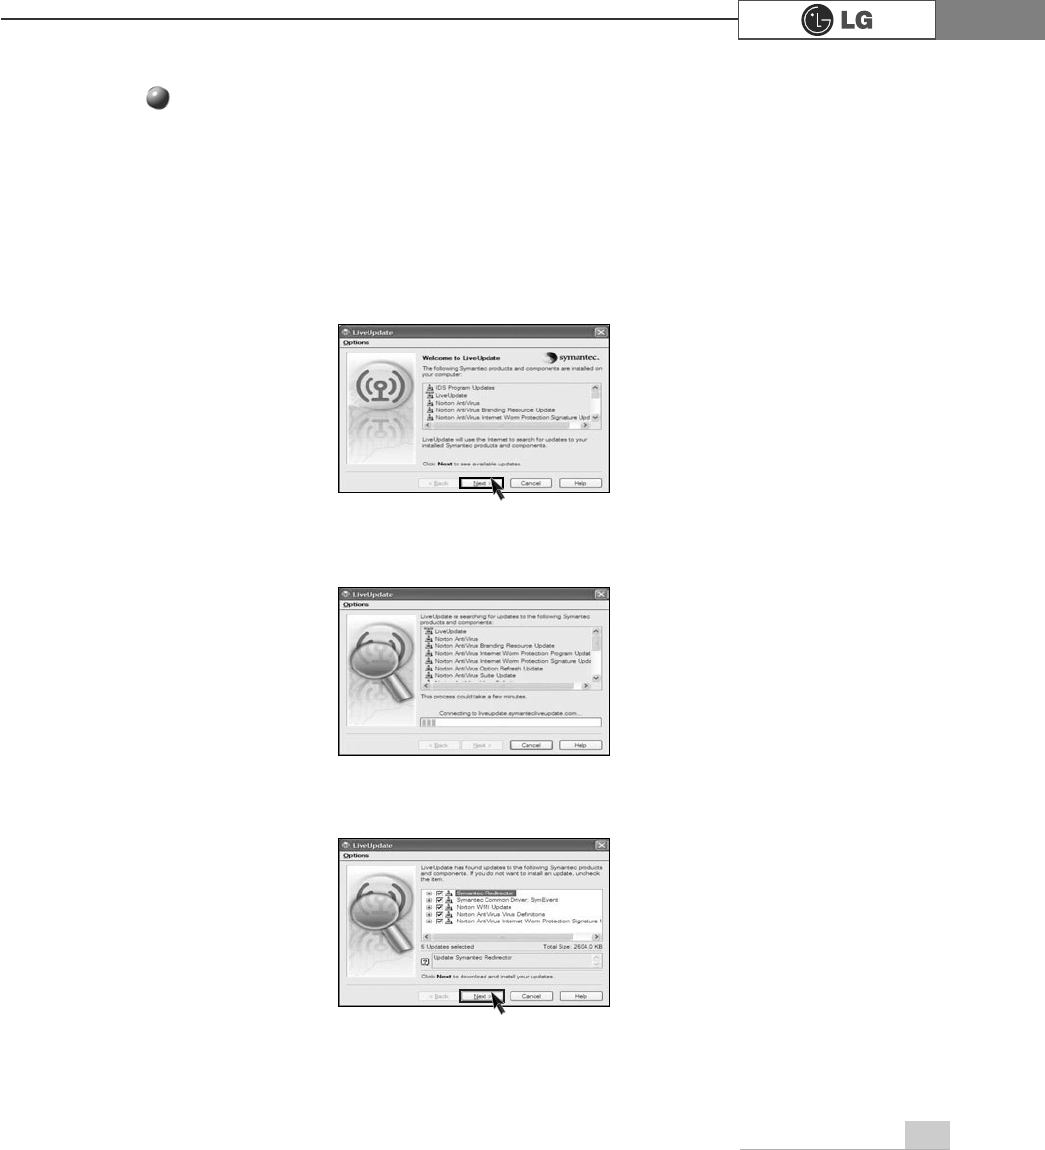
ⓞClick [Start] and [All programs]⍛[Norton Antivirus]⍛[LiveUpdate]⍛
[Norton AntiVirus].
ⓟClick [Next].
ⓠFollowing window appears.
You should have an internet access to process Norton Antivirus update.
Norton Antivirus update
ⓡClick [Next].
44 Using the system
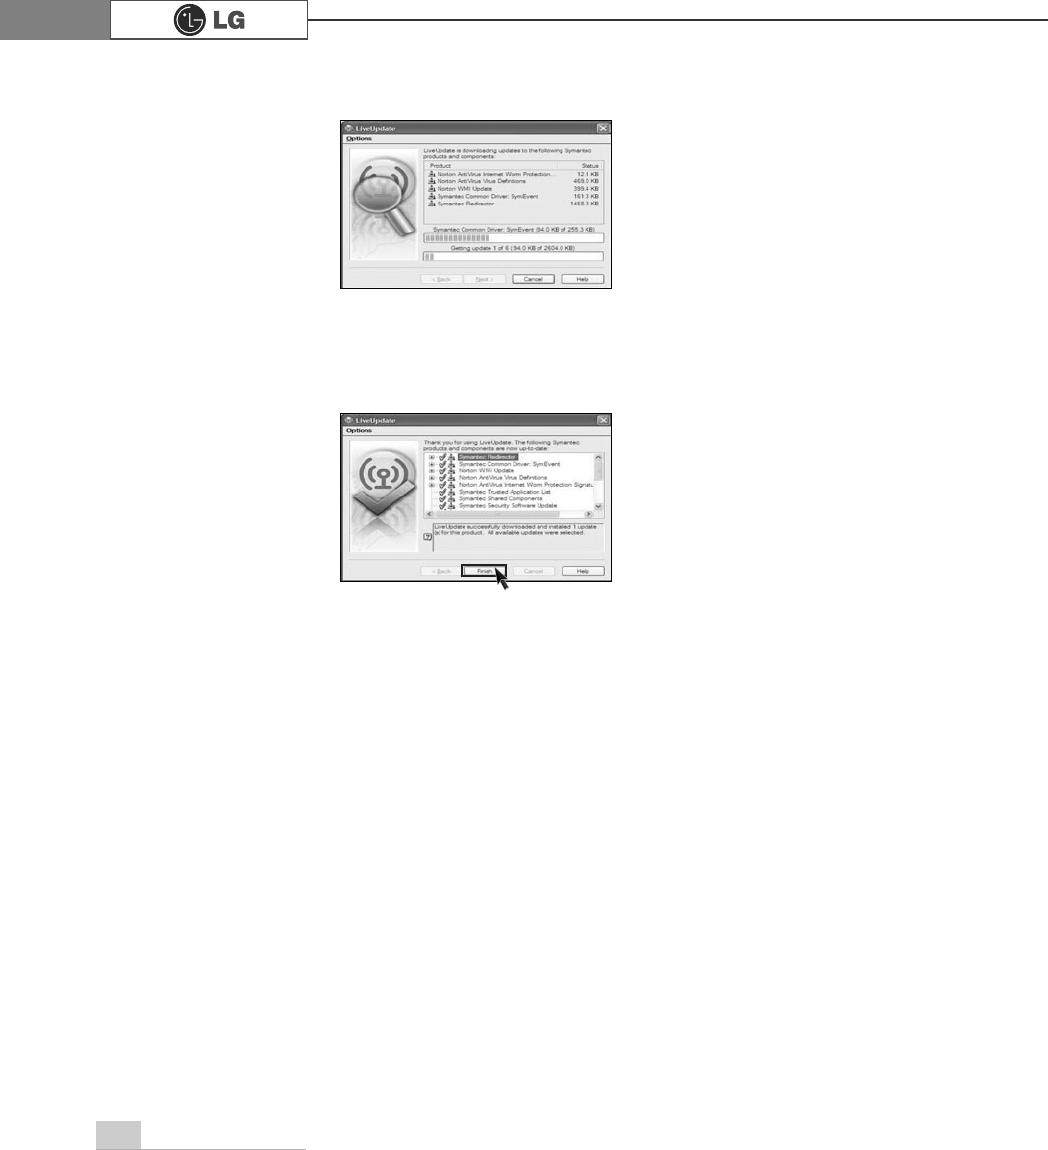
ⓢDownloading update-items online.
ⓣClick [Finish] . Norton Antivirus Update is complete.
45Using the system
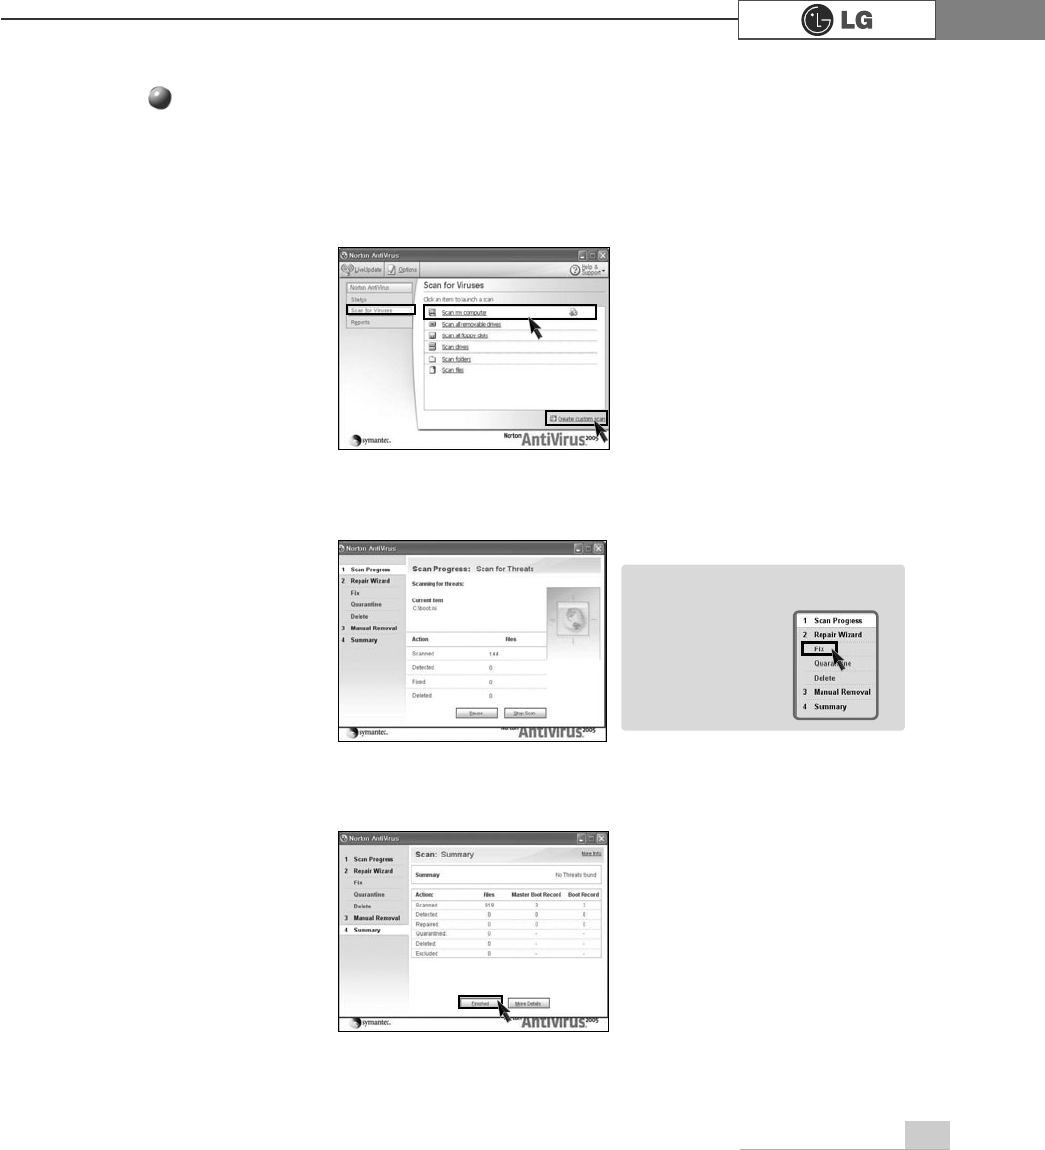
ⓞClick [Start]⍛[All programs]⍛[Norton Antivirus]⍛[Norton AntiVirus2005].
ⓟClick [Scan for virus] and select an item to scan.
ⓠNorton AntiVirus is scanning virus.
ⓡClick [Finish]. Virus scanning is complete.
Running Norton Antivirus
ãIf any virus is detected, click
[Fix] to repair.
Note
System setup
46
System setup means storing hardware configuration information of the computer in
CMOS RAM. Through the System Setup, the computer gets various information -date
of the day, time, memory capacity, H/D capacity and its type.
System Setup is to set passwords, to change booting orders, and to add new periph-
eral devices.
3-1. Entering System Setup
ãBooting with a USB device (Page 48).
ãSetting a password (Page 49).
ãDeleting or changing a password (Page 50).
ãInitializing system setup (Page 52).
ãDeciding the temporary booting orders (Page 53).
.H\V )XQWLRQ
Select the current item.
>(QWHU@
Closes the current task or goes back to the previous screen.
>(VF@
Moves up, down, right, and left.
>Ⓑ@>Ⓒ@>⒵@>Ⓐ@
Increases or decreases the item values.
Goes to the beginning of the screen.
Goes to the end of the screen.
Saves changes and exits System Setup.
>3DJH8S@
>3DJH'RZQ@
>)@
Keys Used in System Setup
3. System setup
Wrong system setup may cause errors during system operation. Therefore, be careful
when changing the System Setup, and it is recommended not to change the setup unless it
is necessary.
For performance improvement, CMOS setup menu configuration and the initial setup status
may be changed and may become different from images included in the user manual.
System setup 47
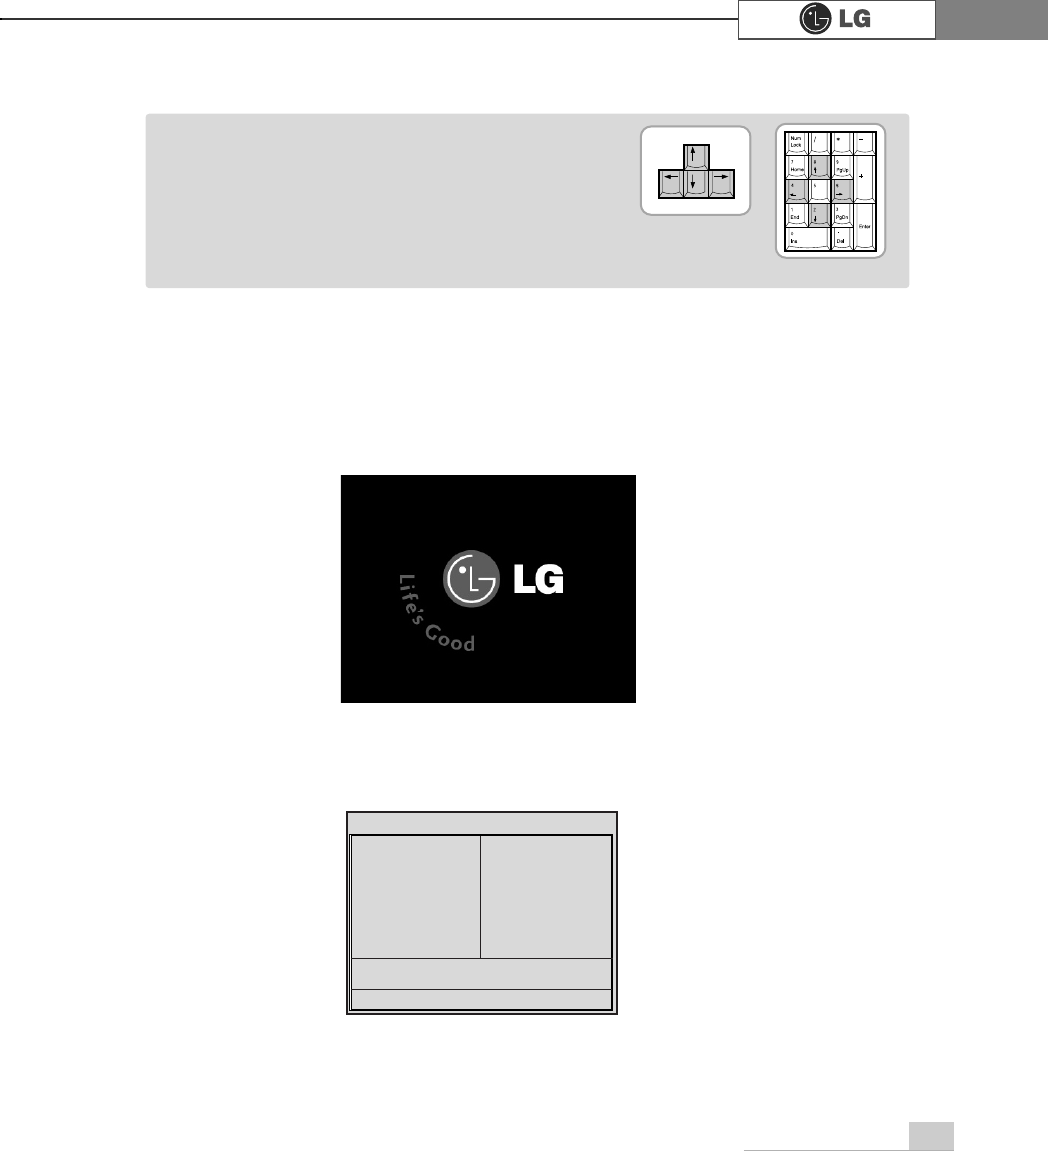
ⓞTurn on the computer and the monitor.
ⓟ
While the LG logo screen is on, press [Delete] key.
ⓠThe initial setup screen will appear.
ãCursor Pad
These keys are used to move the cursors on the
monitor screen up, down, right, and left.
When the Num Lock button is off on the numeric
keypad, the numeric keypad functions the same as
the cursor keypad.
Note
<Cursor Keypad>
<Numeric Keypad>
&0266HWXS8WLOLW\&RS\ULJKW&$ZDUG6RIWZDUH
Ě 6WDQGDUG&026)HDWXUHV Ě 3&+HDOWK6WDWXV
Ě $GYDQFHG%,26)HDWXUHV Ě )UHTXHQF\9ROWDJH&RQWURO
Ě $GYDQFHG&KLSVHW)HDWXUHV /RDG2SWLPL]HG'HIDXOWV
Ě ,QWHJUDWHG3HULSKHUDOV 6HW3DVVZRUG
Ě 3RZHU0DQDJHPHQW6HWXS 6DYH([LW6HWXS
Ě 3Q33&,&RQILJXUDWLRQV ([LW:LWKRXW6DYLQJ
(VF4XLW êëè é 6HOHFWOWHP
)4)ODVK )6DYH([LW6HWXS
9LUXV3URWHFWLRQ%RRW6HTXHQFH
System setup48
3-2. Booting with a USB Drive
A booting with a USB device (USB-FDD, USB-ZIP, USB-CD-ROM, or USB-HDD)
proceeds as follows.
ⓞ
Execute the initial screen of System Setup, and select Advance Bios Features
by pressing
>Ⓑ@>Ⓒ@>⒵@
, and
>Ⓐ@
keys. Then, press [Enter] key.
ⓟ
When the following screen appears, select First Boot Device by pressing
>Ⓑ@>Ⓒ@>⒵@
, and
>Ⓐ@
keys. Then, select the device and press [Enter] key.
ⓠ
To save changes in System Setup, press the [F10] key.
ⓡ
When the following message appears on the screen, press the [Enter] key to
restart the screen.
SAVE to CMOS and EXIT(Y/N)? Y
Bootable devices will be dis-
played only when bootable
devices are equipped.
CMOS Setup Utility-Copyright(C)1984-2004 Award Software
Advanced BIOS Features
êëèé:Move Enter:Select +/-/PU/PD:Value F10:Save ESC:Exit F1:General Help
F5:Previous Values F7:Optimized Defaults
Ě
Hard Disk Boot Priority [Press Enter]
BIOS Flash Protection [Auto]
First Boot Device [CDROM]
Second Boot Device [USB-FDD]
Third Boot Device [Hard Disk]
Boot Up Floppy Seek [Disabled]
Boot Up Num-Loce [On]
Passward Check [System]
Interrupt Mode [APIC]
Boot to OS2 or DR-DOS [Disabled]
HDD S,M,A,R,T, Capability [Enabled]
CPU Hyper-Threading [Enabled]
Limit CPUID Max.to3 [Enabled]
Full Screen LOGO Show [Enabled]
Summary Screen Show [Disabled]
Item Help
Memu Level Ě
Select Your Boot
Device Priority
First Boot Device USB-FDD
Note
49System setup
ⓟ
When the next screen appears, select Password Check by pressing
>Ⓑ@>Ⓒ@>⒵@
, and
>Ⓐ@
keys and the Setup or System by pressing the [Page Up]
and [Page Down] keys. Then, press [Enter] key.
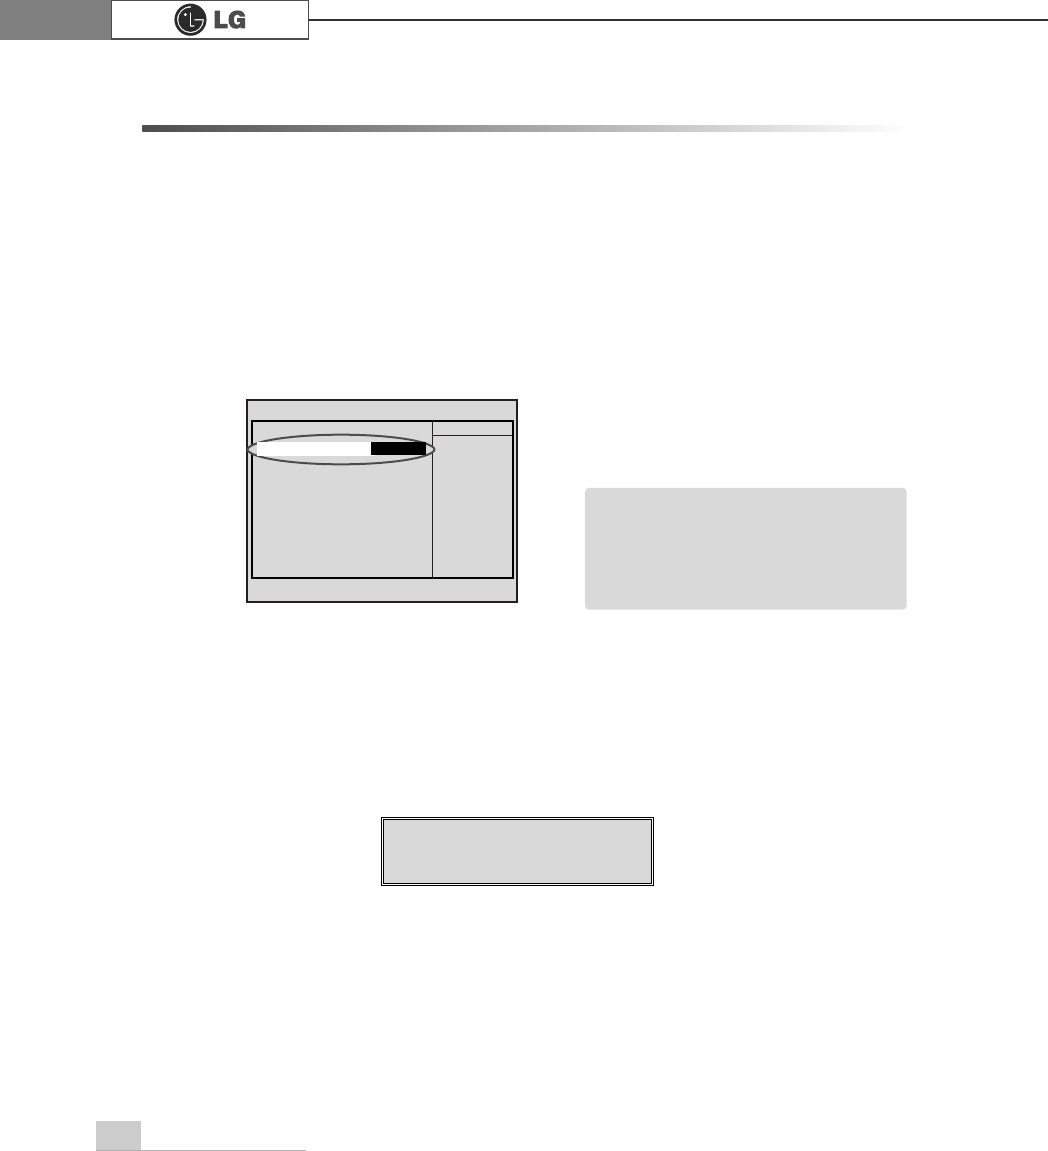
ⓞ
Execute the initial screen of System Setup and select Advanced Bios Features
by pressing
>Ⓑ@>Ⓒ@>⒵@
, and
>Ⓐ@
keys. Then, press [Enter] key.
ⓠ
Select Set Password by pressing
>Ⓑ@>Ⓒ@>⒵@
, and
>Ⓐ@
keys on the initial setup
screen, and press [Enter].
3-3. Setting a Password
To prevent other users from changing computer settings, you can register a pass-
word. A password can be registered during booting or System Setup.
Without the registered password, if any, access to the system will be denied. Write down
and keep your password in a safe place.
ãYou will be asked to input the password only when you select "Setup" in Security Option or
when you select "Setup" by pressing [Delete] key on the initial screen. The password pro-
tects the computer by stopping others from changing computer settings and system setup.
Note
CMOS Setup Utility-Copyright(C)1984-2004 Award Software
Advanced BIOS Features
êëèé:Move Enter:Select +/-/PU/PD:Value F10:Save ESC:Exit F1:General Help
F5:Previous Values F7:Optimized Defaults
ĚHard Disk Boot Priority [Press Enter]
BIOS Flash Protection [Auto]
First Boot Device [CDROM]
Second Boot Device [USB-FDD]
Third Boot Device [Hard Disk]
Boot Up Floppy Seek [Disabled]
Boot Up Num-Loce [On]
Passward Check [System]
Interrupt Mode [APIC]
Boot to OS2 or DR-DOS [Disabled]
HDD S,M,A,R,T, Capability [Enabled]
CPU Hyper-Threading [Enabled]
Limit CPUID Max.to3 [Enabled]
Full Screen LOGO Show [Enabled]
Summary Screen Show [Disabled]
Item Help
Memu Level Ě
Select Your Boot
Device Priority
Passward Check Setup
50 System setup
3-4. Deleting or Changing a Password
You can delete or change the password only after inputting the current password.
ⓞ
Execute the initial screen of System Setup, enter the password, and press the
[Enter] key.
ⓢ
When asked to confirm the password, input the password again and press [Enter]
key.
ⓣ
To save changes in System Setup, press [F10].
ⓤ
When the following message appears, press [Enter] key to restart the computer.
ⓡ
When the following message appears on the screen, input the password and
press [Enter] key. The password must be alphanumeric and not exceed eight
digits.
SAVE to CMOS and EXIT(Y/N)? Y
Confirm Password :
Enter Password :
&0266HWXS8WLOLW\&RS\ULJKW&$ZDUG6RIWZDUH
Ě 6WDQGDUG&026)HDWXUHV Ě 3&+HDOWK6WDWXV
Ě $GYDQFHG%,26)HDWXUHV Ě )UHTXHQF\9ROWDJH&RQWURO
Ě $GYDQFHG&KLSVHW)HDWXUHV /RDG2SWLPL]HG'HIDXOWV
Ě ,QWHJUDWHG3HULSKHUDOV 6HW3DVVZRUG
Ě 3RZHU0DQDJHPHQW6HWXS 6DYH([LW6HWXS
Ě 3Q33&,&RQILJXUDWLRQV ([LW:LWKRXW6DYLQJ
(VF4XLW êëè é 6HOHFWOWHP
)4)ODVK )6DYH([LW6HWXS
9LUXV3URWHFWLRQ%RRW6HTXHQFH
(QWHU3DVVZRUG
51System setup
ĚChanging the Password
Change the password in the same procedure as that of password setting.
ĚĚDeleting the Password
ⓟ
Select Set Password by pressing
>Ⓑ@>Ⓒ@>⒵@
, and
>Ⓐ@
keys on the initial screen
of the Setup menu, and press the [Enter] key.
ⓠ
When the following message appears, press the [Enter] key.
ⓡ
A message will appear saying that the password has been deleted.
Press the [Enter] key.
ⓢTo save the change in System Setup, press the [F10].
ⓣWhen the following message appears on the screen, press the [Y] key and the
[Enter] key. Then, the computer will restart.
PASSWORD DISABLD!!!
Press any key to continue...
Enter Password :
SAVE to CMOS and EXIT(Y/N)? Y
CMOS Setup Utility-Copyright(C)1984-2004 Award Software
ĚStandard CMOS Features ĚPC Health Status
ĚAdvanced BIOS Features ĚFrequency/Voltage Control
ĚAdvanced Chipset Features Load Optimized Defaults
ĚIntegrated Peripherals Set Password
ĚPower Management Setup Save & Exit Setup
ĚPnP/PCI Configurations Exit Without Saving
Esc : Quit êëè é : Select ltem
F8: Q-Flash F10 : Save & Exit Setup
Virus Protection, Boot Sequence...
6HW3DVVZRUG
52 System setup
3-5. Initializing System Setup
If you changed the system setup by mistake, it can be recovered to the default set-
ting.
ⓞ
Execute the initial screen of System Setup, and select the Load Optimized
Defaults item by pressing arrow keys. Then, press [Enter].
ⓟ
When the following message appears on the screen, press [Y] and [Enter].
System setup will be return to the factory setting.
ⓠ
To save the change in System Setup, press [F10].
ⓡ
When the following message appears, press the [Enter] key to restart the com-
puter.
SAVE to CMOS and EXIT(Y/N)? Y
Load Optimized Defaults (Y/N) ? Y

53System setup
The following instruction explains a way to decide the temporary booting orders with-
out affecting CMO setup.
3-6. Deciding the Temporary Booting Orders
ⓞTurn on the computer and the monitor.
ⓠSelect USB-FDD from the Boot Menu to restart the computer.
ⓟWhile LG logo screen is on, press [F12].
ãThe menus may differ by product model :
USB-FDD, USB-ZIP, USB-HDD, and USB-
CD-ROM. Bootable devices will be dis-
played only when they are equipped in
before turning the computer on
Note
54 System setup
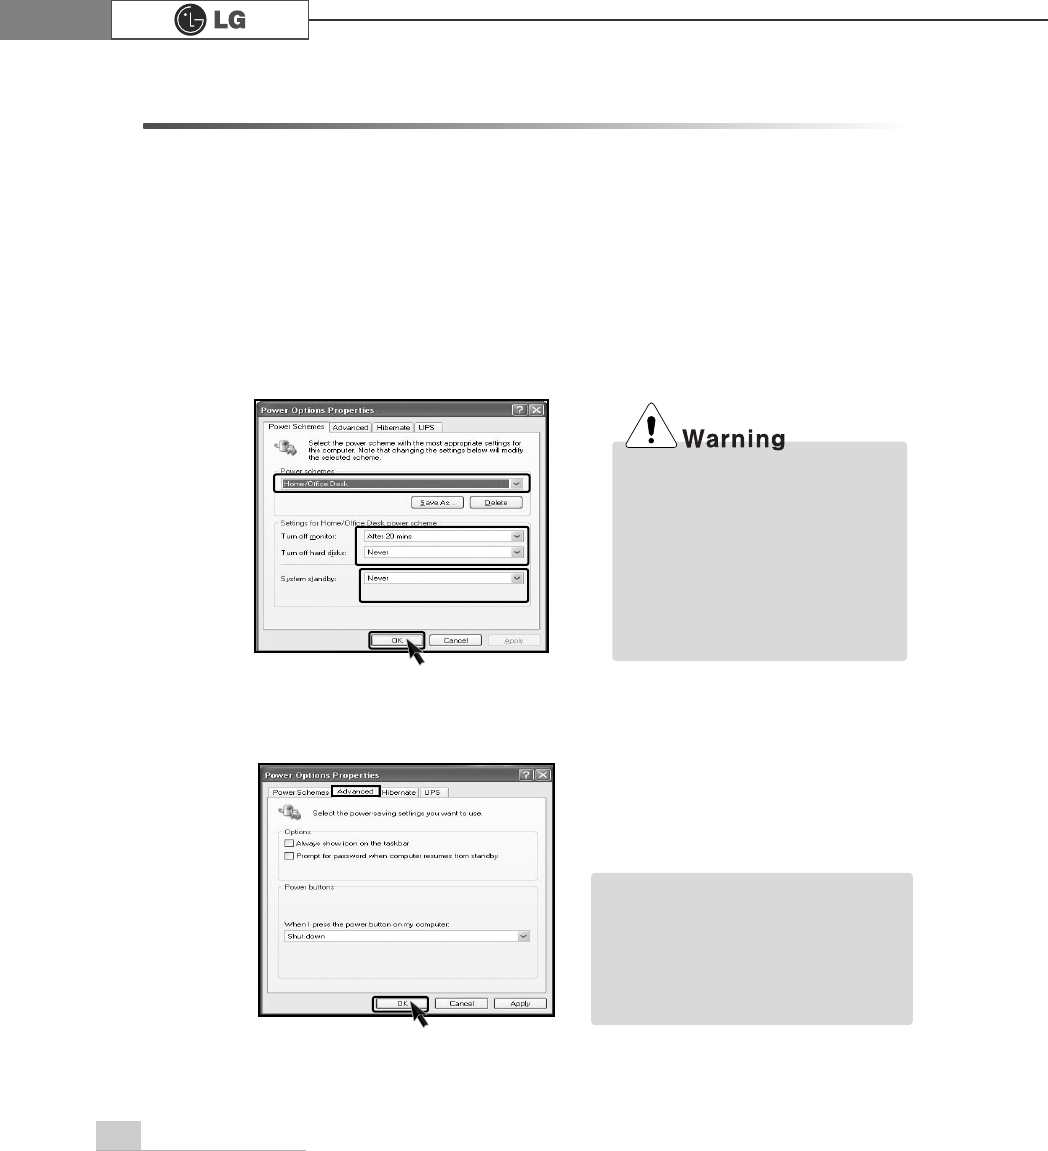
Regardless of BIOS setup, you can use the Power Saver mode in Windows as fol-
lows.
3-7. Setting the Power Saver Mode
ⓡPress the advanced tab and set options appropriately. Then, click the [OK] button.
ⓠAfter setting Power Scheme items in the Power Schemes tab, click the [OK]
button.
ⓞSelect [Start]
èè
[Control Panel]
è
[Switch to Classic View].
ⓟDouble-click the Power option icon on the Control Panel window.
TWhen the device connected to
the computer does not support
Power Saver functions, the
Standby mode or Hibernate
mode may not be properly func-
tion.
In this case, deactivate Power
Saver feature.
ãHibernate Mode :The current
work states are saved intact on the
H/D before the power goes off.
The states will be recovered as
they were when the power is on
later.
Note
55System setup
The Hyper-threading feature improves the performance of the CPU greatly as if
two CPUs were running. This feature is especially efficient for multimedia tasks
such as games and graphic jobs. Hyper-threading is supported only by the CPU
with Hyper-Threading (HT) feature. Check the "Intel" sticker on the side of the
computer to see if the CPU supports hyper-threading.
3-8. Using Hyper-Threading Feature
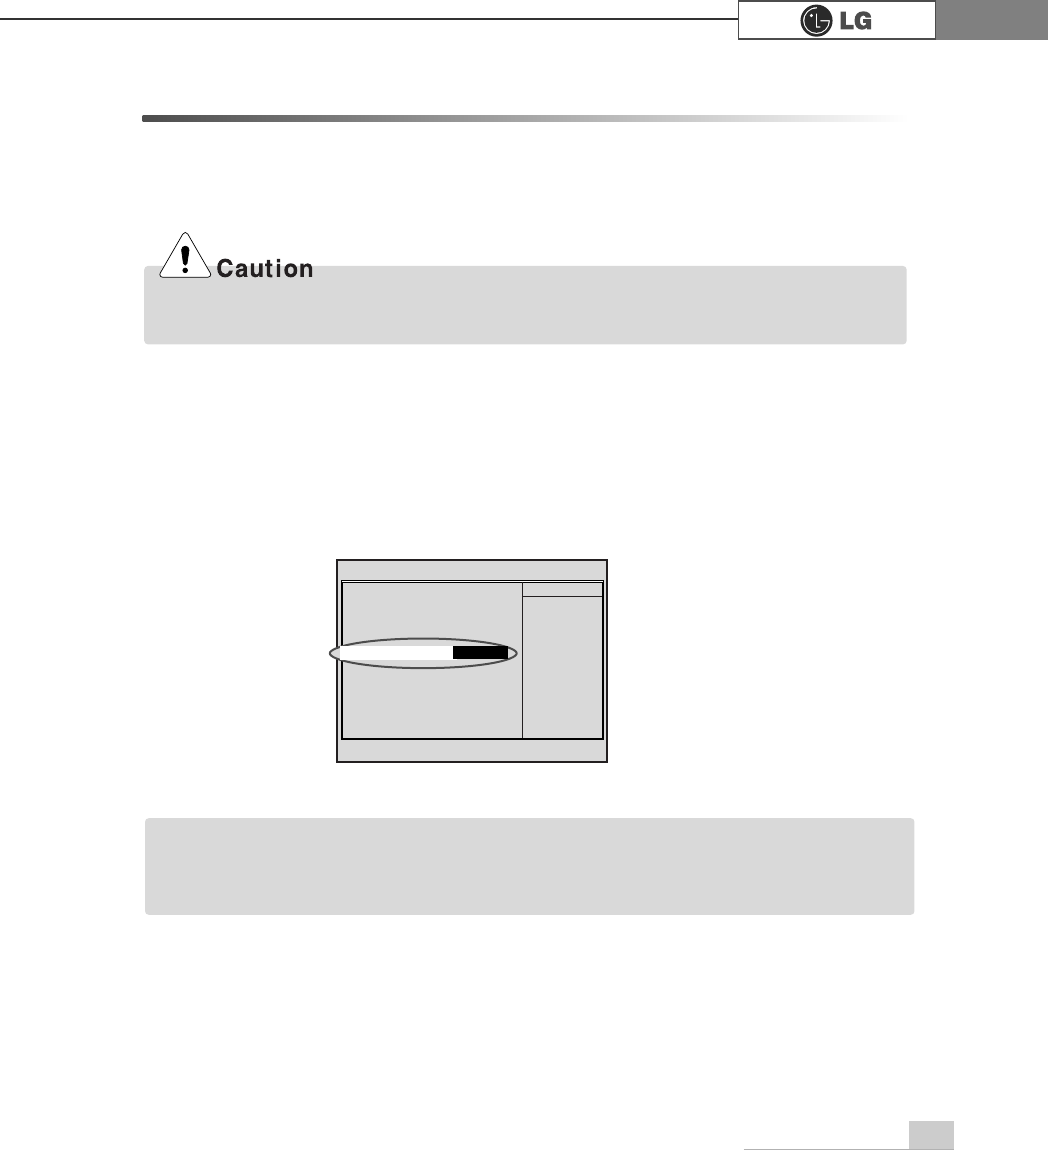
ⓞExecute the initial screen of System Setup, and select Advanced Bios
Features by pressing
>Ⓑ@>Ⓒ@>⒵@
, and
>Ⓐ@
keys. Then, press the [Enter] key.
ⓟWhen the following screen appears, select Hyper-Threading Technology and
Enabled.
ⓠTo save changes in System Setup, press [F10].
ⓡWhen the following message appears, press the [Enter] key to restart the com-
puter.
SAVE to CMOS and EXIT(Y/N)? Y
ãHyper-threading is supported only by Windows XP. If you execute software or games
that does not support hyper-threading, an error may occur. When this happens, disable
the "Hyper-Threading Technology" featuree.
Note
CMOS Setup Utility-Copyright(C)1984-2004 Award Software
Advanced BIOS Features
êëèé:Move Enter:Select +/-/PU/PD:Value F10:Save ESC:Exit F1:General Help
F5:Previous Values F7:Optimized Defaults
ĚHard Disk Boot Priority [Press Enter]
BIOS Flash Protection [Auto]
First Boot Device [CDROM]
Second Boot Device [USB-FDD]
Third Boot Device [Hard Disk]
Boot Up Floppy Seek [Disabled]
Boot Up Num-Loce [On]
Passward Check [System]
Interrupt Mode [APIC]
Boot to OS2 or DR-DOS [Disabled]
HDD S,M,A,R,T, Capability [Enabled]
CPU Hyper-Threading [Enabled]
Limit CPUID Max.to3 [Enabled]
Full Screen LOGO Show [Enabled]
Summary Screen Show [Disabled]
Item Help
Memu Level Ě
Select Your Boot
Device Priority
Hyper-Threading Technology Enabled
System Recovery
56
You can restore the system in two ways depending on the current status of the sys-
tem. However, to restore the hard disk, you need to back up necessary software
and data files in advance. After completing Windows installation, you need to regis-
ter the User Properties when booting the system as if you did your new computer.
4.System Recovery
ⓞ
Back up the data stored in the computer.
ⓟInsert the Restore CD in the CD-ROM drive. When "Press any key to boot
from CD..." message appears on the screen, press the [Enter] key.
ⓠContinue installation by following instructions on the screen.
ⓡAfter completing installation of Windows, remove the CD and restart the sys-
tem. When the following screen appears, register the User Properties according
to instructions on the screen.
Installation with Recovery CD
Installation
ⓢAfter the Windows operating system installation is complete, install the LG GILJABI
CD (software installation CD) on your computer, and then you can use all application
programs and device drivers.
System Recovery 57
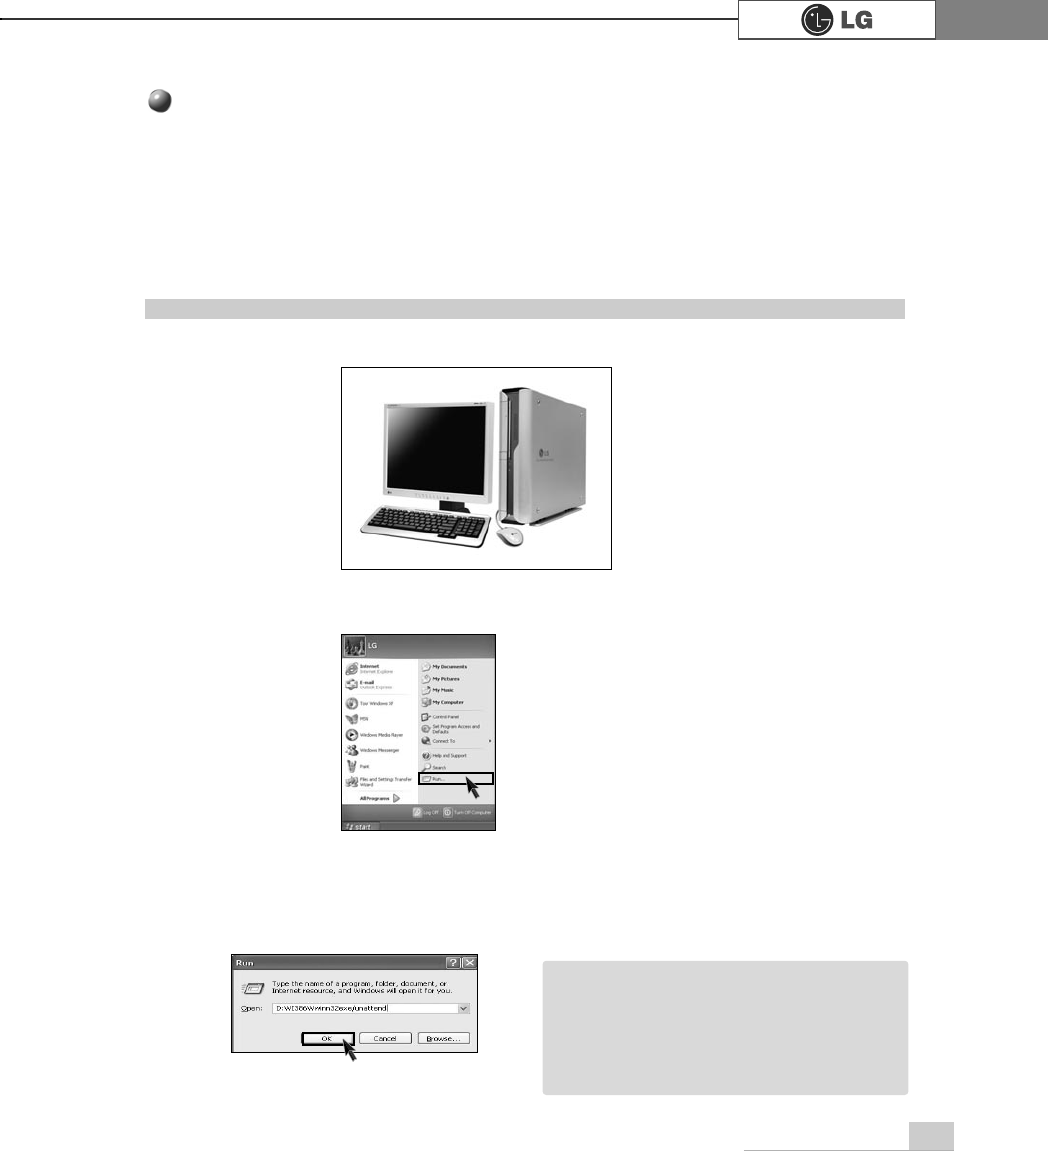
For Windows users
If Windows XP is already installed on the hard disk, you can upgrade existing
Windows XP without formatting the hard disk
In the case that Windows XP is already running on the hard disk, upgrade
Windows XP as follows.
ⓟ
Click the [Start] and [Run] button.
ⓠ
Insert the Restore CD, and input D:\i386\winnt32.exe/unattend. Then, click the
[OK] button. (When the CD-ROM drive is D drive.)
ⓞTurn on the system where Windows XP is installed.
Installation of Windows XP Upgrade
ãTo execute "winnt32.exe" without using
"Unattend" option, you must input the
product key attached on the computer.
You also need to have the computer
certified within 30 days after this
Note
5. Reinstallation of Drivers
58 Reinstallation of Drivers
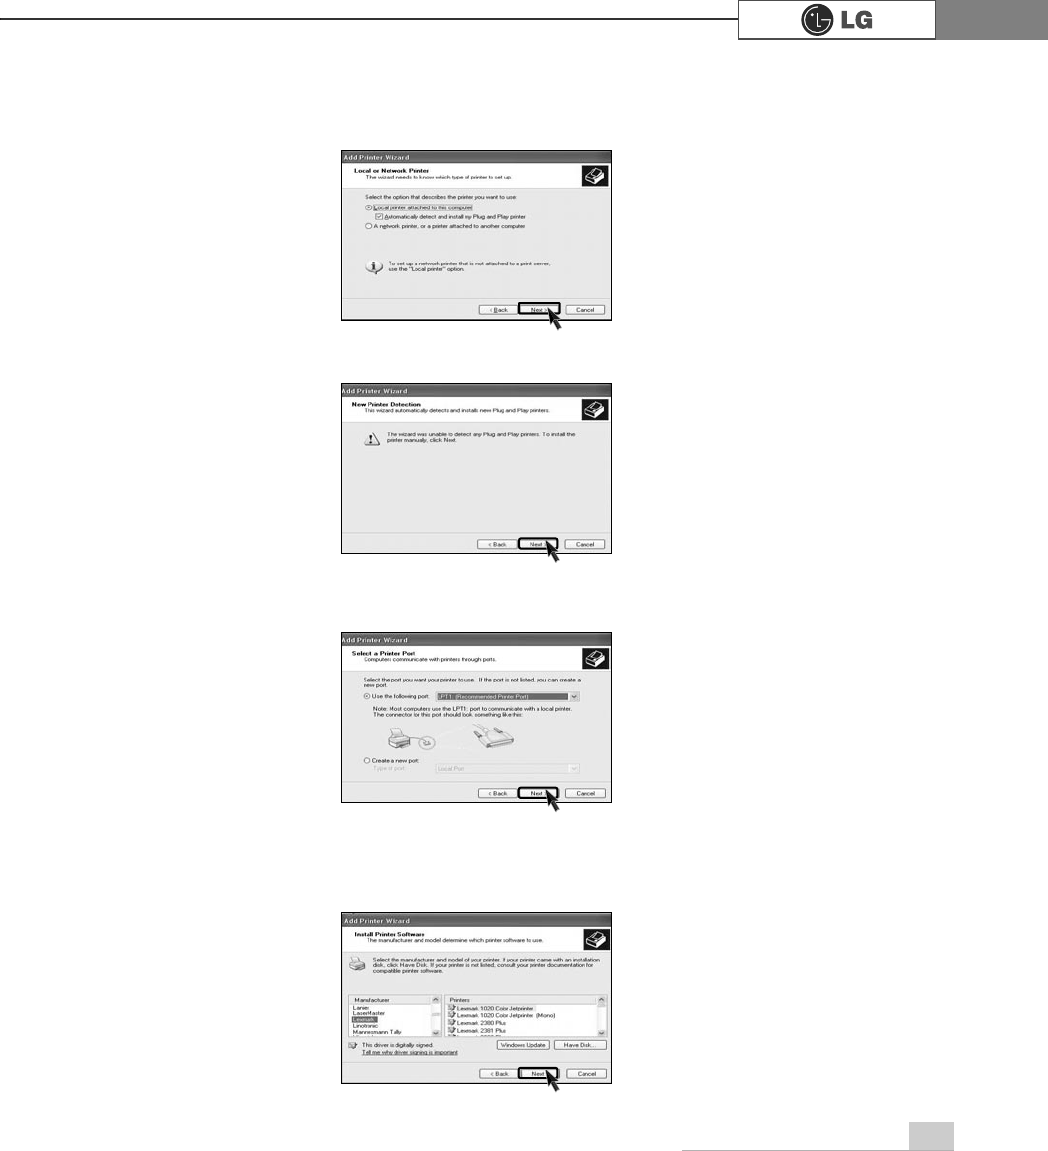
You must install the printer driver after connecting the printer. Windows XP can
automatically detect printer drivers. However, if Windows XP does not detect your
printer driver, install the printer driver as follows.
5-1.Reinstalling Printer Driver
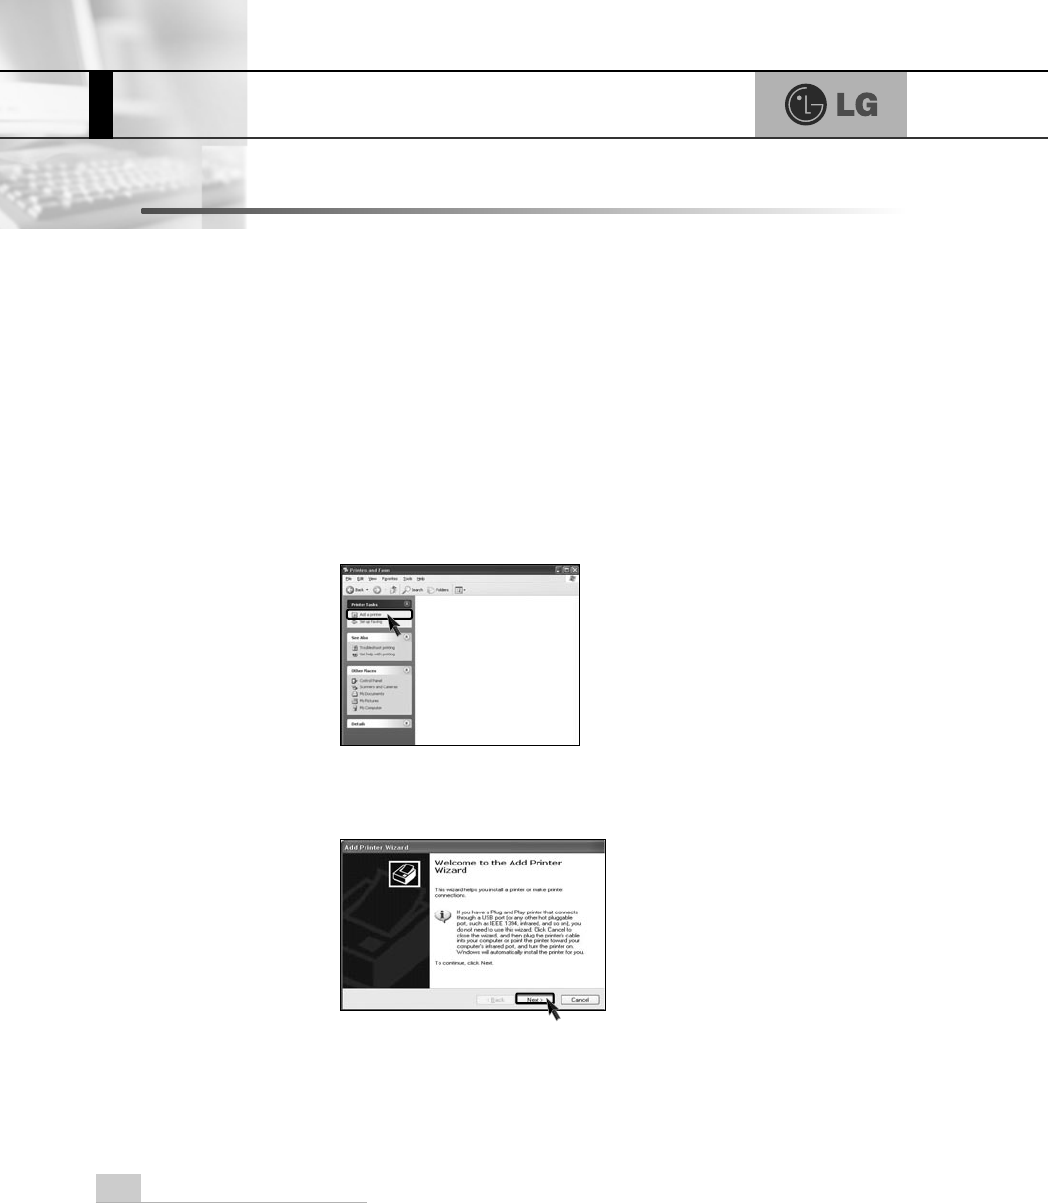
ⓟDouble click the [Printer and Fax] on the Control Panel window.
ⓠWhen the following screen appears, click the [Add Printer] button.
ⓞSelect [Start] è
è[Control Panel] è[Class Desktop].
ⓡWhen the Add Printer Wizard appears, click the [Next] button.
59Reinstallation of Drivers
ⓢWhen the following screen appears, check the connection type of the printer -
local or network. Then, select a printer and click the [Next] button.
ⓣNew Printer Detection screen will appear. Click the [Next] button.
ⓤWhen Set Printer Port screen appears, select LPT1 or LPT2 before clicking the
[Next] button.
ⓥSelect the manufacturer and model of your printer on the Select Printer screen.
If your printer came with an installation disk, click [Have Disk]. If not, just click
the [Next] button.
60 Reinstallation of Drivers
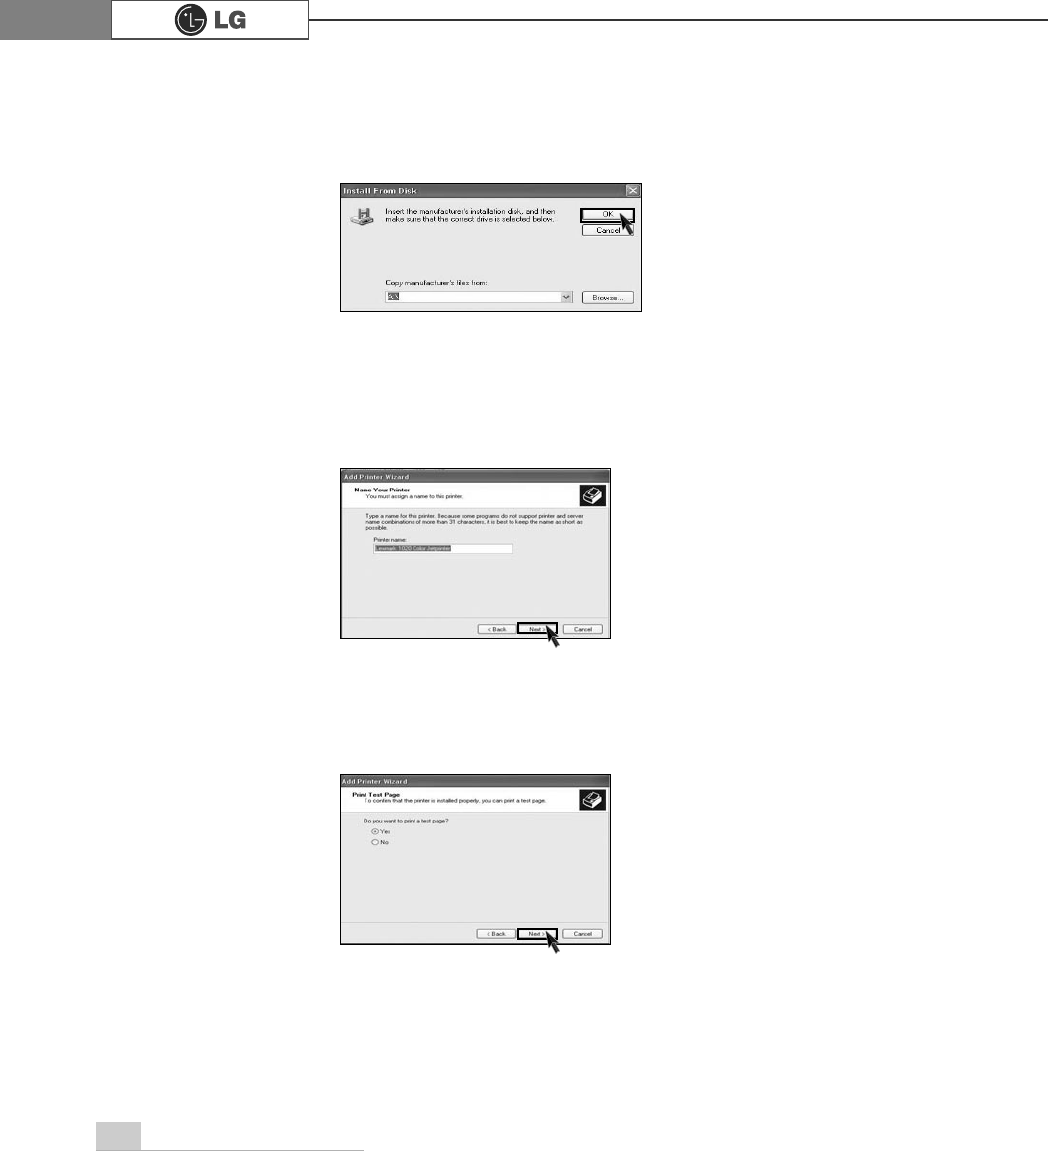
ⓧWhen Print Test Page screen appears, click the [Yes] and [Next].
ⓦInsert the diskette or driver CD in the driver and click the [OK] button.
ⓦName the printer, and click the [Next] button.
When [Have Disk] is selected.
When [Next] is selected
61Reinstallation of Drivers
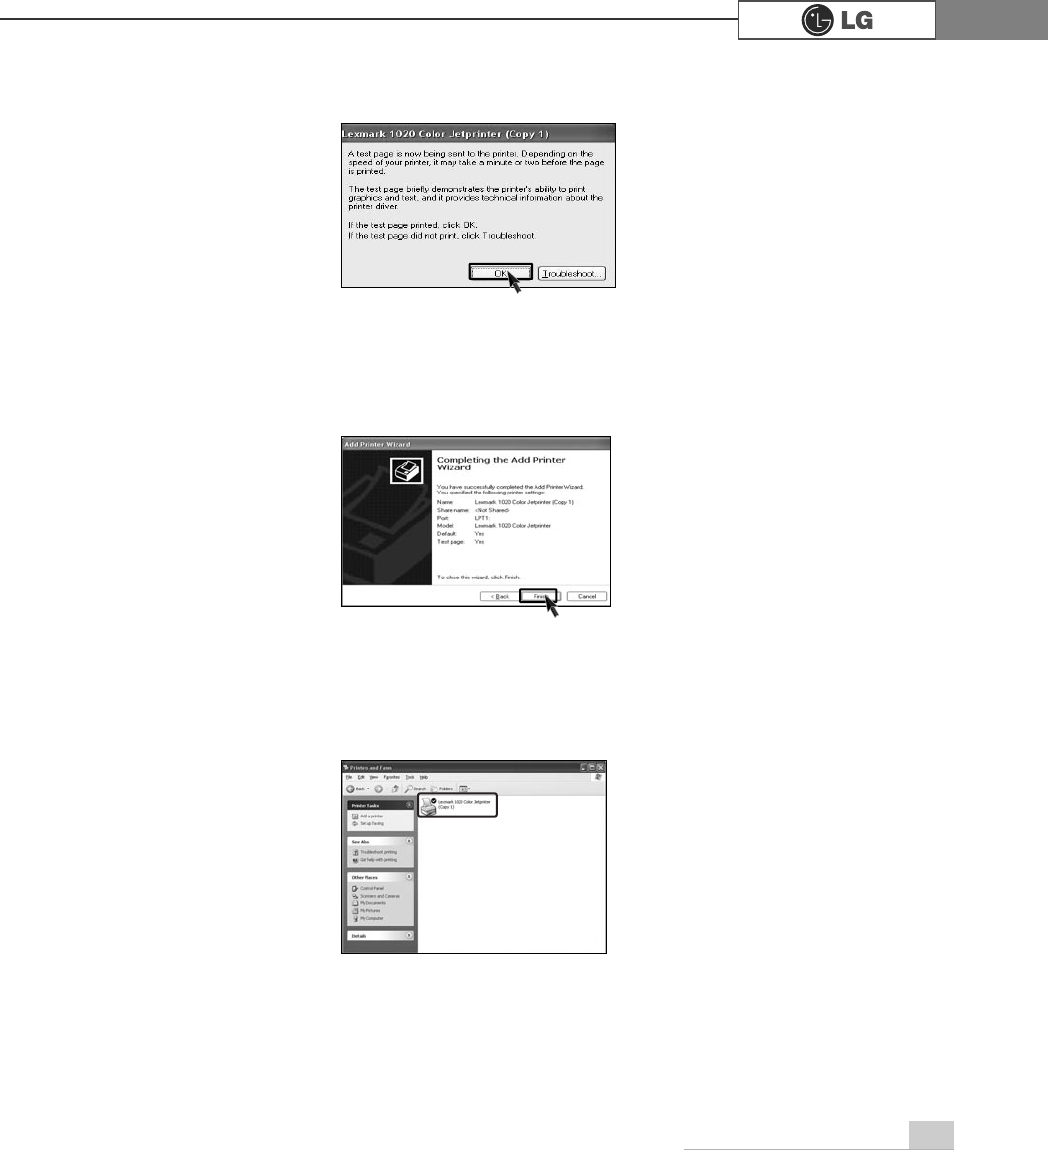
ⓨAfter the test page is properly printed out, click the [OK] button.
ⓩWhen the following screen appears, check the printer and click the [Finish]
button.
⓪Now, the printer has been added. .
62 Reinstallation of Drivers
You must install a sound driver to listen to music files and CDs on the computer. A
sound driver basically comes out with the computer. If it has to be reinstalled,
however, follow the process below.
5-2.Reinstalling Sound Driver
ⓞTurn on the computer and the monitor.
ⓟInsert LG GILJABI CD in the CD-ROM driver. Select the sound driver to install
from the list.
ⓠThe driver installation process will start. Follow instructions on the screen.
63Reinstallation of Drivers
The video driver displays on the monitor data stored on the computer. The video
driver is included in basic specification of the computer. However, in the case that
it is necessary to reinstall the video driver, carry out the following process.
5-3.Reinstalling Video Driver
ⓞTurn on the computer and the monitor.
ⓟInsert LG GILJABI CD in the CD-ROM driver. Select the video driver to install
from the list.
ⓠThe driver installation process will start. Follow instructions on the screen.
ãWhen the computer uses the Intel Onboard Video, some games and programs that does
not support Screen Rotation may not be executed on the screen. When this happens,
disable the Screen Rotation.
Note
System Expansion
64
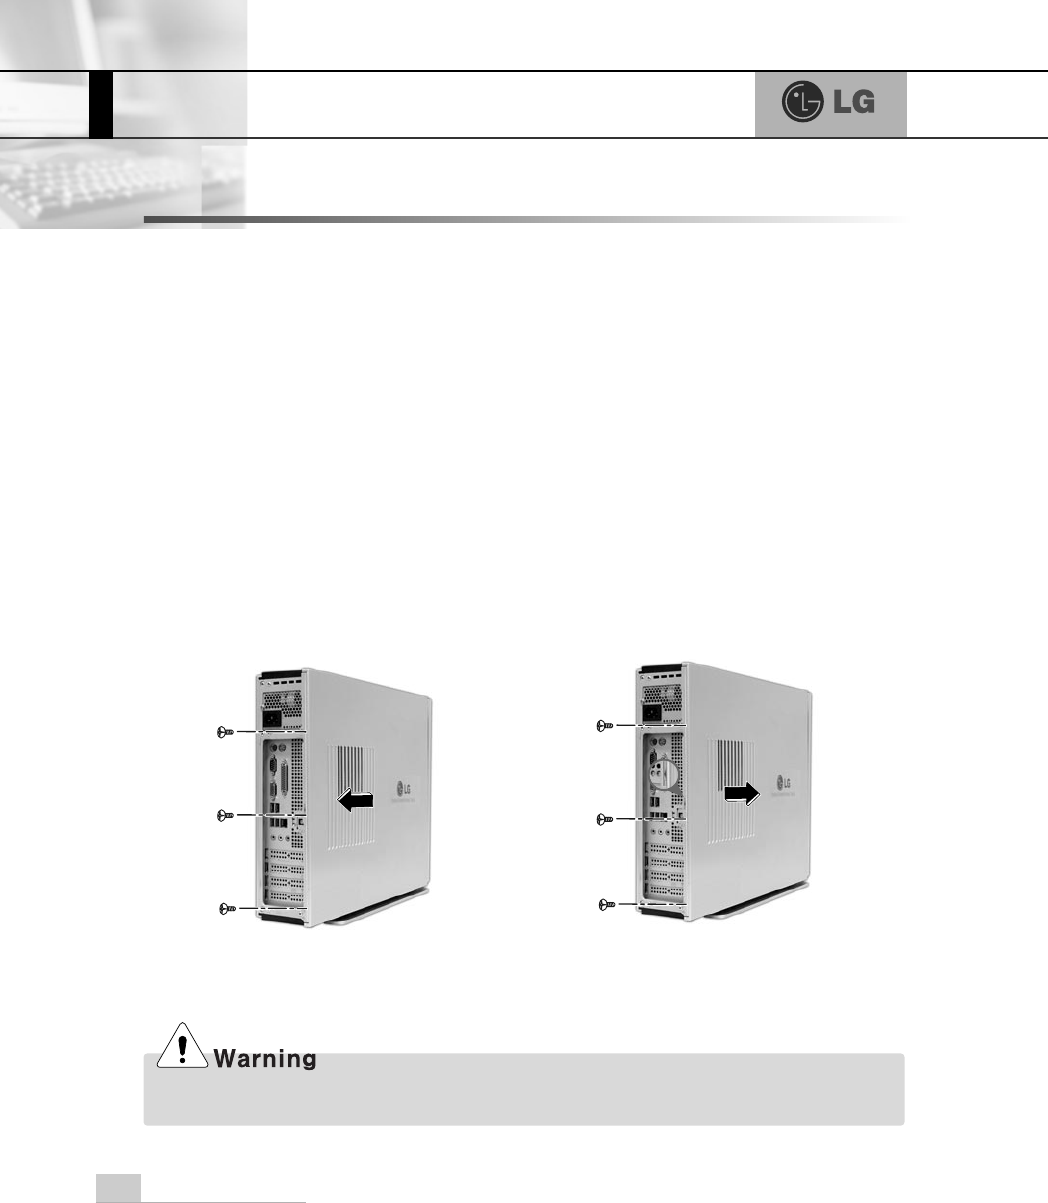
6-1. Opening the computer case
Always consult with your service representatives before opening the computer case.
Note the following when opening the computer cover.
Opening the computer cover Closing the computer cover
ãQuit all programs in use.
ãTurn off the computer and the monitor before disconnecting the power.
ãKeep magnetic tools (for example, drivers) away from the computer since parts
inside the computer are electrically charged and sensitive to magnetic force.
ãInstall the computer in a clean, easily-accessible place.
ãA small electric shock inside the computer may cause operational problems.
Before touching the computer, put hands on an unpainted metallic surface for two
or three seconds to remove static electricity before opening the cover.
ãWhen disassembling the computer, wear gloves to protect internal parts of the
computer and slot cards from damage.
6.System Expansion
Before assembling the computer cover, check if there is any metallic material left inside the
main body. A metallic substance inside the main body can cause an electric shock or fire.
Loosen three screws on the computer
cover, and pull the cover off.
Adjust the computer cover to the main
body, and fasten three screws through
the cover.
System Expansion 65
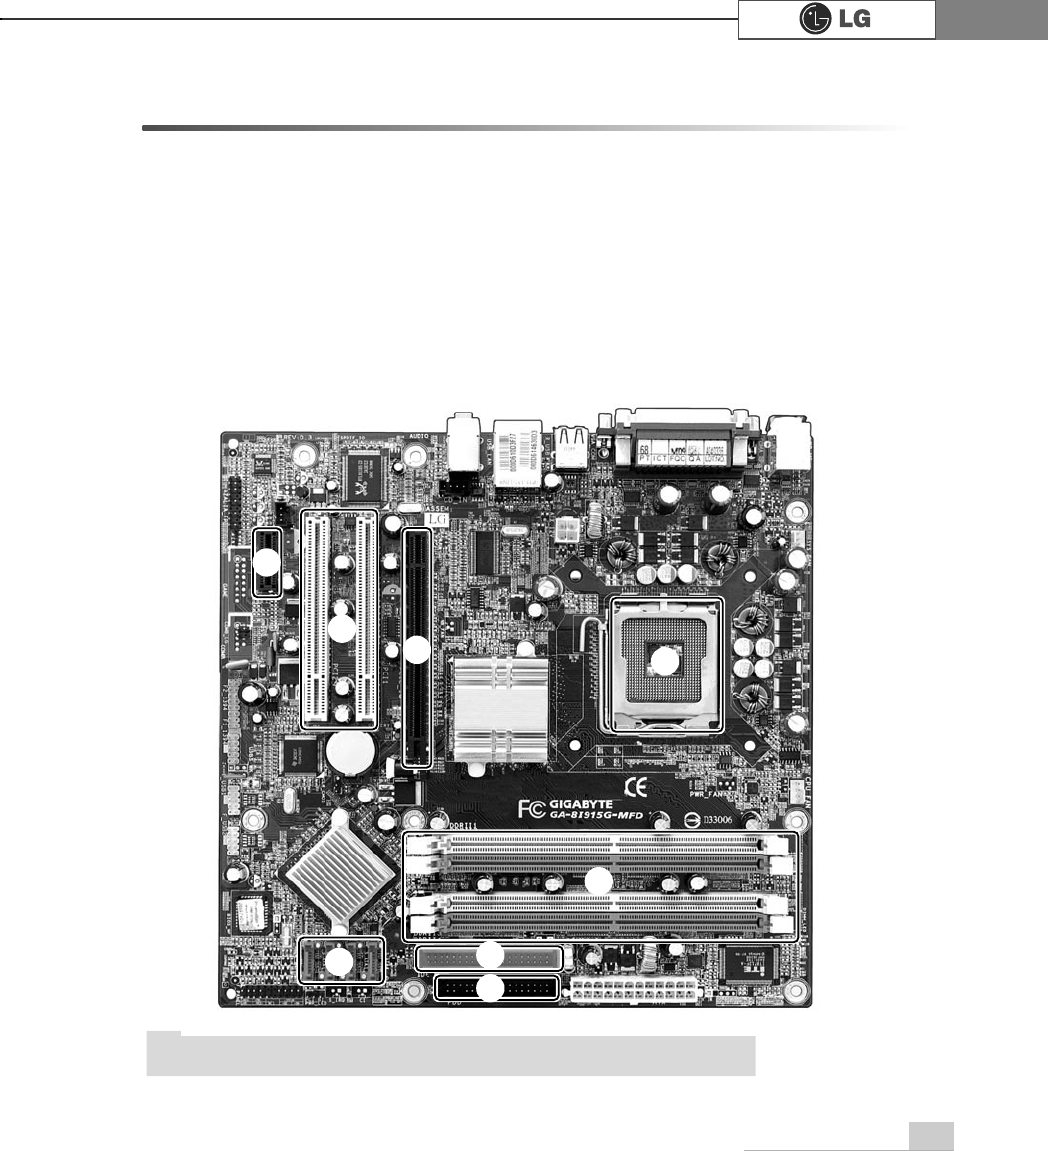
6-2. Main Board
The model name of the computer depends on the main board type. When extend-
ing the computer, check the model name on the label attached on the rear panel
of the computer and the following. Before extending the computer, check the main
board first
℘Expansion slot (PCI-E x1)
ℙ
ℙExpansion slot (PCI)
ℚExpansion slot (PCI-E x16)
ℛ
ℛCPU socket (with Pentium4 Á16
LGA 775)
ℜℜMemory socket (DIMM)
ℝFloppy disk connector
℞
℞Hard disk/CD-ROM connector
℟Serial ATA-type hard disk con-
nector
ãThe main board in your computer may look different from the picture.
Note
℘
ℙℚℛ
ℜ
ℝ
℞
℟
System Expansion66
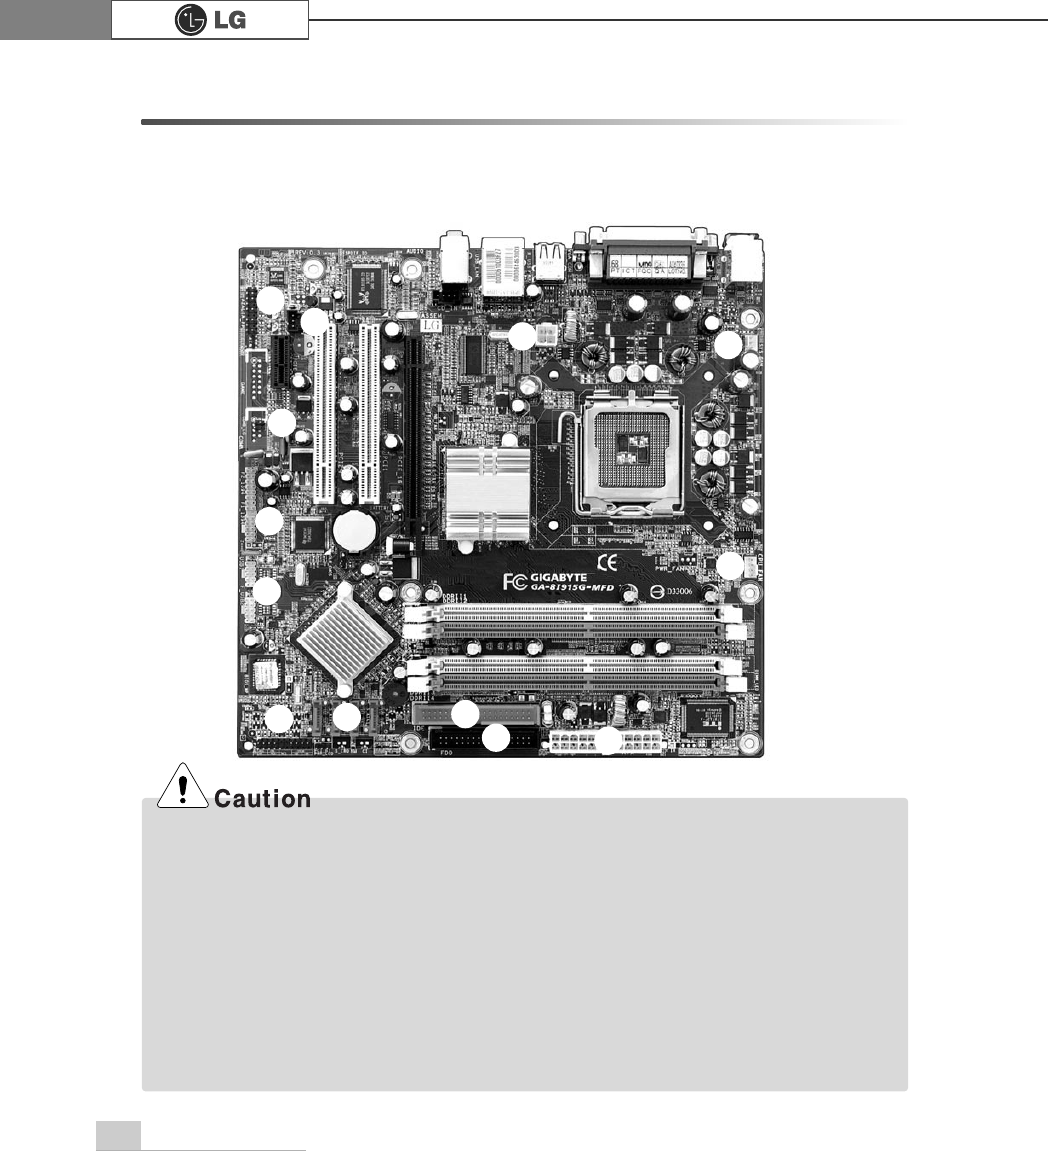
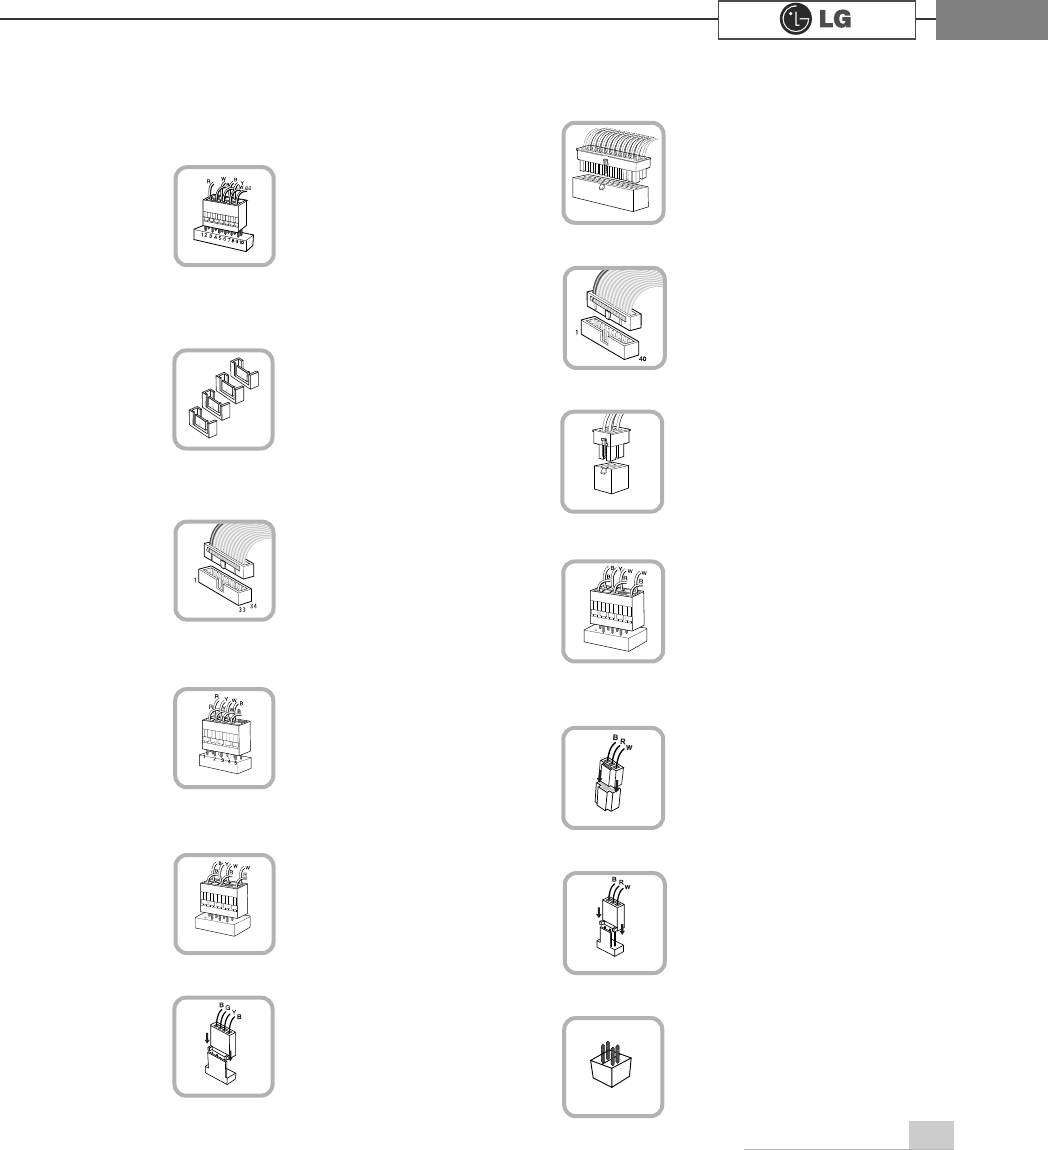
6-3. Internal Connectors
Connectors are configured in a certain way at the factory, and connectors show the
connection status between the main board of the computer and peripherals.
(Connector configuration depends on product models.)
ãBefore separating the connector, check the connection state of the connectors and leave a
record on the state.
ãLink the floppy disk driver connector and the hard disk/CD-ROM connector in the correct
direction.
ãThe Pin Number and the color of the connector cable must match. Otherwise, an error may
occur in the computer.
ãRisk of explosin if battery is replaced by an incorrect type. Dispose of used batteries
according to the instructions.
ãThere is a risk of explosion if the backup(standby) RTC battery is replaced by an incorrect
type. Dispose of used backup(stadby) RTC battery according to your local ordinances or
regulation.
℘ℚℜ
ℛ
ℝ
℞
℟
℠℡
⌅
⌆
⌇
ℙ
System Expansion 67
℘Power on/off and power/hard disk
operation status indication lamp
connector (F_PANEL)
Connects the floppy disk
driver.
ℜ
ℜFloppy disk driver connector
(FDD: 34 pins)
ℙPower connector (ATX: 24 pins)
Connects the power
supply unit.
ℝ
ℝPower connector (ATX_12V: 4 pins)
&RQQHFWVWKHIURQW86%
.
℞
℞USB connector (F_USB1, F_USB1:
10 pins)
Connects camcorders
supporting IEEE1394.
℟1394 connector (F1_1394: 10 pins)
Connects a front ear-
phone and microphone.
℠
℠Audio connector (AZALIA_FP: 10
pins)
S_ATA connector is
linked to the hard disk
driver.
Connects the power
on/off switch and the
power/hard disk operation
status indication lamp.
CDROM, hard disk
driver.
Connects the power
supply unit.
ℚHard disk connector (S_ATA1,
S_ATA2, S_ATA3, S_ATA4: 7 pins)
ℛ
ℛOptic drive connector (IDE : 40 pins)
Connects the SPDIF
port with optic output
feature.
℡SPDIF connector (SPDIF_LG: 3 pins)
Provides power to the
CPU fan.
⌅
⌅CPU fan (CPU_FAN: 4 pins)
Connects the VFD.
⌇VFD connector
Installed at the bottom
(rear panel) of the system,
and connects the VFD.
⌆
⌆System fan (SYSTEM_FAN: 3 pins)
F_PANEL
ATX
S_ATA
IDE
FDD
ATX
USB
F1_1394
AZALIA_FP
SPIF
CPU_FAN
SYSTEM_FAN
VFD
System Expansion68
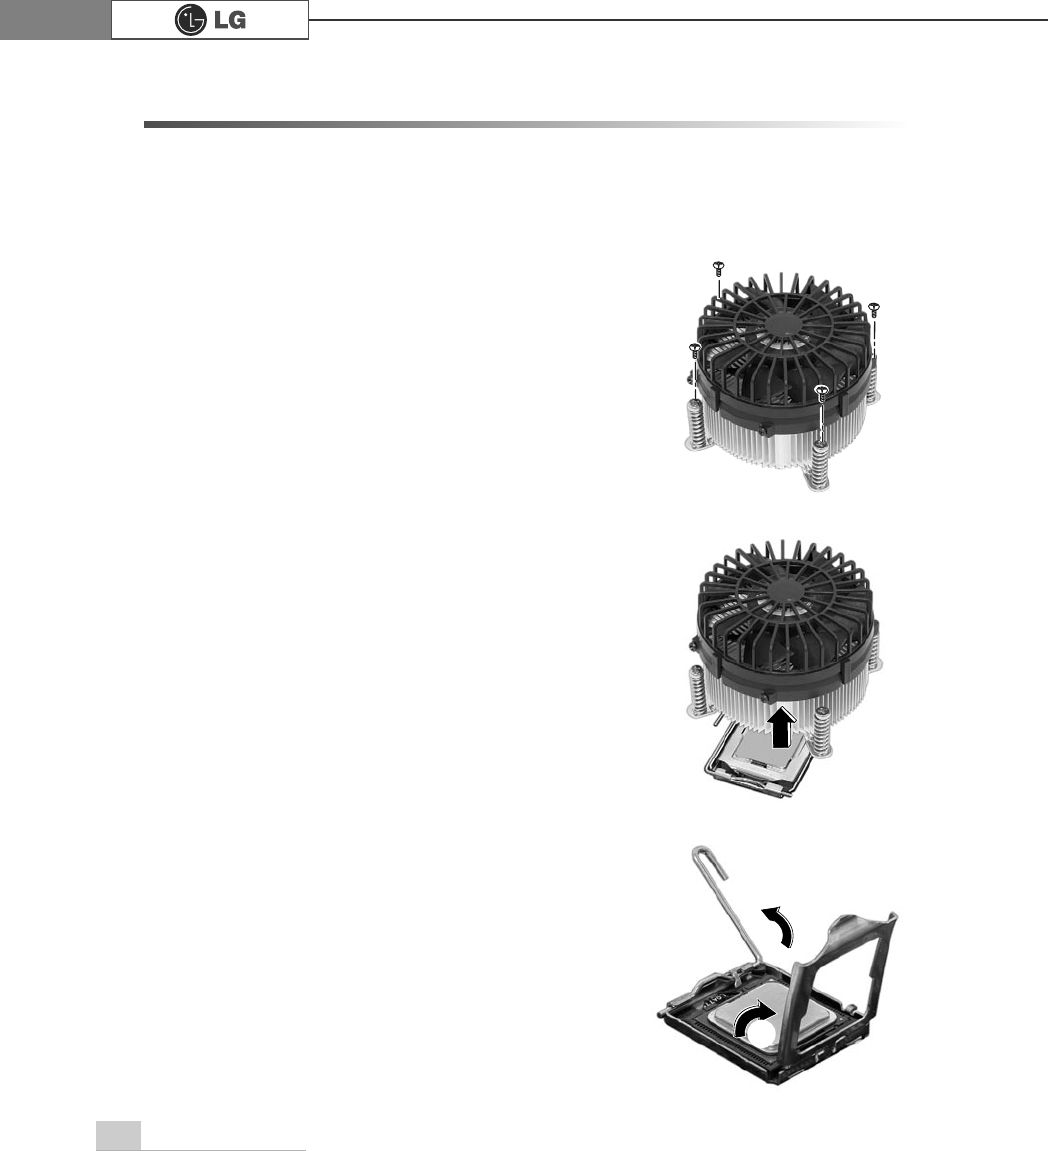
6-4 Replacing the CPU
To upgrade the CPU for better performance of the computer, you need to replace the
CPU first. Check the location and the type of the CPU in the main board, and do the
following. (Shape of the CPU FAN and CPU replacement methods may differ by
model.)
ⓞ
Remove four screws fixing the CPU fan as shown
in the figure.
ⓟ
Remove the CPU fan as shown in the figure.
ⓠTurn the CPU socket handle as shown in the figure
of Step ℘, and open the cover as shown in the fig-
ure of Step ℙ.
℘
ℙ
System Expansion 69
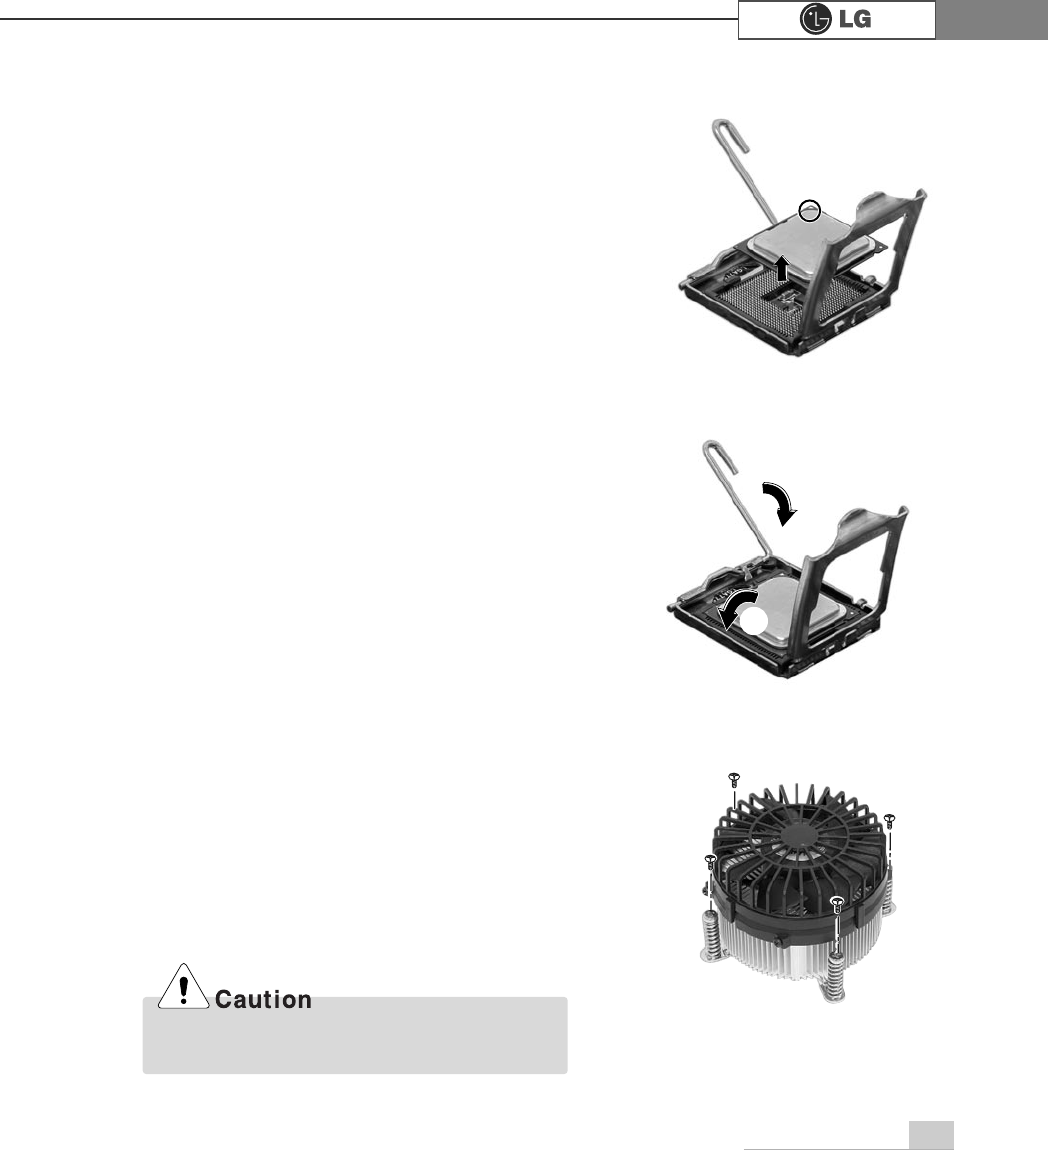
ⓡ
Lift the CPU up carefully to remove it from the main board.
ⓢ
Insert the new CPU with caution in the CPU socket in
the correct direction and put down the handle of the
CPU socket ℘and close the cover ℙ.
ⓣInsert the CPU FAN as shown in the figure, and
fix it with four screws.
If you force the CPU into the socket without
aligning the mark, you may break the pins.
℘
ℙ

System Expansion70
6-5. Expanding the Computer Memory
You may expand the memory capacity, if needs be.
About Memory
This system uses a 240-pin memory module called Double Data Rate-2 (DDR-2),
not the old 184-pin memory module called Double Data Rate (DDR). The main
board can support maximum 2GB in memory.
Before Expanding the Memory
ãWhen disassembling the computer, wear gloves to protect internal parts of the
computer and slot cards from damage.
ãAs the memory is sensitive to static electricity, be careful with the static electrici-
ty when removing or installing a memory.
ãCheck the specifications of the current memory and the new memory before
expanding the memory.
ãUnlike SIMM, DIMM is of 64 bits. Therefore, single DIMM can function, and you
can add DIMM by one.
ãWindows 95, 98SE, and ME support maximum 512MB. Installing a memory with higher
capacity than 512MB may cause malfunctioning of the system.
Note
Note
ãWhen expanding the memory, add a memory with the same specification (DDR-2
SDRAM for 1.8V). (The shape of the memory may differ depending on the product
model.)
ãThe DDR-2 memory provides greatly improved transmission rate than existing memo-
ries, and is differently shaped.
'
''5
System Expansion 71
Refer to the following when expanding memory.
ãThis computer supports PC3200/4300, DDR-2 specification.
ãWhen expanding the memory, use only unbuffered DDR SDRAM DMM
ãWhen inserting two same memories in same-colored DIMM slots, the computer will oper-
ate in Dual Channel mode.
FSB Frequency
400/533 MHz
Usable Memory
PC3200/4300-DDR-2 SDRAM 400/533MHz
Preparing a Memory
Before purchasing memory, study the specifications and features of the current
memory.
Specification : PC3200/4300 (240-pin DDR-2 SDRAM)
Rate : 400MHz (200MHz Á2), 533MHz (266MHz Á2)
Type : 256MB, 512MB
Composing the Memory
Total memory capacity
DIMM 1 DIMM 2 DIMM 3 DIMM 4
DUAL/SINGLE
SINGLE
DUAL
DUAL
SINGLE
DUAL
DUAL
DUAL
DUAL
512MB
256MB 256MB
256MB 256MB
256MB
1024MB
256MB 256MB 256MB 256MB
512MB 512MB
512MB 512MB
2048MB 512MB 512MB 512MB 512MB
512 (One out of four slots)
256 (One out of four slots)
ãThe computer operates faster in Dual Channel mode.
ãUse the same memory to operate the computer in Dual Channel mode.
ãIt is recommended to use Dual Channel mode.
Note
System Expansion72
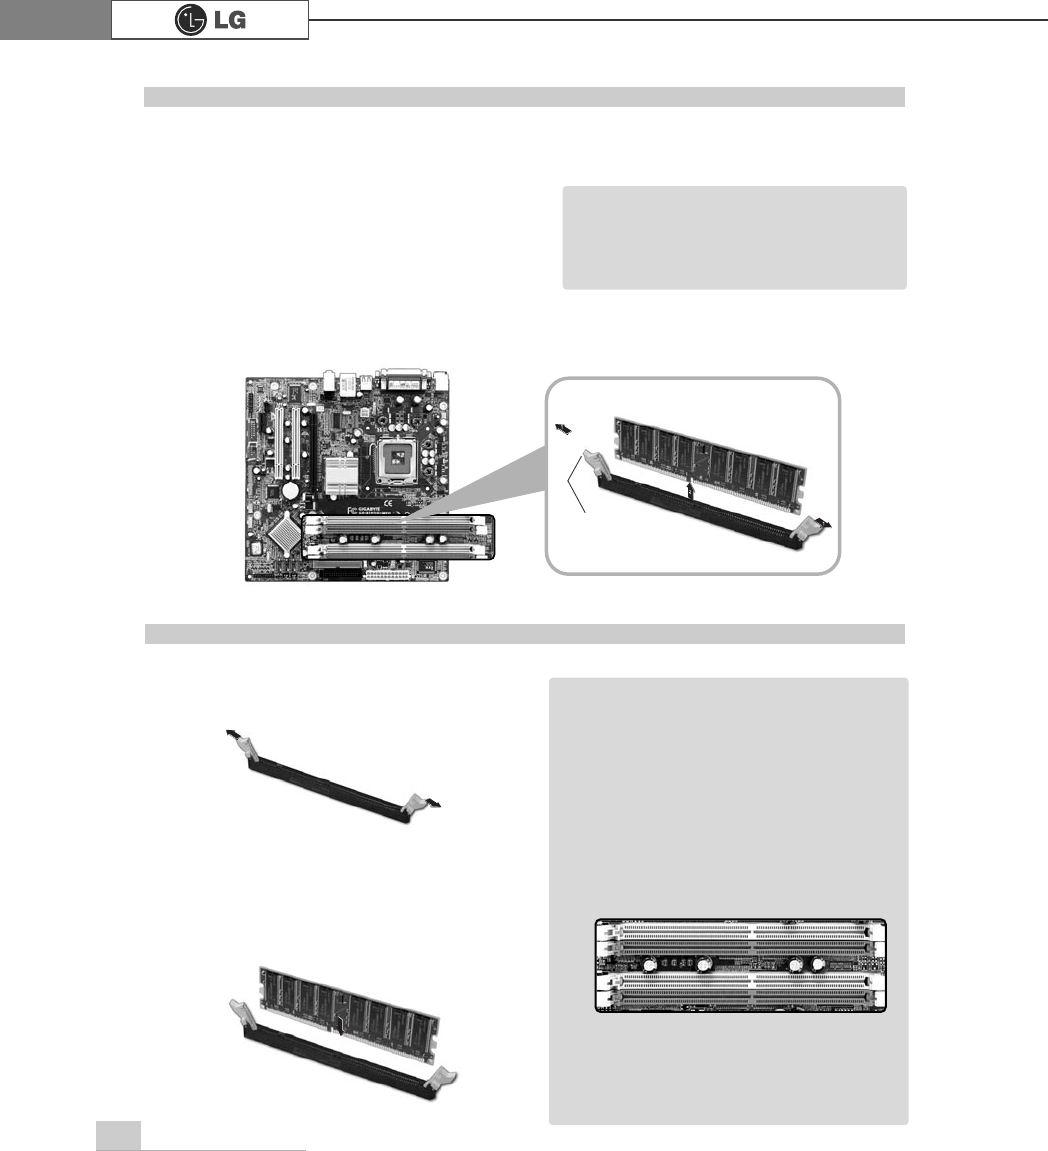
Main board configuration, memory socket and memory type may differ by model.
ⓞLoosen the screws on the rear panel
of the computer, and remove the
cover.
ⓟRelease the latches from both flanks of the memory. The memory will be
removed automatically.
Replacing the Memory
ãBefore opening the computer cover,
turn off the power and all peripherals
connected to the computer.
Disconnect all power cables.
Note
ⓞ
Lay the latches outwards from the
memory socket.
ⓟ
Insert the memory (DIMM) vertically in
the socket in line with the grooves as
shown in the figure.
Installing Memory
ãWhen using a DDR-2 memory, the
memory must be installed in each
channel for Dual Channel mode.
1-3 and 2-4 of dual Channels No. 1 ~ 4
The memory will be automatically
installed even if not latched.
However, it is recommended to fas-
ten the latches until the memory is
completely fixed.
Note
The memory will be automatically
installed even if not latched. However, it
is recommended to fasten the latches
until the memory is completely fixed
latch
℘
ℙ
ℚ
ℛ
System Expansion 73
Checking the Expanded Memory
Turn on the power after installing the memory. Then, the computer will detect the mem-
ory so that you don't need to change the system setup. The capacity of the installed
memory is checked as follows.
ⓞConnect the power cord and other cables, and turn on the computer and the moni-
tor. Then, the initial screen to check the status of the computer will appear.
ⓟWhen the following screen appears, press [Esc] key. Then, POST screen will
appear.
ⓠOn the next screen, press [Pause] to freeze the screen temporarily and to check
the Memory Testing : XXXXXX OK part.
ⓡAfter checking the memory, press the [Esc] key. Windows screen will proceed.
ãIn the case that the logo screen is processed too fast to stop, press [Delete] key on the
LG logo screen. Then, select Advanced BIOS Features ĚFull Screen Logo Show
Selectable, and change status from Enabled to Disabled.
Note
$ZDUG0RGXODU%,26Y;;;;;$Q(QHUJ\6WDU$OO\
&RS\ULJKW&$ZDUG6RIWZDUH,QF
%XLOG,'/*;;;;;;;;;;;;;;
0DLQ3URFHVVRU,QWHO53HQWLXP5;3URFHVVRU;;;0+]
0HPRU\7HVW;;;;;;2.
3UHVV'(/WRHQWHU6(783
;;;;;;;;;;;;;;;;;;;;;;;;;
0HPRU\7HVWLQJ;;;;;;2.
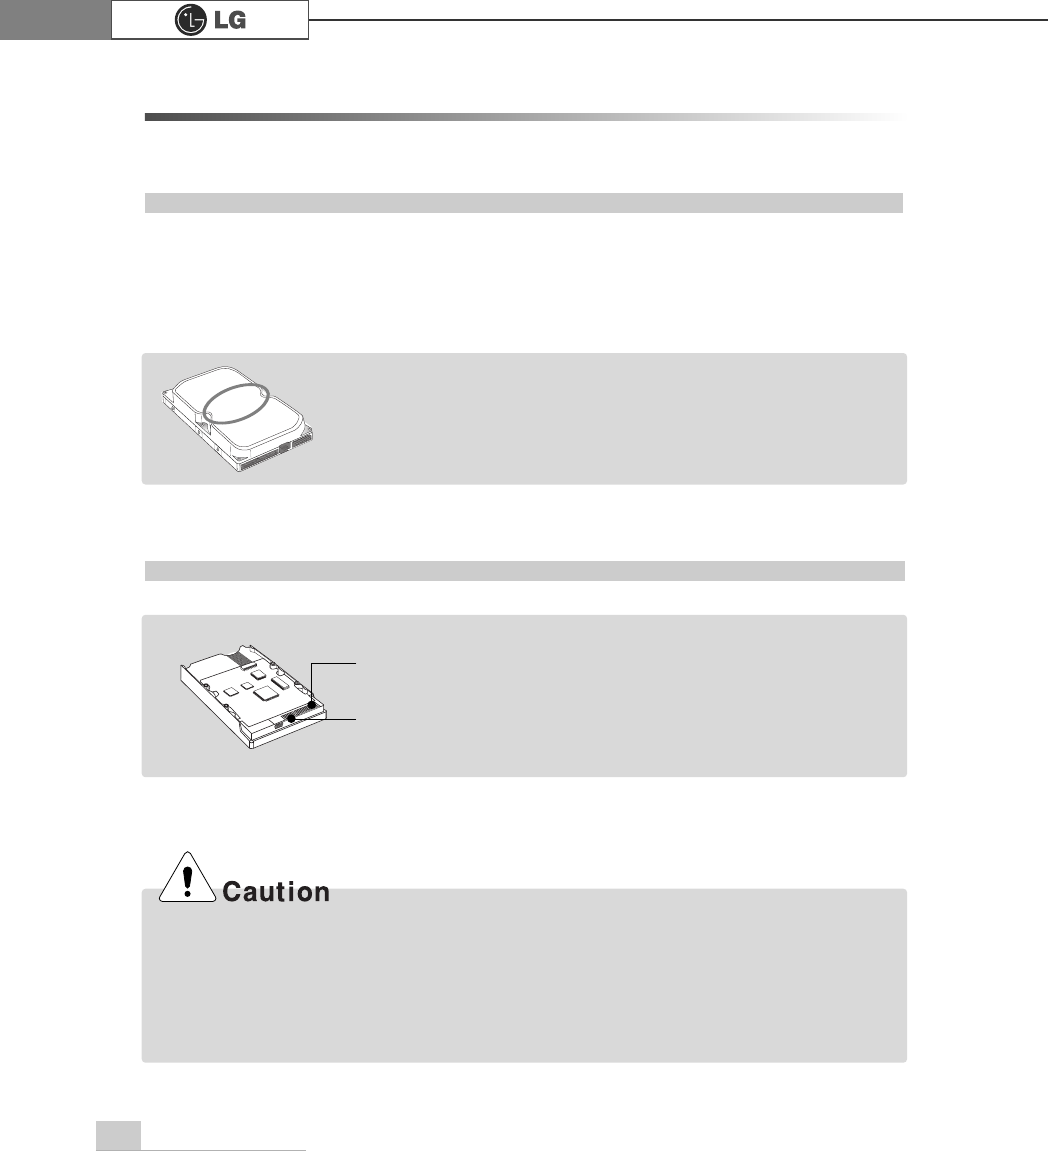
System Expansion74
6-6. Adding a Hard Disk
This computer supports up to four serial ATA controllers, and you can add one hard
disk drive.
The following is when you purchase a hard disk and installs it, and describes the
most common case when you add a hard disk to a computer that is already equipped
with one hard disk
ãWhen disassembling the computer, wear gloves to protect internal parts of the computer
and slot cards from damage.
ãUse screws compatible with specification when installing the hard disk in the main body.
Otherwise, critical damage may be done to electronic parts. For stable use of the hard
disk, fix the hard disk in the main body of the computer to prevent vibration.
Before Adding a Hard Disk
Adding a Hard Disk
ãWrite down the capacity, the cylinder count, the numbers of heads
and sectors of the hard disk marked on the upper part of the hard
disk. They are necessary for system setup (depending on the
product model.)
Note
Note
ãPrepare the hard disk to install.
ãThe hard disk must be serial ATA type.
Signal
connector
Power
connector
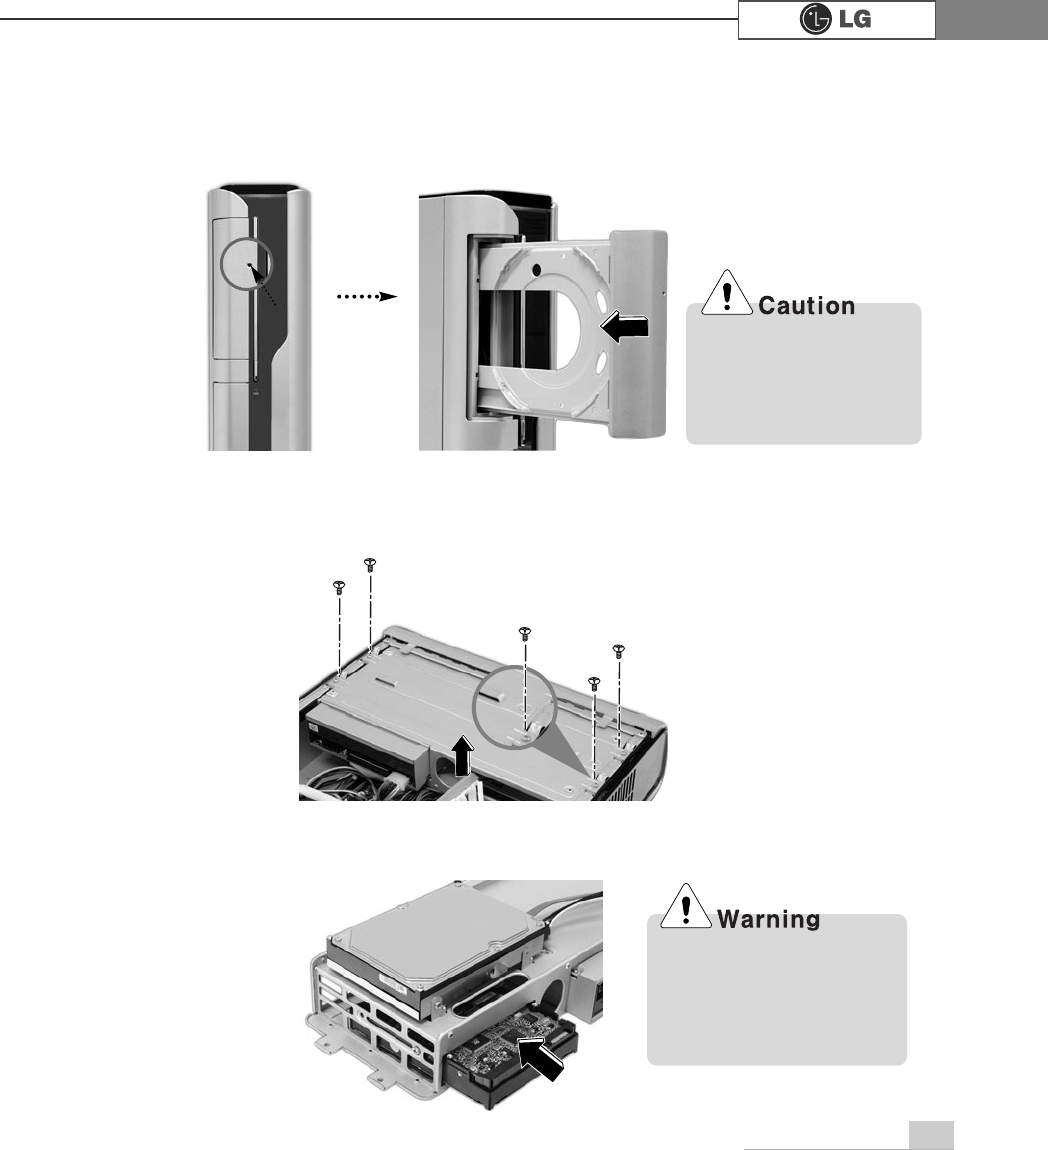
System Expansion 75
ⓟRemove the computer cover as described in [Cover Open] on Page 64. Remove
four screws from the hard case, and lift the hard case as shown in the figure.
ⓞAs shown in Figure ℘, open the CD-RI-ROM drive by inserting a thin and solid
pin that is not bent in the emergency hold of the CD-RIM drive drawer. Then,
push the CD-RIOM drive drawer and remove it as shown in Figure ℙ.
ⓠInsert the additional hard case in the separated hard disk case as shown in the
figure.
Turn off the system and
disconnect the cable
before disassembling the
product. Otherwise, an
electric shock may occur.
Correctly connect the signal
cable and the power cable.
Otherwise, malfunctioning,
product damage, or an elec-
tric shock may occur.
℘ℙ
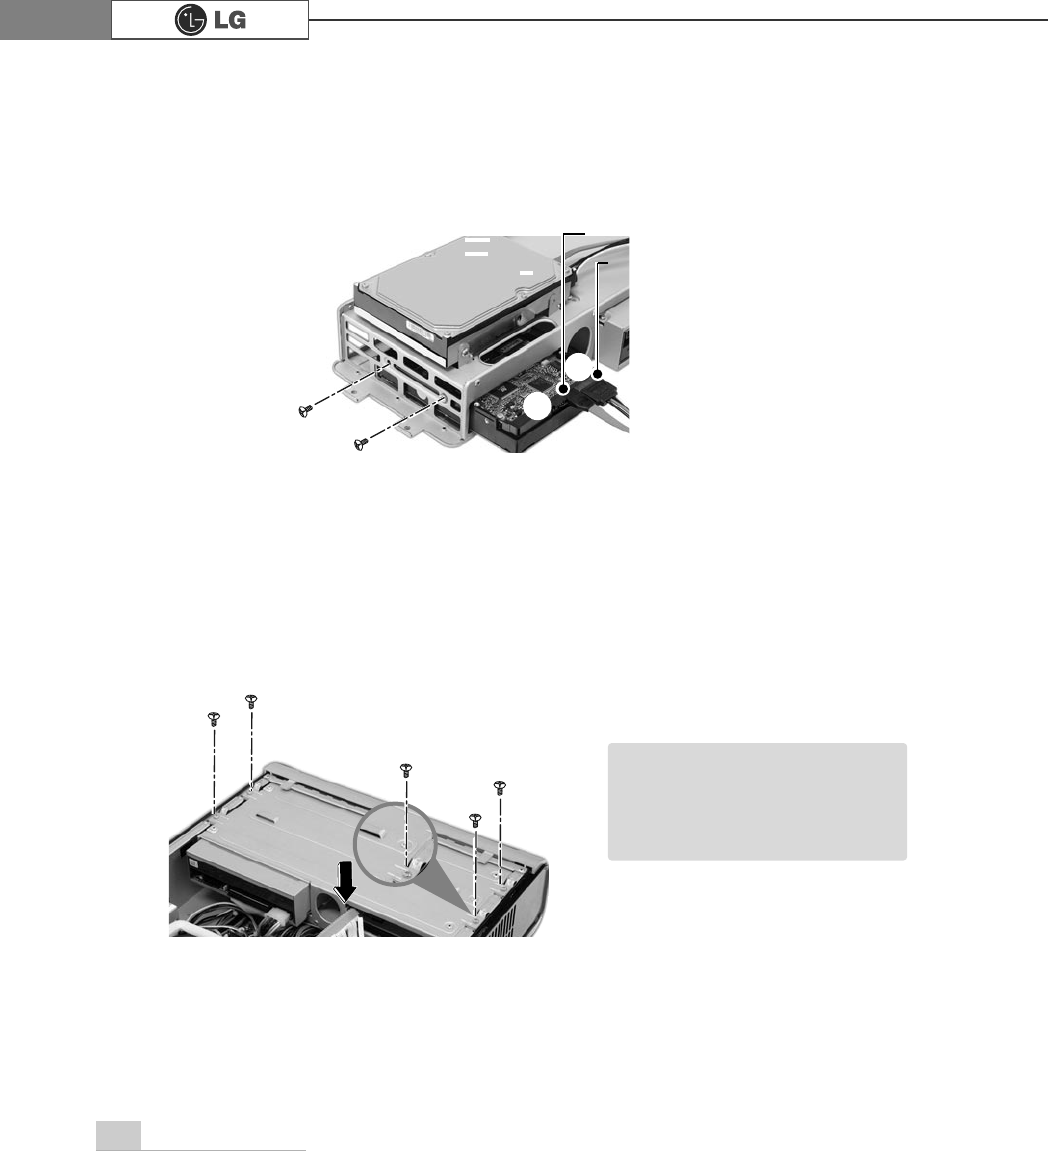
System Expansion76
ⓡConnect the power cable to Hard Disk ℘(slave hard) to add, and connect the sig-
nal cable as shown in the figure ℙbelow. Fasten two screws in the hard disk
case.
ⓢAfter installed the cable-connected hard disk, fasten four screws. Put the cover
as described in Closing Computer Cover on. Install the CD-ROM drive drawer.
ãAfter installing an additional
hard disk, you need to set up
and format the hard disk. See
Hard Disk Setup on.
Note
signal cable
power cable
℘
ℙ
System Expansion 77
ⓞ
Turn on the computer and the monitor.
ⓟ
While the LG logo screen is on, press [Delete] key.
ⓠ
Then, the initial screen of System Setup menu will appear.
ⓡExecute the initial screen of the System Setup menu, and select Standard
CMOS Features by pressing
>Ⓑ@>Ⓒ@>⒵@
, and
>Ⓐ@
keys. Then, press [Enter].
Hard disk drive setup
3KRHQL[$ZDUG%,26&0266HWXS8WLOLW\
Ě 6WDQGDUG&026)HDWXUHV Ě
3&+HDOWK6WDWXV
Ě $GYDQFHG%,26)HDWXUHV Ě )UHTXHQF\9ROWDJH&RQWURO
Ě $GYDQFHG&KLSVHW)HDWXUHV /RDG2SWLPL]HG'HIDXOWV
Ě ,QWHJUDWHG3HULSKHUDOV 6HW3DVVZRUG
Ě 3RZHU0DQDJHPHQW6HWXS 6DYH([LW6HWXS
Ě 3Q33&,&RQILJXUDWLRQV ([LW:LWKRXW6DYLQJ
(VF4XLW êëè é 6HOHFWOWHP
)6DYH([LW6HWXS
9LUXV3URWHFWLRQ%RRW6HTXHQFH

System Expansion78
ⓢ
When the following appears, select IDE Channel 0 Salve by pressing
>Ⓑ@>Ⓒ@>⒵@
, and
>Ⓐ@
keys and press [Enter] key.
ⓣ
Press [Enter] key on IDE Channel 0 Slave to set it as Auto, and press [Enter]
key again on IDE HDD Auto-Detection to set it as Slave. Then, the additionally
installed hard disk will be automatically detected.
ⓤTo save changes in System Setup, press the [F10] key.
ⓥWhen the following message appears, press the [Enter] key to restart the computer.
Phoenix-Award BIOS CMOS Set up Utility
Standard BIOS Features
Data (mm:dd:yy) XXX, XXX, XXXX
Time (hh:mm:ss) XX, XX, XX
ĚIDE Channel 0 Master Press EnterXXXXXMB
ĚIDE Channel 0 Slave Press Enter None
ĚIDE Channel 1 Master Press Enter None
ĚIDE Channel 1 Slave Press Enter None
Drive A X.XXM, X.Xin
Drive B None
Video EGA/VGA
Halt On All, But Keyboard.
CPU Type X.XXX.XXX.XX
BIOS Version Build ID :LG
Video Memory X.XX K
System Memory X.XX K
Total Memory X.XX K
Item Help
Menu Level Ě
To auto-detect the
HDD's size, head...on
this channel
êëèé:Move Enter:Select +/-/PU/PD:Value F10:Save ESC:Exit F1:General Help
F5:Previous Values F7:Optimized Defaults
3UHVV(QWHU1RQH
Ě
,'(&KDQQHO6ODYH
IDE HDD Auto-Detection
Press Enter
IDE Channel 0 Slave Auto
Access Mode Auto
Capacity 0 MB
Cylinder 0
Head 0
Precomp 0
Lauding Zome 0
Sector 0
Item Help
Menu Level Ě
To auto-detect the
HDD's size, head...on
this channel
êëèé:Move Enter:Select +/-/PU/PD:Value F10:Save ESC:Exit F1:General Help
F5:Previous Values F7:Optimized Defaults
$XWR
3UHVV(QWHU
6$9(WR&026 DQG(;,7<1"<
Phoenix-Award BIOS CMOS Set up Utility
IDE Channel 0 Slave
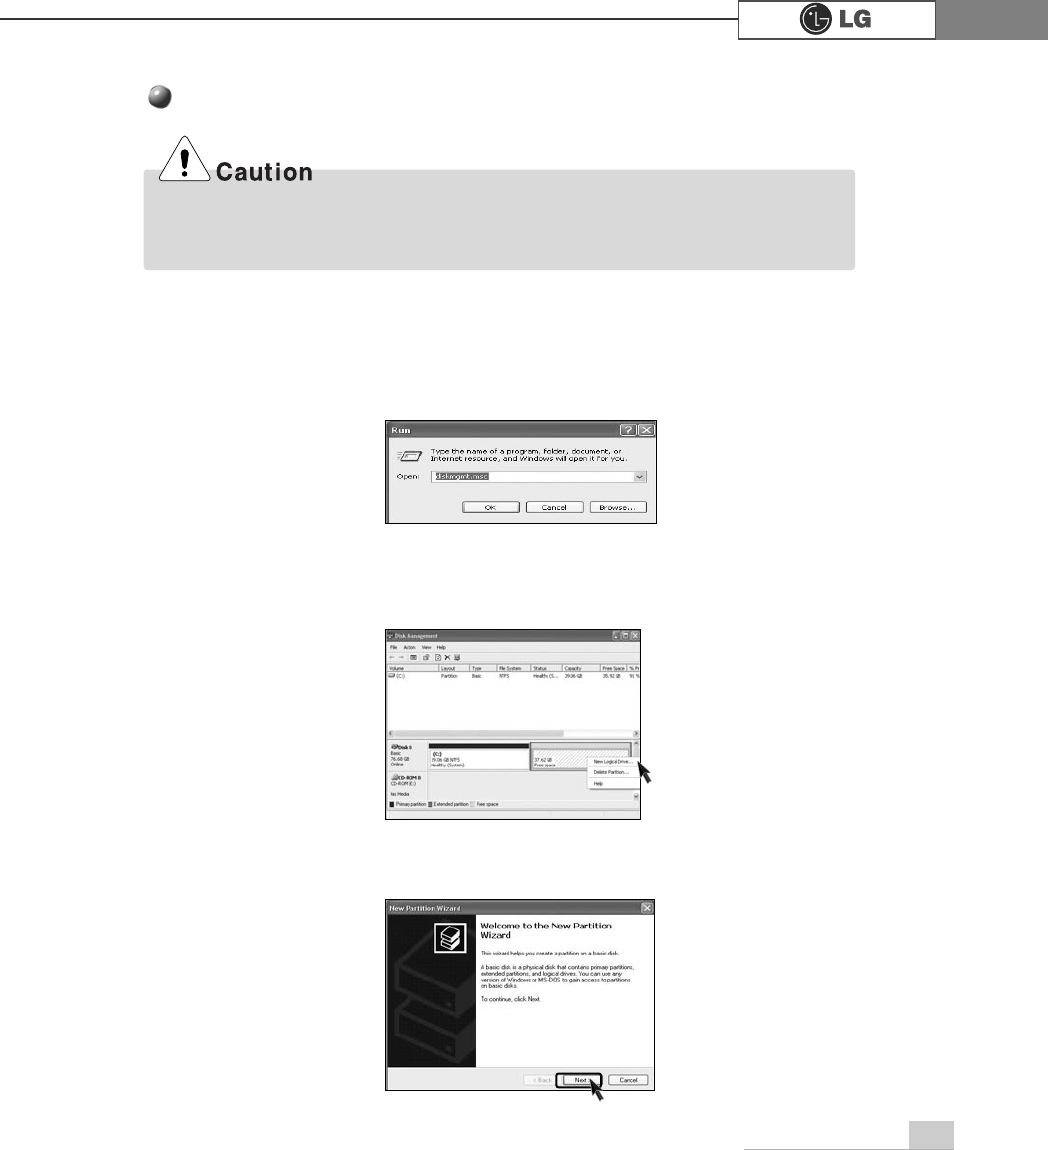
System Expansion 79
Configuring the Hard Disk (in Factory Setting Status)
ⓞSelect the [Start] button on the desk top, and click the [Execute].
ⓟInput diskmgmt.msc, and click [OK].
ⓠSelect Added Disk 1 on Disk Management screen.
Right-click and select [New Loglcal Drive].
ⓡWhen New Partition Wizard screen appears, click the [Next] button.
If you partition the hard disk using "diskmgmt.msc" existing data on the hard disk
driver will be deleted. You must carefully partition the hard disk when there is data on
the disk.
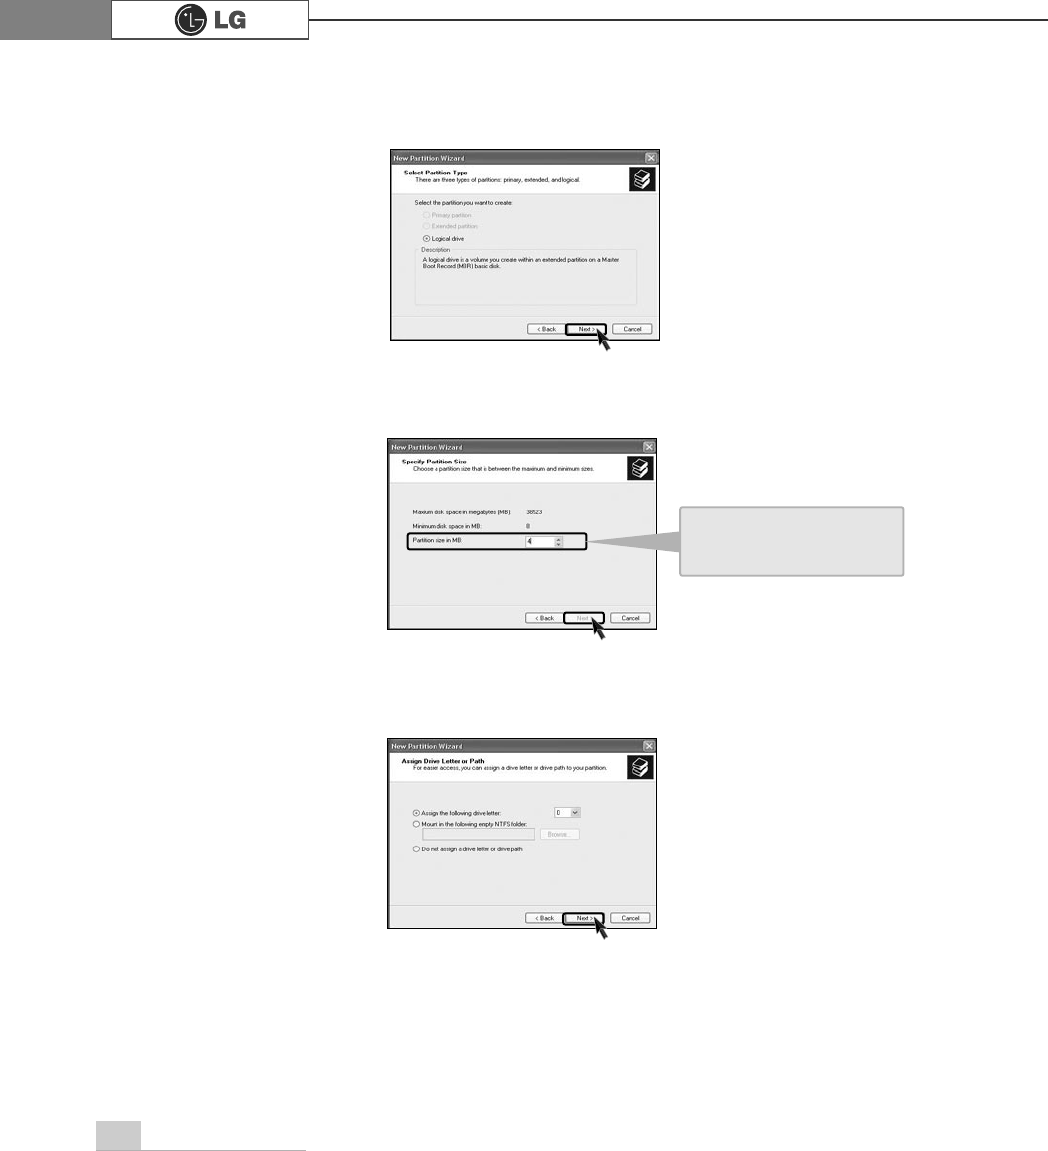
80 System Expansion
ⓢWhen the partition type selection screen appears, select the main partition and
click the [Next] button.
ⓣSelect the maximum size, and click the [Next] button.
ⓤSelect the Drive Letter and click the [Next] button.
You can use as much
space as you select in the
above window.
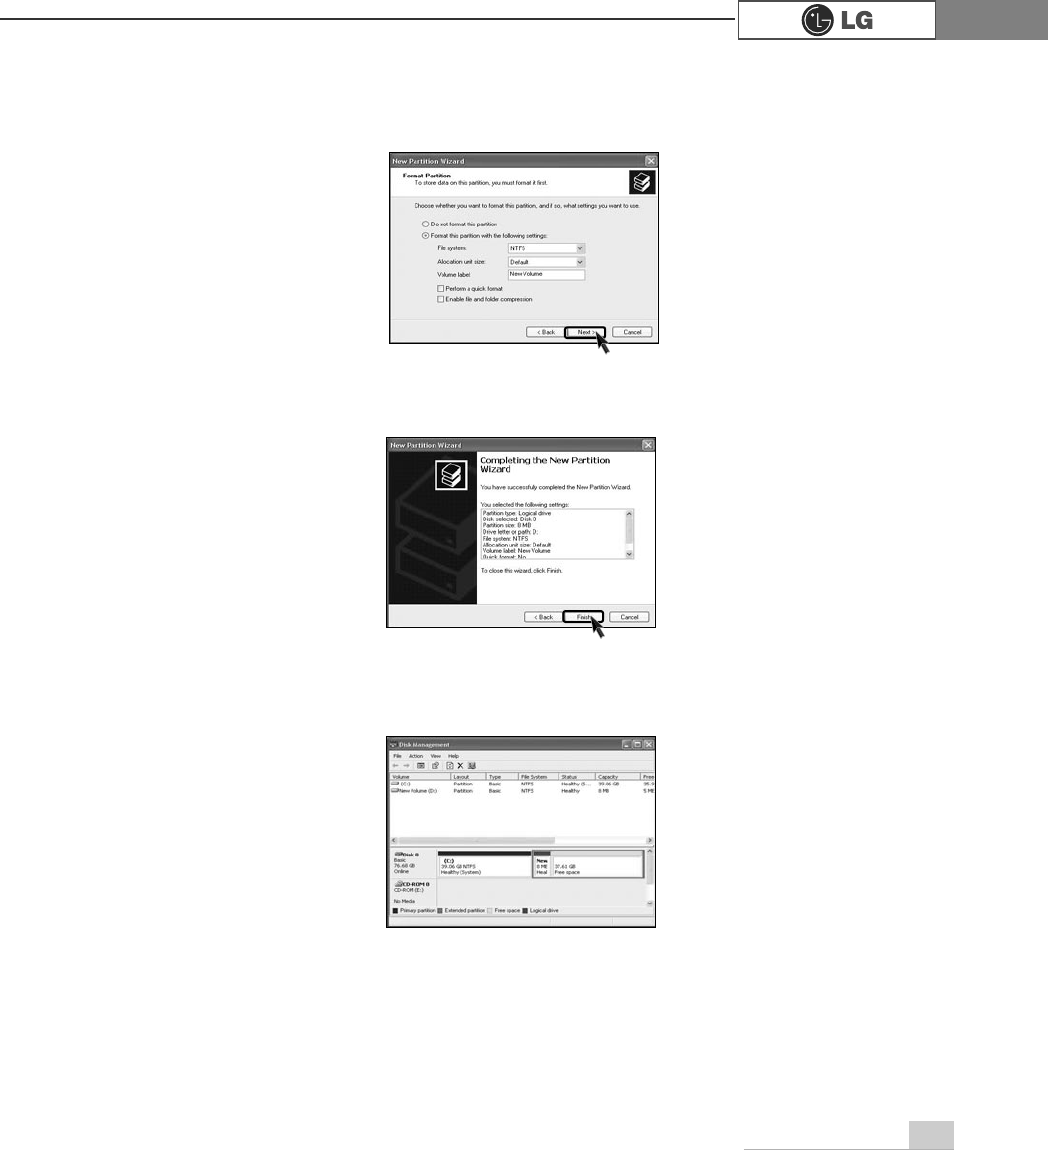
81System Expansion
ⓥWhen the partition format appears, set the file system, allocation unit, and vol-
ume label suitable for the User Environment and click the [Next] button.
ⓦThe Partition Wizard has been completed. Click the [Finish] button.
ⓧAfter the completion, the additional hard disk will normally function.
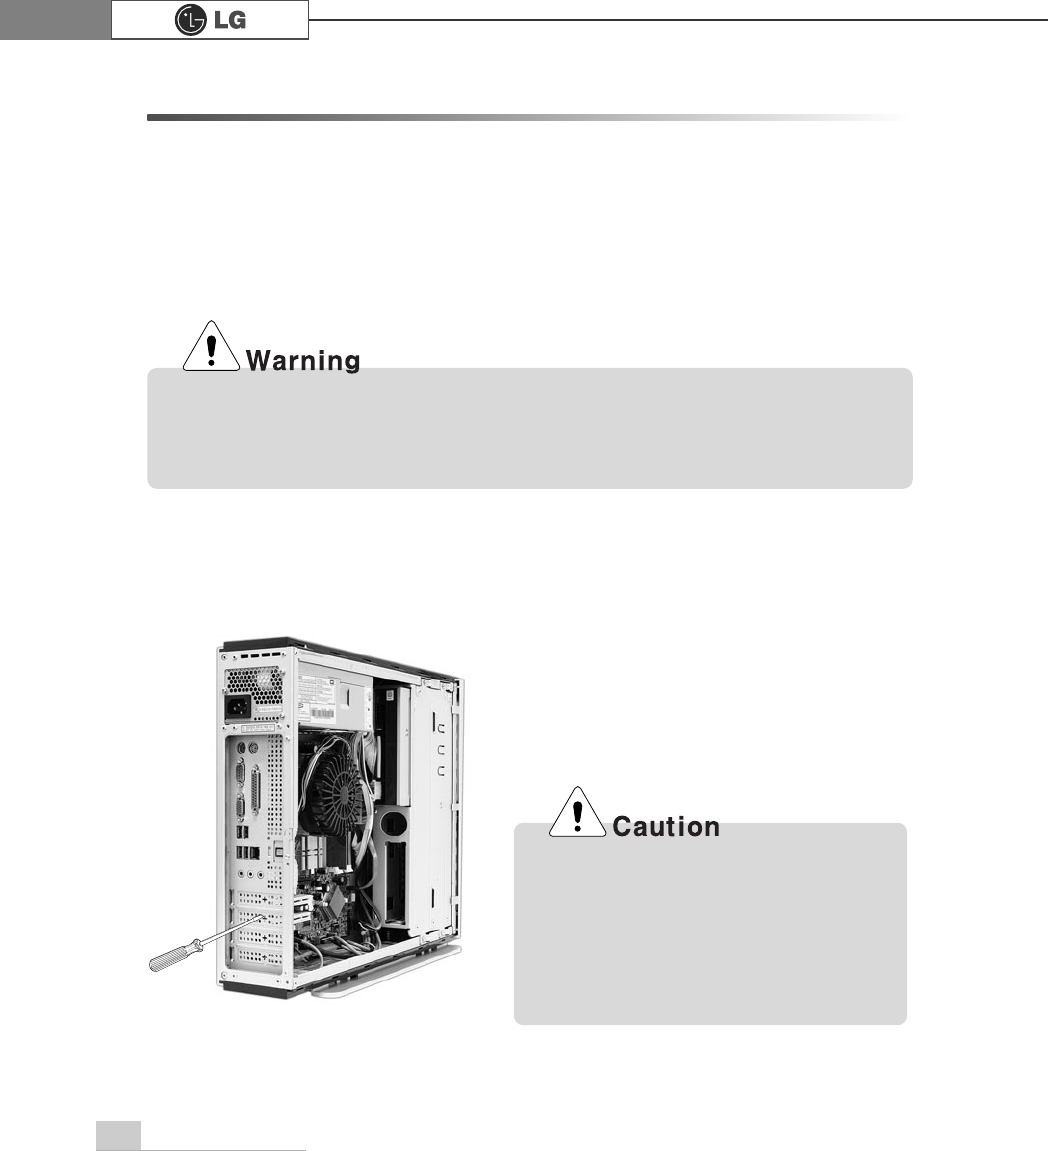
82 System Expansion
6-7.Installing an Expansion Card
You sometimes need to disassemble and reconfigure the computer to expand the
performance. The following describes how to install an expansion card for this pur-
pose.
ⓞOpen the computer cover as described in Opening the computer Cover on.
ⓟ
Remove the metallic slot cover to install the extension card using a proper tool
(for example, + driver)
ÚRemove the slot cover only when installing an additional card.
ãUse proper tools (for example, drivers) when removing metallic slot covers
to prevent hand injuries.
ãWhen disassembling the computer, wear gloves to protect internal parts of
the computer and slot cards from damage.
This computer adopted a slim design,
and general ATX products cannot be
installed in this computer. Please pre-
pare a slim-designed extension card.
(Ask the dealer when purchasing an
extension card.)
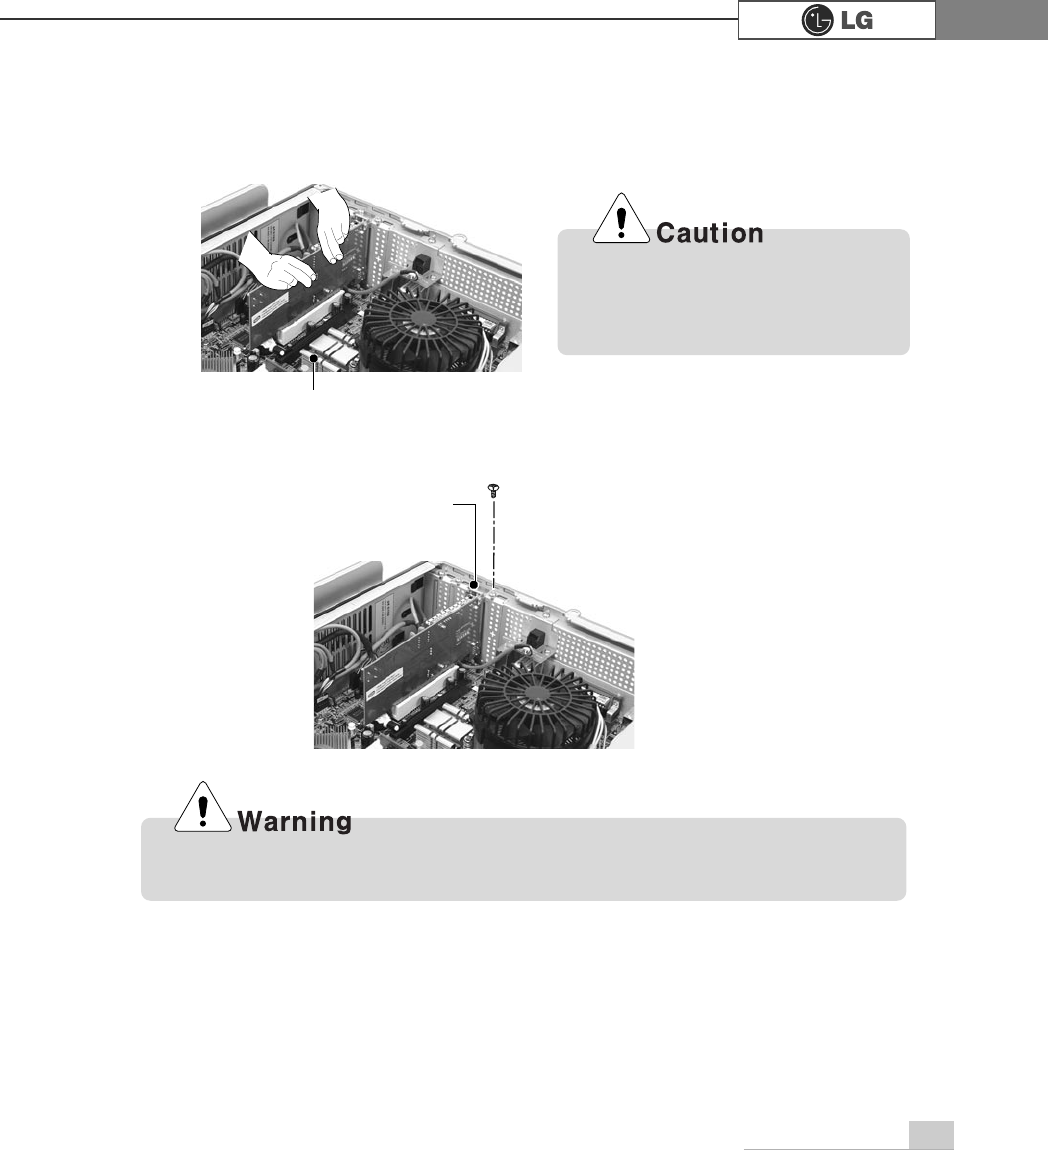
83System Expansion
Close the computer cover before using the computer. Otherwise, an electric
shock, injury, or breakdown may occur.
When the card is not properly
installed, the card or the main
board may get damaged or mal-
function.
ⓠ
Grab the card with two hands, and insert the card in the extension slot in the
right direction.
ⓡ
After a metallic bracket is completely installed, fix it with screws.
ⓢ
Put the computer cover as described in Closing the Computer Cover on.
ⓣ
installing a new card, you also need to install the driver of the corresponding card.
Expansion slot
Metal bracket

84 memo
PHPR

85memo
PHPR

86 memo
PHPR

87Product Specifications
Product Specifications *
).0RGHO
Mouse PS/2 mouse or USB (ball / wheel)
Sound Equipped in the main board (MIC connector, speaker connec-
tor, line-in connector) and in the extension connector on the
rear part of the system.
System memory
128MB or higher. Differs depending on the model.
(FK models allocate minimum 8MB or maximum 64MB as the
local video memory [frame buffer] using a built-in VGA.)
USB Equipped in the main board (four) and in the front (two).
Serial I/O Installed in the main board. (one 9-pin connector).
Parallel I/O One printer port (25pins)
Extension slot One PCI-E 16x slot, One PCI-E 1x slot, Two PCI slots.
Product size Width 100 x Height 365 x depth 460(mm)
Power spec 100~127 / 200~240VAC, 5A / 4A, 50/60Hz or
200~240VAC. 4A, 50/60Hz
Front I/O Two USB ports and audio ports (SPEAKER-OUT and MIC-IN)
Video Equipped in PCI-E 16x video card (one 15-pin connector) or in
the main board.
Keyboard PS/2 keyboard (104keys)
Hard disk drive 40 GB or higher (Serial ATA type).
Cache memory 256KB/512KB or 1024KB L2 cache is equipped in the CPU.
CPU
Supports Pentium4/ LGA775 2.8/3.0/3.2/3.4/3.6 GHz or higher (FSB:
533/800MHz)
Temperature:Average temperature:77ĕ(25Ë
Operating temperature:41ĕ~95ĕ(5~35Ë
Storage temperature:-4ĕ~131ĕ
-25~55Ë
Humidity:Average humidity:60%(RH)
Operating humidity:30%~80%(RH)/Storage humidity:30%~80%(RH)
Environmental
requirement
ÚÚSpecifications below differ depending on the models.
This equipment has been tested and found to comply with the limits for a Class B
digital device, pursuant to part 15 of the FCC Rules. These limits are designed to
pro-vide reasonable protection against harmful interference in a residential installa-
tion. This equipment generates, uses and can radi-ate radio frequency energy and,
if not in-stalled and used in accordance with the in-structions, may cause harmful
interference to radio communications. However, there is no guarantee that interfer-
ence will not occur in a particular installation. If this equip-ment does cause harmful
interference to radio or television reception, which can be determined by turning the
equipment off and on, the user is encouraged to try to correct the interference by
one or more of the fol-lowing measures:
-. Reorient or relocate the receiving antenna.
-. Increase the separation between the equip-ment and receiver.
-. Connect the equipment into an outlet on a circuit different from that to which the
re-ceiver is connected.
-. Consult the dealer or an experienced radio/TV technician for help.
NOTE
Changes or modifications not expressly approved by the party responsible for com-
pliance could void the user's authority to operate the equipment.