LG Electronics USA DU60PY10 PDP Display User Manual 479Hen
LG Electronics USA PDP Display 479Hen
Contents
- 1. Users Manual Part 1
- 2. Users Manual Part 2
- 3. Users Manual Part 3
Users Manual Part 2
Owner’s Manual 15
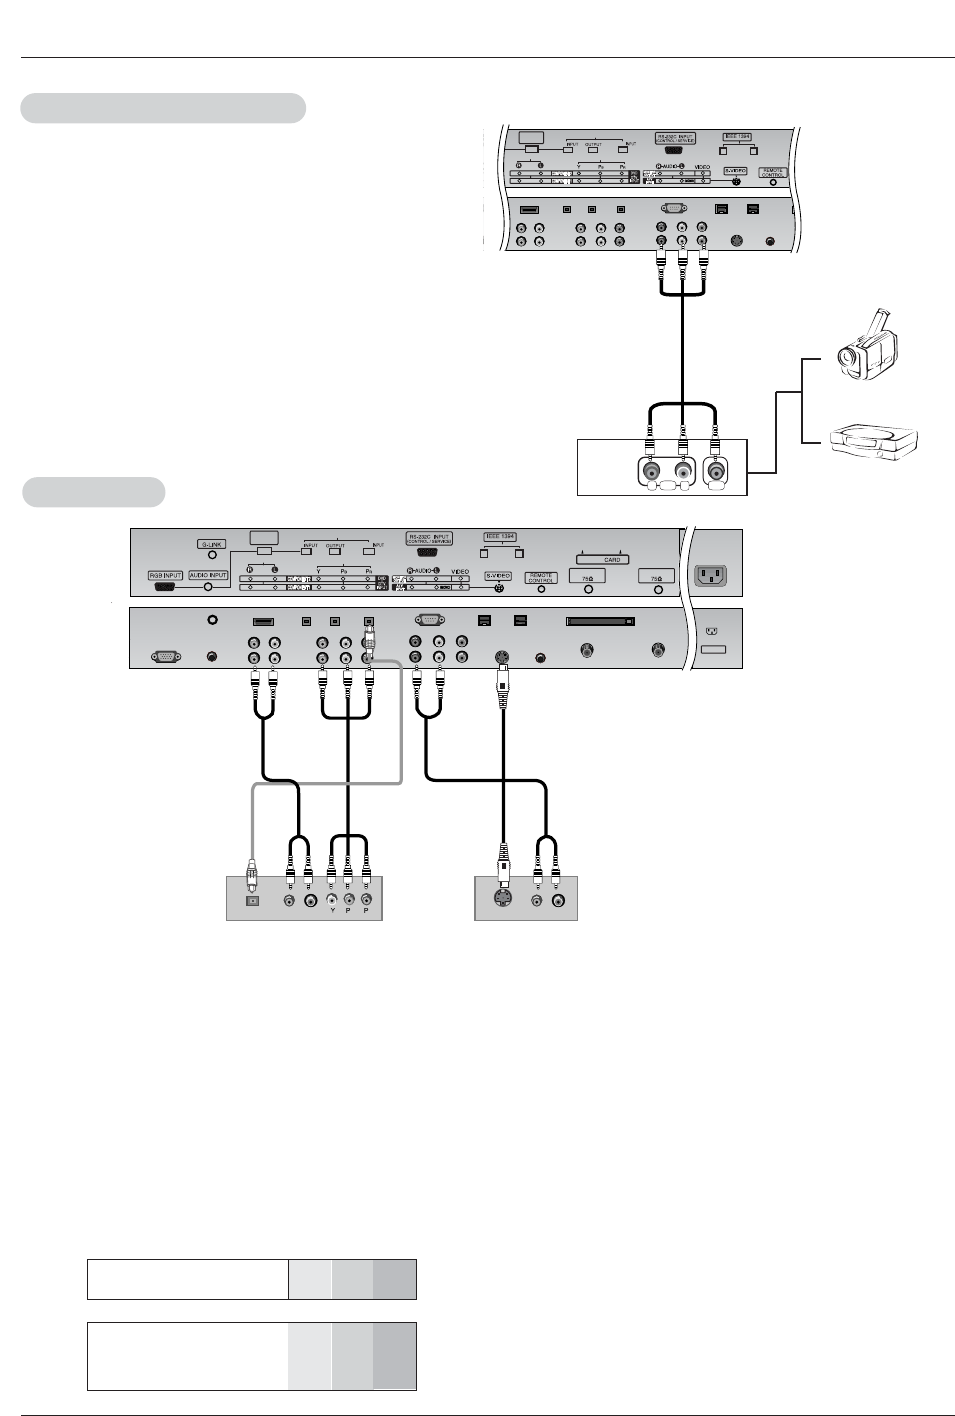
•Component Input ports
To get better picture quality, connect a DVD player to the compo-
nent input ports as shown below.
How to connect
Connect the audio and video cables from the external equip-
ment's output jacks to the TV input jacks, as shown in the
figure.
When connecting the TV to external equipment, match the
jack colors (Video = yellow, Audio Left = white, and Audio
Right = red).
How to use
1. Select the input source with using the TV/VIDEO button on
the remote control. (If connected to A/V INPUT , select
Video input source).
2. Operate the corresponding external equipment. Refer to
external equipment operating the tv guide on screen system.
Component ports
on the TV YPBPR
Video output ports
on DVD player
Y
Y
Y
Y
Pb
B-Y
Cb
PB
Pr
R-Y
Cr
PR
How to connect
1. Connect the DVD video outputs (Y, PB, PR) to the COMPONENT (Y, PB, PR) INPUT jacks on the TV and connect the DVD
audio outputs to the AUDIO INPUT jacks on the TV, as shown in the figure.
2. If your DVD only has an S-Video output jack, connect this to the S-VIDEO input on the TV and connect the DVD audio outputs
to the AUDIO INPUT jacks on the TV, as shown in the figure.
Note: If your DVD player does not have component video output, use S-Video.
How to use
1. Turn on the DVD player, insert a DVD.
2. Use the TV/VIDEO or COMP/RGB/HDMI button on the remote control to select Component 1 or Component 2. (If connected
to S-VIDEO, select the Video or Front Video external input source.)
3. Refer to the DVD player's manual for operating instructions.
External
External A/V Source Setup
A/V Source Setup
DVD Setup
DVD Setup
CABLE
Cable
ANTENNA
AC INPUT
RL
AUDIO VIDEO
DVI
COMPONENT2
DIGITAL AUDIO(OPTICAL)
VIDEO INPUT
AUDIO INPUT
HDMI /
DVI(VIDEO)
AC INPUTAC INPUT
BR
(R) AUDIO (L)
DIGITAL AUDIO
OPTICAL (R) AUDIO (L)
S-VIDEO
CABLE
Cable
ANTENNA
DVI
COMPONENT2
DIGITAL AUDIO(OPTICAL)
VIDEO INPUT
AUDIO INPUT
HDMI /
DVI(VIDEO)
DVD
or
Camcorder
Video Game Set
Notes:
• Digital Audio will not work for Component 1 input source.
• Digital Audio operation has priority if Digital Audio and AUDIO L/R
are connected at the same time.
or
16 Plasma TV
Installation
- This TV can receive Digital Over-the-air/Cable signals without an external digital set-top box. However, if you do receive Digital
signals from a digital set-top box or other digital external device, refer to the figure as shown below.
- This TV supports HDCP (High-bandwidth Digital Contents Protection) protocol for Digital Contents (480p,720p,1080i).
How to connect
Use the TV’s COMPONENT (Y, PB, PR) INPUT, RGB or HDMI/DVI jack
for video connections, depending on your set-top box connector. Then,
make the corresponding audio connections.
How to use
1. Turn on the digital set-top box. (Refer to the owner’s manual for the
digital set-top box.)
2. Use TV/VIDEO or COMP/RGB/HDMI on the remote control to select
Component 1,Component 2,RGB-DTV, or HDMI/DVI source.
HDSTB Setup
HDSTB Setup
AC INPUT
(R) AUDIO (L)
RGB-DTV OUTPUT
BR
(R) AUDIO (L)
DIGITAL AUDIO
OPTICAL
(R) AUDIO (L)
DVI-DTV OUTPUT
DIGITAL AUDIO
OPTICAL
DVI
COMPONENT2
DIGITAL AUDIO(OPTICAL)
VIDEO INPUT
AUDIO INPUT
HDMI /
DVI(VIDEO)
CABLE
Cable
ANTENNA
HDMI-DTV OUTPUT
Digital Set-top Box
or or
or or
Signal
480i
480p
720p
1080i
Component 1/2
Yes
Yes
Yes
Yes
RGB-DTV,HDMI/DVI
No
Yes
Yes
Yes
CableCARD
CableCARDTM
TM Setup
Setup
AC INPUT
CABLE
Cable
ANTENNA
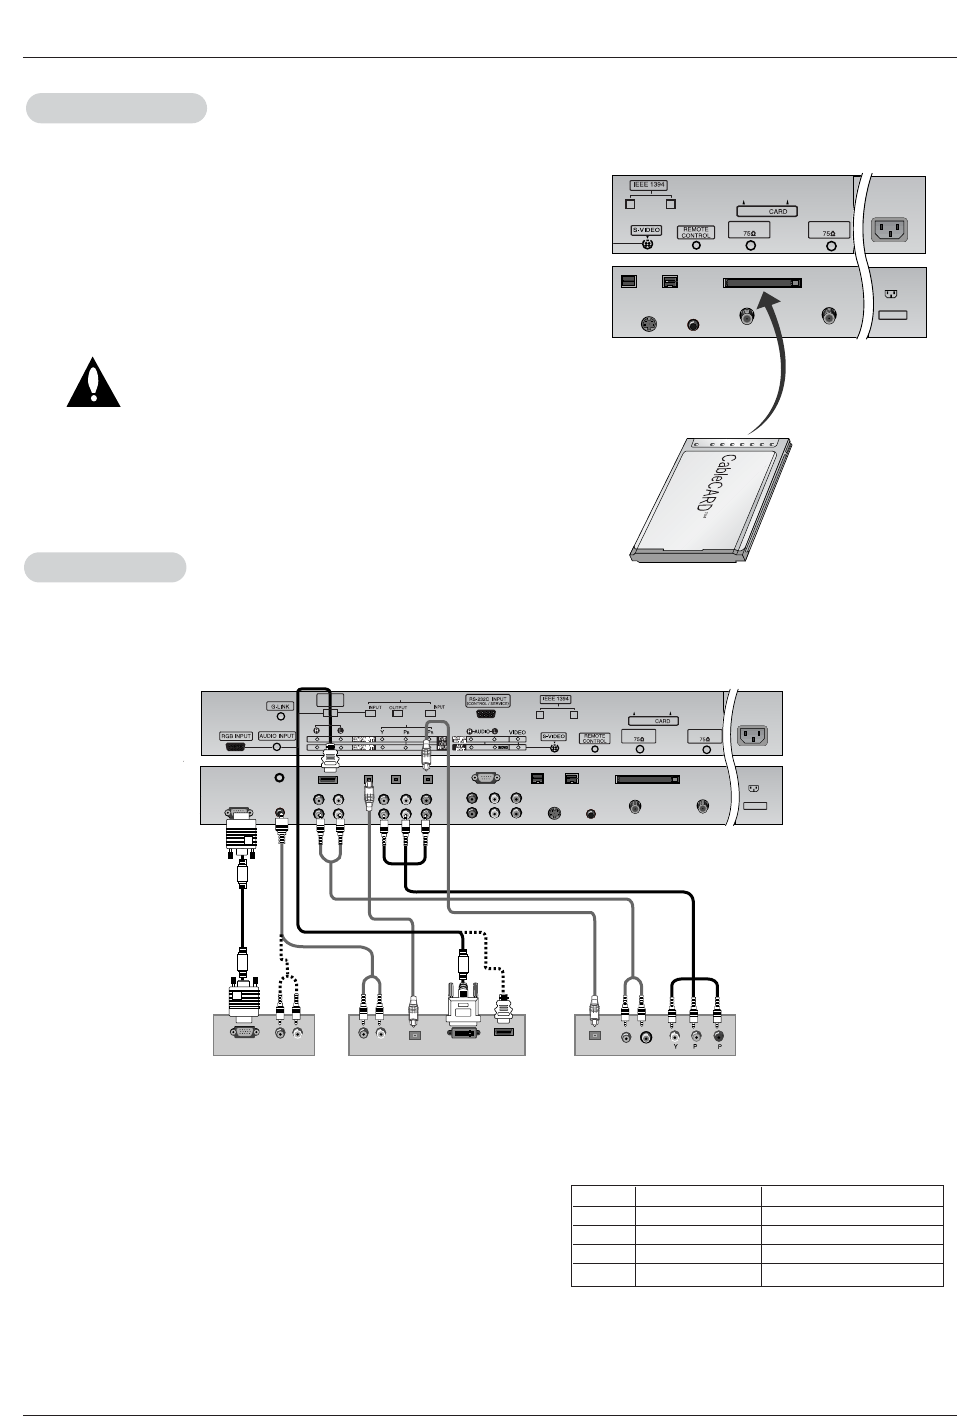
How to use
Insert the CableCARDTM
TM received from Cable Service provider to
CableCARDTM
TM slot of TV back panel.
If Host or CableCARDTM
TM does not display on the screen, contact with Cable
service provider by phone.
Note :
• CableCARDTM
TM has the types of Motorola, Scientific Atlanta, SCM etc..
These 3 types of CableCARDTM
TM can be used for this PLASMA TV.
Caution: When removing the CableCARDTM
TM, do not
fall it as this may cause impact to the
CableCARDTM
TM.
Owner’s Manual 17
Installation
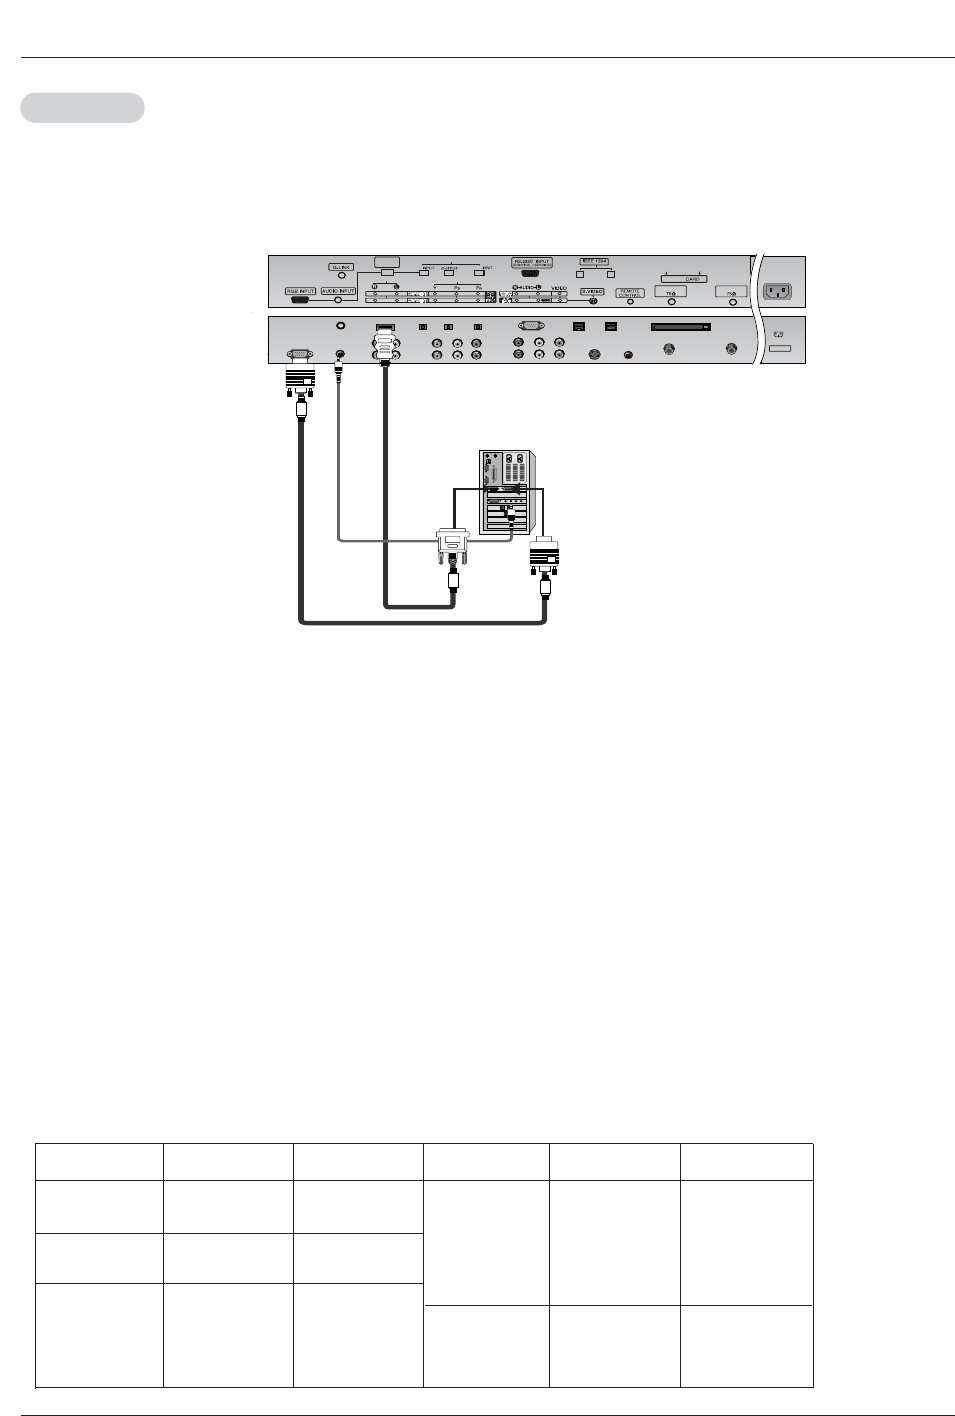
How to connect
1. To get the best picture quality, adjust the PC graphics card to 1024x768, 60Hz.
2. Use the TV’s RGB INPUT or HDMI/DVI (Digital Visual Interface) INPUT port for video connections, depending on your PC con-
nector.
• If the graphic card on the PC does not output analog and digital RGB simultaneously, connect only one of either RGB INPUT
or DVI INPUT to display the PC on the TV.
• If the graphic card on the PC does output analog and digital RGB simultaneously, set the TV to either RGB or HDMI/DVI; (the
other mode is set to Plug and Play automatically by the TV.)
3. Then, make the corresponding audio connections. If using a sound card, adjust the PC sound as required.
How to use
1. Turn on the PC and the TV.
2. Turn on the display by pressing the POWER button on the TV's remote control.
3. Select RGB-PC or HDMI/DVI input source in main input option of SETUP menu. (Refer to P.59)
4. Check the image on your TV. There may be noise associated with the resolution, vertical pattern, contrast or brightness in PC
mode. If noise is present, change the PC mode to another resolution, change the refresh rate to another rate or adjust the
brightness and contrast on the menu until the picture is clear. If the refresh rate of the PC graphic card can not be changed,
change the PC graphic card or consult the manufacturer of the PC graphic card.
Notes: • Depending on the graphics card, DOS mode may not work if you use a HDMI to DVI cable.
• Avoid keeping a fixed image on the TV's screen for a long period of time. The fixed image may become permanently
imprinted on the screen. Use the Orbiter screen saver when possible.
• The synchronization input form for Horizontal and Vertical frequencies is separate.
PC Setup
PC Setup
AC INPUT
DVI
COMPONENT2
DIGITAL AUDIO(OPTICAL)
VIDEO INPUT
AUDIO INPUT
HDMI /
DVI(VIDEO)
CABLE
Cable
ANTENNA
- This TV provides Plug and Play capability, meaning that the PC adjusts automatically to the TV's settings.
- The TV perceives 640x480, 60Hz as DTV 480p based on the PC graphic card, change the screen scanning rate for the graphic
card accordingly.
Resolution
640x350
720x400
640x480
800x600
Horizontal
Frequency(KHz)
31.468
37.861
31.469
37.927
31.469
37.861
37.500
43.269
70.09
85.08
70.08
85.03
59.94
72.80
75.00
85.00
35.156
37.879
48.077
46.875
53.674
48.363
56.476
60.023
56.25
60.31
72.18
75.00
85.06
60.00
70.06
75.02
Vertical
Frequency(Hz) Resolution Horizontal
Frequency(KHz)
Vertical
Frequency(Hz)
1024x768
Monitor Display Specifications (RGB-PC )
18 Plasma TV
Installation
Send the TV’s audio to external audio equipment (stereo system) via
the Digital Audio Output (Optical) port.
How to connect
1. Connect one end of an optical cable to the TV Digital Audio
(Optical) Output port.
2. Connect the other end of the optical cable to the digital audio (opti-
cal) input on the audio equipment.
3. Set the “ TV Speaker option - Off” in the AUDIO menu. Refer to
page 64.
See the external audio equipment instruction manual for operation.
Caution: Do not look into the optical output port.
Looking at the laser beam may damage
your vision.
Digital
Digital Audio Output
Audio Output
Cable
ANTENNA
DVI
COMPONENT2
DIGITAL AUDIO(OPTICAL)
VIDEO INPUT
AUDIO INPUT
HDMI /
DVI(VIDEO)
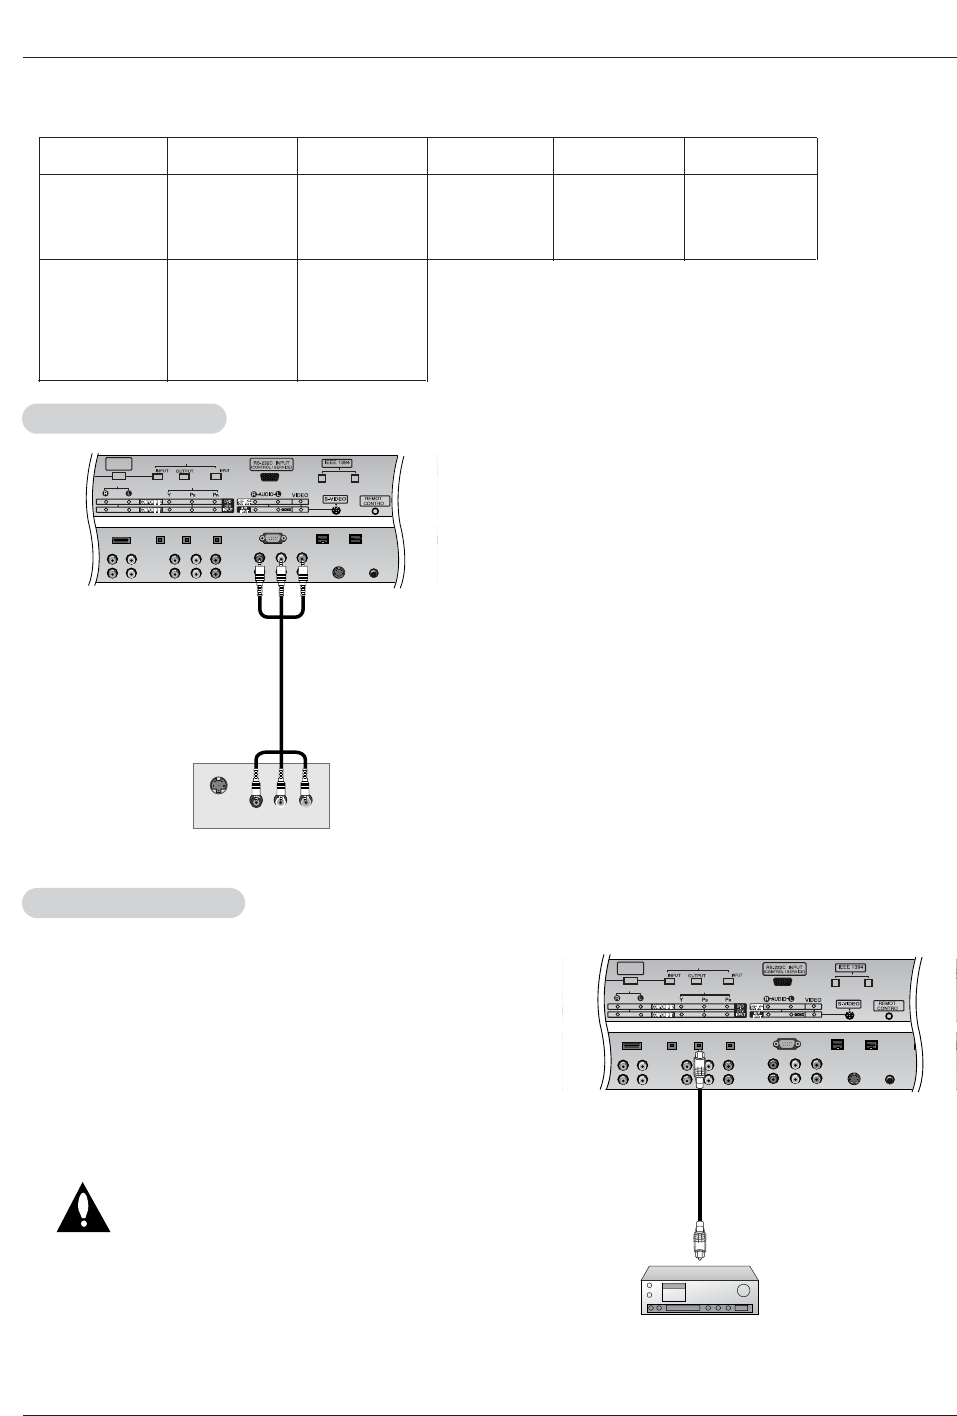
The TV has a special signal output capability which allows you to
hook up a second TV or monitor.
Connect the second TV or monitor to the TV’s MONITOR OUTPUT.
See the Operating Manual of the second TV or monitor for further
details regarding that device’s input settings.
Note
• Component, RGB-PC/RGB-DTV, HDMI/DVI, DTV input sources
cannot be used for Monitor out.
Cable
ANTENNA
S-VIDEO IN
(R) AUDIO (L) VIDEO
DVI
COMPONENT2
DIGITAL AUDIO(OPTICAL)
VIDEO INPUT
AUDIO INPUT
HDMI /
DVI(VIDEO)
Monitor Out Setup
Monitor Out Setup
Resolution
640x480
800x600
Horizontal
Frequency(KHz)
31.469
37.861
37.500
35.156
37.879
48.077
46.875
59.94
72.80
75.00
56.25
60.31
72.18
75.00
48.363
56.476
60.023
60.00
70.06
75.02
Vertical
Frequency(Hz) Resolution Horizontal
Frequency(KHz)
Vertical
Frequency(Hz)
1024x768
Monitor Display Specifications (HDMI/DVI Mode)

Owner’s Manual 19
HDMI
HDMI/DVI (VIDEO)
HDMI/DVI (VIDEO)
-HDMITM, the HDMI logo and High-Definition Multimedia Interface are trademarks or registered trademarks of HDMI Licensing LLC."
-This TV SET can receive the High-Definition Multimedia Interface(HDMI) or Input of Digital Visual Interface(DVI).
-This TV SET supports HDCP(High-bandwidth Digital Contents Protection) Protocol for TV SET(480p, 720p, 1080i) modes.
-When you Connect with HDMI/DVI Source Devices (DVD Player or Set Top Box or PC) supporting Auto HDMI/DVI function, auto-
matically, support Plug & Play and then set the HDMI/DVI Source Devices(1280 x 720p). After reading in HDMI/DVI Source
Devices using Display Data Channel(DDC) Protocol, EDID stored in TV SET is used . If HDMI/DVI Source Devices not support-
ed Auto HDMI/DVI is been, the Resolution is setted, manually.
- To get the best picture quality, adjust the DVD Player or Set Top Box output resolution to 1280 x 720p.
- To get the best picture quality, adjust the PC graphics card to 1024 x 768, 60Hz.
- When Source Devices have DVI Output Connector, you must connect audio with separated cable.(Refer to <How to connect>)
How to connect
1. When Source Devices(DVD Player or Set Top Box) support HDMI.
- If Source Devices have HDMI Output Connector, Source Devices connect to DTV with HDMI Cable .(not supplied with the prod-
uct).
- If Source Devices support Auto HDMI, automatically, Source Devices divert output resolution in 1280x720p. But if not, resolution
divert Manually Setting for reference Manual of Source Devices.
- To get the best picture quality, adjust the DVD Player or Set Top Box output resolution to 1280 x 720p.
- Because HDMI sends Digital Video and Audio with one cable, need not especial Audio Cable for using HDMI Cable.
2. When Source Devices(DVD Player or Set Top Box) supports DVI.
- If Source Devices have DVI Output Connector, Source Devices connect to DTV with HDMI to DVI Cable (not supplied with the
product).
- If Source Devices support Auto DVI, automatically, Source Devices divert output resolution in 1280x720p. But if not, resolution
divert Manually Setting for reference Manual of Source Devices.
- To get the best picture quality, adjust the DVD Player or Set Top Box output resolution to 1280 x 720p.
- In this case, Audio use other cable. When Source Devices have Fiber Optic Digital Audio Output Connector, Digital Audio DVI
Input(DVI) of DTV connect to Fiber Optic Digital Audio Cable (not supplied with the product) or when Source Devices have Analog
Audio Output Connector, RGB/DVI Audio Input of DTV connect to Audio Cable (not supplied with the product). And then you can
listen to normal Audio.
3. When PC supports DVI.
- If PC have DVI Output Connector, Source Devices connect to DTV with HDMI to DVI Cable (not supplied with the product).
- To get the best picture quality, adjust the PC graphics card to 1024 x 768, 60Hz.
- Use the DTV’s HDMI/DVI(VIDEO) for video connections, depending on your PC connector.
- If the graphics card on the PC does not output analog RGB and DVI simultaneously, connect only one of either RGB Input or
HDMI/DVI Input to display the PC on the DTV.
- If he graphics card on the PC does output analog RGB and DVI simultaneously, set the DTV to either RGB Input or HDMI/DVI
Input;(the other mode is set to Plug and Play automatically by the DTV.)
- Then, make the corresponding audio connections. If using a sound card, adjust the PC sound as required.
- In this case, Audio use other cable. When PC (or sound card of PC) have Fiber Optic Digital Audio Output Connector, Digital Audio
DVI Input(DVI) of DTV connect to Fiber Optic Digital Audio Cable (not supplied with the product) or when PC (or sound card of
PC) have Analog Audio Output Connector, RGB/DVI Audio Input of DTV connect to Analog Audio Cable (not supplied with the
product). And then you can listen to normal Audio.
20 Plasma TV
HDMI
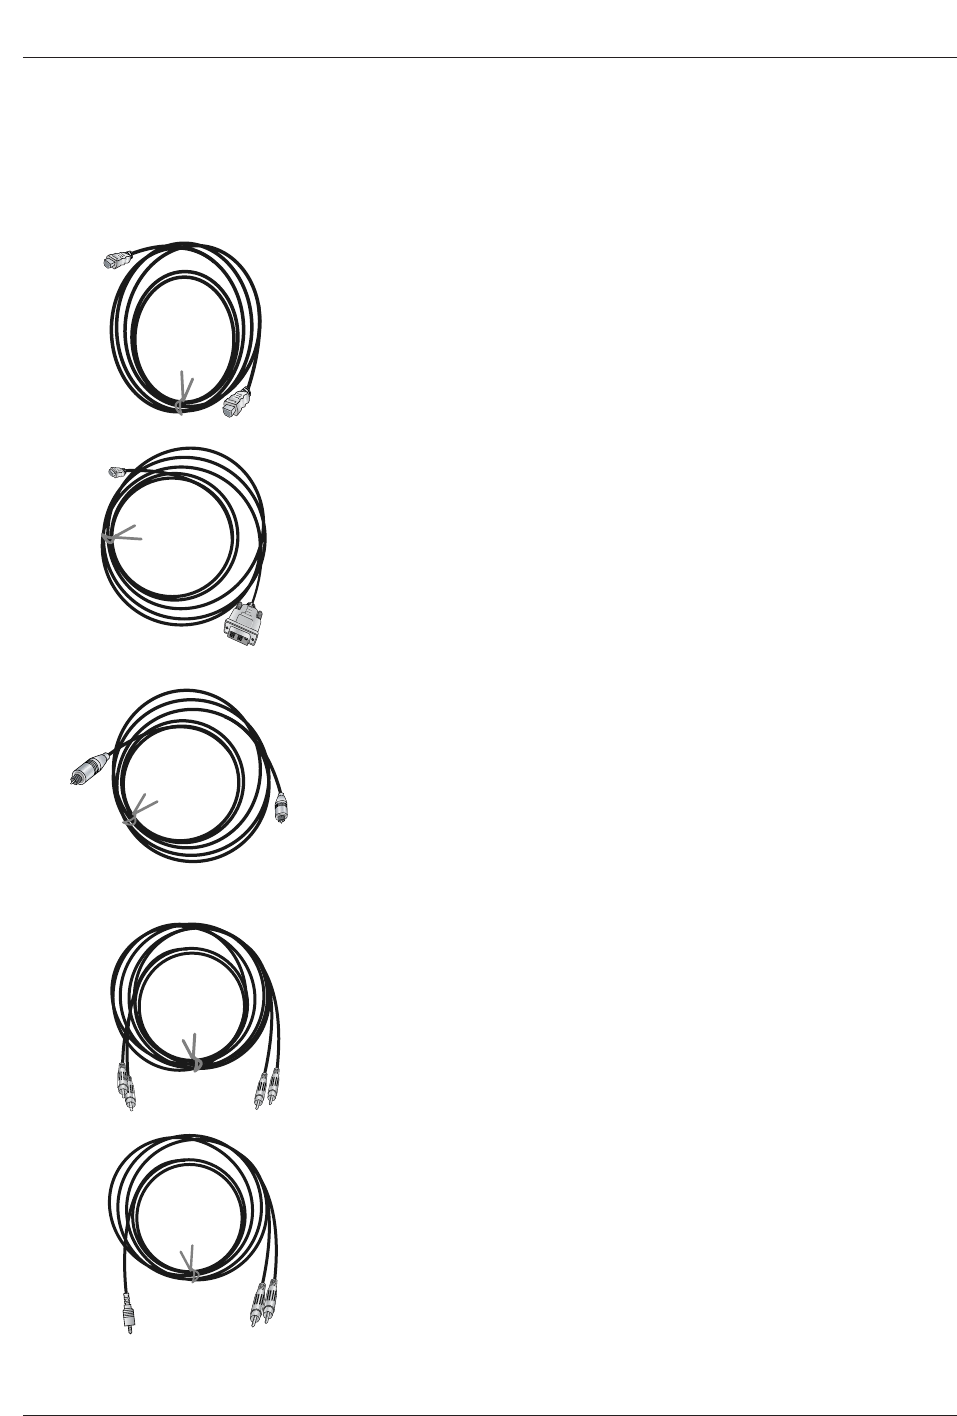
Reference
Cable sample
HDMI Cable
(not supplied with the product)
HDMI to DVI Cable
(not supplied with the product)
Fiber Optic Digital Audio Cable
(not supplied with the product)
Analog Audio Cable(RCA type)
(not supplied with the product)
Analog Audio Cable(Stereo to RCA type)
(not supplied with the product)
Owner’s Manual 21
HDMI
How to use
1. Connect the HDMI/DVI Source Devices(DVD Player or Set Top Box or PC) and the TV SET.
2. Turn on the display by pressing the POWER button on the TV SET and HDMI/DVI Source Devices remote control.
3. Select HDMI/DVI Input source in Main Input option of SETUP menu.(Refer to P.60)
4. Check the image on your TV SET. There may be noise associated with the resolution, vertical pattern, contrast or brightness in
HDMI/DVI Source Devices. If noise is present, change the HDMI/DVI Source Devices to another resolution, change the refresh
rate or adjust the brightness and contrast on the menu until the picture is clear. If the refresh rate of the PC graphics card can
not changed, change the PC graphics card or consult the manufacturer of the PC graphics card.
Notes:
- Depending on the graphics card, DOS mode may not work if you use a HDMI to DVI Cable.
- Avoid keeping a fixed image on the TV SET screen for a long period of time. The fixed image may become permanently imprint-
ed on the screen. Use the Orbiter screen saver when possible.
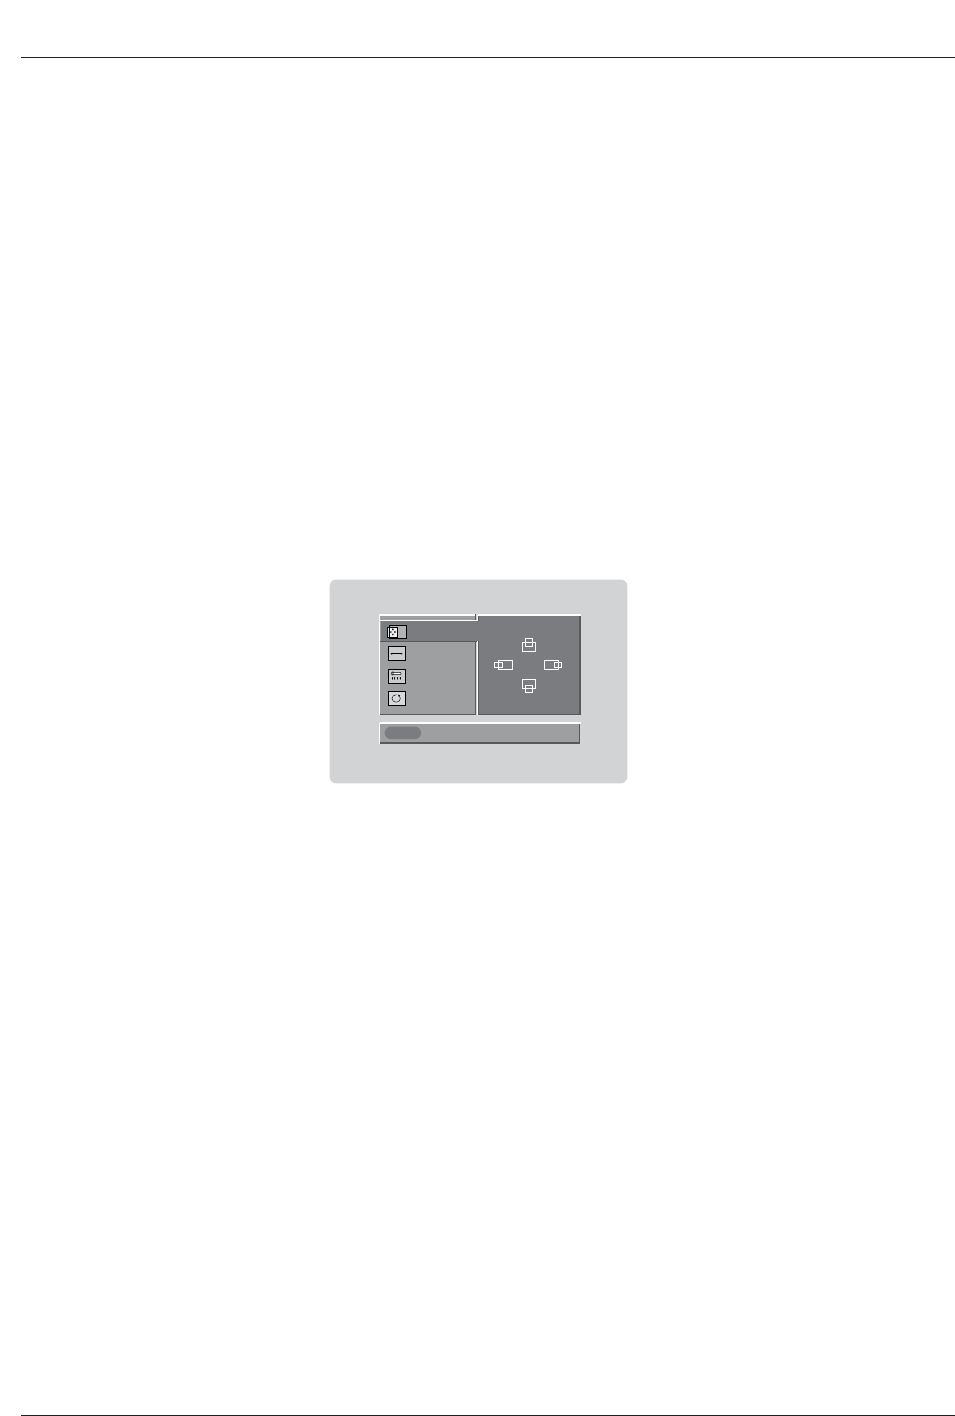
- When Source Devices connected HDMI/DVI Input, output PC Resolution(VGA, SVGA, XGA), Position, Size may not fit to
Screen. As shown the lower picture, press the Adjust button to adjust the screen Position of TV SET and contact an PC graph-
ics card service center.
- When Source Devices connected HDMI/DVI Input output TV SET Resolution(480p, 720p, 1080i), TV SET Display fit EIA/CEA-
861-B Specification to Screen. If not, refer to the Manual of HDMI/DVI Source Devices or contact your service center.
- In case HDMI/DVI Source Devices is not connected Cable or poor cable connection, "NO SIGNAL" OSD display in HDMI/DVI
Input. And In case of, Video Resolution not supported TV SET output in HDMI/DVI Source Devices, "INVALID FORMAT" OSD
display. Refer to the Manual of HDMI/DVI Source Devices or contact your service center.
Close
POSITION G
SIZE
PHASE
RESET
Adjust
D
FG
E
In This Mode, the Supported TV SET Resolution Specification
- 1920 x 1080 I @ 59.94Hz / 60Hz, 16:9
- 1280 x 720 P @ 59.94Hz / 60Hz, 16:9(preferred format)
- 704 x 480 P @ 59.94Hz / 60Hz, 16:9
- 704 x 480 P @ 59.94Hz / 60Hz, 4:3
In This Mode, the Supported PC Resolution Specification
- 640 x 480 @ 60Hz
- 640 x 480 @ 72Hz
- 640 x 480 @ 75Hz
- 800 x 600 @ 56Hz
- 800 x 600 @ 60Hz
- 800 x 600 @ 72Hz
- 800 x 600 @ 75Hz
- 1024 x 768 @ 60Hz(preferred format)
- 1024 x 768 @ 70Hz
- 1024 x 768 @ 75Hz
22 Plasma TV
Installation
TV Guide On Screen Setup
- The TV Guide On Screen system uses Setup information to provide you with show listings and lineups in your area—which are
updated several times a day.
- Once you set up the TV according to manufacturer’s instructions, you are ready to set up the TV Guide On Screen system.
Note: The TV Guide On Screen System interactive program guide provides listings for cable-ready, cable box, and digital cable
services as well as over-the-air broadcast. It does not provide listings for satellite services.
AC INPUTAC INPUT
S-VIDEO
OUT
IN
(R) AUDIO (L) VIDEO
34
OUTPUT
SWITCH
ANT IN
ANT OUT
DVI
COMPONENT2
DIGITAL AUDIO(OPTICAL)
VIDEO INPUT
AUDIO INPUT
CABLE
HDMI /
DVI(VIDEO)
Cable
ANTENNA
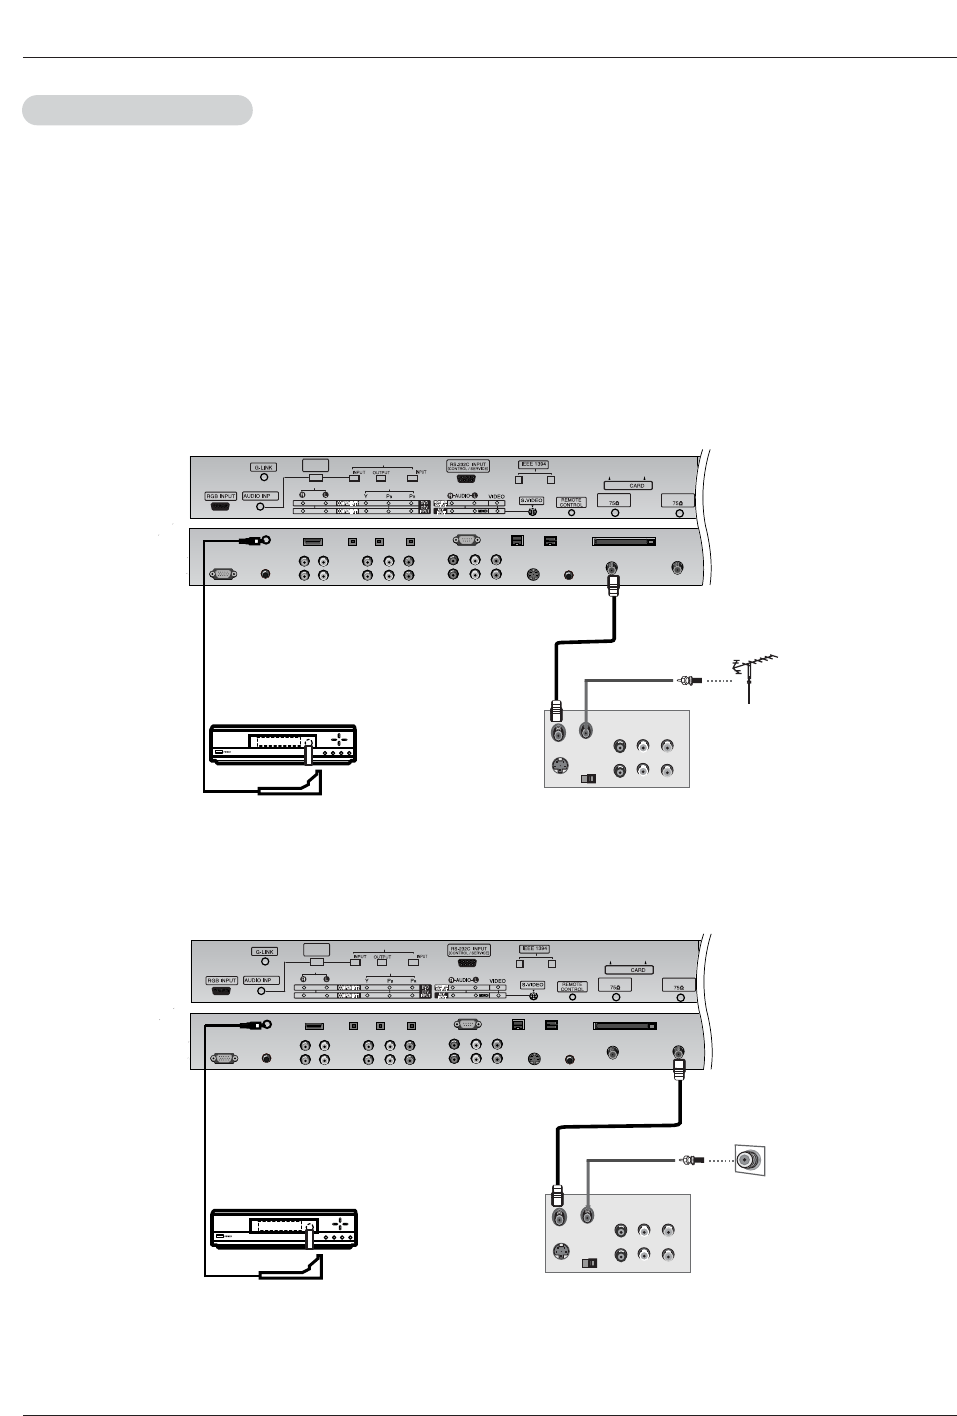
How to connect VCR and Cable Box
1. Antenna Service
2. Cable Service without a Cable Box
AC INPUTAC INPUT
S-VIDEO
OUT
IN
(R) AUDIO (L) VIDEO
34
OUTPUT
SWITCH
DVI
COMPONENT2
DIGITAL AUDIO(OPTICAL)
VIDEO INPUT
AUDIO INPUT
CABLE
HDMI /
DVI(VIDEO)
Cable
ANTENNA
ANT IN
ANT OUT
VCR Rear
VCR Front
VCR Rear
VCR Front
Owner’s Manual 23
Installation
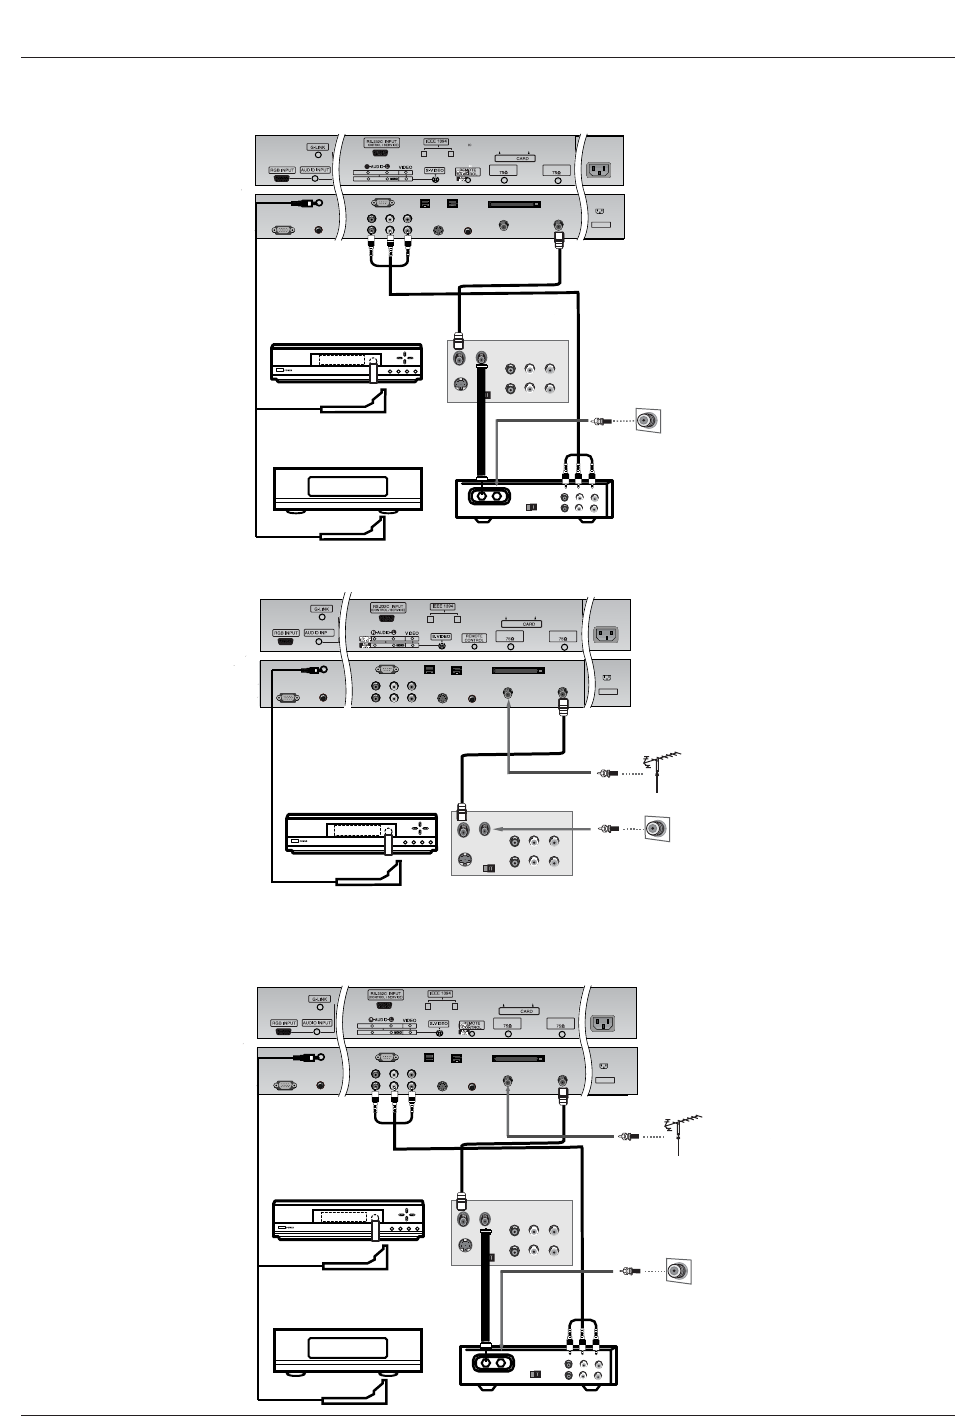
3. Cable Service with a Cable Box
AC INPUTAC INPUT
RF
TV
VCR
Cable
(R) AUDIO (L) VIDEO
34
OUTPUT
SWITCH
CABLE
Cable
ANTENNA
S-VIDEO
OUT
IN
(R) AUDIO (L) VIDEO
34
OUTPUT
SWITCH
ANT IN
ANT OUT
4. Antenna and Cable Service without a Cable Box
5. Antenna and Cable Service with a Cable Box
AC INPUT
S-VIDEO
OUT
IN
(R) AUDIO (L) VIDEO
34
OUTPUT
SWITCH
CABLE
Cable
ANTENNA
ANT IN
ANT OUT
AC INPUTAC INPUT
AC INPUTAC INPUT
CABLE
Cable
ANTENNA
S-VIDEO
OUT
IN
(R) AUDIO (L) VIDEO
34
OUTPUT
SWITCH
RF
TV
VCR
Cable
(R) AUDIO (L) VIDEO
34
OUTPUT
SWITCH
ANT OUT
ANT IN
Cable Box Rear
VCR Rear
VCR Front
Cable Box Front
or
VCR Rear
VCR Front
Cable Box Rear
VCR Rear
VCR Front
Cable Box Front
or
24 Plasma TV
Installation
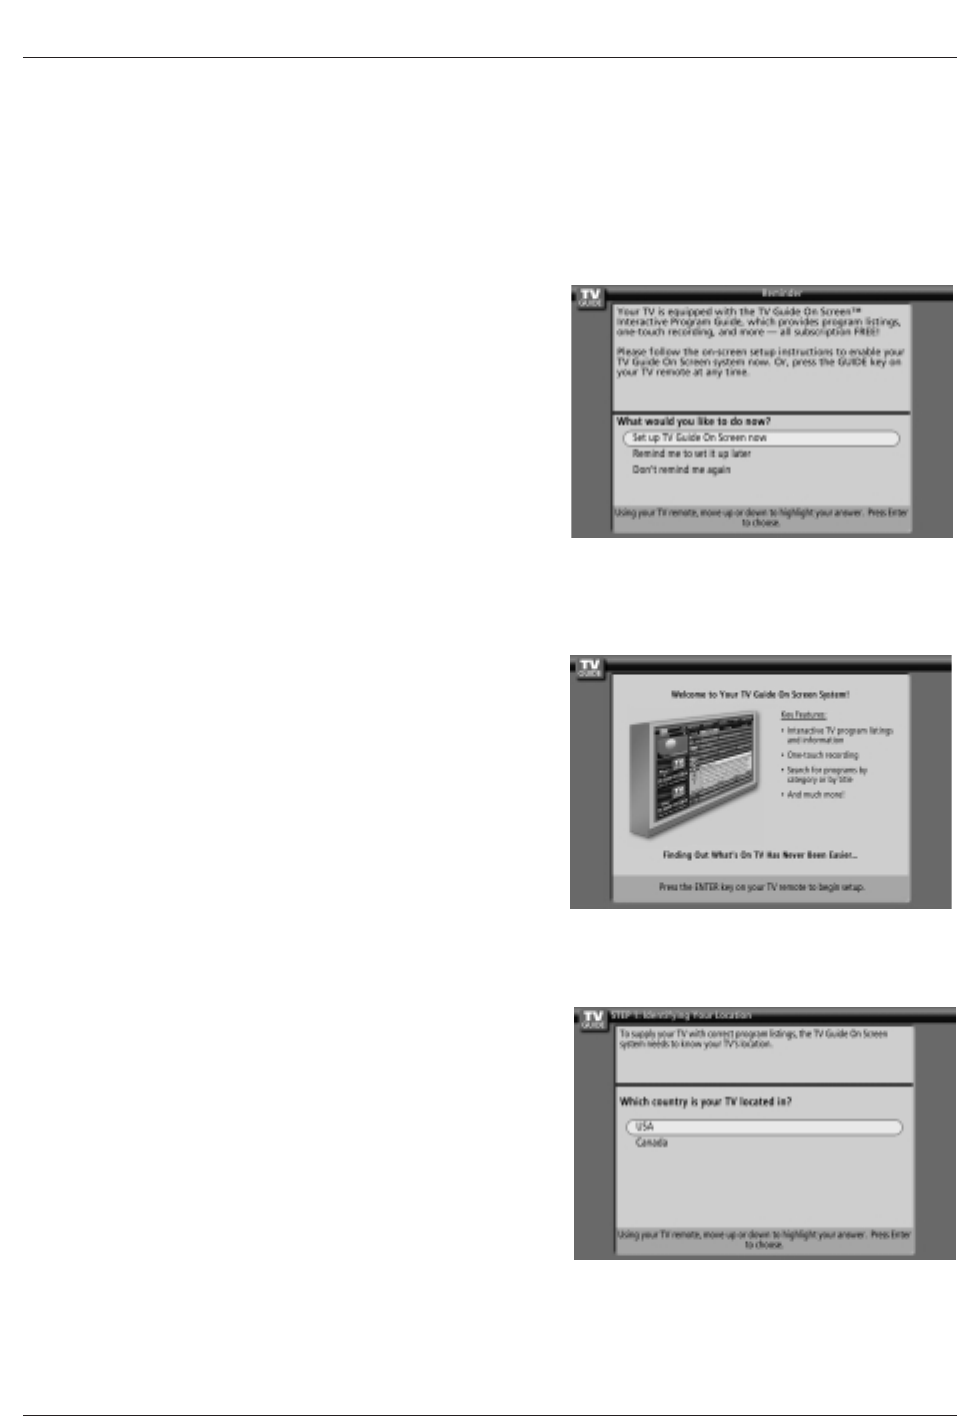
1.Reminder Screen
The TV Guide On Screen system's Reminder Screen appears:
-- after initial TV set up
-- if you power Off the TV and then power it back On
To make a selection, use the D/Ebutton to highlight to an option,
and press ENTER.
• "Set up TV Guide On Screen now," displays the Welcome Screen.
Press ENTER to begin Setup.
• "Remind me to set up later" returns you to watching TV.
• "Don't remind me again" returns you to watching TV and stops the
reminder screen from appearing upon power On.
How to use
1. Screen 1: Country
•This screen asks you the location of your TV.
•Use the D/Ebutton to highlight a country.
•Press ENTER to display Screen 2.
2.Welcome Screen
The TV Guide On Screen system's Welcome Screen appears:
-- by pressing the TV Guide key
-- when you power On your TV if you previously skipped "Set up TV
Guide On Screen now" on the Reminder Screen.
The Welcome Screen highlights features of the TV Guide On Screen
system.
Press ENTER to begin Setup.
Note:
• The G-LINK cable is necessary for the TV Guide On Screen system to work with your Cable Box and VCR. See Page
22~23 for G-LINK connection instructions.