LG Electronics USA E19MAE07 Refrigerator User Manual EMISSION TEST REPORT
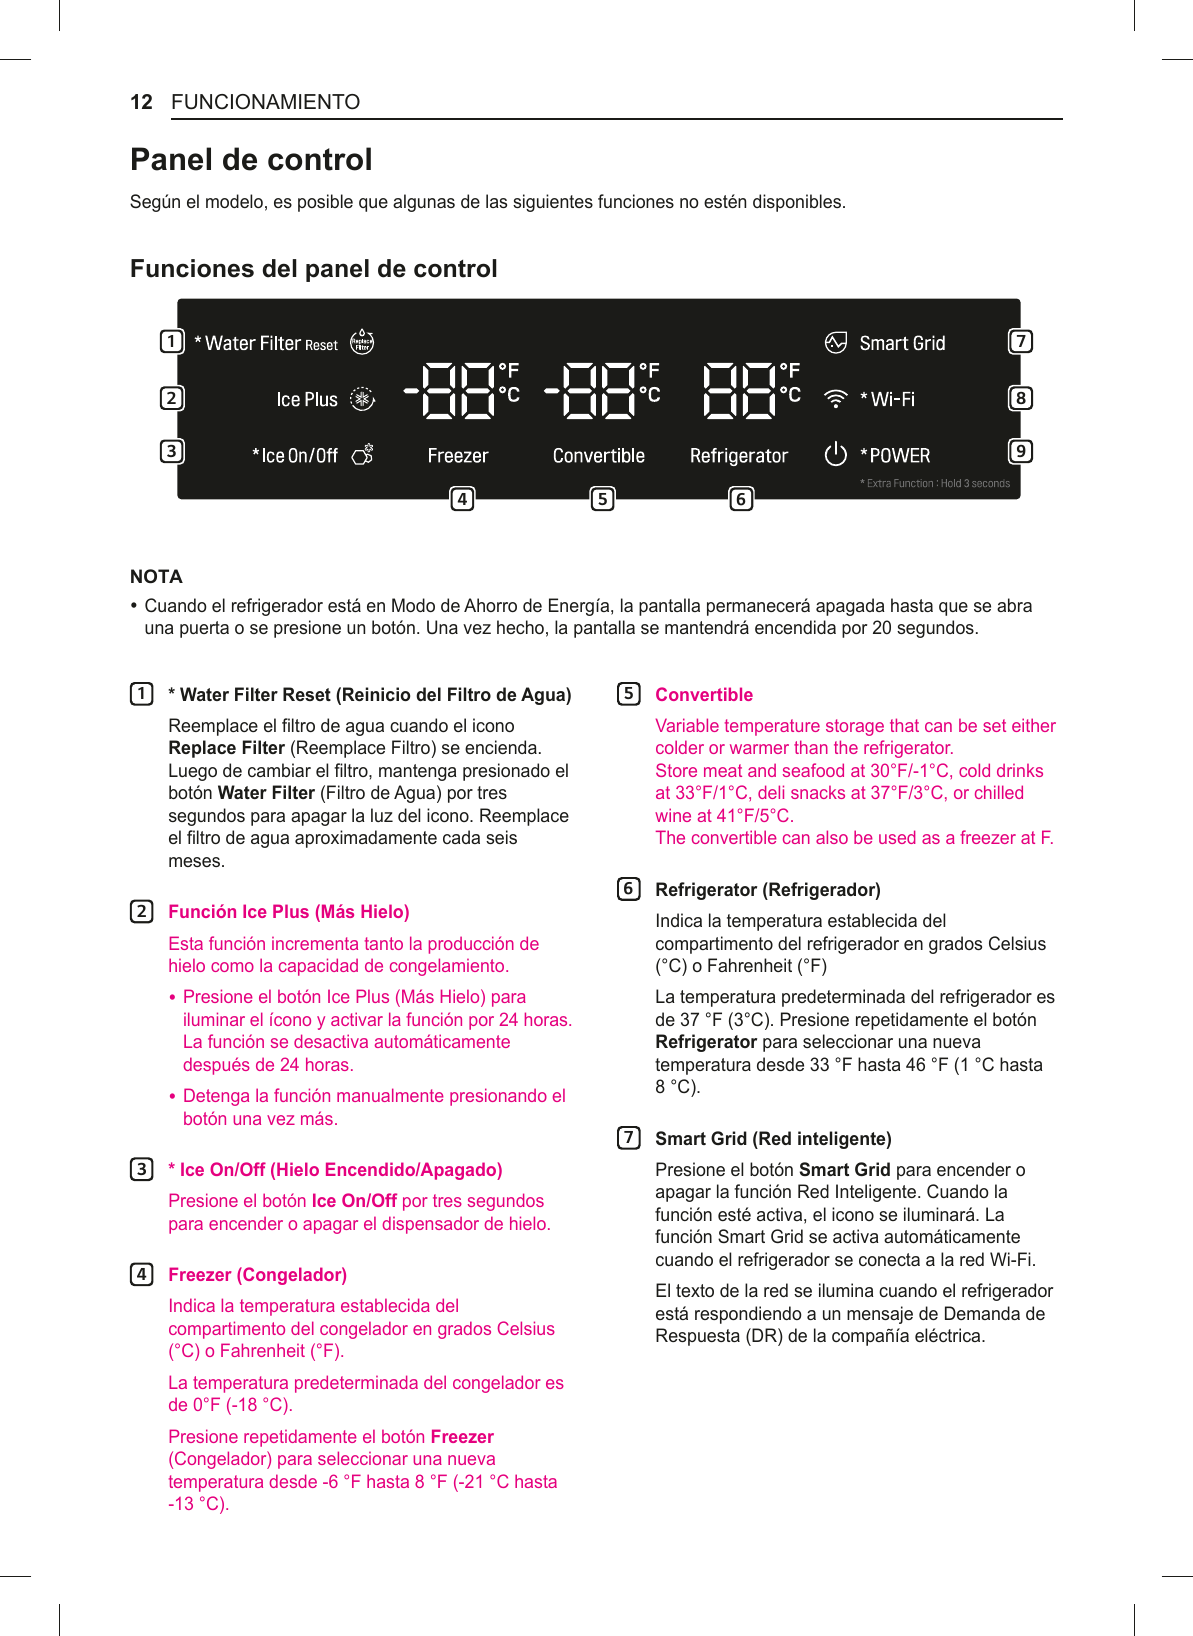
LG Electronics USA Refrigerator EMISSION TEST REPORT
UserManual.wiki
>
LG Electronics USA
>
E19MAE07 User Manual
User Manual
Navigation menu
Upload a User Manual
Namespaces
Wiki Guide
HTML
PDF
Info
Views
User Manual
Discussion / Help
Navigation

![6SAFETY INSTRUCTIONSMAINTENANCE %Do not use a hair dryer to dry the inside of the refrigerator. %Do not light a candle to remove odors in the refrigerator. %,QWKHHYHQWRIDUHIULJHUDQWOHDNPRYHÀDPPDEOHREMHFWVDZD\IURPWKHUHIULJHUDWRU(QVXUHWKHDUHDLVadequately ventilated and contact an authorized service center. %.HHSÀDPPDEOHPDWHULDOVDQGYDSRUVVXFKDVJDVROLQHDZD\IURPWKHUHIULJHUDWRU %This appliance is intended to be used in household and similar applications such as staff kitchen areas in VKRSVRI¿FHVDQGRWKHUZRUNLQJHQYLURQPHQWVIDUPKRXVHVDQGE\FOLHQWVLQKRWHOVPRWHOVDQGRWKHUUHVLGHQWLDOW\SHHQYLURQPHQWVEHGDQGEUHDNIDVWW\SHHQYLURQPHQWVFDWHULQJDQGVLPLODUQRQUHWDLOapplications. %Unplug the power plug before cleaning or repairing the refrigerator. %The refrigerator and freezer compartment lights are interior LED lighting, and service should be performed E\DTXDOL¿HGWHFKQLFLDQ %Unplug the power plug immediately in the event of a blackout or thunderstorm. %Turn the power off if water or dust penetrates into the refrigerator. Call a service agent. %Do not store glass containers or soda in the freezer compartment. Contents may expand when frozen, break the container and cause injury. %'RQRWVWRUHGLVDVVHPEOHRUUHSDLUWKHDSSOLDQFH\RXUVHOIRUDOORZXQTXDOL¿HGSHUVRQQHOWRGRVR %If the electrical supply cord is damaged, it must only be replaced by the manufacturer or its service agent or DVLPLODUTXDOL¿HGSHUVRQLQRUGHUWRDYRLGDKD]DUG %'RQRWVWRUHH[SORVLYHVXEVWDQFHVVXFKDVDHURVROFDQVZLWKDÀDPPDEOHSURSHOODQWLQWKLVDSSOLDQFH %In case of LED, it should be replaced by service person.DISPOSAL %Junked or abandoned refrigerators are dangerous, even if they are sitting for only a few days. When disposing of the refrigerator, remove the packing materials from the door or take off the doors but leave the shelves in place so that children may not easily climb inside. %,IGLVSRVLQJRIDUHIULJHUDWRUPDNHVXUHWKHUHIULJHUDQWLVUHPRYHGIRUSURSHUGLVSRVDOE\DTXDOL¿HGVHUYLFHU,I\RXUHOHDVHWKHUHIULJHUDQW\RXPD\EH¿QHGRULPSULVRQHGLQDFFRUGDQFHZLWKWKHUHOHYDQWHQYLURQPHQWDOlaw.GROUNDING INSTRUCTIONS %Improper connection of the equipment-grounding conductor can result in a risk of electric shock. Check with DTXDOL¿HGHOHFWULFLDQRUVHUYLFHSHUVRQLI\RXDUHLQGRXEWZKHWKHUWKHDSSOLDQFHLVSURSHUO\JURXQGHG'RQRWPRGLI\WKHSOXJSURYLGHGZLWKWKHDSSOLDQFHLILWZLOOQRW¿WWKHRXWOHWKDYHDSURSHURXWOHWLQVWDOOHGE\DTXDOL¿HGHOHFWULFLDQ %+DYHDFHUWL¿HGHOHFWULFLDQFKHFNWKHZDOORXWOHWDQGZLULQJIRUSURSHUJURXQGLQJ %1HYHUXQSOXJWKHDSSOLDQFHE\SXOOLQJRQWKHSRZHUFRUG$OZD\VJULSWKHSOXJ¿UPO\DQGSXOOVWUDLJKWRXWIURPWKHRXWOHW)DLOXUHWRGRVRPD\GDPDJHWKHSRZHUFRUGUHVXOWLQJLQDULVNRI¿UHDQGHOHFWULFVKRFN](https://usermanual.wiki/LG-Electronics-USA/E19MAE07/User-Guide-3706887-Page-7.png)

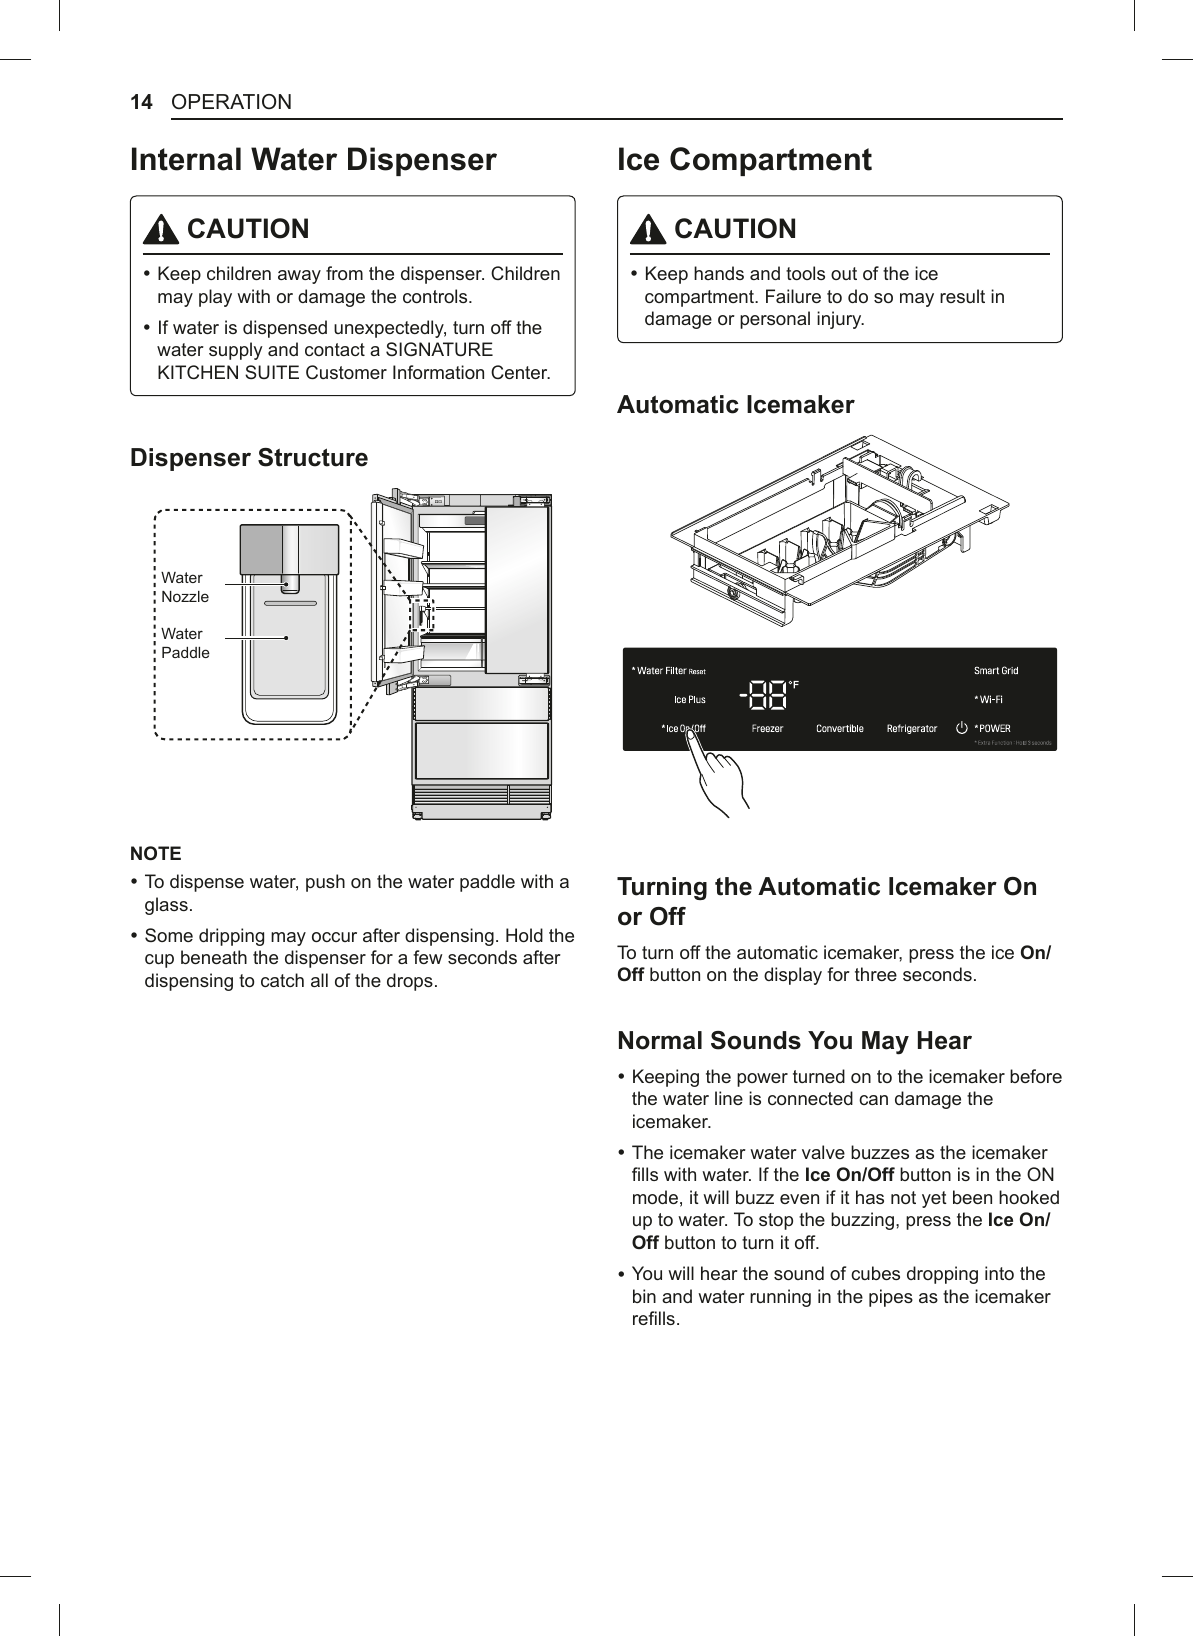
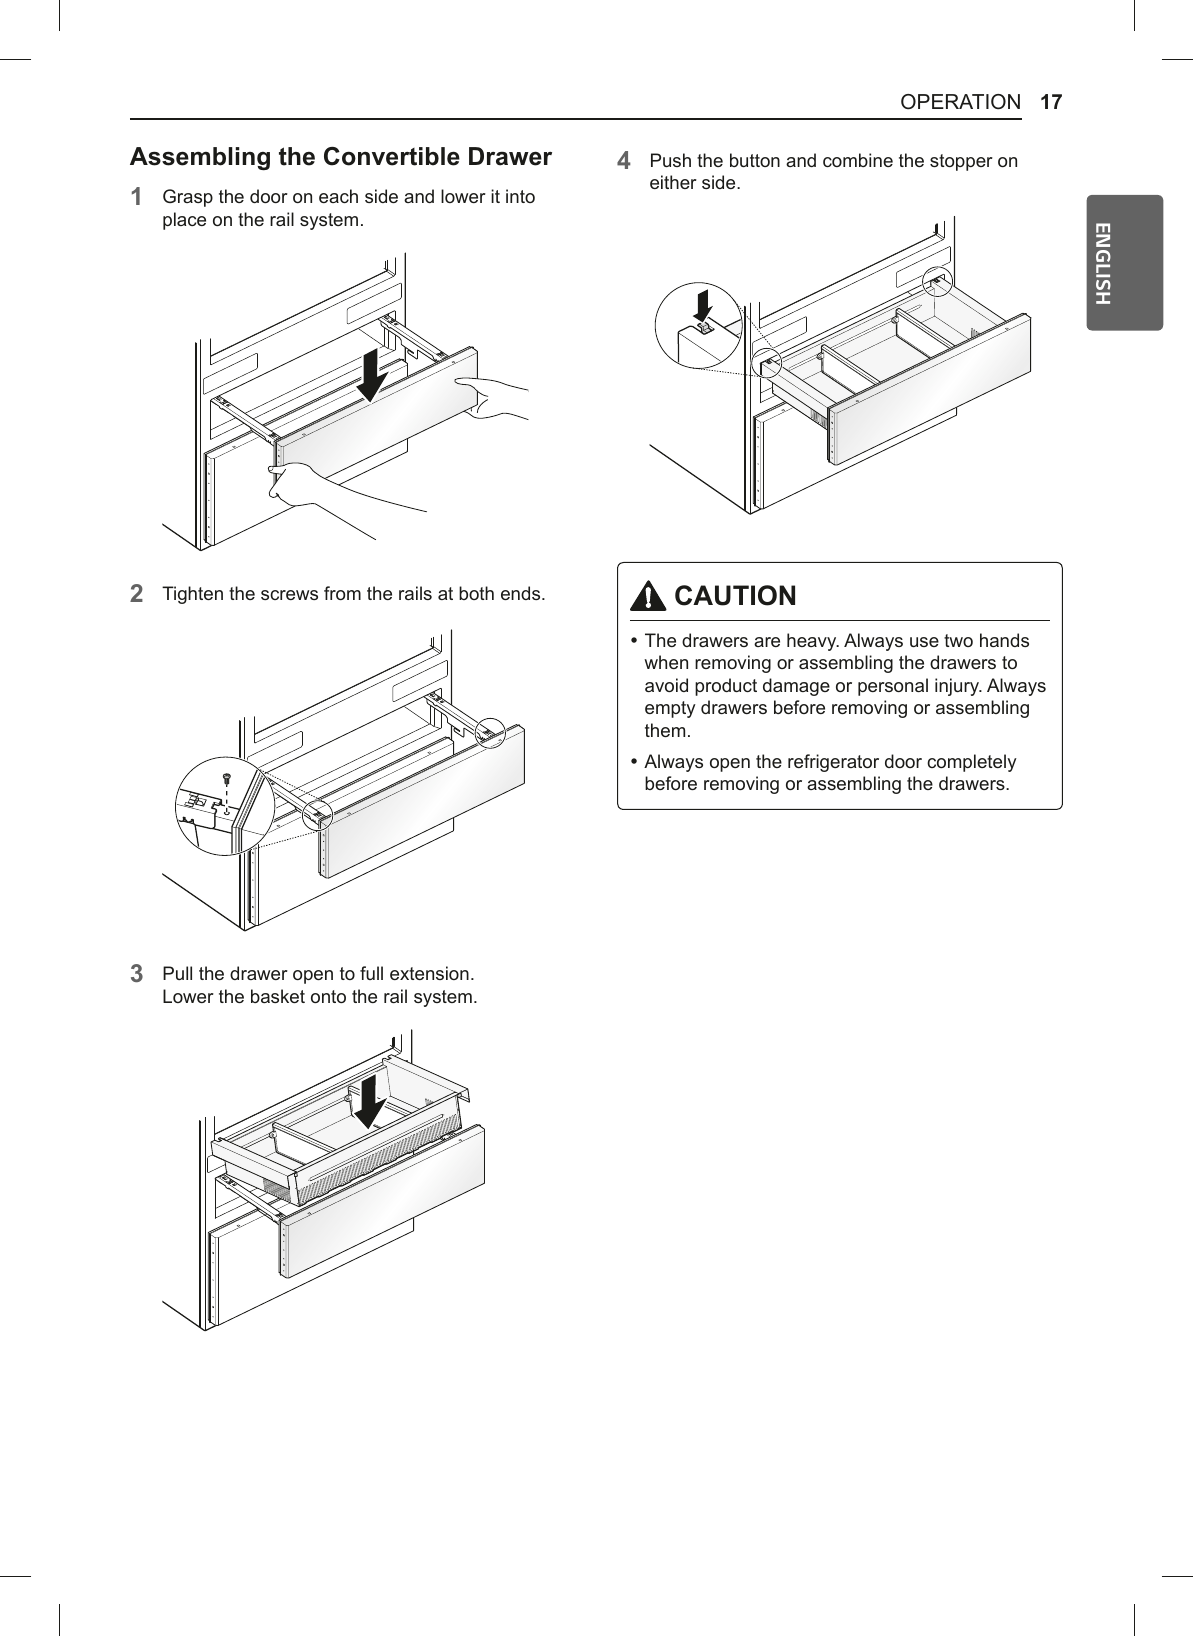
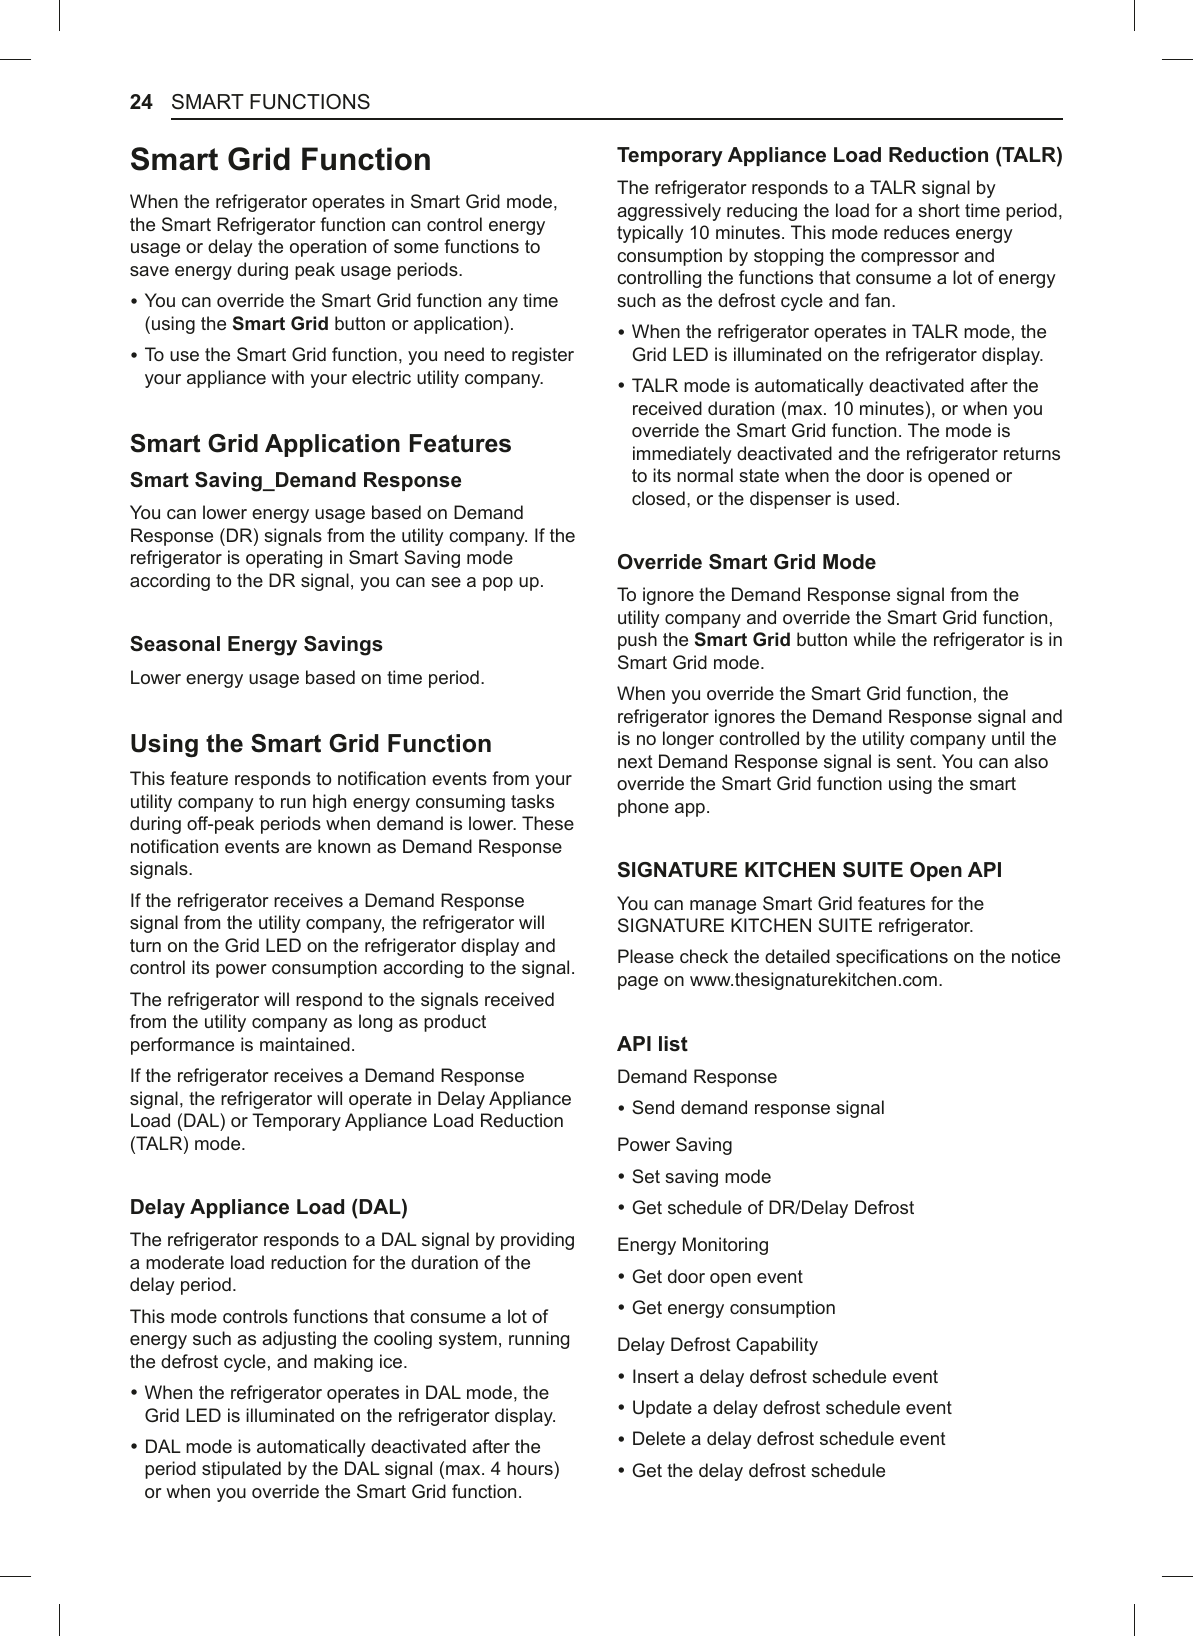
![18 OPERATIONFreezer Drawer5HPRYLQJWKH)UHH]HU'UDZHUNOTE %Before removing the Freezer Drawer, it must be removing the Convertible Drawer. 1Pull the drawer out until it stops. Empty all contents out of the drawer before removing it.2Push the button and remove the stopper on either side.3Remove the basket by lifting the basket from the rail system.4Remove the screws from the rails at both ends.5Hold both sides of the door and lift it to remove it from the rail system.](https://usermanual.wiki/LG-Electronics-USA/E19MAE07/User-Guide-3706887-Page-19.png)
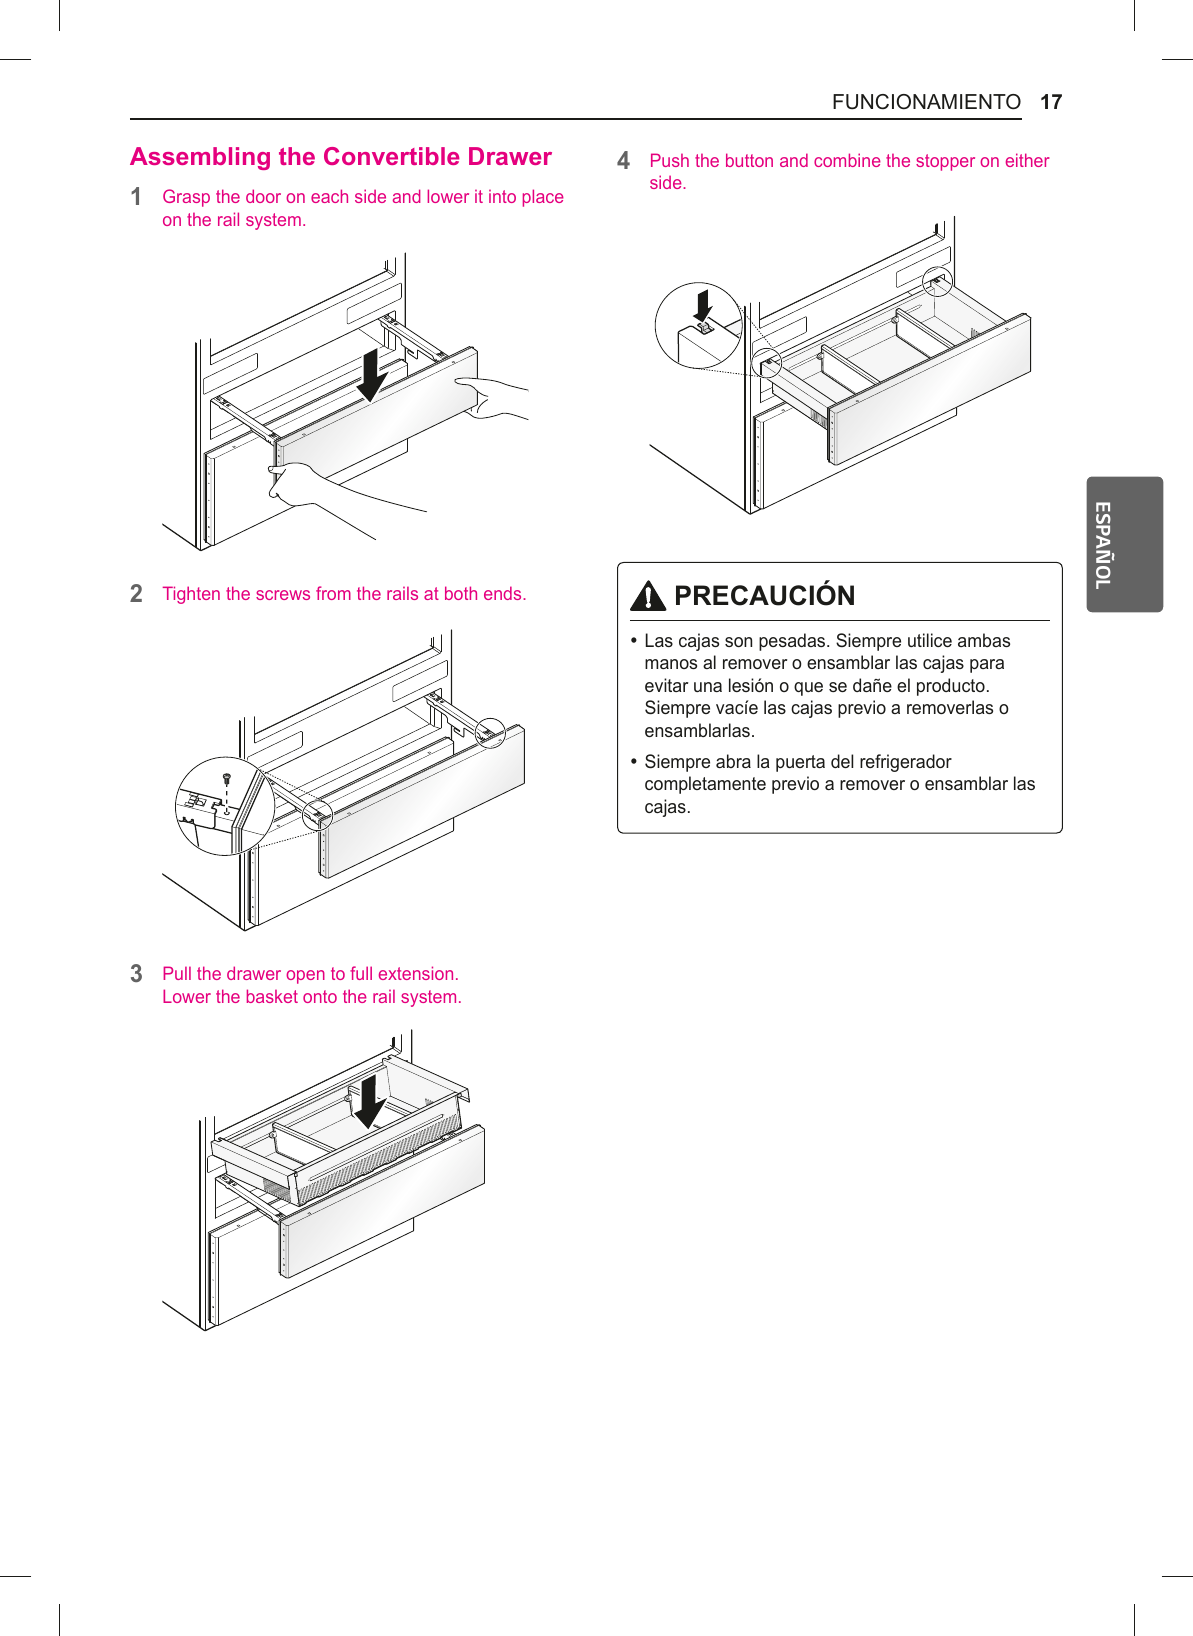
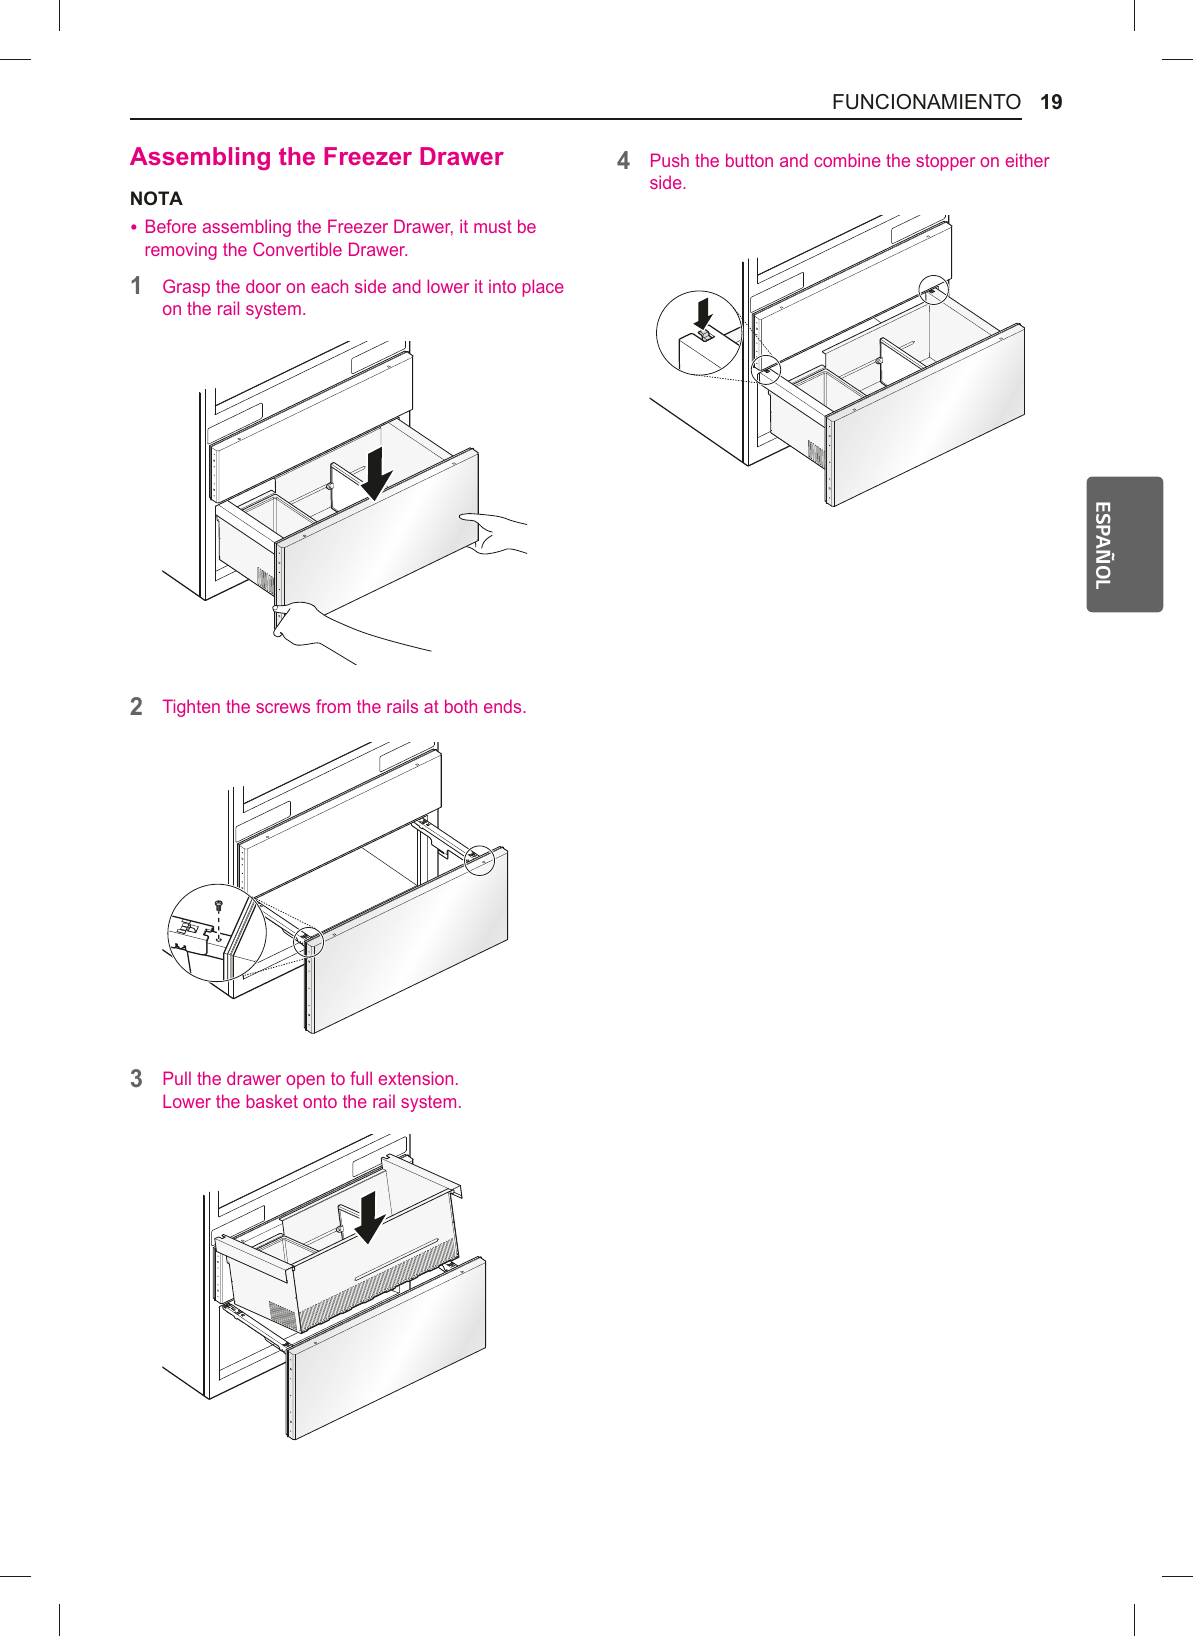
![19OPERATIONENGLISH$VVHPEOLQJWKH)UHH]HU'UDZHUNOTE %Before assembling the Freezer Drawer, it must be removing the Convertible Drawer. 1Grasp the door on each side and lower it into place on the rail system.2Tighten the screws from the rails at both ends. 3Pull the drawer open to full extension. Lower the basket onto the rail system.4Push the button and combine the stopper on either side.](https://usermanual.wiki/LG-Electronics-USA/E19MAE07/User-Guide-3706887-Page-20.png)
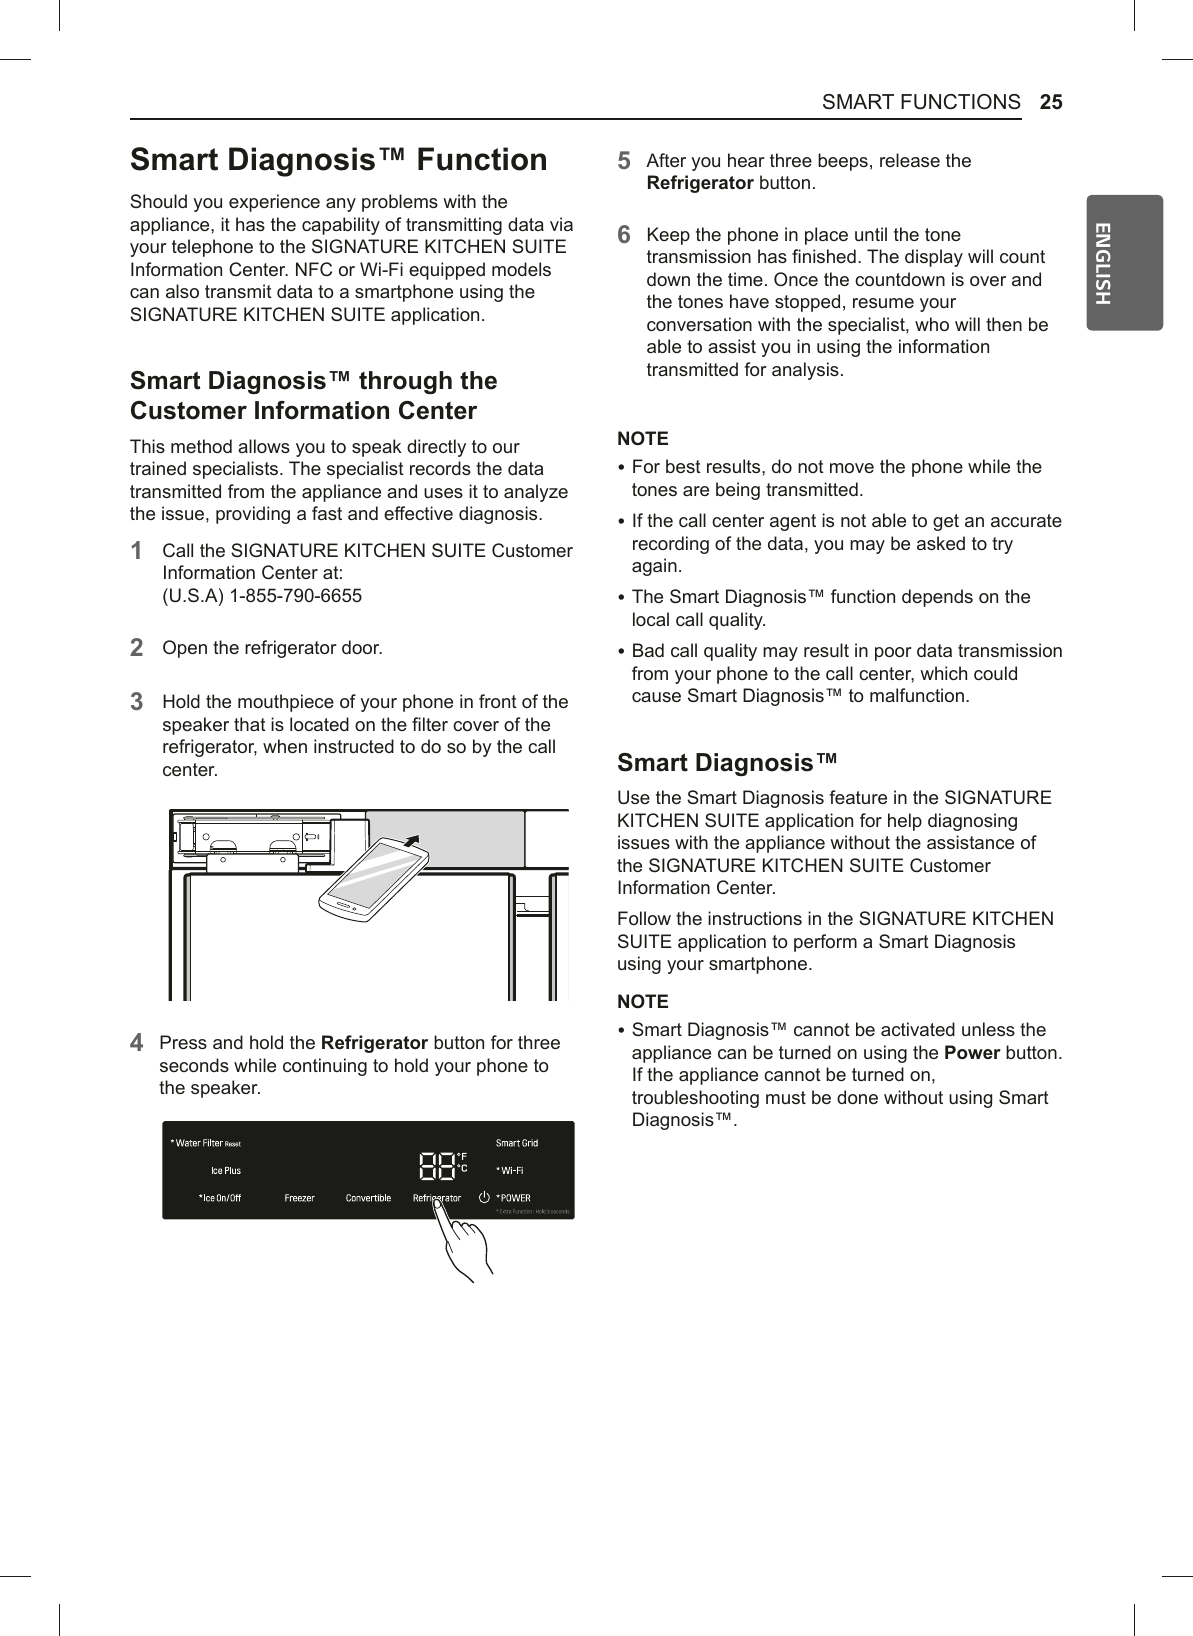
![28 MAINTENANCEMAINTENANCE&OHDQLQJ WARNING %8VHQRQÀDPPDEOHFOHDQHU)DLOXUHWRGRVRFDQUHVXOWLQ¿UHH[SORVLRQRUGHDWK CAUTION %Do not use an abrasive cloth or sponge when cleaning the interior and exterior of the refrigerator. %Do not place your hand on the bottom surface of the refrigerator when opening and closing the doors.*HQHUDO&OHDQLQJ7LSV %7KHUHIULJHUDWRUGHIURVWVDXWRPDWLFDOO\KRZHYHUclean it once a month to prevent odors. %Wipe up spills immediately. %Unplug the refrigerator or disconnect power before cleaning. %Remove all removable parts, such as shelves. %Use a clean sponge or soft cloth and a mild detergent in warm water. Do not use abrasive or harsh cleaners. %Hand wash, rinse and dry all surfaces thoroughly. %When cleaning the inside or outside of the appliance, do not wipe it with a rough brush, WRRWKSDVWHRUÀDPPDEOHPDWHULDOV'RQRWXVHFOHDQLQJDJHQWVFRQWDLQLQJÀDPPDEOHVXEVWDQFHV <Doing so may cause discoloration or damage to the appliance. <Flammable substances: alcohol (ethanol, methanol, isopropyl alcohol, isobutyl alcohol, HWFWKLQQHUEOHDFKEHQ]HQHÀDPPDEOHOLTXLGabrasive, etc.Inside WallsTo help remove odors, wash the inside of the refrigerator with a mixture of baking soda and warm water. Mix 2 tablespoons of baking soda to 1 quart of water (26 g soda to 1 liter water.) Be sure the baking soda is completely dissolved so it does not scratch the surfaces of the refrigerator.Door Liners and GasketsUse a clean sponge or soft cloth and a mild detergent in warm water. Do not use cleaning waxes, concentrated etergents, bleaches, or cleaners containing petroleum on plastic refrigerator parts.Plastic Parts (covers and panels)Use a clean sponge or soft cloth and a mild detergent in warm water. Do not use glass cleaners, abrasive cleansers, or flammable fluids. These can scratch or damage the material.](https://usermanual.wiki/LG-Electronics-USA/E19MAE07/User-Guide-3706887-Page-29.png)
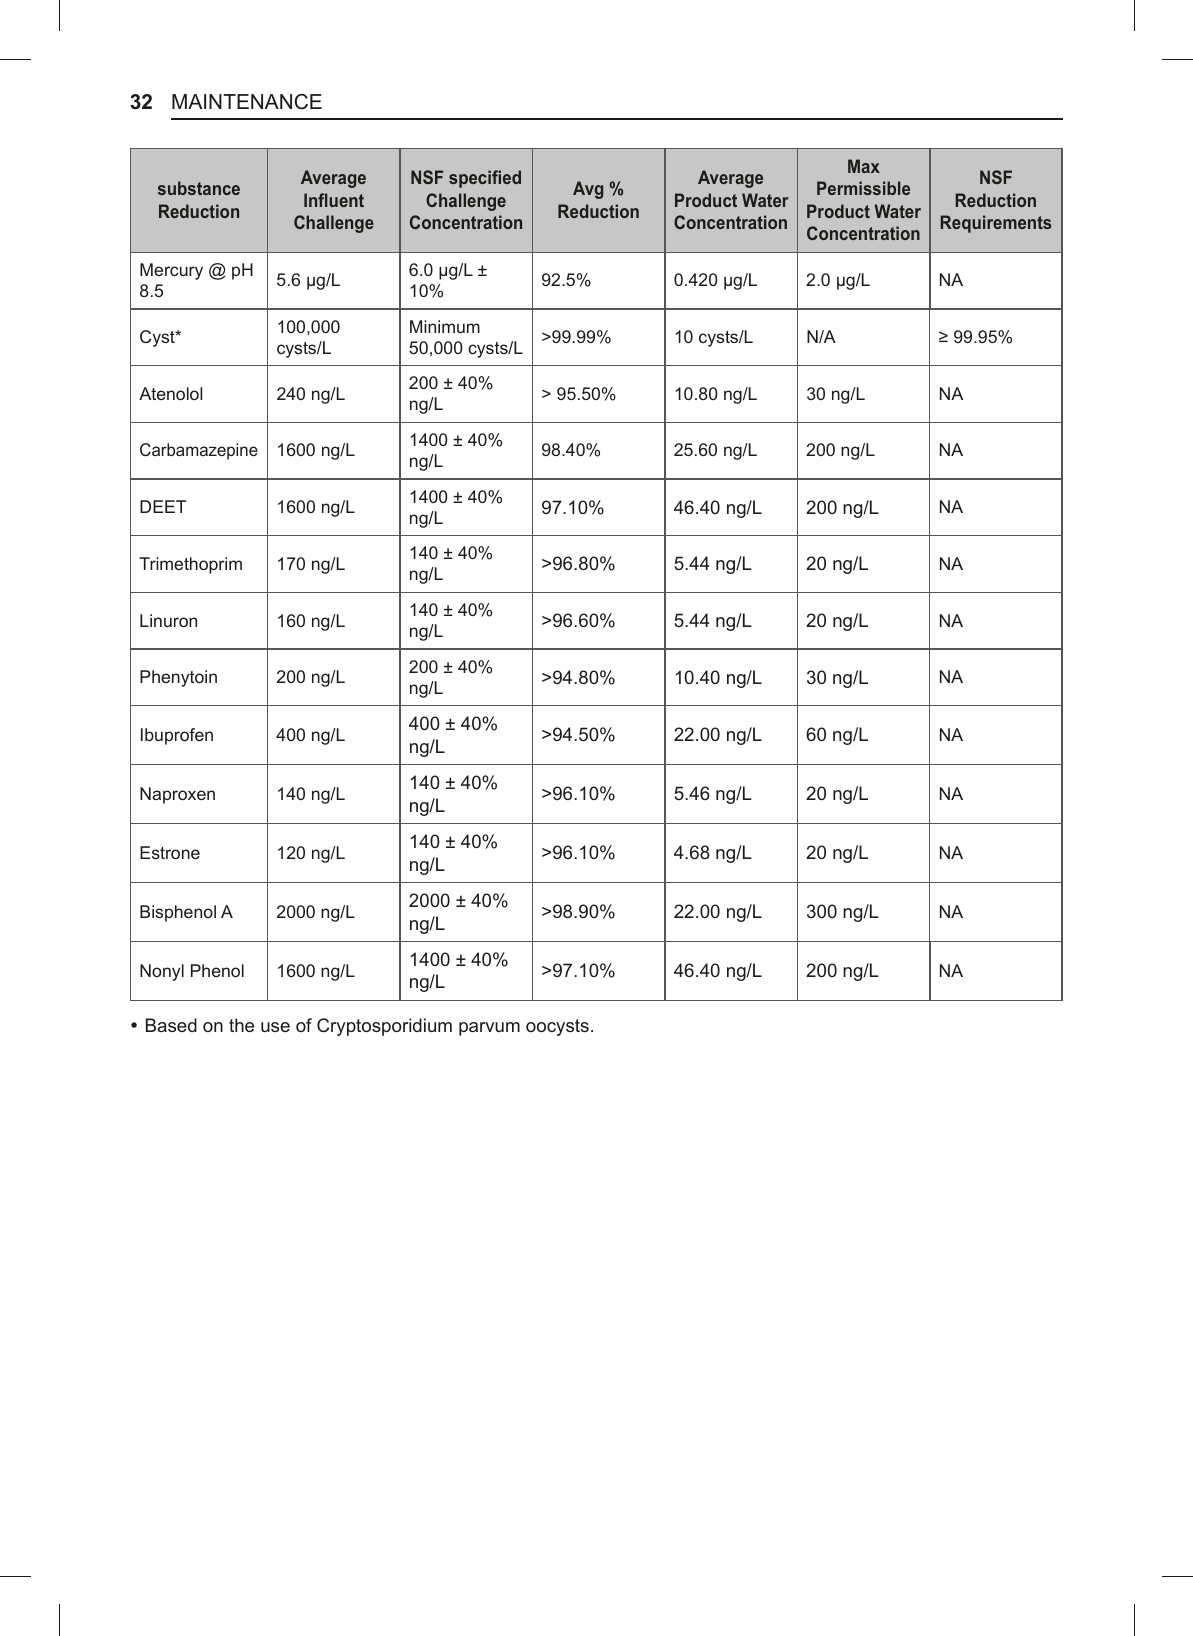
![33MAINTENANCEENGLISHApplication Guidelines/Water Supply ParametersService Flow 0.5 gpm (1.89 lpm)Water Supply Community or Private Well - Potable WaterWater Pressure 20 – 120 psi (138 – 827 kPa)Water Temperature 33 °F – 100 °F (0.6 °C – 37.8 °C)Capacity 200 gallons (757 liters)It is essential that the manufacturer’s recommended installation, maintenance and filter replacement requirements be carried out for the product to perform as advertised.NOTE %While the testing was performed under standard laboratory conditions, actual performance may vary.Replacement Cartridge: LT1000P/PC/PCS/P(S)For replacement filters, visit your local dealer or distributor or search under “water filters” on the WKHVLJQDWXUHNLWFKHQFRP website.For further assistance, the SIGNATURE KITCHEN SUITE Customer Information Center is open 24 hours a day/7 days a week.USA : 1-855-790-6655NSF is trademark of NSF. WARNING7RUHGXFHWKHULVNDVVRFLDWHGZLWKFKRNLQJ %Do not allow children under 3 years of age to have access to small parts during the installation of this product.To reduce the risk associated with the LQJHVWLRQRIFRQWDPLQDQWV %Do not use with water that is microbiologically unsafe or of unknown quality without adequate disinfection before or after the system. Systems FHUWL¿HGIRUF\VWUHGXFWLRQPD\EHXVHGRQGLVLQIHFWHGZDWHUWKDWPD\FRQWDLQ¿OWHUDEOHcysts. EPA Establishment # 070595-MEX-001 CAUTIONTo reduce the risk associated with property GDPDJHGXHWRZDWHUOHDNDJH %Read and follow Use Instructions before installation and use of this system. %Installation and use MUST comply with all state and local plumbing codes. %Do not install if water pressure exceeds 120 psi (827 kPa). If your water pressure exceeds 80 psi, you must install a pressure limiting valve. Contact a plumber if uncertain how to check your water pressure. %Do not install where water hammer conditions may occur. If water hammer conditions exist you must install a water hammer arrester. Contact a plumbing professional if you are uncertain how to check for this condition. %Do not install on hot water supply lines. The maximum operating water temperature of this ¿OWHUV\VWHPLV)& %3URWHFW¿OWHUIURPIUHH]LQJ'UDLQ¿OWHUZKHQtemperatures drop below 40 °F (4.4 °C). %7KHGLVSRVDEOH¿OWHUFDUWULGJH0867EHUHSODFHGevery 6 months, at the rated capacity or if a QRWLFHDEOHUHGXFWLRQLQÀRZUDWHRFFXUV %3URWHFWIURPIUHH]LQJUHPRYH¿OWHUFDUWULGJHwhen temperatures are expected to drop below 33 °F. %Do not install systems in areas where ambient temperatures may go above 110° F (43.3 °C). %:KHUHDEDFNÀRZSUHYHQWLRQGHYLFHLVLQVWDOOHGon a water system, a device for controlling pressure due to thermal expansion must be installed. %(QVXUHDOOWXELQJDQG¿WWLQJVDUHVHFXUHDQGIUHHof leaks.](https://usermanual.wiki/LG-Electronics-USA/E19MAE07/User-Guide-3706887-Page-34.png)
![34 TROUBLESHOOTINGTROUBLESHOOTING)$4V)UHTXHQWO\$VNHG4XHVWLRQV4 :KDWDUHWKHEHVWWHPSHUDWXUHVHWWLQJVIRUP\IUHH]HU"A: The default setting for the freezer is 0° Fahrenheit (-18° Celsius). Adjust these settings as necessary to keep food at desired temperatures. Ice cream should be firm and ice cubes should not melt in the freezer. To switch the display from Fahrenheit to Celsius, press the Freezer button first to wake the display then press and hold the Freezer and Smart Grid buttons until you hear a beep and the settings in the display change. 4 :KDWDUHWKHEHVWWHPSHUDWXUHVHWWLQJVIRUP\UHIULJHUDWRU"A: The default setting for the refrigerator is 37° Fahrenheit (3° Celsius). Adjust these settings as necessary to keep food at desired temperatures. To switch the display from Fahrenheit to Celsius, press the Refrigerator button first to wake the display then press and hold the Refrigerator and Smart Grid buttons until you hear a beep and the settings in the display change.4 +RZGR,VHWWKHWHPSHUDWXUH"A: Continually press the 5HIULJHUDWRURU&RQYHUWLEOHRU)UHH]HUEXWWRQRQWKHFRQWUROSDQHOXQWLOWKHdesired temperature appears. The numbers will cycle from highest to lowest and then return to the highest again with continuous pressing.4 :K\GR,KHDUDEX]]LQJQRLVHIURPP\IUHH]HUSHULRGLFDOO\"A: This may happen if you do not have a water source attached to your freezer and the icemaker is turned on. If you do not have a water source attached to the freezer you should turn the icemaker off on the control panel.4 :K\GRHVWKHLFHPDNHUWUD\ORRNFURRNHG"A: This is a normal part of the icemaker cycle. The icemaker tray may appear level or with a slight tilt. The change in position is to assist in the freezing process.4 0\IUHH]HULVSRZHUHGRQDQGWKHFRQWUROVDUHZRUNLQJEXWLW¶VQRWFRROLQJDQGWKHGLVSOD\VKRZV³2)´VHHEHORZ:KDWLVZURQJ"A: The freezer is in Demo Mode. This mode disables cooling to save energy while the appliance is on display in a store. To restore normal operation, press Freezer button first to wake the display then press and hold the Freezer and Water Filter Reset buttons until you hear a beep and the temperature setting appears in the display. Use the same procedure to return the freezer to Demo Mode, if desired.](https://usermanual.wiki/LG-Electronics-USA/E19MAE07/User-Guide-3706887-Page-35.png)
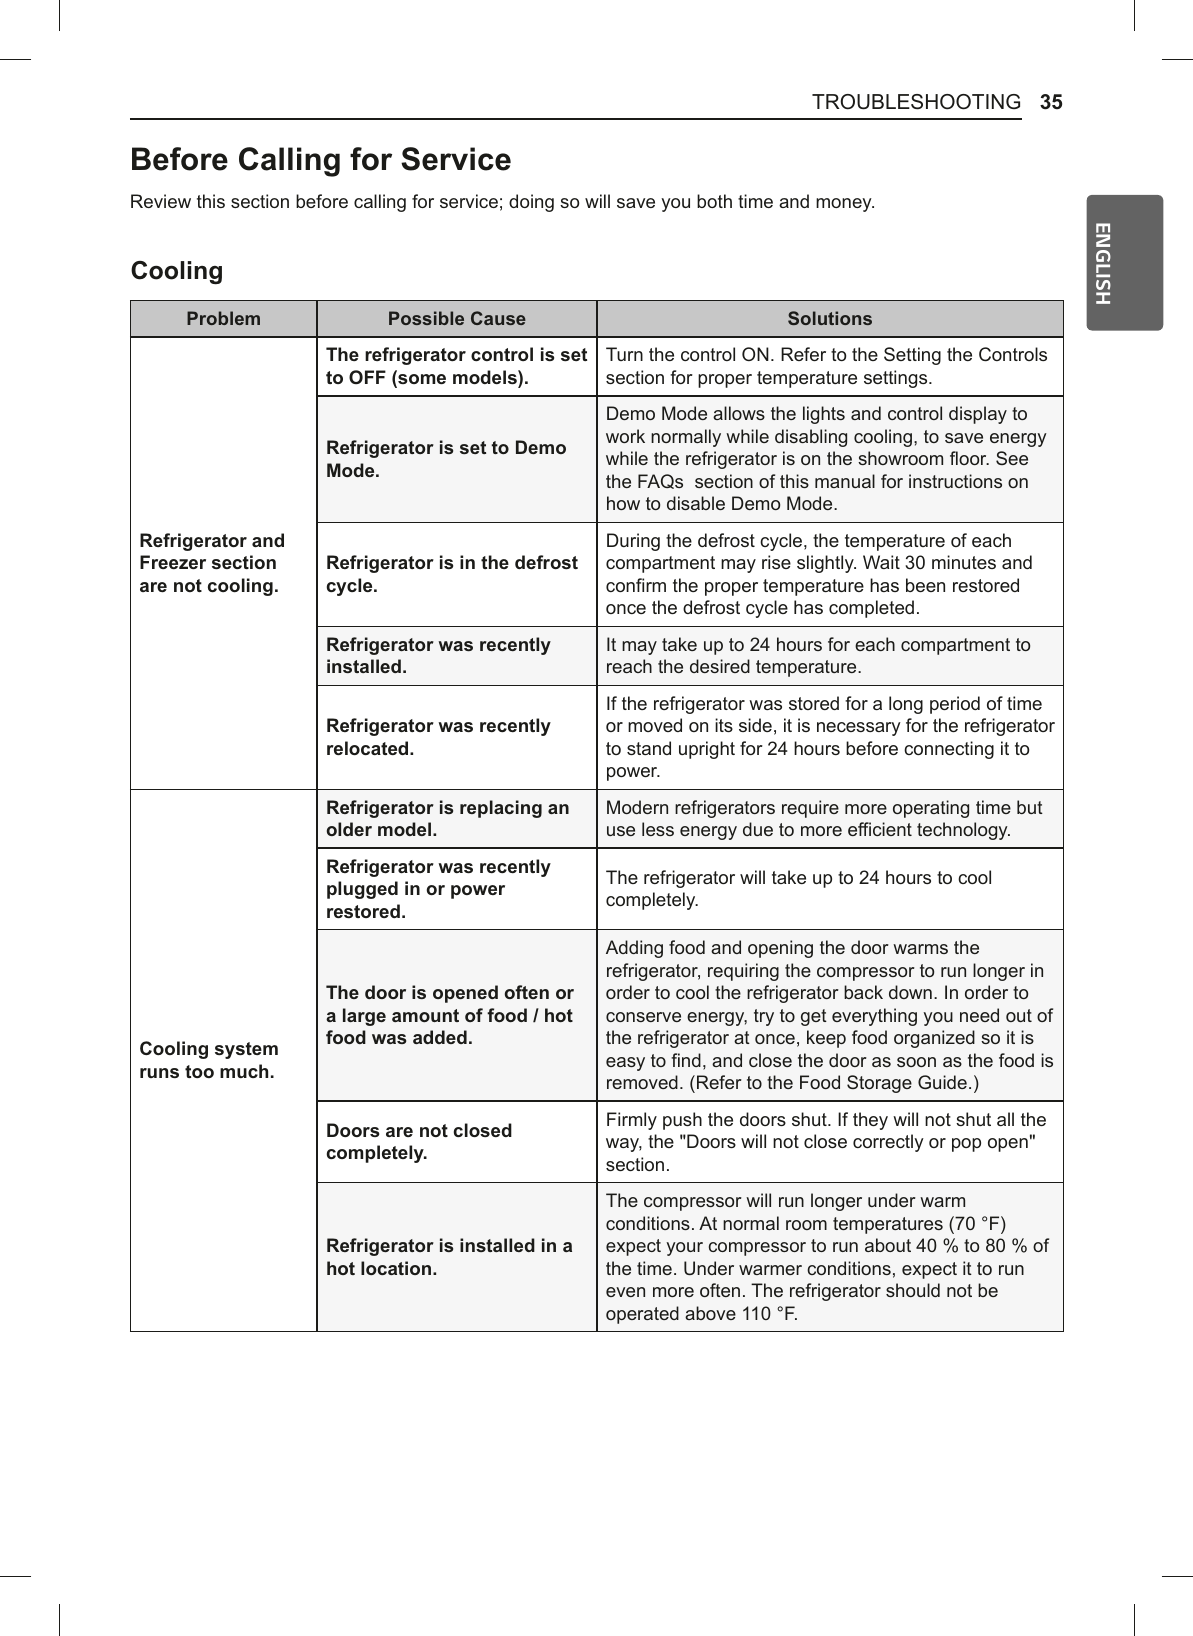
![36 TROUBLESHOOTING&RROLQJ3UREOHP 3RVVLEOH&DXVH SolutionsInterior moisture EXLOGXSDoors are opened often or IRUORQJSHULRGVRIWLPHWhen the doors are opened often or for long periods of time, warm, humid air enters the compartment. This raises the temperature and moisture level within the compartment. To lessen the effect, reduce the frequency and duration of door openings.Doors are not closed correctly.See the "Doors will not close correctly or pop open" section.Weather is humid.Humid weather allows additional moisture to enter the compartments when the doors are opened leading to condensation or frost. Maintaining a reasonable level of humidity in the home will help to control the amount of moisture that can enter the compartments.Defrost cycle recently completed.During the defrost cycle, the temperature of each compartment may rise slightly and condensation may form on the back wall. Wait 30 minutes and confirm that the proper temperature has been restored once the defrost cycle has completed.)RRGLVQRWSDFNDJHGcorrectly.Food stored uncovered or unwrapped, and damp containers can lead to moisture accumulation within each compartment. Wipe all containers dry and store food in sealed packaging to prevent condensation and frost.)RRGLVIUHH]LQJLQWKHUHIULJHUDWRUcompartment.)RRGZLWKKLJKZDWHUFRQWHQWwas placed near an air vent.Rearrange items with high water content away from air vents.5HIULJHUDWRUWHPSHUDWXUHcontrol is set incorrectly.If the temperature is too cold, adjust the control one increment at a time and wait for the temperature to stabilize. Refer to the Control Panel section for more information.5HIULJHUDWRULVLQVWDOOHGLQDcold location.When the refrigerator is operated in temperature below 41°F (5°C), food can freeze in the refrigerator compartment. The refrigerator should not be operated in temperature below 55°F (13°C).5HIULJHUDWRULVWRRwarm.5HIULJHUDWRUZDVUHFHQWO\installed.It may take up to 24 hours for each compartment to reach the desired temperature.7KHDLUYHQWVDUHEORFNHGLocate air vents by using your hand to sense airflow and move all packages that block vents and restrict airflow. Rearrange items to allow air to flow throughout the compartment.](https://usermanual.wiki/LG-Electronics-USA/E19MAE07/User-Guide-3706887-Page-37.png)

![39TROUBLESHOOTINGENGLISHNoises3UREOHP 3RVVLEOH&DXVH Solutions&OLFNLQJThe defrost control will click when the DXWRPDWLFGHIURVWF\FOHEHJLQVDQGends. The thermostat control (or UHIULJHUDWRUFRQWURORQVRPHPRGHOVZLOODOVRFOLFNZKHQF\FOLQJRQDQGRIINormal Operation5DWWOLQJ5DWWOLQJQRLVHVPD\FRPHIURPWKHIORZRIUHIULJHUDQWWKHZDWHUOLQHRQWKHEDFNof the unit, or items stored on top of or DURXQGWKHUHIULJHUDWRUNormal Operation5HIULJHUDWRULVQRWUHVWLQJVROLGO\RQWKHfloor.Floor is weak or uneven or leveling legs need to be adjusted. See the Leveling and Door Alignment section.5HIULJHUDWRUZLWKOLQHDUFRPSUHVVRUZDVMDUUHGZKLOHUXQQLQJ Normal Operation:KRRVKLQJ(YDSRUDWRUIDQPRWRULVFLUFXODWLQJDLUWKURXJKWKHUHIULJHUDWRUFRPSDUWPHQW Normal Operation$LULVEHLQJIRUFHGRYHUWKHFRQGHQVHUE\WKHFRQGHQVHUIDQ Normal Operation*XUJOLQJ 5HIULJHUDQWIORZLQJWKURXJKWKHFRROLQJsystem. Normal Operation3RSSLQJ Contraction and expansion of the inside ZDOOVGXHWRFKDQJHVLQWHPSHUDWXUH Normal Operation6L]]OLQJ :DWHUGULSSLQJRQWKHGHIURVWKHDWHUGXULQJDGHIURVWF\FOH Normal Operation9LEUDWLQJ,IWKHVLGHRUEDFNRIWKHUHIULJHUDWRULVWRXFKLQJDFDELQHWRUZDOOVRPHRIWKHQRUPDOYLEUDWLRQVPD\PDNHDQDXGLEOHsound.To eliminate the noise, make sure that the sides and back cannot vibrate against any wall or cabinet.'ULSSLQJ :DWHUUXQQLQJLQWRWKHGUDLQSDQGXULQJthe defrost cycle. Normal Operation3XOVDWLQJRUKLJKpitched sound<RXUUHIULJHUDWRULVGHVLJQHGWRUXQmore efficiently to keep your food items DWWKHGHVLUHGWHPSHUDWXUH7KHKLJKefficiency compressor may cause your QHZUHIULJHUDWRUWRUXQORQJHUWKDQ\RXUROGRQHEXWLWLVVWLOOPRUHHQHUJ\efficient than previous models. While WKHUHIULJHUDWRULVUXQQLQJLWLVQRUPDOWRKHDUDSXOVDWLQJRUKLJKSLWFKHGsound.Normal Operation](https://usermanual.wiki/LG-Electronics-USA/E19MAE07/User-Guide-3706887-Page-40.png)
![41WARRANTYENGLISHSIGNATURE KITCHEN SUITE REFRIGERATOR LIMITED WARRANTY - U.S.AShould your SIGNATURE KITCHEN SUITE Refrigerator ("Product") fail due to a defect in materials or workmanship under normal home use, during the warranty period set forth below, SIGNATURE KITCHEN SUITE will at its option repair or replace the product. This limited warranty is valid only to the original retail purchaser of the product and applies only when purchased and used within the United States including U.S. Territories. Proof of original retail purchase is required to obtain warranty service under this limited warranty. WARRANTY PERIOD5HIULJHUDWRU Sealed System &RQGHQVHU'U\HU&RQQHFWLQJ7XEHDQG(YDSRUDWRU Linear CompressorThree (3) years from the GDWHRIRULJLQDOUHWDLOpurchaseParts and Labor (internal/functional parts only)Three (3) years from the GDWHRIRULJLQDOUHWDLOpurchaseParts and LaborSeven (7) years from the GDWHRIRULJLQDOUHWDLOpurchaseParts only (Consumer will be charged for labor)Ten (10) years from the GDWHRIRULJLQDOUHWDLOpurchasePart only (Consumer will be charged for labor)Noises associated with normal operation and failure to follow instructions found in the use and care and LQVWDOODWLRQJXLGHVRURSHUDWLQJWKHXQLWLQDQXQVXLWDEOHHQYLURQPHQWZLOOQRWEHFRYHUHGXQGHUWKLVwarranty. %Replacement products and parts are warranted for the remaining portion of the original warranty period or ninety (90) days, whichever is greater. %Replacement products and parts may be new or remanufactured.THIS WARRANTY IS IN LIEU OF ANY OTHER WARRANTY, EXPRESS OR IMPLIED, INCLUDING WITHOUT LIMITATION, ANY WARRANTY OF MERCHANTABILITY OR FITNESS FOR A PARTICULAR PURPOSE. TO THE EXTENT ANY IMPLIED WARRANTY IS REQUIRED BY LAW, IT IS LIMITED IN DURATION TO THE EXPRESS WARRANTY PERIOD ABOVE. NEITHER THE MANUFACTURER NOR ITS U.S. DISTRIBUTOR SHALL BE LIABLE FOR ANY INCIDENTAL, CONSEQUENTIAL, INDIRECT, SPECIAL, OR PUNITIVE DAMAGES OF ANY NATURE, INCLUDING WITHOUT LIMITATION, LOST REVENUES OR PROFITS, OR ANY OTHER DAMAGE WHETHER BASED IN CONTRACT, TORT, OR OTHERWISE. Some states do not allow the exclusion or limitation of incidental or consequential damages or limitations on how long an implied warranty lasts, so the above exclusion or limitation may not apply to you. This warranty gives you specific legal rights and you may also have other rights that vary from state to state.7+,6/,0,7(':$55$17<'2(6127&29(5 %6HUYLFHWULSVWRGHOLYHUSLFNXSLQVWDOORUUHSDLUWKHSURGXFWLQVWUXFWWKHFXVWRPHURQRSHUDWLRQRIWKHSURGXFWrepair or replace fuses or correct wiring or plumbing, or correction of unauthorized repairs/installation. %Failure of product to perform during power failures and interruptions or inadequate electrical service. %Damage caused by leaky or broken water pipes, frozen water pipes, restricted drain lines, inadequate or interrupted water supply or inadequate supply of air. %Damage resulting from operating the product in a corrosive atmosphere or contrary to the instructions outlined in the product owner’s manual. %'DPDJHWRWKHSURGXFWFDXVHGE\DFFLGHQWVSHVWVDQGYHUPLQOLJKWQLQJZLQG¿UHÀRRGVRUDFWVRI*RG %Damage resulting from misuse, abuse, improper installation, repair, or maintenance. Improper repair includes XVHRISDUWVQRWDSSURYHGRUVSHFL¿HGE\SIGNATURE KITCHEN SUITE. %'DPDJHRUIDLOXUHFDXVHGE\XQDXWKRUL]HGPRGL¿FDWLRQRUDOWHUDWLRQRULILWLVXVHGIRURWKHUWKDQWKHLQWHQGHGpurpose, or any water leakage where the unit was not properly installed. %Damage or failure caused by incorrect electrical current, voltage, or plumbing codes, commercial or industrial XVHRUXVHRIDFFHVVRULHVHJZDWHU¿OWHUVHWFFRPSRQHQWVRUFRQVXPDEOHFOHDQLQJSURGXFWVWKDWDUHQRWapproved by SIGNATURE KITCHEN SUITE.](https://usermanual.wiki/LG-Electronics-USA/E19MAE07/User-Guide-3706887-Page-42.png)
![4CONSIGNES DE SÉCURITÉCONSIGNES DE SÉCURITÉ/,6(=7287(6/(6&216,*1(6$9$17/ӂ87,/,6$7,21,OHVWWUqVLPSRUWDQWGތDVVXUHUYRWUHVpFXULWpHWFHOOHGHVDXWUHVNous fournissons de nombreux conseils de sécurité importants dans ce manuel et sur votre appareil. Lisez toujours l’ensemble des messages de sécurité et respectez-les.&HFLHVWOHV\PEROHGތDOHUWHGHVpFXULWp Ce symbole est destiné à vous alerter des dangers potentiels pouvant entraîner la mort ou des blessures. 7RXVOHVPHVVDJHVGHVpFXULWpVHURQWSUpFpGpVGXV\PEROHGތDOHUWHGHVpFXULWpHWGXWHUPHAVERTISSEMENT ou MISE EN GARDE.Voici le message que ces mots véhiculent : AVERTISSEMENTVous pouvez être tué ou grièvement blessé si vous ne suivez pas les consignes. MISE EN GARDEVous pouvez être légèrement blessé ou pouvez endommager le produit si vous ne suivez pas les consignes.Tous les messages de sécurité vous indiqueront quel est le danger potentiel, comment réduire les risques de blessures et ce qui peut se produire en cas de non-respect des consignes.CONSIGNES DE SÉCURITÉ IMPORTANTES AVERTISSEMENTS3RXUUpGXLUHOHVULVTXHVG¶H[SORVLRQG¶LQFHQGLHGHGpFqVG¶pOHFWURFXWLRQGHEUOXUHRXGHEOHVVXUHVFRUSRUHOOHVORUVGHO¶XWLOLVDWLRQGHFHSURGXLWVXLYH]OHVSUpFDXWLRQVGHEDVH\FRPSULVFHTXLVXLW3URSRVLWLRQGHOD&DOLIRUQLHeWDWV8QLVVHXOHPHQW %Ce produit contient des produits chimiques reconnus par l’État de la Californie pour provoquer des cancers et des malformations congénitales ou d’autres problèmes de reproduction Lavez-vous les mains après avoir manipulé l’appareil.](https://usermanual.wiki/LG-Electronics-USA/E19MAE07/User-Guide-3706887-Page-47.png)
![5CONSIGNES DE SÉCURITÉFRANÇAISFONCTIONNEMENT %/¶DSSDUHLOQ¶HVWSDVFRQoXSRXUrWUHXWLOLVpjGHV¿QVVSpFLDOHVFRPPHO¶HQWUHSRVDJHGHPpGLFDPHQWVRXGHmatériaux d’essai, ni pour être utilisé sur des bateaux, etc. %NE permettez PAS aux enfants de grimper sur les portes ou les étagères du réfrigérateur, ni de s’y tenir ou de s’y accrocher. Ils pourraient endommager le réfrigérateur et se blesser sérieusement. %Ne permettez pas aux enfants de grimper à l’intérieur de l’appareil. Ils pourraient demeurer coincés et suffoquer. %/DVXUYHLOODQFHGHVHQIDQWVHVWUHTXLVHD¿QGHV¶DVVXUHUTX¶LOVQHMRXHQWSDVDYHFO¶DSSDUHLO %Gardez vos doigts à distance des zones de coincement; les dégagements entre les portes et les armoires sont inévitablement réduits. Soyez prudent lorsque vous fermez les portes de l’appareil et que des enfants se trouvent à proximité de celui-ci. %Ne touchez pas les aliments surgelés ou les composants métalliques du congélateur si vos mains sont mouillées ou humides. Cela pourrait entraîner des gelures. %Ne recongelez pas des aliments surgelés qui ont été complètement décongelés. Cela pourrait être dangereux pour la santé. %Un circuit de dérivation ou un disjoncteur correctement mis à la terre est recommandé. %1¶XWLOLVH]SDVGH¿FKHG¶DGDSWDWLRQHWQHEUDQFKH]SDVOD¿FKHG¶DOLPHQWDWLRQpOHFWULTXHVXUXQHUDOORQJHélectrique à prises multiples. %1¶XWLOLVH]SDVGHFRUGRQTXLSUpVHQWHGHV¿VVXUHVRXGHVWUDFHVG¶DEUDVLRQVXUVDORQJXHXURXHQFRUHjO¶H[WUpPLWpGHOD¿FKHRXjFHOOHGXFRQQHFWHXU'HPDQGH]jXQHPSOR\pG¶XQFHQWUHGHVHUYLFHVDXWRULVpGHUHPSODFHURXGHUpSDUHULPPpGLDWHPHQWWRXWFRUGRQG¶DOLPHQWDWLRQGpQXGpHI¿ORFKpRXDXWUHPHQWHQGRPPDJp %Ne faites pas fonctionner le réfrigérateur et ne touchez pas le cordon d’alimentation si vos mains sont mouillées. %1HPRGL¿H]HWQHSURORQJH]SDVOHFRUGRQG¶DOLPHQWDWLRQ %N’utilisez pas de prises de courant non homologuées. Ne branchez pas l’appareil sur une prise de courant murale si celle-ci est endommagée. %Ne placez pas vos pieds ou vos mains, ou encore des objets dans les évents d’aération ou au bas du réfrigérateur. Cela pourrait causer des blessures ou provoquer une décharge électrique. %En cas de fuite de gaz (propane, GPL), assurez-vous que les lieux sont bien ventilés et contactez un centre de services autorisé avant de remettre l’appareil en fonction. Ne touchez pas l’appareil ou son cordon d’alimentation. %Si un bruit étrange, une odeur particulière ou de la fumée provient de l’appareil, débranchez le cordon d’alimentation sur-le-champ et contactez un centre de services autorisé. %1¶XWLOLVH]SDVGHIXVLEOHFRPPHGXFXLYUHXQ¿OG¶DFLHUjO¶H[FHSWLRQG¶XQIXVLEOHVWDQGDUG %Ne placez pas et n’utilisez pas d’appareil électrique à l’intérieur de l’appareil, sauf s’il s’agit d’un type d’appareil recommandé par le fabricant. %Ne placez pas d’animaux à l’intérieur de l’appareil. %Ne placez pas d’objets lourds ou fragiles, de contenants emplis de liquide, de produits combustibles ou d’objets LQÀDPPDEOHVFRPPHGHVERXJLHVHWGHVODPSHVVXUO¶DSSDUHLO %Évitez tout contact avec les pièces mobiles du mécanisme d’éjection ou avec l’élément chauffant qui libère les cubes de glace. NE placez PAS vos doigts dans la machine à glaçons automatique lorsque l’appareil est branché. %Cet appareil n’est pas destiné à être utilisé par des personnes (y compris des enfants) ayant des capacités physiques, sensorielles ou mentales réduites, ou un manque d’expérience et de connaissances, à moins d’être sous surveillance ou d’avoir reçu des instructions concernant l’utilisation de l’appareil de la part d’une personne responsable de leur sécurité. %En cas de branchement sur un circuit protégé par des fusibles, utilisez un fusible temporisé.](https://usermanual.wiki/LG-Electronics-USA/E19MAE07/User-Guide-3706887-Page-48.png)
![6CONSIGNES DE SÉCURITÉENTRETIEN %N’utilisez pas de séchoir à cheveux pour sécher l’intérieur de l’appareil. %N’allumez pas de bougie pour dissiper les odeurs à l’intérieur de l’appareil. %6LXQHIXLWHGHIULJRULJqQHVXUYLHQWpORLJQH]OHVREMHWVLQÀDPPDEOHVGHO¶DSSDUHLO$VVXUH]YRXVTXHOHVOLHX[sont bien ventilés et contactez un centre de services autorisé. %eORLJQH]GXUpIULJpUDWHXUWRXWHVOHVPDWLqUHVHWYDSHXUVLQÀDPPDEOHVFRPPHO¶HVVHQFH %&HWDSSDUHLOHVWFRQoXSRXUrWUHXWLOLVpjGHV¿QVGRPHVWLTXHVHWjG¶DXWUHV¿QVGHFHW\SHSDUH[HPSOHGDQVOHcoin cuisine du personnel des magasins, des bureaux et d’autres environnements de travail; dans les fermes et par les clients des hôtels, des motels et d’autres environnements de type résidentiel; dans des environnements comme les gîtes; pour des applications dans le domaine de la restauration et de la vente en gros. %'pEUDQFKH]O¶DSSDUHLOGHOD¿FKHG¶DOLPHQWDWLRQDYDQWGHOHQHWWR\HURXGHOHUpSDUHU %L’éclairage à l’intérieur du réfrigérateur et du congélateur est un éclairage à DEL, et son entretien doit être réalisé SDUXQWHFKQLFLHQTXDOL¿p %'pEUDQFKH]O¶DSSDUHLOGHOD¿FKHG¶DOLPHQWDWLRQLPPpGLDWHPHQWVLXQHSDQQHGHFRXUDQWRXXQRUDJHVXUYLHQW %Éteignez l’alimentation de l’appareil si de l’eau ou de la poussière pénètre à l’intérieur de celui-ci. Appelez un agent du centre de services. %Ne placez pas de contenants en verre ni de boissons gazeuses dans le congélateur. Le contenu liquide peut prendre de l’expansion lorsqu’il est congelé, endommager le contenant et causer des blessures. %N’entreposez pas, ne démontez pas et ne réparez pas l’appareil vous-même, et ne laissez pas un employé non TXDOL¿pOHIDLUH %Si le cordon d’alimentation électrique est endommagé, il ne doit être remplacé que par le fabricant, son agent G¶HQWUHWLHQRXXQHSHUVRQQHD\DQWOHVPrPHVFRPSpWHQFHVHWFHD¿QG¶pYLWHUWRXWULVTXH %1HUDQJH]SDVGHVXEVWDQFHVH[SORVLYHVWHOOHVTXHGHVDpURVROVDYHFXQJD]SURSXOVHXULQÀDPPDEOHGDQVFHWappareil. %En ce qui concerne les DEL, elles doivent être remplacées par un technicien.MISE AU REBUT %Les réfrigérateurs abandonnés sont dangereux, même si cette situation ne dure que quelques jours. Lorsque vous voulez mettre le réfrigérateur au rebut, retirez les matériaux d’emballage des portes ou retirez les portes en ODLVVDQWOHVWDEOHWWHVHQSODFHD¿QTXHOHVHQIDQWVQHSXLVVHQWSDVJULPSHUIDFLOHPHQWjO¶LQWpULHXUGHO¶DSSDUHLO %Si vous souhaitez mettre l’appareil au rebut, assurez-vous que le frigorigène a été retiré et qu’il sera éliminé de façon adéquate par un employé d’un centre de services autorisé. Si vous êtes responsable d’une fuite de frigorigène, vous pourriez devoir payer une amende ou vous pourriez être emprisonné en vertu des lois environnementales applicables.CONSIGNES DE MISE À LA TERRE %Un raccordement incorrect du conducteur de mise à la terre de l’appareil peut entraîner un risque de décharge pOHFWULTXH&RQVXOWH]XQpOHFWULFLHQRXXQWHFKQLFLHQG¶HQWUHWLHQTXDOL¿pVLYRXVGRXWH]TXHO¶DSSDUHLOVRLWFRUUHFWHPHQWPLVjODWHUUH1HPRGL¿H]SDVOD¿FKHIRXUQLHDYHFO¶DSSDUHLO'DQVOHFDVRFHOOHFLQHVHUDLWSDVDGDSWpHjODSULVHIDLWHVLQVWDOOHUXQHSULVHDGpTXDWHSDUXQpOHFWULFLHQTXDOL¿p %$VVXUH]YRXVTX¶XQpOHFWULFLHQTXDOL¿pH[DPLQHODSULVHGHFRXUDQWPXUDOHHWOHFkEODJHHWTX¶LOFRQ¿UPHTXHODmise à la terre est adéquate. %1HGpEUDQFKH]MDPDLVO¶DSSDUHLOHQWLUDQWVXUOHFRUGRQG¶DOLPHQWDWLRQ7HQH]WRXMRXUVOD¿FKHIHUPHPHQWSRXUODretirer de la prise. Le non-respect de cette consigne peut endommager le cordon d’alimentation, ce qui peut causer un incendie ou entraîner une décharge électrique.](https://usermanual.wiki/LG-Electronics-USA/E19MAE07/User-Guide-3706887-Page-49.png)
![7CONSIGNES DE SÉCURITÉFRANÇAIS MISES EN GARDE3RXUUpGXLUHOHVULVTXHVGHEOHVVXUHVPLQHXUHVGHSDQQHVRXGHGRPPDJHVFDXVpVjOތDSSDUHLORXjODSURSULpWpORUVGHOތXWLOLVDWLRQGHOތDSSDUHLOSUHQH]OHVSUpFDXWLRQVpOpPHQWDLUHV\FRPSULVOHVVXLYDQWHVINSTALLATION %N’installez pas l’appareil à un endroit à partir duquel il risque de tomber. %L’appareil doit être installé correctement, conformément aux instructions d’installation.FONCTIONNEMENT %N’utilisez pas d’aérosols à proximité de l’appareil. %/¶DSSDUHLOHVWFRQoXSRXUrWUHXWLOLVpVHXOHPHQWjGHV¿QVGRPHVWLTXHVHWjG¶DXWUHV¿QVGHFHW\SH %N’appliquez pas une force excessive et ne frappez pas sur toute surface de verre. Ne touchez pas les surfaces GHYHUUHVLHOOHVVRQW¿VVXUpHVRXHQGRPPDJpHV %Ne placez pas trop d’articles ou des articles trop rapprochés les uns des autres dans les balconnets. Cela pourrait endommager les balconnets ou causer des blessures aux utilisateurs si les articles sont retirés des balconnets avec force. %Ne placez pas une quantité excessive d’aliments dans l’appareil. Cela pourrait causer des blessures aux utilisateurs ou des dommages matériels. %N’accrochez pas et ne placez pas d’objets lourds sur le distributeur de l’appareil.ENTRETIEN %N’utilisez pas de puissants détergents comme de la cire ou des diluants pour nettoyer l’appareil. Nettoyez-le à l’aide d’un linge doux. %5HWLUH]OHVFRUSVpWUDQJHUVFRPPHODSRXVVLqUHHWO¶HDXGHV]RQHVGHFRQWDFWHWGHVEURFKHVGHOD¿FKHG¶DOLPHQWDWLRQ1¶XWLOLVH]SDVXQOLQJHPRXLOOpRXKXPLGHSRXUQHWWR\HUOD¿FKH %Ne vaporisez pas d’eau directement sur les surfaces intérieures ou extérieures de l’appareil. %Ne nettoyez pas les tablettes ou les couvercles en verre avec de l’eau chaude lorsqu’ils sont froids. Une exposition à un changement brusque de température peut les endommager. AVERTISSEMENTS %Maintenez libres de toute obstruction les ouvertures de ventilation qui se trouvent dans l’enceinte de l’appareil ou dans la structure intégrée. %N’utilisez pas de dispositifs mécaniques ou d’autres moyens pour accélérer le processus de dégivrage autres que ceux recommandés par le fabricant. %1¶HQGRPPDJH]SDVOHFLUFXLWIULJRUL¿TXH %N’utilisez pas d’appareils électriques à l’intérieur des compartiments pour nourriture de l’appareil, sauf s’ils sont du type recommandé par le fabricant. %(QUDLVRQGXUpIULJpUDQWHWGXJD]GHVRXIÀDJHG¶LVRODWLRQXWLOLVpVGDQVFHWDSSDUHLOGHVSURFpGXUHVVSpFLDOHVGHPLVHDXUHEXWVRQWQpFHVVDLUHV$YDQWG¶HQGLVSRVHUYHXLOOH]FRQVXOWHUO¶DJHQWGHVHUYLFHRXXQHDXWUHSHUVRQQHTXDOL¿pHCet appareil contient une petite quantité de réfrigérant isobutane (R600a); il s’agit d’un gaz naturel à haute compatibilité environnementale, mais qui est également combustible. Lors du transport et de l’installation de l’appareil, veillez à ce qu’aucune partie du circuit frigorifique ne soit endommagée. En cas de fuite du réfrigérant, celui-ci pourrait s’enflammer ou provoquer une blessure aux yeux. Si une fuite est détectée, éloignez les flammes nues ou les sources potentielles d’inflammation et aérez la pièce dans laquelle l’appareil se trouve pendant plusieurs minutes.Afin d’éviter la formation d’un mélange d’air et de gaz inflammable en cas de fuite dans le circuit frigorifique, la taille de la pièce dans laquelle l’appareil est utilisé est déterminée selon la quantité de réfrigérant utilisée. La pièce doit avoir une taille de 1 m² pour chaque 8 g de réfrigérant R600a dans l’appareil. La quantité de réfrigérant qui se trouve dans votre appareil est indiquée sur la plaque d’identification située à l’intérieur de celui-ci. Ne mettez jamais en marche un appareil qui présente des signes de dommages. En cas de doute, consultez votre revendeur.GARDEZ CES CONSIGNES](https://usermanual.wiki/LG-Electronics-USA/E19MAE07/User-Guide-3706887-Page-50.png)
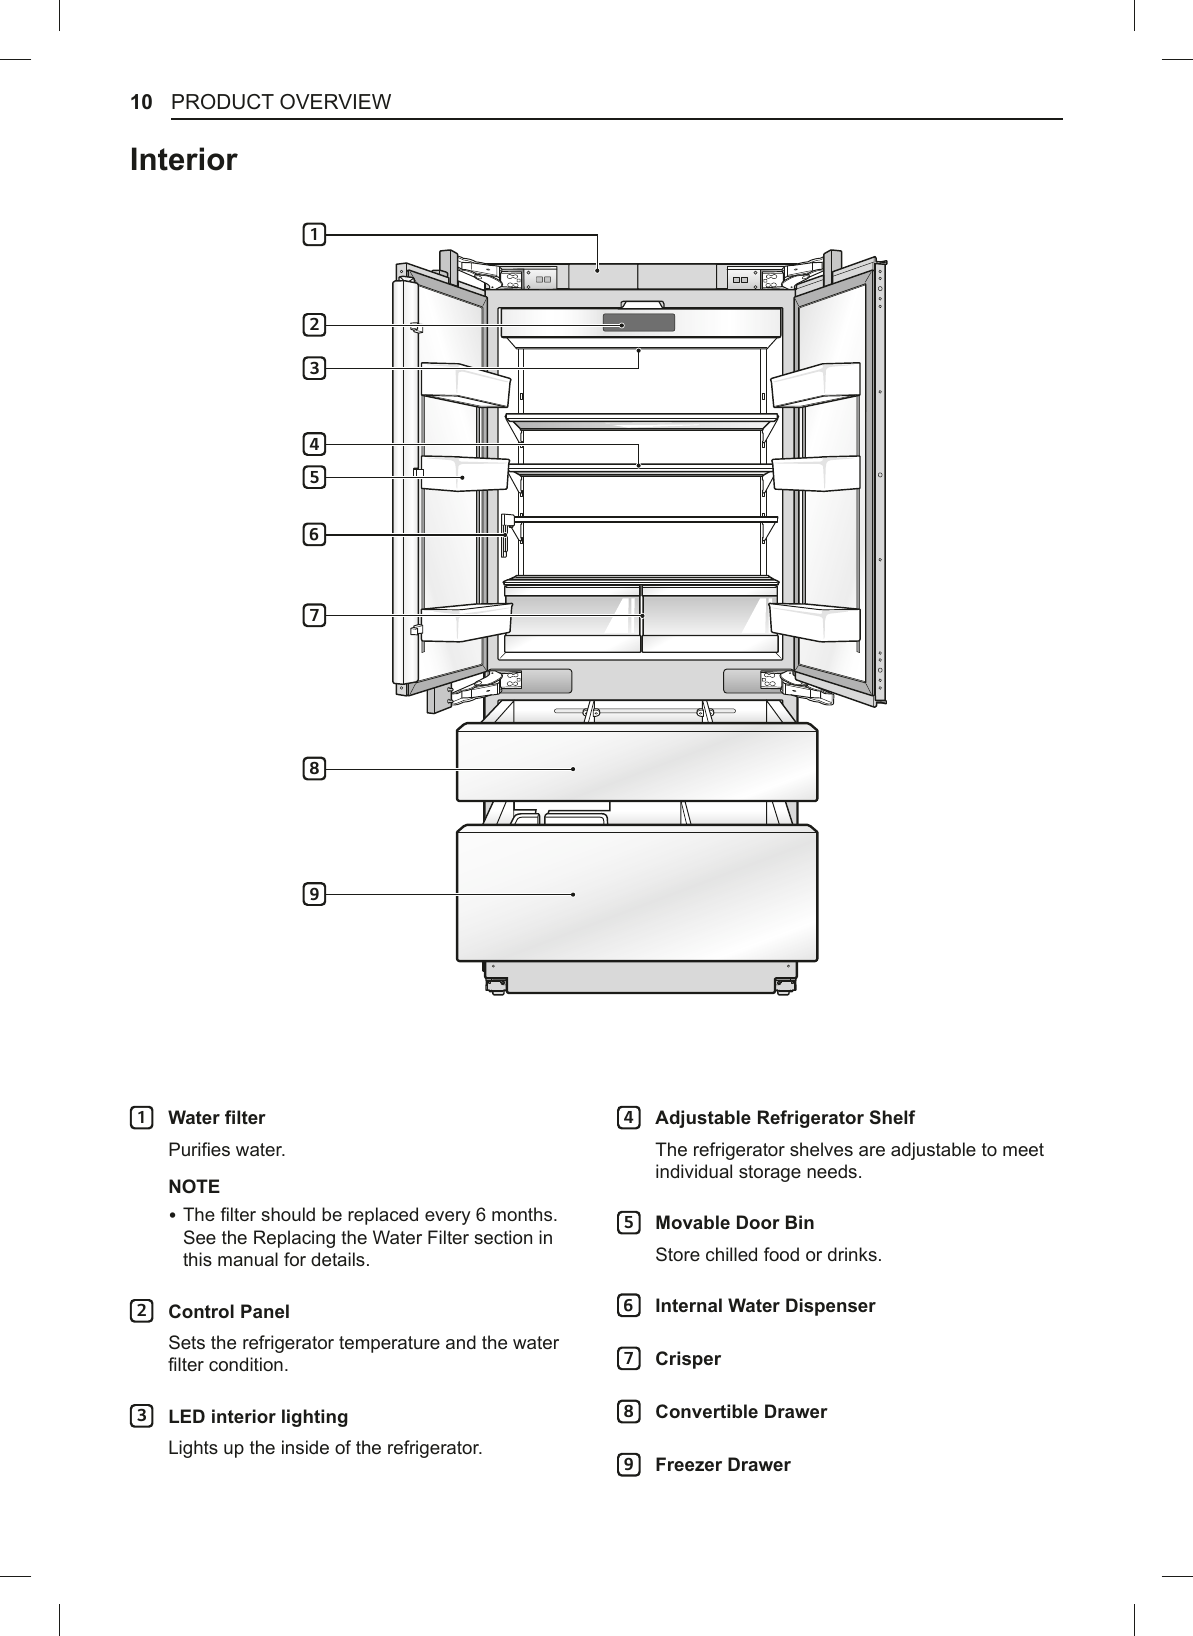
![10 APERÇU DU PRODUIT1)LOWUHjHDXPurifie l’eau.REMARQUE %/H¿OWUHGRLWrWUHUHPSODFpWRXVOHVVL[PRLV3RXUplus de détails, veuillez vous référer à la section ©5HPSODFHPHQWGX¿OWUHjHDXªTXLVHWURXYHdans ce manuel.23DQQHDXGHFRPPDQGHRègle la température du réfrigérateur et l’état du filtre à eau.3eFODLUDJHj'(/jO¶LQWpULHXUÉclaire l’intérieur du réfrigérateur.,QWpULHXU47DEOHWWHDMXVWDEOHLes tablettes du réfrigérateur sont ajustables pour répondre à tout type de besoins en matière de rangement.5%DOFRQQHWPRELOHPermet de conserver les boissons et les aliments froids.6'LVWULEXWHXUG¶HDXLQWpJUp7Crisper8&RQYHUWLEOH'UDZHU9)UHH]HU'UDZHU278965431](https://usermanual.wiki/LG-Electronics-USA/E19MAE07/User-Guide-3706887-Page-53.png)
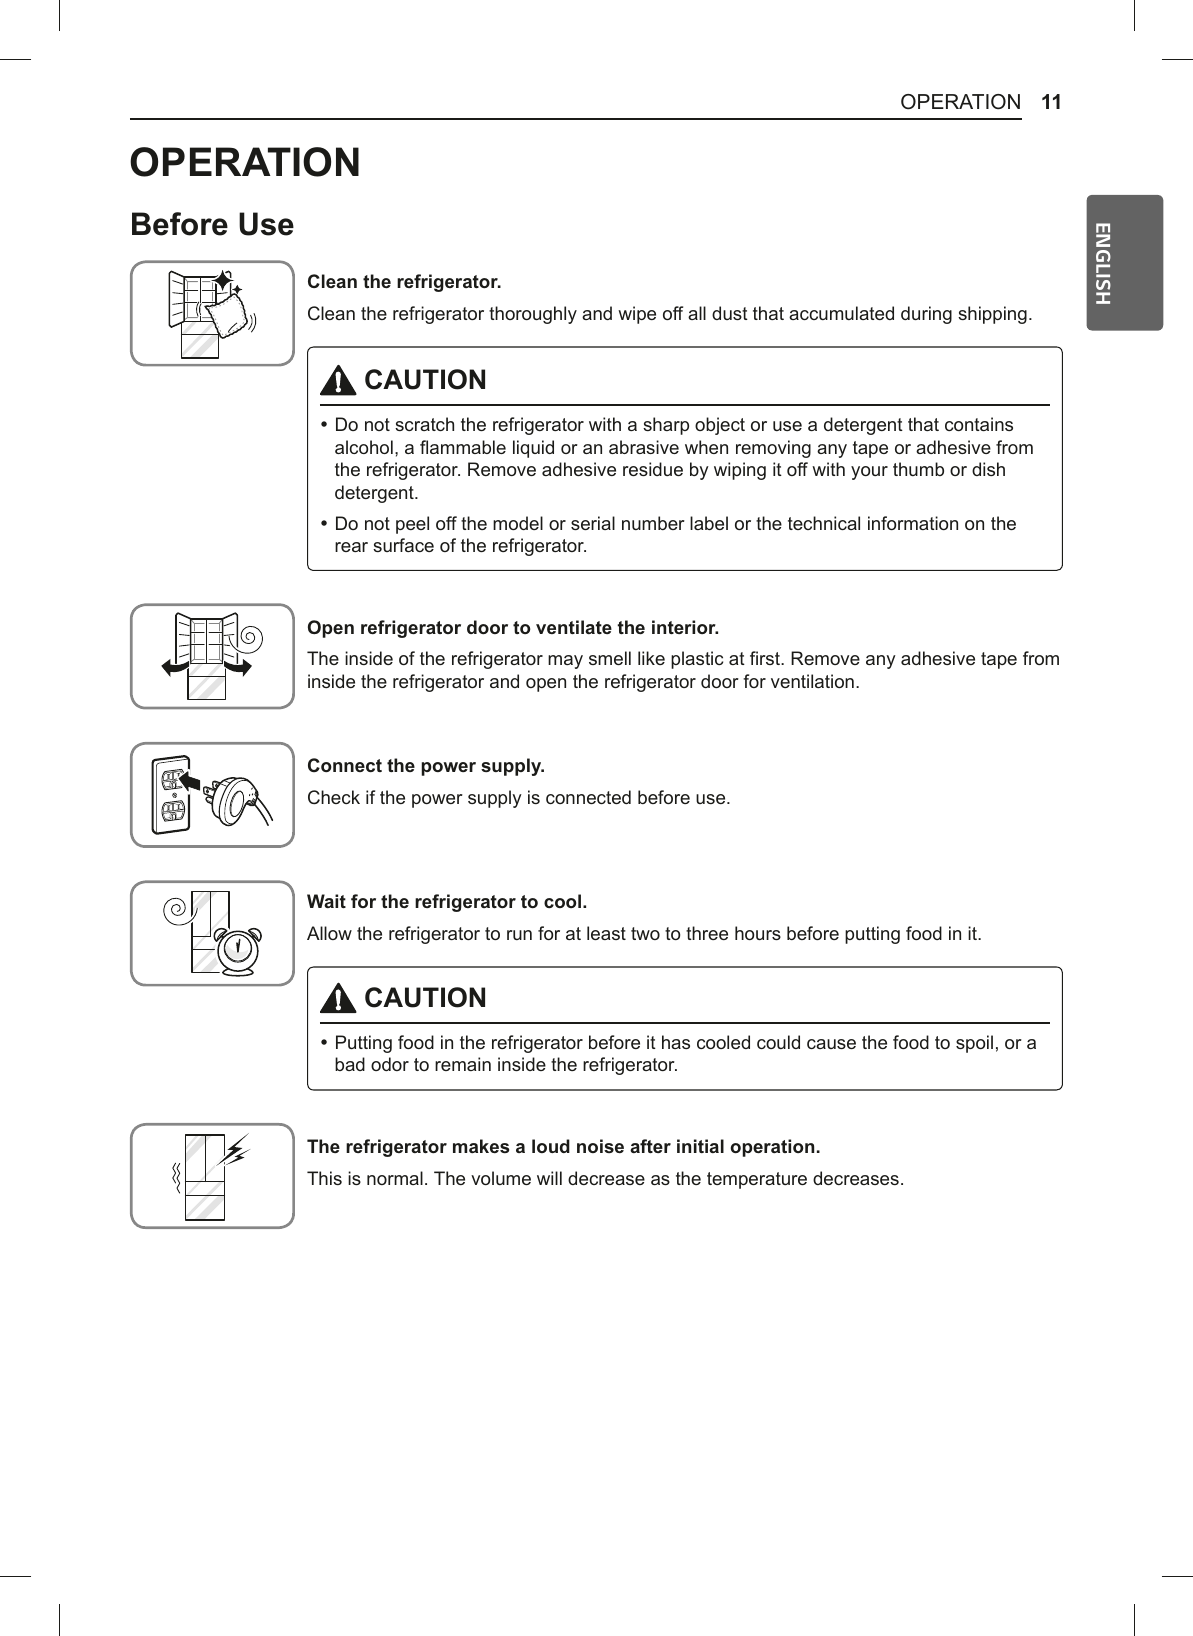
![11FONCTIONNEMENTFRANÇAIS$YDQWO¶XWLOLVDWLRQ1HWWR\H]OHUpIULJpUDWHXUNettoyez le réfrigérateur à fond et enlevez toute la poussière qui s’est accumulée pendant le transport. MISES EN GARDE %Ne grattez pas le réfrigérateur avec un objet pointu et n’utilisez pas de détergent qui FRQWLHQWGHO¶DOFRROGXOLTXLGHLQÀDPPDEOHRXXQHVXEVWDQFHDEUDVLYHSRXUUHWLUHUOHUXEDQadhésif ou la colle du réfrigérateur. Enlevez les résidus de colle en les essuyant avec votre pouce ou du détergent à vaisselle. %Ne retirez pas l’étiquette du numéro de modèle ou de série ou les informations techniques sur la surface arrière du réfrigérateur.2XYUH]ODSRUWHGXUpIULJpUDWHXUSRXUDpUHUO¶LQWpULHXUL’intérieur du réfrigérateur peut dégager une odeur de plastique au début. Enlevez tout ruban adhésif de l’intérieur du réfrigérateur et ouvrez la porte du réfrigérateur à des fins de ventilation.%UDQFKH]O¶DOLPHQWDWLRQVérifiez que l’alimentation est branchée avant l’utilisation.$WWHQGH]TXHOHUpIULJpUDWHXUUHIURLGLVVHLaissez votre réfrigérateur en marche de deux à trois heures au moins avant d’y mettre des aliments. MISE EN GARDE %Attendez que les aliments aient refroidi avant de les placer dans le réfrigérateur, sinon ils SRXUUDLHQWVHJkWHURXODLVVHUXQHPDXYDLVHRGHXUWHQDFHjO¶LQWpULHXUGXUpIULJpUDWHXU/HUpIULJpUDWHXUpPHWXQEUXLWIRUWDSUqVODPLVHHQPDUFKHLQLWLDOHC’est normal. Le volume diminue à mesure que la température baisse.FONCTIONNEMENT](https://usermanual.wiki/LG-Electronics-USA/E19MAE07/User-Guide-3706887-Page-54.png)
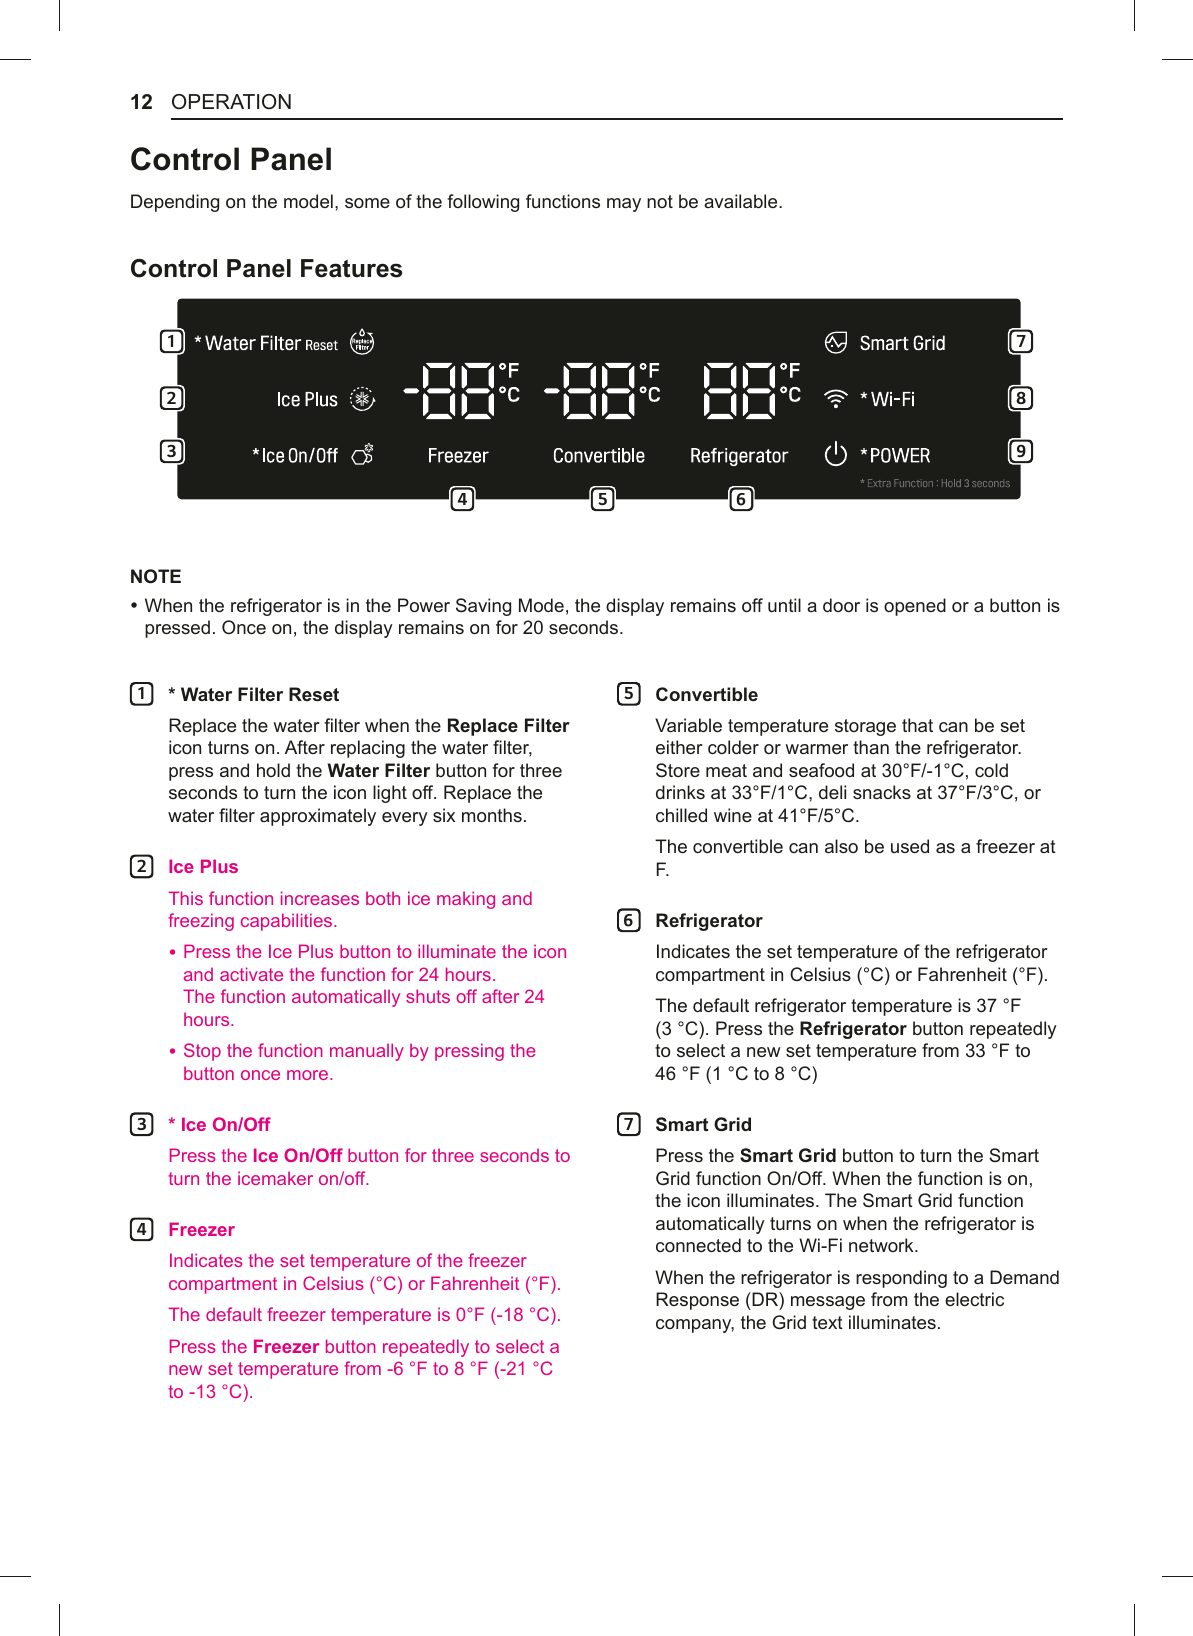
![12 FONCTIONNEMENT3DQQHDXGHFRPPDQGHSelon le modèle, certaines des fonctions suivantes pourraient ne pas être offertes.&DUDFWpULVWLTXHVGXSDQQHDXGHFRPPDQGH1 72 83 94 5 6REMARQUE %Lorsque le réfrigérateur est placé en mode d’économie d’énergie, l’écran reste éteint jusqu’à ce qu’une porte soit ouverte ou qu’une touche soit enfoncée. Une fois allumé, l’écran reste allumé pendant 20 secondes.1* Water Filter Reset UpLQLWLDOLVDWLRQGXILOWUHjHDXRemplacez le filtre à eau si l’icône 5HSODFH)LOWHU (changer le filtre) est allumée. Après avoir remplacé le filtre à eau, maintenez enfoncée la touche Replace Filter (changer le filtre) pendant trois secondes pour éteindre la lumière de l’icône. Vous devez changer le filtre à eau environ tous les six mois.2,FH3OXVJODFHSOXVCette fonction augmente aussi bien les capacités de production de glace que de congélation. %Appuyez sur la touche Ice Plus (glace plus) pour allumer l’icône et activer la fonction pendant 24 heures. La fonction s’éteindra automatiquement après 24 heures. %Vous pouvez arrêter cette fonction manuellement en appuyant sur la touche une autre fois.3,FH2Q2IIPDFKLQHjJODoRQVPDUFKHDUUrWAppuyez sur la touche ,FH2Q2II (machine à glaçons marche/arrêt) pendant trois secondes pour allumer ou éteindre la machine à glaçons.4)UHH]HUFRQJpODWHXUIndique la température du compartiment du congélateur en Celsius (°C) ou en Fahrenheit (°F).La température par défaut du congélateur est de -18 °C (0 °F).Appuyez sur la touche Freezer (congélateur) à plusieurs reprises pour sélectionner une nouvelle température entre -21 °C et -13 °C (entre -6 °F et 8 °F).5&RQYHUWLEOHVariable temperature storage that can be set either colder or warmer than the refrigerator. Store meat and seafood at 30°F/-1°C, cold drinks at 33°F/1°C, deli snacks at 37°F/3°C, or chilled wine at 41°F/5°C. The convertible can also be used as a freezer at F.65HIULJHUDWRUUpIULJpUDWHXUIndique la température du compartiment du réfrigérateur en Celsius (°C) ou en Fahrenheit (°F).La température par défaut du réfrigérateur est de 3 °C (37 °F). Appuyez sur la touche 5HIULJHUDWRU (réfrigérateur) à plusieurs reprises pour sélectionner une nouvelle température entre 1 °C et 8 °C (entre 33 °F et 46 °F).76PDUW*ULGUpVHDXLQWHOOLJHQWAppuyez sur la touche Smart Grid (réseau intelligent) pour mettre en marche ou éteindre la fonction Réseau intelligent. Lorsque la fonction est en marche, l’icône s’allume. La fonction Réseau intelligent se met automatiquement en marche lorsque le réfrigérateur est connecté à un réseau Wi-Fi.Lorsque le réfrigérateur répond à un message de gestion de la demande (GD) de la compagnie d’électricité, le mot Grid (réseau) s’allume.](https://usermanual.wiki/LG-Electronics-USA/E19MAE07/User-Guide-3706887-Page-55.png)
![14 FONCTIONNEMENT'LVWULEXWHXUG¶HDXLQWpJUp MISES EN GARDE %Gardez les enfants loin du distributeur. Ils pourraient jouer avec les commandes ou les endommager. %Si de l’eau est distribuée de façon inattendue, coupez l’alimentation en eau et appelez le Centre d’information à la clientèle de SIGNATURE KITCHEN SUITE.6WUXFWXUHGXGLVWULEXWHXUBuse à eauPalette à eauREMARQUES %Pour distribuer de l’eau, appuyez sur l’interrupteur d’eau avec un verre. %Quelques gouttes peuvent tomber après la distribution. Tenez votre tasse sous le distributeur pendant quelques secondes après la distribution pour recueillir toutes les gouttes.%DFjJODoRQV MISE EN GARDE %N’insérez ni vos mains ni vos outils dans le bac à glaçons. Ne pas respecter ces consignes peut entraîner des dommages ou des blessures.0DFKLQHjJODoRQVDXWRPDWLTXH0LVHHQPDUFKHHWDUUrWGHODPDFKLQHjJODoRQVDXWRPDWLTXHPour désactiver la machine à glaçons automatique, appuyez sur le bouton 2Q2IIPDUFKHDUUrW des glaçons situé sur l’écran et maintenez-le enfoncé pendant 3 secondes./HVVRQVQRUPDX[TXHYRXVHQWHQGUH] %Si vous laissez la machine à glaçons en marche avant qu’elle soit raccordée à l’arrivée d’eau, vous risquez de l’endommager. %La vanne d’arrivée d’eau de la machine à glaçons émettra un bourdonnement pendant le remplissage de la machine. Si la touche ,FH2Q2II (machine à glaçons marche/arrêt) est réglée sur ON (marche), la machine à glaçons bourdonnera même si elle n’est pas encore raccordée à une arrivée d’eau. Pour arrêter ce bourdonnement, appuyez sur la touche ,FH2Q2II (machine à glaçons marche/arrêt) pour éteindre la machine. %Vous entendrez le son des glaçons tombant dans le bac et l’eau qui circule dans les tuyaux tandis que la machine à glaçons se remplit à nouveau.](https://usermanual.wiki/LG-Electronics-USA/E19MAE07/User-Guide-3706887-Page-57.png)
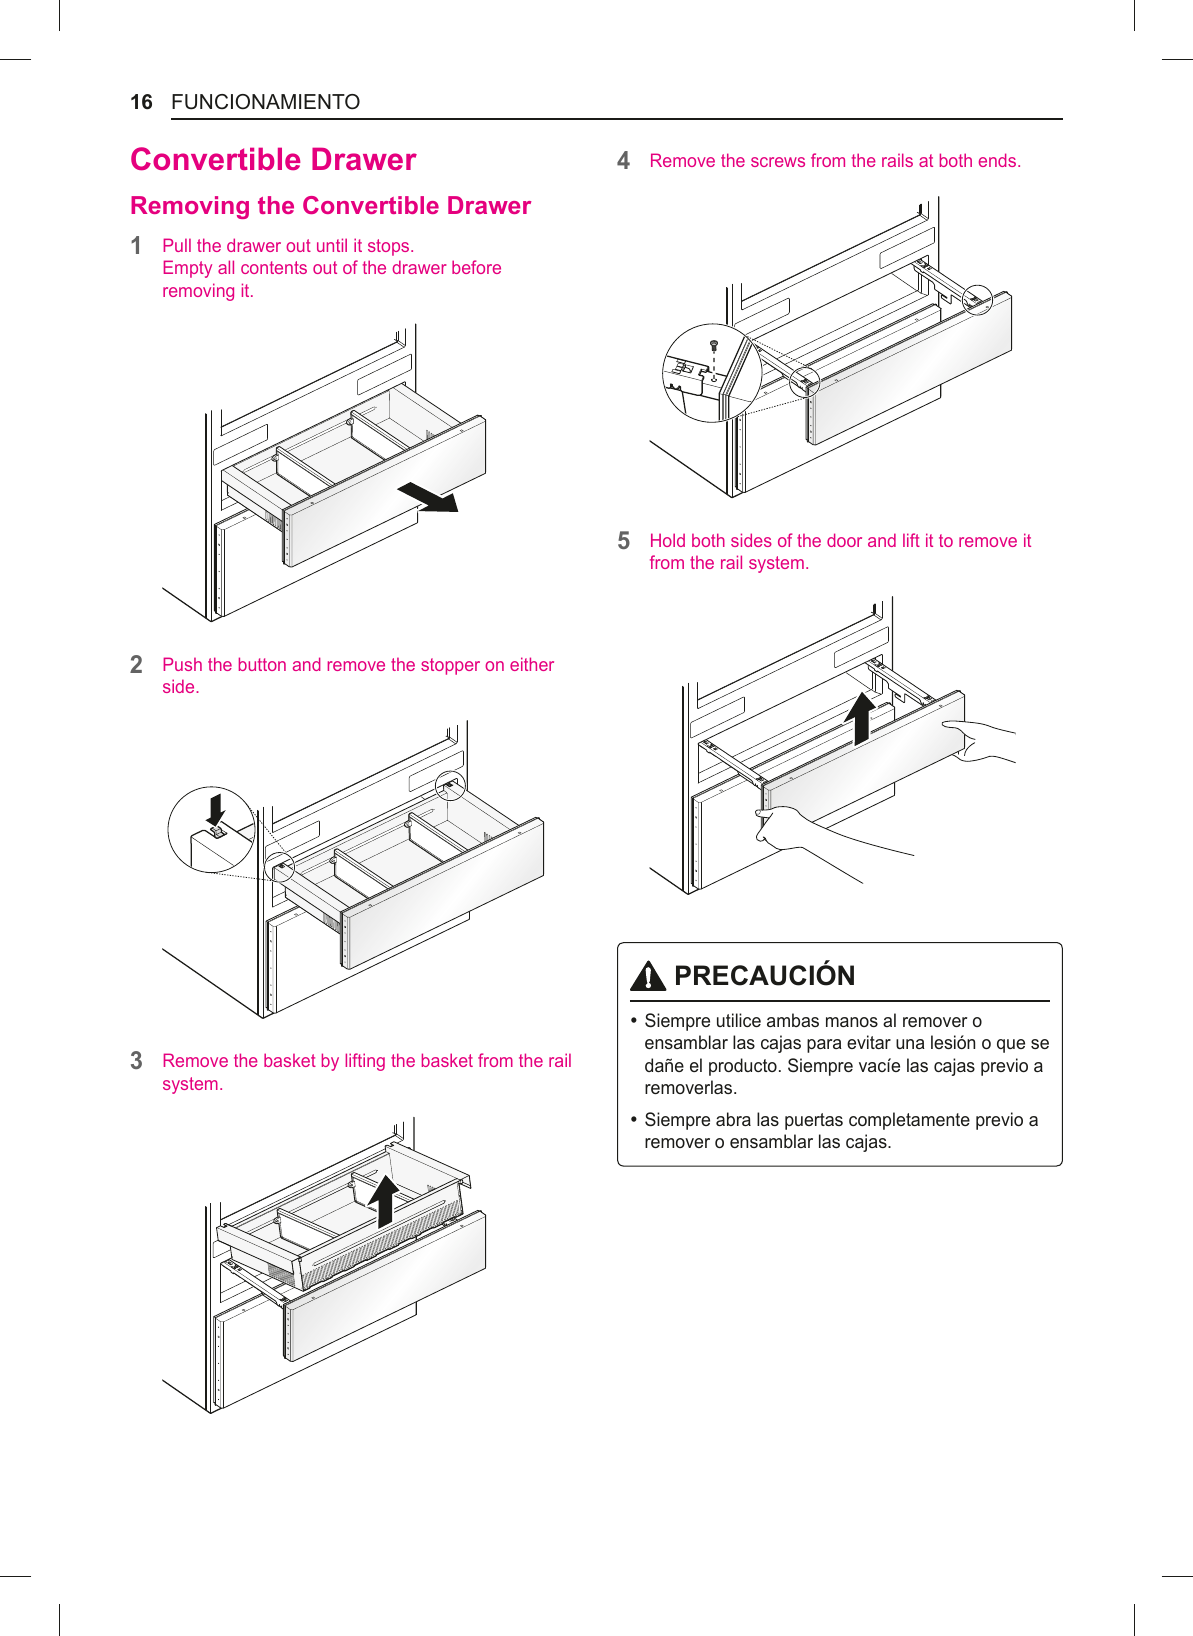
![16 FONCTIONNEMENT&RQYHUWLEOH'UDZHU5HPRYLQJWKH&RQYHUWLEOH'UDZHU1Pull the drawer out until it stops. Empty all contents out of the drawer before removing it.2Push the button and remove the stopper on either side.3Remove the basket by lifting the basket from the rail system.4Remove the screws from the rails at both ends.5Hold both sides of the door and lift it to remove it from the rail system. MISES EN GARDE %Les tiroirs sont lourds. Utilisez toujours vos deux mains lorsque vous enlevez ou que vous DVVHPEOH]OHVWLURLUVD¿QG¶pYLWHUWRXWGRPPDJHRXtoute blessure. Videz toujours les tiroirs avant de les enlever. %Ouvrez toujours complètement la porte avant d’enlever ou d’assembler les tiroirs.](https://usermanual.wiki/LG-Electronics-USA/E19MAE07/User-Guide-3706887-Page-59.png)
![17FONCTIONNEMENTFRANÇAIS$VVHPEOLQJWKH&RQYHUWLEOH'UDZHU1Grasp the door on each side and lower it into place on the rail system.2Tighten the screws from the rails at both ends. 3Pull the drawer open to full extension. Lower the basket onto the rail system.4Push the button and combine the stopper on either side. MISES EN GARDE %Les tiroirs sont lourds. Utilisez toujours vos deux mains lorsque vous enlevez ou que vous DVVHPEOH]OHVWLURLUVD¿QG¶pYLWHUWRXWGRPPDJHRXtoute blessure. Videz toujours les tiroirs avant de les enlever ou de les assembler. %Ouvrez toujours complètement la porte du réfrigérateur avant d’enlever ou d’assembler les tiroirs.](https://usermanual.wiki/LG-Electronics-USA/E19MAE07/User-Guide-3706887-Page-60.png)
![18 FONCTIONNEMENT)UHH]HU'UDZHU5HPRYLQJWKH)UHH]HU'UDZHUREMARQUES %Before removing the Freezer Drawer, it must be removing the Convertible Drawer. 1Pull the drawer out until it stops. Empty all contents out of the drawer before removing it.2Push the button and remove the stopper on either side.3Remove the basket by lifting the basket from the rail system.4Remove the screws from the rails at both ends.5Hold both sides of the door and lift it to remove it from the rail system.](https://usermanual.wiki/LG-Electronics-USA/E19MAE07/User-Guide-3706887-Page-61.png)
![19FONCTIONNEMENTFRANÇAIS$VVHPEOLQJWKH)UHH]HU'UDZHUREMARQUES %Before assembling the Freezer Drawer, it must be removing the Convertible Drawer. 1Grasp the door on each side and lower it into place on the rail system.2Tighten the screws from the rails at both ends. 3Pull the drawer open to full extension. Lower the basket onto the rail system.4Push the button and combine the stopper on either side.](https://usermanual.wiki/LG-Electronics-USA/E19MAE07/User-Guide-3706887-Page-62.png)

![22 FONCTIONS INTELLIGENTESFONCTIONS INTELLIGENTES$SSOLFDWLRQ6,*1$785(KITCHEN SUITEL’application SIGNATURE KITCHEN SUITE vous permet de communiquer avec l’appareil à l’aide d’un téléphone intelligent.$YDQWG¶XWLOLVHUO¶DSSOLFDWLRQ1Vérifiez la puissance du signal sans fil à proximité de l’appareil. %6LODGLVWDQFHHQWUHO¶DSSDUHLOHWOHURXWHXUVDQV¿Oest trop grande, l’intensité du signal s’affaiblit. Cela peut prendre plus de temps pour enregistrer l’appareil ou l’installation peut échouer.2Désactivez les GRQQpHVPRELOHV ou les GRQQpHVFHOOXODLUHV sur votre téléphone intelligent.3Connectez votre téléphone intelligent au routeur sans fil.REMARQUES %3RXUYpUL¿HUO¶pWDWGHODFRQQH[LRQWi-Fi , assurez-vous que l’icône Wi-Fi, qui se trouve sur le panneau de commande, est allumée. %L’appareil prend seulement en charge les réseaux :L)LGH*+]3RXUYpUL¿HUODIUpTXHQFHGHYRWUHréseau, contactez votre fournisseur de services Internet ou référez-vous au manuel de votre routeur VDQV¿O %L’application SIGNATURE KITCHEN SUITE n’est pas responsable des problèmes de connexion au réseau, ni des pannes, défaillances ou erreurs causées par la connexion au réseau. %/¶HQYLURQQHPHQWVDQV¿OHQYLURQQDQWSHXWIDLUHHQVRUWHTXHOHVHUYLFHGHUpVHDXVDQV¿OIRQFWLRQQHlentement. %Si l’appareil ne parvient pas à se connecter au réseau Wi-Fi, c’est peut-être parce qu’il est trop éloigné du URXWHXU$FKHWH]XQUpSpWHXU:L)LDPSOL¿FDWHXUGHfréquences) pour accroître la force du signal Wi-Fi. %La connexion réseau peut ne pas fonctionner correctement selon le fournisseur de services Internet. %La connexion Wi-Fi peut ne pas se faire ou être interrompue à cause de l’environnement du réseau domestique. %Si l’appareil ne peut pas être enregistré en raison de SUREOqPHVDYHFODWUDQVPLVVLRQGXVLJQDOVDQV¿Odébranchez le routeur et attendez environ une minute avant de le remettre en marche et de réessayer. %6LOHSDUHIHXGHYRWUHURXWHXUVDQV¿OHVWDFWLYpdésactivez-le ou ajoutez-y une exception. %/HQRPGXUpVHDXVDQV¿O66,'GRLWrWUHXQHcombinaison de lettres et de chiffres anglais. (N’utilisez pas de caractères spéciaux.) %L’interface utilisateur (IU) du téléphone intelligent peut varier en fonction du système d’exploitation (SE) mobile et du fabricant. %6LOHSURWRFROHGHVpFXULWpGXURXWHXUHVWFRQ¿JXUppour le WEP, vous pourriez avoir à le changer pour le :3$D¿QGHUpXVVLUjHQUHJLVWUHUOHSURGXLW](https://usermanual.wiki/LG-Electronics-USA/E19MAE07/User-Guide-3706887-Page-65.png)
![23FONCTIONS INTELLIGENTESFRANÇAIS,QVWDOODWLRQGHO¶DSSOLFDWLRQSIGNATURE KITCHEN SUITEÀ partir d’un téléphone intelligent, cherchez l’application SIGNATURE KITCHEN SUITE dans la boutique Google Play ou l’App Store d’Apple. Suivez les directives pour télécharger et installer l’application.REMARQUE %Si vous choisissez la connexion simple pour accéder à l’application SIGNATURE KITCHEN SUITE, vous devrez passer par le processus d’enregistrement de l’appareil chaque fois que vous changez de téléphone intelligent ou que vous réinstallez l’application.&DUDFWpULVWLTXHVGHO¶DSSOLFDWLRQSIGNATURE KITCHEN SUITEGestion des alimentsCette fonction vous permet de savoir quels aliments se trouvent dans votre réfrigérateur et votre congélateur, vous avertit lorsqu’ils approchent de la date limite de consommation, génère des listes d’épicerie et envoie des liens vers des recettes.6XUYHLOODQFHGHODFRQVRPPDWLRQG¶pQHUJLHCette fonction permet de suivre la consommation énergétique du réfrigérateur ainsi que le nombre de fois RODSRUWHHVWRXYHUWH0HVVDJHVDXWRPDWLTXHVSi la porte reste ouverte pendant plus de dix minutes, vous recevrez un message automatisé. Lorsque la fonction Ice Plus (glace plus) est terminée, vous recevrez aussi un message automatisé.6PDUW'LDJQRVLVMCCette fonction fournit des renseignements utiles pour GLDJQRVWLTXHUHWUpVRXGUHOHVSUREOqPHVDYHFOތDSSDUHLOHQVHEDVDQWVXUOHSURILOGތXWLOLVDWLRQParamètresVous permet de régler diverses options du réfrigérateur et de l’application.REMARQUES %6LYRXVFKDQJH]GHURXWHXUVDQV¿OGHIRXUQLVVHXUGHservices Internet ou de mot de passe après l’enregistrement de l’appareil, veuillez le supprimer de l’application SIGNATURE KITCHEN SUITE dans Paramètresĺ0RGL¿HUOHSURGXLW et l’enregistrer de nouveau. %Ces renseignements étaient à jour au moment de la publication du présent manuel. L’application est sujette jGHVPRGL¿FDWLRQVjGHV¿QVG¶DPpOLRUDWLRQGXproduit, et ce, sans que l’utilisateur en soit préalablement avisé.](https://usermanual.wiki/LG-Electronics-USA/E19MAE07/User-Guide-3706887-Page-66.png)
![25FONCTIONS INTELLIGENTESFRANÇAIS)RQFWLRQ6PDUW'LDJQRVLVMCSachez que si vous éprouvez des problèmes avec votre électroménager, celui-ci a la capacité de transmettre des données au centre d’information SIGNATURE KITCHEN SUITE par l’intermédiaire de votre téléphone. Les modèles équipés de la technologie NFC ou du Wi-Fi peuvent également transmettre des données à un téléphone intelligent à l’aide de l’application SIGNATURE KITCHEN SUITE.6PDUW'LDJQRVLVMC±GLDJQRVWLFSDUOH&HQWUHGތLQIRUPDWLRQjODFOLHQWqOHCette méthode vous permet de parler directement à l’un de nos spécialistes formés. Le spécialiste enregistre les données transmises par l’appareil et les utilise pour analyser le problème, fournissant ainsi un diagnostic rapide et efficace.1Appelez le Centre d’information à la clientèle de SIGNATURE KITCHEN SUITE au : (É.-U.) 1 855 790-66552Ouvrez la porte du réfrigérateur.3Approchez le microphone de votre téléphone devant le haut-parleur situé sur le couvercle du filtre du réfrigérateur lorsque le spécialiste du Centre d’information à la clientèle vous le demandera.4Maintenez enfoncée la touche 5HIULJHUDWRU (réfrigérateur) pendant trois secondes tout en tenant votre téléphone devant le haut-parleur.5$SUqVDYRLUHQWHQGXOHVWURLVVLJQDX[UHOkFKH]ODtouche 5HIULJHUDWRU (réfrigérateur).6Gardez le téléphone en place jusqu’à la fin de la transmission sonore. Un compte à rebours s’affichera à l’écran. Lorsque le décompte est terminé et que vous n’entendez plus les tonalités, reprenez votre conversation avec le spécialiste, qui VHUDDORUVHQPHVXUHGHYRXVDLGHUJUkFHjl’information transmise aux fins d’analyse.REMARQUES %Pour obtenir les meilleurs résultats, évitez de bouger le téléphone pendant la transmission sonore. %6LOތDJHQWGXFHQWUHGHVHUYLFHQތDSDVSXREWHQLUXQHQUHJLVWUHPHQWH[DFWGHVGRQQpHVLOVHSHXWTXތLOYRXVGHPDQGHGތHVVD\HUGHQRXYHDX %La fonction Smart DiagnosisMC dépend de la qualité de OތDSSHOORFDO %Une mauvaise télécommunication peut entraîner une piètre transmission de données entre votre téléphone et le centre d’appels, de sorte que le Smart DiagnosisMC risque de ne pas fonctionner correctement.6PDUW'LDJQRVLVMCUtilisez la fonction Smart Diagnosis de l’application SIGNATURE KITCHEN SUITE pour vous aider à diagnostiquer les problèmes avec l’appareil sans l’assistance du Centre d’information à la clientèle SIGNATURE KITCHEN SUITE.Suivez les instructions de l’application SIGNATURE KITCHEN SUITE pour effectuer un diagnostic intelligent à l’aide de votre téléphone intelligent.REMARQUE %La fonction Smart DiagnosisMC ne peut être activée que si l’appareil peut être mis sous tension à l’aide de la touche 3RZHU (alimentation). Si l’appareil ne peut pas être mis sous tension, le dépannage doit être effectué sans utiliser la fonction Smart DiagnosisMC.](https://usermanual.wiki/LG-Electronics-USA/E19MAE07/User-Guide-3706887-Page-68.png)
![28 ENTRETIENENTRETIEN1HWWR\DJH AVERTISSEMENT %8WLOLVH]XQSURGXLWGHQHWWR\DJHLQLQÀDPPDEOH1Hpas le faire pourrait entraîner un incendie, une explosion ou des blessures mortelles. MISES EN GARDE %N’utilisez pas de chiffons ou d’éponges rugueuses pour nettoyer l’intérieur et l’extérieur du réfrigérateur. %Ne placez pas votre main sur la surface inférieure du réfrigérateur quand vous ouvrez ou fermez les portes.&RQVHLOVJpQpUDX[GHQHWWR\DJH %Le réfrigérateur se dégivre automatiquement. Toutefois, nettoyez-le une fois par mois pour éviter les odeurs. %Essuyez immédiatement les aliments renversés. %Débranchez toujours le réfrigérateur ou coupez le courant avant de le nettoyer. %Enlevez toutes les pièces amovibles, telles que les tablettes, les bacs à légumes et fruits, etc. %Utilisez une éponge propre ou un chiffon et un détergent doux avec de l’eau chaude. N’utilisez pas de produits de nettoyage abrasifs ou forts. %Lavez à la main, rincez et séchez soigneusement toutes les surfaces. %Lors du nettoyage de l’intérieur ou de l’extérieur de l’appareil, ne le nettoyez pas avec une brosse rugueuse, du dentifrice ou des matériaux LQÀDPPDEOHV1¶XWLOLVH]SDVGHSURGXLWVGHQHWWR\DJHFRQWHQDQWGHVVXEVWDQFHVLQÀDPPDEOHV <Cela peut causer une décoloration de l’appareil ou entraîner des dommages. </LVWHGHVVXEVWDQFHVLQÀDPPDEOHVDOFRROpWKDQROméthanol, alcool isopropylique, alcool isobutylique, etc.), diluant, eau de javel, benzène, liquide LQÀDPPDEOHDEUDVLIHWF3DURLVLQWpULHXUHVPour éliminer les odeurs, vous pouvez laver l’intérieur du réfrigérateur avec un mélange de bicarbonate de soude et d’eau chaude. Mélangez deux cuillères à soupe de bicarbonate de soude à un litre d’eau (26 g de bicarbonate de soude pour un litre d’eau). Assurez-vous que le bicarbonate de soude est complètement dissous afin de ne pas rayer les surfaces du réfrigérateur.5HYrWHPHQWVHWMRLQWVGHSRUWHUtilisez une éponge propre ou un chiffon et un détergent doux avec de l’eau chaude. N’utilisez pas de cire de nettoyage, de détergent concentré, d’eau de Javel ou de nettoyant contenant du pétrole sur les pièces en plastique du réfrigérateur.3LqFHVHQSODVWLTXHFRXYHUFOHVHWSDQQHDX[Utilisez une éponge propre ou un chiffon et un détergent doux avec de l’eau chaude. N’utilisez pas de produits nettoyants pour vitres, de nettoyants abrasifs ou de liquides inflammables. Ces produits peuvent rayer ou endommager la surface.](https://usermanual.wiki/LG-Electronics-USA/E19MAE07/User-Guide-3706887-Page-71.png)
![29ENTRETIENFRANÇAIS5HPSODFHPHQWGX¿OWUHjHDXRemplacer le filtre à eau %Environ tous les six mois. %Lorsque l’icône 5HSODFH)LOWHUFKDQJHUOH¿OWUH s’allume. %Lorsque la sortie d’eau du distributeur diminue.15HWLUH]O¶DQFLHQILOWUHjHDXAppuyez en haut à droite du réfrigérateur sur le panneau du filtre à eau pour l’ouvrir.REMARQUES %/HUHPSODFHPHQWGX¿OWUHjHDXSURYRTXHOHGUDLQDJHd’une petite quantité d’eau (environ 25 ml ou 1 oz). %(QYHORSSH]O¶H[WUpPLWpDYDQWGXFRXYHUFOHGX¿OWUHjeau avec un linge pour recueillir l’eau qui s’écoulera. 0DLQWHQH]OH¿OWUHjHDXjODYHUWLFDOHXQHIRLVTX¶LOHVWenlevé pour éviter que de l’eau s’en échappe.2Placez le bouchon sur le filtre à eau, puis tenez-le et tournez-le vers la gauche pour retirer le filtre à eau de la tête du filtre.Bouchon35HPSODFH]DYHFXQQRXYHDXILOWUHjHDXRetirez le nouveau filtre à eau de son emballage et retirez le couvercle de protection des joints toriques. Placez le bouchon sur le nouveau filtre à eau, puis poussez-le dans l’orifice du collecteur jusqu’à ce qu’il soit en place.4Prenez le bouchon et faites-le tourner vers la droite jusqu’à ce qu’il s’arrête. Replacez le bouchon sur le côté du filtre à eau.5Une fois que le filtre à eau a été remplacé, faites couler environ neuf litres d’eau (ce qui prendra environ cinq minutes) pour éliminer l’air et les contaminants du système.REMARQUE %Ne faites pas couler les neuf litres d’eau de façon FRQWLQXH$SSX\H]HWUHOkFKH]ODWRXFKHGXGLVWULEXWHXUpour des cycles de 30 secondes en position de marche et de 60 secondes en position d’arrêt.](https://usermanual.wiki/LG-Electronics-USA/E19MAE07/User-Guide-3706887-Page-72.png)
![30 ENTRETIEN6Une fois le filtre remplacé, maintenez la touche Water Filter Reset (réinitialisation du filtre à eau) enfoncée pendant trois secondes pour réinitialiser le témoin lumineux.REMARQUES3RXUDFKHWHUXQILOWUHjHDXGHUHFKDQJH %Rendez-vous chez un détaillant ou un distributeur %Web : Trouvez des pièces et des accessoires sur la page de soutien du site thesignaturekitchen.com. %Téléphone : 1 855 790-6655 (États-Unis)3RXUSOXVGHUHQVHLJQHPHQWVDSSHOH]DX e8 %Cartouche de remplacement à utiliser : /73$'4 /73&$'4 /73&6$'4 /736$'4](https://usermanual.wiki/LG-Electronics-USA/E19MAE07/User-Guide-3706887-Page-73.png)
![33ENTRETIENFRANÇAIS'LUHFWLYHVG¶XWLOLVDWLRQHWVSpFLILFDWLRQVGHO¶DOLPHQWDWLRQHQHDXDébit d’utilisation 1,89 l/min (0,5 gal/min)Alimentation en eauRéseau municipal ou puits privé - Eau potablePression de l’eau De 20 à 120 psi (de 138 à 827 kPa)Température de l’eauDe 0,6 °C à 37,8 °C (de 33 °F à 100 °F)Capacité 757 litres (200 gallons)Il est essentiel de suivre les recommandations du fabricant relatives à l’installation, à l’entretien et au remplacement du filtre afin que l’appareil fonctionne conformément aux performances annoncées.REMARQUE %Les tests ont été effectués en laboratoire et le rendement peut varier en situation d’utilisation réelle.Cartouche de remplacement : /733&3&636Pour obtenir de l’information sur les filtres à eau de rechange, rendez-vous chez un détaillant ou un GLVWULEXWHXURXUHFKHUFKH]OHVPRWV©ILOWUHjHDXªVXUOHsite WKHVLJQDWXUHNLWFKHQFRPPour plus de renseignements, le Centre d’information à la clientèle SIGNATURE KITCHEN SUITE est ouvert en tout temps.É.-U. : 1 855 790-6655NSF est une marque de commerce de la NSF. AVERTISSEMENTS$ILQGHUpGXLUHOHVULVTXHVG¶pWRXIIHPHQW %N’autorisez pas les enfants de moins de 3 ans à avoir accès aux petites pièces pendant l’installation de ce produit.$ILQGHUpGXLUHOHULVTXHDVVRFLpjO¶LQJHVWLRQGHSURGXLWVFRQWDPLQDQWV %N’utilisez pas d’eau insalubre ou de qualité inconnue sans désinfection adéquate en amont ou HQDYDOGXV\VWqPH/HVV\VWqPHVFHUWL¿pVSRXUODréduction du nombre de sporocystes peuvent être utilisés avec de l’eau désinfectée pouvant contenir GHVVSRURF\VWHV¿OWUDEOHVeWDEOLVVHPHQWGHO¶(3$n° 070595-MEX-001 MISES EN GARDE$ILQGHUpGXLUHOHULVTXHDVVRFLpjGHVGRPPDJHVPDWpULHOVFDXVpVSDUXQHIXLWHG¶HDX %Lisez et suivez les instructions d’utilisation avant l’installation et l’utilisation de ce système. %L’installation et l’utilisation DOIVENT être conformes à l’ensemble des codes de plomberie régionaux et locaux en vigueur. %N’installez pas le produit si la pression d’eau dépasse 120 psi (827 kPa). Si la pression d’eau dépasse 80 psi, vous devez installer une valve de limitation de pression. Faites appel à un plombier si vous ne savez SDVFRPPHQWYpUL¿HUODSUHVVLRQG¶HDX %N’installez pas ce produit dans des conditions propices aux coups de bélier. S’il est possible que des coups de bélier se produisent, vous devez absolument installer un dispositif antibélier. Contactez un plombier si vous QHVDYH]SDVFRPPHQWHIIHFWXHUFHWWHYpUL¿FDWLRQ %N’installez pas ce produit sur des conduites d’alimentation en eau chaude. La température maximale de l’eau pour le bon fonctionnement de ce V\VWqPHGH¿OWUHHVWGH)& %3URWpJH]OH¿OWUHGXJHO9LGDQJH]OH¿OWUHORUVTXHODtempérature descend sous 4,4 °C (40 °F). %/DFDUWRXFKHGX¿OWUHMHWDEOH'2,7rWUHUHPSODFpHtous les six mois, selon la capacité évaluée, ou plus tôt si le débit ralentit de façon manifeste. %Protégez le dispositif contre le gel, retirez la cartouche ¿OWUDQWHORUVTXHOHVWHPSpUDWXUHVULVTXHQWGHdescendre au-dessous de 0 °C. %1¶LQVWDOOH]SDVFHVV\VWqPHVGDQVGHVUpJLRQVROHVtempératures ambiantes peuvent dépasser 43,3 °C (110 °F). %Si un dispositif de prévention du refoulement est installé sur le système, un dispositif permettant de contrôler la pression résultant de la dilatation thermique doit être installé. %9pUL¿H]TXHWRXVOHVWX\DX[HWOHVUDFFRUGVVRQWserrés et ne présentent aucune trace de fuite.](https://usermanual.wiki/LG-Electronics-USA/E19MAE07/User-Guide-3706887-Page-76.png)
![34 DÉPANNAGEDÉPANNAGE)RLUHDX[TXHVWLRQV4 4XHOOHVVRQWOHVWHPSpUDWXUHVRSWLPDOHVSRXUPRQFRQJpODWHXU"R : Le réglage par défaut du congélateur est de 0 °F (-18 °C). Ajustez ces réglages au besoin pour conserver les aliments à la température désirée. La crème glacée doit être ferme et les glaçons ne doivent pas fondre dans le congélateur. Pour passer des degrés Fahrenheit aux degrés Celsius sur l’écran, appuyez d’abord sur le bouton Freezer (congélateur) pour activer l’écran, puis appuyez sur les boutons Freezer (congélateur) et Smart Grid (réseau intelligent) et maintenez-les enfoncés jusqu’à ce que vous entendiez un bip et que les réglages changent à l’écran. 4 4XHOOHVVRQWOHVWHPSpUDWXUHVRSWLPDOHVSRXUPRQUpIULJpUDWHXU"R : Le réglage par défaut du réfrigérateur est de 37 °F (3 °C). Ajustez ces réglages au besoin pour conserver les aliments à la température désirée. Pour passer des degrés Fahrenheit aux degrés Celsius sur l’écran, appuyez d’abord sur le bouton Refrigerator (réfrigérateur) pour activer l’écran, puis appuyez sur les boutons Refrigerator (réfrigérateur) et Smart Grid (réseau intelligent) et maintenez-les enfoncés jusqu’à ce que vous entendiez un bip et que les réglages changent à l’écran.4 +RZGR,VHWWKHWHPSHUDWXUH"R : Continually press the 5HIULJHUDWRURU&RQYHUWLEOHRU)UHH]HUEXWWRQRQWKHFRQWUROSDQHOXQWLOWKHGHVLUHGWHPSHUDWXUHDSSHDUV. The numbers will cycle from highest to lowest and then return to the highest again with continuous pressing.4 4XHOHVWFHERXUGRQQHPHQWTXHOHFRQJpODWHXUpPHWGHWHPSVjDXWUH"R : Ce son peut être émis si le congélateur n’est pas alimenté en eau alors que la machine à glaçons est allumée. Si vous n’avez pas de source d’eau reliée au congélateur, vous devriez désactiver la machine à glaçons sur le panneau de commande.4 3RXUTXRLOHSODWHDXGHODPDFKLQHjJODoRQVVHPEOHWLOFURFKH"R : Il s’agit d’un état normal du cycle de la machine à glaçons. Le plateau de la machine à glaçons peut sembler à niveau ou légèrement incliné. Le changement de position aide au processus de congélation.4 0RQFRQJpODWHXUHVWVRXVWHQVLRQHWOHVFRPPDQGHVIRQFWLRQQHQWPDLVLOQHUHIURLGLWSDVHWO¶DIILFKHXULQGLTXH©2)ªYRLUFLGHVVRXV4XHOHVWOHSUREOqPH"R : Le congélateur est en mode Présentation. Ce mode désactive le refroidissement dans le but d’économiser l’énergie lorsque l’appareil est présenté en magasin. Pour rétablir le fonctionnement normal, appuyez d’abord sur le bouton Freezer (congélateur) pour activer l’écran, puis appuyez sur les boutons Freezer (congélateur) et Water Filter Reset (remplacement du filtre à eau) et maintenez-les enfoncés jusqu’à ce que vous entendiez un bip et que le réglage de la température s’affiche à l’écran. Utilisez la même procédure pour rétablir le mode Présentation du congélateur, si vous le souhaitez.](https://usermanual.wiki/LG-Electronics-USA/E19MAE07/User-Guide-3706887-Page-77.png)
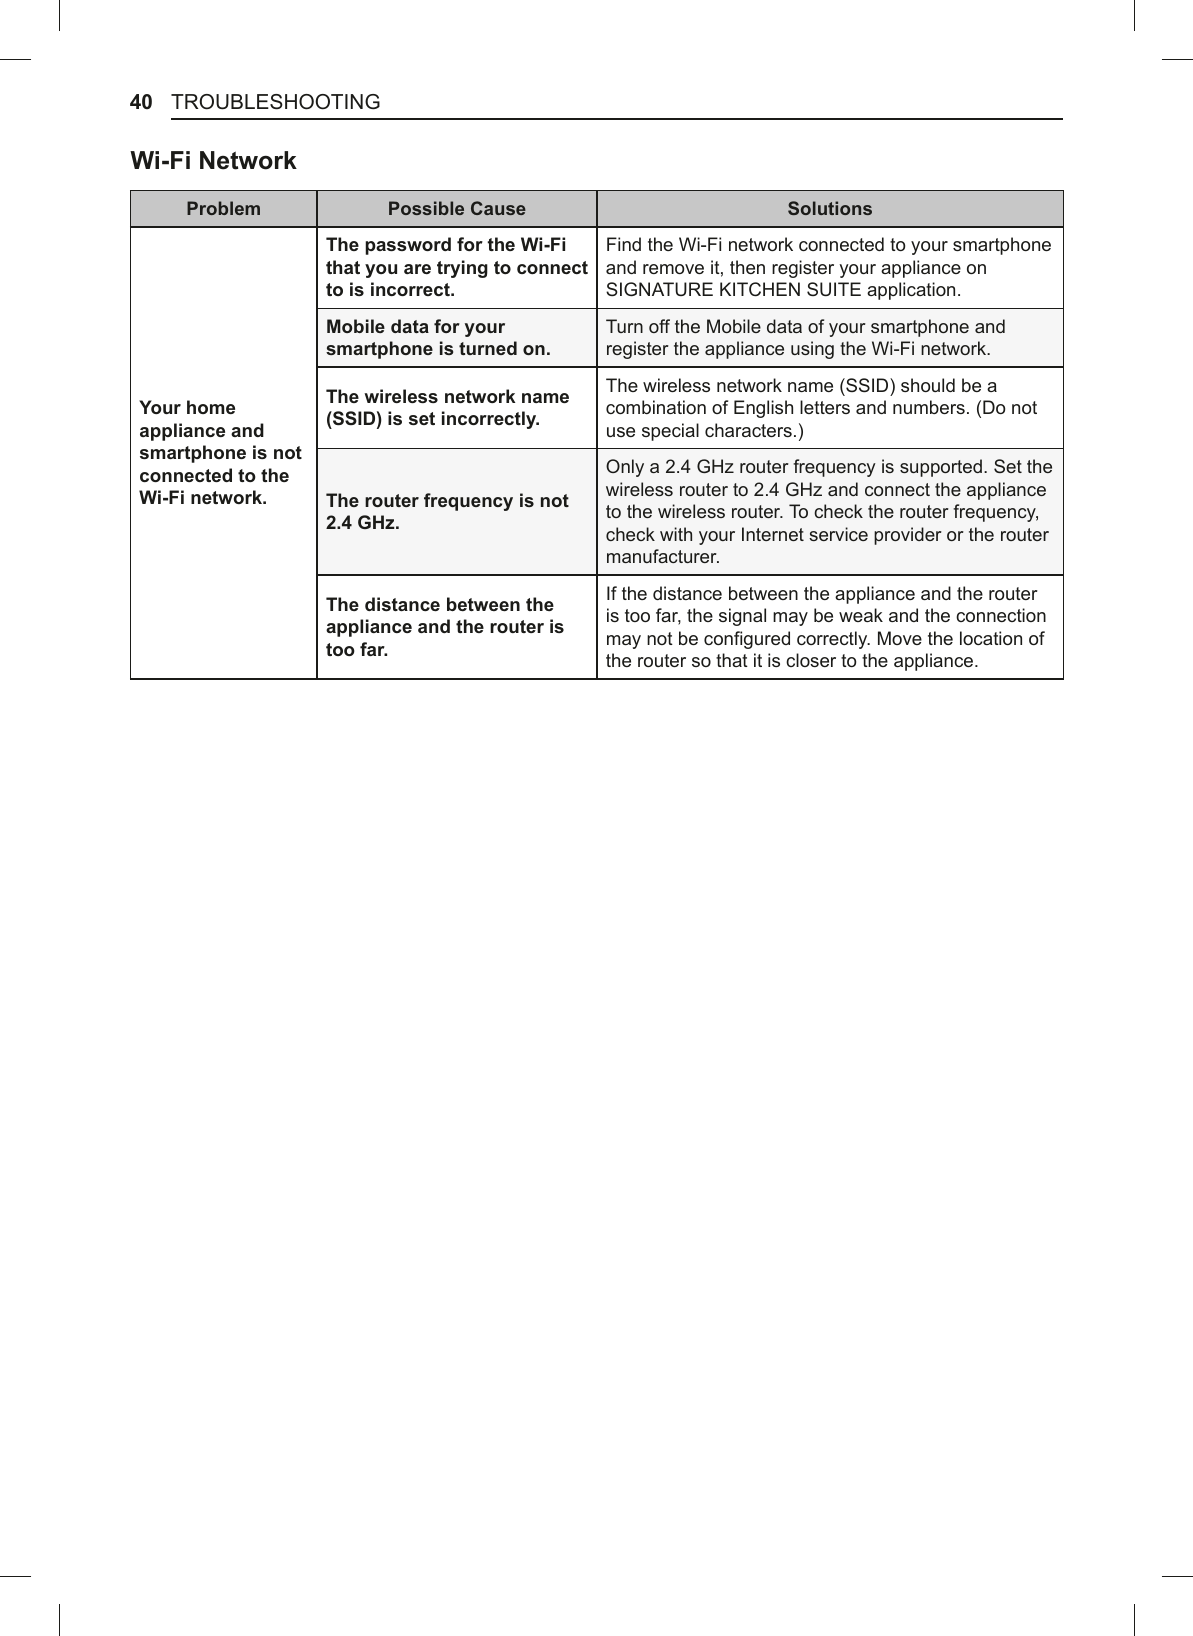
![40 DÉPANNAGE5pVHDX:L)LProblème &DXVHSRVVLEOH 6ROXWLRQVVotre appareil pOHFWURPpQDJHUHWYRWUHWpOpSKRQHLQWHOOLJHQWQHVRQWSDVFRQQHFWpVDXUpVHDX:L)L/HPRWGHSDVVHGXUpVHDX:L)LDXTXHOYRXVHVVD\H]GHYRXVFRQQHFWHUHVWLQFRUUHFWTrouvez le réseau Wi-Fi connecté à votre téléphone intelligent et supprimez-le, puis enregistrez votre appareil sur l’application SIGNATURE KITCHEN SUITE./HVGRQQpHVPRELOHVGHYRWUHWpOpSKRQHLQWHOOLJHQWVRQWDFWLYpHVDésactivez les données mobiles sur votre téléphone intelligent avant d’enregistrer l’appareil à l’aide du réseau Wi-Fi./HQRPGXUpVHDXVDQVILO66,'HVWHUURQpLe nom du réseau sans fil (SSID) doit être une combinaison de lettres et de chiffres anglais. (N’utilisez pas de caractères spéciaux.)/DIUpTXHQFHGXURXWHXUQ¶HVWSDVGH*+]Seule une fréquence de routeur de 2,4 GHz est prise en charge. Réglez le routeur sans fil à 2,4 GHz et connectez-y l’appareil. Pour connaître la fréquence du routeur, informez-vous auprès de votre fournisseur de services Internet ou du fabricant du routeur./DGLVWDQFHHQWUHO¶DSSDUHLOHWOHURXWHXUHVWWURSJUDQGHSi l’appareil est trop éloigné du routeur, le signal peut être faible et la connexion peut ne pas être configurée correctement. Déplacez le routeur afin qu’il soit plus près de l’appareil.](https://usermanual.wiki/LG-Electronics-USA/E19MAE07/User-Guide-3706887-Page-83.png)
![42 GARANTIE %Les dommages résultant d’une mauvaise utilisation, d’un abus, d’une installation inadéquate, d’une mauvaise réparation ou d’un entretien incorrect. Une réparation incorrecte comprend l’utilisation de pièces non approuvées ou VSpFL¿pHVSDU6,*1$785(.,7&+(168,7( %/HVGRPPDJHVRXODGpIDLOODQFHGXSURGXLWFDXVpVSDUXQHPRGL¿FDWLRQQRQDXWRULVpHGXSURGXLWRXV¶LOHVWHPSOR\ppour une utilisation autre que celle pour laquelle il a été conçu, ou tout dommage causé par une fuite d’eau provoquée par une mauvaise installation. %Les dommages ou la défaillance du produit causés par un courant ou une tension électrique incorrects, par des codes de plomberie incorrects, par une utilisation commerciale ou industrielle inappropriées, ou par l’utilisation G¶DFFHVVRLUHVSH[¿OWUHVjHDXGHFRPSRVDQWVRXGHSURGXLWVGHQHWWR\DJHQRQDSSURXYpVSDU6,*1$785(KITCHEN SUITE. %Les dommages consécutifs au transport et à la manutention du produit, y compris les égratignures, les bosses, les pEUpFKXUHVHWWRXWDXWUHGRPPDJHDXSURGXLW¿QLVDXIVLGHWHOVGRPPDJHVVRQWFDXVpVSDUGHVGpIDLOODQFHVmatérielles ou associées à la main-d’œuvre et qu’ils sont rapportés dans un délai d’une (1) semaine après la livraison (appelez le 1 855 790-6655). %/HVGRPPDJHVjRXOHVpOpPHQWVPDQTXDQWVGHWRXWDI¿FKDJHERvWHRXYHUWHSURGXLWHQUDEDLVRXSURGXLWUHPLVjneuf. %'HVSURGXLWVGRQWOHQXPpURGHVpULHRULJLQDODpWpUHWLUpPRGL¿pRXQHSHXWrWUHIDFLOHPHQWGpWHUPLQp/HVQXPpURVde modèle et de série ainsi que le reçu original de vente au détail sont requis pour une validation de la garantie. %Les augmentations des frais de fonctionnement et des autres dépenses de fonctionnement. %/HUHPSODFHPHQWGHVDPSRXOHVGHV¿OWUHVRXGHVFRQVRPPDEOHV %/HVUpSDUDWLRQVHIIHFWXpHVORUVTXHOHSURGXLWHVWXWLOLVpjGHV¿QVDXWUHVTXHO¶XWLOLVDWLRQGRPHVWLTXHKDELWXHOOHHWnormale (par exemple : usage commercial, dans des bureaux ou dans des installations récréatives) ou de façon contraire aux instructions du manuel d’utilisation. %Les coûts associés au déplacement du produit à partir de votre maison pour des réparations. %Le déplacement et la réinstallation du produit, s’il est installé dans un endroit inaccessible ou s’il n’est pas installé conformément aux instructions d’installation publiées, y compris celles des manuels d’installation et d’utilisation de SIGNATURE KITCHEN SUITE. %Les tablettes, les balconnets de porte, les tiroirs, les poignées, les accessoires et les autres pièces en dehors de celles qui ont été initialement jointes à ce modèle particulier./HFRWGHVUpSDUDWLRQVRXGXUHPSODFHPHQWGDQVOHVFLUFRQVWDQFHVG¶H[FOXVLRQFLGHVVXVHVWDVVXPpSDUOHFRQVRPPDWHXU,QVFULYH]YRVLQIRUPDWLRQVGHJDUDQWLHFLGHVVRXV,QIRUPDWLRQG¶HQUHJLVWUHPHQWGXSURGXLW0RGqOH1XPpURGHVpULH'DWHG¶DFKDW3RXUREWHQLUGHVUHQVHLJQHPHQWVGpWDLOOpVFRQFHUQDQWODJDUDQWLHHWOHVHUYLFHjODFOLHQWqOHYHXLOOH]QRXVFRQWDFWHURXYLVLWHUQRWUHVLWH:HEAppelez au 1 855 790-6655 (24 heures par jour, 365 jours par année) et sélectionnez une option dans le menu ou visitez notre site Web au www.thesignaturekitchen.com. ou par courrier : Centre d’information à la clientèle de SIGNATURE KITCHEN SUITE : C. P. 240007, 201, James Record Road, Huntsville (Alabama), 35813 ATTN : CIC](https://usermanual.wiki/LG-Electronics-USA/E19MAE07/User-Guide-3706887-Page-85.png)
![6INSTRUCCIONES DE SEGURIDADMANTENIMIENTO %No use secadoras eléctricas para secar el interior del producto. %No prenda velas para remover el olor interno del producto. %(QHOFDVRGHIXJDGHOUHIULJHUDQWHDOHMHORVREMHWRVLQÀDPDEOHVGHOUHIULJHUDGRU$VHJ~UHVHGHTXHHOiUHDHVWpbien ventilada y póngase en contacto con un centro de servicio autorizado. %0DQWHQJDPDWHULDOHVLQÀDPDEOHV\YDSRUHVFRPRJDVROLQDDOHMDGRVGHOUHIULJHUDGRU %Este electrodoméstico está diseñado para uso doméstico y aplicaciones similares como areas de cocina en WLHQGDVR¿FLQDV\OXJDUHVGHWUDEDMRJUDQMDVSRUFOLHQWHVHQKRWHOHVPRWHOHV\RWURVWLSRVGHDPELHQWHVresidenciales; dormitorios; aplicaciones de abastecimiento y de servicios similares de no distribución. %Desenchufe el cable de alimentación antes de limpiar o reparar el electrodoméstico. %Las luces del refrigerador y el compartimento del congelador son luces LED para interiores, y un técnico FDOL¿FDGRGHEHUHDOL]DUHOPDQWHQLPLHQWR %En caso de apagón o tormenta eléctrica, desenchufe el cable de alimentación de inmediato. %Apague la alimentación si ingresa agua o polvo en el electrodoméstico. Llame a un agente de servicio. %No almacene contenedores de vidrio ni refrescos en el compartimento del congelador. Al congelarse, los contenidos pueden expandirse, romper el contenedor y provocar lesiones. %No almacene, desarme, ni repare el electrodoméstico usted mismo, y tampoco permita que personal no FDOL¿FDGRORKDJD %Si el cable de suministro eléctrico está dañado, este deberá ser reemplazado únicamente por el fabricante, su DJHQWHGHVHUYLFLRRSRUXQDSHUVRQDVLPLODUPHQWHFXDOL¿FDGDDPDQHUDGHHYLWDUULHVJRV %1RDOPDFHQHVXVWDQFLDVH[SORVLYDVFRPRODWDVGHDHURVROFRQSURSXOVRUHVLQÀDPDEOHVHQHVWHelectrodoméstico. %En caso de LED, ésta deberá ser reemplazada por personal de servicio.ELIMINACIÓN %Los refrigeradores desechados o abandonados son peligrosos, incluso si lo están sólo por unos días. Al momento de desechar el refrigerador, retire los materiales de embalaje de la puerta o quite las puertas, pero deje ORVHVWDQWHVHQVXOXJDUD¿QGHTXHORVQLxRVQRSXHGDQLQJUHVDUIiFLOPHQWHDpVWH %6LGHVHFKDUDXQUHIULJHUDGRUDVHJ~UHVHGHUHWLUDUHOUHIULJHUDQWHSDUDTXHXQPLHPEURFDOL¿FDGRGHOSHUVRQDOGHservicio lo deseche correctamente. Si usted libera el refrigerante, podría ser multado o encarcelado de conformidad con la ley ambiental vigente.INSTRUCCIONES DE CONEXIÓN A TIERRA %La conexión incorrecta del conductor de puesta a tierra del equipo puede provocar un riesgo de descarga HOpFWULFD&RQVXOWHFRQXQHOHFWULFLVWDFDOL¿FDGRRWpFQLFRGHVHUYLFLRVLWLHQHGXGDVVREUHVLHODSDUDWRHVWiGHELGDPHQWHFRQHFWDGRDWLHUUD1RPRGL¿TXHHOHQFKXIHSURYHtGRFRQHOHOHFWURGRPpVWLFRVLHVWHQRFD]DHQVXWRPDFRUULHQWHGHEHVROLFLWDUODLQVWDODFLyQGHXQRDGHFXDGRDXQHOHFWULFLVWDFXDOL¿FDGR %+DJDTXHXQWpFQLFRFHUWL¿FDGRYHUL¿TXHTXHHOWRPDFRUULHQWHGHSDUHG\ORVFDEOHVHVWpQDGHFXDGDPHQWHconectados a tierra. %Nunca tire del cable de alimentación para desenchufar el electrodoméstico. Agarre siempre el enchufe ¿UPHPHQWH\WLUHGHOPLVPRSDUDUHWLUDUORGHOWRPDFRUULHQWH6LQRKDFHHVWRSRGUtDGDxDUHOFDEOHGHalimentación y generar un riesgo de incendio y descarga eléctrica.](https://usermanual.wiki/LG-Electronics-USA/E19MAE07/User-Guide-3706887-Page-91.png)
![7INSTRUCCIONES DE SEGURIDADESPAÑOL PRECAUCIÓNPara reducir el riesgo de lesiones leves o moderadas a personas, el mal funcionamiento o daño al producto o propiedad cuando use este producto, siga las precauciones básicas, incluidas las siguientes:INSTALACIÓN %No coloque el electrodoméstico en un lugar donde pueda caerse. %El refrigerador debe instalarse correctamente, teniendo en cuenta las instrucciones de instalación.FUNCIONAMIENTO %No use aerosoles cerca del electrodoméstico. %Este refrigerador está destinado únicamente a usos domésticos y similares. %1RJROSHHQLDSOLTXHGHPDVLDGDIXHU]DHQODVVXSHU¿FLHVGHYLGULR1RWRTXHODVVXSHU¿FLHVGHYLGULRVLHVWiQagrietadas o rotas. %No llene ni envase en exceso los alimentos en los compartimentos de la puerta. Esto podría dañar el compartimento o provocar lesiones personales al retirar los alimentos aplicando una fuerza excesiva. %No llene demasiado el electrodoméstico. Si lo hace podría lesionarse o causar daño a la propiedad. %No cuelgue ni coloque objetos pesados en el dispensador del electrodoméstico.MANTENIMIENTO %No use detergentes fuertes como cera o diluyentes para la limpieza. Limpie con un trapo suave. %Remueva objetos extraños (como polvo y agua) de las clavijas del cable de alimentación y áreas de contacto. No utilice un paño humedo o mojado al limpiar el enchufe. %No rocíe agua directamente en el interior o exterior del electrodoméstico. %Cuando estén fríos, no limpie los estantes de vidrio ni las tapas con agua caliente. Si se exponen a cambios de temperatura repentinos, podrían romperse. ADVERTENCIA %Mantenga las aperturas de ventilación, en la cubierta del electrodoméstico o en la estructura incorporada, despejadas de obstrucciones. %No utilice dispositivos mecánicos u otros medios para acelerar el proceso de descongelado, con excepción de aquellos recomendados por el fabricante. %No dañe el circuito refrigerante. %No utilice aparatos eléctricos dentro de los compartimientos de almacenaje de alimentos del electrodoméstico, a menos que sean de un tipo recomendado por el fabricante. %El gas refrigerante y de aislamiento usado en el electrodoméstico requiere procedimientos de desechado HVSHFLDOHV$OGHVHFKDUSRUIDYRUFRQVXOWHFRQXQDJHQWHGHVHUYLFLRRSHUVRQDVLPLODUPHQWHFDOL¿FDGDEste electrodoméstico contiene una pequeña cantidad de refrigerante isobutano (R600a), gas natural con alta compatibilidad ambiental, pero también combustible. Al transportar e instalar el electrodoméstico, debe prestar atención para asegurar que ninguna parte del circuito refrigerante se dañe. Fuga del refrigerante fuera de las pipas podría generar un incendio o causar una lesión ocular. Si se detecta una fuga, evite cualquier llama descubierta o causas potenciales de incendio, y ventile el ambiente en el que se encuentra el electrodoméstico por varios minutos.A manera de evitar la creación de una mezcla de gas y aire inflamable en caso ocurra una fuga en el circuito refrigerante, el tamaño del ambiente en el que el electrodoméstico se ubica deberá corresponder a la cantidad de refrigerante usada. El espacio debe ser de 1 m² por cada 8g de refrigerante R600a dentro del electrodoméstico. La cantidad de refrigerante en su electrodoméstico particular se muestra en la placa de identificación ubicada dentro del mismo. Nunca inicie un electrodoméstico mientras este muestre algún signo defectuoso. En caso de dudas, consulte con su distribuidor.GUARDE ESTAS INSTRUCCIONES](https://usermanual.wiki/LG-Electronics-USA/E19MAE07/User-Guide-3706887-Page-92.png)
![10 DESCRIPCIÓN GENERAL DEL PRODUCTO1Filtro de aguaPurifica el agua.NOTA %(O¿OWURGHEHFDPELDUVHFDGDPHVHV&RQVXOWHODVHFFLyQ5HHPSOD]RGHO¿OWURGHDJXDGHHVWHmanual para obtener más información.2Panel de controlAjusta la temperatura del refrigerador y la condición del filtro de agua.3Iluminación interior LEDIlumina el interior del refrigerador.Interior4Estante ajustable de refrigeradorLos estantes del refrigerador son ajustables para satisfacer sus necesidades personales de almacenamiento.5Bandeja Móvil de la PuertaPreserva las comidas o bebidas congeladas.6Dispensador de Agua Interno7Crisper8Convertible Drawer9Freezer Drawer278965431](https://usermanual.wiki/LG-Electronics-USA/E19MAE07/User-Guide-3706887-Page-95.png)
![13FUNCIONAMIENTOESPAÑOL8* Wi-FiEl botón Wi-Fi, al ser usado con la aplicación para teléfonos inteligentes SIGNATURE KITCHEN SUITE, permite al refrigerador conectarse a la red Wi-Fi doméstica. Consulte la sección Funciones Inteligentes para recibir información sobre la configuración inicial de la aplicación.El ícono Wi-Fi muestra el estado de la conexión de red del refrigerador. El icono se ilumina cuando el refrigerador está conectado a la red Wi-Fi.Mantenga presionado el botón Wi-Fi por 3 segundos para conectarse a la red. El ícono parpadea mientras la conexión está en proceso, luego se enciende cuando ésta se ha logrado exitosamente.9* Power (Encendido/Apagado)El botón Power corta toda la corriente eléctrica de la unidad.Mantenga presionado el botón Power por 3 segundos para apagar el electrodoméstico. Cuando está apagado, la luz indicadora también lo está. No es necesario cortar la energía en el disyuntor o receptáculo de pared. Utilice esta función para servicio o vacaciones extendidas.2 y 5SABBATHEl modo Sabbath es utilizado en el Sabbat y las festividades Judías. %Para encender el modo Sabbath, presione la pantalla para activarla, luego mantenga presionados los botones Refrigerator y Power por 3 segundos hasta que aparezca Sb en la pantalla. %El modo Sabbath se desactiva automáticamente después de 96 horas. %Para apagar el modo Sabbath manualmente, mantenga presionados los botones Refrigerator y Power por 3 segundos. %Una vez encendido, el modo Sabbath se mantendrá activo incluso si ocurre un apagón. %Elegir el modo Sabbath automáticamente desactiva las funciones de Luz y Alarma. El dispensador también se desactiva. %La pantalla interior se mantiene encendida durante el modo Sabbath, pero sólo se muestra “Sb” y los botones Refrigerator y Power. %/DWHPSHUDWXUDGHOUHIULJHUDGRUVH¿MDHQ37°F (3°C) y no puede ser cambiada hasta que el modo Sabbath sea desactivado.NOTA %La función Smart Grid (Red Inteligente) se desactiva automáticamente en modo Sabbath. &XDQGRHOPRGR6DEEDWK¿QDOL]DODIXQFLyQ6PDUWGrid (Red Inteligente) debe ser activada de nuevo manualmente. PRECAUCIÓNModo de Visualización (Únicamente Para Uso de Tiendas) %El Modo de Exhibición deshabilita todo el enfriamiento en el refrigerador para conservar energía mientras éste se exhibe en una tienda detallista. Cuando está activo, se muestra OF en el panel de control, y la pantalla permanece encendida por 20 segundos.Para desactivar / activar: %Con la puerta del refrigerador abierta, mantenga presionados los botones Refrigerator y Water Filter Reset al mismo tiempo por cinco segundos. El panel de control emite un pitido y se muestra la FRQ¿JXUDFLyQGHWHPSHUDWXUDSDUDFRQ¿UPDUTXHHOModo de Exhibición ha sido desactivado. Utilice el mismo procedimiento para activar el Modo de Exhibición.](https://usermanual.wiki/LG-Electronics-USA/E19MAE07/User-Guide-3706887-Page-98.png)

![26 FUNCIONES INTELIGENTESAviso FCCEl siguiente aviso cubre el módulo transmisor contenido en este producto.Este equipo ha sido evaluado y se encuentra en conformidad con los límites del equipo digital Clase B, dispuesto en la Parte 15 de las Reglas FCC, y también en la Parte 18 de las Reglas FCC. Estos límites están designados para proveer una protección razonable contra interferencia dañina en una instalación residencial. Este equipo genera, usa, y emite energía de radio frecuencias y, si no se instala y utiliza de acuerdo a las instrucciones, podría causar interferencia dañina a las radio comunicaciones. De cualquier manera, no existe garantía de que no ocurrirá interferencia en una instalación particular. Si este equipo causara interferencia dañina a la recepción de radio o televisión, lo cual puede ser determinado al encenderlo y apagarlo, se alienta al usuario a intentar corregir la interferencia con una o más de las siguientes medidas <Reoriente o reubique la antena receptora. <Incremente la distancia entre el equipo y el receptor. <Conecte el equipo a un enchufe en un circuito diferente al del receptor. <Consulte con un distribuidor o un técnico experimentado en radio/TV para recibir ayuda.Este equipo se encuentra en conformidad con la parte 15 y 18 de las Reglas FCC. El funcionamiento está sujeto a las dos condiciones siguientes:1) este dispositivo puede no causar interferencia dañina; y2) este dispositivo debe aceptar cualquier interferencia, incluyendo aquella que pueda causar el funcionamiento no deseado del dispositivo.&XDOTXLHUFDPELRRPRGL¿FDFLyQHQODFRQVWUXFFLyQGHeste dispositivo, que no esté aprobado expresamente por la parte responsable de su cumplimiento, podría anular la autoridad del usuario de operar el equipo.Declaración de Exposición a Radiación FCC RFEste equipo se encuentra en conformidad con los límites de exposición a radiación FCC enunciados para un ambiente no controlado. Este transmisor no debe ser ubicado u operado en conjunto con cualquier otra antena o transmisor.Este equipo debe ser instalado y operado con una distancia mínima de 20 cm (7.8 pulgadas) entre la antena y su cuerpo. Los usuarios deben seguir las instrucciones operativas específicas para satisfacer el cumplimiento de exposición RF.Declaración de Industria Canadiense (Para el módulo transmisor contenido en este producto)Este dispositivo cumple con la exención de licencia aplicable de la industria de Canadá RSSs. El funcionamiento está sujeto a las dos condiciones siguientes:1) Este dispositivo puede no causar interferencia dañina; y2) Este dispositivo debe aceptar cualquier interferencia, incluyendo aquella que pueda causar el funcionamiento no deseado del dispositivo.Industria Canadiense ICES-001 Etiqueta de Conformidad: CAN ICES-1/NMB-1Declaración de Exposición a Radiación ICEste equipo cumple con los límites de exposición a radiación IC establecidos para un entorno no controlado.Este equipo debe ser instalado y operado con una distancia mínima de 20 cm (7.8 pulgadas) entre la antena y su cuerpo.NOTA %El fabricante no se hace responsable por cualquier interferencia de radio o TV causada por una PRGL¿FDFLyQQRDXWRUL]DGDDHVWHHTXLSR'LFKDVPRGL¿FDFLRQHVSRGUtDQDQXODUODDXWRULGDGGHOXVXDULRpara operar el equipo.Específicaciones de Módulo LAN InalámbricoModelo LCW-003Rango de Frecuencia 2412 MHz - 2462 MHzPotencia de Salida (Max)IEEE 802.11b: 17.56 dBmIEEE 802.11g: 25.53 dBmIEEE 802.11n: 25.29 dBmInformación de Anuncio de Programas de Código AbiertoPara obtener el código fuente bajo GPL, LGPL, MPL y otras licencias de fuente abierta, que esté contenido en este producto, por favor visite http://opensource.thesignaturekitchen.comAdicional al código fuente, todos los términos de referencia de la licencia, renuncias de garantía y notificaciones de derechos de autor están disponibles para descarga.SIGNATURE KITCHEN SUITE también le puede proveer el código de fuente abierta en un CD por un cargo que cubra el costo de distribución (como el costo de los medios, envío, y manejo) al requerirlo mediante correo electrónico a opensource@thesignaturekitchen.comEsta oferta es válida por un período de tres años después de nuestro último envío de este producto. Esta oferta es válida para cualquier que haya recibido esta información.](https://usermanual.wiki/LG-Electronics-USA/E19MAE07/User-Guide-3706887-Page-111.png)
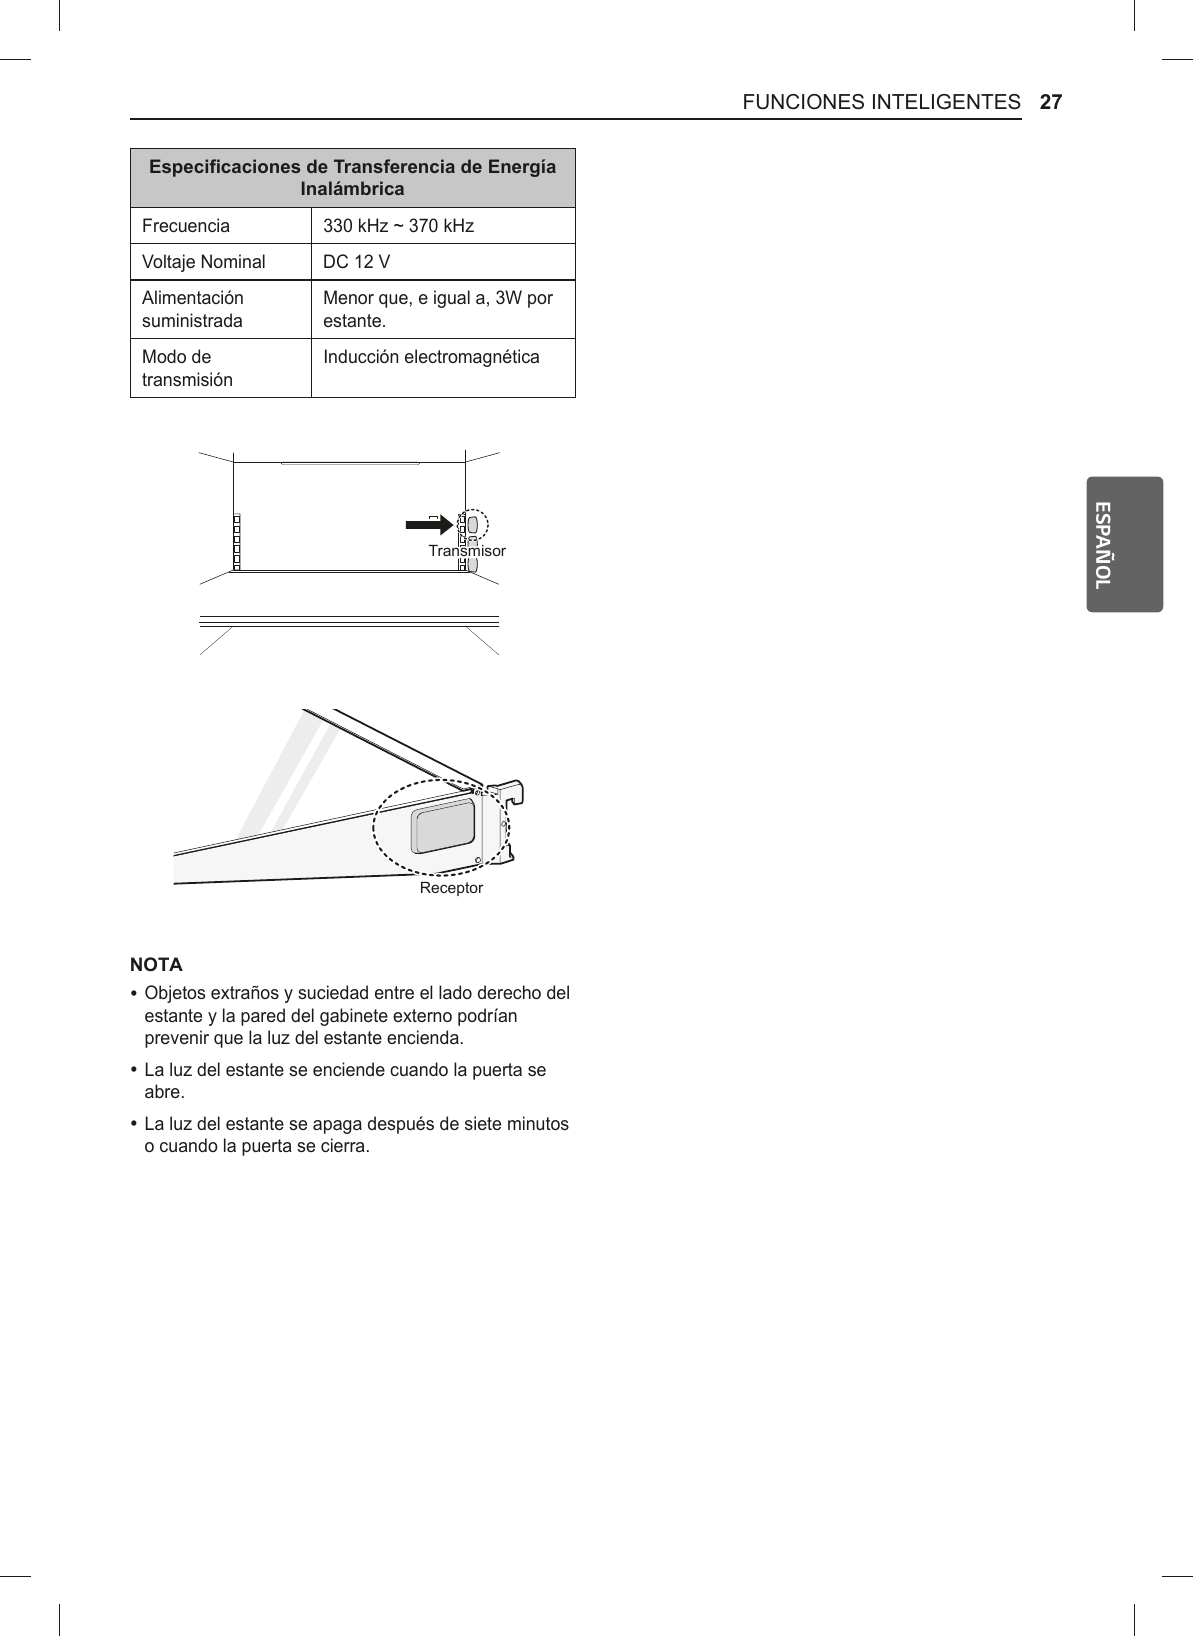
![28 MANTENIMIENTOMANTENIMIENTOLimpieza ADVERTENCIA %8WLOLFHXQOLPSLDGRUQRLQÀDPDEOH1RKDFHUORpodría resultar en un incendio, explosión, o incluso la muerte. PRECAUCIÓN %No use un trapo abrasivo o esponja mientras limpia el interior y exterior del refrigerador. %1RFRORTXHVXPDQRHQODVXSHU¿FLHLQIHULRUGHOrefrigerador cuando abra y cierre las puertas.Consejos Generales de Limpieza %El refrigerador se descongela automáticamente; sin embargo, limpiélo una vez al mes para prevenir olores. %Limpie derrames inmediatamente. %Desconecte el refrigerador o la corriente eléctrica previo a la limpieza. %Remueva todas las partes removibles, como los estantes. %Use una esponja limpia o un paño suave y un detergente ligero en agua tibia. No utilice abrasivos o limpiadores ásperos. %/DYHDPDQRHQMXDJXH\VHTXHWRGDVODVVXSHU¿FLHVintensivamente. %Al limpiar el interior o exterior del electrodoméstico, no utilice un cepillo duro, pasta dental, o materiales LQÀDPDEOHV1RXWLOLFHDJHQWHVGHOLPSLH]DTXHFRQWHQJDQVXVWDQFLDVLQÀDPDEOHV <Esto podría causar decoloración o daños al electrodoméstico. <6XVWDQFLDVLQÀDPDEOHVDOFRKROHWDQROPHWDQROalcohol isopropílico, alcohol isobutílico, etc.), GLVROYHQWHVFORUREHQFHQROtTXLGRVLQÀDPDEOHVabrasivos, etc.Paredes InterioresComo ayuda para remover olores, lave el interior del refrigerador con una mezcla de bicarbonato de sodio y agua tibia. Mezcle 2 cucharadas de bicarbonato de sodio con 1 cuarto de galón de agua (26 g de bicarbonato en 1 litro de agua). Asegúrese de que el bicarbonato de sodio esté completamente disuelto para que este no raye las superficies del refrigerador .Revestimientos de Puertas y JuntasUse una esponja limpia o un paño suave y un detergente ligero en agua tibia. No utilice ceras de limpieza, detergentes concentrados, lejías o limpiadores que contengan petróleo en las partes plásticas del refrigerador.Partes Plásticas (Cubiertas y Paneles)Use una esponja limpia o un paño suave y un detergente ligero con agua tibia. No utilice limpiadores de vidrio, limpiadores abrasivos o líquidos inflamables. Estos pueden rayar o dañar el material.](https://usermanual.wiki/LG-Electronics-USA/E19MAE07/User-Guide-3706887-Page-113.png)
![29MANTENIMIENTOESPAÑOLReemplazo del Filtro de AguaReemplace el Filtro de Agua %Aproximadamente cada seis meses. %Cuando el icono Replace Filter (Reemplace Filtro) se encienda. %Cuando disminuya la potencia del dispensador de agua.1Retire el filtro de agua viejoPresione para abrir la cubierta del filtro de agua en la parte superior derecha del refrigerador.NOTA %5HHPSOD]DUHO¿OWURGHDJXDFDXVDTXHXQDSHTXHxDcantidad de agua (alrededor de 1 oz o 25 cc) se drene. %Envuelva un paño alrededor del extremo frontal de la FXELHUWDGHO¿OWURSDUDGHWHQHUFXDOTXLHUIXJDGHDJXD8QDYH]UHPRYLGRVXMHWHHO¿OWURGHDJXDHQSRVLFLyQvertical a manera de prevenir que el agua remanente se salga.2Coloque la tapa en el filtro de agua, luego sujétela y gírela hacia la izquierda para remover el filtro de agua de la cabeza del filtro.Tapa3Reemplace con un nuevo filtro de agua.Retire el nuevo filtro de agua de su empaque y remueva la cubierta protectora de los anillos. Coloque la tapa en el nuevo filtro de agua, y luego empújelo en el agujero colector hasta que se detenga.4Sujete y rote la tapa hacia la derecha hasta que se detenga. Reemplace la tapa al lado del filtro de agua.5Luego de reemplazar el filtro de agua, dispense 2.5 galones de agua (deje correr el agua por aproximadamente 5 minutos) para remover el aire atrapado y los contaminantes del sistema.NOTA %No dispense los 2.5 galones completos de manera continua. Presione y suelte el botón del dispensador en ciclos de 30 segundos ENCENDIDO y 60 segundos APAGADO.](https://usermanual.wiki/LG-Electronics-USA/E19MAE07/User-Guide-3706887-Page-114.png)
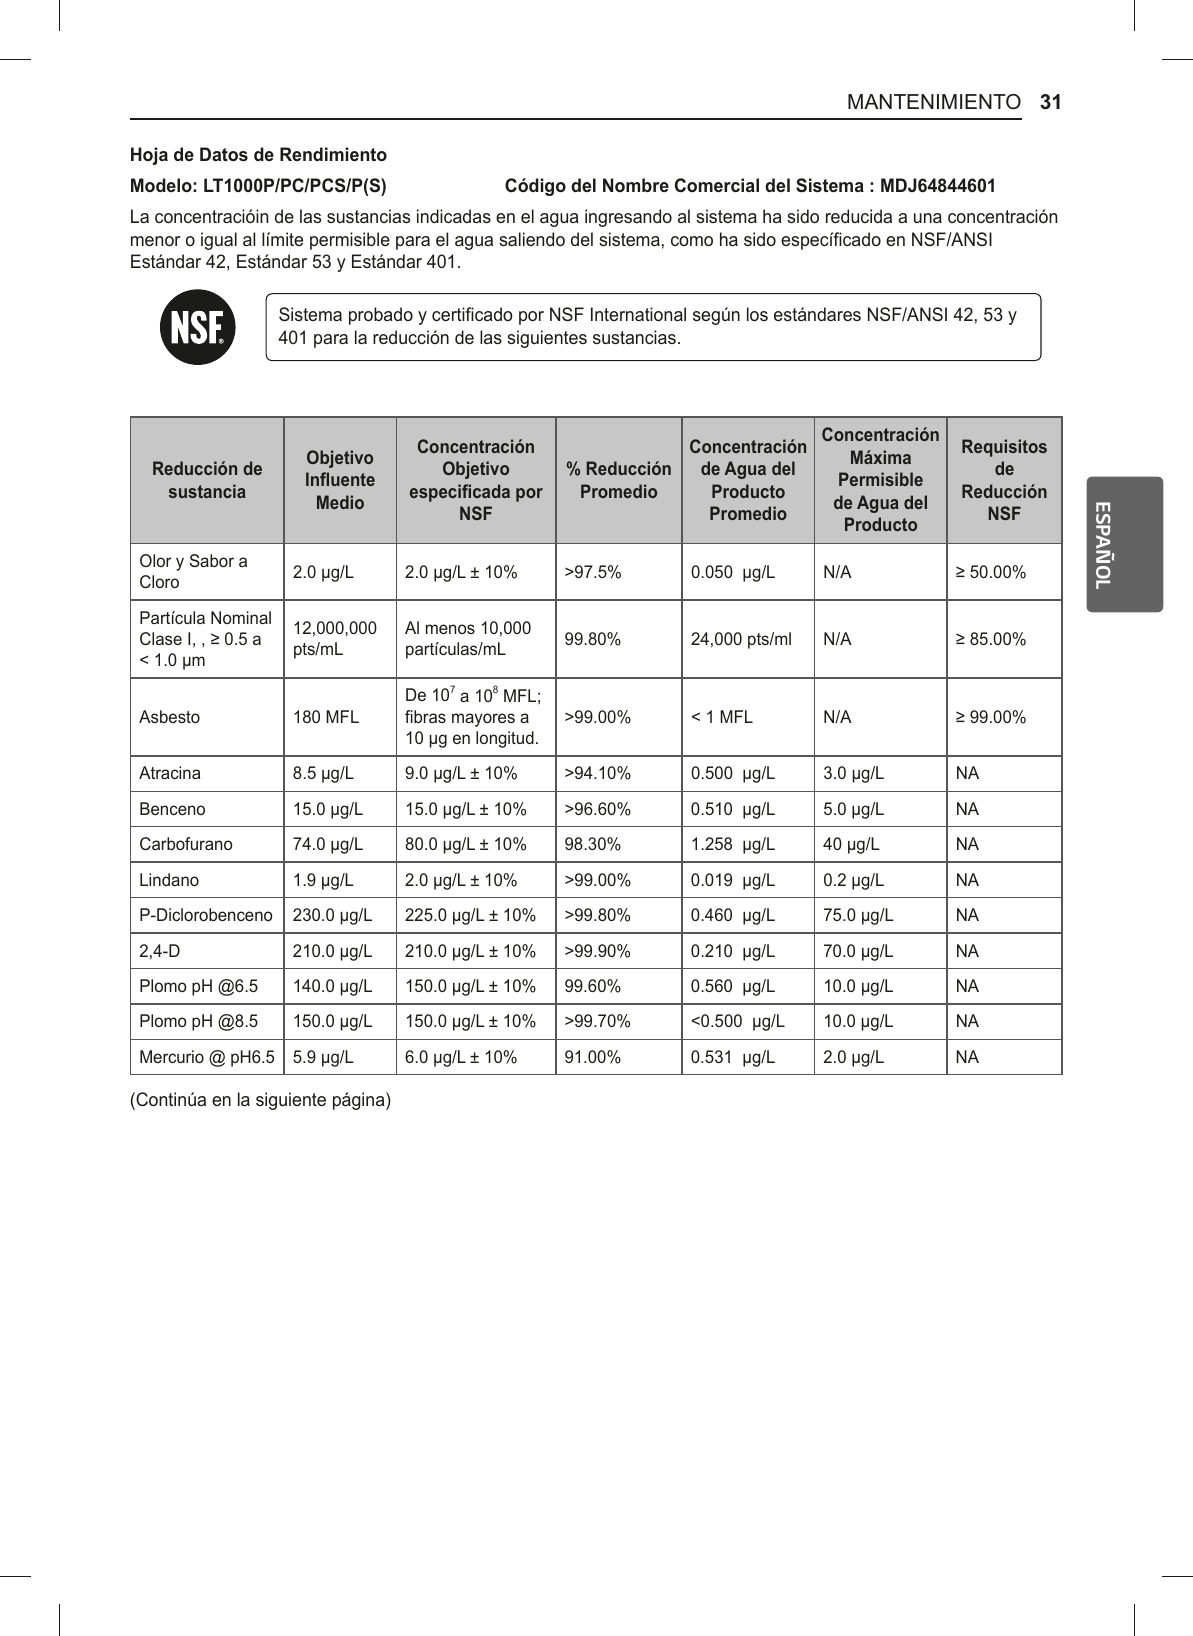
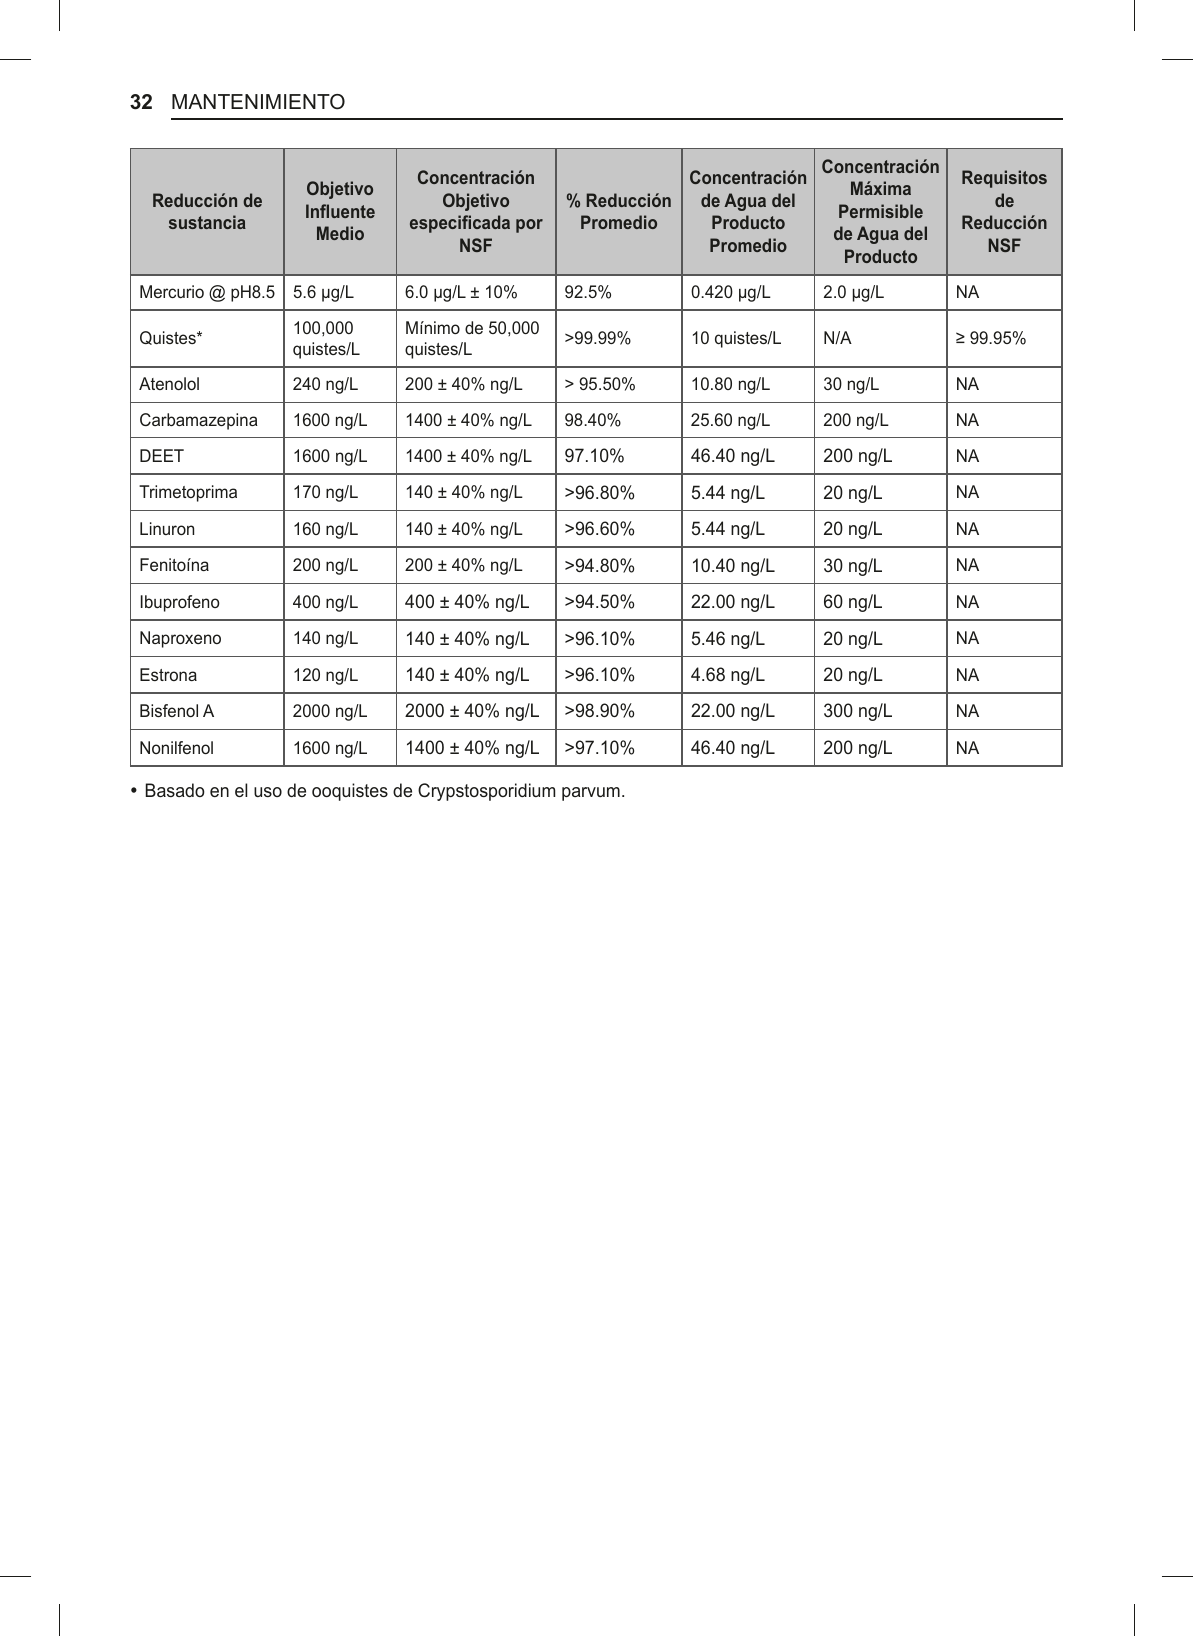
![33MANTENIMIENTOESPAÑOLLineamientos de Aplicación / Parámetros de Suministro de AguaFlujo de Servicio 0.5 gpm (1.89 lpm)Suministro de AguaPozo Comunitario o Privado - Agua PotablePresión de Agua 20 – 120 psi (138 – 827 kPa)Temperatura del agua 33 °F – 100 °F (0.6 °C – 37.8 °C)Capacidad 200 galones (757 litros)Es indispensable que se realicen la instalación recomendada por el fabricante, el mantenimiento y los requerimientos de remplazo del filtro para que el producto funcione adecuadamente.NOTA %Aunque se llevaron a cabo las pruebas en condiciones estándar de laboratorio, el desempeño real podría variar.Cartucho de Reemplazo: LT1000P/PC/PCS/P(S)Para filtros de reemplazo, visite a su proveedor o distribuidor local, o búsque “filtros de agua” en el sitio web thesignaturekitchen.comPara asistencia adicional, el Centro de Información al Cliente SIGNATURE KITCHEN SUITE está abierto 24 horas al día/7 días a la semana.EE.UU: 1-855-790-6655NSF es una marca registrada de NSF ADVERTENCIAPara reducir el riesgo asociado con asfixia: %No permita que los niños menores de 3 años tengan acceso a las piezas pequeñas durante la instalación de este producto.Para reducir el riesgo asociado con la ingesta de contaminantes: %No lo utilice con agua microbiológicamente insegura o de calidad desconocida sin la desinfección adecuada antes o después del VLVWHPD6LVWHPDVFHUWL¿FDGRVSDUDUHGXFFLyQGHquístes pueden ser utilizados en agua desinfectada TXHSXHGDFRQWHQHUTXLVWHV¿OWUDEOHVEstablecimiento EPA # 070595-MEX-001 PRECAUCIÓNPara reducir el riesgo asociado con daños a la propiedad debido a fugas de agua: %Lea y siga las Instrucciones de Uso previo a la instalación y el uso de este sistema. %La instalación y uso DEBEN cumplir con toda la normativa de plomería estatal y local. %No lleve a cabo la instalación si la presión del agua excede los 120 psi (827 kPa). Si la presión de su agua excede los 80 psi, debe instalar una válvula limitante de presión. Contacte a un plomero si no VDEHFRQFHUWH]DFyPRYHUL¿FDUODSUHVLyQGHODJXD %No lleve a cabo la instalación donde puedan ocurrir condiciones de golpe de ariete. Si existen condiciones de golpe de ariete, debe instalar un protector para éste. Contacte a un plomero si no VDEHFRQFHUWH]DFyPRYHUL¿FDUpVWDFRQGLFLyQ %No lleve a cabo la instalación en líneas de suministro de agua caliente. La temperatura Pi[LPDGHRSHUDFLyQGHHVWHVLVWHPDGH¿OWUDGRes de 100 °F (37.8 °C). %(YLWHODFRQJHODFLyQGHO¿OWUR'UHQHHO¿OWURFXDQGRla temperatura caiga debajo de 40 °F (4.4 °C). %(OFDUWXFKRGH¿OWURGHVHFKDEOH'(%(VXVWLWXLUVHcada 6 meses, con la capacidad nominal o si se REVHUYDXQDVLJQL¿FDWLYDUHGXFFLyQGHOFDXGDO %Para proteger de la congelación, remueva el FDUWXFKRGHO¿OWURFXDQGRVHSUHYHDTXHODVtemperaturas puedan ser inferiores a 33° F. %No instale sistemas en áreas donde la temperatura ambiente pueda superar los 110° F (43.3° C). %Donde se instale un dispositivo de prevención de UHÀXMRHQXQVLVWHPDGHDJXDGHEHUiLQVWDODUVHXQdispositivo para controlar la presión debido a la expansión térmica. %Asegúrese de que todas las tuberías y conexiones estén correctamente instaladas y sin fugas.](https://usermanual.wiki/LG-Electronics-USA/E19MAE07/User-Guide-3706887-Page-118.png)
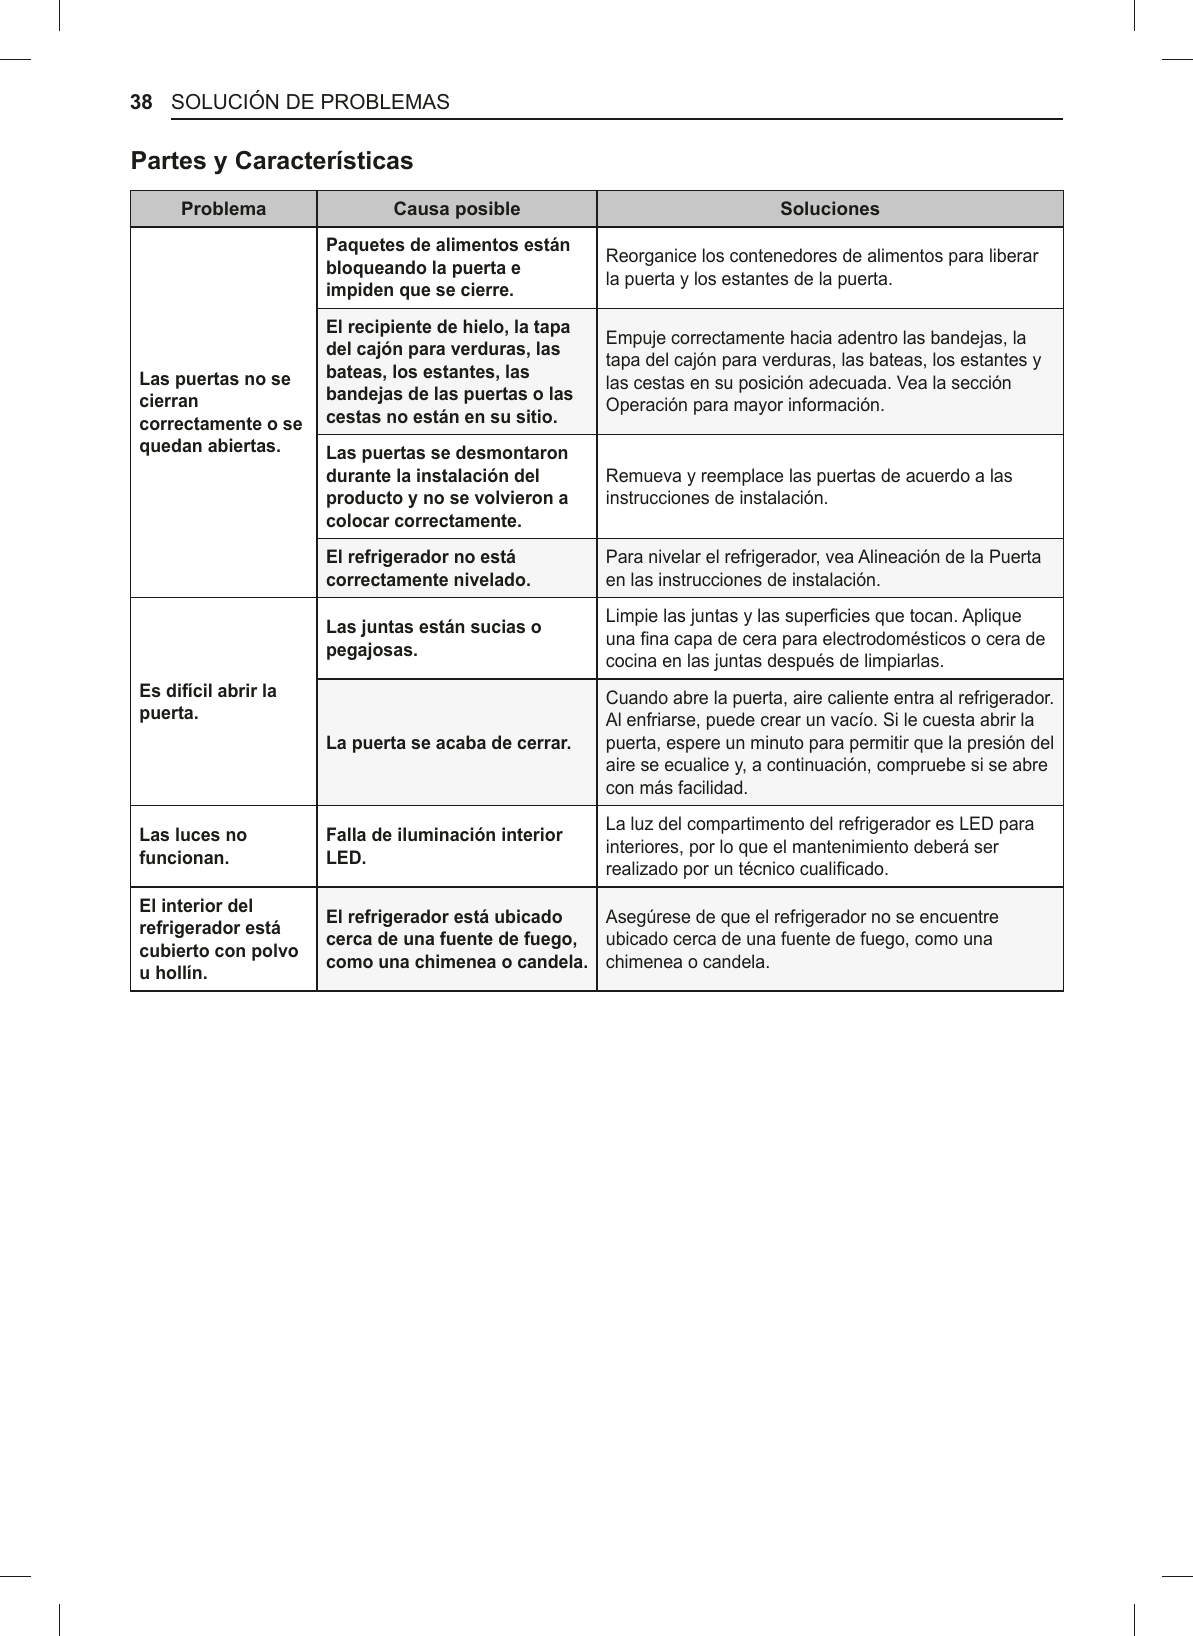
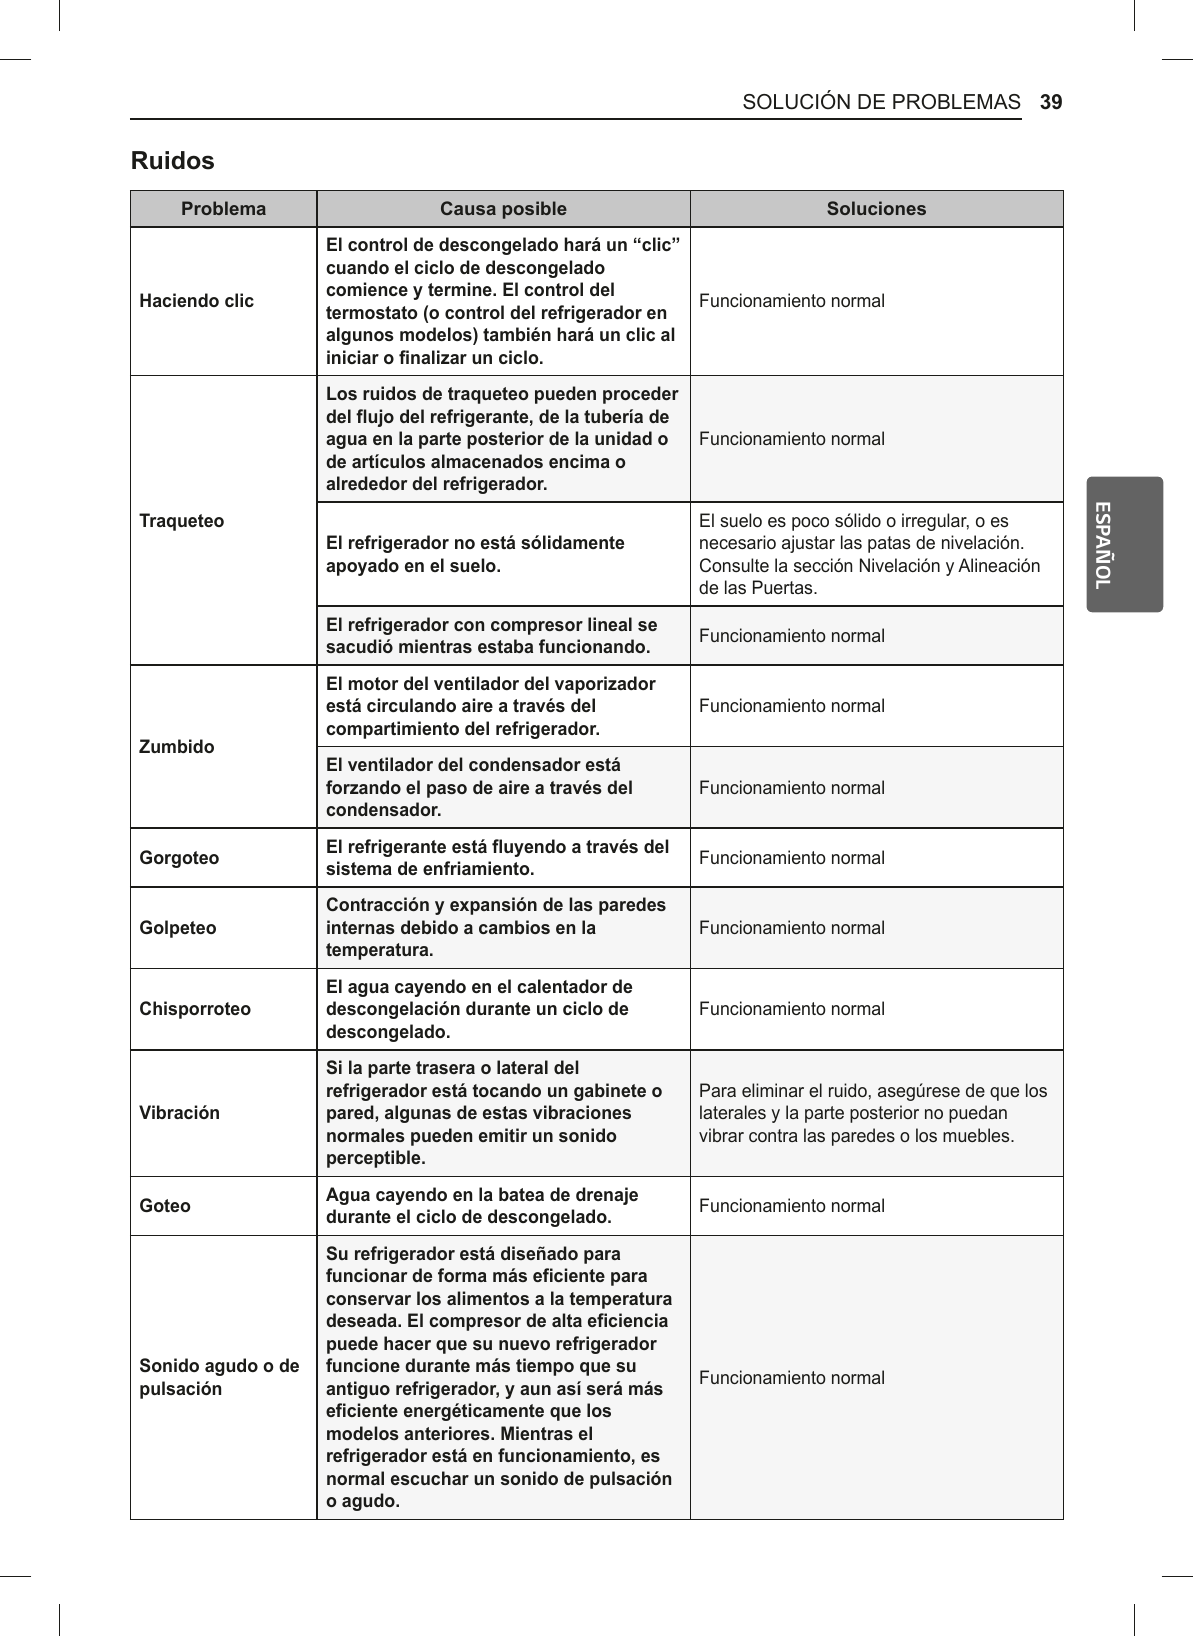
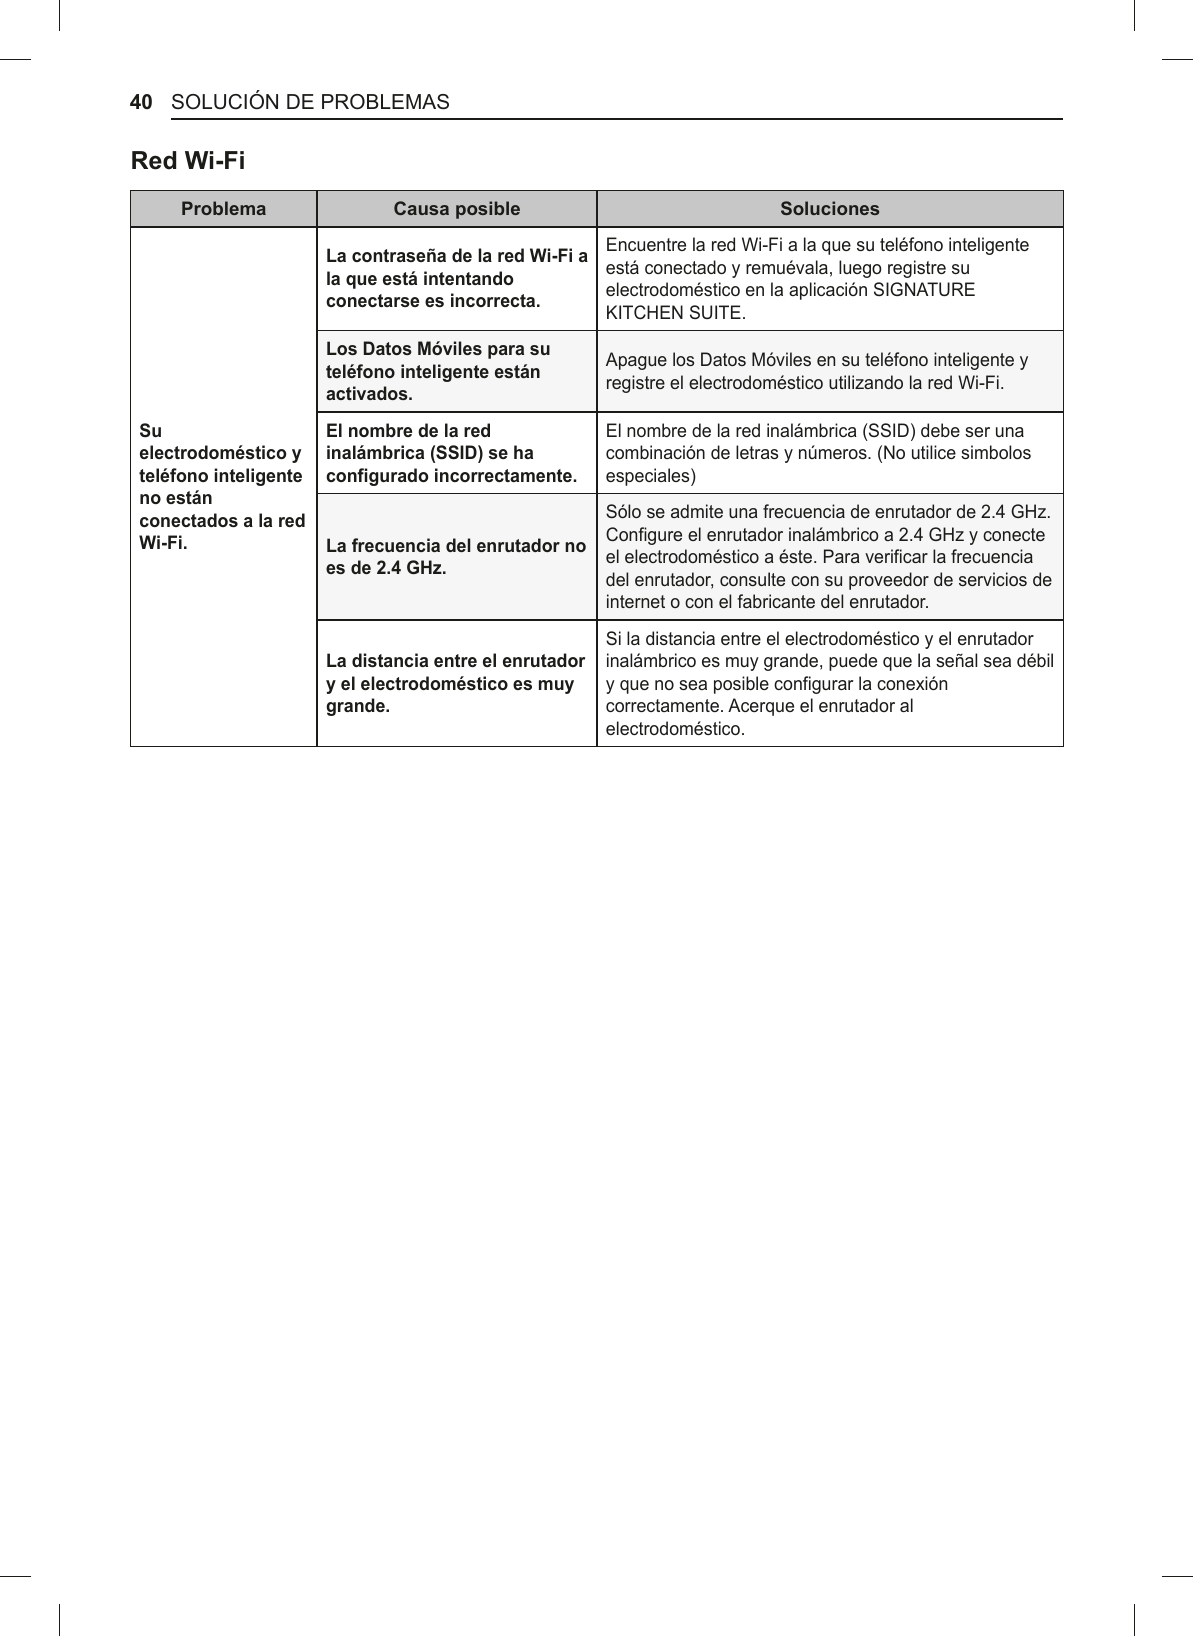
![41GARANTÍAESPAÑOLSIGNATURE KITCHEN SUITE GARANTÍA LIMITADA REFRIGERADOR - EE.UUSi en caso su Refrigerador SIGNATURE KITCHEN SUITE (“Producto”) fallara debido a defectos en los materiales o a mano de obra, bajo un uso normal en el hogar, durante el período de garantía expreso más adelante, SIGNATURE KITCHEN SUITE reparará o reemplazará el producto a su criterio. Esta garantía limitada es válida únicamente para el comprador original del producto y aplica únicamente cuando este ha sido comprado y utilizado dentro de los Estados Unidos, incluyendo territorios estadounidenses. Prueba de la compra original es requerida para obtener el servicio de garantía bajo esta garantía limitada.PERIODO DE GARANTÍARefrigeradorSistema Sellado (Condensador, Filtro desecante, Tubo Conector y Evaporador)Compresor LinealTres (3) años a partir de la fecha original de compraPiezas y mano de obra (solo piezas internas/ funcionales)Tres (3) años a partir de la fecha original de compraPiezas y TrabajoSiete (7) años a partir de la fecha original de compraSolo piezas (Se le cobrará mano de obra al consumidor)Diez (10) años a partir de la fecha original de compraSolo piezas (Se le cobrará mano de obra al consumidor)No serán cubiertos bajo esta garantía, ruidos asociados con la operación normal, fallos al seguir instrucciones encontradas en las guías de instalación y de uso y cuidado, o la operación de la unidad en un ambiente no adecuado. %Los productos y las piezas de repuesto están garantizados durante el tiempo restante del período original de garantía o noventa (90) días, lo que resulte mayor. %Los productos de reemplazo y las piezas pueden ser nuevas o refabricadas.ESTA GARANTÍA REEMPLAZA TODA OTRA GARANTÍA, EXPRESA O IMPLÍCITA, INCLUYENDO SIN LIMITARSE A, CUALQUIER GARANTÍA DE COMERCIABILIDAD O ADECUACIÓN PARA UN FIN PARTICULAR. EN EL GRADO EN QUE CUALQUIER GARANTÍA IMPLÍCITA SEA REQUERIDA POR LEY, ESTA GARANTÍA SE LIMITARÁ EN DURACIÓN AL PERÍODO EXPRESADO ANTERIORMENTE. NI EL FABRICANTE NI SUS DISTRIBUIDORES EN ESTADOS UNIDOS SERÁN RESPONSABLES DE CUALQUIER DAÑO INCIDENTAL, CONSECUENCIAL, INDIRECTO, ESPECIAL O PUNITIVO DE CUALQUIER TIPO, INCLUIDAS SIN LIMITACIÓN, PÉRDIDAS DE INGRESOS O BENEFICIOS, O CUALQUIER OTRO DAÑO BASADO EN CONTRATO, RESPONSABILIDAD EXTRACONTRACTUAL O DE OTRO TIPO. Algunos estados no permiten la exclusión o limitación de los daños incidentales o consecuenciales, o las limitaciones sobre el tiempo que una garantía implica, así que la exclusión mencionada previamente puede no ser aplicable en su caso. Esta garantía le brinda derechos legales especiales, y puede que tenga otros derechos que variarán de estado a estado.ESTA GARANTÍA LIMITADA NO CUBRE LO SIGUIENTE: %Viajes de servicio para entregar, recoger, instalar o reparar el producto; instrucciones al cliente sobre cómo operar el producto, reparación o remplazo de fusibles o corrección del cableado o tuberías, o corrección de las reparaciones/instalaciones no autorizadas. %Fallo del producto al operar durante fallas eléctricas y al interrumpido o inadecuado servicio eléctrico. %Daños causados por una fuga o por una pipa de agua rota, congelada, con drenaje restringido, suministro de agua inadecuado o interrumpido, o suministro de aire inadecuado. %El daño resultante de operar el producto en una atmósfera corrosiva o de forma contraria a las instrucciones HVSHFt¿FDGDVHQHOPDQXDOGHOXVXDULRGHOSURGXFWR %Daño al producto causado por accidentes, plagas, parásitos, truenos, viento, fuego, inundaciones o casos fortuitos. %Daños resultantes de un uso inadecuado, abuso del producto, instalación, reparación o mantenimiento incorrecto. /DVUHSDUDFLRQHVLQFRUUHFWDVLQFOX\HQODXWLOL]DFLyQGHSLH]DVQRDSUREDGDVRHVSHFt¿FDGDVSRU6,*1$785(KITCHEN SUITE.](https://usermanual.wiki/LG-Electronics-USA/E19MAE07/User-Guide-3706887-Page-126.png)
![42 GARANTÍA %'DxRVRIDOORVFDXVDGRVSRUPRGL¿FDFLRQHVRDOWHUDFLRQHVQRDXWRUL]DGDVRVLHOHOHFWURGRPpVWLFRHVXWLOL]DGRSDUDotro propósito más que el previsto, o cualquier fuga de agua donde la unidad no haya sido instalada apropiadamente. %Daño o falla causada por el incorrecto uso de la corriente eléctrica, voltaje, o códigos locales de plomería, uso FRPHUFLDORLQGXVWULDORXVRGHDFFHVRULRV(MHPSOR¿OWURVGHDJXDHWFFRPSRQHQWHVRSURGXFWRVGHOLPSLH]Dconsumibles que no estén aprobados por SIGNATURE KITCHEN SUITE. %Daño causado por el transporte y el manejo, incluyendo rasguños, abolladuras, pintura saltada, y/u otros daños al acabado de su producto, a menos que dicho daño sea resultado de defectos en materiales o mano de obra y que esto sea reportado en un período de no más de una (1) semana desde la entrega. (Llamar: 1-855-790-6655). %Daños o falta de elementos en cualquier producto de exposición, caja abierta, de descuento o reacondicionado. %Productos cuyos números de serie originales hayan sido retirados, alterados o no se puedan determinar fácilmente. El Modelo y el número de Serie, junto con el recibo original de compra, son requeridos para la validación de la garantía. %Aumentos en los costos de los servicios públicos y otros gastos adicionales de dichos servicios. %5HHPSOD]RGHIRFRV¿OWURVRFXDOTXLHUSDUWHFRQVXPLEOH %Reparaciones cuando se esté dando al producto una utilización diferente al uso doméstico normal (por ejemplo, uso FRPHUFLDOHQR¿FLQDV\HQLQVWDODFLRQHVUHFUHDWLYDVRFRQWUDULDDODVLQVWUXFFLRQHVGHOPDQXDOGHOSURSLHWDULRGHOproducto. %Gastos asociados a la retirada del producto de su hogar para reparaciones. %La retirada y nueva instalación del producto, si este se ha instalado en una ubicación inaccesible o si no ha sido instalado de acuerdo a las instrucciones de instalación publicadas, incluyendo los manuales SIGNATURE KITCHEN SUITE del propietario y de instalación. %Estantes, bandejas de puerta, cajas, manijas, accesorios, y otras partes adicionales a aquellas que fueron incluidas originalmente con este modelo particular.El costo de la reparación o el reemplazo en estas circunstancias excluidas estará a cargo del consumidor.Escriba su información de garantía a continuación:Información de Registro del Producto:Modelo:Número de Serie:Fecha de Compra:Para detalles completos de la garantía y asistencia al cliente, por favor llame o visite nuestro sitio web:Comuníquese al 1-855-790-6655 (24 horas al día, 365 días al año) y seleccione la opción apropiada del menú, o visite nuestro sitio web en www.thesignaturekitchen.com O por correo: Centro de información al cliente de SIGNATURE KITCHEN SUITE: P. O. Box 240007, 201 James Record Road Huntsville, Alabama 35813 ATTN: CIC](https://usermanual.wiki/LG-Electronics-USA/E19MAE07/User-Guide-3706887-Page-127.png)