LG Electronics USA E19MAE07 Refrigerator User Manual EMISSION TEST REPORT
LG Electronics USA Refrigerator EMISSION TEST REPORT
User Manual

Order Number
: GETEC-C1-17-578
FCC Part 18
Test Report Number
: GETEC-E3-17-053
Page 1 / 1
EUT Type: Refrigerator
FCC ID.: BEJE19MAE07
APPENDIX H
: USER’S MANUAL

ENGLISH FRANÇAIS ESPAÑOL
MFL70339803_Rev.00
OWNER’S MANUAL
BUILT-IN REFRIGERATOR
Read this owner's manual thoroughly before operating the appliance
and keep it handy for reference at all times.
www.thesignaturekitchen.com
SKSFD3604P
Copyright © 2017 Signature Kitchen Suite. All Rights Reserved.

2TABLE OF CONTENTS
3 PRODUCT FEATURES
4 SAFETY INSTRUCTIONS
4 IMPORTANT SAFETY INSTRUCTIONS
8 PRODUCT SPECIFICATIONS
9 PRODUCT OVERVIEW
9 Exterior
10 Interior
11 OPERATION
11 Before Use
12 Control Panel
14 Internal Water Dispenser
14 Ice Compartment
15 Storing Food
16 Convertible Drawer
18 Freezer Drawer
20 Door Bins
20 Adjusting the Shelves
21 Crisper
22 SMART FUNCTIONS
22 SIGNATURE KITCHEN SUITE Application
24 Smart Grid Function
25 Smart Diagnosis™ Function
28 MAINTENANCE
28 Cleaning
29 Replacing the Water Filter
34 TROUBLESHOOTING
34 FAQs: Frequently Asked Questions
35 Before Calling for Service
41 WARRANTY
TABLE OF CONTENTS

3PRODUCT FEATURES
ENGLISH
PRODUCT FEATURES
Depending on the model, some of the following functions may not be available.
FILTERED WATER
The water dispenser dispenses fresh, chilled water.
DOOR ALARM
The Door Alarm function is designed to prevent refrigerator malfunctioning that could occur if a door remains
open. If a door is left open for more than 60 seconds, a warning alarm sounds at 30-second intervals.
4SAFETY INSTRUCTIONS
SAFETY INSTRUCTIONS
READ ALL INSTRUCTIONS BEFORE USE
Your safety and the safety of others are very important.
We have provided many important safety messages in this manual and on your appliance. Always read and
follow all safety messages.
This is the safety alert symbol.
This symbol alerts you to potential hazards that can kill or injure you and others.
All safety messages will follow the safety alert symbol and either the word WARNING or CAUTION.
These words mean:
WARNING
You may be killed or seriously injured if you do not follow instructions.
CAUTION
You may be injured or cause damage to the product if you do not follow instructions.
All safety messages will tell you what the potential hazard is, tell you how to reduce the chance of injury, and
tell you what may happen if the instructions are not followed.
IMPORTANT SAFETY INSTRUCTIONS
WARNING
7RUHGXFHWKHULVNRIH[SORVLRQ¿UHGHDWKHOHFWULFVKRFNVFDOGLQJRULQMXU\WR
SHUVRQVZKHQXVLQJWKLVSURGXFWIROORZEDVLFSUHFDXWLRQVLQFOXGLQJWKHIROORZLQJ
California Proposition 65 (USA only)
%This product contains chemicals known to the State of California to cause cancer and birth defects or other
reproductive harm. Wash hands after handling.

5SAFETY INSTRUCTIONS
ENGLISH
OPERATION
%This product is not to be used for special purposes such as the storage of medicine or test materials or for
use on ships, etc.
%DO NOT allow children to climb, stand, or hang on the refrigerator doors or on the shelves in the
refrigerator. They could damage the refrigerator and seriously injure themselves.
%Do not allow children to climb into the refrigerator. They could be trapped and suffocated.
%Children should be supervised to ensure that they do not play with the refrigerator.
%.HHS¿QJHUVRXWRISLQFKSRLQWDUHDVFOHDUDQFHVEHWZHHQWKHGRRUVDQGFDELQHWVDUHQHFHVVDULO\VPDOO%H
careful closing doors when children are nearby.
%Do not touch frozen food or the metal parts in the freezer compartment with wet or damp hands. Doing so
may cause frostbite.
%Do not refreeze frozen food that has thawed completely. Doing so may result in a serious health hazard.
%An individual properly grounded branch circuit or circuit breaker is recommended.
%Do not use an adapter plug or plug the power plug into a multi-outlet extension cord.
%Do not use a cord that shows cracks or abrasion damage along its length or at either the plug or connector
end. Immediately have all power cords that have become frayed or otherwise damaged repaired or replaced
E\TXDOL¿HGVHUYLFHSHUVRQQHO
%Do not operate the refrigerator or touch the power cord with wet hands.
%Do not modify or extend the power cord.
%'RQRWXVHDQXQFHUWL¿HGSRZHURXWOHW'RQRWSOXJDSSOLDQFHLQWRDGDPDJHGZDOORXWOHW
%Do not put hands, feet or other objects into the air vents or bottom of the refrigerator. Doing so could result
in personal injury or electric shock.
%In the event of a gas leak (propane/LPG), ensure the area is adequately ventilated and contact an
authorized service center before resuming use. Do not touch the refrigerator or power cord of the
refrigerator.
%Disconnect the power cord immediately and contact an authorized service center if there is a strange noise,
odor, or smoke coming from the appliance.
%Do not use any fuse (such as copper, steel wire, etc.) other than a standard fuse.
%Do not place or use an electrical appliance inside the refrigerator, unless it is of a type recommended by the
manufacturer.
%Do not put animals inside the appliance.
%'RQRWSODFHKHDY\RUIUDJLOHREMHFWVOLTXLG¿OOHGFRQWDLQHUVFRPEXVWLEOHVXEVWDQFHVRUÀDPPDEOHREMHFWV
(such as candles and lamps) on the appliance.
%Avoid contact with any moving parts of the ejector mechanism or with the heater that releases the ice
FXEHV'2127SODFH¿QJHUVLQWKHDXWRPDWLFLFHPDNHUZKHQWKHUHIULJHUDWRULVSOXJJHGLQ
%This appliance is not intended for use by persons (including children) with reduced physical, sensory or
mental capabilities, or lack of experience and knowledge, unless they have been given supervision or
instruction concerning the use of the appliance by a person responsible for their safety.
%If connected to a circuit protected by fuses, use time delay fuse.

6SAFETY INSTRUCTIONS
MAINTENANCE
%Do not use a hair dryer to dry the inside of the refrigerator.
%Do not light a candle to remove odors in the refrigerator.
%,QWKHHYHQWRIDUHIULJHUDQWOHDNPRYHÀDPPDEOHREMHFWVDZD\IURPWKHUHIULJHUDWRU(QVXUHWKHDUHDLV
adequately ventilated and contact an authorized service center.
%.HHSÀDPPDEOHPDWHULDOVDQGYDSRUVVXFKDVJDVROLQHDZD\IURPWKHUHIULJHUDWRU
%This appliance is intended to be used in household and similar applications such as staff kitchen areas in
VKRSVRI¿FHVDQGRWKHUZRUNLQJHQYLURQPHQWVIDUPKRXVHVDQGE\FOLHQWVLQKRWHOVPRWHOVDQGRWKHU
UHVLGHQWLDOW\SHHQYLURQPHQWVEHGDQGEUHDNIDVWW\SHHQYLURQPHQWVFDWHULQJDQGVLPLODUQRQUHWDLO
applications.
%Unplug the power plug before cleaning or repairing the refrigerator.
%The refrigerator and freezer compartment lights are interior LED lighting, and service should be performed
E\DTXDOL¿HGWHFKQLFLDQ
%Unplug the power plug immediately in the event of a blackout or thunderstorm.
%Turn the power off if water or dust penetrates into the refrigerator. Call a service agent.
%Do not store glass containers or soda in the freezer compartment. Contents may expand when frozen,
break the container and cause injury.
%'RQRWVWRUHGLVDVVHPEOHRUUHSDLUWKHDSSOLDQFH\RXUVHOIRUDOORZXQTXDOL¿HGSHUVRQQHOWRGRVR
%If the electrical supply cord is damaged, it must only be replaced by the manufacturer or its service agent or
DVLPLODUTXDOL¿HGSHUVRQLQRUGHUWRDYRLGDKD]DUG
%'RQRWVWRUHH[SORVLYHVXEVWDQFHVVXFKDVDHURVROFDQVZLWKDÀDPPDEOHSURSHOODQWLQWKLVDSSOLDQFH
%In case of LED, it should be replaced by service person.
DISPOSAL
%Junked or abandoned refrigerators are dangerous, even if they are sitting for only a few days. When
disposing of the refrigerator, remove the packing materials from the door or take off the doors but leave the
shelves in place so that children may not easily climb inside.
%,IGLVSRVLQJRIDUHIULJHUDWRUPDNHVXUHWKHUHIULJHUDQWLVUHPRYHGIRUSURSHUGLVSRVDOE\DTXDOL¿HGVHUYLFHU
,I\RXUHOHDVHWKHUHIULJHUDQW\RXPD\EH¿QHGRULPSULVRQHGLQDFFRUGDQFHZLWKWKHUHOHYDQWHQYLURQPHQWDO
law.
GROUNDING INSTRUCTIONS
%Improper connection of the equipment-grounding conductor can result in a risk of electric shock. Check with
DTXDOL¿HGHOHFWULFLDQRUVHUYLFHSHUVRQLI\RXDUHLQGRXEWZKHWKHUWKHDSSOLDQFHLVSURSHUO\JURXQGHG'R
QRWPRGLI\WKHSOXJSURYLGHGZLWKWKHDSSOLDQFHLILWZLOOQRW¿WWKHRXWOHWKDYHDSURSHURXWOHWLQVWDOOHGE\D
TXDOL¿HGHOHFWULFLDQ
%+DYHDFHUWL¿HGHOHFWULFLDQFKHFNWKHZDOORXWOHWDQGZLULQJIRUSURSHUJURXQGLQJ
%1HYHUXQSOXJWKHDSSOLDQFHE\SXOOLQJRQWKHSRZHUFRUG$OZD\VJULSWKHSOXJ¿UPO\DQGSXOOVWUDLJKWRXW
IURPWKHRXWOHW)DLOXUHWRGRVRPD\GDPDJHWKHSRZHUFRUGUHVXOWLQJLQDULVNRI¿UHDQGHOHFWULFVKRFN
7SAFETY INSTRUCTIONS
ENGLISH
CAUTION
7RUHGXFHWKHULVNRIPLQRURUPRGHUDWHLQMXU\WRSHUVRQVPDOIXQFWLRQRUGDPDJH
WRWKHSURGXFWRUSURSHUW\ZKHQXVLQJWKLVSURGXFWIROORZEDVLFSUHFDXWLRQV
LQFOXGLQJWKHIROORZLQJ
INSTALLATION
%Do not install the refrigerator where there may be a danger of the unit falling.
%The refrigerator must be properly installed in accordance with the Installation Instructions.
OPERATION
%Do not use aerosols near the refrigerator.
%This appliance is intended to be used only in domestic and similar applications.
%Do not strike or apply excessive force to any glass surface. Do not touch glass surfaces if they are cracked
or broken.
%'RQRWRYHU¿OORUSDFNLWHPVWRRWLJKWO\LQWRGRRUELQV'RLQJVRPD\FDXVHGDPDJHWRWKHELQRUSHUVRQDO
injury if items are removed with excessive force.
%'RQRWRYHU¿OOWKHDSSOLDQFHZLWKIRRG'RLQJVRPD\FDXVHSHUVRQDOLQMXU\RUSURSHUW\GDPDJH
%Do not hang on to or place heavy objects on the refrigerator’s dispenser.
MAINTENANCE
%Do not use strong detergents like wax or thinners for cleaning. Clean with a soft cloth.
%Remove foreign objects (such as dust and water) from the prongs of the power plug and contact areas. Do
not use a wet or damp cloth when cleaning the plug.
%Do not spray water directly on the inside or outside of the refrigerator.
%Do not clean glass shelves or covers with warm water when they are cold. They may break if exposed to
sudden temperature changes.
WARNING
%Keep ventilation openings, in the appliance enclosure or in the built-in structure, clear of obstruction.
%Do not use mechanical devices or other means to accelerate the defrosting process, other than those
recommended by the manufacturer.
%Do not damage the refrigerant circuit.
%Do not use electrical appliances inside the food storage compartments of the appliance, unless they are of
the type recommended by the manufacturer.
%The refrigerant and insulation blowing gas used in the appliance require special disposal procedures. When
GLVSRVLQJSOHDVHFRQVXOWZLWKVHUYLFHDJHQWRUDVLPLODUO\TXDOL¿HGSHUVRQ
This appliance contains a small amount of isobutane refrigerant (R600a), natural gas with high
environmental compatibility, but it is also combustible. When transporting and installing the appliance, care
should be taken to ensure that no parts of the refrigerating circuit are damaged. Refrigerant squirting out of
the pipes could ignite or cause an eye injury. If a leak is detected, avoid any naked flames or potential
sources of ignition and air the room in which the appliance is standing for several minutes.
In order to avoid the creation of a flammable gas air mixture if a leak in the refrigerating circuit occurs, the
size of the room in which the appliance may be sited depends on the amount of refrigerant used. The room
must be 1m
2
in size for every 8g of R600a refrigerant inside the appliance. The amount of refrigerant in
your particular appliance is shown on the identification plate inside the appliance. Never start up an
appliance showing any signs of damage. If in doubt, consult your dealer.
SAVE THESE INSTRUCTIONS

8PRODUCT SPECIFICATIONS
PRODUCT SPECIFICATIONS
The appearance and specifications listed in this manual may vary due to constant product improvements.
(OHFWULFDOUHTXLUHPHQWV 115 V, 60 Hz
0LQ0D[ZDWHUSUHVVXUH 20 - 120 psi (138 - 827 kPa)
Model SKSCR3001P
Description Built-in, Refrigerator
1HWZHLJKW 483 lb (219 kg)
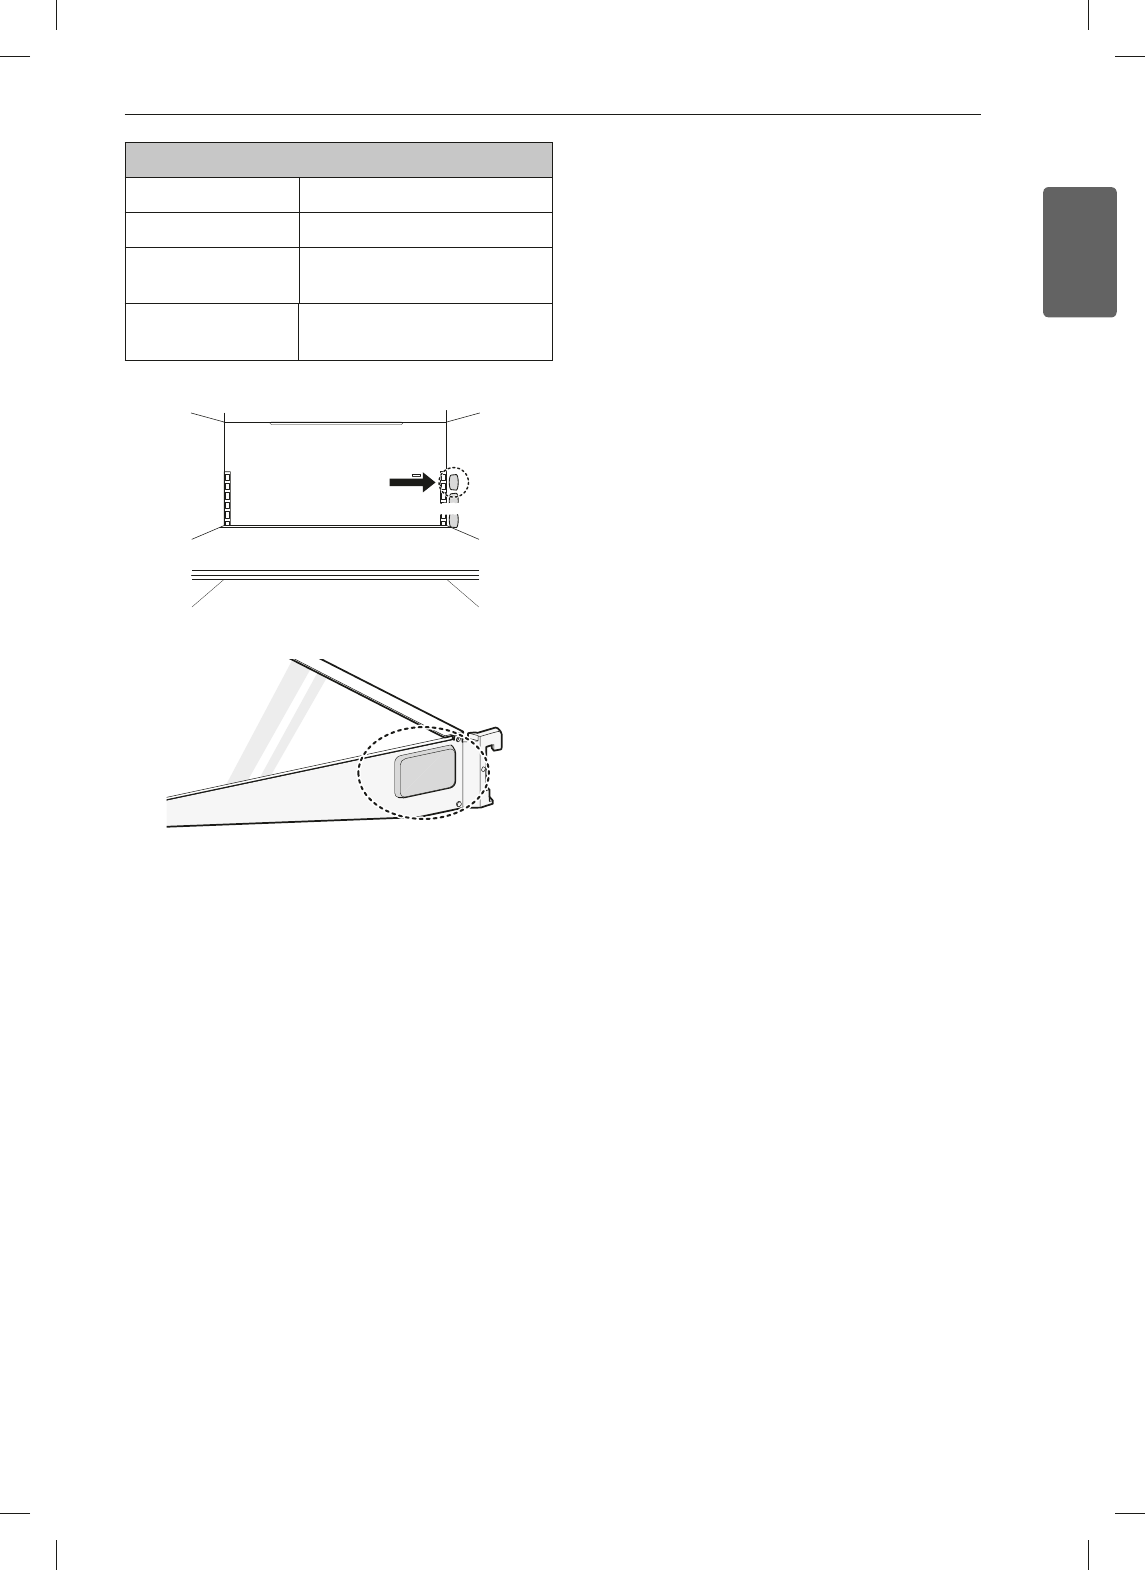
9PRODUCT OVERVIEW
ENGLISH
PRODUCT OVERVIEW
The images in this guide may be different from the actual components and accessories, which are subject to
change by the manufacturer without prior notice for product improvement purposes.
Exterior

10 PRODUCT OVERVIEW
1
Water filter
Purifies water.
NOTE
%7KH¿OWHUVKRXOGEHUHSODFHGHYHU\PRQWKV
See the Replacing the Water Filter section in
this manual for details.
2
Control Panel
Sets the refrigerator temperature and the water
filter condition.
3
/('LQWHULRUOLJKWLQJ
Lights up the inside of the refrigerator.
2
7
8
9
6
5
4
3
1
Interior
4
$GMXVWDEOH5HIULJHUDWRU6KHOI
The refrigerator shelves are adjustable to meet
individual storage needs.
5
0RYDEOH'RRU%LQ
Store chilled food or drinks.
6
Internal Water Dispenser
7
Crisper
8
&RQYHUWLEOH'UDZHU
9
Freezer Drawer
11OPERATION
ENGLISH
Before Use
&OHDQWKHUHIULJHUDWRU
Clean the refrigerator thoroughly and wipe off all dust that accumulated during shipping.
CAUTION
%Do not scratch the refrigerator with a sharp object or use a detergent that contains
DOFRKRODÀDPPDEOHOLTXLGRUDQDEUDVLYHZKHQUHPRYLQJDQ\WDSHRUDGKHVLYHIURP
the refrigerator. Remove adhesive residue by wiping it off with your thumb or dish
detergent.
%Do not peel off the model or serial number label or the technical information on the
rear surface of the refrigerator.
2SHQUHIULJHUDWRUGRRUWRYHQWLODWHWKHLQWHULRU
The inside of the refrigerator may smell like plastic at first. Remove any adhesive tape from
inside the refrigerator and open the refrigerator door for ventilation.
Connect the power supply.
Check if the power supply is connected before use.
:DLWIRUWKHUHIULJHUDWRUWRFRRO
Allow the refrigerator to run for at least two to three hours before putting food in it.
CAUTION
%Putting food in the refrigerator before it has cooled could cause the food to spoil, or a
bad odor to remain inside the refrigerator.
7KHUHIULJHUDWRUPDNHVDORXGQRLVHDIWHULQLWLDORSHUDWLRQ
This is normal. The volume will decrease as the temperature decreases.
OPERATION

12 OPERATION
Control Panel
Depending on the model, some of the following functions may not be available.
Control Panel Features
1 7
2 8
3 9
4 5 6
NOTE
%When the refrigerator is in the Power Saving Mode, the display remains off until a door is opened or a button is
pressed. Once on, the display remains on for 20 seconds.
1
* Water Filter Reset
Replace the water filter when the Replace Filter
icon turns on. After replacing the water filter,
press and hold the Water Filter button for three
seconds to turn the icon light off. Replace the
water filter approximately every six months.
2
Ice Plus
This function increases both ice making and
freezing capabilities.
%Press the Ice Plus button to illuminate the icon
and activate the function for 24 hours.
The function automatically shuts off after 24
hours.
%Stop the function manually by pressing the
button once more.
3
* Ice On/Off
Press the Ice On/Off button for three seconds to
turn the icemaker on/off.
4
Freezer
Indicates the set temperature of the freezer
compartment in Celsius (°C) or Fahrenheit (°F).
The default freezer temperature is 0°F (-18 °C).
Press the Freezer button repeatedly to select a
new set temperature from -6 °F to 8 °F (-21 °C
to -13 °C).
5
&RQYHUWLEOH
Variable temperature storage that can be set
either colder or warmer than the refrigerator.
Store meat and seafood at 30°F/-1°C, cold
drinks at 33°F/1°C, deli snacks at 37°F/3°C, or
chilled wine at 41°F/5°C.
The convertible can also be used as a freezer at
F.
6
5HIULJHUDWRU
Indicates the set temperature of the refrigerator
compartment in Celsius (°C) or Fahrenheit (°F).
The default refrigerator temperature is 37 °F
(3 °C). Press the 5HIULJHUDWRU button repeatedly
to select a new set temperature from 33 °F to
46 °F (1 °C to 8 °C)
7
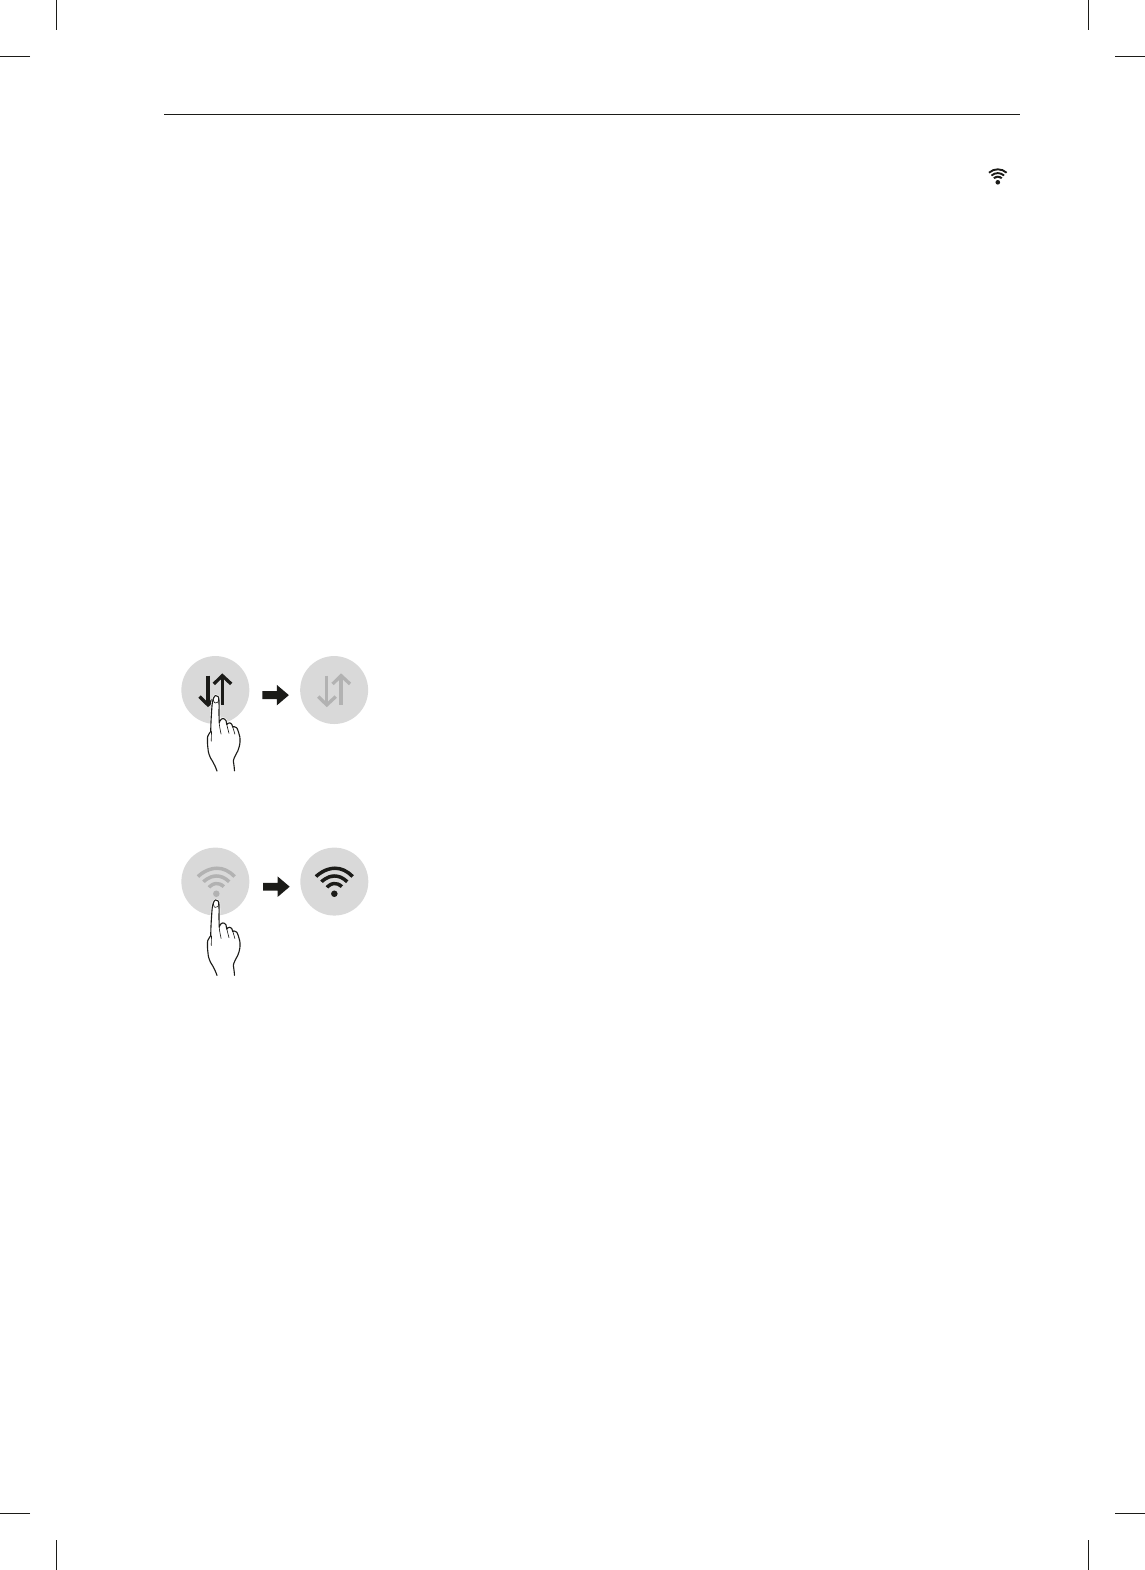
Smart Grid
Press the Smart Grid button to turn the Smart
Grid function On/Off. When the function is on,
the icon illuminates. The Smart Grid function
automatically turns on when the refrigerator is
connected to the Wi-Fi network.
When the refrigerator is responding to a Demand
Response (DR) message from the electric
company, the Grid text illuminates.

13OPERATION
ENGLISH
8
* Wi-Fi
The Wi-Fi button, when used with the
SIGNATURE KITCHEN SUITE smart phone
app, allows the refrigerator to connect to a home
Wi-Fi network. Refer to the Smart Functions
section for information on the initial setup of the
application.
The Wi-Fi icon shows the status of the
refrigerator’s network connection. The icon
illuminates when the refrigerator is connected to
the Wi-Fi network.
Press and hold the Wi-Fi button for 3 seconds to
connect to the network. The icon blinks while the
connection is being made, then turns on once
the connection is successfully made.
9
* Power
The Power button turns off all electrical power to
the unit.
Press and hold the Power button for 3 seconds
to turn off the power. When the power is off, the
indicator light is off. There is no need to turn off
power at the circuit breaker or wall receptacle.
Use this function for service or extended
vacations.
2
and
9
SABBATH
6DEEDWKPRGHLVXVHGRQWKH-HZLVK
6DEEDWKDQGKROLGD\V
%To turn Sabbath mode on, touch the
display to activate it, then press and
hold the Refrigerator and Power
buttons for 3 seconds until Sb appears
in the display.
%Sabbath mode automatically turns off
after 96 hours.
%To turn Sabbath mode off manually,
press and hold the Refrigerator and
Power buttons for 3 seconds.
%Once turned on, Sabbath mode is
maintained even after a power outage.
%Selecting Sabbath mode automatically
turns off the Light and Alarm functions.
The dispenser is also disabled.
%The interior display stays on during
Sabbath mode, but only “Sb” and the
Refrigerator and Power buttons are
displayed.
%The refrigerator temperature is set to
37°F (3°C) and cannot be changed
until Sabbath mode is turned off.
NOTE
%The Smart Grid function is automatically turned off
in Sabbath mode.
When Sabbath mode ends, the Smart Grid function
must be activated again manually.
CAUTION
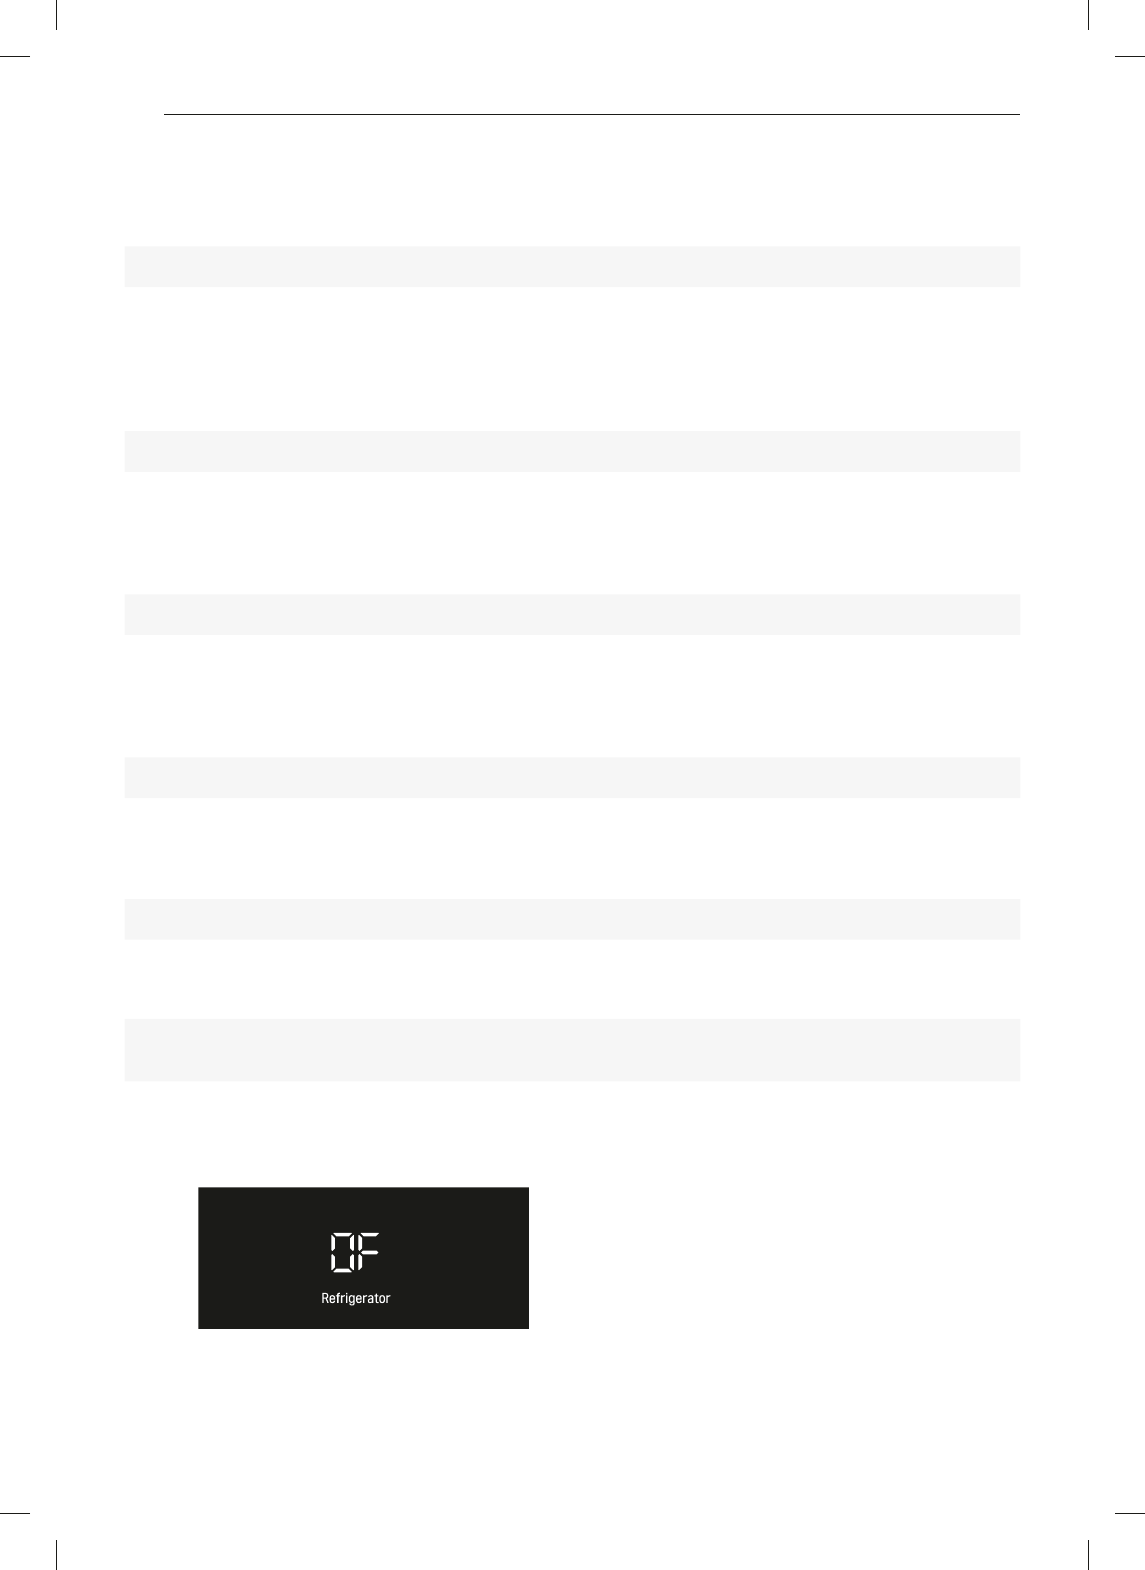
Display Mode (For Store Use Only)
%The Display Mode disables all cooling in the
refrigerator to conserve energy while on display
in a retail store. When activated, OF is displayed
on the control panel and the display remains on
for 20 seconds.
7RGHDFWLYDWHDFWLYDWH
%With the refrigerator door open, press and hold
the Refrigerator and Water Filter reset buttons at
WKHVDPHWLPHIRU¿YHVHFRQGV7KHFRQWURO
panel beeps and the temperature settings
GLVSOD\WRFRQ¿UPWKDW'LVSOD\0RGHLV
deactivated. Use the same procedure to activate
Display Mode.

14 OPERATION
Internal Water Dispenser
CAUTION
%Keep children away from the dispenser. Children
may play with or damage the controls.
%If water is dispensed unexpectedly, turn off the
water supply and contact a SIGNATURE
KITCHEN SUITE Customer Information Center.
Dispenser Structure
Water
Nozzle
Water
Paddle
NOTE
%To dispense water, push on the water paddle with a
glass.
%Some dripping may occur after dispensing. Hold the
cup beneath the dispenser for a few seconds after
dispensing to catch all of the drops.
Ice Compartment
CAUTION
%Keep hands and tools out of the ice
compartment. Failure to do so may result in
damage or personal injury.
Automatic Icemaker
7XUQLQJWKH$XWRPDWLF,FHPDNHU2Q
or Off
To turn off the automatic icemaker, press the ice On/
Off button on the display for three seconds.
Normal Sounds You May Hear
%Keeping the power turned on to the icemaker before
the water line is connected can damage the
icemaker.
%The icemaker water valve buzzes as the icemaker
¿OOVZLWKZDWHU,IWKHIce On/Off button is in the ON
mode, it will buzz even if it has not yet been hooked
up to water. To stop the buzzing, press the Ice On/
Off button to turn it off.
%You will hear the sound of cubes dropping into the
bin and water running in the pipes as the icemaker
UH¿OOV
15OPERATION
ENGLISH
3UHSDULQJIRU9DFDWLRQ
Set the Ice On/Off button to OFF and shut off the
water supply to the freezer.
NOTE
%The ice bin should be emptied any time the Ice On/
Off button is turned to the OFF mode.
If the ambient temperature will drop below freezing,
have a qualified technician drain the water supply
system to prevent serious property damage due to
flooding caused by ruptured water lines or
connections.
6WRULQJ)RRG
CAUTION
%'RQRWRYHU¿OORUSDFNLWHPVWRRWLJKWO\LQWRGRRU
bins. Doing so may cause damage to the bin or
personal injury if items are removed with
excessive force.
NOTE
%If you are leaving home for a short period, like a
short vacation, the refrigerator should be left on.
Refrigerated foods that are able to be frozen will
stay preserved longer if stored in the freezer.
%If you are leaving the refrigerator turned off for an
extended period, remove all food and unplug the
power cord. Clean the interior, and leave the door
open to prevent fungi from growing in the
refrigerator.
%Do not store food with high moisture content
towards the top of the refrigerator. The moisture
could come in direct contact with the cold air and
freeze.
%Wash food before storing it in the refrigerator.
Vegetables should be washed, and food packaging
should be wiped down to prevent adjacent foods
from being contaminated.
%If the refrigerator is kept in a hot and humid place,
frequent opening of the door or storing a lot of
vegetables in the refrigerator may cause
condensation to form. Wipe off the condensation
with a clean cloth or a paper towel.
%If the refrigerator door is opened or closed too often,
warm air may penetrate the refrigerator and raise its
temperature. This can increase the running costs of
the unit.
)RRG6WRUDJH7LSV
Wrap or store food in the refrigerator in airtight and
moisture-proof material unless otherwise noted. This
prevents food odor and taste transfer throughout the
refrigerator. For dated products, check date code to
ensure freshness.
Food How to
Butter or
Margarine
Keep opened butter in covered dish
or closed compartment. When storing
an extra supply, wrap in freezer
packaging and freeze.
Cheese
Store in original wrapping until used.
Once opened, rewrap tightly in
plastic wrap or aluminum foil.
Milk Wipe milk cartons. For coldest milk,
place containers on an interior shelf.
Eggs Store in original carton on interior
shelf, not on door shelf.
Fruit
Do not wash or hull fruit until it is
ready to be used. Sort and keep fruit
in original container in a crisper, or
store in completely closed paper bag
on refrigerator shelf.
Leafy
Vegetables
Remove store wrapping, trim or tear
off bruised and discolored areas,
wash in cold water, and drain. Place
in plastic bag or plastic container and
store in crisper.
Vegetables
with skins
(carrots,
peppers)
Place in plastic bags or plastic
container and store in crisper.
Fish
Freeze fresh fish and shellfish if they
are not being eaten the same day
purchased. Eating fresh fish and
shellfish the same day purchased is
recommended.
Leftovers
Cover leftovers with plastic wrap or
aluminum foil, or store in plastic
containers with tight lids.

16 OPERATION
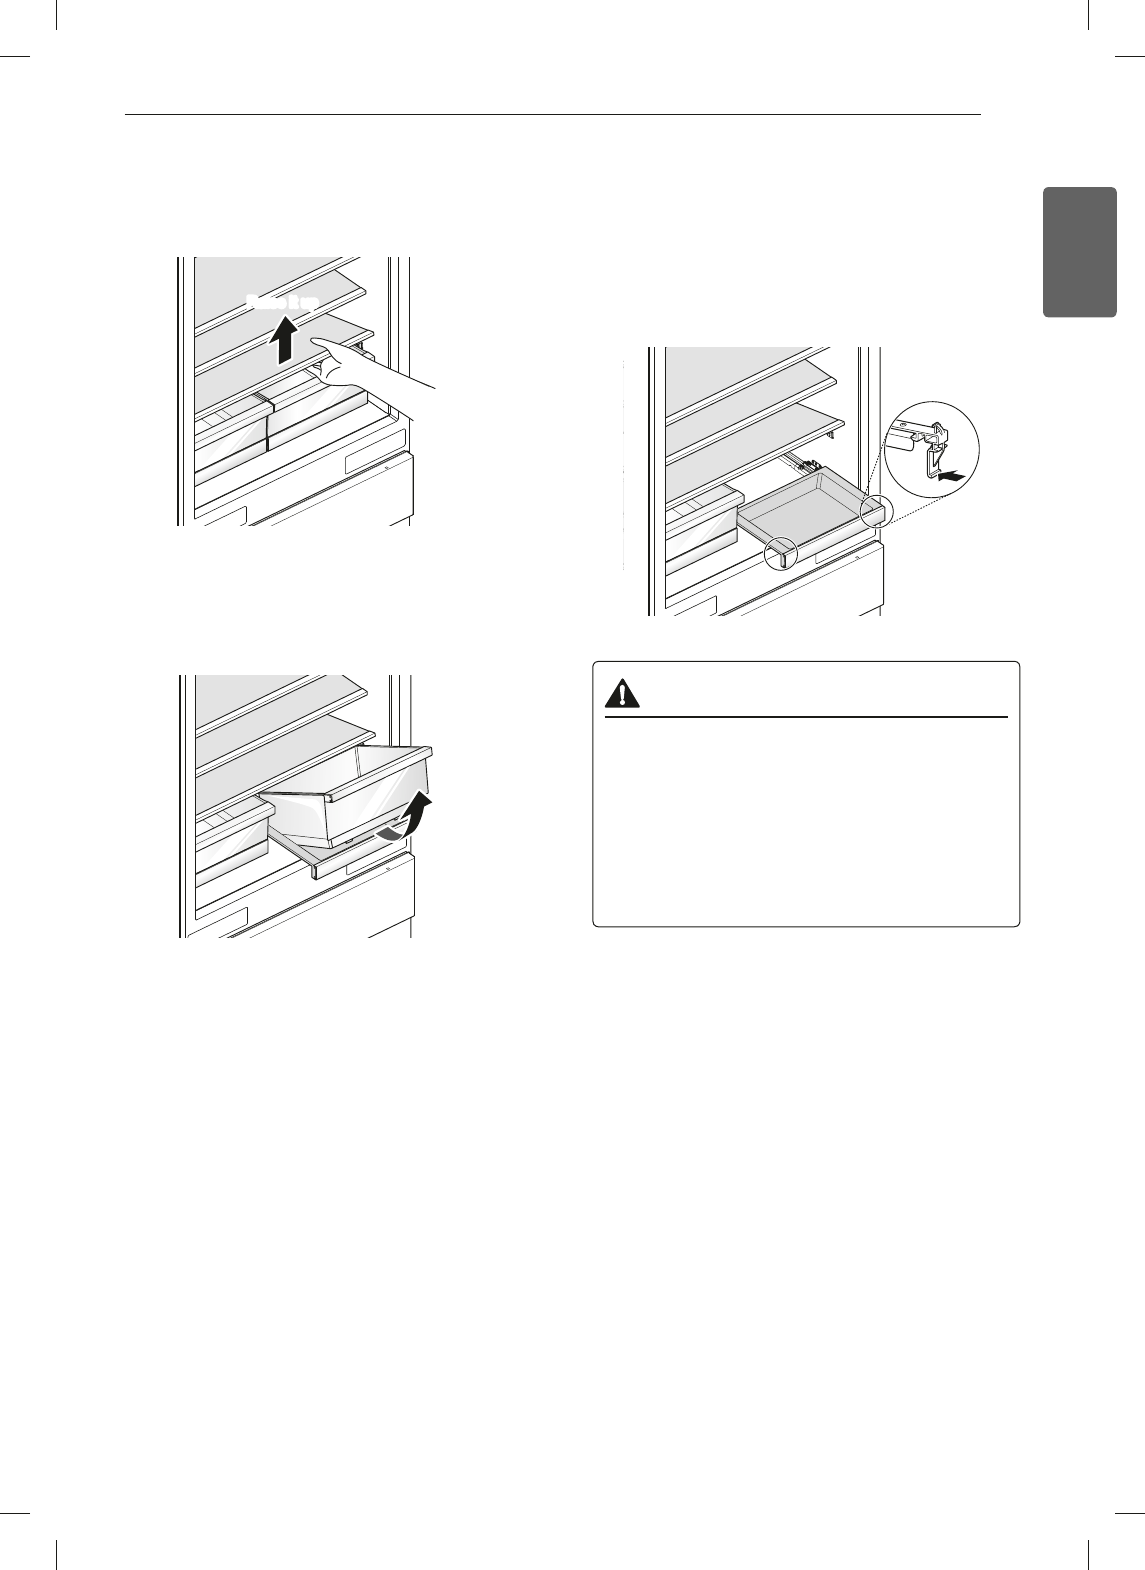
&RQYHUWLEOH'UDZHU
5HPRYLQJWKH&RQYHUWLEOH'UDZHU
1Pull the drawer out until it stops.
Empty all contents out of the drawer before
removing it.
2Push the button and remove the stopper on either
side.
3Remove the basket by lifting the basket from the
rail system.
4Remove the screws from the rails at both ends.
5Hold both sides of the door and lift it to remove it
from the rail system.
CAUTION
%The drawers are heavy. Always use two hands
when removing or assembling the drawers to
avoid product damage or personal injury. Always
empty drawers before removing them.
%Always open the door completely before
removing or assembling the drawers.
17OPERATION
ENGLISH
$VVHPEOLQJWKH&RQYHUWLEOH'UDZHU
1Grasp the door on each side and lower it into
place on the rail system.
2Tighten the screws from the rails at both ends.
3Pull the drawer open to full extension.
Lower the basket onto the rail system.
4Push the button and combine the stopper on
either side.
CAUTION
%The drawers are heavy. Always use two hands
when removing or assembling the drawers to
avoid product damage or personal injury. Always
empty drawers before removing or assembling
them.
%Always open the refrigerator door completely
before removing or assembling the drawers.
18 OPERATION
Freezer Drawer
5HPRYLQJWKH)UHH]HU'UDZHU
NOTE
%Before removing the Freezer Drawer, it must be
removing the Convertible Drawer.
1Pull the drawer out until it stops.
Empty all contents out of the drawer before
removing it.
2Push the button and remove the stopper on either
side.
3Remove the basket by lifting the basket from the
rail system.
4Remove the screws from the rails at both ends.
5Hold both sides of the door and lift it to remove it
from the rail system.

19OPERATION
ENGLISH
$VVHPEOLQJWKH)UHH]HU'UDZHU
NOTE
%Before assembling the Freezer Drawer, it must be
removing the Convertible Drawer.
1Grasp the door on each side and lower it into
place on the rail system.
2Tighten the screws from the rails at both ends.
3Pull the drawer open to full extension.
Lower the basket onto the rail system.
4Push the button and combine the stopper on
either side.
20 OPERATION
Door Bins
To remove the door bins, hold the bin with both hands
and rotate on the axis.
the axis of rotation
To assemble the door bin, align both sides of the bin
with the guides and push the bin down until it snaps
into place.
To adjust the location of the bin, tilt the front of the bin
up and slide the bin up or down to the desired
location.
$GMXVWLQJWKH6KHOYHV
The shelves in the refrigerator are adjustable to meet
individual storage needs.
Adjusting the shelves to fit items of different heights
will make finding the exact item you want easier.
'HWDFKLQJWKH6KHOI
1Tilt up the front of the shelf and then lift the shelf
straight up.
2Pull the shelf out.
$VVHPEOLQJWKH6KHOI
1Tilt the front of the shelf up and guide the shelf
hooks into the slots at a desired height.
2Lower the front of the shelf so that the hooks
drop into the slots.
CAUTION
%Make sure that shelves are level from one side
to the other. Failure to do so may result in the
shelf falling or spilled food.
%Do not clean glass shelves with warm water
while they are cold. Shelves may break if
exposed to sudden temperature changes or
impact.
%Glass shelves are heavy. Use special care when
removing them.
21OPERATION
ENGLISH
Crisper
'LVDVVHPEOHWKH&ULVSHU
%Raise up the Crisper and Disassemble the Crisper.
Raise it up
'LVDVVHPEOHWKH7UD\'UDZHU
%Pull Tray Drawer to the End.
%Raise Tray drawer up to Disassemble
+RZWR'LVDVVHPEOH&RYHU'UDZHU
1Disassemble Tray Drawer.
2Pull Cover Drawer to the end.
3Push Rack and Lift Cover Drawer(Rack is located
in Left, Right Slide Rail)
Rack
CAUTION
%Make sure that Crisper is level from one side to
the other. Failure to do so may result in the
Crisper falling or spilled food.
%Do not clean the Crisper glass with warm water
while it is cold. Crisper may break if exposed to
sudden temperature changes or impact.
%Crisper is heavy. Use special care when
removing it.
22 SMART FUNCTIONS
SMART FUNCTIONS
SIGNATURE KITCHEN SUITE
Application
The SIGNATURE KITCHEN SUITE application allows
you to communicate with the appliance using a
smartphone.
%HIRUH8VLQJWKH$SSOLFDWLRQ
1Check the strength of the wireless signal near the
appliance.
%If the distance between the appliance and the
wireless router is too far, the signal strength
becomes weak. It may take a long time to
register or installation may fail.
2Turn off the 0RELOHGDWD or Cellular Data on
your smartphone.
3Connect your smartphone to the wireless router.
NOTE
%To verify the Wi-Fi connection, check that Wi-Fi
icon on the control panel is lit.
%The appliance supports 2.4 GHz Wi-Fi networks
only. To check your network frequency, contact your
Internet service provider or refer to your wireless
router manual.
%The SIGNATURE KITCHEN SUITE application is
not responsible for any network connection
problems or any faults, malfunctions, or errors
caused by network connection.
%The surrounding wireless environment can make
the wireless network service run slowly.
%If the appliance is having trouble connecting to the
Wi-Fi network, it may be too far from the router.
Purchase a Wi-Fi repeater (range extender) to
improve the Wi-Fi signal strength.
%The network connection may not work properly
depending on the Internet service provider.
%The Wi-Fi connection may not connect or may be
interrupted because of the home network
environment.
%If the appliance cannot be registered due to
problems with the wireless signal transmission, turn
off the router and wait about a minute before turning
it back on and trying again.
%,IWKH¿UHZDOORQ\RXUZLUHOHVVURXWHULVHQDEOHG
GLVDEOHWKH¿UHZDOORUDGGDQH[FHSWLRQWRLW
%The wireless network name (SSID) should be a
combination of English letters and numbers. (Do not
use special characters.)
%Smartphone user interface (UI) may vary depending
on the mobile operating system (OS) and the
manufacturer.
%If the security protocol of the router is set to WEP,
you may need to change it to WPA2 in order to
successfully register the product.

23SMART FUNCTIONS
ENGLISH
,QVWDOOLQJ6,*1$785(.,7&+(1
SUITE Application
Search for the SIGNATURE KITCHEN SUITE
application from the Google Play Store or Apple App
Store on a smart phone. Follow instructions to
download and install the application.
NOTE
%If you choose the simple login to access the
SIGNATURE KITCHEN SUITE application, you
must go through the appliance registration process
each time you change your smartphone or reinstall
the application.
SIGNATURE KITCHEN SUITE
Application Features
0DQDJH)RRG
This feature helps track items in the refrigerator and
freezer, sends alerts when items are near their use by
dates, generates grocery lists, and links to related
recipes.
(QHUJ\0RQLWRULQJ
This feature keeps track of the refrigerator’s power
consumption and the number of door openings.
3XVK0HVVDJHV
If the door remains open for more than ten minutes,
you will receive a push message. When Ice Plus is
finished, you will receive a push message.
6PDUW'LDJQRVLV
This function provides useful information for
diagnosing and solving issues with the appliance
based on the pattern of use.
6HWWLQJV
Allows you to set various options on the refrigerator
and in the application.
NOTE
%If you change your wireless router, your Internet
service provider or your password after registering
the appliance, please delete it from the
SIGNATURE KITCHEN SUITE application 6HWWLQJV
ĺ(GLW3URGXFW and register again.
%This information is current at the time of publication.
The application is subject to change for product
improvement purposes without notice to users.

24 SMART FUNCTIONS
Smart Grid Function
When the refrigerator operates in Smart Grid mode,
the Smart Refrigerator function can control energy
usage or delay the operation of some functions to
save energy during peak usage periods.
%You can override the Smart Grid function any time
(using the Smart Grid button or application).
%To use the Smart Grid function, you need to register
your appliance with your electric utility company.
Smart Grid Application Features
6PDUW6DYLQJB'HPDQG5HVSRQVH
You can lower energy usage based on Demand
Response (DR) signals from the utility company. If the
refrigerator is operating in Smart Saving mode
according to the DR signal, you can see a pop up.
6HDVRQDO(QHUJ\6DYLQJV
Lower energy usage based on time period.
8VLQJWKH6PDUW*ULG)XQFWLRQ
This feature responds to notification events from your
utility company to run high energy consuming tasks
during off-peak periods when demand is lower. These
notification events are known as Demand Response
signals.
If the refrigerator receives a Demand Response
signal from the utility company, the refrigerator will
turn on the Grid LED on the refrigerator display and
control its power consumption according to the signal.
The refrigerator will respond to the signals received
from the utility company as long as product
performance is maintained.
If the refrigerator receives a Demand Response
signal, the refrigerator will operate in Delay Appliance
Load (DAL) or Temporary Appliance Load Reduction
(TALR) mode.
Delay Appliance Load (DAL)
The refrigerator responds to a DAL signal by providing
a moderate load reduction for the duration of the
delay period.
This mode controls functions that consume a lot of
energy such as adjusting the cooling system, running
the defrost cycle, and making ice.
%When the refrigerator operates in DAL mode, the
Grid LED is illuminated on the refrigerator display.
%DAL mode is automatically deactivated after the
period stipulated by the DAL signal (max. 4 hours)
or when you override the Smart Grid function.
Temporary Appliance Load Reduction (TALR)
The refrigerator responds to a TALR signal by
aggressively reducing the load for a short time period,
typically 10 minutes. This mode reduces energy
consumption by stopping the compressor and
controlling the functions that consume a lot of energy
such as the defrost cycle and fan.
%When the refrigerator operates in TALR mode, the
Grid LED is illuminated on the refrigerator display.
%TALR mode is automatically deactivated after the
received duration (max. 10 minutes), or when you
override the Smart Grid function. The mode is
immediately deactivated and the refrigerator returns
to its normal state when the door is opened or
closed, or the dispenser is used.
Override Smart Grid Mode
To ignore the Demand Response signal from the
utility company and override the Smart Grid function,
push the Smart Grid button while the refrigerator is in
Smart Grid mode.
When you override the Smart Grid function, the
refrigerator ignores the Demand Response signal and
is no longer controlled by the utility company until the
next Demand Response signal is sent. You can also
override the Smart Grid function using the smart
phone app.
SIGNATURE KITCHEN SUITE Open API
You can manage Smart Grid features for the
SIGNATURE KITCHEN SUITE refrigerator.
Please check the detailed specifications on the notice
page on www.thesignaturekitchen.com.
API list
Demand Response
%Send demand response signal
Power Saving
%Set saving mode
%Get schedule of DR/Delay Defrost
Energy Monitoring
%Get door open event
%Get energy consumption
Delay Defrost Capability
%Insert a delay defrost schedule event
%Update a delay defrost schedule event
%Delete a delay defrost schedule event
%Get the delay defrost schedule
25SMART FUNCTIONS
ENGLISH
6PDUW'LDJQRVLV)XQFWLRQ
Should you experience any problems with the
appliance, it has the capability of transmitting data via
your telephone to the SIGNATURE KITCHEN SUITE
Information Center. NFC or Wi-Fi equipped models
can also transmit data to a smartphone using the
SIGNATURE KITCHEN SUITE application.
6PDUW'LDJQRVLVWKURXJKWKH
Customer Information Center
This method allows you to speak directly to our
trained specialists. The specialist records the data
transmitted from the appliance and uses it to analyze
the issue, providing a fast and effective diagnosis.
1Call the SIGNATURE KITCHEN SUITE Customer
Information Center at:
(U.S.A) 1-855-790-6655
2Open the refrigerator door.
3Hold the mouthpiece of your phone in front of the
speaker that is located on the filter cover of the
refrigerator, when instructed to do so by the call
center.
4Press and hold the 5HIULJHUDWRU button for three
seconds while continuing to hold your phone to
the speaker.
5After you hear three beeps, release the
5HIULJHUDWRU button.
6Keep the phone in place until the tone
transmission has finished. The display will count
down the time. Once the countdown is over and
the tones have stopped, resume your
conversation with the specialist, who will then be
able to assist you in using the information
transmitted for analysis.
NOTE
%For best results, do not move the phone while the
tones are being transmitted.
%If the call center agent is not able to get an accurate
recording of the data, you may be asked to try
again.
%The Smart Diagnosis™ function depends on the
local call quality.
%Bad call quality may result in poor data transmission
from your phone to the call center, which could
cause Smart Diagnosis™ to malfunction.
6PDUW'LDJQRVLV
Use the Smart Diagnosis feature in the SIGNATURE
KITCHEN SUITE application for help diagnosing
issues with the appliance without the assistance of
the SIGNATURE KITCHEN SUITE Customer
Information Center.
Follow the instructions in the SIGNATURE KITCHEN
SUITE application to perform a Smart Diagnosis
using your smartphone.
NOTE
%Smart Diagnosis™ cannot be activated unless the
appliance can be turned on using the Power button.
If the appliance cannot be turned on,
troubleshooting must be done without using Smart
Diagnosis™.
26 SMART FUNCTIONS
FCC Notice
The following notice covers the transmitter module
contained in this product.
This equipment has been tested and found to comply
with the limits for a Class B digital device, pursuant to
Part 15 of the FCC Rules and also Part 18 of the FCC
Rules. These limits are designed to provide
reasonable protection against harmful interference in
a residential installation. This equipment generates,
uses, and can radiate radio frequency energy and, if
not installed and used in accordance with the
instructions, may cause harmful interference to radio
communications. However, there is no guarantee that
interference will not occur in a particular installation. If
this equipment does cause harmful interference to
radio or television reception, which can be determined
by turning the equipment off and on, the user is
encouraged to try to correct the interference by one
or more of the following measures:
<Reorient or relocate the receiving antenna.
<Increase the separation between the equipment
and the receiver.
<Connect the equipment to an outlet on a circuit
different from that to which the receiver is
connected.
<Consult the dealer or an experienced radio/TV
technician for help.
This device complies with Part 15, Part 18 of the FCC
Rules. Operation is subject to the following two
conditions:
1) this device may not cause harmful interference and
2) this device must accept any interference received,
including interference that may cause undesired
operation of the device.
$Q\FKDQJHVRUPRGL¿FDWLRQVLQFRQVWUXFWLRQRIWKLV
device which are not expressly approved by the party
responsible for compliance could void the user’s
authority to operate the equipment.
FCC RF Radiation Exposure
Statement
This equipment complies with FCC radiation exposure
limits set forth for an uncontrolled environment. This
transmitter must not be co-located or operating in
conjunction with any other antenna or transmitter.
This equipment should be installed and operated with
a minimum distance of 20 cm (7.8 inches) between
the antenna and your body. Users must follow the
specific operating instructions for satisfying RF
exposure compliance.
Industry Canada Statement (For
transmitter module contained in this
product)
This device complies with Industry Canada’s
applicable licence- exempt RSSs. Operation is
subject to the following two conditions:
7KLVGHYLFHPD\QRWFDXVHLQWHUIHUHQFHDQG
2) This device must accept any interference, including
interference that may cause undesired operation of
the device.
Industry Canada ICES-001 Compliance Label: CAN
ICES-1/NMB-1
IC Radiation Exposure Statement
This equipment complies with IC radiation exposure
limits set forth for an uncontrolled environment.
This equipment should be installed and operated with
a minimum distance of 20 cm (7.8 inches) between
the antenna and your body.
NOTE
%The manufacturer is not responsible for any radio or
TV interference caused by unauthorized
PRGL¿FDWLRQVWRWKLVHTXLSPHQW6XFKPRGL¿FDWLRQV
could void the user's authority to operate the
equipment.
Wireless LAN Module Specifications
Model LCW-003
Frequency Range 2412 MHz - 2462 MHz
Output Power
(Max)
IEEE 802.11b: 17.56 dBm
IEEE 802.11g: 25.53 dBm
IEEE 802.11n: 25.29 dBm
Open Source Software Notice
Information
To obtain the source code under GPL, LGPL, MPL,
and other open source licenses, that is contained in
this product, please visit http://opensource.
thesignaturekitchen.com.
In addition to the source code, all referred license
terms, warranty disclaimers and copyright notices are
available for download.
SIGNATURE KITCHEN SUITE will also provide open
source code to you on CD-ROM for a charge covering
the cost of performing such distribution (such as the
cost of media, shipping, and handling) upon email
request to opensource@thesignaturekitchen.com.
This offer is valid for a period of three years after our
last shipment of this product. This offer is valid to
anyone in receipt of this information.
27SMART FUNCTIONS
ENGLISH
Wireless Power Transfer Specifications
Frequency 330 kHz ~ 370 kHz
Rated voltage DC 12 V
Delivered power Less than and equal to 3 W
per shelf
Transmission
mode
Electromagnetic induction
Transmitter
Receiver
NOTE
%Foreign objects and dirt between the right side of
shelf and the inner cabinet wall could prevent the
shelf light from turning on.
%The shelf light turns on when the door is opened.
%The shelf light turns off after seven minutes or when
the door is closed.
28 MAINTENANCE
MAINTENANCE
&OHDQLQJ
WARNING
%8VHQRQÀDPPDEOHFOHDQHU)DLOXUHWRGRVRFDQ
UHVXOWLQ¿UHH[SORVLRQRUGHDWK
CAUTION
%Do not use an abrasive cloth or sponge when
cleaning the interior and exterior of the
refrigerator.
%Do not place your hand on the bottom surface of
the refrigerator when opening and closing the
doors.
*HQHUDO&OHDQLQJ7LSV
%7KHUHIULJHUDWRUGHIURVWVDXWRPDWLFDOO\KRZHYHU
clean it once a month to prevent odors.
%Wipe up spills immediately.
%Unplug the refrigerator or disconnect power before
cleaning.
%Remove all removable parts, such as shelves.
%Use a clean sponge or soft cloth and a mild
detergent in warm water. Do not use abrasive or
harsh cleaners.
%Hand wash, rinse and dry all surfaces thoroughly.
%When cleaning the inside or outside of the
appliance, do not wipe it with a rough brush,
WRRWKSDVWHRUÀDPPDEOHPDWHULDOV'RQRWXVH
FOHDQLQJDJHQWVFRQWDLQLQJÀDPPDEOHVXEVWDQFHV
<Doing so may cause discoloration or damage to
the appliance.
<Flammable substances: alcohol (ethanol,
methanol, isopropyl alcohol, isobutyl alcohol,
HWFWKLQQHUEOHDFKEHQ]HQHÀDPPDEOHOLTXLG
abrasive, etc.
Inside Walls
To help remove odors, wash the inside of the
refrigerator with a mixture of baking soda and warm
water. Mix 2 tablespoons of baking soda to 1 quart of
water (26 g soda to 1 liter water.) Be sure the baking
soda is completely dissolved so it does not scratch
the surfaces of the refrigerator.
Door Liners and Gaskets
Use a clean sponge or soft cloth and a mild detergent
in warm water. Do not use cleaning waxes,
concentrated etergents, bleaches, or cleaners
containing petroleum on plastic refrigerator parts.
Plastic Parts (covers and panels)
Use a clean sponge or soft cloth and a mild detergent
in warm water. Do not use glass cleaners, abrasive
cleansers, or flammable fluids. These can scratch or
damage the material.
29MAINTENANCE
ENGLISH
5HSODFLQJWKH:DWHU)LOWHU
Replace the Water Filter :
%Approximately every six months.
%When the Replace Filter icon turns on.
%When the water dispenser output decreases.
1Remove the old water filter.
Push to open the water filter cover at the top right
of the refrigerator.
NOTE
%5HSODFLQJWKHZDWHU¿OWHUFDXVHVDVPDOODPRXQWRI
water (around 1 oz. or 25 cc) to drain.
%:UDSDFORWKDURXQGWKHIURQWHQGRIWKHZDWHU¿OWHU
cover to collect any leaking water. Hold the water
¿OWHUXSULJKWRQFHLWLVUHPRYHGWRSUHYHQWDQ\
UHPDLQLQJZDWHUIURPVSLOOLQJRXWRIWKHZDWHU¿OWHU
2Put the cap on the water filter, then grasp and
rotate it counterclockwise to remove the water
filter from the filter head.
Cap
3Replace with a new water filter.
Take the new water filter out of its packing and
remove the protective cover from the o-rings. Put
the cap on the new water filter, then push it into
the manifold hole until it stops.
4Grasp and rotate cap clockwise until it stops.
Replace the cap to the side of the water filter.
5After the water filter is replaced, dispense 2.5
gallons of water (flush for approximately 5
minutes) to remove trapped air and contaminants
from the system.
NOTE
%Do not dispense the entire 2.5 gallon amount
continuously. Press and release the dispenser pad
for cycles of 30 seconds ON and 60 seconds OFF.

30 MAINTENANCE
6After changing the filter, press and hold the Water
Filter Reset button for three seconds to reset the
indicator light.
NOTE
7RSXUFKDVHDUHSODFHPHQWZDWHUILOWHU
%Visit your local dealer or distributor
%Web : Find Parts & Accessories from Support
section of thesignaturekitchen.com
%Call : 1-855-790-6655 (USA)
)RUIXUWKHUDVVLVWDQFHFDOO
1-855-790-6655 (USA)
%Use replacement cartridge:
LT1000P (ADQ74793501)
LT1000PC (ADQ74793504)
LT1000PCS (ADQ74793505)
LT1000P(S) (ADQ74793506)
31MAINTENANCE
ENGLISH
Performance Data Sheet
0RGHO/733&3&636 16)6\VWHP7UDGH1DPH&RGH0'-
The concentration of the indicated substances in water entering the system was reduced to a concentration less
than or equal to the permissible limit for water leaving the system as specified in NSF/ANSI Standard 42,
Standard 53 and Standard 401.
System tested and certified by NSF International against NSF/ANSI Standard 42, Standard
53 and Standard 401 for the reduction of substances listed below.
VXEVWDQFH
Reduction
$YHUDJH
Influent
&KDOOHQJH
NSF specified
&KDOOHQJH
Concentration
$YJ
Reduction
$YHUDJH
Product Water
Concentration
Max
3HUPLVVLEOH
Product Water
Concentration
NSF
Reduction
Requirements
Chlorine Taste
and Odor ȝJ/ ȝJ/ ! ȝJ/ N/A
Nominal
Particulate
&ODVV,
WRȝP
12,000,000
pts/mL
At least
10,000
particles/mL
24,000 pts/ml N/A
Asbestos 180 MFL
107 to 108
0)/ILEHUV
greater than
ȝJ/LQ
length
! < 1 MFL N/A
Atrazine ȝJ/ ȝJ/
! ȝJ/ ȝJ/ NA
Benzene ȝJ/ ȝJ/
! ȝJ/ ȝJ/ NA
Carbofuran ȝJ/ ȝJ/
ȝJ/ ȝJ/ NA
Lindane ȝJ/ ȝJ/
! ȝJ/ ȝJ/ NA
P-Dichlorobenzene
ȝJ/ ȝJ/
! ȝJ/ ȝJ/ NA
2,4-D ȝJ/ ȝJ/
! ȝJ/ ȝJ/ NA
Lead pH @6.5 ȝJ/ ȝJ/
ȝJ/ ȝJ/ NA
Lead pH @8.5 ȝJ/ ȝJ/
! ȝJ/ ȝJ/ NA
Mercury @ pH
6.5 ȝJ/ ȝJ/
ȝJ/ ȝJ/ NA
(Continued on next page)

32 MAINTENANCE
VXEVWDQFH
Reduction
$YHUDJH
Influent
&KDOOHQJH
NSF specified
&KDOOHQJH
Concentration
$YJ
Reduction
$YHUDJH
Product Water
Concentration
Max
3HUPLVVLEOH
Product Water
Concentration
NSF
Reduction
Requirements
Mercury @ pH
8.5 ȝJ/ ȝJ/
ȝJ/ ȝJ/ NA
Cyst* 100,000
cysts/L
Minimum
50,000 cysts/L ! 10 cysts/L N/A
Atenolol 240 ng/L
ng/L ! 10.80 ng/L 30 ng/L NA
Carbamazepine
1600 ng/L
ng/L 25.60 ng/L 200 ng/L NA
DEET 1600 ng/L
ng/L 46.40 ng/L 200 ng/L NA
Trimethoprim 170 ng/L
ng/L ! 5.44 ng/L 20 ng/L NA
Linuron 160 ng/L
ng/L ! 5.44 ng/L 20 ng/L NA
Phenytoin 200 ng/L
ng/L ! 10.40 ng/L 30 ng/L NA
Ibuprofen 400 ng/L
ng/L ! 22.00 ng/L 60 ng/L NA
Naproxen 140 ng/L
ng/L ! 5.46 ng/L 20 ng/L NA
Estrone 120 ng/L
ng/L ! 4.68 ng/L 20 ng/L NA
Bisphenol A 2000 ng/L
ng/L ! 22.00 ng/L 300 ng/L NA
Nonyl Phenol 1600 ng/L
ng/L ! 46.40 ng/L 200 ng/L NA
%Based on the use of Cryptosporidium parvum oocysts.

33MAINTENANCE
ENGLISH
Application Guidelines/Water Supply
Parameters
Service Flow 0.5 gpm (1.89 lpm)
Water Supply Community or Private Well -
Potable Water
Water
Pressure 20 – 120 psi (138 – 827 kPa)
Water
Temperature 33 °F – 100 °F (0.6 °C – 37.8 °C)
Capacity 200 gallons (757 liters)
It is essential that the manufacturer’s recommended
installation, maintenance and filter replacement
requirements be carried out for the product to perform
as advertised.
NOTE
%While the testing was performed under standard
laboratory conditions, actual performance may vary.
Replacement Cartridge: LT1000P/PC/PCS/P(S)
For replacement filters, visit your local dealer or
distributor or search under “water filters” on the
WKHVLJQDWXUHNLWFKHQFRP website.
For further assistance, the SIGNATURE KITCHEN
SUITE Customer Information Center is open 24 hours
a day/7 days a week.
USA : 1-855-790-6655
NSF is trademark of NSF.
WARNING
7RUHGXFHWKHULVNDVVRFLDWHGZLWKFKRNLQJ
%Do not allow children under 3 years of age to
have access to small parts during the installation
of this product.
To reduce the risk associated with the
LQJHVWLRQRIFRQWDPLQDQWV
%Do not use with water that is microbiologically
unsafe or of unknown quality without adequate
disinfection before or after the system. Systems
FHUWL¿HGIRUF\VWUHGXFWLRQPD\EHXVHGRQ
GLVLQIHFWHGZDWHUWKDWPD\FRQWDLQ¿OWHUDEOH
cysts. EPA Establishment # 070595-MEX-001
CAUTION
To reduce the risk associated with property
GDPDJHGXHWRZDWHUOHDNDJH
%Read and follow Use Instructions before
installation and use of this system.
%Installation and use MUST comply with all state
and local plumbing codes.
%Do not install if water pressure exceeds 120 psi
(827 kPa). If your water pressure exceeds 80
psi, you must install a pressure limiting valve.
Contact a plumber if uncertain how to check your
water pressure.
%Do not install where water hammer conditions
may occur. If water hammer conditions exist you
must install a water hammer arrester. Contact a
plumbing professional if you are uncertain how
to check for this condition.
%Do not install on hot water supply lines. The
maximum operating water temperature of this
¿OWHUV\VWHPLV)&
%3URWHFW¿OWHUIURPIUHH]LQJ'UDLQ¿OWHUZKHQ
temperatures drop below 40 °F (4.4 °C).
%7KHGLVSRVDEOH¿OWHUFDUWULGJH0867EHUHSODFHG
every 6 months, at the rated capacity or if a
QRWLFHDEOHUHGXFWLRQLQÀRZUDWHRFFXUV
%3URWHFWIURPIUHH]LQJUHPRYH¿OWHUFDUWULGJH
when temperatures are expected to drop below
33 °F.
%Do not install systems in areas where ambient
temperatures may go above 110° F (43.3 °C).
%:KHUHDEDFNÀRZSUHYHQWLRQGHYLFHLVLQVWDOOHG
on a water system, a device for controlling
pressure due to thermal expansion must be
installed.
%(QVXUHDOOWXELQJDQG¿WWLQJVDUHVHFXUHDQGIUHH
of leaks.
34 TROUBLESHOOTING
TROUBLESHOOTING
)$4V)UHTXHQWO\$VNHG4XHVWLRQV
4 :KDWDUHWKHEHVWWHPSHUDWXUHVHWWLQJVIRUP\IUHH]HU"
A: The default setting for the freezer is 0° Fahrenheit (-18° Celsius). Adjust these settings as necessary
to keep food at desired temperatures. Ice cream should be firm and ice cubes should not melt in the
freezer. To switch the display from Fahrenheit to Celsius, press the Freezer button first to wake the
display then press and hold the Freezer and Smart Grid buttons until you hear a beep and the settings
in the display change.
4 :KDWDUHWKHEHVWWHPSHUDWXUHVHWWLQJVIRUP\UHIULJHUDWRU"
A: The default setting for the refrigerator is 37° Fahrenheit (3° Celsius). Adjust these settings as
necessary to keep food at desired temperatures. To switch the display from Fahrenheit to Celsius,
press the Refrigerator button first to wake the display then press and hold the Refrigerator and Smart
Grid buttons until you hear a beep and the settings in the display change.
4 +RZGR,VHWWKHWHPSHUDWXUH"
A: Continually press the 5HIULJHUDWRURU&RQYHUWLEOHRU)UHH]HUEXWWRQRQWKHFRQWUROSDQHOXQWLOWKH
desired temperature appears.
The numbers will cycle from highest to lowest and then return to the highest again with continuous
pressing.
4 :K\GR,KHDUDEX]]LQJQRLVHIURPP\IUHH]HUSHULRGLFDOO\"
A: This may happen if you do not have a water source attached to your freezer and the icemaker is
turned on. If you do not have a water source attached to the freezer you should turn the icemaker off
on the control panel.
4 :K\GRHVWKHLFHPDNHUWUD\ORRNFURRNHG"
A: This is a normal part of the icemaker cycle. The icemaker tray may appear level or with a slight tilt.
The change in position is to assist in the freezing process.
4 0\IUHH]HULVSRZHUHGRQDQGWKHFRQWUROVDUHZRUNLQJEXWLW¶VQRWFRROLQJDQGWKHGLVSOD\
VKRZV³2)´VHHEHORZ:KDWLVZURQJ"
A: The freezer is in Demo Mode. This mode disables cooling to save energy while the appliance is on
display in a store. To restore normal operation, press Freezer button first to wake the display then
press and hold the Freezer and Water Filter Reset buttons until you hear a beep and the temperature
setting appears in the display. Use the same procedure to return the freezer to Demo Mode, if desired.
35TROUBLESHOOTING
ENGLISH
%HIRUH&DOOLQJIRU6HUYLFH
5HYLHZWKLVVHFWLRQEHIRUHFDOOLQJIRUVHUYLFHGRLQJVRZLOOVDYH\RXERWKWLPHDQGPRQH\
&RROLQJ
3UREOHP 3RVVLEOH&DXVH Solutions
5HIULJHUDWRUDQG
Freezer section
DUHQRWFRROLQJ
7KHUHIULJHUDWRUFRQWUROLVVHW
to OFF (some models).
Turn the control ON. Refer to the Setting the Controls
section for proper temperature settings.
5HIULJHUDWRULVVHWWR'HPR
Mode.
Demo Mode allows the lights and control display to
work normally while disabling cooling, to save energy
while the refrigerator is on the showroom floor. See
the FAQs section of this manual for instructions on
how to disable Demo Mode.
5HIULJHUDWRULVLQWKHGHIURVW
cycle.
During the defrost cycle, the temperature of each
compartment may rise slightly. Wait 30 minutes and
confirm the proper temperature has been restored
once the defrost cycle has completed.
5HIULJHUDWRUZDVUHFHQWO\
installed.
It may take up to 24 hours for each compartment to
reach the desired temperature.
5HIULJHUDWRUZDVUHFHQWO\
relocated.
If the refrigerator was stored for a long period of time
or moved on its side, it is necessary for the refrigerator
to stand upright for 24 hours before connecting it to
power.
&RROLQJV\VWHP
runs too much.
5HIULJHUDWRULVUHSODFLQJDQ
older model.
Modern refrigerators require more operating time but
use less energy due to more efficient technology.
5HIULJHUDWRUZDVUHFHQWO\
SOXJJHGLQRUSRZHU
restored.
The refrigerator will take up to 24 hours to cool
completely.
The door is opened often or
DODUJHDPRXQWRIIRRGKRW
food was added.
Adding food and opening the door warms the
refrigerator, requiring the compressor to run longer in
order to cool the refrigerator back down. In order to
conserve energy, try to get everything you need out of
the refrigerator at once, keep food organized so it is
easy to find, and close the door as soon as the food is
removed. (Refer to the Food Storage Guide.)
Doors are not closed
completely.
Firmly push the doors shut. If they will not shut all the
way, the "Doors will not close correctly or pop open"
section.
5HIULJHUDWRULVLQVWDOOHGLQD
hot location.
The compressor will run longer under warm
conditions. At normal room temperatures (70 °F)
H[SHFW\RXUFRPSUHVVRUWRUXQDERXWWRRI
the time. Under warmer conditions, expect it to run
even more often. The refrigerator should not be
operated above 110 °F.
36 TROUBLESHOOTING
&RROLQJ
3UREOHP 3RVVLEOH&DXVH Solutions
Interior moisture
EXLOGXS
Doors are opened often or
IRUORQJSHULRGVRIWLPH
When the doors are opened often or for long periods
of time, warm, humid air enters the compartment. This
raises the temperature and moisture level within the
compartment. To lessen the effect, reduce the
frequency and duration of door openings.
Doors are not closed
correctly.
See the "Doors will not close correctly or pop open"
section.
Weather is humid.
Humid weather allows additional moisture to enter the
compartments when the doors are opened leading to
condensation or frost. Maintaining a reasonable level
of humidity in the home will help to control the amount
of moisture that can enter the compartments.
Defrost cycle recently
completed.
During the defrost cycle, the temperature of each
compartment may rise slightly and condensation may
form on the back wall. Wait 30 minutes and confirm
that the proper temperature has been restored once
the defrost cycle has completed.
)RRGLVQRWSDFNDJHG
correctly.
Food stored uncovered or unwrapped, and damp
containers can lead to moisture accumulation within
each compartment. Wipe all containers dry and store
food in sealed packaging to prevent condensation and
frost.
)RRGLVIUHH]LQJLQ
WKHUHIULJHUDWRU
compartment.
)RRGZLWKKLJKZDWHUFRQWHQW
was placed near an air vent.
Rearrange items with high water content away from
air vents.
5HIULJHUDWRUWHPSHUDWXUH
control is set incorrectly.
If the temperature is too cold, adjust the control one
increment at a time and wait for the temperature to
stabilize. Refer to the Control Panel section for more
information.
5HIULJHUDWRULVLQVWDOOHGLQD
cold location.
When the refrigerator is operated in temperature
below 41°F (5°C), food can freeze in the refrigerator
compartment. The refrigerator should not be operated
in temperature below 55°F (13°C).
5HIULJHUDWRULVWRR
warm.
5HIULJHUDWRUZDVUHFHQWO\
installed.
It may take up to 24 hours for each compartment to
reach the desired temperature.
7KHDLUYHQWVDUHEORFNHG
Locate air vents by using your hand to sense airflow
and move all packages that block vents and restrict
airflow. Rearrange items to allow air to flow throughout
the compartment.
37TROUBLESHOOTING
ENGLISH
&RROLQJ
3UREOHP 3RVVLEOH&DXVH Solutions
5HIULJHUDWRULVWRR
warm.
Doors are opened often or
IRUORQJSHULRGVRIWLPH
When the doors are opened often or for long periods
of time, warm, humid air enters the compartment. This
raises the temperature and moisture level within the
compartment. To lessen the effect, reduce the
frequency and duration of door openings.
Unit is installed in a hot
location.
The refrigerator should not be operated in
temperatures above 110 °F.
$ODUJHDPRXQWRIIRRGRUKRW
food was added to the
compartment.
Adding food warms the compartment requiring the
cooling system to run. Allowing hot food to cool to
room temperature before putting it in the refrigerator
will reduce this effect.
Doors not closed correctly. See the Doors will not close correctly or pop open
section in Parts & Features Troubleshooting.
Temperature control is not
set correctly.
If the temperature is too warm, adjust the control one
increment at a time and wait for the temperature to
stabilize.
Defrost cycle has recently
completed.
During the defrost cycle, the temperature of each
compartment may rise slightly and condensation may
form on the back wall. Wait 30 minutes and confirm
the proper temperature has been restored once the
defrost cycle has completed.
5HIULJHUDWRULVWRR
cold.
Incorrect temperature control
VHWWLQJV
If the temperature is too cold, adjust the control one
increment at a time and wait for the temperature to
stabilize. Refer to the Control Panel for more
information.
38 TROUBLESHOOTING
Parts & Features
3UREOHP 3RVVLEOH&DXVH Solutions
Doors will not
close correctly or
pop open.
)RRGSDFNDJHVDUHEORFNLQJ
the door open.
Rearrange food containers to clear the door and door
shelves.
,FHELQFULVSHUFRYHUSDQV
VKHOYHVGRRUELQVRU
EDVNHWVDUHRXWRISRVLWLRQ
Push bins all the way in and put crisper cover, pans,
shelves and baskets into their correct positions. See
the Operation section for more information.
The doors were removed
GXULQJSURGXFWLQVWDOODWLRQ
and not properly replaced.
Remove and replace the doors according to the
installation instructions.
5HIULJHUDWRULVQRWOHYHOHG
properly.
See Door Alignment in the installation instructions to
level refrigerator.
Door is difficult to
open.
7KHJDVNHWVDUHGLUW\RU
sticky.
Clean the gaskets and the surfaces that they touch.
Rub a thin coat of appliance polish or kitchen wax on
the gaskets after cleaning.
Door was recently closed.
When you open the door, warmer air enters the
refrigerator. As the warm air cools, it can create a
vacuum. If the door is hard to open, wait one minute
to allow the air pressure to equalize, then see if it
opens more easily.
/LJKWVGRQRW
work. /('LQWHULRUOLJKWLQJIDLOXUH
The refrigerator compartment lamp is LED interior
lighting, and service should be performed by a
qualified technician.
The interior of the
UHIULJHUDWRULV
covered with dust
or soot.
7KHUHIULJHUDWRULVORFDWHG
near a fire source, such as a
fireplace, chimney, or candle.
Make sure that the refrigerator is not located near a
fire source, such as a fireplace, chimney or candle.
39TROUBLESHOOTING
ENGLISH
Noises
3UREOHP 3RVVLEOH&DXVH Solutions
&OLFNLQJ
The defrost control will click when the
DXWRPDWLFGHIURVWF\FOHEHJLQVDQG
ends. The thermostat control (or
UHIULJHUDWRUFRQWURORQVRPHPRGHOV
ZLOODOVRFOLFNZKHQF\FOLQJRQDQGRII
Normal Operation
5DWWOLQJ
5DWWOLQJQRLVHVPD\FRPHIURPWKHIORZ
RIUHIULJHUDQWWKHZDWHUOLQHRQWKHEDFN
of the unit, or items stored on top of or
DURXQGWKHUHIULJHUDWRU
Normal Operation
5HIULJHUDWRULVQRWUHVWLQJVROLGO\RQWKH
floor.
Floor is weak or uneven or leveling legs
need to be adjusted. See the Leveling and
Door Alignment section.
5HIULJHUDWRUZLWKOLQHDUFRPSUHVVRU
ZDVMDUUHGZKLOHUXQQLQJ Normal Operation
:KRRVKLQJ
(YDSRUDWRUIDQPRWRULVFLUFXODWLQJDLU
WKURXJKWKHUHIULJHUDWRUFRPSDUWPHQW Normal Operation
$LULVEHLQJIRUFHGRYHUWKHFRQGHQVHU
E\WKHFRQGHQVHUIDQ Normal Operation
*XUJOLQJ 5HIULJHUDQWIORZLQJWKURXJKWKHFRROLQJ
system. Normal Operation
3RSSLQJ Contraction and expansion of the inside
ZDOOVGXHWRFKDQJHVLQWHPSHUDWXUH Normal Operation
6L]]OLQJ :DWHUGULSSLQJRQWKHGHIURVWKHDWHU
GXULQJDGHIURVWF\FOH Normal Operation
9LEUDWLQJ
,IWKHVLGHRUEDFNRIWKHUHIULJHUDWRULV
WRXFKLQJDFDELQHWRUZDOOVRPHRIWKH
QRUPDOYLEUDWLRQVPD\PDNHDQDXGLEOH
sound.
To eliminate the noise, make sure that the
sides and back cannot vibrate against any
wall or cabinet.
'ULSSLQJ :DWHUUXQQLQJLQWRWKHGUDLQSDQGXULQJ
the defrost cycle. Normal Operation
3XOVDWLQJRUKLJK
pitched sound
<RXUUHIULJHUDWRULVGHVLJQHGWRUXQ
more efficiently to keep your food items
DWWKHGHVLUHGWHPSHUDWXUH7KHKLJK
efficiency compressor may cause your
QHZUHIULJHUDWRUWRUXQORQJHUWKDQ\RXU
ROGRQHEXWLWLVVWLOOPRUHHQHUJ\
efficient than previous models. While
WKHUHIULJHUDWRULVUXQQLQJLWLVQRUPDO
WRKHDUDSXOVDWLQJRUKLJKSLWFKHG
sound.
Normal Operation
40 TROUBLESHOOTING
Wi-Fi Network
3UREOHP 3RVVLEOH&DXVH Solutions
Your home
appliance and
smartphone is not
connected to the
Wi-Fi network.
The password for the Wi-Fi
WKDW\RXDUHWU\LQJWRFRQQHFW
to is incorrect.
Find the Wi-Fi network connected to your smartphone
and remove it, then register your appliance on
SIGNATURE KITCHEN SUITE application.
0RELOHGDWDIRU\RXU
smartphone is turned on.
Turn off the Mobile data of your smartphone and
register the appliance using the Wi-Fi network.
The wireless network name
(SSID) is set incorrectly.
The wireless network name (SSID) should be a
combination of English letters and numbers. (Do not
use special characters.)
The router frequency is not
2.4 GHz.
Only a 2.4 GHz router frequency is supported. Set the
wireless router to 2.4 GHz and connect the appliance
to the wireless router. To check the router frequency,
check with your Internet service provider or the router
manufacturer.
7KHGLVWDQFHEHWZHHQWKH
appliance and the router is
too far.
If the distance between the appliance and the router
is too far, the signal may be weak and the connection
may not be configured correctly. Move the location of
the router so that it is closer to the appliance.
41WARRANTY
ENGLISH
SIGNATURE KITCHEN SUITE
REFRIGERATOR LIMITED WARRANTY - U.S.A
Should your SIGNATURE KITCHEN SUITE Refrigerator ("Product") fail due to a defect in materials or
workmanship under normal home use, during the warranty period set forth below, SIGNATURE KITCHEN SUITE
will at its option repair or replace the product. This limited warranty is valid only to the original retail purchaser of
the product and applies only when purchased and used within the United States including U.S. Territories. Proof
of original retail purchase is required to obtain warranty service under this limited warranty.
WARRANTY PERIOD
5HIULJHUDWRU Sealed System
&RQGHQVHU'U\HU&RQQHFWLQJ7XEHDQG(YDSRUDWRU Linear Compressor
Three (3) years from the
GDWHRIRULJLQDOUHWDLO
purchase
Parts and Labor (internal/
functional parts only)
Three (3) years from the
GDWHRIRULJLQDOUHWDLO
purchase
Parts and Labor
Seven (7) years from the
GDWHRIRULJLQDOUHWDLO
purchase
Parts only
(Consumer will be charged
for labor)
Ten (10) years from the
GDWHRIRULJLQDOUHWDLO
purchase
Part only
(Consumer will be charged
for labor)
Noises associated with normal operation and failure to follow instructions found in the use and care and
LQVWDOODWLRQJXLGHVRURSHUDWLQJWKHXQLWLQDQXQVXLWDEOHHQYLURQPHQWZLOOQRWEHFRYHUHGXQGHUWKLV
warranty.
%Replacement products and parts are warranted for the remaining portion of the original warranty period or
ninety (90) days, whichever is greater.
%Replacement products and parts may be new or remanufactured.
THIS WARRANTY IS IN LIEU OF ANY OTHER WARRANTY, EXPRESS OR IMPLIED, INCLUDING WITHOUT
LIMITATION, ANY WARRANTY OF MERCHANTABILITY OR FITNESS FOR A PARTICULAR PURPOSE. TO
THE EXTENT ANY IMPLIED WARRANTY IS REQUIRED BY LAW, IT IS LIMITED IN DURATION TO THE
EXPRESS WARRANTY PERIOD ABOVE. NEITHER THE MANUFACTURER NOR ITS U.S. DISTRIBUTOR
SHALL BE LIABLE FOR ANY INCIDENTAL, CONSEQUENTIAL, INDIRECT, SPECIAL, OR PUNITIVE
DAMAGES OF ANY NATURE, INCLUDING WITHOUT LIMITATION, LOST REVENUES OR PROFITS, OR
ANY OTHER DAMAGE WHETHER BASED IN CONTRACT, TORT, OR OTHERWISE. Some states do not
allow the exclusion or limitation of incidental or consequential damages or limitations on how long an implied
warranty lasts, so the above exclusion or limitation may not apply to you. This warranty gives you specific legal
rights and you may also have other rights that vary from state to state.
7+,6/,0,7(':$55$17<'2(6127&29(5
%6HUYLFHWULSVWRGHOLYHUSLFNXSLQVWDOORUUHSDLUWKHSURGXFWLQVWUXFWWKHFXVWRPHURQRSHUDWLRQRIWKHSURGXFW
repair or replace fuses or correct wiring or plumbing, or correction of unauthorized repairs/installation.
%Failure of product to perform during power failures and interruptions or inadequate electrical service.
%Damage caused by leaky or broken water pipes, frozen water pipes, restricted drain lines, inadequate or
interrupted water supply or inadequate supply of air.
%Damage resulting from operating the product in a corrosive atmosphere or contrary to the instructions outlined
in the product owner’s manual.
%'DPDJHWRWKHSURGXFWFDXVHGE\DFFLGHQWVSHVWVDQGYHUPLQOLJKWQLQJZLQG¿UHÀRRGVRUDFWVRI*RG
%Damage resulting from misuse, abuse, improper installation, repair, or maintenance. Improper repair includes
XVHRISDUWVQRWDSSURYHGRUVSHFL¿HGE\SIGNATURE KITCHEN SUITE.
%'DPDJHRUIDLOXUHFDXVHGE\XQDXWKRUL]HGPRGL¿FDWLRQRUDOWHUDWLRQRULILWLVXVHGIRURWKHUWKDQWKHLQWHQGHG
purpose, or any water leakage where the unit was not properly installed.
%Damage or failure caused by incorrect electrical current, voltage, or plumbing codes, commercial or industrial
XVHRUXVHRIDFFHVVRULHVHJZDWHU¿OWHUVHWFFRPSRQHQWVRUFRQVXPDEOHFOHDQLQJSURGXFWVWKDWDUHQRW
approved by SIGNATURE KITCHEN SUITE.
42 WARRANTY
%Damage caused by transportation and handling, including scratches, dents, chips, and/or other damage to the
¿QLVKRI\RXUSURGXFWXQOHVVVXFKGDPDJHUHVXOWVIURPGHIHFWVLQPDWHULDOVRUZRUNPDQVKLSDQGLVUHSRUWHG
within one (1) week of delivery (Call: 1-855-790-6655).
%Damage or missing items to any display, open box, discounted, or refurbished product.
%Products with original serial numbers that have been removed, altered, or can not be readily determined.
Model and Serial numbers, along with original retail sales receipt, are required for warranty validation.
%Increases in utility costs and additional utility expenses.
%5HSODFHPHQWRIOLJKWEXOEV¿OWHUVRUDQ\FRQVXPDEOHSDUWV
%Repairs when your product is used in other than normal and usual household use (e.g. commercial use,
RI¿FHVDQGUHFUHDWLRQDOIDFLOLWLHVRUFRQWUDU\WRWKHLQVWUXFWLRQVRXWOLQHGLQWKHSURGXFWRZQHU¶VPDQXDO
%Costs associated with removal of your product from your home for repairs.
%The removal and reinstallation of the product if it is installed in an inaccessible location or is not installed in
accordance with published installation instructions, including SIGNATURE KITCHEN SUITE’s owner’s and
installation manuals.
%Shelves, door bins, drawers, handles, accessories, and other parts besides those that were originally included
with this particular model.
7KHFRVWRIUHSDLURUUHSODFHPHQWXQGHUWKHVHH[FOXGHGFLUFXPVWDQFHVVKDOOEHERUQHE\WKHFRQVXPHU
:ULWH\RXUZDUUDQW\LQIRUPDWLRQEHORZ
3URGXFW5HJLVWUDWLRQ,QIRUPDWLRQ
0RGHO
6HULDO1XPEHU
'DWHRI3XUFKDVH
For complete warranty details and customer assistance,
SOHDVHFDOORUYLVLWRXUZHEVLWH
Call 1-855-790-6655 (24 hours a day, 365 days a year) and select
the appropriate option from the menu, or visit our website at
www.thesignaturekitchen.com
Or by mail:
SIGNATURE KITCHEN SUITE Customer Information Center:
P. O. Box 240007, 201 James Record Road Huntsville,
Alabama 35813 ATTN: CIC
FRANÇAIS
MANUEL DU PROPRIÉTAIRE
RÉFRIGÉRATEUR INTÉGRÉ
ajznqqjqnwjfyyjsyn{jrjsyqjuwxjsyrfszjqij¨zynqnxfyjzwf{fsyij
kfnwjktshyntssjw¨fuufwjnqjyhtsxjw{jqjĆutwyjijqfrfnsutzwqj
consulter en tout temps.
www.thesignaturekitchen.com
SKSFD3604P
Copyright © 2017 Signature Kitchen Suite. Tous droits réservés.
P/No. : MFL70339803_Rev.00

2TABLE DES MATIÈRES
3 CARACTÉRISTIQUES DU
PRODUIT
4 CONSIGNES DE SÉCURITÉ
4 CONSIGNES DE SÉCURITÉ IMPORTANTES
8 CARACTÉRISTIQUES DU
PRODUIT
9 APERÇU DU PRODUIT
9 Extérieur
10 Intérieur
11 FONCTIONNEMENT
11 Avant l’utilisation
12 Panneau de commande
14 Distributeur d’eau intégré
14 Stockage des aliments
15 Tiroirs
17 Réglage des balconnets de porte
17 Réglage des tablettes
18 Réglage du bac à collation
19 FONCTIONS INTELLIGENTES
19 Application SIGNATURE KITCHEN SUITE
21 Fonction Réseau intelligent
22 Fonction Smart DiagnosisMC
25 ENTRETIEN
25 Nettoyage
26 Remplacement du filtre à eau
31 DÉPANNAGE
31 Foire aux questions
$YDQWGތDSSHOHUOHUpSDUDWHXU
38 GARANTIE
TABLE DES MATIÈRES

3CARACTÉRISTIQUES DU PRODUIT
FRANÇAIS
CARACTÉRISTIQUES DU PRODUIT
Selon le modèle, certaines des fonctions suivantes pourraient ne pas être offertes.
EAU FILTRÉE
Le distributeur d’eau fournit de l’eau fraîche et froide.
AVERTISSEUR DE PORTE OUVERTE
L’avertisseur de porte ouverte est conçu pour prévenir un dysfonctionnement du réfrigérateur qui pourrait se produire
si une porte demeure ouverte. Si une porte demeure ouverte pendant plus de 60 secondes, un signal sonore
d’avertissement se fait entendre à des intervalles de 30 secondes.
4CONSIGNES DE SÉCURITÉ
CONSIGNES DE SÉCURITÉ
/,6(=7287(6/(6&216,*1(6$9$17/ӂ87,/,6$7,21
,OHVWWUqVLPSRUWDQWGތDVVXUHUYRWUHVpFXULWpHWFHOOHGHVDXWUHV
Nous fournissons de nombreux conseils de sécurité importants dans ce manuel et sur votre appareil. Lisez toujours
l’ensemble des messages de sécurité et respectez-les.
&HFLHVWOHV\PEROHGތDOHUWHGHVpFXULWp
Ce symbole est destiné à vous alerter des dangers potentiels pouvant entraîner la mort ou des blessures.
7RXVOHVPHVVDJHVGHVpFXULWpVHURQWSUpFpGpVGXV\PEROHGތDOHUWHGHVpFXULWpHWGXWHUPH
AVERTISSEMENT ou MISE EN GARDE.
Voici le message que ces mots véhiculent :
AVERTISSEMENT
Vous pouvez être tué ou grièvement blessé si vous ne suivez pas les consignes.
MISE EN GARDE
Vous pouvez être légèrement blessé ou pouvez endommager le produit si vous ne suivez pas les consignes.
Tous les messages de sécurité vous indiqueront quel est le danger potentiel, comment réduire les risques de
blessures et ce qui peut se produire en cas de non-respect des consignes.
CONSIGNES DE SÉCURITÉ IMPORTANTES
AVERTISSEMENTS
3RXUUpGXLUHOHVULVTXHVG¶H[SORVLRQG¶LQFHQGLHGHGpFqVG¶pOHFWURFXWLRQGH
EUOXUHRXGHEOHVVXUHVFRUSRUHOOHVORUVGHO¶XWLOLVDWLRQGHFHSURGXLWVXLYH]OHV
SUpFDXWLRQVGHEDVH\FRPSULVFHTXLVXLW
3URSRVLWLRQGHOD&DOLIRUQLHeWDWV8QLVVHXOHPHQW
%Ce produit contient des produits chimiques reconnus par l’État de la Californie pour provoquer des cancers et des
malformations congénitales ou d’autres problèmes de reproduction Lavez-vous les mains après avoir
manipulé l’appareil.

5CONSIGNES DE SÉCURITÉ
FRANÇAIS
FONCTIONNEMENT
%/¶DSSDUHLOQ¶HVWSDVFRQoXSRXUrWUHXWLOLVpjGHV¿QVVSpFLDOHVFRPPHO¶HQWUHSRVDJHGHPpGLFDPHQWVRXGH
matériaux d’essai, ni pour être utilisé sur des bateaux, etc.
%NE permettez PAS aux enfants de grimper sur les portes ou les étagères du réfrigérateur, ni de s’y tenir ou de s’y
accrocher. Ils pourraient endommager le réfrigérateur et se blesser sérieusement.
%Ne permettez pas aux enfants de grimper à l’intérieur de l’appareil. Ils pourraient demeurer coincés et suffoquer.
%/DVXUYHLOODQFHGHVHQIDQWVHVWUHTXLVHD¿QGHV¶DVVXUHUTX¶LOVQHMRXHQWSDVDYHFO¶DSSDUHLO
%Gardez vos doigts à distance des zones de coincement; les dégagements entre les portes et les armoires sont
inévitablement réduits. Soyez prudent lorsque vous fermez les portes de l’appareil et que des enfants se trouvent
à proximité de celui-ci.
%Ne touchez pas les aliments surgelés ou les composants métalliques du congélateur si vos mains sont mouillées
ou humides. Cela pourrait entraîner des gelures.
%Ne recongelez pas des aliments surgelés qui ont été complètement décongelés. Cela pourrait être dangereux
pour la santé.
%Un circuit de dérivation ou un disjoncteur correctement mis à la terre est recommandé.
%1¶XWLOLVH]SDVGH¿FKHG¶DGDSWDWLRQHWQHEUDQFKH]SDVOD¿FKHG¶DOLPHQWDWLRQpOHFWULTXHVXUXQHUDOORQJH
électrique à prises multiples.
%1¶XWLOLVH]SDVGHFRUGRQTXLSUpVHQWHGHV¿VVXUHVRXGHVWUDFHVG¶DEUDVLRQVXUVDORQJXHXURXHQFRUHj
O¶H[WUpPLWpGHOD¿FKHRXjFHOOHGXFRQQHFWHXU'HPDQGH]jXQHPSOR\pG¶XQFHQWUHGHVHUYLFHVDXWRULVpGH
UHPSODFHURXGHUpSDUHULPPpGLDWHPHQWWRXWFRUGRQG¶DOLPHQWDWLRQGpQXGpHI¿ORFKpRXDXWUHPHQWHQGRPPDJp
%Ne faites pas fonctionner le réfrigérateur et ne touchez pas le cordon d’alimentation si vos mains sont mouillées.
%1HPRGL¿H]HWQHSURORQJH]SDVOHFRUGRQG¶DOLPHQWDWLRQ
%N’utilisez pas de prises de courant non homologuées. Ne branchez pas l’appareil sur une prise de courant murale
si celle-ci est endommagée.
%Ne placez pas vos pieds ou vos mains, ou encore des objets dans les évents d’aération ou au bas du
réfrigérateur. Cela pourrait causer des blessures ou provoquer une décharge électrique.
%En cas de fuite de gaz (propane, GPL), assurez-vous que les lieux sont bien ventilés et contactez un centre de
services autorisé avant de remettre l’appareil en fonction. Ne touchez pas l’appareil ou son cordon d’alimentation.
%Si un bruit étrange, une odeur particulière ou de la fumée provient de l’appareil, débranchez le cordon
d’alimentation sur-le-champ et contactez un centre de services autorisé.
%1¶XWLOLVH]SDVGHIXVLEOHFRPPHGXFXLYUHXQ¿OG¶DFLHUjO¶H[FHSWLRQG¶XQIXVLEOHVWDQGDUG
%Ne placez pas et n’utilisez pas d’appareil électrique à l’intérieur de l’appareil, sauf s’il s’agit d’un type d’appareil
recommandé par le fabricant.
%Ne placez pas d’animaux à l’intérieur de l’appareil.
%Ne placez pas d’objets lourds ou fragiles, de contenants emplis de liquide, de produits combustibles ou d’objets
LQÀDPPDEOHVFRPPHGHVERXJLHVHWGHVODPSHVVXUO¶DSSDUHLO
%Évitez tout contact avec les pièces mobiles du mécanisme d’éjection ou avec l’élément chauffant qui libère les
cubes de glace. NE placez PAS vos doigts dans la machine à glaçons automatique lorsque l’appareil est
branché.
%Cet appareil n’est pas destiné à être utilisé par des personnes (y compris des enfants) ayant des capacités
physiques, sensorielles ou mentales réduites, ou un manque d’expérience et de connaissances, à moins d’être
sous surveillance ou d’avoir reçu des instructions concernant l’utilisation de l’appareil de la part d’une personne
responsable de leur sécurité.
%En cas de branchement sur un circuit protégé par des fusibles, utilisez un fusible temporisé.

6CONSIGNES DE SÉCURITÉ
ENTRETIEN
%N’utilisez pas de séchoir à cheveux pour sécher l’intérieur de l’appareil.
%N’allumez pas de bougie pour dissiper les odeurs à l’intérieur de l’appareil.
%6LXQHIXLWHGHIULJRULJqQHVXUYLHQWpORLJQH]OHVREMHWVLQÀDPPDEOHVGHO¶DSSDUHLO$VVXUH]YRXVTXHOHVOLHX[
sont bien ventilés et contactez un centre de services autorisé.
%eORLJQH]GXUpIULJpUDWHXUWRXWHVOHVPDWLqUHVHWYDSHXUVLQÀDPPDEOHVFRPPHO¶HVVHQFH
%&HWDSSDUHLOHVWFRQoXSRXUrWUHXWLOLVpjGHV¿QVGRPHVWLTXHVHWjG¶DXWUHV¿QVGHFHW\SHSDUH[HPSOHGDQVOH
coin cuisine du personnel des magasins, des bureaux et d’autres environnements de travail; dans les fermes et
par les clients des hôtels, des motels et d’autres environnements de type résidentiel; dans des environnements
comme les gîtes; pour des applications dans le domaine de la restauration et de la vente en gros.
%'pEUDQFKH]O¶DSSDUHLOGHOD¿FKHG¶DOLPHQWDWLRQDYDQWGHOHQHWWR\HURXGHOHUpSDUHU
%L’éclairage à l’intérieur du réfrigérateur et du congélateur est un éclairage à DEL, et son entretien doit être réalisé
SDUXQWHFKQLFLHQTXDOL¿p
%'pEUDQFKH]O¶DSSDUHLOGHOD¿FKHG¶DOLPHQWDWLRQLPPpGLDWHPHQWVLXQHSDQQHGHFRXUDQWRXXQRUDJHVXUYLHQW
%Éteignez l’alimentation de l’appareil si de l’eau ou de la poussière pénètre à l’intérieur de celui-ci. Appelez un
agent du centre de services.
%Ne placez pas de contenants en verre ni de boissons gazeuses dans le congélateur. Le contenu liquide peut
prendre de l’expansion lorsqu’il est congelé, endommager le contenant et causer des blessures.
%N’entreposez pas, ne démontez pas et ne réparez pas l’appareil vous-même, et ne laissez pas un employé non
TXDOL¿pOHIDLUH
%Si le cordon d’alimentation électrique est endommagé, il ne doit être remplacé que par le fabricant, son agent
G¶HQWUHWLHQRXXQHSHUVRQQHD\DQWOHVPrPHVFRPSpWHQFHVHWFHD¿QG¶pYLWHUWRXWULVTXH
%1HUDQJH]SDVGHVXEVWDQFHVH[SORVLYHVWHOOHVTXHGHVDpURVROVDYHFXQJD]SURSXOVHXULQÀDPPDEOHGDQVFHW
appareil.
%En ce qui concerne les DEL, elles doivent être remplacées par un technicien.
MISE AU REBUT
%Les réfrigérateurs abandonnés sont dangereux, même si cette situation ne dure que quelques jours. Lorsque
vous voulez mettre le réfrigérateur au rebut, retirez les matériaux d’emballage des portes ou retirez les portes en
ODLVVDQWOHVWDEOHWWHVHQSODFHD¿QTXHOHVHQIDQWVQHSXLVVHQWSDVJULPSHUIDFLOHPHQWjO¶LQWpULHXUGHO¶DSSDUHLO
%Si vous souhaitez mettre l’appareil au rebut, assurez-vous que le frigorigène a été retiré et qu’il sera éliminé de
façon adéquate par un employé d’un centre de services autorisé. Si vous êtes responsable d’une fuite de
frigorigène, vous pourriez devoir payer une amende ou vous pourriez être emprisonné en vertu des lois
environnementales applicables.
CONSIGNES DE MISE À LA TERRE
%Un raccordement incorrect du conducteur de mise à la terre de l’appareil peut entraîner un risque de décharge
pOHFWULTXH&RQVXOWH]XQpOHFWULFLHQRXXQWHFKQLFLHQG¶HQWUHWLHQTXDOL¿pVLYRXVGRXWH]TXHO¶DSSDUHLOVRLW
FRUUHFWHPHQWPLVjODWHUUH1HPRGL¿H]SDVOD¿FKHIRXUQLHDYHFO¶DSSDUHLO'DQVOHFDVRFHOOHFLQHVHUDLWSDV
DGDSWpHjODSULVHIDLWHVLQVWDOOHUXQHSULVHDGpTXDWHSDUXQpOHFWULFLHQTXDOL¿p
%$VVXUH]YRXVTX¶XQpOHFWULFLHQTXDOL¿pH[DPLQHODSULVHGHFRXUDQWPXUDOHHWOHFkEODJHHWTX¶LOFRQ¿UPHTXHOD
mise à la terre est adéquate.
%1HGpEUDQFKH]MDPDLVO¶DSSDUHLOHQWLUDQWVXUOHFRUGRQG¶DOLPHQWDWLRQ7HQH]WRXMRXUVOD¿FKHIHUPHPHQWSRXUOD
retirer de la prise. Le non-respect de cette consigne peut endommager le cordon d’alimentation, ce qui peut
causer un incendie ou entraîner une décharge électrique.
7CONSIGNES DE SÉCURITÉ
FRANÇAIS
MISES EN GARDE
3RXUUpGXLUHOHVULVTXHVGHEOHVVXUHVPLQHXUHVGHSDQQHVRXGHGRPPDJHV
FDXVpVjOތDSSDUHLORXjODSURSULpWpORUVGHOތXWLOLVDWLRQGHOތDSSDUHLOSUHQH]OHV
SUpFDXWLRQVpOpPHQWDLUHV\FRPSULVOHVVXLYDQWHV
INSTALLATION
%N’installez pas l’appareil à un endroit à partir duquel il risque de tomber.
%L’appareil doit être installé correctement, conformément aux instructions d’installation.
FONCTIONNEMENT
%N’utilisez pas d’aérosols à proximité de l’appareil.
%/¶DSSDUHLOHVWFRQoXSRXUrWUHXWLOLVpVHXOHPHQWjGHV¿QVGRPHVWLTXHVHWjG¶DXWUHV¿QVGHFHW\SH
%N’appliquez pas une force excessive et ne frappez pas sur toute surface de verre. Ne touchez pas les surfaces
GHYHUUHVLHOOHVVRQW¿VVXUpHVRXHQGRPPDJpHV
%Ne placez pas trop d’articles ou des articles trop rapprochés les uns des autres dans les balconnets. Cela pourrait
endommager les balconnets ou causer des blessures aux utilisateurs si les articles sont retirés des balconnets avec force.
%Ne placez pas une quantité excessive d’aliments dans l’appareil. Cela pourrait causer des blessures aux
utilisateurs ou des dommages matériels.
%N’accrochez pas et ne placez pas d’objets lourds sur le distributeur de l’appareil.
ENTRETIEN
%N’utilisez pas de puissants détergents comme de la cire ou des diluants pour nettoyer l’appareil. Nettoyez-le à
l’aide d’un linge doux.
%5HWLUH]OHVFRUSVpWUDQJHUVFRPPHODSRXVVLqUHHWO¶HDXGHV]RQHVGHFRQWDFWHWGHVEURFKHVGHOD¿FKH
G¶DOLPHQWDWLRQ1¶XWLOLVH]SDVXQOLQJHPRXLOOpRXKXPLGHSRXUQHWWR\HUOD¿FKH
%Ne vaporisez pas d’eau directement sur les surfaces intérieures ou extérieures de l’appareil.
%Ne nettoyez pas les tablettes ou les couvercles en verre avec de l’eau chaude lorsqu’ils sont froids. Une
exposition à un changement brusque de température peut les endommager.
AVERTISSEMENTS
%Maintenez libres de toute obstruction les ouvertures de ventilation qui se trouvent dans l’enceinte de l’appareil ou
dans la structure intégrée.
%N’utilisez pas de dispositifs mécaniques ou d’autres moyens pour accélérer le processus de dégivrage autres
que ceux recommandés par le fabricant.
%1¶HQGRPPDJH]SDVOHFLUFXLWIULJRUL¿TXH
%N’utilisez pas d’appareils électriques à l’intérieur des compartiments pour nourriture de l’appareil, sauf s’ils sont
du type recommandé par le fabricant.
%(QUDLVRQGXUpIULJpUDQWHWGXJD]GHVRXIÀDJHG¶LVRODWLRQXWLOLVpVGDQVFHWDSSDUHLOGHVSURFpGXUHVVSpFLDOHVGHPLVH
DXUHEXWVRQWQpFHVVDLUHV$YDQWG¶HQGLVSRVHUYHXLOOH]FRQVXOWHUO¶DJHQWGHVHUYLFHRXXQHDXWUHSHUVRQQHTXDOL¿pH
Cet appareil contient une petite quantité de réfrigérant isobutane (R600a); il s’agit d’un gaz naturel à haute
compatibilité environnementale, mais qui est également combustible. Lors du transport et de l’installation
de l’appareil, veillez à ce qu’aucune partie du circuit frigorifique ne soit endommagée. En cas de fuite du
réfrigérant, celui-ci pourrait s’enflammer ou provoquer une blessure aux yeux. Si une fuite est détectée,
éloignez les flammes nues ou les sources potentielles d’inflammation et aérez la pièce dans laquelle
l’appareil se trouve pendant plusieurs minutes.
Afin d’éviter la formation d’un mélange d’air et de gaz inflammable en cas de fuite dans le circuit
frigorifique, la taille de la pièce dans laquelle l’appareil est utilisé est déterminée selon la quantité de
réfrigérant utilisée. La pièce doit avoir une taille de 1 m² pour chaque 8 g de réfrigérant R600a dans
l’appareil. La quantité de réfrigérant qui se trouve dans votre appareil est indiquée sur la plaque
d’identification située à l’intérieur de celui-ci. Ne mettez jamais en marche un appareil qui présente des
signes de dommages. En cas de doute, consultez votre revendeur.
GARDEZ CES CONSIGNES

8CARACTÉRISTIQUES DU PRODUIT
CARACTÉRISTIQUES DU PRODUIT
/ތDVSHFWHWOHVFDUDFWpULVWLTXHVpQXPpUpVGDQVOHSUpVHQWPDQXHOSHXYHQWYDULHUHQUDLVRQGHVFRQVWDQWHV
améliorations apportées au produit.
Alimentation : 115 V, 60 Hz
3UHVVLRQGHO¶HDXPLQPD[ : 20 à 120 psi (138 à 827 kPa)
Modèle SKSCR3001P
'HVFULSWLRQ Réfrigérateur intégré
Poids net 483 lb (219 kg)
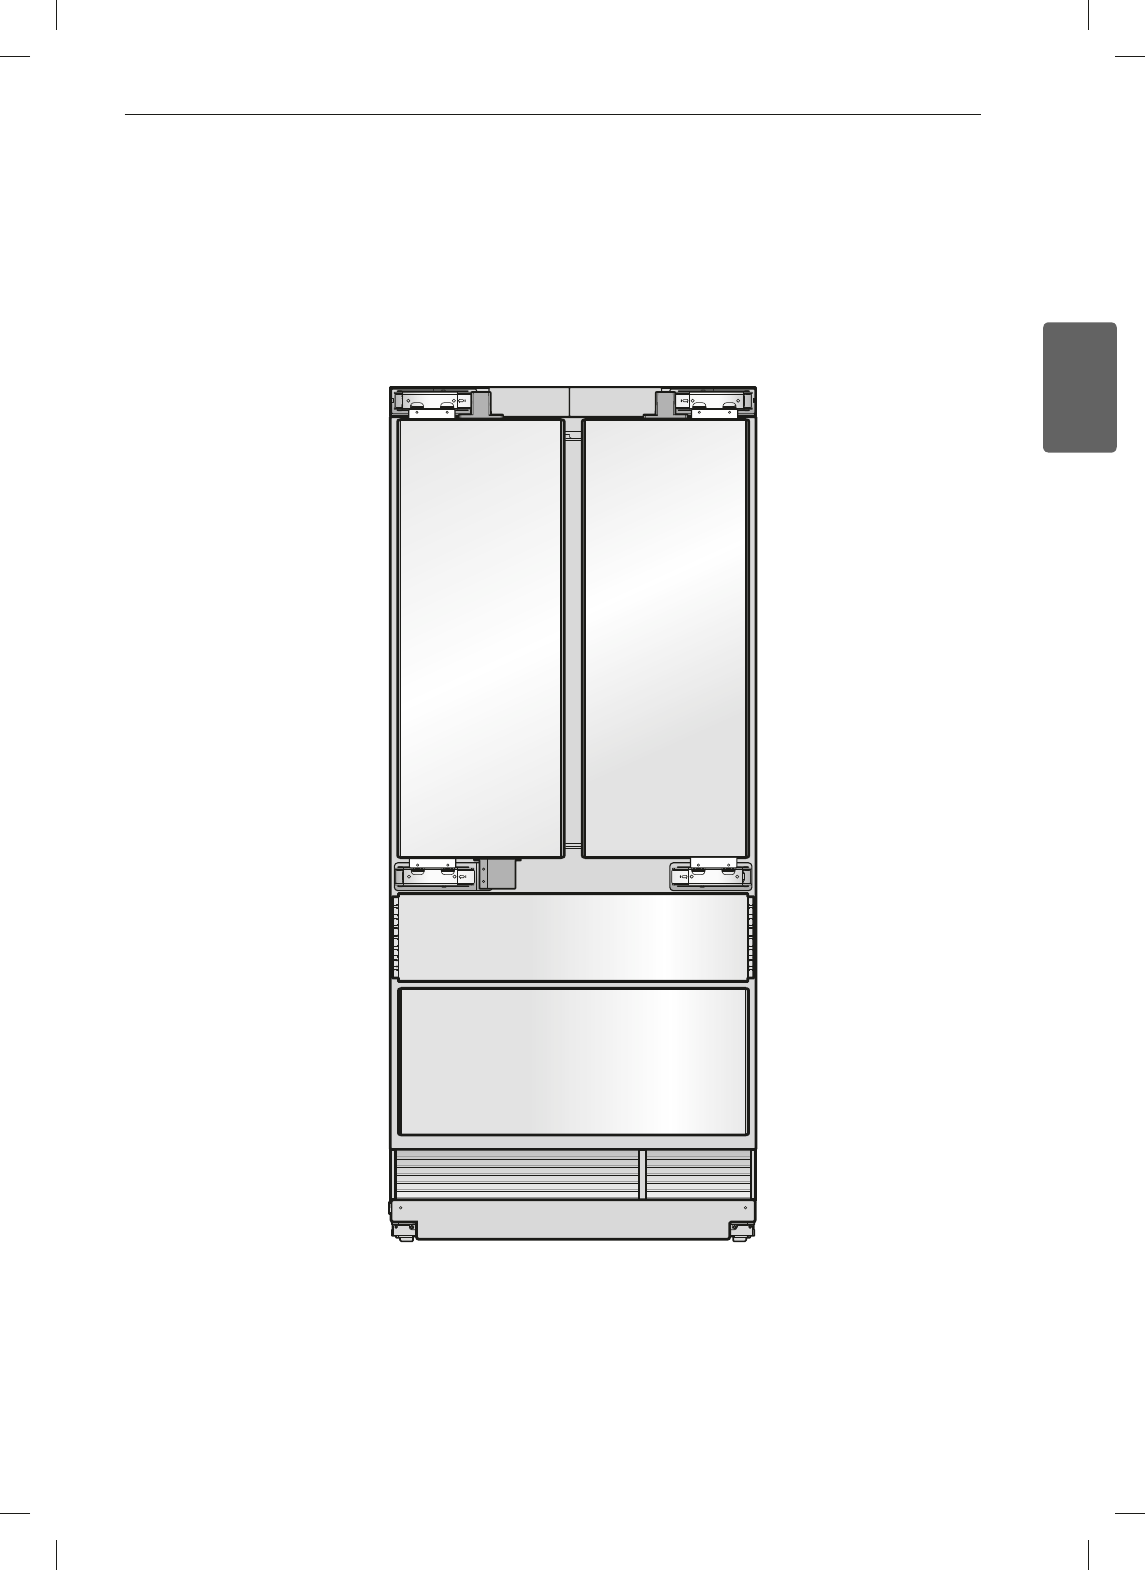
9APERÇU DU PRODUIT
FRANÇAIS
APERÇU DU PRODUIT
Les illustrations fournies dans ce manuel peuvent être différentes des composants et accessoires réels, lesquels
peuvent faire l’objet de modifications par le fabricant sans avis préalable à des fins d’amélioration du produit.
([WpULHXU
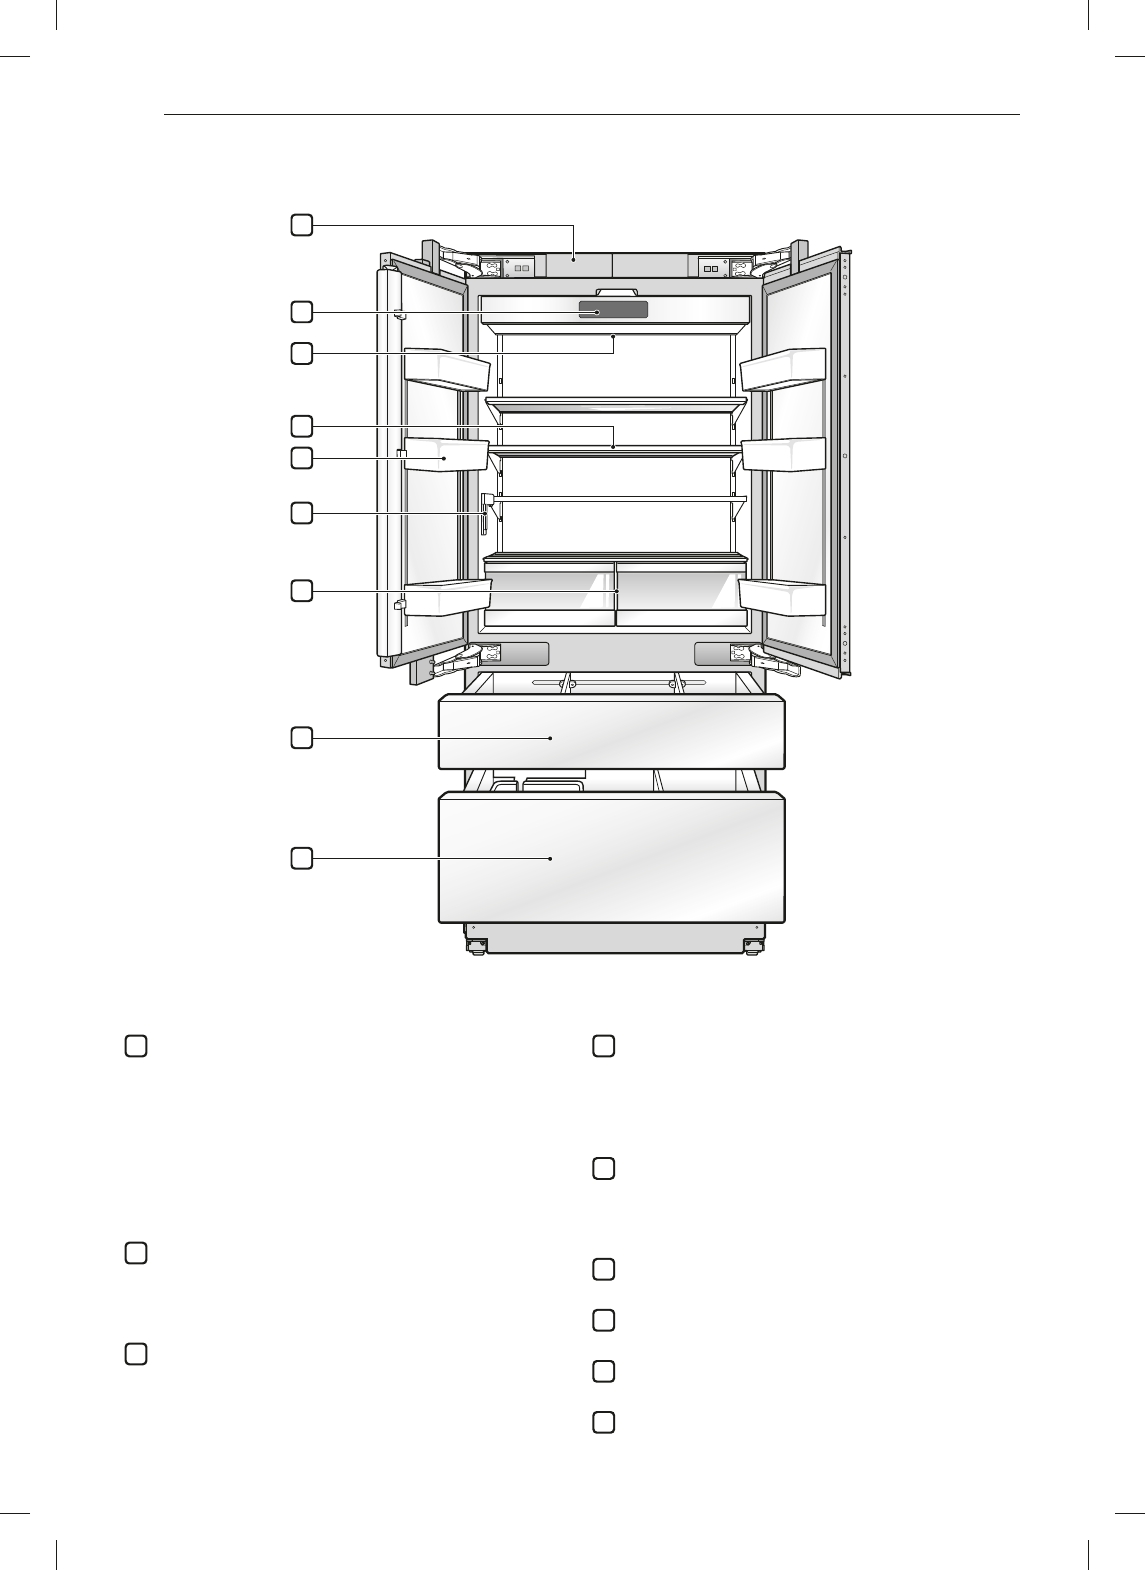
10 APERÇU DU PRODUIT
1)LOWUHjHDX
Purifie l’eau.
REMARQUE
%/H¿OWUHGRLWrWUHUHPSODFpWRXVOHVVL[PRLV3RXU
plus de détails, veuillez vous référer à la section
©5HPSODFHPHQWGX¿OWUHjHDXªTXLVHWURXYH
dans ce manuel.
23DQQHDXGHFRPPDQGH
Règle la température du réfrigérateur et l’état du
filtre à eau.
3eFODLUDJHj'(/jO¶LQWpULHXU
Éclaire l’intérieur du réfrigérateur.
,QWpULHXU
47DEOHWWHDMXVWDEOH
Les tablettes du réfrigérateur sont ajustables pour
répondre à tout type de besoins en matière de
rangement.
5%DOFRQQHWPRELOH
Permet de conserver les boissons et les aliments
froids.
6'LVWULEXWHXUG¶HDXLQWpJUp
7Crisper
8&RQYHUWLEOH'UDZHU
9)UHH]HU'UDZHU
2
7
8
9
6
5
4
3
1
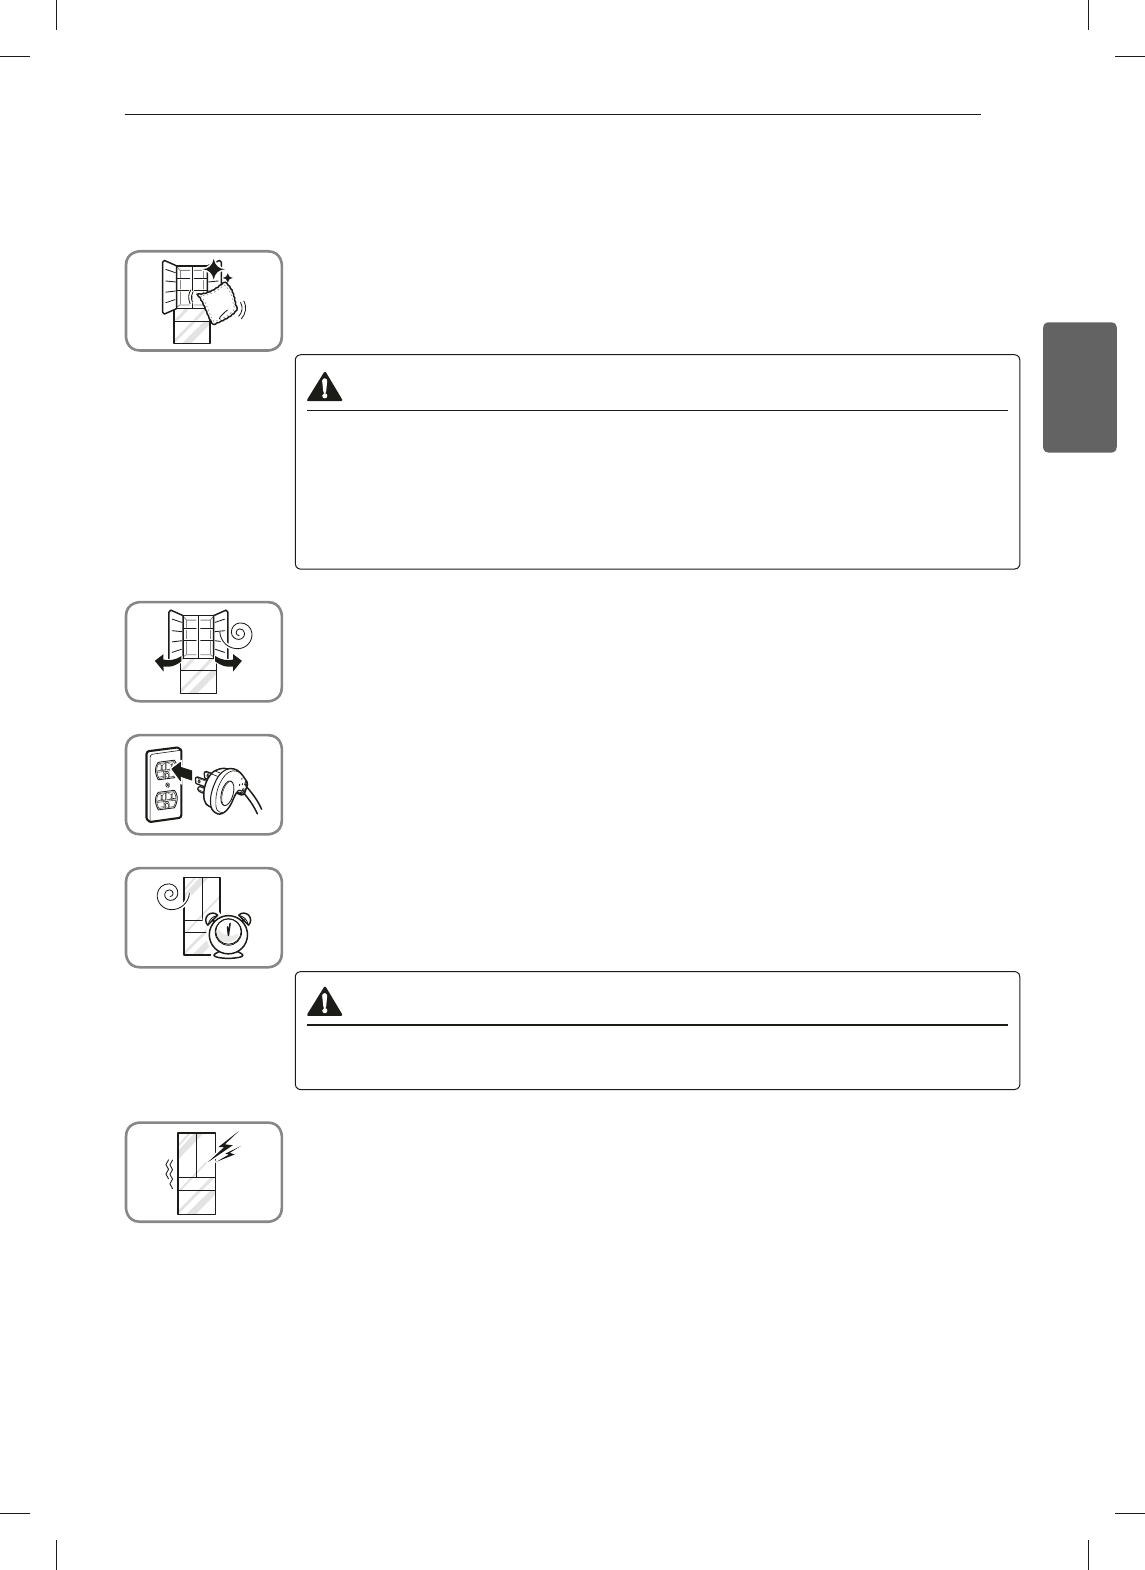
11FONCTIONNEMENT
FRANÇAIS
$YDQWO¶XWLOLVDWLRQ
1HWWR\H]OHUpIULJpUDWHXU
Nettoyez le réfrigérateur à fond et enlevez toute la poussière qui s’est accumulée pendant le
transport.
MISES EN GARDE
%Ne grattez pas le réfrigérateur avec un objet pointu et n’utilisez pas de détergent qui
FRQWLHQWGHO¶DOFRROGXOLTXLGHLQÀDPPDEOHRXXQHVXEVWDQFHDEUDVLYHSRXUUHWLUHUOHUXEDQ
adhésif ou la colle du réfrigérateur. Enlevez les résidus de colle en les essuyant avec votre
pouce ou du détergent à vaisselle.
%Ne retirez pas l’étiquette du numéro de modèle ou de série ou les informations techniques
sur la surface arrière du réfrigérateur.
2XYUH]ODSRUWHGXUpIULJpUDWHXUSRXUDpUHUO¶LQWpULHXU
L’intérieur du réfrigérateur peut dégager une odeur de plastique au début. Enlevez tout ruban
adhésif de l’intérieur du réfrigérateur et ouvrez la porte du réfrigérateur à des fins de ventilation.
%UDQFKH]O¶DOLPHQWDWLRQ
Vérifiez que l’alimentation est branchée avant l’utilisation.
$WWHQGH]TXHOHUpIULJpUDWHXUUHIURLGLVVH
Laissez votre réfrigérateur en marche de deux à trois heures au moins avant d’y mettre des
aliments.
MISE EN GARDE
%Attendez que les aliments aient refroidi avant de les placer dans le réfrigérateur, sinon ils
SRXUUDLHQWVHJkWHURXODLVVHUXQHPDXYDLVHRGHXUWHQDFHjO¶LQWpULHXUGXUpIULJpUDWHXU
/HUpIULJpUDWHXUpPHWXQEUXLWIRUWDSUqVODPLVHHQPDUFKHLQLWLDOH
C’est normal. Le volume diminue à mesure que la température baisse.
FONCTIONNEMENT
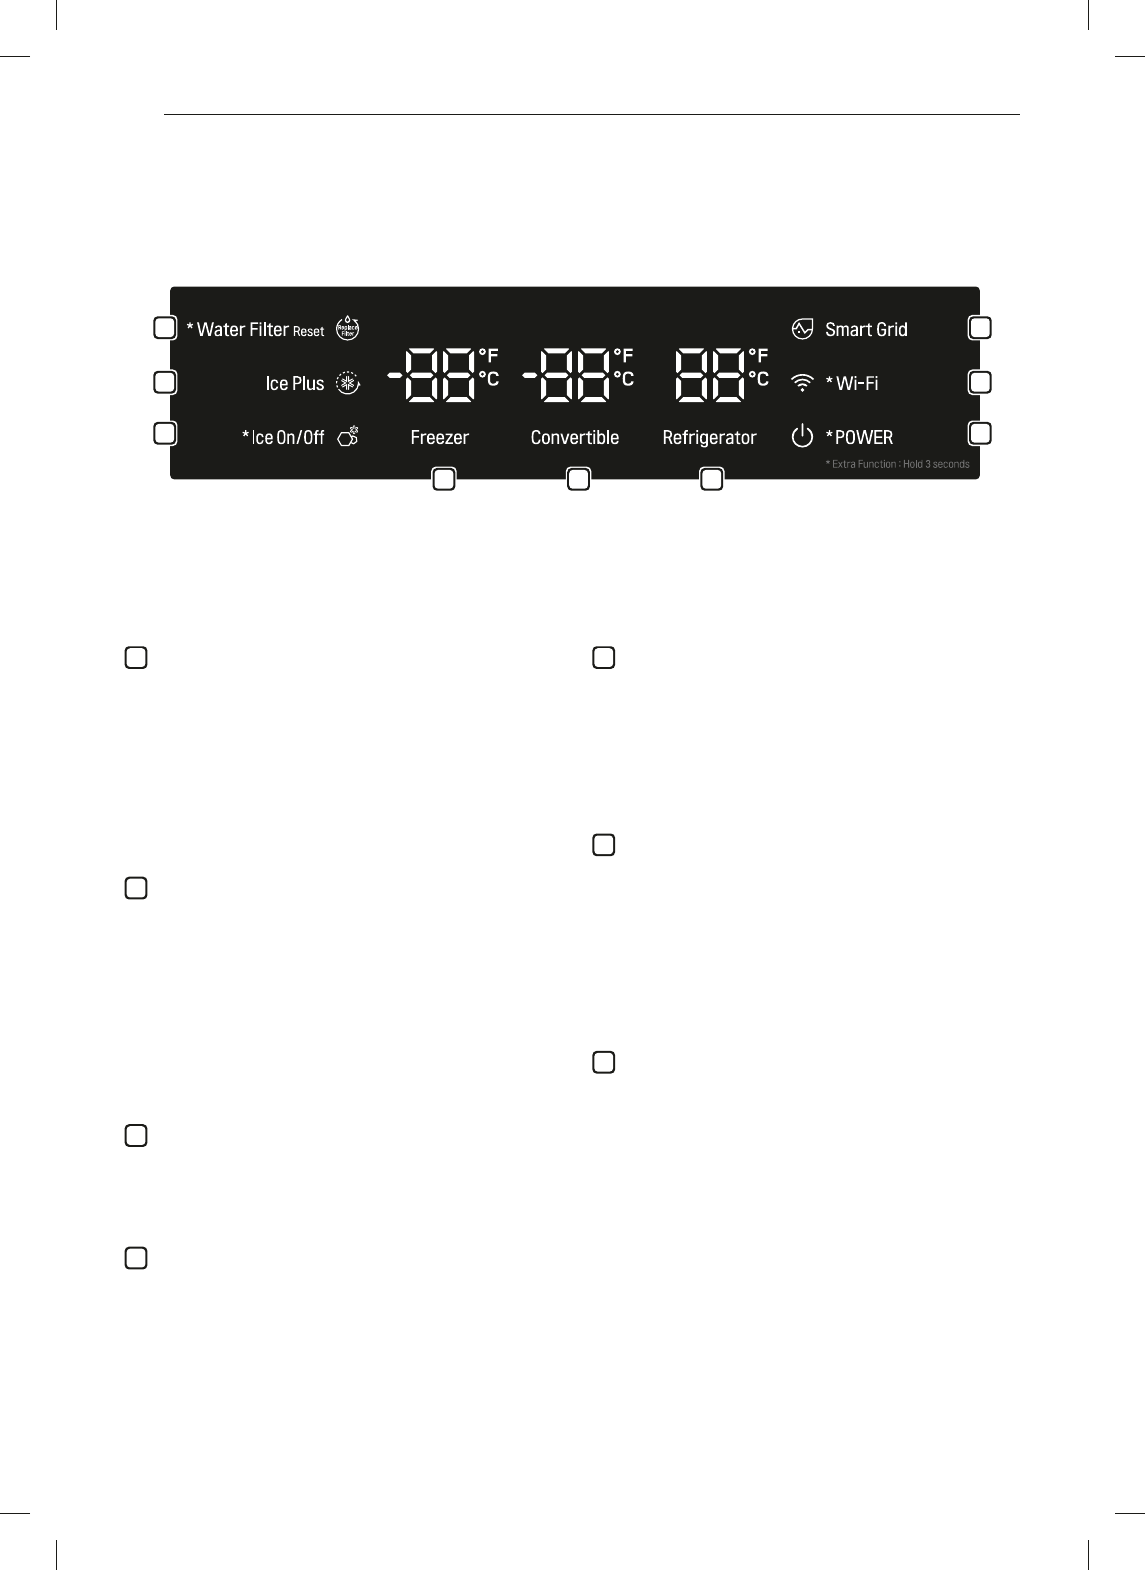
12 FONCTIONNEMENT
3DQQHDXGHFRPPDQGH
Selon le modèle, certaines des fonctions suivantes pourraient ne pas être offertes.
&DUDFWpULVWLTXHVGXSDQQHDXGHFRPPDQGH
1 7
2 8
3 9
4 5 6
REMARQUE
%Lorsque le réfrigérateur est placé en mode d’économie d’énergie, l’écran reste éteint jusqu’à ce qu’une porte soit
ouverte ou qu’une touche soit enfoncée. Une fois allumé, l’écran reste allumé pendant 20 secondes.
1* Water Filter Reset
UpLQLWLDOLVDWLRQGXILOWUHjHDX
Remplacez le filtre à eau si l’icône 5HSODFH)LOWHU
(changer le filtre) est allumée. Après avoir remplacé
le filtre à eau, maintenez enfoncée la touche
Replace Filter (changer le filtre) pendant trois
secondes pour éteindre la lumière de l’icône. Vous
devez changer le filtre à eau environ tous les six
mois.
2,FH3OXVJODFHSOXV
Cette fonction augmente aussi bien les capacités
de production de glace que de congélation.
%Appuyez sur la touche Ice Plus (glace plus) pour
allumer l’icône et activer la fonction pendant 24
heures. La fonction s’éteindra automatiquement
après 24 heures.
%Vous pouvez arrêter cette fonction manuellement
en appuyant sur la touche une autre fois.
3,FH2Q2IIPDFKLQHjJODoRQVPDUFKHDUUrW
Appuyez sur la touche ,FH2Q2II (machine à
glaçons marche/arrêt) pendant trois secondes pour
allumer ou éteindre la machine à glaçons.
4)UHH]HUFRQJpODWHXU
Indique la température du compartiment du
congélateur en Celsius (°C) ou en Fahrenheit (°F).
La température par défaut du congélateur est de
-18 °C (0 °F).
Appuyez sur la touche Freezer (congélateur) à
plusieurs reprises pour sélectionner une nouvelle
température entre -21 °C et -13 °C (entre -6 °F et
8 °F).
5&RQYHUWLEOH
Variable temperature storage that can be set either
colder or warmer than the refrigerator.
Store meat and seafood at 30°F/-1°C, cold drinks
at 33°F/1°C, deli snacks at 37°F/3°C, or chilled
wine at 41°F/5°C.
The convertible can also be used as a freezer at F.
65HIULJHUDWRUUpIULJpUDWHXU
Indique la température du compartiment du
réfrigérateur en Celsius (°C) ou en Fahrenheit (°F).
La température par défaut du réfrigérateur est de
3 °C (37 °F). Appuyez sur la touche 5HIULJHUDWRU
(réfrigérateur) à plusieurs reprises pour sélectionner
une nouvelle température entre 1 °C et 8 °C (entre
33 °F et 46 °F).
76PDUW*ULGUpVHDXLQWHOOLJHQW
Appuyez sur la touche Smart Grid (réseau
intelligent) pour mettre en marche ou éteindre la
fonction Réseau intelligent. Lorsque la fonction est
en marche, l’icône s’allume. La fonction Réseau
intelligent se met automatiquement en marche
lorsque le réfrigérateur est connecté à un réseau
Wi-Fi.
Lorsque le réfrigérateur répond à un message de
gestion de la demande (GD) de la compagnie
d’électricité, le mot Grid (réseau) s’allume.
13FONCTIONNEMENT
FRANÇAIS
8* Wi-Fi
Lorsqu’elle est utilisée avec l’application pour téléphone
intelligent SIGNATURE KITCHEN SUITE, la touche
Wi-Fi permet au réfrigérateur de se connecter au
réseau Wi-Fi de votre domicile. Consultez la section sur
les fonctions intelligentes pour connaître les
informations sur la configuration initiale de l’application.
L’icône Wi-Fi vous permet de vérifier l’état de connexion
au réseau du réfrigérateur. Lorsque le réfrigérateur est
connecté au réseau Wi-Fi, l’icône s’allume.
Appuyez sur la touche Wi-Fi et maintenez-la enfoncée
pendant trois secondes pour établir la connexion au
réseau. L’icône clignote lorsque la connexion est en
cours, et s’allume lorsque la connexion a été établie
avec succès.
93RZHUDOLPHQWDWLRQ
Le bouton d’alimentation permet de couper
l’alimentation électrique de l’appareil.
Appuyez sur la touche d’alimentation et maintenez-la
enfoncée pendant trois secondes pour couper
l’alimentation. Lorsque l’appareil est hors tension, le
témoin lumineux est éteint. Il n’est pas nécessaire de
couper l’alimentation à partir du disjoncteur ou de la prise
de courant murale. Utilisez cette fonctionnalité lors de
l’entretien ou avant de partir pour de longues vacances.
2 et 9mode SABBAT
/HPRGH6DEEDWHVWXWLOLVpORUVGX6DEEDW
MXLIHWGHVMRXUVIpULpV
%Pour activer le mode Sabbat, appuyez sur
l’écran, puis appuyez simultanément sur les
boutons Refrigerator (réfrigérateur) et Power
(alimentation) et maintenez-les enfoncés
SHQGDQWVHFRQGHVMXVTX¶jFHTXH©6Eª
V¶DI¿FKHjO¶pFUDQ
%Le mode Sabbat s’éteint automatiquement
après 96 heures.
%Pour désactiver le mode Sabbat
manuellement, appuyez simultanément sur
les boutons Refrigerator (réfrigérateur) et
Power (alimentation) et maintenez-les
enfoncés pendant 3 secondes.
%Une fois activé, le mode Sabbat est maintenu
même après une panne de courant.
%La sélection du mode Sabbat désactive
automatiquement les fonctionnalités Éclairage et
Alarme. Le distributeur est également désactivé.
%L’écran situé à l’intérieur de l’appareil reste
allumé lorsque le mode Sabbat est activé, mais il
Q¶DI¿FKHTXH©6EªHWOHVERXWRQV5HIULJHUDWRU
(réfrigérateur) et Power (alimentation).
%La température du réfrigérateur est réglée à
)&HWQHSHXWSDVrWUHPRGL¿pH
jusqu’à ce que le mode Sabbat soit désactivé.
REMARQUE
%La fonctionnalité Réseau intelligent s’éteint
automatiquement en mode Sabbat.
Une fois le mode Sabbat éteint, la fonctionnalité
Réseau intelligent doit être de nouveau activée
manuellement.
MISES EN GARDE
0RGH3UpVHQWDWLRQSRXUXQHXWLOLVDWLRQHQ
PDJDVLQXQLTXHPHQW
%Le mode Présentation désactive tout
UHIURLGLVVHPHQWGDQVOHUpIULJpUDWHXUD¿QGH
conserver l’énergie lors de la présentation en
magasin. Lorsque ce mode est activé, l’indication
OF apparaît sur le panneau de commande et
l’écran s’éteint après 20 secondes lorsque vous
fermez la porte.
3RXUGpVDFWLYHURXDFWLYHUOHPRGH3UpVHQWDWLRQ
%En laissant la porte du réfrigérateur ouverte,
maintenez enfoncées simultanément les touches
Refrigerator (réfrigérateur) et Water Filter Reset
UHPSODFHPHQWGX¿OWUHjHDXSHQGDQWFLQT
secondes. Le panneau de commande émet un
signal sonore et les réglages de température
V¶DI¿FKHQWSRXUFRQ¿UPHUTXHOHPRGH3UpVHQWDWLRQ
est désactivé. Utilisez la même procédure pour
activer le mode Présentation.

14 FONCTIONNEMENT
'LVWULEXWHXUG¶HDXLQWpJUp
MISES EN GARDE
%Gardez les enfants loin du distributeur. Ils
pourraient jouer avec les commandes ou les
endommager.
%Si de l’eau est distribuée de façon inattendue,
coupez l’alimentation en eau et appelez le Centre
d’information à la clientèle de SIGNATURE
KITCHEN SUITE.
6WUXFWXUHGXGLVWULEXWHXU
Buse à
eau
Palette
à eau
REMARQUES
%Pour distribuer de l’eau, appuyez sur l’interrupteur
d’eau avec un verre.
%Quelques gouttes peuvent tomber après la distribution.
Tenez votre tasse sous le distributeur pendant
quelques secondes après la distribution pour recueillir
toutes les gouttes.
%DFjJODoRQV
MISE EN GARDE
%N’insérez ni vos mains ni vos outils dans le bac à
glaçons. Ne pas respecter ces consignes peut
entraîner des dommages ou des blessures.
0DFKLQHjJODoRQVDXWRPDWLTXH
0LVHHQPDUFKHHWDUUrWGHOD
PDFKLQHjJODoRQVDXWRPDWLTXH
Pour désactiver la machine à glaçons automatique,
appuyez sur le bouton 2Q2IIPDUFKHDUUrW des
glaçons situé sur l’écran et maintenez-le enfoncé
pendant 3 secondes.
/HVVRQVQRUPDX[TXHYRXV
HQWHQGUH]
%Si vous laissez la machine à glaçons en marche avant
qu’elle soit raccordée à l’arrivée d’eau, vous risquez
de l’endommager.
%La vanne d’arrivée d’eau de la machine à glaçons
émettra un bourdonnement pendant le remplissage de
la machine. Si la touche ,FH2Q2II (machine à
glaçons marche/arrêt) est réglée sur ON (marche), la
machine à glaçons bourdonnera même si elle n’est
pas encore raccordée à une arrivée d’eau. Pour
arrêter ce bourdonnement, appuyez sur la touche ,FH
2Q2II (machine à glaçons marche/arrêt) pour
éteindre la machine.
%Vous entendrez le son des glaçons tombant dans le
bac et l’eau qui circule dans les tuyaux tandis que la
machine à glaçons se remplit à nouveau.

15FONCTIONNEMENT
FRANÇAIS
3UpSDUDWLRQHQYXHGHVYDFDQFHV
Réglez la touche ,FH2Q2II (machine à glaçons
marche/arrêt) à OFF (arrêt) et coupez l’arrivée d’eau au
congélateur.
REMARQUES
%Le bac à glaçons doit être vidé chaque fois que la
touche Ice On/Off (machine à glaçons marche/arrêt)
est réglée sur OFF (arrêt).
Si la température ambiante risque de descendre sous le
point de congélation, demandez à un technicien qualifié
de drainer le système d’alimentation en eau pour
HPSrFKHUOHVGpJkWVLPSRUWDQWVTXHFDXVHUDLWODUXSWXUH
des lignes ou des conduites d’eau ou des raccordements.
6WRFNDJHGHVDOLPHQWV
MISE EN GARDE
%Ne placez pas trop d’articles ou des articles trop
rapprochés les uns des autres dans les balconnets.
Cela pourrait endommager les balconnets ou
causer des blessures aux utilisateurs si les articles
sont retirés des balconnets avec force.
REMARQUES
%Si vous quittez votre domicile pendant une courte
période de temps, pour des vacances, par exemple, le
réfrigérateur devrait rester allumé. Les aliments
réfrigérés qui supportent la congélation se
conserveront plus longtemps s’ils sont stockés dans le
congélateur.
%Si vous laissez le réfrigérateur éteint pendant une
période prolongée, videz-le de tous les aliments et
débranchez-le. Nettoyez l’intérieur et laissez la porte
ouverte pour empêcher les moisissures de se
développer dans le réfrigérateur.
%Ne stockez pas d’aliments à teneur élevée en humidité
dans la partie supérieure du réfrigérateur. L’humidité
pourrait entrer directement en contact avec l’air froid et
geler.
%Lavez les aliments avant de les stocker dans le
réfrigérateur. Les fruits et les légumes doivent être
lavés et l’emballage des aliments doit être essuyé pour
empêcher de contaminer les aliments à proximité.
%Si le réfrigérateur est installé dans un endroit chaud et
humide, l’ouverture fréquente de la porte ou le fait de
stocker beaucoup de légumes dans le réfrigérateur
peut provoquer de la condensation. Essuyez la
condensation avec un chiffon propre ou une serviette
en papier.
%Si la porte du réfrigérateur est ouverte ou fermée trop
souvent, l’air chaud peut pénétrer dans le réfrigérateur
et élever sa température. Cela peut aussi accroître le
coût de fonctionnement de l’appareil.
&RQVHLOVSRXUOHVWRFNDJHGHV
aliments
Pour conserver les aliments au réfrigérateur,
enveloppez-les de pellicule étanche à l’air et résistante
à l’humidité ou conservez-les dans des contenants
hermétiques, sauf indication contraire. Cela empêche la
diffusion de l’odeur et du goût des aliments dans le
réfrigérateur. Pour assurer la fraîcheur des produits
périssables, vérifiez la date de péremption.
Aliment &RPPHQWOHVWRFNHU
Beurre ou
margarine
Conservez le beurre dont l’emballage
est ouvert dans un plat couvert ou un
compartiment fermé. Lorsque vous en
stockez une quantité supplémentaire,
enveloppez-la dans un emballage pour
congélateur et congelez le tout.
Fromage
Stockez-le dans l’emballage d’origine
jusqu’au moment de le consommer.
Une fois l’emballage ouvert, réemballez
le fromage hermétiquement dans de la
pellicule plastique ou du papier
d’aluminium.
Lait
Essuyez les cartons de lait. Pour que le
lait soit plus froid, placez-le sur une
tablette à l’intérieur du réfrigérateur.
Œufs
Stockez-les dans la boîte d’origine sur
une tablette à l’intérieur du réfrigérateur,
et non dans la porte.
Fruits
Ne lavez ou pelez pas les fruits jusqu’à
ce qu’ils soient prêts à être
consommés. Triez les fruits et
conservez-les dans leur contenant
d’origine que vous placerez dans un
bac à fruits et légumes ou rangez-les
dans un sac en papier bien fermé sur
une tablette du réfrigérateur.
Légumes à
feuilles
Retirez les légumes de l’emballage du
commerce, puis coupez ou déchirez les
portions endommagées et décolorées.
Lavez les légumes à l’eau froide et
égouttez-les. Rangez-les dans un sac
ou un contenant en plastique et placez-
les dans le bac à fruits et légumes.
Légumes
avec pelure
(carottes,
poivrons)
Rangez-les dans un sac ou un
contenant en plastique et placez-les
dans le bac à fruits et légumes.
Poisson
Congelez le poisson et les crustacés
frais s’ils ne sont pas consommés le
jour même de l’achat. Il est
recommandé de consommer le poisson
et les crustacés frais le jour même de
l’achat.
Restes
Couvrez les restes de pellicule
plastique ou de papier d’aluminium, ou
rangez-les dans des contenants en
plastique hermétiques.

16 FONCTIONNEMENT
&RQYHUWLEOH'UDZHU
5HPRYLQJWKH&RQYHUWLEOH'UDZHU
1Pull the drawer out until it stops.
Empty all contents out of the drawer before
removing it.
2Push the button and remove the stopper on either
side.
3Remove the basket by lifting the basket from the rail
system.
4Remove the screws from the rails at both ends.
5Hold both sides of the door and lift it to remove it
from the rail system.
MISES EN GARDE
%Les tiroirs sont lourds. Utilisez toujours vos deux
mains lorsque vous enlevez ou que vous
DVVHPEOH]OHVWLURLUVD¿QG¶pYLWHUWRXWGRPPDJHRX
toute blessure. Videz toujours les tiroirs avant de
les enlever.
%Ouvrez toujours complètement la porte avant
d’enlever ou d’assembler les tiroirs.
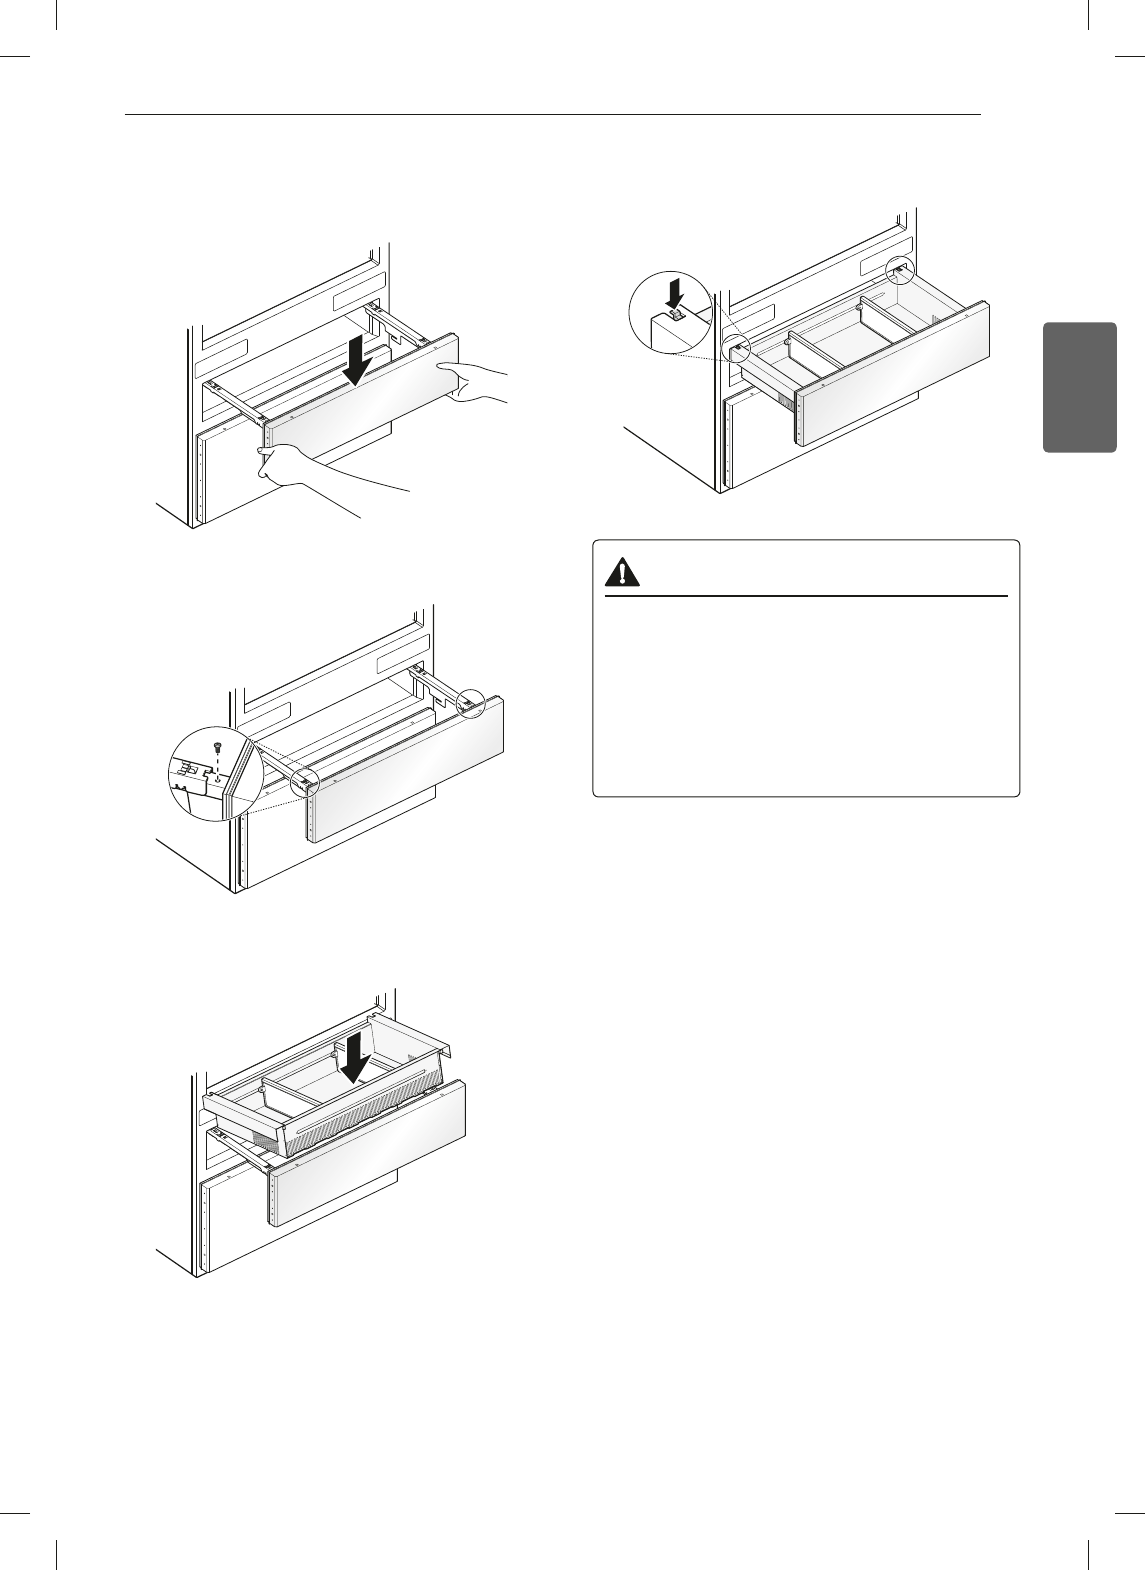
17FONCTIONNEMENT
FRANÇAIS
$VVHPEOLQJWKH&RQYHUWLEOH'UDZHU
1Grasp the door on each side and lower it into place
on the rail system.
2Tighten the screws from the rails at both ends.
3Pull the drawer open to full extension.
Lower the basket onto the rail system.
4Push the button and combine the stopper on either
side.
MISES EN GARDE
%Les tiroirs sont lourds. Utilisez toujours vos deux
mains lorsque vous enlevez ou que vous
DVVHPEOH]OHVWLURLUVD¿QG¶pYLWHUWRXWGRPPDJHRX
toute blessure. Videz toujours les tiroirs avant de
les enlever ou de les assembler.
%Ouvrez toujours complètement la porte du
réfrigérateur avant d’enlever ou d’assembler les
tiroirs.

18 FONCTIONNEMENT
)UHH]HU'UDZHU
5HPRYLQJWKH)UHH]HU'UDZHU
REMARQUES
%Before removing the Freezer Drawer, it must be
removing the Convertible Drawer.
1Pull the drawer out until it stops.
Empty all contents out of the drawer before
removing it.
2Push the button and remove the stopper on either
side.
3Remove the basket by lifting the basket from the rail
system.
4Remove the screws from the rails at both ends.
5Hold both sides of the door and lift it to remove it
from the rail system.
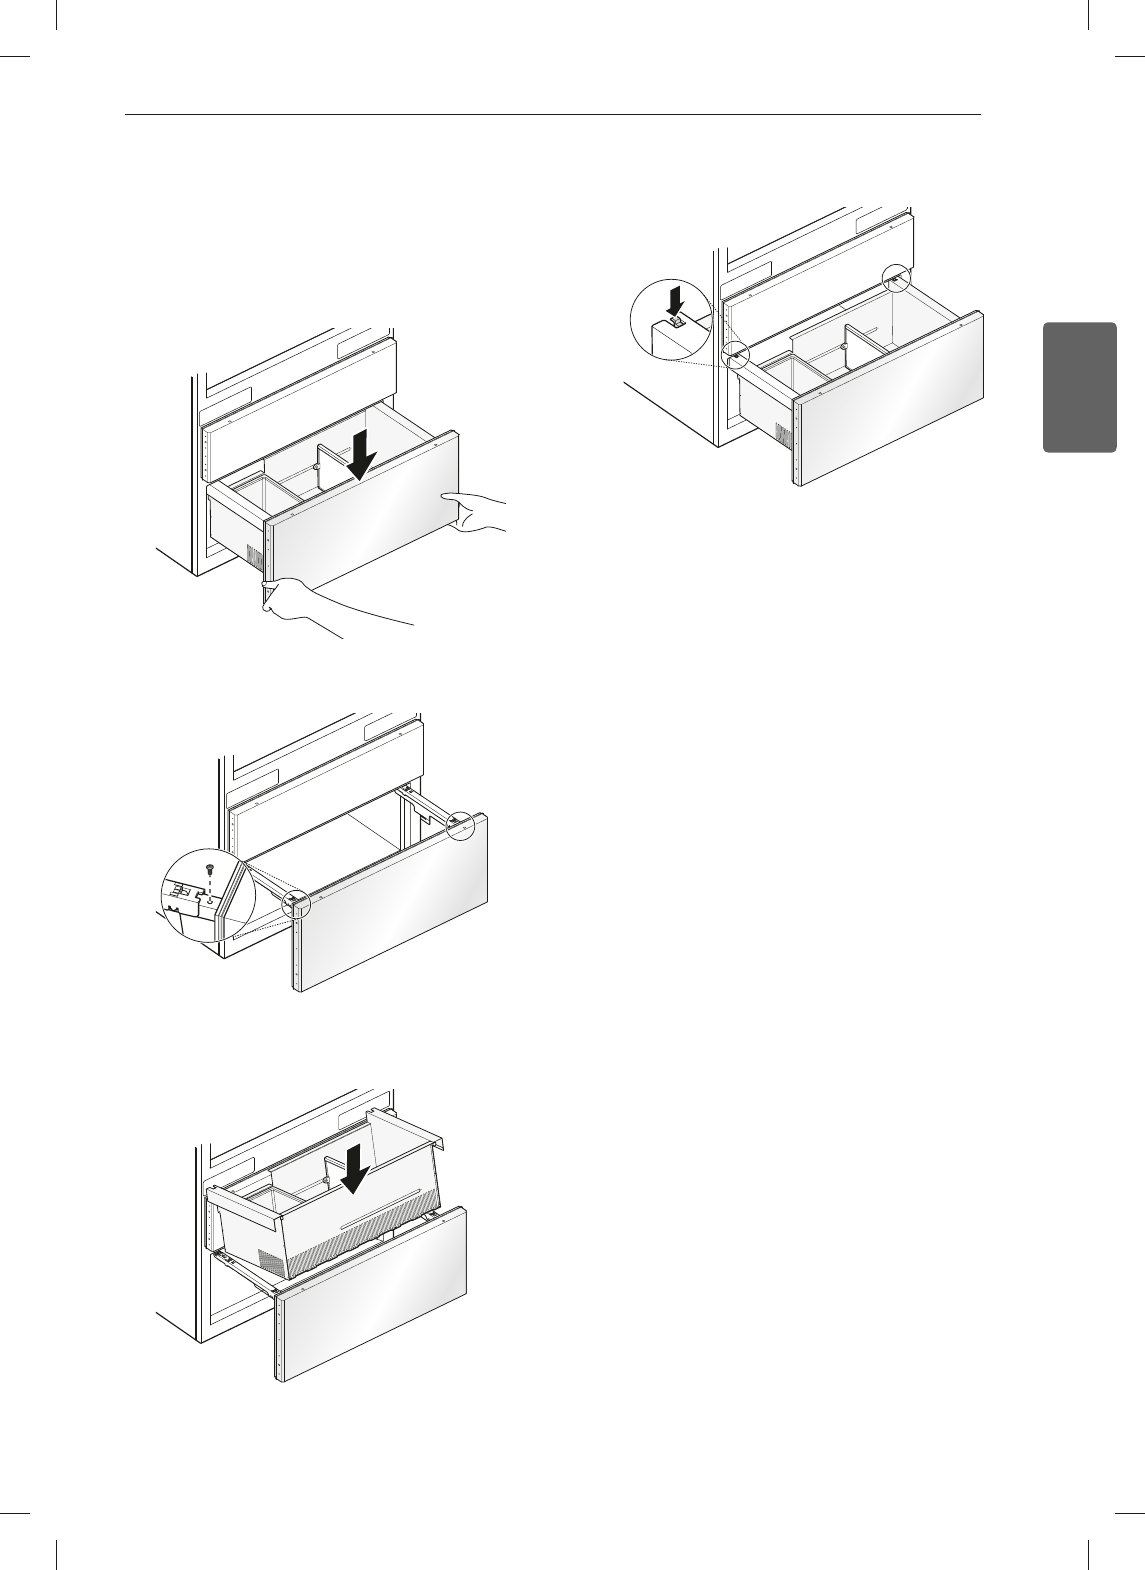
19FONCTIONNEMENT
FRANÇAIS
$VVHPEOLQJWKH)UHH]HU'UDZHU
REMARQUES
%Before assembling the Freezer Drawer, it must be
removing the Convertible Drawer.
1Grasp the door on each side and lower it into place
on the rail system.
2Tighten the screws from the rails at both ends.
3Pull the drawer open to full extension.
Lower the basket onto the rail system.
4Push the button and combine the stopper on either
side.
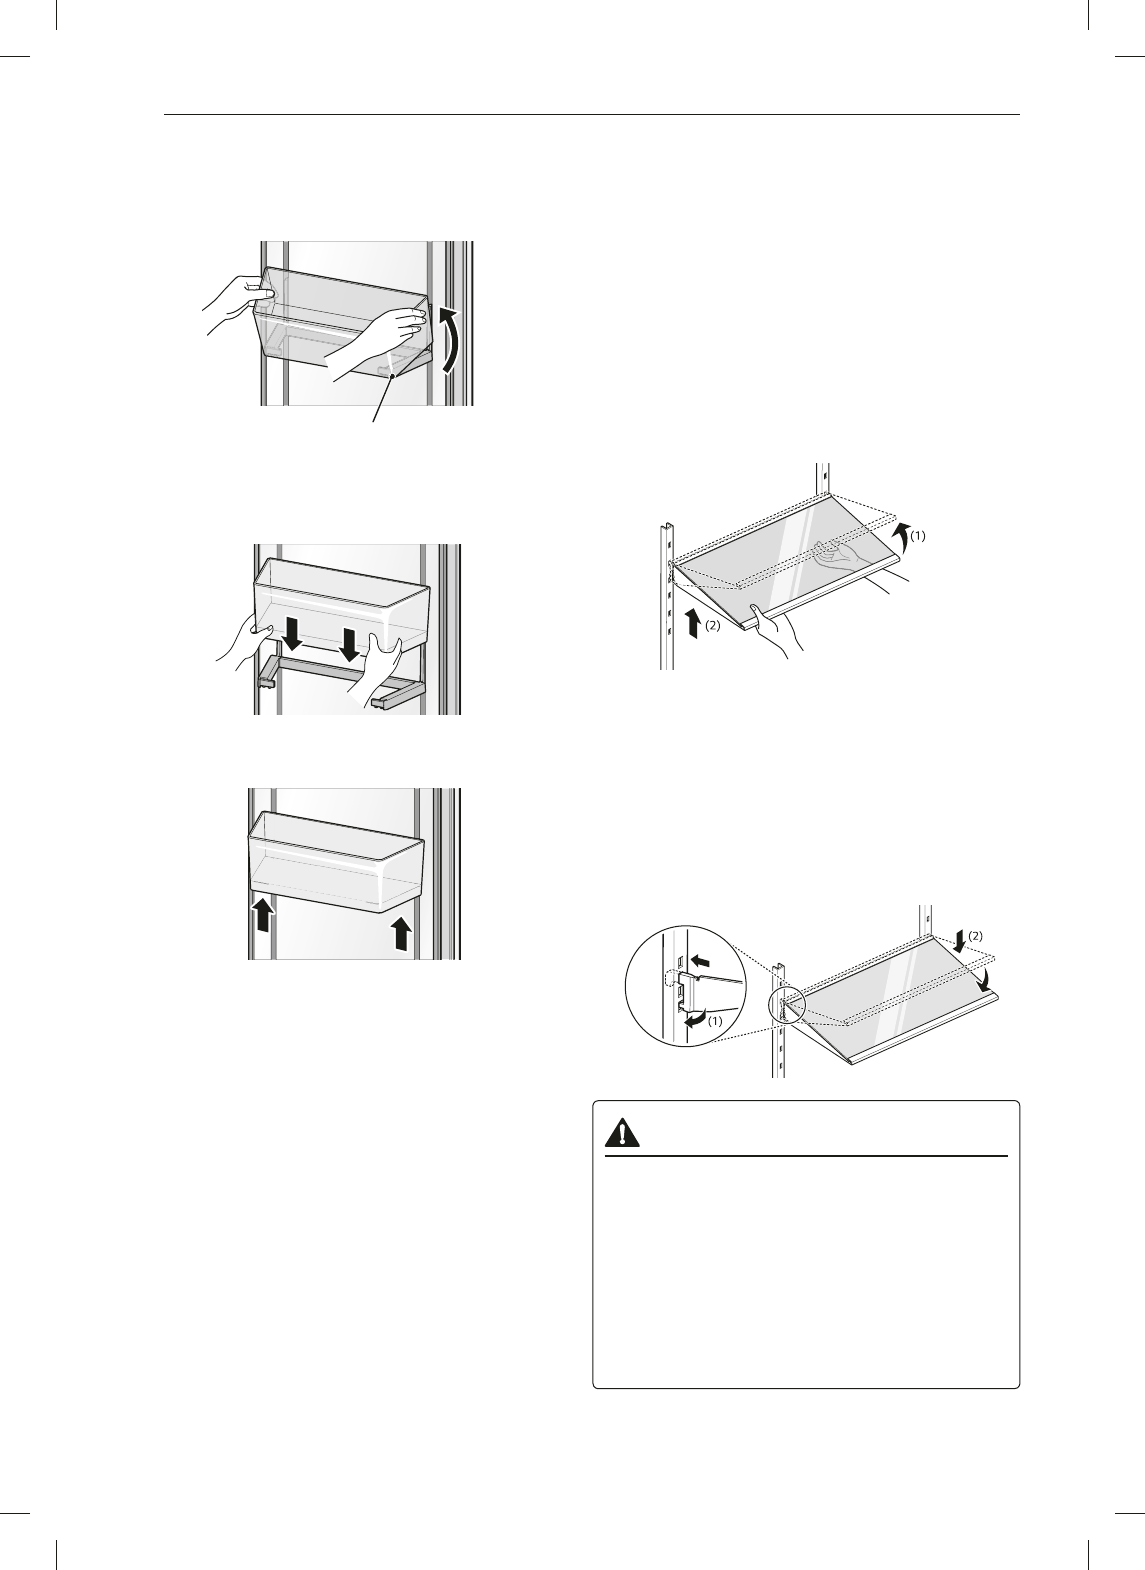
20 FONCTIONNEMENT
Door Bins
To remove the door bins, hold the bin with both hands
and rotate on the axis.
the axis of rotation
To assemble the door bin, align both sides of the bin
with the guides and push the bin down until it snaps into
place.
To adjust the location of the bin, tilt the front of the bin up
and slide the bin up or down to the desired location.
5pJODJHGHVWDEOHWWHV
Les tablettes de votre réfrigérateur sont ajustables pour
répondre à vos besoins de stockage particuliers.
En réglant la hauteur des tablettes pour y placer des
aliments de différentes tailles, vous retrouverez plus
facilement ce que vous cherchez.
Retrait de la tablette
1Faites basculer l’avant de la tablette et soulevez-la.
2Retirez-la.
$VVHPEODJHGHODWDEOHWWH
1Faites basculer l’avant la tablette vers le haut et
guidez les crochets de la tablette dans les fentes à
la hauteur désirée.
2Ensuite, abaissez l’avant de la tablette afin que les
crochets tombent dans les fentes.
MISES EN GARDE
%Assurez-vous que les tablettes sont d’aplomb d’un
côté à l’autre. Ne pas le faire peut provoquer la
chute de la tablette ou des aliments.
%Ne nettoyez pas les tablettes en verre avec de l’eau
chaude lorsqu’elles sont froides. Elles pourraient se
briser si elles sont exposées à des changements
brusques de température ou à des impacts.
%Les tablettes en verre sont lourdes. Soyez
particulièrement prudent lorsque vous les enlevez.
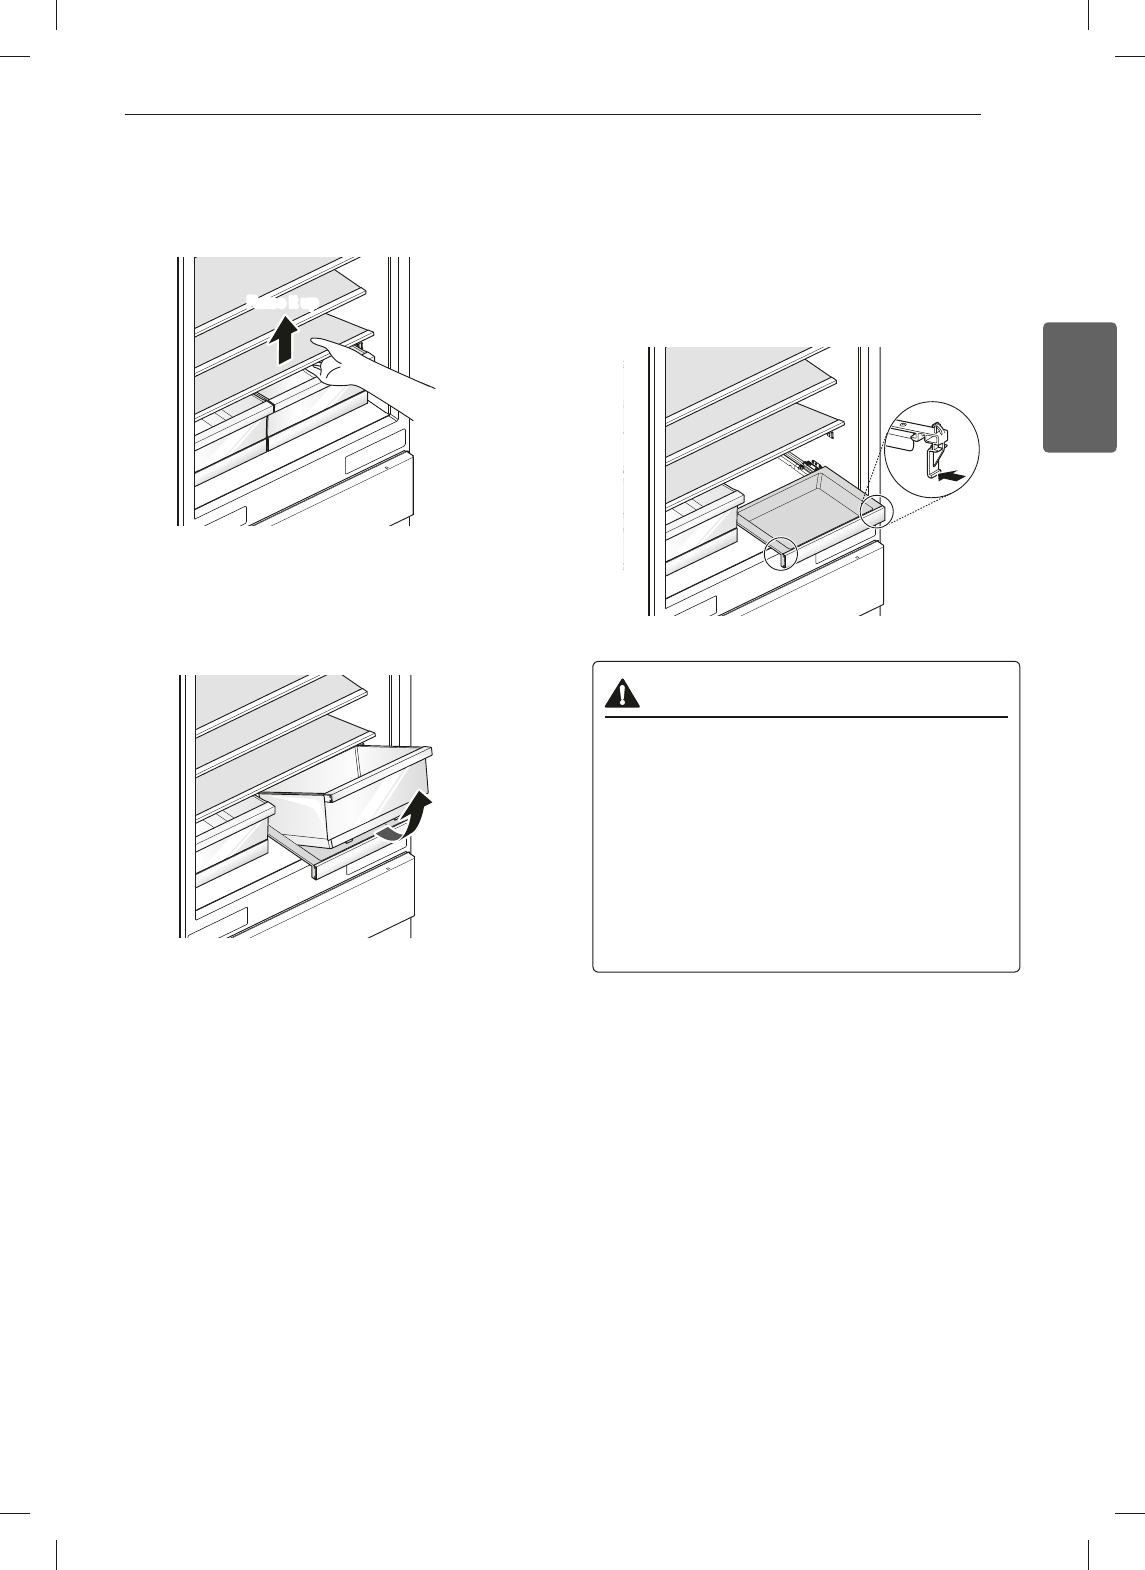
21FONCTIONNEMENT
FRANÇAIS
Crisper
'LVDVVHPEOHWKH&ULVSHU
%Raise up the Crisper and Disassemble the Crisper.
Raise it up
'LVDVVHPEOHWKH7UD\'UDZHU
%Pull Tray Drawer to the End.
%Raise Tray drawer up to Disassemble
+RZWR'LVDVVHPEOH&RYHU'UDZHU
1Disassemble Tray Drawer.
2Pull Cover Drawer to the end.
3Push Rack and Lift Cover Drawer(Rack is located in
Left, Right Slide Rail)
Rack
MISES EN GARDE
%Assurez-vous que le bac à collation est d’aplomb
d’un côté à l’autre. Ne pas le faire peut provoquer
la chute du bac à collation ou des aliments.
%Ne nettoyez pas le verre du bac à collation avec de
l’eau chaude s’il est froid. Le bac à collation
pourrait se briser s’il est exposé à des
changements brusques de température ou à des
impacts.
%Le bac à collation est lourd. Soyez particulièrement
prudent lorsque vous l’enlevez.
22 FONCTIONS INTELLIGENTES
FONCTIONS
INTELLIGENTES
$SSOLFDWLRQ6,*1$785(
KITCHEN SUITE
L’application SIGNATURE KITCHEN SUITE vous
permet de communiquer avec l’appareil à l’aide d’un
téléphone intelligent.
$YDQWG¶XWLOLVHUO¶DSSOLFDWLRQ
1Vérifiez la puissance du signal sans fil à proximité
de l’appareil.
%6LODGLVWDQFHHQWUHO¶DSSDUHLOHWOHURXWHXUVDQV¿O
est trop grande, l’intensité du signal s’affaiblit.
Cela peut prendre plus de temps pour enregistrer
l’appareil ou l’installation peut échouer.
2Désactivez les GRQQpHVPRELOHV ou les GRQQpHV
FHOOXODLUHV sur votre téléphone intelligent.
3Connectez votre téléphone intelligent au routeur
sans fil.
REMARQUES
%3RXUYpUL¿HUO¶pWDWGHODFRQQH[LRQWi-Fi , assurez-
vous que l’icône Wi-Fi, qui se trouve sur le panneau
de commande, est allumée.
%L’appareil prend seulement en charge les réseaux
:L)LGH*+]3RXUYpUL¿HUODIUpTXHQFHGHYRWUH
réseau, contactez votre fournisseur de services
Internet ou référez-vous au manuel de votre routeur
VDQV¿O
%L’application SIGNATURE KITCHEN SUITE n’est pas
responsable des problèmes de connexion au réseau,
ni des pannes, défaillances ou erreurs causées par la
connexion au réseau.
%/¶HQYLURQQHPHQWVDQV¿OHQYLURQQDQWSHXWIDLUHHQ
VRUWHTXHOHVHUYLFHGHUpVHDXVDQV¿OIRQFWLRQQH
lentement.
%Si l’appareil ne parvient pas à se connecter au réseau
Wi-Fi, c’est peut-être parce qu’il est trop éloigné du
URXWHXU$FKHWH]XQUpSpWHXU:L)LDPSOL¿FDWHXUGH
fréquences) pour accroître la force du signal Wi-Fi.
%La connexion réseau peut ne pas fonctionner
correctement selon le fournisseur de services Internet.
%La connexion Wi-Fi peut ne pas se faire ou être
interrompue à cause de l’environnement du réseau
domestique.
%Si l’appareil ne peut pas être enregistré en raison de
SUREOqPHVDYHFODWUDQVPLVVLRQGXVLJQDOVDQV¿O
débranchez le routeur et attendez environ une minute
avant de le remettre en marche et de réessayer.
%6LOHSDUHIHXGHYRWUHURXWHXUVDQV¿OHVWDFWLYp
désactivez-le ou ajoutez-y une exception.
%/HQRPGXUpVHDXVDQV¿O66,'GRLWrWUHXQH
combinaison de lettres et de chiffres anglais. (N’utilisez
pas de caractères spéciaux.)
%L’interface utilisateur (IU) du téléphone intelligent peut
varier en fonction du système d’exploitation (SE)
mobile et du fabricant.
%6LOHSURWRFROHGHVpFXULWpGXURXWHXUHVWFRQ¿JXUp
pour le WEP, vous pourriez avoir à le changer pour le
:3$D¿QGHUpXVVLUjHQUHJLVWUHUOHSURGXLW

23FONCTIONS INTELLIGENTES
FRANÇAIS
,QVWDOODWLRQGHO¶DSSOLFDWLRQ
SIGNATURE KITCHEN SUITE
À partir d’un téléphone intelligent, cherchez l’application
SIGNATURE KITCHEN SUITE dans la boutique Google
Play ou l’App Store d’Apple. Suivez les directives pour
télécharger et installer l’application.
REMARQUE
%Si vous choisissez la connexion simple pour accéder à
l’application SIGNATURE KITCHEN SUITE, vous
devrez passer par le processus d’enregistrement de
l’appareil chaque fois que vous changez de téléphone
intelligent ou que vous réinstallez l’application.
&DUDFWpULVWLTXHVGHO¶DSSOLFDWLRQ
SIGNATURE KITCHEN SUITE
Gestion des aliments
Cette fonction vous permet de savoir quels aliments se
trouvent dans votre réfrigérateur et votre congélateur,
vous avertit lorsqu’ils approchent de la date limite de
consommation, génère des listes d’épicerie et envoie
des liens vers des recettes.
6XUYHLOODQFHGHODFRQVRPPDWLRQG¶pQHUJLH
Cette fonction permet de suivre la consommation
énergétique du réfrigérateur ainsi que le nombre de fois
RODSRUWHHVWRXYHUWH
0HVVDJHVDXWRPDWLTXHV
Si la porte reste ouverte pendant plus de dix minutes,
vous recevrez un message automatisé. Lorsque la
fonction Ice Plus (glace plus) est terminée, vous
recevrez aussi un message automatisé.
6PDUW'LDJQRVLVMC
Cette fonction fournit des renseignements utiles pour
GLDJQRVWLTXHUHWUpVRXGUHOHVSUREOqPHVDYHFOތDSSDUHLO
HQVHEDVDQWVXUOHSURILOGތXWLOLVDWLRQ
Paramètres
Vous permet de régler diverses options du réfrigérateur
et de l’application.
REMARQUES
%6LYRXVFKDQJH]GHURXWHXUVDQV¿OGHIRXUQLVVHXUGH
services Internet ou de mot de passe après
l’enregistrement de l’appareil, veuillez le supprimer de
l’application SIGNATURE KITCHEN SUITE dans
Paramètresĺ0RGL¿HUOHSURGXLW et l’enregistrer de
nouveau.
%Ces renseignements étaient à jour au moment de la
publication du présent manuel. L’application est sujette
jGHVPRGL¿FDWLRQVjGHV¿QVG¶DPpOLRUDWLRQGX
produit, et ce, sans que l’utilisateur en soit
préalablement avisé.

24 FONCTIONS INTELLIGENTES
)RQFWLRQ5pVHDXLQWHOOLJHQW
Lorsque le réfrigérateur est en mode Réseau intelligent,
la fonction Réfrigérateur intelligent peut contrôler
l’utilisation de l’énergie ou retarder la mise en marche de
certaines fonctions afin d’économiser l’énergie durant
les périodes de pointe.
%Vous pouvez annuler la fonction Réseau intelligent en
tout temps (au moyen de la touche ou de l’application
Smart Grid (réseau intelligent)).
%Pour utiliser la fonction Réseau intelligent, vous devez
enregistrer votre appareil auprès de votre fournisseur
d’électricité.
)RQFWLRQQDOLWpVGHO¶DSSOLFDWLRQ
5pVHDXLQWHOOLJHQW
eFRQRPLHLQWHOOLJHQWHB*HVWLRQGHODGHPDQGH
Vous pouvez réduire l’utilisation énergétique en fonction
des signaux de gestion de la demande (GD) provenant de
la société de services publics. Si le réfrigérateur est en
mode d’économie intelligente selon les signaux de gestion
de la demande, vous verrez apparaître une fenêtre.
eFRQRPLHG¶pQHUJLHHQVDLVRQ
Réduisez la consommation selon la période de l’année.
8WLOLVDWLRQGHODIRQFWLRQ5pVHDX
LQWHOOLJHQW
Cette fonctionnalité répond aux notifications envoyées
par votre fournisseur d’électricité pour exécuter les
WkFKHVFRQVRPPDQWEHDXFRXSG¶pOHFWULFLWpSHQGDQWOHV
heures creuses, lorsque la demande est moins élevée.
Ces notifications sont appelées « signaux de gestion de
ODGHPDQGHª
Si le réfrigérateur reçoit un signal de gestion de la
demande de la part du fournisseur d’électricité, il allume
le voyant Grid (réseau) sur l’écran et contrôle sa
consommation d’énergie en fonction du signal.
Le réfrigérateur répondra aux signaux reçus aussi
longtemps qu’il pourra maintenir son efficacité.
Si le réfrigérateur reçoit un signal de gestion de la
demande, il fonctionnera en mode DAL (charge différée)
ou TALR (réduction temporaire de la charge).
&KDUJHGLIIpUpH'$/
Le réfrigérateur répondra à un signal DAL en réduisant
de façon modérée la charge pour la durée de la période
indiquée.
Ce mode contrôle les fonctions énergivores telles que
l’ajustement du système de refroidissement, le
dégivrage et la fabrication de la glace.
%Lorsque le réfrigérateur est en mode DAL, le voyant
Grid (réseau) est allumé sur l’écran du réfrigérateur.
%/HPRGH'$/HVWDXWRPDWLTXHPHQWGpVDFWLYpjOD¿QGH
la période indiquée par le signal DAL (max. de 4 heures)
ou lorsque vous annulez la fonction Réseau intelligent.
5pGXFWLRQWHPSRUDLUHGHODFKDUJHGH
O¶DSSDUHLO7$/5
Le réfrigérateur réagit à un signal TALR en diminuant
fortement la charge pendant une courte période, soit
généralement 10 minutes. Ce mode permet de réduire
la consommation d’énergie en arrêtant le compresseur
et en contrôlant les fonctionnalités qui consomment
beaucoup d’énergie, telles que le cycle de décongélation
et le ventilateur.
%Lorsque le réfrigérateur est en mode TALR, le voyant
Grid (réseau) est allumé sur l’écran du réfrigérateur.
%Le mode TALR est automatiquement désactivé après
l’écoulement de la durée établie (10 minutes max) ou
lorsque vous ignorez la fonction Réseau intelligent. Ce
mode est automatiquement désactivé et le réfrigérateur
est ramené à son état normal si vous ouvrez ou fermez
une porte ou si le distributeur est utilisé.
$QQXODWLRQGXPRGH5pVHDXLQWHOOLJHQW
Si vous voulez que le réfrigérateur ignore le signal de
gestion de la demande de votre fournisseur d’électricité,
vous pouvez annuler la fonction Réseau intelligent en
appuyant sur la touche Smart Grid (réseau intelligent)
pendant que le réfrigérateur fonctionne en mode Réseau
intelligent.
Lorsque vous ignorez la fonction Réseau intelligent, le
réfrigérateur ne tient pas compte du signal de gestion de
la demande et il n’est alors plus contrôlé par votre
fournisseur d’électricité, et ce, jusqu’à l’envoi du
prochain signal de gestion de la demande. Vous pouvez
également ignorer la fonction Réseau intelligent à l’aide
de l’application du téléphone intelligent.
$3,RXYHUWHGH6,*1$785(.,7&+(168,7(
Vous pouvez gérer les fonctions Réseau intelligent du
réfrigérateur SIGNATURE KITCHEN SUITE.
Veuillez consulter la page de notification à l’adresse
www.thesignaturekitchen.com pour plus de détails.
Liste des API
Réponse à la demande
%Envoyer un signal de réponse à la demande
Mode écoénergétique
%Régler le mode écoénergétique
%Obtenir l’horaire (programme) du DR/report de dégivrage
Surveillance de la consommation d’énergie
%Obtenir l’événement d’ouverture de porte
%Obtenir la consommation d’énergie
Reporter la fonction de dégivrage
%Insérer un événement programmé de report du
dégivrage
%Mettre à jour un événement programmé de report du
dégivrage
%Annuler un événement programmé de report du
dégivrage
%Obtenir le programme du report de dégivrage
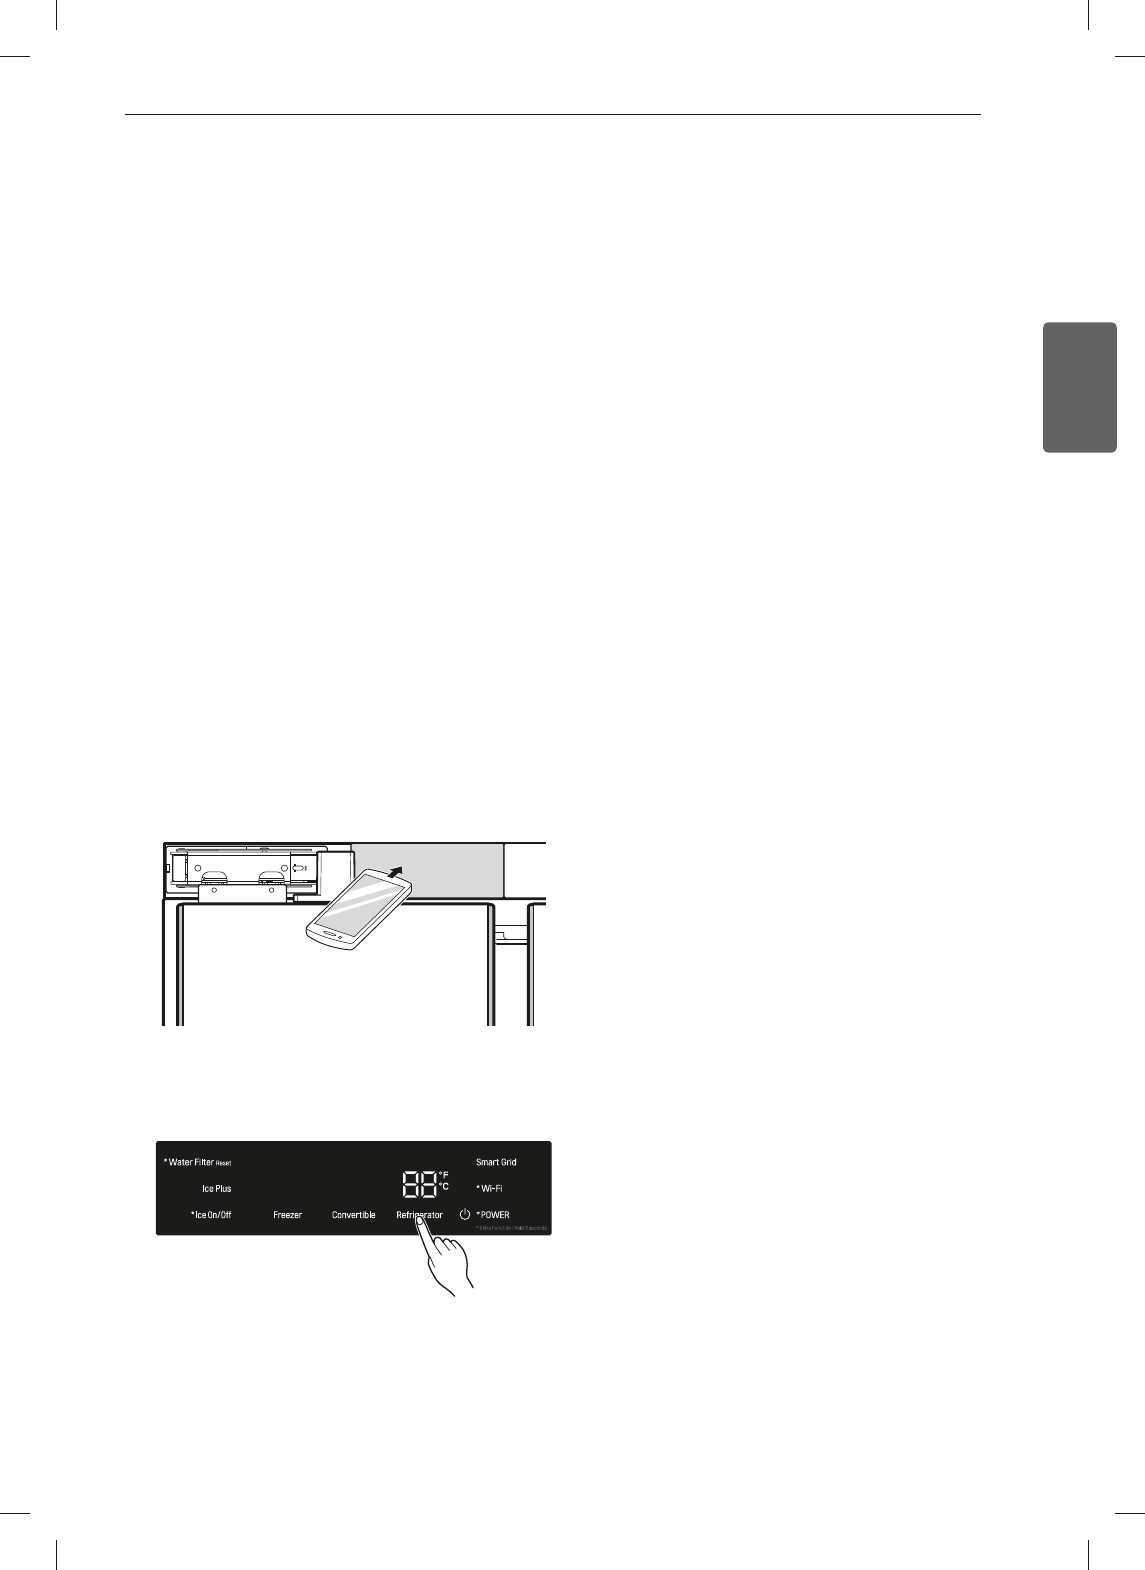
25FONCTIONS INTELLIGENTES
FRANÇAIS
)RQFWLRQ6PDUW'LDJQRVLVMC
Sachez que si vous éprouvez des problèmes avec votre
électroménager, celui-ci a la capacité de transmettre des
données au centre d’information SIGNATURE KITCHEN
SUITE par l’intermédiaire de votre téléphone. Les
modèles équipés de la technologie NFC ou du Wi-Fi
peuvent également transmettre des données à un
téléphone intelligent à l’aide de l’application
SIGNATURE KITCHEN SUITE.
6PDUW'LDJQRVLVMC±GLDJQRVWLFSDUOH
&HQWUHGތLQIRUPDWLRQjODFOLHQWqOH
Cette méthode vous permet de parler directement à l’un
de nos spécialistes formés. Le spécialiste enregistre les
données transmises par l’appareil et les utilise pour
analyser le problème, fournissant ainsi un diagnostic
rapide et efficace.
1Appelez le Centre d’information à la clientèle de
SIGNATURE KITCHEN SUITE au :
(É.-U.) 1 855 790-6655
2Ouvrez la porte du réfrigérateur.
3Approchez le microphone de votre téléphone devant
le haut-parleur situé sur le couvercle du filtre du
réfrigérateur lorsque le spécialiste du Centre
d’information à la clientèle vous le demandera.
4Maintenez enfoncée la touche 5HIULJHUDWRU
(réfrigérateur) pendant trois secondes tout en tenant
votre téléphone devant le haut-parleur.
5$SUqVDYRLUHQWHQGXOHVWURLVVLJQDX[UHOkFKH]OD
touche 5HIULJHUDWRU (réfrigérateur).
6Gardez le téléphone en place jusqu’à la fin de la
transmission sonore. Un compte à rebours
s’affichera à l’écran. Lorsque le décompte est
terminé et que vous n’entendez plus les tonalités,
reprenez votre conversation avec le spécialiste, qui
VHUDDORUVHQPHVXUHGHYRXVDLGHUJUkFHj
l’information transmise aux fins d’analyse.
REMARQUES
%Pour obtenir les meilleurs résultats, évitez de bouger
le téléphone pendant la transmission sonore.
%6LOތDJHQWGXFHQWUHGHVHUYLFHQތDSDVSXREWHQLUXQ
HQUHJLVWUHPHQWH[DFWGHVGRQQpHVLOVHSHXWTXތLO
YRXVGHPDQGHGތHVVD\HUGHQRXYHDX
%La fonction Smart Diagnosis
MC
dépend de la qualité de
OތDSSHOORFDO
%Une mauvaise télécommunication peut entraîner une
piètre transmission de données entre votre téléphone
et le centre d’appels, de sorte que le Smart
Diagnosis
MC
risque de ne pas fonctionner
correctement.
6PDUW'LDJQRVLVMC
Utilisez la fonction Smart Diagnosis de l’application
SIGNATURE KITCHEN SUITE pour vous aider à
diagnostiquer les problèmes avec l’appareil sans
l’assistance du Centre d’information à la clientèle
SIGNATURE KITCHEN SUITE.
Suivez les instructions de l’application SIGNATURE
KITCHEN SUITE pour effectuer un diagnostic intelligent
à l’aide de votre téléphone intelligent.
REMARQUE
%La fonction Smart Diagnosis
MC
ne peut être activée
que si l’appareil peut être mis sous tension à l’aide de
la touche 3RZHU (alimentation). Si l’appareil ne peut
pas être mis sous tension, le dépannage doit être
effectué sans utiliser la fonction Smart Diagnosis
MC
.
26 FONCTIONS INTELLIGENTES
5HQVHLJQHPHQWVUHODWLIVjOD
UpJOHPHQWDWLRQ)&&
L’avis suivant couvre le module de transmetteur se
trouvant dans le produit.
Cet appareil a été testé et jugé conforme aux limites
imposées aux sections 15 et 18 de la réglementation de
la FCC concernant un appareil numérique de classe B.
Ces limites visent à fournir une protection raisonnable
contre les interférences nuisibles dans un
environnement résidentiel. Cet appareil génère, utilise et
peut irradier de l’énergie de radiofréquences; s’il n’est
pas installé et utilisé conformément aux instructions, il
peut produire des interférences nuisibles aux
radiocommunications. Toutefois, rien ne garantit que des
interférences ne seront pas produites dans un
environnement donné. Si cet appareil génère des
interférences nuisibles pour la réception de la radio ou
de la télévision, ce qui peut être vérifié en éteignant puis
en rallumant l’appareil, l’utilisateur est invité à essayer
de corriger ces interférences à l’aide de l’une des
mesures suivantes :
<Réorienter ou déplacer l’antenne de réception.
<Augmenter la distance entre l’appareil et le récepteur.
<Brancher l’appareil sur une prise électrique d’un circuit
différent de celui sur lequel le récepteur est branché.
<&RQWDFWHUOHGpWDLOODQWRXXQWHFKQLFLHQTXDOL¿pHQ
entretien et en réparation de matériel audio-vidéo.
Cet appareil est conforme aux limites imposées aux
sections 15 et 18 de la réglementation de la FCC.
L’exploitation est soumise aux deux conditions suivantes :
1) cet appareil ne doit pas provoquer d’interférences
nuisibles;
2) cet appareil doit accepter toutes les interférences, y
compris celles pouvant entraîner son
dysfonctionnement.
/HVPRGL¿FDWLRQVGDQVODFRQFHSWLRQGHFHWDSSDUHLOTXL
ne sont pas expressément approuvées par l’autorité
responsable de la conformité pourraient annuler
l’autorisation accordée à l’utilisateur de faire fonctionner
l’équipement.
eQRQFpGHOD)&&VXUO¶H[SRVLWLRQ
DX[UD\RQQHPHQWV5)
Cet appareil est conforme aux limites de la FCC en ce
qui concerne l’exposition aux rayonnements établies
pour un environnement non contrôlé. Cet émetteur ne
doit pas être colocalisé ni utilisé conjointement avec tout
autre émetteur ou antenne.
Cet appareil doit être installé et utilisé de façon à
maintenir une distance minimale de 20 cm (7,8 po) entre
l’antenne et les utilisateurs. Les utilisateurs doivent
respecter les directives d’utilisation afin de satisfaire aux
critères en matière d’exposition aux rayonnements RF.
eQRQFpG¶,QGXVWULH&DQDGDSRXUOH
PRGXOHGHWUDQVPHWWHXUTXLVHWURXYH
GDQVOHSURGXLW
Cet appareil est conforme aux CNR d’Industrie Canada
applicables aux appareils radio exempts de licence.
L’exploitation est soumise aux deux conditions suivantes :
1) cet appareil ne doit pas produire d’interférences;
2) cet appareil doit accepter toutes les interférences, y
compris celles pouvant entraîner son
dysfonctionnement.
Étiquette de conformité ICES-001 d’Industrie Canada :
CAN ICES-1/NMB-1
eQRQFpG¶,&VXUO¶H[SRVLWLRQDX[
UD\RQQHPHQWV
Cet appareil est conforme aux limites d’Industrie Canada
en ce qui concerne l’exposition aux rayonnements
établies pour un environnement non contrôlé.
Cet appareil doit être installé et utilisé de façon à
maintenir une distance minimale de 20 cm (7,8 po) entre
l’antenne et les utilisateurs.
REMARQUE
%Le fabricant n’est pas responsable des interférences
UDGLRRXWpOpYLVpHVJpQpUpHVSDUXQHPRGL¿FDWLRQQRQ
approuvée apportée à cet équipement. De telles
PRGL¿FDWLRQVSRXUUDLHQWDQQXOHUO¶DXWRULVDWLRQDFFRUGpH
à l’utilisateur de faire fonctionner l’équipement.
&DUDFWpULVWLTXHVGXPRGXOH/$1VDQVILO
Modèle LCW-003
Gamme de fréquences 2 412 MHz - 2 462 MHz
Puissance de sortie
(max.)
IEEE 802.11B : 17,56 dBm
IEEE 802.11g : 25,53 dBm
IEEE 802.11n : 25,29 dBm
,QIRUPDWLRQVVXUOHVORJLFLHOVOLEUHV
Pour obtenir le code source conformément aux
dispositions de la licence publique générale, de la licence
publique générale limitée, de la licence publique Mozilla
et de toute autre licence régissant les logiciels à code
source libre contenus dans cet appareil, visitez le site
http://opensource.thesignaturekitchen.com.
En plus du code source, toutes les dispositions de
licence, les exonérations de garantie et les avis de droits
d’auteurs peuvent être téléchargés.
SIGNATURE KITCHEN SUITE mettra également à votre
disposition le code source libre sur CD-ROM pour un prix
couvrant le coût de la distribution (coût du support, de
l’expédition et de la manutention) sur simple demande par
courriel à l’adresse opensource@thesignaturekitchen.com.
Cette offre est valable pour une période de trois ans
après la dernière commande de ce produit. Cette offre est
valable pour toute personne recevant cette information.
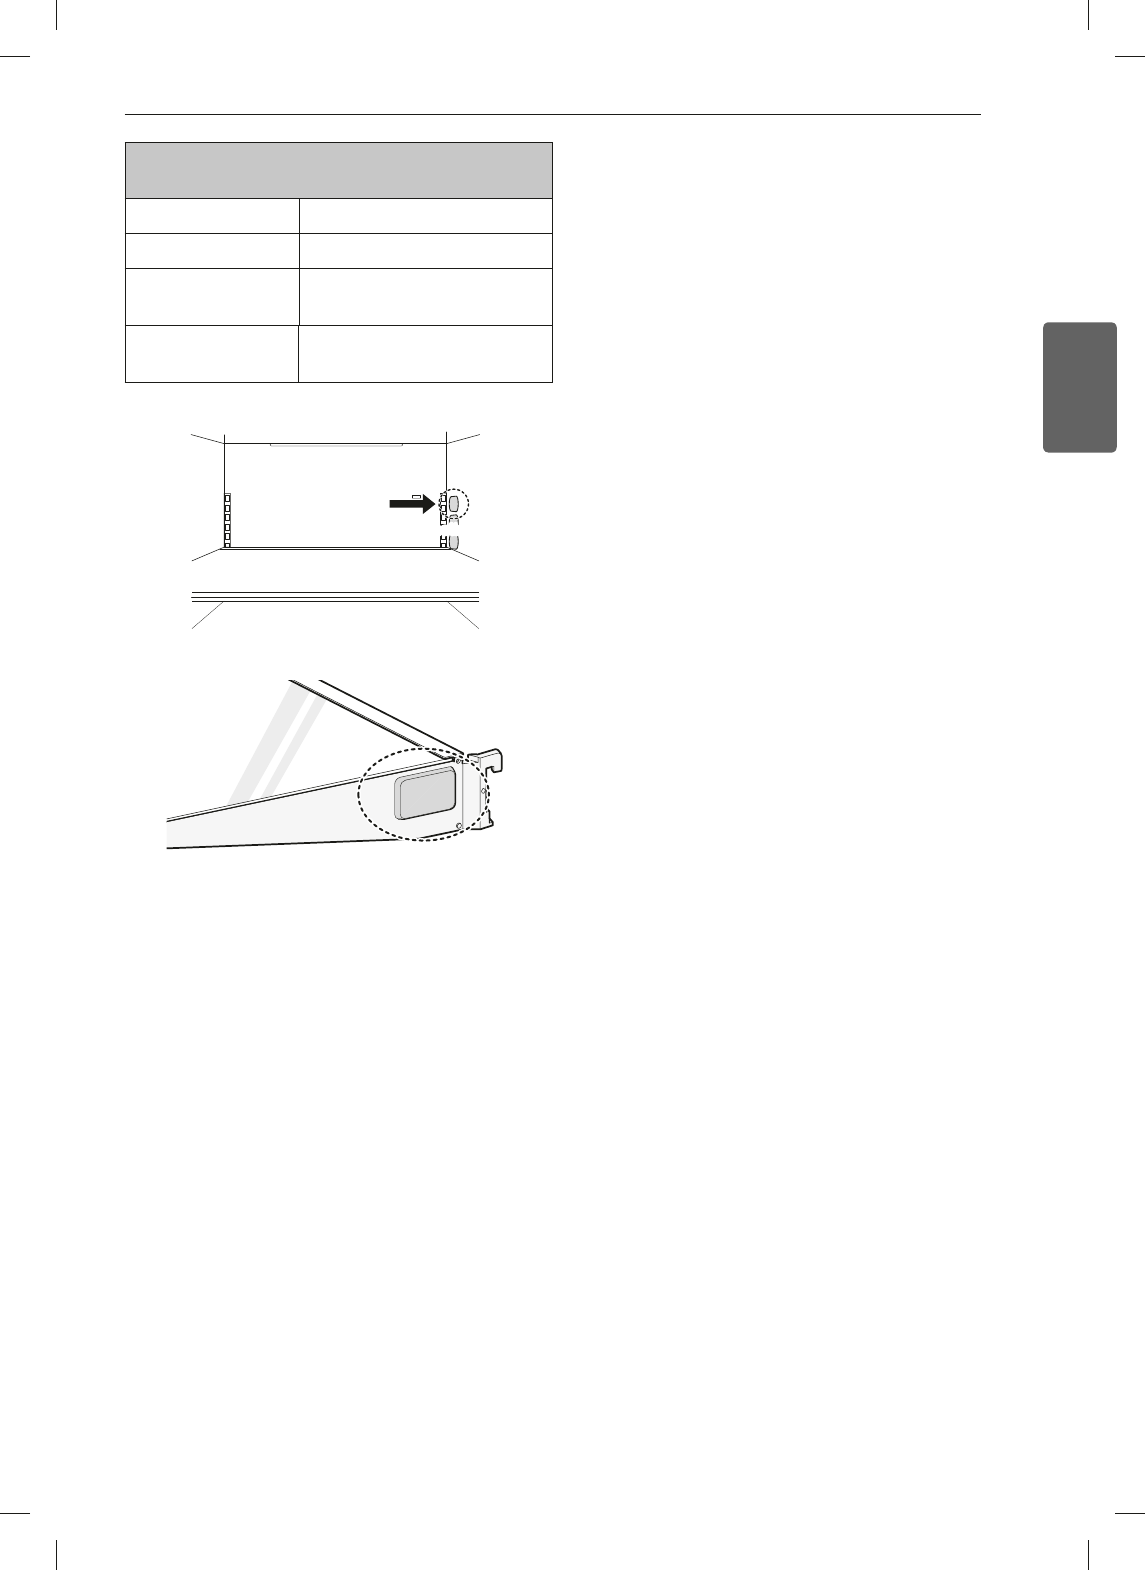
27FONCTIONS INTELLIGENTES
FRANÇAIS
'RQQpHVWHFKQLTXHVGHWUDQVIHUWGHSXLVVDQFH
sans fil
Fréquence 330 kHz ~ 370 kHz
Tension nominale 12 V c.c.
Puissance délivrée Inférieure ou égale à 3 W par
clayette
Mode de
transmission
Induction électromagnétique
Émetteur
Récepteur
REMARQUES
%Des corps étrangers et de la saleté se trouvant entre
le côté droit de la tablette et la paroi du cadre intérieur
pourraient empêcher l’éclairage de la tablette de
s’allumer.
%L’éclairage de la tablette s’allume lorsque la porte est
ouverte.
%L’éclairage de la tablette s’éteint après sept minutes
ou lorsque la porte est fermée.
28 ENTRETIEN
ENTRETIEN
1HWWR\DJH
AVERTISSEMENT
%8WLOLVH]XQSURGXLWGHQHWWR\DJHLQLQÀDPPDEOH1H
pas le faire pourrait entraîner un incendie, une
explosion ou des blessures mortelles.
MISES EN GARDE
%N’utilisez pas de chiffons ou d’éponges rugueuses
pour nettoyer l’intérieur et l’extérieur du
réfrigérateur.
%Ne placez pas votre main sur la surface inférieure
du réfrigérateur quand vous ouvrez ou fermez les
portes.
&RQVHLOVJpQpUDX[GHQHWWR\DJH
%Le réfrigérateur se dégivre automatiquement.
Toutefois, nettoyez-le une fois par mois pour éviter les
odeurs.
%Essuyez immédiatement les aliments renversés.
%Débranchez toujours le réfrigérateur ou coupez le
courant avant de le nettoyer.
%Enlevez toutes les pièces amovibles, telles que les
tablettes, les bacs à légumes et fruits, etc.
%Utilisez une éponge propre ou un chiffon et un
détergent doux avec de l’eau chaude. N’utilisez pas de
produits de nettoyage abrasifs ou forts.
%Lavez à la main, rincez et séchez soigneusement
toutes les surfaces.
%Lors du nettoyage de l’intérieur ou de l’extérieur de
l’appareil, ne le nettoyez pas avec une brosse
rugueuse, du dentifrice ou des matériaux
LQÀDPPDEOHV1¶XWLOLVH]SDVGHSURGXLWVGHQHWWR\DJH
FRQWHQDQWGHVVXEVWDQFHVLQÀDPPDEOHV
<Cela peut causer une décoloration de l’appareil ou
entraîner des dommages.
</LVWHGHVVXEVWDQFHVLQÀDPPDEOHVDOFRROpWKDQRO
méthanol, alcool isopropylique, alcool isobutylique,
etc.), diluant, eau de javel, benzène, liquide
LQÀDPPDEOHDEUDVLIHWF
3DURLVLQWpULHXUHV
Pour éliminer les odeurs, vous pouvez laver l’intérieur
du réfrigérateur avec un mélange de bicarbonate de
soude et d’eau chaude. Mélangez deux cuillères à
soupe de bicarbonate de soude à un litre d’eau (26 g de
bicarbonate de soude pour un litre d’eau). Assurez-vous
que le bicarbonate de soude est complètement dissous
afin de ne pas rayer les surfaces du réfrigérateur.
5HYrWHPHQWVHWMRLQWVGHSRUWH
Utilisez une éponge propre ou un chiffon et un détergent
doux avec de l’eau chaude. N’utilisez pas de cire de
nettoyage, de détergent concentré, d’eau de Javel ou de
nettoyant contenant du pétrole sur les pièces en
plastique du réfrigérateur.
3LqFHVHQSODVWLTXHFRXYHUFOHVHW
SDQQHDX[
Utilisez une éponge propre ou un chiffon et un détergent
doux avec de l’eau chaude. N’utilisez pas de produits
nettoyants pour vitres, de nettoyants abrasifs ou de
liquides inflammables. Ces produits peuvent rayer ou
endommager la surface.
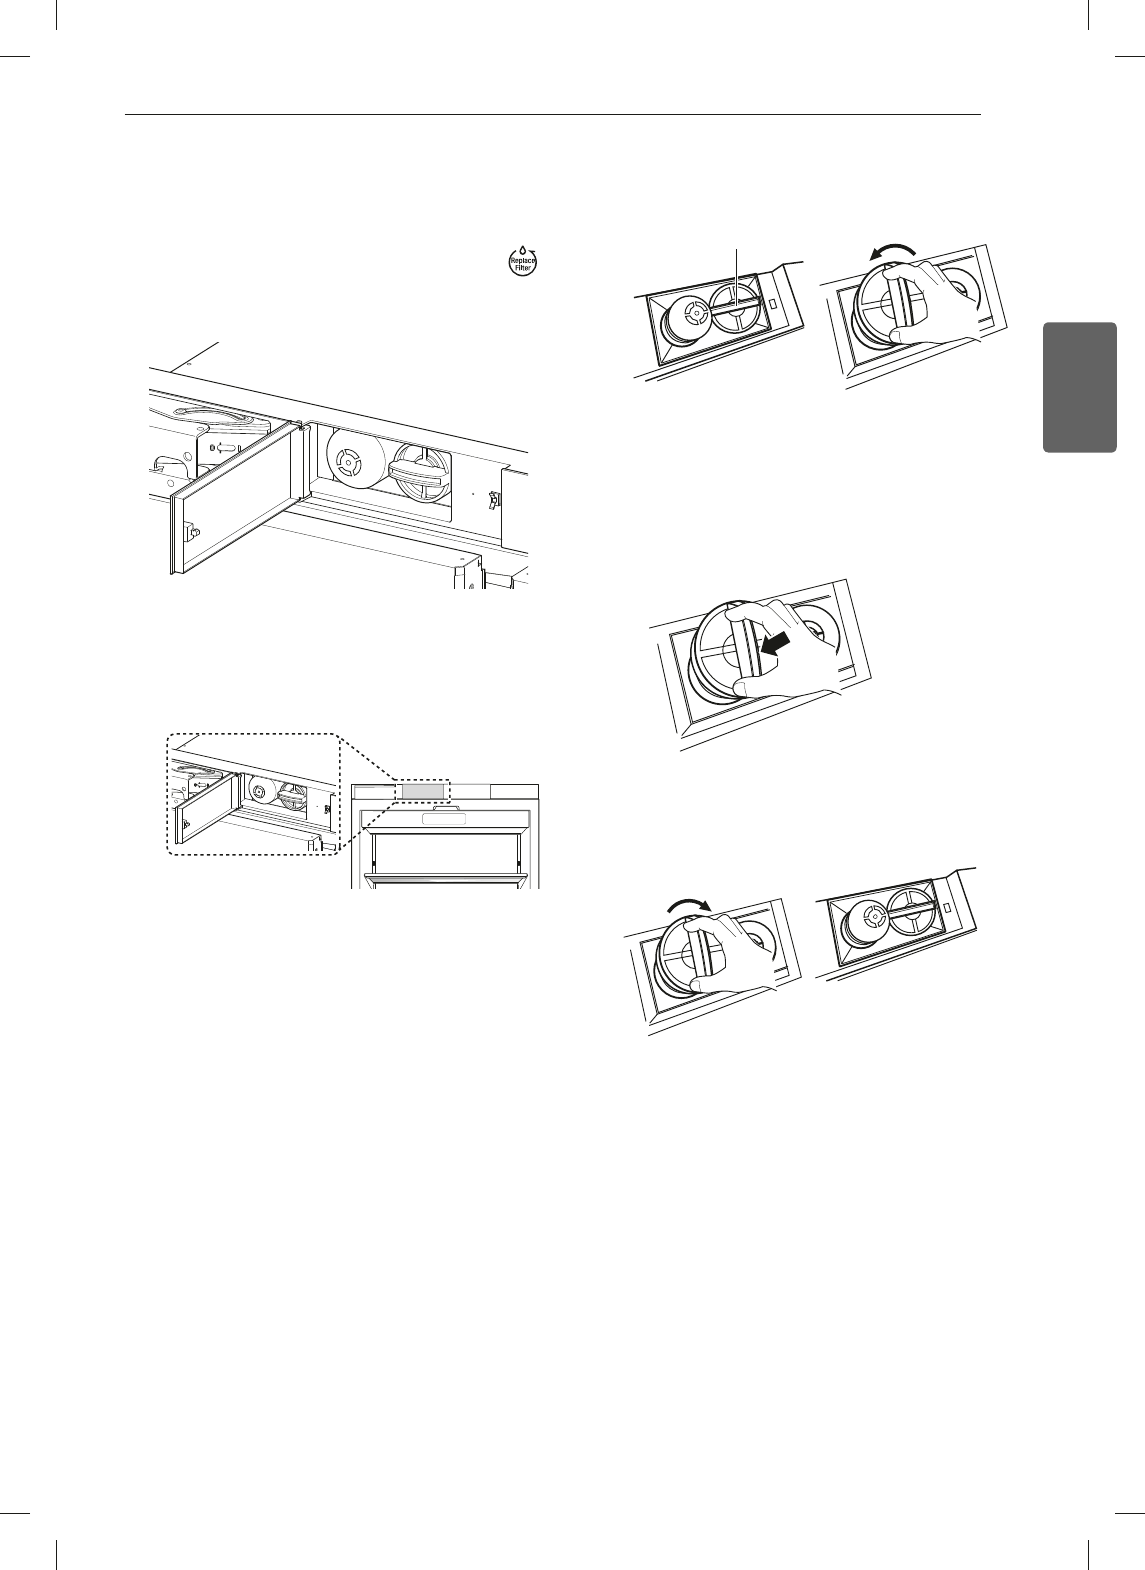
29ENTRETIEN
FRANÇAIS
5HPSODFHPHQWGX¿OWUHjHDX
Remplacer le filtre à eau
%Environ tous les six mois.
%Lorsque l’icône 5HSODFH)LOWHUFKDQJHUOH¿OWUH
s’allume.
%Lorsque la sortie d’eau du distributeur diminue.
15HWLUH]O¶DQFLHQILOWUHjHDX
Appuyez en haut à droite du réfrigérateur sur le
panneau du filtre à eau pour l’ouvrir.
REMARQUES
%/HUHPSODFHPHQWGX¿OWUHjHDXSURYRTXHOHGUDLQDJH
d’une petite quantité d’eau (environ 25 ml ou 1 oz).
%(QYHORSSH]O¶H[WUpPLWpDYDQWGXFRXYHUFOHGX¿OWUHj
eau avec un linge pour recueillir l’eau qui s’écoulera.
0DLQWHQH]OH¿OWUHjHDXjODYHUWLFDOHXQHIRLVTX¶LOHVW
enlevé pour éviter que de l’eau s’en échappe.
2Placez le bouchon sur le filtre à eau, puis tenez-le
et tournez-le vers la gauche pour retirer le filtre à
eau de la tête du filtre.
Bouchon
35HPSODFH]DYHFXQQRXYHDXILOWUHjHDX
Retirez le nouveau filtre à eau de son emballage et
retirez le couvercle de protection des joints toriques.
Placez le bouchon sur le nouveau filtre à eau, puis
poussez-le dans l’orifice du collecteur jusqu’à ce
qu’il soit en place.
4Prenez le bouchon et faites-le tourner vers la droite
jusqu’à ce qu’il s’arrête.
Replacez le bouchon sur le côté du filtre à eau.
5Une fois que le filtre à eau a été remplacé, faites
couler environ neuf litres d’eau (ce qui prendra
environ cinq minutes) pour éliminer l’air et les
contaminants du système.
REMARQUE
%Ne faites pas couler les neuf litres d’eau de façon
FRQWLQXH$SSX\H]HWUHOkFKH]ODWRXFKHGXGLVWULEXWHXU
pour des cycles de 30 secondes en position de
marche et de 60 secondes en position d’arrêt.

30 ENTRETIEN
6Une fois le filtre remplacé, maintenez la touche
Water Filter Reset (réinitialisation du filtre à eau)
enfoncée pendant trois secondes pour réinitialiser le
témoin lumineux.
REMARQUES
3RXUDFKHWHUXQILOWUHjHDXGHUHFKDQJH
%Rendez-vous chez un détaillant ou un distributeur
%Web : Trouvez des pièces et des accessoires sur la
page de soutien du site thesignaturekitchen.com.
%Téléphone : 1 855 790-6655 (États-Unis)
3RXUSOXVGHUHQVHLJQHPHQWVDSSHOH]DX
e8
%Cartouche de remplacement à utiliser :
/73$'4
/73&$'4
/73&6$'4
/736$'4
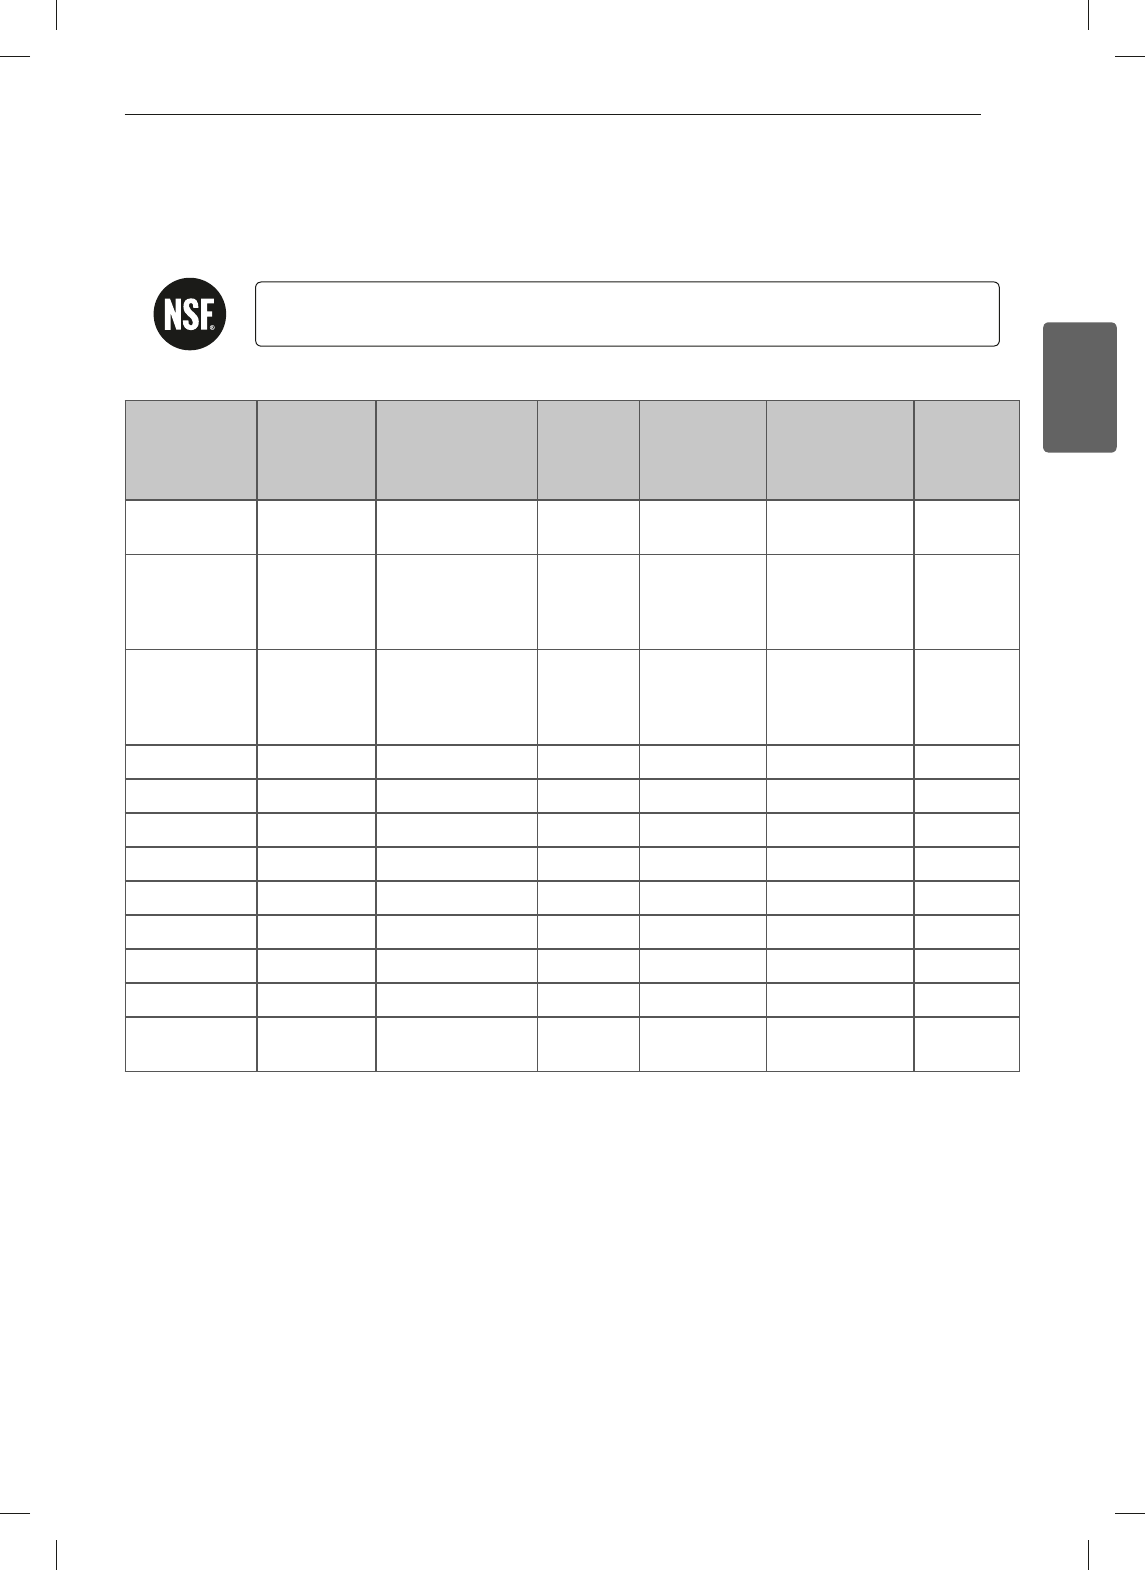
31ENTRETIEN
FRANÇAIS
)LFKHWHFKQLTXHGHVSHUIRUPDQFHV
0RGqOH/733&3&636 &RGHGHGpQRPLQDWLRQFRPPHUFLDOHGXV\VWqPH16)0'-
La concentration des substances indiquées présentes dans l’eau entrant dans le circuit a été réduite à une
concentration inférieure ou égale à la limite autorisée pour l’eau quittant le circuit, selon les spécifications NSF/ANSI
des normes 42, 53 et 401.
Circuit testé et certifié par NSF International au regard des spécifications NSF/ANSI des
normes 42, 53 et 401 pour la diminution des substances répertoriées ci-dessous.
5pGXFWLRQGHV
VXEVWDQFHV
$IIOXHQW
PR\HQGDQV
O¶HDXjWUDLWHU
&RQFHQWUDWLRQ
YLVpHSDU16)
% de la
GLPLQXWLRQ
PR\HQQH
&RQFHQWUDWLRQ
PR\HQQH
G¶HDXGDQVOH
SURGXLW
&RQFHQWUDWLRQ
G¶HDXPD[LPDOH
permise dans le
SURGXLW
([LJHQFHV
NSF de
GLPLQXWLRQ
Goût et odeur
de chlore ȝJO ȝJO ! ȝJO s. o.
Particules
nominales de
FODVVH,j
ȝP
12 000 000
pts/ml
Au moins
10 000 particules/ml 24 000 pts/ml s. o.
Amiante 180 MFL
10
7
à 10
8
MFL; longueur des
fibres supérieures à
ȝJ/LQ
! < 1 MFL s. o.
Atrazine ȝJO ȝJO ! ȝJO ȝJO s. o.
Benzène ȝJO ȝJO ! ȝJO ȝJO s. o.
Carbofuran ȝJO ȝJO ȝJO ȝJO s. o.
Lindane ȝJO ȝJO ! ȝJO ȝJO s. o.
P-Dichlorobenzène
ȝJO ȝJO ! ȝJO ȝJO s. o.
2,4-D ȝJO ȝJO ! ȝJO ȝJO s. o.
Plomb pH @ 6,5 ȝJO ȝJO ȝJO ȝJO s. o.
Plomb pH @ 8,5 ȝJO ȝJO ! ȝJO ȝJO s. o.
Mercure à
pH 6,5 ȝJO ȝJO ȝJO ȝJO s. o.
(Page suivante)

32 ENTRETIEN
5pGXFWLRQGHV
VXEVWDQFHV
$IIOXHQW
PR\HQGDQV
O¶HDXjWUDLWHU
&RQFHQWUDWLRQ
YLVpHSDU16)
% de la
GLPLQXWLRQ
PR\HQQH
&RQFHQWUDWLRQ
PR\HQQH
G¶HDXGDQVOH
SURGXLW
&RQFHQWUDWLRQ
G¶HDXPD[LPDOH
permise dans le
SURGXLW
([LJHQFHV
NSF de
GLPLQXWLRQ
Mercure à
pH 8,5 ȝJO ȝJO ȝJO ȝJO s. o.
Sporocyste* 100 000
sporocystes/l
Au minimum 50 000
sporocystes/l ! 10
sporocystes/l s. o.
Aténolol 240 ng/l QJO ! 10,80 ng/l 30 ng/l s. o.
Carbamazépine 1 600 ng/l QJO 25,60 ng/l 200 ng/l s. o.
DEET 1 600 ng/l QJO 46,40 ng/l 200 ng/L s. o.
Triméthoprime 170 ng/l QJO ! 5,44 ng/l 20 ng/L s. o.
Linuron 160 ng/l QJO ! 5,44 ng/l 20 ng/l s. o.
Phénytoïne 200 ng/l QJO ! 10,40 ng/l 30 ng/l s. o.
Ibuprofène 400 ng/l QJO ! 22,00 ng/l 60 ng/l s. o.
Naproxène 140 ng/l QJO ! 5,46 ng/l 20 ng/l s. o.
Estrone 120 ng/l QJO ! 4,68 ng/l 20 ng/l s. o.
Bisphénol A 2 000 ng/l QJO ! 22,00 ng/l 300 ng/l s. o.
Nonylphénol 1 600 ng/l QJO ! 46,40 ng/l 200 ng/l s. o.
%Basé sur l’utilisation des ocystes Cryptosporidium parvum.
33ENTRETIEN
FRANÇAIS
'LUHFWLYHVG¶XWLOLVDWLRQHWVSpFLILFDWLRQVGH
O¶DOLPHQWDWLRQHQHDX
Débit
d’utilisation 1,89 l/min (0,5 gal/min)
Alimentation
en eau
Réseau municipal ou puits privé
- Eau potable
Pression de
l’eau De 20 à 120 psi (de 138 à 827 kPa)
Température
de l’eau
De 0,6 °C à 37,8 °C
(de 33 °F à 100 °F)
Capacité 757 litres (200 gallons)
Il est essentiel de suivre les recommandations du
fabricant relatives à l’installation, à l’entretien et au
remplacement du filtre afin que l’appareil fonctionne
conformément aux performances annoncées.
REMARQUE
%Les tests ont été effectués en laboratoire et le
rendement peut varier en situation d’utilisation réelle.
Cartouche de remplacement : /733&3&636
Pour obtenir de l’information sur les filtres à eau de
rechange, rendez-vous chez un détaillant ou un
GLVWULEXWHXURXUHFKHUFKH]OHVPRWV©ILOWUHjHDXªVXUOH
site WKHVLJQDWXUHNLWFKHQFRP
Pour plus de renseignements, le Centre d’information à
la clientèle SIGNATURE KITCHEN SUITE est ouvert en
tout temps.
É.-U. : 1 855 790-6655
NSF est une marque de commerce de la NSF.
AVERTISSEMENTS
$ILQGHUpGXLUHOHVULVTXHVG¶pWRXIIHPHQW
%N’autorisez pas les enfants de moins de 3 ans à
avoir accès aux petites pièces pendant l’installation
de ce produit.
$ILQGHUpGXLUHOHULVTXHDVVRFLpjO¶LQJHVWLRQGH
SURGXLWVFRQWDPLQDQWV
%N’utilisez pas d’eau insalubre ou de qualité
inconnue sans désinfection adéquate en amont ou
HQDYDOGXV\VWqPH/HVV\VWqPHVFHUWL¿pVSRXUOD
réduction du nombre de sporocystes peuvent être
utilisés avec de l’eau désinfectée pouvant contenir
GHVVSRURF\VWHV¿OWUDEOHVeWDEOLVVHPHQWGHO¶(3$
n° 070595-MEX-001
MISES EN GARDE
$ILQGHUpGXLUHOHULVTXHDVVRFLpjGHV
GRPPDJHVPDWpULHOVFDXVpVSDUXQHIXLWHG¶HDX
%Lisez et suivez les instructions d’utilisation avant
l’installation et l’utilisation de ce système.
%L’installation et l’utilisation DOIVENT être conformes à
l’ensemble des codes de plomberie régionaux et
locaux en vigueur.
%N’installez pas le produit si la pression d’eau dépasse
120 psi (827 kPa). Si la pression d’eau dépasse
80 psi, vous devez installer une valve de limitation de
pression. Faites appel à un plombier si vous ne savez
SDVFRPPHQWYpUL¿HUODSUHVVLRQG¶HDX
%N’installez pas ce produit dans des conditions propices
aux coups de bélier. S’il est possible que des coups de
bélier se produisent, vous devez absolument installer
un dispositif antibélier. Contactez un plombier si vous
QHVDYH]SDVFRPPHQWHIIHFWXHUFHWWHYpUL¿FDWLRQ
%N’installez pas ce produit sur des conduites
d’alimentation en eau chaude. La température
maximale de l’eau pour le bon fonctionnement de ce
V\VWqPHGH¿OWUHHVWGH)&
%3URWpJH]OH¿OWUHGXJHO9LGDQJH]OH¿OWUHORUVTXHOD
température descend sous 4,4 °C (40 °F).
%/DFDUWRXFKHGX¿OWUHMHWDEOH'2,7rWUHUHPSODFpH
tous les six mois, selon la capacité évaluée, ou plus
tôt si le débit ralentit de façon manifeste.
%Protégez le dispositif contre le gel, retirez la cartouche
¿OWUDQWHORUVTXHOHVWHPSpUDWXUHVULVTXHQWGH
descendre au-dessous de 0 °C.
%1¶LQVWDOOH]SDVFHVV\VWqPHVGDQVGHVUpJLRQVROHV
températures ambiantes peuvent dépasser 43,3 °C
(110 °F).
%Si un dispositif de prévention du refoulement est
installé sur le système, un dispositif permettant de
contrôler la pression résultant de la dilatation
thermique doit être installé.
%9pUL¿H]TXHWRXVOHVWX\DX[HWOHVUDFFRUGVVRQW
serrés et ne présentent aucune trace de fuite.

34 DÉPANNAGE
DÉPANNAGE
)RLUHDX[TXHVWLRQV
4 4XHOOHVVRQWOHVWHPSpUDWXUHVRSWLPDOHVSRXUPRQFRQJpODWHXU"
R : Le réglage par défaut du congélateur est de 0 °F (-18 °C). Ajustez ces réglages au besoin pour conserver
les aliments à la température désirée. La crème glacée doit être ferme et les glaçons ne doivent pas
fondre dans le congélateur. Pour passer des degrés Fahrenheit aux degrés Celsius sur l’écran, appuyez
d’abord sur le bouton Freezer (congélateur) pour activer l’écran, puis appuyez sur les boutons Freezer
(congélateur) et Smart Grid (réseau intelligent) et maintenez-les enfoncés jusqu’à ce que vous entendiez
un bip et que les réglages changent à l’écran.
4 4XHOOHVVRQWOHVWHPSpUDWXUHVRSWLPDOHVSRXUPRQUpIULJpUDWHXU"
R : Le réglage par défaut du réfrigérateur est de 37 °F (3 °C). Ajustez ces réglages au besoin pour conserver
les aliments à la température désirée. Pour passer des degrés Fahrenheit aux degrés Celsius sur l’écran,
appuyez d’abord sur le bouton Refrigerator (réfrigérateur) pour activer l’écran, puis appuyez sur les
boutons Refrigerator (réfrigérateur) et Smart Grid (réseau intelligent) et maintenez-les enfoncés jusqu’à ce
que vous entendiez un bip et que les réglages changent à l’écran.
4 +RZGR,VHWWKHWHPSHUDWXUH"
R : Continually press the 5HIULJHUDWRURU&RQYHUWLEOHRU)UHH]HUEXWWRQRQWKHFRQWUROSDQHOXQWLOWKH
GHVLUHGWHPSHUDWXUHDSSHDUV.
The numbers will cycle from highest to lowest and then return to the highest again with continuous
pressing.
4 4XHOHVWFHERXUGRQQHPHQWTXHOHFRQJpODWHXUpPHWGHWHPSVjDXWUH"
R : Ce son peut être émis si le congélateur n’est pas alimenté en eau alors que la machine à glaçons est
allumée. Si vous n’avez pas de source d’eau reliée au congélateur, vous devriez désactiver la machine à
glaçons sur le panneau de commande.
4 3RXUTXRLOHSODWHDXGHODPDFKLQHjJODoRQVVHPEOHWLOFURFKH"
R : Il s’agit d’un état normal du cycle de la machine à glaçons. Le plateau de la machine à glaçons peut
sembler à niveau ou légèrement incliné. Le changement de position aide au processus de congélation.
4 0RQFRQJpODWHXUHVWVRXVWHQVLRQHWOHVFRPPDQGHVIRQFWLRQQHQWPDLVLOQHUHIURLGLWSDVHW
O¶DIILFKHXULQGLTXH©2)ªYRLUFLGHVVRXV4XHOHVWOHSUREOqPH"
R : Le congélateur est en mode Présentation. Ce mode désactive le refroidissement dans le but d’économiser
l’énergie lorsque l’appareil est présenté en magasin. Pour rétablir le fonctionnement normal, appuyez
d’abord sur le bouton Freezer (congélateur) pour activer l’écran, puis appuyez sur les boutons Freezer
(congélateur) et Water Filter Reset (remplacement du filtre à eau) et maintenez-les enfoncés jusqu’à ce
que vous entendiez un bip et que le réglage de la température s’affiche à l’écran. Utilisez la même
procédure pour rétablir le mode Présentation du congélateur, si vous le souhaitez.
35DÉPANNAGE
FRANÇAIS
$YDQWGތDSSHOHUOHUpSDUDWHXU
Consultez cette section du manuel avant de demander un service d’entretien; ce faisant, vous économiserez temps et
argent.
Refroidissement
Problème &DXVHSRVVLEOH 6ROXWLRQV
/HVFRPSDUWLPHQWV
GXUpIULJpUDWHXUHW
GXFRQJpODWHXUQH
UHIURLGLVVHQWSDV
/DFRPPDQGHHVWUpJOpHVXU
2))DUUrWVXUFHUWDLQV
PRGqOHV
Réglez la commande sur ON (marche). Veuillez
consulter la section Panneau de commande pour un bon
ajustement des températures.
/HUpIULJpUDWHXUHVWUpJOpVXUOH
PRGH3UpVHQWDWLRQ
Le mode Présentation permet un fonctionnement normal
de l’éclairage et de l’affichage du panneau de
commande, mais désactive le refroidissement pour
économiser l’énergie durant l’exposition en magasin.
Voir la section FAQ de ce manuel pour des instructions
sur la façon de désactiver le mode Présentation.
/HUpIULJpUDWHXUHVWGDQVXQ
F\FOHGHGpJLYUDJH
Durant le cycle de dégivrage, la température de chaque
compartiment peut augmenter légèrement. Attendez
30 minutes, puis vérifiez que la température est revenue
à la normale une fois le cycle de dégivrage terminé.
/HUpIULJpUDWHXUYLHQWG¶rWUH
LQVWDOOp
Chaque compartiment peut mettre jusqu’à 24 h pour
atteindre la température visée.
/HUpIULJpUDWHXUDUpFHPPHQW
pWpGpSODFp
Si le réfrigérateur a été entreposé ou couché pendant
une longue période, celui-ci doit être placé à la verticale
pendant 24 h avant d’être mis sous tension.
/HV\VWqPHGH
refroidissement est
WURSSXLVVDQW
/HUpIULJpUDWHXUUHPSODFHXQ
DQFLHQPRGqOH
Les réfrigérateurs modernes nécessitent un temps de
fonctionnement plus long, mais consomment moins
G¶pQHUJLHJUkFHjXQHWHFKQRORJLHSOXVHIILFDFH
/HUpIULJpUDWHXUYLHQWG¶rWUH
EUDQFKpRXUHPLVVRXV
WHQVLRQ
Le réfrigérateur peut mettre jusqu’à 24 h pour refroidir
complètement.
/DSRUWHDVRXYHQWpWpRXYHUWH
RXEHDXFRXSG¶DOLPHQWVRX
GHVDOLPHQWVFKDXGV\RQWpWp
SODFpV
L’ajout d’aliments ou l’ouverture de la porte réchauffe le
réfrigérateur, ce qui demande au compresseur de
fonctionner plus longtemps pour refroidir les
compartiments. Afin de conserver l’énergie, essayez de
sortir tout ce dont vous avez besoin du réfrigérateur en
une seule fois, rangez vos aliments de manière
organisée afin de les trouver facilement et fermez la
porte dès que les aliments sont sortis. (Consultez le
Guide de conservation des aliments.)
Les portes ne sont pas
FRPSOqWHPHQWIHUPpHV
Poussez les portes fermement. Si elles ne se ferment
pas complètement, consultez la section Les portes ne se
ferment pas complètement ou s’ouvrent toutes seules
dans la partie Pièces et caractéristiques de la section
Dépannage.
/HUpIULJpUDWHXUHVWLQVWDOOp
GDQVXQHQYLURQQHPHQWFKDXG
Le compresseur fonctionnera plus longtemps dans un
environnement chaud. Lorsque la température ambiante
est normale (21 °C), votre compresseur fonctionne entre
HWGXWHPSV6LODSLqFHHVWSOXVFKDXGH
attendez-vous à ce qu’il fonctionne encore plus. Le
réfrigérateur ne doit pas être mis en fonction lorsque la
température ambiante est supérieure à 43 °C.
36 DÉPANNAGE
Refroidissement
Problème &DXVHSRVVLEOH 6ROXWLRQV
$FFXPXODWLRQ
G¶KXPLGLWpj
O¶LQWpULHXU
/HVSRUWHVVRQWVRXYHQW
RXYHUWHVRXUHVWHQWRXYHUWHV
ORQJWHPSV
Lorsque les portes sont souvent ouvertes ou restent
ouvertes longtemps, de l’air chaud et humide entre à
l’intérieur du compartiment. La température et le niveau
d’humidité augmentent ainsi à l’intérieur du
compartiment. Pour diminuer cet effet, réduisez la
fréquence et la durée d’ouverture des portes.
Les portes ne sont pas
IHUPpHVFRUUHFWHPHQW
Si elles ne se ferment pas complètement, consultez la
section Les portes ne se ferment pas complètement ou
s’ouvrent toutes seules dans la partie Pièces et
caractéristiques de la section Dépannage.
Conditions ambiantes
KXPLGHV
Des conditions ambiantes humides font entrer plus
d’humidité dans les compartiments lorsque les portes
sont ouvertes, ce qui génère de la condensation ou du
givre. Maintenir un niveau d’humidité raisonnable dans la
maison aidera à contrôler la quantité d’humidité qui peut
entrer dans les compartiments.
&\FOHGHGpJLYUDJHUpFHPPHQW
HIIHFWXp
Pendant le cycle de dégivrage, la température de chaque
compartiment peut augmenter légèrement et de la
condensation peut se former sur la paroi arrière. Une
fois le cycle de dégivrage terminé, attendez 30 minutes
et vérifiez que la température a bien été rétablie.
Les aliments ne sont pas
HPEDOOpVFRUUHFWHPHQW
Les aliments qui sont rangés à découvert ou sans
emballage et les contenants humides peuvent entraîner
une accumulation d’humidité dans chaque compartiment.
Essuyez tous les contenants et rangez les aliments dans
des emballages scellés pour éviter la condensation et le
givre.
/HVDOLPHQWVJqOHQW
dans le
FRPSDUWLPHQWGX
UpIULJpUDWHXU
'HVDOLPHQWVjWHQHXUpOHYpH
HQHDXRQWpWpSODFpVj
SUR[LPLWpG¶XQHERXFKH
G¶DpUDWLRQ
Placez les aliments à haute teneur en eau loin des
bouches d’aération.
/DWHPSpUDWXUHGX
UpIULJpUDWHXUHVWPDOUpJOpH
Si la température est trop froide, ajustez-la une unité à la
fois et attendez que la température se stabilise. Pour
plus d’information, reportez-vous à la section Réglage
des commandes.
/HUpIULJpUDWHXUHVWLQVWDOOp
GDQVXQHQGURLWIURLG
Lorsque le réfrigérateur fonctionne dans des conditions
inférieures à 41 °F (5 °C), les aliments peuvent geler
dans le compartiment du réfrigérateur. Le réfrigérateur
ne doit pas être utilisé à une température inférieure à
55 °F (13 °C).
/HUpIULJpUDWHXUHVW
WURSFKDXG
/HUpIULJpUDWHXUYLHQWG¶rWUH
LQVWDOOp
Chaque compartiment peut mettre jusqu’à 24 h pour
atteindre la température visée.
/HVERXFKHVG¶DpUDWLRQVRQW
REVWUXpHV
Repérez les évents d’aération à l’aide de votre main pour
détecter l’air et déplacez tous les articles qui obstruent
les évents et limitent la circulation de l’air. Réorganisez
les aliments pour permettre à l’air de circuler dans tout le
compartiment.

37DÉPANNAGE
FRANÇAIS
Refroidissement
Problème &DXVHSRVVLEOH 6ROXWLRQV
/HUpIULJpUDWHXUHVW
WURSFKDXG
/HVSRUWHVVRQWVRXYHQW
RXYHUWHVRXUHVWHQWRXYHUWHV
ORQJWHPSV
Lorsque les portes sont souvent ouvertes ou restent
ouvertes longtemps, de l’air chaud et humide entre à
l’intérieur du compartiment. La température et le niveau
d’humidité augmentent ainsi à l’intérieur du
compartiment. Pour diminuer cet effet, réduisez la
fréquence et la durée d’ouverture des portes.
/HUpIULJpUDWHXUHVWLQVWDOOp
GDQVXQHQGURLWFKDXG
Le réfrigérateur ne doit pas être mis en fonction lorsque
la température ambiante est supérieure à 43 °C.
%HDXFRXSG¶DOLPHQWVRXGHV
DOLPHQWVFKDXGVRQWpWpSODFpV
GDQVOHFRPSDUWLPHQW
L’ajout d’aliments augmente la température du
compartiment, ce qui entraîne le déclenchement du
système de refroidissement. Pour limiter cet effet, laissez
refroidir les aliments chauds à température ambiante
avant de les placer dans le réfrigérateur.
Les portes ne sont pas
FRUUHFWHPHQWIHUPpHV
Si elles ne se ferment pas complètement, consultez la
section Les portes ne se ferment pas complètement ou
s’ouvrent toutes seules dans la partie Pièces et
caractéristiques de la section Dépannage.
/DWHPSpUDWXUHQ¶HVWSDV
UpJOpHFRUUHFWHPHQW
Si la température est trop élevée, ajustez les réglages
une position à la fois et attendez que la température se
stabilise.
/HF\FOHGHGpJLYUDJHYLHQWGH
VHWHUPLQHU
Durant le cycle de dégivrage, la température de chaque
compartiment peut augmenter légèrement et des signes
de condensation peuvent apparaître sur la paroi arrière.
Attendez 30 minutes, puis vérifiez que la température est
revenue à la normale une fois le cycle de dégivrage
terminé.
/HUpIULJpUDWHXUHVW
WURSIURLG
/DWHPSpUDWXUHQ¶HVWSDV
UpJOpHFRUUHFWHPHQW
Si la température est trop basse, ajustez les réglages
une position à la fois et attendez que la température se
stabilise. Consultez le Panneau de commande pour plus
de renseignements à ce sujet.

38 DÉPANNAGE
3LqFHVHWFDUDFWpULVWLTXHV
Problème &DXVHSRVVLEOH 6ROXWLRQV
Les portes ne se
ferment pas
FRPSOqWHPHQWRX
V¶RXYUHQWWRXWHV
VHXOHV
'HVDOLPHQWVHPSrFKHQWOD
IHUPHWXUHGHODSRUWH
Rangez les aliments d’une autre façon pour dégager la
porte et ses tablettes.
/HEDFjJODoRQVOHFRXYHUFOH
GXEDFjOpJXPHVHWIUXLWVOHV
EDFVOHVWDEOHWWHVOHV
EDOFRQQHWVGHODSRUWHRXOHV
paniers ne sont pas
SRVLWLRQQpVFRUUHFWHPHQW
Poussez les bacs jusqu’au fond et placez le couvercle
du bac à légumes et fruits, les bacs, les tablettes et les
paniers dans leur position normale. Veuillez consulter la
section Fonctionnement pour en savoir plus à ce sujet.
/HVSRUWHVRQWpWpHQOHYpHV
GXUDQWO¶LQVWDOODWLRQGH
O¶DSSDUHLOHWQ¶RQWSDVpWp
FRUUHFWHPHQWUHPLVHVHQ
SODFH
Enlevez et replacez les portes en suivant les instructions
d’installation.
/HUpIULJpUDWHXUQ¶HVWSDV
G¶DSORPE
Veuillez consulter la section Alignement de la porte dans
la partie Installation pour positionner le réfrigérateur de
façon adéquate.
/DSRUWHHVWGLIILFLOH
jRXYULU
/HVMRLQWVVRQWVDOHVRX
FROODQWV
Nettoyez les joints et leurs surfaces de contact. Frottez
un chiffon avec du lustre ou de la cire pour meubles sur
les joints après les avoir nettoyés.
/DSRUWHYLHQWG¶rWUHUHIHUPpH
Lorsque vous ouvrez la porte, de l’air tiède entre dans le
réfrigérateur. À mesure que l’air tiède se refroidit, il peut
créer un effet d’aspiration. Si la porte est difficile à ouvrir,
veuillez patienter une minute pour permettre à la
pression de l’air de s’équilibrer, puis vérifiez que la porte
s’ouvre plus facilement.
/¶pFODLUDJHQH
IRQFWLRQQHSDV
/HVOXPLqUHVj'(/jO¶LQWpULHXU
QHIRQFWLRQQHQWSDV
La lampe du compartiment du réfrigérateur est une diode
d’éclairage interne, et son entretien doit être réalisé par
un professionnel.
/¶LQWpULHXUGX
UpIULJpUDWHXUHVW
FRXYHUWGH
SRXVVLqUHRXGH
VXLH
/HUpIULJpUDWHXUHVWSODFpSUqV
G¶XQHIODPPHRXG¶XQIHX
FRPPHXQHFKHPLQpHXQ
SRrOHjERLVRXXQHERXJLH
Assurez-vous que le réfrigérateur n’est pas situé près
d’une flamme ou d’un feu, comme une cheminée, un
poêle à bois ou une bougie.
39DÉPANNAGE
FRANÇAIS
%UXLWV
Problème &DXVHSRVVLEOH 6ROXWLRQV
&OLF
/DFRPPDQGHGXGpJLYUDJHFOLTXHWWH
ORUVTXHOHF\FOHGHGpJLYUDJH
DXWRPDWLTXHVHPHWHQPDUFKHRX
V¶DUUrWH/DFRPPDQGHGXWKHUPRVWDWRX
ODFRPPDQGHGXUpIULJpUDWHXUVXUFHUWDLQV
PRGqOHVFOLTXHWWHDXVVLHQGpEXWHWHQ
ILQGHF\FOH
Fonctionnement normal
&OLTXHWLV
'HVFOLTXHWLVSHXYHQWrWUHGXVjOD
FLUFXODWLRQGXIOXLGHIULJRULJqQHjOD
FRQGXLWHG¶DOLPHQWDWLRQHQHDXjO¶DUULqUH
GHO¶DSSDUHLORXDX[pOpPHQWVUDQJpV
DXGHVVXVRXDXWRXUGXUpIULJpUDWHXU
Fonctionnement normal
/HUpIULJpUDWHXUQ¶HVWSDVHQSRVLWLRQ
VWDEOHVXUOHVRO
Le sol flanche ou est inégal, ou les pieds de
nivellement doivent être ajustés sous le
réfrigérateur. Veuillez consulter la section
Nivellement et alignement de la porte.
/HUpIULJpUDWHXUGRWpG¶XQFRPSUHVVHXU
OLQpDLUHDpWpGpSODFpEUXVTXHPHQW Fonctionnement normal
Sifflement
/HPRWHXUGXYHQWLODWHXUGHO¶pYDSRUDWHXU
IDLWFLUFXOHUGHO¶DLUjWUDYHUVOH
FRPSDUWLPHQWGXUpIULJpUDWHXU
Fonctionnement normal
/HYHQWLODWHXUGXFRQGHQVHXUVRXIIOHGH
O¶DLUVXUOHFRQGHQVDWHXU Fonctionnement normal
*DUJRXLOOHPHQW /HIOXLGHIULJRULJqQHFLUFXOHGDQVOH
V\VWqPHGHUHIURLGLVVHPHQW Fonctionnement normal
Pop
&RQWUDFWLRQHWH[SDQVLRQGHVSDURLV
LQWHUQHVFDXVpHVSDUOHVFKDQJHPHQWVGH
WHPSpUDWXUH
Fonctionnement normal
*UpVLOOHPHQW (DXV¶pJRXWWDQWVXUOHUDGLDWHXUGH
GpJLYUDJHORUVGXF\FOHGHGpJLYUDJH Fonctionnement normal
Vibration
6LOHF{WpRXO¶DUULqUHGXUpIULJpUDWHXU
WRXFKHXQPHXEOHRXXQPXUFHUWDLQHV
GHVYLEUDWLRQVQRUPDOHVGHO¶DSSDUHLO
SHXYHQWpPHWWUHXQVRQDXGLEOH
Pour supprimer ce bruit, assurez-vous que
les côtés et l’arrière du réfrigérateur ne
peuvent pas vibrer contre un meuble ou un
mur.
eJRXWWHPHQW (DXV¶pFRXODQWjWUDYHUVO¶pJRXWWRLUDX
FRXUVGXF\FOHGHGpJLYUDJH Fonctionnement normal
6RQSXOVDWRLUHRX
DLJX
9RWUHUpIULJpUDWHXUHVWFRQoXSRXU
IRQFWLRQQHUGHPDQLqUHHIILFDFHSRXU
FRQVHUYHUYRVDOLPHQWVjODERQQH
WHPSpUDWXUH/HFRPSUHVVHXUjKDXWH
SHUIRUPDQFHSHXWDPHQHUYRWUHQRXYHDX
UpIULJpUDWHXUjIRQFWLRQQHUSOXV
UpJXOLqUHPHQWPDLVLOHVWWRXMRXUVSOXV
pFRQRPHHQpQHUJLHTXHOHVDQFLHQV
PRGqOHV,OHVWQRUPDOG¶HQWHQGUHGHV
SXOVDWLRQVRXXQVRQDLJXDXFRXUVGX
IRQFWLRQQHPHQWGHYRWUHUpIULJpUDWHXU
Fonctionnement normal

40 DÉPANNAGE
5pVHDX:L)L
Problème &DXVHSRVVLEOH 6ROXWLRQV
Votre appareil
pOHFWURPpQDJHUHW
YRWUHWpOpSKRQH
LQWHOOLJHQWQHVRQW
SDVFRQQHFWpVDX
UpVHDX:L)L
/HPRWGHSDVVHGXUpVHDX
:L)LDXTXHOYRXVHVVD\H]GH
YRXVFRQQHFWHUHVWLQFRUUHFW
Trouvez le réseau Wi-Fi connecté à votre téléphone
intelligent et supprimez-le, puis enregistrez votre appareil
sur l’application SIGNATURE KITCHEN SUITE.
/HVGRQQpHVPRELOHVGHYRWUH
WpOpSKRQHLQWHOOLJHQWVRQW
DFWLYpHV
Désactivez les données mobiles sur votre téléphone
intelligent avant d’enregistrer l’appareil à l’aide du réseau
Wi-Fi.
/HQRPGXUpVHDXVDQVILO
66,'HVWHUURQp
Le nom du réseau sans fil (SSID) doit être une
combinaison de lettres et de chiffres anglais. (N’utilisez
pas de caractères spéciaux.)
/DIUpTXHQFHGXURXWHXUQ¶HVW
SDVGH*+]
Seule une fréquence de routeur de 2,4 GHz est prise en
charge. Réglez le routeur sans fil à 2,4 GHz et
connectez-y l’appareil. Pour connaître la fréquence du
routeur, informez-vous auprès de votre fournisseur de
services Internet ou du fabricant du routeur.
/DGLVWDQFHHQWUHO¶DSSDUHLOHW
OHURXWHXUHVWWURSJUDQGH
Si l’appareil est trop éloigné du routeur, le signal peut
être faible et la connexion peut ne pas être configurée
correctement. Déplacez le routeur afin qu’il soit plus près
de l’appareil.
41GARANTIE
FRANÇAIS
SIGNATURE KITCHEN SUITE
GARANTIE LIMITÉE DU RÉFRIGÉRATEUR –
ÉTATS-UNIS
6LYRWUHUpIULJpUDWHXU6,*1$785(.,7&+(168,7(©SURGXLWªQHIRQFWLRQQHSDVjFDXVHG¶XQGpIDXWGHPDWpULHORXGH
fabrication lors de l’usage domestique normal au cours de la période de garantie énoncée ci-dessous, SIGNATURE
KITCHEN SUITE réparera ou remplacera le produit, à sa discrétion. Cette garantie limitée n’est valide que pour l’acheteur
initial au détail du produit et ne s’applique que lorsque l’appareil est acheté et utilisé aux États-Unis, y compris les
territoires américains. Une preuve de l’achat original est exigée pour obtenir l’entretien de garantie en vertu de cette
garantie limitée.
PÉRIODE DE GARANTIE
5pIULJpUDWHXU
6\VWqPHVFHOOp
FRQGHQVDWHXUGpVK\GUDWHXUWX\DXGHUDFFRUGHPHQWHW
pYDSRUDWHXU
&RPSUHVVHXUOLQpDLUH
7URLVDQVDSUqVODGDWH
G¶DFKDWRULJLQDOGH
O¶DSSDUHLO
Pièces et main-d’œuvre
(pièces internes et
fonctionnelles uniquement)
7URLVDQVDSUqVODGDWH
G¶DFKDWRULJLQDOGH
O¶DSSDUHLO
Pièces et main-d’œuvre
6HSWDQVDSUqVODGDWH
G¶DFKDWRULJLQDOGH
O¶DSSDUHLO
Pièces uniquement
(la main-d’œuvre sera
facturée au client)
'L[DQVDSUqVODGDWH
GތDFKDWRULJLQDOGH
OތDSSDUHLO
Pièces uniquement
(la main-d’œuvre sera
facturée au client)
/HVEUXLWVOLpVDXIRQFWLRQQHPHQWQRUPDOOHQRQUHVSHFWGHVGLUHFWLYHVGXPDQXHOG¶XWLOLVDWLRQG¶HQWUHWLHQRX
G¶LQVWDOODWLRQGHPrPHTXHO¶XWLOLVDWLRQGHO¶DSSDUHLOGDQVXQHQYLURQQHPHQWLQDGpTXDWQHVRQWSDVFRXYHUWV
SDUFHWWHJDUDQWLH
%Les produits et pièces de remplacement sont garantis pour la portion restante de la période de garantie originale ou
quatre-vingt-dix (90) jours, selon la période la plus longue.
%Les pièces et les produits de rechange peuvent être neufs ou réusinés.
&(77(*$5$17,(5(03/$&(7287($875(*$5$17,((;3/,&,7(28,03/,&,7(<&2035,60$,66$16
6¶</,0,7(57287(*$5$17,('(48$/,7e0$5&+$1'(28'¶$'$37$7,21¬8186$*(3$57,&8/,(5
'$16/$0(685(287287(*$5$17,(,03/,&,7((67(;,*e(3$5/$/2,&(77(*$5$17,((67
/,0,7e('$16/(7(036¬/$3e5,2'('(*$5$17,((;3/,&,7(&,'(66861,/()$%5,&$171,621
',675,%87(85$0e5,&$,11(62175(63216$%/(6'(7287'200$*($&&(662,5(&216e&87,)
,1',5(&763e&,$/28381,7,)'(48(/48(1$785(48(&(62,7,1&/8$170$,66$166¶</,0,7(5
/(63(57(6'(5(9(18628'(%e1e),&(6287287$875('200$*(48¶,/62,7&2175$&78(/
'e/,&78(/28$875( Certains États n’autorisent pas l’exclusion ou la limitation des dommages accessoires ou
consécutifs, ou la limitation sur la durée d’une garantie implicite; l’exclusion ou la limitation ci-dessus pourraient ne pas
s’appliquer à vous. La présente garantie vous confère des droits légaux spécifiques. Vous pouvez jouir d’autres droits
qui peuvent varier en fonction de l’État et des lois qui y sont appliquées.
/$35e6(17(*$5$17,(/,0,7e(1(&2895(3$6&(48,68,7
%Les déplacements du technicien d’entretien pour livrer, ramasser, installer ou réparer le produit; donner des
LQVWUXFWLRQVVXUVRQXWLOLVDWLRQUpSDUHURXUHPSODFHUOHVIXVLEOHVFRUULJHUOHFkEODJHRXODSORPEHULHRXFRUULJHU
toute réparation ou installation non autorisée.
%Le dysfonctionnement du produit en cas de défaillances ou de coupures électriques, ou en cas de services
d’électricité inadaptés.
%/HVGpJkWVFDXVpVSDUGHVFRQGXLWHVG¶HDXTXLIXLHQWRXTXLVRQWEULVpHVGHVFRQGXLWHVG¶HDXJHOpHVGHVFRQGXLWHV
GHGUDLQDJHREVWUXpHVXQHDOLPHQWDWLRQHQHDXLQDGpTXDWHRXLQWHUURPSXHRXXQDSSRUWG¶DLULQVXI¿VDQW
%Les dommages consécutifs à l’utilisation du produit dans une atmosphère corrosive ou de façon contraire aux
LQVWUXFWLRQVVSpFL¿pHVGDQVOHPDQXHOG¶XWLOLVDWLRQ
%Les dommages au produit causés par des accidents, des insectes nuisibles, de la vermine, la foudre, le vent, un
incendie, une inondation ou une catastrophe naturelle.
42 GARANTIE
%Les dommages résultant d’une mauvaise utilisation, d’un abus, d’une installation inadéquate, d’une mauvaise
réparation ou d’un entretien incorrect. Une réparation incorrecte comprend l’utilisation de pièces non approuvées ou
VSpFL¿pHVSDU6,*1$785(.,7&+(168,7(
%/HVGRPPDJHVRXODGpIDLOODQFHGXSURGXLWFDXVpVSDUXQHPRGL¿FDWLRQQRQDXWRULVpHGXSURGXLWRXV¶LOHVWHPSOR\p
pour une utilisation autre que celle pour laquelle il a été conçu, ou tout dommage causé par une fuite d’eau
provoquée par une mauvaise installation.
%Les dommages ou la défaillance du produit causés par un courant ou une tension électrique incorrects, par des
codes de plomberie incorrects, par une utilisation commerciale ou industrielle inappropriées, ou par l’utilisation
G¶DFFHVVRLUHVSH[¿OWUHVjHDXGHFRPSRVDQWVRXGHSURGXLWVGHQHWWR\DJHQRQDSSURXYpVSDU6,*1$785(
KITCHEN SUITE.
%Les dommages consécutifs au transport et à la manutention du produit, y compris les égratignures, les bosses, les
pEUpFKXUHVHWWRXWDXWUHGRPPDJHDXSURGXLW¿QLVDXIVLGHWHOVGRPPDJHVVRQWFDXVpVSDUGHVGpIDLOODQFHV
matérielles ou associées à la main-d’œuvre et qu’ils sont rapportés dans un délai d’une (1) semaine après la
livraison (appelez le 1 855 790-6655).
%/HVGRPPDJHVjRXOHVpOpPHQWVPDQTXDQWVGHWRXWDI¿FKDJHERvWHRXYHUWHSURGXLWHQUDEDLVRXSURGXLWUHPLVj
neuf.
%'HVSURGXLWVGRQWOHQXPpURGHVpULHRULJLQDODpWpUHWLUpPRGL¿pRXQHSHXWrWUHIDFLOHPHQWGpWHUPLQp/HVQXPpURV
de modèle et de série ainsi que le reçu original de vente au détail sont requis pour une validation de la garantie.
%Les augmentations des frais de fonctionnement et des autres dépenses de fonctionnement.
%/HUHPSODFHPHQWGHVDPSRXOHVGHV¿OWUHVRXGHVFRQVRPPDEOHV
%/HVUpSDUDWLRQVHIIHFWXpHVORUVTXHOHSURGXLWHVWXWLOLVpjGHV¿QVDXWUHVTXHO¶XWLOLVDWLRQGRPHVWLTXHKDELWXHOOHHW
normale (par exemple : usage commercial, dans des bureaux ou dans des installations récréatives) ou de façon
contraire aux instructions du manuel d’utilisation.
%Les coûts associés au déplacement du produit à partir de votre maison pour des réparations.
%Le déplacement et la réinstallation du produit, s’il est installé dans un endroit inaccessible ou s’il n’est pas installé
conformément aux instructions d’installation publiées, y compris celles des manuels d’installation et d’utilisation de
SIGNATURE KITCHEN SUITE.
%Les tablettes, les balconnets de porte, les tiroirs, les poignées, les accessoires et les autres pièces en dehors de
celles qui ont été initialement jointes à ce modèle particulier.
/HFRWGHVUpSDUDWLRQVRXGXUHPSODFHPHQWGDQVOHVFLUFRQVWDQFHVG¶H[FOXVLRQFLGHVVXVHVWDVVXPpSDUOH
FRQVRPPDWHXU
,QVFULYH]YRVLQIRUPDWLRQVGHJDUDQWLHFL
GHVVRXV
,QIRUPDWLRQG¶HQUHJLVWUHPHQWGXSURGXLW
0RGqOH
1XPpURGHVpULH
'DWHG¶DFKDW
3RXUREWHQLUGHVUHQVHLJQHPHQWVGpWDLOOpVFRQFHUQDQWOD
JDUDQWLHHWOHVHUYLFHjODFOLHQWqOHYHXLOOH]QRXVFRQWDFWHU
RXYLVLWHUQRWUHVLWH:HE
Appelez au 1 855 790-6655 (24 heures par jour, 365 jours par
année) et sélectionnez une option dans le menu ou visitez notre
site Web au www.thesignaturekitchen.com.
ou par courrier : Centre d’information à la clientèle de
SIGNATURE KITCHEN SUITE :
C. P. 240007, 201, James Record Road,
Huntsville (Alabama), 35813 ATTN : CIC
ESPAÑOL
MANUAL DEL PROPIETARIO
REFRIGERADOR INCORPORADO
Lea detenidamente el manual del propietario antes de poner el
electrodoméstico en funcionamiento y consérvelo a mano en todo
momento para su referencia.
www.thesignaturekitchen.com
SKSFD3604P
Copyright © 2017 Signature Kitchen Suite. Todos los Derechos Reservados.
P/No. : MFL70339803_Rev.00

2TABLA DE CONTENIDOS
3 CARACTERÍSTICAS DEL
PRODUCTO
4 INSTRUCCIONES DE SEGURIDAD
4 INSTRUCCIONES IMPORTANTES DE
SEGURIDAD
8 ESPECIFICACIONES DEL
PRODUCTO
9 DESCRIPCIÓN GENERAL DEL
PRODUCTO
9 Exterior
10 Interior
11 FUNCIONAMIENTO
11 Antes de Usar
12 Panel de control
14 Dispensador de Agua Interno
14 Almacenando Alimentos
15 Cajas
17 Ajustando las Bandejas de la Puerta
17 Ajustando los Estantes
18 Ajustando la Bandeja de Bocadillos
19 FUNCIONES INTELIGENTES
19 Aplicación SIGNATURE KITCHEN SUITE
21 Función Smart Grid (Red Inteligente)
22 Función Smart Diagnosis ™ (Diagnóstico
Inteligente)
25 MANTENIMIENTO
25 Limpieza
26 Reemplazo del Filtro de Agua
31 SOLUCIÓN DE PROBLEMAS
31 Preguntas frecuentes
32 Antes de llamar al servicio técnico
38 GARANTÍA
TABLA DE CONTENIDOS

3CARACTERÍSTICAS DEL PRODUCTO
ESPAÑOL
CARACTERÍSTICAS DEL PRODUCTO
Según el modelo, es posible que algunas de las siguientes funciones no estén disponibles.
AGUA FILTRADA
El dispensador de agua dispensa agua fresca y helada.
ALARMA DE LA PUERTA
La función Alarma de la Puerta está diseñada para prevenir problemas de funcionamiento en el refrigerador que
puedan ocurrir al dejar una puerta abierta. Si una puerta se deja abierta por más de 60 segundos, una alarma de
advertencia sonará a intervalos de 30 segundos.

4INSTRUCCIONES DE SEGURIDAD
INSTRUCCIONES DE SEGURIDAD
LEA TODAS LAS INSTRUCCIONES ANTES DE UTILIZAR
Su seguridad y la de los demás son muy importantes.
Tanto en este manual como en el equipo, hemos proporcionado muchos mensajes de seguridad importantes.
Siempre debe leer y respetar todos los mensajes de seguridad.
Este es el símbolo de alerta de seguridad.
Este símbolo le advierte sobre posibles riesgos que pueden ocasionar lesiones o la muerte a usted o a otros.
El símbolo de alerta de seguridad siempre estará acompañado de las palabras “ADVERTENCIA” o
“PRECAUCIÓN” y seguido de un mensaje de seguridad importante.
Estos términos significan lo siguiente:
ADVERTENCIA
Podría sufrir lesiones graves o la muerte si no sigue las instrucciones.
PRECAUCIÓN
Puede resultar lesionado o causar daño al producto si no sigue las instrucciones.
Todos los mensajes de seguridad le indicarán cuál es el riesgo potencial, le indicarán cómo reducir la probabilidad
de lesiones y le proporcionarán información sobre qué podría suceder si no se siguen las instrucciones.
INSTRUCCIONES IMPORTANTES DE SEGURIDAD
ADVERTENCIA
Para reducir riesgos de explosión, incendio, muerte, descarga eléctrica,
quemaduras o heridas a personas mientras se utiliza el producto, siga
precauciones básicas, incluyendo las siguientes:
Propuesta 65 de California (Solo USA)
%Este producto contiene químicos conocidos por el estado de California por causar cáncer, malformaciones de
nacimiento u otros daños reproductivos. Lave sus manos luego de la manipulación.

5INSTRUCCIONES DE SEGURIDAD
ESPAÑOL
FUNCIONAMIENTO
%1RXVHHVWHHOHFWURGRPpVWLFRSDUD¿QHVHVSHFLDOHVFRPRSDUDFRQVHUYDUPHGLFDPHQWRVRPDWHULDOHVGH
ensayo, usar en barcos, etc.
%NO PERMITA que los niños se suban, paren, o cuelguen de las puertas o estantes del refrigerador.
Podrían dañar el refrigerador y ocasionarse una herida.
%No permita que los niños entren al electrodoméstico. Podrían quedar atrapados y sofocarse.
%Debe supervisar a los niños para asegurarse de que no jueguen con el electrodoméstico.
%Mantenga los dedos lejos de los puntos de riesgo de pinzamiento; las distancias de separación entre las puertas
y los gabinetes son necesariamente pequeñas. Tenga cuidado al cerrar las puertas cuando haya niños cerca.
%No toque los alimentos congelados ni las partes metálicas del compartimento del congelador si tiene las manos
mojadas o húmedas. Hacerlo podría causar congelación.
%No vuelva a congelar alimentos congelados que se hayan descongelado por completo. Esto podría ser peligroso
para su salud.
%Se recomienda un disyuntor o un circuito derivado individual, con una conexión a tierra apropiada.
%No use adaptadores ni enchufe el cable de alimentación en un alargador de múltiples tomacorrientes.
%No use un cable que tenga grietas o daño de abrasión en su longitud o en algún extremo del enchufe o conector.
+DJDTXHSHUVRQDOGHVHUYLFLRFDOL¿FDGRUHSDUHLQPHGLDWDPHQWHWRGRFDEOHGHHQHUJtDTXHHVWpJDVWDGRR
dañado de alguna manera.
%No use el refrigerador ni toque el cable de alimentación con las manos mojadas.
%1RPRGL¿TXHQLH[WLHQGDHOFDEOHGHDOLPHQWDFLyQ
%1RXVHXQWRPDFRUULHQWHTXHQRHVWpFHUWL¿FDGR1RHQFKXIHHOHOHFWURGRPpVWLFRHQXQWRPDFRUULHQWHGHSDUHG
dañado.
%No coloque las manos, los pies u otros objetos en las ranuras de ventilación ni en la parte inferior del
refrigerador. Si lo hace, podría sufrir lesiones personales o descargas eléctricas.
%Si se produce una fuga de gas (propano/GPL), asegúrese de que el área esté adecuadamente ventilada y
póngase en contacto con un centro de servicio autorizado antes de volver a usar el refrigerador. No toque ni
desarme el electrodoméstico ni el cable de alimentación.
%Ante la presencia de ruidos u olores extraños, o si sale humo del electrodoméstico, desconecte el cable de
alimentación de inmediato y póngase en contacto con un centro de servicio autorizado.
%No use fusibles (como cobre, alambre de acero, etc.) que no sean los fusibles estándar.
%No coloque ni use un aparato eléctrico dentro del electrodoméstico, a menos que sea de un tipo recomendado
por el fabricante.
%No introduzca animales con vida dentro del electrodoméstico.
%No coloque objetos pesados o frágiles, contenedores llenos de líquido, sustancias combustibles u objetos
LQÀDPDEOHVFRPRYHODV\OiPSDUDVVREUHHOHOHFWURGRPpVWLFR
%Evite el contacto con las partes móviles del mecanismo eyector o con el elemento de calor que dispensa los
cubos de hielo. NO introduzca los dedos en el mecanismo de fabricación automática de hielo con el refrigerador
enchufado.
%Este electrodoméstico no está destinado al uso por personas (incluyendo niños) con capacidades físicas,
sensoriales o mentales reducidas, a menos que se les provea supervisión o instrucciones concernientes al uso
del mismo por parte de una persona responsable de su seguridad.
%Si se conecta a un circuito protegido con fusibles, utilice un fusible de retardo.

6INSTRUCCIONES DE SEGURIDAD
MANTENIMIENTO
%No use secadoras eléctricas para secar el interior del producto.
%No prenda velas para remover el olor interno del producto.
%(QHOFDVRGHIXJDGHOUHIULJHUDQWHDOHMHORVREMHWRVLQÀDPDEOHVGHOUHIULJHUDGRU$VHJ~UHVHGHTXHHOiUHDHVWp
bien ventilada y póngase en contacto con un centro de servicio autorizado.
%0DQWHQJDPDWHULDOHVLQÀDPDEOHV\YDSRUHVFRPRJDVROLQDDOHMDGRVGHOUHIULJHUDGRU
%Este electrodoméstico está diseñado para uso doméstico y aplicaciones similares como areas de cocina en
WLHQGDVR¿FLQDV\OXJDUHVGHWUDEDMRJUDQMDVSRUFOLHQWHVHQKRWHOHVPRWHOHV\RWURVWLSRVGHDPELHQWHV
residenciales; dormitorios; aplicaciones de abastecimiento y de servicios similares de no distribución.
%Desenchufe el cable de alimentación antes de limpiar o reparar el electrodoméstico.
%Las luces del refrigerador y el compartimento del congelador son luces LED para interiores, y un técnico
FDOL¿FDGRGHEHUHDOL]DUHOPDQWHQLPLHQWR
%En caso de apagón o tormenta eléctrica, desenchufe el cable de alimentación de inmediato.
%Apague la alimentación si ingresa agua o polvo en el electrodoméstico. Llame a un agente de servicio.
%No almacene contenedores de vidrio ni refrescos en el compartimento del congelador. Al congelarse, los
contenidos pueden expandirse, romper el contenedor y provocar lesiones.
%No almacene, desarme, ni repare el electrodoméstico usted mismo, y tampoco permita que personal no
FDOL¿FDGRORKDJD
%Si el cable de suministro eléctrico está dañado, este deberá ser reemplazado únicamente por el fabricante, su
DJHQWHGHVHUYLFLRRSRUXQDSHUVRQDVLPLODUPHQWHFXDOL¿FDGDDPDQHUDGHHYLWDUULHVJRV
%1RDOPDFHQHVXVWDQFLDVH[SORVLYDVFRPRODWDVGHDHURVROFRQSURSXOVRUHVLQÀDPDEOHVHQHVWH
electrodoméstico.
%En caso de LED, ésta deberá ser reemplazada por personal de servicio.
ELIMINACIÓN
%Los refrigeradores desechados o abandonados son peligrosos, incluso si lo están sólo por unos días. Al
momento de desechar el refrigerador, retire los materiales de embalaje de la puerta o quite las puertas, pero deje
ORVHVWDQWHVHQVXOXJDUD¿QGHTXHORVQLxRVQRSXHGDQLQJUHVDUIiFLOPHQWHDpVWH
%6LGHVHFKDUDXQUHIULJHUDGRUDVHJ~UHVHGHUHWLUDUHOUHIULJHUDQWHSDUDTXHXQPLHPEURFDOL¿FDGRGHOSHUVRQDOGH
servicio lo deseche correctamente. Si usted libera el refrigerante, podría ser multado o encarcelado de
conformidad con la ley ambiental vigente.
INSTRUCCIONES DE CONEXIÓN A TIERRA
%La conexión incorrecta del conductor de puesta a tierra del equipo puede provocar un riesgo de descarga
HOpFWULFD&RQVXOWHFRQXQHOHFWULFLVWDFDOL¿FDGRRWpFQLFRGHVHUYLFLRVLWLHQHGXGDVVREUHVLHODSDUDWRHVWi
GHELGDPHQWHFRQHFWDGRDWLHUUD1RPRGL¿TXHHOHQFKXIHSURYHtGRFRQHOHOHFWURGRPpVWLFRVLHVWHQRFD]DHQ
VXWRPDFRUULHQWHGHEHVROLFLWDUODLQVWDODFLyQGHXQRDGHFXDGRDXQHOHFWULFLVWDFXDOL¿FDGR
%+DJDTXHXQWpFQLFRFHUWL¿FDGRYHUL¿TXHTXHHOWRPDFRUULHQWHGHSDUHG\ORVFDEOHVHVWpQDGHFXDGDPHQWH
conectados a tierra.
%Nunca tire del cable de alimentación para desenchufar el electrodoméstico. Agarre siempre el enchufe
¿UPHPHQWH\WLUHGHOPLVPRSDUDUHWLUDUORGHOWRPDFRUULHQWH6LQRKDFHHVWRSRGUtDGDxDUHOFDEOHGH
alimentación y generar un riesgo de incendio y descarga eléctrica.

7INSTRUCCIONES DE SEGURIDAD
ESPAÑOL
PRECAUCIÓN
Para reducir el riesgo de lesiones leves o moderadas a personas, el mal
funcionamiento o daño al producto o propiedad cuando use este producto, siga las
precauciones básicas, incluidas las siguientes:
INSTALACIÓN
%No coloque el electrodoméstico en un lugar donde pueda caerse.
%El refrigerador debe instalarse correctamente, teniendo en cuenta las instrucciones de instalación.
FUNCIONAMIENTO
%No use aerosoles cerca del electrodoméstico.
%Este refrigerador está destinado únicamente a usos domésticos y similares.
%1RJROSHHQLDSOLTXHGHPDVLDGDIXHU]DHQODVVXSHU¿FLHVGHYLGULR1RWRTXHODVVXSHU¿FLHVGHYLGULRVLHVWiQ
agrietadas o rotas.
%No llene ni envase en exceso los alimentos en los compartimentos de la puerta. Esto podría dañar el
compartimento o provocar lesiones personales al retirar los alimentos aplicando una fuerza excesiva.
%No llene demasiado el electrodoméstico. Si lo hace podría lesionarse o causar daño a la propiedad.
%No cuelgue ni coloque objetos pesados en el dispensador del electrodoméstico.
MANTENIMIENTO
%No use detergentes fuertes como cera o diluyentes para la limpieza. Limpie con un trapo suave.
%Remueva objetos extraños (como polvo y agua) de las clavijas del cable de alimentación y áreas de contacto. No
utilice un paño humedo o mojado al limpiar el enchufe.
%No rocíe agua directamente en el interior o exterior del electrodoméstico.
%Cuando estén fríos, no limpie los estantes de vidrio ni las tapas con agua caliente. Si se exponen a cambios de
temperatura repentinos, podrían romperse.
ADVERTENCIA
%Mantenga las aperturas de ventilación, en la cubierta del electrodoméstico o en la estructura incorporada,
despejadas de obstrucciones.
%No utilice dispositivos mecánicos u otros medios para acelerar el proceso de descongelado, con excepción de
aquellos recomendados por el fabricante.
%No dañe el circuito refrigerante.
%No utilice aparatos eléctricos dentro de los compartimientos de almacenaje de alimentos del electrodoméstico, a
menos que sean de un tipo recomendado por el fabricante.
%El gas refrigerante y de aislamiento usado en el electrodoméstico requiere procedimientos de desechado
HVSHFLDOHV$OGHVHFKDUSRUIDYRUFRQVXOWHFRQXQDJHQWHGHVHUYLFLRRSHUVRQDVLPLODUPHQWHFDOL¿FDGD
Este electrodoméstico contiene una pequeña cantidad de refrigerante isobutano (R600a), gas natural con
alta compatibilidad ambiental, pero también combustible. Al transportar e instalar el electrodoméstico,
debe prestar atención para asegurar que ninguna parte del circuito refrigerante se dañe. Fuga del
refrigerante fuera de las pipas podría generar un incendio o causar una lesión ocular. Si se detecta una
fuga, evite cualquier llama descubierta o causas potenciales de incendio, y ventile el ambiente en el que
se encuentra el electrodoméstico por varios minutos.
A manera de evitar la creación de una mezcla de gas y aire inflamable en caso ocurra una fuga en el
circuito refrigerante, el tamaño del ambiente en el que el electrodoméstico se ubica deberá corresponder
a la cantidad de refrigerante usada. El espacio debe ser de 1 m² por cada 8g de refrigerante R600a dentro
del electrodoméstico. La cantidad de refrigerante en su electrodoméstico particular se muestra en la placa
de identificación ubicada dentro del mismo. Nunca inicie un electrodoméstico mientras este muestre algún
signo defectuoso. En caso de dudas, consulte con su distribuidor.
GUARDE ESTAS INSTRUCCIONES

8ESPECIFICACIONES DEL PRODUCTO
ESPECIFICACIONES DEL PRODUCTO
La apariencia y las especificaciones detalladas en este manual podrían variar debido a mejoras constantes en el
producto.
Requisitos Eléctricos 115 V, 60 Hz
Presión de Agua Min / Max 20 - 120 psi (138 - 827 kPa)
Modelo SKSCR3001P
Descripción Refrigerador Incorporado
Peso neto 483 lb (219 kg)
9DESCRIPCIÓN GENERAL DEL PRODUCTO
ESPAÑOL
DESCRIPCIÓN GENERAL DEL PRODUCTO
Las ilustraciones en esta guía pueden diferir de los componentes y accesorios reales, los cuales están sujetos a
cambios sin previo aviso por parte del fabricante a fin de introducir mejoras en el producto.
Exterior

10 DESCRIPCIÓN GENERAL DEL PRODUCTO
1Filtro de agua
Purifica el agua.
NOTA
%(O¿OWURGHEHFDPELDUVHFDGDPHVHV&RQVXOWH
ODVHFFLyQ5HHPSOD]RGHO¿OWURGHDJXDGHHVWH
manual para obtener más información.
2Panel de control
Ajusta la temperatura del refrigerador y la condición
del filtro de agua.
3Iluminación interior LED
Ilumina el interior del refrigerador.
Interior
4Estante ajustable de refrigerador
Los estantes del refrigerador son ajustables para
satisfacer sus necesidades personales de
almacenamiento.
5Bandeja Móvil de la Puerta
Preserva las comidas o bebidas congeladas.
6Dispensador de Agua Interno
7Crisper
8Convertible Drawer
9Freezer Drawer
2
7
8
9
6
5
4
3
1
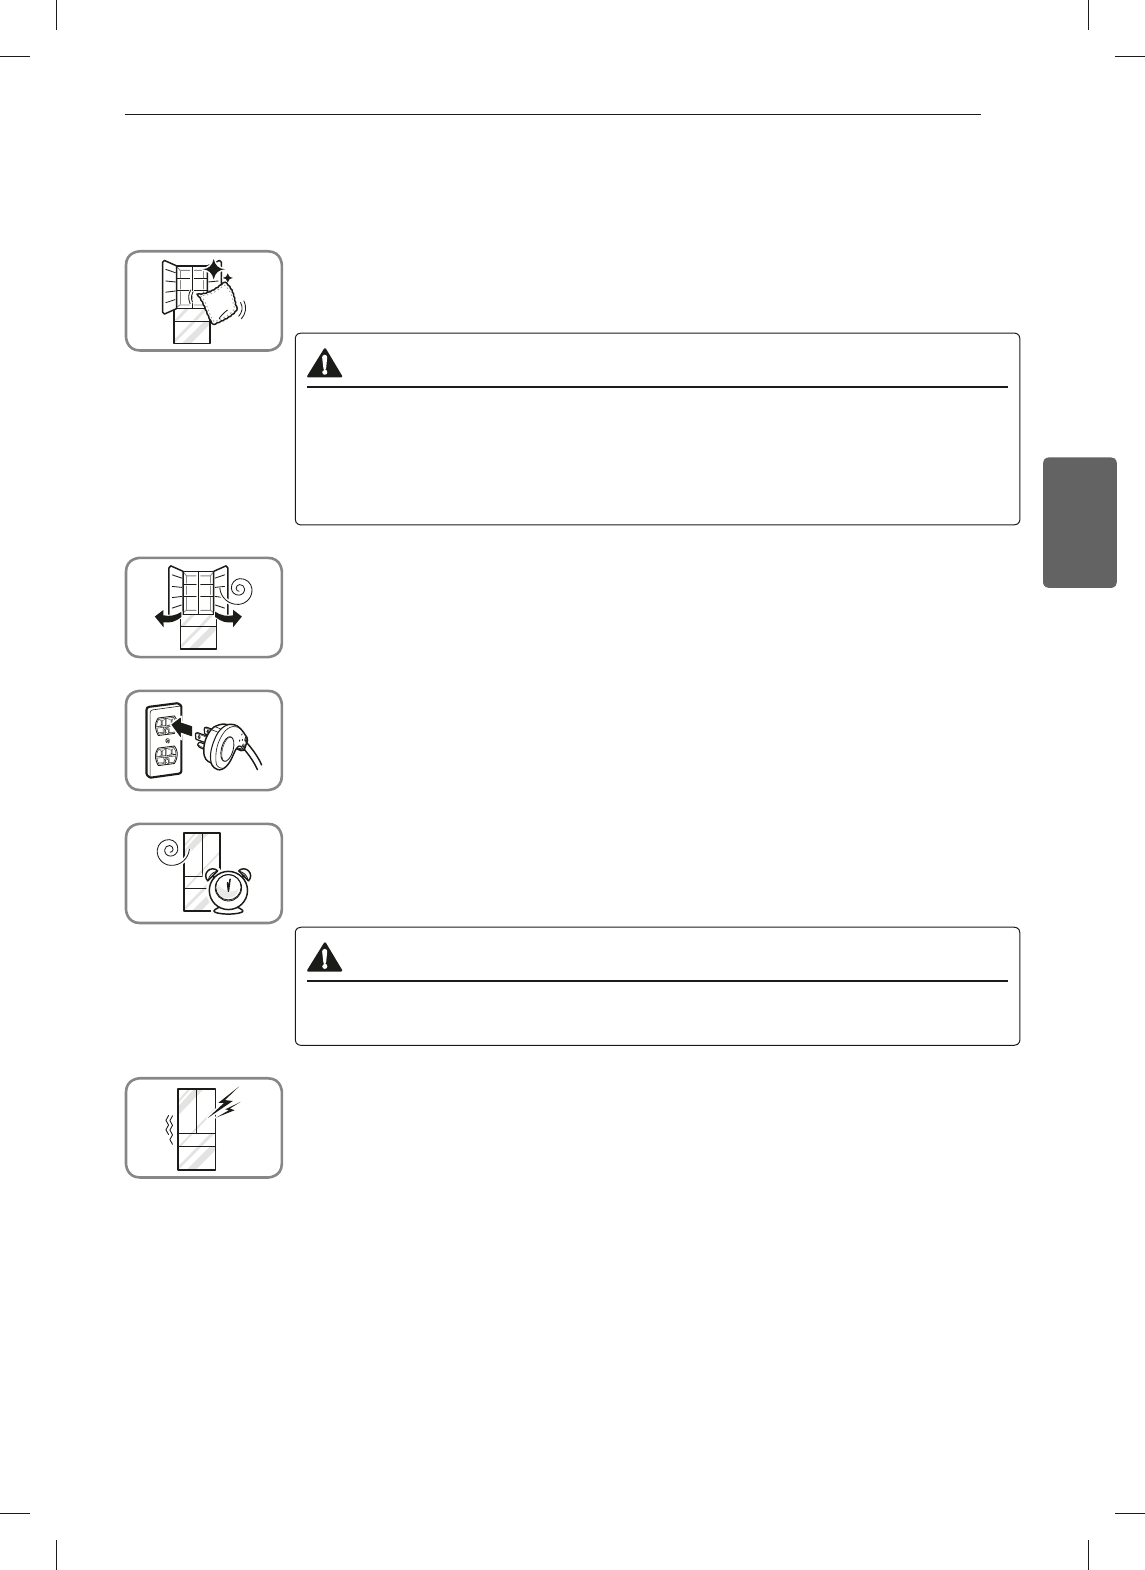
11FUNCIONAMIENTO
ESPAÑOL
Antes de Usar
Limpie el refrigerador.
Limpie el refrigerador intensivamente y sacuda todo el polvo acumulado durante el envío.
PRECAUCIÓN
%No raye el refrigerador con objetos puntiagudos ni use detergente que contenga alcohol,
OtTXLGRVLQÀDPDEOHVRDEUDVLYRVDOUHPRYHUFXDOTXLHUFLQWDRDGKHVLYRGHOPLVPR
Remueva los residuos de adhesivos borrándolos con su pulgar o detergente para platos.
%No despegue la etiqueta de número de serie, modelo o información técnica del panel
trasero del refrigerador.
Abra las puertas del refrigerador para ventilar el interior del mismo.
Puede que al inicio el interior del refrigerador huela a plástico. Remueva toda cinta adhesiva del
interior del refrigerador y abra las puertas del mismo para que se ventile.
Conecte la fuente de energía.
Verifique que la fuente de energía esté conectada previo a usar.
Espere a que el refrigerador enfríe.
Permita que el refrigerador funcione por al menos dos o tres horas previo a colocar alimentos
dentro.
PRECAUCIÓN
%Colocar alimentos en el refrigerador, previo a que éste haya enfriado, podría causar que
éstos se echen a perder o que un mal olor permanezca en su interior.
El refrigerador hace un sonido fuerte luego de la operación inicial.
Esto es normal. El volumen disminuirá conforme baje la temperatura.
FUNCIONAMIENTO

12 FUNCIONAMIENTO
Panel de control
Según el modelo, es posible que algunas de las siguientes funciones no estén disponibles.
Funciones del panel de control
1 7
2 8
3 9
4 5 6
NOTA
%Cuando el refrigerador está en Modo de Ahorro de Energía, la pantalla permanecerá apagada hasta que se abra
una puerta o se presione un botón. Una vez hecho, la pantalla se mantendrá encendida por 20 segundos.
1* Water Filter Reset (Reinicio del Filtro de Agua)
Reemplace el filtro de agua cuando el icono
Replace Filter (Reemplace Filtro) se encienda.
Luego de cambiar el filtro, mantenga presionado el
botón Water Filter (Filtro de Agua) por tres
segundos para apagar la luz del icono. Reemplace
el filtro de agua aproximadamente cada seis
meses.
2Función Ice Plus (Más Hielo)
Esta función incrementa tanto la producción de
hielo como la capacidad de congelamiento.
%Presione el botón Ice Plus (Más Hielo) para
iluminar el ícono y activar la función por 24 horas.
La función se desactiva automáticamente
después de 24 horas.
%Detenga la función manualmente presionando el
botón una vez más.
3* Ice On/Off (Hielo Encendido/Apagado)
Presione el botón Ice On/Off por tres segundos
para encender o apagar el dispensador de hielo.
4Freezer (Congelador)
Indica la temperatura establecida del
compartimento del congelador en grados Celsius
(°C) o Fahrenheit (°F).
La temperatura predeterminada del congelador es
de 0°F (-18 °C).
Presione repetidamente el botón Freezer
(Congelador) para seleccionar una nueva
temperatura desde -6 °F hasta 8 °F (-21 °C hasta
-13 °C).
5Convertible
Variable temperature storage that can be set either
colder or warmer than the refrigerator.
Store meat and seafood at 30°F/-1°C, cold drinks
at 33°F/1°C, deli snacks at 37°F/3°C, or chilled
wine at 41°F/5°C.
The convertible can also be used as a freezer at F.
6Refrigerator (Refrigerador)
Indica la temperatura establecida del
compartimento del refrigerador en grados Celsius
(°C) o Fahrenheit (°F)
La temperatura predeterminada del refrigerador es
de 37 °F (3°C). Presione repetidamente el botón
Refrigerator para seleccionar una nueva
temperatura desde 33 °F hasta 46 °F (1 °C hasta
8 °C).
7Smart Grid (Red inteligente)
Presione el botón Smart Grid para encender o
apagar la función Red Inteligente. Cuando la
función esté activa, el icono se iluminará. La
función Smart Grid se activa automáticamente
cuando el refrigerador se conecta a la red Wi-Fi.
El texto de la red se ilumina cuando el refrigerador
está respondiendo a un mensaje de Demanda de
Respuesta (DR) de la compañía eléctrica.
13FUNCIONAMIENTO
ESPAÑOL
8* Wi-Fi
El botón Wi-Fi, al ser usado con la aplicación para
teléfonos inteligentes SIGNATURE KITCHEN
SUITE, permite al refrigerador conectarse a la red
Wi-Fi doméstica. Consulte la sección Funciones
Inteligentes para recibir información sobre la
configuración inicial de la aplicación.
El ícono Wi-Fi muestra el estado de la conexión de
red del refrigerador. El icono se ilumina cuando el
refrigerador está conectado a la red Wi-Fi.
Mantenga presionado el botón Wi-Fi por 3
segundos para conectarse a la red. El ícono
parpadea mientras la conexión está en proceso,
luego se enciende cuando ésta se ha logrado
exitosamente.
9* Power (Encendido/Apagado)
El botón Power corta toda la corriente eléctrica de
la unidad.
Mantenga presionado el botón Power por 3
segundos para apagar el electrodoméstico.
Cuando está apagado, la luz indicadora también lo
está. No es necesario cortar la energía en el
disyuntor o receptáculo de pared. Utilice esta
función para servicio o vacaciones extendidas.
2 y 5SABBATH
El modo Sabbath es utilizado en el Sabbat
y las festividades Judías.
%Para encender el modo Sabbath, presione
la pantalla para activarla, luego mantenga
presionados los botones Refrigerator y
Power por 3 segundos hasta que aparezca
Sb en la pantalla.
%El modo Sabbath se desactiva
automáticamente después de 96 horas.
%Para apagar el modo Sabbath
manualmente, mantenga presionados los
botones Refrigerator y Power por 3
segundos.
%Una vez encendido, el modo Sabbath se
mantendrá activo incluso si ocurre un
apagón.
%Elegir el modo Sabbath automáticamente
desactiva las funciones de Luz y Alarma. El
dispensador también se desactiva.
%La pantalla interior se mantiene encendida
durante el modo Sabbath, pero sólo se
muestra “Sb” y los botones Refrigerator y
Power.
%/DWHPSHUDWXUDGHOUHIULJHUDGRUVH¿MDHQ
37°F (3°C) y no puede ser cambiada hasta
que el modo Sabbath sea desactivado.
NOTA
%La función Smart Grid (Red Inteligente) se desactiva
automáticamente en modo Sabbath.
&XDQGRHOPRGR6DEEDWK¿QDOL]DODIXQFLyQ6PDUW
Grid (Red Inteligente) debe ser activada de nuevo
manualmente.
PRECAUCIÓN
Modo de Visualización (Únicamente Para Uso de
Tiendas)
%El Modo de Exhibición deshabilita todo el
enfriamiento en el refrigerador para conservar
energía mientras éste se exhibe en una tienda
detallista. Cuando está activo, se muestra OF en el
panel de control, y la pantalla permanece
encendida por 20 segundos.
Para desactivar / activar:
%Con la puerta del refrigerador abierta, mantenga
presionados los botones Refrigerator y Water Filter
Reset al mismo tiempo por cinco segundos. El
panel de control emite un pitido y se muestra la
FRQ¿JXUDFLyQGHWHPSHUDWXUDSDUDFRQ¿UPDUTXHHO
Modo de Exhibición ha sido desactivado. Utilice el
mismo procedimiento para activar el Modo de
Exhibición.

14 FUNCIONAMIENTO
Dispensador de Agua Interno
PRECAUCIÓN
%Mantenga a los niños alejados del dispensador.
Pueden jugar con los controles y dañarlos.
%Si se dispensa hielo o agua inesperadamente,
apague el suministro de agua y contacte al Centro
de Información al Cliente SIGNATURE KITCHEN
SUITE.
Estructura del Dispensador
Boquilla
de Agua
Interruptor
de Agua
NOTA
%Para dispensar agua, presione el Interruptor de agua
con un vaso.
%Algo de goteado puede ocurrir luego de dispensar.
Sostenga la taza debajo del dispensador por algunos
segundos luego de dispensar para que esta recoja
todas las gotas.
Compartimento de Hielo
PRECAUCIÓN
%Mantenga sus manos y cualquier herramienta fuera
del compartimiento de hielo. No seguir esta
indicación podría resultar en daños o heridas
personales.
Máquina de Hielo Automática
Encendido y apagado de la máquina
de hielo automática
Para apagar manualmente la máquina de hielo
automática, presione el botón Ice On/Off en la pantalla
por tres segundos.
Sonidos Normales Que Puede
Escuchar
%Mantener el suministro energético del dispensador de
hielo encendido previo a conectar la línea de agua
puede dañar el dispensador.
%La válvula de agua de la máquina de hielo emite un
pitido conforme se va llenando de agua.Si el botón Ice
On/Off está en la posición ON, se emitirá un pitido aún
si no ha sido conectada al agua.Para detener el pitido,
presione el botón Ice On/Off para apagar la máquina
de hielo.
%Escuchará el sonido de cubos de hielo cayendo en el
recipiente y agua corriendo por la tubería mientras el
dispensador de hielo se llena nuevamente.
15FUNCIONAMIENTO
ESPAÑOL
Preparando para Vacaciones
Ajuste el botón Ice On/Off en la posición OFF, y cierre
el suministro de agua del congelador.
NOTA
%El recipiente de hielo debe ser vaciado cada vez que
el botón Ice On/Off se coloca en la posición OFF.
Si la temperatura ambiente cae al punto de congelación,
contacte a un técnico calificado para drenar el sistema
de suministro de agua y así prevenir serios daños a la
propiedad debido a inundaciones causadas por la
ruptura de líneas de agua o conexiones.
Almacenando Alimentos
PRECAUCIÓN
%No llene en exceso, ni almacene artículos
demasiado cerca en los compartimentos de la
puerta. Esto podría dañar el compartimento o
provocar lesiones personales al retirar los
alimentos aplicando fuerza excesiva.
NOTA
%Si se ausentará de casa por un corto período de
tiempo, como unas pequeñas vacaciones, el
refrigerador debe dejarse encendido. La comida
refrigerada que pueda ser congelada se preservará
por más tiempo si es almacenada en el congelador.
%Si dejará el refrigerador apagado por un período largo
de tiempo, saque toda la comida y desconecte el
cable de corriente. Limpie el interior y deje la puerta
abierta para prevenir la formación de hongos en el
refrigerador.
%No almacene alimentos con contenido muy húmedo
cerca del área superior del refrigerador. La humedad
podría entrar en contacto directo con el aire frío y
congelarse.
%Lave los alimentos previo a almacenarlos en el
refrigerador. Frutas y vegetales deben ser lavados, y
empaques de alimentos deben ser limpiados para
evitar que alimentos cercanos sean contaminados.
%Si el refrigerador se mantiene en un lugar caliente y
húmedo, abrir frecuentemente la puerta o almacenar
muchos vegetales en el refrigerador podría causar la
formación de condensación. Limpie la condensación
con un paño limpio o una toalla de papel.
%Si la puerta del refrigerador se abre o cierra con
demasiada frecuencia, aire caliente podría ingresar y
elevar así su temperatura. Esto podría elevar los
gastos de funcionamiento de la unidad.
Consejos de Almacenamiento de
Alimentos
Envuelva o almacene alimentos en el refrigerador en
materiales herméticos y a prueba de humedad a menos
que se indique lo contrario. Esto previene que el olor y
sabor de los alimentos se transfiera a través del
refrigerador . Para productos con fecha de caducidad,
revise las fechas para asegurar su frescura.
Comida Cómo
Manteca o
Margarina
Si tiene manteca abierta, manténgala
en un plato cerrado o compartimento
cerrado. Cuando almacene suministros
adicionales, envuélvalos en empaque
para congelador y congele.
Queso
Almacene en empaquetado original
hasta que se use. Una vez abierto,
reempaque ajustadamente en
envoltorio plástico o papel aluminio.
Leche
Limpie las cajas de leche. Para
conservar la leche más fría, coloque
los contenedores en un estante interior.
Huevos
Almacene en cartón original en el
estante interior, no en el estante de la
puerta.
Fruta
No lave o pele fruta hasta que esté
lista para ser usada. Organice y
mantenga la fruta en el cajón de
verduras en sus contenedores
originales, o almacénelas en bolsas de
papel completamente cerradas en el
estante del refrigerador.
Vegetales
Frondosos
Remueva el empaquetado de la tienda,
recorte o arranque áreas descoloridas
y dañadas, lave en agua fría y escurra.
Coloque en bolsas o contenedores
plásticos y almacene en el cajón de
verduras.
Vegetales
con
cáscaras
(zanahorias,
chiles)
Coloque en bolsas o contenedores
plásticos y almacene en el cajón de
verduras.
Pescado
Almacene pescado fresco y mariscos
si estos no son consumidos el mismo
día de la compra. Es recomendable
comer pescado fresco y mariscos el
mismo día de la compra.
Restos de
comida
Cubra los restos de comida con
envoltorio plástico o papel aluminio, o
almacénelos en contenedores plásticos
con tapas ajustadas.
16 FUNCIONAMIENTO
Convertible Drawer
Removing the Convertible Drawer
1Pull the drawer out until it stops.
Empty all contents out of the drawer before
removing it.
2Push the button and remove the stopper on either
side.
3Remove the basket by lifting the basket from the rail
system.
4Remove the screws from the rails at both ends.
5Hold both sides of the door and lift it to remove it
from the rail system.
PRECAUCIÓN
%Siempre utilice ambas manos al remover o
ensamblar las cajas para evitar una lesión o que se
dañe el producto. Siempre vacíe las cajas previo a
removerlas.
%Siempre abra las puertas completamente previo a
remover o ensamblar las cajas.
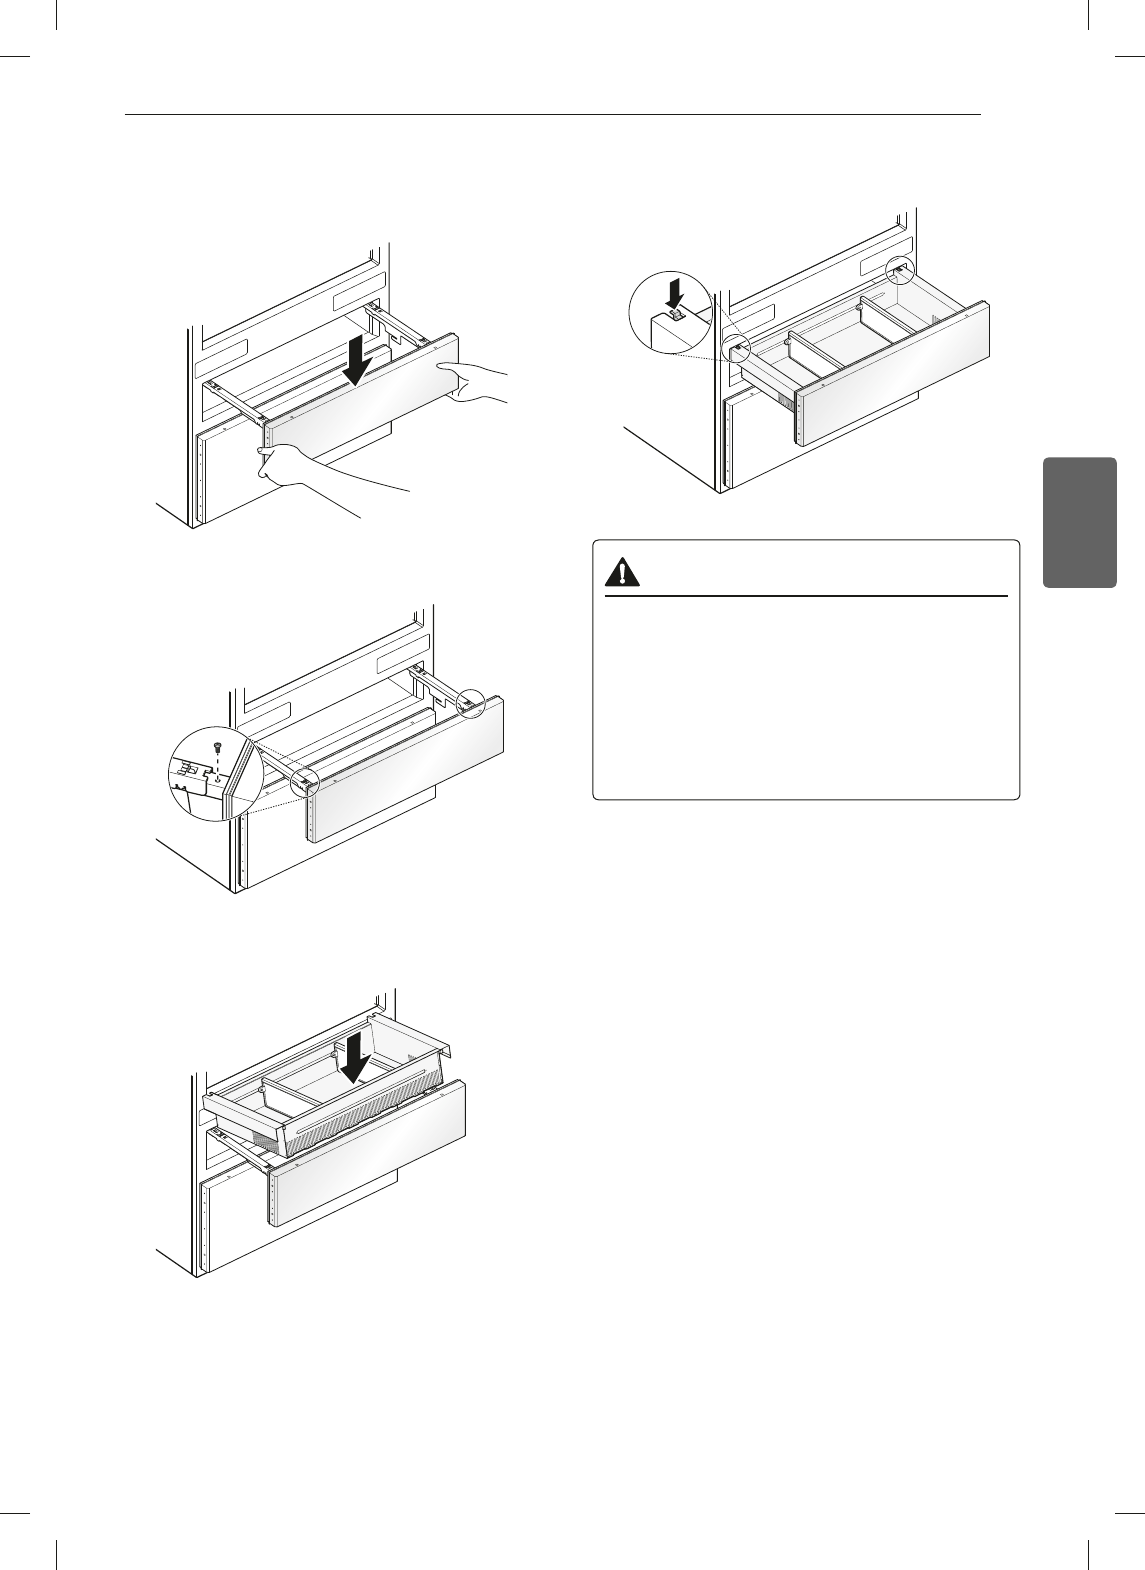
17FUNCIONAMIENTO
ESPAÑOL
Assembling the Convertible Drawer
1Grasp the door on each side and lower it into place
on the rail system.
2Tighten the screws from the rails at both ends.
3Pull the drawer open to full extension.
Lower the basket onto the rail system.
4Push the button and combine the stopper on either
side.
PRECAUCIÓN
%Las cajas son pesadas. Siempre utilice ambas
manos al remover o ensamblar las cajas para
evitar una lesión o que se dañe el producto.
Siempre vacíe las cajas previo a removerlas o
ensamblarlas.
%Siempre abra la puerta del refrigerador
completamente previo a remover o ensamblar las
cajas.

18 FUNCIONAMIENTO
Freezer Drawer
Removing the Freezer Drawer
NOTA
%Before removing the Freezer Drawer, it must be
removing the Convertible Drawer.
1Pull the drawer out until it stops.
Empty all contents out of the drawer before
removing it.
2Push the button and remove the stopper on either
side.
3Remove the basket by lifting the basket from the rail
system.
4Remove the screws from the rails at both ends.
5Hold both sides of the door and lift it to remove it
from the rail system.
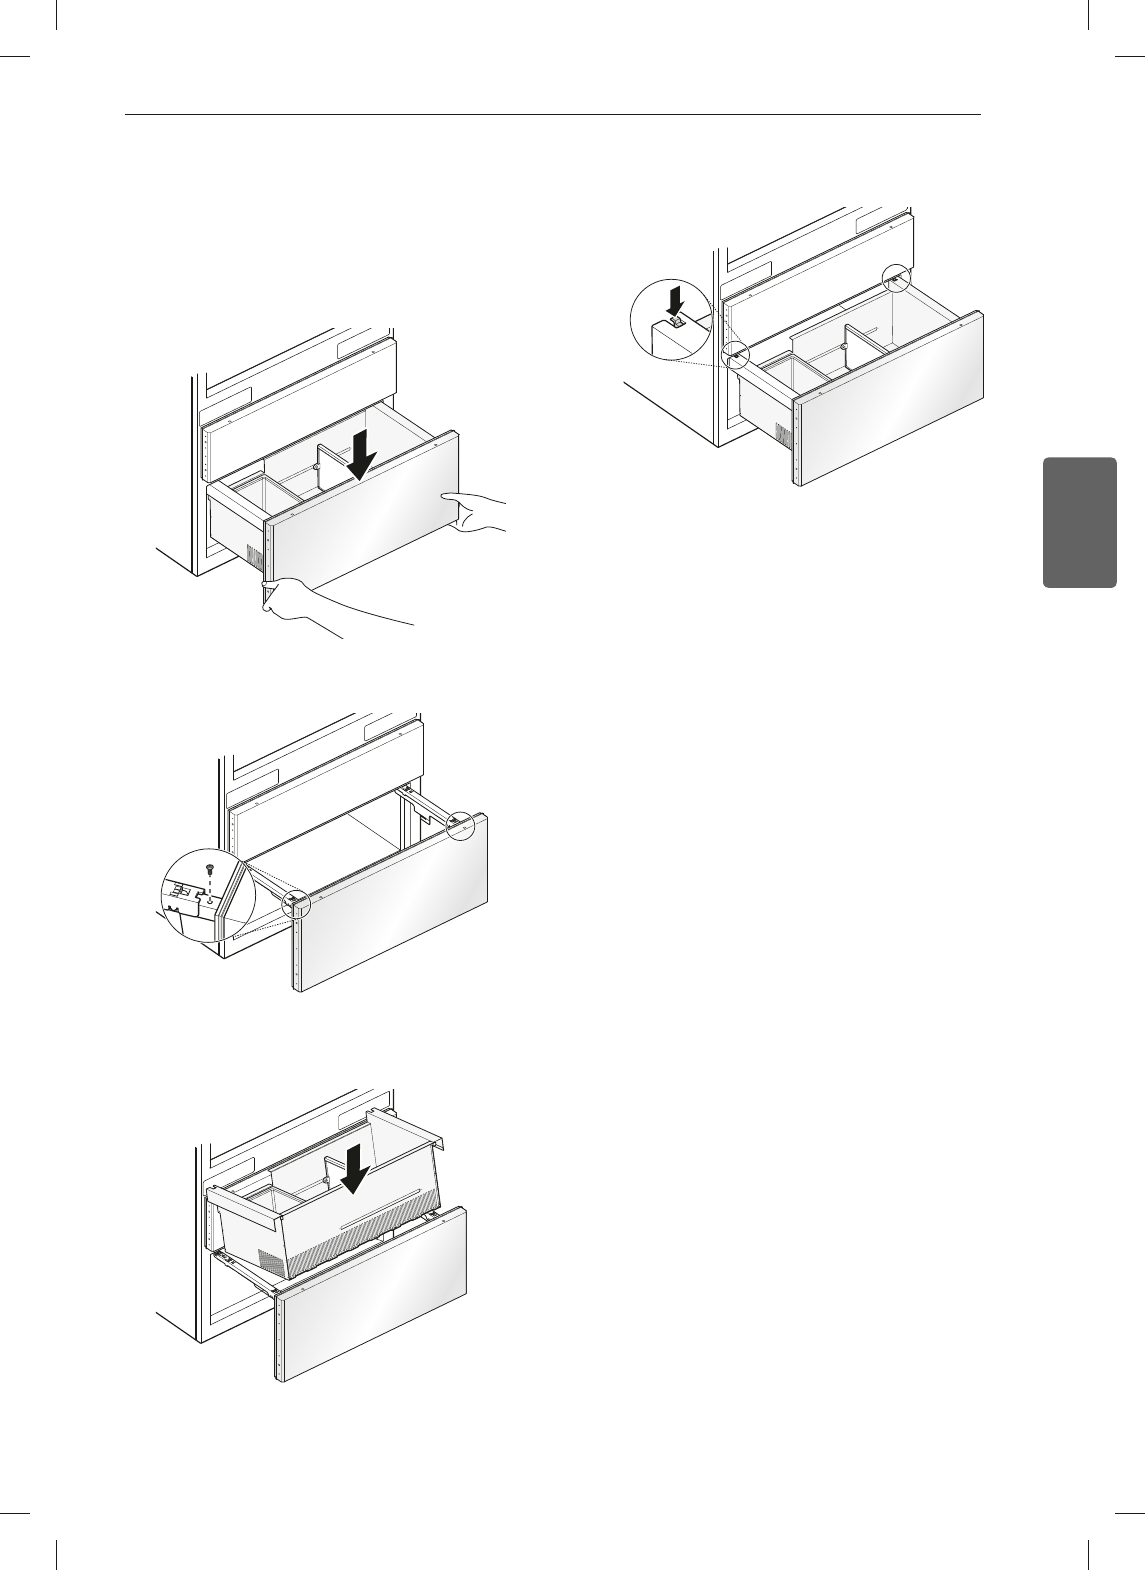
19FUNCIONAMIENTO
ESPAÑOL
Assembling the Freezer Drawer
NOTA
%Before assembling the Freezer Drawer, it must be
removing the Convertible Drawer.
1Grasp the door on each side and lower it into place
on the rail system.
2Tighten the screws from the rails at both ends.
3Pull the drawer open to full extension.
Lower the basket onto the rail system.
4Push the button and combine the stopper on either
side.
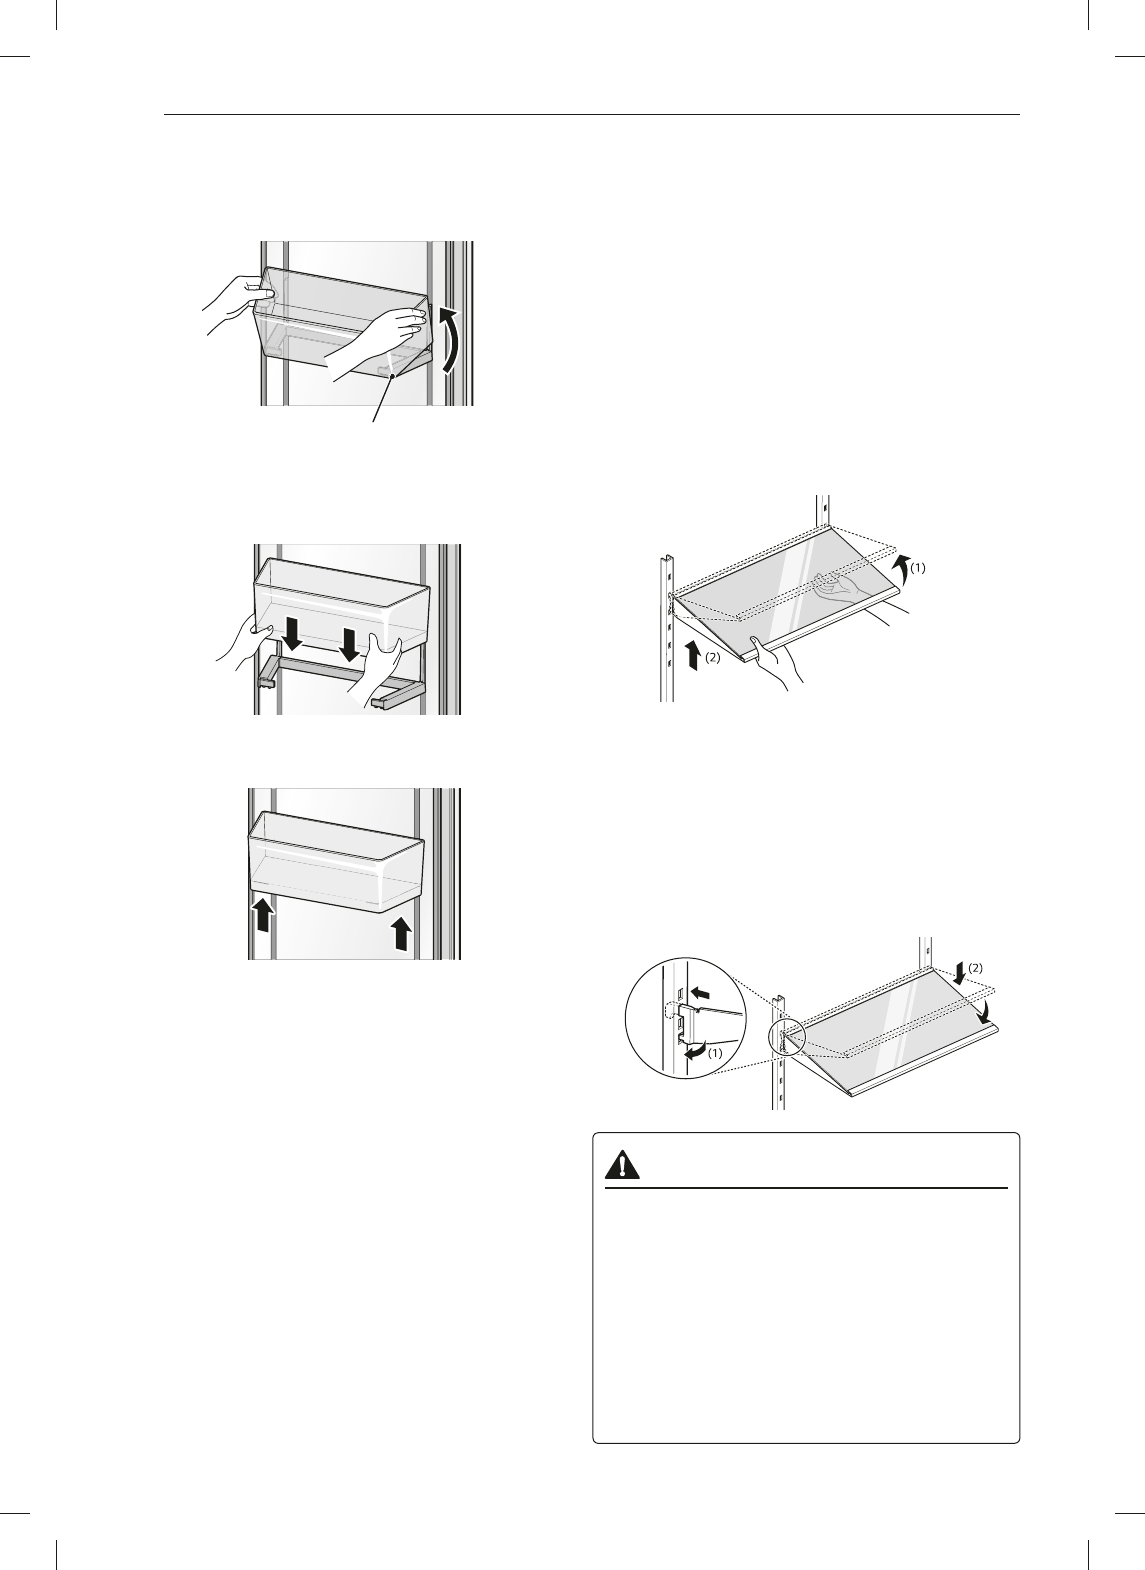
20 FUNCIONAMIENTO
Door Bins
To remove the door bins, hold the bin with both hands
and rotate on the axis.
the axis of rotation
To assemble the door bin, align both sides of the bin
with the guides and push the bin down until it snaps into
place.
To adjust the location of the bin, tilt the front of the bin up
and slide the bin up or down to the desired location.
Ajustando los Estantes
Los estantes del refrigerador son ajustables para
satisfacer sus necesidades personales de
almacenamiento.
Ajustar los estantes para que quepan artículos de
diferentes tamaños hará más fácil la búsqueda de
artículos específicos.
Desmontaje del estante
1Incline hacia arriba la parte frontal del estante y
luego levántelo.
2Retire el estante.
Ensamblando el Estante
1Incline el frente del estante hacia arriba y guíe los
ganchos hacia dentro de las ranuras a la altura
deseada.
2Baje el frente del estante para que los ganchos
caigan dentro de las ranuras.
PRECAUCIÓN
%Asegúrese de que los estantes estén nivelados de
un lado al otro. No seguir esta indicación podría
resultar en la caída del estante o en alimentos
derramados.
%No limpie estantes de vidrio con agua tibia cuando
estén fríos. Estos pueden romperse al estar
expuestos a impactos o cambios de temperatura
repentinos.
%Los estántes de vidrio son pesados. Tenga especial
cuidado al removérlos.
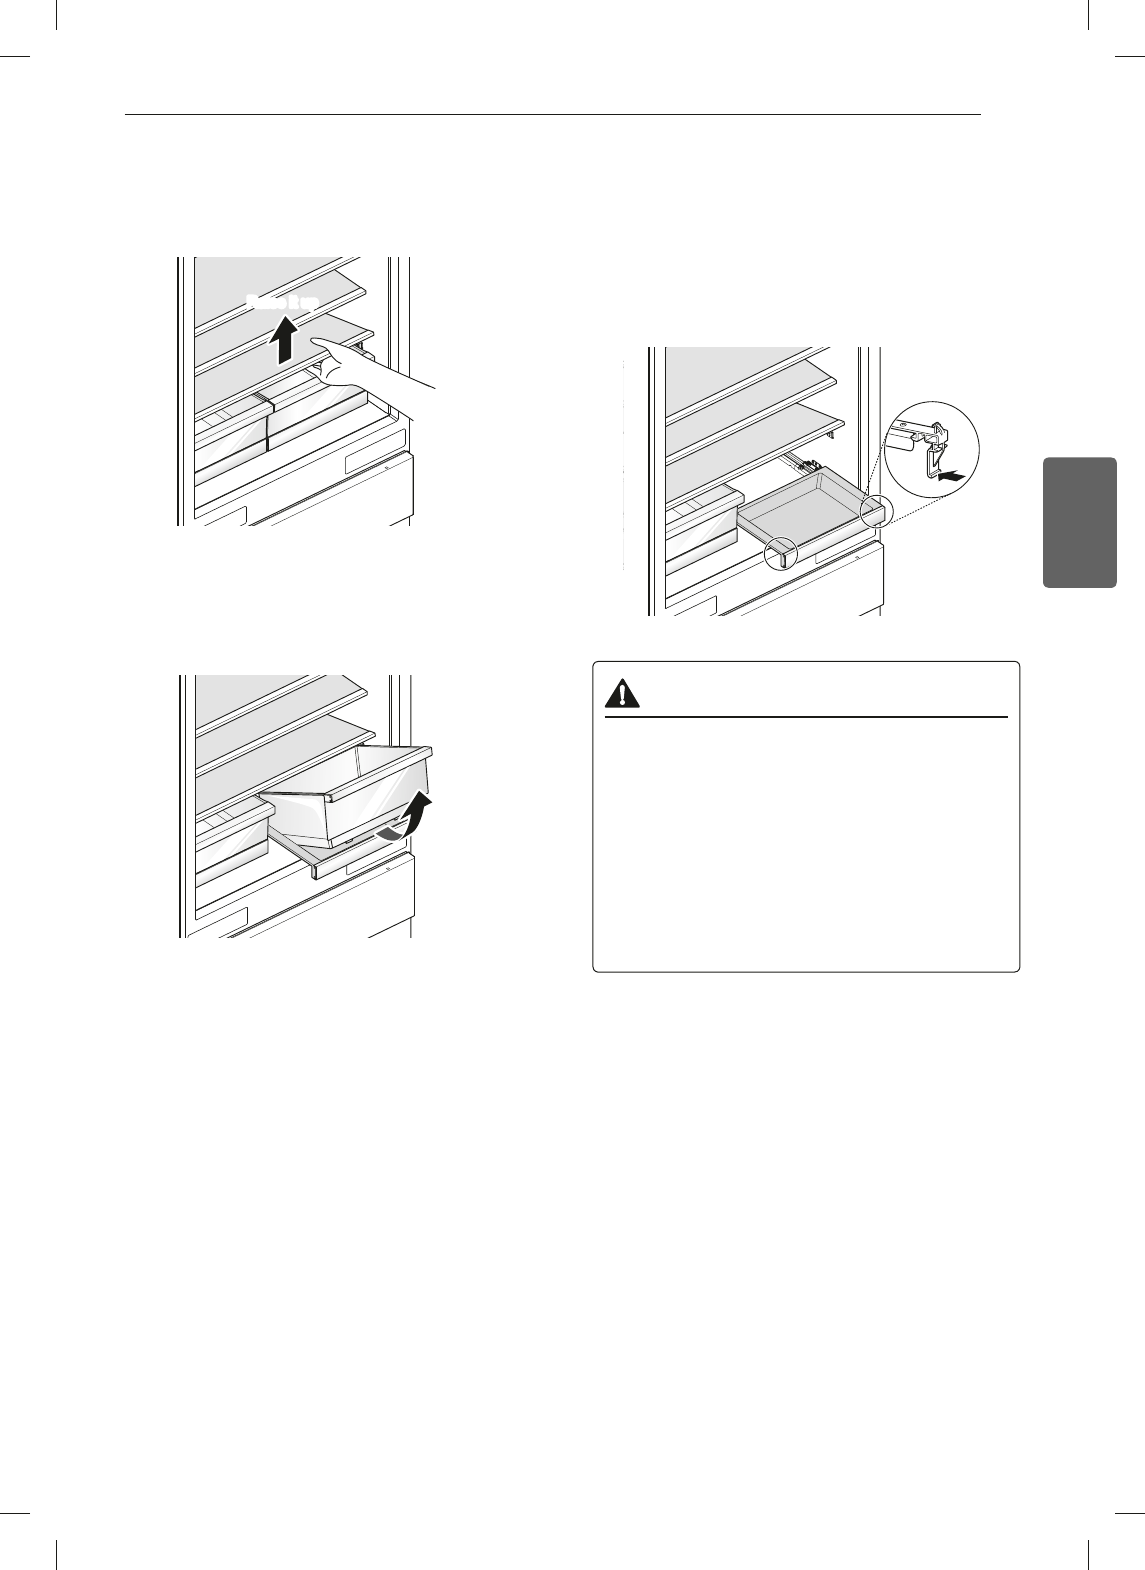
21FUNCIONAMIENTO
ESPAÑOL
Crisper
Disassemble the Crisper
%Raise up the Crisper and Disassemble the Crisper.
Raise it up
Disassemble the Tray Drawer
%Pull Tray Drawer to the End.
%Raise Tray drawer up to Disassemble
How to Disassemble Cover Drawer
1Disassemble Tray Drawer.
2Pull Cover Drawer to the end.
3Push Rack and Lift Cover Drawer(Rack is located in
Left, Right Slide Rail)
Rack
PRECAUCIÓN
%Asegúrese de que la Bandeja de Bocadillos esté
nivelada de un lado al otro. No seguir esta
indicación podría resultar en la caída de la bandeja
o en alimentos derramados.
%No limpie el vidrio de la Bandeja de Bocadillos con
agua caliente mientras esté frío. La Bandeja de
Bocadillos podría romperse al estar expuesta a
impactos o cambios de temperatura repentinos.
%La Bandeja de Bocadillos es pesada. Tenga
especial cuidado al removerla.
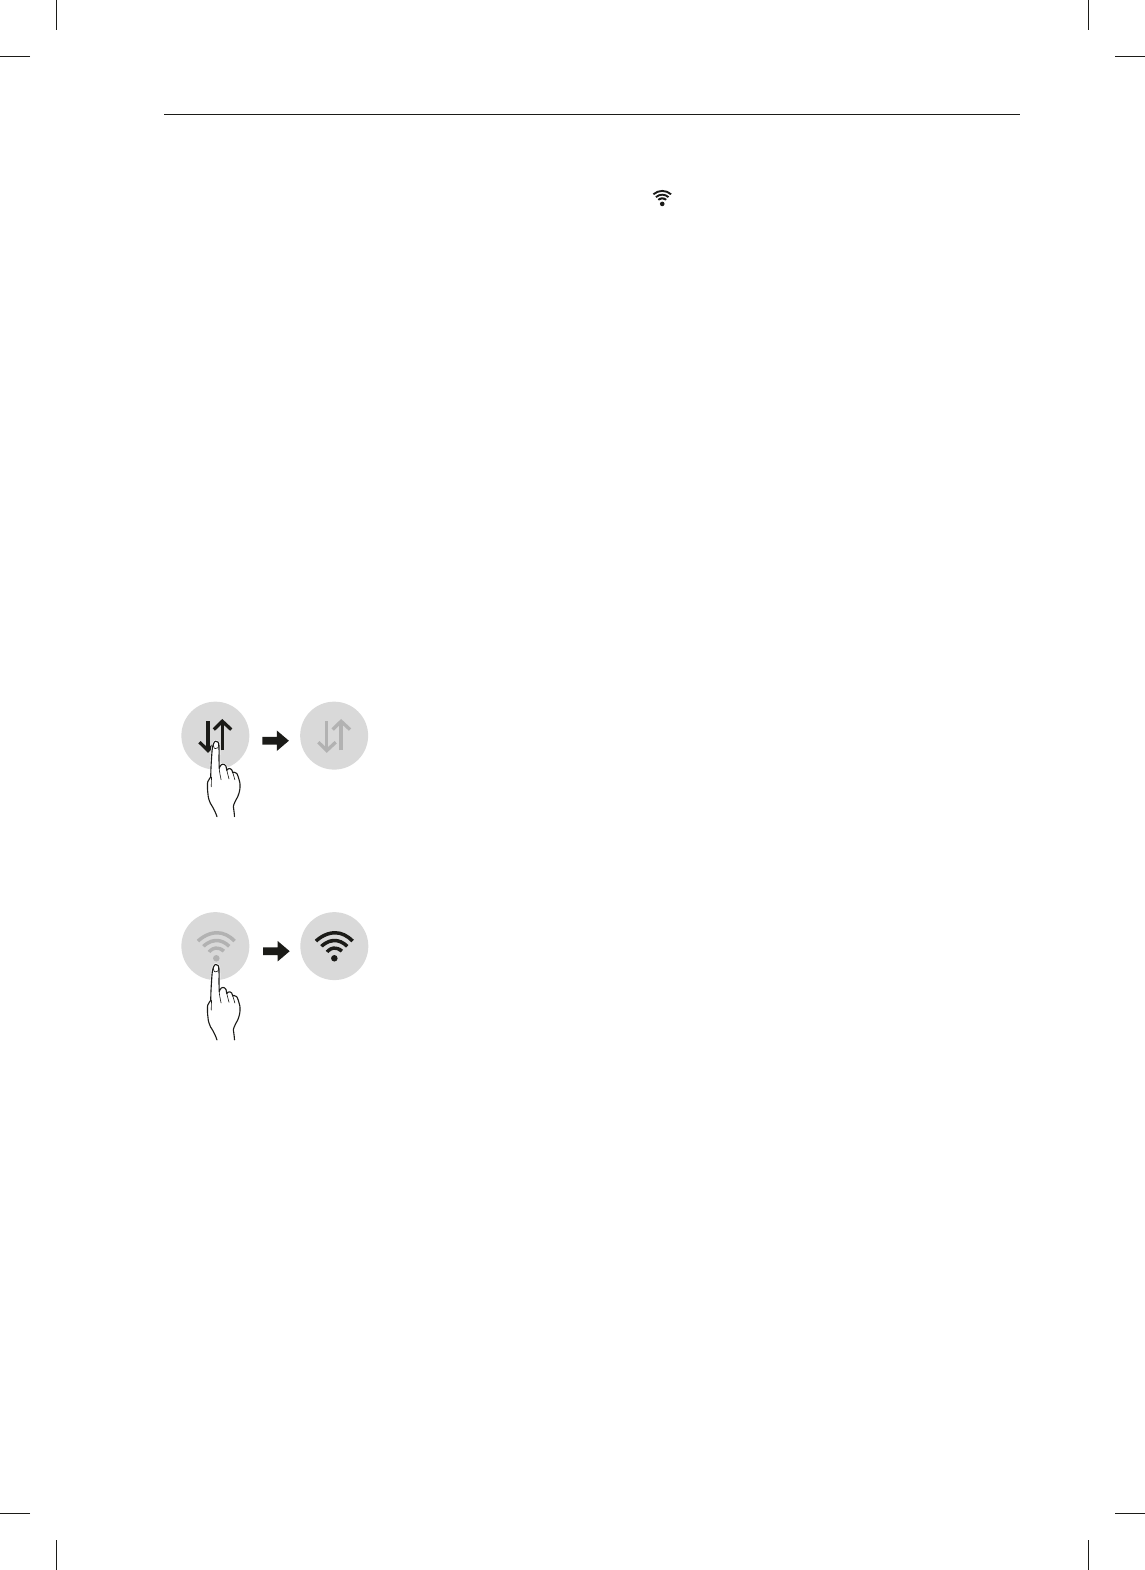
22 FUNCIONES INTELIGENTES
FUNCIONES
INTELIGENTES
Aplicación SIGNATURE
KITCHEN SUITE
La aplicación SIGNATURE KITCHEN SUITE le permite
comunicarse con el electrodoméstico usando un
teléfono inteligente.
Previo a Utilizar la Aplicación
1Verifique la intensidad de la señal inalámbrica cerca
del electrodoméstico.
%Si la distancia entre el electrodoméstico y el
enrutador inalámbrico es muy grande, la señal
será débil. Puede que le tome más tiempo
registrarse o que falle la instalación.
2Desactive los Datos Móviles o Datos Celulares en
su teléfono inteligente.
3Conecte su teléfono inteligente al enrutador
inalámbrico.
NOTA
%3DUDYHUL¿FDUODFRQH[LyQ:L)LUHYLVHTXHHOLFRQR
Wi-Fi en el panel de control esté encendido.
%La máquina soporta únicamente redes Wi-Fi de 2.4
GHz. Para revisar la frecuencia de su red, contacte a
VXSURYHHGRUGHVHUYLFLRVGHLQWHUQHWRYHUL¿TXHHO
manual del enrutador inalámbrico.
%La aplicación SIGNATURE KITCHEN SUITE no es
responsable de ningún problema de conexión de red
ni de errores, fallos o anomalías causadas por la
misma.
%El entorno inalámbrico circundante puede hacer que el
servicio de red inalámbrica funcione lentamente.
%Si el electrodoméstico tiene problemas conectándose
a la red Wi-Fi, puede que se encuentre muy lejos del
enrutador. Compre un repetidor de Wi-Fi (Extensión
de rango) para mejorar la intensidad de la señal Wi-Fi.
%Es posible que la conexión de red no funcione bien
por cuestiones relacionadas con su proveedor de
servicios de Internet.
%Es posible que la conexión Wi-Fi no se conecte o se
interrumpa debido al entorno de la red doméstica.
%Si el electrodoméstico no puede registrarse debido a
problemas con la transmisión de la señal inalámbrica,
desconecte el enrutador y espere alrededor de un
minuto previo a encenderlo e intentarlo de nuevo.
%Si el cortafuegos de su enrutador inalámbrico está
activado, desactivelo o añada una excepción a éste.
%El nombre de la red inalámbrica (SSID) debe ser una
combinación de letras y números. (No utilice simbolos
especiales)
%La interfaz de usuario (IU) del teléfono inteligente
puede variar dependiendo del sistema operativo (OS)
del móvil y del fabricante.
%Si el protocolo de seguridad del enrutador está en
WEP, puede que deba cambiarlo a WPA2 a manera
de registrar el producto exitosamente.

23FUNCIONES INTELIGENTES
ESPAÑOL
Instalando la Aplicación SIGNATURE
KITCHEN SUITE
Busque la aplicación SIGNATURE KITCHEN SUITE en
la tienda Google Play Store o Apple Store desde un
teléfono inteligente. Siga las instrucciones para
descargar e instalar la aplicación.
NOTA
%Si elige el inicio de sesión simple para acceder a la
aplicación SIGNATURE KITCHEN SUITE, deberá
realizar el proceso de registro del electrodoméstico
cada vez que cambie de teléfono o reinstale la
aplicación.
Características de la Aplicación
SIGNATURE KITCHEN SUITE
Administrador de Alimentos
Esta característica ayuda a buscar artículos en el
refrigerador y congelador, envía alertas cuando artículos
están cerca de sus fechas de caducidad, genera listas
de compras y vincula a recetas relacionadas.
Energy Monitoring (Monitoreo de energía)
Esta función lleva un registro del consumo de energía
del refrigerador y la cantidad de veces que se abrió la
puerta.
Mensajes Push
Si la puerta permanece abierta durante más de diez
minutos, recibirá un mensaje automático. Cuando Ice
Plus haya finalizado, recibirá un mensaje de notificación.
Smart Diagnosis™
Esta función brinda información útil para diagnosticar y
resolver problemas con el producto conforme a su
patrón de uso.
&RQ¿JXUDFLyQ
Le permite ajustar varias opciones en el refrigerador y
en la aplicación.
NOTA
%Si después de registrar el electrodoméstico cambia su
enrutador inalámbrico, proveedor de servicios de
internet, o su contraseña, por favor borre el producto
de SIGNATURE KITCHEN SUITE $MXVWHVĺ(GLWDU
Producto y regístrelo de nuevo.
%La información está actualizada al momento de la
publicación. La aplicación está sujeta a cambios con
propósito de mejoras en el electrodoméstico sin previo
aviso a los usuarios.

24 FUNCIONES INTELIGENTES
Función Smart Grid (Red
Inteligente)
Cuando el refrigerador opera en modo Smart Grid (Red
Inteligente), la función Refrigerador Inteligente puede
controlar el uso de energía o retrasar la operación de algunas
funciones para ahorrar energía durante períodos de uso pico.
%Puede anular la función Smart Grid (Red Inteligente)
en cualquier momento (usando el botón o aplicación
Smart Grid).
%Para usar la función Smart Grid (Red Inteligente),
necesita registrar su electrodoméstico con su
compañía eléctrica.
Características de la Aplicación
Smart Grid (Red Inteligente)
Ahorro Inteligente_Respuesta bajo Demanda
Puede disminuir el uso de energía de acuerdo a las
señales de Respuesta a la demanda (DR) de la
compañía de energía. Si el refrigerador está
funcionando en modo ahorro inteligente de acuerdo a la
señal DR, verá un mensaje emergente.
Ahorro de Energía por Temporada
Menor uso de energía basado en un período de tiempo.
Usando la Función Smart Grid (Red
Inteligente)
Esta característica responde a eventos de notificación de
su compañía eléctrica para llevar a cabo tareas de alto
consumo energético durante períodos no pico cuando la
demanda es baja. Estos eventos de notificación son
conocidos como señales de Respuesta Bajo Demanda.
Si el refrigerador recibe una señal de Respuesta Bajo
Demanda de la compañía eléctrica, éste activará el LED
de Red (Grid LED) en la pantalla y controlará su
consumo energético de acuerdo a la señal.
El refrigerador responderá a las señales recibidas desde
la compañía eléctrica siempre y cuando se le dé
mantenimiento al desempeño del producto.
Si el refrigerador recibe una señal de Respuesta Bajo
Demanda, éste operará en modo Retardo de Carga del
Electrodoméstico (DAL) o Reducción Temporal de Carga
del Electrodoméstico (TALR).
Retardo de Carga del Electrodoméstico (DAL)
El refrigerador responde a la señal DAL proporcionando
una reducción moderada de carga durante la duración
del período de retraso.
Este modo controla funciones que consumen mucha
energía como el ajustado del sistema de enfriado, ciclo
de descongelado y producción de hielo.
%Cuando el refrigerador opera en modo DAL, el LED de
Red (Grid LED) se ilumina en la pantalla del refrigerador.
%El modo DAL es desactivado automáticamente luego
del período estipulado por la señal DAL (máx. 4 horas)
o cuando anula la función Smart Grid.
Reducción Temporal de Carga del
Electrodoméstico (TALR)
El refrigerador responde a la señal TALR al reducir
agresivamente la carga por un corto período de tiempo,
tipicamente de 10 minutos. Este modo reduce el
consumo de energía al detener el compresor y controlar
las funciones que consumen mucha energía como el
ciclo de descongelado y el ventilador.
%Cuando el refrigerador opera en modo TALR, el LED
de Red (Grid LED) se ilumina en la pantalla.
%El modo TALR es desactivado automáticamente luego
del período estipulado por la señal (máx. 10 minutos)
o cuando anula la función Smart Grid. El modo es
desactivado inmediatamente y el refrigerador vuelve a
su estado normal cuando la puerta es abierta o
cerrada, o cuando el dispensador es utilizado.
Anule el Modo Smart Grid (Red Inteligente)
Para ignorar la señal de Respuesta bajo Demanda de la
compañía eléctrica y anular la función Smart Grid,
presione el botón Smart Grid mientras el refrigerador
está en modo Smart Grid.
Cuando anula la función Smart Grid, el refrigerador
ignora la señal de Respuesta bajo Demanda y este ya
no es controlado por la compañía eléctrica hasta que la
siguiente es enviada. También puede anular la función
Smart Grid usando la aplicación para teléfonos
inteligentes.
API Abierto de SIGNATURE KITCHEN SUITE
Puede administrar las características de Smart Grid
para el refrigerador SIGNATURE KITCHEN SUITE.
Sírvase revisar las especificaciones detalladas en la
página de aviso en www.thesignaturekitchen.com.
Lista API
Respuesta bajo Demanda
%Enviar señal de respuesta bajo demanda
Ahorro de Energía
%&RQ¿JXUDUPRGRGHDKRUUR
%Obtener programación de DR/Retraso de
Descongelado
Energy Monitoring (Monitoreo de energía)
%Obtener evento puerta abierta
%Obtener consumo de energía
Capacidad de Retraso de Descongelado
%Introducir un evento de programación de retraso de
descongelado.
%Actualizar un evento de programación de retraso de
descongelado
%Borrar un evento de programación de descongelado
atrasado
%Obtener programación de descongelado atrasado.
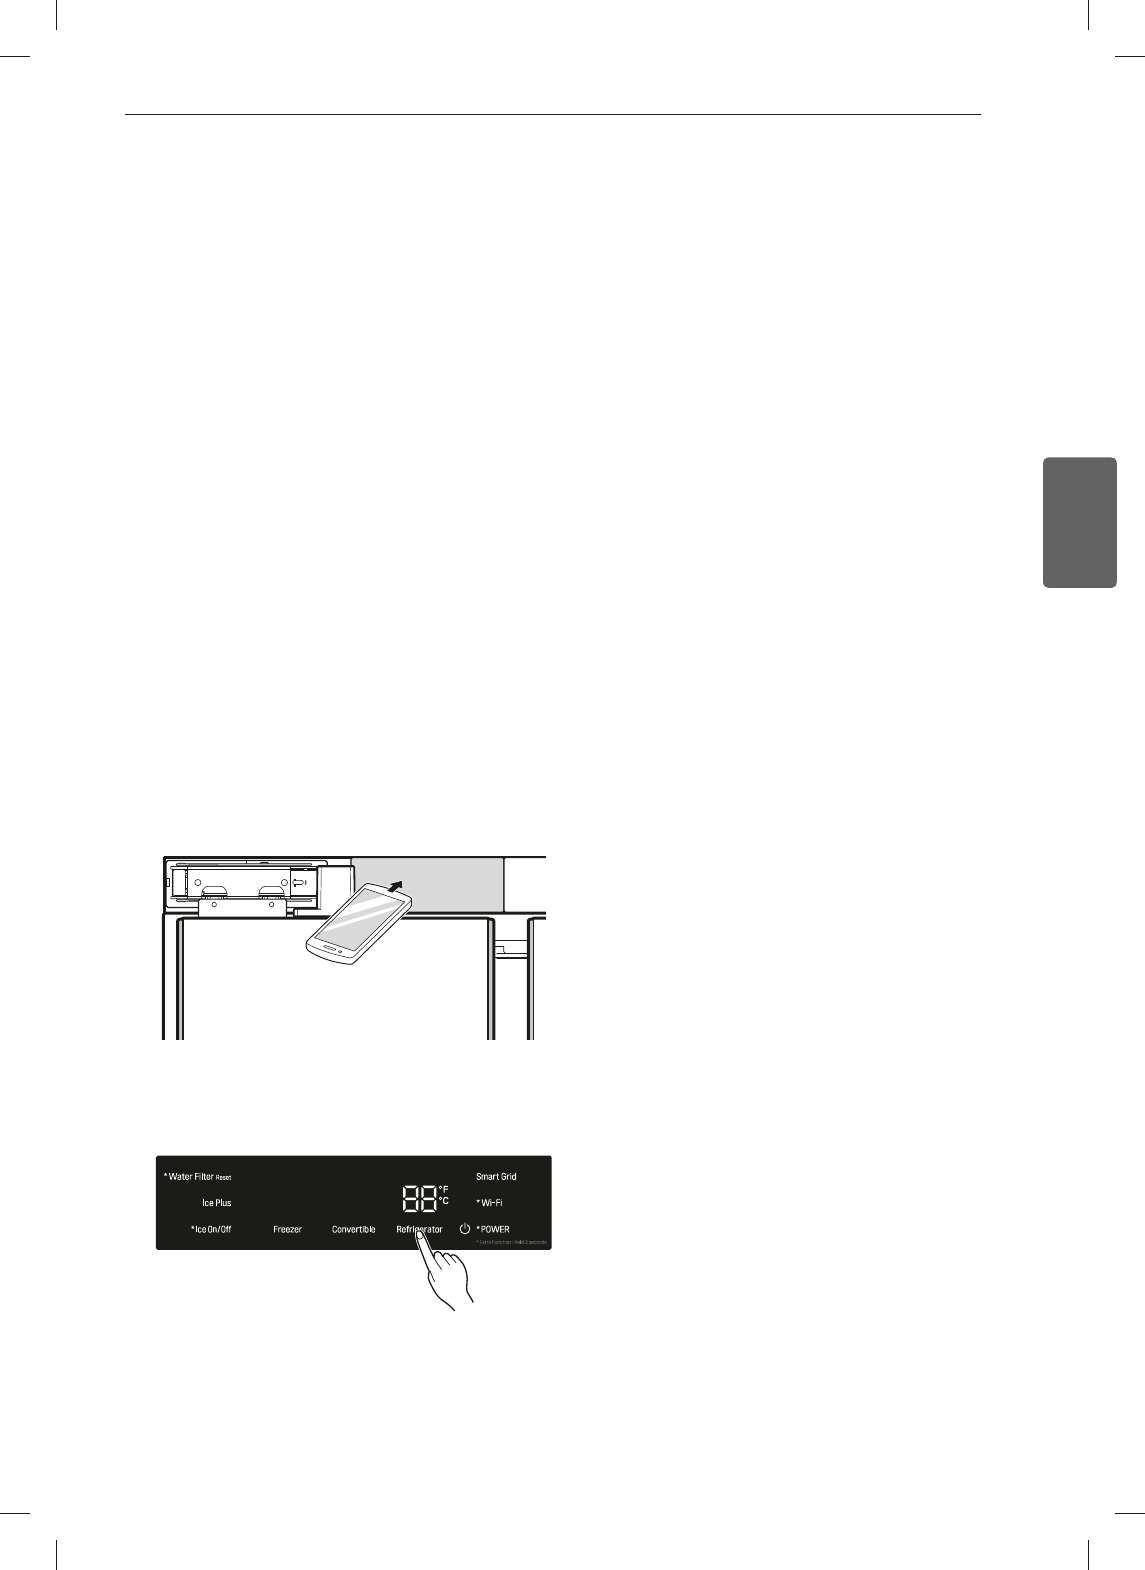
25FUNCIONES INTELIGENTES
ESPAÑOL
Función Smart Diagnosis ™
(Diagnóstico Inteligente)
En caso de experimentar algún problema con el aparato,
éste tiene la capacidad de transmitir datos a través de
su teléfono al Centro de información SIGNATURE
KITCHEN SUITE. Los modelos equipados con NFC o
Wi-Fi pueden también transmitir datos a un teléfono
inteligente usando la aplicación SIGNATURE KITCHEN
SUITE.
Smart Diagnosis™ a través del
Centro de Información al cliente
Este método le permite hablar directamente con uno de
nuestros especialistas cualificados. El especialista
registra los datos transmitidos desde el aparato y los
usa para analizar el problema, así le brinda un
diagnostico efectivo y rápido.
1Comuníquese con el Centro de información al
cliente de SIGNATURE KITCHEN SUITE llamando
al: (EE. UU.) 1-855-790-6655
2Abra la puerta del refrigerador.
3Cuando se lo indique el centro de llamadas,
sostenga el micrófono de su teléfono frente al
altavoz que se encuentra ubicado en la cubierta del
filtro del refrigerador.
4Mantenga presionado el botón Refrigerator por tres
segundos mientras continúa sosteniendo su teléfono
contra el altavoz.
5Tras escuchar tres pitidos, suelte el botón
Refrigerator.
6Mantenga el teléfono en esa posición hasta que el
tono de transmisión haya finalizado. La pantalla
mostrará la cuenta regresiva del tiempo. Una vez la
cuenta regresiva haya terminado y los tonos se
hayan detenido, continúe su conversación con el
especialista, quien podrá asistirle en utilizar la
información transmitida para análisis.
NOTA
%Para obtener resultados óptimos, no mueva el teléfono
mientras se transmiten los tonos.
%Si el agente del centro de atención no puede obtener
una grabación precisa de los datos, es posible que le
pida que lo intente nuevamente.
%La calidad de la función Smart Diagnosis™ depende
de la calidad de la llamada local.
%Una llamada de mala calidad puede resultar en la
mala transmisión de los datos desde su teléfono al
centro de llamadas, por lo que Smart Diagnosis™
podría no funcionar adecuadamente.
Smart Diagnosis™
Use la función Smart Diagnosis (Diagnóstico Inteligente)
en la aplicación SIGNATURE KITCHEN SUITE para
ayudar a diagnosticar problemas sin la ayuda del Centro
de información del cliente de SIGNATURE KITCHEN
SUITE.
Siga las instrucciones en la aplicación SIGNATURE
KITCHEN SUITE para realizar un Diagnóstico
Inteligente usando su teléfono inteligente.
NOTA
%Smart Diagnosis™ no puede activarse a menos que el
electrodoméstico se encienda usando el botón Power
(Encendido/Apagado). Si no es posible encender el
electrodoméstico, entonces la resolución de
problemas debe llevarse a cabo sin usar Smart
Diagnosis™.
26 FUNCIONES INTELIGENTES
Aviso FCC
El siguiente aviso cubre el módulo transmisor contenido
en este producto.
Este equipo ha sido evaluado y se encuentra en
conformidad con los límites del equipo digital Clase B,
dispuesto en la Parte 15 de las Reglas FCC, y también
en la Parte 18 de las Reglas FCC. Estos límites están
designados para proveer una protección razonable
contra interferencia dañina en una instalación
residencial. Este equipo genera, usa, y emite energía de
radio frecuencias y, si no se instala y utiliza de acuerdo
a las instrucciones, podría causar interferencia dañina a
las radio comunicaciones. De cualquier manera, no
existe garantía de que no ocurrirá interferencia en una
instalación particular. Si este equipo causara
interferencia dañina a la recepción de radio o televisión,
lo cual puede ser determinado al encenderlo y apagarlo,
se alienta al usuario a intentar corregir la interferencia
con una o más de las siguientes medidas
<Reoriente o reubique la antena receptora.
<Incremente la distancia entre el equipo y el receptor.
<Conecte el equipo a un enchufe en un circuito
diferente al del receptor.
<Consulte con un distribuidor o un técnico
experimentado en radio/TV para recibir ayuda.
Este equipo se encuentra en conformidad con la parte
15 y 18 de las Reglas FCC. El funcionamiento está
sujeto a las dos condiciones siguientes:
1) este dispositivo puede no causar interferencia dañina;
y
2) este dispositivo debe aceptar cualquier interferencia,
incluyendo aquella que pueda causar el
funcionamiento no deseado del dispositivo.
&XDOTXLHUFDPELRRPRGL¿FDFLyQHQODFRQVWUXFFLyQGH
este dispositivo, que no esté aprobado expresamente
por la parte responsable de su cumplimiento, podría
anular la autoridad del usuario de operar el equipo.
Declaración de Exposición a
Radiación FCC RF
Este equipo se encuentra en conformidad con los límites
de exposición a radiación FCC enunciados para un
ambiente no controlado. Este transmisor no debe ser
ubicado u operado en conjunto con cualquier otra
antena o transmisor.
Este equipo debe ser instalado y operado con una
distancia mínima de 20 cm (7.8 pulgadas) entre la
antena y su cuerpo. Los usuarios deben seguir las
instrucciones operativas específicas para satisfacer el
cumplimiento de exposición RF.
Declaración de Industria Canadiense
(Para el módulo transmisor contenido
en este producto)
Este dispositivo cumple con la exención de licencia aplicable
de la industria de Canadá RSSs. El funcionamiento está
sujeto a las dos condiciones siguientes:
1) Este dispositivo puede no causar interferencia dañina;
y
2) Este dispositivo debe aceptar cualquier interferencia,
incluyendo aquella que pueda causar el
funcionamiento no deseado del dispositivo.
Industria Canadiense ICES-001 Etiqueta de
Conformidad: CAN ICES-1/NMB-1
Declaración de Exposición a
Radiación IC
Este equipo cumple con los límites de exposición a
radiación IC establecidos para un entorno no controlado.
Este equipo debe ser instalado y operado con una
distancia mínima de 20 cm (7.8 pulgadas) entre la
antena y su cuerpo.
NOTA
%El fabricante no se hace responsable por cualquier
interferencia de radio o TV causada por una
PRGL¿FDFLyQQRDXWRUL]DGDDHVWHHTXLSR'LFKDV
PRGL¿FDFLRQHVSRGUtDQDQXODUODDXWRULGDGGHOXVXDULR
para operar el equipo.
Específicaciones de Módulo LAN Inalámbrico
Modelo LCW-003
Rango de Frecuencia 2412 MHz - 2462 MHz
Potencia de Salida
(Max)
IEEE 802.11b: 17.56 dBm
IEEE 802.11g: 25.53 dBm
IEEE 802.11n: 25.29 dBm
Información de Anuncio de
Programas de Código Abierto
Para obtener el código fuente bajo GPL, LGPL, MPL y
otras licencias de fuente abierta, que esté contenido en
este producto, por favor visite http://opensource.
thesignaturekitchen.com
Adicional al código fuente, todos los términos de referencia
de la licencia, renuncias de garantía y notificaciones de
derechos de autor están disponibles para descarga.
SIGNATURE KITCHEN SUITE también le puede proveer
el código de fuente abierta en un CD por un cargo que
cubra el costo de distribución (como el costo de los
medios, envío, y manejo) al requerirlo mediante correo
electrónico a opensource@thesignaturekitchen.com
Esta oferta es válida por un período de tres años después
de nuestro último envío de este producto. Esta oferta es
válida para cualquier que haya recibido esta información.
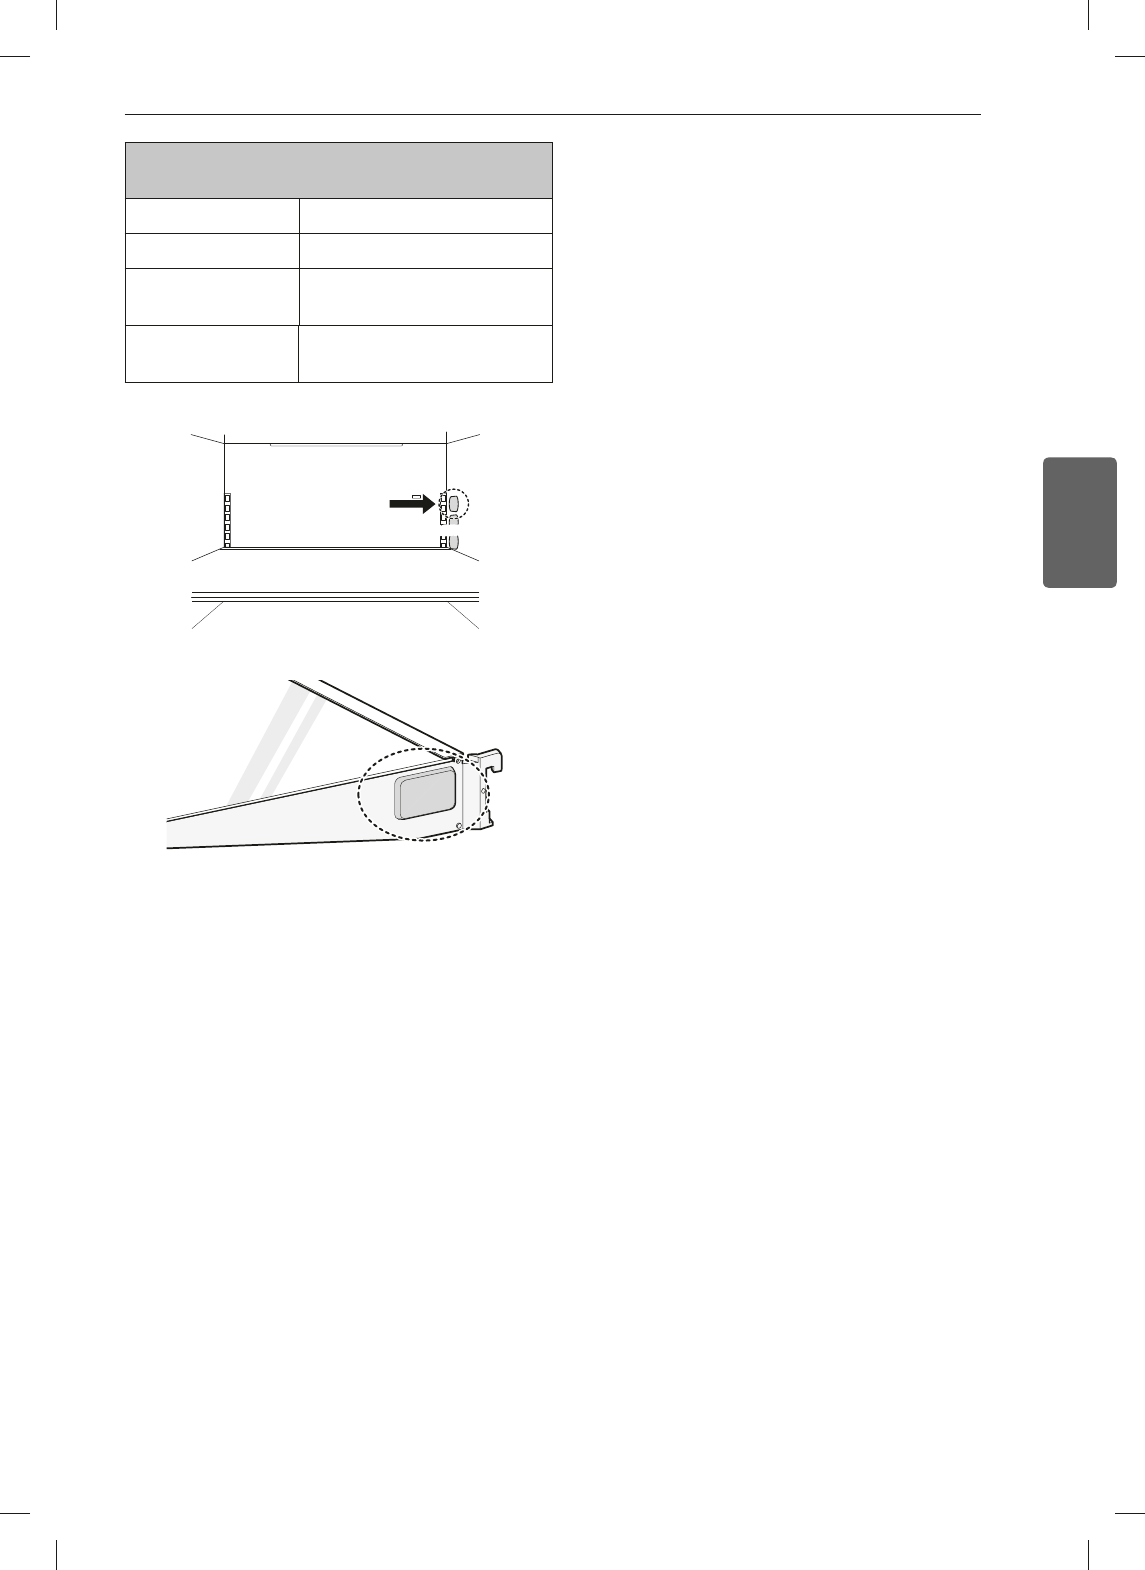
27FUNCIONES INTELIGENTES
ESPAÑOL
Especificaciones de Transferencia de Energía
Inalámbrica
Frecuencia 330 kHz ~ 370 kHz
Voltaje Nominal DC 12 V
Alimentación
suministrada
Menor que, e igual a, 3W por
estante.
Modo de
transmisión
Inducción electromagnética
Transmisor
Receptor
NOTA
%Objetos extraños y suciedad entre el lado derecho del
estante y la pared del gabinete externo podrían
prevenir que la luz del estante encienda.
%La luz del estante se enciende cuando la puerta se
abre.
%La luz del estante se apaga después de siete minutos
o cuando la puerta se cierra.
28 MANTENIMIENTO
MANTENIMIENTO
Limpieza
ADVERTENCIA
%8WLOLFHXQOLPSLDGRUQRLQÀDPDEOH1RKDFHUOR
podría resultar en un incendio, explosión, o incluso
la muerte.
PRECAUCIÓN
%No use un trapo abrasivo o esponja mientras limpia
el interior y exterior del refrigerador.
%1RFRORTXHVXPDQRHQODVXSHU¿FLHLQIHULRUGHO
refrigerador cuando abra y cierre las puertas.
Consejos Generales de Limpieza
%El refrigerador se descongela automáticamente; sin
embargo, limpiélo una vez al mes para prevenir olores.
%Limpie derrames inmediatamente.
%Desconecte el refrigerador o la corriente eléctrica
previo a la limpieza.
%Remueva todas las partes removibles, como los
estantes.
%Use una esponja limpia o un paño suave y un
detergente ligero en agua tibia. No utilice abrasivos o
limpiadores ásperos.
%/DYHDPDQRHQMXDJXH\VHTXHWRGDVODVVXSHU¿FLHV
intensivamente.
%Al limpiar el interior o exterior del electrodoméstico, no
utilice un cepillo duro, pasta dental, o materiales
LQÀDPDEOHV1RXWLOLFHDJHQWHVGHOLPSLH]DTXH
FRQWHQJDQVXVWDQFLDVLQÀDPDEOHV
<Esto podría causar decoloración o daños al
electrodoméstico.
<6XVWDQFLDVLQÀDPDEOHVDOFRKROHWDQROPHWDQRO
alcohol isopropílico, alcohol isobutílico, etc.),
GLVROYHQWHVFORUREHQFHQROtTXLGRVLQÀDPDEOHV
abrasivos, etc.
Paredes Interiores
Como ayuda para remover olores, lave el interior del
refrigerador con una mezcla de bicarbonato de sodio y
agua tibia. Mezcle 2 cucharadas de bicarbonato de
sodio con 1 cuarto de galón de agua (26 g de
bicarbonato en 1 litro de agua). Asegúrese de que el
bicarbonato de sodio esté completamente disuelto para
que este no raye las superficies del refrigerador .
Revestimientos de Puertas y Juntas
Use una esponja limpia o un paño suave y un
detergente ligero en agua tibia. No utilice ceras de
limpieza, detergentes concentrados, lejías o limpiadores
que contengan petróleo en las partes plásticas del
refrigerador.
Partes Plásticas (Cubiertas y
Paneles)
Use una esponja limpia o un paño suave y un
detergente ligero con agua tibia. No utilice limpiadores
de vidrio, limpiadores abrasivos o líquidos inflamables.
Estos pueden rayar o dañar el material.
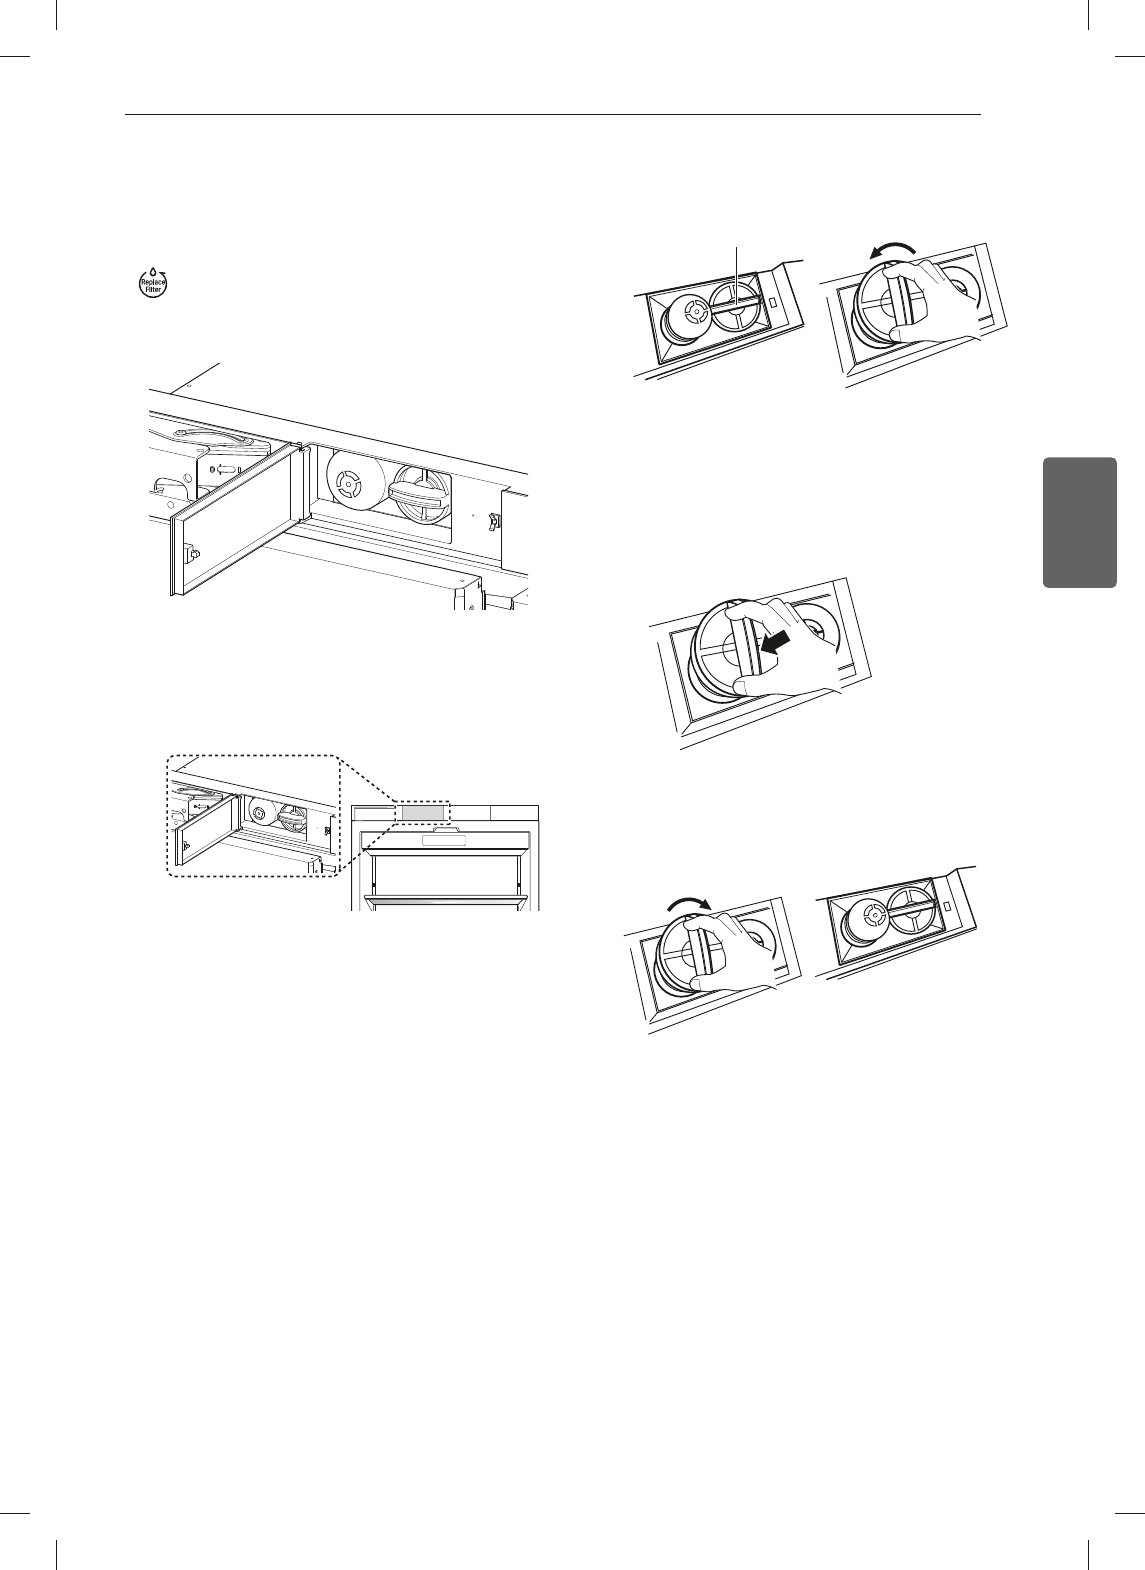
29MANTENIMIENTO
ESPAÑOL
Reemplazo del Filtro de Agua
Reemplace el Filtro de Agua
%Aproximadamente cada seis meses.
%Cuando el icono Replace Filter (Reemplace Filtro)
se encienda.
%Cuando disminuya la potencia del dispensador de
agua.
1Retire el filtro de agua viejo
Presione para abrir la cubierta del filtro de agua en
la parte superior derecha del refrigerador.
NOTA
%5HHPSOD]DUHO¿OWURGHDJXDFDXVDTXHXQDSHTXHxD
cantidad de agua (alrededor de 1 oz o 25 cc) se
drene.
%Envuelva un paño alrededor del extremo frontal de la
FXELHUWDGHO¿OWURSDUDGHWHQHUFXDOTXLHUIXJDGHDJXD
8QDYH]UHPRYLGRVXMHWHHO¿OWURGHDJXDHQSRVLFLyQ
vertical a manera de prevenir que el agua remanente
se salga.
2Coloque la tapa en el filtro de agua, luego sujétela y
gírela hacia la izquierda para remover el filtro de
agua de la cabeza del filtro.
Tapa
3Reemplace con un nuevo filtro de agua.
Retire el nuevo filtro de agua de su empaque y
remueva la cubierta protectora de los anillos.
Coloque la tapa en el nuevo filtro de agua, y luego
empújelo en el agujero colector hasta que se
detenga.
4Sujete y rote la tapa hacia la derecha hasta que se
detenga.
Reemplace la tapa al lado del filtro de agua.
5Luego de reemplazar el filtro de agua, dispense 2.5
galones de agua (deje correr el agua por
aproximadamente 5 minutos) para remover el aire
atrapado y los contaminantes del sistema.
NOTA
%No dispense los 2.5 galones completos de manera
continua. Presione y suelte el botón del dispensador
en ciclos de 30 segundos ENCENDIDO y 60 segundos
APAGADO.

30 MANTENIMIENTO
6Luego de cambiar el filtro, mantenga presionado el
botón Water Filter Reset por tres segundos para
reiniciar la luz indicadora.
NOTA
Para comprar un filtro de agua de repuesto:
%Visite a su proveedor o distribuidor local
%Web : Encuentre Partes y Accesorios en la sección de
soporte de thesignaturekitchen.com
%Llame : (EE. UU.) 1-855-790-6655
Para mayor asistencia, llame al:
(EE. UU.) 1-855-790-6655
%Utilice Cartucho de Reemplazo:
LT1000P (ADQ74793501)
LT1000PC (ADQ74793504)
LT1000PCS (ADQ74793505)
LT1000P(S) (ADQ74793506)
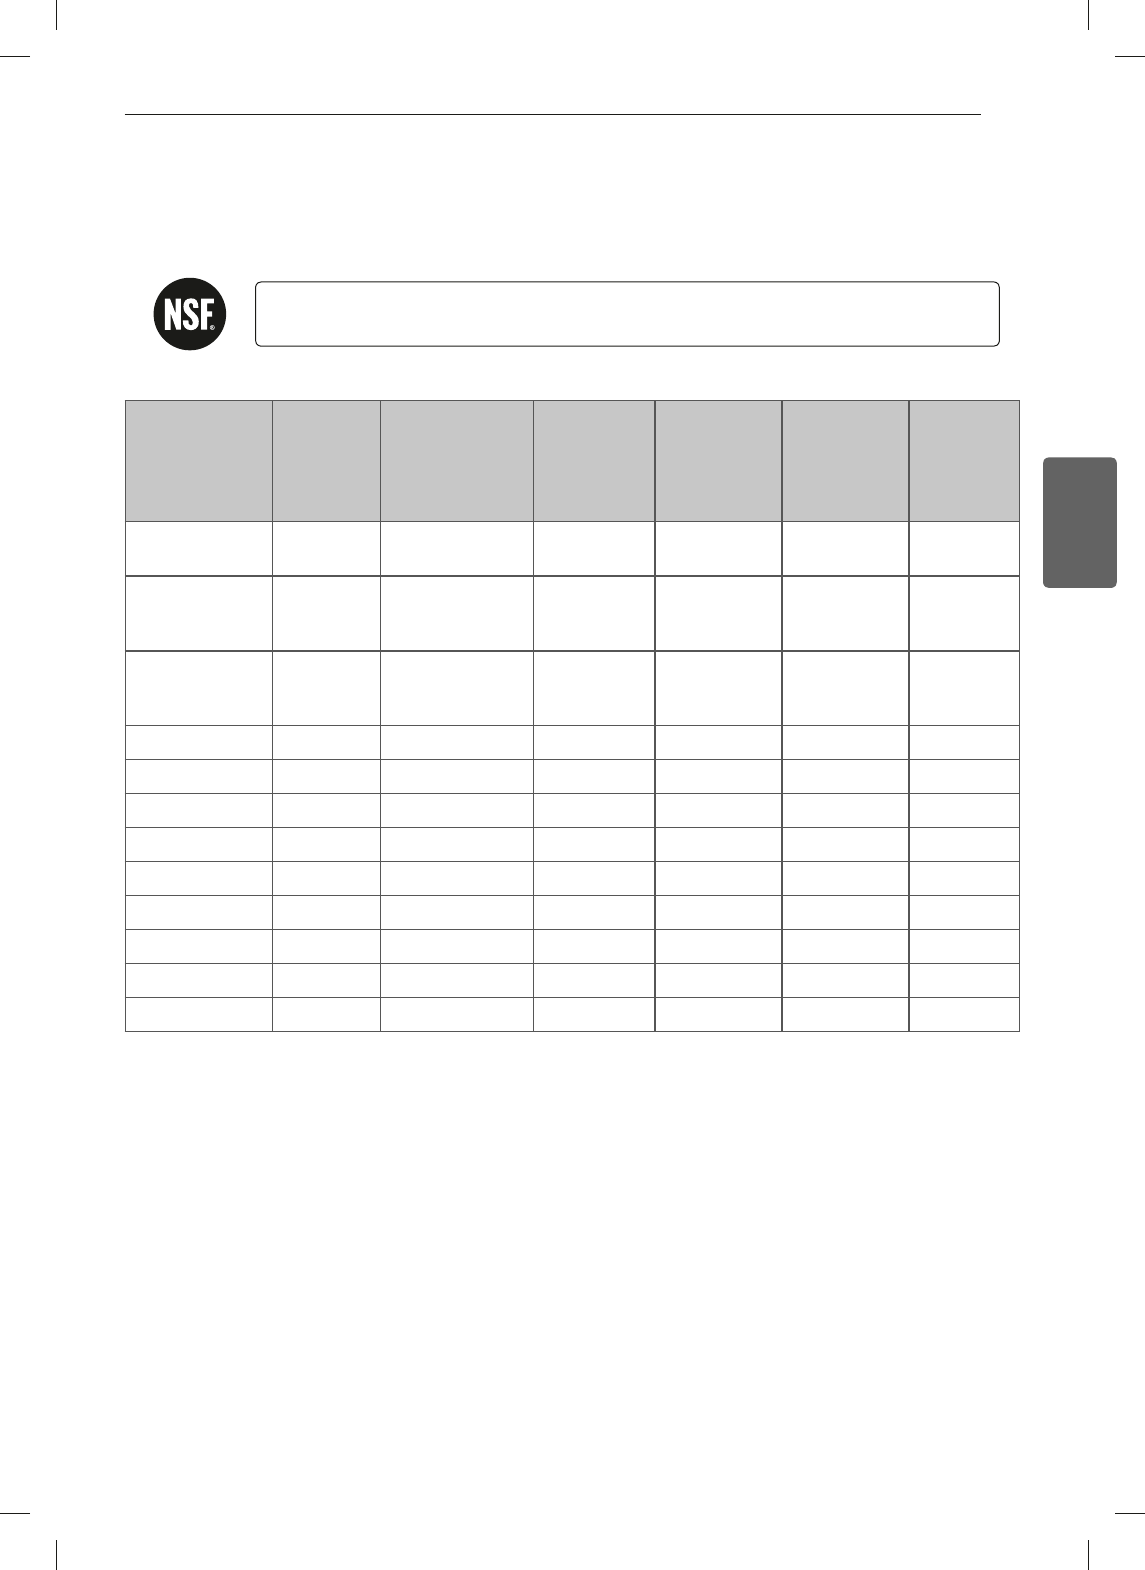
31MANTENIMIENTO
ESPAÑOL
Hoja de Datos de Rendimiento
Modelo: LT1000P/PC/PCS/P(S) Código del Nombre Comercial del Sistema : MDJ64844601
La concentracióin de las sustancias indicadas en el agua ingresando al sistema ha sido reducida a una concentración
menor o igual al límite permisible para el agua saliendo del sistema, como ha sido específicado en NSF/ANSI
Estándar 42, Estándar 53 y Estándar 401.
Sistema probado y certificado por NSF International según los estándares NSF/ANSI 42, 53 y
401 para la reducción de las siguientes sustancias.
Reducción de
sustancia
Objetivo
Influente
Medio
Concentración
Objetivo
especificada por
NSF
% Reducción
Promedio
Concentración
de Agua del
Producto
Promedio
Concentración
Máxima
Permisible
de Agua del
Producto
Requisitos
de
Reducción
NSF
Olor y Sabor a
Cloro ȝJ/ ȝJ/ ! ȝJ/ N/A
Partícula Nominal
&ODVH,D
ȝP
12,000,000
pts/mL
Al menos 10,000
partículas/mL 24,000 pts/ml N/A
Asbesto 180 MFL
De 10
7
a 10
8
MFL;
fibras mayores a
ȝJHQORQJLWXG
! < 1 MFL N/A
Atracina ȝJ/ ȝJ/ ! ȝJ/ ȝJ/ NA
Benceno ȝJ/ ȝJ/ ! ȝJ/ ȝJ/ NA
Carbofurano ȝJ/ ȝJ/ ȝJ/ ȝJ/ NA
Lindano ȝJ/ ȝJ/ ! ȝJ/ ȝJ/ NA
P-Diclorobenceno ȝJ/ ȝJ/ ! ȝJ/ ȝJ/ NA
2,4-D ȝJ/ ȝJ/ ! ȝJ/ ȝJ/ NA
Plomo pH @6.5 ȝJ/ ȝJ/ ȝJ/ ȝJ/ NA
Plomo pH @8.5 ȝJ/ ȝJ/ ! ȝJ/ ȝJ/ NA
Mercurio @ pH6.5 ȝJ/ ȝJ/ ȝJ/ ȝJ/ NA
(Continúa en la siguiente página)
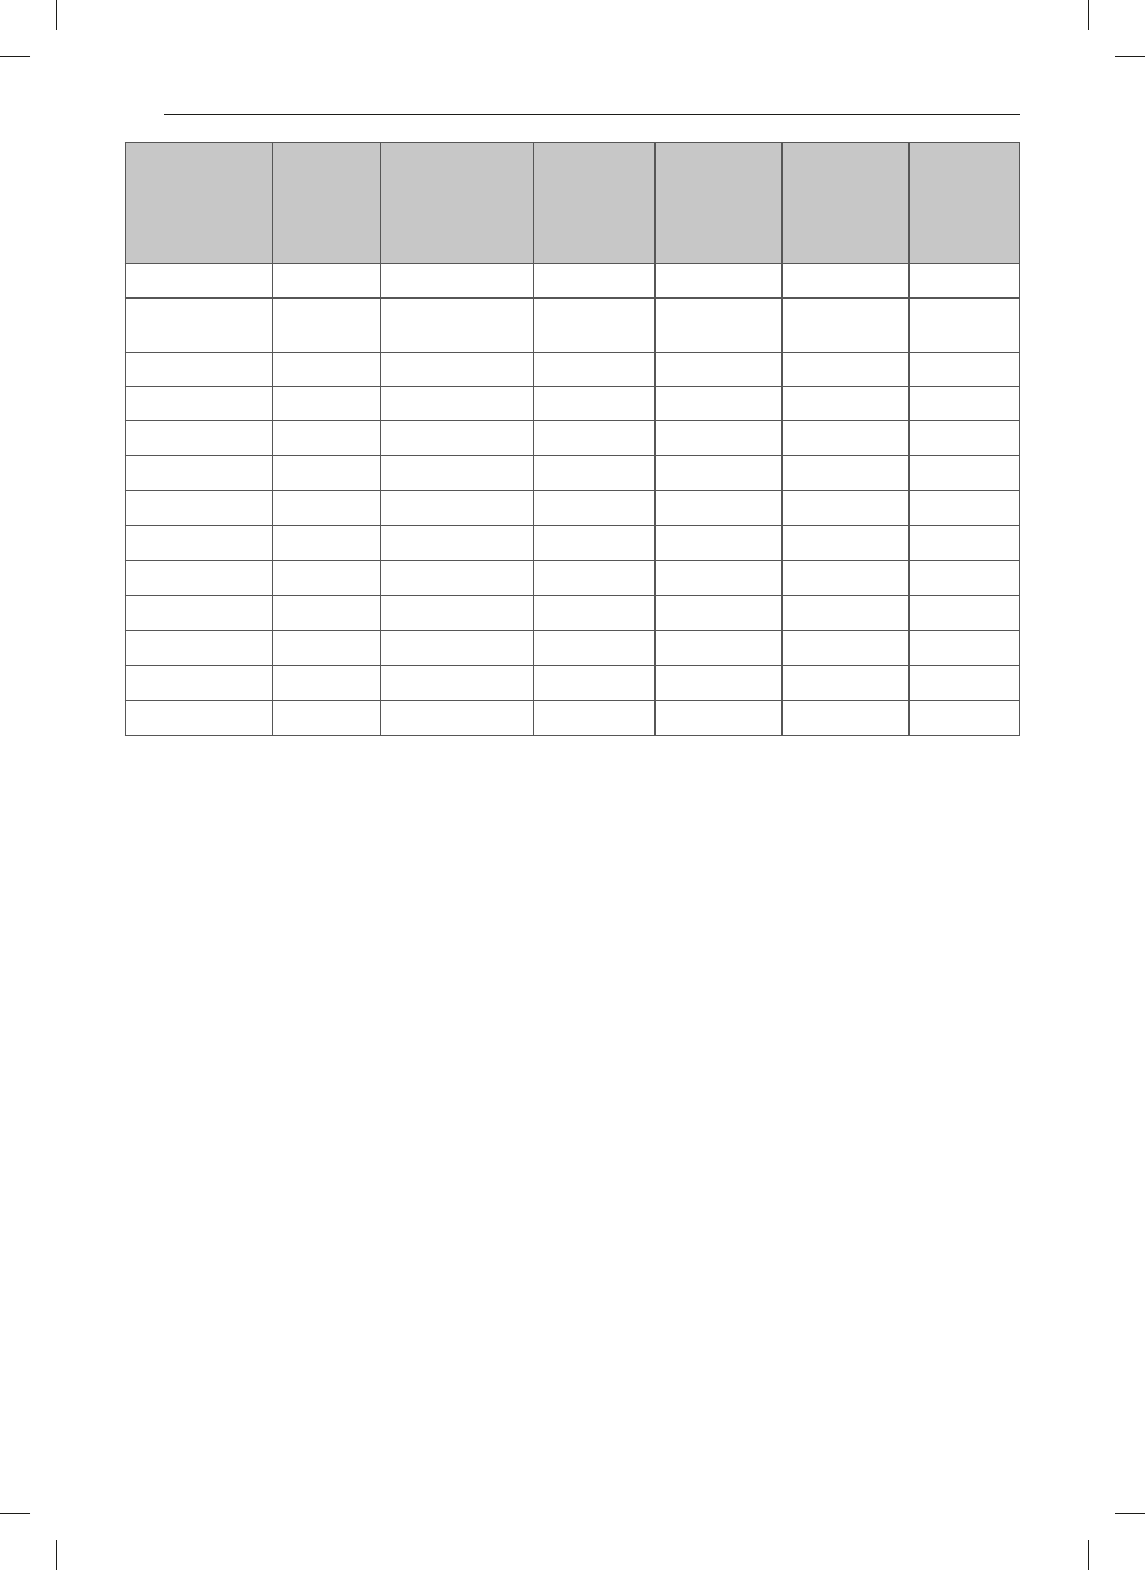
32 MANTENIMIENTO
Reducción de
sustancia
Objetivo
Influente
Medio
Concentración
Objetivo
especificada por
NSF
% Reducción
Promedio
Concentración
de Agua del
Producto
Promedio
Concentración
Máxima
Permisible
de Agua del
Producto
Requisitos
de
Reducción
NSF
Mercurio @ pH8.5 ȝJ/ ȝJ/ ȝJ/ ȝJ/ NA
Quistes* 100,000
quistes/L
Mínimo de 50,000
quistes/L ! 10 quistes/L N/A
Atenolol 240 ng/L QJ/ ! 10.80 ng/L 30 ng/L NA
Carbamazepina 1600 ng/L QJ/ 25.60 ng/L 200 ng/L NA
DEET 1600 ng/L QJ/ 46.40 ng/L 200 ng/L NA
Trimetoprima 170 ng/L QJ/ ! 5.44 ng/L 20 ng/L NA
Linuron 160 ng/L QJ/ ! 5.44 ng/L 20 ng/L NA
Fenitoína 200 ng/L QJ/ ! 10.40 ng/L 30 ng/L NA
Ibuprofeno 400 ng/L QJ/ ! 22.00 ng/L 60 ng/L NA
Naproxeno 140 ng/L QJ/ ! 5.46 ng/L 20 ng/L NA
Estrona 120 ng/L QJ/ ! 4.68 ng/L 20 ng/L NA
Bisfenol A 2000 ng/L QJ/ ! 22.00 ng/L 300 ng/L NA
Nonilfenol 1600 ng/L QJ/ ! 46.40 ng/L 200 ng/L NA
%Basado en el uso de ooquistes de Crypstosporidium parvum.
33MANTENIMIENTO
ESPAÑOL
Lineamientos de Aplicación /
Parámetros de Suministro de Agua
Flujo de
Servicio 0.5 gpm (1.89 lpm)
Suministro de
Agua
Pozo Comunitario o Privado - Agua
Potable
Presión de
Agua 20 – 120 psi (138 – 827 kPa)
Temperatura
del agua 33 °F – 100 °F (0.6 °C – 37.8 °C)
Capacidad 200 galones (757 litros)
Es indispensable que se realicen la instalación
recomendada por el fabricante, el mantenimiento y los
requerimientos de remplazo del filtro para que el
producto funcione adecuadamente.
NOTA
%Aunque se llevaron a cabo las pruebas en condiciones
estándar de laboratorio, el desempeño real podría
variar.
Cartucho de Reemplazo: LT1000P/PC/PCS/P(S)
Para filtros de reemplazo, visite a su proveedor o
distribuidor local, o búsque “filtros de agua” en el sitio
web thesignaturekitchen.com
Para asistencia adicional, el Centro de Información al
Cliente SIGNATURE KITCHEN SUITE está abierto 24
horas al día/7 días a la semana.
EE.UU: 1-855-790-6655
NSF es una marca registrada de NSF
ADVERTENCIA
Para reducir el riesgo asociado con asfixia:
%No permita que los niños menores de 3 años
tengan acceso a las piezas pequeñas durante la
instalación de este producto.
Para reducir el riesgo asociado con la ingesta de
contaminantes:
%No lo utilice con agua microbiológicamente
insegura o de calidad desconocida sin la
desinfección adecuada antes o después del
VLVWHPD6LVWHPDVFHUWL¿FDGRVSDUDUHGXFFLyQGH
quístes pueden ser utilizados en agua desinfectada
TXHSXHGDFRQWHQHUTXLVWHV¿OWUDEOHV
Establecimiento EPA # 070595-MEX-001
PRECAUCIÓN
Para reducir el riesgo asociado con daños a la
propiedad debido a fugas de agua:
%Lea y siga las Instrucciones de Uso previo a la
instalación y el uso de este sistema.
%La instalación y uso DEBEN cumplir con toda la
normativa de plomería estatal y local.
%No lleve a cabo la instalación si la presión del agua
excede los 120 psi (827 kPa). Si la presión de su
agua excede los 80 psi, debe instalar una válvula
limitante de presión. Contacte a un plomero si no
VDEHFRQFHUWH]DFyPRYHUL¿FDUODSUHVLyQGHODJXD
%No lleve a cabo la instalación donde puedan ocurrir
condiciones de golpe de ariete. Si existen
condiciones de golpe de ariete, debe instalar un
protector para éste. Contacte a un plomero si no
VDEHFRQFHUWH]DFyPRYHUL¿FDUpVWDFRQGLFLyQ
%No lleve a cabo la instalación en líneas de
suministro de agua caliente. La temperatura
Pi[LPDGHRSHUDFLyQGHHVWHVLVWHPDGH¿OWUDGR
es de 100 °F (37.8 °C).
%(YLWHODFRQJHODFLyQGHO¿OWUR'UHQHHO¿OWURFXDQGR
la temperatura caiga debajo de 40 °F (4.4 °C).
%(OFDUWXFKRGH¿OWURGHVHFKDEOH'(%(VXVWLWXLUVH
cada 6 meses, con la capacidad nominal o si se
REVHUYDXQDVLJQL¿FDWLYDUHGXFFLyQGHOFDXGDO
%Para proteger de la congelación, remueva el
FDUWXFKRGHO¿OWURFXDQGRVHSUHYHDTXHODV
temperaturas puedan ser inferiores a 33° F.
%No instale sistemas en áreas donde la temperatura
ambiente pueda superar los 110° F (43.3° C).
%Donde se instale un dispositivo de prevención de
UHÀXMRHQXQVLVWHPDGHDJXDGHEHUiLQVWDODUVHXQ
dispositivo para controlar la presión debido a la
expansión térmica.
%Asegúrese de que todas las tuberías y conexiones
estén correctamente instaladas y sin fugas.
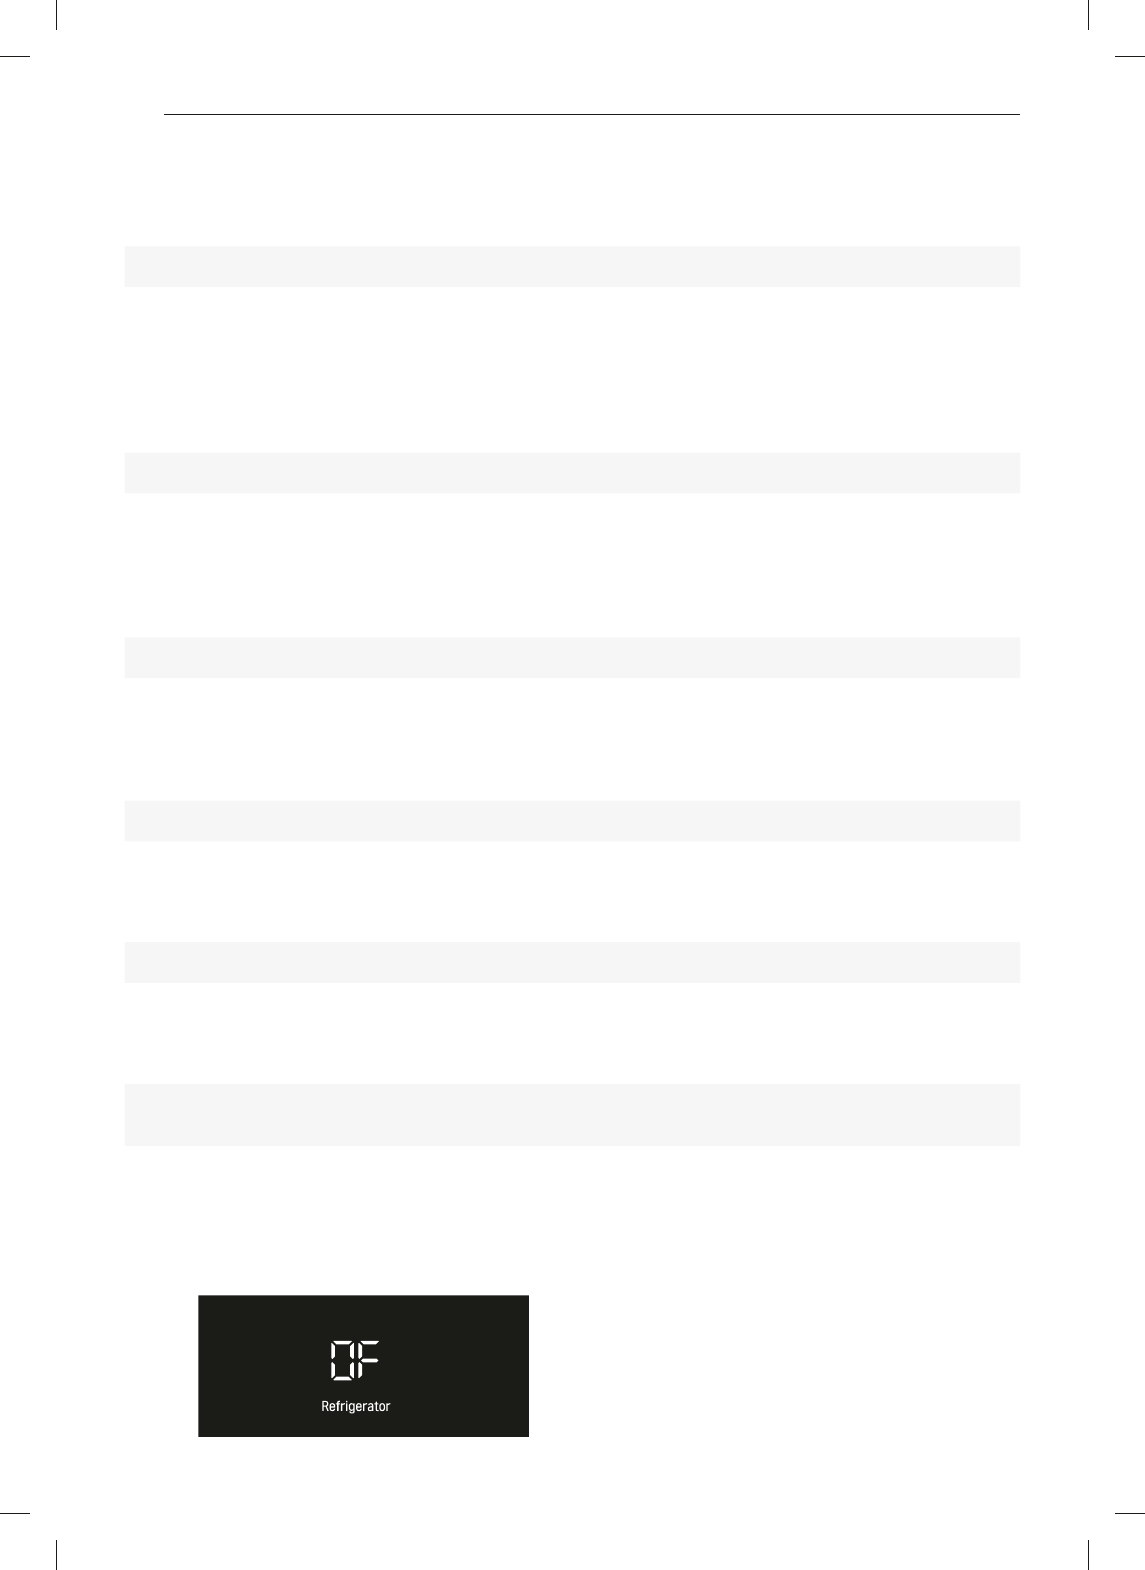
34 SOLUCIÓN DE PROBLEMAS
SOLUCIÓN DE PROBLEMAS
Preguntas frecuentes
P: ¿Cuál es la mejor configuración de temperatura para mi congelador?
R: La configuración predeterminada para el congelador es de 0° Fahrenheit (-18° Celsios). Ajuste esta
configuración según sus necesidades para mantener los alimentos a la temperatura deseada. Los helados
deben mantenerse firmes y los cubos de hielo no deben derretirse en el congelador. Para cambiar de
Fahrenheit a Celsios en la pantalla, primero presione el botón Freezer para activar la pantalla y luego
mantenga presionados los botones Freezer y Smart Grid hasta que escuche un tono y cambie la
configuración en la pantalla.
P: ¿Cuál es la mejor configuración de temperatura para mi refrigerador?
R: La configuración predeterminada para el refrigerador es de 37° Fahrenheit (3° Celsios). Ajuste esta
configuración según sus necesidades para mantener los alimentos a la temperatura deseada. Para
cambiar de Fahrenheit a Celsios en la pantalla, primero presione el botón Refrigerator para activar la
pantalla y luego mantenga presionados los botones Refrigerator y Smart Grid hasta que escuche un tono y
cambie la configuración en la pantalla.
P: How do I set the temperature?
R: Continually press the Refrigerator or Convertible or Freezer button on the control panel until the
desired temperature appears.
The numbers will cycle from highest to lowest and then return to the highest again with continuous
pressing.
P: ¿Por qué escucho un zumbido periódicamente desde mi congelador?
R: Esto podría pasar si no tiene un suministro de agua conectado al congelador y la máquina de hielo está
encendida. Si no tiene un suministro de agua conectado al congelador debería apagar la máquina de hielo
en el panel de control.
P: ¿Por qué el recipiente del dispensador de hielo se ve encorvado?
R: Esta es una parte normal del ciclo del dispensador de hielo. La bandeja del dispensador de hielo puede
parecer nivelada o con una leve inclinación. El cambio de posición es para asistir el proceso de
congelación.
P: Mi congelador está encendido y los controles están funcionando, pero no está enfriando y la
pantalla muestra “OF” (Vea abajo). ¿Qué está mal?
R: El congelador está en Modo de Exhibición. El Modo de Exhibición deshabilita todo el enfriamiento para
conservar energía mientras el electrodoméstico se exhibe en una tienda. Para restaurar la operación
normal, primero presione el botón Freezer para activar la pantalla y luego mantenga presionados los
botones Freezer y Water Filter Reset hasta que escuche un tono y aparezca la configuración de
temperatura en la pantalla. Utilice el mismo procedimiento para regresar el congelador al Modo de
Exhibición, si así lo desea.
35SOLUCIÓN DE PROBLEMAS
ESPAÑOL
Antes de llamar al servicio técnico
Revise esta sección antes de llamar para servicio; hacerlo le ahorrará tiempo y dinero.
Enfriamiento
Problema Causa posible Soluciones
Las secciones del
Refrigerador y
Congelador no
están enfriando.
El control está en la posición
APAGADO (algunos modelos).
Configure el control en la posición de ENCENDIDO.
Consulte la Configuración en la sección Controles para
los ajustes apropiados de temperatura.
El Refrigerador está
configurado en Modo de
Exhibición.
El Modo de Exhibición permite que las luces y la pantalla
de control operen normalmente mientras, a la vez,
deshabilita el enfriamiento para ahorrar energía mientras
el refrigerador está en la sala de exhibición. Vea la
sección de Preguntas Frecuentes (FAQs) de este
manual para obtener instrucciones sobre cómo
deshabilitar el Modo de Exhibición.
El refrigerador está en el ciclo
de descongelado.
Durante el ciclo de descongelado, la temperatura de
cada compartimento puede incrementarse levemente.
Espere 30 minutos y confirme que la temperatura
apropiada haya sido restaurada una vez que el ciclo de
descongelado haya sido completado.
El refrigerador fue instalado
recientemente.
Puede tomar hasta 24 horas para que cada
compartimento alcance la temperatura deseada.
El refrigerador fue reubicado
recientemente.
Si el refrigerador estaba almacenado o reclinado por un
largo período de tiempo, es necesario que éste se
mantenga en posición vertical por 24 horas previo a
conectarlo a la corriente eléctrica.
El sistema de
enfriamiento se
ejecuta mucho.
El refrigerador está
reemplazando un modelo
anterior.
Los refrigeradores modernos requieren más tiempo de
operación pero usan menos energía debido a tecnología
más eficiente.
El refrigerador fue conectado
recientemente o su fuente de
energía fue restablecida.
Puede tomar hasta 24 horas para que el refrigerador
enfríe completamente.
La puerta es abierta
frecuentemente o una gran
cantidad de alimentos /
alimentos calientes fueron
añadidos.
Al añadir alimentos y abrir las puertas, el refrigerador se
calienta, requiriendo que el compresor se ejecute más
tiempo a manera de enfriarlo de nuevo. A manera de
conservar energía, intente retirar todo lo que necesita
del refrigerador al mismo tiempo, mantenga los
alimentos organizados para que sea fácil encontrarlos, y
cierre la puerta en cuanto los alimentos sean retirados.
(Consulte la Guía de Almacenamiento de Alimentos.)
Las puertas no están
completamente cerradas.
Cierre las puertas firmemente. Si éstas no cierran
completamente, vea la sección Puertas no cierran o
abren completamente en Solución de Problemas.
El refrigerador está instalado
en una ubicación caliente.
El compresor se ejecutará por más tiempo en
condiciones templadas. A una temperatura ambiente
normal (70 °F) puede esperar que su compresor se
HMHFXWHDOUHGHGRUGHODOGHOWLHPSR%DMR
condiciones más calientes, éste se ejecutará más a
menudo. El refrigerador no debe ser operado a una
temperatura superior a 110 °F.

36 SOLUCIÓN DE PROBLEMAS
Enfriamiento
Problema Causa posible Soluciones
Acumulación de
humedad interior.
Las puertas están abiertas
constantemente o por
períodos largos de tiempo.
Cuando las puertas están abiertas constantemente o por
períodos largos de tiempo, el aire caliente y húmedo
entra al compartimento. Esto eleva la temperatura y el
nivel de humedad dentro del compartimento. Para
disminuir el efecto, reduzca la frecuencia y duración de
apertura de la puerta.
Las puertas no están cerradas
correctamente.
Vea la sección Puertas no cierran o abren
completamente.
El clima es húmedo.
El clima húmedo permite que humedad adicional ingrese
a los compartimentos cuando las puertas se abren,
provocando condensación o escarcha. Mantener un
nivel de humedad razonable en el hogar ayudará a
controlar la cantidad de humedad que pueda ingresar a
los compartimentos.
Ciclo de descongelado
recientemente completado.
Durante el ciclo de descongelado, la temperatura de
cada compartimento puede incrementar levemente y
puede que se forme condensación en la pared trasera.
Espere 30 minutos y confirme que la temperatura
adecuada se ha restaurado una vez el ciclo de
descongelado ha sido completado.
Los alimentos no están
empacados correctamente.
Los alimentos almacenados, descubiertos o
desenvueltos, y contenedores húmedos pueden llegar a
generar acumulación de humedad dentro de cada
compartimento. Seque todos los contenedores y
almacene los alimentos en empaques sellados para
prevenir condensación y escarcha.
Los alimentos se
están congelando
en el
compartimento del
refrigerador.
Alimentos con contenido alto
en agua fueron ubicados cerca
de una ranura de ventilación.
Reorganice los artículos con contenido alto en agua
alejados de las ranuras de ventilación.
La temperatura del refrigerador
está configurada
incorrectamente.
Si la temperatura es muy baja, ajuste el control mediante
un incremento a la vez y espere a que la temperatura se
estabilice. Consulte la sección Ajustando los Controles
para más información.
El refrigerador está instalado
en una ubicación fría.
Cuando el refrigerador es operado en una temperatura
inferior a 41°F (5°C), los alimentos pueden congelarse
en el compartimento del refrigerador. El refrigerador no
debe ser operado en temperaturas inferiores a 55°F
(13°C).
El refrigerador está
demasiado caliente.
El refrigerador fue instalado
recientemente.
Puede tomar hasta 24 horas para que cada
compartimento alcance la temperatura deseada.
Los respiraderos están
bloqueados.
Ubique las ranuras de ventilación utilizando su mano
para sentir el flujo de aire y remueva los empaques que
bloqueen la ventilación y restrinjan el flujo de aire.
Reacomode los artículos a manera de permitir el flujo de
aire a través del compartimiento.
37SOLUCIÓN DE PROBLEMAS
ESPAÑOL
Enfriamiento
Problema Causa posible Soluciones
El refrigerador está
demasiado caliente.
Las puertas están abiertas
constantemente o por
períodos largos de tiempo.
Cuando las puertas están abiertas constantemente o por
períodos largos de tiempo, el aire caliente y húmedo
entra al compartimento. Esto eleva la temperatura y el
nivel de humedad dentro del compartimento. Para
disminuir el efecto, reduzca la frecuencia y duración de
apertura de la puerta.
La unidad está instalada en un
lugar caluroso.
No se debería usar el refrigerador en temperaturas
superiores a los 110 °F.
Se ha agregado una gran
cantidad de alimentos o
comida caliente al
compartimiento.
Agregar alimentos hace que el compartimiento se
caliente, requiriendo así que se ejecute el sistema de
enfriamiento. Permitir que los alimentos calientes se
enfríen a temperatura ambiente previo a colocarlos en el
refrigerador reducirá este efecto.
Las puertas no cierran
correctamente.
Vea la sección Puertas no cierran o abren
completamente en Solución de Problemas de Partes &
Características.
El control de temperatura no
es el adecuado.
Si la temperatura es muy alta, ajuste el control un
incremento a la vez y espere a que la temperatura se
estabilice.
El ciclo de descongelación se
ha completado recientemente.
Durante el ciclo de descongelado, la temperatura de
cada compartimento puede incrementar levemente y
formar condensación en la pared trasera. Espere 30
minutos y confirme que la temperatura apropiada haya
sido restaurada una vez el ciclo de descongelado haya
sido completado.
El refrigerador está
demasiado frío.
Ajustes de control de
temperatura incorrectos.
Si la temperatura es muy fría, ajuste el control un
incremento a la vez y espere a que la temperatura se
estabilice. Consulte el Panel de Control para mayor
información.
38 SOLUCIÓN DE PROBLEMAS
Partes y Características
Problema Causa posible Soluciones
Las puertas no se
cierran
correctamente o se
quedan abiertas.
Paquetes de alimentos están
bloqueando la puerta e
impiden que se cierre.
Reorganice los contenedores de alimentos para liberar
la puerta y los estantes de la puerta.
El recipiente de hielo, la tapa
del cajón para verduras, las
bateas, los estantes, las
bandejas de las puertas o las
cestas no están en su sitio.
Empuje correctamente hacia adentro las bandejas, la
tapa del cajón para verduras, las bateas, los estantes y
las cestas en su posición adecuada. Vea la sección
Operación para mayor información.
Las puertas se desmontaron
durante la instalación del
producto y no se volvieron a
colocar correctamente.
Remueva y reemplace las puertas de acuerdo a las
instrucciones de instalación.
El refrigerador no está
correctamente nivelado.
Para nivelar el refrigerador, vea Alineación de la Puerta
en las instrucciones de instalación.
Es difícil abrir la
puerta.
Las juntas están sucias o
pegajosas.
Limpie las juntas y las superficies que tocan. Aplique
una fina capa de cera para electrodomésticos o cera de
cocina en las juntas después de limpiarlas.
La puerta se acaba de cerrar.
Cuando abre la puerta, aire caliente entra al refrigerador.
Al enfriarse, puede crear un vacío. Si le cuesta abrir la
puerta, espere un minuto para permitir que la presión del
aire se ecualice y, a continuación, compruebe si se abre
con más facilidad.
Las luces no
funcionan.
Falla de iluminación interior
LED.
La luz del compartimento del refrigerador es LED para
interiores, por lo que el mantenimiento deberá ser
realizado por un técnico cualificado.
El interior del
refrigerador está
cubierto con polvo
u hollín.
El refrigerador está ubicado
cerca de una fuente de fuego,
como una chimenea o candela.
Asegúrese de que el refrigerador no se encuentre
ubicado cerca de una fuente de fuego, como una
chimenea o candela.
39SOLUCIÓN DE PROBLEMAS
ESPAÑOL
Ruidos
Problema Causa posible Soluciones
Haciendo clic
El control de descongelado hará un “clic”
cuando el ciclo de descongelado
comience y termine. El control del
termostato (o control del refrigerador en
algunos modelos) también hará un clic al
iniciar o finalizar un ciclo.
Funcionamiento normal
Traqueteo
Los ruidos de traqueteo pueden proceder
del flujo del refrigerante, de la tubería de
agua en la parte posterior de la unidad o
de artículos almacenados encima o
alrededor del refrigerador.
Funcionamiento normal
El refrigerador no está sólidamente
apoyado en el suelo.
El suelo es poco sólido o irregular, o es
necesario ajustar las patas de nivelación.
Consulte la sección Nivelación y Alineación
de las Puertas.
El refrigerador con compresor lineal se
sacudió mientras estaba funcionando. Funcionamiento normal
Zumbido
El motor del ventilador del vaporizador
está circulando aire a través del
compartimiento del refrigerador.
Funcionamiento normal
El ventilador del condensador está
forzando el paso de aire a través del
condensador.
Funcionamiento normal
Gorgoteo El refrigerante está fluyendo a través del
sistema de enfriamiento. Funcionamiento normal
Golpeteo
Contracción y expansión de las paredes
internas debido a cambios en la
temperatura.
Funcionamiento normal
Chisporroteo
El agua cayendo en el calentador de
descongelación durante un ciclo de
descongelado.
Funcionamiento normal
Vibración
Si la parte trasera o lateral del
refrigerador está tocando un gabinete o
pared, algunas de estas vibraciones
normales pueden emitir un sonido
perceptible.
Para eliminar el ruido, asegúrese de que los
laterales y la parte posterior no puedan
vibrar contra las paredes o los muebles.
Goteo Agua cayendo en la batea de drenaje
durante el ciclo de descongelado. Funcionamiento normal
Sonido agudo o de
pulsación
Su refrigerador está diseñado para
funcionar de forma más eficiente para
conservar los alimentos a la temperatura
deseada. El compresor de alta eficiencia
puede hacer que su nuevo refrigerador
funcione durante más tiempo que su
antiguo refrigerador, y aun así será más
eficiente energéticamente que los
modelos anteriores. Mientras el
refrigerador está en funcionamiento, es
normal escuchar un sonido de pulsación
o agudo.
Funcionamiento normal
40 SOLUCIÓN DE PROBLEMAS
Red Wi-Fi
Problema Causa posible Soluciones
Su
electrodoméstico y
teléfono inteligente
no están
conectados a la red
Wi-Fi.
La contraseña de la red Wi-Fi a
la que está intentando
conectarse es incorrecta.
Encuentre la red Wi-Fi a la que su teléfono inteligente
está conectado y remuévala, luego registre su
electrodoméstico en la aplicación SIGNATURE
KITCHEN SUITE.
Los Datos Móviles para su
teléfono inteligente están
activados.
Apague los Datos Móviles en su teléfono inteligente y
registre el electrodoméstico utilizando la red Wi-Fi.
El nombre de la red
inalámbrica (SSID) se ha
configurado incorrectamente.
El nombre de la red inalámbrica (SSID) debe ser una
combinación de letras y números. (No utilice simbolos
especiales)
La frecuencia del enrutador no
es de 2.4 GHz.
Sólo se admite una frecuencia de enrutador de 2.4 GHz.
Configure el enrutador inalámbrico a 2.4 GHz y conecte
el electrodoméstico a éste. Para verificar la frecuencia
del enrutador, consulte con su proveedor de servicios de
internet o con el fabricante del enrutador.
La distancia entre el enrutador
y el electrodoméstico es muy
grande.
Si la distancia entre el electrodoméstico y el enrutador
inalámbrico es muy grande, puede que la señal sea débil
y que no sea posible configurar la conexión
correctamente. Acerque el enrutador al
electrodoméstico.

41GARANTÍA
ESPAÑOL
SIGNATURE KITCHEN SUITE
GARANTÍA LIMITADA REFRIGERADOR - EE.UU
Si en caso su Refrigerador SIGNATURE KITCHEN SUITE (“Producto”) fallara debido a defectos en los materiales o a
mano de obra, bajo un uso normal en el hogar, durante el período de garantía expreso más adelante, SIGNATURE
KITCHEN SUITE reparará o reemplazará el producto a su criterio. Esta garantía limitada es válida únicamente para el
comprador original del producto y aplica únicamente cuando este ha sido comprado y utilizado dentro de los Estados
Unidos, incluyendo territorios estadounidenses. Prueba de la compra original es requerida para obtener el servicio de
garantía bajo esta garantía limitada.
PERIODO DE GARANTÍA
Refrigerador
Sistema Sellado
(Condensador, Filtro desecante, Tubo Conector y
Evaporador)
Compresor Lineal
Tres (3) años a partir de la
fecha original de compra
Piezas y mano de obra (solo
piezas internas/ funcionales)
Tres (3) años a partir de la
fecha original de compra
Piezas y Trabajo
Siete (7) años a partir de la
fecha original de compra
Solo piezas
(Se le cobrará mano de obra
al consumidor)
Diez (10) años a partir de
la fecha original de
compra
Solo piezas
(Se le cobrará mano de obra
al consumidor)
No serán cubiertos bajo esta garantía, ruidos asociados con la operación normal, fallos al seguir
instrucciones encontradas en las guías de instalación y de uso y cuidado, o la operación de la unidad en un
ambiente no adecuado.
%Los productos y las piezas de repuesto están garantizados durante el tiempo restante del período original de
garantía o noventa (90) días, lo que resulte mayor.
%Los productos de reemplazo y las piezas pueden ser nuevas o refabricadas.
ESTA GARANTÍA REEMPLAZA TODA OTRA GARANTÍA, EXPRESA O IMPLÍCITA, INCLUYENDO SIN LIMITARSE
A, CUALQUIER GARANTÍA DE COMERCIABILIDAD O ADECUACIÓN PARA UN FIN PARTICULAR. EN EL
GRADO EN QUE CUALQUIER GARANTÍA IMPLÍCITA SEA REQUERIDA POR LEY, ESTA GARANTÍA SE
LIMITARÁ EN DURACIÓN AL PERÍODO EXPRESADO ANTERIORMENTE. NI EL FABRICANTE NI SUS
DISTRIBUIDORES EN ESTADOS UNIDOS SERÁN RESPONSABLES DE CUALQUIER DAÑO INCIDENTAL,
CONSECUENCIAL, INDIRECTO, ESPECIAL O PUNITIVO DE CUALQUIER TIPO, INCLUIDAS SIN LIMITACIÓN,
PÉRDIDAS DE INGRESOS O BENEFICIOS, O CUALQUIER OTRO DAÑO BASADO EN CONTRATO,
RESPONSABILIDAD EXTRACONTRACTUAL O DE OTRO TIPO. Algunos estados no permiten la exclusión o
limitación de los daños incidentales o consecuenciales, o las limitaciones sobre el tiempo que una garantía implica,
así que la exclusión mencionada previamente puede no ser aplicable en su caso. Esta garantía le brinda derechos
legales especiales, y puede que tenga otros derechos que variarán de estado a estado.
ESTA GARANTÍA LIMITADA NO CUBRE LO SIGUIENTE:
%Viajes de servicio para entregar, recoger, instalar o reparar el producto; instrucciones al cliente sobre cómo operar el
producto, reparación o remplazo de fusibles o corrección del cableado o tuberías, o corrección de las reparaciones/
instalaciones no autorizadas.
%Fallo del producto al operar durante fallas eléctricas y al interrumpido o inadecuado servicio eléctrico.
%Daños causados por una fuga o por una pipa de agua rota, congelada, con drenaje restringido, suministro de agua
inadecuado o interrumpido, o suministro de aire inadecuado.
%El daño resultante de operar el producto en una atmósfera corrosiva o de forma contraria a las instrucciones
HVSHFt¿FDGDVHQHOPDQXDOGHOXVXDULRGHOSURGXFWR
%Daño al producto causado por accidentes, plagas, parásitos, truenos, viento, fuego, inundaciones o casos fortuitos.
%Daños resultantes de un uso inadecuado, abuso del producto, instalación, reparación o mantenimiento incorrecto.
/DVUHSDUDFLRQHVLQFRUUHFWDVLQFOX\HQODXWLOL]DFLyQGHSLH]DVQRDSUREDGDVRHVSHFt¿FDGDVSRU6,*1$785(
KITCHEN SUITE.
42 GARANTÍA
%'DxRVRIDOORVFDXVDGRVSRUPRGL¿FDFLRQHVRDOWHUDFLRQHVQRDXWRUL]DGDVRVLHOHOHFWURGRPpVWLFRHVXWLOL]DGRSDUD
otro propósito más que el previsto, o cualquier fuga de agua donde la unidad no haya sido instalada
apropiadamente.
%Daño o falla causada por el incorrecto uso de la corriente eléctrica, voltaje, o códigos locales de plomería, uso
FRPHUFLDORLQGXVWULDORXVRGHDFFHVRULRV(MHPSOR¿OWURVGHDJXDHWFFRPSRQHQWHVRSURGXFWRVGHOLPSLH]D
consumibles que no estén aprobados por SIGNATURE KITCHEN SUITE.
%Daño causado por el transporte y el manejo, incluyendo rasguños, abolladuras, pintura saltada, y/u otros daños al
acabado de su producto, a menos que dicho daño sea resultado de defectos en materiales o mano de obra y que
esto sea reportado en un período de no más de una (1) semana desde la entrega. (Llamar: 1-855-790-6655).
%Daños o falta de elementos en cualquier producto de exposición, caja abierta, de descuento o reacondicionado.
%Productos cuyos números de serie originales hayan sido retirados, alterados o no se puedan determinar fácilmente.
El Modelo y el número de Serie, junto con el recibo original de compra, son requeridos para la validación de la
garantía.
%Aumentos en los costos de los servicios públicos y otros gastos adicionales de dichos servicios.
%5HHPSOD]RGHIRFRV¿OWURVRFXDOTXLHUSDUWHFRQVXPLEOH
%Reparaciones cuando se esté dando al producto una utilización diferente al uso doméstico normal (por ejemplo, uso
FRPHUFLDOHQR¿FLQDV\HQLQVWDODFLRQHVUHFUHDWLYDVRFRQWUDULDDODVLQVWUXFFLRQHVGHOPDQXDOGHOSURSLHWDULRGHO
producto.
%Gastos asociados a la retirada del producto de su hogar para reparaciones.
%La retirada y nueva instalación del producto, si este se ha instalado en una ubicación inaccesible o si no ha sido
instalado de acuerdo a las instrucciones de instalación publicadas, incluyendo los manuales SIGNATURE KITCHEN
SUITE del propietario y de instalación.
%Estantes, bandejas de puerta, cajas, manijas, accesorios, y otras partes adicionales a aquellas que fueron incluidas
originalmente con este modelo particular.
El costo de la reparación o el reemplazo en estas circunstancias excluidas estará a cargo del consumidor.
Escriba su información de garantía a
continuación:
Información de Registro del Producto:
Modelo:
Número de Serie:
Fecha de Compra:
Para detalles completos de la garantía y asistencia al
cliente, por favor llame o visite nuestro sitio web:
Comuníquese al 1-855-790-6655 (24 horas al día, 365 días al
año) y seleccione la opción apropiada del menú, o visite nuestro
sitio web en www.thesignaturekitchen.com
O por correo:
Centro de información al cliente de SIGNATURE KITCHEN SUITE:
P. O. Box 240007, 201 James Record Road Huntsville, Alabama
35813 ATTN: CIC

43MEMORÁNDUM
MEMORÁNDUM
Customer Information Center
For inquires or comments, call;
1-855-790-6655 USA, Consumer User