LG Electronics USA E410J Cellular/PCS GSM and Cellular WCDMA Phone with WLAN and Bluetooth User Manual 2
LG Electronics MobileComm USA, Inc. Cellular/PCS GSM and Cellular WCDMA Phone with WLAN and Bluetooth Users Manual 2
Contents
- 1. Users Manual 1
- 2. Users Manual 2
- 3. Users Manual 3
Users Manual 2
45
When you first turn on your phone, you have the opportunity to activate the network, to
sign into your Google Account and select how you want to use certain Google services.
To set up your Google account
• Sign into a Google Account from the prompted set-up screen.
OR
• Touch > Apps tab > select a Google application, such as Gmail > select New to
create a new account.
If you have a Google account, touch Existing, enter your email address and password, then
touch .
Once you have set up your Google account on your phone, your phone automatically
synchronizes with your Google account on the Web.
Your contacts, Gmail messages, Calendar events and other information from these
applications and services on the Web are synchronized with your phone. (This will depend on
your synchronization settings.)
After signing in, you can use Gmail™ and take advantage of Google services on your phone.
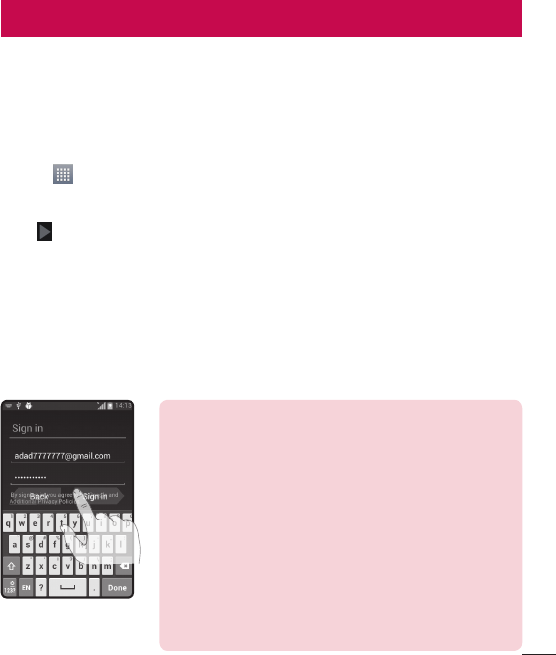
About the Google account setting up screen
Notice:
• When setting up the Google account, some texts
or tabs on the screen may appear overlapped with
each other depending on the software version.
• With the Android ecosystem, some available Market
applications only operate correctly with phones that
have a specific screen resolution. Please be advised
that some of the applications on the Android Market
may not be available for your phone due an LCD
resolution requirement that does not match your
phone. In addition, please be aware that 3rd party
applications with programming defects may cause
abnormal behavior of your phone.
(The upper screen displays may
vary by software version.)
Google account setup

46
Connecting to Networks and Devices
Wi-Fi
With Wi-Fi, you can use high-speed Internet access within the coverage of the wireless
access point (AP). Enjoy wireless Internet using Wi-Fi, without extra charges.
Connecting to Wi-Fi networks
To use Wi-Fi on your phone, you need to access a wireless access point or ‘hotspot’.
Some access points are open and you can simply connect to them. Others are hidden
or use security features, you must configure your phone to be able to connect to them.
Turn off Wi-Fi when you're not using it to extend the life of your battery.
NOTE: If you are out of the Wi-Fi zone or have set Wi-Fi to OFF, additional
charges may be applied by your mobile operator for mobile data use.
Turning Wi-Fi on and connecting to a Wi-Fi network
1 Touch > Apps tab > Settings > Wi-Fi from the WIRELESS & NETWORKS tab.
2 Set Wi-Fi to ON and start scanning for available Wi-Fi networks.
3 Tap the Wi-Fi menu again to see a list of active and in-range Wi-Fi networks.
• Secured networks are indicated by a lock icon.
4 Touch a network to connect to it.
• If the network is secured, you are prompted to enter a password or other
credentials. (Ask your network administrator for details)
5 The status bar displays icons that indicate Wi-Fi status.

47
Bluetooth
You can use Bluetooth to send data by running a corresponding application, not from
the Bluetooth menu as on most other mobile phones.
NOTE:
• LG is not responsible for the loss, interception or misuse of data sent or
received via the Bluetooth wireless feature.
• Always ensure that you share and receive data with devices that are trusted
and properly secured. If there are obstacles between the devices, the
operating distance may be reduced.
• Some devices, especially those that are not tested or approved by Bluetooth
SIG, may be incompatible with your device.
Turning on Bluetooth and pairing up your phone with a Bluetooth device
You must pair your device with another device before you connect to it.
1 Touch > Apps tab > Settings > set Bluetooth to ON from the WIRELESS &
NETWORKS tab.
2 Tap the Bluetooth menu again. You will see the option to make your phone visible
and option to search devices. Now tap Search for devices to view the devices in
the Bluetooth Range.
3 Choose the device you want to pair with from the list.
Once the paring is successful, your device will connect to the other device.
NOTE: Some devices, especially headsets or hands-free car kits, may have a
fixed Bluetooth PIN, such as 0000. If the other device has a PIN, you will be
asked to enter it.

48
Send data using the Bluetooth wireless feature
1 Select a file or item, such as a contact, calendar event or media file from an
appropriate application or from Downloads.
2 Select the option for sending data via Bluetooth.
NOTE: The method for selecting an option may vary by data type.
3 Search for and pair with a Bluetooth-enabled device.
Receive data using the Bluetooth wireless feature
1 Touch > Apps tab > Settings > set Bluetooth to ON and touch Model name
to be visible on other devices.
NOTE: To select the length of time that your device will be visible, touch
> Visibility timeout.
2 Select Accept to confirm that you are willing to receive data from the device.
Sharing your phone's data connection
USB tethering and portable Wi-Fi hotspot are great features when there are no wireless
connections available. You can share your phone's mobile data connection with a
single computer via a USB cable (USB tethering). You can also share your phone's data
connection with more than one device at a time by turning your phone into a portable
Wi-Fi hotspot.
When your phone is sharing its data connection, an icon appears in the status bar and
as an ongoing notification in the notifications drawer.
For the latest information about tethering and portable hotspots, including supported
operating systems and other details, visit http://www.android.com/tether.
Connecting to Networks and Devices

49
To change Portable Wi-Fi hotspot settings:
1 Touch > Apps tab > Settings > More... from the WIRELESS & NETWORKS tab
> Portable Wi-Fi hotspot > choose options that you want to adjust.
TIP! If your computer is running Windows 7 or a recent distribution of some
flavours of Linux (such as Ubuntu), you will not usually need to prepare your
computer for tethering. But, if you are running an earlier version of Windows
or another operating system, you may need to prepare your computer to
establish a network connection via USB. For the most current information
about which operating systems support USB tethering and how to configure
them, visit http://www.android.com/tether.
To rename or secure your portable hotspot
You can change the name of your phone's Wi-Fi network name (SSID) and secure its
Wi-Fi network.
1 On the Home screen, touch > Apps tab > Settings.
2 Touch More... from the WIRELESS & NETWORKS tab and select Portable Wi-Fi
hotspot.
3 Ensure that Portable Wi-Fi hotspot is checked.
4 Touch Set up Wi-Fi hotspot.
• The Set up Wi-Fi hotspot dialogue box will open.
• You can change the Network SSID (name) that other computers see when
scanning for Wi-Fi networks.
• You can also touch the Security menu to configure the network with Wi-Fi
Protected Access 2 (WPA2) security using a pre-shared key (PSK).
• If you touch the WPA2 PSK security option, a password field is added to the Set
up Wi-Fi hotspot dialogue box. If you enter a password, you will need to enter
that password when you connect to the phone's hotspot with a computer or other
device. You can set Open in the Security menu to remove security from your Wi-Fi
network.

50
Connecting to Networks and Devices
5 Touch Save.
ATTENTION! If you set the security option as Open, you cannot prevent
unauthorised usage of online services by other people and additional charges
may be incurred. To avoid unauthorized usage, you are advised to keep the
security option active.
PC connections with a USB cable
Learn to connect your device to a PC with a USB cable in USB connection modes. By
connecting the device to a PC you can directly transfer data to and from your device
and use the PC software (LG PC Suite).
Syncing your phone with your computer
To synchronize your phone with your PC using the USB cable, you need to install the PC
software (LG PC Suite) on your PC. Download the program from the LG website (www.
lg.com).
1 Use the USB data cable to connect your phone to the PC. The USB connection type
list will appear; select the LG software.
2 Run the LG PC Suite program on your PC. Refer to the PC software (LG PC Suite)
help for more information.
NOTE: The LG integrated USB driver is required to connect an LG device to a
PC. It is installed automatically when you install the LG PC Suite software.

51
Transferring music, photos and videos using the USB mass storage mode
1 Connect the your phone to a PC using a USB cable.
2 If you haven't installed the LG Android Platform Driver on your PC, you will need to
manually change the settings. Touch > Apps tab > Settings > PC connection
> USB Connection type, then select Media sync (MTP).
3 You can now view the mass storage content on your PC and transfer the files.
Synchronise with Windows Media Player
Ensure that Windows Media Player is installed on your PC.
1 Use the USB cable to connect the phone to a PC on which Windows Media Player
has been installed.
2 Select the Media sync (MTP) option. When connected, a pop-up window will appear
on the PC.
3 Open Windows Media Player to synchronize music files.
4 Edit or enter your device’s name in the pop-up window (if necessary).
5 Select and drag the music files you want to the sync list.
6 Start synchronization.
• The following requirements must be satisfied to synchronize with Windows Media
Player.
Items Requirement
OS Microsoft Windows XP SP2, Vista or higher
Window Media Player version Windows Media Player 10 or higher
• If the Windows Media Player version is lower than 10, install version 10 or higher.
52
Calls
Making a call
1 Touch to open the keypad.
2 Enter the number using the keypad. To delete a digit, touch the .
3 Touch to make a call.
4 To end a call, touch the End icon .
TIP! To enter "+" to make international calls, touch and hold .
Calling your contacts
1 Touch > Apps tab > .
2 Scroll through the contact list or enter the first few letters of the contact you want to
call by touching Search contacts.
3 In the list, touch to make the call.
Answering and rejecting a call
When you receive a call in Lock state, swipe the in any direction to Answer the
incoming call. When the screen is unlocked, you just need to touch the icon to answer.
Swipe the in any direction to Decline an incoming call.
Adjusting the in-call volume
To adjust the in-call volume during a call, use the Volume up and down keys on the left-
hand side of the phone.
Making a second call
1 During your first call, touch Menu key > Add call and dial the number. You can also
go to the recently dialled numbers list by touching or can search contacts by
touching and select the contact you want to call.
53
2 Touch to make the call.
3 Both calls are displayed on the call screen. Your initial call is locked and put on hold.
4 Touch the displayed number to toggle between calls. Or touch Merge calls to
start a conference call.
5 To end active calls, touch End or press the Home key, and slide the notification bar
down and select the End call icon .
NOTE: You are charged for each call you make.
Viewing your call logs
On the Home screen, touch and choose the Call logs tab .
View a complete list of all dialled, received and missed calls.
TIP!
• Touch any call log entry to view the date, time and duration of the call.
• Touch the Menu key , then touch Delete all to delete all the recorded
items.
Call settings
You can configure phone call settings such as call forwarding, as well as other special
features offered by your carrier.
1 On the Home screen, touch .
2 Touch .
3 Tap Call settings and choose the options that you wish to adjust.
54
Contacts
Add contacts to your phone and synchronize them with the contacts in your Google
account or other accounts that support contact syncing.
Searching for a contact
On the Home screen
1 Touch > Apps tab > .
2 Touch Search contacts and enter the contact name using the keyboard.
Adding a new contact
1 Touch , enter the new contact's number, then touch the Menu key . Touch
Add to Contacts > Create new contact.
2 If you want to add a picture to the new contact, touch the image area.
Choose from Take photo or Select from Gallery.
3 Select the contact type by touching .
4 Touch a category of contact information and enter the details about your contact.
5 Touch Save.
Favorite contacts
You can classify frequently called contacts as favorites.
Adding a contact to your favorites
1 Touch > Apps tab > .
2 Touch a contact to view its details.
3 Touch the star to the right corner of the contact's name. The star will turn to yellow
color.

55
Removing a contact from your favorites list
1 Touch > Apps tab > .
2 Touch the tab, and choose a contact to view its details.
3 Touch the yellow color star to the right corner of the contact's name. The star turns
to grey color and the contact is removed from your favorites.
Creating a group
1 Touch > Apps tab > .
2 Touch Groups and touch the Menu key . Select New group.
3 Enter a name for the new group. You can also set a ringtone for the newly created
group.
4 Touch Save to save the group.
NOTE: If you delete a group, the contacts assigned to that group will not be
lost. They will remain in your contacts.
56
Messaging
Your phone combines SMS and MMS into one intuitive, easy-to-use menu.
Sending a message
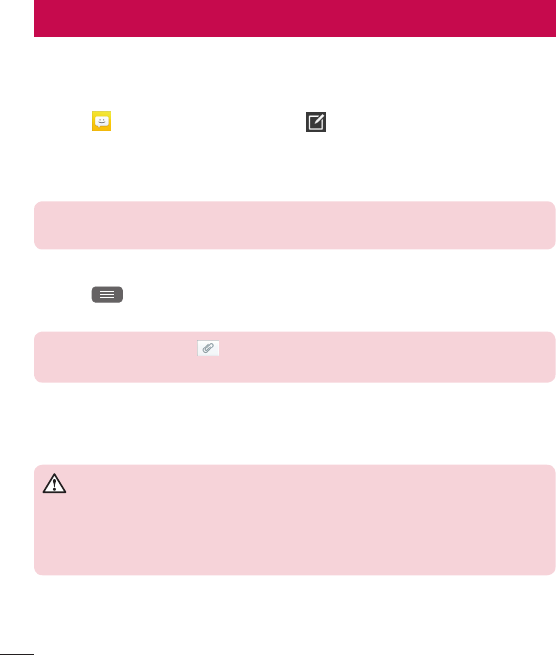
1 Touch on the Home screen and touch to open a blank message.
2 Enter a contact name or contact number in the To field. As you enter the contact
name, matching contacts will appear. You can touch a suggested recipient. You can
add more than one contact.
NOTE: You will be charged for a text message for every person you send the
message to.
3 Touch Enter message field and begin composing your message.
4 Touch to open the Options menu. Choose from Insert smiley, Schedule
sending, Add subject and Discard.
TIP! You can touch the icon to attach the file you want to share to your
message.
5 Touch Send to send your message.
6 Responses will appear on the screen. As you view and send additional messages, a
message thread is created.
WARNING
• The 160-character limit may vary from country to country, depending on the
language and how the SMS is coded.
• If an image, video or audio file is added to an SMS message, it is
automatically converted into an MMS and you are charged accordingly.

57
Threaded box
Unread messages (SMS, MMS) are located on the top. And the others exchanged with
another party can be displayed in chronological order so that you can conveniently see
an overview of your conversation.
Changing your message settings
Your phone message settings are pre-defined, so you can send messages immediately.
You can change the settings according to your preferences.
Touch the Messaging icon on the Home screen, touch and then tap Settings.

58
E-mail
You can use the Email application to read emails from services like Gmail. The Email
application supports the following account types: POP3, IMAP and Exchange.
Your service provider or system administrator can provide you with the account settings
you need.
Managing an email account
The first time you open the E-mail application, a set-up wizard opens to help you to set
up an email account.
After the initial set-up, E-mail displays the contents of your inbox. If you have added
more than one account, you can switch among accounts.
To add another email account:
• Touch > Apps tab > E-mail > touch > Accounts > in the Accounts
screen, touch > Add account.
To change an email account's settings:
• Touch > Apps tab > E-mail > touch > Accounts > in the Accounts
screen, touch > Entire settings.
To delete an email account:
• Touch > Apps tab > E-mail > touch > Accounts > in the Accounts
screen, touch > Remove account > touch an account you want to delete >
Remove > select Yes.
Working with account folders
Touch > Apps tab > E-mail > touch and select Folders.
Each account has an Inbox, Outbox, Sent and Drafts folder. Depending on the features
supported by your account's service provider, you may have additional folders.

59
Composing and sending email
To compose and send a message
1 While in the E-mail application, touch .
2 Enter an address for the message's intended recipient. As you enter text, matching
addresses will be proposed from your Contacts. Separate multiple addresses using
semicolon.
3 Touch the Cc/Bcc field to add Cc/Bcc and touch to attach files, if required.
4 Enter the text of the message.
5 Touch .
If you aren't connected to a network, for example, if you're working in airplane mode,
the messages that you send will be stored in your Outbox folder until you connect to
a network again. If it contains any pending messages, the Outbox will be displayed
on the Accounts screen.
TIP! When a new email arrives in your Inbox, you will be notified by a sound
or vibration.
60
Camera
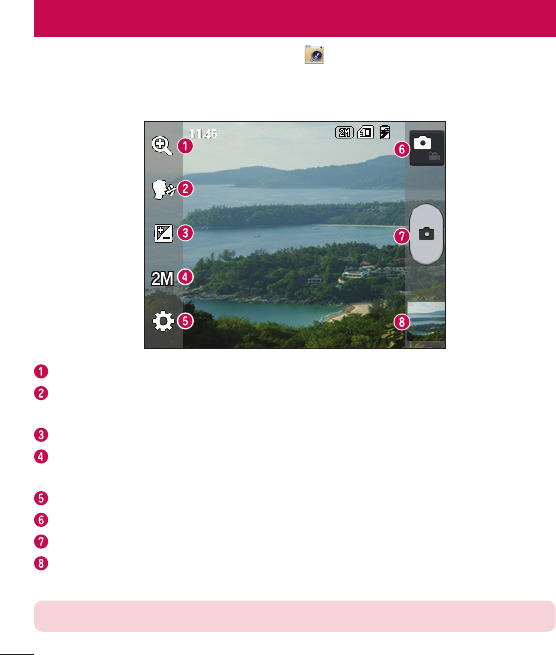
To open the Camera application, tap Camera on the Home screen.
Getting to know the viewfinder
Zoom – Zoom in or zoom out.
Cheese shutter – To take a photo, say one of the following words: "Cheese",
"Smile","Whisky", "Kimchi" or "LG".
Brightness – Defines and controls the amount of sunlight entering the image.
Camera size – Selects photo resolution. If you choose high resolution, file size will
increase, which means you will be able to store fewer photos in the memory.
Settings – Touch this icon to open the settings menu.
Video mode – Touch this icon to switch to video mode.
Taking a photo
Gallery – Touch to view the last photo you captured. This enables you to access
your gallery and view saved photos while in camera mode.
NOTE: Please ensure the camera lens is clean before taking pictures.
61
Using the advanced settings
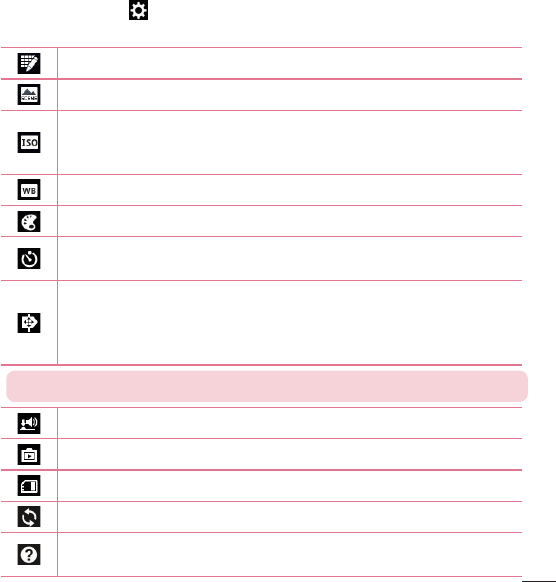
In the viewfinder, tap to open the advanced options. You can change the camera
settings by scrolling through the list. After selecting the option, tap the Back key.
Touch if you want to change the viewfinder menu.
Finds the color and light settings for the current environment.
The ISO rating determines the sensitivity of the camera's light sensor. The
higher the ISO, the more sensitive the camera. This is useful in darker
conditions when you cannot use the flash.
Improves color quality in various lighting conditions.
Applies artistic effects to your pictures.
Sets a delay after the capture button is pressed. This is ideal if you want to
be in the photo.
Activate this to use your phone's location-based services. Take pictures
wherever you are and tag them with the location. If you upload tagged
pictures to a blog that supports geotagging, you can see the pictures
displayed on a map.
NOTE: This function is only available when the GPS function is active.
Selects a shutter sound.
Automatically shows you the picture you just took.
Select storage to save images.
Restore all camera default settings.
Touch this whenever you want to know how a function works. This icon will
provide you with a quick guide.
62
Camera
TIP!
• When you exit the camera, some settings return to their defaults, such as
white balance, color effect, timer and scene mode. Check these before you
take your next photo.
• The setting menu is superimposed over the viewfinder so, when you change
photo color or quality elements, you will see a preview of the changed image
behind the Settings menu.
Taking a quick photo
1 Open the Camera application.
2 Holding the phone horizontally, point the lens towards the subject you want to
photograph.
3 Touch to capture the photo.
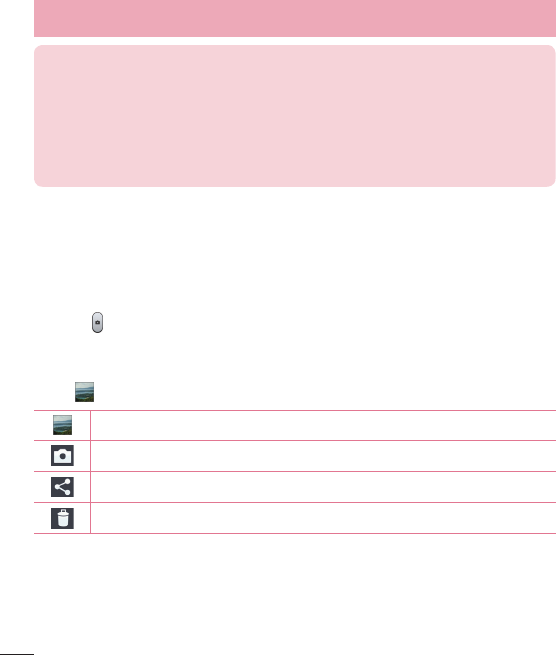
Once you've taken a photo
Touch to view the last photo you took.
Tap to view the Gallery of your saved photos.
Touch to take another photo immediately.
Touch to send your photo to others or share it via social network services.
Touch to delete the photo.
63
TIP! If you have an SNS account and set it up on your phone, you can share
your photo with your SNS community.
NOTE: Additional charges may apply when MMS are downloaded while
roaming.
Touch the Menu key to open all advanced options.
Set image as – Touch to use the photo as a Contact photo, Home screen wallpaper
or Lock screen wallpaper.
Move – Touch to move the photo to another place.
Copy – Touch to copy the selected photo and save it to another album.
Rename – Touch to edit the name of the selected photo.
Rotate left/right – To rotate left or right.
Crop – Crop your photo. Move your finger across the screen to select the area to be
cropped.
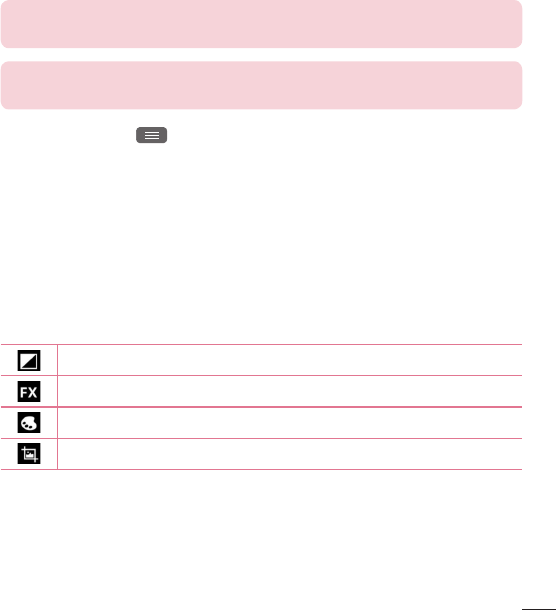
Edit – View and edit the photo.
Adjusts light and shade to your photo.
Applies artistic effects to your photos.
Improves color quality in various lighting conditions.
Applies additional options to your photos.
Slideshow – Automatically shows you the images in the current folder one after the
other.
Details – Find out more information about the contents.