LG Electronics USA GM210 Cellular/ PCS GSM/ EDGE Phone with Bluetooth User Manual 2
LG Electronics USA Cellular/ PCS GSM/ EDGE Phone with Bluetooth Users Manual 2
UserManual.wiki
>
LG Electronics USA
>
GM210 User Manual
>
Users Manual 2
Contents
1.
Users Manual 1
2.
Users Manual 2
3.
Users Manual 3
Users Manual 2
Navigation menu
Upload a User Manual
Namespaces
Wiki Guide
HTML
PDF
Info
Views
User Manual
Discussion / Help
Navigation
![33Your phone provides a number of control functions that you can use during a call. To access these functions during a call, press the left soft key [Options].During a callThe menu displayed on the handset screen during a call is different than the default main menu displayed when in idle screen, and the options are described below.Making a Second Call(Network Dependent)You can search and dial the number from Contacts to make a second call.Swapping Between Two CallsTo switch between two calls, press the key or the left soft key, and then select Swap Call.Answering an Incoming CallTo answer an incoming call when the handset is ringing, simply press the key. The handset is also able to warn you of an incoming call while you are already on a call. A tone sounds in the earpiece, and the display will show that a second call is waiting.This feature, known as Call waiting, is only available if your network supports it. For details of how to activate and deactivate it see Call waiting feature.If Call waiting is on, you can put the first call on hold and answer the second, by pressing the left soft key or the send key.Rejecting an Incoming CallYou can reject an incoming call without answering by simply pressing the key.During a call, you can reject an incoming call by pressing the key.In-call menuIn-call menu](https://usermanual.wiki/LG-Electronics-USA/GM210.Users-Manual-2/User-Guide-1066914-Page-6.png)
![34Muting the MicrophoneYou can mute the microphone during a call by pressing the right soft key [Mute]. The handset can be unmuted by pressing the right soft key [Unmute]. When the handset is muted, the caller cannot hear you, but you can still hear them.DTMF tones while callingTo switch on DTMF tones while calling (e.g. to use the phone with an automatic switchboard) press the left soft key [Options] followed by Enable DTMF. Select Disable DTMF to disable DTMF tones. DTMF tones are normally on.Conference CallsThe conference service provides you with the ability to have a simultaneous conversation with more than one caller, if your network service provider supports this feature.A conference call can only be set up when you have one active call and one call on hold, both calls having been answered.Once a conference call is set up, calls may be added, disconnected or separated (that is, removed from the conference call but still connected to you) by the person who set up the conference call. These options are all available from the In-Call menu. The maximum callers in a conference call are five. Once started, you are in control of the conference call, and only you can add calls to the conference call.Making a Second CallYou can make a second call while currently in call. Enter the second number and press the key.When the second call is connected, the first call is automatically placed on hold. You can swap between calls, by pressing the key.In-call menuIn-call menu](https://usermanual.wiki/LG-Electronics-USA/GM210.Users-Manual-2/User-Guide-1066914-Page-7.png)
![35Setting Up a Conference CallTo set up a conference call, place one call on hold and while the active call is on, press the left soft key and then select the Join menu of Conference call.Activate the Conference Call on HoldTo activate a conference call on hold, press the key. Alternatively press the left soft key [Options] and select Join all/Hold all calls. Other users on hold will stay connected. To return to conference call mode, press the left soft key [Options] followed by Conference call.Adding Calls to the Conference CallTo add a call to an existing conference call, press the left soft key, and then select the Join menu of Conference call.Private Call in a Conference CallTo have a private call with one caller from a conference call, display the number of the caller you wish to talk to on the screen, then press the left soft key. Select the Private menu of Conference call to put all the other callers on hold.Ending a Conference CallCurrently displayed caller from a conference call can be disconnected by pressing the key.In-call menu](https://usermanual.wiki/LG-Electronics-USA/GM210.Users-Manual-2/User-Guide-1066914-Page-8.png)
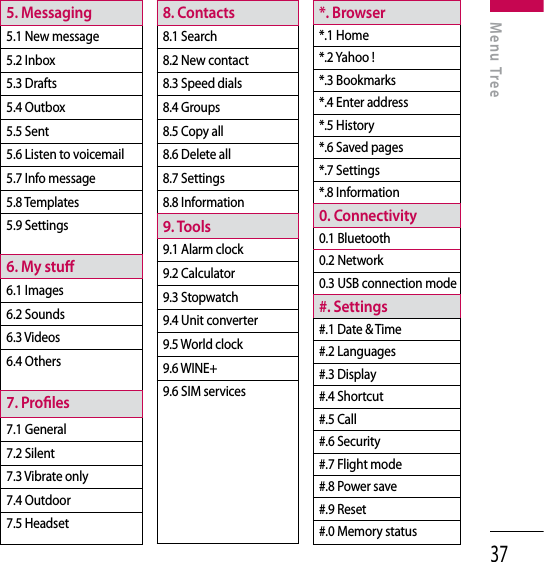
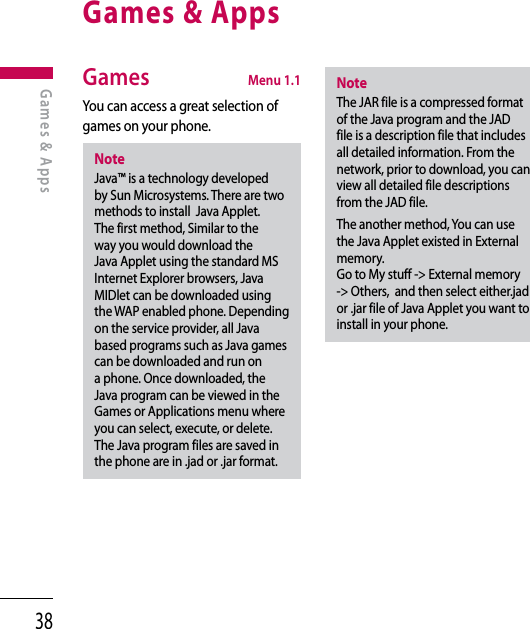
![36Menu Tre eMenu TreeThe menu in this phone can be displayed in 2 ways. The menu in this phone can be displayed in either Grid view or List View. Please note that menu number options are different in each view. The default setting on the phone is set to show the menu in grid view, so therefore all the menu number selections throughout the manual are shown according to that setting.You can go to the desired menu using the left soft key [Menu], navigation keys and the OK key. And you can also take a shortcut by pressing the corresponding number key of desired menu after pressing the left soft key [Menu].1. Games & Apps1.1 Games1.2 Applications1.3 Network profiles2. Call history2.1 All calls2.2 Missed calls2.3 Dialed calls2.4 Received calls2.5 Call duration2.6 Call costs2.7 Data information3. Organizer3.1 Calendar3.2 Memo 3.3 To do4. Multimedia4.1 MP3 player4.2 Camera4.3 Video camera 4.4 FM radio4.5 Voice recorder](https://usermanual.wiki/LG-Electronics-USA/GM210.Users-Manual-2/User-Guide-1066914-Page-9.png)
![42Calendar Menu 3.1You can refer to your schedule by months. The cursor is on the current date, and the registered date is marked.Each press of skips back a year. skips forward a year. moves to today. skips back a month. skips forward a month.You can view the schedule note or memo for the chosen day by pressing the OK key.v View: You can view the schedule note or memo for the chosen day.v New schedule: Select this to enter a new schedule.v Scheduler tone: You can set the scheduler tone.v All schedules: You can view all schedules.v Go to date: You can go the chosen date directly.v Delete old: Select this to delete the expired schedule notes that you have already been notified of.v Delete all: Select this to delete all the schedule notes.Memo Menu 3.2You can add new memo, view and manage saved memos.1. If the entry is empty, press the left soft key [New] and enter the contents of the memo. You can save the memo to the list by the left soft key [Options] then choose [Save].2. If you have saved memos, you can access following options with the left soft key [Options] : View, Delete, New memo, Send via, Edit, Multi delete, Delete all.NoteIf you want to change the text input mode, press the key.OrganizerOrganizer](https://usermanual.wiki/LG-Electronics-USA/GM210.Users-Manual-2/User-Guide-1066914-Page-15.png)
![43To do Menu 3.3You can view, edit and add tasks to do. Tasks are displayed in time order. Tasks that have been completed or not completed are displayed in different ways.1. If the entry is empty, press the left soft key [New].2. Input the Due date, Note, Priority, and Status.3. When you have finished entering the data, press the left soft key [Save].4. You can manage saved to do notes by pressing the left soft key [Options].Organizer](https://usermanual.wiki/LG-Electronics-USA/GM210.Users-Manual-2/User-Guide-1066914-Page-16.png)
![46MultimediaCamera Menu 4.2Using the camera module built in your phone, you can take pictures of people. Additionally, you can send photos to other people and select photos as wallpaper.NoteWhen using the camera, power consumption increases. If the battery is too low, you may not be able to use the Camera feature, please recharge the battery before use.• To take a picture- To take clear pictures, press the camera key while holding the camera without any movement.- Appropriately adjust distance to the object that you want take a picture of (more than 50 cm).- Handle carefully since the camera is vulnerable to shock and use a soft cloth when cleaning the camera lens.- Do not disassemble or modify the camera as this may lead to fire or malfunctioning.1. Press the camera key in standby mode.2. Focus on the subject to capture the image, and then press the camera key or the OK key.3. The photo you have taken is automatically saved in the Images folder of My stuff. After taking a photo, you can select the submenus by pressing the left soft key [Options].Before taking a photo, you can set the following options by pressing the left soft key [Options].v Resolution: Allows you to set the image size. (320*240/640*480/1280*1024/1600*1200)v Quality: Allows you to set the image quality from Normal, Fine and Super fine.Multimedia](https://usermanual.wiki/LG-Electronics-USA/GM210.Users-Manual-2/User-Guide-1066914-Page-19.png)
![47v Self timer: Allow you to select the delay time (Off/ 3 secs/ 5 secs/ 10 secs). Then the phone takes a photo after the specified time.v View option: You can set the view mode. (Full image/Full screen)v Save to: You can set the save option for a picture. (Phone/External)v Multi shot: allows you to take multishot-photos successively.v Effects: 4 settings are available. (Off/Sepia/Mono/Negative)v White balance: Allows you to change the settings according to the enviroment. (Auto/Daylight/Incandescent/Cloudy/Fluorescent/ Nightmode)v Shutter tone: You can set the sound when taking a picture.v Reset settings: Allows you to reset the settings.Notev You can adjust the brightness by using the , .v The zoom function varies depending on the resolution the camera is set to. For example, if the camera resolution is set to the highest setting you can’t zoom.3. the photo you have taken is automatically saved in the Images folder of My stuff. After taking a photo, you can select the submenus by pressing the left soft key [Options].v New photo: You can take a new photo.v Set as: You can set the taken photo as a Wallpaper/Picture ID.v Send via: You can send the photo via/Bluetoothv Album: You can access the Images folder of My stuff.Multimedia](https://usermanual.wiki/LG-Electronics-USA/GM210.Users-Manual-2/User-Guide-1066914-Page-20.png)