LG Electronics USA GM210 Cellular/ PCS GSM/ EDGE Phone with Bluetooth User Manual 2
LG Electronics USA Cellular/ PCS GSM/ EDGE Phone with Bluetooth Users Manual 2
Contents
- 1. Users Manual 1
- 2. Users Manual 2
- 3. Users Manual 3
Users Manual 2

28
General Functions
General Functions
Entering text
You can enter alphanumeric characters
by using the phone’s keypad.
For example, storing names in the
contacts, writing a message, creating
a personal greeting. The following
text input methods are available in
the phone.
T9 (T9 Abc) mode
This mode lets you enter words
with only one keystroke per
letter. Each key on the keypad
has more than one letter. The T9
mode automatically compares
your keystrokes with an internal
dictionary to determine the correct
word, thus requiring far fewer
keystrokes than the traditional ABC
mode. This is sometimes known as
predictive text.
ABC mode
This mode lets you enter letters
by pressing the key labelled with
the required letter once, twice,
three or four times until the letter is
displayed.
123 mode (Number mode)
Type numbers using one keystroke
per number. To change to 123 mode
in a text entry field, press the
key until 123 Mode is displayed.

29
General Functions
Changing the text
input mode
1. When you are in a field that allows
characters to be entered, you
will notice the text input mode
indicator in the upper right corner
of the LCD screen.
2. Change the text input mode by
pressing the key. You can
check the current text input mode
in the upper right corner of the LCD
screen.
Using the T9 mode
The T9 predictive text input mode
lets you enter words easily with a
minimum number of key presses. As
you press each key, the phone begins
to display the characters that it thinks
you are typing based on the built-in
dictionary. You can also add new
words in the dictionary. As new words
are added, the word changes to
reflect the most likely candidate from
the dictionary.
1. When you are in the T9 predictive
text input mode, start entering a
word by pressing keys to .
Press one key per letter.
v The word changes as letters are
typed. Ignore what’s on the screen
until the word is typed completely.
v If the word is still incorrect after
typing completely, press the
Down Navigation key once or more
to cycle through the other word
options.
Example
Press 4663 to type
Good
v If the desired word is missing from
the word choice list, add it using the
ABC mode.
v You can also turn off the T9 mode
by selecting
T9 off
. The default
setting on the phone is T9 enabled
mode.
2. Enter the whole word before
editing or deleting any keystrokes.

30
3. Complete each word with a space
by or key.
To delete letters, press . Press and
hold down to erase the letters
continuously.
Using the ABC mode
Use the to
keys to enter
your text.
1. Press the key labelled with the
required letter:
v Once for the first letter
v Twice for the second letter
v And so on
2. To insert a space, press the right
navigation key once.
To delete letters, press the key.
Using the 123 (Number)
mode
The 123 mode enables you to enter
numbers in a text message
(a telephone number, for example).
Press the keys corresponding to
the required digits before manually
switching back to the appropriate text
entry mode.
General Functions
General Functions

31
Using the symbol mode
To enter a symbol, select Options o
Insert o Symbol or press key. Use
the navigation and numeric keys to
select the desired symbol and press
the OK key.
General Functions

32
Selecting functions and options
Your phone offers a set of functions
that allow you to customise the
phone. These functions are arranged
in menus and sub-menus, accessed
via the two soft keys marked. Each
menu and sub-menu lets you view
and alter the settings of a particular
function.
The roles of the soft keys vary
according to the current context; the
label on the bottom line of the screen
just above each key indicates its
current role.
Selecting functions and options

33
Your phone provides a number of
control functions that you can use
during a call. To access these functions
during a call, press the left soft key
[Options].
During a call
The menu displayed on the handset
screen during a call is different than
the default main menu displayed
when in idle screen, and the options
are described below.
Making a Second Call
(Network Dependent)
You can search and dial the number
from
Contacts
to make a second call.
Swapping Between Two Calls
To switch between two calls, press the
key or the left soft key, and then
select
Swap Call
.
Answering an Incoming Call
To answer an incoming call when the
handset is ringing, simply press the
key. The handset is also able to
warn you of an incoming call while
you are already on a call.
A tone sounds in the earpiece, and
the display will show that a second
call is waiting.
This feature, known as
Call waiting
,
is only available if your network
supports it. For details of how to
activate and deactivate it see Call
waiting feature.
If
Call waiting
is on, you can put
the first call on hold and answer the
second, by pressing the left soft key or
the send key.
Rejecting an Incoming Call
You can reject an incoming call
without answering by simply pressing
the key.
During a call, you can reject an
incoming call by pressing the key.
In-call menu
In-call menu

34
Muting the Microphone
You can mute the microphone
during a call by pressing the right
soft key [Mute]. The handset can be
unmuted by pressing the right soft
key [Unmute]. When the handset is
muted, the caller cannot hear you, but
you can still hear them.
DTMF tones while calling
To switch on DTMF tones while
calling (e.g. to use the phone with
an automatic switchboard) press the
left soft key [Options] followed by
Enable DTMF. Select Disable DTMF to
disable DTMF tones. DTMF tones are
normally on.
Conference Calls
The conference service provides
you with the ability to have a
simultaneous conversation with
more than one caller, if your network
service provider supports this feature.
A conference call can only be set up
when you have one active call and
one call on hold, both calls having
been answered.
Once a conference call is set up,
calls may be added, disconnected or
separated (that is, removed from the
conference call but still connected to
you) by the person who set up the
conference call. These options are
all available from the In-Call menu.
The maximum callers in a conference
call are five. Once started, you are
in control of the conference call,
and only you can add calls to the
conference call.
Making a Second Call
You can make a second call while
currently in call. Enter the second
number and press the key.
When the second call is connected,
the first call is automatically placed on
hold. You can swap between calls, by
pressing the key.
In-call menu
In-call menu

35
Setting Up a Conference Call
To set up a conference call, place one
call on hold and while the active call
is on, press the left soft key and then
select the Join menu of Conference
call.
Activate the Conference Call
on Hold
To activate a conference call on hold,
press the key. Alternatively press
the left soft key [Options] and select
Join all/Hold all calls. Other users on
hold will stay connected. To return
to conference call mode, press the
left soft key [Options] followed by
Conference call.
Adding Calls to the
Conference Call
To add a call to an existing conference
call, press the left soft key, and then
select the Join menu of Conference
call.
Private Call in a Conference
Call
To have a private call with one caller
from a conference call, display the
number of the caller you wish to talk
to on the screen, then press the left
soft key. Select the Private menu of
Conference call to put all the other
callers on hold.
Ending a Conference Call
Currently displayed caller from a
conference call can be disconnected
by pressing the key.
In-call menu
36
Menu Tre e
Menu Tree
The menu in this phone can be displayed in 2 ways. The menu in this phone can
be displayed in either Grid view or List View.
Please note that menu number options are different in each view.
The default setting on the phone is set to show the menu in grid view, so
therefore all the menu number selections throughout the manual are shown
according to that setting.
You can go to the desired menu using the left soft key [Menu], navigation keys
and the OK key. And you can also take a shortcut by pressing the corresponding
number key of desired menu after pressing the left soft key [Menu].
1. Games & Apps
1.1 Games
1.2 Applications
1.3 Network profiles
2. Call history
2.1 All calls
2.2 Missed calls
2.3 Dialed calls
2.4 Received calls
2.5 Call duration
2.6 Call costs
2.7 Data information
3. Organizer
3.1 Calendar
3.2 Memo
3.3 To do
4. Multimedia
4.1 MP3 player
4.2 Camera
4.3 Video camera
4.4 FM radio
4.5 Voice recorder
37
Menu Tre e
5. Messaging
5.1 New message
5.2 Inbox
5.3 Drafts
5.4 Outbox
5.5 Sent
5.6 Listen to voicemail
5.7 Info message
5.8 Templates
5.9 Settings
6. My stu
6.1 Images
6.2 Sounds
6.3 Videos
6.4 Others
7. Proles
7.1 General
7.2 Silent
7.3 Vibrate only
7.4 Outdoor
7.5 Headset
8. Contacts
8.1 Search
8.2 New contact
8.3 Speed dials
8.4 Groups
8.5 Copy all
8.6 Delete all
8.7 Settings
8.8 Information
9. Tools
9.1 Alarm clock
9.2 Calculator
9.3 Stopwatch
9.4 Unit converter
9.5 World clock
9.6 WINE+
9.6 SIM services
*. Browser
*.1 Home
*.2 Yahoo !
*.3 Bookmarks
*.4 Enter address
*.5 History
*.6 Saved pages
*.7 Settings
*.8 Information
0. Connectivity
0.1 Bluetooth
0.2 Network
0.3 USB connection mode
#. Settings
#.1 Date & Time
#.2 Languages
#.3 Display
#.4 Shortcut
#.5 Call
#.6 Security
#.7 Flight mode
#.8 Power save
#.9 Reset
#.0 Memory status

38
Games & Apps
Games Menu 1.1
You can access a great selection of
games on your phone.
Note
Java™ is a technology developed
by Sun Microsystems. There are two
methods to install Java Applet.
The first method, Similar to the
way you would download the
Java Applet using the standard MS
Internet Explorer browsers, Java
MIDlet can be downloaded using
the WAP enabled phone. Depending
on the service provider, all Java
based programs such as Java games
can be downloaded and run on
a phone. Once downloaded, the
Java program can be viewed in the
Games or Applications menu where
you can select, execute, or delete.
The Java program files are saved in
the phone are in .jad or .jar format.
Note
The JAR file is a compressed format
of the Java program and the JAD
file is a description file that includes
all detailed information. From the
network, prior to download, you can
view all detailed file descriptions
from the JAD file.
The another method, You can use
the Java Applet existed in External
memory.
Go to My stuff -> External memory
-> Others, and then select either.jad
or .jar file of Java Applet you want to
install in your phone.
Games & Apps

39
Caution
Only J2ME (Java 2 Micro Edition)
based programs will run in a phone
environment. The J2SE (Java 2
Standard Edition) based programs
will only run in a PC environment.
Applications Menu 1.2
When Applications menu is selected,
Java loading screen is displayed.
You can select and easily access other
applications in this menu. For further
details, please contact your service
provider.
Network profiles Menu 1.3
Network profiles menu allows you
to see the network information used
to connect to the Internet. You can
activate or add new profiles.
Games & Apps

40
Call history
You can check the record of missed,
received, and Last dialled calls only
if the network supports the Calling
Line Identification (CLI) within the
service area.
The number and name (if available)
are displayed together with the date
and time at which the call was made.
You can also view the number of
times you have called.
All calls Menu 2.1
You can view all lists of outgoing or
incoming calls or missed calls.
Missed calls Menu 2.2
Allows you to view missed call
records, make a call, send a message,
and save the number in the contacts.
Dialled calls Menu 2.3
Allows you to view dialled call records,
make a call, send a message, and save
the number in the contacts.
Received calls Menu 2.4
Allows you to view received call
records, make a call, send a message,
and save the number in the contacts.
Call duration Menu 2.5
Allows you to view the duration of
your incoming and outgoing calls.
You can also reset the call timers.
The following timers are available:
v
Last call:
Length of the last call.
v
All calls:
Total length of all calls
made and incoming calls since the
timer was last reset.
v
Dialed calls:
Length of the
outgoing calls.
v
Received calls:
Length of the
incoming calls.
Call history

41
Call costs Menu 2.6
Allows you to check the cost of your
last call and all calls.
Data information
Menu 2.7
You can check the amount of data
transferred over the network through
the GPRS information option.
In addition, you can also view how
much time you are online.
Call history
42
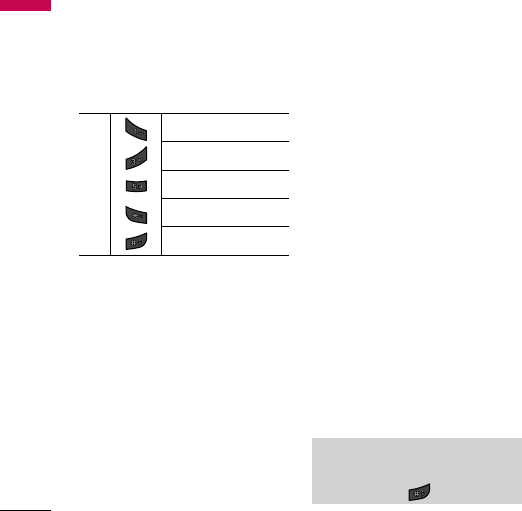
Calendar Menu 3.1
You can refer to your schedule by
months. The cursor is on the current
date, and the registered date is
marked.
Each
press
of
skips back a year.
skips forward a year.
moves to today.
skips back a month.
skips forward a month.
You can view the schedule note or
memo for the chosen day by pressing
the OK key.
v
View:
You can view the schedule
note or memo for the chosen day.
v
New schedule:
Select this to enter
a new schedule.
v
Scheduler tone:
You can set the
scheduler tone.
v
All schedules:
You can view all
schedules.
v
Go to date:
You can go the chosen
date directly.
v
Delete old:
Select this to delete the
expired schedule notes that you
have already been notified of.
v
Delete all:
Select this to delete all
the schedule notes.
Memo Menu 3.2
You can add new memo, view and
manage saved memos.
1. If the entry is empty, press the
left soft key [New] and enter the
contents of the memo. You can save
the memo to the list by the left soft
key [Options] then choose [Save].
2. If you have saved memos, you
can access following options with
the left soft key [Options] :
View
,
Delete
,
New memo
,
Send via
,
Edit
,
Multi delete
,
Delete all
.
Note
If you want to change the text input
mode, press the key.
Organizer
Organizer

43
To do Menu 3.3
You can view, edit and add tasks to
do. Tasks are displayed in time order.
Tasks that have been completed
or not completed are displayed in
different ways.
1. If the entry is empty, press the left
soft key [New].
2. Input the
Due date
,
Note
,
Priority
,
and
Status
.
3. When you have finished entering
the data, press the left soft key
[Save].
4. You can manage saved to do
notes by pressing the left soft key
[Options].
Organizer

44
Multimedia
MP3 player Menu 4.1
The GM210 has an integrated MP3
player built-in. You can enjoy listening
to MP3 music files on your phone
using a compatible headset or via the
internal loudspeaker.
Note
Because of the small dimension
of the speaker, in some cases the
audio could be distorted, especially
at maximum volume and when
there are lots of bass sounds.
Therefore, we recommend you to
use the stereo headset in order to
appreciate the high quality of your
music.
The music player supports:
•
MPEG-2 Layer III, MPEG-2.5
Layer III:
Sampling frequency up
from 8KHz to 48KHz. Bit rate up to
320Kbps, stereo.
•
AAC
: ADIF, ADTS formats (Sampling
frequency from 8KHz to 48KHz)
•
AAC+
: V1: (Bit rate 16~128Kbps)
V2 : (Bit rate 16~48Kbps)
(Sampling frequency from
8KHz to 48KHz)
Note
GM210 doesn’t support the variable
bit rate of all mentioned file types.
Therefore, you can’t change the file
from MP3 format to AAC.
You can transfer MP3 files from a
compatible PC to the memory in your
phone using the
Mass
Storage
.
When you connect the phone to a
PC using the USB cable and then you
can show removable disk through
windows explorer. After you copy
songs in removable disk, you should
execute safe remove from your
system.
Multimedia

45
Note
v You should copy MP3 to Sounds/
MP3 folder. If you copy another
folder, you can’t see MP3 files.
v The PC should run Windows 98
SE, Windows ME, Windows 2000,
Windows XP operating system.
All songs (Menu 4.1.1)
You can see the all of music files.
My playlist (Menu 4.1.2)
You can set the music files of your
taste.
Settings (Menu 4.1.3)
v
Shuffle:
If you select
On
, you can
listen to the music randomly.
v
Repeat:
This menu allows to set the
play mode:
Off
,
One
,
All
.
v
Equalizer:
This menu helps you to
adjust various of environment on
listening to the music.
v
Player skin:
This menu allows to
change the background of main
LCD on playing MP3 file.
Note
Music is copyright protected in
international treaties and national
copyright laws. It may be necessary
to obtain permission or a license to
reproduce or copy music. In some
countries national law prohibits
private copying of copyrighted
material. Please check the national
legislation of the applicable country
concerning the use of such material.
Multimedia

46
Multimedia
Camera Menu 4.2
Using the camera module built in
your phone, you can take pictures of
people. Additionally, you can send
photos to other people and select
photos as wallpaper.
Note
When using the camera, power
consumption increases. If the
battery is too low, you may not be
able to use the
Camera
feature,
please recharge the battery before
use.
• To take a picture
- To take clear pictures, press the
camera key while holding the
camera without any movement.
- Appropriately adjust distance to the
object that you want take a picture
of (more than 50 cm).
- Handle carefully since the camera is
vulnerable to shock and use a soft
cloth when cleaning the camera
lens.
- Do not disassemble or modify the
camera as this may lead to fire or
malfunctioning.
1. Press the camera key in standby
mode.
2. Focus on the subject to capture the
image, and then press the camera
key or the OK key.
3. The photo you have taken is
automatically saved in the
Images
folder of
My
stuff
. After taking a
photo, you can select the submenus
by pressing the left soft key
[Options].
Before taking a photo, you can set the
following options by pressing the left
soft key [Options].
v
Resolution:
Allows you to set the
image size. (320*240/640*480/1280
*1024/1600*1200)
v
Quality:
Allows you to set the
image quality from
Normal
,
Fine
and
Super fine
.
Multimedia

47
v
Self timer:
Allow you to select the
delay time (Off/ 3 secs/ 5 secs/ 10
secs). Then the phone takes a photo
after the specified time.
v
View option:
You can set the view
mode. (Full image/Full screen)
v
Save to:
You can set the save option
for a picture. (Phone/External)
v
Multi shot:
allows you to take
multishot-photos successively.
v
Effects:
4 settings are available.
(Off/Sepia/Mono/Negative)
v
White balance:
Allows you to
change the settings according to
the enviroment. (Auto/Daylight/
Incandescent/Cloudy/Fluorescent/
Nightmode)
v
Shutter tone:
You can set the
sound when taking a picture.
v
Reset settings:
Allows you to reset
the settings.
Note
v You can adjust the brightness by
using the , .
v The zoom function varies
depending on the resolution the
camera is set to. For example, if
the camera resolution is set to the
highest setting you can’t zoom.
3. the photo you have taken is
automatically saved in the Images
folder of My stuff. After taking
a photo, you can select the
submenus by pressing the left soft
key [Options].
v
New photo:
You can take a new
photo.
v
Set as:
You can set the taken photo
as a
Wallpaper/Picture ID
.
v
Send via:
You can send the photo
via/Bluetooth
v
Album:
You can access the
Images
folder of
My stuff
.
Multimedia