LG Electronics USA GU290F Cellular/PCS GSM/WCDMA/EDGE Phone with Bluetooth User Manual GU290f Eng 100304 indd
LG Electronics USA Cellular/PCS GSM/WCDMA/EDGE Phone with Bluetooth GU290f Eng 100304 indd
Contents
- 1. Users Manual 1
- 2. Users Manual 2
Users Manual 2
![21In-Call Menu During a CallYour phone provides a number of control functions that you can use during a call. To access these functions during a call, press the right soft key [Options].Making a Second CallYou can select a number you wish to dial from the Address Book, to make a second call. Press the right soft key [Options], then select Address Book. Highlight the contact, then press the [SEND] key to make a second call. Swapping Between Two CallsWhen two calls are active. You can switch between the calls by using one of the following three methods:► Press the [SEND] key.► Press the right soft key and then select “Swap Calls”.► Press Up/Down on the navigation key.Answering an Incoming CallTo answer an incoming call when the handset is ringing, simply press the [SEND] key. The handset is also able to warn you of an incoming call while you are already on a call. A tone sounds in the earpiece, and the display will show that a second call is waiting. This feature, known as Call Waiting, is only available if your network supports it.If Call Waiting is turned on, you can put the first call on hold and answer the second call by pressing the [SEND] key.Rejecting an Incoming CallYou can reject an incoming call without answering by simply pressing the [END] key. NotePush to TalkPush to Talk (PTT) from AT&T lets you see whether your family, friends, and co-workers are available to talk before you call. You can reach them individually or all at once via a group call, all in an instant.](https://usermanual.wiki/LG-Electronics-USA/GU290F.Users-Manual-2/User-Guide-1258280-Page-1.png)
![In-Call Menu22Muting the MicrophoneYou can mute the microphone during a call by pressing the left soft key [Mute]. The handset can be unmuted by pressing the left soft key [Unmute]. When the handset is muted, the caller cannot hear you, but you can still hear the caller.Using the SpeakerphoneYou can use the integrated Speakerphone during a call by pressing the [OK] key. The loudspeaker is automatically deactivated when you end the call. WarningDue to increased volume levels, do not place the phone near your ear while the speakerphone is enabled. Conference CallsThe conference service provides you with the ability to have a simultaneous conversation with more than one caller. The conference call feature can be used only if your network service provider supports this feature.A conference call can only be set up when you have one call active and one call on hold, meaning both calls must have been answered. Once a conference call is set up, calls may be added, disconnected (Exclude Call is an option that allows you to select a call to disconnect from the conference call), or separated (the Private Call option allows you to separate a call from the conference call, but that is still connected to you) by the person who set up the conference call. These options are all available from the In-Call menu.](https://usermanual.wiki/LG-Electronics-USA/GU290F.Users-Manual-2/User-Guide-1258280-Page-2.png)
![In-Call Menu23The maximum number of callers in a conference call is five. Once started, you are in control of the conference call, and only you can add calls to the conference call.Making a Second CallYou can make a second call while currently on a call simply by entering the second number and pressing the [SEND] key. When the second call is connected, the first call is automatically placed on hold. You can swap between calls by pressing the [SEND] key.Setting Up a Conference CallTo set up a conference call, place one call on hold, then conference in the second active call by pressing the right soft key [Options], selecting Conference Call and then selecting Join Calls.Place the Conference Call on HoldTo place a conference call on hold, press the [SEND] key.Adding Calls to the Conference CallTo add a call to an existing conference call, press the right soft key, and then select the Join Calls sub menu from the Conference Call option.Private Call in a Conference CallTo have a private call with one of the callers in the conference call, press the right soft key and select Private Call from the Conference Call option. When the numbers of the callers are displayed, select the one with which you wish to speak in private.](https://usermanual.wiki/LG-Electronics-USA/GU290F.Users-Manual-2/User-Guide-1258280-Page-3.png)
![24Ending a Conference CallAn active conference call can be disconnected by pressing the [END] key. Video Share CallingMaking and Answering a Video Share CallYou can make or answer a Video Share call with other 3G video phones. In order to start a Video Share call, both sides must have a 3G Video Share capable phone and both must be in a 3G coverage area. NoteBefore you start a Video Share Call you must check the following:• Phone must be in an AT&T 3G service area.To initiate Video Share follow these steps:1. Make a phone call by dialing a number, or selecting a number either from the Contact List or Recent Call List. From the Recent Call or Contact List, you can also directly make a Video Share call by selecting [Options] > [Video Share] and selecting Video Type (Live or Recorded). In this case skip steps 2-3.2. A few seconds after the connection is established, a “Video Share Ready” prompt will appear on the screen once the other party is ready to use the Video Share service. If Audio alert in Video Share setting (See Application Setting) is set to ‘ON’, the auditory alert will sound along with prompt.3. To Share Video with another party, you can press the left soft key [Video] or Camera key and select Video type (Live or Recorded).In-Call Menu](https://usermanual.wiki/LG-Electronics-USA/GU290F.Users-Manual-2/User-Guide-1258280-Page-4.png)
![25In-Call Menu NoteThe Speakerphone will be automatically activated when a Video Share session begins, unless a hands-free device (Bluetooth® or stereo headset) is connected.► Live: You can share a real-time video stream with the other party while having a conversation.► Recorded: You can share a pre-recorded video clip with the other party while having a conversation. (Note that H.263 video format in 176x144 size is supported)4. If the other party accepts the Video Share invitation, the Video Share session will begin. (After accepting, it may take several seconds before actual Video Share starts) During the Video Share, you can do the following via the [Options].During the Video Share session, you can navigate the [Options] menu items using the right soft key.► Spk. On: You can turn the integrated Speakerphone on while you are using Bluetooth.► Mute/Unmute: You can mute/unmute the microphone by selecting mute/unmute.► Stop Video Share: You can stop video sharing and proceed with the voice call only by selecting ‘Stop Video Share’.► Brightness: You can adjust the brightness of the screen by selecting Brightness.► Zoom: You can zoom in/out the video by selecting Zoom.► Audio to Bluetooth®/Audio to Phone: When ‘Audio to Bluetooth®’ is selected, you can have a conversation using Bluetooth®. When ‘Audio to Phone’ is selected, you can have a conversation using either speakerphone or headset.► Record Video Share/Stop Recording: You can start recording the live video by selecting ‘Record Video Share’. Once you are recording the video, you can stop recording by selecting ‘Stop Recording’.► End Call: You can end the phone call by selecting ‘End Call’. (Note: Video Share will stop as well)► Hold Call: You can place the phone call on hold by selecting ‘Hold Call’. (Note: Video Share will stop when you select ‘Hold Call’)](https://usermanual.wiki/LG-Electronics-USA/GU290F.Users-Manual-2/User-Guide-1258280-Page-5.png)
![In-Call Menu26During the Video Share session, you can turn the speakerphone on/off using the ‘Spk. off’/ ‘Spk. on’ key (OK key).You can record a current video clip via Options menu, and the recorded video will be saved in [My stuff] – [Video].5.1. You can stop a Video Share call and proceed to a voice call by1. Press [Stop] Key (Left soft key)2. Selecting [Option] > [Stop Video share]5.2. You can end a voice call along with the Video Share call by1. Press [End] Key2. Selecting [Option] > [End Call] Note1. A Video Share Call will be unavailable or terminated in the following cases:• When trying to make a conference call/second call during a Video Share Call.• When the voice call is placed on hold.• When the voice call is disconnected.• When either party moves out of an AT&T 3G service area.• When the network connection is poor.2. If you receive a Video Share request during a call, select the left soft key [Accept] to start the Video Share Call. If you don’t want to accept the request, press the right soft key [Decline] to decline the request. (Note that after accepting the call, it may take several seconds before the Video Share session starts.)Making a Video Share Call from the Camera, Camcorder or Video GalleryWhen you are in the Camera or Video Recording mode, you can easily make a Video Share Call to a person in your Contact List.1. Start Video Share call as follows:► In Take a Photo mode, switch to Record Video mode.► In ‘Record Video’ mode, select the first icon from the bottom [Video Share].► During an active phone call with someone that has a Video Share capable phone, a prompt will automatically ask you if you want to initiate a Video Share call. Selecting ‘Yes’ will initiate the Video Share function.](https://usermanual.wiki/LG-Electronics-USA/GU290F.Users-Manual-2/User-Guide-1258280-Page-6.png)
![In-Call Menu27 NoteThis menu item is active only in 3G coverage. NoteIf the other party is not ready for Video Share, the call will proceed to an ordinary voice call.Saving your Video ShareThe sender can record video during the Video Share session by1. Selecting [Option] > [Record Video Share] during a live Video Share call.2. Setting Auto Record to ‘ON’(See Application Settings).Sender can save the recorded video by1. Selecting [Option] > [Stop Recording] during a live Video Share call.2. Ending Video Share call.Recorded video will be saved in [My Stuff] > [Video] folder in the phone.](https://usermanual.wiki/LG-Electronics-USA/GU290F.Users-Manual-2/User-Guide-1258280-Page-7.png)

![34MessagingThis menu includes functions related to SMS (Short Message Service), MMS (Multimedia Message Service), voice mail as well as the network’s service messages.Create Message Menu 2.1In the Standby screen, select Menu > Messaging > Create Message. Or, you can simply press the Up navigation key from Standby mode to create a new message. NoteIf you insert a Picture, Audio or Video file while writing a multimedia message, the file loading time will take about 5 seconds. You will not be able to activate any key during the file loading time. When the file loading is complete, you will be able to write a multimedia message.Editing a messageThe following options are available when Editing a Message. (Press the left soft key [Insert])► Symbol: You can insert various symbols into your message. Pressing the left and right soft keys scrolls through the pages. Using the navigation key highlights symbols.► Picture: You can select a picture to insert by using the navigation keys. You can preview the selected picture by pressing the left soft key [View].► Audio: You can insert an audio file from your saved audio files.► Video: You can insert a video clip.► Record New Audio: You can record a new audio clip by pressing the center key [Record]. Press the right soft key [Options] before you begin recording to set the options (below). After recording a new audio clip, you can delete it by pressing the right key [Delete]. • Quality: Set the audio’s quality to Fine, Normal or Economy.](https://usermanual.wiki/LG-Electronics-USA/GU290F.Users-Manual-2/User-Guide-1258280-Page-14.png)
![35 • Select Storage Defaults: You can assign the default storage to Phone Memory or Memory Card.► Record New Video: You can record a new video by pressing the center key [Record]. When finished recording, press the center key [Insert].► Template • Text: You can easily insert frequently used sentences in the text message. • Multimedia: Preset multimedia templates can be created (Menu > Messaging > Message Settings > Multimedia Settings > Multimedia Templates > New). • Signature: Insert your own created signature. For further details, see page 43.► More: Allows you to insert Subject, vCard, vCalendar, vNote, vTask or Contact. NotevCard, vCalendar, vNote and vTask are created by the Address Book, Calendar, Notepad and Tasks functions, respectively. Go to the Tools and Address Book sections in this Manual for more detailed information.Using OptionsWhile entering text, press the right soft key [Options].• Text Entry Mode: Sets the text input mode. For more details, refer to Entering Text (page 17).• Text Entry Settings: Text Entry Language allows you to set the text entry language to English, Spanish, French or Korean. You can set to use T9 Word Candidate List. Also, T9 Next Word Prediction is available when it is set to On. Use T9 Dictionary to add words or delete/reset/modify words.• Delivery Options - Delivery Receipt: If this is set to On in this menu, you can receive notification that your message was sent successfully. Delivery Receipt may not be compatible will all carriers. - Reply via Same Message: You can set On or Off.Messaging](https://usermanual.wiki/LG-Electronics-USA/GU290F.Users-Manual-2/User-Guide-1258280-Page-15.png)
![36• Save to Drafts: Saves the message to Drafts.• Cancel Message: Allows you to exit the text input mode without saving your message.Sending a MessageAfter completing a message, using Insert and/or Options, press the OK key [Send To] to select a recipient.Press the right soft key [Options].• Enter the recipient(s). For more options, press the right soft key [Options]. In this menu you can choose an option item below. - Enter Number - Enter Email: You can enter Email address instead of phone number. - Insert Symbol - Caller Groups: Shows Contacts in the saved Groups. - Recent Messages: Choose a contact from recent messages. - Recent Calls: Choose a contact from recent calls. - Delivery Options: Options of Delivery Receipt, Reply via Same Message, Add Cc, and Add Bcc. - Edit Message: Go back to the message editing mode. - Save to Draft: Saves the selected message to Drafts. - Text Entry Mode - Text Entry Settings: Text Entry Language, T9 Word Candidate List, T9 Next Word Prediction and T9 Dictionary. - Cancel Message: You can cancel the message. Inbox Menu 2.2You will be alerted when you receive a message. New messages are stored in the Inbox. In the Inbox, you can identify each message by icons. If you are notified that you have received a multimedia message, you can download the whole multimedia message by selecting it in the Inbox menu. To reach the Inbox, from the standby screen, select Menu > Messaging > Inbox.Messaging](https://usermanual.wiki/LG-Electronics-USA/GU290F.Users-Manual-2/User-Guide-1258280-Page-16.png)
![37The following [Options] are available in the Inbox list. The options (below) vary depending on the View mode set (Conversational or Standard).► Add to Address Book: You can save the sender’s phone number in the Contact List.► Delete: You can delete the current message.► Standard view: Switches the Inbox view mode.► Forward: You can forward the selected message to another party.► Copy to Phone/Copy to SIM: You can copy to Phone or SIM depending on where the text message is stored. ► Select Multiple: You can select multiple messages. ► Message Details: You can view information about received messages; message Type, Subject, Sender’s address, and message Time.► Delete All Read Messages: You can delete all read messages.► Conversation view: Switches the Inbox view mode. IM Menu 2.3The Instant Messaging feature can only be used with the support of the network operator or communities such as AIM, Windows Live and Yahoo! Messenger. For Instant Messaging users, a valid User ID and Password will be required in order to login and exchange messages as well as checking the online status.To access the IM featurePress the left soft key [Menu], then select Messaging, lastly select 3.IMYou can also access IM from Standby mode by using the IM hotkey (the right navigation key). Quickly pressing the hotkey from the standby screen will bring up the available IM clients. 1.2.Messaging](https://usermanual.wiki/LG-Electronics-USA/GU290F.Users-Manual-2/User-Guide-1258280-Page-17.png)
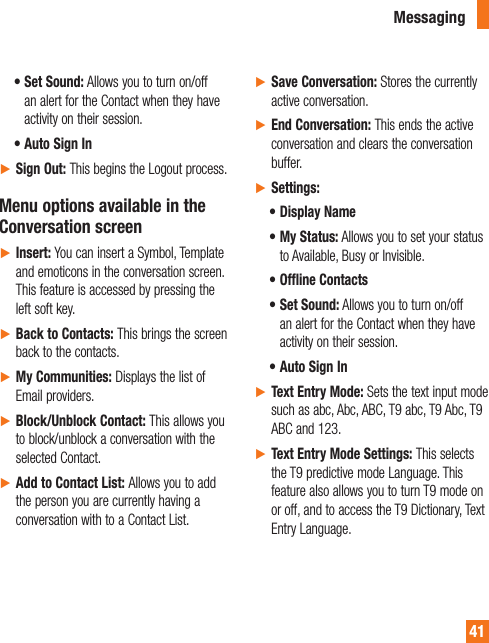
![Messaging42► Minimize: Minimizes the IM window and returns to the standby screen.► Sign Out: This begins the logout process. Note• In the conversation window, you can use the up/down navigation key for scrolling through the conversation.• The maximum number of characters supported by a message is 800 characters, for receiving, and 127 characters for sending.• The current information might not update in real time so the “Refresh List”/“Refresh Contact” option can be used for the most up to date status.Mobile Email Menu 2.4Mobile Email allows you to access your Yahoo! Mail, AOL Mail, AIM Mail, Windows Live Hotmail, AT&T Mail, Gmail and Other providers accounts on your phone. So, now you can quickly and easily check your email while you are away from your computer.To Set Up Mobile Email:Open Mobile Email: From the Standby screen, press the left soft key [Menu], then choose Mobile Email.Select an Email Provider: Use the navigation key to highlight the email provider you wish to use and press Select.Log In:Highlight the ID entry field, press the center key, and then type in your existing email ID.Scroll down and highlight the Password field, press the center key, and enter your password.Quick Tip: Your password is case sensitive. Press the button on the keypad to change to lower case or upper case.To save your password scroll down to Remember Me and press down on the navigation key to check the box.Select Sign In.1.2.3.1.2.3.4.](https://usermanual.wiki/LG-Electronics-USA/GU290F.Users-Manual-2/User-Guide-1258280-Page-22.png)
![► Opening an Email: Just scroll down and highlight the email subject line you want to open and press down on the center key. When the email is open, select Options to Reply, Forward, Delete, Reply to All, View All Recipients or Mark Unread.► Deleting an Email: Scroll down to the email you want to delete, press Options, then Delete.Outbox Menu 2.5Outbox is the storage place for recently sent messages. When you press the [SEND] key, you can make a call to the number of the recipient number of the selected message.If the message is not sent from the Outbox, you will receive a sound alert along with a Message Sending Failure notice on the screen. Another attempt will be made to send the failed message and after two unsuccessful attempts, the message will no longer be sent automatically. In order to send the message that has failed, you must press the left soft key [Resend] to resend the message.After the maximum number of Send attempts has been reached, the [Send] function has failed. If you were trying to send a text message, open the message and check that the Sending options are correct.When the message Send has failed, the following [Options] are available in the Outbox list.► View Status: Shows the status of each message.► Delete: Deletes the selected message which has failed.► Edit: Allows you to edit the selected message.► Select Multiple: Allows you to select multiple messages from the list.► Message Details: Allows you to view the information on the message.Messaging43](https://usermanual.wiki/LG-Electronics-USA/GU290F.Users-Manual-2/User-Guide-1258280-Page-23.png)
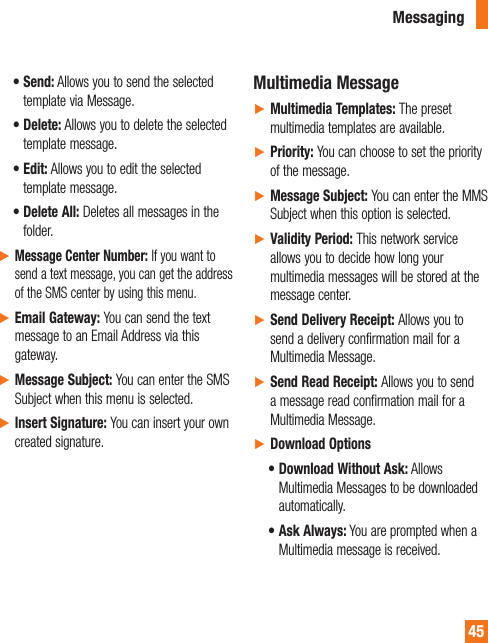
![Drafts Menu 2.6You can view the messages saved as drafts. To see the Drafts, in the Standby screen, select Menu > Messaging > Drafts. The following Options are available.► Select Multiple: Allows you to delete multiple messages you select from the folder.► Message Details: Allows you to view the information on the message. Voicemail Menu 2.7This menu provides you with a quick way of accessing your voice mailbox (if provided by your network).Another shortcut is available. To quickly check your voicemail when in Standby mode, press and hold the key. NotePlease check with your network service provider for details of their service in order to configure the handset accordingly.Message Settings Menu 2.8To access and configure your Message Settings, go to Menu > Messaging > Message Settings.Message AlertAllows you to set the Sounds and Alert Type.Save ToAllows you to choose whether to save to the SIM Card or the Phone.SignatureThis feature allows you to create your Text signature. You can use symbols, templates and contacts as part of the signature.Text MessageAllows you to set preferences for when you create a new outgoing message.The following [Options] are available.► Text Templates: Predefined messages that can quickly be sent. To send it, or access the other available options (below), press the right soft key [Options].Messaging44](https://usermanual.wiki/LG-Electronics-USA/GU290F.Users-Manual-2/User-Guide-1258280-Page-24.png)

![48Mobile WebThis application connects you to the Internet. By default, the account connects you to AT&T’s homepage. This menu shows how to access the Internet by launching the browser.Mobile Web is one of the services provided by AT&T and it gives you access to all the cool things you can do with your wireless phone. NoteCheck the availability of services, pricing and tariffs with your network operator and/or the service provider whose service you wish to use. Service providers will also give you instructions on how to use their services.Please contact your service provider to open an Internet account.Launch the BrowserTo launch the browser in standby mode, hold down the center key. You can also, while in standby mode, press the left soft key [Menu] and then select Mobile Web.Once connected, the homepage is displayed. To exit the browser at any time, press the [END] key.Menus for the BrowserYou can surf the Internet using either the phone keys or the Browser menu.Using the Navigation KeysWhen surfing the Internet, the navigation keys function similarly from when the phone is on Standby Mode.](https://usermanual.wiki/LG-Electronics-USA/GU290F.Users-Manual-2/User-Guide-1258280-Page-28.png)
![Playing MusicTo listen to music that you have transferred to your phone, follow these quick easy steps:Playing Music with the Slide OpenPress the left soft key [Menu] to open the Main Menu. Select AT&T Music.Select Music Player (1) to view your options. You can select from Now Playing, All Songs, Playlists, Artists, Albums and Genres to select your Music or you can just select Shuffle Songs to shuffle your collection.• Press the [OK] key to Play/Pause a selected song. While playing, press the up or down navigation keys to change the volume, and left or right keys to go to the previous or next song.• While playing music, press the Left Soft Key [Minimize] to Minimize the music player and access other phone functions while music is playing.1.2.3. NoteFiles under 300kb are stored as ringtone files.Adding Music To Your HandsetMusic files can be added to your handset by using one or more of the following methods:• Download music and ringtones over the AT&T network directly to your device via the Shop Music link in the AT&T Music Folder or the Shop Tones link in the AT&T MEdia Mall folder• From your existing digital media collection on your PC via Windows Media® Player and/or Windows Explorer.• From your PC using other music subscription services, such as Napster or eMusic.Purchasing and downloading Music directly to your DeviceWith Slide open, press Left Soft Key [Menu] to open the Main Menu.Press (6) or use the Navigation Keys to select AT&T Music.Select Shop Music (2).1.2.3.AT&T Music50](https://usermanual.wiki/LG-Electronics-USA/GU290F.Users-Manual-2/User-Guide-1258280-Page-30.png)
![53AT&T MusicDrag and Drop Music Using LG GU290f As A Mass Storage DeviceInsert a microSD™ memory card. Power on the phone. Connect the device to a PC using a LG GU290f USB data cable. Access My Computer on the PC.The phone’s memory card will be listed under “Devices with Removable Storage” in the same location as an optical drive. NoteThe PC will automatically assign a drive letter.Explore files in a new window for desired music files. Drag and drop the desired music content from the PC window to the “Storage Card” window.Disconnect the device from the cable. Access the Music Player on the phone. NoteIf the target computer does not detect the newly connected handset as Mass Storage, skip to the Changing USB Connection Settings section below.1.2.3.4.5.6.7.8.9.Changing USB Connection SettingsWhen the Idle screen displays, go to the Main Menu by pressing the left soft key [Menu].Select Settings.Select Connection.Use the Up or Down Navigation key to highlight and select USB Connection Mode.Use the Up or Down Navigation key to highlight Music Sync (if using Windows Media® Player or other Digital Music Services) or Mass Storage (if you are going to drag or drop files) and press the [OK] key.Reconnect the device to a PC.Deleting Music FilesWhen you have transferred files with the Music Sync feature and you want to delete them from your phone, you should connect the phone to your PC and delete using the method with which you first added the music. The following are the four options available to delete Music from your Phone:A. Delete a file using Mass Storage, but not using Music sync function.1.2.3.4.5.6.](https://usermanual.wiki/LG-Electronics-USA/GU290F.Users-Manual-2/User-Guide-1258280-Page-33.png)
![56My StuffAudio Menu 7.3► Shop Tones: This menu option connects to AT&T’s ringtone download site.► Answer tones: This menu option allows to set the tone for answering a call.► Record Voice: You can record your own audio by pressing the center [Record] key.► Saved audio files are displayed in the list.Games Menu 7.4 NoteThe JAR file is a compressed format of the Java program and the JAD file is a description file that includes all detailed information. From the network, prior to download, you can view all detailed file descriptions from the JAD file. WarningOnly J2ME (Java 2 Micro Edition) based programs will run on a phone.J2SE (Java 2 Standard Edition) based programs will only run on a PC. ► Shop Games: This menu option connects to AT&T’s game download site.You download games from the list that appears.Picture Menu 7.5► Shop Wallpapers: Connects to AT&T’s wallpapers download site.► Take Picture: Takes you to the camera function, from where you can take pictures.► Make Animated GIF: Allows you to create an animated GIF file with the images in your phone.► The picture files saved on your phone and memory card (if inserted) are displayed.](https://usermanual.wiki/LG-Electronics-USA/GU290F.Users-Manual-2/User-Guide-1258280-Page-36.png)
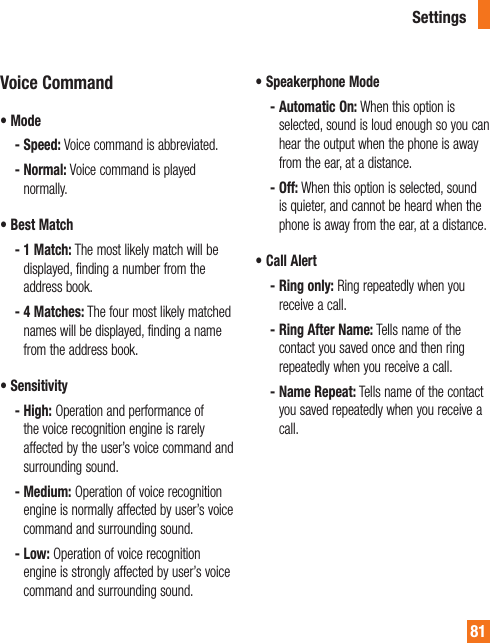
![58• Follow-up Commands Available - yes: make the phone call. - no: moves to the next result. - cancel: go back to the main voice command menu. - exit: terminate voice command. - next: moves to the next result.Listen Voicemail: This command is activated when the user says “Listen Voicemail”. The user will then be automatically connected to voicemail.Missed Calls: This command is activated when the user says the words “Missed Calls”. The mobile phone presents missed call lists.• Follow-up Commands Available - yes: make the phone call. - no: moves to the next result. - cancel: go back to the main voice command menu. - exit: terminate voice command. - next: moves to the next result.2.3.Messages: This command is activated when the user says “Messages”. Mobile phone displays details of unread SMS or MMS messages.Time & Date: This command is activated when the user says “time and date”. The phone displays the current local time and date.Voice Command OptionsWhen the Voice Command option is activated, you can press the right soft key [Options] for the following options:• Mode - speed: with this setting, you no longer receive voice prompts from the phone when Voice Command is activated. - normal: voice command prompts you when Voice Command is activated.4.5.My Stuff](https://usermanual.wiki/LG-Electronics-USA/GU290F.Users-Manual-2/User-Guide-1258280-Page-38.png)
![59• Best Match - 1 match: the most likely match will be displayed when finding a number from the address book. - 4 matches: the four most likely matched names will be displayed when finding a name from the address book. • Sensitivity - High - Medium - Low• Speakerphone mode - Automatic On: When this option is selected, sound is loud enough so you can hear the output when the phone is away from the ear, at a distance - Off: When this option is selected, sound is quieter, and cannot be heard when the phone is away from the ear, at a distance• Call Alert - Ring only: The phone rings during an incoming call. - Ring After Name: The phone announces the name or number of the incoming call, then rings. - Name Repeat: The phone announces an incoming call by repeating the name or number of the caller repeatedly.Recent CallsThis shows recent calls categorized as All/Missed/Dialed/Received by tab.Alarm ClockThe alarm function allows you to set up multiple separate alarms. You can also set the time, repetition interval and alarm sound. If there is no alarm setting, press the left soft key [New] to add a new alarm.Alarm Options► Time: Select the desired set time mode using the keypad. ► Repeat: Select the desired repeat mode using the left/right navigation keys.My Stuff](https://usermanual.wiki/LG-Electronics-USA/GU290F.Users-Manual-2/User-Guide-1258280-Page-39.png)
![► Alarm Tone: Press the center key to access the list of available Alarm Tones.► Memo: Input alarm name. Press the left soft key [Save] to save your new Alarm. CalendarWhen you enter this menu, a calendar will be displayed. The square cursor is used to locate a particular day. The bottom bar on the calendar indicates save schedules (if any) for that day. This function helps you keep track of your schedule. The phone can sound an alarm tone if it has been set for a specific schedule item.The chart below shows the keys that can be used to navigate the Calendar:Key Descriptionup/down navigation key Weeklyleft/right navigation key Daily key/ key Annually key/ key MonthlyThe following [Options] are available when a Calendar event is selected from the Calendar menu.► Search: Allows you to search the saved schedule(s).► Delete: Allows you to delete the selected schedule.► Send Schedule Via: Sends the selected schedule by Text Message, Multimedia Message or Bluetooth®.► Set Holiday: Allows you to set specific dates to display as Holidays on your calendar.► Selective Delete: Allows you to delete Old Schedules or All Schedules selectively.► View All: Allows you to view all saved schedules.► Go to Date: Allows you to jump to a specific date.► Select Multiple: Allows you to select multiple schedules in the same day. My Stuff60](https://usermanual.wiki/LG-Electronics-USA/GU290F.Users-Manual-2/User-Guide-1258280-Page-40.png)
![NotepadYou can create up to a maximum of 30 memos.Press the left soft key [New] to create a new memo.Input the memo and press the center key to save. CalculatorThe calculator function allows you to add, subtract, multiply and divide. You can input numbers using the number keys, and input operators using the navigation keys: the up key for “+”, down key for “-”, left key for “÷” and right key for “x”. You can see the result by pressing the center key “=”.You can input a decimal point by pressing the [Star] key.Use the key to delete numbers. 1.2.World ClockThe World clock function provides time information for major cities worldwide.You will be asked to enter the name of your current city. Enter the name, then press the left soft key [Save].View the time in another city. Press the left soft key [New], find the city and set the Daylight Savings Time (on or off). Then press [Save].You will then see the new city’s time and date information. TasksThis feature allows you to save and manage a task.To add a new To Do item, select the left soft key [New] in the Task enquiry screen.Input Due Date, Note, Priority and Status information for the new Task.Press the left soft key [Save] to save the Task item.1.2.1.2.3.My Stuff61](https://usermanual.wiki/LG-Electronics-USA/GU290F.Users-Manual-2/User-Guide-1258280-Page-41.png)
![My Stuff62The following [Options] are available in the Task list.► Mark ‘Complete’: Allows you to change the status of the selected task as Completed.► Edit: Allows you to edit a saved task.► Delete: Deletes the selected task.► Selective Delete: Allows you to delete All Completed/All Past Tasks selectively.► Send Task Via: Enables the selected task to be sent via Text Message/Multimedia Message/Bluetooth®.► Select Multiple: Allows you to select multiple Tasks.► View Calendar: The calendar pop-up window will display, from there you will be able to create New Tasks. Stop WatchThis menu allows you to record the elapsed time of an event. The duration of an individual lap time (up to 20 times) and the total time can also be displayed.► New TimeTo start timing, press the center key [Start]. The running time is displayed as HH.MM.SS.hh (hours, minutes, seconds, hundredths of a second).During the timing, you can record an individual lap time by pressing the right soft key [Lap]. Up to 20 lap times can be recorded.You can stop or restart timing by pressing the center key again.To reset the stop watch, press the left soft key [Reset].► Saved Times: You can see the saved recorded times. Tip CalculatorThis feature allows you to quickly and easily calculate the tip amount based on the total bill as well as the split of the total bill based on the number of people. 1.2.3.4.](https://usermanual.wiki/LG-Electronics-USA/GU290F.Users-Manual-2/User-Guide-1258280-Page-42.png)
![Unit ConverterThis function allows you to convert units of measurement.There are 6 types of units that can be converted: Area, Length, Weight, Temperature, Volume and Velocity. NoteYou can input a decimal by pressing the [Star] key.Camera & Recordings Menu 7.9 Take PhotoUsing the camera module built into your phone, you can take pictures of people or events while on the move. Additionally, you can send photos to other people in a picture message.The following options will appear (as icons) on the right side of the screen.► Album: You can see saved image and video files.► Video: Go to the video application, enabling you to record a video clip.► Capture: You can capture the image.► Zoom: You can set the zoom level.► Video Share: If available, this will allow you to initiate a Video Share call. The right soft key [Settings] will bring up the following options:Preview tab► Image Size: The resolution of the image can be captured in 1280*960/640*480/320*240/160*120.► View Mode: Set the View Mode as Full Screen/Full Image.► Brightness: Adjust brightness with a slider by using the navigation key.► Color Effects: Includes options of Color/Mono/Sepia/Negative.► White Balance: Set the White Balance as Auto/Daylight/Cloudy/Illuminate/Indoors.► Night Mode► Timer: Timer can be set to Off/3 Seconds/5 Seconds/10 Seconds.My Stuff63](https://usermanual.wiki/LG-Electronics-USA/GU290F.Users-Manual-2/User-Guide-1258280-Page-43.png)
![► Continuous Shot: TThis is great for taking photos of moving objects or at sporting events. The continuous shot is only available in QVGA(320x240) mode, and can be set 3/6/9 shots per event.► Image Quality: The quality of the captured image can be Super Fine/Fine/Normal.Others tab► Hide Icons: Select from Auto/Manual.► Shutter Tones: Can be set to Tone 1/Tone 2/Tone 3/Off.► Reset Settings: Allows you to set to the default settings.Using ZoomIn Take Photo mode, you can Zoom in/out by using the up/down side keys. The maximum zoom scale depends on the resolution as follows.Resolution Zoom scale1280*690 Not Available640*480 Level 1 ~ Level 10320*240 Level 1 ~ Level 10160*120 Level 1 ~ Level 10 Record VideoYou can record a video clip with your phone. Before starting to record, press the right soft key [Settings] to configure your settings.The following options will appear (as icons) on the right side of the screen.► Album: You can see saved image and video files.► Photo: Switches to the Camera function, allowing you to take a picture.► Record: Begins recording the video.► Zoom: You can set the zoom level.► Video Share: You can make a Video Share Call. For more details, refer to ‘Video Share Calling’.The right soft key [Settings] will bring up the following options:Preview Tab ► Video Size: Allows you to select a vide size between 320*240 or 176*144. ► Brightness: Adjust brightness with a slider by using the navigation key.► Color Effects: Includes options of Color/Mono/Sepia/Negative/Blue.My Stuff64](https://usermanual.wiki/LG-Electronics-USA/GU290F.Users-Manual-2/User-Guide-1258280-Page-44.png)
![► White Balance: Set the White Balance as Auto/Daylight/Cloudy/Illuminate/Indoors.► Night Mode► Video Quality: Allows you to set video quality. Includes options for Super Fine/Fine/Normal. ► Duration: Set the recording duration between Normal Mode/Video Share Mode/MMS Mode. Others Tab ► Hide Icons: Select from Auto/Manual.► Voice: Mute or unmute the voice.► Recording Tones► Reset Settings: Allows you to set to the default settings. NoteIn Video Record mode, you can adjust the zoom scale by using the up/down side volume keys. The maximum zoom scale depends on the resolution as follows.Resolution Zoom scale320*240 Level 1~Level 10176*144 Level 1~Level 10Camera AlbumYou can view the pictures and videos that are captured with the camera. When a file is highlighted, the following options are available when you press the right soft key [Options] (fewer options are available for video files). Use As/Send Via/Print/Delete/Rename/Select Multiple/Information.Record VoiceYou can record an audio clip in this menu. The recorded audio file is saved automatically in the Audio menu.The right soft key [Options] will bring up the following options.► Record Mode: Sets the recording mode to either MMS or General.► Quality: Determines the quality of an audio clip.► Set Storage Defaults: You can set the default storage of the recorded audio to the Handset Memory or the Memory Card.► Cancel: Takes you back to the previous menu.My Stuff65](https://usermanual.wiki/LG-Electronics-USA/GU290F.Users-Manual-2/User-Guide-1258280-Page-45.png)
![My Stuff66The left soft key [Gallery] takes you to the Audio & Ringtones gallery.Other Files Menu 7.0When you receive files of an undefined format (such as .vcs, .vcf, etc.) via email, the files are saved in this folder.The following [Options] are available.► Send Via: Send the selected file via Bluetooth® or MMS.► Delete: Allows you to delete the selected file. ► Move To Another Folder: You can move the selected file.► Copy To Another Folder: You can copy the selected file.► Rename: You can edit the name of the selected file.► Select Multiple: You can delete, copy, move, Send Via Message or Send via Bluetooth® multiple files at once.► Sort by: You can sort the folders by name, date and type.► Information: You can view information about the selected file.File Manager Menu 7.*This menu allows you to view the items in your memory care (if inserted).](https://usermanual.wiki/LG-Electronics-USA/GU290F.Users-Manual-2/User-Guide-1258280-Page-46.png)
![Contact Management Menu 8.5This menu allows you to copy all of the information from your SIM card, e.g. name, handset number, etc. to your handset. If a name is duplicated during the copying operation, the information is also duplicated.You can copy the entry from the SIM card to the phone memory. You can copy the entry from the handset memory to the SIM card (though not all the data will be copied).You can delete all entries in the SIM card or the Handset. Press the [END] key to return to standby mode. Service Dial Numbers Menu 8.6You can view the list of Service Dialing Numbers (SDN) assigned by your network provider. Such numbers could include the emergency services, directory assistance and voice mail numbers.Select the Service dial number option.The names of the available services will be shown.Use the up/down navigation touch keys to select a service. Press the [SEND] key. My Numbers Menu 8.7This displays your phone numbers stored in the SIM card.1.2.3.Address Book68](https://usermanual.wiki/LG-Electronics-USA/GU290F.Users-Manual-2/User-Guide-1258280-Page-48.png)
![69Settings Audio & Ringtones Menu 9.1There are 4 sound modes: General, Vibrate All, Alarm Only, and Silent All. Preferences can be set in the Audio & Ringtones menu. In addition, pressing and holding the [Pound] key while on the standby screen switches between Normal mode and Vibrating mode. Ear Mic is available when respective instruments are attached. Shop TonesConnects to the AT&T Ringtone store.Ringtone► Sounds: Allows you to access and play your ringtones. These can be downloaded ringtones from Ringtone shops.► Volume: This menu allows you to control your Ringtone volume.► Alert Type: Supports 3 ring alert types. Ring, Ring and Vibration and Ring after Vibration.► Increasing Ringtone: Allows you to select an Increasing Ringtone type which is played when you receive an incoming call. You can select to turn this On or Off. NoteFull length music tracks cannot be set as either ringtones or message tones.Message Tone► Sounds: Allows you to access and play your message tones. These can be downloaded ringtones from Ringtone shops.► Volume: This menu allows you to control your New Message alert volume.► Alert Type: Supports 6 message alert types: Ring Once, Ring Every 2 Min., Ring Every 15 Min., Ring & Vibrate, Vibrate and Silent.Alert Tone► Sounds: Allows you to select a set of alert tones. Supports 2 alert tone types, Alert Tone 1 and Alert Tone 2.► Volume: This menu allows you to control your Alerts volume.► Alert Type: You can select to turn Alert Tones to Ring or Silent.](https://usermanual.wiki/LG-Electronics-USA/GU290F.Users-Manual-2/User-Guide-1258280-Page-49.png)
![73Call Menu 9.4Call ForwardingWhen this network service is activated, you can direct your incoming calls to another number, for example, to your voice mailbox number. For details, contact AT&T. Select one of the forwarding options, for example, select If Busy to forward voice calls when your number is busy or when you reject an incoming call.The following options are available:► All Voice Calls: Diverts voice calls unconditionally.► If Busy: Diverts voice calls when the phone is in use.► If No Answer: Diverts voice calls which you do not answer.► If Out of Reach: Diverts voice calls when the phone is switched off or out of coverage.Send My NumberThis network service allows you to set your phone number to be displayed or hidden Off from the person you are calling. You can select Set by Network if you prefer to have different settings for different service providers. Auto RedialSelect On, your phone redials the number you’re trying to call up to 10 times after you hear a quick, busy signal. Press [END] to stop the call attempts.This feature attempts to redial numbers that are engaged due to the wireless network. It does not redial numbers to an engaged party. NoteThere will be no alert indicating the call has been connected. You must stay on the line to hear when the call is connected.Settings](https://usermanual.wiki/LG-Electronics-USA/GU290F.Users-Manual-2/User-Guide-1258280-Page-53.png)
![74 Answer ModeThis allows you to determine how to answer the phone.► Any Key: You can answer an incoming call by pressing any key, except the [END] key, side volume keys, Push-To-Talk key, or the right soft key [Silent].► Send Key Only: You can only answer an incoming call by pressing the [SEND] key or left soft key[Accept].► Slide Up: You can slide open the phone to answer an incoming call. Minute MinderThis option allows you to specify whether the phone will beep every minute during an outgoing call to keep you informed of the length of the call.Call WaitingThe network will notify you of a new incoming call while you have a call in progress. Select Activate to request the network to activate call waiting, Deactivate to request the network to deactivate call waiting or View Status, to check if the function is active or not.Call RejectThis menu allows you to enable or disable call reject for all numbers or just the numbers on the Call Reject List.► Call Reject On/Off: Allows you to activate or deactivate Call Reject. When the Reject All Calls option is set, all incoming calls are routed directly to Voicemail. Reject on List allows you to enable Call Reject for the numbers saved on your Call Reject List (Menu 9.4.7.2).► Call Reject List: Configures conditional call reject mode. After tapping [New], you can add to the call reject list by selecting [Contact List] or [New Number]. When you add a number to the list, you can add the number by entering it directly or by searching for the number in the Contact List.Send DTMF TonesSelect from On/Off.TTYSelect from TTY Full/TTY Talk/TTY Hear/TTY Off.Settings](https://usermanual.wiki/LG-Electronics-USA/GU290F.Users-Manual-2/User-Guide-1258280-Page-54.png)
![76 NoteWe recommend that your phone and the Bluetooth® device you are communicating with should be no more than 10 meters apart. The connection may be improved if there are no solid objects between your phone and the other Bluetooth® device.Bluetooth Menu Options► Turn On/Off: This menu sets the Bluetooth® on or off.► My Visibility On/Off - Selecting the On option exposes your phone to other Bluetooth® devices. - Selecting Off shows your phone to already-paired devices only.► Search New Device: This function allows you to search for and add new devices.► My Devices: This function allows you to view the list of all devices that are paired with your phone.Press the left soft key [New] to search for the device that can be connected, and which is also within range.If you want to stop searching, press the left soft key [Stop].All of the devices found are displayed.Select the desired device by pressing the [OK] key and entering the password.► My Bluetooth® Info: This menu allows you to configure the profile for Bluetooth®. - My Device Name: Allows you to change the handset’s name which can be seen by other Bluetooth® devices. - Supported Services: Shows you all services that the handset supports.1.2.3.Settings](https://usermanual.wiki/LG-Electronics-USA/GU290F.Users-Manual-2/User-Guide-1258280-Page-56.png)
![77 - Primary Storage: Allows you can assign the default storage to Handset Memory or Memory Card for files received via Bluetooth®.USB Connection ModeYou can transfer files from a compatible PC to the memory in your phone using the Mass Storage. When you connect the phone to a PC using the USB cable, this will be displayed as a removable disk through Windows Explorer.The USB Connection Mode determines how your Phone will communicate with other USB devices when they are connected with a USB cable.Internet ProfilesThis menu shows the Internet Profiles. You can add, delete and edit Internet Profiles by using the [Options] Menu. However, you cannot delete or edit default configurations provided by AT&T.Access PointsThis menu shows the Access Points. You can register, delete and edit by using the Options Menu. However, you cannot delete or edit default configurations provided by AT&T.Memory Menu 9.6Used SpaceThis function shows the memory status of the handset and memory card (if inserted).► Phone CommonThis function shows the Memory Status of the phone and the memory being used by Audio, Image, Video, Multimedia Message, Java and Others types of files.► Phone Reserved This function shows the status of the reserved memory used by Text Messages, Contacts, Calendar items, Tasks and the Notepad.► Memory CardIf your phone has a memory card in the card slot, you can save images, sounds and videos on the memory card. You can check the current status of the Settings](https://usermanual.wiki/LG-Electronics-USA/GU290F.Users-Manual-2/User-Guide-1258280-Page-57.png)
![78external memory card in this memory status menu.► SIM Card This function shows the status of the SIM Card memory.Set Storage DefaultsApplication Settings Menu 9.7This Menu allows you to adjust the settings to the following features on the phone:Video Share► Audio Alert: Enable/Disable audio alert when Video Share is available.► Auto Record: Enable/Disable automatic recording of live Video Share.MessagingFor more details, refer to Message Settings.BrowserThis menu allows you to configure the Browser located in the My Stuff menu (Menu > My Stuff > Applications > Browser).AccountsThis includes the network information used to connect the browser to the Internet. Select the desired account by tapping the screen, then tap [Activate]. This will activate the account that will be used for future connections. ► Activate: Select the account among the list of accounts, so it can be used for future connections.► View: Allows you to see the specific account information.The following options will be available when you press on the right soft key [Options]:► Edit: Allows you to change the account information. This option is not available for the default Account.► Delete: Allows you to delete the account.► New: Allows you to create new account.Settings](https://usermanual.wiki/LG-Electronics-USA/GU290F.Users-Manual-2/User-Guide-1258280-Page-58.png)