LG Electronics USA GW525G Cellular/PCS GSM/EDGE/WCDMA Phone with Bluetooth User Manual 1
LG Electronics USA Cellular/PCS GSM/EDGE/WCDMA Phone with Bluetooth Users Manual 1
Contents
- 1. Users Manual 1
- 2. Users Manual 2
Users Manual 1

GW525 User Guide
Some of the contents in this
manual may differ from your phone
depending on the software of the
phone or your service provider.
GW525g

Part 15.21 statement
" Change or Modifications that are not expressly approved by the manufacturer could void
the user's authority to operate the equipment. “
Part 15.105 statement
This equipment has been tested and found to comply with the limits for a class B digital
device, pursuant to Part 15 of the FCC Rules.
These limits are designed to provide reasonable protection against harmful interference in
a residential installation. This equipment generates uses and can radiate radio frequency
energy and, if not installed and used in accordance with the instructions, may cause harmful
interference to radio communications. However, there is no guarantee that interference will
not occur in a particular installation. If this equipment does cause harmful interference or
television reception, which can be determined by turning the equipment off and on, the user
is encouraged to try to correct the interference by one or more of the following measures:
- Reorient or relocate the receiving antenna.
- Increase the separation between the equipment and receiver.
- Connect the equipment into an outlet on a circuit different from that to
which the receiver is connected.
- Consult the dealer or an experienced radio/TV technician for help.
This device is not intended for sale in the USA.

Part 15 Class B Compliance
This device and its accessories comply with part15 of FCC rules.
Operation is subject to the following two conditions:
(1) This device & its accessories may not cause harmful interference.
(2) This device & its accessories must accept any interference received,
including interference that may cause undesired operation.
Body-worn Operation
This device has been tested for typical body-worn operations
with the distance of 0.79inches (2.0cm) from the user’s body.
To comply with FCC RF exposure requirements, a minimum separation distance
of 0.79inches(2.0cm) must be maintained from the user's body.
Additionally, Belt clips, holsters & other body-worn accessories may not contain
metallic components.
8 | User Guide
Getting to know your phone
Charger, cable and handsfree connector
Call key
• Dials a phone number and
answers incoming calls.
Multi-tasking
key
End/
Power key
• Ends or rejects
a call. Turns the
phone on/off.
Press once to
return to the
standby screen.
WARNING: Putting a
heavy object on the phone or
sitting on it while it is in your
pocket can damage the phone’s
LCD and touch screen functionality.
Side keys
• When the screen is idle: volume
of ring and touch tone.
• During a call: earpiece volume.
TIP: To connect the USB cable, wait
until the phone has powered up
and has registered to the network.
Micro SD memory
card socket
Lock/Unlock key
Camera key

9
Change the
text input mode
(capital/ small)
Alpha numeric keys
Space key
Use to enter a space
when editing.
Clear key
• Clears a character
each time it is
pressed. Hold the
key down to clear
all input.
Enter key
Symbol key
• Enters symbolic
character
Open view

10 | User Guide
Open view
Battery
SIM card socket
Camera lens
Battery cover
11
Installing the SIM and battery
1 Remove the battery cover
Slide the battery cover towards
the top and away from the phone.
2 Remove the battery
Using the cut-out at the
bottom, lift it from the battery
compartment.
WARNING: Do not use
your ngernail to remove the
battery.
WARNING: Do not remove
the battery when the phone
is switched on, as this may
damage the phone.
12 | User Guide
Installing the SIM and battery
3 Install the SIM card
Slide the SIM card into the SIM
card holder making sure that the
gold contact area on the card is
facing downwards. To remove the
SIM card, gently pull it outwards.
4 Install the battery
First insert the top of the battery
into the top edge of the battery
compartment. Ensure that the
battery contacts align with the
phone’s terminals. Press the
bottom of the battery down until
it clicks into place.
13
5 Charging your phone
Lift and twist the charger socket
cover on the top of your GW525g.
Insert the charger and plug it
into a mains socket. Your GW525g
needs to be charged until the
“Battery full” message appears on
the screen.
14 | User Guide
Memory card
Installing a memory card
You can increase the memory space
on your phone by using a Micro SD
memory card.
NOTE: A memory card is an optional
accessory.
1 Open the memory card slot cover
on the right-hand edge of the
phone.
2 Slide the memory card into the
slot until it clicks into place. Make
sure the gold contact area is
facing downwards.
3 Close the cover.
Formatting the memory card
Your memory card may already be
formatted. If it isn’t, you will need
to format it before you can start to
use it.
1 From the standby screen select
, then touch and choose
Phone settings.
2 Touch Memory manager then
choose External memory.
3 Touch Format and then confirm
your choice.
4 Enter the password, if one has
been set. The card will then be
formatted and ready to use.
TIP! To change your
default storage destination,
open Memory manager from
the Phone settings menu and
select the Primary storage
settings.

15
NOTE: If your memory card already
contains files, they will automatically
be put in the correct folder; for
example, videos will be stored in the
My Videos folder.
Transferring your contacts
To transfer your contacts from your
SIM to your phone:
1 From the Communication menu,
select and choose Settings.
2 Touch Copy.
3 Choose SIM to handset.
4 Choose Select all or choose
names one by one and touch
Copy.
16 | User Guide
Menu map
Touch on the standby screen to open the Main menu. From here you
can access further menus: Communication, Entertainment, Utilities and
Settings.
Communication
1 Contacts
2 Recent history
3 Messaging
4 Email
5 Dialling
6 Windows Live
Messenger
Entertainment
1 Camera
2 Video camera
3 Gallery
4 My stuff
5 Music
6 Muvee studio
7 Games & Apps
8 FM radio
Utilities
1 Browser
2 Google
3 Alarm
4 Organiser
5 Memo
6 Voice recorder
7 Tools
Settings
1 Profiles
2 Screen settings
3 Phone settings
4 Call settings
5 Bluetooth
6 Touch settings
7 Connectivity

17
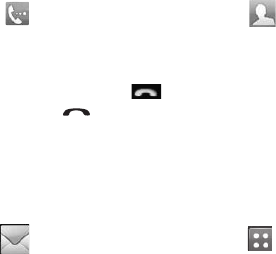
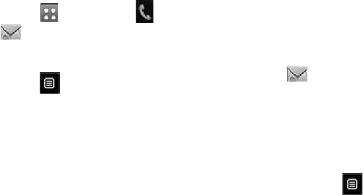
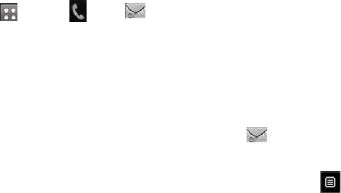
Your standby screen
From here you can access all the
menu options, make a quick call,
view the status of your phone and
much more.
Touch screen tips
The standby screen is also a great
place to get accustomed to the
touch screen.
To select an item, touch the centre
of the icon. Your GW525g will vibrate
slightly when it recognises you have
touched an option.
To scroll through lists, touch the last
item visible and slide your finger up
the screen. The list will move up to
display more items.
• There is no need to press too
hard; the touchscreen is sensitive
enough to pick up on a light, firm
touch.
• Use the tip of your finger to touch
the option you require. Be careful
not to touch any other options
around it.
• When the screen back light is off,
press the Unlock/Lock key on the
right hand side to bring back the
home screen.
• Don’t cover the phone with a case
or cover. The touchscreen won’t
work if any material is covering it.
• There are two types of idle screen.
Flick left or right to change your
idle screen type on the standby
screen.
1 Widget idle - When you touch
, the mobile widget panel
appears. You can drag icons
displayed on the widget panel to
the main screen.
2 Livesquare - On the Livesquare
screen, making a call, sending a
message and saving a number is
easy using the number allocated
to an avatar To use the call,
message or Contacts function,
select an avatar and choose the
Quick key icon you want to use.
18 | User Guide
Your standby screen
The quick keys
The quick keys provide easy, one-touch access to your most used functions.
Touch it to bring up the touch
dialling pad, which lets you
make a call. Enter the number
as you would on a normal key
pad and touch or press
the hard key.
Touch to open your Contacts.
To search for the number
you want to call, enter the
name of the contact at the
top of the screen using the
touchpad. You can also create
new contacts and edit existing
ones.
Touch to access the Messaging
options menu. From here you
can create a new SMS or MMS
or view your message folder.
Touch to open the full main
menu, which is divided into
four vertical sub-menus. Touch
the tab for each sub-menu to
view further options.
19
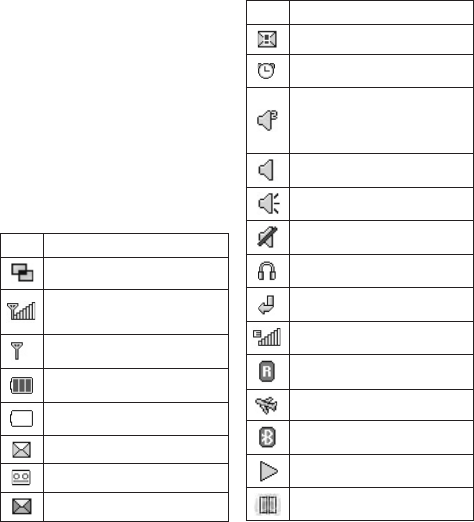
The status bar
The status bar uses various icons to
indicate things like signal strength,
new messages and battery life, as
well as telling you whether your
Bluetooth or GPRS is active.
Below is a table which explains the
meaning of the icons you are most
likely to see in the status bar.
Icon Description
Multi-tasking
Network signal strength
(number of bars will vary)
No network signal
Remaining battery life
Battery flat
New text message
New voice message
Message inbox is full
Icon Description
Message sending failed
An alarm is set
Customised profile in use
(number in the icon will
vary)
Normal profile in use
Outdoor profile in use
Silent profile in use
Headset profile in use
Calls are diverted
EDGE in use
Roaming
Flight mode is on
Bluetooth is active
BGM play
BGM pause

20 | User Guide
Your standby screen
Changing your status from
the status bar
Touch the status bar to open the
Status Summary. It shows the
current time, network, SVC ID,
battery, handset memory, external
memory, profile, MP3 and Bluetooth
status. Here you can set the Profile
type, play/pause MP3s and activate/
deactivate Bluetooth.
Using the Multi-tasking
function
Press the Multi-tasking hard key
to open the Multi-tasking
menu. From here you can view all
applications that are running and
access them with one touch.
When an application is running in
the background (e.g. a game or the
FM radio), will appear on the
status bar.
21
Calls
Making a call
1 Touch to open the keypad.
2 Key in the number using the
keypad. To delete a digit touch
the clear key.
3 Press on the key pad or the
hard key to initiate the call.
4 To end the call press the
hard key.
TIP! To enter + for making
an international call, press and
hold .
TIP! Press the lock/unlock
hard key to lock the
touchscreen and prevent calls
being made by mistake.
TIP! To bring up the
keypad during a call, press .
TIP! Touch to unlock. You can
unlock the phone by holding
down the button until the
screen is able to work or
pressing the Unlock hard key
.
TIP! You can send a
message, save a number and
search contacts by tapping .
Changing the dialling keypad
display settings
1 Touch to open the keypad.
2 Touch and select Dial screen
setting to change the dialling pad
display.
3 You can change the size and
colour.
22 | User Guide
Calling your contacts
1 From the standby screen touch
to open the Contacts.
2 Tap the search field box and enter
the first few letters of the contact
you would like to call.
3 From the filtered list, touch the
contact you want to call and
select the number to use if there
is more than one for that contact.
4 Press the hard key.
Answering and rejecting a
call
When your phone rings press the
hard key or touch to
answer the call.
Tap to mute the ringing. This is
useful if you forgot to change your
profile to Silent for a meeting.
Press the hard key or touch
to reject an incoming call.
Adjusting call volume
To adjust the volume during a call,
use the up and down button on the
left edge of the phone.
Speed dialling
You can assign a frequently-called
contact to a speed dial number.
1 From the standby screen touch
and select Contacts in the
Communication menu and then
tap Speed dials.
2 Your voicemail is already set to
speed dial 1. You cannot change
this. Touch any other number to
assign it to a speed dial contact.
3 Your Contacts will open. Select
the contact you want to assign
to that number by touching their
phone number once. To find a
contact tap the search field box
and enter the first letter of the
name of the contact required.
Calls
23
Making a second call
1 During your initial call, touch
and select the number you want
to call.
2 Dial the number or search your
contacts.
3 Press to connect the call.
4 Both calls will be displayed on the
call screen. Your initial call will be
locked and the caller put on hold.
5 To change between the calls,
touch and choose Swap call
or press the number of the held
call.
6 To end one or both calls press
and select End followed by All,
Held or Active.
TIP! You can combine your
calls by selecting Accept then
Join. Check that your network
provider supports conference
calling.
NOTE: You will be charged for each
call you make.
Turning off DTMF
DTMF lets you use numerical
commands to navigate menus
within automated calls. DTMF is
switched on by default.
To turn it off during a call (to make
a note of a number for example)
touch and select DTMF off.
Viewing your call logs
TIP! To scroll through a list of
options, touch the last item
visible and slide your nger up
the screen. The list will move up
to display more items.
Touch and tap in the
Communication menu.
Choose to view:
All - View a complete list of all
your dialled, received and missed
calls.
Dialled - View a list of all the
numbers you have called.
24 | User Guide
Calls
Received - View a list of all the
numbers that have called you.
Missed - View a list of all the
calls you have missed.
TIP! From any call log,
touch and Delete all to
delete all recorded items.
TIP! Touch any single call
log entry to view the date, time
and duration of the call.
Using call divert
1 Touch , select and choose
.
2 Touch Call divert.
3 Choose whether to divert all calls
when the line is busy, when there
is no answer or when you cannot
be contacted.
4 Enter the number you want to
divert to.
5 Touch Request to activate.
NOTE: Diverting calls will incur
charges. Please contact your
network provider for details.
TIP! To turn o all call
diverts, select Deactivate all
from the Call divert menu.
Call waiting
If call waiting is activated, the
handset is also able to warn you
about an incoming call when you
are already on a call.
Using call barring
1 Touch , select and choose
.
2 Touch Call barring.
3 Choose any or all of the six
options:
All outgoing
Outgoing international
Outgoing international calls
except to home country
All incoming
25
Incoming when abroad
Deactivate all
4 Enter the call barring password.
Please check with your network
operator about this service.
Fixed dial number
Select Fixed dial numbers to turn
on and compile a list of numbers
that can be called from your phone.
You’ll need your PIN2 code from
your operator. When activated, only
numbers included in the fixed dial
list can be called from your phone.
Using Excuse message
You can send a message to explain
why you do not receive an incoming
call using “ Excuse message “ before
you reject an incoming call.
Call costs
View the charges applied to your
dialled numbers (this service is
network-dependant and some
operators are unable to support it).
Call durations
View the duration of all your dialled
and received calls or both.
Data volume
View the amount in kilobytes of all
received data, sent data or both.
TIP! Select Fixed dial
number to turn on and compile
a list of numbers that can be
called from your phone. You’ll
need your PIN2 code from
your operator. Only numbers
included in the xed dial list can
be called from your phone.
Changing the common call
setting
1 Touch , select and choose
.
2 Touch Common settings. From
here you can adjust the settings
for:

26 | User Guide
Calls
Call reject - Slide the switch to
On to highlight the Reject list. You
can touch the text box to choose
from all calls, specific contacts or
groups, those from unregistered
numbers (those not in your
contacts), or no caller ID. Touch
Save to change this setting.
Send my number - Choose
whether to display your number
on an outgoing call.
Auto redial - Slide the switch left
for On or right for Off.
Answer mode - Choose whether
to answer the phone using the
send key or any key.
Minute minder - Slide the switch
left to On to hear a tone every
minute during a call.
BT answer mode - Select Hands-
free to be able to answer a call
using a Bluetooth headset, or
select Handset to press a handset
key to answer a call.
Save new number - Select Yes to
save a new number.
TIP! To scroll through a list
of options, touch the last item
visible and slide your nger up
the screen. The list will move up
to display more items.

27
Searching for a contact
There are two ways to search for a
contact:
From the standby screen
1 From the standby screen touch
to open the contacts.
2 Touch next to the contact
you would like to call. This is only
available when you set the Quick
command key as Make voice
call in Contact list settings.
From the main menu
1 Touch .
2 Touch in the Communication
menu and select Search.
3 Your contacts will bring up a list
of contacts corresponding to the
letters you have entered.
Adding a new contact
1 From the standby screen touch
and touch Add contact.
2 Choose whether to save the
contact to your Handset or SIM.
3 Enter the first and last name of
your new contact. You do not
have to enter both, but you must
enter at least one.
4 You can enter up to five different
numbers per contact. Each entry
is assigned a preset type: Mobile,
Home, Office, Pager, Fax, VT or
General. When you have finished,
touch Close.
5 Add an email address.
6 Assign the contact to one or
more groups, choosing between
No group, Family, Friends,
Colleagues, School or VIP.
7 You can also add a Ringtone,
Birthday, Anniversary,
Homepage, Home address,
Company name, Job title,
Company address or a Memo.
8 Touch Save to save the contact.
TIP! You can create
customised groups for your
contacts.
Contacts
Contacts
28 | User Guide
Contact options
There are many things you can do
when viewing a contact. Here is
how to access and use the options
menu:
1 Open the contact you would like
to use.
2 You can edit the contact or send a
message directly from here.
3 Press to open the list of
options.
Delete - Delete the contact.
Touch Yes if you are sure.
Copy or Move to SIM/Handset
- Choose to move or copy to the
SIM card or handset (depending
on where you originally saved the
contact).
Send business card - Send
the contact’s details to another
person as a business card. Choose
to send as a Text message,
Multimedia msg, Email or via
Bluetooth.
TIP! Send message - Send
a message to the contact. If the
contact has an email address,
select whether you’d like to send
an email or SMS/MMS.
Creating a group
1 Touch .
2 Touch in the Communication
menu then Groups.
3 Touch .
4 Select Add group.
5 Enter a name for your new group
in the Name field.
6 Touch Save. You can also assign a
ringtone to the group.
NOTE: Even if you delete a group,
the contacts which were assigned to
that group will not be lost. They will
remain in your contacts.

29
Changing your contact
settings
You can adapt your contact settings
so that your contacts suits your own
preferences.
1 From the standby screen, touch
in the Communication menu.
2 Touch and select Settings.
3 From here, you can adjust the
following settings:
Contact list settings - Choose
whether to view contacts saved
to both your Handset and SIM,
Handset only or SIM only
You can also choose to show
the first name or last name of
a contact first and whether to
display a quick command key
next to the contact or not.
Copy - Copy your contacts from
your handset to your SIM or from
your SIM to your handset.
You can choose all contacts by
touching Select all or select each
contact to copy one by one.
Move - This works in the same
way as Copy, but the contact will
only be saved to the location
you’ve moved it to. So if you
move a contact from the SIM to
the handset it will be deleted
from the SIM memory.
Send all contacts via Bluetooth -
Send all your contacts to another
device using Bluetooth. Bluetooth
will be automatically turned on if
you select this option.
Backup and Restore contacts
- Backup and restore contacts to
the Memory Card.
Clear contacts - Delete all your
contacts on your handset or SIM.
Touch Yes if you are sure you want
to delete all your contacts from
your contacts.
Viewing information
1 From the standby screen, touch
in the Communication menu.
2 Touch and select
Information.

30 | User Guide
Contacts
3 From here you can view your
Service dial numbers, your Own
number, your Memory info.
(how much memory space you’ve
got left) and My business card.
TIP! To add your own
business card, select My
business card and enter your
details as you would for any
contact. Touch Save to nish.
31
Messaging
Messaging
Your GW525g combines SMS and
MMS into one intuitive and easy to
use menu.
There are two ways to enter the
messaging centre:
Touch from the standby screen,
or touch from the standby
screen and choose in the
Communication menu.
Sending a message
1 Touch and choose New
message to open a blank
message.
2 From here you can send an SMS
or MMS. To send an email, touch
from the standby screen, then
in the Communication menu.
3 To send an SMS or MMS, touch
New message. In case of Email.
Touch New Email.
4 Touch Insert to add an image,
video, sound, template etc.
5 Touch To(1) at the top of the
screen to enter the recipient’s
number, or touch the search icon
to open your contacts. You can
add multiple contacts. Touch
Send when ready.
WARNING: If an
image, video or sound is
added to an SMS it will be
automatically convert to an
MMS and you will be charged
accordingly.
TIP! Quick reply - Send a
reply to the selected message
promptly, using a template.

32 | User Guide
Entering text
There are three ways to enter text:
T9 text mode/ Normal text mode/
Qwerty keypad.
Touch to turn T9 predictive
text on or off.
You can choose the writing
language.
Tap to change between the
number, symbol and text keypad.
Use to scroll through the
different keyboards in each text
entry mode (e.g., capital or lower
case letters) when the screen is in
Landscape mode.
To enter a space touch .
To delete a character or remove the
sentence, touch clear .
TIP! Simply touch each
letter to write your message and
press:
to switch to upper case
to add a space
T9 predictive
In T9 mode, you will see .
T9 uses a built-in dictionary to
recognise your words based on the
key sequences you touch. Simply
touch the number key associated
with the letter you want to enter,
and the dictionary will predict the
word you want to use.
For example, press 8, 3, 5, 3, 7, 4, 6,
6, 3 to write ‘telephone’.
If the word you want doesn’t
appear, touch Spell. If you touch
Messaging
33
Spell you can then enter the word
using Abc manual mode and your
word or name will be added to the
dictionary.
Abc manual
In Abc mode, you will see .
In Abc mode you must touch the
key repeatedly to enter a letter if T9
mode is switched off. For example,
to write ‘hello’, touch 4 twice, 3
twice, 5 three times, 5 three more
times, then 6 three times.
Qwerty keypad
Entering text
You can enter alphanumeric
characters using the phone’s
keypad. For example, storing names
in Contacts, writing a message
and creating scheduling events
in the calendar all require you
to enter text. The following text
nput methods are available on the
phone: ABC manual mode and 123
mode.
TIP! Some elds may allow
only one text input mode (e.g.
telephone number in contacts
elds).
To enter a symbol in the text entry
field, press the key and select a
symbol, then select OK.
Scroll using the navigation keys to
show more symbol options.
Separate each word with a space by
pressing .
To delete a character, press the
key.
Text input mode using the keypad
When you are required to enter
text, for example when writing a
message, the keypad will default
to ABC mode. If you are entering a
number, for example when making
a call, the keypad number keys will
default to numbers.
In ABC mode, you can enter
numbers by first pressing and
then the number you require.
Messaging
34 | User Guide
Setting up your email
You can stay in touch on the move
using email on your GW525g. It’s
quick and simple to set up a POP3
or IMAP4 email account.
TIP! To scroll through a list
of options, touch the last item
visible and slide your nger up
the screen. The list will move up
to display more items.
1 Touch .
2 Select from the
Communication menu then .
3 Touch Add Account.
4 The Setup Wizard will help you set
up your email settings.
If no email account is set, you can
set one up by using the email set-
up wizard.
5 You can now choose how to set
up your account:
Email address - Enter email
address
Server address - Enter server
address (Microsoft Exchange
only).
Domain - Enter domain
(Microsoft Exchange only).
Username - Enter the account
username.
Password - Enter the account
password.
Mailbox type - Enter mailbox
type: POP3 or IMAP4.
Incoming server - Enter
incoming email server address.
Outgoing server - Enter
outgoing email server address.
SMTP authentication - Choose
security settings for outgoing mail
server.
Account name - Now your
account is set up, it will appear in
the list of accounts in your Email
folder.
35
Retrieving your emails
You can automatically or manually
check your account for new emails.
1 Touch then select from
the Communication menu.
2 Touch the account you want to
use then , then select Inbox and
touch .
3 Choose Retrieve and your
GW525g will connect to your email
account and retrieve your new
messages.
Sending an email using your
new account
1 Touch New Email in the email
account you want to use and a
new email will open.
2 You can enter the recipient’s
address and write your message.
You can also attach images,
videos, sounds or other file types.
3 Touch Send and your email will
be sent.
Changing your email settings
You can change your email settings
based on your own preferences.
1 Touch then select and .
2 Tap and select Settings to
change the following settings:
Email accounts - Set up the Email
account.
Preferred Email - Select the email
account you want to use.
Allow reply email - Choose
to allow the sending of ‘read
confirmation’ messages.
Request reply email - Choose
whether to request read
confirmation messages.
Retrieve interval - Select how
often your GW525g checks for new
email messages.
Retrieve amount - Select the
number of emails to be retrieved
at any one time.

36 | User Guide
Messaging
Include message in Fwd & Reply
- Select whether to include the
original message in your reply.
Include attachment - Select
whether to include the original
attachment in any reply.
Auto Retrieval in Roaming
- Choose whether to retrieve
messages automatically when
abroad (roaming).
TIP! Costs for retrieving
email may be higher when
roaming. Check with your
network supplier.
New email notification - Choose
whether to be alerted to new
emails.
Signature - Create an email
signature and switch this feature
on.
Priority - Select the priority level
of your email messages.
Mail sending size - Select the
size limit of your emails.
Email counter - view email
information.
Message folders
You’ll recognise the folder structure
used on your GW525g, and it is fairly
self-explanatory.
Inbox - All the messsages you
receive are placed into your inbox.
From here you can view, delete
and more; see Managing your
messages below for details.
Outbox - This is a temporary
storage folder while messages are
being sent.
Sent items - All the messages you
have sent are placed in this folder.
Drafts - If you do not finish writing
a message, you can save what you
have done in this folder.
My Folders - Create folders to store
your messages.
Trash - All the mesages you have
trashed are placed in this folder
(email only)
37
Managing your messages
You can use your Inbox to manage
your messages.
1 Touch then select and
.
2 Select Inbox.
3 Touch and then choose to:
Delete - Delete marked messages.
Change view - Select Threaded
view or Standard view.
Create new message - Open a
new blank message or email.
Move to My folders - Move the
marked messages to My folders.
Filter - Choose one of the filter
options.
Delete all - Delete all messages
in Inbox.
If you see the message No space for
SIM messages you should delete
some messages on the SIM.
If you see the message No space for
messages you should delete some
messages to free up memory space.
Using templates
Create templates for the SMS and
MMS messages you send most
often. There are already some
templates on the phone, which you
can edit.
1 Touch then choose
Templates from the
Communication menu.
2 Choose Text templates or
Multimedia templates. You
can then touch to Add
templates, Delete or Delete all
templates.
3 Touch Add template to create a
new template.
4 You can view the template by
selecting it on the list and edit it
by touching it on the view screen.
Using emoticons
Liven up your messages using
emoticons. There are some
commonly used emoticons already
on your phone.

38 | User Guide
Messaging
1 Touch then choose
Emoticons from the
Communication menu.
2 Touch to Add new, Delete or
Delete all emoticons.
3 Touch Add emoticon to create a
new emoticon.
4 You can view the emoticon by
selecting it on the list and edit it
by touching it on the view screen.
Changing your text message
settings
Your GW525g message settings are
pre-defined so that you can send
messages immediately. These
settings can be changed based on
your preferences.
Touch then choose Settings
from the Communication menu.
Select Text message. You can make
change the following:
Text message centre - Enter the
details of your message centre.
Delivery report - Slide the switch
left to receive confirmation that
your messages have been delivered.
Validity period - Choose how long
your messages are stored at the
message centre.
Message types - Convert your
text into Text, Voice, Fax, X.400 or
Email.
Character encoding - Choose
how your characters are encoded.
This impacts on the size of your
messages and therefore on your
data charges.
Send long text as - Choose to send
long messages as Multiple SMS
messages or as an MMS.
Changing your multimedia
message settings
Your GW525g message settings are
pre-defined so that you can send
messages immediately. These
settings can be changed based on
your preferences.
39
Touch , select then .
Choose Settings and Multimedia
message. You can make change the
following:
Retrieval mode - Choose Home
network or Roaming network. If
you then select Manual you will only
receive notifications about MMS
messages. You can then decide
whether to download them in full.
Delivery report - Choose whether
to allow and/or request a delivery
report.
Read reply - Choose to allow and/
or request a read report.
Priority - Choose the priority level
of your MMS.
Validity period - Choose how
long your message is stored at the
message centre.
Slide duration - Choose how long
slides appear on screen.
Creation mode - Choose your
message mode.
Delivery time - Choose how long to
wait before a message is delivered.
Multi msg centre - Enter the details
of your message centre.
Changing your other settings
Touch in the Communication
menu and choose Settings then:
Voicemail - Touch to add a
new Voicemail service. Contact
your network operator for more
information about the service they
provide.
Service message - Choose
whether to receive or block service
messages. You can also set message
security levels by creating trusted
and not trusted sender lists.
Message counter - Choose to set
or reset the message counter.
Info. service - Select your reception
status, language and other settings.
40 | User Guide
Messaging
Windows Live Messager
NOTE: This service is not available
in all countries. Please contact
your service provider for further
information.
You can have a chat with other
peoples using this menu. Windows
Live Messager can only be used with
a supporting of SIM and country.
41
Taking a quick photo
1 Press and hold down the key
on the right side of the phone.
2 The viewfinder will appear on
screen.
3 Holding the phone horizontally,
point the lens towards the subject
of the photo.
4 Position the phone so you can
see the subject of your photo in
the preview screen.
5 When the camera has focused on
your subject, either press the
on the side of the phone firmly
or press the red box on the lower
right of the screen to take the
photo. The sending options then
appear on the screen.
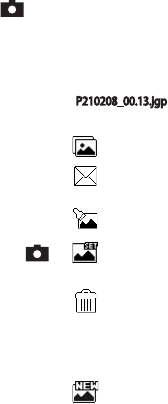
After taking a photo
Your captured photo will appear
on screen. The name of the image
runs along the bottom of the screen
along with six icons on the right-
hand side.
P210208_00.13.jgp
Touch to move to your gallery.
Touch to send the photo as a
message, email or via Bluetooth.
Touch to edit Picture.
Touch to set the picture you
have taken as Wallpaper.
Touch to delete the photo
you have just taken and confirm by
touching Yes. The viewfinder will
reappear.
Touch to take another photo
immediately. Your current photo will
be saved.
Camera
42 | User Guide
Getting to know the viewfinder
TIP! You can bring up the options by
tapping the screen. They automatically
turn o after a few seconds.
Settings - Touch this icon to open the
settings menu.
Camera mode - Camera mode is selected.
Video camera mode - Touch this icon to
switch to video mode.
Back - Touch here to return to the standby
screen.
Gallery
Exposure
Shot mode
Take a picture
Camera
43
Choosing a shot type
1 Touch to open the available
shot types.
2 Choose from two options:
Normal shot - This is the default
shot type - the photo will be taken
in the normal way, as outlined in
taking a quick photo.
Burst shot - This enables you
to take three, six or nine shots
automatically in very quick
succession.
Adjusting the exposure
Exposure defines the difference
between light and dark (contrast)
in an image. A low contrast image
will appear fuzzy, whereas a high
contrast image will appear much
sharper.
1 Touch .
2 Slide the contrast indicator along
the bar - left for a lower exposure
and hazier image, or right for
a higher exposure and sharper
image.
Using the advanced settings
From the viewfinder, touch to
open all advanced settings options.
Preview settings
Size - Change the size of the photo
to save memory space or take a
picture of the correct size for a
contact.
Colour Effect - Choose a colour
tone to use on your new photo.
White balance - Choose from Auto,
Incandescent, Sunny, Fluorescent
or Cloudy.
Night mode - Useful for use in dark
places.
Self-timer - The self-timer allows
you to set a delay after the capture
44 | User Guide
Camera
button is pressed before the camera
takes the picture. Choose from Off,
3 seconds, 5 seconds or 10 seconds.
This is ideal if you want to be
included in a photo.
Quality - Choose between Super
fine, Fine and Normal. The finer the
quality, the sharper a photo will be,
but the file size will increase. This
means you’ll be able to store fewer
photos in your memory.
View Mode - Choose between Full
screen or Full image. In Full screen,
the image may be cropped to fit the
screen.
Other settings
Memory - Choose whether to
save your photos to the Handset
memory or to the External memory.
Shutter sound - Select one of the
three shutter sounds.
Grid screen - Choose from Off,
Simple cross or Trisection.
Reset settings - Reset all the
camera settings.
TIP! When you exit the camera
all settings will return to their
defaults except image size and
image quality. Any non-default
settings will need to be reset,
for example colour tone. Check
these before you take your next
photo.
TIP! The settings menu
is superimposed over the
viewnder, so when you change
elements of the image colour or
quality you will see a preview of
the image change behind the
settings menu.
Viewing your saved photos
You can access your saved photos
from within camera mode. Simply
touch and your gallery will
appear on screen.