LG Electronics USA HSTND-2591-G LCD Monitor User Manual User s Manual H ok
LG Electronics USA LCD Monitor User s Manual H ok
UserManual.wiki
>
LG Electronics USA
>
HSTND 2591 G User Manual
Users Manual
Navigation menu
Upload a User Manual
Namespaces
Wiki Guide
HTML
PDF
Info
Views
User Manual
Discussion / Help
Navigation

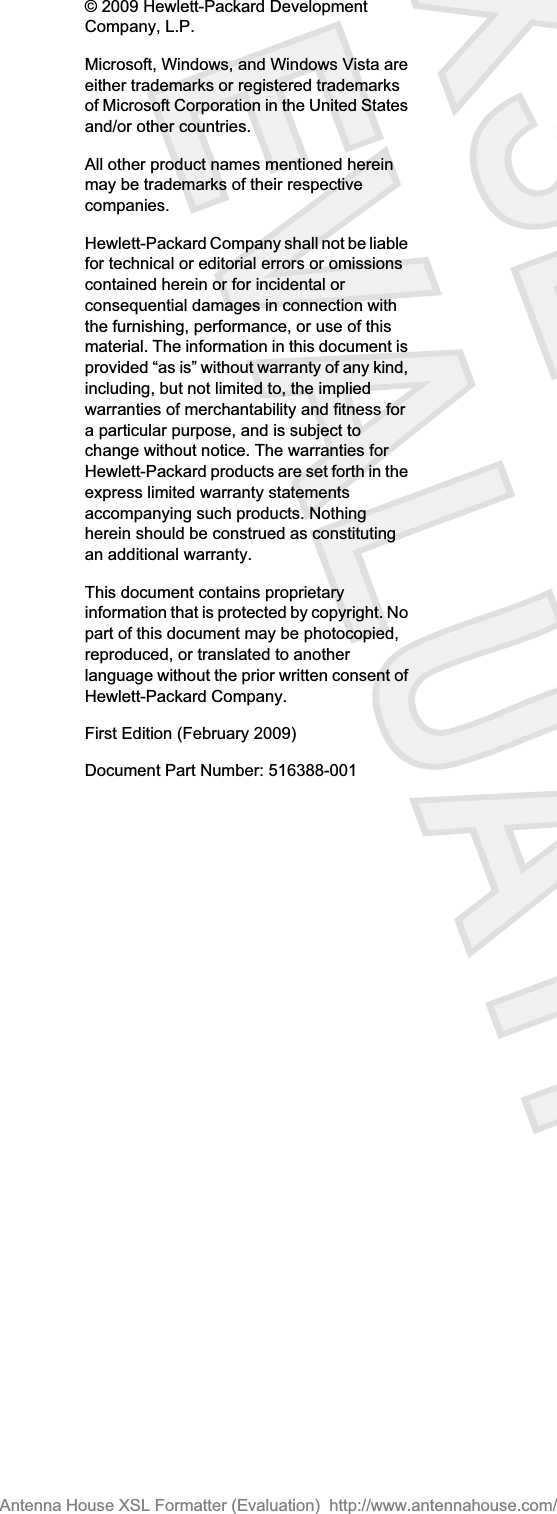
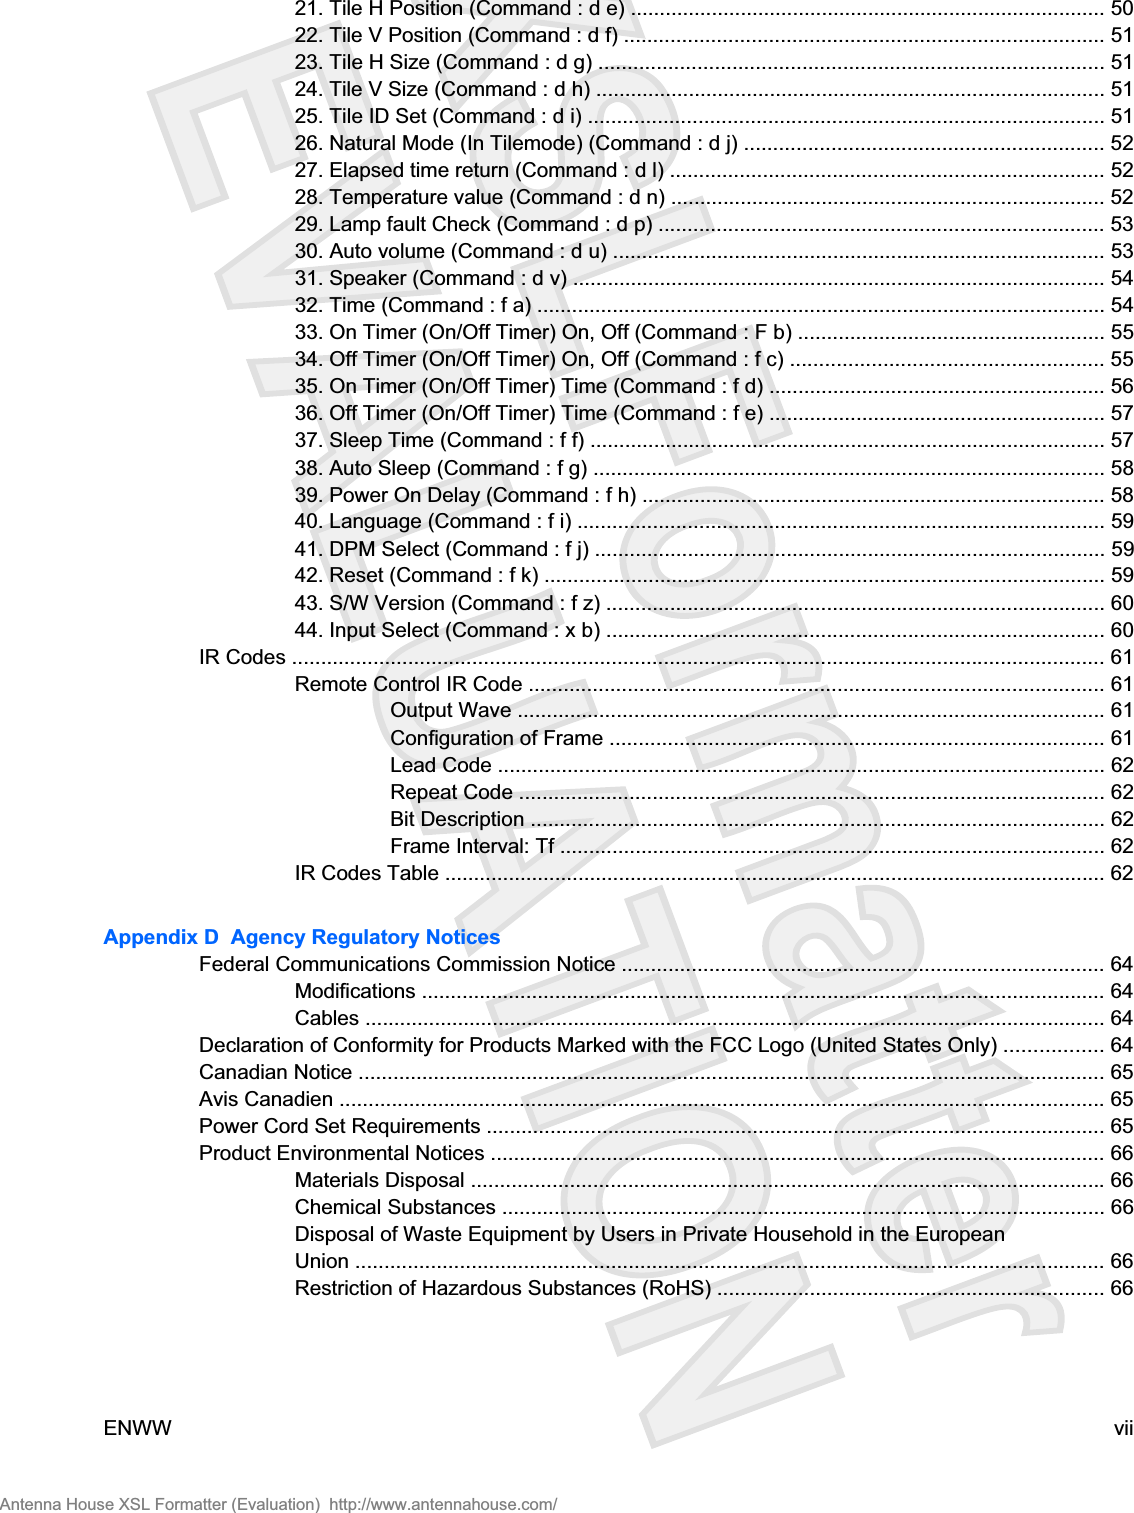
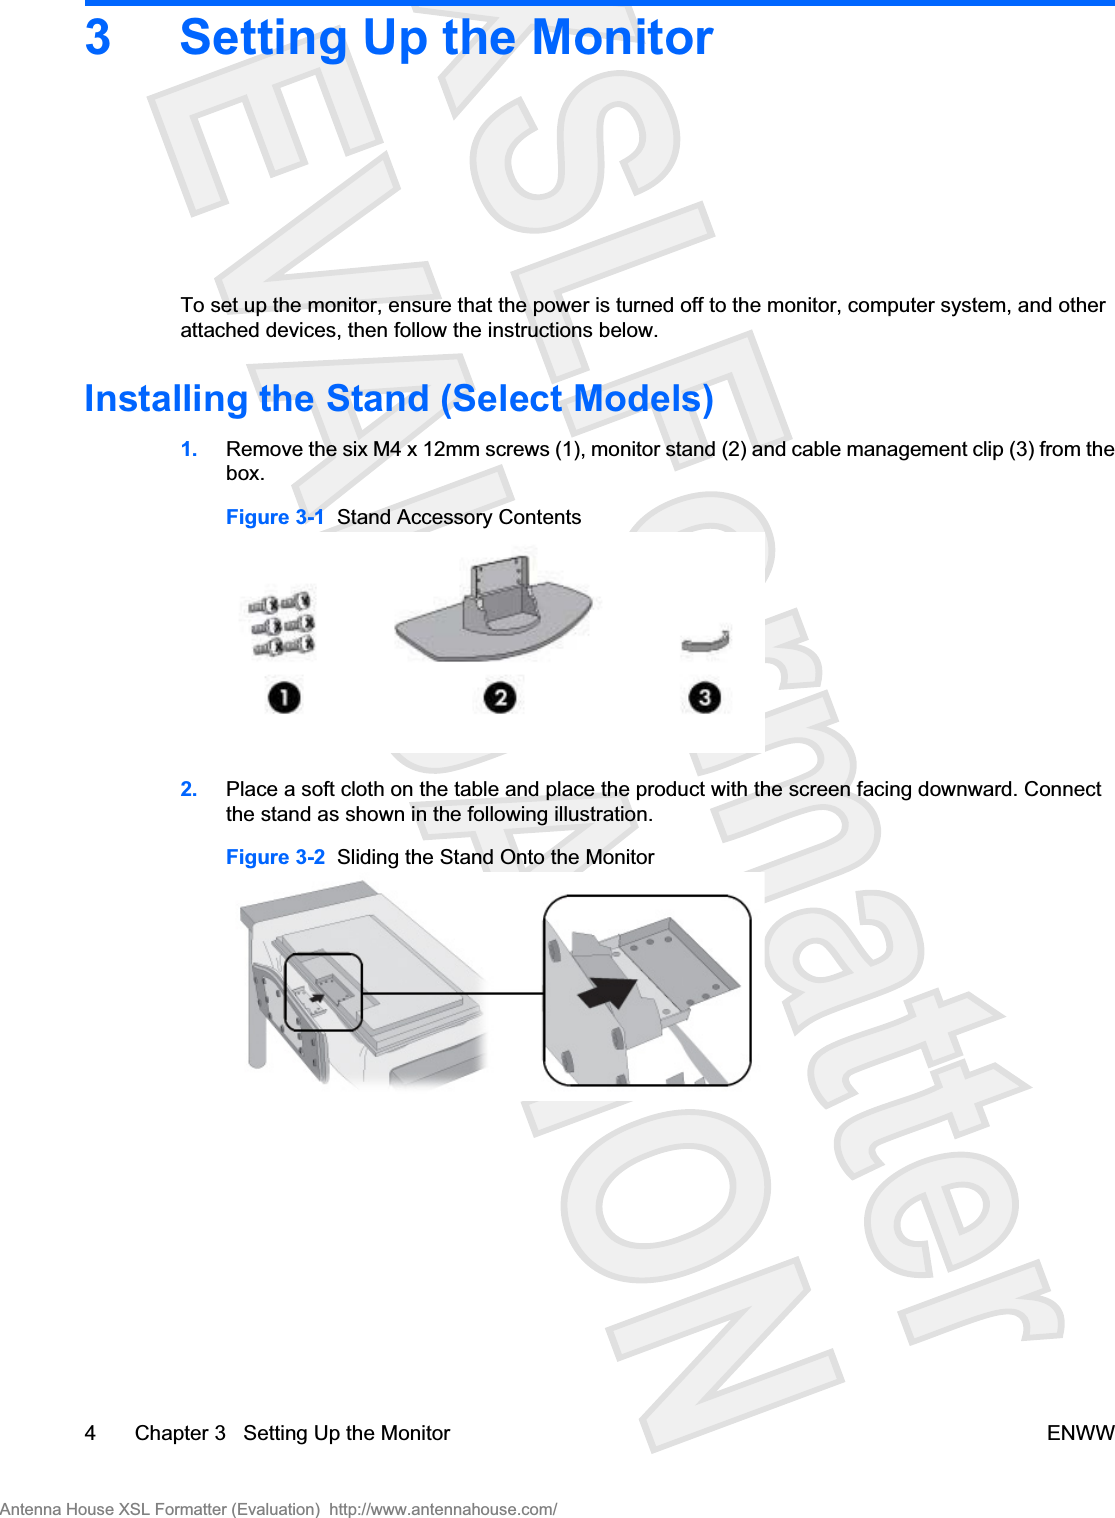
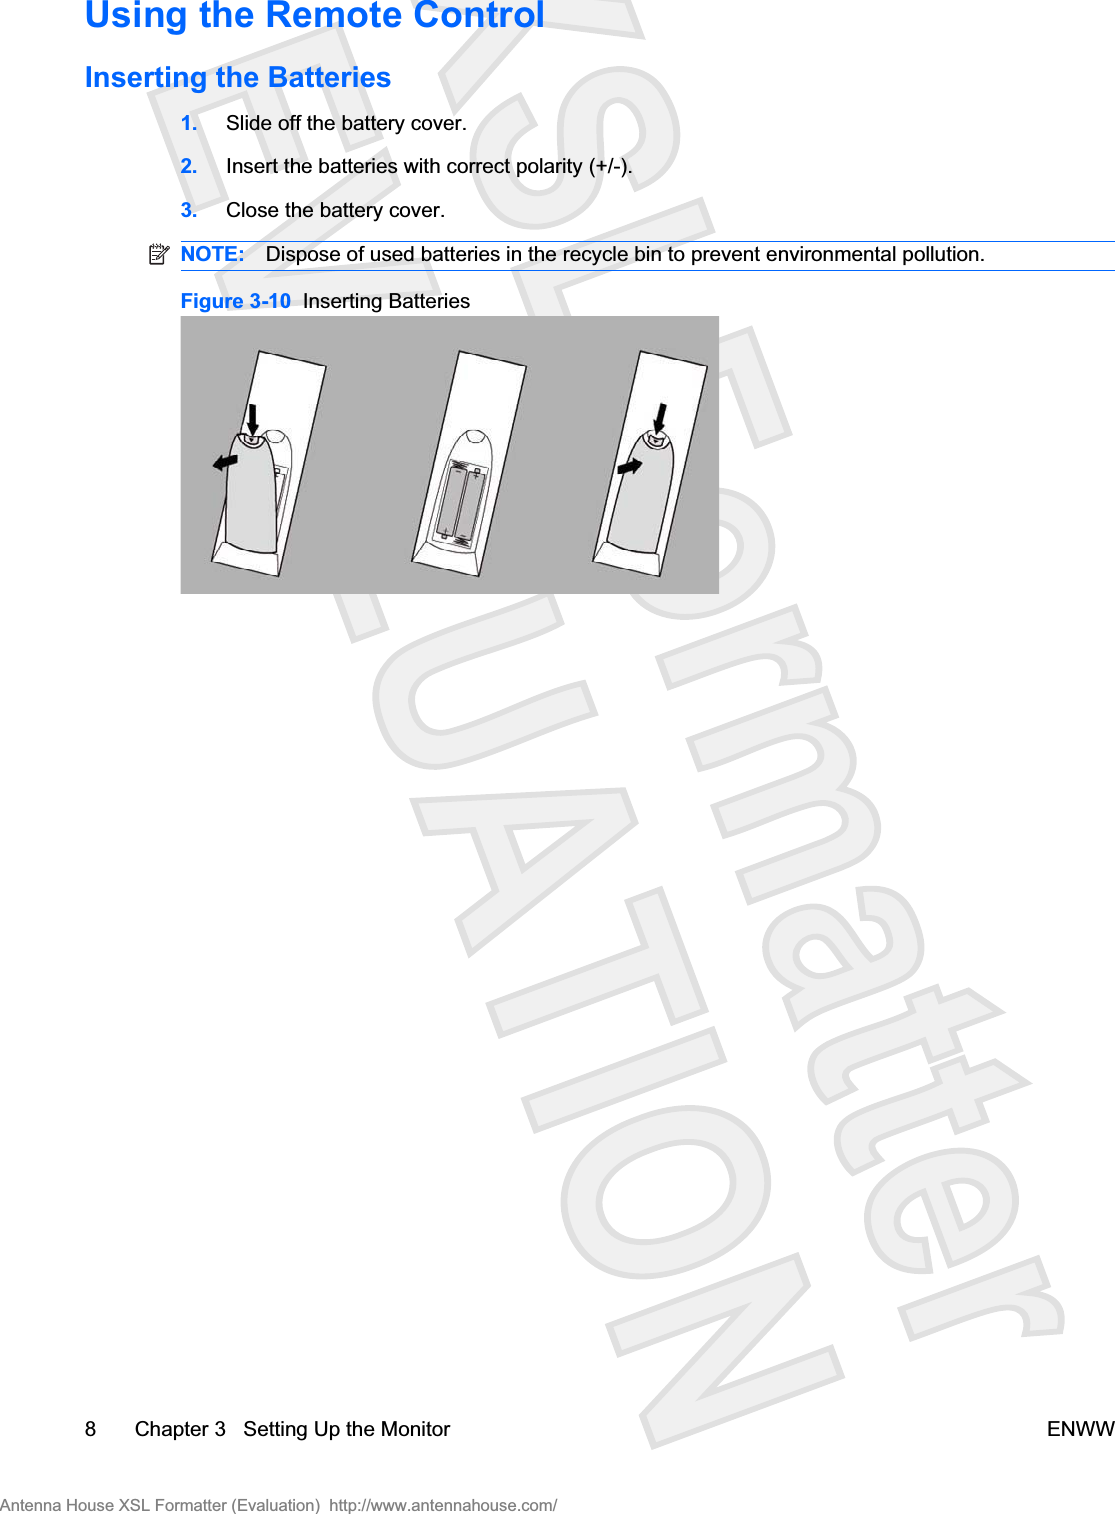

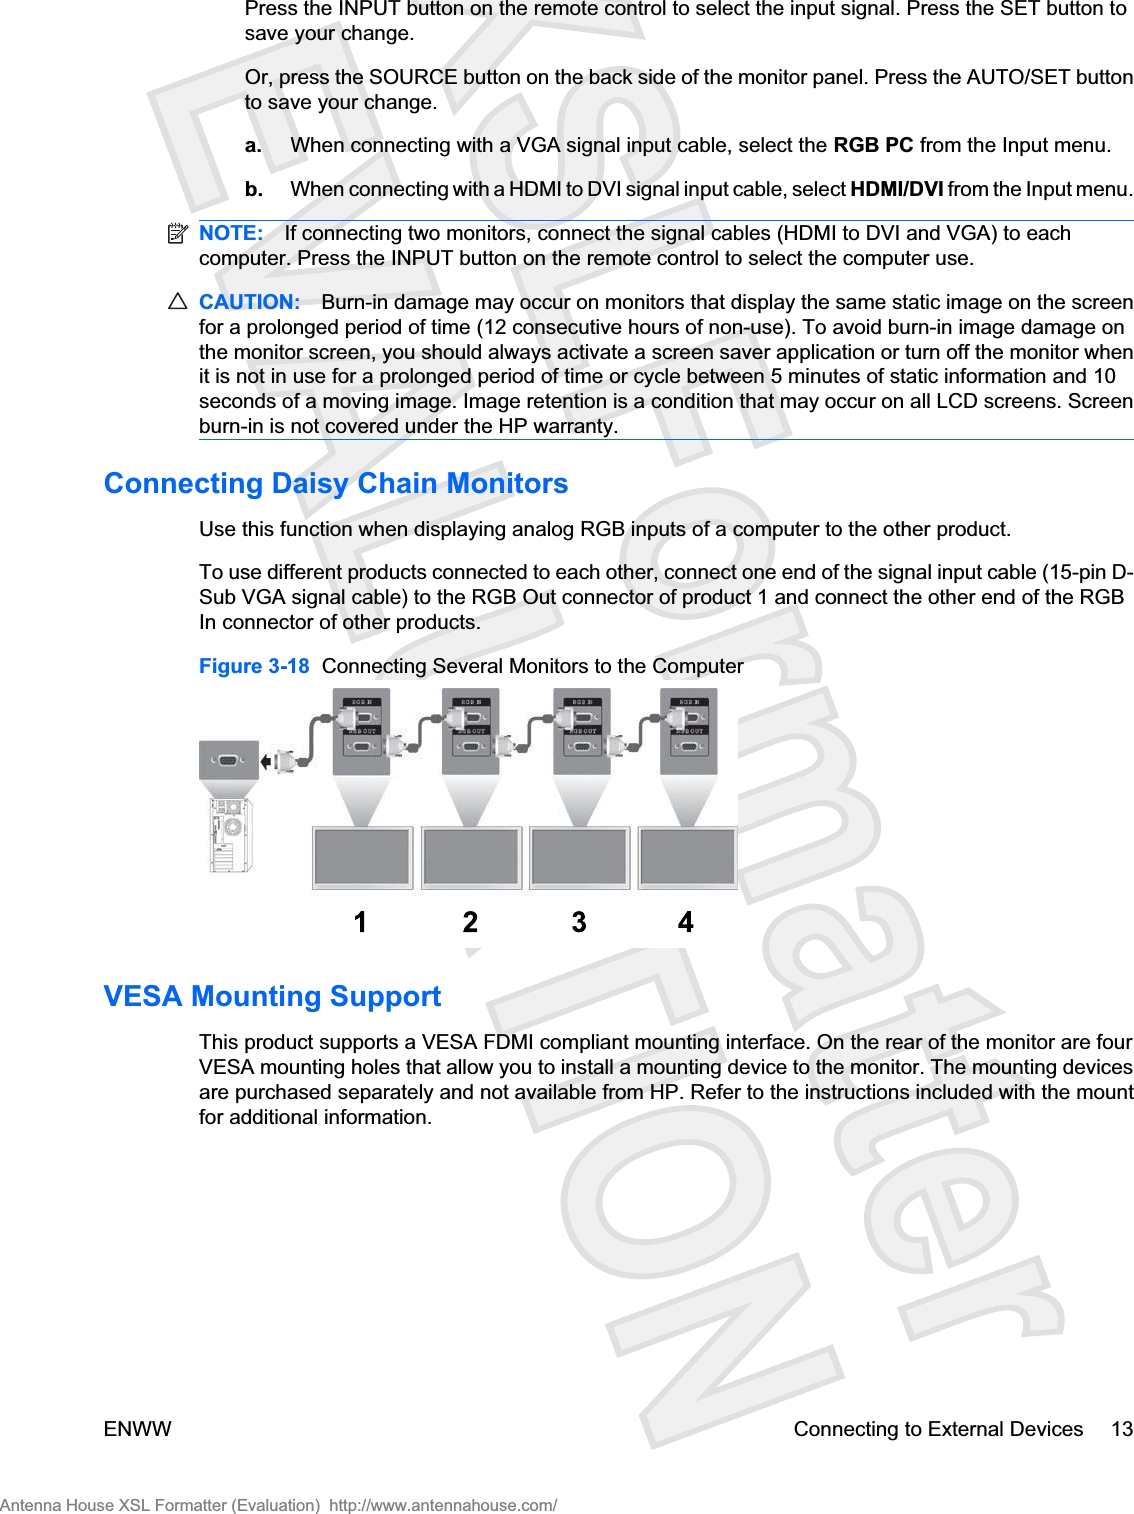
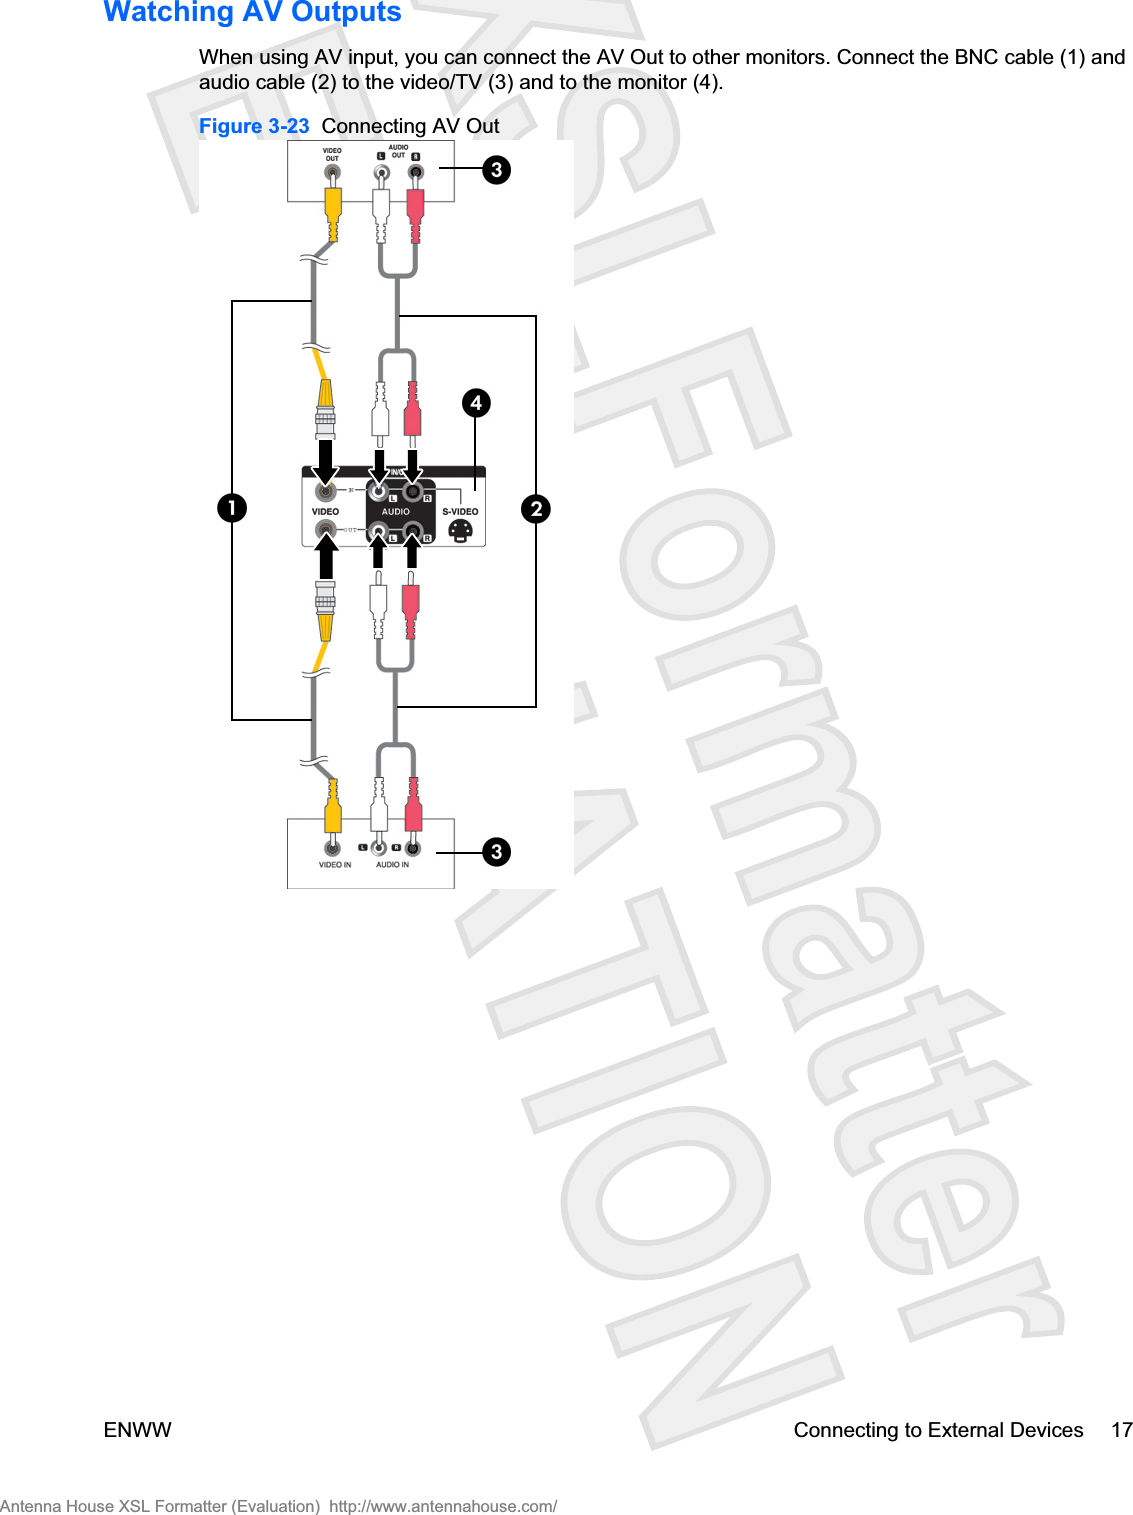
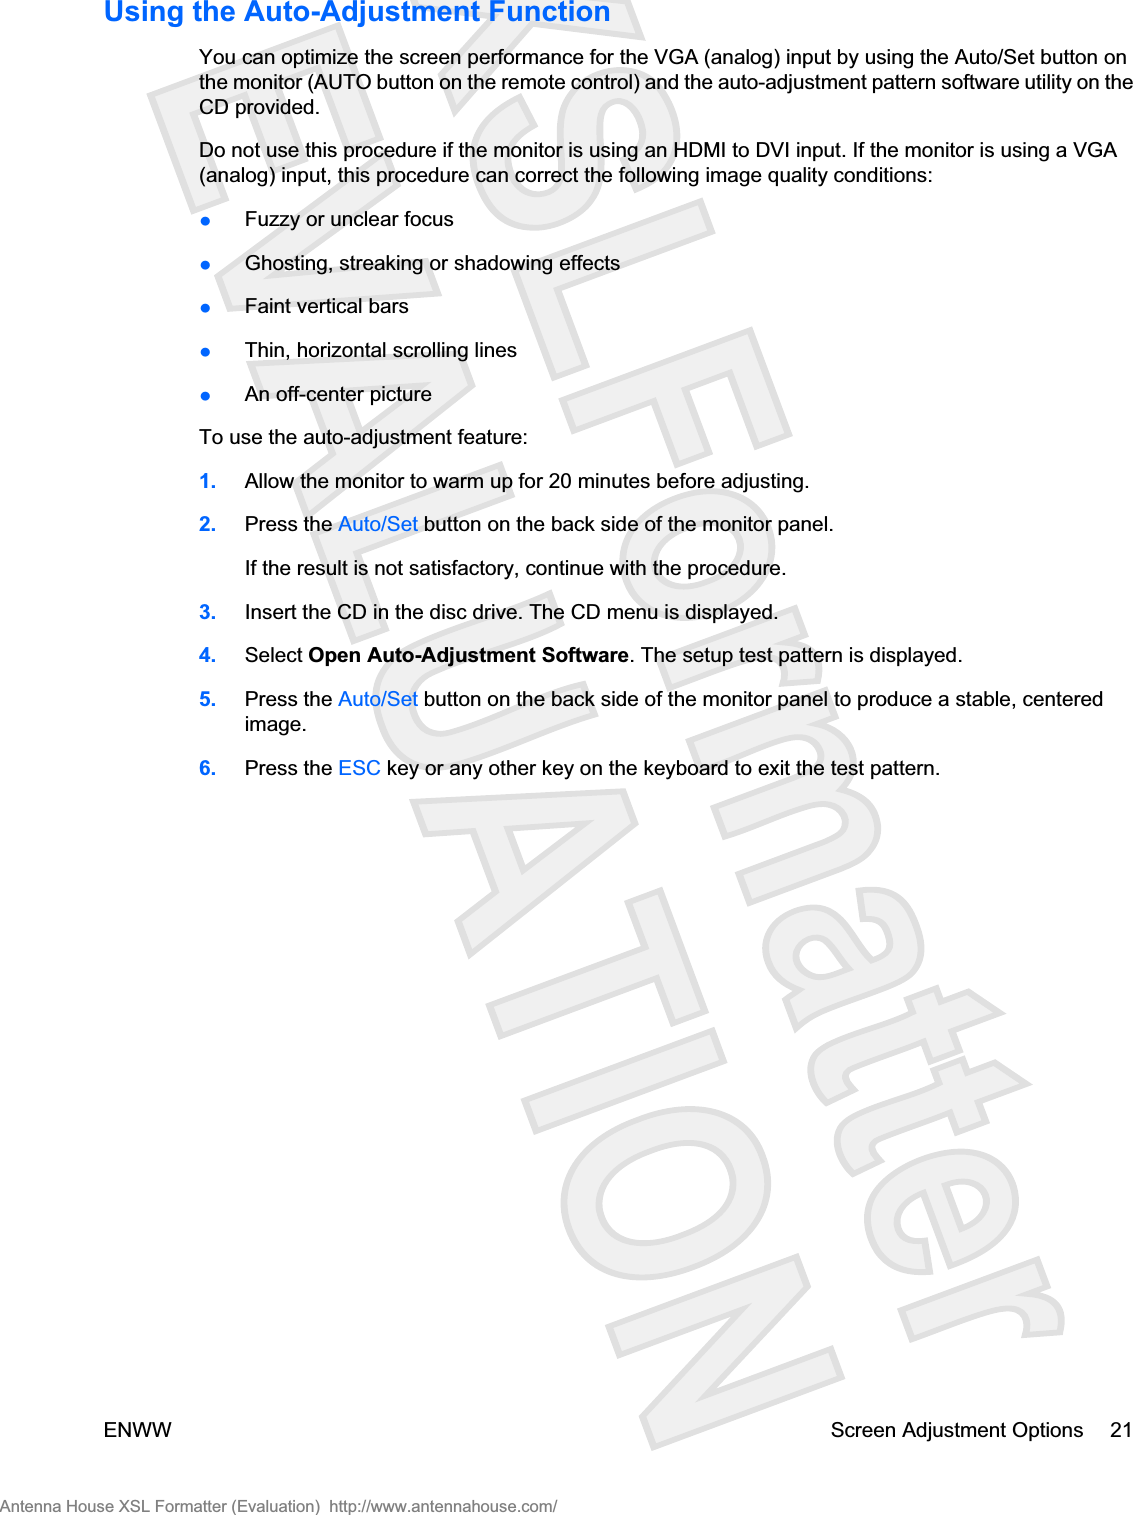
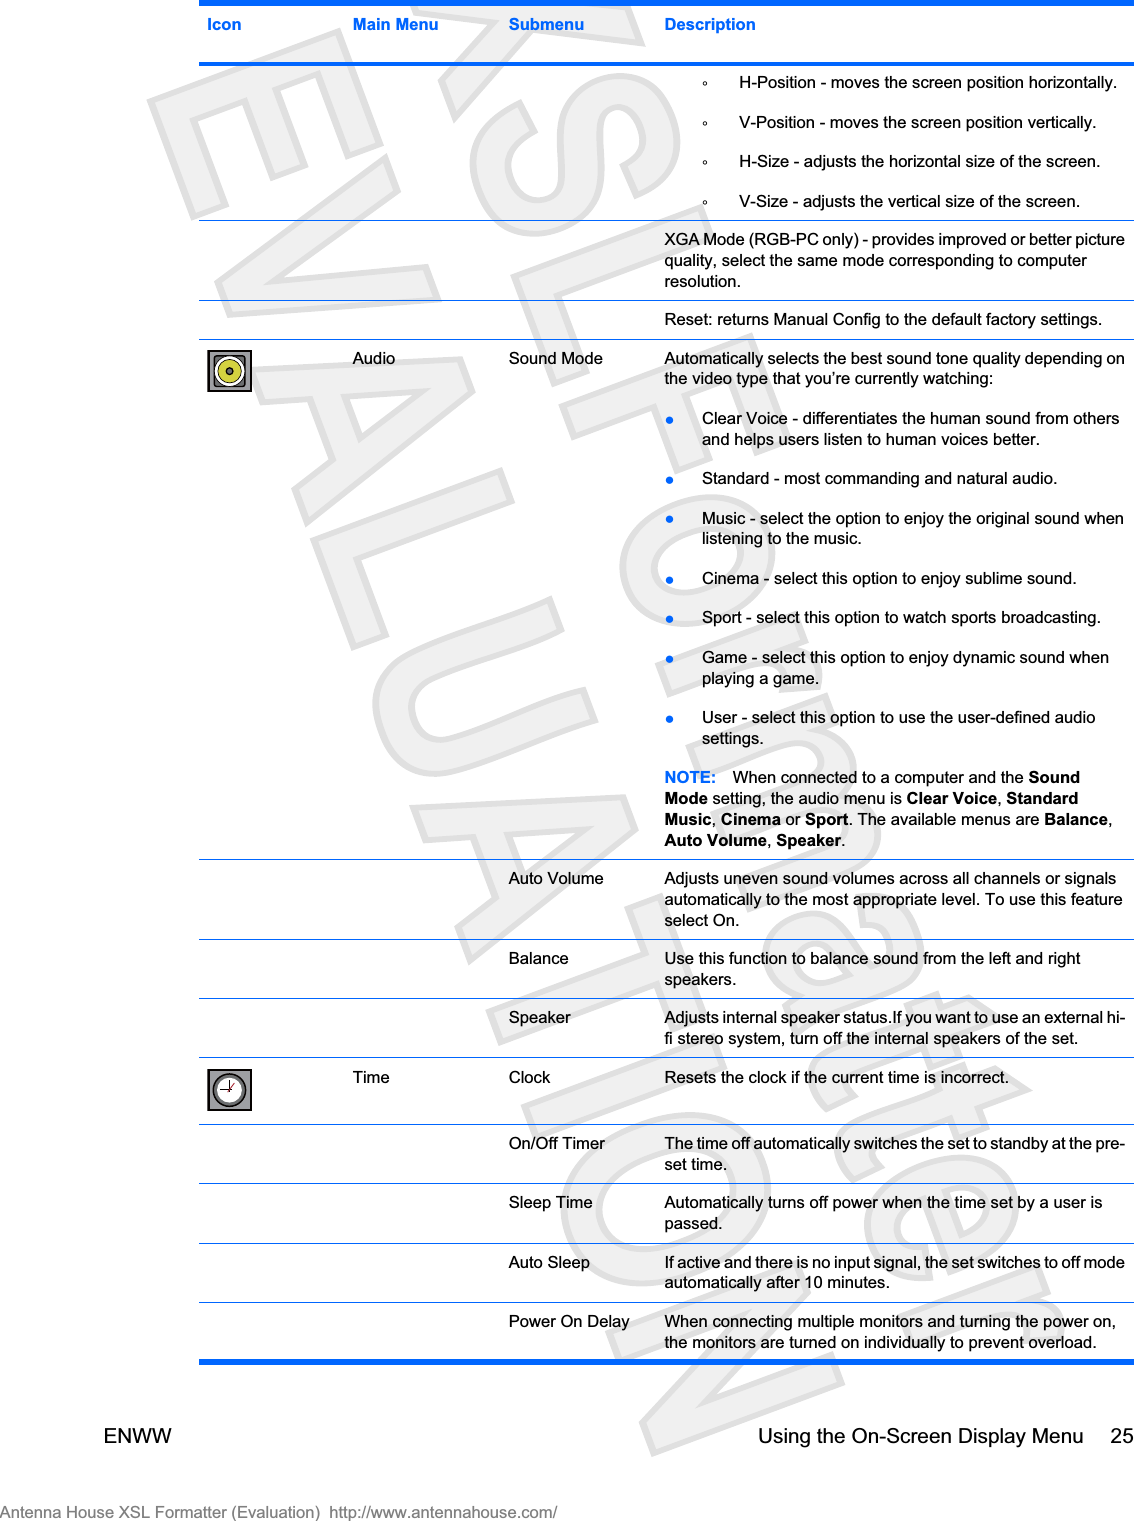
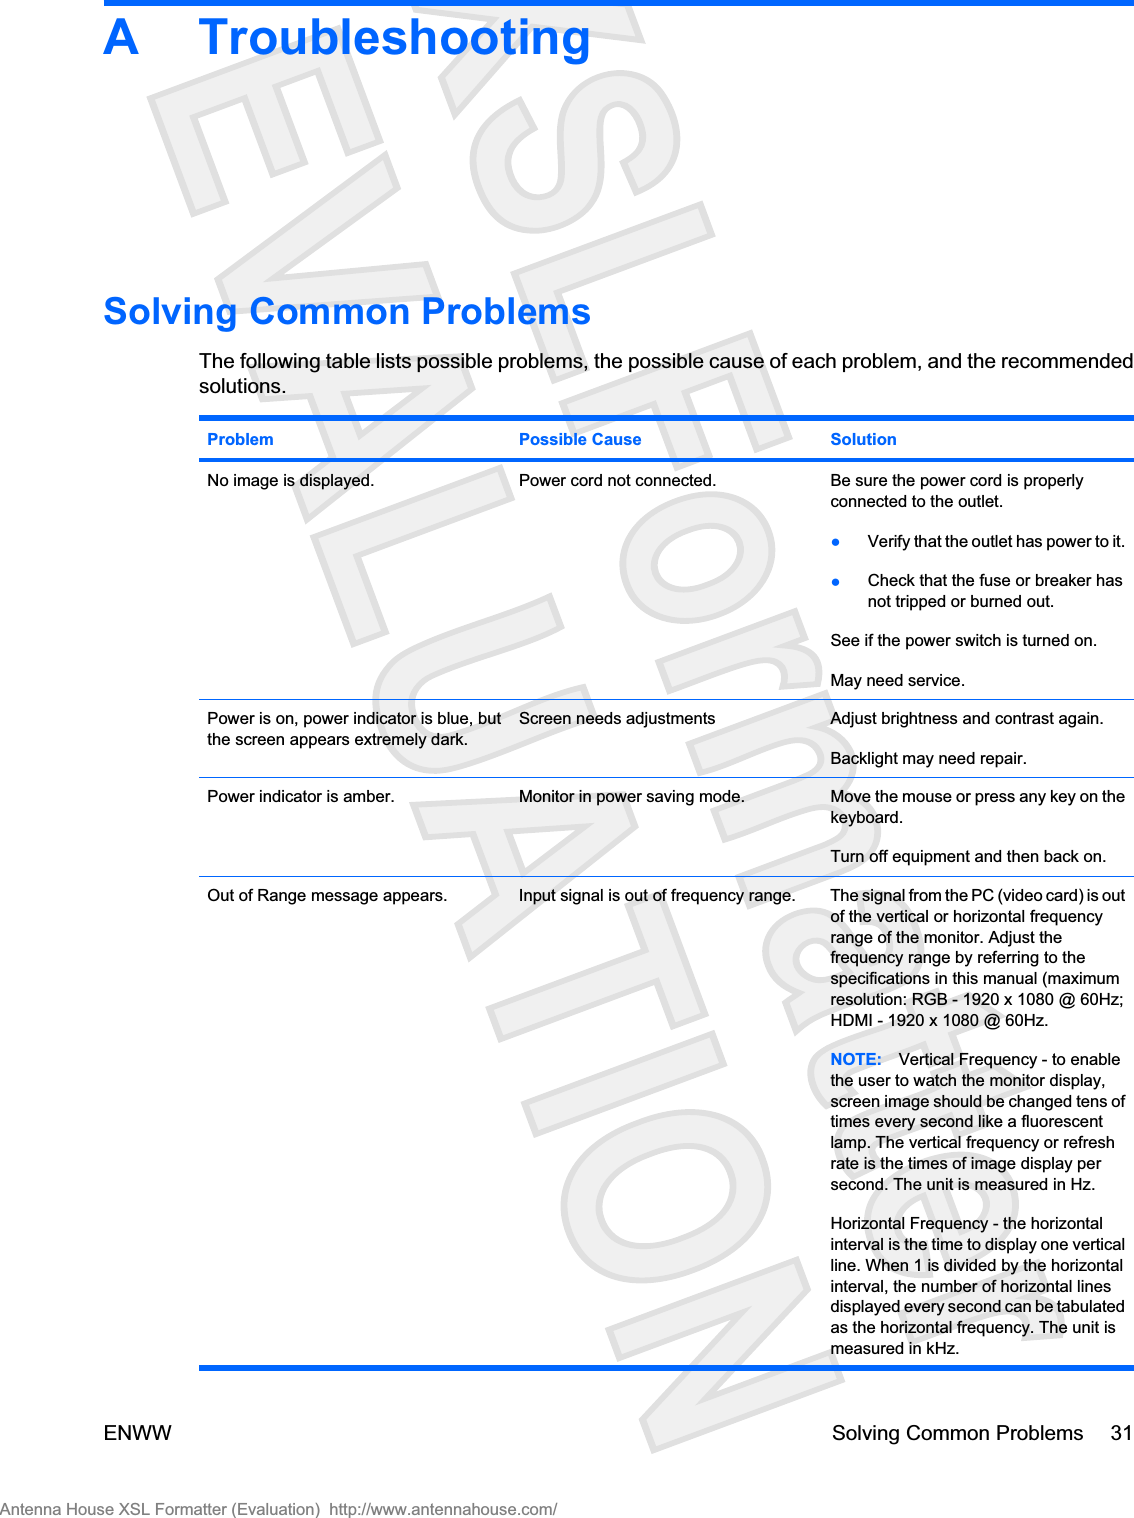
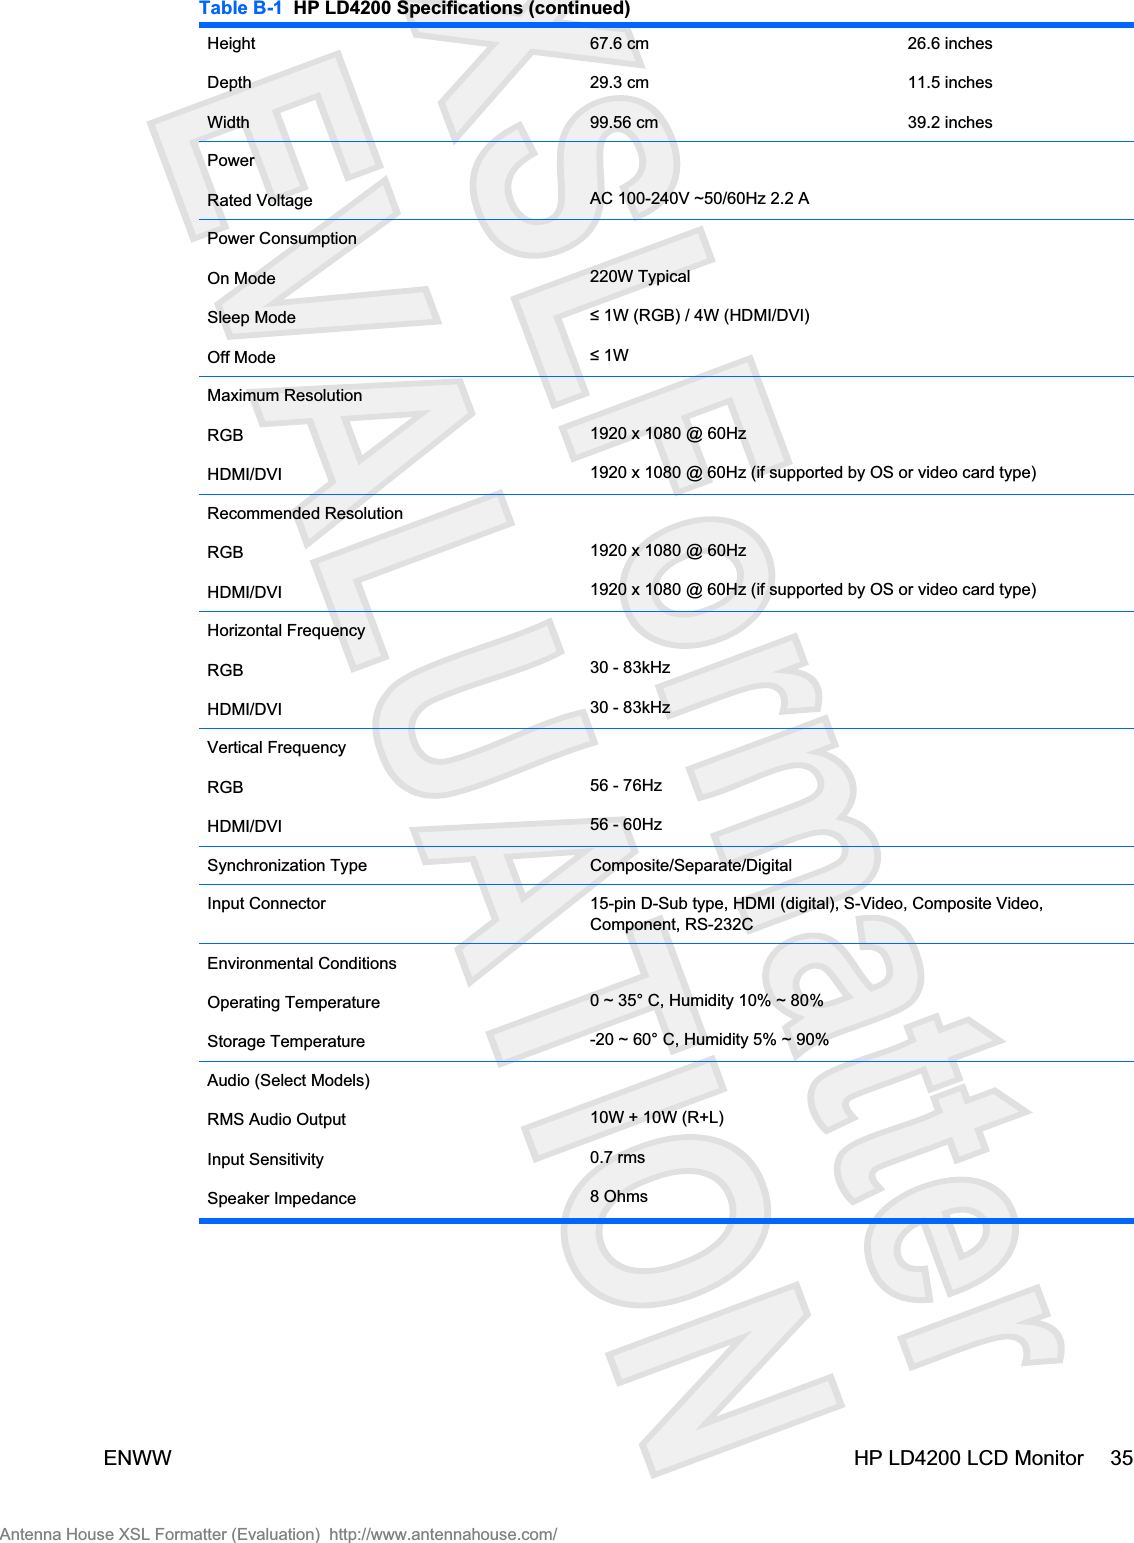
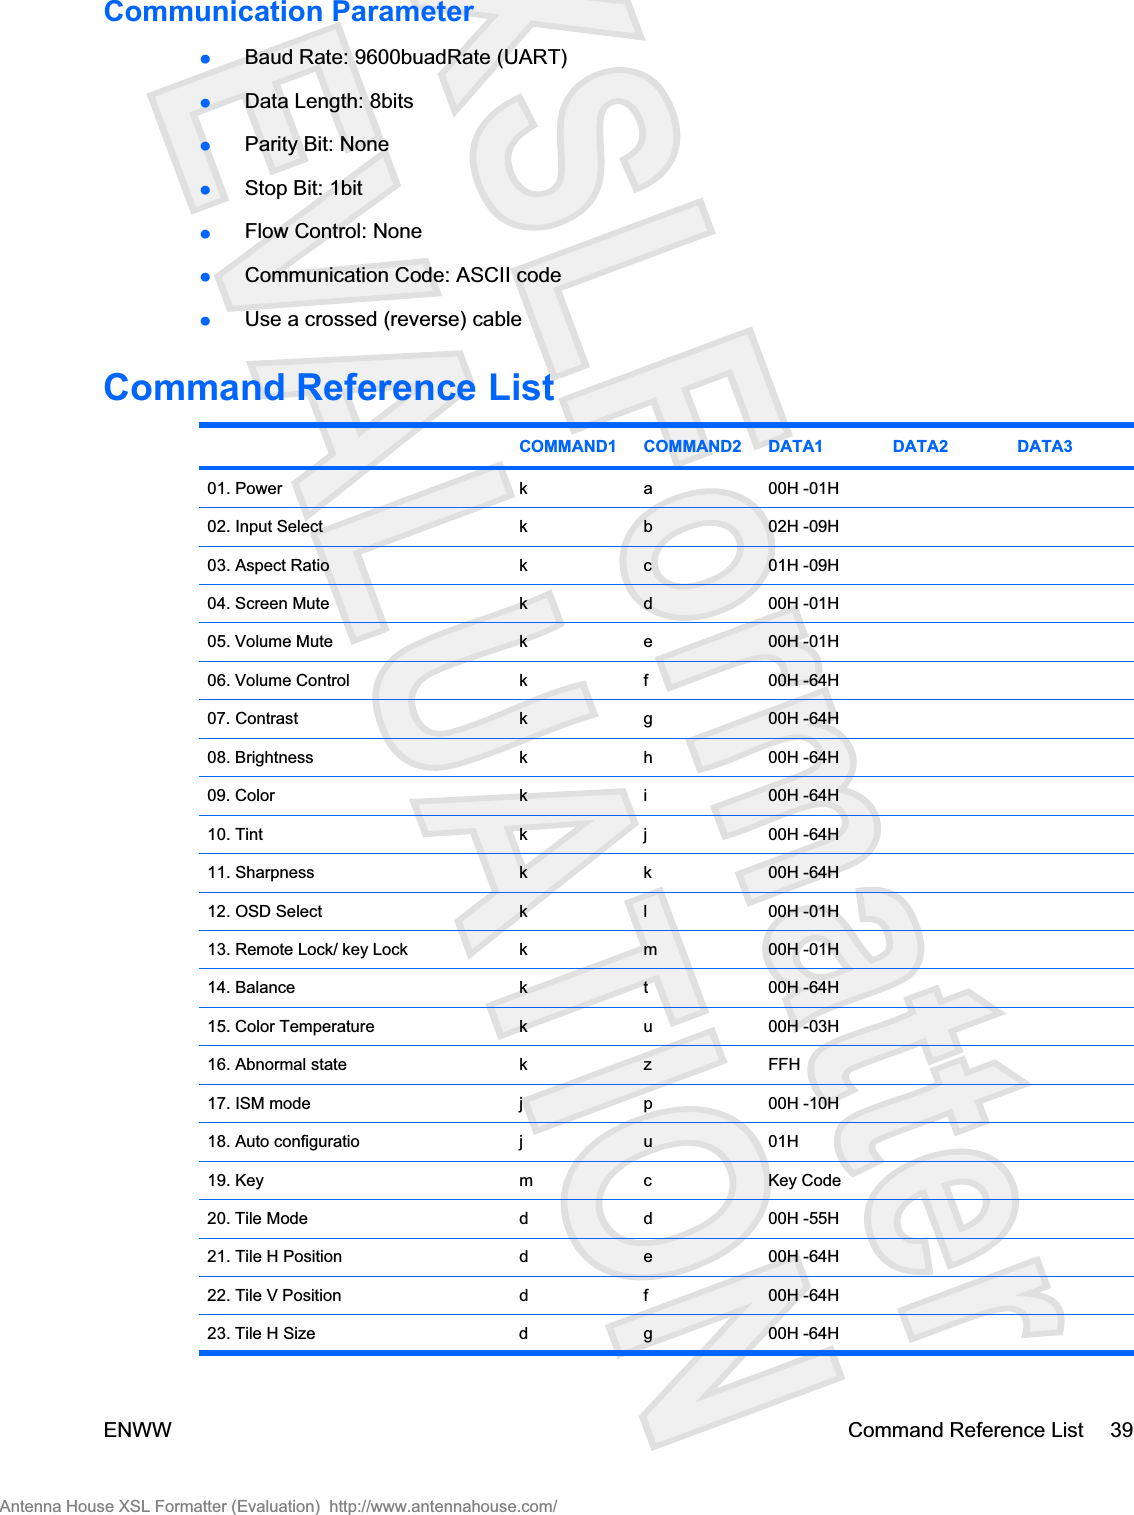
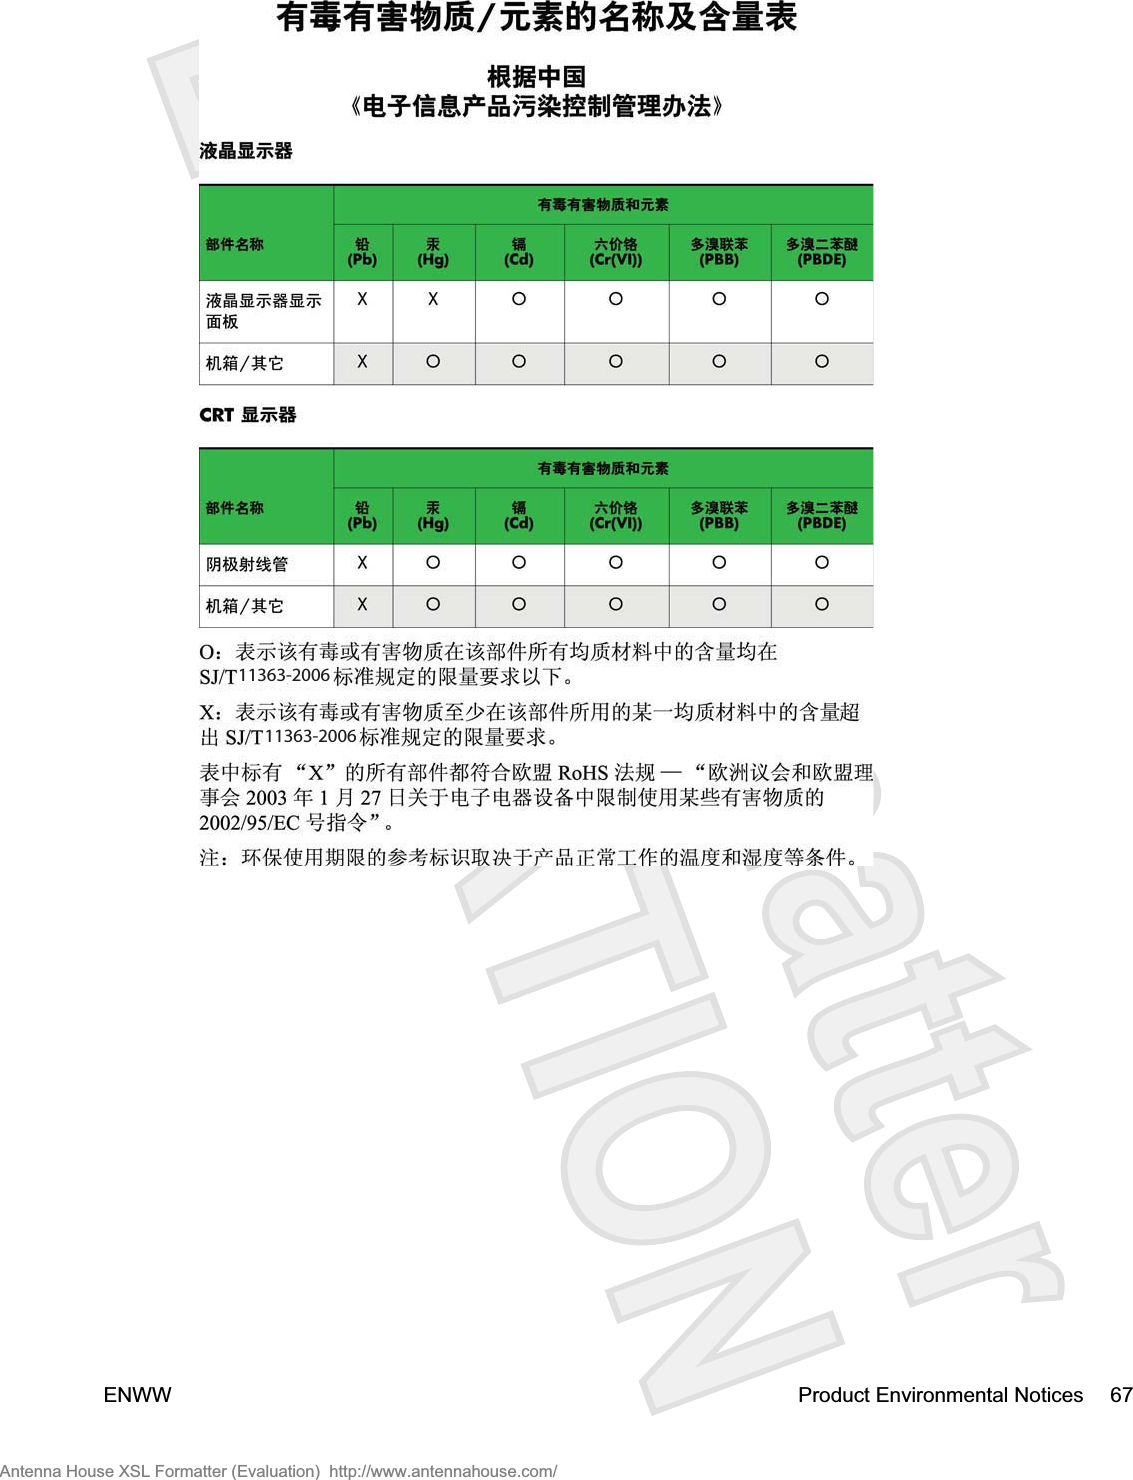
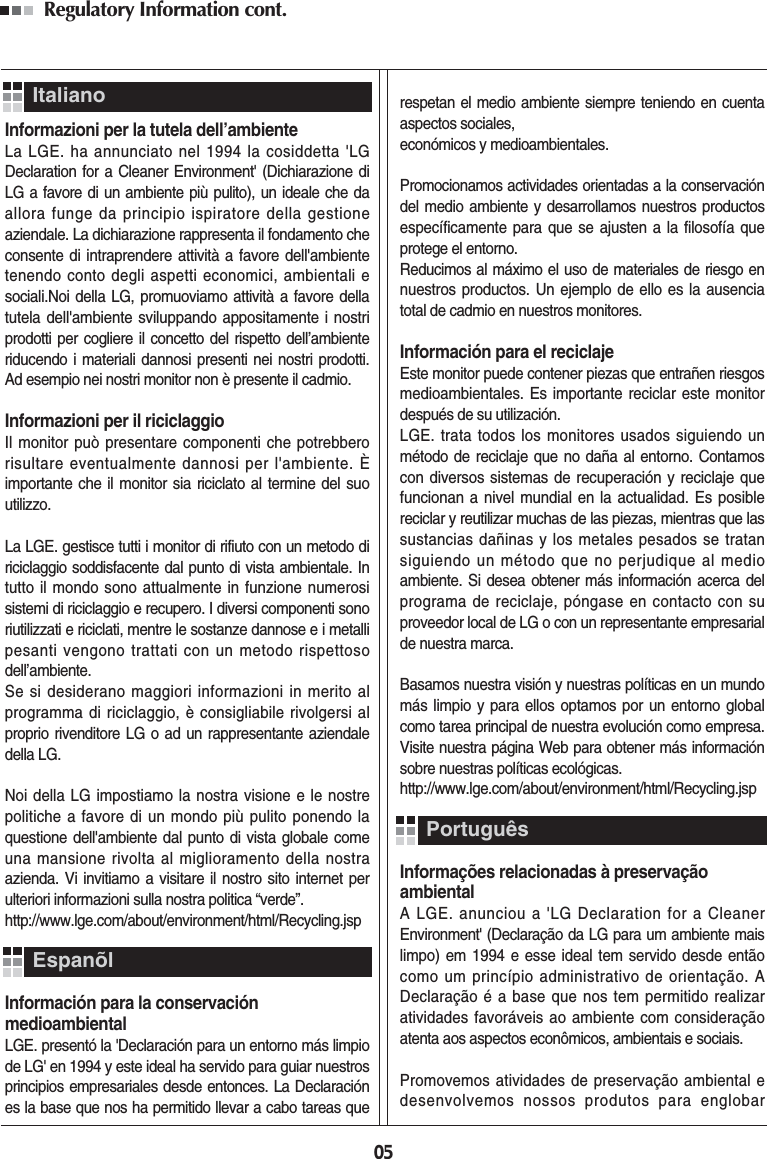
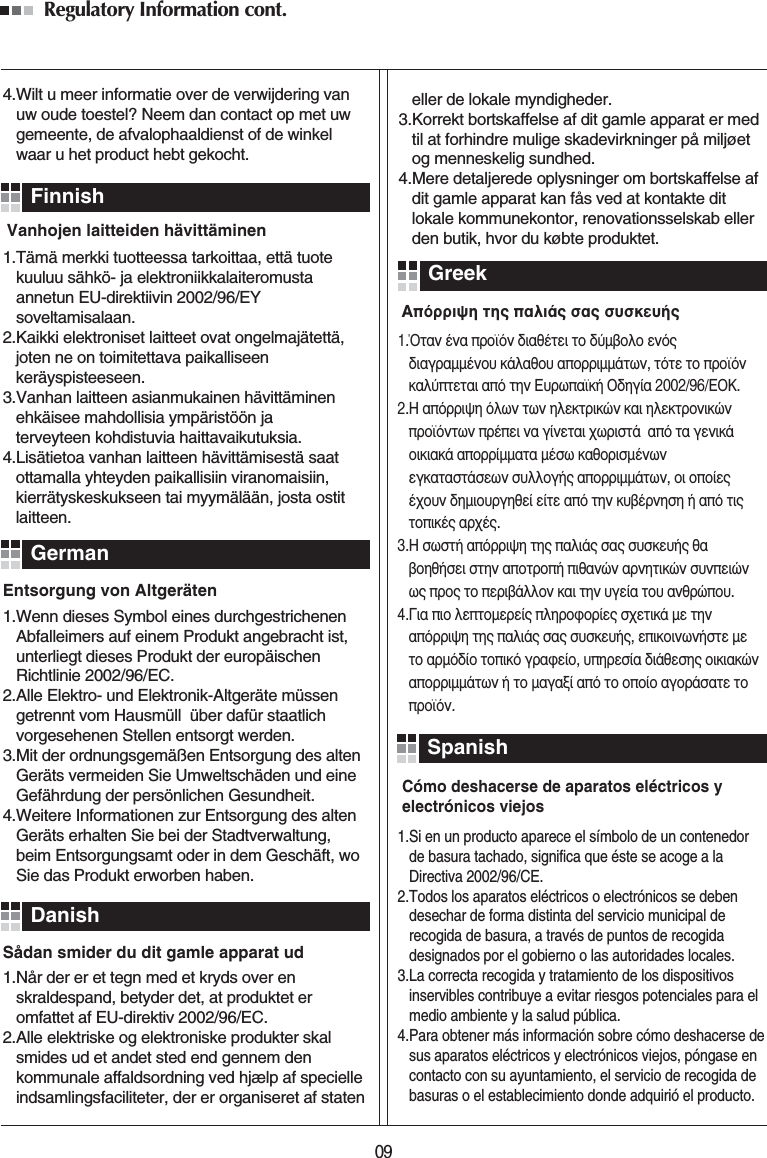
![COMMAND1 COMMAND2 DATA1 DATA2 DATA324. Tile V Size d h 00H -64H25. Tile ID Set d i 00H -19H26. Natural Mode (In Tilemode) d j 00H -01H27. Elapsed time return d l FFH28. Temperature value d n FFH29. Lamp fault check d p FFH30. Auto Volume d u 00H -01H31. Speaker d v 00H -01H32. Time f a 00H -06H 00H - 17H 0 - 3BH33. On Timer (On/Off Timer) On, Off f b 00H, FFH34. Off Timer (On/Off Timer) On, Off f c 00H, FFH35. On Timer (On/Off Timer) Time f d 00H -07H 00H - 17H 00 - 3BH36. Off Timer (On/Off Timer) Time f e 00H -07H 00H - 17H 00 - 3BH37. Sleep Time f f 00H -08H38. Auto Sleep f g 00H -01H39. Power On Delay f h 00H -64H40. Language f i 00H -09H41. DPM Select f j 00H -01H42. Reset f k 00H -02H43. S/W Version f z FFH44. Input Select x b 20H -A0H Transmission / Receiving ProtocolTransmission[Command1][Command2][ ][Set ID][ ][Data][Cr]*[Command 1]: First command. (k)*[Command 2]: Second command.(a ~ u)*[Set ID]: Set up the Set ID number of product.range : 01H~63H. by setting '00H', server can control all products.* In case of operating with more than 2 sets using set ID as '0' at the same time, it should not be checkedthe ack message.Because all sets will send the ack message, so it's impossible the check the whole ack messages.40 Appendix C Controlling the Multiple Product ENWWAntenna House XSL Formatter (Evaluation) http://www.antennahouse.com/](https://usermanual.wiki/LG-Electronics-USA/HSTND-2591-G/User-Guide-1037886-Page-45.png)
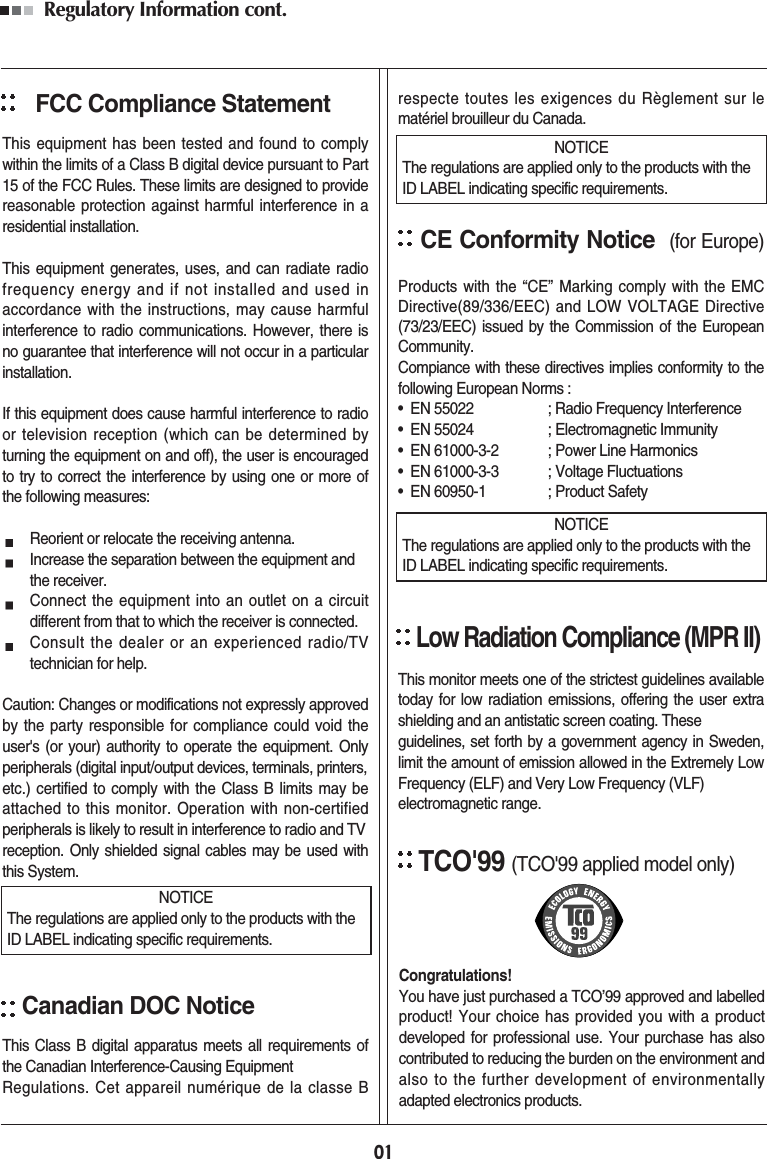
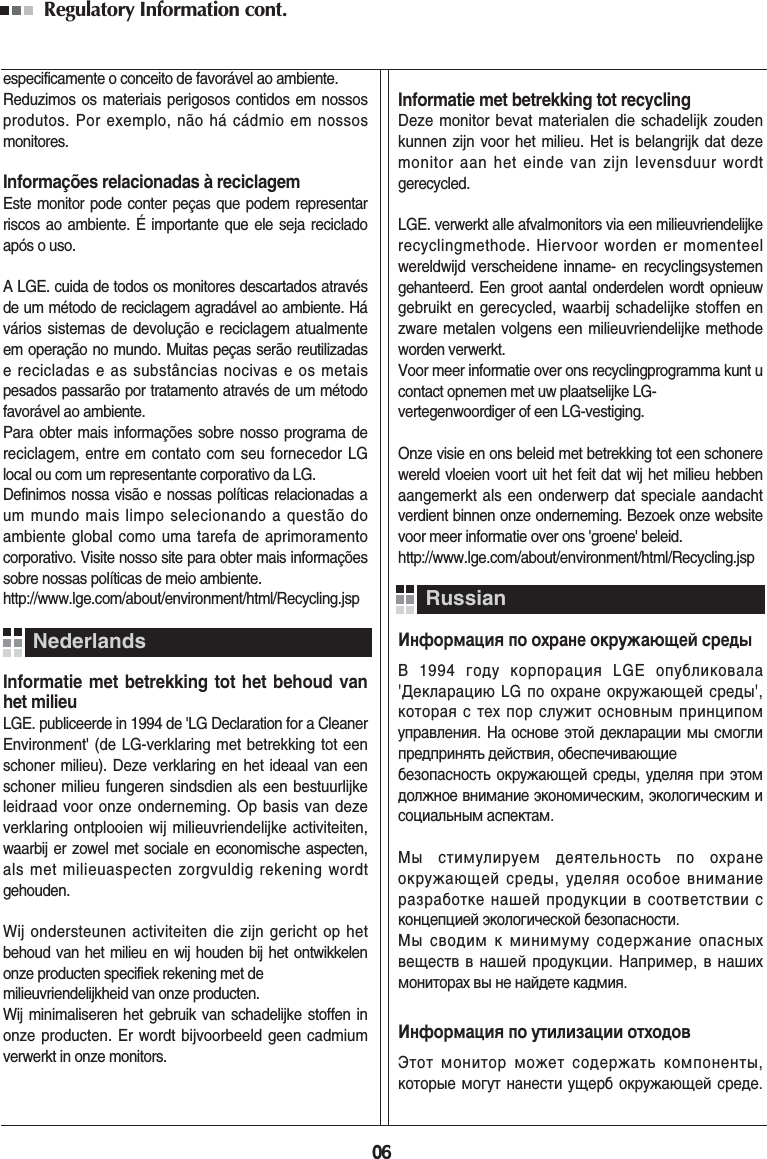
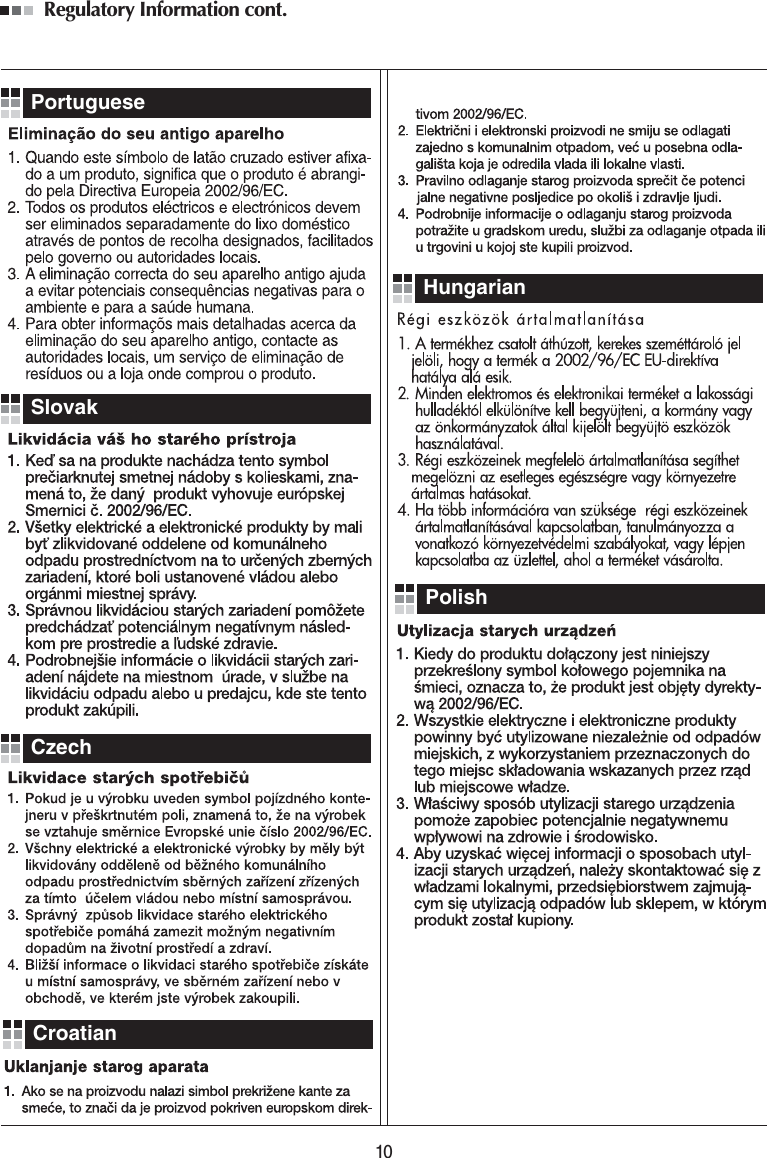
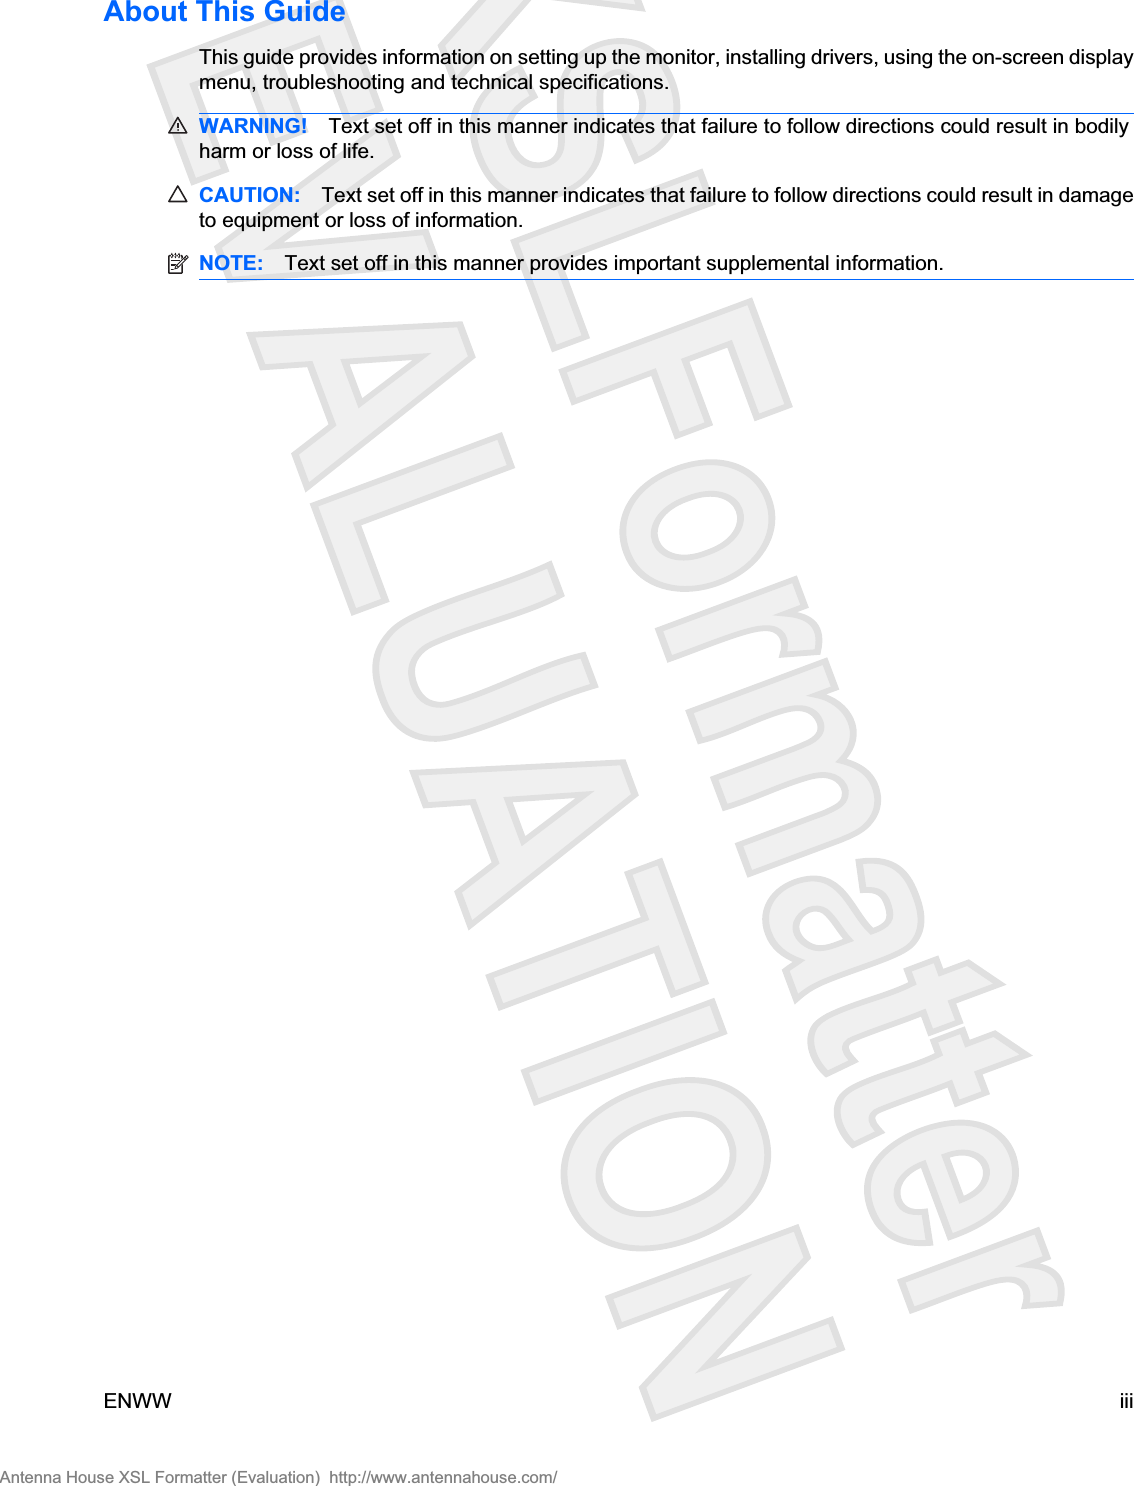
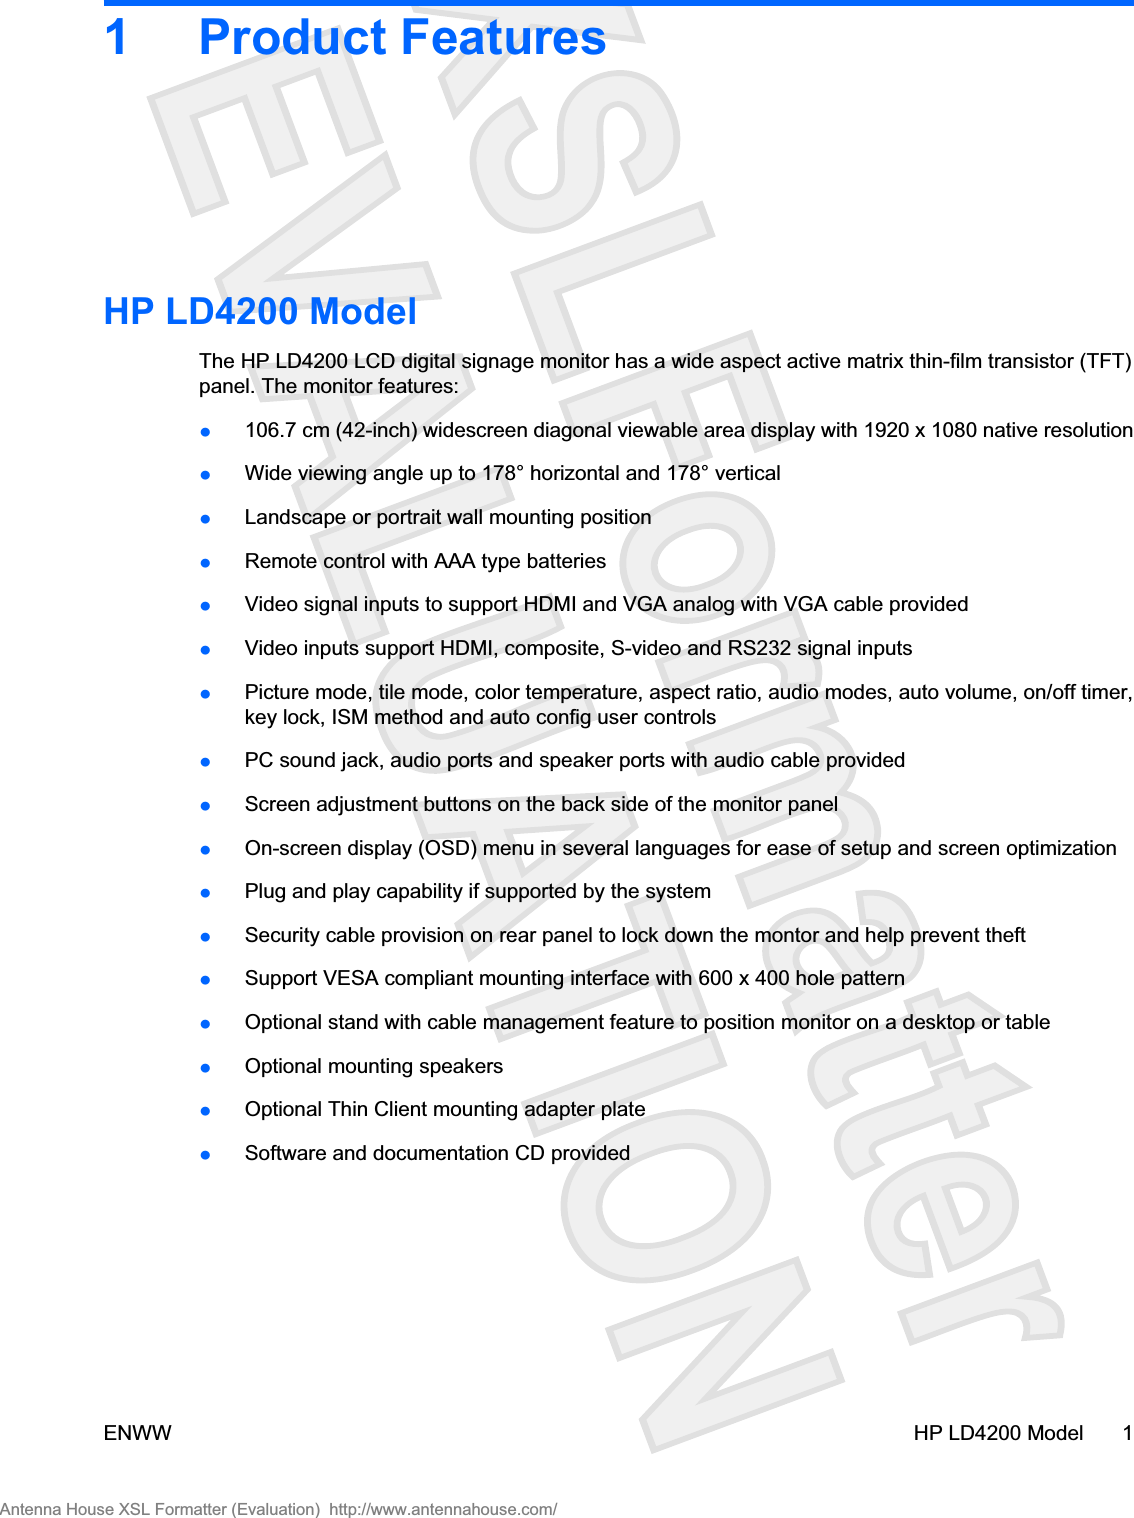
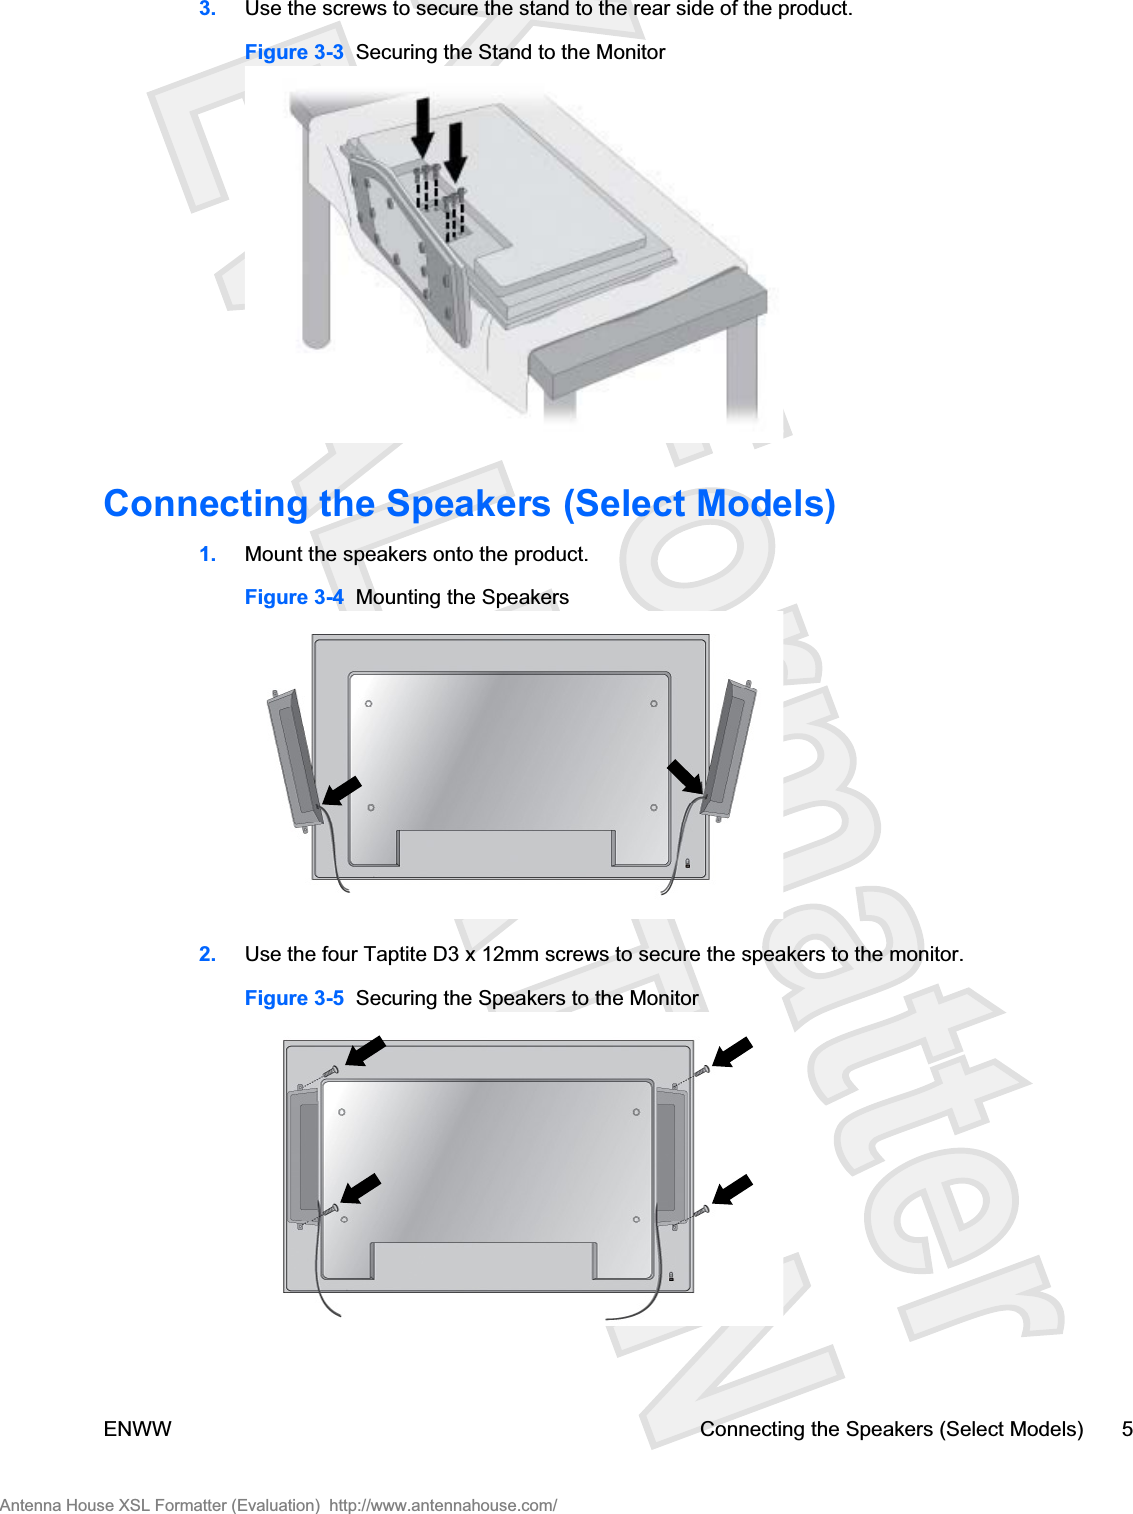
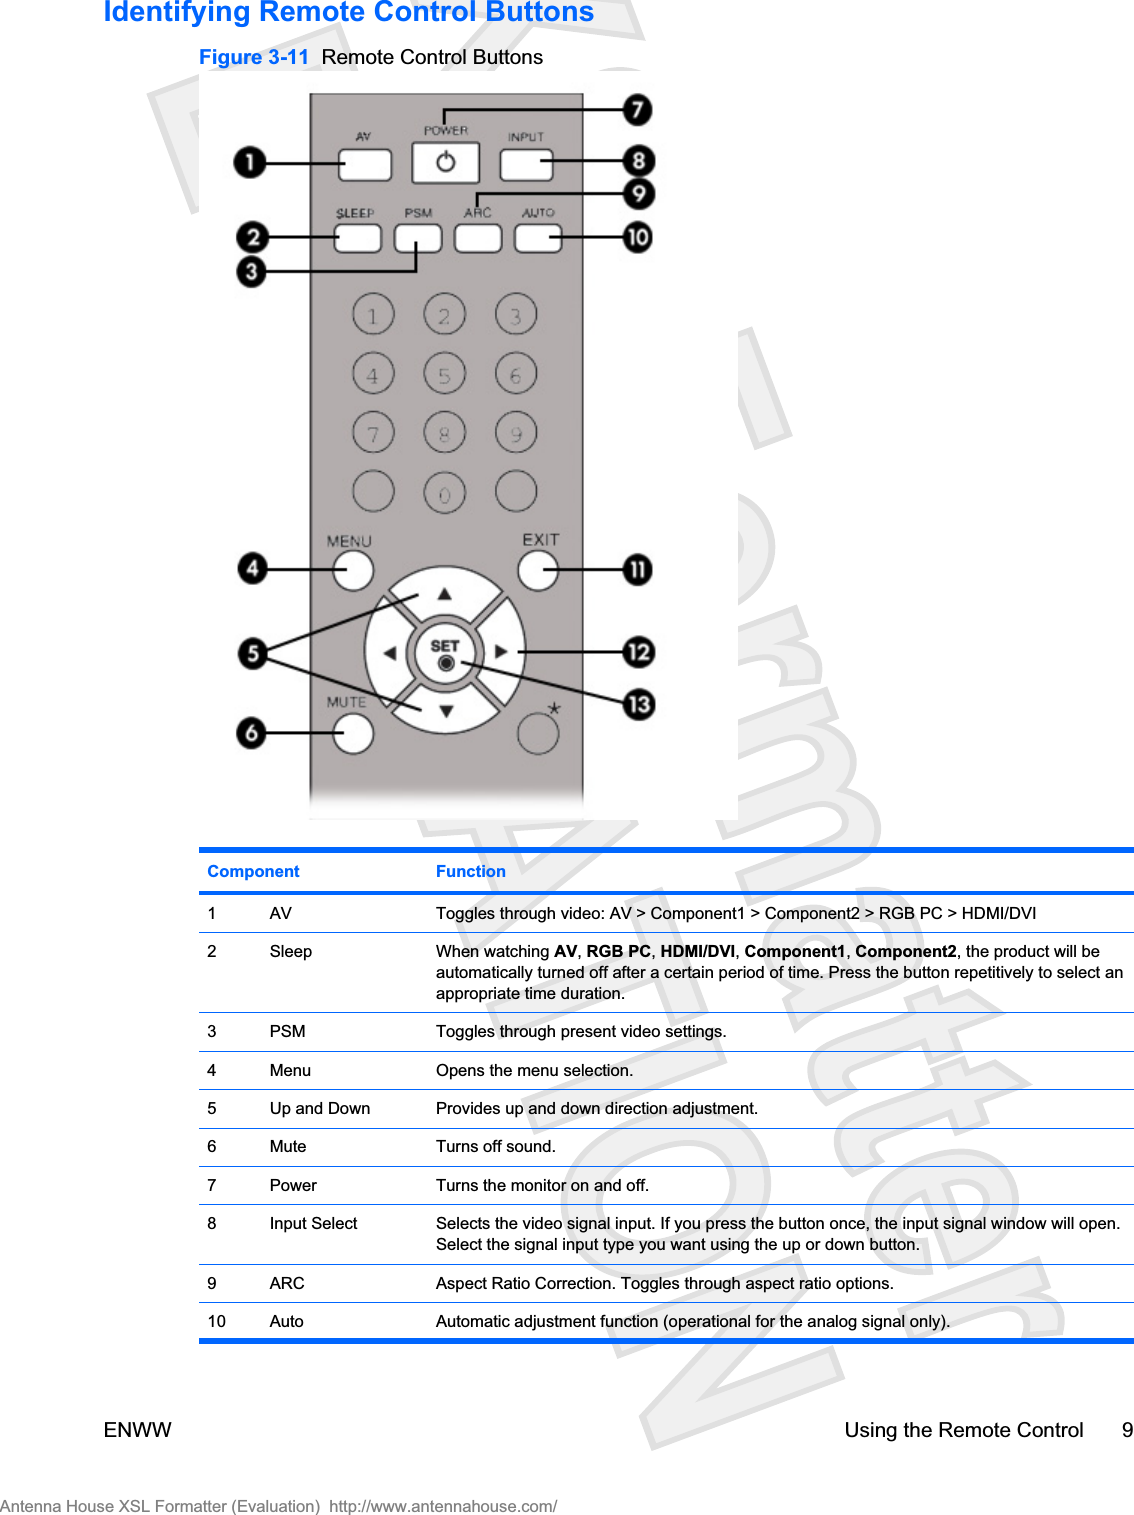
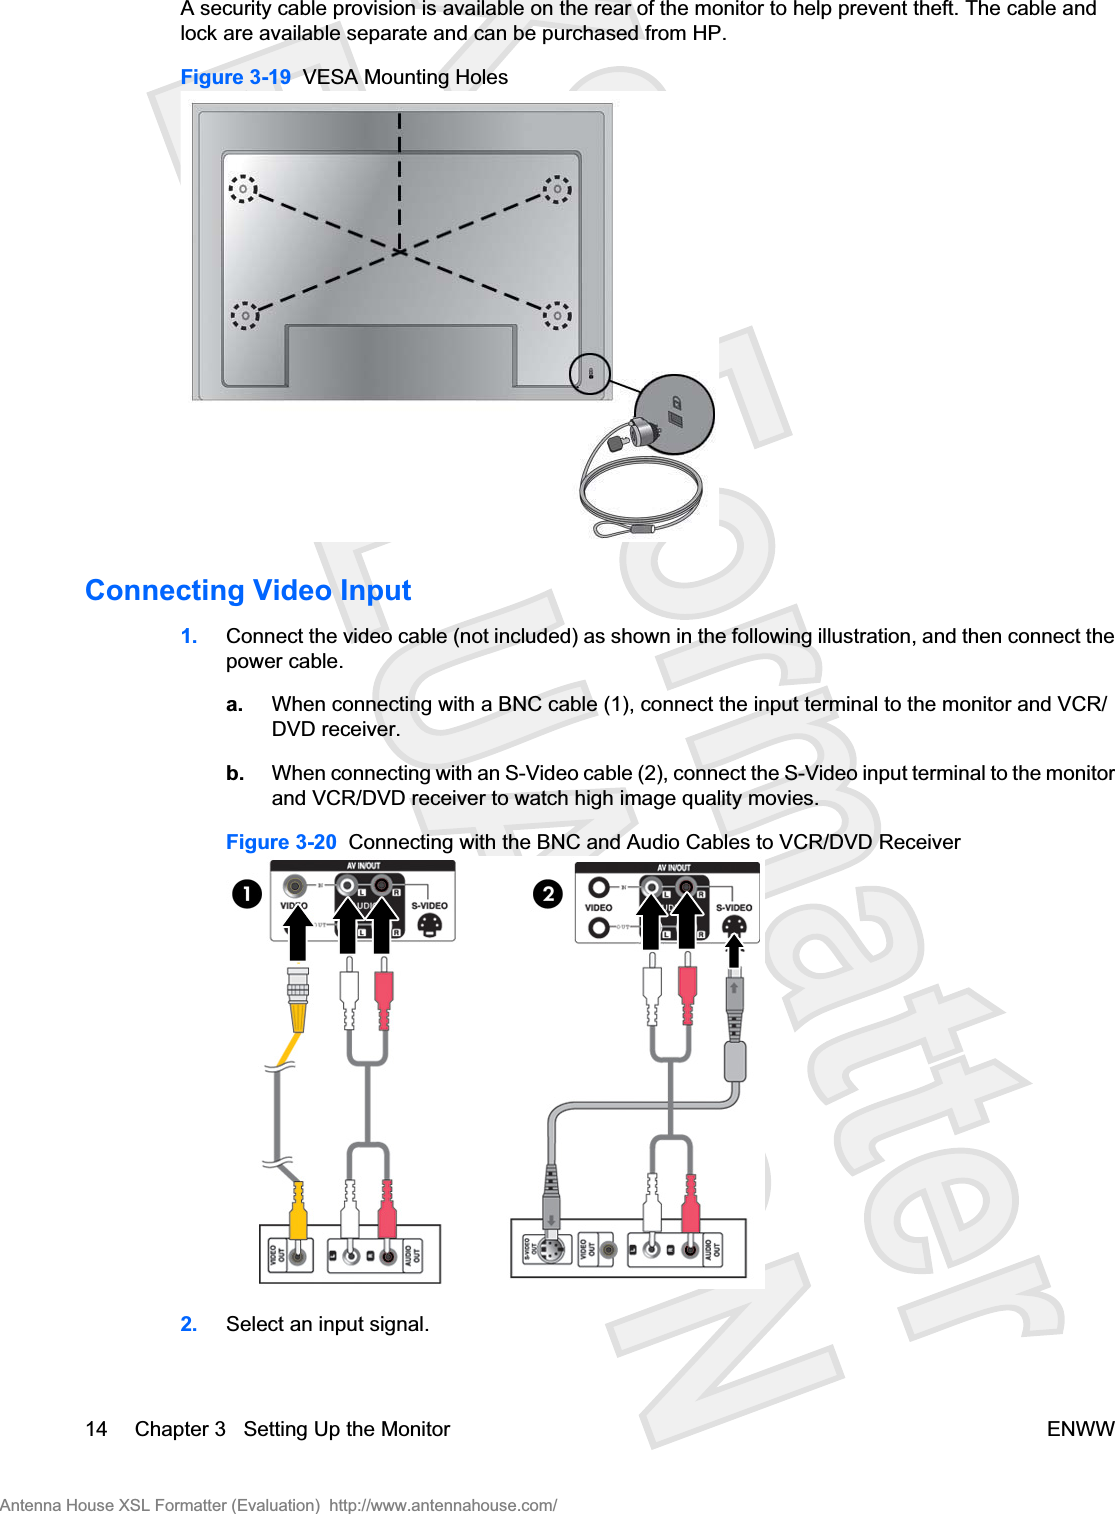
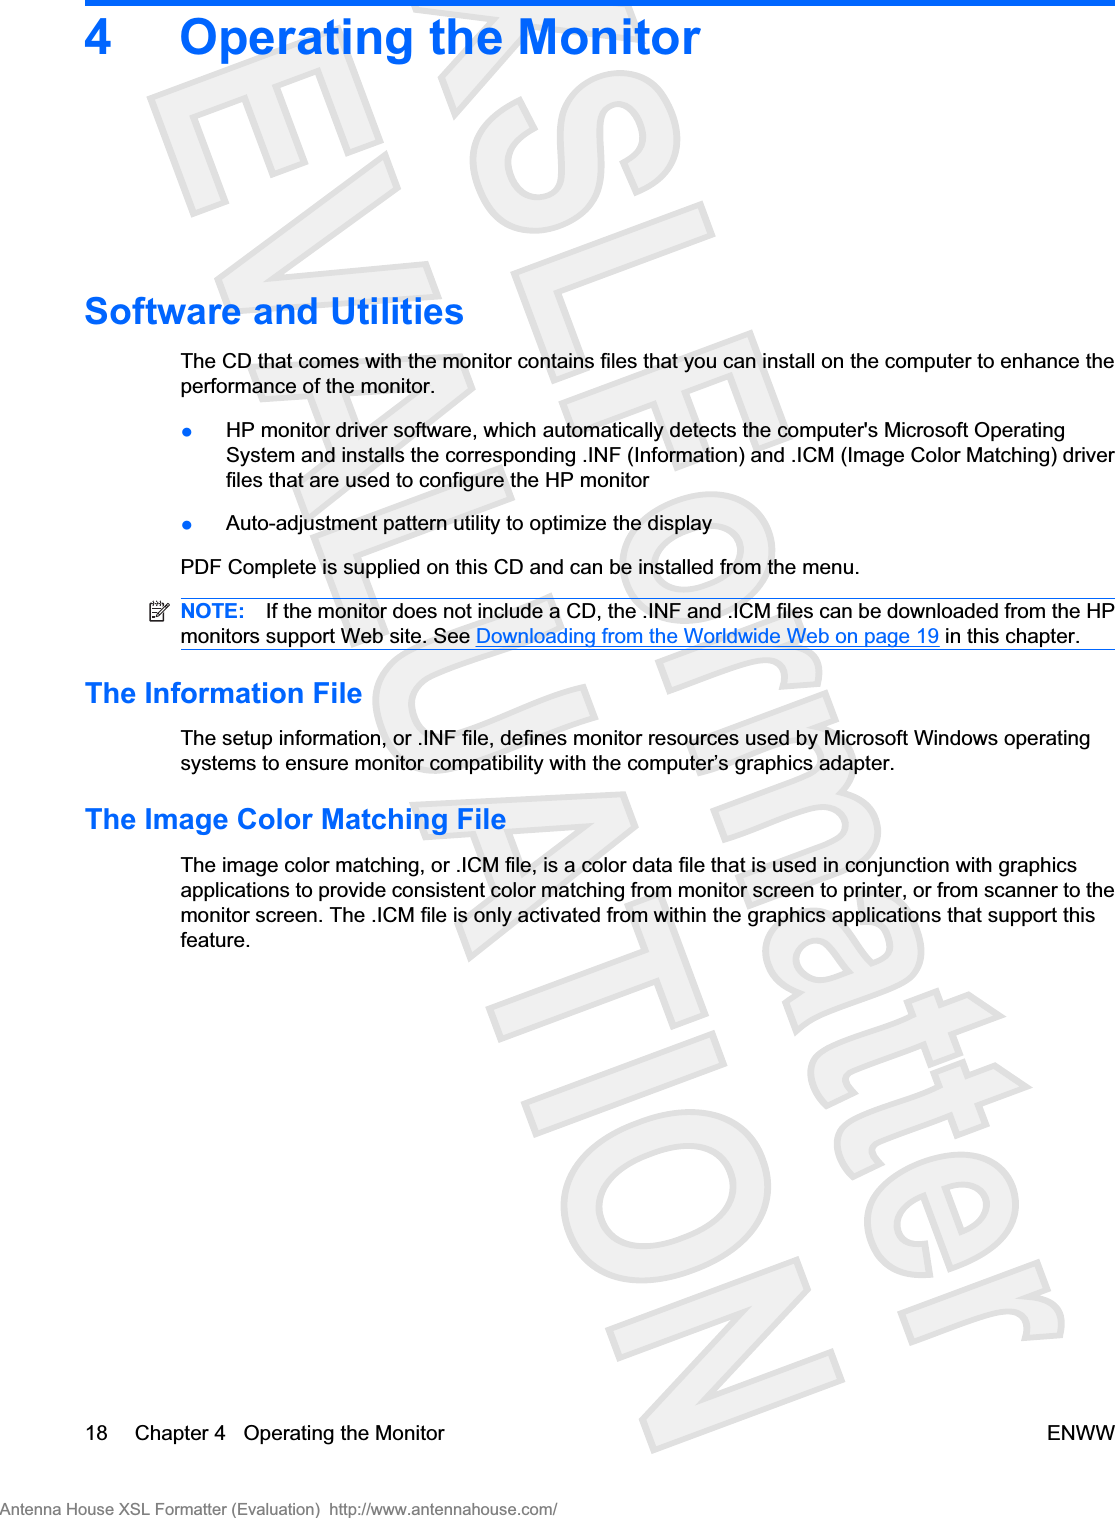
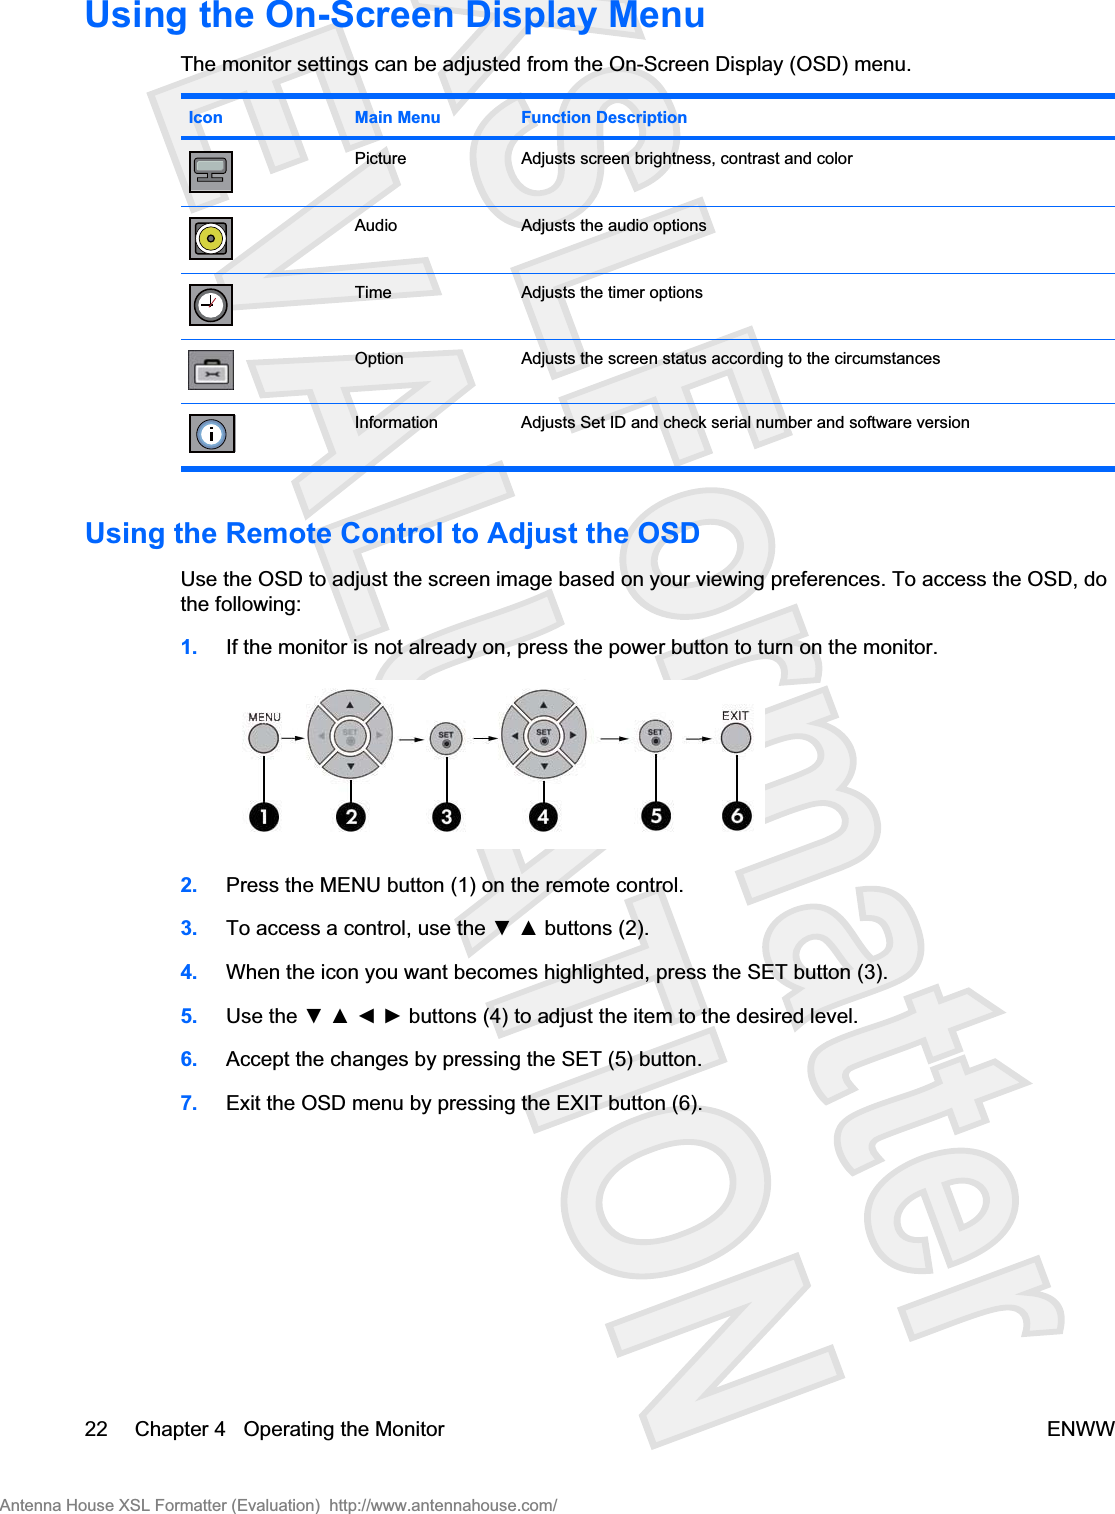
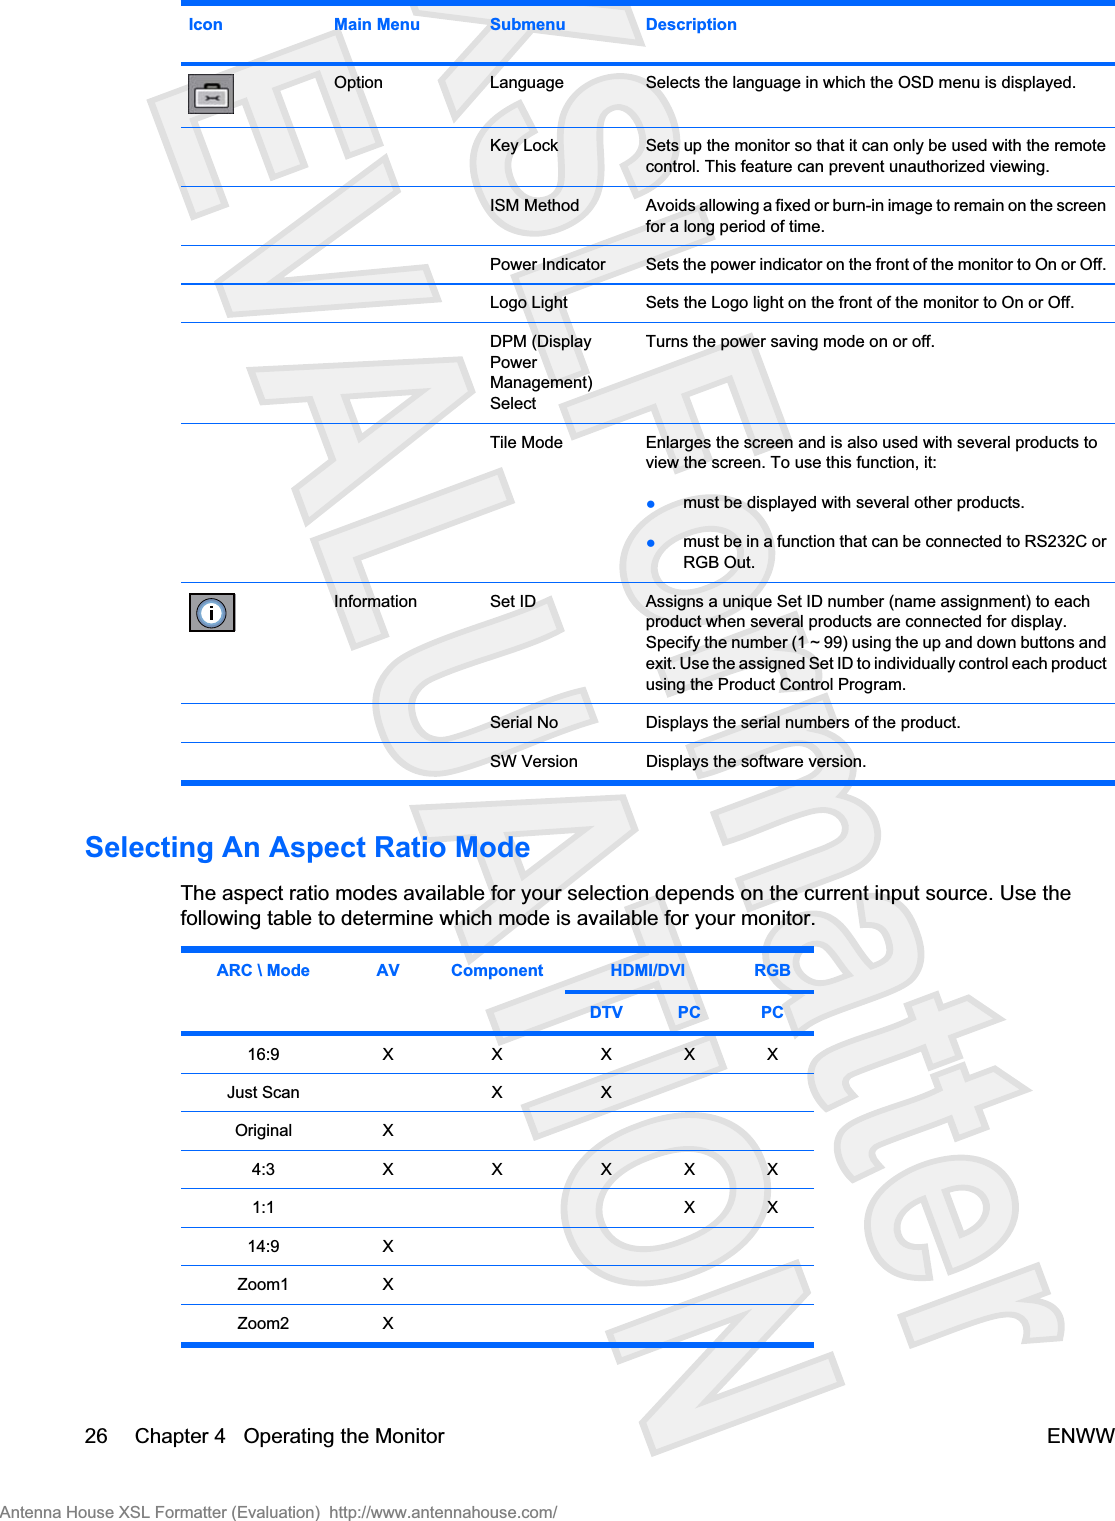
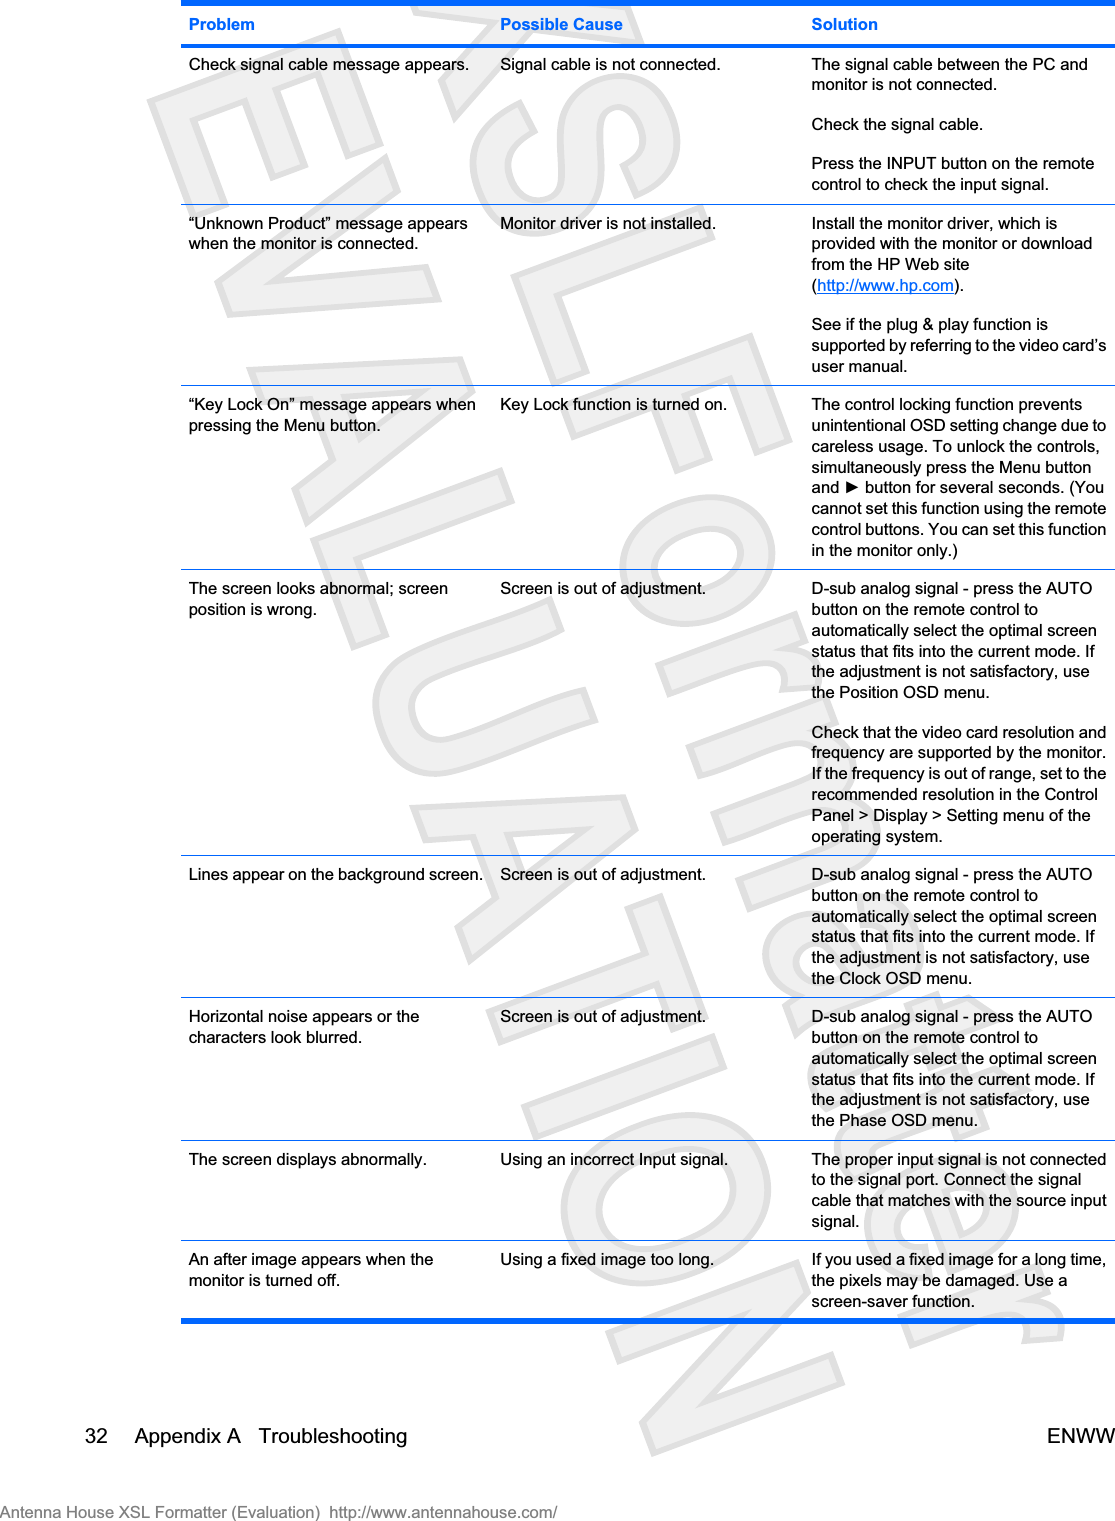
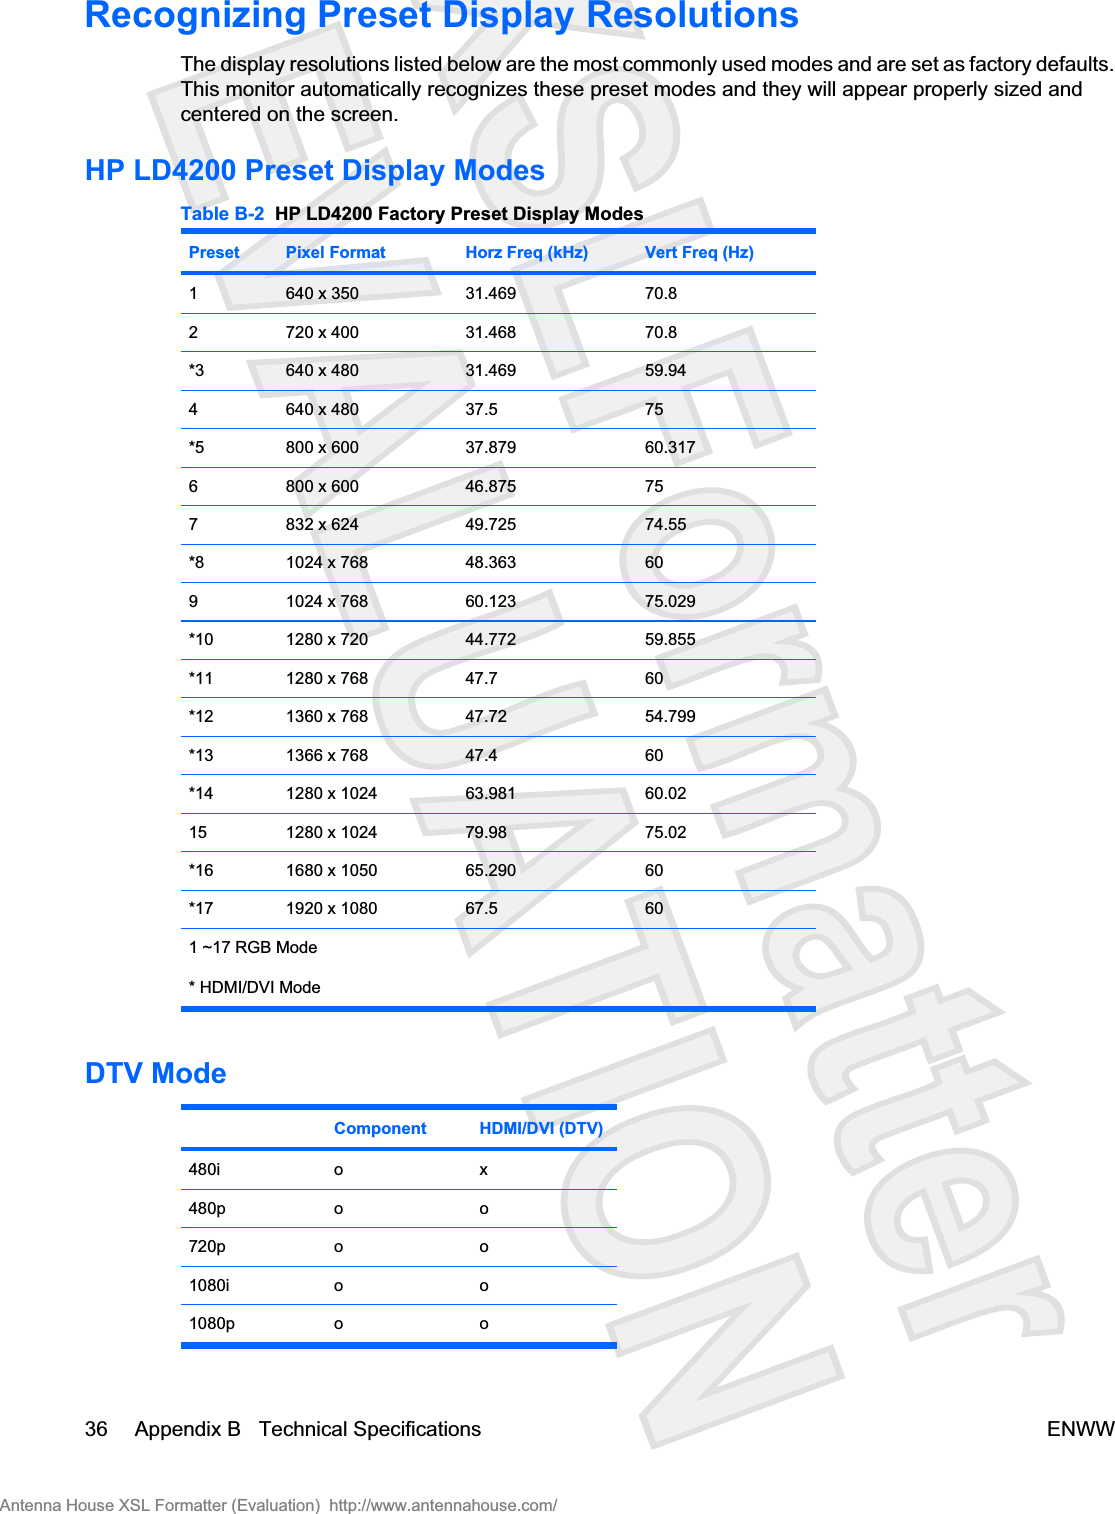
![*[DATA]: To transmit command data.Transmit 'FF' data to read status of command.*[Cr]: Carriage ReturnASCII code ‘0x0D’*[ ]: ASCII code Space (0x20)’OK Acknowledgement[Command2][ ][Set ID][ ][OK][Data][x]*The Product transmits ACK (acknowledgement) based on this format when receiving normal data. Atthis time, if the data is data read mode, it indicates present status data.If the data is data write mode, it returns the data of the PC computer.Error Acknowledgement[Command2][ ][Set ID][ ][NG][Data][x]*If there is error, it returns NG01. Power (Command : a)To control Power On/Off of the Set.Transmission[k][a][ ][Set ID][ ][Data][Cr]Data 0 : Power Off 1 : Power OnAcknowledgement[a][ ][Set ID][ ][OK][Data][x]To show the status of Power On/Off.Transmission[k][a][ ][Set ID][ ][FF][Cr]Acknowledgement[a][ ][Set ID][ ][OK][Data][x]ENWW Transmission / Receiving Protocol 41Antenna House XSL Formatter (Evaluation) http://www.antennahouse.com/](https://usermanual.wiki/LG-Electronics-USA/HSTND-2591-G/User-Guide-1037886-Page-46.png)
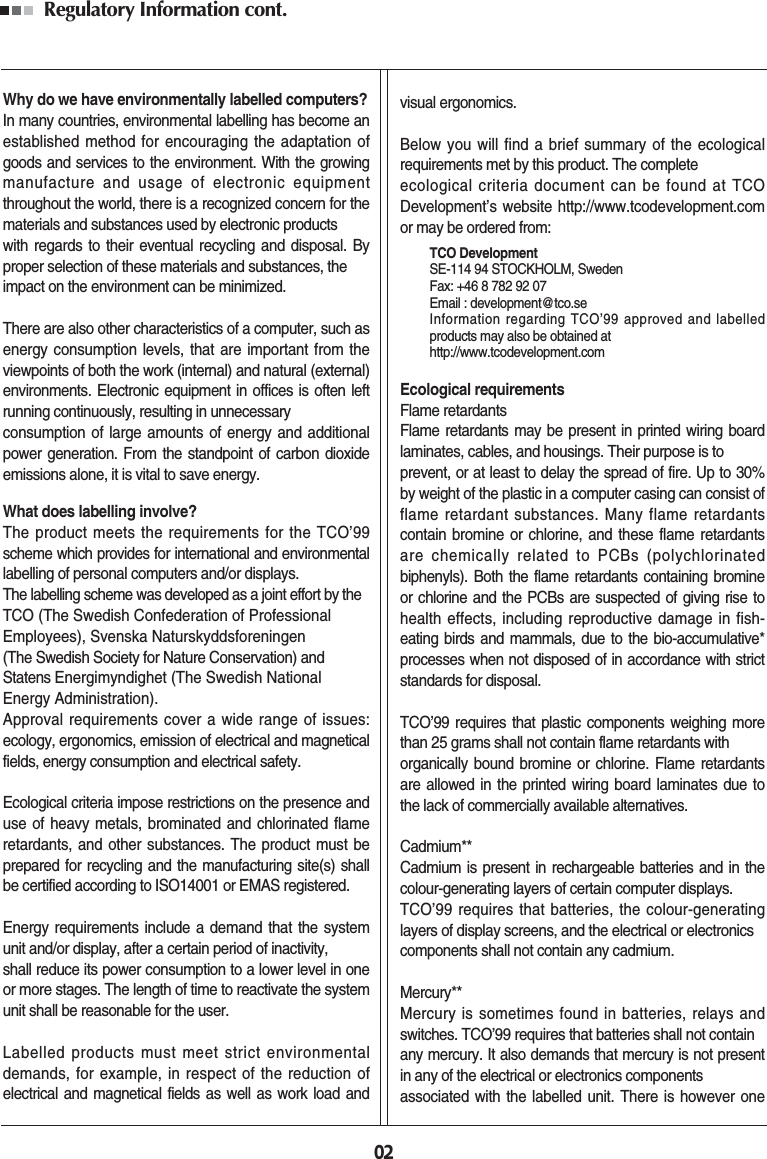
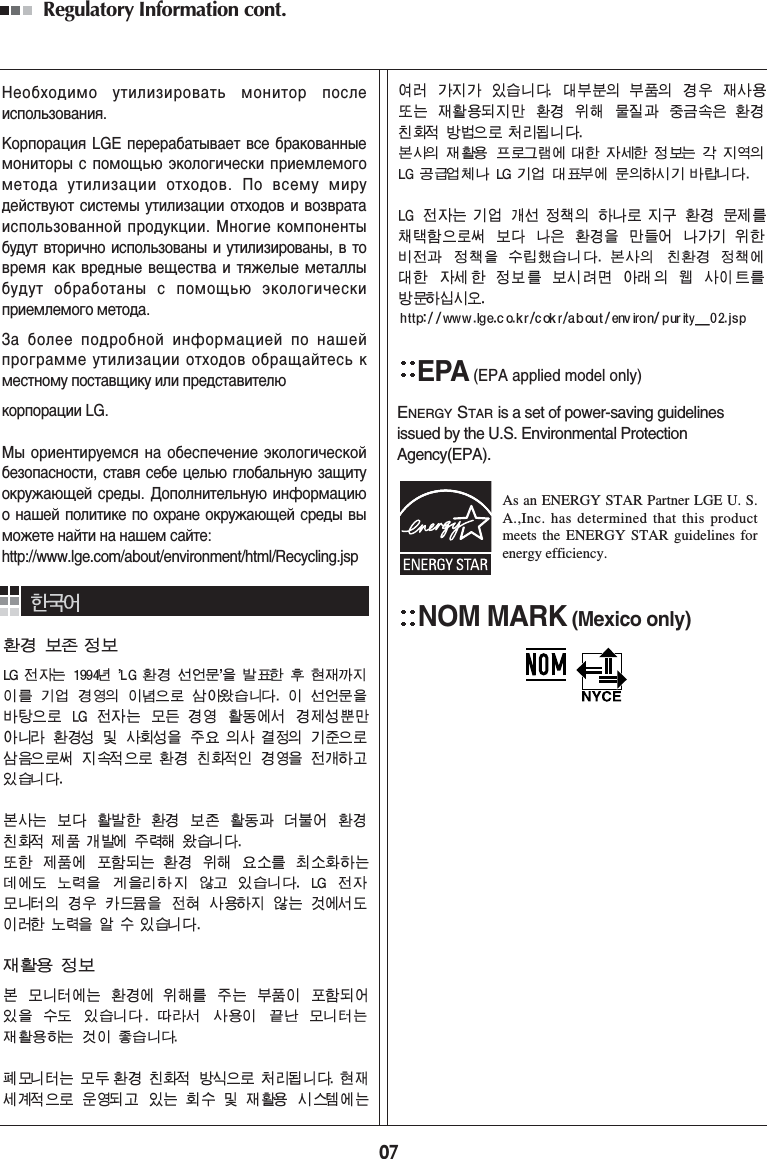
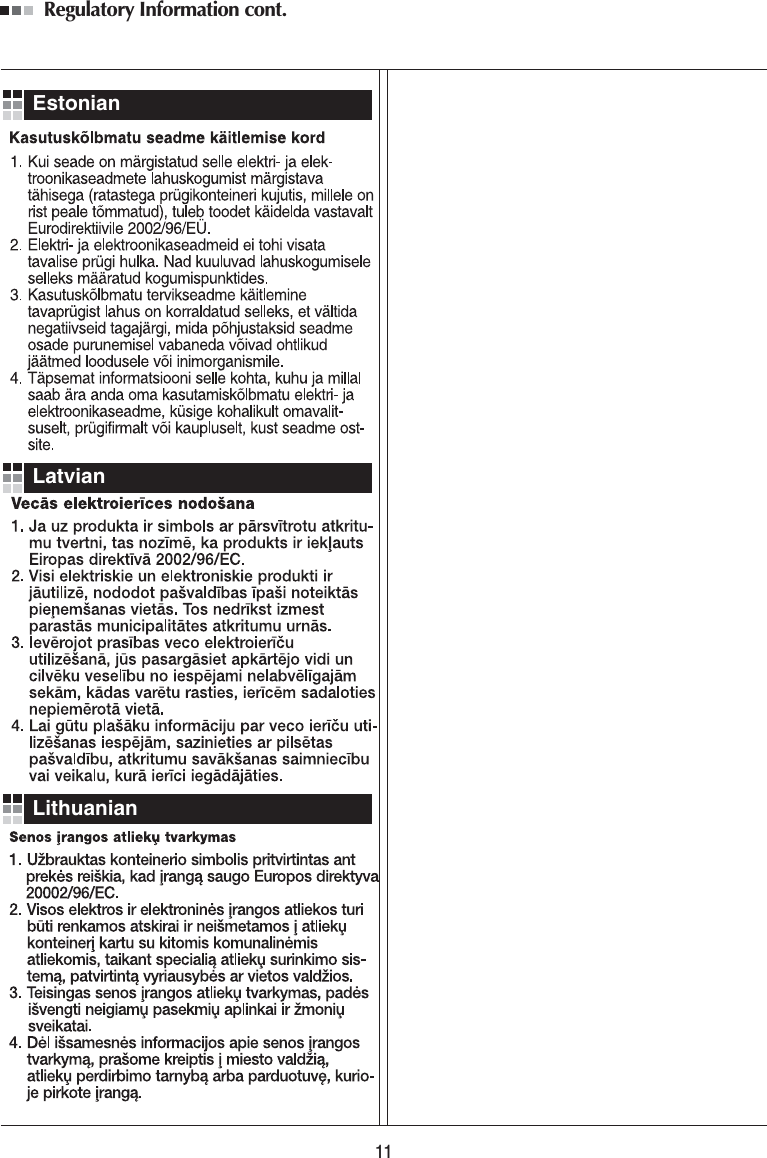
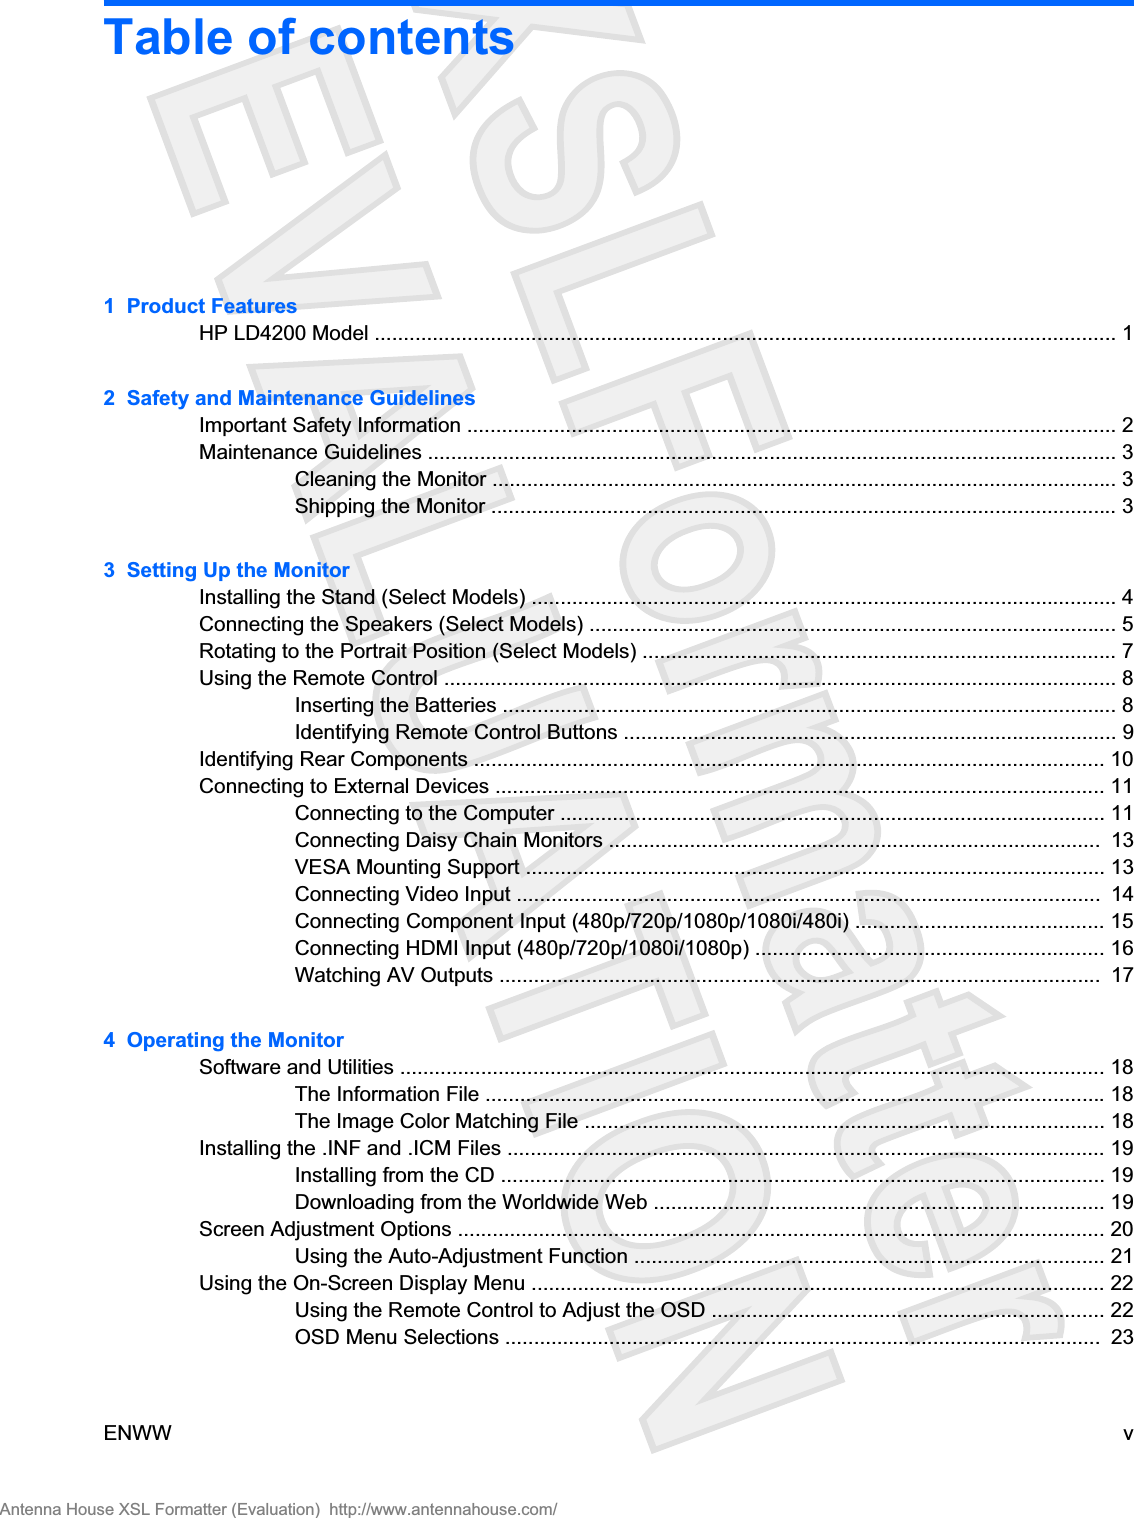
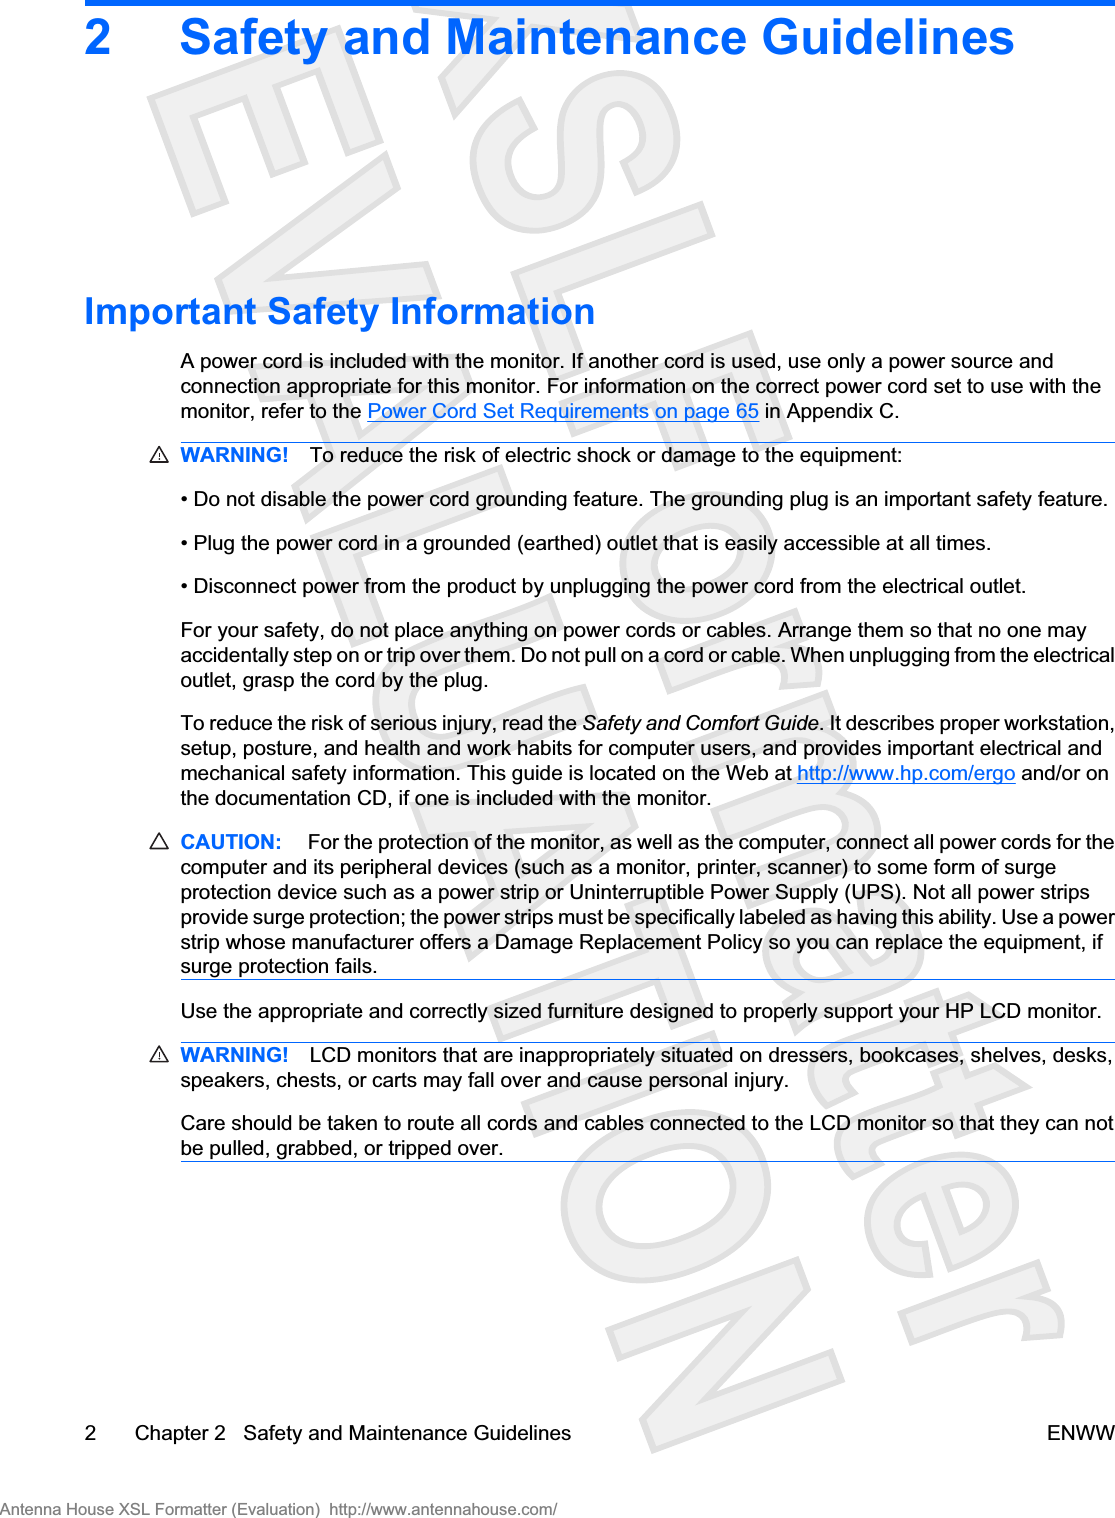
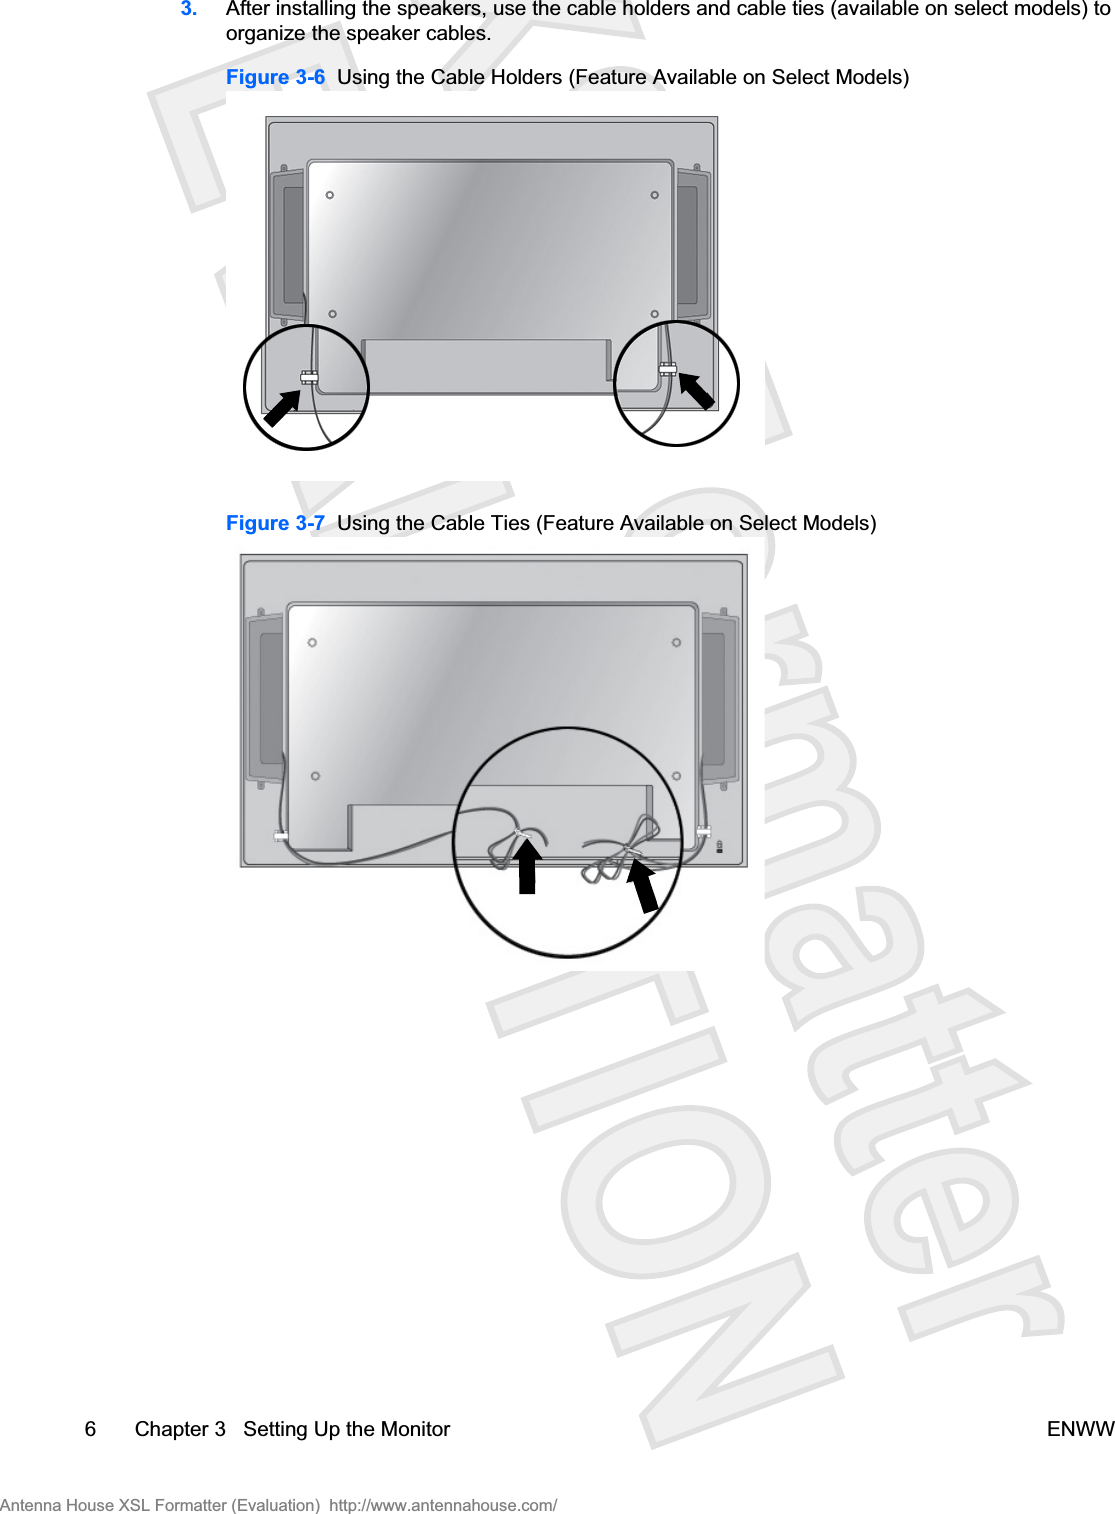
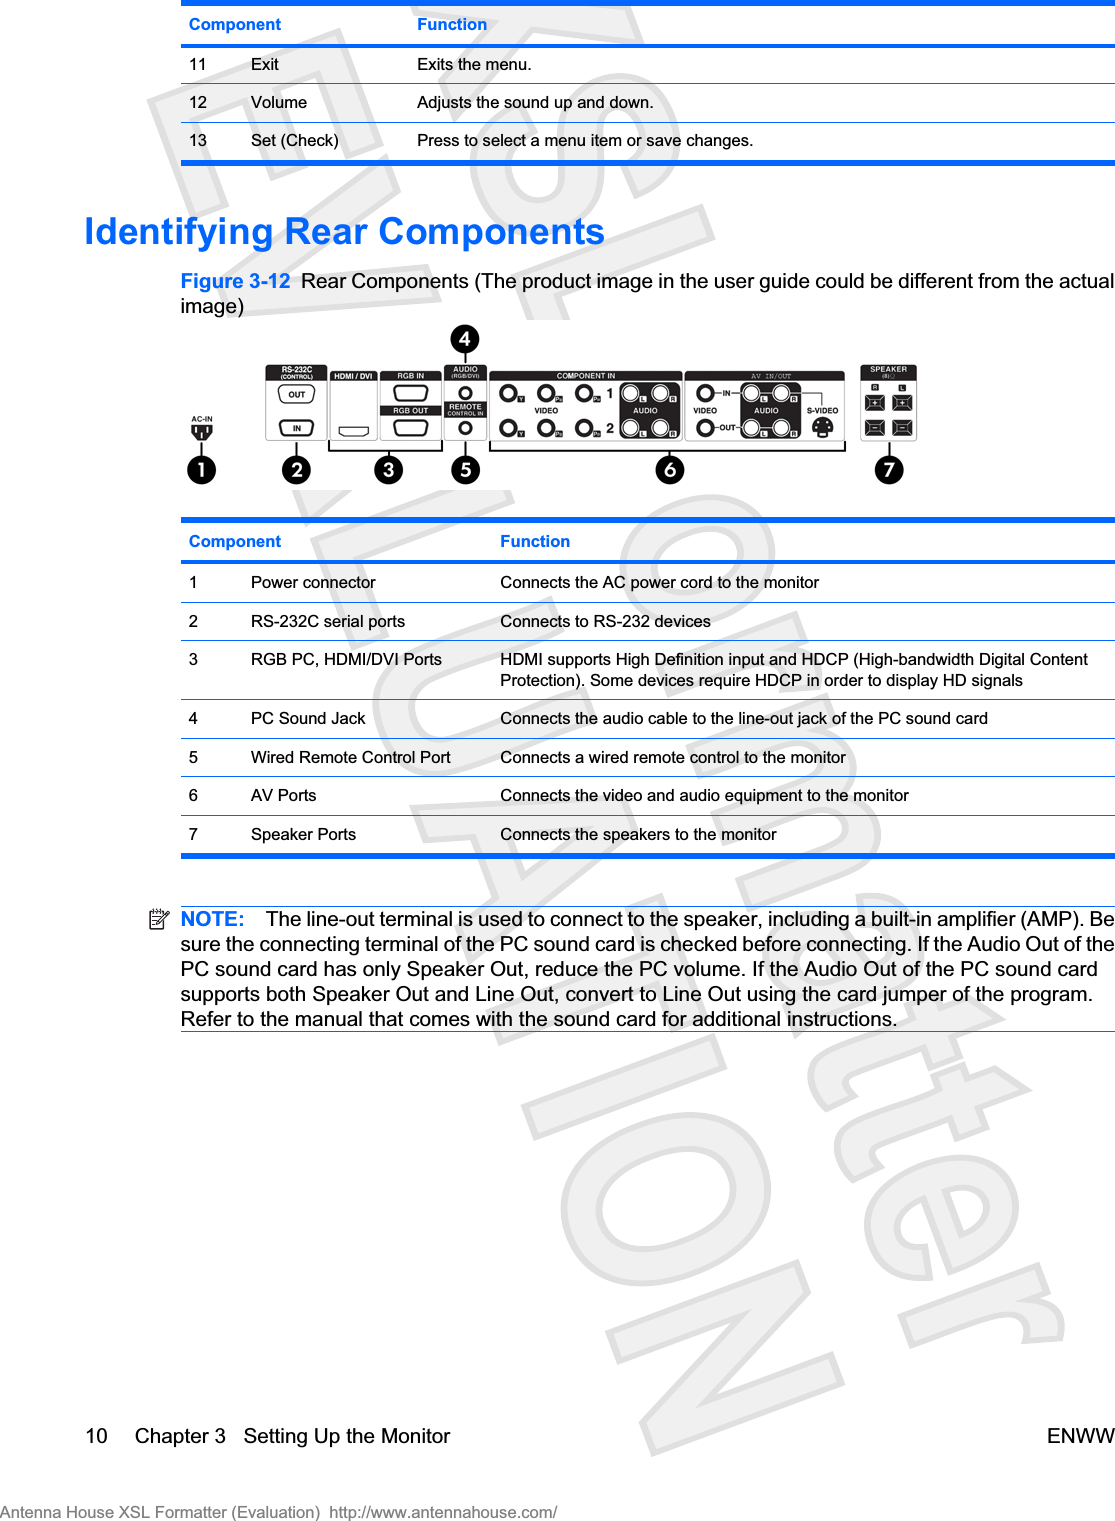
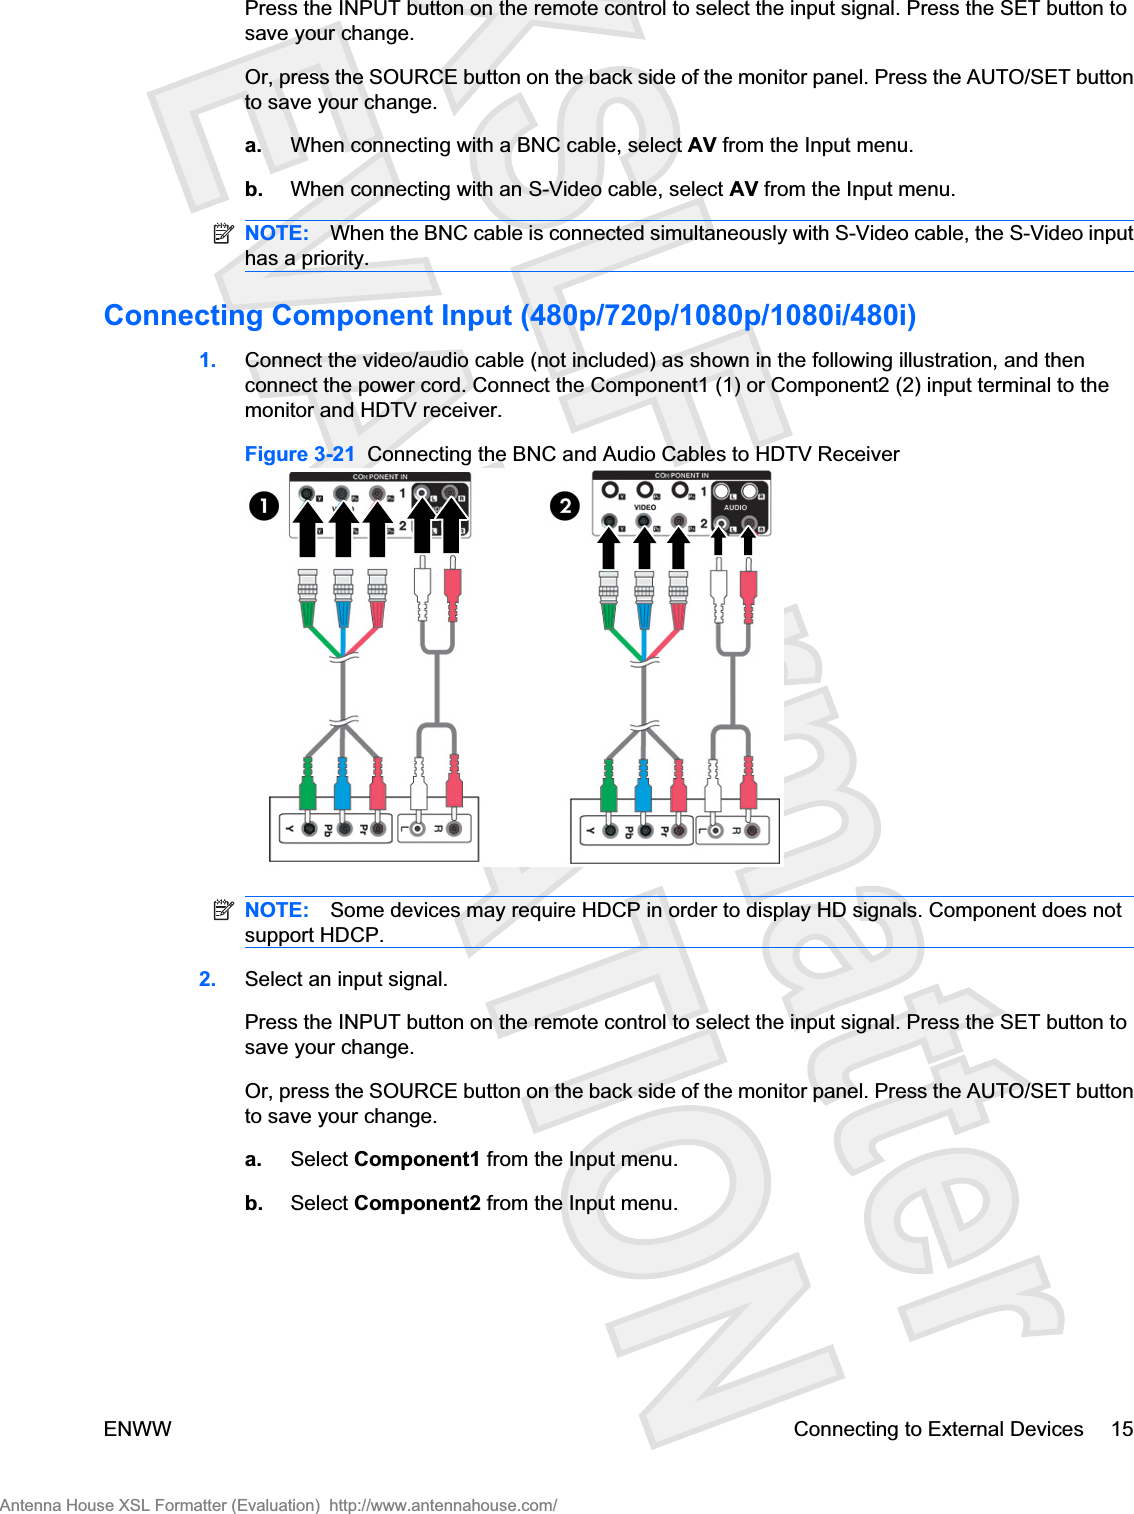
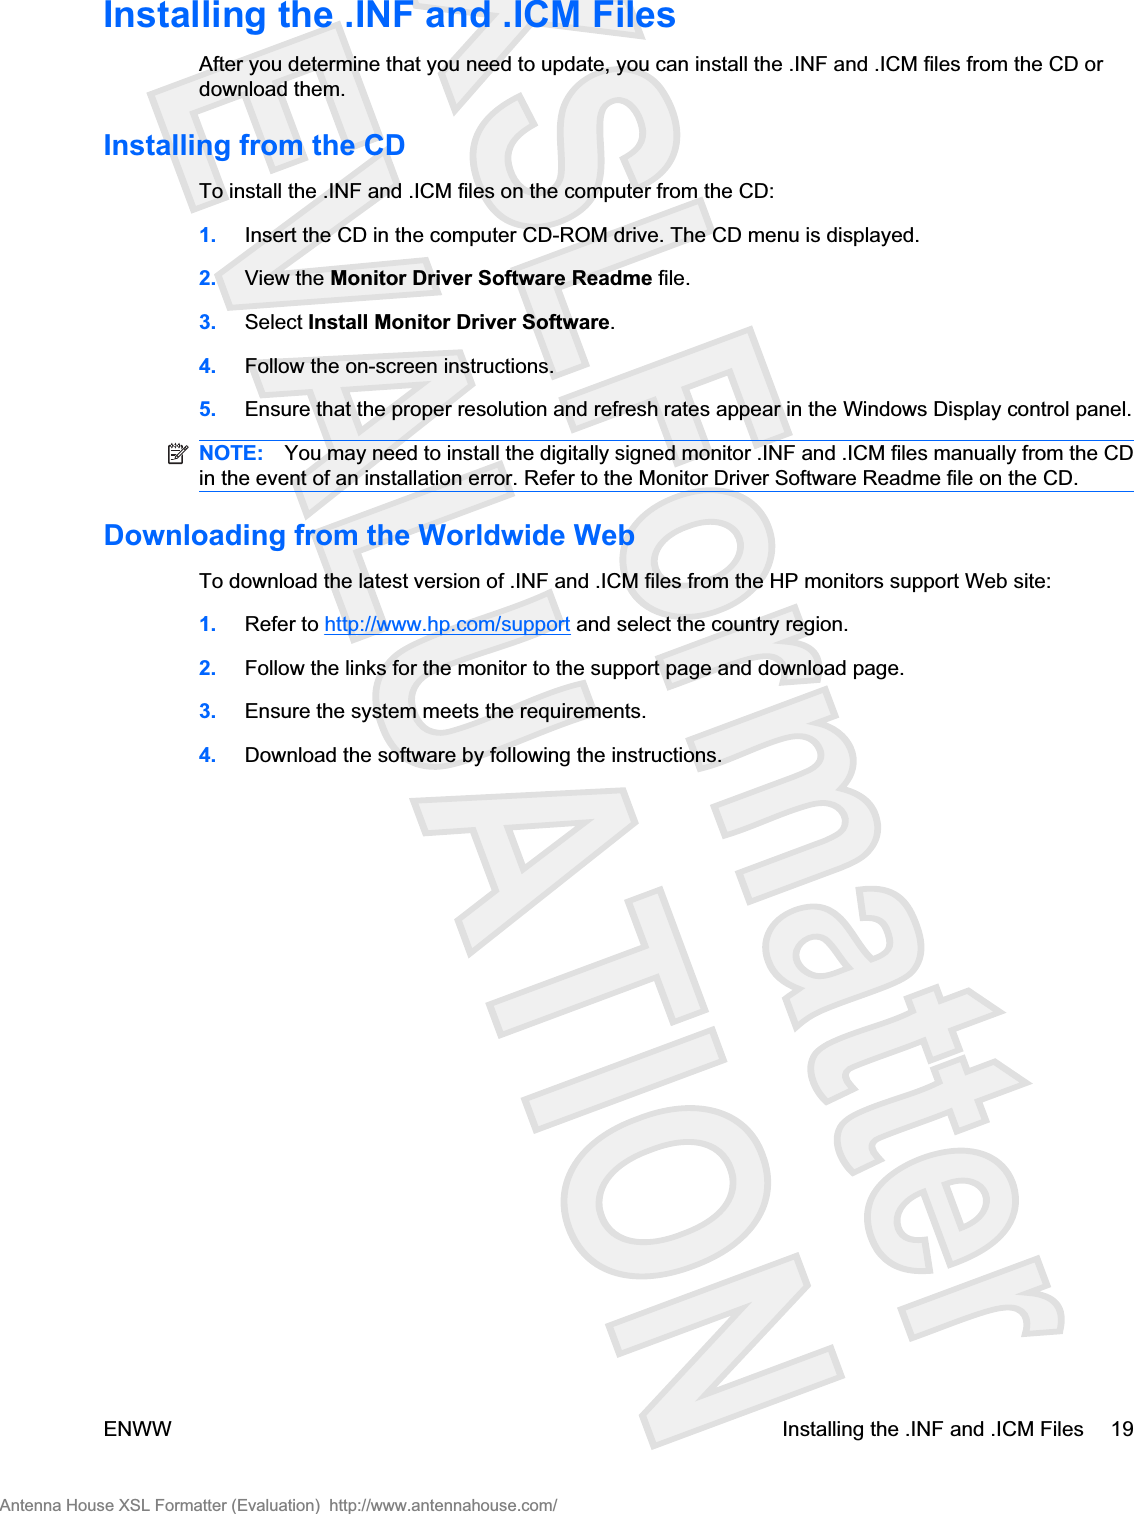
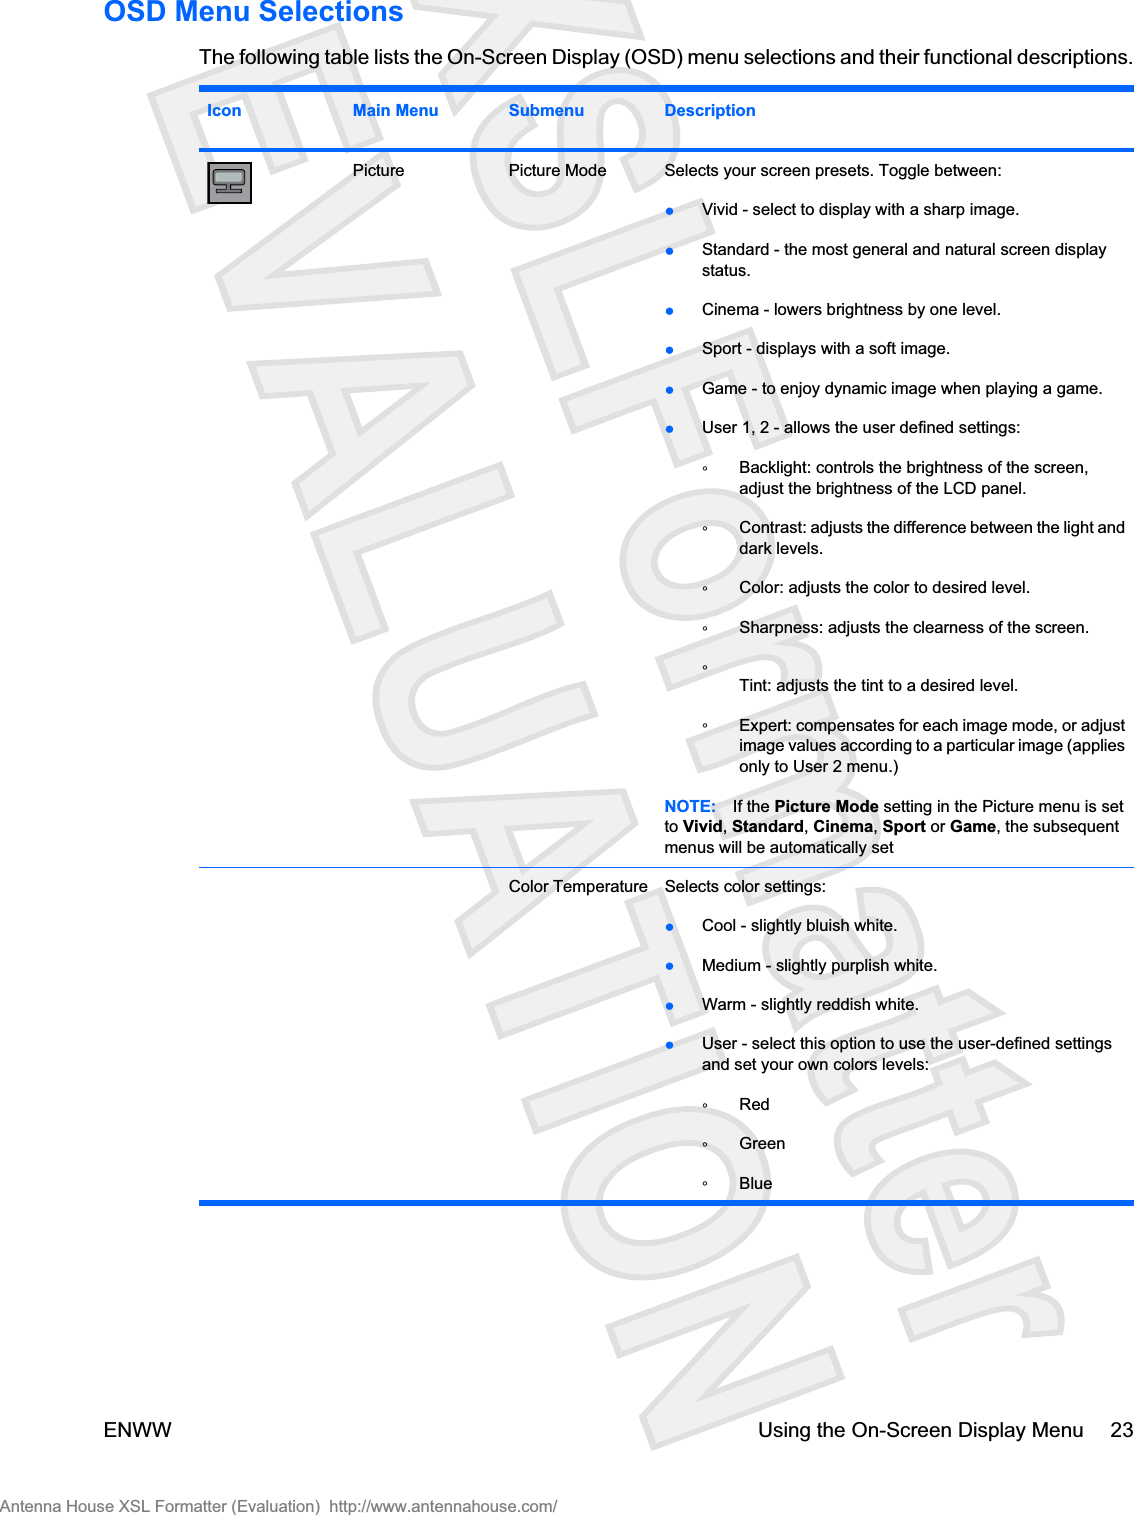
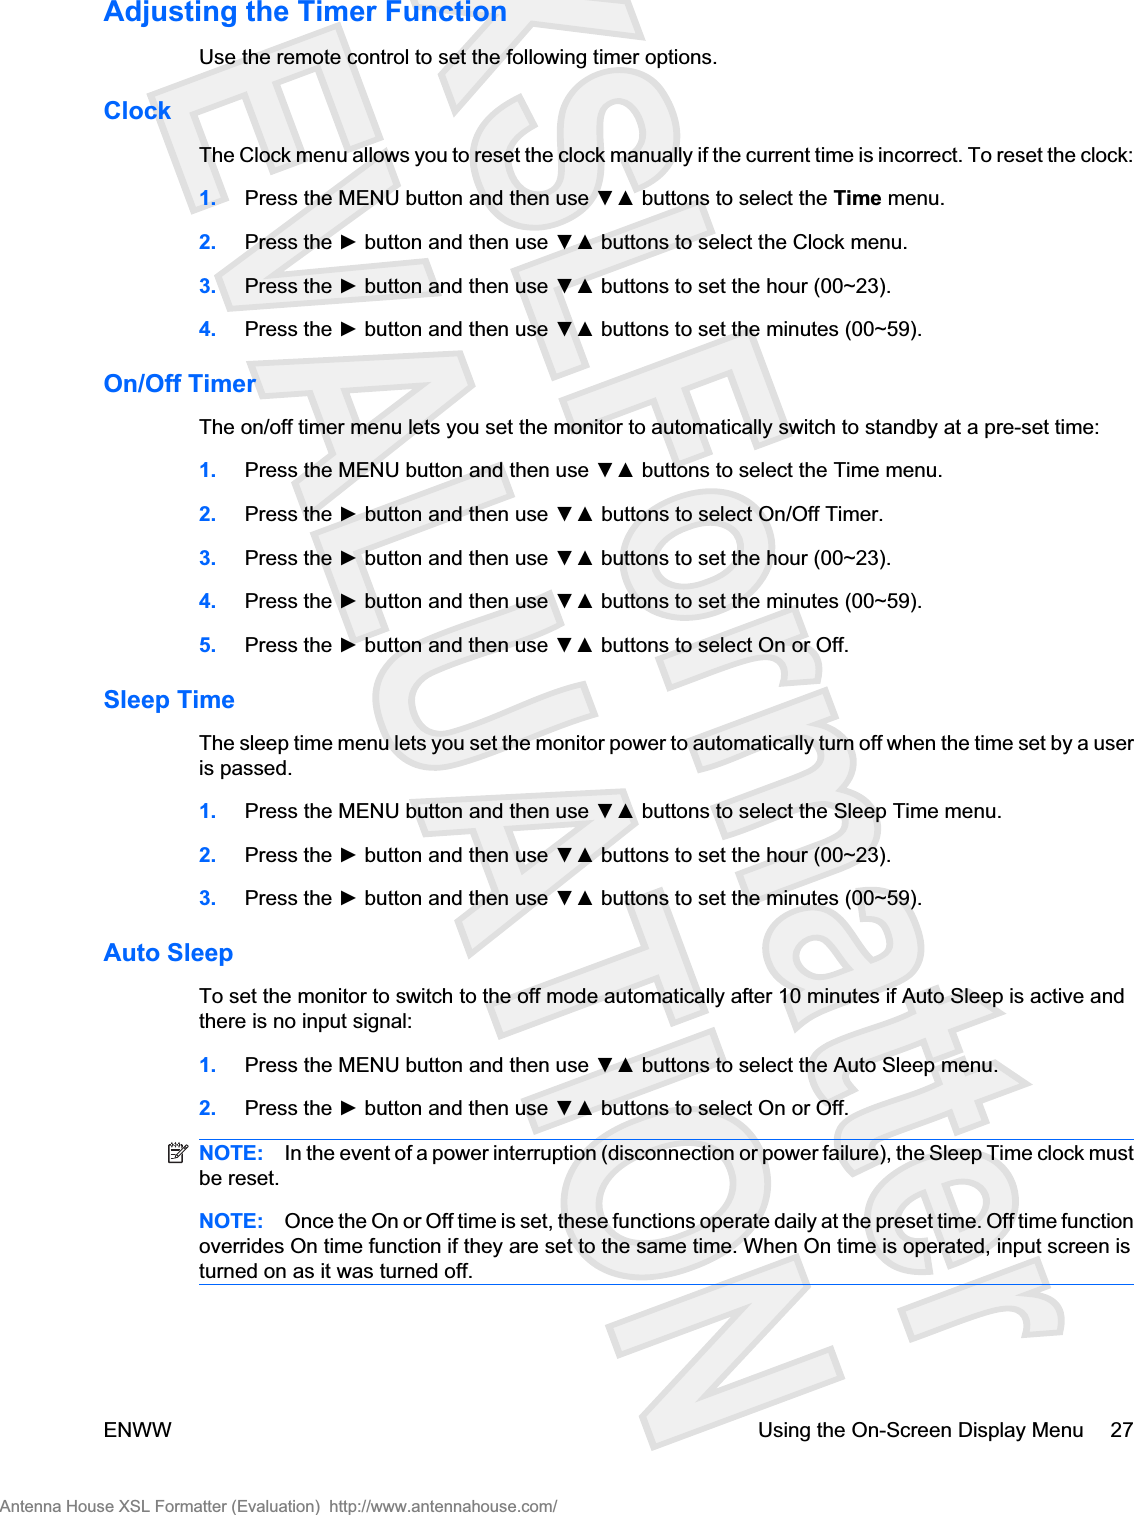
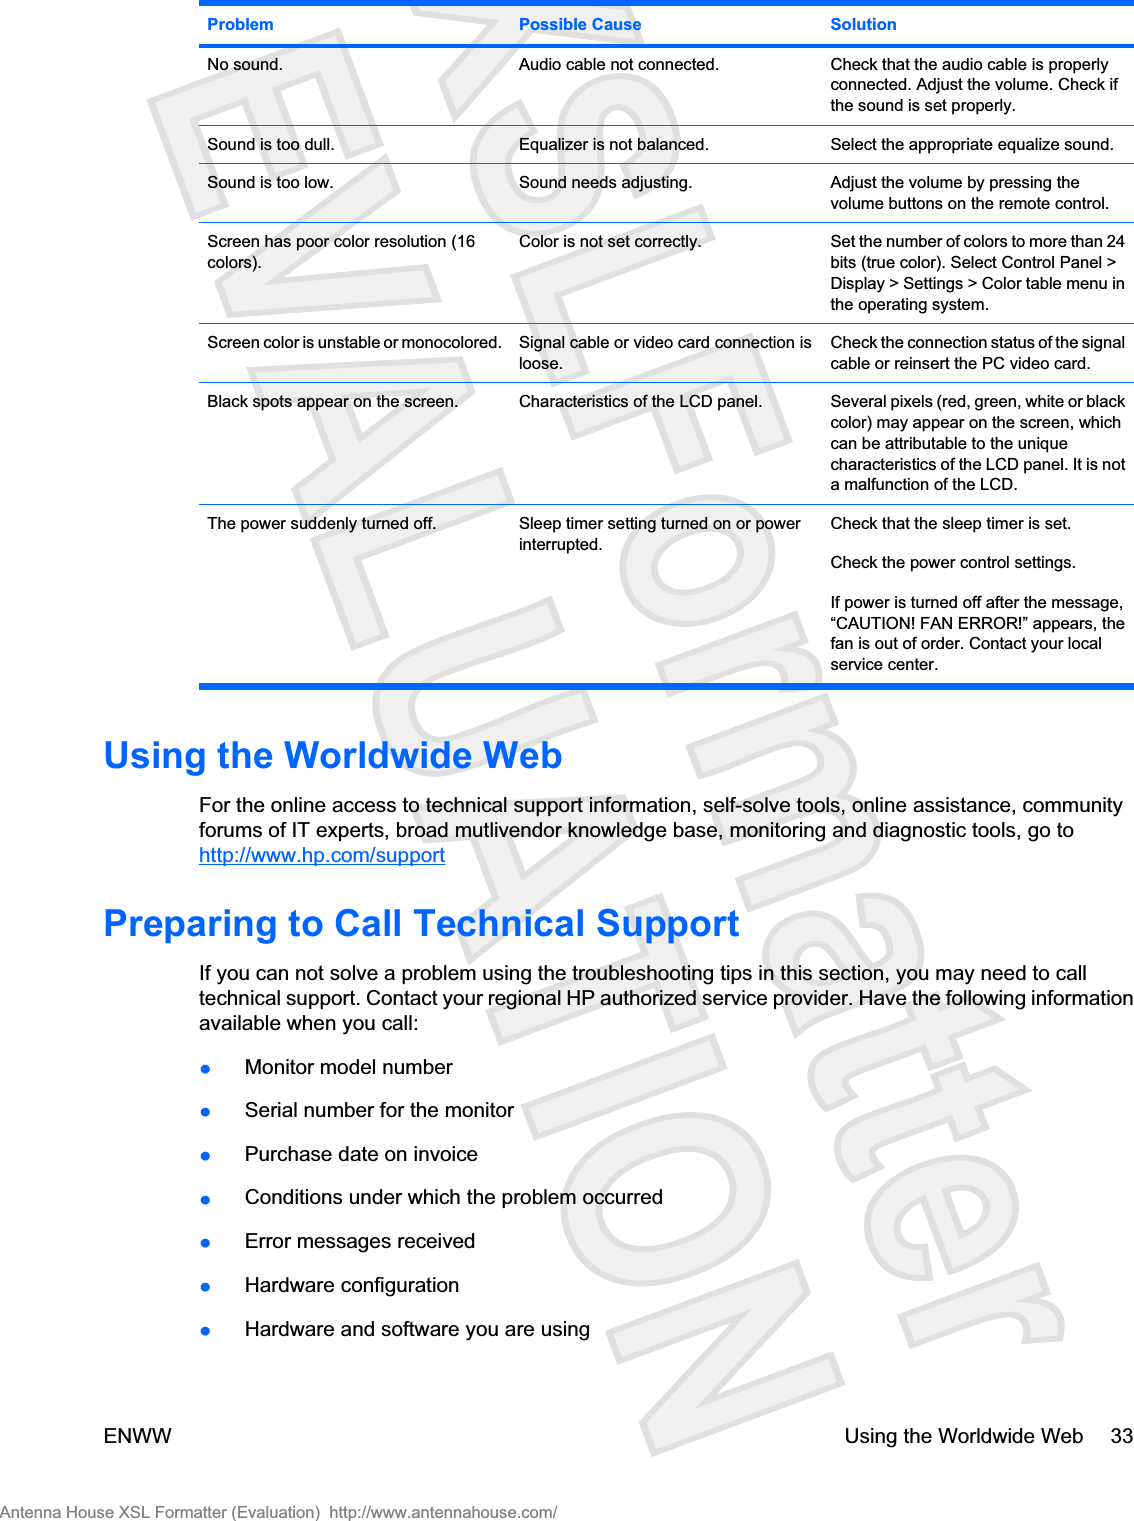
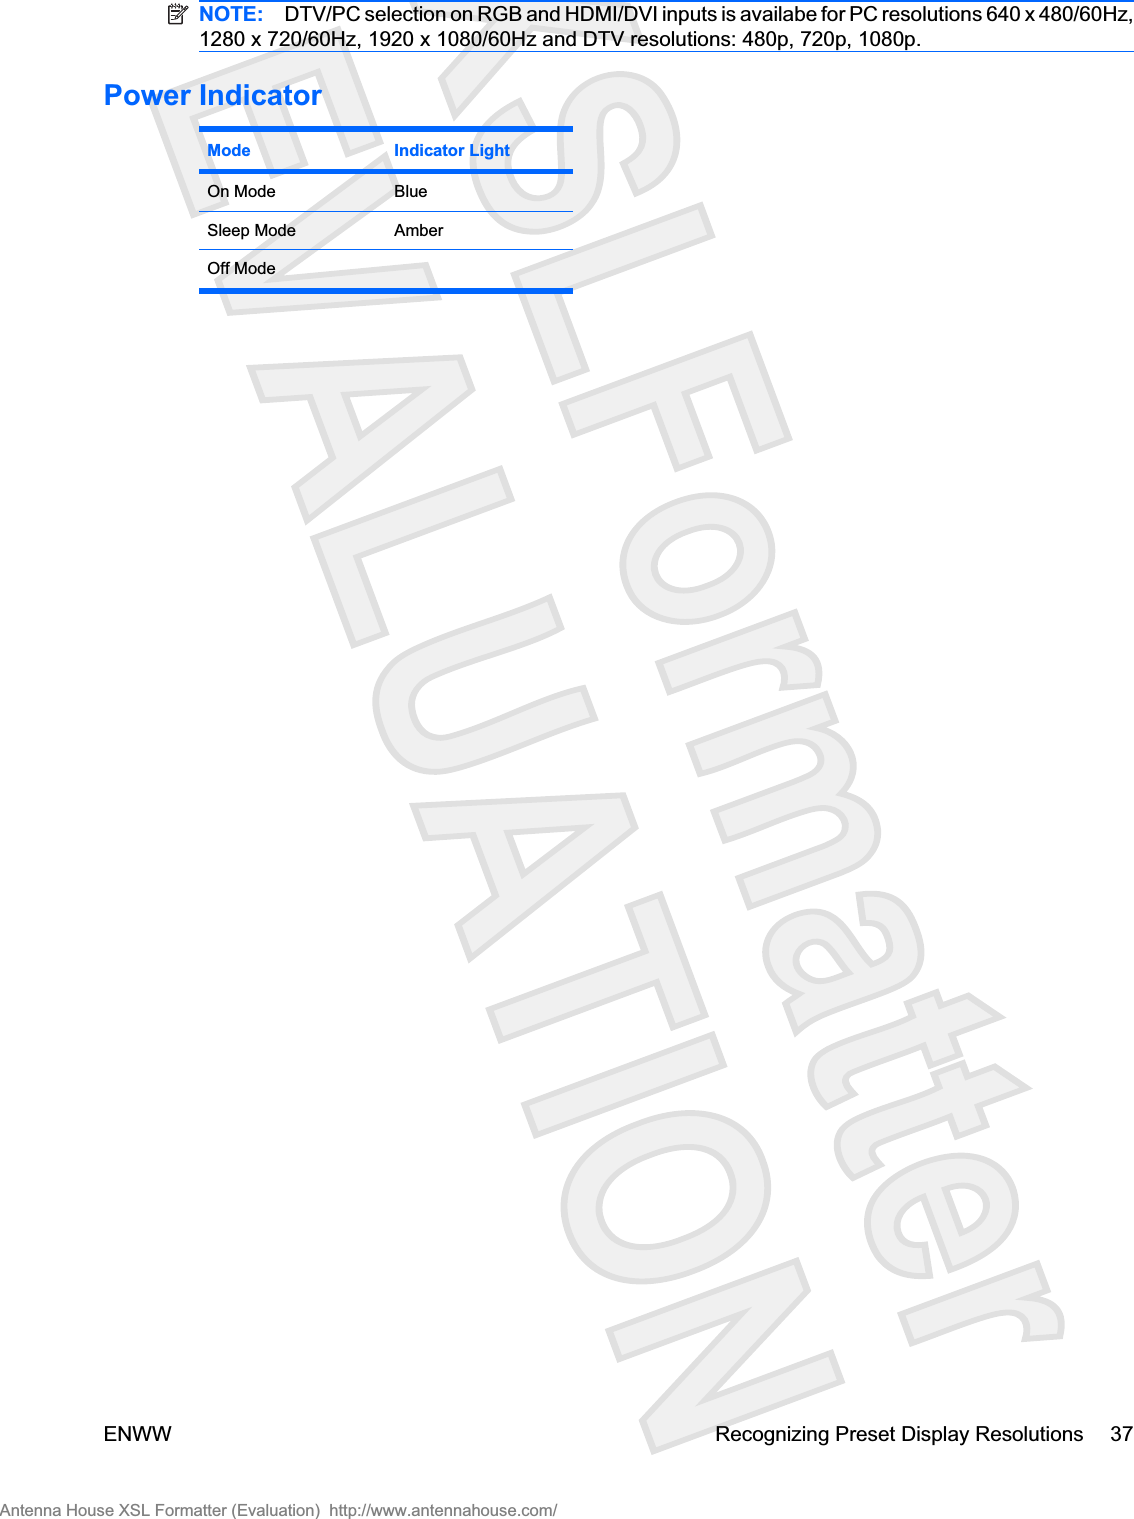
![Data 0 : Power Off 1 : Power On02. Input Select (Command : b) (Main Picture Input)To select input source for the Set.You can also select an input source using the INPUT button on the remote control.Transmission[k][b][ ][Set ID][ ][Data][Cr]Data 2: AV4 : Component 15 : Component 27 : RGB (PC)8 : HDMI (DTV)9 : HDMI (PC)Acknowledgement[b][ ][Set ID][ ][OK][Data][x]Data 2 : AV4 : Component 15 : Component 27 : RGB (PC)8 : HDMI (DTV)9 : HDMI (PC)03. Aspect Ratio (Command : c) (Main picture format)To adjust the screen format.You can also adjust the screen format using the ARC (Aspect Ratio Control) button on remote controlor in the Screen menu.Transmission[k][c][ ][Set ID][ ][Data][Cr]Data 1 : Normal Screen (4:3)2 : Wide Screen (16 :9)42 Appendix C Controlling the Multiple Product ENWWAntenna House XSL Formatter (Evaluation) http://www.antennahouse.com/](https://usermanual.wiki/LG-Electronics-USA/HSTND-2591-G/User-Guide-1037886-Page-47.png)
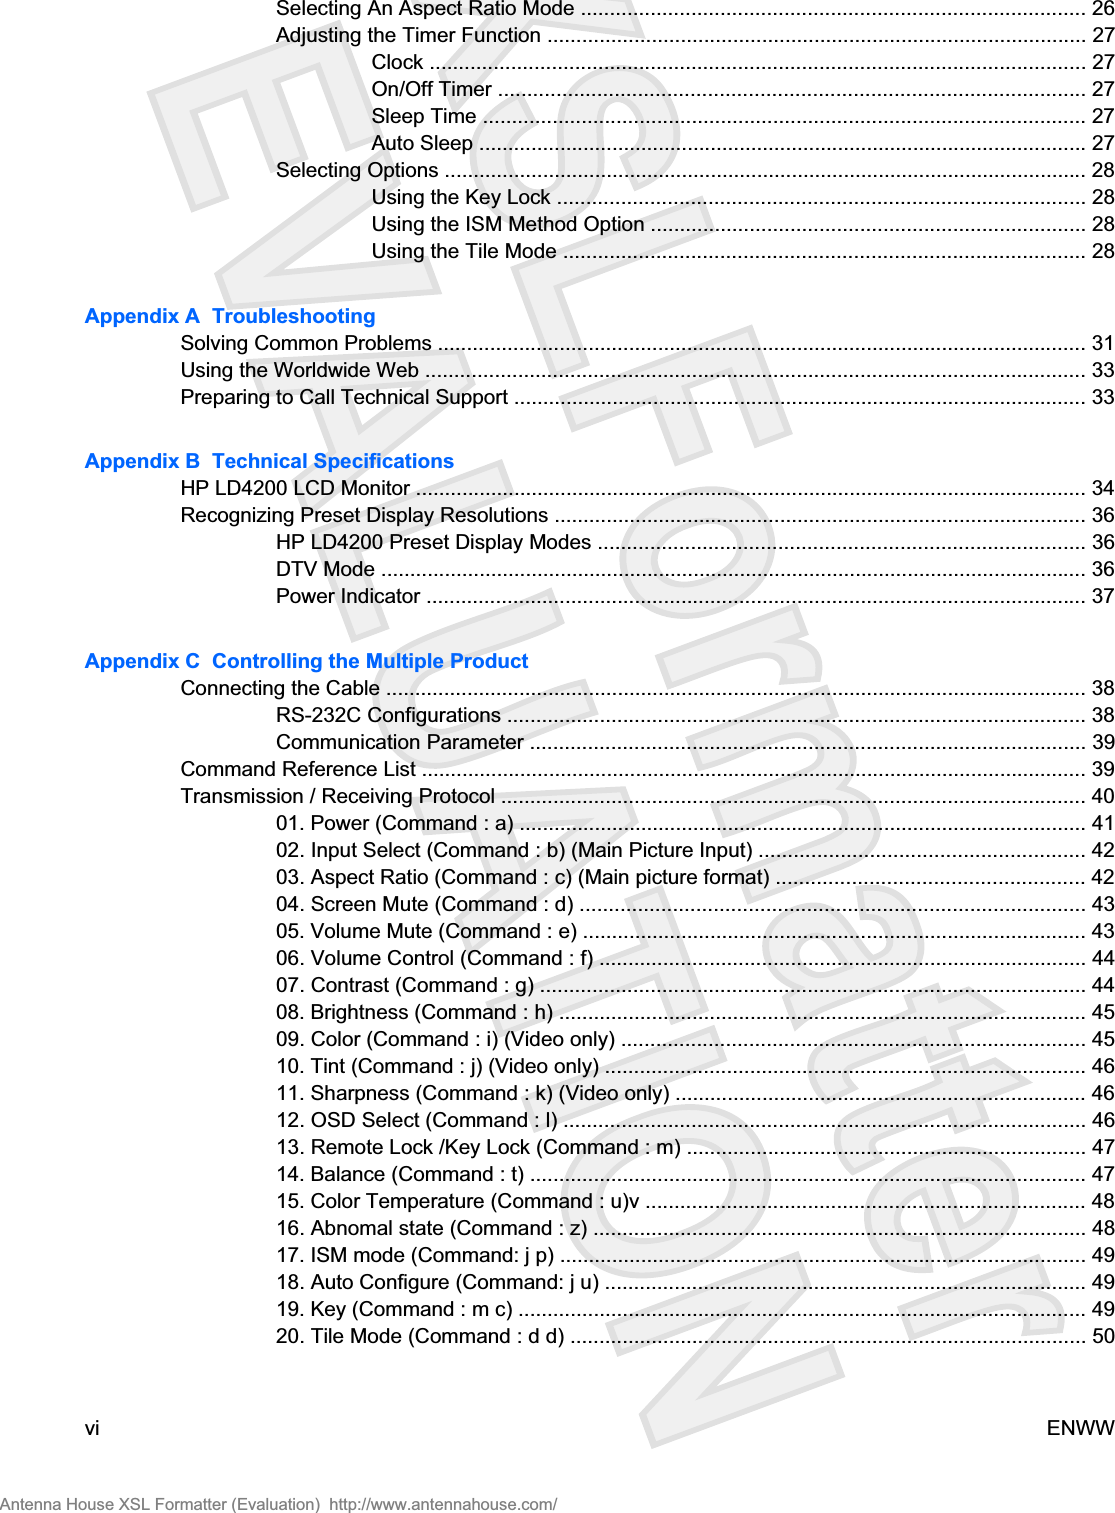
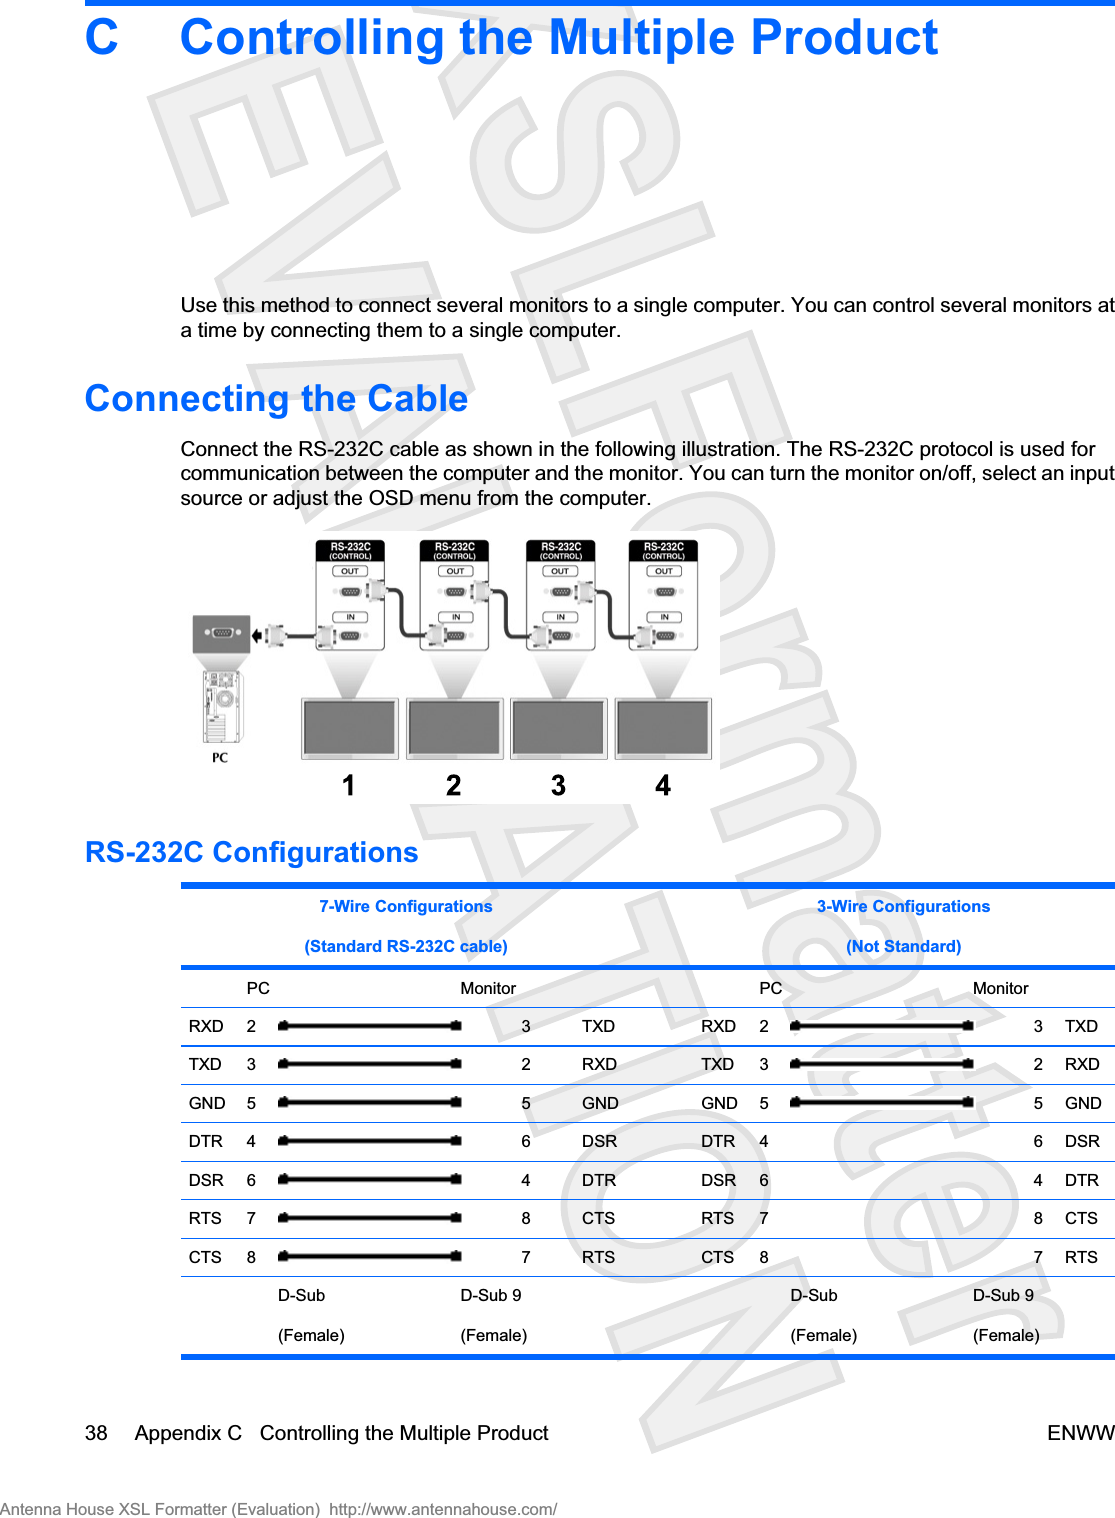
![4 : Zoom1 (AV)5 : Zoom2 (AV)6 : Original (AV)7 : 14:9 (AV)9 : Just Scan(HD DTV), 1:1 (RGB PC, HDMI/DVI PC)Acknowledgement[c][ ][Set ID][ ][OK][Data][x]04. Screen Mute (Command : d)To select screen mute on/off.Transmission[k][d][ ][Set ID][ ][Data][Cr]Data 0 : Screen mute off (Picture on)1 : Screen mute on (Picture off)Acknowledgement[d][ ][Set ID][ ][OK][Data][x]05. Volume Mute (Command : e)To control On/Off of the Volume Mute.Transmission[k][e][ ][Set ID][ ][Data][Cr]Data 0 : Volume Mute On (Volume Off)1 : Volume Mute Off (Volume On)Acknowledgement[e][ ][Set ID][ ][OK][Data][x]Data 0 : Volume Mute On (Volume Off)1 : Volume Mute Off (Volume On)ENWW Transmission / Receiving Protocol 43Antenna House XSL Formatter (Evaluation) http://www.antennahouse.com/](https://usermanual.wiki/LG-Electronics-USA/HSTND-2591-G/User-Guide-1037886-Page-48.png)
![06. Volume Control (Command : f)To adjust Volume.Transmission[k][f][ ][Set ID][ ][Data][Cr]Data Min : 00H ~ Max : 64H(Hexadecimal code)Acknowledgement[f][ ][Set ID][ ][OK][Data][x]Data Min : 00H ~ Max : 64HRefer to “Real data mapping” in this appendix.07. Contrast (Command : g)To adjust screen contrast. You can also adjust the contrast in the Picture menu.Transmission[k][g][ ][Set ID][ ][Data][Cr]Data Min : 00H ~ Max : 64HRefer to “Real data mapping” as shown below.Acknowledgement[g][ ][Set ID][ ][OK][Data][x]* Real data mapping0 : Step 0:A : Step 10:F : Step 1510 : Step 16:44 Appendix C Controlling the Multiple Product ENWWAntenna House XSL Formatter (Evaluation) http://www.antennahouse.com/](https://usermanual.wiki/LG-Electronics-USA/HSTND-2591-G/User-Guide-1037886-Page-49.png)
![64 : Step 10008. Brightness (Command : h)To adjust screen brightness. You can also adjust the brightness in the Picture menu.Transmission[k][h][ ][Set ID][ ][Data][Cr]Data Min : 00H ~ Max : 64HRefer to “Real data mapping” as shown below.Acknowledgement[h][ ][Set ID][ ][OK][Data][x]* Real data mapping0 : Step:A : Step 10:F : Step 1510 : Step 16:64 : Step 10009. Color (Command : i) (Video only)To adjust the screen color. You can also adjust the color in the Picture menu.Transmission[k][i][ ][Set ID][ ][Data][Cr]Data Min : 00H ~ Max : 64H (Hexadecimal code)Refer to “Real data mapping” in the previous section of this appendix.Acknowledgement[i][ ][Set ID][ ][OK][Data][x]ENWW Transmission / Receiving Protocol 45Antenna House XSL Formatter (Evaluation) http://www.antennahouse.com/](https://usermanual.wiki/LG-Electronics-USA/HSTND-2591-G/User-Guide-1037886-Page-50.png)
![Data Min : 00H ~ Max : 64H10. Tint (Command : j) (Video only)To adjust the screen tint. You can also adjust the tint in the Picture menu.Transmission[k][j][ ][Set ID][ ][Data][Cr]Data Red: 00H ~ Green: 64H (Hexadecimal code)Refer to “Real data mapping” in the previous section of this appendix.Acknowledgement[j][ ][Set ID][ ][OK][Data][x]Data Red: 00H ~ Green: 64H* Tint Real data mapping0 : Step -50:64 : Step 5011. Sharpness (Command : k) (Video only)To adjust the screen Sharpness. You can also adjust the sharpness in the Picture menu.Transmission[k][k][ ][Set ID][ ][Data][Cr]Data Min : 00H ~ Max : 64H(Hexadecimal code)Refer to “Real data mapping” in the previous section of this appendix.Acknowledgement[k][ ][Set ID][ ][OK][Data][x]Data Min : 00H ~ Max : 64H12. OSD Select (Command : l)To control OSD on/off to the set.46 Appendix C Controlling the Multiple Product ENWWAntenna House XSL Formatter (Evaluation) http://www.antennahouse.com/](https://usermanual.wiki/LG-Electronics-USA/HSTND-2591-G/User-Guide-1037886-Page-51.png)
![Transmission[k][l][ ][Set ID][ ][Data][Cr]Data 0 : OSD Off 1 : OSD OnAcknowledgement[l][ ][Set ID][ ][OK][Data][x]Data 0 : OSD Off 1 : OSD On13. Remote Lock /Key Lock (Command : m)To control Remote Lock on/off to the set.This function, when controlling RS-232C, locks the remote control and the local keys.Transmission[k][m][ ][Set ID][ ][Data][Cr]Data 0 : Off 1 : OnAcknowledgement[m][ ][Set ID][ ][OK][Data][x]Data 0 : Off 1 : On14. Balance (Command : t)To adjust the sound balance.Transmission[k][t][ ][Set ID][ ][Data][Cr]Data Min : 00H ~ Max : 64H(Hexadecimal code)Refer to “Real data mapping” in the previous section of the appendixAcknowledgement[t][ ][Set ID][ ][OK][Data][x]ENWW Transmission / Receiving Protocol 47Antenna House XSL Formatter (Evaluation) http://www.antennahouse.com/](https://usermanual.wiki/LG-Electronics-USA/HSTND-2591-G/User-Guide-1037886-Page-52.png)
![Data Min : 00H ~ Max : 64HBalance : L50 ~ R5015. Color Temperature (Command : u)vTo adjust the screen color temperature.Transmission[k][u][ ][Set ID][ ][Data][Cr]Data 0 : Medium1 : Cool2 : Warm3 : UserAcknowledgement[u][ ][Set ID][ ][OK][Data][x]Data 0 : Medium1 : Cool2 : Warm3 : User16. Abnomal state (Command : z)Abnormal State : Used to Read the power off status when Stand-by mode.Transmission[k][z][ ][Set ID][ ][Data][Cr]Data FF : Read0 : Normal (Power on and signal exist)1 : No signal (Power on)2 : Turn the monitor off by remote control3 : Turn the monitor off by sleep time function4 : Turn the monitor off by RS-232C function8 : Turn the monitor off by off time function48 Appendix C Controlling the Multiple Product ENWWAntenna House XSL Formatter (Evaluation) http://www.antennahouse.com/](https://usermanual.wiki/LG-Electronics-USA/HSTND-2591-G/User-Guide-1037886-Page-53.png)
![9 : Turn the monitor off by auto off functionAcknowledgement[z][ ][Set ID][ ][OK][Data][x]17. ISM mode (Command: j p)Used to select the afterimage preventing function.Transmission[j][p][ ][Set ID][ ][Data][Cr]Data 1H : Inversion2H : Orbiter4H : White Wash8H : Normal10H : Dot WashAcknowledgement[p][ ][Set ID][ ][OK][Data][x]18. Auto Configure (Command: j u)To adjust picture position and minimize image shaking automatically. It works only in RGB(PC) mode.Transmission[j][u][ ][Set ID][ ][Data][Cr]Data 1 : To setAcknowledgement[u][ ][Set ID][ ][OK][Data][x]19. Key (Command : m c)To send IR remote key code.Transmission[m][c][ ][Set ID][ ][Data][Cr]ENWW Transmission / Receiving Protocol 49Antenna House XSL Formatter (Evaluation) http://www.antennahouse.com/](https://usermanual.wiki/LG-Electronics-USA/HSTND-2591-G/User-Guide-1037886-Page-54.png)
![Data Key code : Refer to page A18.Acknowledgement[c][ ][Set ID][ ][OK][Data][x]20. Tile Mode (Command : d d)Change a Tile Mode.Transmission[d][d][][Set ID][][Data][x]Data Description00 Tile mode is off.12 1 x 2 mode(column x row)13 1 x 3 mode14 1 x 4 mode... ...55 5 x 5 mode*The data can not be set to 0X or X0 except 00Acknowledgement[d][][00][][OK/NG][Data][x]21. Tile H Position (Command : d e)To set the Horizontal position.Transmission[d][e][][Set ID][][Data][x]Data Min : 00H ~ Max : 64HAcknowledgement[e][][Set ID][][OK/NG][Data][x]50 Appendix C Controlling the Multiple Product ENWWAntenna House XSL Formatter (Evaluation) http://www.antennahouse.com/](https://usermanual.wiki/LG-Electronics-USA/HSTND-2591-G/User-Guide-1037886-Page-55.png)
![22. Tile V Position (Command : d f)To set the Vertical position.Transmission[d][f][][Set ID][][Data][x]Data Min : 00H ~ Max : 64HAcknowledgement[f][][Set ID][][OK/NG][Data][x]23. Tile H Size (Command : d g)To set the Horizontal size.Transmission[d][g][][Set ID][][Data][x]Data Min : 00H ~ Max : 64HAcknowledgement[g][][Set ID][][OK/NG][Data][x]24. Tile V Size (Command : d h)To set the Vertical size.Transmission[d][h][][Set ID][][Data][x]Data Min : 00H ~ Max : 64HAcknowledgement[h][][Set ID][][OK/NG][Data][x]25. Tile ID Set (Command : d i)To assign the Tile ID for Tiling function.TransmissionENWW Transmission / Receiving Protocol 51Antenna House XSL Formatter (Evaluation) http://www.antennahouse.com/](https://usermanual.wiki/LG-Electronics-USA/HSTND-2591-G/User-Guide-1037886-Page-56.png)
![[d][i][][Set ID][][Data][x]Data Min : 00H ~ Max : 19H(Hexadecimal code)Acknowledgement[i][][Set ID][][OK/NG][Data][x]26. Natural Mode (In Tilemode) (Command : d j)The image is omitted by the distance between the screens to be naturally shown.Transmission[d][j][][Set ID][][Data][x]Data 0 : Natural Off1 : Natural Onff : Read StatusAcknowledgement[j][][Set ID][][OK/NG][Data][x]27. Elapsed time return (Command : d l)To read the elapsed time.Transmission[d][l][][Set ID][][Data][x]* The data is always FF(in Hex).Acknowledgement[l][][Set ID][][OK/NG][Data][x]* The data means used hours. (Hexadecimal code)28. Temperature value (Command : d n)To read the inside temperature value.52 Appendix C Controlling the Multiple Product ENWWAntenna House XSL Formatter (Evaluation) http://www.antennahouse.com/](https://usermanual.wiki/LG-Electronics-USA/HSTND-2591-G/User-Guide-1037886-Page-57.png)
![Transmission[d][n][][Set ID][][Data][x]* The data is always FF(in Hex).Acknowledgement[n][][Set ID][][OK/NG][Data][x]* The data is 1 byte long in Hexadecimal.29. Lamp fault Check (Command : d p)To check lamp fault.Transmission[d][p][][Set ID][][Data][x]* The data is always FF(in Hex).Acknowledgement[p][][Set ID][][OK/NG][Data][x]Data 0 : Lamp Fault1 : Lamp OK30. Auto volume (Command : d u)Automatically adjust the volume level.Transmission[d][u][][Set ID][][Data][x]Data 0 : Off1 : OnAcknowledgement[u][][Set ID][][OK/NG][Data][x]ENWW Transmission / Receiving Protocol 53Antenna House XSL Formatter (Evaluation) http://www.antennahouse.com/](https://usermanual.wiki/LG-Electronics-USA/HSTND-2591-G/User-Guide-1037886-Page-58.png)
![31. Speaker (Command : d v)Turn the speaker on or off.Transmission[d][v][][Set ID][][Data][x]Data 0 : Off1 : OnAcknowledgement[v][][Set ID][][OK/NG][Data][x]32. Time (Command : f a)Set the current time.Transmission[f][a][][Set ID][][Data1][][Data2][][Data3][Cr][Data1]0 : Monday1 : Tuesday2 : Wednesday3 : Thursday4 : Friday5 : Saturday6 : Sunday[Data2]0H~17H (Hours)[Data3]00H~3BH (Minutes)Acknowledgement[a][][Set ID][][OK/NG][Data1][Data2][Data3][x]54 Appendix C Controlling the Multiple Product ENWWAntenna House XSL Formatter (Evaluation) http://www.antennahouse.com/](https://usermanual.wiki/LG-Electronics-USA/HSTND-2591-G/User-Guide-1037886-Page-59.png)
![*When reading data, FFH is inputted for [Data1], [Data2] and [Data3]. In other cases, all are treated asNG.33. On Timer (On/Off Timer) On, Off (Command : F b)Set days for On Timer.Transmission[f][b][][Set ID][][Data1][][Data2][Cr][Data1]0 (Write), FFH(Read)[Data2]00H~FFHbit0 : Monday On Timer On(1), Off(0)bit1 : Tuesday On Timer On(1), Off(0)bit2 : Wednesday On Timer On(1), Off(0)bit3 : Thursday On Timer On(1), Off(0)bit4 : Friday On Timer On(1), Off(0)bit5 : Saturday On Timer On(1), Off(0)bit6 : Sunday On Timer On(1), Off(0)bit7 : Everyday On Timer On(1), Off(0)Acknowledgement[b][][Set ID][][OK/NG][Data1][Data2][x]34. Off Timer (On/Off Timer) On, Off (Command : f c)Set days for Off Timer.Transmission[f][c][][Set ID][][Data1][][Data2][Cr][Data1]0 (Write), FFH(Read)[Data2]00H~FFHENWW Transmission / Receiving Protocol 55Antenna House XSL Formatter (Evaluation) http://www.antennahouse.com/](https://usermanual.wiki/LG-Electronics-USA/HSTND-2591-G/User-Guide-1037886-Page-60.png)
![bit0 : Monday Off Timer On(1), Off(0)bit1 : Tuesday Off Timer On(1), Off(0)bit2 : Wednesday Off Timer On(1), Off(0)bit3 : Thursday Off Timer On(1), Off(0)bit4 : Friday Off Timer On(1), Off(0)bit5 : Saturday Off Timer On(1), Off(0)bit6 : Sunday Off Timer On(1), Off(0)bit7 : Everyday Off Timer On(1), Off(0)Acknowledgement[c][][Set ID][][OK/NG][Data1][Data2][x]35. On Timer (On/Off Timer) Time (Command : f d)Set On Timer.Transmission[f][d][][Set ID][][Data1][][Data2][Data3][Cr][Data1]0 : Monday1 : Tuesday2 : Wednesday3 : Thursday4 : Friday5 : Saturday6 : Sunday7 : Everyday[Data2]00H~17H (Hours)[Data3]00H~3BH (Minutes)Acknowledgement[d][][Set ID][][OK/NG][Data1][Data2][Data3][x]56 Appendix C Controlling the Multiple Product ENWWAntenna House XSL Formatter (Evaluation) http://www.antennahouse.com/](https://usermanual.wiki/LG-Electronics-USA/HSTND-2591-G/User-Guide-1037886-Page-61.png)
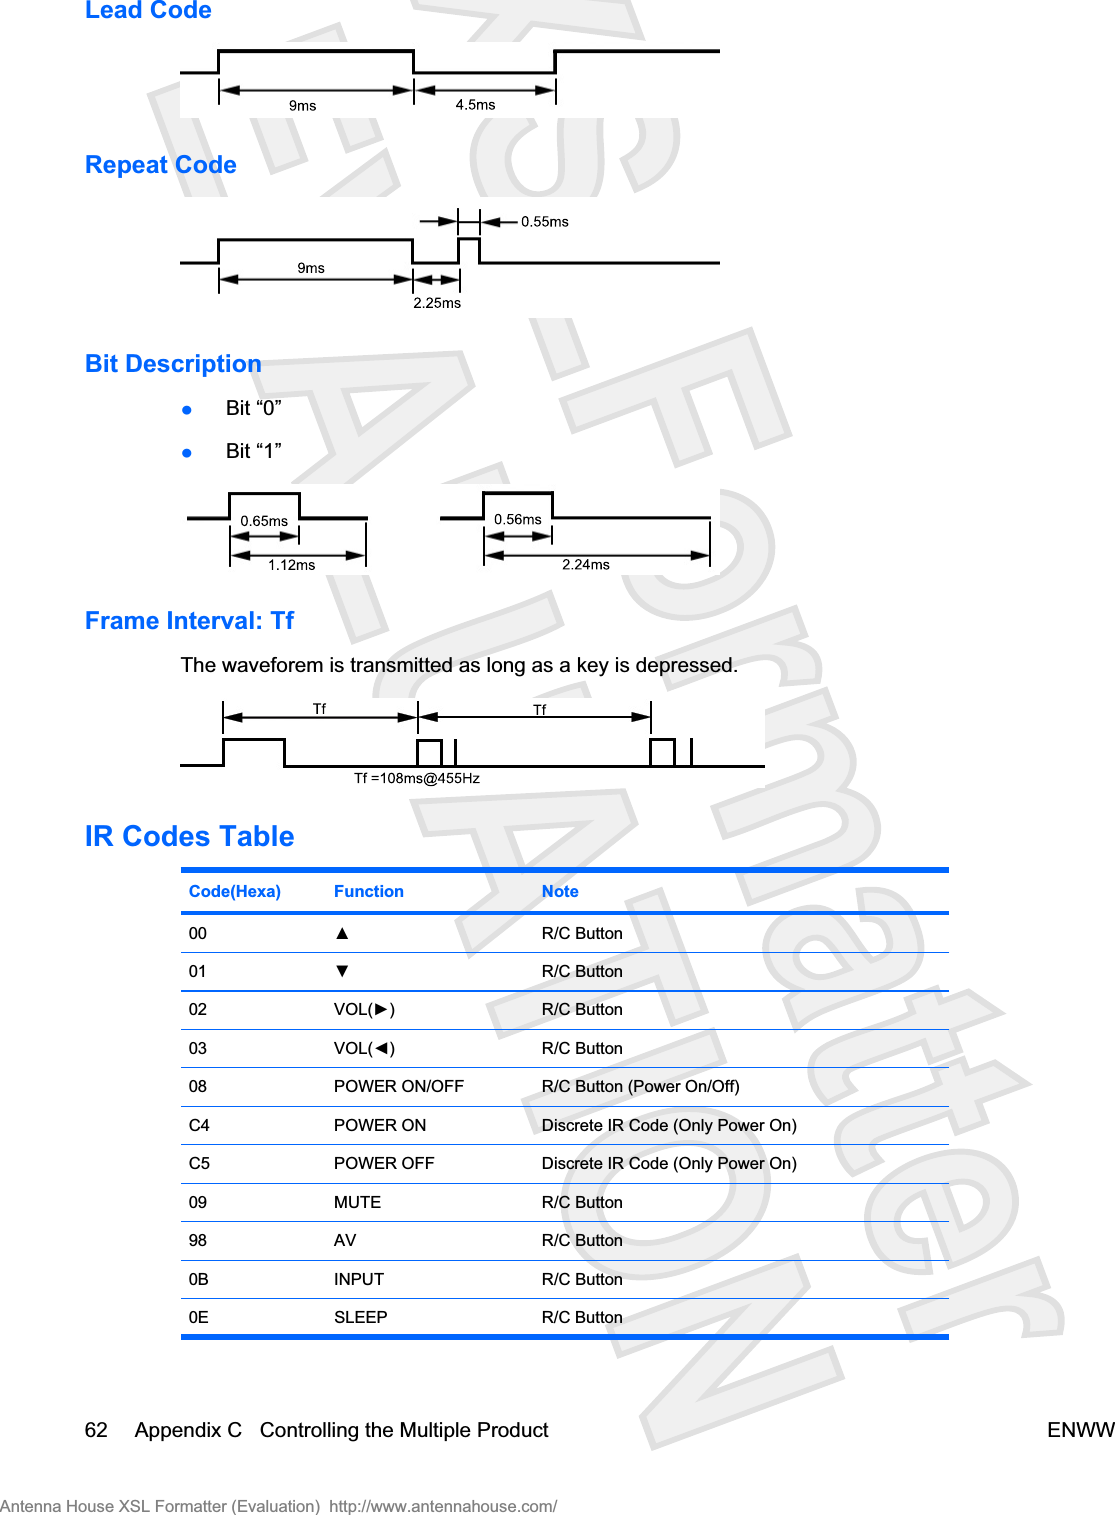
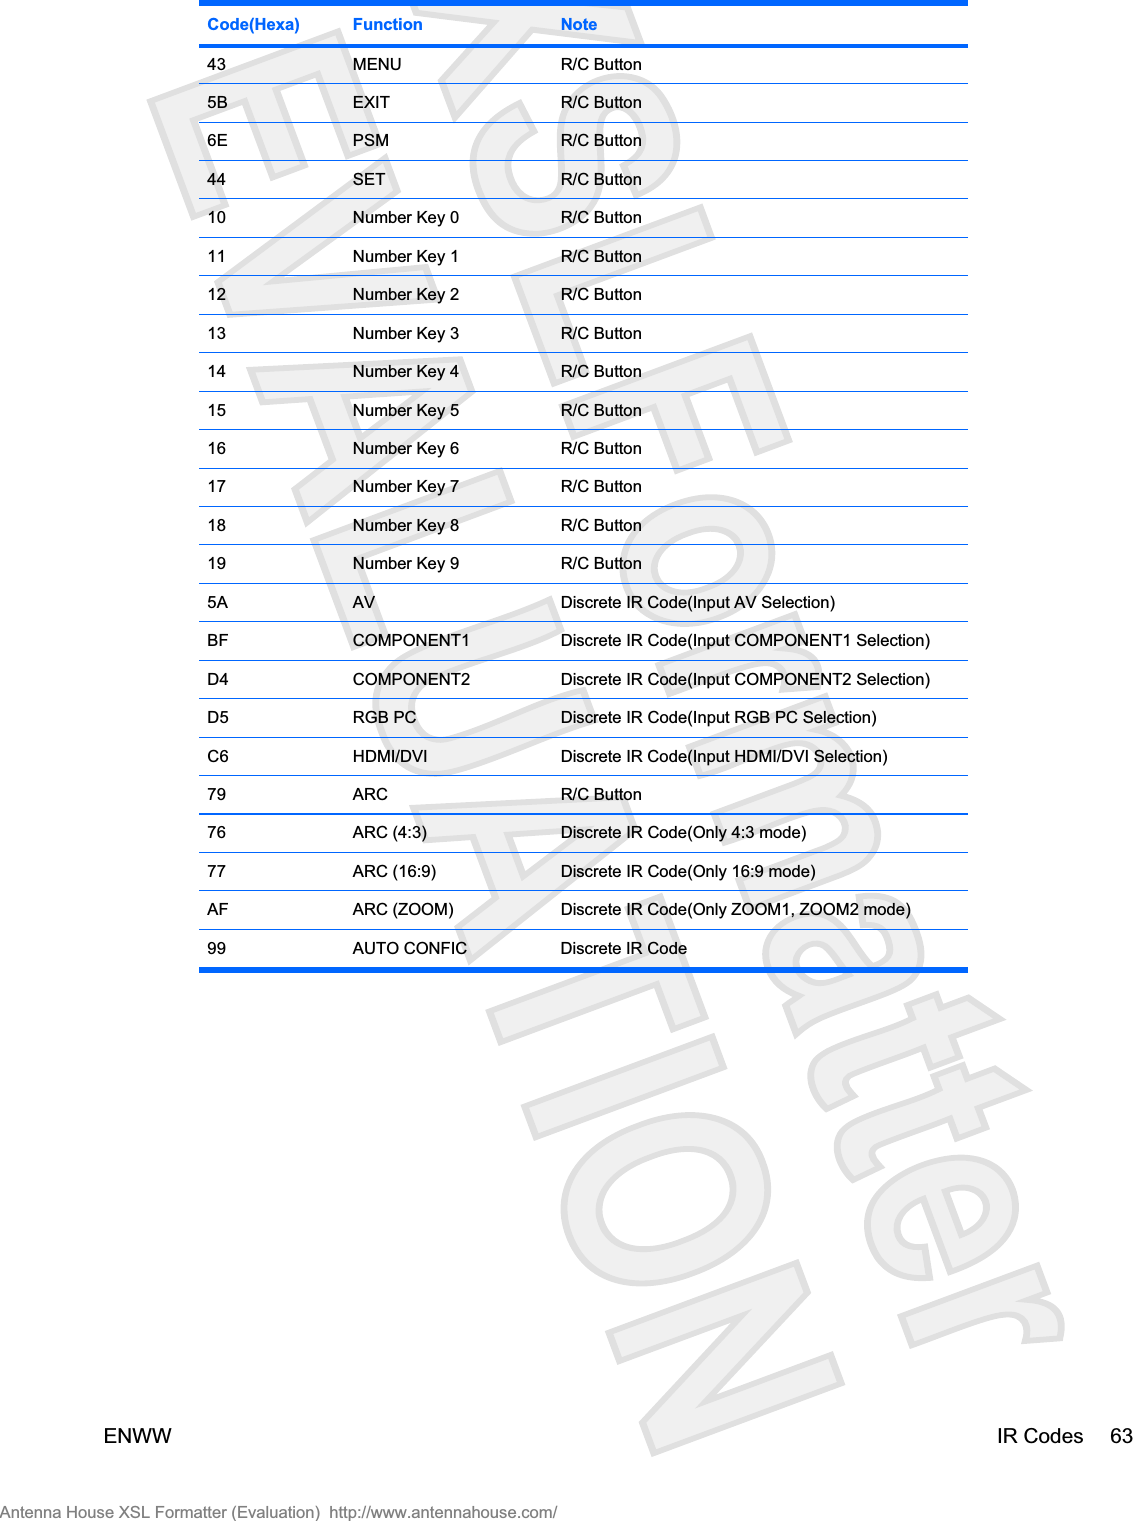
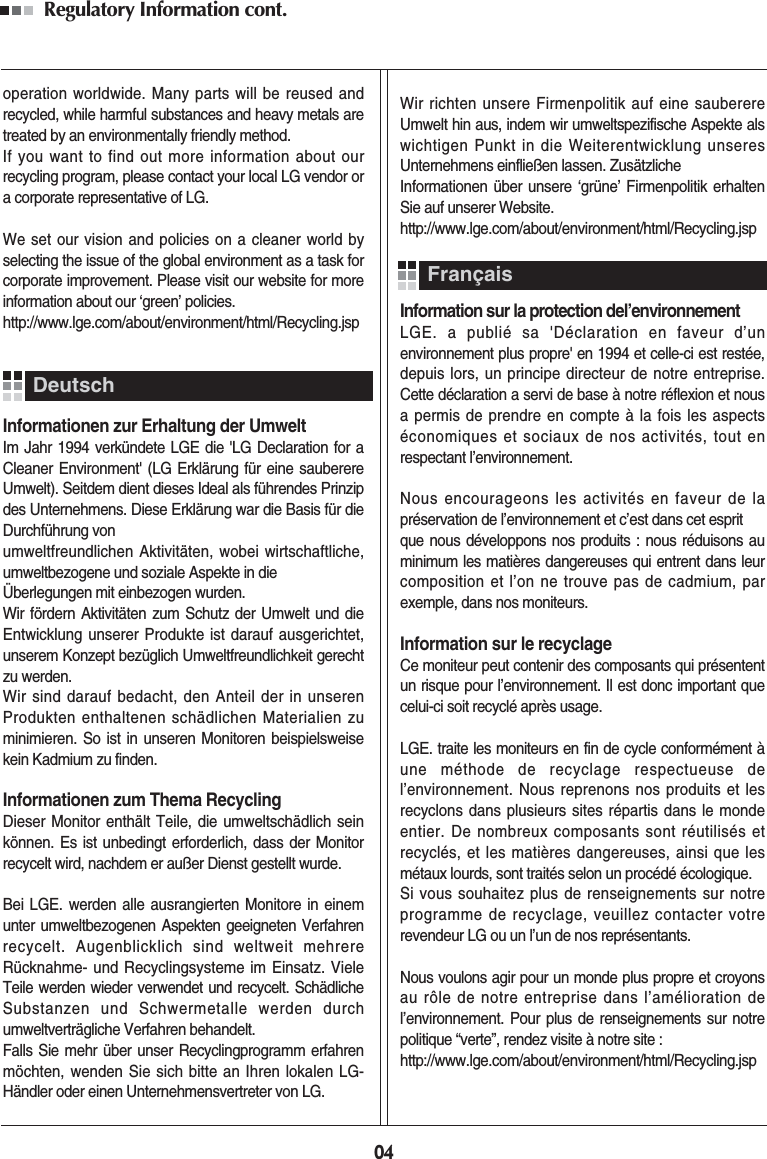
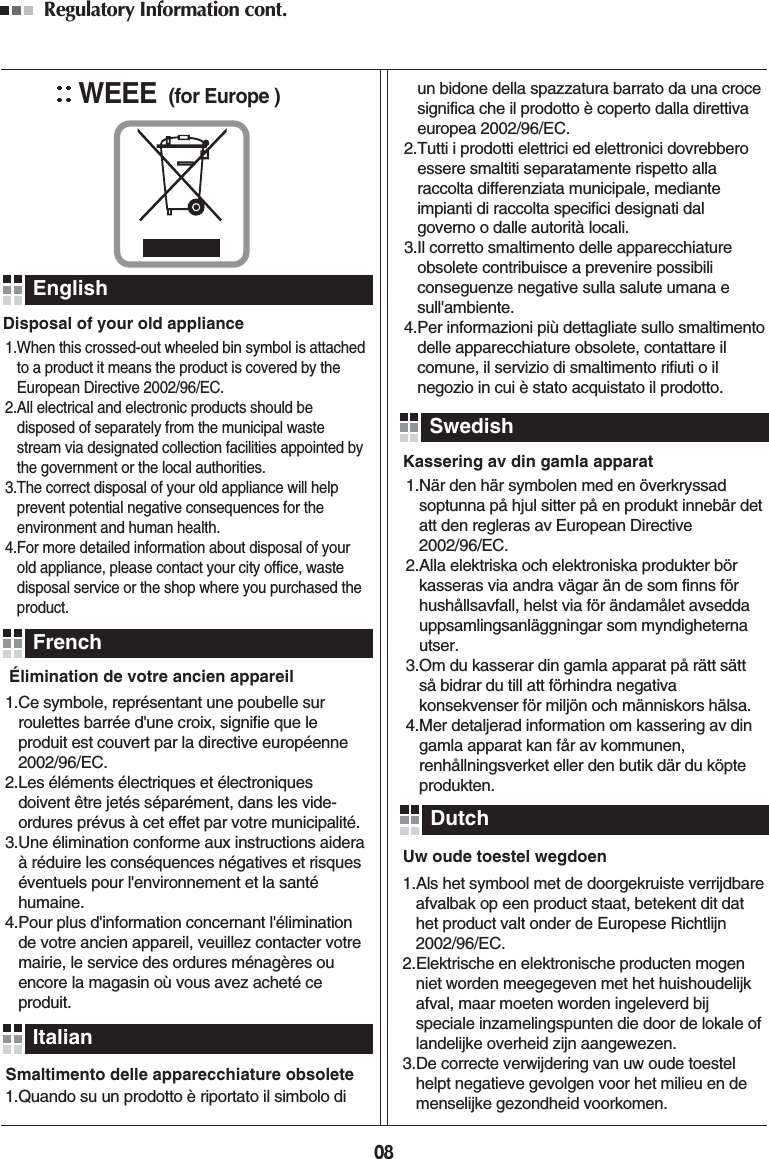
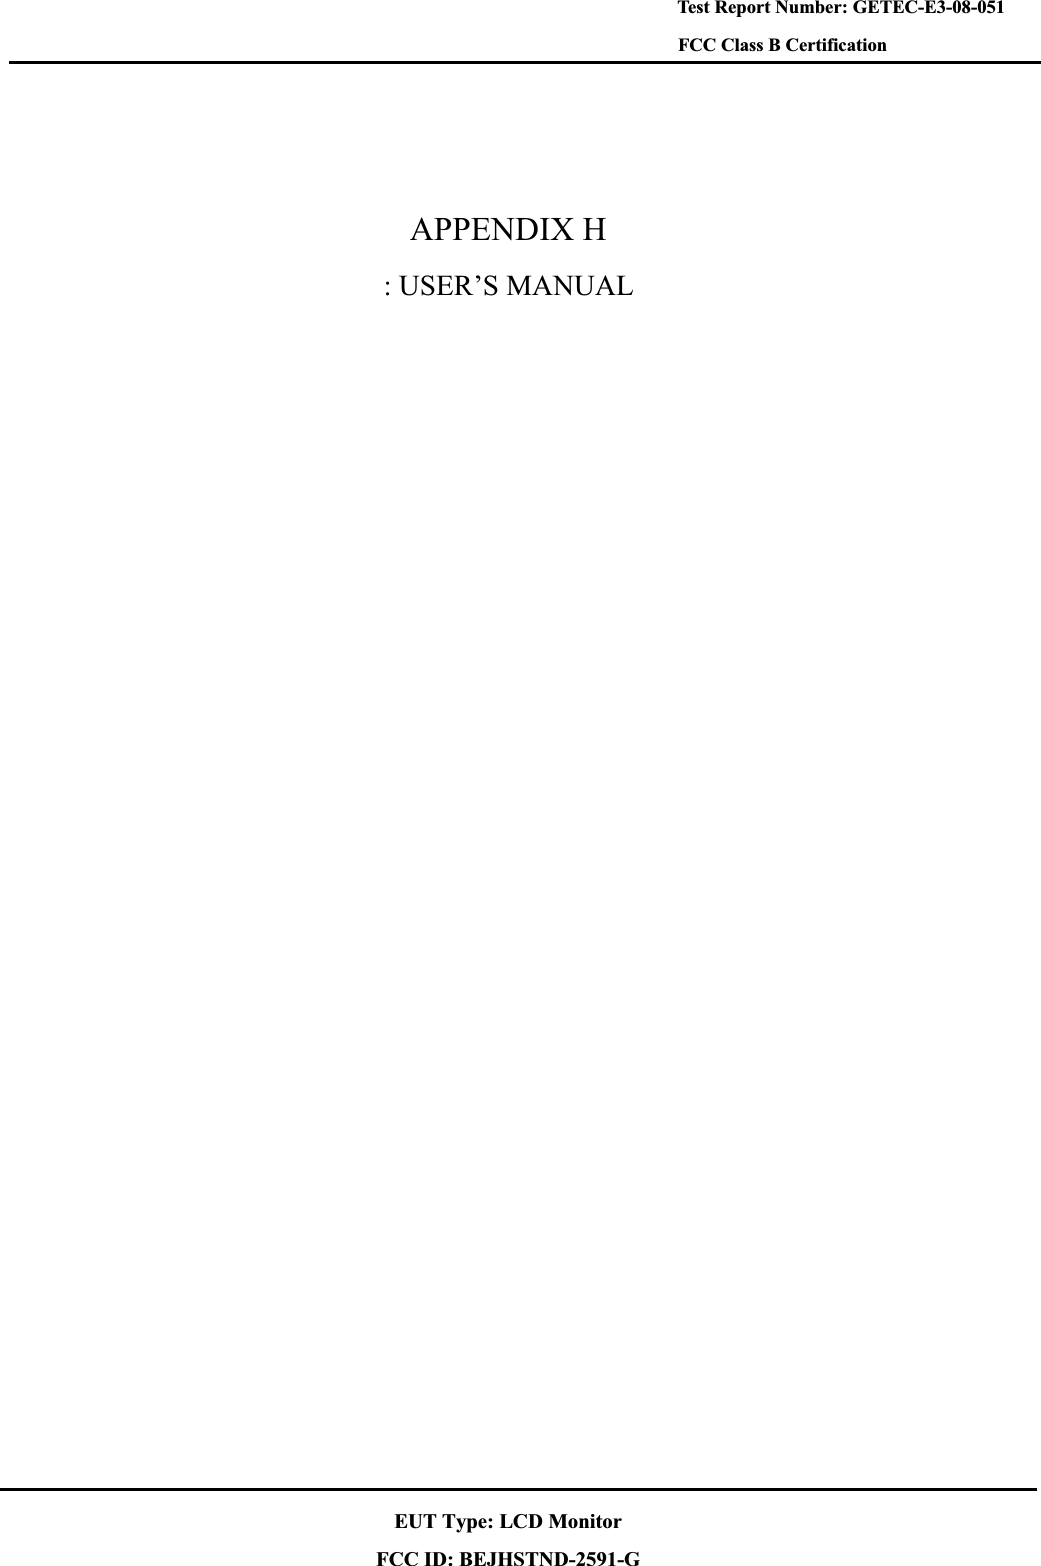
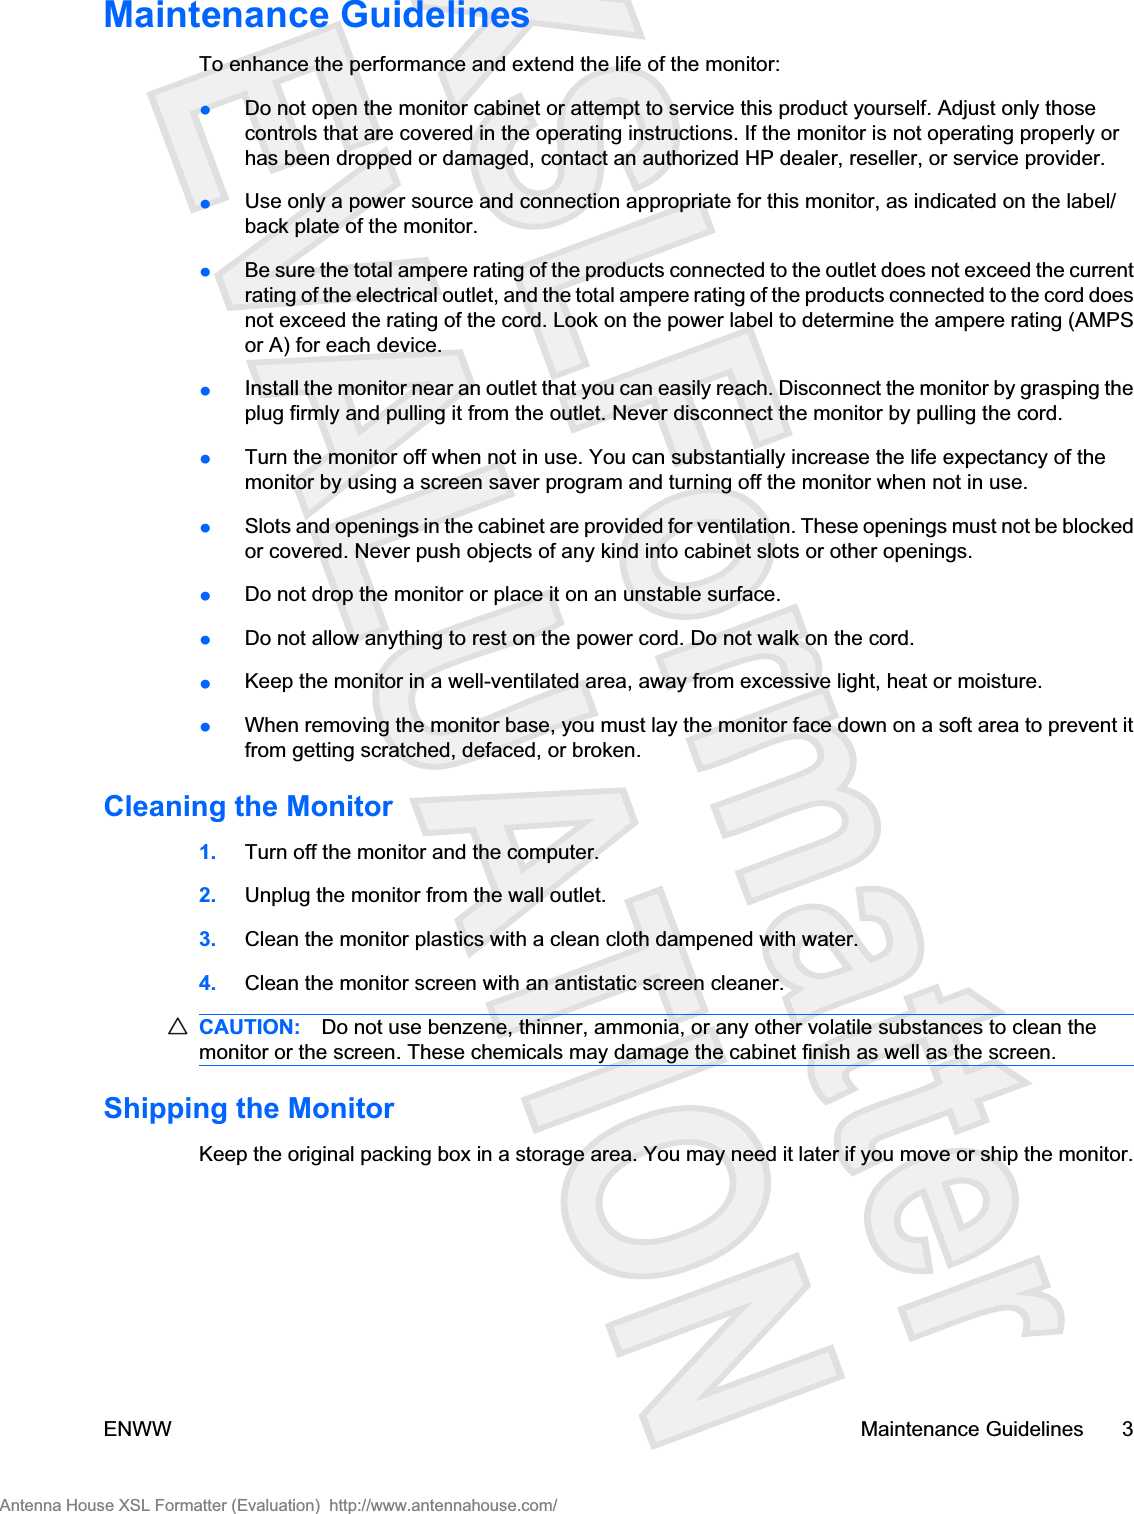
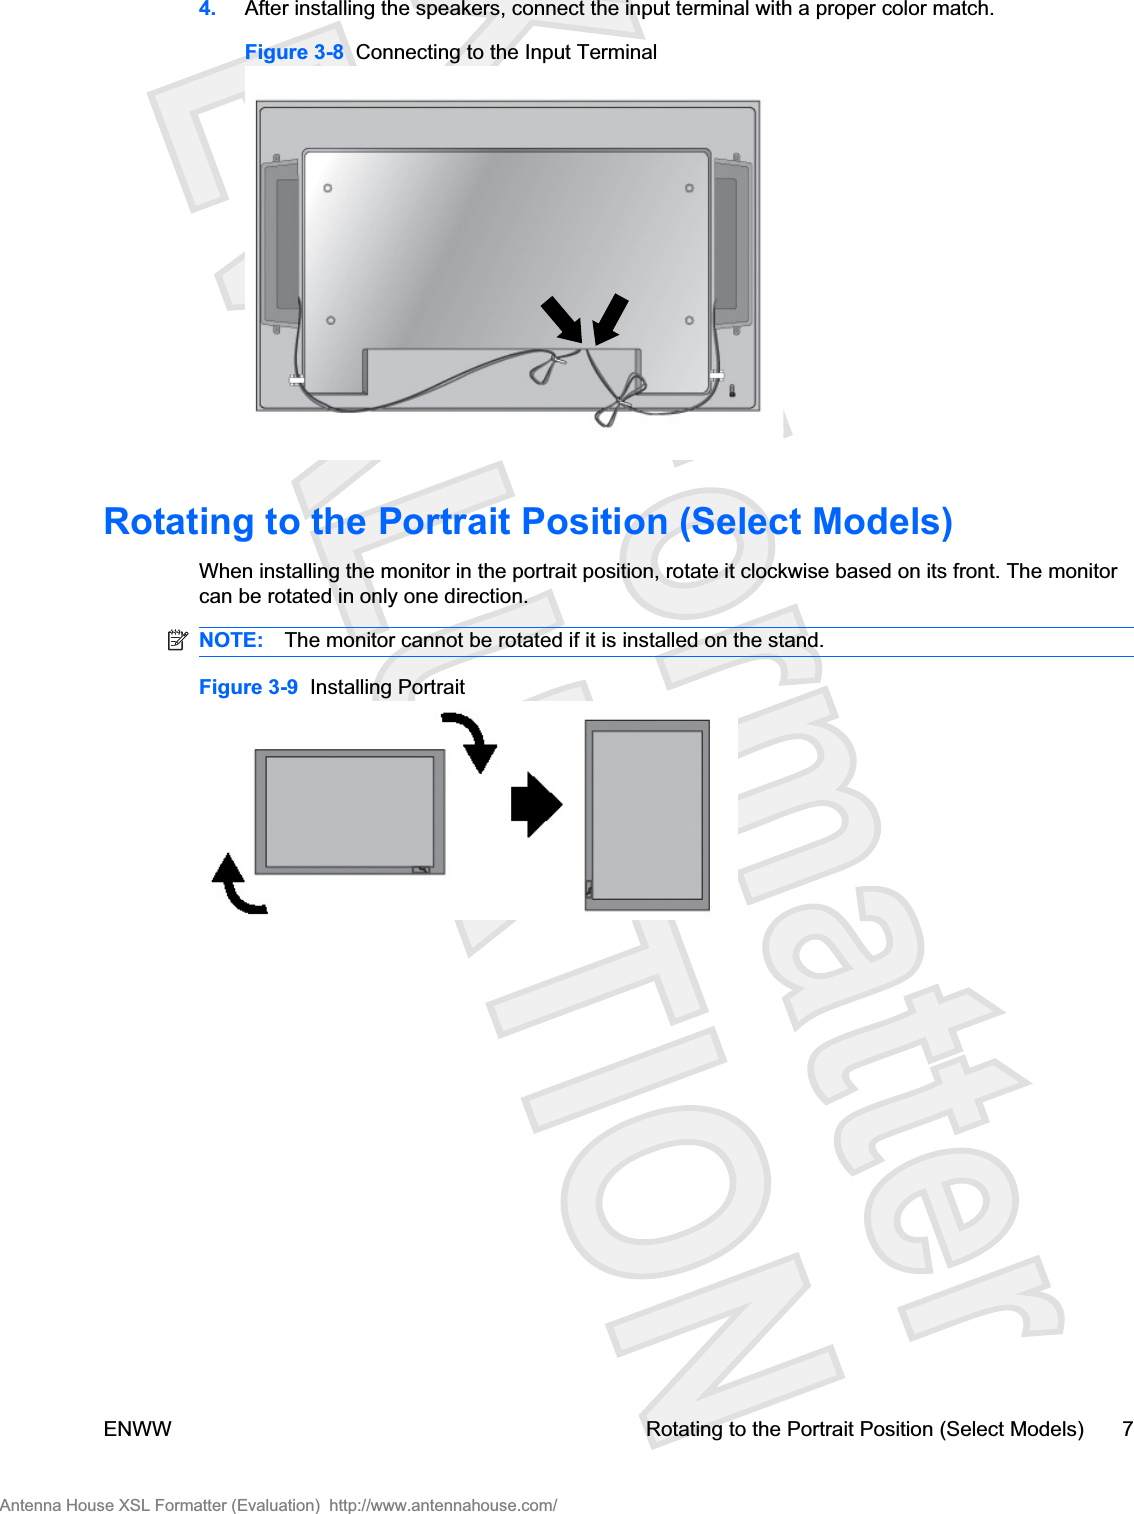
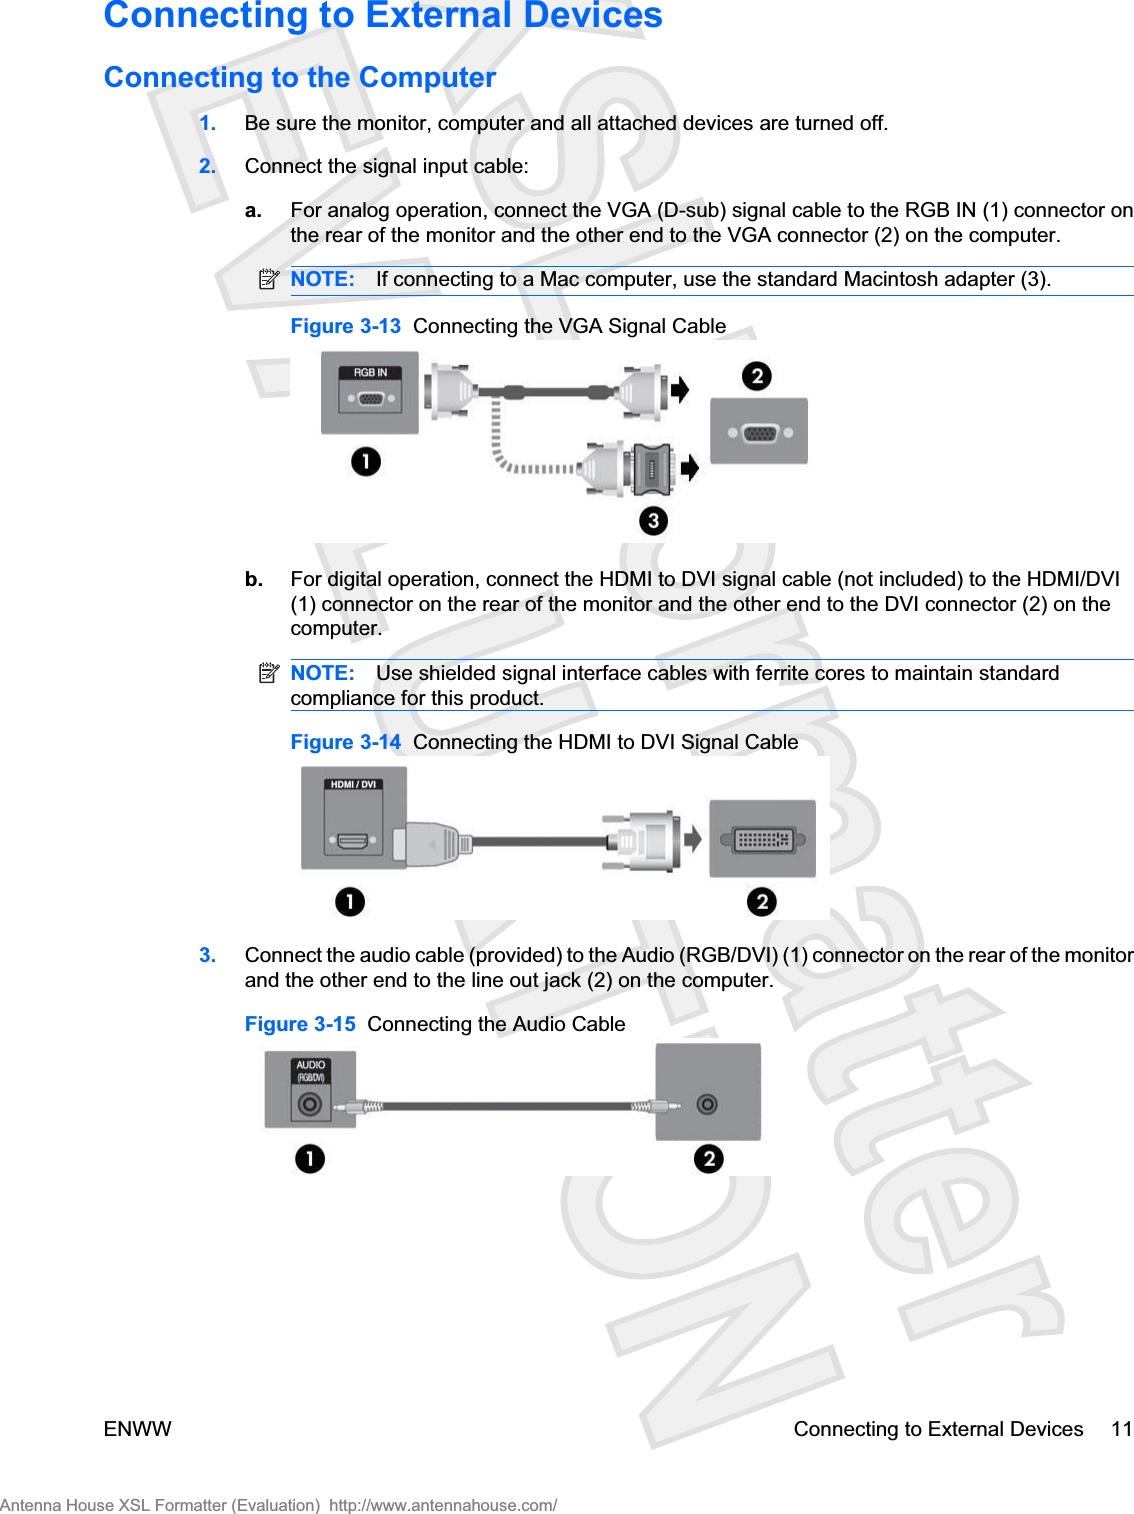
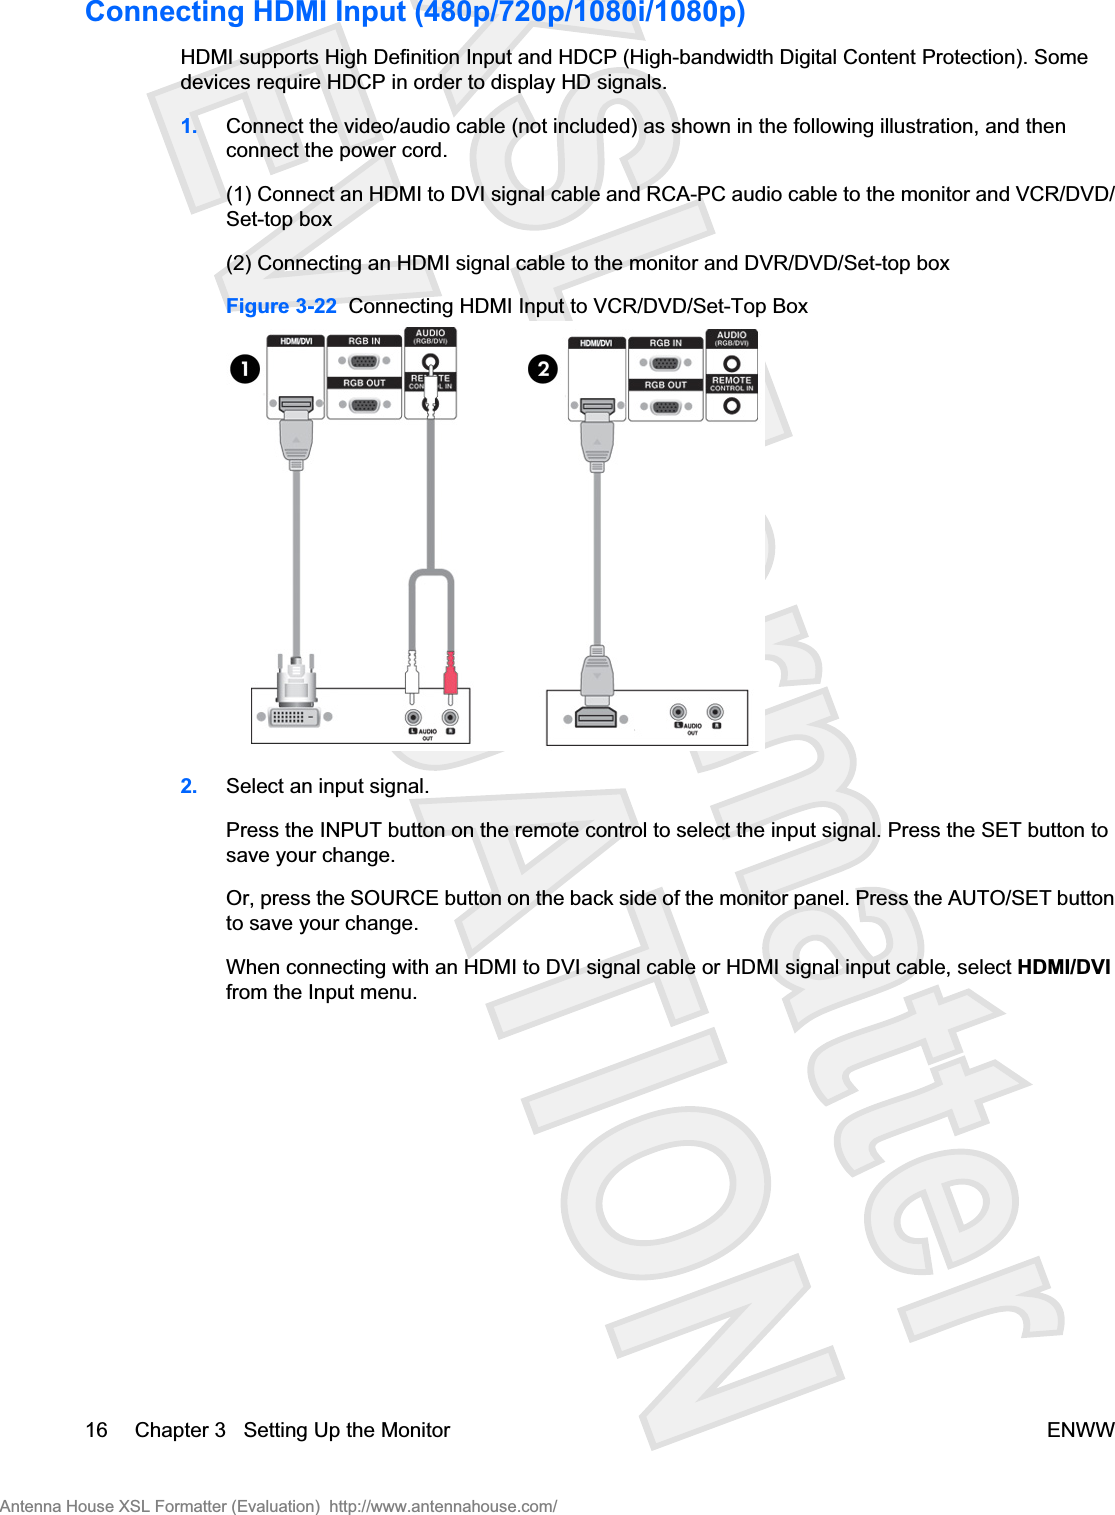
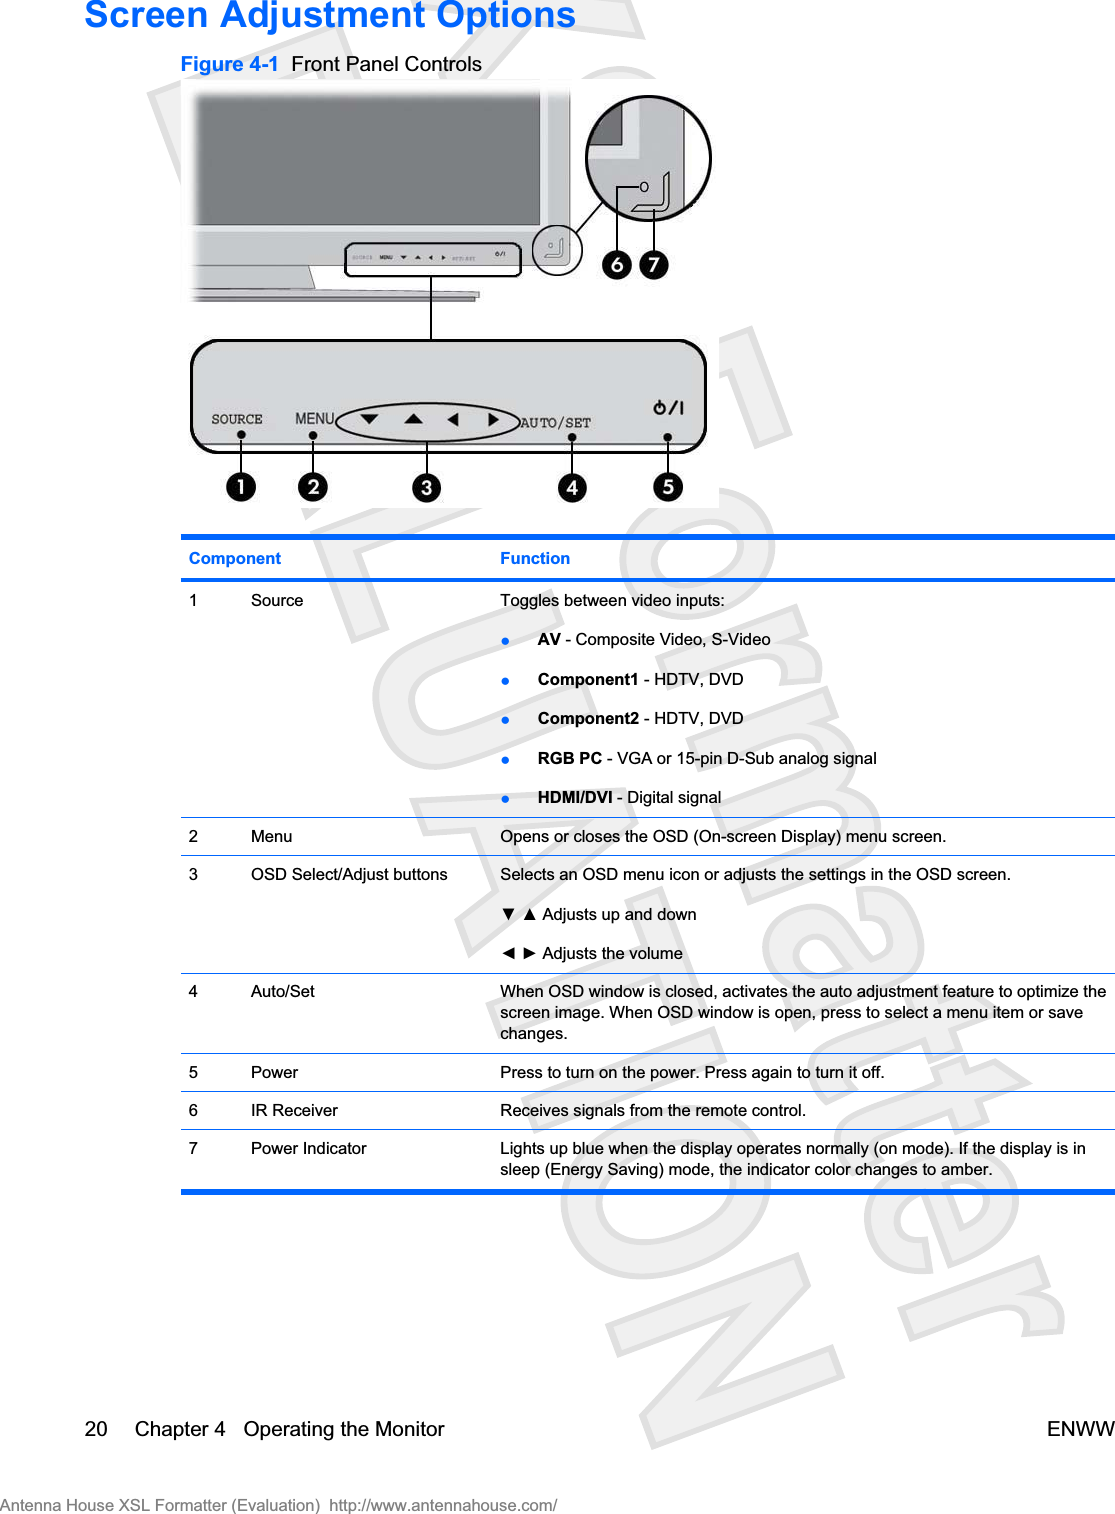
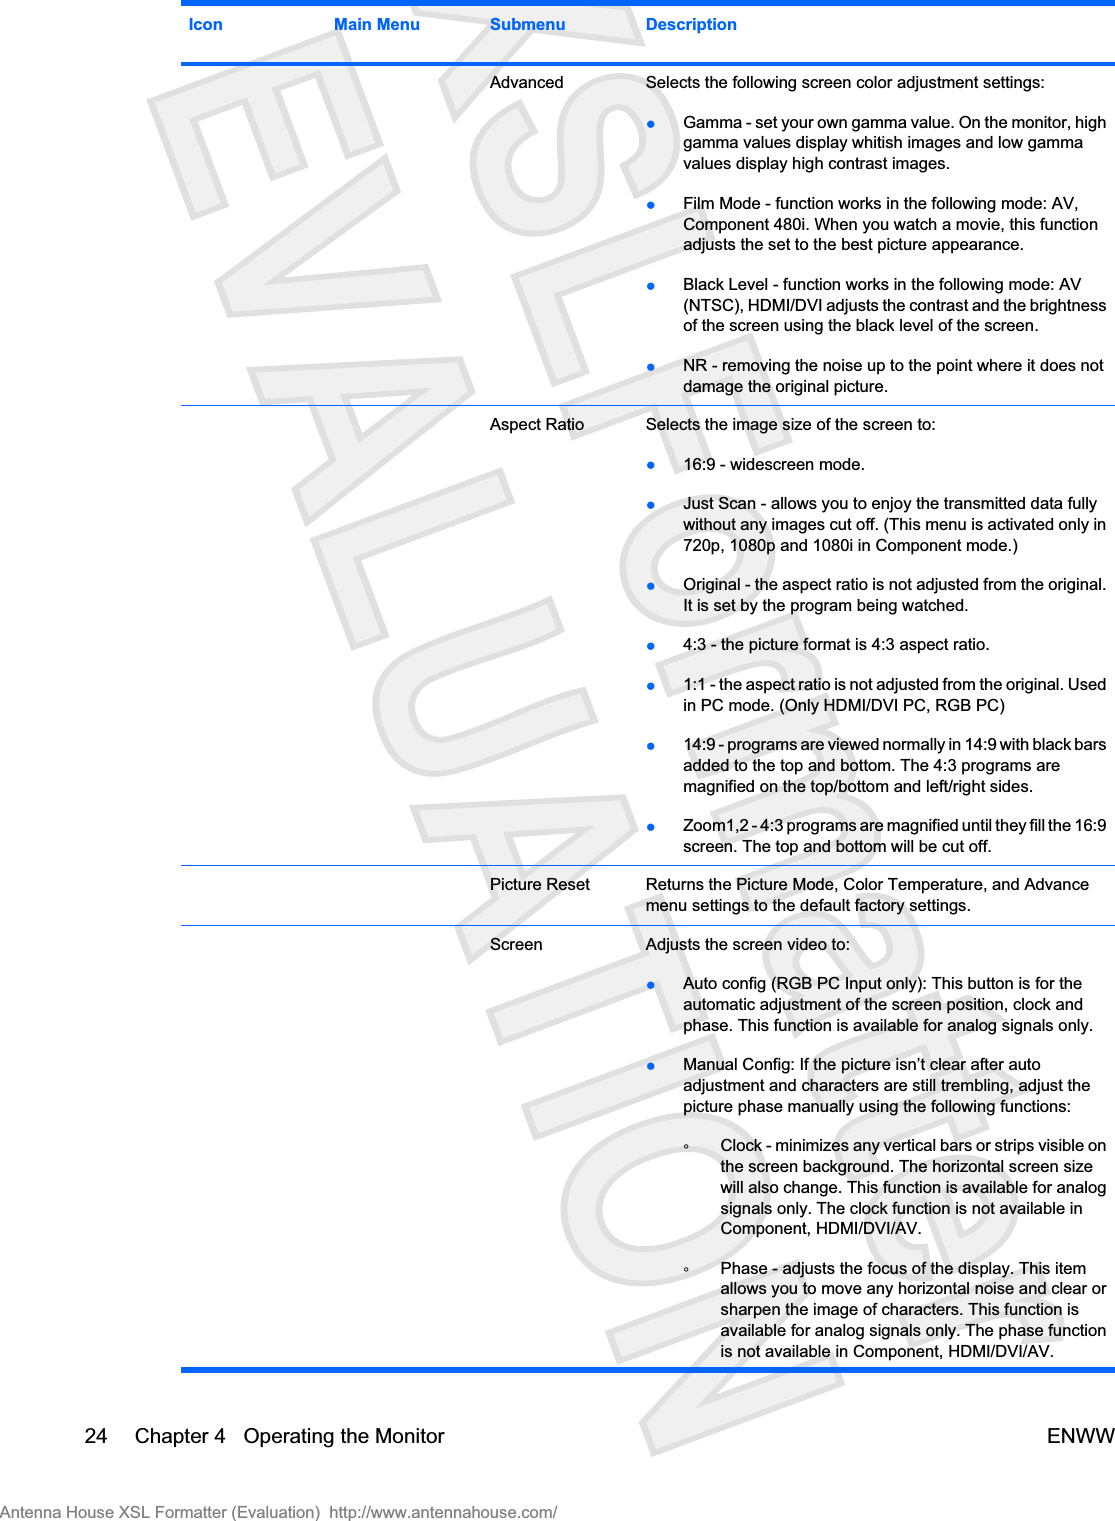
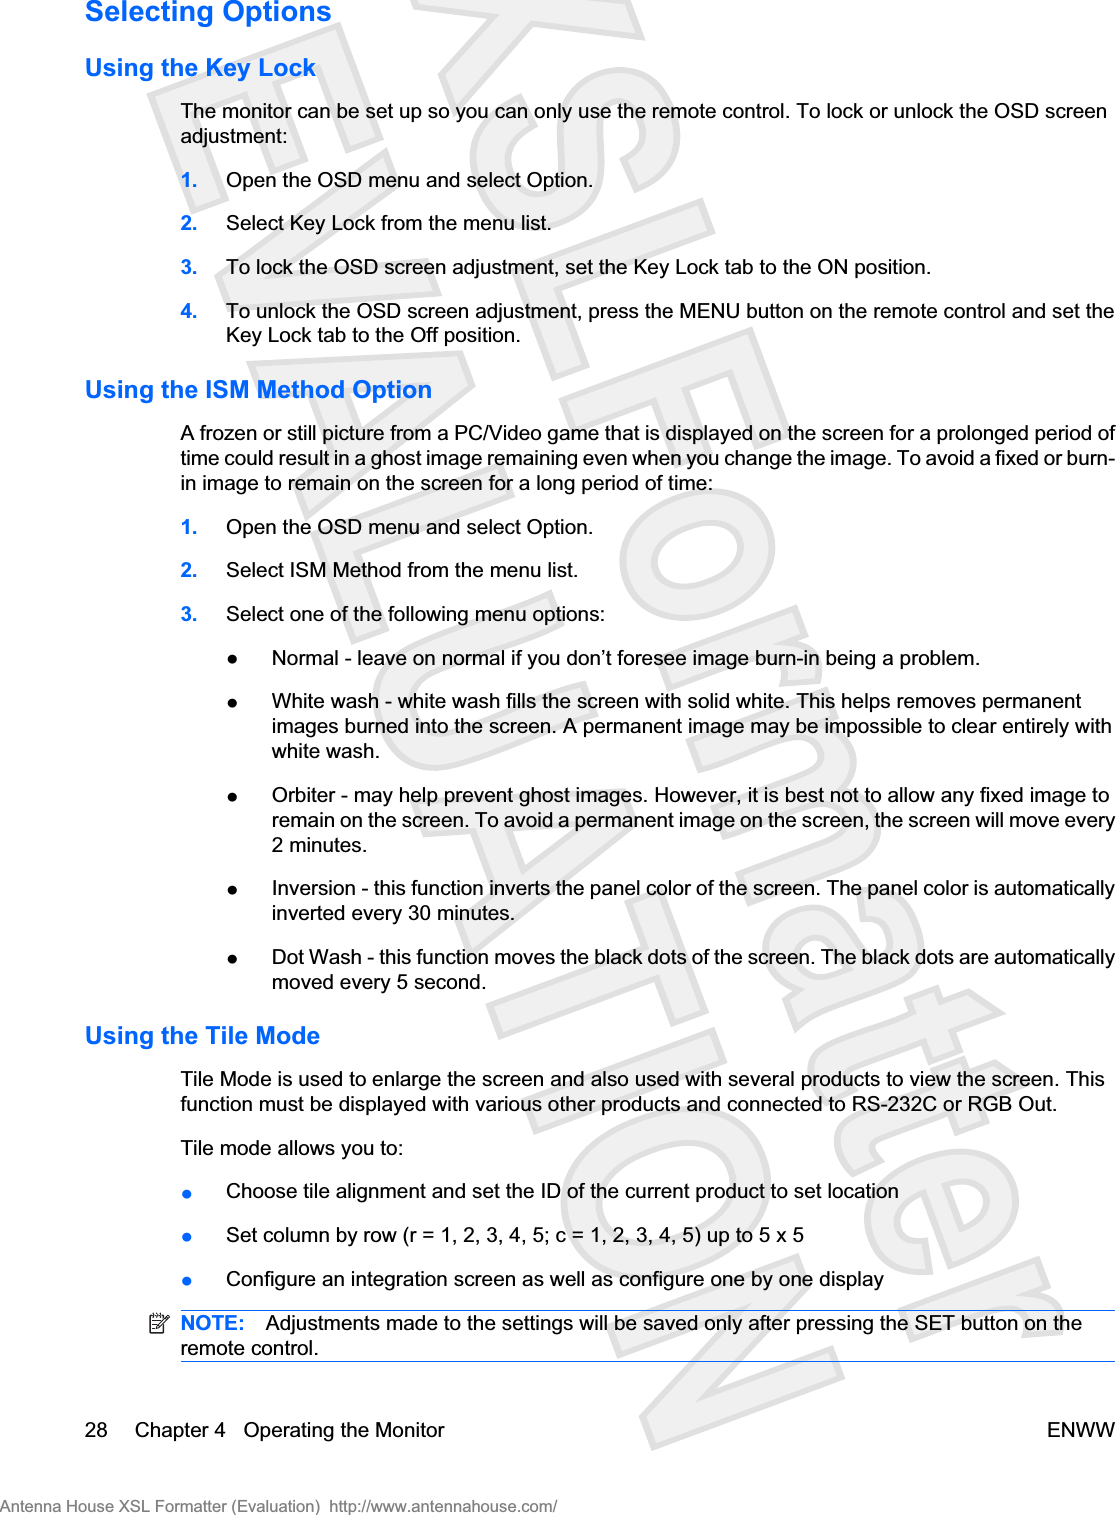
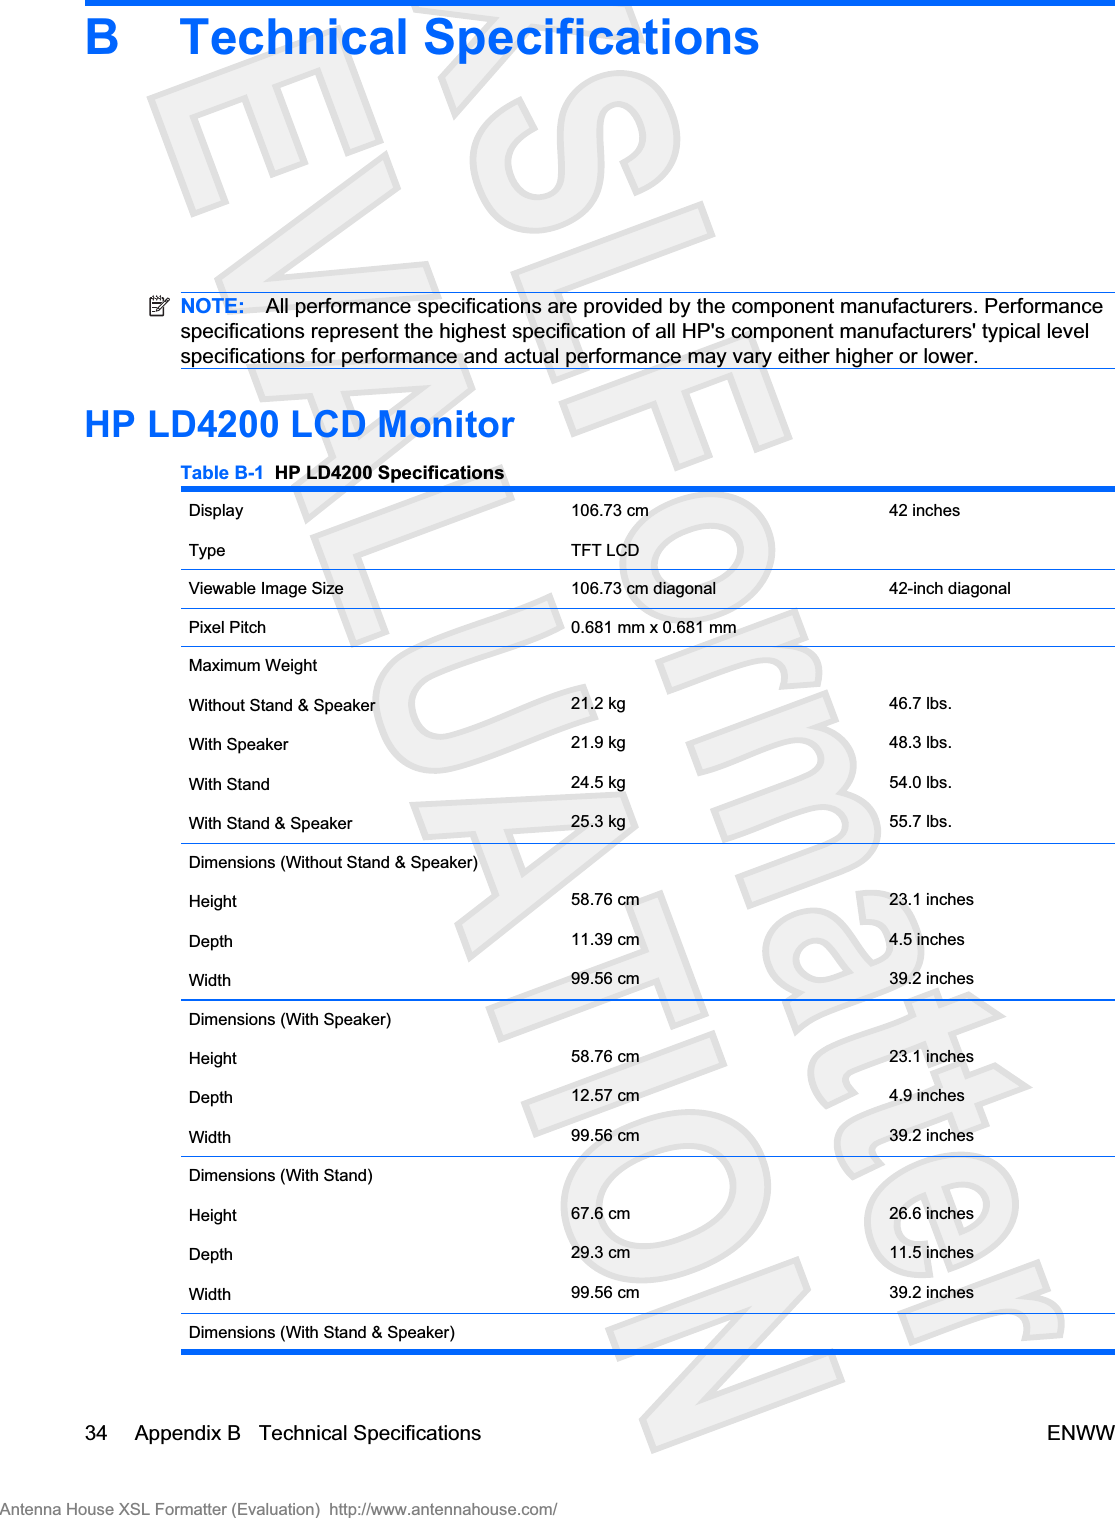
![Acknowledgement[b][ ][Set ID][ ][OK][Data][x]Data 20H : AV40H : Component 141H : Component 260H : RGB (PC)90H : HDMI/DVI (DTV)A0H : HDMI/DVI (PC)IR CodesUse this method to connect your wired remote control port on the monitor.Remote Control IR CodeOutput WavełSingle pulse, modulated with 37.9KHz signal at 455kHzłCarrier FrequencyŃFCAR = 1/Tc=fosc/12ŃDuty Ratio = T1/Tc = 1/3Configuration of FramełFirst FramełRepeat FrameENWW IR Codes 61Antenna House XSL Formatter (Evaluation) http://www.antennahouse.com/](https://usermanual.wiki/LG-Electronics-USA/HSTND-2591-G/User-Guide-1037886-Page-62.png)