LG Electronics USA IPS226TX Part15 Subpart B-LCD Monitor User Manual ENG E2 50V IP100105
LG Electronics USA Part15 Subpart B-LCD Monitor ENG E2 50V IP100105
Contents
- 1. BEJIPS226TX_User Manual 1
- 2. BEJIPS226TX_User Manual 2
- 3. BEJIPS226TX_User Manual 3
BEJIPS226TX_User Manual 2
16
On Screen Display(OSD) Selection and Adjustment
Main menu Sub menu Description
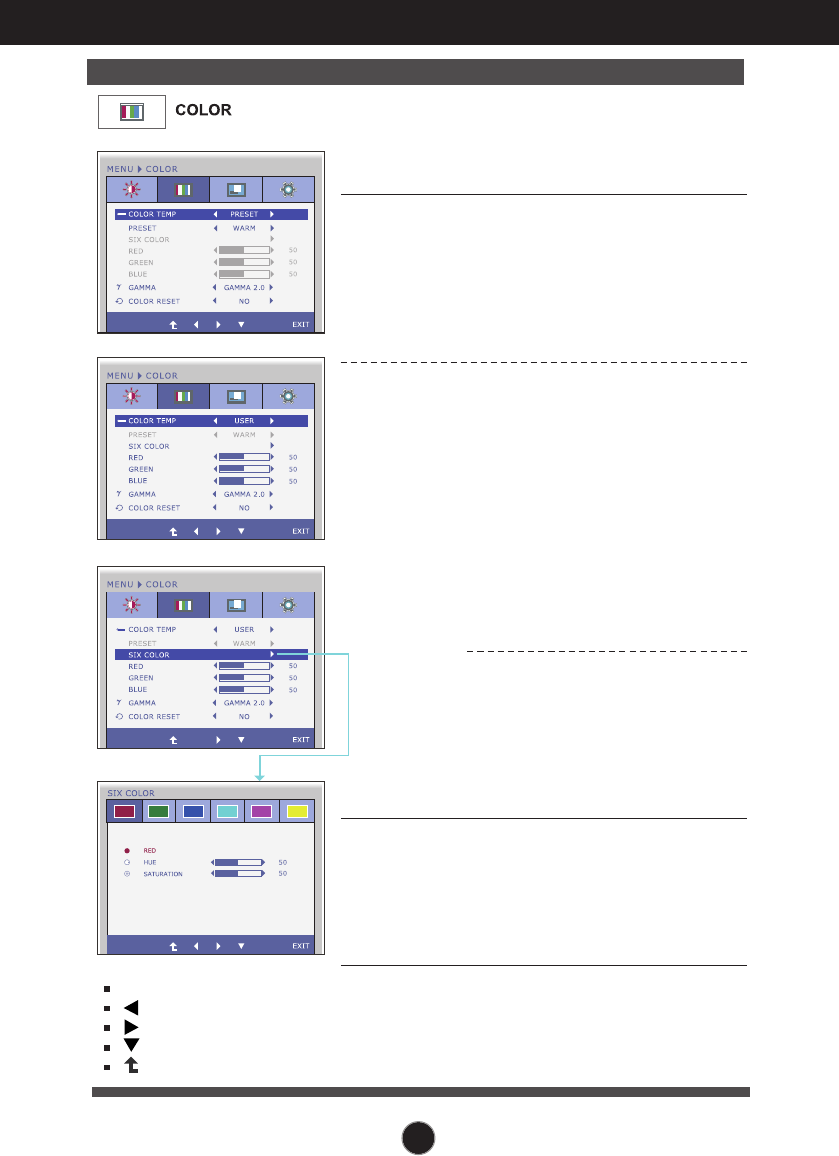
COLOR TEMP
PRESET
Select either PRESET or USER to adjust
the screen color.
Select the preset color temperature.
• WARM: Set the screen to warm
color temperature .
• MEDIUM: Set the screen to medium
color temperature.
• COOL: Set the screen to cool color
temperature.
USER
GAMMA
COLOR
RESET
SIX COLOR
Sets and stores the hue and saturation
for six colors(RED/GREEN/BLUE/CYA
N/
MAGENTA/YELLOW
) to satisfy the
color requirements of a user.
HUE
Adjusts the screen hue.
SATURATION
Adjusts the color sharpness on the
screen. Lower values make the color
sharpness weaker and colors lighter
while higher values make the color
sharpness stronger and colors darker.
RED
Set your own red color levels.
GREEN
Set your own green color levels.
BLUE
Set your own blue color levels.
Set your own gamma value. :
1.8/2.0/2.2/2.4/2.6
On the monitor, high gamma values
display whitish images and low gamma
values display blackish images.
Resets the color settings to the
factory
default settings for the current input
device.
PRESET Mode
USER
Mode
Exit : Exit
: Decrease
: Increase
: Select another sub-menu
: Restart to select sub-menu
17
On Screen Display(OSD) Selection and Adjustment
Main menu Sub menu Description
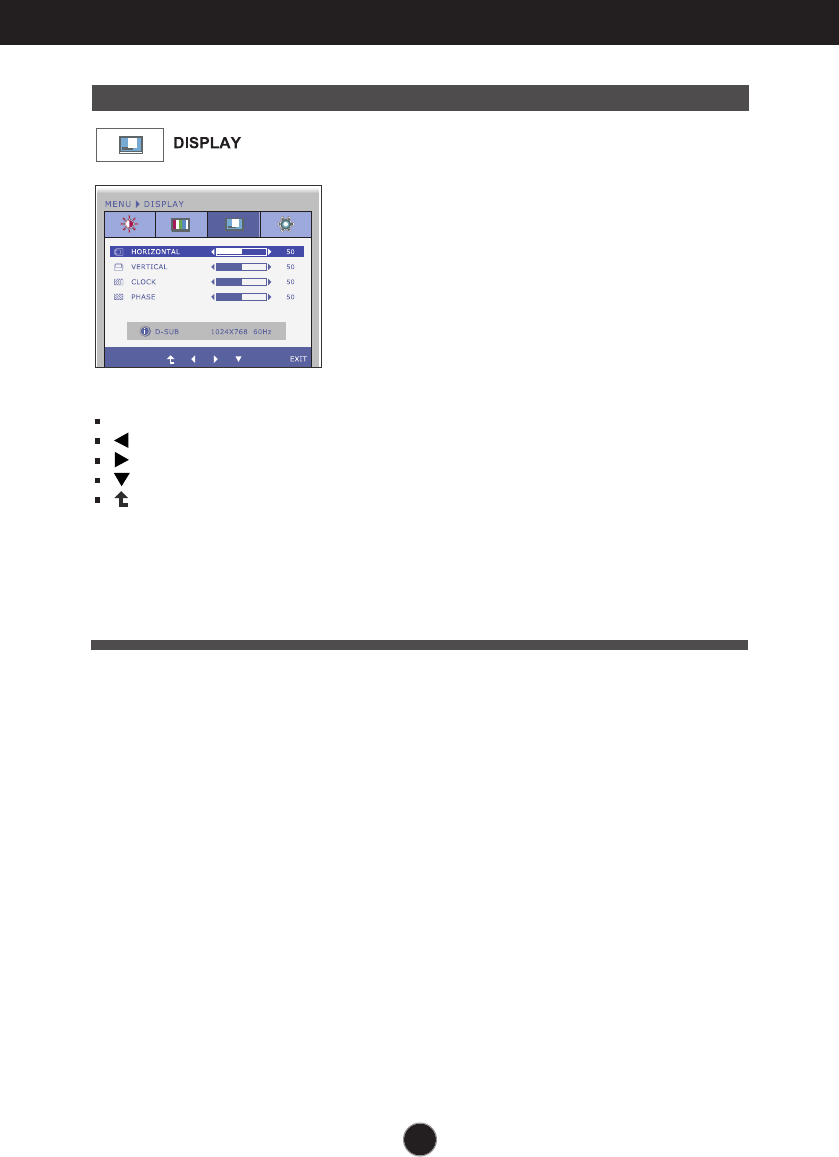
CLOCK
PHASE
To minimize any vertical bars or
stripes visible on the screen
background.
The horizontal screen size will also
change.
To adjust the focus of the display.
This item allows you to remove any
horizontal noise and clear or sharpen
the image of characters.
HORIZONTAL
VERTICAL
To move image left and right.
To move image up and down.
Exit : Exit
: Decrease
: Increase
: Select another sub-menu
: Restart to select sub-menu
18
On Screen Display(OSD) Selection and Adjustment
Press the , buttons to reset
immediately.
Main menu Sub menu Description
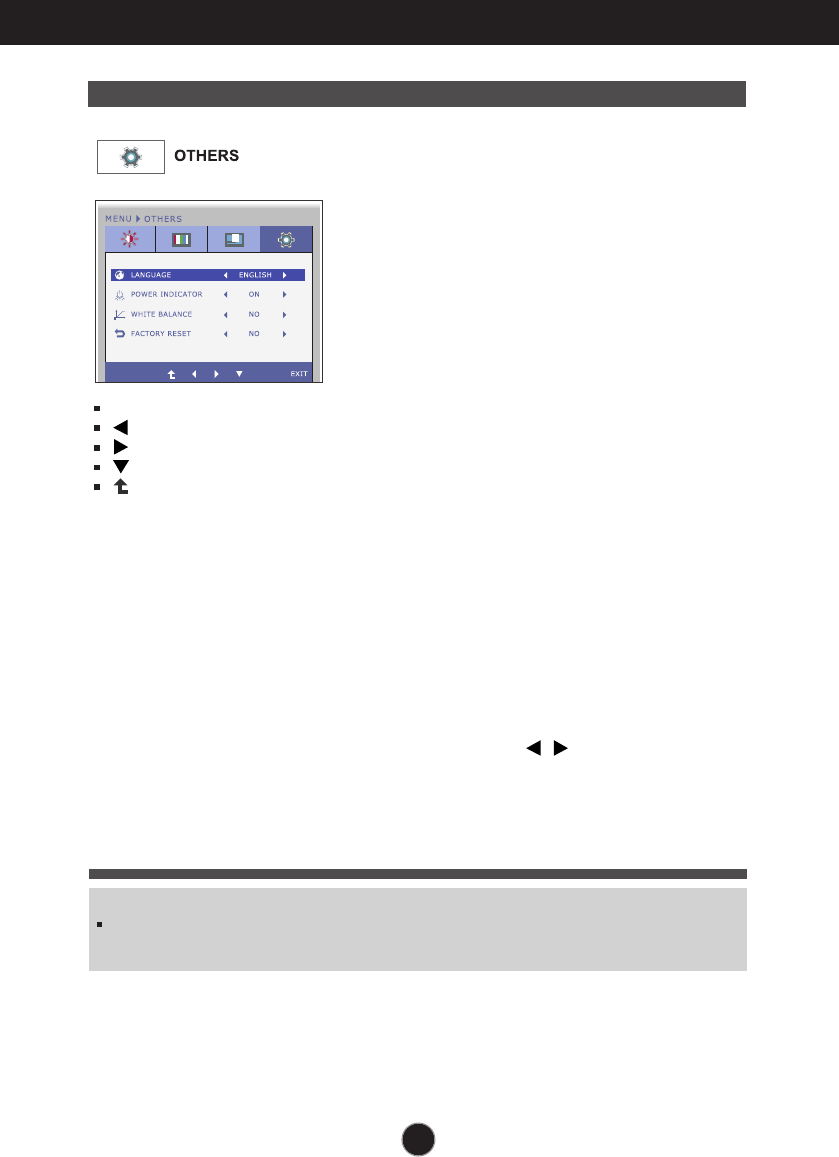
To choose the language in which the
control names are displayed.
LANGUAGE
WHITE
BALANCE
If the output of the video card is
different the required specifications,
the color level may deteriorate due
to video signal distortion. Using this
function, the signal level is adjusted
to fit into the standard output level of
the video card in order to provide the
optimal image.
Activate this function when white
and black colors are present in the
screen.
Restore all factory default settings except
"LANGUAGE."
FACTORY
RESET
POWER
INDICATOR
Use this function to set the power
indicator on the front side of the monitor
to ON or OFF.
If you set OFF, it will be turned off.
If you set ON at any time, the power
indicator will automatically be turned on.
NOTE
If this does not improve the screen image, restore the factory default settings. If necessary, execute the
WHITE BALANCE function again. This function will be enabled only when the input signal is an analog
signal.
Exit : Exit
: Decrease
: Increase
: Select another sub-menu
: Restart to select sub-menu
19
On Screen Display(OSD) Selection and Adjustment
You were introduced to the procedure of selecting and adjusting an item
using the OSD system. Listed below are the icons, icon names, and icon
descriptions of the all items shown on the Menu.
Sub-
menus
NOTE
OSD (On Screen Display) menu languages on the monitor may differ from the manual.
Menu Name
Icons
Button
Tip
Exit
Move
Restart to select sub-menu
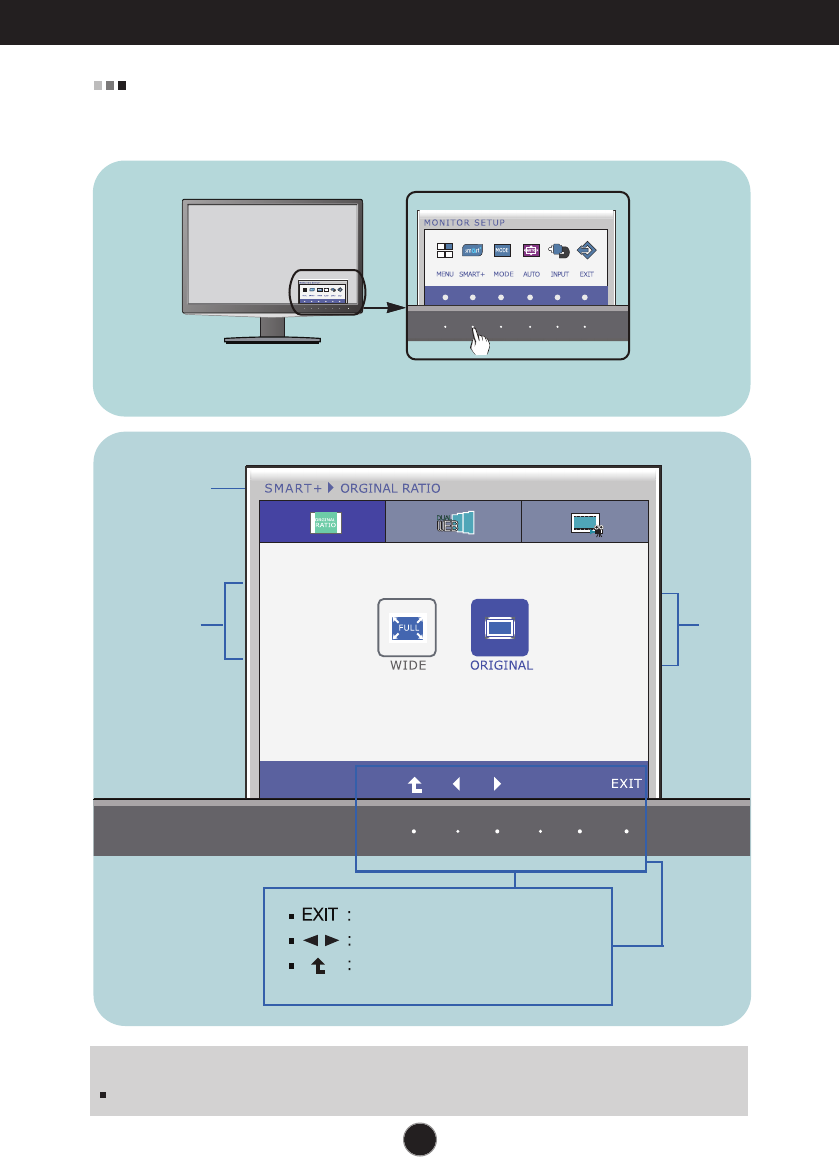
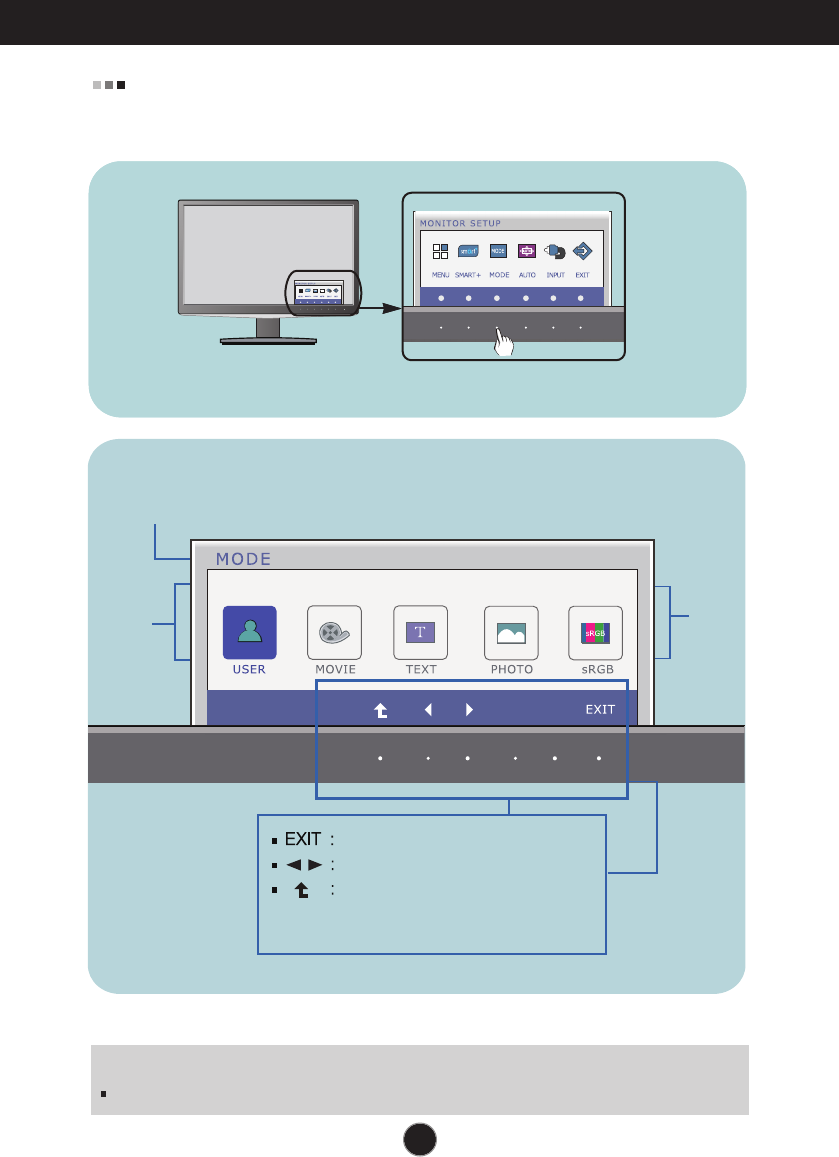
Press the SMART+ Button, then the main menu of the OSD appears.
20
On Screen Display(OSD) Selection and Adjustment
Main menu Sub menu Description
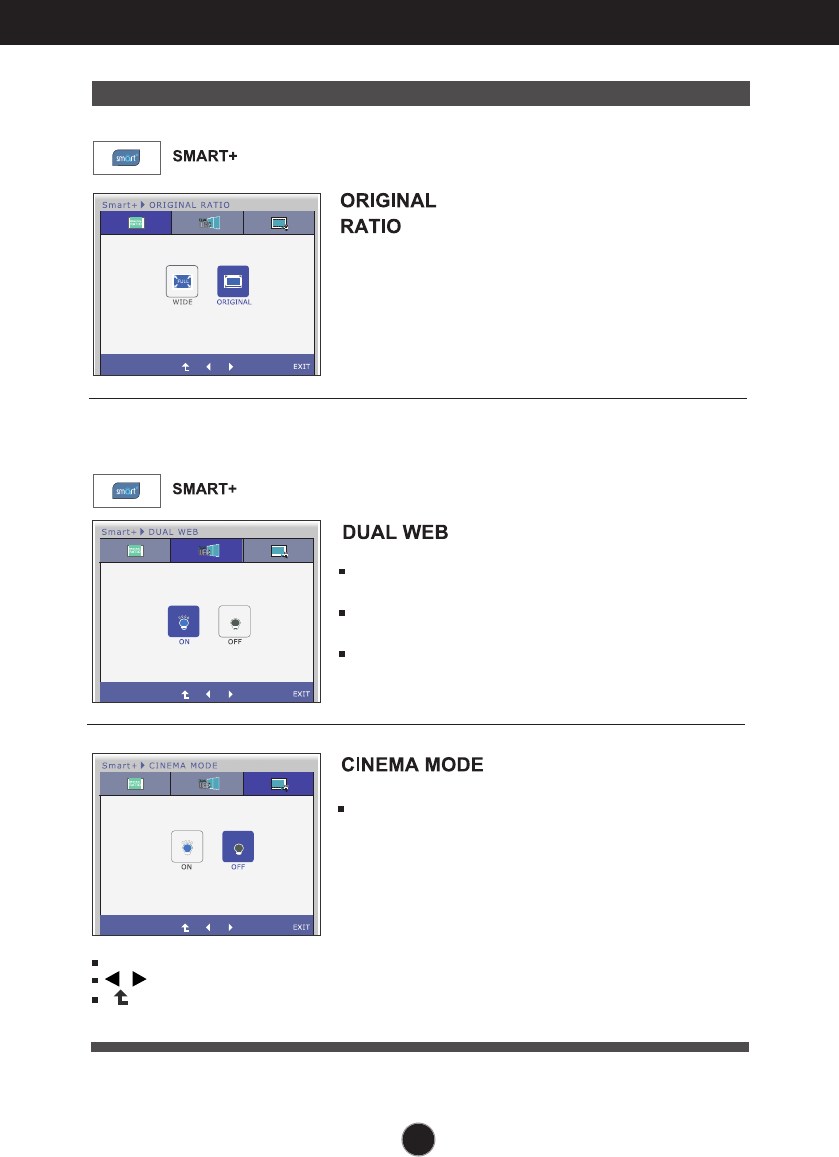
Switch to full screen mode according to input
image signal.
*This function works only if input resolution is
lower than monitor ratio (16:9).
Make the eye comfortable by reducing the
background brightness in the web page.
* Before using below functions, please install Easy Set Package program.
Help user to browse web efficiently by dividing in half.
Help to arrange and move windows on screen.
Help user to control divided windows ratio.
Exit : Exit
, : Move
: Restart to select sub-menu
21
On Screen Display(OSD) Selection and Adjustment
You were introduced to the procedure of selecting and adjusting an item
using the OSD system. Listed below are the icons, icon names, and icon
descriptions of the all items shown on the Menu.
Sub-
menus
NOTE
OSD (On Screen Display) menu languages on the monitor may differ from the manual.
Menu Name
Icons
Button
Tip
Exit
Move
Restart to select sub-menu
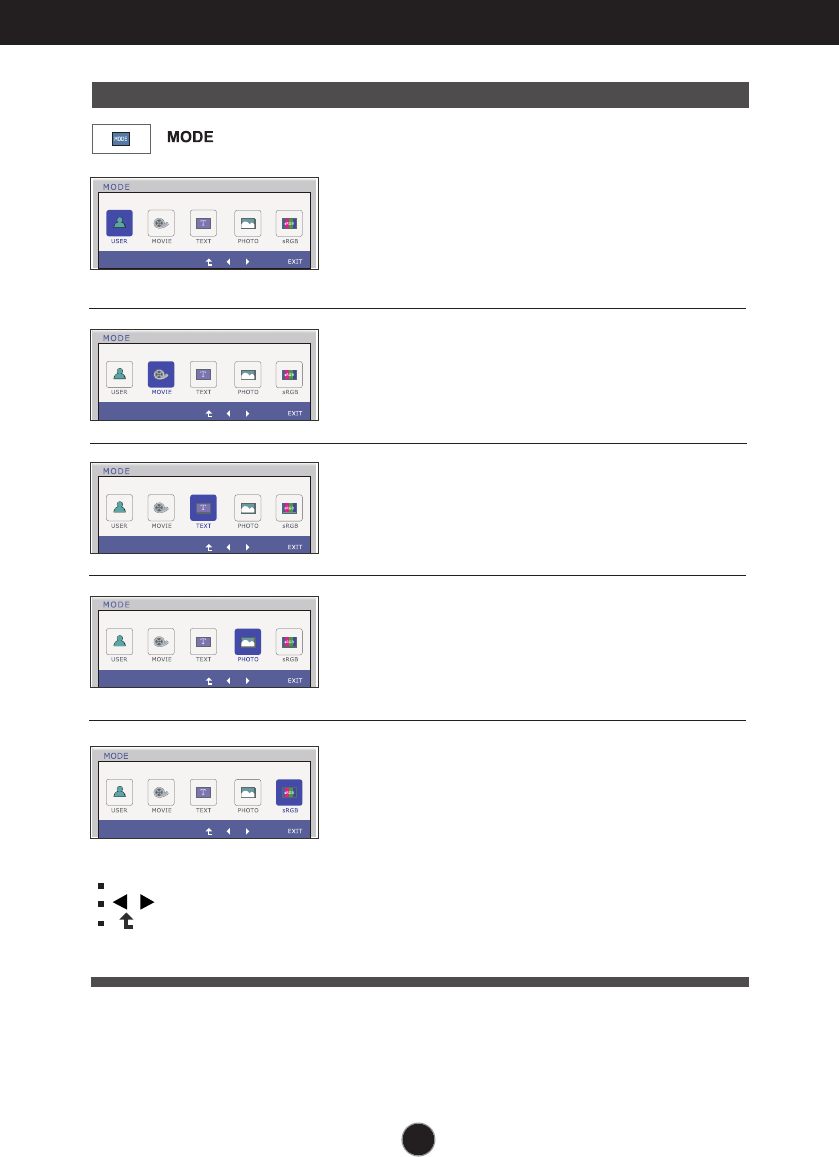
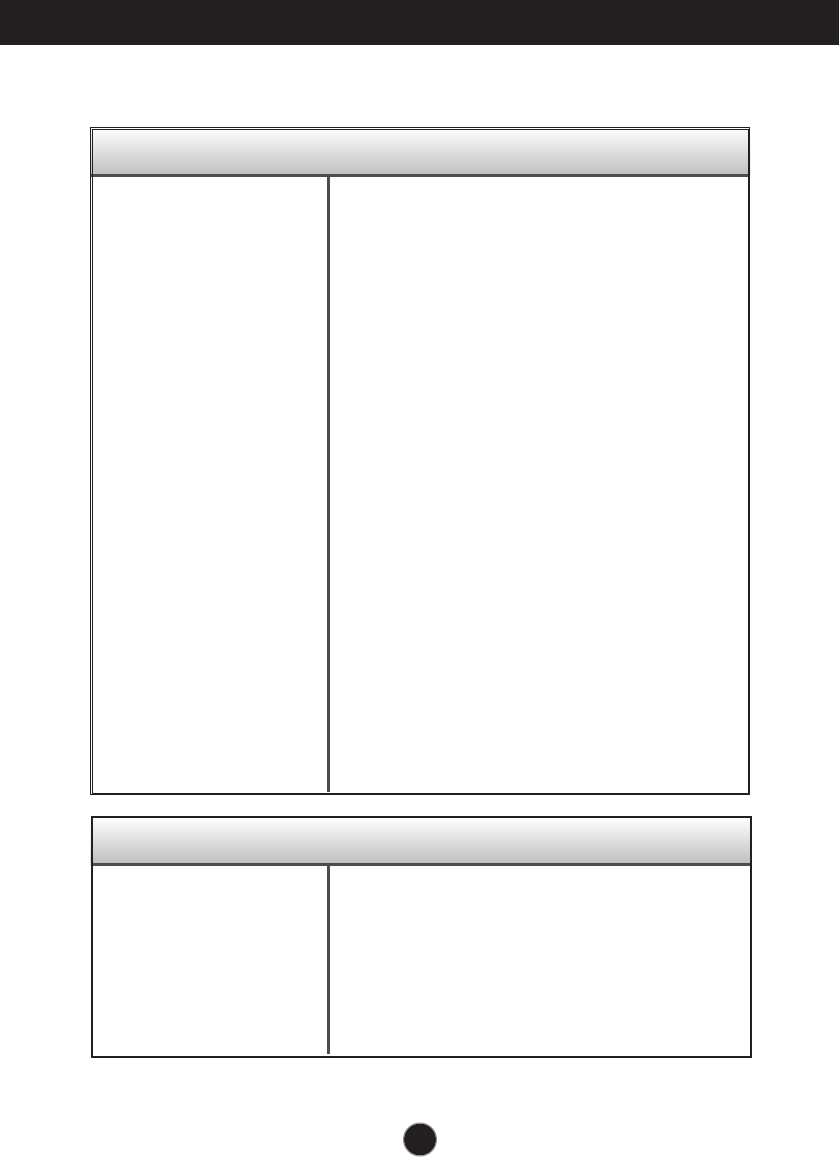
Press the MODE Button, then the main menu of the OSD appears.
22
On Screen Display(OSD) Selection and Adjustment
Main menu Sub menu Description
Exit : Exit
, : Move
: Select another sub-menu
MOVIE It is a mode that the screen is adjusted
to the best to view the videos.
TEXT
PHOTO
USER
sRGB
It is a mode that the screen is adjusted
to the best for the text works.
It is a mode that the screen is adjusted
to the best to view pictures.
It is a mode that the user can adjust
each element. It can adjust the color
mode of the Main Menu.
It is a mode that the screen is adjusted
to the standard sRGB.
23
Troubleshooting
No image appears
Check the following before calling for service.
No image appears
Do you see a "OSD LOCKED" message on the screen?
●Is the power cord of the
display connected?
●Is the power indicator
light on?
●Is the power indicator
flickering?
●Do you see an "OUT OF
RANGE" message on
the screen?
●Do you see a "CHECK
SIGNAL CABLE"
message on the
screen?
•
Check and see if the power cord is connected
properly to the power outlet.
•
Press the Power button.
•
If the display is in power saving mode, try moving
the mouse or pressing any key on the keyboard to
bring up the screen.
• Try to turn on the PC
.
•
This message appears when the signal from the
PC (video card) is out of horizontal or vertical
frequency range of the display. See the
'Specifications' section of this manual and
configure your display again.
•
This message appears when the signal cable
between your PC and your display is not
connected. Check the signal cable and try again.
• You can secure the current control settings,
so that they cannot be inadvertently changed.
You can unlock the OSD controls at any time
by pushing the MENU button for several
seconds: the message
“OSD UNLOCKED” will appear.
●
Do you see “OSD
LOCKED” when you
push MENU button?
24
Troubleshooting
Display image is incorrect
●Display Position is
incorrect.
●On the screen
background, vertical
bars or stripes are
visible.
●Any horizontal noise
appearing in any
image or characters
are not clearly
portrayed.
•
Press the AUTO button to automatically adjust
your display image to the ideal setting.
If the results are unsatisfactory, adjust the image
position using the H position and V position icon
in the on screen display.
•
Press the AUTO button to automatically adjust
your display image to the ideal setting.
If the results are unsatisfactory, decrease the
vertical bars or stripes using the CLOCK icon in
the on screen display.
•
Press the AUTO button to automatically adjust
your display image to the ideal setting.
If the results are unsatisfactory, decrease the
horizontal bars using the PHASE icon in the on
screen display.
•
Check Control Panel --> Display --> Settings
and adjust the display to the recommended
resolution or adjust the display image to the ideal
setting. Set the color setting higher than 24 bits
(true color).
IMPORTANT
Check Control Panel --> Display --> Settings and see if the frequency or the
resolution were changed. If yes, readjust the video card to the recommend
resolution.
If the recommended resolution (optimal resolution) is not selected, letters may be
blurred and the screen may be dimmed, truncated or biased. Make sure to select
the recommend resolution.
The setting method can differ by computer and O/S (Operation System),
and resolution mentioned above may not be supported by the video card
performance. In this case, please ask to the computer or the video card
manufacturer.

25
Troubleshooting
Display image is incorrect
●The screen color is
mono or abnormal.
●The screen blinks.
•
Check if the signal cable is properly connected
and use a screwdriver to fasten if necessary.
•
Make sure the video card is properly inserted in
the slot.
•
Set the color setting higher than 24 bits (true color)
at Control Panel - Settings.
•
Check if the screen is set to interlace mode and if
yes, change it to the recommend resolution.
Do you see an "Unrecognized monitor, Plug&Play (VESA
DDC) monitor found" message?
●
Have you installed the
display driver?
•
Be sure to install the display driver from the display
driver CD (or diskette) that comes with your
display. Or, you can also download the driver from
our web site: http://www.lg.com.
•
Make sure to check if the video card supports
Plug&Play function.
26
Specifications IPS206T
50.8 cm (20.0 inch) Flat Panel Active matrix-TFT LCD
Anti-Glare coating
Visible diagonal size :
50.8
cm
0.2766 x 0.2766 mm (Pixel pitch)
Display
Horizontal Freq. 30 - 83 kHz (Automatic)
Vertical Freq. 56 - 75 Hz (Automatic)
Input Form Separate Sync.
Digital
Sync Input
Signal Input 15 pin D-Sub Connector
DVI-D Connector (Digital)
Input Form RGB Analog (0.7 Vp-p/ 75 ohm), Digital
Video Input
Max VESA 1600 x 900 @ 60 Hz
Recommend VESA 1600 x 900 @ 60 Hz
Resolution
Plug&Play
On Mode :
28 W(Typ.)
Sleep Mode ≤0.5 W
Off Mode ≤0.5 W
Power
Consumption
Operating Conditions
Temperature 10 ˚C to 35 ˚C
Humidity 10 % to 80 % non-Condensing
Storage Conditions
Temperature -20 ˚C to 60 ˚C
Humidity 5 % to 90 % non-Condensing
Environment
al Conditions
With Stand
Width 47.99 cm (18.89 inch)
Height 38.30 cm (15.08 inch)
Depth 23.00 cm ( 9.06 inch)
Weight(excl. packing) 3.1 kg (6.84 lb)
Dimensions
& Weight
Tilt : -5˚ - 15˚
Range
19 V 2.0 A
Power Input
Attached ( ), Detached ( O )
Stand Base
Wall-outlet type
Power cord
DDC 2B(Digital),DDC2AB(Anlaog)
Without Stand
Width 47.99 cm (18.89 inch)
Height 31.12 cm (12.25 inch)
Depth 3.99 cm ( 1.57 inch)
NOTE
Information in this document is subject to change without notice.
Type PA-1650-68,manufactured by LITEON TECHNOLOGY CORP.
or Type EADP-40LB B,manufactured by Delta Electronics,Inc.
AC-DC Adapter
27
Specifications IPS226T
54.6 cm (21.5 inch) Flat Panel Active matrix-TFT LCD
Anti-Glare coating
Visible diagonal size :
54.6
cm
0.248 x 0.248 mm (Pixel pitch)
Display
Horizontal Freq. 30 - 83 kHz (Automatic)
Vertical Freq. 56 - 75 Hz (Automatic)
Input Form Separate Sync.
Digital
Sync Input
Signal Input 15 pin D-Sub Connector
DVI-D Connector (Digital)
Input Form RGB Analog (0.7 Vp-p/ 75 ohm), Digital
Video Input
Max VESA 1920 x 1080 @ 60 Hz
Recommend VESA 1920 x 1080 @ 60 Hz
Resolution
Plug&Play
On Mode :
33 W(Typ.)
Sleep Mode ≤0.5 W
Off Mode ≤0.5 W
Power
Consumption
Operating Conditions
Temperature 10 ˚C to 35 ˚C
Humidity 10 % to 80 % non-Condensing
Storage Conditions
Temperature -20 ˚C to 60 ˚C
Humidity 5 % to 90 % non-Condensing
Environment
al Conditions
With Stand
Width 51.48 cm (20.27 inch)
Height 40.30 cm (15.87 inch)
Depth 23.00 cm ( 9.06 inch)
Weight(excl. packing) 3.4 kg (7.50 lb)
Dimensions
& Weight
Tilt : -5˚ - 15˚
Range
19 V 2.0 A
Power Input
Attached ( ), Detached ( O )
Stand Base
Wall-outlet type
Power cord
DDC 2B(Digital),DDC2AB(Anlaog)
Without Stand
Width 51.48 cm (20.27 inch)
Height 33.22 cm (13.08 inch)
Depth 4.04 cm ( 1.59 inch)
NOTE
Information in this document is subject to change without notice.
Type PA-1650-68,manufactured by LITEON TECHNOLOGY CORP.
or Type EADP-40LB B,manufactured by Delta Electronics,Inc.
AC-DC Adapter

28
Specifications
Preset Modes (Resolution)
Indicator
On Mode
Sleep Mode
Off Mode
Blue
Blue Blinking
Off
LED Color
MODE
Display Modes (Resolution) Horizontal Freq. (kHz) Vertical Freq. (Hz)
* Recommend Mode
IPS206T
1
2
3
4
5
6
7
8
*9
720 x 400
640 x 480
640 x 480
800 x 600
800 x 600
1024 x 768
1024 x 768
1152 x 864
1600 x 900
31.468
31.469
37.500
37.879
46.875
48.363
60.123
67.500
60.000
70
60
75
60
75
60
75
75
60
Display Modes (Resolution) Horizontal Freq. (kHz) Vertical Freq. (Hz)
* Recommend Mode
IPS226T
1
2
3
4
5
6
7
8
9
10
11
*12
720 x 400
640 x 480
640 x 480
800 x 600
800 x 600
1024 x 768
1024 x 768
1152 x 864
1280 x 1024
1280 x 1024
1680 x 1050
1920 x 1080
31.468
31.469
37.500
37.879
46.875
48.363
60.123
67.500
63.981
79.976
65.290
67.500
70
60
75
60
75
60
75
75
60
75
60
60
29
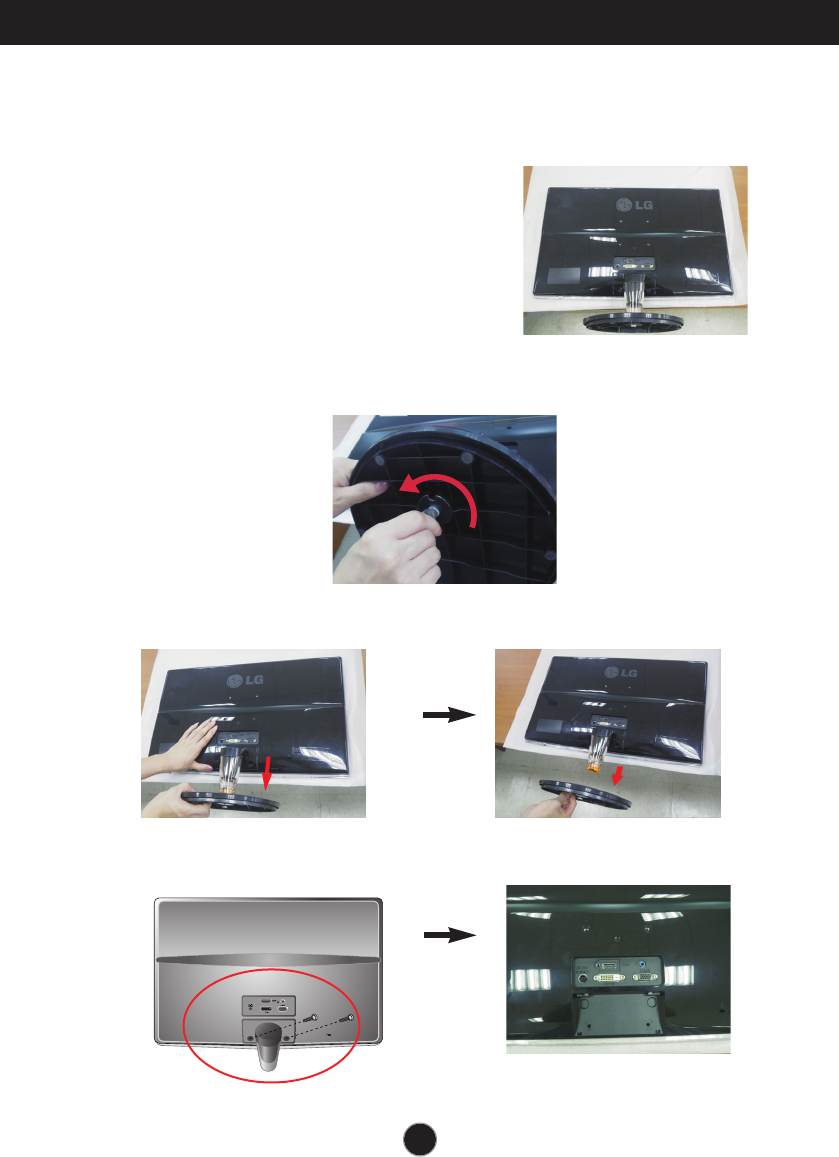
Installing the Wall mount plate
This monitor satisfies the specifications of the Wall mount plate
or the interchange device.
1. Place the monitor face down on the soft cloth.
2. When you desire to disintegrate the monitor from the stand base, use a coin to turn the
screw counterclockwise.
3.
Pull out the Stand Base to remove.
4.
Remove the
Stand Body.
30
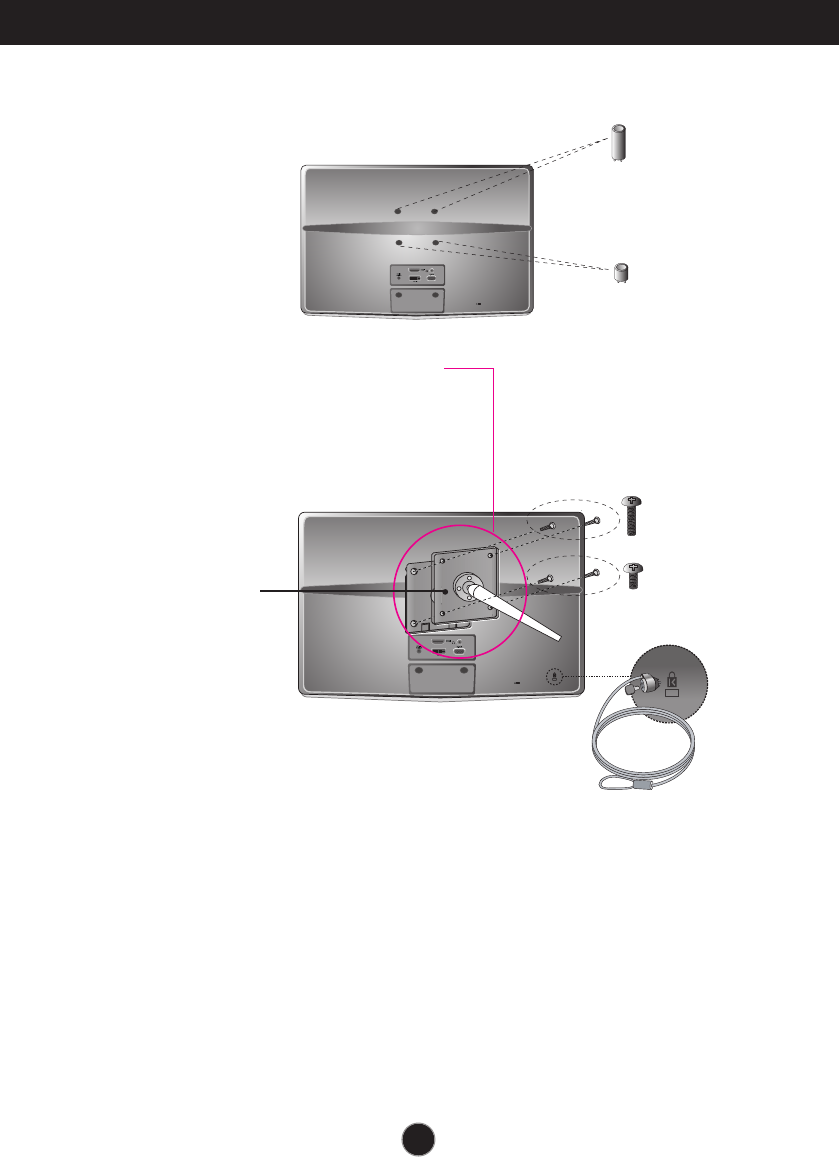
Installing the Wall mount plate
5.
Install the Wall mount plate.
Wall mount plate(Separate purchase)
This is stand-type or wall mount type and is
connectable with Wall mount plate.
Please refer to the installation guide for more details,
which is provided when Wall mount plate is
purchased.
Kensington Security Slot
Connected to a locking cable that
can be purchased separately at
most computer stores.
Wall Mount pad

Make sure to read the Safety Precautions
before using the product.
Keep the OWNER’S MANUAL(CD) in an
accessible place for furture reference.
The model and serial number of the SET is
located on the back or one side of the SET.
Record it below should you ever need service.
MODEL
SERIAL
As an ENERGY STAR Partner LGE U. S. A.,Inc.
has determined that this product meets the
ENERGY STAR guidelines for energy efficiency.
ENERGY STAR is a set of power-saving
guidelines issued by the U.S.Environmental
Protection Agency(EPA).