LG Electronics USA IPS237WY DLP PROJECTOR User Manual EMISSION TEST REPORT
LG Electronics USA DLP PROJECTOR EMISSION TEST REPORT
UserManual.wiki
>
LG Electronics USA
>
IPS237WY User Manual
user manual
Navigation menu
Upload a User Manual
Namespaces
Wiki Guide
HTML
PDF
Info
Views
User Manual
Discussion / Help
Navigation


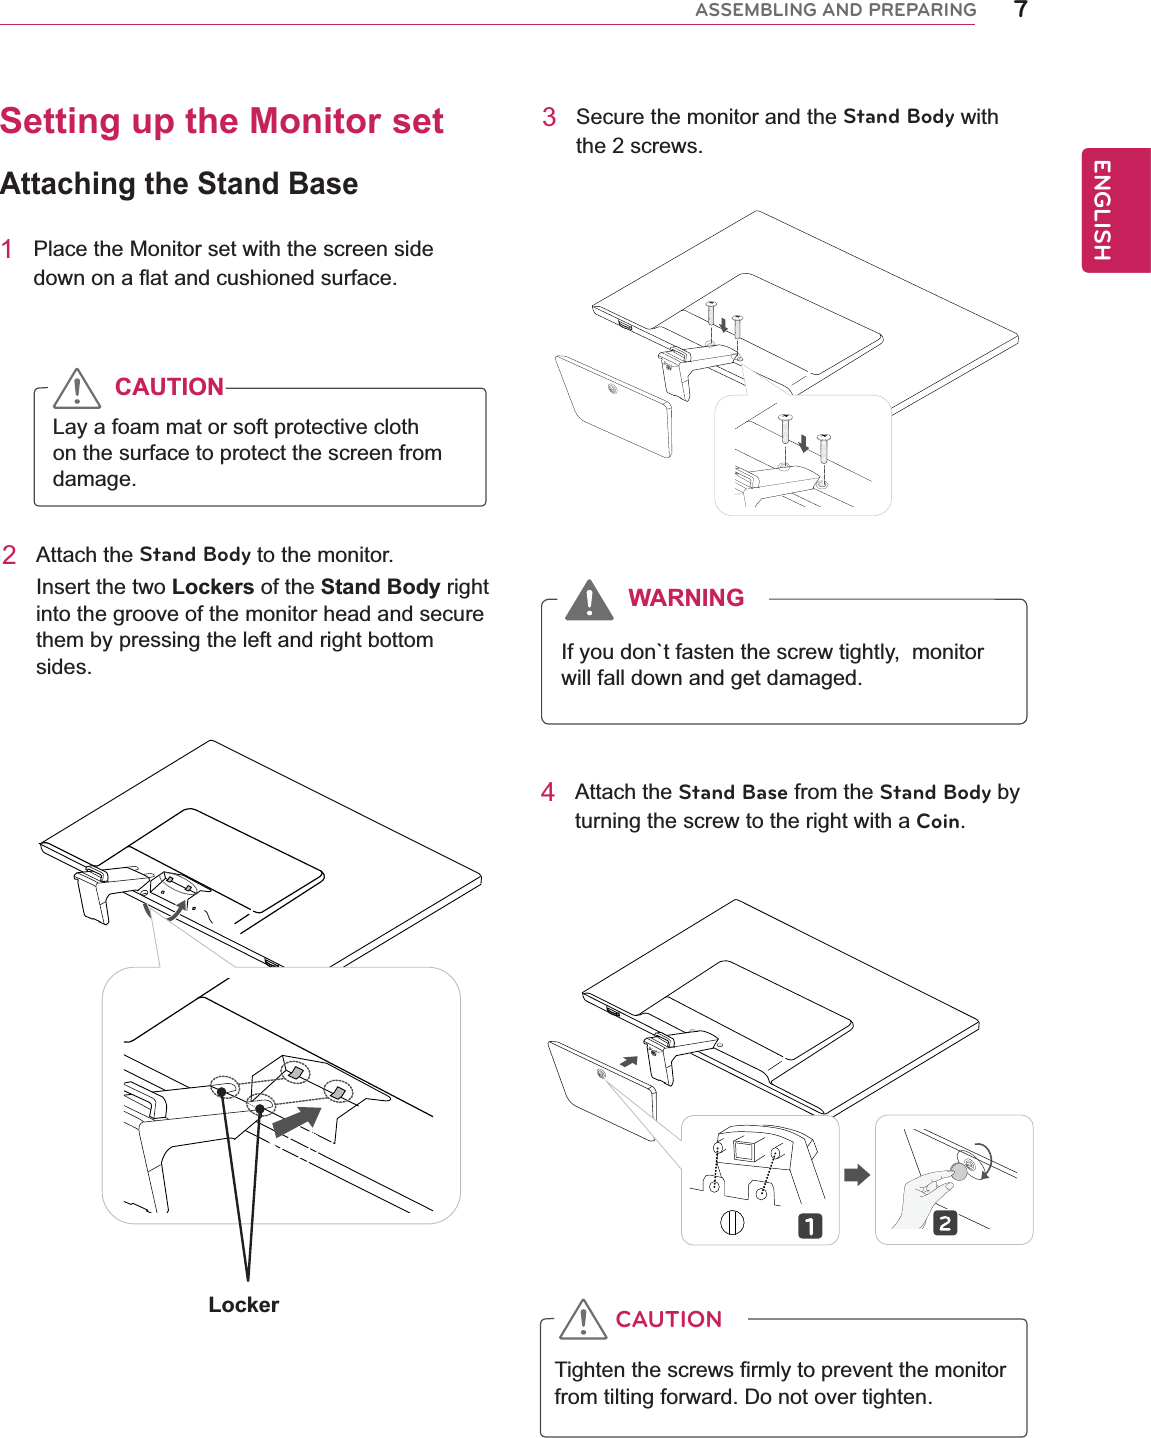
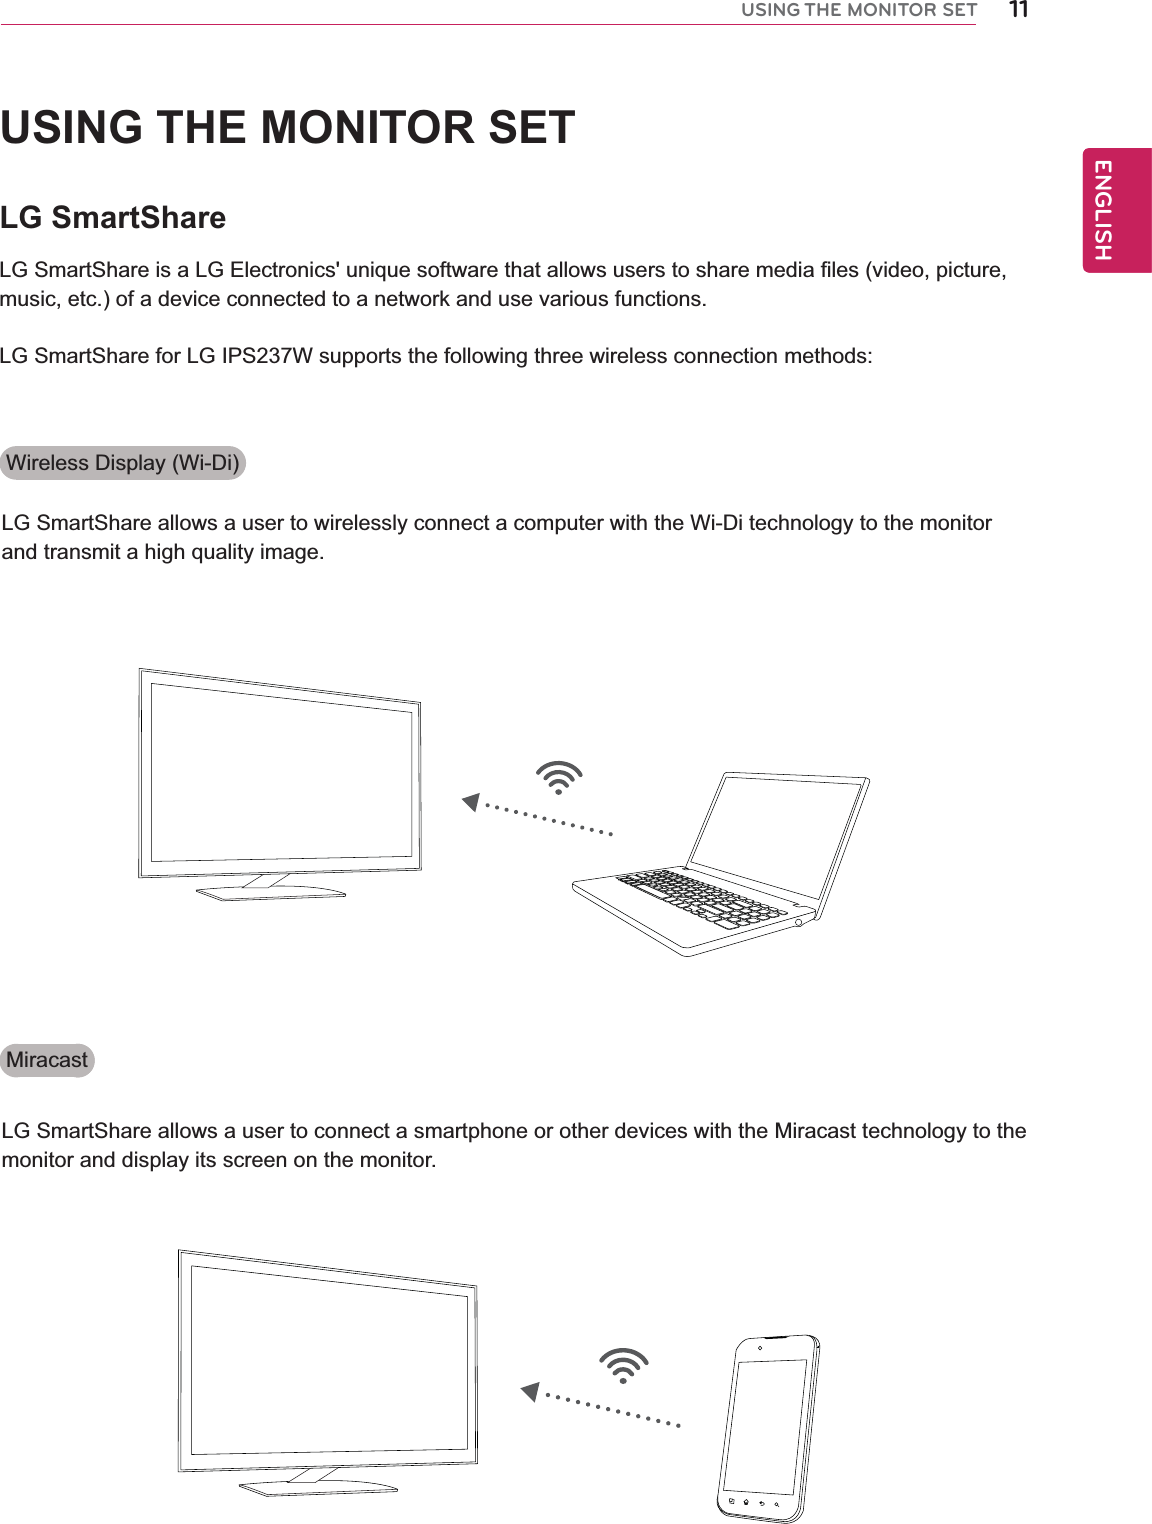
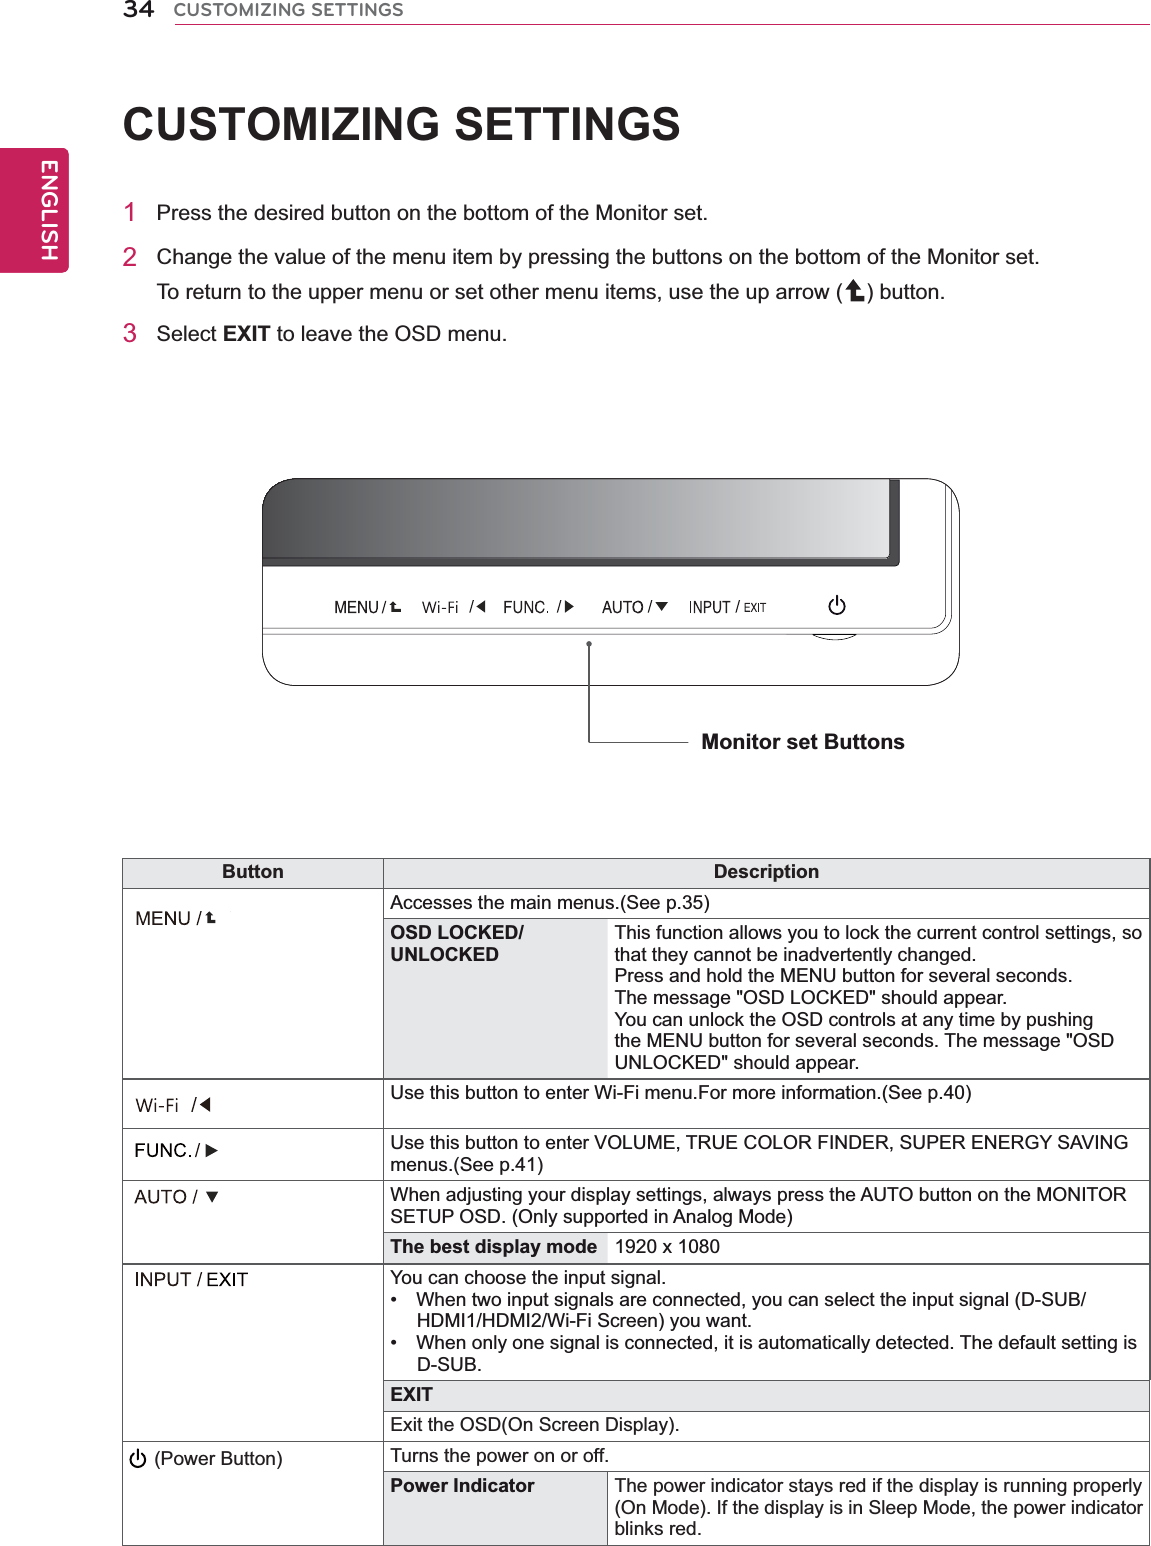
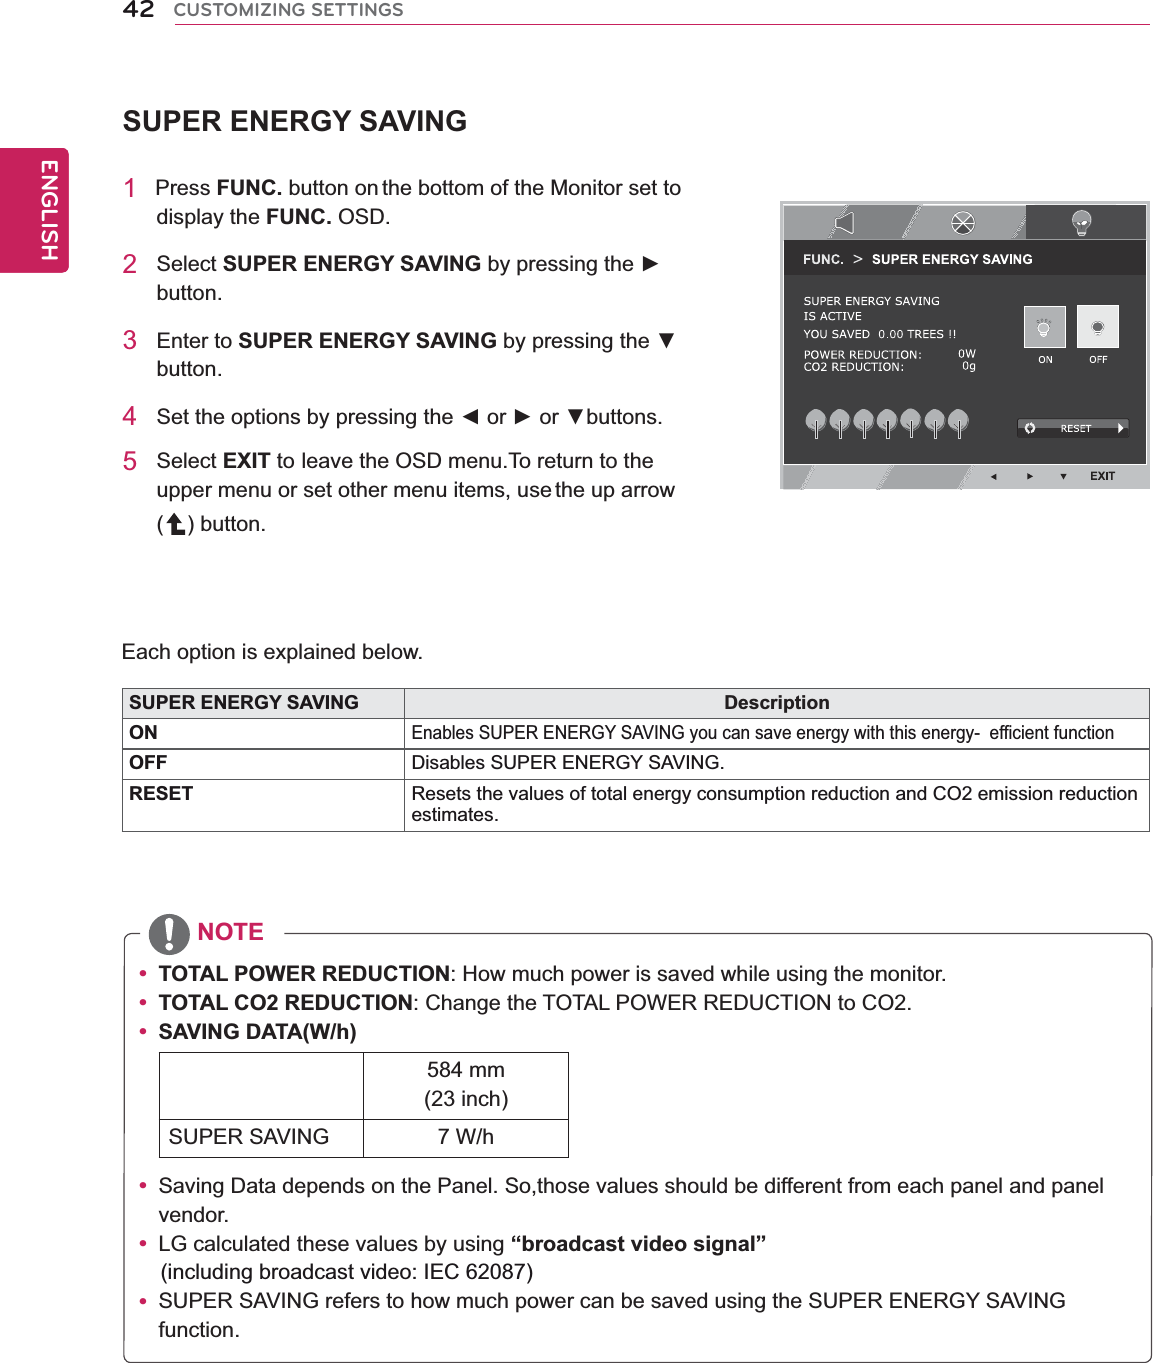
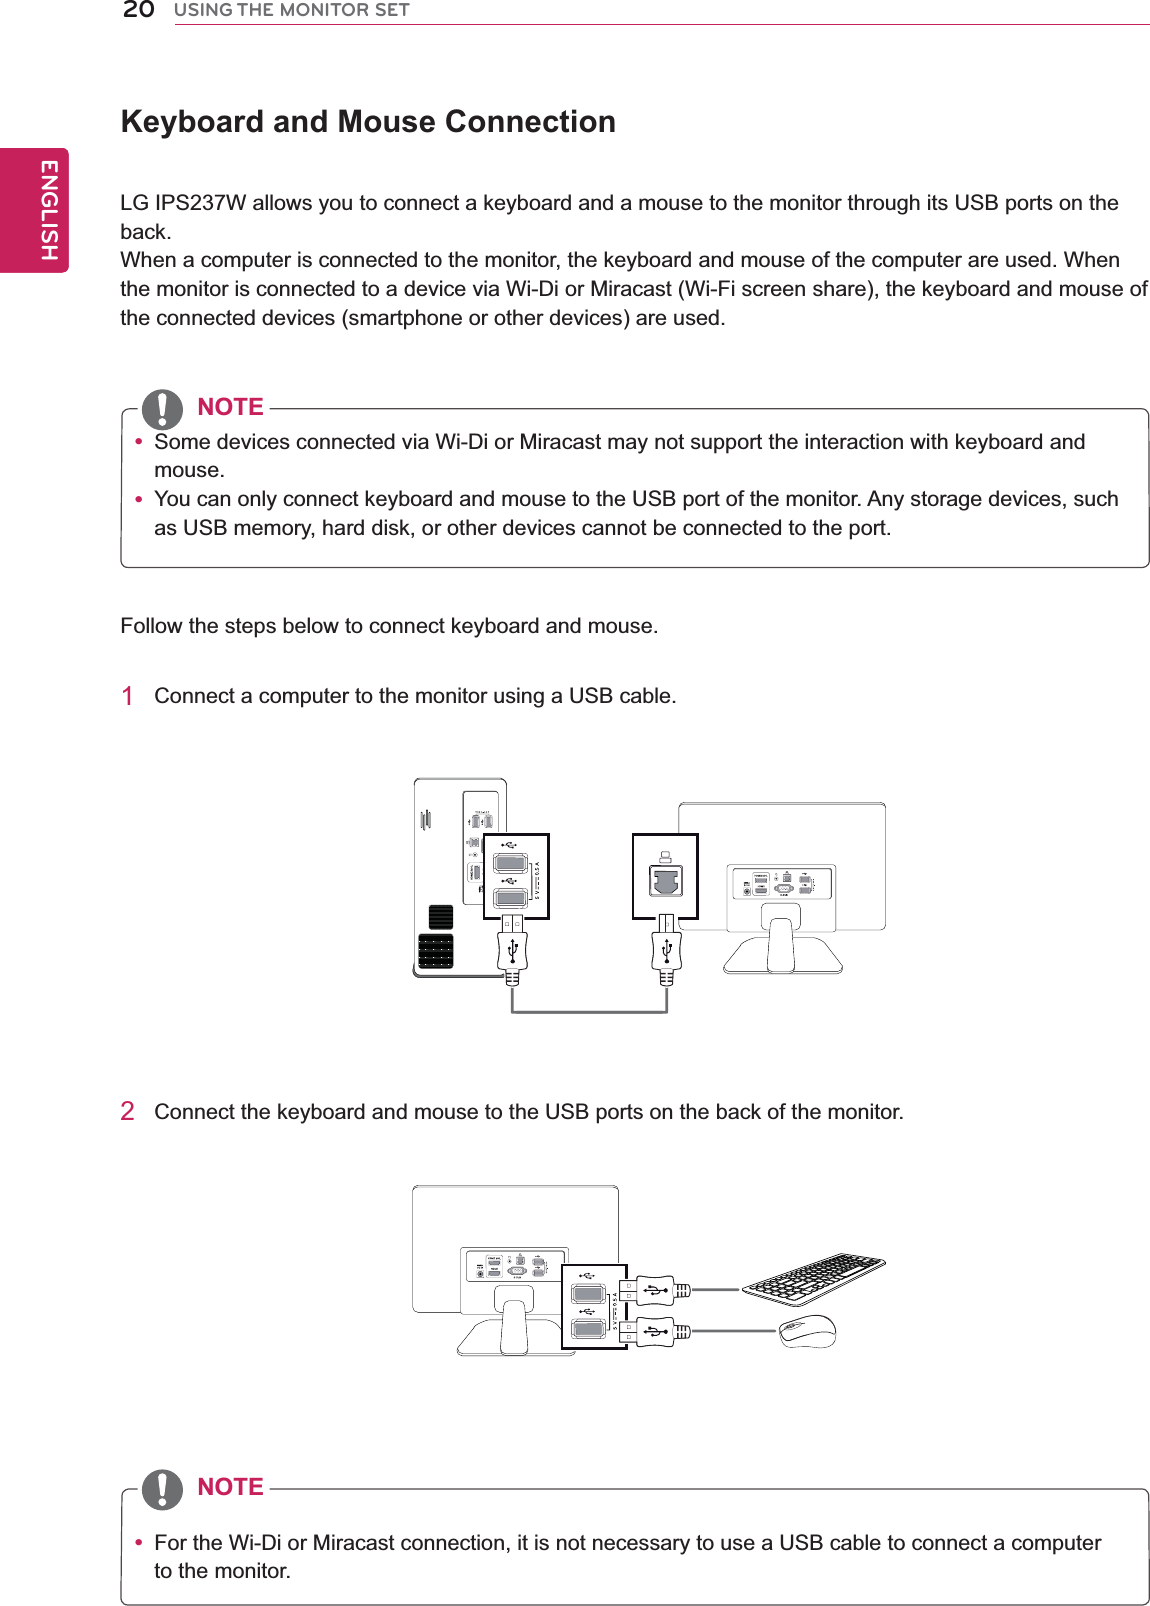
![14ENGENGLISHUSING THE MONITOR SETLG_Monitor_C54A 2233/PU$POOFDUFEYou can enjoy contents from smart devices directly on your monitor screen through SmartShare feature.Please execute Miracast, WiDi, DLNA function of your devicesthat you would like to connect to your monitor.Press 'Wi-Fi' button for settingsConnecting or Disconnecting Wireless RouterThe monitor must be connected to a wireless router to use DLNA.y Automatic firmware update is possible only when the monitor is connected to a wireless router that is connected to the Internet.y The network connection may not be working properly depending on Internet Service Provider (ISP).y The wireless network may be affected by the interference from a device that uses 2.4 GHz frequency, such as a wireless telephone, Bluetooth device or microwave. It is also interfered by a device that uses 5 GHz frequency such as Wi-Fi devices.y The wireless network service may run slowly depending on surrounding wireless environment.y Some devices may have network traffic jam if any of local home networks is turned on.y To connect to a wireless router, a router that supports wireless connection is necessary; the wireless connection function of the corresponding router must also be activated. Ask the router manufacturer whether the router supports wireless connection.y To connect to a wireless router, verify the SSID and security settings of the wireless router. Please refer to the user guide of the corresponding router regarding SSID and security settings of the wireless router.y The connection method may vary according to the manufacturer of the wireless router.y Adhoc or WPS connection is not supported.NOTEFollow the steps below to connect the monitor to a wireless router.1 Turn on the monitor by pressing the (power button) of the monitor and press the [Wi-Fi] button to go to the SmartShare home screen.2 When the monitor name and ID are all displayed on the SmartShare home screen, press the [Wi-Fi] button.Connecting Wireless Router](https://usermanual.wiki/LG-Electronics-USA/IPS237WY/User-Guide-1813383-Page-15.png)
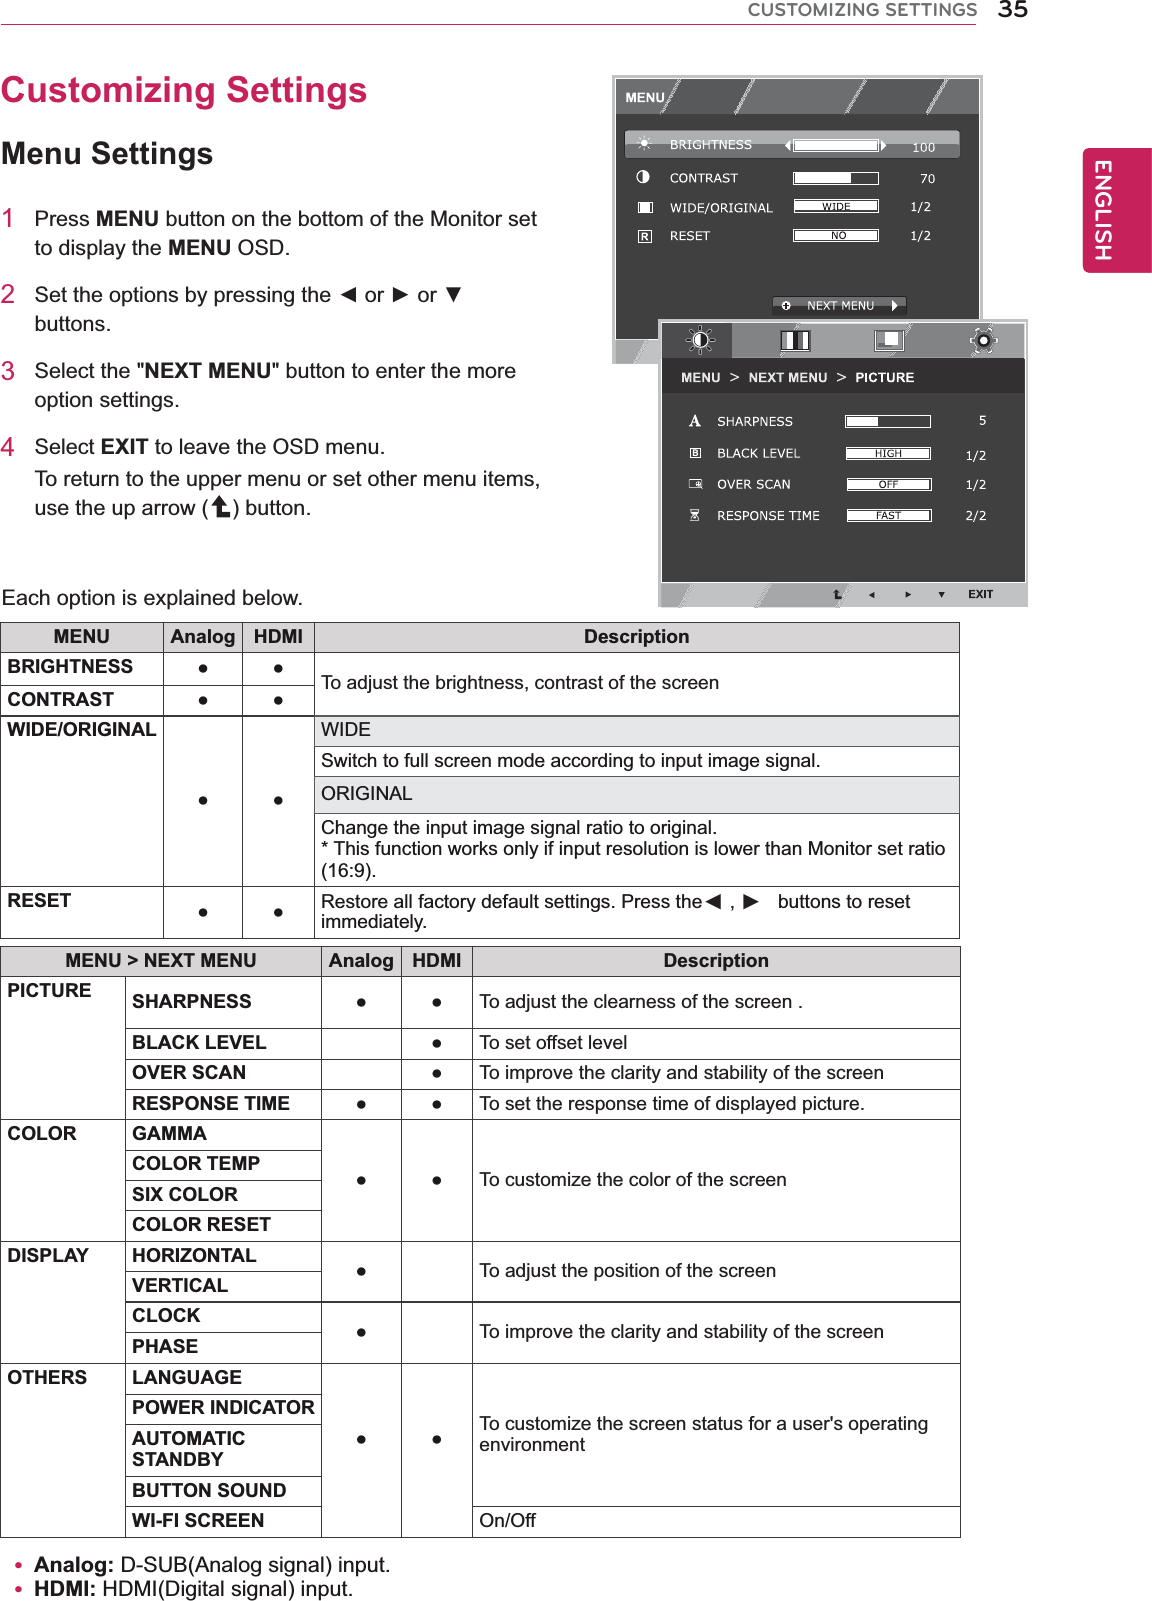
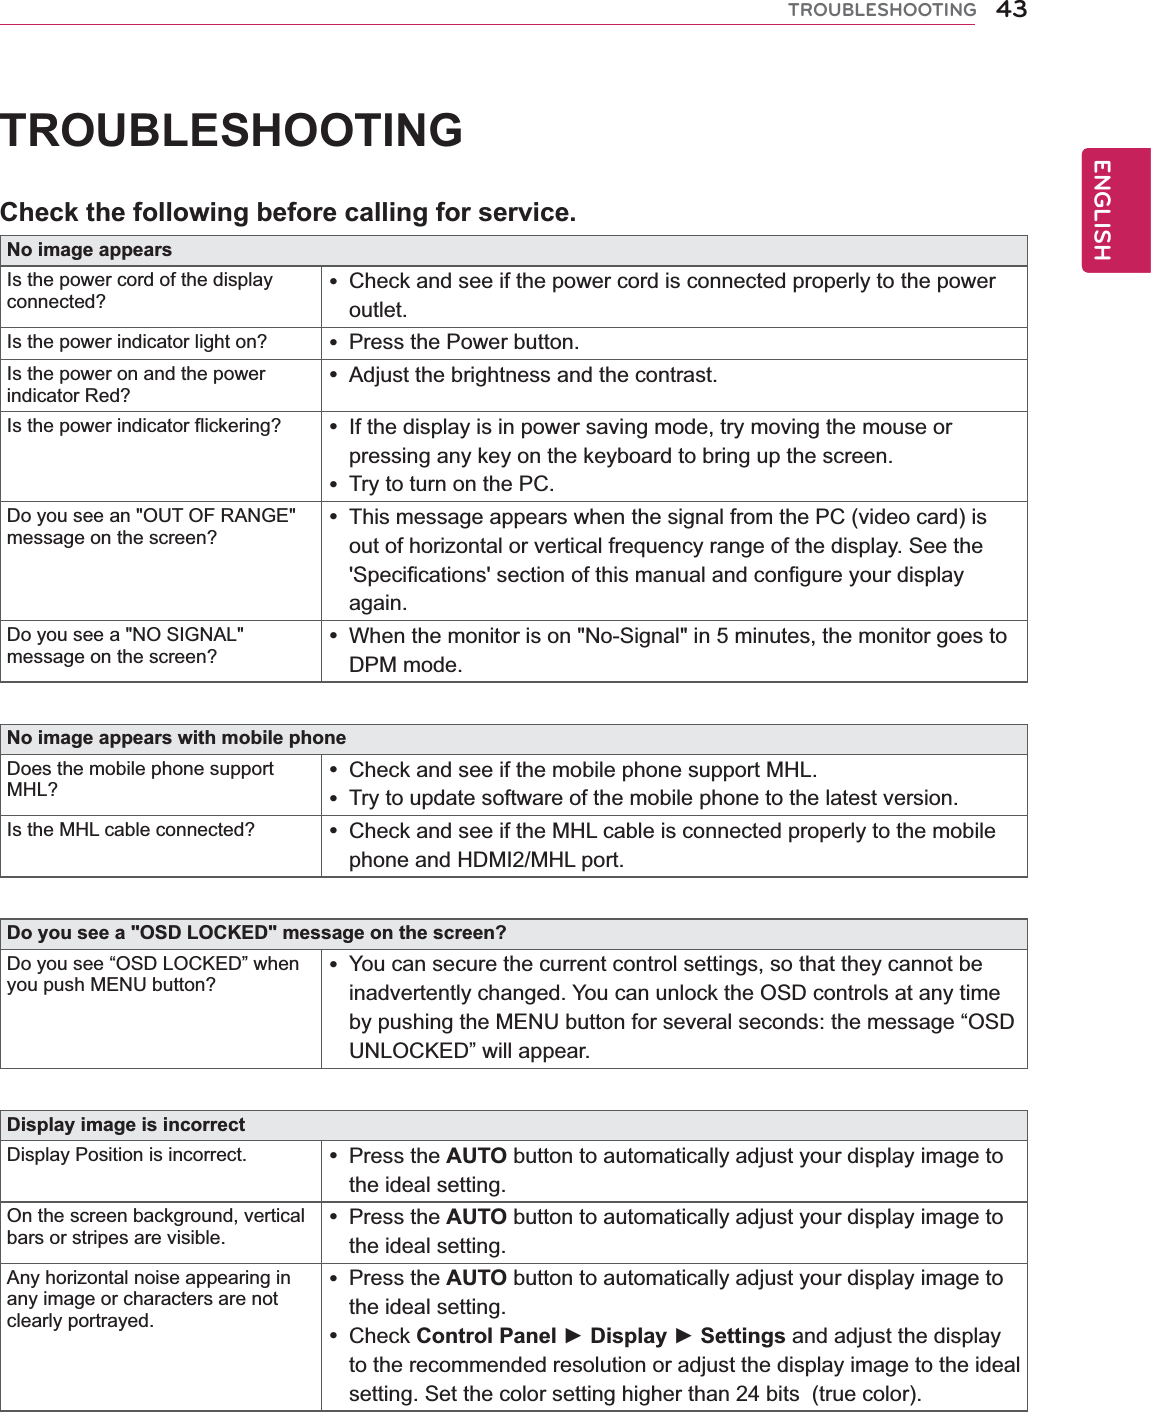
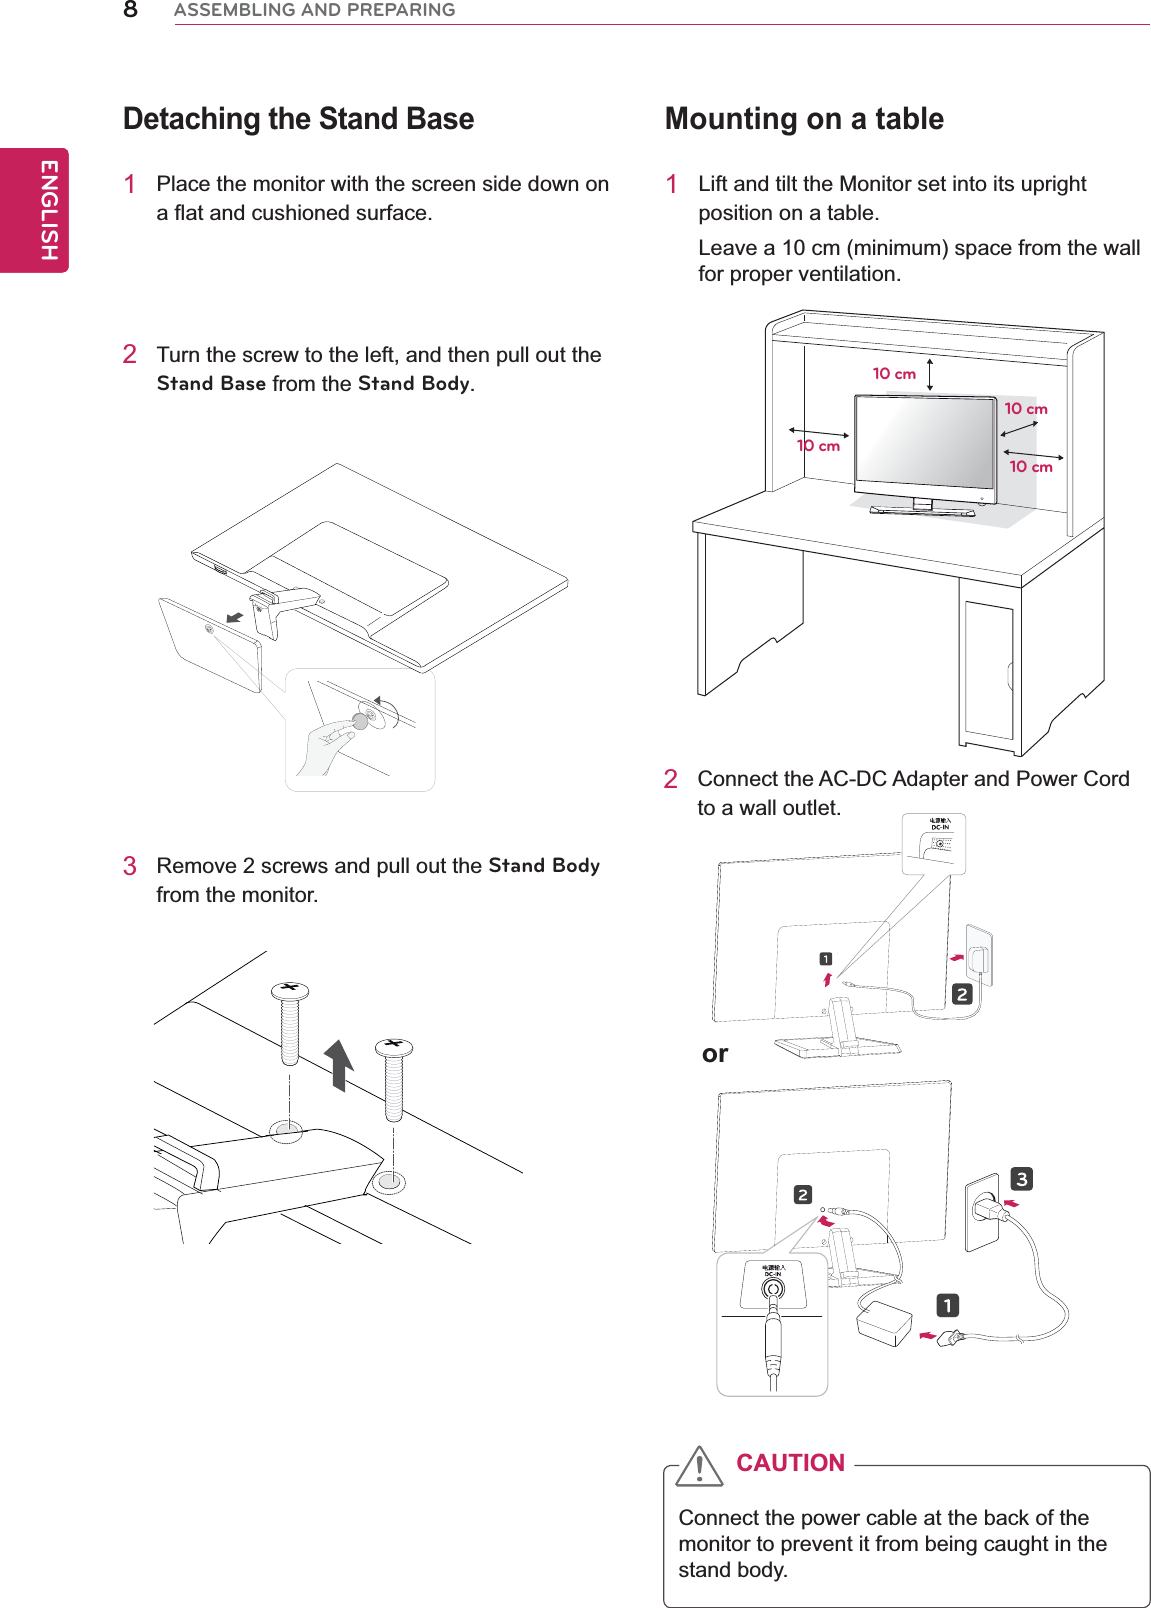
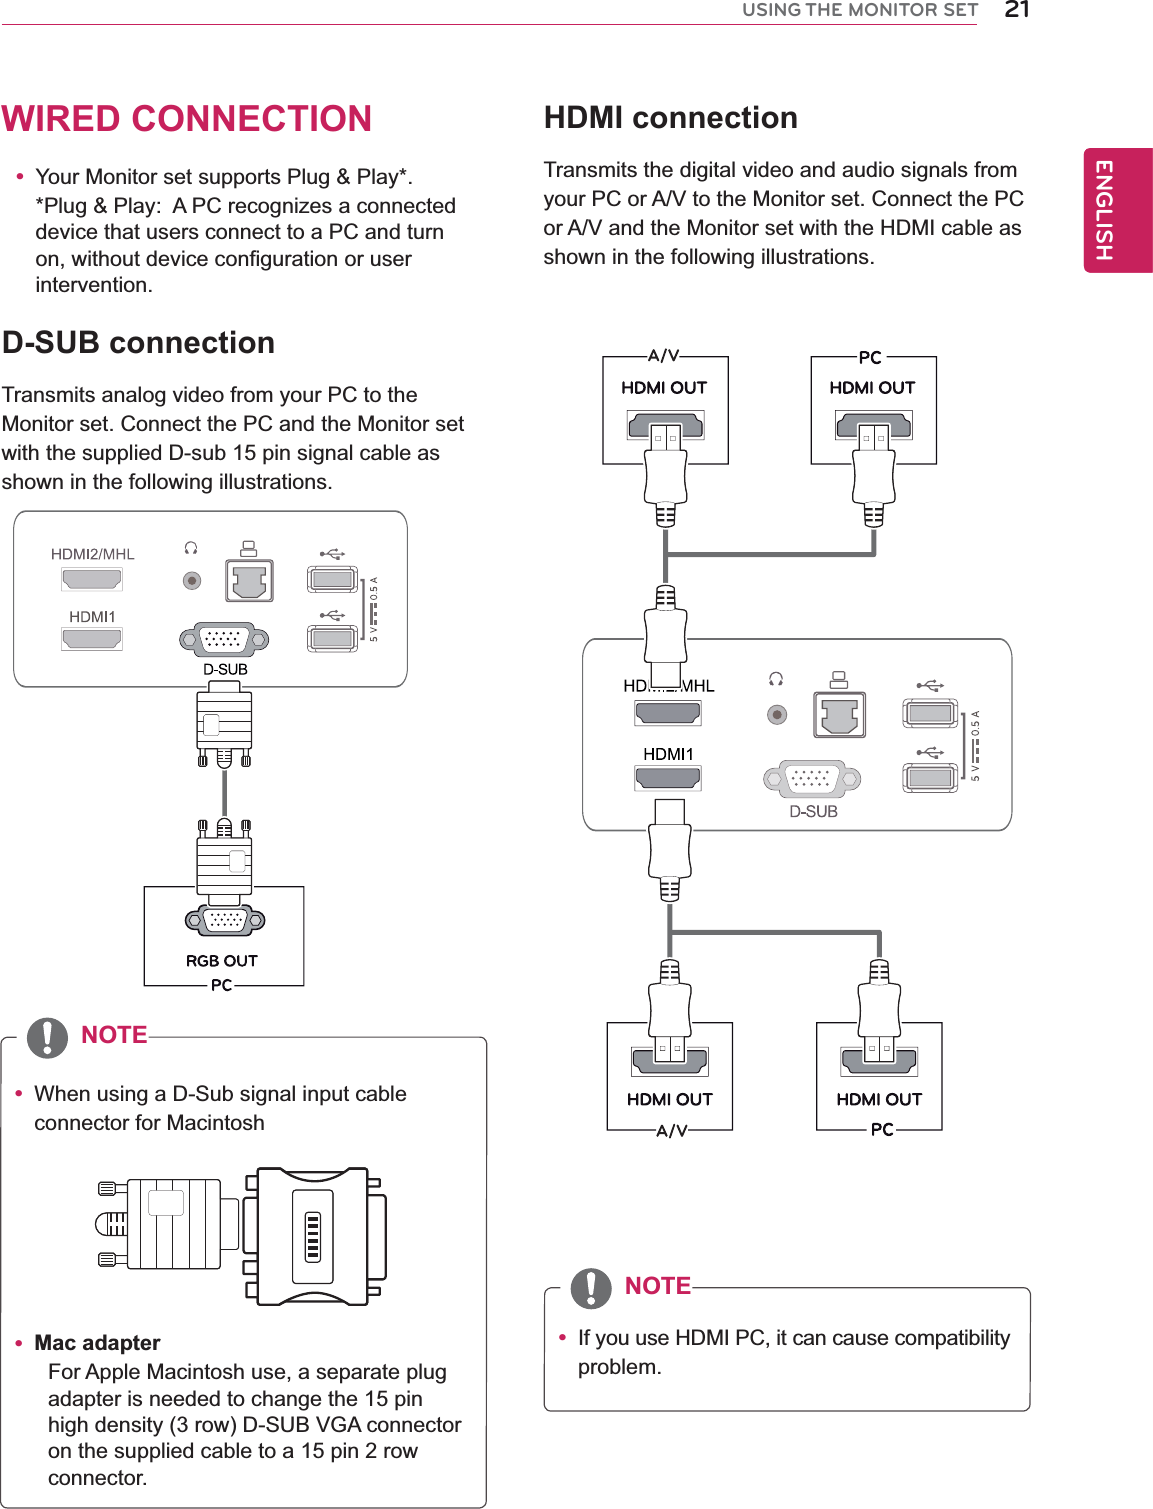
![15ENGENGLISHUSING THE MONITOR SETConnect to your wireless network.You can enjoy the content from other devices easily through DLNA.Miracast Device Search AP (Access Point) SearchSettingsSELECT EXITSELECT EXIT$IPPTFGSPN"1TUPDPOOFDUUPUIFOFUXPSL4FUUJOHT"1"DDFTT1PJOU4FBSDI 1BHF$0//&$5 &9*5$I G "1 I L"1/BNF "1/BNF "1/BNF"1/BNF"1/BNF"1/BNF"1/BNF"1/BNF"1/BNF"1/BNF"1/BNF"1/BNF$0//&$5&9*53 When the Settings screen appears, select the [AP (Access Point) Search] and press the [Select] button.4 When wireless routers are searched and displayed, select a wireless router to use and press the [Connect] button.](https://usermanual.wiki/LG-Electronics-USA/IPS237WY/User-Guide-1813383-Page-16.png)
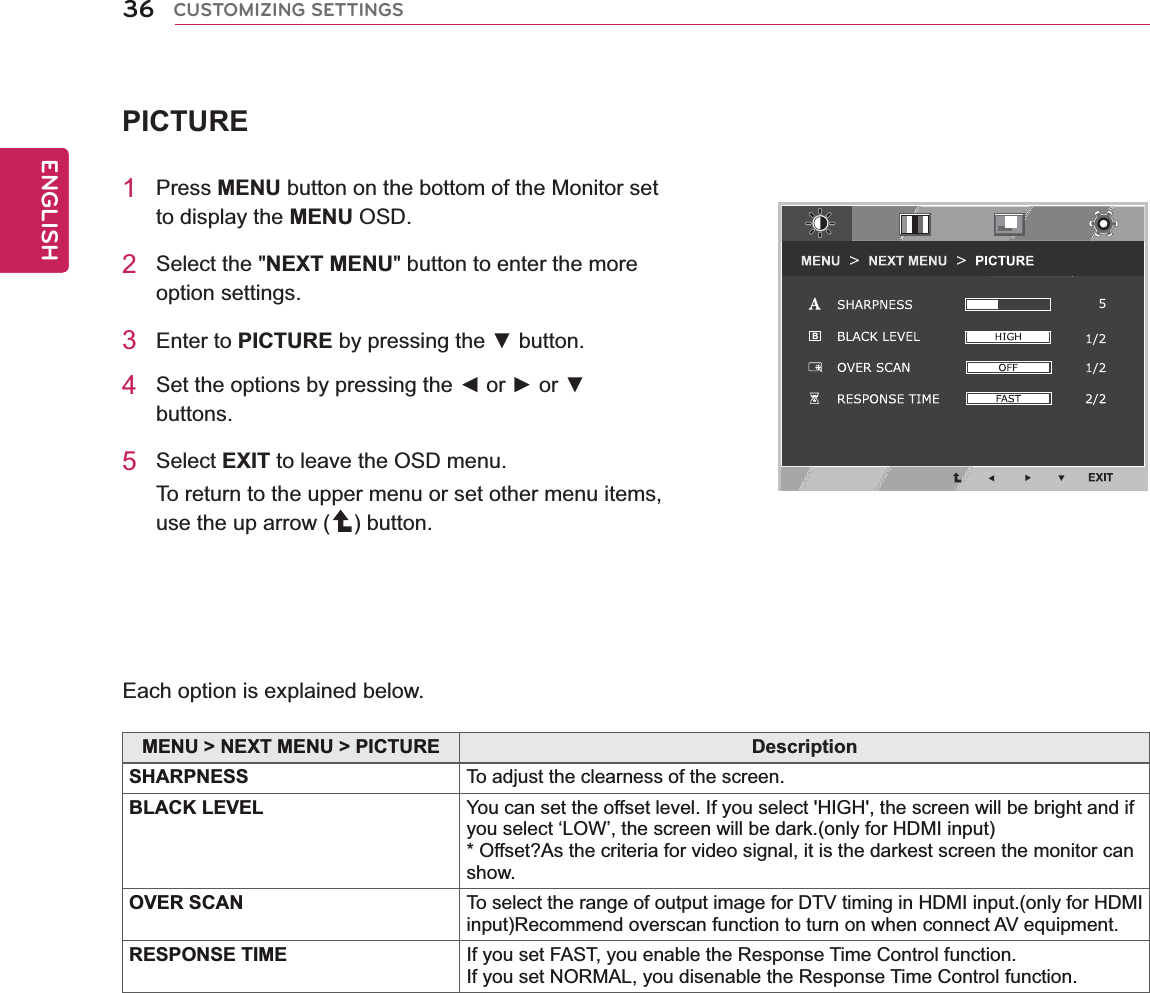
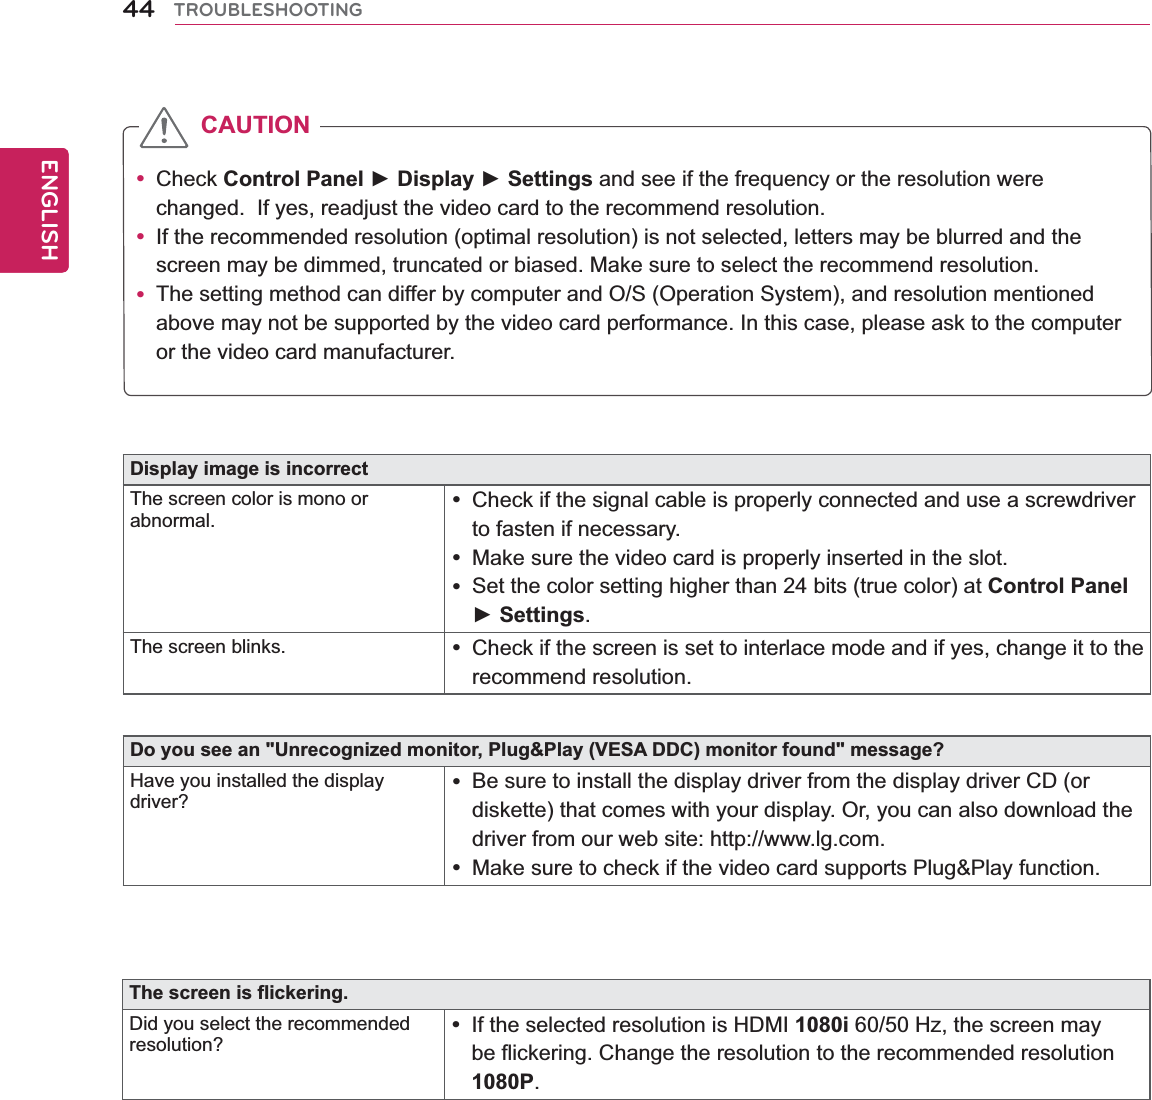
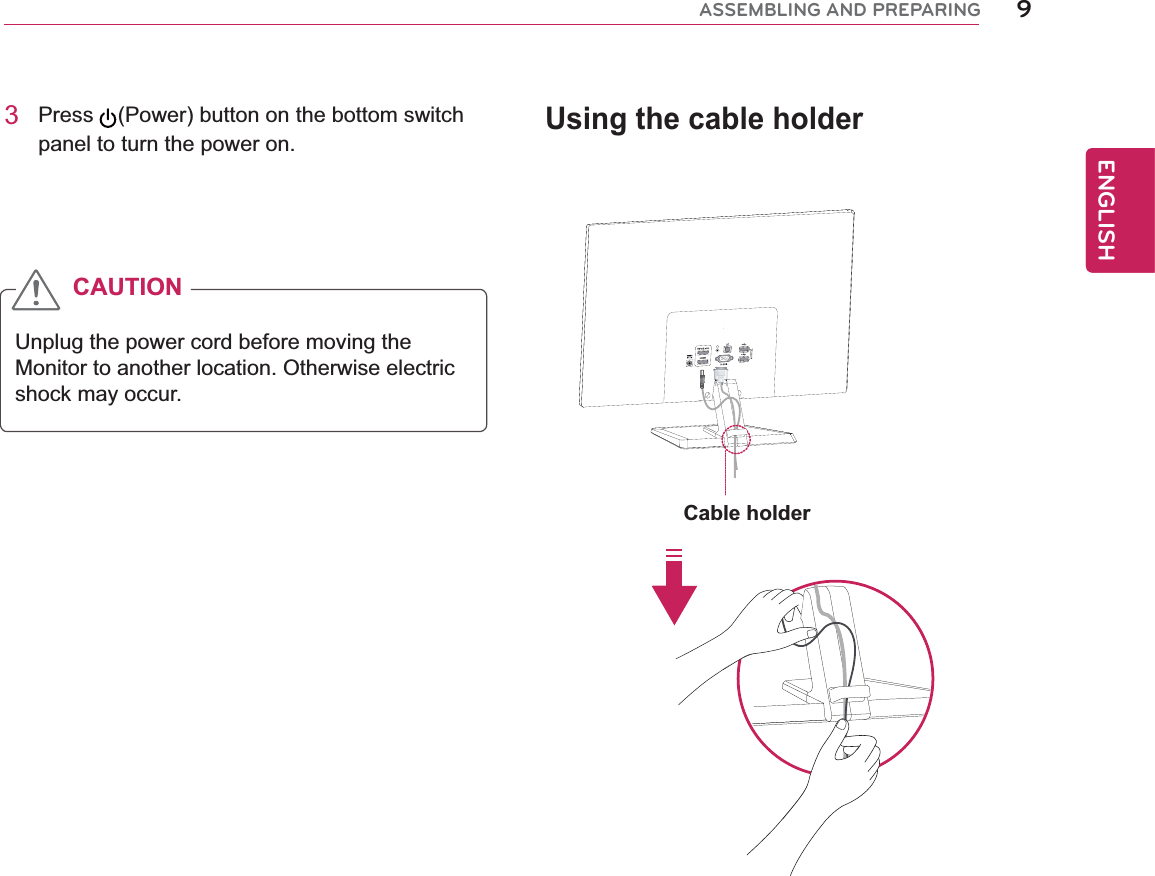
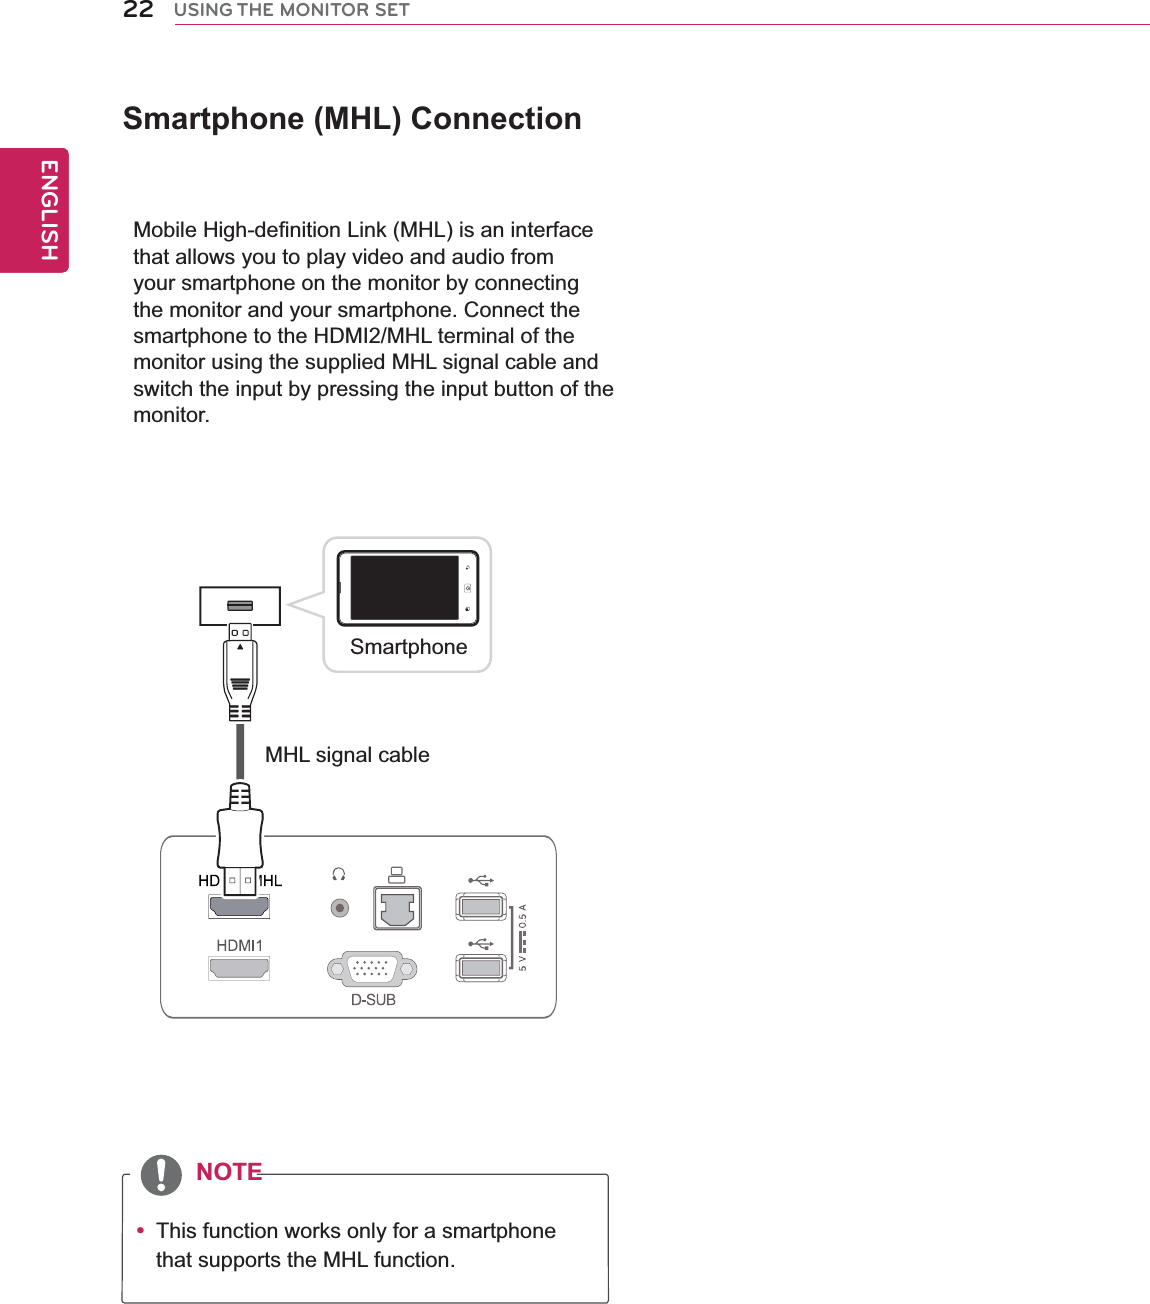
![16ENGENGLISHUSING THE MONITOR SETWireless : AP Name 001Enter security key of network.Forgot your password? Contact your AP manufacturer.Password:4&-&$5 &9*5WirEntForgLG_Monitor_5286(5286) AP Name 001Connecting…5 For a secured wireless router, the following screen appears asking to enter your password. Enter the correct password and then move to the [OK] button by using the direction key. Press the [Select] button.6 The wireless router connection is processed as shown below.](https://usermanual.wiki/LG-Electronics-USA/IPS237WY/User-Guide-1813383-Page-17.png)
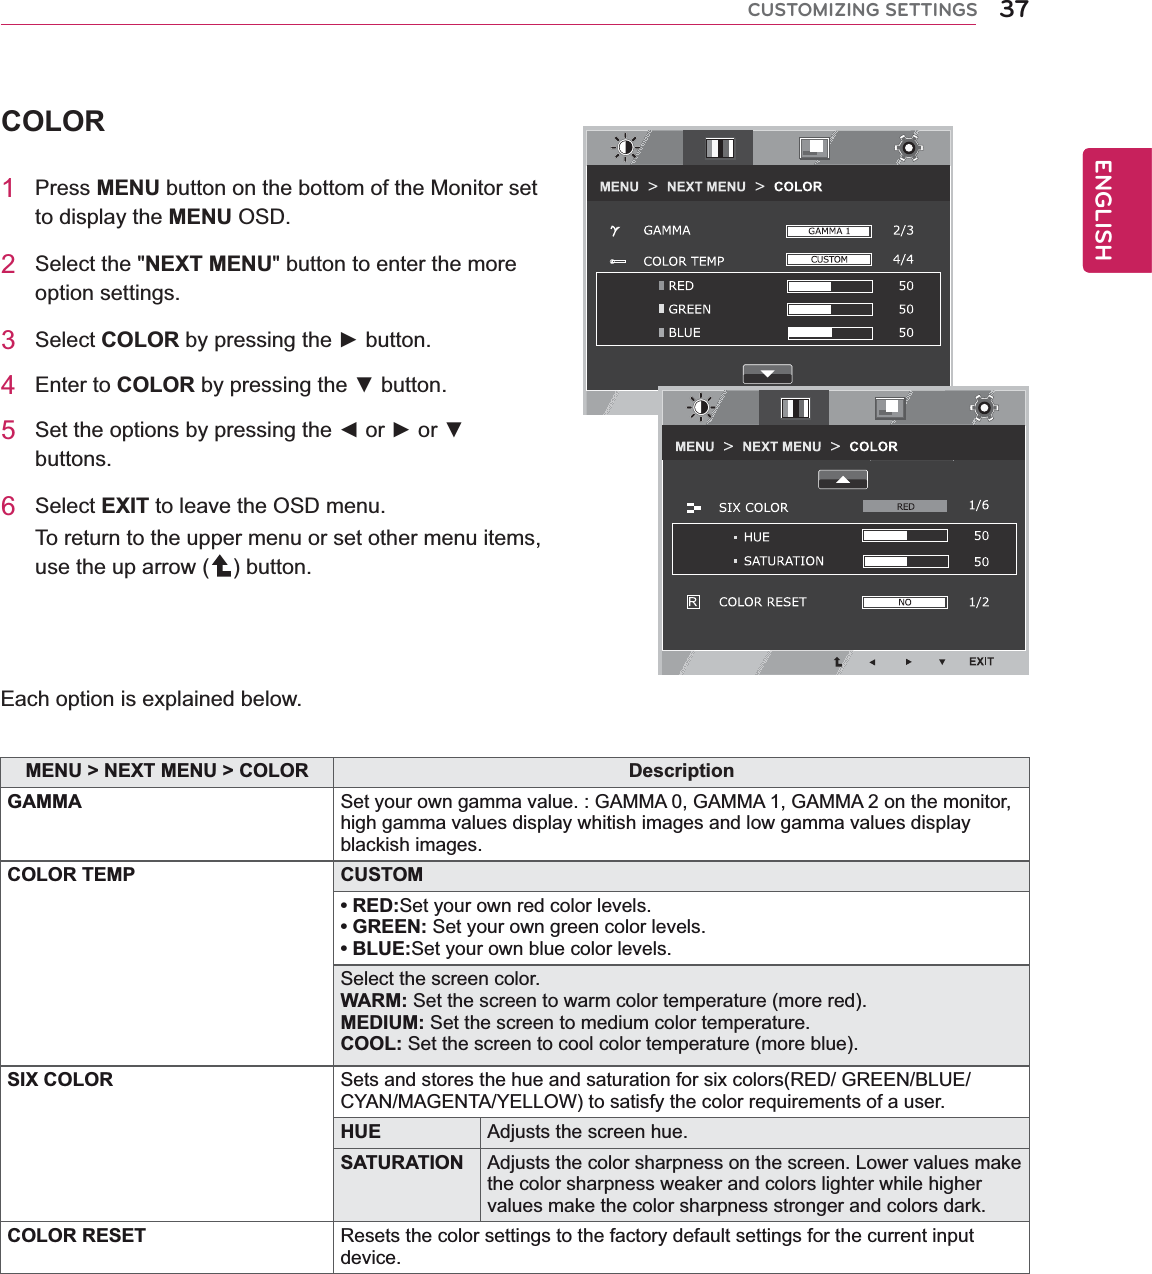
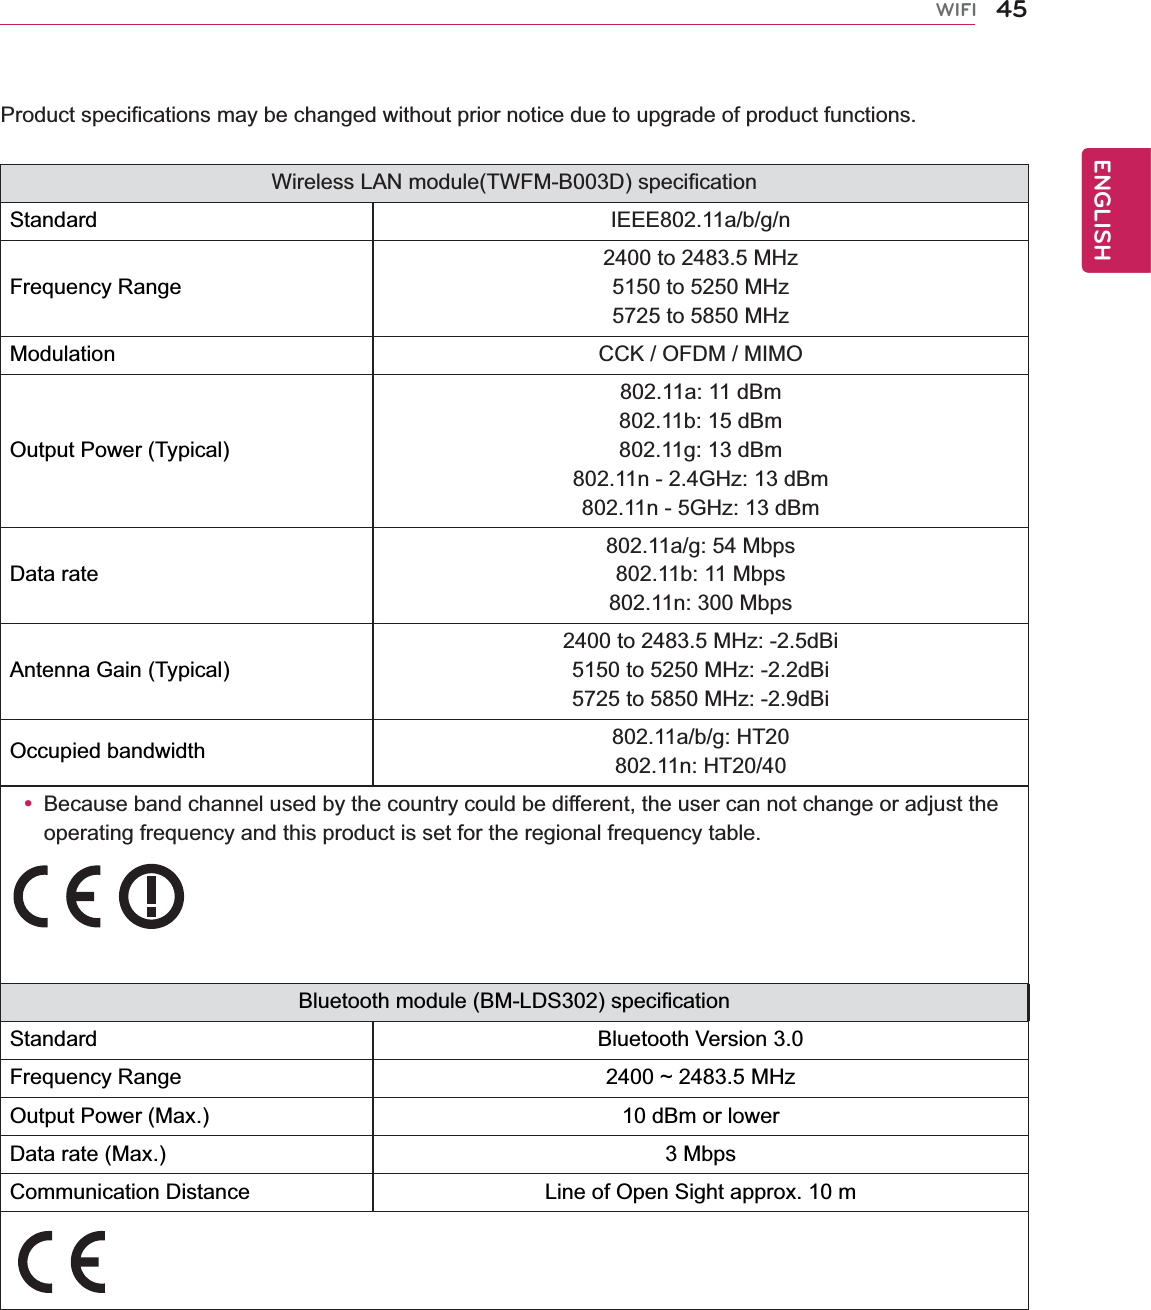
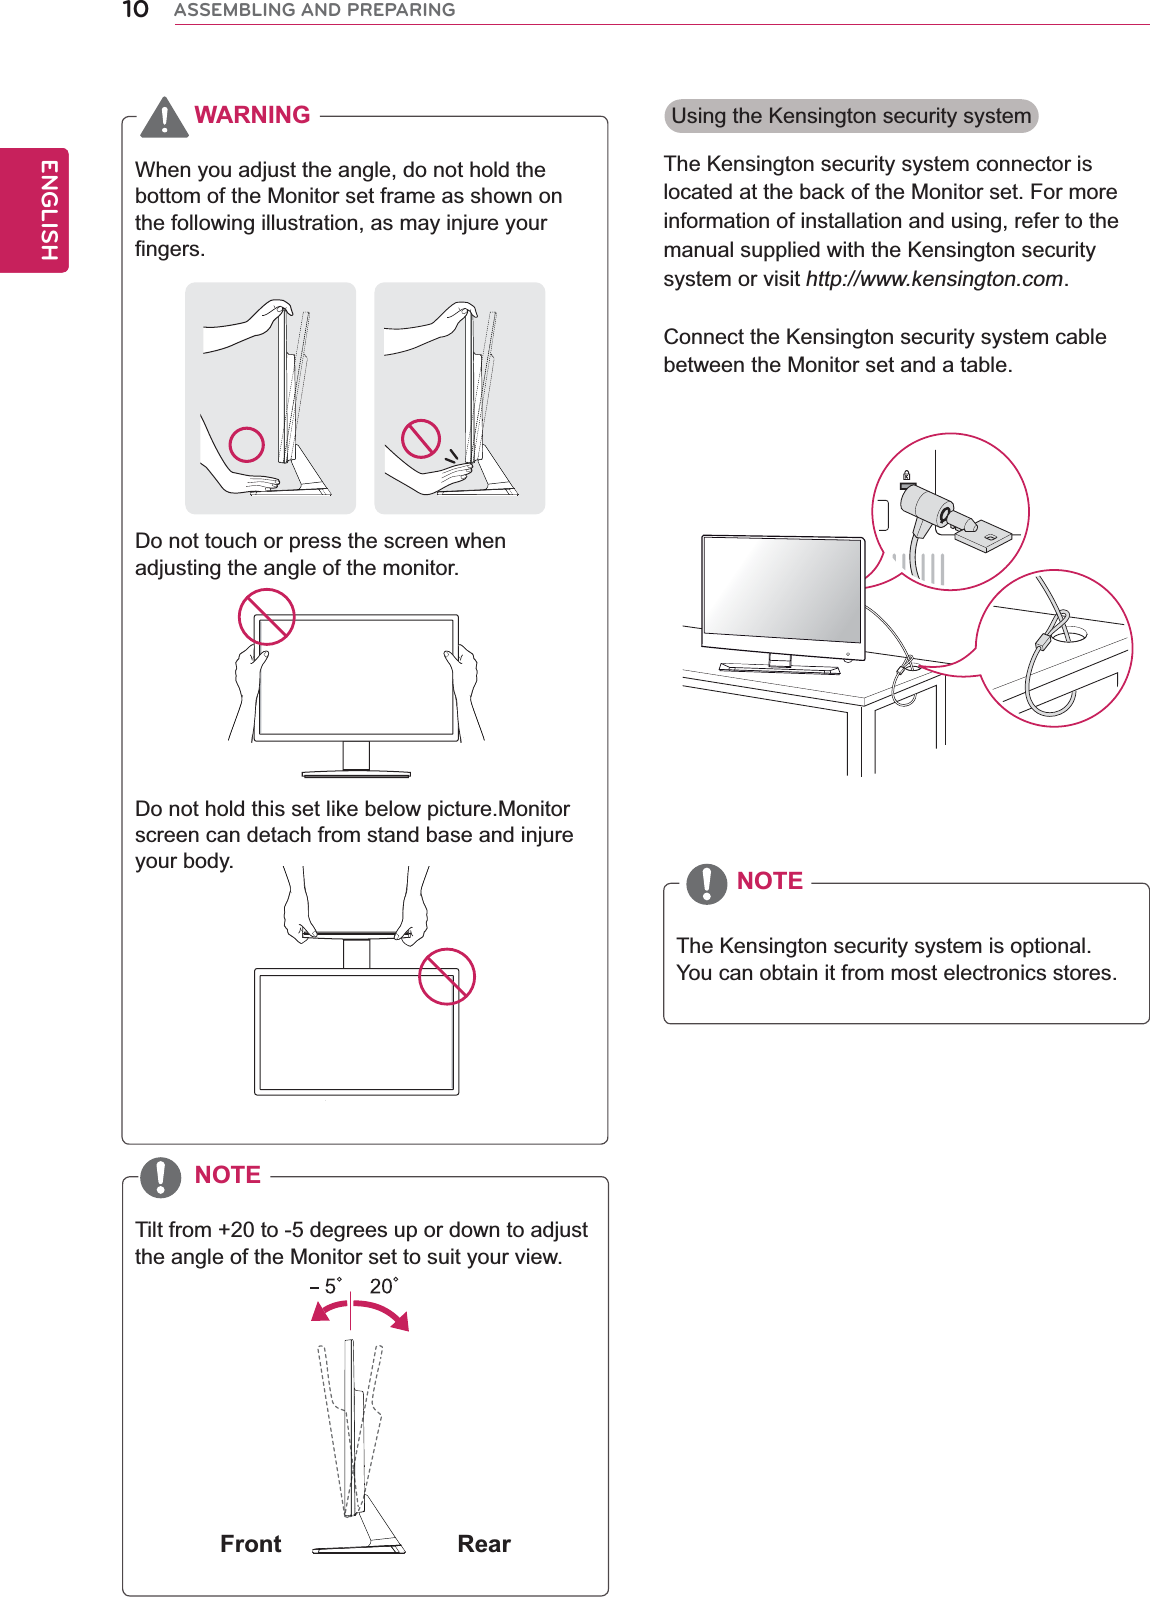
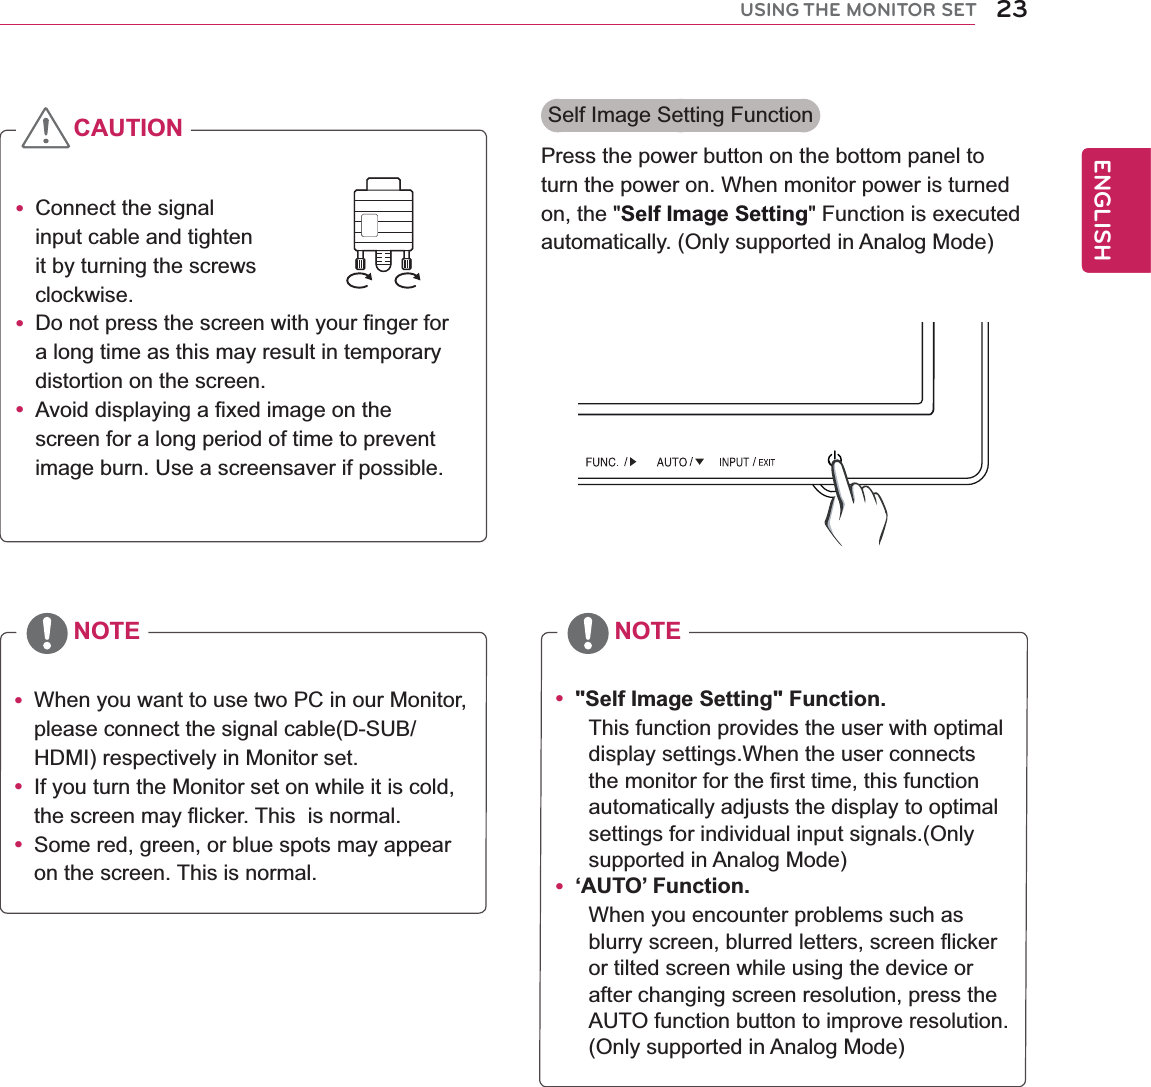
![18ENGENGLISHUSING THE MONITOR SETLG_Monitor_C54A 2233/PU$POOFDUFEYou can enjoy contents from smart devices directly on your monitor screen through SmartShare feature.Please execute Miracast, WiDi, DLNA function of your devicesthat you would like to connect to your monitor.Press 'Wi-Fi' button for settingsConnect to your wireless network.You can enjoy the content from other devices easily through DLNA.Miracast Device Search AP (Access Point) SearchSettingsSELECT EXITSELECT EXITFollow the steps below to disconnect a wireless router.1 On the SmartShare home screen, press the [Wi-Fi] button.2 When the setup screen appears, select the [AP (Access Point) Search] and press the [Select] button.Disconnecting Wireless Router](https://usermanual.wiki/LG-Electronics-USA/IPS237WY/User-Guide-1813383-Page-19.png)
![19ENGENGLISHUSING THE MONITOR SETLG_Monitor_C54A 2233 AP Name 001AP Name 001Are you sure you want to disconnect?%JTDPOOFDUFE #"$,$IPPTFGSPN"1TUPDPOOFDUUPUIFOFUXPSL4FUUJOHT"14FBSDIJOH 1BHF$0//&$5 &9*5$I G "1 I L$0//&$5&9*53 Select the currently connected wireless router and then press the [Disconnect] button.4 In the disconnection screen, select [Disconnect] and press the [Select] button. The wireless router will be disconnected.y The connected wireless router appears to be the first on the [AP (Access Point) Search] screen. y When the connected wireless router is selected, the [Select] button is changed to the [Disconnect] button.NOTE](https://usermanual.wiki/LG-Electronics-USA/IPS237WY/User-Guide-1813383-Page-20.png)
![24ENGENGLISHUSING THE MONITOR SETy The "Switch Input Signal to Wireless Connection" function When the monitor is used in wired connection (D-SUB, HDMI, MHL) or in energy saving mode, the monitor is wirelessly connected if it is connected via Wi-Di/Miracast or a content file plays via DLNA. y To use the "Switch Input Signal to Wireless Connection" function, run LG SmartShare at least once by pressing the Wi-Fi button.y If the monitor is not used over 15 minutes on the SmartShare screen, it enters a waiting for connection mode as shown below.Even when the monitor is in waiting for connection mode, you can try the wireless connection or play media content files.y Some subtitles created by a user may not work.y The supported file size may be different depending on the encoding environment.8BJUJOHGPSSFRVFTUUPDPOOFDULG_Monitor_C54A 2233/PU$POOFDUFEYou can enjoy contents from smart devices directly on your monitor screen through SmartShare feature.Please execute Miracast, WiDi, DLNA function of your devicesthat you would like to connect to your monitor.Press 'Wi-Fi' button for settingsCheck the followings before using the wireless connection.Wi-Di (Wireless Display) can directly connect the monitor to a computer supporting Wi-Di.1 Turn on the monitor by pressing (power button).2 Press the [Wi-Fi] button. The SmartShare home screen appears soon.WIRELESS CONNECTIONWi-Di ConnectionNOTE](https://usermanual.wiki/LG-Electronics-USA/IPS237WY/User-Guide-1813383-Page-25.png)
![25ENGENGLISHUSING THE MONITOR SET?Intel WiDi Notebook LG_Monitor_C54A(C54A)Please input below PIN to [Intel WiDi Notebook]My PIN : 2324CANCELIntel WiDi NotebookTFDPlease input below PIN to [Intel WiDi NotebooMy PIN : 23243 Turn on the wireless LAN from the computer.4 Pressing the Windows [Start] button and select [All Programs] > [Intel Corporation] > [Intel(R) WiDi] > [Intel WiDi].5 When the license agreement screen is displayed, read it and then press the Accept button.6 When the following screen appears, check the monitor name and then press the [Connect] button.7 When the My PIN code appears on the monitor, enter the PIN code in the computer and then press the [Continue] button.(Enter the PIN code only for the first connection.)y Wi-Di does not require the wireless router connection. For optimized performance, it is recommended to connect the computer to a wireless router.NOTE](https://usermanual.wiki/LG-Electronics-USA/IPS237WY/User-Guide-1813383-Page-26.png)
![26ENGENGLISHUSING THE MONITOR SET8 When the [Rename adapter] window is displayed on the computer, rename the adapter and then press the [Continue] button.9 When the setup complete screen is displayed, press the [Finish] button to complete the connection.10 When the connection is complete, the computer screen is displayed on the monitor.11 If the monitor screen is not displayed properly, press the [Properties] button in the Intel WiDi window.Rename adapterEnter a simple name that best describes your adapter.For example: “Living Room” or “Bedroom”. The name is limited to 18 characters, consisting of the letters A through Z, numbers and punctuation marks except for “-”. LG_Monitor_C54A?Properties HelpContinue?Connected adapterProperties HelpLG_Monitor_C54A Indicates an adapter you have previously connected to.ConnectDetected adaptersType Name ID Model Signal](https://usermanual.wiki/LG-Electronics-USA/IPS237WY/User-Guide-1813383-Page-27.png)
![27ENGENGLISHUSING THE MONITOR SETproperties?Properties HelpAudio/Visual tuningBehavior Automatically connect to this adapterUse this if the image doesn’t fit your screenUse this to test and adjust your audio.Register your LG_Electronics TIGA adapter for support and updates.Adapter name:Network address:Adapter ID:Adapter manufacturer:Adapter model:Adapter hardware version:Adapter firmware version:192.168.16.4C54ALG_ElectronicsTIGA2.1.1.02.1.0.0 Firmware is up to date.AdapterLG_Monitor_C54AResize TV pictureTest audioOK Cancel Apply?Properties HelpIf you notebook display does not look correct on the TV screen, you may need to adjust the size. If your picture is too small, you will see black borders around the edges of the TV screen. Increase the size of the picture using the plus button.If your picture is too big, the picture will extend off the edge of the TV screen, Decrease the size of the picture using the minus button.Tip:Look at the Start menu in the lower left hand corner and use the pictures below to help you tune your display.Too big Just right Too smallOK12 When the Intel WiDi properties window appears, press the [Resize TV picture] button.13 When the following screen appears, adjust the picture size by pressing the [-] or [+] button and then press the [OK] button.y The computer screen is displayed on the monitor within 10 seconds.If the wireless environment is not good, a problem may occur with the screen display or Wi-Di may be disconnected.y Wi-Di connection has three modes: "Copy", "Expand", or "Projector Only (Monitor Only)".y The screen mode change method may be different per OS or model.y For more information about how to use Wi-Di, visit http://intel.com/go/widi.NOTE](https://usermanual.wiki/LG-Electronics-USA/IPS237WY/User-Guide-1813383-Page-28.png)
![28ENGENGLISHUSING THE MONITOR SETMiracast ConnectionMiracast allows you to directly connect the monitor to a smartphone as well as various devices that support Miracast.y Miracast may be used in different ways depending on device manufacturer or OS. y A device connected through Miracast cannot use a Wi-Fi network while the monitor is used.NOTE1 Turn on the monitor by pressing the (power button) of the monitor and press the [Wi-Fi] button to go to the SmartShare home screen.2 Turn on the Miracast function on your smartphone or a device to be connected.3 Search for Miracast devices.4 Refer to the user guide that came with a device you want to connect and connect it to the monitor.Connecting Monitor from Other DevicesLG_Monitor_C54A 2233/PU$POOFDUFEYou can enjoy contents from smart devices directly on your monitor screen through SmartShare feature.Please execute Miracast, WiDi, DLNA function of your devicesthat you would like to connect to your monitor.Press 'Wi-Fi' button for settings](https://usermanual.wiki/LG-Electronics-USA/IPS237WY/User-Guide-1813383-Page-29.png)
![29ENGENGLISHUSING THE MONITOR SET1 Turn on the monitor by pressing the (power button) of the monitor and press the [Wi-Fi] button to go to the SmartShare home screen.2 When the monitor name and ID are all displayed on the SmartShare home screen, press the [Wi-Fi] button.3 When the setup screen appears, select [Miracast Device Search] and then press the [Select] button.Connecting from MonitorLG_Monitor_C54A 2233/PU$POOFDUFEYou can enjoy contents from smart devices directly on your monitor screen through SmartShare feature.Please execute Miracast, WiDi, DLNA function of your devicesthat you would like to connect to your monitor.Press 'Wi-Fi' button for settings:PVDBOXJSFMFTTMZTIBSFTDSFFOGSPNTNBSUQIPOFTVQQPSUJOH.JSBDBTU4FBSDI.JSBDBTUTVQQPSUJOHEFWJDFTBOEDPOOFDU4FUUJOHT4&-&$5 &9*5"1"DDFTT1PJOU4FBSDI.JSBDBTU%FWJDF4FBSDI4&-&$5 &9*5](https://usermanual.wiki/LG-Electronics-USA/IPS237WY/User-Guide-1813383-Page-30.png)
![30ENGENGLISHUSING THE MONITOR SET4 Turn on the Miracast in a device to connect.5 When the device to connect is displayed, select the device and press the [Connect] button.6 Miracast connection is processed.y As the menu names for Miracast may be different depending on the device to connect, refer to its user guide for more information on how to use Miracast on the device.NOTELG_Monitor_C54A 2233 HP Name 001Connecting…HP N 001Choose from the list of devices to connect to the monitor.Settings > Miracast Device Search 1 / 1 PageCONNECT EXITHP Name 001 HP Name 002Chfthli tfditttthit](https://usermanual.wiki/LG-Electronics-USA/IPS237WY/User-Guide-1813383-Page-31.png)
![32ENGENGLISHUSING THE MONITOR SETUsing DLNAIf the monitor and a device, such as a computer or a smartphone, that supports DLNA are connected through the same network, the media contents (video, picture, or music, etc.) of the devices can be displayed on the monitor.Refer to the user guide came with a product you want to use and connect to DLNA.When a LG Electronics product with LG SmartShare installed is connected through DLNA, you can use the following functions.y To use DLNA, the monitor must be connected to a wireless router.y For optimized performance, it is recommended to use a wireless router that supports 5 Ghz frequency bandwidth.y To watch the 1080p video through DLNA, a router that uses 5 GHz frequency is required. If a 2.4 GHz router is used, the video does not play properly.y Refer to [Connecting Wireless Router] in the [BEFORE USING] section if the monitor is not con-nected to a wireless router. y The monitor may not work properly if network devices (wire/wireless router or hub, etc.) are incorrectly set up. Install the device correctly by referring to the user guide of the device and then connect it to the network. y The DLNA function may not be supported for a router that does not support multi-cast. For more infor-mation, refer to the user guide of the router or contact its manufacturer. y It is recommended to use a LG Electronics product with LG SmartShare installed, which provides high compatibility and various functions. y If a third-party DLNA software other than LG SmartShare is used, a compatibility issue may occur.y Check your network settings when the DLNA option does not work properly.y To watch the 1080p video through DLNA, a router that uses 5 GHz frequency is required. If a 2.4 GHz router is used, the video does not play properly.y DLNA may not work properly in the wireless network. It is recommended to connect to the wired network.y When a video plays in the DLNA mode, the bilingual languages and internal subtitles are not supported.y If multiple TVs are connected to one server in the DLNA mode, the content may not be played properly depending on server performance.y The DLNA function may not work properly depending on network environment.y The DLNA function may not be supported for a router that does not support multi-cast. For more information, refer to the user guide of the router or contact its manufacturer.y If there are too many folders or files in a folder, it may not be working properly.NOTEWhen DLNA is Malfunctioning](https://usermanual.wiki/LG-Electronics-USA/IPS237WY/User-Guide-1813383-Page-33.png)
![33ENGENGLISHUSING THE MONITOR SETSOFTWARE UPDATEThe LG IPS237W monitor supports automatic software update.If there is any updated software, the updates are automatically downloaded.When the download is complete, the software update screen appears.y Do not turn off the monitor during the software update.It may cause the monitor malfunction.y To use the automatic software update function, the monitor must be connected to a wireless router that has access to the Internet.y If a wireless router is not connected, see [BEFORE USING] > [Connecting or Disconnecting Wireless Router] section to connect a wireless router.NOTECAUTION](https://usermanual.wiki/LG-Electronics-USA/IPS237WY/User-Guide-1813383-Page-34.png)