LG Electronics USA KU970 PCS GSM/ EDGE Phone with Bluetooth User Manual KU970 Eng UK
LG Electronics USA PCS GSM/ EDGE Phone with Bluetooth KU970 Eng UK
UserManual.wiki
>
LG Electronics USA
>
KU970 User Manual
Users Manual
Navigation menu
Upload a User Manual
Namespaces
Wiki Guide
HTML
PDF
Info
Views
User Manual
Discussion / Help
Navigation
![8For Your SafetyImportant InformationThis user guide contains important information on the use andoperation of this phone. Please read all the informationcarefully for optimal performance and to prevent any damageto or misuse of the phone. Any changes or modifications notexpressly approved in this user guide could void your warrantyfor this equipment.Before You StartSafety InstructionsWARNING! To reduce the possibility of electric shock, do notexpose your phone to high humidity areas, such as thebathroom, swimming pool, etc.Always store your phone away from heat. Never store yourphone in settings that may expose it to temperatures less than32°F or greater than 104°F, such as outside during extremeweather conditions or in your car on a hot day. Exposure toexcessive cold or heat will result in malfunction, damageand/or catastrophic failure.Be careful when using your phone near other electronicdevices. RF emissions from your mobile phone may affectnearby in adequately shielded electronic equipment. Youshould consult with manufacturers of any personal medicaldevices such as pacemakers and hearing aides to determine ifthey are susceptible to interference from your mobile phone.Turn off your phone in a medical facility or at a gas station.Never place your phone in a microwave oven as this willcause the battery to explode.IMPORTANT! Please read the TIA SAFETY INFORMATION onpage 78 before using your phone.Safety InformationRead these simple guidelines. Breaking the rules may bedangerous or illegal. Further detailed information is given in thisuser guide.]Never use an unapproved battery since this could damagethe phone and/or battery and could cause the battery toexplode.]Never place your phone in a microwave oven as it willcause the battery to explode.]Do not dispose of your battery by fire or with hazardous orflammable materials.]Make sure that no sharp-edged items come into contactwith the battery. There is a risk of this causing a fire.]Store the battery in a place out of reach of children.]Be careful that children do not swallow any parts such asrubber plugs (earphone, connection parts of the phone,etc.). This could cause asphyxiation or suffocation.](https://usermanual.wiki/LG-Electronics-USA/KU970/User-Guide-760562-Page-5.png)
![9For Your Safety]Unplug the power cord and charger during lightning stormsto avoid electric shock or fire.]When riding in a car, do not leave your phone or set up thehands-free kit near to the air bag. If wireless equipment isimproperly installed and the air bag is activated, you may beseriously injured.]Do not use a hand-held phone while driving.]Do not use the phone in areas where its use is prohibited.(For example: aircraft).]Do not expose the battery charger or adapter to directsunlight or use it in places with high humidity, such as abathroom.]Never store your phone in temperatures less than- 4°F orgreater than 122°F.]Do not use harsh chemicals (such as alcohol, benzene,thinners, etc.) or detergents to clean your phone. There is arisk of this causing a fire.]Do not drop, strike, or shake your phone severely. Suchactions may harm the internal circuit boards of the phone.]Do not use your phone in high explosive areas as the phonemay generate sparks.]Do not damage the power cord by bending, twisting, pulling,or heating. Do not use the plug if it is loose as it may causea fire or electric shock.]Do not place any heavy items on the power cord. Do notallow the power cord to be crimped as it may cause fire orelectric shock.]Do not handle the phone with wet hands while it is beingcharged. It may cause an electric shock or seriouslydamage your phone.]Do not disassemble the phone.]Do not place or answer calls while charging the phone as itmay short-circuit the phone and/or cause electric shock orfire.]Only use the batteries, antennas, and chargers provided byLG. The warranty will not be applied to products provided byother suppliers.]Only authorized personnel should service the phone and itsaccessories. Faulty installation or service may result inaccidents and consequently invalidate the warranty.]Do not hold or let the antenna come in contact with yourbody during a call.]An emergency call can be made only within a service area.For an emergency call, make sure that you are within aservice area and that the phone is turned on.](https://usermanual.wiki/LG-Electronics-USA/KU970/User-Guide-760562-Page-6.png)
![11For Your SafetyVehicle Mounted External Antenna(optional, if available)A minimum separation distance of 8 inches (20cm) must bemaintained between the user/bystander and the vehiclemounted external antenna to satisfy FCC RF exposurerequirements. For more information about RF exposure, visitthe FCC website at www.fcc.govFCC Part 15 Class B ComplianceThis device and its accessories comply with part 15 of FCCrules. Operation is subject to the following two conditions: (1) This device and its accessories may not cause harmfulinterference, and (2) this device and its accessories mustaccept any interference received, including interference thatmay cause undesired operation.Cautions for Battery]Do not disassemble.]Do not short-circuit.]Do not expose to high temperature: 60°C (140°F).]]Do not incinerate.Battery Disposal]Please dispose of your battery properly or bring to yourlocal wireless carrier for recycling.]Do not dispose in fire or with hazardous or flammablematerials.Adapter (Charger) Cautions]Using the wrong battery charger could damage your phoneand void your warranty.]The adapter or battery charger is intended for indoor useonly.Do not expose the adapter or battery charger to direct sunlightor use it in places with high humidity, such as the bathroom.](https://usermanual.wiki/LG-Electronics-USA/KU970/User-Guide-760562-Page-8.png)
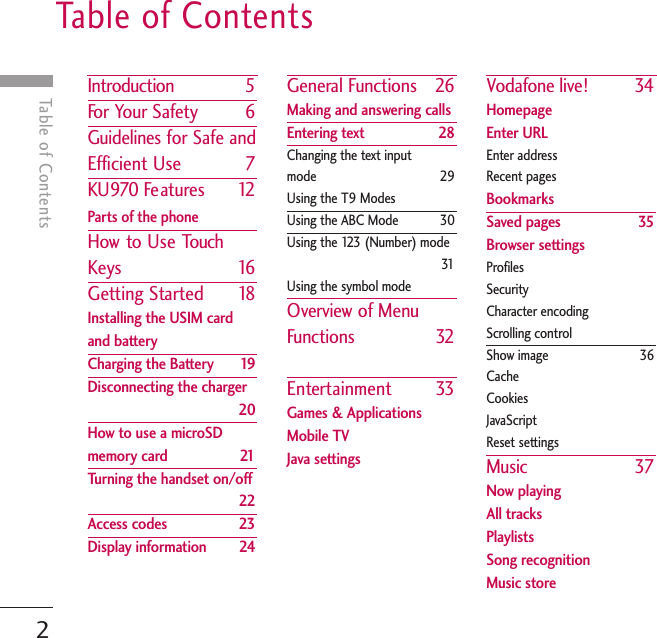

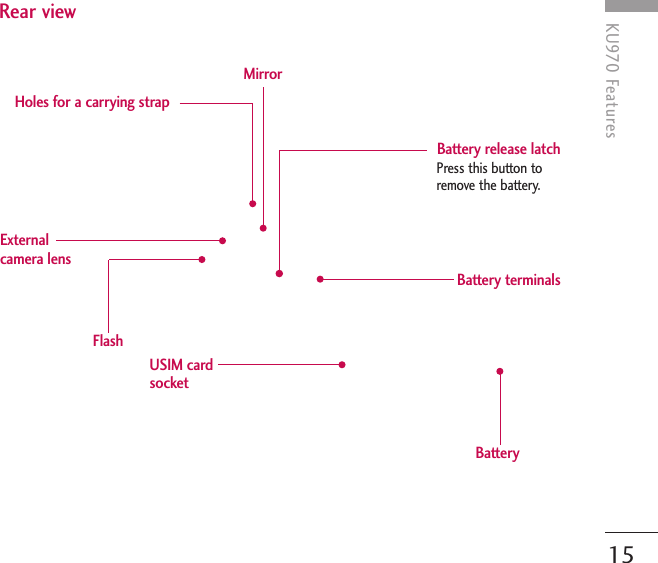
![12KU970 FeaturesKU970 FeaturesParts of the phoneOpen viewEarpieceInternal camera lensNavigation keys ]In standby mode:List of ProfilesContacts listMessagingCalendar]In menu: Navigates menus.LCD screen]Top: Icons showing signalstrength, battery level andvarious other functions]Bottom: Soft keyindicationsAlpha numeric keys ]In standby mode: Inputnumbers to dial. Hold down:for international calls.to dial voice mail centre.to for speed dials.]In editing mode: Enternumbers & characters.](https://usermanual.wiki/LG-Electronics-USA/KU970/User-Guide-760562-Page-13.png)
![13KU970 FeaturesLeft soft key/ Right soft keyPerforms the function indicated at the bottom ofthe display.Confirm keySelects menu options and confirms actions.Clear key]Clears a character with each press. Hold the key down to clear all input. ]Use this key to go back to a previous screen.Send key ]Dials a phone number and answers a call.]In standby mode: Shows a history of callsmade, received, and missed.](https://usermanual.wiki/LG-Electronics-USA/KU970/User-Guide-760562-Page-14.png)
![14KU970 FeaturesKU970 FeaturesLeft side view Right side view Side keys ]In standby mode (open):Key tone volume adjustment]In standby mode (closed):Turns the LCD light on.]In menu: Scrolls up & down.]During a call: Earpiece volumeadjustmentHeadset/Charger/Cableconnector End key ]Switch on/off (hold down)]End or reject a call.Menu key ]Opens the main menu.]Opens the task manager (Long press).Music hot key ]Accesses the Music menu. Goes toMP3 player (whilst playing music).Note]To protect your hearingwhile the slide is open,maximum volume level is 3.Note]Please ensure phone ispowered on and in idlemode before connectingthe USB cable.Micro SD memory card slot](https://usermanual.wiki/LG-Electronics-USA/KU970/User-Guide-760562-Page-15.png)
![16How to Use Touch KeysCautions for Touch Keys1. Make sure your hands are clean and dry.- Remove all moisture from the surface ofyour hands or the touch keys in a humidenvironment.2. You do not need to press hard on thetouch keys to make them work normally.Do not subject the product to severeimpact, as this may damage the touch keysensors.3. Use the tip of your finger to press exactlyon the touch key you want, being carefulnot to touch the keys for other functions.4. When both the home screen and touchkey lights are off, pressing a touch key willnot turn on the home screen light. Pressand the home screen light will turn backon(touch keys do not work when thetouch key lights are off).5. If the slide is closed and the TouchProtection function is on, during calls theTouch key Lock function is automaticallyenabled. (For details, see “Touch KeyStatus When Using Mobile Phone”.)]This product’s keys on the slide are touch keys.]Be sure to read “Cautions for Touch Keys” before using touch keys.How to Use Touch KeysTouch keypadTouch key shortcutimageNote:You can enable this feature in thedisplay settings menu[Menu #.2.1.1].](https://usermanual.wiki/LG-Electronics-USA/KU970/User-Guide-760562-Page-17.png)
![How to Use Touch Keys176. Touch keys may not work normally if amobile phone case or plastic cover iscovering them. Also, touch keys may notwork normally if you are wearing gloves.7. Keep metal and other conductive materialsaway from the surface of the touch keys, ascontact with them may result in an error.Touch Key Status WhenUsing Mobile PhoneWhen the slide is closed, to preventindiscreet action of the touch keys whilstusing the phone or during calls, the TouchProtection function is automatically enabled.(In this case, the touch keys will not workeven if they are pressed)1. When slide is closed- When the slide is closed, the TouchProtection function is automaticallyenabled. (Opening the slide willautomatically disable it.)- To disable Touch Protection when the slideis closed, press the volume key twice. - After disabling Touch Protection, if there isno key action for a certain duration (3 seconds), the Touch Protection functionis enabled again.2. During calls- During calls, regardless of slide status, theTouch Protection function is automaticallyenabled. - To disable the Touch Protection, press anykey except . - After disabling the Touch key Lock, if there is no key action for a certainduration (3 seconds), the Touch Protectionfunction is enabled again.Note]For user convenience, the touch keyimage with the functions of each touchkey is shown on the home screen whenpurchasing products.](https://usermanual.wiki/LG-Electronics-USA/KU970/User-Guide-760562-Page-18.png)
![Installing the USIM cardand battery1. Installing the USIM card.Your USIM card contains your phone number,service details and contacts and must beinserted into your handset.If your USIM card is removed then yourhandset becomes unusable (except foremergency calls) until a valid one is inserted.Always disconnect the charger and otheraccessories from your handset beforeinserting and removing your USIM card. Slidethe USIM card into the USIM card holder.Make sure that the USIM card is properlyinserted and the gold contact area on thecard is facing downwards. To remove theUSIM card, press down lightly and pull it inthe reverse direction.To insert the USIM card To remove the USIM card2. Installing the battery.Slide the battery upwards until it snaps backinto place.Getting Started18Getting StartedNote]The metal contact of the USIM card caneasily be damaged by scratches. Payspecial attention to the USIM card whilehandling. Follow the instructions suppliedwith the USIM card.](https://usermanual.wiki/LG-Electronics-USA/KU970/User-Guide-760562-Page-19.png)
![Getting StartedTo remove the battery.Turn the power off. (If the power is left on,there is a chance you could lose the storedtelephone numbers and messages.)Press and hold down the battery releasebutton and slide the battery down. Charging the BatteryBefore connecting the travel adapter to thephone you must first install the battery.1. With the arrow facing you as shown in thediagram push the plug on the batteryadapter into the socket on the left side ofthe phone until it clicks into place.2. Connect the other end of the traveladapter to the mains socket. 19Note]Only use the charger included in the box.](https://usermanual.wiki/LG-Electronics-USA/KU970/User-Guide-760562-Page-20.png)
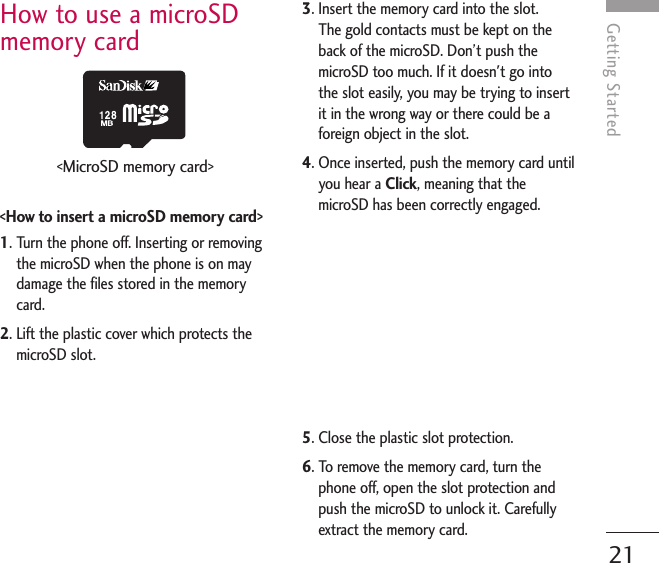
![Getting Started22Getting StartedAttention:]Avoid using the Flash Memory Card whenthe battery is low.]When writing to the card, wait for theoperation to complete before removing the card.]The card is designed to fit easily into thesystem one way only.]Do not bend the card or force it into the slot.]Do not insert any memory cards other thanthose made by microSD.]If the microSD has been formatted usingFAT32, format the microSD using FAT16again.For more information on the microSD, pleaserefer to the memory card instruction manual. Memory card formattingBefore you start to use the memory card youhave to format it. After you insert thememory card, select Menu > Settings >Phone settings > Memory status > Formatexternal memory, then press . Thisoperation should only be done when youinsert the memory card for the first time.During formatting various folders will becreated for different data types.Turning the handseton/offTurning your handset onEnsure that your USIM card is in yourhandset and the battery is charged. Press andhold until the power comes on. Enter theUSIM PIN code that was supplied with yourUSIM card if the PIN code request is set toOn. (Note: Please refer to page 79) After a few seconds you will be registered onthe network.Turning your handset off Press and hold until the power goes off.There may be a few seconds delay while thehandset powers down.Do not turn the handset on again during thistime.](https://usermanual.wiki/LG-Electronics-USA/KU970/User-Guide-760562-Page-23.png)
![Getting StartedAccess codesYou can use the access codes described inthis section to avoid unauthorised use ofyour phone. The access codes (except thePUK and PUK2 codes) can be changed byusing the Change codes feature [Menu#.1.4.3].PIN code (4 to 8 digits)The PIN (Personal Identification Number)code protects your USIM card againstunauthorised use. The PIN code is usuallysupplied with the USIM card. When the PINcode request is set to On, your phone willrequest the PIN code every time it isswitched on. When the PIN code request isset to Off, your phone connects to thenetwork directly without the PIN code.PIN2 code (4 to 8 digits)The PIN2 code, supplied with some USIMcards, is required to access functions such asFixed dial number. These functions are onlyavailable if supported by your USIM card.PUK code (4 to 8 digits)The PUK (PIN Unblocking Key) code isrequired to unblock a blocked PIN code. ThePUK code may be supplied with the USIMcard. If not, contact your network operator’scustomer service department for the code. Ifyou lose the code, contact your networkoperator’s customer service department.PUK2 code (4 to 8 digits)The PUK2 code, supplied with some USIMcards, is required to unblock a blocked PIN2code. If you lose the code, contact yournetwork operator’s customer servicedepartment.Security code (4 to 8digits)The security code prevents unauthorised useof your phone. The default security code isset to ‘0000’ and the security code isrequired to delete all phone entries and torestore the handset to the factory settings.23](https://usermanual.wiki/LG-Electronics-USA/KU970/User-Guide-760562-Page-24.png)
![General Functions26General FunctionsMaking and answering callsMaking a voice call1. Enter the number including the full areacode.]To delete a digit press .To delete all digits press and hold .2. Press to make the call.3. Press to finish the call, or close thehandset.Making a call from the call logs1. In standby mode, press and the latestincoming, outgoing and missed phonenumbers will be displayed.2. Select the desired number by using / .3. Press to call the number.Making a video callYou can make a video call in a 3G coveredservice area. If the called user has a 3G videophone in a 3G covered service area, the callwill be established. You can also answer avideo call for video incoming call. Tomake/answer a video call, do the following.1. Input the phone number using the keypad,or select the phone number from the callsmade/received lists.]To correct mistakes, press briefly todelete the last number, or press andhold to delete all numbers.2. If you do not want to use thespeakerphone, ensure you have theheadset plugged in.3. To start the video function, press the leftsoft key [Options] and select Make videocall.]You will be notified that you will need toclose other applications to make thevideo call.Note]To activate the speakerphone during acall, activate the touch keys and press .](https://usermanual.wiki/LG-Electronics-USA/KU970/User-Guide-760562-Page-27.png)
![General Functions274. Adjust the camera position if necessary.5. Press to finish the call, or close thehandset.Making a voice/video call fromContactsIt is easy to call anyone whose number youhave stored in your Contacts.1. Press to access the contacts list.2. Scroll to the contact to make a call.3. Press to make a voice call. Press the leftsoft key and select Make video call tomake a video call. 4. Press to finish the call.Making international calls1. Press and hold for the internationalprefix. The ‘+’ character prefixes theinternational access code.2. Enter the country code, area code, andthe phone number.3. Press .Adjusting the volumeDuring a call, if you want to adjust theearpiece volume, use on the left side ofthe phone. In idle mode, you can adjust thekey volume using .Answering a callWhen you receive a call, the phone rings andthe flashing phone icon appears on thescreen. If the caller can be identified, thecaller’s phone number (or name if stored inyour Contacts) is displayed.Note]The video call may take some time toconnect. Please be patient. Theconnection time will also depend on howquickly the other party answers the call.While the video call is connecting, youwill see your own image; after the otherparty has answered, their image will bedisplayed on the screen.](https://usermanual.wiki/LG-Electronics-USA/KU970/User-Guide-760562-Page-28.png)
![1. Open the slider to answer an incomingcall.Note]To reject an incoming call, press or theright soft key twice.]If you set Answer mode as Press sendkey (Menu #.5.0.4), you can answerthe call by pressing after opening theslider.]If the answer mode is set to Press anykey, any key will answer a call except for.2. End the call by closing the handset orpressing .Shortcut to activate vibratemodeYou can activate the vibrate only mode bypressing and holding down after opening thephone.Signal strength You can check the strength of your signal bythe signal indicator ( ) on the LCD screenof your phone. Signal strength can vary,particularly inside buildings. Moving close toa window may improve reception.Entering text You can enter alphanumeric characters using the keypad.For example, storing names in Contacts,writing a message, creating a personalgreeting or scheduling events in the calendarall require entering text.The following text input methods areavailable with the handset.General Functions28General FunctionsNote]You can answer a call while using theContacts or other menu features.]When the compatible headset isconnected, you can also answer a callusing the headset key, as well as usingthe phone. To reject an incoming call,press .]You can mute the ringtone when a callcomes in by pressing and holding thevolume down side key.](https://usermanual.wiki/LG-Electronics-USA/KU970/User-Guide-760562-Page-29.png)
![]The word changes as letters are typed.Ignore what’s on the screen until theword is typed completely.]If the word is still incorrect after typingcompletely, press once or more toscroll through the other word options.ExamplePress to type Good.Press to get Home.]If the desired word is missing from theword choices list, add it by using theABC mode.2. Enter the whole word before editing ordeleting any keystrokes.3. Complete each word with a space bypressing .To delete letters, press . Press and holddown to erase entire words.Using the ABC ModeUse to to enter your text.1. Press the key labelled with the requiredletter:]Once for the first letter.]Twice for the second letter.]And so on.2. To insert a space, press once. Todelete letters, press .Press andhold down to clear the display. Refer to the following table for moreinformation on the characters availableusing the alphanumeric keys.General Functions30General Functions](https://usermanual.wiki/LG-Electronics-USA/KU970/User-Guide-760562-Page-31.png)
![General FunctionsNote]The characters assigned to the keys andtheir order of appearance depends onthe language selected using the optionInput method.The table above providesthe characters set for English language.Using the 123 (Number) modeThe 123 mode enables you to enter numbersin a message(a telephone number, forexample). Press the keys corresponding tothe required digits before manually switchingback to the appropriate text entry mode.Using the symbol modeThe symbol mode enables you to entervarious symbols or special characters. Toenter a symbol, select Options > Insert >Symbol. Use the navigation and numeric keysto select the desired symbol and press .31Upper caseLower case. , ? ! 1. , ? ! 1A B C 2 À Á Â Ã Ä Å Æ Ça b c 2 à á â ã ä å æ ç D E F 3 È É Ê Ëd e f 3 è é ê ëG H I 4 Ì Í Î Ïg h i 4 ì í î ïJ K L 5 £j k l 5 £M N O 6 Ñ Ò Ó Ô Õ Ö Ø OEm n o 6 ñ ò ó ô õ ö ø oeP Q R S 7 ß $p q r s 7 ß $T U V 8 Ù Ú Û Üt u v 8 ù ú û üW X Y Z 9w x y z 9Space, 0Space, 0Characters in the order displayKey](https://usermanual.wiki/LG-Electronics-USA/KU970/User-Guide-760562-Page-32.png)
![33EntertainmentEntertainment [Menu 1]Games & ApplicationsMenu 1.1You can easily download games and otherapplications in this menu. It has two folders,Games and Applications, as default. Eachfolder has an embedded link for downloadinggames or applications. Please note thatadditional costs may be incurred when usingonline services. You can create a folder usingthe left soft key [Options].Mobile TV Menu 1.2You can access Mobile TV by selecting thismenu. Java settings Menu 1.3Activating a profile1. Move the cursor to the profile which youwould like to activate.2. Press or select Activate from theOptions menu.Adding a new profile 1. Select Add new from the Options menu.The following items need to be configured.2. Press the right soft key [Done] to save anyconfiguration changes.You can edit or delete a profile by selectingEdit and Delete from Options menu.Enter an account name for the profile.Service name Choose from the given list ofconnection modes. (Default is TCPwith Proxy)Connectionmode Enter the WAP Gateway IP addressprovided by the operator. (e.g. 195.115. 025. 129)IP addressPort details are provided by theoperator, depending upon theConnection mode.Proxy serverport Choose from the given list of accesspoints. (For more details on adding orediting a new access point, refer topage 98.)Access point](https://usermanual.wiki/LG-Electronics-USA/KU970/User-Guide-760562-Page-34.png)
![Vodafone live! [Menu 2]34Vodafone live!HomepageMenu 2.1You can launch the web browser and accessthe homepage of the web service providedby Vodafone.]You can also directly access Vodafone live!by pressing the right soft key in idle mode.Enter URL Menu 2.2Enter address (Menu 2.2.1)You can manually enter a URL address andaccess the associated web page. ]To enter a symbol, press or the rightsoft key [Symbol] to display the Symboltable. ]To switch input mode, press .Recent pages (Menu 2.2.2)Shows the recently-browsed pages.Bookmarks Menu 2.3You can store frequently accessed orfavourite URLs/Pages. Open, Send, Addnew, Edit, Mark/Unmark or Deleteoperations can be performed on Bookmarks.Several preconfigured URLs are stored asbookmarks.Adding a new bookmark 1. Press the right soft key [Add].2. Enter the title and associated URLinformation.3. Press the right soft key [Done] to save.Connecting to a desired bookmark Press or select Open from the Optionsmenu. Sending the bookmark to others Select Send from Options menu. You cansend it via Message or Email. Deleting a bookmarkSelect Delete from Options menu. You candelete multiple bookmarks using theMark/Unmark option.](https://usermanual.wiki/LG-Electronics-USA/KU970/User-Guide-760562-Page-35.png)
![MusicMusic [Menu 3]37Now playingMenu 3.1This menu will be activated when there aresome tracks currently played.All tracks Menu 3.2You can view the entire music files in thephone/external memory.PlaylistsMenu 3.3You can create your own playlists bychoosing tracks from the All tracks menu list.Song recognitionMenu 3.4Selecting this menu starts dialling a numberfor song recognition. For further information,please contact your service provider.Music storeMenu 3.5Connects to the Vodafone music downloadsite.NoteAdditional charges may be incurred whendownloading music.Contact your service provider for furtherinformation.](https://usermanual.wiki/LG-Electronics-USA/KU970/User-Guide-760562-Page-38.png)
![Camera [Menu 4]38CameraCameraMenu 4.1This application enables you to take a still picture. You can take a picture in the size you want,and use it for the address book photo, home screen and other more general purposes. Once taken, the picture can be sent by Message, Postcard, Email or Bluetooth.1. Press the left soft key to access Options and set the desired environment as follows. ]Move between the options menus with / .]Select the desired value with / and confirm the selection with the left soft key[Select] or .Displays the currentcamera settings.You can switch betweencamera and the videorecorder using / .Press the to take a picture. You can switch the camerato activate either Internalor External using the rightsoft key.](https://usermanual.wiki/LG-Electronics-USA/KU970/User-Guide-760562-Page-39.png)
![Camera39The Pictures folder is launched anddisplays existing pictures asthumbnails.You can view pictures by pressing .You can also send the selected pictureto another party via Message,Postcard, Email or Bluetooth.Go to1600x1200 ( ), 1280x960 ( ),640x480 ( ), 320x240 ( ),Wallpaper ( ), 176x144 ( ),Contact ( )SizeSuper fine ( ), Fine ( ),Standard ( )QualityOff , Always on ( ), When taking ()]You can turn the camera lighton/off with in preview mode.LightOne, Three ( ), Six ( ), Nine ( )(Note: Available multishot depends onthe size.)Multishotx1 ( ), x2 ( ) (Note: Availablezoom level depends on the size.)]You can zoom in with / zoomout with in preview mode.ZoomFrom –2.0 to 2.0 at 0.5 intervals. Thehigher the level, the brighter thescreen. ]You can adjust the brightness using in preview mode.BrightnessYou can adjust the tone of thebackground photo according to theweather.Auto, Daylight, Cloudy, Illuminate,IndoorsWhitebalanceYou can take better pictures at nightby selecting On.Night modeYou can apply one of 9 frame effectswhen taking a picture. (available only in case of Wallpapersize)Frame ShotYou can delay the camera shutter time.None, 3 seconds, 5 seconds, 10seconds“ ” is shown when the timer isactivated.TimerNone, Black & White, Negative, SepiaEffectSelect the desired shutter sound.SoundSelect the desired memory, eitherHandset or External.MemoryYou can activate the mirror effect byselecting On.MirrorYou can switch the camera to activateeither the Internal or the Externalcamera. SwitchNormal, Full screenPreview Style](https://usermanual.wiki/LG-Electronics-USA/KU970/User-Guide-760562-Page-40.png)
![2. After finishing all the settings, press the right soft key [Close].3. Focus the camera on what you want to take and press .4. Press to save the picture. It is saved in the Pictures folder of My Files. You can directly send the picture via Message, Postcard, Email or Bluetooth by pressing the right soft key [Send].Camera40CameraNotePress to go back to the preview mode without saving the picture.](https://usermanual.wiki/LG-Electronics-USA/KU970/User-Guide-760562-Page-41.png)
![Camera41Video recorder Menu 4.2This application enables you to record a video clip. You can play and watch a saved video file inthis menu. Once recorded, a video clip can be sent by Message, Email or Bluetooth.1. Press the left soft key to access Options and set the desired environment as follows. ]Move between the options menus with / .]Select the desired value with / and confirm the selection with the left soft key[Select] or .Displays the currentcamera settings.You can switch betweencamera and the videorecorder using / .Press the to record avideo clip. You can switch the camerato activate either Internalor External using the rightsoft key.](https://usermanual.wiki/LG-Electronics-USA/KU970/User-Guide-760562-Page-42.png)
![Camera42CameraThe Videos folder is launched anddisplays existing videos as thumbnails. You can view videos by pressing .You can also send the selected videoto another party via Message, Email orBluetooth.Go to320x240 ( ), 176x144 ( ),128x96 ( )SizeSuper fine ( ), Fine ( ),Standard ( )QualityOff, Always on ( ), When recording() ]You can turn the camera lighton/off with in preview mode.Lightx1 ( ), x2 ( ) (Note: Availablezoom level depends on the size.) ]You can zoom in with / zoom outwith in preview mode.ZoomFrom –2.0 to 2.0 at 0.5 intervals. Thehigher the level, the brighter thescreen. ]You can adjust the brightness using in preview mode.BrightnessYou can adjust the tone of thebackground video according to theweather.Auto, Daylight, Cloudy, Illuminate,IndoorsWhite balanceYou can take better shots at night byselecting On.Night modeNone, Black & White, Negative, SepiaEffectSelect the desired recording time. Message, 30 seconds, 1 minute, 2minutes, 5 minutes and 60 minutesDurationSelect the desired memory, eitherHandset or External.MemoryYou can activate the mirror effect byselecting On.MirrorDecide whether to record the soundor not.SoundYou can switch the camera to activateeither Internal or External.Switch](https://usermanual.wiki/LG-Electronics-USA/KU970/User-Guide-760562-Page-43.png)
![Camera2. After finishing all the settings, press the right soft key [Close].3. Focus the camera on what to record and press to start recording. And press to stop recording.]You can pause the recording by pressing the right soft key [Pause].4. Press to save the video clip. It is saved in the Videos folder of My Files. You can directly send the video clip via Message, Email or Bluetooth by pressing the right soft key [Send].43NotePress to go back to the preview mode without saving the video clip.](https://usermanual.wiki/LG-Electronics-USA/KU970/User-Guide-760562-Page-44.png)
![Messaging [Menu 5]44MessagingCreate newMenu 5.1Message (Menu 5.1.1)You can write and edit a message containinga combination of text, image, video andaudio.1. Enter your message in the Message field.Option menus in Message field]Insert: You can perform the followingactions:1. Pictures: You can insert an image.(One image per slide)2. Take Picture: The camera moduleopens and you can take a picture. Thepicture is then inserted in the messagewindow. (One picture per slide).3. Videos: You can insert a video clip.(One video clip per slide)4. Take Video: The video recordermodule opens and you can record avideo. The recorded video is insertedin the message. (One video clip perslide)5. Sounds: You can insert a sound file.(One sound per slide)6. Record Sound: The voice recordermodule opens and you can record asound. The recorded sound is insertedin the message. (One sound per slide)7. Contact details: You can add a nameand/or a number stored in theContacts. Make your selection to sendeither the Name, Number or Name &Number and press . The Contactslist opens and you can search thedesired contact to be inserted.8. Templates: You can insert a texttemplate saved on the phone. Afterselecting one, press . The selectedtemplate is inserted into the Messagewindow.9. Cc: Select this to insert Cc.0. Subject: Select this to insert asubject.. New slide: Select this to add a newslide.#. Symbol: You can insert symbols.After entering the correspondingnumber keys, press .](https://usermanual.wiki/LG-Electronics-USA/KU970/User-Guide-760562-Page-45.png)
![Messaging45]Add recipients: You can add recipientsfrom your Contacts or enter the numberdirectly.]Send: Select this to send the createdmessage.]Save to drafts: Select this to save themessage to drafts.]Input method: Select the desireddictionary mode.]Add to dictionary: You can add a wordto the dictionary.]Cancel: Select this to cancel editing.2. Press the right soft key [Continue]. Youcan add recipients from Contacts or enterthe number directly. (You can enter up to10 numbers.) Option menus in To field]Add recipients: You can add recipientsfrom your Contacts or enter the numberdirectly.]Send: Select this to send the message.]Save to drafts: Saves the message to drafts.]Cancel: Select this to cancel editing.3. Press the right soft key [Send] to send themessage. The message will automaticallybe saved in the Sent messages folder. Ifthe message has not been sent, it willremain in the Outbox with a failed status.Postcard (Menu 5.1.2)(Note: This service is not available in all countries. Pleasecontact your service provider for further information.)1. Key in a message.2. Press the right soft key [Insert]. You caninsert a stored image or newly takenpicture.3. After an image is inserted, the format willbe changed to Postcard format. 4. Fill out the fields: Name, Additional info,Address, Post code, City, State, Country.5. Press the right soft key [Send] to send thecreated postcard.](https://usermanual.wiki/LG-Electronics-USA/KU970/User-Guide-760562-Page-46.png)
![Email (Menu 5.1.3)To send/receive an email, you should set upthe email account. (Refer to page 54-56 forhow to set up an Email account.)1. Enter the email addresses of the recipientsin the To, Cc, Bcc fields. You can searchthe Contacts by pressing .2. Move the cursor to the Subject field andkey in the subject. 3. You can enter the message contents bymoving the cursor to the Message field.4. Use the following functions by using theleft soft key [Options].]Insert: Select this menu to insert specialcharacters, templates, and contacts. It isalso possible to attach multimedia files(pictures, videos and sounds).]Add recipients: Select this menu toinsert email addresses saved in Contacts.(Only shown in Option menu whencursor is located in To/Cc/Bcc fields.)]Send: Sends the created email.]Save to drafts: Select this menu to savethe message in Drafts.]Preview: You can preview the created email before sending it.]View attachment: Shows the attachedfiles. (This item is only available whensome files have been attached.)Messaging46MessagingNote• Enter the reference email address toforward the email in Cc(Carbon copy)field.• Enter a hidden reference email address toforward the email without forwardinginformation in Bcc(Blind Carbon Copy)field.• Only valid email addresses are allowed forthe recipient (To), reference address (Cc)and hidden reference address (BCC)fields. When an email address has beenspecified, another field where you canspecify another address appears. You canspecify up to 20 recipients for the Toand Cc address fields and 10 recipientsfor the BCC address field.](https://usermanual.wiki/LG-Electronics-USA/KU970/User-Guide-760562-Page-47.png)
![Messaging47]Input method: Select the desireddictionary mode.]Add to dictionary: You can add a newword to the dictionary.]Set mail priority: You can configure thepriority of the email you wish to send.]Cancel: Exits the email composer.5. When you have finished writing an email,press the right soft key [Send] to send the email.InboxMenu 5.21. You can view saved messages. Select amessage and then press to view themessage.2. You can view the previous or next messageby using / 3. To view a multimedia message(Notification), select Retrieve in themessage notification view screen. Then thefile is transmitted, and you can view the filewhen the transmission is complete.You can use the following functions by usingthe left soft key [Options] in the Inbox.]View: Opens the selected message.]Reply: Creates a reply to the sender orall recipients of the selected message.]Forward: Forwards the selected message. ]Make video call: You can make a videocall.]Delete: Deletes the current message.]Create new message: You can write anew message or an Email.]Mark/Unmark: You can select one ormore messages for multiple deletion.]Filter: Displays messages by desiredmessage types.]Copy: In case of SMS, you can copy themessage into handset or USIM.]Move: In case of SMS, you can move themessage into handset or USIM.NoteNot supported for multimedia message(Notification) and WAP push messages.](https://usermanual.wiki/LG-Electronics-USA/KU970/User-Guide-760562-Page-48.png)
![]Message info.: You can check themessage type, date and time and whereit is saved.DraftsMenu 5.3You can view saved messages. Select amessage and then press to edit themessage.You can use the following functions by usingthe left soft key [Options].] Edit: You can edit messages.] Delete: Deletes the selected message.] Create new message: You can write a newmessage or an Email.] Mark/Unmark: You can select one ormore messages for multiple deletion.]Filter: Displays messages by desiredmessage types.] Message info.: You can check the messagetype, date and time and where it's saved. OutboxMenu 5.4The Outbox is a temporary storage place formessages waiting to be sent. Failed messagesare also placed in Outbox. For example,Emails will be placed in Outbox if the Emailaccount is not correctly configured.1. Select a message and then press toview the message.2. You can use the following functions byusing the left soft key [Options].[For sending / waiting messages] /]Create new message: You can write a newmessage or an Email.]Cancel: You can stop sending/waitingstatus.] Message info.: You can check the messagetype, date and time and where it's saved. [For sending a failed message] ]Resend: Resends the selected message.]Forward: Forwards the selected message.]Edit: You can edit the selected message.]Delete: Deletes the current message.Messaging48MessagingNoteYou can check the saved Emails in Email[Menu 5.6].](https://usermanual.wiki/LG-Electronics-USA/KU970/User-Guide-760562-Page-49.png)
![Messaging49]Create new message: You can write a newmessage or an Email.]Mark/Unmark: You can select one ormore messages for multiple deletion.]Message info.: You can check the messagetype, date and time and where it's saved.Sent messagesMenu 5.5Shows the messages you sent (Message/Postcard/ Email).[Options]]View: Opens the selected message.]Reply: Creates a reply to sender or allrecipients of the selected message.]Forward: Forwards the selected message.]Delete: Deletes the current message.]Edit: You can edit the selected message.]Create new message: You can write a newmessage.]Save number: Save the sender's number.]Mark/Unmark: You can select one ormore messages for multiple deletion.]Filter: Displays messages by desiredmessage types.]Copy: In case of SMS, you can copy themessage into handset or USIM. ]Move: In case of SMS, you can move themessage into handset or USIM.]Message info.: You can check the messagetype, date and time and where it is saved.EmailMenu 5.6Viewing email message list1. Select an email account and then pressto view the received email list.2. Using the right soft key [Retrieve], youcan retrieve a new email list from the emailserver of the selected account.3. In email list, you can use the followingfunctions by using the left soft key[Options].](https://usermanual.wiki/LG-Electronics-USA/KU970/User-Guide-760562-Page-50.png)
![]View: Opens selected email. ]Reply: Creates a reply to the selectedemail.]Forward: Forwards the selected emailmessage to others.]Retrieve: Retrieves new email messages.]Delete: Deletes the email.]Create new message: Creates a newmessage or Email.]Save address: Save sender's address toContacts.]Mark/Unmark: Use mark/unmarkoption for multiple deletion.]Set as read/unread: You can set theselected email to read or unread.]Message info.: Brief information on themessage including size, type, date, timeand filenames.Viewing an email message1. Select one of the received emails andpress the Open key to receive thecontents of the email.2. The contents of the received email areautomatically displayed in the View screen.3. You can view the contents of the previousor next email by using / .4. In the email View screen, you can selectthe following functions by using the leftsoft key [Options].]Reply: Creates a reply to the selectedemail. ]Forward: Forwards the selected emailmessage to others.]Delete: Deletes the email.]Save address: Saves the sender'saddress to Contacts.]Create new message: Creates a newmessage.]Use: Extracts the number, email addressor Web address from email message.]View attachment: Shows the attachedfile.]View to address: Shows the emailaddresses of the recipients andreference (Cc).Messaging50Messaging](https://usermanual.wiki/LG-Electronics-USA/KU970/User-Guide-760562-Page-51.png)
![Messaging51]Message info.: Brief information on themessage including size, type, date, timeand filenames.TemplatesMenu 5.7Text templates (Menu 5.7.1) You can add, edit, and delete frequently used useful phrases using the left soft key[Options].Multimedia templates (Menu 5.7.2)You can create, edit and view availabletemplates when creating multimediamessages. Five types of template (Birthday,Greeting, Holiday, Thanks, Sorry) are savedby default.The following options are available.]Add new: You can create a new multimediatemplate.]Write multimedia message: Creates a multimedia message with the selectedtemplate.]View: Displays the selected template.]Edit: Edits the selected template.]Delete: Deletes the selected template.(Not available for default five templates)live! Studio Menu 5.8(Note: This service is not available in all countries. Pleasecontact your service provider for further information.)Accesses the remote media album.Messaging settingsMenu 5.9SMS (Menu 5.9.1)You can configure text message relatedoptions.1. Text message centre: Input the addressof the Text message centre.2. Delivery report: By enabling this option,you can verify whether your message hasNoteDepending on your service provider, usefulphrases are saved as a default.](https://usermanual.wiki/LG-Electronics-USA/KU970/User-Guide-760562-Page-52.png)
![been sent successfully.3. Validity period: This network serviceallows you to set how long your textmessages will be stored at the messagecentre.4. Message types: Text,Voice,Fax,X.400,Email Usually, the type of message is set to Te x t .You can convert your text into alternativeformats. Contact your service provider forthe availability of this function.5. Character encoding: Auto/ Defaultalphabet/ Unicode.]Auto(default): Message with singlebyte character is normally encoded inDefault alphabet(GSM7). Message withdouble-byte character is automaticallyencoded in unicode(UCS2).]Default alphabet: Message with evendouble byte character is encoded insingle byte. Please note that doublebyte characters with accent may beconverted into single byte characterwithout accent.]Unicode: Message is encoded in doublebyte. Please note that you may becharged double.6. Send long text as: Select a long textmessage as Multiple SMS or MMS.MMS (Menu 5.9.2)You can configure Multimedia messagerelated options.1. Retrieval mode: You can set the retrievalmode using Home network and Roamingnetwork respectively. If you selectAutomatic, you will receive multimediamessages automatically. If you selectManual, you will only receive a notificationmessage in the inbox and then you candecide whether to download multimediamessages or not.2. Delivery report: Allows you to determinewhether to request a delivery confirmationmail to a recipient, and whether to allowsending a delivery confirmation mail to asender.Messaging52Messaging](https://usermanual.wiki/LG-Electronics-USA/KU970/User-Guide-760562-Page-53.png)
![Messaging53]Request report: Determines whether torequest a delivery confirmation mail for aMultimedia message.]Allow report: Determines whether toallow sending a delivery confirmation mailfor a delivery confirmation mail request.3. Read reply: Allows you to determinewhether to request a read confirmationmail to a recipient, and whether to allowsending a read confirmation mail to asender.]Request reply: Determines whether torequest a read confirmation mail for aMultimedia message.]Allow reply: Determines whether to allowsending a read confirmation mail for aread confirmation mail request.4. Priority: You can select the priority levelof the messages (Low, Normal and High).5. Validity period: Allows you to configurethe term of validity for a message whentransmitting a multimedia message. Themessage would be saved in the multimediamessage server only for the configuredterm.6. Slide duration: Allows you to configurethe duration of each page when writing amessage.7. Delivery time: Configures the deliverytime of message to the recipient. TheMultimedia message centre will deliver themessage after the delivery time.8. Multimedia msg. centre: Allows you toconfigure network information such as theMMSC and the WAP gateway, to send amultimedia message.Using the left soft key [Options], you canactivate, add or delete a profile. A profilename selected by a checkmark is thecurrently configured value. You can viewand edit the contents of the profile in editmode by pressing the right soft key [Edit].The edit screen also appears whencreating a new profile under Options. Themeaning of each item is given below.](https://usermanual.wiki/LG-Electronics-USA/KU970/User-Guide-760562-Page-54.png)
![]Title: Profile name.]MMSC URL: Enter the multimediamessage centre URL.]MMS Proxy: Enter the WAP gatewayaddress and port number.]Connection mode: Select one of theconnection mode. (TCP with Proxy, TCPwithout Proxy, UDP)]Access points: Specify the access pointname. (see WAP connection settings.)Press the right soft key [Done] to save thechanges and complete Multimedia msg.centre setting.E-mail (Menu 5.9.3)You can configure settings for receiving andtransmitting emails.1. Vodafone Mail: Access to Vodafone Mail.(Note: This service is not available in all countries.Please contact your service provider for furtherinformation.)2. Allow reply email: Determines whether toallow sending a read confirmation mail fora read confirmation mail request.3. Request reply email: Determines whetherto request a read confirmation mail.4. Auto retrieve: You can configure Autoretrieve to retrieve emails automaticallyfrom the incoming mail server. When a newemail arrives, an icon appears at the top ofthe screen. You can select the autoreceiving time slot to Off, 15 minutes, 30minmutes or 1 hour. Please note that additional charges maybe incurred using the Auto retrievefeature.5. Include message in Fwd. & Reply:Determines whether to include theMessaging54Messaging](https://usermanual.wiki/LG-Electronics-USA/KU970/User-Guide-760562-Page-55.png)
![Messaging55received message when you forward themessage or reply to it.6. Signature: You can configure a textsignature to be attached to the end of anemail. The configured signature text isautomatically or manually attached to theend of the email when it is sent.7. Priority: You can select the priority levelof Emails (Low, Normal and High).8. Email accounts: You can create orconfigure an email account including theemail server and user ID. You can edit aselected email account by pressing theright soft key [Edit]. You can select anemail account to be used to send an emailusing . You can select the followingfunctions using the left soft key [Options].]Add new: Create a new email account.]Edit: To edit the selected email account.]Activate: Activates the selected accountfor outgoing mail.]Delete: Deletes a selected emailaccount. All the emails included in theaccount will be deleted.Creating a new email account1. Select Add new from the Email accountmenu options.2. The following items need to be configured.Enter the user name of the emailaccount.UsernameEnter a title.TitleEnter the email account password.PasswordEnter the email address for outgoingmail.Email addressEnter the email address to reply toyour email.Reply emailaddressEnter the outgoing email server.Outgoing mailserverEnter the incoming email server.Incoming mailserverEnter the mail server port number. Ingeneral, the SMTP (Outgoing mailserver port number) is 25.SMTP portnumberEnter the mail server port number. Ingeneral, the incoming mail server portnumber is 110(POP3) or 143(IMAP4).Incoming serverport](https://usermanual.wiki/LG-Electronics-USA/KU970/User-Guide-760562-Page-56.png)
![3. Press the right soft key [Done] tocomplete the email account configuration. Editing an email account1. Select a desired email account from theemail account list and press the right softkey [Edit].2. You can edit desired fields by moving thecursor up and down.3. When configuration is complete, press theright soft key [Done] to complete theemail account configuration.Messaging56MessagingSelect the maximum email receive sizeusing . The permissible maximumreceive size is no more than 1MB.Maximum receivesizeDecide whether the outgoing mailserver to require authentication or notusing . When the SMTPauthentication is set to On, you canenter the SMTP Username and SMTPPassword for SMTP authentication.SMTPauthenticationDecide whether to activate APOPsecure login or not using . Whenthe mailbox type is IMAP4, APOPsecure login is always set to OFF.APOP secureloginDecide whether to activate Autoretrieve or not using . You can setthe auto receiving time slot using theAuto retrieve [Menu 5.9.3.4]. (Seepage 54.)Auto retrieveSelect an access point to connect tothe Internet. You can select aconfigured access point using .Access pointsSelect where to save the sent mails(when the mailbox type is set toIMAP4). When the mailbox type isPOP3, sent mails are always saved intohandset.Select the email inbox type eitherPOP3 or IMAP4 using .Save to serverSave sent mailintoMailbox typeNoteWhen you try to change the mailboxtype, all emails downloaded beforewould be deleted.Determine whether to leave a copy ofmessages on the incoming server ornot using . When the mailbox typeis set to IMAP4, a copy of messagesare always saved to the server.](https://usermanual.wiki/LG-Electronics-USA/KU970/User-Guide-760562-Page-57.png)
![MessagingInfo. service (Menu 5.9.4)]Cell broadcast: You can set the receptionstatus.]Channels: You can add or modify thechannels.]Languages: You can select the languageyou want by pressing . Then, the infoservice message will be shown in thelanguage that you have selected.Service message (Menu 5.9.5)You can configure the service messagereceipt option.57](https://usermanual.wiki/LG-Electronics-USA/KU970/User-Guide-760562-Page-58.png)
![My Files [Menu 6]58My FilesPictures Menu 6.1The Pictures folder consists of embeddedlinks for downloading pictures through theInternet and Default images.Pictures taken using the camera are stored inthe Pictures folder and you can create newfolders to manage them. You can also saveselected files as animated Gifs and sendmultiple files to other people.When a file is selected, the following optionswill be displayed by pressing the left soft key[Options].]View: You can view the selected picture.]Create new folder: You can create a newfolder within the folder currently selected.]Send: You can send the selected image viaMessage, Postcard, Email or Bluetooth.]File- Move: Enables the file to be moved toother folder.- Copy: Enables the file to be copied toother folder.- Rename: You can rename the image.- Edit: Enables the image to be edited.- Make GIF animation: You can create ananimated GIF file with different photos(up to 10 files of 176X220 resolutionwith a 2Mbyte file size limit for display).- Info.: Shows information on the selectedimage file.]Delete: Deletes the selected image.]Mark/Unmark: Using the Mark function,you can send, delete, move and copymultiple files.]Main display: You can set an image as thescreen theme (Home screen, Outgoing call,Start up image, Power off image).]Slide show: You can start a slide show.]Sort by: You can sort the files by name,date, or file type.]List view/Grid view: You can view theimages as a List view or Grid view.]Memory status: You can view the memorystatus(handset or external memory card).](https://usermanual.wiki/LG-Electronics-USA/KU970/User-Guide-760562-Page-59.png)
![My Files59Sounds Menu 6.2The Sounds folder consists of embeddedlinks for downloading ringtones and music aswell as folders containing the Default soundsand Voice recordings. Here you can manage,send or set sounds as ringtones.Videos Menu 6.3Here you can manage or send downloaded orcaptured videos clips.The following are available using the left softkey [Options] in the Video list.]Play: Plays the video.]Create new folder: You can create a newfolder.]Send: You can send the selected video clipvia Message, Email or Bluetooth if notprotected by Digital Rights Management(DRM).]File- Move: Moves the file into handsetmemory or external memory.- Copy: Copies the file in handset memoryor external memory.- Rename: You can rename the video.- Info.: Shows information on the selectedvideo file.]Delete: Deletes the selected video.]Mark/Unmark: Using the Mark function,you can send, delete, move and copymultiple files.]Sound theme: You can set a video as thevoice ringtone or video ringtone.]Sort by: You can sort files by name, date,or file type.]List view/Grid view: Displays the videofiles as a List view or Grid view.]Memory status: Displays the memorystatus(handset or external memory card).](https://usermanual.wiki/LG-Electronics-USA/KU970/User-Guide-760562-Page-60.png)
![My Files60My FilesYou can view a video using the video player.Video files are displayed in the list asthumbnails. You can select a desired video byusing the / / / . Select adesired video and select Play to view therecorded video.Select the right soft key [Send] to attach theselected video to a message, Email orBluetooth.When option 1. Play is selected, the videoclip will be played with the Media Player. Topause the playback, press during theplayback. To resume the paused playback,press once again.To capture the screen shot, press the rightsoft key [Capture] when the playback ispaused.To view the current playback in full screen,press the right soft key during the playback.To return to the previous screen size, pressthe right soft key once again in full screenmode.When viewing video clips in the Media Player,the following options are available:]Pause/Play: You can play or pause playinga file for a moment.]Send: You can send the video via Message,Email or Bluetooth if the file is notprotected by Digital Rights Management(DRM).]Go to list: Goes back to the list.]Delete: Deletes the selected video.]Sound theme: You can set a video as thevoice ringtone or video ringtone.]Wide view: You can view the video in wideview mode.]Mute/Unmute: If the Volume is set tomore than 0, Mute mode is activated and ifthe Volume is set to 0, the Unmute mode isactivated. ]Capture: You can save what is on thepaused screen as an image file (onlypossible in Pause mode).]Set repeat: You can set the repeat option(None/Current file/All files).](https://usermanual.wiki/LG-Electronics-USA/KU970/User-Guide-760562-Page-61.png)
![My Files61]Move to - Previous file: Plays the previous video file.- Next file: Plays the next video file.]File info.: You can check information onfiles being played(File name, Size, Date,Type, Duration, Protection).Games & ApplicationsMenu 6.4You can easily download games and otherapplications in this menu. It has two folders,Games and Applications, as default. Eachfolder has an embedded link for downloadinggames or applications. Please note thatadditional cost may be incurred when usingonline services. You can create a folder usingthe left soft key [Options].Bluetooth data Menu 6.5The files received using Bluetooth are savedin this folder. You cannot create a sub-folderwithin the Bluetooth data folder.You cannot copy or move files that are notmanaged by My Files.The options displayed depend on the type offile selected. For instance, in case of animage, the following functions are supported.]View/Edit/Move/Copy/Delete/Renamefile(s).]Mark/Unmark one or all file(s).]Send a file via MMS, Email or Bluetooth ifnot protected by Digital RightsManagement (DRM).]If relevant, you can set an image as thescreen theme (Home screen, Outgoing call,Start up image, Power off image).]If relevant, start or set (normal or fullscreen, at what pace) a slide show.]If relevant, create an animated GIF file withdifferent pictures.]Sort the files by name, date or file type. NoteFor the image files of which resolution is640x480 or above, you can send themvia Postcard.](https://usermanual.wiki/LG-Electronics-USA/KU970/User-Guide-760562-Page-62.png)
![My Files62My Files]Memory info(handset or external memorycard).]View file information.Other files Menu 6.6Other files except pictures, sounds, videos,games & applications are stored in thisfolder. External memory Menu 6.7If you purchase an optional external microSDmemory card, you can manage more content.Refer to the section How to use a microSDmemory card on page 21 and 22 to learnhow to insert and remove the memory card.You can manage content as you do on yourphone.](https://usermanual.wiki/LG-Electronics-USA/KU970/User-Guide-760562-Page-63.png)
![Organiser & ToolsOrganiser & Tools [Menu 7]63Alarms Menu 7.1If you set the alarm, the appears on theindicator bar. The specified alarm sounds atthe scheduled time. Press to stop thealarm, and the alarm is released. Press theright soft key [Snooze] and choose thesnooze interval. The alarm sound stops andresumes after the selected Snooze duration.You can configure up to 5 alarms.1. Select your desired alarm to configure inthe alarm list. If there is no alarm, pressthe right soft key [Add] to add a newalarm.2. Set/Cancel alarm: Set or cancel thealarm using the options for specifyingwhether the alarm is on or by choosingthe alarm time.3. Input alarm time: Input your desiredalarm time by specifying Hour and Minute.Choose either ‘AM’ or ‘PM’ which is visibleif 12 hour format is specified for thephone.4. Select repeat mode: Select the desiredrepeat mode using / or select thedesired one from the list by pressing .5. Select bell: Select the bell to ring at thealarm time using / or opening thelist by pressing .6. Input memo: Input alarm name.7. Snooze: You can set the snooze durationfor the alarm.8. When you have finished setting the alarm,press the right soft key [Done].Calendar Menu 7.2Schedule inquiry and search1. Reference by MonthsYou can refer to your schedule by months.The cursor is on the current date, and theregistered date is marked. The schedule saved for the date where thecursor is located is represented by an icon.NoteThe alarm will go off even when the phoneis switched off.](https://usermanual.wiki/LG-Electronics-USA/KU970/User-Guide-760562-Page-64.png)
![Organiser & Tools64Organiser & ToolsPressing the shortcut key moves to theprevious year and pressing move tothe next year and pressing moves totoday. Pressing moves to the previousmonth, and moves to the next month.Pressing moves to the weekly calendar,and moves to the monthly calendar.You can move the date using / // .2. Reference by DaysPressing in the reference by monthmoves to reference by day where you canrefer to your schedule by days. You canrefer to the moving date tab using /. As a search result, brief schedulecontents, repetition set up configuration,and alarm set up configuration aredisplayed. You can send the schedule toanother phone or an Internet site throughSMS(Text message) or MMS(Picturemessage) or Email or Bluetooth.3. Detailed referenceYou can refer to a detailed schedule, thatis the whole contents of the scheduleconfigured by the user. You can send theschedule to another phone or an Internetsite through SMS(Text message) orMMS(Picture message) or Email orBluetooth using the left soft key[Options].Search scheduleYou can add a schedule. You can configurethe start date, end date, start time, end time,contents, type of schedule, repetition, alarmof the schedule.]Set type: Appointment, Anniversary,Birthday, Others]Set repeat: Once, Daily, Weekly, Monthly,Annually, User setting]Set alarm: No alarm, On time, 15 minsbefore, 30 mins before, 1 hour before, 1day before, 3 days before, 1 week beforeDelete schedule1. Delete elapsed schedulesYou can delete all elapsed schedules usingthis function.](https://usermanual.wiki/LG-Electronics-USA/KU970/User-Guide-760562-Page-65.png)
![Organiser & Tools652. Delete allYou can delete all saved schedule contentsusing this function.Set up and release holidayYou can set up or release user holidays. Press theleft soft key [Options] and select Set holiday.The selected date will be displayed in red.To release the holiday, press the left soft key[Options] and select Reset holiday.Schedule notificationIf the user has configured the alarm setting,the specified alarm sound will ring. If thenotification time is before the schedule starttime, you can set up the alarm again.Tasks Menu 7.3You can view, edit and add tasks to do. Tasksare displayed in time order. Tasks that havebeen completed or not completed aredisplayed in different ways.AddTo add a task, press the right soft key [Add]in the Tasks list management screen. Theninput the date, description and priority forthe task.When you have finished entering the data,press the right soft key [Done] to save thenew task.Detailed view and EditTo view detailed task contents, locate thecursor on the desired item in the Tasks list,and then press . You can edit and deletea task using the left soft key [Options]. Youcan also delete multiple or all tasks at onceusing the Mark/Unmark option.Set job statusTasks set as finished are displayed as crossedout below the unfinished tasks in the Taskslist. You can set Finished tasks to Notfinished by selecting Option.](https://usermanual.wiki/LG-Electronics-USA/KU970/User-Guide-760562-Page-66.png)
![Organiser & Tools66Organiser & ToolsMemo Menu 7.4Using the memo management function, youcan view and manage saved memo contents,and add new memo.Add memoTo add a new memo, press the right soft key[Add]. Enter the contents of the memo. Youcan save the memo to the list by pressing theright soft key [Done].Edit and delete memoHighlight the desired memo and press toview its contents. You can edit or delete thecontents of a memo using the left soft key[Options]. You can return to the memomanagement screen by pressing . You canselect Multiple or All memos using theMark/Unmark option and then delete amemo by pressing the right soft key [Delete].Calculator Menu 7.5The calculator module allows you toperform basic arithmetic functions such asaddition, subtraction, multiplication, anddivision as well as some scientific functions.1. Press the left soft key [Options].2. Select the appropriate function.You can enter numbers by using the numberkeys, and the operators by using / , / . You can enter a decimal point bypressing . Whenever you press ,characters are sequentially deleted in reverseorder. Whenever you hold down, all thecharacters are deleted in reverse order in onego.When calculation is complete and the resultis displayed on the screen, pressing a numberclears the previous result and the calculatorwaits for new input, even if you did not pressthe right soft key [AC]. When calculation iscomplete and the result is displayed on thescreen, pressing a symbol saves the resultinto the symbol, and continues calculation.](https://usermanual.wiki/LG-Electronics-USA/KU970/User-Guide-760562-Page-67.png)
![Organiser & Tools67Converter Menu 7.6Using this menu, users can convert Currency,Surface, Length, Weight, Temperature,Volume and Velocity.Currency (Menu 7.6.1)1. Select the Currency menu.2. Users can set a currency exchange rateusing [Rate].3. Enter currency rates for up to 6 currenciesequivalent to GBP and then press [Done].Then you can convert from one currencyto another.4. You can view the value of up to 6 currencyunits.5. Press [Reset] to clear the current inputField.6. To exit the currency conversion function,press the [Back] key.Surface (Menu 7.6.2)1. Select Surface menu.2. Select the desired unit to convert using[Unit].3. Enter the standard unit and view theconverted value. 4. Press [Reset] to clear the current inputField, and locate the cursor in the inputfield.5. To exit the Surface conversion function,press [Back] key.Length (Menu 7.6.3)1. Select the length menu.2. Select the desired unit to convert using[Unit].3. Enter the standard unit and view yourconverted value.4. Press [Reset] to clear the current inputfield and locate the cursor in the inputfield.5. To exit the length conversion function,press the [Back] key.](https://usermanual.wiki/LG-Electronics-USA/KU970/User-Guide-760562-Page-68.png)
![Organiser & Tools68Organiser & ToolsWeight (Menu 7.6.4)1. Select the Weight menu.2. Select the desired unit to convert using[Unit].3. Enter the standard unit and view theconverted value.4. Press [Reset] to clear the current input Field,and locate the cursor in the input field.5. To exit the Weight conversion function,press the [Back] key.Temperature (Menu 7.6.5)1. Select the Temperature menu.2. Position the cursor on the desired unit byusing the up or down arrow keys.3. Enter the standard unit and view theconverted value.4. Press [Reset] to clear the current inputfield and locate the cursor in the inputfield.5. To exit the Temperature conversionfunction, press the [Back] key. 6. You can insert negative values by selecting[-].Volume (Menu 7.6.6)1. Select the Volume menu.2. Select the desired unit to convert using[Unit].3. Enter the standard unit and view theconverted value.4. Press [Reset] to clear the current inputfield and locate the cursor in the inputfield.5. To exit the volume conversion function,press the [Back] key.Velocity (Menu 7.6.7)1. Select the Velocity menu.2. Select the desired unit to convert using[Unit].3. Enter the standard unit and view theconverted value.](https://usermanual.wiki/LG-Electronics-USA/KU970/User-Guide-760562-Page-69.png)
![Organiser & Tools694. Press [Reset] to clear the current inputfield and locate the cursor in the inputfield.5. To exit the Velocity conversion function,press the [Back] key.World time Menu 7.7The World time function provides timeinformation on major cities worldwide.You can view the time of the desired countryor city by navigating using / You can select a desired city as a base usingthe right soft key [Home].Voice recorder Menu 7.81. Press the left soft key [Options] to displaythe option pop up menu before recording.2. Move to the desired menu item using /and press .]Quality: You can select a recordingquality from Super Fine, Fine andNormal.]Duration: You can set the recordingduration to MMS msg. size, 30 secs, or 1min.]New recording: Select this menu to startrecording to a new file.]My Files: Opens the Voice recordingsfolder in My Files.3. Pressing starts recording. When arecording is started, the recording timeappears on the LCD. To cancel therecording, press the right soft key[Cancel].4. When you finish the recording, pressto exit. The recorded file is automaticallysaved in the Voice recordings folder in Myfiles.5. When no recording is in progress, pressing starts recording on a new file.When no recording is in progress, pressthe right soft key [Send] to send arecorded file.Select one from Message, Email, orBluetooth using / and press .](https://usermanual.wiki/LG-Electronics-USA/KU970/User-Guide-760562-Page-70.png)
![Organiser & Tools70Organiser & Tools6. Press the left soft key to select the variousoptions after the voice recording.7. Select the desired menu using /and press .]Delete: Select this menu to delete arecorded file.]New recording: Select this menu to starta new voice recording.]Send: To send the recorded file. Selectone from Message, Email and Bluetoothusing / and press .]Sound theme: You can set the recordedfile as the Voice Ringtone, VideoRingtone, Start up sound or Power offsound. ]My Files: Opens the Voice recordingsfolder in My Files.8. Press the right soft key to close the sub-menu popup window.](https://usermanual.wiki/LG-Electronics-USA/KU970/User-Guide-760562-Page-71.png)
![ContactsContacts [Menu 8]71Add newMenu 8.1You can register a new contact address. Youcan enter the name, different phone numbersand email addresses of a new contact. Youcan also assign the contact to groups,include an image or avatar, assign a specificringtone and even enter a memo for thecontact. Other available fields include Homepage URL, Home address, Company name,Job title and company address. You can enterand manage contact addresses depending onthe memory usage.Contacts list Menu 8.2Performs the contact address searchfunction. The search operation is performedbased on a name as a default. The currentsearch method and results found aredisplayed in the Search window. You canmake a phone call or send a message to theselected phone number. A Contacts searchcan be performed based on the phonenumber or group information.Groups Menu 8.3Using this menu you can manage groupinformation (both stored in the Handset andthe USIM). In the handset memory, there are4 default groups: Family, Friends, Colleaguesand School. You can add, edit and deletegroups. When a ringtone for a number is notspecified, a call from the number sounds thegroup ringtone assigned to the number forthe group.Speed dialsMenu 8.4Using this menu you can manage speed dials.Speed dials are configured between 2-9. Youcan register speed dials for a specific contactaddress up to 5 different numbers, and acontact address may have multiple speeddials.Service dial numbers Menu 8.5You can view the list of Service DiallingNumbers (SDN) assigned by your serviceprovider (if supported by the USIM card).](https://usermanual.wiki/LG-Electronics-USA/KU970/User-Guide-760562-Page-72.png)
![CallsCalls [Menu 9]73You can check the record of missed, received,and dialled calls only if the network supportsCalling Line Identification (CLI) within theservice area.The number and name (if available) aredisplayed together with the date and time atwhich the call was made. You can also viewcall times.All calls Menu 9.1Allows you to view the missed, received, anddialled call records. You can make a call, orsend a message to the number you haveselected from the records. You can also savethe number in Contacts.Dialled calls Menu 9.2Allows you to view dialled call records, make acall, send a message, and save the number inContacts.Received calls Menu 9.3Allows you to view received call records, makea call, send a message, and save the numberin Contacts.Missed calls Menu 9.4Allows you to view missed call records, makea call, send a message, and save the numberin Contacts.](https://usermanual.wiki/LG-Electronics-USA/KU970/User-Guide-760562-Page-74.png)
![USIM Tool Kit [Menu *]74USIM Tool KitDepending on whether you have SAT supportservices or not (i.e. USIM Application Toolkit)on the USIM card, this menu (Menu ) maybe different.If the USIM card supports SAT services, thismenu will be the operator-specific servicename stored on the USIM card, for instance“Special”. Please refer in that case to theinformation provided with your USIM cardfor further information on how to use therelated options.If the USIM card does not support SATservices, this menu will be Alarms.For the Alarms menu feature, please refer topage 63.](https://usermanual.wiki/LG-Electronics-USA/KU970/User-Guide-760562-Page-75.png)
![Video callVideo call [Menu 0]75You can make a video call using this menu. 1. Enter the number you want to dial.]You can key in the number.]You can select the number from Contactusing the left soft key [Contacts]. ]You can find the number from call logsby pressing [Calls].2. Press the right soft key [V-Call] to make avideo call.During a video callWhen you are in a video call, the screen willshow the contact's name and duration of call,contact's image, volume indicator, videocontrol panel, and your image.You can access the following option menusby pressing the left soft key [Options].]Microphone on/off]Speaker on/off]Bluetooth/Handset talk (When theBluetooth headset is connected)]Private/Show mode]Hold/Resume]Capture]View sender number]Settings]End callIncoming video callWhen a video call is received, the caller'sinformation is displayed as following.]Picture/Animation: Displays picture ID,graphic image configured in Contacts, ordefault animation indicating the incomingcall.]Caller's name and number: Showsincoming caller's number. If the number isstored in Contacts, displays the name ofthe contacts.Picture ID and animation setting is used inthe order of Contacts, video file used inGroup ringtone, and video file used in Profile.](https://usermanual.wiki/LG-Electronics-USA/KU970/User-Guide-760562-Page-76.png)
![Video call76Video callAlso, sound can be set for the incomingvideo call. The sound setting is used in theorder of Contacts, Group ringtone, andProfile.You can accept the incoming call by pressingthe left soft key [Accept]. The incoming call ringing can be silenced bypressing the right soft key [Silent]. It can bealso silenced by long press on on the leftside of the phone.When ringing is silenced, press the right softkey [Reject] to reject the call.](https://usermanual.wiki/LG-Electronics-USA/KU970/User-Guide-760562-Page-77.png)
![SettingsSettings [Menu #]77Phone settings Menu #.1 Profile (Menu #.1.1)You can select ringtone or vibration for anincoming call and configure the sound andvolume of the ringtone, key tone, and soundeffect, according to a profile. The profilesprovided include [Normal], [Silent], [Vibrateonly], [Outdoor], [Headset], [Customised1], [Customised 2], and [Customised 3].Select a profile, and press to activate theprofile. After pressing the left soft key[Options], select the Edit menu for the[Normal], [Outdoor], [Headset],[Customised 1], [Customised 2] and[Customised 3] profile to change theconfiguration. A different list of options isavailable for each profile that has beenselected for editing.Alert byThis option determines the incoming callnotification mode. You can select from[Ring], [Vibration], [Silent], [Ring &vibration], [Ring after vibration], [Max Ring &Vibration].Voice ringtoneYou can select the ringtone for incomingvoice calls.Video ringtoneYou can select the ringtone for incomingvideo calls.VolumeSet the ringtone volume.Message alertYou can set how often the phone is to informyou of a received message until it is read.Message toneYou can select a file from among your ownpersonal files or from the default files, to beplayed by the phone upon receiving amessage.Key toneYou can set the key tone to be played whenpressing the keys.](https://usermanual.wiki/LG-Electronics-USA/KU970/User-Guide-760562-Page-78.png)
![Settings796. Press the right soft key [Done] to set thetime with the specified value.Date1. Select the Date item from the Date &time list, and then press .2. Select the date format using / .3. Enter Day, Month and Year using thenumber keys.4. Press the right soft key [Done] to set thedate with the specified value.Auto update date/timeWhen Auto Update is configured to On, thetime and date are automatically updatedaccording to the current time zone. IfConfirm first is selected, the time and dateupdate is confirmed before it is updatedautomatically.Daylight savingSelect whether to activate the daylight savingfunction or not. You can set the Summertime difference of selected home city for 1hour or 2 hours.Language (Menu #.1.3)Select the display language. You can selectAutomatic language option to changedisplay language to the USIM card supportedlanguage.Security (Menu #.1.4)PIN code requestWhen this is set to On, you are requested toenter your PIN each time you switch thephone on.Note]Press in the PIN code entry windowto return to the previous step.]3 incorrect PIN code entries wouldinvalidate the PIN code. And you have toenter the PUK (PIN Unblock Key) codeto configure the PIN code again.]The maximum number of times you mayenter the PUK code is 10. (Note: If youenter an incorrect PUK code 10 times,the USIM card will be blocked and mustbe replaced.)]If the PIN code request cannot bedisabled by operator settings, you willnot be able to choose this menu item.](https://usermanual.wiki/LG-Electronics-USA/KU970/User-Guide-760562-Page-80.png)
![Settings80SettingsHandset lockYou can lock your phone. The following 4lock functions are available.When switching on: Locks the handsetwhenever the handset is switched on.If USIM changed: Locks the handset whenthe phone's USIM card has been changed.Immediate: Locks the handset immediately.None: Deactivates the lock function.You are requested to enter the security codeto confirm the selection.]To unlock the handset, you need to enterthe security code.Change codesYou can change the PIN, PIN2, the mobilephone password and the call barringpassword.PIN codePIN is the abbreviation for PersonalIdentification Number, and is used to restrictuse by an unauthorised user. PIN code change procedure1. Select ‘PIN code’ from the ‘Change codes'list and then press .2. Enter the current PIN code, and press .3. Enter the new PIN code, and press .4. Enter the new PIN code once again, andpress .]If the PIN code is different from that ofstep 3, the procedure is restarted fromstep 3.5. When the PIN code is changed properly, aChanged message is displayed. If youenter an incorrect PIN code in step 2, theprocedure is restarted from step 2, andthe number of attempts you have left toenter the number decreased by 1.6. Press in the PIN code entry window toreturn to the previous step.](https://usermanual.wiki/LG-Electronics-USA/KU970/User-Guide-760562-Page-81.png)
![Settings81PIN2 codePIN2 is the abbreviation for PersonalIdentification Number 2, and is used torestrict use by unauthorised users as with thePIN. The PIN2 code change procedure is thesame as the one for the PIN code. 3incorrect PIN2 code entries would invalidatethe PIN2 code. In this case, you have toenter the PUK2 code in order to use thePIN2 code again. The maximum number oftimes you may try to enter the PUK2 code is10, like PUK1. 10 incorrect PUK2 codeentries would invalidate the PIN2 code.Security codeThe security code is used to change themobile phone password. The maximumnumber of attempts to enter the securitycode is not limited as it is with PIN and PIN2.Keypad lockIf you select Off, the keypad can beactivated only when the slide is open. If youselect On, you can activate the keypad bypressing on the left side of the phone.Power save (Menu #.1.5)Decide whether to activate the power savemode or not. Memory status (Menu #.1.6)User memoryThis function shows the status of the usermemory of the mobile phone. Since thisfunction scans the overall file system forstatistics, a few seconds are required.Note]Three incorrect PIN code entries in thePIN code entry window would invalidatethe PIN code. In this case, you have toenter the PUK (PIN Unblock Key) codeto configure the PIN code again. Themaximum number of times you mayenter the PUK code is 10. (Note: If youenter an incorrect PUK code10 times,the USIM card will be blocked and mustbe replaced.)](https://usermanual.wiki/LG-Electronics-USA/KU970/User-Guide-760562-Page-82.png)
![Settings82SettingsUser reserved memoryThis function shows the status of the Userreserved memory. The usual contents areText messages, Contacts, Calendar, Tasks,Memo. And it gives a clear illustration of theactual amount compared with the totalamount for each item.USIM memoryThis function shows the status of the USIMcard user memory.External memoryThis function shows the status of theExternal card user memory. This functiondisplays the In-use and free memory usagestatistics.Format external memorySelect this to format the external memory.Handset Information (Menu #.1.7)This functions shows the USIM cardtelephone number, model name and softwareversion of the mobile phone.Reset settings (Menu #.1.8)Clear memorySelect this to clear the memory. You arerequested to enter the security code.]Handset contents: Deletes all themultimedia contents downloaded.]Handset personal info.: Deletes personalinformation such as received messages oremails.Default settingSelect this to reset your phone to its defaultconfiguration. You are requested to enter thesecurity code.](https://usermanual.wiki/LG-Electronics-USA/KU970/User-Guide-760562-Page-83.png)
![Settings83Display settings Menu #.2This menu allows you to personalise thedisplay options of the screens and of themenus entire graphic interface.Main Display (Menu #.2.1)You can set the screen theme to be displayedon the main screen.Home screen]Wallpaper: You can select an image to bedisplayed on the main screen.]Display items: You can select which itemsto display on the screen: Calendar + Clock,Calendar, Clock, Dual clock or Do not show.]Shows shortcut icons: Decide whether todisplay the shortcut icons or not.Outgoing callYou can select the image to be displayedwhile dialling a number.Start up imageYou can select the image to be displayedwhile the phone is being switched on.Power off imageYou can select the image to be displayedwhile the phone is being switched off.Menu style (Menu #.2.2)You can select the desired menu style fromGrid style and One by one style.Font (Menu #.2.3)You can set the font style, dialling font size,and dialling font colour using / .Backlight (Menu #.2.4)You can set the backlight duration on theHome screen and Keypad individually.Welcome message (Menu #.2.5)After selecting On, you can write a welcomemessage.](https://usermanual.wiki/LG-Electronics-USA/KU970/User-Guide-760562-Page-84.png)
![Settings84SettingsJava settings Menu #.3Activating a profile1. Move the cursor to the profile you wouldlike to activate.2. Press or select Activate from theOptions menu.Adding a new profile 1. Select Add new from the Options menu.The following items need to be configured.2. Press the right soft key [Done] to save anyconfiguration changes.You can edit and delete a profile by selectingEdit and Delete from the Options menu.Messaging settingsMenu #.4For detailed information, please refer to page51 .Call settings Menu #.5Call durations (Menu #.5.1)You can view call time by types. Press the leftsoft key [Options] to choose either partialinitialisation or entire initialisation. Also pressright soft key [Clear] to initialise a selectedduration type. Initialization will require yourSecurity code.The following timers are available:]Last call: Shows the latest call time in unitsof hours/minutes/seconds.Enter an account name for the profile.Service name Choose from the given list ofconnection modes. (Default is TCPwith Proxy)Connectionmode Enter the WAP Gateway IP addressprovided by the operator. (e.g. 195.115. 025. 129)IP addressPort details are provided by theoperator, depending upon theConnection mode.Proxy serverport Choose from the given list of accesspoints. (For more details on adding orediting a new access point, refer topage 98.)Access point](https://usermanual.wiki/LG-Electronics-USA/KU970/User-Guide-760562-Page-85.png)
![Settings85]Received calls: Shows incoming call time.]Dialled calls: Shows outgoing call time.]All calls: Shows total call time.Call barring (Menu #.5.2)Call barring menus for Voice and Video callsare provided.The menu consists of Voice calls, Video callsand Deactivate all. The Voice calls and Videocalls menus have the following submenus.The Call barring menu consists of Alloutgoing, Outgoing international,Outgoing international calls except homecountry, All incoming and Incoming whenabroad submenus. The All outgoing menu bars dialling alloutgoing calls, the Outgoing internationalmenu bars dialling outgoing internationalcalls, and the Outgoing international callsexcept home country menu bars diallingoutgoing international calls except for theHome PLMN country. All incoming rejects all incoming calls and the Incoming whenabroad menu rejects incoming calls whenroaming.Voice callsVideo callsAll outgoing1. When is selected, it receives theBarring password from user, and activatesthe barring service on the network. Arequesting message and animationappears. When the network answers, theresult of the operation is displayed.2. When the Options menu is selected, itactivates the Outgoing calls menu. Selectthe Options menu from the soft menus onthe lowest menu. Then Deactivate,Activate, Deactivate all, View status andChange password menus appear. Selectthe Activate menu to receive the Barringpassword from the user and activate thebarring service on the network.The Deactivate menu deactivates thebarring service after the user's Barringpassword is entered. The Deactivate all](https://usermanual.wiki/LG-Electronics-USA/KU970/User-Guide-760562-Page-86.png)
![Settings87Fixed dial numbers (Menu #.5.3)]FDN ON/OFF: Select whether to activateFDN or not. PIN authentication is required.]FDN List: Displays the current FDN list.You can edit, add, or delete fixed dialnumbers. PIN2 authentication is requiredto edit the list. And the configurationinformation is saved on the USIM. Theinformation saved on the USIM is usedwhen FDN restricts outgoing calls.Data volume (Menu #.5.4)Allows you to check the sent, received and alldata volume transferred. (Data volumetransferred through TE connection isexcluded from counting.) Press the left soft key [Options] to choosefor partial initialization or entire initialization.You can also use the right soft key [Clear]for the initialization of the selected volumetype. Initialization will require your Securitycode.Call costs (Menu #.5.5)1. This function displays the call costs of theLast call and All calls.2. To initialise, press the right soft key[Clear] and enter the PIN2 code.3. You can select either Units or Currency inSet call cost. According to your setting,the call cost is displayed during a call (IfUSIM and Network support Advice OfCharge(AOC)).4. In the Set limit configuration, select Onto configure the cost limit. When a costlimit is configured, and the call costs reachthe limit, making a call will not be allowed.](https://usermanual.wiki/LG-Electronics-USA/KU970/User-Guide-760562-Page-88.png)

![Settings913. When Recent divert number list isselectedIt operates the same as All voice callsmenu.4. When Options menu is selectedActivates and operates If out of reach menu. It operates the same as All voice calls menu.Call waiting (Menu #.5.7)]Activate: Activates waiting service.Selecting this item, displays requestingmessage and animation. When the networkanswers, the result of the operation isdisplayed.]Deactivate: Deactivates Call waitingservice. Selecting this item displaysrequesting message and animation. Whenthe network answers, the result of theoperation is displayed.]View status: Displays activated Call waitingservice group item of the network.Selecting this item displays requestingmessage and animation. When the networkanswers, the result of the operation isdisplayed.Voicemail (Menu #.5.8)You can add or modify voice mail centre.Video call (Menu #.5.9)You can set the screen display when making/receiving a video call.]Show private image: Determine whetherto show the private image or not.]Select still image: Select the still image tobe displayed.]Mirror: Select to activate the mirror effector not.- On: Displays the image flipped side toside.- Off: Displays the image as it is.]My image size: Select my image size to bedisplayed.](https://usermanual.wiki/LG-Electronics-USA/KU970/User-Guide-760562-Page-92.png)
![Settings92Settings]My image position: Select the positionwhere your image will be displayed.Common settings (Menu #.5.0)Call rejectYou can set whether to reject incoming calls.1. Select On in Reject menu to activate callreject. The Reject list menu appears.2. Set the desired call reject option in theReject list menu.]All calls: Rejects all calls.]Contacts: Rejects the calls from thenumber stored in Contacts.]Groups: You can specify call rejects bygroup units stored in Contacts.]Unregistered: Rejects calls from thenumber not stored in Contacts.]No caller ID: Reject calls which do nothave CLI information.Send my number]Set by network: Configures with thedefault settings determined by the serviceprovider.]On: Configures to send my phone numberwhen making an outgoing call.]Off: Configures not to send my phonenumber when making an outgoing call.Auto redialAllows you to set the auto redial functionwhen a call attempt has failed.Answer modeAllows you to set the answering method. Youcan choose between Press send key, Slideup and Press any key.Minute minderDetermines whether to sound a 1 minutetone every 1 minute when you are on thephone.](https://usermanual.wiki/LG-Electronics-USA/KU970/User-Guide-760562-Page-93.png)
![Settings93BT answer mode]Hands-free: You can answer a call usingthe Bluetooth headset, when the Bluetoothis connected.]Handset: If you press on the handsetto answer a call, you can talk on thehandset. If you press the Bluetoothheadset key to answer a call, you can talkusing the Bluetooth headset.This is the initial answer mode selection. Andwhile talking, you can switch from handset toheadset or from headset to handset.Contact settings Menu #.6For detailed information, please refer to 72.(Menu 8.7)Connectivity Menu #.7Bluetooth (Menu #.7.1)Bluetooth connectionYour phone has built-in Bluetooth wirelesstechnology which makes it possible for youto connect your phone wirelessly to otherBluetooth devices such as a handsfree, PC,PDA or other phones.You can, for example, have a conversation viaa cordless Bluetooth handsfree or browse theInternet, wirelessly connected via a mobilephone. You can also exchange, for example,business cards, calendar items and pictures.Note]We recommend that your phone andthe Bluetooth device you arecommunicating with be within a range of10 meters. The connection may beimproved if there are no solid objectsbetween your phone and the otherBluetooth device.](https://usermanual.wiki/LG-Electronics-USA/KU970/User-Guide-760562-Page-94.png)
![Settings94Settings1. Getting started• Menu > #. Settings > 7. Connectivity > 1. Bluetooth > 1. Paired devicesTo use the Bluetooth function, you must firstset Bluetooth to On.2. Configuring Bluetooth settings• Menu > #. Settings > 7. Connectivity > 1. Bluetooth > 2. Settings- Bluetooth usage: To use the Bluetoothfunction, set it to [On]. Otherwise, set it to[Off].- My handset’s visibility: Set [My handset’svisibility] to [Show to all] so that otherdevices can detect your phone when theyare searching for a Bluetooth device. If youselect [Hidden], other devices will not beable to detect your phone when they aresearching for a Bluetooth device.- My handset’s name: You can name orrename your phone as it will appear onother devices. Your phone's name will beshown on other devices only when [Myhandset’s visibility] is set to [Show to all].3. Paired devicePairing Devices(Pairing with a device)If a paired Bluetooth device already exists.• Menu > #. Settings > 7. Connectivity >1. Bluetooth > 1. Paired devices >Options > Add newIf there is no paired Bluetooth device.• Menu > #. Settings > 7. Connectivity > 1. Bluetooth > 1. Paired devices > AddOptions]Add new: Using this menu, you can pair anew Bluetooth device with your phone.Note]When user uses Bluetooth Device in thehandset, the security of the handset is atrisk.Therefore, we recommend that Bluetoothvisibility be set to Hiddenafterconfiguration or device pairing.For incoming files via Bluetoothregardless of paired devices, you canchoose to accept or reject theconnection, after checking the senderdetails.](https://usermanual.wiki/LG-Electronics-USA/KU970/User-Guide-760562-Page-95.png)
![Settings95]Assign short name: Using this menu, youcan rename a paired phone as required.]Connecting/Disconnecting the device1. If you want to open the connection tothe selected device, select the Connect.2. If you want to close the connection tothe selected device, select theDisconnect.]Delete: Using this menu, you can deletethe paired Bluetooth device.]Delete all: Using this menu, you can deleteall of the paired Bluetooth devices.<Pairing devices>1. To search for a Bluetooth device to pair,press Add or Add new.2. Screen shows Searching for devices.Bluetooth devices within a range of 10mwill be found.3. If Bluetooth devices are found, thesedevices are listed on the screen. If noBluetooth device is found, you will beasked if you want to search again.4. Pairing procedure- Press . A window will appear on thescreen asking you to enter yourpassword.- After creating a password (of 1 to 16digits), the user of the other devicemust enter the password for pairing.The user of the other device must knowthe password in advance forauthentication.<Deleting devices>1. Select a device to delete from the Paireddevices screen.2. You can delete a device by pressing theDelete key or by selecting Options >Delete. To delete all paired devices, selectOptions >Delete All.<Transmitting data using Bluetooth>1. To transmit data from your phone toanother Bluetooth device, first select theapplication where the target data is saved.For example, to send data in the My Filesto another device, select](https://usermanual.wiki/LG-Electronics-USA/KU970/User-Guide-760562-Page-96.png)
![Settings96SettingsMenu > 6. My Files > 1. Pictures /2. Sounds / 3. Videos/ 5. Bluetooth data/ 6. Other files / 7. External memory >Select data to transmit > Send > 3.Bluetooth2. Transmitting data1) Last device found is displayed. If thedesired device does not exist in thelist, select [More devices].2) Select the device to which you wantto transmit data from the devices onthe screen and press .3) If the other party selects [Yes] for[Connection request], the data istransmitted.<Receiving data using Bluetooth>Menu > #. Settings > 7. Connectivity > 1. Bluetooth > 1. Paired devicesIf another party attempts to transmit data,the [Connection request] question willappear on the screen. If you select [Yes], thedata will be transmitted to your phone.During data transmission, the Bluetooth iconflashes.<Bluetooth data storage folder>You can check the received data by selectingMenu > 6. My Files > 5. Bluetooth data.4. Device<Connecting a headset>Menu >#. Settings >7. Connectivity >1. Bluetooth1. Connect the headset according to theprocedures described in the PairingDevices section.2. To use the headset, select the headsetfrom the registered devices, press theOption key and then select 3.Connect.3. To check that the selected headset hasbeen connected successfully, press theOption key. If it is properly connected,3.Disconnect will appear. If it is notconnected, 3.Connect will appear.<Connecting a handsfree kit>1. Menu > #. Settings > 7. Connectivity > 1. Bluetooth](https://usermanual.wiki/LG-Electronics-USA/KU970/User-Guide-760562-Page-97.png)
![Settings972. Connect the handsfree kit according tothe procedures described in the PairingDevices section.3. To use the handsfree kit, select thehandsfree kit from the registered devices,press the Option key and then select3.Connect.4. To check that the selected handsfree kithas been connected successfully, press theOption key. If it is properly connected,3.Disconnect will appear. If it is notconnected, 3.Connect will appear.Network (Menu #.7.2)Network selectionSelect between Automatic and Manual.]Automatic: Automatically searches for thenetwork and registers the handset to thenetwork. This is recommended for bestservice and quality.]Manual: All the currently 2G(GSM) and3G(UMTS) available networks are shownand you can select one of them forregistration. If the registration of thenetwork has failed, all the currentlyavailable networks are listed again and youcan select any other one for registration.Network modeYou can set a type of network to search forwhen networks are searched in the Selectnetwork menu.]Automatic: Searches all the networksconnectable.]UMTS: Searches only networks supporting3G.]GSM 900/1800: Searches only networkssupporting GSM 900/1800 band.]GSM 1900: Searches only networkssupporting GSM 1900 band.](https://usermanual.wiki/LG-Electronics-USA/KU970/User-Guide-760562-Page-98.png)
![Settings98SettingsPreferred listsIf the network is searching automatically, youcan add a preferable network to beconnected to. And the following options areavailable.]Add new: You can add a new network usingthe followings.- Search: You can select one from thenetwork list stored in the phone.- Enter new network: You can enter thecountry code (MCC) and the networkcode (MNC) to add. After setting, pressDone key.]Edit: You can modify the information ofthe selected network.]Delete: Deletes the selected network.]Move up: Moves the selected networkupward.]Move down: Moves the selected networkdownward.Access points (Menu #.7.3)This menu shows the access point list. Youcan create new profiles, delete or edit themby using the Option Menu. However, youcannot delete or edit default configurationsdepending on country variant.You can edit the following configurationitems by selecting the right soft key.]Press Done key to save any configurationchanges.Access Point profile name.Connection titleChoose the bearer from the list.(Default is UMTS.)BearerChoose the authentication from thelist. (Default is No auth)AuthenticationInformation provided by serviceprovider.User nameInformation provided by serviceprovider.PasswordAPN name to access network.Information provided by serviceprovider.APN](https://usermanual.wiki/LG-Electronics-USA/KU970/User-Guide-760562-Page-99.png)
![Settings99Browser settings (Menu #.7.4)ProfilesSelect the appropriate profile by pressing . This will activate the profile to initiatebrowser launch.SecurityIf user presses Certificates, certificationinformation is shown.User can clear secure session information bypressing Session clear.CertificatesIf stored, a list of root/ca certificates requiredfor WTLS/TLS can be found here.Certificates can be viewed from the list.Session clearSecure (WTLS/ TLS) session data can becleared using this option. Session datashould be cleared to establish a new securesession.Character encodingSets the browser default character set to oneof the following.]Automatic, English(ASCII), English(ISO),English(LATIN), Unicode(UCS2 BE),Unicode(UCS2 LE), Unicode(UCS2 Auto),Unicode(UTF-16 BE), Unicode(UTF-16 LE),Unicode(UTF-16 Auto), Unicode(UTF-8).Scrolling controlAllows you to set the scroll speed byselecting the number of lines to scroll. Select from Small(1 line), Medium(2 lines),Large(3 lines).Show Image Allows you to enable or disable image displayduring browsing.](https://usermanual.wiki/LG-Electronics-USA/KU970/User-Guide-760562-Page-100.png)
![Settings100SettingsCacheEnabling Cache allows you to store accessedpages to your phone. Once a page has beenstored in cache it will greatly enhance thepage loading speed on subsequent browsingof the same page.Cookies Enabling Cookies allows you to store cookiessent from the server. Disabling this functionwill prevent cookies from being stored onyour phone.JavaScriptSelect On/Off.Reset settingsSelect this to reset your phone to its defaultconfiguration.Streaming (Menu #.7.5)If you want to set different network setting toplay streaming content, you can set differentnetwork settings.Dial-up network (Menu #.7.6)You can use your phone with a variety of PCconnectivity and data communicationsapplications. Select USB and Bluetooth youwant to use for the data connection.Note]Enabling this function will delaydisplaying of images until transmission iscompleted. Disabling this function willprevent the browser from downloadingimages from the server, thus allowingfaster transmission.](https://usermanual.wiki/LG-Electronics-USA/KU970/User-Guide-760562-Page-101.png)
![AccessoriesAccessories101There are various accessories for your mobile phone. You can select these options according toyour personal communication requirements.Travel Adapter This charger allowsyou to charge thebattery while awayfrom home or youroffice.Standard Battery Data cable/CD You can connect yourphone to PC toexchange the databetween them. Hands free ear-microphone and musicplayer controller combo Stereo headsetController: Answer &End key, music playercontrol, volume control,Hold button and microphone.After connecting the headset and thecontroller, plug the end of controller into theheadset jack on the right side of the phone.Note] Always use genuine LG accessories.] Failure to do so may invalidate yourwarranty.] Accessories may vary in different regions:please check with our regional servicecompany or agent for furtherinformation.](https://usermanual.wiki/LG-Electronics-USA/KU970/User-Guide-760562-Page-102.png)