LG Electronics USA L03F USB Modem with Multi-band GPRS and WCDMA User Manual
LG Electronics MobileComm USA, Inc. USB Modem with Multi-band GPRS and WCDMA
UserManual.wiki
>
LG Electronics USA
>
L03F User Manual
Users Manual
Navigation menu
Upload a User Manual
Namespaces
Wiki Guide
HTML
PDF
Info
Views
User Manual
Discussion / Help
Navigation


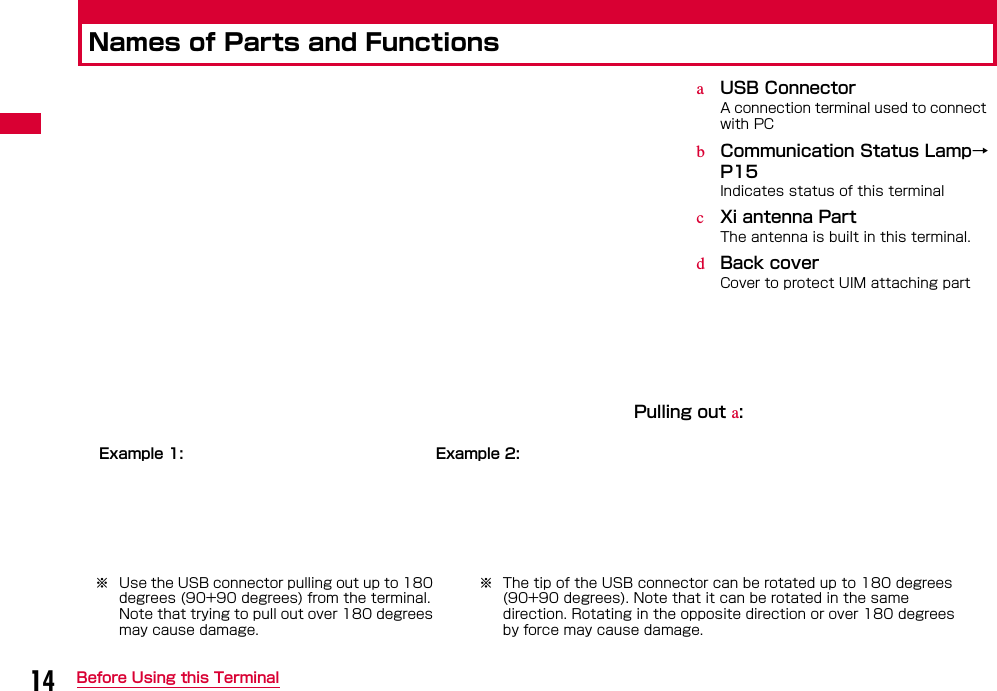

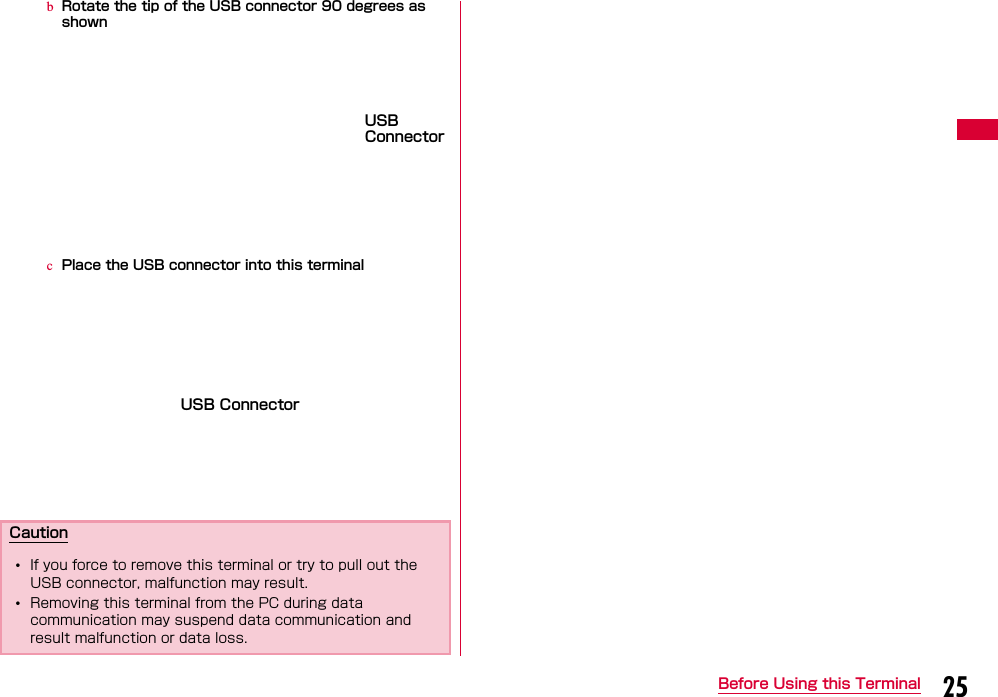
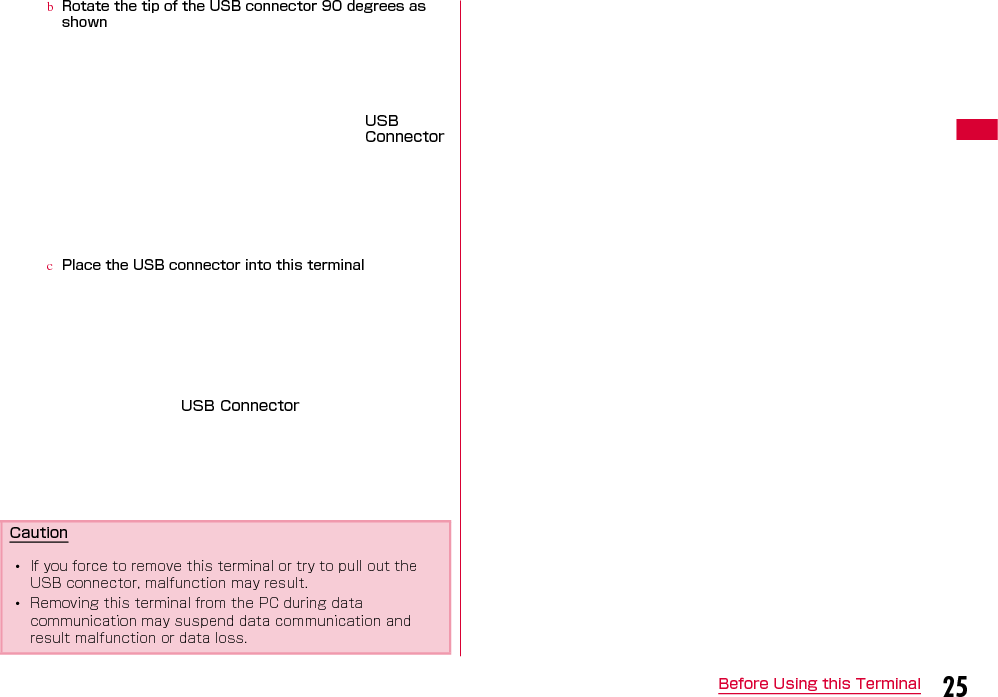
![17Before Using this TerminalcFit the back cover to the ditch of this terminal at approximately 1mm. While pushing in the direction of a, slide the back cover in the direction of b until it clicksSecurity CodeYou can set PIN1 code (Personal Identification Number) for UIM. The default setting for the PIN1 code is [0000]. The PIN1 code is a 4 to 8-digit security code to be entered every time this terminal is turned on for user verification to prevent any unauthorized use by others.■ Changing PIN1 CodeYou can change the PIN1 code to any number. To prevent unauthorized use by third parties, change it to your own number. If you improperly enter the PIN1 code 3 times in a row, PIN1 code is locked automatically (PIN Lock), so be sure to keep a separate note of the numbers you set.•"Changing PIN1 Code" (→P57)■ Unblocking PIN CodeThe unblocking PIN code is the number in 8 digits used to unblock the PIN1 code, which cannot be changed by yourself. If you improperly enter the unblocking PIN code for 10 times in a row, the UIM is locked automatically.Note•Do not lose the removed UIM.•Make sure to both sides of the UIM.•Be careful not to scratch the UIM IC tip.•Inserting a UIM in the reversed direction may cause malfunction.•Inserting or removing the UIM with an excessive force may cause damage to your UIM.•Do not remove the UIM while this terminal is inserted to a PC, it may cause damage to your UIM.•Do not transfer the UIM to others.•Do not get the UIM scratched or transformed. The data stored in UIM will disappear or be changed.Approx.1mmICIf your UIM is set to require a PIN1 code, data communication cannot be performed until the PIN1 code is entered. Use UIM after verifying the PIN1 code, or set (→P57) UIM not to verify the PIN1 code in advance.](https://usermanual.wiki/LG-Electronics-USA/L03F/User-Guide-2211164-Page-19.png)
![19Before Using this TerminalAvailable CommunicationsXi Data Communication/FOMA Packet CommunicationFees for this communication method are based on the amount of exchanged data. You can perform data communication at a speed of up to 75Mbps for receiving data and up to 25Mbps for sending data by using a connection that allows Xi data communication or FOMA packet communication such as "mopera U", one of DOCOMO's Internet connection services.※ Communication speed is theoretical values when sending and receiving data which does not show the actual ones. The actual communication speed depends on communication environment and network congestion.•Depending on bandwidth, communication speed for receiving is theoretically 100/100/75/37.5Mbps (with bandwidth of [20/15/10/5MHz]), and for sending is 50/37.5/25/12.5Mbps (with bandwidth of [20/15/10/5MHz]).•For the FOMA HIGH-SPEED areas outside Xi area, the maximum speed for receiving data is 14Mbps and for sending is 5.7Mbps (best effort).•Sending and receiving data become 384kbps in FOMA area out of Xi area and FOMA HIGH-SPEED area.•The communication speed varies depending on the access point and radio wave status.•The communication speed varies depending on the overseas carrier or network when using overseas.Note•Communication fees become high when performing communications with large amount of data such as browsing websites with many graphics or downloading data.•Data communication may take more time or become difficult to connect depending on the network congestion. For customers who use a large amount of data communication (Approximate 1Gbytes data or more is used within the last three days including the current day), it may have difficulties in sending and receiving data on time. Also, data communication may get disconnected in the following cases such as when a large amount of data communication occurs at a time or within a certain period of time, when being connected for a long time, or when connecting several times in a row within a certain period of time.•This terminal does not support 64K data communication.•This terminal does not support Remote Wakeup.•This terminal does not support FAX communication.](https://usermanual.wiki/LG-Electronics-USA/L03F/User-Guide-2211164-Page-21.png)
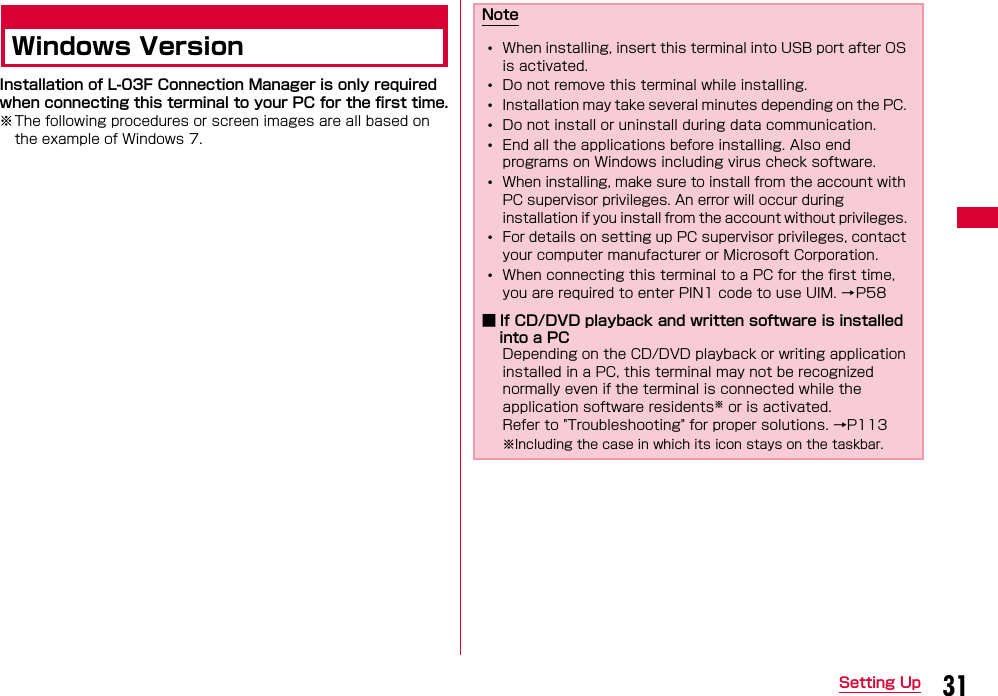
![32 Setting UpPreparation before Using L-03FSetting Zero Installation (Auto)aTurn on a PC and activate OSbConnect this terminal with the PCThe device driver which connects this terminal to a PC is automatically installed by zero installation. When the installation finishes, the message, "Device driver software installed successfully." appears, then L-03F Connection Manager setup screen appears."AutoPlay" screen will be displayed depending on settings of the PC. If the screen is displayed, check "Always do this for software and games:" and select "Run L03FLauncher.exe".npcClick [Yes] on "User Account Control" screen■For Windows Vista•Click [Continue] on "User Account Control" screen.■For Windows XP•"User Account Control" screen is not displayed. Follow the next step.dSelect "English (United States)" in the "Choose Setup Language" screen, then click [Next]](https://usermanual.wiki/LG-Electronics-USA/L03F/User-Guide-2211164-Page-34.png)
![33Setting UpeClick [Next]fConfirm the contents of "License Agreement". When agree with the contents, select "I accept the terms of the license agreement" and click [Next]gSelect "Standard installation (recommended)" on the "Select the installation method" screen, then click [Next]Installation starts. Then installation of L-03F communication configuration file (Driver) continues.※It may take time to move to the next procedure depending on your PC.■Custom installationaOn the "Select the installation method" screen, select"Custom installation" and click [Next]bSelect "Install all of L-03F Connection Manager, L-03F APN Tool, and L-03F USB Driver. (Recommended)" or "Install L-03F USB driver only", then click [Next]](https://usermanual.wiki/LG-Electronics-USA/L03F/User-Guide-2211164-Page-35.png)
![34 Setting Up•To install all, also set "Profile setting" "Automatic connection setting".•If you install L-03F USB driver only and make packet communications, connect in the manner in Mobile Broadband (→P65) or Configuring Network Manually (→P69).•For Windows XP, the "Setting optimized communication" screen appears. When the setting is made, click [Next] to proceed the next step.hConfirm that this terminal is recognized by the PCOn the right side of the taskbar, "Installing device driver software" appears, and this terminal is recognized automatically.※To recognize this terminal automatically, "L-03F is not recognized" may appear on L-03F Connection Manager temporarily. After a while, this terminal will be recognized.If this terminal is recognized properly, "Your device is ready to use" will appear.■For Windows Vista• On the right side of the taskbar, a message of "Installing device driver software" appears, this terminal will be recognized automatically.• If this terminal is recognized normally, a message of "Your devices are ready to use" will appear.](https://usermanual.wiki/LG-Electronics-USA/L03F/User-Guide-2211164-Page-36.png)
![35Setting Up■For Windows XP• On the right side of the taskbar, "Found New Hardware" appears, and this terminal is recognized automatically.• If this terminal is recognized properly, "Your new hardware is installed and ready to use." will appear.iClick [Finish]•If you optimize communication settings (W-TCP setting) under Windows XP, click [Finish] on the setup wizard screen to restart.■Installing Flash PlayerIf Flash Player is installed into your PC, screen shown in "Confirming L-03F Connection Manager" (→P36) appears and setup finishes.If not, a message appears. Install Flash Player by the following procedures.aClick [OK]bRead the content of "License Agreement", check "I have read and agree to the terms of the Flash Player License Agreement." and click [INSTALL]](https://usermanual.wiki/LG-Electronics-USA/L03F/User-Guide-2211164-Page-37.png)
![36 Setting UpcClick [DONE]Installation finishes.Confirming after InstallationConfirming L-03F Connection ManageraDouble click L-03F Connection Manager icon (blue) displayed on the desktopWhen the following screen is displayed, the confirmation of installation finishes.Note•Alternatively, remove this terminal from the PC, and then reconnect to check.•For Windows 7, L-03F Connection Manager cannot be activated due to the setting of mobile broadband auto connection. Set to "Never connect automatically". →P65](https://usermanual.wiki/LG-Electronics-USA/L03F/User-Guide-2211164-Page-38.png)
![37Setting UpConfirming the Installed L-03F Communication Configuration File (Drivers)Confirm whether L-03F Communication Configuration File (Drivers) is set in a PC.aClick (Start) "Control Panel" "System and Security"■For Windows Vista•Click (Start) "Control Panel" "System and Maintenance".■For Windows XP•Click [start] "Control Panel" "Performance and Maintenance" "System".bClick "Device Manager"■For Windows Vista•Click "Device Manager" [Continue].■For Windows XP•Click "Hardware" tab [Device Manager].cClick each device display to confirm the driver name installed•Confirm whether the driver name is displayed below "Network adapters", "Ports (COM & LPT)", "Modems", "Universal Serial Bus controllers".](https://usermanual.wiki/LG-Electronics-USA/L03F/User-Guide-2211164-Page-39.png)
![39Setting UpUninstalling L-03F Connection Manager (including a driver)•Before uninstalling, remove this terminal from the PC.•When uninstalling, make sure to install from the account with PC supervisor privileges. aClick (Start) "All Programs" "L-03F Connection Manager" "Uninstall L-03F Connection Manager"■For Windows Vista•Click (Start) "All Programs" "L-03F Connection Manager" "Uninstall L-03F Connection Manager".■For Windows XP•Click [start] "All Programs" "L-03F Connection Manager" "Uninstall L-03F Connection Manager".bClick [Yes] on "User Account Control" screenClick [No] to stop uninstalling.■For Windows Vista•Click [Continue] on "User Account Control" screen.■For Windows XP•"User Account Control" screen is not displayed, follow the next procedure.cClick [Yes] on the confirmation of deleting application screendClick [Yes] on the "Confirm delete userdata" screen to delete user dataClick [No] if you do not want to delete user data.•Even if you click [Yes], APN information is not deleted.](https://usermanual.wiki/LG-Electronics-USA/L03F/User-Guide-2211164-Page-41.png)
![40 Setting Up■For Windows XP•Mark "Clear communication settings (W-TCP setting) (Recommended)" on the "Delete communication settings" screen, then click [Next] to display the screen in Step 4.eClick [Finish]Uninstallation finishes.•If communication settings (W-TCP setting) is deleted under Windows XP, restarting is required.Installing L-03F USB driver onlya (Start) Click "Control Panel" "Programs" "Uninstall a program" "docomo L03F", then click "Uninstall"■For Windows XP•[start] Click "Control Panel" "Add or Remove Programs" "docomo L03F", then click [Remove].bClick [Yes] on the confirmation of deleting application screencClick [Finish]■For Windows XP•Click [Finish] on the setup wizard screen. If communication setting (W-TCP setting) is unmarked, restarting is required.•If the "Delete communication settings" screen appears, select "Clear communication settings (W-TCP setting) (recommended)" then click [Next].](https://usermanual.wiki/LG-Electronics-USA/L03F/User-Guide-2211164-Page-42.png)
![42 Setting UpdDouble click "Installer.mpkg"eClick [Continue]fClick [Continue]gRead "Software License Agreement" and click "Agree" if you agree to continue installation](https://usermanual.wiki/LG-Electronics-USA/L03F/User-Guide-2211164-Page-44.png)
![43Setting UphClick [Install]■If a selection screen for installation destination appears•Select an installation destination, click [Continue] [Install].■To change installation destination•Click [Change Install Location...], then specify installation destination.iEnter administrator password Click [OK]jClick [Continue Installation]kSelect "Standard installation (recommended)", click [Continue]](https://usermanual.wiki/LG-Electronics-USA/L03F/User-Guide-2211164-Page-45.png)
![44 Setting Up■Custom installationaSelect "Custom installation", click [Continue]bMake settings on the "Profile setting" screen, then click [Continue]cSelect "ON (recommended)" or "OFF" on the "Automatic connection setting" screen, then click [Continue]lClick [Restart]The PC restarts. Installation finishes.Remove this terminal from the PC temporarily.](https://usermanual.wiki/LG-Electronics-USA/L03F/User-Guide-2211164-Page-46.png)
![45Setting UpConfirming after InstallationConfirming L-03F Connection ManageraConnect this terminal with the PCbDrag the CD-ROM icon displayed on the desktop into trash binThis terminal will be recognized as a modem.cClick [Network Preferences...]■For Mac OS X 10.7.2•Proceed to Step 6.dSelect "docomo L03F" and click [Apply]eClose "Network" screen](https://usermanual.wiki/LG-Electronics-USA/L03F/User-Guide-2211164-Page-47.png)
![46 Setting UpfDouble click to launch Finder "Applications" "L-03F_Connection_Manager"When the following screen is displayed, the confirmation of installation finishes.■Installing Flash PlayerA message appears when activating the L-03F Connection Manager for the first time if Flash Player is not installed in your PC. Install Flash Player following the procedures below.aDouble click to launch Finder "Applications" "L-03F_Connection_Manager"bClick [OK]cConfirm the content of the License Agreement, check "I have read and agree to the terms of the Flash Player License Agreement." and click [INSTALL]](https://usermanual.wiki/LG-Electronics-USA/L03F/User-Guide-2211164-Page-48.png)
![47Setting UpdEnter administrator password and click [OK]eClick [DONE]Installation finishes.Uninstalling L-03F Connection Manager (including a driver)•When uninstalling, make sure to log in with PC supervisor privileges.aConnect to a PCCD-ROM icon is displayed on the desktop.bDouble click the CD-ROM iconcDouble click "Uninstaller"dClick [Uninstall]Note•When communicating data via L-03F Connection Manager, settings of L-03F Connection Manager is required.→P54](https://usermanual.wiki/LG-Electronics-USA/L03F/User-Guide-2211164-Page-49.png)
![48 Setting UpeEnter administrator password Click [OK]fClick [Restart]gRemove this terminal from the PCUninstallation finishes.](https://usermanual.wiki/LG-Electronics-USA/L03F/User-Guide-2211164-Page-50.png)
![53L-03F Connection ManagerWhen Automatic connection setting is OFF•Set auto connection to OFF beforehand.aConnect this terminal with a PC•For Windows, L-03F Connection Manager is activated automatically.For Mac, activate L-03F Connection Manager manually.bClick in Home screen•"Connected" appears for Connection status.Note •The default setting of APN is "mopera.net". Set Profile setting to change APN. →P55•A message of "Failed to connect. Do you want to try again?" appears when connection fails. Check APN and connect again.•If the PC goes to sleep or turns off while this terminal is connected via packet communication, connection may not be established after resume. Disconnect packet communication and remove the terminal from the PC before the PC goes to sleep or turns off.•Clicking with Automatic connection setting ON does not reconnect automatically. To execute packet communication again, click .•For Mac OS, when L-03F communication device is not set, a message "The "docomo L03F" network interface has not been set up. To set up this interface, use Network Preferences." appears. Click [Network Preferences...] on the screen. When "Network" screen appears, check "docomo L03F" is displayed and click [Apply]. Clicking [Cancel] in the message box exits L-03F Connection Manager. Activate L-03F Connection Manager again.•"User name", "Password", "Authentication method" for the Profile setting (→P55) and Automatic connection setting (→P59) are managed by user account.](https://usermanual.wiki/LG-Electronics-USA/L03F/User-Guide-2211164-Page-55.png)
![55L-03F Connection ManagerConfirming Packet Usage•Check the amount of sending and receiving data.aClick "Used amount" in Setting screenPacket usage is displayed.Total use amount: Accumulated total data usageUse amount of this month:Usage from 1st of this month to currentPrevious use amount:Data usage of current session:Reset "Total use amount" and "Use amount of this month", respectively.:Click to reset all the amount.Setting Profile•Set basic items for packet communication.aClick "Profile setting" in Setting screenbPerform the following operationsAccess point name (APN): APN for packet communicationUser name: ID supplied by your providerPassword: Supplied by your providerAuthentication method: To enable to use this terminal:Click to change settings.: Click to return to default setting.cClick [Set]A message to confirm is displayed.dClick [Yes]eClick [OK]Note•The data usage displayed on the screen may differ from the actual volume of packet communication.](https://usermanual.wiki/LG-Electronics-USA/L03F/User-Guide-2211164-Page-57.png)
![56 L-03F Connection ManagerSetting a UIM•"Lock PIN1", "Unlock PIN1" and "Change PIN1 code" are available.aClick "DOCOMO UIM card setting" in Setting screenDOCOMO UIM card setting screen is displayed.Locking PIN1•Set security to UIM.aSelect "Lock PIN1" in DOCOMO UIM card setting screenEntering PIN1 code screen is displayed.bEnter the PIN1 code set in UIMcClick [OK]dClick [OK]Note•"Connection type" is set according to the IPv4, IPv6 IP address setting by network settings in the OS.•Click [Set] to renew the settings. Always remember to click when changing settings.•If ID or password is wrong, Internet connection cannot be made.•Set the content of each profile according to the values specified by each provider or network administrator. Connection does not correctly perform with wrong settings.•You can connect to "mopera U" even if "User name" and "Password" are in blank.Note•If you lock PIN1 then remove and insert this terminal, PIN1 code entry screen appears when L-03F Connection Manager restarts. Enter a correct PIN1 code to use this terminal.](https://usermanual.wiki/LG-Electronics-USA/L03F/User-Guide-2211164-Page-58.png)
![57L-03F Connection ManagerUnlocking PIN1aSelect "Unlock PIN1" in DOCOMO UIM card setting screenEntering PIN1 code screen is displayed.bEnter the PIN1 code set in UIM cClick [OK]dClick [OK]Changing PIN1 Code•Set the password required when unlocking or locking PIN1.•Changing PIN1 code is only available when PIN1 is locked.aClick [Change PIN1 code] in the DOCOMO UIM card setting screenbEnter the current PIN1 code set in UIM in "PIN1 code" fieldcEnter new PIN1 code in "New PIN1 code"Enter a 4- to 8- digit PIN1 code.dIn "Confirm new PIN1 code", enter the PIN1 code that has been entered in "New PIN1 code" code againeClick [Set]fClick [OK]Note•If PIN1 is unlocked, you can use UIM information from this terminal without verifying PIN1 code.](https://usermanual.wiki/LG-Electronics-USA/L03F/User-Guide-2211164-Page-59.png)
![58 L-03F Connection ManagerEntering PIN1 Code•When L-03F Connection Manager is started after setting PIN1 lock or it is restarted to reset this terminal, PIN1 code input screen will appear.aEnter PIN1 codeEnter the 4- to 8- digit PIN1 code.bClick [OK]cConfirm the result after entering PIN1 codeEx.1: When PIN1 code is entered correctlyHome screen of L-03F Connection Manager is displayed.Ex.2: When PIN1 code is entered incorrectlyEx.3: When PIN1 code is entered incorrectly for 3 times in a row.•If you improperly enter the PIN1 code 3 times in a row, the unblocking PIN code entry screen will be displayed.■Unblocking PIN code settingaEnter the unblocking PIN code set your UIM to "PIN unlocking code"bEnter a new PIN1 code in "New PIN1 code"cIn "Confirm new PIN1 code", enter the PIN1 code that has been entered in "New PIN1 code" code againdClick [Set]](https://usermanual.wiki/LG-Electronics-USA/L03F/User-Guide-2211164-Page-60.png)
![59L-03F Connection ManagerMaking Automatic connection setting•Set whether to automatically connect to the Internet when L-03F Connection Manager is activated.•Automatic connection setting is not available during international roaming.aClick "Automatic connection setting" in Setting screenbSelect "ON (Recommended)" or "OFF"cClick [Set]dClick [OK]Setting language•Select Japanese or English as a display language for L-03F Connection Manager.aClick "Language setting" in Setting screenbSelect "English" or "Japanese"cClick [Set]dClick [OK]Caution•If you select Japanese on an OS other than Japanese version, specified settings or installations may be required. For details on settings, contact your computer manufacturer or Microsoft Corporation.](https://usermanual.wiki/LG-Electronics-USA/L03F/User-Guide-2211164-Page-61.png)
![60 L-03F Connection ManagerSetting to check the latest software•Set whether to automatically check the latest software each time L-03F Connection Manager is activated.aClick "Check latest SW setting" in Setting screenbSelect "ON" or "OFF"ON: Check the latest software each time L-03F Connection Manager is activated.OFF:Check the latest software by clicking on the information screen of L-03F Connection Manager.cClick [Set]dClick [OK]Checking the version informationClick on the title bar in the L-03F Connection Manager screen to display information about L-03F Connection Manager software.:Click to check updates.Note•For information on how to update the software, see "Updating Software". →P118•Software update is not available on Mac OS. Update software on Windows.](https://usermanual.wiki/LG-Electronics-USA/L03F/User-Guide-2211164-Page-62.png)

![65Mobile Broadband■ Property screen for setting each itemaSetting tabs on Property screenSubscription:Display provider details, own number, etc. Profile:Set APN or auto connection. (→P66)Roaming※:Select a network to use while roaming.Security:When connecting mobile broadband, set PIN authentication. (→P67)※ Display only during international roaming.Connecting through Mobile BroadbandaConnect this terminal with a PC■When connecting for the first timeaClick ( if network connection is not made) or in the task tray displayed on the bottom rightbRight click "DOCOMO" and click "Connect"cSet each item Click "Continue"•Enter APN in "APN" field.•Enter the settings specified by your provider or network administrator in "User name" and "Password".•If connect to "mopera U", connection is available with"User name" and "Password" blank.dSet auto connection Click "Continue"•Select from "Connect automatically except when roaming", "Always connect automatically" or "Never connect automatically" in pull-down menu.bFollow the auto connection setting on profile tab to connect■Connect automatically except when roaming•Connect automatically while using in Japan. While roaming, operations are the same as "■ Never connect automatically".■Always connect automatically•Connect automatically after connecting with this terminal.■ Never connect automaticallyaClick ( if network connection is not made) or in the task tray displayed on the bottom rightbSelect "DOCOMO" Click [Connect]](https://usermanual.wiki/LG-Electronics-USA/L03F/User-Guide-2211164-Page-67.png)
![66 Mobile BroadbandDisconnecting Mobile BroadbandaClick or in the task tray on the bottom rightbSelect "DOCOMO" Click [Disconnect]Changing APN SettingsaConnect this terminal with a PCbClick ( if network connection is not made) or in the task tray on the bottom rightcRight click "DOCOMO" and click "Properties"dClick "Profile" tab Set each item•Enter APN in "APN" field. •Enter the specified settings by provider or network administrator in "User name", "Password" field.•If connect to "mopera U", connection is available even if "User name" and "Password" are in blank.•In "Autoconnect" field, select from "Connect automatically except when roaming", "Always connect automatically" and "Never connect automatically".•If a PC accesses Internet via LAN, check the check box of "Autoconnect only if no alternate Internet connection is available" not to connect automatically on Windows.eClick [OK]Note•A screen to confirm PIN1 code appears according to the setting. Enter PIN1 code after the screen appears.•When mobile broadband is used to connect data communication, L-03F Connection Manager and dial-up connection are not available."Disconnect" the mobile broadband or set auto connection setting to "Never connect automatically" to enable to use L-03F Connection Manager or dial-up connection.•If select "Always connect automatically", the amount of packet transmission may go huge due to the long time connection. Note that hefty fee may result.•Note that communication fees may become high when "Always connect automatically" is set during overseas use.](https://usermanual.wiki/LG-Electronics-USA/L03F/User-Guide-2211164-Page-68.png)
![67Mobile BroadbandSetting UIM•[Enable PIN...], [Disable PIN...] and [Change PIN...] can be performed on UIM.aConnect this terminal with a PCbClick ( if network connection is not made) or in the task tray on the bottom rightcRight click "DOCOMO" and click "Properties"dClick "Security" tab Set each item•Set PIN1 lock in [Enable PIN...].•Unlock PIN1 in [Disable PIN...].•Change PIN1 in [Change PIN...].Note•If connect mobile broadband under PIN validation, PIN1 code entry screen is displayed. In this case, this terminal cannot normally function with wrong PIN1 code.•If entering PIN1 code is failed 3 times in a row, PIN code will be locked. In that case, enter unblocking PIN code.•If entering unblocking PIN code is failed 10 times in a row, UIM will be locked automatically. In that case, contact a docomo Shop.•If set to PIN invalidation, mobile broadband connection is available without confirming PIN1 code.](https://usermanual.wiki/LG-Electronics-USA/L03F/User-Guide-2211164-Page-69.png)
![70 Configuring Network ManuallyWindows VersionSetting APN Using L-03F APN ToolSet the settings required when connecting dial up manually through L-03F APN Tool.Set the access point (APN) in packet communication of dial-up connection. Up to 10 APN can be set up and they are managed with cid's.•While L-03F Connection Manager is activated, L-03F APN Tool cannot be activated. •The registration number (cid) 1 is pre-installed to mopera.net. Use cid2 to cid10 to set another APN.•For APNs other than "mopera U", contact your ISP or network administrator.aConnect this terminal with a PCbDouble click L-03F APN Tool icon (purple) on the desktopL-03F APN Tool is launched.cSelect "CID No." field to set Click [Add/Edit]■Deleting APNaSelect "CID No." field to deletebClick [Remove]cClick [Yes]dClick [Save]eClick [OK]■Initializing APNaClick [APN Reset]bClick [Yes]cClick [Save]dClick [OK]](https://usermanual.wiki/LG-Electronics-USA/L03F/User-Guide-2211164-Page-72.png)
![71Configuring Network ManuallydEnter the APN in "APN" field Click [Set]eClick [Save]Confirmation screen appears.fClick [OK]The setting of APN finishes.Setting APN Without Using L-03F APN ToolDescribe how to set an APN by using "Hyper Terminal" attached on standard Windows XP.•Windows 7 and Vista do not support "Hyper Terminal". Setting with software compatible with each OS is required. For setting instructions, refer to the instructions for each OS.aConnect this terminal with a PCbClick [start] "All Programs" "Accessories" "Communications" "Hyper Terminal"Hyper Terminal starts.cEnter a connection name in "Name" field Click [OK]dEnter a number does not exist (like "0") in "Phone number" field Check that "docomo L03F Modem Driver" is displayed in "Connect using" Click [OK]•If two or more modem names are displayed in the "Connect using" field, check this terminal modem name and select a proper one. (→P38)](https://usermanual.wiki/LG-Electronics-USA/L03F/User-Guide-2211164-Page-73.png)
![72 Configuring Network ManuallyeClick [Cancel] on connection screenThe Hyper Terminal screen opens.fEnter the APN in the following format Press Enter AT+CGDCONT=<cid>,"<PDP type>","<APN>"Enter the following information in the corresponding <cid>, <PDP type> and <APN> sections.If "OK" appears after you enter the information, the APN has been setup.•If the entered characters do not appear, enter ATE1 .■To reset the specified cid APN settingsEnter AT+CGDCONT=<cid>■To view the registered APNEnter AT+CGDCONT?gConfirm if "OK" is displayedhClick "File" "Exit"iClick [Yes] on confirming disconnection screen Click [No] on the confirming to save screenHyper Terminal quits, and the settings of the APN complete.cid : Enter any number from 2 to 10.※ Keep in mind that the old setting information will be overwritten if you select a cid number which has been set.PDP type : Enter a connection method. Enter IP enclosed in quotation marks " ".APN : Enter an (APN) enclose it in quotation marks " ".Note•The APN information is saved in this terminal. If you connect a different terminal, save the APN information again.•If you want to use the APN information registered on the PC, register the same APN in the same cid of this terminal.•When setting connection through PDP type, enter the specified content by each provider or network administrator.](https://usermanual.wiki/LG-Electronics-USA/L03F/User-Guide-2211164-Page-74.png)
![73Configuring Network ManuallyConfiguring Dial-up Network ManuallySet up the dial-up network on the PC.•For setting up a connection to other than "mopera U", contact your ISP or network administrator.Example: Connecting to the DOCOMO Internet connection service "mopera U", which is registered to <cid>=1For Windows 7aClick (Start) "Control Panel" "Network and Internet" "Network and Sharing Center"bClick "Set up a new connection or network"cSelect "Set up a dial-up connection" Click [Next]](https://usermanual.wiki/LG-Electronics-USA/L03F/User-Guide-2211164-Page-75.png)
![74 Configuring Network ManuallydWhen the modem selection screen appears, click "docomo L03F Modem Driver"The modem selection screen opens only if two or more modems are connected to a PC.eConfigure each setting, then click [Connect]•Enter *99***<cid># in the "Dial-up phone number". Enter the registration number of an APN set in <cid>. (→P70)•Enter the user name and password specified by your ISP or network administrator in the "User name" and "Password" fields.•You can leave the "User name" and "Password" fields unfilled when connecting to "mopera U".•Enter a connection name in the "Connection name" field.](https://usermanual.wiki/LG-Electronics-USA/L03F/User-Guide-2211164-Page-76.png)
![75Configuring Network ManuallyfClick "Skip" on the "Connecting to (APN)..." screenThe connection test will not be performed. Only the settingswill be checked.gClick [Close]hClick (Start) "Control Panel" "Network and Internet" "Network and Sharing Center"i"Change adapter settings" Select the created dial-up icon Right click the icon and select "Properties"jCheck the settings on the "General" tab windowIf two or more modems are connected to a PC, enable only "Modem - docomo L03F Modem Driver" in the "Connect using" field.•Disable "Use dialing rules".](https://usermanual.wiki/LG-Electronics-USA/L03F/User-Guide-2211164-Page-77.png)
![76 Configuring Network ManuallykClick "Networking" tab Configure each settingThe settings for "QoS Packet Scheduler" in "This connection uses the following items" field should follow your ISP or network administrator. Do not change the other items.•When the IP and DNS information settings are requested by your ISP, etc., select "Internet Protocol Version 6 (TCP/IPv6)" or "Internet Protocol Version 4 (TCP/IPv4)", then click "Properties" to make the settings. For setting details, contact your ISP or network administrator.lClick the "Options" tab Click [PPP Settings...]mRemove check marks from all items Click [OK]nOn the "Options" tab window, click [OK]](https://usermanual.wiki/LG-Electronics-USA/L03F/User-Guide-2211164-Page-78.png)
![77Configuring Network ManuallyFor Windows VistaaClick (Start) "Connect to"bClick "Set up a connection or network"cSelect "Set up a dial-up connection" Click [Next]](https://usermanual.wiki/LG-Electronics-USA/L03F/User-Guide-2211164-Page-79.png)
![78 Configuring Network ManuallydWhen the modem selection screen appears, click "docomo L03F Modem Driver"The modem selection screen opens only if two or more modems are connected to a PC.eConfigure each setting, then click [Connect]•Enter *99***<cid># in the "Dial-up phone number". Enter the registration number of an APN set in <cid>. (→P70)•Enter the user name and password specified by your ISP or network administrator in the "User name" and "Password" fields.•You can leave the user name and password fields unfilled when connecting to "mopera U".•Enter a connection name in the "Connection name" field.](https://usermanual.wiki/LG-Electronics-USA/L03F/User-Guide-2211164-Page-80.png)
![79Configuring Network ManuallyfClick [Skip] on the "Connecting to (APN)..." screen The connection test will not be performed. Only the settings will be checked.•If you do not click [Skip], the connection to the Internet will be established.gClick "Set up the connection anyway" [Close]hClick (Start) "Connect to"iSelect the created dial-up connection icon Right click "Properties"](https://usermanual.wiki/LG-Electronics-USA/L03F/User-Guide-2211164-Page-81.png)
![81Configuring Network ManuallylClick the "Options" tab Click [PPP Settings...]mRemove check marks in all items Click [OK]nOn the "Options" tab window, click [OK]For Windows XPaClick [start] "All Programs" "Accessories" "Communications" "New Connection Wizard"bOn the "New Connection Wizard" screen, click [Next]](https://usermanual.wiki/LG-Electronics-USA/L03F/User-Guide-2211164-Page-83.png)
![82 Configuring Network ManuallycSelect "Connect to the Internet" Click [Next]dSelect "Set up my connection manually" Click [Next]eSelect "Connect using a dial-up modem" Click [Next]fIf "Select a Device" screen appears, check in "Modem - docomo L03F Modem Driver" check box Click [Next]The "Select a Device" screen appears only if two or more modems are connected to a PC.](https://usermanual.wiki/LG-Electronics-USA/L03F/User-Guide-2211164-Page-84.png)
![83Configuring Network ManuallygEnter a name in the "ISP Name" field Click [Next]hEnter the APN number in the "Phone number" field Click [Next]•Enter "*99***<cid>#". Enter the registered number of APN in <cid>. (→P70)iSelect the connection usage range Click [Next]Select a user.•Depending on the PC settings, this screen may not appear.jFill in the "User name", "Password", and "Confirm password" fields Click [Next]Enter the information provided by your ISP or network administrator.•Enter "User name" and "Password" correctly according to the instruction from the provider. Pay attention to the capital characters.•For "mopera U", connection is available with "User name" and "Password" blank.](https://usermanual.wiki/LG-Electronics-USA/L03F/User-Guide-2211164-Page-85.png)
![84 Configuring Network ManuallykClick [Finish]lClick [start] "All Programs" "Accessories" "Communications" "Network Connections"mSelect the created dial-up connection icon Right click Click "Properties"](https://usermanual.wiki/LG-Electronics-USA/L03F/User-Guide-2211164-Page-86.png)
![86 Configuring Network ManuallypClick [Settings]qRemove check marks from all items Click [OK]rClick [OK] on the "Networking" tab windowCommunicating (Connecting by Dial-up)This section describes steps to start and terminate communication without using L-03F Connection Manager or Mobile Broadband.•Check whether this terminal and the PC are connected properly before starting communication. (→P20)•When performing communication, connect this terminal you used to configure the settings. If a different terminal is connected, L-03F Connection Manager (including a drivers) may need to be reinstalled.•When set PIN1 lock using L-03F Connection Manager, start after unlocking PIN1.aClick (Start) "Control Panel" "Network and Internet" "Network and Sharing Center" "Change adapter settings" Double click the set APN icon ■For Windows Vista•Click (Start) "Connect to" Select the set APN Click [Connect].■For Windows XP•Click [start] "All Programs" "Accessories" "Communications" "Network connections" Double click the set APN icon.](https://usermanual.wiki/LG-Electronics-USA/L03F/User-Guide-2211164-Page-88.png)
![87Configuring Network ManuallybEnter "User name" and "Password" Click [Dial]The APN will be connected.•To connect to "mopera U", you can leave the " User name" and "Password" fields unfilled and click [Dial]. If another ISP or dialup connection is selected, fill in the "User name" and "Password" fields and click [Dial].•You can save the user name and password or just the password to skip entering them next time.•Depending on the operating system, a connection completion screen may appear when the dial-up connection is established. However, the connection completion screen does not appear if you previously set the completion message not to appear.Disconnecting CommunicationExiting the Internet browser may not terminate the connection. Perform the following steps to terminate the connection securely.aClick (dial-up icon) on the task tray of a PCA screen indicating the connection status appears.bSelect an APN Click [Disconnect]Communication is disconnected.■For Windows Vista•Click "Connect or disconnect..." "Disconnect".■For Window XP•Click [Disconnect].Note•The communication speed shown on the PC screen may be different from the actual communication speed.](https://usermanual.wiki/LG-Electronics-USA/L03F/User-Guide-2211164-Page-89.png)
![90 Overseas UseInternational Roaming Service (WORLD WING)International roaming service enables you to use this terminal domestically in a service area of international carrier associated with DOCOMO.■ Available areaThis terminal can be used in 3G network andGPRS network service areas. Also, it can be used in the countries and areas that support 3G850MHz. Check available areas. •Before using this terminal overseas, see the following items.- "Mobile Phone User's Guide [International Services]"- DOCOMO International Services website•For areas out of Xi area such as overseas, connect to 3G or GPRS network.Services Available OverseasService DescriptionData Communication Available for data communication using packets communication.Note•For details on available communication services while using international roaming, refer to Mobile Phone User's Guide [International Services] or visit DOCOMO "International Service Website".•L-03F does not support voice call or video telephony features.](https://usermanual.wiki/LG-Electronics-USA/L03F/User-Guide-2211164-Page-92.png)

![93Overseas UsecSpecify a search method from "Network search method"■[Automatic search]Network can be searched automatically.■[Manual search]※•Connect to the listed networks manually.•How to manually configure network- Select [Manual search].- Click [Yes].- The available network list will be displayed after searching.- Select one from the available networks.- Click .- Click [Yes].※ If you manually select a network overseas, reset to "Automatic search" after coming back to Japan.dSpecify whether to show or hide the network information in "Operator name display"■[Show]•The name of the network receiving current service is displayed on the screen.■[Hide]•The name of the network receiving current service is not displayed on the screen.eClick the applicable •The information entered will not be set without clicking the applicable .fClick [Yes]gClick [Close]( ○ ): Available, (×): Unavailable are shown afterthe detected network operators name.Note•Connecting to Internet may not be able to operate properly when network settings are changed manually.](https://usermanual.wiki/LG-Electronics-USA/L03F/User-Guide-2211164-Page-95.png)

![97Appendix/TroubleshootingAT Command ListThe following AT commands can be used on the "L-03F" modem port.•[&F]:A command to initialize settings used as AT&F command.•[?][=?]:The current settings appear when adding "?" at the end of the command, and the effective range of the current settings appears when adding "=?" at the end of the command. Command Overview Parameters/Description Examples of Commands AT OK is displayed. - ATOK AT&C<n> [&F]Select the operating conditions of the circuit CD signal for TE.n=0: Always keeps CD signal ONn=1 (default): CD changes depending on the other party's modem status.AT&C1 OK AT&D<n> [&F]Select the operation when receiving circuit ER signal from TE.n=0 : Same as n=2n=1 : Same as n=2n=2 (default) : If ER signal is changed from ON to OFF, line will be disconnected and become offline command.AT&D1OKAT&F<n> Reset the settings on this terminal with the nonvolatile memory contents. If performed during a communication, the line is disconnected.Only n=0 can be set (Skippable) AT&FOKAT+CEER Set up error report is displayed. - AT+CEER +CEER: 36 OK](https://usermanual.wiki/LG-Electronics-USA/L03F/User-Guide-2211164-Page-99.png)
![98 Appendix/TroubleshootingAT+CEREG=<n>[&F][?] [=?]Set if notify EPS network registration.<n>: Set if send unsolicited result coden=0: Do not send unsolicited result code (default)n=1: Send network registration status as unsolicited result coden=2: Send network registration status and location information as unsolicited result code<stat>:Packet data exchange network registration statusstat=0:Outside area and not searchingstat=1: Within area (HOME)stat=2: Outside area and Attach or searchingstat=3: Registration is refusedstat=4: Unclear (other)stat=5: Within area (while roaming)<lac>:Location area codeThis parameter is string parameter. It will be surrounded by "". Notation as a hex of 2byte.<ci>:Cell IDThis parameter is string parameter. It will be surrounded by "". Notation as a hex of 4byte.<AcT>: Within areaAcT=0:GSMAcT=2:3G (FOMA)AcT=7:LTE (Xi)<rac>: Routing area codeThis parameter is string parameter, it will be surrounded by "". Notation as a hex of 1byte.AT+CEREG?+CEREG:2,1,"00C3","01","0000C4D1",7OKAT+CGDCONT [?] [=?] Set APN when sending Packet communication.Refer to P111 Refer to P111Command Overview Parameters/Description Examples of Commands](https://usermanual.wiki/LG-Electronics-USA/L03F/User-Guide-2211164-Page-100.png)
![99Appendix/TroubleshootingAT+CGEQMIN [?] [=?] Register criteria value for determining if QoS (Quality of Service) sent from network when PPP Packet communication is established is acceptable or not.Refer to P111 Refer to P111AT+CGEQREQ [?] [=?] Set QoS(Quality of Service) to request for the network when PPP Packet communication starts.Refer to P111 Refer to P111AT+CGMR Display IMEISV value of this terminal.- AT+CGMR 1234512345123456OK Command Overview Parameters/Description Examples of Commands](https://usermanual.wiki/LG-Electronics-USA/L03F/User-Guide-2211164-Page-101.png)
![100 Appendix/TroubleshootingAT+CGREG=<n> [&F][?] [=?] Set if notify GPRS network registration.<n>: Set if send unsolicited result coden=0:Do not send unsolicited result code (default)n=1:Send network registration status as unsolicited result coden=2:Send network registration status and location information as unsolicited result code<stat>:Packet data exchange network registration statusstat=0:Outside area and not searchingstat=1:Within area (HOME)stat=2:Outside area and Attach or searchingstat=3:Registration is refusedstat=4:Unclear (Other)stat=5:Within area (while roaming)<lac>:Location area codeThis parameter is string parameter. It will be surrounded by "". Notation as a hex of 2byte.<ci>:Cell IDThis parameter is string parameter. It will be surrounded by "". Notation as a hex of 4byte.<AcT>:Within areaAcT=0:GSMAcT=2:3G (FOMA)AcT=7:LTE (Xi)<rac>:Routing area codeThis parameter is string parameter. It will be surrounded by "". Notation as a hex of 1byte.AT+CGREG?+CGREG:2,1,"00C3","0000C4D1",2,"01"OKAT+CGSN Display the serial number of this terminal.- AT+CGSN 12345678901 2345OK Command Overview Parameters/Description Examples of Commands](https://usermanual.wiki/LG-Electronics-USA/L03F/User-Guide-2211164-Page-102.png)
![101Appendix/TroubleshootingAT+CIND[?] [=?]The signal status of this terminal is displayed. Execute "AT+CIND=?", then appears as "+CIND:<battchg>,<signal>,<service>".<battchg>battchg=0∼5 : Battery charge level* Not supportive.<signal>signal=1 : 0 or 1 bar of antenna is displayedsignal=3 : 2 bars of antenna are displayedsignal=5 : 3 bars of antenna are displayed<service>service=0 : Out of areaservice=1 : Within areaAT+CIND?+CIND:5,5,1OKAT+CIND=?+CIND:("battchg",(0-5)),("signal",(0-5)),("service",(0,1))OKAT+CLCK=<fac>,<mode>[,<passwd>][=?]Change PIN lock setting and inquire the setting items.<fac>: Lock typefac="SC" : Operation of setting UIM PIN lock<mode>: Lock controlmode=0 : Unlock PIN lockmode=1 : Set PIN lock mode=2 : Status of PIN lock<passwd>: PIN codeExecute "AT+CLCK="SC",2", then appears as "+CLCK:<state>".<state>: Lock status0 : PIN is unlocked1 : PIN is lockedAT+CLCK="SC",0,"0000"OKAT+CLCK="SC",2+CLCK:1OKCommand Overview Parameters/Description Examples of Commands](https://usermanual.wiki/LG-Electronics-USA/L03F/User-Guide-2211164-Page-103.png)
![102 Appendix/TroubleshootingAT+CMEE=<n> [&F][?] [=?] Set the error report form of this terminal.n=0: Display "ERROR". (default)n=1: Display in the form of "+CMEE ERROR: xxxx" (where xxxx are numbers)n=2: Display in the form of "+CMEE ERROR: xxxx" (where xxxx are text)※ If using ATZ or AT&F command to default, "0" is setup. Note that when connecting L-03F to power, the value of ATZ or AT&F command differs.AT+CMEE=0 OK AT+CMEE?+CMEE:0OK AT+CMEE=?+CMEE:(0-2)OKAT+ CNUM Display the own number of this terminal.Executing "AT+CNUM" displays in the form of "+CNUM: <number>, <type>".number: phone numbertype=129: Excluding the international access code+type=145: Including the international access code+AT+CNUM+CNUM:,"09012345678",129 OK Command Overview Parameters/Description Examples of Commands](https://usermanual.wiki/LG-Electronics-USA/L03F/User-Guide-2211164-Page-104.png)
![103Appendix/TroubleshootingAT+COPS=〔<mode>〔,<format>〔,<oper>〔,<AcT>〕〕〕〕[?] [=?]Select network operator and set. <mode> Parameter is supporting 0-4.<format> Parameter is only supporting 2(default).<oper> MCC+MNCFor example, if PLMN Number is 440 (MCC) 10 (MNC), <oper>="44010".<stat> Parameter is supporting the followings.stat=0:unknownstat=1:availablestat=2:currentstat=3:forbidden<AcT>: Within areaAcT=0:GSMAcT=2:3G (FOMA)AcT=7:LTE (Xi)AT+COPS=0OKAT+COPS?+COPS:0OKAT+COPS=1,2,"44010",7OKCommand Overview Parameters/Description Examples of Commands](https://usermanual.wiki/LG-Electronics-USA/L03F/User-Guide-2211164-Page-105.png)
![104 Appendix/TroubleshootingAT+CPAS [=?] Display this terminal state. Displays in the form of "+CPAS : <n>".n=0: Availablen=1: Unavailablen=2: Unclearn=3: Available and while incoming call receivingn=4: Available and communicatingAT+CPAS +CPAS:0 OK AT+CPIN="PIN"/ AT+CPIN="PUK" , "PIN"[?] Command to enter the PIN1 code or unblocking PIN code for UIM.Enter the PIN1 code for "PIN", and enter unblocking PIN code for "PUK".Executing "AT+CPIN?" displays "+CPIN: <n>".n=READY: Authenticatedn=SIM PIN: Waiting for entryn=SIM PUK: Waiting forunblocking PIN code entryn=ERROR: Locked(+CPIN:SIM PIN status)AT+CPIN="1234" OK(+CPIN:SIM PUK status)AT+CPIN="12345678", "1234"OK AT+CPWD=<fac>,<oldpwd>,<newpwd>[=?]Change password of PIN1 code. <fac>fac="SC" : Change PIN1 code of UIM<oldpwd><newpwd>means enter the current PIN code and new PIN code. Execute "AT+CPWD=?", then appears as"+CPWD:("SC",<pwdlength>)".<pwdlength> displays maximum character number of PIN.AT+CPWD="SC", "0000", "1111"OKCommand Overview Parameters/Description Examples of Commands](https://usermanual.wiki/LG-Electronics-USA/L03F/User-Guide-2211164-Page-106.png)
![105Appendix/TroubleshootingAT+CR=<mode>[&F][?] [=?]Set if display service report. <mode>0 : Do not return report (default).1 : Return report.AT+CR=0OKAT+CR?+CR:0OKAT+CREG=<n>[&F][?] [=?]Set if notify EPS network registration and make an inquiry.<n>: Set if send unsolicited result coden=0 : Do not send unsolicited result code (default)n=1 : Send network registration status as unsolicited result coden=2 : Send network registration status and location information as unsolicited result code<stat>:Packet exchange network registration statusn=0 : Outside area and not searchingAT+CREG=0OKAT+CREG?+CREG:0,0OKAT+CSQ[=?]Display the wireless quality of this terminal.Execute "AT+CSQ", then appears as "+CSQ:<rssi>,<ber>".<rssi>rssi=0 : Under -113dBmrssi=1 : -111dBmrssi=2∼30 : -109dBm∼-53dBmrssi=31 : Over -51dBmrssi=99 : Unclear or not detected<ber>ber=0∼7 : Bit Error Rate, RXQUALber=99 : Unclear or not detectedAT+CSQ+CSQ:31,7OKCommand Overview Parameters/Description Examples of Commands](https://usermanual.wiki/LG-Electronics-USA/L03F/User-Guide-2211164-Page-107.png)
![106 Appendix/TroubleshootingAT+GCAP Display the capability list of this terminal.- AT+GCAP +GCAP: +CGSM,+WOK AT+GMI Display the manufacturer of this terminal.-AT+GMI LG Electronics IncOK AT+GMM Display the name of this terminal. - AT+GMM docomo L03F OK AT+GMR Display the S/W version of this terminal.-AT+GMRL03F-MDM9200-VXXX-XXX-XX-XXXX-DCM-JPOK AT+IFC=<n>,<m> [&F][?] [=?] Set the local flow control method between the PC and this terminal.n : DCE by DTE controln=0 : No flow control.n=1 : Perform XON/XOFF flow control.n=2 (default): Perform RS/CS (RTS/CTS) flow control.m : DTE by DCE controlm=0: No flow controlm=1: Perform XON/XOFF flow control.m=2(default) : Perform RS/CS (RTS/CTS) flow controlAT+IFC=2,2OK AT+IFC=1,1OKAT+IFC=0,0OKCommand Overview Parameters/Description Examples of Commands](https://usermanual.wiki/LG-Electronics-USA/L03F/User-Guide-2211164-Page-108.png)
![107Appendix/TroubleshootingAT+WS46=<n> [?] [=?] Set the wireless network to be used by this terminal when dialing.n=12 : 3GPP Systems*For AT+WS46? , the answer is only 25.AT+WS46=12OKAT+WS46? 25 OK A/ Retry a command just before performing. is not needed after entering command. A/OK ATA Display NO CARRIER under offline command mode.-ATANO CARRIERATD Send packet. Sending packet:ATD*99***<cid># <cid>1∼10: + Display the APN that configured +CGDCONT ATD*99# CONNECT ATE<n> [&F] Set whether to echo back the text sent from a PC.n=0 : Not echo back.n=1(default) : Echo back.ATE0 OKATE1 OKATH<n> The line is disconnected. Only n=0 (default) can be specified. ATHOKCommand Overview Parameters/Description Examples of Commands](https://usermanual.wiki/LG-Electronics-USA/L03F/User-Guide-2211164-Page-109.png)
![108 Appendix/TroubleshootingATI<n> Display the recognition code. n=0 : Display [NTT DOCOMO, INC.] n=1 : Display the name of this terminal (Same as +GMM).n=2 : Display this terminal version (same as +GMR).n=3 : Display OK.n=4 : Display the details of communication functions of this terminal.ATINTT DOCOMO, INC.OKATI0NTT DOCOMO, INC.OKATI1docomo L03FOKATI2L03F-MDM9200-VXXX-XXX-XX-XXXX-DCM-JPOKATI3OKATI44OK ATS0=<n>[&F] [?]Set the RING value while receiving automatically.n=0 (default) : Cannot receive automatically.n=1∼255 : Receive automatically by specified RING value.ATS0=0OKATS0?000OKCommand Overview Parameters/Description Examples of Commands](https://usermanual.wiki/LG-Electronics-USA/L03F/User-Guide-2211164-Page-110.png)
![109Appendix/TroubleshootingATS3=<n> [&F] [?] Set the return character (CR) to recognize the end of AT command text string.Only n=13 (default) can be specified. ATS3=13 OK ATS4=<n> [&F] [?] Set the line feed (LF) character. It is positioned next to the return character (CR) if displaying the result code in English characters.Only n=10 (default) can be specified. ATS4=10 OK ATS5=<n> [&F] [?] Set the back space (BS) character to delete the last character in the input buffer while AT commands are entered.Only n=8 (default) can be specified. ATS5=8 OK ATS6=<n>[&F] [?]Set pause duration (seconds) till dial.This command can be set but is not functional.ATS6=5OKATS8=<n>[&F] [?]Set pause duration (seconds) of comma dial.This command can be set but is not functional.ATS8=3OKATS8?003OKATS10=<n>[&F] [?]Set delay duration of auto disconnection (1/10 seconds).This command can be set but is not functional.ATS10=1OKATS10?001OKATQ<n>[&F]Set if display result code. n=0 (default) : Display result code.n=1 : Not display result code.ATQ0OKATV<n> [&F] Set the display method of the result code.n=0 :Display in numeric characters. n=1(default): Display in text.ATV1 OK Command Overview Parameters/Description Examples of Commands](https://usermanual.wiki/LG-Electronics-USA/L03F/User-Guide-2211164-Page-111.png)
![110 Appendix/TroubleshootingATX<n>[&F]Set if detect dial tone. n=0 : No busy tone detected, no dial tone detected, no speed displayn=1 : No busy tone detected, no dial tone detected, speed display detectedn=2 : No busy tone detected, dial tone detected, speed display detectedn=3 : Busy tone detected, no dial tone detected, speed display detectedn=4 (default) : Busy tone detected, dial tone detected, speed display detectedATX1OKATZ Reset the settings on this terminal with the nonvolatile memory contents. If performed during a communication, the line is disconnected.-ATZ OK Command Overview Parameters/Description Examples of Commands](https://usermanual.wiki/LG-Electronics-USA/L03F/User-Guide-2211164-Page-112.png)
![111Appendix/TroubleshootingSupplementary Explanation of AT Commands■ Command name:+CGDCONT•OverviewSet APN when sending packet connection.•Form+CGDCONT=[<cid>[,"<PDP type>"[,"<APN>"]]]•Parameter descriptionsSet the destination (APN) when sending packets. See the following examples for command operations.<cid>※1:1 to 10<PDP type>※2:IP<APN>※3:Optional※1 <cid> is the number used to control the destination (APN) for the packet communication to be registered in this terminal. 1 to 10 can be registered. The default value of <cid>=1 is "mopera.net". Set cid number from 2 to 10.※2 <PDP type> is a protocol for packet communication. The pre-installed <PDP type>=IP is set to <cid>=1 as default.※3 <APN> is optional string that indicates each destination.•Command examplesCommand to register an APN with the name of abc (When PDP type is IP, cid is 2)AT+CGDCONT=2,"IP","abc"OK•Operations without a parameterAT+CGDCONT= : Clear all the settings of <cid>.However, the setting of <cid>=1 is reset to the value when purchasing.AT+CGDCONT?:Display the current settings.■ Command name: +CGEQMIN=[Parameter]•OverviewRegister the threshold to accept the QoS (Quality of Service) sent from the network when packet communication is established.LTE data communication is not supported.•Format+CGEQMIN=[<cid>[,,<Maximum bitrate UL>[,<Maximum bitrate DL>]]]•Parameter description<cid>※1:1 to 10<Maximum bitrate UL>※2:None (default)<Maximum bitrate DL>※2:None (default)※1 <cid> is a number used to manage the access point (APN) for the packet communication registered in this terminal. ※2 <Maximum bitrate UL> and <Maximum bitrate DL>indicate the minimum communication speed [kbps] of upload and download traffic respectively between this terminal and the base station. If these are set to None (default), all speeds are permissible. Be aware that a packet communication may not be established because any other speed than this is not permissible.•Command examples(1) Command to permit all speeds for both upload and download (When cid=2)AT+CGEQMIN=2OK(2) Command to permit only 5,760kbps for upload and 7,232kbps for download (When cid=2)AT+CGEQMIN=2,,5760,7232OK(3) Command to permit 5,760kbps for upload and all speeds for download (When cid=2)AT+CGEQMIN=2,,5760OK](https://usermanual.wiki/LG-Electronics-USA/L03F/User-Guide-2211164-Page-113.png)
![112 Appendix/Troubleshooting(4) Command to permit all speeds for upload and only 7,232kbps for download (When cid=4)AT+CGEQMIN=4,,,7232OK■ Command name: +CGEQREQ=[Parameter]•OverviewSet the QoS (Quality of Service) requested to the network when packet communication is dialed.•Format+CGEQREQ=[<cid>[,,<Maximum bitrate UL>[,<Maximum bitrate DL>]]]•Parameter description<cid>※1:1 to 10<Maximum bitrate UL>※2:None (default)<Maximum bitrate DL>※2:None (default)※1 <cid> is a number used to manage the access point (APN) for the packet communication registered in this terminal.※2 <Maximum bitrate UL> and <Maximum bitrate DL>indicate the minimum communication speed [kbps] of upload and download traffic respectively between this terminal and the base station. If these are set to None (default), Qos of network is not required.•Command exampleCommand to require 5,760kbps for upload and 7,232kbps for download (When cid=2)AT+CGEQREQ=2,2,5760,7232OKResult Codes■ List of result codesOptions and related devicesCombining this terminal with optional accessories supports a wide variety of uses from personal use to business use. Some merchandise are not available in some regions.For details, contact a docomo Shop. For details about the optional devices, refer to the instruction manual for each device.•Back Cover L30Note•This command, (+CGDCONT, +CGEQMIN, + CGEQREQ) is not reset by [&F] and [Z], either.Numeric display Text display Description0 OK Operation performed properly1 CONNECT Connected to other party3 NO CARRIER Line disconnected4 ERROR Unable to accept command100 RESTRICTION Network restriction display](https://usermanual.wiki/LG-Electronics-USA/L03F/User-Guide-2211164-Page-114.png)
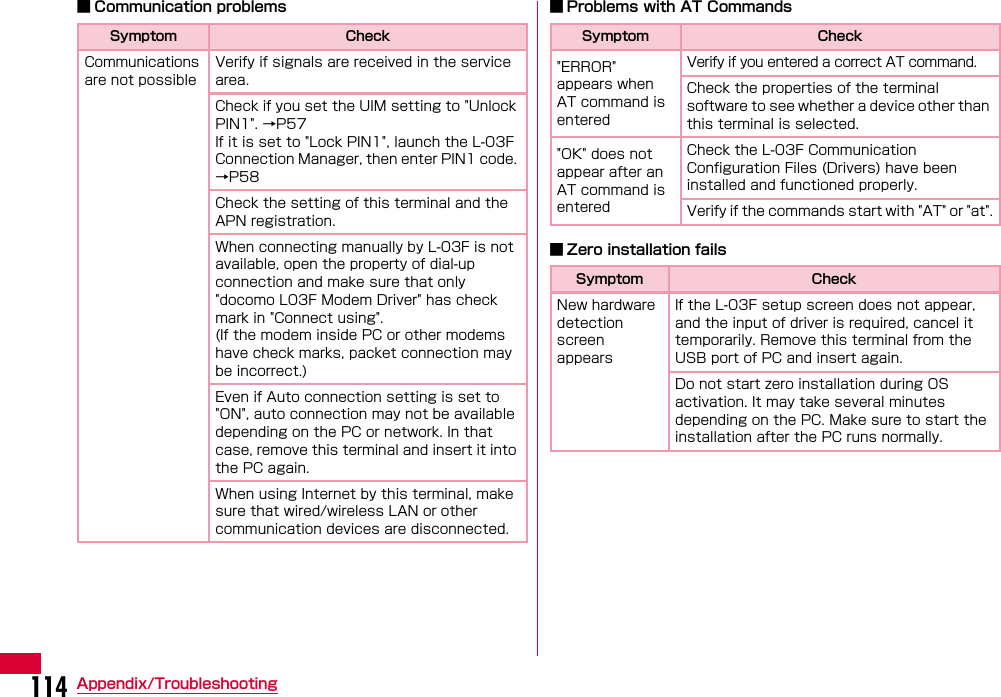
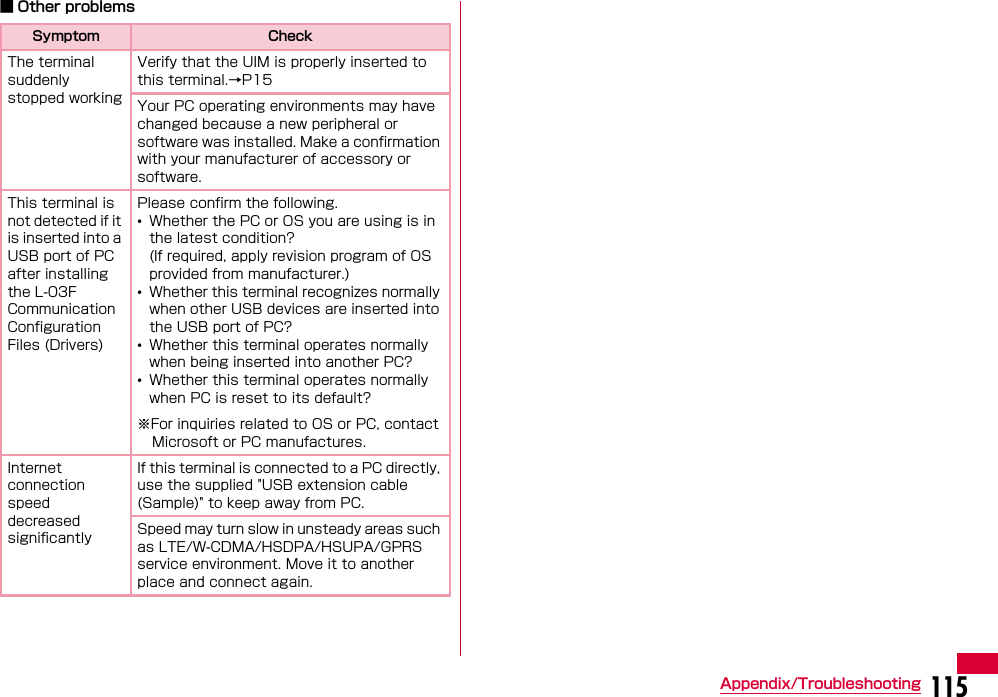
![113Appendix/TroubleshootingTroubleshootingFirst, check whether software is required to update. Update software if necessary. (Updating Software⇒P118)Contact General Inquiries specified by DOCOMO located in "Repairs" (Japanese only) at the last page of the manual if the symptom is not improved after confirming the item to check.■ This terminal is not recognizedSymptom CheckThis terminal is not recognized Insert the USB port firmly into this terminal.Verify the L-03F Communication Configuration Files (Drivers) for this terminal functioning properly.→P31, P41This terminal may not be recognized correctly when activating the PC with this terminal being connected, during restarting or after retrieving from the states of standby (sleeping)/stopping during packet communication. Remove this terminal from the PC and insert again after restarting the PC.Delete the driver of this terminal on device manager when "!" appears in this terminal device. Only install the driver again.The UIM will not be able to use if PIN1 unlock code is wrongly entered 10 times in a row. For further information, visit docomo Shop.This terminal is not recognized ■If CD/DVD playback and written software isinstalled into a PCDepending on the CD/DVD playback or writing application installed in a PC, this terminal may not be recognized normally even if the terminal is connected while the application software residents※ or is activated.Try the following methods in that case.■To recognize after finishing the running applicationaRemove this terminal from the PCbFinish CD/DVD playback and the executants of written application softwarecConnect this terminal to the PC■To recognize via icon●For Windows 7• (Start) Double click icon of "Computer".●For Windows Vista• (Start) Double click icon of "Computer". ●For Windows XP•[start] Double click icon of "My computer". ※Including the case in which its icon stays on the taskbar.Symptom Check](https://usermanual.wiki/LG-Electronics-USA/L03F/User-Guide-2211164-Page-115.png)
![119Appendix/TroubleshootingbClick [Yes]•Update software following the onscreen instructions from here. For details, refer to Software Update procedure on the NTT DOCOMO website.Main Specifications■ Operating systemWindows XP Japanese/English version (Service Pack 3)Windows Vista 32bit/64bit Japanese/English version (Service Pack 2)Windows 7 32bit/64bit Japanese/English version (Service Pack 1)Mac OS X 10.6.8 32bit/64bit Japanese/English versionMac OS X 10.7.2 32bit/64bit Japanese/English versionNote•Do not unplug this terminal with the computer during software update.•Software update (downloading and rewriting) may take a while.•If software update fails, all operations become unavailable. In this case, bring this terminal to a DOCOMO service center.](https://usermanual.wiki/LG-Electronics-USA/L03F/User-Guide-2211164-Page-121.png)
![120 Appendix/Troubleshooting■ Communication SpeedUp to 75Mbps for receiving dataUp to 25Mbps for sending data※ Communication speed is theoretical value when sending and receiving data which does not show the actual ones. The actual communication speed depends on communication environment and network congestion.※ Depending on the bandwidth of Xi area, the theoretical value is 100/100/75/37.5Mbps for receiving speed (bandwidth [20/15/10/5MHz]) and 50/37.5/25/12.5Mbps for sending speed (bandwidth [20/15/10/5MHz)※ Refer to NTT DOCOMO website for detailed areas that support Xi.※ Receiving data up to 14Mbps, sending data up to 5.7Mbps in FOMA HIGH-SPEED area out of Xi area.※ Sending and receiving data speed may become up to 384kbps in the FOMA HIGH-SPEED area.※ Sending and receiving data speed becomes up to 384kbps in FOMA area out of Xi area and FOMA HIGH-SPEED area.■ Operating environmentsTemperature:5℃ to 35℃Humidity:45% to 85%■ Power sourcePower voltage DC5V (Supplied from PC)Max Current consumption※ Max Current consumption while communicating LTE: Approx. xxxmA or lower 3G: Approx. xxxmA or lower GPRS: Approx. xxxmA or lower Average Current consumption while communicating LTE: Approx. xxxmA or lower 3G: Approx. xxxmA or lower GPRS: Approx. xxxmA or lower Average Current consumption while Standby: LTE: Approx. xxxmA or lower 3G: Approx. xxxmA or lower GPRS: Approx. xxxmA or lower※ Depending on the usage, power consumption fluctuates.■ Form factorUSB connection type■ DimensionsHeight: Approx. xxmmWidth: Approx. xxmmDepth: Approx. xxmm ■WeightApprox. xxg----------------------------------------------------------------■ JATE certification number AD11-0386001](https://usermanual.wiki/LG-Electronics-USA/L03F/User-Guide-2211164-Page-122.png)