LG Electronics USA L05D PCS GSM Phone with WLAN, Bluetooth and RFID User Manual DS1106 E UG indb
LG Electronics MobileComm USA, Inc. PCS GSM Phone with WLAN, Bluetooth and RFID DS1106 E UG indb
Contents
- 1. Users Manual 1
- 2. Users Manual 2
Users Manual 2

cannot be performed when nearby electric devices
are powered on. TVs and radios may receive noise
or video interference.
•Move the Bluetooth device to a place where
connection is available when there is a broadcast
station or radio near the Bluetooth device, and
the terminal cannot be connected to the device.
Strong radio waves may prevent connection
between the terminal and the Bluetooth device.
•Wireless connection is available with Bluetooth
device put in a bag or pocket. However, lowering
of communication speed or noise may result when
you are in between the Bluetooth device and the
terminal.
•Bluetooth communication in some cases may
result in an accident, so turn off the terminal and
other Bluetooth devices in the following places.
- On trains
- On airplanes
- In hospitals
- Near automatic doors or re alarms
- In places such as gas stations where ammable
gas is generated
Reception interference caused by wireless LAN
devices
•As the terminal's Bluetooth device and wireless
LAN devices use the same frequency (2.4 GHz),
reception interference may occur or the
communications speed may lower if you use the
Bluetooth device near the wireless LAN devices.
Also, you may hear noise or have a connection
problem. In these cases, do the following:
- Keep the Bluetooth device over 10 m away from
a wireless LAN device.
- Within 10 m, turn off either the Bluetooth device
or the wireless LAN device.
Pass code (PIN) of Bluetooth function
•Pass code (PIN) is an authentication code to enter
when accessing Bluetooth devices for the first
time to recognize and permit the connection each
other. Entering the same pass code (PIN) (up to
16 single-byte alphanumeric characters) on each
sending/receiving device is required.
•On the terminal, pass code may be displayed as
"PIN".
135
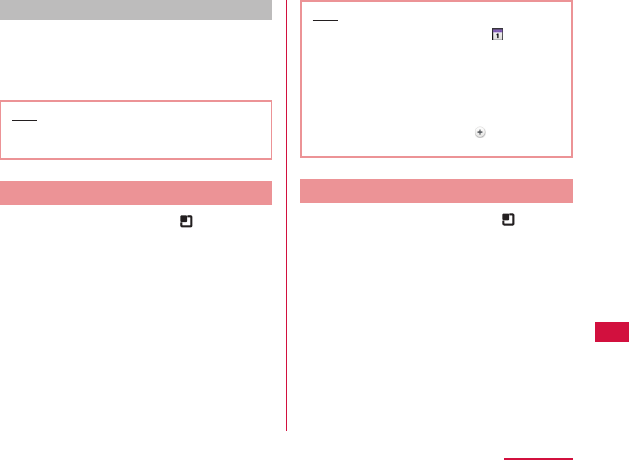
File Management
Turning ON Bluetooth Function to
Make the Terminal Discoverable
a From the Home screen, u "Settings"
u "Wireless & networks" u "Bluetooth
settings"
bPlace a check mark on "Bluetooth"
•Bluetooth function turns ON.
cTap "Device name" and enter the
terminal name u Tap "OK"
dPlace a check mark on "Discoverable"
•The terminal can be detected by another
Bluetooth device for approx. 120 seconds.
Note
•When you do not use Bluetooth function, turn it
OFF to save the battery.
•The setting of the Bluetooth ON/OFF is not
changed even when the power is turned off.
Pairing/Connecting with Other
Bluetooth Device
To transfer data by Bluetooth connection, perform
pairing (pairing setting) with the device in advance and
register it to the terminal.
•Depending on Bluetooth device, only pairing is
performed or pairing and connecting is performed
successively.
a From the Home screen, u "Settings"
u "Wireless & networks" u "Bluetooth
settings" u "Scan for devices"
•Detected Bluetooth devices list appears.
bTap a device that you want to connect
with u Tap "Pair"
•If pass code (PIN) is set on Bluetooth devices,
enter pass code (PIN) and tap "OK".
•For some Bluetooth devices, after completion
of pairing, connection may be established
successively by tapping a device.
136
File Management
Note
•Even for device requiring entry of pass code
(PIN) when pairing, once pairing is performed,
entering pass code (PIN) is not necessary for
next connection.
•Pairing can be set even if a device is unable
to connect such as non-profile-compliant.
However, it cannot be connected even if you tap
the device.
•Touch a device that has already been paired
for over 1 second, tap "Connection access" and
then select "Automatic" to connect or "Always
ask".
•Devices that are not compatible with SCMS-T
cannot play any audio related data such as
music.
When the other device requests for
pairing
When a screen asking for pairing for Bluetooth
connection appears, tap "Pair & connect" or enter pass
code (PIN) if required and tap "OK".
Disconnecting
a Tap the connected device on "Bluetooth
devices" list u "OK"
•Touch the connected device for over 1 second
and tap "Disconnect" to disconnect.
Canceling the pairing
a Touch a device to unpair for over 1
second on "Bluetooth devices" list u
Tap "Disconnect & unpair"
•If you want to unpair with a device being only
paired, touch the device for over 1 second and
tap "Unpair".
137
File Management

Sending/Receiving Data via
Bluetooth Function
•Set the Bluetooth function to ON beforehand to be
discoverable.
Sending data via Bluetooth
You can send data of Phonebook (name card data in
vcf format), files such as photos or videos, etc. to a
Bluetooth device (PC etc.).
•For sending, perform the operation from the menu
such as "Share"/"Send" of each application.
Receiving data via Bluetooth
a Set the terminal to discoverable
bTap "Accept" when Bluetooth
Authorization Request screen appears
• is displayed in the status bar, and data
reception starts.
•You can confirm data reception on the
Notification panel.
•Message screen appears at the bottom screen
after receiving data.
External Device Connection
Connecting the Terminal with a PC
Make sure that Windows Media Player 11 or later and
dedicated driver are installed on PC. If Windows Media
Player 11 or later and dedicated driver are not installed,
the terminal may not be recognized by PC correctly.
For details about operating environment, refer to "File
Operation" (P131).
138
File Management
a Connect the microUSB connector of
USB connection cable to the microUSB
connection terminal of the terminal
•Insert the microUSB connector horizontally with
the surface with the USB mark facing up.
bConnect the USB connector of USB
connection cable to the USB port of PC
•The terminal is recognized automatically by PC.
•Request for installation of the device driver may
appear on your PC. If it appears, cancel it.
• is displayed in the status bar.
•The "USB connection mode" screen appears on
the terminal.
If the "USB connection mode" screen does not
appear, drag or swipe the status bar down
to open the Notification panel, and then tap
"Charge only", "Mass storage", "PC sync", or
"USB tethering".
•The following operations are available from the
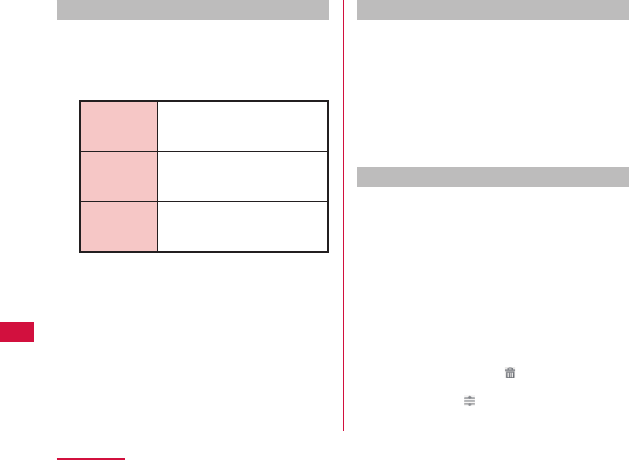
"USB connection mode" screen.
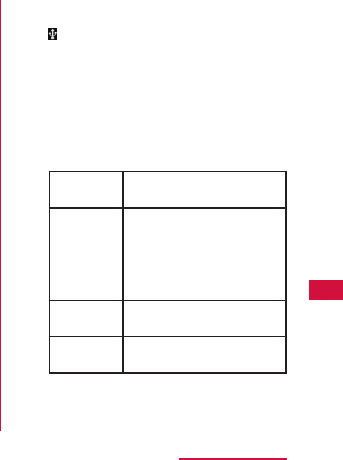
Charge only Select this to charge only.
(P39)
Mass
storage
Select this to synchronize
music with Windows Media
Player on a PC and transfer
data between PC and the
terminal by dragging and
dropping. (P131)
PC sync Select this to sync your
contacts and calendars.
USB
tethering
Select this to use USB
tethering. (P119)
c"Charge only" / "Mass storage" / "PC
sync" / "USB tethering" u "OK"
139
File Management
Note
•While connecting to a PC, drag or swipe the
status bar down to open the Notification panel,
and then tap "Charge only", "Mass storage", "PC
sync", or "USB tethering" to display the "USB
connection mode" screen, and then you can
change the USB connection mode.
•To change the default USB connection mode for
connecting with a PC, from the Home screen,
tap u "Settings" u "Connectivity settings" u
"Default connection mode".
•Do not turn off the terminal while reading or
writing data
•Do not unplug USB connection cable while
reading or writing data. It results in loss of data.
•For details about Windows Media Player, refer to
Windows Media Player help.
140
File Management
Application
Camera
The terminal has a built-in camera that can shoot
photos and videos.
Before Shooting
All photos and videos shot on your terminal are saved
to a microSD card. Please insert a microSD card before
using Camera.
You cannot shoot photos while you are transferring files
to the microSD card.
Copyrights and portrait rights
Avoid copyright infringements when copying or
editing photos and videos that have been shot on the
terminal. You should also avoid infringing the portrait
rights of other people by using or modifying their
portraits without their consent. Note that the shooting or
recording of stage performances, shows or exhibitions
may be prohibited, even for personal use.
Please be considerate of the privacy of
individuals around you when shooting and
sending photos using camera-equipped mobile
phones.
Notes for capturing images
•The Camera employs high precision technology, but
some pixels or lines may seem brighter or darker
than others. Also, when you shoot photos in places
with insufficient lighting, noises seen as white line
increase. This is normal.
•Clean the lens with a soft cloth before shooting. If the
lens is stained with fingerprints or oil, the shot photo
may appear out of focus or blurred.
•Do not leave the terminal in a warm place or under a
direct sunlight for a long period of time. The quality
of shot photos or video may deteriorate.
•If you shoot under a fluorescent light, mercury lamp
or sodium lamp flickering at high speed, flickering
such as stripes may appear. The color tone of photos
or videos may vary depending on the shooting
timing.
•Do not expose the lens to direct sunlight for a long
period of time and do not point at the sun or a bright
light directly. The image may become discolored or
the camera may fail to operate properly.
•Do not cover the lens with your fingers or hair when
shooting.
141
Application

•Shooting a fast moving object may result in an image
slightly distorted from the image displayed on the
screen at the time of shooting, or the image may be
blurred.
•When the battery level is low, you may not be able to
save shot photos or videos. Check the battery level
before using the camera.
•Shot photos or videos may differ from the actual
subjects in brightness or color tone.
•You can hear shutter sound even when the terminal
is set to Silent mode.
Shooting a Photo
You can shoot photos with both horizontal and vertical
screen.
Viewing shooting screen
The meanings of marks (icons and others) on the photo
shooting screen are as follows:
a Switching cameras
Switch between the front and main cameras.
b Zoom
Adjust zoom.
c Brightness
Adjust brightness.
142
Application
d Flash
Set flash mode to Auto, Off or On.
e Settings (while shooting photos)
Set Focus/Image size/Scene mode/ISO/White
balance/Color effect/Timer/Shot mode/Auto review/
Tag location (horizontal screen).
f Auto focus frame
Touch the screen on the area where you want to
focus.
It is shown in green when auto focus is successfully
done. It turns to red if auto focus is failed.
g Focus mode
Adjust the focus to a specified position (Auto/Face
tracking).
h Possible number of shooting images
i Switch button
Switch between photo mode and video mode.
j Shutter
k Thumbnail
Tap to display the preview screen and confirm the
shot photo. Also you can edit the photos.
Shooting a photo
a From the Home screen, "Applications"
u "Camera"
•The photo shooting screen is displayed.
•Menus appear on the screen to allow you to
configure various settings to suit the scene and
conditions for shooting.
•If you tap a menu icon, and appear.
Tap to return all settings to the initial settings.
Tap to confirm the details of each function.
bPoint the camera at the subject
cTap
•The shutter sound plays and the photo is shot.
•After shooting, a preview of the photo is
displayed.
•The shot data is saved in "Gallery".
143
Application
Note
•Menus are displayed on the preview screen
after shooting a photo. The following operations
are available.
<Left part (Top part for vertical screen)>
- "Share": Send via Bluetooth, Gmail, Picasa,
etc.
- "Set as": Set to wallpaper or phonebook icon.
- "Rename": Edit the name of the shot photo.
<Right part (Bottom part for vertical screen)>
- : Delete the displayed photo.
- : Shoot a new photo.
- : Confirm and edit the shot photo.
Shooting Videos
You can shoot videos by switching modes. Videos are
shot horizontally.
Viewing shooting screen
The meanings of marks (icons and others) on the video
shooting screen are as follows:
a Switching cameras
Switch between the front and main cameras.
b Zoom
Adjust zoom.
c Brightness
Adjust brightness.
144
Application
d Flash
Set flash mode to ON or OFF.
e Settings (when shooting video)
Set the video size/white balance/color effects/audio
recording/auto review.
f Sound (On/Off)
g Switch button
Switch between photo mode and video mode.
h Recording button
i Thumbnail
Tap to display the preview screen and confirm the
shot videos.
j Shooting duration
Shooting videos
a Drag on the photo shooting screen.
•The screen switches to the video shooting
screen.
•Menus appear on the screen to allow you to
configure various settings to suit the scene and
conditions for shooting.
•If you tap a menu icon, and appear.
Tap to return all settings to the initial settings.
Tap to confirm the details of each function.
bPoint the camera at the subject
cTap
•The recording start sound plays and Camera
starts shooting.
•While you are recording, "REC" appears and a
red circle blinks.
dTap
•The recording stop sound plays and recording
stops. Then, the screen displayed at the start of
recording appears.
•The shot data is saved in "Gallery".
145
Application
Note
•Menus are displayed on the preview screen
after shooting a video. The following operations
are available.
<Left part>
- "Play": Play the shot video.
- "Share": Send via Bluetooth, Gmail, YouTube,
etc.
- "Rename": Edit the name of the shot video.
<Right part>
- : Delete the displayed video.
- : Shoot a new video.
- : Confirm the shot video.
Gallery
Gallery allows you to view photos/videos in a slide show.
Photos can be trimmed.
Viewing Photos and Videos
a From the Home screen, "Applications"
u "Gallery"
•The Gallery screen appears.
•Gallery contains both photos and videos shot
with camera and those downloaded.
• : Tap to switch between the Calendar
screen and Gallery screen. Tap a date on the
Calendar screen to display photos and videos
shot on that day by thumbnail.
bTap a folder
•Both photos and videos are displayed by
thumbnail.
•Photos and videos are categorized by shooting
date by tapping .
•To view photos or videos shot by this terminal,
tap "Camera".
cTap one of the thumbnails
•Photo can be zoomed in or out by tapping
or pinching out or in on the touch
screen.
•The video is played if you tap a video thumbnail.
146
Application
Note
•A screen appears to enable/disable thumbnail
selection if you tap on the Gallery screen,
or touch one thumbnail for over 1 second. The
following operations are available.
<Top part>
- "Select all": Select all the thumbnails.
- "xx items": Show the number of the selected
thumbnails.
- "Deselect all": Cancel all the selected
thumbnails.
<Bottom part>
- "Share": Send the selected photos via Picasa,
Gmail, or Bluetooth, and the selected videos
via YouTube, Gmail, or Bluetooth.
- "Delete": Delete the selected photos or
videos.
- "More": Confirm the detailed information
of photos and videos, configure the photo
settings, trim the photos, etc.
•The following operations are available from the
photo display screen.
- "Slide show": Display the photos and videos
saved in terminal in slide show order.
- "Menu": Share or delete photos.
- : Zoom in or out the image.
- : Activate Camera to shoot photos or
videos.
- Tap the left/right side of the terminal to view
previous/next image when you place a
check mark on "Previous/next picture" for the
"Gesture" settings (P44).
•For details on video playing operation, refer to
"Playing Videos" (P152).
Viewing Photos and Videos on a TV
When the terminal and a TV with HDMI are connected
using the HDMI conversion cable L01 (optional) and
a commercial HDMI cable, you can view photos and
videos saved in the terminal on the TV.
•1Seg is not compatible with video output using HDMI
connection due to copyright protection.
147
Application
Media Player
The "Media Player" application plays music files and
video files saved on the microSD card. Media Player
supports the following file formats.
Available file formats
Music files MP3, 3GP, 3GA, AMR, WMA,
AAC, MID, WAV, OGG, ISMA,
M4A, FLAC, AWB
Video files MP4, AVI, 3GP, WMV, ASF, MKV,
MOV, WebM, TS, ISMV, FLV,
OGM, DivX (Only for Non-DRM
contents)
Note
•Some files may not be played even with the
supported file format.
•Some files are protected by copyright and may
not be played.
Copying Music Files and Videos
to the Terminal
From Media Player, you can play music files and video
files of your own after copying them to a microSD card.
a Connect the terminal with a PC via the
supplied USB connection cable (P138)
bSet USB connection mode to "Mass
storage" (P139)
cOpen "マイコンピュータ" (My computer)
and select "リムーバブルディスク"
(Removable disk) on PC
•A microSD card root folder for the terminal
appears.
•"自動再生" (Auto play) screen may appear
depending on the setting. Choose "デバイスを
開いてファイルを表示する" (Open the device to
display) when the screen is displayed.
dCreate a folder in the root folder of
microSD card
•You can also create a subfolder to manage the
files.
eCopy files to the created folder
fDisconnect the terminal from a PC (P134)
148
Application

Note
•While the terminal is connected to your PC,
you cannot use applications, such as Camera,
Gallery, Media Player, etc., that use a microSD
card.
•To ensure no loss of data from the microSD
card, always follow the PC's instructions when
disconnecting from the PC.
For more details, refer to "Disconnecting the
terminal from a PC" (P134).
•This terminal can be connected to most devices
supporting the USB mass storage interface and
the following operating systems (OS).
- Windows® 7 (32-bit/64-bit version)
- Windows Vista® (32-bit/64-bit version)
- Windows® XP (32-bit/64-bit version)
Opening the Media Player
a From the Home screen, "Applications"
u "Media Player"
•The "Media Player" screen appears.
•Tap the icon at the bottom of the screen to
switch between lists for "Songs", "Artists",
"Albums", and "Movie".
149
Application
a Quick play bar
This is displayed when there is music playing/
paused.
Tap this to display the Music screen.
b Play/Pause icon
This is displayed for the music playing/paused.
c Title
d Artist name
e Index
A list of songs starting with the tapped letter are
displayed.
f Bottom bar
You can change the icons that are displayed on the
bottom bar. For more details, refer to "Setting the
Media Player" (P155).
•Songs: Display a list of playable songs saved on
the microSD card.
Tap a song to display the Music screen.
•Artists: Display a list of artists.
Tap an artist name to display a list of albums by
the artist. Tap an album title to display a list of
songs on the album.
•Albums: Display a list of albums.
Tap an album title to display a list of songs
included on the album.
•Movie: Display a list of playable videos saved on
the microSD card.
•MUSIC Store: Access the dmarket Music Store.
While a list of videos is displayed, the "VIDEO
Store" icon appears. Tap this to access the
dmarket VIDEO Store.
Note
•From the "Media Player" screen, tap u "Sort"
to switch the list display between ascending
and descending order.
•From the "Media Player" screen, tap u
"Search" to access dmarket for purchasing
songs.
•From the "Media Player" screen, while a list of
albums/videos is displayed, tap u "Switch
display" to switch the list display format between
thumbnail display and list display.
•From the "Media Player" screen/Music screen/
Video screen, tap u "Exit" to close the Media
Player.
150
Application

Playing Music
a In the song list, tap a song you want to
play
•The Music screen appears and the song is
played.
a Elapsed time
b Play progress bar
Drag or tap to play a song from a desired point
within the song.
c Cover flow
Tap to switch between display/not display elapsed
time, play progress bar, and song length.
Flick left or right to scroll through the thumbnails on
horizontal screen.
d Contents information
Title/artist name/album title are displayed.
e Return to list
Return to the song list.
f Back button
Start playing from the beginning of the current song.
Double-tap to start playing from the beginning of
the previous song.
g Play/Pause button
h Song length
i Repeat/1 Repeat button
Switch between Repeat all/1 repeat/Repeat OFF.
j Shuffle button
Turn shuffle play on/off.
k Forward button
l Volume bar
Drag or tap to adjust the volume.
151
Application
Note
•While a song is playing, is displayed in the
status bar.
•From the Music screen, tap u "Settings"
u "This song : Ringtone settings" to set the
displayed song as a ringtone for voice calls,
email, or sp-mode mail.
Playing Videos
a From the "Media Player" screen, tap
•A list of playable videos saved on the microSD
card appears.
bTap a video you want to play
•The Video screen appears and the video is
played.
152
Application
a Elapsed time
b Play progress bar
Drag or tap to play a video from a desired point
within the video.
c Video information
Displays titles/artist names.
d Video list button
Return to the video list.
e Back button
Start playing from the beginning of the current
video. Double-tap to start playing from the
beginning of the previous video.
f Play/Pause button
g Video length
h Rotation lock button
Lock not to change the orientation of the screen
even when the orientation of the terminal changes.
i Forward button
j Volume bar
Drag or tap to adjust the volume.
Note
•Tilt the terminal to the side while displaying
the Video screen to switch to horizontal screen
display so that videos can be displayed on the
whole screen. Tap the screen to switch between
button display/not display.
Using Playlists
Playlists allow you to play your favorite songs in a
desired order.
Set to view playlists
With the initial setting, the bottom bar of the "Media
Player" screen does not display the "Play list" icon. The
following operation will allow you to display it.
a From the "Media Player" screen, u
"Settings" u "Arrange icons"
•The "Arrange icons" screen appears.
bDrag the "Play list" icon and drop it on
the bottom bar
•You cannot change the "Movie", "MUSIC Store",
and "VIDEO Store" icons.
c"Apply"
153
Application
Displaying playlists
a From the "Media Player" screen, tap
"Play list"
•Current playlists are displayed.
•The following quick playlists are available.
Recently
added songs
Display songs that were added
in the last two weeks in the
order you add them.
Recently
played songs
Display songs that were played
in the last two weeks with the
most recent date on top.
Most played
songs
Display songs that were played
with the most frequently played
song on top.
bTap a playlist/quick playlist
•The songs contained in the playlist are
displayed.
•Tap a song from the playlist/quick playlist to
play.
Creating a playlist
a In the Playlists, tap "New"
b"Add songs to playlist"
•Tap the "All songs", "Artists", and "Albums" tabs
to switch the display list.
cTap the song you want to add
•Tap "Add all songs" to add all songs in the list.
d"Apply" u "Save" u "OK"
Editing playlists
a In the list of Playlists, tap the playlist
that you want to edit
•The songs contained in the playlist are
displayed.
b"Edit"
•Tap the title of the playlist to edit the title.
•Tap "Add songs to playlist" to add a song to the
playlist.
•Tap "Delete all songs" to delete all songs.
Deleting all songs from a playlist will also delete
the playlist itself.
•Tap on a song to make turn red and become
a deletion target.
•Drag and drop to change the order of the
song.
154
Application
cAfter you finish editing, tap "Save"
Deleting/sorting a playlist
a In the Playlists, tap "Edit"
•Tap "Delete all playlists" to delete all playlists.
•Tap on a playlist to make turn red and
become a deletion target.
•Drag and drop to change the order of the
playlist/quick playlist.
bAfter you finish editing, tap "Save"
Setting the Media Player
a From the "Media Player" screen, u
"Settings"
•The "Settings" menu appears.
bChange the settings if required
Audio effect
settings
Set effects for when playing
music.
Ringtone
settings
Set a song as a ringtone for
voice calls, emails, and sp-
mode mail.
•Some songs cannot be set
as ringtones.
Movie sort
settings
Select the order of the video
list from "Saved date and time"
and "Title".
Delete
contents
Delete all/selected displayed
music files/video files.
155
Application
Arrange icons Drag and drop to change the
icons displayed on the bottom
bar of the "Media Player"
screen.
•If you change the icons
to "Play list", "Genre", or
"Age", you can display lists
according to Playlists/Genre/
Age on the "Media Player"
screen.
•You cannot change the
"Movie", "MUSIC Store", and
"VIDEO Store" icons.
Update
database
Update the Media Player
database.
Reset settings Return the Media Player to its
initial settings.
Market
Android Market enables you to access applications and
games you like and download them to install into the
terminal.
Opening Android Market
a From the Home screen, "Applications"
u "Market"
•When the application is activated for the first
time, the terms of Android Market use appears.
It only appears for the first time open.
b"Accept"
•Android Market opens.
156
Application
Note
•Be sure to check the security of application,
and then install it at your own risk. The terminal
may be infected with a virus and the data may
be damaged.
•NTT DOCOMO is not liable for malfunctions, if
any, caused by the application you installed.
•NTT DOCOMO is not liable for any
disadvantage brought to you or any third party
due to an application you installed.
•Some applications automatically perform packet
communications. Packet communication is kept
active unless you disconnect or it is timed out.
To disconnect packet communication, tap
u "Settings" u "Wireless & networks" u "Mobile
networks" on the Home screen, and uncheck
the "Data enabled" checkbox.
•If you need more information about Android
Market, tap u "Help" when Market is open.
Searching or Installing an
Application
a Search for the desired application
•If you tap and enter a key word on the
"Market" screen, you can search for an
application by its name.
bTap the application name
•The application details are displayed. Users'
comments and their evaluations are displayed
on the screen.
cTo continue installing operation,
tap "Download" / "Install" (for free
application) or Price button (if paid
application)
•The displayed content differs depending on the
application.
•If the application needs to access data and
functions on the terminal, the functions used by
the application are displayed.
d"Accept & download" / "Accept & buy"
•It is download and installed automatically. When
installation is complete, the notification icon
appears in the status bar.
157
Application
Note
•Read the application details carefully. Once you
install the application, you accept liability for its
use.
•You are required to purchase those paid
applications. For purchasing an application, refer
to "Purchasing an Application" (P159).
•If it takes a long time to download, you can tap
"My Apps" to check the progress status on-
screen.
•Most applications can be installed in a few
seconds, but, if the download does not end
after a long time, you can stop it by tapping
u "My Apps" u "× Stop 1" displayed in the
application to abort downloading.
•If download or installation is finished normally,
the notification icon will be displayed in the
status bar. Display the Notification panel and tap
the application name. The installed application
opens.
Updating an Application
If an installed application is updated, the notification
icon appears on the status bar. You can also check the
update information on the "My Apps" screen. Once you
have confirmed the availability of an update, you can
update the application.
a Tap the application which shows
"Update" on the "My Apps" screen
b"Update" u "Accept & download"
•You can update the application by following the
same procedures used for installation.
Note
•You can also display the "My Apps" screen by
tapping u "My Apps" on the "Market" screen.
"Update" appears beside updated applications.
Tap the application to update it by following the
same procedures used for installation.
158
Application
Uninstalling an Application
You can uninstall applications whenever you want.
a Tap any of application on the "My Apps"
screen
•The application details are displayed.
b"Uninstall"
•A message appears.
c"OK"
Purchasing an Application
Before downloading a paid application, you must first
purchase it. Try it for free within a certain period. If you
do not ask for a refund within a certain period after
purchasing, your credit card will be charged.
Note
•You pay for the application only once. You are
not charged for uninstalling an application or for
downloading it again.
•If you have multiple Android devices that use
the same Google account, you may download
the purchased application to all of them at no
additional cost.
159
Application
Purchasing an application
a Tap an application that you want to
purchase
•The application's functions and other users'
comments and evaluations appear.
bPrice button u "Accept & buy"
•If the application needs to access data and
functions on the terminal, the functions used by
the application are displayed.
•Purchase procedure screen is displayed.
•When purchasing for the first time, tap "Add
payment method" u "Add card" to proceed.
Requesting a refund and deleting an
application
a In the "Market" screen, u "My Apps"
•The "My Apps" screen appears.
bTap the application that you want to
uninstall
c"Refund"
•A menu asking why you want to delete the
application appears. If this menu does not
appear, the trial period has expired.
dTap the answer that best matches your
reason, and then "OK"
Maps
"Maps" enables you to show your current location,
search for other locations and routes. Open Google
Maps to show your approximate location according to
information received from the nearest base station. Your
current location will be updated more accurately if your
current position is determined by GPS.
Note
•Activate the GPS function before getting your
current location.
•Google Maps needs to be data connectable
(LTE/3G/GPRS), or connected to Wi-Fi.
•Google Maps does not work for all nations or
regions.
•Your current location may not be detected with
just a 3G/Wi-Fi connection.
160
Application

Location Information Services
Mobile networks, Wi-Fi and GPS methods are available
to obtain current locations. With Wi-Fi current locations
can be speedily determined, but accuracy is lacking.
If GPS is used, it takes more time, but accurate
positioning can be obtained. When determining current
locations, activate both Wi-Fi and GPS to utilize both of
their advantages.
What is GPS
•GPS is a function that receives signals from GPS
satellites for obtaining the location of the terminal.
•It cannot be used as navigation devices for aircraft,
vehicles and people or as a high-precision GPS
for measurement. Please note that DOCOMO
shall not bear responsibility for damages which
are pure economic losses which are generated
by opportunities missed to confirm positioning
results and missed communications due to
external factors (including exhausted batteries)
such as malfunctions, improper operations and
power outages of the terminal if it is used for these
purposes or even if it is not used for these purposes.
•Since GPS is governed by the United States
Department of Defense, the GPS signals might
be controlled (degradation of accuracy, signal
blackouts, etc.) according to national security
reasons of the US. Also even if positioning is done
in the same locations and environments, identical
results may not be obtained due to the differences
in signal conditions caused by the locations of the
satellites.
•Since GPS uses signals from satellites, in the
following environments there are locations where
signals cannot be received or reception is poor.
Thus, the range of error of location information may
be over 300 m.
- In the midst of or underneath dense tree growth,
in areas lined with buildings or dense residential
areas
- Inside or underneath buildings
- Inside of underground tunnels, underground and
underwater
- Near high-voltage lines
- Inside of cars and trains
- In poor weather such as heavy rainfall and snow
- Inside of bags and boxes
- Hindrances (people and things) around the
terminal
- If the terminal is held with the hands covering up
the area around the screen, buttons, microphone
and speakers
•Please check the websites of the GPS service
provider and DOCOMO for news regarding the
usage of positioning provisions and current locations
notifications. Also using these functions may incur
charges.
161
Application
Note
•This terminal is equipped with a GPS receiver
that uses satellite signals to calculate current
locations. Some GPS functions use the Internet.
Transferring data may incur charges.
•To use a function which requires a GPS receiver
for positioning of your current location, check
for an unimpeded view of the sky. Move to
another location if your current location is not
determined after a few minutes.
•In order to calculate the current location faster,
do not move or cover GPS antenna with other
objects.
•It may take up to ten minutes to determine
current locations when the GPS functions are
used for the first time.
Activating GPS functions
a From the Home screen, u "Settings"
u "Location & security"
bPlace a check mark on "Use GPS
satellites"
•The "Notice" menu appears.
c"Agree"
•The GPS function is enabled.
Enabling location search by Wi-Fi
a From the Home screen, u "Settings"
u "Location & security"
bPlace a check mark on "Use wireless
networks"
•The "Location consent" menu appears.
c"Agree"
•You can search for your location with an
application that uses Wi-Fi.
Note
•Location information that is collected by Wi-
Fi does not identify individual users. Location
information can also be collected even when
the application is not running.
162
Application
Open Maps
a From the Home screen, "Applications"
u "Maps"
•Google Maps opens.
•Refer to the following to zoom in or zoom out a
map.
Pinch out/
pinch in
Pinch your fingers apart to zoom
in, or together to zoom out.
Double-tap Double-tap to zoom in.
Tap with 2
fingers
Tap with two fingers to zoom out.
Identifying your Current Location
a In the "Maps" screen, tap
•Your current location is displayed on the map by
a blinking blue circle.
Viewing Street View
You can switch to the Street View of your current
location.
a From the Maps screen, touch the section
that you want to view in Street View for
over 1 second
•A balloon appears.
bTap the balloon u Tap
•Street View appears.
Note
•Street View is not available in some areas.
is light gray for areas where Street View is not
available. is dark gray for areas where Street
View is available.
•You can change direction by dragging the
"Street View" screen. You can also zoom in/out
by pinching out/in on the screen. Drag to the
place that you want to view.
•If you tap u "Compass mode" when viewing
Street View, the terminal's magnetic compass
directions is linked to the directions displayed in
Street View.
163
Application
Searching for a Specific Location
a From the Maps screen, tap the "Search
Maps" box and enter the location that
you are looking for
•In addition to the address, you can specify city
names or facility names in your search (e.g.,
"Tokyo" and "museum").
•When you tap "Search Maps" box, a list of
previously searched or viewed locations
appears. You can also display a location by
tapping the list.
bTap
•An icon appears at the location on the map.
cTap the location icon
•Balloons with names of locations and facilities
appear.
dTap the balloon
•Detailed information appears.
: Return to the Maps screen.
: Start navigation to the displayed location,
or search for routes.
: Make a call.
: Display other options.
•The displayed information and available options
vary depending on the location.
Note
•You can also search by voice entry. For details,
refer to "Searching for a web page by voice
entry" (P128).
Changing Layer
The map can display multiple layers of different
information.
Adding a layer
a Tap in the "Maps" screen
•The "Layers" menu appears. The following
information is displayed in the layers.
Traffic View traffic information. This is
only available in some areas.
Satellite View satellite photos.
Terrain View topography.
Transit
Lines
View train information. This is only
available in some areas.
Latitude Join Latitude. For details, refer to
"Joining Latitude" (P167).
164
Application
My Maps View My Maps you created on
your PC. You can only view My
Maps on the terminal. You cannot
create My Maps on the terminal.
Wikipedia Display .
Tap to view a Wikipedia article
about the location.
Clear Map Clear all displayed layers, route
search results, etc.
Deleting a layer
a Tap in the "Maps" screen
•The "Layers" menu appears.
bTap the checked layer
•The layer is unchecked and deleted.
Searching for a Route
You can view a detailed route to your destination.
a From the "Maps" screen, tap u
"Directions"
bEnter your departure point in "Start
point:*1" box u Enter your destination in
"End point:" box
•You can also select your Start point and End
point by tapping to the right of their respective
boxes to display a menu and then choosing
from "My current location*2", "Contacts", "Point on
map" and "My Places*3" on the menu.
*1 "My current location" is entered in "Start point:"
box.
*2 If "My current location" is entered in "Start point:"
box or "End point:" box, it will not be displayed
even if you tap .
*3 Only the location with star mark can be displayed.
165
Application

cSelect / / as your mode of
transportation
d"Get directions"
•A list of routes to your destination appears.
eTap one of the routes
•The selected route appears.
Note
•If the routes are searched by car, on foot, or on
bicycle, the routes are displayed on the map.
•Tap the icon on the top left of the screen to
choose the mode of transportation, "Driving",
"Transit", "Walking" or "Bicycling".
•When appears, if you tap , Google maps
navigation is activated, and route guidance all
the way up to the destination is started.
•Tap to change "Start point:"/"End point:".
•When routes are searched via Public
transportation agencies, route choices are
displayed under "End point:". Tap any one of the
routes and details concerning travel times and
transfer for trains, station names and fares are
displayed.
•Tap to search for routes according to
“Departure time", "Arrival time" and "Last
available time".
•Tap "Show earlier trips" or "Show later trips", to
search for routes at earlier or later times.
•When routes are searched via Car, On foot,
Bicycle, if the items displayed under "End point:"
are tapped, the changes in directions for the
points on the routes are displayed on the maps.
166
Application
Clearing a Map
You can clear all displayed layers and route search
results.
a Tap in the "Maps" screen
•The "Layers" menu appears.
b"Clear Map"
•The displayed layers and route search results
are cleared.
Note
•If there is nothing that can be cleared, "Clear
Map" is grayed out and cannot be tapped.
•You can also clear a specific layer by tapping
on the Maps screen and tapping checked
layers to uncheck them.
•You can also clear displayed layers and route
search results by tapping u "Clear Map" in
the Maps screen.
Latitude
Google Latitude enables you and your friends to check
each other's locations on maps and share status
messages with each other. It also enables you to send
emails, make calls and search for routes to friend's
locations.
Location information is not shared automatically. You
must first join Latitude and then invite friends to provide
their locations, or accept invitations from friends to
share your location.
Joining Latitude
a From the Home screen, "Applications"
u "Latitude"
•The first time that you join Latitude, you are
prompted to accept or reject the Google privacy
policy.
bTap the link for "Google Privacy Policy"
u After reading, tap
c u "Join Latitude" u "Allow and
Share"
•Latitude opens and a list of members with
Google accounts appears.
167
Application
Opening Latitude
a From the Home screen, "Applications"
u "Latitude"
•Latitude opens and a list of members with
Google accounts appears.
Note
•You can also open Latitude by tapping u
"Latitude" on the Maps screen.
•For more details, tap u "See map" u u
"More" u "Help" u "Latitude" in the Latitude
screen, to refer to Mobile Help.
Navigation
Google Maps Navigation (beta) is route guidance
software with voice guidance.
a From the Home screen, "Applications"
u "Navigation"
•Service terms are displayed. Check "Show this
message next time", and from the next time
onward the same message is displayed.
b"Accept"
•Opens Google Maps navigation and displays
menu.
cTap one of the items
Enter or select your destination to start route
guidance.
•"Speak Destination": Search for destination via
voice.
•"Type Destination": Enter the characters of your
destination.
•"Contacts": Search for an address registered in
your contacts.
•"Starred Places": Search for a location with a star
added in Google Maps.
• (Route options): Set whether to use the
expressway and toll roads.
• : Display a map.
• / : Select by car or on foot
Note
•Any operation during driving should be
performed by a passenger.
168
Application
Places
You can use Places to easily search for nearby
restaurants, cafes, bars, travel spot, ATMs, gas stations,
and other places of interest.
a From the Home screen, "Applications"
u "Places"
•Places opens.
bTap one from "Restaurants" / "Coffee" /
"Bars" / "Attractions" / "ATMs" / "Gas
Stations" / "Explore Nearby"
•A list of search results appears. Tap a search
result to view details.
Note
•You can also open Places by tapping on the
Maps screen.
•To add the search condition, tap "Add", enter a
category to search, and tap "Add".
1Seg
1Seg is a digital terrestrial TV broadcasting service for
mobile devices that allows you to receive data programs
along with video and audio. It is also possible to acquire
detailed program information, participate in quiz shows,
and enjoy TV shopping.
For details on "1Seg" service, refer to the following
homepage.
Association for Promotion of Digital Broadcasting
http://www.dpa.or.jp/english/
●Before Using the 1Seg
•1Seg is a service provided by TV broadcast
companies (broadcast stations). Receiving video
and audio is free. For more information about NHK
reception fees, contact NHK.
•There are two types of information displayed in the
data broadcasting area: "Data broadcasts" and
"Data broadcast sites".
"Data broadcasts" are displayed by broadcast
wave for both video and audio, and "Data
broadcast sites" are displayed by connecting to
the site provided by the TV broadcasting company
(broadcast station) through the data broadcast
information. To view "Data broadcast sites",
etc. packet communication fees are charged.
Information fees may be required to access some
sites.
169
Application
●Broadcast wave
1Seg is one of broadcast services, and receives
radio waves (broadcast waves) that are different
from FOMA/LTE service. Therefore, it is not possible
to receive at locations where broadcast waves do not
reach or during time zones where broadcasting is off
regardless of whether you are in an area with FOMA/
LTE service.
In addition, in areas with digital terrestrial TV
broadcast service, reception may be poor or may not
be available in the following locations.
•Locations far from the broadcasting tower where
the broadcast wave is sent
•Locations where waves are blocked by landscape
or buildings such as in the mountains and or near
buildings.
•Locations where waves are weak such as tunnels,
underground, and building basements
In order to have better reception, completely extend
the 1Seg antenna. Changing the antenna orientation
or changing location may help improve reception.
•Due to the stop of analog waves, at some locations,
channels may be reorganized. Therefore, you may
need to reset channels (P176) using autoscan.
After resetting channels, it is necessary to register
them to the channel list.
•For details on digital terrestrial channel packs,
refer to the following homepage.
The Ministry of Internal Affairs and
Communications, TV Recipient Support Center,
Channel Change Call Center
0120-922-303
Homepage
http://www.digisuppo.jp/index.php/repack/
(in Japanese only)
170
Application
●About the 1Seg antenna
•To view 1Seg, fully extend the 1Seg antenna. If you
give too much force when the antenna is not fully
extended, it may be damaged.
•When changing the orientation of the 1Seg
antenna, hold the bottom portion.
Note
•When retracting the 1Seg antenna, hold the
antenna straight up and push down. If too much
force is applied, it may be damaged.
•When retracting the top portion of the 1Seg
antenna, pay attention to its orientation.
•1Seg audio cannot be output by Bluetooth
devices that are not compatible with SCMS-T.
•1Seg is not compatible with video output using
HDMI connection due to copyright protection.
1Seg Viewing
a From the Home screen, "Applications"
u "TV"
•The 1Seg viewing screen appears.
•When activating it for the first time, it is
necessary to accept the terms of service and to
select your viewing area.
171
Application

Viewing the 1Seg viewing screen
Vertical screen display shows the data broadcast.
a TV broadcast area
Flick left or right to switch channels.
Tap to display the TV operation screen.
b Data broadcast area
Tapping directly on the content of the data
broadcast may allow you to operate.
c Data broadcast operation button
d Subtitle display area
Tap to display the TV operation screen.
172
Application

Viewing the TV operation screen
Tap the TV broadcast area/subtitle display area on
the 1Seg viewing screen to temporarily display the TV
operation screen.
a Channel, Broadcast station, Program name
b "Channels" tab
Tap to display the channel list. Tap on a channel to
switch channels.
c Volume bar
Swipe left and right to adjust the volume.
It is also possible to adjust the volume using the
volume key (up)/volume key (down).
d Channel switch button
Tap to switch to the previous/next broadcast station
registered in the channel list. Touch for over 1
second to start a channel search and switch to the
first received broadcast station regardless of the
channel list order.
e "Programs" tab
Tap to display the program schedule of the channel
you are watching. Tap on a program to display the
details.
173
Application
Fixing the screen orientation
You can fix the screen orientation that is currently
displayed.
a From the 1Seg viewing screen, u "Fix
screen direction"
Note
•To cancel fixed screen orientation, from the
1Seg viewing screen, tap u "Unfix screen
direction".
Using the Program Schedule
You can view a TV guide of both terrestrial TV programs
and BS digital broadcast programs. You can search
programs using key words or by genre, and make
reservations for viewing.
a From the 1Seg viewing screen, u
"Programs"
•The program schedule appears.
•When activating it for the first time, it is
necessary to accept the terms of service and to
select your viewing area.
bTap on a program
•Program information is displayed.
•Tap "ワンセグ" (1Seg) u "ワンセグ起動"
(Activate 1Seg) to switch the channel to view the
1Seg viewing screen.
•Tap "ワンセグ" (1Seg) u "ワンセグ視聴予約"
(1Seg Viewing Reservation) to reserve a
program for viewing.
Viewing Reservations
If you make a reservation for a program, an alarm is
notified before the program begins.
a From the 1Seg viewing screen, u "TV
timer"
•The "TV timer list" screen appears.
b u "New TV timer"
•A menu appears. You can make viewing
reservations according to the following method.
Set from
the program
guide
Reserve viewing reservation
from the program schedule.
Set manually Reserve by specifying the
start date, start time, channel,
program name, and repetition.
174
Application
Note
•The start of a program cannot be notified if the
terminal power is OFF at the reservation time.
Confirming, editing, or deleting
reservation contents
a From the "TV timer list" screen, touch a
viewing reservation for over 1 second
•A menu appears. The following operations are
available to you.
Detail Display the viewing reservation
details.
Edit Edit the viewing reservation.
Delete Delete the viewing reservation.
Using TV Link
Some data broadcasts may show link information
(TV link) to related sites. By registering a TV link, it is
possible to connect to related sites later.
•To register a TV link, tap the item that can be
registered for the TV link that is displayed in the data
broadcast area.
a From the 1Seg viewing screen, u
"TVlink"
•The "TVlink" list screen appears.
bTap the TV link
•Connect to the registered site.
Note
•From the "TVlink" list screen, touch the TV link
for over 1 second, and tap "Delete" u "Yes" to
delete.
•From the "TVlink" list screen, tap u "Delete
All" u "Yes" to delete all TV links.
175
Application
1Seg Settings
a From the 1Seg viewing screen, u
"Settings"
•The "Settings" menu appears.
bChange the settings if required
Subtitle
settings
Subtitle
display
Put a mark in the
checkbox to display
subtitles.
Subtitle
language
If the program provides
multiple subtitles, select
the subtitle you want to
display.
Audio
setting
Main/Sub
switch
If a sub audio channel
is available for a
program, you can
switch between the
main and sub audio
channels.
Audio
switch
If multiple sounds are
available for a program,
you can select the
sound you want to hear.
Other
settings
Channel
setting
Create and edit channel
lists, switch channel
lists, and initialize
channel lists.
Alarm
setting
Configure the settings
for the viewing
reservation alarm.
Reset
broadcast
memory
Delete the information
and TV links that are
registered on the data
broadcast
176
Application
Creating a channel list
a From the 1Seg viewing screen, u
"Settings" u "Channel setting" u
"Channel list edit"
•The "Channel list edit" screen appears.
bTouch "Untitled" for over 1 second
c"Create"
•The "Creating channel list" screen appears. The
following operations are available to you.
Manual
setting
Select the viewing area from the
area list, and create a channel list.
Auto
setting
Scan broadcast stations that can
be received at the current location
and create a channel list.
Osaifu-Keitai
Osaifu-Keitai is equipped with an IC card, so by waving
the terminal close to a reader at a shop, it is possible to
make payments or use coupons or participate in stamp
rallies. By waving the terminal close to a reader, it is
also possible to access sites and home pages, acquire
the latest coupons using communication, and deposit
money and confirm usage status for e-money. As a
countermeasure for loss, an Osaifu-Keitai lock function
is available so that you can use it without worry.
•For details about Osaifu-Keitai, refer to "Mobile
Phone User's Guide [sp-mode]" or dmarket.
•To use Osaifu-Keitai compatible services, it is
necessary to make settings through sites or
applications.
•If the terminal has a problem, data in the IC card
(including e-money and points) may be lost or
changed (if the terminal needs repair, terminals with
data cannot be accepted, so principally the user
needs to delete the data). For more information
about reissuing and restoring data, and support for
saving and transferring data, contact the Osaifu-
Keitai service provider. Please use Osaifu-Keitai
compatible services that provide backup services to
save you important data.
177
Application
•We are not responsible for damages such as lost
or changed data in the IC card, or other damages
related to Osaifu-Keitai compatible services in any
cases including terminal malfunction or terminal
replacement.
•If a terminal is stolen or lost, please immediately
contact your Osaifu-Keitai compatible providers for
what to do.
Using Osaifu-Keitai
To use Osaifu-Keitai compatible services, from the
Osaifu-Keitai compatible site, download the application
for Osaifu-Keitai and then configure settings. Some
services do not require downloading of an Osaifu-Keitai
compatible application.
a From the Home screen, "Applications"
u "Osaifu-Keitai"
•The "Service List" screen appears.
•If your initial settings have not been completed,
the Initial Settings screen appears.
bTap the service that you want to use
cConfigure service settings
•Make necessary settings from the service site or
application.
Swiping Close to Readers
Communication can be executed by swiping the
mark close to a reader.
Keep in mind the following when swiping to a reader.
•Do not let the terminal hit the reader
•Swipe the mark parallel to the reader
•Swipe the mark as close to the center of the
reader as possible
•If the reader does not read, the mark needs to be
adjusted front, back, left, or right.
•Do not attach metallic objects to the surface of the
mark.
178
Application
Locking Osaifu-Keitai
Lock the Osaifu-Keitai service from being used. After
locking, data cannot be acquired from the reader.
a From the Home screen, "Applications"
u "Osaifu-Keitai"
•The "Service List" screen appears.
b u "Osaifu-Keitai Lock Setting"
cTap the "Password:" box and enter
password
dTap the "Confirm Password:" box and
enter the same password entered in
Step 3
e"OK"
Note
•The lock is not canceled even if the power is
turned off.
Canceling the lock
a From the Home screen, "Applications"
u "Osaifu-Keitai"
•The "Service List" screen appears.
b u "Osaifu-Keitai Lock Setting"
cTap the "Password:" box and enter the
same password entered for locking
d"OK"
179
Application

ToruCa
ToruCa is an electronic card that can be loaded to your
mobile. It can be acquired from readers and websites as
the shop information or coupons. The acquired ToruCa
will be saved in "ToruCa" application. Use "ToruCa"
application to display, search or update.
•For details of ToruCa, refer to "Mobile Phone User's
Guide [sp-mode]" or dmarket.
a From the Home screen, "Applications"
u "ToruCa"
Note
•Packet communication fee may incur when
acquiring, displaying or updating ToruCa.
•You may not be able to acquire, display or
update the ToruCa provided for i-mode terminal.
•The functions below may not be available
depending on the IP (Information Provider)
setting.
- Acquiring from readers
- Update
- ToruCa sharing
- Transferring and copying data to microSD
card
- Viewing maps
•It is not possible to acquire ToruCa from readers
while Osaifu-Keitai is locked.
•Depending on IP setting, ToruCa that can be
displayed on the map from ToruCa (details) may
not be able to be displayed on the map from
ToruCa list.
•When sending ToruCa using email, it is sent with
the status before acquiring ToruCa (details).
•The received ToruCa by email may not be saved
depending on the email application you use.
•ToruCa may not be acquired depending on the
browser you use.
•When moving or copying ToruCa to microSD
card, it is moved or copied with the status
before acquiring ToruCa (details).
•ToruCa may not be acquired from readers when
Osaifu-Keitai is not initialized.
180
Application
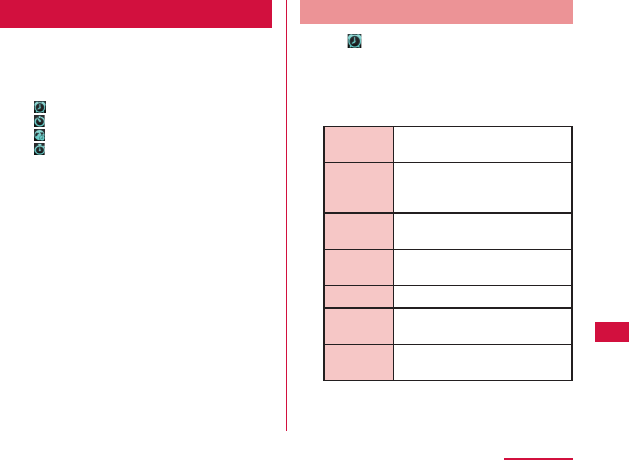
Alarm Clock
a From the Home screen, "Applications"
u "Alarm Clock"
•The following functions are available by
switching tabs.
: Alarm
: Timer
: World Clock
: Stopwatch
Setting Alarm
a Tap on the Alarm Clock screen
•The "Alarm" screen appears.
b"New alarm"
•The "Set alarm" screen is displayed, and the
following settings are available.
Hour/
Minute
Change the time setting.
Repeat Set the alarm to repeat on certain
days of the week at the same
time.
Snooze
duration
Set the snooze time.
Vibration Check to enable both alarm
sound and vibrator.
Alarm tone Set the alarm sound.
Puzzle lock Check to enable or uncheck to
disable the puzzle setteing.
Memo Add memos to alarms that are
set.
181
Application
cSet alarm details and tap "Save"
•The "Alarm" screen is displayed. The set alarm
is added to the list. Set the alarm ON or OFF by
tapping / .
•Tap the list to display the "Set alarm" screen and
change the content.
Tap "Save" to overwrite the changes, and return
to the "Alarm" screen.
Note
•The alarm functions at the time set for the alarm.
Tap "Stop" to stop the alarm. Tap "Snooze" to
make the alarm function again according to the
time interval set in the alarm setting for "Snooze
duration".
Setting the Timer
a Tap on the Alarm Clock screen
•The Timer screen is displayed, and the following
settings are available.
Hour/Minute/
Second
Set the timer.
Vibration Check to enable both alarm
sound and vibrator.
Alert tone Set the alarm sound.
b"Start"
•The timer starts.
Setting the World Clock
You can confirm the date and time for registered cities in
a list.
a Tap on the Alarm Clock screen
b"New city"
•City names are displayed. Tap to display the
current time and name of the selected city on
the list screen. Tap to add/delete cities.
182
Application
Setting the Stopwatch
a Tap on the Alarm Clock screen
b"Start"
•The stopwatch starts. Tap "Lap" to count lap
times.
•To stop the stopwatch, tap "Stop".
•Tap "Resume" to restart the stopwatch, and tap
"Reset" to reset it.
Calendar
Calendar
The terminal has a calendar for managing your
schedule. It can synchronize with scheduler built by
Microsoft Exchange Server or with Google Calendar if
you have a Google account.
Opening Calendar
a From the Home screen, "Applications"
u "Calendar"
•The Calendar screen appears.
183
Application
Changing Calendar Display/
Displaying Schedule
Changing to Day/Week/Month view
a Tap "Day" / "Week" / "Month" in the
change display box
•Tap "Agenda" in the change display box to
display a list of events. Tap each list to display
the content.
Note
•If you swipe left or right in Day, Week, or Month
view, the previous or next day, week, or month
is shown.
•If you tap "Today" in the Calendar screen
when in Week or Month view, today's date is
highlighted according to the system date.
Setting calendar type to display
a From the Calendar screen, u
"Calendars"
•The registered calendar types are displayed.
bTap of the calendar you want to
display
•If appears, update is automatically running. If
appears, the calendar is displayed. If both of
them are grayed out, functions are not available.
c"OK"
•The Calendar screen appears and information
based on the settings you set is displayed.
Note
•This application cannot create calendar type. To
create calendar type, access Google calendar
web page from browser and tap "設定" (Settings)
menu.
184
Application
Viewing your schedule
a From the Calendar screen, tap the
schedule that you want to view
•The "Agenda" screen appears, and a list of your
schedules is displayed.
Note
•Tap "Agenda" in the change display box to
display the "Agenda" screen.
Creating a Schedule
a From the Calendar screen, u "New
event"
•The "New event" screen appears. Follow the on-
screen instructions to fill out each item and tap
"Save".
Note
•As the schedule time approaches, appears
in the status bar. Drag or swipe the status bar
downwards to open the Notification panel then
tap the calendar notification, the "Calendar
notifications" screen is displayed. Tap "Dismiss
all" to delete the notification or tap "Snooze all"
to repeat the notification 5 minutes later.
•From the Calendar screen, tap to display the
"New event" screen.
Changing Calendar Settings
a From the Calendar screen, tap u
"Settings"
•The "Settings" screen appears.
bChange the settings if required
•Set how to notify an event, also set ringtone,
vibrator and default notification time.
185
Application
Calculator
a From the Home screen, "Applications"
u "Calculator"
•The Calculator screen appears.
bCalculate
•The results are displayed.
Note
•You can display the Functions screen by
dragging or swiping the keypad area to the left
on the Calculator screen or by tapping u
"Advanced panel".
You can return to the Calculator screen by
dragging or swiping the keypad area to the
right on the Function screen or by tapping u
"Basic panel".
•Tap "CLEAR" to delete the most recently
entered number or arithmetic operator. Touch
"CLEAR" for over 1 second to delete all entered
information.
•Tap u "Clear History" to clear the history.
SmartWorld
a From the Home screen, "Applications"
u "SmartWorld"
•The “SmartWorld" screen appears.
SmartWorld menu
For SmartWorld, the following menu is displayed.
Item Description
Hot & New Hot & New screen is displayed.
Apps Apps screen is displayed.
動画 (Video) Video screen is displayed.
検索 (Search) Search screen is displayed.
マイアプリ
(My application)
My application screen is
displayed.
186
Application
YouTube
You can play YouTube videos or upload the videos you
have shot to YouTube.
•First-time users are required to accept "mobile terms
of service".
a From the Home screen, "Applications"
u "YouTube"
•The “YouTube" screen appears.
: Enter a keyword and then search for a
video
: Shoot a video with the camera of the
terminal and then upload the video to
YouTube
•You need to log in to your YouTube account to
upload a video.
bTap a video you want to play
•The video is played.
: Switch between high quality (HQ)
playback and low quality playback.
•Tap screen to pause a video, or to show the
playback bar to change the playback position.
Polaris Office
a From the Home screen, "Applications"
u "Polaris Office"
•The "Polaris Office" screen appears.
Note
•If you have not registered as a user, the user
registration screen appears when activating
"Polaris Office".
•Files with password may not be usable.
•Files created on PC may be displayed differently
or may not be displayed.
187
Application
File Types and Formats
You can use Polaris Office to read or edit Word, Excel,
PowerPoint files saved on the terminal or microSD card
(as of November 2011).
Type File format
Microsoft Word
(Word 97 to Word 2003)
doc
Microsoft Word (Word 2007) docx
Microsoft Excel
(Excel 97 to Excel 2003)
xls
Microsoft Excel (Excel 2007) xlsx
Microsoft PowerPoint (Power Point
97 to PowerPoint 2003)
ppt
Microsoft PowerPoint
(Power Point 2007)
pptx
Adobe PDF (Version 1.2 to 1.7) pdf
Text file txt, asc
Note
•Only Word, Excel, and PowerPoint files can be
edited in Polaris Office.
•If you edit Word 2007, Excel 2007 or PowerPoint
2007 by using Polaris Office, it is saved as doc,
xls, or ppt format respectively.
iD設定アプリ (iD appli)
"iD" is convenient e-money that uses the credit
settlement system. Credit card information is set to an
Osaifu-Keitai or iD compatible card so that you can do
shopping by simply swiping over a reader at shops. Up
to two types of credit card information can be set for
Osaifu-Keitai, so you can use them according to their
merits. Cash advance may be available depending on
the card issuing company.
•To use iD with Osaifu-Keitai, you need to apply to
an iD compatible card issuing company and make
settings using iD appli.
•Fees (annual membership) for using the iD service
depend on the card issuing company.
•For overseas use, fees differ from packet
communication fees in Japan.
•For more information about iD, refer to the iD site
(http://id-credit.com/) (in Japanese only).
188
Application
a From the Home screen, "Applications"
u "iD設定アプリ" (iD appli)
•The "ご使用上の注意" (Usage Precautions)
screen appears. After this, follow the on-screen
instructions.
Electronic Dictionary
Searching for a Word
a From the Home screen, "Applications"
u "Dictionary"
•The Dictionary screen appears.
bEnter a word you are looking for
•A list of words matching what you have entered
appears.
cTap a word
•The meaning appears.
Note
•Tap to search again.
Switching Dictionaries
You can switch among "Obunsha ENG-JPN", "Obunsha
JPN-ENG" and "Obunsha JPN-JPN" to search for a
word.
a From the Dictionary screen, u
"Change Dictionary"
•The "Change Dictionary" menu appears.
bTap a dictionary
•The target dictionary is displayed.
Searching from History
a From the Dictionary screen, u
"History"
•The "History" screen is displayed and a list of
words you searched for previously is displayed.
bTap a word
•The meaning of the selected word is displayed.
Marking with a Highlighter Pen
a From the screen where the word
meaning is displayed, u "Highlight
Pen"
•The word being displayed is highlighted.
189
Application
Adding a Word to Wordbook/
Viewing Wordbook
You can register a search result on Wordbook.
a From the screen where the word
meaning is displayed, u "Save"
•The word is added to Wordbook.
bFrom the Dictionary screen, u
"Wordbook"
•The "Wordbook" screen appears and a list of
registered words is displayed.
cTap a word
•The word meaning is displayed.
Note
•From the "Wordbook" screen, tap "ALL", then
"ENG" or "JPN" to display the words only in
English or Japanese.
•Words that you added to the Wordbook are
displayed in the order of registration date. Tap
u "Align" on the "Wordbook" screen to sort
the words.
•Tap u "Delete" on the "Wordbook" screen to
delete the registered words.
Changing Dictionary Settings
a From the Dictionary screen, u "Dict.
Settings"
•The "Dict. Settings" screen appears.
bChange the settings if required
•Settings of highlighter color and font size are
available.
190
Application
Downloads
The terminal can download images, music and web
pages from the Internet. Use the following operations to
check, display or playback downloaded data.
a From the Home screen, "Applications"
u "Downloads"
•A list of downloaded files is displayed.
bTap a file name to check
•The downloaded file is displayed/played back.
Note
•Downloading methods vary depending on
the web page. Please follow the web page's
instruction for downloading.
•Files contained in web pages that require
authentication or file contained in SSL web
pages might not be downloaded.
Application Manager
You can use Application Manager to confirm or end the
activated application.
a From the Home screen, "Applications"
u "Application Manager"
Tab name Description
Running
applications
Display the activated applications.
Descriptions for applications
which use a lot of CPU or power
are written in red font.
•Tap "Stop all" or "Stop" to end
one or all applications.
•Tap u "Sort by" to switch
among "Start time", "Name",
"CPU usage", and "RAM usage".
Installed
applications
Installed applications are
displayed as a list. Applications
pre-installed in the terminal are not
displayed in the list.
•Tap "Uninstall" to uninstall an
application.
•Tap u "Sort by" to switch
among "Installed date", "Name",
and "Size".
191
Application
Tab name Description
Help Confirm the details about
Application Manager.
Note
•When setting "Home Switcher" application to
"Home", you can always check the number of
activated applications by putting Application
Manager widget on the Home screen.
•Problem may occur to the system if an
application is ended.
•The application activated on the background
may not be displayed on "Running applications"
list.
Data Backup and Settings
Backup
Using "Link Backup"
Use "Link Backup" application to backup call log
(history), calendar (schedule), system settings, text
message (SMS), and bookmark into microSD card.
192
Application
Backing up
a From the Home screen, "Applications"
u "Link Backup"
•The Link Backup menu appears.
•When you first launch Link Backup, a license
agreement appears. Tap "Accept".
b"Backup" u "Storage Card"
c"Add new"
•If a file has already been backed up, tap the file
name to back up over the file.
dEnter the backup file name, and tap
"Continue"
•A list of files that can be backed up appears.
eTap to unmark items that you do not
want to back up
f"Continue"
•The backup file is created.
g
Tap "Continue" on the completion
screen
•You are returned to the Link Backup menu.
Restoring from a backup file
When data is restored, the data on the terminal is
replaced with the data included in the backup file on
the microSD card. You should therefore exert adequate
caution when restoring data.
a From the Home screen, "Applications"
u "Link Backup"
•The Link Backup menu appears.
b"Restore" u "Storage Card"
cTap the file that you want to restore
•A list of files that can be restored appears.
dTap to unmark items that you do not
want to restore
e"Continue" u "Restore"
•The data is restored from the backup file.
fTap "Continue" on the completion
screen
Note
•If system settings are included in the restored
data, restart the terminal after data restoration.
Tap "Yes" on the completion screen.
193
Application
Setting the backup schedule
You can schedule the automatic backing up of data.
a From the Home screen, "Applications"
u "Link Backup"
•The Link Backup menu appears.
b"Schedule" u "Storage Card"
cTap to select a backup cycle
•If you have tapped "Weekly", "Every two weeks"
or "Monthly", select the scheduled day of the
week or date.
d"Continue"
•A list of files that can be backed up appears.
eTap to unmark items that you do not
want to back up
f"Continue"
•The backup schedule is set.
Note
•Set the backup starting time in "Backup start
time".
•The backup is not performed if the terminal is
powered off at the scheduled time.
Changing Link Backup settings
a From the Home screen, "Applications"
u "Link Backup"
•The Link Backup menu appears.
b u "Settings"
•The "Backup settings" screen appears.
cChange the settings if required
•You can configure the security settings and the
number of backup files to store when a backup
schedule is set.
194
Application
Backing up Phonebook
You can back up the Phonebook from your terminal to
a microSD card. You can also import Phonebook from a
UIM or microSD card to your terminal.
Backing up Phonebook to a microSD card
a From the Home screen, "Phone"
•The "Phone" screen appears.
bTap "Phonebook"
c u "Others" u "Import/Export"
•A menu appears.
d"Export to SD card"
eSelect the selection method for
Phonebook data u Tap "OK"
fTap the phonebook that you wish to
export u "OK"
g
Tap "Yes" or "No" for attaching name
cards
h"OK" on the "Confirm export" screen
•The phonebook is exported to a microSD card.
Importing a phonebook from a UIM or
microSD card
a From the Home screen, "Phone"
bTap "Phonebook"
c u "Others" u "Import/Export"
•A menu appears.
•If you are importing from a UIM, tap "Import from
SIM card".
d"Import from SIM card" or "Import from
SD card"
eTap the account you wish to import
fSelect the selection method for
Phonebook data u Tap "OK"
g
Tap the phonebook that you wish to
import u "OK"
•The phonebook is imported.
195
Application

Backing up SMS Messages to a
UIM
You can copy or move up to 20 messages (SMS) to the
UIM.
a From the Home screen, "Applications"
u "Messaging"
•The "Messaging" screen appears.
bTap one of the received messages or
threads
•The message appears.
cTouch the message that you want to
back up for over 1 second
•The "Message options" menu appears.
dTap "Copy to SIM" or "Move to SIM"
•The SMS message is copied/moved to the UIM.
196
Application
Using Overseas
Overview of International
Roaming (WORLD WING)
The international roaming service (WORLD WING)
allows you to use your terminal in the service areas of
overseas operators affiliated with DOCOMO, with the
same phone number and email address. Calls and SMS
can be used with no settings changes.
●Available areas
This terminal can be used in 3G network and GSM/
GPRS network service areas. Please check the
information on available areas.
●Before using the terminal overseas, refer to the
following items.
•"Mobile Phone User's Guide [International
Services]"
•DOCOMO "International Services website"
•Help for "
ドコモ海外利用" (docomo while overseas)
application
●Overseas is outside of the Xi area, so use a 3G
network or GSM/GPRS network.
Note
•For a country code, international call access
code, and universal number international prefix,
available countries, and international network
operators refer to "Mobile Phone User's Guide
[International Services]" or the DOCOMO
"International Services website".
•When using international roaming, before
departing, turn the power OFF or turn "Airplane
mode" ON. After arriving overseas, turn the
power ON or turn "Airplane mode" OFF.
Similarly, when returning from overseas, before
departing, turn the power OFF or turn "Airplane
mode" ON. After returning, turn the power ON or
turn "Airplane mode" OFF.
197
Using Overseas
Available Services
Main communication
service 3G GSM/
GPRS GSM
Calls ○○○
SMS ○○○
Email*1 ○○×
Packet
communication*1 ○○×
GPS location
verification*2 ○○×
(○ : Available × : Not available)
*1 To use data communication while roaming, set the
data roaming to ON. (P206)
*2 Packet communication charges are incurred during
GPS positioning (location verification).
•Some services are not available depending on the
overseas operator or network being used.
Confirming before Using
Confirming before Departure
Before using the terminal overseas, check the following
in Japan.
●Contract
Check whether you have applied for WORLD WING.
For more details, contact "General Inquiries" on the
back of this instruction manual.
●Charges
•Fees (call fee, packet communication fee) for
overseas use are different from those in Japan.
•Auto communication may start depending on the
applications you use, so packet communication
fees may be high. Ask the supplier for operating
conditions of each application.
●Remote operation settings
•To use subscribed network services overseas,
such as Voice Mail Service, Call Forwarding
Service, etc., you need to activate the remote
operation settings. For the operating procedures,
refer to "Mobile Phone User's Guide [International
Services]".
198
Using Overseas
●SMS rejection
•You can set to reject SMS (including reception
information when the FOMA terminal is out
of service area) overseas. For the operating
procedures, refer to "Mobile Phone User's Guide
[International Services]".
Pre-configuring
●Network service configuration
If you have subscribed Network service, voice mail
service, call forwarding service, number notification
service, etc. are available overseas. However, some
network services are unavailable.
•Starting "Remote operation settings" service is
required when using networks service overseas.
You also can set "Remote operation settings" after
arriving abroad.
•Network service may not be available depending
on the network operator you are using abroad
even if its setting and cancellation is available.
Confirming Overseas
When you arrive overseas, the terminal automatically
connects to an available network operator when it is
powered on.
●About connections
If "Available networks" in "Network operators" is set
to "Select automatically", your terminal automatically
searches and connects to the optimum network.
If you manually connect to a network operator which
offers a flat-rate service, the cost for using packet
communication in overseas will be a flat-rate per
day. You need subscription to use packet flat-rate
service. For detail, refer to the "Mobile Phone User's
Guide [International Services]" and in DOCOMO
"International service website".
●About screen display
•The type of network you are using is indicated by
an icon in the status bar on the screen.
Icon Network Type
/
GPRS network available/communicating
/ 3G (packet) network available/
communicating
/ FOMA HIGH-SPEED/HSDPA network
available/communicating
•You can check the connected network operator
name in the Notification panel.
199
Using Overseas

●About date & time
If the "Automatic" checkbox in "Date & time" has been
marked, the time and time zone of the terminal's
clock will be automatically changed when information
about the local time and time zone is received from
the network of the overseas operator to which you
are connected.
•The automatic time/time zone setting may not work
properly depending on the overseas operator. In
that case, change the time zone manually.
•The timing of these changes varies depending on
the overseas operator.
•When configuring settings manually, unmark
"Automatic" and set items of "Set date", "Select
time zone" and "Set time".
•"Date & Time" → P120
●About network services during international roaming
If you are subscribed to the network services, you
can use the Voice Mail Service, Call Forwarding
Service, and other network services overseas.
However, some network services are unavailable.
For the operating procedures, refer to "Mobile Phone
User's Guide [International Services]".
•To operate network services overseas, you need
to activate "Remote operation settings". For details
on the remote operation settings, refer to "Mobile
Phone User's Guide [International Services]".
•You can set an announcement to notify the
other party that you are using the international
roaming service when you receive a call during
international roaming, and set the incoming call
restriction function (Bar Incoming Call). For the
operating procedures, refer to "Mobile Phone
User's Guide [International Services]".
•When you use a network service overseas, the
international call charges in the country of use will
be incurred.
•The network services that are available overseas
may not be available depending on the overseas
operator to which you are connected.
200
Using Overseas

●About missed call notification
If you were unable to answer a call during
international roaming because the power of your
terminal was off or you were out of the service area,
you are notified of the missed call information (date
and time of the call and the phone number of the
caller) by SMS.
●Inquiries
•If your terminal or UIM is lost or stolen overseas,
contact DOCOMO immediately from your current
location and carry out the procedure to suspend
usage. For contact information, refer to "General
Inquiries" on the back of this manual. Please note
that you are liable for any call or communication
charges incurred after the loss or theft of the
terminal.
•You will need the country's international call
access code or universal number international
prefix if calling from a land-line phone from
overseas.
After Returning to Japan
When you return to Japan, the terminal automatically
connects to the docomo network. If it is unable to
connect, change the following settings.
a From the Home screen, u "Settings"
u "Wireless & networks" u "Mobile
networks"
b"Network Mode" u "Automatic"
c"Network operators" u "Select
automatically"
201
Using Overseas
How to Make and Receive
Calls at your Destination
Making Calls to Other Countries
(including Japan)
You can use the international roaming service to make
calls to other countries while overseas.
•For information about the countries and operators
that you can access, refer to "Mobile Phone User's
Guide [International Services]".
a From the Home screen, "Phone"
•The "Phone" screen appears.
bTap the "Dial" tab
cEnter "+" (touch "0" for over 1 second)
u Country code u Area code (city code)
u Other party's phone number in order
•Do not enter "0" if an area code begins with "0".
You may need to dial "0" at the beginning of the
phone number for calls to some countries and
regions, such as Italy.
d
eWhen the call is finished, tap "End"
Making Domestic Calls
You can make a call to the other party's land-line phone
or mobile phone in the same way as in Japan.
a From the Home screen, "Phone"
•The "Phone" screen appears.
bTap the "Dial" tab
cEnter the other party's phone number
•To make a call to a land-line phone, enter the
area code (city code) and the other party's
phone number.
d
eWhen the call is finished, tap "End"
Making Calls to WORLD WING
Users
When the other party that you are making a call to is a
WORLD WING user, make an international call to Japan
even if the other party is in the country in which you are
staying.
•Dial "+" and "81" (country code of Japan) first and
then dial the phone number omitting the "0" at the
beginning as if you are making a call to Japan
because the call is routed through Japan regardless
of the destination.
202
Using Overseas
Settings for making/receiving calls
overseas
Configure the international roaming service to make/
receive calls while overseas.
•This might not be available depending on the
overseas operator.
a From the Home screen, u "Settings"
u "Call settings" u "Roaming settings"
bChange the settings if required
Restricting
incoming calls*1
Activate restriction
Deactivate restriction
Confirm settings
Incoming
notification while
roaming*2
Activate notification
Deactivate notification
Confirm notification settings
Roaming
guidance*3
Activate
Deactivate
Confirming settings
International dial
assist
Automatic conversion
function
Country code
International prefix
Network service Configure settings overseas
for DOCOMO network
services such as Voice Mail
Service.
*1 To set, it is necessary to enter your network
security code.
*2 Configure settings of the SMS message
notification that will be received for calls that
were missed while the terminal was powered
off or outside of the service area. (Free)
*3 If enabled, notification will be made to the
caller that you are overseas.
203
Using Overseas

Receiving Calls
You can receive calls in the same way as in Japan.
Note
•When you receive a call while using the
international roaming service, the call is
forwarded internationally from Japan, regardless
of the country from which the call is made. The
caller incurs call charges for the call to Japan,
and the receiver incurs incoming call charges.
•Even if the other party has made a call with
notification of the Caller ID set, you may not
be notified of the Caller ID depending on the
overseas operator. Also, the number you are
notified of may differ from the other party's
Caller ID depending on the network that the
other party is using.
•The incoming call may not be declined during
use overseas. (P81)
Making a Call from Other Parties
●Having the other party call you overseas from Japan
Have the other party call you by dialing your phone
number in the same way as when you are in Japan.
●Having the other party call you overseas from a
country outside Japan
You need to have the other party dial the international
call access code and "81" regardless of the
destination because the call is routed through Japan.
International call access code of the country in which
the caller is staying -81-90 (or 80) -xxxx-xxxx
204
Using Overseas
Settings for Network
Connection at Overseas
When you use the terminal overseas, it is necessary
to switch to the network of an operator that can be
connected to in the country you are staying.
At the time of purchase, the terminal is set to
automatically search for and then switch to a network
that can be connected to but you can also change the
settings manually.
Setting Network Mode
a From the Home screen, u "Settings"
u "Wireless & networks" u "Mobile
networks" u "Network Mode"
bTap a prior network mode to use
•Automatic: Select LTE/3G network or GSM/
GPRS network automatically to use.
•GSM only: Only use GSM/GPRS network.
Note
•If you change the Network mode while using
data communication, the data communication
will be stopped and the Network service will be
disconnected.
Searching an Available Network
and Setting Manually
a From the Home screen, u "Settings"
u "Wireless & networks" u "Mobile
networks" u "Network operators"
•The "Available networks" screen appears.
b"Search networks" / "Select
automatically"
Note
•If you manually set the operator to connect, the
terminal will not automatically switch to another
operator that can be connected to when you
move out of the service area.
•If you manually set the operator to connect to,
set "Select automatically" after you return to
Japan.
•If you tap "Network operators" while using
data communication over a 3G network, the
message, "Network with Limited Service found.
Do you want to initiate a Network Search?"
appears. Tap "Yes" to stop data communication
and search for networks.
•Tap "Network operators" while using data
communication over a GSM/GPRS network
to stop data communication and search for
networks.
205
Using Overseas
Automatically Selecting an
Available Network
a From the Home screen, u "Settings"
u "Wireless & networks" u "Mobile
networks" u "Network operators"
b"Select automatically"
Activating Data Roaming
a From the Home screen, u "Settings"
u "Wireless & networks" u "Mobile
networks"
bPlace a check mark on "Data roaming"
•A caution message appears.
c"OK"
206
Using Overseas

Appendix / Index
Introduction of Options and
Related Devices
You can expand the range of the terminal's uses, in both
the personal and business realms, by combining it with
various optional devices. Some products may not be
available in certain areas.
For more details, please contact a service counter such
as a docomo Shop. For details on optional devices, refer
to the related instruction manuals.
•Back Cover L28
•Battery Pack L15
•Desktop Holder L12
•HDMI Conversion Cable L01
•FOMA Charging microUSB Conversion Adapter L01
•FOMA AC Adapter 01*2/02*2
•FOMA AC Adapter 01 for Global Use*2
•FOMA DC Adapter 01*2/02*2
•FOMA Dry Battery Adapter 01*2
•FOMA Portable Charging Adapter 02*2
•Wireless Earphone Set 02
•Bone Conduction Microphone/Receiver 02
•In-Car Hands-Free Kit 01
•In-Car Holder 01
•Carry Case 02
•Pocket Charger 01
*1
*2 FOMA charging microUSB conversion adapter L01
is required when connecting with L-05D.
207
Appendix / Index
Troubleshooting (FAQs)
Troubleshooting
•First, check whether a software update is required.
If required, update the software. (Updating
Software→P218)
•If a symptom does not improve after checking the
check items, contact "Repairs" (in Japanese only) on
the back of this instruction manual or a repair counter
specified by DOCOMO.
■ Power supply
Symptom Check item
Power does not
turn ON
•Is the battery pack inserted
correctly?
•Is the battery dead? →P35
■ Charging
Symptom Check item
Cannot charge •Is the battery pack inserted
correctly?
•Is the adapter plug and cigar
lighter plug properly inserted
into power outlet or cigar lighter
socket?
•Are the adapter and the terminal
set properly?
•When the AC adapter is
used, is the AC adapter firmly
connected to the terminal or
desktop holder (optional) using
the USB connection cable?
•When the desktop holder
(optional) is used, is the
charging terminal of the
terminal clean? If dirty, wipe the
terminals with, for example, a
dry cotton swab.
•Any call or data communication
while charging, or using other
functions for a long time may
result in the terminal getting hot
and the battery's status icon
may not indicate charging. In
this case, charge again after the
terminal cools down.
208
Appendix / Index
Symptom Check item
"Please connect
charger"
appears on the
screen
•Charge the battery pack if the
battery is low. →P35
■ Terminal Operation
Symptom Check item
Becomes
hot during
operation or
charging
•The terminal, battery pack, or
adapter may become hot during
operations or charging, or when
shooting videos or using 1Seg
for a long time while charging.
This is not a safety hazard, so
you can continue using them.
Symptom Check item
Battery usage
time is short
•Has the terminal been out of the
network service area for a long
time? As the terminal searches
for radio waves in order to
enable communication when
out of the network service area,
more battery is consumed than
usual.
•The operating time of the
battery pack varies depending
on operating environment and
degradation of the battery pack.
•The battery pack is a
consumable accessory. Every
time you repeat the charging of
battery pack, usable time will
become short gradually.
When the usage time has
become extremely short even
though the battery pack is
charged, please purchase a
specified battery pack.
209
Appendix / Index
Symptom Check item
Power turns
off or restart
automatically
•If the battery pack terminal is
dirty, the contact may become
poor and the power may be
turned off. If dirty, wipe the
battery pack terminals with, for
example, a dry cotton swab.
Keys do not
respond
•Has the screen been locked?
→P40
Screen
response to key
press is slow
•It might occur if a large amount
of data is saved in terminal or
data with extremely large size
are processed between the
terminal and microSD card.
The UIM is not
recognized
•Is the UIM inserted in the right
direction? →P31
Clock is wrong •Clock may become wrong if the
power has been turned on for a
long
time.
Check whether "Automatic" of
"Date & time" in "Settings" is
checked. Turn it on again at a
place with better radio signal.
Symptom Check item
Terminal
operation is
unstable
•An application that was installed
to the terminal after purchasing
may be causing a problem.
If the problem improves by
starting in Safe mode, an
installed application needs to be
uninstalled to fix the problem.
* Safe mode is a function for
starting up under near-initial
conditions.
•Method for starting in Safe
mode
1. While in the power OFF
status, press the power key.
2. After the docomo logo
appears, keep touching the
key until the Home screen
appears.
* When Safe mode starts, "Safe
mode" appears on the bottom
left of the screen.
* To stop Safe mode, turn the
power OFF once and restart it.
•Before starting Safe mode,
backup necessary data.
210
Appendix / Index
Symptom Check item
Terminal
operation is
unstable
•Widgets that you have created
may be gone.
•Safe mode is not the normal
starting condition, so stop Safe
mode before normal usage.
■ Calls
Symptom Check item
Calls cannot
be made by
tapping
•Has "SIM/RUIM card lock" been
set? →P113
•Is the terminal in Airplane
mode? →P101
The ringtone
does not sound
•Is the ringtone volume set to
minimum? →P108
•Is the terminal in Silent mode?
→P108
•Is the ring time for the Voice
Mail Service or Call Forwarding
Service set to "0 sec."? →P93,
P97
Symptom Check item
Calls are not
connected (The
out of service
area icon does
not disappear
when you move,
or calls cannot
be made or
received even
when the radio
wave is strong
enough)
•Turn the power off and on, or
remove and reinsert the battery
or UIM.
•You may not be able to make
or receive calls, depending on
the type of radio signal, even in
the service area or even when
strong signal is indicated with
4 wave-level bars . Move to
another place and call again.
•Depending on how congested
the radio waves are, it may
be difficult to establish a
connection in crowded places
due to a congestion of calls and
emails. In this case, the caller
hears a busy tone. Move to
another place or call again later.
211
Appendix / Index
■ Screen
Symptom Check item
The display is
dim
•Has the screen backlight time-
out been set? →P109
•Has the screen brightness been
adjusted? →P109
•Is the battery level low?
→P35
The "Brightness"
and "Screen
timeout" are
grayed out
and cannot be
made changes
•When no SIM (UIM) card is
inserted, "Brightness" and
"Screen timeout" for the "Display"
cannot be changed.
■ Sound
Symptom Check item
During a voice
call, the other
party's voice is
difficult to hear
or is too loud
•Has the call volume adjusted with
the volume key?
→
P82
■ Camera
Symptom Check item
Photos and
videos shot with
the camera are
blurred
•Check whether the lens is
cloudy or has dirt on it.
■ 1Seg
Symptom Check item
1Seg cannot be
viewed
•Are you at a location that is
outside of the digital terrestrial
broadcast service area, or
where the broadcast wave is
weak?
•Are the channels configured?
→P177
Can be viewed
images, but
there is no
audio
•Audio cannot be heard
from devices that are not
compatible with SCMS-T.
1Seg cannot be
viewed on the
TV
•Due to copyright protection,
1Seg is not compatible with
video output (video and audio)
via HDMI connection.
212
Appendix / Index
■ Osaifu-Keitai
Symptom Check item
Osaifu-Keitai
cannot be used
•When the battery pack is
removed, Osaifu-Keitai
functions cannot be used
regardless of the Osaifu-Keitai
lock setting.
•Is Osaifu-Keitai set to lock?
→P179
•Did you swipe the mark of
the terminal over the reader?
→P178
■ Overseas use
Symptom Check item
The terminal is
not available to
use overseas.
Antenna mark appears
•Have you applied for WORLD
WING?
Check whether you have
applied for WORLD WING.
Icon which indicates out of
service area appears
•Are you at a location that is
outside of the international
roaming service area, or
where the signal is weak?
Use "Mobile Phone User's
Guide [International Services]"
or DOCOMO "International
Services website" to check
whether a service area or
network operator is available.
•Try to change the settings of
network or overseas network
operator.
- Set "Network Mode" to
"Automatic" (P201).
- Set "Network operators" to
"Select automatically" (P206)
•Turn off the terminal and then
turn it on again.
213
Appendix / Index
Symptom Check item
Data
communication
is not available
overseas
•Set Data roaming to ON.
(P206)
The terminal
has become
unusable
suddenly while
using overseas
•Has the approximate limit of
usage fee been exceeded?
For "International roaming
service (WORLD WING)", the
approximate limit of usage fee
is set in advance. If the limit
is exceeded, all services are
stopped. Pay off the usage fee
to resume services.
The other
party's
number is not
displayed/
A different
number is
displayed/
The registered
Phonebook
or Caller ID
notification
does not
operate
properly
•Even if the other party has
made a call with notification
of the Caller ID set, you may
not be notified of the Caller
ID depending on the network
or network operator. Also, the
number you are notified may
differ from the other party's
Caller ID depending on the
network or network operator you
use.
■ Data management
Symptom Check item
Data transfer is
not working
•Are you using a USB HUB?
If you use a USB HUB, data
transfer may not work properly.
The data saved
on a microSD
card is not
displayed
•Remove the microSD card and
insert it again. (P33)
When trying to
view an image,
appears or
appears in
preview
• / may appear if image
data has been destroyed.
214
Appendix / Index
■ Bluetooth function
Symptom Check item
The terminal
cannot find/
be connected
to a Bluetooth
compatible
device
•Put the Bluetooth compatible
device (commercial) on standby
and register it on the terminal. If
you want to delete a registered
device and register it again as
a new device, you must delete
the registered device from both
the Bluetooth compatible device
(commercial) and the terminal
before you register it again.
→P136
Cannot make
calls from the
terminal when
connected to
an external
device, such as
a car navigation
or hands free
device
•If you attempt to call somebody
several times when he or she
does not answer or is out of the
service area, calls to that number
may be disabled. In this case,
turn off the terminal and then turn
it back on again.
Error Message
Error message Description
通信サービスなし
(No
communication
service)
•You cannot use the terminal
because it is out of the
service area or is in a place
where there is no reception.
Move to a location where you
can get a reception.
•The UIM is not working
properly. If the problem is not
resolved by removing and
reinserting the UIM, contact
"Repairs" (in Japanese only)
on the back of this manual.
PUKがブロック
されました
(PUK is blocked)
Enter your PUK (PIN unblocking
key) (P113) correctly.
メモリ不足です
(Insufficient
memory)
There is no free space. Delete
unwanted applications (P64)
to free up memory space.
215
Appendix / Index

Warranty and After-Sales
Service
Warranty
•Be sure to receive a warranty at the time of purchase
of the terminal. Read contents of the warranty and
confirm information such as "販売店名・お買い上げ
日" (shop name and date of purchase) and keep it in
a safe place. If necessary items are not described,
immediately contact the shop of purchase. The
warranty for free repair is valid for one year from the
date of purchase.
•This product and its accessories are subject to
modified, in part or whole, for improvement without
prior notice.
•Data saved in Phonebook, etc. may be modified or
lost due to the malfunction, repair or other handling
of the terminal. You should therefore make a copy
of the Phonebook data, etc. as a precautionary
measure.
* Phonebook data can be saved on microSD card in
this terminal.
After-Sales Service
When the terminal breaks down
Before requesting repairs, read "Troubleshooting" in this
instruction manual. If the problem still persists, contact
"Repairs" (in Japanese only) on the back of this manual.
Repairs
Bring your terminal to a repair counter specified by
DOCOMO. Repairs are accepted during business hours
of a repair counter. Also, you must bring the warranty.
Note that it may take some days to repair the terminal
depending on the malfunction state.
During the warranty period
•The terminal is repaired at no charge under the
conditions of the warranty.
•Make sure to bring the warranty for repair. You will
be charged even during the warranty period if the
warranty is not presented or the trouble or damage
is caused by your inappropriate handling (such as
damage to LCD or connector, etc.).
•You will be charged even during the warranty
period if malfunction is caused by the use of
devices and consumables other than those
specified by DOCOMO.
216
Appendix / Index

Repair may not be possible in the following cases
•When a repair counter judges the cause of
malfunction is exposure to water (e.g., when wet-
indication seal reacts).
•When, as the result of inspection, corrosion is
found due to exposure to water, condensation or
sweat, or any of the internal boards are damaged
or deformed (damage to the external connection
terminal (earphone/microphone terminal), LCD, or
cracked body could be the case as well).
* Since these conditions are outside the scope of
the warranty, any repairs, if at all possible, will be
charged.
After expiration of the warranty
•All repairs that are requested are charged.
Replacement parts
•Replacement parts (parts required to maintain
functions) will in principle be kept in stock for 4
years after termination of production. However,
depending on the malfunctioning part, repair
may not be possible due to a lack of replacement
parts. Even after the stock period has expired,
the repair of some malfunctioning parts may be
possible. You should therefore contact "Repairs" (in
Japanese only) on the back of this manual.
Precautions
•Never modify the terminal or accessories.
- Doing so may result in fire, injuries or malfunctions.
- The modified terminal may be repaired only if
the owner agrees on that all the modified parts
are restored to the original conditions. However,
repairs may be refused depending on the
modifications.
The following cases may be considered as
modifications.
•Put a sticker on portions such as of the liquid-
crystal screen or keypad.
•Glued decorations on the terminal using
adhesion bond, etc.
•Change the parts such as exterior to other than
DOCOMO standard parts.
- Malfunction and damage due to modifications will
be repaired at the owner's expense even during
the warranty period.
•The model plate must not be removed from the
terminal. The model plate certifies that the terminal
satisfies technical standards. It should be noted that
if the plate is removed or is replaced with a different
plate, and the original model plate cannot be
verified, it may disqualify the unit from repairs due to
not being able to determine the technical standards
of that particular phone.
217
Appendix / Index

•Note that the settings and other information may be
cleared (reset) as a result of malfunction, repair or
other handling. In this case, make the settings again.
•When the repair is executed, MAC address of Wi-Fi/
Bluetooth address in the terminal may be changed
regardless of repaired part.
•Magnetic components are used in the parts that are
described below. Do not allow cash cards or other
devices that are vulnerable to magnetism to come
into contact with the phone.
Used parts: speaker, microphone
•If the terminal has gotten wet or moist, immediately
power off the terminal, remove the battery pack, and
bring it to the DOCOMO-specified repair office as
soon as possible. However, note that it may not be
repaired depending on the extent of the damage.
Memory dial (Phonebook function) and
downloaded data
•When you change the model or repair the terminal,
data that has been imported, downloaded or created
by you may be changed or lost. DOCOMO shall have
no liability for any change or loss of any kind. Under
some circumstances, DOCOMO may replace your
terminal with its equivalent instead of repairing it. In
this case, most data from the old terminal cannot be
transferred to the replacement terminal.
Updating Software
Software Update
Software Update is a function that connects to the
network to check whether software on L-05D needs
to be updated, downloads the software by packet
communication as and when required, and updates the
software.
The NTT DOCOMO website provides information about
required software updates.
There are 3 methods of updating software: Auto Update,
Immediate Update and Scheduled Update.
Auto
Update
: Automatically download new software
and install it at a preset time.
Immediate
Update
: Perform an immediate update
whenever you want to update.
Scheduled
Update
: Schedule a time to install the update
package so that the software is
automatically updated at the scheduled
time.
218
Appendix / Index

Note
•You can update software while still retaining
data (such as phonebook, camera images,
emails, downloaded data, etc.) on L-05D.
Please note, however, that such data may not
be protected, depending on the state of L-05D
(malfunction, damage, exposure to water, etc.).
We recommend that you make backups of
important data, to be prepared for unexpected
trouble. Please note that some data, such as
downloaded data, cannot be backed up.
Before Updating Software
•Do not remove the battery pack while updating
software. This may result in a failed update.
•Fully charge the battery pack before updating
software.
•Software cannot be updated in the following
circumstances.
- When you are on a call or out of the service area
- When you are roaming overseas
- When the terminal is in Airplane mode
- When you are connected to a Wi-Fi network
- While OS version is being upgraded
- When the date or time has not been set correctly
- When the battery level is too low for software
update
- When there is insufficient free space for software
update
•Software update (download, installation) may take
time.
•During a software update, you cannot make or
receive calls, or use any functions, including all
communication functions (voice calls can be
received during downloading).
•When updating software, the terminal makes an SSL/
TLS connection with the server (DOCOMO server).
219
Appendix / Index
•We recommend that you update software without
moving and when you have strong reception (4
wave-level bars).
* If the reception deteriorates during a software
update and the download is stopped, move to
a location with a better reception and start the
software update again.
•If the software has already been updated, "No
update is needed." appears when you check for
software updates.
•While using international roaming or when you are
outside the area, "Failed to start update. Due to no
network or roaming." appears.
•If the battery level is too low for software update, the
message, "Failed to start update. Due to low battery.
Please recharge and retry later." appears.
•SMS messages sent during a software update are
stored at an SMS center.
•During a software update, your L-05D information
(model and manufacturing numbers) are automatically
sent to a software update server managed by
DOCOMO. DOCOMO shall not use this information
for any purpose other than software update.
•If the software update fails, "Update failed" appears
and no further operation may be possible. In this
case, please take the terminal to a repair counter
specified by DOCOMO.
•If a PIN code has been set, the PIN code entry
screen appears during the restart after rewriting and
you are required to enter your PIN code.
•Do not start any other applications during a software
update.
Performing an Automatic Software
Update using Auto Update
Auto Update automatically downloads new software and
installs it at a preset time.
The default setting of Auto Update is "Automatic
Update".
When the update is ready to be installed, the notification
icon (software update available) appears. Check
the installation time, and select whether to change the
installation time or install now.
When the installation time arrives with (software
update available) displayed, the update is automatically
installed and (software update available) disappears.
Software update is not started if the battery level
is insufficient or if you are on a voice call when the
installation time arrives. The update is performed at the
same time on the following day. If Auto Update is set to
"Manual Update" or if Immediate Update is in progress,
the software cannot be automatically updated.
220
Appendix / Index

Auto Update settings
a From the Home screen, u "Settings"
u "About phone" u "Software Update"
u "Configure the software update"
bSelect an operation when there is a
software update notification
•Automatically perform software update:
"Automatic Update"
•Do not automatically perform software update:
"Manual Update"
Operations when update is required
When the software is automatically downloaded, the
notification icon (software update available) appears
on the Home screen.
a Drag or swipe the status bar downwards
•The Notification panel appears.
bTap "Software update is available"
cSelect an installation method
•If software update is required, the installation
time appears.
"OK"
•You are returned to the Home screen. The
installation starts when the specified time
arrives.
"Sets Time" u Step 1 of "Performing a Scheduled
Update" (P224)
•Set the time that the update package will be
installed.
"Starts update" u Step 1 of "Updating Software
Immediately" (P223)
•The installation starts.
•When installation is complete, the notification
icon (Update completed) appears. The
notification icon disappears when it is
confirmed once.
Note
•If the software update failed to start at the time
specified for Auto Update, the notification icon
(software update available) appears on the
Home screen.
221
Appendix / Index
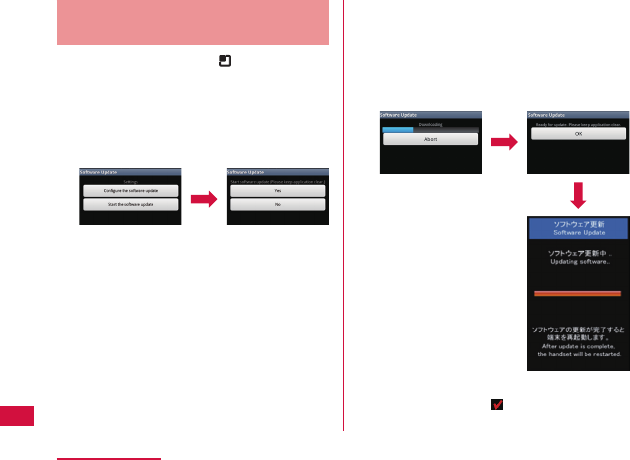
Starting Software Update with
Immediate Update
a From the Home screen, u "Settings"
u "About phone" u "Software Update"
u "Start the software update" u "Yes"
•Software update is performed automatically
when the download starts.
•If you abort the download before it finishes, the
data downloaded to that point is deleted.
•If software update is not required, "No update is
needed." appears.
bFollow the instructions displayed on the
screen
•The update starts after the terminal is restarted.
•All key operations are disabled during the
update. The update cannot be stopped either.
•The terminal is automatically restarted twice
during the update.
cThe Home screen appears
•The notification icon (Update completed)
appears. The notification icon disappears when
it is confirmed once.
222
Appendix / Index
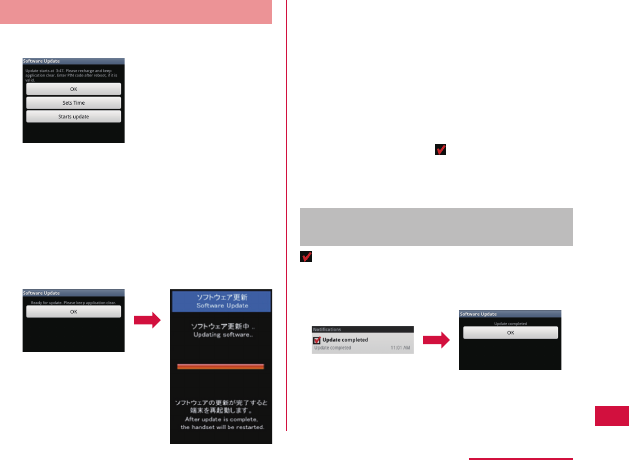
Updating Software Immediately
a "Starts update"
b"Ready for update. Please keep
application clear." appears u Tap "OK"
•The installation automatically starts after "Ready
for update. Please keep application clear." is
displayed for approximately 3 seconds.
•All key operations are disabled during installation.
The installation cannot be stopped either.
•When the installation is complete, the terminal
automatically restarts.
cSoftware update starts automatically
after the restart
•All key operations are disabled during the
update. The update cannot be stopped either.
•When the update is complete, the terminal is
restarted approximately 5 seconds later.
dThe Home screen appears
•The Home screen appears when the software
update is complete.
•The notification icon (Update completed)
indicating the completion of update appears
on the Home screen. The notification icon
disappears when it is confirmed once.
The display after completion of software
update
is displayed in the status bar. Drag or swipe the
status bar downwards to view the Notification panel. If
you tap "Update completed", a message indicating that
the software update has completed appears.
223
Appendix / Index
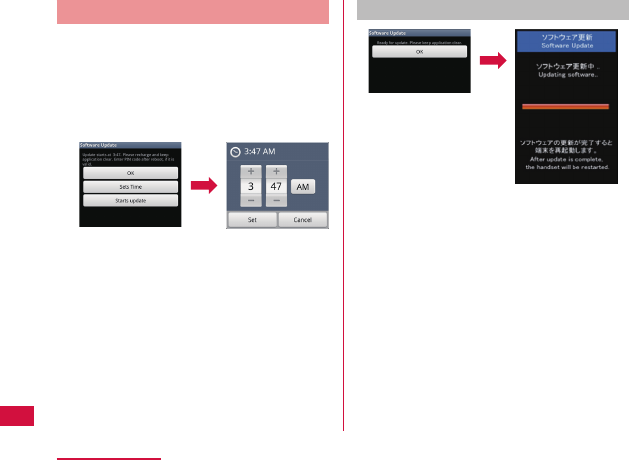
Performing a Scheduled Update
If you want to schedule the installation of the update
package for a different time, you can set the software
update time in advance.
a "Sets Time"
•A screen for setting the installation start time
appears.
•The time appears with the time on L-05D.
bEnter the desired time u Tap "Set"
•Tap "+"/"-" to change the update time.
When the scheduled time arrives
a "Ready for update. Please keep
application clear." appears u "OK"
•The software update automatically starts after
"Ready for update. Please keep application
clear." is displayed for approximately 3 seconds.
•When the scheduled software update time
arrives, display the Home screen in a location
with sufficient reception.
•If the battery level is too low for software update
when the scheduled time arrives, the update will
be performed at the same time on the following
day.
•The software update is prioritized if the alarm
has been set for the same time as the scheduled
time.
224
Appendix / Index
•Software cannot be updated during OS version
upgrade.
•If L-05D is turned off at the scheduled time of
the software update, the software update is
performed when the time becomes the same as
the scheduled time after the terminal has been
turned on.
Main Specifications
Terminal
Model name L-05D
Dimensions
(H × W × D)
Approx. 124.2 mm × 62.4
mm × 9.9 mm
(Max. thickness: Approx.
11.4 mm)
Weight Approx. XXX g
Memory ROM 4GB + RAM 1GB
Continuous
standby
time
Xi/LTE Stationary (Automatic):
Approx. 240 hours
FOMA/3G Stationary (Automatic):
Approx. 300 hours
GSM Stationary (Automatic):
Approx. 240 hours
Continuous
call time
FOMA/3G Approx. 340 minutes
GSM Approx. 240 minutes
Charging time FOMA AC Adapter 01/02:
Approx. 330 minutes
FOMA DC Adapter 01/02:
Approx. 330 minutes
1Seg watching time Approx. 240 minutes
225
Appendix / Index
Display Type TFT 16,777,216 colors
Size Approx. 4.0 inches
Pixels 800 dots × 480 dots HD
Image
pickup
device
Type CMOS
Size Main camera: 1/3.2 inch
Front camera: 1/6.0 inch
Effective
pixels
Main camera:
Approx. 8.1 Megapixels
Front camera:
Approx. 1.3 Megapixels
Camera Recorded
pixels
(maximum)
Main camera:
Approx. 8 Megapixels
Front camera:
Approx. 1.3 Megapixels
Zoom
(Digital)
When shooting photos:
Main camera:
Up to approx. 4×
Front camera: -
When shooting video:
Main camera:
Up to approx. 4×
Front camera: -
Photo
recorded
size
Main
camera
3,264×2,448 (8M)
3,264×1,836 (W6M)
2,560×1,920 (5M)
2,048×1,536 (3M)
2,304×1,296 (W3M)
1,280×960 (1M)
1,536×864 (W1M)
Front
camera
1,280×960 (1M)
1,280×720 (W1M)
640×480 (VGA)
Video
recorded
size
Main
camera
1,920×1,088 (Full HD)
1,280×720 (HD)
720×480 (TV)
640×480 (VGA)
320×240 (QVGA)
176×144 (QCIF)
Front
camera
1,280×720 (HD)
720×480 (TV)
640×480 (VGA)
320×240 (QVGA)
176×144 (QCIF)
Frame rate Up to 30 fps
Music
playback
MP3 file
Continuous playback time:
Approx. 1,500 minutes
(Supports background
playback)
226
Appendix / Index
Wireless LAN IEEE802.11b/g/n*1
compliant
Bluetooth
Compatible
Bluetooth
version
Bluetooth standard version
4.0*2
Output Bluetooth standard version
Power Class 2
Line-of-sight
communication
distance*
3
Within approx. 10.0
meters
Compatible
Bluetooth
profiles*4
HFP, HSP, OPP, SPP,
A2DP, AVRCP, PBAP, and
FTP
*1 It is compatible with only 2.4 GHz frequency band
of IEEE802.11n.
*2 We confirm that all Bluetooth compatible devices
including this terminal are compliant with Bluetooth
standards designated by Bluetooth SIG and are
certified. However, procedures may vary and data
transfer may not be possible, depending on the
characteristics and specifications of the device that
you connect to.
*3 This varies depending on the obstacles between
the communicating devices and the reception
quality.
*4 These are Bluetooth standards that provide
specifications for communications between
Bluetooth compatible device.
•Continuous call time is an estimate of the battery life
during a continuous call with normal signal reception.
•Continuous standby time is an estimate of the battery
life during a continuous standby with normal signal
reception. In certain circumstances, the standby
time may drop to as low as half the time shown due
to the battery charge, function settings, temperature,
or radio wave reception in the area (no reception or
weak).
•A use of the Internet reduces the actual call
(communication)/standby time. Even if you do
not perform communication or use the Internet,
composing emails, activating application, using
camera also reduces call (communication)/standby
time.
•Stationary continuous standby time is the average
battery life when you are stationary with normal
signal reception.
•Moving continuous standby time is the combined
average battery life for when "stationary" or "moving"
with normal signal reception and when "out of service
area".
•Charging time is an estimate of the time required to
charge a completely empty battery pack while the
terminal is turned off. The charging time is longer if
you charge while the terminal is turned on.
227
Appendix / Index
Battery pack
Battery type Lithium-ion battery
Nominal voltage 4.35V
Nominal capacity 1,690mAh
File formats
The terminal supports the display or playback of the
following file formats.
Type File formats
Audio MP3, 3GP, 3GA, AMR, WMA, AAC, MID,
WAV, OGG, ISMA, M4A, FLAC, AWB
Image PNG, JPG, GIF, BMP, WBMP
Video MP4, AVI, 3GP, WMV, ASF, MKV, MOV,
WebM, TS, ISMV, FLV, OGM, DivX (Only
for Non-DRM contents)
Photos are saved in the following file format.
Type File formats
Photo JPEG
Number of shooting photos (estimate)
Resolution
Number of shooting photos saved
in microSD card (2GB)
640×480 (VGA) Approx. 43,430
Video recording time (estimate)
Resolution
Video recording time saved in
microSD card (2GB)
640×480 (VGA) Up to approx. 117 minutes (per
video)
Up to approx. 123 minutes (total)
228
Appendix / Index

Specific Absorption Rate
(SAR), etc. of Mobile Phones
Specific Absorption Rate (SAR)
of Mobile Phones
This model L-05D mobile phone complies with
Japanese technical regulations and international
guidelines regarding exposure to radio waves.
This mobile phone was designed in observance of
Japanese technical regulations regarding exposure
to radio waves*1 and limits to exposure to radio waves
recommended by a set of equivalent international
guidelines. This set of international guidelines was set
out by the International Commission on Non-Ionizing
Radiation Protection (ICNIRP), which is in collaboration
with the World Health Organization (WHO), and the
permissible limits include a substantial safety margin
designed to assure the safety of all persons, regardless
of age and health condition.
The technical regulations and international guidelines
set out limits for radio waves as the Specific Absorption
Rate, or SAR, which is the value of absorbed energy
in any 10 grams of tissue over a 6-minute period. The
SAR limit for mobile phones is 2.0 W/kg. The highest
SAR value for this mobile phone when tested for use at
the ear is 0.491 W/kg. There may be slight differences
between the SAR levels for each product, but they all
satisfy the limit.
The actual SAR of this mobile phone while operating
can be well below that indicated above. This is due to
automatic changes to the power level of the device to
ensure it only uses the minimum required to reach the
network. Therefore in general, the closer you are to a
base station, the lower the power output of the device.
This mobile phone can be used in positions other
than against your ear. This mobile phone satisfies the
international guidelines when used with a carrying case
or a wearable accessory approved by NTT DOCOMO,
INC.*2 In case you are not using the approved
accessory, please use a product that does not contain
any metals, and one that positions the mobile phone at
least 1.0 cm away from your body.
The World Health Organization has stated that "a large
number of studies have been performed over the last
two decades to assess whether mobile phones pose a
potential health risk. To date, no adverse health effects
have been established as being caused by mobile
phone use."
Please refer to the WHO website if you would like more
detailed information.
http://www.who.int/docstore/peh-emf/publications/
facts_press/fact_english.htm
229
Appendix / Index

Please refer to the websites listed below if you would
like more detailed information regarding SAR.
Ministry of Internal Affairs and Communications
Website:
http://www.tele.soumu.go.jp/e/sys/ele/index.htm
Association of Radio Industries and Businesses
Website:
http://www.arib-emf.org/index02.html (in Japanese
only)
NTT DOCOMO, INC. Website:
http://www.nttdocomo.co.jp/english/product/sar/
LG Electronics Inc. Website (Check the Specifications
page for this terminal.):
http://www.lg.com/jp/mobile-phones/all-phones/
index.jsp (in Japanese only)
(The URL is subject to change without prior notice.)
*1 Technical regulations are defined by the Ministerial
Ordinance Related to Radio Law (Article 14-2 of
Radio Equipment Regulations).
*2 Regarding the method of measuring SAR when
using mobile phones in positions other than against
the ear, international standards (IEC62209-2) were
set in March of 2010. On the other hand, technical
regulation is currently being deliberated on by
national council. (As of November, 2011)
Radio Frequency (RF) Signals
THIS MODEL PHONE MEETS THE U.S.
GOVERNMENT'S REQUIREMENTS FOR EXPOSURE
TO RADIO WAVES.
Your wireless phone contains a radio transmitter and
receiver.
Your phone is designed and manufactured not
to exceed the emission limits for exposure to
radio frequency (RF) energy set by the Federal
Communications Commission of the U.S. Government.
These limits are part of comprehensive guidelines and
establish permitted levels of RF energy for the general
population. The guidelines are based on standards
that were developed by independent scientific
organizations through periodic and thorough evaluation
of scientific studies.
The exposure standard for wireless mobile phones
employs a unit of measurement known as the Specific
Absorption Rate (SAR).The SAR limit set by the FCC is
1.6 W/kg.* Tests for SAR are conducted using standard
operating positions accepted by the FCC with the
phone transmitting at its highest certified power level
in all tested frequency bands. Although the SAR is
determined at the highest certified power level, the
actual SAR level of the phone while operating can be
well below the maximum value.
230
Appendix / Index

This is because the phone is designed to operate
at multiple power levels so as to use only the power
required to reach the network. In general, the closer
you are to a wireless base station antenna, the lower
the output.
Before a phone model is available for sale to the public,
it must be tested and certified to the FCC that it does
not exceed the limit established by the U.S. government-
adopted requirement for safe exposure. The tests are
performed on position and locations (for example, at the
ear and worn on the body) as required by FCC for each
model. The highest SAR value for this model phone as
reported to the FCC when tested for use at the ear is
0.491 W/kg, and when worn on the body, is 0.719 W/kg.
(Body-worn measurements differ among phone models,
depending upon available accessories and FCC
requirements).
While there may be differences between the SAR levels
of various phones and at various positions, they all
meet the U.S. government requirement.
The FCC has granted an Equipment Authorization for
this model phone with all reported SAR levels evaluated
as in compliance with the FCC RF exposure guidelines.
SAR information on this model phone is on file with the
FCC and can be found under the Display Grant section
at http://transition.fcc.gov/oet/ea/fccid/ after search on
FCC ID : ZNFL05D.
For body worn operation, this phone has been tested
and meets the FCC RF exposure guidelines when used
with an accessory designated for this product or when
used with an accessory that contains no metal and that
positions the handset a minimum of 1.0 cm from the
body.
* In the United States, the SAR limit for wireless
mobile phones used by the public is 1.6 watts/
kg (W/kg) averaged over one gram of tissue.
SAR values may vary depending upon national
reporting requirements and the network band.
231
Appendix / Index

Declaration of Conformity
The product "L-05D" is declared to conform with the
essential requirements of European Union Directive
1999/5/EC Radio and Telecommunications Terminal
Equipment Directive 3.1(a), 3.1(b) and 3.2.
This mobile phone complies with the EU requirements
for exposure to radio waves.
Your mobile phone is a radio transceiver, designed
and manufactured not to exceed the SAR* limits** for
exposure to radio-frequency (RF) energy, which SAR*
value, when tested for compliance against the standard
was 0.491 W/kg at the ear, and 0.719 W/kg when worn
on the body. While there may be differences between
the SAR* levels of various phones and at various
positions, they all meet*** the EU requirements for RF
exposure.
* The exposure standard for mobile phones
employs a unit of measurement known as the
Specific Absorption Rate, or SAR.
** The SAR limit for mobile phones used by the
public is 2.0 watts/kilogram (W/kg) averaged
over ten grams of tissue, recommended by
The Council of the European Union. The limit
incorporates a substantial margin of safety to
give additional protection for the public and to
account for any variations in measurements.
***
Tests for SAR have been conducted using
standard operating positions with the phone
transmitting at its highest certified power level in
all tested frequency bands. Although the SAR is
determined at the highest certified power level,
the actual SAR level of the phone while operating
can be well below the maximum value.
This is because the phone is designed to operate
at multiple power levels so as to use only the
power required to reach the network. In general,
the closer you are to a base station antenna, the
lower the power output.
232
Appendix / Index
European Union Directives
Conformance Statement
Hereby, LG Electronics Inc.
declares that this product is in
compliance with:
•The essential requirements and
other relevant provisions of
Directive 1999/5/EC
•All other relevant EU Directives
The above gives an example of a
typical Product Approval Number.
Wi-Fi
(WLAN)
This device is intended for sale in Japan
only.
It can be operated in all European
countries.
The WLAN can be operated in the EU
without restriction indoors, but cannot
be operated outdoors in France, Russia
and Ukraine.
Important Safety Information
AIRCRAFT
Switch off your wireless device when boarding an
aircraft or whenever you are instructed to do so by
airline staff. If your device offers a 'flight mode' or
similar feature consult airline staff as to whether it can
be used on board.
DRIVING
Full attention should be given to driving at all times and
local laws and regulations restricting the use of wireless
devices while driving must be observed.
HOSPITALS
Mobile phones should be switched off wherever you
are requested to do so in hospitals, clinics or health
care facilities. These requests are designed to prevent
possible interference with sensitive medical equipment.
233
Appendix / Index

PETROL STATIONS
Obey all posted signs with respect to the use of
wireless devices or other radio equipment in locations
with flammable material and chemicals. Switch off your
wireless device whenever you are instructed to do so
by authorized staff.
INTERFERENCE
Care must be taken when using the phone in close
proximity to personal medical devices, such as
pacemakers and hearing aids.
Pacemakers
Pacemaker manufacturers recommend that a minimum
separation of 15 cm be maintained between a mobile
phone and a pacemaker to avoid potential interference
with the pacemaker. To achieve this use the phone on
the opposite ear to your pacemaker and do not carry it
in a breast pocket.
Hearing Aids
Some digital wireless phones may interfere with some
hearing aids. In the event of such interference, you
may want to consult your hearing aid manufacturer to
discuss alternatives.
NOTE: Excessive sound pressure from earphones
can cause hearing loss.
For other Medical Devices:
Please consult your physician and the device
manufacturer to determine if operation of your phone
may interfere with the operation of your medical device.
234
Appendix / Index

Export Administration
Regulations
Japan Export Control Regulations ("Foreign Exchange
and Foreign Trade Law" and relevant laws and
regulations) may apply to this product and its
accessories. U.S. Re-export Regulations (Export
Administration Regulations) applies to this product and
its accessories. If you export or re-export this product or
its accessories, please follow the necessary procedures
at your own risk and expense. For details on the
procedures, contact the Ministry of Economy, Trade and
Industry or the U.S. Department of Commerce.
Intellectual Property Right
Copyrights and Portrait Rights
You have no right to copy, modify, or distribute contents
such as text, images, music, map data, or software
downloaded from websites on the Internet, or photos
shot by the camera of this product without permission
from the copyright holder except when the copy or quote
is for personal use that is allowed under Copyright Law.
Note that it may be prohibited to shoot or record live
performances or exhibitions even for personal use.
Refrain from taking portraits of other people and
uploading such portraits to websites using this product
without their consent, as this violates portrait rights.
235
Appendix / Index
Trademarks
•"FOMA", "i-mode", i-αppli", "sp-mode mail", "Deco-
mail", "WORLD CALL", "WORLD WING", "mopera",
"mopera U", "ToruCa" and the "Osaifu-Keitai" logo, "Xi"
logo are the trademarks or registered trademarks of
NTT DOCOMO, INC.
•"Catch Phone (Call waiting service)" is a registered
trademark of Nippon Telegraph and Telephone
Corporation.
•The microSDHC Logo is a trademark of
SD-3C, LLC.
•LG On-Screen Phone is a registered trademark of LG
Electronics Inc.
•The Bluetooth word mark and
logos are owned by the Bluetooth
SIG, INC. and any use of such
marks by NTT DOCOMO, INC. is
under license. Other trademarks
and trade names are those of their
respective owners.
•Wi-Fi Certified® and logos
are trademarks or registered
trademarks of Wi-Fi Alliance.
•Microsoft®, Windows®, Windows Vista® and Windows
Media® are trademarks or registered trademarks of
Microsoft Corporation in the United States and/or
other countries.
•Google and Google logo, Android, Android Market
and Android Market logo, Google Map, Google Talk,
Google Calendar, Gmail and Gmail logo, YouTube
and YouTube logo are trademarks or registered
trademarks of Google, Inc.
• is a registered trademark of FeliCa Networks, Inc.
•Other company names or product names described
in this manual are trademarks or registered
trademarks of those companies.
236
Appendix / Index

Others
•Rovi, G-GUIDE, G-GUIDE MOBILE and
G-Guide related logos are trademarks
or registered trademarks of Rovi
Corporation and/or its subsidiaries in
Japan.
•This product contains Adobe® Flash® Player and
Adobe® Flash® Lite® technology by Adobe Systems
Incorporated.
- Adobe Flash Player Copyright
© 1996-2011 Adobe Systems
Incorporated. All rights reserved.
- Adobe Flash Lite Copyright © 2003-2011 Adobe
Systems Incorporated. All rights reserved.
- Adobe, Flash and Flash Lite are either registered
trademarks or trademarks of Adobe Systems
Incorporated in the United States and/or other
countries.
•The abbreviations of operating systems (Japanese
versions) below are used in this manual.
- Windows 7 stands for Microsoft® Windows® 7
(Starter, Home Basic, Home Premium,
Professional, Enterprise and Ultimate).
- Windows Vista stands for Windows Vista® (Home
Basic, Home Premium, Business, Enterprise and
Ultimate).
- Windows XP indicates Microsoft® Windows®
XP Professional operating system or Microsoft®
Windows® XP Home Edition operating system.
•This product is licensed complying with the MPEG-
4 Patent Portfolio License. If you use it for private
purpose without any profits, you are allowed to use
them only when:
- Recording videos that are compliant with the
standard of MPEG-4 Visual (hereinafter referred to
as MPEG-4 Video)
- Playing MPEG-4 Videos recorded personally by
consumers not engaged in profit activities
- Playing MPEG-4 Video supplied from the provider
licensed from MPEG-LA
For details, contact MPEG LA, LLC of the U.S.
•FeliCa is a contactless IC card technology
developed by Sony Corporation. FeliCa is a
registered trademark of Sony Corporation.
•iWnn of OMRON SOFTWARE Co., Ltd. is used for
conversion methods for Japanese language.
iWnn © OMRON SOFTWARE Co., Ltd. 2008-2011 All
Rights Reserved.
237
Appendix / Index

Index
A
About phone ……………………………………………120
Accessibility …………………………………………… 117
Access point ……………………………………………104
Checking ……………………………………………104
Initializing …………………………………………… 105
Setting an additional access point ………………… 104
Accounts & sync ……………………………………… 115
Adapter ………………………………………… 17, 24, 37
After-sales service …………………………………… 216
Alarm Clock ……………………………………………181
Android Market …………………………………………156
Installing ………………………………………………157
Purchasing an application …………………………159
Requesting a refund and deleting
an application ………………………………………160
Searching an application ……………………………157
Uninstalling …………………………………………159
Updating an application ……………………………158
Applications …………………………………… 4, 66, 115
List …………………………………………………… 67
Moving ……………………………………………… 74
Application screen …………………………………… 66
Area Mail ………………………………………………125
B
Backing up data and settings …………………………192
Backlight ……………………………………………… 41
Battery pack ……………………………… 15, 24, 34, 228
Attaching …………………………………………… 34
Life …………………………………………………… 35
Removing …………………………………………… 35
Before Using this Terminal …………………………… H2
Bluetooth …………………………………… 25, 101, 134
Connecting …………………………………………136
Notes on using ………………………………………134
ON/OFF ………………………………………………136
Pairing ………………………………………………136
Pass code (PIN) ……………………………………135
Reception interference caused by wireless
LAN devices ………………………………………… 135
Sending/receiving data ……………………………138
Bookmarks………………………………………………128
Browser …………………………………………………126
C
Calculator ………………………………………………186
Calendar ………………………………………………183
Changing display ……………………………………184
Changing settings ……………………………………185
238
Appendix / Index

Creating a schedule ………………………………185
Setting calendar type ………………………………184
Viewing schedules …………………………………185
Caller ID Notification Service ………………………… 98
Call Forwarding Service ……………………………… 96
Basic flow …………………………………………… 96
Call charge ………………………………………… 97
Call Forwarding voice prompts …………………… 98
Setting ……………………………………………… 97
Call log ………………………………………………… 83
Adding to Phonebook ……………………………… 84
Calling a number from the call log ………………… 84
Calling to answer a missed call …………………… 83
Deleting ……………………………………………… 85
Calls …………………………………………………… 78
Caller ID Notification Service ……………………… 98
Call Forwarding Service …………………………… 96
Call log ……………………………………………… 83
Call Waiting Service ………………………………… 95
Declining a call …………………………………… 81
Emergency numbers ……………………………… 79
Ending a call ………………………………………… 79
Entering a pause …………………………………… 79
Making a call ……………………………………… 78
Making an international call ……………………… 80
Network services …………………………………… 91
Operations during a call …………………………… 82
Phonebook ………………………………………… 85
Putting the call on hold …………………………… 82
Receiving a call …………………………………… 81
Voice Mail Service ………………………………… 92
Call settings …………………………………………… 106
Call Waiting Service …………………………………… 95
Putting the current call on hold and answering
an incoming call …………………………………… 95
Putting the current call on hold and making
a call to another party ……………………………… 96
Setting ……………………………………………… 95
Camera …………………………………………………141
Notes for capturing images ……………………… 141
Shooting a photo ……………………………………143
Shooting videos ……………………………………145
Viewing photos and videos ………………………… 146
Viewing shooting screen …………………… 142, 144
Changing screen orientation ………………………… 45
Character entry ……………………………………… 57
Character mode ……………………………………… 59
Charging ……………………………………………… 35
Battery charging …………………………………… 35
Charging time (estimate) …………………………… 36
Charging with a PC ………………………………… 39
Charging with the desktop holder ………………… 38
Charging with the AC adapter …………………… 37
Usage time (estimate) …………………………… 36
Checking or unchecking options …………………… 42
Connectivity settings ………………………………… 118
Copyrights and portrait rights ………………… 141, 235
239
Appendix / Index

D
Data roaming …………………………………………… 206
Date & time ……………………………………………120
Declaration of Conformity ……………………………232
Desktop holder ………………………………………… 38
Display …………………………………………………109
docomo Palette UI …………………………………… 62
docomo service ……………………………………… 107
Downloads ……………………………………………… 191
E
Electronic dictionary ……………………………………189
Dict. Settings ………………………………………190
Marking by a highlighter pen ………………………189
Searching for a word ………………………………189
Searching from History …………………………… 189
Switching to target dictionary ……………………… 189
Wordbook …………………………………………… 190
Electronic medical equipment ……………………… 19
Emergency call ………………………………………… 79
Emoticons ……………………………………………… 59
European Union Directives Conformance
Statement ………………………………………………233
Export Administration Regulations …………………235
External device connection …………………………… 138
Connecting the terminal with a PC ………………138
F
FAQs ……………………………………………………208
File formats ……………………………………………228
File management ………………………………………131
Folder and file operations …………………………133
Hardware requirements ……………………………131
Necessary equipment ……………………………… 131
Windows Media Player ……………………………131
G
Gallery ………………………………………………… 146
Gesture …………………………………………………109
Gmail ……………………………………………………124
Google Talk ……………………………………………129
Chatting ………………………………………………130
Logging in ……………………………………………129
GPS function …………………………………………161
Group …………………………………………………… 74
Adding ……………………………………………… 74
Deleting ……………………………………………… 75
Editing names ……………………………………… 75
H
Handling and Care …………………………………… 22
Home screen …………………………………………… 62
Changing wallpaper ………………………………… 65
How to Use this Manual ………………………………… 4
240
Appendix / Index

I
Icons …………………………………………………… 53
iD設定アプリ (iD appli) ………………………………188
Important Safety Information …………………………233
Incoming/Outgoing history …………………………… 83
Initializing the terminal ………………………………… 116
Initial settings…………………………………………… 46
Instruction Manual ……………………………………… 1
Intellectual property right ………………………………235
Internal storage ……………………………………… 116
International roaming (WORLD WING) ……………… 197
IP address ……………………………………………… 49
K
Key Lock ……………………………………………… 40
Koe-no-Takuhaibin …………………………………… 90
L
Language & keyboard ………………………………… 117
Latitude …………………………………………………167
Joining ………………………………………………167
Location Information Services ……………………… 161
Location & security …………………………………… 110
M
Main specifications ……………………………………225
Making an international call ………………………… 80
Calls to fixed-line telephone ……………………… 80
Calls to mobile phone ……………………………… 81
Maps …………………………………………… 160, 163
Activating GPS functions …………………………162
Changing Layer …………………………………… 164
Clearing a Map …………………………………… 167
Enabling location search by Wi-Fi …………………162
Identifying your current location …………………… 163
Location Information Services …………………… 161
Searching for a specific location …………………164
Searching up a route ………………………………165
Share locations ……………………………………167
Viewing Street View ……………………………… 163
Zooming in or out …………………………………163
Market …………………………………………………156
Material list …………………………………………… 21
Media Player …………………………………………… 148
Available file formats ……………………………… 148
Copying music files and videos to the terminal …148
Editing playlists ……………………………………… 154
Media Player screen ………………………………149
Playing music ………………………………………151
Using playlists ………………………………………153
Messaging ………………………………………………122
microSD card…………………………………………… 33
Exporting Phonebook ……………………………… 89
Importing Phonebook ……………………………… 90
Inserting ……………………………………………… 33
Removing …………………………………………… 33
241
Appendix / Index

Missed calls …………………………………………… 83
mopera U ………………………………………………105
N
Name of each part …………………………………… 29
Navigation ………………………………………………168
Network Mode …………………………………………205
Network security code ……………………………… 112
Network services ……………………………………… 91
Available network service ………………………… 91
Caller ID Notification Service ……………………… 98
Call Forwarding Service …………………………… 96
Call Waiting Service ………………………………… 95
Public mode (Power OFF) ………………………… 99
Voice Mail Service ………………………………… 92
Notes about the Terminal …………………………… 23
Notes on Using this Terminal …………………………… 8
Notification icons ……………………………………… 54
Notification panel ……………………………………… 55
O
Online service accounts ……………………………… 51
Adding ……………………………………………… 51
Deleting ……………………………………………… 52
Manually synchronizing …………………………… 52
On-screen keyboards ………………………………… 57
10-key keyboard …………………………………… 57
Changing character entry settings ……………… 59
Entering symbols/emoticons ……………………… 59
QWERTY keyboard ………………………………… 57
Switching the character mode …………………… 59
Switching the keyboard …………………………… 58
On-Screen Phone (OSP) …………………………… 118
Operations during a call ……………………………… 82
Adjusting call volume ……………………………… 82
Muting the microphone …………………………… 82
Options ……………………………………………… 82
Putting the call on hold …………………………… 82
Turning the speaker ON/OFF ……………………… 82
Optional accessories …………………………………… 2
Options …………………………………………………207
Osaifu-Keitai …………………………………………… 177
Overseas use …………………………………………197
After returning to Japan ……………………………201
Automatically selecting an available network ……206
Available services ……………………………………198
Confirming before departure ………………………198
Confirming overseas ………………………………199
Data roaming …………………………………………206
International roaming (WORLD WING)…………… 197
Making a call from other parties ……………………204
Making calls to other countries
(including Japan) ……………………………………202
Making calls to WORLD WING users ……………202
Making domestic calls ………………………………202
Network Mode ………………………………………205
Pre-configuring ………………………………………199
Receiving calls ………………………………………204
242
Appendix / Index

Searching an available network and
setting manually ……………………………………205
Own number ……………………………………………121
P
Pass code (PIN) ………………………………………135
Pause …………………………………………………… 79
Phonebook …………………………………………… 85
Adding to Favorites ………………………………… 89
Deleting ……………………………………………… 88
Editing ……………………………………………… 86
Importing …………………………………………… 195
Making calls/sending emails/chatting …………… 87
Registering ………………………………………… 86
Searching …………………………………………… 87
Sharing ……………………………………………… 88
Viewing ……………………………………………… 85
Viewing the Map …………………………………… 88
Phonebook Copy Tool ………………………………… 89
Copying Contacts on Google account to
docomo account …………………………………… 90
Exporting to microSD card ………………………… 89
Importing from microSD card ……………………… 90
Open ………………………………………………… 89
Pinch-in ………………………………………………… 43
Pinch-out ……………………………………………… 43
PIN code ……………………………………………… 112
Changing …………………………………………… 113
Enabling ……………………………………………… 113
Entering ……………………………………………… 114
PIN unblocking key (PUK) …………………………… 113
Places …………………………………………………169
Polaris Office ……………………………………………187
Precautions for Terminal ……………………………… 13
Privacy ………………………………………………… 116
Public mode (Power OFF) …………………………… 99
PUK locked …………………………………………… 114
R
Radio Frequency (RF) Signals ………………………230
Receiving calls ………………………………………… 81
Declining a call …………………………………… 81
Muting ringtone …………………………………… 81
Related devices ………………………………………207
Remote operation settings ……………………………198
S
Safe mode ………………………………………………210
Safety Precautions ……………………………………… 9
Screen …………………………………………………109
Screen display ………………………………………… 53
Screen lock/unlock ……………………………… 40, 110
Scrolling screen ……………………………………… 42
Security codes ………………………………………… 111
Setting Alarm ………………………………………… 181
Settings …………………………………………………100
Settings menu ………………………………………… 100
243
Appendix / Index

SmartWorld …………………………………………… 186
SMS ……………………………………………………122
Backing up to UIM …………………………………196
Receiving/Viewing …………………………………123
Sending ………………………………………………122
SMS rejection ………………………………………199
Software Update ………………………………………218
Auto Update …………………………………………220
Before Updating Software …………………………219
Immediate Update …………………………………222
Scheduled Update …………………………………224
Sound ………………………………………………… 108
Speaker ………………………………………………… 29
ON/OFF ……………………………………………… 82
Specific Absorption Rate (SAR) ……………………229
sp-mode ………………………………………………… 105
sp-mode mail……………………………………………122
Status bar ……………………………………………… 53
Status icons …………………………………………… 53
Storage ………………………………………………… 116
Street View ……………………………………………163
Supplied accessories …………………………………… 2
Symbols ………………………………………………… 59
T
Talk ………………………………………………………129
ToruCa …………………………………………………180
Touch Screen ………………………………………… 41
Precautions on Using Touch Screen ……………… 41
Trademarks ……………………………………………236
Troubleshooting…………………………………………208
Turning OFF the power ……………………………… 40
Turning ON the power ………………………………… 40
TV ………………………………………………… 69, 169
U
UIM ………………………………………… 19, 25, 31, 111
Inserting ……………………………………………… 31
Removing …………………………………………… 32
Unlocking SIM …………………………………………… 1
USB connection ……………………………………… 118
USB tethering ………………………………………… 119
Using motion gesture ………………………………… 44
Alarm ………………………………………………… 44
Gallery ……………………………………………… 45
Receiving calls ……………………………………… 44
V
Voice input ……………………………………………… 117
Voice input & output …………………………………… 117
Voice Mail Service …………………………………… 92
Basic flow …………………………………………… 93
Playing a voice message ………………………… 94
Setting ……………………………………………… 93
Voice output …………………………………………… 117
VPN …………………………………………………… 103
Adding ………………………………………………103
244
Appendix / Index

Connecting …………………………………………103
Deleting ……………………………………………… 104
Editing ……………………………………………… 103
W
Wallpaper ……………………………………………… 65
Warranty ……………………………………………… 216
Widget ………………………………………………… 63
Wi-Fi …………………………………………………… 47
Adding ……………………………………………… 50
Changing password ………………………………… 50
Connecting ………………………………………… 48
Connecting by specifying a static IP address …… 49
Disconnecting ……………………………………… 50
Notifying when Wi-Fi network with no security
protection is detected ……………………………… 49
Status ………………………………………………… 47
Tethering …………………………………………… 102
Windows Media Player ………………………………131
Wireless LAN (WLAN) ……………………………27, 47
Wireless & networks ………………………………… 101
WORLD CALL ………………………………………… 80
Y
YouTube ………………………………………………… 187
Z
Zooming in or out …………………………………… 43
Numerals
1Seg ……………………………………………………169
1Seg antenna ………………………………………171
Program schedule ………………………………… 174
Setting ………………………………………………176
Viewing ………………………………………………171
Viewing reservations ……………………………… 174
245
Appendix / Index

You can view/change your contract details, subscribe to services, and request information materials on the
Internet.
My docomo (http://www.mydocomo.com/) u 各種お申込・お手続き (Various Applications/Procedures) (in Japanese only)
* You need your docomo ID/password in order to access this page.
* If you do not have or you have forgotten your "docomo ID/password", contact "General Inquiries" on the back
of this manual.
* You may not be able to access the site depending on your subscription.
* You may not be able to access the site due to system maintenance, etc.
Using mobile phones with your manners!
Please be considerate of others around you when using the terminal.
Always turn OFF your terminal in the following situations
In a place where the use of mobile phones is
prohibited
Always turn off your terminal on an airplane and in a
hospital.
* Please note that medical electrical equipment is
used not only in a hospital ward. Always turn off
your terminal in lobbies and waiting rooms as well.
When you are in a crowded train or other
places where implanted cardiac pacemaker or
defibrillator wearers could be nearby
The terminal may exert a harmful effect on implanted
cardiac pacemakers and implanted defibrillators.
Set your terminal to Public mode in the following situations
While driving
Using the mobile phone in your hand while driving is
subject to punishment.
* However, this excludes situations when the use
of a mobile phone is unavoidable, such as the
rescue of the sick and injured or the maintenance
of public safety.
When you are in a public place such as a theater,
movie theater, or museum
Using the terminal in a public place, where you need
to be quiet, annoys people around you.
246

Please be considerate of the privacy of individuals around you when
shooting and sending photos using camera-equipped mobile phones.
Functions for maintaining good manners in public places
The terminal is equipped with usual functions that allow you not to answer an incoming call or to mute
the sound.
Silent mode → P108
Silent mode mutes the terminal's sounds, such as operation sounds and the ringtone.
* However, shutter sound is not available to set to mute.
Vibrate → P108
Notifies incoming calls by vibration.
Public mode (Power OFF) → P99
A message plays notifying callers that you are where you have to power off the phone and cannot answer,
and the phone automatically hangs up.
You can also use optional services such as the Voice Mail Service (P92) and the Call Forwarding
Service (P96).
Be considerate of where you use your terminal and keep your voice and ringtone down
Respect privacy
Keep your voice down when using the terminal
in a quiet place such as a restaurant and hotel
lobby.
If you are in an outdoor public place, make sure
you do not disturb others.
247
If you lose your terminal or have it stolen, immediately take the steps necessary for suspending the use
of the terminal.
If the terminal you purchased is damaged, bring your terminal to a repair counter specied by DOCOMO
after returning to Japan.
Failures encountered overseas
<Network Support and Operation Center>
(available 24 hours a day)
* You are charged a call fee to Japan when calling from
a land-line phone, etc.
From DOCOMO mobile phones
Dial +81-3-6718-1414 to make a call via L-05D
(touch "0" for 1 second to input "+").
-81-3-6718-1414* (toll free)
International call access code
for the country you stay
From land-line phones <Universal number>
* You might be charged a domestic call fee according to
the call rate for the country you stay.
For international call access codes for major
countries and universal number international prefix,
refer to DOCOMO International Services website.
-8005931-8600*
Universal number
international prefix
Loss or theft of terminal or
payment of cumulative cost overseas
<docomo Information Center>
(available 24 hours a day)
* You are charged a call fee to Japan when calling from
a land-line phone, etc.
From DOCOMO mobile phones
Dial +81-3-6832-6600 to make a call via L-05D
(touch "0" for 1 second to input "+").
-81-3-6832-6600* (toll free)
International call access code
for the country you stay
From land-line phones <Universal number>
* You might be charged a domestic call fee according to
the call rate for the country you stay.
For international call access codes for major
countries and universal number international prefix,
refer to DOCOMO International Services website.
-8000120-0151*
Universal number
international prefix
Don't forget your mobile phone … or your manners!
When using your mobile phone in a public place, don't forget to show common courtesy and consideration to others around you.
General Inquiries
<docomo Information Center> Repairs
For Applications or Repairs and After-Sales Service, please contact the above-mentioned information center or
the docomo Shop etc. near you searched on the NTT DOCOMO website.
NTT DOCOMO website http://www.nttdocomo.co.jp/english/
Please conrm the phone number before you dial.
0120-800-000
* Unavailable from part of IP phones.
■From land-line phones (In Japanese only)
* Unavailable from land-line phones, etc.
(No prex) 151 (toll free)
■From DOCOMO mobile phones (In Japanese only)
0120-800-000
* Unavailable from part of IP phones.
■From land-line phones (In Japanese only)
* Unavailable from land-line phones, etc.
(No prex) 113 (toll free)
■From DOCOMO mobile phones (In Japanese only)
To prevent damage to the environment,
bring used battery packs to a docomo service
counter, a docomo agent or recycle center.
Li-ion00
'12.XX (1st Edition)
MBMXXXXXXXX
’12.XX
L-05D
INSTRUCTION MANUAL
L-05D
INSTRUCTION MANUAL
Contents / Precautions
Confirmation and
Settings before Using
docomo Palette UI
Application
Using Overseas
Appendix / Index
File Management
Mail / Internet
Settings
Calling /
Network Services
(Business hours: 9:00 a.m. to 8:00 p.m.)
* Service available in: English, Portuguese, Chinese, Spanish, Korean.
* Unavailable from part of IP phones.
0120-005-250
(toll free)
(Business hours: 9:00 a.m. to 8:00 p.m. (open all year round))
(Business hours: 24 hours (open all year round))

Part 15.21 statement
" Change or Modifications that are not expressly approved by the manufacturer could void
the user's authority to operate the equipment. “
Part 15.105 statement
This equipment has been tested and found to comply with the limits for a class B digital
device, pursuant to Part 15 of the FCC Rules.
These limits are designed to provide reasonable protection against harmful interference in
a residential installation. This equipment generates uses and can radiate radio frequency
energy and, if not installed and used in accordance with the instructions, may cause harmful
interference to radio communications. However, there is no guarantee that interference will
not occur in a particular installation. If this equipment does cause harmful interference or
television reception, which can be determined by turning the equipment off and on, the user
is encouraged to try to correct the interference by one or more of the following measures:
- Reorient or relocate the receiving antenna.
- Increase the separation between the equipment and receiver.
- Connect the equipment into an outlet on a circuit different from that to
which the receiver is connected.
- Consult the dealer or an experienced radio/TV technician for help.

FCC Part 15 Class B Compliance
This device and its accessories comply with part 15 of FCC
rules and ICES-003 Class B digital apparatus requirements
for Industry Canada. Operation is subject to the following
two conditions:(1) This device and its accessories may not
cause harmful interference, and (2) this device and its
accessories must accept any interference received, including
interference that may cause undesired operation.
Body-worn Operation
This device was tested for typical body-worn operations
with the back of the phone kept 1.0cm between
the user’s body and the back of the phone. To comply with
FCC RF exposure requirements, a minimum separation
distance of 1.0cm must be maintained between
the user's body and the back of the phone. Third-party
belt-clips, holsters, and similar accessories containing
metallic components PXVW not be used. Body-worn
accessories that cannot maintain 1.0cm
separation distance between the user's body and the back
of the phone, and have not been tested for typical body-
worn operations may not comply with FCC RF exposure
limits and should be avoided.

Conformité aux normes FCC Part 15 Class B
Cet appareil et ses accessoires sont conformes aux
normes FCC Part 15 Class B de la Federal
Communications Commission et aux exigences pour
appareils numériques ICES-003 Class B d’Industrie
Canada.Son fonctionnement est sujet aux deux conditions
suivantes :(1) Cet appareil et ses accessoires ne doivent
pas provoquer de brouillage préjudiciable, et (2) cet
appareil et ses accessoires doivent accepter toutes les
interférences reçues, y compris celles pouvant causer un
fonctionnement indésirable.
Utilisation comme appareil portatif
Ce téléphone a été testé en vue d’une utilisation type
comme appareil portatif, avec une distance de 1.0cm
entre l’arrière de l’appareil et le corps de
l’utilisateur. Pour satisfaire aux exigences de la FCC en
matière d’exposition aux radiofréquences, une distance
d’au moins 1.0cm doit être maintenue entre
le corps de l’utilisateur et l’arrière du téléphone. Les
pinces de ceinture, les étuis et autres accessoires
semblables d’autres marques et contenant des
composantes métalliques ne doivent pas être utilisés.Les
accessoires portatifs empêchant le maintien d’une
distance de 1.0cm entre le corps de
l’utilisateur et l’arrière du téléphone et qui n’ont pas été
testés en vue d’une utilisation type comme accessoires
portatifs peuvent ne pas satisfaire aux limites d’exposition
aux radiofréquences stipulées par la FCC et, par
conséquent, ne doivent pas être utilisés.