LG Electronics USA L1530TMM 15" LCD Monitor User Manual users manual
LG Electronics USA 15" LCD Monitor users manual
UserManual.wiki
>
LG Electronics USA
>
L1530TMM User Manual
users manual
Navigation menu
Upload a User Manual
Namespaces
Wiki Guide
HTML
PDF
Info
Views
User Manual
Discussion / Help
Navigation

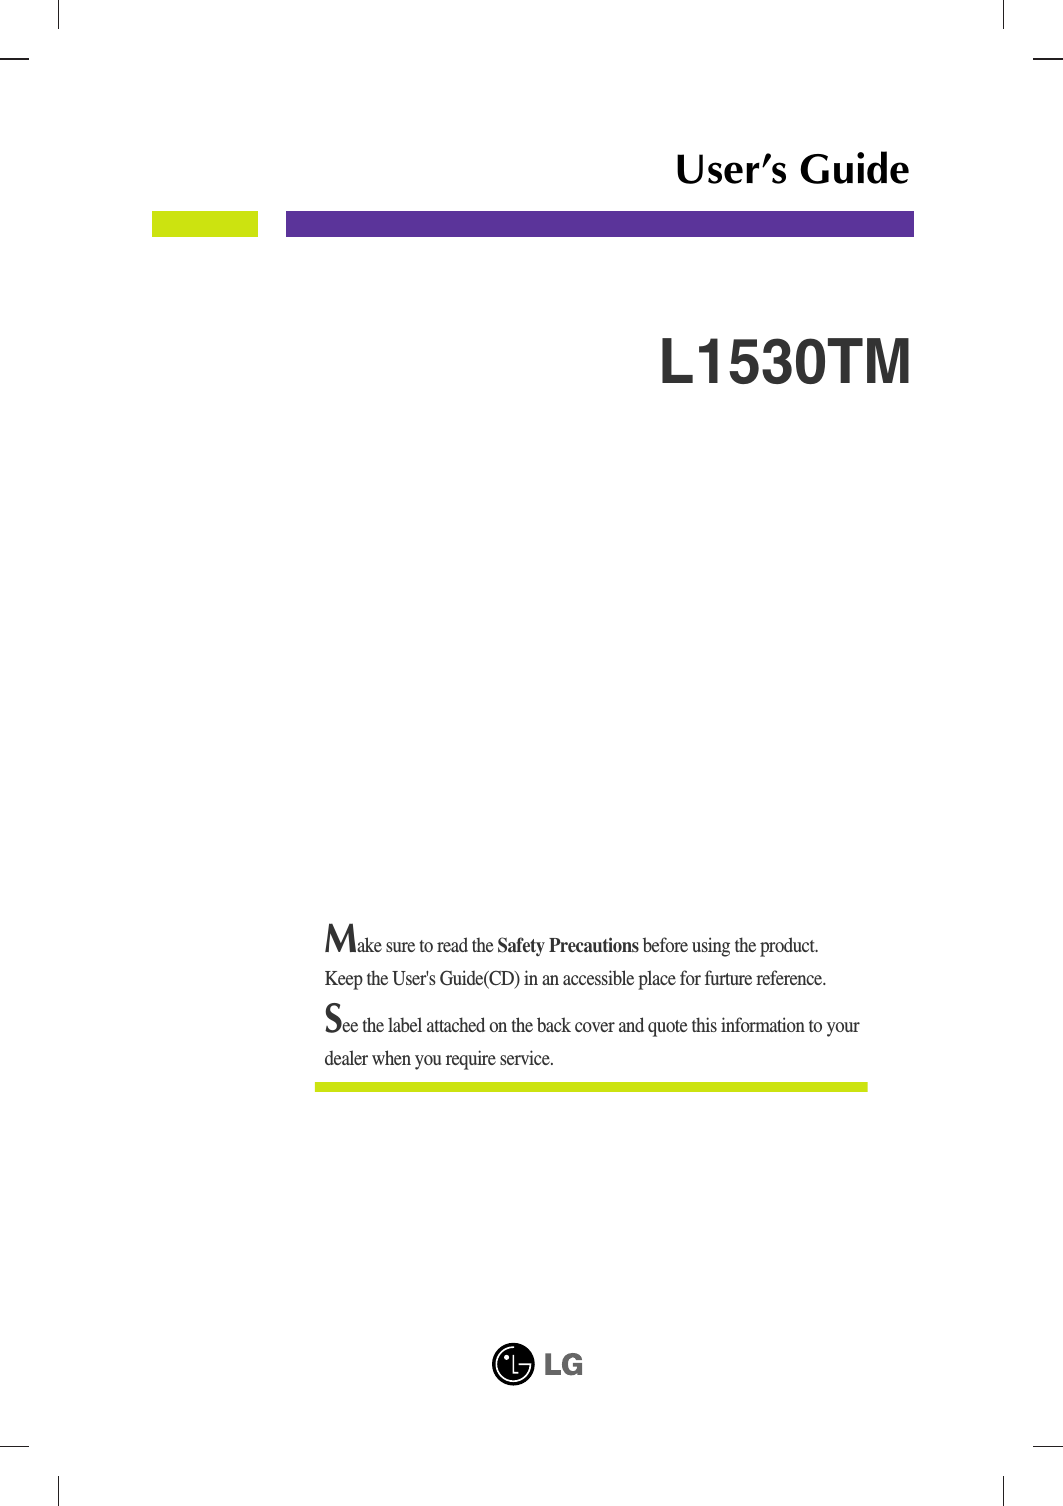

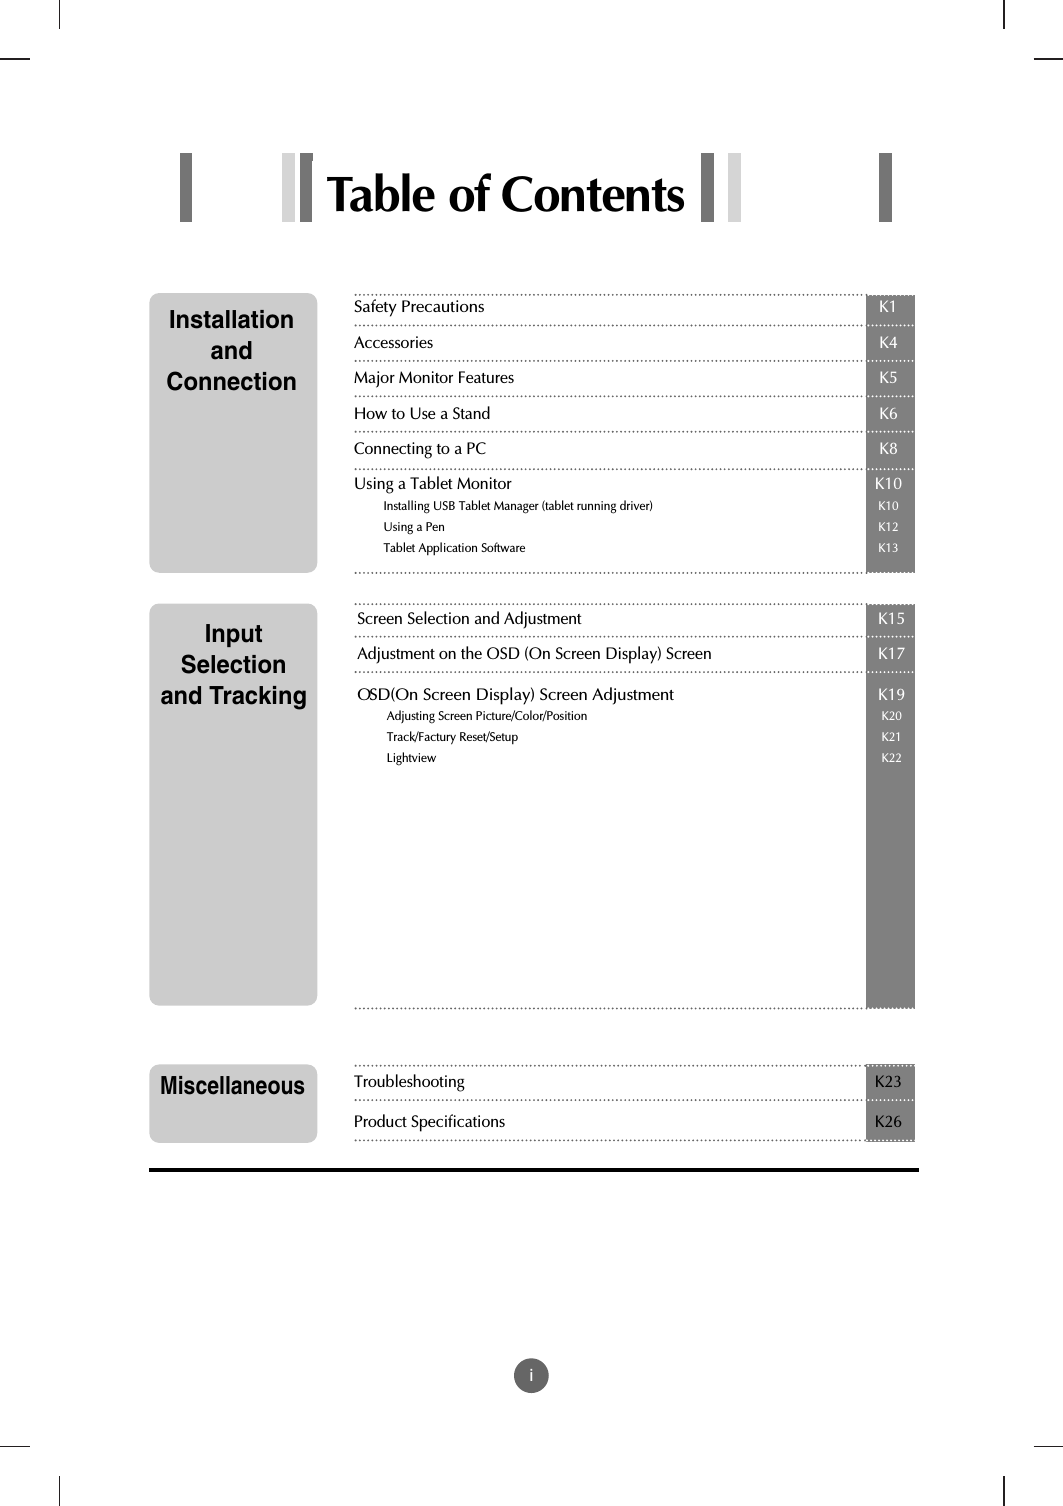
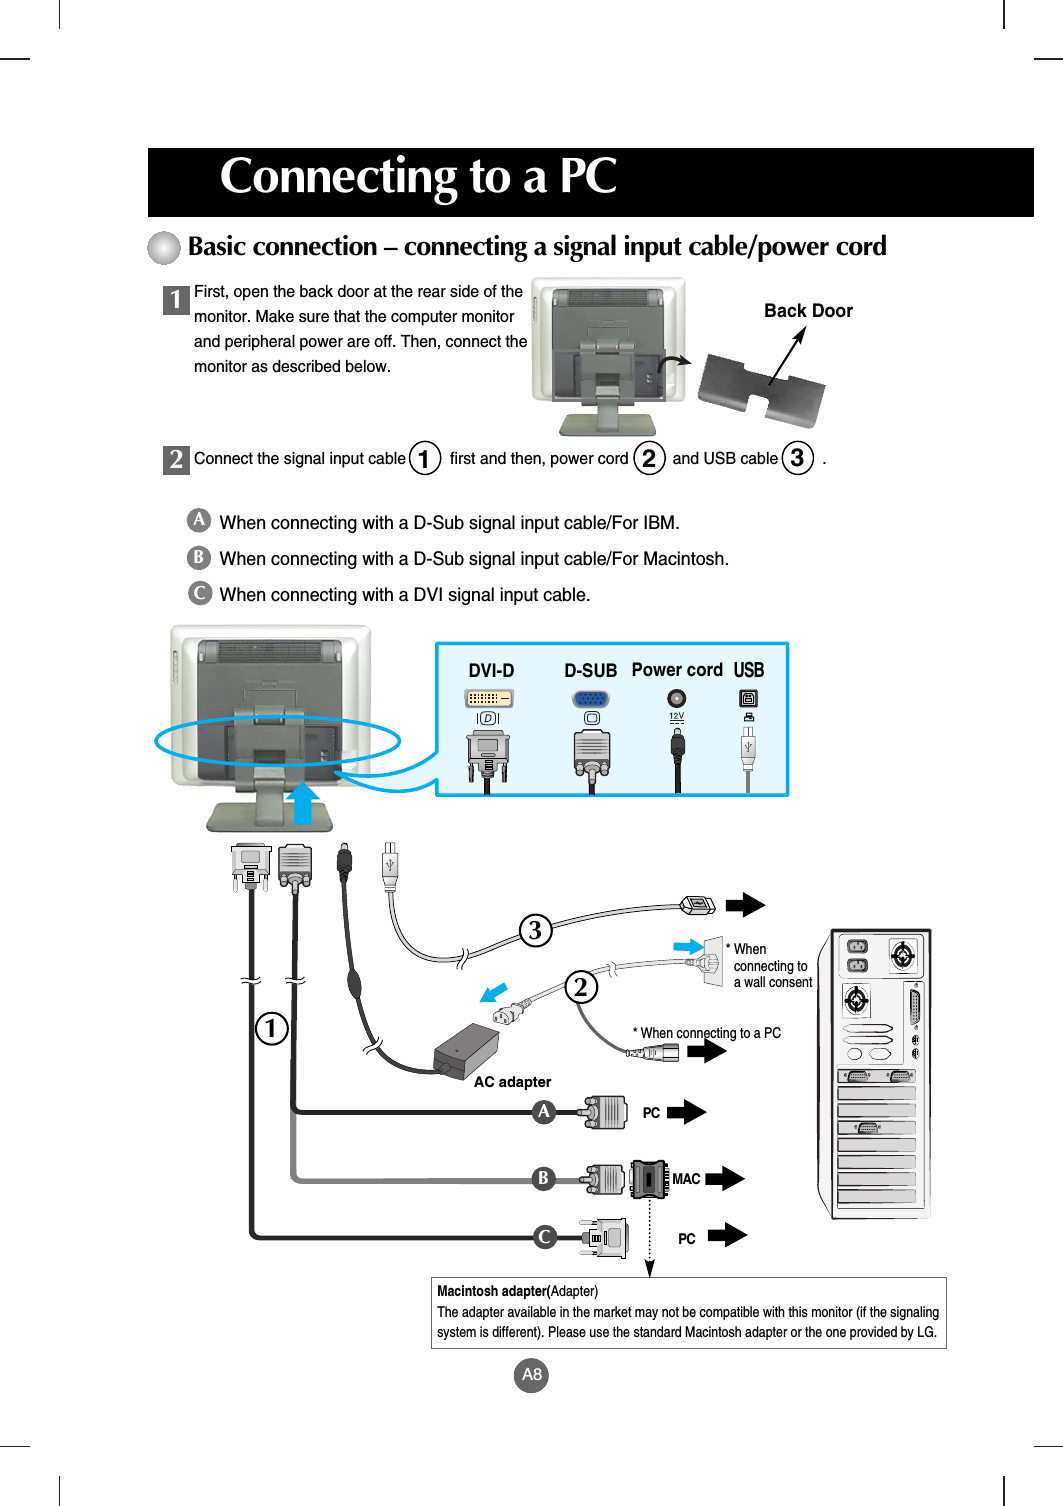
![A12Name and Function of the PartsUsing a PenUsing a Pen[When Using a Pen][Inserting a Battery][Using a Pen]ON/OFF ButtonSide Button (Upper)Side Button (Lower)Pen Content[When Keeping a Pen]Pen CabPen HolderOpen the pen cab and insert the provided battery into it. Hold the pen as if you’re holding anormal pen or pencil. Press the side button using your thumb or index finger.1. ON/OFF button.2. Side Button: You can set the right/left mouse button or double click function. Refer to“How to Use USB Tablet Manager” (Page K12) on the details of function setting.3. Pen Content: When the pen content is worn out, replace it with new one, which is includedin the product.1. Pointing: The screen point moves when you move a pen nib on the tablet screen, nottouching it but moving just over it.2. Click: Clicking the screen with a pen has the same effect as that of a mouse.3. Double Click: Rapidly click the same screen position with a pen twice to imitate a mousedouble click. Or press the upper side button.4. Drag: Drag the pen while holding the pen on the screen.Replacing a Pen Content1. Taking out the pen content: Hold the pen nib and extract it using a pincette or tweezers(optional).2. Inserting new pen content: Push the replacement in softly until it is blocked.To use the pen side button as a right mouse button, click the side button while not touchingthe pen on the screen.Note](https://usermanual.wiki/LG-Electronics-USA/L1530TMM/User-Guide-387736-Page-19.png)
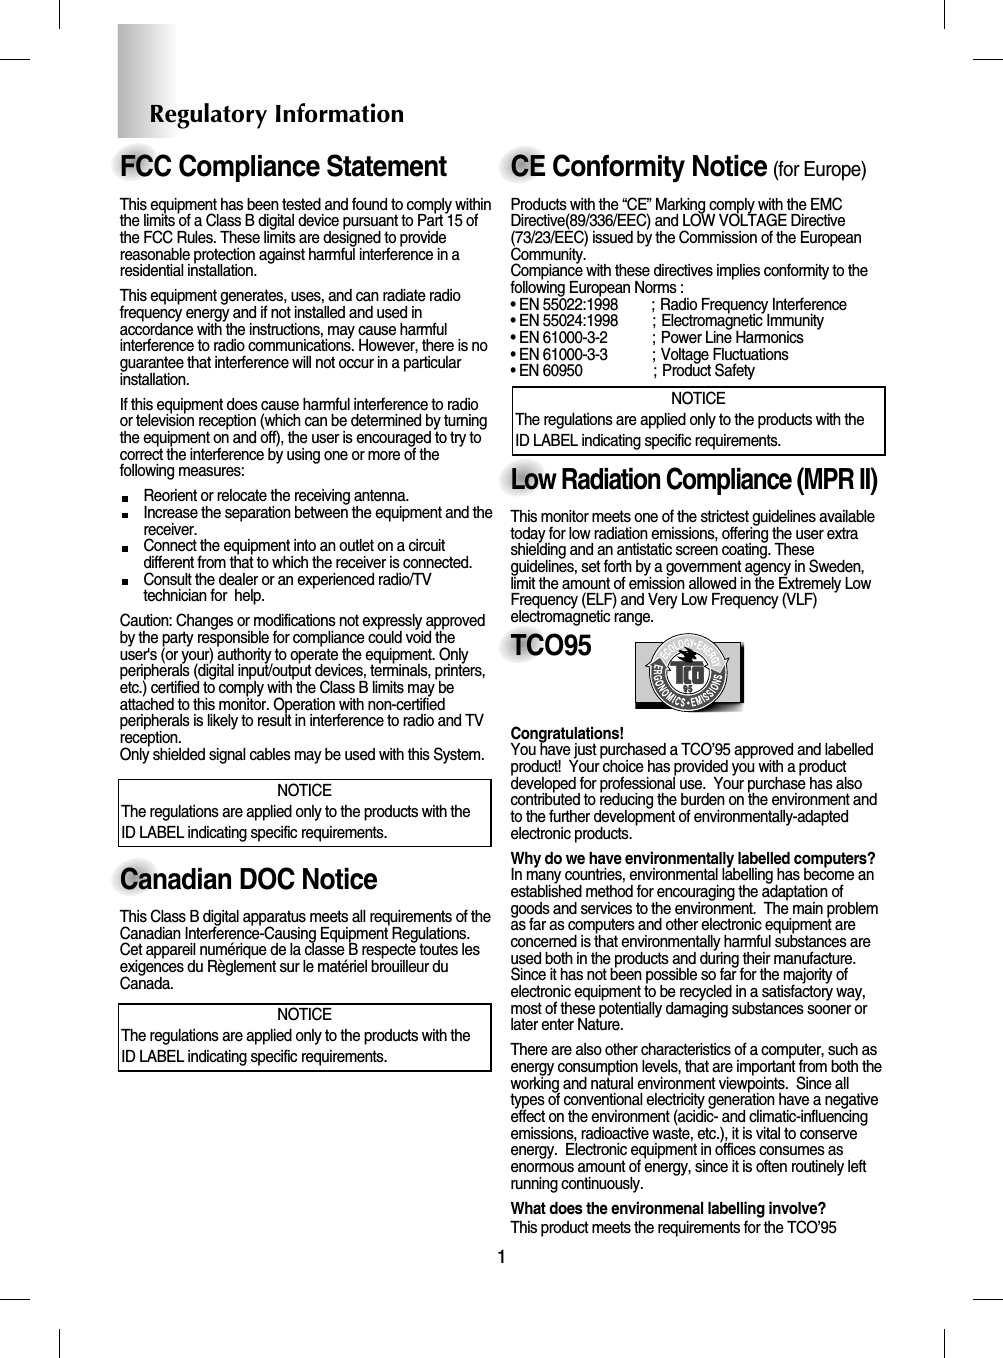
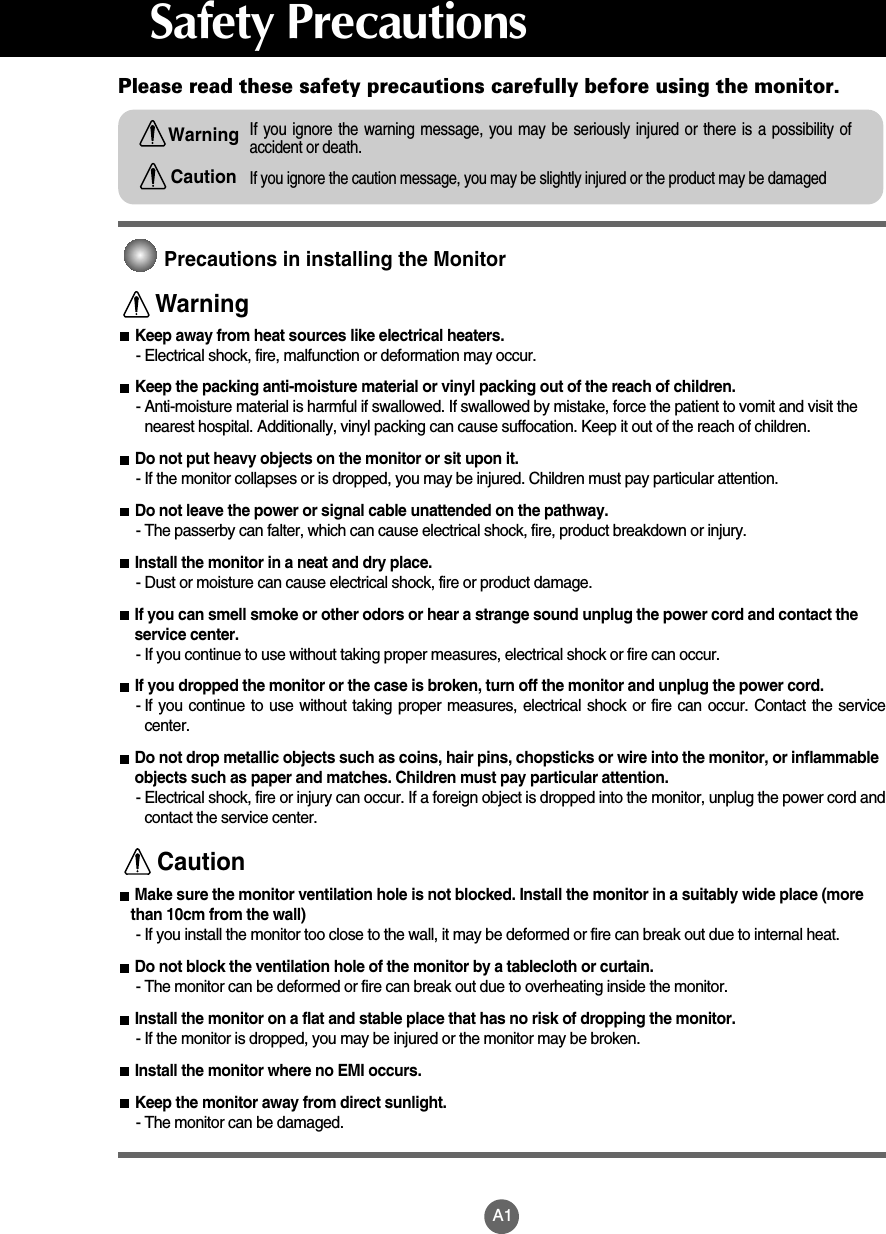
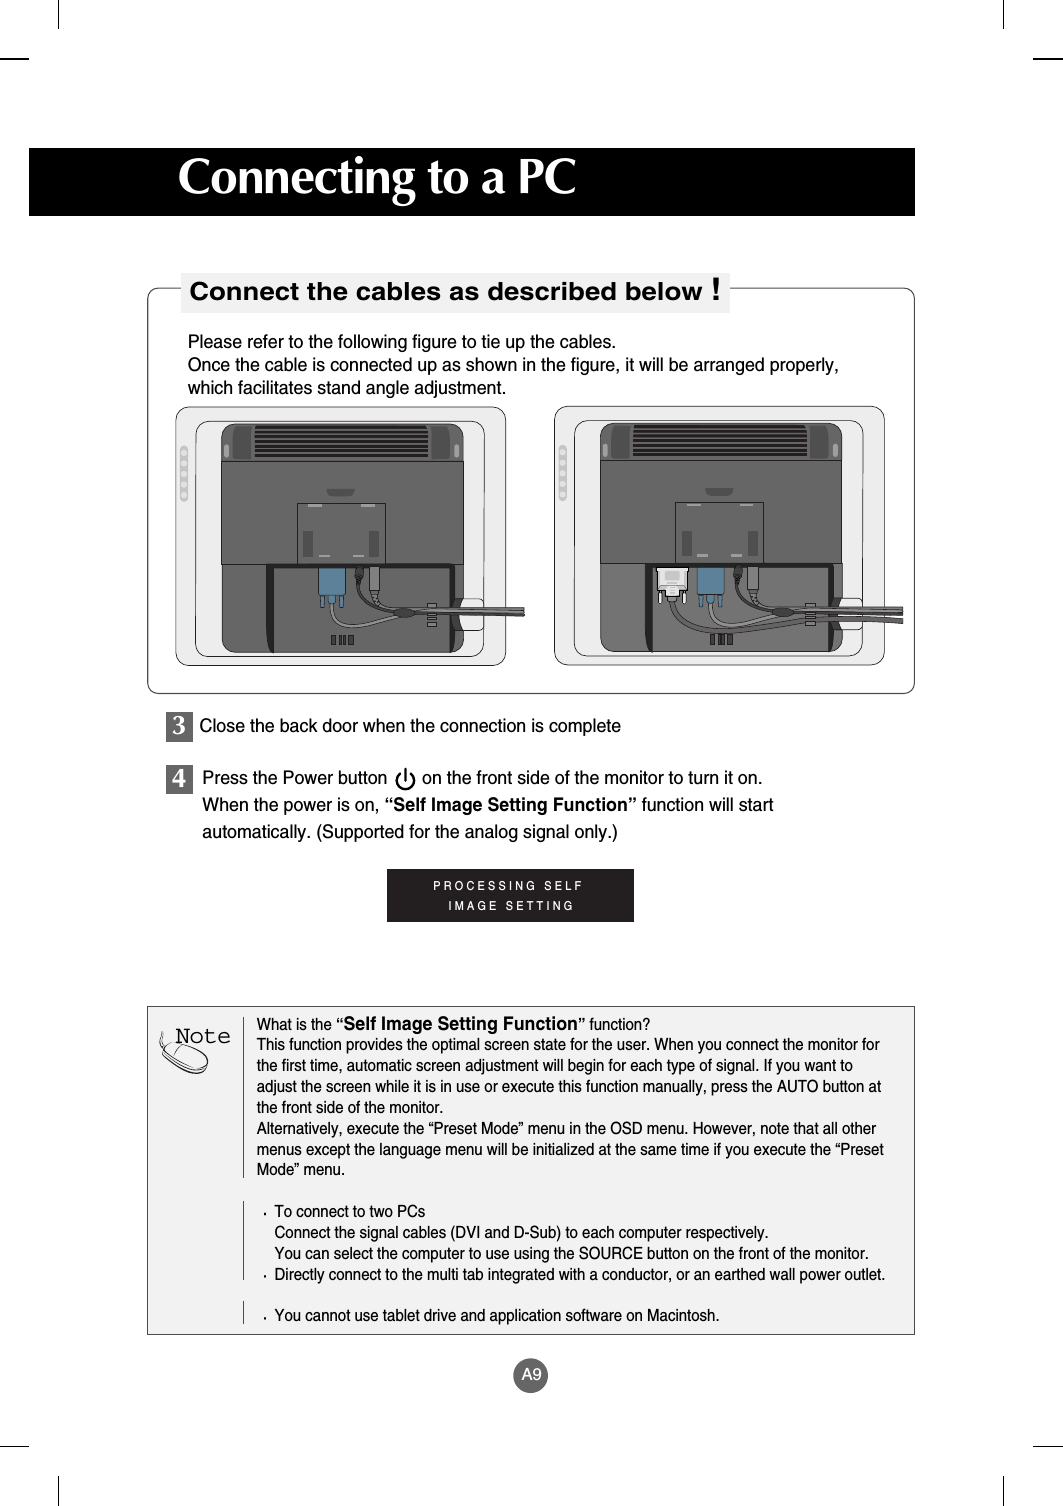
![A13Using a Tablet MonitorTablet Application SoftwareArt DabblerArt Dabbler from Corel, the specialized graphic tool vendor, allows youto present the graphics with rich texture selection and modification aswell as various types of pens and colors. Its text input function enablesyou to enter the description on the picture, if necessary.The presented graphic can be saved with various formats. You can alsocreate a simple animation using Art Dabbler.[Example of Using Art Dabbler][Example of Using Free Notes][Example of Using Office Ink]Install the provided software to use a tablet monitor more usefully and invarious ways.Insert the software CD-ROM included in this manual into the PC DC-ROM drive.Then, the main window will be automatically populated. Click the icon of the softwareto install and follow the instructions displayed on the screen.1Free NotesFree Notes is an exclusive document handling program that enablesyou to import the picture like a general word processor and modify apicture or a handwritten document, using various modes displayed atthe bottom of the window. The composed document or picture can besaved with the file extension of “*.fns" or “*.jpg”. The file saved with the“*.fns" extension can be opened and modified by “FreeNotes” programinstalled in other PC.You can send a composed picture or a text as an e-mail attachment orprint out.Office InkOffice Ink is the bundle software include in Free Notes. Unlike FreeNotes, you can input a picture or handwrite letters on the backgroundscreen freely using the pen with various pen touch techniques andcolors. However, Office Ink is designed for instant pen touch and thefile saving function is provided like Free Notes.However, you can use this program usefully to highlight a lecturingitem or add a comment, instead of a pen.21234](https://usermanual.wiki/LG-Electronics-USA/L1530TMM/User-Guide-387736-Page-20.png)
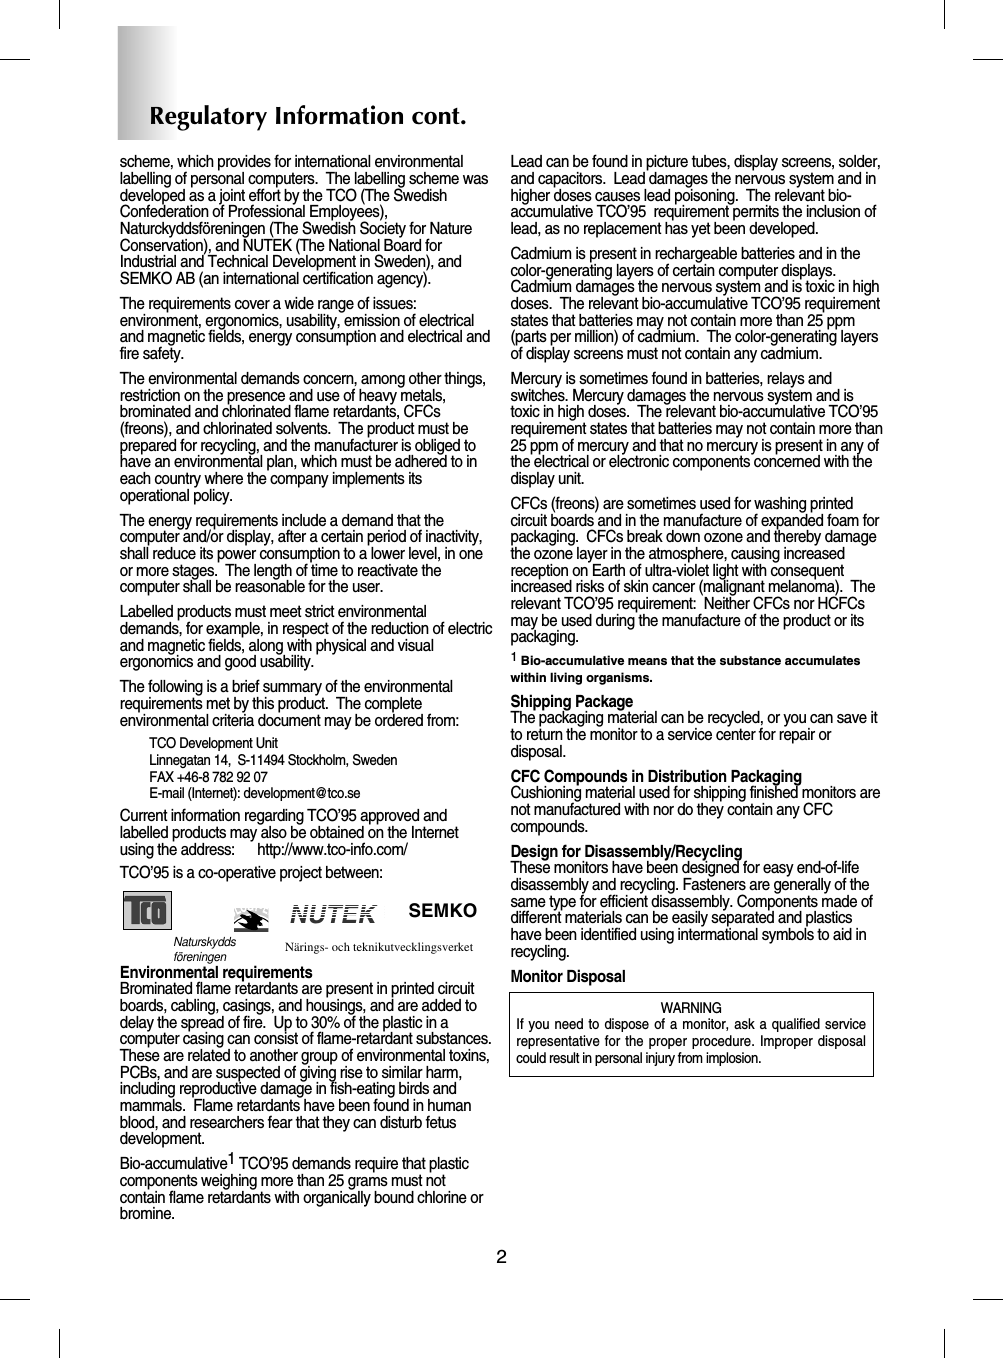
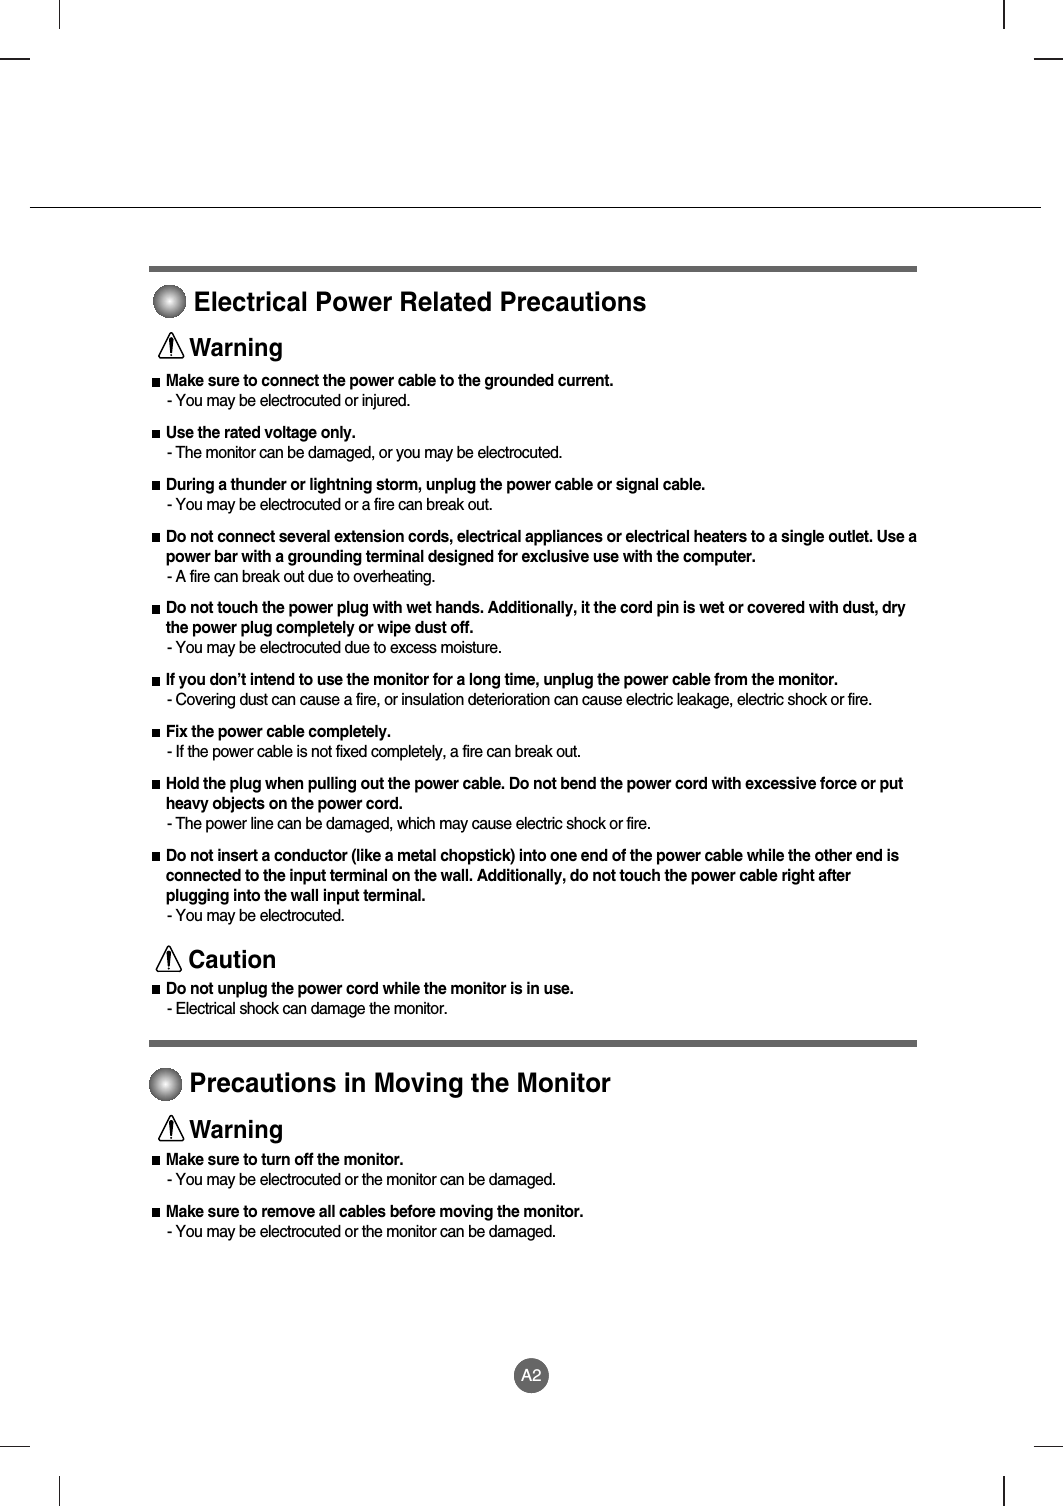
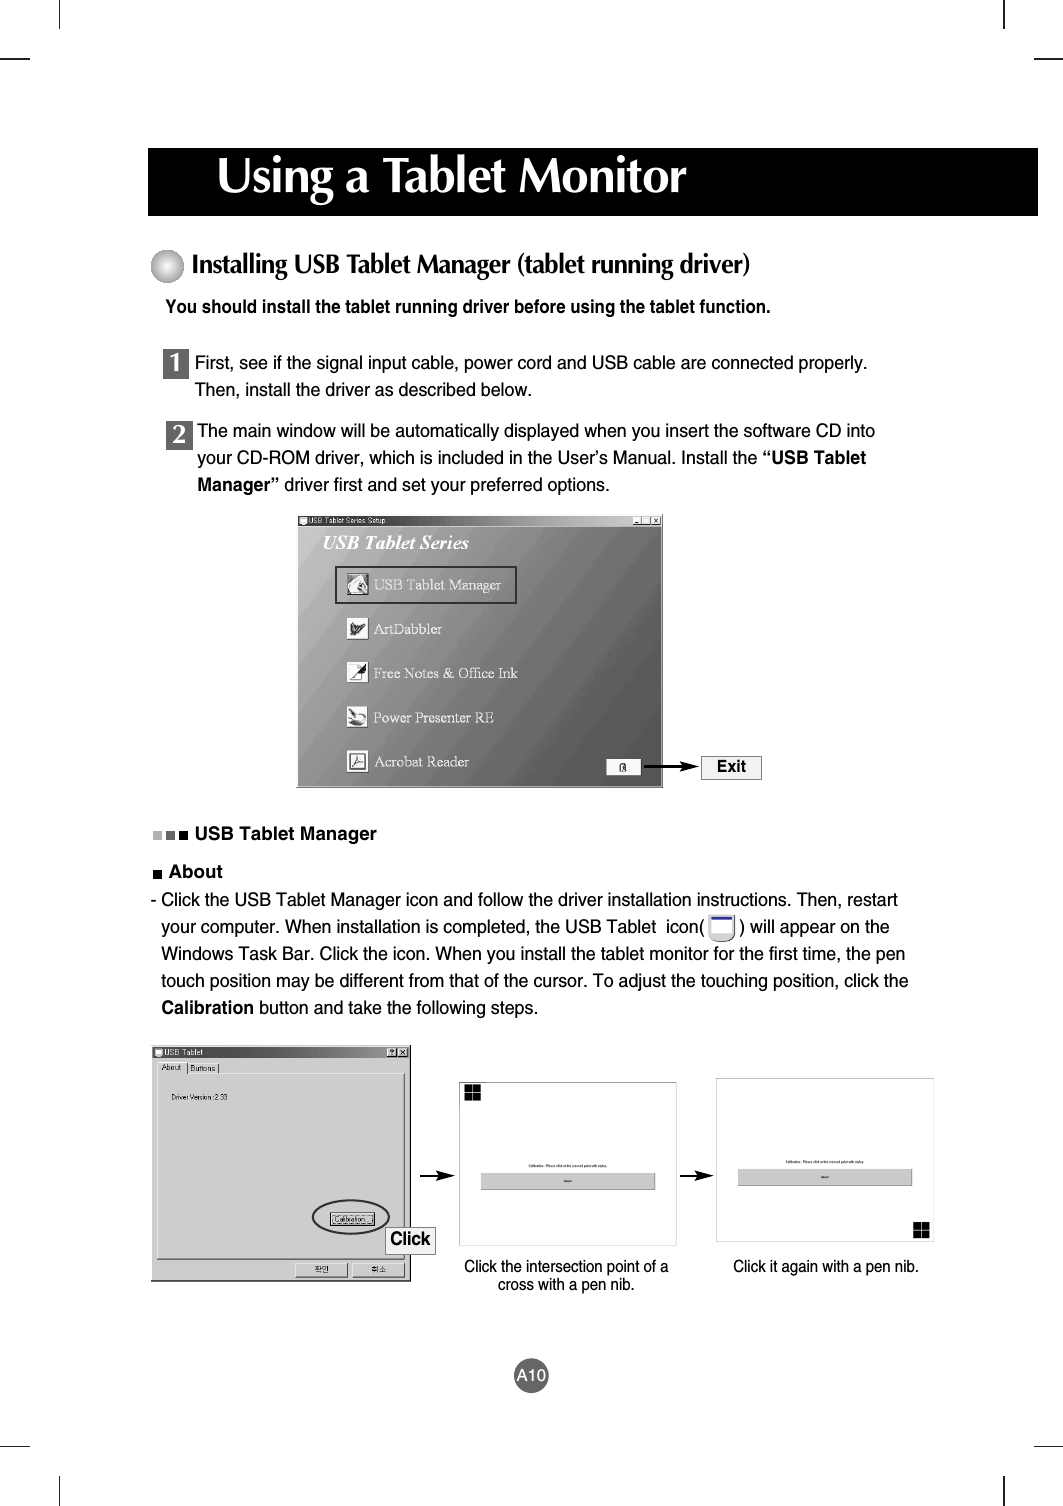
![A14[Example of Using Power Presenter RE]Power Presenter REPower Presenter RE is a program designed to be used with PowerPointpresentations. It enables you to highlight the section to emphasize, or providesupplementary description using a whiteboard or blackboard. The presentedpicture or text can be saved as “*.jpg”, or sent to other person as an e-mailattachment. The recording function can be used conveniently for repetitivetraining or presentation. Since Power Presenter RE is solely designed forpresentation, instead of a picture or other purposes, only the limited number ofcolors is provided.You can use Power Presenter RE with MS PowerPoint or other applicationprograms.When the application program is successfully installed, the AP Manager icon ( )will appear on the Task Bar. Click the icon to pop up the AP Manager window. Whenthe program is running, the icon can be used as a shortcut key. Click once to start theprogram.3Acrobat ReaderUser’s manuals of the application programs are provided as a PDF file. Please install Acrobat Reader toretrieve the user’s manual.You can retrieve the user’s manual by selecting Windows Start -> Programs.4Art Dabbler Free Notes Office Ink Power Presenter RE](https://usermanual.wiki/LG-Electronics-USA/L1530TMM/User-Guide-387736-Page-21.png)
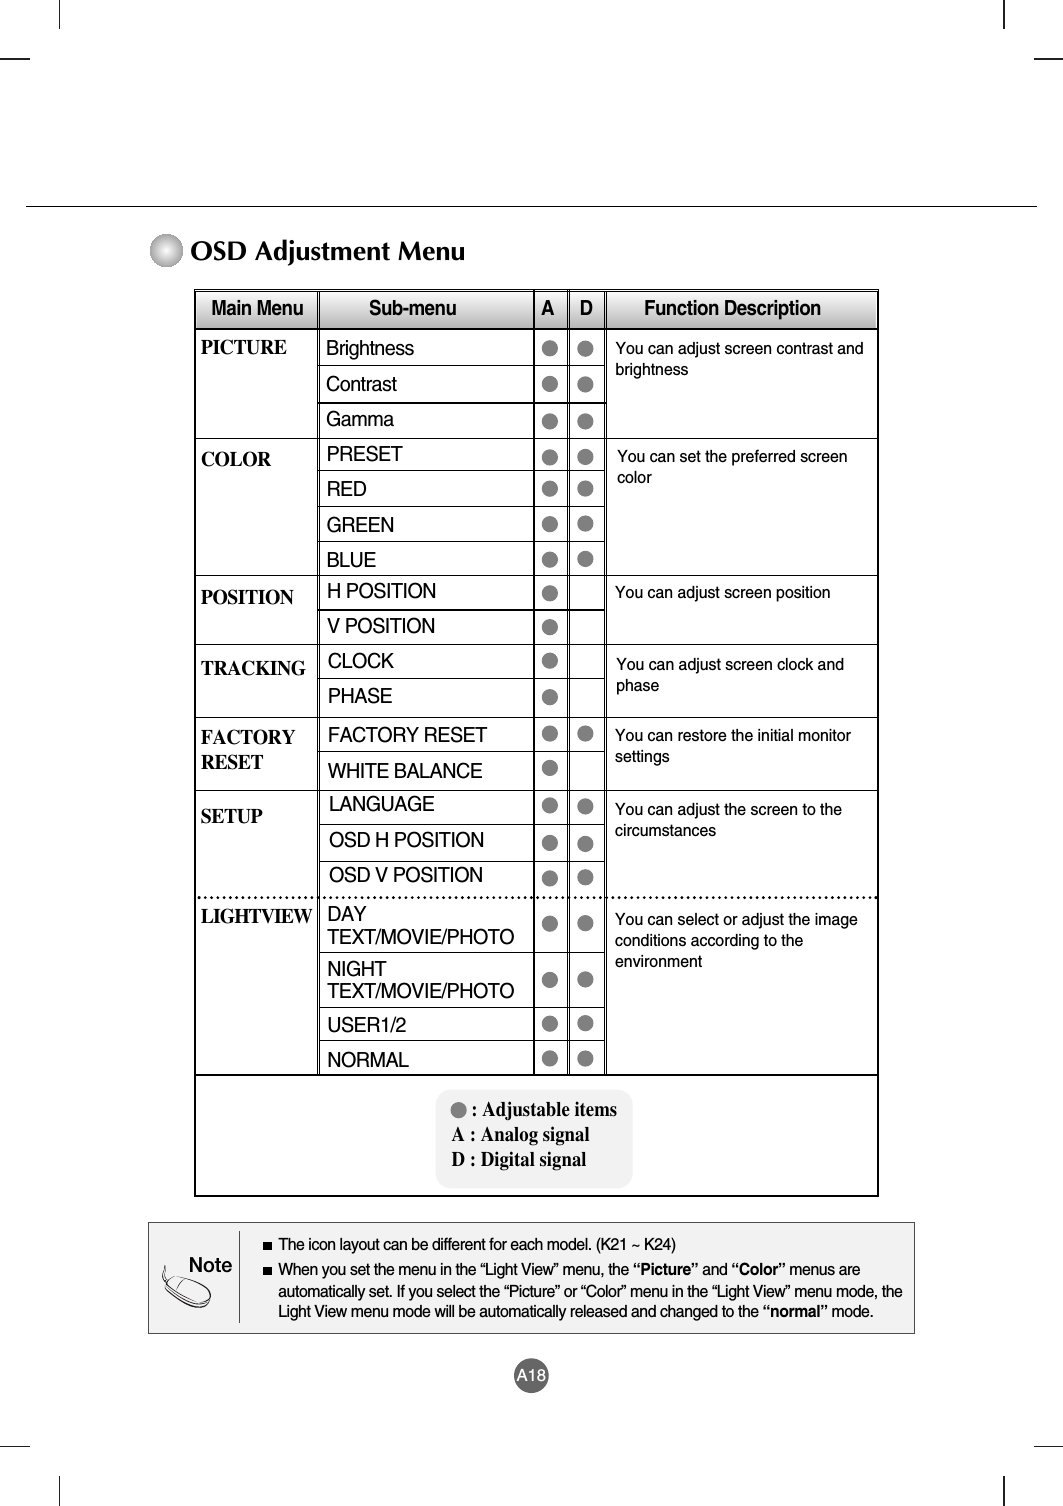
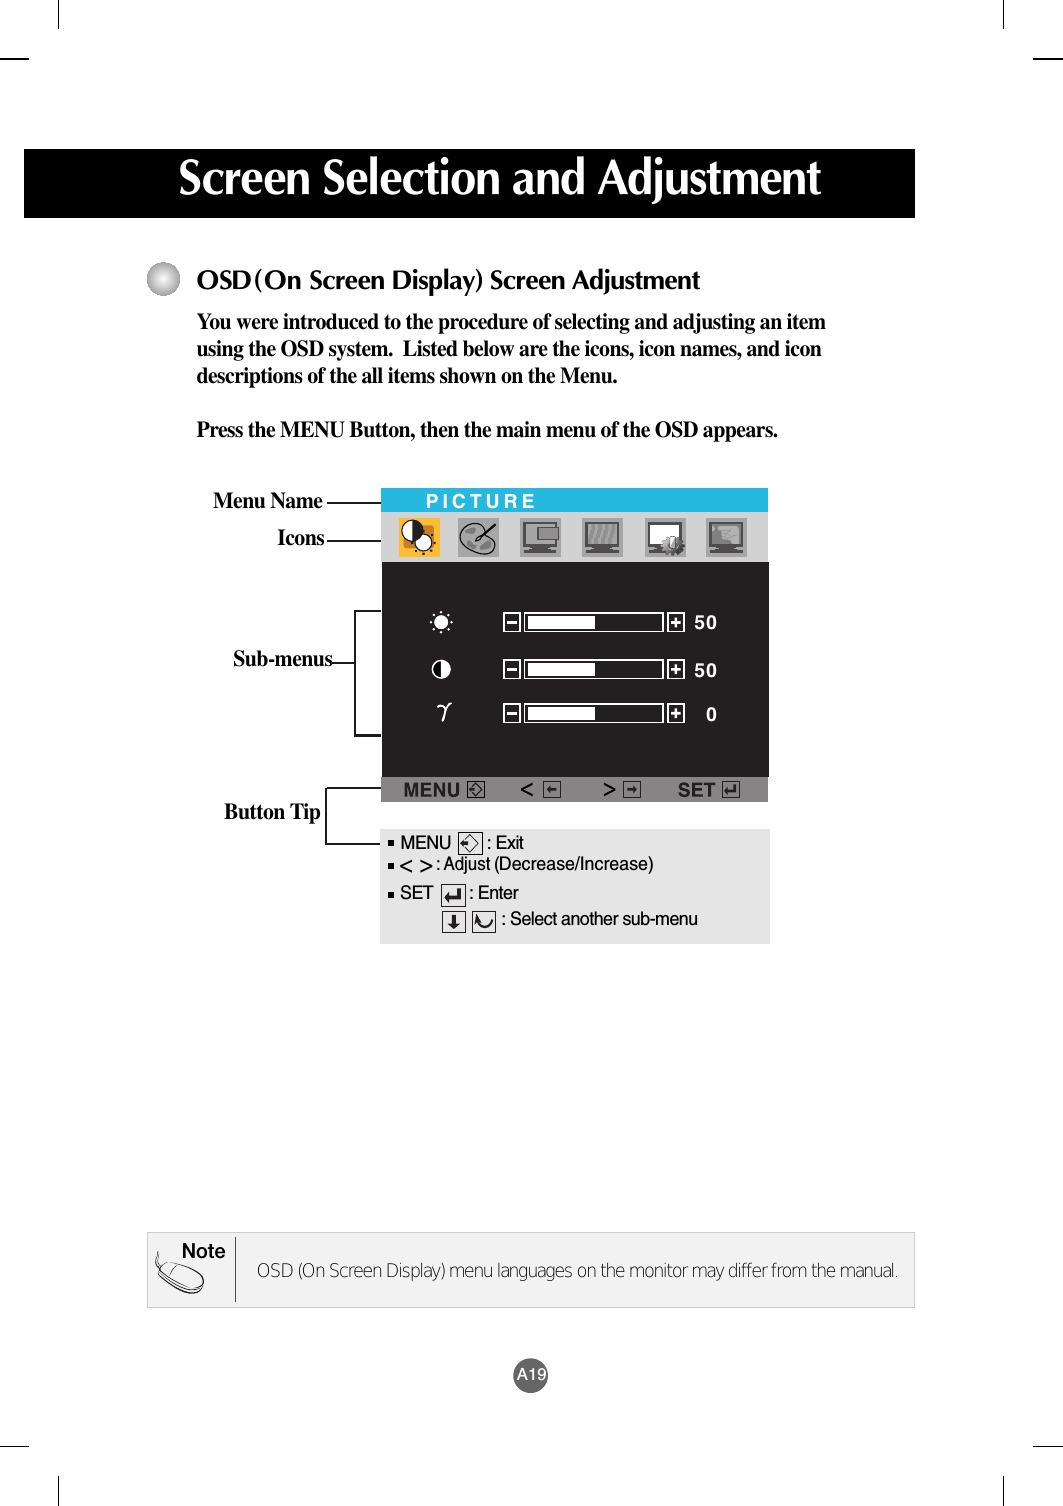
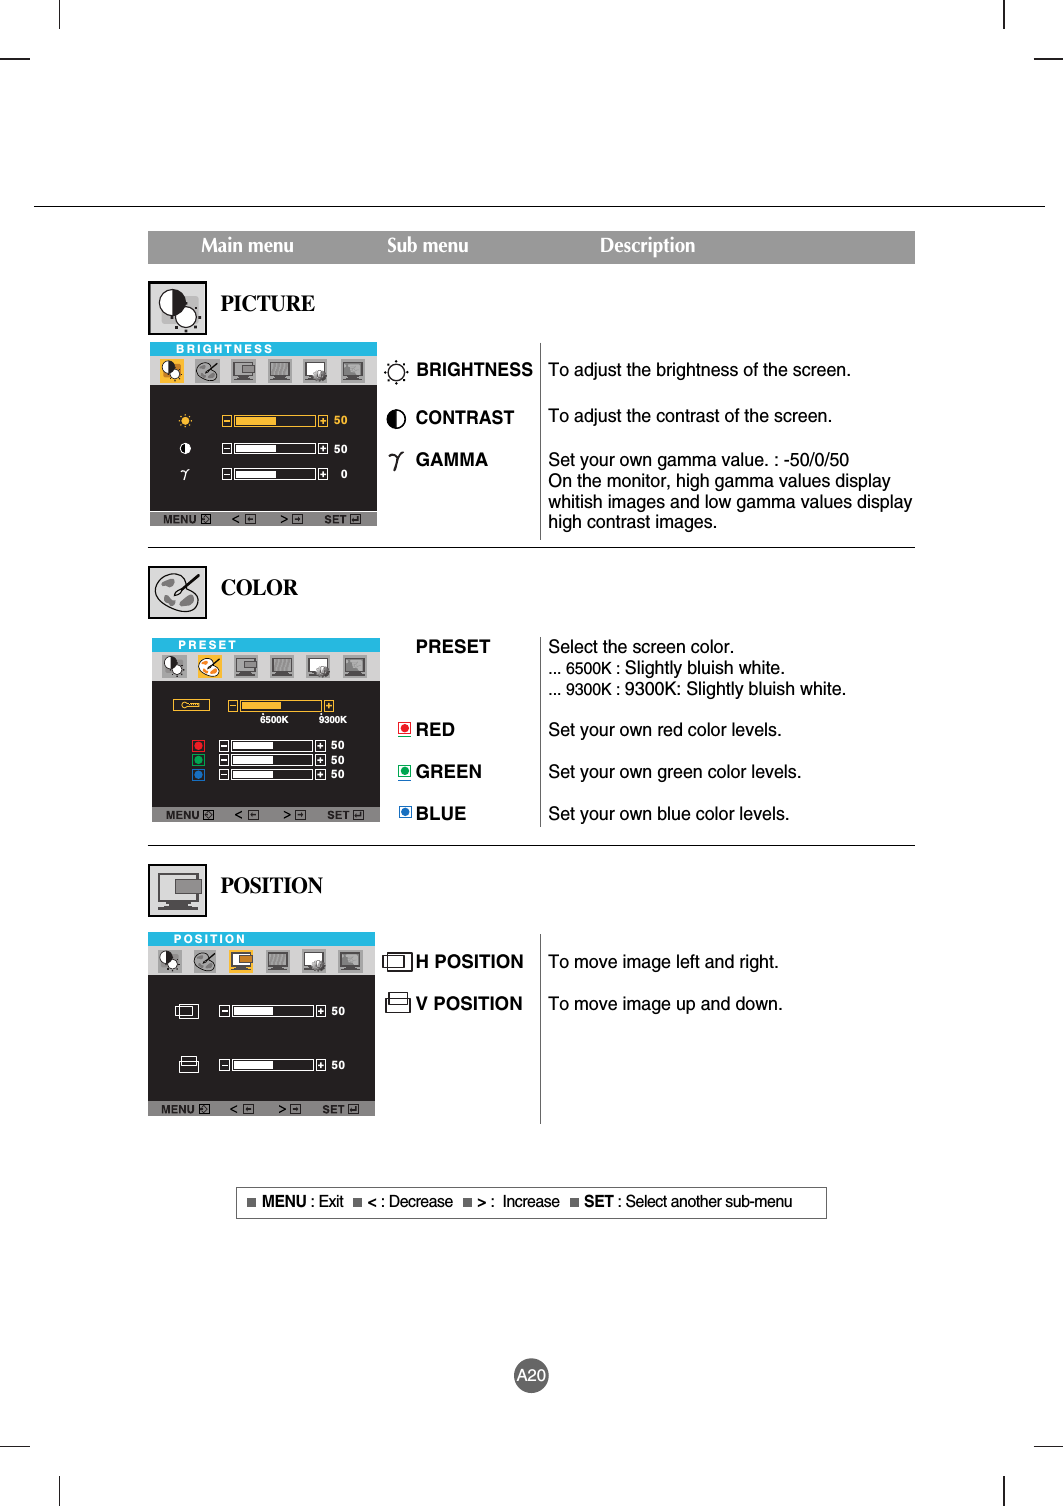
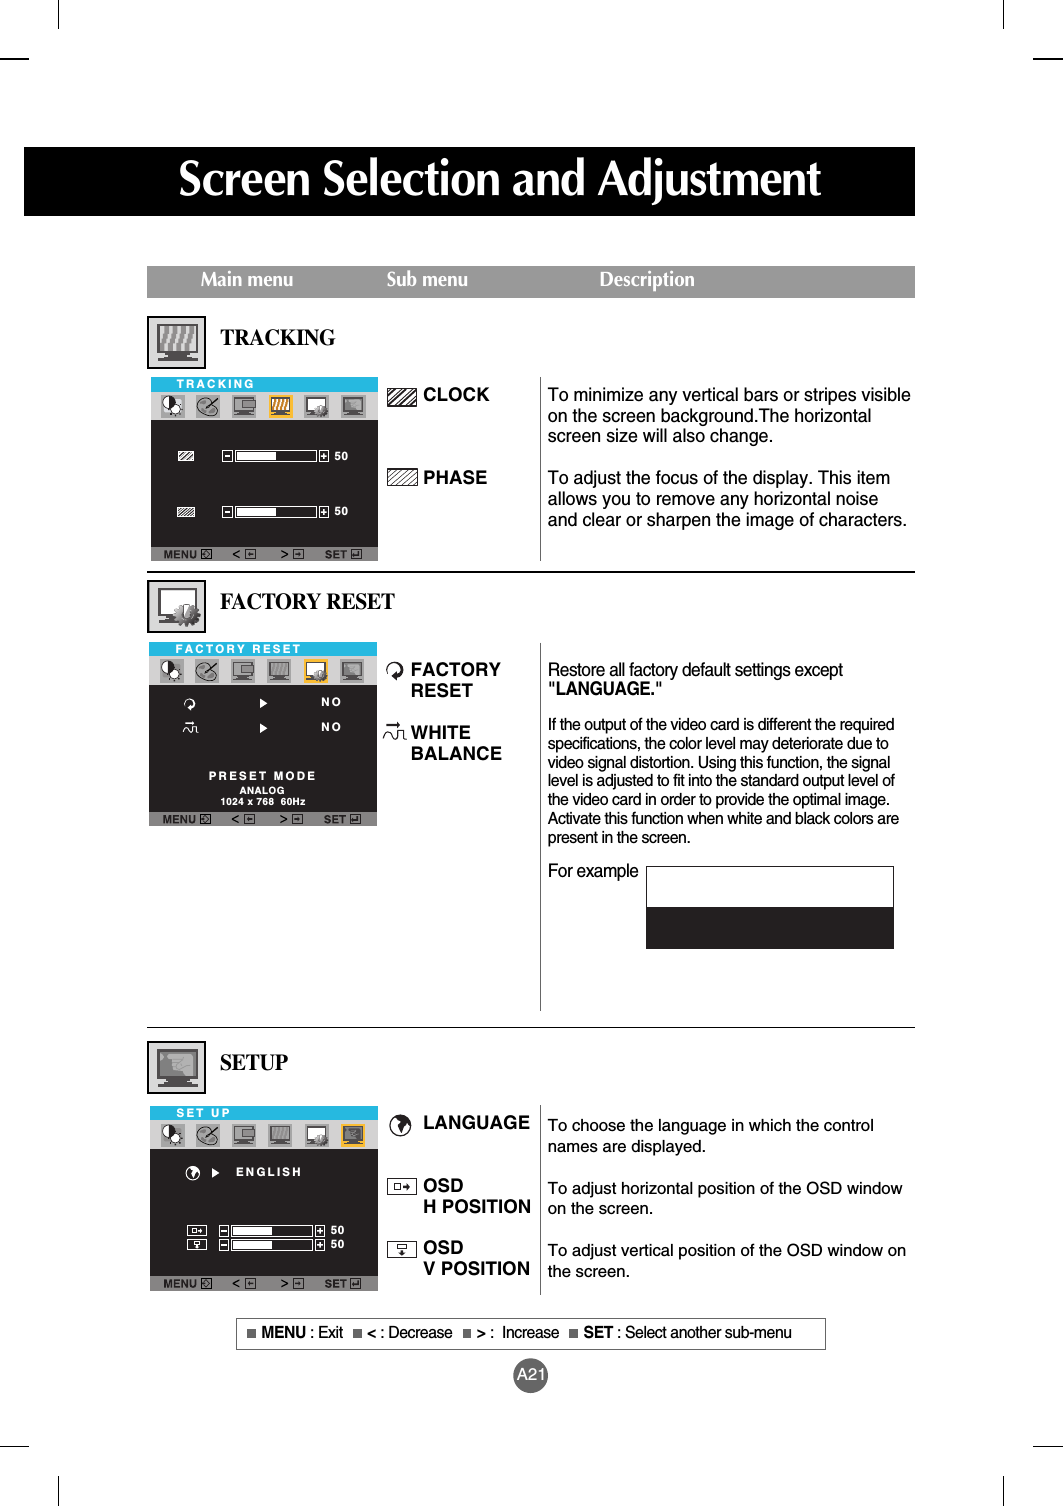
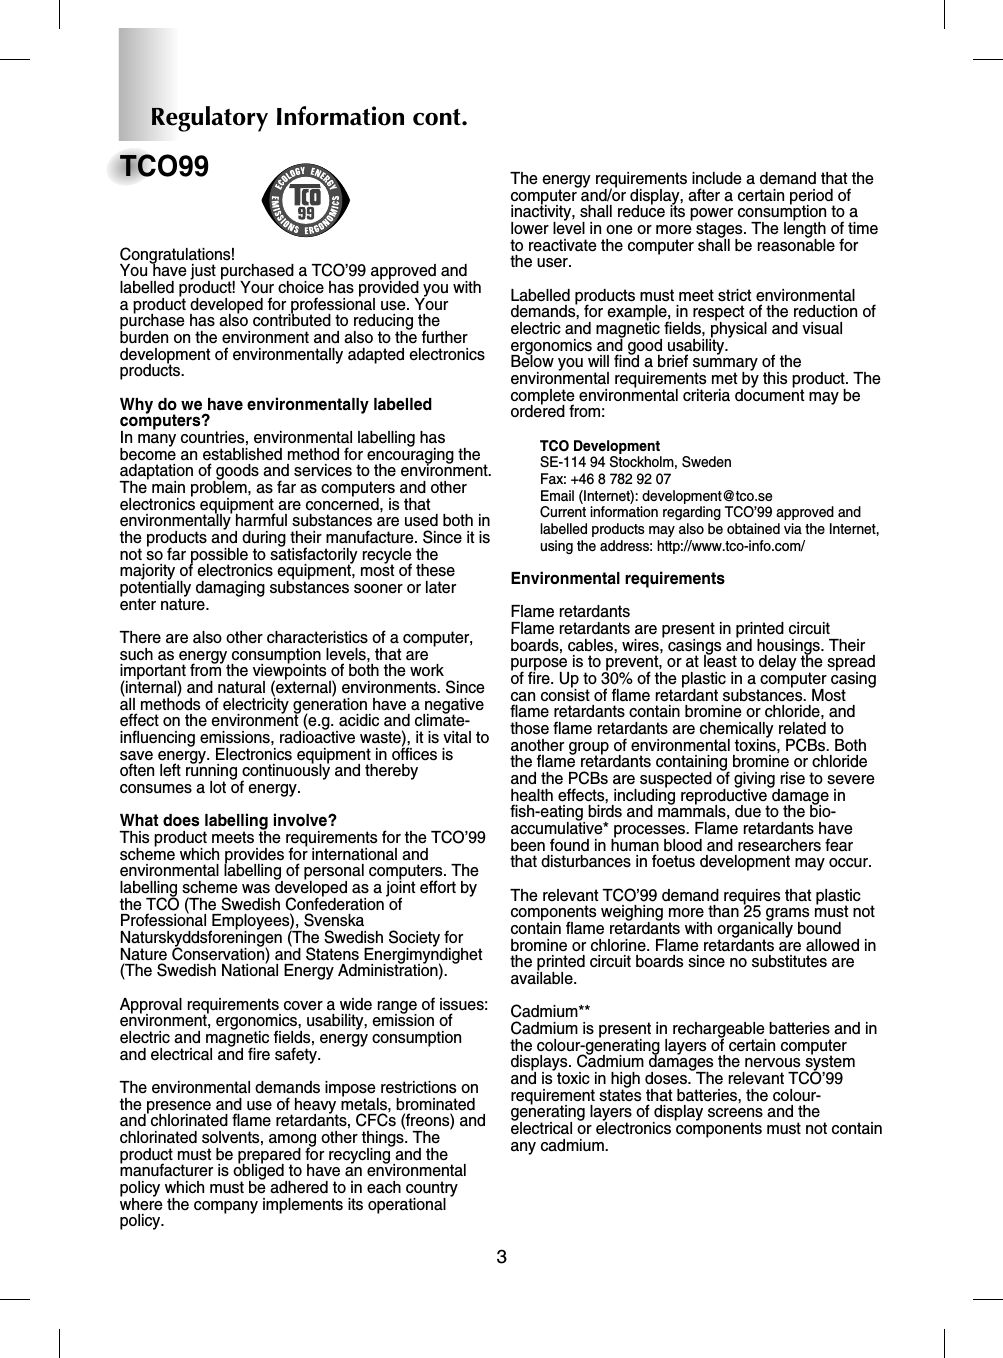
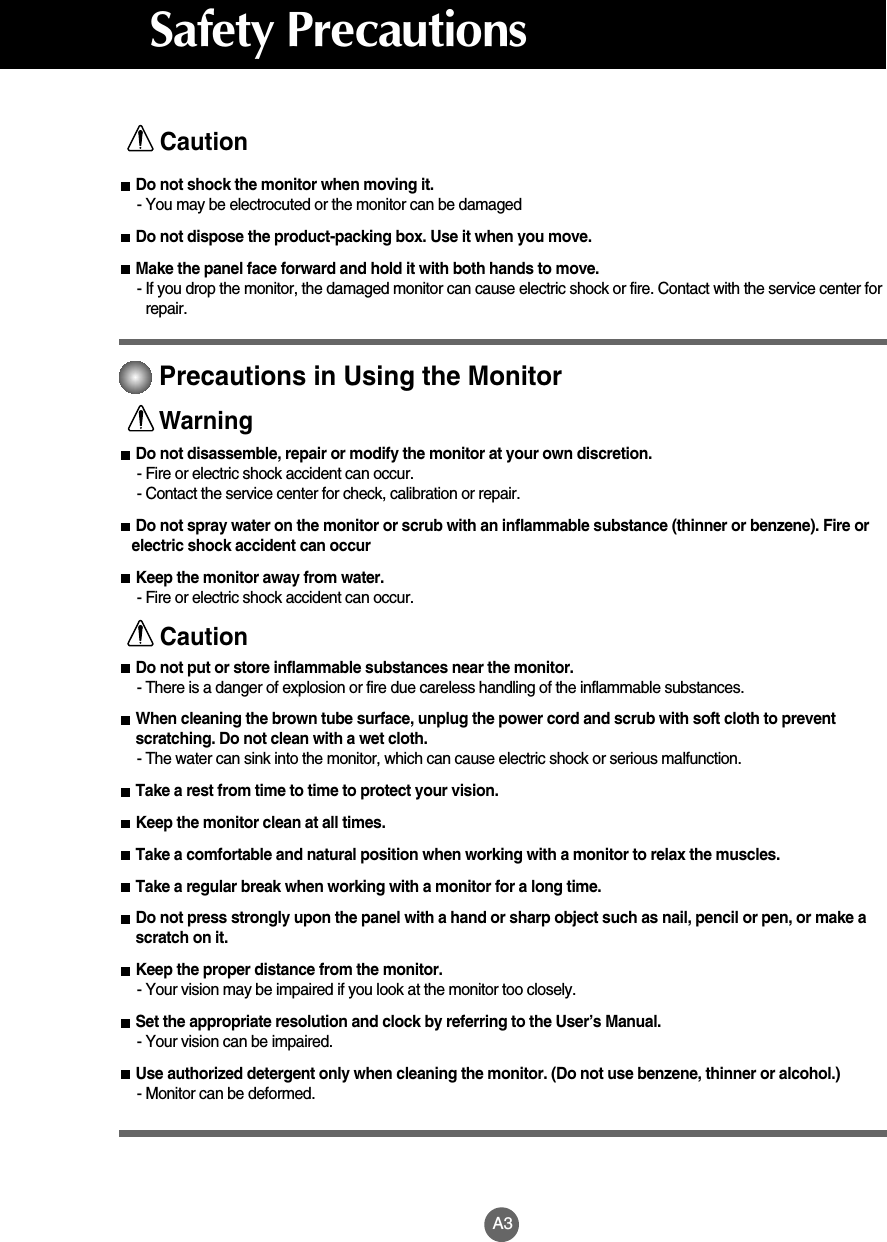
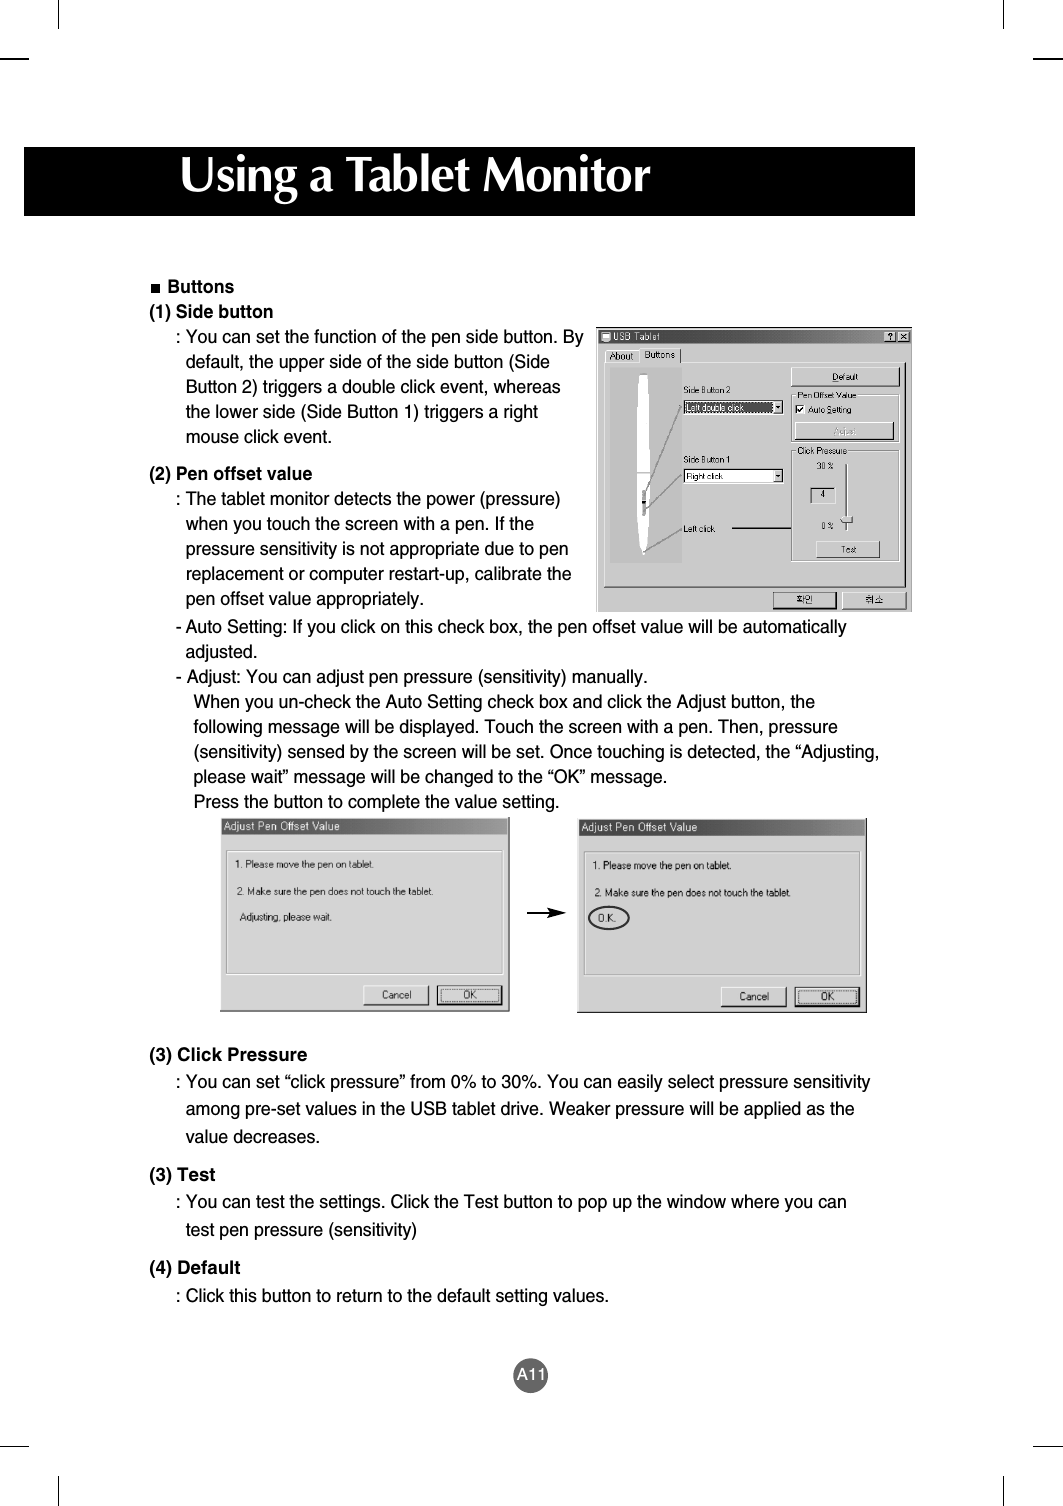
![A17Adjustment on the OSD (On Screen Display) ScreenYou need to adjust the screen if you connect the monitor to the newcomputer or change the mode.Refer to the following description to keep the screen in an optimal state. Press the AUTO/SET button to carry out automatic screen adjustment that best fits into the current screenmode. If adjustment is found to be unsatisfactory, you may need to adjust screen position, frequency orbrightness manually in the OSD menu. (Supported only for the analog signal only.)PROCESSING AUTO IMAGE ADJUSTMENTScreen Selection and AdjustmentSelects themenu iconSelects the icon Adjusts the statusSelects theadjustmentvalue/Closes theOSD screenPress the MENU button to open the OSD screen.Adjust the OSD menu item using the > < button. When the menu icon is selected, press the AUTO/SET buttonAdjust the item values using the > < button. To move down to the sub-menu or other menu, press theAUTO/SET button to move.To select other functions or to return to the previous screen, press the MENU button again.Press the MENU button twice to close the OSD screen.Automatic Saving FunctionWhen you select another menu or close the OSD screen after changing the value while the OSD screen isopen, the adjusted value will be automatically saved. Even though you don’t close the screen afteradjustment, the OSD will disappear automatically and the adjusted values will be saved accordingly.1234OSD(On Screen Display)The OSD screen provides graphical presentation of the screen adjustment state so that you canchange the setting visually.[Note] The language displayed in the monitor may differ from the one in the User’s Manual.Pops up theOSD screenAdjusts the OSD screen easily and automatically…Note](https://usermanual.wiki/LG-Electronics-USA/L1530TMM/User-Guide-387736-Page-24.png)