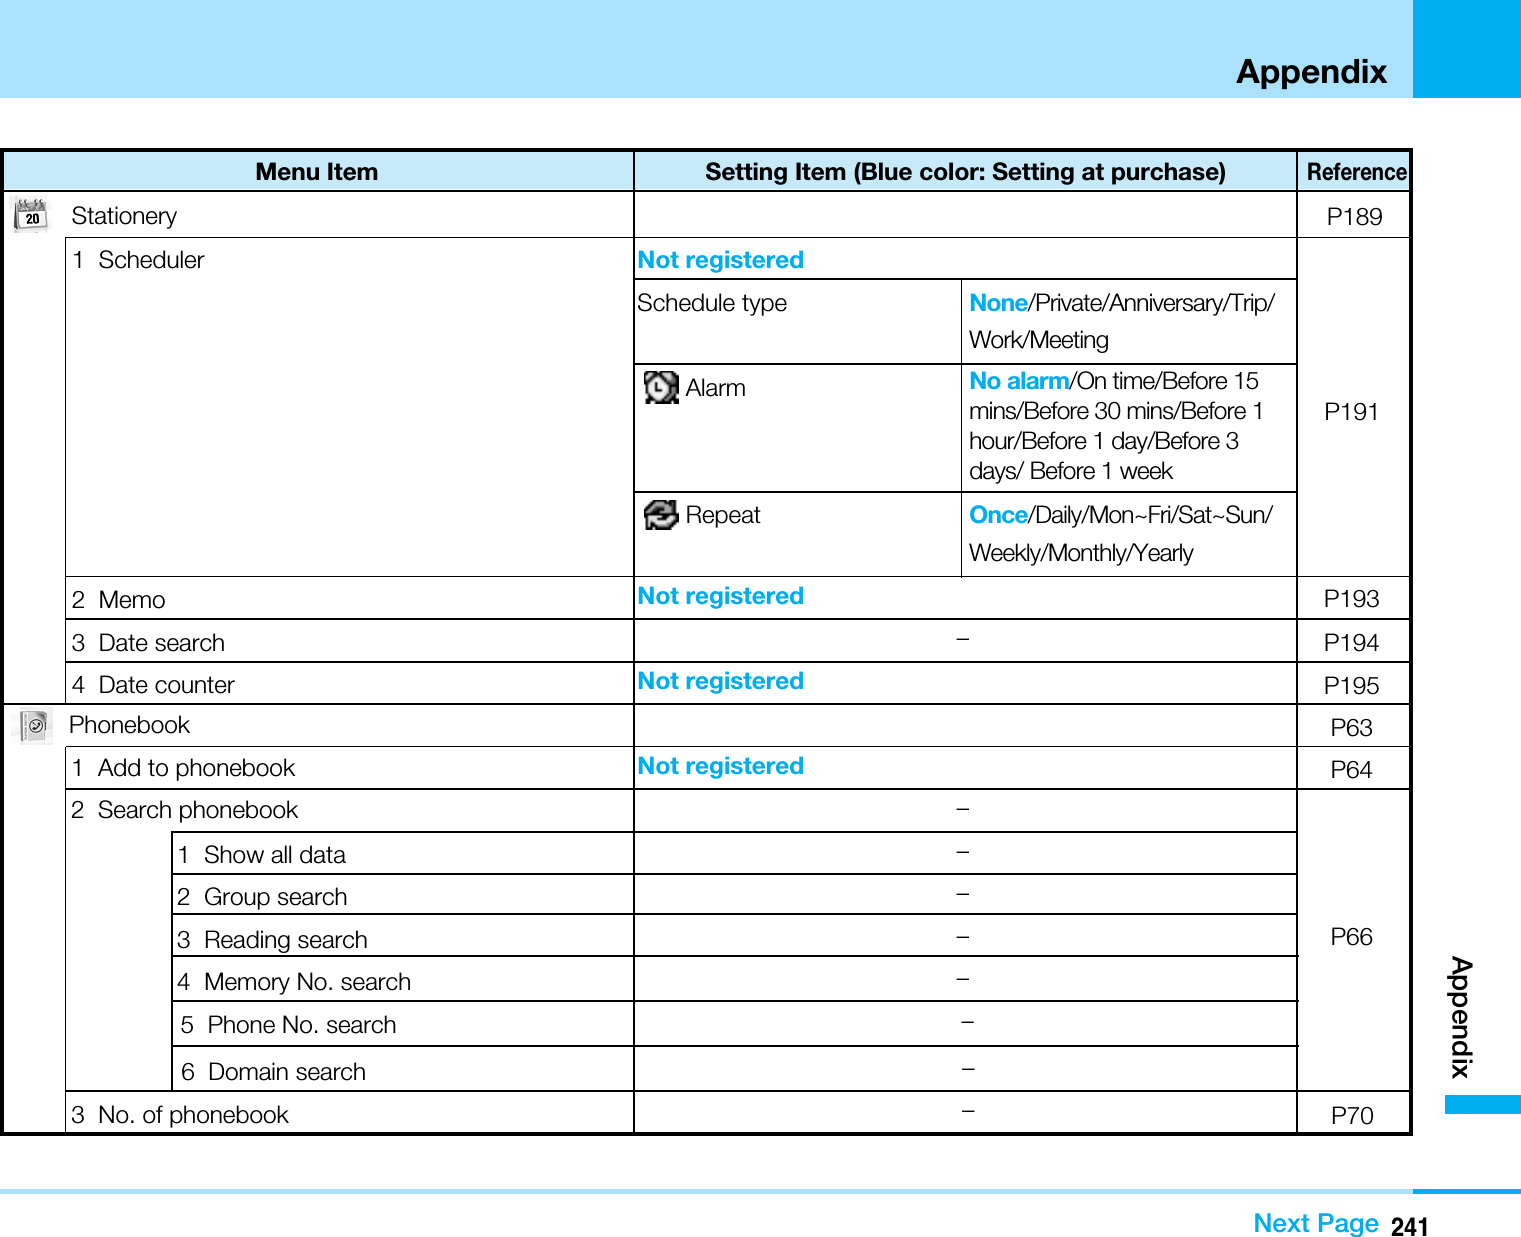
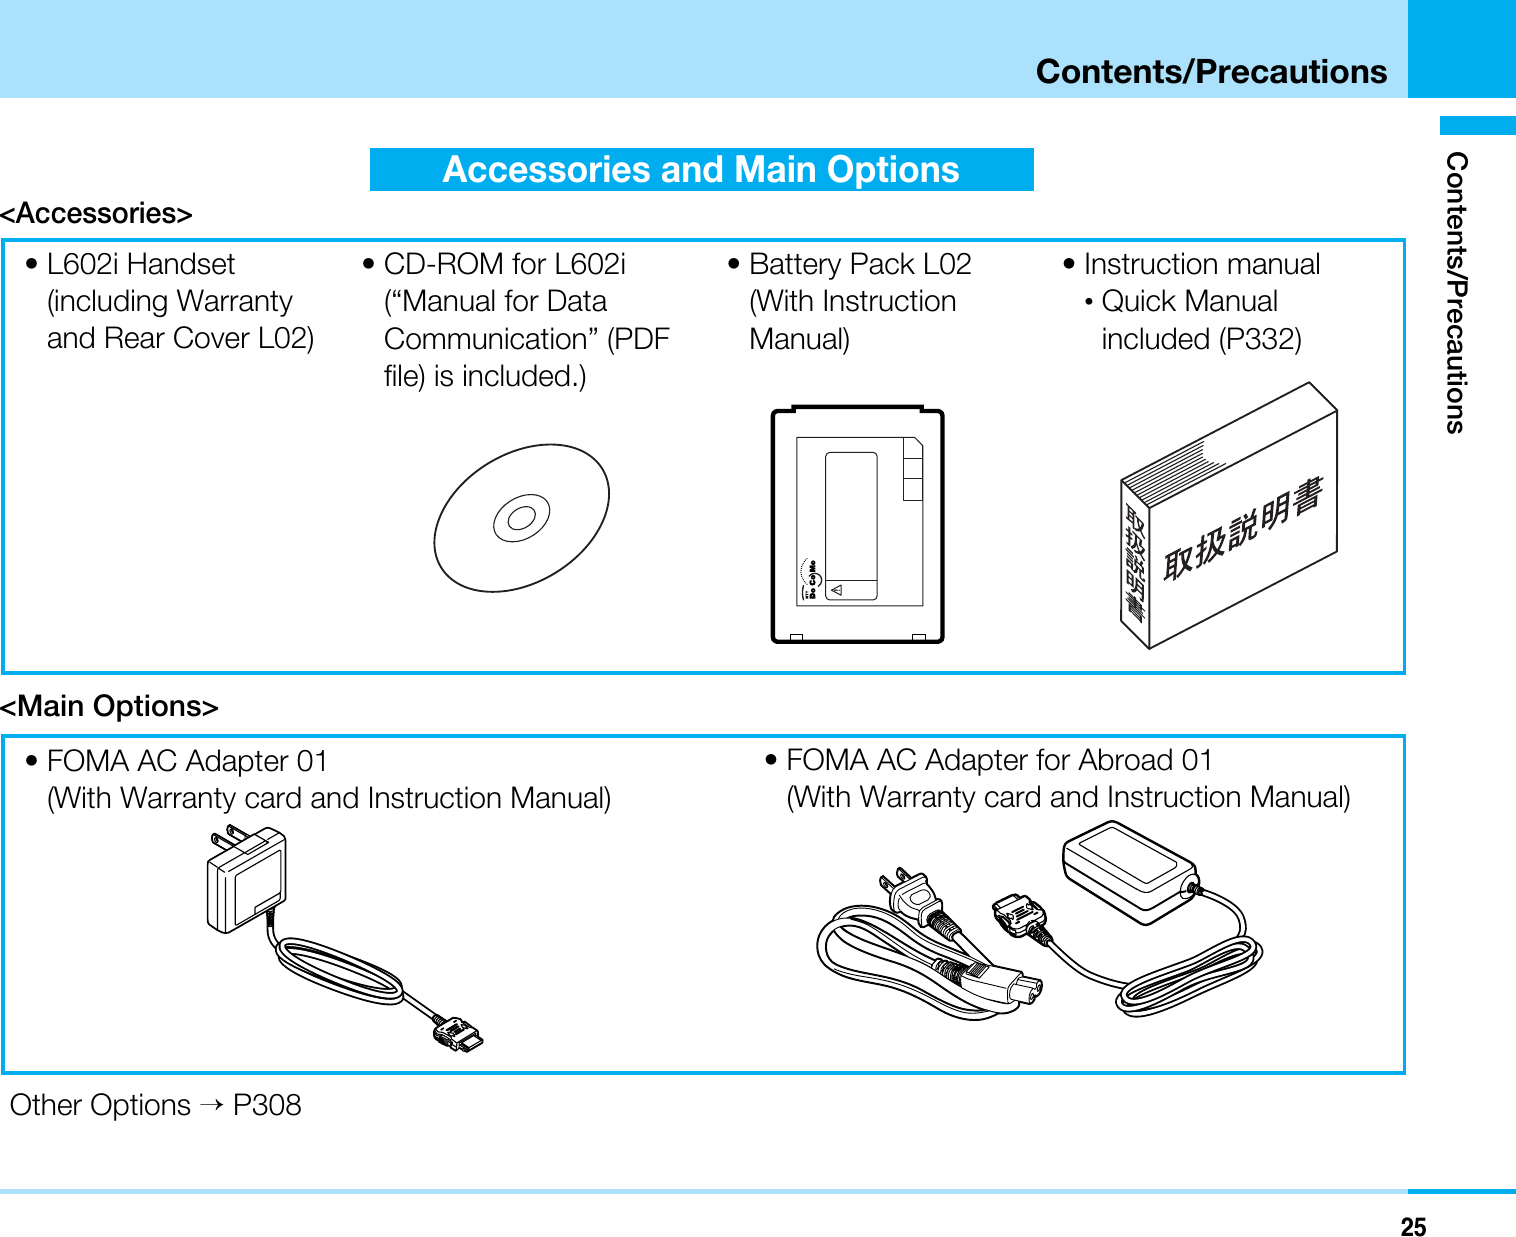
LG Electronics USA L602I PCS GSM Phone User Manual L601i E 047 056
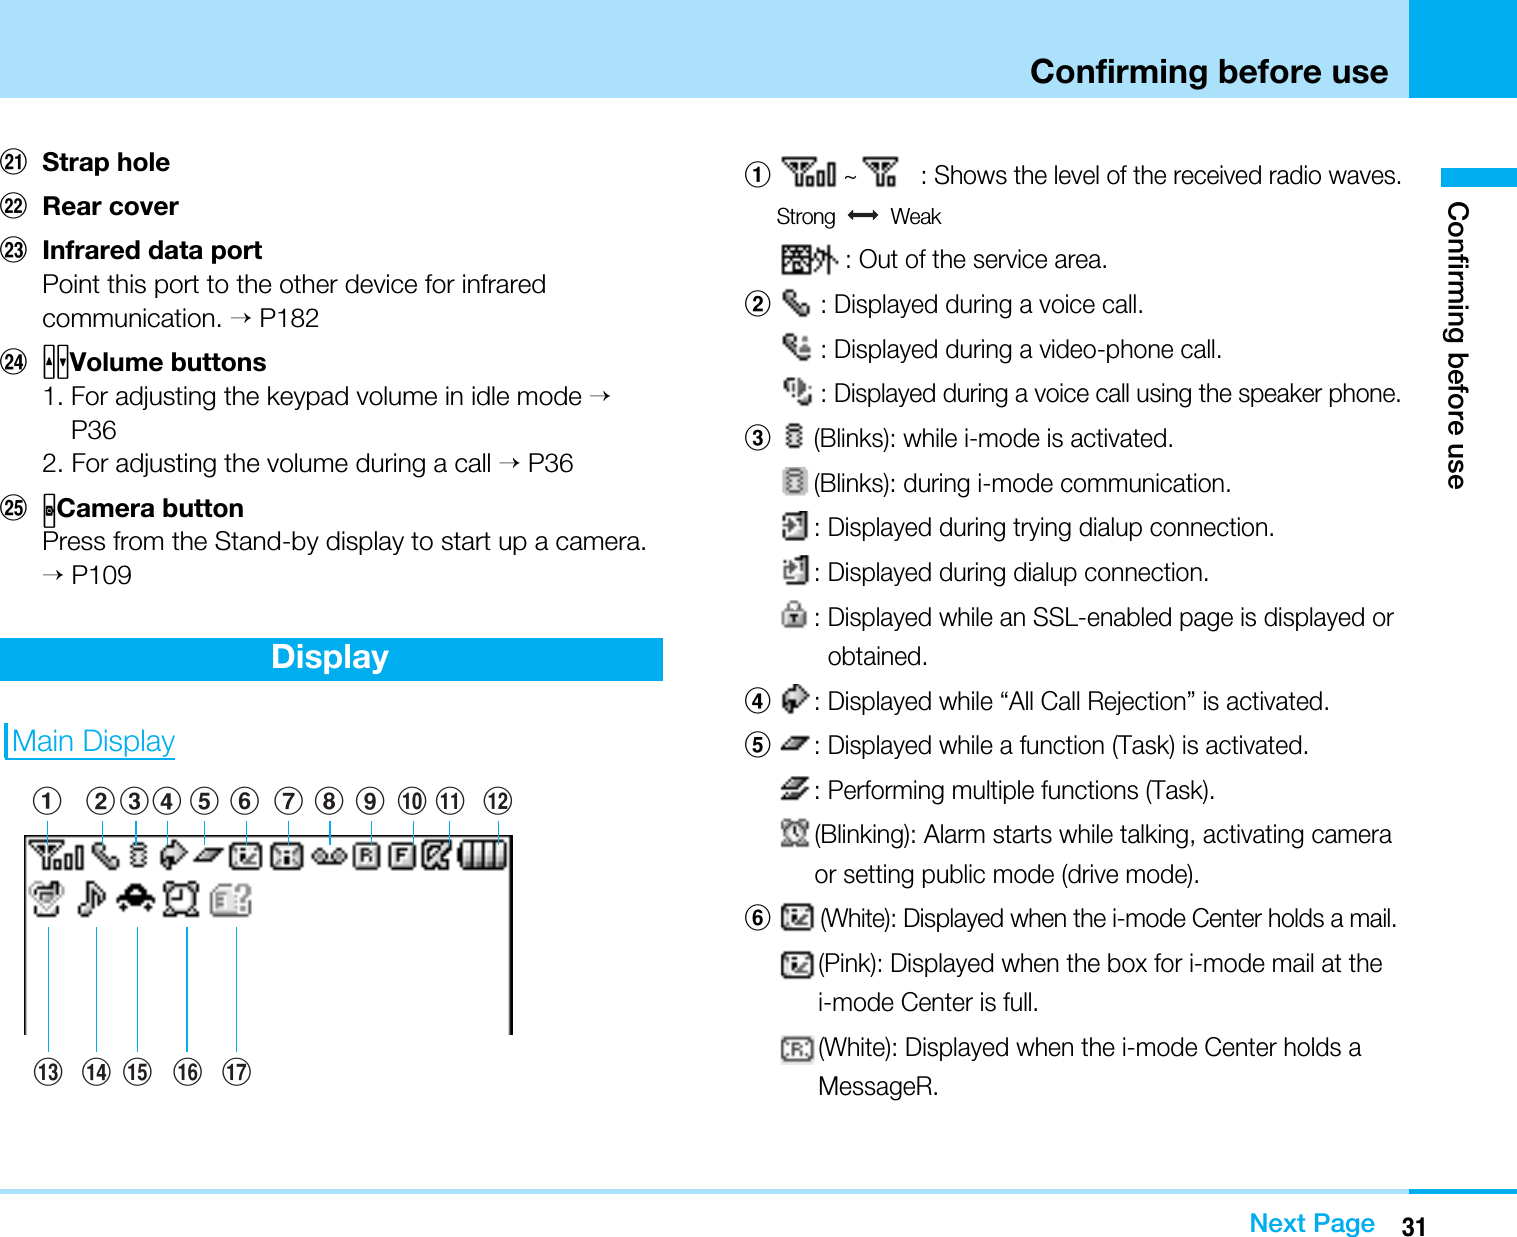
LG Electronics USA PCS GSM Phone L601i E 047 056
UserManual.wiki
>
LG Electronics USA
>
L602I User Manual
>
Users Manual 1
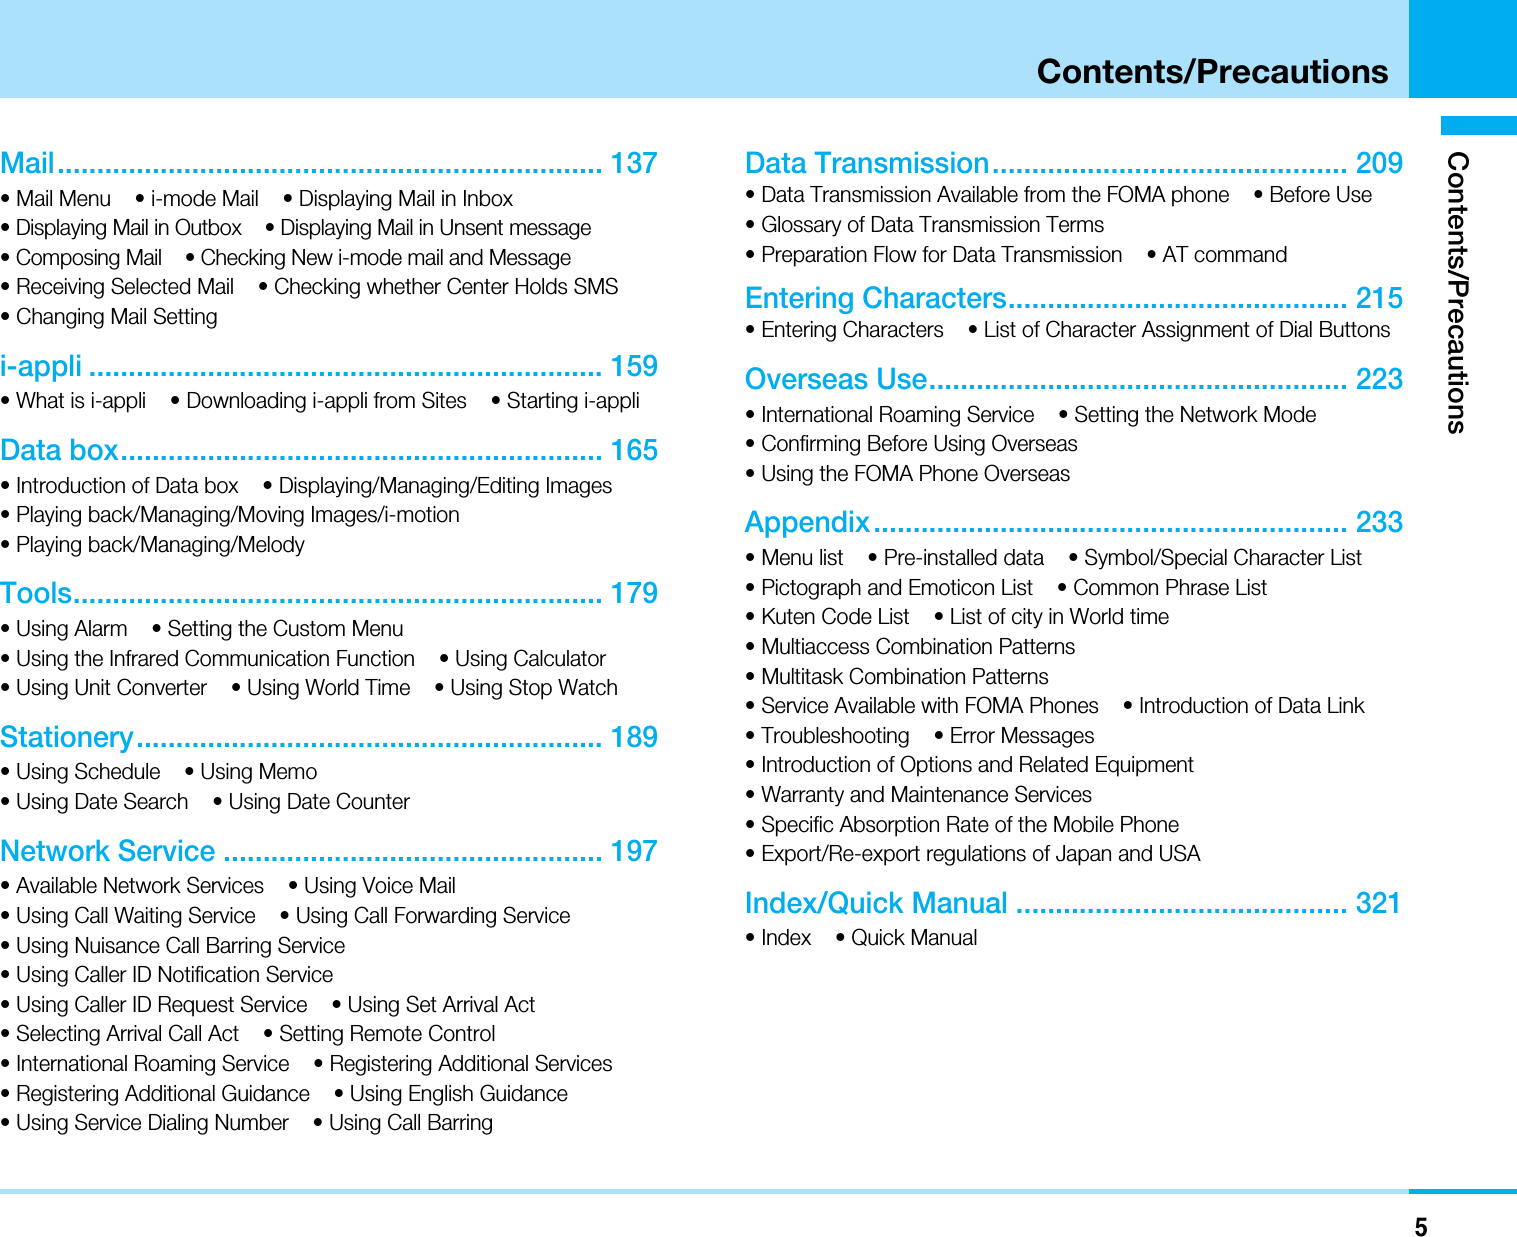
Contents
1.
Users Manual 1
2.
Users Manual 2
Users Manual 1
Navigation menu
Upload a User Manual
Namespaces
Wiki Guide
HTML
PDF
Info
Views
User Manual
Discussion / Help
Navigation
![8For Your SafetyImportant InformationThis user guide contains important information on the use andoperation of this phone. Please read all the informationcarefully for optimal performance and to prevent any damageto or misuse of the phone. Any changes or modifications notexpressly approved in this user guide could void your warrantyfor this equipment.Before You StartSafety InstructionsWARNING! To reduce the possibility of electric shock, do notexpose your phone to high humidity areas, such as thebathroom, swimming pool, etc.Always store your phone away from heat. Never store yourphone in settings that may expose it to temperatures less than32°F or greater than 104°F, such as outside during extremeweather conditions or in your car on a hot day. Exposure toexcessive cold or heat will result in malfunction, damageand/or catastrophic failure.Be careful when using your phone near other electronicdevices. RF emissions from your mobile phone may affectnearby in adequately shielded electronic equipment. Youshould consult with manufacturers of any personal medicaldevices such as pacemakers and hearing aides to determine ifthey are susceptible to interference from your mobile phone.Turn off your phone in a medical facility or at a gas station.Never place your phone in a microwave oven as this willcause the battery to explode.IMPORTANT! Please read the TIA SAFETY INFORMATION onpage 78 before using your phone.Safety InformationRead these simple guidelines. Breaking the rules may bedangerous or illegal. Further detailed information is given in thisuser guide.]Never use an unapproved battery since this could damagethe phone and/or battery and could cause the battery toexplode.]Never place your phone in a microwave oven as it willcause the battery to explode.]Do not dispose of your battery by fire or with hazardous orflammable materials.]Make sure that no sharp-edged items come into contactwith the battery. There is a risk of this causing a fire.]Store the battery in a place out of reach of children.]Be careful that children do not swallow any parts such asrubber plugs (earphone, connection parts of the phone,etc.). This could cause asphyxiation or suffocation.](https://usermanual.wiki/LG-Electronics-USA/L602I.Users-Manual-1/User-Guide-760911-Page-3.png)
![9For Your Safety]Unplug the power cord and charger during lightning stormsto avoid electric shock or fire.]When riding in a car, do not leave your phone or set up thehands-free kit near to the air bag. If wireless equipment isimproperly installed and the air bag is activated, you may beseriously injured.]Do not use a hand-held phone while driving.]Do not use the phone in areas where its use is prohibited.(For example: aircraft).]Do not expose the battery charger or adapter to directsunlight or use it in places with high humidity, such as abathroom.]Never store your phone in temperatures less than- 4°F orgreater than 122°F.]Do not use harsh chemicals (such as alcohol, benzene,thinners, etc.) or detergents to clean your phone. There is arisk of this causing a fire.]Do not drop, strike, or shake your phone severely. Suchactions may harm the internal circuit boards of the phone.]Do not use your phone in high explosive areas as the phonemay generate sparks.]Do not damage the power cord by bending, twisting, pulling,or heating. Do not use the plug if it is loose as it may causea fire or electric shock.]Do not place any heavy items on the power cord. Do notallow the power cord to be crimped as it may cause fire orelectric shock.]Do not handle the phone with wet hands while it is beingcharged. It may cause an electric shock or seriouslydamage your phone.]Do not disassemble the phone.]Do not place or answer calls while charging the phone as itmay short-circuit the phone and/or cause electric shock orfire.]Only use the batteries, antennas, and chargers provided byLG. The warranty will not be applied to products provided byother suppliers.]Only authorized personnel should service the phone and itsaccessories. Faulty installation or service may result inaccidents and consequently invalidate the warranty.]Do not hold or let the antenna come in contact with yourbody during a call.]An emergency call can be made only within a service area.For an emergency call, make sure that you are within aservice area and that the phone is turned on.](https://usermanual.wiki/LG-Electronics-USA/L602I.Users-Manual-1/User-Guide-760911-Page-4.png)
![11For Your SafetyVehicle Mounted External Antenna(optional, if available)A minimum separation distance of 8 inches (20cm) must bemaintained between the user/bystander and the vehiclemounted external antenna to satisfy FCC RF exposurerequirements. For more information about RF exposure, visitthe FCC website at www.fcc.govFCC Part 15 Class B ComplianceThis device and its accessories comply with part 15 of FCCrules. Operation is subject to the following two conditions: (1) This device and its accessories may not cause harmfulinterference, and (2) this device and its accessories mustaccept any interference received, including interference thatmay cause undesired operation.Cautions for Battery]Do not disassemble.]Do not short-circuit.]Do not expose to high temperature: 60°C (140°F).]]Do not incinerate.Battery Disposal]Please dispose of your battery properly or bring to yourlocal wireless carrier for recycling.]Do not dispose in fire or with hazardous or flammablematerials.Adapter (Charger) Cautions]Using the wrong battery charger could damage your phoneand void your warranty.]The adapter or battery charger is intended for indoor useonly.Do not expose the adapter or battery charger to direct sunlightor use it in places with high humidity, such as the bathroom.](https://usermanual.wiki/LG-Electronics-USA/L602I.Users-Manual-1/User-Guide-760911-Page-6.png)
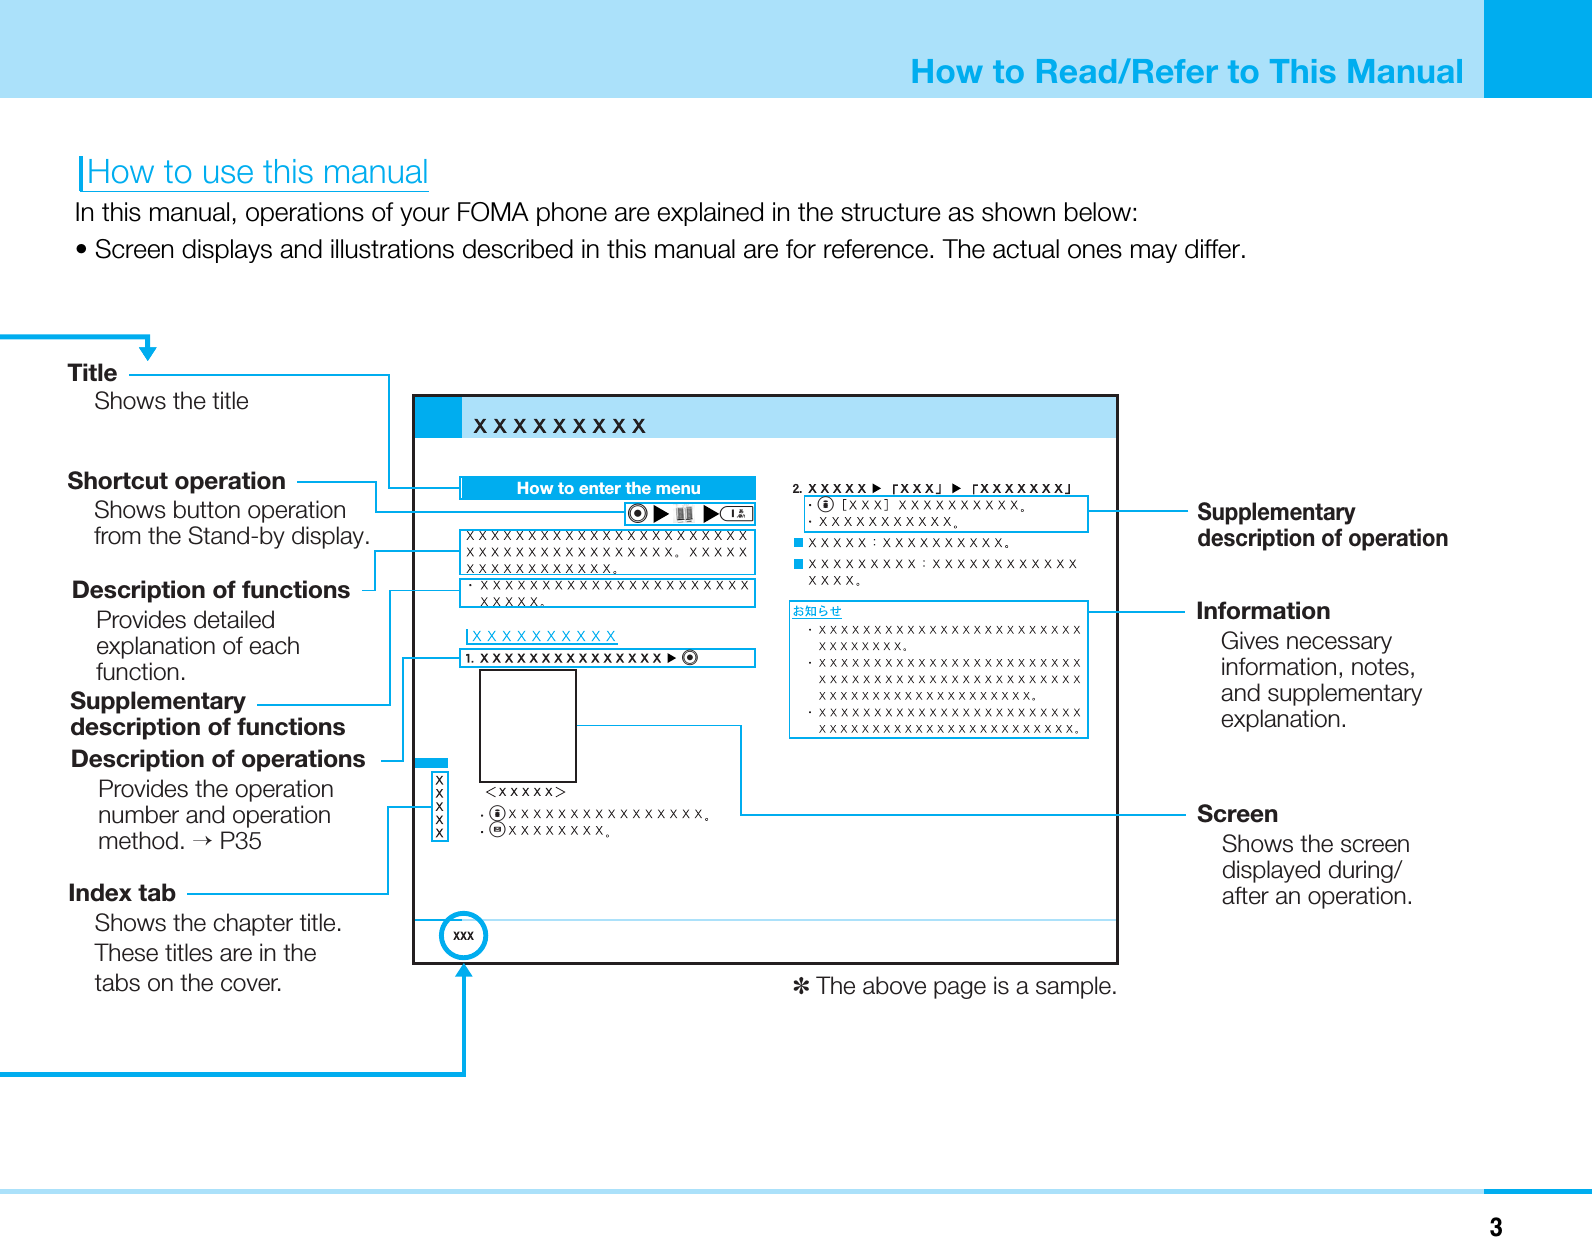
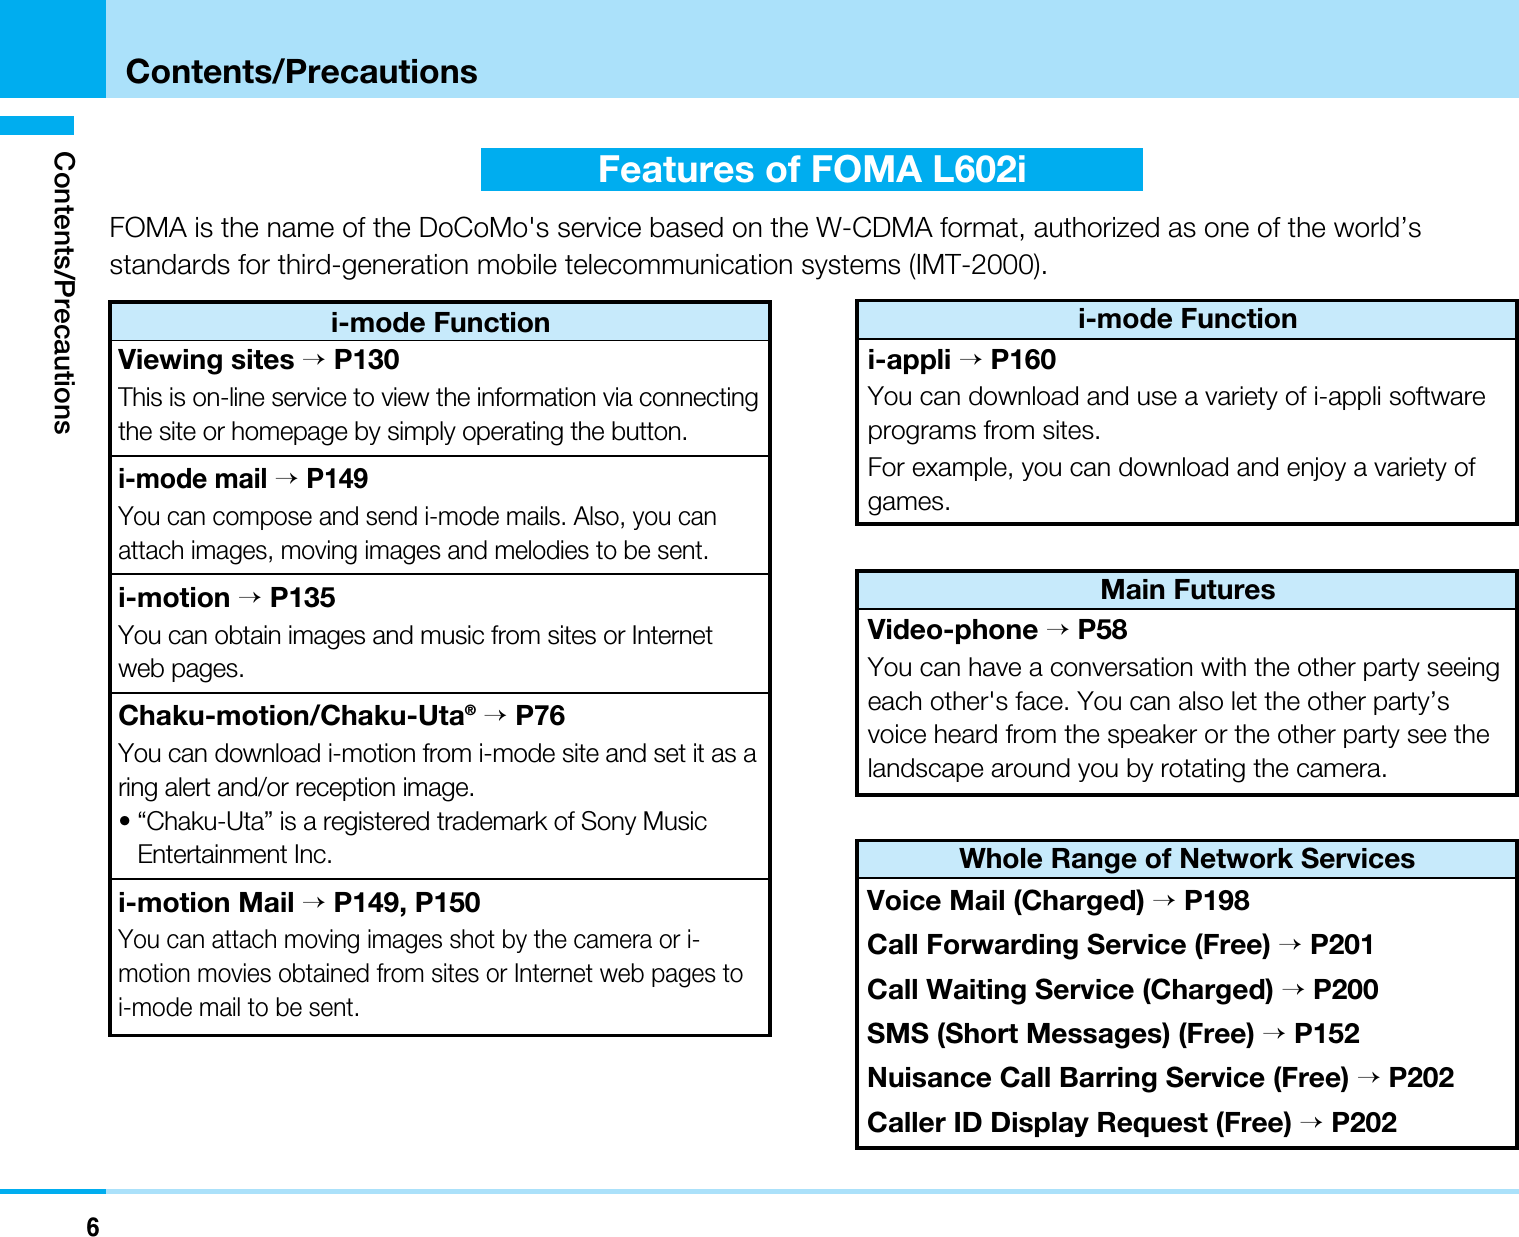
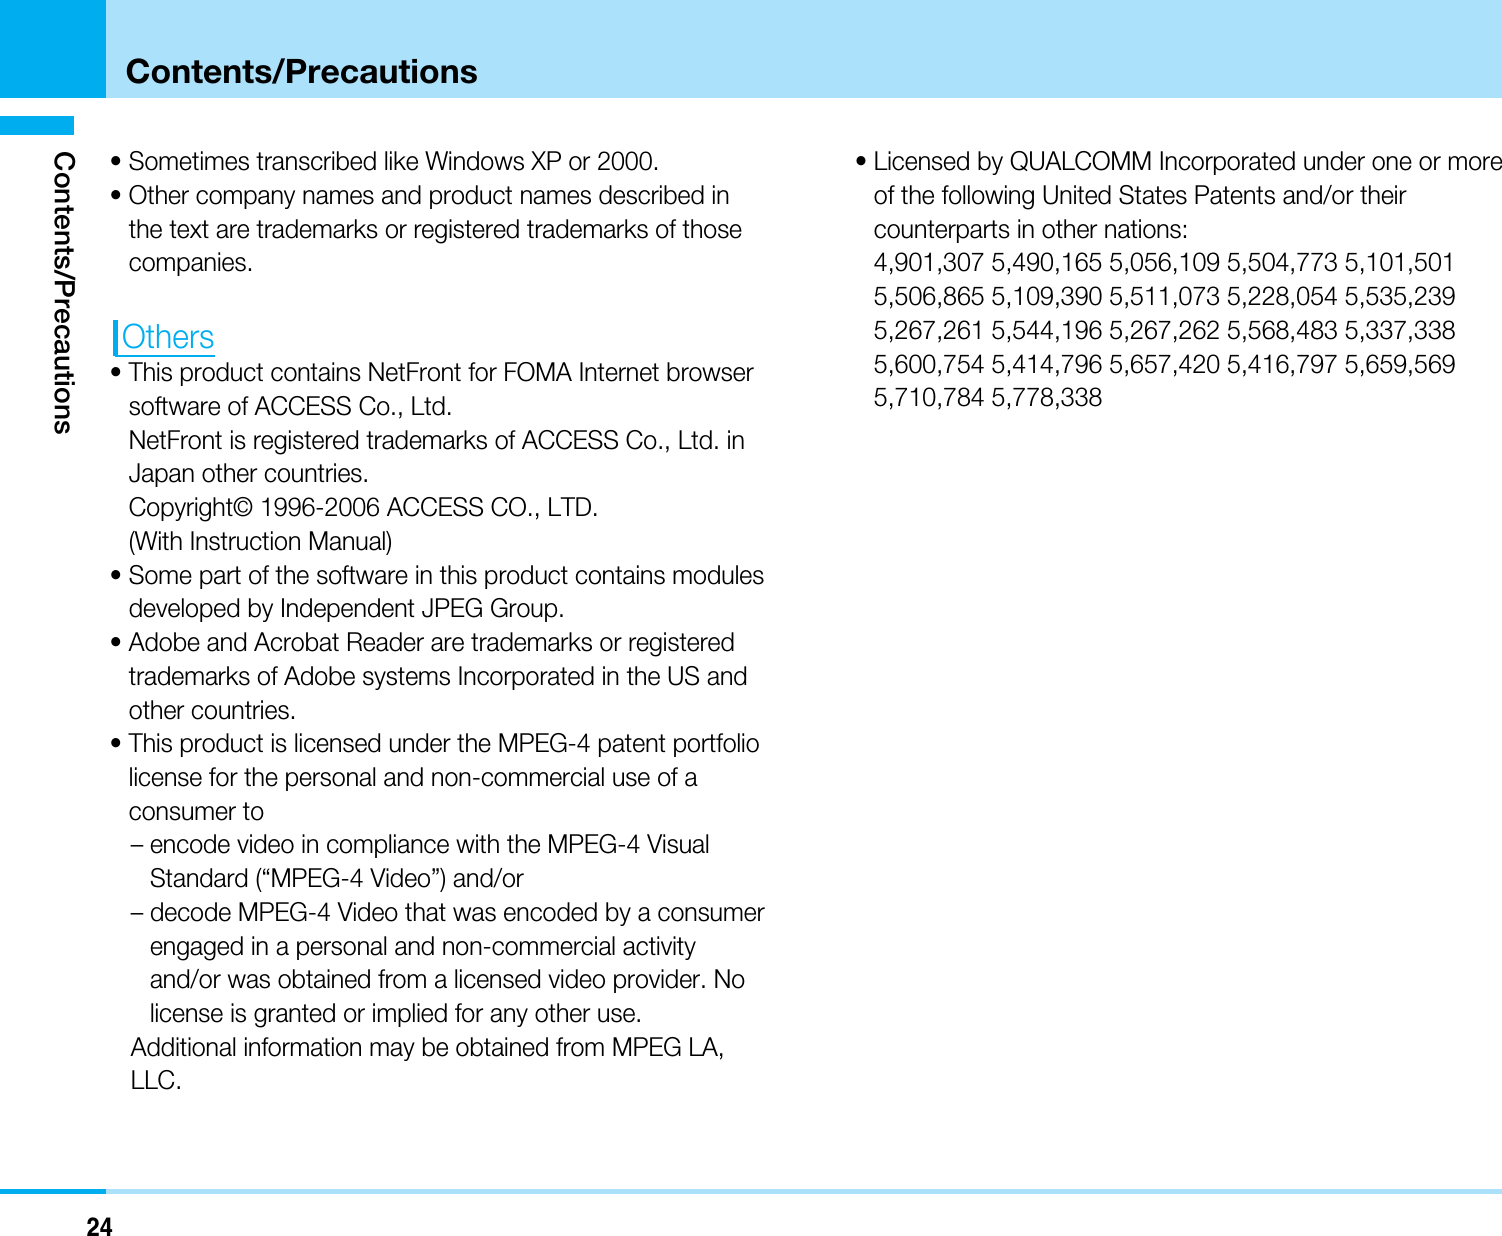
![1How to Read/Refer to This ManualThe search methods and page structure of this manual are described here. Screen displays and illustrations described in thismanual are for reference. The actual ones may differ.How to Refer to This ManualBy the following search methods, you can find pages where your desired functions and explanations are described:Tabs on Cover ]CoverSearch from the tabs printed on the cover.]See the next page for more details.Index ]P322Search from keywords when you know the names of functions or services.Contents ]P4Search from the contents that categorize functions.Features ]P6Search from features when you want to use specific functions of FOMA L602i such as new functions or useful functions.Menu List ]P234Search from list for menus of FOMA L602i.Quick Manual ]P332Quick Manual gives you a clear, brief explanation about fundamental functions. You can take it with you when you go out.Note that “FOMA L602i” is referred to as “FOMA phone” in this manual.It is prohibited to copy all or part of this manual without permission.The instructions contained in this manual may be changed without notice.How to Read/Refer to This ManualaSee “Overseas use” (P223) for how to use your FOMA phone outside Japan.](https://usermanual.wiki/LG-Electronics-USA/L602I.Users-Manual-1/User-Guide-760911-Page-8.png)
![2How to Read/Refer to This ManualaFrom the Tabs on the Front CoverSearch for the functions and explanations in the order of the Front Cover >First page of Chapter >Description page.aFrom the IndexSearch from the index when you know the names of functions or services.Contents / PrecautionsConfirming before useMaking Calls / Receiving CallsMaking / ceiving videophone callsPhonebookSound / DisplaySettingsSafety settingsMultimedia(Camera)i-modeMaili-appliData boxAdjusting the Ring Volume ....................76Adjusting the Effect Tone Volume .........76Setting a Ring Tone................................76Setting an Effect Tone ...........................77Setting a Vibrator ...................................78Activating the Manner Mode .................78Setting Ringing Operations for Incoming Mail ........................................80Setting Ringing Time..............................80Setting Main Screen...............................80Setting Sub Display................................82Setting Fonts of Dial Characters ...........83Setting Menu Style .................................83Setting Backlight ....................................83Setting color Scheme 83Sound/Display1 Ring volume2 Effect tone volume3 Select ringtone4 Select effect tone5 Vibration settings6 Manner settings7 Mail ring durationSelectSoundOn the Stand-by display, C[Menu] ](Sound) or “Sound” To display the Sound menu 1 Main display2 Sub display3 Font4 Menu style5 Backlight6 Color scheme7 Lighting LEDSelectDisplayOn the Standby display, C[Menu] ](Display) or “Display”To display the Display menu 2.....91calls.....80.....82...115...109.....36.....63...141.....686, 148...153Folder list (Melody) .................177Folder list (Moving/i-motion) ...168Mail list (Received)..................141Mail list (Sent).........................146Mail list (Unsent).....................148Software list...........................161Sound .........................................76Effect tone volume ...................76Mail ring ON/OFF .....................79Manner mode ..........................78Ring volume.............................76Ringing time.............................80Setting an Effect Tone..............77Setting a ring tone....................762](https://usermanual.wiki/LG-Electronics-USA/L602I.Users-Manual-1/User-Guide-760911-Page-9.png)


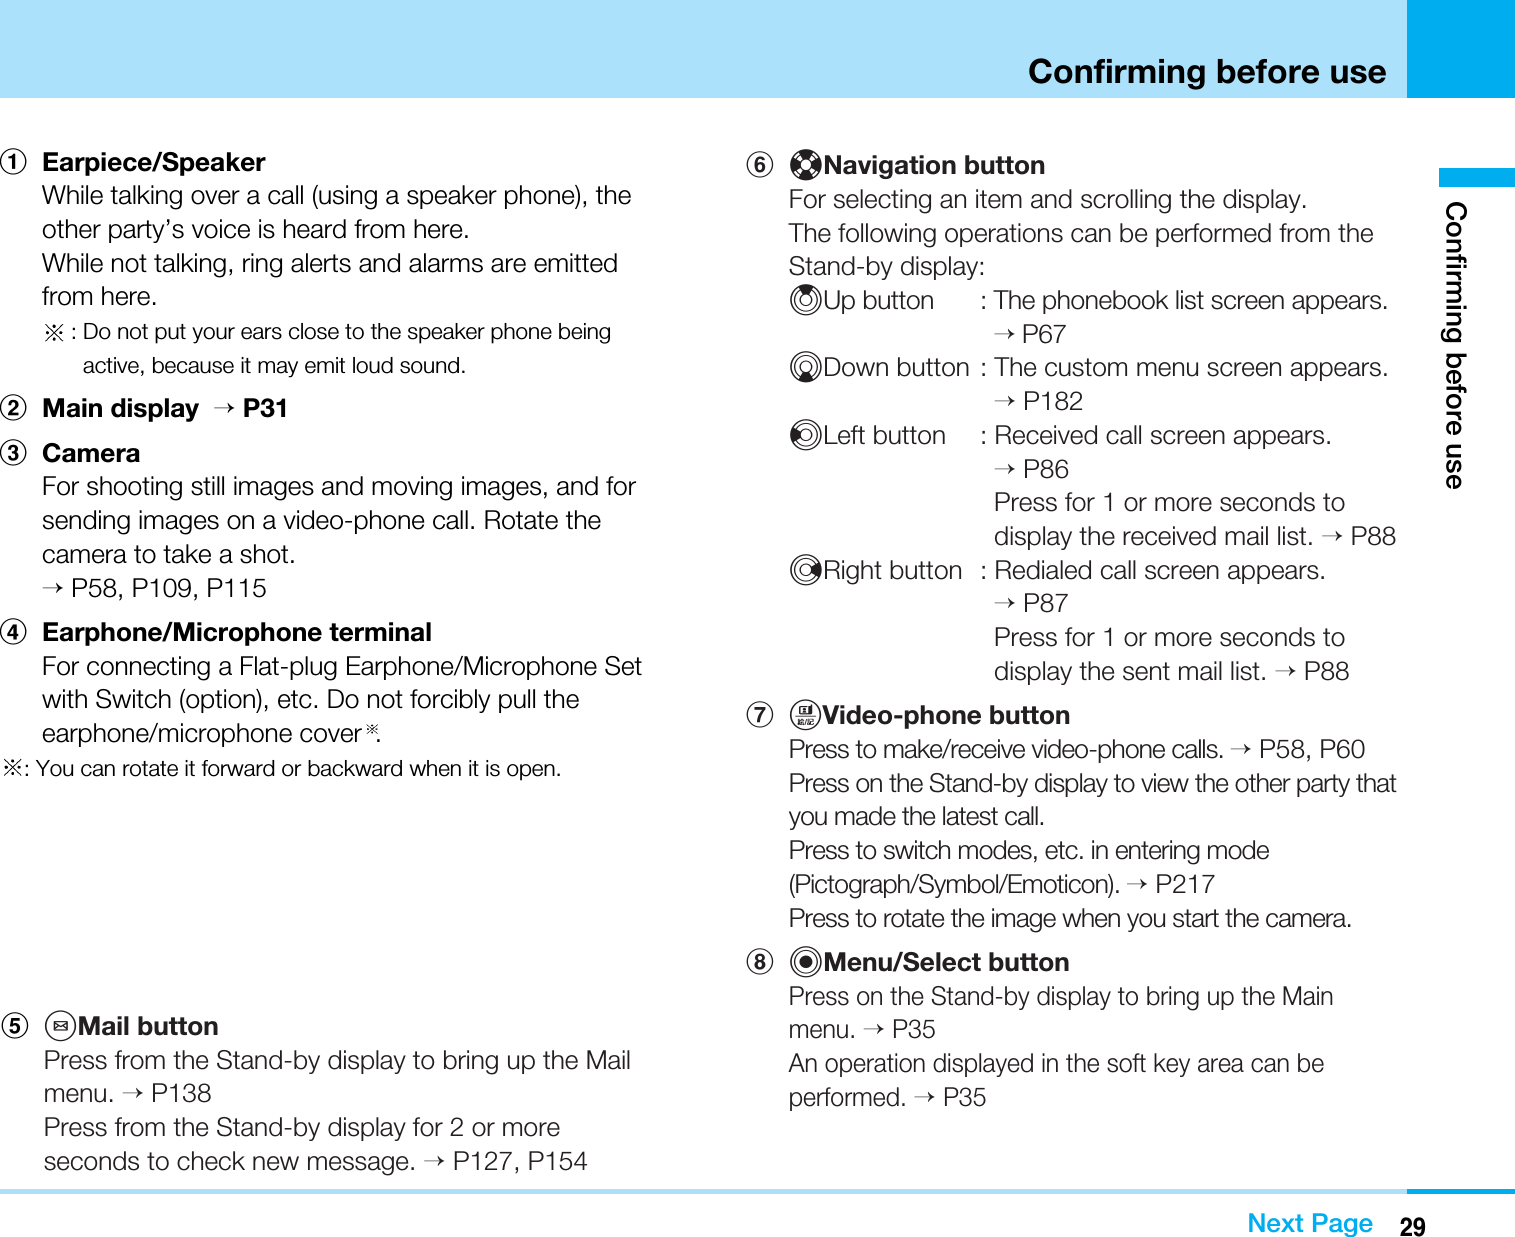
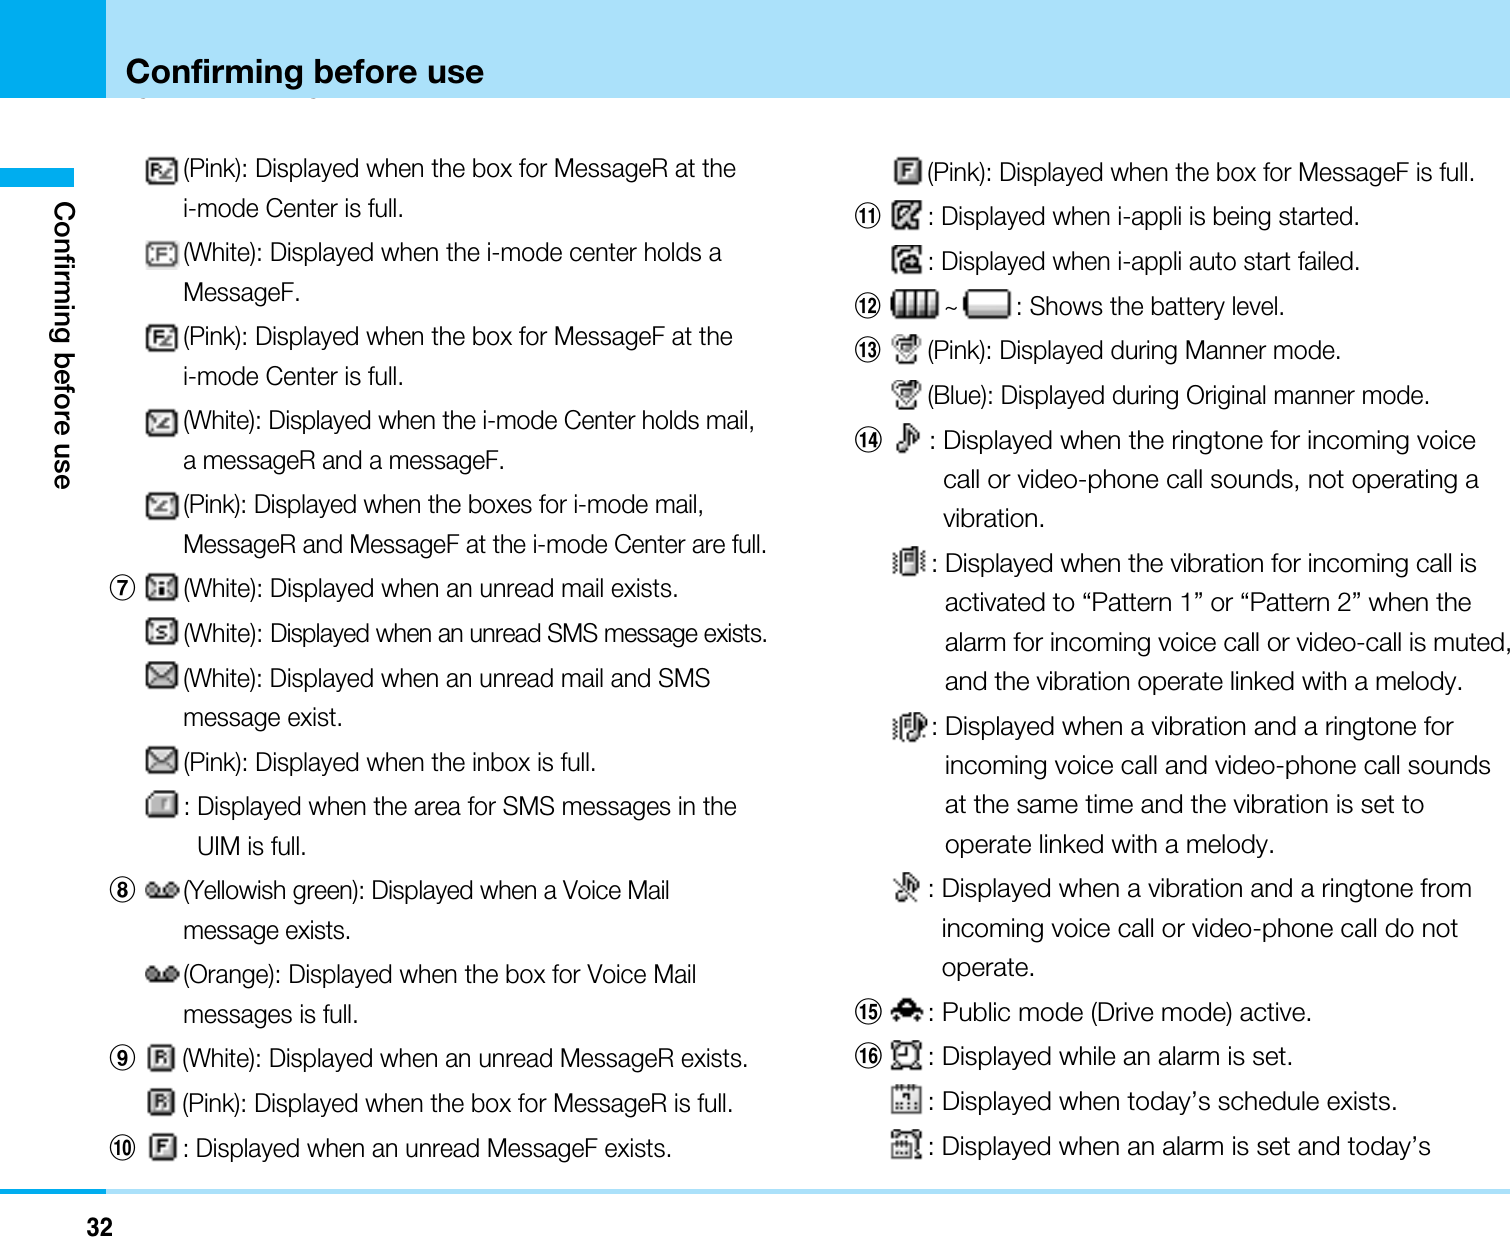
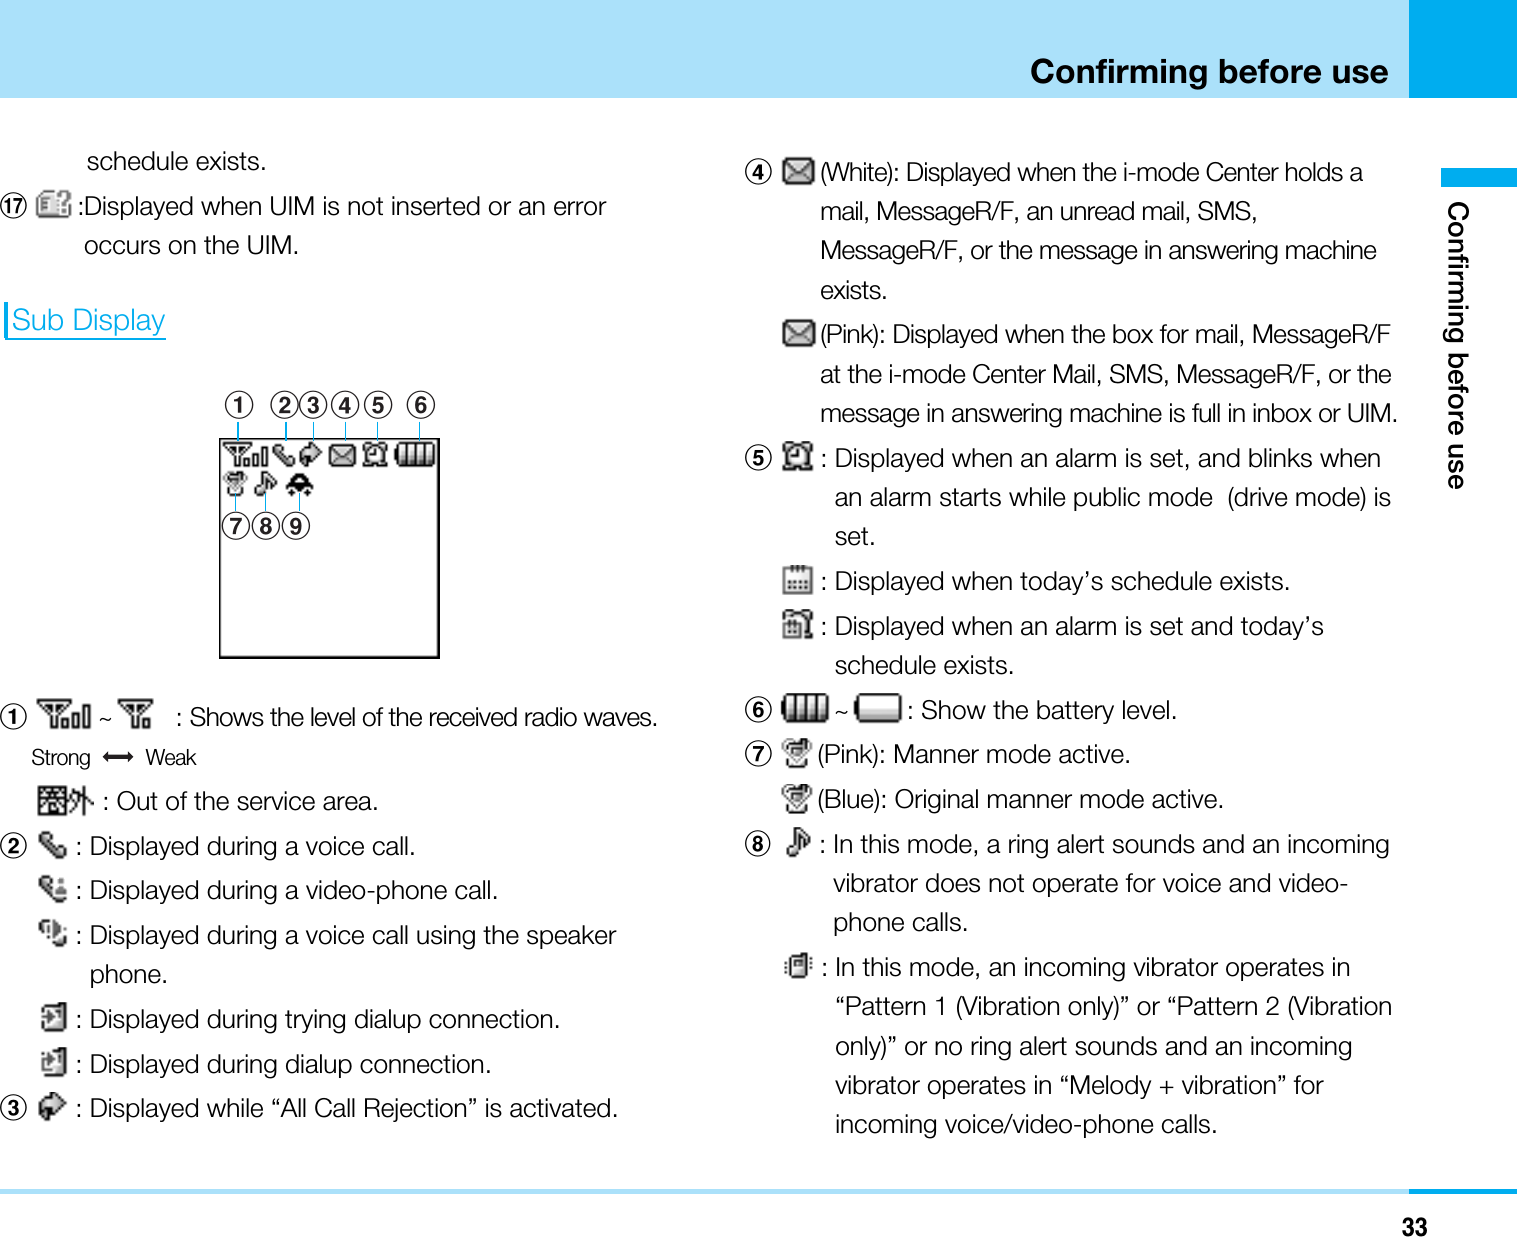
![34Confirming before useÇ)égópëOÇÃämîFConfirming before use: In this mode, a ring alert sounds and an incomingvibrator operates in “Melody + vibration” forincoming voice/video-phone calls.: In this mode no ring alert sounds and no incomingvibrator operates for incoming voice/video-phonecalls.9: Public mode (Drive mode) active.SubdisplayThe various information such as clock or icons isdisplayed as follows.<Clock> <Alarm> <Incoming call>Missed call/ New received E-mailWhen closing the FOMA phone, following messages aredisplayed on the Sub display.<Missed call> <New message>• When you open the FOMA phone on displaying “XMissed call”, you can view the time or phone number inmain display. You can view the call history by pressingC. If you press I[Close], “X Missed call” will not bedisplayed anymore.• When you open the FOMA phone on displaying “XMessage”, the pop up message on the Sub display willdisappear after confirming the screen.1 Message1 Missed callDoCoMo Taro](https://usermanual.wiki/LG-Electronics-USA/L602I.Users-Manual-1/User-Guide-760911-Page-41.png)
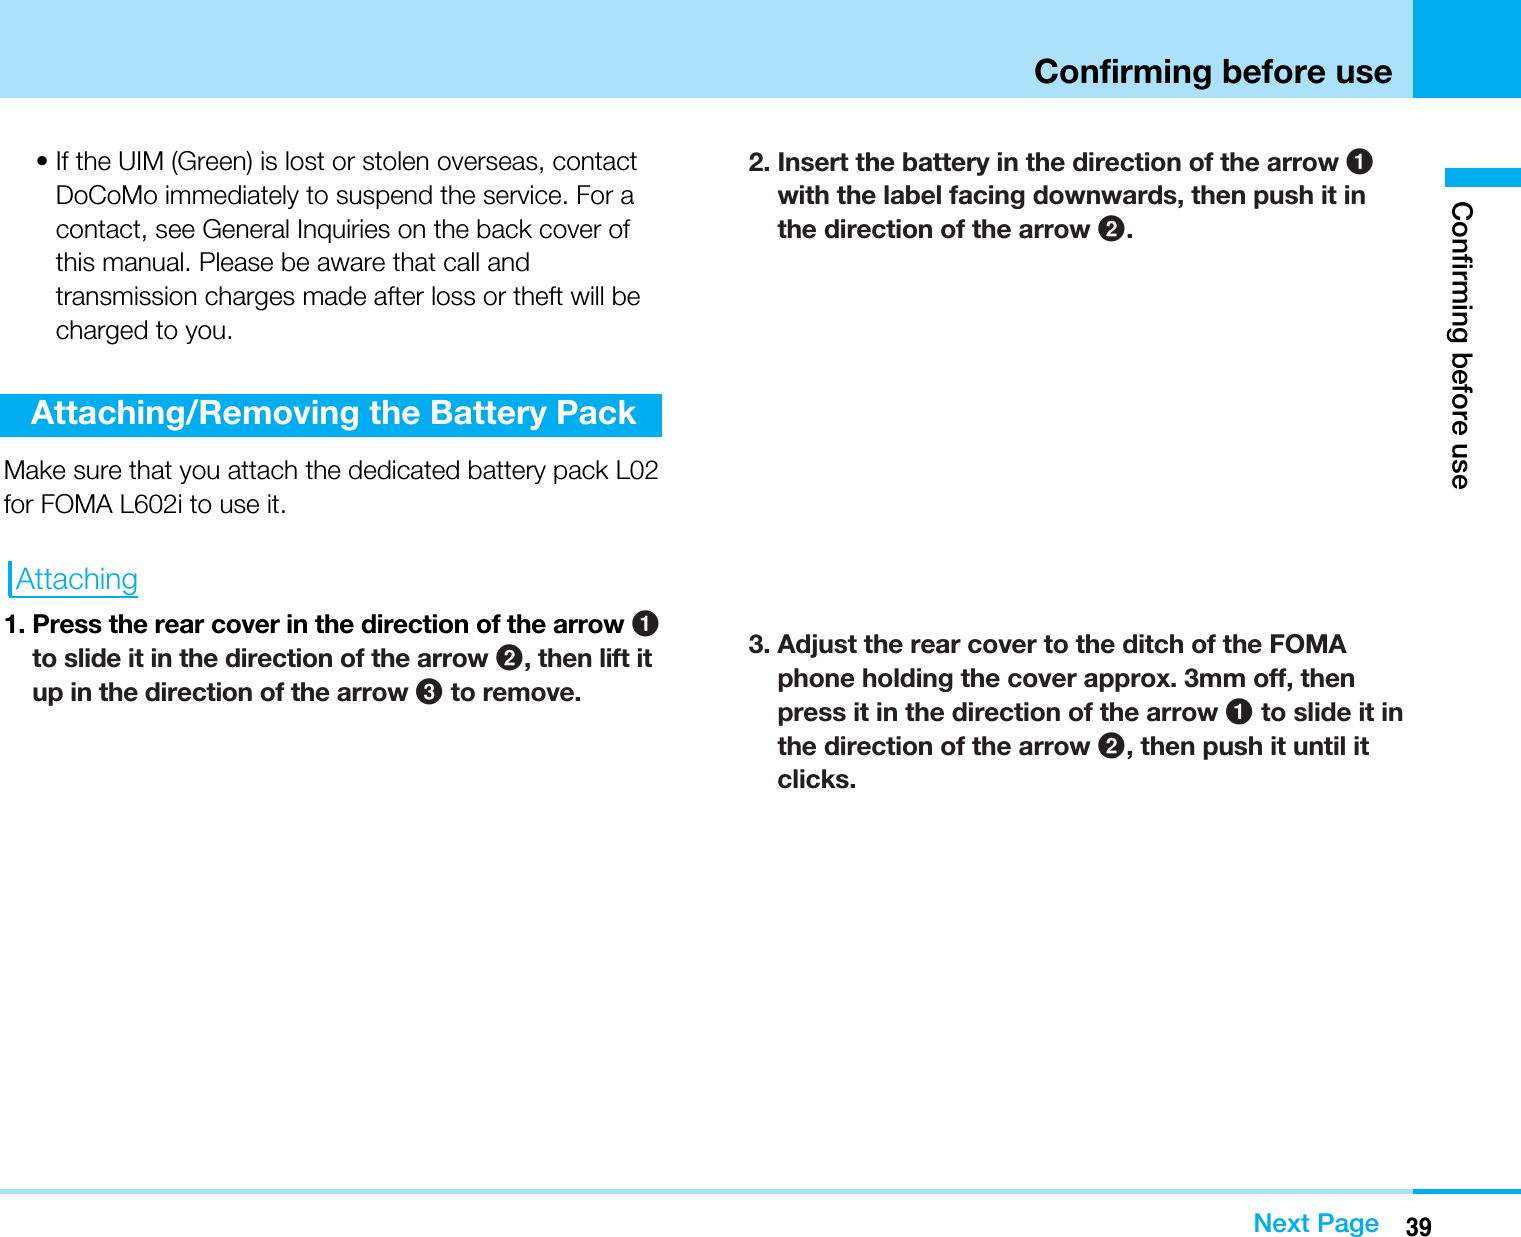
![Menu OperationsExample: How to set the “Stand-by display” of the “Maindisplay”.aSelecting a function using K1. On the Stand-by display, C[Menu] ]Enlargeusing K]C]Highlight “Main display” usingH]Move the cursor to “Stand-by display” usingH]CaSelecting a function by pressing the keycorresponding to the menu number1. On the Stand-by display, C[Menu] ]Enlargeusing K]C]1]1Soft Key OperationsTo perform an operation displayed in the soft key area onthe Main display, press the corresponding button asbelow.Information• (Navigation icon) that indicates the directions in which youcan scroll and select items using Kis also displayed in thesoft key area.• Items displayed in the soft key area vary depending on thedisplay.KC 1 11 Main displayDisplaySelect1 Stand-by display2 Incoming call3 Outgoing callSelectMain displaySelectDisplay2 Sub display3 Font4 Menu style5 Backlight6 Color scheme7 Lighting LEDKC HC HC1 Main displayDisplaySelect1 Stand-by display2 Incoming call3 Outgoing callSelectMain displaySelectDisplay2 Sub display3 Font4 Menu style5 Backlight6 Color scheme7 Lighting LED35Confirming before useConfirming before useSoft key area](https://usermanual.wiki/LG-Electronics-USA/L602I.Users-Manual-1/User-Guide-760911-Page-42.png)
![36Confirming before useÇ)égópëOÇÃämîFConfirming before useSide Button Main OperationsaMajor operations that can be performed by pressingFE/Gwith the FOMA phone closedaMain operations that can be performed by pressingFE/Gwith the FOMA phone openedPlay back/pause movingimages/a melodyStart the cameraAdjust the volume when playingback a moving image/melodyWhile playing a movingimage/melody ]FEWhen moving images/a melody ispaused ]G(Play back)While moving images/a melody isplayed back ]G(Pause)In Stand-by ]Press GFOMA phone operation How to operateAdjust the volume formoving image/melodyplaybackScroll the List display bypageSwitch the MonthlySchedule displays by monthWhile moving images/a melody isplayed back ]FEWhile each List display isdisplayed ]FE• The cursor is moved on somedisplays.While the Monthly Scheduledisplay is displayed ]FEZoom While the Still or Moving imagedFinder screen is displayed ]FEIncoming call ]Press Gfor 1secondWhile an alarm / schedule alarm issounding ]Press EStop the alarmReject an incoming callIn Stand-by (Switch ON/OFF) ]FE/GSwitch the display light ofthe sub display to ONFOMA phone operation How to operateAdjust the volume of a ringtone for incoming call Incoming call ]FEAdjust the volume of a ringtone for incoming call Incoming call ]FEIn Stand-by ]FEAdjust the volume of key toneDuring a voice call/video-phonecall ]FEAdjust the volume](https://usermanual.wiki/LG-Electronics-USA/L602I.Users-Manual-1/User-Guide-760911-Page-43.png)

![45Confirming before useConfirming before useDate/TimeYou can set the date and time and daylight saving time.See “Setting Date & Time” (P95) for details of how to setthem up.Using Caller ID Notification ServiceThe Caller ID Notification Service enables you to notify theother party of your phone number when you make a call.See “Using Caller ID Notification Service” (P202) for detailsof how to set it up.Own NumberYou can display your phone number recorded in the UIM.1. On the Stand-by display, C]0• See “Displaying Own Number” (P72) for details ofhow to change the settings on the Own Numberdisplay.](https://usermanual.wiki/LG-Electronics-USA/L602I.Users-Manual-1/User-Guide-760911-Page-52.png)

![48Making calls/Receiving callsMaking calls/Receiving callsMaking calls1. Enter the other party’s phone number<Enter Phone Number>•Q:The last digit is cleared. To clear all digits,press it for 1 or more seconds.•C[Save]: You can register / add the entered phonenumber to phonebook. Go to step 2 on page 64 of“Adding to Phonebook”.•I[Search]: You can search for the phone number inphonebook. See the contents after step 3 on page 66.2. A]Start talking when the other party answers• Press Qfor 1 or more seconds: You can switchON/OFF the speaker phone.3. Pto end the call after talking.Information• If you press Aafter entering the number from 0 to 9 in theEnter Phone Number screen, you can make a call directlymatching the the number saved in memory.• You can enter a phone number of up to 42 digits.• If you enter a phone number exceeding 16 digits, dialing will bemade displaying the first 16 digits digits of the phone number.• You can make a call after entering “184” (Not notify) or “186”(Notify) in front of phone number.• When the Flat-plug Earphone/Microphone Set with Switch(option) is attached, you can only talk on the Earphone /Microphone regardless that the speaker phone is ON/OFF.• When the call is disconnected, the alert sound sounds from areceiver.• When dialing/receiving overseas, some name of the otherparty may not be displayed even that name is registered in thephonebook.Using the Submenus of the Enter Phone Number Display1. From the Enter Phone Number screen (See left),M[Menu]]Select from the following submenuitemsNotify caller IDSet whether to notify your phone number per call.The other party's name Ŧ1The other party's phone numberCall durationThe other party's picture Ŧ2Ŧ1 : In case of the other party you don't register the information in phonebook, “Unregistered” will be displayed when receiving or making a call.Ŧ2 : The picture will be displayed when you register the picture in phonebook.SaveMenu Search<Talking>](https://usermanual.wiki/LG-Electronics-USA/L602I.Users-Manual-1/User-Guide-760911-Page-55.png)
![49Making calls/Receiving callsMaking calls/Receiving callsNext page–Not notify : “#31#” is added in front of the phonenumber entered, but the phone number is not notified.–Notify : “31#” is added in front of the phonenumber entered, and the phone number is notified.–Cancel : The added “#31#” or “ 31#” is deleted. Select prefixThe number saved in “Setting Prefix Dial” (P92) isadded before the phone number is entered.International callThe international access code saved in “International dialsetting” (P92) is added before the phone number isentered.SaveYou can save the entered phone number entered intothe Phonebook. Go to step 2 on page 64 of “Addingto Phonebook”.Search phonebookYou can search for the phone number in phonebook. Foroperations after searching, see 3 on page 66 of“Searching for Phonebook Entries”.Using the Submenus of the Talking screen1. From the Talking screen (P48), M[Menu]]Selectfrom the following submenu itemsNew call 1You can put the current call on make and hold a callto another party.End active callYou can disconnect the call.Hold 1/Cancel held call 1You can put/release the call on hold.Mute 2/Unmute 2You can mute/unmute the voice transmitted to the otherparty.1: Available only for Call Waiting Service subscribers.To use this service, go to “Using Call Waiting Service” (P200).2: Not displayed during call is held.Making a Call From the Dialed/Received Call Record1. From the Stand-by display, L/R/A/T]Select a record ]AInformation•See “Using the Submenu of the Received Calls display” (P86) forsubmenus.Making a Call from the Phonebook1. Uin the Stand-by display, or search thephonebook]Select the party you want to call]AWhen multiple phone numbers are registered, press Ato display the Select call number screen, then select thephone number and press C[Call].Information• To switch the phonebook list to display between the FOMAphone and UIM, select M[Menu] >“View handset”/“ViewUIM” on the phonebook list screen.](https://usermanual.wiki/LG-Electronics-USA/L602I.Users-Manual-1/User-Guide-760911-Page-56.png)
![50Making calls/Receiving callsMaking calls/Receiving callsThe name of DoCoMo's pocket bell has been changed to Quick Cast since January, 2001.Using Pause DialYou can use services such as sending messages to apocket bell, reserving tickets or checking the balance ofyour bank account by sending push signal from the FOMAhandset.1. Enter the phone number2. Enter the dial data• Press *3 times to enter pause “P”• Only 0to 9,#,*and pause “P” canbe entered.• Up to 42 digit can be entered.• If you enter pause “P” before the phone number, youcan not dial.3. A• A call is made to the other party, and the dial datafrom the beginning to the first pause “P” is displayedwhile being connected.4. Confirm that the other party accepted >AorC[Select]• The dial data from the beginning to the first “P” issent, and the dial data to the next pause “P” isdisplayed. Each time you press Aor C, the dialdata to the next “P” is sent. When you send the lastnumber, the calling screen appears.Information• The other party may not be able to receive the signaldepending on the type of the receiver's handset.• When using video-phone call, you can not use pause dial.International CallsYou can make an inteÎrnational call easily using theDoCoMo international call service “WORLD CALL”.When you have signed up for FOMA service, you havecontracted to use “WORLD CALL” (except those whohave applied not to use it).• You can make calls to 240 countries and areasworldwide.aHow to make calls009130 >010 >Country code >Area code >Destination phone number >A• This service is not available with some billing plans.• Application/monthly fee for WORLD CALL is free ofcharge.• The WORLD CALL charges are added to your monthlyFOMA bill.• Contact “DoCoMo Information Center” on the back ofthis manual for inquiries about WORLD CALL.• If the other party uses a specific 3G mobile phoneoverseas, you can make an “International Video-phoneCall” by dialing out using Tafter following the dialingmethod described above.](https://usermanual.wiki/LG-Electronics-USA/L602I.Users-Manual-1/User-Guide-760911-Page-57.png)
![51Making calls/Receiving callsMaking calls/Receiving callsNext Page– See the International Service web page of DoCoMo forthe information about connectable countries andtelecommunications carriers.– Images sent from the other party may blur on yourFOMA phone or you may not be able to connect,depending on the other party’s phone used for theinternational video-phone.• When the area code begins with “0”, leave this outwhen dialing. However, include “0” when making a callto some countries or regions such as Italy.Making an International Call Easily• Confirm that the “Setting Prefix Dial” (P92) is set to“AUTO” and “009130010” (WORLD CALL) is set for“IDD prefix code” in “IDD prefix setting”.1. On the Stand-by display, press 0for 1 or moreseconds to enter “+”2. Enter Country code >Area code >Destinationphone number]A(T)3. “Yes”Confirmation with the test machine required.4. Pto end the call after talkingAdjusting the Volume1. Press FE Hduring a call or press Hfor 1 or moreseconds.Information• The changed volume is held even after ending the call.Receiving calls1. When you receive a call, A•I[Silent]: You can set to no sound for incoming call.If you subsequently press I[Reject], incoming callwill be rejected.•P: You can reject the incoming call.• If you close the handset while a call is incoming, thecall will be rejected.2. Pto end the call after talkingInformation• When dialing/receiving overseas, some name of the otherparty may not be displayed even that name is registered in thephonebook.The other party's name Ŧ2The other party's phone numberThe other party's image Ŧ1Ŧ1 : Displayed only when the other party's image is registered in the phonebook.Ŧ2 : In case the other party's information is not registered in the phonebook, “Unregistered” will be displayed.<Ringing screen>](https://usermanual.wiki/LG-Electronics-USA/L602I.Users-Manual-1/User-Guide-760911-Page-58.png)
![52Making calls/Receiving callsMaking calls/Receiving callsWhen you didn't get a call When you could not answer the incoming voice call/video-phone call, the following screen indicating a missed callappears and the LED blinks for approx. 60 seconds.•C[OK] : You can view the list of received calls.•I[Close] : You can close the screen for missed calls.Using the Submenu of the Ringing Display1. From the Ringing screen (P51), M[Menu]] Selectfrom the following submenu itemsVoice mail 1The Call is connected to the Voice Mail ServiceCenter.Call rejectionThe call is disconnected without answering it.Call forwarding 2The call is forwarded to the registered phone number.1: If you use voice mail menu, you should register this servicein operator. For details, see “Using voice mail” (P198).2: If you use call forwarding menu, you should register thisservice in operator. For details, please refer to the “UsingCall Forwarding Service” (P201).Using Public mode (drive mode)Public mode is an auto-answer service that puts stress onmanners in public spaces. When there is an incoming callin Public mode, a guidance to the effect that you cannotanswer the call because you are driving a car or in a place(train, bus, theater, etc.) that requires restraint from using aphone is played for the caller and the call is disconnected.• Public mode can be set/cancelled only from the stand-bydisplay (in addition, from a screen showing “ ”).• You can make calls in Public mode.• When there is an incoming call with “Deactivate caller IDnotification” set while caller ID request service is“Activate”, a caller ID request guidance is played (noPublic mode guidance is played).Setting the Public Mode (drive mode)1. On the stand-by display ]Press *for 1 or moreseconds.• The Public mode is set and is appeared.The name not registered inphonebook is not displayed.](https://usermanual.wiki/LG-Electronics-USA/L602I.Users-Manual-1/User-Guide-760911-Page-59.png)
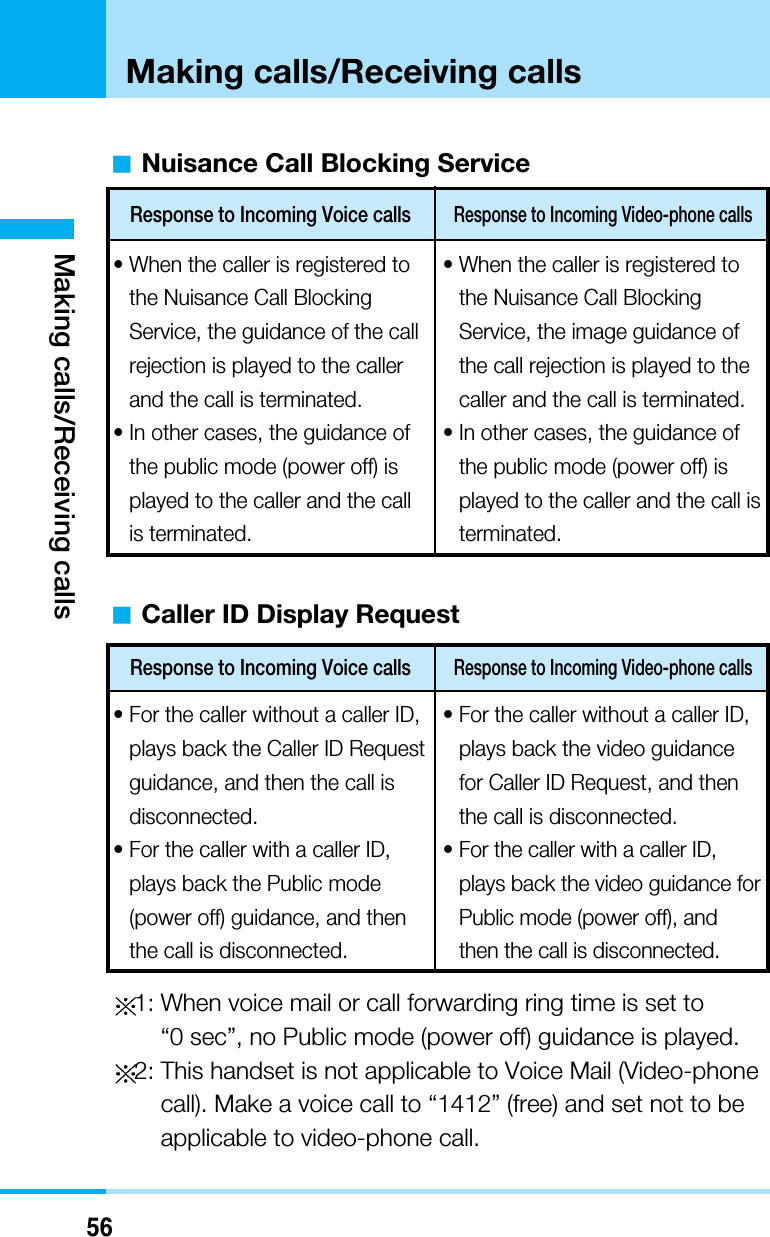
![54Making calls/Receiving callsMaking calls/Receiving callsaNuisance Call Blocking ServiceaCaller ID Request Service: When voice mail or call forwarding ring time is “0 sec”, no Publicmode (drive mode) guidance is played and the call is notrecorded in Received calls.• This handset is not applicable to Voice Mail (Video-phonecall). Make a voice call to “1412” (free) and set not to beapplicable to video-phone call.InformationIn Public mode, the following sounds are not generated:• Ring alert for incoming voice/video-phone calls• Ring alert for incoming mail• Ring alert for incoming MessageR/F• Wake-up alarm sound (the icon blinks)• Schedule alarm sound (the icon blinks)• Battery exhaustion alarm sound• The sound of the i-appli started by the setting of auto-start.• Battery charging confirmation soundThe alarm sounds after releasing the public mode (drive mode).Using Public mode (power off)Public mode is an auto-answer service that lays stress onmanners in public spaces. Once you activate Public mode(power off), the guidance is played back telling that youcannot take the call as you are currently in a place (in hospital, airplane, or in around priority seat in a train)where use is prohibited. Then the call is disconnected.Activate Public mode (power off)1. *25251]A• Public mode (power off) is set. (Nothing is changed inthe Stand-by display.)When a voice call is receivedWhen a video-phone call is received• For a call with no caller IDnotified, a caller ID requestguidance is played for the callerand the call is disconnected.• For a call with caller ID notified, aPublic mode (drive mode)guidance is played for the callerand the call is disconnected.• For a call with no caller IDnotified, a caller ID request videoguidance is played for the callerand the call is disconnected.• For a call with caller ID notified, aPublic mode (drive mode) videoguidance is played for the callerand the call is disconnected.When a voice call is receivedWhen a video-phone call is received• For a call from a caller registeredfor nuisance call blocking, a callrejection guidance is played forthe caller and the call isdisconnected.• For a call from a caller notregistered, a Public mode (drivemode) guidance is played for thecaller and the call isdisconnected.• For a call from a caller registeredfor nuisance call blocking, a callrejection video guidance isplayed for the caller and the callis disconnected.• For a call from a caller notregistered, a Public mode (drivemode) guidance is played for thecaller and the call isdisconnected.](https://usermanual.wiki/LG-Electronics-USA/L602I.Users-Manual-1/User-Guide-760911-Page-61.png)
![55Making calls/Receiving callsMaking calls/Receiving calls• After setting Public mode (power off) and turning offthe power, the guidance “The person you are callingis currently in an area where use is prohibited. Pleasetry again later.” is played back for incoming calls.aTo release Public mode (power off)*25250 ]AaTo check Public mode (power off) for the setting,*25259 ]AWhen Public mode (power off) is activatedWhen there is an incoming voice call, the guidance isplayed back to the caller telling that you are currently in anarea where use is prohibited, and then the call isdisconnected. When there is an incoming video-phonecall, the video-guidance of the public mode is played backto the caller, and then the call is disconnected. • This setting is continued until you release the setting bydialing “ 25250”. If you just switch on, this setting is notreleased.• The Public mode (power off) guidance is played backeven when you are out of the service area or radiowaves do not reach.Activating between network services and Public mode (power off)If you use Public mode (power off) and Network service atthe same time, the operation will be activated as follow.Depending on the setting or calling, the network servicecan be preferred, so the activation of Public mode (poweroff) or the record of missed call may not be displayed.aVoice MailaCall Forwarding ServiceResponse to Incoming Video-phone callsResponse to Incoming Voice callsPlays back the Public mode(power off) guidance to caller, andthen the call is connected to theVoice mail Service Center.1The call is terminated without beingconnected to the Voice MailService Center.2Response to Incoming Voice callsResponse to Incoming Video-phone callsPlays back the Public mode(power off) guidance to caller, andthen the call is forwarded to theforwarding destination.1Theguidance depends on setting ofCall Forwarding Service.Does not play back the videoguidance for Public mode, and thecall is forwarded to the forwardingdestination. If the destination doesnot support video-phone call, thecall is disconnected.](https://usermanual.wiki/LG-Electronics-USA/L602I.Users-Manual-1/User-Guide-760911-Page-62.png)
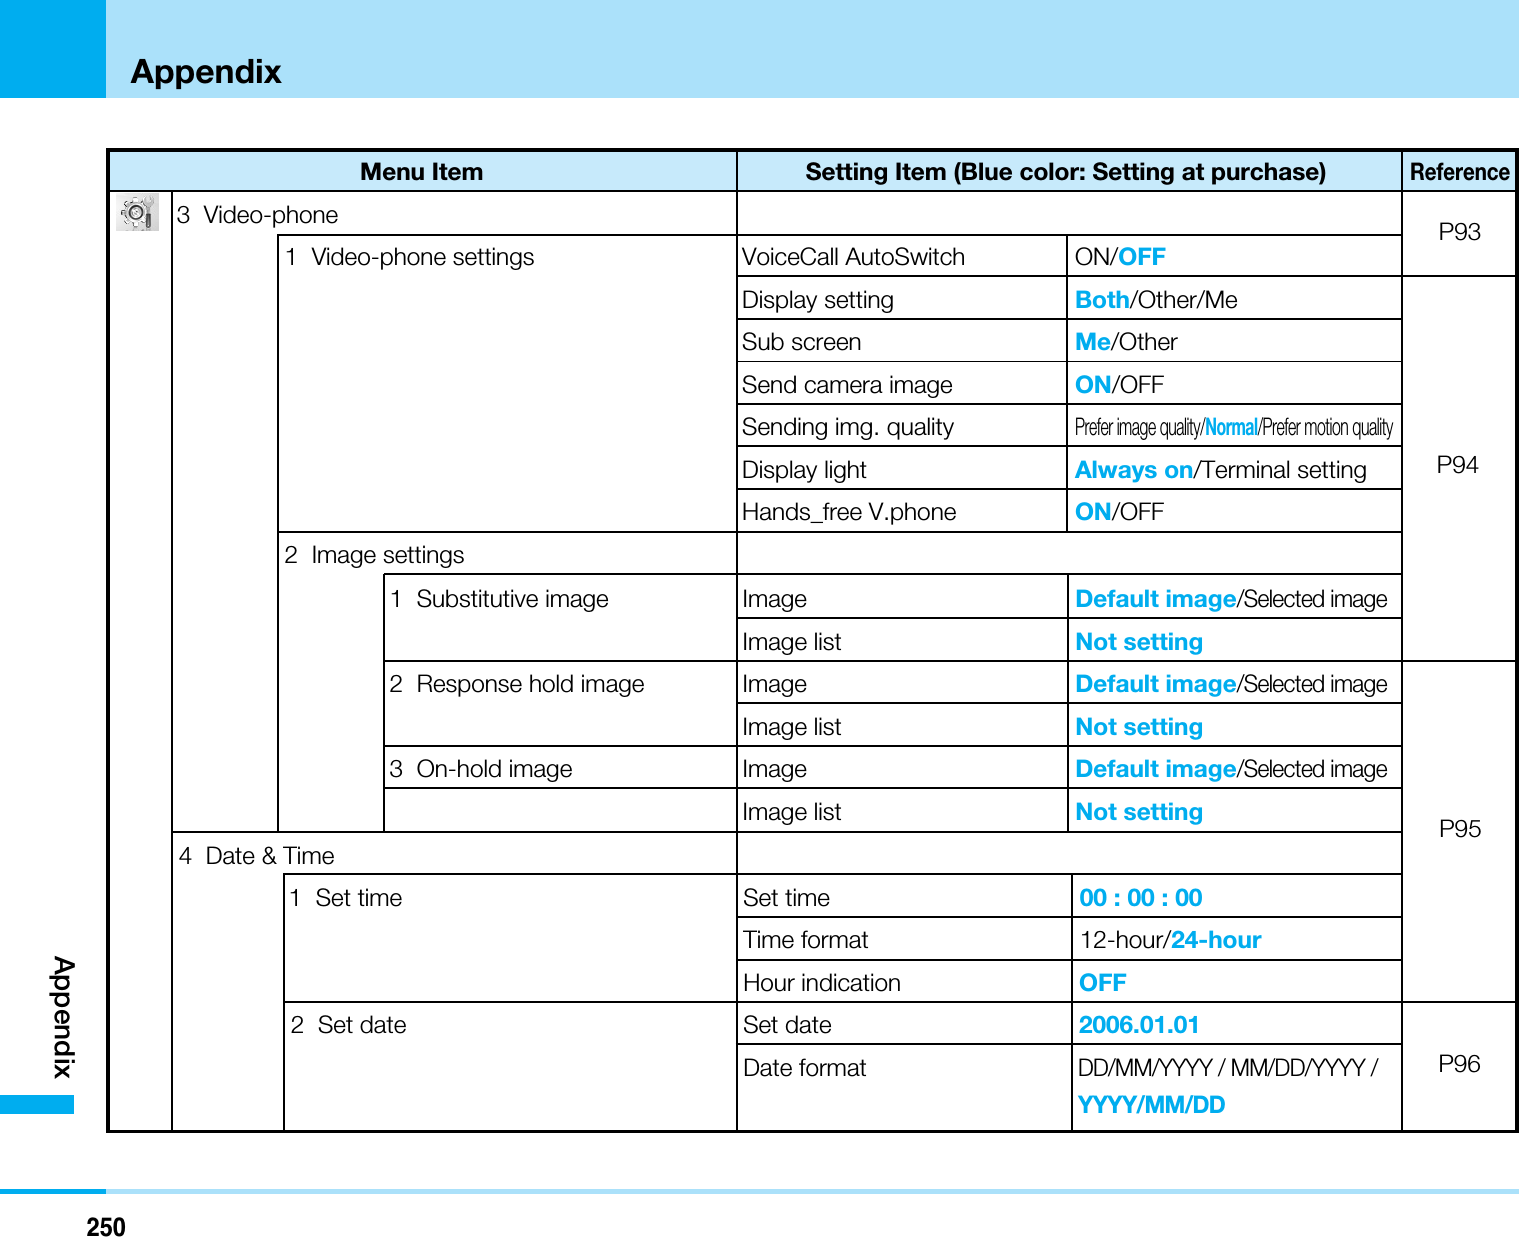
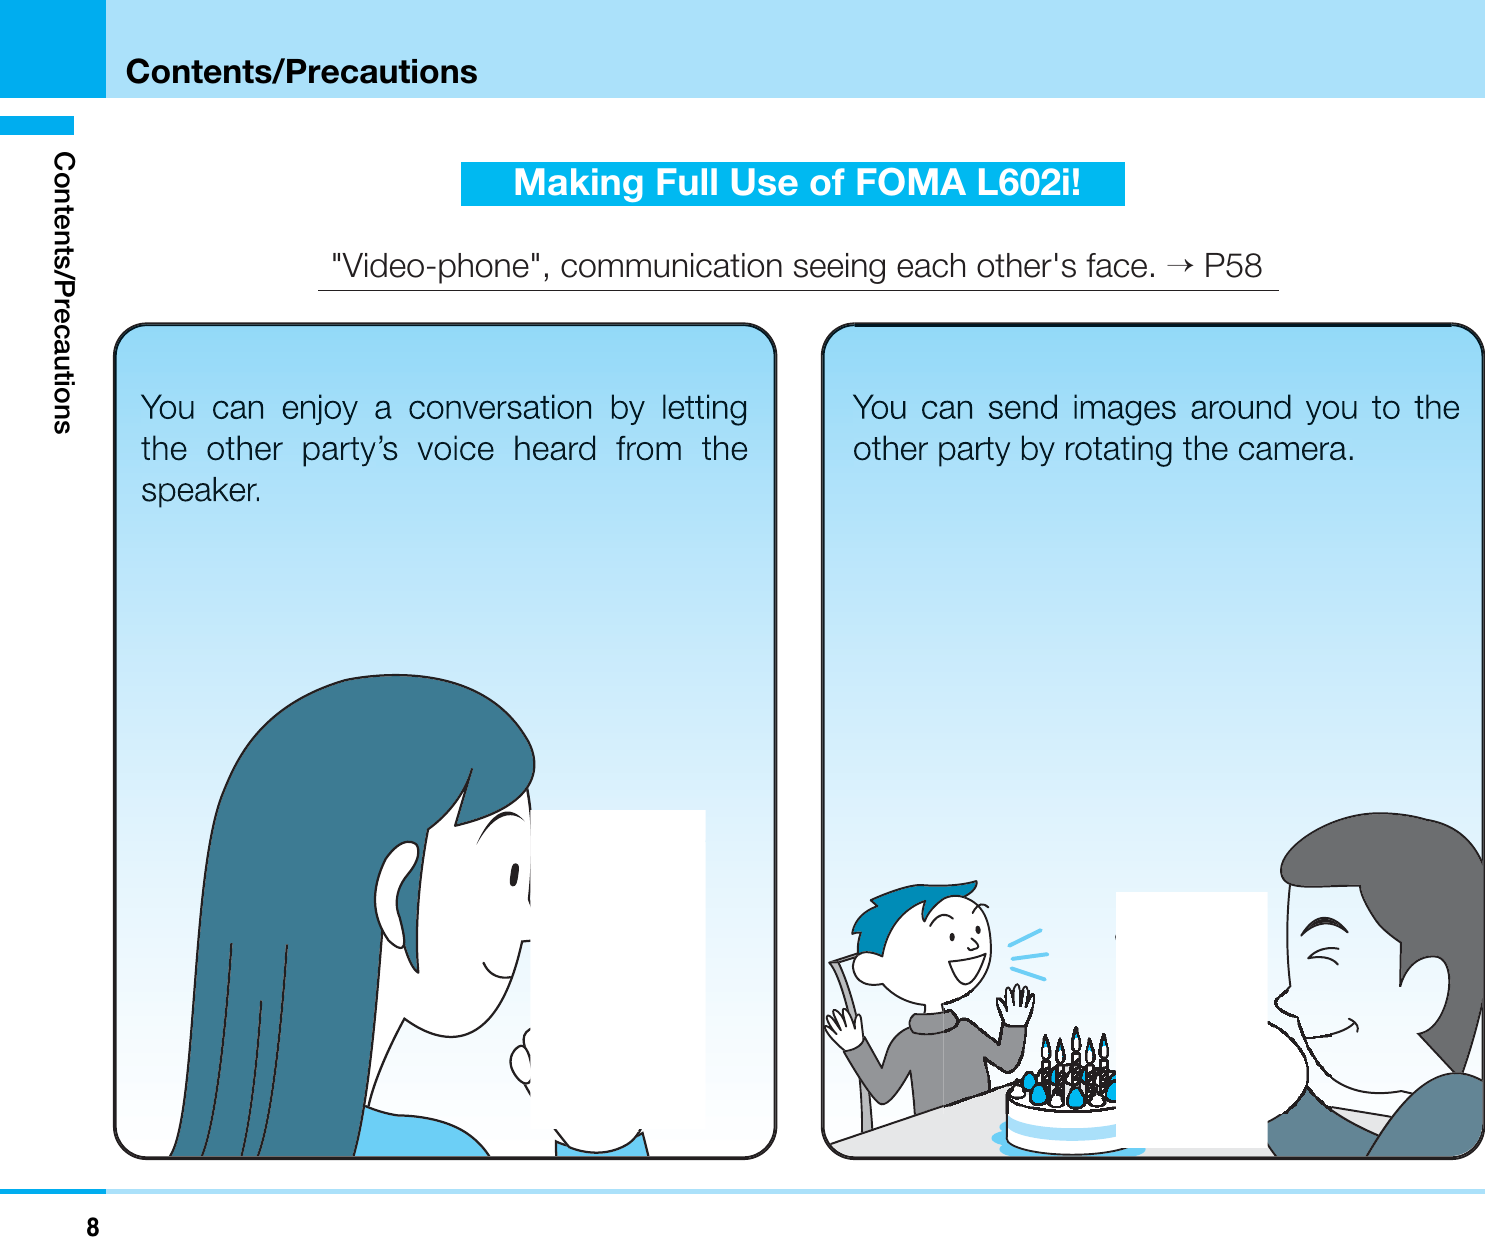
![58Making/Receiving Video-phone callsMaking/Receiving Video-phone callsAbout Video-phoneWhen both you and the other party use DoCoMo's video-phones, you can talk seeing each other's image.• DoCoMo video-phones conform to 3G – 324M 2standardized by the international standard 3GPP 1.You cannot connect to the video-phone that uses adifferent format.1 : 3GPP (3rd Generation Partnership Project) is the regionalstandards organization for developing common technicalspecifications for third-generation mobiletelecommunications systems (IMT–2000).2 : 3G–324M is the international standard for the thirdgeneration of mobile video-phones.• The video-phone call is activated at the speed of 64Kbytes.Making Video-phone Calls1. Enter the other party’s phone number• The Enter Phone Number screen (P48) is displayed.2. T]Start talking when the other party answers<Talking Display>• The voice of the other party is heard from thespeaker when the call starts.• Press Qfor 1 or more second: You can switchON/OFF the speaker phone.•C[Image]/[Camera]: You can switch betweenSubstitutive image and your photo image for sendingto the other party.•I[Hold]/[Active]: You can put the call on hold orrelease hold. While the call is put on hold, asubstitutive image is sent to the other party.•T: Rotate an image.3. Press Pto end the call after talkingInformation• See “International Calls” (P50) for how to make international calls.• When the Flat-plug Earphone/Microphone Set with Switch (option)is attached, you can only talk on the Earphone/ Microphoneregardless of whether the speaker phone is ON/OFF.Using the Submenu of the Enter Phone Number screenSee “Using the Submenus of the Enter Phone Numberscreen” (P48) of voice calls for the submenus available.The other party's imageThe volume during a callCall durationOwn imageMenu HoldImageDescriptionMark/Speaker phone ON/OFFZooming magnification](https://usermanual.wiki/LG-Electronics-USA/L602I.Users-Manual-1/User-Guide-760911-Page-65.png)
![59Making/Receiving Video-phone callsMaking/Receiving Video-phone callsUsing the Submenus of the Talking screenSetting item/Setting at purchase >P2531. From the Talking screen (P58), M[Menu] ]Selectfrom the following submenu itemsEnd callThe call is disconnected.HoldYou can put the call on hold. You can cancel thefunction by pressing I[Active].Substitutive image/Camera imageYou can switch to the Substitutive image for sendingto the other party. >P94Camera settingsYou can set the camera of Video-phone call. You canselect the icon by pressing J. After setting, press I[Close].–Zoom : The camera image is zoomed. (x1/x2)–Brightness : You can change the brightness ofphoto images.–Night mode : You can set it up when using thecamera in a dark place.Video-phone settingsYou can set the display of Video-phone call. Aftersetting, press I[Done]. >P93–Display setting : You can set the display methodfor the Talking screen.• Both : The other party’s image and your imageare displayed.• Other : Only the other party’s image is displayed.• Me : Only your image is displayed.–Sub screen : If you select “Both” of “video-phonesettings”, you can set the image which displayedeach screen.• Me : Only your image is displayed.• Other : Only the other party's image is displayed.–Display light: You can set the lighting method ofthe backlight on the Talking screen.•Always on : Always lights during a call.•Terminal setting : Follows the settings on the“Main screen” of the “Backlight”. >P83Sending image qualityYou can set the quality of images to be sent to theother party.–Normal : Sends images in standard quality andmotion speed.–Prefer motion quality : Sends images laying stresson motion speed. Prefer motion quality is effectivefor moving images.–Prefer image quality : Sends images laying stresson image quality. Prefer image quality is effective ifthere is little motion.](https://usermanual.wiki/LG-Electronics-USA/L602I.Users-Manual-1/User-Guide-760911-Page-66.png)
![60Making/Receiving Video-phone callsMaking/Receiving Video-phone callsMaking a Video-phone call from the Dialed/Received Call Record1. On the Stand-by display, L/R/A/T]Selecta history ]TInformation• See “Using the Submenu of the Received Call Record Screen”(P86) for the submenu.Making a Video-phone Call from the Phonebook1. On the Stand-by display U, or Search forphonebook entries (P66) ]Select a party to call ]TWhen multiple phone numbers are registered, press Ttodisplay the Select call number screen, then select thephone number and press C[Call].Information• To switch the phonebook to display between the FOMAphone and UIM, select M[Menu] >Select “View handset” /“View UIM”.Adjusting the Volume1. Press H/FE during a call.Information• The changed volume is held even after ending the call.Receiving Video-phone Calls1. When you receive a call, T/A•C[Image]: You can receive a call. The substitutiveimage will be sent to the other party.•P: You can put the call on hold. The holdingimage will be sent to the other party. If you press C,you can answer the call.•T: Rotate an image.• If you close the handset while a call is incoming, thecall will be rejected.2. Pto end the call after talkingThe other party's name Ŧ2The other party's phone numberThe other party's image Ŧ1Ŧ1 : Displayed only when the other party's image is registered in the phonebook.Ŧ2 : In case the other party's information is not registered in the phonebook, “Unregistered” will be displayed.<Ringing Display>](https://usermanual.wiki/LG-Electronics-USA/L602I.Users-Manual-1/User-Guide-760911-Page-67.png)
 ]3You can set the operation and display for video-phonecalls. See “Setting Operation and Display for video-phoneCalls” (P93) and “Selecting an Image for video-phoneCalls” (P94) for details of the settings.](https://usermanual.wiki/LG-Electronics-USA/L602I.Users-Manual-1/User-Guide-760911-Page-68.png)

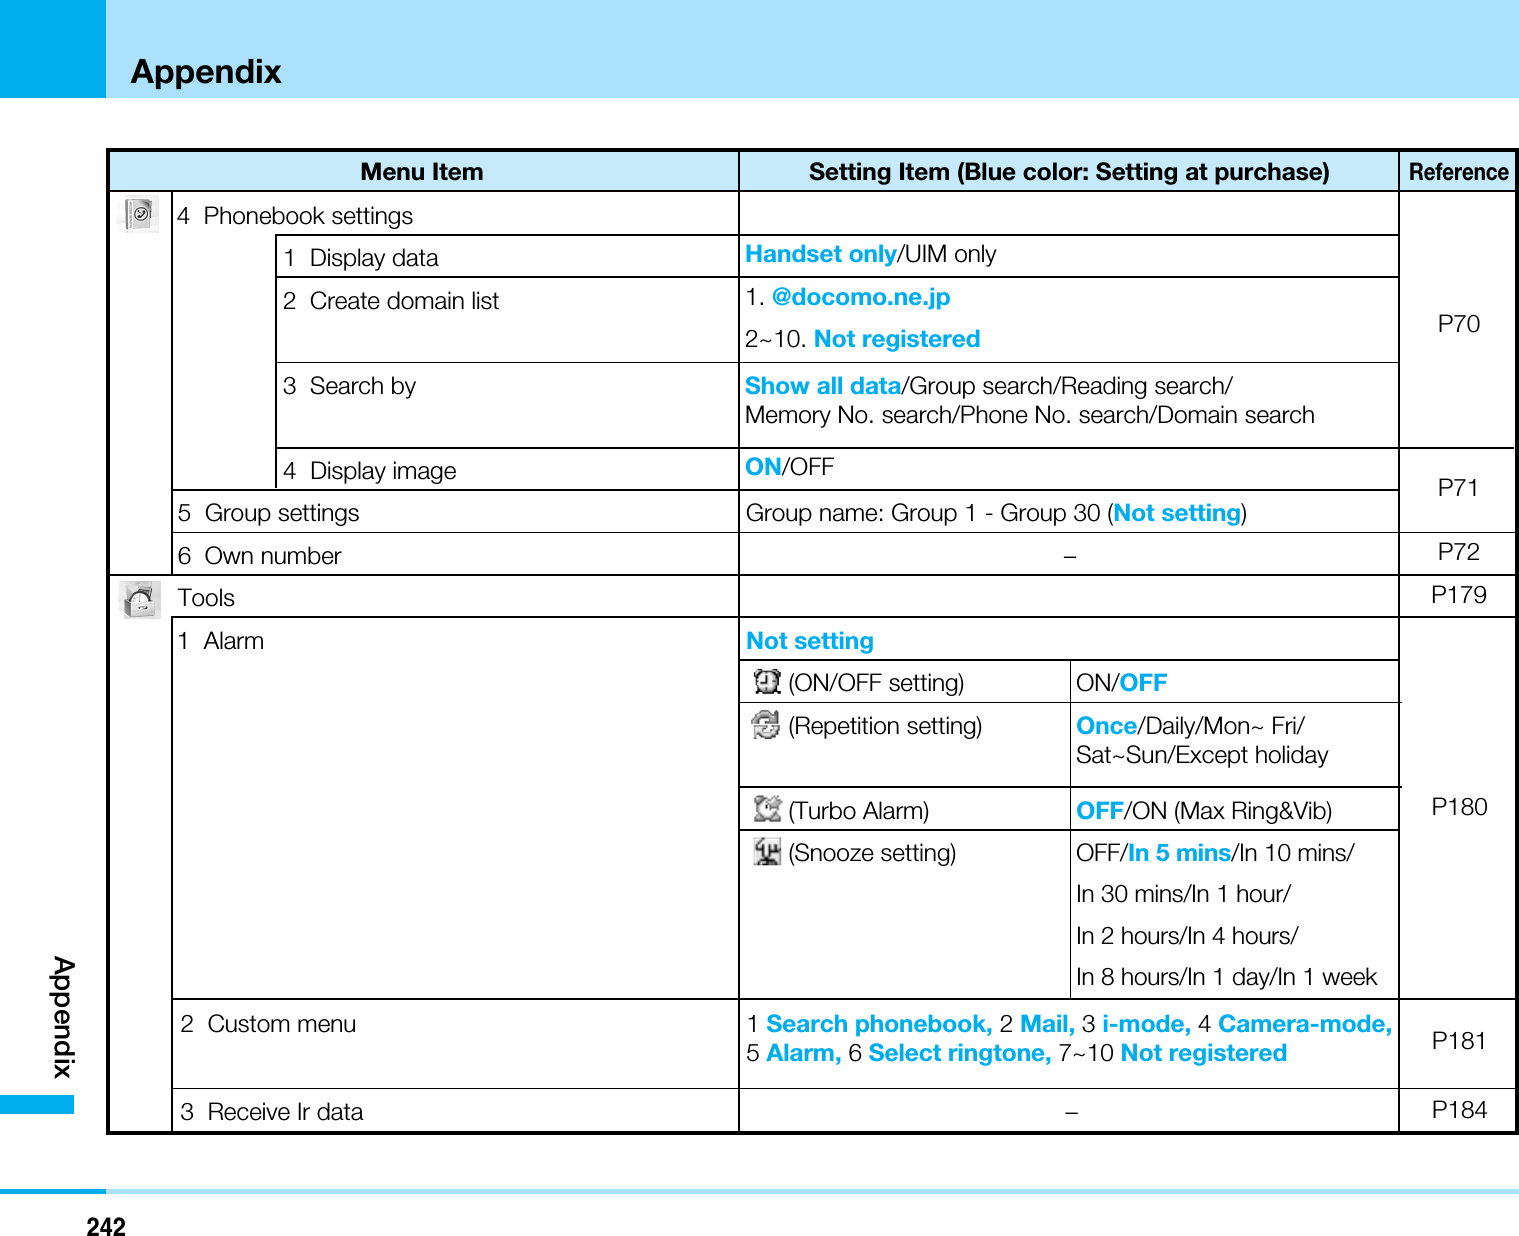
![63Adding to Phonebook ............................64Searching for Phonebook Entries..........66Checking the Number of SavedPhonebook Entries.................................70Setting Phonebook.................................70Setting Groups .......................................71Displaying Own Number ........................72PhonebookOn the Stand-by display, C[Menu] ](Phonebook) or “Phonebook”To display the Phonebook menuSelectPhonebook1 Add to phonebook2 Seach phonebook3 No. of phonebook4 Phonebook settings5 Group settings6 Own numberSelectPhonebook](https://usermanual.wiki/LG-Electronics-USA/L602I.Users-Manual-1/User-Guide-760911-Page-70.png)
 ]12 types of phonebooks are available, the phonebooksaved in the handset of the FOMA phone and thephonebook saved in UIM.1. From the Phonebook menu (P63), “Add tophonebook”<Saving Phonebook Entries>2. Select an item to saveHandset / FOMA card (UIM)Select a storage location of the Phonebook (Handset/ UIM).NameEnter a name. Unless you enter a name, thePhonebook entry cannot be saved.ReadingEnter reading of the name. Automatically inserted ifyou enter “Name”.Number 1 ~ 5 1Enter a phone number. If you press M[Icon] afterentering, you can set a mark other than .Mail addr 1 – 3 1Enter a mail address. If you press M[Icon] afterentering, you can set a mark other than .Group (Handset)/ GroupFOMA card (UIM)Select a group to save.Image 2Select an image to be displayed on dialing / receivingcalls screen, talking screen, phonebook list screenand phonebook detail screen.–No image : No image is set.–Character: You can set the character. Select thepart (Face, Hair, Tops, Bottoms, Acc., Scenery) bypressing H, and then select the item by pressingJ. After setting, press C.–Select picture : You can select from images savedin “My picture” of “Data box”. >P166–Take picture: You can start a camera. Go to step 2on page 109 of “Shooting Still Images”. The size ofimage 80x96 cannot be changed.Set ringtone 2You can set a ring tone for when you receive a voice /video-phone call from registered caller.–Data box : You can select from melodies saved in“Melody” of “Data box”. >P176NameReadingNumber1Mail addr1No groupHandsetAdd to phonebookSaveSelectPhonebook](https://usermanual.wiki/LG-Electronics-USA/L602I.Users-Manual-1/User-Guide-760911-Page-71.png)
![65PhonebookPhonebook–Terminal setting : Go to the settings of “Select ringtone”. >P76Set mail ringtone 2You can set a ring tone for when you receive mailfrom registered party.–Data box: You can select from melodies saved in“Melody” of “Data box”. >P176–Terminal setting: Follows the settings of“ringtone”. >P76URL 2You can enter a URL.Postal code 2You can enter a postal code.Home addr. 2You can enter a home address.Company name 2You can enter a company name.Job title 2You can enter a job title.Company addr. 2You can enter a company address.Memo 2You can enter a memo.Secret Code 3Set to the secret code.1 : Only 1 entry can be saved if the storage location for thePhonebook is set to “FOMA card (UIM)”.2 : Not displayed if the storage location for the Phonebook is setto “FOMA card (UIM)”.3 : For secret code, refer to “Mobile Phone User's Guide [i-mode]”.3. After storing, I[Save] ] Enter a memory number(0-499) ]CSaving in UIM1. From the Saving Phonebook Entries screen (P64),select the (Handset) field ]Select using J2. Enter required items • See (P64) of “Adding to Phonebook” for details of theitems.3. I[Save]Information• For phone numbers of the Phonebook saved in Memory No 0 – 9 (1 saved in “Number1”), if you press 0~9and thenpress A(T) from the Stand-by display, you can make avoice (video-phone) call.• 500 Phonebook entries can be saved in the FOMA phone and50 Phonebook entries can be saved in the UIM. Note that thenumber of savable entries may be smaller depending on thesaved contents. >P70](https://usermanual.wiki/LG-Electronics-USA/L602I.Users-Manual-1/User-Guide-760911-Page-72.png)
 ]2You can display the Phonebook in the FOMA phone / UIMspecifying a search method.1. From the Phonebook menu (P63), “Searchphonebook”•I[UIM]/[Handset]: You can switch PhonebookSearch screens between the FOMA phone and theUIM.2. Select the following search methodShow all dataPress the buttons 1~0corresponding to the50 Japanese syllables (corresponding to Columns) forsearching. If you press *, you can search for Otheritem. You can switch tab of the 50 syllabary bypressing J.Group search You can specify a group for searching. (Group 1~30(FOMA Handset) / 1~10 (UIM)). After searching, youcan switch groups by pressing J.Reading searchYou can search by entering some of the characterscontained in the reading of the name. Memory No. searchYou can search by using a memory number (0-499).You can switch tab of the memory number by pressingJ.Phone No. search You can search by entering part of the phonenumber.Domain searchYou can search by specifying a domain. You canswitch domains using J.• To create a domain to specify, see “Creating adomain list” (P70).: Not selectable on the Phonebook Search display of UIM.3. The Phonebook List meeting the search method isdisplayed.<Phonebook List>•A/T: You can make a voice call or video-phonecall to the selected phone number saved inphonebook.However, when multiple phone numbers areregistered, press A/Tto display the Select callnumber screen, then select the phone number andpress C[Call].](https://usermanual.wiki/LG-Electronics-USA/L602I.Users-Manual-1/User-Guide-760911-Page-73.png)
![67PhonebookPhonebookNext Page •I[Mail] : You can compose i-mode mail to selectedmail address or phone number registered in theselected phonebook. Go to step 3 on page 149 of“Composing i-mode mail”. When multiple mailaddresses or phone numbers are registered in thephonebook, press I[Mail] to display the destinationselection screen, then select the destination.: If the mail address or phone number is notregistered in the phonebook, you cannot use thisfunction.4. Select the desired Phonebook ]C<Detailed Phonebook>•A/T: You can make a voice call or video-phonecall to the phone number saved in phonebook.When multiple phone numbers are registered, theSelect call number screen is displayed, and selectthe phone number and press C[Call].•C[Call] : You can make a call to selected phonenumber.•C[Mail] : You can compose an i-mode mail toselected mail address saved in phonebook. Go tostep 3 on page 149 of “Composing i-mode mail”.•C[Connect] : You can connect the web page ofselected URL.Using the Submenus of the Phone ListdisplaySetting item/Setting at purchase >P2531.From the Phonebook List screen (P60), M[Menu]]Select from the following submenu items View UIM 4/FOMA phone phonebook display 5Switch between UIM phonebook and FOMA phonephonebook displays.Search ctgry menu 1–Handset4/UIM5Group settings :After “Groupsearch”, you can set the each displayed group in thephonebook list screen. Go to step 2 on page 71 of“Using the Submenus of the Group Settings screen”.–Input char chg: You can switch entry modes forthe Character Entry column displayed at the top ofthe phonebook list screen after “Reading search”. –Return to input: You can return without “Inputcharacter change”. –Create domain list: You can create a new domainlist from the Phone List display after “Domain search”.Go to step 2 on page 70 of “Creating a Domain List”.](https://usermanual.wiki/LG-Electronics-USA/L602I.Users-Manual-1/User-Guide-760911-Page-74.png)
![68PhonebookPhonebookMail/URL 2–Compose mail: The mail address or phone numbersaved in the selected Phonebook is entered into thedestination. Go to step 3 on page 149 of“Composing i-mode mail message”.–Compose SMS: The phone number saved in theselected Phonebook is entered into the destination. Goto step 3 on page 152 of “Creating SMS”.–Connect to URL: Connected to the web page withthe URL saved in the selected Phonebook. Add newYou can create a new phonebook. Go to step 2 on page64 of “Adding to Phonebook” for items to be saved. EditYou can edit the selected Phonebook. Go to step 2 onPage 64 of “Adding to Phonebook” for items to be saved. Send Ir data 3For Infrared Communication, see “Using the InfraredCommunication” (P182).–Focused data: Send a selected phonebook entry viainfrared communication.–All data: Send all phonebook entries via infraredcommunication.Search by You can select another search method to display aphonebook. For the searching method, Go to step 2 onpage 66 of “Searching for Phonebook Entries”.Copy–Copy to UIM 4:You can copy the Phonebookselected to the UIM. –Select copy to UIM 4:You can copy multiplePhonebooks selected to the UIM. If you press M,you can select “All data”. After selecting, pressI[Done].–Copy to handset 5:You can copy the Phonebookselected to the handset of the FOMA phone. –Select copy to handset 5:You can copy multiplePhonebooks selected to the handset of the FOMAphone. If you press M, you can select “All data”. Afterselecting, press I[Done].Delete–Delete: You can delete the selected Phonebook. –Delete selected: You can delete the multiplePhonebooks selected. If you press M, you canselect all data. After selecting, press I[Done].–Delete all 6:You can delete all Phonebooks. Todelete all Phonebooks, your terminal security code isrequired.Display image 7If an image is registered in phonebook list, you canset whether to display the image or not. >P71Int'l call (Japan) 8Make a call to a phone number registered in theselected phonebook. >P227This submenu appears only while Internationalroaming service is active.](https://usermanual.wiki/LG-Electronics-USA/L602I.Users-Manual-1/User-Guide-760911-Page-75.png)
![69PhonebookPhonebook1: You can user phonebook list by Group search except for “Nogroup”, “Reading search”, “Phone No. search” and “Domainsearch”. You may not be able to select it depending on thesearch method or storage status of the selected Phonebook.2: You cannot select it if no phone number/mail address/URL isstored in the selected Phonebook.3: Not selected in Phonebook for UIM. 4: Displayed on the Phonebook of the handset. 5: Displayed on the Phonebook of the UIM. 6: If you perform “Delete all” while checking new i-modemail/SMS or activating i-appli, active functions are terminatedand returns to Stand-by screen.7: No image is displayed on the Phonebook of the UIM.8: Does not appear within Japan.Using the Submenus of the Detailed Phonebook Display1.From the Detailed Phonebook screen (P67), M[Menu]]Select from the following submenu items Mail/URL 1–Compose mail: The mail address or phone numbersaved in the phonebook displayed is entered intothe Address. Go to step 3 (P149) of “Composing i-mode mail message”.–Compose SMS: The phone number saved in thephonebook displayed is entered into the Address. Goto step 3 (P152) of “Composing SMS”.–Connect to URL: Connected to the homepage ofthe URL saved in the Phonebook displayed.EditYou can edit the phonebook. Go to step 2 on page64 of “Adding to Phonebook”.Send Ir data 2For details, please refer to “Using the InfraredCommunication Function” (P182).Copy to UIM 3You can copy the phonebook entry to the UIM.Copy to handset 4You can copy the phonebook entry to the FOMA handset.DeleteYou can delete the phonebook entry.Int'l call (Japan) 5Make a call to a phone number registered in theselected phonebook. >P2271: You cannot select it if no phone number/mail address/URL isstored in the selected Phonebook.2: Not selected in Phonebook for UIM. 3: Displayed during displaying the Phonebook of the handset ofthe FOMA phone. 4: Displayed during displaying the Phonebook of the UIM. 5: Does not appear within Japan.](https://usermanual.wiki/LG-Electronics-USA/L602I.Users-Manual-1/User-Guide-760911-Page-76.png)
 ]3You can check the number of phonebook entries saved inthe handset of the FOMA phone and in the UIM as well asthe number of phonebook entries available.1.From the Phonebook menu (P63), “No. of phonebook”Information• Actual savable number of phonebook may be smallerdepending on the contents saved in Phonebook.Setting PhonebookSetting Display DataC](Phonebook) ]41You can set whether to display the phonebook of thehandset of the FOMA phone or the phonebook of the UIMwhen displaying a phonebook.Setting item/Setting at purchase >P241, P2421. From the Phonebook menu (P63), “Phonebooksettings” ]“Display data” ]“Handset only”/“UIMonly”Creating a Domain ListC](Phonebook) ]42You can store domains to be used when doing “DomainSearch” (P66).Setting item/Setting at purchase >P2421. From the Phonebook menu (P63), “Phonebooksettings” ]“Create domain list”•I[Disp.] 1: You can view all domain registered in a list.•M[Delete] 2: You can delete the domain saved.1: You cannot use this menu when you select no input screen.2: You cannot use this menu when you select“@docomo.ne.jp” or no input screen.2. Select the domain list field ]C]Enter a domain]CSelecting a Search Method C(Phonebook) 43You can set the search method for when you press Uonthe Stand-by display and bring up the phonebook searchdisplay.Setting item/Setting at purchase >P2421. From the Phonebook menu (P63), “Phonebooksettings”]“Search by” ]Select a search method• Go to step 2 on page 66 of “Searching thePhonebook Entries” for the search method.](https://usermanual.wiki/LG-Electronics-USA/L602I.Users-Manual-1/User-Guide-760911-Page-77.png)
 ]44You can set whether to display the image set whenselecting a phonebook with “ (image setting)” set (P64)on the phonebook list screen.Setting item/Setting at purchase >P2421. From the Phonebook menu (P63), “Phonebooksettings”]“Display image” ]“ON”/“OFF”Setting GroupsC](Phonebook) ]5You can save the group name for Group of thephonebook. You can also set a ring tone for each group.Setting item/Setting at purchase >P2421. From the Phonebook menu (P63), “Group settings”• Group settings display appears.•I[UIM]/[Handset]: You can switch the Group settingsdisplays between the FOMA phone (handset) and theUIM.2. Select the group to set ]C]Select the followingitem to register ]After setting, press I[Finish]Group nameYou can save the name of the group.RingtoneYou can set a ring tone for when a call comes in.–Data box: You can select from the melodies storedin “Melodies” of “ Data box”. >P176–Terminal setting: Follows the settings of“ringtone”. >P76Mail ringtoneYou can set a ring tone for when mail comes in.–Data box: You can select from the melodies savedin “Melody” of “Data box”. >P176–Terminal setting: Follows the settings of “Selectringtone”. >P76: Not displayed on the Group setting display of the UIM.Information• You cannot set to “No group”.](https://usermanual.wiki/LG-Electronics-USA/L602I.Users-Manual-1/User-Guide-760911-Page-78.png)
![72PhonebookPhonebookUsing the Submenus of the Group SettingsScreen1. From the Group Settings screen, M[Menu]]Select from the following submenu items Reset 1You can reset the settings of the group selected. Move 2You can change the order of the group selected. EditYou can edit the group selected. Go to step 2 (P71) of“Setting Groups”.Reset all 3You can reset the settings and orders of all groups. 1: You cannot use this menu when the selected group is not edited.2: You cannot use this menu in FOMA card group setting screen.3: You cannot use this menu when not moving or editing anygroup.Displaying Own Number C](Phonebook) ]6You can display your phone number recorded in the UIM. 1. From the Phonebook menu (P63), “Own number” • The Own number screen appears. Information•You can also check your own number by pressingC0fromthe Stand-by display. Displaying Details of Own Number 1. From the Own number screen, C[Detail]]Enteryour terminal security code ]C• The Detail screen appears. •A/T: You can make a voice/ video-phone callby the number registered in. (except own number)When multiple phone numbers are registered, theSelect call number screen is displayed, and selectthe phone number and press C[Call].•C[Call] : You can make a voice call to the selectedphone number.: You cannot use your own number.•C[Mail]: You can compose i-mode mail to selectedmail address. Go to step 3 on page 149 of“Composing i-mode Mail”.•C[Connect]: You can connect the homepage ofselected URL.](https://usermanual.wiki/LG-Electronics-USA/L602I.Users-Manual-1/User-Guide-760911-Page-79.png)
![73PhonebookPhonebookUsing the Submenu of the Detail Screen 1. From the Detail Screen, M[Menu]]Select fromthe following submenu items Mail/URL 1–Compose mail: The mail address registered in mynumber will be entered to destination. Go to step 3on page 149 of “Composing i-mode Mail”.–Compose SMS2:The phone number registered inmy number will be entered to destination. Go to step3 on page 152 of “Composing SMS message”.–Connect to URL: You can connect the homepageof URL registered in my number.EditYou can store your own information. For addingmethod, go to step 2 on page 64 of “Adding toPhonebook”. However, your number registered in“ (Own number)” cannot be edited.Send Ir data 3You can send your own number through infraredcommunication. For details related to infraredcommunication, go to “Using the InfraredCommunication Function” on P182.Reset 4You can reset the edited own number information toits default. 1: You cannot use this menu if the phone number/mail/URL arenot registered.2: You cannot use the menu even if you operate the numberregistered in own number.3: You cannot use this menu during a call.4: You cannot use this menu when the own number information isnot registered.](https://usermanual.wiki/LG-Electronics-USA/L602I.Users-Manual-1/User-Guide-760911-Page-80.png)

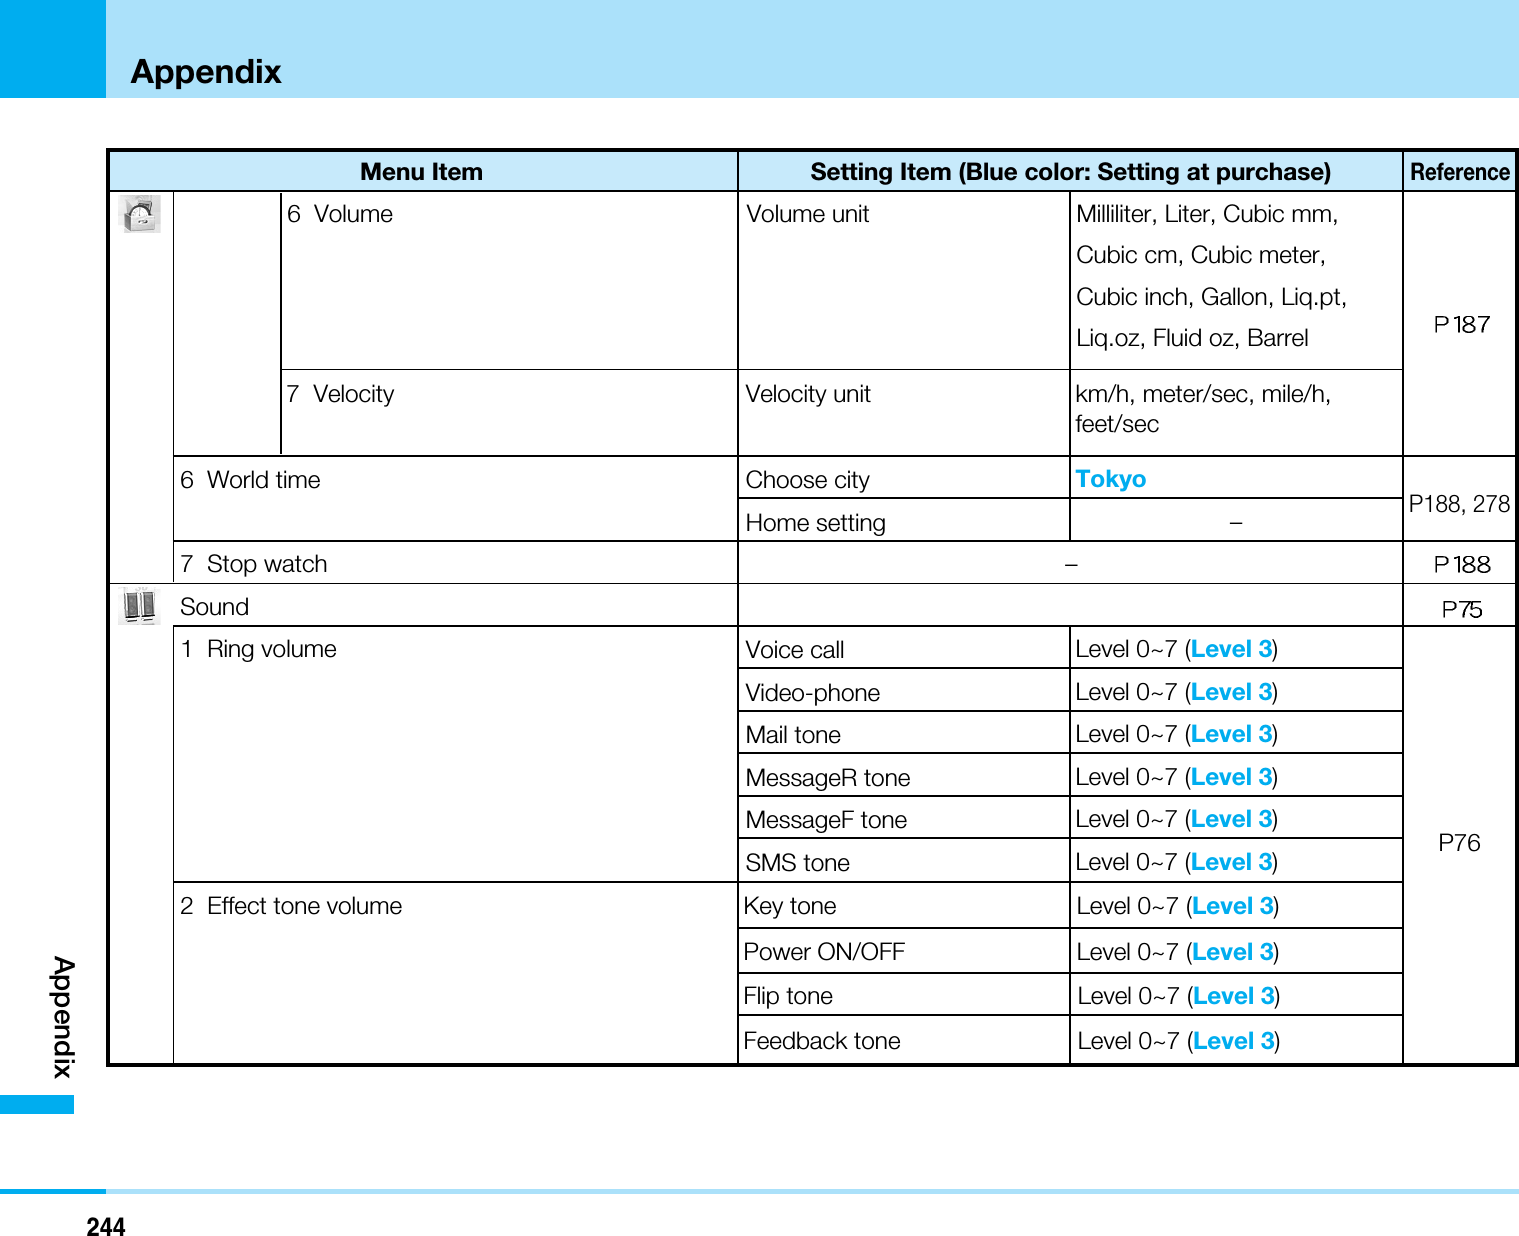
![75Adjusting the Ring Volume ....................76Adjusting the Effect Tone Volume .........76Setting a Ring Tone................................76Setting an Effect Tone ...........................77Setting a Vibrator ...................................78Activating the Manner Mode .................78Setting Ringing Operations for Incoming Mail ........................................79Setting Ringing Time..............................80Setting Main Screen...............................80Setting Sub Display................................82Setting Fonts of Dial Characters ...........83Setting Menu Style .................................83Setting Backlight ....................................83Setting color Scheme.............................84Setting LED.............................................84Sound/Display1 Ring volume2 Effect tone volume3 Select ringtone4 Select effect tone5 Vibration settings6 Manner settings7 Mail ring durationSelectSoundOn the Stand-by display, C[Menu] ](Sound) or “Sound” To display the Sound menu 1 Main display2 Sub display3 Font4 Menu style5 Backlight6 Color scheme7 Lighting LEDSelectDisplayOn the Standby display, C[Menu] ](Display) or “Display”To display the Display menu](https://usermanual.wiki/LG-Electronics-USA/L602I.Users-Manual-1/User-Guide-760911-Page-82.png)
 ]1Setting items/Setting at purchase >P2441. From the Sound menu (P75), “Ring volume” ]Select from the following adjustment items ]After setting,I[Done]Voice callYou can adjust the ring tone volume for voice calls.Video-phoneYou can adjust the ring tone volume for video-phonecalls.Mail toneYou can adjust the ring tone volume for mail.MessageR toneYou can adjust the ring tone volume for MessageR.MessageF toneYou can adjust the ring tone volume for MessageF.SMS toneYou can adjust the ring tone volume for SMS.Information• When you receive mail, messageR/F or SMS on opening theflip, the alarm sound will be fixed to level 1 regardless of eachsetting of “Ring volume”. However, if you set level 0 of ringtone, the alarm does not sound.Adjusting the Effect Tone VolumeC](Sound) ]2Setting items/Setting at purchase >P2441. From the Sound menu (P75), “Effect tone volume”]Select from the following adjustment items ]After setting,I[Done]Key toneYou can adjust the key pad sound volume.Power ON/OFFYou can adjust the tone volume for when turning theFOMA phone on/off.Flip toneYou can adjust the tone volume for when opening orclosing the FOMA phone.Feedback toneYou can adjust the tone volume for when a popupappears.Setting a Ring ToneC](Sound) ]3You can set the ring tone for voice call, video-phone call ormail. In addition to ring alerts and melodies registered bydefault, you can set melodies and/or i-motion downloadedfrom i-mode sites and web pages as incoming ring alerts.You can set the SMF, MFI or MP4 file as a ringtone.Sound/Display](https://usermanual.wiki/LG-Electronics-USA/L602I.Users-Manual-1/User-Guide-760911-Page-83.png)
![77Sound/DisplaySound/Display•For the melody registered at purchase, see “List ofmelody” (P251).Setting items/Setting at purchase >P2451. From the Sound menu (P75), “Select ringtone” ]Select from the following adjustment items ]After setting, I[Done]• Select from the melodies stored in “Melody” or “i-motion” in “Data box” respectively. >P176• On a folder list screen, press Qto switch between“Melody” and “i-motion”.Voice callYou can select a ring tone for voice calls.Video-phoneYou can select a ring tone for video-phone calls.Mail toneYou can select a ring tone for mail.MessageR toneYou can select a ring tone for messageR.MessageF toneYou can select a ring tone for messageF.SMS toneYou can select a ring tone for SMS.Information• If you have set a ring tone depending on the voice call/ videophone call/ Mail, the ring tone is preferred. The priority order isas follows:1Ringtone set in the FOMA phone’s phonebook >Set thephonebook (P64)2Ringtone set for a group of the FOMA phone’s phonebook>Set group (P71)3Ringtone volume/Video call ring tone/Mail, Message ringtone >Select the ring tone (P76)Setting an Effect ToneC](Sound) ]4Setting items/Setting at purchase >P2451. From the Sound menu (P75), “Select effect tone” ]Select from the following adjustment items ]Aftersetting, I[Done]Key toneYou can set to emit an effect tone for when you touchthe buttons. The effect tone does not sound whensetting to “OFF”.Power ON/OFFYou can set whether to emit an effect tone for whenyou switch ON/OFF the FOMA phone.Flip toneYou can set whether to emit an effect tone for whenyou open/close the FOMA phone.Feedback toneYou can set whether to emit an effect tone for when apopup appears.](https://usermanual.wiki/LG-Electronics-USA/L602I.Users-Manual-1/User-Guide-760911-Page-84.png)
 ]5Setting items/Setting at purchase >P2451. From the Sound menu (P75), Vibration settings ]Select from the following setting items ]Aftersetting, I[Done]Incoming callYou can select a vibration pattern for when a voicecall or a video-phone call comes in.–melody+vibration: The vibration and the melodyfor incoming call are activated at the same time.–Pattern 1(Vibration only): This activates thevibration to pattern 1. Regardless of ring tone, thetone for incoming call does not sound.–Pattern 2(Vibration only): This activates thevibration to pattern 2. Regardless of ring tone, thetone for incoming call does not sound.–OFF: The vibration is not activated in FOMA phone. MessageYou can set a vibration pattern for when mail,messageR/F or SMS comes in.–melody+vibration: The vibration and the melodyfor incoming call are activated at the same time.–Pattern 1(Vibration only): This activates thevibration to pattern 1. Regardless of ring tone, thetone for incoming call does not sound.–Pattern 2(Vibration only): This activates thevibration to pattern 2. Regardless of ringtone, thetone for incoming call does not sound.–OFF: The vibration is not activated in FOMA phone.Activating the Manner ModeYou can set whether to mute the ring tone, key pad soundand any other sound from the speaker to avoid annoyingpeople around you. If the manner mode is activated, anincoming call or alarm, etc. is notified with vibrator.• You can change the activation on setting manner modeto “Original manner mode”. >P791. From the Stand-by display, press #for 2 ormore seconds•The handset of the FOMA phone vibrates displaying(blue/in the Original manner mode) or (pink/inthe Manner mode). • You can cancel it by pressing #for 2 or moreseconds with the Manner mode activated. Changing Manner Modes C](Sound) ]6You can change operations in the Manner mode. Setting at purchase >P245, P2461. From the Sound menu (P75), “Manner settings” ]Select from the following setting items](https://usermanual.wiki/LG-Electronics-USA/L602I.Users-Manual-1/User-Guide-760911-Page-85.png)
![79Sound/DisplaySound/DisplayManner modeYou can set the Manner mode.Original manner modeYou can customize operations in the Manner mode.After setting, press I[Done].–Incoming call sound: You can set whether tomake the ring tone sound when a voice call orvideo-phone call comes in.–Incoming call vib.: You can set whether to vibratethe phone when a voice call or video-phone callcomes in. –Message sound: You can set whether to make thering tone sound when mail, messageR/F or SMScomes in.–Message vibration: You can set whether to vibratethe phone when mail, messageR/F or SMS comesin.–Key tone: You can set whether to make the keyoperation sound when you do key operations. –Flip tone: You can set whether to make an effecttone sound when you open or close the FOMAphone.–Low battery tone: You can set whether to make abattery alarm tone sound when the battery is flat.Information• The following sounds are emitted even when the mannermode is activated.– The shutter tone on shooting still and moving image. >P110– The alert tone for disconnecting a call. >P48, P51– The alert tone to reconnect >P91– The alert tone for the quality of calling >P92• If you try to play the melody, moving image or i-motion onmanner mode, the confirmation screen appears and you canselect whether to play with sounds.Setting Ringing Operations for Incoming Mail C](Sound) ]7You can set whether to make the ring tone sound whenmail or SMS comes in. You can also set ringing durationand cycle of rings.Setting items/Setting at purchase >P2461. From the Sound menu (P75), “Mail ring duration” ]Select from the following setting items ]Aftersetting, I[Done]Mail ring ON/OFFYou can set whether to make the ring tone soundwhen mail comes in. If you select “ON”, you can setthe ringing duration or cycle of ringing.Mail ring durationYou can set ringing time and number of rings for theringing tone.–Time: After selecting Sec. section by pressing D,you can enter the duration of ringing.](https://usermanual.wiki/LG-Electronics-USA/L602I.Users-Manual-1/User-Guide-760911-Page-86.png)
 ]8You can specify the mute time in seconds before ringingstarts when a voice call or video-phone call which is notregistered in phonebook comes in. This function is effectiveas a countermeasure for nuisance calls such as 1 ring phonescam.Setting items/Setting at purchase >P2461. From the Sound menu (P75), Select “Set muteseconds” ]Enter ring time. ]I[Done]Information• If the voice call or video-phone call which are not registered inphonebook disconnects within the setting ringing time, they arenot recorded in received call list.Setting Main ScreenYou can set the display for stand-by display orIncoming/outgoing screen as Main display.You can set the maximum of the image size of 1280 x1024, the file size of JPEG file to 700K bytes and the filesize of GIF file to 500K bytes on the Stand-by display.Depending on the image, some cannot be set properly.• When the image saved in stand-by mode, making andreceiving a call at purchase, please refer to “Pre-installeddata” (P260)Setting the Stand-by DisplayC](Display) ]11You can set wallpapers and clock displays for the Stand-by display.Setting items/Setting at purchase >P2461. From the Display Menu (P75), “Main display” ]“Stand-by display” ]Select from the followingsetting items ]After setting, I[Done]Wallpaper–Select type field 1• Select file ... Select an image saved in “My picture”of “Data box” from “Select file/Clock theme field”.• Clock theme ... Select a clock theme from “Selectfile/Clock theme field”.–Select file/Clock theme field 1:Select an image(P166) or a clock theme saved in “My picture” of“Data box”.• The selectable items may differ depending on thesettings of “Select type field”.](https://usermanual.wiki/LG-Electronics-USA/L602I.Users-Manual-1/User-Guide-760911-Page-87.png)
![81Sound/DisplaySound/DisplayDisplay items 2–Select display type field 1• Clock ... Display a digital clock on the stand-byscreen. You can select the type of the clock by“Select clock/city field”.• Dual clock ... Display 2 cities and times on the stand-by screen. You can select the city of the second timedisplayed lower by “Select clock/city field”. 3• Calendar + Clock ... Display both calendar andclock on the stand-by screen. You can select thefont color of the clock by “Clock font color”.• Do not show ... Do not display the clock on thestand-by screen.–Select clock/city field 1 4:Select the type of thedigital clock or a city.• The selectable items may differ depending on thesettings of “Select display type field”.Clock font color 5Set the font color of the clock display.1: Actually, the name of the selected item is displayed.2: Not displayed when you select “Clock theme” by “Select typefield”.3: You can change the displayed city name also by “World time”>P1874: Not displayed when you select “Do not show”/“Calendar +Clock” by “Select display type field”.5: Displayed only when you select “Calendar + clock” or “Digital4” of “Clock” by “Select display type field”.Information• If you press M[View], you can confirm the display set. Setting the Display for Incoming Calls C](Display) ]12You can set the image displayed when you receive anincoming call. Setting items/Setting at purchase >P2461. From the Display Menu (P75), “Main display” ]“Incoming call” •Select from the images saved on “My picture” of “Databox”.>P166Setting Display for Outgoing Calls C](Display) ]13You can set the image displayed when you make a call. Setting items/Setting at purchase >P2461. From the Display Menu ]“Main display” ]“Outgoing call” (P75)•Select from the images saved on “My picture” of “Databox”.>P166](https://usermanual.wiki/LG-Electronics-USA/L602I.Users-Manual-1/User-Guide-760911-Page-88.png)
 ]21You can set wallpapers and clock displays on the Stand-by display.Setting items/Setting at purchase >P246, P2471. From the Display Menu (P75), “Sub display” ]“Stand-by display” ]Select from the followingsetting items ]After setting, I[Done]Wallpaper–Select type field 1• Select file ... Select an image saved in “My picture”of “Data box” from “Select file/Clock theme field”.• Clock theme ... Select a clock theme from “Selectfile/Clock theme field”.–Select file/Clock theme field 1:Select an image(P166) or a clock theme saved in “My picture” of“Data box”.• The selectable items may differ depending on thesettings of "Select type field".Display items 2You can set the display format for the clock.1: Actually, the name of the selected item is displayed.2: Does not appear when a wallpaper is set as stand-by theme.Information• You can view the screen after setting by pressing M[View].Setting Display for Incoming CallsC](Display) ]22You can set the image to be displayed when you receive acall.Setting items/Setting at purchase >P2471. From Display Menu (P75), “Sub display” ]“Incoming call”•Select from the images saved on “My picture” of “Databox”.>P166](https://usermanual.wiki/LG-Electronics-USA/L602I.Users-Manual-1/User-Guide-760911-Page-89.png)
 ]23You can change the image to be displayed when youmake a call.Setting items/Setting at purchase >P2471. From Display Menu (P75), “Sub display” ]“Outgoing call”•Select from the images saved on “My picture” of “Databox”.>P166Setting Fonts of Dial CharactersC](Display) ]3You can set the sizes and colors of the dial fontsdisplayed when you make a call, etc.Setting items/Setting at purchase >P2471. From the Display Menu (P75), “Font” ]Select fromthe following setting items ]After setting,I[Done].Dial font sizeSelect a size of dial fonts.Dial font colorSelect a color of dial fonts.Setting Menu StyleC](Display) ]4You can set the style of the Menu Style that appears whenpressing C[Menu] on the Stand-by display.Setting items/Setting at purchase >P2471. From the Display Menu (P75), “Menu style” ]“Grid”/“List” ]I[Done]Setting BacklightC](Display) ]5You can set the lighting duration of the Main screen, Subdisplay or buttons.Setting items/Setting at purchase >P2471. From the Display Menu (P75), “Backlight” ]Selectfrom the following setting items ]After setting,I[Done].Main displaySet the lighting duration and brightness of the Mainscreen.Sub displaySet the lighting duration and brightness of the Subdisplay.KeypadSet the lighting duration of the buttons.](https://usermanual.wiki/LG-Electronics-USA/L602I.Users-Manual-1/User-Guide-760911-Page-90.png)
 ]6You can set the color scheme of the Main screen.Setting items/Setting at purchase >P2471. From the Display Menu (P75), “Color scheme” ]Select the color scheme you want to set ]I[Done].Information• If you press C[View], you can view the screen after setting.Setting LEDC](Display) ]7Set lighting for incoming voice calls, etc.Setting items/Setting at purchase >P247, P2481. From Display menu (P75), “Lighting LED” ]Selectnext item to be set ]I[Done]LightingSet whether to set lighting.Incoming voice callSet lighting pattern and color used for incoming voicecalls.Incoming video callSet lighting pattern and color used for incoming video-phone calls.Receiving mailSet lighting pattern and color used for incoming mail.Receiving message RSet lighting pattern and color used for incomingMessageR.Receiving message FSet lighting pattern and color used for incomingMessageF.Receiving SMSSet lighting pattern and color used for incoming SMS.Playing musicSet lighting pattern and color used when playingmusic.AlarmSet lighting pattern and color used for alarm.ScheduleSet lighting pattern and color used for scheduledalarm.During callSet lighting pattern and color used during talking overa call.](https://usermanual.wiki/LG-Electronics-USA/L602I.Users-Manual-1/User-Guide-760911-Page-91.png)
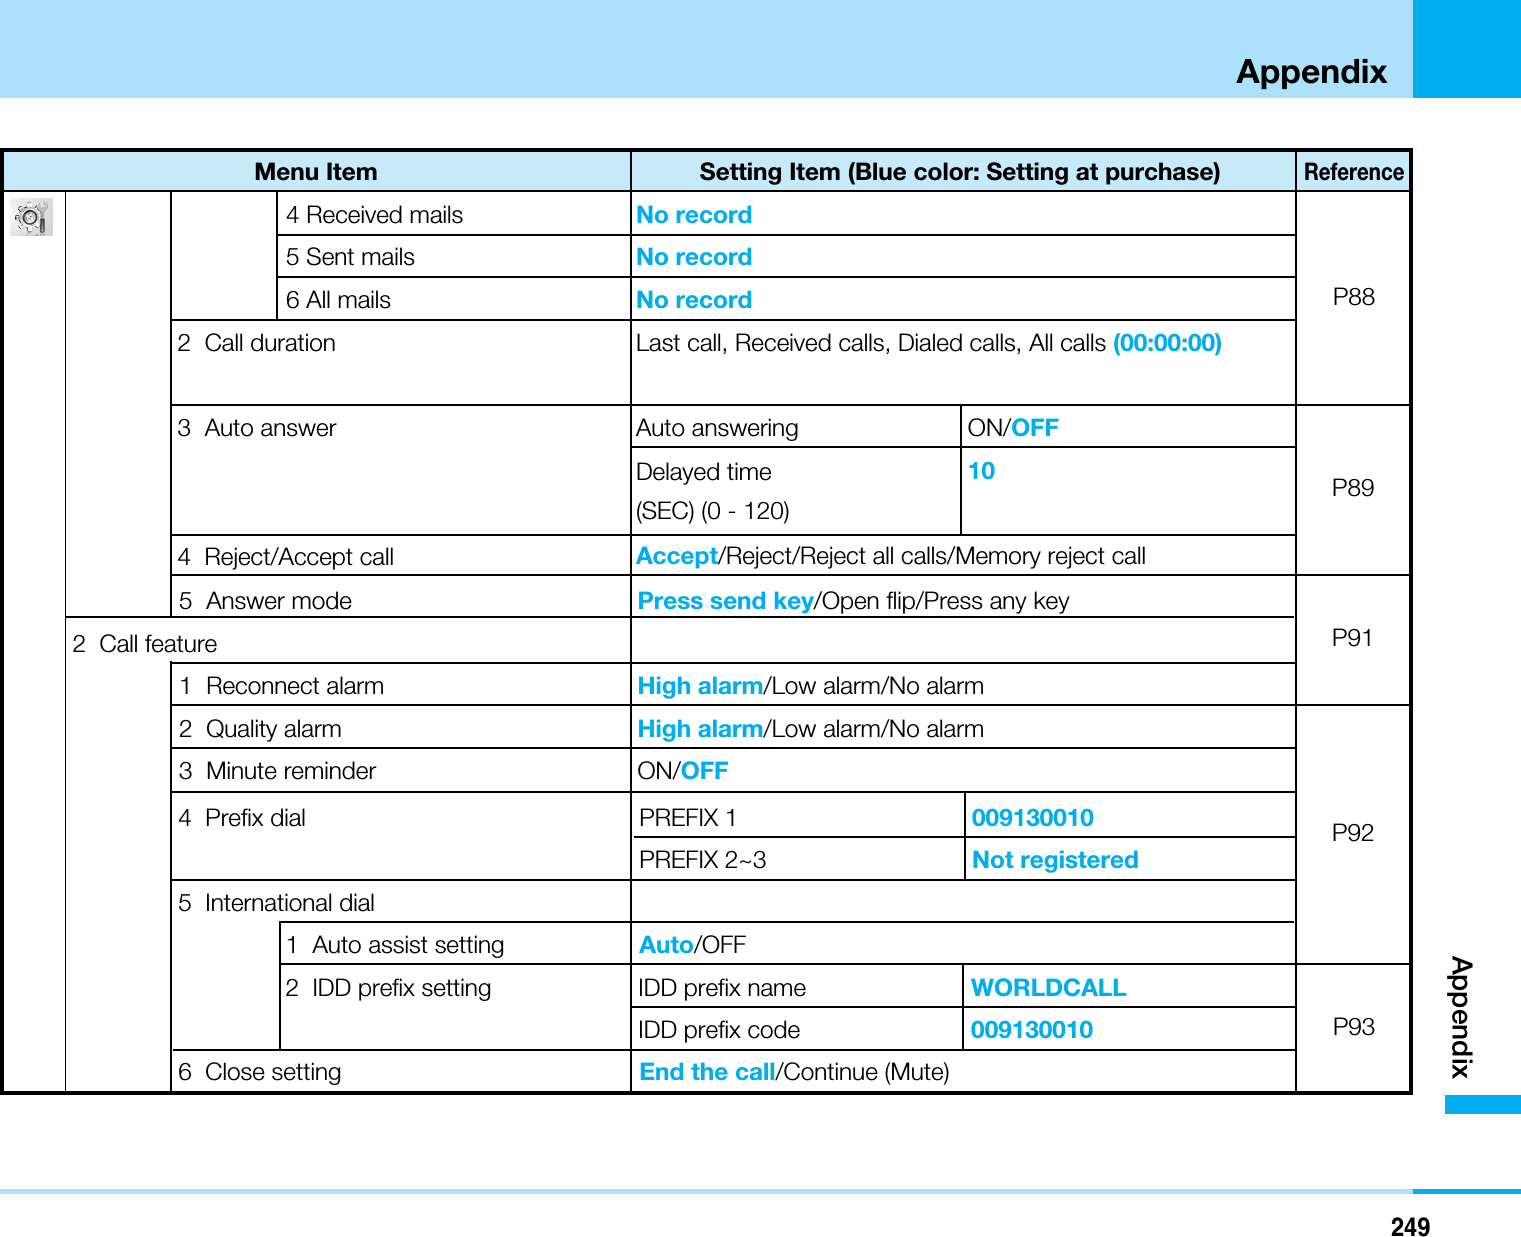
![85Call/Answer ............................................86Call Feature ............................................91Video-Phone...........................................93Date & Time ............................................95Network (for overseas use) ....................96Changing a Host from i-mode ...............98Security...................................................99.........................................101Others Settings.....................................101SettingsOn the Stand-by display, C[Menu] ](Settings) or “Settings” To display the Settings menu](https://usermanual.wiki/LG-Electronics-USA/L602I.Users-Manual-1/User-Guide-760911-Page-92.png)
 ]111You can view the record of received call.1. From the Settings menu (P85), “Call/Answer” ]“Call/Mail history” ] “Received calls”•A/T: You can make a call to the other party ofthe record being selected.•I[Delete]: You can delete the record being selected.2. Select a call record ]C<Detail>•A/T: You can make a call to the other party in alist.•I[Delete]: You can delete the list of call record. •J: You can view the call record.Using the Submenu of the Received Calls screen/ Details screen1. From the Received Calls screen (See left)/Detailscreen (See above), M[Menu] ] Select from thefollowing submenu itemsView 1You can view details of the call record selected.When you select “Missed call history”, “Ringing time” is displayed.This list will be displayed when thephone number in a list are registeredin phonebook list. You can view thelist by pressing J.SettingsIcon DescriptionReceived voice callsReceived video-phone callsRejected callsMissed calls (Voice calls)Missed calls (Video-phone calls)<Received Calls>](https://usermanual.wiki/LG-Electronics-USA/L602I.Users-Manual-1/User-Guide-760911-Page-93.png)
 ]112You can view dialed call records.1. From the Settings menu (P85), “Call/Answer” ]“Call/Mail history” ] “Dialed calls”• The Dialed Call Records appears.2. Select a history ]C• The Detail screen appears.Information• See “Using the Submenu of Received Calls Screen”/“Usingthe Submenu of the Detailed Screen” (P86) for the displayoperation method and the submenus available from the Dialedcall records/Detail screen.• “Dialed calls” appears as the Redial screen when you pressRon the stand-by screen.Displaying All Call RecordsC](Settings) ]113Received and dialed call records are displayed together.1. From the Settings menu (P85), “Call/Answer” ]“Call/Mail history” ] “All calls”• The All calls screen appears.Mark DescriptionDialed voice callsDialed video-phone calls](https://usermanual.wiki/LG-Electronics-USA/L602I.Users-Manual-1/User-Guide-760911-Page-94.png)
![88SettingsSettings2. Select a history ]C• The Detail screen appears.Information• See “Using the Submenu of Received Call RecordsScreen” / “Using the Submenu of the Detailed Screen”(P86) for the display operation method and the submenusavailable from the All Calls screen / Detail screen.Displaying received mail historyC](Settings) ]114Display history of received mail.1. From Settings menu (P85), select “Call/Answer” ]“Call/Mail history” ] “Recv. mails”• A history of the received mail appears.2. Select a history ]C• Detail screen appears.Information• See “Using the Submenu of Received mail history Screen”/ “Using the Submenu of the Detailed Screen” (P86) for thedisplay operation method and the submenus availablefrom the All Calls screen / Detail screen.Displaying sent mail historyC](Settings) ]115Display history of sent mail.1. From Settings menu (P85), select “Call/Answer” ]“Call/Mail history” ] “Sent mails”• A history of sent mail appears.2. Select a history ]C• Detail screen appears.Information• See “Using the Submenu of Received Call RecordsScreen” / “Using the Submenu of the Detailed Screen”(P86) for the display operation method and the submenusavailable from the All Calls screen / Detail screen.Displaying all mail historyC](Settings) ]116Display history of all sent/received mail collectively.1. From Settings menu (P85), select “Call/Answer” ]“Call/Mail history” ] “All mails”• A history of all mail appears.2. Select a history ]C• Detail screen appears.Information• See “Using the Submenu of Received mail history Screen”/ “Using the Submenu of the Detailed Screen” (P86) for thedisplay operation method and the submenus availablefrom the All Calls screen / Detail screen.](https://usermanual.wiki/LG-Electronics-USA/L602I.Users-Manual-1/User-Guide-760911-Page-95.png)
 ]12You can confirm call duration for each call type. You canconfirm the following items:• The displayed call duration is a standard. The real of callduration may differ.1. From the Settings menu (P85), “Call/Answer” ]“Call duration”• Call duration display appears.Last callYou can confirm the last call duration.Received callsYou can confirm the received call duration.Dialed callsYou can confirm the dialed call duration.All callsYou can confirm the total call duration.Information• If the display of call time exceeds “9999999:59:59”, thesetting will be reset to “000000:00:00”.Resetting call duration1. Select a call duration you want to clear on the Callduration screen ]I[Reset] ]Enter yourterminal security code ]C]“Yes”• To clear all the call durations ]M[Menu] ] “Resetall”Setting Earphone/Microphone Auto AnswerC](Settings) ]13You can set how to answer an incoming call with the Flat-plug Earphone/Microphone Set with Switch (option)connected.Setting item/Setting at purchase >P2491. From the Settings menu (P85), “Call/Answer” ]“Auto answer” ] Select from the following settingitems ]After setting, I[Done]Auto answeringYou can set the earphone/microphone auto answer toON/OFF.Delayed time (SEC) (0-120)You can set the time between receiving call andanswering a call automatically.Information• During a phone number display, you can make a call bypressing the switch.• While receiving a call, you can connect it by pressing the switch.• During talking over a call, you can end the call by pressing theswitch for 1 or more seconds.• If you press the switch for 1 or more seconds while receiving acall, the call will be rejected.](https://usermanual.wiki/LG-Electronics-USA/L602I.Users-Manual-1/User-Guide-760911-Page-96.png)
 ]14You can set whether to reject incoming calls.Setting item/Setting at purchase >P2491. From the Settings menu (P85), “Call/Answer” ]“Reject/Accept call” ] Enter your terminalsecurity code ]C• The Reject/Accept call display appears.2. Select from the following setting itemsAcceptYou can set whether to accept all incoming calls.Reject on listYou can reject the incoming call from the specificparties. You can set the rejecting action and theparty's phone number to reject a call by pressing I[List] (See below).Reject all calls–Silent : You can disable the ringing tone for allincoming calls. –Disconnect call : You can reject all incoming calls. Memory reject call You can reject calls from parties not registered inphonebook and those with no caller IDs.Information• Even when rejecting a call by “Reject on list”, “Reject all calls”,or “Memory reject call”, the record will be remained.Setting Reject call List1. From the Reject/Accept call display (See left),Select “Reject on list” ] I[List]• The Reject on list will be displayed.•M[Menu]: You can edit/delete the list set. 2. I[Add] ]Select from the following setting items]After setting, I[Done]Reject types –Silent : Disables the ring tone when receiving thecall from the other party set to “Reject number”. –Disconnect call : Rejects incoming calls whenreceiving the call from the other party set to “Rejectnumber”.Reject number Enter the phone number of a caller you want to reject.You can select a phone number from the phonebookby pressing C[Search] .: If you use M[Menu] >Edit from “Reject on list”, you cannot usethis function.Mark DescriptionThe type of reject call is set to “Silent”.The type of reject call is set to “Disconnect call”.](https://usermanual.wiki/LG-Electronics-USA/L602I.Users-Manual-1/User-Guide-760911-Page-97.png)
 ]15You can set whether to answer a voice call by pressing abutton other thanASetting item/Setting at purchase >P2491. From the Settings menu (P85), “Call/Answer” ]”Answer mode” ]Select from the followingsetting itemsPress send keyYou can answer a call by pressing Aonly.Open flipYou can answer a call by opening the FOMA phone. Ifthe FOMA phone is already open, you can answer acall by pressing A.Press any keyYou can answer a call by pressing any key except forM,I,FE,G.Information• This setting is not available for video phone call.Call FeatureSetting the Reconnect ControlC](Settings) ]21You can set whether to make an alarm sound to informyou when you are reconnected immediately afterdisconnected owing to bad radio wave conditions.Setting item/Setting at purchase >P2491. From the Settings menu (P85), “Call feature” ]”Reconnect alarm” ]Select from the followingsetting itemsHigh alarmSet high alarm sounds.Low alarmSet Low alarm sounds.No alarmNo sound.Information• The time to reconnect the network may differ depending onthe status of phone or radio (the maximum 10 seconds).• The duration to reconnect the network can be chargeable.• Depending on the status of phone or radio, the alarm may notsound, and the call may be disconnected.](https://usermanual.wiki/LG-Electronics-USA/L602I.Users-Manual-1/User-Guide-760911-Page-98.png)
 ]22You can set whether to make an alarm sound to informyou when a call is liable to be disconnected midwaybecause of bad radio wave conditions.Setting item/Setting at purchase >P2501. From the Settings menu (P85), “Call feature” ]“Quality alarm” ]Select from the followingsetting itemsHigh alarmSet high alarm sounds.Low alarmSet low alarm sounds.No alarmNo sounds.Setting Minute ReminderC](Settings) ]23You can check the call duration by beep sound everyminute during a voice call (Not support this function forVideo-phone call).Setting item/Setting at purchase >P2491. From the Settings menu (P85), “Call feature” ]“Minute reminder” ]“ON”/“OFF”Information• This setting is not available with a video-phone call.Setting Prefix DialC](Settings) ]24You can store prefix numbers such as international accesscode or “184 / 186” and add it to the beginning of thephone number to dial.Setting item/Setting at purchase >P2491. From the Settings menu (P85), “Call feature” ]“Prefix dial”• The Prefix Dial screen appears.2. Select a PREFIX field to enter ]Enter a number ]I[Done]Setting International DialSetting Auto assistC](Settings) ]251You can set whether to automatically replace “+´” at thebeginning of a phone number with an international accesscode such as “009130010” for making an international call.Setting item/Setting at purchase >P2491. From the Settings menu (P85), “Call feature” ]“International dial” ]“Auto assist setting” ]“Auto”/“OFF”](https://usermanual.wiki/LG-Electronics-USA/L602I.Users-Manual-1/User-Guide-760911-Page-99.png)
 ]252You can set the international access code to be added tothe beginning of a phone number for making aninternational call.Setting item/Setting at purchase >P2491. From the Settings menu (P85), “Call feature” ]“International dial” ]“IDD prefix setting” ]Selectfrom the following setting items ]After setting,I[Done]IDD prefix nameEnter the name of an international call service.IDD prefix codeEnter an international access code.Setting Close settingC](Settings) ]26You can set how the FOMA phone works when it isfolded.Setting item/Setting at purchase >P2491. From the Settings menu (P85), “Call feature” ]“Close setting” ]Select from the following settingitemsEnd the callThe call is disconnected.Continue(Mute)Put the call on mute without emitting Continue (Mute)holding sound. In this case, your voice is not heard tothe other party.Information• During video-phone call, if you close the flip, the call will bedisconnected regardless of this setting.Video-PhoneYou can change settings for the video-phone operationand display.Changing the Video-Phone SettingsC](Settings) ]31You can set how the FOMA phone works and screenswhen making a video-phone call.Setting item/Setting at purchase >P2501. From the Settings menu (P85), “Video-phone” ]“Video-phone settings” ]Select from thefollowing setting items ]After setting, I[Done]VoiceCall AutoSwitchSets whether to redial by automatically switching to avoice call if the other party is unable to answer avideo-phone call.](https://usermanual.wiki/LG-Electronics-USA/L602I.Users-Manual-1/User-Guide-760911-Page-100.png)
 ]321You can set a substitutive image to send in place of yourown image during a video-phone call.Setting item/Setting at purchase >P2501. From the Settings menu (P85), “Video-phone” ]“Image settings” ]“Substitutive image” ]Selectfrom the following setting items ]After setting,I[Done]Image–Default Image : The image by default.–Selected image : You can select an image otherthan the default image from the “Image list”.Image listYou can select an image for when “Image” is set to“Selected image”. Select from images stored in “Mypicture” of “Data box”. >P166](https://usermanual.wiki/LG-Electronics-USA/L602I.Users-Manual-1/User-Guide-760911-Page-101.png)
 ]322You can set an image to display when you put the call onhold during ringing of a video-phone call.Setting item/Setting at purchase >P2501. From the Settings menu (P85), “Video-phone” ]”Image settings” ]”Response hold image”• See “Changing Substitutive image” (P94) for thesubsequent operations.Changing On-hold ImagesC](Settings) ]323You can set an image to display when you put the call onhold.Setting item/Setting at purchase >P2501. From the Settings menu (P85), “Video phone” ]“Image settings” ]“On-hold image”• See “Changing Substitutive image” (P94) for thesubsequent operations.Date & TimeSetting TimeC](Settings) ]41You can set the time of city which is already set “Home”(the city at purchase: Tokyo) by “World time” (P187).Setting item/Setting at purchase >P2501. From the Settings menu (P85), Select “Date &Time” ]“Set time” ]Select from the followingsetting items ]After setting, I[Done]Set timePress Jto select an input item (hour, minute,second, am/pm ). Use the numeric keys to enternumbers. Press Cto switch between am/pm .Time formatYou can set whether to display time in the 12-hourformat or in the 24-hour format.Hour indicationYou can set whether the alarm will sound or not aftersetting (00 min). You can select the ring tone as analarm. If you do not want this indication, set to “OFF”.: Displayed if “Time format” is set to “12-hour”.Setting DateC](Settings) ]42You can set the date.Setting item/Setting at purchase >P250](https://usermanual.wiki/LG-Electronics-USA/L602I.Users-Manual-1/User-Guide-760911-Page-102.png)
![96SettingsSettings1. From the Settings menu (P85) ]Select “Date &Time” ]“Set date” ]Select from the followingsetting items ]After setting, I[Done]Set datePress Jto select an input item (year, month, date).Use the numeric keys to enter numbers.Date formatYou can change display formats of the date.(DD/MM/YYYY, MM/DD/YYYY, YYYY/MM/DD): YYYY stands for Year, MM stands for Month, and DD stands forDay.Setting Daylight SavingC](Settings) ]43You can set daylight saving time.Setting item/Setting at purchase >P2511. From the Settings menu (P85), “Date & Time” ]“Daylight saving” ]“ON”/“OFF”Network (for overseas use)Selecting the Network Connection ModeMaking settings for Network searchC](Settings) ]51You can select a network setting method in casedestination networks (Communication carriers) change foroverseas use, etc.Setting item/Setting at purchase >P2511. From the Settings menu (P85), “Network” ]“Network selection” ]Select from the followingsetting itemsAutoAutomatically searches for the network for setting.ManualThe network search display appears, allowing you toselect a network from the list displayed after search.Information• It may take a few minutes to find the network.• If you set “Auto”, you can search the network automatically inthe following situation.– When you switch on – Out of the service area• If you stop searching the network by “Manual”, the setting willbe changed to “Auto”.](https://usermanual.wiki/LG-Electronics-USA/L602I.Users-Manual-1/User-Guide-760911-Page-103.png)
 ]52You can set a type of network to search for when networksare searched according to “Network selection”.Setting item/Setting at purchase >P2511. From the Settings menu (P85), “Network” ]“Network mode” ]Select from the followingsetting itemsAutoSearches all the networks connectable.WCDMA onlySearches only networks supporting 3G.GSM onlySearches only networks supporting GSM/GPRS.Information• You cannot exchange the data through packet service underGSM network.• When using the FOMA handset in Japan or in the service areaof 3G network, we recommend you change the setting of the“Network mode” to “WCDMA only” to save battery power.Registering a Network of Preferred listC](Settings) ]53Setting NetworksWhen you search the network automatically, you can adda preferable network (communication carrier) to connectto.Setting item/Setting at purchase >P2511. From the Settings menu (P85), “Network” ]“Preferred lists”• Networks registered in UIM are listed downward fromthe one with the highest priority.•I[Delete]: You can delete the network selected.2. M[Menu] ]Select from the following settingitemsAdd new- Search networkYou can select from the network list stored in theFOMA phone for adding.- Enter new networkYou can enter the country code (MCC) and thenetwork code (MNC) for adding. After setting, pressI[Done].DeleteYou can delete the selected network.](https://usermanual.wiki/LG-Electronics-USA/L602I.Users-Manual-1/User-Guide-760911-Page-104.png)
![98SettingsSettingsMove upYou can move the selected network upward. Thenetwork moved upward is more preferred.Move downYou can move the selected network downward. Thenetwork moved downward is less preferred.: If you register multiple networks, you can use this menu. Information• If the network is not registered, [Menu], [Delete] of soft keyarea on preferred list to register will not be displayed. To addnew network, press I[Add], select and register.• The registered data is saved in UIM.Displaying the Network NameC](Settings) ]54You can set whether to display the name of the networkcurrently set on the Stand-by display.Setting item/Setting at purchase >P2511. From the Settings menu (P85), “Network” ]“Network name display” ]“Display on”/“Displayoff”Changing a Host from i-modeSetting / Changing the HostC](Settings) ]6Normally, you do not need to change the setting.You can set a host to use services of various providersother than i-mode. If the host is changed, i-modebecomes unavailable.Setting item/Setting at purchase >P2511. From the Settings menu (P85), “Host selection” ]From the Host selection screen, I[Add] ]Enteryour terminal security code ]C]Set thefollowing items ]After setting, I[Done]• The host set is displayed on the Host selectionscreen with attached to it.Host nameEnter the name displayed on the Host selectionscreen.Host addressEnter the address of the host.Access pointEnter the Access point (URL, etc.).](https://usermanual.wiki/LG-Electronics-USA/L602I.Users-Manual-1/User-Guide-760911-Page-105.png)
![99SettingsSettingsNext PageInformation• To switch the host back to “i-Mode” or to switch to anotherhost, select “i-Mode”/other hosts and press Con the Hostselection screen.• If you press M[Menu] on the Host selection screen, you canedit / delete / display the host set. Note that you cannot edit /delete pre-installed “i-Mode”.• In Access point menu, you should enter IP address in PDPtype.SecuritySetting All LockC](Settings) ]71You can set whether to lock requiring to enter the terminalsecurity code to operate function. During All Lock, “Alllock” is displayed on the Stand-by display.Setting item/Setting at purchase >P2511. From the Settings menu (P85), “Security” ]“Alllock” ]Select from the following setting itemsPower onYou can set whether to lock the FOMA phone whenyou turn of the power. You need to enter your terminalsecurity code to set it.ImmediateSets All lock immediately. You need to enter yourterminal security code to set it.noneYou can release All lock. You need to enter yourterminal security code to release it.Information• While “All lock” is set, even though you receive an SMS, it isonly saved, and it is received after you release “All lock”.• While “All lock” is set, you cannot perform packet transmissionconnecting a personal computer.• While “All lock” is set, answering operation is not performedeven though you receive a call, and only busy tone is played. Itis displayed as a missed call after you release “All lock”.• While “All lock” is set, you can receive mails and messageR/F.However, the screen of receiving messageR/F or receivingresult of the message will not appear, and only the iconappears.• While “All lock” is set, the alarm tone does not sound, andonly the icon appears. The alarm tone sounds after yourelease “All lock”.Releasing All Lock1. Press one of 1~0]Enter your terminalsecurity code ]C• Pressing I[Emergency Call] key on the “lock” screen:Emergency calls (110/118/119) can be made.](https://usermanual.wiki/LG-Electronics-USA/L602I.Users-Manual-1/User-Guide-760911-Page-106.png)
 ]72You can set to enter PIN1 code every time you turn on thepower to the FOMA phone.Setting item/Setting at purchase >P2511. From the Settings menu (P85), “Security” ]“PINcode request” ]“ON”/“OFF” ]Enter PIN1 code ]CChanging Your PasswordChanging the PIN1 code / PIN2 codeC](Settings) ]731 /C](Settings) ]732You can change the PIN1 code / PIN2 code. To changethe PIN1 code, you need to set “PIN code request” to“ON” beforehand. The code is set to “0000” at purchase,but you can change to any number as desired.• In case you purchase a new FOMA phone and startusing it inserting the UIM you have been using, use thePIN1 code / PIN2 code you have set. 1. From the Settings menu (P85), “Security” ]“Change password” ]“PIN1 code”/“PIN2 code”<Change PIN1 code>2. Enter the current PIN1 code/PIN2 code ]C3. Enter a new PIN1 code/PIN2 code ]C4. Enter the same code that you did in Step 3 again ]CInformation• If you enter a wrong PIN code over 3 times, the PIN code willbe locked automatically. If you unlock the PIN code, see“Releasing PIN lock code” (P105).Current PIN1 code. R:3New PIN1 codeVerify PIN1 codeChange PIN1 codeThe remaining time to enterPIN is available](https://usermanual.wiki/LG-Electronics-USA/L602I.Users-Manual-1/User-Guide-760911-Page-107.png)
 ]733You can change your terminal security code.Setting item/Setting at purchase >P2511. From the Settings menu (P85), “Security” ]“Change password” ]“Security code”• For the subsequent steps, just like the steps to changethe PIN1 code / PIN2 code, enter your current terminalsecurity code, enter a new terminal security code andthen enter the same code again for confirmation.C](Settings) ]8You can switch the languages of the FOMA phonebetween Japanese and English.Setting item/Setting at purchase >P2511. From the Settings menu (P85), “ ”]“”/“English”Information• This setting is registered in FOMA phone and UIM which iscurrently inserted. If you insert other UIM which registeredother settings, the settings of this UIM will be preferred. Others SettingsChecking the Memory StatusC](Settings) ]91You can check the usage status and available space of thememories of the handset of the FOMA phone.1. From the Settings menu (P85), “Others” ]“Memorystatus” ]Select from the following itemsData boxYou can check the empty or the reserved capacity(Approximate) of the Data box for data such as Mypicture, i-motion or Melody are stored.Personal info.You can check the empty or the reserved capacity(Approximate) of the memory for Personal info. for datasuch as Phonebook, Schedule, Memo or Date Counter.UIM memoryYou can check the empty or the reseved capacity(Approximate) of the memory for data such as“Phonebook” or “SMS”.Resetting the SettingsClearing the MemoryC](Settings) ]921You can clear all the data recorded in the FOMA phone.](https://usermanual.wiki/LG-Electronics-USA/L602I.Users-Manual-1/User-Guide-760911-Page-108.png)
![102SettingsSettings1. From the Settings menu (P85), “Others” ]“Resetsettings” ]“Clear memory” ]Select from thefollowing items• You need to enter your terminal security code fordeleting.Data boxClears all the data saved in the Data box folder of theFOMA phone.Personal info.Clears all the personal data saved in the FOMA phonesuch as phonebooks, schedule, call history and so on.Initializing the Default SettingsC](Settings) ]922You can reset to all settings at purchase except for “i-mode setting” and “Mail setting”.1. From the Settings menu (P85), “Others” ]“Resetsettings” ]Default settings ]“Yes” ]Enter theterminal security code ]Press CInformation• When the date and time are reset, display or play of i-motionand files with valid period and/or expiration date set may bedisabled.Changing the Settings for the SMS CenterC](Settings) ]93Normally, you do not need to change the settings.You can change the SMS centers to use.Setting item/Setting at purchase >P2521. From the Settings menu (P85), “Others” ]“SMScenter” ]“Select from the following setting items]After setting, I[Done]SMSC–DoCoMo : You can use the DoCoMo SMS center.–Others : You can use another company’s SMScenter.AddressIf “SMSC” is set to “Others”, enter the address of theSMS center.Resetting the holidayC](Settings) ]94You can reset all settings of holiday of FOMA phone tosettings at purchase.1. From the Settings menu (P85), “Others” ]“Resetholiday” ]“Yes”](https://usermanual.wiki/LG-Electronics-USA/L602I.Users-Manual-1/User-Guide-760911-Page-109.png)
![106Safety settingsSetting not to display mail withoutpermissionYou can set the security function for the Inbox, Outbox,and Unsent of the Mail menu. For setting this function, see“Display” of “Mail setting” (P156).Other Safety SettingsThe FOMA phone has the following safety settings inaddition to the “Security” function:Safety settingsPurpose Function/ServiceTo change the mailaddressReceive/reject only mailbetween i-modeterminalsReceive/reject mailfrom specified domainsReceive/reject mailfrom specifiedaddressesTo reject 200th andsucceeding i-modemessages sent from asingle i-mode phone onthe same day To reject unsolicited AdmailTo reject SMSreceptionTo store/check safetyinformation when adisaster occurs To stop the mailfunction temporarily To check the settingsfor the mail function Change mail addressMeasures for nuisancemail (reception/rejectionsetting) Receive fromspecified domainSelected Mail Senders Reject unsolicited Admail/Reject mailSet/Confirm SMSRejection Settings i-mode DisasterMessage Board Service Suspend Mail Stop the mail functionConfirm SettingsReferenceRefer to“MobilePhoneUser'sGuide[i-mode]”Purpose Function/ServiceTo reject calls fromspecified callersTo receive calls from callersregistered in the phonebookNot to take nuisancecallsNot to take calls fromcallers not notifying caller IDTo receive necessarymail only Reject/Accept callMemory reject callNuisance call barringCaller ID requestReceive optionReferenceP90P90P202P203P154](https://usermanual.wiki/LG-Electronics-USA/L602I.Users-Manual-1/User-Guide-760911-Page-113.png)
![107Notes for using the camera .......................108Using the Camera ......................................109Shooting Still Images .................................109Shooting Moving Images...........................115Setting Camera...........................................118Multimedia (Camera) 1 Camera-mode2 Movie-mode3 Camera settingsSelectMultimediaOn the Stand-by display, C[Menu] ](Multimedia) or “Multimedia” To display the Multimedia menu SelectMultimedia](https://usermanual.wiki/LG-Electronics-USA/L602I.Users-Manual-1/User-Guide-760911-Page-114.png)
 ]1Still images can be shot. The still images you take aresaved to “Camera” folder or its sub folders of “My picture”in “Data box” of the FOMA phone. A saving folder can beset from “Auto Saving” (P118).Please respect the privacy of individuals around you whentaking and sending photos using camera-equippedmobile phones.](https://usermanual.wiki/LG-Electronics-USA/L602I.Users-Manual-1/User-Guide-760911-Page-116.png)
![110Multimedia (Camera)Multimedia (Camera)1. In Stand-by mode, press G<Still Image Finder Stand-by>•H/FE: You can set the magnification of the image.•J: You can change the brightness of the image.•I[Album]: You can view the “Camera” folder of “Mypicture”.•T: Flip the image vertically.2. After confirming the subject, C<Still Image Shooting End>•I[Mail]: You can compose the message withattaching the image. Go to step 2 on page 149 of“Composing i-mode mail”.•C[OK]: Return to the Still Image Finder Stand-byscreen.•M[Menu]: You can perform the operations such asdeleting the picture in submenu. >P113•Q: Return to Still Image Finder Stand-by screenwithout saving the shot image.aWhen ”Auto Saving” is set to OFFPress C[Save] immediately after shooting an imageand go to the next step. When not saving the shotimage, press I[Cancel]. For “Auto Saving” >P118<Still image saving screen>•I[Save]: After deciding the folder to save the image,the finishing screen of shooting still image is displayed.•C[Open]: Opens a selected folder.•M[Menu]: A submenu opens. >P114FilesFileFilesFileCameraData transferItemPre-installedMy pictureMenu SwitchOpenMenu MailOKSavedSavedMenu AlbumRec.](https://usermanual.wiki/LG-Electronics-USA/L602I.Users-Manual-1/User-Guide-760911-Page-117.png)
![111Multimedia (Camera)Multimedia (Camera)Next pageAfter taking a multishotAfter setting a multishot (P112) and taking multiple images,you can view the display as below.<Screen multishot shooting End>•C[View]: You can view the selected file using zooming.•I[Mail]: You can compose i-mode mail with attaching theselected file. Go to step 2 on page 149 of “Composing i-mode Mail”.•Q: Returns to Still Image Finder Stand-by screen totake a picture.Icons on the Still Image Finder Stand-by Screen• Indicates the status of the still image shot setting.1: The remaining number of shots varies depending on thesettings of shooting.2 : The selected value is displayed.If “Size” is set to “128X96” and “Quality” is set to “Normal”,the savable number of still images is approx. 8000.Camera [1/3]MailMenu View The file size of selected oneDescriptionIconCamera mode (Still image shot mode)169 2Remaining number of shotsAuto timerSizeZoomBrightnessMultishotNo restriction100KBFile sizerestriction19KBSuper fineFineStorageimagequalitysetup Normal](https://usermanual.wiki/LG-Electronics-USA/L602I.Users-Manual-1/User-Guide-760911-Page-118.png)
![112Multimedia (Camera)Multimedia (Camera)Using the Submenus of the Still Image Finder Stand-by ScreenYou can set up functions to shoot still images.Setting item/Setting at purchase >P2541. From the Still Image Finder Stand-by screen (P110),M[Menu] ]Select from the following submenuitems using J]Select a setting item ]C]I[Close]RotateSet to rotate the view. You can rotate the view also by pressing Ton StillImage Finder Stand-by screen.SizeYou can set the photo size.QualityYou can set the image quality to store shots of stillimages.MultishotYou can set the number of continuous shots of stillimages to be taken by pushing the shutter.ZoomYou can set the magnification of the image.BrightnessYou can set brightness (exposure) of the image.White balanceYou can revise the color tone for the image. Thissetting is for a shot image with an unnatural colortone.Night modeThis setting is for when taking a shot in a dark place,etc.Frame shotThis setting is for when taking a shot with a frameattached to the subject. Select “Choose Frame” andselect a frame using J>Press C.Auto timerYou can set Auto timer. Select the number of secondsbetween pressing the shutter and taking a shot.EffectThis setting is for when taking a shot with specialeffect applied to the image.Size restrictionYou can restrict the size of still images to store.Information• If taking a shot with the “size” set to “1280x1024”, you cannotuse the zoom.• If “Multishot” is set, still images are automatically saved even if“Auto Saving” is set to OFF.• If “Multishot” is set, the “Size” automatically changes to“320x240”. After setting Multishot, you cannot change the size.](https://usermanual.wiki/LG-Electronics-USA/L602I.Users-Manual-1/User-Guide-760911-Page-119.png)
![113Multimedia (Camera)Multimedia (Camera)• If the “Frame shot” is set, the “size” automatically changes to“176x220”. After setting the Frame shot, you cannot changethe “size”.• You cannot set “Multishot” and “Frame shot” at the sametime.• If you are unable to store images in the size set in “File sizerestriction”, automatically lower the resolution to store images.• If you set “File size restriction” to “9KB”,- You cannot set “Quality”.- You can set “Size” only to “128 x 96” or “176 x 144”.• If you set “File size restriction” to “100KB”,- You cannot set “Quality”.- You cannot set “Size” to “1280 x 1024”.• For the frame image stored by default, see “Frame” (P250) in“Data stored by default”.Using the submenus of the Still ImageShooting End ScreenSetting item/Setting at purchase >P2551. From the Still Image Shooting End screen (P110) /Multishot Shooting End Screen (P111), M[Menu]]Select from the following submenu itemsNew pictureReturns to Still Image Shooting screen.Mark/UnmarkYou can delete the file shot by multishot. After selecting afile, press M[Menu] >“Delete”.–Mark : You can mark a file at a time.–Mark all : You can mark all the files collectively.–Unmark : You can unmark the file marked by“Mark” or one of the files marked by “Mark all” at atime.–Unmark all : You can unmark the file marked by“Mark” or all the files marked by “Mark all”.Send via mailYou can attach shots of still images to i-mode mail forsending. Go to step 2 (P149) of “Composing i-modemail message”.Delete (Selected shot )You can delete a shot of a still image.Set as wallpaperSet as wallpaper for “Main display” or “Sub display”.](https://usermanual.wiki/LG-Electronics-USA/L602I.Users-Manual-1/User-Guide-760911-Page-120.png)
![114Multimedia (Camera)Multimedia (Camera)Slide show–Go : You can display still images shot in Multishot inorder.–Settings : You can set up “View as” and “Timeinterval (secs)” for slide show. After setting, pressI[Done].Make animated GIFYou can select multiple files to create animation. Afterselecting files, press I[Make].Sort byYou can sort files.View byYou can change file display methods.File propertyYou can display the name, size and type of the filebeing selected.: Displayed only after taking images in Multishot.Using submenu on still image saving screenSetting items/Setting at purchase >P2581. Press M[Menu] on still image saving screen(P110) ]Select the next submenu itemOpenOpen a selected folder.Save to current folderAfter deciding the current folder as the folder to save theimage, the finishing screen of shooting still image isdisplayed.New folderCreate a folder.DeleteDelete a selected folder.Sort bySort folders.View byChange the folder display method.Memory info.Display states, etc. of storage area in phone memory,etc.Folder propertyDisplay the name, size, number of included files andother information of a selected folder.: Unavailable for folders set at purchase.](https://usermanual.wiki/LG-Electronics-USA/L602I.Users-Manual-1/User-Guide-760911-Page-121.png)
 ]2Moving images can be shot. Shot moving images aresaved to “Camera” folder or its sub folders of “i-motion” in“Data box” of the FOMA phone. A saving folder can be setfrom “Auto Saving”. (P110)1. From the Multimedia menu (P107), “Movie-mode”< Moving Image Finder Stand-by>•H/FE: You can change the magnification of theimages.•J: You can change the brightness of the images.•I[Album]: You can view the folder of “Camera” in “i-motion”.•T: Flip the image vertically.You cannot flip the image vertically while shootingmoving image.2. After confirming the subject, C<Moving Image Shooting>•H/FE: You can change the magnification of animage.•Q: If you press this key on recording, the movingimage is not saved, and return to Stand-by mode totake a picture.•C[Stop]: Press this key to end the camera andreturn to the screen of step 3.3. The shooting is ended.<Moving Image Shooting End>OKMenu MailSavedSavedIlluminates in red during shot.Shot elapsed time/maximum shot timeShot elapsed time is displayed with a bar.StopRec.Menu Album](https://usermanual.wiki/LG-Electronics-USA/L602I.Users-Manual-1/User-Guide-760911-Page-122.png)
![116Multimedia (Camera)Multimedia (Camera)•I[Mail]: You can compose i-mode mail withattaching the selected file. Go to step 2 on page 149of “Composing i-mode mail”.•C[OK]: Return to the Moving Image Finder Stand-byscreen.•M[Menu]: You can delete the picture in submenu. >P117•Q: Return to Still Image Finder Stand-by screenwithout saving the shot image.aWhen “Auto Saving” is set to OFFPress C[Save] immediately after shooting an imageand go to the next step. When not saving the shotimage, press I[Cancel]. For “Auto Saving” >P118<Still image saving screen>•I[Save]: After deciding the folder to save the image,the finishing screen of shooting moving image isdisplayed.•C[Open]: Opens a selected folder.•M[Menu]: A submenu opens. >P117Icons on the Moving Image Finder Stand-by Screen• Indicates the status of the moving image shot setting.• See “Icons on the Still Image Finder Stand-by Screen”(P111) for other icons.: The recording time of a moving image can be set up to 30minutes.If “Quality” is set to “Super fine” and “Type” is set to“Sound+Video", the preservation time of the recorded movie isapprox. 80 minutes.The preservation time varies depending on the set shootingcondition.Using the Submenu of the Moving ImageFinder Stand-by ScreenYou can set up functions to shoot moving images.Setting item/Setting at purchase >P2551. From the Moving Image Finder Stand-by screen(P115), M[Menu] ]Select from the followingsubmenu items using J]Select a setting item ]C]I[Close]FilesFileFilesFileCameraData transferItemPre-installedMy pictureMenu SaveOpenDescriptionIconRecording time (for Mail)Sound+VideoVideo onlySound onlyMovie typeMovie mode (Taking a moving image)](https://usermanual.wiki/LG-Electronics-USA/L602I.Users-Manual-1/User-Guide-760911-Page-123.png)
![117Multimedia (Camera)Multimedia (Camera)RotateSet to shoot a rotated image.You can rotate the view also by pressing Ton StillImage Finder Stand-by screen.QualityYou can set the image quality to store shots of movingimages.ZoomYou can set up the magnification of the images.BrightnessYou can set up brightness (exposure) of the images.White balanceYou can revise the color tone for the images. This settingis for shot images with an unnatural color tone.Night modeThis setting is for when shooting a shot in a darkplace, etc.EffectThis setting is for when shooting a shot with specialeffect applied to the image.Recording timeYou can set the recording time for moving images.TypeYou can set whether or not images / sound arerecorded when shooting moving images.Information• If “Recording time” is set to “Mail attach”, the recording timevaries depending on the “Quality” setting.Using the Submenus of Moving ImageShooting End Screen1. From the Moving Image Shooting End screen(P115), M[Menu] ]Select from the followingsubmenu itemsNew movieThe Finder screen returns.Send via mailYou can attach shot moving images to i-mode mail forsending. Go to step 2 (P149) of “Composing i-modemail message”.DeleteYou can delete shot moving images.Using submenu on moving image saving screenSetting items/Setting at purchase >P2591. Press M[Menu] on moving image saving screen(P116) ]Select one of the submenu items givenbelowOpenOpen a selected folder.](https://usermanual.wiki/LG-Electronics-USA/L602I.Users-Manual-1/User-Guide-760911-Page-124.png)
 ]3Camera functions for shooting still and/or moving imagescan be set.1. Select “Camera settings” from Multimedia menu(P107) ]Select one of the following items to besetSaving optionSet whether to automatically save shot still or movingimage. Use Jto set ON/OFF. When ON, set thesaving destination of still or moving image. Aftersetting, press I[Done].Shutter soundSet a sound to be emitted when the shutter is pressed.• When an item is selected, a sample sound is emitted.Flicker tuningSet suppressing flickering of the screen.Information• Depending on the shooting environment and/or object tone,flickering may not be completely suppressed by setting“Flicker tuning”.](https://usermanual.wiki/LG-Electronics-USA/L602I.Users-Manual-1/User-Guide-760911-Page-125.png)
![119i-mode Menu ........................................120What is i-mode? ...................................120Displaying the iMenu display...............120Displaying Sites from Bookmark .........121Displaying Screen memo .....................122Displaying Last URL.............................123Displaying Internet Web Pages ...........123Displaying MessageR/F .......................124Checking Whether Center HoldsMessageR/F .........................................127Setting Functions of i-mode ................127Displaying Sites....................................130How to See/Use Sites ..........................132Using My Menu ....................................135Changing i-mode Password ................136i-modeMenuSelectOn the Stand-by display, C[Menu] ](i-mode) or “i-mode” To display the i-mode menuSelecti-mode](https://usermanual.wiki/LG-Electronics-USA/L602I.Users-Manual-1/User-Guide-760911-Page-126.png)
![120i-modei-modei-mode MenuThe i-mode menu is the basic display for viewing varioussites and Internet web pages. You can use each function ofi-mode from the i-mode menu.What is i-mode?i-mode is the online service that makes use of the displayof the i-mode phone to enable you to use convenientinformation from i-mode sites (programs) and homepagessupporting i-mode and to exchange mail easily.• Refer to “Mobile Phone User's Guide [i-mode]” fordetails.• Not all the services described in “Mobile Phone User'sGuide [i-mode]” are supported. Check the descriptionof the models supporting each service with “MobilePhone User's Guide [i-mode]”.Displaying the iMenu displayC](i-mode) ]1You can access each i-mode site from iMenu.1. From the i-mode menu (P119), “iMenu”•Refer to “Mobile Phone User's Guide [i-mode]” foritems displayed on the iMenu display.• See “Displaying Sites” (P130) for the subsequentoperations.DescriptionMenu itemConnects to the i-mode CenterDisplays your favorite sites and Internetweb pages.Enter URL to connect to the internet.Displays pages of sites, etc. saved in theFOMA phone.Displays the most recently accessedsite or Internet web page.BookmarkLast URLDisplays a list of the receivedMessageR/F.MessageYou can set the FOMA functions relatedto i-mode.You can check whether the i-modeCenter holds mail and MessageR/F.Check newmessageGo tolocationMenuScreen memoi-modesetting](https://usermanual.wiki/LG-Electronics-USA/L602I.Users-Manual-1/User-Guide-760911-Page-127.png)
 ]2You can directly access your favorite sites from Bookmark.• For the registration method, see “Using the Submenusof the Site Screen” (P130).1. From the i-mode menu (P119), “Bookmark”<Bookmark List>2. Select a bookmark ]C• Connected to the site.Using the Submenus of the Bookmark List Screen1. From the Bookmark List screen (See above), M[Menu] ]Select from the following submenuitemsConnectYou can connect to the selected Bookmark site.Edit bookmarkYou can edit the title and URL of the selectedBookmark. After editing, press I[Done].DeleteYou can delete the selected Bookmark.Delete selectedYou can select and delete multiple Bookmarks. Afterselecting, M[Menu]>Select “Delete”Delete allYou can delete all the registered Bookmarks. To deleteall, enter terminal security code >C[OK].URLYou can display the URL of the selected Bookmark.Copy URLYou can copy the URL of the selected Bookmark. Forthe copy, see “Copying/Cutting/Pasting” (P219).Compose messageYou can paste the URL of the selected Bookmark tothe text of i-mode mail and send it. Go to step 2 of“Composing i-mode mail” (P149).SendSend a selected bookmark via infrared communication.Send allSend all bookmarks via infrared communication.: For infrared communication, see “Using infrared communication”(P182).](https://usermanual.wiki/LG-Electronics-USA/L602I.Users-Manual-1/User-Guide-760911-Page-128.png)
 ]3You can display the web pages saved without connectingto i-mode.• For the registration method for the site screen, see“Using the submenus for the Site screen” (P130).1. From the i-mode menu (P119), “Screen memo”<Screen Memo List>2. Select a screen memo ]C• The Screen Memo List screen appears.Using the Submenus of the Screen MemoScreen1. From the Screen memo List screen (See above)M[Menu] ]Select from the following submenuitemsViewYou can display the selected screen memo.Edit titleYou can edit the title of the selected screen memo.DeleteYou can delete the selected screen memo.Delete selectedYou can select and delete multiple screen memos.After selecting, M[Menu]>Select “Delete”.Delete allYou can delete all the screen memos. To delete all,enter terminal security code >C[OK].URLYou can display the URL of the selected screenmemo.Protect ON/OFFYou can give or cancel protection for the selectedscreen memo. You cannot delete protected screenmemos.i-modeDescriptionIconProtected ScreenmemoUnprotected Screenmemo](https://usermanual.wiki/LG-Electronics-USA/L602I.Users-Manual-1/User-Guide-760911-Page-129.png)
![123i-modeUsing the Submenus of the Screen MemoScreen1. From the Screen memo display See left M[Menu]]Select from the following submenu itemsSave graphics 1You can select and save an image contained in ascreen memo. You can confirm the saved image by“My picture” of “Data box”>”i-mode” folder. >P166Show properties–URL : You can display the URL of the displayedscreen memo.–Page properties : You can check the title and URLof the displayed screen memo.–Certificates 2:You can display the certificate usedby the displayed screen memo.Retry 3A GIF animation is played back from the beginning.Edit titleYou can edit the title of the displayed screen memo.DeleteYou can delete the displayed screen memos.Protect ON/OFFYou can activate or cancel protection for the displayedthe page. You cannot delete protected saved pages.1: This menu is not selected in case the selected screen memodoes not include an image.2: This menu is not selected in case the certificate is not used forthe displayed screen memo.3: This menu is not selected in case the selected screen memodoes not include of GIF animation. Displaying Last URLC](i-mode) ]4When you exit i-mode, the URL of the page displayed last isstored as “Last URL”. Using “Last URL”, you can connect tothe site or Internet web page you visited last time.1. From the i-mode menu (P119), “Last URL” ]I[Done]Information• If you press Cin screen of URL, you can edit the latest URLaddress.Displaying Internet Web PagesC](i-mode) ]5You can display web pages supporting i-mode anddirectly access sites from the history of the sites youvisited by entering their URLs.i-modeNext Page](https://usermanual.wiki/LG-Electronics-USA/L602I.Users-Manual-1/User-Guide-760911-Page-130.png)
![124i-mode1. From the i-mode menu (P119), “Go to location” ]Select from the following itemsInput addressYou can display Internet web pages supporting i-modeby entering URLs. After entering, press I[Done] toaccess.URL historyYou can directly access sites by selecting URLs youvisited from the URL history.Information• You can enter URL up to 256 half-pitch characters.• You can view the list up to 50 address in URL history.• Depending on the type of the accessed Internet site, the pagemay not be displayed correctly.• Web pages other than Internet web pages supporting i-modemay not be displayed correctly.Using the Submenus of the URL Screen1. From URL history screen, press M[Menu] ]Select from the following submenu itemsConnectYou can connect the site in URL history.Edit URLYou can connect URL in history after editing URLaddress.DeleteYou can delete the history of URL.Delete allYou can delete the history of all registered URL. Todelete all, enter terminal security code >C[OK].Compose messageYou can compose i-mode mail with attaching URL tothe text. Go to step 2 on page 149 of “Composing i-mode mail”.Displaying MessageR/FC](i-mode) ]6You can display received MessagesR/F.• MessageR:Your required information is delivered automaticallyonce you apply for the message service on the siteproviding the service.• MessageF:Messages are delivered free of charge by performingthe Received settings in the option settings. Refer to “Mobile Phone User's Guide [i-mode]” for how to set itup.: If you subscribed to the FOMA service after October 1, 2004,the setting at purchase is “Receive”.i-mode](https://usermanual.wiki/LG-Electronics-USA/L602I.Users-Manual-1/User-Guide-760911-Page-131.png)
![126i-modeUsing the Submenus of the MessageR/FList ScreenSetting item/Setting at purchase >P2561. From the MessageR/F List (P125), M[Menu] ]Select from the following submenu itemsDeleteYou can delete the selected MessageR/F.Delete selectedYou can select and delete multiple MessagesR/F. Afterselecting, M[Menu] >Select “Delete”.Delete allYou can delete all the MessagesR/F. To delete all,enter terminal security code >C[OK].Protect ON/OFFYou can give or cancel protection for the selectedMessageR/F. You cannot delete protected MessagesR/F.SortYou can sort MessagesR/F displayed on the Listscreen.FilterYou can change types of the MessageR/F displayedon the List screen.Using the Submenus of the DisplayMessageR/F Screen1. From the Display MessageR/F screen (P125),M[Menu] ]Select from the following submenuitemsDeleteYou can delete the displayed MessageR/F.Protect ON/OFFYou can give or cancel protection for the displayedMessageR/F. You cannot delete protectedMessagesR/F.Add to phonebook 1You can add phone number or mail address displayedon the MessageR/F to phonebook. Go to step 2 on page64 of “Adding to Phonebook”.Save attach file 2You can save the melody ( ) or image ( )attached to the MessageR/F. You can view the savedmelody or the image in “Melody”/“My picture” of “Databox”>“i-mode” folder. >P166, P1761: Activate this menu after selecting the phone number or mailaddress that can be registered. If no item exists, you cannotactivate this function.2: You can activate this function after selecting the file saved in. If the file to save does not exist, you cannot use this file.i-mode](https://usermanual.wiki/LG-Electronics-USA/L602I.Users-Manual-1/User-Guide-760911-Page-133.png)
 ]7You can check whether the i-mode Center holds any i-mode mail and/or MessageR/F that arrived while thephone was out of the service area or turned off.1. From the Stand-by screen, press M[Mail] for 2 ormore seconds• The Check Result screen appears. To read thereceived MessageR/F immediately, select“MessageR”/“MessageF” and press C.Information•If the i-mode Center holds i-mode mail and/or a MessageR/F,an icon (P31) is displayed. Note that the icon may not bedisplayed if i-mode mail or a MessageR/F arrived at the i-mode Center while the FOMA phone was turned off.Setting Functions of i-modeYou can set functions of i-mode and MessageR/F.i-mode](https://usermanual.wiki/LG-Electronics-USA/L602I.Users-Manual-1/User-Guide-760911-Page-134.png)
 ]81You can set the URL of a web page displayed when “Home”is selected and whether to enable/disable “Home” (P121).Setting items/Setting at purchase >P2341. From the i-mode menu (P119), “i-mode setting” ]“Home”2.“Enable” or “Disable”3. Select the URL field ]C]Enter a URL ]C• If “ [Done] Disable” is selected, you cannot enter aURL.4. I[Done]ViewC](i-mode) ]82You can set functions related to displaying sites andscreen memos.Setting at purchase >P234, 2351. From the i-mode menu (P119), “i-mode setting” ]“View” ]Select from the following setting items ]After setting, I[Done]Character sizeYou can change the character size for text of sites,screen memos pages and MessagesR/F.Image displayYou can set whether to display images contained insites, or screen memos.ScrollYou can set the number of lines scrolled whenpressing Hon a display displaying text of sites,screen memos or MessagesR/F.Message list disp.You can set how to display MessageR/F list (thenumber of lines).: Images of MessageR/F are displayed regardless of this setting.CertificatesC](i-mode) ]83You can set a certificate used for displaying SSL-enabledsites.1. From the i-mode menu (P119), “i-mode setting” ]“Certificates” ]M[Menu] ]Select from thefollowing setting itemsCertificate infoYou can view the selected certificate.Valid/InvalidYou can set whether to validate or invalidate theselected certificate.• You can check the status of a certificate by thefollowing symbols. : Valid : Invalidi-mode](https://usermanual.wiki/LG-Electronics-USA/L602I.Users-Manual-1/User-Guide-760911-Page-135.png)
 ]84You can set i-mode connection timeout and the type ofmessage to check. You can also check the i-modesettings.Setting items/Setting at purchase >P2351. From i-mode menu (P119), “i-mode setting” ]“Others” ]Select from the following setting itemsConnection timeoutIt may take time to download from some sites. Youcan set the time to wait before cancelingdownloading. After setting, press I[Done].i-motion auto playYou can set whether to play back an i-motion movieautomatically when you download a standard (normal)type of i-motion movie from a site. After setting, pressI[Done].Check new messageYou can set the contents to check by performing“Check new message” from among i-mode mail,MessageR or Message F. After setting, pressI[Done].Check settingsYou can check the individual “i-mode setting”.Reset settingsYou can reset each of the “i-mode setting” to theirdefaults. To reset the settings, enter terminal securitycode >C[OK].Reset dataYou can delete all data related to i-mode (Bookmark,Screen memo, URL history) except for MessageR/F.To reset the data, enter terminal security code >C[OK].Information• Even when you have set “Connection Timeout” to “Unlimited”,you may be disconnected depending on radio waveconditions.i-mode](https://usermanual.wiki/LG-Electronics-USA/L602I.Users-Manual-1/User-Guide-760911-Page-136.png)
![130i-modeDisplaying SitesYou can connect to sites by easy key operation, and usevarious types of services offered by IPs (Information ServiceProviders). (For some sites, you may be required to apply tothe IPs separately.)1. From the i-mode menu (P119), “iMenu”• blinks during i-mode communication.2. Select an item (link) ]C<Site>•FE: You can scroll the menu.•P: You can end i-mode.Information• If there is a number in front of the item showing the link, youcan connect to that link directly by pressing the same numberon the keypad. Note that some sites cannot be connected.• Depending on the site, images may not be displayed.• Depending on the site connected, the confirmation screenmay appear stating that mobile phone information is sent.Your mobile phone information (the model and the serialnumber of your mobile phone) is sent to the IP (InformationService Provider) over the Internet, so could be perceived bythird parties. The phone number, address or age are not sentto IP (Information Service provider).Using the Submenus of the Site Screen1. From the Site screen (See left), M[Menu] ]Selectfrom the following submenu itemsAdd bookmarkYou can add the displayed URL of the Site to Bookmark.The bookmark screen is displayed, and you can registerthe site by pressing I[Done]. You can access directlyto the site from the registered bookmark. >P121Add screen memoYou can save a displayed web page as a screenmemo. You can display saved screen memos withoutconnecting to i-mode. >P122Save graphics 1You can select and save an image contained in a webpage.>P134Show properties–URL : You can check the URL of the displayed site.–Page properties : You can check information onthe displayed web page.i-mode](https://usermanual.wiki/LG-Electronics-USA/L602I.Users-Manual-1/User-Guide-760911-Page-137.png)
![131i-modei-mode–Certificates 2:You can check the certificate usedin the displayed site.Bookmark listYou can view a list of bookmarks registered by “Addbookmark”. If you select a bookmark, you can directlyaccess the site.Go to location–Input address : You can access web pagessupporting i-mode by entering URL. After entering it,press I[Done] to connect to the site.–URL history : You can select the URL history of adisplayed site to directly access the web page.Screen memo listYou can view a list of pages saved as “Screen Memo”.You can display the saved page by selecting it.MenuYou can bring up the iMenu display.HomeYou can display the web page registered as “Home”(P128).ReloadYou can reload data of a site. The contents of the sitewill change to the latest information each time youreload if the site has been updated.Compose messageYou can send the URL of site being displayed or theURL for link with them attaching to the message text.Go to step 2 on page 149 of “Composing message”.Change char. codeWhen characters are not displayed correctly, you canconvert them to the correct ones.Add to phonebook 3You can add the phone number and mail addressdisplayed on the web page to the phonebook. Go tostep 2 on page 64 of “Adding to phonebook”.Retry 4You can play back a GIF animation from the beginning.1: You cannot activate this menu in case the image that can besaved is not included in a site or “Image” is set not to display.(P128)2: If no certificate is used in the site, you cannot use this menu.3: Activate this menu after selecting the phone number or mailaddress to register. Otherwise, you cannot activate this menu.4: You cannot activate this menu when GIF animation is notincluded in displayed site.](https://usermanual.wiki/LG-Electronics-USA/L602I.Users-Manual-1/User-Guide-760911-Page-138.png)
![133i-modeReturning to Obtained Previous Page/Goingto Obtained Next PageThe FOMA phone stores the last few screens displayed.1. To display the previous page, LTo display the next page, ROperations from Highlighted InformationYou can easily make calls, send mails, and display Internetweb pages using highlighted information (phone numbers,mail addresses, URLs, and so on) displayed on sites and inmail and MessageR/F.Phone To function/AV Phone To functionYou can make a call by selecting displayed informationsuch as a phone number.• You may not be able to use the Phone To/AV Phone Tofunction depending on the site.1. Select information such as a phone number ]C2. “Voice call”/“Video-phone call”• You can make a call after setting the Caller IDnotification according to the screen.Information• You can add phone number information displayed on a webpage to the phonebook using the submenu of the site screen.Mail To functionYou can send mails by selecting displayed informationsuch as a mail address.• You may not be able to use the Mail To functiondepending on the site.1. Select information such as a mail address ]C• Go to step 2 of “Composing i-mode mail” (P149).Information• You can add mail address information displayed on a webpage to the phonebook using the submenu of the site screen.Web To functionYou can access a web page by selecting displayedinformation such as a URL.• You may not be able to use the Web To functiondepending on the site.1. Select information such as URL ]Press C• If the confirmation screen to connect appears, pressI[Yes].i-modeNext page](https://usermanual.wiki/LG-Electronics-USA/L602I.Users-Manual-1/User-Guide-760911-Page-140.png)
![134i-modei-appli To functionYou can start i-appli by selecting the displayed URL (link).1. Select i-appli information ]C]I[Yes]Information• If “i-appli To” (P162) is set to “OFF”, you cannot start i-appli bythis operation.Downloading Images from SitesYou can set images saved from the displayed web pageor screen memos. You can check the saved images in“My picture” of “Data box” >“i-mode” folder. >P1661. Displaying Site / Saved Page screen ]M[Menu]]“Save graphics” ]C]Select an image ]C]“Yes”Information• Some images may not be saved.• You cannot select “Save graphics” if the image that can besaved is not included or “Image” (P128) is set not to be saved.Downloading i-melody from SitesYou can download a melody from a site and set it.Download a melody from a site. A saved melody can bechecked by “Melody” of “Data box” >“i-mode” folder(P176).1. Display a site that supports downloading ofmelodies ]Select a melody ]C• After the download is completed, the confirmationscreen appears.2. Video content menu• “Play”: You can play the downloaded melody.• “File Protection”: You can view the information of i-motion downloaded from network.• “Back”: You can return to the site without saving themelody.Information• Depending on the site, you may not be able to downloadmelodies.• Some downloaded melodies may not be played backsuccessfully.i-mode](https://usermanual.wiki/LG-Electronics-USA/L602I.Users-Manual-1/User-Guide-760911-Page-141.png)
![135i-modeObtaining i-motion Movies from SitesThe i-motion movie is a moving image file containingimages and sound. Acquired i-motion can be checked by“i-motion” of “Data box” >“i-mode” folder (P173).• See “Mobile Phone User's Guide [i-mode]” for details.1. Select an i-motion movie on a site that supportsdownloading of i-motion movies ]C• When downloading is done, the confirmation screenappears.2. Video content menu• “Play”: You can play i-motion downloaded fromnetwork.• “File property”: You can view the information of i-motion downloaded from network. • “Back”: You can return to the site without saving i-motion.Information• You can change the playback methods for while downloading i-motion movies. >P129• Some downloaded i-motion movies might not be played backcorrectly.• You cannot download i-motion movies of the streaming typeand the ASF format.Using My MenuIf you register frequently-used sites in My Menu, you canaccess them easily.Registering Sites in My Menu1.Bring up the page of the site to be registered]Select“Register My Menu”]C2. Select the i-mode password text box ]C]Enterthe i-mode password ]C]“Select”• For i-mode password, see “Changing i-modePassword”.Information• Some sites may not be registered in My Menu.• If you subscribe to Menu/Search in a pay site, it will beregistered in My Menu automatically.Displaying Sites from My Menu1. From the Stand-by display, I[i-mode] ]“iMenu”]“My Menu” ]Select a site to access ]Ci-mode](https://usermanual.wiki/LG-Electronics-USA/L602I.Users-Manual-1/User-Guide-760911-Page-142.png)
![136i-modei-modeChanging i-mode PasswordThe “i-mode password” (4 digits) is required to subscribe toand unsubscribe from message services and i-mode paysites, and to perform i-mode mail settings. At purchase, thispassword is set to “0000” (4 zeros), so you need to changeit to your own i-mode password. Be sure not to let othersknow your i-mode password.1.On the Stand-by display, I[i-mode] ]“iMenu” ]“English” ]“Options” ]“Change i-modePassword”2. Select the “Current Password” text box ]C]Enter your i-mode password (4 digits) ]C• At purchase, the setting is “0000”, so enter “0000”for the first time.3. Select the “New Password” text box ]C]Entera new i-mode password (4 digits) ]C4. Select the “New Password (Confirmation)” text box]C]Enter a new i-mode password (4 digits) ]C]“Select”• Enter the same number as you entered in step 3.Information• If you forget your i-mode password, you can have it reset to“0000” at a handling counter such as a DoCoMo shop. Youwill be required to show your official identification (driver’slicense, etc.).](https://usermanual.wiki/LG-Electronics-USA/L602I.Users-Manual-1/User-Guide-760911-Page-143.png)
![137Mail Menu .............................................138i-mode Mail...........................................138Displaying Mail in Inbox.......................139Displaying Mail in Outbox....................144Displaying Mail in Unsent message ....147Composing Mail ...................................149Checking New i-mode mail and Message ...............................................154Receiving Selected Mail ......................154Checking whether Center Holds SMS....155Changing Mail Setting..........................155MailSelectInboxOn the Stand-by display, C[Menu] ](Mail) or “Mail”To display the Mail menuSelectMail](https://usermanual.wiki/LG-Electronics-USA/L602I.Users-Manual-1/User-Guide-760911-Page-144.png)
![Mail MenuOn the mail menu, the mail functions offered by the FOMAphone are displayed.i-mode MailThe i-mode phone has the mail functions for exchanging e-mail (electronic mail) via the Internet. You need to subscribeto “i-mode” to use i-mode mail.• See “Mobile Phone User's Guide [i-mode]” for moredetails.• This model does not support all the services describedin “Mobile Phone User's Guide [i-mode].” Check whichmodels support which services in “Mobile Phone User'sGuide [i-mode]”.SMS messages (short messages)You can send and receive SMS messages betweenFOMA phones without subscribing to i-mode.Sending and receiving SMS messages with subscribers tooverseas carriers in addition to DoCoMo are alsoavailable. For information on the countries and overseascarriers with which SMS messages can be exchanged,see the International Service web page of DoCoMo.• Refer to “Network Services User’s Guide” for more details.138MailMailDescriptionMenu itemInbox You can check the records and contents ofreceived i-mode mails and SMS messages.You can check the records and contents ofsent i-mode mails and SMS messages.You can check the contents of temporarilysaved i-mode mails and SMS messages.You can bring up the display to compose i-mode mails and SMS messages.You can receive i-mode mails held at the i-mode Center.You can receive SMS messages by checkingthe SMS Center.OutboxUnsentmessageCompose mailCheck newmessageReceive option You can check the subjects of i-mode mail heldat the i-mode Center and select mail to receive,or delete mail at the Center before receiving it.Check newSMSMail setting You can change the settings of each mailfunction of the FOMA phone.](https://usermanual.wiki/LG-Electronics-USA/L602I.Users-Manual-1/User-Guide-760911-Page-145.png)
 ]1The inbox folder list is displayed. You can sort mails byfolder. You can check the records and contents ofreceived i-mode mails and SMS messages.1. From the Mail menu (P137), “Inbox”<Received Mail Folder List>2. Select a folder ]C•J/FE: You can view previous or after pages formultiple pages.3. Select mail ]C<Received Mail Display>•I[Reply]: You can reply the receiver. Go to step 3 onpage 149 of “Composing i-mode mail” / step 3 of page152 “Composing SMS”.•J: You can view previous or next mail.•FE: You can scroll the screen.Information• To delete all displayed the contents in box setting “Security”(P156), enter terminal security code >C[OK].• The deco mail via FOMA phone includes of text and URL. If you select the URL, you can read deco mail. >P144• You can save up to 400 received mails/SMS. Depending onthe size of mails/SMS messages, the number of mails/SMSmessages to save may be fewer.SubjectŦ3The time to receive the mailŦ1 SenderŦ2The mail you receive is displayed on a time basis that day. From the next day on, each message is displayed by the date when you received it.The name is displayed when theentry is saved in phonebook.SMS is displayed as “SMS”Ŧ1:Ŧ2:Ŧ3:The number of unread mailsSelectMenuFolderInbox (1)1/1139MailMailNext Page](https://usermanual.wiki/LG-Electronics-USA/L602I.Users-Manual-1/User-Guide-760911-Page-146.png)
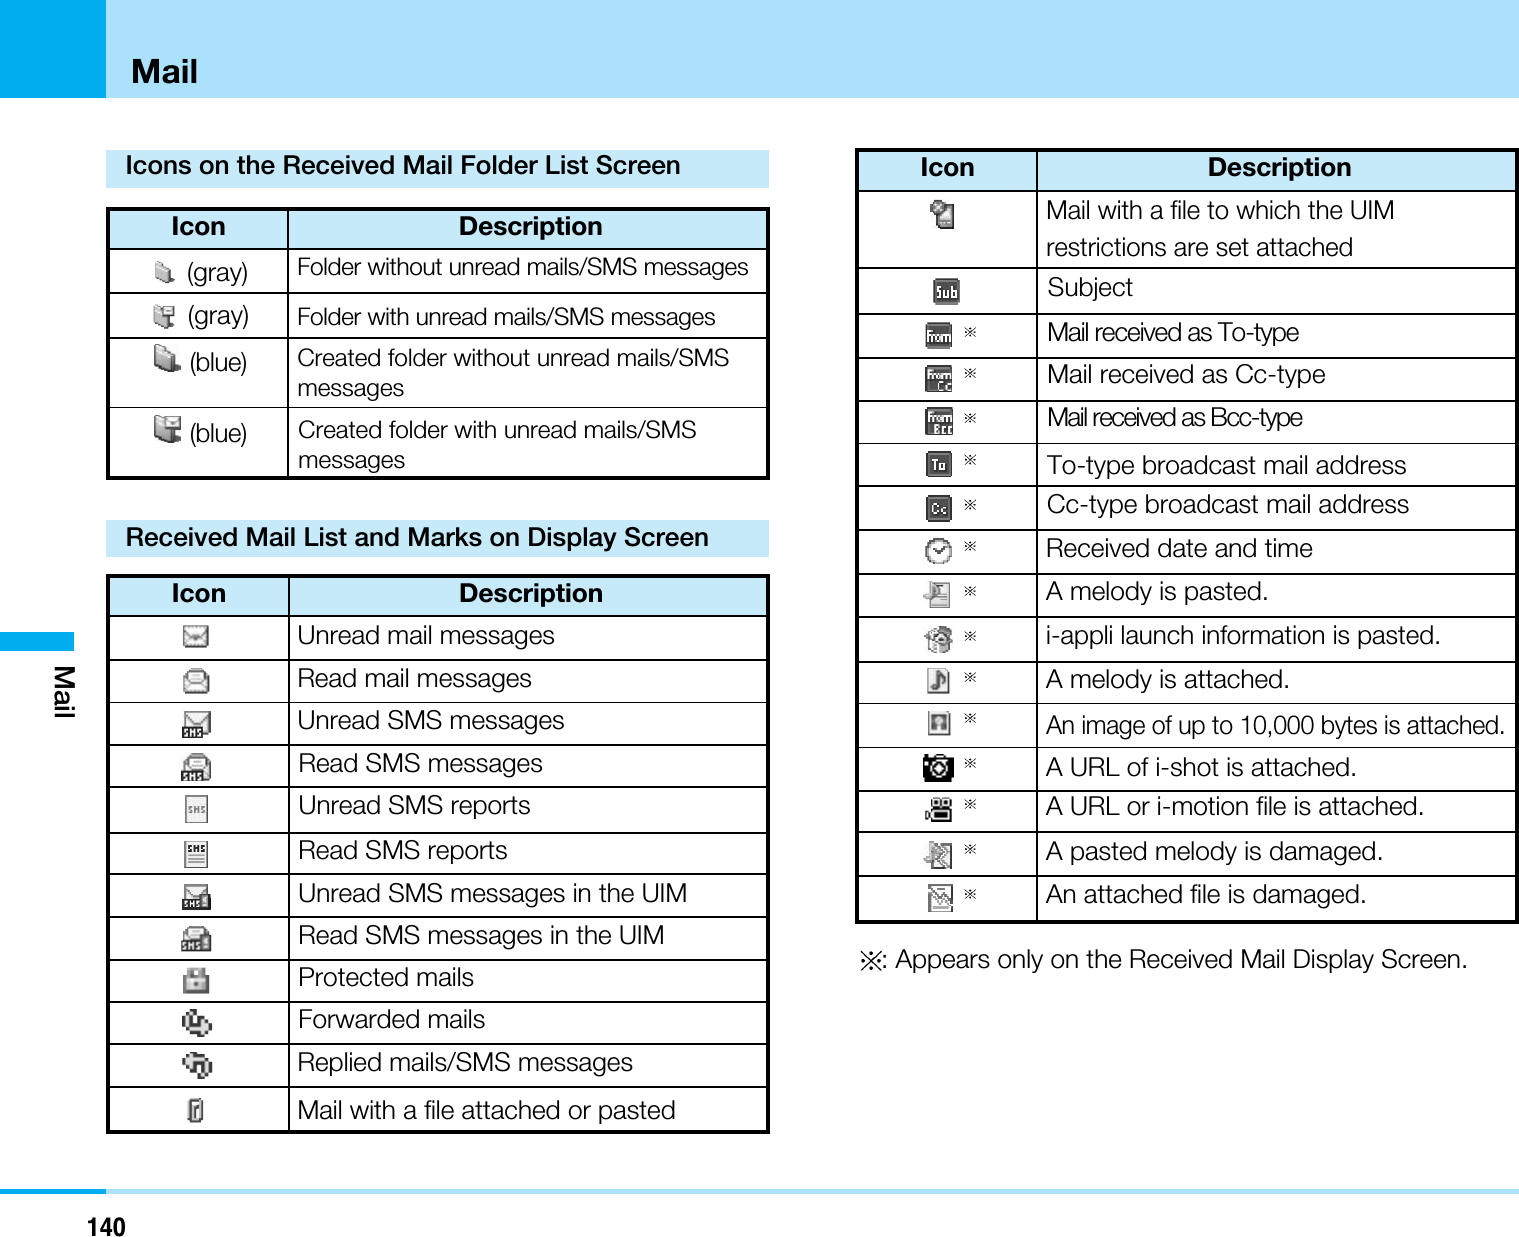
![141MailUsing the Submenu of the Received Mail FolderList Display1. On the Received Mail Folder List screen (P139), M[Menu] ]Select from the following submenu itemsCreate folderYou can add a folder.Rename folderYou can edit the name of the selected folder.Delete folderYou can delete the selected folder. You cannot deletea folder if a mail is saved.Auto sortYou can set sort conditions to the selected folder. Goto step 2 of “Distributing the received mail to thefolder automatically” (P143).: These operations are not available when you select Inbox.Using the Submenu of the Received MailList ScreenSetting item/Setting at purchase >P2561.On the Received Mail List screen (P139), M[Menu] ]Select from the following submenu itemsMove to folder 1You can move the selected mails and messages toother added folders.DeleteYou can delete the selected mails and messages.Delete selectedYou can select and delete multiple mails and messages.After selecting mail messages, M[Menu] >Select“Delete”.Delete allYou can delete all mail messages in the folder. To deleteall, enter terminal security code >C[OK].Protect ON/OFF 1You can set or cancel the protection of the selectedmails and messages. Protected mail cannot bemoved/deleted.SortYou can sort the mails and messages displayed onthe List display.FilterYou can change the type of the mails and messagesdisplayed on the List display.UIM 2You can move and copy the selected SMS messagesin the FOMA phone to the UIM, and move and copythe SMS messages in the UIM to the FOMA phone.1: You cannot use this menu for SMS in the UIM.2: You cannot use this menu for protected SMS or SMS deliveryreport.MailNext Page](https://usermanual.wiki/LG-Electronics-USA/L602I.Users-Manual-1/User-Guide-760911-Page-148.png)
![142MailUsing the Submenu of the Received MailDisplay Screen1. On the Received Mail List screen (P139), M[Menu]]Select from the following submenu itemsReplyYou can reply after selecting the method to reply. Go tostep 3 on page 149 of “Composing i-mode mail”/ step 3on page 152 of “Composing SMS”.– Reply 1:You can reply to the sender of i-mode mailfrom the detailed received mail list.– Reply quoted 1:You can send the reply quoting theoriginal text in your received i-mode mail.– Reply all 1:You can reply all receivers and sendersat the same time.– Reply quoted all 1:You can reply all receivers andsenders with quoting the original text in yourreceived i-mode mail.ForwardYou can forward the displayed mail to other party. Goto step 2 (P149) of “Composing i-mode mail” or step2 (P152) of “Composing SMS messages.Move to folder 2You can move the displayed mail to other added folders.DeleteYou can delete the displayed mail.Protect ON/OFF 2You can set or cancel the protection to the displayedmail. The protected mail messages cannot bemoved/deleted.Store AddressYou can register mail address / phone number ofreceiver on displaying the mail. Go to step 2 on page64 of “Adding to Phonebook”.Add to phonebook 3You can add the mail address / phone number writtenon the displayed mail text to the phonebook. Go tostep 2 of “Adding to Phonebook” (P64).Save attach file 4You can save an image ( ) and a melody ( ) of upto 10,000 bytes attached to the displayed mail. Youcan check the saved images by selecting “Data box”.>“My picture”. >“i-mode” folder. >P166, P176Copy• For copying after selecting the following items, see“Copying/Cutting/Pasting” (P219).– Body: You can copy the text.– Subject 1:You can copy the title.–Sender: You can copy e-mail address / phone numberof the sender.UIM 5You can move / copy the displayed SMS message inthe FOMA phone to the UIM, and move / copy theSMS messages in the UIM to the FOMA phone.1: This menu is not displayed for SMS.2: You cannot use this menu for SMS of UIM.3: Activate this menu after selecting mail address / phone numberto register. If nothing to be registered is included, you cannotactivate this function.4: Activate this menu after selecting the file to save. If the file toregister does not exist, you cannot activate this function.Mail](https://usermanual.wiki/LG-Electronics-USA/L602I.Users-Manual-1/User-Guide-760911-Page-149.png)
![143Mail5: You cannot activate this function for i-mode mail or protectedSMS.Information• The Submenu items for the SMS report / voice mail incomingnotification display screen are “Move to folder”, “Delete,” and“Protect ON/OFF” only.Distributing the received mail to the folderautomaticallyThe mails / SMS messages is applicable for the conditioncan be saved to the folder automatically. You can set thisonly to additional folder.1. On the Received Mail Folder List screen (P139),select a folder to specify conditions ]M[Menu]]Auto Sort• The screen for automatic sort is displayed.2. M[Menu] ]Select submenu.Address 1 2You can enter e-mail address or phone number todistribute each folder.– Open phonebook: You can enter the phonenumber searching from phonebook.– Input address: You can directly enter the address.When you enter e-mail address, you input correctlyto a domain (the part of after @ mark).Subject 1 2You can input the subject of mail to distribute a folder.ReleaseYou can cancel one of conditions of distribution of folder.Release allYou can cancel all distribution conditions of folders.1 : When a received mail contains multiple conditions, it isdistributed to the top folder of the folder list that correspondingcondition is set.2 : You cannot set the multiple conditions in the same folder. Receiving i-mode Mail/SMS MessagesAutomaticallyWhen the FOMA phone is in the service area, itautomatically receives i-mode mail/ SMS messages.1. A mail or an SMS message is received• (White) or (White) is displayed.2. The result of the reception is displayed• If you want to check the received i-mode mailmessage immediately, select “i-mode mail”, andpress C.•If you want to check the received SMS messageimmediately, press C•Q: Go to previous screen.Mail](https://usermanual.wiki/LG-Electronics-USA/L602I.Users-Manual-1/User-Guide-760911-Page-150.png)
![144MailSaving Images over 10,000 bytesA JPEG image over 10,000 bytes is not downloadedproperly to the FOMA handset. Therefore, you can save itafter extracting the data from URL for image view in mailtext, and connecting i-shot center.1. On the Received Mail Folder List screen (P139),select “URL” ]C]“Yes”• For the method of saving images, see “ObtainingImages from Sites” (P134).Information• You can view the contents of received Deco-mails in this way.Downloading i-motion Movies from i-motion MailData of i-motion mail is not downloaded to the FOMA phoneeven when it is received. You need to access the i-motionmail Center from its URL given to the mail text to see an i-motion movie to download and save the data. The saved i-motion can be checked in “i-motion” of “Data box” >“i-mode” folder (P173).1. From the Received Mail Folder List screen (P139),select the URL ]C]I“Yes”• Downloading of i-motion starts.• The i-motion is played while being downloaded in the caseit is possible.2. After downloading, press Q• “Play”: You can play downloaded i-motion.• “File property”: You can view information ofdownloaded i-motion from a site. • “Back”: The site will be returned, not saving i-motion. Displaying Mail in OutboxC](Mail) ]2The Sent Mail List is displayed. You can check the recordsand contents of sent i-mode mail and SMS messages.1. From the Mail menu (P137), select “Outbox”.•K/FE: Display the previous or next page for multiplepages.SubjectŦ3The time to send the mailŦ1 ReceiverŦ2The mail you receive is displayedon a time basis that day. Fromthe next day on, each message isdisplayed by the date when youreceived it.The name is displayed when theentry is saved in phonebook.SMS is displayed as SMSŦ1:Ŧ2:Ŧ3:Mail<Outbox>](https://usermanual.wiki/LG-Electronics-USA/L602I.Users-Manual-1/User-Guide-760911-Page-151.png)
![2. Select a mail ]C<Sent Mail Display>•J: Display the previous or next page.•FE: Scroll by screen.Information• To display the box which is set “Security” (P156), enterterminal security code >C[OK].• You can save up to 400 mails / SMS. Depending on the sizeof mails / SMS messages, the number of mails / SMSmessages that can be saved may be smaller.Icons on the Sent Mail List display and the Sent Maildisplay screen: Appears only on the Sent Mail Display Screen.SubjectŦThe time to send the mailŦReceiverŦ145MailMailDescriptionIconMail successfully sentMail failed to be sentDescriptionIconAn image of up to 10,000 bytes is attached.An image (JPEG) of over 10,000 bytes is attached.Moving images are attached.A corrupted melody file is attached.A corrupted file is attached.Sent SMS messages in the UIMProtected mail / SMS messagesMail with a file attachedMail with an attached file to which UIMrestrictions are setMail address failed to be sent as To-type mailMail address successfully sent as Cc-type mailMail address failed to be sent as Cc-type mailMail address successfully sent as Bcc-type mailMail address failed to be sent as Bcc-type mailA pasted melody file is attached.An i-appli activation information file is attached.A melody is attached.SubjectMail address successfully sent as To-type mailSent date and timeSMS message successfully sentSMS message failed to be sent](https://usermanual.wiki/LG-Electronics-USA/L602I.Users-Manual-1/User-Guide-760911-Page-152.png)
![146MailUsing the Submenu of the Sent Mail ListScreenSetting item/Setting at purchase >P2561. From the Sent Mail Folder List screen (P144), M[Menu] ]Select from the following Submenu itemsEditYou can edit the selected mail again. See “Composingi-mode mail” (P149) / “Composing SMS messages”(P152).DeleteYou can delete the selected mail.Delete selectedYou can select and delete multiple mail messages. Afterselecting mail messages, M[Menu] >Select “Delete”.Delete allYou can delete all mail messages in the Sent box. To delete all, enter terminal security code >C[OK].Protect ON/OFF 1You can set or cancel the protection to the selectedmail. Protected mail cannot be deleted.SortYou can sort the mail messages displayed in the listscreen.FilterYou can change the type of the mail messagesdisplayed in the list screen.UIM 2You can move and copy the selected SMS messagein the FOMA phone to the UIM, and move and copythe SMS messages in the UIM to the FOMA phone.1 : You cannot use this menu for SMS in the UIM.2 : You cannot use this menu for i-mode mail or SMS deliveryreport.Using the Submenu of the Sent Mail DisplayScreen1. From the Sent Mail Display screen (P145), M[Menu] ]Select from the following Submenu itemsEditYou can edit the displayed mail again. Go to step 2 in“Composing i-mode mail” (P149) /“Composing SMSmessages” (P152).DeleteYou can delete the displayed mail.Protect ON/OFF 1You can set or cancel the protection to the displayedmail. The protected mail messages cannot be deleted.Store addressYou can register mail address/phone number ofreceiver on displaying the mail. Go to step 2 on page64 of “Adding to Phonebook”.Mail](https://usermanual.wiki/LG-Electronics-USA/L602I.Users-Manual-1/User-Guide-760911-Page-153.png)
![147MailAdd to phonebook 2You can add the mail address and phone number ofthe sender of the displayed mail to the phonebook.Go to step 2 (P64) of “Adding to Phone Book”.Copy 3• For copying after selecting the item, see “Copying /Cutting / Pasting” (P219).– Body: You can copy the text.– Subject: You can copy the subject.UIM 4You can move and copy the displayed SMS messageto the UIM, and move and copy the SMS messages inthe UIM to the FOMA phone.1: This function is not available in SMS of UIM.2: After selecting the mail address / phone number, you canactivate the function. If nothing that can be registered isincluded, you cannot activate the menu properly.3: This function is not available for SMS.Information• To display the box which is set “Security” (P156), enterterminal security code >C[OK].• You can save up to 400 mails / SMS. Depending on the sizeof mail/ SMS, the number of mails / SMS messages that canbe saved may be smaller.SubjectŦ3The time to saveŦ1 ReceiverŦ2The mail you save is displayed ona time basis that day. From thenext day on, each message isdisplayed by the date when yousaved it.The name is displayed when theentry is saved in phonebook.SMS is displayed as “SMS”Ŧ1:Ŧ2:Ŧ3:Mail<Unsent message List>](https://usermanual.wiki/LG-Electronics-USA/L602I.Users-Manual-1/User-Guide-760911-Page-154.png)
![148MailIcons on the Unsent Mail List display and the UnsentMail display screen: Only appears on the Unsent Mail display screen.Using the Submenu of the Unsent MessageList ScreenSetting item/Setting at purchase >P2571. From the Unsent Message List screen (P147), M[Menu] ]Select from the following submenuitemsSendYou can send the selected mails and messages.DeleteYou can delete the selected mails and messages.Delete selectedYou can select and delete multiple mail mails andmessages. After selecting mail messages, M[Menu]>Select “Delete”.Delete allYou can delete all mail messages in the folder. Todelete all, enter terminal security code >C[OK].SortYou can sort the mail messages displayed in the listdisplay.FilterYou can change the type of the mail messagesdisplayed on the list display.MailDescriptionIconUnsent mailUnsent SMS messageMail with a file attachedA damaged file is attached.SubjectAddress of To-typeAddress of Cc-typeMail with an attached file to which UIMrestrictions are setAttached fileA pasted melody file is attached.i-appli launch information is attached.A melody file is attached.An image file of up to 10,000 bytes is attached.An image (JPEG) of over 10,000 bytes is attached.A moving image file is attached.A damaged melody file is attached.TextAddress of Bcc-type](https://usermanual.wiki/LG-Electronics-USA/L602I.Users-Manual-1/User-Guide-760911-Page-155.png)
![149MailUsing the Submenu of the Unsent Mail Display ScreenFrom the Unsent Mail display screen (P147), press M[Menu] and select a submenu item. See “Using theSubmenu of the Compose mail display” (P150) / “Usingthe Submenu of the Compose SMS Screen” (P153) forthe available submenu items.Composing MailComposing i-mode MailC](Mail) ]41You can create and send new i-mode mail.1. From the Mail menu (P137), select “Compose mail”]“Compose message”<Compose message Display>2. Select the Address field ]C]“EnterAddress” ]Enter the address ]“Enter Address”]C• For a menu displayed for destinations, see “Addressmenu” (P150) of “Using the Submenu of theCompose Mail Display”. 3. Select the Subject field ]C]Enter thesubject ]C• In case of not attaching the file, go to step 5. 4. Select (Attach file) field ]C]Add attachedfile• Select the file saved in “My picture” / “i-motion”(P166) / “Melody” (P173) of Data box” (P176) /“Melody”.• For a menu displayed for attachment files, see“Attach file menu” (P150) of “Using the Submenu ofthe Compose Mail Display”.• If a file is attached, it can be displayed/played bypressing I.5. Select the Message field ]C]Entermessage ]C6.I[Send]MailNext Page](https://usermanual.wiki/LG-Electronics-USA/L602I.Users-Manual-1/User-Guide-760911-Page-156.png)
![150MailInformation• Depending on the radio wave conditions, the characters maynot be sent successfully to the destination.• Half-pitch katakana or pictographs may not be displayedproperly when exchanging mails between i-mode phones.• When you enter the destination of the phonebook that asecret code is set, the secret code is automatically added.However, the secret code does not remain on the destinationof the sent mail.Using the Submenu of the Compose MailDisplay1. From the Compose Mail display (P149), M[Menu] ]Select from the following Submenu itemsSendYou can send the i-mode mail that you arecomposing or editing.SaveYou can save the i-mode mail that you are composingor editing in unsent message.Add addressYou can add addresses. When you add addresses,you can send same i-mode mail to multiple recipientsat the same time. You can send same mail to up to 5addresses at a time.– Open phonebook: You can add the address bysearching the phonebook.– Input address: You can enter the address directly.– Received list: Set an address selected fromreceived mail history.– Sent list: Set an address selected from sent mailhistory.Address menu 1– Open phonebook: You can add the address bysearching the phonebook.– Input address: You can enter the address directly.– Change to To: You can change the setting ofreceiver to “To type”.– Change to Cc: You can change the setting ofreceiver to “Cc type”.– Change to Bcc: You can change the setting ofreceiver to “Bcc type”.– Delete address: You can delete the address. – Received list: Set an address selected fromreceived mail history.– Sent list: Set an address selected from sent mailhistory.Attach file menu– Attach file: You can select the file in “My picture”(P166) / “i-motion” (P173) / “Melody” (P176) of “Databox”.– Take a picture 3:A Still Image Finder Stand-byscreen appears. >P110Press C[Attach] on Still Image Shooting End displayto add to the attachment file.Mail](https://usermanual.wiki/LG-Electronics-USA/L602I.Users-Manual-1/User-Guide-760911-Page-157.png)
![151Mail– Take a movie 4:A Moving Image Finder Stand-byscreen appears. >P115Press C[OK] on Moving Image Shooting End displayto add to the attachment file.– Delete att. file 2:You can delete the attachment file.– Play/ Display file 2:You can play or view the file.Add signatureYou can insert a signature at the end of the text of mail.• You need to register the signature beforehand. >p156Delete bodyYou can delete the the text of mail that you arecomposing or editing.Delete mailYou can delete the mail under composing or editing.1 : After selecting / / , you can operate the menu.2 : After selecting , you can operate the menu.3 : Unavailable when a shot still image exceeding 5,000 bytes isalready attached to an attachment file.4 : Unavailable when a moving image/i-motion or JPEG imageexceeding 10,000 bytes is already attached to an attachmentfile.Information• The type or receiver– To: Ordinary receiver– Cc: To inform the contents in addition to the receiver.– Bcc: To inform the contents if you do not want otherreceivers to know except for direct receiver.• About attachable files1 : Up to 10 files when the total size of a data file includingmelodies, images and the text is equivalent to 5,000 full-pitch characters (i.e., 10,000 bytes).2 : You can attach either an image or moving image/i-motion movie of up to 100K bytes. You can attach thefile separately from melody files and images of 10,000bytes or less.• You cannot attach files that are prohibited from beingattached to mail or output from the FOMA phone to otherdevices.• When a JPEG image or an i-motion movie in excess of 10,000bytes is attached, the number of characters you can enter inthe text field decreases by the equivalent of 100 full-pitch (200half-pitch) characters.• The i-mode phone of the mova service cannot receive GIFimages and melodies.• Some attached files may be deleted at the i-mode Center ornot be received, displayed, or played properly by therecipients.MailMaximum number of filesType of fileMelodyUp to 10 files 11 file 2Image of 10,000 bytesor less (JPEG, GIF)Moving image/ i-motion movieImage over 10,000bytes (JPEG)](https://usermanual.wiki/LG-Electronics-USA/L602I.Users-Manual-1/User-Guide-760911-Page-158.png)
![152MailUsing the Submenu of the Creating nextEntry ScreenFrom creating next Entry screen, press M[Menu] andselect a Submenu item. See “Using the Submenu ofCharacter Entry display” (P218) for the available Submenuitems.Composing SMS messagesC](Mail) ]42You can create and send SMS messages. You can sendand receive SMS messages to and from the subscribersto overseas carriers in addition to DoCoMo. Forinformation on the countries and overseas carriers withwhich SMS messages can be exchanged, see theInternational Service web page of DoCoMo.1. From the Mail menu (P137), select “Compose mail”]“Compose SMS”<Compose SMS Display>2. Select the Address field ]C]“EnterAddress” ]Enter the recipient’s phone number ]C• For a menu displayed for destinations, see “Addressmenu” (P153) of “Using the Submenu” of theCompose SMS Display.3. Select the Message field ]C]Enter themessage ]C4. I[Send]If the recipient is a subscriber to an overseas carrierother than DoCoMo:“+” (Press key 2 times) ]“Country code” ]“Mobile phone number of the recipient”or“010” ]“Country code” ]“Mobile phone numberof the recipient”• If the mobile phone number starts with 0, enter thenumber by omitting “0”.Information• Depending on the radio wave conditions, the characters maynot be sent successfully to the destination.• When you send an SMS message to a subscriber to anoverseas carrier, if characters that the other party does notsupport are included in its text, they may not be displayedcorrectly.• If the receiver has an i-mode phone of mova service, it mayreceive SMS from FOMA phone as i-mode mail.Select SendMenuCompose SMSMail](https://usermanual.wiki/LG-Electronics-USA/L602I.Users-Manual-1/User-Guide-760911-Page-159.png)
![153Mail• If the sender does not notify caller ID (including publicphone/Unknown ID), you cannot answer to the SMSmessage.Using the Submenu of the Compose SMSDisplay1. From the Compose SMS display (P152), M[Menu]]Select from the following Submenu items SendYou can send an SMS message that you arecomposing or editing.SaveYou can save an SMS message that you arecomposing or editing in Draft box.Address menu– Open phonebook: You can add the address bysearching the phonebook.– Input address: You can enter the address directly.– Received list: Set an address selected fromreceived mail history.– Sent list: Set an address selected from sent mailhistory.SMS report requestYou can set whether to request a report for the SMSmessage that you are composing. An SMS report isan SMS message to notify you when your SMSmessage reaches the recipient.SMS validity termYou can set the period during which the SMS Centerholds the SMS message that you are composing orediting when the recipient cannot receive itimmediately.Delete bodyYou can delete whole sentences entered in the text.The phone number of receiver will not be deleted.Delete SMSYou can delete the SMS message that you arecomposing or editing.Using the Submenu of of the Character Entering Display while Composing SMSFrom the Compose SMS display, press M[Menu] andselect a submenu item. See “Using the Submenu of theCharacter Entry display” (P218) for the availableSubmenu items.Mail](https://usermanual.wiki/LG-Electronics-USA/L602I.Users-Manual-1/User-Guide-760911-Page-160.png)
 ]5When your FOMA phone has been turned off or out of theservice area, you can check whether or not the i-modeCenter holds i-mode mail and messageR/F.1. From the Stand-by screen, press Mfor 2 or moreseconds• The Check results display appears. To read thereceived i-mode mail immediately, select “Mail” andpress C.Information• When the i-mode Center holds i-mode mail and messageR/F,the relevant icon (P31) is displayed. When mail or messagesarrive at the Center when, for instance, your FOMA phone isturned off, the icon may not be displayed.• When “Receive option” is set to “ON,” you will receive all mailheld at the Center if you use “Check new message.” If you donot want to receive all mail, unmark “Mail” from the “Checknew message” (P155) beforehand.Receiving Selected MailC](Mail) ]6You can check the subject of i-mode mail held at the i-mode Center and select mails to receive, or delete mailsat the Center before receiving them.To use this function, you need to set “Receive option”(P155) to “ON” beforehand. Note that, when this is “ON”,i-mode mail cannot be received automatically.1. From the Mail menu (P137), “Receive option”• The phone is connected to the Center, and thedisplay for selecting mail to receive is displayed.2. Select the pull-down menu for each mail ]C]Select “Receive”, “Delete” or “Hold” ]C3. Select “Receive/Delete” ]C• The confirmation screen appears.4. Select “OK” ]C• In step 2, the mail for which “Receive” was selectedare received immediately.Mail](https://usermanual.wiki/LG-Electronics-USA/L602I.Users-Manual-1/User-Guide-760911-Page-161.png)
 ]7When your FOMA phone has been turned off or out of theservice area, you can check whether or not the SMS Centerholds SMS messages.1. From the Mail menu (P137), “Check new SMS”• The Check results display appears. To read thereceived SMS messages immediately, press C.Changing Mail SettingCommunicationC](Mail) ]81You can make settings related to communication of mailand SMS messages.Setting items/Setting at purchase >P2391. From the Mail menu (P137), “Mail setting” ]“Communication” ]Select from the followingsetting items ]After setting, I[Done]Receive opt. settingYou can set whether to select i-mode mail to receive.If this function is set to “ON,” you cannot receive i-mode mail automatically.Receive attach fileYou can set whether to receive images or melodiesattached to i-mode mail.Check new messageWhen you receive messages by performing “CheckNew Message,” you can select an item to check fromi-mode mail, messageR/F.SMS report requestYou can set whether to request a report for the SMSmessage that you are composing. An SMS report isan SMS message to notify you when your SMSmessage reaches the recipient.SMS validity termYou can set the period during which the SMS Centerkeeps the SMS message that you are composing orediting when the recipient cannot receive itimmediately.Information• The attachment file set to by “Receive attach file” cannotbe received as the file is deleted at i-mode center.• You can receive the melody of MFi format attached to thebody of mail even if you set the “Melody” to by “Receiveattach file”.Mail](https://usermanual.wiki/LG-Electronics-USA/L602I.Users-Manual-1/User-Guide-760911-Page-162.png)
 ]82You can make settings related to a signature to beattached to the mail text and quotation mark for whenreplying to mail.Setting items/Setting at purchase >P2391. From the Mail menu (P137), “Mail setting” ]“Edit”]Select from the following setting items ]Aftersetting, I[Done]Edit signatureYou can set whether to automatically attach yourname and address (signature) at the end of the textand can set the contents of the signature.Edit quotationYou can set symbols or sentences to be attached tothe head of the original text (quotation mark) for“Reply quoted”.ViewC](Mail) ]83You can make the settings related to the display of mailand SMS messages.Setting items/Setting at purchase >P2391. From the Mail menu (P137), “Mail setting” ]“View” ]Select from the following setting items ]After setting, I[Done]Character sizeYou can set the character size of the text on the Maildisplay screen.ScrollYou can set the number of lines to scroll whenpressingHon the Mail display screen.Mail list displayYou can set the display method (the number oflines/the contents displayed) on the mail list display.Folder securityYou can set security to Inbox, Outbox, and Unsentmessages in the Mail menu. To display the messagesin the box with security set, enter terminal securitycode >C[OK].Melody auto playYou can set whether to automatically play a melodyattached or pasted on the mail display screen.](https://usermanual.wiki/LG-Electronics-USA/L602I.Users-Manual-1/User-Guide-760911-Page-163.png)
 ]84You can check the settings made in “Mail setting” andreset the settings to the default.1. From the Mail menu (P137), “Mail setting” ]“Others” ]Select from the following setting items.Check settingsYou can check the settings made in the “Mailsettings”.Reset settingsYou can reset the settings made in the “Mail settings”to the default. To reset settings, enter terminal securitycode >C[OK].Reset dataYou can delete all mail messages and MessageR/Fstored in the FOMA phone. To reset the datal, enterterminal security code >C[OK].](https://usermanual.wiki/LG-Electronics-USA/L602I.Users-Manual-1/User-Guide-760911-Page-164.png)

![159What is i-appli.......................................160Downloading i-appli from Sites ...........160Starting i-appli......................................161i-appliOn the Stand-by display, C[Menu] ](i-appli) or “i-appli”To display the Software ListSelectMenuSoftware list 1/1Selecti-appli](https://usermanual.wiki/LG-Electronics-USA/L602I.Users-Manual-1/User-Guide-760911-Page-166.png)
![160i-applii-appliWhat is i-appliBy downloading various software programs from sites andsaving them into the FOMA phone, you can automaticallyupdate the stock prices, weather information, etc. andenjoy games even without connecting to the network.• Refer to “Mobile Phone User's Guide [i-mode]” fordetails.• This model does not support all the services describedin “Mobile Phone User's Guide [i-mode]”. Check whichmodels support which services described in “MobilePhone User's Guide [i-mode]”.Downloading i-appli from SitesDownload software from sites and start the FOMA phone.1. Display a site that supports downloading of i-appli]Select an item that enables you to download thesoftware ]C2. After the download is finished, C• After the download is finished, the communicationsetup display may appear. After setting, press I[Done].• Some software may start immediately after it isdownloaded. In this case, the software may not havebeen saved. When ending the software, theconfirmation display may appear asking whether tosave it. Select “Yes” to save it.3. “Yes”/“No”• “Yes”: Activates i-appli.• “No”: Returns to the Site display.Information• Downloading is not available at some accessed sites.• At downloading software, the confirmation display may appearasking whether to use the “serial number of your mobilephone/UIM”. Select “Yes” to start downloading. In this case,the “serial number of your mobile phone/UIM” is sent to the IP(Information Service Provider) over the Internet, so could beperceived by third parties. However, your phone number,address, age and gender are not notified to the IP (InformationService Provider) or others by this operation.](https://usermanual.wiki/LG-Electronics-USA/L602I.Users-Manual-1/User-Guide-760911-Page-167.png)
1. Press I[i-mode] for 1 or more seconds from onStand-by display.<Software List>2. Select the software to be launched ]C•P: End the activation of i-appli.Icons on the Software List• Each icon will be displayed thinly when downloading by other UIMor upgraded of i-appli (Restriction on UIM). Information• Some software continues communication after downloaded.You can let it not communicate by “Communication” setting.Using the Submenu of the Software ListSetting item/Setting at purchase >P257• Some submenus are not available depending on thesoftware.1. From the Software List (See left), M[Menu] ]Select from the following Submenu itemsCreate folderYou can create a folder.Delete folderYou can delete a selected holder. You cannot delete afolder in which software is saved.Rename folderYou can edit the name of the selected holder.Move to folderYou can move a selected software to another folderyou created.UpgradeYou can upgrade the version of the selected software.DeleteYou can delete the selected software.Delete selectedYou can select and delete multiple software. Afterselecting, M[Menu] >Select “Delete”.DescriptionIconi-appli that Auto start is seti-appli downloaded from SSL siteNormal i-appliThe folder you created(Blue)](https://usermanual.wiki/LG-Electronics-USA/L602I.Users-Manual-1/User-Guide-760911-Page-168.png)
![162i-applii-appliDelete allYou can delete all softwares in i-appli. To delete all,C>Enter terminal security code >C[Done].SortYou can sort software.PropertiesYou can check the name, size, etc. of the selectedsoftware.CertificateYou can check the owner, issuer, expiration date, etc.of the certificate used for the selected software.Network settingYou can set whether to communicate while theselected software is being started. After setting, pressI[Done].i-appli ToYou can set whether to start the software selectedfrom a site or mail. After setting, press I[Done].Icon info settingYou can set whether icon information for i-mode mail,SMS, messageR/F, battery level, Manner Mode, radiowave strength and being out of area is to be used bythe software selected. After setting, press I[Done].Autostart settingYou can set to activate the selected softwareautomatically. If you set to “Set”, select “Edit” andenter the method for activation and the time. Aftersetting, press I[Done].Show desc settingYou can set whether to display software informationat i-appli downloading. After setting, press I[Done].Autostart failureYou can check information when i-appli fails to startautomatically.Trace infoYou can check information when i-appli supporting thetrace function has been terminated due to an error.System infoYou can check system information such as memoryusage status of i-appli.: You cannot use the folder you created.](https://usermanual.wiki/LG-Electronics-USA/L602I.Users-Manual-1/User-Guide-760911-Page-169.png)
![163i-applii-appliNext page Information• Note that you may not be able to receive timely information ifyou have set “Network Setting” to “OFF”.• When you perform “Upgrade” of the software, theconfirmation display may appear asking whether to use the“serial number of your FOMA phone / UIM”. If you select“Yes”, version upgrade starts. In this case, your “mobile phonenumber / serial number of UIM” is sent to the IP (InformationService Provider) over the Internet, so could be perceived bythird parties. However, your phone number, address, age, andgender are not notified to the IP (Information Service Provider)or others by this operation.• Since the version up of pre-installed i-appli is free of charge,the confirmation screen asking whether to use the “serialnumber of your FOMA phone / UIM” does not appear.• If “Icon Info set” is set to “Use”, icon information for i-modemail, SMS, messageR/F, battery level, Manner mode, radiowave strength and being out of area may be sent to the IP(Information Service Provider) over the Internet just like your“mobile phone number / serial number of UIM”, so could beperceived by third parties. However, your phone number,address, age, and gender are not notified to the IP(Information Provider) or others by this operation.Pre-installed i-appliThis game is to remove the blocks when putting the blockhas a same result after multiplying the serial number.(Brain teaser by multiplication matrix)1. From the screen of software list (P161), select “”]C]Select the following menu•I[Quit]: You can end a game.Start 1Starts the game.Stage 1You can select the stage (01~10) by pressing JContinue 2You can resume the game on pause.Key infoYou can view the information on each button. Afterdisplaying, press I[Menu] to return to the menu.HelpYou can view the information to remove the block.After displaying, when you press J, you can changethe screen. Press I[Menu] to return to the menu.RankYou can view the status of score rank. After displaying,you can return to the menu by pressing I[Menu].](https://usermanual.wiki/LG-Electronics-USA/L602I.Users-Manual-1/User-Guide-760911-Page-170.png)
![164i-applii-appliSoundYou can set the sound of game. Each time you pressC, you can turn on or off sound.1 : You cannot see these menus on games on pause.2 : You can see these menus only on games on pause.Screen on game•M[Pause]/[Resume]: You can pause the game. If youpress it again, you can resume it.•I[Menu]: Terminate the game and display the menu.Button on gameSee Key info (P163) of menu for details.Deleting the blockYou can delete the falling blocks if you meet the followingcondition. When the blocks are full from 4th line to 7th linefrom the left, the game is over.• In case the result after multiplying is 2 digits a, you canpaste the block beside same to the last number.• See “Help” (P163), for the block except for number.Game overThe screen of game over is displayed. If you press C,you can view the score by displaying rank screen. If youpress I[Menu], you can return to the menu.Information• When you close the FOMA phone during the game, the gameis continued. The game is paused when a call comes in.Vertical direction Horizontal direction<Example: Combining the block of number 224>All 3 blocks will beremoved.ĿŁĿŁPause MenuIf you remove the block, the number will be reduced. If the number is 0,the stage will be clear.Indicates next block.Indicates the current stage. If the rest of blocks are cleared, theblock will be dropped beside 1 line.](https://usermanual.wiki/LG-Electronics-USA/L602I.Users-Manual-1/User-Guide-760911-Page-171.png)
![165Introduction of Data box......................166Displaying/Managing/Editing Images......................................166Playing back/Managing/Moving Images/i-motion......................173Playing back/Managing/Melody..........176Data boxOn the Stand-by display, C[Menu] ](Data box) or “Data box”To display the Data box menu1 My picture2 i-motion3 MelodySelectData boxSelectData box](https://usermanual.wiki/LG-Electronics-USA/L602I.Users-Manual-1/User-Guide-760911-Page-172.png)
 ]1You can display the shot still images, or still imagesobtained from sites or i-mode mails.The File Format To Display• This FOMA phone supports to display file format as follows.: Some files cannot be played depending on the file format. Data boxMenu item ContentsFolderMy picturei-motionStill images etc. shotcamera.Pre-installed stillimagesStill images obtainedfrom sites, etc.Pre-installed movingimagesi-motion obtained fromsites, etc.CameraPre-installedi-modeCameraPre-installedi-modeMenu item ContentsFolderMelodyPre-installedMelodies obtained fromsites, etc.Pre-installed melodiesi-modeData transferStill images obtainedthrough datatransmission, etc.Data transferMelodies obtainedthrough datatransmission, etc.Data transferMoving images obtainedthrough datatransmission, etc.ItemStill images usable forframes and elementsMoving images shot byvideo camera etc. File format JPEG, GIFPixel/File sizeUp to 1280 x 1024 dotsFile sizeExtension nameJPEG file : Up to 700K bytes, GIF file : Up to 500K bytesjpg, gif](https://usermanual.wiki/LG-Electronics-USA/L602I.Users-Manual-1/User-Guide-760911-Page-173.png)
![167Data boxData boxDisplaying Images1. From Data box menu (P165), “My picture”<Folder List>2. Select a folder ]C<Image File List>3. Select a file ]CThe mark on the image file list: Output from the FOMA phone is inhibited or file editing isrestricted.FullMenu MailFile name<Image>•CĮFullį : The image will be displayed in full screen.•IĮMailį : You can send i-mode mail with attaching the selected file. Go to step 2 on page 149 of “Composing i-mode mail”. •J : Displays the previous or next file.Hp!up!Nz!qjduvsfCamera [1/5]OpenMenu SwitchThe name and size of selected file •I [Mail] : You can compose i-mode mail with attaching the selected file. Go to step 2 on page 149 “Composing i-mode mail”.OpenMenu SwitchMy picture [1/5]CameraData transfer0 File4 fileItem 80 FilesPre-installed0 File •I [View by] : You can select the type of listing the folder.The number of files in the selected folderDescriptionMarkPrevious listThe file set the restrictionUnrecognized file](https://usermanual.wiki/LG-Electronics-USA/L602I.Users-Manual-1/User-Guide-760911-Page-174.png)
![168Data boxData boxUsing the Submenu of the Folder ListSetting item/Setting at purchase >P2581. From the Folder List (P167), M[Menu] ]Selectfrom the following Submenu itemsOpenYou can open the selected folder.New folderYou can create a folder.DeleteYou can delete the selected folder.Sort byYou can sort the folders.Sorting the created folders are applied to only by the“Name”.View byYou can change folder display methods.Memory info.You can check status of the storage area on theFOMA phone, etc.Folder propertyYou can check the name, size and the number of thefiles in the folder of the selected folder.: You cannot use this menu in pre-installed folder. Information• If you delete a folder which includes an image set as awallpaper in stand-by mode, phonebook or the video-phonecall, or if you delete a folder which includes a melody set toringtone, alarm or schedule, each one can be returned to thesetting at purchase.Using the Submenu of the Image File List DisplaySetting item/Setting at purchase >P2581. From the Image File List screen (P167), select a file]M[Menu] ]Select from the following SubmenuitemsNew folder 1You can create a folder.Files 1–View : You can display the selected file.–Edit 2 4 :You can edit the selected file. >P171–Move 3:You can move the selected file to otherfolder. Select the folder C>I[Paste].–Copy 3:You can copy the selected file to otherfolder. Select the folder C>I[Paste].–Delete : You can delete the selected file.–Delete all : You can delete all the files in the folder.You need to enter your terminal security code fordeleting.–Rename : You can change the name of theselected file.](https://usermanual.wiki/LG-Electronics-USA/L602I.Users-Manual-1/User-Guide-760911-Page-175.png)
![169Data boxData boxMark/Unmark 1You can move, copy, and delete after selectingmultiple files. After selecting, press M[Menu] >“File”>Select “Move”/“Copy”/“Delete”–Mark : You can select a file at a time.–Mark all : You can select all the files collectively.–Unmark : You can deselect the file selected by“Mark” or one of the files selected by “Unmark all” ata time.–Unmark all : You can deselect the file selected by“Mark” or all the files selected by “Unmark all”.Send via mail 1 4You can attach a file to i-mode mail for sending. Go tostep 2 (P149) of “Compose i-mode mail ”.Set as wallpaperSelect the “Main display” or “Sub display” and set aswallpaper for the Stand-by display, etc.Slide show–Go : Files in the folder are displayed in order.–Settings : You can set the “view as” and “Timeinterval (secs)”. After setting, press I[Done].Make animated GIF 1 4You can select up to 10 files to create animation. Afterselecting the files, press I[Make].Sort byYou can sort files.View byYou can change file display methods.Memory info.You can check status of the storage area on theFOMA phone, etc.File propertyYou can check the name, size and type, created time,resolution, file restriction of the selected file.1: You cannot use this menu in “Item” or “Pre-installed” folder.2: You can use only JPEG file (Except for unrestricted file).3: You cannot move and copy this menu to “Item” or “Pre-installed” folder.4: You cannot use this menu for restricted file.Information• If you delete the image set in stand-by mode, phonebook, orvideo-phone, each image returns to the setting at purchase.](https://usermanual.wiki/LG-Electronics-USA/L602I.Users-Manual-1/User-Guide-760911-Page-176.png)
![170Data boxData boxUsing the Submenu of the Image DisplaySetting items/Setting at purchase >P2581. From the Image display (P167), M[Menu] ]Selectfrom the following Submenu itemsMFiles 1–Delete : You can delete the displayed file.–Rename : You can change the name of thedisplayed file.–Edit 2:You can edit the displayed file. >P171Send via mail 1 3You can attach a file to i-mode mail for sending. Go tostep 2 of “Compose i-mode mail” (P149).FullYou can bring up an image on the full display hiding thesoft keys and display information.•J: The previous image/next image is displayed.•Q: The full display is cancelled.ZoomDisplays an image in a large size.•M[+]: Each time you press M, the displayedimage is enlarged.•I[–]: The image is displayed in the previous size.•K: You can move the display position of theexpanded image.•Q: The zoom is cancelled.Set as wallpaperSelect the “Main display” or “Sub display” to set aswallpaper for the Stand-by display.Slide show–Go : Files in the folder are displayed in order.–Settings : You can set the “View as” and “Timeinterval (secs)” for the slide show. After the setting,press I[Done].Go to listYou can return to the list screen. (P167)File propertyYou can check the name, size, type , created time,resolution and file restriction of the selected file.1: You cannot use this menu in “Item” or “Pre-installed” folder.2: You can use only JPEG file (Except unrestricted file).3: You cannot use this menu in restricted file.Information• If you delete each image which set as a wallpaper in stand-bymode, phonebook, or video-phone call, each one can bereturned to the setting at purchase.](https://usermanual.wiki/LG-Electronics-USA/L602I.Users-Manual-1/User-Guide-760911-Page-177.png)
![171Data boxData boxNext PageEditing Still ImagesYou can edit a still image. You can edit only a JPEG file.There are some cases that you may not be able to edit. Theedited still image is saved into the folder containing theoriginal still image.Setting items/Setting at purchase >P2581. From the Image File List (P167) Display (P167),select a file, on the Image Display screen, pressM[Menu] ]“Files” ]“Edit”• The screen to edit the image appears.2. From the Edit display, M[Menu] ]Select from thefollowing editing methods ]After setting,C[Save] ]New file/Original file ]C• After editing in screen, you can operate the functionas follow.–M[Menu]: Displays the edit menu.–I[Undo]: Undoes the edited file.SaveYou can save the edited still image.RotateYou can rotate a still image 90 degrees to the left orto the right.1) Left / Right•M[Rotate]: You can rotate a still image 90 degreesto the left or to the right.•I[Cancel]: You can cancel editing. 2) Press CResizingYou can change the size of a still image.Insert–Text : You can paste a text to a still image.• If you press M[Menu], you can change thesettings of “Font size” and “Font color”.1) Select a text box ]C2) Enter text ]C•M[Text]: You can change the text box.•I[Cancel]: Returns to previous menu.3) C]Select a position of the text using K]C](https://usermanual.wiki/LG-Electronics-USA/L602I.Users-Manual-1/User-Guide-760911-Page-178.png)
![172Data boxData box–Frame : A frame is added to a still image.Select a frame to add.1) Select a frame ]C•M[Rotate]: You can rotate a still image 180degrees to the left or to the right.•I[Cancel]: Returns to previous menu.2) Press C–Element : An element is pasted to a still image.• If you press M[Menu] on element selection screen,you can select a size of the element.1) Select an element ]C2) Select a position to paste the element by K]C• If you continue to add same element, repeat step2.•M[More]: You can change to another element.3) I[Done]Clipping1) Select the size for trimming ]C• The range for trimming is marked in red line.2) Select the position for trimming by pressing K]C• If you select “User defined size”, move the redcursor by pressing K, and set the starting andending point for trimming by pressing C.Effect–Black & White : Makes the color tone black andwhite.–Sepia : Makes the color tone sepia.–Negative : Reverses the color tone.–Black & White negative : Makes the color toneblack and white and reverses the color tone.–Color balance : After selecting “Red”, “Green” or“Blue”, adjust the shading by pressing J.–Contrast : Emphasizes or weakens contrast.–Sharpness : Emphasizes the contour.–Softness : Gradates the contour.–Mosaic Blur : Applies the mosaic. Select “Square”/ “Round” and move to red line by pressing K, andthen set the starting and ending point to apply themosaic by pressing C.MirrorReverse the image horizontally.UndoUndoes the edited file.You cannot use this menu for the file before editing.Information• You can perform “Resizing” only to make it smaller than theoriginal still image. You may not be able to change the sizedepending on the display size of the original image.• If a screen proportion of the size selected by “Resize” isdifferent from the original size of still image, it may be saved bydifferent size from selected one.](https://usermanual.wiki/LG-Electronics-USA/L602I.Users-Manual-1/User-Guide-760911-Page-179.png)
 ]2You can play back moving images shot by the camera, ormoving images obtained from sites or i-mode mail. Playable file formatFOMA handset can play the file as follow.You may not be able to play some files depending on file formateven if it is compatible with a phone.Information• When more than 3,000 files are stored in one folder, if you tryto play a movie stored in this folder, it may not be playedproperly because of lack of memory. In this case, move the fileto another folder and play. Playing back Moving Images / i-motion1. From the Data box menu (P165), “i-motion”<Folder List>•I[Switch] : You can change the type of display offolder.2. Select a folder ]C<Moving image File List>Hp!up!j.npujpoCamera [1/6]OpenMenu Switch• See step 2 Display screen (P167) for the mark on display screenVoice fileThe name and size of selected file OpenMenu Switchi-motion [1/5]CameraData transfer0 File5 filePre-installed1 Filesi-mode 0 FileThe number of the files in the selected folderCodec systemFile formatExtension nameMP4MP4 file (Image: MPEG4, H.263,Voice: AAC, AMR)3gp](https://usermanual.wiki/LG-Electronics-USA/L602I.Users-Manual-1/User-Guide-760911-Page-180.png)
![174Data boxData box•I[Mail] : You can send i-mode mail attaching theselected file. Go to step 2 on page 149 of“Composing message”.3. Select a file ]C<Moving Image Playback>•C[Plays back]/G[Pauses]:Plays back / Pauses•I[Stop]: Stops•J: Plays back the previous file / next file•J(Press and hold): The images are fast forwarded/ fast rewound while it is pressed•H/FE: Adjusts volumeUsing the Submenu of the Folder ListSee “Using the Submenu of the Folder List” of images (P168)for the submenus available.Using the Submenu of the Moving Image File ListSetting item/Setting at purchase >P2591. From the Moving Image File List (P173), select afile ]M[Menu] ]Select from the followingSubmenu itemsPlayPlays back the selected file.New folder 1You can create a folder.Files 1–Move 2:You can move the selected file to anotherfolder. Select a folder to move >C>I[Paste].–Copy 2:You can copy the selected file to anotherfolder. Select a folder to move >C>I[Paste].–Delete : You can delete the selected file.–Delete all : You can delete all files in the folder. Ifyou delete all files, you need to enter your terminalsecurity code.–Rename : You can change the name of theselected file.Mark/Unmark 1You can move, copy or delete multiple files. Afterselecting , M[Menu] >“File” >Select “Move”/“Copy”/“Delete”.–Mark 2:You can select a file at a time.–Mark all : You can select all the files collectively.VolumePlayback barPlayback elapsed time /maximum playback timeStereo / monauralPause StopMenu](https://usermanual.wiki/LG-Electronics-USA/L602I.Users-Manual-1/User-Guide-760911-Page-181.png)
![175Data boxData box–Unmark : You can deselect the file selected by“Mark” or one of the files selected by “Mark all” at atime.–Unmark all : You can deselect the file selected by“Mark” or all the files selected by “Mark all”.Send via mail 1 3You can attach a file to i-mode mail for sending. Go tostep 2 (P149) of “Compose i-mode mail”.RingtonesSet a ring alert for incoming voice and video-phonecalls.–Voice call : Set a selected file as a ring alert forincoming voice calls.–Video-phone : Set a selected file as a ring alert forincoming video-phone calls.Sort byYou can sort files.View byYou can change file display methods.Memory info.You can check the status of the storage area on theFOMA phone, etc.File propertyYou can check the name, size, type, created time,resolution or file restriction of the selected file.1: You cannot use the file in “Pre-installed” folder. 2: You cannot move or copy the file in “Pre-installed” folder.3: You cannot use this menu in restricted file.Using the Submenu of the Moving ImagePlayback ScreenFor MP4 file with only voice without image, see “Using theSubmenu of the Melody Playback” (P177).Setting item/Setting at purchase >P2591. From the Moving Image Playback display (P174),M[Menu] ]Select from the following SubmenuitemsPause 3(Play 5)You can pause the moving images being playedback.Send via mail 1 2You can compose an i-mode mail attaching a file to it forsending. Go to step 2 (P149) of “Composing i-modemessage”.Expand 3You can view the whole moving image without displayingthe indication of soft key or player. •Q: cancel this function.](https://usermanual.wiki/LG-Electronics-USA/L602I.Users-Manual-1/User-Guide-760911-Page-182.png)
 ]3You can play back pre-installed melodies, and melodiesobtained from sites, etc.Playable file format• This FOMA phone supports to display file format as follow.1: Some files may not be played even if its format is supported.2: The voice format of AAC or AMR is saved as 3gp file in “i-motion” folder.Information• When more than 3,000 files are stored in one folder, if you tryto play a melody stored in this folder, it may not be playedproperly because of lack of memory. In this case, move the fileto another folder and play. Playing Back Melody1. From the Data box menu (P165), “Melody”<Folder List>•I[Switch] : You can change the display type offolder.Open SwitchMenuMelody [1/3]Data transfer 0 Filei-mode 0 FilePre-installed47 FilesFolder nameThe number of files in the folder.File format 1Extension nameSMF, MFi, MP4 2mid, mld](https://usermanual.wiki/LG-Electronics-USA/L602I.Users-Manual-1/User-Guide-760911-Page-183.png)
![177Data boxData box2. Select a folder ]C<Melody File List>•I[Mail] : You can attach the file to i-mode mail. Go to step 2 on page 149 of “Composing i-mode mail”.3. Select a file ]C<Melody Playback>–C,G: Plays back / pauses–J: Plays pack the previous file / next file–J(Press and hold): Melodies are fast forwarded /fast rewound while pressing it.–H/FE: Adjusts the sound volume–I[]: Sets the repeat area (Starting point/Ending point) If you press after setting, you canrelease it.Information• When you play an MFI file that auto-repeat is set. you cannotpause (stop temporarily) while playing the file after secondplay back. To pause the file, select “Pause” from the submenu. >P178Using the Submenu on the Folder ListFor the submenu items available see “Using the Submenu ofthe Folder List” of Images (P168).Using the Submenu of the Melody File ListSee “Using the Submenu of the i-motion File List” (P174)for the Submenus available.Information• If you delete the melody set as the tone for incoming call, alarmor schedule, each melody returns to setting at purchase.Using the Submenu of the Melody Playback ScreenSetting item/Setting at purchase >P2591. From the Melody Playback display (P177), M[Menu]]Select from the following Submenu itemsPlayback barPlayback elapsed time /maximum playback timeVolumePauseMenuOpenMenu SwitchPre-installed [1/46]..Go to MelodyAlarm02.mid1.8KBAlarm01.mid2.3KBAlarm03.mid2.0KB• See step 2 “Display screen” for the mark on display screen.File name/File size](https://usermanual.wiki/LG-Electronics-USA/L602I.Users-Manual-1/User-Guide-760911-Page-184.png)
![178Data boxData boxPause 4(Play 5)You can pause the melody being played back.Send via mail 1 2You can attach melody files to i-mode mail for sending.Go to step 2 (P149) of “Composing i-mode mail”.Ringtones 2 3You can set a ring tone for voice or video phone calls.Mute (Unmute)You can mute the tone for playing back melodies.Set repeat 3 4You can select a repeat method of melody.–None : You can cancel repeat setting.–Current file ( ) : You can repeatedly play backthe current melody.–All files ( ) : You can repeatedly play back allthe melodies in the folder.–Shuffle : You can shuffle and play back all themelodies in the folder.Area repeat ( )5You can specify a playback area for playing backmelodies. You can set the starting point byperforming this operation. You can set the endingpoint by repeating the same operation or pressing I[].Player settingsYou can change settings of the visual effect and thecolor tone of the player.File propertyYou can display the name, size, type, created time,duration, ringtone and file restriction of the selectedfile.1: You cannot use the menu in pre-installed folder.2: You cannot use this menu for restricted file.3: You cannot use this menu in MP4 file, if image is not recorded.4: You can use this menu only on playing.5: You can use this menu only on pause or after ending to playback.6: You cannot use this menu on pause or after ending to playback.Information• You can also change settings of the ring tone from theMelody File List Screen. From the Melody File List screen(P177), press M[Menu] select a “Ringtone”.](https://usermanual.wiki/LG-Electronics-USA/L602I.Users-Manual-1/User-Guide-760911-Page-185.png)
![179Using Alarm ..........................................180Setting the Custom Menu ....................181Using the Infrared Communication Function................................................182Using Calculator...................................184Using Unit Converter............................185Using World Time.................................187Using Stop Watch ................................188ToolsOn the Stand-by display, C[Menu] ](Tools) or “Tools”To display the Tools menu1 Alarm2 Custom menu3 Receive Ir data4 Calculator5 Unit converter6 World time7 Stop watchSelectToolsSelectTools](https://usermanual.wiki/LG-Electronics-USA/L602I.Users-Manual-1/User-Guide-760911-Page-186.png)
 ]1You can set Alarm to alert you at the specified time. Youcan also set Snooze or an alarm tone.Setting AlarmSetting item/Setting at purchase >P2421. From the Tools menu (P179), “Alarm”<Alarm List>•I[ON]/[OFF] : You can set the alarm ON or OFF.2. Select the alarm to edit ]C]Select the item toedit ]C]After editing, I[Done].(Setting ON/OFF)You can select “ON” or “OFF”. To set Alarm, select“ON”.Time settingYou can set the time for making the Alarm sound.(Setting repeat)You can select the type of repeat.• If you set “Except holiday”, the alarm does not alerton Sunday or holiday (P192).(Melody)You can select an alarm tone.• Select from alarm tone stored in “Melody” in “Databox”. >P176(Memo)You can enter an alarm name.Turbo AlarmSet an alarm to sound at the maximum volume andthe vibration to operate at the maximum level. Select“OFF” when not setting the turbo alarm.SnoozeSelect the time intervals of Snooze. If you do not wantto use Snooze, select “OFF”.If “Snooze” is set to “ON”, the alarm repeats up to 12times.When the Specified Time ComesWhen the specified time comes, the display informing ofAlarm appears and the Alarm sounds. To stop Alarm,perform the following operations:•C[OFF]: Alarm stops. When Snooze is set to “ON”, it iscanceled.•I[Snooze]: Alarm stops. The set Snooze continues.ToolsDescriptionIconAlarm is set to “ON”Alarm is set to repeat](https://usermanual.wiki/LG-Electronics-USA/L602I.Users-Manual-1/User-Guide-760911-Page-187.png)
![181ToolsToolsNext PageaDuring a Voice/Video-phone CallAn alarm does not sound at the specified time during acall because the icon is not displayed on upper side. Afterending the call, the alarm will be alerted on time.• After ending to play a file/to take image, the alarm willbe sounded with displaying alarm screen.• If you receive a voice call or video-phone call duringAlarm notification, Alarm is temporarily stopped, andthe Alarm is resumed after terminating the call.aDuring playing back moving image, melody/activating camera, video camera An alarm does not sound at the specified time during acall but the icon is displayed on upper side. Afterending the call/shooting, the alarm screen is displayedand alarm sounds.Information• If the FOMA phone is not turned on, the alarm does notsound.• If the alarm cannot be sounded during activating i-appli, thealarm icon blinks on upper part of the screen instead ofalarm sound to notify that the set time has come.• The alarm sounds after i-appli is finished.Using the Submenu of the Alarm List Screen1. From the Alarm List screen (P180), M[Menu]]Select from the following Submenu itemsEditYou can edit the selected alarm. Go to step 2 on page180 of “Setting alarm”.ON/(OFF)You can activate/deactivate the selected alarm.Mark/UnmarkSelect and set 1 or more of edited alarms “ON” or“OFF”. After selecting alarm(s), select M[Menu] >“ON”/“OFF”.–Mark: You can mark 1 alarm at a time.–Mark all: You can mark all alarms at once.–Unmark:You can unmark 1 alarm at a time, whichyou selected by “Mark” or “Mark all”.–Unmark all: You can collectively unmark all alarmsyou selected by “Mark” or “Mark all”.Setting the Custom MenuC](Tools) ]2You can specify functions to store in the Custom menu. Ifyou store functions frequently used in the Custom menu,you can quickly start the functions simply by pressingDon the Stand-by display.Setting item/Setting at purchase >P242](https://usermanual.wiki/LG-Electronics-USA/L602I.Users-Manual-1/User-Guide-760911-Page-188.png)
![182ToolsTools1.From the Tools menu (P179), “Custom menu”<Custom Menu>•C[Select]: You can activate the selected menu.•I[Edit]: You can change the menu saved asCustom.2. Select a blank line ]I[Add]• The list of functions that can be stored in the Custommenu appears.3. Select a function ]C• You cannot select the menu which is alreadyregistered.Using the Submenu of the Custom MenuDisplay1.From the Custom menu display (See above), M[Menu]]Select from the following Submenu itemsAdd new 1You can add a function to be registered from thefunction list. Go to step 3 of “Setting the CustomMenu” (See above).Open 2You can start the function selected.Edit 2You can change the functions registered. Go to step3 of “Setting the Custom Menu” (See above).Delete 2You can delete a function registered at a time.Delete allYou can delete all the registered functions collectively.1: This Submenu item is displayed when a blank line is selected.2: This Submenu item is displayed when a registered function isselected.Using the Infrared CommunicationFunctionC](Tools) ]3You can send and receive data such as Phonebook andBookmark using the infrared communication to and fromother FOMA phones and personal computers supporting theinfrared communication function.1 Search phonebook2 Mail3 i-mode4 Camera-mode5 Alarm6 Select ringtone7 [Menu7]SelectMenu EditCustom menu](https://usermanual.wiki/LG-Electronics-USA/L602I.Users-Manual-1/User-Guide-760911-Page-189.png)
![183ToolsToolsThe data to send by infraredPerforming Infrared CommunicationPlace the FOMA phone parallel to another device so that theinfrared data ports of these devices face each other.• The infrared data port is located on the right side of theFOMA phone. >P28• Place the FOMA phone on a stable location such as atable and do not move it during communication.• The distance for infrared communication should bewithin 20 cm.• Use Infrared communication within ±15 degrees fromthe center line.Information• During infrared communication, do not remove the battery. Ifyou remove the battery during communication the data viainfrared, this operation will be stopped.• If the battery level is low, you cannot exchange the data viainfrared. Before activating this menu, check the battery level. • The amount of data that can be received varies depending onthe capacity of the memory. If you cannot receive data, deleteunnecessary data, and then activate infrared menu again.• Before activating the infrared between the other phone, checkthe infrared compatibility of each equipment.• You may not be able to exchange data via infrared even if theother party supports infrared communication function.• While performing infrared communication, call, i-mode or datatransmission cannot be performed as the FOMA phonebecomes the same status as out of of the service area.Sending DataMake the receiving end ready for receiving the data andthen start sending data within 30 seconds following thesteps below.<Example: When you want to send/receive a phonebookvia infrared communication>1. Display of the data to be sent ]M[Menu]]“Send Ir data”]“Focusd data”/“All data” ]“Yes”: Not displayed when sending a bookmark.Data ContentsSending / Receiving 1 or multipledata (Phonebook of FOMAphone) Data that can be sent /received is name / phone number/ mail address / note / web page.(vCard items)Sending / Receiving 1 or multipledata (Bookmark of FOMA phone)Data available in infraredcommunication is title / URL. (vBookmark items)Own numberPhonebookBookmark](https://usermanual.wiki/LG-Electronics-USA/L602I.Users-Manual-1/User-Guide-760911-Page-190.png)
![184ToolsTools2. Make sure that the receiving end is ready forreceiving the data] “Yes”• When sending all items, enter a terminal security code(P104) and authentication password .: Enter the same password as that entered from thereceiver's terminal.Receiving Data1. Select “Receive Ir data” from Tools menu (P179)2. Perform sending operation on sender's terminal3. “Receive”/“Receive all” ] “OK”• When receiving all items, enter a terminal securitycode (P104) and authentication password .• When receiving 1 bookmark, confirm a bookmarkregistration screen displayed and press I[Done].• The Phonebook will be registered to the availablesmallest memory number.• The bookmark will be registered at the top of thebookmark list.• You can view a received phonebook by “Searchphonebook” (P66) and bookmark by “Bookmark”(P121).• If you remove the battery pack or turn off the handsetwhile receiving a bookmark via infrared communicationand receiving is interrupted, the bookmark receivedbefore the interruption will not be saved.: Enter the same password as that entered from thesender's terminal.Using CalculatorC](Tools) ]4You can perform calculation such as addition, subtraction,multiplication and division. Use the numeric buttons toenter numbers.1.From the Tools menu (P179), Select “Calculator”< Calculator screen >•*: Used to enter decimal point. •#: Used to enter the parenthesis.•Q: Used to delete the number to backward fromthe end.•I[AC]: You can reset all the number and calculation.Using the Function Menu of the Calculator Display1.From the Calculator display (See above), M[func]]Select from the following function menu items+/-Switches between positive and negative numbers.(period) Does not go to step 2.=func. ACCalculator](https://usermanual.wiki/LG-Electronics-USA/L602I.Users-Manual-1/User-Guide-760911-Page-191.png)
![185ToolsToolssinUsed for calculation of trigonometric functions.cosUsed for calculation of trigonometric functions.tanUsed for calculation of trigonometric functions.logUsed for calculation of logarithmic functions.lnUsed for calculation of natural logarithms (thelogarithm assuming e as the base) of the specifiedpositive number.expUsed for calculation of exponential functions.sqrtUsed for calculation of square roots (root).degSpecifies the unit of angle to “degree”.radSpecifies the unit of angle to “radian”.Radian expresses the angle in constant number n (nradian equals to 180 degree). 1 radian (360degree/2/) equals to approx. 57.29578 degree, 1degree (2//360 degree) equals to approx. 0.01745radian (/=3.141592653).(Step)2.Enter the number ]M[=]Using Unit ConverterThis is a useful function to convert currency, surface,length, weight, temperature, volume, and velocity.Converting Unit of CurrencyC](Tools) ]51This is a useful function for converting the yen on hand tothe dollar, etc.Setting at purchase >P242, P2431. From the Tools menu (P179), “Unit converter” ]“Currency”• The screen for converting a currency is displayed.(P186)2. Select the currency ]I[Rate]<Currency Unit Conversion>Currency unit filedValue entry field](https://usermanual.wiki/LG-Electronics-USA/L602I.Users-Manual-1/User-Guide-760911-Page-192.png)
![186ToolsTools3. Select next item ]After setting, press I[Done].Currency unit fieldSelect the unit of the currency. If you press C, you canedit the currency. However, you cannot change “ ”.Value entry fieldYou can set the currency exchange rate. For example, incase you convert from (Dollar) to (Yen) (Ex. 1120 ), you can set to 120, to 1.•#: Enters the decimal point.•Q: Deletes the number you entered from theend.Converting the currencyConverts a currency that exchange rate is set to anothercurrency. You can enter the currency whichever field toconvert. The value after conversion is displayed in theother field.1. “Unit converter” from “Tool”(P179) ]“Currency”<Currency conversion display>2. Select next item.Currency unit fieldYou can select the unit before / after conversion.Exchange rate entry fieldEnter the amount of the currency to convert. The amountafter the conversion is displayed in the other field.•#: You can enter decimal point.•Q: Deletes the character you entered from the end.•I[Reset]: You can reset all the number you entered.Converting Unit of SurfaceC](Tools) ]52You can change the unit of surface. You can enter theunit in up / down field to enter. The number after theconversion is displayed in the other field.Setting item/Setting at purchase >P2431. From the Tools menu (P179), “Unit converter” ]“Surface”• The Surface Unit Conversion display appears<Surface Unit Conversion>Surface unit fieldValue entry fieldListSurfaceAcreHectare00](https://usermanual.wiki/LG-Electronics-USA/L602I.Users-Manual-1/User-Guide-760911-Page-193.png)
![187ToolsToolsSurface unit fieldYou can select the unit of surface before/afterconversion.Value entry fieldEnter a numerical value of the surface to be converted.The number after the conversion is displayed in theother field.•#: Enters the decimal point.•Q: Deletes the number which you alreadyentered from the end. •I: [Reset]: The numerical value is reset.• The maximum input value is an integer of 10 digitsand 8 digits after the decimal point. However, whenyou input an actual number, the maximum inputvalue is 10 digits including the decimal point.• The maximum output value is an integer of 10 digitsand 6 digits after the decimal point. However, it willbe the value rounded off to six decimal places.Converting Unit of Length/Weight/Temperature/Volume/VelocityC](Tools) ]53~7Setting item/Setting at purchase >P243,P2441. From the Tools menu (P179), “Unit converter”]“Length”/“Weight”/“Temperature”/“Volume”/“Velocity”• For the subsequent operations, perform the sameoperations as “Converting Unit of Surface” (P186).Using World TimeC](Tools) ]6You can check the date and time of major cities in theworld.The time of city “Home” is set to the time of “Settingdate/time” (P95).1.From the Tools menu (P179), “World time”<World Time>•C[List]: You can select a city by displaying the citylist.2. Use Jto select a city to be checked•I[Set]: The selected city is set as Home.The city name and timewhich are checked](https://usermanual.wiki/LG-Electronics-USA/L602I.Users-Manual-1/User-Guide-760911-Page-194.png)
![188ToolsToolsUsing the Submenu of the World Time DisplaySetting item/Setting at purchase >P2441. From the World time display (P187), M[Menu]]Select from the following Submenu itemsChoose cityYou can choose a city. After choosing, press C.Set time zoneSets the selected city to home.: This menu is not displayed if you select the city as a home.Using Stop WatchC](Tools) ]7You can use the FOMA phone as a stop watch.1. From the Tools menu (P179), Select “Stop watch”•C[Go]/[Stop]: You can start or stop measuring.•I[Reset]: You can reset the result of measuring.• During measuring, you can do the followingoperations.–I[Lap]: The lap time is recorded and displayed atthe bottom of the display.–M[Detail]: You can view the list of the lap records.](https://usermanual.wiki/LG-Electronics-USA/L602I.Users-Manual-1/User-Guide-760911-Page-195.png)
![189Using Schedule....................................190Using Memo.........................................193Using Date Search...............................194Using Date Counter .............................195StationeryOn the Stand-by display, C[Menu] ](Stationery) or “Stationery”To display the Stationery menu1 Scheduler2 Memo3 Date search4 Date counterSelectStationerySelectStationery](https://usermanual.wiki/LG-Electronics-USA/L602I.Users-Manual-1/User-Guide-760911-Page-196.png)
 ]1Storing Schedule Events1. From the Stationery menu (P189), “Scheduler”• The monthly display (P191) appears.2. Select a date to store a schedule event. ]I[Add]<Add new schedule display>3. Select from the following items to store ]Afterstoring, I[Done]Start dateYou can set a date to start the schedule event. Youcan enter a date by pressing Rand dial buttons. Youcan select a date from the calendar display bypressing C.End dateYou can set a date to end the schedule event. You canenter a date by pressing Jand dial buttons. You canselect a date from the calendar display by pressing C.When the “Start date” and the “End date” are different,set the “End date” later than the “Start date”.None 1(Schedule type)You can set a type of the schedule event.TimeYou can set time to start and end the schedule event.• You cannot set the starting time and the ending time ofone event on different days. For example, if you want toset the starting time to 22:00 of the starting day and setthe ending time to 9:00 of the following day, you shouldset two events, 22:00 to 23:59 on the starting day and00:00 to 9:00 on the following day. • Regardless of the number the days till the ending, theending time cannot be set earlier than the starting timeof the starting day.–All day: The schedule event is stored as an all-dayevent.–Set time: You can set time to start and end theevent by selecting the time field. You can enter thetime using Jand dial buttons.SubjectYou can set a subject of the schedule event. Youcannot store the event without entering a subject.AlarmYou can set whether or not to be notified by an alarmwhen the date and time specified in “Start date” and“Time” come. You can select a melody 1when the alarmfunction is set to other than “No alarm”.• You can select the menu from “Melody” of “Data box”.>P176EditAdd new2006/12/01 (Fri)NoneTimeSubjectAll day00:00 ~ 23:59DoneStationery](https://usermanual.wiki/LG-Electronics-USA/L602I.Users-Manual-1/User-Guide-760911-Page-197.png)
![191StationeryNext PageStationeryRepeat 2You can set the repeat setting for the schedule event.If you do not want to repeat it, select “Once”1: The content you have set is displayed.2: If “Start date” and “End date” are different, you can use only“Once”.Information• You can save up to 200 schedules and up to 100 holidays.• When the specified time of a schedule event setting by alarmcomes, the display to notify it appears.–C[OK]: After stopping the alarm, you can view the time andthe subject of schedule. If you press Cagain, the alarm willbe released.–I[Snooze]: You can set the snooze. • As for the operation of alarm setting during a call or taking aphoto, see “When the Specified Time Comes” (P180).Checking Schedule Events1.From the Stationery menu (P189), “Scheduler”<Monthly Display>•13: You can move the year of date.•79/FE: You can move the month of date.•5: You can move the cursor to the current date .•I[Add]: You can add your own schedule. Go to step 3on page 190 of “Storing Schedule Events”.2. Select a date in which a schedule event is stored]C<Daily Display>•I[Add]: You can add your own schedule. Go to step 3on page 190 of “Storing Schedule Events”.•J: Displays the schedule of previous and next day.3. Select a schedule event ] C<Display>Edit DeleteView (20/23)10 : 00am ~ 11 : 00amAlarm01.mid2006/06/01 (Thu)NoneUmbrellaNo alarmOnceThe number of schedule events storedin the date on which the cursor is placed.The date registered the scheduleis underlined.Select AddMenuTu We Th Fr Sa SuMo32006 JuneDescriptionIconSets the alarm settingSets the repeat settingDescriptionIconStart date of scheduleEnd date of scheduleThe type of scheduleHolidayAlarm](https://usermanual.wiki/LG-Electronics-USA/L602I.Users-Manual-1/User-Guide-760911-Page-198.png)
![192StationeryStationery• For other icons, see page 190.•C[Edit]: You can edit the selected schedule. Go tostep 3 on page 190 of “Storing Schedule Events”.•I[Delete]: You can delete the selected schedule. •J: Displays the previous and next schedule.Using the Submenus of the Monthly Display1.From the monthly display (P191), M[Menu] ]Selectfrom the following submenu items.Add newYou can add a new schedule event. See step 2(P190) of “Storing Schedule Events”.OpenYou can see the details of the schedule events of theselected date (Daily display).Set holidayYou can set the selected date to holiday. Afterentering the holiday name, press I[Done]. Thesetting date is marked in red color on Monthly view.–On the day: Enter the holiday name and set theselected date as a holiday.–Weekly: Enter the holiday name and set the selectedday of the week as a holiday for every week.–Monthly: Enter the holiday name and set theselected date as a holiday for every month.–Annually: Enter the holiday name and set theselected date as a holiday for every year.–Duration (2~31): Enter the holiday name and setthe holiday period.Go to dateThe cursor is moved to the specified date. You canenter a date by pressing Jand dial buttons.Delete–Holiday: All the schedule events set as holidays aredeleted.–Old schedules: All the schedule events stored forup to the preceding day of the selected date aredeleted.–Current day schedules: The schedule events ofthe selected date are deleted.–Current week schedules: All the schedule eventsof the selected week are deleted.–Current month schedules: All the schedule eventsof the selected month are deleted.–All schedules: All the schedule events are deleted.Calendar Type–Sunday first: Display a calendar with weeksbeginning with Sunday.–Monday first: Display a calendar with weeksbeginning with Monday.: You cannot the menu if select the date which you've already set“Set holiday”.](https://usermanual.wiki/LG-Electronics-USA/L602I.Users-Manual-1/User-Guide-760911-Page-199.png)
![193StationeryStationeryUsing the Submenus of the Daily Display Screen1. From the Daily display screen (P191), M[Menu] ]Select from the following Submenu itemsAdd newYou can add a new schedule event. See Step 3(P190) of “Storing Schedule Events”.OpenThe details of the selected schedule event (Displayscreen) are displayed.Edit 1 2You can edit the selected schedule event. See Step 3on page 190 of “Storing Schedule Events”.Set holiday 2You can set the selected date as a holiday. See“Holiday settings” of “Using the Submenus of theMonthly Display Screen” (P192) for the setting items.Mark/UnmarkYou can delete after selecting multiple schedules.After selecting, press I[Delete].Go to DateDisplays the schedule you set. You can enter a dateby pressing Jand dial buttons.DeleteYou can delete schedule events.1: You cannot use this menu when you select the date which isalready set as the holiday by “Set holiday”.2: You cannot use this menu when you select the daily display ofthe date which is already set as the holiday.Using MemoC](Stationery) ]2Creating MemoYou can create and save a memo.1. From the Stationery menu (P189), “Memo”• The memo display (See right) appears.2. I[Add] ]Enter a memo ]CViewing MemoYou can view the memo that you created.1. From the Stationery menu (P189), “Memo”<Memo>2. Select a memo to view ]C•The screen will be displayed.Select AddMemo (1/2)2006/06/01 (Thu)Meeting June 12006/06/01 (Thu)Video-phone callMenu](https://usermanual.wiki/LG-Electronics-USA/L602I.Users-Manual-1/User-Guide-760911-Page-200.png)
![194StationeryStationery•C[Edit]: You can edit the displayed memo.•I[Delete]: You can delete the displayed memo. •J: Displays the previous and next memo.Using the Submenus of the Memo Display/Display Screen1. From the Memo display (P193)/Display screen, M[Menu] ]Select from the following submenu itemsAdd newYou can create a memo.OpenYou can display the screen of the selected memo.EditYou can edit the selected/displayed memo.Mark/UnmarkYou can select and delete multiple memos. Afterselecting, press I[Delete].DeleteYou can delete the memo selected or displayedmemo.: This menu is not displayed in submenus of the displayed screen.Using Date SearchC](Stationery) ]3You can search for the number of days (target date) after aspecified period from a specified date. For instance, you cansearch for the date after 90 days from the current date forconvenience.1.From the Stationery menu (P189), “Date search”]Select from the following setting items•I[Reset]: You can reset all setting values.FromYou can enter a date to start the search. Enter thedate using Jand the dial buttons.AfterYou can enter the number of days. Use the dialbuttons to enter the number of days. For instance, ifyou want to know the date after 90 days from the“Start date”, enter 90.](https://usermanual.wiki/LG-Electronics-USA/L602I.Users-Manual-1/User-Guide-760911-Page-201.png)
 ]4If you store the name and date of an event such as abirthday, you can check how many days remain beforethe event or how many days have passed after the event.Storing Events in Date Counter1. From the Stationery menu (P189), “Date counter”• The Date counter display (P187) appears.2. I[Add] ]Select from the following setting items]After setting, I[Done](Date)You can set the date of an event. Enter the date usingJand the dial buttons.(Memo)You can enter a memo. You cannot set withoutentering.Displaying Date Counter1. From the Stationery menu (P189), “Date counter”<Date Counter>I[Add]: You can compose the date counter. Go to step 2 (See above) of “Storing Events in DateCounter”.2. Select a date counter ]C<Display Screen>•C[Edit]: You can edit the selected date counter.Go to step 2 (P195) of “Storing Events in DateCounter”.•I[Delete]: You can delete the selected daily counter.Edit DeleteView (1/2)2006/05/31 (Wed)D-day : -1MeetingMenuSelectMenu AddDate counter (1/2)Meeting - 12006/05/31Destination+162006/06/17– before a number: The number of daysbefore the specified date+ before a number: The number of daysafter the specified date](https://usermanual.wiki/LG-Electronics-USA/L602I.Users-Manual-1/User-Guide-760911-Page-202.png)
![196StationeryStationery•J: Displays the date counter of previous and nextday.Using the Submenu of the Date Counter Display/Display Screen1. From the Date counter display (P195)/displayscreen (P195), M[Menu] ]Select from thefollowing submenu itemsAdd newYou can store an event to the date counter. SeeStep2 (P195) of “Storing Events in Date Counter”.OpenYou can view the selected date counter.EditYou can edit the selected or displayed date counter.See Step2 of “Storing Events in Date Counter”.Mark/UnmarkThis function is used when you select and deletemultiple date counters. After selecting, press I[Delete].DeleteYou can delete the selected or displayed datecounter.: This menu is not displayed in submenus of screen.](https://usermanual.wiki/LG-Electronics-USA/L602I.Users-Manual-1/User-Guide-760911-Page-203.png)
![197Available Network Services .................198Using Voice Mail ...................................198Using Call Waiting Service...................200Using Call Forwarding Service.............201Using Nuisance Call Barring Service...202Using Caller ID Notification Service ....202Using Caller ID Request Service..........203Using Set Arrival Act ............................203Selecting Arrival Call Act......................203Setting Remote Control........................204International Roaming Service.............204Registering Additional Services...........205Registering Additional Guidance .........206Using English Guidance .......................206Using Service Dialing Number .............207Using Call Barring.................................207Network ServiceOn the Stand-by display, C[Menu] ](NW service) or “NW service”To display the Network service menuSelectNW service1 Voice mail2 Call waiting3 Call forwarding4 Nuisance call barring5 Caller ID notification6 Caller ID request7 Set arrival actSelectNW serviceIn this manual, the outline of the network service isexplained by the method of using the FOMAhandset menu. For details, refer to “NetworkServices User's Guide”.](https://usermanual.wiki/LG-Electronics-USA/L602I.Users-Manual-1/User-Guide-760911-Page-204.png)
![Available Network ServicesWith FOMA phone, following DoCoMo Network Services areavailable.• In this manual, the summaries each network service areexplained in the ways using the menu of the FOMAphone. For detail, see “Mobile Phone User's Guide[Network services]”.• This FOMA phone is not applicable to all the servicesdescribed in “Mobile Phone User's Guide [Networkservices]”.• Contact “DoCoMo Information Center” on the back ofthis manual for application or inquiry.Information• The Network Services that are operated by connecting to theNetwork Service Center are not available when When “ ” isdisplayed on your handset.• You can register newly provided network services whenadditionally provided by DoCoMo. >P205Using Voice MailC](NW Service) ]1When you are in an area where radio waves do not reach,when you turn off the FOMA phone or when you cannotanswer the call, this service answers to the party whomade a voice/video-phone call to you, and the Voice MailCenter holds voice mail messages for you.•When you did not answer a voice call or video-phone callthat came in while Voice Mail is activated, it is recorded tothe received call history as a missed call and a screennotifying a missed call appears.•This handset is not applicable to Voice Mail (Video-phonecall). Make a voice call to “1412” (free) and set not to beapplicable to video-phone call.198Network ServiceNetwork ServiceServiceReferenceMonthly feeApplicationVoice MailSee rightChargedRequiredCall Waiting Service P200ChargedRequiredCall Forwarding ServiceP201FreeRequiredNuisance Call Barring ServiceP202FreeRequiredP203FreeNot requiredCaller ID Notification ServiceP202FreeNot requiredRemote controlNot requiredFree P204International roaming service Not requiredFree P204English GuidanceNot requiredFree P206Service Dialing NumberNot requiredFree P207Caller ID Request ServicePublic mode (power off)Not requiredFree P54Public mode (drive mode)Not requiredFree P51](https://usermanual.wiki/LG-Electronics-USA/L602I.Users-Manual-1/User-Guide-760911-Page-205.png)
![199Network ServiceNetwork Service•If a call comes in from a caller not notifying caller ID with“Caller ID request” activated, the Caller ID Requestguidance is played back and the center will not holdvoice mail messages.1. From the Network Service menu (P197), “Voicemail” ]Select from the following setting itemsActivate voice mailYou can start using Voice Mail.Set ringing timeYou can set the time from the first ring until the call isconnected to the Voice Mail Service Center. (period)Deactivate voice mailYou can stop using Voice Mail.Voice mail status requestYou can check the current settings of Voice MailService. If you press M[Menu], you can start/stop theservice of voice mail or set the length of ringing time.Play messagesYou can play back recorded Voice Mail messages.Voice mail settingYou can connect to the Voice Mail Service Center tochange the settings of Voice Mail by following thevoice guidance.Check messagesYou can check whether or not new messages arerecorded.Notify missed callIf the FOMA phone is turned off or out of the servicearea, you are informed by SMS (Short Message Service)of missed calls when the FOMA phone is turned on or inthe service area again.–Activate missed call notification: You can startusing Missed Call Notice Service.–Deactivate missed call notification: You canstop using Missed Call Notice Service.–Missed call notification status request: You cancheck the settings of the Missed Call Notice Service.Delete voice mail iconYou can delete displayed in the icon view area.Set message alert ringerYou can set the ring tone to sound when a newmessage is recorded.](https://usermanual.wiki/LG-Electronics-USA/L602I.Users-Manual-1/User-Guide-760911-Page-206.png)
 ]2When you receive another voice call during a call, you willbe notified of it by busy ring tone, and you can put thecurrent call on hold to answer the new call. You can alsonewly make a call to another party by putting the currentcall on hold.• To use Call Waiting Service, set “Arrival Call Act” (P203)to “Answer” beforehand. If this is set to another setting,you cannot answer the incoming voice call while you areperforming a voice call even if you start Call WaitingService.• When using Call Waiting, set “Arrival call act” to“Answer”. >P203•If a call comes in from a caller not notifying caller ID whileCaller ID Request Service is set to “Activate caller IDRequest”, the Caller ID Request guidance is played backand Call Waiting is not available.• When a video-phone call comes in during a voice call, ora voice call comes in during a video-phone call, CallWaiting does not work. The second call is recorded as amissed call in Received Calls.1. From the Network Service menu (P197), “Callwaiting” ]Select from the following setting itemsActivate call waitingYou can start using Call Waiting.Deactivate call waitingYou can stop using Call Waiting.Call waiting status requestYou can check whether the Call Waiting is activatedor deactivated.Submenus on using Call Waiting Service• Press to view the submenu.aWhen a new call comes in during a callVoice mail 1When a new call comes in, the caller can connect thevoice mail center.Call rejectionYou can reject a call without receiving.Call forwarding 2You can forward the incoming call to the forwardingdestination you have registered beforehand.End active callYou can answer a new call after disconnecting thecurrent call.Mute/UnmuteThe voice to send to the other party is set to mute orunmute.1: You can use the voice mail when you have signed up thisservice. See “Using Voice Mail” (P198) for details.2: You can use the call forwarding service only when you havesigned up this service. See “Using Call Forwarding Service” onthe next page.](https://usermanual.wiki/LG-Electronics-USA/L602I.Users-Manual-1/User-Guide-760911-Page-207.png)
 ]3This is a service to forward a voice call/video-phone callwhen you are in an area where radio waves do not reach,you turn off the handset or you did not answer within theset ring time.•When you did not answer a voice call or video-phonecall that came in while Call Forwarding Service isactivated, it is recorded to the received call history as amissed call and a screen notifying a missed call appears.•If a call comes in from a caller not notifying caller ID whileCaller ID Request Service is set to “Activate caller IDRequest”, the Caller ID Request guidance is played backand the call is not forwarded.• Call Forwarding Service will be automatically deactivatedif “Voice Mail” is set to “Activate Voice mail”.• This service is not available with some billing plans.1. From the Network Service menu (P197), “Callforwarding” ]Select from the following settingitemsActivate call forwardingYou can start using Call forwarding Service.–Register fwd number: You can register the phonenumber of the forwarding destination. If you pressM[Search], you can search for phonebook.–Set ringing time: You can set the time from thefirst ring until the call is forwarded.Deactivate call forwardingYou can stop using Call forwarding Service.Register the forwarding numberYou can change the phone number of the forwardingdestination. If you press M[Search], you can searchfor phonebook.Setting at forwarded party busyYou can set an incoming call to be connected to theVoice Mail Service Center if the forwarded destinationis busy.Call forwarding status requestYou can check the current setting status of CallForwarding Service.](https://usermanual.wiki/LG-Electronics-USA/L602I.Users-Manual-1/User-Guide-760911-Page-208.png)
![202Network ServiceNetwork ServiceSetting to enable or disable call forwarding guidancePress 1429A.• Make settings following the voice guidance.• For details, see “Mobile Phone User's [Networkservices]”.Using Nuisance Call Barring ServiceC](NW Service) ]4This is a service to reject "Nuisance calls" such as prankcalls. If you register a caller to reject, calls from the callerwill be automatically rejected and the caller will beanswered by the guidance. • Even if a call from a caller who is registered to berejected, the ring tone will not sound, and the call will notbe recorded in the received call history.1. From the Network Service menu (P197),“Nuisance call barring” ]Select from thefollowing setting itemsRegister nuisance callerYou can register the phone number of the call thatyou answered the last for rejection.Delete all entriesAll the phone numbers registered for rejection aredeleted.Delete most recent entryYou can delete the phone number registered last forrejection.Using Caller ID Notification ServiceC](NW Service) ]5You can notify your phone number to the other partywhen making a call. When the other party's phone is thedigital terminal that supports caller ID, your phone numberappears on the other party’s phone.• Your caller ID is important information, so take greatcare to notify it.1. From the Network Service menu (P197), “Caller IDnotification” ]Select from the following settingitemsActivate/Deactivate caller ID notificationYou can display your phone number on the otherparty's phone (display) when making a call. To usethis service, enter the Network Security Code.Caller ID notification status requestYou can check the current setting status of Caller IDNotification.](https://usermanual.wiki/LG-Electronics-USA/L602I.Users-Manual-1/User-Guide-760911-Page-209.png)
 ]6This is a service to request for the Caller ID notification byguidance to the call from the party who does not notifyCaller ID, and terminate the call.• A call that was not answered by Caller ID RequestService will not be recorded in the received call history,and the screen notifying of the missed call does notappear.1. From the Network Service menu (P197), Caller IDrequest” ]Select from the following setting itemsActivate caller ID requestYou can start using Caller ID Request Service.Deactivate caller ID requestYou can stop using Caller ID Request Service.Caller ID request status requestYou can check the current settings of Caller IDRequest Service.Using Set Arrival ActC](NW Service) ]7You can activate or cancel the arrival call act set by“Selecting Arrival Call Act” (See right). You can view thecurrent settings.1. From the Network Service menu (P197), “Set arrivalact” ]Select from the following setting itemsActivate arrival actYou can start using the response you set in “ArrivalCall Act”.Deactivate arrival actYou can stop using the response you set in “ArrivalCall Act”.Arrival act status requestYou can check the current settings of Set Arrival Act.Selecting Arrival Call ActC](NW Service) ]8You can set how to react to a voice call/video-phone callthat comes to a customer who has subscribed to “VoiceMail”, “Call Forwarding Service” or “Call Waiting Service”while performing a call.• If you have not subscribed to “Voice Mail”, “CallForwarding Service” or “Call Waiting Service”, youcannot answer a call while performing a call.• To use arrival act, set “Set arrival act” to “Activate arrivalact”.Setting item/Setting at purchase >P237](https://usermanual.wiki/LG-Electronics-USA/L602I.Users-Manual-1/User-Guide-760911-Page-210.png)
![204Network ServiceNetwork Service1. From the Network Service menu (P197), “Arrivalcall act” ]Select from the following setting itemsAnswerThe phone rings. If Voice Mail, Call Waiting Service, orCall Forwarding Service is activated, the phonefollows each setting.Voice mailConnects incoming calls to Voice Mail. Even if CallWaiting Service is activated, the calls are connectedto Voice Mail.Call forwardingForwards incoming calls to the forwarding phonenumber registered. Even if Call Waiting Service orVoice Mail is activated, the calls are forwarded.Call rejectionRejects incoming calls.Setting Remote ControlC](NW Service) ]9This service allows you to operate “Voice Mail” or “CallForwarding Service” from touch-tone phones, publicphones or DoCoMo's cellular phones.• To use “Voice Mail” or “Call Forwarding Service”overseas, you need to set “Remote control” to “Activateremote control” beforehand.1. Select “Remote control” from Network Servicemenu (P197) ]Select one of the following items tobe setActivate remote controlStart remote control.Deactivate remote controlStop remote control.Remote control status requestCheck settings for remote control.International Roaming ServiceC](NW Service) ]0This service allows you to use functions such as VoiceMail and Call Forwarding Service while you stay overseas.1. Select “International service” from NW servicemenu (P197) ]Select one of the following items tobe setVoice mail (Int.)- Activate voice mail: Start Voice Mail.- Deactivate voice mail: Stop Voice Mail.- Play messages: Play recorded voice message.- Voice mail setting: Check current settings of VoiceMail.](https://usermanual.wiki/LG-Electronics-USA/L602I.Users-Manual-1/User-Guide-760911-Page-211.png)
 ]*1When a new network service is added by DoCoMo, youcan register the service to the menu and use.1. From the Network Service menu (P197), “Others”]“Additional service”• The additional service list will be displayed.2. I[Edit] ]After editing, press C[Select]USSD codeEnter the service code (USSD) supplied by DoCoMo.Service nameEnter any service name. Press I[Edit] to edit.Using the Submenu of the Additional Service List Screen1. From the Additional Service List screen,M[Menu] ]Select from the following submenuitemsEditEdit a service.SelectThe selected service is performed.Delete 1 itemThe selected service is deleted.Delete allAll the registered services are deleted.: Not displayed if an unregistered service is selected.Using Registered Services1. From the Additional Service List screen, select aregistered service ]C](https://usermanual.wiki/LG-Electronics-USA/L602I.Users-Manual-1/User-Guide-760911-Page-212.png)
 ]*2When you perform services added by “Additional Service”,you can register reply messages that correspond to thecodes (USSD) returned from the Service Center. The replymessage is displayed when the registered code isreturned as a reply.1. From the Network Service menu (P197), “Others”]“Additional guidance”• The reply message list will be displayed.2. I[Edit] ]After setting, press C[OK]USSD codeEnter the service code (USSD) supplied by DoCoMo.Reply messageEnter a reply message name. Press I[Edit] to edit.Using the Submenu of the Reply Message List Screen1. From the Reply Message List screen, M[Menu]]Select from the following Submenu itemsEditYou can set a reply message.Delete 1 itemThe selected reply message is deleted.Delete allThe all registered reply messages are deleted.: Not displayed if an unregistered service is selected.Using English GuidanceC](NW Service) ]*3You can set the guidance of setting network services suchas “Voice Mail” or voice guidance such as “out of theservice area” to English.Available LanguagesLanguageSettingJapanesePlays back the guidance in Japanese.Plays back the guidance in English.First plays back the guidance inJapanese and then in English.First plays back the guidance inEnglish and then in Japanese.EnglishJapanese +EnglishEnglish +Japanese](https://usermanual.wiki/LG-Electronics-USA/L602I.Users-Manual-1/User-Guide-760911-Page-213.png)
![207Network ServiceNetwork Service1. From the Network Service menu (P197), “Others”]“English guidance” ]Select from the followingsetting itemsGuidance setting–Outgoing + Incoming call: You can set languagesof the guidance for outgoing and incoming calls.Select “Yes” and then select a language.–Outgoing call: You can set a language of theguidance only for outgoing calls. Select “Yes” andthen select a language.–Incoming call: You can set a language of theguidance only for incoming calls. Select “Yes” andthen select a language.Guidance status requestYou can check the current settings of the guidance.Using Service Dialing NumberC](NW Service) ]*4You can make a call to DoCoMo Information Center orDoCoMo repair counter.• The displayed item may differ or some items may not bedisplayed depending on the FOMA card.1. From the Network Service menu (P197), “Others”]“Service dialing number” ]Select from thefollowing items(DoCoMo Malfunctioninformation)Connect to the DoCoMo repair counter.(General information)Connect to the DoCoMo Information Center.Using Call BarringC](NW Service) ]*5You can block all incoming calls while you are roamingoutside Japan with the FOMA phone.1. From the Network Service menu (P197), “Others”]“Call barring” ]Select from the followingsetting itemsActivate barring of incoming call - roam–Barring all incoming calls: All incoming calls arerestricted. Enter your Network Security Code.–Data calls barring: Only incoming video-phonecalls are restricted. Enter your Network SecurityCode.Deactivate barring of incoming call - roamYou can stop using Barring All Incoming When Roam.Enter your Network Security Code.Barring of incoming call - roam status requestYou can check the settings of Barring All IncomingWhen Roam.](https://usermanual.wiki/LG-Electronics-USA/L602I.Users-Manual-1/User-Guide-760911-Page-214.png)

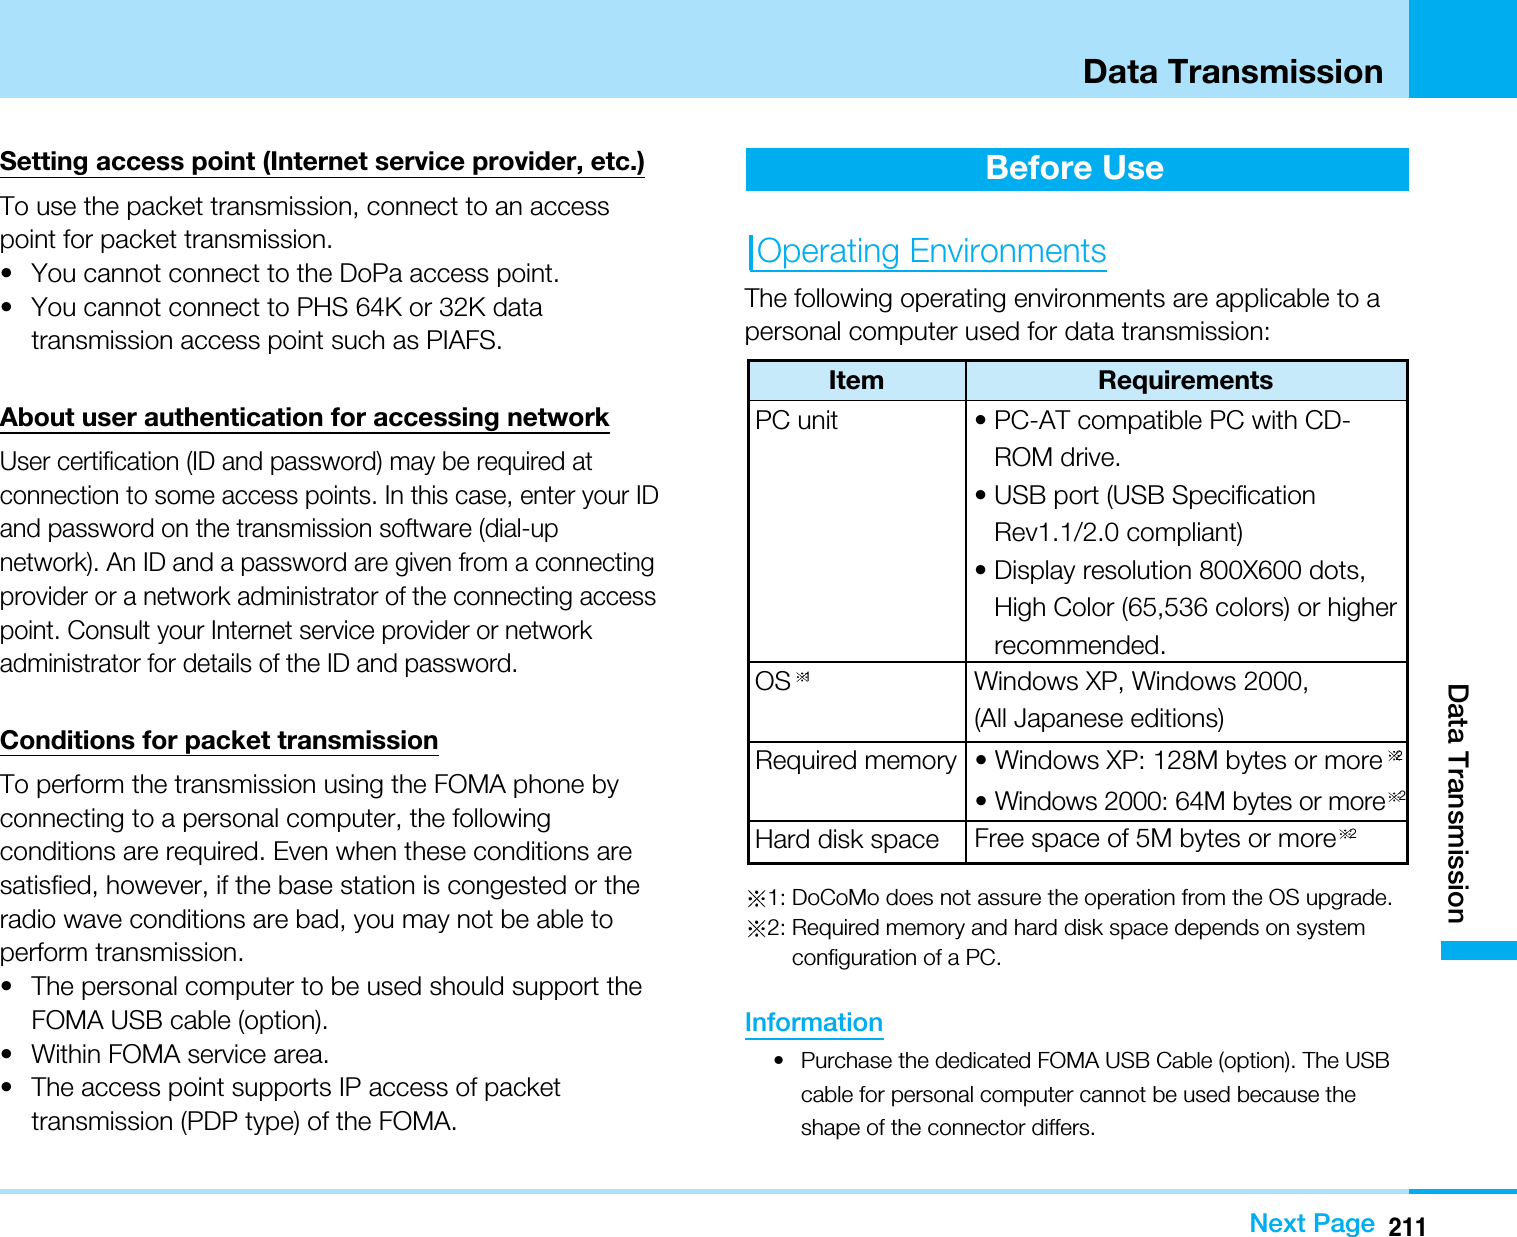
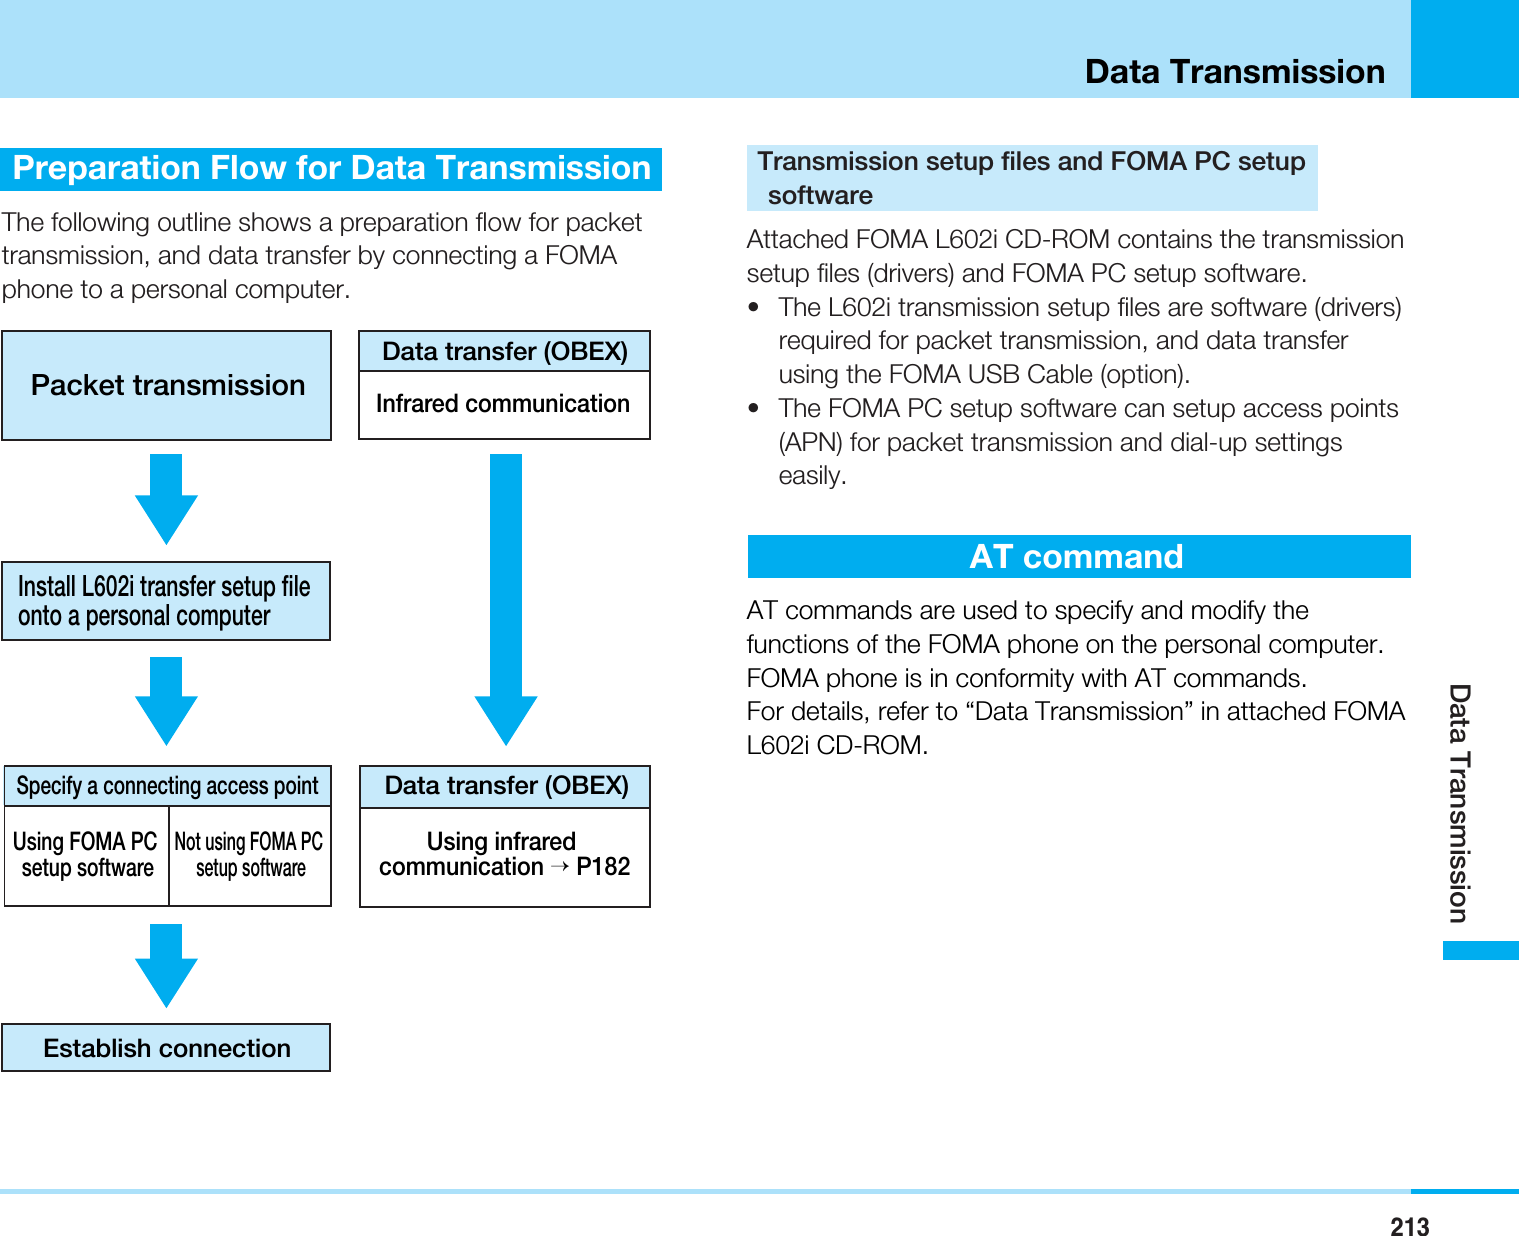

![216Entering CharactersEntering CharactersEntering CharactersAbout Character Entry DisplayFOMA phone has some functions to enter characters forphonebook or mail.On the Character Entry display, information on the currentinput mode or operation guidance is displayed.<Character Entry display>1Remaining number of bytes: Remaining number ofcharacters you can enter is displayed in bytes.2Operation guidance field: Full-pitch and half-pitch aredisplayed.3Input mode field: Input mode is displayed.Setting the prediction conversion to entercharacterYou can set ON/OFF to predict the conversion candidates(P217) on entering Hiragana.• This method is set to “ON” at purchase.1. From the Character Entry display, M[Menu] ]“Input setting” ]“Prediction ON/OFF”2. ON/OFFSwitching Input Mode1. Press I[i-mode] on the Character Entry display(See left)• Each time you press I[i-mode], the input modeswitches.“” ... You can enter Kanji and Hiragana.“” ... You can enter Katakana.“”…You can enter Alphabets.: Indicates that you can enter the capital letters.“”…You can enter Numerals.Switching Between Full-pitch/Half-pitch• You may not be able to switch between full/half-pitchdepending on the display of character entry.1. Press Aon the Full Entry display (See left)](https://usermanual.wiki/LG-Electronics-USA/L602I.Users-Manual-1/User-Guide-760911-Page-223.png)
![217Entering CharactersEntering CharactersNext page• Each time you press A, the full-pitch and half-pitchmodes switch.Switching Pictograph/Symbol/Emoticon Mode• You cannot switch the mode depending on the displayof character entry.1. Press Ton the Character Entry display (P216)• Each time you press T, the input mode switches.“” ... You can enter pictographs.“” ... You can enter full-pitch Symbols.“” ... You can enter half-pitch Symbols.“” ... You can enter emoticons.–I[Continue]: You can enter characters afterselecting multiple. After selecting them, press I[Set].–A: You can change the page. If you select “”, the cursor will be jumped.Entering CharactersYou can enter characters by pressing dial buttons towhich desired characters are assigned.•To allocate the character on each button, refer to “List ofCharacter Assignment of Dial Buttons” (P222).Entering Characters in Prediction mode• You can use this method on setting “ ” of Hiraganamode.1. Enter characters on the Character Entry display(P216)•M[KanaA1]: The entered characters are convertedto Katakana or Numerals.•I[Conv]: The entered characters are converted toKanji or other characters.•C: The entered characters are finalized.2. Move the cursor to Prediction/Conversion areausing H.3. Select a character to convert ]CEntering Characters in Normal modeWhen entering the characters in other than “Hiraganamode ( )”, the conversion (after step 2) is not required.1. On Character Entry display (P216), enter characters•M[Katakana/ Numeral] : You can convert thecharacters on inputting to Katakana or number.](https://usermanual.wiki/LG-Electronics-USA/L602I.Users-Manual-1/User-Guide-760911-Page-224.png)
![218Entering CharactersEntering Characters•C[Set] : You can confirm the character oninputting.: In Hiragana mode2. D/I[Convert]3. Move the cursor by pressing Hto the area ofconversion candidates.4. Select the character to convert. ]CaSwitching Upper / Lower Character ModeTo switch upper / lower characters, press *severaltimes after entering characters. If the character is notcorrespond with each one, you cannot convert it.• You cannot convert the character in numeral mode(“1(12)”).aEntering Voiced / Semivoiced MarksAfter entering the character, press Aseveral times.However, you cannot enter a full-pitch character if itdoes not correspond to a half-pitch character.• You cannot enter it in alphabet (“a(ab/AB)”) or numeral(“1(12)”) mode.aEntering a PunctuationPress *several times.• You cannot enter it in alphabet (“a(ab/AB)”) or numeral(“1(12)”) mode. aEntering Line FeedPress #/D• Press Din numeral mode (“1(12)” a line feed).aEntering a SpaceM[Menu] >“Special input” >Select “Space”. In caseof being the cursor at the middle of sentence, press Rto enter a space.aDeleting a CharacterMove the cursor to the character to delete and pressQ. If the cursor is at the end of a character, pressQonce to delete the character left of the cursor.And, press Qfor more than 1 seconds to delete allthe characters.Using the Submenu on the Character EntryDisplay• A few menus may not be activated depending on thedisplay of character entry.1.From the Character Entry display (P216), M[Menu]]Select from the following Submenu items.Common phrases–Input common phrase: You can select and enterthe registered common phrases.–Edit common phrase: You can create and registercommon phrases and edit registered commonphrases. Go to step 2 in “Editing Common Phrases”(P220).Edit characterYou can specify a range to copy/cut and pastecharacters. Go to “Copying/Cutting/Pasting” (P219).](https://usermanual.wiki/LG-Electronics-USA/L602I.Users-Manual-1/User-Guide-760911-Page-225.png)
![219Entering CharactersEntering CharactersNext PageEdit wordYou can register words. Go to step 2 (P221) of“Registering Words”.Quote–Phonebook: You can access a Phonebook entryand quote the registered contents. Go to step 3 onpage 66 of “Searching Phonebook”.–Own number: You can bring up your own numberand quote the registered contents.Input setting–Full/Half: You can switch between full-pitch andhalf-pitch.–Upper/Lower :You can switch between uppercase and lower case of Alphabets (a/A (ab/AB)).–Prediction ON/OFF: You can activate/deactivatethe Prediction and Conversion function.Special input–Changing line: You can start a new line.–Space: You can enter a space before the cursor.–Kuten code: You can enter characters using theKuten code. Go to step 2 of “Entering CharactersUsing Kuten Code” (See right).: After converting the English mode “a(ab/AB)”, you can activatethe menu. You cannot use this menu in other modes.Entering Characters Using Kuten CodeYou can enter characters or symbols using the 4-digitKuten code.• For details, see “Kuten code list” (P269).1. From the Character Entry display (P216), M[Menu] ]“Special input” ]“Kuten code”2. Enter a Kuten code using the numeric buttons ]C• You can also select characters or symbols using K.Copying/Cutting/PastingYou can copy or cut a character string and paste it toanother display/position.1. From the Character Entry display (P216), M[Menu] ]“Edit character” ]“Copy”/“Cut”2. Move the cursor to the start position using K]C3. Move the cursor to the end position using K]C4. Display the Character Entry display to which youwant to paste the copied/cut characters ]Movethe cursor to the desired position for pastingusing K.5. M[Menu] ]“Edit character” ]“Paste” ]“Yes”• Select M[Menu] ]“Edit character” ]“Undo” insequence to undo cut or pasted characters.Information• If the number of characters which are copied or cut from thesentence exceeds the limit, you can paste them after deletingthe characters over the limit.](https://usermanual.wiki/LG-Electronics-USA/L602I.Users-Manual-1/User-Guide-760911-Page-226.png)
![220Entering CharactersEntering Characters• To paste the character after copying or cutting, its type shouldbe same. For example, you cannot enter (half pitch ofAlphabet and numeral) Hiragana or Kanji in screen to inputmail address. • If you paste character lines including a line feed in the entryscreen that line feeds cannot be entered, it is replaced by ablank (half-pitch space).Editing Common PhrasesYou can edit registered common phrases or add newcommon phrases.1. From the Character Entry display (P216), M[Menu] ]“Common phrases” ]“Edit commonphrase”<Edit common phrase>2. Select Category ]C• The Select Common phrase display appears.• If you press Cin common phrase list, you can viewall categories.• If you register new phrase, select “Original”.3. Select a common phrase to be changed ]I[Edit]]Edit/input the common phrase ]CUsing the Submenus of the Edit CommonPhrase Display/ Select Common PhraseDisplay / Input Common Phrase Display1.From the Edit Common Phrase display / CommonPhrase display, M[Menu]]Select from the followingSubmenu itemsReset all 1All common phrases are reset to their defaults.Delete 1 item 2A selected/displayed common phrase is deleted.Reset 1 item 2A selected/displayed common phrase is reset to itsdefault.Category reset 2All common phrases stored in the category are resetto their defaults.CancelYou can cancel editing of common phrases.1: Not displayed on the submenu of the common phrase display.2: Not displayed on the submenu of the Edit common phrasedisplay.SelectMenuEdit common phrase2 Greeting3 Business4 Private5 Reply6 Pictograph idiom7 Original1 Internet](https://usermanual.wiki/LG-Electronics-USA/L602I.Users-Manual-1/User-Guide-760911-Page-227.png)
![221Entering CharactersEntering CharactersInformation• If you activate the menu “Reset all”, the contents of “Original”will be deleted.Registering WordsFor those words not displayed as the conversioncandidates or words with unusual readings, you canregister them with their readings. Once registered, thewords are displayed as conversion candidates when theirreadings are entered.1. From the Character Entry display (P216), M[Menu] ]“Edit word”• The registered Words List is displayed.• Select a dictionary and press Cto confirm theregistered words.2. I[New registration] ]Select the next item toregister ]After registering, I[Register]followingReadingYou can set reading of “Word”.WordYou can set a word that will be displayed as aconversion candidate when you enter charactersregistered as “Reading”.Deleting Words1. From the Registered Words list, M[Menu] ]“Delete 1 item”/“Delete all” ]“Yes”](https://usermanual.wiki/LG-Electronics-USA/L602I.Users-Manual-1/User-Guide-760911-Page-228.png)
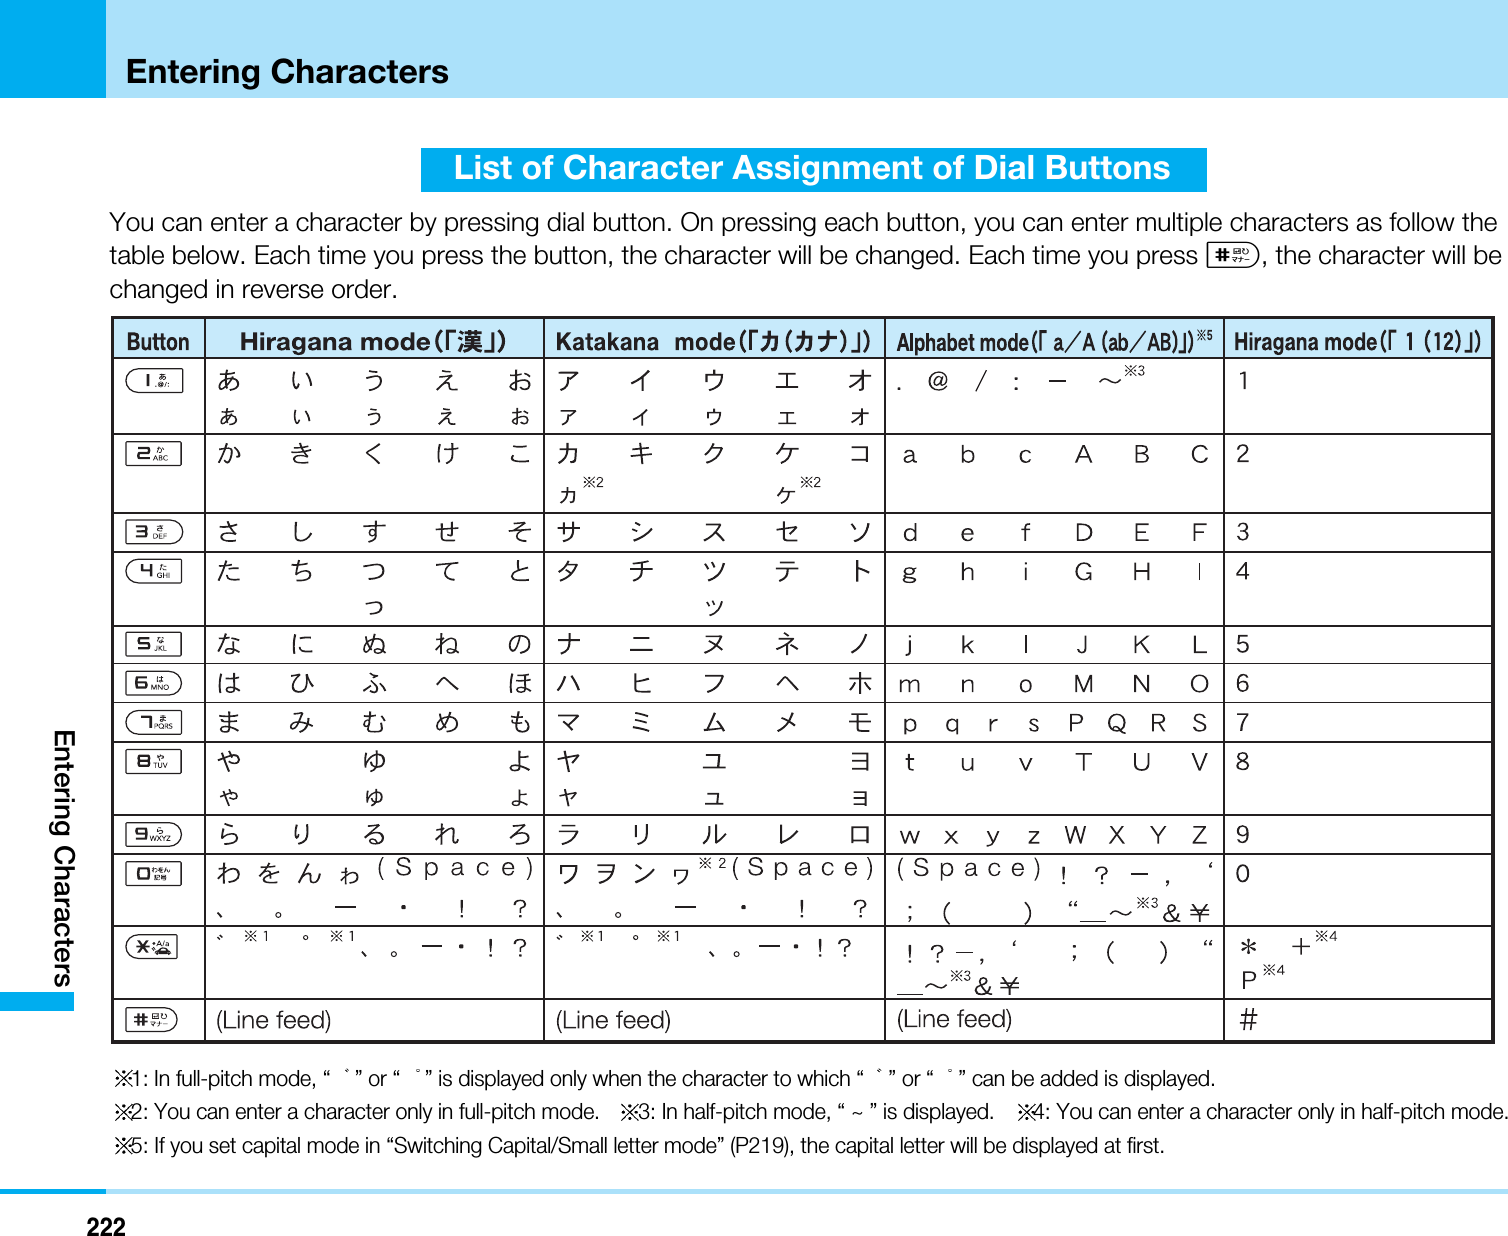

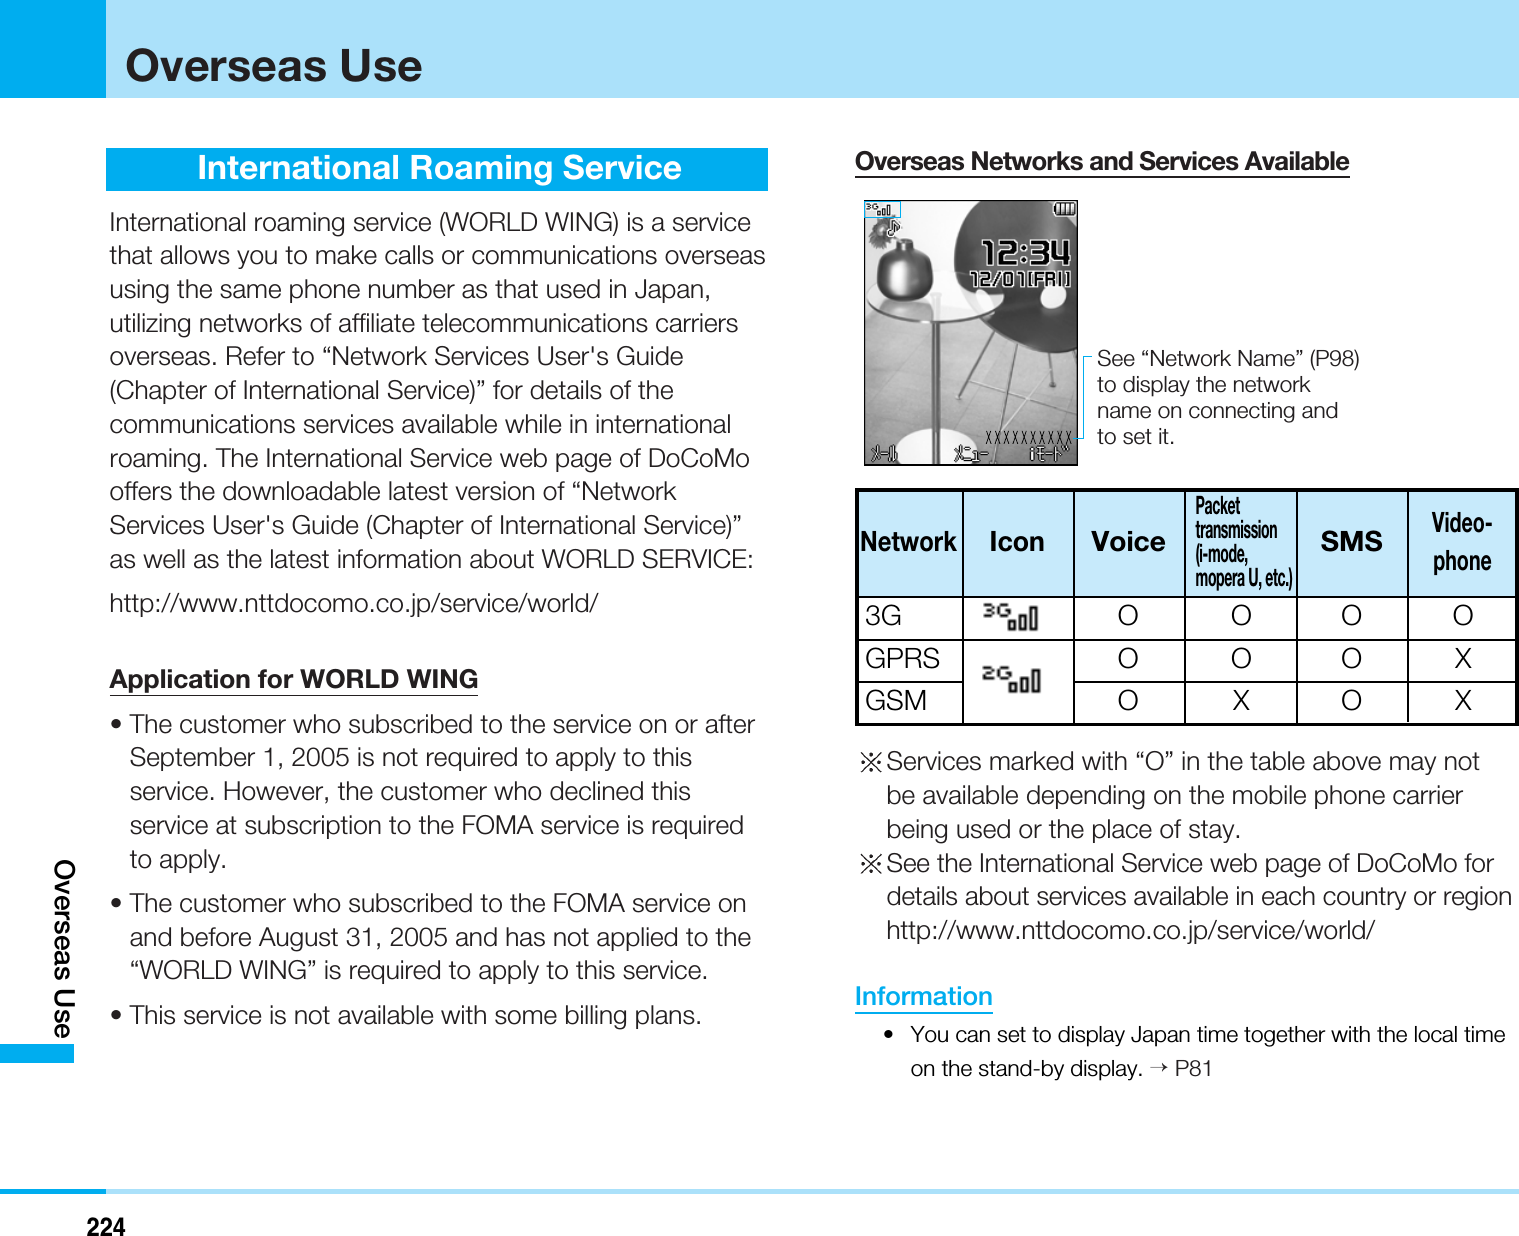
 ]52Network mode of the FOMA phone is set to “Auto” atpurchase. If you know the network in your area, you canselect it directly.Setting item/Setting at purchase >P2511. From the Settings menu (P85), “Network” ]“Network mode” ]Select from the followingsetting itemsAutoSearches all the networks connectable.WCDMA onlySearches only networks supporting 3G.GSM onlySearches only networks supporting GSM/GPRS.For the network search setting (changing of thecommunication carriers), see P96.Information• You cannot exchange the data through packet service underGSM network.• When using the FOMA handset in Japan or in the service areaof 3G network, we recommend you change the setting of the“Network mode” to “WCDMA only” to save battery power.Confirming Before Using OverseasBefore DepartureCharging the BatteryMake sure of the voltage available in the country or area ofstay and use the FOMA Overseas/Domestic AC Adaptor 01(option) for overseas and domestic usage (a conversionplug adapter according to the place of stay will be required).And, do not charge the FOMA phone using an electricaltransformer for overseas travel.Using Voice Mail/Call Forwarding from OverseasUse of the Voice Mail or Call Forwarding service fromoverseas is part of “remote operation” and requires theactivation of Remote operation before your departure. Fordetails to set the remote operations, refer to “RemoteOpeartion Settings” (P204).Before departure, make sure that you have the NetworkSecurity Code, which may be required for remote-accessing the Voice Mail etc. If you have forget yourNetwork Security Code, visit a DoCoMo Shop orDoCoMo World Counter with an identification such asthe driver’s license to make necessary changes.](https://usermanual.wiki/LG-Electronics-USA/L602I.Users-Manual-1/User-Guide-760911-Page-232.png)
![Using i-mode OverseasTo use i-mode overseas, you need to set “InternationalSettings” to “YES”.aTo change settings in Japan• No packet transmission fees apply.“iMenu” ]“English” ]“Options” ]“InternationalSettings” ]“YES”aTo change settings outside JapanPacket transmission fees apply.“iMenu” ]“International Settings” ]“YES”•If set to “NO”, you can send and receive i-mode mailmessages and view the i Menu only. The setting atpurchase is “NO”.Some i-mode sites may not be available depending onthe information provider.Packet transmission fees apply to all types of accessfrom overseas including transmissions that are free ofcharge in Japan.Japan time applies even if i-mode sites are accessedfrom overseas. Be careful when registering entries to ordeleting entries from My Menu at the beginning or endof a month.Using FOMA phone overseasSetting Mobile Phone CarrierThe network will be set after searching it automatically if“Setting the Network Mode” (P97) is set to “Auto” ininternational roaming.• You can set up beforehand the type of network onsearching by “Setting the Network Mode” (P97).• If you search the network automatically, you can set thepreferred network by “Registering a Network from thelist” (P97).• You can select the network manually. Refer to “Selectingthe Network Connection Mode” (P96).Information• “Network mode” is set to “Auto” after you search with“Network mode” set to “WCDMA only” or “GSM only” and“Network selection” set to “Auto”, “Network mode” will be setto “Auto” after searching.• If you search with “Network mode” set to “Auto” and “Networkselection” set to “Auto”, the same mode (“WCDMA only” /“GSM only”) of the network (communication carrier) youselected after searching will be set.226Overseas UseOverseas Use](https://usermanual.wiki/LG-Electronics-USA/L602I.Users-Manual-1/User-Guide-760911-Page-233.png)
![Settings to be made after returning to JapanAfter Coming Back to JapanWhen network settings have been changed for useoverseas, “ ” may appear in Japan.In that case, make settings given below.• You have to set “Network selection” (P97) to“Auto/WCDMA only”.• You have to set “Network selection” (P96) to “Auto” or“Manual” and select “JP DoCoMo-3G” on the networkselection screen displayed after searching. Using the FOMA Phone Overseas•If the other party subscribes to a mobile phone carriersupporting the FOMA video-phone, you can make avideo-phone call by pressing T.Making CallsaMaking a call to Japan from the country you stay When entering the phone number directlyPress 0for 1 or more seconds to display “+”]81(Country code for Japan) ]Other party’sphone number excluding “0 (zero)” at the beginningof the area code ]A(T)Example: When the other party is in one of the 23wards of Tokyo (area code: 03)“+”>81> 3> XXXX – XXXXMaking a call to a number registered in phonebookThe phonebook list screen (P67) or M[Menu] onphonebook detail screen (P67) ]“International call(Japan)” ]C[Call] when recipient's phone numberappearsExample: When a phone number saved in phonebookhas area code “03” (in 23 ward of Tokyo)+813XXXX - XXXX• A recipient's phone number is generated,automatically prefixed with Japan's Cuontry code“+81” and “0” removed from area code.aCalling another WORLD WING/WORLD WALKER userPress 0for 1 or more seconds to display “+”]81(Country code for Japan) ]Otherparty’s phone number excluding “0 (zero)” at thebeginning of the area code ]A(T)Example: When the other party has a mobile phonenumber beginning with (090)“+” > 81 > 90 >XXXX –XXXXaCalling a mobile phone or fixed-line phone within thecountry of stayDial the other party’s phone number including thearea code ]A(T)227Overseas UseOverseas Use](https://usermanual.wiki/LG-Electronics-USA/L602I.Users-Manual-1/User-Guide-760911-Page-234.png)
![228Overseas UseOverseas UseaCalling from the country of stay to a mobile phone orfixed-line phone in another country (except for Japan)• In some countries or areas such as Italy, “0” may berequired.Press 0for 1 or more seconds to display “+”]Country code of the other party]Other party’sphone number excluding “0 (zero)” at the beginning ofthe area code ]A(T)Receiving callsWhen a call comes in, A(T)Having Others Call YouaReceiving a call from JapanHave the other party call you at your mobile phonenumber as usual.090>XXXX – XXXX/080>XXXX – XXXX]CALLaReceiving a call from a country other than JapanInternational access code of the country where youmake the call ]81 (Country code for Japan)]Your phone number excluding “0 (zero)” at thebeginning ]CALLTroubleshootingUnable to Make or Receive Calls/Always Out of the Service Area/Handset Does Not Turn ONPossible causes for inability to make or receive calls,reception level indication permanently being “Out of theservice area” or the handset not turning on are as follows:• Weak radio waves being received or being out of theservice area• Failure of the local switchboard or base station ortemporary line congestion• Wrong operation of the handset• OthersSee the International Service web page of DoCoMo for thelatest information about service areas and networkinterruption:In addition, make sure of the operation and try the following:• If you are indoors, confirm if the condition is the sameoutdoors.• Confirm if your monthly charges have not exceeded thelimit.• Turn OFF the handset once and back ON.• Manually select the mobile phone carrier to use.If the problem persists after the above troubleshootingprocedures are taken, contact the Network TechnicalSupport and Operations Center (P229).](https://usermanual.wiki/LG-Electronics-USA/L602I.Users-Manual-1/User-Guide-760911-Page-235.png)
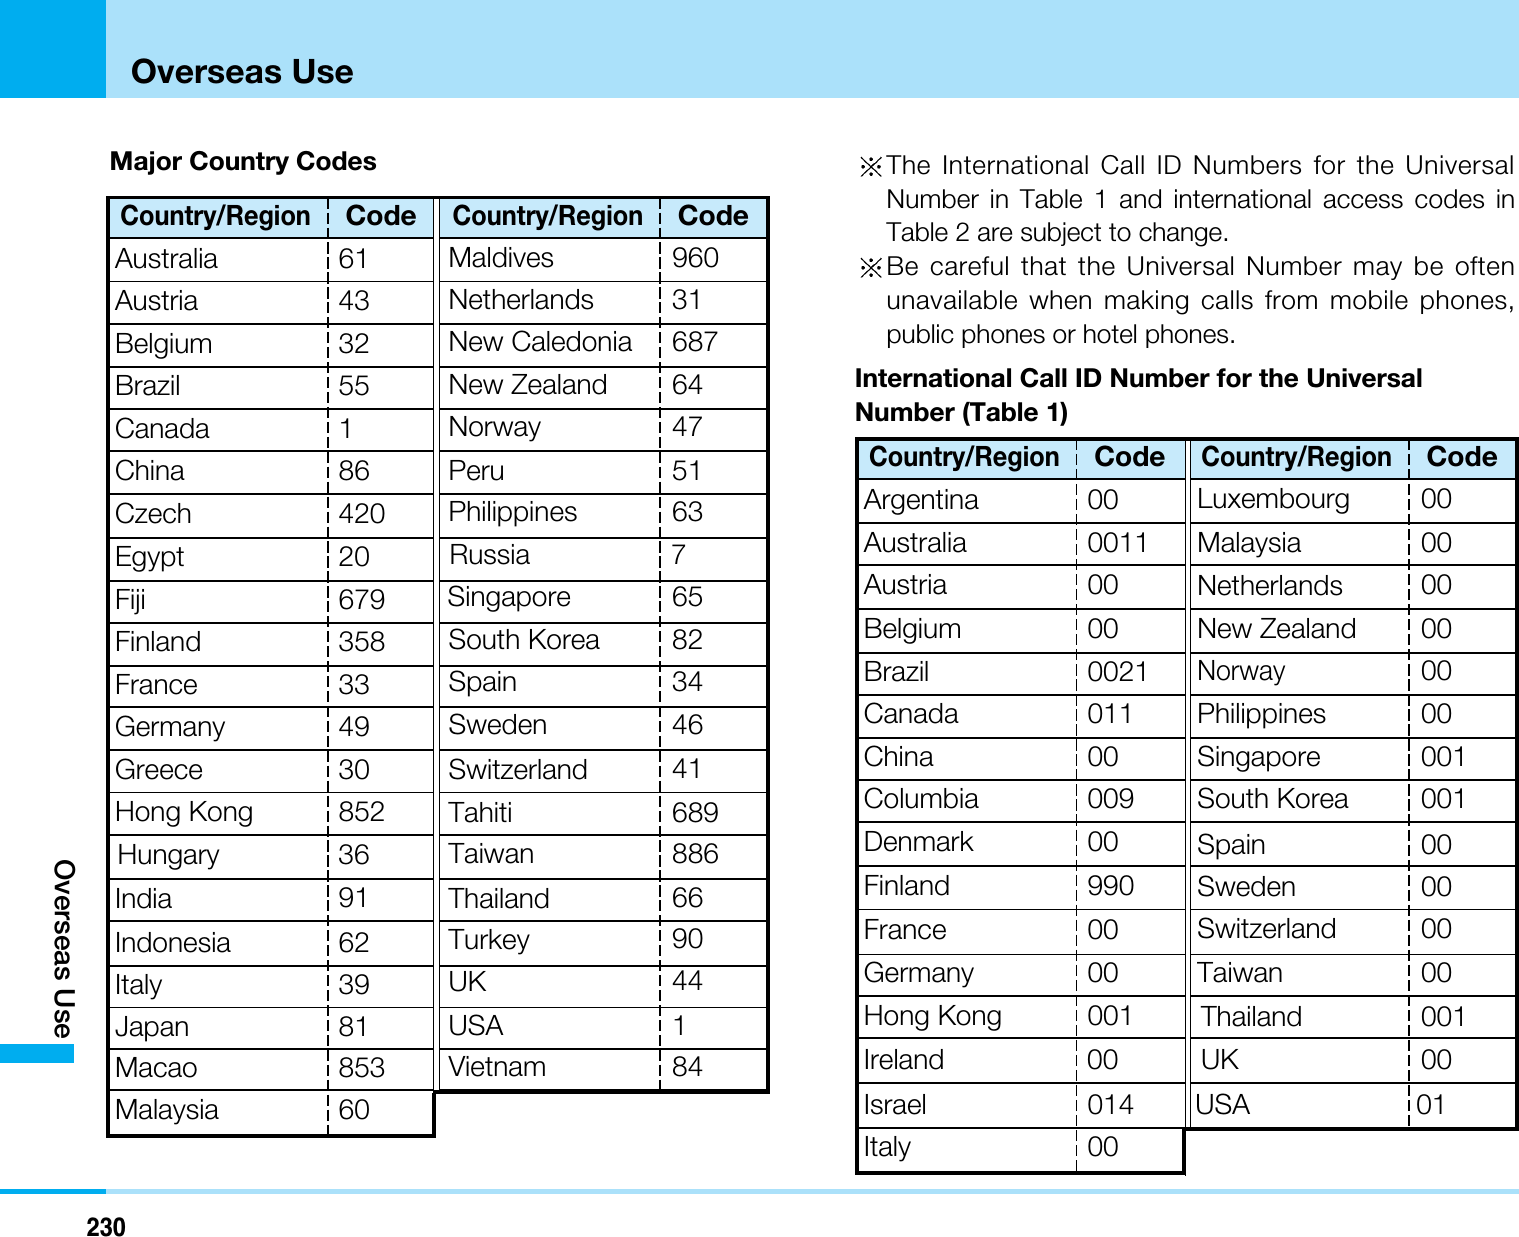
![231Overseas UseOverseas UseMajor International Access Codes (Table 2) Be careful that the Universal Number may be oftenunavailable when making calls from mobile phones,public phones or hotel phones.Applying for WORLD WINGAt DoCoMo e-siteaBy i-mode“iMenu” ]“ ” ]“ e ”aFrom a personal computerMy DoCoMo (http://www.mydocomo.com/)]Procedures (e)You need to enter your “Network Security Code” forapplication by i-mode.You need to enter your “DoCoMo ID/Password” forapplication from a personal computer.DoCoMo e-site may not be available for the applicationdepending on the contracted contents.By phone<DoCoMo Information Center>aFrom DoCoMo mobile phone or PHS151 (toll-free)Not accessible from fixed-line phones, etc.aFrom fixed-line phones, etc.0120–800–000 (Japanese only)Also accessible from a mobile phone or PHS.Ireland 00Australia 0011India 00Indonesia 001Italy 00Luxembourg 00UAE 00UK 00USA 011Country/RegionCodeBelgium 00Brazil 004100210023Country/RegionCodeMonaco 00Netherlands 00New Zealand 00NorwayPhilippinesPoland00Canada 011 00China 00 00Czech 00 Portugal 00Denmark 00 Russia 81000 Singapore 001990 South Korea 001France 00 Spain 00Germany 00 Sweden 00Greece 00 Switzerland 00Hong Kong 001 Taiwan 002HungaryMalaysia0000Thailand 001Turkey 00Macao 00Vietnam 00PhilippineFinland](https://usermanual.wiki/LG-Electronics-USA/L602I.Users-Manual-1/User-Guide-760911-Page-238.png)
![232Overseas UseOverseas UseMake sure that you dial the correct number.At DoCoMo ShopYour local DoCoMo Shop accepts the application.At the DoCoMo World CounterApplications accepted even on the day of departure.aDoCoMo World Counter Narita International Airport No.1: 4F Central Building, Narita International AirportTerminal 1aDoCoMo World Counter Narita International Airport No.2: B1F Main Building, Narita International AirportTerminal 2aDoCoMo World Counter Kansai International Airport: 4FKansai International Airport Terminal BuildingaDoCoMo World Counter Central Japan InternationalAirport: Business Center P@tio, 3F Central JapanInternational Airport Terminal BuildingProcessing the application may take time. Allowsufficient time for application at the DoCoMo WorldCounter.For business hours, refer to “Network Services User'sGuide (Chapter of International Service)”.How to Use WORLD CALLaCheck the settings of “International Settings”<How to activate WORLD CALL>C[Menu] ]or “Settings” ]“Call feature” ]“International dial” ]“IDD prefix setting”• Set to use “009130010” for WORLD CALL.aMakingDisplay “+” > Country code > Area code > Otherparty’s phone number > AWhen you call a mobile phone, dial the mobile phonenumber after the country code.When the other party’s area code or mobile phonenumber begins with 0, omit the zero when dialing(This does not apply in some countries/regions).](https://usermanual.wiki/LG-Electronics-USA/L602I.Users-Manual-1/User-Guide-760911-Page-239.png)