LG Electronics USA L704I PCS GSM Phone User Manual L602i Cover1 4
LG Electronics USA PCS GSM Phone L602i Cover1 4
UserManual.wiki
>
LG Electronics USA
>
L704I User Manual
Users Manual
Navigation menu
Upload a User Manual
Namespaces
Wiki Guide
HTML
PDF
Info
Views
User Manual
Discussion / Help
Navigation

![8For Your SafetyImportant InformationThis user guide contains important information on the use andoperation of this phone. Please read all the informationcarefully for optimal performance and to prevent any damageto or misuse of the phone. Any changes or modifications notexpressly approved in this user guide could void your warrantyfor this equipment.Before You StartSafety InstructionsWARNING! To reduce the possibility of electric shock, do notexpose your phone to high humidity areas, such as thebathroom, swimming pool, etc.Always store your phone away from heat. Never store yourphone in settings that may expose it to temperatures less than32°F or greater than 104°F, such as outside during extremeweather conditions or in your car on a hot day. Exposure toexcessive cold or heat will result in malfunction, damageand/or catastrophic failure.Be careful when using your phone near other electronicdevices. RF emissions from your mobile phone may affectnearby in adequately shielded electronic equipment. Youshould consult with manufacturers of any personal medicaldevices such as pacemakers and hearing aides to determine ifthey are susceptible to interference from your mobile phone.Turn off your phone in a medical facility or at a gas station.Never place your phone in a microwave oven as this willcause the battery to explode.IMPORTANT! Please read the TIA SAFETY INFORMATION onpage 78 before using your phone.Safety InformationRead these simple guidelines. Breaking the rules may bedangerous or illegal. Further detailed information is given in thisuser guide.]Never use an unapproved battery since this could damagethe phone and/or battery and could cause the battery toexplode.]Never place your phone in a microwave oven as it willcause the battery to explode.]Do not dispose of your battery by fire or with hazardous orflammable materials.]Make sure that no sharp-edged items come into contactwith the battery. There is a risk of this causing a fire.]Store the battery in a place out of reach of children.]Be careful that children do not swallow any parts such asrubber plugs (earphone, connection parts of the phone,etc.). This could cause asphyxiation or suffocation.](https://usermanual.wiki/LG-Electronics-USA/L704I/User-Guide-801613-Page-3.png)
![9For Your Safety]Unplug the power cord and charger during lightning stormsto avoid electric shock or fire.]When riding in a car, do not leave your phone or set up thehands-free kit near to the air bag. If wireless equipment isimproperly installed and the air bag is activated, you may beseriously injured.]Do not use a hand-held phone while driving.]Do not use the phone in areas where its use is prohibited.(For example: aircraft).]Do not expose the battery charger or adapter to directsunlight or use it in places with high humidity, such as abathroom.]Never store your phone in temperatures less than- 4°F orgreater than 122°F.]Do not use harsh chemicals (such as alcohol, benzene,thinners, etc.) or detergents to clean your phone. There is arisk of this causing a fire.]Do not drop, strike, or shake your phone severely. Suchactions may harm the internal circuit boards of the phone.]Do not use your phone in high explosive areas as the phonemay generate sparks.]Do not damage the power cord by bending, twisting, pulling,or heating. Do not use the plug if it is loose as it may causea fire or electric shock.]Do not place any heavy items on the power cord. Do notallow the power cord to be crimped as it may cause fire orelectric shock.]Do not handle the phone with wet hands while it is beingcharged. It may cause an electric shock or seriouslydamage your phone.]Do not disassemble the phone.]Do not place or answer calls while charging the phone as itmay short-circuit the phone and/or cause electric shock orfire.]Only use the batteries, antennas, and chargers provided byLG. The warranty will not be applied to products provided byother suppliers.]Only authorized personnel should service the phone and itsaccessories. Faulty installation or service may result inaccidents and consequently invalidate the warranty.]Do not hold or let the antenna come in contact with yourbody during a call.]An emergency call can be made only within a service area.For an emergency call, make sure that you are within aservice area and that the phone is turned on.](https://usermanual.wiki/LG-Electronics-USA/L704I/User-Guide-801613-Page-4.png)
![11For Your SafetyVehicle Mounted External Antenna(optional, if available)A minimum separation distance of 8 inches (20cm) must bemaintained between the user/bystander and the vehiclemounted external antenna to satisfy FCC RF exposurerequirements. For more information about RF exposure, visitthe FCC website at www.fcc.govFCC Part 15 Class B ComplianceThis device and its accessories comply with part 15 of FCCrules. Operation is subject to the following two conditions: (1) This device and its accessories may not cause harmfulinterference, and (2) this device and its accessories mustaccept any interference received, including interference thatmay cause undesired operation.Cautions for Battery]Do not disassemble.]Do not short-circuit.]Do not expose to high temperature: 60°C (140°F).]]Do not incinerate.Battery Disposal]Please dispose of your battery properly or bring to yourlocal wireless carrier for recycling.]Do not dispose in fire or with hazardous or flammablematerials.Adapter (Charger) Cautions]Using the wrong battery charger could damage your phoneand void your warranty.]The adapter or battery charger is intended for indoor useonly.Do not expose the adapter or battery charger to direct sunlightor use it in places with high humidity, such as the bathroom.](https://usermanual.wiki/LG-Electronics-USA/L704I/User-Guide-801613-Page-6.png)

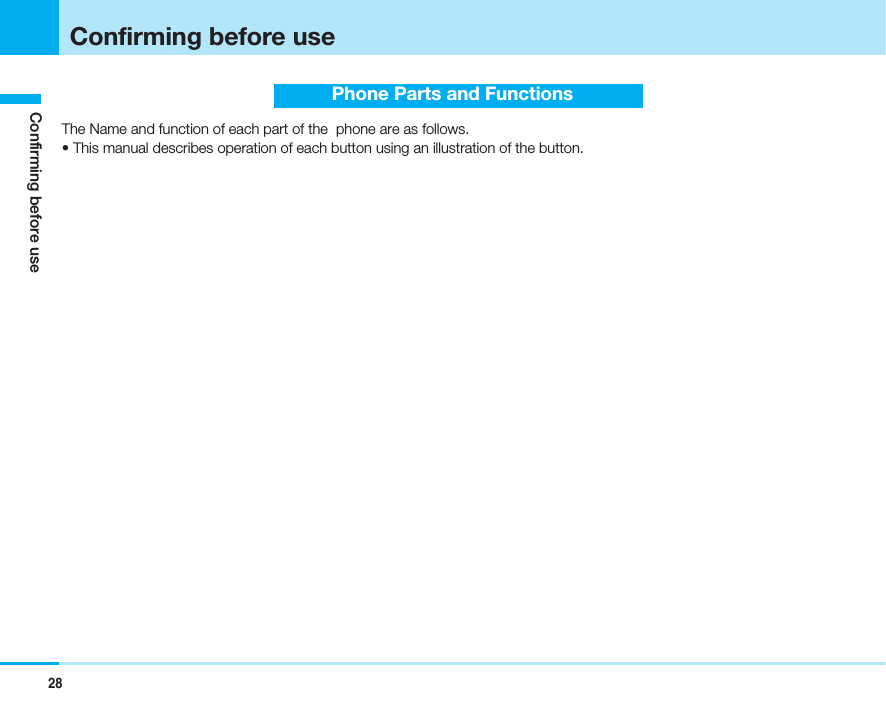
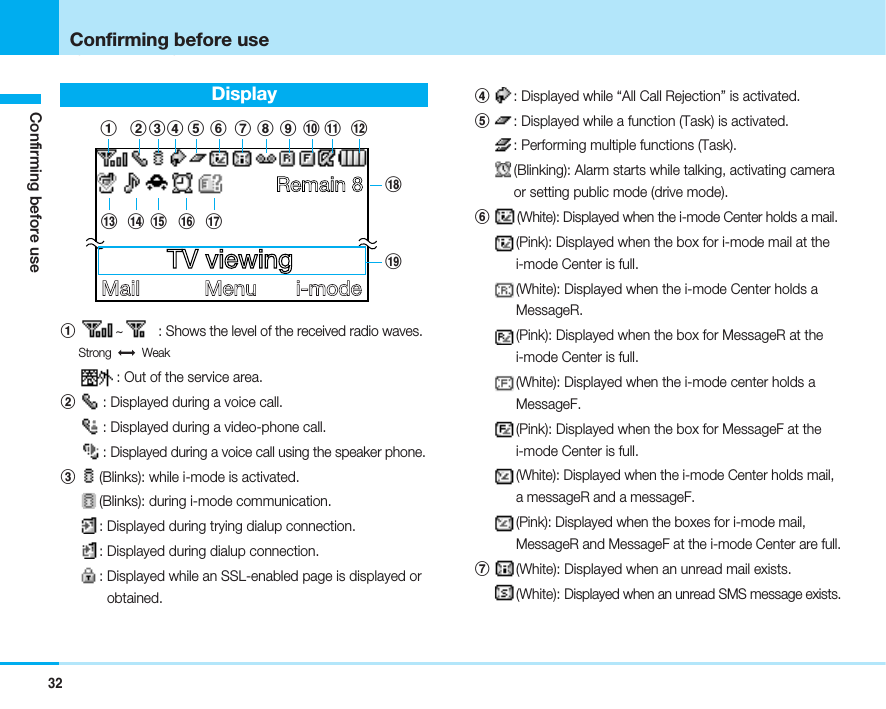
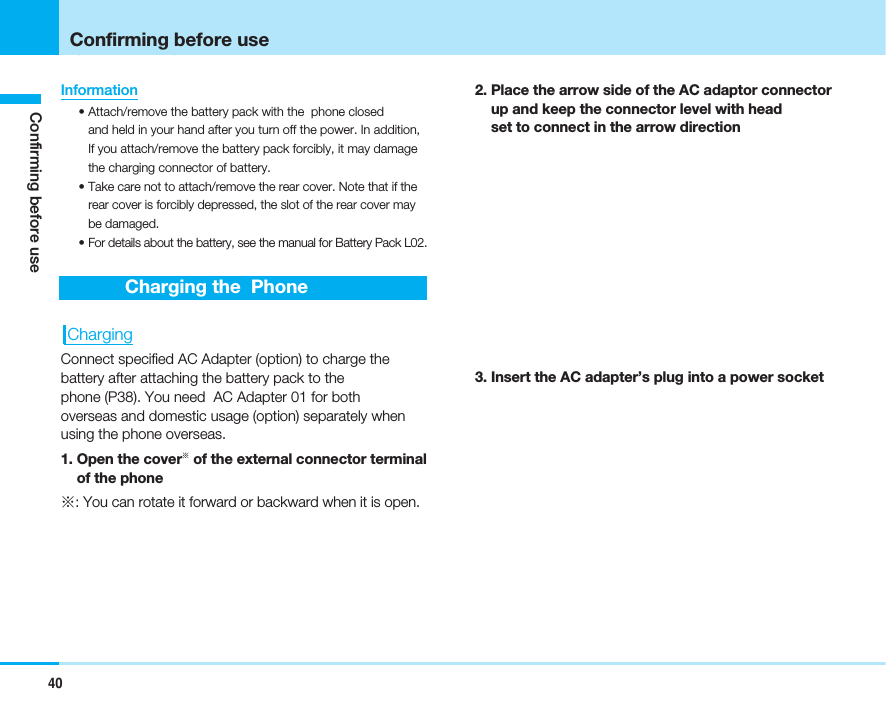
![34Confirming before useÇ≤égópëOÇÃämîFConfirming before useMenu OperationsThis section describes the operation using an example forsetting a wall paper on the Stand-by display.aSelecting a function by a K1. On the Stand-by display, C[Menu] ]Highlightusing K]C]HMove the cursor to theStand-by display ]C]HMove the cursor to theWallpaper ]CaSelecting a function by pressing the keycorresponding to the menu number1. On the Stand-by display, C[Menu] ]Highlightusing K]C]1]1Soft Key OperationsTo perform an operation displayed in the soft key area onthe 待受画面, press the corresponding button as below.Information• (Navigation icon) that indicates the directions in which youcan scroll and select items using Kis also displayed in thesoft key area.• Items displayed in the soft key area vary depending on thedisplay.K C1 1Stand-by displayDisplaySelectWallpaperClock/CalenderWallpaper memoSelectStand-by displaySelectCall displayFontMenu styleBacklightColor schemeK CH CH CStand-by displayDisplaySelectWallpaperClock/CalenderWallpaper memoSelectStand-by displaySelectCall displayFontMenu styleBacklightColor scheme](https://usermanual.wiki/LG-Electronics-USA/L704I/User-Guide-801613-Page-14.png)
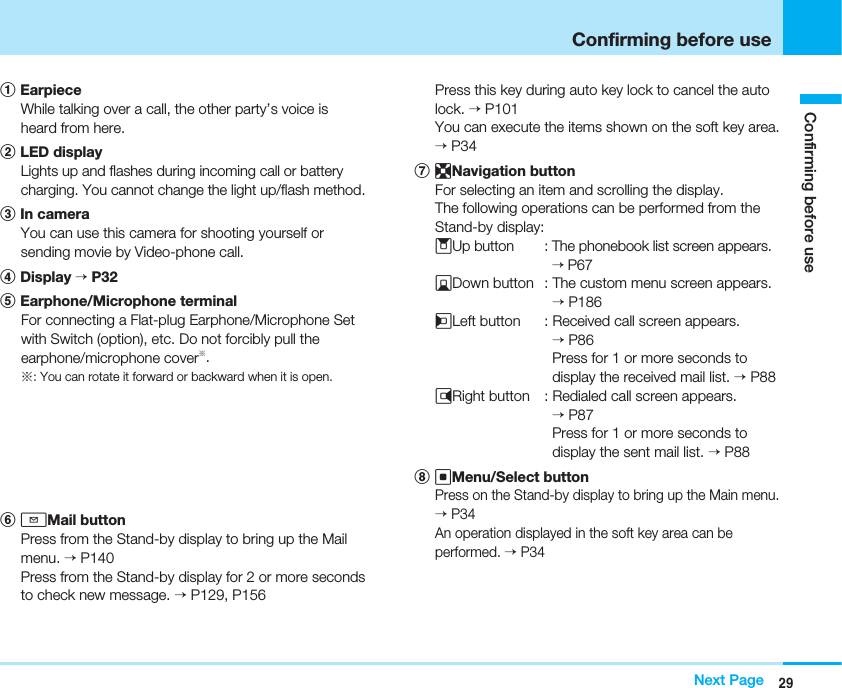
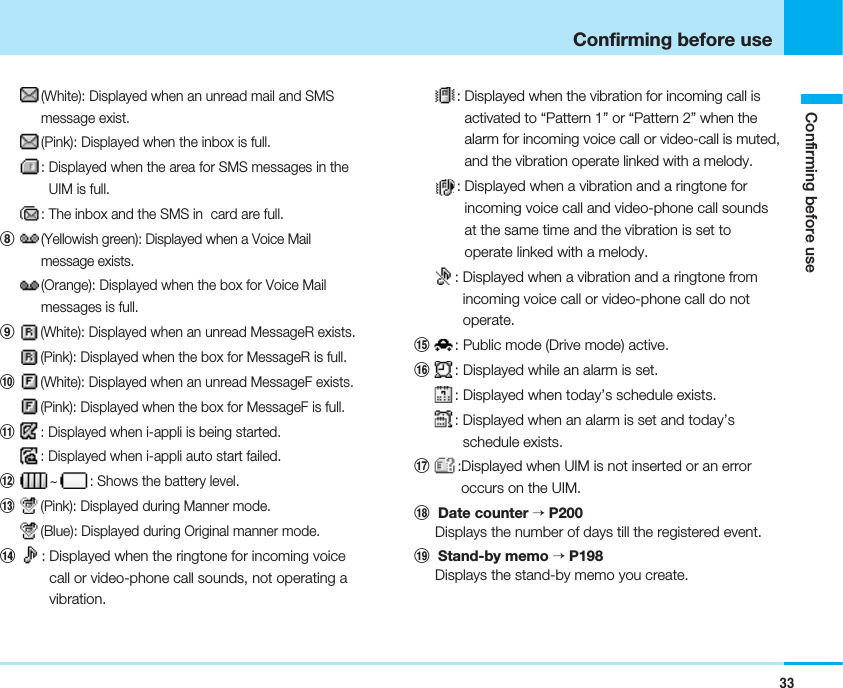
![Side Button Main Operations• If auto key lock (P100) is enabled with phoneclosed, the operations are as follows:FE : the auto lock can be cancelled temporarily. Refer tothe table below.G: Cannot be operated.35Confirming before useConfirming before useHow to operate phoneoperationOperation of phoneDuring voice phone/Video-phone call]FE Open/CloseCall rejectionPress ]Gfor 1 or moreseconds during incoming callCloseStopping alarmDuring the alarm/ schedulealarm is ringing ]EOpen/CloseScrolling the listingdisplay or sitedisplay by page※1During displaying eachscreen]FE Open/CloseSwitch the onemoth scheduledisplay by monthDuring displaying the onemonth display in theScheduler]FEOpen/CloseStarting camera During stand-by]G(Photo mode)Press]Gfor 1 or moreseconds during stand-by(Movie mode)Open/CloseDuring the auto key lock]FE]CWhen the display is turnedoff]FE/GOperation of phoneHow to operate phoneoperationWhen the display isturned onOpen/CloseCancel temporarilythe auto key lockCloseDuring the still image/movingimages shooting display isdisplayed ]FEZoom Open/CloseDuring stand-by, press]For Efor 1 or moreseconds (light up)When the photo lightlights up, press]For E(light off)Photo light on/off※2Open/CloseDuring stand-by]FEAdjust phonevolumeAdjust the buttoncheck volumeOpen/CloseAdjust ring tonevolume During incoming call]FEOpen/Close](https://usermanual.wiki/LG-Electronics-USA/L704I/User-Guide-801613-Page-15.png)
![36Confirming before useÇ≤égópëOÇÃämîFConfirming before use※1 : Depending on the display type, you can move the cursor upand down.※2 : “Flashlight” (P192 ) is set to “Not use”, this does not function.Using the UIM ( Card)Your phone number and contracted contents for theservice, etc. are recorded in the UIM. You need to insert itinto the phone to make/receive calls or performcommunication.Refer to the UIM manual for details of how to use it.Inserting/Removing UIM ( Card)Insert/remove the UIM after you turn off the power of thephone and remove the rear cover and battery packbeforehand (P39).• Remove the AC adapter and options beforehand.Inserting1. Insert the UIM with its IC-side facing downwards inthe direction of the arrow underneath the guideRemoving1. Slide the UIM in the direction of the arrow toremove itOperation of phoneHow to operate phoneoperationWhen playing movingimages/melodies]FEAdjusting the volumewhen moving images/melodies are replayedOpen/CloseWhen moving images/melodies are stopped, ]G(play)When the movingimages/ melodies areplayed, ]G(pause)Playing and pausingmoving images/melodiesOpen/Close](https://usermanual.wiki/LG-Electronics-USA/L704I/User-Guide-801613-Page-16.png)

![45Confirming before useConfirming before useDate/TimeYou can set the date and time. See “Setting Date & Time”(P96) for details of how to set them up.Using Caller ID Notification ServiceThe Caller ID Notification Service enables you to notify theother party of your phone number when you make a call.See “Using Caller ID Notification Service” (P208) for detailsof how to set it up.Own NumberYou can display your phone number recorded in the UIM.1. On the Stand-by display, C]0• See “Displaying Own Number” (P72) for details ofhow to change the settings on the Own Numberdisplay.](https://usermanual.wiki/LG-Electronics-USA/L704I/User-Guide-801613-Page-25.png)
![48Making calls/Receiving callsMaking calls/Receiving callsMaking calls1. Enter the other party’s phone number• Q: The last digit is cleared. To clear all digits,press it for 1 or more seconds.• C[Save]: You can register / add the entered phonenumber to phonebook. Go to step 2 on page 64 of“Adding to Phonebook”.• I[Search]: You can search for the phone number inphonebook. See the contents after step 3 on page 67.2. A]Start talking when the other party answers• Press Qfor 1 or more seconds: You can switchON/OFF the speaker phone.3. Pto end the call after talking• When the call is disconnected, the alert soundsounds from a receiver.Information• If you press Aafter entering the number from 0 to 9 in theEnter Phone Number screen, you can make a call directlymatching the the number saved in memory.• You can enter a phone number of up to 42 digits.• If you enter a phone number exceeding 16 digits, dialing will bemade displaying the first 16 digits digits of the phone number.• You can make a call after entering “184” (Not notify) or “186”(Notify) in front of phone number.• When the Flat-plug Earphone/Microphone Set with Switch(option) is attached, you can only talk on the Earphone /Microphone regardless that the speaker phone is ON/OFF.• When dialing/receiving overseas, some name of the other partymay not be displayed even that name is registered in thephonebook.Using the Submenus of the Enter Phone Number Display1. From the Enter Phone Number screen (See left),M[Menu]]Select from the following submenuitemsNotify caller IDSet whether to notify your phone number per call.](https://usermanual.wiki/LG-Electronics-USA/L704I/User-Guide-801613-Page-27.png)
![49Making calls/Receiving callsMaking calls/Receiving callsNext page– Not notify : “#31#” is added in front of the phonenumber entered, but the phone number is not notified.– Notify : “*31#” is added in front of the phonenumber entered, and the phone number is notified.– Cancel : The added “#31#” or “*31#” is deleted. Select prefixThe number saved in “Setting Prefix Dial” (P93) isadded before the phone number is entered.International callThe international access code saved in “International dialsetting” (P92) is added before the phone number isentered.SaveYou can save the entered phone number entered intothe Phonebook. Go to step 2 on page 64 of “Addingto Phonebook”.Search phonebookYou can search for the phone number in phonebook. Foroperations after searching, see 3 on page 66 of“Searching for Phonebook Entries”.Using the Submenus of the Talking screen1. From the Talking screen (P48), M[Menu] ]Selectfrom the following submenu itemsNew call※1You can put the current call on make and hold a callto another party.End active callYou can disconnect the call.Hold※1/Cancel held call※1You can put/release the call on hold.Mute※2/Unmute※2You can mute/unmute the voice transmitted to the otherparty.※1: Available only for Call Waiting Service subscribers.To use this service, go to “Using Call Waiting Service” (P206).※2: Not displayed during call is held.Making a Call From the Dialed/Received Call Record1. From the Stand-by display, L/R/A/T]Selecta record ]AInformation• See “Using the Submenu of the Received Calls display” (P86)for submenus. Making a Call from the Phonebook1. Uin the Stand-by display, or search thephonebook ]Select the party you want to call]A• When there are multiple registered phone numbers,press Aon the phonebook list display. Then, theoutgoing call phone number selection display isdisplayed, select the phone number and press C[Call].](https://usermanual.wiki/LG-Electronics-USA/L704I/User-Guide-801613-Page-28.png)
![50Making calls/Receiving callsMaking calls/Receiving callsInformation• To switch the phonebook list to display between the phone and UIM, select M[Menu] >“View handset” / “ViewUIM” on the phonebook list screen.Using Pause DialYou can use services such as sending messages to apocket bell, reserving tickets or checking the balance ofyour bank account by sending push signal from the handset. When the pause "P" has been entered, you cansend while dividing the dial data at the position where thepause is entered.1. Enter the phone number2. Enter the dial data• Press *3 times to enter pause “P”.• Only 0to 9, #, *and pause “P” can beentered.• Up to 42 digit can be entered.• If you enter pause “P” before the phone number, youcan not dial.3. A• A call is made to the other party, and the dial datafrom the beginning to the first pause “P” is displayedwhile being connected.4. Confirm that the other party accepted ]Aor C[Select]• The dial data from the beginning to the first “P” issent, and the dial data to the next pause “P” isdisplayed. Each time you press Aor C, the dialdata to the next “P” is sent. When you send the lastnumber, the calling screen appears.Information• Depending on the target device, the dial data may not bereceived.• When using video-phone call, you can not use pause dial.International CallsYou can make an inteÎrnational call easily using the international call service “WORLD CALL”.When you have signed up for service, you havecontracted to use “WORLD CALL” (except those whohave applied not to use it).• You can make calls to 240 countries and areasworldwide.aHow to make calls009130 >010 >Country code >Area code >Destination phone number ]A• This service is not available with some billing plans.• Application/monthly fee for WORLD CALL is free ofcharge.• The WORLD CALL charges are added to your monthly bill.](https://usermanual.wiki/LG-Electronics-USA/L704I/User-Guide-801613-Page-29.png)
![51Making calls/Receiving callsMaking calls/Receiving callsNext Page• Contact “ Information Center” on the back ofthis manual for inquiries about WORLD CALL.• If the other party uses a specific 3G mobile phoneoverseas, you can make an “International Video-phoneCall” by dialing out using Tafter following the dialingmethod described above.– See the International Service web page of forthe information about connectable countries andtelecommunications carriers.– Images sent from the other party may blur on your phone or you may not be able to connect,depending on the other party’s phone used for theinternational video-phone.• When the area code begins with “0”, leave this out whendialing. However, include “0” when making a call tosome countries or regions such as Italy.Making an International Call Easily• Confirm that the “Setting Prefix Dial” (P93) is set to“AUTO” and “009130010” (WORLD CALL) is set for“IDD prefix code” in “IDD prefix setting”.1. On the Stand-by display, press 0for 1 or moreseconds to enter “+”2. Enter Country code >Area code >Destinationphone number]A(T)3. “Yes”4. Pto end the call after talkingAdjusting the Volume1. Press FE Hduring a call or press Hfor 1 or moresecondsInformation• The changed volume is held even after ending the call.Receiving calls1. When you receive a call, A• I[Silent]: You can set to no sound for incoming call.If you subsequently press I[Reject], incoming callwill be rejected.• P: Reject the call.2. Pto end the call after talking• A confirmation tone is emitted from the phone whenthe incoming call is disconnected.](https://usermanual.wiki/LG-Electronics-USA/L704I/User-Guide-801613-Page-30.png)
![52Making calls/Receiving callsMaking calls/Receiving callsInformation• When dialing/receiving overseas, some name of the other partymay not be displayed even that name is registered in thephonebook.When you didn't get a call When you could not answer the incoming voice call/video-phone call, the following screen indicating a missed callappears and the LED blinks for approx. 60 seconds.• C[Select]: You can view the list of received calls.• I[Close]: You can close the screen for missedcalls.Using the Submenu of the Ringing Display1. From the Ringing screen (P51), M[Menu] ]Select from the following submenu itemsVoice mail※1The Call is connected to the Voice Mail ServiceCenter.Call rejectionThe call is disconnected without answering it.Call forwarding※2The call is forwarded to the registered phone number.※1: If you use voice mail menu, you should register this servicein operator. For details, see “Using voice mail” (P204).※2: If you use call forwarding menu, you should register thisservice in operator. For details, please refer to the “UsingCall Forwarding Service” (P207).Using Public mode (drive mode)Public mode is an auto-answer service that puts stress onmanners in public spaces. When there is an incoming callin Public mode, a guidance to the effect that you cannotanswer the call because you are driving a car or in a place(train, bus, theater, etc.) that requires restraint from using aphone is played for the caller and the call is disconnected.• Public mode can be set/cancelled only from the stand-bydisplay (in addition, from a screen showing “”).• You can make calls in Public mode.• When the Caller ID request service is set to “Activate”and the “User unset” incoming call is received, a voiceguidance requesting to send Caller ID is played. (No public mode guidance is played.)](https://usermanual.wiki/LG-Electronics-USA/L704I/User-Guide-801613-Page-31.png)
![53Making calls/Receiving callsMaking calls/Receiving callsSetting the Public Mode (drive mode)1. On the stand-by display ]Press *for 1 or moreseconds• The Public mode is set and appears.aReleasing the Public ModeOn the stand-by display, press *for 1 or moreseconds• The Public mode is released, and disappears.In Public modeWhen an incoming call without Caller ID is received at your phone, no ringtone sounds. The missed calls display(P52) is displayed and the incoming call is recorded as a“missed call history” in the “Call/Mail history”.• A guidance to the effect that you cannot answer the callbecause you are driving a car or in a place that requiresrestraint from using a phone is played for the caller andthe call is disconnected.Operations while Network Service and Public mode (drive mode) are both activeWhile Public mode (drive mode) and Network Service areboth active at the same time, the phone operationsas listed below. Depending on the settings and/or steps formaking a call, Network Service may have precedence,disabling Public mode (drive mode) operations or recordingor display of missed calls.aVoice MailaCall WaitingaCall Forwarding ServiceWhen a video-phone call is receivedWhen a voice call is receivedA Public mode (drive mode)guidance is played for the callerand the call is connected toVoice Mail Service Center.※1The call is terminated withoutbeing connected to the VoiceMail Service Center.※2When a video-phone call is receivedWhen a voice call is receivedA Public mode (drive mode)guidance is played for the callerand the call is disconnected.Disconnect the call after displayingthe video guidance of the publicmode to the other party.When a video-phone call is receivedWhen a voice call is receivedA Public mode (drive mode)guidance is played for the callerand the call is connected to theforwarding destination.※Whether the guidance is playedto the other party or notdepends on the setting of theCall Forwarding Service.The call is connected to theforwarding destination, with noPublic mode (drive mode) videoguidance played for the caller.※When the target hand set doesnot support the Video-phone call,the transmission is disconnected.](https://usermanual.wiki/LG-Electronics-USA/L704I/User-Guide-801613-Page-32.png)
![55Making calls/Receiving callsMaking calls/Receiving callsActivate Public mode (power off)1. *25251]A• Public mode (power off) is set. (Nothing is changed inthe Stand-by display.)• After setting Public mode (power off) and turning offthe power, the guidance “The person you are calling iscurrently in an area where use is prohibited. Please tryagain later.” is played back for incoming calls.aTo release Public mode (power off)*25250 ]AaTo check Public mode (power off) for the setting,*25259 ]AWhen Public mode (power off) is activatedWhen an incoming call is received at your phone,the guidance is played back to the caller telling that youare currently in an area where use is prohibited, and thenthe call is disconnected. When there is an incoming video-phone call, the video-guidance of the public mode isplayed back to the caller, and then the call isdisconnected. • This setting is continued until you release the setting bydialing “*25250”. If you just switch on, this setting is notreleased.• The Public mode (power off) guidance is played backeven when you are out of the service area or radiowaves do not reach.Activating between network services and Public mode (power off)If you use Public mode (power off) and Network service atthe same time, the operation will be activated as follow.Depending on the setting or calling, the network servicecan be preferred, so the activation of Public mode (poweroff) or the record of missed call may not be displayed.aVoice MailaCall Forwarding ServiceResponse to Incoming Video-phone callsResponse to Incoming Voice callsPlays back the Public mode(power off) guidance to caller, andthen the call is connected to theVoice mail Service Center.※1The call is terminated without beingconnected to the Voice MailService Center.※2Response to Incoming Voice callsResponse to Incoming Video-phone callsPlays back the Public mode(power off) guidance to caller, andthen the call is forwarded to theforwarding destination.※1Theguidance depends on setting ofCall Forwarding Service.Does not play back the videoguidance for public mode (poweroff), and the call is forwarded tothe forwarding destination. If thedestination does not supportvideo-phone call, the call isdisconnected.](https://usermanual.wiki/LG-Electronics-USA/L704I/User-Guide-801613-Page-34.png)
![58Making/Receiving Video-phone callsMaking/Receiving Video-phone callsAbout Video-phoneWhen both you and the other party use video-phones, you can talk seeing each other's image.• video-phones conform to 3G – 324M※1standardized by the international standard 3GPP※2 . You cannot connect to the video-phone that uses adifferent format.※1: 3G-324M is the international standard for the thirdgeneration of mobile video-phones.※2: 3GPP (3rd Generation Partnership Project) is the regionalstandards organization for developing common technicalspecifications for third-generation mobiletelecommunications systems (IMT-2000).• The video-phone call is activated at the speed of 64Kbytes.Making Video-phone Calls1. Enter the other party’s phone number• The Enter Phone Number screen (P48) is displayed.2. T]Start talking when the other party answers• The voice of the other party is heard from the speakerwhen the call starts.• Press Qfor 1 or more second: You can switchON/OFF the speaker phone.• C[Image]/[Camera]: You can switch betweenSubstitutive image and your photo image for sendingto the other party.• I[Switch]: You can switch the video that is sent tothe other party to the image of the in camera or theout camera.• T: You can zoom in/out the image in the camerayou are using.3. Press Pto end the call after talkingInformation• See “International Calls” (P50) for how to make internationalcalls.• When the Flat-plug Earphone/Microphone Set with Switch(option) is attached, you can only talk on the Earphone/Microphone regardless of whether the speaker phone isON/OFF.Using the Submenu of the Enter Phone Number screenSee “Using the Submenus of the Enter Phone Numberscreen” (P48) of voice calls for the submenus available.DescriptionMarkSpeaker phone ON/OFFZooming magnification](https://usermanual.wiki/LG-Electronics-USA/L704I/User-Guide-801613-Page-37.png)
![59Making/Receiving Video-phone callsMaking/Receiving Video-phone callsUsing the Submenus of the Talking Screen>P2571. From the Talking screen (P58), M[Menu] ]Select from the following submenu itemsEnd callThe call is disconnected.HoldYou can put the call on hold. You can cancel thefunction by pressing I[Active].Substitutive image/Camera imageYou can switch to the Substitutive image for sendingto the other party. >P95Camera settingsYou can set the camera of Video-phone call. You canselect the icon by pressing J. After setting, pressI[Close].– Zoom : The camera image is zoomed. (x1/x2)– Brightness : You can change the brightness ofphoto images.– Night mode : You can set it up when using thecamera in a dark place.Video-phone settingsYou can set the display of Video-phone call. Aftersetting, press I[Done]. >P94– Display setting : You can set the display methodfor the Talking screen.• Both : The other party’s image and your imageare displayed.• Other : Only the other party’s image is displayed.• Me : Only your image is displayed.– Sub screen : If you select “Both” of “video-phonesettings”, you can set the image which displayedeach screen.• Me : Only your image is displayed.• Other : Only the other party's image is displayed.– Display light: You can set the lighting method ofthe backlight on the Talking screen.• Always on : Always lights during a call.• Terminal setting : Follows the setting of“Backlight”. >P83Sending image qualityYou can set the quality of images to be sent to theother party.– Normal : Sends images in standard quality andmotion speed.– Prefer motion quality : Sends images laying stresson motion speed. Prefer motion quality is effectivefor moving images.– Prefer image quality : Sends images laying stresson image quality. Prefer image quality is effective ifthere is little motion.Setting item/Setting at purchase](https://usermanual.wiki/LG-Electronics-USA/L704I/User-Guide-801613-Page-38.png)
![60Making/Receiving Video-phone callsMaking/Receiving Video-phone callsMaking a Video-phone call from the Dialed/Received Call Record1. On the Stand-by display, L/R/A/T]Selecta history ]TInformation• See “Using the Submenu of the Received Call Record Screen”(P86) for the submenu.Making a Video-phone Call from the Phonebook1. On the Stand-by display U, or Search forphonebook entries (P66) ]Select a party to call ]T• When there are multiple registered phone numbers,press Ton the phonebook list display. Then, theoutgoing call phone number selection display isdisplayed, select the phone number and press C[Call].Information• To switch the phonebook to display between the phoneand UIM, select M[Menu] >Select “View handset” / “ViewUIM”.Adjusting the Volume1. Press H/FE during a callInformation• The changed volume is held even after ending the call.Receiving Video-phone Calls1. When you receive a call, T/A• C[Image]: You can receive a call. The substitutiveimage will be sent to the other party.• P: You can put the call on hold. The holding imagewill be sent to the other party. If you press C[Answer],you can answer the call.2. Pto end the call after talkingInformation• When inserting the switch of the Flat-plug Earphone/Microphone set with Switch (option), you can connect a call byearphone regardless of Speakerphone ON/OFF.](https://usermanual.wiki/LG-Electronics-USA/L704I/User-Guide-801613-Page-39.png)
 ]3You can set the operation and display for video-phonecalls. See “Setting Operation and Display for video-phoneCalls” (P94) and “Selecting an Image for video-phoneCalls” (P95) for details of the settings.](https://usermanual.wiki/LG-Electronics-USA/L704I/User-Guide-801613-Page-40.png)
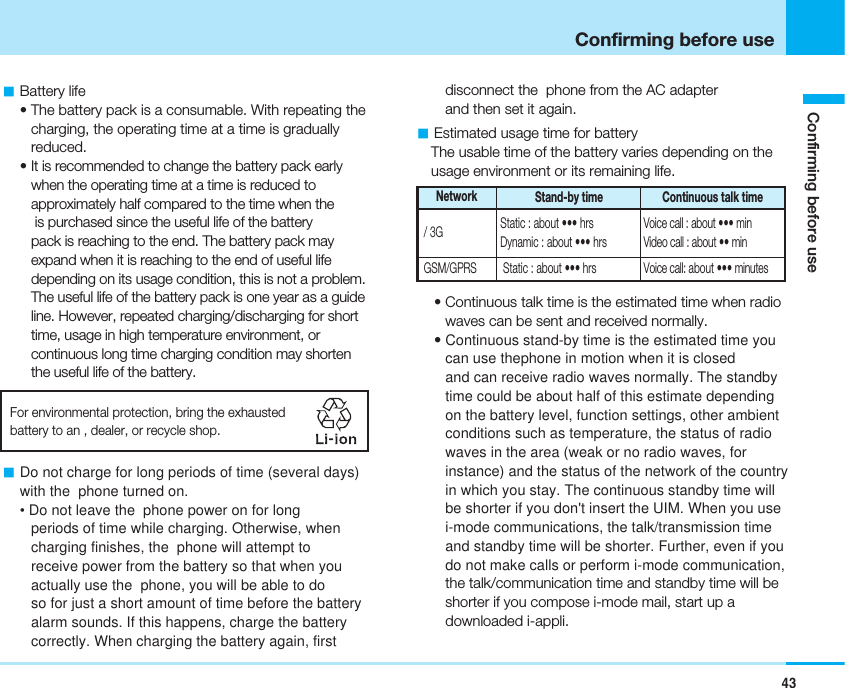
![75Adjusting the Ring Volume ....................76Adjusting the Effect Tone Volume .........76Setting a Ring Tone................................76Setting an Effect Tone ...........................77Setting a Vibrator ...................................78Activating the Manner Mode .................78Setting Ringing Operations for Incoming Mail .........................................79Setting Ringing Time..............................80Setting Display .......................................80Setting Fonts of Dial Characters ...........82Setting Menu Style .................................83Setting Backlight ....................................83Setting color Scheme.............................83Sound/Display On the Stand-by display, C[Menu] ](Sound) or “Sound” To display the Sound menu On the Standby display, C[Menu] ](Display) or “Display”To display the Display menu](https://usermanual.wiki/LG-Electronics-USA/L704I/User-Guide-801613-Page-41.png)
 ]1>P2501. From the Sound menu (P75), “Ring volume” ]Select from the following adjustment items ]After setting,I[Done]Voice callYou can adjust the ring tone volume for voice calls.Video-phone You can adjust the ring tone volume for video-phonecalls.Mail toneYou can adjust the ring tone volume for mail.MessageR toneYou can adjust the ring tone volume for MessageR.MessageF toneYou can adjust the ring tone volume for MessageF.SMS toneYou can adjust the ring tone volume for SMS.Information• This notifies an incoming call by the small volume ring tone atbeginning and gradually increasing to the volume you set.Adjusting the Effect Tone VolumeC](Sound) ]2>P2501. From the Sound menu (P75), “Effect tone volume”]Select from the following adjustment items ]After setting,I[Done]Key toneYou can adjust the key pad sound volume.Power ON/OFFYou can adjust the tone volume for when turning thephone on/off.Slide toneYou can adjust the tone volume for when opening orclosing the phone.Feedback toneYou can adjust the tone volume for when a popupappears.Setting a Ring ToneC](Sound) ]3You can set the ring tone for voice call, video-phone call ormail. In addition to ring alerts and melodies registered bydefault, you can set melodies and/or i-motion downloadedfrom i-mode sites and web pages as incoming ring alerts.You can set the SMF, MFI or MP4 file as a ringtone.Setting item/Setting at purchaseSetting item/Setting at purchaseSound/Display](https://usermanual.wiki/LG-Electronics-USA/L704I/User-Guide-801613-Page-42.png)
![77Sound/DisplaySound/DisplayHowever, the ring tone may not be set depending on themelody or i-motion.• For the melody registered at purchase, see “List ofmelody” (P267).>P2511. From the Sound menu (P75), “Select ringtone” ]Select from the following adjustment items ]After setting, I[Done]• Select from the melodies stored in “Melody” or “i-motion” in “Data box” respectively. >P176, P179• On a folder list screen, press Qto switch between“Melody” and “i-motion”.Voice callYou can select a ring tone for voice calls.Video-phoneYou can select a ring tone for video-phone calls.Mail toneYou can select a ring tone for mail.MessageR toneYou can select a ring tone for messageR.MessageF toneYou can select a ring tone for messageF.SMS toneYou can select a ring tone for SMS.Information• If you have set a ring tone depending on the voice call/ videophone call/ Mail, the ring tone is preferred. The priority order isas follows:1 Ringtone set in the phone’s phonebook >Set thephonebook (P64)2 Ringtone set for a group of the phone’s phonebook>Set group (P71)3 Ringtone volume/Video call ring tone/Mail, Message ringtone >Select the ring tone (P76)Setting an Effect ToneC](Sound) ]4>P2511. From the Sound menu (P75), “Select effect tone” ]Select from the following adjustment items ]Aftersetting, I[Done]Key toneYou can set to emit an effect tone for when you touchthe buttons. The effect tone does not sound whensetting to “OFF”.Power ON/OFFYou can set whether to emit an effect tone for whenyou switch ON/OFF the phone.Slide toneYou can set whether to emit an effect tone for whenyou open/close the phone.Setting item/Setting at purchaseSetting item/Setting at purchase](https://usermanual.wiki/LG-Electronics-USA/L704I/User-Guide-801613-Page-43.png)
 ]5>P2511. From the Sound menu (P75), Vibration settings ]Select from the following setting items ]Aftersetting, I[Done]Incoming callYou can select a vibration pattern for when a voicecall or a video-phone call comes in.– melody+vibration: The vibration and the melodyfor incoming call are activated at the same time.– Pattern 1(Vibration only): This activates thevibration to pattern 1. Regardless of ring tone, thetone for incoming call does not sound.– Pattern 2(Vibration only): This activates thevibration to pattern 2. Regardless of ring tone, thetone for incoming call does not sound.– OFF: The vibration is not activated in phone. MessageYou can set a vibration pattern for when mail,messageR/F or SMS comes in.– melody+vibration: The vibration and the melodyfor incoming call are activated at the same time.– Pattern 1(Vibration only): This activates thevibration to pattern 1. Regardless of ring tone, thetone for incoming call does not sound.– Pattern 2(Vibration only): This activates thevibration to pattern 2. Regardless of ringtone, thetone for incoming call does not sound.– OFF: The vibration is not activated in phone.Activating the Manner ModeYou can set whether to mute the ring tone, key pad soundand any other sound from the speaker to avoid annoyingpeople around you. If the manner mode is activated, anincoming call or alarm, etc. is notified with vibrator.• You can change the activation on setting manner modeto “Original manner mode”. >P791. From the Stand-by display, press #for 1 ormore seconds• The handset of the phone vibrates displaying(blue/in the Original manner mode) or (pink/in theManner mode). • You can cancel it by pressing #for 1 or moreseconds with the Manner mode activated. Setting item/Setting at purchase](https://usermanual.wiki/LG-Electronics-USA/L704I/User-Guide-801613-Page-44.png)
 ]6You can change operations in the Manner mode. >P251, P2521. From the Sound menu (P75), “Manner settings” ]Select from the following setting itemsManner modeYou can set the Manner mode.Original manner modeYou can set the operation of the original mannermode if desired. After setting, press I[Done].– Incoming call sound: You can set whether tomake the ring tone sound when a voice call orvideo-phone call comes in.– Incoming call vib.: You can set whether to vibratethe phone when a voice call or video-phone callcomes in. – Message sound: You can set whether to make thering tone sound when mail, messageR/F or SMScomes in.– Message vibration: You can set whether to vibratethe phone when mail, messageR/F or SMS comesin. – Key tone: You can set whether to make the keyoperation sound when you do key operations. – Slide tone: You can set whether to make an effecttone sound when you open or close the phone. – Low battery tone: You can set whether to make abattery alarm tone sound when the battery is flat.Information• The following sounds are emitted even when the manner modeis activated.– Shutter sound during camera shooting– The alert tone to reconnect– The alert tone for the quality of calling• If you try to play the melody, moving image or i-motion onmanner mode, the confirmation screen appears and you canselect whether to play with sounds.Setting Ringing Operations for Incoming MailC](Sound) ]7You can set whether to make the ring tone sound whenmail or SMS comes in. You can also set ringing durationand cycle of rings.>P2521. From the Sound menu (P75), “Mail ring duration” ]Select from the following setting items ]Aftersetting, I[Done]Setting item/Setting at purchaseSetting item/Setting at purchase](https://usermanual.wiki/LG-Electronics-USA/L704I/User-Guide-801613-Page-45.png)
 ]8You can specify the mute time in seconds before ringingstarts when a voice call or video-phone call which is notregistered in phonebook comes in. This function is effectiveas a countermeasure for nuisance calls such as 1 ring phonescam.>P2521. From the Sound menu (P75), Select “Set muteseconds” ]Enter ring time. ]I[Done]Information• If the voice call or video-phone call which are not registered inphonebook disconnects within the setting ringing time, theyare not recorded in received call list.Setting DisplayYou can set the display for stand-by display orIncoming/outgoing screen.You can set the maximum of the image size of 1280 x1024, the file size of JPEG file to 700K bytes and the filesize of GIF file to 500K bytes on the Stand-by display.Depending on the image, some cannot be set properly.• When the image saved in stand-by mode, making andreceiving a call at purchase, please refer to “Pre-installeddata” (P264)Setting the Stand-by DisplayYou can set wallpapers and clock displays for the Stand-by display.WallpaperC](Display) ]11>P2521. From the Display Menu (P75), “Stand-by display” ]“Wallpaper” ]Select from the following settingitems ]After setting, I[Done]Type– Image: You can select an image (P169) savedwithin the “My picture” in the “Data box”.Setting item/Setting at purchaseSetting item/Setting at purchase](https://usermanual.wiki/LG-Electronics-USA/L704I/User-Guide-801613-Page-46.png)
 ]12• The option cannot be set when the “Type” of the“Wallpaper” (P80) is set to “Stand-by theme”.>P2521. From the Display menu (P75), “Stand-by display” ]“Clock/Calendar display” ]Select next settingitem ]After setting I[Finish]Clock/Calendar– Not show: The clock is not displayed on the Stand-by display.– Clock: A digital clock is displayed on the Stand-bydisplay. You can select the type of the clock in“Clock display setting”.– Calendar + Clock Display: The calendar and theclock is displayed on the Stand-by display. You canselect the character color of the clock in the “ClockCharacter Color”.– Dual-clock: You can display two date/times of twocities on the Stand-by display. You can selectsecond clock of the city※that is shown under the“City Setting”.Clock Display Setting/Clock Character Color/City SettingYou can select the type of the digital clock, clockcharacter color, or the city.• The selection item is changed depending on thesettings in “Clock/Calendar”.• You can also select the clock character color whenthe “Digital Clock 3” is selected in the “Clock DisplayStetting.”.※: You can also change the city to display in "World Clock" (P191).Information• If you press M[View], you can confirm the display set. Using Stand-by MemoC](Display) ]13>P2521. From the Display menu (P75), “Stand-by display” ]“Stand-by Memo” ]Select next setting item ]After setting I[Finish]Screen DisplayYou can set whether the stand-by memo is displayedon the Stand-by display. The following items cannotbe set when you set to “Not display”.Setting item/Setting at purchaseSetting item/Setting at purchase](https://usermanual.wiki/LG-Electronics-USA/L704I/User-Guide-801613-Page-47.png)
 ]21You can set the image displayed when you receive anincoming call. >P2531. From the Display Menu (P75), “Outgoing/IncomingCalls Display” ]“Incoming call” • Select from the images saved on “My picture” of “Databox”. >P169Setting Display for Outgoing Calls C](Display) ]22You can set the image displayed when you make a call. >P2531. From the Display Menu ]“Outgoing/IncomingCalls Display” ]“Outgoing call” (P75)• Select from the images saved on “My picture” of “Databox”. >P169Setting Fonts of Dial CharactersC](Display) ]3You can set the sizes and colors of the dial fontsdisplayed when you make a call, etc.>P2531. From the Display Menu (P75), “Font” ]Select fromthe following setting items ]After setting,I[Done]Dial font sizeSelect a size of dial fonts.Dial font colorSelect a color of dial fonts.Setting item/Setting at purchaseSetting item/Setting at purchaseSetting item/Setting at purchase](https://usermanual.wiki/LG-Electronics-USA/L704I/User-Guide-801613-Page-48.png)
 ]4You can set the style of the Menu Style that appears whenpressing C[Menu] on the Stand-by display.>P2531. From the Display Menu (P75), “Menu style” ]“Grid”/“List” ]I[Done]Setting BacklightC](Display) ]5You can set the time for the Stand-by display to light up.>P2531. From the Display Menu (P75), “Backlight” ]Selectfrom the following setting items ]After setting,I[Done]Light up timeYou can set the light up time of the Stand-by displaylight.BrightnessYou can set the brightness of Stand-by display.Setting color SchemeC](Display) ]6You can set the color tone of the Stand-by display.>P2531. From the Display Menu (P75), “Color scheme” ]Select the color scheme you want to set ]I[Done]Information• If you press C[View], you can view the screen after setting.Setting item/Setting at purchaseSetting item/Setting at purchaseSetting item/Setting at purchase](https://usermanual.wiki/LG-Electronics-USA/L704I/User-Guide-801613-Page-49.png)
![85Call/Answer ............................................86Call Feature ............................................92Video-Phone...........................................94Date & Time ............................................96Network (for overseas use) ....................97Changing a Host from i-mode ...............99Setting Lock/Security.............................99Setting Bilingual ...................................102Others Settings.....................................103SettingsOn the Stand-by display, C[Menu] ](Settings) or “Settings” To display the Settings menuSelect](https://usermanual.wiki/LG-Electronics-USA/L704I/User-Guide-801613-Page-50.png)
 ]111You can view the record of received call.1. From the Settings menu (P85), “Call/Answer” ]“Call/Mail history” ] “Received calls”• A/T: You can make a call to the other party ofthe record being selected.• I[Delete]: You can delete the record being selected.2. Select a call record ]C• A/T: You can make a call to the other party in alist. • I[Delete]: You can delete the list of call record. • J: You can view the call record.Using the Submenu of the Received Calls screen/ Details screen1. From the Received Calls screen (See left)/Detailscreen (See above), M[Menu] ] Select from thefollowing submenu itemsView※1You can view details of the call record selected.Add to phonebook※2Register a selected/displayed phone number in thehistory newly/additionally to a phonebook. Go to step2 (P64) in ”Adding to phonebook”.SettingsIcon DescriptionReceived voice callsReceived video-phone callsRejected callsMissed calls (Voice calls)Missed calls (Video-phone calls)](https://usermanual.wiki/LG-Electronics-USA/L704I/User-Guide-801613-Page-51.png)
 ]112You can view dialed call records.1. From the Settings menu (P85), “Call/Answer” ]“Call/Mail history” ] “Dialed calls”• The Dialed Call Records appears.2. Select a history ]C• The Detail screen appears.Information• See “Using the Submenu of Received Calls Screen”/“Using theSubmenu of the Detailed Screen” (P86) for the displayoperation method and the submenus available from the Dialedcall records/Detail screen.• The operation of the redial display that is shown when Rispressed on the Stand-by display is also the same.Displaying All Call RecordsC](Settings) ]113Received and dialed call records are displayed together.1. From the Settings menu (P85), “Call/Answer” ]“Call/Mail history” ] “All calls”• The All calls screen appears.Mark DescriptionDialed voice callsDialed video-phone calls](https://usermanual.wiki/LG-Electronics-USA/L704I/User-Guide-801613-Page-52.png)
![88SettingsSettings2. Select a history ]C• The Detail screen appears.Information• See “Using the Submenu of Received Call Records Screen”/ “Using the Submenu of the Detailed Screen” (P86) for thedisplay operation method and the submenus available fromthe All Calls screen / Detail screen.Displaying received mail historyC](Settings) ]114Display history of received mail.1. From Settings menu (P85), select “Call/Answer” ]“Call/Mail history” ] “Recv. mails”• A history of the received mail appears.2. Select a history ]C• Detail screen appears.Information• See “Using the Submenu of Received mail history Screen” /“Using the Submenu of the Detailed Screen” (P86) for thedisplay operation method and the submenus available fromthe All Calls screen / Detail screen. However, “Internationalcall (Japan)” is not displayed.Displaying sent mail historyC](Settings) ]115Display history of sent mail.1. From Settings menu (P85), select “Call/Answer” ]“Call/Mail history” ] “Sent mails”• A history of sent mail appears.2. Select a history ]C• Detail screen appears.Information• See “Using the Submenu of Received Call Records Screen”/ “Using the Submenu of the Detailed Screen” (P86) for thedisplay operation method and the submenus available fromthe All Calls screen / Detail screen. However, “Internationalcall (Japan)” is not displayed.Displaying all mail historyC](Settings) ]116Display history of all sent/received mail collectively.1. From Settings menu (P85), select “Call/Answer” ]“Call/Mail history” ] “All mails”• A history of all mail appears.2. Select a history ]C• Detail screen appears.](https://usermanual.wiki/LG-Electronics-USA/L704I/User-Guide-801613-Page-53.png)
 ]12You can confirm call duration for each call type. You canconfirm the following items:• The displayed call duration is a standard. The real of callduration may differ.1. From the Settings menu (P85), “Call/Answer” ]“Call duration”• Call duration display appears.Last callYou can confirm the last call duration.Received callsYou can confirm the received call duration.Dialed callsYou can confirm the dialed call duration.All callsYou can confirm the total call duration.Information• If the display of call time exceeds “9999999:59:59”, the settingwill be reset to “000000:00:00”.Resetting call duration1. Select a call duration you want to clear on the Callduration screen ]I[Reset] ]Enter yourterminal security code ]C]“Yes”• To clear all the call durations ]M[Menu] ] “Resetall”Setting Earphone/Microphone Auto AnswerC](Settings) ]13You can set how to answer an incoming call with the Flat-plug Earphone/Microphone Set with Switch (option)connected.>P2531. From the Settings menu (P85), “Call/Answer” ]“Auto answer” ] Select from the following settingitems ]After setting, I[Done]Auto answeringYou can set the earphone/microphone auto answer toON/OFF.Delayed time (SEC) (0-120)You can set the time between receiving call andanswering a call automatically.Setting item/Setting at purchase](https://usermanual.wiki/LG-Electronics-USA/L704I/User-Guide-801613-Page-54.png)
 ]14You can set whether to reject incoming calls.>P2541. From the Settings menu (P85), “Call/Answer” ]“Reject/Accept call” ] Enter your terminalsecurity code ]C• The Reject/Accept call display appears.2. Select from the following setting itemsAccept You can set whether to accept all incoming calls.Reject on listYou can reject the incoming call from the specific parties.You can set the rejecting action and the party's phonenumber to reject a call by pressing I[List] (See below).Reject all calls– Silent : You can disable the ringing tone for allincoming calls.– Disconnect call : You can reject all incoming calls. Memory reject call You can reject calls from parties not registered inphonebook and those with no caller IDs.Information• Even when rejecting a call by “Reject on list”, “Reject all calls”,or “Memory reject call”, the record will be remained.Setting Reject call List1. From the Reject/Accept call display (See left),Select “Reject on list” ] I[List] • The Reject on list will be displayed.• M[Menu]: You can edit/delete the list set. 2. I[Add] ]Select from the following setting items]After setting, I[Done]Reject types – Silent : Disables the ring tone when receiving thecall from the other party set to “Reject number”. Setting item/Setting at purchaseMark DescriptionThe type of reject call is set to “Silent”.The type of reject call is set to “Disconnect call”.](https://usermanual.wiki/LG-Electronics-USA/L704I/User-Guide-801613-Page-55.png)
![91SettingsSettingsNext Page– Disconnect call : Rejects incoming calls whenreceiving the call from the other party set to “Rejectnumber”. Reject number Enter the phone number of a caller you want to reject.You can select a phone number from the phonebookby pressing C[Search]※.※: If you use M[Menu] >Edit from “Reject on list”, you cannotuse this function.Setting an Answer ModeC](Settings) ]15You can set whether to answer a voice call by pressing abutton other thanA>P2541. From the Settings menu (P85), “Call/Answer” ]”Answer mode” ]Select from the following settingitemsSlide answerYou can answer a call by opening the phone. Ifthe phone is already open, you can answer acall by pressing A.Press any keyYou can answer a call by pressing any key except forM, I, FE, G.Press send keyYou can answer a call by pressing Aonly.Information• This setting is not available for video phone call.Setting item/Setting at purchase](https://usermanual.wiki/LG-Electronics-USA/L704I/User-Guide-801613-Page-56.png)
 ]21You can set whether to make an alarm sound to informyou when you are reconnected immediately afterdisconnected owing to bad radio wave conditions.>P2541. From the Settings menu (P85), “Call feature” ]”Reconnect alarm” ]Select from the followingsetting itemsHigh alarmSet high alarm sounds.Low alarmSet Low alarm sounds.No alarmNo sound.Information• The time to reconnect the network may differ depending on thestatus of phone or radio (the maximum 10 seconds).• The duration to reconnect the network can be chargeable.• Depending on the status of phone or radio, the alarm may notsound, and the call may be disconnected.Setting Quality AlarmC](Settings) ]22You can set whether to make an alarm sound to informyou when a call is liable to be disconnected midwaybecause of bad radio wave conditions.>P2541. From the Settings menu (P85), “Call feature” ]“Quality alarm” ]Select from the following settingitemsHigh alarmSet high alarm sounds.Low alarmSet low alarm sounds.No alarmNo sounds.Setting Minute ReminderC](Settings) ]23You can check the call duration by beep sound everyminute during a voice call (Not support this function forVideo-phone call).>P2541. From the Settings menu (P85), “Call feature” ]“Minute reminder” ]“ON”/“OFF”Information• This setting is not available with a video-phone call.Setting item/Setting at purchaseSetting item/Setting at purchaseSetting item/Setting at purchase](https://usermanual.wiki/LG-Electronics-USA/L704I/User-Guide-801613-Page-57.png)
 ]24You can store prefix numbers such as international accesscode or “184 / 186” and add it to the beginning of thephone number to dial.>P2541. From the Settings menu (P85), “Call feature” ]“Prefix dial”• The Prefix Dial screen appears.2. Select a PREFIX field to enter ]Enter a number ]I[Done]Setting International DialSetting Auto assistC](Settings) ]251You can set whether to automatically replace “+´” at thebeginning of a phone number with an international accesscode such as “009130010” for making an international call.>P2541. From the Settings menu (P85), “Call feature” ]“International dial” ]“Auto assist setting” ]“Auto”/“OFF”Setting IDD prefix C](Settings) ]252You can set the international access code to be added tothe beginning of a phone number for making aninternational call.>P2541. From the Settings menu (P85), “Call feature” ]“International dial” ]“IDD prefix setting” ]Selectfrom the following setting items ]After setting,I[Done]IDD prefix nameEnter the name of an international call service.IDD prefix codeEnter an international access code.Setting Close settingC](Settings) ]26You can select the operation when the phone isclosed during a call.>P2541. From the Settings menu (P85), “Call feature” ]“Close setting” ]Select from the following settingitemsEnd the callThe call is disconnected.Setting item/Setting at purchaseSetting item/Setting at purchaseSetting item/Setting at purchaseSetting item/Setting at purchase](https://usermanual.wiki/LG-Electronics-USA/L704I/User-Guide-801613-Page-58.png)
 ]51You can select a network setting method in casedestination networks (Communication carriers) change foroverseas use, etc.>P2551. From the Settings menu (P85), “Network” ]“Network selection” ]Select from the followingsetting itemsAutoAutomatically searches for the network for setting.ManualThe network search display appears, allowing you toselect a network from the list displayed after search.Information• It may take a few minutes to find the network.• If you set “Auto”, you can search the network automatically inthe following situation.– When you switch on – Out of the service area• If you stop searching the network by “Manual”, the setting willbe changed to “Auto”.Setting the Network ModeC](Settings) ]52You can set a type of network to search for when networksare searched according to “Network selection”.>P2551. From the Settings menu (P85), “Network” ]“Network mode” ]Select from the followingsetting itemsAutoSearches all the networks connectable.WCDMA onlySearches only networks supporting 3G.GSM onlySearches only networks supporting GSM/GPRS.Information• You cannot exchange the data through packet service underGSM network.• When using the handset in Japan or in the service areaof 3G network, we recommend you change the setting of the“Network mode” to “WCDMA only” to save battery power.Setting item/Setting at purchaseSetting item/Setting at purchase](https://usermanual.wiki/LG-Electronics-USA/L704I/User-Guide-801613-Page-59.png)
 ]53Setting NetworksWhen you search the network automatically, you can adda preferable network (communication carrier) to connectto.>P2551. From the Settings menu (P85), “Network” ]“Preferred lists”• Networks registered in UIM are listed downward fromthe one with the highest priority.• I[Delete]: You can delete the network selected.2. M[Menu] ]Select from the following settingitemsAdd new- Search networkYou can select from the network list stored in the phone for adding.- Enter new networkYou can enter the country code (MCC) and thenetwork code (MNC) for adding. After setting, pressI[Done].DeleteYou can delete the selected network.Move up※You can move the selected network upward. Thenetwork moved upward is more preferred.Move down※You can move the selected network downward. Thenetwork moved downward is less preferred.※: If you register multiple networks, you can use this menu. Information• If the network is not registered, [Menu], [Delete] of soft key areaon preferred list to register will not be displayed. To add newnetwork, press I[Add], select and register.• The registered data is saved in UIM.Displaying the Network NameC](Settings) ]54You can set whether to display the name of the networkcurrently set on the Stand-by display.>P2551. From the Settings menu (P85), “Network” ]“Network name display” ]“Display on”/“Displayoff”Setting item/Setting at purchaseSetting item/Setting at purchase](https://usermanual.wiki/LG-Electronics-USA/L704I/User-Guide-801613-Page-60.png)
 ]6※Normally, you do not need to change the setting.You can set a host to use services of various providersother than i-mode. If the host is changed, i-modebecomes unavailable.>P2551. From the Settings menu (P85), “Host selection” ]From the Host selection screen, I[Add] ]Enteryour terminal security code ]C]Set thefollowing items ]After setting, I[Done]• The host set is displayed on the Host selectionscreen with attached to it.Host nameEnter the name displayed on the Host selectionscreen.Host addressEnter the address of the host.Access pointEnter the Access point (URL, etc.).Information• To switch the host back to “i-Mode” or to switch to anotherhost, select “i-Mode”/other hosts and press Con the Hostselection screen.• If you press M[Menu] on the Host selection screen, you canedit / delete / display the host set. Note that you cannot edit /delete pre-installed “i-Mode”.• In Access point menu, you should enter IP address in PDPtype.Setting Lock/SecuritySetting All LockC](Settings) ]71You can set whether to lock requiring to enter the terminalsecurity code to operate function. During All Lock, “Alllock” is displayed on the Stand-by display.>P2551. From the Settings menu (P85), “Lock/Security” ]“All lock” ]Select from the following setting itemsPower onYou can set whether to lock the phone whenyou turn of the power. You need to enter your terminalsecurity code to set it.Setting item/Setting at purchaseSetting item/Setting at purchase](https://usermanual.wiki/LG-Electronics-USA/L704I/User-Guide-801613-Page-61.png)
![100SettingsSettingsImmediateSets All lock immediately. You need to enter yourterminal security code to set it.noneYou can release All lock. You need to enter yourterminal security code to release it.Information• While “All lock” is set, the received mail or messageR/F is onlysaved in i-mode center. When “All lock” is released, the iconthat shows there is a mail or a message R/F in the i-modecenter is displayed.• While “All lock” is set, even though you receive an SMS, it isonly saved, and it is received after you release “All lock”.• While “All lock” is set, you cannot perform packet transmissionconnecting a personal computer.• While “All lock” is set, answering operation is not performedeven though you receive a call, and only busy tone is played. Itis displayed as a missed call after you release “All lock”.• While “All lock” is set, the alarm tone does not sound, and onlythe icon appears. The alarm tone sounds after you release “Alllock”.Releasing All Lock1. Press one of 1~0]Enter your terminalsecurity code ]C• Pressing I[Emergency Call] key on the “lock”screen: Emergency calls (110/118/119)※can be made.※Display may differ depending on the used UIM.Information• If you enter a wrong terminal security code 5 times in a row,the handset turns off automatically. When you turn on thepower again, you can enter the terminal security code.Setting Auto Key LockC](Settings) ]72This function prevents the button operation when aspecified time elapses after the phone is closed.>P2561. From the Settings menu (P85) ]“Auto key locksetting” ]Select the time until the phone keys areautomatically locked ]C• If you do not want to use auto key lock, set the optionto “OFF”.• When a specified time elapses after the phoneis closed, is displayed in the soft key area andeach button except for FEM is locked.Setting item/Setting at purchase](https://usermanual.wiki/LG-Electronics-USA/L704I/User-Guide-801613-Page-62.png)
![101SettingsSettingsInformation• To enable auto key lock regardless of the specified timeperiod, you can press Qfor 1 or more second On theStand-by display (with phone closed).• The auto key lock is not enabled when the camera shootingscreen is displayed or you are shooting even when the phone is closed.• You can receive an incoming call during the auto key lock.Releasing Auto Key LockYou can release the auto key lock by opening phone, and also release it when the phone is closed.1. FE or MRelease lock ]CSetting PIN Code RequestC](Settings) ]73You can set to enter PIN1 code every time you turn on thepower to the phone.>P2561. From the Settings menu (P85), “Lock/Security” ]“PIN code request” ]“ON”/“OFF” ]Enter PIN1code ]CChanging Your PasswordChanging the PIN1 code / PIN2 codeC](Settings) ]741/C](Settings) ]742You can change the PIN1 code / PIN2 code. To changethe PIN1 code, you need to set “PIN code request” to“ON” beforehand. The code is set to “0000” at purchase,but you can change to any number as desired.• In case you purchase a new phone and startusing it inserting the UIM you have been using, use thePIN1 code / PIN2 code you have set. 1. From the Settings menu (P85), “Lock/Security” ]“Change password” ]“PIN1 code”/“PIN2 code”Setting item/Setting at purchase](https://usermanual.wiki/LG-Electronics-USA/L704I/User-Guide-801613-Page-63.png)
![102SettingsSettings2. Enter the current PIN1 code/PIN2 code ]C3. Enter a new PIN1 code/PIN2 code ]C4. Enter the same code that you did in Step 3 again ]CInformation• If you enter a wrong PIN code over 3 times, the PIN code willbe locked automatically. If you unlock the PIN code, see“Releasing PIN lock code” (P107).Information• This setting is registered in phone and UIM which iscurrently inserted. If you insert other UIM which registeredother settings, the settings of this UIM will be preferred. Setting item/Setting at purchaseSetting item/Setting at purchase](https://usermanual.wiki/LG-Electronics-USA/L704I/User-Guide-801613-Page-64.png)
 ]91You can check the usage status and available space of thememories of the handset of the phone.1. From the Settings menu (P85), “Others” ]“Memorystatus” ]Select from the following itemsData boxYou can check the empty or the reserved capacity(Approximate) of the Data box for data such as Mypicture, i-motion or Melody are stored.Personal info.You can check the empty or the reserved capacity(Approximate) of the memory for Personal info. for datasuch as Phonebook, Schedule, Memo or Date Counter.UIM memoryYou can check the empty or the reseved capacity(Approximate) of the memory for data such as“Phonebook” or “SMS”.Resetting the SettingsClearing the MemoryC](Settings) ]921You can clear all the data recorded in the phone.1. From the Settings menu (P85), “Others” ]“Resetsettings” ]“Clear memory” ]Select from thefollowing items• You need to enter your terminal security code fordeleting.Data boxAll data saved in the data box (except for the pre-installed data and i-appli) is deleted.Personal info.Clears all the personal data saved in the phonesuch as phonebooks, schedule, call history and so on.Initializing the Default SettingsC](Settings) ]922You can reset to all settings at purchase except for “i-mode setting” and “Mail setting”.1. From the Settings menu (P85), “Others” ]“Resetsettings” ]Default settings ]“Yes” ]Enter theterminal security code ]Press CInformation• When the date and time are reset, display or play of i-motionand files with valid period and/or expiration date set may bedisabled.](https://usermanual.wiki/LG-Electronics-USA/L704I/User-Guide-801613-Page-65.png)
 ]93※Normally, you do not need to change the settings.You can change the SMS centers to use.>P2561. From the Settings menu (P85), “Others” ]“SMScenter” ]“Select from the following setting items]After setting, I[Done]SMSC– : You can use the SMS center.– Others : You can use another company’s SMScenter.AddressIf “SMSC” is set to “Others”, enter the address of theSMS center.Resetting the holidayC](Settings) ]94You can restore the holiday setting set in Scheduler(P194) in phone.1. From the Settings menu (P85), “Others” ]“Resetholiday” ]“Yes”Setting item/Setting at purchase](https://usermanual.wiki/LG-Electronics-USA/L704I/User-Guide-801613-Page-66.png)
![121i-mode Menu ........................................122What is i-mode? ...................................122Displaying the iMenu display...............122Displaying Sites from Bookmark .........123Displaying Screen memo .....................124Displaying Last URL.............................125Displaying Internet Web Pages ...........125Displaying MessageR/F .......................126Checking Whether Center HoldsMessageR/F .........................................129Setting Functions of i-mode ................129Displaying Sites....................................132How to See/Use Sites ..........................134Using My Menu ....................................137Changing i-mode Password ................138i-modeOn the Stand-by display, C[Menu] ](i-mode) or “i-mode” To display the i-mode menuSelect](https://usermanual.wiki/LG-Electronics-USA/L704I/User-Guide-801613-Page-67.png)
![122i-modei-modei-mode MenuThe i-mode menu is the basic display for viewing varioussites and Internet web pages. You can use each function ofi-mode from the i-mode menu.What is i-mode?i-mode is the online service that makes use of the displayof the i-mode phone to enable you to use convenientinformation from i-mode sites (programs) and homepagessupporting i-mode and to exchange mail easily.• Refer to “Mobile Phone User's Guide [i-mode]” fordetails.• Not all the services described in “Mobile Phone User'sGuide [i-mode]” are supported. Check the description ofthe models supporting each service with “Mobile PhoneUser's Guide [i-mode]”.Displaying the iMenu displayC](i-mode) ]1You can access each i-mode site from iMenu.1. From the i-mode menu (P121), “iMenu”• Refer to “Mobile Phone User's Guide [i-mode]” foritems displayed on the iMenu display.• See “Displaying Sites” (P132) for the subsequentoperations.DescriptionMenu itemConnects to the i-mode CenterDisplays your favorite sites and Internetweb pages.Enter URL to connect to the internet.Displays pages of sites, etc. saved in thephone.Displays the most recently accessedsite or Internet web page.BookmarkLast URLDisplays a list of the receivedMessageR/F.MessageYou can set the functions relatedto i-mode.You can check whether the i-modeCenter holds mail and MessageR/F.Check newmessageGo tolocationMenuScreen memoi-modesetting](https://usermanual.wiki/LG-Electronics-USA/L704I/User-Guide-801613-Page-68.png)
 ]2You can directly access your favorite sites from Bookmark.• For the registration method, see “Using the Submenusof the Site Screen” (P132).1. From the i-mode menu (P121), “Bookmark”2. Select a bookmark ]C• Connected to the site.Using the Submenus of the Bookmark List Screen1. From the Bookmark List screen (See above), M[Menu] ]Select from the following submenu itemsConnectYou can connect to the selected Bookmark site.Edit bookmarkYou can edit the title and URL of the selectedBookmark. After editing, press I[Done].DeleteYou can delete the selected Bookmark.Delete selectedYou can select and delete multiple Bookmarks. Afterselecting, M[Menu]>Select “Delete”Delete allYou can delete all the registered Bookmarks. To deleteall, enter terminal security code >C[OK].URLYou can display the URL of the selected Bookmark.Copy URLYou can copy the URL of the selected Bookmark. Forthe copy, see “Copying/Cutting/Pasting” (P225).Compose messageYou can paste the URL of the selected Bookmark tothe text of i-mode mail and send it. Go to step 2 of“Composing i-mode mail” (P152).SendSend a selected bookmark via infrared communication.※Send allSend all bookmarks via infrared communication.※※: For infrared communication, see “Using infrared communication”(P186).](https://usermanual.wiki/LG-Electronics-USA/L704I/User-Guide-801613-Page-69.png)
 ]3You can display the web pages saved without connectingto i-mode.• For the registration method for the site screen, see“Using the submenus for the Site screen” (P132).1. From the i-mode menu (P121), “Screen memo”2. Select a screen memo ]C• The Screen Memo List screen appears.Using the Submenus of the Screen Memo Screen1. On the Screen Memo List screen (left figure), M[Menu] ]Select from the following submenu itemsViewYou can display the selected screen memo.Edit titleYou can edit the title of the selected screen memo.DeleteYou can delete the selected screen memo.Delete selectedYou can select and delete multiple screen memos.After selecting, M[Menu]>Select “Delete”.Delete allYou can delete all the screen memos. To delete all,enter terminal security code >C[OK].URLYou can display the URL of the selected screenmemo.Protect ON/OFFYou can give or cancel protection for the selectedscreen memo. You cannot delete protected screenmemos.i-modeDescriptionIconProtected ScreenmemoUnprotected Screenmemo](https://usermanual.wiki/LG-Electronics-USA/L704I/User-Guide-801613-Page-70.png)
![125i-modeUsing the Submenus of the Screen Memo Screen1. On the Screen Memo List screen (P124), M[Menu] ]Select from the following submenu itemsSave graphics※1You can select and save an image contained in ascreen memo. You can confirm the saved image by“My picture” of “Data box”>”i-mode” folder. >P169Show properties– URL : You can display the URL of the displayedscreen memo.– Page properties : You can check the title and URLof the displayed screen memo.– Certificates※2: You can display the certificate usedby the displayed screen memo.Retry※3A GIF animation is played back from the beginning.Edit titleYou can edit the title of the displayed screen memo.DeleteYou can delete the displayed screen memos.Protect ON/OFFYou can activate or cancel protection for the displayedthe page. You cannot delete protected saved pages.※1: This menu is not selected in case the selected screen memodoes not include an image.※2: This menu is not selected in case the certificate is not used forthe displayed screen memo.※3: This menu is not selected in case the selected screen memodoes not include of GIF animation. Displaying Last URLC](i-mode) ]4When you exit i-mode, the URL of the page displayed last isstored as “Last URL”. Using “Last URL”, you can connect tothe site or Internet web page you visited last time.1. From the i-mode menu (P121), “Last URL” ]I[Done]Information• If you press Cin screen of URL, you can edit the latest URLaddress.Displaying Internet Web PagesC](i-mode) ]5You can display web pages supporting i-mode anddirectly access sites from the history of the sites youvisited by entering their URLs.1. From the i-mode menu (P121), “Go to location” ]Select from the following itemsi-modeNext Page](https://usermanual.wiki/LG-Electronics-USA/L704I/User-Guide-801613-Page-71.png)
![126i-modeInput addressYou can display Internet web pages supporting i-modeby entering URLs. After entering, press I[Done] toaccess.URL historyYou can directly access sites by selecting URLs youvisited from the URL history.Information• You can enter URL up to 256 half-pitch characters.• You can view the list up to 50 address in URL history.• Depending on the type of the accessed Internet site, the pagemay not be displayed correctly.• Web pages other than Internet web pages supporting i-modemay not be displayed correctly.Using the Submenus of the URL Screen1. From URL history screen, press M[Menu] ]Select from the following submenu itemsConnectYou can connect the site in URL history.Edit URLYou can connect URL in history after editing URLaddress.DeleteYou can delete the history of URL.Delete allYou can delete the history of all registered URL. To delete all, enter terminal security code >C[OK].Compose messageYou can compose i-mode mail with attaching URL tothe text. Go to step 2 on page 152 of “Composing i-mode mail”.Displaying MessageR/FC](i-mode) ]6You can display received MessagesR/F.• MessageR:Your required information is delivered automatically onceyou apply for the message service on the site providingthe service.• MessageF:Messages are delivered free of charge by performing theReceived settings in the option settings. Refer to “MobilePhone User's Guide [i-mode]” for how to set it up.※: If you subscribed to the service after October 1, 2004,the setting at purchase is “Receive”.i-mode](https://usermanual.wiki/LG-Electronics-USA/L704I/User-Guide-801613-Page-72.png)
![127i-mode1. From the i-mode menu (P121), “Message” ]“MessageR”/“MessageF”• J/FE : You can check the previous or next page formultiple pages.2. Select a MessageR/F to display ]C• J: Displays the history of messageR/F.• FE : You can scroll the screen.Information• You can save up to 100 MessageR and up to 50MessageF. Depending on the size of messages, thenumber of savable messages may be smaller.• If a message is attached to the received MessageR/F,the melody will be played automatically when youdisplay the message.Icons on the MessageR/F List Screen and theDisplay MessageR/F Screeni-modeNext PageDescriptionIconUnread MessageR/FRead MessageR/FProtected MessageR/FSubjectAn image is attached.A file with the UIM operation restriction functionset up is attached.MessageR/F with a file attached or pasted//A melody is attached.A melody is pasted.Received date and time](https://usermanual.wiki/LG-Electronics-USA/L704I/User-Guide-801613-Page-73.png)
![128i-modeUsing the Submenus of the MessageR/F ListScreen>P2601. From the MessageR/F List (P127), M[Menu] ]Select from the following submenu itemsDeleteYou can delete the selected MessageR/F.Delete selectedYou can select and delete multiple MessagesR/F. Afterselecting, M[Menu] >Select “Delete”.Delete allYou can delete all the MessagesR/F. To delete all,enter terminal security code >C[OK].Protect ON/OFFYou can give or cancel protection for the selectedMessageR/F. You cannot delete protected MessagesR/F.SortYou can sort MessagesR/F displayed on the Listscreen.FilterYou can change types of the MessageR/F displayedon the List screen.Using the Submenus of the Display MessageR/FScreen1. From the Display MessageR/F screen (P127),M[Menu] ]Select from the following submenuitemsDeleteYou can delete the displayed MessageR/F.Protect ON/OFFYou can give or cancel protection for the displayedMessageR/F. You cannot delete protectedMessagesR/F.Add to phonebook※1You can add phone number or mail address displayedon the MessageR/F to phonebook. Go to step 2 on page64 of “Adding to Phonebook”.Save attach file※2You can save the melody ( ) or image ( )attached to the MessageR/F. You can view the savedmelody or the image in “Melody”/“My picture” of “Databox” >“i-mode” folder. >P169, P179※1: Activate this menu after selecting the phone number or mailaddress that can be registered. If no item exists, you cannotactivate this function.※2: You can activate this function after selecting the file saved in. If the file to save does not exist, you cannot use this file.Setting item/Setting at purchasei-mode](https://usermanual.wiki/LG-Electronics-USA/L704I/User-Guide-801613-Page-74.png)
 ]7You can check whether the i-mode Center holds any i-mode mail and/or MessageR/F that arrived while thephone was out of the service area or turned off.1. From the Stand-by screen, press M[Mail] for 2or more seconds• The Check Result screen appears. To read thereceived MessageR/F immediately, select“MessageR”/“MessageF” and press C.Information• If the i-mode Center holds i-mode mail and/or aMessageR/F, an icon (P32) is displayed. Note that theicon may not be displayed if i-mode mail or aMessageR/F arrived at the i-mode Center while the phone was turned off.Setting Functions of i-modeYou can set functions of i-mode and MessageR/F.i-mode](https://usermanual.wiki/LG-Electronics-USA/L704I/User-Guide-801613-Page-75.png)
 ]81You can set the URL of a web page displayed when “Home”is selected and whether to enable/disable “Home” (P133).>P2401. From the i-mode menu (P121), “i-mode setting” ]“Home”2. “Enable” or “Disable”3. Select the URL field ]C]Enter a URL ]C• If “ [Done] Disable” is selected, you cannot enter aURL.4. I[Done]ViewC](i-mode) ]82You can set functions related to displaying sites andscreen memos.>P240, P2411. From the i-mode menu (P121), “i-mode setting” ]“View” ]Select from the following setting items ]After setting, I[Done]Character sizeYou can change the character size for text of sites,screen memos pages and MessagesR/F.Image displayYou can set whether to display images contained insites, or screen memos.※ScrollYou can set the number of lines scrolled whenpressing Hon a display displaying text of sites,screen memos or MessagesR/F.Message list disp.You can set how to display MessageR/F list (thenumber of lines).※: Images of MessageR/F are displayed regardless of this setting.CertificatesC](i-mode) ]83You can set a certificate used for displaying SSL-enabledsites.1. From the i-mode menu (P121), “i-mode setting” ]“Certificates” ]M[Menu] ]Select from thefollowing setting itemsCertificate infoYou can view the selected certificate.Valid/InvalidYou can set whether to validate or invalidate theselected certificate.• You can check the status of a certificate by thefollowing symbols. : Valid : InvalidSetting item/Setting at purchaseSetting item/Setting at purchasei-mode](https://usermanual.wiki/LG-Electronics-USA/L704I/User-Guide-801613-Page-76.png)
 ]84You can set i-mode connection timeout and the type ofmessage to check. You can also check the i-modesettings.>P2411. From i-mode menu (P121), “i-mode setting” ]“Others” ]Select from the following setting itemsConnection timeoutIt may take time to download from some sites. Youcan set the time to wait before cancelingdownloading. After setting, press I[Done].i-motion auto playYou can set whether to play back an i-motion movieautomatically when you download a standard (normal)type of i-motion movie from a site. After setting, pressI[Done].Check new messageYou can set the contents to check by performing“Check new message” from among i-mode mail,MessageR or Message F. After setting, pressI[Done].Check settingsYou can check the individual “i-mode setting”.Reset settingsYou can reset each of the “i-mode setting” to theirdefaults. To reset the settings, enter terminal securitycode >C[OK].Reset dataYou can delete all data related to i-mode (Bookmark,Screen memo, URL history) except for MessageR/F.To reset the data, enter terminal security code >C[OK].Information• Even when you have set “Connection Timeout” to “Unlimited”,you may be disconnected depending on radio waveconditions.Setting item/Setting at purchasei-mode](https://usermanual.wiki/LG-Electronics-USA/L704I/User-Guide-801613-Page-77.png)
![132i-modeDisplaying SitesYou can connect to sites by easy key operation, and usevarious types of services offered by IPs (Information ServiceProviders). (For some sites, you may be required to apply tothe IPs separately.)1. From the i-mode menu (P121), “iMenu”• blinks during i-mode communication.2. Select an item (link) ]C• FE: You can scroll the menu.• P: You can end i-mode.Information• If there is a number in front of the item showing the link, youcan connect to that link directly by pressing the same numberon the keypad. Note that some sites cannot be connected.• Depending on the site, images may not be displayed.• Depending on the site connected, the confirmation screen mayappear stating that mobile phone information is sent. Yourmobile phone information (the model and the serial number ofyour mobile phone) is sent to the IP (Information ServiceProvider) over the Internet, so could be perceived by thirdparties. The phone number, address or age are not sent to IP(Information Service provider).Using the Submenus of the Site Screen1. From the Site screen (See left), M[Menu] ]Select from the following submenu itemsAdd bookmarkYou can add the displayed URL of the Site to Bookmark.The bookmark screen is displayed, and you can registerthe site by pressing I[Done]. You can access directlyto the site from the registered bookmark. >P123Add screen memoYou can save a displayed web page as a screenmemo. You can display saved screen memos withoutconnecting to i-mode. >P124Save graphics※1You can select and save an image contained in a webpage. >P136i-mode](https://usermanual.wiki/LG-Electronics-USA/L704I/User-Guide-801613-Page-78.png)
![133i-modei-modeShow properties– URL : You can check the URL of the displayed site.– Page properties : You can check information onthe displayed web page.– Certificates※2: You can check the certificate usedin the displayed site.Bookmark listYou can view a list of bookmarks registered by “Addbookmark”. If you select a bookmark, you can directlyaccess the site.Go to location– Input address : You can access web pagessupporting i-mode by entering URL. After entering it,press I[Done] to connect to the site.– URL history : You can select the URL history of adisplayed site to directly access the web page.Screen memo listYou can view a list of pages saved as “Screen Memo”.You can display the saved page by selecting it.MenuYou can bring up the iMenu display.HomeYou can display the web page registered as “Home”(P130).ReloadYou can reload data of a site. The contents of the sitewill change to the latest information each time youreload if the site has been updated.Compose messageYou can send the URL of site being displayed or theURL for link with them attaching to the message text.Go to step 2 on page 152 of “Composing message”.Change char. codeWhen characters are not displayed correctly, you canconvert them to the correct ones.Add to phonebook※3You can add the phone number and mail addressdisplayed on the web page to the phonebook. Go tostep 2 on page 64 of “Adding to phonebook”.Retry※4You can play back a GIF animation from the beginning.※1: You cannot activate this menu in case the image that can besaved is not included in a site or “Image” is set not to display.(P130)※2: If no certificate is used in the site, you cannot use this menu.※3: Activate this menu after selecting the phone number or mailaddress to register. Otherwise, you cannot activate this menu.※4: You cannot activate this menu when GIF animation is notincluded in displayed site.](https://usermanual.wiki/LG-Electronics-USA/L704I/User-Guide-801613-Page-79.png)
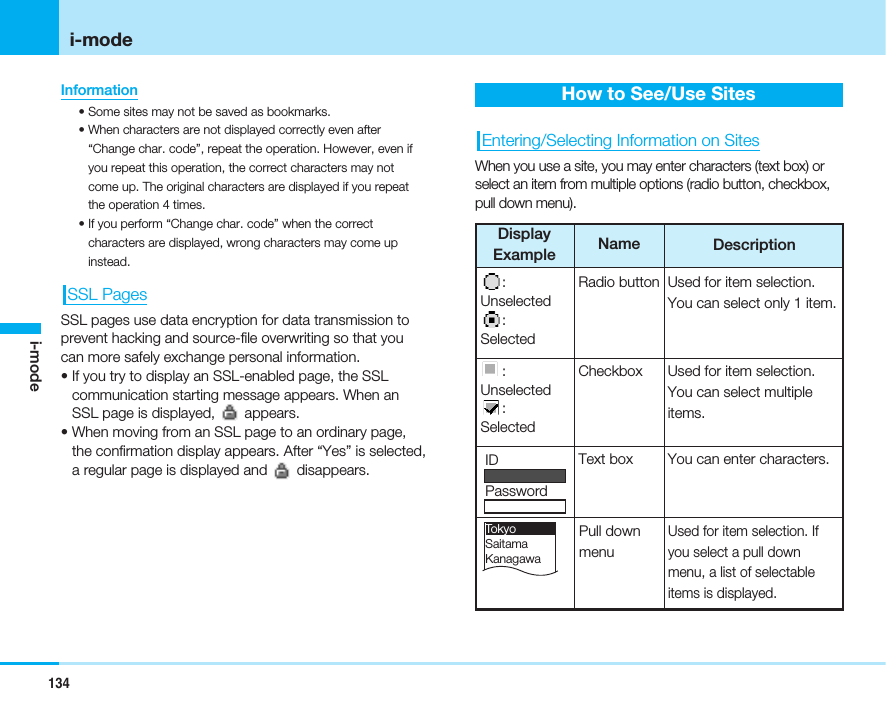
![135i-modeReturning to Obtained Previous Page/Goingto Obtained Next PageThe phone stores the last few screens displayed.1. To display the previous page, LTo display the next page, ROperations from Highlighted InformationYou can easily make calls, send mails, and display Internetweb pages using highlighted information (phone numbers,mail addresses, URLs, and so on) displayed on sites and inmail and MessageR/F.Phone To function/AV Phone To functionYou can make a call by selecting displayed informationsuch as a phone number.• You may not be able to use the Phone To/AV Phone Tofunction depending on the site.1. Select information such as a phone number ]C2. “Voice call”/“Video-phone call”• You can make a call after setting the Caller IDnotification according to the screen.Information• You can add phone number information displayed on a webpage to the phonebook using the submenu of the site screen.Mail To functionYou can send mails by selecting displayed informationsuch as a mail address.• You may not be able to use the Mail To functiondepending on the site.1. Select information such as a mail address ]C• Go to step 3 of “Composing i-mode mail” (P152).Information• You can add mail address information displayed on a webpage to the phonebook using the submenu of the site screen.Web To functionYou can access a web page by selecting displayedinformation such as a URL.• You may not be able to use the Web To functiondepending on the site.1. Select information such as URL ]Press C• If the confirmation screen to connect appears, pressI[Yes].i-modeNext page](https://usermanual.wiki/LG-Electronics-USA/L704I/User-Guide-801613-Page-81.png)
![136i-modei-appli To functionYou can start i-appli by selecting the displayed URL (link).1. Select i-appli information ]C]I[Yes]Information• If “i-appli To” (P164) is set to “OFF”, you cannot start i-appli bythis operation.Downloading Images from SitesYou can set images saved from the displayed web pageor screen memos. You can check the saved images in“My picture” of “Data box” >“i-mode” folder. >P1691. Displaying Site / Saved Page screen ]M[Menu]]“Save graphics” ]C]Select an image ]C]“Yes”Information• Some images may not be saved.• You cannot select “Save graphics” if the image that can besaved is not included or “Image” (P130) is set not to be saved.Downloading i-melody from SitesYou can download a melody from a site and set it. A saved melody can be checked by “Melody” of “Databox” >“i-mode” folder (P179).1. Display a site that supports downloading ofmelodies ]Select a melody ]C• After the download is completed, the confirmationscreen appears.2. Video content menu• “Play”: You can play the downloaded melody.• “File Protection”: You can view the information of i-motion downloaded from network.• “Back”: You can return to the site without saving themelody.Information• Depending on the site, you may not be able to downloadmelodies.• Some downloaded melodies may not be played backsuccessfully.i-mode](https://usermanual.wiki/LG-Electronics-USA/L704I/User-Guide-801613-Page-82.png)
![137i-modeObtaining i-motion Movies from SitesThe i-motion movie is a moving image file containingimages and sound. Acquired i-motion can be checked by“i-motion” of “Data box” >“i-mode” folder (P176).• See “Mobile Phone User's Guide [i-mode]” for details.1. Select an i-motion movie on a site that supportsdownloading of i-motion movies ]C• The download of i-motion starts.• For i-motion that can be played back duringdownloading, it is played back during downloading.2. After the completion of download Q]“Save”• “Play”: You can play i-motion downloaded fromnetwork.• “File property”: You can view the information of i-motion downloaded from network. • “Back”: You can return to the site without saving i-motion. Information• You can change the playback methods for while downloading i-motion movies. >P131• Some downloaded i-motion movies might not be played backcorrectly.• You cannot download i-motion movies of the streaming typeand the ASF format.Using My MenuIf you register frequently-used sites in My Menu, you canaccess them easily.Registering Sites in My Menu1. Bring up the page of the site to be registered]Select“Register My Menu”]C2. Select the i-mode password text box ]C]Enterthe i-mode password ]C]“Select”• For i-mode password, see “Changing i-modePassword”. (P138)Information• Some sites may not be registered in My Menu.• If you subscribe to Menu/Search in a pay site, it will beregistered in My Menu automatically.Displaying Sites from My Menu1. From the Stand-by display, I[i-mode] ]“iMenu” ]“My Menu” ]Select a site to access ]Ci-mode](https://usermanual.wiki/LG-Electronics-USA/L704I/User-Guide-801613-Page-83.png)
![138i-modei-modeChanging i-mode PasswordThe “i-mode password” (4 digits) is required to subscribe toand unsubscribe from message services and i-mode paysites, and to perform i-mode mail settings. At purchase, thispassword is set to “0000” (4 zeros), so you need to changeit to your own i-mode password. Be sure not to let othersknow your i-mode password.1.On the Stand-by display, I[i-mode] ]“iMenu”]“English” ]“Options” ]“Change i-modePassword”2. Select the “Current Password” text box ]C]Enter your i-mode password (4 digits) ]C• At purchase, the setting is “0000”, so enter “0000” forthe first time.3. Select the “New Password” text box ]C]Entera new i-mode password (4 digits) ]C4. Select the “New Password (Confirmation)” text box]C]Enter a new i-mode password (4 digits) ]C]“Select”• Enter the same number as you entered in step 3.Information• If you forget your i-mode password, you can have it reset to“0000” at a handling counter such as a shop. You willbe required to show your official identification (driver’s license,etc.).](https://usermanual.wiki/LG-Electronics-USA/L704I/User-Guide-801613-Page-84.png)
![Mail MenuOn the mail menu, the mail functions offered by the phone are displayed.i-mode MailThe i-mode phone has the mail functions for exchanging e-mail (electronic mail) via the Internet. You need to subscribeto “i-mode” to use i-mode mail.• See “Mobile Phone User's Guide [i-mode]” for moredetails.• This model does not support all the services describedin “Mobile Phone User's Guide [i-mode].” Check whichmodels support which services in “Mobile Phone User'sGuide [i-mode]”.SMS messages (short messages)You can send and receive SMS messages between phones without subscribing to i-mode.Sending and receiving SMS messages with subscribers tooverseas carriers in addition to are alsoavailable. For information on the countries and overseascarriers with which SMS messages can be exchanged,see the International Service web page of .• Refer to “Network Services User’s Guide” for more details.Displaying Mail in InboxC](Mail) ]1The inbox folder list is displayed. You can sort mails byfolder. You can check the records and contents ofreceived i-mode mails and SMS messages.140MailMailDescriptionMenu itemInbox You can check the records and contents ofreceived i-mode mails and SMS messages.You can check the records and contents ofsent i-mode mails and SMS messages.You can check the contents of temporarilysaved i-mode mails and SMS messages.You can bring up the display to compose i-mode mails and SMS messages.You can receive i-mode mails held at the i-mode Center.You can receive SMS messages by checkingthe SMS Center.OutboxUnsentmessageCompose mailCheck newmessageReceive option You can check the subjects of i-mode mail heldat the i-mode Center and select mail to receive,or delete mail at the Center before receiving it.Check newSMSMail setting You can change the settings of each mailfunction of the phone.](https://usermanual.wiki/LG-Electronics-USA/L704I/User-Guide-801613-Page-85.png)
![1. From the Mail menu (P139), “Inbox”2. Select a folder ]C• I[Simple]: You can use the fixed text registered onthe simple reply phrase (P158) for the mail body andreply to the sender. Fixed the mail is sent immediatelyafter the text is selected.• J/FE: You can view previous or after pages formultiple pages.3. Select mail ]C• I[Reply]: You can select how to reply and then replyto the sender, etc. “Simple reply”... Refer to thedescriptions for I[Simple] on the Received Mail Listdisplay. Except for “Simple reply”... Go to the step 3(P152) in “Compose i-mode mail”/the step 3 (P155) in“Creating SMS”.• J: You can view previous or next mail.• FE: You can scroll the screen.Information• To delete all displayed the contents in box setting “Security”(P159), enter terminal security code >C[OK].• The deco mail via phone includes of text and URL. If you select the URL, you can read deco mail. >P146• You can save up to 400 received mails/SMS. Depending onthe size of mails/SMS messages, the number of mails/SMSmessages to save may be fewer.141MailMailNext Page](https://usermanual.wiki/LG-Electronics-USA/L704I/User-Guide-801613-Page-86.png)
![Icons on the Received Mail Folder List ScreenReceived Mail List and Marks on Display Screen※: Appears only on the Received Mail Display Screen.Using the Submenu of the Received Mail FolderList Display1. On the Received Mail Folder List screen (P141), M[Menu] ]Select from the following submenu items142MailMailDescriptionIconDescriptionIconUnread mail messagesRead mail messagesUnread SMS messagesRead SMS messagesUnread SMS reportsFolder with unread mails/SMS messagesCreated folder without unread mails/SMSmessagesCreated folder with unread mails/SMSmessages(gray)(blue)(blue)DescriptionIcon(gray) Folder without unread mails/SMS messages※Mail received as To-type※Mail received as Cc-type※Mail received as Bcc-type※※Cc-type broadcast mail address※※※A melody is attached.A melody is pasted.Received date and time※i-appli launch information is pasted.※※A URL or i-motion file is attached.※To-type broadcast mail addressAn image of up to 10,000 bytes is attached.A URL of i-shot is attached.An attached file is damaged.A pasted melody is damaged.※※Read SMS reportsUnread SMS messages in the UIMRead SMS messages in the UIMProtected mailsForwarded mailsReplied mails/SMS messagesSubjectMail with a file to which the UIMrestrictions are set attachedMail with a file attached or pasted](https://usermanual.wiki/LG-Electronics-USA/L704I/User-Guide-801613-Page-87.png)
![143MailCreate folderYou can add a folder.Rename folder※You can edit the name of the selected folder.Delete folder※You can delete the selected folder. You cannot deletea folder if a mail is saved.Auto sort※You can set sort conditions to the selected folder. Goto step 2 of “Distributing the received mail to thefolder automatically” (P145).※: These operations are not available when you select Inbox.Using the Submenu of the Received Mail ListScreen>P2601. On the Received Mail List screen (P141), M[Menu] ]Select from the following submenu itemsMove to folder※1You can move the selected mails and messages toother added folders.DeleteYou can delete the selected mails and messages.Delete selectedYou can select and delete multiple mails and messages.After selecting mail messages, M[Menu] >Select“Delete”.Delete allYou can delete all mail messages in the folder. To deleteall, enter terminal security code >C[OK].Protect ON/OFF※1You can set or cancel the protection of the selectedmails and messages. Protected mail cannot bemoved/deleted.SortYou can sort the mails and messages displayed onthe List display.FilterYou can change the type of the mails and messagesdisplayed on the List display.UIM※2You can move and copy the selected SMS messagesin the phone to the UIM, and move and copythe SMS messages in the UIM to the phone.Simple replyYou can use the fixed text registered on the simplereply phrase (P158) for the mail body and reply. Themail is sent immediately after the text is selected.※1: You cannot use this menu for SMS in the UIM.※2: You cannot use this menu for protected SMS or SMS deliveryreport.Setting item/Setting at purchaseMailNext Page](https://usermanual.wiki/LG-Electronics-USA/L704I/User-Guide-801613-Page-88.png)
![144MailUsing the Submenu of the Received Mail DisplayScreen1. On the Received Mail List screen (P141), M[Menu] ]Select from the following submenu itemsReplyYou can reply after selecting the method to reply. Whenyou select any of following items (except for “Simple reply”),please go to the step 3 (P152) in “Compose i-mode mail” /the step 3 (P155) in “Creating SMS”.– Reply: You can reply to the sender of i-mode mailfrom the detailed received mail list.– Reply quoted※1:You can send the reply quoting theoriginal text in your received i-mode mail.– Reply all※1:You can reply all receivers and sendersat the same time.– Reply quoted all※1:You can reply all receivers andsenders with quoting the original text in yourreceived i-mode mail.– Simple reply: You can use the fixed text registeredon the simple reply phrase (P158) for the mail bodyand reply. Fixed text the mail is sent immediatelyafter the text is selected.ForwardYou can forward the displayed mail to other party. Goto step 2 (P152) of “Composing i-mode mail” or step2 (P155) of “Composing SMS messages”.Move to folder※2You can move the displayed mail to other added folders.DeleteYou can delete the displayed mail.Protect ON/OFF※2You can set or cancel the protection to the displayedmail. The protected mail messages cannot bemoved/deleted.Store AddressYou can register mail address / phone number ofreceiver on displaying the mail. Go to step 2 on page64 of “Adding to Phonebook”.Add to phonebook※3You can add the mail address / phone number writtenon the displayed mail text to the phonebook. Go tostep 2 of “Adding to Phonebook” (P64).Save attach file※4You can save an image ( ) and a melody ( ) of upto 10,000 bytes attached to the displayed mail. Youcan check the saved images by selecting “Data box”.>“My picture”. >“i-mode” folder. >P169, P170Copy• For copying after selecting the following items, see“Copying/Cutting/Pasting” (P225).– Body: You can copy the text.– Subject※1:You can copy the title.– Sender: You can copy e-mail address / phone numberof the sender.UIM※5You can move / copy the displayed SMS message inthe phone to the UIM, and move / copy theSMS messages in the UIM to the phone.Mail](https://usermanual.wiki/LG-Electronics-USA/L704I/User-Guide-801613-Page-89.png)
![145MailSimple replyYou can use the fixed text registered on the simplereply phrase (P158) for the mail body and reply. Themail is sent immediately after the text is selected.※1: This menu is not displayed for SMS.※2: You cannot use this menu for SMS of UIM.※3: Activate this menu after selecting mail address / phone numberto register. If nothing to be registered is included, you cannotactivate this function.※4: Activate this menu after selecting the file to save. If the file toregister does not exist, you cannot activate this function.※5: You cannot activate this function for i-mode mail or protectedSMS.Information• The Submenu items for the SMS report / voice mail incomingnotification display screen are “Move to folder”, “Delete”, and“Protect ON/OFF” only.Distributing the received mail to the folderautomaticallyThe mails / SMS messages is applicable for the conditioncan be saved to the folder automatically. You can set thisonly to additional folder.1. On the Received Mail Folder List screen (P141),select a folder to specify conditions ]M[Menu]]Auto Sort• The screen for automatic sort is displayed.2. M[Menu] ]Select submenu.Address※1You can enter e-mail address or phone number todistribute each folder.– Open phonebook: You can enter the phonenumber searching from phonebook.– Input address: You can directly enter the address.When you enter e-mail address, you input correctlyto a domain (the part of after @ mark).Subject※1 ※2You can input the subject of mail to distribute a folder.ReleaseYou can cancel one of conditions of distribution of folder.Release allYou can cancel all distribution conditions of folders.※1 : When a received mail contains multiple conditions, it isdistributed to the top folder of the folder list that correspondingcondition is set.※2 : You cannot set the multiple conditions in the same folder. Receiving i-mode Mail/SMS MessagesAutomaticallyWhen the phone is in the service area, itautomatically receives i-mode mail/ SMS messages.1. A mail or an SMS message is received• (White) or (White) is displayed.Mail](https://usermanual.wiki/LG-Electronics-USA/L704I/User-Guide-801613-Page-90.png)
![146Mail2. The result of the reception is displayed• If you want to check the received i-mode mailmessage immediately, select “i-mode mail”, andpress C.• If you want to check the received SMS messageimmediately, press C• Q: Go to previous screen.Saving Images over 10,000 bytesA JPEG image over 10,000 bytes is not downloadedproperly to the handset. Therefore, you can save itafter extracting the data from URL for image view in mailtext, and connecting i-shot center.1. On the Received Mail Folder List screen (P141),select “URL” ]C]“Yes”• For the method of saving images, see “ObtainingImages from Sites” (P136).Information• You can view the contents of received Deco-mails in this way.Downloading i-motion Movies from i-motion MailData of i-motion mail is not downloaded to the phoneeven when it is received. You need to access the i-motionmail Center from its URL given to the mail text to see an i-motion movie to download and save the data. The saved i-motion can be checked in “i-motion” of “Data box” >“i-mode” folder (P175).1. From the Received Mail Folder List screen (P141),select the URL ]C]I“Yes”• Downloading of i-motion starts.• The i-motion is played while being downloaded in the caseit is possible.2. After downloading, press Q• “Play”: You can play downloaded i-motion.• “File property”: You can view information ofdownloaded i-motion from a site. • “Back”: The site will be returned, not saving i-motion. Displaying Mail in OutboxC](Mail) ]2The Sent Mail List is displayed. You can check the recordsand contents of sent i-mode mail and SMS messages.Mail](https://usermanual.wiki/LG-Electronics-USA/L704I/User-Guide-801613-Page-91.png)
![1. From the Mail menu (P139), select “Outbox”.• K/FE: Display the previous or next page for multiplepages.2. Select a mail ]C• J: Display the previous or next page.• FE: Scroll by screen.Information• To display the box which is set “Security” (P159), enter terminalsecurity code >C[OK].• You can save up to 400 mails / SMS. Depending on the size ofmails / SMS messages, the number of mails / SMS messagesthat can be saved may be smaller.Icons on the Sent Mail List display and the Sent Maildisplay screenSubject※3The time to send the mail※1 Receiver※2The mail you receive is displayedon a time basis that day. Fromthe next day on, each message isdisplayed by the date when youreceived it.The name is displayed when theentry is saved in phonebook.SMS is displayed as SMS※1:※2:※3:147MailMailDescriptionIconMail successfully sentMail failed to be sentSent SMS messages in the UIMProtected mail / SMS messagesMail with a file attachedMail with an attached file to which UIMrestrictions are set※※※Mail address failed to be sent as To-type mailMail address successfully sent as Cc-type mailMail address failed to be sent as Cc-type mailMail address successfully sent as Bcc-type mail※Subject※Mail address successfully sent as To-type mailSMS message successfully sentSMS message failed to be sent](https://usermanual.wiki/LG-Electronics-USA/L704I/User-Guide-801613-Page-92.png)
![148Mail※: Appears only on the Sent Mail Display Screen.Using the Submenu of the Sent Mail List Screen>P2601. From the Sent Mail Folder List screen (P147), M[Menu] ]Select from the following Submenu itemsEditYou can edit the selected mail again. See “Composingi-mode mail” (P152) / “Composing SMS messages”(P155).DeleteYou can delete the selected mail.Delete selectedYou can select and delete multiple mail messages. Afterselecting mail messages, M[Menu] >Select “Delete”.Delete allYou can delete all mail messages in the Sent box. To delete all, enter terminal security code >C[OK].Protect ON/OFF※1You can set or cancel the protection to the selectedmail. Protected mail cannot be deleted.SortYou can sort the mail messages displayed in the listscreen.FilterYou can change the type of the mail messagesdisplayed in the list screen.Setting item/Setting at purchaseMailDescriptionIcon※※An image of up to 10,000 bytes is attached.An image (JPEG) of over 10,000 bytes is attached.Moving images are attached.※A corrupted melody file is attached.※A corrupted file is attached.※※※※※Mail address failed to be sent as Bcc-type mailA pasted melody file is attached.An i-appli activation information file is attached.A melody is attached.Sent date and time](https://usermanual.wiki/LG-Electronics-USA/L704I/User-Guide-801613-Page-93.png)
![149MailUIM※2You can move and copy the selected SMS messagein the phone to the UIM, and move and copythe SMS messages in the UIM to the phone.※1 : You cannot use this menu for SMS in the UIM.※2 : You cannot use this menu for i-mode mail or SMS deliveryreport.Using the Submenu of the Sent Mail DisplayScreen1. From the Sent Mail Display screen (P147), M[Menu] ]Select from the following Submenu itemsEditYou can edit the displayed mail again. Go to step 2 in“Composing i-mode mail” (P152) /“Composing SMSmessages” (P155).DeleteYou can delete the displayed mail.Protect ON/OFF※1You can set or cancel the protection to the displayedmail. The protected mail messages cannot be deleted.Store addressYou can register mail address/phone number ofreceiver on displaying the mail. Go to step 2 on page64 of “Adding to Phonebook”.Add to phonebook※2You can add the mail address and phone number ofthe sender of the displayed mail to the phonebook.Go to step 2 (P64) of “Adding to Phone Book”.Copy※3• For copying after selecting the item, see “Copying /Cutting / Pasting” (P225).– Body: You can copy the text.– Subject: You can copy the subject.UIM※4You can move and copy the displayed SMS messageto the UIM, and move and copy the SMS messages inthe UIM to the phone.※1: This function is not available in SMS of UIM.※2: After selecting the mail address / phone number, you canactivate the function. If nothing that can be registered isincluded, you cannot activate the menu properly.※3: This function is not available for SMS.※4: This function is not available for the protected SMS.Displaying Mail in Unsent MessageC](Mail) ]3The Unsent message List is displayed. You can check thecontents of saved i-mode mail and SMS messages whichhave been saved without being sent.Mail](https://usermanual.wiki/LG-Electronics-USA/L704I/User-Guide-801613-Page-94.png)
![150Mail1. From the Mail menu (P139), “Unsent message”• J/FE: Displays the previous or next page for multiplepages.2. Select a mail ]CInformation• To display the box which is set “Security” (P159), enter terminalsecurity code >C[OK].• You can save up to 400 mails / SMS. Depending on the size ofmail/ SMS, the number of mails / SMS messages that can besaved may be smaller.Icons on the Unsent Mail List display and the UnsentMail display screen※: Only appears on the Unsent Mail display screen.Subject※3The time to save※1 Receiver※2 The mail you save is displayed ona time basis that day. From the next day on, each message is displayed by the date when you saved it.The name is displayed when the entry is saved in phonebook.SMS is displayed as “SMS”※1:※2:※3:MailDescriptionIconUnsent mailUnsent SMS messageMail with a file attachedA damaged file is attached.SubjectAddress of To-typeAddress of Cc-typeMail with an attached file to which UIMrestrictions are set※※※Attached file※※※A pasted melody file is attached.i-appli launch information is attached.※A melody file is attached.※An image file of up to 10,000 bytes is attached.※An image (JPEG) of over 10,000 bytes is attached.※A moving image file is attached.※A damaged melody file is attached.※※TextAddress of Bcc-type](https://usermanual.wiki/LG-Electronics-USA/L704I/User-Guide-801613-Page-95.png)
![151MailUsing the Submenu of the Unsent MessageList Screen>P2611. From the Unsent Message List screen (P150), M[Menu] ]Select from the following submenu itemsSendYou can send the selected mails and messages.DeleteYou can delete the selected mails and messages.Delete selectedYou can select and delete multiple mail mails andmessages. After selecting mail messages, M[Menu]>Select “Delete”.Delete allYou can delete all mail messages in the folder. Todelete all, enter terminal security code >C[OK].SortYou can sort the mail messages displayed in the listdisplay.FilterYou can change the type of the mail messagesdisplayed on the list display.Using the Submenu of the Unsent Mail DisplayScreenFrom the Unsent Mail display screen (P150), press M[Menu] and select a submenu item. See “Using theSubmenu of the Compose mail display” (P152) / “Usingthe Submenu of the Compose SMS Screen” (P155) forthe available submenu items.Composing MailComposing i-mode MailC](Mail) ]41You can create and send new i-mode mail.1. From the Mail menu (P139), select “Compose mail”]“Compose message”Setting item/Setting at purchaseMailNext Page](https://usermanual.wiki/LG-Electronics-USA/L704I/User-Guide-801613-Page-96.png)
![152Mail2. Select the Address field ]C]“EnterAddress” ]Enter the address ]“Enter Address”]C• For a menu displayed for destinations, see “Addressmenu” (P153) of “Using the Submenu of theCompose Mail Display”. 3. Select the Subject field ]C]Enter thesubject ]C• In case of not attaching the file, go to step 5. 4. Select (Attach file) field ]C]Add attachedfile• Select the file saved in “My picture” / “i-motion”(P176) / “Melody” (P175) of Data box” (P179) /“Melody”.• For a menu displayed for attachment files, see“Attach file menu” (P153) of “Using the Submenu ofthe Compose Mail Display”.• If a file is attached, it can be displayed/played bypressing I[Play].5. Select the Message field ]C]Entermessage ]C6. I[Send]Information• Depending on the radio wave conditions, the characters maynot be sent successfully to the destination.• Half-pitch katakana or pictographs may not be displayedproperly when exchanging mails between i-mode phones.• When you enter the destination of the phonebook that a secretcode is set, the secret code is automatically added. However,the secret code does not remain on the destination of the sentmail.Using the Submenu of the Compose Mail Display1. From the Compose Mail display (P151), M[Menu]]Select from the following Submenu itemsSendYou can send the i-mode mail that you arecomposing or editing.SaveYou can save the i-mode mail that you are composingor editing in unsent message.Add addressYou can add addresses. When you add addresses,you can send same i-mode mail to multiple recipientsat the same time. You can send same mail to up to 5addresses at a time.– Open phonebook: You can add the address bysearching the phonebook.– Input address: You can enter the address directly.Mail](https://usermanual.wiki/LG-Electronics-USA/L704I/User-Guide-801613-Page-97.png)
![153Mail– Received list: Set an address selected fromreceived mail history.– Sent list: Set an address selected from sent mailhistory.Address menu※1– Open phonebook: You can add the address bysearching the phonebook.– Input address: You can enter the address directly.– Change to To: You can change the setting ofreceiver to “To type”.– Change to Cc: You can change the setting ofreceiver to “Cc type”.– Change to Bcc: You can change the setting ofreceiver to “Bcc type”.– Delete address: You can delete the address. – Received list: Set an address selected fromreceived mail history.– Sent list: Set an address selected from sent mailhistory.Attach file menu– Attach file: You can select the file in “My picture”(P169) / “i-motion” (P176) / “Melody” (P179) of “Databox”. – Take a picture※3:A Still Image Finder Stand-byscreen appears. >P112Press C[Attach] on Still Image Shooting Enddisplay to add to the attachment file.– Take a movie※4:A Moving Image Finder Stand-byscreen appears. >P117Press C[OK] on Moving Image Shooting Enddisplay to add to the attachment file.– Delete att. file※2:You can delete the attachment file.– Play/ Display file※2:You can play or view the file.Add signatureYou can insert a signature at the end of the text of mail.• You need to register the signature beforehand. >p158Delete bodyYou can delete the the text of mail that you arecomposing or editing.Delete mailYou can delete the mail under composing or editing.※1 : After selecting / / , you can operate the menu.※2 : After selecting , you can operate the menu.※3 : Unavailable when a shot still image exceeding 5,000 bytes isalready attached to an attachment file.※4 : Unavailable when a moving image/i-motion or JPEG imageexceeding 10,000 bytes is already attached to an attachmentfile.Information• The type or receiver– To: Ordinary receiver– Cc: To inform the contents in addition to the receiver.– Bcc: To inform the contents if you do not want otherreceivers to know except for direct receiver.Mail](https://usermanual.wiki/LG-Electronics-USA/L704I/User-Guide-801613-Page-98.png)
![154Mail• About attachable files※1 : Up to 10 files when the total size of a data file includingmelodies, images and the text is equivalent to 5,000 full-pitch characters (i.e., 10,000 bytes).※2 : You can attach either an image or moving image/i-motion movie of up to 100K bytes. You can attach the fileseparately from melody files and images of 10,000 bytes orless.• You cannot attach files that are prohibited from being attachedto mail or output from the phone to other devices.• When a JPEG image or an i-motion movie in excess of 10,000bytes is attached, the number of characters you can enter inthe text field decreases by the equivalent of 100 full-pitch (200half-pitch) characters.• The i-mode phone of the mova service cannot receive GIFimages and melodies.• Some attached files may be deleted at the i-mode Center ornot be received, displayed, or played properly by therecipients.Using the Submenu of the Creating next EntryScreenFrom creating next Entry screen, press M[Menu] andselect a Submenu item. See “Using the Submenu ofCharacter Entry display” (P224) for the available Submenuitems.Composing SMS messagesC](Mail) ]42You can create and send SMS messages. You can sendand receive SMS messages to and from the subscribersto overseas carriers in addition to . Forinformation on the countries and overseas carriers withwhich SMS messages can be exchanged, see theInternational Service web page of .1. From the Mail menu (P139), select “Compose mail”]“Compose SMS”MailMaximum number of filesType of fileMelodyUp to 10 files※11 file※2Image of 10,000 bytesor less (JPEG, GIF)Moving image/ i-motion movieImage over 10,000bytes (JPEG)](https://usermanual.wiki/LG-Electronics-USA/L704I/User-Guide-801613-Page-99.png)
![155Mail2. Select the Address field ]C]“EnterAddress” ]Enter the recipient’s phone number ]C• For a menu displayed for destinations, see “Addressmenu” (shown on the right) of “Using the Submenu”of the Compose SMS Display.3. Select the Message field ]C]Enter themessage ]C4. I[Send]If the recipient is a subscriber to an overseas carrierother than :“+” (Press *key 2 times) ]“Country code” ]“Mobile phone number of the recipient”or“010” ]“Country code” ]“Mobile phone numberof the recipient”• If the mobile phone number starts with 0, enter thenumber by omitting “0”.Information• Depending on the radio wave conditions, the characters maynot be sent successfully to the destination.• When you send an SMS message to a subscriber to anoverseas carrier, if characters that the other party does notsupport are included in its text, they may not be displayedcorrectly.• If the receiver has an i-mode phone of mova service, it mayreceive SMS from phone as i-mode mail.• If the sender does not notify caller ID (including publicphone/Unknown ID), you cannot answer to the SMS message.• It is recommended to use half-width alpha-numeric whensending to a user having a service contract of foreign mobilephone.• When you send an international SMS, a communication feeoccurs (when receiving an international SMS, nocommunications fee occurs). However, note that acommunications fee may occur even when the transmissionhas not been completed due to error of address, etc.Using the Submenu of the Compose SMS Display1. From the Compose SMS display (P154), M[Menu]]Select from the following Submenu items SendYou can send an SMS message that you arecomposing or editing.SaveYou can save an SMS message that you arecomposing or editing in Draft box.Address menu– Open phonebook: You can add the address bysearching the phonebook.– Input address: You can enter the address directly.– Received list: Set an address selected fromreceived mail history.– Sent list: Set an address selected from sent mailhistory.Mail](https://usermanual.wiki/LG-Electronics-USA/L704I/User-Guide-801613-Page-100.png)
![156MailSMS report requestYou can set whether to request a report for the SMSmessage that you are composing. An SMS report isan SMS message to notify you when your SMSmessage reaches the recipient.SMS validity termYou can set the period during which the SMS Centerholds the SMS message that you are composing orediting when the recipient cannot receive itimmediately.Delete bodyYou can delete whole sentences entered in the text.The phone number of receiver will not be deleted.Delete SMSYou can delete the SMS message that you arecomposing or editing.Using the Submenu of of the Character EnteringDisplay while Composing SMSFrom the Compose SMS display, press M[Menu]and select a submenu item. See “Using the Submenuof the Character Entry display” (P224) for the availableSubmenu items.Checking New i-mode mail and MessageC](Mail) ]5When your phone has been turned off or out of theservice area, you can check whether or not the i-modeCenter holds i-mode mail and messageR/F.1. From the Stand-by screen, press Mfor 2 or moreseconds• The Check results display appears. To read thereceived i-mode mail immediately, select “Mail” andpress C.Information• When the i-mode Center holds i-mode mail and messageR/F,the relevant icon (P32) is displayed. When mail or messagesarrive at the Center when, for instance, your phone isturned off, the icon may not be displayed.• When “Receive option” is set to “ON,” you will receive all mailheld at the Center if you use “Check new message.” If you donot want to receive mail, first deselect the “Mail” of the “i-mode check” (P158) in “Mail Setting”, then check messages.Mail](https://usermanual.wiki/LG-Electronics-USA/L704I/User-Guide-801613-Page-101.png)
 ]6You can check the subject of i-mode mail held at the i-mode Center and select mails to receive, or delete mailsat the Center before receiving them.To use this function, you need to set “Receive option” (shown on the right) to “ON” beforehand. Note that, whenthis is “ON”, i-mode mail cannot be received automatically.1. From the Mail menu (P139), “Receive option”• The phone is connected to the Center, and thedisplay for selecting mail to receive is displayed.2. Select the pull-down menu for each mail ]C]Select “Receive”, “Delete” or “Hold” ]C3. Select “Receive/Delete” ]C• The confirmation screen appears.4. Select “OK” ]C• In step 2, the mail for which “Receive” was selectedare received immediately.Checking whether Center Holds SMSC](Mail) ]7When your phone has been turned off or out of theservice area, you can check whether or not the SMSCenter holds SMS messages.1. From the Mail menu (P139), “Check new SMS”• The Check results display appears. To read thereceived SMS messages immediately, press C.Changing Mail SettingCommunicationC](Mail) ]81You can make settings related to communication of mailand SMS messages.>P2451. From the Mail menu (P139), “Mail setting” ]“Communication” ]Select from the followingsetting items ]After setting, I[Done]Receive opt. settingYou can set whether to select i-mode mail to receive.If this function is set to “ON,” you cannot receive i-mode mail automatically.Setting item/Setting at purchaseMail](https://usermanual.wiki/LG-Electronics-USA/L704I/User-Guide-801613-Page-102.png)
 ]82You can set a signature attached to the mail body, aquotation mark used for mail reply, and items related tothe fixed text that is inserted as a body when the simplyreply is used.>P2451. From the Mail menu (P139), “Mail setting” ]“Edit”]Select from the following setting items ]Aftersetting, I[Done]Edit signatureYou can set whether to automatically attach yourname and address (signature) at the end of the textand can set the contents of the signature.Edit quotationYou can set symbols or sentences to be attached tothe head of the original text (quotation mark) for“Reply quoted”.Simple reply phraseYou can set the fixed text that is inserted as a bodywhen the simple replay is used.• I[Add]: You can type and add a new fixed text.Information• You cannot edit or delete the registered fixed text that hasbeen registered to “Simple reply phrase” in advance.Setting item/Setting at purchase](https://usermanual.wiki/LG-Electronics-USA/L704I/User-Guide-801613-Page-103.png)
 ]83You can make the settings related to the display of mailand SMS messages.>P2451. From the Mail menu (P139), “Mail setting” ]“View” ]Select from the following setting items ]After setting, I[Done]Character sizeYou can set the character size of the text on the Maildisplay screen.ScrollYou can set the number of lines to scroll whenpressing Hon the Mail display screen.Mail list displayYou can set the display method (the number oflines/the contents displayed) on the mail list display.Folder securityYou can set security to Inbox, Outbox, and Unsentmessages in the Mail menu. To display the messagesin the box with security set, enter terminal securitycode >C[OK].Melody auto playYou can set whether to automatically play a melodyattached or pasted on the mail display screen.OthersC](Mail) ]84You can check the settings made in “Mail setting” andreset the settings to the default.1. From the Mail menu (P139), “Mail setting” ]“Others” ]Select from the following setting items.Check settingsYou can check the settings made in the “Mailsettings”.Reset settingsYou can reset the settings made in the “Mail settings”to the default. To reset settings, enter terminal securitycode >C[OK].Reset dataYou can delete all mail messages and MessageR/Fstored in the phone. To reset the datal, enterterminal security code >C[OK].Setting item/Setting at purchase](https://usermanual.wiki/LG-Electronics-USA/L704I/User-Guide-801613-Page-104.png)
![203Available Services ................................204Using Voice Mail ...................................204Using Call Waiting Service...................206Using Call Forwarding Service.............207Using Nuisance Call Barring Service...208Using Caller ID Notification Service ....208Using Caller ID Request Service..........209Using Set Arrival Act ............................209Selecting Arrival Call Act......................209Setting Remote Control........................210International Roaming Service.............210Registering Additional Services...........211Registering Additional Guidance .........212Using English Guidance .......................212Using Service Dialing Number .............213Using Call Barring.................................213Network ServiceOn the Stand-by display, C[Menu] ](NW service) or “NW service”To display the Service menuSelectIn this manual, the outline of the service is explainedby the method of using the handset menu.For details, refer to “Services User's Guide”.](https://usermanual.wiki/LG-Electronics-USA/L704I/User-Guide-801613-Page-105.png)
![Available ServicesWith phone, following Services areavailable.• In this manual, the summaries each service areexplained in the ways using the menu of the phone. For detail, see “Mobile Phone User's Guide[Services]”.• This phone is not applicable to all the servicesdescribed in “Mobile Phone User's Guide [Services]”.• Contact “Information Center” on the back ofthis manual for application or inquiry.Information• The Services that are operated by connecting to the ServiceCenter are not available when When “圏外” is displayed onyour handset.• You can register newly provided services when additionallyprovided by . >P211Using Voice MailC](NW service) ]1When you are in an area where radio waves do not reach,when you turn off the phone or when you cannotanswer the call, this service answers to the party whomade a voice call to you, and the Voice Mail Center holdsvoice mail messages for you.• When you did not answer a voice call that came in whileVoice Mail is activated, it is recorded to the received callhistory as a missed call and a screen notifying a missed callappears.• This handset is not applicable to Voice Mail (Video-phonecall). Make a voice call to “1412” (free) and set not to beapplicable to video-phone call.204Network ServiceNetwork ServiceServiceReferenceMonthly feeApplicationVoice MailSee rightChargedRequiredCall Waiting Service P206ChargedRequiredCall Forwarding ServiceP207FreeRequiredNuisance Call Barring ServiceP208FreeRequiredP209FreeNot requiredCaller ID Notification ServiceP208FreeNot requiredRemote controlNot requiredFree P210International roaming service Not requiredFree P210English GuidanceNot requiredFree P212Service Dialing NumberNot requiredFree P213Caller ID Request ServicePublic mode (power off)Not requiredFree P54Public mode (drive mode)Not requiredFree P51](https://usermanual.wiki/LG-Electronics-USA/L704I/User-Guide-801613-Page-106.png)
![205Network ServiceNetwork Service• If a call comes in from a caller not notifying caller ID with“Caller ID request” activated, the Caller ID Requestguidance is played back and the center will not holdvoice mail messages.1. From the Service menu (P203), “Voice mail”]Select from the following setting itemsActivate voice mailYou can start using Voice Mail.Set ringing timeYou can set the time from the first ring until the call isconnected to the Voice Mail Service Center. (period)Deactivate voice mailYou can stop using Voice Mail.Voice mail status requestYou can check the current settings of Voice MailService. If you press M[Menu], you can start/stopthe service of voice mail or set the length of ringingtime.Play messagesYou can play back recorded Voice Mail messages.Voice mail settingYou can connect to the Voice Mail Service Center tochange the settings of Voice Mail by following thevoice guidance.Check messagesYou can check whether or not new messages arerecorded.Notify missed callIf the phone is turned off or out of the servicearea, you are informed by SMS (Short Message Service)of missed calls when the phone is turned on or inthe service area again.– Activate missed call notification: You can startusing Missed Call Notice Service.– Deactivate missed call notification: You canstop using Missed Call Notice Service.– Missed call notification status request: You cancheck the settings of the Missed Call Notice Service.Delete voice mail iconYou can delete displayed in the icon view area.Set message alert ringerYou can set the ring tone to sound when a newmessage is recorded.](https://usermanual.wiki/LG-Electronics-USA/L704I/User-Guide-801613-Page-107.png)
 ]2When you receive another voice call during a call, you willbe notified of it by busy ring tone, and you can put thecurrent call on hold to answer the new call. You can alsonewly make a call to another party by putting the currentcall on hold.• To use Call Waiting Service, set “Arrival call act” (P209)to “Answer” beforehand. If this is set to another setting,you cannot answer the incoming voice call while you areperforming a voice call even if you start Call WaitingService.• If a call comes in from a caller not notifying caller ID whileCaller ID request is set to “Activate caller ID request”, theCaller ID Request guidance is played back and CallWaiting is not available.• When a video-phone call comes in during a voice call, ora voice call comes in during a video-phone call, CallWaiting does not work. The second call is recorded as amissed call in Received Calls.1. From the Service menu (P203), “Call waiting”]Select from the following setting itemsActivate call waitingYou can start using Call Waiting.Deactivate call waitingYou can stop using Call Waiting.Call waiting status requestYou can check whether the Call Waiting is activatedor deactivated.Submenus on using Call Waiting Service• Press M[Menu] to view the submenu.aWhen a new call comes in during a callVoice mail※1When a new call comes in, the caller can connect thevoice mail center.Call rejectionYou can reject a call without receiving.Call forwarding※2You can forward the incoming call to the forwardingdestination you have registered beforehand.End active callHangs up the current call and displays the incomingcall display for another party. You can receive anincoming call.Mute/UnmuteThe voice to send to the other party is set to mute orunmute.※1: You can use the voice mail when you have signed up thisservice. See “Using Voice Mail” (P204) for details.※2: You can use the call forwarding service only when you havesigned up this service. See “Using Call Forwarding Service” onthe next page.](https://usermanual.wiki/LG-Electronics-USA/L704I/User-Guide-801613-Page-108.png)
 ]3This is a service to forward a voice call/video-phone callwhen you are in an area where radio waves do not reach,you turn off the handset or you did not answer within theset ring time.• When you did not answer a voice call or video-phone callthat came in while Call Forwarding Service is activated, itis recorded to the received call history as a missed calland a screen notifying a missed call appears.• If a call comes in from a caller not notifying caller ID whileCaller ID Request Service is set to “Activate caller IDrequest”, the Caller ID Request guidance is played backand the call is not forwarded.• Call Forwarding Service will be automatically deactivatedif “Voice mail” is set to “Activate voice mail”.• This service is not available with some billing plans.1. From the Service menu (P203), “Call forwarding”]Select from the following setting itemsActivate call forwardingYou can start using Call forwarding Service.– Register fwd number: You can register the phonenumber of the forwarding destination. If you pressM[Search], you can search for phonebook.– Set ringing time: You can set the time from thefirst ring until the call is forwarded.Deactivate call forwardingYou can stop using Call forwarding Service.Register the forwarding numberYou can change the phone number of the forwardingdestination. If you press M[Search], you can searchfor phonebook.Setting at forwarded party busyYou can set an incoming call to be connected to theVoice Mail Service Center if the forwarded destinationis busy.Call forwarding status requestYou can check the current setting status of CallForwarding Service.](https://usermanual.wiki/LG-Electronics-USA/L704I/User-Guide-801613-Page-109.png)
![208Network ServiceNetwork ServiceSetting to enable or disable call forwarding guidancePress 1429A.• Make settings following the voice guidance.• For details, see “Mobile Phone User's [Services]”.Using Nuisance Call Barring ServiceC](NW service) ]4This is a service to reject "Nuisance calls" such as prankcalls. If you register a caller to reject, calls from the callerwill be automatically rejected and the caller will beanswered by the guidance. • Even if a call from a caller who is registered to berejected, the ring tone will not sound, and the call will notbe recorded in the received call history.1. From the Service menu (P203), “Nuisance callbarring” ]Select from the following setting itemsRegister nuisance callerYou can register the phone number of the call thatyou answered the last for rejection.Delete all entriesAll the phone numbers registered for rejection aredeleted.Delete most recent entryYou can delete the last registered telephone number.You can delete the numbers one by one by repeatingthe same operation first from the last saved one.Using Caller ID Notification ServiceC](NW service) ]5You can notify your phone number to the other partywhen making a call. When the other party's phone is thedigital terminal that supports caller ID, your phone numberappears on the other party’s phone.• Your caller ID is important information, so take greatcare to notify it.1. From the Service menu (P203), “Caller IDnotification” ]Select from the following settingitemsActivate/Deactivate caller ID notificationYou can display your phone number on the otherparty's phone (display) when making a call. To usethis service, enter the Network Security Code.Caller ID notification status requestYou can check the current setting status of Caller IDNotification.](https://usermanual.wiki/LG-Electronics-USA/L704I/User-Guide-801613-Page-110.png)
 ]6This is a service to request for the Caller ID notification byguidance to the call from the party who does not notifyCaller ID, and terminate the call.• A call that was not answered by Caller ID RequestService will not be recorded in the received call history,and the screen notifying of the missed call does notappear.1. From the Service menu (P203), “Caller ID request”]Select from the following setting itemsActivate caller ID requestYou can start using Caller ID Request Service.Deactivate caller ID requestYou can stop using Caller ID Request Service.Caller ID request status requestYou can check the current settings of Caller IDRequest Service.Using Set Arrival ActC](NW service) ]7You can activate or cancel the arrival call act set by“Arrival call act” (See right). You can view the currentsettings.1. From the Service menu (P203), “Set arrival act”]Select from the following setting itemsActivate arrival actYou can start using the response you set in “ArrivalCall Act”.Deactivate arrival actYou can stop using the response you set in “ArrivalCall Act”.Arrival act status requestYou can check the current settings of Set Arrival Act.Selecting Arrival Call ActC](NW service) ]8You can set how to react to a voice call/video-phone callthat comes to a customer who has subscribed to “VoiceMail”, “Call Forwarding Service” or “Call Waiting Service”while performing a call.• If you have not subscribed to “Voice Mail”, “CallForwarding Service” or “Catch Phone (Call WaitingService)”, you cannot answer a call while performing acall.• To use arrival act, set “Set arrival act” to “Activate arrivalact”.>P243Setting item/Setting at purchase](https://usermanual.wiki/LG-Electronics-USA/L704I/User-Guide-801613-Page-111.png)
![210Network ServiceNetwork Service1. From the Service menu (P203), “Arrival call act”]Select from the following setting itemsAnswerThe phone rings. If Voice Mail, Call Waiting Service, orCall Forwarding Service is activated, the phonefollows each setting.Voice mailConnects incoming calls to Voice Mail. Even if CallWaiting Service is activated, the calls are connectedto Voice Mail.Call forwardingForwards incoming calls to the forwarding phonenumber registered. Even if Call Waiting Service orVoice Mail is activated, the calls are forwarded.Call rejectionRejects incoming calls.Setting Remote ControlC](NW service) ]9This service allows you to operate “Voice Mail” or “CallForwarding Service” from touch-tone phones, publicphones or cellular phones.• To use “Voice Mail” or “Call Forwarding Service”overseas, you need to set “Remote control” to “Activateremote control” beforehand.1. Select “Remote control” from Service menu (P203)]Select one of the following items to be setActivate remote controlStart remote control.Deactivate remote controlStop remote control.Remote control status requestCheck settings for remote control.International Roaming ServiceC](NW service) ]0This service allows you to use functions such as VoiceMail and Call Forwarding Service while you stay overseas.1. Select “International service” from Service menu(P203) ]Select one of the following items to be setVoice mail (Int.)- Activate voice mail: Start Voice Mail.- Deactivate voice mail: Stop Voice Mail.- Play messages: Play recorded voice message.- Voice mail setting: Check current settings of VoiceMail.](https://usermanual.wiki/LG-Electronics-USA/L704I/User-Guide-801613-Page-112.png)
 ]*1When a new service is added by , you canregister the service to the menu and use.1. From the Service menu (P203), “Others”]“Additional service”• The additional service list will be displayed.2. I[Edit] ]After editing, press C[OK]USSD codeEnter the service code (USSD) supplied by .Service nameEnter any service name. Press I[Edit] to edit.Using the Submenu of the Additional Service ListScreen1. From the Additional Service List screen,M[Menu] ]Select from the following submenuitemsEditEdit a service.Select※The selected service is performed.Delete 1 item※The selected service is deleted.Delete allAll the registered services are deleted.※: Not displayed if an unregistered service is selected.Using Registered Services1. From the Additional Service List screen, select aregistered service ]C](https://usermanual.wiki/LG-Electronics-USA/L704I/User-Guide-801613-Page-113.png)
 ]*2When you perform services added by “Additional service”,you can register reply messages that correspond to thecodes (USSD) returned from the Service Center. The replymessage is displayed when the registered code isreturned as a reply.1. From the Service menu (P203), “Others”]“Additional guidance”• The reply message list will be displayed.2. I[Edit] ]After setting, press C[OK]USSD codeEnter the service code (USSD) supplied by .Reply messageEnter a reply message name. Press I[Edit] to edit.Using the Submenu of the Reply Message ListScreen1. From the Reply Message List screen, M[Menu]]Select from the following Submenu itemsEditYou can set a reply message.Delete 1 item※The selected reply message is deleted.Delete allThe all registered reply messages are deleted.※: Not displayed if an unregistered service is selected.Using English GuidanceC](NW service) ]*3You can set the guidance of setting services such as“Voice Mail” or voice guidance such as “out of the servicearea” to English.Available LanguagesLanguageSettingJapanesePlays back the guidance in Japanese.Plays back the guidance in English.First plays back the guidance inJapanese and then in English.First plays back the guidance inEnglish and then in Japanese.EnglishJapanese +EnglishEnglish +Japanese](https://usermanual.wiki/LG-Electronics-USA/L704I/User-Guide-801613-Page-114.png)
![213Network ServiceNetwork Service1. From the Service menu (P197), “Others” ]“Englishguidance” ]Select from the following settingitemsGuidance setting– Outgoing + Incoming call: You can set languagesof the guidance for outgoing and incoming calls.Select “Yes” and then select a language.– Outgoing call: You can set a language of theguidance only for outgoing calls. Select “Yes” andthen select a language.– Incoming call: You can set a language of theguidance only for incoming calls. Select “Yes” andthen select a language.Guidance status requestYou can check the current settings of the guidance.Using Service Dialing NumberC](NW service) ]*4You can make a call to Information Center orrepair counter.• The displayed item may differ or some items may not bedisplayed depending on the card.1. From the Service menu (P203), “Others”]“Service dialing number” ]Select from thefollowing itemsMalfunction informationConnect to the repair counter.General informationConnect to the Information Center.Using Call BarringC](NW service) ]*5You can block all incoming calls while you are roamingoutside Japan with the phone.• This service is not available in some overseas carriers.1. From the Service menu (P203), “Others” ]“Callbarring” ]Select from the following setting itemsActivate barring of incoming call - roam– Barring all incoming calls: All incoming calls arerestricted. Enter your Network Security Code.– Data calls barring: Only incoming video-phonecalls are restricted. Enter your Network SecurityCode.Deactivate barring of incoming call - roamYou can stop using Barring All Incoming When Roam.Enter your Network Security Code.Barring of incoming call - roam status requestYou can check the settings of Barring All IncomingWhen Roam.](https://usermanual.wiki/LG-Electronics-USA/L704I/User-Guide-801613-Page-115.png)
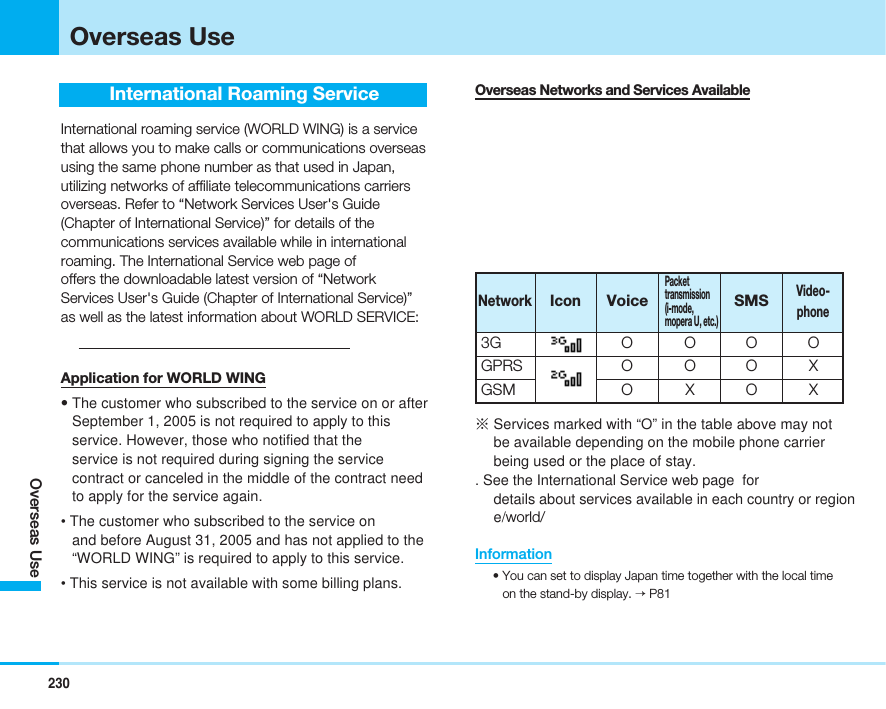
 ]52Network mode of the phone is set to “Auto” atpurchase. If you know the network in your area, you canselect it directly.>P2551. From the Settings menu (P85), “Network” ]“Network mode” ]Select from the followingsetting itemsAutoSearches all the networks connectable.WCDMA onlySearches only networks supporting 3G.GSM onlySearches only networks supporting GSM/GPRS.For the network search setting (changing of thecommunication carriers), see P97.Information• You cannot exchange the data through packet service underGSM network.• When using the handset in Japan or in the service areaof 3G network, we recommend you change the setting of the“Network mode” to “WCDMA only” to save battery power.Confirming Before Using OverseasBefore DepartureCharging the BatteryMake sure of the voltage available in the country or area ofstay and use the Overseas/Domestic AC Adaptor 01(option) for overseas and domestic usage (a conversionplug adapter according to the place of stay will be required).And, do not charge the phone using an electricaltransformer for overseas travel.Using Voice Mail/Call Forwarding from OverseasUse of the Voice Mail or Call Forwarding service fromoverseas is part of “remote operation” and requires theactivation of Remote operation before your departure. Fordetails to set the remote operations, refer to “RemoteOpeartion Settings” (P210)..Before departure, make sure that you have theNetwork Security Code, which may be required forremote-accessing the Voice Mail etc. If you have forgetyour Network Security Code, visit a Shop orWorld Counter with an identification such asthe driver’s license to make necessary changes.Setting item/Setting at purchase](https://usermanual.wiki/LG-Electronics-USA/L704I/User-Guide-801613-Page-118.png)
![Using i-mode OverseasTo use i-mode overseas, you need to set “InternationalSettings” to “YES”.aTo change settings in JapanNo packet transmission fees apply.“iMenu” ]“English” ]“Options” ]“InternationalSettings” ]“i-mode services Settings” ]“YES”aTo change settings outside JapanPacket transmission fees apply.“iMenu” ]“International Settings” ]“i-mode servicesSettings” ]“YES”• If set to “NO”, you can send and receive i-mode mailmessages and view the i Menu only. The setting atpurchase is “NO”.※Some i-mode sites may not be available depending onthe information provider.※Packet transmission fees apply to all types of accessfrom overseas including transmissions that are free ofcharge in Japan.※Japan time applies even if i-mode sites are accessedfrom overseas. Be careful when registering entries to ordeleting entries from My Menu at the beginning or endof a month.Using phone overseasSetting Mobile Phone CarrierThe network will be set after searching it automatically if“Setting the Network Mode” (P97) is set to “Auto” ininternational roaming.• You can set up beforehand the type of network onsearching by “Setting the Network Mode” (P97).• If you search the network automatically, you can set thepreferred network by “Registering a Network from thelist” (P98).• You can select the network manually. Refer to “Selectingthe Network Connection Mode” (P97).Information• “Network mode” is set to “Auto” after you search with“Network mode” set to “WCDMA only” or “GSM only” and“Network selection” set to “Auto”, “Network mode” will be setto “Auto” after searching.• If you search with “Network mode” set to “Auto” and “Networkselection” set to “Auto”, the same mode (“WCDMA only” /“GSM only”) of the network (communication carrier) youselected after searching will be set.232Overseas UseOverseas Use](https://usermanual.wiki/LG-Electronics-USA/L704I/User-Guide-801613-Page-119.png)
![Settings to be made after returning to JapanAfter Coming Back to JapanWhen network settings have been changed for useoverseas, “圏外” may appear in Japan.In that case, make settings given below.• You have to set “Network selection” (P97) to“Auto/WCDMA only”.• You have to set “Network selection” (P97) to “Auto” or“Manual” and select “3G” on the networkselection screen displayed after searching. Using the Phone Overseas• If the other party subscribes to a mobile phone carriersupporting the video-phone, you can make avideo-phone call by pressing T.Making CallsaMaking a call to Japan from the country you stay When entering the phone number directlyPress 0for 1 or more seconds to display “+”]81(Country code for Japan) ]Other party’sphone number excluding “0 (zero)” at the beginningof the area code ]A(T)Example: When the other party is in one of the 23wards of Tokyo (area code: 03)“+”>81> 3> XXXX – XXXXMaking a call to the phone number registered in thephonebook or call/mail historyOn the Phonebook List (P67)/Call/Mail history (P86)display or Detailed Phonebook (P67)/Detail (P86)display, M[Menu] ]“International call (Japan)” ]After the other party's number is displayed C[Call]Example: When the phone number registered in thePhonebook or Call history is one of the 23districts in Tokyo+813XXXX - XXXX• A recipient's phone number is generated,automatically prefixed with Japan's Cuontry code“+81” and “0” removed from area code.aCalling another WORLD WING/WORLD WALKER userPress 0for 1 or more seconds to display “+”]81(Country code for Japan) ]The otherparty' mobile phone number excluding “0 (zero)” ]A(T)Example: When the other party has a mobile phonenumber beginning with (090)“+” > 81 > 90 >XXXX –XXXXaCalling a mobile phone or fixed-line phone within thecountry of stayDial the other party’s phone number including thearea code ]A(T)233Overseas UseOverseas Use](https://usermanual.wiki/LG-Electronics-USA/L704I/User-Guide-801613-Page-120.png)
![234Overseas UseOverseas UseaCalling from the country of stay to a mobile phone orfixed-line phone in another country (except for Japan)※In some countries or areas such as Italy, “0” may berequired.Press 0for 1 or more seconds to display “+”]Country code of the other party]Other party’sphone number excluding “0 (zero)” at the beginning ofthe area code ]A(T)Receiving callsWhen a call comes in, A(T)Having Others Call YouaReceiving a call from JapanHave the other party call you at your mobile phonenumber as usual.090>XXXX – XXXX/080>XXXX – XXXX]CALLaReceiving a call from a country other than JapanInternational access code of the country where youmake the call ]81 (Country code for Japan)]Your phone number excluding “0 (zero)” at thebeginning ]CALLTroubleshootingUnable to Make or Receive Calls/Always Out of the Service Area/Handset Does Not Turn ONPossible causes for inability to make or receive calls,reception level indication permanently being “Out of theservice area” or the handset not turning on are as follows:• Weak radio waves being received or being out of theservice area• Failure of the local switchboard or base station ortemporary line congestion• Wrong operation of the handset• OthersSee the International Service web page of thelatest information about service areas and networkinterruption:In addition, make sure of the operation and try the following:• If you are indoors, confirm if the condition is the sameoutdoors.• Confirm if your monthly charges have not exceeded thelimit.• Turn OFF the handset once and back ON.• Manually select the mobile phone carrier to use.If the problem persists after the above troubleshootingprocedures are taken, contact the Network TechnicalSupport and Operations Center (P235).](https://usermanual.wiki/LG-Electronics-USA/L704I/User-Guide-801613-Page-121.png)