LG Electronics USA L704I PCS GSM Phone User Manual L602i Cover1 4
LG Electronics USA PCS GSM Phone L602i Cover1 4
Users Manual
Part 15.21 statement
" Change or Modifications that are not expressly approved by the manufacturer could void
the user's authority to operate the equipment. "
Part 15.105 statement
This equipment has been tested and found to comply with the limits for a class B digital device,
pursuant to Part 15 of the FCC Rules.
These limits are designed to provide reasonable protection against harmful interference in a
residential installation.
This equipment generates uses and can radiate radio frequency energy and, if not installed and used
in accordance with the instructions, may cause harmful interference to radio communications.
However, there is no guarantee that interference will not occur in a particular installation. if this
equipment does cause harmful interference or television reception, which can be determined by
turning the equipment off and on, the user is encouraged to try to correct the interference by one or
more of the following measures:
- Reorient or relocate the receiving antenna.
- Increase the separation between the equipment and receiver.
- Connect the equipment into an outlet on a circuit different from that to
which the receiver is connected
- Consult the dealer or an experienced radio/TV technician for help.
LIMITED WARRANTY STATEMENT
1. WHAT THIS WARRANTY COVERS:
LG offers you a limited warranty that the enclosed subscriber unit and its enclosed accessories will be
free from defects in material and workmanship, according to the following terms and conditions:
(1) The limited warranty for the product extends for ONE (1) year beginning on the data of purchase
of the product.
(2) The limited warranty extends on to the original purchaser of the product and is not assignable or
transferable to any subsequent purchaser/end user.
(3) This warranty is good only to the original purchaser of the product during the warranty period as
long as it is in the U.S., including Alaska, Hawaii, U.S. Territories and Canada.
(4) The external housing and cosmetic parts shall not be covered under these limited warranty terms.
(5) Upon request from LG, the consumer must provide information to reasonably prove the date of
purchase.
(6) The customer shall bear the cost of shipping the product to the Customer Service Department of
LG. LG shall bear the cost of shipping the product back to the consumer after the completion of
service under this limited warranty.
2. WHAT THIS WARRANTY DOES NOT COVER:
(1) Defects or damages resulting from use of the product in other than its normal and customary
manner.
(2) Defects or damages from abnormal use, abnormal conditions, improper storage, exposure to
moisture or dampness, unauthorized modifications, unauthorized connections, unauthorized repair,
misuse, neglect, abuse, accident, alteration, improper installation, or other acts which are not the
fault of LG, including damage caused by shipping blown fuses spills of food or liquid.
(3) Breakage or damage to antennas unless caused directly by defects in material or workmanship.
(4) That the Customer Service Department at LG was net notified by consumer of the alleged defect
or malfunction of the product during the applicable limited warranty period.
(5) Products which have had the serial number removed or made illegible.
(6) The limited warranty is in lieu of all other warranties, express or implied either in fact or by
operations law, statutory or otherwise, including, but limited to any implied warranty of
marketability or fitness for a particular use.
(7) Damage resulting from use of non-LG approved accessories.
(8) All plastic surfaces and all other externally exposed parts that are scratched or damaged due to
normal customer use.
(9) Products operated outside published maximum ratings.
3
(10) Products used or obtained in a rental program.
(11) Consumables (such as fuses).
3. STATE LAW RIGHTS:
No other express warranty is applicable to this product. THE DURATION OF ANY IMPLIED
WARRANTIES, INCLUDING THE IMPLIED WARRANTY OF MARKETABILITY, IS LIMITED
TO THE DURATION OF THE EXPRESS WARRANTY HEREIN. LG INFOCOMM INC. SHALL
NOT BE LIABLE FOR THE LOSS OF THE USE OF THE PRODUCT, INCONVENIENCE, LOSS
OR ANY OTHER DAMAGES, DIRECT OR CONSEQUENTIAL, RISING OUT OF THE USE OF,
OR INABILITY TO USE, THIS PRODUCT OR FOR ANY BREACH OF ANY EXPRESS OR
IMPLIED WARRANTY, INCLUDING THE IMPLIED WARRANTY OF MARKETABILITY
APPLICABLE TO THIS PRODUCT. Some states do not allow the exclusive of imitation of incidental
or consequential damages or limitations on how long an implied warranty lasts; so these limitations or
exclusions may not apply to you. This warranty gives you specific legal rights and you may also have
other rights which vary from state to state.
4. HOW TO GET WARRANTY SERVICE:
To obtain warranty service, please call the following web address:
www.lgeservice.com

8
For Your Safety
Important Information
This user guide contains important information on the use and
operation of this phone. Please read all the information
carefully for optimal performance and to prevent any damage
to or misuse of the phone. Any changes or modifications not
expressly approved in this user guide could void your warranty
for this equipment.
Before You Start
Safety Instructions
WARNING! To reduce the possibility of electric shock, do not
expose your phone to high humidity areas, such as the
bathroom, swimming pool, etc.
Always store your phone away from heat. Never store your
phone in settings that may expose it to temperatures less than
32°F or greater than 104°F, such as outside during extreme
weather conditions or in your car on a hot day. Exposure to
excessive cold or heat will result in malfunction, damage
and/or catastrophic failure.
Be careful when using your phone near other electronic
devices. RF emissions from your mobile phone may affect
nearby in adequately shielded electronic equipment. You
should consult with manufacturers of any personal medical
devices such as pacemakers and hearing aides to determine if
they are susceptible to interference from your mobile phone.
Turn off your phone in a medical facility or at a gas station.
Never place your phone in a microwave oven as this will
cause the battery to explode.
IMPORTANT! Please read the TIA SAFETY INFORMATION on
page 78 before using your phone.
Safety Information
Read these simple guidelines. Breaking the rules may be
dangerous or illegal. Further detailed information is given in this
user guide.
]Never use an unapproved battery since this could damage
the phone and/or battery and could cause the battery to
explode.
]Never place your phone in a microwave oven as it will
cause the battery to explode.
]Do not dispose of your battery by fire or with hazardous or
flammable materials.
]Make sure that no sharp-edged items come into contact
with the battery. There is a risk of this causing a fire.
]Store the battery in a place out of reach of children.
]Be careful that children do not swallow any parts such as
rubber plugs (earphone, connection parts of the phone,
etc.). This could cause asphyxiation or suffocation.

9
For Your Safety
]Unplug the power cord and charger during lightning storms
to avoid electric shock or fire.
]When riding in a car, do not leave your phone or set up the
hands-free kit near to the air bag. If wireless equipment is
improperly installed and the air bag is activated, you may be
seriously injured.
]Do not use a hand-held phone while driving.
]Do not use the phone in areas where its use is prohibited.
(For example: aircraft).
]Do not expose the battery charger or adapter to direct
sunlight or use it in places with high humidity, such as a
bathroom.
]Never store your phone in temperatures less than- 4°F or
greater than 122°F.
]Do not use harsh chemicals (such as alcohol, benzene,
thinners, etc.) or detergents to clean your phone. There is a
risk of this causing a fire.
]Do not drop, strike, or shake your phone severely. Such
actions may harm the internal circuit boards of the phone.
]Do not use your phone in high explosive areas as the phone
may generate sparks.
]Do not damage the power cord by bending, twisting, pulling,
or heating. Do not use the plug if it is loose as it may cause
a fire or electric shock.
]Do not place any heavy items on the power cord. Do not
allow the power cord to be crimped as it may cause fire or
electric shock.
]Do not handle the phone with wet hands while it is being
charged. It may cause an electric shock or seriously
damage your phone.
]Do not disassemble the phone.
]Do not place or answer calls while charging the phone as it
may short-circuit the phone and/or cause electric shock or
fire.
]Only use the batteries, antennas, and chargers provided by
LG. The warranty will not be applied to products provided by
other suppliers.
]Only authorized personnel should service the phone and its
accessories. Faulty installation or service may result in
accidents and consequently invalidate the warranty.
]Do not hold or let the antenna come in contact with your
body during a call.
]An emergency call can be made only within a service area.
For an emergency call, make sure that you are within a
service area and that the phone is turned on.

10
For Your Safety
FCC RF Exposure Information
WARNING! Read this information before operating the phone.
In August 1996, the Federal Communications (FCC) of he United
States, with its action in Report and Order FCC 96-326, adopted
an updated safety standard for human exposure to radio
frequency (RF) electromagnetic energy emitted by FCC
regulated transmitters. Those guidelines are consistent with
the safety standard previously set by both U.S. and
international standards bodies.
The design of this phone complies with the FCC guidelines and
these international standards.
CAUTION
Use only the supplied and approved antenna. Use of
unauthorized antennas or modifications could impair call
quality, damage the phone, void your warranty and/or result in
violation of FCC regulations. Do not use the phone with a
damaged antenna. If a damaged antenna comes into contact
with skin, a minor burn may result. Contact your local dealer
for a replacement antenna.
Body-worn Operation
This device was tested for typical body-worn operations with
the back of the phone kept 0.79 inches (2cm) between the
user’s body and the back of the phone. To comply with FCC RF
exposure requirements, a minimum separation distance of 0.79
inches(2cm) must be maintained between the user's body
and the back of the phone. Third-party belt-clips, holsters, and
similar accessories containing metallic components should not
be used. Body-worn accessories that cannot maintain 0.79
inches(2cm) separation distance between the user's body
and the back of the phone, and have not been tested for typical
body-worn operations may not comply with FCC RF exposure
limits and should be avoided.

11
For Your Safety
Vehicle Mounted External Antenna
(optional, if available)
A minimum separation distance of 8 inches (20cm) must be
maintained between the user/bystander and the vehicle
mounted external antenna to satisfy FCC RF exposure
requirements. For more information about RF exposure, visit
the FCC website at www.fcc.gov
FCC Part 15 Class B Compliance
This device and its accessories comply with part 15 of FCC
rules. Operation is subject to the following two conditions:
(1) This device and its accessories may not cause harmful
interference, and (2) this device and its accessories must
accept any interference received, including interference that
may cause undesired operation.
Cautions for Battery
]Do not disassemble.
]Do not short-circuit.
]Do not expose to high temperature: 60°C (140°F).]
]Do not incinerate.
Battery Disposal
]Please dispose of your battery properly or bring to your
local wireless carrier for recycling.
]Do not dispose in fire or with hazardous or flammable
materials.
Adapter (Charger) Cautions
]Using the wrong battery charger could damage your phone
and void your warranty.
]The adapter or battery charger is intended for indoor use
only.
Do not expose the adapter or battery charger to direct sunlight
or use it in places with high humidity, such as the bathroom.

27
Confirming before use
Phone Parts and Functions ...................28
Display ....................................................32
Menu Operations....................................34
Soft Key Operations...............................34
Side Button Main Operations ................35
Using the UIM ..................36
Attaching/Removing the Battery Pack..38
Charging the Phone....................40
Turning Power ON..................................44
Turning Power OFF ................................44
Date/Time ...............................................45
Using Caller ID Notification Service ......45
Own Number...........................................45

28
Confirming before use
Ç≤égópëOÇÃämîF
Confirming before use
Phone Parts and Functions
The Name and function of each part of the phone are as follows.
• This manual describes operation of each button using an illustration of the button.

29
Confirming before use
Confirming before use
Next Page
1Earpiece
While talking over a call, the other party’s voice is
heard from here.
2LED display
Lights up and flashes during incoming call or battery
charging. You cannot change the light up/flash method.
3In camera
You can use this camera for shooting yourself or
sending movie by Video-phone call.
4Display >P32
5Earphone/Microphone terminal
For connecting a Flat-plug Earphone/Microphone Set
with Switch (option), etc. Do not forcibly pull the
earphone/microphone cover※.
※: You can rotate it forward or backward when it is open.
6MMail button
Press from the Stand-by display to bring up the Mail
menu. >P140
Press from the Stand-by display for 2 or more seconds
to check new message. >P129, P156
Press this key during auto key lock to cancel the auto
lock. >P101
You can execute the items shown on the soft key area.
>P34
7KNavigation button
For selecting an item and scrolling the display.
The following operations can be performed from the
Stand-by display:
UUp button : The phonebook list screen appears.
>P67
DDown button : The custom menu screen appears.
>P186
LLeft button : Received call screen appears.
>P86
Press for 1 or more seconds to
display the received mail list. >P88
RRight button : Redialed call screen appears.
>P87
Press for 1 or more seconds to
display the sent mail list. >P88
8CMenu/Select button
Press on the Stand-by display to bring up the Main menu.
>
P34
An operation displayed in the soft key area can be
performed.
>
P34

30
Confirming before use
Ç≤égópëOÇÃämîF
Confirming before use
9TVideo-phone button
Press to make/receive video-phone calls. >P58, P60
Press on the Stand-by display to view the other party that
you made the latest call.
Press to switch modes, etc. in entering mode
(Pictograph/Symbol/Emoticon). >P223
Press to switch in camera and out camera when
camera is started.
!AStart button
Press to make/receive voice calls. >P48, P50
Press on the Stand-by display to view the other party
that you made the latest call. Press for 1 or more
seconds to display all received/sent mail history.
Press while characters are entered to switch between
full-pitch and half-pitch. >P222
"FEVolume buttons
Press to adjust the volume, etc. >P35
Press these buttons on the Stand-by display for 1 or
more seconds to turn on the photo light. >P192
#Dial button
$**(asterisk) button/Public mode (drive mode)
button
Press to enter “*” and to switch between upper case
and lower case while characters are entered. >P224
On the stand-by display, press this key for 1 or more
seconds to set or cancel Public mode (drive mode).
>P52
%Microphone
For speaking to the other party.
For recording sound when shooting moving images by
the camera.
&Ii-mode button
Press from the Stand-by display to bring up the
i-mode menu. >P122
Press for 2 or more seconds from the Stand-by display
to bring up software list screen of i-appli. >P163
Press from the entering character mode to switch the
mode (Hiragana/Katakana/English/ Number)
An operation displayed in the soft key area can be
performed. >P34
(NMultitask button
Press to bring up the Task Manager.
Press for 1 or more seconds to bring up the New Task
screen.
>P284
)PPower/End button
Press for 2 or more seconds to turn the power on.
Press for 2 or more seconds to turn the power off.
>P44
Press to end calls and end functions.
~QClear button
Press to return to the previous operation.
Press this button on the Stand-by display (when the
phone is closed) for 1 or more seconds to enable
the auto key lock
>P100
Press to cancel the operation depending on the function
such as sending mails or downloading data.※

31
Confirming before use
Confirming before use
Next Page
Also, press to delete entered text.
※
:
Note that the operation may not be canceled
depending on the timing of canceling※.
+#(Sharp)/ Manner Mode button
Press for 1 or more seconds from the Stand-by display
to activate/deactivate the Manner Mode.
>P78
Also, press to enter “#” and to start a new line while
characters are entered.
,Connector terminal
For connecting adapters and cables.
-Infrared data port
Point this port to the other device for infrared
communication. >P186
.Strap hole
/Speaker
Ring tone and alarm can be heard from here.
The voice of the other partner can be heard from here
when you are calling using the speaker phone.
:Rear cover
;GCamera button
Press this button on the Stand-by display to activate
the photo mode and press this for 1 or more seconds
to activate the movie mode. >P111, >P117
<Out camera
You can use this camera for shooting still image or
moving images or sending movie by Video-phone call.
=Photo light
You can turn on this light when the out camera is used.
This lights up/flashes in red during shooting still image
or moving images. >P111, >P117
You can also use this light as a flashlight. >P192
Opening/closing phone
Slide the body front portion where the Stand-by display
exists upward to open the phone. Slide it downward to
close the phone.
Information
• Note that sliding it roughly results in a failure.
32
Confirming before use
Ç≤égópëOÇÃämîF
Confirming before use
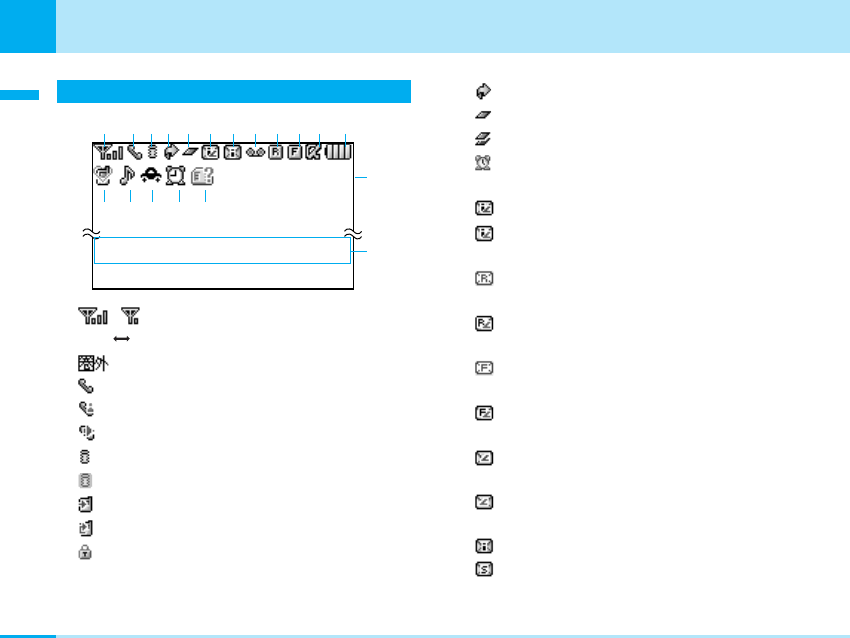
Display
1~ : Shows the level of the received radio waves.
Strong Weak
: Out of the service area.
2: Displayed during a voice call.
: Displayed during a video-phone call.
: Displayed during a voice call using the speaker phone.
3(Blinks): while i-mode is activated.
(Blinks): during i-mode communication.
: Displayed during trying dialup connection.
: Displayed during dialup connection.
: Displayed while an SSL-enabled page is displayed or
obtained.
4: Displayed while “All Call Rejection” is activated.
5: Displayed while a function (Task) is activated.
: Performing multiple functions (Task).
(Blinking): Alarm starts while talking, activating camera
or setting public mode (drive mode).
6(White): Displayed when the i-mode Center holds a mail.
(Pink): Displayed when the box for i-mode mail at the
i-mode Center is full.
(White): Displayed when the i-mode Center holds a
MessageR.
(Pink): Displayed when the box for MessageR at the
i-mode Center is full.
(White): Displayed when the i-mode center holds a
MessageF.
(Pink): Displayed when the box for MessageF at the
i-mode Center is full.
(White): Displayed when the i-mode Center holds mail,
a messageR and a messageF.
(Pink): Displayed when the boxes for i-mode mail,
MessageR and MessageF at the i-mode Center are full.
7(White): Displayed when an unread mail exists.
(White): Displayed when an unread SMS message exists.
Mail Menu i-mode
1 23456 789!" #
$%&()
~
+
Remain 8
TV viewing
33
Confirming before use
Confirming before use
(White): Displayed when an unread mail and SMS
message exist.
(Pink): Displayed when the inbox is full.
: Displayed when the area for SMS messages in the
UIM is full.
: The inbox and the SMS in card are full.
8(Yellowish green): Displayed when a Voice Mail
message exists.
(Orange): Displayed when the box for Voice Mail
messages is full.
9(White): Displayed when an unread MessageR exists.
(Pink): Displayed when the box for MessageR is full.
!(White): Displayed when an unread MessageF exists.
(Pink): Displayed when the box for MessageF is full.
": Displayed when i-appli is being started.
: Displayed when i-appli auto start failed.
#~ : Shows the battery level.
$(Pink): Displayed during Manner mode.
(Blue): Displayed during Original manner mode.
%: Displayed when the ringtone for incoming voice
call or video-phone call sounds, not operating a
vibration.
: Displayed when the vibration for incoming call is
activated to “Pattern 1” or “Pattern 2” when the
alarm for incoming voice call or video-call is muted,
and the vibration operate linked with a melody.
: Displayed when a vibration and a ringtone for
incoming voice call and video-phone call sounds
at the same time and the vibration is set to
operate linked with a melody.
: Displayed when a vibration and a ringtone from
incoming voice call or video-phone call do not
operate.
&: Public mode (Drive mode) active.
(: Displayed while an alarm is set.
: Displayed when today’s schedule exists.
: Displayed when an alarm is set and today’s
schedule exists.
):Displayed when UIM is not inserted or an error
occurs on the UIM.
~Date counter >P200
Displays the number of days till the registered event.
+Stand-by memo >P198
Displays the stand-by memo you create.
34
Confirming before use
Ç≤égópëOÇÃämîF
Confirming before use
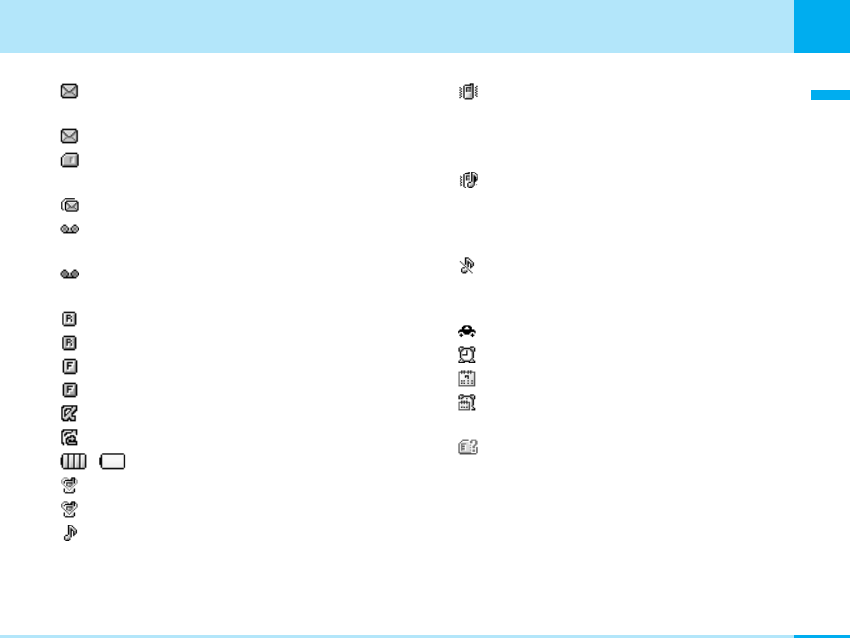
Menu Operations
This section describes the operation using an example for
setting a wall paper on the Stand-by display.
aSelecting a function by a K
1. On the Stand-by display, C[Menu] ]Highlight
using K]C]HMove the cursor to the
Stand-by display ]C]HMove the cursor to the
Wallpaper ]C
aSelecting a function by pressing the key
corresponding to the menu number
1. On the Stand-by display, C[Menu] ]Highlight
using K]C]1]1
Soft Key Operations
To perform an operation displayed in the soft key area on
the 待受画面, press the corresponding button as below.
Information
• (Navigation icon) that indicates the directions in which you
can scroll and select items using Kis also displayed in the
soft key area.
• Items displayed in the soft key area vary depending on the
display.
K C1 1
Stand-by display
Display
Select
Wallpaper
Clock/Calender
Wallpaper memo
Select
Stand-by display
Select
Call display
Font
Menu style
Backlight
Color scheme
K CH CH C
Stand-by display
Display
Select
Wallpaper
Clock/Calender
Wallpaper memo
Select
Stand-by display
Select
Call display
Font
Menu style
Backlight
Color scheme
Side Button Main Operations
• If auto key lock (P100) is enabled with phone
closed, the operations are as follows:
FE : the auto lock can be cancelled temporarily. Refer to
the table below.
G: Cannot be operated.
35
Confirming before use
Confirming before use
How to operate
phone
operation
Operation of
phone
During voice phone/
Video-phone call
]
FE Open/
Close
Call rejection
Press ]Gfor 1 or more
seconds during incoming call
Close
Stopping alarm
During the alarm/ schedule
alarm is ringing ]E
Open/
Close
Scrolling the listing
display or site
display by page※1
During displaying each
screen
]
FE Open/
Close
Switch the one
moth schedule
display by month
During displaying the one
month display in the
Scheduler
]
FE
Open/
Close
Starting camera During stand-by
]
G
(Photo mode)
Press
]
Gfor 1 or more
seconds during stand-by
(Movie mode)
Open/
Close
During the auto key lock
]
FE
]
C
When the display is turned
off
]
FE
/
G
Operation of
phone
How to operate
phone
operation
When the display is
turned on
Open/
Close
Cancel temporarily
the auto key lock
Close
During the still image/moving
images shooting display is
displayed ]FE
Zoom Open/
Close
During stand-by, press
]
For Efor 1 or more
seconds (light up)
When the photo light
lights up, press
]
For E
(light off)
Photo light on/off※2Open/
Close
During stand-by
]
FE
Adjust phone
volume
Adjust the button
check volume
Open/
Close
Adjust ring tone
volume During incoming call
]
FE
Open/
Close
36
Confirming before use
Ç≤égópëOÇÃämîF
Confirming before use
※1 : Depending on the display type, you can move the cursor up
and down.
※2 : “Flashlight” (P192 ) is set to “Not use”, this does not function.
Using the UIM ( Card)
Your phone number and contracted contents for the
service, etc. are recorded in the UIM. You need to insert it
into the phone to make/receive calls or perform
communication.
Refer to the UIM manual for details of how to use it.
Inserting/Removing UIM ( Card)
Insert/remove the UIM after you turn off the power of the
phone and remove the rear cover and battery pack
beforehand (P39).
• Remove the AC adapter and options beforehand.
Inserting
1. Insert the UIM with its IC-side facing downwards in
the direction of the arrow underneath the guide
Removing
1. Slide the UIM in the direction of the arrow to
remove it
Operation of
phone
How to operate
phone
operation
When playing moving
images/melodies
]
FE
Adjusting the volume
when moving images/
melodies are replayed
Open/
Close
When moving images/
melodies are stopped, ]
G(play)
When the moving
images/ melodies are
played, ]G(pause)
Playing and pausing
moving images/
melodies
Open/
Close
37
Confirming before use
Confirming before use
Information
• When inserting / removing the UIM, close the flip, and then put
it on your hand. Take care not to accidentally torch or scratch
the IC.
About Password of UIM
You can set 2 passwords, PIN1 and PIN2, for a UIM.
>P107
UIM Restriction Functions
The UIM has a restriction function to protect your data and
files.
If you obtain the following types of data and files with a
UIM inserted, restrictions are automatically imposed to
disable them when the UIM is not inserted or when
another UIM is inserted.
• Images/melodies/i-motion/i-appli obtained from sites
and Internet web pages
• Files attached to i-mode mail messages and
MessagesR/F
Differences of UIM
The card (blue) differs from the card
(Green/White) as follows:
aAbout WORLD WING
WORLD WING is international roaming
service that allows you to use the same mobile pone
number for making and receiving calls after inserting
your UIM (Green/White) in a phone applicable to
the service or mobile phone available for overseas use
(WCDMA or GSM).
• Application is not required for the user who signed a
service contract after September 1, 2005.
However, those who notified that the service is not
required during signing the service contract or
canceled in the middle of the contract need to apply
for the service again.
UIM
(Green/White)
Function UIM (Blue)
Number of digits of the phone
number that can be stored in
the UIM phonebook
Up to 26 digitsUp to 20 digits
WORLD WING AvailableNot available
Service dialing AvailableNot available

38
Confirming before use
Ç≤égópëOÇÃämîF
Confirming before use
• Those who did not apply for WORLD WING before
August 31, 2005 need to apply for the service.
• Some billing plans may not be applied to WORLD
WING.
• For loss or theft of the phone, account settlement of
total charges, or phone failure while overseas, see
"Failure while overseas" the back side of the
operation manual. Note that the customer shall also
pay the fees for call and communication after the
phone is lost or stolen.
Attaching/Removing the Battery Pack
Make sure that you attach the dedicated battery pack L02
for L704i to use it.
Attaching
1. Press the rear cover in the direction of the arrow 1
to slide it in the direction of the arrow 2, then lift it
up in the direction of the arrow 3to remove
2. Insert the battery in the direction of the arrow 1
with the label facing downwards, then push it in
the direction of the arrow 2

39
Confirming before use
Confirming before use
Next Page
3. Adjust the rear cover to the ditch of the
phone holding the cover approx. 3mm off, then
press it in the direction of the arrow 1to slide it in
the direction of the arrow 2, then push it until it
clicks
Removing
1. Press the rear cover in the direction of the arrow 1
to slide it in the direction of the arrow 2, then lift it
up in the direction of the arrow 3to remove
2. Take the projection of the battery pack to lift it up
in the direction of the arrow

40
Confirming before use
Ç≤égópëOÇÃämîF
Confirming before use
Information
• Attach/remove the battery pack with the phone closed
and held in your hand after you turn off the power. In addition,
If you attach/remove the battery pack forcibly, it may damage
the charging connector of battery.
• Take care not to attach/remove the rear cover. Note that if the
rear cover is forcibly depressed, the slot of the rear cover may
be damaged.
• For details about the battery, see the manual for Battery Pack L02.
Charging the Phone
Charging
Connect specified AC Adapter (option) to charge the
battery after attaching the battery pack to the
phone (P38). You need AC Adapter 01 for both
overseas and domestic usage (option) separately when
using the phone overseas.
1. Open the cover※of the external connector terminal
of the phone
※: You can rotate it forward or backward when it is open.
2. Place the arrow side of the AC adaptor connector
up and keep the connector level with head
set to connect in the arrow direction
3. Insert the AC adapter’s plug into a power socket

41
Confirming before use
Confirming before use
Next Page
• If you start to charge the battery, the charging start
tone will sound.
The battery level icon ( ) flashes on and off in turn
and it is red. After charging, the alarm tone for ending
the charging will ring and then the flashing disappears
and the LED turns off.
• If you charge the phone with the power off, the
animation for the battery level is displayed as follows,
depending on the battery level.
- In case the battery level is low: “Please wait” >
“Charging” >“Battery charged”
- In case the battery is empty: “Please wait” >“Low
battery Please wait” >“Charging” >“Battery
charged”
Information
• When you use the phone for the first time, the battery
pack is not fully charged. Fully charge the battery before using
it.
• When you attach the AC adapter to the phone, do not
use unnecessary force. The phone and the connector
may be damaged.
• Do not remove the battery pack and the UIM during charging.
• If the battery cannot be charged correctly, turn off the power
once, remove the battery pack, and then reattach it to charge
the battery again.
• If the battery level becomes very low during a video-phone call,
connecting the AC adapter may not charge the battery fully,
and the power may go off.
• When charging the battery pack overseas, confirm the voltage
used in the country or the area of stay, and use
Overseas/Domestic AC Adapter 01 (option) (A conversion plug
adapter for overseas travel applying to the country or area of
stay is required). Also, do not charge the battery pack using an
electric transformer for overseas travel.
• Refer to the instruction manuals for AC Adapter 01
(option) and AC Adapter 01 for both overseas and
domestic usage (option) for details.
42
Confirming before use
Ç≤égópëOÇÃämîF
Confirming before use
Removing the AC Adapter
After charging completes, disconnect the AC adapter from
the phone.
1. Disconnect the connector of the AC adapter from
the power socket
2. While pressing the release buttons on both sides
of the connector, remove it horizontally from the
phone in the direction of the arrow
• Do not pull the connector forcibly. Malfunction may
result.
3. Close the cover of the external connector terminal
of the phone
Checking the Battery Level
When turning the power on, the battery level (estimate)
icon appears.
• The Battery Level display indicates just an estimate of
the battery level.
: Almost full
: Getting low
: Almost empty. Charge the battery immediately.
When You Need to Charge the Battery
If the battery is completely flat, a message appears,
flickers, and the battery alarm sounds. If you press
C
, the
message disappears and the battery alarm stops.
Information
• If you set “Manner mode” or “Original manner mode” and set
battery alarm to OFF, the alert tone does not ring.
Precautions on the Battery Pack
Be sure to use the battery pack dedicated to the
phone.
43
Confirming before use
Confirming before use
aBattery life
• The battery pack is a consumable. With repeating the
charging, the operating time at a time is gradually
reduced.
• It is recommended to change the battery pack early
when the operating time at a time is reduced to
approximately half compared to the time when the
is purchased since the useful life of the battery
pack is reaching to the end. The battery pack may
expand when it is reaching to the end of useful life
depending on its usage condition, this is not a problem.
The useful life of the battery pack is one year as a guide
line. However, repeated charging/discharging for short
time, usage in high temperature environment, or
continuous long time charging condition may shorten
the useful life of the battery.
aDo not charge for long periods of time (several days)
with the phone turned on.
• Do not leave the phone power on for long
periods of time while charging. Otherwise, when
charging finishes, the phone will attempt to
receive power from the battery so that when you
actually use the phone, you will be able to do
so for just a short amount of time before the battery
alarm sounds. If this happens, charge the battery
correctly. When charging the battery again, first
disconnect the phone from the AC adapter
and then set it again.
aEstimated usage time for battery
The usable time of the battery varies depending on the
usage environment or its remaining life.
• Continuous talk time is the estimated time when radio
waves can be sent and received normally.
• Continuous stand-by time is the estimated time you
can use thephone in motion when it is closed
and can receive radio waves normally. The standby
time could be about half of this estimate depending
on the battery level, function settings, other ambient
conditions such as temperature, the status of radio
waves in the area (weak or no radio waves, for
instance) and the status of the network of the country
in which you stay. The continuous standby time will
be shorter if you don't insert the UIM. When you use
i-mode communications, the talk/transmission time
and standby time will be shorter. Further, even if you
do not make calls or perform i-mode communication,
the talk/communication time and standby time will be
shorter if you compose i-mode mail, start up a
downloaded i-appli.
Stand-by time
Network Continuous talk time
/ 3G Static : about ••• hrs
Dynamic : about ••• hrs
Voice call : about ••• min
Video call : about •• min
GSM/GPRS Static : about ••• hrs Voice call: about ••• minutes
For environmental protection, bring the exhausted
battery to an , dealer, or recycle shop.
44
Confirming before use
Ç=égópëOÇÃämîF
Confirming before use
• The continuous standby time for standstill is the
average number of hours you can use the
phone in standstill status when it is closed and can
receive radio waves normally.
• The continuous standby time for in motion is the
average number of hours you can use the
phone in the combined status of ”standstill”, “moving”
and “out of the service area” when it is closed, in an
area where it can receive radio waves normally.
• The talk/communication time and standby time will
also be shorter than the above-mentioned estimates
when you perform data transmission or multi-access
or when you use the camera.
aEstimated time for charging battery
• The estimated charging time is for when the
phone is off and the battery is being charged from
empty. The charging time will be longer if you charge
the battery with the power turned on.
aOther precautions
• Do not use any other adapter than the specified one.
It may shorten the life of the battery pack.
Turning Power ON
• Before you turn on the power, make sure that the UIM is
inserted and that the battery is fully charged.
1. Press Pfor 2 or more seconds
• After the Wake-up display is displayed, the Stand-by
display appears.
Information
• If “PIN code request” (P101) is set to “ON”, you need to enter
the PIN1 code.
• If “All lock” (P99) is set to “Power on”, you need to enter the
terminal security code.
Turning Power OFF
1. Press Pfor 2 or more seconds
• Select "Yes" on the Confirm display when the
phone is closed.
• The Exit display appears and the power is turned off.
Information
• The time to turn off the phone may be long. Depending
on the status of network, the lead time may differ. During
switching off the power, do not repeat to power on/off.
AC Adapter 01 Approx. ••• minutes

45
Confirming before use
Confirming before use
Date/Time
You can set the date and time. See “Setting Date & Time”
(P96) for details of how to set them up.
Using Caller ID Notification Service
The Caller ID Notification Service enables you to notify the
other party of your phone number when you make a call.
See “Using Caller ID Notification Service” (P208) for details
of how to set it up.
Own Number
You can display your phone number recorded in the UIM.
1. On the Stand-by display, C]0
• See “Displaying Own Number” (P72) for details of
how to change the settings on the Own Number
display.

47
Making calls............................................48
Receiving calls .......................................51
Using Public mode (drive mode) ...........52
Using Public mode (power off) ..............54
Making calls/
Receiving calls

48
Making calls/Receiving calls
Making calls/Receiving calls
Making calls
1. Enter the other party’s phone number
• Q: The last digit is cleared. To clear all digits,
press it for 1 or more seconds.
• C[Save]: You can register / add the entered phone
number to phonebook. Go to step 2 on page 64 of
“Adding to Phonebook”.
• I[Search]: You can search for the phone number in
phonebook. See the contents after step 3 on page 67.
2. A
]
Start talking when the other party answers
• Press Qfor 1 or more seconds: You can switch
ON/OFF the speaker phone.
3. Pto end the call after talking
• When the call is disconnected, the alert sound
sounds from a receiver.
Information
• If you press Aafter entering the number from 0 to 9 in the
Enter Phone Number screen, you can make a call directly
matching the the number saved in memory.
• You can enter a phone number of up to 42 digits.
• If you enter a phone number exceeding 16 digits, dialing will be
made displaying the first 16 digits digits of the phone number.
• You can make a call after entering “184” (Not notify) or “186”
(Notify) in front of phone number.
• When the Flat-plug Earphone/Microphone Set with Switch
(option) is attached, you can only talk on the Earphone /
Microphone regardless that the speaker phone is ON/OFF.
• When dialing/receiving overseas, some name of the other party
may not be displayed even that name is registered in the
phonebook.
Using the Submenus of the Enter Phone
Number Display
1. From the Enter Phone Number screen (See left),
M[Menu]
]
Select from the following submenu
items
Notify caller ID
Set whether to notify your phone number per call.

49
Making calls/Receiving calls
Making calls/Receiving calls
Next page
– Not notify : “#31#” is added in front of the phone
number entered, but the phone number is not notified.
– Notify : “*31#” is added in front of the phone
number entered, and the phone number is notified.
– Cancel : The added “#31#” or “*31#” is deleted.
Select prefix
The number saved in “Setting Prefix Dial” (P93) is
added before the phone number is entered.
International call
The international access code saved in “International dial
setting” (P92) is added before the phone number is
entered.
Save
You can save the entered phone number entered into
the Phonebook. Go to step 2 on page 64 of “Adding
to Phonebook”.
Search phonebook
You can search for the phone number in phonebook. For
operations after searching, see 3 on page 66 of
“Searching for Phonebook Entries”.
Using the Submenus of the Talking screen
1. From the Talking screen (P48), M[Menu]
]
Select
from the following submenu items
New call※1
You can put the current call on make and hold a call
to another party.
End active call
You can disconnect the call.
Hold※1/Cancel held call※1
You can put/release the call on hold.
Mute※2/Unmute※2
You can mute/unmute the voice transmitted to the other
party.
※1: Available only for Call Waiting Service subscribers.
To use this service, go to “Using Call Waiting Service” (P206).
※2: Not displayed during call is held.
Making a Call From the Dialed/Received Call Record
1. From the Stand-by display, L/R/A/T
]Select
a record ]
A
Information
• See “Using the Submenu of the Received Calls display” (P86)
for submenus.
Making a Call from the Phonebook
1. Uin the Stand-by display, or search the
phonebook
]
Select the party you want to call
]
A
• When there are multiple registered phone numbers,
press Aon the phonebook list display. Then, the
outgoing call phone number selection display is
displayed, select the phone number and press C
[Call].

50
Making calls/Receiving calls
Making calls/Receiving calls
Information
• To switch the phonebook list to display between the
phone and UIM, select M[Menu] >“View handset” / “View
UIM” on the phonebook list screen.
Using Pause Dial
You can use services such as sending messages to a
pocket bell, reserving tickets or checking the balance of
your bank account by sending push signal from the
handset. When the pause "P" has been entered, you can
send while dividing the dial data at the position where the
pause is entered.
1. Enter the phone number
2. Enter the dial data
• Press *3 times to enter pause “P”.
• Only 0to 9, #, *and pause “P” can be
entered.
• Up to 42 digit can be entered.
• If you enter pause “P” before the phone number, you
can not dial.
3. A
• A call is made to the other party, and the dial data
from the beginning to the first pause “P” is displayed
while being connected.
4. Confirm that the other party accepted ]Aor C
[Select]
• The dial data from the beginning to the first “P” is
sent, and the dial data to the next pause “P” is
displayed. Each time you press Aor C, the dial
data to the next “P” is sent. When you send the last
number, the calling screen appears.
Information
• Depending on the target device, the dial data may not be
received.
• When using video-phone call, you can not use pause dial.
International Calls
You can make an inteÎrnational call easily using the
international call service “WORLD CALL”.
When you have signed up for service, you have
contracted to use “WORLD CALL” (except those who
have applied not to use it).
• You can make calls to 240 countries and areas
worldwide.
aHow to make calls
009130 >010 >Country code >Area code >
Destination phone number ]A
• This service is not available with some billing plans.
• Application/monthly fee for WORLD CALL is free of
charge.
• The WORLD CALL charges are added to your monthly
bill.

51
Making calls/Receiving calls
Making calls/Receiving calls
Next Page
• Contact “ Information Center” on the back of
this manual for inquiries about WORLD CALL.
• If the other party uses a specific 3G mobile phone
overseas, you can make an “International Video-phone
Call” by dialing out using Tafter following the dialing
method described above.
– See the International Service web page of for
the information about connectable countries and
telecommunications carriers.
– Images sent from the other party may blur on your
phone or you may not be able to connect,
depending on the other party’s phone used for the
international video-phone.
• When the area code begins with “0”, leave this out when
dialing. However, include “0” when making a call to
some countries or regions such as Italy.
Making an International Call Easily
• Confirm that the “Setting Prefix Dial” (P93) is set to
“AUTO” and “009130010” (WORLD CALL) is set for
“IDD prefix code” in “IDD prefix setting”.
1. On the Stand-by display, press 0for 1 or more
seconds to enter “+”
2. Enter Country code >Area code >Destination
phone number
]
A(T)
3. “Yes”
4. Pto end the call after talking
Adjusting the Volume
1. Press FE Hduring a call or press Hfor 1 or more
seconds
Information
• The changed volume is held even after ending the call.
Receiving calls
1. When you receive a call, A
• I[Silent]: You can set to no sound for incoming call.
If you subsequently press I[Reject], incoming call
will be rejected.
• P: Reject the call.
2. Pto end the call after talking
• A confirmation tone is emitted from the phone when
the incoming call is disconnected.

52
Making calls/Receiving calls
Making calls/Receiving calls
Information
• When dialing/receiving overseas, some name of the other party
may not be displayed even that name is registered in the
phonebook.
When you didn't get a call
When you could not answer the incoming voice call/video-
phone call, the following screen indicating a missed call
appears and the LED blinks for approx. 60 seconds.
• C[Select]: You can view the list of received calls.
• I[Close]: You can close the screen for missed
calls.
Using the Submenu of the Ringing Display
1. From the Ringing screen (P51), M[Menu]
]
Select from the following submenu items
Voice mail※1
The Call is connected to the Voice Mail Service
Center.
Call rejection
The call is disconnected without answering it.
Call forwarding※2
The call is forwarded to the registered phone number.
※1: If you use voice mail menu, you should register this service
in operator. For details, see “Using voice mail” (P204).
※2: If you use call forwarding menu, you should register this
service in operator. For details, please refer to the “Using
Call Forwarding Service” (P207).
Using Public mode (drive mode)
Public mode is an auto-answer service that puts stress on
manners in public spaces. When there is an incoming call
in Public mode, a guidance to the effect that you cannot
answer the call because you are driving a car or in a place
(train, bus, theater, etc.) that requires restraint from using a
phone is played for the caller and the call is disconnected.
• Public mode can be set/cancelled only from the stand-by
display (in addition, from a screen showing “”).
• You can make calls in Public mode.
• When the Caller ID request service is set to “Activate”
and the “User unset” incoming call is received, a voice
guidance requesting to send Caller ID is played.
(No public mode guidance is played.)

53
Making calls/Receiving calls
Making calls/Receiving calls
Setting the Public Mode (drive mode)
1. On the stand-by display ]Press *for 1 or more
seconds
• The Public mode is set and appears.
aReleasing the Public Mode
On the stand-by display, press *for 1 or more
seconds
• The Public mode is released, and disappears.
In Public mode
When an incoming call without Caller ID is received at your
phone, no ringtone sounds. The missed calls display
(P52) is displayed and the incoming call is recorded as a
“missed call history” in the “Call/Mail history”.
• A guidance to the effect that you cannot answer the call
because you are driving a car or in a place that requires
restraint from using a phone is played for the caller and
the call is disconnected.
Operations while Network Service and Public mode
(drive mode) are both active
While Public mode (drive mode) and Network Service are
both active at the same time, the phone operations
as listed below. Depending on the settings and/or steps for
making a call, Network Service may have precedence,
disabling Public mode (drive mode) operations or recording
or display of missed calls.
aVoice Mail
aCall Waiting
aCall Forwarding Service
When a video-phone call is received
When a voice call is received
A Public mode (drive mode)
guidance is played for the caller
and the call is connected to
Voice Mail Service Center.※1
The call is terminated without
being connected to the Voice
Mail Service Center.※2
When a video-phone call is received
When a voice call is received
A Public mode (drive mode)
guidance is played for the caller
and the call is disconnected.
Disconnect the call after displaying
the video guidance of the public
mode to the other party.
When a video-phone call is received
When a voice call is received
A Public mode (drive mode)
guidance is played for the caller
and the call is connected to the
forwarding destination.※
Whether the guidance is played
to the other party or not
depends on the setting of the
Call Forwarding Service.
The call is connected to the
forwarding destination, with no
Public mode (drive mode) video
guidance played for the caller.※
When the target hand set does
not support the Video-phone call,
the transmission is disconnected.

54
Making calls/Receiving calls
Making calls/Receiving calls
aNuisance Call Blocking Service
aCaller ID Request Service
※1: When the Voice Mail ringing time or Call Forwarding ringing
time is set to “0 sec”, the phone is in out of the service area, or
it is turned off, the public mode (drive mode) guidance is not
provided and nothing is recorded to the received call history.
※2: This handset is not applicable to Voice Mail (Video-phone call).
Make a voice call to “1412” (free) and set not to be applicable to
video-phone call.
Information
In Public mode, the following sounds are not generated:
• Ring alert for incoming voice/video-phone calls
• Ring alert for incoming mail
• Ring alert for incoming MessageR/F
• Wake-up alarm sound ( blinks)※
• Schedule alarm sound ( blinks)※
• Battery exhaustion alarm sound
• The sound of the i-appli started by the setting of auto-start.
• Battery charging confirmation sound
※: The alarm sounds after releasing the public mode (drive
mode).
Using Public mode (power off)
Public mode is an auto-answer service that lays stress on
manners in public spaces. Once you activate Public mode
(power off), the guidance is played back telling that you
cannot take the call as you are currently in a place
(in hospital, airplane, or in around priority seat in a train)
where use is prohibited. Then the call is disconnected.
When a voice call is received
When a video-phone call is received
• For a call with no caller ID
notified, a caller ID request
guidance is played for the caller
and the call is disconnected.
• For a call with caller ID notified,
a Public mode (drive mode)
guidance is played for the caller
and the call is disconnected.
• For a call with no caller ID
notified, a caller ID request video
guidance is played for the caller
and the call is disconnected.
• For a call with caller ID notified, a
Public mode (drive mode) video
guidance is played for the caller
and the call is disconnected.
When a voice call is received
When a video-phone call is received
• For a call from a caller
registered for nuisance call
blocking, a call rejection
guidance is played for the caller
and the call is disconnected.
• For a call from a caller not
registered, a Public mode (drive
mode) guidance is played for
the caller and the call is
disconnected.
• For a call from a caller
registered for nuisance call
blocking, a call rejection video
guidance is played for the caller
and the call is disconnected.
• For a call from a caller not
registered, a Public mode (drive
mode) Video guidance is
played for the caller and the call
is disconnected.
55
Making calls/Receiving calls
Making calls/Receiving calls
Activate Public mode (power off)
1. *25251
]
A
• Public mode (power off) is set. (Nothing is changed in
the Stand-by display.)
• After setting Public mode (power off) and turning off
the power, the guidance “The person you are calling is
currently in an area where use is prohibited. Please try
again later.” is played back for incoming calls.
aTo release Public mode (power off)
*25250 ]A
aTo check Public mode (power off) for the setting,
*25259 ]A
When Public mode (power off) is activated
When an incoming call is received at your phone,
the guidance is played back to the caller telling that you
are currently in an area where use is prohibited, and then
the call is disconnected. When there is an incoming video-
phone call, the video-guidance of the public mode is
played back to the caller, and then the call is
disconnected.
• This setting is continued until you release the setting by
dialing “*25250”. If you just switch on, this setting is not
released.
• The Public mode (power off) guidance is played back
even when you are out of the service area or radio
waves do not reach.
Activating between network services and Public
mode (power off)
If you use Public mode (power off) and Network service at
the same time, the operation will be activated as follow.
Depending on the setting or calling, the network service
can be preferred, so the activation of Public mode (power
off) or the record of missed call may not be displayed.
aVoice Mail
aCall Forwarding Service
Response to Incoming Video-phone calls
Response to Incoming Voice calls
Plays back the Public mode
(power off) guidance to caller, and
then the call is connected to the
Voice mail Service Center.
※1
The call is terminated without being
connected to the Voice Mail
Service Center.
※2
Response to Incoming Voice calls
Response to Incoming Video-phone calls
Plays back the Public mode
(power off) guidance to caller, and
then the call is forwarded to the
forwarding destination.
※1
The
guidance depends on setting of
Call Forwarding Service.
Does not play back the video
guidance for public mode (power
off), and the call is forwarded to
the forwarding destination. If the
destination does not support
video-phone call, the call is
disconnected.
56
Making calls/Receiving calls
Making calls/Receiving calls
aNuisance Call Blocking Service
aCaller ID Display Request
※1: When voice mail or call forwarding ring time is set to
“0 sec”, no Public mode (power off) guidance is played.
※2: This handset is not applicable to Voice Mail (Video-phone call).
Make a voice call to “1412” (free) and set not to be applicable
to video-phone call.
Response to Incoming Voice calls
Response to Incoming Video-phone calls
• When the caller is registered to
the Nuisance Call Blocking
Service, the guidance of the call
rejection is played to the caller
and the call is terminated.
• In other cases, the guidance of
the public mode (power off) is
played to the caller and the call
is terminated.
• When the caller is registered to
the Nuisance Call Blocking
Service, the image guidance of
the call rejection is played to the
caller and the call is terminated.
• In other cases, Video guidance
of the public mode (power off) is
played to the caller and the call is
terminated.
Response to Incoming Voice calls
Response to Incoming Video-phone calls
• For the caller without a caller ID,
plays back the Caller ID Request
guidance, and then the call is
disconnected.
• For the caller with a caller ID,
plays back the Public mode
(power off) guidance, and then
the call is disconnected.
• For the caller without a caller ID,
plays back the video guidance
for Caller ID Request, and then
the call is disconnected.
• For the caller with a caller ID,
plays back the video guidance for
Public mode (power off), and
then the call is disconnected.

57
About Video-phone ................................58
Making Video-phone Calls.....................58
Receiving Video-phone Calls.................60
Changing Settings for
Video-phone Calls..................................61
Making/Receiving
Video-phone calls
58
Making/Receiving Video-phone calls
Making/Receiving Video-phone calls
About Video-phone
When both you and the other party use video-
phones, you can talk seeing each other's image.
• video-phones conform to 3G – 324M※1
standardized by the international standard 3GPP※2 .
You cannot connect to the video-phone that uses a
different format.
※1: 3G-324M is the international standard for the third
generation of mobile video-phones.
※2: 3GPP (3rd Generation Partnership Project) is the regional
standards organization for developing common technical
specifications for third-generation mobile
telecommunications systems (IMT-2000).
• The video-phone call is activated at the speed of 64K
bytes.
Making Video-phone Calls
1. Enter the other party’s phone number
• The Enter Phone Number screen (P48) is displayed.
2. T]Start talking when the other party answers
• The voice of the other party is heard from the speaker
when the call starts.
• Press Qfor 1 or more second: You can switch
ON/OFF the speaker phone.
• C[Image]/[Camera]: You can switch between
Substitutive image and your photo image for sending
to the other party.
• I[Switch]: You can switch the video that is sent to
the other party to the image of the in camera or the
out camera.
• T: You can zoom in/out the image in the camera
you are using.
3. Press Pto end the call after talking
Information
• See “International Calls” (P50) for how to make international
calls.
• When the Flat-plug Earphone/Microphone Set with Switch
(option) is attached, you can only talk on the Earphone/
Microphone regardless of whether the speaker phone is
ON/OFF.
Using the Submenu of the Enter Phone
Number screen
See “Using the Submenus of the Enter Phone Number
screen” (P48) of voice calls for the submenus available.
Description
Mark
Speaker phone ON/OFF
Zooming magnification

59
Making/Receiving Video-phone calls
Making/Receiving Video-phone calls
Using the Submenus of the Talking Screen
>P257
1. From the Talking screen (P58), M[Menu] ]
Select from the following submenu items
End call
The call is disconnected.
Hold
You can put the call on hold. You can cancel the
function by pressing I[Active].
Substitutive image/Camera image
You can switch to the Substitutive image for sending
to the other party. >P95
Camera settings
You can set the camera of Video-phone call. You can
select the icon by pressing J. After setting, press
I[Close].
– Zoom : The camera image is zoomed. (x1/x2)
– Brightness : You can change the brightness of
photo images.
– Night mode : You can set it up when using the
camera in a dark place.
Video-phone settings
You can set the display of Video-phone call. After
setting, press I[Done]. >P94
– Display setting : You can set the display method
for the Talking screen.
• Both : The other party’s image and your image
are displayed.
• Other : Only the other party’s image is displayed.
• Me : Only your image is displayed.
– Sub screen : If you select “Both” of “video-phone
settings”, you can set the image which displayed
each screen.
• Me : Only your image is displayed.
• Other : Only the other party's image is displayed.
– Display light: You can set the lighting method of
the backlight on the Talking screen.
• Always on : Always lights during a call.
• Terminal setting : Follows the setting of
“Backlight”. >P83
Sending image quality
You can set the quality of images to be sent to the
other party.
– Normal : Sends images in standard quality and
motion speed.
– Prefer motion quality : Sends images laying stress
on motion speed. Prefer motion quality is effective
for moving images.
– Prefer image quality : Sends images laying stress
on image quality. Prefer image quality is effective if
there is little motion.
Setting item/Setting at purchase

60
Making/Receiving Video-phone calls
Making/Receiving Video-phone calls
Making a Video-phone call from the
Dialed/Received Call Record
1. On the Stand-by display, L/R/A/T]Select
a history ]T
Information
• See “Using the Submenu of the Received Call Record Screen”
(P86) for the submenu.
Making a Video-phone Call from the
Phonebook
1. On the Stand-by display U, or Search for
phonebook entries (P66) ]Select a party to call ]
T
• When there are multiple registered phone numbers,
press Ton the phonebook list display. Then, the
outgoing call phone number selection display is
displayed, select the phone number and press C[Call].
Information
• To switch the phonebook to display between the phone
and UIM, select M[Menu] >Select “View handset” / “View
UIM”.
Adjusting the Volume
1. Press H/FE during a call
Information
• The changed volume is held even after ending the call.
Receiving Video-phone Calls
1. When you receive a call, T/A
• C[Image]: You can receive a call. The substitutive
image will be sent to the other party.
• P: You can put the call on hold. The holding image
will be sent to the other party. If you press C[Answer],
you can answer the call.
2. Pto end the call after talking
Information
• When inserting the switch of the Flat-plug Earphone/
Microphone set with Switch (option), you can connect a call by
earphone regardless of Speakerphone ON/OFF.

61
Making/Receiving Video-phone calls
Making/Receiving Video-phone calls
Using the Submenus of the Ringing screen
See “Using the Submenus of the Ringing screen” (P51) of
voice calls for the submenus available. Note that “Voice
mail” is not displayed for video-phone calls.
Changing Settings for Video-phone Calls
C](Settings) ]3
You can set the operation and display for video-phone
calls. See “Setting Operation and Display for video-phone
Calls” (P94) and “Selecting an Image for video-phone
Calls” (P95) for details of the settings.

75
Adjusting the Ring Volume ....................76
Adjusting the Effect Tone Volume .........76
Setting a Ring Tone................................76
Setting an Effect Tone ...........................77
Setting a Vibrator ...................................78
Activating the Manner Mode .................78
Setting Ringing Operations for
Incoming Mail .........................................79
Setting Ringing Time..............................80
Setting Display .......................................80
Setting Fonts of Dial Characters ...........82
Setting Menu Style .................................83
Setting Backlight ....................................83
Setting color Scheme.............................83
Sound/
Display
On the Stand-by display, C[Menu] ]
(Sound) or “Sound”
To display the Sound menu
On the Standby display, C[Menu] ]
(Display) or “Display”
To display the Display menu
76
Sound/Display
Adjusting the Ring Volume
C](Sound) ]1
>P250
1. From the Sound menu (P75), “Ring volume” ]
Select from the following adjustment items ]
After setting,I[Done]
Voice call
You can adjust the ring tone volume for voice calls.
Video-phone
You can adjust the ring tone volume for video-phone
calls.
Mail tone
You can adjust the ring tone volume for mail.
MessageR tone
You can adjust the ring tone volume for MessageR.
MessageF tone
You can adjust the ring tone volume for MessageF.
SMS tone
You can adjust the ring tone volume for SMS.
Information
• This notifies an incoming call by the small volume ring tone at
beginning and gradually increasing to the volume you set.
Adjusting the Effect Tone Volume
C](Sound) ]2
>P250
1. From the Sound menu (P75), “Effect tone volume”
]Select from the following adjustment items ]
After setting,I[Done]
Key tone
You can adjust the key pad sound volume.
Power ON/OFF
You can adjust the tone volume for when turning the
phone on/off.
Slide tone
You can adjust the tone volume for when opening or
closing the phone.
Feedback tone
You can adjust the tone volume for when a popup
appears.
Setting a Ring Tone
C](Sound) ]3
You can set the ring tone for voice call, video-phone call or
mail. In addition to ring alerts and melodies registered by
default, you can set melodies and/or i-motion downloaded
from i-mode sites and web pages as incoming ring alerts.
You can set the SMF, MFI or MP4 file as a ringtone.
Setting item/Setting at purchaseSetting item/Setting at purchase
Sound/Display
77
Sound/Display
Sound/Display
However, the ring tone may not be set depending on the
melody or i-motion.
•
For the melody registered at purchase, see “List of
melody” (P267).
>P251
1. From the Sound menu (P75), “Select ringtone” ]
Select from the following adjustment items ]
After setting, I[Done]
• Select from the melodies stored in “Melody” or
“i-motion” in “Data box” respectively. >P176, P179
• On a folder list screen, press Qto switch between
“Melody” and “i-motion”.
Voice call
You can select a ring tone for voice calls.
Video-phone
You can select a ring tone for video-phone calls.
Mail tone
You can select a ring tone for mail.
MessageR tone
You can select a ring tone for messageR.
MessageF tone
You can select a ring tone for messageF.
SMS tone
You can select a ring tone for SMS.
Information
• If you have set a ring tone depending on the voice call/ video
phone call/ Mail, the ring tone is preferred. The priority order is
as follows:
1 Ringtone set in the phone’s phonebook >Set the
phonebook (P64)
2 Ringtone set for a group of the phone’s phonebook
>Set group (P71)
3 Ringtone volume/Video call ring tone/Mail, Message ring
tone >Select the ring tone (P76)
Setting an Effect Tone
C](Sound) ]4
>P251
1. From the Sound menu (P75), “Select effect tone” ]
Select from the following adjustment items ]After
setting, I[Done]
Key tone
You can set to emit an effect tone for when you touch
the buttons. The effect tone does not sound when
setting to “OFF”.
Power ON/OFF
You can set whether to emit an effect tone for when
you switch ON/OFF the phone.
Slide tone
You can set whether to emit an effect tone for when
you open/close the phone.
Setting item/Setting at purchase
Setting item/Setting at purchase
78
Sound/Display
Sound/Display
Feedback tone
You can set whether to emit an effect tone for when a
popup appears.
Setting a Vibrator
C](Sound) ]5
>P251
1. From the Sound menu (P75), Vibration settings ]
Select from the following setting items ]After
setting, I[Done]
Incoming call
You can select a vibration pattern for when a voice
call or a video-phone call comes in.
– melody+vibration: The vibration and the melody
for incoming call are activated at the same time.
– Pattern 1(Vibration only): This activates the
vibration to pattern 1. Regardless of ring tone, the
tone for incoming call does not sound.
– Pattern 2(Vibration only): This activates the
vibration to pattern 2. Regardless of ring tone, the
tone for incoming call does not sound.
– OFF: The vibration is not activated in phone.
Message
You can set a vibration pattern for when mail,
messageR/F or SMS comes in.
– melody+vibration: The vibration and the melody
for incoming call are activated at the same time.
– Pattern 1(Vibration only): This activates the
vibration to pattern 1. Regardless of ring tone, the
tone for incoming call does not sound.
– Pattern 2(Vibration only): This activates the
vibration to pattern 2. Regardless of ringtone, the
tone for incoming call does not sound.
– OFF: The vibration is not activated in phone.
Activating the Manner Mode
You can set whether to mute the ring tone, key pad sound
and any other sound from the speaker to avoid annoying
people around you. If the manner mode is activated, an
incoming call or alarm, etc. is notified with vibrator.
• You can change the activation on setting manner mode
to “Original manner mode”. >P79
1. From the Stand-by display, press #for 1 or
more seconds
•
The handset of the phone vibrates displaying
(blue/in the Original manner mode) or (pink/in the
Manner mode).
• You can cancel it by pressing #for 1 or more
seconds with the Manner mode activated.
Setting item/Setting at purchase
79
Sound/Display
Sound/Display
Changing Manner Modes
C](Sound) ]6
You can change operations in the Manner mode.
>P251, P252
1. From the Sound menu (P75), “Manner settings” ]
Select from the following setting items
Manner mode
You can set the Manner mode.
Original manner mode
You can set the operation of the original manner
mode if desired. After setting, press I[Done].
– Incoming call sound: You can set whether to
make the ring tone sound when a voice call or
video-phone call comes in.
– Incoming call vib.: You can set whether to vibrate
the phone when a voice call or video-phone call
comes in.
– Message sound: You can set whether to make the
ring tone sound when mail, messageR/F or SMS
comes in.
– Message vibration: You can set whether to vibrate
the phone when mail, messageR/F or SMS comes
in.
– Key tone: You can set whether to make the key
operation sound when you do key operations.
– Slide tone: You can set whether to make an effect
tone sound when you open or close the
phone.
– Low battery tone: You can set whether to make a
battery alarm tone sound when the battery is flat.
Information
• The following sounds are emitted even when the manner mode
is activated.
– Shutter sound during camera shooting
– The alert tone to reconnect
– The alert tone for the quality of calling
• If you try to play the melody, moving image or i-motion on
manner mode, the confirmation screen appears and you can
select whether to play with sounds.
Setting Ringing Operations for
Incoming Mail
C](Sound) ]7
You can set whether to make the ring tone sound when
mail or SMS comes in. You can also set ringing duration
and cycle of rings.
>P252
1. From the Sound menu (P75), “Mail ring duration” ]
Select from the following setting items ]After
setting, I[Done]
Setting item/Setting at purchase
Setting item/Setting at purchase
80
Sound/Display
Sound/Display
Mail ring ON/OFF
You can set whether to make the ring tone sound
when mail comes in. If you select “ON”, you can set
the ringing duration or cycle of ringing.
Mail ring duration
You can set ringing time and number of rings for the
ringing tone.
– Time: After selecting Sec. section by pressing D,
you can enter the duration of ringing.
– Cycle: After selecting Cycle section by pressing D,
you can enter the number of cycle.
Setting Ringing Time
C](Sound) ]8
You can specify the mute time in seconds before ringing
starts when a voice call or video-phone call which is not
registered in phonebook comes in. This function is effective
as a countermeasure for nuisance calls such as 1 ring phone
scam.
>P252
1. From the Sound menu (P75), Select “Set mute
seconds” ]Enter ring time. ]I[Done]
Information
• If the voice call or video-phone call which are not registered in
phonebook disconnects within the setting ringing time, they
are not recorded in received call list.
Setting Display
You can set the display for stand-by display or
Incoming/outgoing screen.
You can set the maximum of the image size of 1280 x
1024, the file size of JPEG file to 700K bytes and the file
size of GIF file to 500K bytes on the Stand-by display.
Depending on the image, some cannot be set properly.
• When the image saved in stand-by mode, making and
receiving a call at purchase, please refer to “Pre-installed
data” (P264)
Setting the Stand-by Display
You can set wallpapers and clock displays for the Stand-
by display.
Wallpaper
C](Display) ]11
>P252
1. From the Display Menu (P75), “Stand-by display” ]
“Wallpaper” ]Select from the following setting
items ]After setting, I[Done]
Type
– Image: You can select an image (P169) saved
within the “My picture” in the “Data box”.
Setting item/Setting at purchase
Setting item/Setting at purchase

81
Sound/Display
Sound/Display
– Stand-by theme: You can select from two types of
stand-by theme in the “Select”.
Select
You can select an image or a stand-by theme saved
within “My picture” in “Data box”.
• Depending on the setting in the “Image”, the
selection item is changed.
Clock/Calendar Display
C](Display) ]12
• The option cannot be set when the “Type” of the
“Wallpaper” (P80) is set to “Stand-by theme”.
>P252
1. From the Display menu (P75), “Stand-by display” ]
“Clock/Calendar display” ]Select next setting
item ]After setting I[Finish]
Clock/Calendar
– Not show: The clock is not displayed on the Stand-
by display.
– Clock: A digital clock is displayed on the Stand-by
display. You can select the type of the clock in
“Clock display setting”.
– Calendar + Clock Display: The calendar and the
clock is displayed on the Stand-by display. You can
select the character color of the clock in the “Clock
Character Color”.
– Dual-clock: You can display two date/times of two
cities on the Stand-by display. You can select
second clock of the city※that is shown under the
“City Setting”.
Clock Display Setting/Clock Character Color/
City Setting
You can select the type of the digital clock, clock
character color, or the city.
• The selection item is changed depending on the
settings in “Clock/Calendar”.
• You can also select the clock character color when
the “Digital Clock 3” is selected in the “Clock Display
Stetting.”.
※: You can also change the city to display in "World Clock" (P191).
Information
• If you press M[View], you can confirm the display set.
Using Stand-by Memo
C](Display) ]13
>P252
1. From the Display menu (P75), “Stand-by display” ]
“Stand-by Memo” ]Select next setting item ]
After setting I[Finish]
Screen Display
You can set whether the stand-by memo is displayed
on the Stand-by display. The following items cannot
be set when you set to “Not display”.
Setting item/Setting at purchase
Setting item/Setting at purchase
82
Sound/Display
Sound/Display
Layout
You can set, for example, the display location, etc. of
the stand-by memo.
Font Color
You can set the character color of the stand-by
memo.
Character Frame Color
You can set the character frame color of the stand-by
memo.
Background color
You can set the background color of the stand-by
memo.
Information
• Register the text shown on the Stand-by display as a stand-by
memo on the “Stand-by Memo” (P198), you can register the
text shown on the Stand-by display as a stand-by memo. If no
text is registered, nothing is displayed even when you set the
option to “Show”.
Setting the Display for Incoming Calls
C](Display) ]21
You can set the image displayed when you receive an
incoming call.
>P253
1. From the Display Menu (P75), “Outgoing/Incoming
Calls Display” ]“Incoming call”
•
Select from the images saved on “My picture” of “Data
box”.
>
P169
Setting Display for Outgoing Calls
C](Display) ]22
You can set the image displayed when you make a call.
>P253
1. From the Display Menu ]“Outgoing/Incoming
Calls Display” ]“Outgoing call” (P75)
•
Select from the images saved on “My picture” of “Data
box”.
>
P169
Setting Fonts of Dial Characters
C](Display) ]3
You can set the sizes and colors of the dial fonts
displayed when you make a call, etc.
>P253
1. From the Display Menu (P75), “Font” ]Select from
the following setting items ]After setting,
I[Done]
Dial font size
Select a size of dial fonts.
Dial font color
Select a color of dial fonts.
Setting item/Setting at purchase
Setting item/Setting at purchase
Setting item/Setting at purchase

83
Sound/Display
Sound/Display
Setting Menu Style
C](Display) ]4
You can set the style of the Menu Style that appears when
pressing C[Menu] on the Stand-by display.
>P253
1. From the Display Menu (P75), “Menu style” ]
“Grid”/“List” ]I[Done]
Setting Backlight
C](Display) ]5
You can set the time for the Stand-by display to light up.
>P253
1. From the Display Menu (P75), “Backlight” ]Select
from the following setting items ]After setting,
I[Done]
Light up time
You can set the light up time of the Stand-by display
light.
Brightness
You can set the brightness of Stand-by display.
Setting color Scheme
C](Display) ]6
You can set the color tone of the Stand-by display.
>P253
1. From the Display Menu (P75), “Color scheme” ]
Select the color scheme you want to set ]I
[Done]
Information
• If you press C[View], you can view the screen after setting.
Setting item/Setting at purchase
Setting item/Setting at purchase
Setting item/Setting at purchase

85
Call/Answer ............................................86
Call Feature ............................................92
Video-Phone...........................................94
Date & Time ............................................96
Network (for overseas use) ....................97
Changing a Host from i-mode ...............99
Setting Lock/Security.............................99
Setting Bilingual ...................................102
Others Settings.....................................103
Settings
On the Stand-by display, C[Menu] ]
(Settings) or “Settings”
To display the Settings menu
Select
86
Settings
Call/Answer
Checking Call/Mail History
Displaying Received Call Records
C](Settings) ]111
You can view the record of received call.
1. From the Settings menu (P85), “Call/Answer” ]
“Call/Mail history” ] “Received calls”
• A/T: You can make a call to the other party of
the record being selected.
• I[Delete]: You can delete the record being selected.
2. Select a call record ]C
• A/T: You can make a call to the other party in a
list.
• I[Delete]: You can delete the list of call record.
• J: You can view the call record.
Using the Submenu of the Received Calls screen/
Details screen
1. From the Received Calls screen (See left)/Detail
screen (See above), M[Menu] ] Select from the
following submenu items
View※1
You can view details of the call record selected.
Add to phonebook※2
Register a selected/displayed phone number in the
history newly/additionally to a phonebook. Go to step
2 (P64) in ”Adding to phonebook”.
Settings
Icon Description
Received voice calls
Received video-phone calls
Rejected calls
Missed calls (Voice calls)
Missed calls (Video-phone calls)
87
Settings
Settings
Send mail※3
Create i-mode mail with a destination set to a mail
address saved in phonebook. Go to step 3 (P152) of
“Composing i-mode mail message”.
Delete
You can delete the call record selected/displayed.
Delete all※1
You can delete all the call records.
Go to list※4
You can return to the screen of received call list (P86).
International call (Japan)※5
You can call to Japan by the telephone number you
select. >P233
※1: Not displayed in submenu of detail screen.
※2: Not displayed if information on the caller of the call record
selected is stored in the phonebook.
※3: When you compose a mail on the Received Calls screen, the
phone number or the mail address that the cursor is placed on
at the bottom of the screen will be entered as the destination.
When you compose a mail on the Detail screen, the mail
address which is saved in the phonebook will be entered as
the destination. However, when no mail address is registered,
phone number is entered as the destination.
※4: Displayed in submenu of detail screen.
※5: This service is available only during the international roaming
service.
Displaying Dialed Call Records
C](Settings) ]112
You can view dialed call records.
1. From the Settings menu (P85), “Call/Answer” ]
“Call/Mail history” ] “Dialed calls”
• The Dialed Call Records appears.
2. Select a history ]C
• The Detail screen appears.
Information
• See “Using the Submenu of Received Calls Screen”/“Using the
Submenu of the Detailed Screen” (P86) for the display
operation method and the submenus available from the Dialed
call records/Detail screen.
• The operation of the redial display that is shown when Ris
pressed on the Stand-by display is also the same.
Displaying All Call Records
C](Settings) ]113
Received and dialed call records are displayed together.
1. From the Settings menu (P85), “Call/Answer” ]
“Call/Mail history” ] “All calls”
• The All calls screen appears.
Mark Description
Dialed voice calls
Dialed video-phone calls
88
Settings
Settings
2. Select a history ]C
• The Detail screen appears.
Information
• See “Using the Submenu of Received Call Records Screen”
/ “Using the Submenu of the Detailed Screen” (P86) for the
display operation method and the submenus available from
the All Calls screen / Detail screen.
Displaying received mail history
C](Settings) ]114
Display history of received mail.
1. From Settings menu (P85), select “Call/Answer” ]
“Call/Mail history” ] “Recv. mails”
• A history of the received mail appears.
2. Select a history ]C
• Detail screen appears.
Information
• See “Using the Submenu of Received mail history Screen” /
“Using the Submenu of the Detailed Screen” (P86) for the
display operation method and the submenus available from
the All Calls screen / Detail screen. However, “International
call (Japan)” is not displayed.
Displaying sent mail history
C](Settings) ]115
Display history of sent mail.
1. From Settings menu (P85), select “Call/Answer” ]
“Call/Mail history” ] “Sent mails”
• A history of sent mail appears.
2. Select a history ]C
• Detail screen appears.
Information
• See “Using the Submenu of Received Call Records Screen”
/ “Using the Submenu of the Detailed Screen” (P86) for the
display operation method and the submenus available from
the All Calls screen / Detail screen. However, “International
call (Japan)” is not displayed.
Displaying all mail history
C](Settings) ]116
Display history of all sent/received mail collectively.
1. From Settings menu (P85), select “Call/Answer” ]
“Call/Mail history” ] “All mails”
• A history of all mail appears.
2. Select a history ]C
• Detail screen appears.
89
Settings
Settings
Next Page
Information
• See “Using the Submenu of Received mail history Screen” /
“Using the Submenu of the Detailed Screen” (P86) for the
display operation method and the submenus available from
the All Calls screen / Detail screen. However, “International
call (Japan)” is not displayed.
Displaying Call Time
C](Settings) ]12
You can confirm call duration for each call type. You can
confirm the following items:
• The displayed call duration is a standard. The real of call
duration may differ.
1. From the Settings menu (P85), “Call/Answer” ]
“Call duration”
• Call duration display appears.
Last call
You can confirm the last call duration.
Received calls
You can confirm the received call duration.
Dialed calls
You can confirm the dialed call duration.
All calls
You can confirm the total call duration.
Information
• If the display of call time exceeds “9999999:59:59”, the setting
will be reset to “000000:00:00”.
Resetting call duration
1. Select a call duration you want to clear on the Call
duration screen ]I[Reset] ]Enter your
terminal security code ]C]“Yes”
• To clear all the call durations ]M[Menu] ] “Reset
all”
Setting Earphone/Microphone Auto Answer
C](Settings) ]13
You can set how to answer an incoming call with the Flat-
plug Earphone/Microphone Set with Switch (option)
connected.
>P253
1. From the Settings menu (P85), “Call/Answer” ]
“Auto answer” ] Select from the following setting
items ]After setting, I[Done]
Auto answering
You can set the earphone/microphone auto answer to
ON/OFF.
Delayed time (SEC) (0-120)
You can set the time between receiving call and
answering a call automatically.
Setting item/Setting at purchase
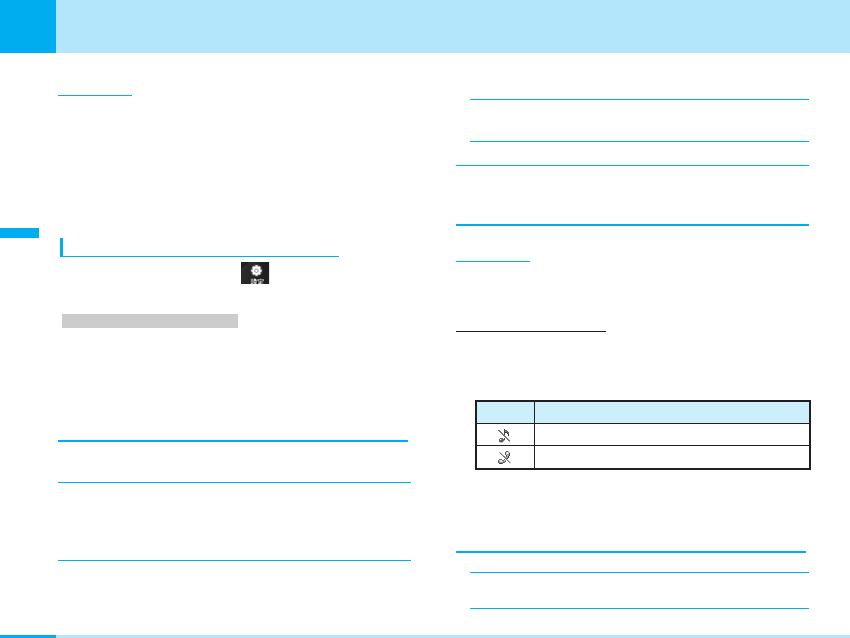
90
Settings
Settings
Information
• You can make a call by pressing the switch during showing a
phone number or selecting a phonebook.
• While receiving a call, you can connect it by pressing the switch.
• During talking over a call, you can end the call by pressing the
switch for 1 or more seconds.
• If you press the switch for 1 or more seconds while receiving a
call, the call will be rejected.
Setting to Reject/Accept Incoming Calls
C](Settings) ]14
You can set whether to reject incoming calls.
>P254
1. From the Settings menu (P85), “Call/Answer” ]
“Reject/Accept call” ] Enter your terminal
security code ]C
• The Reject/Accept call display appears.
2. Select from the following setting items
Accept
You can set whether to accept all incoming calls.
Reject on list
You can reject the incoming call from the specific parties.
You can set the rejecting action and the party's phone
number to reject a call by pressing I[List] (See below).
Reject all calls
– Silent : You can disable the ringing tone for all
incoming calls.
– Disconnect call : You can reject all incoming calls.
Memory reject call
You can reject calls from parties not registered in
phonebook and those with no caller IDs.
Information
• Even when rejecting a call by “Reject on list”, “Reject all calls”,
or “Memory reject call”, the record will be remained.
Setting Reject call List
1. From the Reject/Accept call display (See left),
Select “Reject on list” ] I[List]
• The Reject on list will be displayed.
• M[Menu]: You can edit/delete the list set.
2. I[Add] ]Select from the following setting items
]After setting, I[Done]
Reject types
– Silent : Disables the ring tone when receiving the
call from the other party set to “Reject number”.
Setting item/Setting at purchase
Mark Description
The type of reject call is set to “Silent”.
The type of reject call is set to “Disconnect call”.
91
Settings
Settings
Next Page
– Disconnect call : Rejects incoming calls when
receiving the call from the other party set to “Reject
number”.
Reject number
Enter the phone number of a caller you want to reject.
You can select a phone number from the phonebook
by pressing C[Search]※.
※: If you use M[Menu] >Edit from “Reject on list”, you cannot
use this function.
Setting an Answer Mode
C](Settings) ]15
You can set whether to answer a voice call by pressing a
button other thanA
>P254
1. From the Settings menu (P85), “Call/Answer” ]
”Answer mode” ]Select from the following setting
items
Slide answer
You can answer a call by opening the phone. If
the phone is already open, you can answer a
call by pressing A.
Press any key
You can answer a call by pressing any key except for
M, I, FE, G.
Press send key
You can answer a call by pressing Aonly.
Information
• This setting is not available for video phone call.
Setting item/Setting at purchase
92
Settings
Settings
Call Feature
Setting the Reconnect Control
C](Settings) ]21
You can set whether to make an alarm sound to inform
you when you are reconnected immediately after
disconnected owing to bad radio wave conditions.
>P254
1. From the Settings menu (P85), “Call feature” ]
”Reconnect alarm” ]Select from the following
setting items
High alarm
Set high alarm sounds.
Low alarm
Set Low alarm sounds.
No alarm
No sound.
Information
• The time to reconnect the network may differ depending on the
status of phone or radio (the maximum 10 seconds).
• The duration to reconnect the network can be chargeable.
• Depending on the status of phone or radio, the alarm may not
sound, and the call may be disconnected.
Setting Quality Alarm
C](Settings) ]22
You can set whether to make an alarm sound to inform
you when a call is liable to be disconnected midway
because of bad radio wave conditions.
>P254
1. From the Settings menu (P85), “Call feature” ]
“Quality alarm” ]Select from the following setting
items
High alarm
Set high alarm sounds.
Low alarm
Set low alarm sounds.
No alarm
No sounds.
Setting Minute Reminder
C](Settings) ]23
You can check the call duration by beep sound every
minute during a voice call (Not support this function for
Video-phone call).
>P254
1. From the Settings menu (P85), “Call feature” ]
“Minute reminder” ]“ON”/“OFF”
Information
• This setting is not available with a video-phone call.
Setting item/Setting at purchase
Setting item/Setting at purchase
Setting item/Setting at purchase
93
Settings
Settings
Next Page
Setting Prefix Dial
C](Settings) ]24
You can store prefix numbers such as international access
code or “184 / 186” and add it to the beginning of the
phone number to dial.
>P254
1. From the Settings menu (P85), “Call feature” ]
“Prefix dial”
• The Prefix Dial screen appears.
2. Select a PREFIX field to enter ]Enter a number ]
I[Done]
Setting International Dial
Setting Auto assist
C](Settings) ]251
You can set whether to automatically replace “+´” at the
beginning of a phone number with an international access
code such as “009130010” for making an international call.
>P254
1. From the Settings menu (P85), “Call feature” ]
“International dial” ]“Auto assist setting” ]
“Auto”/“OFF”
Setting IDD prefix
C](Settings) ]252
You can set the international access code to be added to
the beginning of a phone number for making an
international call.
>P254
1. From the Settings menu (P85), “Call feature” ]
“International dial” ]“IDD prefix setting” ]Select
from the following setting items ]After setting,
I[Done]
IDD prefix name
Enter the name of an international call service.
IDD prefix code
Enter an international access code.
Setting Close setting
C](Settings) ]26
You can select the operation when the phone is
closed during a call.
>P254
1. From the Settings menu (P85), “Call feature” ]
“Close setting” ]Select from the following setting
items
End the call
The call is disconnected.
Setting item/Setting at purchase
Setting item/Setting at purchase
Setting item/Setting at purchase
Setting item/Setting at purchase

97
Settings
Settings
Network (for overseas use)
Selecting the Network Connection Mode
Making settings for Network search
C](Settings) ]51
You can select a network setting method in case
destination networks (Communication carriers) change for
overseas use, etc.
>P255
1. From the Settings menu (P85), “Network” ]
“Network selection” ]Select from the following
setting items
Auto
Automatically searches for the network for setting.
Manual
The network search display appears, allowing you to
select a network from the list displayed after search.
Information
• It may take a few minutes to find the network.
• If you set “Auto”, you can search the network automatically in
the following situation.
– When you switch on – Out of the service area
• If you stop searching the network by “Manual”, the setting will
be changed to “Auto”.
Setting the Network Mode
C](Settings) ]52
You can set a type of network to search for when networks
are searched according to “Network selection”.
>P255
1. From the Settings menu (P85), “Network” ]
“Network mode” ]Select from the following
setting items
Auto
Searches all the networks connectable.
WCDMA only
Searches only networks supporting 3G.
GSM only
Searches only networks supporting GSM/GPRS.
Information
• You cannot exchange the data through packet service under
GSM network.
• When using the handset in Japan or in the service area
of 3G network, we recommend you change the setting of the
“Network mode” to “WCDMA only” to save battery power.
Setting item/Setting at purchase
Setting item/Setting at purchase
98
Settings
Settings
Registering a Network of Preferred list
C](Settings) ]53
Setting Networks
When you search the network automatically, you can add
a preferable network (communication carrier) to connect
to.
>P255
1. From the Settings menu (P85), “Network” ]
“Preferred lists”
• Networks registered in UIM are listed downward from
the one with the highest priority.
• I[Delete]: You can delete the network selected.
2. M[Menu] ]Select from the following setting
items
Add new
- Search network
You can select from the network list stored in the
phone for adding.
- Enter new network
You can enter the country code (MCC) and the
network code (MNC) for adding. After setting, press
I[Done].
Delete
You can delete the selected network.
Move up※
You can move the selected network upward. The
network moved upward is more preferred.
Move down※
You can move the selected network downward. The
network moved downward is less preferred.
※: If you register multiple networks, you can use this menu.
Information
• If the network is not registered, [Menu], [Delete] of soft key area
on preferred list to register will not be displayed. To add new
network, press I[Add], select and register.
• The registered data is saved in UIM.
Displaying the Network Name
C](Settings) ]54
You can set whether to display the name of the network
currently set on the Stand-by display.
>P255
1. From the Settings menu (P85), “Network” ]
“Network name display” ]“Display on”/“Display
off”
Setting item/Setting at purchase
Setting item/Setting at purchase
99
Settings
Settings
Next Page
Changing a Host from i-mode
Setting / Changing the Host
C](Settings) ]6
※Normally, you do not need to change the setting.
You can set a host to use services of various providers
other than i-mode. If the host is changed, i-mode
becomes unavailable.
>P255
1. From the Settings menu (P85), “Host selection” ]
From the Host selection screen, I[Add] ]Enter
your terminal security code ]C]Set the
following items ]After setting, I[Done]
• The host set is displayed on the Host selection
screen with attached to it.
Host name
Enter the name displayed on the Host selection
screen.
Host address
Enter the address of the host.
Access point
Enter the Access point (URL, etc.).
Information
• To switch the host back to “i-Mode” or to switch to another
host, select “i-Mode”/other hosts and press Con the Host
selection screen.
• If you press M[Menu] on the Host selection screen, you can
edit / delete / display the host set. Note that you cannot edit /
delete pre-installed “i-Mode”.
• In Access point menu, you should enter IP address in PDP
type.
Setting Lock/Security
Setting All Lock
C](Settings) ]71
You can set whether to lock requiring to enter the terminal
security code to operate function. During All Lock, “All
lock” is displayed on the Stand-by display.
>P255
1. From the Settings menu (P85), “Lock/Security” ]
“All lock” ]Select from the following setting items
Power on
You can set whether to lock the phone when
you turn of the power. You need to enter your terminal
security code to set it.
Setting item/Setting at purchase
Setting item/Setting at purchase
100
Settings
Settings
Immediate
Sets All lock immediately. You need to enter your
terminal security code to set it.
none
You can release All lock. You need to enter your
terminal security code to release it.
Information
• While “All lock” is set, the received mail or messageR/F is only
saved in i-mode center. When “All lock” is released, the icon
that shows there is a mail or a message R/F in the i-mode
center is displayed.
• While “All lock” is set, even though you receive an SMS, it is
only saved, and it is received after you release “All lock”.
• While “All lock” is set, you cannot perform packet transmission
connecting a personal computer.
• While “All lock” is set, answering operation is not performed
even though you receive a call, and only busy tone is played. It
is displayed as a missed call after you release “All lock”.
• While “All lock” is set, the alarm tone does not sound, and only
the icon appears. The alarm tone sounds after you release “All
lock”.
Releasing All Lock
1. Press one of 1~0]Enter your terminal
security code ]C
• Pressing I[Emergency Call] key on the “lock”
screen: Emergency calls (110/118/119)※can be made.
※Display may differ depending on the used UIM.
Information
• If you enter a wrong terminal security code 5 times in a row,
the handset turns off automatically. When you turn on the
power again, you can enter the terminal security code.
Setting Auto Key Lock
C](Settings) ]72
This function prevents the button operation when a
specified time elapses after the phone is closed.
>P256
1. From the Settings menu (P85) ]“Auto key lock
setting” ]Select the time until the phone keys are
automatically locked ]C
• If you do not want to use auto key lock, set the option
to “OFF”.
• When a specified time elapses after the phone
is closed, is displayed in the soft key area and
each button except for FEM is locked.
Setting item/Setting at purchase
101
Settings
Settings
Information
• To enable auto key lock regardless of the specified time
period, you can press Qfor 1 or more second On the
Stand-by display (with phone closed).
• The auto key lock is not enabled when the camera shooting
screen is displayed or you are shooting even when the
phone is closed.
• You can receive an incoming call during the auto key lock.
Releasing Auto Key Lock
You can release the auto key lock by opening
phone, and also release it when the phone is closed.
1. FE or MRelease lock ]C
Setting PIN Code Request
C](Settings) ]73
You can set to enter PIN1 code every time you turn on the
power to the phone.
>P256
1. From the Settings menu (P85), “Lock/Security” ]
“PIN code request” ]“ON”/“OFF” ]Enter PIN1
code ]C
Changing Your Password
Changing the PIN1 code / PIN2 code
C](Settings) ]741/
C](Settings) ]742
You can change the PIN1 code / PIN2 code. To change
the PIN1 code, you need to set “PIN code request” to
“ON” beforehand. The code is set to “0000” at purchase,
but you can change to any number as desired.
• In case you purchase a new phone and start
using it inserting the UIM you have been using, use the
PIN1 code / PIN2 code you have set.
1. From the Settings menu (P85), “Lock/Security” ]
“Change password” ]“PIN1 code”/“PIN2 code”
Setting item/Setting at purchase
102
Settings
Settings
2. Enter the current PIN1 code/PIN2 code ]C
3. Enter a new PIN1 code/PIN2 code ]C
4. Enter the same code that you did in Step 3 again ]
C
Information
• If you enter a wrong PIN code over 3 times, the PIN code will
be locked automatically. If you unlock the PIN code, see
“Releasing PIN lock code” (P107).
Information
• This setting is registered in phone and UIM which is
currently inserted. If you insert other UIM which registered
other settings, the settings of this UIM will be preferred.
Setting item/Setting at purchase
Setting item/Setting at purchase
103
Settings
Settings
Others Settings
Checking the Memory Status
C](Settings) ]91
You can check the usage status and available space of the
memories of the handset of the phone.
1. From the Settings menu (P85), “Others” ]“Memory
status” ]Select from the following items
Data box
You can check the empty or the reserved capacity
(Approximate) of the Data box for data such as My
picture, i-motion or Melody are stored.
Personal info.
You can check the empty or the reserved capacity
(Approximate) of the memory for Personal info. for data
such as Phonebook, Schedule, Memo or Date Counter.
UIM memory
You can check the empty or the reseved capacity
(Approximate) of the memory for data such as
“Phonebook” or “SMS”.
Resetting the Settings
Clearing the Memory
C](Settings) ]921
You can clear all the data recorded in the phone.
1. From the Settings menu (P85), “Others” ]“Reset
settings” ]“Clear memory” ]Select from the
following items
• You need to enter your terminal security code for
deleting.
Data box
All data saved in the data box (except for the pre-
installed data and i-appli) is deleted.
Personal info.
Clears all the personal data saved in the phone
such as phonebooks, schedule, call history and so on.
Initializing the Default Settings
C](Settings) ]922
You can reset to all settings at purchase except for
“i-mode setting” and “Mail setting”.
1. From the Settings menu (P85), “Others” ]“Reset
settings” ]Default settings ]“Yes” ]Enter the
terminal security code ]Press C
Information
• When the date and time are reset, display or play of i-motion
and files with valid period and/or expiration date set may be
disabled.
104
Settings
Settings
Changing the Settings for the SMS Center
C](Settings) ]93
※Normally, you do not need to change the settings.
You can change the SMS centers to use.
>P256
1. From the Settings menu (P85), “Others” ]“SMS
center” ]“Select from the following setting items
]After setting, I[Done]
SMSC
– : You can use the SMS center.
– Others : You can use another company’s SMS
center.
Address
If “SMSC” is set to “Others”, enter the address of the
SMS center.
Resetting the holiday
C](Settings) ]94
You can restore the holiday setting set in Scheduler
(P194) in phone.
1. From the Settings menu (P85), “Others” ]“Reset
holiday” ]“Yes”
Setting item/Setting at purchase

121
i-mode Menu ........................................122
What is i-mode? ...................................122
Displaying the iMenu display...............122
Displaying Sites from Bookmark .........123
Displaying Screen memo .....................124
Displaying Last URL.............................125
Displaying Internet Web Pages ...........125
Displaying MessageR/F .......................126
Checking Whether Center Holds
MessageR/F .........................................129
Setting Functions of i-mode ................129
Displaying Sites....................................132
How to See/Use Sites ..........................134
Using My Menu ....................................137
Changing i-mode Password ................138
i-mode
On the Stand-by display, C[Menu] ]
(i-mode) or “i-mode”
To display the i-mode menu
Select
122
i-mode
i-mode
i-mode Menu
The i-mode menu is the basic display for viewing various
sites and Internet web pages. You can use each function of
i-mode from the i-mode menu.
What is i-mode?
i-mode is the online service that makes use of the display
of the i-mode phone to enable you to use convenient
information from i-mode sites (programs) and homepages
supporting i-mode and to exchange mail easily.
• Refer to “Mobile Phone User's Guide [i-mode]” for
details.
• Not all the services described in “Mobile Phone User's
Guide [i-mode]” are supported. Check the description of
the models supporting each service with “Mobile Phone
User's Guide [i-mode]”.
Displaying the iMenu display
C](i-mode) ]1
You can access each i-mode site from iMenu.
1. From the i-mode menu (P121), “iMenu”
•
Refer to “
Mobile Phone User's Guide [i-mode]
” for
items displayed on the iMenu display.
• See “Displaying Sites” (P132) for the subsequent
operations.
DescriptionMenu item
Connects to the i-mode Center
Displays your favorite sites and Internet
web pages.
Enter URL to connect to the internet.
Displays pages of sites, etc. saved in the
phone.
Displays the most recently accessed
site or Internet web page.
Bookmark
Last URL
Displays a list of the received
MessageR/F.
Message
You can set the functions related
to i-mode.
You can check whether the i-mode
Center holds mail and MessageR/F.
Check new
message
Go to
location
Menu
Screen memo
i-mode
setting
123
i-mode
i-mode
Displaying Sites from Bookmark
C](i-mode) ]2
You can directly access your favorite sites from Bookmark.
• For the registration method, see “Using the Submenus
of the Site Screen” (P132).
1. From the i-mode menu (P121), “Bookmark”
2. Select a bookmark ]C
• Connected to the site.
Using the Submenus of the Bookmark List Screen
1. From the Bookmark List screen (See above),
M
[Menu] ]Select from the following submenu items
Connect
You can connect to the selected Bookmark site.
Edit bookmark
You can edit the title and URL of the selected
Bookmark. After editing, press I[Done].
Delete
You can delete the selected Bookmark.
Delete selected
You can select and delete multiple Bookmarks. After
selecting, M[Menu]>Select “Delete”
Delete all
You can delete all the registered Bookmarks. To delete
all, enter terminal security code >C[OK].
URL
You can display the URL of the selected Bookmark.
Copy URL
You can copy the URL of the selected Bookmark. For
the copy, see “Copying/Cutting/Pasting” (P225).
Compose message
You can paste the URL of the selected Bookmark to
the text of i-mode mail and send it. Go to step 2 of
“Composing i-mode mail” (P152).
Send
Send a selected bookmark via infrared communication.
※
Send all
Send all bookmarks via infrared communication.※
※: For infrared communication, see “Using infrared communication”
(P186).
124
i-mode
Displaying Screen memo
C](i-mode) ]3
You can display the web pages saved without connecting
to i-mode.
• For the registration method for the site screen, see
“Using the submenus for the Site screen” (P132).
1. From the i-mode menu (P121), “Screen memo”
2. Select a screen memo ]C
• The Screen Memo List screen appears.
Using the Submenus of the Screen Memo Screen
1. On the Screen Memo List screen (left figure),
M
[Menu] ]Select from the following submenu items
View
You can display the selected screen memo.
Edit title
You can edit the title of the selected screen memo.
Delete
You can delete the selected screen memo.
Delete selected
You can select and delete multiple screen memos.
After selecting,
M
[Menu]
>
Select “Delete”.
Delete all
You can delete all the screen memos. To delete all,
enter terminal security code >C[OK].
URL
You can display the URL of the selected screen
memo.
Protect ON/OFF
You can give or cancel protection for the selected
screen memo. You cannot delete protected screen
memos.
i-mode
DescriptionIcon
Protected Screen
memo
Unprotected Screen
memo

125
i-mode
Using the Submenus of the Screen Memo Screen
1. On the Screen Memo List screen (P124),
M
[Menu] ]Select from the following submenu items
Save graphics※1
You can select and save an image contained in a
screen memo. You can confirm the saved image by
“My picture” of “Data box”>”i-mode” folder. >P169
Show properties
– URL : You can display the URL of the displayed
screen memo.
– Page properties : You can check the title and URL
of the displayed screen memo.
– Certificates※2: You can display the certificate used
by the displayed screen memo.
Retry※3
A GIF animation is played back from the beginning.
Edit title
You can edit the title of the displayed screen memo.
Delete
You can delete the displayed screen memos.
Protect ON/OFF
You can activate or cancel protection for the displayed
the page. You cannot delete protected saved pages.
※1: This menu is not selected in case the selected screen memo
does not include an image.
※2: This menu is not selected in case the certificate is not used for
the displayed screen memo.
※3: This menu is not selected in case the selected screen memo
does not include of GIF animation.
Displaying Last URL
C](i-mode) ]4
When you exit i-mode, the URL of the page displayed last is
stored as “Last URL”. Using “Last URL”, you can connect to
the site or Internet web page you visited last time.
1. From the i-mode menu (P121), “Last URL” ]I
[Done]
Information
• If you press Cin screen of URL, you can edit the latest URL
address.
Displaying Internet Web Pages
C](i-mode) ]5
You can display web pages supporting i-mode and
directly access sites from the history of the sites you
visited by entering their URLs.
1. From the i-mode menu (P121), “Go to location” ]
Select from the following items
i-mode
Next Page

126
i-mode
Input address
You can display Internet web pages supporting i-mode
by entering URLs. After entering, press I[Done] to
access.
URL history
You can directly access sites by selecting URLs you
visited from the URL history.
Information
• You can enter URL up to 256 half-pitch characters.
• You can view the list up to 50 address in URL history.
• Depending on the type of the accessed Internet site, the page
may not be displayed correctly.
• Web pages other than Internet web pages supporting i-mode
may not be displayed correctly.
Using the Submenus of the URL Screen
1. From URL history screen, press M[Menu] ]
Select from the following submenu items
Connect
You can connect the site in URL history.
Edit URL
You can connect URL in history after editing URL
address.
Delete
You can delete the history of URL.
Delete all
You can delete the history of all registered URL.
To delete all, enter terminal security code >C[OK].
Compose message
You can compose i-mode mail with attaching URL to
the text. Go to step 2 on page 152 of “Composing
i-mode mail”.
Displaying MessageR/F
C](i-mode) ]6
You can display received MessagesR/F.
• MessageR:
Your required information is delivered automatically once
you apply for the message service on the site providing
the service.
• MessageF:
Messages are delivered free of charge by performing the
Received settings in the option settings. Refer to “Mobile
Phone User's Guide [i-mode]” for how to set it up.
※: If you subscribed to the service after October 1, 2004,
the setting at purchase is “Receive”.
i-mode
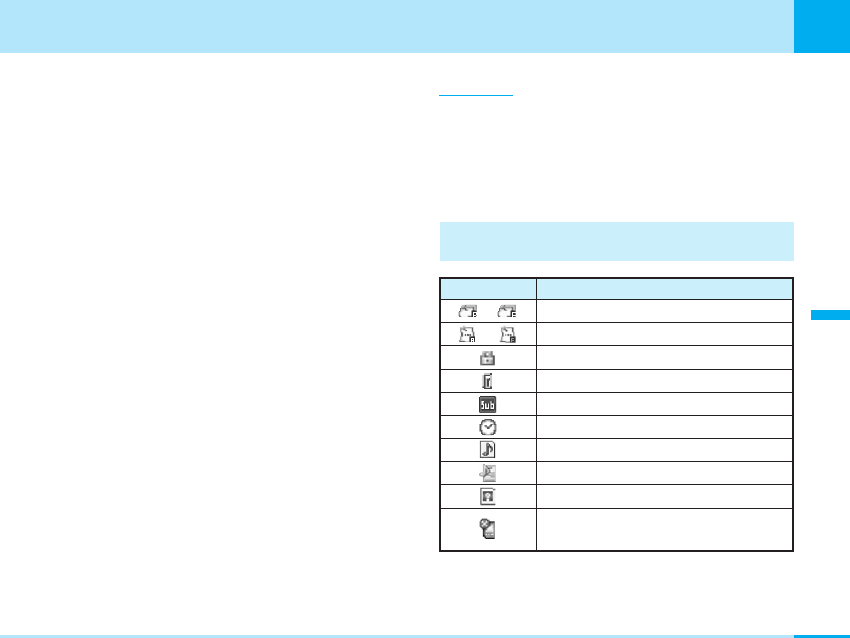
127
i-mode
1. From the i-mode menu (P121), “Message” ]
“MessageR”/“MessageF”
• J/FE : You can check the previous or next page for
multiple pages.
2. Select a MessageR/F to display ]C
• J: Displays the history of messageR/F.
• FE : You can scroll the screen.
Information
• You can save up to 100 MessageR and up to 50
MessageF. Depending on the size of messages, the
number of savable messages may be smaller.
• If a message is attached to the received MessageR/F,
the melody will be played automatically when you
display the message.
Icons on the MessageR/F List Screen and the
Display MessageR/F Screen
i-mode
Next Page
DescriptionIcon
Unread MessageR/F
Read MessageR/F
Protected MessageR/F
Subject
An image is attached.
A file with the UIM operation restriction function
set up is attached.
MessageR/F with a file attached or pasted
/
/
A melody is attached.
A melody is pasted.
Received date and time
128
i-mode
Using the Submenus of the MessageR/F List
Screen
>P260
1. From the MessageR/F List (P127), M[Menu] ]
Select from the following submenu items
Delete
You can delete the selected MessageR/F.
Delete selected
You can select and delete multiple MessagesR/F. After
selecting, M[Menu] >Select “Delete”.
Delete all
You can delete all the MessagesR/F. To delete all,
enter terminal security code >C[OK].
Protect ON/OFF
You can give or cancel protection for the selected
MessageR/F. You cannot delete protected MessagesR/F.
Sort
You can sort MessagesR/F displayed on the List
screen.
Filter
You can change types of the MessageR/F displayed
on the List screen.
Using the Submenus of the Display MessageR/F
Screen
1. From the Display MessageR/F screen (P127),
M[Menu] ]Select from the following submenu
items
Delete
You can delete the displayed MessageR/F.
Protect ON/OFF
You can give or cancel protection for the displayed
MessageR/F. You cannot delete protected
MessagesR/F.
Add to phonebook※1
You can add phone number or mail address displayed
on the MessageR/F to phonebook. Go to step 2 on page
64 of “Adding to Phonebook”.
Save attach file※2
You can save the melody ( ) or image ( )
attached to the MessageR/F. You can view the saved
melody or the image in “Melody”/“My picture” of “Data
box”
>
“i-mode” folder.
>
P169, P179
※1: Activate this menu after selecting the phone number or mail
address that can be registered. If no item exists, you cannot
activate this function.
※2: You can activate this function after selecting the file saved in.
If the file to save does not exist, you cannot use this file.
Setting item/Setting at purchase
i-mode

129
i-mode
Automatically Receiving MessageR/F
If you are in the service area, MessageR/F are sent
automatically.
1. Receive a MessageR or MessageF
•
(White) or (White) is displayed.
2. The reception results are displayed
• To confirm the received MessageR/F immediately,
select “MessageR”/“MessageF” and press C.
• Q: Returns to previous screen.
Checking Whether Center Holds
MessageR/F
C](i-mode) ]7
You can check whether the i-mode Center holds any i-
mode mail and/or MessageR/F that arrived while the
phone was out of the service area or turned off.
1. From the Stand-by screen, press M[Mail] for 2
or more seconds
• The Check Result screen appears. To read the
received MessageR/F immediately, select
“MessageR”/“MessageF” and press C.
Information
• If the i-mode Center holds i-mode mail and/or a
MessageR/F, an icon (P32) is displayed. Note that the
icon may not be displayed if i-mode mail or a
MessageR/F arrived at the
i-mode Center while the phone was turned off.
Setting Functions of i-mode
You can set functions of i-mode and MessageR/F.
i-mode
130
i-mode
Home
C](i-mode) ]81
You can set the URL of a web page displayed when “Home”
is selected and whether to enable/disable “Home” (P133).
>P240
1. From the i-mode menu (P121), “i-mode setting” ]
“Home”
2. “Enable” or “Disable”
3. Select the URL field ]C]Enter a URL ]C
• If “ [Done] Disable” is selected, you cannot enter a
URL.
4. I[Done]
View
C](i-mode) ]82
You can set functions related to displaying sites and
screen memos.
>P240, P241
1. From the i-mode menu (P121), “i-mode setting” ]
“View” ]Select from the following setting items ]
After setting, I[Done]
Character size
You can change the character size for text of sites,
screen memos pages and MessagesR/F.
Image display
You can set whether to display images contained in
sites, or screen memos.※
Scroll
You can set the number of lines scrolled when
pressing Hon a display displaying text of sites,
screen memos or MessagesR/F.
Message list disp.
You can set how to display MessageR/F list (the
number of lines).
※: Images of MessageR/F are displayed regardless of this setting.
Certificates
C](i-mode) ]83
You can set a certificate used for displaying SSL-enabled
sites.
1. From the i-mode menu (P121), “i-mode setting” ]
“Certificates” ]M[Menu] ]Select from the
following setting items
Certificate info
You can view the selected certificate.
Valid/Invalid
You can set whether to validate or invalidate the
selected certificate.
• You can check the status of a certificate by the
following symbols. : Valid : Invalid
Setting item/Setting at purchase
Setting item/Setting at purchase
i-mode

131
i-mode
Information
• If “Valid/Invalid” is set to “Invalid”, you cannot display the sites
with that certificate.
Others
C](i-mode) ]84
You can set i-mode connection timeout and the type of
message to check. You can also check the i-mode
settings.
>P241
1. From i-mode menu (P121), “i-mode setting” ]
“Others” ]Select from the following setting items
Connection timeout
It may take time to download from some sites. You
can set the time to wait before canceling
downloading. After setting, press I[Done].
i-motion auto play
You can set whether to play back an i-motion movie
automatically when you download a standard (normal)
type of i-motion movie from a site. After setting, press
I[Done].
Check new message
You can set the contents to check by performing
“Check new message” from among i-mode mail,
MessageR or Message F. After setting, press
I[Done].
Check settings
You can check the individual “i-mode setting”.
Reset settings
You can reset each of the “i-mode setting” to their
defaults. To reset the settings, enter terminal security
code >C[OK].
Reset data
You can delete all data related to i-mode (Bookmark,
Screen memo, URL history) except for MessageR/F.
To reset the data, enter terminal security code >C[OK].
Information
• Even when you have set “Connection Timeout” to “Unlimited”,
you may be disconnected depending on radio wave
conditions.
Setting item/Setting at purchase
i-mode

132
i-mode
Displaying Sites
You can connect to sites by easy key operation, and use
various types of services offered by IPs (Information Service
Providers). (For some sites, you may be required to apply to
the IPs separately.)
1. From the i-mode menu (P121), “iMenu”
• blinks during i-mode communication.
2. Select an item (link) ]C
• FE: You can scroll the menu.
• P: You can end i-mode.
Information
• If there is a number in front of the item showing the link, you
can connect to that link directly by pressing the same number
on the keypad. Note that some sites cannot be connected.
• Depending on the site, images may not be displayed.
• Depending on the site connected, the confirmation screen may
appear stating that mobile phone information is sent. Your
mobile phone information (the model and the serial number of
your mobile phone) is sent to the IP (Information Service
Provider) over the Internet, so could be perceived by third
parties. The phone number, address or age are not sent to IP
(Information Service provider).
Using the Submenus of the Site Screen
1. From the Site screen (See left), M[Menu] ]
Select from the following submenu items
Add bookmark
You can add the displayed URL of the Site to Bookmark.
The bookmark screen is displayed, and you can register
the site by pressing I[Done]. You can access directly
to the site from the registered bookmark. >P123
Add screen memo
You can save a displayed web page as a screen
memo. You can display saved screen memos without
connecting to i-mode. >P124
Save graphics※1
You can select and save an image contained in a web
page.
>
P136
i-mode

133
i-mode
i-mode
Show properties
– URL : You can check the URL of the displayed site.
– Page properties : You can check information on
the displayed web page.
– Certificates※2: You can check the certificate used
in the displayed site.
Bookmark list
You can view a list of bookmarks registered by “Add
bookmark”. If you select a bookmark, you can directly
access the site.
Go to location
– Input address : You can access web pages
supporting i-mode by entering URL. After entering it,
press I[Done] to connect to the site.
– URL history : You can select the URL history of a
displayed site to directly access the web page.
Screen memo list
You can view a list of pages saved as “Screen Memo”.
You can display the saved page by selecting it.
Menu
You can bring up the iMenu display.
Home
You can display the web page registered as “Home”
(P130).
Reload
You can reload data of a site. The contents of the site
will change to the latest information each time you
reload if the site has been updated.
Compose message
You can send the URL of site being displayed or the
URL for link with them attaching to the message text.
Go to step 2 on page 152 of “Composing message”.
Change char. code
When characters are not displayed correctly, you can
convert them to the correct ones.
Add to phonebook※3
You can add the phone number and mail address
displayed on the web page to the phonebook. Go to
step 2 on page 64 of “Adding to phonebook”.
Retry※4
You can play back a GIF animation from the beginning.
※1: You cannot activate this menu in case the image that can be
saved is not included in a site or “Image” is set not to display.
(P130)
※2: If no certificate is used in the site, you cannot use this menu.
※3: Activate this menu after selecting the phone number or mail
address to register. Otherwise, you cannot activate this menu.
※4: You cannot activate this menu when GIF animation is not
included in displayed site.
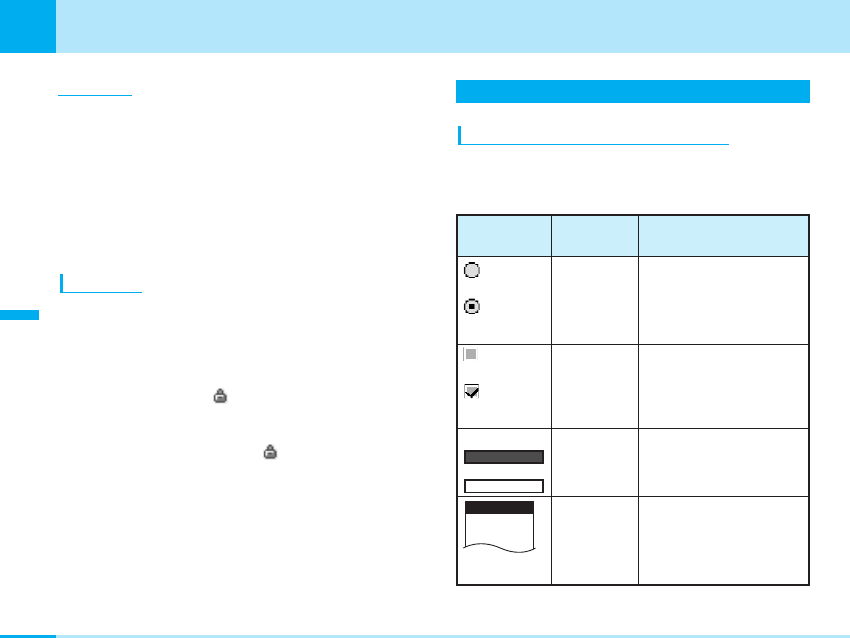
134
i-mode
Information
• Some sites may not be saved as bookmarks.
• When characters are not displayed correctly even after
“Change char. code”, repeat the operation. However, even if
you repeat this operation, the correct characters may not
come up. The original characters are displayed if you repeat
the operation 4 times.
• If you perform “Change char. code” when the correct
characters are displayed, wrong characters may come up
instead.
SSL Pages
SSL pages use data encryption for data transmission to
prevent hacking and source-file overwriting so that you
can more safely exchange personal information.
• If you try to display an SSL-enabled page, the SSL
communication starting message appears. When an
SSL page is displayed, appears.
• When moving from an SSL page to an ordinary page,
the confirmation display appears. After “Yes” is selected,
a regular page is displayed and disappears.
How to See/Use Sites
Entering/Selecting Information on Sites
When you use a site, you may enter characters (text box) or
select an item from multiple options (radio button, checkbox,
pull down menu).
i-mode
Used for item selection.
You can select only 1 item.
Radio button
Used for item selection.
You can select multiple
items.
Checkbox
Display
Example Description
Name
You can enter characters.Text box
Used for item selection. If
you select a pull down
menu, a list of selectable
items is displayed.
Pull down
menu
ID
Password
Tokyo
Saitama
Kanagawa
:
Unselected
:
Selected
:
Unselected
:
Selected

135
i-mode
Returning to Obtained Previous Page/Going
to Obtained Next Page
The phone stores the last few screens displayed.
1. To display the previous page, L
To display the next page, R
Operations from Highlighted Information
You can easily make calls, send mails, and display Internet
web pages using highlighted information (phone numbers,
mail addresses, URLs, and so on) displayed on sites and in
mail and MessageR/F.
Phone To function/AV Phone To function
You can make a call by selecting displayed information
such as a phone number.
• You may not be able to use the Phone To/AV Phone To
function depending on the site.
1. Select information such as a phone number ]C
2. “Voice call”/“Video-phone call”
• You can make a call after setting the Caller ID
notification according to the screen.
Information
• You can add phone number information displayed on a web
page to the phonebook using the submenu of the site screen.
Mail To function
You can send mails by selecting displayed information
such as a mail address.
• You may not be able to use the Mail To function
depending on the site.
1. Select information such as a mail address ]C
• Go to step 3 of “Composing i-mode mail” (P152).
Information
• You can add mail address information displayed on a web
page to the phonebook using the submenu of the site screen.
Web To function
You can access a web page by selecting displayed
information such as a URL.
• You may not be able to use the Web To function
depending on the site.
1. Select information such as URL ]Press C
• If the confirmation screen to connect appears, press
I[Yes].
i-mode
Next page

136
i-mode
i-appli To function
You can start i-appli by selecting the displayed URL (link).
1. Select i-appli information ]C]I[Yes]
Information
• If “i-appli To” (P164) is set to “OFF”, you cannot start i-appli by
this operation.
Downloading Images from Sites
You can set images saved from the displayed web page
or screen memos. You can check the saved images in
“My picture” of “Data box” >“i-mode” folder. >P169
1. Displaying Site / Saved Page screen ]
M
[Menu]
]“Save graphics” ]
C
]Select an image ]
C
]
“Yes”
Information
• Some images may not be saved.
• You cannot select “Save graphics” if the image that can be
saved is not included or “Image” (P130) is set not to be saved.
Downloading i-melody from Sites
You can download a melody from a site and set it.
A saved melody can be checked by “Melody” of “Data
box” >“i-mode” folder (P179).
1. Display a site that supports downloading of
melodies ]Select a melody ]C
• After the download is completed, the confirmation
screen appears.
2. Video content menu
• “Play”: You can play the downloaded melody.
• “File Protection”: You can view the information of
i-motion downloaded from network.
• “Back”: You can return to the site without saving the
melody.
Information
• Depending on the site, you may not be able to download
melodies.
• Some downloaded melodies may not be played back
successfully.
i-mode

137
i-mode
Obtaining i-motion Movies from Sites
The i-motion movie is a moving image file containing
images and sound. Acquired i-motion can be checked by
“i-motion” of “Data box” >“i-mode” folder (P176).
• See “Mobile Phone User's Guide [i-mode]” for details.
1. Select an i-motion movie on a site that supports
downloading of i-motion movies ]C
• The download of i-motion starts.
• For i-motion that can be played back during
downloading, it is played back during downloading.
2. After the completion of download Q]“Save”
• “Play”: You can play i-motion downloaded from
network.
• “File property”: You can view the information of
i-motion downloaded from network.
• “Back”: You can return to the site without saving
i-motion.
Information
• You can change the playback methods for while downloading
i-motion movies. >P131
• Some downloaded i-motion movies might not be played back
correctly.
• You cannot download i-motion movies of the streaming type
and the ASF format.
Using My Menu
If you register frequently-used sites in My Menu, you can
access them easily.
Registering Sites in My Menu
1.
Bring up the page of the site to be registered
]
Select
“Register My Menu”
]C
2. Select the i-mode password text box ]C]Enter
the i-mode password ]C]“Select”
• For i-mode password, see “Changing i-mode
Password”. (P138)
Information
• Some sites may not be registered in My Menu.
• If you subscribe to Menu/Search in a pay site, it will be
registered in My Menu automatically.
Displaying Sites from My Menu
1. From the Stand-by display, I[i-mode] ]
“iMenu” ]“My Menu” ]Select a site to access ]
C
i-mode

138
i-mode
i-mode
Changing i-mode Password
The “i-mode password” (4 digits) is required to subscribe to
and unsubscribe from message services and i-mode pay
sites, and to perform i-mode mail settings. At purchase, this
password is set to “0000” (4 zeros), so you need to change
it to your own i-mode password. Be sure not to let others
know your i-mode password.
1.On the Stand-by display, I[i-mode] ]“iMenu”
]“English” ]“Options” ]“Change i-mode
Password”
2. Select the “Current Password” text box ]C]
Enter your i-mode password (4 digits) ]C
• At purchase, the setting is “0000”, so enter “0000” for
the first time.
3. Select the “New Password” text box ]C]Enter
a new i-mode password (4 digits) ]C
4. Select the “New Password (Confirmation)” text box
]C]Enter a new i-mode password (4 digits) ]
C]“Select”
• Enter the same number as you entered in step 3.
Information
• If you forget your i-mode password, you can have it reset to
“0000” at a handling counter such as a shop. You will
be required to show your official identification (driver’s license,
etc.).
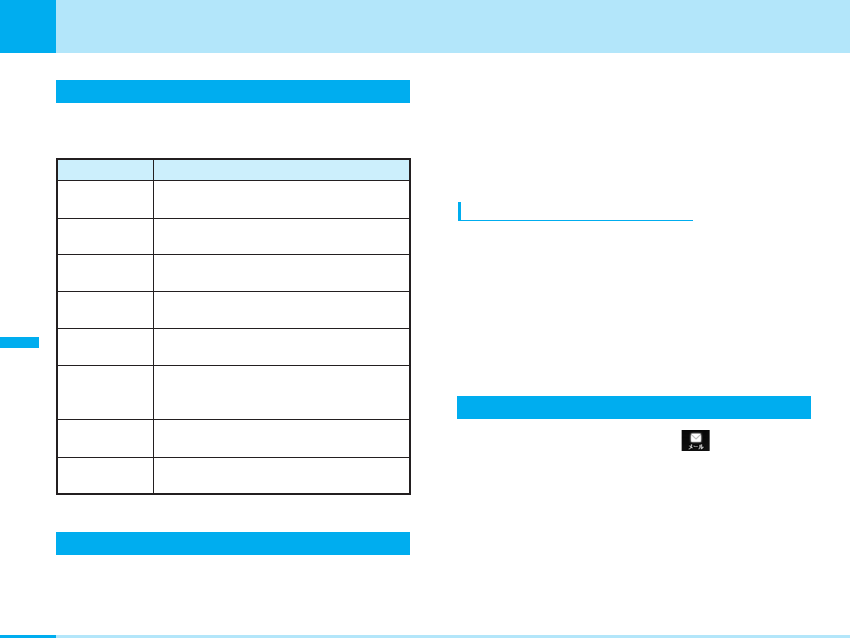
Mail Menu
On the mail menu, the mail functions offered by the
phone are displayed.
i-mode Mail
The i-mode phone has the mail functions for exchanging e-
mail (electronic mail) via the Internet. You need to subscribe
to “i-mode” to use i-mode mail.
• See “Mobile Phone User's Guide [i-mode]” for more
details.
• This model does not support all the services described
in “Mobile Phone User's Guide [i-mode].” Check which
models support which services in “Mobile Phone User's
Guide [i-mode]”.
SMS messages (short messages)
You can send and receive SMS messages between
phones without subscribing to i-mode.
Sending and receiving SMS messages with subscribers to
overseas carriers in addition to are also
available. For information on the countries and overseas
carriers with which SMS messages can be exchanged,
see the International Service web page of .
• Refer to “Network Services User’s Guide” for more details.
Displaying Mail in Inbox
C](Mail) ]1
The inbox folder list is displayed. You can sort mails by
folder. You can check the records and contents of
received i-mode mails and SMS messages.
140
Mail
Mail
DescriptionMenu item
Inbox You can check the records and contents of
received i-mode mails and SMS messages.
You can check the records and contents of
sent i-mode mails and SMS messages.
You can check the contents of temporarily
saved i-mode mails and SMS messages.
You can bring up the display to compose
i-mode mails and SMS messages.
You can receive i-mode mails held at the i-
mode Center.
You can receive SMS messages by checking
the SMS Center.
Outbox
Unsent
message
Compose mail
Check new
message
Receive option You can check the subjects of i-mode mail held
at the i-mode Center and select mail to receive,
or delete mail at the Center before receiving it.
Check new
SMS
Mail setting You can change the settings of each mail
function of the phone.

1. From the Mail menu (P139), “Inbox”
2. Select a folder ]C
• I[Simple]: You can use the fixed text registered on
the simple reply phrase (P158) for the mail body and
reply to the sender. Fixed the mail is sent immediately
after the text is selected.
• J/FE: You can view previous or after pages for
multiple pages.
3. Select mail ]C
• I
[Reply]: You can select how to reply and then reply
to the sender, etc. “Simple reply”... Refer to the
descriptions for
I
[Simple] on the Received Mail List
display. Except for “Simple reply”... Go to the step 3
(P152) in “Compose i-mode mail”/the step 3 (P155) in
“Creating SMS”.
• J: You can view previous or next mail.
• FE: You can scroll the screen.
Information
• To delete all displayed the contents in box setting “Security”
(P159), enter terminal security code >C[OK].
• The deco mail via phone includes of text and URL.
If you select the URL, you can read deco mail. >P146
• You can save up to 400 received mails/SMS. Depending on
the size of mails/SMS messages, the number of mails/SMS
messages to save may be fewer.
141
Mail
Mail
Next Page
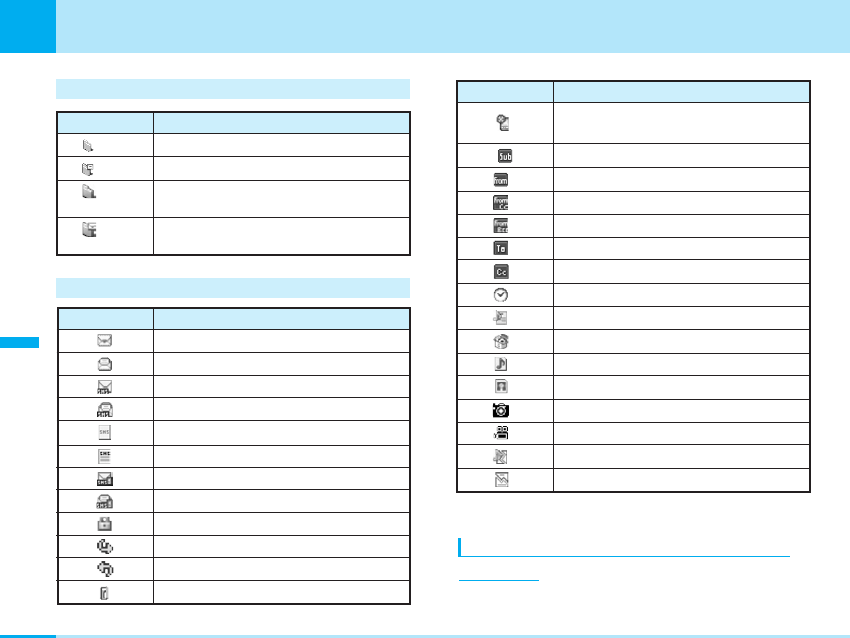
Icons on the Received Mail Folder List Screen
Received Mail List and Marks on Display Screen
※: Appears only on the Received Mail Display Screen.
Using the Submenu of the Received Mail Folder
List Display
1. On the Received Mail Folder List screen (P141), M
[Menu] ]Select from the following submenu items
142
Mail
Mail
DescriptionIcon
DescriptionIcon
Unread mail messages
Read mail messages
Unread SMS messages
Read SMS messages
Unread SMS reports
Folder with unread mails/SMS messages
Created folder without unread mails/SMS
messages
Created folder with unread mails/SMS
messages
(gray)
(blue)
(blue)
DescriptionIcon
(gray) Folder without unread mails/SMS messages
※Mail received as To-type
※Mail received as Cc-type
※Mail received as Bcc-type
※
※Cc-type broadcast mail address
※
※
※
A melody is attached.
A melody is pasted.
Received date and time
※
i-appli launch information is pasted.
※
※
A URL or i-motion file is attached.
※
To-type broadcast mail address
An image of up to 10,000 bytes is attached.
A URL of i-shot is attached.
An attached file is damaged.
A pasted melody is damaged.
※
※
Read SMS reports
Unread SMS messages in the UIM
Read SMS messages in the UIM
Protected mails
Forwarded mails
Replied mails/SMS messages
Subject
Mail with a file to which the UIM
restrictions are set attached
Mail with a file attached or pasted

143
Mail
Create folder
You can add a folder.
Rename folder※
You can edit the name of the selected folder.
Delete folder※
You can delete the selected folder. You cannot delete
a folder if a mail is saved.
Auto sort※
You can set sort conditions to the selected folder. Go
to step 2 of “Distributing the received mail to the
folder automatically” (P145).
※: These operations are not available when you select Inbox.
Using the Submenu of the Received Mail List
Screen
>P260
1.
On the Received Mail List screen (P141), M[Menu] ]
Select from the following submenu items
Move to folder※1
You can move the selected mails and messages to
other added folders.
Delete
You can delete the selected mails and messages.
Delete selected
You can select and delete multiple mails and messages.
After selecting mail messages, M[Menu] >Select
“Delete”.
Delete all
You can delete all mail messages in the folder. To delete
all, enter terminal security code >C[OK].
Protect ON/OFF※1
You can set or cancel the protection of the selected
mails and messages. Protected mail cannot be
moved/deleted.
Sort
You can sort the mails and messages displayed on
the List display.
Filter
You can change the type of the mails and messages
displayed on the List display.
UIM※2
You can move and copy the selected SMS messages
in the phone to the UIM, and move and copy
the SMS messages in the UIM to the phone.
Simple reply
You can use the fixed text registered on the simple
reply phrase (P158) for the mail body and reply. The
mail is sent immediately after the text is selected.
※1: You cannot use this menu for SMS in the UIM.
※2: You cannot use this menu for protected SMS or SMS delivery
report.
Setting item/Setting at purchase
Mail
Next Page
144
Mail
Using the Submenu of the Received Mail Display
Screen
1. On the Received Mail List screen (P141), M
[Menu] ]Select from the following submenu items
Reply
You can reply after selecting the method to reply. When
you select any of following items (except for “Simple reply”),
please go to the step 3 (P152) in “Compose i-mode mail” /
the step 3 (P155) in “Creating SMS”.
– Reply: You can reply to the sender of i-mode mail
from the detailed received mail list.
– Reply quoted※1:You can send the reply quoting the
original text in your received i-mode mail.
– Reply all※1:You can reply all receivers and senders
at the same time.
– Reply quoted all※1:You can reply all receivers and
senders with quoting the original text in your
received i-mode mail.
– Simple reply: You can use the fixed text registered
on the simple reply phrase (P158) for the mail body
and reply. Fixed text the mail is sent immediately
after the text is selected.
Forward
You can forward the displayed mail to other party. Go
to step 2 (P152) of “Composing i-mode mail” or step
2 (P155) of “Composing SMS messages”.
Move to folder※2
You can move the displayed mail to other added folders.
Delete
You can delete the displayed mail.
Protect ON/OFF※2
You can set or cancel the protection to the displayed
mail. The protected mail messages cannot be
moved/deleted.
Store Address
You can register mail address / phone number of
receiver on displaying the mail. Go to step 2 on page
64 of “Adding to Phonebook”.
Add to phonebook※3
You can add the mail address / phone number written
on the displayed mail text to the phonebook. Go to
step 2 of “Adding to Phonebook” (P64).
Save attach file※4
You can save an image ( ) and a melody ( ) of up
to 10,000 bytes attached to the displayed mail. You
can check the saved images by selecting “Data box”.
>“My picture”. >“i-mode” folder. >P169, P170
Copy
• For copying after selecting the following items, see
“Copying/Cutting/Pasting” (P225).
– Body: You can copy the text.
– Subject※1:You can copy the title.
–
Sender: You can copy e-mail address / phone number
of the sender.
UIM※5
You can move / copy the displayed SMS message in
the phone to the UIM, and move / copy the
SMS messages in the UIM to the phone.
Mail

145
Mail
Simple reply
You can use the fixed text registered on the simple
reply phrase (P158) for the mail body and reply. The
mail is sent immediately after the text is selected.
※1: This menu is not displayed for SMS.
※2: You cannot use this menu for SMS of UIM.
※3: Activate this menu after selecting mail address / phone number
to register. If nothing to be registered is included, you cannot
activate this function.
※4: Activate this menu after selecting the file to save. If the file to
register does not exist, you cannot activate this function.
※5: You cannot activate this function for i-mode mail or protected
SMS.
Information
• The Submenu items for the SMS report / voice mail incoming
notification display screen are “Move to folder”, “Delete”, and
“Protect ON/OFF” only.
Distributing the received mail to the folder
automatically
The mails / SMS messages is applicable for the condition
can be saved to the folder automatically. You can set this
only to additional folder.
1. On the Received Mail Folder List screen (P141),
select a folder to specify conditions ]M[Menu]
]Auto Sort
• The screen for automatic sort is displayed.
2. M[Menu] ]Select submenu.
Address※1
You can enter e-mail address or phone number to
distribute each folder.
– Open phonebook: You can enter the phone
number searching from phonebook.
– Input address: You can directly enter the address.
When you enter e-mail address, you input correctly
to a domain (the part of after @ mark).
Subject※1 ※2
You can input the subject of mail to distribute a folder.
Release
You can cancel one of conditions of distribution of folder.
Release all
You can cancel all distribution conditions of folders.
※1 : When a received mail contains multiple conditions, it is
distributed to the top folder of the folder list that corresponding
condition is set.
※2 : You cannot set the multiple conditions in the same folder.
Receiving i-mode Mail/SMS Messages
Automatically
When the phone is in the service area, it
automatically receives i-mode mail/ SMS messages.
1. A mail or an SMS message is received
• (White) or (White) is displayed.
Mail

146
Mail
2. The result of the reception is displayed
• If you want to check the received i-mode mail
message immediately, select “i-mode mail”, and
press C.
• If you want to check the received SMS message
immediately, press C
• Q: Go to previous screen.
Saving Images over 10,000 bytes
A JPEG image over 10,000 bytes is not downloaded
properly to the handset. Therefore, you can save it
after extracting the data from URL for image view in mail
text, and connecting i-shot center.
1. On the Received Mail Folder List screen (P141),
select “URL” ]C]“Yes”
• For the method of saving images, see “Obtaining
Images from Sites” (P136).
Information
• You can view the contents of received Deco-mails in this way.
Downloading i-motion Movies from i-motion Mail
Data of i-motion mail is not downloaded to the phone
even when it is received. You need to access the i-motion
mail Center from its URL given to the mail text to see an
i-motion movie to download and save the data. The saved
i-motion can be checked in “i-motion” of “Data box” >
“i-mode” folder (P175).
1. From the Received Mail Folder List screen (P141),
select the URL ]C]I“Yes”
• Downloading of i-motion starts.
• The i-motion is played while being downloaded in the case
it is possible.
2. After downloading, press Q
• “Play”: You can play downloaded i-motion.
• “File property”: You can view information of
downloaded i-motion from a site.
• “Back”: The site will be returned, not saving i-motion.
Displaying Mail in Outbox
C](Mail) ]2
The Sent Mail List is displayed. You can check the records
and contents of sent i-mode mail and SMS messages.
Mail
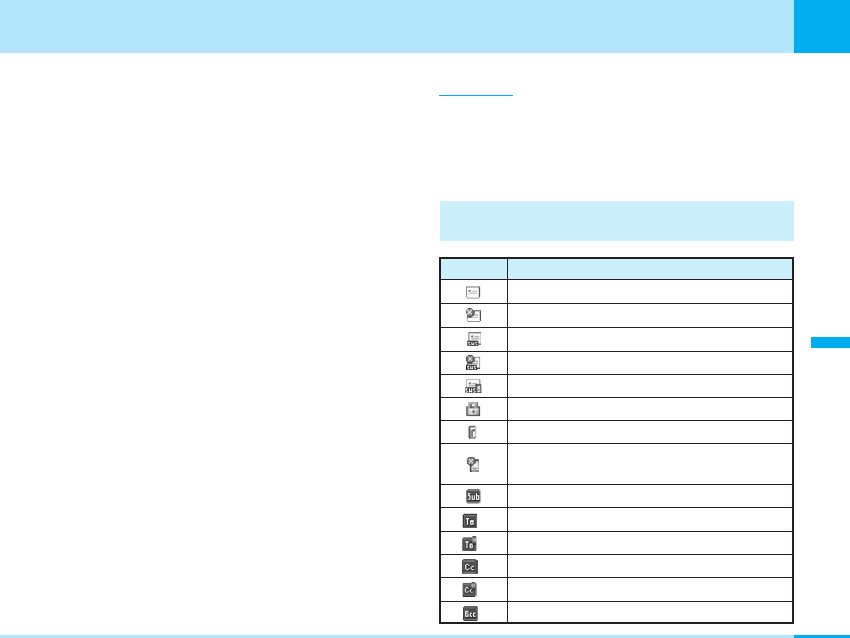
1. From the Mail menu (P139), select “Outbox”.
• K/FE: Display the previous or next page for multiple
pages.
2. Select a mail ]C
• J: Display the previous or next page.
• FE: Scroll by screen.
Information
• To display the box which is set “Security” (P159), enter terminal
security code >C[OK].
• You can save up to 400 mails / SMS. Depending on the size of
mails / SMS messages, the number of mails / SMS messages
that can be saved may be smaller.
Icons on the Sent Mail List display and the Sent Mail
display screen
Subject※3
The time to send the mail※1 Receiver※2
The mail you receive is displayed
on a time basis that day. From
the next day on, each message is
displayed by the date when you
received it.
The name is displayed when the
entry is saved in phonebook.
SMS is displayed as SMS
※1:
※2:
※3:
147
Mail
Mail
Description
Icon
Mail successfully sent
Mail failed to be sent
Sent SMS messages in the UIM
Protected mail / SMS messages
Mail with a file attached
Mail with an attached file to which UIM
restrictions are set
※
※
※
Mail address failed to be sent as To-type mail
Mail address successfully sent as Cc-type mail
Mail address failed to be sent as Cc-type mail
Mail address successfully sent as Bcc-type mail
※
Subject
※Mail address successfully sent as To-type mail
SMS message successfully sent
SMS message failed to be sent
148
Mail
※: Appears only on the Sent Mail Display Screen.
Using the Submenu of the Sent Mail List Screen
>P260
1. From the Sent Mail Folder List screen (P147), M
[Menu] ]Select from the following Submenu items
Edit
You can edit the selected mail again. See “Composing
i-mode mail” (P152) / “Composing SMS messages”
(P155).
Delete
You can delete the selected mail.
Delete selected
You can select and delete multiple mail messages. After
selecting mail messages, M[Menu] >Select “Delete”.
Delete all
You can delete all mail messages in the Sent box.
To delete all, enter terminal security code >C[OK].
Protect ON/OFF※1
You can set or cancel the protection to the selected
mail. Protected mail cannot be deleted.
Sort
You can sort the mail messages displayed in the list
screen.
Filter
You can change the type of the mail messages
displayed in the list screen.
Setting item/Setting at purchase
Mail
Description
Icon
※
※
An image of up to 10,000 bytes is attached.
An image (JPEG) of over 10,000 bytes is attached.
Moving images are attached.
※A corrupted melody file is attached.
※A corrupted file is attached.
※
※
※
※
※
Mail address failed to be sent as Bcc-type mail
A pasted melody file is attached.
An i-appli activation information file is attached.
A melody is attached.
Sent date and time

149
Mail
UIM※2
You can move and copy the selected SMS message
in the phone to the UIM, and move and copy
the SMS messages in the UIM to the phone.
※1 : You cannot use this menu for SMS in the UIM.
※2 : You cannot use this menu for i-mode mail or SMS delivery
report.
Using the Submenu of the Sent Mail Display
Screen
1. From the Sent Mail Display screen (P147), M
[Menu] ]Select from the following Submenu items
Edit
You can edit the displayed mail again. Go to step 2 in
“Composing i-mode mail” (P152) /“Composing SMS
messages” (P155).
Delete
You can delete the displayed mail.
Protect ON/OFF※1
You can set or cancel the protection to the displayed
mail. The protected mail messages cannot be deleted.
Store address
You can register mail address/phone number of
receiver on displaying the mail. Go to step 2 on page
64 of “Adding to Phonebook”.
Add to phonebook※2
You can add the mail address and phone number of
the sender of the displayed mail to the phonebook.
Go to step 2 (P64) of “Adding to Phone Book”.
Copy※3
• For copying after selecting the item, see “Copying /
Cutting / Pasting” (P225).
– Body: You can copy the text.
– Subject: You can copy the subject.
UIM※4
You can move and copy the displayed SMS message
to the UIM, and move and copy the SMS messages in
the UIM to the phone.
※1: This function is not available in SMS of UIM.
※2: After selecting the mail address / phone number, you can
activate the function. If nothing that can be registered is
included, you cannot activate the menu properly.
※3: This function is not available for SMS.
※4: This function is not available for the protected SMS.
Displaying Mail in Unsent Message
C](Mail) ]3
The Unsent message List is displayed. You can check the
contents of saved i-mode mail and SMS messages which
have been saved without being sent.
Mail
150
Mail
1. From the Mail menu (P139), “Unsent message”
• J/FE
: Displays the previous or next page for multiple
pages.
2. Select a mail ]C
Information
• To display the box which is set “Security” (P159), enter terminal
security code >C[OK].
• You can save up to 400 mails / SMS. Depending on the size of
mail/ SMS, the number of mails / SMS messages that can be
saved may be smaller.
Icons on the Unsent Mail List display and the Unsent
Mail display screen
※: Only appears on the Unsent Mail display screen.
Subject※3
The time to save※1 Receiver※2
The mail you save is displayed on
a time basis that day. From the next
day on, each message is displayed
by the date when you saved it.
The name is displayed when the
entry is saved in phonebook.
SMS is displayed as “SMS”
※1:
※2:
※3:
Mail
DescriptionIcon
Unsent mail
Unsent SMS message
Mail with a file attached
A damaged file is attached.
Subject
Address of To-type
Address of Cc-type
Mail with an attached file to which UIM
restrictions are set
※
※
※
Attached file
※
※
※
A pasted melody file is attached.
i-appli launch information is attached.
※A melody file is attached.
※
An image file of up to 10,000 bytes is attached.
※
An image (JPEG) of over 10,000 bytes is attached.
※A moving image file is attached.
※A damaged melody file is attached.
※
※Text
Address of Bcc-type
151
Mail
Using the Submenu of the Unsent Message
List Screen
>P261
1. From the Unsent Message List screen (P150),
M
[Menu] ]Select from the following submenu items
Send
You can send the selected mails and messages.
Delete
You can delete the selected mails and messages.
Delete selected
You can select and delete multiple mail mails and
messages. After selecting mail messages, M[Menu]
>Select “Delete”.
Delete all
You can delete all mail messages in the folder. To
delete all, enter terminal security code >C[OK].
Sort
You can sort the mail messages displayed in the list
display.
Filter
You can change the type of the mail messages
displayed on the list display.
Using the Submenu of the Unsent Mail Display
Screen
From the Unsent Mail display screen (P150), press
M
[Menu] and select a submenu item. See “Using the
Submenu of the Compose mail display” (P152) / “Using
the Submenu of the Compose SMS Screen” (P155) for
the available submenu items.
Composing Mail
Composing i-mode Mail
C](Mail) ]41
You can create and send new i-mode mail.
1. From the Mail menu (P139), select “Compose mail”
]“Compose message”
Setting item/Setting at purchase
Mail
Next Page

152
Mail
2. Select the Address field ]
C
]“Enter
Address” ]Enter the address ]“Enter Address”
]
C
• For a menu displayed for destinations, see “Address
menu” (P153) of “Using the Submenu of the
Compose Mail Display”.
3. Select the Subject field ]
C
]Enter the
subject ]
C
• In case of not attaching the file, go to step 5.
4. Select (Attach file) field ]
C
]Add attached
file
• Select the file saved in “My picture” / “i-motion”
(P176) / “Melody” (P175) of Data box” (P179) /
“Melody”.
• For a menu displayed for attachment files, see
“Attach file menu” (P153) of “Using the Submenu of
the Compose Mail Display”.
• If a file is attached, it can be displayed/played by
pressing I[Play].
5. Select the Message field ]
C
]Enter
message ]
C
6.
I
[Send]
Information
• Depending on the radio wave conditions, the characters may
not be sent successfully to the destination.
• Half-pitch katakana or pictographs may not be displayed
properly when exchanging mails between i-mode phones.
• When you enter the destination of the phonebook that a secret
code is set, the secret code is automatically added. However,
the secret code does not remain on the destination of the sent
mail.
Using the Submenu of the Compose Mail Display
1. From the Compose Mail display (P151), M[Menu]
]Select from the following Submenu items
Send
You can send the i-mode mail that you are
composing or editing.
Save
You can save the i-mode mail that you are composing
or editing in unsent message.
Add address
You can add addresses. When you add addresses,
you can send same i-mode mail to multiple recipients
at the same time. You can send same mail to up to 5
addresses at a time.
– Open phonebook: You can add the address by
searching the phonebook.
– Input address: You can enter the address directly.
Mail
153
Mail
– Received list: Set an address selected from
received mail history.
– Sent list: Set an address selected from sent mail
history.
Address menu※1
– Open phonebook: You can add the address by
searching the phonebook.
– Input address: You can enter the address directly.
– Change to To: You can change the setting of
receiver to “To type”.
– Change to Cc: You can change the setting of
receiver to “Cc type”.
– Change to Bcc: You can change the setting of
receiver to “Bcc type”.
– Delete address: You can delete the address.
– Received list: Set an address selected from
received mail history.
– Sent list: Set an address selected from sent mail
history.
Attach file menu
– Attach file: You can select the file in “My picture”
(P169) / “i-motion” (P176) / “Melody” (P179) of “Data
box”.
– Take a picture※3:A Still Image Finder Stand-by
screen appears. >P112
Press C[Attach] on Still Image Shooting End
display to add to the attachment file.
– Take a movie※4:A Moving Image Finder Stand-by
screen appears. >P117
Press C[OK] on Moving Image Shooting End
display to add to the attachment file.
– Delete att. file※2:You can delete the attachment file.
– Play/ Display file※2:You can play or view the file.
Add signature
You can insert a signature at the end of the text of mail.
• You need to register the signature beforehand.
>p158
Delete body
You can delete the the text of mail that you are
composing or editing.
Delete mail
You can delete the mail under composing or editing.
※1 : After selecting / / , you can operate the menu.
※2 : After selecting , you can operate the menu.
※3 : Unavailable when a shot still image exceeding 5,000 bytes is
already attached to an attachment file.
※4 : Unavailable when a moving image/i-motion or JPEG image
exceeding 10,000 bytes is already attached to an attachment
file.
Information
• The type or receiver
– To: Ordinary receiver
– Cc: To inform the contents in addition to the receiver.
– Bcc: To inform the contents if you do not want other
receivers to know except for direct receiver.
Mail
154
Mail
• About attachable files
※1 : Up to 10 files when the total size of a data file including
melodies, images and the text is equivalent to 5,000 full-
pitch characters (i.e., 10,000 bytes).
※2 : You can attach either an image or moving image/
i-motion movie of up to 100K bytes. You can attach the file
separately from melody files and images of 10,000 bytes or
less.
• You cannot attach files that are prohibited from being attached
to mail or output from the phone to other devices.
• When a JPEG image or an i-motion movie in excess of 10,000
bytes is attached, the number of characters you can enter in
the text field decreases by the equivalent of 100 full-pitch (200
half-pitch) characters.
• The i-mode phone of the mova service cannot receive GIF
images and melodies.
• Some attached files may be deleted at the i-mode Center or
not be received, displayed, or played properly by the
recipients.
Using the Submenu of the Creating next Entry
Screen
From creating next Entry screen, press M[Menu] and
select a Submenu item. See “Using the Submenu of
Character Entry display” (P224) for the available Submenu
items.
Composing SMS messages
C](Mail) ]42
You can create and send SMS messages. You can send
and receive SMS messages to and from the subscribers
to overseas carriers in addition to . For
information on the countries and overseas carriers with
which SMS messages can be exchanged, see the
International Service web page of .
1. From the Mail menu (P139), select “Compose mail”
]“Compose SMS”
Mail
Maximum number of filesType of file
Melody
Up to 10 files※1
1 file※2
Image of 10,000 bytes
or less (JPEG, GIF)
Moving image/ i-motion movie
Image over 10,000
bytes (JPEG)

155
Mail
2. Select the Address field ]
C
]“Enter
Address” ]Enter the recipient’s phone number ]
C
• For a menu displayed for destinations, see “Address
menu” (shown on the right) of “Using the Submenu”
of the Compose SMS Display.
3. Select the Message field ]
C
]Enter the
message ]
C
4. I[Send]
If the recipient is a subscriber to an overseas carrier
other than :
“+” (Press *key 2 times) ]“Country code” ]
“Mobile phone number of the recipient”
or
“010” ]“Country code” ]“Mobile phone number
of the recipient”
• If the mobile phone number starts with 0, enter the
number by omitting “0”.
Information
• Depending on the radio wave conditions, the characters may
not be sent successfully to the destination.
• When you send an SMS message to a subscriber to an
overseas carrier, if characters that the other party does not
support are included in its text, they may not be displayed
correctly.
• If the receiver has an i-mode phone of mova service, it may
receive SMS from phone as i-mode mail.
• If the sender does not notify caller ID (including public
phone/Unknown ID), you cannot answer to the SMS message.
• It is recommended to use half-width alpha-numeric when
sending to a user having a service contract of foreign mobile
phone.
• When you send an international SMS, a communication fee
occurs (when receiving an international SMS, no
communications fee occurs). However, note that a
communications fee may occur even when the transmission
has not been completed due to error of address, etc.
Using the Submenu of the Compose SMS Display
1. From the Compose SMS display (P154),
M
[Menu]
]Select from the following Submenu items
Send
You can send an SMS message that you are
composing or editing.
Save
You can save an SMS message that you are
composing or editing in Draft box.
Address menu
– Open phonebook: You can add the address by
searching the phonebook.
– Input address: You can enter the address directly.
– Received list: Set an address selected from
received mail history.
– Sent list: Set an address selected from sent mail
history.
Mail

156
Mail
SMS report request
You can set whether to request a report for the SMS
message that you are composing. An SMS report is
an SMS message to notify you when your SMS
message reaches the recipient.
SMS validity term
You can set the period during which the SMS Center
holds the SMS message that you are composing or
editing when the recipient cannot receive it
immediately.
Delete body
You can delete whole sentences entered in the text.
The phone number of receiver will not be deleted.
Delete SMS
You can delete the SMS message that you are
composing or editing.
Using the Submenu of of the Character Entering
Display while Composing SMS
From the Compose SMS display, press M[Menu]
and select a submenu item. See “Using the Submenu
of the Character Entry display” (P224) for the available
Submenu items.
Checking New i-mode mail and Message
C](Mail) ]5
When your phone has been turned off or out of the
service area, you can check whether or not the i-mode
Center holds i-mode mail and messageR/F.
1. From the Stand-by screen, press Mfor 2 or more
seconds
• The Check results display appears. To read the
received i-mode mail immediately, select “Mail” and
press C.
Information
• When the i-mode Center holds i-mode mail and messageR/F,
the relevant icon (P32) is displayed. When mail or messages
arrive at the Center when, for instance, your phone is
turned off, the icon may not be displayed.
• When “Receive option” is set to “ON,” you will receive all mail
held at the Center if you use “Check new message.” If you do
not want to receive mail, first deselect the “Mail” of the
“i-mode check” (P158) in “Mail Setting”, then check messages.
Mail

157
Mail
Receiving Selected Mail
C](Mail) ]6
You can check the subject of i-mode mail held at the
i-mode Center and select mails to receive, or delete mails
at the Center before receiving them.
To use this function, you need to set “Receive option”
(shown on the right) to “ON” beforehand. Note that, when
this is “ON”,
i-mode mail cannot be received automatically.
1. From the Mail menu (P139), “Receive option”
• The phone is connected to the Center, and the
display for selecting mail to receive is displayed.
2. Select the pull-down menu for each mail ]C]
Select “Receive”, “Delete” or “Hold” ]C
3. Select “Receive/Delete” ]C
• The confirmation screen appears.
4. Select “OK” ]C
• In step 2, the mail for which “Receive” was selected
are received immediately.
Checking whether Center Holds SMS
C](Mail) ]7
When your phone has been turned off or out of the
service area, you can check whether or not the SMS
Center holds SMS messages.
1. From the Mail menu (P139), “Check new SMS”
• The Check results display appears. To read the
received SMS messages immediately, press C.
Changing Mail Setting
Communication
C](Mail) ]81
You can make settings related to communication of mail
and SMS messages.
>P245
1. From the Mail menu (P139), “Mail setting” ]
“Communication” ]Select from the following
setting items ]After setting,
I
[Done]
Receive opt. setting
You can set whether to select i-mode mail to receive.
If this function is set to “ON,” you cannot receive
i-mode mail automatically.
Setting item/Setting at purchase
Mail
158
Mail
Mail
Receive attach file
You can set whether to receive images or melodies
attached to i-mode mail.
Check new message
When you receive messages by performing “Check
New Message,” you can select an item to check from
i-mode mail, messageR/F.
SMS report request
You can set whether to request a report for the SMS
message that you are composing. An SMS report is
an SMS message to notify you when your SMS
message reaches the recipient.
SMS validity term
You can set the period during which the SMS Center
keeps the SMS message that you are composing or
editing when the recipient cannot receive it
immediately.
Information
• The attachment file set to by “Receive attach file” cannot
be received as the file is deleted at i-mode center.
• You can receive the melody of MFi format attached to the body
of mail even if you set the “Melody” to by “Receive attach
file”.
Edit
C](Mail) ]82
You can set a signature attached to the mail body, a
quotation mark used for mail reply, and items related to
the fixed text that is inserted as a body when the simply
reply is used.
>P245
1. From the Mail menu (P139), “Mail setting” ]“Edit”
]Select from the following setting items ]After
setting, I[Done]
Edit signature
You can set whether to automatically attach your
name and address (signature) at the end of the text
and can set the contents of the signature.
Edit quotation
You can set symbols or sentences to be attached to
the head of the original text (quotation mark) for
“Reply quoted”.
Simple reply phrase
You can set the fixed text that is inserted as a body
when the simple replay is used.
• I[Add]: You can type and add a new fixed text.
Information
• You cannot edit or delete the registered fixed text that has
been registered to “Simple reply phrase” in advance.
Setting item/Setting at purchase
159
Mail
Mail
View
C](Mail) ]83
You can make the settings related to the display of mail
and SMS messages.
>P245
1. From the Mail menu (P139), “Mail setting” ]
“View” ]Select from the following setting items ]
After setting, I[Done]
Character size
You can set the character size of the text on the Mail
display screen.
Scroll
You can set the number of lines to scroll when
pressing
H
on the Mail display screen.
Mail list display
You can set the display method (the number of
lines/the contents displayed) on the mail list display.
Folder security
You can set security to Inbox, Outbox, and Unsent
messages in the Mail menu. To display the messages
in the box with security set, enter terminal security
code >C[OK].
Melody auto play
You can set whether to automatically play a melody
attached or pasted on the mail display screen.
Others
C](Mail) ]84
You can check the settings made in “Mail setting” and
reset the settings to the default.
1. From the Mail menu (P139), “Mail setting” ]
“Others” ]Select from the following setting items.
Check settings
You can check the settings made in the “Mail
settings”.
Reset settings
You can reset the settings made in the “Mail settings”
to the default. To reset settings, enter terminal security
code >C[OK].
Reset data
You can delete all mail messages and MessageR/F
stored in the phone. To reset the datal, enter
terminal security code >C[OK].
Setting item/Setting at purchase
203
Available Services ................................204
Using Voice Mail ...................................204
Using Call Waiting Service...................206
Using Call Forwarding Service.............207
Using Nuisance Call Barring Service...208
Using Caller ID Notification Service ....208
Using Caller ID Request Service..........209
Using Set Arrival Act ............................209
Selecting Arrival Call Act......................209
Setting Remote Control........................210
International Roaming Service.............210
Registering Additional Services...........211
Registering Additional Guidance .........212
Using English Guidance .......................212
Using Service Dialing Number .............213
Using Call Barring.................................213
Network Service
On the Stand-by display, C[Menu] ]
(NW service) or “NW service”
To display the Service menu
Select
In this manual, the outline of the service is explained
by the method of using the handset menu.
For details, refer to “Services User's Guide”.
Available Services
With phone, following Services are
available.
• In this manual, the summaries each service are
explained in the ways using the menu of the
phone. For detail, see “Mobile Phone User's Guide
[Services]”.
• This phone is not applicable to all the services
described in “Mobile Phone User's Guide [Services]”.
• Contact “Information Center” on the back of
this manual for application or inquiry.
Information
• The Services that are operated by connecting to the Service
Center are not available when When “圏外” is displayed on
your handset.
• You can register newly provided services when additionally
provided by . >P211
Using Voice Mail
C](NW service) ]1
When you are in an area where radio waves do not reach,
when you turn off the phone or when you cannot
answer the call, this service answers to the party who
made a voice call to you, and the Voice Mail Center holds
voice mail messages for you.
•
When you did not answer a voice call that came in while
Voice Mail is activated, it is recorded to the received call
history as a missed call and a screen notifying a missed call
appears.
•
This handset is not applicable to Voice Mail (Video-phone
call). Make a voice call to “1412” (free) and set not to be
applicable to video-phone call.
204
Network Service
Network Service
Service
Reference
Monthly feeApplication
Voice Mail
See right
ChargedRequired
Call Waiting Service P206ChargedRequired
Call Forwarding Service
P207FreeRequired
Nuisance Call Barring Service
P208FreeRequired
P209Free
Not required
Caller ID Notification Service
P208Free
Not required
Remote control
Not required
Free P210
International roaming service Not required
Free P210
English Guidance
Not required
Free P212
Service Dialing Number
Not required
Free P213
Caller ID Request Service
Public mode (power off)
Not required
Free P54
Public mode (drive mode)
Not required
Free P51
205
Network Service
Network Service
•
If a call comes in from a caller not notifying caller ID with
“Caller ID request” activated, the Caller ID Request
guidance is played back and the center will not hold
voice mail messages.
1. From the Service menu (P203), “Voice mail”
]Select from the following setting items
Activate voice mail
You can start using Voice Mail.
Set ringing time
You can set the time from the first ring until the call is
connected to the Voice Mail Service Center. (period)
Deactivate voice mail
You can stop using Voice Mail.
Voice mail status request
You can check the current settings of Voice Mail
Service. If you press M[Menu], you can start/stop
the service of voice mail or set the length of ringing
time.
Play messages
You can play back recorded Voice Mail messages.
Voice mail setting
You can connect to the Voice Mail Service Center to
change the settings of Voice Mail by following the
voice guidance.
Check messages
You can check whether or not new messages are
recorded.
Notify missed call
If the phone is turned off or out of the service
area, you are informed by SMS (Short Message Service)
of missed calls when the phone is turned on or in
the service area again.
– Activate missed call notification: You can start
using Missed Call Notice Service.
– Deactivate missed call notification: You can
stop using Missed Call Notice Service.
– Missed call notification status request: You can
check the settings of the Missed Call Notice Service.
Delete voice mail icon
You can delete displayed in the icon view area.
Set message alert ringer
You can set the ring tone to sound when a new
message is recorded.

206
Network Service
Network Service
Using Call Waiting Service
C](NW service) ]2
When you receive another voice call during a call, you will
be notified of it by busy ring tone, and you can put the
current call on hold to answer the new call. You can also
newly make a call to another party by putting the current
call on hold.
• To use Call Waiting Service, set “Arrival call act” (P209)
to “Answer” beforehand. If this is set to another setting,
you cannot answer the incoming voice call while you are
performing a voice call even if you start Call Waiting
Service.
•
If a call comes in from a caller not notifying caller ID while
Caller ID request is set to “Activate caller ID request”, the
Caller ID Request guidance is played back and Call
Waiting is not available.
• When a video-phone call comes in during a voice call, or
a voice call comes in during a video-phone call, Call
Waiting does not work. The second call is recorded as a
missed call in Received Calls.
1. From the Service menu (P203), “Call waiting”
]Select from the following setting items
Activate call waiting
You can start using Call Waiting.
Deactivate call waiting
You can stop using Call Waiting.
Call waiting status request
You can check whether the Call Waiting is activated
or deactivated.
Submenus on using Call Waiting Service
• Press M[Menu] to view the submenu.
aWhen a new call comes in during a call
Voice mail※1
When a new call comes in, the caller can connect the
voice mail center.
Call rejection
You can reject a call without receiving.
Call forwarding※2
You can forward the incoming call to the forwarding
destination you have registered beforehand.
End active call
Hangs up the current call and displays the incoming
call display for another party. You can receive an
incoming call.
Mute/Unmute
The voice to send to the other party is set to mute or
unmute.
※1: You can use the voice mail when you have signed up this
service. See “Using Voice Mail” (P204) for details.
※2: You can use the call forwarding service only when you have
signed up this service. See “Using Call Forwarding Service” on
the next page.
207
Network Service
Network Service
aWhen you are talking with a party while a call to
another party is put on hold (Multi call).
Switch
Put the current call on hold to enable talking with
another party on hold.
End
– End active call: After ending a call, you can take
the new call on hold.
– End held call: You can end a call on hold.
– End all calls: You can end both calls.
Mute/Unmute
The voice to send to the other party is set to mute or
unmute.
Using Call Forwarding Service
C](NW service) ]3
This is a service to forward a voice call/video-phone call
when you are in an area where radio waves do not reach,
you turn off the handset or you did not answer within the
set ring time.
•
When you did not answer a voice call or video-phone call
that came in while Call Forwarding Service is activated, it
is recorded to the received call history as a missed call
and a screen notifying a missed call appears.
•
If a call comes in from a caller not notifying caller ID while
Caller ID Request Service is set to “Activate caller ID
request”, the Caller ID Request guidance is played back
and the call is not forwarded.
• Call Forwarding Service will be automatically deactivated
if “Voice mail” is set to “Activate voice mail”.
• This service is not available with some billing plans.
1. From the Service menu (P203), “Call forwarding”
]Select from the following setting items
Activate call forwarding
You can start using Call forwarding Service.
– Register fwd number: You can register the phone
number of the forwarding destination. If you press
M[Search], you can search for phonebook.
– Set ringing time: You can set the time from the
first ring until the call is forwarded.
Deactivate call forwarding
You can stop using Call forwarding Service.
Register the forwarding number
You can change the phone number of the forwarding
destination. If you press M[Search], you can search
for phonebook.
Setting at forwarded party busy
You can set an incoming call to be connected to the
Voice Mail Service Center if the forwarded destination
is busy.
Call forwarding status request
You can check the current setting status of Call
Forwarding Service.
208
Network Service
Network Service
Setting to enable or disable call forwarding guidance
Press 1429A.
• Make settings following the voice guidance.
• For details, see “Mobile Phone User's [Services]”.
Using Nuisance Call Barring Service
C](NW service) ]4
This is a service to reject "Nuisance calls" such as prank
calls. If you register a caller to reject, calls from the caller
will be automatically rejected and the caller will be
answered by the guidance.
• Even if a call from a caller who is registered to be
rejected, the ring tone will not sound, and the call will not
be recorded in the received call history.
1. From the Service menu (P203), “Nuisance call
barring” ]Select from the following setting items
Register nuisance caller
You can register the phone number of the call that
you answered the last for rejection.
Delete all entries
All the phone numbers registered for rejection are
deleted.
Delete most recent entry
You can delete the last registered telephone number.
You can delete the numbers one by one by repeating
the same operation first from the last saved one.
Using Caller ID Notification Service
C](NW service) ]5
You can notify your phone number to the other party
when making a call. When the other party's phone is the
digital terminal that supports caller ID, your phone number
appears on the other party’s phone.
• Your caller ID is important information, so take great
care to notify it.
1. From the Service menu (P203), “Caller ID
notification” ]Select from the following setting
items
Activate/Deactivate caller ID notification
You can display your phone number on the other
party's phone (display) when making a call. To use
this service, enter the Network Security Code.
Caller ID notification status request
You can check the current setting status of Caller ID
Notification.
209
Network Service
Network Service
Using Caller ID Request Service
C](NW service) ]6
This is a service to request for the Caller ID notification by
guidance to the call from the party who does not notify
Caller ID, and terminate the call.
• A call that was not answered by Caller ID Request
Service will not be recorded in the received call history,
and the screen notifying of the missed call does not
appear.
1. From the Service menu (P203), “Caller ID request”
]Select from the following setting items
Activate caller ID request
You can start using Caller ID Request Service.
Deactivate caller ID request
You can stop using Caller ID Request Service.
Caller ID request status request
You can check the current settings of Caller ID
Request Service.
Using Set Arrival Act
C](NW service) ]7
You can activate or cancel the arrival call act set by
“Arrival call act” (See right). You can view the current
settings.
1. From the Service menu (P203), “Set arrival act”
]Select from the following setting items
Activate arrival act
You can start using the response you set in “Arrival
Call Act”.
Deactivate arrival act
You can stop using the response you set in “Arrival
Call Act”.
Arrival act status request
You can check the current settings of Set Arrival Act.
Selecting Arrival Call Act
C](NW service) ]8
You can set how to react to a voice call/video-phone call
that comes to a customer who has subscribed to “Voice
Mail”, “Call Forwarding Service” or “Call Waiting Service”
while performing a call.
• If you have not subscribed to “Voice Mail”, “Call
Forwarding Service” or “Catch Phone (Call Waiting
Service)”, you cannot answer a call while performing a
call.
• To use arrival act, set “Set arrival act” to “Activate arrival
act”.
>P243
Setting item/Setting at purchase
210
Network Service
Network Service
1. From the Service menu (P203), “Arrival call act”
]Select from the following setting items
Answer
The phone rings. If Voice Mail, Call Waiting Service, or
Call Forwarding Service is activated, the phone
follows each setting.
Voice mail
Connects incoming calls to Voice Mail. Even if Call
Waiting Service is activated, the calls are connected
to Voice Mail.
Call forwarding
Forwards incoming calls to the forwarding phone
number registered. Even if Call Waiting Service or
Voice Mail is activated, the calls are forwarded.
Call rejection
Rejects incoming calls.
Setting Remote Control
C](NW service) ]9
This service allows you to operate “Voice Mail” or “Call
Forwarding Service” from touch-tone phones, public
phones or cellular phones.
• To use “Voice Mail” or “Call Forwarding Service”
overseas, you need to set “Remote control” to “Activate
remote control” beforehand.
1. Select “Remote control” from Service menu (P203)
]Select one of the following items to be set
Activate remote control
Start remote control.
Deactivate remote control
Stop remote control.
Remote control status request
Check settings for remote control.
International Roaming Service
C](NW service) ]0
This service allows you to use functions such as Voice
Mail and Call Forwarding Service while you stay overseas.
1. Select “International service” from Service menu
(P203) ]Select one of the following items to be set
Voice mail (Int.)
- Activate voice mail: Start Voice Mail.
- Deactivate voice mail: Stop Voice Mail.
- Play messages: Play recorded voice message.
- Voice mail setting: Check current settings of Voice
Mail.
211
Network Service
Next page
Network Service
Call forwarding (Int.)
- Activate call forwarding: Start Call Forwarding
Service.
- Deactivate call forwarding: Stop Call Forwarding
Service.
Roaming guidance (Int.)※
Set roaming guidance.
※: Even if the option has been set, a foreign language guidance
may played because of the situation for overseas carriers.
Using OFFICEED
“OFFICEED” is an in-group flat-rate service that is
provided by the specified IMCS (Indoor Mobile
Communication System). You need to apply separately to
use this service. For details, see the corporate
service home page
Registering Additional Services
C](NW service) ]*1
When a new service is added by , you can
register the service to the menu and use.
1. From the Service menu (P203), “Others”
]“Additional service”
• The additional service list will be displayed.
2. I[Edit] ]After editing, press C[OK]
USSD code
Enter the service code (USSD) supplied by .
Service name
Enter any service name. Press I[Edit] to edit.
Using the Submenu of the Additional Service List
Screen
1. From the Additional Service List screen,
M[Menu] ]Select from the following submenu
items
Edit
Edit a service.
Select※
The selected service is performed.
Delete 1 item※
The selected service is deleted.
Delete all
All the registered services are deleted.
※: Not displayed if an unregistered service is selected.
Using Registered Services
1. From the Additional Service List screen, select a
registered service ]C
212
Network Service
Network Service
Registering Additional Guidance
C](NW service) ]*2
When you perform services added by “Additional service”,
you can register reply messages that correspond to the
codes (USSD) returned from the Service Center. The reply
message is displayed when the registered code is
returned as a reply.
1. From the Service menu (P203), “Others”
]“Additional guidance”
• The reply message list will be displayed.
2. I[Edit] ]After setting, press C[OK]
USSD code
Enter the service code (USSD) supplied by .
Reply message
Enter a reply message name. Press I[Edit] to edit.
Using the Submenu of the Reply Message List
Screen
1. From the Reply Message List screen, M[Menu]
]Select from the following Submenu items
Edit
You can set a reply message.
Delete 1 item※
The selected reply message is deleted.
Delete all
The all registered reply messages are deleted.
※: Not displayed if an unregistered service is selected.
Using English Guidance
C](NW service) ]*3
You can set the guidance of setting services such as
“Voice Mail” or voice guidance such as “out of the service
area” to English.
Available Languages
LanguageSetting
Japanese
Plays back the guidance in Japanese.
Plays back the guidance in English.
First plays back the guidance in
Japanese and then in English.
First plays back the guidance in
English and then in Japanese.
English
Japanese +
English
English +
Japanese
213
Network Service
Network Service
1. From the Service menu (P197), “Others” ]“English
guidance” ]Select from the following setting
items
Guidance setting
– Outgoing + Incoming call: You can set languages
of the guidance for outgoing and incoming calls.
Select “Yes” and then select a language.
– Outgoing call: You can set a language of the
guidance only for outgoing calls. Select “Yes” and
then select a language.
– Incoming call: You can set a language of the
guidance only for incoming calls. Select “Yes” and
then select a language.
Guidance status request
You can check the current settings of the guidance.
Using Service Dialing Number
C](NW service) ]*4
You can make a call to Information Center or
repair counter.
• The displayed item may differ or some items may not be
displayed depending on the card.
1. From the Service menu (P203), “Others”
]“Service dialing number” ]Select from the
following items
Malfunction information
Connect to the repair counter.
General information
Connect to the Information Center.
Using Call Barring
C](NW service) ]*5
You can block all incoming calls while you are roaming
outside Japan with the phone.
• This service is not available in some overseas carriers.
1. From the Service menu (P203), “Others” ]“Call
barring” ]Select from the following setting items
Activate barring of incoming call - roam
– Barring all incoming calls: All incoming calls are
restricted. Enter your Network Security Code.
– Data calls barring: Only incoming video-phone
calls are restricted. Enter your Network Security
Code.
Deactivate barring of incoming call - roam
You can stop using Barring All Incoming When Roam.
Enter your Network Security Code.
Barring of incoming call - roam status request
You can check the settings of Barring All Incoming
When Roam.

229
International Roaming Service ............230
Setting the Network Mode...................231
Confirming Before Using Overseas.....231
Using the Phone Overseas.......233
Overseas Use

230
Overseas Use
International Roaming Service
International roaming service (WORLD WING) is a service
that allows you to make calls or communications overseas
using the same phone number as that used in Japan,
utilizing networks of affiliate telecommunications carriers
overseas. Refer to “Network Services User's Guide
(Chapter of International Service)” for details of the
communications services available while in international
roaming. The International Service web page of
offers the downloadable latest version of “Network
Services User's Guide (Chapter of International Service)”
as well as the latest information about WORLD SERVICE:
Application for WORLD WING
• The customer who subscribed to the service on or after
September 1, 2005 is not required to apply to this
service. However, those who notified that the
service is not required during signing the service
contract or canceled in the middle of the contract need
to apply for the service again.
• The customer who subscribed to the service on
and before August 31, 2005 and has not applied to the
“WORLD WING” is required to apply to this service.
• This service is not available with some billing plans.
Overseas Networks and Services Available
※Services marked with “O” in the table above may not
be available depending on the mobile phone carrier
being used or the place of stay.
.See the International Service web page for
details about services available in each country or region
e/world/
Information
• You can set to display Japan time together with the local time
on the stand-by display. >P81
Overseas Use
Network
Icon
Voice
Packet
transmission
(i-mode,
mopera U, etc.)
SMS
Video-
phone
3G
GPRS
GSM
O
O
O
O
O
X
O
O
O
O
X
X

231
Overseas Use
Next Page
Overseas Use
Setting the Network Mode
C](Settings) ]52
Network mode of the phone is set to “Auto” at
purchase. If you know the network in your area, you can
select it directly.
>P255
1. From the Settings menu (P85), “Network” ]
“Network mode” ]Select from the following
setting items
Auto
Searches all the networks connectable.
WCDMA only
Searches only networks supporting 3G.
GSM only
Searches only networks supporting GSM/GPRS.
For the network search setting (changing of the
communication carriers), see P97.
Information
• You cannot exchange the data through packet service under
GSM network.
• When using the handset in Japan or in the service area
of 3G network, we recommend you change the setting of the
“Network mode” to “WCDMA only” to save battery power.
Confirming Before Using Overseas
Before Departure
Charging the Battery
Make sure of the voltage available in the country or area of
stay and use the Overseas/Domestic AC Adaptor 01
(option) for overseas and domestic usage (a conversion
plug adapter according to the place of stay will be required).
And, do not charge the phone using an electrical
transformer for overseas travel.
Using Voice Mail/Call Forwarding from Overseas
Use of the Voice Mail or Call Forwarding service from
overseas is part of “remote operation” and requires the
activation of Remote operation before your departure. For
details to set the remote operations, refer to “Remote
Opeartion Settings” (P210).
.Before departure, make sure that you have the
Network Security Code, which may be required for
remote-accessing the Voice Mail etc. If you have forget
your Network Security Code, visit a Shop or
World Counter with an identification such as
the driver’s license to make necessary changes.
Setting item/Setting at purchase
Using i-mode Overseas
To use i-mode overseas, you need to set “International
Settings” to “YES”.
aTo change settings in Japan
No packet transmission fees apply.
“iMenu” ]“English” ]“Options” ]“International
Settings” ]“i-mode services Settings” ]“YES”
aTo change settings outside Japan
Packet transmission fees apply.
“iMenu” ]“International Settings” ]“i-mode services
Settings” ]“YES”
•
If set to “NO”, you can send and receive i-mode mail
messages and view the i Menu only. The setting at
purchase is “NO”.
※Some i-mode sites may not be available depending on
the information provider.
※
Packet transmission fees apply to all types of access
from overseas including transmissions that are free of
charge in Japan.
※Japan time applies even if i-mode sites are accessed
from overseas. Be careful when registering entries to or
deleting entries from My Menu at the beginning or end
of a month.
Using phone overseas
Setting Mobile Phone Carrier
The network will be set after searching it automatically if
“Setting the Network Mode” (P97) is set to “Auto” in
international roaming.
• You can set up beforehand the type of network on
searching by “Setting the Network Mode” (P97).
• If you search the network automatically, you can set the
preferred network by “Registering a Network from the
list” (P98).
• You can select the network manually. Refer to “Selecting
the Network Connection Mode” (P97).
Information
• “Network mode” is set to “Auto” after you search with
“Network mode” set to “WCDMA only” or “GSM only” and
“Network selection” set to “Auto”, “Network mode” will be set
to “Auto” after searching.
• If you search with “Network mode” set to “Auto” and “Network
selection” set to “Auto”, the same mode (“WCDMA only” /
“GSM only”) of the network (communication carrier) you
selected after searching will be set.
232
Overseas Use
Overseas Use
Settings to be made after returning to Japan
After Coming Back to Japan
When network settings have been changed for use
overseas, “圏外” may appear in Japan.
In that case, make settings given below.
• You have to set “Network selection” (P97) to
“Auto/WCDMA only”.
• You have to set “Network selection” (P97) to “Auto” or
“Manual” and select “3G” on the network
selection screen displayed after searching.
Using the Phone Overseas
• If the other party subscribes to a mobile phone carrier
supporting the video-phone, you can make a
video-phone call by pressing T.
Making Calls
aMaking a call to Japan from the country you stay
When entering the phone number directly
Press 0for 1 or more seconds to display “+”
]81(Country code for Japan) ]Other party’s
phone number excluding “0 (zero)” at the beginning
of the area code ]A(T)
Example: When the other party is in one of the 23
wards of Tokyo (area code: 03)
“+”>81> 3> XXXX – XXXX
Making a call to the phone number registered in the
phonebook or call/mail history
On the Phonebook List (P67)/Call/Mail history (P86)
display or Detailed Phonebook (P67)/Detail (P86)
display, M[Menu] ]“International call (Japan)” ]
After the other party's number is displayed C[Call]
Example: When the phone number registered in the
Phonebook or Call history is one of the 23
districts in Tokyo
+813XXXX - XXXX
• A recipient's phone number is generated,
automatically prefixed with Japan's Cuontry code
“+81” and “0” removed from area code.
aCalling another WORLD WING/WORLD WALKER user
Press 0for 1 or more seconds to display “+”
]81(Country code for Japan) ]The other
party' mobile phone number excluding “0 (zero)” ]
A(T)
Example: When the other party has a mobile phone
number beginning with (090)
“+” > 81 > 90 >XXXX –
XXXX
aCalling a mobile phone or fixed-line phone within the
country of stay
Dial the other party’s phone number including the
area code
]
A(T)
233
Overseas Use
Overseas Use
234
Overseas Use
Overseas Use
a
Calling from the country of stay to a mobile phone or
fixed-line phone in another country (except for Japan)
※In some countries or areas such as Italy, “0” may be
required.
Press 0for 1 or more seconds to display “+”
]
Country code of the other party
]
Other party’s
phone number excluding “0 (zero)” at the beginning of
the area code
]
A(T)
Receiving calls
When a call comes in, A(T)
Having Others Call You
aReceiving a call from Japan
Have the other party call you at your mobile phone
number as usual.
090
>
XXXX – XXXX/
080
>
XXXX – XXXX
]
CALL
aReceiving a call from a country other than Japan
International access code of the country where you
make the call ]81 (Country code for Japan)
]Your phone number excluding “0 (zero)” at the
beginning ]CALL
Troubleshooting
Unable to Make or Receive Calls/Always Out of the
Service Area/Handset Does Not Turn ON
Possible causes for inability to make or receive calls,
reception level indication permanently being “Out of the
service area” or the handset not turning on are as follows:
• Weak radio waves being received or being out of the
service area
• Failure of the local switchboard or base station or
temporary line congestion
• Wrong operation of the handset
• Others
See the International Service web page of the
latest information about service areas and network
interruption:
In addition, make sure of the operation and try the following:
• If you are indoors, confirm if the condition is the same
outdoors.
• Confirm if your monthly charges have not exceeded the
limit.
• Turn OFF the handset once and back ON.
• Manually select the mobile phone carrier to use.
If the problem persists after the above troubleshooting
procedures are taken, contact the Network Technical
Support and Operations Center (P235).
If i-mode is inaccessible
• If i-mode sites other than “iMenu” is unavailable, first
make “International Settings” (P232). Some sites may
not be available depending on the information provider.
• The i-mode services may not be available depending on
the operator being used.
• Select a mobile phone carrier compatible with packet
transmission.
• For the latest information about overseas carriers
compatible with packet transmission, see the
International Service web page .
• “i-mode” services offered by overseas carriers are not
available.
Contact (While outside Japan)
If the handset is lost or stolen, etc.
< Information Center> (24-hour service)
aUniversal Number
International Call ID Number for the Universal Number
(See Table 1)
– 800-0120-0151
※Domestic call charges of the country you stay apply if you
make a call from a mobile phone.
aIf the Universal Number (above) is not available
International access code for the country of stay
(See Table 2)
– 81-3-5366-3114
For loss or theft of the phone, account settlement of total
charges, or phone failure while overseas, see “Failure
while overseas” the back side of the operation manual.
Note that the customer shall also pay the fees for call and
communication after the phone is lost or stolen.
If the Handset is not Working Properly
<Network Technical Support and Operations Center>
(24-hour service)
aUniversal Number
International Call ID Number for the Universal Number
(See Table 1)
– 800-5931-8600
※Domestic call charges of the country you stay apply if you
make a call from a mobile phone.
aIf the Universal Number above is not available
International access code for the country of stay
(See Table 2)
– 81-3-6718-1414
235
Overseas Use
Next Page
Overseas Use
236
Overseas Use
Overseas Use
Major Country Codes • See the International Service web page of
for the latest information international call ID
numbers for the universal number and international
access number.
International Call ID Number for the Universal
Number (Table 1)
Australia 0011
Austria 00
Belgium 00
Brazil 0021
Canada 011
China 00
Columbia 009
Denmark 00
Finland 990
France 00
Germany
Hong Kong
00
001
Hungary 00
Luxembourg 00
Malaysia 00
Netherlands
00
00
New Zealand
Norway
Philippines
00
00
Singapore 001
South Africa 09
South Korea 001
Spain 00
Sweden
Switzerland
00
00
Taiwan 00
Country/Region
Code
Argentina 00
Ireland 00
Country/Region
Code
Israel 014
Italy 00
Thailand 001
UK 00
USA 01
Country/Region
Code
Australia 61
Austria 43
Belgium 32
Brazil 55
Canada 1
China 86
Czech 420
Country/Region
Code
Egypt 20
Fiji 679
Finland 358
France 33
Germany 49
Greece 30
Hong Kong 852
Indonesia
Italy
62
39
Maldives 960
Netherlands 31
687
New Zealand 64
Norway
Peru
47
51
Singapore 65
India 91
South Korea 82
Spain 34
Sweden 46
Switzerland 41
Tahiti 689
Taiwan 886
Japan 81 USA 1
Philippines
Russia
63
7
Hungary 36
New Caledonia
Macao 853 Vietnam 84
Malaysia 60
Thailand 66
Turkey 90
UK 44