LG Electronics USA L705I PCS GSM Phone User Manual
LG Electronics USA PCS GSM Phone
UserManual.wiki
>
LG Electronics USA
>
L705I User Manual
>
Users Manual 1
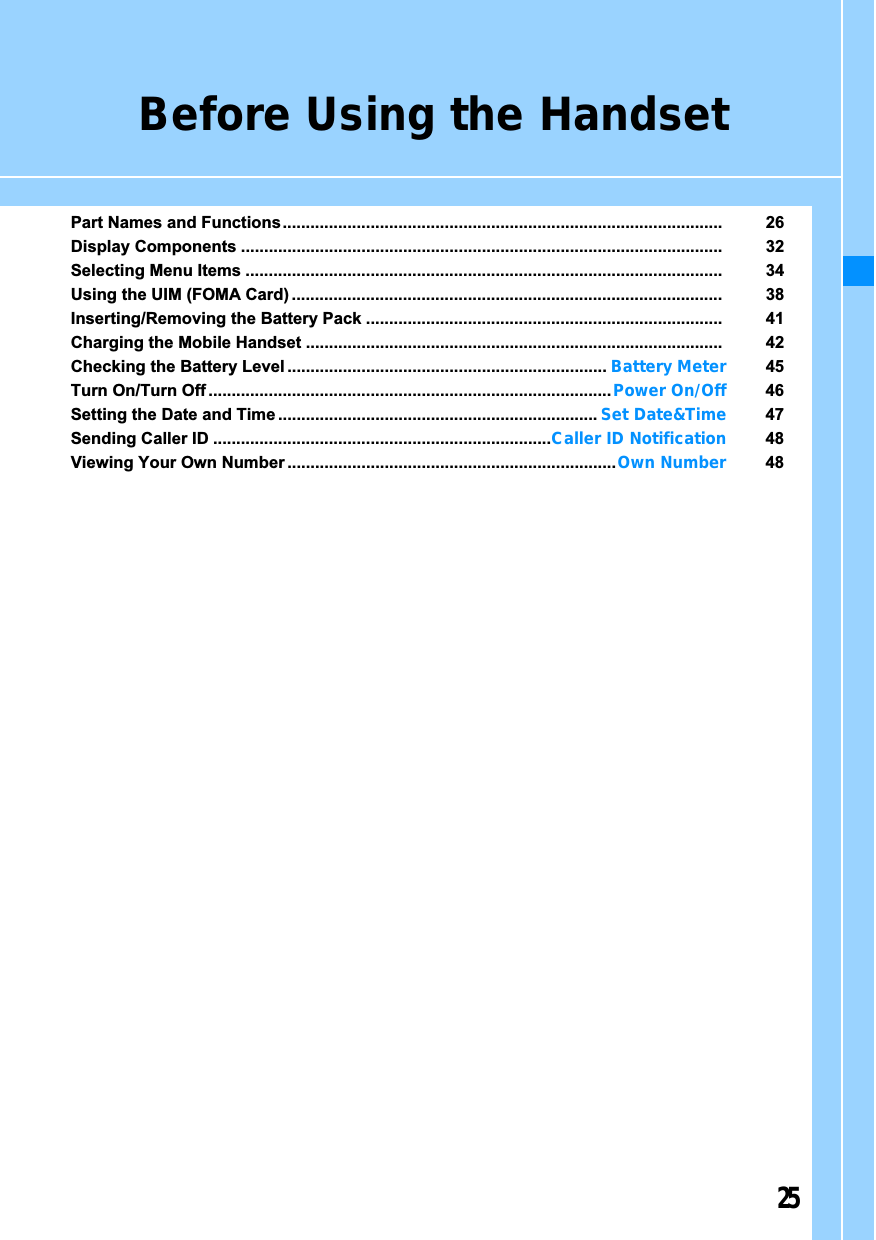
Contents
1.
Users Manual 1
2.
Users Manual 2
Users Manual 1
Navigation menu
Upload a User Manual
Namespaces
Wiki Guide
HTML
PDF
Info
Views
User Manual
Discussion / Help
Navigation
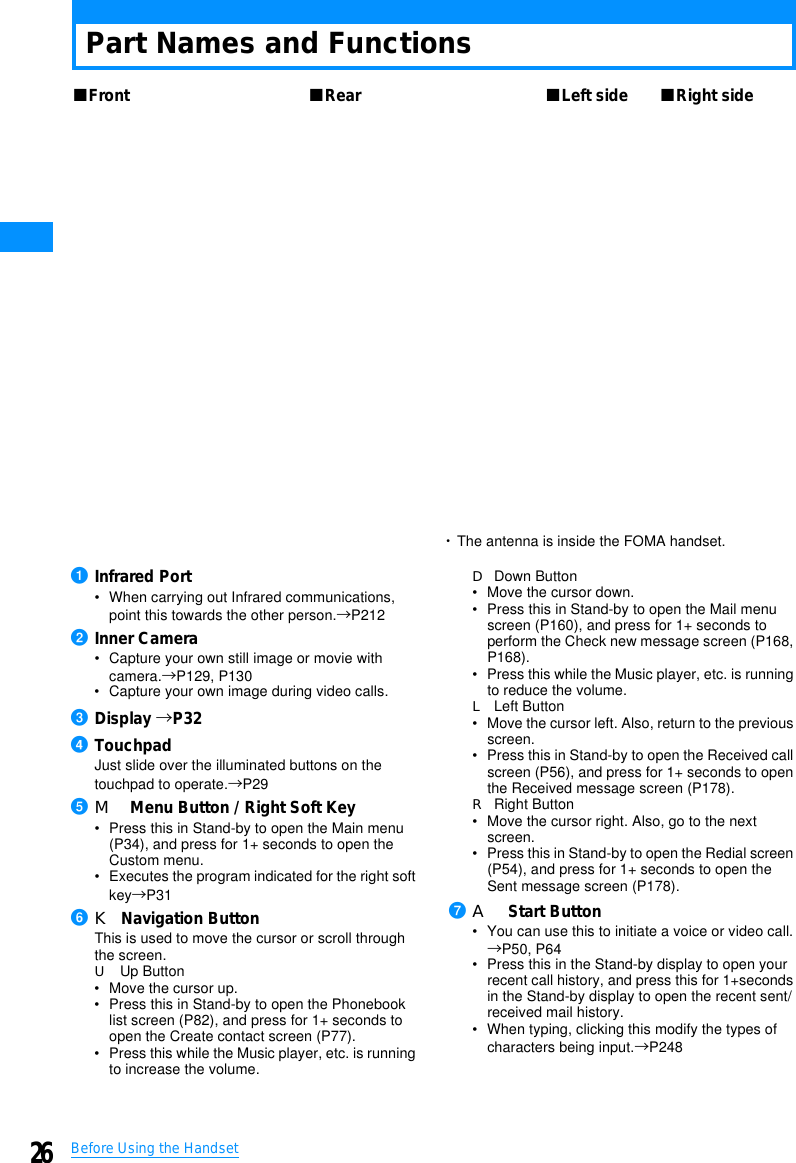
![8For Your SafetyImportant InformationThis user guide contains important information on the use andoperation of this phone. Please read all the informationcarefully for optimal performance and to prevent any damageto or misuse of the phone. Any changes or modifications notexpressly approved in this user guide could void your warrantyfor this equipment.Before You StartSafety InstructionsWARNING! To reduce the possibility of electric shock, do notexpose your phone to high humidity areas, such as thebathroom, swimming pool, etc.Always store your phone away from heat. Never store yourphone in settings that may expose it to temperatures less than32°F or greater than 104°F, such as outside during extremeweather conditions or in your car on a hot day. Exposure toexcessive cold or heat will result in malfunction, damageand/or catastrophic failure.Be careful when using your phone near other electronicdevices. RF emissions from your mobile phone may affectnearby in adequately shielded electronic equipment. Youshould consult with manufacturers of any personal medicaldevices such as pacemakers and hearing aides to determine ifthey are susceptible to interference from your mobile phone.Turn off your phone in a medical facility or at a gas station.Never place your phone in a microwave oven as this willcause the battery to explode.IMPORTANT! Please read the TIA SAFETY INFORMATION onpage 78 before using your phone.Safety InformationRead these simple guidelines. Breaking the rules may bedangerous or illegal. Further detailed information is given in thisuser guide.]Never use an unapproved battery since this could damagethe phone and/or battery and could cause the battery toexplode.]Never place your phone in a microwave oven as it willcause the battery to explode.]Do not dispose of your battery by fire or with hazardous orflammable materials.]Make sure that no sharp-edged items come into contactwith the battery. There is a risk of this causing a fire.]Store the battery in a place out of reach of children.]Be careful that children do not swallow any parts such asrubber plugs (earphone, connection parts of the phone,etc.). This could cause asphyxiation or suffocation.](https://usermanual.wiki/LG-Electronics-USA/L705I.Users-Manual-1/User-Guide-860503-Page-3.png)
![9For Your Safety]Unplug the power cord and charger during lightning stormsto avoid electric shock or fire.]When riding in a car, do not leave your phone or set up thehands-free kit near to the air bag. If wireless equipment isimproperly installed and the air bag is activated, you may beseriously injured.]Do not use a hand-held phone while driving.]Do not use the phone in areas where its use is prohibited.(For example: aircraft).]Do not expose the battery charger or adapter to directsunlight or use it in places with high humidity, such as abathroom.]Never store your phone in temperatures less than- 4°F orgreater than 122°F.]Do not use harsh chemicals (such as alcohol, benzene,thinners, etc.) or detergents to clean your phone. There is arisk of this causing a fire.]Do not drop, strike, or shake your phone severely. Suchactions may harm the internal circuit boards of the phone.]Do not use your phone in high explosive areas as the phonemay generate sparks.]Do not damage the power cord by bending, twisting, pulling,or heating. Do not use the plug if it is loose as it may causea fire or electric shock.]Do not place any heavy items on the power cord. Do notallow the power cord to be crimped as it may cause fire orelectric shock.]Do not handle the phone with wet hands while it is beingcharged. It may cause an electric shock or seriouslydamage your phone.]Do not disassemble the phone.]Do not place or answer calls while charging the phone as itmay short-circuit the phone and/or cause electric shock orfire.]Only use the batteries, antennas, and chargers provided byLG. The warranty will not be applied to products provided byother suppliers.]Only authorized personnel should service the phone and itsaccessories. Faulty installation or service may result inaccidents and consequently invalidate the warranty.]Do not hold or let the antenna come in contact with yourbody during a call.]An emergency call can be made only within a service area.For an emergency call, make sure that you are within aservice area and that the phone is turned on.](https://usermanual.wiki/LG-Electronics-USA/L705I.Users-Manual-1/User-Guide-860503-Page-4.png)
![11For Your SafetyVehicle Mounted External Antenna(optional, if available)A minimum separation distance of 8 inches (20cm) must bemaintained between the user/bystander and the vehiclemounted external antenna to satisfy FCC RF exposurerequirements. For more information about RF exposure, visitthe FCC website at www.fcc.govFCC Part 15 Class B ComplianceThis device and its accessories comply with part 15 of FCCrules. Operation is subject to the following two conditions: (1) This device and its accessories may not cause harmfulinterference, and (2) this device and its accessories mustaccept any interference received, including interference thatmay cause undesired operation.Cautions for Battery]Do not disassemble.]Do not short-circuit.]Do not expose to high temperature: 60°C (140°F).]]Do not incinerate.Battery Disposal]Please dispose of your battery properly or bring to yourlocal wireless carrier for recycling.]Do not dispose in fire or with hazardous or flammablematerials.Adapter (Charger) Cautions]Using the wrong battery charger could damage your phoneand void your warranty.]The adapter or battery charger is intended for indoor useonly.Do not expose the adapter or battery charger to direct sunlightor use it in places with high humidity, such as the bathroom.](https://usermanual.wiki/LG-Electronics-USA/L705I.Users-Manual-1/User-Guide-860503-Page-6.png)
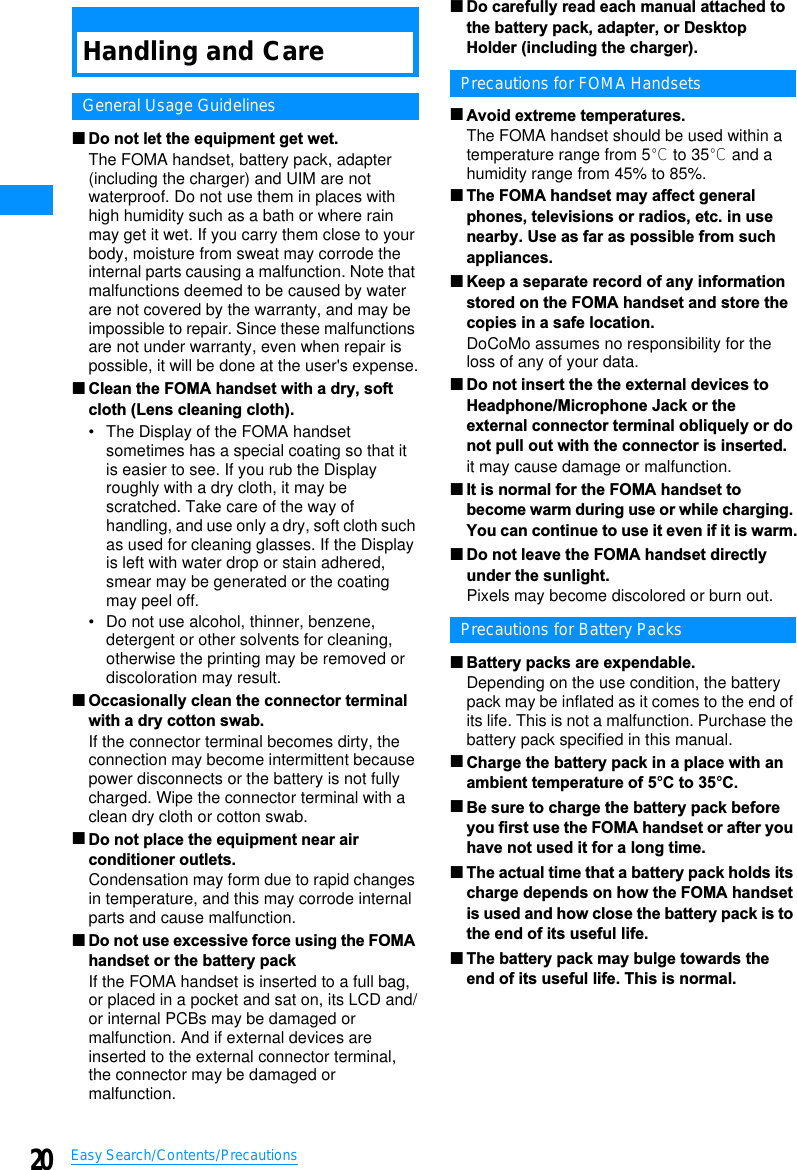
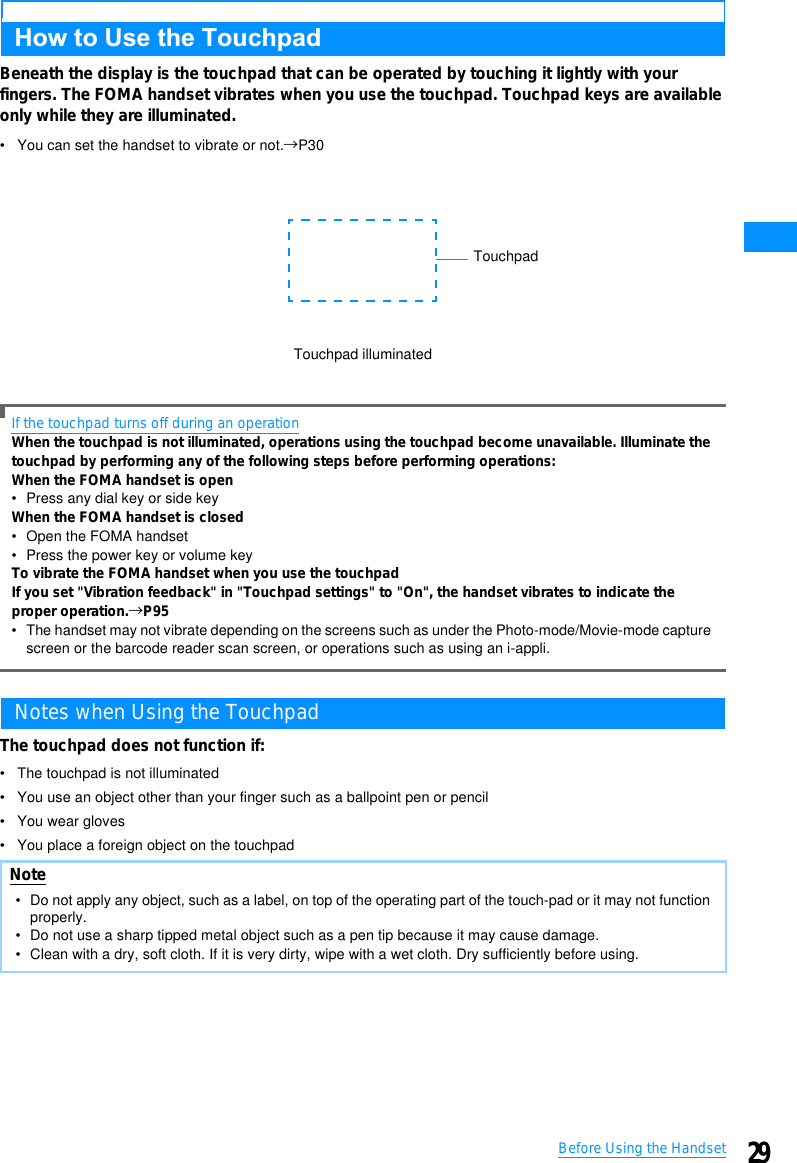
![30Before Using the HandsetVibration feedback settingsSettig Touchpad VibrationSet whether using the touchpad vibrates the FOMA handset or not.aM[Menu]X(Settings)X"Others"X"Touchpad settings"XVibration feedbackXOn/OffIf this is set to "Off", the FOMA handset does not vibrate when you use the touchpad.Touchpad sensitivity settingsTouchpad sensitivity settingsSet to adjust the touchpad sensitivity.aM[Menu]X(Settings)X"Others"X"Touchpad settings"X"Touchpad sensitivity"XSelect a sensitivityHigh䋺Increase the sensitivity of the touchpad.Standard䋺Set the sensitivity of the touchpad to normal.Low䋺Increase the sensitivity of the touchpad.Default OnDefault Standard](https://usermanual.wiki/LG-Electronics-USA/L705I.Users-Manual-1/User-Guide-860503-Page-29.png)
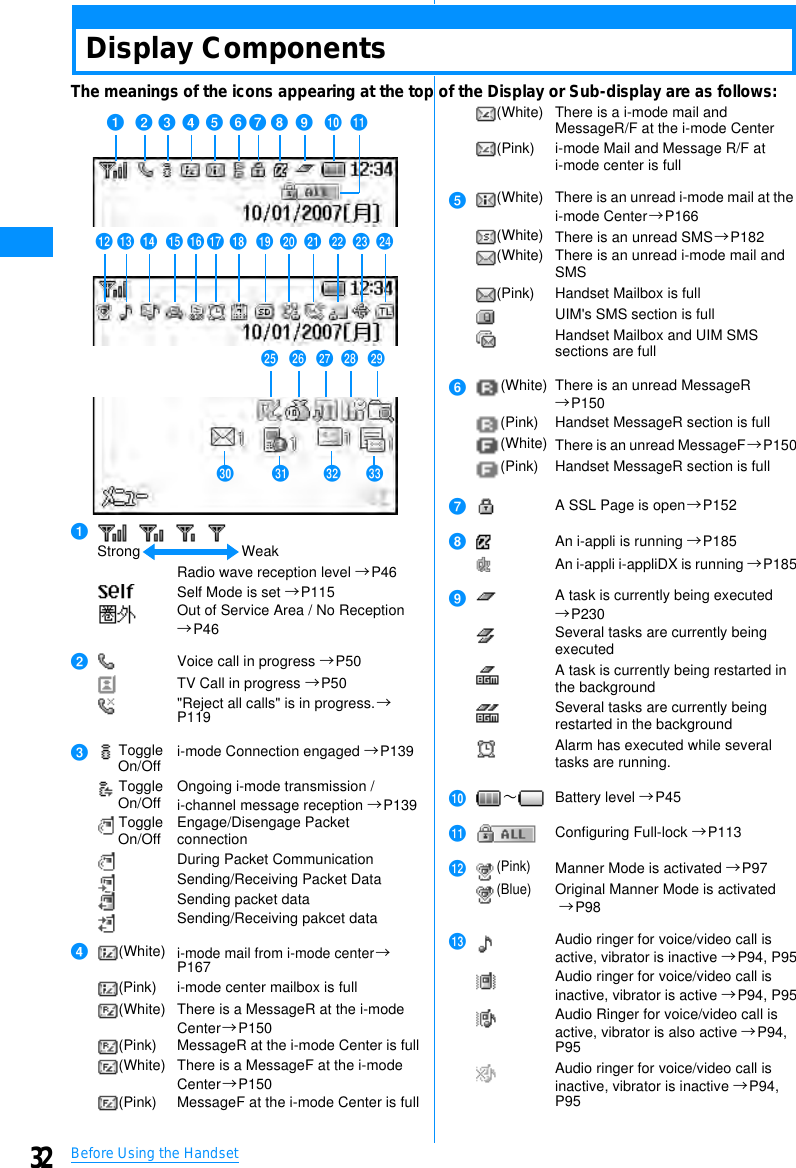
![31Before Using the HandsetSoft KeysAvailable operations on the currently opened screen are displayed as Soft Keys at the bottomof the screen. Press the following keys on the touchpad to perform functions corresponding toSoft Keys.• Different Soft Keys appear depending on the function or display status.Notation of Soft Key OperationsThis manual describes the Soft Key operations as follows.aOperations performed using Mwill be displayed.bOperations performed using Cwill be displayed.• Indicates and displays where Scrolling / Item Selectionis possible.cIOperations performed with will be displayed. 䉸䊐䊃 䉨䊷䉣䊥 䉝䇭䇭䇭M[Menu]䇭 The Button Soft Keys](https://usermanual.wiki/LG-Electronics-USA/L705I.Users-Manual-1/User-Guide-860503-Page-30.png)
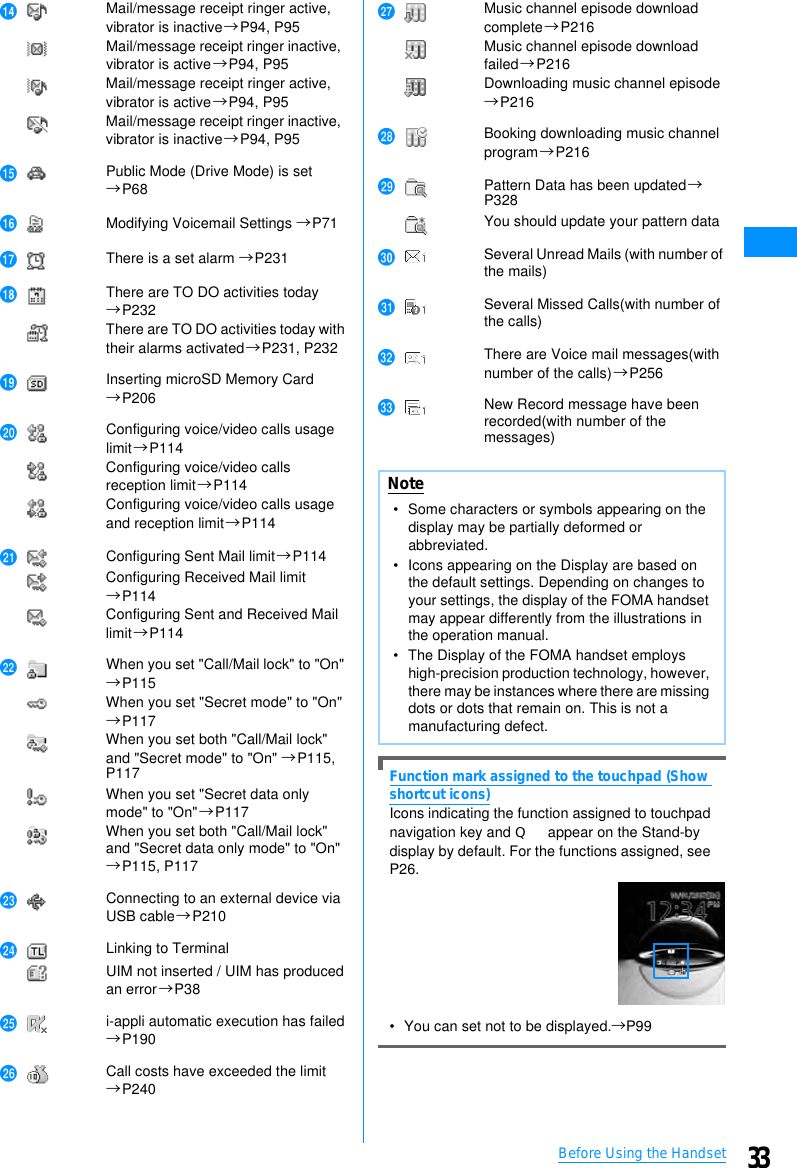
![35Before Using the HandsetSelecting Menu ItemsAs an example, we explain how to modify "Light" from the Stand-by display.• This manual explains how to select functions using the navigation buttons as follow:.aPress the M[Menu] button on the Stand-by display.Main menu appears.bAt the main menu, press Kand move the cursor over(Settings) and press C[Select]cAt the Settings menu screen, press Hand move thecursor over "Display" and press C[Select]dAt the display menu, press Hand move the cursorover "Light" and press C[Select]Making a Selection with the Dial ButtonsThis section explains the steps for using dial key numbers to open the "Camera Settings"screen from the main menu, as an example.aPress the M[Menu] button on the Stand-by display.bFrom the Main menu screen, press 8that corresponds to the"Camera" menu.cFrom the Camera screen, press 4that corresponds to the"Camera settings".Settings screendisplay screenScreenBrightnessSettingsCamera Screen Camera SettingScreen48Main Menu ScreenMenu numberContinue on the next page](https://usermanual.wiki/LG-Electronics-USA/L705I.Users-Manual-1/User-Guide-860503-Page-34.png)
![36Before Using the HandsetBasic Functions for Each MenuReturning to the Previous Screen/the Stand-by DisplayPress the following keys to return to the previous screen or pause/cancel the operation toreturn to the Stand-by display.•Q䋺Return to the previous menu•P䋺Returns to the Stand-by display. If a confirmation screen to exit is displayed, press "Yes" to return to the Stand-by display.Selecting Setting ItemsOption fields for a setting screen show the currently set options. To change a setting, select anoption field and select an item from a list that opens.• When is displayed to the right and left of an option field, use J to switch items.AuthenticationFor certain functions and services, it may be required for confirmationpurposes to enter a password(P110). If the entry screen appears, use the dialbuttons to enter the password and press C[OK]. If correctly entered, youcan complete the function, or continue to use the function.• The entered password will appear as "䋪" (Asterisk) marks.Note• Depending on the operation on the FOMA handset, pressing P䋯Q may not return to the Stand-by display/the previous screen.Note• The settings may not be switched depending on the items.Note• To cancel entering the security code and close the entry screen, press M[cancel]HXCHXCPassword entryscreen (Example:Security Codeentry screen)](https://usermanual.wiki/LG-Electronics-USA/L705I.Users-Manual-1/User-Guide-860503-Page-35.png)
![37Before Using the HandsetSub MenuWhen "Menu" is displayed on the Soft Key, you can call up the sub menu to perform variousfunctions.• The sub menu's display varies depending on the function or your FOMA headset's settings.䂓About the sub menu on the List ScreenOn the sub menu for a list screen, there are some items that apply only to the highlighted item such as "Delete" and other items that apply all items on the list such as "Delete all" Move the cursor to the item before pressing M[Menu] when executing an operation that applies to only one item.Notation for Menu OperationThis manual makes explanations by using steps to be performed mainly from the Stand-bydisplay. Basically, descriptions of operations are simplified as follows:Example of OperationsaAn icon to press to operatebAn icon on the main menu Use K to move the cursor on the icon and press C[Select] to select.cMenu item names. There are situations where it may say "Perform the following operation" or "select xxx". Press H to move the cursor onto the item and press C[Select] to select.Sub Menu ExampleItems displayed on the sub menu may vary depending on the settings or registration status ofthe FOMA handset.Note• For items that have a sub menu, move the cursor and press C [Select]/R to view the sub menu.• Press M[Close]/ Qto close the sub menuPhone numberentry screenM[Menu]Items that have sub menusSub menuaM[Menu]X(Settings)X"Display"X"Call display"䇭䇭䇭䇭 a䇭䇭䇭䇭䇭䇭䇭䇭 b䇭䇭䇭䇭䇭䇭 䇭䇭䇭䇭c[Sort]According to certain situations, the files can be displayed in different fashion.X"Display name"/"Date"/"Size"/"Source"[Memory Info]HandsetmemoryExternal䋺Display the status of storage space in the "Data box".䋺Display the status of storage space on the microSD memory card.dabcContinue on the next page](https://usermanual.wiki/LG-Electronics-USA/L705I.Users-Manual-1/User-Guide-860503-Page-36.png)
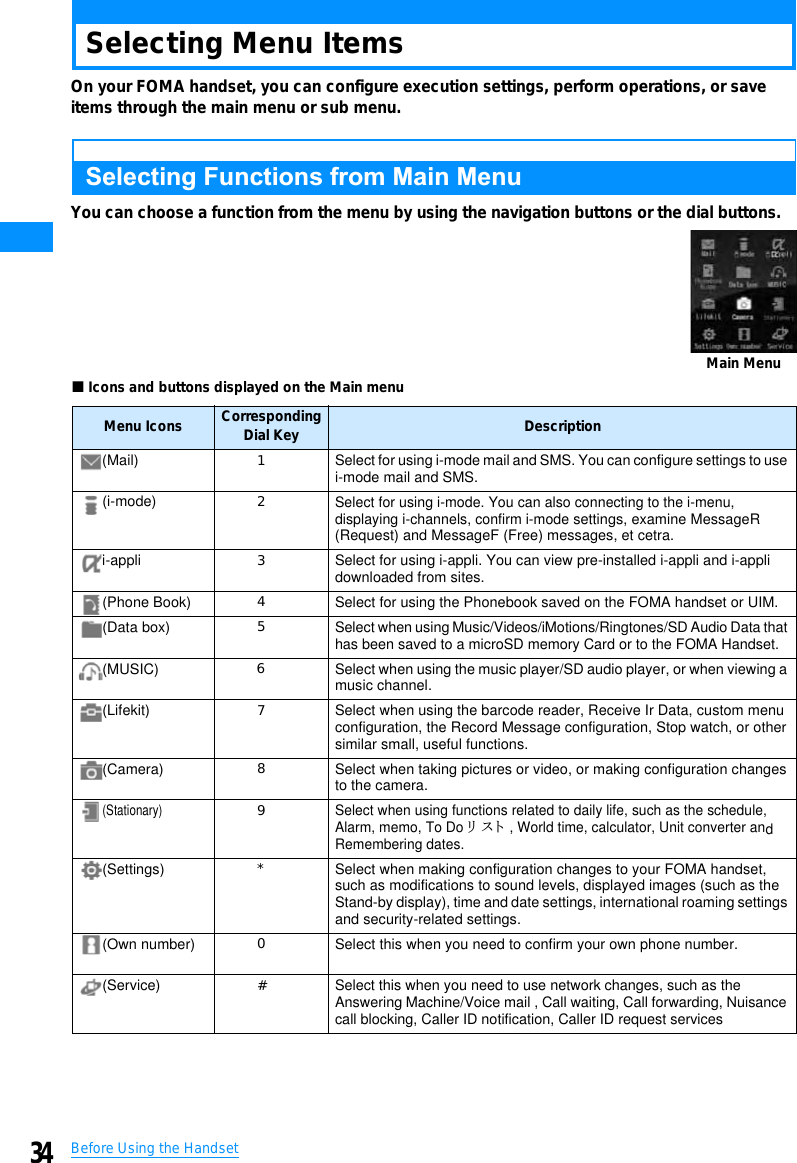
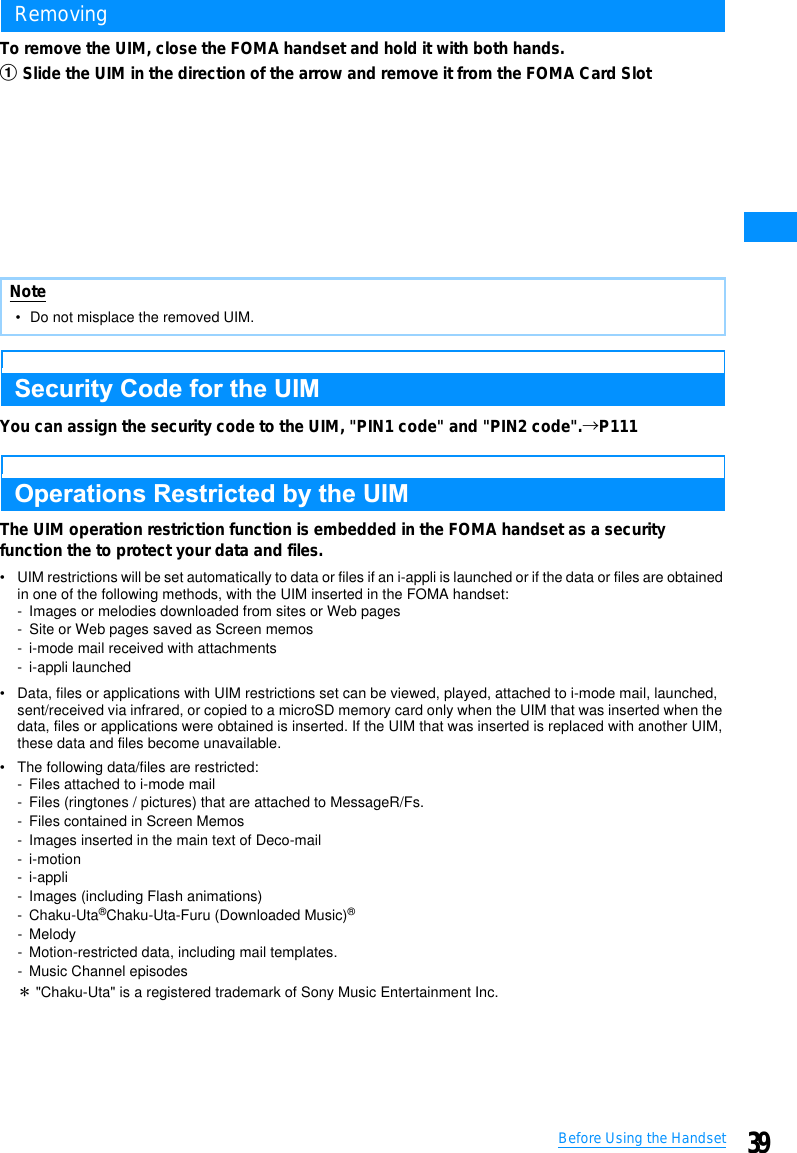
![38Before Using the HandsetaMenu item names. Press H to move the cursor onto the item and press C[Select] to select.bFunctional description of items.cOperational description of items. Operate aft er selecting a.dItem names, function description of items, and operation description of items after the selection of items.Notation Rules䂓Description of steps starting from other than the Stand-by displayAt the beginning of the description, the status of the handset or the screen to open such as "Ringing " or "List screen" is written.䂓Omitting C[Select] in selection operationAs shown in c in "Example of Operations" (P37), to explain a step to select an icon or a function from a list, operational steps such as pressing C[Select] are omitted.Similarly, to explain steps to enter a password or fix entered characters, the operations for fixing such as C[OK] are omitted.䂓Omitting C when carrying out a function to make into The instruction beginning with "Enable xxx checkbox" means that you have to enable the checkbox by pressing C to turn to shown beside the desired item.Using the UIM (FOMA Card)The UIM is an IC card that contains subscription information, such as your phone number. Youcan use communication functions including calls, mail, and i-mode communication by insertingthe UIM into the handset. Inserting the UIM into another FOMA handset allows you to operatemultiple FOMA handsets for various purposes.For details on how to handle the UIM, refer to the UIM instruction manual.Inserting/Removing the UIM• After you turned off the handset following the steps described in "Turning the Power Off" (P46), turn the handset upside down, then remove or insert the battery pack.→P42• Turn off the FOMA handset and remove the battery pack before inserting or removing the UIM.→P46InsertingTo insert the UIM, close the FOMA handset and hold it with both hands.Note• If multiple sub menus such as the redial list screen and the redial detail screen are collectively described, some menu items that do not actually appear may be included (depending on the settings or screens).aInsert the UIM in the direction of the arrow with the IC chip side downNote• Do not use excessive force inserting the UIM to avoid damaging it.](https://usermanual.wiki/LG-Electronics-USA/L705I.Users-Manual-1/User-Guide-860503-Page-37.png)
![45Before Using the HandsetBattery MeterChecking the Battery LevelAn icon indicating the approximate battery level is displayed at the top of the screen.(Blue) : The battery is full(Blue) : The battery is getting low(Red) : Battery is almost completely exhausted Charge the battery.(Red) : Battery is almost completely exhausted The handset will turn itself off in a moment. Charge the battery.Checking Battery Level with the Sound and DisplayBattery Level can be checked through display and sounds.aM[Menu]X(Settings)X"Others"X"Battery level"The confirmation screen is displayed, a sound indicating the remaining power is produced The display screen for the battery level disappears in approximately 3 seconds."Beep Beep Beep": Battery Power is full."Beep Beep": Battery power is running out."Beep": Battery Power is almost all gone. Charge the battery.When the battery pack is running outA warning message sounds, saying "Low battery. Please charge". The (Red) at the top the screen flashes. After a little while, the phone turns off automatically.Note• You can set whether to light the Charging Indicator during charging.→P103• During charging, the battery level icon changes in the order of →→→ (Blue) in animation display, and after the charging completes, (Blue) lights up.<AC Adapter/DC Adapter>• Use the adapter with the specified power source and voltage. Failing to do so may result in fire or malfunction.<DC Adapter>• The DC adapter is exclusive for a negative ground car (12V/24V).• A fuse (2A) is a consumable item. Purchase a replacement fuse from any car parts shop.• Do not charge while the car engine is not running to avoid exhausting the car battery.Note• When an icon indicating battery level is (Red) or (Red), the following actions are performed.- Camera functions (including the barcode reader) and infrared communication functions are unavailable.- When the Music player or the SD-Audio player is started, the warning screen indicating the low battery level appears.Note• When "Key tone" is set to "Silent" or "Manner mode" is in active, you will not hear anything.](https://usermanual.wiki/LG-Electronics-USA/L705I.Users-Manual-1/User-Guide-860503-Page-44.png)
![47Before Using the HandsetSet Date&TimeSetting the Date and TimeYou can set to update the time automatically. Also, the Local time zone, Daylight Saving andDate&Time setting can be set.aM[Menu]X(Settings)X"Date&Time"X"SetDate&Time"bPerform the following operations• If [Auto time set] is set to [On], you cannot set [Local time zone], [Daylight saving], and [Set Set Date&Time].[Auto time set]Set whether to update the time on the FOMA handset based on the time information from the network.[Local time zone ]䋪Set the time zone for the current date and time.For selecting from the country/city name list by pressing c[List], press M[Prev.] or I[Next] to switchthe list by page.XSelect a time zone[Daylight saving]䋪Set whether to use Daylight savings time.X"Off"/"+1 hour"/"+2 hours"[Set date&time]䋪You can manually set the time and date .To set the date, use J to move the cursor to the value to change and enter the date with the dial keys (to set the date on the calendar screen, press C[List] in the date entry field). Operations on the calendar screen→P234To set the time, use J to move the cursor to the value to change, enter the time with dial keys, and switch between [AM] and [PM] with C(pressing C in the time entry field opens the time settings screen on which you can enter a time using dial keys and J).• Depending on the settings in [Date&Time format](P106), the display format or order of the date and time may differ.䋪G:GAfter selecting a field, press C to switch between "AM" and "PM".• Depending on the set values of "Date&Time format", these items may be displayed in a different order, or "AM/PM" may not appear.• You can set the value between 1908/01/01 and 2099/12/31.Default Auto time set Settings PresentSettings Presentno setting䋺The date and time are updated automatically.䋺Auto update will not be performed.Note<Auto Time Set>• Time may not be updated depending on the radio wave reception level.• When using the FOMA handset overseas, the time or time zone may not be updated depending on the network in use. As well, the time may not be displayed properly. Use the handset after setting the time of the place you stay by World Clock.→P240• Time is not updated when an i-appli is running or the UIM is not inserted.• An error of a few seconds may occur.Time and DateSettings Screen](https://usermanual.wiki/LG-Electronics-USA/L705I.Users-Manual-1/User-Guide-860503-Page-46.png)
![48Before Using the HandsetCaller ID NotificationSending Caller IDYou can set to show/hide your Caller ID to the network in advance.• Your Caller ID (phone number) is valuable information. Be cautious about sending your Caller ID• Caller ID notification cannot be set when "Out of service area" is displayed.aM[Menu]X(Service)X"Caller ID notification"bPerform the following operation[Activate/Deactivate caller ID notification]Set to show/hide Caller ID.X"Notify"/"Not notify"XEnter the network security code[Check Caller ID notification setting]Check the status of the setting.Own NumberViewing Your Own NumberYou can view your own phone number (My Number) saved in the UIM.aM[Menu]X(Own number)䂓To view the saved detailed informationPressing C[Detail] and entering the security code on the own number screenopen the own number detail screen.You can also save items other than the ownnumber.→P239• If you have saved a phone number other than your own number, mail address,or URL, you can make a call, create i-mode Mail, or connect to a site by movingthe cursor to the item and pressing I.Note• Your Caller ID is only displayed if the other party's phone is capable of displaying it.• You can set to Caller ID notification for each dialed call.→P58Own numberscreen](https://usermanual.wiki/LG-Electronics-USA/L705I.Users-Manual-1/User-Guide-860503-Page-47.png)
![50Voice/Videophone CallsAbout Video PhoneThe Video phone function can be used with a handset that supports DoCoMo's Video phoneservice.• DoCoMo's Video phone service complies with "ISO 3GPP䋪1 standardized 3G-324M䋪2." DoCoMo's Video phone cannot connect with handsets that support a different form of video call.䋪1䋺3GPP (3rd Generation Partnership Project) is local standardization organization established for the development of common technical specifications related to 3rd Generation Mobile Communication System (IMT-2000).䋪2䋺3G-324M is the international standard of 3rd Generation Mobile Video Phone.• Though Video phone may have communication speeds of 64K (64K bps) or 32K (32K bps), this FOMA handset cannot make 32K Video call.• This FOMA handset does not support remote monitoring.Components of Video Call ScreenaMain windowThe other party's image appears by default.bSub windowYour image appears by default.cCall DurationDisplay in the format of Minutes: Seconds.dSettings icons/ Zoom Adjustment→P53/ Handsfree ON/OFFState Display→P49/ Picture mode ("Send camera image"/"Private mode")→P53Making Voice/Video CallsaEnter a phone number• Up to 80 digits can be entered. Since the screen can display up to 32 digits, as more than 32 digits are entered, the first entered digits will be hidden.• Enter a number from "0" to "99" to display the phone number in the Phonebook entry of the corresponding memory number. Also, entering a number with 3 digits or more finds phone numbers containing the number from the Phonebook.→P89• Start from the area code even for a local call.•C[Save] : Add a new or extra phone number to Phonebook.→P80•I[Mail] : Create a mail to the phone number that you entered.→P161䂓When making a call to a fixed line phone䂓When making a call to a mobile phone090䋭XXXX䋭XXXX/080䋭XXXX䋭XXXX䂓When making a call to a PHS070䋭XXXX䋭XXXXacbdPhone numberentry screenArea Code - City Code - Phone Number](https://usermanual.wiki/LG-Electronics-USA/L705I.Users-Manual-1/User-Guide-860503-Page-49.png)
![51Voice/Videophone CallsbAMA ringing tone sounds from the earpiece, and "Voice Calling..." the dialing screen with until the other party answers the call.• When the Touchpad is not illuminated, touchpad keys are unavailable. Press a dial key /*/# to illuminate the touchpad, then operate with the touchpad keys•C[Spk on/Spk off] : Toggle Hands-free On or Off.• Pressing a dial key/*/# during a call allows you to send Touch-tone signals.䂓During a video call•I[Image/Camera] : Switch the image to send between the alternate image and the camera image.•A: Switches between the Inner and Outer Camera for the image to send to the other partycTo terminate the call PTo correct an entered phone numberTo delete an entered digit, use LXK to move the cursor to the right of the digit and press Q.To add a digit, use LXK to move the cursor to the position and enter the digit with the Dial Keys.Screen Display during DialingThe other party's name is displayed if the other party's number is saved in the phone book.If a video call could not be madeThe following messages appear if a video call could not be made (depending on the other party's mobile phone model or subscribed network services, the displayed messages may not describe the actual situation).Note• If you hear the voice guidance of Caller ID Request, make a call again sending the Caller ID.• You cannot switch to a voice/video call during a voice call using this FOMA handset.• When the "Close setting" is set to "End the call", closing the FOMA handset during a call terminates the call. However, when using accessories such as a flat-plug earphone/microphone with switch (option), the call will not be terminated when the handset is closed.<Video call>• To use this function, terminate those applications in the task list screen.→P231• It is impossible to make a connection if you make a video phone call to a phone without video phone capabilities, or if the other party is out of service area, or his phone is off. If the other party's phone doesn't support video phone, and you have set Auto redial as voice to "On", before making a video call connection it will cut out and automatically redial the number as a voice call. However, if the other party is using an ISDN 64k or a PIAFS connection and their video phone does not support the 3G-324M standard (As of 䃂 2007), or when calling a wrong number, it may not behave in this fashion. Communication charges may apply.• If you make a video phone call to an emergency number such as "110", "119" or "118", it will make a voice call automatically.• i-mode mail or Message R/F arriving during a video call is stored at the i-mode Center. SMS can be received even during a video call.• There is a digital charge for sending the Substitute Image.• During a call, the low battery alert sounds from the Earpiece every 30 seconds. You can keep talking; however, the call will be terminated momentarily when the handset power is automatically turned off.Message DescriptionCheck number, then redial.The phone number is not valid.Number Busy The other party is on a call (this message may appear when the other party is in packet communication depending on the handset).Video call screenVoice call screenWhen making voice callWhen making video callContinue on the next page](https://usermanual.wiki/LG-Electronics-USA/L705I.Users-Manual-1/User-Guide-860503-Page-50.png)
![52Voice/Videophone CallsSub Menu on the Phone Number Entry ScreenaPhone number entry screen (P50) XM[Menu]XPerform thefollowing operations[Video phone call]Make a Video Phone.[Caller ID]Sets whether the other party receives your Caller ID information when you make a phone call.→P58X"Not notify"/"Notify"/"Cancel"[International dial]After selecting the country code to make a call, "009130010" (WORLD CALL) and the country code will be inserted at the beginning of the phone number.→P59[Select prefix]Adds the prefix number at the beginning of the entered phone number. You can do that only one time.→P60[Multi number]If you subscribe to Multi number, select a number to use for Caller ID when making calls.→P262X"Basic Number"/"Additional number1"/ "Additional number2"/"Cancel"[Compose mail]Creates a new i-mode mail to the entered phone number.→P161[Add to phonebook]Adds an entry to the phonebook→P80[Search phonebook ]Search the phonebook with the number already entered→P83Voice Call Screen Sub MenuaIn-call display (P49) XM[Menu] XPerform the followingoperations[Add new]䋪1Making a Call Putting Current Call on Hold and immediately dial another party.[End active call ]Disconnect the call.Number in packet communicationThe other party is in packet communication.Out of Service Area/Power Off.The other party's handset is either out of the service area or turned off.Activate Caller ID The Caller ID was not sent (when the call is made to V-live or Visualnet)).Call forwarded. Please waitThe call is being forwarded.Redial as a voice call The Call forwarding service is activated, and the forwarding destination is a non-video phone.Limit exceeded. Call cannot be connectedYour usage fee limit plan (Type limit or Family wide limit) has been exceeded.Connect from i-mode The video call was not dialed from the official i-mode site information provider (when the call is made to V-live).Video Call Failed Activate the "Caller ID notification" and redial.• This message may appear for other reasons, as well.Message Description](https://usermanual.wiki/LG-Electronics-USA/L705I.Users-Manual-1/User-Guide-860503-Page-51.png)
![53Voice/Videophone Calls[Hold/Cancel held call]䋪1Put a call on hold, or cancel the hold on the call.[Mute/Unmute]Enable or disable to mute your voice on the other party's handset.[Send My Info.]Creates an i-mode mail in which the phone number(Own number) is entered in the body. →P161[Search phonebook]䋪2Search for a Phonebook entry.→P83䋪1䋺 Not available if you do not subscribe to the Call Waiting service.䋪2䋺 Not available if you make a call using Redial or Received calls or Phonebook is activated. To use this function, terminate those applications in the task list screen.Sub Menu During a Video CallaVideo call screen (P49) XM[Menu] XPerform the followingoperations[End call]Disconnect the call.[Hold]Place the call on hold the active call. To cancel, press C.[Substitute image/Camera image]Switch the image to send between the alternate image and the camera image.[Camera settings]Configure the camera for video calls. Press J to select an icon. After setting, press M[Close].[Video phone set]You can set the display and lighting for video calls. After setting, press I[Done].[Screen size]Sets the display size of the main window.X"Normal"/"Large"[Visual preference]Configures the preferences for the images sent to the other party[Switch camera]Switches the camera to send the image to the other party between the Inner camera and the Outer camera.[Search phonebook]䋪Search for a Phonebook entry.→P83ZoomBrightnessNight mode: Zooms the camera image (x1 / x2).: Adjusts the brightness of the camera screen (High /Standard /Low).: Set this when using in dark places (et cetera..).Display settingOther-MeOther-MeOther onlyMe only:: Other-Me: Display the other party's image on the main window and your image on the sub window.: Other-Me: Display your image on the main window and the other party's image on the sub window.: Other only: Display only the other party's image.: Me only: Display only your image.Backlight"Always 'ON'" : Always lights during a call."Alert setting" : In accord with "Light" in (Settings)→P103Prefer img qualStandardPrefer motion spd: Set priority to sent image quality. Effective when there is little movement.: Set the sent video quality and motion to standard.: Set priority to motion for sent images. Effective when there is a lot of movement.](https://usermanual.wiki/LG-Electronics-USA/L705I.Users-Manual-1/User-Guide-860503-Page-52.png)
![54Voice/Videophone Calls[Own number]Displays your phone number(Own number).䋪䋺 Not available if you make a call using Redial or Received calls or Phonebook is activated. To use this function, terminate those applications in the task list screen.Using Redial/Received Call LogsRedial and the Received call logs can be used to make phone calls. Also, the Recent calls (sentand received) can be used to make calls.RedialCalling the Same Party AgainRedial maintains a list of the last 30 calls and video phone calls made. The phone number andthe calling date/time are stored in the call logs.• If there have been more than 30 calls made, the most recent 60 calls are retained.aThe Stand-by display XR• The call logs also saves the names of people called if they are in the phone book. The call logs saves the phone number and category of people who called if they are not in the phone book.aThe other party's name as saved in the PhonebookIf the name is not saved, the phone number will be displayed.bOutgoing phone call type䇭Dialing a voice call䇭Dialing a video callcThe Other Party's Phone NumberdDialing an International Call䃨䇭 Calling overseas from Japan䃨䇭 Calling from overseas䃨䇭 Dialing an international call using international roaming overseaseDialed from Multi Number䋪䋯䋯 Basic number/Additional number 1/Additional number 2䋪: Appears if you subscribe to the Multi number service.fSent Date and TimebMove cursor to the Number to RedialXCaOutgoing phone call typebThe name entered into the phone bookIf not entered into the phone book, "Unregistered" is displayed.cThe Other Party's Phone NumberdDialed from Multi NumberThe name registered for the line in "Number settings" in P262 appears with an outgoing Multi number call.䋪: Appears if you subscribe to the Multi number service.eSent Date and TimefCall DurationRedial List ScreendefbcaRedial DetailsScreenabcdefg](https://usermanual.wiki/LG-Electronics-USA/L705I.Users-Manual-1/User-Guide-860503-Page-53.png)
![55Voice/Videophone CallsgInternational Call Duration䃨䇭 Calling overseas from Japan䃨䇭 Calling from overseas䃨䇭 When making voice callcAM[Menu] and then selectX"Video phone call"Redial List Screen / Redial Details Screen Sub MenuaThe Redial List Screen(P54)/ Redial Details Screen(P54)XM[Menu]XPerforms the following operations[Video phone call]Make a Video Phone.[Compose mail]Creates an i-mode mail to the phone number on the Redial screen.→P161[Add to phonebook]Adds a number to the phonebook from the redial list.→P80[Customize call]Make a call changing the phone number in the ridial. You can save the phone number to the phonebook by using C [Save].XLon the Phone number entry screen XKto move the cursor to the place where you want change thenumber Xchange the phone number XA[Change list]䋪Switch logs to display.[Delete 1 item]Delete the selected/displayed Redial entry.XC[Yes][Delete all]䋪Deletes all redial entries.XC[Yes]䋪䋺 Not displayed on the Detail screen.Note• You can also make a call by selecting an entry on the Dialed Calls list screen and pressing A. You can also make a video call if you select M[Menu] X"Dialed video call". • If the same phone number is saved repeatedly in the Phonebook, the name found first in a Reading search is displayed.• Phone numbers dialed with "184" or "186" will be recorded as a different phone number.• Press I[Mail] on the Redial List Screen / Redial Details Screen, to create an i-mode mail to the phone number on the selected redial entry.Recent callsRecent mailReceived CallsReceived mailSent mail: Display the recent call list screen.→P57: Display the recent mail list screen.→P178: Display the Received call log list screen.→P56: Display the received mail log list screen.→P178: Display the sent mail log list screen.→P178When making voice callWhen making video callContinue on the next page](https://usermanual.wiki/LG-Electronics-USA/L705I.Users-Manual-1/User-Guide-860503-Page-54.png)
![56Voice/Videophone CallsReceived CallsUsing the Received Calls LogUp to 30 incoming voice or video call entries are recorded in Received Calls. The phonenumber and the date/time are stored in the call logs.• If there have been more than 30 calls made, the most recent 30 calls are retained in the log.aThe Stand-by display XL• If the caller sends Caller ID, the type of call and a name saved in the Phonebook are displayed. If the caller is not saved in the Phonebook, the call type and the phone number are displayed. If the caller did not send the Caller ID, the reason for No Caller ID is displayed.aThe other party's name as saved in the PhonebookIf the name is not saved, the phone number will be displayed.bIncoming Method䋯 Arrived /Miss voice call(includes "Reject call")䋯 Arrived /Miss video call(includes "Reject call")cThe Other Party's Phone NumberIf the phone number has not been saved in the phone book, "Not recorded" is displayed.If there are arrows right and left of the icon, press J to view the content.dIncoming international call䃨䇭 Incoming international call from overseas䃨䇭 Calling from overseas䃨䇭 Dialing an international call using international roaming overseaseIncoming Multi number call䋪䋯䋯 Basic number/Additional number 1/Additional number 2䋪: Appears if you subscribe to the Multi number service.fReceived Date and TimebMove cursor to a log XCaIncoming MethodbThe name entered into the phone bookIf the phone number is not in the phone book, "Unregistered" is displayed, and if the information of the phone number has not been received, "User unset" is displayed.cThe Other Party's Phone NumberdIncoming Multi number call䋪The name registered for the line in "Number settings" in P262 appears with an incoming Multi number call.䋪 : This is displayed when you subscribe to Multi number.eReceived Date and TimefCall Duration䋯䇭Arrived /Miss voice callgInternational Call Duration䃨䇭 ᶏᄖ䈎䉌 ࿖㓙㔚䈪⌕ା䃨䇭 ᶏᄖ䈪࿖㓙䊨 䊷䊚 䊮 䉫 ਛ䈮⌕ା䃨䇭 ᶏᄖ䈪࿖㓙䊨 䊷䊚 䊮 䉫 ਛ䈮࿖㓙㔚䈪⊒ାcAM[Menu] and then select X"Video phone call"Received Calls ListdefbcaReceived CallsDetails ScreenabcdefgWhen making voice callWhen making video call](https://usermanual.wiki/LG-Electronics-USA/L705I.Users-Manual-1/User-Guide-860503-Page-55.png)
![57Voice/Videophone CallsSub Menu of the Received Calls List/Details ScreenaThe Received Calls List Screen(P56)/ Received Calls DetailsScreen(P56)XM[Menu]XPerforms the following operations[Video phone call]Make a Video Phone.[Compose mail]Creates an i-mode mail to the phone number on the Received calls screen.→P161[Add to phonebook]Adds a number to the phonebook from the Received call logs .→P80[Customize call]Pick up a phone number from the Received calls list screen, edit the phone number, then make a call. Use C[Save] to register the phone number to the Phonebook.XL on the Phone number entry screen XK to move the cursor to the place where you want change the number X change the phone number XA[Change list]Switch logs to display.[Delete 1 item]Delete the selected/displayed Redial entry.XC[Yes][Delete all]Delete all entries from the Received calls.XC[Yes]䋪䋺 Not displayed on the Detail screen.Recent callsUsing the Recent CallsUp to 60 incoming and outgoing calls can be recorded in "Recent call logs".• When more than 60 items have been added, items are deleted sequentially from the oldest ones.aThe Stand-by displayuAFor subsequent steps and the description of screen components, see the"Redial"(P54), "Received calls"(P56) section.Note• You can also make a call by selecting alog on the Received Calls list screen and pressing A. You can also make a video call if you select M[Menu]XDialed video call". • The reason for the lack of a Caller ID is displayed in the history for a call without Caller ID.→P119• If the same phone number is saved repeatedly in the Phonebook, the name found first in a Reading search is displayed.• Received calls from parties using dial-in service may have a different number from the number they actually dialed from.• Press I[Mail] on the Received Calls List/Details Screen, to create an i-mode mail to the phone number on the selected received entry.Recent callsRecent mailReceived mailRedialSent mail: Display the recent call list screen.→P57: Display the recent mail list screen.→P178: Display the received mail log list screen.→P178: Display the redial list screen.→P54: Display the sent mail log list screen.→P178](https://usermanual.wiki/LG-Electronics-USA/L705I.Users-Manual-1/User-Guide-860503-Page-56.png)
![58Voice/Videophone Calls184/186Showing/Hiding Caller ID for Each CallThere are 2 ways to show/hide Caller ID for each call: adding "184"/"186", or using the submenu on the Phone number entry screen.Showing/Hiding Caller ID by Adding 184/186aEnter "184"(Not notify)/"186"(Notify) XEnter the phone numberbAM[Menu] and then select X"Video phone call"Showing/Hiding Caller ID Using the Sub MenuExample: Using the Sub menu of the Phone number entry screenaEnter the phone numberXM[Menu]X"CallerID"X"Notify"/"Not notify"/"Cancel"bAM[Menu] and then select X"Video phone call"PauseSending Touch-tone Signals QuicklyEnter "P" and a number after the phone number and make a voice call to the number. It willsend a Push signal (DTMF) to the number after "P".• The signal may not be received depending on the device on the receiving side.aEnter the phone numberXPress *3timesandenter"P"XEnterthe number to sendXAAfter the call is connected, the number after "P" is displayed. The displayed number is send by pressing A.Note• The sub menu of the Recent call list screen/detail screen is the same as the one of the Redial and Received call list screen/detail screen.→P55, P57Note• You can set to show/hide Caller ID to the network in advance.→P260When making voice callWhen making video callWhen making voice callWhen making video call](https://usermanual.wiki/LG-Electronics-USA/L705I.Users-Manual-1/User-Guide-860503-Page-57.png)
![59Voice/Videophone CallsWORLD CALLMaking International CallsWORLD CALL is an international calling service available on DoCoMo mobile phones.FOMA service subscribers are also signed up for WORLD CALL at the time of initialsubscription (except subscribers explicitly declining this service).• This service works with approximately 240 countries and regions around the world.• Charges for "WORLD CALL" are added to the monthly FOMA service call charges.• No initial fee and no fixed monthly charges apply.• This service is not available with some billing plans.• For details on WORLD CALL, contact the "DoCoMo Information Center" shown at the back of this manual.• When using international carriers other than DoCoMo, please contact the carrier directly.Change to the International Call Dialing ProcedureThe "MY LINE" service is not applicable to mobile phone communications, including WORLDCALL service. Along with the introduction of the "MY LINE" service, the dialing procedure forinternational communications using a mobile phone has been changed. Consequently, theprevious dialing procedure (Omitting "010" from the following dialing procedure) can no longerbe used.Enter the Phone Number And Make a International CallEnter the number in the following order.a"009130-010-Country code- Area Code (City Code) - PhoneNumber"• Generally, in the situation where a "0" appears before the Area Code (City Code), please remove "0". (In a few countries, like Italy, "0" must not be removed).bA䂓When making International video callM[Menu] and then select X "Video phone call"If an overseas party uses a specific 3G mobile phone, you can make an International video call to that party by pressing M[Menu] X Select "Video phone call" after the following dialing procedures.• For information about the countries where connection can be made and telecommunications carriers, visit the DoCoMo's web site.• The other party's image displayed on the FOMA handset may blur and may be unable to be connected depending on the handset connecting the international video-phone.](https://usermanual.wiki/LG-Electronics-USA/L705I.Users-Manual-1/User-Guide-860503-Page-58.png)
![60Voice/Videophone CallsMaking an International Call Using "+"Enter "+" at the beginning of a phone number and dial to replace "+" with an internationalaccess code automatically. Press 0for more than one second to enter "+".• The WORLD CALL (009130010) is set to be added automatically by default.→P61a0(for 1+ seconds) XEnter "Country Code - Area Code (CityCode) - Phone Number"• Generally, in the situation where a "0" appears before the Area Code (City Code), please remove "0". (In a few countries, like Italy, "0" must not be removed).bAInternational call: Make a call after converting "+" into an international access code.Original number: Make a call without converting "+"into an international access code.Cancel 䋺Cancel dialing.䂓When making International video callM[Menu] and then select X "Video phone call"cSelect a dialing methodMaking an International Call Adding International AccessCodeYou can select an international access code from the sub menu and add it to the phonenumber.aEnter "Area code - other party's phone number"• Generally, in the situation where a "0" appears before the Area Code (City Code), please remove "0". (In a few countries, like Italy, "0" must not be removed).bM[Menu]X"Select prefix"XSelect an international access codeThe selected international access code is inserted at the beginning of the entered phone number.cA䂓When making International video callM[Menu] and then select X "Video phone call"Making an International Call EasilyThe International Call settings can be changed.Note• This option is available only inside the FOMA network service area.• If the phone number has "+81" as its prefix, "+" will not be converted into the International Access Code.Note• By default, WORLD CALL(009130010) is registered to "Prefix 1".→P63Dialed callconfirmationscreen](https://usermanual.wiki/LG-Electronics-USA/L705I.Users-Manual-1/User-Guide-860503-Page-59.png)
![61Voice/Videophone CallsSetting to Add the International Access Code Automatically<Auto assistsetting>You can set whether to add an international access code automatically instead of "+" whenyou make a call by entering "+" at the beginning of the phone number.aM[Menu]X(Settings)X"International dial"X"Auto assistsetting"X"Auto"/"OFF "Auto 䋺 When set, it automatically sets the international access code prefix.None䋺 Doesn't change the number.Setting International Access Codes<International Prefix Settings>When setting "Auto assist setting" to "Auto", specify the international access code to addautomatically.aM[Menu]X(Settings)X"International dial "X"IDD prefixsetting"bPerform the following operation[IDD prefix name]Enters the International Dial number of the country from the Auto Assist Settings[IDD prefix code]Enters the International Dial number of the country from the Auto Assist SettingscI[Done]Setting Auto Assist of Country Code<Auto internastional dial>Set whether to automatically replace leading "0", if entered, of a phone number with "+ Countrycode" during international roaming. Also, you can specify Country code to be addedautomatically.aM[Menu] X(Setting) X"International dial" X"Autointernational dial" XPerform the following operations[Auto international dial]X"On" / "Off"[Target country]XSelect a Country codebI[Done]Default AutoDefault IDD prefix name: WORLDCALL IDD prefix code: 009130010Default Auto international dial: On Target country: Japan 81](https://usermanual.wiki/LG-Electronics-USA/L705I.Users-Manual-1/User-Guide-860503-Page-60.png)
![62Voice/Videophone CallsRegistering Country Code<Country code list>Up to 50 Country codes can be registered.aM[Menu] X(Setting) X"International dial" X"Country code list"bI[Menu] XPerform the following operations•C : Edit the selected county code.[Country name]Register a name of Country code. Up to 7 full-pitch or 14 half-pitch characters can be entered.XEnter name[MCC]Up to 5 digits can be stored.XSelect a Country codecI[Done]Sub menu of the "Country code list" screena"Country code list" screen (P62) XM[Menu] XPerform thefollowing operations[Add new]Go to Step 2 (P62) in "Registering Country Code".[Edit]Edit the selected country code. Go to Step 2 (P62) in "Registering Country Code".[[Delete]Delete the selected country code.X"Yes"[Delete all]Delete all country codes.X"Yes"Default 22 country codes have been storedNote<Edit>• You can edit a default country code.<Delete>• You cannot delete the country code that is set to be added automatically in "Auto international dial" (P61)."Country codelist" screen](https://usermanual.wiki/LG-Electronics-USA/L705I.Users-Manual-1/User-Guide-860503-Page-61.png)
![63Voice/Videophone CallsPrefix SettingsSet the Prefix Added to the Telephone NumberUp to 3 numbers number (prefix) to add to the beginning of the phone number such as aninternational access code, "184", "186 can be stored .aM[Menu]X(Settings)X"Call/VT/Dialing "X"Prefix dial"bSelect Prefix Input Column XEnter the NumberXI[Done]• Up to ten digits can be entered as a prefix.Sub AddressMaking a Call by Specifying a Sub AddressAllows user to set if digits after ":" in a phone number with a ":" are identified as a sub-address. A sub-address is used to call up a specific device connected to an ISDN line or toselect contents on "V live".aM[Menu]X(Settings)X"Call/VT/Dialing "X"Sub-addresssetting"X"On"/"Off"On 䋺Separates sub addresses by ":".Off 䋺Doesn't separate Sub addresses by ":".Default Prefix 1: 009130010 Prefix 2/Prefix 3: UnregisteredNote• Please do not add Pauses and the such to the prefix. If they are present, the call can not be connected.Default OnNote•":" is not identified as a delimiter of a sub-address if:-":" is entered at the beginning of the phone number.- A specific number such as "184" or "186" is entered at the beginning of the phone number and ":" is entered right after it.](https://usermanual.wiki/LG-Electronics-USA/L705I.Users-Manual-1/User-Guide-860503-Page-62.png)
![64Voice/Videophone CallsReconnect AlarmSetting the Alarm Sounding until theReconnecting is PerformedYou can set an alarm that keeps sounding until a voice or video call is reconnected when thecall was disconnected due to weak signals.aM[Menu]X(Settings)X"Call/VT/Dialing "X"Call feature"X"Reconnection alarm"XSelect AlarmHigh alarm䋺Sets to High alarm.Low alarm 䋺Sets to Low alarm.No Alarm 䋺Sets not to sound an alarm.Noise ReductionClarifies Conversations in Noisy LocationsNoise Reduction reduces background noise. The other party can more easily understand theconversation, even in a noisy locale.aM[Menu]X(Settings)X"Call/VT/Dialing "X"Call feature"X"Noise reduction"X"On"/"Off"On 䋺Noise Reduction is engaged.Off 䋺Noise Reduction is disengaged.Receiving Voice/Video CallaIncoming Call ArrivesThe ringtone sounds.•P䋺Place the call on response hold.→P67䂓During a voice call•I[Silent] : Stop the ring tone or vibration. Again, if I[Reject] is pressed, the call is rejected.䂓During a video call•C[Substitute image] : Answer the call using the substitute image.Default High alarmNote• Reconnection depends on the situation and signal strength.• If the signal suddenly worsens, the call may be dropped without the alarm sounding.• The billed airtime will continue during the reconnection attempt.• If the call is dropped, the other party will hear nothing.Default OffIncoming voicecall screen Incoming videocall screen](https://usermanual.wiki/LG-Electronics-USA/L705I.Users-Manual-1/User-Guide-860503-Page-63.png)
![65Voice/Videophone CallsbAAnswer the call.• When the Touchpad is not illuminated, touchpad keys are unavailable. Press a dial key /*/# to illuminate the touchpad, then operate with the touchpad keys•C[Spk on/Spk off] : Toggle Hands-free On or Off.• Pressing a dial key/*/# during a call allows you to send Touch-tone signals.䂓During a voice call•I[Hold/Release] : If you subscribe to the Call waiting service, you can hold the call or cancel the hold.䂓During a video call•I[Image/Camera] : Switch the image to send between the alternate image and the camera image.•A: Switches between the Inner and Outer Camera for the image to send to the other partycWhen talking is over, PWhen the caller has sent Caller ID• If you subscribe to Multi number, the name registered for the line in "Number settings" in P262 appears with an incoming call.When the caller has sent Caller IDThe reason for no Caller ID is displayed instead of a phone number.→P119Note• The incoming call actions such as a ring tone or vibration vary depending on the settings in "Profile" or the settings saved in the Phonebook.→P77, P92, P95• When "General manner" is activated, the ring tone does not sound. But if "Original manner mode" is set, the ring tone may sound depending on the settings.→P98•When "Answer mode " is set to "Slide up", you can answer a call by opening the handset.→P66• When the "Close setting" is set to "End the call", closing the FOMA handset during a call terminates the call. However, when using accessories such as the flat-plug earphone/microphone with switch (option) the call will not be terminated when the handset is closed.• If subscribed to the Voice mail, Call waiting or Call forwarding service, when "Arrival call act" is set to "Answer" and "Set in-call arrival act." is set to "Activate", a tone during a call sounds if a call arrives during another call. If tone sounds during a call , the network services are available.→P261• When the Public mode (Drive mode) is activated, incoming call is not informed (The ring tone does not sound). Also, even if a call arrives when the display is turned off, the backlight of the display will not be turned on.• When the caller is registered in the Phonebook, the phone number and registered name appear.• You can set "Set mute ring (sec.)" to delay the incoming call actions for a call made from the other party not saved in the or without Caller ID.→P121• Use the following functions to reject incoming calls from a caller not saved in Phonebook/specific caller.- In "Accept/Reject call ", activate "Reject unknown "→P121- In "Accept/Reject call ", activate "Reject on list"→P118<Video call>• You cannot switch to a video call during a voice call using this FOMA handset.• During a call, the low battery alert sounds from the Earpiece every 30 seconds. You can keep talking;however, the call will be terminated momentarily when the handset power is automatically turned off.• This FOMA handset does not support handsfree devices (such as In-car handsfree kit 01) via USB connection.• When the Voice mail service is activated during a video call, a SMS notifies you of a new message.• Even if the Call forwarding service is activated, an incoming video call is not forwarded if the forwarding destination is not a video-phone device supporting 3G-324M. Check the forwarding destination device before setting the Call Forwarding.• i-mode mail or Message R/F arriving during a video call is stored at the i-mode Center. SMS can be received even during a video call.• You cannot receive 32K video calls and they are not recorded in Received Calls.• You cannot switch between a voice and video call during a call using the FOMA handset.](https://usermanual.wiki/LG-Electronics-USA/L705I.Users-Manual-1/User-Guide-860503-Page-64.png)
![66Voice/Videophone CallsIncoming Call Screen Sub MenuaIncoming call screen (P64) XM[Menu]XPerform the followingoperations[Voice mail]䋪1Connect a call to the Voice mail service center.[Call rejection]䋪2Reject an incoming call and hang up.[Call forwarding]Transfer an incoming call to the specified number.䋪1䋺This option is not available unless you subscribe to the Voice mail service.䋪2䋺This option is not available unless you subscribe to the Call forwarding service and you specify a forwarding destination.Answer modeSetting how to answer incoming voice calls<Answer mode>You can set to answer an incoming voice call by opening the FOMA handset (Slide up) orpressing a dial key in addition to A.aM[Menu]X(Settings)X"Call/VT/Dialing"X"Incoming call "X"Answer mode"bPerform the following operation[Slide up]You can answer a call by opening the FOMA handset.[Any key answer]You can answer a call by pressing dial keys, *,# other than A.[SEND key only]You can answer a call by pressing A.Close SettingEnd/Hold Calls by Closing the FOMA HandsetaM[Menu]X(Settings)X"Call/VT/Dialing"X"Call feature"X"Close settings"XSelect conditions of closing the FOMA handsetEnd Call䋺Ends the call.Continue䋺Continues the call.On Hold 䋺Place the call on hold the active call.Default SEND key onlyDefault End Call](https://usermanual.wiki/LG-Electronics-USA/L705I.Users-Manual-1/User-Guide-860503-Page-65.png)
![67Voice/Videophone CallsReceiver volumeAdjusting the Volume during a CallThe Receiver volume can be adjusted in 7 levels from 1䌾7.aIncoming Call Screen (P49) XF䋯E•F䋺 Increase the volume.•E䋺 Decreases the volume.Incoming call volumeAdjusting the Ring VolumeThe ring volume can be adjusted in 8 levels from 0 to 7.aThe Stand-by display XF䋯EThe sound volume adjustment screen opens, and each press of F䋯E changes the volume.• If no action is taken for approximately 2 seconds, the sound volume adjustment screen closes automatically and the volume is set.On holdPlacing a Call on Hold When You CannotAnswer a Call ImmediatelyaIncoming Call Screen (P64) XPThe tone set in the "On hold tone"(P68) is played. The image set in the "Response hold image"(P73) appears for video calls.bwhen you can resume the callA• You can also cancel the hold on a video call by pressing c [Answer]. If you press A to cancel the hold, the alternate image will be sent to the other party.䂓To terminate a voice call/video callPress P.Default 3Note• The adjusted Earpiece volume will be retained after the call.• "Receiver volume" in "Volume" (P94) is changed, too.Default 3Note• Not available when Manner Mode is activated.• "Incoming call volume" in "Volume" (P94) is changed, too.Voice Call onHold screen Video CallResponseHoldscreenContinue on the next page](https://usermanual.wiki/LG-Electronics-USA/L705I.Users-Manual-1/User-Guide-860503-Page-66.png)
![68Voice/Videophone CallsOn Hold ToneSetting the "On Hold Tone"Instead of answering the ring, you can select to play one of the 3 on-hold-tones (guidance) tothe calling party.aM[Menu]X(Settings)X"Call/VT/Dialing"X"Incoming call "X"On hold tone"X"Hold tone 1"/"Hold tone 2"/"Hold tone 3"•I[Play] : plays back the hold tone.Holding ToneSetting the Holding ToneThe Holding tone which the other party hear can be selected from 3 tones.aM[Menu]X(Settings)X"Call/VT/Dialing "X"Call feature"X"Holding tone"X"Hold tone 1"/"Hold tone 2"/"Hold tone 3"•I[Play] : plays back the hold tone.Public mode (Drive mode)Using Public mode (Drive mode)Public mode (Drive mode) is an automatic response service to assist in observing manners inpublic locations. When Public mode (Drive mode) is activated, a voice guidance is played tothe other party indicating that you are driving or at a place where you cannot talk (such as on atrain, bus, or in a movie theater) and cannot answer the call, and the call is disconnected.• You can set or cancel Public mode (Drive mode) in Standby (and when "out of service area" is displayed).• This option is not available during data communication.a*(One second later)When a call arrives, a voice guidance is played in Japanese saying that "The person you are calling is currently driving or in the area where cellphone should not be used. Please try again later" is played.Note• The other party is charged even during a hold.• If you subscribe to the Voice mail service/Call forwarding service, you can connect the incoming call to the Voicemail service center/forward the incoming call to the specified phone number.→P256, P259Default Hold Tone 1Default Hold Tone 1](https://usermanual.wiki/LG-Electronics-USA/L705I.Users-Manual-1/User-Guide-860503-Page-67.png)
![71Voice/Videophone CallsMissed CallChecking Missed CallsIf you could not answer a call, the Missed call notification screen opens on the Stand-bydisplay. The Received Calls List Screen can be accessed from its icons, allowing the user toconfirm who has called.aAn incoming call terminatesThe missed call icon is shown on the Stand-by display. The number on the icon indicates the number of calls.bCXKto select an missed call iconThe Received Calls list screens (P56) displayed.Record messageRecording of Voice Message from a CallerWhen You Cannot Answer a CallWhen record message is activated, if you cannot answer the call, the voice guidance is playedand the other party’s message is recorded.Setting the Record MessageaM[Menu] X(LifeKit)X"Record message"X"Record msg.setting"bPerform the following operation•C [List] : List of the items is displayed.[Activate record msg.]Set the Record Message. When selecting "Off", you cannot set the following items:X"On/"Off"[To answer]When a phone call is received, set a time between 0 and 120 seconds for the Record Message to auto-answer the call.XEnter Response Time[Answer message]Select an answer message.X"Japanese1"/"Japanese2"/"English"•I You can listen to the response message.cI[Done]Note• After he Received Calls list screen is displayed, the missed call icon will vanish.Default Activate record msg.: OffStand-by displayMissed call icon(The number indicates the number of calls)](https://usermanual.wiki/LG-Electronics-USA/L705I.Users-Manual-1/User-Guide-860503-Page-70.png)
![72Voice/Videophone CallsWhen a Call Arrives with Record Message ActivatedIn a Voice Call, the other party's voice is recorded.䂓To answer the caller while you are playing or recording messagesPress A.䂓To play Record MessageThe Stand-by displayXPress C[OK]XJ and then select or press E for 1+ seconds. The Record Message list screen (P72)is displayed.• disappears after the Record Message is.Playing/Deleting Record MessageaM[Menu]X(Lifekit)X"Record message"X"Record Msg. list"•I[Delete] : The selected Record Message is deleted.䂓To delete all Recorded MessagesM[Menu] on the Record Message list screen XSelect "Delete all".bMove the cursor to a Record MessageXC[Play]The Record message is played.•C䋺Stop the message.•Q䋺Return to the Record Message list screen.Note• (Blue) appears at the top of the screen when the Record Message is activated.<Response Time>• If the set Response time is longer than the set ringing time for Voice mail service/Call forwarding service, the settings of the ringing time for the Voicemail service/Call Forwarding service take precedence.• If the response time is set shorter than the set "Set mute ring (sec.)", Record message starts without the ringing action.Note• The Record Message cannot be recorded when "Out of service area" is displayed, the handset power is turned off, or Public mode (Drive mode) is set.• If a call arrives when the Additional guidance is being played or when a Record message is being recorded, the call is rejected.䂓䈍㗿䈇It is recommended that you write down messages from the Record Message and store them in a separatelocation. DoCoMo is not responsible for lost data due to failure or repair of the FOMA handset.During anincoming call PlayingAdditionalGuidanceRecording aRecord MessageDisplaying aniconThe set time has elapsedRecordedDisplayingan newRecordmessage icon(The numberindicatesthenumberof calls)RecordMessageList Screen](https://usermanual.wiki/LG-Electronics-USA/L705I.Users-Manual-1/User-Guide-860503-Page-71.png)
![73Voice/Videophone CallsSetting the Image to Send to the Other PartySubstitute imageSetting the Substitute ImageaM[Menu]X(Settings)X"Call/VT/Dialing"X"Video phone"X"Substitute image"X"Default"/"Select image"XI[Done]• When "Select image" is selected, press D on "Select file" field. XC[List] and then select from the images saved in "My picture" in "Data box".→P194 Response hold imageSetting the Response Hold ImageaM[Menu] X(Settings) X"Call/VT/Dialing" X"Video Phone"X"Responseholdimage"X"Default"/"Select image"XI[Done]• When "Select image" is selected, press D on "Select file" field. XC[List] and then select from the images saved in "My picture" in "Data box".→P194Holding imageSetting the Holding ImageaM[Menu]X(Settings)X"Call/VT/Dialing"X"Video Phone"X"Holding Image"X"Default"/"Select image"XI[Done]• When "Select image" is selected, press D on "Select file" field. XC[List] and then select from the images saved in "My picture" in "Data box".→P194Video phone settingsChanging the Video Call SettingsaM[Menu]X(Settings)X"Call/VT/Dialing "X"Video phone"X"Videophone set"bPerform the following operation•C[List] : List of the items is displayed.[Display setting]Sets the output of the main window and sub window for the Video Phone.Default Displaying setting : Me-Other Send camera image: On Screen size: Large Visualpreference: Normal Light: Always on Auto redial as voice: OffHand-free switch: OnMe-OtherOther-MeOther onlyMe only: The caller's image is displayed on the main window, and your image on the sub window.: Your image is displayed on the main window, and the caller's image on the sub window.: Other Party's Image only displayed.: Your image only displayed.](https://usermanual.wiki/LG-Electronics-USA/L705I.Users-Manual-1/User-Guide-860503-Page-72.png)
![74Voice/Videophone Calls[Send camera image]Sets whether one sends the other party one's image. When "Off" is set, the other party receives a substitute image.X"ON"/"OFF"[Screen size]Sets the display size of the main window.X"Normal"/"Large"[Visual preference]Configures the preferences for the images sent to the other party[Light]Sets the talking screen's backlight level.[Auto redial as voice]You can set whether to automatically redial after switching to a voice call if the handset of the receiving party does not support video calls.X"ON"/"OFF"[Hands-Free switch]S et whether or not to do a Hands-free call during a video call.X"ON"/"OFF"cI[Done]Prefer img qualStandardPrefer motion spd: Set priority to sent image quality. Effective when there is little movement.: Set the sent video quality and motion to standard.: Set priority to motion for sent images. Effective when there is a lot of movement.Always onTerminal setting : Always stays on during a call.: In accord with the "Light" in (Settings).→P103](https://usermanual.wiki/LG-Electronics-USA/L705I.Users-Manual-1/User-Guide-860503-Page-73.png)
![77PhonebookSaving to FOMA Hanset PhonebookaThe Stand-by displayXU(1+ seconds)bPerform the following operations[(Saveto)]Select save location. This section explains the case where "Handset" is specified as the saving destination. When "UIM" is specified as the saving destination, the UIM phonebook entry screen is displayed. →P79X"Handset"/"UIM"[(MemoryNo.)]The smallest un-assigned number is allocated to a new record automatically. You can still re-allocate it to your favorite number from 000 to 999 manually.XEnter Memory Number[ Name]Up to 16 full-pitch or 32 half-pitch characters can be entered. Enter using Kanji, Hiragana, Pictograph, symbol, alphanumeric character, or Katakana.XEnter name[Reading]Enter or edit when necessary. Up to 32 half-pitch characters can be entered. Enter using Katakana, alphanumeric or symbol. XEnter reading[ Phone number]Up to 26 digits can be entered.XEnter the phone number[ Mail address]Up to 50 half-pitch characters can be entered. Enter using alphanumeric characters or symbols.XEnter a mail address[ Secret code]䋪Enter the security code, set the secret code. I When pressing [Release], the settings are deleted.XEnter Secret code[䉫䊦䊷䊒 (Group)]You can select from among 31 types of groups, from "No group" or from "Group1" to "Group 30". Groups can be used for a Group search (P83)XSelect a group[Image]When sending/receiving calls, or when checking Phonebook data, set the screen image/i-motion/etc...CharacterMy Picturesi-motionStill image photographyTerminal setting䋺Set the Character. When H is pressed, each part (hair, face, top, bottom, accessories, background) can be selected, J allows each item to be selected. After setting, press C[Done].䋺Select an image saved in "Image" in the "Data box".→P194䋺Select a movie/i-mode saved in "i-motion" in "Data box".→P201䋺Start the camera, and capture an image as a group image .→P129In accord with the "Call display" settings.→P100"Add tophonebook"screen(FOMA handset ("Handset"))Continue on the next page](https://usermanual.wiki/LG-Electronics-USA/L705I.Users-Manual-1/User-Guide-860503-Page-76.png)
![78Phonebook[ Ringtone]Select the ring tone played when receiving voice/video calls from the parties in Phonebook.[ Mail tone]Select a ring tone played when receiving mails from the parties in Phonebook.[URL]Up to 256 half-pitch characters can be entered.XEnter URL[Zipcode]XEnter contact's postal code[ Home address]XEnter contact's home address[ Company name]XEnter contact's company name[Jobtitle]XEnter contact's title[ Co. zip code]XEnter contact's company postal code[ Company Address]XEnter contact's company address[Memo]Enter using Kanji, Hiragana, full-pitch or 200 half-pitch characters can be entered. Pictograph, symbol, alphanumeric character, or Katakana. Up to 100XEnter the memo[(Birthday)]XEnter birthday[ Substitute image]Sets the substitute image for the video call.[ (Secret)]This option appears when Secret mode setting (P117) is set to "Secret mode". Set this option to "On" if you save the created Phonebook entry as secret data.䋪䋺 For details on the Secret code, refer to "Mobile Phone User's Guide i-mode <FOMA>".cI[Done]MusicMelodyi-motionTerminal setting䋺Select a song saved in "Music" in the "Data box".→P224䋺Select from melodies saved in "Melody" in the "Data box".→P204䋺Select a movie/i-mode saved in "i-motion" in "Data box".→P201䋺In accord with the "Select ring tone" settings.→P92MusicMelodyi-motionTerminal setting䋺Select a song saved in "Music" in the "Data box".→P224䋺Select from melodies saved in "Melody" in the "Data box".→P204䋺Select a movie/i-mode saved in "i-motion" in "Data box".→P201䋺In accord with the "Select ring tone" settings.→P92Data boxTerminal setting䋺Select an image saved in "Image" in the "Data box".→P194䋺In accord with the "Call display" settings.→P100](https://usermanual.wiki/LG-Electronics-USA/L705I.Users-Manual-1/User-Guide-860503-Page-77.png)
![79PhonebookSaving UIM Contactsa"Add to phonebook" screen (P77) X(Save to) field X"UIM"bPerform the following operations[ Save to]Select save location. When "Handset" is specified as the saving destination, the FOMA handset (Handset) phonebook entry screen is displayed.→P79X"Handset"/"UIM"[ Name]Up to 10 full-pitch or 21 half-pitch characters can be entered. Enter using Kanji, Hiragana, symbol, alphanumeric character, or Katakana.XEnter name[Reading]Up to 12 full-pitch or 25 half-pitch characters can be entered. Enter or edit when necessary. Enter using full-pitch katakana, half-pitch alphanumeric, or half-pitch symbol.XEnter reading[ Phone number]For green or white UIM, up to 26 digits can be entered. For blue UIM, up to 20 digits can be entered.XEnter the phone number[ Mail address]Up to 50 half-pitch characters can be entered. Enter using alphanumeric characters or symbols.XEnter a mail address[䉫䊦䊷䊒 (Group)]You can select from among 11 types of groups, from "No group" or from "Group1" to "Group 10".Groups can be used for a Group search (P78) XSelect a groupNote<Secret code>• If you add a new mail address defined as "Phone number + secret code@docomo.ne.jp" to Phonebook, you may not receive or send mails to that contact. Save the mail address in the format "Phone number@docomo.ne.jp" first, then insert the Secret code.<Secret>• When the Secret mode setting (P117) is set to "Secret only mode", the Phonebook entry is saved as secret data.• The secret entry is shown only when the "Secret mode" is set to "On" or "Secret only mode".• Secret entries cannot be saved in UIM Phonebooks.• The names saved in the secret entries are shown in the Redial log, history, or mail list/detail screen only when the "Secret mode" is set to "On" or "Secret only mode". The phone numbers and mail addresses are shown when the "Secret mode" is set to "Off".• When the "Secret mode" is set to "Off" , the name, image, melody applied to the secret contact will not be used when you received a call or mail from the contact."Add tophonebook"screen(UIM)](https://usermanual.wiki/LG-Electronics-USA/L705I.Users-Manual-1/User-Guide-860503-Page-78.png)
![80PhonebookcI[Done]Saving Contacts to the Phonebook fromReceived or Dialed CallsYou can save entries to a Phonebook from the list or detail screens of call history, mail, SMS,or bookmarks that contain a phone number, mail address, or URL. Also, you can save a phonenumber currently being entered/displayed on the phone number entry screen or web site, etc.aOpen the screen containing items to save䂓To save phone numbers using "Dialed calls" list screen (P54), "Dialed calls" detail screen (P54),"Received calls" list screen (P56), "Received calls" detail screen (P56):Press M[Menu] X Select "Add to phonebook".• To save phone numbers from the "Dialed calls" or "Received calls" list screen, select the target number from the history first.• If you already have the number in your Phonebook, the "Store" command will not be shown.䂓To save phone numbers using the phone number entry screenPress C[Save].䂓To save the sender or recipient mail addressPress M[Menu] in the mail details screen X Select "Store" X "Add to phonebook". • If there are several mail addresses, select the one to save first).䂓To save items using other screensSelect an item or phone number on the screen and press M[Menu] X Select "Add to phonebook".bPerform the following operations[New registration]Add a new entry to a Phonebook. Go to Step 3.• "Add to phonebook" screen opens for the new entry.[Add registration]Add an item to a saved Phonebook entry. Press M[Menu] on the phonebook entry screen to change the Phonebook search method.→P82XSelect a Phonebook entry to edit.• The updated "Add to phonebook" screen is displayed.• When you edit Phonebook entries in UIM, the updated entry is displayed in the "Add to phonebook" screen.cModify/save Phonebook entries XI[Done]• To save the entries, see Step 2 described in "Saving FOMA Handset (Phone) Contacts" (P77).Note• The data scanned from barcodes can be saved in a Phonebook, too.→P134• If you attempt to input a string longer than the maximum number of characters allowed, a warning screen notifying of the problem is displayed. Then, the truncated string will be shown in the "Add to phonebook" screen.](https://usermanual.wiki/LG-Electronics-USA/L705I.Users-Manual-1/User-Guide-860503-Page-79.png)
![81PhonebookSaving/Editing a Group NameYou can group the contacts in the FOMA handset Phonebook or UIM Phonebook. Up to 31groups can be saved in the FOMA handset Phonebook, and up to 11 groups can be saved inthe UIM Phonebook. "No group" is ascribed to one group.• "No Group" can not be edited.• Only the category names and members can be saved/edited in the UIM Phonebook.aM[Menu]X(Phonebook)X"Search phonebook"X"Group search"XMove the cursor to the targetgroupXI[Settings]•I[UIM]/[Handset] : Switches between the handset and the UIM's group settings.•J: Displays the selected group's setting.• For the operations on the screen (Group List screen) that opens for "Group search", see Step 2 in "Searching Phonebook" (P79)bC[Settings]cPerform the following operations[ (Group name)]Up to 10 full-pitch or 21 half-pitch characters can be entered. Enter using Kanji, Hiragana, pictographs (E-Moji), symbols, or Katakana.XEntering a group name[ Ringtone]Set the ringtone for a voice call.䌛Mail tone]Set the ring tone for when receiving mail.MusicMelodyi-motionTerminal setting䋺Select a song saved in "Music" in the "Data box".→P224䋺Select from melodies saved in "Melody" in the "Data box".→P204䋺Select a movie/i-mode saved in "i-motion" in "Data box".→P201䋺In accord with the "Select ring tone" settings.→P92MusicMelodyi-motionTerminal setting䋺Select a song saved in "Music" in the "Data box".→P224䋺Select from melodies saved in "Melody" in the "Data box".→P204䋺Select a movie/i-mode saved in "i-motion" in "Data box".→P201䋺In accord with the "Select ring tone" settings.→P92Group SettingsList screenGroup SettingsContinue on the next page](https://usermanual.wiki/LG-Electronics-USA/L705I.Users-Manual-1/User-Guide-860503-Page-80.png)
![82Phonebook[Image]Add an image to a group.[ Reject/Accept call]Set to accept/reject calls by groups. To set this item, entering the security code is needed.Enter the security code X"Accept call"/"Reject call"/"Not set"dI[Done]The same icon as on the "Add to phonebook" screen is displayed on each item.→P87Sub Menu on the Group List ScreenaThe Group setting screen (P81) XM[Menu] XPerform thefollowing operations[Reset]Resets the selected group settings. Group name is restored to its default.X"Yes"/"No"[Move]Changes the display position of the selected group.XLocate the new display position XC[OK][Settings]Edit the selected group settings.→P81[Reset all]Reset the group settings or group order.X"Yes"/"No"Search phonbookMaking a Call from the Phonebook• When searching Phonebook entries set as secret, set "Secret mode" to "ON" in advance.→P117Calling after Invoking the PhonebookIt is easy to make a call after invoking Phonebook.My Picturesi-motionStill image photographyTerminal setting䋺Select an image saved in "Image" in the "Data box".→P194䋺Select a movie/i-mode saved in "i-motion" in "Data box".→P201䋺Start the camera, and capture an image as a group image .→P129䋺In accord with the "Call display" settings.→P100](https://usermanual.wiki/LG-Electronics-USA/L705I.Users-Manual-1/User-Guide-860503-Page-81.png)
![83PhonebookaStand-by display XUThe contacts found by normal search appears in the Phonebook Contacts List Screen.→P88bSelect a Phonebook entryThe Phonebook details screen opens with the phone number displayed.•C[Display] : From the Phone number display, press C[Send] to make a call.䂓When multiple phone number is saved in the Phonebook entry.• Press H to select the number to make a phone call to.• Press A to select the number from the phone number selection screen. The selected number is immediately called.cI[Send]䂓When making video callM[Menu]X [Call function] X "Video call"Searching PhonebookYou have various ways to search phonebook.aM[Menu] X(Phonebook) X"Searchphonebook"•I[Default] : Search method at the cursol is set to the search method of Phonebook list screen which is displayed when you press U on the Stand-by screen. is displayed to the set search method.bPerform the following operation[Search all data]Displays all Phonebook entries for readings starting with (䈅line to 䉒 line) line and "others" (for readings other than the Japanese Kana syllables. •Press J to switch the reading line.• You can switch the displayed line by pressing the keys 1 to 0,*(䈅line to 䉒 line, and others) corresponding to reading lines.XSelect a reading line[Group search]Phonebook entries are searched/displayed with respect to each group (Group List Screen). Switch between FOMA handset (Handset) Phonebook and UIM Phonebook by J. Select a group with HXC[Select], Phonebook entries saved in each group are displayed. • In the group list screen, you can perform the following operation. - Scroll the screen by page using F/E.- Move the cursor by entering a group number (1 to 20) with dial keys.XSelect a groupNote• If the "Secret mode" is set to "Secret only mode" (P117), only Phonebook entries set as Secret (P78) can be searched/displayed.PhonebookContacts ListScreen(Example:Whensearching alldata)"Searchphonebook"screenThe usualsearch methodis displayed.](https://usermanual.wiki/LG-Electronics-USA/L705I.Users-Manual-1/User-Guide-860503-Page-82.png)
![84Phonebook[Reading search]Enter a part of the contact name "reading" to be search all the Phonebook entries. Up to 32 half-pitch characters can be entered for a reading.• All Phonebook entries are displayed when a reading is not entered.• You can search readings using other than the leading characters.XEnter reading[Memory No. search]All the Phonebook entries in the FOMA handset (phone) is displayed every 50 entries.•J to switch the display of memory number. • The UIM Phonebook entries can not be displayed.• The Phonebook entries can also be displayed by entering memory numbers with dial keys.XSelect the memory memory number display tab[Phone number?]Enter a part of the phone number saved to search all the Phonebook entries. Up to 26 digits can be entered for a phone number.• All the Phonebook entries are displayed when a phone number is not entered for a number search.• You can search phone numbers using other than the leading numbers.XEnter the phone number[Domain?]Sort the Phonebook entries by domain name within the mail address. • Press J to switch the target domain.• Register a domain to be searched in advance.→P88XSelect a domainSub Menu on the Group List Screena"Searchphonebook"screen(P82)X"Group search" XM[Menu]Xperform the following operation.[View UIM/View Phonebook data]Swithches between the UIM Phonebook and FOMA handset (Phone) Phonebook group search screen and display them.[Settings]The Group setting screen (P81) is displayed.[Select]Select the group at the cursor to search.Viewing a Phonebook EntriesaStand-by display XUaSave locations for the Phonebook entriesSaved in the handset Phonebook䋪Saved in the UIM Phonebook䋪䋺 An icon representing "Phone Number 1" is displayed.bPhonebook entry's image screenWhen an image is assigned to the phonebook entry, it is displayed on the screen.Phonebook listscreenab](https://usermanual.wiki/LG-Electronics-USA/L705I.Users-Manual-1/User-Guide-860503-Page-83.png)
![85PhonebookbSelect a Phonebook entry• When an image is assigned to the phonebook entry, it is displayed on the screen.• The same icon as on the "Add to phonebook" screen is displayed on each item.→P77Operations on the Phonebook list screenSelecting the Phonebook entry in which a phone number or a mail address is saved, pressA to make a call, press I[Mail] to sends a mail. If multiple phone numbers or mail addresses are registered, the Phone number or mail address selection screen opens.Operations on the Phonebook details screenSelecting a saved phone number, mail address, or URL display the following items at the lower right screen, and you can perform the following operations by pressing I.Send : Make a call to the selected phone number.Mail : Create a message and send it to the selected phone number/mail address.→P161Connect : Connect to the site of the selected URL.Sub Menu in the Phonebook List ScreenaPhonebook list screen (P84) XM[Menu] XPerform thefollowing operations[Mail/URL]Create mail or access URL.[Call function]Selects the calling method. If multiple phone numbers are saved, after selecting the calling method, select the number from the phone number selection screen.[Add new]Create a new Phonebook entry.→P77[Edit]Edit the selected contact.→P87[Copy]Copy or back up the selected contact.Compose mailAttach to mailCompose messageConnect to URL䋺Create an i-mode mail address to the selected mail address or phone number.→P161䋺Create an i-mode mail with the selected Phonebook entry attached.→P161䋺Create a short message address to the phone number in the selected phonebook.→P181䋺Connect to the URL saved in the currently selected entry.Video CallCustomize callInternational Call (Japan)䋺Make a Video Phone.䋺XMake a call changing the registered phone number. L on the Phone number entry screen XK to move the cursor to the digit to change Xchange the number XA䋺If you make a call to a phone number saved in the phonebook from overseas, the Country Code for Japan "+81" is added automatically at the beginning of the phone number.• If the phone number has a leading "0", it is automatically deleted.to the UIM䋪1to the phone䋪2to microSDBackup䋺Copy the selected contact to UIM.䋺Copy the selected contact to the handset.䋺Copy the selected contact to a microSD memory card.䋺Copy all data to a microSD card as a backup. • Images saved in the Phonebook cannot be copied.Phonebookdetails screen](https://usermanual.wiki/LG-Electronics-USA/L705I.Users-Manual-1/User-Guide-860503-Page-84.png)
![86Phonebook[Delete]Delete saved data in the Phonebook.[Multiple choice]Select multiple contacts to copy or delete them. After you select the storage location to save multiple phonebook entries from "Handset"/"UIM"(FOMA handset (Handset) Phonebook/UIM Phonebook), perform the following operations.XCheck off the contacts to be selected XM[Menu][Search by]Temporarily change the Phonebook search method.→P83[Send Ir data]Send a contact to an external device using infrared transmission.→P212[Create domain list]Create a domain to be searched using "Domain search".→P88㶎1䋺 Displayed when using the handset phonebook.㶎2䋺 Displayed when using the UIM phonebook.Sub Menu in the Phonebook Details ScreenaPhonebook details screen (P85) XM[Menu] XPerform thefollowing operations[Mail/URL]Create mail or access URL.[Call function]Selects the calling method.[Edit]Edit the displayed contact.→P87Deleteall in phoneall in UIM䋺Delete the selected Phonebook entry.䋺Delete all Phonebook data on the handset.䋺Delete all Phonebook data on the UIM.Copy to UIM䋪1Copy to phone 䋪2Copy to microSDDeleteMark/Unmark䋺Copy the selected contact to UIM.䋺Copy the selected contact to the handset.䋺Copy the selected contact to a microSD memory card.䋺Delete the selected Phonebook entry.䋺Delete all of saved data in the Phonebook.Focused dataall in phoneall in UIM䋺Send the selected contact.䋺Send all data saved in the handset Phonebook.䋺Send all data saved in the UIM Phonebook.Compose mailAttach to mailCompose messageConnect to URL䋺Create an i-mode mail address to the the mail address or phone number in the displayed (current) contact.→P161䋺Create an i-mode mail with the displayed contact data attached.→P161䋺Create a short message address to the phone number in the displayed contact.→P181䋺Access to the URL saved in the selected contact.Video CallCustomize callInternational Call (Japan)䋺Make a Video Phone.䋺Make a call changing the registered phone number. XL on the Phone number entry screen XK to move the cursor to the digit to change X change the number XA䋺If you make a call to a phone number saved in the phonebook from overseas, the Country Code for Japan "+81" is added automatically at the beginning of the phone number.• If the phone number has a leading "0", it is automatically deleted.](https://usermanual.wiki/LG-Electronics-USA/L705I.Users-Manual-1/User-Guide-860503-Page-85.png)
![87Phonebook[Copy]Copy the displayed contact.[Delete]Delete the displayed contact.X"Yes"/"No"[Send Ir data]Send the displayed contact using infrared transmission.→P212X"Yes"/"No"[Accept/Reject call]Select to accept or reject calls by the phone numbers in the FOMA handset "Handset" phonebookThe phone number saved in the "Reject on List"(P119) cannot be set to "Accept".XEnter security code XHto select item XI[Settings/Set as]㶎1䋺 Displayed when using the handset phonebook.㶎2䋺 Displayed when using the UIM phonebook.Editing the Phonebook EntriesaPhonebook details screen (P85) XM[Menu] X[Edit] XEdit theentries.See "Saving FOMA Handset (Phone) Contacts" (P77) or "Saving UIM Contacts" (P79) on how to edit the desired entry.䂓When saving a Phonebook contact to another memory number.A new memory number is added if you edit and save the existing memory number, leaving the original contact data as is.XXEnter any un-assigned memory number (000-999)bPress I[Done] when finished.䂓When saving in UIMEdited entries are overwritten.XI[Done] X "Yes"Deleting ContactsDeleting Individual or All EntriesExample: To delete a Phonebook entry from the Phonebook contacts list screenaMovethe cursor to deleteaPhonebook contact on thePhonebooklist (P84) screen XM[Menu]X"Delete" XSelect a deletingmethodDelete 䋺 Delete the selected Phonebook entry.all in phone䋺 Delete all Phonebook entries saved in the FOMA handset. The security code is required to delete.all in UIM 䋺 Delete all Phonebook entries saved on the UIM. The security code is required to delete.to the UIM䋪1to the phone䋪2to microSD䋺Copy the displayed contact to UIM.䋺Copy the displayed contact to the handset.䋺Copy the displayed contact to a microSD memory card.Phone NumberIn-call arrival action䋺Press J to select a desired phone number.䋺Press J to select the in-call arrival action (Not set /Reject call/Accept call).](https://usermanual.wiki/LG-Electronics-USA/L705I.Users-Manual-1/User-Guide-860503-Page-86.png)
![88Phonebookb"Yes"The selected/displayed Phonebook entry will be deleted.䂓To delete a Phonebook entry from the Phonebook detail list screenYou can delete Phonebook entries one at a time.Phonebook detail screen (P84) XM[Menu] X "Delete" X "Yes"Selecting and Deleting Multiple Contacts• If either of the handset (Phone) Phonebook or UIM Phonebook is displayed, contacts are deleted from the displayed (active) Phonebook.aPhonebooklist screen(P84)XM[Menu] X[Multiplechoice] X"Handset"/"UIM"bSelect the contacts to be deleted XM[Menu] X"Delete"• Put check marks at all unnecessary contacts, then select "Delete".c"Yes"The selected contacts will be deleted.Number of ContactsChecking the Phonebook Capacity and UtilizationYou can check the available space on the handset/UIM Phonebook.aM[Menu] X(Phonebook) X"No. of Phonebook"• "Secret entry" is shown when the secret mode is set to "Secret mode" or "Secret only mode".Setting the PhonebookYou can configure Phonebooks or images to be invoked from the Stand-by display.aM[Menu] X(Phonebook) X"PhoneBooksettings"Multiple choicescreen(when deletingcontacts)"No. ofPhonebook"screen"PhoneBooksettings" screen](https://usermanual.wiki/LG-Electronics-USA/L705I.Users-Manual-1/User-Guide-860503-Page-87.png)
![89PhonebookbPerform the following operation[Default mode]Search method for invoking the Phonebook list screen directly from the Stand-by display.XSelect search method[Create domain list]Create a domain to be searched using "Domain search". Enter a domain name selecting items that are not in the list.XEnter a domain name XC[Set][Display image]Set whether to display image assigned to the Phonebook or not.X"Show" / "Do not show"To edit the domain nameSelect the domain you want to edit from the list XC[Select] X Edit the domain name.You cannot edit "docomo.ne.jp" on that domain.To Delete the set Domain NameSelect the domain you want to delete from the list XM[Menu] X Select "Delete"Dialing Quick SearchCall with the Least Number of ButtonsAs you are in the Stand-by display, you can make a call easily using dial keys by dialing one ortwo digits number which is a memory number from "0" to "99" which corresponds to the phonenumber in the Phonebook.Example: To find a Phonebook entry by entering a memory number<aEnter one or two digits numberXAThe content of the Phonebook entry of the corresponding memory number which is entered is displayed and a call is made to that number.䂓If you enter 3 or more digitsThe phone numbers saved in the Phonebook containing the entered number sequence will be displayed. DXH to select a phone number and press A.•M[Menu] : Display the sub menu of the phone number entry screen.→P52•C[Save] : Add a new or extra phone number to Phonebook.→P80•I[Mail] : If you enter a 1 or 2 digit number, an i-mode mail with the address found in the numbered memory address will be created. If you enter 3 or more digits, an i-mode mail can be created to an address containing the entered number sequence.•H : When you enter a 1 or 2 digit number, the Phonebook entries assigned to the previous and subsequent memory numbers will be displayed. If you enter 3 or more digits, you can select to call from phone numbers containing the same sequence.•J : If the entered number has 1 or 2 digits, you can select from phone numbers from phone numbers saved in the entry at the numbered memory address.Note• When "Dialing Quick Search" in the "Dialing" is set to "Off", this option does not function.→P101• This function does not work when you enter a 2-digit number which begins with "0" such as "01" because it is not recognized as a memory number.The content of the Phonebook entry of the entered phone number or the corresponding memory number is displayed.](https://usermanual.wiki/LG-Electronics-USA/L705I.Users-Manual-1/User-Guide-860503-Page-88.png)
![90PhonebookDisplay the History of Call/MailaM[Menu] X(Phonebook)X[Call/Mail history] XSelect thelog to be displayedReceived Calls 䋺 Show logs for Voice/Video calls.Redial 䋺 Show redial logs for Voice/Video calls.Received mails 䋺 Displays the Received mails.Sent mails 䋺 Displays the Sent mails.Note• Received mails can be accessed from the Stand-by display by pressing L.→P56• Redial can be accessed from the Stand-by display by pressing R.→P54](https://usermanual.wiki/LG-Electronics-USA/L705I.Users-Manual-1/User-Guide-860503-Page-89.png)
![92Sound/Screen/Light SettingsSelect ring toneChanging the Ring ToneYou can change the ring tone for Voice/Video calls, mails, etc.• In addition to the pre-installed ring tones and melodies, i-motion programs, melodies and Chaku-Uta®,Chaku-Uta-Full® downloaded from i-mode sites or websites can be set as ring tones.aM[Menu]X(Settings)X"Sounds&Vibration" X"Select ring tone"bPerform the following operation•C[List] : The ring tone screen of the selected item opens.[Ring tone]Select the ring tone for a voice call.[Video call]Select the ring tone for a video call.[Mail/Message/SMS]Select the Mail tone for a mail.[Message R]Select the ring tone for a Message R.[Message F]Select the ring tone for a Message F.[SMS tone]Select the ring tone for SMS.Default Ring tone: Ring01䇭Video ring tone: Ring02䇭Mail/Message/SMS Volume: Message01MessageR: Message02䇭Message F: Message03SMS ring tone: Message04Musici-motionMelody䋺Select from music data saved in "Music" in the "Data box" .→P224䋺Select a movie/i-motion saved in "i-motion" in the "Data box".→P201䋺Select from melodies saved in "Melody" in the "Data box".→P204Musici-motionMelody䋺Select from music data saved in "Music" in the "Data box" .→P224䋺Select a movie/i-motion saved in "i-motion" in the "Data box".→P201䋺Select from melodies saved in "Melody" in the "Data box".→P204Musici-motionMelody䋺Select from music data saved in "Music" in the "Data box" .→P224䋺Select a movie/i-motion saved in "i-motion" in the "Data box".→P201䋺Select from melodies saved in "Melody" in the "Data box".→P204Musici-motionMelody䋺Select from music data saved in "Music" in the "Data box" .→P224䋺Select a movie/i-motion saved in "i-motion" in the "Data box".→P201䋺Select from melodies saved in "Melody" in the "Data box".→P204Musici-motionMelody䋺Select from music data saved in "Music" in the "Data box" .→P224䋺Select a movie/i-motion saved in "i-motion" in the "Data box".→P201䋺Select from melodies saved in "Melody" in the "Data box".→P204Musici-motionMelody䋺Select from music data saved in "Music" in the "Data box" .→P224䋺Select a movie/i-motion saved in "i-motion" in the "Data box".→P201䋺Select from melodies saved in "Melody" in the "Data box".→P204Ring toneSelection screen](https://usermanual.wiki/LG-Electronics-USA/L705I.Users-Manual-1/User-Guide-860503-Page-91.png)
![93Sound/Screen/Light SettingscI[Done]List of the Ring tone (Pre-installed)• Each melody is the copyright of LG ELECTRONICS.Note• The ringtone is displayed as its file name.• The following file formats can be set for the ring tone (but some files such as restricted files or files including only movies or sounds may not be set).SMF, MFi, MP4 (Mobile MP4), AMR• When the Ringtone is set to Videos/i-Motions, the "Call display"(P100) will be changed to the same.• Audio only Videos/i-Motions can be set for "Mail", "Message F", "Message R" and "SMS".• An Videos/i-Motions included with movie only cannot be set as the ring tone.A Mystique Message03 Ring03A Red Sky Message04 Ring04Alarm01 Morning Dew Ring05Alarm02 Musette Show My LoveAlarm03 New Wave Stand TallAlarm04 Next Time StatlightBell of Temple Piacer d'amor SteppersCigar and Wine Pocket Watch StrangerCsardas Power Off Sunday MorningGo Go Cart Power On Tail of LightHigher Right on Wake Me upMessage01 Ring01Message02 Ring02](https://usermanual.wiki/LG-Electronics-USA/L705I.Users-Manual-1/User-Guide-860503-Page-92.png)
![94Sound/Screen/Light SettingsVolumeChanging the Ringer VolumeaM[Menu]X(Settings)X"Sounds&Vibration"X"Volume"bPerform the following operation•J : Adjust the volume of the selected item. When the volume level is lowest, "Silent" is displayed and the sound is not emitted. Every time the volume is adjusted, the tone for the item sounds in the new volume.(Except "Receiver volume")•C[Select] : Volume Setting screen of the selected item is displayed[Ring tone]Adjust the incoming call volume for voice/video call.[Mail/Message/SMS]Adjust the incoming tone volume for Mail/Message R/F/SMS.[Alarm/Schedule]Adjust the alarm tone volume for Alarm/Schedule.[Dial sound]Adjust the dial sound volume [Slide tone]Adjust the volume when the FOMA handset is opened.[Key tone]Adjust the volume of keypad sound except dial tone and munu effect.[Menu effect]Adjust the volume for main menu operation.[Power On/Off]Adjust the volume when the handset is turned on/off.[Popup tone]Adjusts the volume when the popup window is displayed.[Receiver volume]Adjust the earpiece volume during a call. It can not mute the sound.cI[Done]Default (All) Level 3Volume SettingscreenTo be replaced](https://usermanual.wiki/LG-Electronics-USA/L705I.Users-Manual-1/User-Guide-860503-Page-93.png)
![95Sound/Screen/Light SettingsVibration settingsVibrating Instead of Ring tone or AlarmYou can set the handset to vibrate when a call or mail arrives or at a Schedule alarm time.aM[Menu]X(Settings)X"Sounds&Vibration"X"Vibrator"bPerform the following operation•J : Set the vibrate pattern of the selected item. Every time the vibration patter is changed, the handset vibrates in the new pattern.•C[List] : Vibrate pattern setting screen of the selected item is shown.[Incoming call]Sets the vibration pattern for voice/video call.[Mail/Message/SMS]Sets the vibration pattern for receiving mail/message R/F.[Alarm/Schedule]Sets the vibration pattern for the Alarm/schedule alert.cI[Done]Default (All) OffOffPattern 1Pattern 2Pattern 3䋺The handset does not vibrate.䋺The handset repeatedly vibrates for 0.5 seconds, then stops vibrating for 0.5 seconds.䋺The handset repeatedly vibrates for 1 seconds, then stops vibrating for 0.5 seconds.䋺The handset repeatedly vibrates for 3 seconds, then stops vibrating for 0.5 seconds.OffPattern 1Pattern 2Pattern 3䋺The handset does not vibrate.䋺The handset repeatedly vibrates for 0.5 seconds, then stops vibrating for 0.5 seconds.䋺The handset repeatedly vibrates for 1 seconds, then stops vibrating for 0.5 seconds.䋺The handset repeatedly vibrates for 3 seconds, then stops vibrating for 0.5 seconds.OffPattern 1Pattern 2Pattern 3䋺The handset does not vibrate.䋺The handset repeatedly vibrates for 0.5 seconds, then stops vibrating for 0.5 seconds.䋺The handset repeatedly vibrates for 1 seconds, then stops vibrating for 0.5 seconds.䋺The handset repeatedly vibrates for 3 seconds, then stops vibrating for 0.5 seconds.Vibrate Settingscreen](https://usermanual.wiki/LG-Electronics-USA/L705I.Users-Manual-1/User-Guide-860503-Page-94.png)
![96Sound/Screen/Light SettingsSelect Effect SoundSetting the Sound When a Key is PressedYou can set the effect sound when a key is pressed or a function is performed.aM[Menu]X(Settings)X"Sounds&Vibration"X"Select effect tone"bPerform the following operation•C[List] : List of the items of the selected item is displayed.[Dial sound]䋪Selects the effect sound when dial keys are pressed on the Stand-by screen or the Phone number entry screen. If set to "Japanese", "English", or "Korean", the numbers entered with dial keys will be read out.X"Japanese"/"English"/"Korean"/"Digital tone"[Slide tone]䋪Selects the effect sound when the FOMA handset is opened.X"Slide tone 1"/"Slide tone 2"/Slide tone 3"/"Slide tone 4"[Keypad sound]䋪Select sound effects that sound when a key is pressed other than the Dial sound and Menu effect.X"@@Keypad sound 1"/"Keypad sound 2"/"Keypad sound 3"/"Keypad sound 4@@"[Menu effect]䋪Selects the effect sound when a main menu is selected.X"Menu effect 1"/"Menu effect 2"/"Menu effect 3"/"Menu effect 4"[Power On]Selects the effect sound when the handset is turn on.[Power off]Selects the effect sound when the handset is turned off.[Low battery alert]Set whether to sound an alarm when the battery level is low.X"ON"/"OFF"Default Dial sound: Japanese Slide tone: Slide tone 1 Keypad tone: Keypad tone 1 Menu effect:Menu effect 1 Power On: Power On Power Off: Power Off Low battery alert: OnMusici-motionMelody䋺Select from music data saved in "Music" in the "Data box" .→P224䋺Select a movie/i-motion saved in "i-motion" in the "Data box".→P201䍃Videos/i-motion movies with only graphics cannot be set.䋺Select from melodies saved in "Melody" in the "Data box".→P204Musici-motionMelody䋺Select from music data saved in "Music" in the "Data box" .→P224䋺Select a movie/i-motion saved in "i-motion" in the "Data box".→P201䍃Videos/i-motion movies with only graphics cannot be set.䋺Select from melodies saved in "Melody" in the "Data box".→P204Select EffectTo be replaced](https://usermanual.wiki/LG-Electronics-USA/L705I.Users-Manual-1/User-Guide-860503-Page-95.png)
![97Sound/Screen/Light Settings䋪䋺 Press M[Play} on the Sound effect select screen to sound the sound effect selected by using J.Press M[Mute] not to sound a tone. You can also check the sound effect by pressing I[Play] and H on the Sound effect list screen. cI[Done]Quality alarmHaving a FOMA Terminal Warn You Before aCall Drops OutA FOMA handset uses this function to sound an alarm tone during a voice or videophone callwarning you that the signal quality is deteriorating and the call is likely to drop out.• If the signal rapidly deteriorates, the call may be drop out without warning.aM[Menu]X(Settings)X"Call/VT/Dialing"X"Call feature"X"Quality alarm"X"High alarm"/"Low alarm"/"Alarm off"Mail Ring DurationSetting Ring Time Duration for Receiving MailsYou can set how many times or for how long the ring tone sounds when mail arrives.aM[Menu]X(Settings)X"Sounds&Vibration"X"Mail ringduration"bPerform the following operation•C[List] : List of the items is displayed.[Mail ring]cI[Done]Manner modeMuting Handset TonesTurn off the tones that sound from the handset so as not to disturb others.a#(for 1 + seconds) or U(for 1 + seconds)X"Yes"To cancel Manner ModePress # (for 1 + seconds) or select F(for 1 + seconds) X "Yes" at the Stand-by display.Default High alarmDefault 1࿁OffOnceSelect time䋺Sets not to sound a ring tone.䋺Set to sound the ring tone once.䋺Set the duration of the ring tone. D Enter ring time between 1-30 seconds in the ring time field](https://usermanual.wiki/LG-Electronics-USA/L705I.Users-Manual-1/User-Guide-860503-Page-96.png)
![98Sound/Screen/Light SettingsManner SettingsChanging Manner ModeSelects the action of Manner Mode from "General manner" or "Original manner mode".The setting of the set Manner mode can be changed for the Original manner mode.Example: To change the settings of the Original manner modeaM[Menu]X(Settings)X"Sounds&Vibration"X"Manner settings"X"Original manner mode"XI[Edit]䂓To select the Manner mode type"Manner mode"/"Original manner mode"X Press CThe Manner mode setting will terminate. bPerform the following operation•J : Select the vibrate pattern or volume of the selected item. When the volume level is lowest, "Silent" is displayed and the sound is not emitted.•C[List] : Vibration pattern and their volume setting screen of the selected item is displayed.[Incoming call vib.]Sets the vibration pattern for voice/video call.[Mail/SMS vib.]Sets the vibration pattern for receiving mail/message R/F.[Alarm/Schedule vib.]Sets the vibration pattern for the Alarm/schedule alert.[Incoming call vol.]Adjust the incoming call volume for voice/video call.Note• There are 2 types of Manner Mode: "General manner" and "Original manner mode".→P98• appears at the top of the screen when Manner Mode is activated.• A notification screen appears when you try to play a melody, video or i-motion, while Manner Mode is activated.• Even when Manner Mode is activated, the camera shutter tone sounds.Default Manner ModeOffPattern 1Pattern 2Pattern 3䋺The handset does not vibrate.䋺The handset repeatedly vibrates for 0.5 seconds, then stops vibrating for 0.5 seconds.䋺The handset repeatedly vibrates for 1 seconds, then stops vibrating for 0.5 seconds.䋺The handset repeatedly vibrates for 3 seconds, then stops vibrating for 0.5 seconds.OffPattern 1Pattern 2Pattern 3䋺The handset does not vibrate.䋺The handset repeatedly vibrates for 0.5 seconds, then stops vibrating for 0.5 seconds.䋺The handset repeatedly vibrates for 1 seconds, then stops vibrating for 0.5 seconds.䋺The handset repeatedly vibrates for 3 seconds, then stops vibrating for 0.5 seconds.OffPattern 1Pattern 2Pattern 3䋺The handset does not vibrate.䋺The handset repeatedly vibrates for 0.5 seconds, then stops vibrating for 0.5 seconds.䋺The handset repeatedly vibrates for 1 seconds, then stops vibrating for 0.5 seconds.䋺The handset repeatedly vibrates for 3 seconds, then stops vibrating for 0.5 seconds.Originalmannermode settingscreen](https://usermanual.wiki/LG-Electronics-USA/L705I.Users-Manual-1/User-Guide-860503-Page-97.png)
![99Sound/Screen/Light Settings[Mail/SMS vol.]Adjust the incoming tone volume for Mail/Message R/F/SMS.[Alarm/Schedule vol.]Adjust the alarm tone volume for Alarm/Schedule.[Effect/Popup tone]Adjusts the effect sound or volume when the popup is displayed.[Low battery alert]Set whether to sound an alarm when the battery level is low.X"On" / "Off"cI[Done]Set as stand-byChanging Stand-by DisplaySets the items (Time, Calender, Schedule, Shortcuts, Wallpaper) to be shown on the Stand-bydisplay.aM[Menu]X(Settings)X"Display"X"Set asstand-by"bPerform the following operation•C[List] : List of the items screen of the selected item is displayed.•M[Preview] : The selected preview screen is displayed.[Wallpaper]Sets the image to be displayed on the Wallpaper screen.XDXon the image name field, C[List]XSelect image data[Display items]Sets the display of Clock or Calendar on the Stand-by display.Default Wallpaper: Image, illusion Display items: Clock Clock type: Large digitalShow shortcut icons: ON䇭Imagei-motion 䋺Select an image saved in "Image" in the "Data box".→P194䋺Select a movie/i-mode saved in "i-motion" in "Data box".→P201Do not show:Clock:Calendar:䋺Do not display the Clock or the Calendar.䋺Display the Clock.䋺Display the calendar.*1䍃You can display the calendar Schedule screen on the Stand-by screen (P234) by performing XCX Display a calendar XC[OK] Calendar + Schedule:䋺Display a calendar and schedule events for today.*2䍃You can view the schedule list screen from the Stand-by screen (P234) by performing XCX Display a Schedule XC[OK] . Also, the calendar screen of Schedule (P234) can be displayed from the Stand-by screen by performing the same steps as in setting the "Calendar".Stand-by displayscreenContinue on the next page](https://usermanual.wiki/LG-Electronics-USA/L705I.Users-Manual-1/User-Guide-860503-Page-98.png)
![100Sound/Screen/Light Settings[Clock type]䋪2Sets the displaying method of the Clock type.• The following screen will be displayed from the Stand-by screen by performing XCX Clock type XC[OK]- If "Small Digital", "Large Digital" or "Analog" is set Alarm List Screen (P231) can be displayed.- If "Dual clock" is setIf you select a clock for the Home city (P240), the "Time and Date Settings Screen"(P47) is displayed. If you select a second City, "Stand-by display" opens.[Clock font color]䋪3Sets the font color of the Clock.XJselects the color.[Sub clock]䋪4Set the city for the second clock.XC[List]XSelect a city by using J[Show shortcut icons]Set whether to display the function mark (shortcut icons) assigned to each key of the touchpad to the Stand-by display.→P33X"ON"/"OFF"䋪1䋺 Can not selected if a Flash movie is set as wallpaper.䋪2䋺Shown when "Clock" is selected on "Display items" menu.䋪3䋺 Shown when "Dual clock" is selected on "Clock type" menu.䋪4䋺 Shown when "Small digital" is selected on "Clock type" menu.cI[Done]Call displaySetting the Image When Receiving a CallSets the image shown on the screen when receiving a call.aM[Menu]X"Settings"X"Display"X"Call display".Small DigitalLarge digitalAnalogDual clock䋺Shrinks the digital clock to fit to screen.䋺Enlarge the digital clock to fit to the screen.䋺Sets to display the analog clock on the screen.䋺Displays the time/date for two cities on the Stand-by display. Selects the second city to be displayed on the bottom of screen from the "2-nd City" menu.Note• Some images/Movies/i-motion may not be set for the Stand-by display.• The Movies/i-motion movie set for the Stand-by display is played when the FOMA handset is opened and stops when the handset is closed. When the FOMA handset is opened, use P to play or stop the i-motion movie.• Web To function from Movies/i-motion set to the Stand-by display is not available.Default Incoming voice call: Image, incoming_call_black Incoming video call: Image,incoming_call_blackCall displaySetting screen](https://usermanual.wiki/LG-Electronics-USA/L705I.Users-Manual-1/User-Guide-860503-Page-99.png)
![101Sound/Screen/Light SettingsbPerform the following operation•C[List] : List of the items screen of the selected item is displayed.•M[Preview] : The selected preview screen is displayed.[Incoming voice call]Sets the image shown on the screen when receiving a voice call.XDXon the image name field, C[List]XSelect image data[Incoming video call]Sets the image to be displayed on the incoming voice call screen.XDXon the image name field, C[List]XSelect image datacI[Done]DialingSetting the Screen When DialingSets the screen to enter numbers on the Stand-by display.aM[Menu]X(Settings)X"Display"X"Dialing"bPerform the following operation•C[List] : List of the items screen of the selected item is displayed.[Motion dialing]Sets the display method of the entered numbers.[Dialing Quick Search]When the number is entered 1 digit or 2 digits, sets whether to search the Phonebook entry of corresponding registration number.X"On"/"Off"Imagei-motion䋺Select an image saved in "Image" in the "Data box".→P194䋺Select a movie/i-mode saved in "i-motion" in "Data box".→P201Imagei-motion䋺Select an image saved in "Image" in the "Data box".→P194䋺Select a movie/i-mode saved in "i-motion" in "Data box".→P201Note• Movies/i-motion that includes sounds only cannot be set as the Call display.• When the Call display is set to Movies/i-motion, the "Select ring tone"(P92) will be changed to the same.• If you change the setting of Incoming call screen from the movies or i-motion which has sound to which does not, the ring tone settings goes back to the previous settings automatically. Default Motion dialing: Digital Dialing Quick Search: ONDigitalPictureOff䋺Display in digital design.䋺Display in painting design.䋺Display in no effect.Dialing screenTo beContinue on the next page](https://usermanual.wiki/LG-Electronics-USA/L705I.Users-Manual-1/User-Guide-860503-Page-100.png)
![102Sound/Screen/Light Settings[Dialing font color]Sets the font color of the number entered when "Motion dialing" is set to "OFF".XSelect Dialing font colorcI[Done]Wake-up displayDisplaying a Wake-up MessageYou can display a greeting when you turn the handset power on.aM[Menu]X"Settings"X"Display"X"Wake-up display"bPerform the following operation•C[List] : List of the items is displayed.•M[Preview] : The selected screen is shown[Wake-up display]Sets the image shown on the screen when the handset is starting.XDXon the image name field, C[List]XSelect image datacI[Done]Display phonebook imageDisplaying an Image Saved in the Phonebook onthe Incoming Call <Display phonebook image>When a call with the Caller ID from the other party saved in the phonebook arrives, you candisplay the image set in the phonebook.aM[Menu]X(Settings)X"Call/VT/Dial"X"Incoming call"X"Display phonebook image"X"On"/"Off"Default Image, pwronImagei-motion 䋺Select an image saved in "Image" in the "Data box".→P194䋺Select a movie/i-mode saved in "i-motion" in "Data box".→P201Default OnNote• The priority order for image display on an incoming call is as follows:aImage set in the Phonebook bImage set for Group in the Phonebook cImage set for Call display](https://usermanual.wiki/LG-Electronics-USA/L705I.Users-Manual-1/User-Guide-860503-Page-101.png)
![103Sound/Screen/Light SettingsBack LightSetting the Back Light of DisplayYou can set the Display backlight (Backlight).aM[Menu]X(Settings)X"Display"X"Light"bPerform the following operation•C[List] : List of the items screen of the selected item is displayed.[Display duration]Set the Display backlight duration of the Display between 5-30 seconds.XEnter Display duration[Display brightness]Sets the backlight level of the Display.X"100%"/"80%"/"60%"/"40%"[AC connected]Sets the brightness when the AC charger is connected.cI[Done]Power saver modeDisplaying in the Power Saving ModeSets the backlight level of the Display to the power saving mode of the lowest level.aM[Menu]X(Settings)X"Others"X"Power saver mode"X"ON"/"OFF"Color ThemeSetting the Display ColorYou can select a combination of screen colors and a menu format.aM[Menu]X"Settings"X"Display"X"Color theme"X"Illumination dot"/"Equalizer line"Illumination dot 䋺 Displays the menu in icon shape list with the black-based color scheme.Equalizer line 䋺 Displays the menu in list with bright blue and gray-based color.Default Display duration: 10 Seconds Display brightness: 100% AC Connected: Display settingTerminal settingAlways on䋺In accordance with the setting in "Display duration" and "Display brightness".䋺Light is always on.Default OffDefault Illumination dot](https://usermanual.wiki/LG-Electronics-USA/L705I.Users-Manual-1/User-Guide-860503-Page-102.png)
![104Sound/Screen/Light SettingsMenu settingsChanging the Appearance of Main MenuMenu guidanceShowing Guidance of Main MenuYou can set whether display the guidance of an icon selected on Main Menu.aSelect M[Menu]X(Settings)X"Display"X"Menu settings"X"Menu guidance"X"ON"/"OFF"Menu CustomizationChanging the Display Method of Main MenuYou can change the display of the Main menu. Also, you can save up to two combinations ofMain menu icons.Example: Changing a combination of Main menu iconsaSelect M[Menu]X(Settings)X"Display"X"Menusettings"X"Menu customization"X"Customize 1"/"Customize 2"Select a saving destination for combinations of icons from "Customize 1" or "Customize 2".• To open a preview screen of the main menu, move the cursor to an item to change and press M[Preview] on the "Menu customization" screen.䂓When you do not wish to change the combination of iconsSelect "Color theme".The Main menu display will be in accord with the "Color Theme".Menu customization will terminate.bMove cursor to an icons to changeXC[Change]XSelect newiconXI[Done]X"Yes"Select an icon from images saved in "My picture" in the "Data box"䂓To cancel changing of the iconsSelect "No" on the confirmation screen for saving.To initialize the main menu to the default settingsOn the customize screen you want to restore M[Menu]X"Restore to default"XSelect "Yes"Default OnDefault Color themeNote• Images smaller than 80 x 70 in pixels can be used as icons for customization. Customize screen](https://usermanual.wiki/LG-Electronics-USA/L705I.Users-Manual-1/User-Guide-860503-Page-103.png)
![105Sound/Screen/Light SettingsIllumination dot SettingsSetting Incoming Call LightYou can set the incoming or alarm illumination to On or Off, or set a combination of illuminationcolors for each item.aM[Menu]X(Settings)X"Display"X"Lighting LED"bPerform the following operation•C[List] : List of the items screen of the selected item is displayed.•M[Preview] : The selected lighting pattern is displayed.[Lighting]Sets whether to light/blink the light of the illumination.X"ON"/"OFF"[Incoming voice call]Sets illumination pattern/color when receiving a call.XSelect pattern[Incoming video call]Sets illumination pattern/color when receiving a video call.XSelect pattern[New mail]Sets illumination pattern/color when receiving a new mail.XSelect pattern[New message R]Sets illumination pattern/color when receiving a new message R.XSelect pattern[New message F]Sets illumination pattern/color when receiving a new message F.XSelect pattern[New SMS]Sets illumination pattern/color when receiving a new SMS.XSelect pattern[New Voice mail]Sets illumination pattern/color when playing a Voice mail message.XSelect pattern[New Record message]Sets illumination pattern/color when playing Record message.XSelect pattern[Playing music]Sets illumination pattern/color when playing music.XSelect patternDefaultLighting: ON Incoming voice call: Red Incoming video call: Red & White New mail: BlueNew message R: Blue & WhiteNew message F: Yellow & Pink New SMS: Yellow & Aqua Voice mail: Pink & WhiteRecord message: Green & Yellow Playing music: Pink & Aqua Alarm; Blue & Pink & AquaSchedule/To Do list: Blue & Pink & AquaUnread message: OFF](https://usermanual.wiki/LG-Electronics-USA/L705I.Users-Manual-1/User-Guide-860503-Page-104.png)
![106Sound/Screen/Light Settings[Alarm]Sets illumination pattern/color when an alarm is activated.XSelect pattern[Schedule/To do list]Sets illumination pattern/color for the set time of Schedule/To do list.XSelect pattern[During call]Sets illumination pattern/color during a call.XSelect pattern[Missed call]Sets whether to light the call indicator if you could not answer a call.XON/OFF[Unread message]Sets whether to light the call indicator when an unread message remains.XON/OFFcI[Done]Set Date&TimeSetting Time FormatYou can set the display format for date/time.aM[Menu]X(Settings)X"Date&Time"X"Date&Time format"bPerform the following operation•C[List]: List of the items screen of the selected item is displayed.[Date format]Set the display format for the date.X"dd/mm/yyyy"/"mm/dd/yyyy"/"yyyy/mm/dd"[Time format]Set the display format for the time.X"12-hour"/"24-hour"cI[Done]Default Date format: MM/DD/YYYY Time format: 12-hourNote• yyyy=year, mm=month, dd=day in the display.](https://usermanual.wiki/LG-Electronics-USA/L705I.Users-Manual-1/User-Guide-860503-Page-105.png)
![107Sound/Screen/Light SettingsSelect languageSwitching the Display Language to EnglishYou can switch the language of the displayed function names or messages between Japaneseand English.aM[Menu]X(Settings)X"Others"X"䊋䉟 䊥 䊮䉧䊦 (Bilingual)"X"ᣣᧄ⺆ (Japanese)"/"English"Default JapaneseNote• When set to English, "Select language" is displayed as "䊋䉟 䊥 䊮䉧䊦 (Bilingual)"• The settings of this function are recorded on the UIM. If another UIM is inserted into the phone, the setting on a another UIM has priority.](https://usermanual.wiki/LG-Electronics-USA/L705I.Users-Manual-1/User-Guide-860503-Page-106.png)
![110Security SettingsPasswordsSome functions of the FOMA handset require a password. In addition to the Security Code,there are the network security code and the i-mode Password. These passwords help youutilize your handset.Security CodeThe Security Code is a 4-8 digit number. The Security Code is set to "0000" by default and ,however, you can change the code by yourself.→P111If the Security Code entry screen opens, enter the 4䌾8 digit Security Code andpress C[OK].• The Security Code is marked as "䋪" on the screen. The actual numbers entered will not be displayed.Network Security CodeThe Network Security Code is a 4-digit number that is required to access procedures and touse network services and is set to the number you selected at subscription. You can changethe code by yourself. If you have "DoCoMo ID/Password" for "My DoCoMo", thecomprehensive support site for PCs, you can change the network security code by visiting theweb site from your PC. You can change the Network Security Code by yourself by accessing"ฦ⒳ᚻ⛯䈐 (Procedures)" on DoCoMo e-site using i-mode.• For information on accessing "My DoCoMo" and the "DoCoMo e-site", see the back of this manual.i-mode PasswordAdd/remove from my menu, message service, i-mode service fees/cancellation require the4-digit "i-mode password" to change.(Some other information service providers may set passwords for their sites)i-mode password is originally set to "0000", but you can change it at any time. Access "iMenu"X"ENGLISH" X"Options" X"Change i-mode Password" if you are using i-mode.Warning about Passwords• Avoid setting a password using your birthday, a part of your phone number, your address or room number, 1111 or 1234, that can be easily guessed by others. Be sure to write down the set passwords and store them in a separate location.• Do not reveal your passwords to others. DoCoMo is not responsible for damage caused by misuse of your security codes by others.• DoCoMo will never ask you for your passwords.• If you forget your passwords, you need to bring an ID (driver's license, etc.), the handset and the UIM to a service counter such as DoCoMo shop. For details, contact a "DoCoMo Information Center" on the back of this manual.Security Code entry screen](https://usermanual.wiki/LG-Electronics-USA/L705I.Users-Manual-1/User-Guide-860503-Page-109.png)
![111Security SettingsUIM PIN/UIM PIN2You can assign 2 PIN numbers to the UIM, UIM PIN and UIM PIN2. These codes are set to"0000" by default, however, you can change them by yourself.→P112The UIM PIN is a 4- to 8-digit number (code) required to identify the user every time the UIM isinserted into the handset or the handset power is turned on in order to prevent unauthorizeduse. The UIM PIN entry is required to make or receive calls, and operate the handset. The UIMPIN2 is a 4- to 8-digit number used to reset outgoing call charges, incoming call charges (ifany) and the total of both, to reset total call charges, to set the maximum limit for call charges,to set the currency, or to use or apply for User certificates.If the UIM PIN/UIM PIN2 entry screen opens, enter the 4- to 8-digit UIM PIN/UIM PIN2 and press C[OK].• The entered UIM PIN/UIM PIN2 is marked as "䋪" on the screen. The numbers actually entered will not be displayed.• Use the UIM PIN and UIM PIN2 you set previously if you purchase a new handset but keep the same UIM.PIN Unlock CodeThe PIN Unlock Code is an 8-digit number to unlock the UIM PIN or UIM PIN2.→P112You cannot change it.• If you fail to enter the correct Pin Unlock code 10 times, the UIM PIN1PIN2 functions will be completely locked.New PasswordsChanging PasswordsThe security code can be changed.aM[Menu]X(Settings)X"Lock/Security"X"Change Securitycode"bEnter the current security codeChange Security code screen opens.cEnter a new security codedEnter the new security code again.䈗 ᄾ⚂ᤨ Security code (4 digits): 0000UIM PINentry screen(Example: UIMPIN)ᣂⷙ PIN1 䋯PIN2 䉮䊷䊄䈱⸳ቯ10 ࿁ㅪ⛯ജ䊚 䉴ജ OK䈱႐ว3࿁ㅪ⛯ജ䊚 䉴 PIN 䊨 䉾 䉪 ⸃㒰䉮 䊷䊄䈱ജ䊄 䉮 䊝䉲䊢 䉾 䊒⓹ญ䈮䈍䈇ว䉒䈞䈒 䈣䈘 䈇䇯PIN1 䉮䊷䊄䈱ജPIN2 䉮䊷䊄䈱ജ](https://usermanual.wiki/LG-Electronics-USA/L705I.Users-Manual-1/User-Guide-860503-Page-110.png)
![112Security SettingsPIN codeSetting the UIM PINPIN1 code requestSetting to Enter UIM PIN when the Handset is Turned OnSets the FOMA Handset so it displays UIM PIN 1 entry screen and can't be used withoutentering the UIM PIN at startup.aM[Menu]X(Settings)X"Lock/Security"X"PIN code"XEntersecurity codeX"PIN1 code request"X"ON"/"OFF"XEnter PIN1codeMaking emergency calls (to 110, 119 or 118) when the PIN1 entry screen is open.You can make emergency calls (to 110, 118 or 119) even when the PIN1 entry screen is open.XI[Emergency] Xmove the cursor to an emergency number XC[OK]/AUIM PIN/UIM PIN2Change codeChanging UIM PIN/UIM PIN2• Set "PIN1 code request" to "ON" before changing the UIM PIN.aM[Menu]X(Settings)X"Lock/Security"X"PIN code"XEnterSecurity codeb"Change PIN1 code"/"Change PIN2 code"XEnter Current UIMPIN/UIM PIN2The new UIM PIN/UIM PIN2 entry screen opens.cEnter the new UIM PIN/UIM PIN2 (4- to 8-digit)The new UIM PIN/UIM PIN2 reentry screen opens.dReenter the UIM PIN/UIM PIN2 entered in Step 3Unlocking a Locked UIMIf you enter an incorrect UIM PIN/UIM PIN2 three times in a row and the PIN lock screen opens,enter the PIN unblock code to cancel the lock.• The PIN Unlock code is written on the FOMA subscription application form (customer's copy).• You need to set new UIM PIN/UIM PIN2 after unlocking UIM PIN.䈗ᄾ⚂ᤨ UIMPIN: 0000 UIMPIN2: 0000](https://usermanual.wiki/LG-Electronics-USA/L705I.Users-Manual-1/User-Guide-860503-Page-111.png)
![113Security SettingsaPIN Lock screenXEnter PIN Unlock code (8 digits)The new UIM PIN/UIM PIN2 entry screen opens.bEnter the new UIM PIN/UIM PIN2 (4- to 8-digit)The reentry screen for confirmation screen opens.cReenter the UIM PIN/UIM PIN2 entered in Step 2Lock FunctionsLock allLocking the Handset to Prevent Use by OthersLocks the handset to prevent from using it.• When Lock all is activated, the only operations you can perform are power On/Off, emergency calls, and cancel Lock all.aM[Menu]X(Settings)X"Lock/Security"X"Lock"X"Lock all"XEnter Security codeX"Yes"/"No"Calling Emergency Numbers (110, 119, and 118) During Lock allEmergency numbers (110, 119, and 118) can be called during Lock all.XI[Emergency]XMove the cursor to the emergency number XC[OK]/A.To Cancel Lock allEnter the security code. If an incorrect security code is entered 5 times, the phone automatically shuts off.Lock Function Description ReferenceLock all Lock the handset to prevent unauthorized use. P113Call/Mail lock To prevent unauthorized use of the FOMA handset, you can disable making calls, entering an address with dial keys, answering calls, or displaying mail.P114Self mode You can disable all functions requiring communications such as making/receiving calls, using i-mode, or sending/receiving mail. P115Data access lock You can specify specific functions to lock. P115Keypad unlock You can lock the Sidekeys to prevent improper operations if the keys are pressed accidentally when the closed FOMA handset is kept in a bag. P116Display Call/mail logs You can hide Redial, Received calls, Sent mail logs, and Received mail logs. P117Secret mode You can keep someone from displaying the Phonebook entries, schedule, To Do tasks set as secret data. P117](https://usermanual.wiki/LG-Electronics-USA/L705I.Users-Manual-1/User-Guide-860503-Page-112.png)
![114Security SettingsStopping Incoming/Outgoing CallsCall/Mail lockDisabling Outgoing or Incoming CommunicationsDisable making calls, entering an address with dial keys, answering calls, or displaying mail.aM[Menu]X(Settings)X"Lock/Security"X"Lock"X"Call/Mail Lock"XEnter Security codebPerform the following operation•C[List] : List of the items is displayed.[Call/Mail Lock set]Sets whether to activate the Call/Mail Lock. When setting to "On", select from the items follow.X"On"/"Off"[Dialing call lock]Disable the following operations.• Making calls entering numbers with dial keys • Making calls using Received calls or mail history• Making calls to a phone number in the redial list (while allowing calls to a number saved in the phonebook or an emergency number such as "110", "119", or "118")• Saving, editing, or deleting a phonebook entry (including exchanging data via infrared communication, or copying/moving to the microSD memory card)XCheck off/Uncheck[Send mail lock]Disable the following operations.• Entering a mail address with dial keys• Sending mail to an address in the redial or received call log (while allowing mail to an address saved in the Phonebook)• Performing data communications connecting to a PC, etc.• Saving, editing, or deleting a phonebook entry (including exchanging data via infrared communication, or copying/moving to the microSD memory card)XCheck off/Uncheck[Incoming call lock]While the dialing call lock is activated, a missed call icon will not be displayed and the Received call logcannot be viewedXCheck off/Uncheck[Received mail display lock]While the dialing call lock is activated, an icon will indicate that incoming mail will not be displayed, andmail in the FOMA handset and received mail log can not be viewed. Disables display of send or receivedmails or Message R/F.XCheck off/UncheckcI[Done]䈗 ᄾ⚂ᤨ Lock Settings: OffCall/Mail Lockscreen](https://usermanual.wiki/LG-Electronics-USA/L705I.Users-Manual-1/User-Guide-860503-Page-113.png)
![115Security SettingsSelf modeStopping All Incoming/Outgoing CallsDisables all network functions, such as phone, i-mode and mail. Infrared communication is alsoimpossible.aM[Menu]X(Settings)X"Call/VT/Dialing"X"Self mode"X"On"/"Off"When Self Mode is "On", the Stand-by display displays a .Data access lockDisabling Phonebook or Datebook ViewingYou can lock specified functions and require the security code to use the handset, or restrictthe use of the handset.aM[Menu]X(Settings)X"Lock/Security"X"Lock"X"Data access lock"XEnter security codebPerform the following operation•C[List] : List of the items is displayed.[Data access Lock set]Set whether to activate the "Data access lock". When setting to "On", select from the items follow.While the dialing call lock is activated, an icon will indicate that incoming mail will not be displayed, andmail in the FOMA handset and received mail log can not be viewed.X"On"/"Off"[Phonebook]The Phonebook can not be used until the Security code is entered.• In the Redial list or logs, the phone number or mail address sent by the caller/sender will be displayed instead of the name saved in the Phonebook.• Receiving Phonebook entries using infrared communication becomes unavailable.XCheck off/Uncheck䈗 ᄾ⚂ᤨ OffNote• Self mode is deactivated if you try to call an emergency number.• If Self Mode is active, incoming callers will hear a message indicating that the phone is off. • Voice mail service and call forwarding service still works in Self Mode.• All Mails, Message R/F and SMS received while in Self Mode are stored at the i-mode center and SMS center (respectively). When receiving, after shutting off self mode, check new message/SMS.䈗 ᄾ⚂ᤨ Lock Settings: OffData accesslock setContinue on the next page](https://usermanual.wiki/LG-Electronics-USA/L705I.Users-Manual-1/User-Guide-860503-Page-114.png)
![116Security Settings[Mail]The mail function can not be used until the Security code is entered.• Receiving mail using infrared communication becomes unavailable.• SMS send while this function is activated is not received automatically. Perform "Check new SMS"XCheck off/Uncheck[Data box]The mail function can not be used until the Security code is entered.• Receiving data such as images or melodies to be saved in the Data box using infrared communication becomes unavailable.XCheck off/Uncheck[Record message]The Record message can not be used until the Security code is entered.• If the Record message is set to "On" and locked, $4 record msg.eps$ is not displayed on the Stand-by screen even when a message is recorded.XCheck off/Uncheck[Schedule]The schedule function can not be used until the Security code is entered.• An alarm set for a Schedule event will not sound.• Receiving schedule events using infrared communication becomes unavailable.XCheck off/Uncheck[i-mode]The i-mode can not be used until the Security code is entered.• i-mode connections such as "Web to" other than from the i-mode menu screen become unavailable.• i-Channel tickers will not be displayed.• Updating software or pattern data for the scanning function becomes unavailable.• Receiving Bookmarks using infrared communication becomes unavailable.XCheck off/Uncheck[i-appli]The i-appi can not be used until the Security code is entered.• Receiving i-appli data using infrared communication becomes unavailable.XCheck off/UncheckcI[Done]Keypad unlockPreventing Sidekey OperationsThe handset can be set to lock the Sidekey when it is closed.aM[Menu]X(Settings)X"Lock/Security"X"Keypad unlock"XPerform the following operationSlide up only 䋺Sidekeys are not available with the FOMA handset closed.Allow manual unlock 䋺Press F/E 2times while the FOMA handset is closed, the key lock is temporarily disabled.䈗 ᄾ⚂ᤨ Allow manual unlockNote• If the phone is closed at Photo-mode/Movie-mode, Keypad unlock is not set.](https://usermanual.wiki/LG-Electronics-USA/L705I.Users-Manual-1/User-Guide-860503-Page-115.png)
![117Security SettingsDisplay Call/Mail LogsSetting Redial/Received Call Log DisplayDisables display of redial, received call, sent mail, and received mail logs.aM[Menu]X(Settings)X"Lock/Security"X"Display Call/Mail logs"XEnter Security codebPerform the following operationThe items set to "On" will not be displayed.•C[List] : List of the items is displayed.[Redial logs]Set whether to display the redial function.X"On"/"Off"[Missed call logs]Set whether to display the Received call logs.X"On"/"Off"[Sent mail logs]Set whether to display the sent mail logs.X"On"/"Off"[Received mail logs]Set whether to display the received mail logs.X"On"/"Off"cI[Done]Secret modeDisplaying Secret DataYou can set whether or not to view a secret Phonebook/schedule.aM[Menu]X(Settings)X"Lock/Security"X"Secret mode"XEnter security codeXSelect Secret mode settings䈗 ᄾ⚂ᤨ (All) ONNote• If "Received call logs" is set to "Off", Record message cannot be played back.䈗 ᄾ⚂ᤨ OffDisplay Call/Mail logsSetting screen](https://usermanual.wiki/LG-Electronics-USA/L705I.Users-Manual-1/User-Guide-860503-Page-116.png)
![118Security SettingsOff 䋺Display only general data.On 䋺Display secret and general data.Secret only mode 䋺Secret only mode Display only secret data.Reject on ListRejecting Calls from a Specific NumberYou can reject calls from the specific parties stored in a list.• This function is available only when the caller sends Caller ID.• You should set the Caller ID request concurrently.Saving a Phone Number to RejectaM[Menu]X(Settings)X"Send/VT/Dialing"X"Incoming call"X"Accept/Reject call"XEnter securitycodeX"Accept/Reject set"XMove to the cursor to"Reject on list"XI[List]XI[Add]bPerform the following operation[Reject types]Selects action for rejected call.•C[List] : List of the items is displayed.[Reject number]Sets phone number for call rejection.•M[Search] : Searches and sets number from Phonebook. The name saved in the Phonebook is displayed on the list.•C[Select] : Enter and set phone number. The entered phone number is displayed in the list.cI[Done]To delete a saved phone numberSelect the number to delete from the Reject on list screenXM[Menu]X"Delete"/"Delete all"X"Yes"Note• appears at the top of the screen when Secret mode is activated.䈗 ᄾ⚂ᤨ AcceptSilentDisconnect all䋺Receive a call without the Ring tone. Displays a on the list.䋺You do not receive the call. Displays a on the list.Reject on ListscreenAdd new](https://usermanual.wiki/LG-Electronics-USA/L705I.Users-Manual-1/User-Guide-860503-Page-117.png)
![119Security SettingsTo edit a saved phone numberSelect a phone number to edit on the Reject on list screen XM [Menu] X Select "Edit"• If the phone number has already been saved, you can also save the phone number by performing from the Reject on list screen XM[Menu] X "Add new".Setting the Reject on ListaM[Menu]X(Settings)X"Send/VT/Dialing"X"Incoming call"X"Accept/Reject call"XEnter security codeX"Accept/Reject set"X"Reject on list"䂓To ReleaseSelect "Accept" on "Accept/Reject call" screen.Reject all callsRejecting All Incoming CallsYou can mute all incoming calls and disconnect without incoming call actions.aM[Menu]X(Settings)X"Send/VT/Dialing"X"Incoming call"X"Accept/Reject call"XEnter security codeX"Accept/Reject set"X"Reject all calls"X"Silent"/Disconnect call"Silent 䋺Receives all calls with the ring tones silent.Disconnect all䋺 Does not perform the incoming call actions for all incoming calls.䂓To ReleaseSelect "Accept" on "Accept/Reject call" screen.Anonymous callerActions When Receiving Calls from UnknownCallersYou can set whether to accept or reject calls without Caller ID depending on the reason for noCaller ID.Note• When the Reject call list is activated,and receive a call from the party registered in the Reject call list, appears on the Stand-by display and Received call log is recorded as a Missed call. The other party hears a busy signal.• i-mode mails or SMS are received regardless of rejection settings.䈗 ᄾ⚂ᤨ AcceptNote• When you have a call from the party registered in the Reject call list, appears on the Stand-by display and Received call log is recorded as a Missed call. The other party hears a busy signal.• i-mode mails or SMS are received regardless of rejection settings.䈗 ᄾ⚂ᤨ Anonymous Caller: Disabled Public Phone: Disabled Not Support: DisabledContinue on the next page](https://usermanual.wiki/LG-Electronics-USA/L705I.Users-Manual-1/User-Guide-860503-Page-118.png)
![120Security SettingsaM[Menu]X(Settings)X"Call/VT/Dialing"X"Incoming call "X"Anonymous caller"XEnter securitycodebPerform the following operation•C[List] : List of the items is displayed.[User unset]Set options for calls made without the Caller ID because the caller chose not to send Caller ID.[Pay phone]Set an option for calls made from Payphone.[Not support]Set an option for calls made from overseas or from a fixed line phone via forwarding services, from whichCaller ID cannot be sent. (Caller ID may be sent depending on the carrier.)cI[Done]DisableCall rejectionSilent alertTerminal setting䋺Cancel the setting.䋺Reject a call.䋺Recei ve the call without playing Ring tone. You can select an image saved in "My picture" in the "Data box" for the Incoming call screen.→P194XDXSelect field X "My picture" /"i-motion" X Select the Image䋺You can select a file from the "Data box" for the Incoming call screen or the ring tone.Incoming call screen : XDX Select field X "My picture"/"i-motion" X Select an imageRing tone : XDX Select field X "Music"/"i-motion"/"Melody" X Select a ring toneDisableCall rejectionSilent alertTerminal setting䋺Cancel the setting.䋺Reject a call.䋺Receive the call without playing Ring tone. You can select an image saved in "My picture" in the "Data box" for the Incoming call screen.→P194XDX Select field X "My picture"/"i-motion" X Select an image䋺You can select a file from the "Data box" for the Incoming call screen or the ring tone.Incoming call screen : XDX Select field X "My picture"/"i-motion" X Select an imageRing tone : XDX Select field X "Music"/"i-motion"/"Melody" X Select a ring toneDisableCall rejectionSilent alertTerminal setting䋺Cancel the setting.䋺Reject a call.䋺Receive the call without playing Ring tone. You can select an image saved in "My picture" in the "Data box" for the Incoming call screen.→P194XDX Select field X "My picture"/"i-motion" X Select an image䋺You can select a file from the "Data box" for the Incoming call screen or the ring tone.Incoming call screen : XDX Select field X "My picture"/"i-motion" X Select an imageRing tone : XDX Select field X "Music"/"i-motion"/"Melody" X Select a ring toneNote• When User unset is activated, if a call without caller ID set to "Reject unknown" arrives, the call will not be indicated, is displayed on the Stand-by screen, and the call is recorded in Received call log as a missed call. Calls are rejected even when Voice mail or Call forwarding service is activated. However, if Ringing Time is set to 0 second or the handset is out of service area or turned off, each network service starts.• i-mode mails or SMS are received regardless of rejection settings.<[User unset]>• If the Caller ID Request service is activated, it takes precedence over the settings of "Anonymous caller". the caller hears a message requesting the Caller ID.Anonymouscaller](https://usermanual.wiki/LG-Electronics-USA/L705I.Users-Manual-1/User-Guide-860503-Page-119.png)
![121Security SettingsSet mute ring(sec.)Muting Ring Tones for Unknown CallersYou can set the handset not to ring when a call arrives from other parties not saved in Contactsor without Caller ID. This prevents nuisance calls such as "1 ring calls" that disconnect after ashort ringing time.aM[Menu]X(Settings)X"Sounds&Vibration"X"Set mute ringtime"bPerform the following operation•C[List] : List of the items is displayed.[Set mute ring(sec.)]Sets the time before the ringer is played when a call is received. When setting to "On", select from theitems follow.X"Off"/"On"[Mute seconds ]Set an interval from when a call arrives until the ring action starts between 0 and 99 seconds.Xto enter the time[Mute time]Set whether to show the Received call logs for the call that was terminated within the time specified in"Mute seconds".X"Show"/"Do not show"cI[Done]Reject unknownRejecting Calls from Unknown CallerYou can set to reject calls from other parties not saved in Contacts.• This function is available only when the caller sends Caller ID.• It is recommended that you set the Caller ID request and "Anonymous caller" concurrently.䈗 ᄾ⚂ᤨ OffNote• When a relevant caller calls while this function is activated, incoming call actions, such as sounding the Ring tone, will not be taken for the set time; however, the Incoming call screen is shown.• This option works, even when Secret Mode is set enabled and there is a call from a party whose Phonebook entry is set as secret.<Set mute ring(sec.)>• If the Ring Delay is set longer than the response time of the Voice mail/Call forwarding services, the Record Message starts without the ring action.• If the Ring Delay is set longer than the response time of "Record message", the Record Message starts without the ring action.• You cannot change the "Mute seconds" setting when "Reject unknown" is set to "On".䈗 ᄾ⚂ᤨ Off](https://usermanual.wiki/LG-Electronics-USA/L705I.Users-Manual-1/User-Guide-860503-Page-120.png)
![122Security SettingsaM[Menu]X(Settings)X"Call/VT/Dialing"X"Incoming call"X"Accept/Reject call"XEnter security codeX"Reject unknown"X"On"/"Off"Other "Security Settings"In addition to the security functions described in this chapter, the following functions andservices are available.Note• The handset does not start incoming call actions for a rejected incoming call, but the call is recorded in Received call logs. The other party hears a busy signal.• Calls are rejected even when Voice mail or Call forwarding service is activated. However, if Ringing Time is set to 0 second, each network service starts.• i-mode mails or SMS are received regardless of rejection settings.Purpose Function Names/Service Names ReferenceTo upload or check safety messages through i-mode in case of disaster. "i-mode Disaster Message Board Service" service For further details, please see "Mobile Phone User's Guide (i-mode <FOMA> Chapter)".To Change Email address Change Mail AddressView an Email address if you forget it Confirm Mail AddressTo receive/reject mail from a specified domain Spam Mail Prevention(Reject/Receive Mail Settings)To receive/reject Email via i-mode onlyTo receive/reject mail from a specified addressWant to reject SMS Spam Mail Prevention(SMS Rejection Settings)Do not receive mail containing an URL Spam Mail Prevention(Reject mail with URL)To reject incoming i-mode mail in excess of 200 a day from an i-mode phone Restrict i-mode SpamTo reject unsolicited mail Reject Unsolicited Ad MailTo check the Email setting status Confirm SettingsTo restrict incoming Email size Limit Mail SizeTo temporarily disable mail functions Suspend MailTo select and download Email Receive option P167To register and reject calls from a nuisance caller Nuisance Call Blocking service P259To ask a caller to show Caller ID Caller ID Request P260To update software on the handset when necessary Software Update P325To protect the handset from harmful data Scanning Function P327](https://usermanual.wiki/LG-Electronics-USA/L705I.Users-Manual-1/User-Guide-860503-Page-121.png)
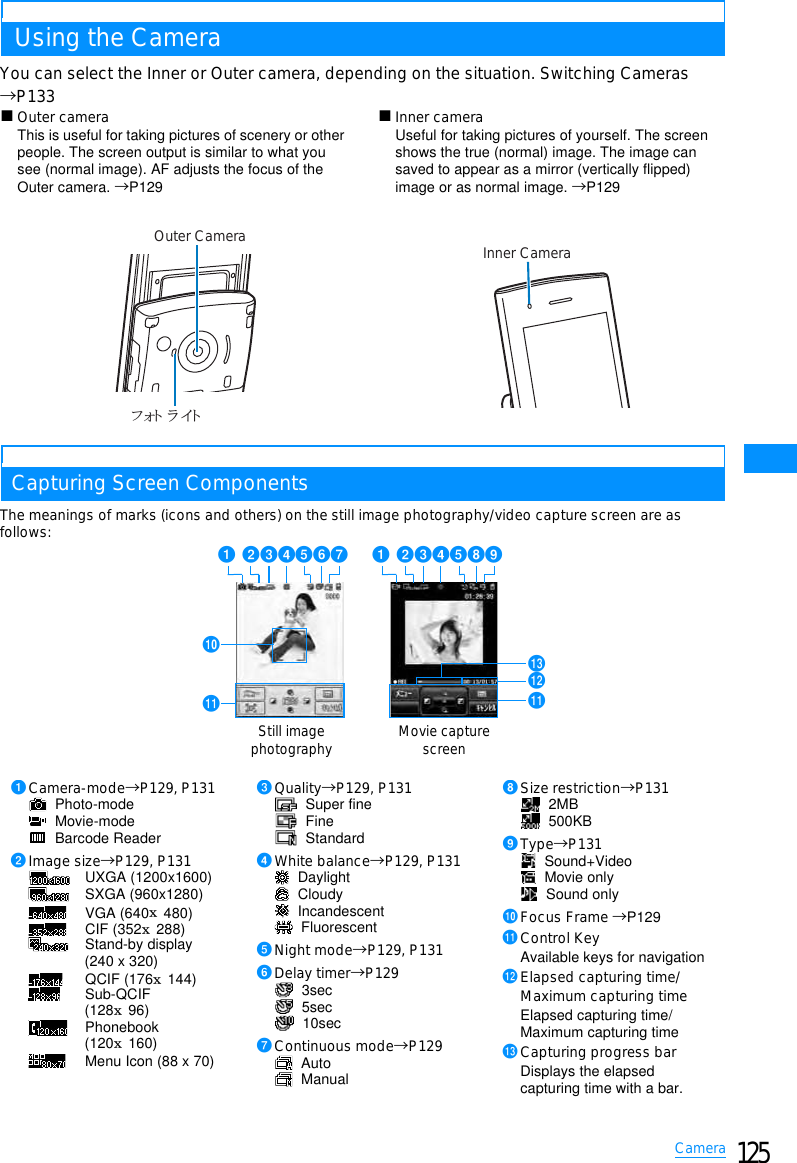
![129CameraPhoto-ModeCapturing Still Images• Captured still images are stored in the "Camera" folder under "My Picture" in "Data box" on the handset. To change the saving destination to the microSD memory card, access "Saving option" (P133).aM[Menu] X(Camera) X"Photo-mode".䂓Key operation on still image photography screenbPoint the camera to the subject XC[Take]䋯GA still image is capturedA still image is captured and automatically saved in the destination specified in "Auto saving" (P133).The Confirm save screen opens and the Still image capture screen returns.• You can use AF while capturing images.→P129• When using the inner camera, images on the capture screen are displayed as mirror images, however, images will be saved as normal images. To save the image as a mirror image, set "Auto saving" to "Off".• Press I to compose an i-mode mail attached with the capture still image file.Using AFThe subject in the center of the screen is automatically focused on. Auto focusing starts when you press A[AF] on the still image photography screen, then the Auto focus function starts and the focus frame turns red when focusedWhen "Saving option" (P133) is set to OffAfter an image is captured, the Captured image confirmation screen opens, and you can select whether to save the image.To save the imagePress C [Save] to open the Specify saving destination screen. Select a destination folder XC [OK] to open the Confirm save screen. Press C [OK] to save the captured image and the Still image capture screen returns.To not save the imagePress I [Cancel].• Even after you pressed C [Save], you can cancel saving by pressing Q䋯I [Cancel] from the Specify saving destination screen or pressing Q on the Confirm save screen.For images captured with "Continuous mode"You can select, delete, or display images to save on the Captured image confirmation screen.• To save selected images, select images to save and press C [Save] or M [Menu] X "Save selected". The Specify saving destination screen opens.• To save all captured images, press M [Menu] X "Save all". The Specify saving destination screen opens.• To delete selected images, select images to delete and press M [Menu] X "Delete".• To display only the selected images, press I[View].Saving the Mirror Image of the Picture Taken bythe Inner cameraIf "Saving option" (P130) is set to "Off", the captured image can be saved as a mirror image (flipped vertically).•XOn the Captured image confirm screen, M[Menu] X "Save mirror image" Xselect a folder XC[OK]• You can confirm the image as a normal image when press M [Menu] select "View normal image".Still Image Photography Screen sub menuKey DescriptionC[Take]䋯GShutterHZoomJBrightness controlsF䋯ESelect Inner or Outer cameraM[Menu] Display sub menuI䌛䌝List of Pictures in "Camera" folder in "My Picture"A[AF] Start AFQ[Cancel] Exit Photo-modeStill imagephotographyConfirm save(Example: Caseof Outer Camera)Note• Even when Manner mode is activated, the shutter tone sounds when capturing.DefaultSelect camera: Outer cameraFrame shot: OFFContinuous mode: OFFNight mode: OFFEffect: NoneWhite balance: AutoDelay timer: NoneSelect size: Wallpaper(240x320)Quality: Fine](https://usermanual.wiki/LG-Electronics-USA/L705I.Users-Manual-1/User-Guide-860503-Page-128.png)
![130CameraaStill image photography screen(P129)XM[Menu] XPerformsthe followingoperations[ Camera-mode]Change photo modesX"Photo-mode"/"Movie-mode"/"Bar code reader"[ Switch camera]Select Inner or Outer camera.X"Inner camera"/"Outer camera"[Frameshot]Adds a frame to the subject when capturing an image.[ Continuous mode]Captures continuous (sequential) images when the shutter is pressed.Captures up to 4 continuous images of "CIF(352 x 288)" pixels, or up to 6 images of less than "CIF(352 x 288)" pixels.[Nightmode]Activate when using in dark places.X"OFF"/"ON"[ Effect]Add an effect to the pictures to be taken.X"None"/"Black & White"/"Sepia"/"Negative"[ White balance]Sets hue/tint for the image. When set according to the conditions, a naturally colored image is produced.X"Auto"/"Daylight"/"Cloudy"/"Incandescent"/"Fluorescent"[ Delay timer]Set the number of seconds from the time the shutter is pressed until the picture is taken.X"None"/"3sec"/"5sec"/"10sec"[ Select size]Sets the image size.XSelect image size→P126[ Quality]Sets still images save settings.X"Super fine"/"Fine"/"Normal"Still Image Capture Completion Screen submenuaConfirm Save screen (P129) XM[Menu] XPerforms the followingoperations[New picture]Return to the still image photography screen.[Compose mail]Attach the picture to a mail and send it.→P161[Edit image]Edit a still image.→P198[Delete]Cancel to save and delete a still image.[Set as wallpaper]Set a captured image as the Stand-by display's wallpaper. Movie-ModeCapturing Movies• Captured movies are stored in the "Camera" folder under "i-motion" in "Data box" on the handset by default. To change the saving destination to the microSD memory card, access "Saving option" (P133).aM[Menu] X(Camera) X"Movie-mode"䂓Key operation on movie capture screenOFFChoose frame䋺Does not attach a frame.䋺Select a frame from "My picture".OFFAutoManual䋺No continuous capturing.䋺Takes continuous pictures by pressing the shutter once.䋺Takes continuous pictures by pressing the shutter consecutively.Note• If the "Select size" is set to "UXGA(1200x1600)" or "SXGA(960x1280)", the zoom feature cannot be used.• When "Continuous mode" is set, the picture size is reduced to "CIF (352x288) ", if the "Select size" is set to "CIF (352x288)".• When "Continuous mode" is set, the "Delay timer" is disabled.• When "Continuous mode" is set to "Auto", the pictures will be taken the following intervals.Inner camera: About 0.7 secondsOuter camera: About 0.2 seconds• When "Continuous mode" is set to "Manual", only press C[Take] to take a picture after second shot. Not available to press G.Key DescriptionC䋯GStart capturing/Resume䋪1HZoom䋪2JBrightness control䋪2Movie capture](https://usermanual.wiki/LG-Electronics-USA/L705I.Users-Manual-1/User-Guide-860503-Page-129.png)
![131Camera䋪1䋺Resumption is not available when "Type" is "Sound only".䋪2䋺Can be used while capturing a movie.bPoint the camera to the subject XC䋯GStart capturing a movie.•C: Pause/resume the capturing.cICapturing ends, and the captured video automatically will be saved in the destination specified in "Auto saving" (P133).The Confirm save screen opens and the Video capture screen returns.• Auto focus function is availble when taking.• When using the inner camera, images on the capture screen are displayed as mirror images, however, images will be saved as normal images. To save the image as a mirror image, set "Auto saving" to "Off".• Press I [Mail] on the Confirm save screen to create i-mode mail with the captured video attached. When "Saving option" (P133) is set to OffAfter a video is captured, the Confirm save screen opens, and you can select whether to save the video.To save the videoPress C [Save] to open the Specify saving destination screen. Select a destination folder XC [OK] to open the Confirm save screen. Press C [OK] to save the captured video and the Video capture screen returns.To not save the videoPress I [Cancel].• Even after you press C [Save], you can cancel saving by pressing Q/I [Cancel] from the Specify saving destination screen or pressing Q on the Confirm save screen.To save a still image captured with the innercamera as a mirror imageIf the "Saving option" (P133) is set to "Off", the captured video can be saved as a mirror image (flipped vertically).XFrom the Confirm save screen, M[Menu]X"Save mirror image" Xselect a folder XC[OK]• From the Confirm save screen, select M[Menu] X "View normal image" to play the video in a normal image.Movie Capture Screen Sub MenuaMovie capture screen(P130) XM[Menu] XPerforms the followingoperations[ Camera-mode]Change photo modesX"Photo-mode"/"Movie-mode"/"Bar code reader"[ Size restriction]To limit the file size of captured movie.X"No restriction"/"2Mbyte"/"500Kbyte"[ Switch camera]Select Inner or Outer camera.X"Inner camera"/"Outer camera"[Nightmode]Activate when using in dark places.X"OFF"/"ON"[ Effect]Add an effect to the pictures to be taken.X"None"/"Black & White"/"Sepia"/"Negative"[ White balance]Sets hue/tint for the image. When set according to the conditions, a naturally colored image is produced.X"Auto"/"Daylight"/"Cloudy"/"Incandescent"/"Fluorescent"[ Select size]Set the image size to take.X"QCIF (176䌸144)"/"Sub-QCIF (128䌸96)"[ Quality]Sets the quality of the saved movie.X"Super fine"/"Fine"/"Normal"[Type]Sets voice settings when taking videos.X"Voice+Video"/"Movie only"/"Sound only"F䋯ESelect Inner or Outer cameraM[Menu] Display sub menuI䌛䌝List of Pictures in "Camera" folder in "i-motion"Q[Cancel] Exit Movie-modeConfirm save Note• Even when Manner mode is activated, the shutter tone sounds when capturing starts and ends.• Video capturing will be terminated when it is interrupted by a call. After the call is over, the confirm save screen appears.DefaultSize restriction: No restrictionSelect camera: Outer cameraNight mode: OFFEffect: NoneWhite balance: AutoSelect size: QCIF (176x144)Quality: Super fineType: Sound + VideoCommon mode: OFF](https://usermanual.wiki/LG-Electronics-USA/L705I.Users-Manual-1/User-Guide-860503-Page-130.png)
![132Camera[ Common mode]Sets maximum file size to 500KB.X"OFF"/"ON"Confirm Save Screen Sub MenuaConfirm Save Screen(130) XM[Menu] XPerforms the followingoperations[New movie]Return to the movie capture screen.[Compose mail]Attach the video to an i-mode mail and send it.→P161[Delete]Cancel to save the video data and delete it.[Set as wallpaper]Set as the Stand-by display's wallpaper.Changing the CaptureSettingsSets the Camera functions according to theconditions.Using ZoomSet the image zoom magnification.Available setting of the image size are as follows:䂓Outer Camera䂓Inner CameraaStill image screen (P129) / videocapture screen (P130) XHallows youto set zoom.Adjusting BrightnessAdjust the brightness (exposure) of the image. Thebrightness can be set from -2to +2.Note• When setting "Common mode" to "ON", "Quality" is not available to set.Default Still Image/Movie: 1XCameraMode Size Zoom Max.magnificationPhotoModeUXGA䋨1200㬍1600䋩䋭䋭SXGA䋨960㬍1280䋩䋭䋭VGA䋨640㬍480䋩10 steps Approx.1.2CIF䋨352㬍288䋩Approx.1.7Wallpaper䋨240㬍320䋩Approx.2.5QCIF䋨176㬍144䋩Approx.3.4PhotoModeSub-QCIF䋨128㬍96䋩 10 steps Approx.3.4Phonebook䋨120㬍160䋩Menu icon䋨80㬍70䋩VideoMode QCIF䋨176㬍144䋩 10 steps Approx.3.4Sub-QCIF䋨128㬍96䋩CameraMode Size Zoom Max.magnificationPhotoMode VGA䋨640㬍480䋩䋭䋭CIF䋨352㬍288䋩 10 steps Approx.1.7Wallpaper䋨240㬍320䋩Approx.2.5QCIF䋨176㬍144䋩Approx.3.4Sub-QCIF䋨128㬍96䋩Phonebook䋨120㬍160䋩Menu icon䋨80㬍70䋩VideoMode QCIF䋨176㬍144䋩 10 steps Approx.3.4Sub-QCIF䋨128㬍96䋩Default Still Image/Video: 0Zoom Settings(Ex.: Still imagephotographyScreen)ZoomMagnification](https://usermanual.wiki/LG-Electronics-USA/L705I.Users-Manual-1/User-Guide-860503-Page-131.png)
![133CameraaStill image screen (P129) / videocapture screen (P130) XJSelectsbrightness (exposure) of the imageSelecting Inner or Outer CameraYou can select Inner or Outer camera according toyour capturing style.aStill image screen (P129) / videocapture screen (P130) XF/EYou can switch Inner and Outer cameras each time you press F/E.→P125Setting the Delay TimerSet the number of seconds from the time the shutteris pressed until the capturing is performed.• The Auto Timer is not available for video capturing.aStillimage (P129)XM[Menu]X[Delaytimer]b"None"/"3sec"/"5sec"/"10sec"(number: second) appears at the top of the screen.cC[Take]䋯GActivate Delay timer. Takes a photo after the set number of seconds automatically.After pressing the shutter button, the photo light flashes and the timer sound rings during the picture will be taken.Camera SetupChanging the CameraSettingsSaving optionSaving OptionSets still image photography / video auto save.aM[Menu] X(Camera) X"Camerasettings" X"Saving option"XPerformthe following operation•C[List] : List of the items is displayed.[Save]Set where picture is saved.X"Handset"/"microSD card"[Auto saving]Sets whether phone automatically saves picture/video.X"ON"/"OFF"[Save picture to]䋪Set where picture is saved.XSelect save location[Save movie to]䋪Set where movie is saved.XSelect video save location䋪䋺 "Save to" is set to "Handset" when "Saving option" is set to "ON".bI[Done]Shutter Sound SettingsaM[Menu]X(Camera)X"Camerasettings"X"Shutter sound"XSelectshutter toneSelect an item and listen to the sample sound.Flicker TuningThe flicker in screen under a fluorescent light, etc.may be reduced depending on the setting.Default Still Image/Movie: Outer cameraDisplay brightness(Ex.: Still imagephotography Screen)Brightness correctionDelay TimerCapture ScreenDefaultSave to: HandsetAuto saving: ONSave picture to: My picture/CameraSave movie to: i-motion/CameraDefault Shutter Tone 1Default Auto](https://usermanual.wiki/LG-Electronics-USA/L705I.Users-Manual-1/User-Guide-860503-Page-132.png)
![134CameraaM[Menu] X(Camera) X"Camerasettings" X"Flicker tuning" XSelectthe tuning methodAuto䋺Controls the flicker automatically.50Hz䋺Set where the frequency of the power is 50Hz.60Hz䋺Set where the frequency of the power is 60Hz.Barc code readerUsing Bar code ReaderYou can scan information embedded in a JapanArticle Number code or QR code using the handsetcamera. You can create i-mode mail or connect tothe Internet using the scanned information.You canalso save or play the scanned information, image ormelody.• UP to 5 pieces of scanned information can be saved.• Scan the code when the entire code is displayed on the screen.• Hold the camera parallel to the code.䂓Japan Article Number codeThe Japan Article Number code is a barcode representing numbers using vertical bars in different thickness and spaces. 8-digit (JAN8) or 13-digit (JAN13) barcode can be scanned.•The scanned result of the following Japan Article Number code is "4942857123456".䂓QR codesThe QR code is one of the 2 dimensional codes that expresses text including Kanji, Kana or Pictograph (E-Moji) in the vertical and horizontal patterns. Some QR codes have an image or melody embedded, and there are split QR codes where multiple images contain 1 larger piece of information.•The scanned result of the following QR code is "ᩣᑼળ␠NTT䊄䉮䊝".Scanning CodesaM[Menu]X(Camera)X"Bar codereader"䂓Key operations on the Scan screen.䋪䋺 Press C[Scan] to operate only on the screen after adjusting AF.bFocus a camera on the code to scanXC[Scan]After the auto focusing, scan the code. When scanning completes, a tone sounds and the scanned data is displayed (Scan data screen).• When the bar code reader is activated, it starts scanning automatically.When focused, scan the code automatically without pressingC[Scan].• When "Keypad sound" is set to "Mute", or "Manner mode" is activated, the beep does not sound.cDepending on the type of scanneddata, performs the following operations• Depending on the scanned data, the display or operation may differ.• Always save the scanned data if you want to use it later.• Up to 16 divided QR codes can be continuously scanned and combined.→135䂓For phone numbersSelect the displayed phone number to open the Phone number entry screen with the scanned phone number already entered.If "Add to Phonebook" is displayed, select the phone number to save to the Phonebook.Key DescriptionC[Scan] Start AFM[Menu] Change the photo mode to Photo-mode/Movie-mode/Bar code readerI[List] List the saved scanned dataA[Retry]䋪Readjust the AF.Q[Cancel] Exit the Bar code readerScan Screen](https://usermanual.wiki/LG-Electronics-USA/L705I.Users-Manual-1/User-Guide-860503-Page-133.png)
![135Camera䂓For mail addressesSelect the displayed mail address to create i-mode mail with the scanned mail address or subject already entered.If "Add to Phonebook" is displayed, select the address to save to the Phonebook.䂓For URLsSelect a displayed URL to access the URL.If "Add to bookmark" is displayed, select the URL to save as a Bookmark.䂓For textThe scanned characters are displayed.䂓For imagesThe scanned image is displayed.䂓For melodiesPress C[Play] to play the scanned melody.䂓For i-appliIf "Start i-appli" is displayed, select the i-appli to launch it.Scanned data screen sub menu• Displayed items vary depending on the type of scanned data.aOn the Scanned data screen (134) XM[Menu] Xperforms the followingoperations[Copy]Copy selected URL, phone number or address on the scanned result screen.[Save the scanned data in a list]Save the scanned data in a list.[Save to Data box]Saves the scanned image/melody to "Data box".[Add to phonebook]The scanned name/phone number, URL, mail address is saved to the phonebook.[Add bookmark]The scanned URL is saved to the "Bookmark".[Retry]Scan the code again.To scan split QR codesaPerform Steps 1 to 3 of "Scanning Codes" (P134)bAfter the message "Scan next QR code" appears, scan the next codecRepeat b• To cancel the scanning, press Q [Cancel], and to readjust AF, press A[Retry].File name of the scanned dataThe scanned data is automatically named with the year, month, date, hour, minute, and second. The file cannot be renamed.Example: If taken at: 2007/10/1 10:10Japan Article Number code: P2007_1001_1010_1.QR䇹OR code: P2007_1001_1010_1.JAN䇹Note<Common Functions>• Barcodes other than Japan Article Number code and QR Codes and 2 dimensional codes cannot be scanned.• Barcodes may not be correctly scanned because of scar, smudge, damage, printing quality or reflection of lights.• Some codes may not be scanned depending on the type, size or QR code version.• If trying to save more than 5 pieces of data, you will see a message asking to delete older data first. "Yes"XSelect ScannerXSelect "Yes".• If Bar code reader can not scan the code within 30 seconds after activation, a message indicating that it fails to scan the code appears. And if the Bar code reader can not scan the code in a certain period of time, it automatically ends.<Compose message/Send Mail>• If the address has invalid characters, nothing is entered in the address.<[Make Call]>• Valid characters are numbers and symbols (#, :, +, -, P, "(" and ")"). If the phone number contains characters other than these, the call cannot be made.<Start i-appli>• If "Barcode i-appli to"(P189) is not set, you can not start an i-appli from scanned dataContinue on the next page](https://usermanual.wiki/LG-Electronics-USA/L705I.Users-Manual-1/User-Guide-860503-Page-134.png)
![136CameraUsing/Deleting Saved DataaScanner start screen (P134)XI[List]䂓Deleting Saved ScannedDataMove the cursor to data to be deleted, M[Menu]X[Delete]XSelect "Yes"䂓Deleting Saved ScannedDataScanned data list screen, M[Menu]X"Delete all"XEnter the terminal sssecurity codeXSelect "Yes"䂓To start scanningOn the Scan data list screen, press M[Menu]X select "Scan".bSelect the scanned dataFor the operation after this, refer to the Step 3 (P134) of "Scanning Codes" depending on the type of data.Scanned DataList](https://usermanual.wiki/LG-Electronics-USA/L705I.Users-Manual-1/User-Guide-860503-Page-135.png)
![137i-mode/i-motion/i-Channeli-mode ................................................................................................................................ 138Displaying the i-mode Menu ...................................................................... i-mode Menu 138Accessing SitesAccessing Sites................................................................................................................. 139Operations on i-mode/Web Sites..................................................................................... 140Saving Entries in My Menu................................................................................My Menu 141Changing i-mode Password................................................. Change i-mode Password 142Opening Web Site ...................................................................................Internet Access 142Save and Quickly Display a Site/Homepage................................................Bookmarks 143Save Site Contents..................................................................................... Screen Memo 144Downloading Videos/Melodies from a SiteSaving Images from a Site or Screen Memo ...............................................Save image 145Downloading Melodies from a Site....................................................................i-melody 146Downloading Templates from a Site ........................................... Download Templates 146Downloading Dictionaries from a Site ......................................Download Dictionaries 147Useful i-mode FunctionsUsing the Phone To䋯Mail To䋯Web To 䋯 i-appliTo Functions....................................................................... Phone To/Mail To/Web To/i-appliTofunction 147Configuring i-mode SettingsModifying i-mode Settings ...................................................................... i-mode Setting 147Using the Message ServiceWhen Receiving Messages .................................................................Receive Message 149Checking for Messages ................................................................. Check new message 150Displaying Messages in the Message Box ................................. MessageR/MessageF 150Using Security CertificatesHandling SSL Certificates ............................................................... SSL Certificate Info 152Using i-motioni-motion .............................................................................................................................. 152[Delete] .......................................................................................Introduction to i-motion 152Using i-ChannelAbout i-Channel ................................................................................................................ 154Displaying the i-mode Menu ............................................................................................ 155Configuring i-Channel .........................................................................i-Channel Setting 155](https://usermanual.wiki/LG-Electronics-USA/L705I.Users-Manual-1/User-Guide-860503-Page-136.png)
![138i-mode/i-motion/i-Channeli-modei-mode is a service that makes use of the display ofthe FOMA handset supporting i-mode (i-modehandset) to enable you to use online services suchas sites (programs) access, Internet access andi-mode mail.• i-mode is a fee-based service requiring a separate subscription. For details on subscription, contact the "DoCoMo Information Center" on the back of this manual.• The i-mode service contents are subject to change. For details, refer to the latest "Mobile Phone User's Guide [i-mode]".Before Using i-mode• Contents of sites (programs) and web sites are generally protected by copyright law. Data, such as text or images you download to the i-mode handset from sites (programs) or web sites, can be used only for personal entertainment but cannot be used, in whole or in part, as it is or after modification, for sale or redistribution, without the consent of the copyright holders.• It is possible that contents saved on the i-mode handset (Mail, Message R/F, Screen memo, i-appli, i-motion) or Bookmarks will be deleted if the battery pack is removed for more than a month. It is recommended that you make a copy of important data and keep it in a separate place. DoCoMo is not responsible for lost data .• If you insert another UIM or turn the handset power on without the UIM, depending on the model of the handset, still images, videos, melodies, mail attachments (still images, videos or melodies), screen memos or Messages R/F cannot be viewed or played.• When the data with UIM restriction is set as the Stand-by display or Ring alert, the setting will revert to its default if a different UIM is inserted or the handset power is turned on without a UIM.i-mode MenuDisplaying the i-modeMenuYou can use i-mode functions from the i-modeMenu.aThe Stand-by displayXIXPerformsthe following operations[iMenu]Connect to the i-mode Center.→P139[Bookmark]Open the Bookmark folder list screen.→P143[Screen memo]Open the Screen memo folder list screen.→P144[Last URL]Open the last viewed i-mode site or web site.→P140[Go to location]Enter a URL to connect to the Internet.→P142[Message]Display a list of Messages R/F.→P150[i-Channel]Open the i-channel menu screen.→P155[Check new messages]Check whether i-mode mail or Message R/F are stored at the i-mode Center.→P150[i-mode setting]Configures the handset's i-mode functions.→P147i-mode menuscreen](https://usermanual.wiki/LG-Electronics-USA/L705I.Users-Manual-1/User-Guide-860503-Page-137.png)
![139i-mode/i-motion/i-ChannelAccessing SitesYou can various services offered by IPs (InformationProviders).• Services vary depending on the information provider. Some sites require a separate subscription.ai-mode menu screen(P138)X"iMenu"X"䊜 䊆䊠 䊷䋯ᬌ⚝ (Menu/Search)" appears at the top of the screen during i-mode communications.• Press I [Stop] to interrupt a page download.bSelect an item (link)•I[Bookmark] : Save the URL to the current page to bookmark.•P : Exit i-mode. Select "Yes".Site Display Screen Sub MenuaSite being displayedXM[Menu]XPerforms the following operations[Bookmark][Screen memo][Save image]Save images contained in the displayed page.→P145[Show properties][Go to location][Home]Connects to the URL set as the "Home" page.[Reload]If the site is changed, the browser is updated with the site's new contents.䌛 䊜 䊷䊦ᚑ䌝Create i-mode mail with the URL of the open page pasted in the message text. Go to Step 2 in "Creating and Sending i-mode Mail" (P161).Select from the following options when a linked item is selected.[Change char code]If characters do not display correctly, try changing the character encoding.[Add to phonebook]Save the highlighted phone number or mail address to the phonebook.→P141[Retry]Play, from the start, the animation/Flash file contained in the displayed page.Note• When a number appears in front of a linked item, press the corresponding Dial Key to visit the site. It may not be possible to connect to some sites.• Some sites require the "serial number of your mobile phone/UIM" to be sent in order to gain access.The "serial number of your mobile phone/UIM" is sent to the IP (Information Provider) so that the IP can recognize you and provide customized information. The serial number is also used to judge whether the contents that the IP provides can be used on your mobile phone. The "serial number of your mobile phone/UIM card" is sent via the Internet to the IP (Information Provider) and it may be seen by a third party. This action does not reveal your postal address, age, or sex to the information provider.C[Select]SaveList䋺Save the URL of the open site as a Bookmark. Go to Step 2 in "Saving in Bookmarks" (P143).䋺Open the Bookmark folder list screen.→P143SaveList䋺Save the displayed page to the Screen memo.→P140䋺Open the Screen memo folder list screen.→P140ShowURLPagePropertiesCertificates䋺Display the URL of the open page.䋺Display the URL and title of the open page.䋺If the displayed Screen memo is an SSL page, the SSL certificate is displayed.XSelect certificateEnterURLURLhistory䋺You can view a web site by entering its URL. Go to Step 2 (P142) of "Opening Web Site".䋺You can visit a web site by selecting an entry in the URL history. Go to Step 2 (P142) of "Using the URL History".This pageNext page䋺Attaches the URL of the current page.䋺Attaches the URL of the link.Continue on the next page](https://usermanual.wiki/LG-Electronics-USA/L705I.Users-Manual-1/User-Guide-860503-Page-138.png)
![140i-mode/i-motion/i-Channel[Settings]When an SSL page is acquiredThe right screen opens when you access an SSL site. After acquisition is completed, the SSL page opens and is displayed on the top of the screen.To return to a normal siteThe right screen opens when you return to a non-SSL site. Select "Yes" to return to a normal site, and disappears.Last URLOpen the Most Recently AccessedWeb SiteAfter i-mode is terminated, the URL of the last openpage is saved in "Last URL". You can re-connect tothe most recently accessed page using Last URL.ai-mode menu screen (P138) X"LastURL" XC[Connect]Operations on i-mode/Web SitesThis section describes basic operations on i-mode/Web sites (pages).Going Back to the Previous Page/Going to the Next PageFOMA handset temporarily saves the displayed sitedata in a cache.Data saved to the cache can be displayed, withoutvisiting the site, by pressing J.• However, the site will be reloaded if the data is larger than the cache size, or if the site requires the latest information always be loaded.• Entered characters or settings at the site will not be stored in the cache.• Terminating i-mode deletes data from the cache.Ex. Pages are displayed in the order of Screen "A"→"B"→"C"→"B"→"D"If opening the pages in the order "A"→"B"→"C", then returning to "B", and opening "D", "C" is deleted from the cache. Pressing J displays "B"→"D".Display imageSound effectsettingsi-motion type䋺Set whether to display images contained on the current page.X"On"/"Off"䋺Set whether to play sound effects in the Flash file contained in the site.X"ON"/"OFF"䋺Set i-motion acquisition settings.→P153Note<Change character code>• If characters do not display correctly, repeat the operation. However, after changing the code 4 times, the default character code restores.• Characters may not be displayed correctly even after repeatedly changing the code.The new character encoding is valid only for the open site.<Image display>• Images may not be displayed correctly even set to "Display". In that case, appears.Note• If the SSL Certificate has already expired or the site does not support SSL, a warning indicating that this site may not be secure may appear. When connecting, select "Yes". However, your personal information (credit card number or contact address) may not be sent safely.Note• When a Flash file is played, displayed action may be different from a standard site display.㵺䊕䊷䉳䈱␜䈱㗅⇟ 㵺↹㕙䇸 D䇹 䈎䉌 ೨䈱䊕䊷䉳 䉕 ␜䈘 䈞䈢 䇭䈫䈐䈱㗅⇟ LLL](https://usermanual.wiki/LG-Electronics-USA/L705I.Users-Manual-1/User-Guide-860503-Page-139.png)
![141i-mode/i-motion/i-ChannelSelecting Links or ItemsYou may need to perform operations using thefollowing items while connected to i-mode. Fordetails, refer to "Mobile Phone User's Guide[i-mode]".Displaying Flash AnimationsThe FOMA handset supports Flash, an animationtechnology using images and sounds. You canaccess sites that provide various kinds ofanimations using the handset. You can alsodownload a Flash file and set it as the Stand-bydisplay.Adding Mail Address/PhoneNumber to PhonebookSaves the displayed phone number or mail addresson the site page to the phonebook.aDisplayed siteXMove cursor to Phonenumber/Mail address XM[Menu]X"Add to Phonebook"X"Yes"Go to Step 2 in "Saving Contacts to the Phonebook from Received or Dialed Calls" (P80).My MenuSaving Entries in MyMenuFrequently accessed sites can be saved in MyMenu for quick connection.• Up to 45 entries can be saved in My Menu.• Some sites cannot be saved in My Menu.aDisplay a site to saveXSelect "䊙䉟 䊜䊆䊠 䊷⊓㍳(Store in My Menu)"• Item names may vary depending on the site.bSelect i-mode password text boxXEnter i-mode passwordX"OK"• The entered i-mode password is masked by asterisks "䋪".• i-mode password→P142Accessing a Site from My Menuai-mode menu screen (P138) X"iMenu"X"English iMenu" X"My Menu"XSelect the site to visitName Displayexample DetailsRadio button (Not selected) You can select only 1 choice.(Selected)Check box (Not selected) You can select multiple choices.(Selected)Text Box Enter text. Select a text box to open the text entry screen.Pull downMenu Select an item from a list of options.Click pull down menus to show these options.Note<Text Box>• Perform the following steps to transfer data from the FOMA handset, such as Phonebook entries, your own number, or data scanned with the Barcode reader, into a text box. M[Menu]X"Quote"X"Phonebook"/"Own number"/"Bar code reader".Note• Even if a Flash file is shown, the animation may not be shown correctly.• Some Flash files can use data saved on your handset. To allow Flash files to use the data, set "Use phone info" to "Yes".• Some Flash files play sound effects. To turn off sound effects, set "Sound effect" to "OFF".• If you play a Flash file with vibration set, the handset vibrates regardless of what the "Sounds&Vibration" setting is on the handset.• Flash files are not displayed if "Image" is set to "OFF".• In some cases, the Flash file cannot be viewed if it was saved or set as a Screen memo, but can be viewed on the site.• Flash sound effects are not played if they are set to the Stand-by display / Call Display.Note• When you subscribe to a fee-based site in "䊜 䊆䊠 䊷䋯ᬌ⚝ (Menu/Search)", .](https://usermanual.wiki/LG-Electronics-USA/L705I.Users-Manual-1/User-Guide-860503-Page-140.png)
![142i-mode/i-motion/i-ChannelChange i-mode PasswordChanging i-mode Password"i-mode Password" (4 digit) is required to subscribeto and unsubscribe from Message Services orfee-based i-mode sites, or configure Email settings.The password is set to "0000" by default. Change itto a number of your own choice. Do not reveal youri-mode password to others.ai-mode menu screen(P138)X"iMenu"X"English iMenu"X"Options"X"Change i-mode Password"bSelect "Current Password" text boxXEnter i-mode password (4 digits)cSelect "New Password" text boxXEnter new i-mode password (4 digits)dSelect "New Password (Confirmation)"text boxXEnter new i-mode password(4 digits)e"Select"Internet AccessOpening Web SiteYou can view a web site by entering its URL. A URLconsists of half-pitch alphanumeric characters andsymbols.ai-mode menu screen(P138)X"Go tolocation"b"Input Address" XEnter the URL XC[Set]• You can enter up to 256 half-pitch characters.Using the URL HistoryUp to 10 previously entered URLs are stored as theURL History. You can visit a web site by using theURL history.ai-mode menu screen (P138)X"Go tolocation"X"URLhistory"URL History List Screen is shown.bSelect the url to displayURL History List Screen Sub MenuaURL history list screen(P142)XMovecursor over URL historyXM[Menu]XPerform the following operation[Connect]Connect to the selected site in the URL history.[Edit URL]Edit and connect to the site of the selected URL.XEdit URLXC[Set][Delete][Compose mail]Create i-mode mail with the URL of the selected Bookmark in the message text. Go to Step 2 in "Creating and Sending i-mode Mail" (P161).Note• If you forget the i-mode password, you need to bring an ID such as your driver's license to a service counter such as DoCoMo shop to have the i-mode password reset to "0000".Note• Web sites that do not support i-mode may not be viewed correctly.• When connected by entering the same URL as one in the history, the old information is overwritten and the entry is shown on top as the latest URL entry in the history.Note• If more than 10 URLs are entered, the oldest URLs will be overwritten.• The URL visited will be re-displayed at the top of the URL history list.Deletethis itemDeletesselecteditemDeleteall䋺Delete the selected/displayed URL history entry. X"Yes"䋺Select and delete an entry in the URL history.XCheck off the URL to be deletedXI"Done"X"Yes"• Press M[Menu], choose "Mark all" and "Release all"䋺Delete entire URL history.XEnter the security codeX"Yes"](https://usermanual.wiki/LG-Electronics-USA/L705I.Users-Manual-1/User-Guide-860503-Page-141.png)
![143i-mode/i-motion/i-ChannelBookmarksSave and QuicklyDisplay a Site/HomepageSave frequently viewed sites or web sites inBookmarks to display the page quickly.Saving in Bookmarks• Up to 100 URLs can be saved in Bookmarks for all folders.aBrowse a web page XI[Bookmark]bEdit the title & URLXI[Done]XSelect the save folder• If there is already the same URL saved, a confirmation screen to overwrite appears. Select "Yes".Accessing Web Sites fromBookmarksai-mode menu screen(P138)X"Bookmar k"•I [Add]:You can add a folder. Up to 16 full-pitch or 32 half-pitch characters can be entered for a folder name.bSelect a FoldercSelect the url to display•I[URL] : Shows the URL.Bookmark Folder List Screen Sub MenuaBookmark folder list screen(P143)XMove cursor to folderXM[Menu]XPerform the following operation[Manage folders][Delete][Send all via IrDA]Send all bookmarks via Infrared.XEnter security codeXEnter Auth. PasswordX"Yes"[Copy all microSD]Copies all bookmarks to a microSD memory card.XEnter the security codeX"Yes"[Memory status]Displays number of saved bookmarks.Note• Up to 256 half-pitch characters can be saved for each URL Bookmark.• Up to 12 full-pitch or 24 half-pitch characters can be saved for a Bookmark title.• If the maximum number of Bookmarks has been saved, an confirmation screen is shown. Choose "Yes"XSelect folderXSelect Bookmark to delete XSelect folder to save in.Icon Description(Grey) "Bookmark" (pre-installed folder)(Blue) User defined folderBookmarkFolder ListScreenCreate folderEdit folder nameSort folder䋺Create a folder. Up to 16 full-pitch or 32 half-pitch characters can be entered for a folder name.XEnter folder name䋺Edit selected folder name.XEnter folder name䋺Sort folders.Select certificateDelete FolderDelete all䋺Delete selected folder.XEnter the security codeX"Yes"䋺Deletes select folder's bookmarksXEnter the security codeX"Yes"Note<Edit folder name/Sort folder/Delete a folder>• The pre-installed "Bookmark" folder cannot be renamed, moved, or deleted.<Delete Folder>• If there are bookmarks in the folder, user is prompted to confirm deletion. Select "Yes" to delete.Bookmark listscreenContinue on the next page](https://usermanual.wiki/LG-Electronics-USA/L705I.Users-Manual-1/User-Guide-860503-Page-142.png)
![144i-mode/i-motion/i-ChannelBookmark Folder List Screen Sub MenuaBookmark list screen(P143)XMovecursor to folderXM[Menu]XPerformthe following operation[Connect]Connect to the selected bookmark's site.䌛Edit title䌝Edit the title & URL of the selected Bookmark.XEdit title & URLXI[Done][Move][Delete][URL]Display the URL of the selected Bookmark.[Copy URL]Copy the URL of the selected Bookmark.䌛Compose message䌝Attach the selected bookmark to a new i-mode mail. Go to Step 2 (P161) in "Creating and Sending i-mode Mail".[Ir exchange]䌛Copy to microSD card][Memory status]Displays number of saved bookmarks.Screen MemoSave Site ContentsSave displayed site contents as a screen memo.Saved Screen memo pages can be opened withoutconnecting to i-mode.Saving Screen Memos• Up to 50 Screen memos can be saved. However, the number may be less if the saved pages are large.• Each page can have up to a maximum of 100KB.aSite displayedXM[Menu]X"Screenmemo"X"Save"X"Yes"Viewing Screen Memosai-mode menu screen(P138)X"Screenmemo"bSelect the Screen Memo to DisplayThe Screen memo detail screen is displayed.•I[URL] : Shows the URL.MovethisMoveselectedMove all䋺Move the selected bookmarks to another folder.XSelect destination folder䋺Select bookmark and move.XCheck off the bookmark to moveXI[Done]XSelect destination folder• Press M[Menu], choose "Mark all", "Release all".䋺Move all mail in the folder to another folder.XSelect destination folderDeleteDeletesselecteditemDeleteall䋺Delete selected bookmark.X"Yes"䋺Delete selected bookmark.XCheck off the URL to be deletedXI[Done]X"Yes"• Press M[Menu], Choose "Mark all" and "Release all"䋺Delete all bookmarks.XEnter the security codeX"Yes"SendSendalldata䋺Sends selected bookmark via Infrared.X"Yes"䋺Send bookmarks in folder via infrared.XEnter security codeXEnter Auth. Password X"Yes"Copy oneCopy all䋺Copies selected bookmark to microSD memory card.X"Yes"䋺Copies selected bookmark to microSD memory card.XEnter the security codeX"Yes"Note• If the Screen memos save limit has been reached, user will be prompted to select something to delete. To continue, choose "Yes"Xand select a Screen memo to delete.Note• The information saved in Screen memo is as of the time it was saved. The memo may not contain the latest information.Screen memoList Screen](https://usermanual.wiki/LG-Electronics-USA/L705I.Users-Manual-1/User-Guide-860503-Page-143.png)
![145i-mode/i-motion/i-ChannelScreen Memo List Screen's Sub MenuaBookmark folder list screen(P144)XMove cursor to Screen memoXM[Menu]XPerform the followingoperation[View]View selected Screen memo.䌛Edit title䌝Edit the title of the selected Screen memo.XEdit the title[Delete][URL]Display selected Screen memo's URL.[Protect on/off][Memory status]Displays number of Screen memosScreen Memo Detail Screen's Sub MenuaScreen Memo details screen (P144)XM[Menu]XPerform the followingoperations[Save image]Save images contained in the Screen memo. Go to Step 2 in "Saving Images from a Site or Screen memo" (P145).䌛Show properties䌝[Add to phonebook]Save the highlighted phone number or mail address to the phonebook.→P141䌛Retry䌝Play a Flash movie or an animation contained in the Screen Memo from the beginning.[Sound effect]Set whether to play sound effects of the Flash movie contained in the Screen memo.䌛Edit title䌝Edit the title of the selected Screen memo.XEdit the title䌛Delete䌝Delete Screen memos.X"Yes"䌛Protect on/off䌝Protect or release the displayed Screen memo.X"Yes"Save imageSaving Images from aSite or Screen MemoYou can save images contained in the site, Screenmemo to the handset.• Obtained images will be saved in "i-mode" folder in "My Pictures" of the "Data box".Example: when saving the image viewed on siteaOn a site XM[Menu]X"Save image"b"Select image" XSelect savable image䂓To save the background image from a siteSelect "Save background".DeleteDeletesselecteditemDeleteall䋺Delete the selected Screen memo.X"Yes"䋺Delete selected Screen memo.XCheck off the URL to be deletedXI[Done]X"Yes"• Press M[Menu], Choose "Mark all" and "Release all"䋺Delete all bookmarks.XEnter the security codeX"Yes"Protect On/OffProtectselected on/offProtect all on/off䋺Disable/Enable protection for the selected Screen memo.X"Yes"䋺Select a Screen memo and toggle "protect".XCheck off the Screen memo to be protectedXI[Done]X"Yes"• Press M[Menu], Choose "Mark all" and "Release all"䋺Delete all Screen memos.XEnter the security codeX"Yes"ShowURLPagePropertiesCertificates䋺Display the URL of the displayed Screen memo.䋺Display the URL and title of the open Screen memo.䋺If the displayed Screen memo is an SSL page, the SSL certificate is displayed.XSelect certificateOnOff䋺Play the Flash's sound effects.䋺Don't play the Flash's sound effects.Note<Delete>• Protected Screen memos cannot be deleted. Release Screen memo(s) before deleting.<Protect On/Off>• Up to 10 Screen memos can be protected. The number of Screen memos that can be protected may vary depending on the data.Savable images havea dotted border.Continue on the next page](https://usermanual.wiki/LG-Electronics-USA/L705I.Users-Manual-1/User-Guide-860503-Page-144.png)
![146i-mode/i-motion/i-Channelc"Yes"i-melodyDownloading Melodiesfrom a Site• Downloaded melodies will be saved in "i-mode" folder in "Melody" of the "Data box".aOn a siteXSelect a melodyWhen the download completes, a confirmation opens.b"Save"Play 䋺Plays a downloaded melody.File property䋺Displays downloaded melody's information.Back 䋺Return to site without saving melody.Download TemplatesDownloading Templatesfrom a SiteYou can download templates for Deco-mail.• Downloaded templates will be saved in "Template of the Mail menu" (P165).aOn a siteXSelect a templateWhen the download completes, a confirmation opens.b"Save"Preview : Display the downloaded template.File property: Displays downloaded template's information.Compose message/Send Mail: Use a downloaded template to create Deco-mail.Back : Return to site without saving template.cI[Done]• To save a renamed file, CX rename the file XPress I[Done].Note• Images cannot be saved if "Image display" is set to "Not display".• The file cannot be saved if a file of the same name already exist in the folder.• The FOMA handset's saved images may not display correctly even if they can be displayed at the site.• Some obtained images may not be displayed correctly.•Image files of JPEG, GIF, or Progressive JPEG䋪formats cannot be displayed after saving them if their size (pixels) exceed the following size. However, they can be output to external devices as mail attachment...etc.䋪 Progressive JPEG is an image format that used in the Internet, being improved image sharpness gradually as downloading proceeds.- JPEG image files that exceed 1600x1200 pixels- GIF or Progressive JPEG image files that exceed 800x600 pixels䂓InformationThe stored content may be lost due to the handset failure or repair. DoCoMo is not responsible for lost data. It is recommended that you keep saved content from the handset on a microSD memory card. You can connect the handset to a PC using Data Link Software and a FOMA USB Cable (optional) and save data to the PC.Note• Download may not be possible depending on the site.• The file cannot be saved if a file of the same name already exist in the folder.• Some downloaded melodies may not play correctly.• Some downloaded melodies may have a section to be played already specified. These melodies will be played in their entirety under playback, however, as a melody set for a ringtone only the specified part is played.䂓InformationThe stored content may be lost due to the handset failure or repair. DoCoMo is not responsible for lost data. It is recommended that you keep saved content from the handset on a microSD memory card. You can connect the handset to a PC using Data Link Software and a FOMA USB Cable (optional) and save data to the PC.](https://usermanual.wiki/LG-Electronics-USA/L705I.Users-Manual-1/User-Guide-860503-Page-145.png)
![147i-mode/i-motion/i-ChannelDownload DictionariesDownloadingDictionaries from a Site• Downloaded dictionaries are saved in "Download dictionary" (P254)• Up to 10 dictionaries can be saved. However, up to 5 can be used.aOn a siteXSelect dictionaryAfter downloading the dictionary, the dictionary is saved automatically on "Download Dictionary".Phone To/Mail To/Web To/i-appliTofunctionUsing the Phone To䋯Mail To䋯Web To䋯i-appliTo FunctionsWhen the highlighted phone number,Email addressor URL is displayed on site page or mail, you canuse this function to easily make a call, send ani-mode mail or display a web site.• Phone To, AV Phone To, Mail To, or Web To function in mail sent from a PC may not be available.Phone To/AV Phone To FunctionMake a voice call/video call (AV Phone). To thehighlighted phone number at a site or in a mailmessage.aSelect phone numberXPerform thefollowing operation[Make Call]䋺 Make a voice call.Video Call 䋺 Make a Video Phone.Copy 䋺 Copies the selected phone number.Mail To FunctionYou can send mail to an Email address highlightedon a site page or mail.aSelect mail address• Go to Step 3 in "Creating and Sending i-mode Mail" (P161).Web To FunctionAccess a URL highlighted on a site page or mail.aSelect URL• In case of mail, press C[Connect] after Step1.i-appli To FunctionYou can start i-appli from a URL highlighted on asite or in i-mode mail.• If there is no check in "Set i-appli to"(P189), "Site i-appli to", "Mail i-appli to", the i-appli does not function.aSelect i-appli informationX"Yes"i-mode SettingModifying i-modeSettingsSet i-mode or Message R/F function.CommunicationConfiguring CommunicationSettingsai-mode menu screen (P138)X"i-modesetting"X"Communication"XPerformthe following operation[Connection timeout]Set the time until the connection is automatically terminated if no response was returned due to network traffic.→P148Note• Using Downloaded Dictionaries→P254Note• The Phone To/AV Phone To function may not be available depending on a site.Note• The Mail To function may not be available depending on a site.• Correct the Email address before sending Email if necessary.Note• The Web To function may not be available depending on a site.• Display of a URL varies depending on a site.• The Web To function is available using a highlighted item other than a URL.Note• It may not be possible to save an i-appli that immediately starts after using the i-appli To function.Default Check new messages :All checkmarkedContinue on the next page](https://usermanual.wiki/LG-Electronics-USA/L705I.Users-Manual-1/User-Guide-860503-Page-146.png)
![148i-mode/i-motion/i-Channel[Check new messages]Sets request settings when using "Check new messages",XCheck off item to checkXI[Done]DisplayConfiguring Display Settingsai-mode menu screen (P138)X"i-modesetting"X"Display" XPerform thefollowing operation[Image]Set whether to display images or Flash images contained on the site page or Screen memo.X"On"/"Off"[Sound effect]Set whether to play sound effects of the Flash movie contained in the site/Screen memo.X"ON"/"OFF"[Use phone info]When a Flash image is displayed on a site or in a Screen memo, information saved on the handset may be used. Sets whether to use the information on the phone.X"On"/"Off"[Font size]Set the font size for text on a site, Screen memo or Message R/Fs.X"Small"/"Standard"/"Large"[Scroll]Set the number of lines scrolled after pressing H on a site, Screen memo or Message R/F.X"1 line"/"3 lines"/"5 lines"/"Page"[Message list]Configures Message R/F list screen display.[Auto-display]Set to automatically display Messages R/F.→P150[Melody auto play]Set whether to automatically play melodies when Messages R/F are displayed.→P150HomeConfiguring Home SettingsTo set the home URL, select "Home" from the sitedisplay screen sub menu.abSelect "Enable" XSelect "http" field XEnter the URL XI[Done]OthersConfiguring Other Settingsai-mode menu screen (P138)X"i-modesetting"X"Others" XPerform thefollowing operation[Check settings]Confirm the contents set in "i-mode setting".[Reset settings]Reset the contents set in "i-mode setting" to the default.XEnter the security codeX"Yes"Connection TimeoutSetting the Connection TimeoutSet the time until the connection is automaticallyterminated if no response was returned due tonetwork traffic.DefaultImage:ONSound effect : ONUse phone info: YesFont size: StandardScroll: 1 lineMail list: 2 linesOne LineTwo Lines䋺Display subject alone on one line.䋺Displays subject and receive time on two lines.Note<Image>• Images may not be displayed correctly even set to "Display". In that case, appears.<Sound Effect>• Even if set to "ON", Sound Effects may not used depending on the Flash file.<Use phone info.>• When this option is set to "Use", the battery level, signal strength, Date & Time, Ring Volume, Language, and handset model information may be sent to IP (Information Provider) via the Internet, and a third party may intercept the information.Default Disable, No URLNote• If "Home" is set to "Disable", even selecting "Home" does not open the specified page. The URL entered in the "http://" field will remain.Default 60 seconds](https://usermanual.wiki/LG-Electronics-USA/L705I.Users-Manual-1/User-Guide-860503-Page-147.png)
![149i-mode/i-motion/i-Channelai-mode menu screen (P138)X"i-modesetting"X"Communication" X"Connection Timeout"X"60 seconds"/"90 seconds"/"Unlimited"• If "Unlimited" is selected, the connection will not be automatically cancelled.Host SelectionChanging the Access Point fromi-modeSet an APN (Access Point Name) when you useservices other than i-mode (DoCoMo). i-mode andi-mode mail become unavailable when you connectto an APN other than DoCoMo.Add Access PointaM[Menu]X(Settings)X"InternationalRoaming"X"Network"X"Host Selection"Host Selection screen opens.bI[Add]XEnter security codeXPerform the following operation[Host name]Enter the host name within 15 full-pitch or 30 half-pitch characters.XEnter access point name[Host number]Enter the host number within 99 half-pitch alphanumeric characters.XEnter access point number[Host address]Enter the host address within 30 half-pitch alphanumeric characters.XEnter access point address[Host address 2]Enter the host address within 30 half-pitch alphanumeric characters.XEnter access point addresscI[Done]Changing the Access PointaHost Selection screen (P149) XSelectAccess point to changeAccess Point Screen Sub MenuaAccess Point screen (P149) XMovecursor to Access pointXM[Menu]XPerform the following operation• "i-mode" functions cannot be carried out while selecting an access point.[Add new]Add new connection.→P149[Edit]Edit the access point settings.XEnter security codeXEdit Access point settingsXI[Done][Delete]Delete the selected Access point.X"Yes"XEnter security code[View]Display the selected access point's settings.•C[Edit] : Edit the access point settings.Receive MessageWhen ReceivingMessagesWhen the handset is in the service area, MessagesR/F are sent automatically from the i-mode Center.When Messages R/F arrive, the display, ringtone orvibration notifies you of new messages.• Up to 100 both message Rs/Fs can be saved. However, the number of savable messages varies depending on the message size.Viewing New MessagesWhen Message R/F arrives, the latest message isappears automatically.• "Message auto-display" can be configured to allows the detail screen to automatically open when receiving a message R/F.→P150Note• Even if this option is set to "Unlimited", the connection attempt may be terminated because of the radio wave reception level.Default i-mode䋪If you use the i-mode service of DoCoMo, donot change the access point.Note• Pake-Hodai is not applied to packet communication with an APN other than "i-mode".• When an access point is changed, the ticker of the i-Channel does not appear. When the information is updated or you download the latest information by pressing Q for 1+ seconds, the ticker will be turned on automatically.• If the set Access point is deleted, it is replaced with "i-mode".](https://usermanual.wiki/LG-Electronics-USA/L705I.Users-Manual-1/User-Guide-860503-Page-148.png)
![150i-mode/i-motion/i-ChannelaAutomatically Receiving a MessageR/F When it Arrives• After messages are received, the reception result of Messages R/F is displayed.• You are forced to return to the screen before receiving mails if no operation is performed for approximately 15 seconds,Auto-display MessageDisplaying MessagesAutomaticallySet how to automatically display MessageR orMessageF.ai-mode menu screen (P138)X"i-modesetting"X"Display" X"Auto-display"XPerform the following operationMessageR preferred: If a Message R and F are received simultaneously, MessageR is automatically shown.MessageR Only: Only MessageR are automatically displayed.MessageF preferred: If a Message R and F are received simultaneously, MessageF is automatically shown.MessageF Only: Only MessageF are automatically displayed.Auto-display off: Messages are not displayed automatically.Melody Auto PlayPlaying a Melody AutomaticallyWhen a Message is DisplayedSet whether to automatically play melodies whenMessages R/F are displayed.ai-mode menu screen (P138)X"i-modesettingX"Display" X"Melody AutoPlay"X"ON"/"OFF"Check new messageChecking for MessagesMessageR/F that were not received because thehandset was out of service area are stored at thei-mode Center and , , and will beappeared on the top on the screen. Checking newmessages downloads the stored messages.• You cannot check new messages when the handset is out of service area.• Set what to check (i-mode mail and Messages R/F) in "Check new messages" (P180).ai-mode menu screen(P138)X"CheckNew Message"When check has completed, the reception result screen opens.b"MessageR"/"MessageF"MessageR/MessageFDisplaying Messages inthe Message BoxWhen Messages R/F arrive from the i-mode Center,, appears at the top of the screen.ai-mode menuscreen(P138)X"Message"X"MessageR"/"Message F"aReceived datebSubjectbSelect a MessageR/F•I[Delete] : Deletes the Selected MessageR/FaReceived date and timebSubject䂓Icons displayed on theMessage R/F list/detailscreenDefault MessageR preferredDefault ONNote• Incoming Message R/F is saved at the i-mode Center when:- When Power is off- During Video Call- During Self mode settings- When out of service area- When FOMA handset's Message R/F is full.Icon Description䋯Unread Messages R/F䋯Read Messages R/FProtected.Received date and time䋯䋯 A melody/still picture/video is attached.Ex.:MessageRList ScreenabEx.:MessageRdetailsscreenab](https://usermanual.wiki/LG-Electronics-USA/L705I.Users-Manual-1/User-Guide-860503-Page-149.png)
![151i-mode/i-motion/i-ChannelMessages R/F List Screen Sub MenuaMessageR/F List screen(P150)XMovecursor to messageXM[Menu]XPerform the following operation[Delete][View settings][Filter]Shows MessageR/F that meet certain conditions.[Read all]Set all MessageRs/Fs to "read".X"Yes"䌛Protect on/off䌝[Memory status]Display number of MessageRs/Fs.Messages R/F Detail Screen Sub MenuaMessageR/F Details Screen (P150)XM[Menu]XPerform the followingoperations[Delete]Delete the MessageR/F.X"Yes"䌛 ⼔䋯⼔⸃㒰䌝Protect or release the displayed MessageR/F.X"Yes"䌛 㔚Ꮽ⊓㍳䌝Save the addressor phone #/mail address highlighted in the MessageR/F to the phonebook.XSelect the address to save to the phonebookX"Yes"Go to Step 2 in "Saving Contacts to the Phonebook from Received or Dialed Calls" (P80).[Attach file]Save/Play/View an attachment from the currently displayed messageR/F.Perform the following steps to save attachments.XSelect the attachment X"Save" X"Yes"Perform the following steps to play/view the attachment.X"Pay/View"Attaches multiple copies of the same file.Damaged file.䋨䋩(Grey) Deleted(Ex. when a still image file)䋨䋩(blue) Not received(Ex. when a still image file)䋨䋩 Obtain a part of a message(Ex. when a still image file)Error䋨䋩 Attachment with UIM operation restriction activatedSubjectDeleteDeletesselecteditemDel allreadDelete all䋺Delete the selected MessageR/F.X"Yes"䋺Delete selected MessageR/F.XCheck off the MessageR/F to be deletedXI[Done]X"Yes"• Press M[Menu], choose from "Mark all", "Release all", "Switch view"䋺Delete all MessageRs/Fs.XEnter the security codeX"Yes"䋺Delete all MessageRs/Fs.XEnter the security codeX"Yes"SwitchView 䋺Configures Message R/F list screen display.Display subject alone on one line.Displays subject and receive time on two lines.Sort 䋺Sorts MessageR/F by the set conditions.X"Subject Asc"/"Subject Desc"/"Date Asc"/"Date Desc"SubjectUnreadReadProtectedNotprotectedImageMelodyAll䋺Only display MessageR/F with a particular subject XEnter subject䋺Only display unread messages.䋺Only display read MessageR/F.䋺Only display protected MessageR/F.䋺Only display unprotected MessageR/F.䋺Only display MessageR/F with attachments.䋺Only display MessageR/F with melodies.䋺Display all MessageRs/Fs.Protect On/OffProtectselected on/offProtect allUnprotect all䋺Protect or release the displayed MessageR/F.X"Yes"䋺Select a MessageR/F and toggle "protect".XCheck off the MessageR/F to be protectedXI[Done]X"Yes"• Press M[Menu], choose from "Mark all", "Release all", "Switch view"䋺Protect all MessageRs/Fs.X"Yes"䋺Unprotect all MessageRs/Fs.X"Yes"Note<Delete>• If there are unread MessageRs/Fs, user is prompted to confirm deletion. Select "Yes" to delete.Continue on the next page](https://usermanual.wiki/LG-Electronics-USA/L705I.Users-Manual-1/User-Guide-860503-Page-150.png)
![152i-mode/i-motion/i-Channel[Inline image]Save an image inserted in the currently displayed messageR/F.XSelect the image X"Save" X"Yes"• To view information about the selected image, select "Info.".Save backgroundSave the background of the displayed messageR/F.X"Save" X"Yes"•To view information about the image, select "Info.".[View settings]SSL Certificate InfoHandling SSL CertificatesView SSL Certificate contents, or set valid or invalid.ai-mode menu screen (P138)X"i-modesetting"X"Certificates"Certificate list screen opens.•C[Select] : Display the selected certificate's details.bMove the cursor onto the certificateXM[Enable] / [Disable]•M[Menu] : Select "Certificate Info" and "Enable/Disable" If you enable "Certificate Info", the detail of the selected certificate will be shown.Certificate List Screen Sub MenuaCertificateList screen(P152)XMovethecursor onto the certificateXM[Menu]XPerform the followingoperations䌛Certificate info.䌝Display detailed information about the selected certificate.䌛Valid/Invalid䌝Set the selected certificate to valid or invalid.Certificates used for SSL communicationIssued by an authentication company and saved on the handset by default.i-motioni-motions are composed of video and sound files.They can be obtained from sites, played, saved, andeven as the Stand-by display or Ringer ID, etc.i-motion TypesThere are 2 types of i-motion movies.䂓StandardThere are 2 forms standard type.aPlayback after downloading-type (Up to 500KB)bPlayback while downloading-type (Up to 500KB)• Some standard type i-motion movies cannot be saved.䂓Streaming TypePlayback while downloading an i-motion movie. Up to 2MB of i-motion can be played. The data is deleted after playback. It cannot be saved on the FOMA handset.Introduction to i-motionDownloading i-motionMovies from SitesUp to 1000 i-motion movies can be saved. However,the savable number depends on the amount of thedata.• Downloaded i-motions are saved in the "i-mode" folder under "i-motion" in the "Data box".aOn a siteXSelect an i-motion• When "i-motion auto play" is set to "ON", an i-motion movie is played automatically after being downloaded. Operations during Playback→P201ScrollFont Size䋺Sets the number of lines scrolled when His pressed at the MessageR/F Display Screen.X"1 line"/"3 lines"/"5 lines"/"Page"䋺Set a font size for message R/F display screen.X"Small"/"Standard"/"Large"Note<Protect>• Up to 100 MessageR and up to 100 MessageF can be protected.<Delete>• Protected messages cannot be deleted.Default All validNote• i-motion movies that can be downloaded and played are in MP4 (Mobile MP4) format. i-motion movies in ASF format cannot be downloaded or played.• When you fast forward/rewind an i-motion movie during playback, only sound is played; video may not be displayed correctly.](https://usermanual.wiki/LG-Electronics-USA/L705I.Users-Manual-1/User-Guide-860503-Page-151.png)
![153i-mode/i-motion/i-Channel䂓Streaming-Type i-motions• Playback confirmation screen opens. When "Yes" is selected, the i-motion plays during download.• If "i-motion type" is set to "Standard type", streaming is impossible. If switching between "Std/Streaming", please download the i-motion again.→P153bAfter downloadQX"Save"Play: Play a downloaded i-motion movie.File property: Display detailed information about the downloaded i-motion movie.Back: Returns to the site display page without saving the i-motion.When Ticker Text is HighlightedWhen a ticker is set in an i-motion movie, the tickeris displayed during playback. You can use thePhone To, AV Phone To, Mail To or Web To functionby selecting the highlighted phone number, mailaddress or URL.aAfter ending i-motion playbackXM[Yes]䂓To use the above functions while playingi-motionPause the i-motion to use Phone To, AV Phone To, Mail To, Web To function. While playing i-motionXC/UXCXM[Yes].i-motion Auto PlaySetting Whether to Play ani-motion Movie AutomaticallyToggle playing an i-motion automatically when it isdownloaded from a site or mail.ai-mode menu screen (P138)X"i-modesetting"X"i-motion"X"i-motion AutoPlay"X"ON"/"OFF"i-motion typeSet i-motion Acquisition Aettings.When downloading a new i-motion, sets thei-motion's type.ai-mode menu screen (P138)X"i-modesetting"X"i-motion" X"i-motion type"XSelect he typeStandard: Only download standard-type i-motions.Standard type / Streaming type: Download standard and streaming-type i-motions.Note• Depending on the connected site or i-motion movie, the i-motion movie may not be downloaded, or played during the download.• If you play a movie while downloading it, the movie may stop playing or the picture may become distorted due to signal reception.• Some i-motion movies cannot be saved on the FOMA handset.• The file cannot be saved if a file of the same name already exist in the folder.• Some i-motion movies have playback restrictions. If an i-motion has a restricted playback (IE: repetitions/length of time, or an expiry date), is displayed. An i-motion movie with playback period restrictions cannot be played prior to or after the restriction period.• Some downloaded i-motion movies may not play correctly.䂓InformationThe stored content may be lost due to the handset failure or repair. DoCoMo is not responsible for lost data. It is recommended that you keep saved content from the handset on a microSD memory card. You can connect the handset to a PC using Data Link Software and a FOMA USB Cable (optional) and save data to the PC.Default ONNote• Even if set to "OFF", streaming-type i-motions will be auto-played.Default StandardNote• When downloading streaming-type i-motions, "Std/Streaming" must be set.](https://usermanual.wiki/LG-Electronics-USA/L705I.Users-Manual-1/User-Guide-860503-Page-152.png)
![154i-mode/i-motion/i-ChannelAbout i-ChannelThe service which DoCoMo or IP (InformationProvider) provide graphical view of information suchas news or weather forecasts, especially fori-Channel compatible handset.It periodically updates information and displays it asa ticker on the Stand-by display. If Qis pressedfor more than 1 second, the channel list is shown.Moreover, rich detail information can be acquiredby selecting favorite channels from a channel list.• Display method of Channel list→P155• For precautions to take and more details about i-Channel, refer to "Mobile Phone User's Guide (i-mode<FOMA>)".㶎䋺 Screens shown are images. They differ from actual ones.There are 2 types of channels: "Basic channels" and"Favorite channels"."Basic channels" is channel provided by DoCoMo.Because it is registered by default, it is immediatelyavailable upon subscription to i-Channel. Packetcommunication charges applying to automaticupdate of information delivered for "Basicchannels" is included in i-Channel service fee."Favorite channels" is provided by IP (InformationProvider) other than DoCoMo and available whenyou register a favorite one. Packet communicationcharges applying to automatic update ofinformation delivered for "Favorite channels" is notincluded in i-Channel service fee.Information for "Basic channels" and "Favoritechannels" can be displayed as a ticker on theStandby-display.• Some "Favorite channels" may require an information fee for use.• Some "Favorite channels" may require a separate subscription to their sponsoring IP (Information Provider).• Both "Basic channels" and "Favorite channels" require packet communication charges for viewing detailed information from a channel list, on top of the i-Channel service fee.• The i-Channel service charge does not includes the packet communication charges for auto-updating the "Basic channels" information that is delivered during International Roaming.• i-Channel is a fee-based service requiring a separate subscription (i-mode contract is necessary for subscription).• Operations→P155Trial ServiceWhen you use an i-Channel compatible handset andhave subscribed to i-mode, but not to i-Channel forthe subscriber line using the i-Channel compatiblehandset, you can use "Basic channels" for apredetermined period of time without servicecharges. Note that you will be charged packetcommunication charges apply for viewing detailinformation from a channel list.• For precautions and details of using the trial service, refer to "Mobile Phone User's Guide [i-mode]".Trial service will be started automatically in principlewhen a predetermined period of time has elapsedafter inserting UIM and starting to use i-Channelcompatible handset. When automatic start isdisabled, i-channel can be started by pressing Qfor one second. Trial service can be used only oncefor 1 subscriber line. Trial service will be terminatedautomatically when a predetermined period of timehas elapsed after the start. For the procedure toterminate it halfway, refer to "Mobile Phone User'sGuide [i-mode]".Before subscribing to the serviceWhen you have not subscribed to i-ChannelAfter the service subscription procedureshave been completedAfter subscribing to i-Channel, a ticker appears on the Stand-by display. At a fixed period of time, information is received or channel list is displayed.Pressing Q for more than 1 second brings up the channel list. You can view in list format information, etc. given in ticker of each channel.You can view detail information screen of each channel by selecting it.Q(for 1+ sec)IP (Information Provider)i-mode Handset i-mode CenterInformation ofPreference ChannelInformation ofthe Basic Channel](https://usermanual.wiki/LG-Electronics-USA/L705I.Users-Manual-1/User-Guide-860503-Page-153.png)
![155i-mode/i-motion/i-ChannelDisplaying the i-modeMenuWhen subscribed to an i-Channel, informationappears, when received, as a ticker on the Stand-byDisplay.• To automatically display the ticker, set "Ticker display" to "ON".→P155• When Public Mode (Drive Mode) is set, the ticker will not be displayed.aThe Stand-by displayXQ(More than1 second)bSelect Channel itemThe site is connected and detail information appears.•L : Returns to the channel list screen.i-Channel SettingConfiguring i-ChannelYou can set whether to display the ticker on theStand-by display or to set the ticker display style.All the i-channel data in the FOMA handset will bedeleted.aIX"i-Channel"XPerforms thefollowing operations[i-Channel list]Open the Channel list screen.䌛Ticker setting䌝䌛Reset i-Channel䌝Deletes all i-channel information on the FOMA handset and restores defaults. Ticker Display is also reset to default settings.X"Yes"Note• While receiving data, blinks.• Even when information is received, no ring alert or vibrator operates. Also, the Call Indicator does not light/blink.• Information may not be received when the handset power is turned off, while out of service area, or when the signal reception is weak. Press Q to receive information. The Stand-by display ticker will show the information automatically. Also, information may not be received while using default settings. In this case, hold down Q. The ticker on the Stand-by display will automatically display the information.• In some conditions, information may be received only when a channel list is displayed.• If you change the connection destination in "Host selection" of "i-mode setting", the connection destination of i-Channel is also changed. (Normally, you do not need to change the settings).• The ticker will not appear after i-Channel is cancelled.• When an i-motion is set to the Standby display, the ticker will not be shown during playback.• There may be a notice of failure to acquire channel information in the following cases.- When i-Channel connection destination has been changed- When UIM has been replacedChannel listTickerQ(Onesecond orTickerDefault Ticker display : ONTicker speed: NormalTicker DisplayTicker speed䋺Set whether to display a Ticker on the Stand-by display.X"ON"/"OFF"䋺Set the ticker display rate.X"Slow"/"Normal"/"Fast"Note<Ticker Display>• If you cancel the i-mode service before canceling i-channel, the "Ticker Display" setting remains.](https://usermanual.wiki/LG-Electronics-USA/L705I.Users-Manual-1/User-Guide-860503-Page-154.png)
![158MailMail Functions of FOMAHandsetFOMA handset provides 2 mail functions: i-modemail and SMS.• Using i-mode mail requires i-mode subscription.• Using SMS requires no i-mode subscription.Sending and Receiving MailFOMA Handset→FOMA HandsetBoth i-mode mail and SMS can be used.FOMA Handset→mova i-mode HandsetBoth i-mode mail and SMS can be used.• SMS sent from a FOMA handset is received by a mova i-mode handset as an i-mode mail.• When "SMS report request" is "ON", SMS cannot be sent to a mova i-mode handset.䋪䋺 This differs depending on the mova i-mode handset settings.mova i-mode Handset→FOMA Handseti-mode mails and SMS sent from mova i-modehandset can be received.•Short mail䋪 sent from a mova i-mode handset canbe received by a FOMA handset as a SMS.䋪䋺 Short mail is a service that allows sending and receiving text messages with a mova handset.What is i-mode Mail?Upon subscription to i-mode, you can send andreceive e-mails via internet, as well as betweeni-mode handsets (including mova handset).On top of the text, a total of 2MB of attachmentscan be sent in 10 files (JPEG, etc..). Also, i-modemail can be decorated by changing the font color,size, or background color of the message text. Inaddition, you can insert Deco-mail pictograms fromthe many pre-installed ones that can be inserted inthe same manner as Pictographs, to easily createand send expressive mail.The Mail address given at i-mode subscription is asbelow.<When newly subscribing to i-mode>Before the "@", a random number is inserted; please make certain of the Mail address.Example: abc1234 ... 789xyz@docomo.ne.jpChecking your mail address"iMenu" →"English iMenu" →"Options" →"MailSettings" →"Confirm Mail Address"• Between i-mode handsets (including mova handsets), mails can be sent and received using only the address preceding @.• When sending mails from PC, etc. to FOMA handset, use the whole address containing @docomo.ne.jp.•Sending mail →P161• Receiving mail →P166• The i-mode service contents are subject to change. For details, refer to "Mobile Phone User's Guide [i-mode]".䂓Receive optionThe subject of mail stored at the i-mode Center can be viewed beforehand; it can then be deleted (without downloading) or downloaded.→P167Mail SettingYou can make various settings as described below.<Setting procedure>"iMenu" → "English iMenu" → "Options" → "Mail Settings" → Specify each item• For details, refer to "Mobile Phone User's Guide [i-mode]" that was provided when you subscribed to i-mode.䂓Changing your mail address [Mail Address(Change Mail Address)]You can change characters preceding mark @ in a mail address, e.g., "docomo.xx_ab1234yz@docomo.ne.jp".䂓Confirm Mail Address [Mail Address (ConfirmMail Address)]You can confirm the current mail address.Up to 70 characters (Japanese)Up to 160 characters (English)Up to 5000 full-pitch charactersSMS SMSi-mode Maili-mode MailFOMA handset FOMA handseFOMA handset i-mode handsmova servicUp to 2000 full-pitch characters?Up to 70 characters (Japanese)Up to 160 characters (English)SMS i-mode Maili-mode Mail i-mode MailFOMA handsi-modehandsetof mova serviceUp to 50 charactersUp to 250 full-pitch charactersShort mailDial specialnumber 1655 SMSi-mode Mail i-mode Mail](https://usermanual.wiki/LG-Electronics-USA/L705I.Users-Manual-1/User-Guide-860503-Page-157.png)
![159Mail䂓Registering secret code [Mail Address (OtherSettings) →Register a Secret Code]When using a mail address of format "mobile phone number@docomo.ne.jp", you can register 4-digit secret code in addition to the mail address. Because mails with no secret code attached are not received, you can avoid receiving unnecessary messages.䂓Resetting mail address [Mail Address (OtherSettings) →Reset Mail Address]You can set your mail address to "phone number@docomo.ne.jp".䂓Spam Mail PreventionYou can set your mail address to "mobile phone number@docomo.ne.jp".aReject Mail with URL[Spam Mail Prevention) → Reject mail with URL]Can set i-mode to reject mails classified by the NetStar corporation as being from Dating, Adult, Illegal and Insecure domains.bReject/Receive Mail Settings [Receiving Mail (Spam Mail Prevention) → Reject/Receive Mail Settings]• You can specify the senders from which you receive mails among DoCoMo, au, SoftBank, Tu-Ka and WILLCOM.You can specify sender's domains or email addresses from which you receive mails. Also, you can exclude specific mail addresses to reject, even if they are from the accepted senders or domains you specified. You can reject mail pretending to use a mobile phone or PHS domain from Internet other than the above.cSMS Rejection Settings [Receiving Mail (Spam Mail Prevention) → SMS Rejection Settings]• You can restrict incoming SMS by selecting an option from "SMS৻ᜎุ (Reject All SMS)", "㕖ㅢ⍮SMSᜎุ (Reject Anonymous SMS)", "࿖㓙SMSᜎุ (Reject Intl. SMS)" or "㕖ㅢ⍮SMS䈶࿖㓙SMSᜎุ (Reject Anonymous and Intl. SMS)". You can also view the current settings.dRestricting reception of mails from mass i-mode mail senders [Receiving Mail (Other Settings) →Reject Mass i-mode Mail Senders]• You reject 201st and subsequent i-mode mails sent from one i-mode handset (including mova handset) a day. "Reject" is set by default, so you do not have to change the settings to reject messages sent from mass mail senders.eReject Unsolicited Ad Mail [Receiving Mail (Other Settings) → Reject Unsolicited Ad Mail]• You reject reception of mails with "Reject Unsolicited Ad Mail" description added to a mail subject which are sent unilaterally for advertisement and/or promotion without agreement of the receiver. "Reject" is set by default, so you do not have to change the settings to reject such messages. (Senders are obligated by law to give description "ᧂᛚ⻌ᐢ๔䋪 (Unsolicited Ad Mail)" (6 full-pitch characters) to the beginning of the mail subject field.)䂓Limiting mail size [Receiving Mail (Limit MailSize)]You can limit i-mode mails to be received with the predetermined size.䂓Confirm Settings [Receiving Mail (ConfirmSettings)]You can check the current settings of mail reception/rejection and others.䂓Suspending mail function [Suspend Mail]You can suspend the mail function in the i-mode Center when it is not necessary.When Mail Cannot be ReceivedMail delivered to i-mode Center will be immediatelysent to your i-mode handset. When the i-modehandset is powered off or the i-mode service areaor due to other reasons, the mail is held at the i-mode center, the center resends this mail to the i-mode handset within a span of 720 hours by thetime you receive it.䋪Also, if the Receive option settings are set, theyallow a user to set which i-mode mails will bedownloaded from the i-mode center.䋪䋺 Mails you have not received are stored in i-mode Center for 720 hours. Mail resend conditions change according to the unsent condition.Other Functions䂓Sending/Receiving Filesi-mode mails can store 2MB of attachments that can be of any type. A limit of 10 files, with a total size of 2MB, can be attached and sent. When receiving an i-mode mail (2MB), all files can be received, or just the first 100KB (Auto receive file attachment); any remaining files that are desired can be selected and downloaded (Selected attachment download). As well, the handset's file send settings permit leaving files less than 100KB on the server, letting the user choose whether or not to download it.Depending on the recipient's handset, some files may not be properly received because of included file types and sizes.Sending ReceivingReceive optionAuto receivingAutoreceiveattachfileAttachFileReceiveoptionattach fileMessage DecomailpictureAttachFileMessageContinue on the next page](https://usermanual.wiki/LG-Electronics-USA/L705I.Users-Manual-1/User-Guide-860503-Page-158.png)
![160Mail䂓Deco-mailYou can create and send or receive enjoyable i-mode mail edited in a decorative manner such as changing the font size and/or background color or pasting an image in the text. The many preinstalled deco-mail pictographs, like emoticons, can be easily inserted into a mail and be sent. (In the case of emails sent from a PC, deco-mail pictographs may not display properly).If deco-mail is sent to a non-supporting phone or one with a 10KB download limit, the other party may receive a mail containing URL. In this case, the receiver can view the Deco-mail by selecting the indicated URL.• Editing/Sending Deco-mail →P162• Applicable models: Available on Deco-mail compatible handsets. For details, refer to "Mobile Phone User's Guide [i-mode]".SMS (Short Message Service)You can send/receive text messages using only themobile phone numbers without subscription toi-mode.Sending →P181䇭Receiving →P181䇭Checking →P182SMS (Short Message Service) DestinationSMS destination is "subscribed mobile phonenumber".• For destinations used for sending/receiving SMS to/from overseas carriers other then DoCoMo, visit DoCoMo's web site.Number of Characters That Can be Sent/ReceivedThe number of characters that can be sent/received in SMS is as listed below.When SMS (Short Message Service)Messages Cannot be ReceivedSMS delivered to SMS Center will be immediatelysent to your FOMA handset. Note that, however;when your FOMA handset is OFF or out of servicearea, the SMS is stored in SMS Center.Mail MenuDisplaying Mail MenuaThe Stand-by displayXDXPerformsthe following operation[Received mail]Displays received mail folder list screen.→P170[Sent mail]Displays sent mail folder list screen.→P170[Unsent messageOpen the Unsent maillist screen.→P171[Compose message]Create a new i-mode mail.→P161[Check new messages]Receive i-mode mail stored in i-mode Center by i-mode check.→P168[Receive option]You can check subjects of i-mode mails stored in i-mode Center and select ones to be received or deleted without reception from the i-mode Center.→P167[SMS]Compose new SMS and receive SMS stored in SMS Center by Check new SMS.→P181, P182[Template]Show a list of saved templates.→P165[Mail setting]Set the mail function.→P179Receiver 21 characters (including "+")SMS textentrysettingsJapanese (70 characters)English (160 characters)Note• The maximum storage period of SMS in SMS Center is 72 hours. The sender can specify the storage period within "SMS validity period".→P182• SMS expired is automatically deleted.• SMS stored in SMS Center can be received by "Check new SMS".→P182• When SMS stored in SMS Center is received, it is deleted from SMS Center.Mail Menu screen](https://usermanual.wiki/LG-Electronics-USA/L705I.Users-Manual-1/User-Guide-860503-Page-159.png)
![161MailCreating and sending i-mode mailCreating and Sendingi-mode MailaMail menu screen(P160)X"Composemessage"b(Receiver)Select fieldX"InputAddress"XEnter the address• Up to 50 half-pitch characters can be entered.• The address can be selected from the Phonebook, Sent mail logs and Received mail logs.→P161cSelect (Subject) fieldXInput subject• Up to 15 full-pitch or 30 half-pitch characters can be entered.dSelect (Body) fieldXInput body• Up to 5000 full-pitch or 10000 half-pitch characters can be entered.eI[Send]I-mode Mail Creation Screen Sub Menuai-mode mail creation screen(P161)XM[Menu]XPerform the followingoperations[Send via]Send mail.[Preview]Displays a preview of the sent mail.[Save]Save mail being created or edited in Unsent box.[Add address]Send to several addresses Up to five addresses can be added.[Delete address]Delete a selected receiver.X"Yes"[Cng. rcv. type][Template]Note• To decorate mail →P163• To send with attached file →P166• You can insert a new line feed while editing the message text. The line feed is counted as 1 full-pitch character.• A space is counted as 1 half-pitch character.• Characters may not be sent correctly to the receiver depending on the radio wave reception level.• Half-pitch katakana and pictographs (E-Moji) except for mail exchanged between i-mode handsets may not be displayed correctly.• The secret code is added automatically when the mail whose address is set with the secret code is sent. However, the address of the sent mail does not display the added secret code.• Even if i-mode mail is sent successfully, an error message "Transmission failed" appears depending on the radio wave reception level.Composei-mode mailscreenReceiverSubjectMessageTotalnumber of bytes of charactersanddecorationMail body inputscreen• When using deco-mail pictograms, the mail is automatically sent as a deco-mail.OpenPhonebookSent AddressReceivedaddressInput Address䋺Select an address from the phonebook.XSelect phonebook䋺Select an address from the Sent mail logs.XSelect history䋺Select an address from the Received mail logs.XSelect history䋺Enter the receiver address directly.XEnter Mail AddressChange toToChange toCcChange toBcc䋺Change the selected receiver to To. The mail address entered in usual Receiver will be shown to recipients.䋺Change the selected receiver to Cc. You can specify additional addresses to send a copy of the same mail to other recipients in addition to the direct recipients. The mail addresses entered in the Cc field will be shown to other recipients.• The mail address may not be displayed depending on the recipient's handset, device or mail software.䋺Change the selected receiver to Bcc. You can specify addresses of people to receive copies but whose identity will not be shown to other recipients. The mail addresses entered in the Bcc field will not be shown to other recipients.LoadtemplateSave䋺Read a template to create Deco-mail.→P164䋺The Deco-mail which you are creating is saved as a template.X"Yes"Continue on the next page](https://usermanual.wiki/LG-Electronics-USA/L705I.Users-Manual-1/User-Guide-860503-Page-160.png)
![162Mail[Attach file]Play/Display/Delete attached file.→P169[Activate camera][Header/Sign.][Delete body]Body software.X"Yes"[Delete Mail]Delete mail being composed.X"Yes"Mail Body Entry Screen Sub Menuamail body entry screen(P161)XM[Menu]XPerform the followingoperations[Decorate mail]Open the palette to select the decoration of Deco-mail (Decoration).→P163[Range choice]Specify the range of text to decorate.Go to Step 2 (P164) of "Changing Decoration".• This cannot be selected when no text has been entered in the message.[Common phrases]Enter or edit Common phrases.→P250[Edit character]Select a character/decoration in the body and copy/cut/paste. Undo the last entry or pasting of characters.→P252[Edit word]Edit Dictionary stored in the FOMA handset.→P253[Quote]Quote the contents of the phonebook.→P250[Input setting]Configure character entry.→P250[Special input]Enter Space / Line feeds and Kuten codes.→P250[Header/Sign.][Jump][File property]Display detailed information about the attached file.[Preview]Open preview screen of message.Deco-mailCreating and SendingDeco-mailYou can create your own designer mail by addingdecorations such as changing font size, font coloror background color, or inserting images when youedit i-mode mail messages.• Deco-mail up to 100KB can be sent.• 20 deco-mail items with 90KB of data can be inserted.• When a Deco-mail is larger than 10KB, other than the following䋪 Deco-mail compatible handsets will not browse itself but only URL to refer it.䋪 : 903i, 904i, 703i (except P703i㱘), 704i model series• When a non-compatible i-Mode handset sends a Deco-mail, the receiving handset sees only a URL. When a Deco-mail is larger than 10KB, some Deco-mail incompatible handsets will not browse it but only URL to refer it, and the other incompatible handsets will browse only Deco-mail's body text without URL.aMail menu screen(P160)X"Composemessage"bEnter the receiver and subject• Entering the receiver and subject → Step 2 and 3 in "Creating and Sending i-mode Mail" (P161)Photo ModeMovie Mode䋺Capture and attach a still image.XTake still pictureXC[OK]䋺Capture and attach a video.XTake videoXC[OK]Attach headerAttach Signature䋺Attach set header.䋺Attach set header.Note<Add Address>• When selecting a Phonebook entry with multiple mail addresses saved, you need to further specify which addresses are to be added.<Cng. rcv. type>• This option is not available when no address is entered.<Template>• If the text is already entered, a confirmation screen whether to delete the text opens. To fetch the template, select "Yes".headerSignature䋺Attach set header.䋺Attach set header.TopBottom䋺Move to the top.䋺Move to the bottom.Body EntryDecoration being set at the cursor position](https://usermanual.wiki/LG-Electronics-USA/L705I.Users-Manual-1/User-Guide-860503-Page-161.png)
![163MailcSelect (Body) fieldXM[Menu]X"Decorate mail"dUse the palette to decorate a messagetext䂓Selecting a decoration before enteringcharactersFor operations, see "Decorating the Text" (P163).䂓To decorate entered charactersFor operations, please see "Changing Decoration" (P164).eI[Body]䂓To view the Deco-mail messageM[Menu] and then select X "Preview" fC[OK]XI[Send]Decorating the TextaMail body entry screen(P161)XM[Menu]X"Decorate mail"XPerform thefollowing operations•I[Body] : Switch from palette functions to character entry.[ (Edit decoration)]Specify the range of text to decorate.→P164• This cannot be selected when no text has been entered in the message.[ (Clear Decoration)]Delete Decoration under the cursor.[(Undo)]Restores a set decoration to previous setting.X"Yes"[ (Font size)]Set a font size.X(Large)/ (Standard)/ (Small)[ (Font color)]Set a color of characters.XSelect colorXEnter text[ (Background color)]Set a background color of mail text.XSelect a color[ (Toggle On/Off)]Make characters blinking.X(Blink : Begin)XEnter text• To stop blink, select (Blink : End).[(Ticker)]Set a ticker to the text.X(Ticker : Begin)XEnter text• Characters entered between and appear as a ticker.• To stop blink, select (Ticker : End).[(Swing)]Set text to swing.X(Swing : Begin)XEnter text• Characters entered between and appear as a swing.• To stop Swing, select (Swing : End).[ (Word alignment)]Set a position to enter characters or insert an image.X(Left)/ (Center)/ (Right)[ (Insert line)]Insert a line in mail text.[ (Insert image)][(Copy)]Specify the range and copy text, an image or line.XKSelect start point XKSelect end pointNote• When non-i-mode handsets received deco-mail, the decorations may not be correctly displayed.• After decorated text is deleted, the decoration codes may remain and this may result in a reduction in the number of characters available for the text. Cancel any decoration before deleting the text. When text is deleted by pressing Q for 1+ seconds, the text including any decoration will be deleted.• If a template contains an image that cannot be sent by mail, the image may be deleted.Palette displayscreenDataboxCapturingStill Images䋺Insert an image saved in "My picture" to mail text.XMove cursor to folderXC[Open]XSelect Image䋺Capture and attach a still image.XTake still pictureXC[OK]Continue on the next page](https://usermanual.wiki/LG-Electronics-USA/L705I.Users-Manual-1/User-Guide-860503-Page-162.png)
![164Mail[(Cut)]Specify the range and cut the text, image or line.XKSelect start point XKSelect end point[(Paste)]Paste the copied or cut data after the cursor.X"Yes"[ (Copy decoration)]Copy all decorations set to the line at the cursor.[ (Paste decoration)]After copying with "Copy Decoration", you can paste to where the cursor is.[ (Reset all)]Delete all decorations.X"Yes"Changing DecorationaMail body entry screen(P161)XM[Menu]X"Decorate mail"XSelect (Edit decoration)bStart selection with K•I[SelAll] : Select the entire message.cPress Kto select End point XPerform the following operation[ (Clear Decoration)]Cancel the decoration of the specified range.[ (Font size)]Change the size of characters in the specified range.X(Large)/ (Standard)/ (Small)[ (Font color)]Change the color of characters in the specified range.XSelect a color[ (blink)]Blink the characters in the specified range.X(Blink :Select)• To cancel blink, select (Blink: End).[ (Ticker)]Display the text in the specified range as a ticker from right to left.X(Ticker : Select)• To cancel a ticker, select (Ticker: Reset).[(Swing)]Swing the text in the specified range.X(Swing : Select)• To cancel swing, select (Swing: Reset).[ (Word alignment)]Change the position of characters or an image in the specified range.X(Left)/ (Center)/ (Right)TemplateCreating Deco-mailUsing TemplateTemplates are form data for Deco-mail withdecorations such as the font size and imageinsertion already set. In addition to templates pre-installed, you can use those downloaded from sites.• Templates pre-installed→P292Note<Copy/Cut>• When characters with "Ticker" or "Swing" set are selected and "Copy" or "Cut" is carried out, the settings for "Ticker" or "Swing" are not affected.<Character Size>• The size of Deco-mail pictographs cannot be changed.<Font color>• Pictographs (E-Moji) are also displayed in the specified color. To restore the default color, select "Default" from the color palette.<Blink>• If applied, blink is displayed on the preview screen or the Compose message screen, the blink ends after a certain period of time.<Insert image>• A maximum of 90KB and 20 items can be inserted. The number of attachments possible is reduced by the file size. If too many are inserted or the size is too large, a warning message is displayed.• By default, they are saved in the "Deco-mail picture" and "Deco-mail pictogram" folders.→P292• If the same image is inserted multiple times, it is considered that 1 image is inserted.](https://usermanual.wiki/LG-Electronics-USA/L705I.Users-Manual-1/User-Guide-860503-Page-163.png)
![165Mailai-mode mail screen(P161)XM[Menu]X"Template"X"Load template"X"YES"• If the mail has message text entered, the entered text will be deleted and the template will be loaded.bSelect a templateXC[Select]The selected template is inserted in the message text.• Selecting a template then pressing J allows you to select the template while viewing it.• You can edit the message text after inserting a template.Creating a New TemplateCreate user-defined templates. Created templatesare saved in the "Template" of Mail menu.aMail Menu Screen(P160)X"Template"XM[Menu]X"New template"bComposing Templates• Decorating operations→P163cAfter making Template XC[Set]XC[Select]XEdit File NameXI[Done]Editing TemplatesYou can edit user-defined templates.aMail menu screen(P160)X"Template"bSelect TemplateXC[Edit]XEdittemplate• Decorating operations→P163cAfter editing templateXC[Select]X"Overwrite save"/"New save"Overwrite: Save the edited template over the source template.Save new entry: Save the edited template as a new template.XC[Select]XEdit file namedI[Done]Template list screen sub menuaTemplate list screen(P165)XMovecursor to templateXM[Menu]XPerform the following operation[New template]Creates a New Template.→P165[Edit]Edit the selected template.→P165[Edit title]Edit the selected template's title.XEdit the title[File property]Display the selected template's properties.[Sort]In some situations, the template can be output differently.X"Date asc"/"Date desc"/"Title asc"/"Title desc"[Delete][Memory status]Show a list of saved templates.Note• Undecorated text cannot be saved as a template.TemplateCreation screenTemplateList screenDeleteDeletesselecteditemDelete all䋺Delete the selected template. X"Yes"䋺Selects and deletes a template.XCheck on the template to be deleted XI[Done] X "OK"XCheck off the Template to be deletedXI[Done]X"Yes"• Press M[Menu], Choose "Mark all" and "Release all"䋺Delete all templates. XEnter the security codeX"Yes"](https://usermanual.wiki/LG-Electronics-USA/L705I.Users-Manual-1/User-Guide-860503-Page-164.png)
![166MailAttaching fileAttaching a FileYou can send i-mode mail attached with images or melodies.• Maximum of 2MB and 10 items can be attached. The number of attachments possible is reduced by the file size.• The following table shows attachable file types:- Image (JPEG, GIF)- Video/i-motion Movie- Melody- Phonebook- Schedule-To Do- Bookmark• A file prohibited to be attached to mail or to be output from FOMA handset cannot be attached.ai-mode mail creation screen(P161)XM[Menu]X"Attach file"XPerform thefollowing operations[Attach file][Del. attach]Delete the selected attachment.X"Yes"[Play/disp file]Play/display an attached file.Automatic Reception of MailWhen i-mode Mail isReceivedWhen the FOMA handset is in the service area,i-mode mail is automatically sent from i-modeCenter.aWhen receiving i-mode mail, isshown at the top of the screenWhen the reception is complete, the Reception result screen opens.• You are forced to return to the screen before receiving mails if no operation is performed for approximately 30 seconds.• Selecting "Mail" opens the Received mail folder list screen.• Until the Detail screen of received i-mode mail opens, appears at the top of the screen and (the number indicates the number of messages) appears on the Stand-by screen.Imagei-motionMelodyPhonebookCalendarTo DoBookmark䋺Select from images saved in "My picture" of "Data box".XMove cursor to folderXC[Open]XSelect Image䋺Select from videos/i-motion movies saved in "i-motion" of "Data box".XMove cursor to folderXC[Open]XSelect Image䋺Select from melodies saved in "Mellody" of "Data box".XMove cursor to folderXC[Open]XSelect Melody䋺Selects an entry in the phonebook.XSelect phonebook䋺Select a schedule saved in the FOMA Handset X Select the dateX Select the Schedule event䋺Select a To Do item saved in the FOMA Handset. XSelect To Do䋺Select bookmarks saved in "Bookmark" of "i-mode". X Move cursor to folderXC[Open]XSelect BookmarkNote<Attach file>• Attached GIF images and melodies cannot be received with an i-mode handset using the mova service.• A video-clip/i-motion movie over 2MB cannot be attached. Reduce the size under "Clipping" to the available size before attaching it.→P203• Depending on the receiving handset, a video-clip may be displayed coarsely or as sequential still images. When sending than to these devices䋪, the settings below are recommended.Size restriction: 500KB, 䋪: 903i, 904i, 703i (except P703iI), 704i model series• Some i-motion movies may not be attached.Note• When new i-mode mail is delivered, other i-mode mail and/or Message R/F stored in i-mode Center are received at the same time.• When Receive option for i-mode mail has been set, sent i-mode mail is stored in i-mode Center. You can confirm a subject, etc. of i-mode mail stored in Center and select and receive it.→P167• If mail is received from a handset that is capable of setting To, Cc, or Bcc, you can check how the mail was addressed to you using the FOMA handset.→P172• Melodies, video clips and still images can be received as attachments to i-mode mail. Incompatible files may be automatically deleted at the i-mode Center. If an attached file is deleted, a message "Del. attach" is added.Reception resultscreen](https://usermanual.wiki/LG-Electronics-USA/L705I.Users-Manual-1/User-Guide-860503-Page-165.png)
![167MailDisplaying Newly Receivedi-mode MailaReceiveResults Screen(P166)X"mail"XSelect a folderbSelect mail to be displayedReceive optionSelecting and Receivingi-mode MailYou can confirm a subject, etc. of i-mode mailstored in i-mode Center and select mail to bereceived or delete it in i-mode Center beforereception. To use Receive option, set "Receiveoption" to "ON" in advance.Setting the Receive optionSet "Receive option" to "On" to receive selected i-mode mail.aMail menu screen (P160) X"Receiveoption" XC[Select] Xselect "On" XI[Done]After this option is set, i-mode mail will not be received automatically.If i-mode mail arrives whenReceive option is setaThe Notification of received mail screenopensPress C [Select] or Q䋯Pto close the notification screen.Setting Receive Option for i-modeMailAfter "Receive option" is set to "On", perform thefollowing steps to select and receive i-mode mail:aMail menu screen (P160) X"Receiveoption"• i-mode mails that are less than 100KB (with attachments included) are automatically downloaded. Those with attachments greater than 100KB must be manually downloaded from the i-mode center.→P169• You can set whether to receive attached melodies or images under "Receive attach file".→P179• If the size of a received mail exceeds the number of characters set under "iMenu" →"English iMenu"→ "Options" → "Mail Settings" → "Limit Mail Size", you can download it by selecting the attached file name and the destination file name to copy the body text to.→P169• Incoming mail is saved at the i-mode Center when:- When Power is off - During Video Call-During Self mode settings䇭- When out of service area- The "Receive option set" is set to "ON"- The Inbox is full with protected or unread mail• When mail remains at the i-mode Center, or is shown. When power is off or out of service area, the icons may not be displayed.• If multiple i-mode mail messages or Message R/F are received concurrently, the ringtone set to the i-mode mail or Message R/F received the last sounds.Note• Videos attached to an i-mode mail may not be properly displayed.Received Mail䈍⍮䉌 䈞• Set "Receive option" to "Off" in "Receive option set" (P179)Note• or indicating the incoming i-mode mail will not be displayed, and the mail ring tone will not sound.Receiving message screen](https://usermanual.wiki/LG-Electronics-USA/L705I.Users-Manual-1/User-Guide-860503-Page-166.png)
![168MailFor subsequent steps, see "Mobile Phone User'sGuide [i-mode]"䂓Icons displayed on the Receive option screenindicating attachmentsCheck new messageChecking for i-modeMailsi-mode mails, if any, that could not be receivedbecause FOMA handset was out of service area orfor other reasons are stored in i-mode Center. Youcan receive stored i-mode mails by checking toi-mode Center.• appears at the top of the screen when mail is kept at the i-mode Center.• You can select items to check (mail or Message R/F) under "Check new messages" (P180).• You cannot check from an out of service area.aMail Menu Screen(P160)X"Check newmessage"When check has completed, the reception result screen opens.Replying to i-mode MailReplying to i-mode MailYou can reply to i-mode mail sender. Replying canbe made by entering new text or quoting the text ofreceived i-mode mail.aReceived Mail Details Screen(P170)XM[Menu]X"Reply"X"Reply"/"Replyquoted"• You can reply to mail also by pressing I[Reply] on Received mail detail screen.• When the mail is sent to receivers other than your mail address simultaneously, you can select "Reply all" or "Rep. quoted all".bEnter subject, body• "Re:" is added to a subject.• When replying by quoting, ">" is added to the beginning of quoted message.• Editing subject and message → "Creating and Sending i-mode Mail" (P161).cI[Send]Forwarding i-mode MailForwarding i-mode Mailto Another ReceiverYou can forward received i-mode mail to anotherreceiver.aReceived Mail Details Screen(P170)XM[Menu]X"Forward"bEntering Receiver• "Fw:" is added to a subject.• Editing subject and message → "Creating and Sending i-mode Mail" (P161).cI[Send]Icon File typeAn image is attached.An i-motion movie is attached.A melody is attached.Other file is attached.Note• Even with "Receive option set" set to "ON", all mails are received when "Check new message" is used. When you do not want to receive mails, delete "Mail" from the inquiry items.→P180• Receive option can also be carried out from "iMenu". Select "iMenu" → "䊜 䊆䊠 䊷䋯ᬌ⚝(Menu/Search)" → "䊜 䊷䊦ㆬᛯฃା (Receive Option)".Note• Even when i-mode mail is kept at the i-mode Center, may not appear on the screen if mail arrived while the FOMA handset power was turned off.Note• After exceeding the storage capacity of the sent mail BOX, a reply cannot be created. Delete mails saved in the sent mail BOX before replying.• The reply to received Deco-mail with quotation has original decoration and images entered in the message text. However, restricted images and highlighted URLs will not be forwarded.Note• When a file that is prohibited from being attached/distributed from FOMA handset is attached/pasted to an i-mode mail forward, it is deleted.• After exceeding the storage capacity of the sent mail BOX, a reply cannot be created. Delete mails saved in sent mail BOX before forwarding.• The forwarded Deco-mail has original decoration and images entered in the message text. However, restricted images and highlighted URLs will not be forwarded.](https://usermanual.wiki/LG-Electronics-USA/L705I.Users-Manual-1/User-Guide-860503-Page-167.png)
![169MailRegistering MailAddress/Phone Numberto PhonebookYou can save email addresses/phone numbers in amail to the Phonebook.To register an address/phone number in themessage textaReceived mail detail screen (P170)XMovecursorover addresses/numbertosaveXM[Menu]X"Save"X"Add toPhonebook"b"Yes"Go to Step 2 in "Saving Contacts to the Phonebook from Received or Dialed Calls" (P80).When Saving Reciever/Origin mail address/Phone numberaReceived Mail Details Screen(P170) XM[Menu] XSelect "Store" X"Storeaddress"If there are multiple recipients/senders, further select the addresses/phone numbers to register.b"Yes"Go to Step 2 in "Saving Contacts to the Phonebook from Received or Dialed Calls" (P80).Playing/Saving anAttached File fromi-mode MailYou can play or save an image, melody, video ori-motion movie attached or pasted to i-mode mailRetrieve Selected Attached FileWhen the size of a received message includingattachments exceeds 100 KB, you will need todownload the attachments from the i-mode Center.• All the attached files selected are downloaded regardless of the setting of "Receive attach file" option in "Mail setting" X "Communication".• The expired files cannot be downloaded.aReceived Mail details screen (P170) XSelect filenameDisplay/Play/Delete Attached FileaReceived mail details screen (P170)Move the cursor onto the attach file XMove cursor over attached file•C[Select] : Display/Play selected attachment.bM[Menu]X"Attach file"XPerform thefollowing operations[Save]Save the selected attachment.X"Yes"• Obtained images will be saved in "i-mode" folder in "My picture" of the "Data box". (If the image can be used as a Deco-mail pictogram, it will be saved in "Deco-mail pictogram".)• Movies/i-motion movies are saved in the "i-mode" folder under "i-motion" in the "Databox".• Obtained melodies will be saved in "i-mode" folder in "Melody" of the "Data box".• Phonebook entries are saved to the Phonebook in the FOMA handset.• Schedule events are saved to Schedule in the FOMA handset.• To Do entries are saved to the To Do 䊥䉴䊃 in the FOMA handset.• Obtained bookmarks will be saved in "Bookmark" in the "i-mode" folder.• Attached files other than the above cannot be saved.[View/Play]Play/Display the selected attachment.[Delete]Delete the selected attachment.X"Yes"AddressConfirmationNote• When there is less empty space in the received mail BOX than the file size, the attachment cannot be added.Note• i-mode mails too large for the Handset are not received and an error message is returned to the source address.• i-mode mails that are less than 100KB (with attachments included) are automatically downloaded. An attachment over 100KB can be downloaded separately from the i-mode center.• One can set a size limit for i-mode mail messages.→P159• When the image size is larger than the screen, it is shrunk and displayed.Continue on the next page](https://usermanual.wiki/LG-Electronics-USA/L705I.Users-Manual-1/User-Guide-860503-Page-168.png)
![170MailSaving Attached ImagesaReceived mail details screen (P170) XM[Menu]X"Inline image"bSelect imageXPerform the followingoperation[Save]Obtained images will be saved in "i-mode" folder in "My picture" of the "Data box".X"Yes"[Inline image]Display detailed information about the selected image.Received Mail BOX/Sent Mail BOX / Unsent Mail BOXDisplaying Mail inReceived/Sent/UnsentMailbox• To display contents of a folder with security set, enter the Security Code.Displaying Received Mails• Up to 1000 i-mode mails and SMS can be saved in the Inbox. However, the savable number depends on the amount of the data.• By default, "䊄䉮䊝䈎䉌䈱䈍⍮䉌䈞 (DoCoMo News)" mails are saved.aMail menu screen(P160)X"Inbox"bSelect a Folder•J: Open the previous or next page when there are 2 or more pages.•I[Reply] : Reply to the sender and/or receivers of simultaneous mail sending.→P168cSelect a message•J: Open the previous or next mail.•I[Reply] : Reply to the sender and/or receivers of simultaneous mail sending.→P168Displaying Messages in the Outbox• Up to 500 i-mode mail, SMS, and unsent messages can be saved in the Outbox. However, the savable number depends on the amount of the data.aMail menu screen(P160)X"Outbox"bSelect a Folder•J: Open the previous or next page when there are 2 or more pages.• Some images, videos/i-motion movies may not be displayed or played.• When "Melody auto play" is set to "ON", an attached melody is played automatically when you open a received i-mode mail.• The deriver program is required to play an i-motion mail on a PC.Received mailfolder list screenNote• If you run an i-appli from the "䊄䉮䊝䈎䉌䈱䈍⍮䉌䈞 Announcement from DoCoMo", communication charges apply.Received mail listReceived MailDetails ScreenSent mail folderlist screenSent mail list](https://usermanual.wiki/LG-Electronics-USA/L705I.Users-Manual-1/User-Guide-860503-Page-169.png)
![171MailcSelect a message•J : Open the previous or next mail.•I[Edit] : Open Compose message or SMS creation screen.→P161, P181Displaying Messages in UnsentMessage• Messages saved in the Unsent Mail BOX are included in the maximum number of savable messages in the Outbox.aMail menu screen(P160)X"Unsentmessage"•I[Delete] : Delete i-mode mail or SMS.bSelect a messageThe i-mode mail or SMS creation screen opens depending on the type of the selected mail. You can also edit unsent mail.Auto sortSorting Sent/Received MailsAutomatically to FoldersSet conditions for automatically saving mails inspecified folders.• This option is not available with the default "Inbox" and "Outbox".aReceived mail folderList Screen(P170)/Sent Mail Folder List Screen (P170)XSelect FolderXM[Menu]X"Autosort"•I[Phonebook] : Settings for selecting mail address from Phonebook.bM[Menu]XPerform the followingoperations[Address]Set mail address as a sort keys. You can specify more than one mail address.[Subject]Set a mail subject as a condition.XEnter subject[Reply invalid]䋪Route messages with Reply impossible to the selected folder.[Switch view]Select a view to display the condition of "Auto sort" setting.[Release]䋪䋺 This icon is not displayed for the sent BOXSent Mail DetailsScreenUnsent mail listscreenOpenPhonebookSent AddressReceivedaddressInput Address䋺Select and set from a phonebook.XSelect phonebook䋺Select an address from the sent mail logs.XSelect history䋺Select an address from the received mail logs.XSelect history䋺Directly enter and set a mail address.XEnter Mail AddressName displayAddress display䋺Display name saved to phonebook.䋺Display mail address.DeleteReleaseselectedUnmarkall䋺Delete the selected Auto sort rule.X"Yes"䋺Select and delete the auto-sort rule.XCheck off the rules to be deletedXI"Done"X"Yes"•Press M[Menu], choose from "Mark all", "Release all", "Switch view"䋺Delete all rules set to the selected folder.X"Yes"Note• You cannot set the multiple conditions such as "Address", "Subject", and "Reply impossible" to a folder concurrently.• The same sorting conditions as ones set to another folder cannot be set.](https://usermanual.wiki/LG-Electronics-USA/L705I.Users-Manual-1/User-Guide-860503-Page-170.png)
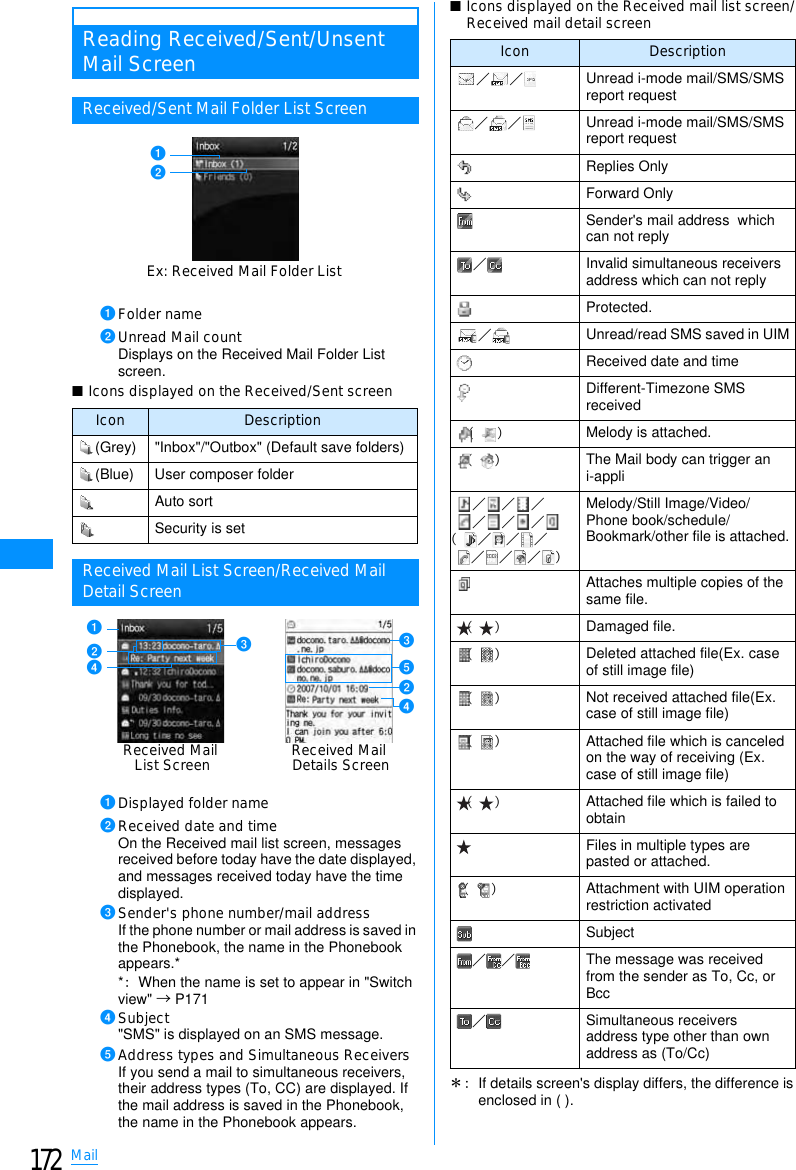
![173MailOutbox List Screen/Outbox Detail ScreenaDisplayed folder namebSent date and timeOn the Outbox list screen, messages sent before today have the date displayed, and messages sent today have the time displayed.cRecipient's phone number/mail addressIf the phone number or mail address is saved in the Phonebook, the name in the Phonebook appears.*䋪䋺 When the name is set to appear in "Switch view" → P174dSubject"SMS" is displayed on an SMS message.eReceiver typeIndicate the receiver type of the received mail (To, Cc, or Bcc).䂓Icons displayed on the Outbox list screen/Outbox detail screen䋪䋺 If details screen's display differs, the difference is enclosed in ( ).Unsent Mail List ScreenaSaved date and timeMessages saved before today have the date displayed, and messages saved today have the time displayed.bSubject"SMS" is displayed on an SMS message.cRecipient's phone number/mail addressIf the phone number or mail address is saved in the Phonebook, the name in the Phonebook appears.*䋪䋺 When the name is set to appear in "Switch view" → P174䂓Icons displayed on the Unsent mail list screen䋪 Other than the above, it is the same as sent mail.Received Mail Folder/Sent Mail Folder ListScreen Sub MenuaReceived mail folder list screen(P170)/Sent mail folder list screen (P170)XM[Menu]XPerform followingoperation[Manage folders]Icon Description䋯(䋯)Sent i-mode mail or SMSi-mode mail sent to many recipientsSend failedMails that failed to send to multiple recipientsProtected.SMS saved in UIMReceived date and time䋨䋩 Melody is attached.䋨䋩 The Mail body can trigger an i-appli䋯䋯䋯䋯䋯䋯䋨䋯䋯䋯䋯䋯䋯䋩Melody/Still Image/Video/Phone book/schedule/Bookmark/other file is attached.Attaches multiple copies of the same file.䋨䋩 Attachment with UIM operation restriction activatedSubject䋯䋯 Send by To/Cc/BccSent maillist screen Sent MailDetails ScreenabcdcbdeIcon DescriptionUnsent i-mode mailUnsent SMSCreatefolder 䋺Create a folder.XEnter folder nameEdit folder name䋺Edit selected folder name.XEnter folder nameSort folder 䋺Select the display position of the folders and sort folders.Select the positionFolder security䋺Set or release security to the selected folder. XEnter the security codeX"Yes"Unsent maillist screenabc](https://usermanual.wiki/LG-Electronics-USA/L705I.Users-Manual-1/User-Guide-860503-Page-172.png)
![174Mail[Delete][Auto sort]Set mails to save them automatically in specified folders.→P171[Send all via IrDA]Transmit all mail in Received mail folder/sent mail folder via infrared.XEnter security codeXEnter Auth. Password X"Yes"[Copy all microSD]Copies all messages in the selected folder to the microSD memory card.XEnter the security codeX"Yes"[Memory status]Display number of mails in Received mail folder/sent mail.[Open folder]Display contents of a selected folder.䋪䋺 This icon is not displayed for the sent BOXReceived Mail List Screen Sub MenuaReceived mail list screen(P170)XMovecursor to mailXM[Menu]XPerformthe following operation[Move][Delete][View settings]Delete Folder䋺Delete selected folder.XEnter the security codeX"Yes"Delete all read䋪䋺Deletes all read messages in the folder.XEnter the security codeX"Yes"Deletes folder contents䋺Deletes all messages in the selected folder.XEnter the security codeX"Yes"Note<Manage Folder>• If I[Add] is pressed at the received mail folder/sent mail folder list screen, a folder can be added.<Edit folder name/Sort folders/Delete folder/Auto sort>• This option is not available with the default "Inbox" and "Outbox" folders.<Delete>• A folder containing protected mails cannot be deleted.• Protected mails or SMS saved in UIM are not deleted.• If "Delete one" is selected for a folder with unread mail, there will be a confirmation prompt asking permission to continue. Select "Yes" to delete.MovethisMoveselectedMove all䋺Move the displayed mail to another folder.XSelect destination folder䋺Select mail messages and move them to another folder. X Check off the mail to move XI[Done]X Select destination folder䋺Move all mail in the folder to another folder. XSelect destination folderDeleteDeletesselected itemDel all readDelete allSMS rmv. in fd.䋺Delete the selected message. X"Yes"䋺Select and delete message. XCheck off the mail to deleteXI[Done]X"Yes" • Press M[Menu], choose from "Mark all", "Release all", "Switch view"䋺Deletes all read messages in the folder. XEnter the security codeX"Yes"䋺Delete all mails in the folder. XEnter the security codeX"Yes"䋺Deletes all SMS reports in the folder. XEnter the security codeX"Yes"SwitchViewSort䋺Set how to display mail. X"1 lines subjt"/"1 lines add"/"1 lines name"/"2 lines add"/"2 lines name"䋺Sort mails by the condition you specify. X"Subject asc"/"Subject desc"/"Address asc"/"Address desc"/"Date asc"/"Date desc"/"Size asc"*/"Size desc"*䋪䋺 Sort mails in ascending order of data size.](https://usermanual.wiki/LG-Electronics-USA/L705I.Users-Manual-1/User-Guide-860503-Page-173.png)
![175Mail[Filter]Shows messages that meet certain conditions.[Read all]Mark all mail in the folder as read.X"Yes"[Protect on/off][Send Ir data][Copy to microSD card][FOMA card (UIM)][Memory status]Display number of mails in Received mail BOX.Received Mail Detail Screen Sub MenuaScreen Memo details screen (P170)XM[Menu]XPerform the followingoperations[Reply]Reply to the viewed mail.→P168[Forward]Forward a the viewed mail→P168[Move]Move the displayed mail to another folder.XSelect destination folder[Delete]Delete a displayed mail.X"Yes"[Protect on/off]Protect or release the displayed mail.X"Yes"[Store]Save the phone numbers and email addresses in the displayed mail to Phonebook.→P169[Attach file]Save, play or view, or delete images attached to the displayed mail.→P169[Inline image]Save images contained in the displayed mail or view the information.→P170AddressSubjectUnreadReadProtectedNot protectedImagei-motionMelodyMailSMSAll䋺Only display mails with a particular addressXSelect itemXSelect/input address䋺Display mail with a specific subject. XEnter subject䋺Only display unread mails.䋺Only display read mails.䋺Display protected mail.䋺Display unprotected mail.䋺Display mail with an image attached.䋺Display mail with an i-motion movie attached.䋺Display mail with a melody attached.䋺Display i-mode mail.䋺Only display SMS, SMS Report.䋺Display all mail in the folder.Protect On/OffProtectselected on/offProtect allProtect all on/off䋺Protect or unprotect the selected mail. X"Yes"䋺Select and protect or unprotect mail. XCheck off the mail to protectXI[Done]X"Yes" •Press M[Menu], choose from "Mark all", "Release all", "Switch view"䋺Protect all mail in the folder. X"Yes"䋺Unprotect all mail in the folder. X"Yes"SendSend alldata䋺Sends selected mail via Infrared. X"Yes"䋺Send all mail in the folder by infrared. XEnter security codeXEnter Auth. Password X"Yes"Copy oneCopy all䋺Copies selected mail to microSD memory card. X"Yes"䋺Copies all mail in folder to microSD memory card.XEnter the security codeX"Yes"Copy to UIM䋺Copy the selected SMS to the UIM.Move to UIM䋺Move the selected SMS to the UIM.Copy fromUIMMove fromUIM䋺Copy the selected SMS to the handset.䋺Move the selected SMS to the handset.Note<Delete>• If there are unread messages, user is prompted to confirm deletion. Select "Yes" to delete.<Filter>• Addresses matched completely and subjects matched even partially are displayed.Continue on the next page](https://usermanual.wiki/LG-Electronics-USA/L705I.Users-Manual-1/User-Guide-860503-Page-174.png)
![176Mail[View settings][Copy]Copy contents of the displayed mail.[Save template]Save Deco-mail as a template.XC[Select]XEdit titleXI[Done][Export]Sent Mail List Screen Sub MenuaSent mail list screen(P170)XMovecursor to mailXM[Menu]XPerformthe following operation[Edit]Edit and send a sent mail.→P161, P181[Move][Delete][View settings]ScrollCharacter Size䋺Sets the number of lines scrolled when H is pressed at the mail Display Screen. X"1 line"/"3 lines"/"5 lines"/"Page"䋺Set a font size for text on mail display screen. X"Small"/"Standard"/"Large"MessageSubjectAddress䋺Select and copy contents of text.→P252䋺Copy a subject.䋺Copy a destination. If there are multiple addresses, select an address from the mail address list screen.Send IrDA 䋺Send the displayed mail via IrDA. X"Yes"Copy to microSD䋺Copy the displayed mail to the microSD memory card. X"Yes"FOMA card (UIM)䋺:Copy or move the selected SMS to the UIM, or copy or move the selected SMS from the UIM to the handset.X"Copy to UIM"/"Move to UIM"/"Move from UIM"/"Copy from UIM" Note<Protect>• Up to 1000 mails can be protected. <Delete>• Protected mails cannot be deleted.MovethisMoveselectedMove all䋺Move the selected mail to another folder. XSelect destination folder䋺Select mail messages and move them to another folder. X Check off the mail to move XI[Done]X Select destination folder䋺Move all mail in the folder to another folder. XSelect destination folderDeleteDeletesselecteditemDeleteall䋺Delete the selected message. X"Yes"䋺Select and delete message. XCheck off the mail to deleteXI[Done]X"Yes"• Press M[Menu], choose from "Mark all", "Release all", "Switch view"䋺Delete all mails in the folder. XEnter the security codeX"Yes"SwitchViewSort䋺Set how to display mail. X"1 lines subjt"/"1 lines add"/"1 lines name"/"2 lines add"/"2 lines name"䋺Sort mails by the condition you specify. X"Subject asc"/"Subject desc"/"Address asc"/"Address desc"/"Date asc"/"Date desc"/"Size asc"*/"Size desc"*䋪䋺 Sort mails in ascending order of data size.](https://usermanual.wiki/LG-Electronics-USA/L705I.Users-Manual-1/User-Guide-860503-Page-175.png)