LG Electronics USA LD803H LCD Monitor User Manual users manaul
LG Electronics USA LCD Monitor users manaul
users manaul

APPENDIX G :
FCC ID : BEJLD803H
USER’S MANUAL

Dell™ 1800FP Color Display User's Guide
Information in this document is subject to change without notice.
© 2001 Dell Computer Corporation. All rights reserved.
Reproduction in any manner whatsoever without the written permission of Dell Computer Corporation is strictly forbidden.
Trademarks used in this text: Dell and the DELL logo are trademarks of Dell Computer Corporation; Microsoft, Windows, and
Windows NT are registered trademarks of Microsoft Corporation; VESA is a registered trademark of Video Electronics
Standards Association; IBM is a registered trademark of International Business Machines Corporation; Adobe is a trademark
of Adobe Systems Incorporated, which may be registered in certain jurisdictions. As an ENERGY STAR Partner, Dell
Computer Corporation has determined that this product meets the ENERGY STAR guidelines for energy efficiency.
Other trademarks and trade names may be used in this document to refer to either the entitles claiming the marks and names
or their products. Dell Computer Corporation disclaims any proprietary interest in trademarks and trade names other than its
own.
Initial release:04/05/2002
Preface
Safety Instructions
Introduction
Setup
Using the Display
Troubleshooting
Specifications
Regulatory Notices
Warranty
Documentation

Back to Contents Page
Preface: Dell™ 1800FP Color Display User's Guide
About This Guide • Notational Conventions
About This Guide
This guide is intended for anyone who uses the Dell 1800FP Color Display. It describes the display's features, setup, and
operation.
The sections are as follows:
Safety Instructions lists safety information.
Introduction gives an overview of the display’s features and provides an orientation to the display.
Setup describes the initial setup process.
Using the Display gives an overview of how to use the display.
Troubleshooting provides tips and solutions for common problems.
Specifications lists the technical specifications of the display.
Regulatory lists regulatory certifications and notices.
Warranty describes the warranty information for this product.
Documentation provides additional documentation that supports this product.
Notational Conventions
The following subsections describe notational conventions used in this document.
Notes, Cautions, and Warnings
Throughout this guide, blocks of text may be accompanied by an icon and printed in bold type or in italic type. These blocks
are notes, cautions, and warnings, and they are used as follows:
Some warnings may appear in alternate formats and may be unaccompanied by an icon. In such cases, the specific
presentation of the warning is mandated by regulatory authority.
Back to Contents Page
NOTE: A NOTE indicates important information that helps you make better use of your computer system.
CAUTION: A CAUTION indicates either potential damage to hardware or loss of data and tells you how to
avoid the problem.
WARNING: A WARNING indicates the potential for bodily harm and tells you how to avoid the

Back to Contents Page
Safety Instructions: Dell™ 1800FP Color Display User's Guide
Read and follow these instructions when connecting and using your computer display:
To help avoid damaging your computer, be sure that the voltage selection switch on the power supply is set to match
the alternating current (AC) power available at your location:
115 volts (V)/60 hertz (Hz) in most of North and South America and some Far Eastern countries such as Japan,
South Korea, and Taiwan.
230 V/50 Hz in most of Europe, the Middle East, and the Far East
Also be sure that your display is electrically rated to operate with the AC power available in your location.
Never insert anything metallic into the display openings. Doing so may create the danger of electric shock.
To avoid electric shock, never touch the inside of the display. Only a qualified technician should open the display's
case.
Never use your display if the power cable has been damaged. Do not allow anything to rest on the power cable, and
keep the cable away from where people could trip over it.
Be sure to hold the plug, not the cable, when disconnecting the display from an electric socket.
Openings in the display cabinet are provided for ventilation. To prevent overheating, these openings should not be
blocked or covered. Also, avoid using the display on a bed, sofa, rug, or other soft surface. Doing so may block the
ventilation openings in the bottom of the cabinet. If you put the display in a bookcase or some other enclosed space, be
sure to provide adequate ventilation.
Put your display in a location with low humidity and a minimum of dust. Avoid places like damp basement or dusty
hallways.
Do not expose the display to rain or use it near water (in kitchens, next to swimming pools, etc.). If the display
accidentally gets wet, unplug it and contact an authorized dealer immediately. You can clean the display with a damp
cloth when necessary, but be sure to unplug the display first.
Place the display on a solid surface and treat it carefully. The screen is made of glass and can be damaged if dropped
or sharply hit.
Locate your display near an easily accessible electric outlet.
If your display does not operate normally - in particular, if there are any unusual sounds or smells coming from it -
unplug it immediately and contact an authorized dealer or service center.
Do not attempt to remove the back cover, as you will be exposed to a shock hazard. The back cover should only be
removed by qualified service personnel.
High temperatures can cause problems. Don't use your display in direct sunlight, and keep it away from heaters,
stoves, fireplaces, and other sources of heat.
Unplug the display when it is going to be left unused for an extended period of time.
Unplug your display from the electric outlet before any service.
Back to Contents Page
WARNING: Use of controls, adjustments, or procedures other than those specified in this documentation
may result in exposure to shock, electrical hazards, and/or mechanical hazards.

Back to Contents Page
Introduction: Dell™ 1800FP Color Display User's Guide
Overview • Graphics
Overview
Congratulations on purchasing the Dell 1800FP Flat Panel Color Display. The 1800FP utilizes a 18.1-inch (45.97cm) Active
Matrix TFT LCD that displays sharp and brilliant images of text and graphics with a maximum resolution up to 1280 x 1024
pixels. This display is optimal for Microsoft® Windows®, CAD/CAM/CAE, desktop publishing, spreadsheets, multimedia, and
any other application that demands large screen size and high resolutions. The Dell 1800FP was designed for a wide variety
of users ranging from the home, small office, or corporate environment. Those who require exceptional quality and reliability at
an affordable price will appreciate the value that the Dell 1800FP provides.
For more details see Specifications Section.
Graphics
The following links show various views of the display and its components.
Front View
Back View
Bottom View
Side View
Back to Contents Page
Back to Contents Page
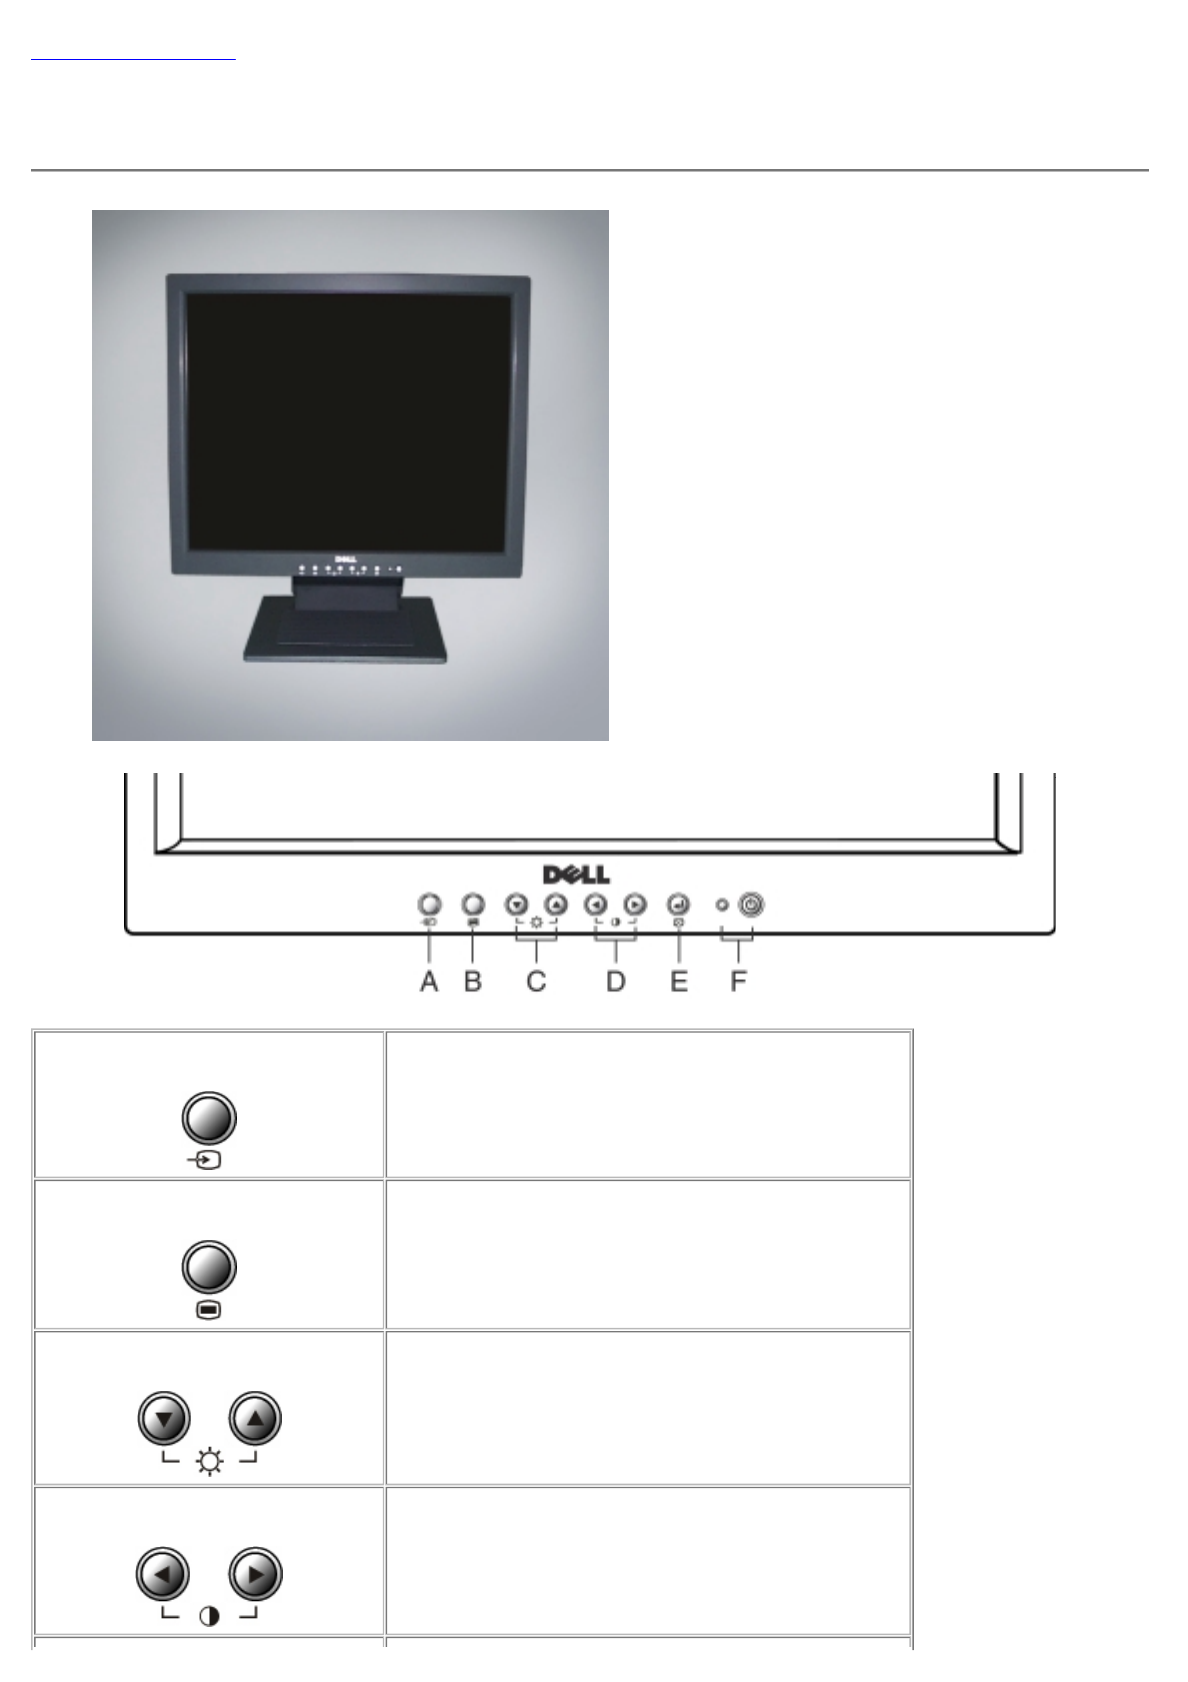
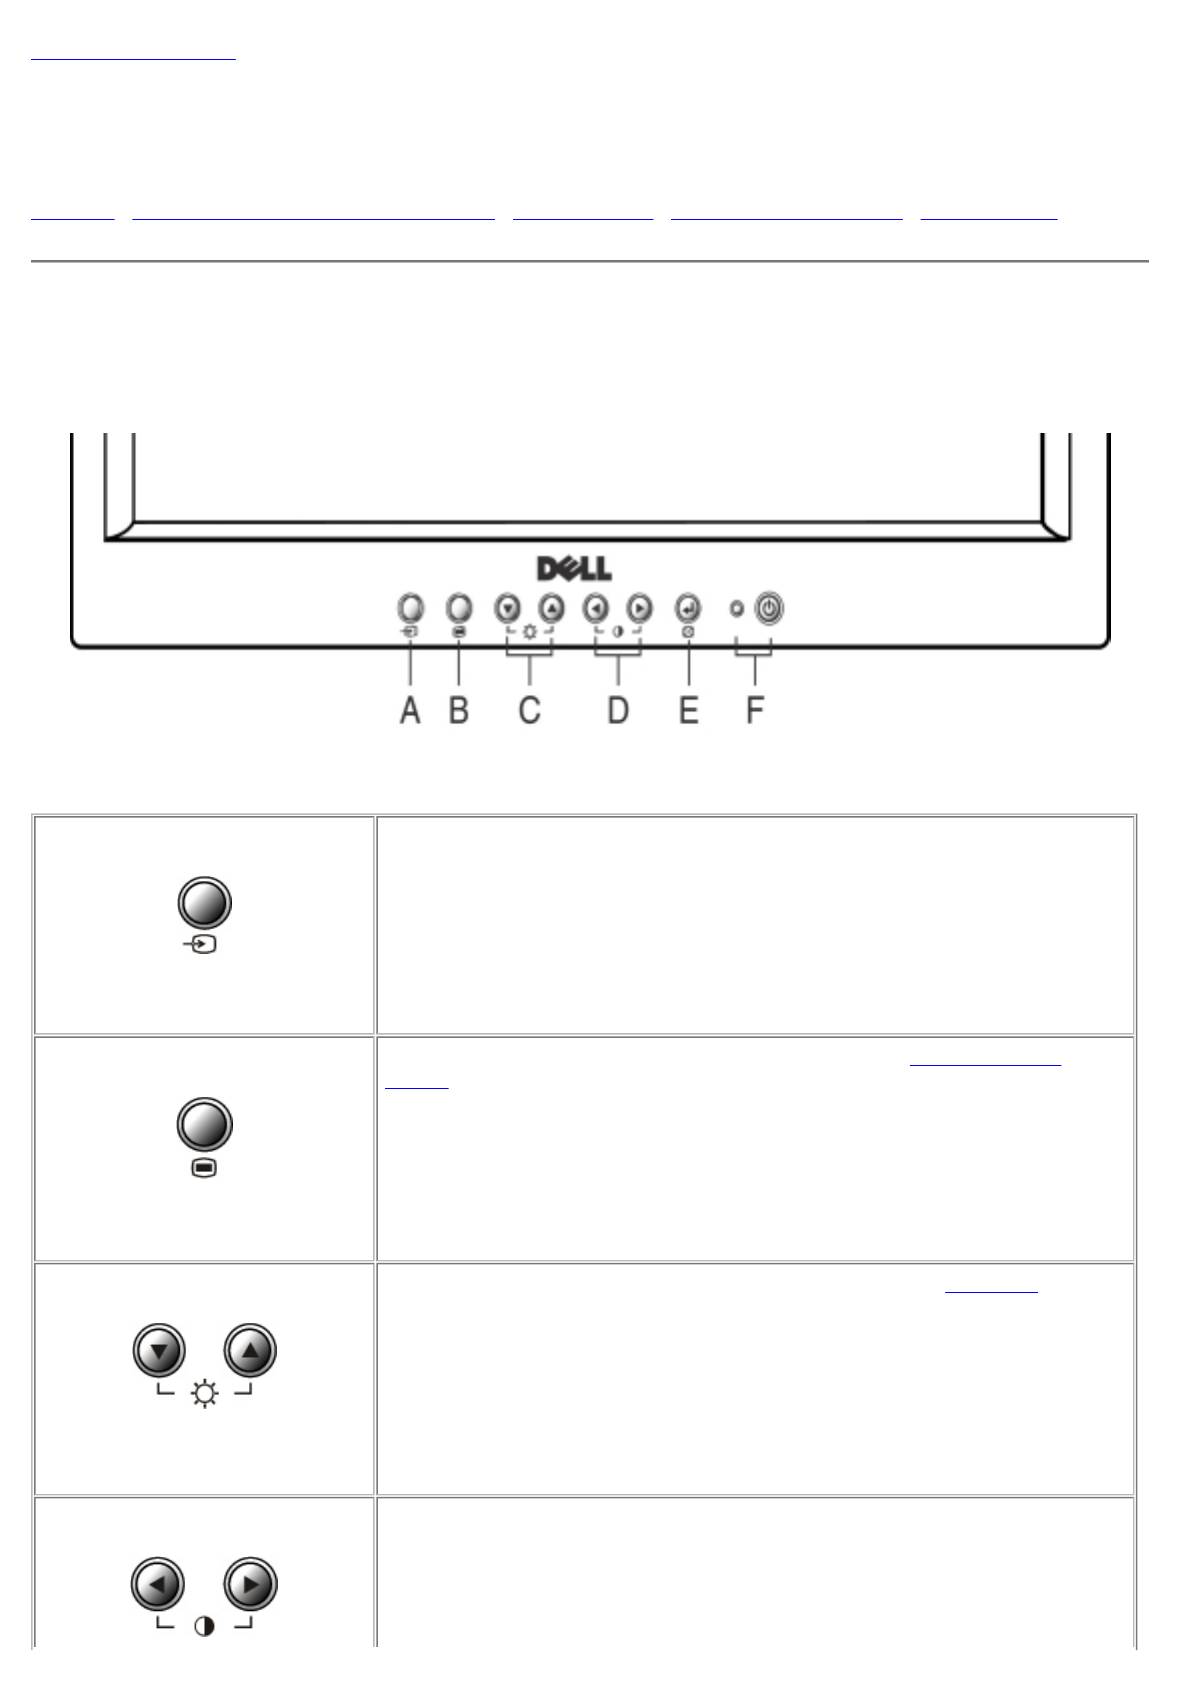
Front View: Dell™ 1800FP Color Display User's Guide
A. Input selection button
Use this button to make Dsub or DVI connector active.
This feature is used when two computers are connected
to the display. The default setting is Dsub.
B. Menu buttons
Use this button to enter or exit the On Screen Display.
C. Up/down arrow buttons
Select between OSD items and activates "Hot key"
function for brightness adjustment.
D. Left/Right arrow buttons
Use these buttons to choose or adjust items in the On
Screen Display and activates Hot Key function for
contrast adjustment.

Back to Contents Page
E. Select/Auto button
-! Use this button to enter a selection in the On Screen
Display.
- Automatically adjust vertical position, horizontal
position, pixel clock and phase.
F. Power button and LED indicator
Turn the display on/off and indicate the status of power
management.
Back to Contents Page
Back View: Dell™ 1800FP Color Display User's Guide
1.Power connector
2.15-pin D-sub input
3.DVI-D digital input
4. Kensington lock
Back to Contents Page
Back to Contents Page
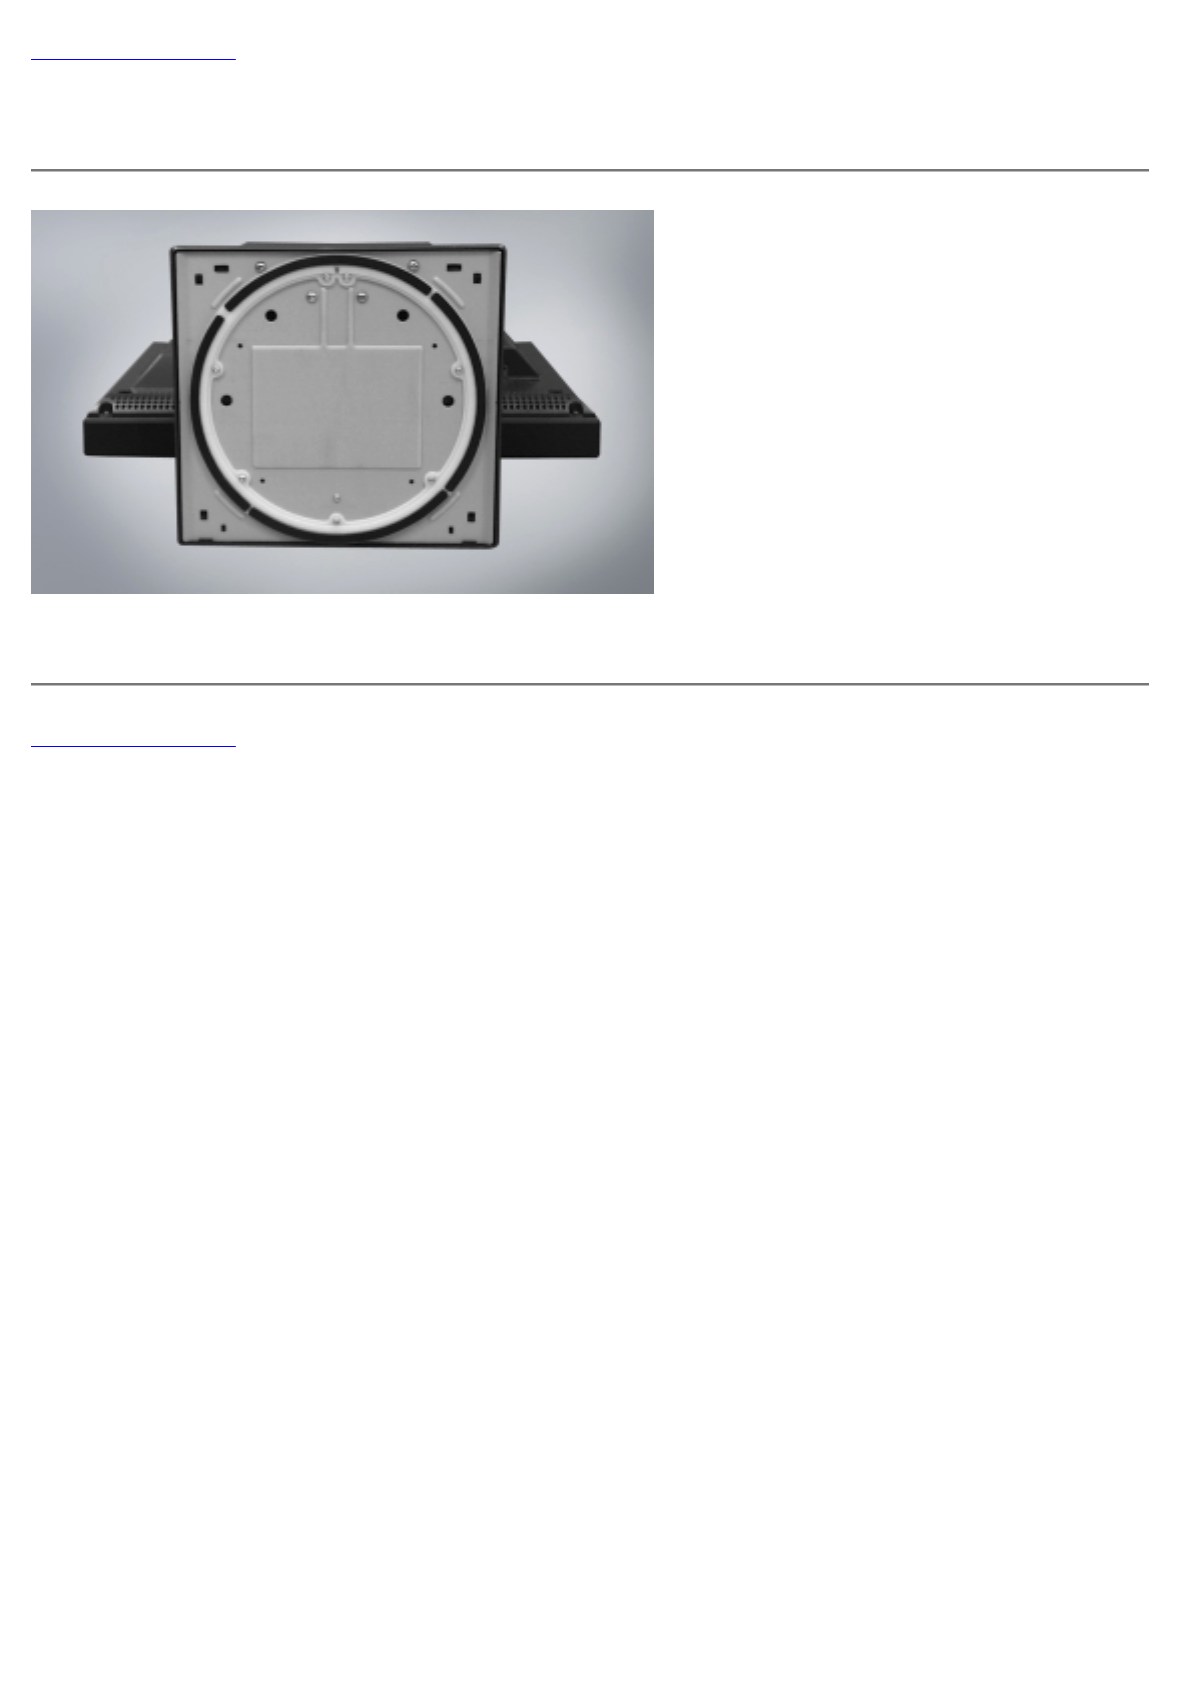
Bottom View: Dell™ 1800FP Color Display User's Guide
The base is attached when the display is shipped and can be removed.
Back to Contents Page
Back to Contents Page
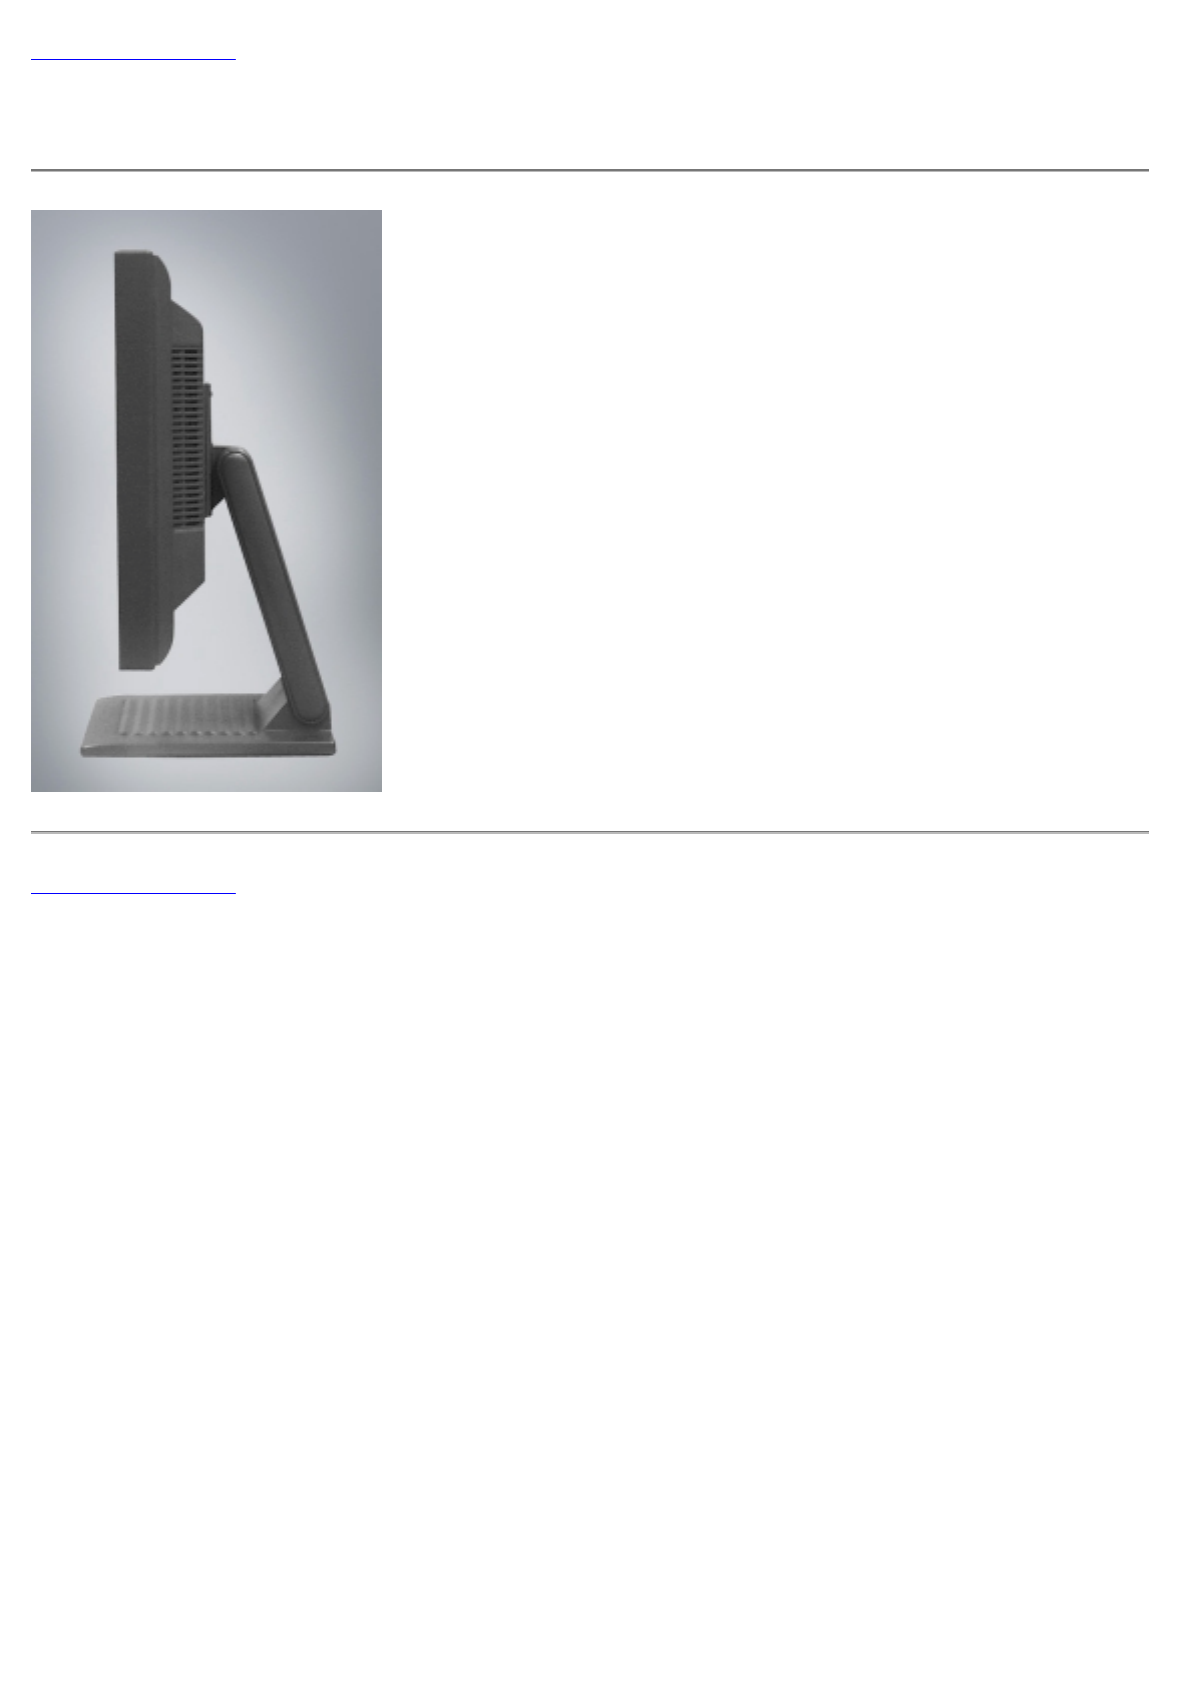
Side View: Dell™ 1800FP Color Display User's Guide
Back to Contents Page

Back to Contents Page
Setup: Dell™ 1800FP Color Display User's Guide
Tilt/Swivel Base
Attaching the Cables
Positioning the Display
Maintenance
Back to Contents Page
Back to Contents Page
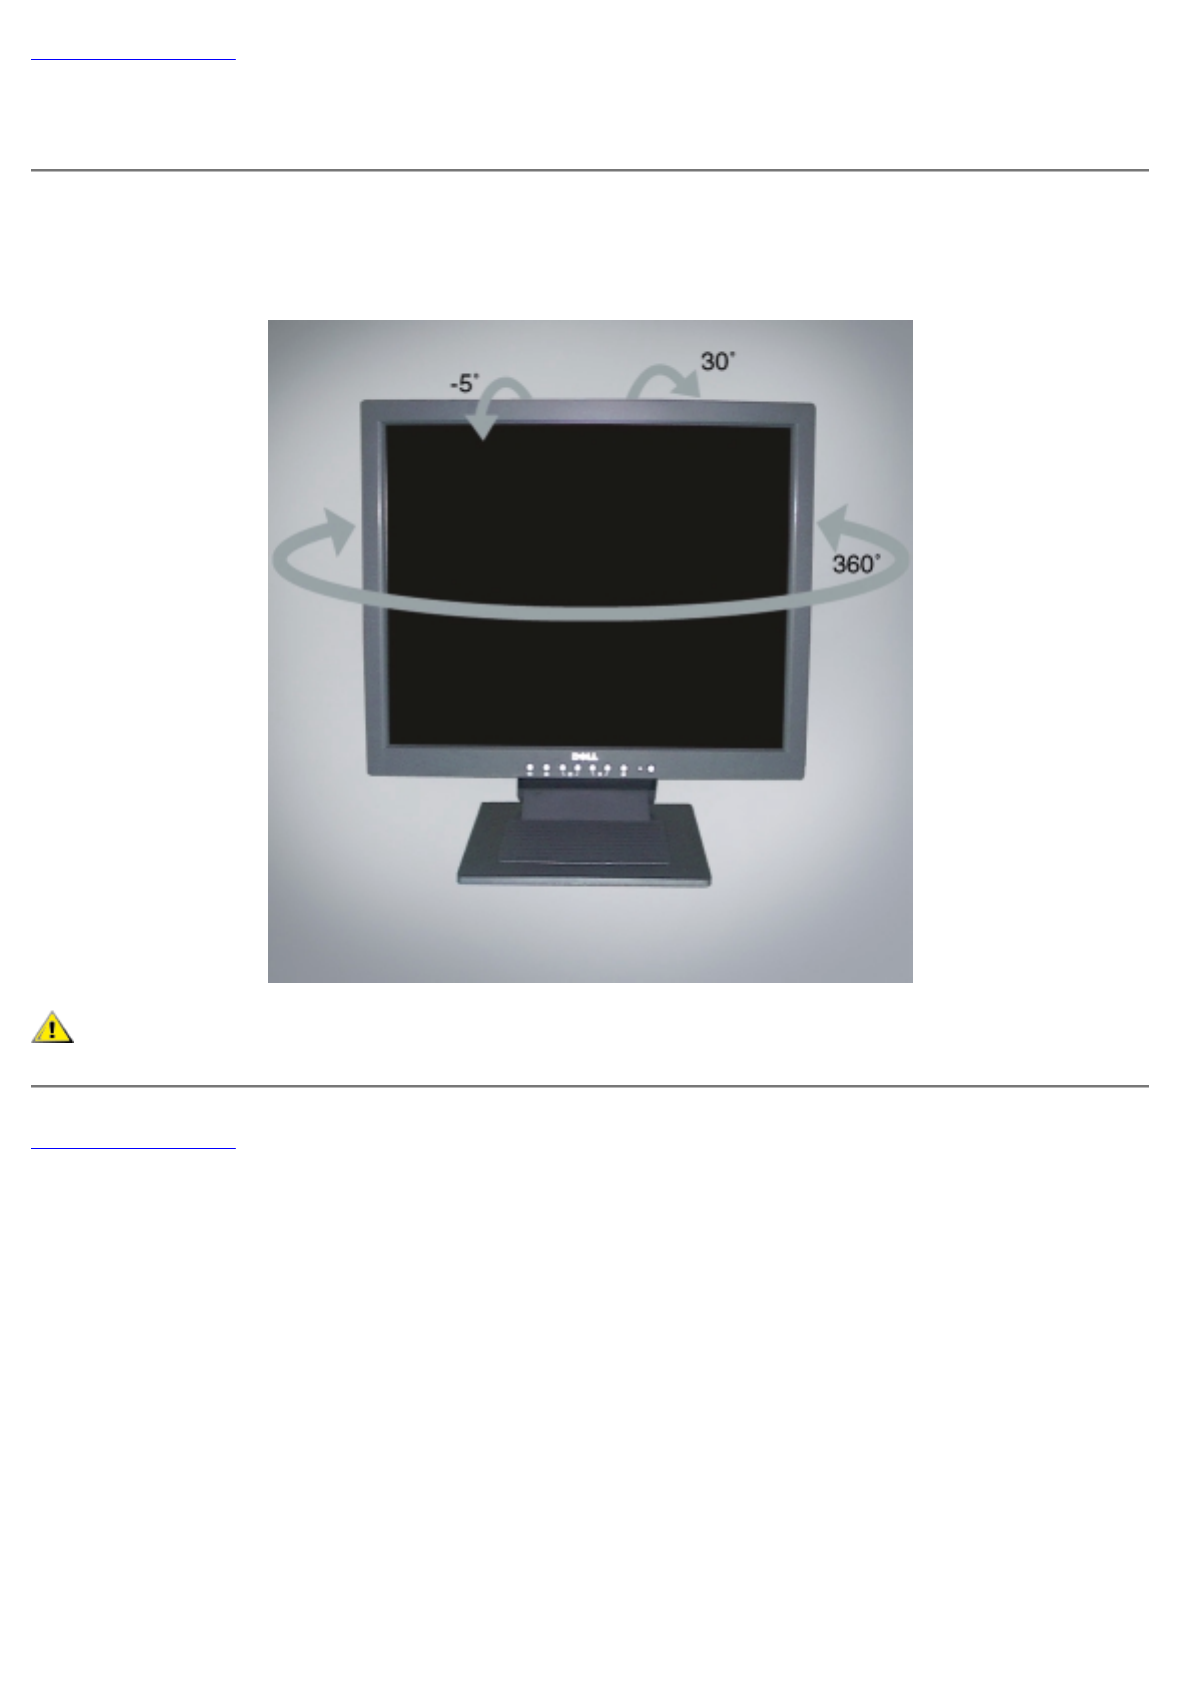
Tilt/Swivel Base: Dell™ 1800FP Color Display User's Guide
Tilt/Swivel Base
With the Tilt/ Swivel base, you can tilt and/or swivel the display for the most comfortable viewing angle.
CAUTION: The base is attached when the display is shipped and can be removed.
Back to Contents Page
Back to Contents Page
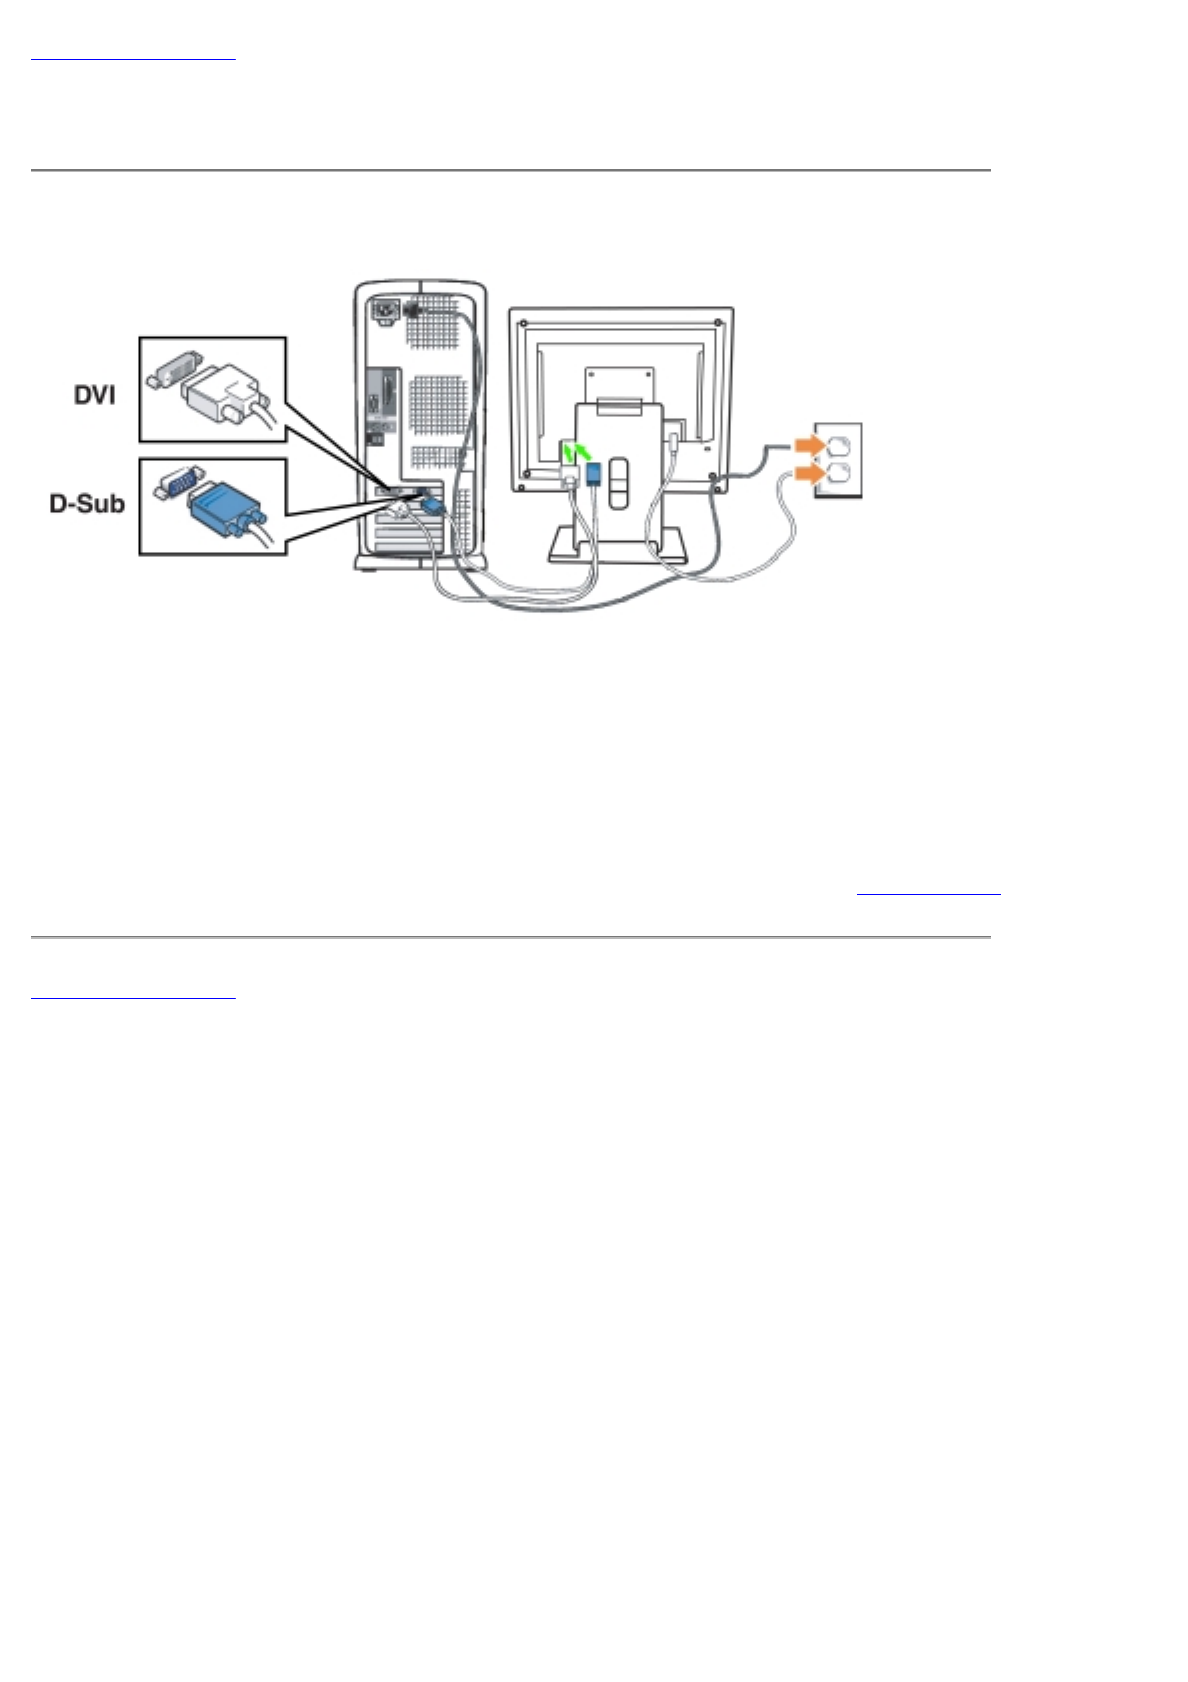
Attaching the Cables: Dell™ 1800FP Color Display User's Guide
Cable Connections On Back of Display and Computer
1. Turn off your computer and unplug its power cable.
2. Connect either the white (digital DVI-D) or the blue (analog D-SUB) display connector cable to the corresponding
video port on the back of your computer. Do not use both cables on the same PC. The only case in which both
cables can be used is if they are connected to two different PCs with appropriate video systems. (The graphics are
for illustration only. System appearance may vary).
3. Connect the power cable for your display to the power port on the back of the display.
4. Plug the power cables of your computer and your display into a nearby outlet.
5. Turn on your display and computer.
If your display displays an image, installation is complete. If it does not display an image, see Troubleshooting.
Back to Contents Page

Back to Contents Page
Positioning the Display: Dell™ 1800FP Color Display User's
Guide
Consider the following environmental factors when you are deciding how to position the display:
If there are any woofer speakers near the display, unplug and relocate the woofer to another room.
Remove all electronic devices such as radios, fans, clocks, and telephones that are within 3 feet away of the display.
If there were electronic devices removed, perform degauss again.
Back to Contents Page

Back to Contents Page
Maintenance: Dell™ 1800FP Color Display User's Guide
To clean your antistatic screen, lightly dampen a soft, clean cloth with water. If possible, use a special screen-cleaning
tissue or solution suitable for the antistatic coating.
To clean your Midnight Gray display cabinet, avoid using detergent of any kind. Detergent leaves a milky film on
plastics; particularly the darker colored ones. It is best to use a lightly dampened warm cloth to clean the cabinet.
White powder substance, due to shipping, may appear on the plastic or near bezel edge. If you observe this, simply
wipe it off.
Darker color plastics may scratch and shows white scuff marks more than lighter-colored display. Handle your Midnight
Gray display with care.
Back to Contents Page
WARNING: To avoid risk of electric shock, do not disassemble the display cabinet. Users cannot service the
display. User maintenance is restricted to cleaning.
NOTE: Before cleaning the display, unplug it from the electrical outlet.

Back to Contents Page
Using the Display: Dell™ 1800FP Color Display User's Guide
Setting the Optimal Resolution
Controls and Indicators
Back to Contents Page

Back to Contents Page
Setting the Optimal Resolution: Dell™ 1800FP Color Display
User's Guide
For optimal display performance while using the Microsoft® Windows® operating systems, set the display resolution to 1280 x
1024 pixels by performing the following steps:
1. Click the Start button, point to Settings, and click Control Panel.
2. Double-click the Display icon in the Control Panel window, and then click the Settings tab.
3. In the Desktop area, move the slidebar to 1280 by 1024 pixels. Then click OK.
Back to Contents Page
Back to Contents Page
Controls and Indicators: Dell™ 1800FP Color Display User's
Guide
Overview • On Screen Display (OSD) Menu System • Automatic Save • OSD_Warning_Messages • LED_Indicators
Overview
Use the control buttons on the front of the display to adjust the characteristics of the image being displayed. As you use these
buttons to adjust the controls, an on-screen display (OSD) shows their numeric values as they change.
A. Input selection button
Use this button to make Dsub or DVI connector active. This feature is used when
two computers are connected to the display. The default setting is Dsub.
B. Menu button
Use this button to enter or exit the On Screen Display. See access the Menu
system.
C. Up/down arrow buttons
Select between OSD items and activates "Hot key" function for brightness
adjustment.
D. Left/Right arrow buttons
Use these buttons to choose or adjust items in the On Screen Display and activates
Hot Key function for contrast adjustment.
On Screen Display (OSD) Menu System
Direct-Access Functions
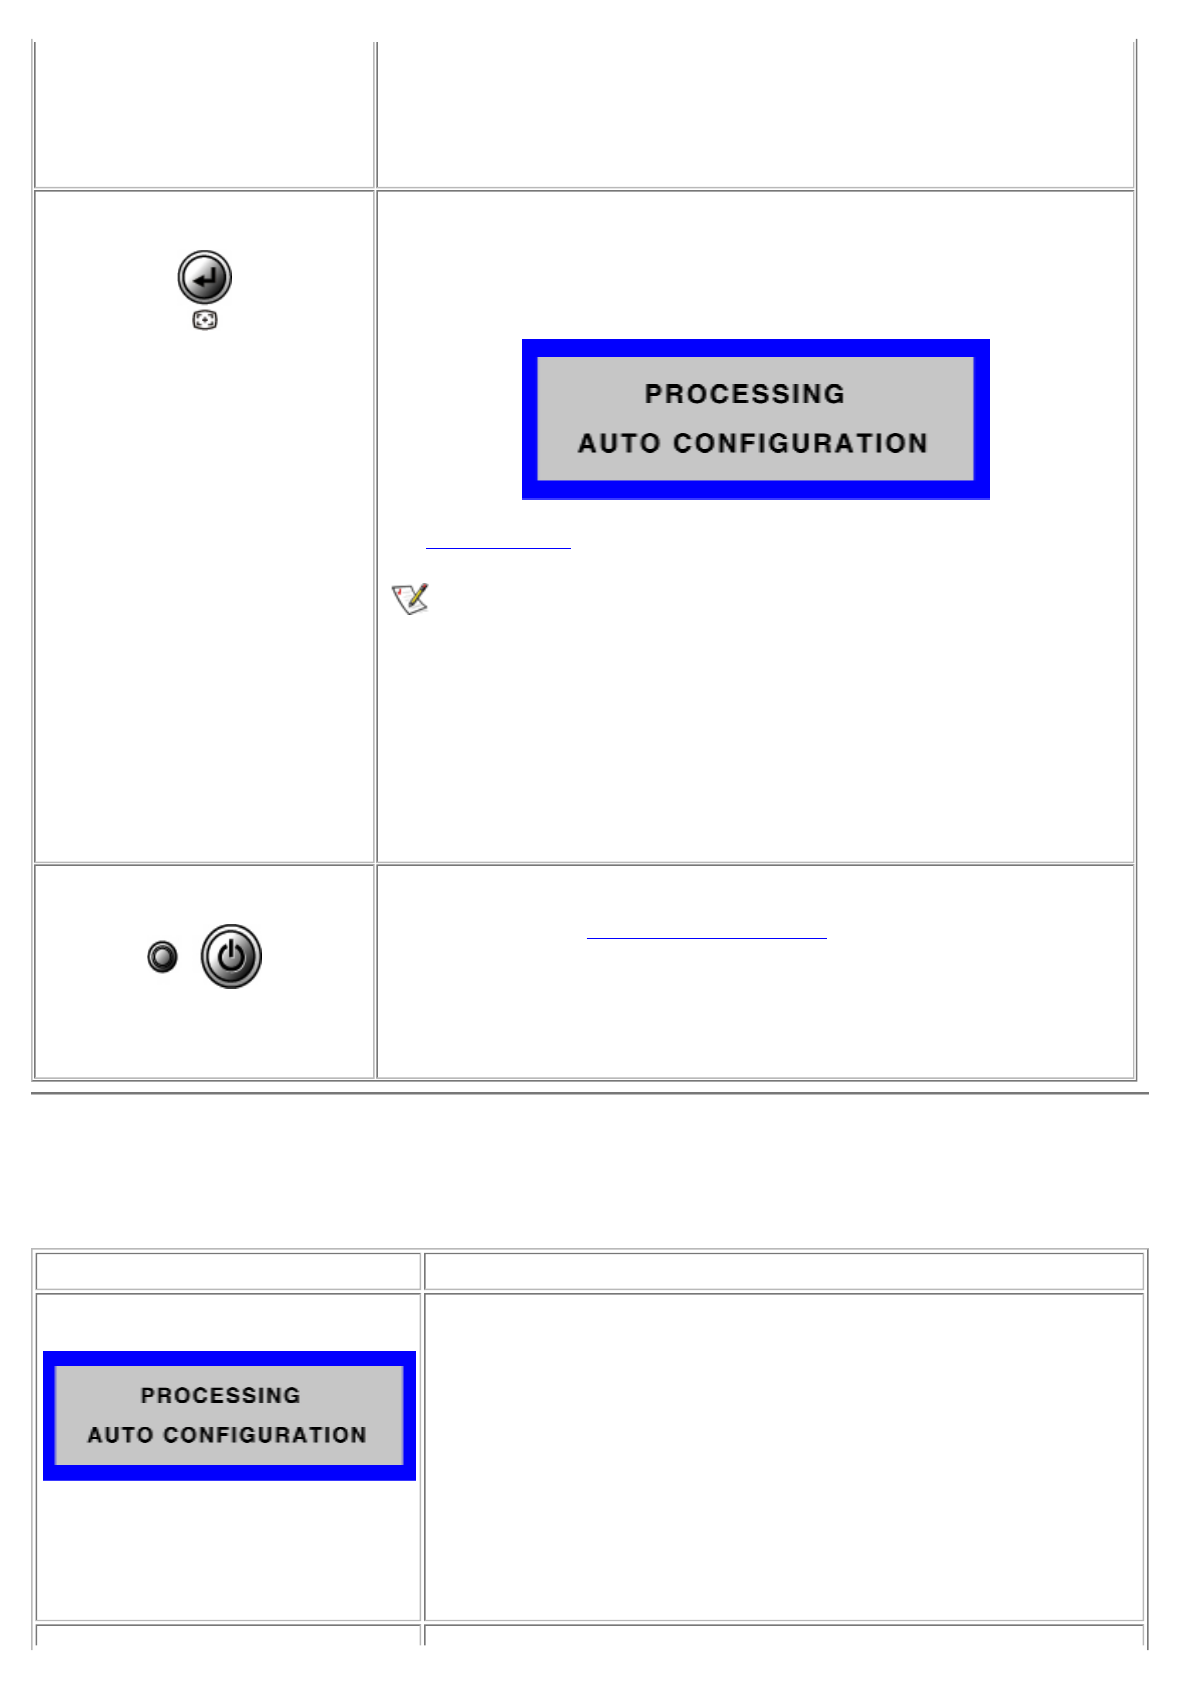
E. Select/Auto button
Automatically adjust vertical position, horizontal position, pixel clock and phase. For
best results, use this button when there is a full screen of detailed information, such
as fine text, or the shutdown window (without shutting down the system). The
following dialog will appear on a black screen as the display self-adjusts to the
current input:
See Auto adjustment.
Note: Auto Adjust will not occur if you press the button while there are no
active video input signals, or attached cables.
F. Power button and LED indicator
Turn the display on/off and indicate the status of power management. The power
indicator lights steady green while the display function normally. The LED is steady
amber for DPMS. See Power management mode.
Function Adjustment Method
Auto adjustment:
Even though your computer system can recognize your new flat panel display
on startup, the 'Auto Adjustment' function will optimize the display settings for
use with your particular setup. Auto Adjustment can be accessed through the
OSD via the Image Settings submenu pictured at left or, you may use the direct
access instructions below:
1.Turn on your computer and display.
2.Push the 'Select/Auto' button (E) to activate the Auto adjustment function.
3.When finished, the pixel clock and phase should be adjusted to their optimal
settings.

Accessing the Menu System
1. With the menu off, push the MENU button to open the OSD system and display the main features menu.
2. OSD main menu has 5 sub-menus including “Brightness/Contrast”, “Color”, “Position”, “Tracking” and “Setup”. Push
the up and down arrow buttons to move between the function icons. As you move from one icon to another, the
Brightness:
The Brightness function adjusts the luminance of the flat panel.
With the menu off, push the up(or down) arrow button to display the Brightness
adjustment menu.
Adjust Brightness first, then adjust Contrast only if further adjustment is
necessary.
increase luminance
decrease luminance
Contrast:
The Contrast function adjusts the degree of difference between darkness and
lightness on the display screen.
With the menu off, push the left(or right) arrow button to display the Contrast
adjustment menu.
increase the contrast
decrease the contrast
Controls Locked/Unlocked :
Menu and :
This function allows you to secure the current control settings, so that they
cannot be inadvertently changed. Press and hold the MENU button and
!button for 3 seconds: the message “CONTROLS LOCKED” appears.
You can unlock the OSD controls at any time by pushing the MENU button and
!button for 3 seconds:
the message “CONTROLS UNLOCKED” will appear.
A Sub-menu icon B Sub-menu name

function name is highlighted to reflect the function or group of functions (sub-menus) represented by that icon. See the
table below for a complete list of all the functions available for the display.
3. Push the MENU button once to activate the highlighted function; then use the left and right buttons or the up and down
arrow buttons, according to the indicators on the menu, to make your changes.
4. Push the Menu button once to return to the main menu to select another function or push the Menu button two or three
times to exit from the OSD.
Main Menu Mode
Grouped by functions, the OSD offers 5 major functions in Main Menu for making adjustments: “Brightness/Contrast”, “Color”,
“Position”, “Tracking” and “Setup”. The following describes the contents of each function and how you can make adjustments.
e
nu Icon Adjustment
Brightness:
Adjust the brightness of the screen.
increase luminance
decrease luminance
Contrast:
Adjust the contrast of the screen.
increase the contrast
decrease the contrast
h
en you enter the Color Settings submenu, this page will show
p
if current input is D-sub or DVI-D. Color temperature is a
e
asure of the 'warmth' of the image colors (red/green/blue). The
ailable range is between 6500 to 9300K. You can select one of
e
2 Preset Color temperature to see how each range suits your
e or utilize the RED/GREEN/BLUE' option to customize the color
ttings to your exact choice.
9300K This preset color temperature favors blu
e
sRGB(6500K) This preset color temperature favors red
c
RED
GREEN
BLUE
User Preset:
You can adjust the Red, Green and Blue
independently to fit your preference.
decrease the brightness of the specific
increase the brightness of the specific
c
Horizontal Position:
A
djust the horizontal position of the displ
a
moves the screen left
moves the screen right
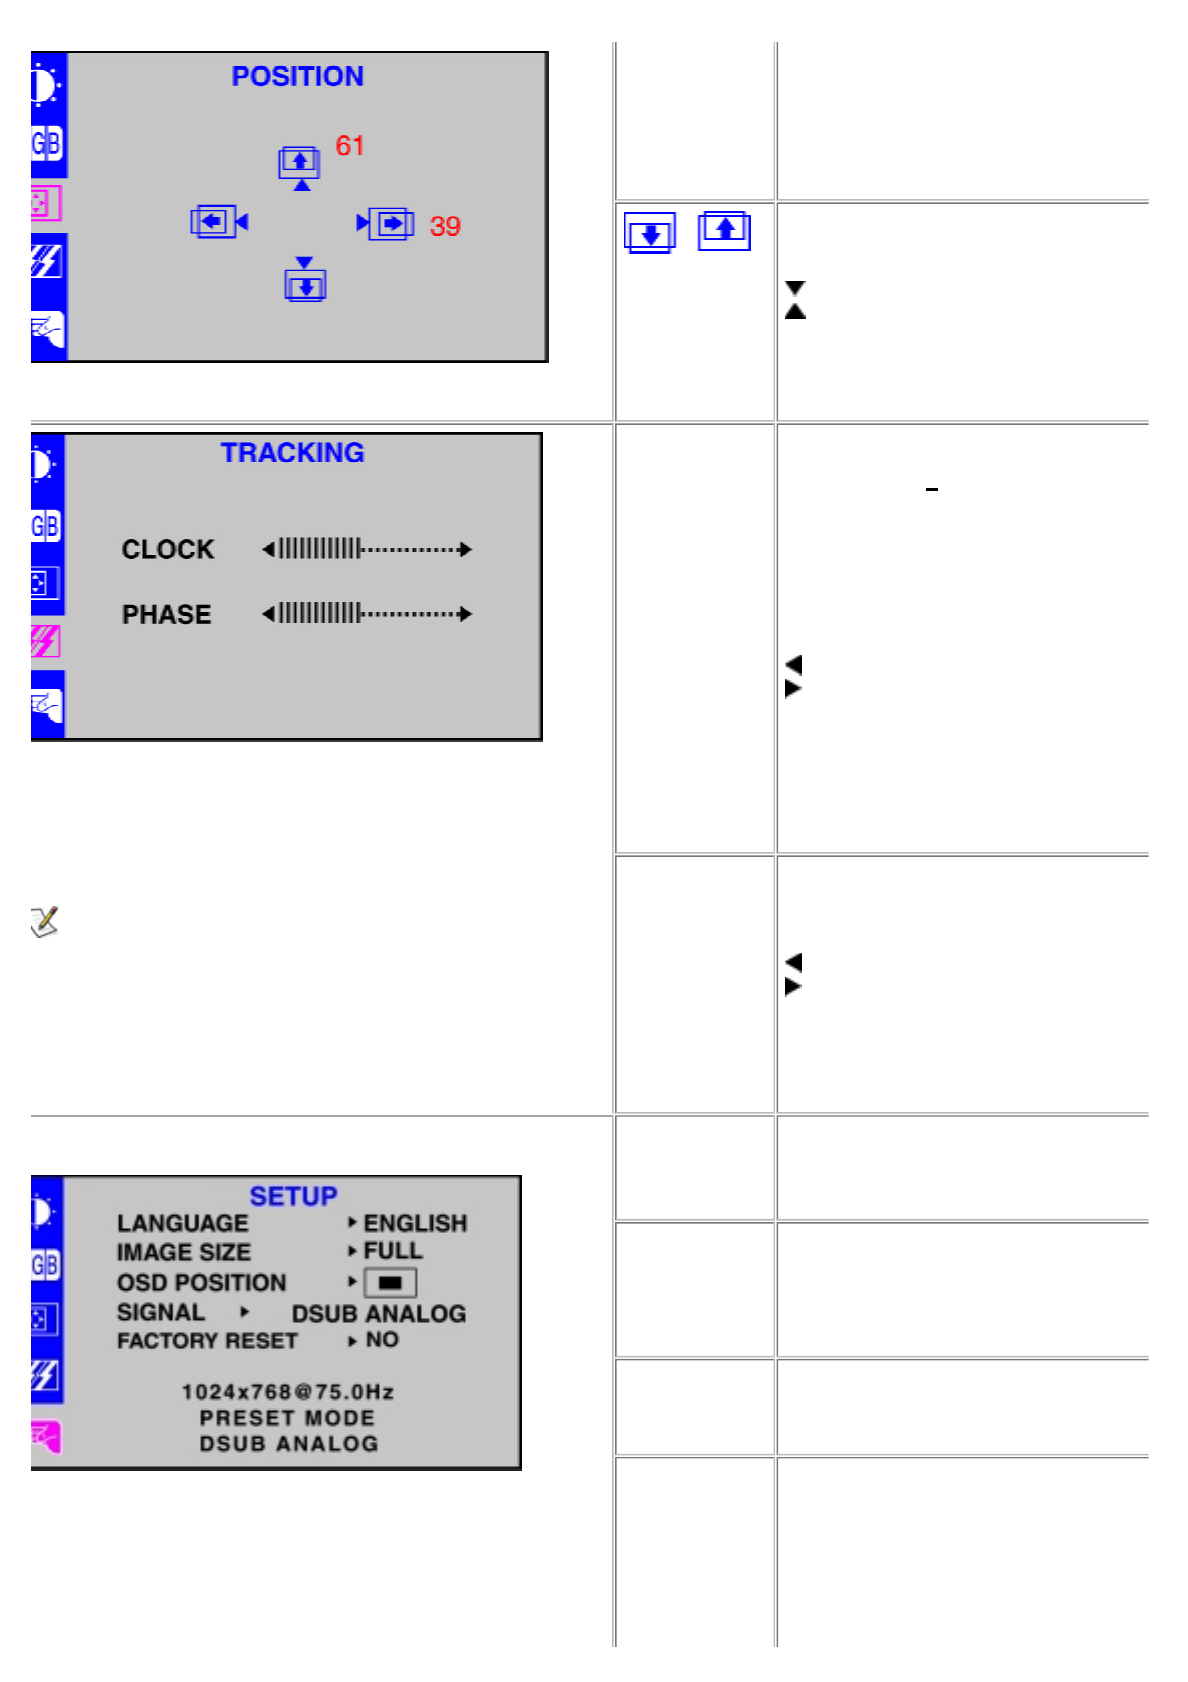
o
sitioning moves the viewing area around on the display screen.
hen making changes to either the
'
Horizontal
'
or
'
Vertical
'
Vertical Position:
Adjust the vertical position of the display.
moves the screen down
moves the screen up
h
e Clock and Phase adjustments allow you to more closely
just your display to your preference. These settings are
cessed through the main OSD menu, by selecting 'Tracking'.
s
atisfactory results are not obtained using the Phase adjustment,
e the Clock adjustment and then use Phase again.
Note: This function may change the width of the
display image. Use the Horizontal function of the
Position menu to center the display image on the
screen.
Clock:
This function only applies to D-sub inp
u
sub signal inputs into the display, it will
b
to a digital signal through a signal sampl
It is rare , although possible, that t
h
interval is not automatically optimized. I
you might see abnormal image displ
a
screen. You can adjust the sampl
i
manually through Pixel Clock function.
decrease the sampling interval
increase the sampling interval
Phase:
Just like Pixel Clock function, you can al
s
sampling phase.
decrease phase shift of sampling sign
a
increase phase shift of sampling signal
Language:
To choose the language in which the control
n
displayed.
Image Size:
This function displays the image in its original
enlarged size so as to fit in the full screen of t
h
panel.
OSD Position:
To adjust position of the OSD window on the
s
Signal:
To select DSUB ANALOG, DVI DIGITAL
A
NALOG / as the active input. This featu
r
when two computers are connected to th
e
The display automatically detects the pro
when only one video source is connecte
d
Automatic Save
With the OSD open, if you make an adjustment and then either proceed to another menu or exit the OSD, the display
automatically saves any adjustments you have made. If you have made no adjustments, the on-screen menu disappears and
the display does not save any new settings.
OSD Warning Messages
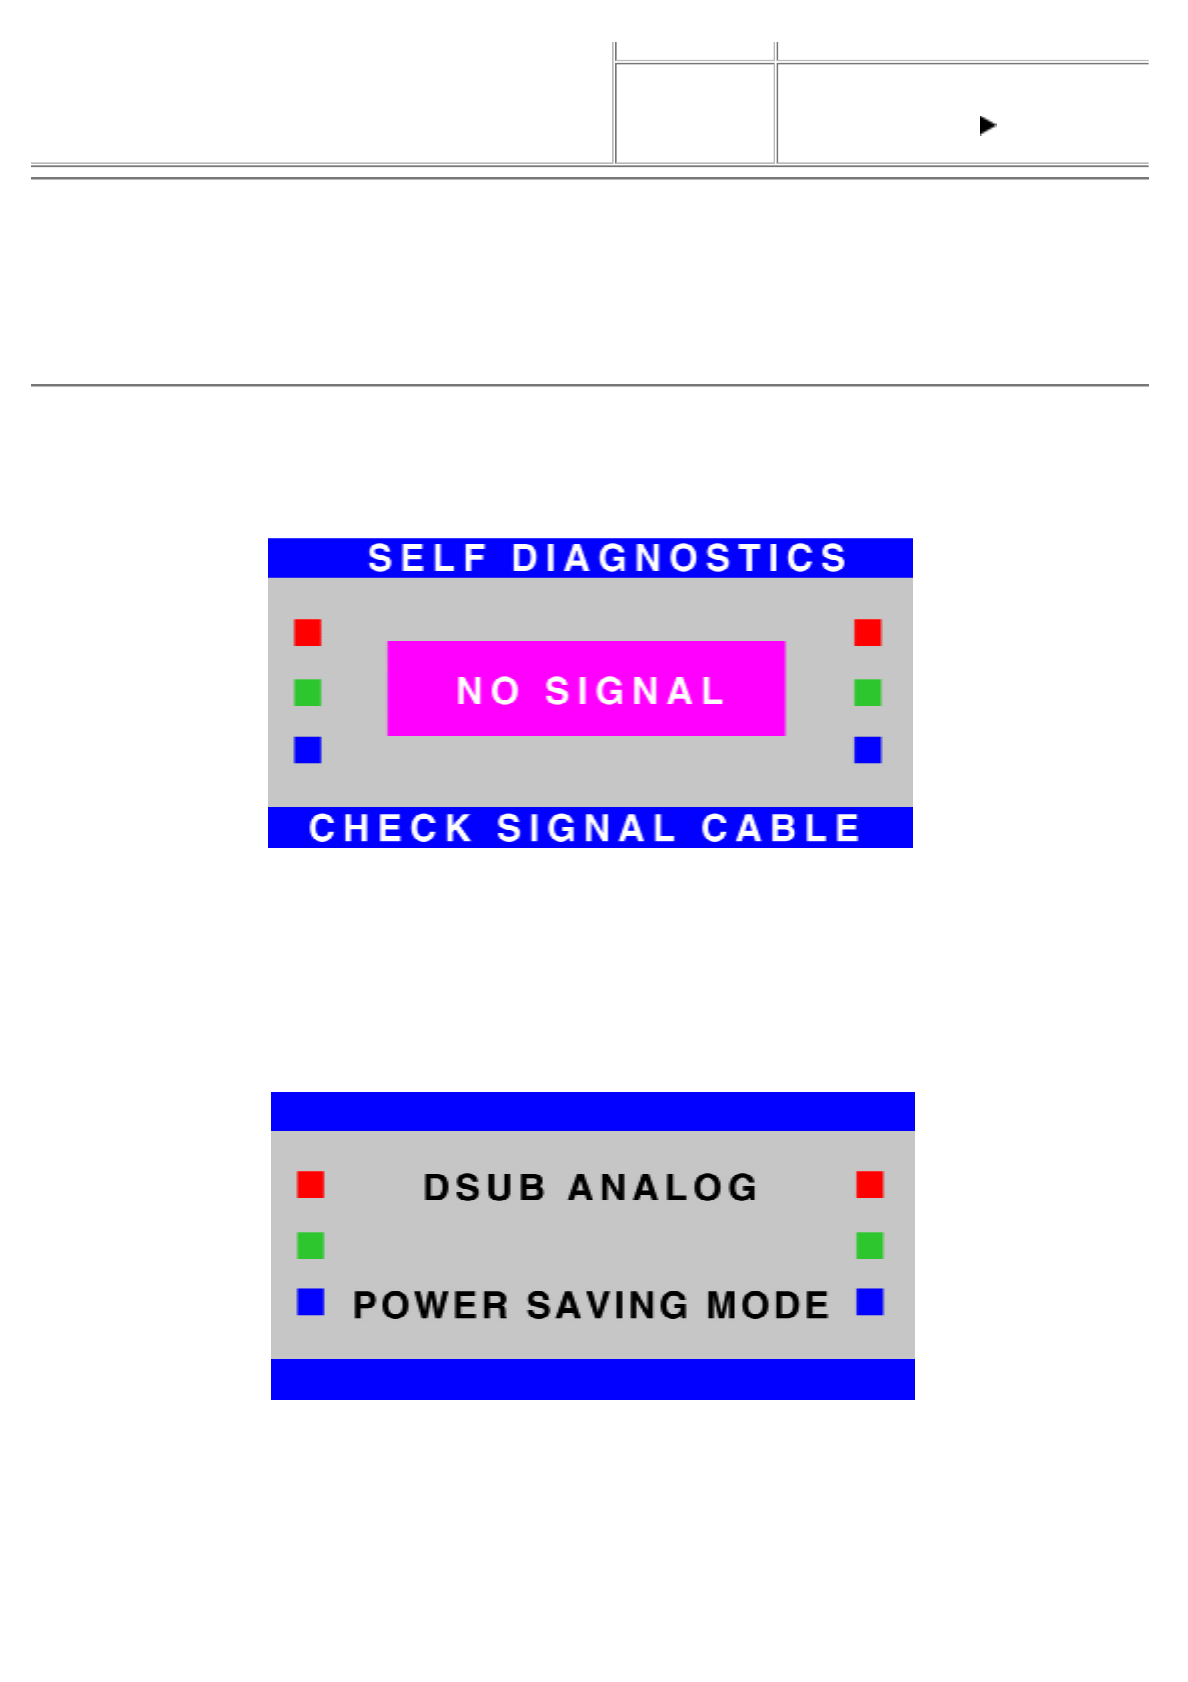
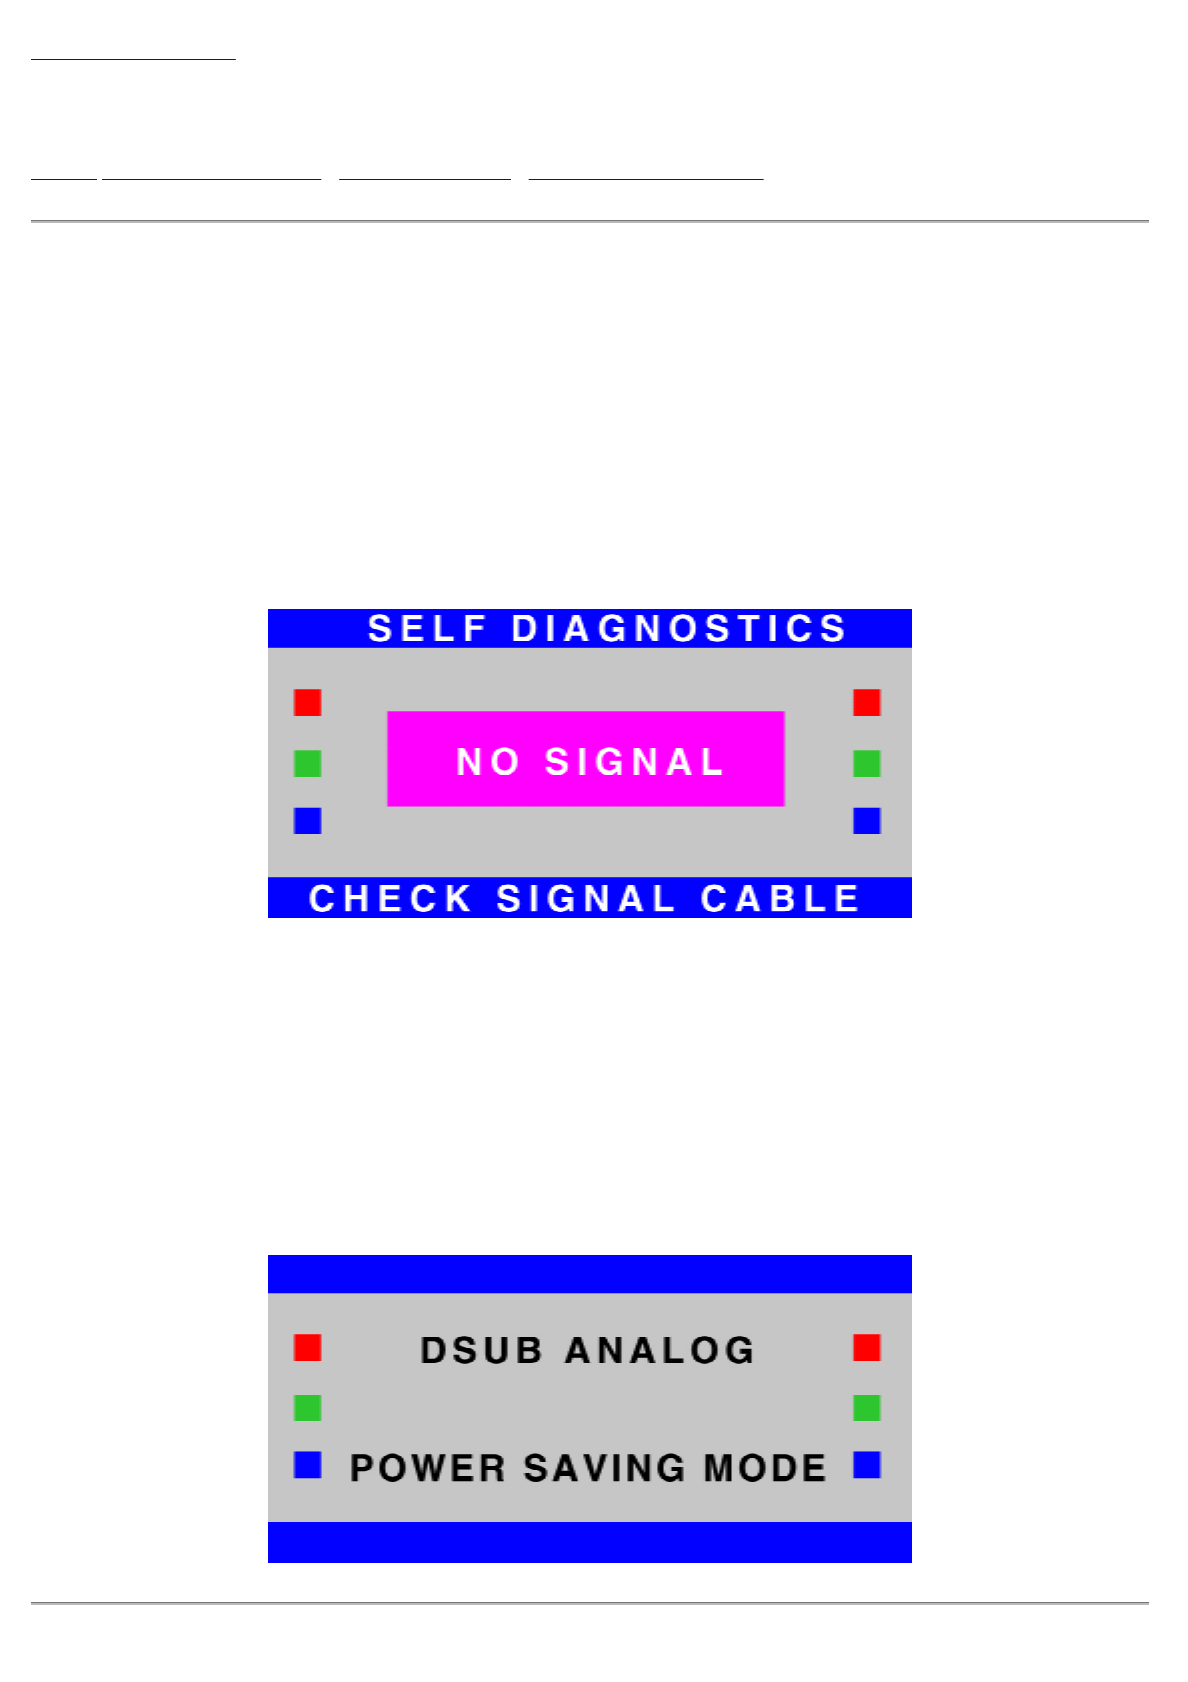
Self-Test Feature Check (STFC)
The floating 'Dell - Self Test Feature Check' dialog will appear on-screen (against a black background) under the following
conditions: First, if the display is powered on with no signal input attached, with any of the inputs selected. Second, if the
signal cable is already attached, display is powered on, display is working properly, then the video cable is detached. This is
true for any inputs selected. The display should stay in STFC mode until the input selection button is pressed to select an
image source which is active, or the cable is re-attached. For the DB15 analog or DVI-D digital inputs, this case will put the
display in power save or DPMS (see next section).
In Power Save Mode
When the computer system send DPMS signals for display power management, the display will show the message of “Power
Saving Mode” for 10 seconds then enter power saving mode. This occurs when the DB15 analog or DVI-D digital input is
connected and selected, but the computer source has gone inactive. While the display is in power saving mode, the screen
will remain black. You can press any key or move mouse to reactivate the display.
In
p
ut Si
g
nal Out of Ran
g
e
Factory Reset:
Return you display settings to those set
a
manufacturing. Press button to activat
e
This means that the display cannot synchronize with the signal that it is receiving from the computer. Either the signal is too
high or too low frequency for the display to use. See Specifications for the Horizontal and Vertical scan ranges addressible by
this display.
Sometimes, no warning message appears, but the screen is blank, which could also indicate that the display is not
synchronizing with the computer.
LED Indicators
See Troubleshooting for more information.
Back to Contents Page
Display State LED state
On Power management indicator is green
DPMS Power management indicator is amber
Selected Input Mode LED state
D-Sub Input LED 1 is steady green
DVI-D Input LED 2 is steady green
Back to Contents Page
Troubleshooting: Dell™ 1800FP Color Display User's Guide
Display Specific Troubleshooting • Common Problems • Product Specific Problems
Display Specific Troubleshooting
Self-Test Feature Check (STFC)
Your display provides a self-test feature that allows you to check whether your display is functioning properly. If your display
and computer are properly connected but the display screen remains dark, run the display self-test by performing the following
steps:
1. Turn off both your computer and the display.
2. Unplug the video cable from the back of the computer.
3. Turn on the display.
If the display is functioning properly, you will see the STFC pattern.
4. While in self-test mode, the power management indicator remains green and the STFC pattern scroll through the
screen.
5. Turn off your display and reconnect the video cable; then turn on both your computer and the display.
If your display screen still remains dark after you use the previous procedure, check your video controller and computer
system; your display is functioning properly.
Power Saving Mode
When the computer system is under power saving mode, the display will show the message of “Power Saving Mode”. Then
press any key to reactivate the PC system.

Common Problems
The following table contains general information about common display problems you might encounter.
COMMON SYMPTOMS WHAT YOU SEE POSSIBLE SOLUTIONS
No Video/ Power LED off No picture, display’s dead. Check connection integrity
Electric outlet verification
No Video/ Power LED on No picture or no brightness Increase brightness & contrast controls
Perform display self test feature check
Check for bent or broken pins on the signal
cable
Make sure the correct video input source is
selected
Poor Focus Picture is fuzzy, blurry or
ghosting
Push Auto key
Adjust Phase and Clock controls via OSD
Eliminate video extension cables
Perform display reset
Decrease brightness & contrast controls
Lower video resolution or increase font size
Shaky/Jittery Video Wavy picture or fine
movement
Push Auto key
Adjust Phase and Clock controls via OSD
Perform display reset
Missing Pixels LCD screen has spots Cycle power on-off
These are some pixels that are permanently o
ff
and is normal in LCD technology
Stuck-on Pixels LCD screen has bright spots Cycle power on-off
These are some pixels that are permanently o
n
and is normal in LCD technology
Brightness Problems Picture too dim or too bright Perform display reset
Adjust brightness & contrast controls
Geometric Distortion Screen not centered correctly Push Auto key
Adjust the centering controls
Perform display reset
Ensure display is in proper video mode
Horizontal/Vertical Lines Screen has one or more lines Perform display reset
Adjust Phase and Clock controls via OSD
Push Auto key
Perform display self test feature check
Check for bent or broken pins
Sync Problems Screen is scrambled or
appears torn Adjust Phase and Clock controls via OSD
Push Auto key
Perform display self test feature check
Check for bent or broken pins
If using Microsoft® Windows®, boot up in the
"safe mode"
LCD Scratched Screen has scratches or
smudges Turn display off and clean the screen
Product Specific Problems
Back to Contents Page
Safety Related Issues Visible signs of smoke or
sparks Do not perform any troubleshooting steps
Display needs to be replaced
Intermittent Problems Display malfunctions on & off Ensure display is in proper video mode
Ensure video cable connection is secure
Perform display reset
Perform display self test feature check
SPECIFIC SYMPTOMS WHAT YOU SEE POSSIBLE SOLUTIONS
Cannot adjust the display with the
buttons on the front panel OSD does not appear on the
screen
Disconnect AC power from the display, wait fiv
e
minutes and then re-connect AC power
Screen image is too small Image is centered on screen,
but does not fill entire viewing
area
Adjust the Scaling feature via the OSD and
select Fill. This feature is located under Image
Settings

Back to Contents Page
Specifications: Dell™ 1800FP Color Display User's Guide
General • Flat Panel • Resolution • Preset Display Modes • Electrical • Physical Characteristics • Environmental • Power
Management Modes • Pin_Assignments • Plug_and_Play_Capability
General
Model number 1800FP
Flat Panel
Screen type Active matrix - TFT LCD
Screen dimensions Diagonal 18.1 inches (459.7 mm)
Horizontal 14.14 inches (359.04 mm)
Vertical 11.31 inches (287.23 mm)
Pixel pitch 0.2805 mm
Viewing angle +/- 80° (vertical) typical, +/- 80° (horizontal) typical
Luminance output 250 CD/m2 typical, 200 CD/m2 minimum
Contrast ratio 350 to 1 typical, 200 to 1 minimum
LCD surface coating Hardness 3H, antiglare treatment
Backlight 6 CCFL type
Resolution
Horizontal scan range Analog: 31 - 80 kHz (automatic)
Digital: 31 – 70kHz (automatic)
Vertical scan range 55 Hz to 85 Hz (automatic)
Optimal preset resolution 1280 x 1024 at 60 Hz
Highest preset resolution 1280 x 1024 at 75 Hz
Dell guarantees image size and centering for all preset modes listed in the following table.
Preset Display Modes
Display Mode Horizontal
Frequency (kHz) Vertical
Frequency (Hz) Pixel Clock
(MHz)
Sync Polarity
(Horizontal /
Vertical)
VGA, 640 x350 31.469 70 25.175 +
VGA, 720 x 400 31.468 70 28.321 -
VGA, 640x480 31.469 60 25.175 -
VESA, 640 x 480 37.500 75 31.5 -
VESA, 640 x 480 43.269 85 36.0 -
VESA, 800 x 600 37.879 60 40.0 +
VESA, 800 x 600 46.875 75 49.5 +
VESA, 800 x 600 53.674 85 56.25 +
MAC, 832 x 624 49.725 75 57.283 +/-
VESA, 1024 x 768 48.363 60 65.0 -
VESA, 1024 x 768 60.123 75 78.75 -
VESA, 1024 x 768 68.677 85 94.5 +
MAC, 1152 x 864 67.5 75 108.0 +/-
VESA, 1152 x 900 61.805 65 92.978 +/-
VESA, 1280 x 1024 63.981 60 108.0 +
VESA, 1280 x 1024 79.976 75 135.0 +
Electrical
Video input signals Analog RGB, 0.7 Volts +/-5%, 75 ohm input impedance
Digital DVI-D TMDS, 600mV for each differential line, 50 ohm input impedance
Synchronization input signals separate horizontal and vertical;
3.3V Cmos or 5V TTL level, positive or negative sync.
Sync on Green
Compsite Sync
AC input voltage / frequency / current 90 ~264 VAC/ 50/60 Hz
1.0 (RMS) max
Inrush current at 120 V 30 A max
Inrush current at 220 V 50 A max
Physical Characteristics
Connector type 15-pin D-subminiature; DVI-D
Signal cable type Detached to display
Dimensions:(with stand)
Height 16.97inches (431mm )
Width 15.98inches (406mm )
Depth 8.78inches (223mm )
Weight (display only) 17.19 lb (7.8 kg )
Weight (with packaging) 22.05 lb (10 kg )
Power Management Modes
If you have VESA's DPMS compliant display card or software installed in your PC, the display can automatically reduce its
power consumption when not in use. If input from keyboard, mouse or other input devices is detected, the display will
automatically "wake up". The following table shows the power consumption and signaling of this automatic power saving
feature:
This display is ENERGY STAR®-compliant .
* Zero power consumption in OFF mode can only be achieved by disconnecting the mains cable from the display.
ENERGY STAR® is a U.S. registered mark. As an ENERGY STAR® Partner, DELL has determined that this product meets
the ENERGY STAR® guidelines for energy efficiency.
Environmental
Temperature:
Operating 41° to 95°F (5° to 35 °C )
Nonoperating -4° to 140°F (-20° to 60°C )
Humidity:
Operating 10% to 80% (noncondensing)
Nonoperating 5% to 95% (noncondensing)
Altitude:
Operating 3,048 m (12,000 ft)
Nonoperating 12,192 m (40,000 ft)
Thermal dissipation 213 BTU/hour (maximum)
205 BTU/hour (typical)
Power Management Definition
VESA's Mode Video H-sync V-sync Power Used Power Saving LED color
ON
Active Yes Yes
maximum 55W
normal 50W
0% Green
Stand-by Blanked No Yes <=3W >80% Amber
Suspend Blanked Yes No <=3W >80% Amber
Active-OFF* Blanked No No <=1W >80% Amber
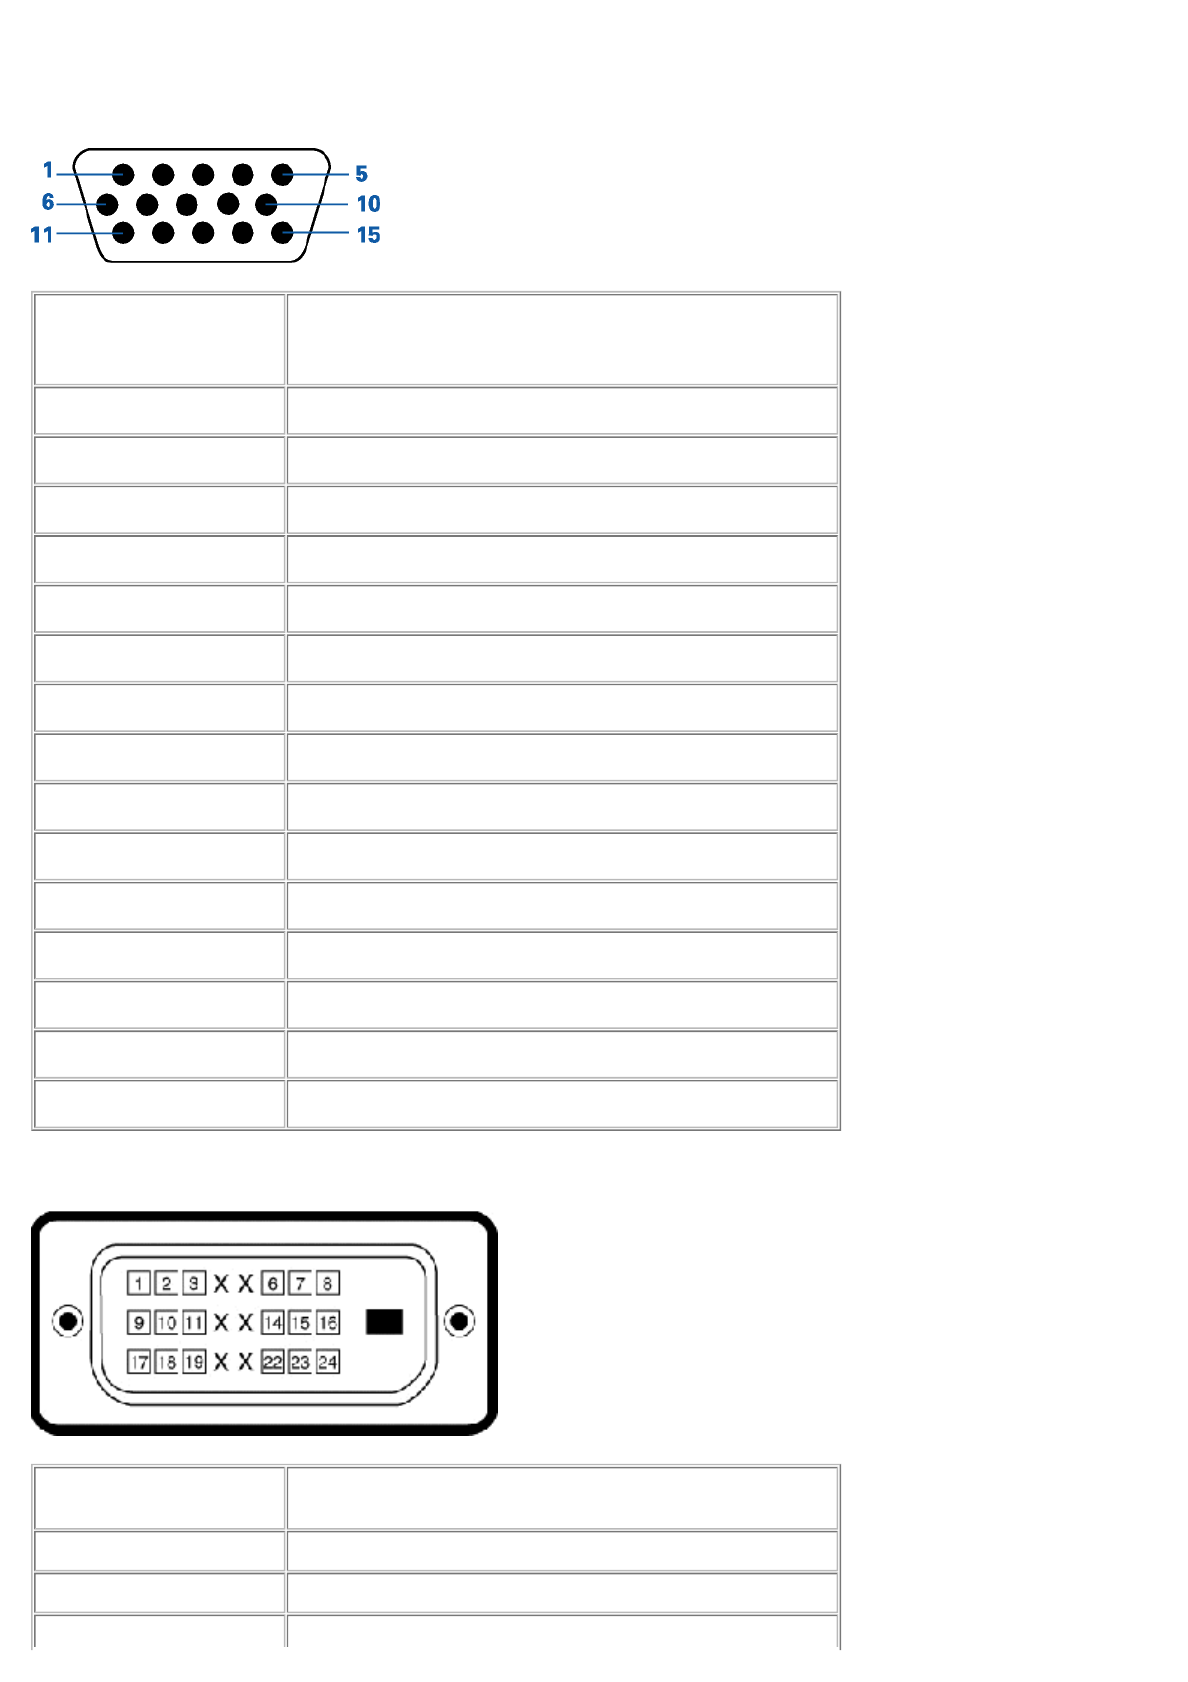
Pin Assignments
15-pin D-sub connector
24 pin DVI-D connector
Pin Number
15-Pin Side of the Signal Cable
1 Video-Red
2 Video-Green
3 Video-Blue
4 GND
5 Self-test
6 GND-R
7 GND-G
8 GND-B
9 +5V Supply
10 GND-sync
11 GND
12 SDA
13 H-sync
14 V-sync
15 SCL
Pin Number
24-Pin Side of the Signal Cable
1 TMDS Data2-
2 TMDS Data2+
Plug and Play Capability
You can install the display in any Plug and Play-compatible system. The display automatically provides the computer system
with its Extended Display Identification Data (EDID) using Display Data Channel (DDC) protocols so the system can configure
itself and optimize the display settings. If desired, the user can select different settings, but in most cases display installation is
automatic.
Back to Contents Page
3 TMDS Data 2/4 Shield
4 TMDS Data4-
5 TMDS Data4+
6 DDC Clock
7 DDC Data
8 Analog Vertical Sync
9 TMDS Data1-
10 TMDS Data1+
11 TMDS Data 1/3 Shield
12 TMDS Data3-
13 TMDS Data3+
14 +5V Power
15 Ground(Return for +5V, H sync
and V sync)
16 Hot Plug Detect
17 TMDS Data 0-
18 TMDS Data0+
19 TMDS Data 0/5 Shield
20 TMDS Data 5-
21 TMDS Data5+
22 TMDS Clock Shield
23 TMDS Clock+
24 TMDS Clock-

Back to Contents Page
Regulatory: Dell™ 1800FP Color Display User's Guide
Electric and Magnetic Fields • Energy Efficiency • Federal Communications Commission (FCC) Notice (U.S. Only) • FCC
Declaration of Conformity • CE Declaration of Conformity • Canadian Regulatory Information (Canada Only) • EN 55022
Compliance (Czech Republic Only) • VCCI Class 2 Notice (Japan Only) • MIC Notice (South Korea Only) • Polish Center for
Testing and Certification Notice • NOM Information (Mexico Only) • BSMI Notice • Ergonomics Notice (Germany Only)
Dell Computer Corporation's Environmental Program • Regulatory Listing
Electric and Magnetic Fields
Congratulations!
You have just purchased a TCO'95 approved and labelled product! Your choice has provided you with a product developed
for professional use. Your purchase has also contributed to reducing the burden on the environment and also to the further
development of environmentally adapted electronics products.
Why do we have environmentally labeled computers?
In many countries, environmental labeling has become an established method for encouraging the adaptation of goods and
services to the environment. The main problem, as far as computers and other electronics equipment are concerned, is that
environmentally harmful substances are used both in the products and during their manufacture. Since it is not so far
possible to satisfactorily recycle the majority of electronics equipment, most of these potentially damaging substances
sooner or later enter nature.
There are also other characteristics of a computer, such as energy consumption levels, that are important from the
viewpoints of both the work (internal) and natural (external) environments. Since all methods of electricity generation have a
negative effect on the environment (e.g. acidic and climate-influencing emissions, radioactive waste), it is vital to save
energy. Electronics equipment in offices is often left running continuously and thereby consumes a lot of energy.
What does labeling involve?
This product meets the requirements for the TCO'95 scheme which provides for international and environmental labeling of
personal computers. The labeling scheme was developed as a joint effort by the TCO (The Swedish Confederation of
Professional Employees), Svenska Naturskyddsforeningen (The Swedish Society for Nature Conservation) and Statens
Energimyndighet (The Swedish National Energy Administration).
Approval requirements cover a wide range of issues: environment, ergonomics, usability, emission of electric and magnetic
fields, energy consumption and electrical and fire safety.
The environmental demands impose restrictions on the presence and use of heavy metals, brominated and chlorinated
flame retardants, CFCs (freons) and chlorinated solvents, among other things. The product must be prepared for recycling
and the manufacturer is obliged to have an environmental policy which must be adhered to in each country where the
company implements its operational policy.
The energy requirements include a demand that the computer and/or display, after a certain period of inactivity, shall reduce
its power consumption to a lower level in one or more stages. The length of time to reactivate the computer shall be
reasonable for the user.
Labeled products must meet strict environmental demands, for example, in respect of the reduction of electric and magnetic
fields, physical and visual ergonomics and good usability.

Ener
gy
Efficienc
y
Below you will find a brief summary of the environmental requirements met by this product. The complete environmental
criteria document may be ordered from:
TCO Development
SE-114 94 Stockholm, Sweden
Fax: +46 8 782 92 07
Email (Internet): development@tco.se
Current information regarding TCO'95 approved and labelled products may also be
obtained via the Internet, using the address: http://www.tco-info.com/
Environmental requirements
Flame retardants
Flame retardants are present in printed circuit boards, cables, wires, casings and housings. Their purpose is to prevent, or at
least to delay the spread of fire. Up to 30% of the plastic in a computer casing can consist of flame retardant substances.
Most flame retardants contain bromine or chloride, and those flame retardants are chemically related to another group of
environmental toxins, PCBs. Both the flame retardants containing bromine or chloride and the PCBs are suspected of giving
rise to severe health effects, including reproductive damage in fish-eating birds and mammals, due to the bio-accumulative*
processes. Flame retardants have been found in human blood and researchers fear that disturbances in foetus development
may occur.
The relevant TCO'95 demand requires that plastic components weighing more than 25 grams must not contain flame
retardants with organically bound bromine or chlorine. Flame retardants are allowed in the printed circuit boards since no
substitutes are available.
Cadmium**
Cadmium is present in rechargeable batteries and in the colour-generating layers of certain computer displays. Cadmium
damages the nervous system and is toxic in high doses. The relevant TCO'95 requirement states that batteries, the colour-
generating layers of display screens and the electrical or electronics components must not contain any cadmium.
Mercury**
Mercury is sometimes found in batteries, relays and switches. It damages the nervous system and is toxic in high doses.
The relevant TCO'95 requirement states that batteries may not contain any mercury. It also demands that mercury is not
present in any of the electrical or electronics components associated with the labelled unit.
CFCs (freons)
The relevant TCO'95 requirement states that neither CFCs nor HCFCs may be used during the manufacture and assembly
of the product. CFCs (freons) are sometimes used for washing printed circuit boards. CFCs break down ozone and thereby
damage the ozone layer in the stratosphere, causing increased reception on earth of ultraviolet light with e.g. increased risks
of skin cancer (malignant melanoma) as a consequence.
Lead**
Lead can be found in picture tubes, display screens, solders and capacitors. Lead damages the nervous system and in
higher doses, causes lead poisoning. The relevant TCO'99 requirement permits the inclusion of lead since no replacement
has yet been developed.
_____________________________
* Bio-accumulative is defined as substances which accumulate within living organisms
** Lead, Cadmium and Mercury are heavy metals which are Bio-accumulative.
Federal Communications Commission (FCC) Notice (U.S. Only)
WARNING: This equipment has been tested and found to comply with the limits for a Class B digital device,
pursuant to Part 15 of the FCC Rules. These limits are designed to provide reasonable protection against harmful
interference in a residential installation. This equipment generates, uses, and can radiate radio frequency energy
and, if not installed and used in accordance with the instructions, may cause harmful interference to radio
communications. However, there is no guarantee that interference will not occur in a particular installation. If this
equipment does cause harmful interference to radio or television reception, which can be determined by turning the
equipment off and on, the user is encouraged to try to correct the interference by one or more of the following
measures:
Reorient or relocate receiving antenna.
Increase the separation between the equipment and receiver.
Connect the equipment into an outlet on a circuit different from that to which the receiver is connected.
Consult the dealer or an experienced radio/TV technician for help.
This device complies with Part 15 of the FCC rules. Operation is subject to the following two conditions:
This device may not cause harmful interference.
This device must accept any interference received including interference that may cause undesired operation.
Instructions to Users: This equipment complies with the requirements of FCC (Federal Communication Commission)
equipment provided that following conditions are met.
1. Power cable: Shielded power cable must be used.
2. Video inputs: The input signal amplitude must not exceed the specified level.
CAUTION: Changes or modifications not expressly approved by the party responsible for compliance could void
the user's authority to operate the equipment.
The proper operation of the function requires a computer
with VESA DPMS power management capabilities. When
used with a computer equipped with VESA DPMS, the
display is ENERGY STAR-compliant.
As an ENERGY STAR Partner, Dell Computer
Corporation has determined that this product meets the
ENERGY STAR guidelines for energy efficiency.
FCC Declaration of Conformity
According to 47 CFR, Part 15 of the FCC Rules
* For the following named product:
COLOR
DISPLAY
(Category
Name)
2000FP / DELL FP2036
(Model No / Brand
Name) (Basic Model)
* Manufactured at:
Acer Communications & Multimedia Inc.
157 Shanying Road, Gueishan, Taoyuan 333, Taiwan, R.O.C.
We hereby declare that this device complies with Part 15 of the FCC Rules.
Operation is subject to the following two conditions:

1. This device may not cause harmful interference, and
2. This device must accept any interference received,
including interference that may cause undesired operation.
* FCC Rules:
Tested to comply with FCC part 15, class B
* Test site at:
Compliance Engineering Services, Sunnyvale, CA, USA
* Responsible Party for Product Compliance:
Acer Communications & Multimedia Inc.
157, Shan-Ying Road, Gueishan, Taoyuan 333, Taiwan, R.O.C.
Tel) 886-3-3598800 Fax) 886-3-3599000
* Manufacturer Information:
Acer Communications &
Multimedia Inc.
157, Shan-Ying Road,
Gueishan, Taoyuan 333
2001-4-26
Ray Huang / Products
Regulatory Manager
(Place and date of issue) (Name and signature of
authorized person)
CE DECLARATION OF CONFORMITYFOR A CLASS B DIGITAL DEVICE
Directives to which conformity is declared
EMC Directives 89/336/EEC and amending directive 92/31/EEC
And
Low Voltage Directive 73/23/EEC
Standards to which conformity is declared
EN55022: 1998; EN55024: 1998; EN60950 +A1+A2+A3+A4: 1992;
EN61000-3-2: 1995; EN61000-3-3: 1995
Manufacturer's Name: Acer Communications&Multimedia Inc.
Manufacturer's Address: 157, Shan-Ying Road, Gueishan, Taoyuan 333, Taiwan, R.O.C.
Importer's Address:
Type of Equipment: Display
Model Number(s): 2000FP
Reference Report Number:
Previously Declared Models:
I, the undersigned, hereby declare that the equipment specified above conforms to the above Directive(s) and
standards.
Place: Acer Communications&Multimedia Inc.
157, Shan-Ying Road, Gueishan, Taoyuan 333, Taiwan, R.O.C.
Signature
Date: 2001-4-27
Full Printed Name
RayHuang
ProductsRegulatory
Canadian Regulatory Information (Canada Only)
This digital apparatus does not exceed the Class B limits for radio noise emissions from digital apparatus set out in the Radio
Interference Regulations of the Canadian Department of Communications.
Note that Canadian Department of Communications (DOC) regulations provide, that changes or modifications not expressly
approved by Dell Computer Corporation could void your authority to operate this equipment.
This Class B digital apparatus meets all requirements of the Canadian Interference-Causing Equipment Regulations.
Cet appareil numerique de la classe B respecte toutes les exigences du Reglement sur le materiel brouilleur du Canada.
EN 55022 Compliance (Czech Republic Only)
VCCI Class 2 Notice (Japan Only)
This equipment complies with the limits for a Class 2 digital device (devices used in or adjacent to a residential environment)
and conforms to the standards for information technology equipment that are set by the Voluntary Control Council for
Interference for preventing radio frequency interference in residential areas.
Class B ITE
MIC Notice (South Korea Only)
B Class Device
ManagerPosition/Title

Please note that this device has been approved for nonbusiness purposes and may be used in any environment, including
residential areas.
Polish Center for Testing and Certification Notice
The equipment should draw power from a socket with an attached protection circuit (a three-prong socket). All equipment that
works together (computer, monitor, printer, and so on) should have the same power supply source.
The phasing conductor of the room's electrical installation should have a reserve short-circuit protection device in the form of a
fuse with a nominal value no larger than 16 amperes (A).
To completely switch off the equipment, the power supply cable must be removed from the power supply socket, which should
be located near the equipment and easily accessible.
A protection mark "B" confirms that the equipment is in compliance with the protection usage requirements of standards PN-
93/T-42107 and PN-89/E-06251.
NOM Information (Mexico Only)
The following information is provided on the device(s) described in this document in compliance with the requirements of the
official Mexican standards (NOM)
Dell Computer Corporation
Información para NOM (únicamente para México)
La información siguiente se proporciona en el dispositivo o en los dispositivos descritos en este documento, en cumplimiento
con los requisitos de la Norma Oficial Mexicana (NOM):
BSMI Notice (Taiwan Only)
Ergonomics Notice (Germany Only)
Under the requirements of German ergonomics standard EK1/59-98, EK1-60-98, ISO 9241-3/8, graphics or characters:
1. Blue graphics or characters in dark background are not recommended. (This combination may increase eye fatigue due
to poor visibility caused by low contrast.)
2. Graphics controller and monitor are recommended to be used in the following conditions:
Vertical frequency: 70 Hz or higher.
Display mode: Dark characters in bright background.
Ergonomie Hinweis (nur Deutschland)
Um den Anforderungen der deutschen Ergonomie-Norm EK1/59-98, EK1-60-98, ISO 9241-3/8 zu antsprechen.
Exporter: One Dell Way
Round Rock, TX 78682
Importer:
Dell Computer de México,
Paseo de la Reforma 2620, 11th Floor
Col. Lomas Altas
Mexcio DF
CP 11950
Ship to:
Dell Computer de Mexico,
S.A. de C.V. al Cuidado de Kuehne &
de México S. de R.I., Avenida Soles No. 55
Col. Peñn de los BaÑs, 15520 Mexico, D.F.
Supply voltage: > 100/240 VAC
Frequency: 50/60 Hz
Current 1.2 A
Exporter: Dell Computer Corporation
One Dell Way
Round Rock, TX 78682
Importador:
Dell Computer de México,
Paseo de la Reforma 2620, 11th Floor
Col. Lomas Altas
Mexcio DF
CP 11950
Embarcar a:
Dell Computer de México,
S.A. de C.V. al Cuidado de Kuehne & Nagel
de M?ico S. de R.I., Avenida Soles No. 55
Col. Peñon de los Baños, 15520 México,
Tensión alimentación: 100/240 VAC
Frecuencia: 50/60 Hz
Consumo de 1.2 A

1. Wird empfahlen, die Grunfarbe Blau nicht auf dunklem Hintergrund zu verwenden (schiechte Erkennbarkeit.
Augenbelastung bei zu geringem Zeicheenkontrast).
2. Wird folgende Einstellung des Grafik-Controllers und Monitors empfohlen.
Vertikalfrequenz : 70 Hz oder hoher.
Ohne Zellensprung.
Dell Computer Corporation's Environmental Program
Please visit Dell's environmental Web site to learn more about Dell's environmental programs.
Back to Contents Page
Regulatory Listing
Safety Certifications:
UL 1950
NOM
CE Mark—EN60950: 1992 + A1 + A2 + A3
NEMKO
SEMKO
DEMKO
FIMKO
EZU
IEC 950
TUV GS
PCBC
GOST
CCIB
JEON
PSB
EMC Certifications:
FCC Part 15 Class B
CE Mark—EN55022:1998 Class B, EN61003-2:1995, EN61003-3:1995, EN55024:1998
EZU
NEMKO
SEMKO
DEMKO
FIMKO
PCBC
GOST
C-Tick
VCCI Class B ITE
MIC
BSMI
Ergonomics:
ENERGY STAR®
TCO 95
GOST Hygienic

Back to Contents Page
Warranties: Dell Service and Support Plan Guide, "Total
Satisfaction" Return Policy (U.S. and Canada Only)
Limited Warranties for Dell Branded Hardware Products • Limited Three-Year Warranty (U.S. Only) • Limited Three-Year
Warranty (Canada Only) • One Year Dell Manufacturer End-User Guarantee European Union, Norway and Switzerland •
"Total Satisfaction" Return Policy (U.S. and Canada Only)
Limited Warranties for Dell Branded Hardware Products
DELL-BRANDED HARDWARE PRODUCTS COME WITH A LIMITED WARRANTY. THE LIMITED WARRANTY COVERING
YOUR PARTICULAR SYSTEM WILL BE NOTED ON YOUR INVOICE AND INCLUDED IN THE DOCUMENTATION
ACCOMPANYING YOUR SYSTEM.
DELL-BRANDED MONITORS PURCHASED INDEPENDENT OF A SYSTEM PURCHASE COME WITH THE LIMITED
WARRANTY SET OUT BELOW.
(For US customers, a copy of Dell's limited warranty statement can be obtained by writing Dell at USA L.P., Attn: Warranties,
One Dell Way, Round Rock, TX 78682.)
Limited Three-Year Warranty (U.S. Only)
Dell Computer Corporation ("Dell") manufactures its hardware products from parts and components that are new or equivalent
to new in accordance with industry-standard practices. Dell warrants that the hardware products it manufactures will be free
from defects in materials and workmanship. The warranty term is three years beginning on the date of invoice, as described in
the following text.
Damage due to shipping the products to you is covered under this warranty. Otherwise, this warranty does not cover damage
due to external causes, including accident, abuse, misuse, problems with electrical power, servicing not authorized by Dell,
usage not in accordance with product instructions, failure to perform required preventive maintenance, and problems caused
by use of parts and components not supplied by Dell.
This warranty does not cover any items that are in one or more of the following categories: software; external devices (except
as specifically noted); accessories or parts added to a Dell system after the system is shipped from Dell; accessories or parts
added to a Dell system through Dell's system integration department; accessories or parts that are not installed in the Dell
factory; or DellWareSM products. Displays, keyboards, and mice that are Dell-branded or that are included on Dell's standard
price list are covered under this warranty; all other displays, keyboards, and mice (including those sold through the DellWare
program) are not covered. Batteries for portable computers are covered only during the initial one-year period of this warranty.
Coverage During Year One
During the one-year period beginning on the invoice date, Dell will repair or replace products covered under this limited
warranty that are returned to Dell's facility. To request warranty service, you must call Dell's Customer Technical Support
within the warranty period. Refer to "Getting Help" in your Installation and Troubleshooting Guide to find the appropriate
telephone number for obtaining customer assistance. If warranty service is required, Dell will issue a Return Material
Authorization Number. You must ship the products back to Dell in their original or equivalent packaging, prepay shipping
charges, and insure the shipment or accept the risk of loss or damage during shipment. Dell will ship the repaired or
replacement products to you freight prepaid if you use an address in the continental U.S., where applicable. Shipments to
other locations will be made freight collect.
Dell owns all parts removed from repaired products. Dell uses new and reconditioned parts made by various manufacturers in
performing warranty repairs and building replacement products. If Dell repairs or replaces a product, its warranty term is not
extended.
Coverage During Years Two and Three
During the second and third years of this limited warranty, Dell will provide, on an exchange basis and subject to Dell's
NOTE: Before you ship the product(s) to Dell, back up the data on the hard-disk drive(s) and any other storage device
(s) in the product(s). Remove any removable media, such as diskettes, CDs, or PC Cards. Dell does not accept liability
for lost data or software.

Exchange Policy in effect on the date of the exchange, replacement parts for the Dell hardware product(s) covered under this
limited warranty when a part requires replacement. You must report each instance of hardware failure to Dell's Customer
Technical Support in advance to obtain Dell's concurrence that a part should be replaced and to have Dell ship the
replacement part. Dell will ship parts (freight prepaid) if you use an address in the continental U.S. or Canada, where
applicable. Shipments to other locations will be made freight collect. Dell will include a prepaid shipping container with each
replacement part for your use in returning the replaced part to Dell. Replacement parts are new or reconditioned. Dell may
provide replacement parts made by various manufacturers when supplying parts to you. The warranty term for a replacement
part is the remainder of the limited warranty term.
You will pay Dell for replacement parts if the replaced part is not returned to Dell. The process for returning replaced parts,
and your obligation to pay for replacement parts if you do not return the replaced parts to Dell, will be in accordance with Dell's
Exchange Policy in effect on the date of the exchange.
You accept full responsibility for your software and data. Dell is not required to advise or remind you of appropriate backup
and other procedures.
General Provisions
THIS WARRANTY GIVES YOU SPECIFIC LEGAL RIGHTS WHICH VARY FROM STATE TO STATE (OR JURISDICTION
TO JURISDICTION). DELL'S RESPONSIBILITY FOR MALFUNCTIONS AND DEFECTS IN HARDWARE IS LIMITED TO
REPAIR AND REPLACEMENT AS SET FORTH IN THIS WARRANTY STATEMENT. ALL EXPRESS AND IMPLIED
WARRANTIES FOR THE PRODUCT, INCLUDING BUT NOT LIMITED TO ANY IMPLIED WARRANTIES OF AND
CONDITIONS OF MERCHANTABILITY AND FITNESS FOR A PARTICULAR PURPOSE, ARE LIMITED IN DURATION TO
THE WARRANTY PERIOD SET FORTH ABOVE AND NO WARRANTIES, WHETHER EXPRESS OR IMPLIED, WILL
APPLY AFTER SUCH PERIOD.
SOME STATES (OR JURISDICTIONS) DO NOT ALLOW LIMITATIONS ON HOW LONG AN IMPLIED WARRANTY LASTS,
SO THE PRECEDING LIMITATION MAY NOT APPLY TO YOU.
DELL DOES NOT ACCEPT LIABILITY BEYOND THE REMEDIES SET FORTH IN THIS WARRANTY STATEMENT OR
LIABILITY FOR INCIDENTAL OR CONSEQUENTIAL DAMAGES, INCLUDING WITHOUT LIMITATION ANY LIABILITY FOR
PRODUCTS NOT BEING AVAILABLE FOR USE OR FOR LOST DATA OR SOFTWARE.
SOME STATES (OR JURISDICTIONS) DO NOT ALLOW THE EXCLUSION OR LIMITATION OF INCIDENTAL OR
CONSEQUENTIAL DAMAGES, SO THE PRECEDING EXCLUSION OR LIMITATION MAY NOT APPLY TO YOU.
These provisions apply to Dell's limited three-year warranty only. For provisions of any service contract covering your system,
refer to your invoice or the separate service contract that you will receive.
If Dell elects to exchange a system or component, the exchange will be made in accordance with Dell's Exchange Policy in
effect on the date of the exchange. In any instance in which Dell issues a Return Material Authorization Number, Dell must
receive the product(s) for repair prior to the expiration of the warranty period in order for the repair(s) to be covered by the
warranty.
Limited Three-Year Warranty (Canada Only)
Dell Computer Corporation ("Dell") manufactures its hardware products from parts and components that are new or equivalent
to new in accordance with industry-standard practices. Dell warrants that the hardware products it manufactures will be free
from defects in materials and workmanship. The warranty term is three years beginning on the date of invoice, as described in
the following text.
Damage due to shipping the products to you is covered under this warranty. Otherwise, this warranty does not cover damage
due to external causes, including accident, abuse, misuse, problems with electrical power, servicing not authorized by Dell,
usage not in accordance with product instructions, failure to perform required preventive maintenance, and problems caused
by use of parts and components not supplied by Dell.
This warranty does not cover any items that are in one or more of the following categories: software; external devices (except
as specifically noted); accessories or parts added to a Dell system after the system is shipped from Dell; accessories or parts
added to a Dell system through Dell's system integration department; accessories or parts that are not installed in the Dell
factory; or DellWareSM products. Displays, keyboards, and mice that are Dell-branded or that are included on Dell's standard
price list are covered under this warranty; all other displays, keyboards, and mice (including those sold through the DellWare
program) are not covered. Batteries for portable computers are covered only during the initial one-year period of this warranty.
Covera
g
e Durin
g
Year One
NOTE: If you chose one of the available warranty and service options in place of the standard limited three-year
warranty described in the preceding text, the option you chose will be listed on your invoice.

During the one-year period beginning on the invoice date, Dell will repair or replace products covered under this limited
warranty that are returned to Dell's facility. To request warranty service, you must call Dell's Customer Technical Support
within the warranty period. Refer to "Getting Help" in your Installation and Troubleshooting Guide to find the appropriate
telephone number for obtaining customer assistance. If warranty service is required, Dell will issue a Return Material
Authorization Number. You must ship the products back to Dell in their original or equivalent packaging, prepay shipping
charges, and insure the shipment or accept the risk of loss or damage during shipment. Dell will ship the repaired or
replacement products to you freight prepaid if you use an address in Canada, where applicable. Shipments to other locations
will be made freight collect.
Dell owns all parts removed from repaired products. Dell uses new and reconditioned parts made by various manufacturers in
performing warranty repairs and building replacement products. If Dell repairs or replaces a product, its warranty term is not
extended.
Coverage During Years Two and Three
During the second and third years of this limited warranty, Dell will provide, on an exchange basis and subject to Dell
Exchange Policy in effect on the date of the exchange, replacement parts for the Dell hardware product(s) covered under this
limited warranty when a part requires replacement. You must report each instance of hardware failure to Dell's Customer
Technical Support in advance to obtain Dell's concurrence that a part should be replaced and to have Dell ship the
replacement part. Dell will ship parts (freight prepaid) if you use an address in the continental U.S. or Canada, where
applicable. Shipments to other locations will be made freight collect. Dell will include a prepaid shipping container with each
replacement part for your use in returning the replaced part to Dell. Replacement parts are new or reconditioned. Dell may
provide replacement parts made by various manufacturers when supplying parts to you. The warranty term for a replacement
part is the remainder of the limited warranty term.
You will pay Dell for replacement parts if the replaced part is not returned to Dell. The process for returning replaced parts,
and your obligation to pay for replacement parts if you do not return the replaced parts to Dell, will be in accordance with Dell's
Exchange Policy in effect on the date of the exchange.
You accept full responsibility for your software and data. Dell is not required to advise or remind you of appropriate backup
and other procedures.
General Provisions
DELL MAKES NO EXPRESS WARRANTIES OR CONDITIONS BEYOND THOSE STATED IN THIS WARRANTY
STATEMENT. DELL DISCLAIMS ALL OTHER WARRANTIES AND CONDITIONS, EXPRESS OR IMPLIED, INCLUDING
WITHOUT LIMITATION IMPLIED WARRANTIES AND CONDITIONS OF MERCHANTABILITY AND FITNESS FOR A
PARTICULAR PURPOSE. SOME STATES (OR JURISDICTIONS) DO NOT ALLOW LIMITATIONS ON IMPLIED
WARRANTIES OR CONDITIONS, SO THIS LIMITATION MAY NOT APPLY TO YOU.
DELL'S RESPONSIBILITY FOR MALFUNCTIONS AND DEFECTS IN HARDWARE IS LIMITED TO REPAIR AND
REPLACEMENT AS SET FORTH IN THIS WARRANTY STATEMENT. THESE WARRANTIES GIVE YOU SPECIFIC LEGAL
RIGHTS, AND YOU MAY ALSO HAVE OTHER RIGHTS, WHICH VARY FROM STATE TO STATE (OR JURISDICTION TO
JURISDICTION).
DELL DOES NOT ACCEPT LIABILITY BEYOND THE REMEDIES SET FORTH IN THIS WARRANTY STATEMENT OR
LIABILITY FOR INCIDENTAL OR CONSEQUENTIAL DAMAGES, INCLUDING WITHOUT LIMITATION ANY LIABILITY FOR
PRODUCTS NOT BEING AVAILABLE FOR USE OR FOR LOST DATA OR SOFTWARE.
SOME STATES (OR JURISDICTIONS) DO NOT ALLOW THE EXCLUSION OR LIMITATION OF INCIDENTAL OR
CONSEQUENTIAL DAMAGES, SO THE PRECEDING EXCLUSION OR LIMITATION MAY NOT APPLY TO YOU.
These provisions apply to Dell's limited three-year warranty only. For provisions of any service contract covering your system,
refer to your invoice or the separate service contract that you will receive.
If Dell elects to exchange a system or component, the exchange will be made in accordance with Dell's Exchange Policy in
effect on the date of the exchange. In any instance in which Dell issues a Return Material Authorization Number, Dell must
receive the product(s) for repair prior to the expiration of the warranty period in order for the repair(s) to be covered by the
warranty.
NOTE: Before you ship the product(s) to Dell, back up the data on the hard-disk drive(s) and any other storage device
(s) in the product(s). Remove any removable media, such as diskettes, CDs, or PC Cards. Dell does not accept liability
for lost data or software.
NOTE: If you chose one of the available warranty and service options in place of the standard limited three-year
warranty described in the preceding text, the option you chose will be listed on your invoice.

One Year Dell Manufacturer End-User Guarantee European Union, Norway and Switzerland
Guarantee
DELL Products, Raheen Industrial Estate, Limerick, Ireland (DELL) warrants to the end-user in accordance with the following
provisions that its branded hardware products, purchased by the end-user from a DELL company or an authorized DELL
distributor, in the European Union, Norway or Switzerland, will be free from defects in materials, workmanship and design
affecting normal use, for a period of one year as of the original purchase date. Products for which proper claims are made will,
at DELL’s option, be repaired or replaced at DELL’s expense.
Exclusions
This Guarantee does not apply to defects resulting from: improper or inadequate installation, use or maintenance; actions or
modifications by unauthorized third parties or the end-user; accidental or wilful damage or normal wear and tear.
Making a claim
Claims must be made in the European Union, Norway or Switzerland, by contacting the point of sale or any DELL office within
the guarantee period. The end-user must always supply proof of purchase, indicating name and address of the seller, date of
purchase, model and serial number, name and address of the customer and details of symptoms and configuration at time of
malfunction, including peripherals and software used. Otherwise, DELL may refuse the guarantee claim. Upon diagnosis of a
warranted defect, DELL will make arrangements, and pay for ground freight and insurance to and from DELL repair/
replacement centre. End-user must ensure defective product is available for collection properly packed in original or equally
protective packaging together with details listed above and the return number provided to the end-user by DELL.
Limitation and Statutory Rights
DELL makes no other warranty, guarantee or like statement other than as explicitly stated above and this Guarantee is given
in place of all other guarantees whatsoever, to the fullest extent permitted by law. In the absence of applicable legislation, this
Guarantee will be the end-user’s sole and exclusive remedy against DELL or any of its affiliates, and neither DELL nor any of
its affiliates shall be liable for loss of profit or contracts, or any other indirect or consequential loss arising from negligence,
breach of contract, or howsoever.
This Guarantee does not impair or affect mandatory statutory rights of the end-user against and/or any rights resulting from
other contracts concluded by the end-user with DELL and/or any other seller.
General Provisions
DELL MAKES NO EXPRESS WARRANTIES OR CONDITIONS BEYOND THOSE STATED IN THIS WARRANTY
STATEMENT. DELL DISCLAIMS ALL OTHER WARRANTIES AND CONDITIONS, EXPRESS OR IMPLIED, INCLUDING
WITHOUT LIMITATION IMPLIED WARRANTIES AND CONDITIONS OF MERCHANTABILITY AND FITNESS FOR A
PARTICULAR PURPOSE. SOME STATES (OR JURISDICTIONS) DO NOT ALLOW LIMITATIONS ON IMPLIED
WARRANTIES OR CONDITIONS, SO THIS LIMITATION MAY NOT APPLY TO YOU.
DELL’S RESPONSIBILITY FOR MALFUNCTIONS AND DEFECTS IN HARDWARE IS LIMITED TO REPAIR AND
REPLACEMENT AS SET FORTH IN THIS WARRANTY STATEMENT. THESE WARRANTIES GIVE YOU SPECIFIC LEGAL
RIGHTS, AND YOU MAY ALSO HAVE OTHER RIGHTS WHICH VARY FROM STATE TO STATE (OR JURISDICTION TO
JURISDICTION).
DELL DOES NOT ACCEPT LIABILITY BEYOND THE REMEDIES SET FORTH IN THIS WARRANTY STATEMENT OR
LIABILITY FOR INCIDENTAL OR CONSEQUENTIAL DAMAGES, INCLUDING WITHOUT LIMITATION ANY LIABILITY FOR
PRODUCTS NOT BEING AVAILABLE FOR USE OR FOR LOST DATA OR SOFTWARE.
SOME STATES (OR JURISDICTIONS) DO NOT ALLOW THE EXCLUSION OR LIMITATION OF INCIDENTAL OR
CONSEQUENTIAL DAMAGES, SO THE PRECEDING EXCLUSION OR LIMITATION MAY NOT APPLY TO YOU.
These provisions apply to Dell’s limited three-year warranty only. For provisions of any service contract covering your system,
refer to your invoice or the separate service contract that you will receive.
"Total Satisfaction" Return Policy (U.S. and Canada Only)
If you are an end-user customer who bought new products directly from a Dell company, you may return them to Dell within 30
NOTE: If you chose one of the available warranty and service options in place of the standard limited three-year
warranty described in the preceding text, the option you chose will be listed on your invoice.

days of the date of invoice for a refund or credit of the product purchase price. If you are an end-user customer who bought
reconditioned or refurbished products from a Dell company, you may return them to Dell within 14 days of the date of invoice
for a refund or credit of the product purchase price. In either case, the refund or credit will not include any shipping and
handling charges shown on your invoice. If you are an organization that bought the products under a written agreement with
Dell, the agreement may contain different terms for the return of products than specified by this policy.
To return products, you must call Dell Customer Service to receive a Credit Return Authorization Number. Refer to "Getting
Help" in your Installation and Troubleshooting Guide to find the appropriate telephone number for obtaining customer
assistance. To expedite the processing of your refund or credit, Dell expects you to return the products to Dell in their original
packaging within five days of the date that Dell issues the Credit Return Authorization Number. You must also prepay shipping
charges and insure the shipment or accept the risk of loss or damage during shipment. You may return software for refund or
credit only if the sealed package containing the diskette(s) or CD(s) is unopened. Returned products must be in as-new
condition, and all of the manuals, diskette(s), CD(s), power cables, and other items included with a product must be returned
with it. For customers who want to return, for refund or credit only, either applications software or an operating system that has
been installed by Dell, the whole system must be returned, along with any media and documentation that may have been
included in the original shipment.
This "Total Satisfaction" Return Policy does not apply to DellWare products, which may be returned under DellWare's then-
current return policy. In addition, reconditioned parts purchased through Dell Spare Parts Sales in Canada are nonreturnable.
Back to Contents Page
.

Back to Contents Page
Documentation: Dell™ 1800FP Color Display User's Guide
You must right-click the link for a portable document format (PDF) file and save the file to your hard-disk drive.
Attempting to link directly to large PDF files causes your system to freeze.
To save PDF files (files with an extension of .pdf) to your hard-disk drive, right-click the document title, click Save Target As
in Microsoft® Internet Explorer or Save Link As in Netscape Navigator, and specify a location on your hard-disk drive.
Right-click only the following link:
"Quick Set-up" (.pdf)
To view a PDF file, launch Adobe™ Acrobat Reader. Click File —> Open and select the PDF file.
Back to Contents Page
NOTE: PDF files require Adobe Acrobat Reader, which can be downloaded from the Adobe World Wide Web
site.