LG Electronics USA LG410G Cellular/PCS GSM Phone User Manual LG410G 1010
LG Electronics USA Cellular/PCS GSM Phone LG410G 1010
UserManual.wiki
>
LG Electronics USA
>
LG410G User Manual
Users Manual
Navigation menu
Upload a User Manual
Namespaces
Wiki Guide
HTML
PDF
Info
Views
User Manual
Discussion / Help
Navigation
![8For Your SafetyImportant InformationThis user guide contains important information on the use andoperation of this phone. Please read all the informationcarefully for optimal performance and to prevent any damageto or misuse of the phone. Any changes or modifications notexpressly approved in this user guide could void your warrantyfor this equipment.Before You StartSafety InstructionsWARNING! To reduce the possibility of electric shock, do notexpose your phone to high humidity areas, such as thebathroom, swimming pool, etc.Always store your phone away from heat. Never store yourphone in settings that may expose it to temperatures less than32°F or greater than 104°F, such as outside during extremeweather conditions or in your car on a hot day. Exposure toexcessive cold or heat will result in malfunction, damageand/or catastrophic failure.Be careful when using your phone near other electronicdevices. RF emissions from your mobile phone may affectnearby in adequately shielded electronic equipment. Youshould consult with manufacturers of any personal medicaldevices such as pacemakers and hearing aides to determine ifthey are susceptible to interference from your mobile phone.Turn off your phone in a medical facility or at a gas station.Never place your phone in a microwave oven as this willcause the battery to explode.IMPORTANT! Please read the TIA SAFETY INFORMATION onpage 78 before using your phone.Safety InformationRead these simple guidelines. Breaking the rules may bedangerous or illegal. Further detailed information is given in thisuser guide.]Never use an unapproved battery since this could damagethe phone and/or battery and could cause the battery toexplode.]Never place your phone in a microwave oven as it willcause the battery to explode.]Do not dispose of your battery by fire or with hazardous orflammable materials.]Make sure that no sharp-edged items come into contactwith the battery. There is a risk of this causing a fire.]Store the battery in a place out of reach of children.]Be careful that children do not swallow any parts such asrubber plugs (earphone, connection parts of the phone,etc.). This could cause asphyxiation or suffocation.](https://usermanual.wiki/LG-Electronics-USA/LG410G/User-Guide-1026396-Page-3.png)
![9For Your Safety]Unplug the power cord and charger during lightning stormsto avoid electric shock or fire.]When riding in a car, do not leave your phone or set up thehands-free kit near to the air bag. If wireless equipment isimproperly installed and the air bag is activated, you may beseriously injured.]Do not use a hand-held phone while driving.]Do not use the phone in areas where its use is prohibited.(For example: aircraft).]Do not expose the battery charger or adapter to directsunlight or use it in places with high humidity, such as abathroom.]Never store your phone in temperatures less than- 4°F orgreater than 122°F.]Do not use harsh chemicals (such as alcohol, benzene,thinners, etc.) or detergents to clean your phone. There is arisk of this causing a fire.]Do not drop, strike, or shake your phone severely. Suchactions may harm the internal circuit boards of the phone.]Do not use your phone in high explosive areas as the phonemay generate sparks.]Do not damage the power cord by bending, twisting, pulling,or heating. Do not use the plug if it is loose as it may causea fire or electric shock.]Do not place any heavy items on the power cord. Do notallow the power cord to be crimped as it may cause fire orelectric shock.]Do not handle the phone with wet hands while it is beingcharged. It may cause an electric shock or seriouslydamage your phone.]Do not disassemble the phone.]Do not place or answer calls while charging the phone as itmay short-circuit the phone and/or cause electric shock orfire.]Only use the batteries, antennas, and chargers provided byLG. The warranty will not be applied to products provided byother suppliers.]Only authorized personnel should service the phone and itsaccessories. Faulty installation or service may result inaccidents and consequently invalidate the warranty.]Do not hold or let the antenna come in contact with yourbody during a call.]An emergency call can be made only within a service area.For an emergency call, make sure that you are within aservice area and that the phone is turned on.](https://usermanual.wiki/LG-Electronics-USA/LG410G/User-Guide-1026396-Page-4.png)
![11For Your SafetyVehicle Mounted External Antenna(optional, if available)A minimum separation distance of 8 inches (20cm) must bemaintained between the user/bystander and the vehiclemounted external antenna to satisfy FCC RF exposurerequirements. For more information about RF exposure, visitthe FCC website at www.fcc.govFCC Part 15 Class B ComplianceThis device and its accessories comply with part 15 of FCCrules. Operation is subject to the following two conditions: (1) This device and its accessories may not cause harmfulinterference, and (2) this device and its accessories mustaccept any interference received, including interference thatmay cause undesired operation.Cautions for Battery]Do not disassemble.]Do not short-circuit.]Do not expose to high temperature: 60°C (140°F).]]Do not incinerate.Battery Disposal]Please dispose of your battery properly or bring to yourlocal wireless carrier for recycling.]Do not dispose in fire or with hazardous or flammablematerials.Adapter (Charger) Cautions]Using the wrong battery charger could damage your phoneand void your warranty.]The adapter or battery charger is intended for indoor useonly.Do not expose the adapter or battery charger to direct sunlightor use it in places with high humidity, such as the bathroom.](https://usermanual.wiki/LG-Electronics-USA/LG410G/User-Guide-1026396-Page-6.png)
![General FunctionsMaking a Call1. Make sure your phone is poweredon.2. Enter a phone number includingthe area code. To edit a number onthe display screen, simply press theClear key to erase one digit at atime.]Press and hold the Clear key toerase the entire number and returnto the idle screen.3. Press the [SEND] key or left softkey to call the number.4. When finished, press the[PWR/END] key.Making a Call by Send Key2. Press the [SEND] key, and themost recent incoming, outgoingand missed phone numbers will bedisplayed.2. Use , to highlight anumber.3. Press [SEND] key to call thehighlighted number.Making International Calls1. Press and hold the key andthe international access character‘+’ will appear.2. Enter the country code, area code,and the phone number.3. Press the [SEND] key.Ending a CallWhen you have finished a call, pressthe [PWR/END] key.Making a Call From theContact ListYou can store names and phonenumbers in the SIM, as well as in thephone memory from the Contactsmenu. (Menu 2.2)You can dial a number by simplyselecting a name in the contacts andpressing the [SEND] key.](https://usermanual.wiki/LG-Electronics-USA/LG410G/User-Guide-1026396-Page-7.png)
![12Adjusting the VolumeDuring a call, if you want to adjust theearpiece volume, use the up/downnavigation key of the phone.Answering a CallWhen you receive a call, the phonerings or vibrates, and the LED blinksuntil the call is answered. If the callercan be identified, the caller's phonenumber (or name if stored in yourContacts) is displayed on the screen.1. Press the [SEND] key or theLeft Soft Key Accept to answer anincoming call. If the answer modehas been set to Any Key (Menu9.4.1), any key press will answer acall except for the [PWR/END]Key or the Right Soft Key Silent.2. End the call by closing the phone orpressing the [PWR/END] key.Vibrate Mode (Quick)Vibrate Mode can be activated bypressing and holding down the[Star] key.Signal StrengthIf you are inside a building, being neara window may give you betterreception. You can see the strength ofyour signal by the signal indicator onyour phone’s display screen.Entering TextYou can enter alphanumeric charactersby using the phone’s keypad. Forexample, storing names in the AddressBook, writing a message, or creatingscheduling events in the Calendar allrequire entering text.The following text input methods areavailable in the phone.NoticeYou can answer a call while using theContacts or other menu features.General Functions](https://usermanual.wiki/LG-Electronics-USA/LG410G/User-Guide-1026396-Page-8.png)
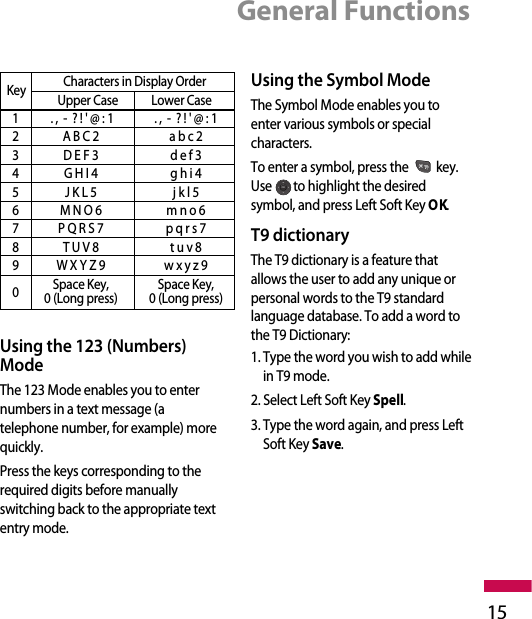
![General Functions13T9 ModeThis mode allows you to enter wordswith only one keystroke per letter.Each key on the keypad has more thanone letter. The T9 mode automaticallycompares your keystrokes with aninternal linguistic dictionary todetermine the correct word, thusrequiring far fewer keystrokes than thetraditional ABC mode. You can set T9input mode to On or Off by selectingRight Soft Key Options, then 3 Set T9from the text message window screen.ABC ModeThis mode allows you to enter lettersby pressing the key labeled with therequired letter once, twice, three orfour times until the letter is displayed.123 Mode (Numbers Mode)Type numbers using one keystroke pernumber. To change to 123 mode in atext entry field, press key until 123mode is displayed.Symbol ModeThis mode allows you to enter specialcharacters. Press [Star] Key toaccess Symbols.Changing the Text InputModeChange the text input mode bypressing . You can check thecurrent text input mode in the upperright corner of the screen.Using the T9 ModeThe T9 predictive text input modeallows you to enter words easily with aminimum number of key presses. Asyou press each key, the phone beginsto display the characters that it thinksyou are typing based on a built-indictionary. As new letters are added,the word changes to reflect the mostlikely candidate from the dictionary.NoticeT9 Mode is set to Off by default.](https://usermanual.wiki/LG-Electronics-USA/LG410G/User-Guide-1026396-Page-9.png)
![General Functions141. When you are in the T9 predictivetext input mode, start entering aword by pressing keysto .]The word changes as letters aretyped - ignore what’s on thescreen until the word is typedcompletely.]If the word is still incorrect aftertyping it completely, press the,keys to cycle throughthe other word options.Example: To type the word"Cook", press 2, 6, 6, 5. Press , until the word"Cook" is displayed.]If the desired word is missing fromthe word choices list, add it byusing the ABC mode.2. Enter the whole word beforeediting or deleting any keystrokes.3. Complete each word with a spaceby pressing the key or the rightnavigation key.To delete letters, press the [Clear]key. Press and hold down the [Clear] key to erase the letterscontinuously.To switch between English andSpanish while in T9 Mode, hold downthe [Star] Key for 2 seconds.Using the ABC ModeUse the alphanumeric keypad to enteryour text.1. Press the key labeled with therequired letter:]Once for the first letter]Twice for the second letter]And so on2. To insert a space, press the keyonce. To delete letters, press the[Clear] key. Press and holddown the [Clear] key to erasethe letters continuously.NoticeRefer to the table below for moreinformation on the charactersavailable using the keys.](https://usermanual.wiki/LG-Electronics-USA/LG410G/User-Guide-1026396-Page-10.png)
![16In-Call MenuYour phone provides a number ofcontrol functions that you can useduring a call. To access these functionsduring a call, press the right soft key[Options].During a CallThe menu displayed on the phone'sscreen during a call is different thanthe default main menu displayedwhen in idle screen, and the optionsare described below.Making a Second CallYou can select a number you wish todial from the Contacts to make asecond call. Press the right soft key[Options] then select Contact List.Use , to highlight the contactyou wish to call, then press .Swapping Between Two CallsTo switch between two calls, press the[SEND] key.Answering an Incoming CallTo answer an incoming call when thephone is ringing, simply press the[SEND] key. The phone is also able towarn you of an incoming call while youare already on a call. A tone sounds inthe earpiece, and the display will showthat a second call is waiting. Thisfeature, known as Call Waiting, is onlyavailable if your network supports it.If Call Waiting is on, you can put thefirst call on hold and answer thesecond call, by pressing the[SEND] key.Rejecting an Incoming CallYou can reject an incoming call bypressing , or by pressing Silent, then Reject.During a call, you can reject anincoming call by pressing , or Reject.](https://usermanual.wiki/LG-Electronics-USA/LG410G/User-Guide-1026396-Page-12.png)
![Muting the MicrophoneYou can mute the microphone duringa call by pressing the left soft key[Mute]. The phone can be unmuted bypressing the left soft key [Unmute].When the phone is muted, the callercannot hear you, but you can still hearthe caller.Using the SpeakerphoneYou can use the integratedSpeakerphone during a call bypressing the right soft key [Options]then select Speaker On. Thespeakerphone indicator [ ] willdisplay on the display screen. Theloudspeaker is automaticallydeactivated when you end the call.Conference CallsThe conference service provides youwith the ability to have a simultaneousconversation with more than onecaller. The conference call feature canbe used only if your network serviceprovider supports this feature. Theconference call can only be set upwhen you have one call active and onecall on hold, meaning both calls musthave been answered. Once aconference call is set up, calls may beadded, disconnected or separated(that is, removed from the conferencecall but still connected to you) by theperson who set up the conference call.These options are all available from theIn-Call menu. The maximum numberof callers in a conference call is five.Once started, you are in control of theconference call, and only you can addcalls to the conference call. WarningBecause of the higher volume level,don’t place the phone too close yourear while the speakerphone isenabled.In-Call Menu](https://usermanual.wiki/LG-Electronics-USA/LG410G/User-Guide-1026396-Page-13.png)
![18In-Call MenuMaking a Second CallYou can make a second call whilecurrently on a call simply by enteringthe second number and pressingthe [SEND] key. When the secondcall is connected, the first call isautomatically placed on hold. You canswap between calls, by pressingthe [SEND] key.Setting Up a Conference CallTo set up a conference call, place onecall on hold, conference in the secondactive call by pressing the right soft keyand select the Join Calls sub menuoption from the Conference Call menu. Activate the Conference Callon HoldTo activate a conference call on hold,press the [SEND] key.Adding Calls to theConference CallTo add a call to an existing conferencecall, press the right soft key, and thenselect the Join Calls sub menu from theConference Call option.Private Call in a ConferenceCallTo have a private call with one callerfrom a conference call, press the rightsoft key and select the Private Menufrom the Conference Call option. Whenthe numbers of the callers aredisplayed, select the one you wish tospeak in private. Ending a Conference CallCurrently active conference call can bedisconnected by pressing the[PWR/END] key.](https://usermanual.wiki/LG-Electronics-USA/LG410G/User-Guide-1026396-Page-14.png)
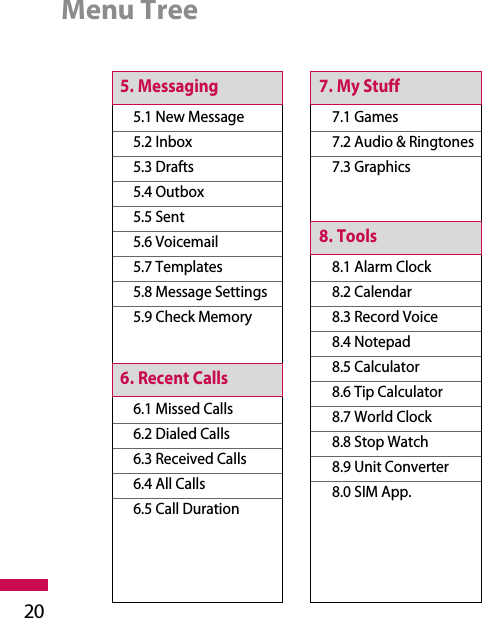
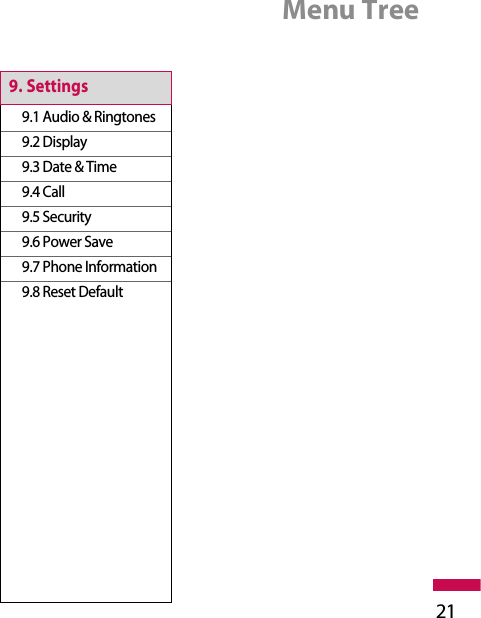
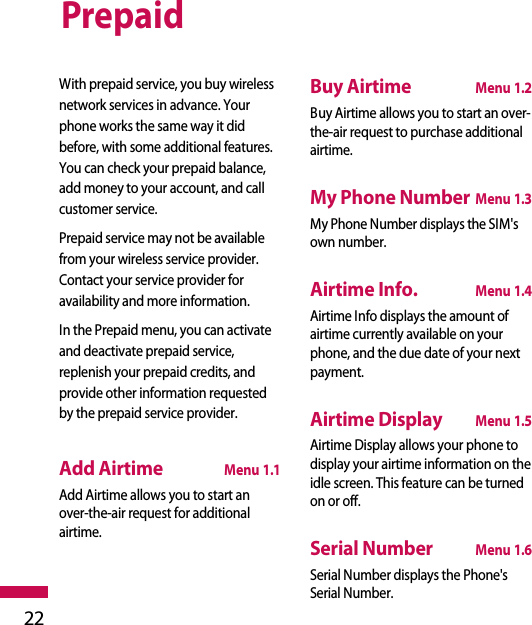
![Menu Tree19The following illustration shows the available menu structure and indicatesthe:]Number assigned to each menu option.]Page where you can find the feature description.1.1 Add Airtime1.2 Buy Airtime1.3 My Phone Number1.4 Airtime Info.1.5 Airtime Display1.6 Serial Number1.7 SIM Number1.8 Code Entry Mode1. Prepaid2.1 Contact List2.2 New Contact2.3 Speed Dial List2.4 Caller Groups2.5 Copy All Contacts2.6 Delete All Contacts2.7 Information2. Contacts3. Games4. Alarm Clock](https://usermanual.wiki/LG-Electronics-USA/LG410G/User-Guide-1026396-Page-15.png)
![Contacts24Contact ListMenu 2.1This menu allows you to save andmanage contact address information.The Contact List functions allow you toadd a new address or search savedcontact addresses by name.New ContactMenu 2.2This menu allows you to add a newcontact address. You can input contactaddress information including name,phone numbers, email addresses,group information items, and memos.Speed Dial ListMenu 2.3This menu allows you to configure thespeed dial numbers. You can select anumber as a speed dial from 2 to 9.You can configure speed dial numbersfor any of the 8 numbers for a specificcontact address.Caller GroupsMenu 2.41. Every Group list will be displayed:Family, VIP, Friends, Colleague,Group 1, Group 2, No Group.2. Select the Group name that youwant to manage by pressing theright soft key [Options].3. You will see the following submenusunder the predefined groups exceptfor the No Group group.• Group Ringtone: Allows you toselect the ringtone to be used whenyou receive a voice phone call froma person in the group.• Group Icon: Allows you to selectthe graphic icon to be displayed onthe group of Group List.• Add Member: Allows you to addthe member to the group.• Remove Member:Allows you todelete the member in the group.• Rename: Allows you to assign aname to the group.](https://usermanual.wiki/LG-Electronics-USA/LG410G/User-Guide-1026396-Page-20.png)
![Contacts25Copy All ContactsMenu 2.5This menu allows you to copy all of theinformation from your SIM (e.g. name,phone number, etc.) to your phone,and vice versa. If a name is duplicatedduring the copying process, theinformation is also duplicated.]SIM to Phone:You can copy theentry from the SIM card to the phonememory.]Phone to SIM: You can copy theentry from the phone memory to theSIM card (not all the data will becopied).Delete All Contacts Menu 2.6You can delete all entries in the SIMand the Phone.InformationMenu 2.7Check Memory (Menu 2.7.1)You can check how many names andnumbers are stored in the AddressBook (SIM card and phone memories).My Numbers (Menu 2.7.2)Allows you to display your phonenumber in the SIM card.](https://usermanual.wiki/LG-Electronics-USA/LG410G/User-Guide-1026396-Page-21.png)
![Alarm Clock27Set the alarm to ring at a specific time.In the Set Alarm Clock menu, thefollowing options are available:1.Navigate to the Alarm Clock menu.2.Select [On] by pressing the right/leftnavigation keys.3.If you want to set the time foractivating the alarm, press the downnavigation key.4.Enter the desired time, and press.5.Set the repeat frequency. Thefollowing options are available:• Once: The alarm rings only onceand is then deactivated.• Daily: The alarm rings every day atthe set time.• Mon ~ Fri: The alarm rings everyweekday (Monday - Friday) at theset time.• Sat ~ Sun:The alarm rings everySaturday and Sunday at the settime.6.Set the alarm melody by using theright/left navigation keys.7.Press the left soft key [Save].Off: Cancel the alarm setting.NoticeIf this option is set to On, the alarmwill ring at the specified time, evenwhen the phone is switched off.To stop the alarm when it rings, pressthe right soft key[Quit].](https://usermanual.wiki/LG-Electronics-USA/LG410G/User-Guide-1026396-Page-23.png)
![New MessageMenu 5.1You can write and edit text messagesof up to 913 characters.1. Type in a message using keypresses. For details on how to entertext, refer to page 19 (EnteringText).2. After completing the messageselect the desired option bypressing the right soft key[Options].The following options are available.]Insert• Symbol: You can insert symbolsranging from sentence notes toemoticons. Use the navigation keysto highlight a symbol, then pressOK or the left soft key OK.• Text Template: You can easilyinsert frequently used sentences inthe text message.• Contact: You can browse one ofyour contacts and place theirinformation within the body of thetext message.• Business Card: Input your ownbusiness card created in (Menu5.7.2). For further details, see page40.]Save to Drafts: Saves the selectedmessage as a draft.]Set T9: You can turn T9 Mode on oroff.]Clear Text: Deletes the writtenmessage.]Cancel: Exit the text editor.]Left Soft Key SEND: Enter therecipient's phone number or selectthe number from your contact list.Messaging28](https://usermanual.wiki/LG-Electronics-USA/LG410G/User-Guide-1026396-Page-24.png)
![Messaging29InboxMenu 5.2You will be alerted when you receive amessage. They will be stored in theInbox.In the Inbox, you can identify eachmessage by icons.Press Options. Choose from thefollowing options:]Delete: Deletes the selectedmessage from the Inbox.]Reply:Allows you to reply to thesender of the selected message.]Forward: Forwards a receivedmessage to other recipients. Afterrecipients are entered, the messagecan be forwarded.]Return call: Call back the sender.]Delete All Read: Deletes allmessages that you have read in thelist.]Delete All Unread: Deletes all themessages that you have not read.]Delete All: Deletes all messages inthe list.]Left Soft Key View: You canview the received messages.Press the left soft key [Reply]: Allows you to reply to the sender ofthe selected message.DraftsMenu 5.3You can view the messages you havesaved as drafts. The draft messages arelisted with the dates and times ofwhen they were saved.Press Options. Choose from thefollowing options:]Delete: Deletes the highlightedmessage.]Delete all: Deletes all messages inthe folder.Press View. While viewing themessage, press Edit to edit themessage.When you are finished editing themessage, press Send to send themessage to a recipient.](https://usermanual.wiki/LG-Electronics-USA/LG410G/User-Guide-1026396-Page-25.png)
![OutboxMenu 5.4If the message transmission fails, youcan save the message in the Outbox.The following [Options] are available inthe Outbox list.]Delete: Deletes the message youchoose.]Delete All: Deletes all messages inthe folder.Press the left soft key [View]]View: View the message you choose.]Edit: Allows you to edit the selectedmessage.SentMenu 5.5This menu allows you to save themessages you have sent successfully.You can also view the delivery status.Press Options. Choose from thefollowing options:]Delete: Deletes the selectedmessage from the Sent list.]Forward: Forwards the currentmessage to other recipients.]Delete all: Deletes all messages inthe folder.]Left Soft Key View: View theselected message from the Sent list. While viewing the selected sentmessage, press Options. SelectDelete to delete the message.Press Send to send the message toa recipient.VoicemailMenu 5.6This menu provides you with a quickway of accessing your voice mailbox (ifprovided by your network).Before using this feature, you mustenter the voice server numberobtained from your service provider.This may already be available; to checkthe voicemail, press and hold thekey.When new voicemail is received, thesymbol will be displayed on thescreen.Messaging30](https://usermanual.wiki/LG-Electronics-USA/LG410G/User-Guide-1026396-Page-26.png)
![Messaging31TemplatesMenu 5.7There are 6 predefined messages inthe list. You can view and edit thetemplate messages or create newmessages. Text Templates (Menu 5.7.1)• Please call me back• I’m late. I will be there at• Where are you now?• I’m on the way.• Urgent! Please contact.• I love youPress Options. Choose from thefollowing options:]Edit: Allows you to write a newmessage or edit the selectedtemplate message.]Send Via Text Message: Allows youto send the selected templatemessage via SMS.]Delete: Allows you to delete theselected template message.]New Template:Use this to create anew template.]Delete All: Deletes all messages inthe folder. ]Left Soft Key View: Allows youto view the the selected templatemessage.NotePlease check with your networkservice provider for details of theirservice in order to configure thephone accordingly.](https://usermanual.wiki/LG-Electronics-USA/LG410G/User-Guide-1026396-Page-27.png)
![Business Card (Menu 5.7.2)This feature allows you to create yourown name card. You can key in theName, Mobile number, Office number,Fax number and E-mail address.]Send Via Text Message: Sends theselected name card by SMS.]Delete: Allows you to delete theselected name card.Press the left soft key [Edit]]Edit: Allows you to write a newmessage or edit the selected namecard.Message settingsMenu 5.8Text Message (Menu 5.8.1)]Message Center Number:If youwant to send a text message, you canreceive the address of the SMS centerthrough this menu.]Email Gateway: You can send thetext message to an Email Address viathis gateway.]Subject: You can enter the SMSSubject when this menu is on.Voicemail Number (Menu 5.8.2)Allows you to change the voicemailserver number, if necessary.Check MemoryMenu 5.9You can check the current used andavailable text message memory.NoteVoice Mail is a network feature.Please contact your service providerfor further details.Messaging32](https://usermanual.wiki/LG-Electronics-USA/LG410G/User-Guide-1026396-Page-28.png)
![My Stuff35GamesMenu 7.1You can play the games that are pre-installed on the phone.Audio & RingtonesMenu 7.2The right soft key [Options] will bringup the following options.]Set as Ringtone: Allows you to setthe selected audio file as yourphone's ringtone.GraphicsMenu 7.3The right soft key [Options] will bringup the following options.]Set as Wallpaper: Currently selectedpicture can be set as a Wallpaper.]List/Icon View: You can configurethe graphic files to List style or Iconstyle.]Left Soft Key View: You canview the currently selected image.NotePictures supplied as default can onlybe used under the Set as Wallpapermode.NoteSounds supplied as default can onlybe used under the Set as Ringtonemode.](https://usermanual.wiki/LG-Electronics-USA/LG410G/User-Guide-1026396-Page-31.png)
![Alarm ClockMenu 8.1For further details, see page 35.CalendarMenu 8.2When you enter this menu a calendarwill be displayed. The square cursor isused to locate a particular day. Anorange colored date indicatesschedule entries for that day. Thisfunction helps remind you of entriesyou have input in the calendar. Thephone will sound an alarm tone if it hasbeen set for a specific schedule item.For changing the day, month, and year.]Left Soft Key View: Allows youto view the selected schedule.]Delete: Allows you to delete theselected schedule entry.]New Schedule: You can enter amaximum of 30 characters andcreate up to 30 notes.]Edit: Allows you to edit the selectedschedule.]Calendar:Allows you to view thecalendar.]Scheduler Tone:The phone cansound an alarm tone when thescheduled date for an event hasbeen reached.]All Schedules: Shows the notes thatare set for all days. Use the up/downnavigation keys to browse throughthe note lists. You can viewadditional options by pressing theright soft key [Options].]Go to Date: Allows you to jump to aspecific date.]Delete Old: Delete past scheduleevents.]Delete All: Delete all scheduleentries. You are asked to confirmyour action.Tools36Key Descriptionup/down navigation key Weeklyleft/right navigation key Dailykey / key Yearlykey/ keyMonthly](https://usermanual.wiki/LG-Electronics-USA/LG410G/User-Guide-1026396-Page-32.png)
![Tools37Record VoiceMenu 8.3Allows you to record a memo. You canrecord up to 3 voice messages witheach message up to 30 seconds.You can use the Voice Memo featureto:• Play the recorded voice memos• Delete one or all voice memos1.Once recording is started, themessage ‘ Recording... ’ and theremaining time is displayed.2.If you want to finish recording, pressthe left soft key [Save].]Play: Allows you to play back allmemos recorded, starting with themost recent memo. The screendisplays the date and time when thememo was recorded.]Delete: Allows you to delete aspecific memo. ]Record New:Allows you to record amemo.]Delete All: Allows you to delete allmemos.NotepadMenu 8.4You can create up to a maximum of 20memos.1. Select a memo pad to edit.2. Press the left soft key [New] to createa new memo.3. Input the memo and press the leftsoft key [Save] to save.CalculatorMenu 8.5Using this feature, you can use thephone as a calculator. The calculatorprovides the basic arithmeticfunctions: addition, subtraction,multiplication and division.NoteIf all memo locations are full, youmust delete an old memo beforerecording a new one.](https://usermanual.wiki/LG-Electronics-USA/LG410G/User-Guide-1026396-Page-33.png)
![Tools38Using the Calculator1.Enter the first number using thenumeric keys.2.Use the navigation keys to select asign for calculation.3.To calculate the result, press OK key.4. To erase your calculation, press Reset.Tip CalculatorMenu 8.6Allows you to quickly and easilyestimate the tip and total amount of abill by inputting the bill amount beforetip, the tip percentage, and dividing itby the number of people paying.World ClockMenu 8.7Allows you to check the currentGreenwich Mean Time(GMT) andmajor cities around the world, usingthe left/right navigation keys.The screen shows the city name,current date and time.To select the time zone in which youare located, proceed as follows:1. Select the city corresponding toyour time zone by pressing theleft/right navigation keys one ormore times. The local date and timeare displayed.2. If you want to set the selected city'stime to your phone, press the leftsoft key [Set].3. If you want to set Daylight Savings,press the right soft key [DST].NoteThe time zone setting of each city inWorld time menu may be affected bynetwork condition.NoteTo input a decimal point, press thekey.](https://usermanual.wiki/LG-Electronics-USA/LG410G/User-Guide-1026396-Page-34.png)
![Tools39Stop WatchMenu 8.81.Press [Start] to start the timer, andrecord lap times by pressing [Lap].2.Press[Stop] to ascertain the recordof lap time.3.Press [Reset] to set the timer back to0.Unit ConverterMenu 8.9This feature allows you to convert unitsof measurement.There are 4 types of units ofmeasurement that can be converted:Length, Surface, Weight andVolume.1. You can select one of four unit typesby pressing the left soft key [Unit].2. Select the standard value by usingthe left/right navigation keys.3. Select the unit you want to convertby pressing the up/down navigationkeys.4. You can check the converted valuefor the unit you want. Also, you caninput a decimal number by pressingthe key.SIM App.Menu 8.0This feature is dependent on yourservice provider. Please contact thecustomer call center of your serviceprovider for more information.](https://usermanual.wiki/LG-Electronics-USA/LG410G/User-Guide-1026396-Page-35.png)
![Settings40Audio & RingtonesMenu 9.1Pressing and holding while on theidle screen will switch between Normalmode and Vibrate mode.Ringtones (Menu 9.1.1)Shows and plays ringtones. Volume (Menu 9.1.2)This menu controls Ringtone, KeyTone, Earpiece and Headset volume.There are 5 volume levels available.Ring Alert Type (Menu 9.1.3)Supports 3 ring alert types. Ring, Ringand Vibrate, and Vibrate then Ring.Message Alert Tones (Menu 9.1.4)Allows you to select an alert tonewhich is played when a message isreceived. Increasing Ringtone (Menu 9.1.5)Allows you to set an IncreasingRingtone which will play whenreceiving an incoming call. You can setthis feature to On or Off.Power On/Off Tones (Menu 9.1.6)Allows you to set a Power On/Off tone.You can set this feature to On or Off.DisplayMenu 9.2Wallpapers (Menu 9.2.1)This option allows you to change thebackground image (wallpaper) to bedisplayed in idle mode. 1. Scroll through the list by pressingthe navigation keys.You have various preset imagesavailable. You can also select anyimages downloaded from the Internet.2. Press the left soft key [View] whenthe desired image is highlighted.3. Press the left soft key [Set], then theselected image will be displayed inidle mode.](https://usermanual.wiki/LG-Electronics-USA/LG410G/User-Guide-1026396-Page-36.png)
![Settings41Backlight Timer (Menu 9.2.2)This option allows you to set theduration of the Display and Keypadbacklighting.Contrast (Menu 9.2.3)This option allows you to adjust thecontrast of the LCD screen by pressingthe navigation key.Languages (Menu 9.2.4)This option allows you to change thedisplay text language on your phone.You can also change the InputLanguage. Date & TimeMenu 9.3Date Format (Menu 9.3.1)YYYY/MM/DD(year/month/day)DD/MM/YYYY(day/month/year)MM/DD/YYYY(month/day/year)Time Format (Menu 9.3.2)24 Hours/12 HoursCallMenu 9.4Call Forwarding (Menu 9.4.1)When this network service is activated,you can direct your incoming calls toanother number, for example, to yourvoice mailbox number. For details,contact your service provider. Selectone of the divert options, for example,select If busyto divert voice calls whenyour number is busy or when youreject incoming calls.The following options are available:]All Voice Calls: Diverts voice callsunconditionally.]If Busy:Diverts voice calls when thephone is in use.]If No Reply:Diverts voice calls whichyou do not answer.]If Out Of Reach:Divert voice callswhen the phone is turned off or outof the coverage area.]Cancel All: Cancels all CallForwarding settings.](https://usermanual.wiki/LG-Electronics-USA/LG410G/User-Guide-1026396-Page-37.png)
![Settings42Answer Mode (Menu 9.4.2)This allows you to determine how youwould like to answer your phone.]Flip Open: When the phone rings,you can answer a call simply byopening the flip.]Any Key: You can answer anincoming call by pressing any key,except the [PWR/END] key orthe right soft key Silent/Reject.]SEND Key Only: You can onlyanswer an incoming call by pressingthe [SEND] key.Send My Number (Menu 9.4.3)This network service allows you to setyour phone number to be displayedOn or hidden Offfrom the person towhom you are calling. You can selectSet by Networkif you prefer to havedifferent settings for different serviceprovider.Call Waiting (Menu 9.4.4)The network will notify you of a newincoming call while you have a call inprogress. Select Activate to requestthe network to activate call waiting,Cancel to request the network todeactivate call waiting, or View Status,to check if the function is active or not.Minute Minder (Menu 9.4.5)This option allows you to specifywhether the phone must beep everyminute during an outgoing call to keepyou informed of the length of the call.Auto Redial (Menu 9.4.6)When set to On, your phone redials thenumber you are trying to call up to 10times after you hear a quick busysignal. Press [PWR/END] key tostop the call attempts.This feature attempts to redialnumbers that are busy due to thewireless network. It does not redialnumbers to a busy party.NoteIf this network service is notactivated, this menu option will notappear on your phone. Contact yourservice provider for details.](https://usermanual.wiki/LG-Electronics-USA/LG410G/User-Guide-1026396-Page-38.png)
![Settings43TTY (Menu 9.4.7)Allows you to attach a TTY deviceenabling you to communicate withparties also using a TTY device. A phone with TTY support is able totranslate typed characters to voice.Voice can also be translated intocharacters and then displayed on theTTY.Send DTMF Tones (Menu 9.4.8)You can send the DTMF (dual tonemulti-frequency) tones of the numberon the display during a call.This option is helpful for entering apassword or account number whenyou call an automated system, like abanking service.SecurityMenu 9.5Various codes and passwords are usedto protect the features of your phone.They are described in the followingsections (see page 17)PIN Code Request (Menu 9.5.1)When the PIN code request feature isset to ‘Enable’, you must enter your PINeach time you switch the phone on.Consequently, any person who doesnot have your PIN cannot use yourphone without your approval.The following options are available:]Enable: You must enter the PIN eachtime the phone is switched on.]Disable: The phone connectsdirectly to the network when youswitch it on.NoteBefore disabling the PIN code requestfeature, you must enter your PIN.](https://usermanual.wiki/LG-Electronics-USA/LG410G/User-Guide-1026396-Page-39.png)
![Fixed Dial Number (Menu 9.5.2)Allows you to restrict your outgoingcalls to selected phone numbers, if thisfunction is supported by your SIM card.The PIN2 code is required.The following options are available:]Enable: You can only call phonenumbers stored in the phonebook.You must enter your PIN2.]Disable: You can call any number.]Number list:You can view thenumber list saved as fixed dialnumber.Change Codes (Menu 9.5.3)The Change codes feature allows youto change your current password to anew one. You must enter the currentpassword before you can specify a newone.You can change the access codes for:Security Code, PIN1 Code, PIN2 CodePower SaveMenu 9.6You can save the power when youdon't use the phone.Phone InformationMenu 9.7This menu is used to view My Number,Manufacturer and Model Name, etc.NotePIN: Personal Identification Number.NoteNot all SIM cards have a PIN2. If yourSIM card does not, this menu optionis not displayed.Settings44](https://usermanual.wiki/LG-Electronics-USA/LG410G/User-Guide-1026396-Page-40.png)

![QHow do I view the list of outgoingcalls, incoming calls and missedcalls?APress the [SEND] key.QHow do I view all numbers stored inmemory?APress the down navigation key.QWhy is the connection inconsistentor not audible in certain areas?AWhen frequency environment isunstable in a certain area,connection may be inconsistent andnot audible. Relocate to another areaand try again.QWhy is the connection notconsistent and abruptly disconnects,even when established?AWhen frequency is unstable or weakor if there are too many users,connection may be cut off even afterit was established. Please try againlater or attempt after relocating toother areas.QWhy does the LCD not turn on?ARemove the battery and turn on thepower after placing it back on. Ifthere is no change, fully charge thebattery and try again.QWhy is there an echo when aconnection is made with certaintelephones in a certain area?AThis is called the "EchoPhenomenon", which occurs ifconnection volume is too high, or byQ&A46Please check to see if any problems you have encountered with the phone aredescribed in this section before taking the phone in for service or calling a serviceengineer.](https://usermanual.wiki/LG-Electronics-USA/LG410G/User-Guide-1026396-Page-42.png)