LG Electronics USA LG70LY390C LED TV User Manual MFL68027111 eng 0304 indd
LG Electronics USA LED TV MFL68027111 eng 0304 indd
user manual

OWNER’S MANUAL
LED TV
Please read this manual carefully before operating
your set and retain it for future reference.
www.lg.com
* LG LED TV applies LCD screen with LED backlights.
P/NO : MFL68027111 (1312-REV00)
Printed in Korea
*MFL68027111*
Model name:70LY390C-CA
Brand name:LG
FCC ID:BEJLG70LY390C

2
ENG
ENGLISH
TABLE OF CONTENTS
TABLE OF CONTENTS
4 LICENSES
4 OPEN SOURCE SOFTWARE
NOTICE
5 SAFETY INSTRUCTIONS
11 Viewing 3D Imaging
(Only 3D models)
12 INSTALLATION PROCEDURE
12 ASSEMBLING AND PREPARING
12 Unpacking
16 Separate purchase
17 Parts and buttons
18 - Using the Joystick button
19 Lifting and moving the TV
20 Setting up the TV
20 - Attaching the stand
22 Mounting on a table
23 Mounting on a wall
25 Tidying cables
26 MAKING CONNECTIONS
26 Antenna connection
27 Network connection
27 - Wireless network connection
27 - Wired network connection
27 Connection overview
28 HDMI connection
28 DVI to HDMI connection
29 Component connection
29 Composite connection
30 Headphone connection
30 Audio connection
30 - Digital optical audio connection
31 USB connection
31 MHL connection
32 CI module connection
33 REMOTE CONTROL FUNCTIONS
33 Inserting batteries
36 Registering the remote control
36 How to use remote control
36 Precautions to take when using the
remote control
37 MAGIC REMOTE FUNCTIONS
38 Registering Magic Remote
38 How to use Magic Remote
38 Precautions to Take when Using the
Magic Remote
39 USING (BASIC)
39 Turning the TV on for the first time
39 Setting the Mode
40 Setting up programmes
40 To use Quick Setting function
41 Accessing Home Menu
42 Checking current programme info
43 Adjusting aspect ratio
44 Using the input list
44 Viewing 3D Imaging (Only 3D models)
45 - Using 3D Glasses
45 Using the customer support
45 - Testing the Picture / Sound
45 - Using the product or service
information
46 APPLICATIONS
46 Android Browser
46 - Getting started
46 - Browser windows
46 Advanced
47 AnZhi TV
47 - Getting started
47 - How to download or remove apps
47 SmartShare
47 - Connect mobile device
47 - Connect PC
47 - Connect USB
47 - Movie, Photo, and Music
48 Dual Play
48 OSS
48 - To use the Universal Control function
49 Tag On
50 On now

3
ENGENGLISH
TABLE OF CONTENTS
WARNING
yIf you ignore the warning message, you
may be seriously injured or there is a
possibility of accident or death.
CAUTION
yIf you ignore the caution message, you
may be slightly injured or the product may
be damaged.
NOTE
yThe note helps you understand and use
the product safely. Please read the note
carefully before using the product.
51 SETTINGS
51 The Main Menus
51㹘㷣(Network)
51ᘅ࿖(Picture)
51៷固(Sound)
52䆉㗵(Programme)
52 䣍垘亚ၬ (Video Input)
52 ⓬☦᎓⓽哻 (Date & time)
52ᶛ㐯(Application)
52 喗㣈᎓᪐ၯ (Privacy & safety)
52 䫆哵Ἦ (Accessibility)
53伐垀 (Options)
53 ᪩ℾ∈ (Customer Support)
53 APPENDIX
53 Updating the TV system
53 Preventing “Image burn” or “Burn-in” on
your TV screen
54 MAINTENANCE
54 Cleaning your TV
54 - Screen, frame, cabinet and stand
54 - Power cord
54 - ᵲᷖៗ㋙
55 TROUBLESHOOTING
58 SPECIFICATIONS
66 ◜⪥◜᪆ㄼ䯻⃣ැኝዾ傢䜻
67 䨹ጝ

4
ENG
ENGLISH
LICENSES / OPEN SOURCE SOFTWARE NOTICE
LICENSES
Supported licenses may differ by model. For more information about licenses, visit www.lg.com.
Manufactured under license from Dolby Laboratories. “Dolby” and the
double-D symbol are trademarks of Dolby Laboratories.
The terms HDMI and HDMI High-Definition Multimedia interface, and the
HDMI logo are trademarks or registered trademarks of HDMI Licensing LLC
in the United States and other countries.
ABOUT DIVX VIDEO: DivX® is a digital video format created by DivX, LLC,
a subsidiary of Rovi Corporation. This is an official DivX Certified® device
that has passed rigorous testing to verify that it plays DivX video. Visit divx.
com for more information and software tools to convert your files into DivX
videos.
ABOUT DIVX VIDEO-ON-DEMAND: This DivX Certified® device must be
registered in order to play purchased DivX Video-on-Demand (VOD) movies.
To obtain your registration code, locate the DivX VOD section in your
device setup menu. Go to vod.divx.com for more information on how to
complete your registration.
“DivX Certified® to play DivX® video up to HD 1080p, including premium
content.”
“DivX®, DivX Certified® and associated logos are trademarks of Rovi
Corporation or its subsidiaries and are used under license.”
“Covered by one or more of the following U.S. patents :
7,295,673; 7,460,668; 7,515,710; 7,519,274”
Manufactured under license under U.S. Patent Nos: 5,956,674; 5,974,380;
6,487,535 & other U.S. and worldwide patents issued & pending. DTS, the
Symbol & DTS and the Symbol together are registered trademarks & DTS
2.0+Digital Out is a trademark of DTS, Inc. Product includes software. © DTS,
Inc. All Rights Reserved.
OPEN SOURCE SOFTWARE NOTICE
To obtain the source code under GPL, LGPL, MPL and other open source licenses, that is contained in
this product, please visit http://opensource.lge.com.
In addition to the source code, all referred license terms, warranty disclaimers and copyright notices
are available for download.
LG Electronics will also provide open source code to you on CD-ROM for a charge covering the cost of
performing such distribution (such as the cost of media, shipping and handling) upon email request to
opensource@lge.com. This offer is valid for three (3) years from the date on which you purchased the
product.

5
ENGENGLISH
SAFETY INSTRUCTIONS
SAFETY INSTRUCTIONS
Please read these safety precautions carefully before using the product.
WARNING
yDo not place the TV and/or remote
control in the following environments:
- A location exposed to direct sunlight
- An area with high humidity such as a
bathroom
- Near any heat source such as stoves
and other devices that produce heat
- Near kitchen counters or humidifiers
where they can easily be exposed to
steam or oil
- An area exposed to rain or wind
- Near containers of water such as vases
Otherwise, this may result in fire, electric
shock, malfunction or product deformation.
yDo not place the product where it might
be exposed to dust.
This may cause a fire hazard.
yMains Plug is the TV connecting/
disconnecting device to AC mains electric
supply. This plug must remain readily
attached and operable when TV is in use.
yDo not touch the power plug with wet
hands. Additionally, if the cord pin is wet
or covered with dust, dry the power plug
completely or wipe dust off.
You may be electrocuted due to excess
moisture.
yMake sure to connect Mains cable to
compliant AC mains socket with Grounded
earth pin. (Except for devices which are not
grounded on earth.) Otherwise possibility
you may be electrocuted or injured.
yInsert power cable plug completely into
wall socket otherwise if not secured
completely into socket, fire ignition may
break out.
yEnsure the power cord does not come into
contact with hot objects such as a heater.
This may cause a fire or an electric shock
hazard.
yDo not place a heavy object, or the product
itself, on power cables.
Otherwise, this may result in fire or electric
shock.
yBend antenna cable between inside and
outside building to prevent rain from
flowing in.
This may cause water damaged inside the
Product and could give an electric shock.

6
ENG
ENGLISH
SAFETY INSTRUCTIONS
yWhen mounting TV onto wall make sure to
neatly install and isolate cabling from rear
of TV as to not create possibility of electric
shock /fire hazard.
yDo not plug too many electrical devices into
a single multiple electrical outlet.
Otherwise, this may result in fire due to
over-heating.
yDo not drop the product or let it fall over
when connecting external devices.
Otherwise, this may result in injury or
damage to the product.
yKeep the anti-moisture packing material or
vinyl packing out of the reach of children.
Anti-moisture material is harmful if
swallowed. If swallowed by mistake, force
the patient to vomit and visit the nearest
hospital. Additionally, vinyl packing can
cause suffocation. Keep it out of the reach
of children.
Desiccant
yDo not let your children climb or cling onto
the TV. Otherwise, the TV may fall over,
which may cause serious injury.
yDispose of used batteries carefully to
ensure that a small child does not consume
them. Please seek Doctor- Medical
Attention immediately if child consumes
batteries.
yDo not insert any metal objects/conductors
(like a metal chopstick/cutlery/screwdriver)
between power cable plug and input Wall
Socket while it is connected to the input
terminal on the wall. Additionally, do not
touch the power cable right after plugging
into the wall input terminal. You may be
electrocuted. (Depending on model)
yDo not put or store inflammable
substances near the product. There is a
danger of combustion/explosion or fire due
to careless handling of the inflammable
substances.
yDo not drop metallic objects such as
coins, hair pins, chopsticks or wire into
the product, or inflammable objects such
as paper and matches. Children must pay
particular attention. Electrical shock, fire
or injury can occur. If a foreign object is
dropped into the product, unplug the power
cord and contact the service centre.
yDo not spray water on the product or scrub
with an inflammable substance (thinner or
benzene). Fire or electric shock accident
can occur.

7
ENGENGLISH
SAFETY INSTRUCTIONS
yDo not allow any impact, shock or any
objects to fall into the unit, and do not drop
anything onto the screen.
You may be injured or the product can be
damaged.
yNever touch this product or antenna during
a thunder or lighting storm.
You may be electrocuted.
yNever touch the wall outlet when there is
leakage of gas, open the windows and
ventilate.
It may cause a fire or a burn by a spark.
yDo not disassemble, repair or modify the
product at your own discretion.
Fire or electric shock accident can occur.
Contact the service centre for check,
calibration or repair.
yIf any of the following occur, unplug the
product immediately and contact your local
service centre.
- The product has been impacted by shock
- The product has been damaged
- Foreign objects have entered the product
- The product produced smoke or a strange
smell
This may result in fire or electric shock.
yUnplug the TV from AC mains wall socket
if you do not intend to use the TV for a long
period of time. Accumulated dust can cause
fire hazard and insulation deterioration can
cause electric leakage/shock/fire.
yApparatus shall not be exposed to dripping
or splashing and no objects filled with liquids,
such as vases, shall be placed on the
apparatus.
yDo not install this product on a wall if it could
be exposed to oil or oil mist.
This may damage the product and causeit to
fall.
CAUTION
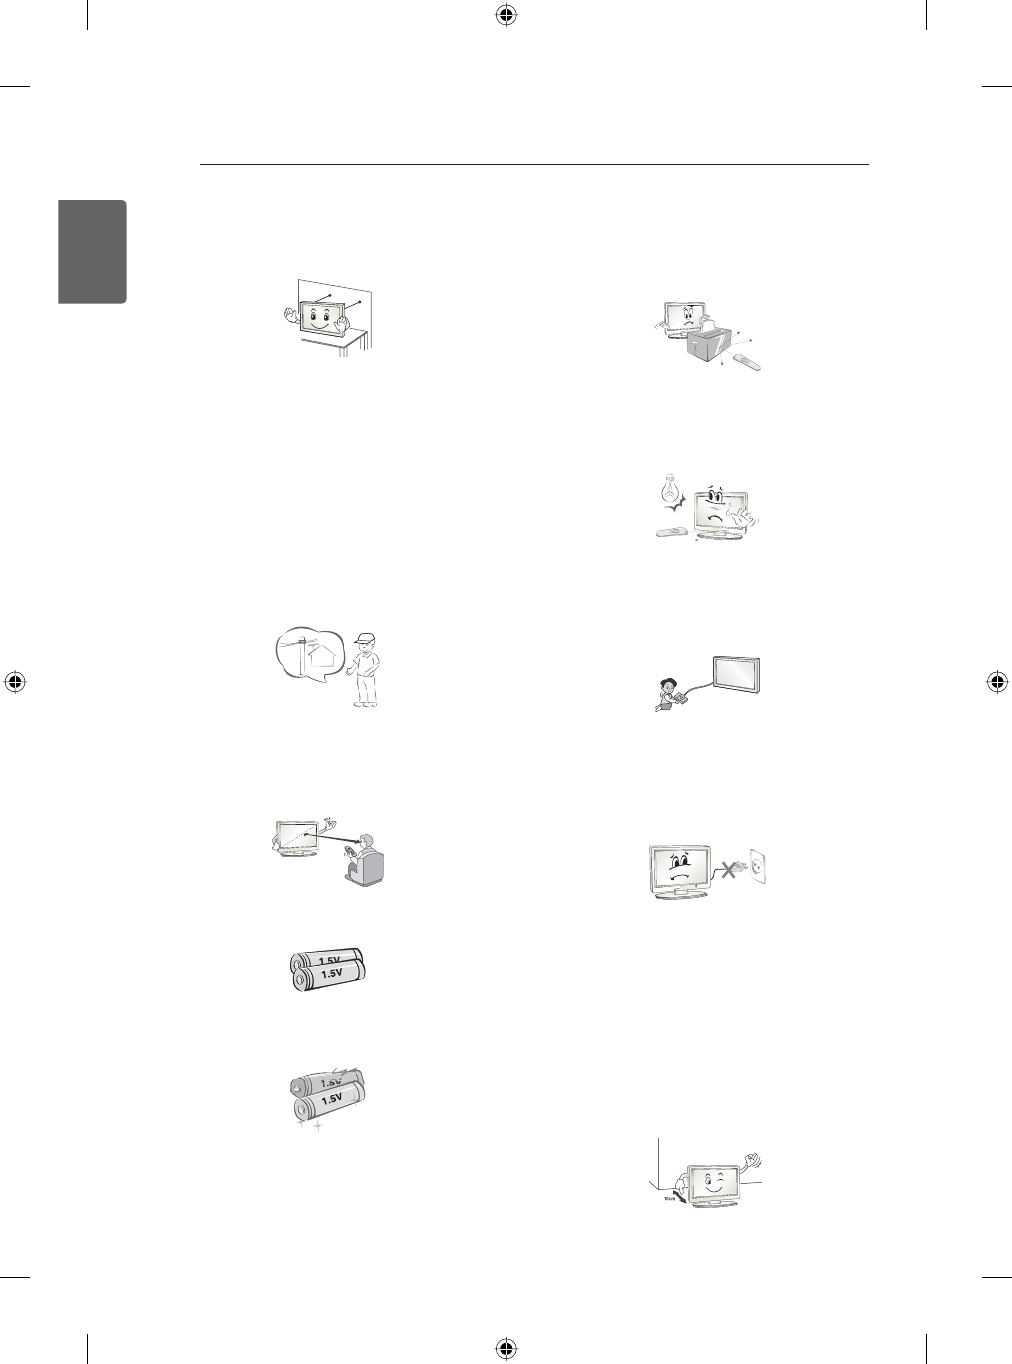
yInstall the product where no radio wave
occurs.
yThere should be enough distance between
an outside antenna and power lines to keep
the former from touching the latter even when
the antenna falls.
This may cause an electric shock.
yDo not install the product on places such
as unstable shelves or inclined surfaces.
Also avoid places where there is vibration or
where the product cannot be fully supported.
Otherwise, the product may fall or flip over,
which may cause injury or damage to the
product.
8
ENG
ENGLISH
SAFETY INSTRUCTIONS
yIf you install the TV on a stand, you need
to take actions to prevent the product from
overturning. Otherwise, the product may fall
over, which may cause injury.
yIf you intend to mount the product to a wall,
attach VESA standard mounting interface
(optional parts) to the back of the product.
When you install the set to use the wall
mounting bracket (optional parts), fix it
carefully so as not to drop.
yOnly use the attachments / accessories
specified by the manufacturer.
yWhen installing the antenna, consult with a
qualified service technician. If not installed
by a qualified technician, this may create a
fire hazard or an electric shock hazard.
yWe recommend that you maintain a
distance of at least 2 to 7 times the diagonal
screen size when watching TV.
If you watch TV for a long period of time,
this may cause blurred vision.
yOnly use the specified type of battery.
This could cause damage to the remote
control.
yDo not mix new batteries with old batteries.
This may cause the batteries to overheat
and leak.
yBatteries should not be exposed to
excessive heat. For example, keep away
from direct Sunlight, open fireplace and
electric heaters.
yDo not place non-rechargeable batteries in
charging device.
yMake sure there are no objects between the
remote control and its sensor.
ySignal from Remote Control can be
interrupted due to external/internal lighting
eg Sunlight, fluorescent lighting.If this
occurs turn off lighting or darken viewing
area.
yWhen connecting external devices such
as video game consoles, make sure the
connecting cables are long enough.
Otherwise, the product may fall over, which
may cause injury or damage the product.
yDo not turn the product On/Off by plugging-
in or unplugging the power plug to the
wall outlet. (Do not use the power plug for
switch.)
It may cause mechanical failure or could
give an electric shock.
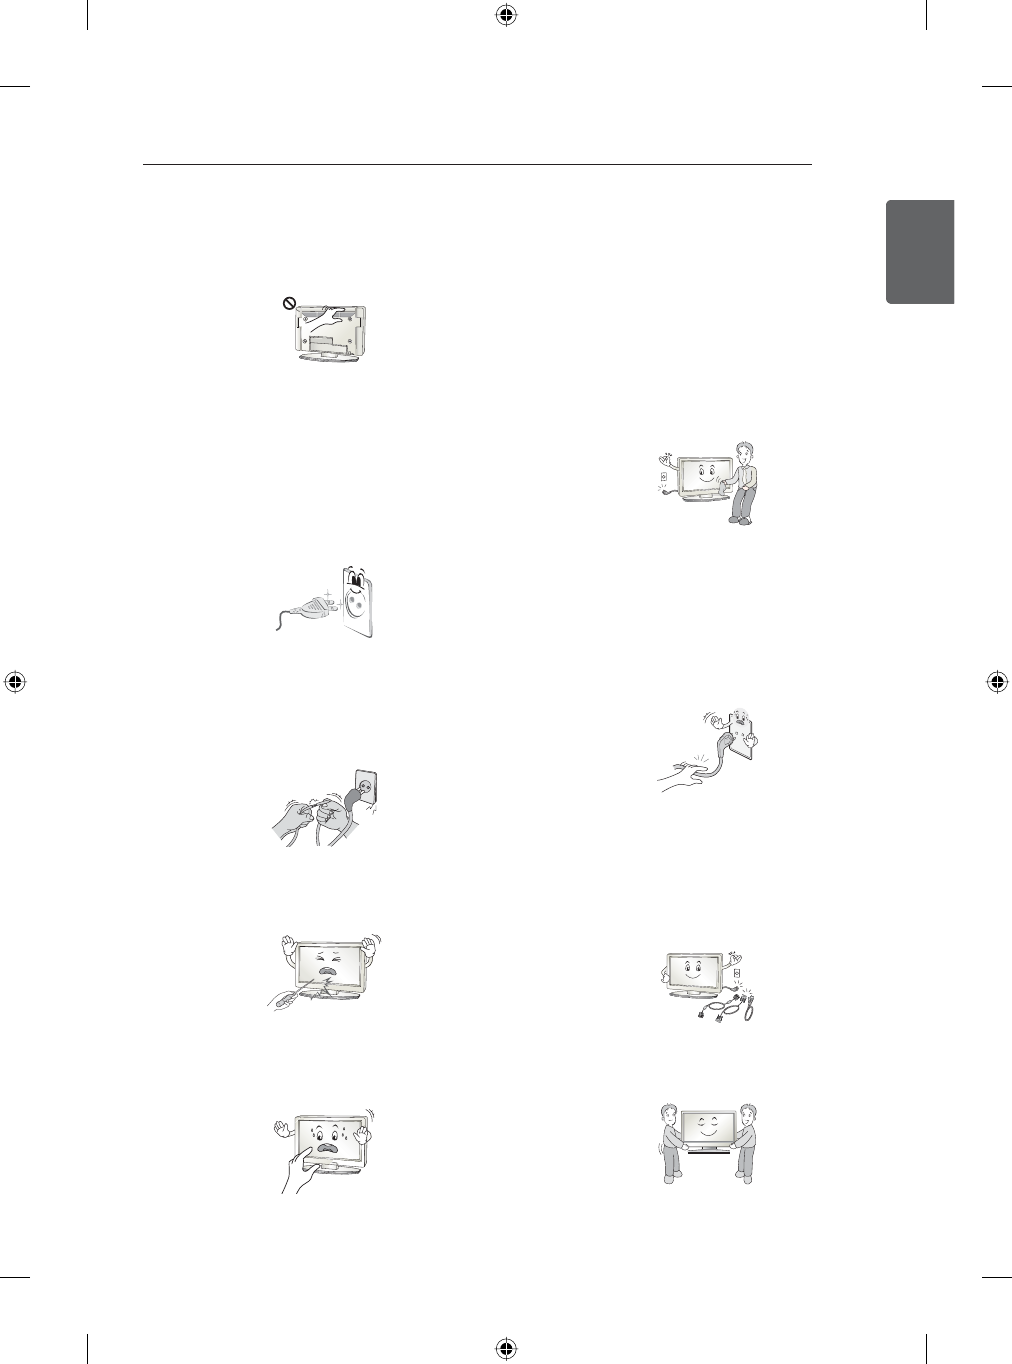
yPlease follow the installation instructions
below to prevent the product from
overheating.
- The distance between the product and the
wall should be more than 10 cm.
- Do not install the product in a place with
no ventilation (e.g., on a bookshelf or in a
cupboard).
- Do not install the product on a carpet or
cushion.
- Make sure the air vent is not blocked by a
tablecloth or curtain.
Otherwise, this may result in fire.
9
ENGENGLISH
SAFETY INSTRUCTIONS
yTake care not to touch the ventilation
openings when watching the TV for long
periods as the ventilation openings may
become hot. This does not affect the
operation or performance of the product.
yPeriodically examine the cord of your
appliance, and if its appearance indicates
damage or deterioration, unplug it,
discontinue use of the appliance, and
have the cord replaced with an exact
replacement part by an authorized servicer.
yPrevent dust collecting on the power plug
pins or outlet.
This may cause a fire hazard.
yProtect the power cord from physical or
mechanical abuse, such as being twisted,
kinked, pinched, closed in a door, or
walked upon. Pay particular attention to
plugs, wall outlets, and the point where the
cord exits the appliance.
yDo not press strongly upon the panel with
a hand or sharp object such as nail, pencil
or pen, or make a scratch on it, as it may
cause damage to screen.
yAvoid touching the screen or holding your
finger(s) against it for long periods of time.
Doing so may produce some temporary or
permanent distortion/damage to screen.
yWhen cleaning the product and its
components, unplug the power first
and wipe it with a soft cloth. Applying
excessive force may cause scratches or
discolouration. Do not spray with water
or wipe with a wet cloth. Never use glass
cleaner, car or industrial shiner, abrasives
or wax, benzene, alcohol etc., which can
damage the product and its panel.
Otherwise, this may result in fire, electric
shock or product damage (deformation,
corrosion or breakage).
yAs long as this unit is connected to the AC
wall outlet, it is not disconnected from the
AC power source even if you turn off this
unit by SWITCH.
yWhen unplugging the cable, grab the plug
and unplug it, by pulling at the plug. Don’t
pull at the cord to unplug the power cord
from the power board, as this could be
hazardous.
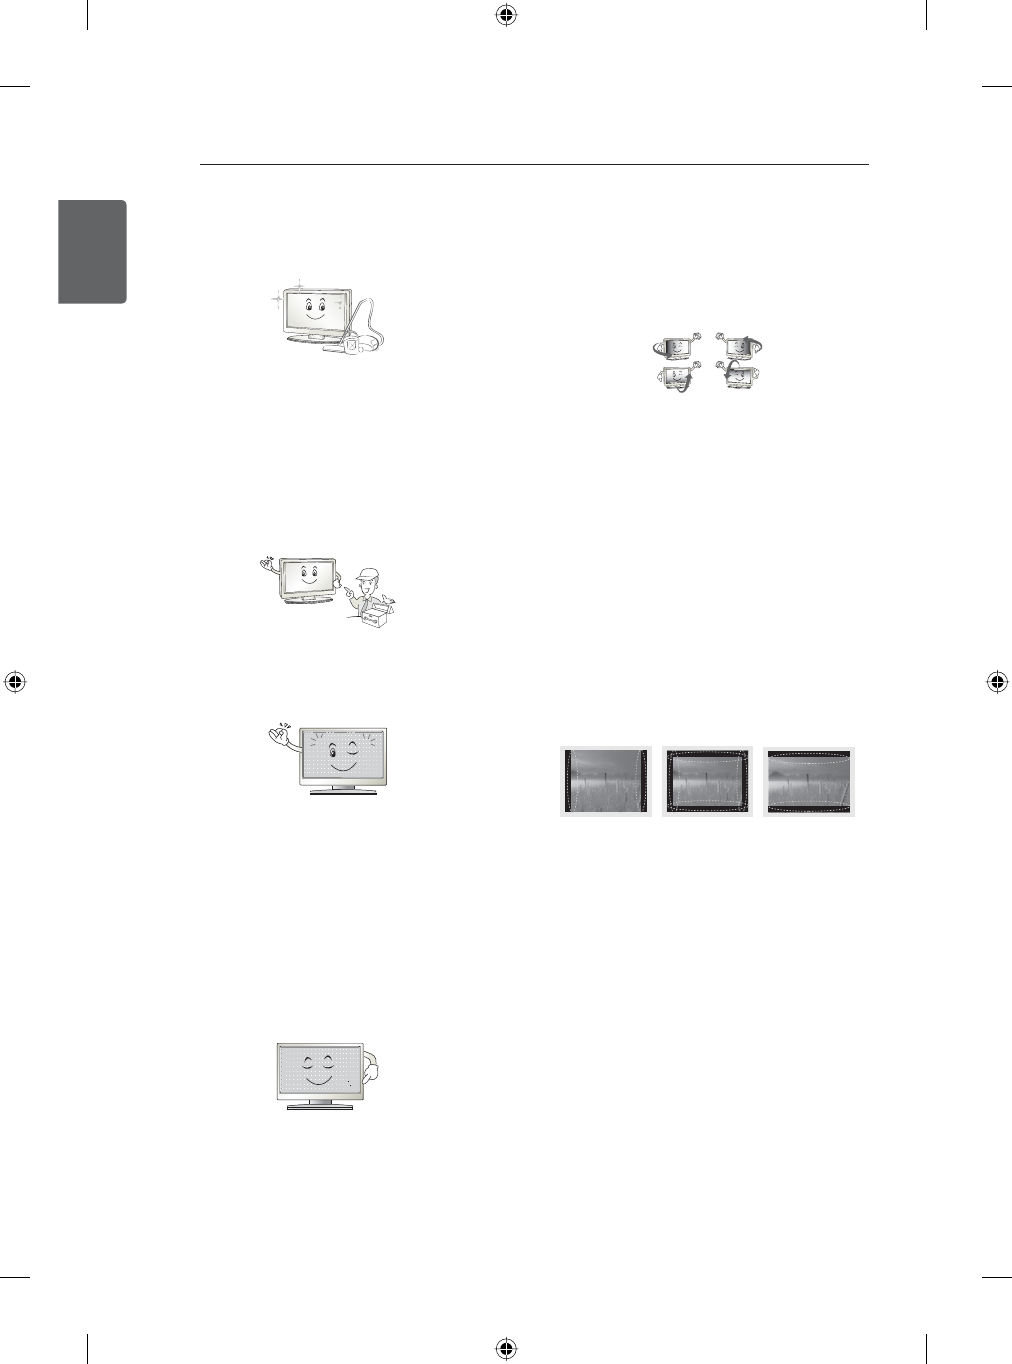
yWhen moving the product, make sure
you turn the power off first. Then, unplug
the power cables, antenna cables and all
connecting cables.
The TV set or power cord may be damaged,
which may create a fire hazard or cause
electric shock.
yWhen moving or unpacking the product,
work in pairs because the product is heavy.
Otherwise, this may result in injury.
10
ENG
ENGLISH
SAFETY INSTRUCTIONS
yContact the service centre once a year to
clean the internal parts of the product.
Accumulated dust can cause mechanical
failure.
yRefer all servicing to qualified service
personnel. Servicing is required when
the apparatus has been damaged in any
way, such as power supply cord or plug
is damaged, liquid has been spilled or
objects have fallen into the apparatus, the
apparatus has been exposed to rain or
moisture, does not operate normally, or has
been dropped.
yIf the product feels cold to the touch, there
may be a small “flicker” when it is turned on.
This is normal, there is nothing wrong with
product.
yThe panel is a high technology display
product with resolution of two million to six
million pixels. You may see tiny black dots
and/or brightly coloured dots (red, blue or
green) at a size of 1 ppm on the panel. This
does not indicate a malfunction and does
not affect the performance and reliability of
the product.
This phenomenon also occurs in third-party
products and is not subject to exchange or
refund.
yYou may find different brightness and colour
of the panel depending on your viewing
position(left/right/top/down).
This phenomenon occurs due to the
characteristic of the panel. It is not related
with the product performance, and it is not
malfunction.
yDisplaying a still image (e.g., broadcasting
channel logo, on-screen menu, scene from
a video game) for a prolonged time may
cause damage to the screen, resulting in
retention of the image, which is known as
image sticking. The warranty does not cover
the product for image sticking.
Avoid displaying a fixed image on your
television’s screen for a prolonged period (2
or more hours for LCD, 1 or more hours for
Plasma).
Also, if you watch the TV at a ratio of 4:3 for
a long time, image sticking may occur on
the borders of the panel.
This phenomenon also occurs in third-party
products and is not subject to exchange or
refund.
yGenerated Sound
“Cracking” noise: A cracking noise that
occurs when watching or turning off the TV
is generated by plastic thermal contraction
due to tempera-ture and humidity. This
noise is common for products where
thermal deformation is required. Electrical
circuit humming/panel buzzing: A low level
noise is generated from a high-speed
switching circuit, which supplies a large
amount of current to operate a product. It
varies depend-ing on the product.
This generated sound does not affect the
performance and reliability of the product.

11
ENGENGLISH
SAFETY INSTRUCTIONS
Viewing 3D Imaging
(Only 3D models)
WARNING
Viewing Environment
yViewing Time
- When watching 3D contents, take 5 - 15
minute breaks every hour. Viewing 3D
contents for a long period of time may
cause headache, dizziness, fatigue or
eye strain.
Those that have a photosensitive
seizure or chronic illness
ySome users may experience a seizure or
other abnormal symptoms when they are
H[SRVHGWRDÀDVKLQJOLJKWRUSDUWLFXODU
pattern from 3D contents.
yDo not watch 3D videos if you feel nausea,
are pregnant and/ or have a chronic illness
such as epilepsy, cardiac disorder, or blood
pressure disease, etc.
y3D Contents are not recommended to those
who suffer from stereo blindness or stereo
anomaly. Double images or discomfort in
viewing may be experienced.
yIf you have strabismus (cross-eyed),
amblyopia (weak eyesight) or astigmatism,
you may have trouble sensing depth and
easily feel fatigue due to double images. It
is advised to take frequent breaks than the
average adult.
yIf your eyesight varies between your right
and left eye, revise your eyesight prior to
watching 3D contents.
Symptoms which require discontinuation or
refraining from watching 3D contents
yDo not watch 3D contents when you feel
fatigue from lack of sleep, overwork or
drinking.
yWhen these symptoms are experienced,
stop using/watching 3D contents and get
enough rest until the symptom subsides.
- Consult your doctor when the symptoms
persist. Symptoms may include
headache, eyeball pain, dizziness,
nausea, palpitation, blurriness,
discomfort, double image, visual
inconvenience or fatigue.
CAUTION
Viewing Environment
yViewing Distance
- Maintain a distance of at least twice the
screen diagonal length when watching 3D
contents. If you feel discomfort in viewing
3D contents, move further away from the
TV.
Viewing Age
yInfants/Children
- Usage/ Viewing 3D contents for children
under the age of 5 are prohibited.
- Children under the age of 10 may
overreact and become overly excited
because their vision is in development (for
example: trying to touch the screen or
trying to jump into it. Special monitoring
and extra attention is required for children
watching 3D contents.
- Children have greater binocular disparity
of 3D presentations than adults because
the distance between the eyes is shorter
than one of adults. Therefore they will
perceive more stereoscopic depth
compared to adults for the same 3D
image.
yTeenagers
- Teenagers under the age of 19 may
react with sensitivity due to stimulation
from light in 3D contents. Advise them to
refrain from watching 3D contens for a
long time when they are tired.
yElderly
- The elderly may perceive less 3D
effect compared to the youth. Do not sit
closer to the TV than the recommended
distance.
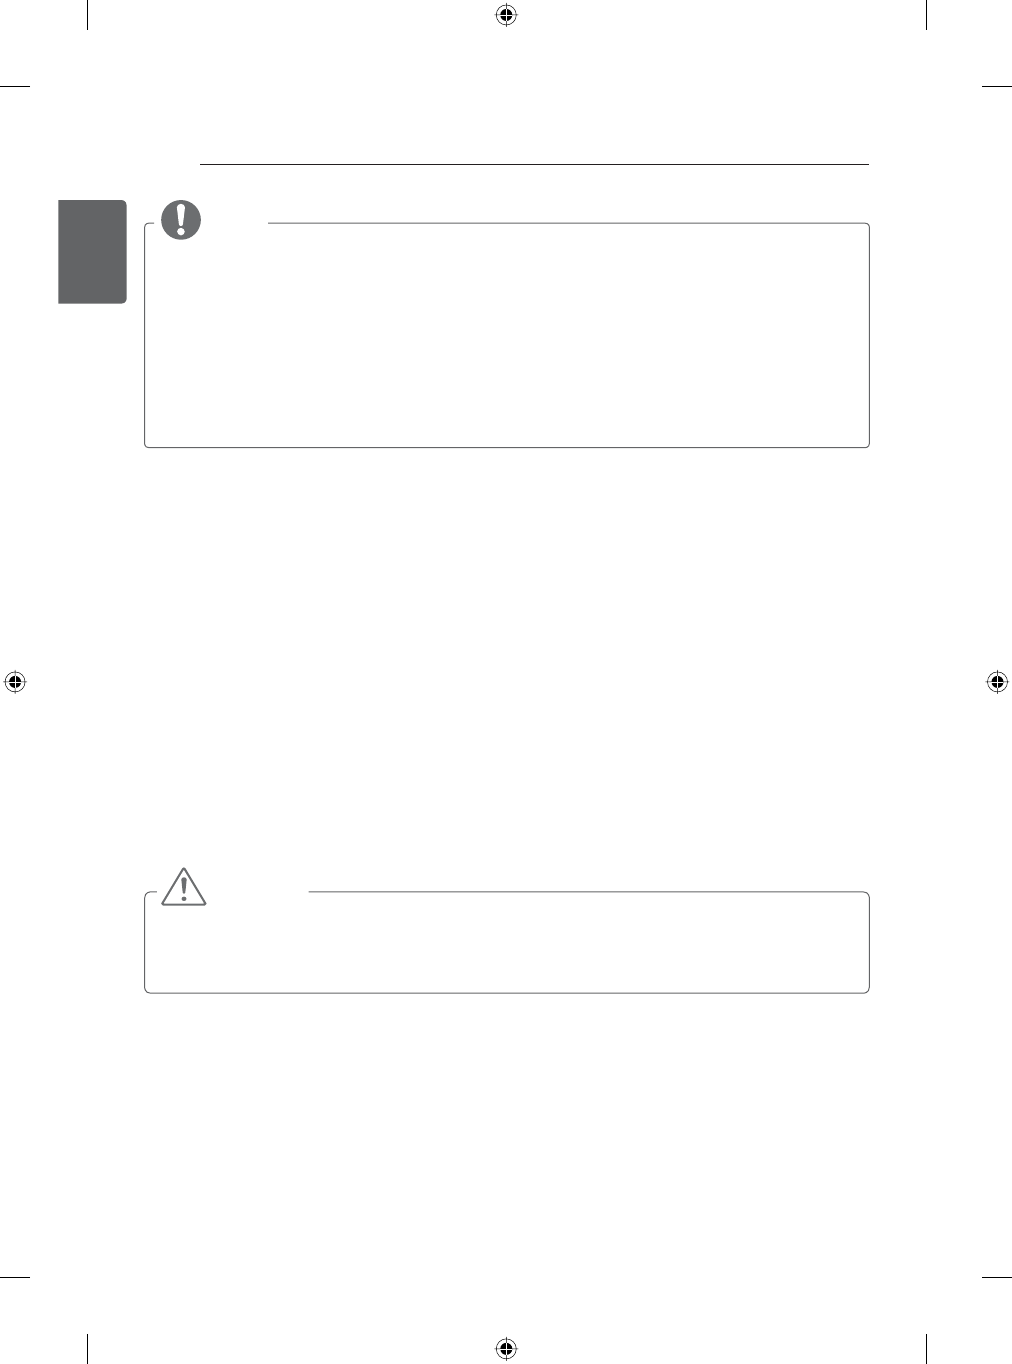
Cautions when using the 3D glasses
yMake sure to use LG 3D glasses. Otherwise,
you may not be able to view 3D videos
properly.
yDo not use 3D glasses instead of your normal
glasses, sunglasses or protective goggles.
y 8VLQJPRGL¿HG'JODVVHVPD\FDXVHH\H
strain or image distortion.
yDo not keep your 3D glasses in extremely high
or low temperatures. It will cause deformation.
yThe 3D glasses are fragile and are easy to be
scratched. Always use a soft, clean piece of
cloth when wiping the lenses. Do not scratch
the lenses of the 3D glasses with sharp
objects or clean/wipe them with chemicals.
12
ENG
ENGLISH
INSTALLATION PROCEDURE / ASSEMBLING AND PREPARING
NOTE
yImage shown may differ from your TV.
yYour TV’s OSD (On Screen Display) may differ slightly from that shown in this manual.
yThe available menus and options may differ from the input source or product model that you
are using.
yNew features may be added to this TV in the future.
yThe TV can be placed in standby mode in order to reduce the power consumption. And the
TV should be turned off if it will not be watched for some time, as this will reduce energy
consumption.
yThe energy consumed during use can be significantly reduced if the level of brightness of the
picture is reduced, and this will reduce the overall running cost.
INSTALLATION PROCEDURE
1 Open the package and make sure all the accessories are included.
2 Attach the stand to the TV set.
3 Connect an external device to the TV set.
4 Make sure the network connection is available.
You can use the TV network functions only when the network connection is made.
* If the TV is turned on for the first time after it was shipped from the factory, initialization of the TV
may take up to one minute.
ASSEMBLING AND PREPARING
Unpacking
Check your product box for the following items. If there are any missing accessories, contact the local
dealer where you purchased your product. The illustrations in this manual may differ from the actual
product and item.
CAUTION
yDo not use any unapproved items to ensure the safety and product life span.
yAny damages or injuries by using unapproved items are not covered by the warranty.
ySome models have a thin film attached on to the screen and this must not be removed.

13
ENGENGLISH
ASSEMBLING AND PREPARING
QWERTY Remote Control,
Batteries (AA)
(Only GB78**)
(See p.34,35)
Magic Remote, Batteries
(AA)
(Only GB58**, GB63**,
GB65**,GB67**, GB72**)
(See p.37)
Owner’s Manual
Tag On
Tag on
(Depending on model)
Antenna Isolator
1EA
Cinema 3D Glasses
The number of 3D glasses
may differ depending on
the model or country.
(Only GB65**,GB67**,
GB72**, GB78**)
Power Cord
(Depending on model)
Wall Mount Spacers
2EA
(Only 42GB58**, 42GB63**,
42GB65**)
(See p.24)
Cable Holder
(Depending on model)
(See p.25)
14
ENG
ENGLISH
ASSEMBLING AND PREPARING
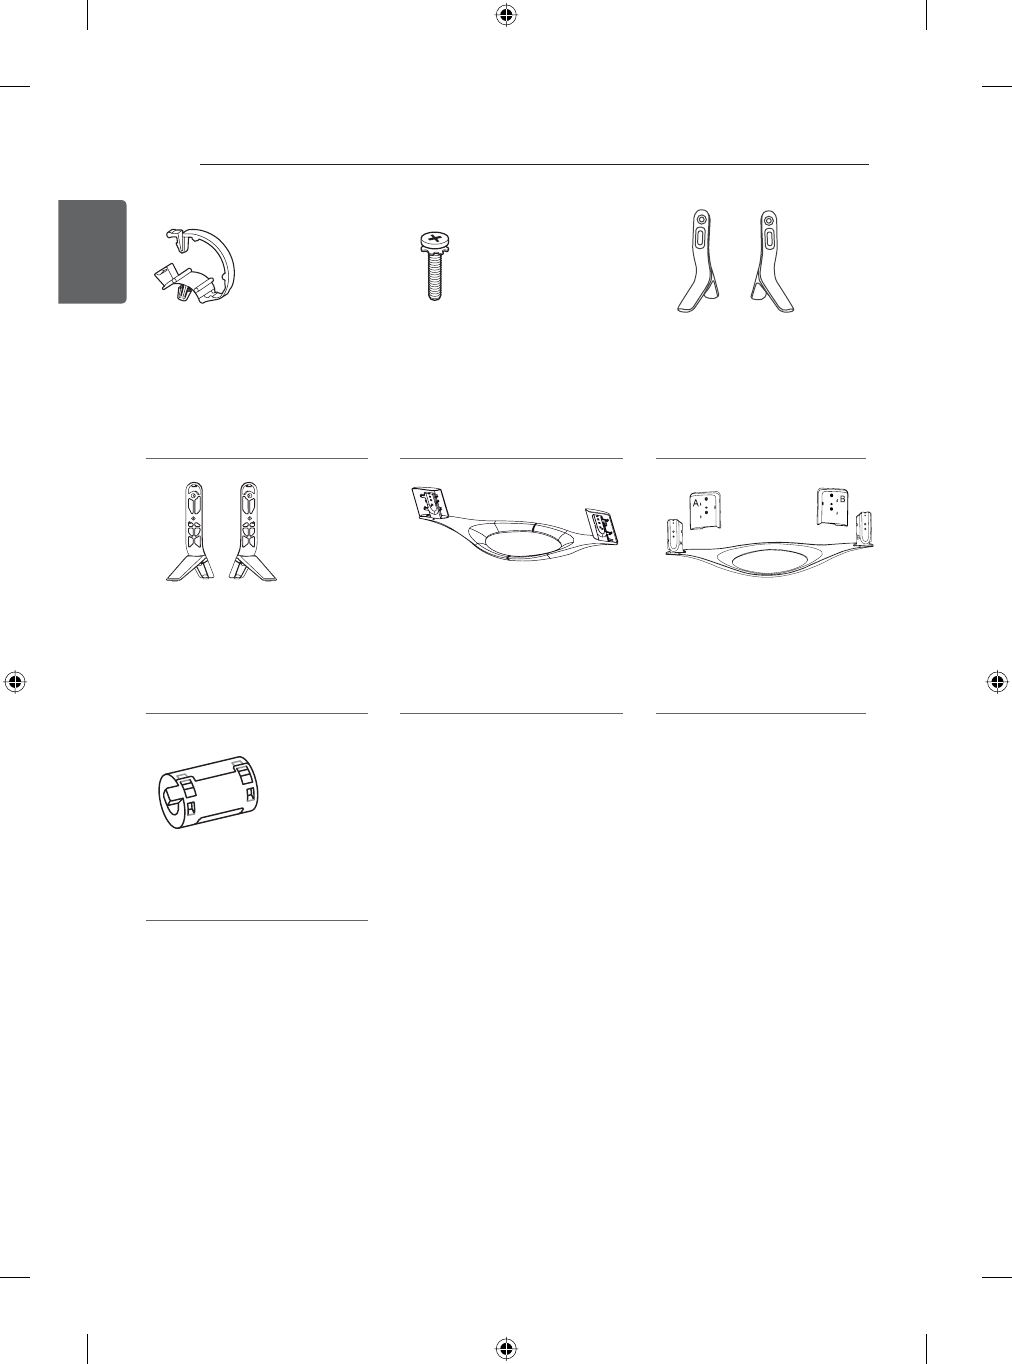
Cable Managements
2EA
(Only GB58**, GB63**,
GB65**, GB67**, GB69**,
GB72**)
(See p.25)
Stand Screws
4EA, M4 x L14
(See p.19, 20)
Stand Base
(Only GB58**,
42/47/55GB63**, GB65**)
(See p.19)
Stand Assy
(Stand Body/Stand Base)
(Only 65GB63**, GB67**,
GB72**)
(See p.19)
Stand Base
(Only 47/55GB78**)
(See p.21)
Stand Base/Stand Cover
(Only 60GB78**)
(See p.21)
Ferrite core
(Only 70GB72**)
(See p.15)
15
ENGENGLISH
ASSEMBLING AND PREPARING
NOTE
yThe items supplied with your product may vary depending on the model.
yProduct specifications or contents of this manual may be changed without prior notice due to
upgrade of product functions.
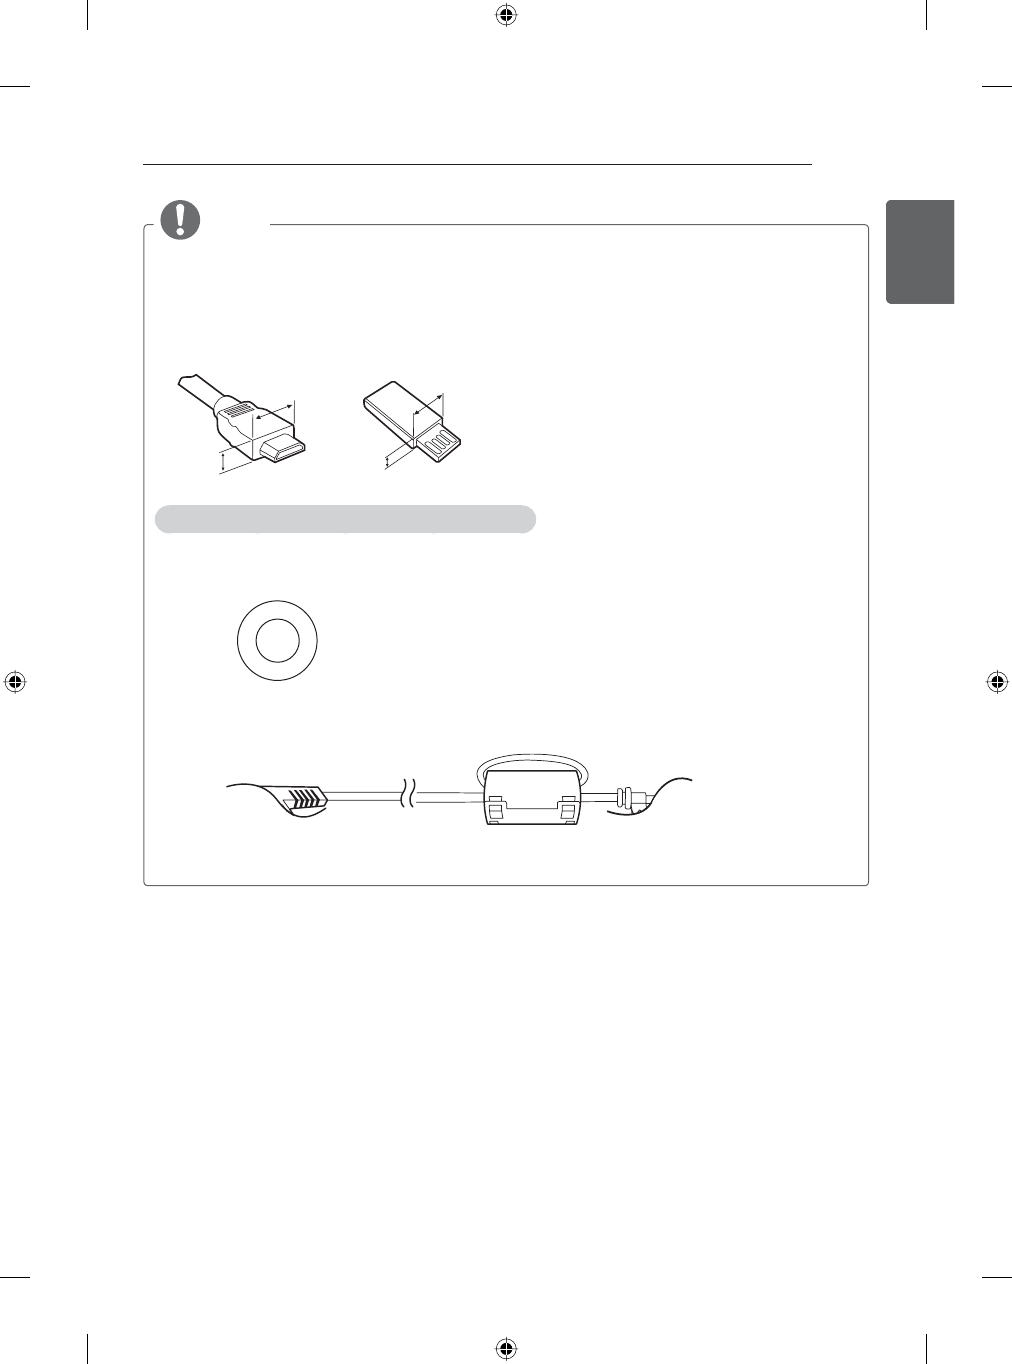
yFor an optimal connection, HDMI cables and USB devices should have bezels less than 10 mm
thick and 18 mm width. Use an extension cable that supports USB 2.0 if the USB cable or USB
memory stick does not fit into your TV’s USB port.
A
B
A
B
*A
≤
10 mm
*B
≤
18 mm
How to use the ferrite core (Only 70GB72**)
yUse the ferrite core to reduce the electromagnetic interference in the power cable. Wind the
power cable once on the ferrite core. Place the ferrite core close to the TV.
[to a wall plug]
[to the TV]
[Cross Section of Ferrite Core]

16
ENG
ENGLISH
ASSEMBLING AND PREPARING
Separate purchase
Separate purchase items can be changed or modified for quality improvement without any notification.
Contact your dealer to buy these items.
These devices only work with certain models.
AG-F***DP
Dual Play Glasses
AG-F***
Cinema 3D Glasses
AN-GR500
QWERTY Remote Control
Tag on
Compatibility GB58**, GB63** GB65**, GB67**, GB72**, GB78**
AG-F***DP
Dual Play Glasses
AG-F***
Cinema 3D Glasses
Tag on
AN-GR500
QWERTY Remote Control
The model name or design may be changed depending on the upgrade of product functions,
manufacturer’s circumstances or policies.
17
ENGENGLISH
ASSEMBLING AND PREPARING
Parts and buttons
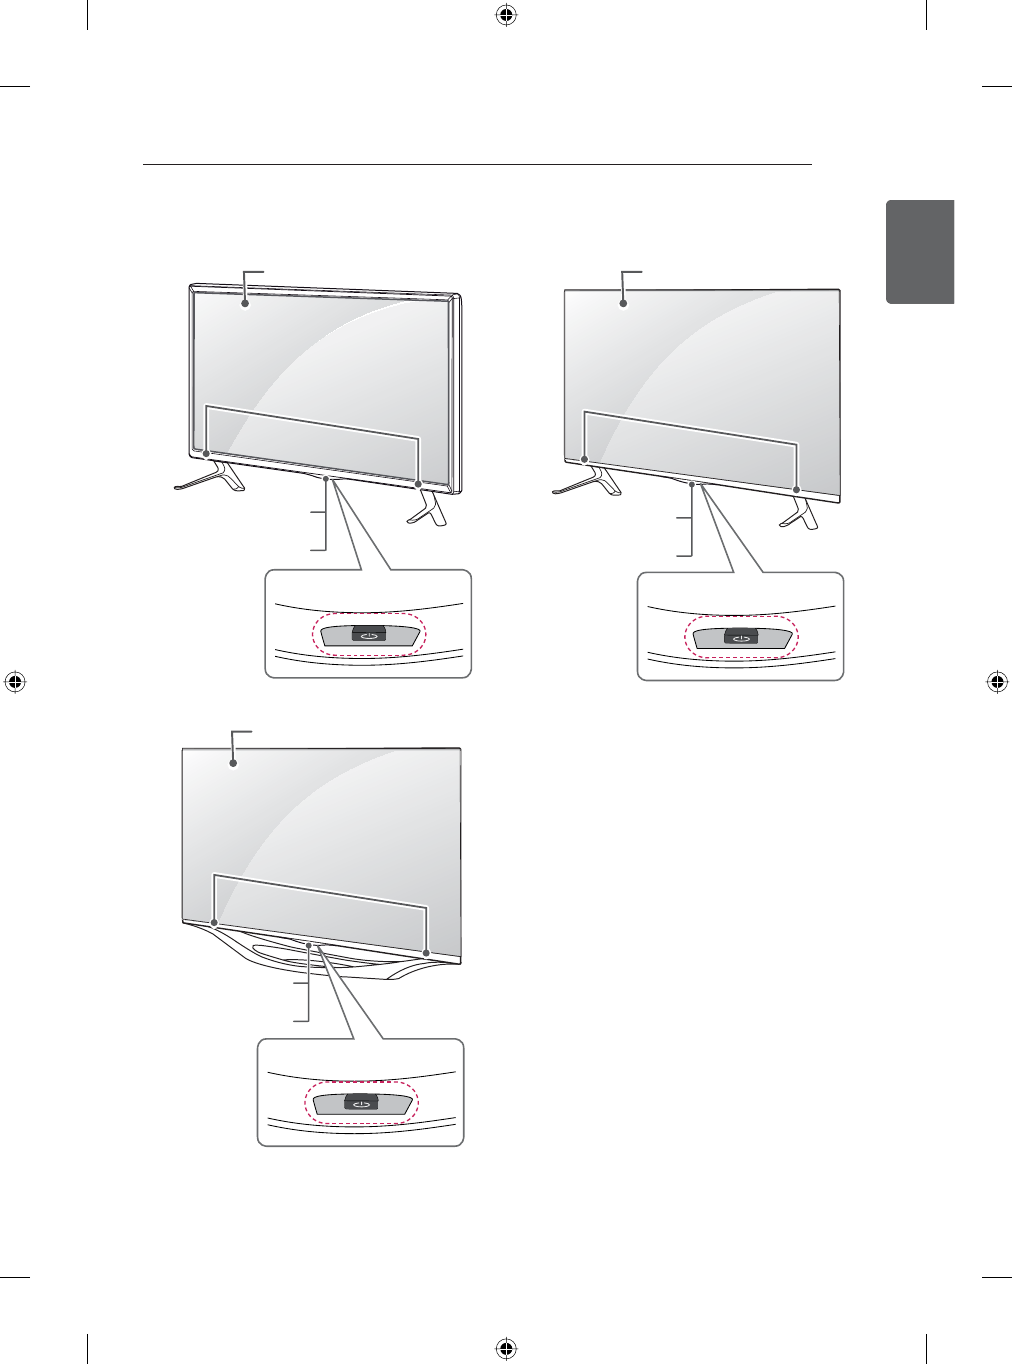
1 Intelligent sensor - Adjusts the image quality and brightness based on the surrounding environment.
2 Joystick Button - This button is located below the TV screen.
A type : GB58**, GB63**,GB65** B type : GB67**,GB72**
C type : GB78**
Speakers
Screen
Remote control and
Intelligent1 sensors
Power Indicator
Joystick Button2
Remote control and
Intelligent1 sensors
Power Indicator
Joystick Button2
Screen
Speakers
Screen
Joystick Button2
Remote control and
Intelligent1 sensors
Power Indicator
Speakers
18
ENG
ENGLISH
ASSEMBLING AND PREPARING
Using the Joystick button
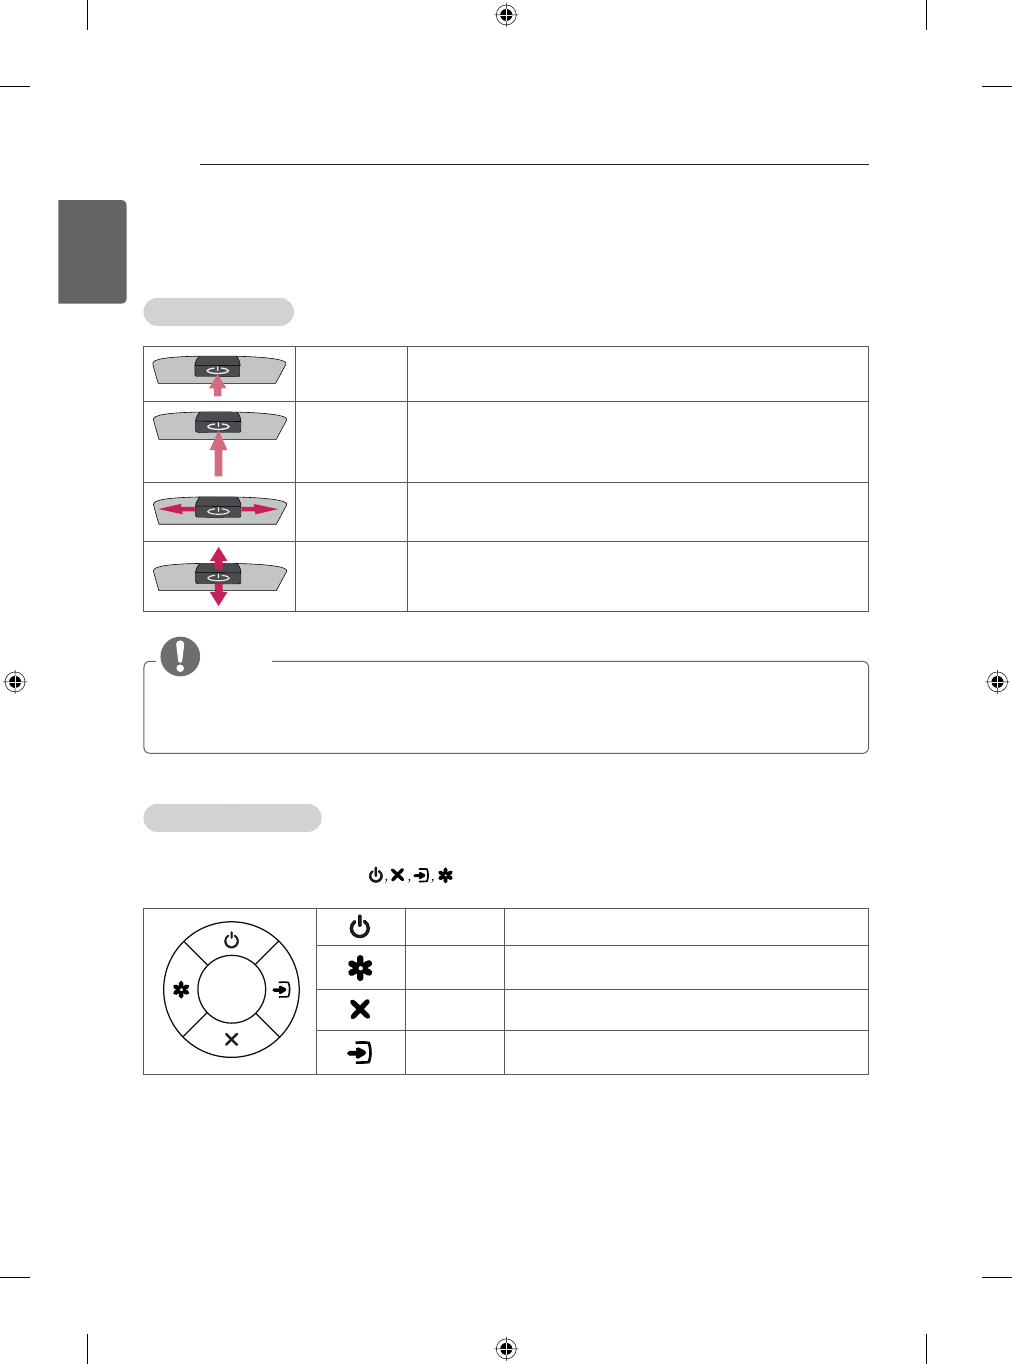
You can simply operate the TV functions by pressing to turn On/Off or sliding your finger over joystick
button moving up, down, left or right.
Basic Functions
Power On When the TV is turned off, place your finger on the joystick
button and press it once and release it.
Power Off When the TV is turned on, place your finger on the joystick
button and press it once for a few seconds and release it.
Volume
Control
If you place your finger over the joystick button and move it left
or right, you can adjust the volume level you want.
Programmes
Control
If you place your finger over the joystick button and move it up
or down, you can scrolls through the saved programmes you
want.
NOTE
yWhen your finger is over the joystick button and you are sliding finger forward/back, left or right,
be careful not to press down to hard on joystick. If you press down hard on joystick button first
then the adjustment of volume level and programme scroll action will not operate.
Adjusting the Menu
When the TV is turned on, press the joystick button one time.
You can adjust the Menu items( ) moving the joystick button up, down, left or right.
TV Off Turns the power off.
Settings Accesses the main menu.
Close Closes Clears on-screen displays and returns to
TV viewing.
Inputs Changes the input source.
19
ENGENGLISH
ASSEMBLING AND PREPARING
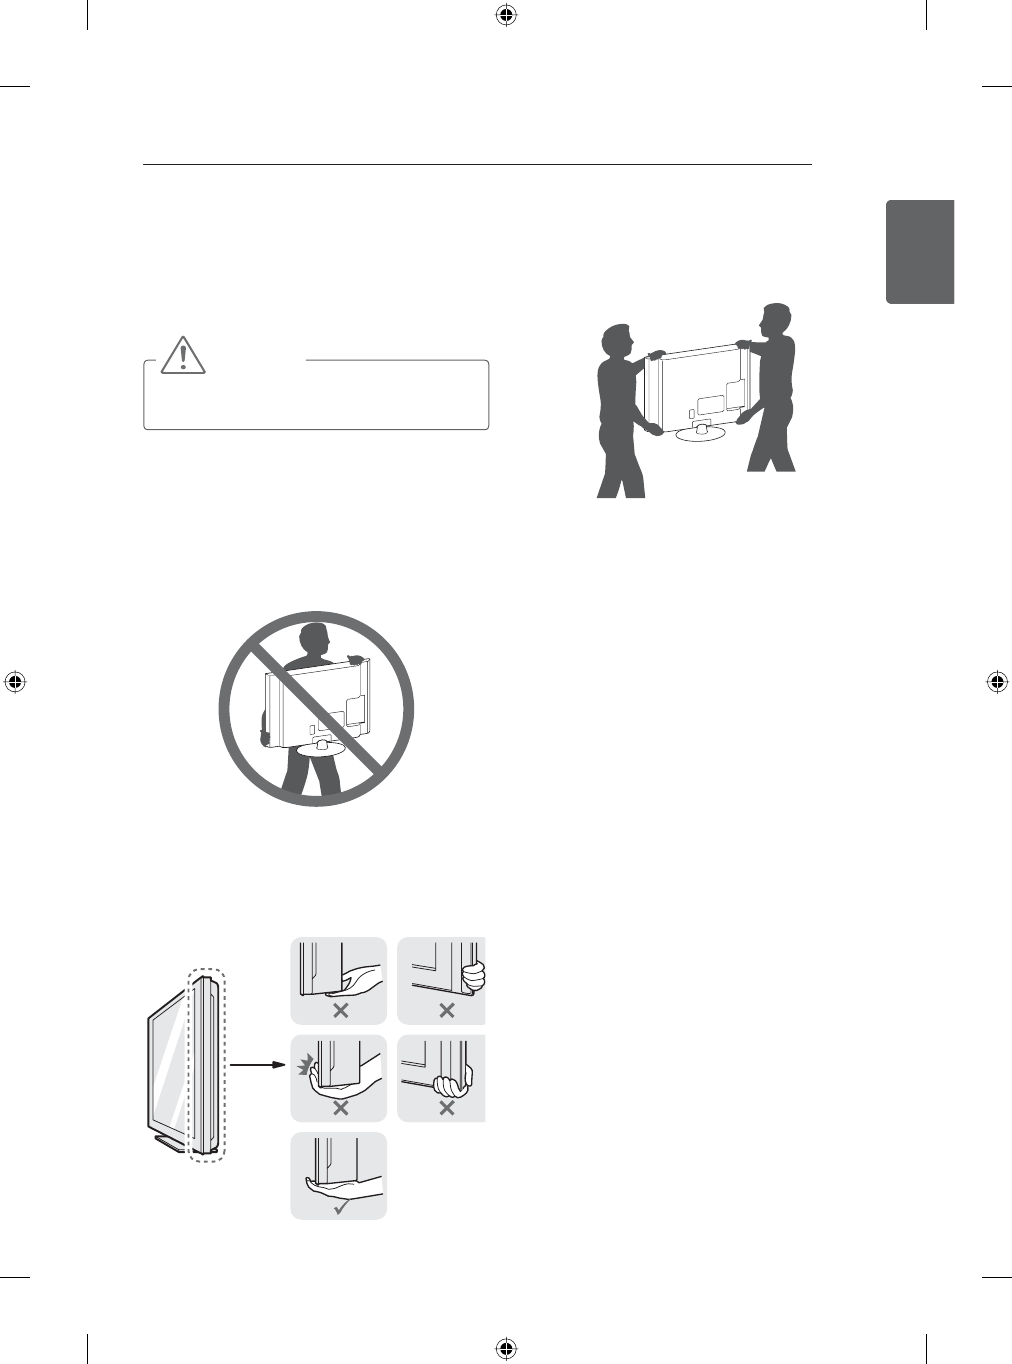
Lifting and moving the TV
Please note the following advice to prevent the
TV from being scratched or damaged and for
safe transportation regardless of its type and
size.
CAUTION
yAvoid touching the screen at all times, as
this may result in damage to the screen.
yIt is recommended to move the TV in the
box or packing material that the TV originally
came in.
yBefore moving or lifting the TV, disconnect
the power cord and all cables.
yWhen holding the TV, the screen should face
away from you to avoid damage.
yHold the top and bottom of the TV frame
¿UPO\0DNHVXUHQRWWRKROGWKHWUDQVSDUHQW
part, speaker, or speaker grill area.
yWhen transporting a large TV, there should
be at least 2 people.
yWhen transporting the TV by hand, hold the
TV as shown in the following illustration.
yWhen transporting the TV, do not expose the
TV to jolts or excessive vibration.
yWhen transporting the TV, keep the TV
upright, never turn the TV on its side or tilt
towards the left or right.
yDo not apply excessive pressure to cause
ÀH[LQJEHQGLQJRIIUDPHFKDVVLVDVLWPD\
damage screen.
yWhen handling the TV, be careful not to
damage the protruding joystick button.
20
ENG
ENGLISH
ASSEMBLING AND PREPARING
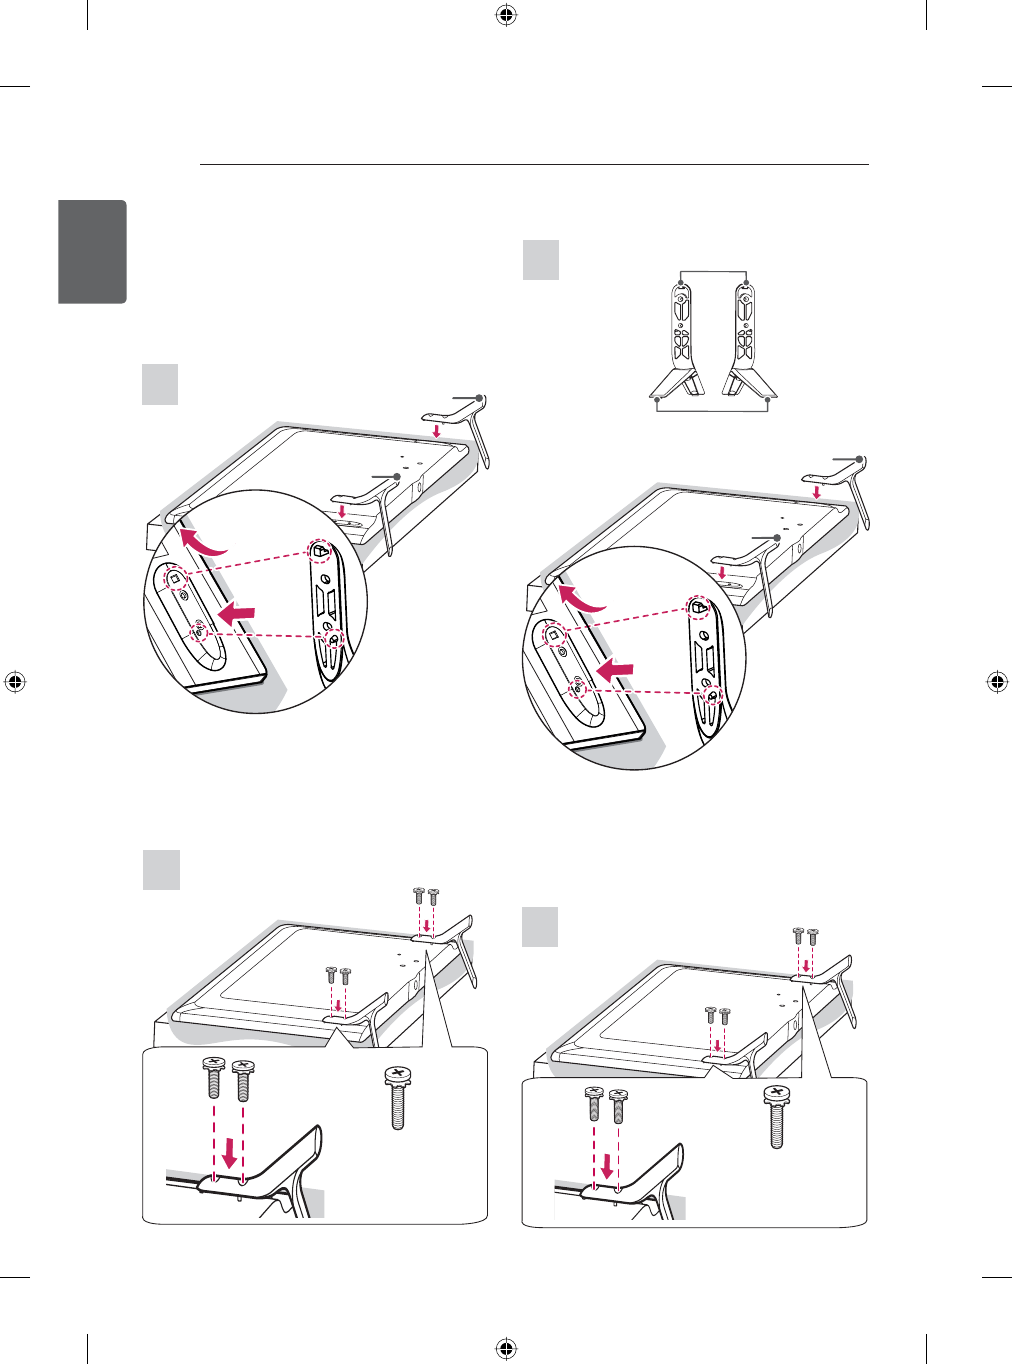
GB58**, 42/47/55GB63**, GB65**
Setting up the TV
Image shown may differ from your TV.
Attaching the stand
1
2
Stand Base
Stand Body
65GB63**, GB67**, GB72**
2
M4 x L14
4EA
M4 x L14
4EA
1
B stand base
1
2
A stand base
B stand base
A stand base
1
2
1 Attach the stand to the TV using the upper
mounting hole on the back of the TV.
2 Attach the stand to the TV using the lower
connection on the back of the TV. 1 Attach the stand to the TV using the upper
mounting hole on the back of the TV.
2 Attach the stand to the TV using the lower
connection on the back of the TV.
21
ENGENGLISH
ASSEMBLING AND PREPARING
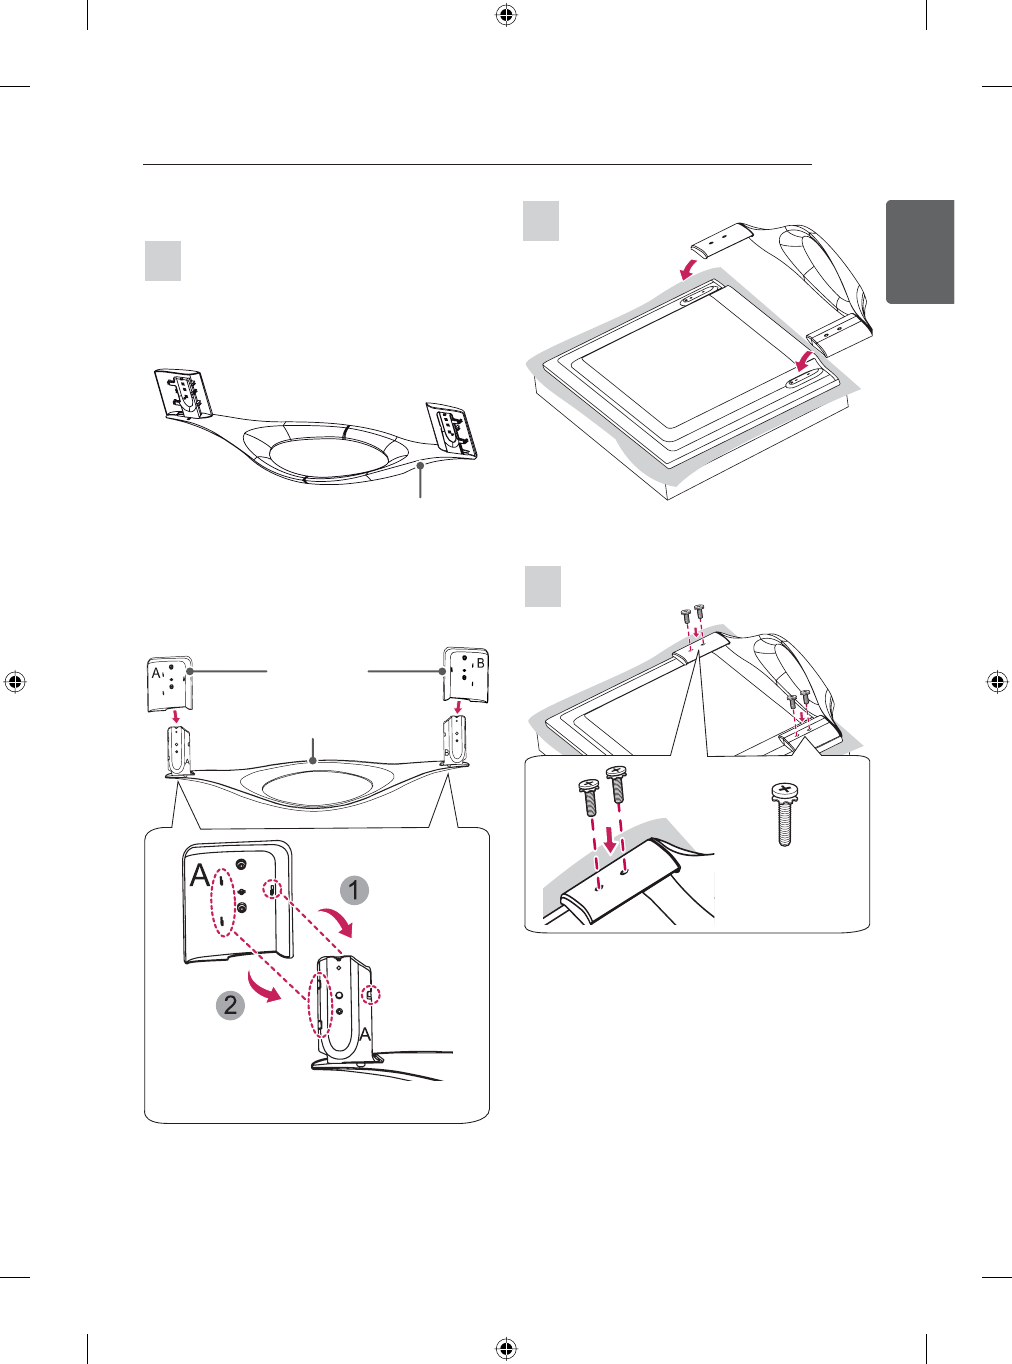
GB78**
1
Stand Base
M4 x L14
4EA
2
3
(Only 47/55GB78**)
(Only 60GB78**)
Stand Base
Stand Cover
* Please attach the Stand and Stand Cover.
22
ENG
ENGLISH
ASSEMBLING AND PREPARING
CAUTION
yWhen attaching the stand to the TV
set, place the screen facing down on a
cushioned table or flat surface to protect
the screen from scratches.
yMake sure that the screws are fastened
completely. (If they are not fastened
securely enough, the TV may tilt forward
after being installed.)
Do not use too much force and over
tighten the screws; otherwise screw may
be damaged and not tighten correctly.
NOTE
yRemove the stand before installing the
TV on a wall mount by performing the
stand attachment in reverse.
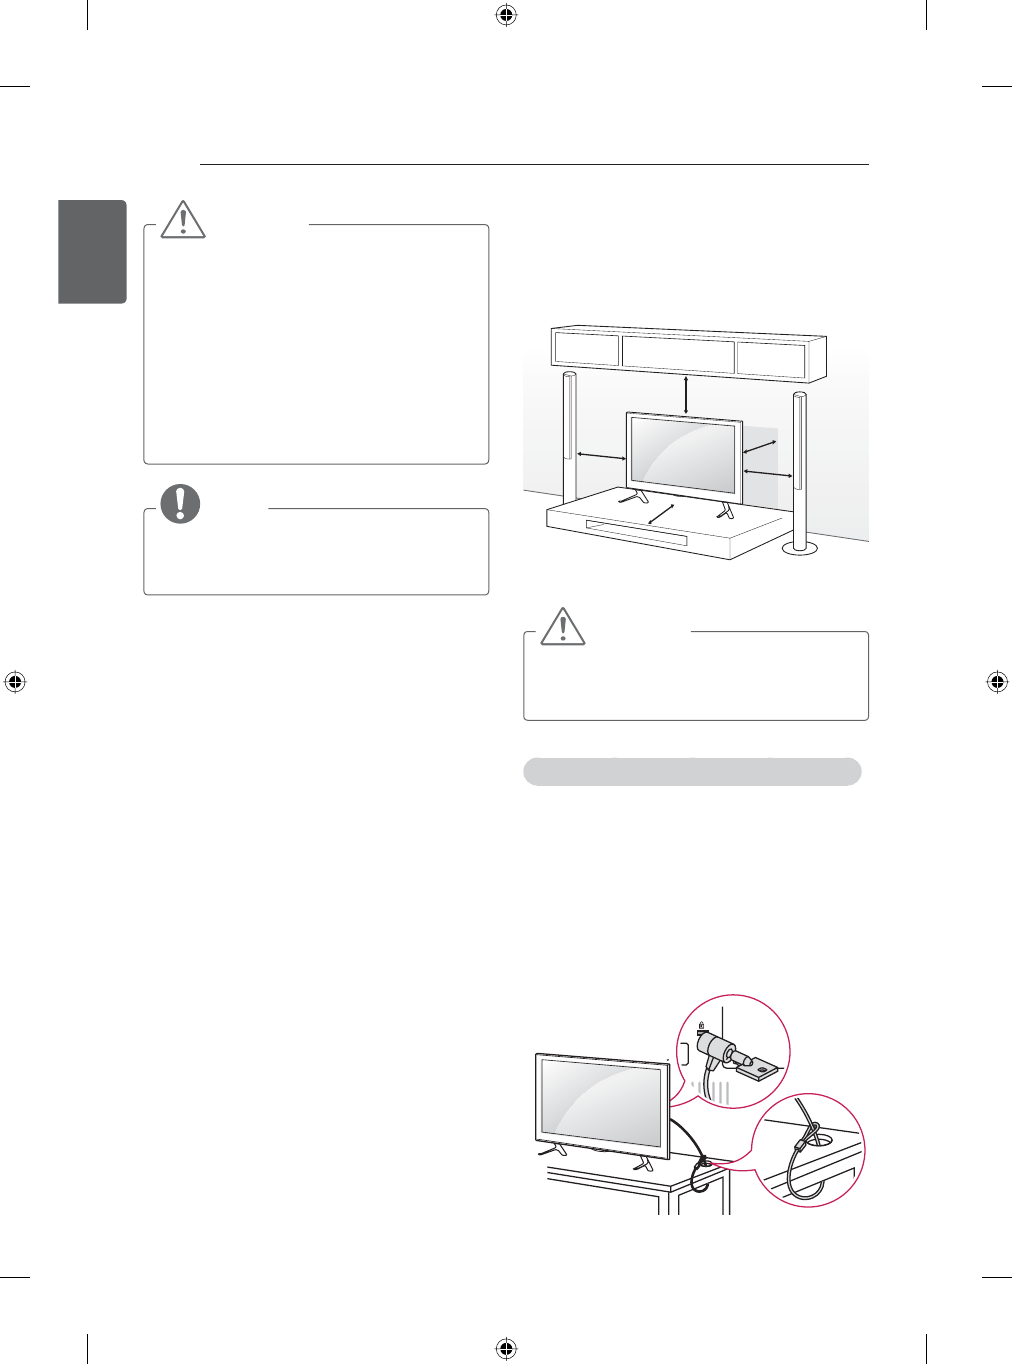
Mounting on a table
1 Lift and tilt the TV into its upright position on
a table.
- Leave a 10 cm (minimum) space from
the wall for proper ventilation.
10 cm
10 cm
10 cm
10 cm
10 cm
2 Connect the power cord to a wall outlet.
CAUTION
yDo not place the TV near or on sources
of heat, as this may result in fire or other
damage.
Using the Kensington security system
(This feature is not available for all models.)
yImage shown may differ from your TV.
The Kensington security system connector
is located at the rear of the TV. For more
information of installation and using, refer to the
manual provided with the Kensington security
system or visit http://www.kensington.com.
Connect the Kensington security system cable
between the TV and a table.
23
ENGENGLISH
ASSEMBLING AND PREPARING
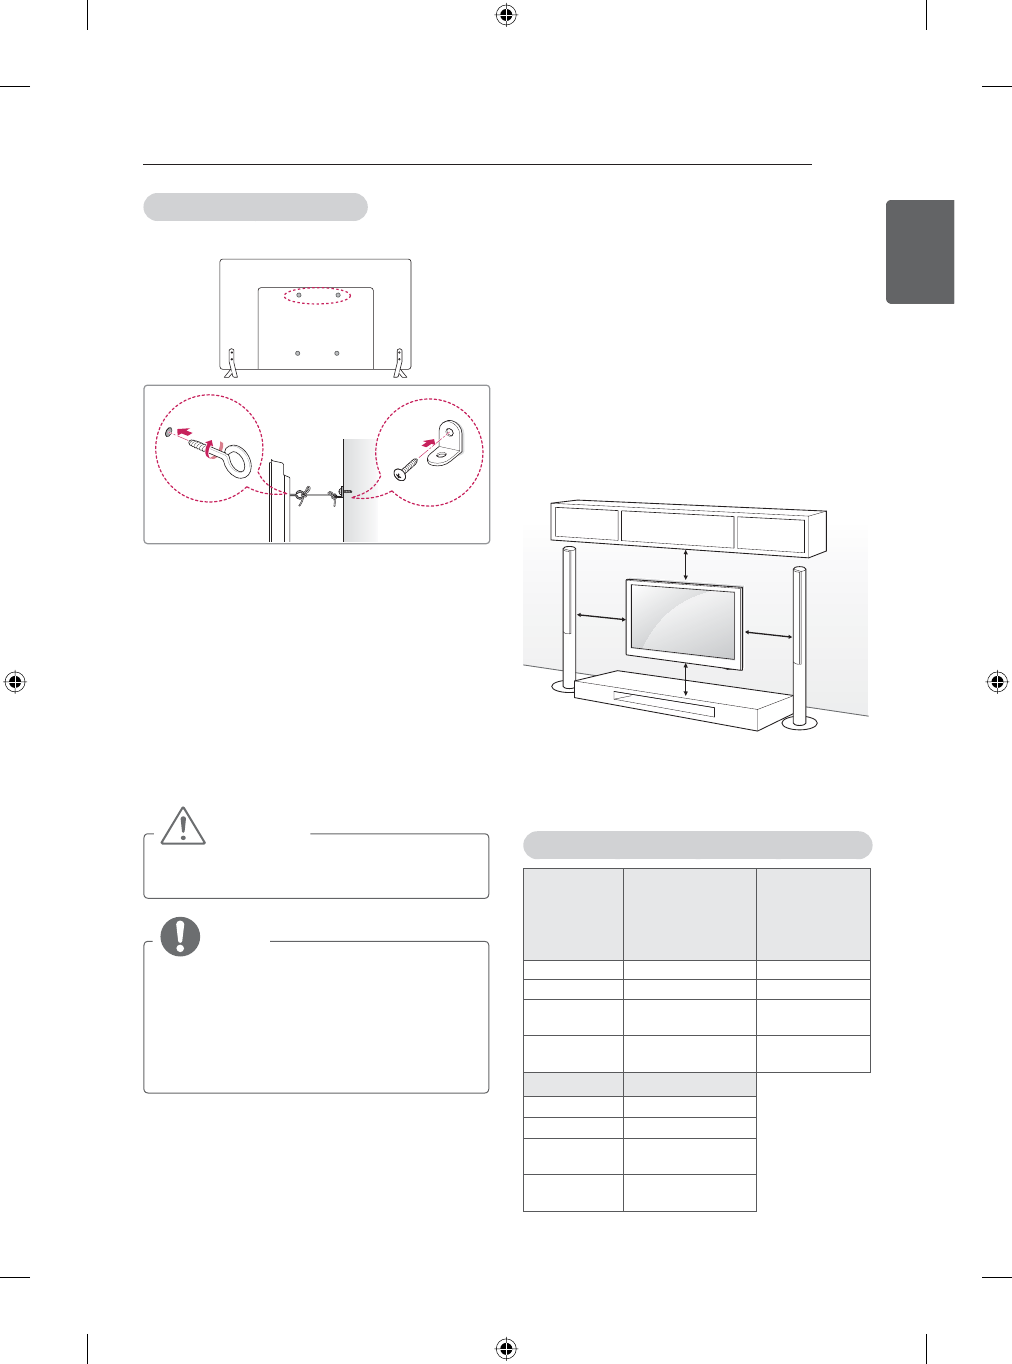
Securing the TV to a wall
(This feature is not available for all models.)
1 Insert and tighten the eye-bolts, or TV
brackets and bolts on the back of the TV.
- If there are bolts inserted at the eye-
bolts position, remove the bolts first.
2 Mount the wall brackets with the bolts to the
wall.
Match the location of the wall bracket and
the eye-bolts on the rear of the TV.
3 Connect the eye-bolts and wall brackets
tightly with a sturdy rope.
Make sure to keep the rope horizontal with
the flat surface.
CAUTION
yMake sure that children do not climb on
or hang on the TV.
NOTE
yUse a platform or cabinet that is strong
and large enough to support the TV
securely.
yBrackets, bolts and ropes are not
provided. You can obtain additional
accessories from your local dealer.
Mounting on a wall
Attach an optional wall mount bracket at the rear
of the TV carefully and install the wall mount
bracket on a solid wall perpendicular to the
floor. When you attach the TV to other building
materials, please contact qualified personnel.
LG recommends that wall mounting be
performed by a qualified professional installer.
We recommend the use of LG’s wall mount
bracket.
When you do not use LG’s wall mount bracket,
please use a wall mount bracket where the
device is adequately secured to the wall with
enough space to allow connectivity to external
devices.
10 cm
10 cm
10 cm
10 cm
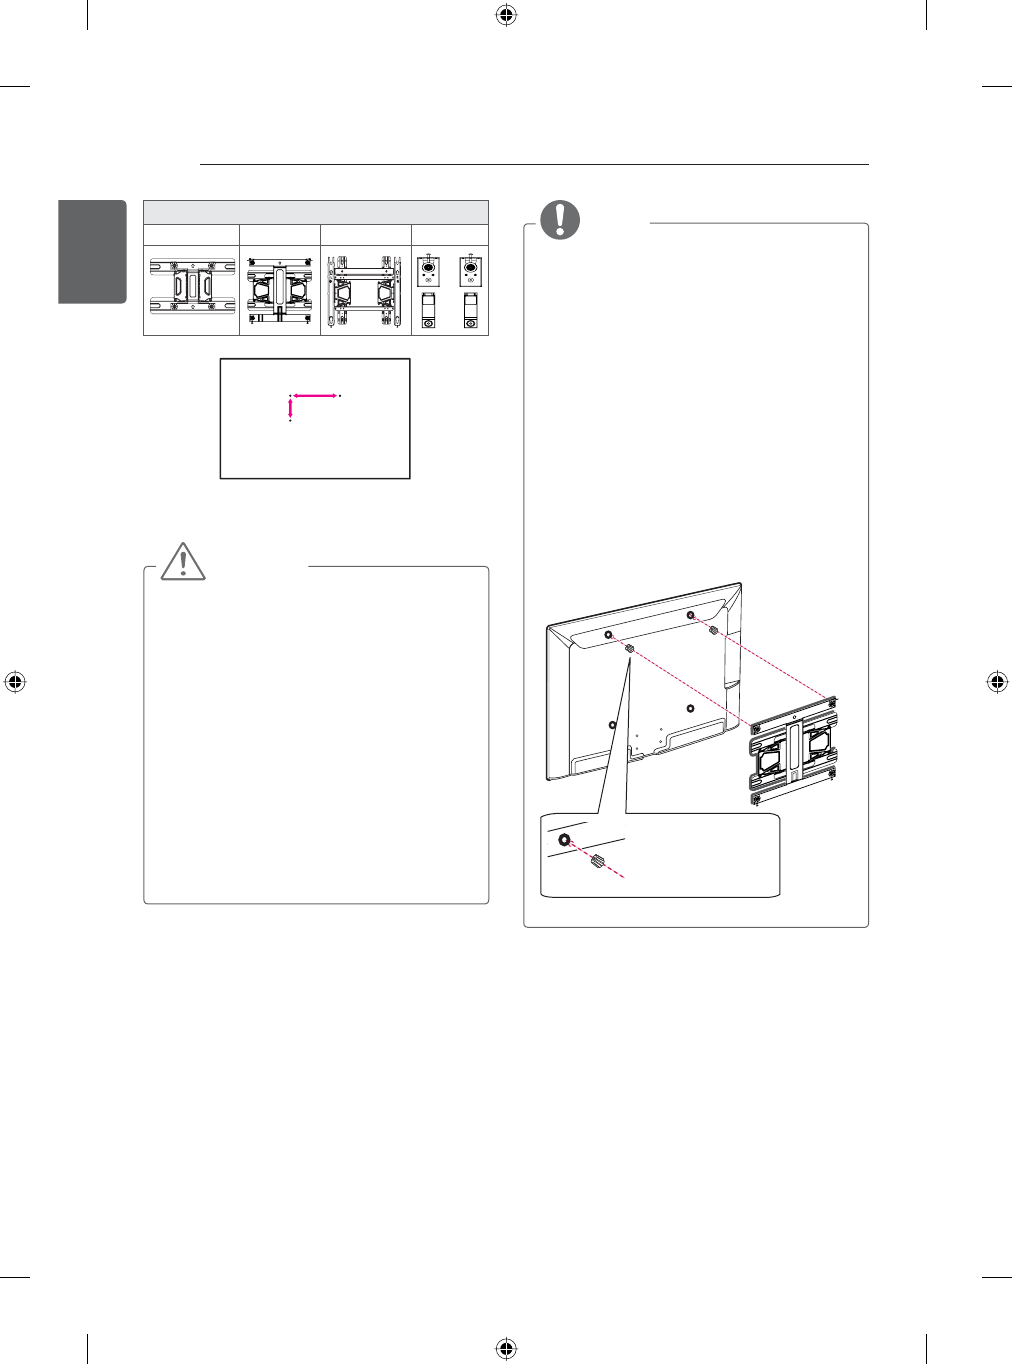
Make sure to use screws and wall mount
bracket that meet the VESA standard. Standard
dimensions for the wall mount kits are described
in the following table.
Separate purchase (Wall Mounting Bracket)
Model 42/47/50/55GB58**
42/47/55GB63**
42/47/55GB65**
65GB63**
60GB65**
47/55GB67**
65GB72**
47/55/60GB78**
VESA (A x B) 400 x 400 400 x 400
Standard screw
M6 M6
Number of
screws
44
Wall mount
bracket
LSW440B
MSW240
LSW440B
Model 70GB72**
VESA (A x B) 600 x 400
Standard screw
M8
Number of
screws
4
Wall mount
bracket
LSW640B
24
ENG
ENGLISH
ASSEMBLING AND PREPARING
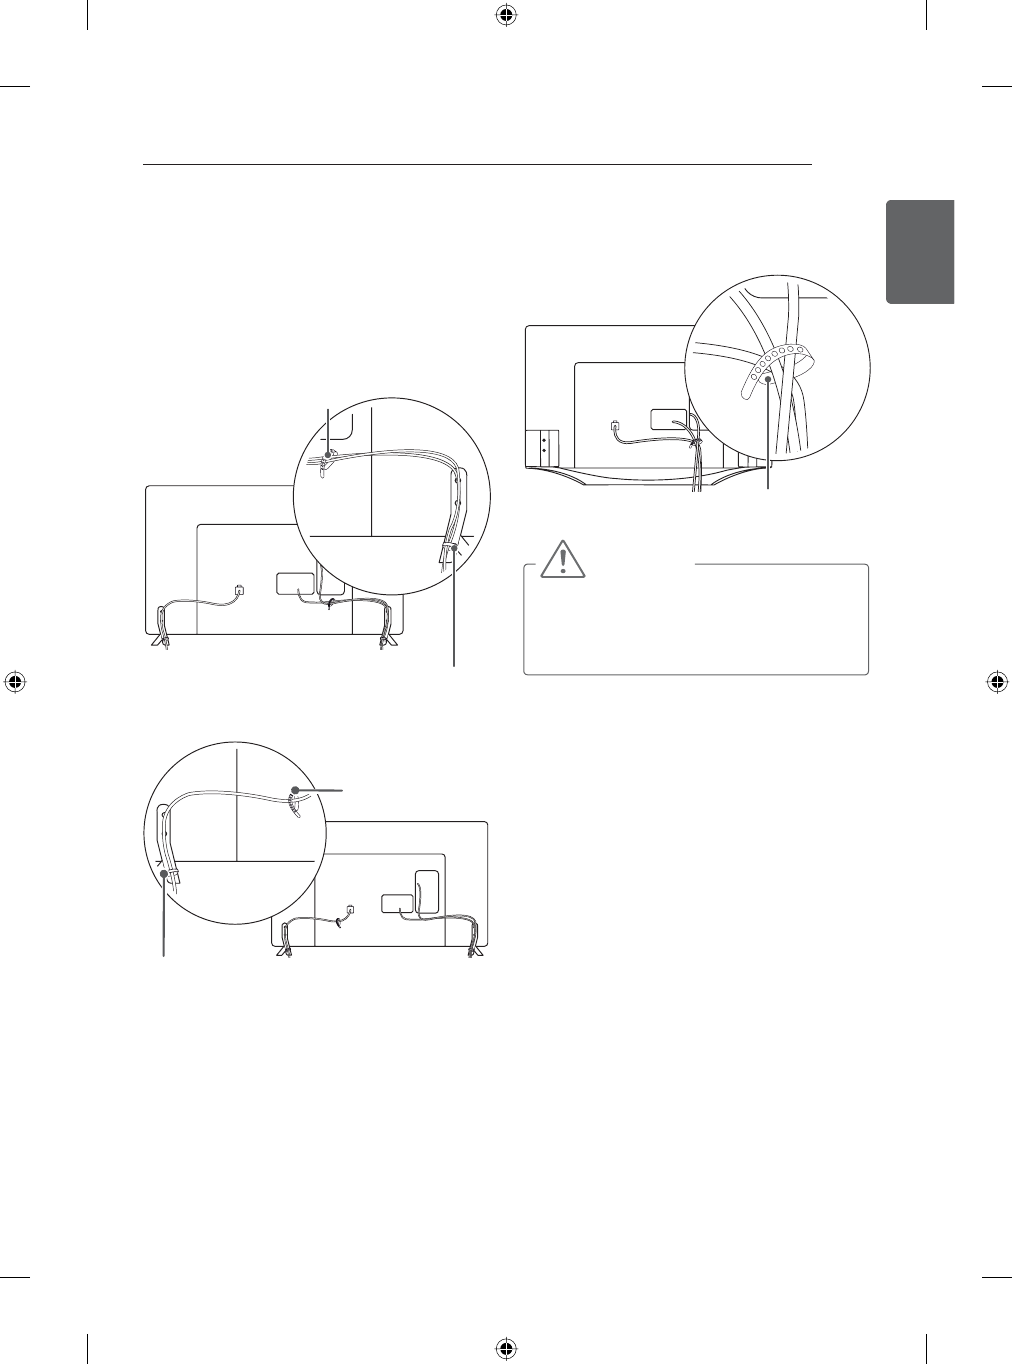
Wall mount bracket
LSW240B LSW440B LSW640B MSW240
A
B
CAUTION
yDisconnect the power first, and then
move or install the TV. Otherwise electric
shock may occur.
yIf you install the TV on a ceiling or slanted
wall, it may fall and result in severe injury.
Use an authorised LG wall mount and
contact the local dealer or qualified
personnel.
yDo not over tighten the screws as this
may cause damage to the TV and void
your warranty.
yUse the screws and wall mounts that
meet the VESA standard. Any damages
or injuries by misuse or using an
improper accessory are not covered by
the manufacturer’s warranty.
NOTE
yUse the screws that are listed on the
VESA standard screw specifications.
yThe wall mount kit includes an installation
manual and necessary parts.
yThe wall mount bracket is not provided.
You can obtain additional accessories
from your local dealer.
yThe length of screws may differ
depending on the wall mount. Make sure
to use the proper length.
yFor more information, refer to the manual
supplied with the wall mount.
yWhen attaching a wall mounting bracket
to the TV, insert the wall mount spacers
into the TV wall mount holes to adjust the
vertical angle of the TV. (Only 42GB58**,
42GB63**,42GB65**)
Wall Mount Spacer
25
ENGENGLISH
ASSEMBLING AND PREPARING
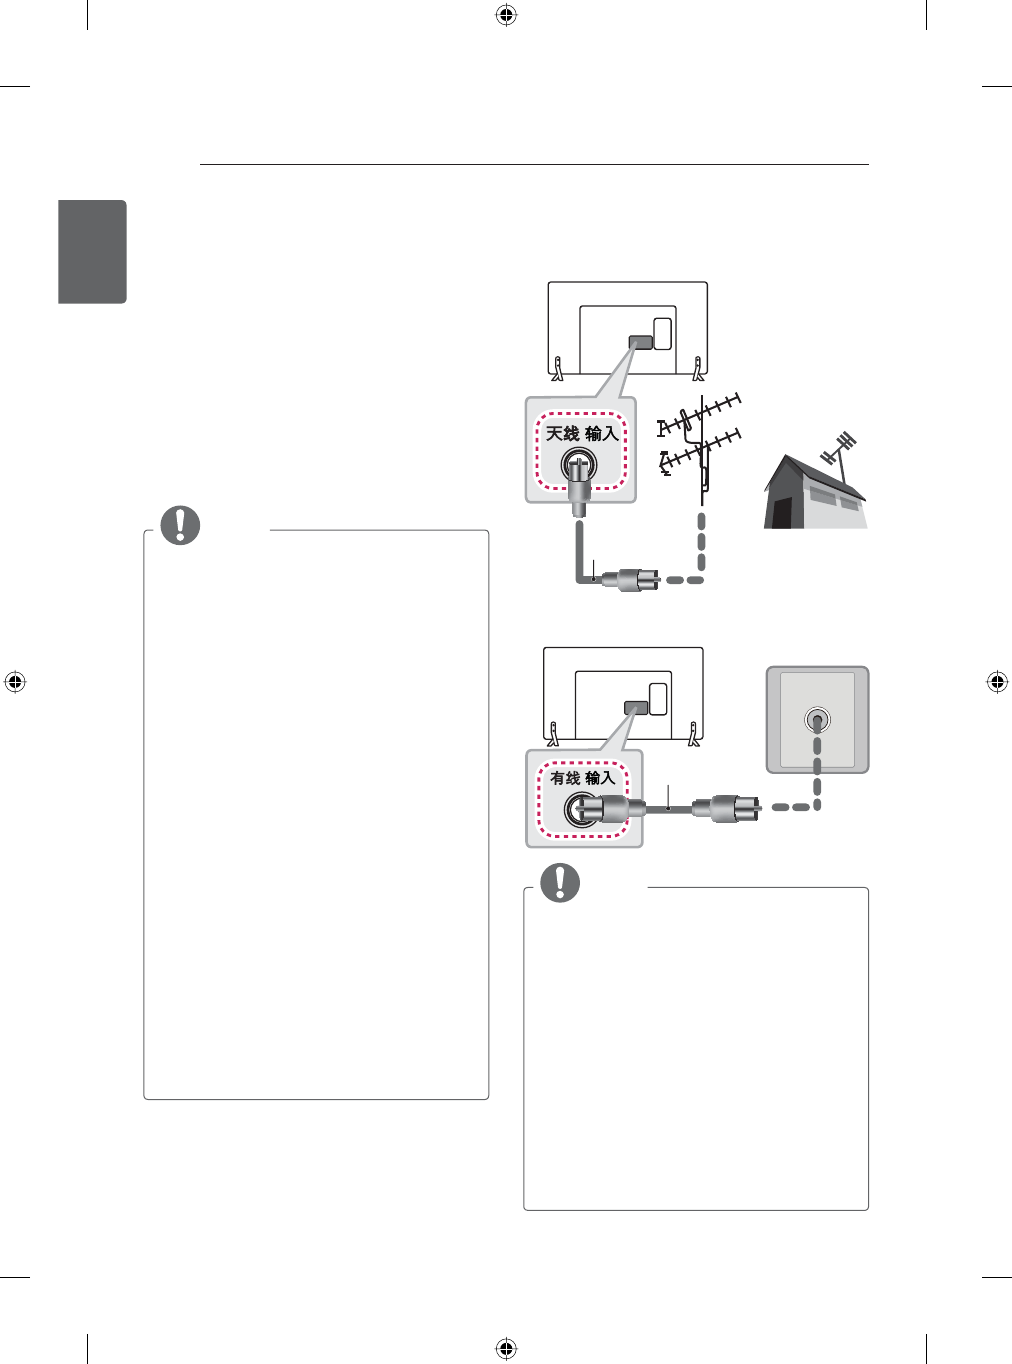
Tidying cables
Image shown may differ from your TV.
1 Gather and bind the cables with the cable
holder. (Depending on model)
2 Fix the Cable Management firmly to the TV.
(Only GB58**, GB63** , GB65**,GB67**,
65GB72**)
Cable Holder
Cable Management
(Only 70LB72**)
Cable Holder
Cable Management
1 Gather and bind the cables with the Cable
Holder.
(Only GB78**)
Cable Holder
CAUTION
yDo not move the TV by holding the cable
holder, as the cable holder may break,
and injuries and damage to the TV may
occur.
26
ENG
ENGLISH
MAKING CONNECTIONS
MAKING CONNECTIONS
This section on MAKING CONNECTIONS
mainly uses diagrams for the 55GB65** models.
Connect various external devices to the TV
and switch input modes to select an external
device. For more information of external device’s
connection, refer to the manual provided with
each device.
Available external devices are: HD receivers,
DVD players, VCRs, audio systems, USB
storage devices, PC, gaming devices, and other
external devices.
NOTE
yThe external device connection may differ
from the model.
yConnect external devices to the TV
regardless of the order of the TV port.
yIf you record a TV programme on a
DVD recorder or VCR, make sure to
connect the TV signal input cable to the
TV through a DVD recorder or VCR. For
more information of recording, refer to
the manual provided with the connected
device.
yRefer to the external equipment’s manual
for operating instructions.
yIf you connect a gaming device to the TV,
use the cable supplied with the gaming
device.
yIn PC mode, there may be noise
associated with the resolution, vertical
pattern, contrast or brightness. If noise is
present, change the PC output to another
resolution, change the refresh rate to
another rate or adjust the brightness and
contrast on the PICTURE menu until the
picture is clear.
yIn PC mode, some resolution settings
may not work properly depending on the
graphics card.
Antenna connection
Connect the TV to a wall antenna socket with an
RF cable (75 ).
VHF Antenna
UHF Antenna
(*Not Provided)
(*Not Provided)
or
NOTE
yUse a signal splitter to use more than 2
TVs.
yIf the image quality is poor, install a signal
amplifier properly to improve the image
quality.
yIf the image quality is poor with an
antenna connected, try to realign the
antenna in the correct direction.
yAn antenna cable and converter are not
supplied.
ySupported DTV Audio: MPEG, Dolby
Digital, Dolby Digital Plus, HE-AAC.
yThis set can meet insulation requirement
between PG and RF network system so
you can connect RF cable directly.
27
ENGENGLISH
MAKING CONNECTIONS
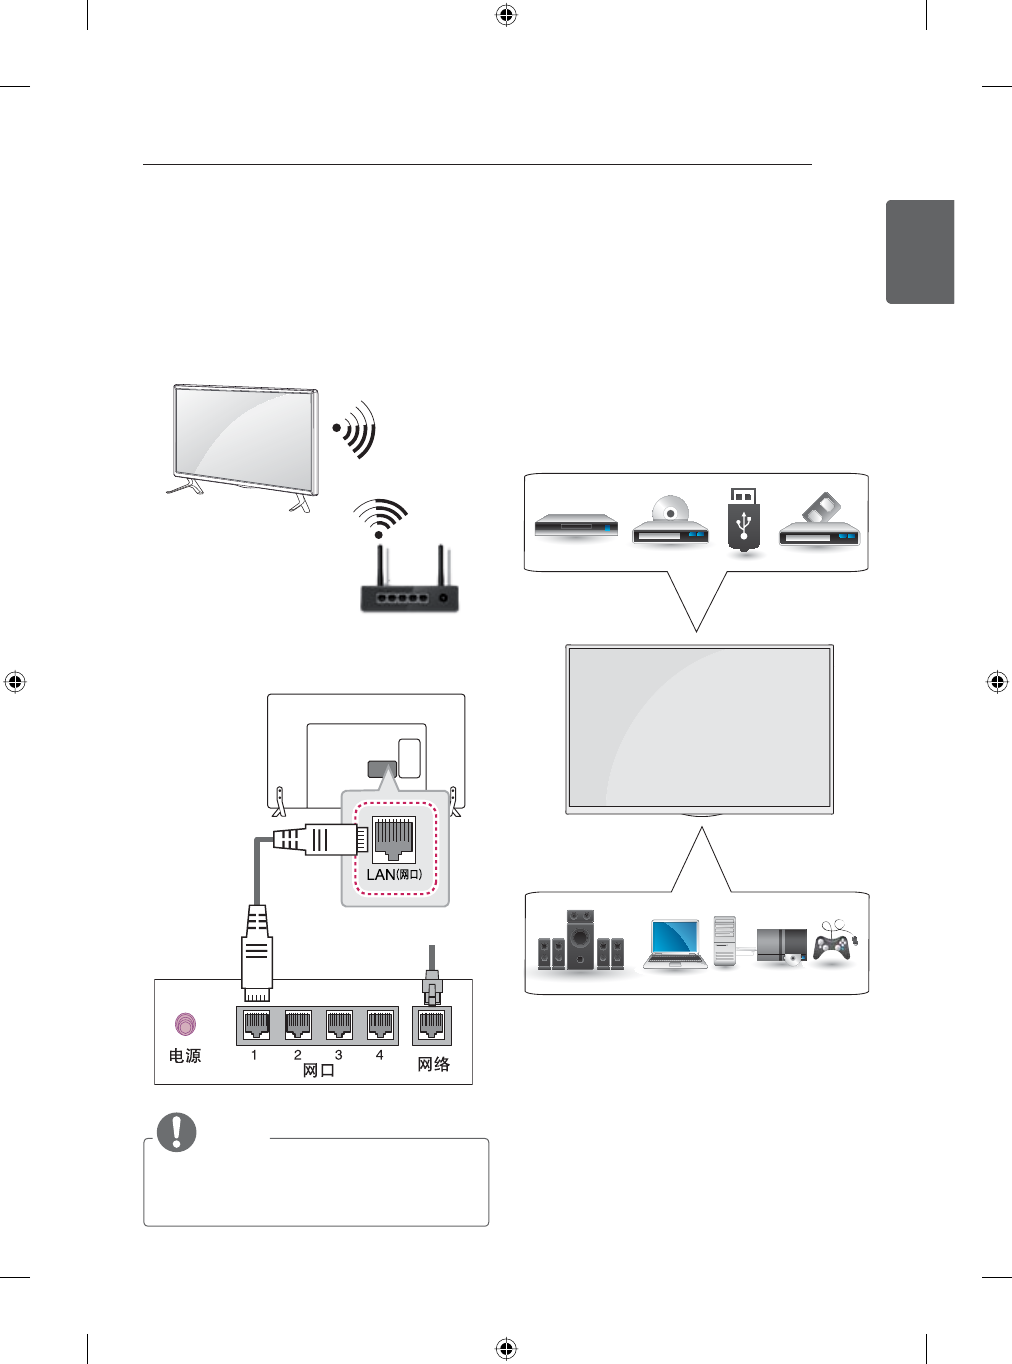
Network connection
Connect the TV to a router with a LAN cable. Or
connect with Wi-Fi by accessing Network Setup
in the initial Setup Wizard. For seamless internet
streaming, LG recommends a stable 4 Mbps
broadband speed and 1.5 Mbps as a minimum.
Wireless network connection
Wireless Router
Wired network connection
Wired Router
Internet Connection
NOTE
yWhen TV is connected at the same time
both by wired and wireless modes, TV
default connection will be Wired.
Connection overview
Connect various external devices to the ports on
the TV back panel.
1 Find an external device you want to connect
to your TV as shown.
2 Check the connection type of the external
device.
3 Go to the appropriate illustration and check
the connection details.
HD STB / HD Cable Box / DVD / USB / VCR
Speaker / PC / Game devices
28
ENG
ENGLISH
MAKING CONNECTIONS
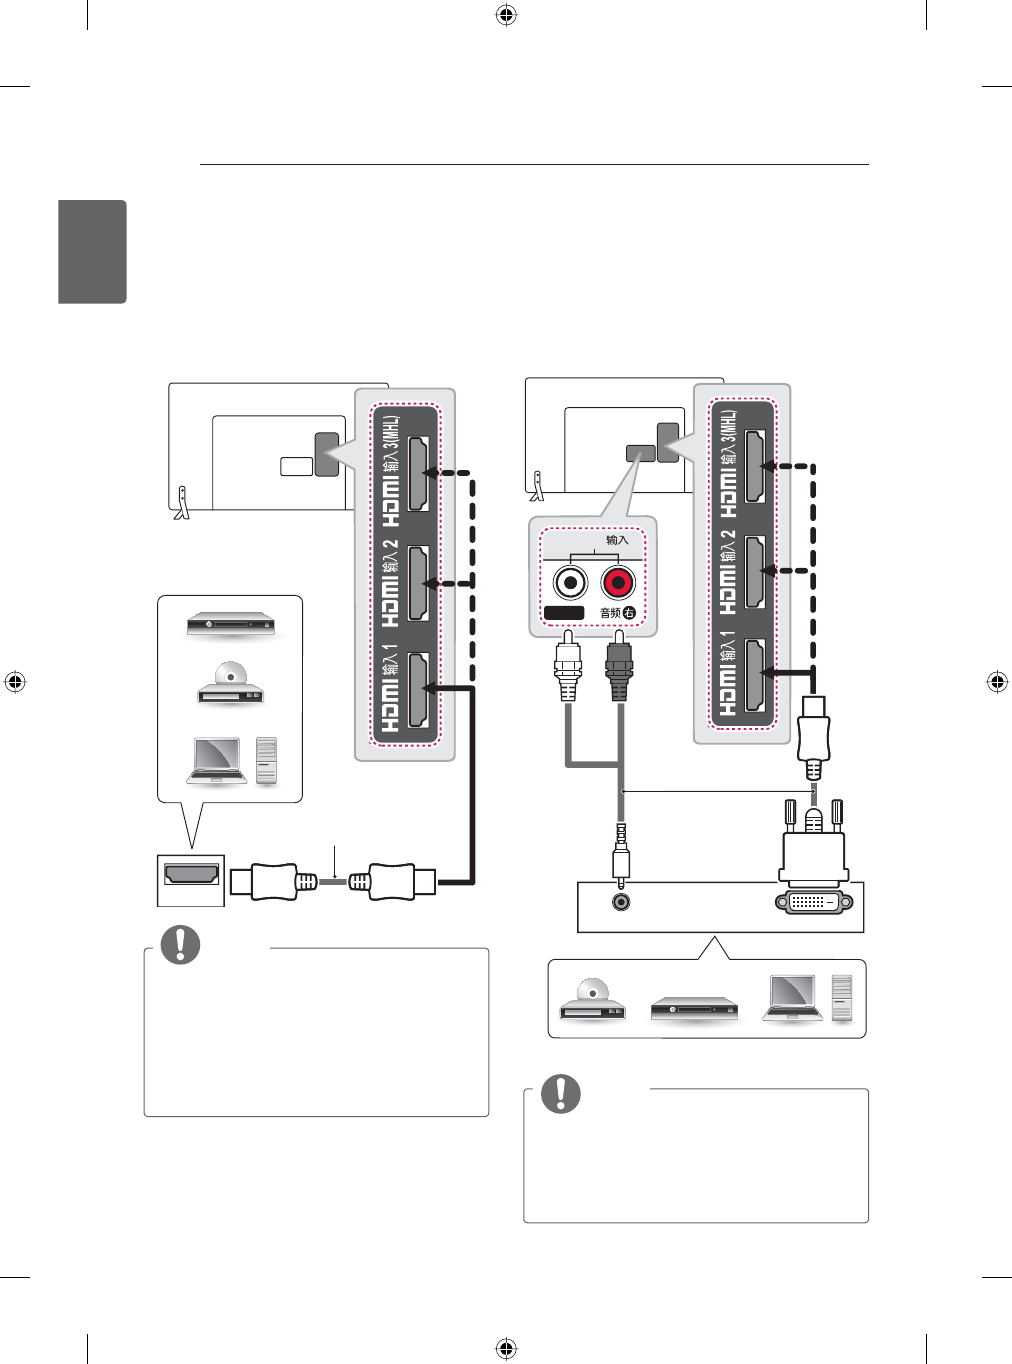
HDMI connection
Transmits the digital video and audio signals
from an external device to the TV. Connect the
external device and the TV with the HDMI cable
as shown.
Choose any HDMI input port to connect. It does
not matter which port you use.
HDMI
DVD/ Blu-Ray / HD Cable
Box / HD STB / PC
(*Not Provided)
NOTE
yHigh Speed HDMI™ Cables are tested
to carry an HD signal up to 1080p and
higher.
ySupported HDMI Audio format : Dolby
Digital, DTS, PCM (Up to 192 KHz,
32 KHz/44.1 KHz/48 KHz/88 KHz/96
KHz/176 KHz/192 KHz).
DVI to HDMI connection
Transmits the digital video signal from an
external device to the TV. Connect the external
device and the TV with the DVI-HDMI cable as
shown. To transmit an audio signal, connect an
audio cable.
Choose any HDMI input port to connect. It does
not matter which port you use.
DVI OUT
AUDIO OUT
㐈㿤囆坤
Ჹረៃ伦
WHITE
(*Not Provided)
DVD / Blu-Ray / HD Cable Box / PC / HD STB
RED
NOTE
yDepending on the graphics card, DOS
mode may not work if a HDMI to DVI
Cable is in use.
yWhen using the HDMI/DVI cable, Single
link is only supported.
29
ENGENGLISH
MAKING CONNECTIONS
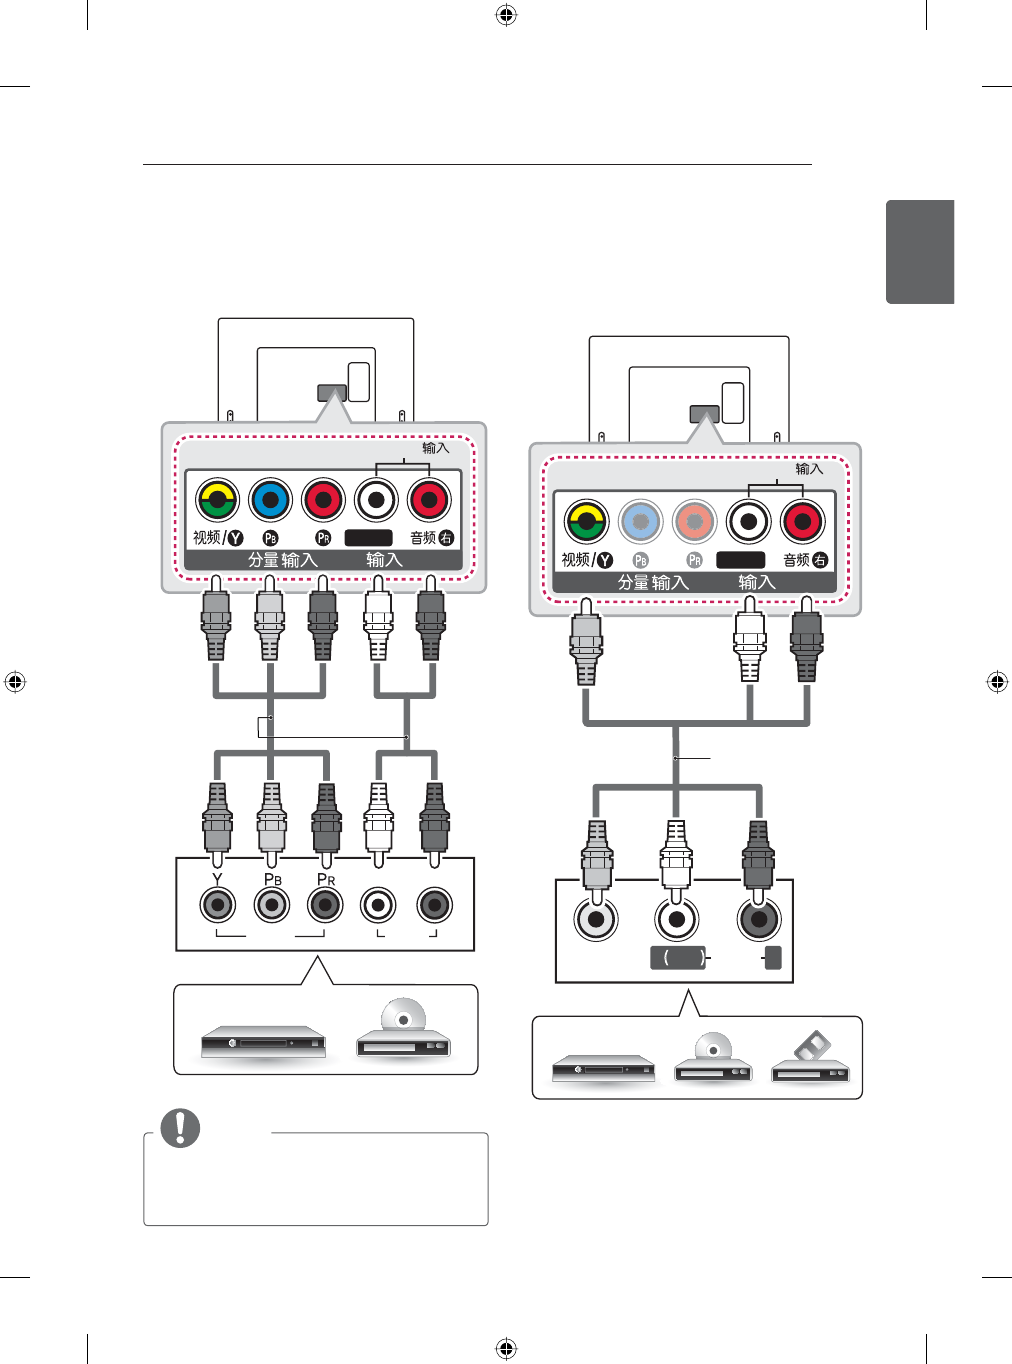
Component connection
Transmits analog video and audio signals
from an external device to the TV. Connect the
external device and the TV with a component
cable as shown.
AUDIO
VIDEO
LR
/ AV
㐈㿤囆坤
Ჹረៃ伦
GREEN
BLUE
RED
WHITE
(*Not Provided)
RED
DVD / Blu-Ray / HD Cable Box
GREEN
BLUE
RED
WHITE
RED
NOTE
yIf cables are not installed correctly, it
could cause this image to display in black
and white or with distorted colours.
Composite connection
Transmits analog video and audio signals
from an external device to the TV. Connect the
external device and the TV with the composite
cable as shown.
/ AV
㐈㿤囆坤
Ჹረៃ伦
VIDEO
MONO
( )
AUDIOLR
YELLOW
WHITE
RED
RED
WHITE
DVD / Blu-Ray / HD Cable Box / VCR
YELLOW
(*Not Provided)
30
ENG
ENGLISH
MAKING CONNECTIONS
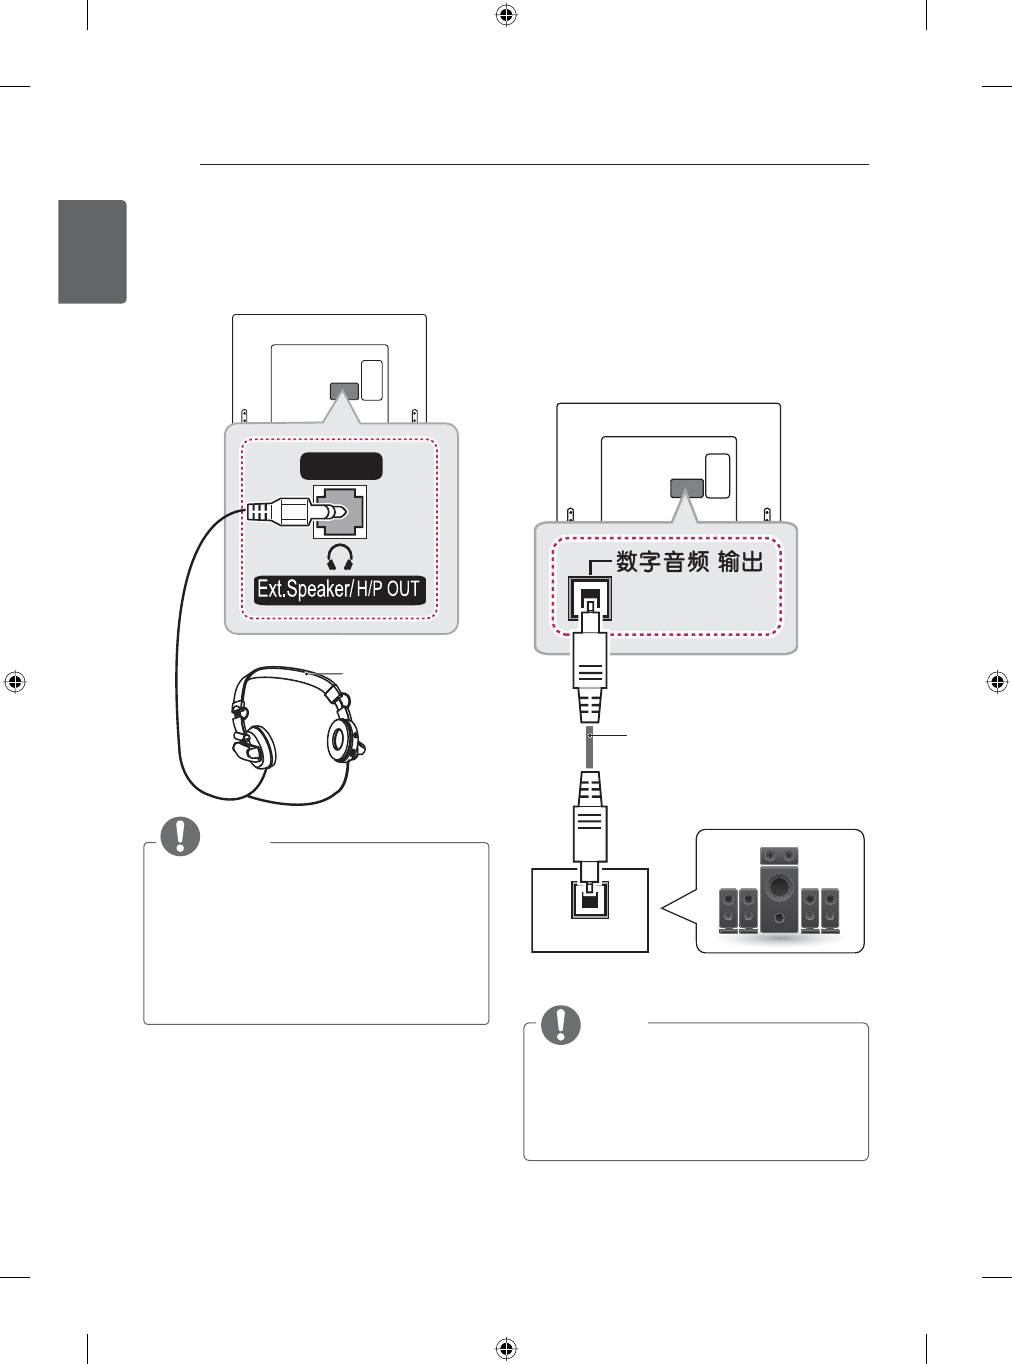
Headphone connection
Transmits the headphone signal from the TV to
an external device. Connect the external device
and the TV with the headphone as shown.
㼆☍≸
(*Not Provided)
NOTE
yAUDIO menu items are disabled when
connecting a headphone.
yOptical Digital Audio Out is not available
when connecting a headphone.
y+HDGSKRQHLPSHGDQFH
yMax audio output of headphone: 0.627
mW to 1.334 mW
yHeadphone jack size: 0.35 cm
Audio connection
You may use an optional external audio system
instead of the built-in speaker.
Digital optical audio connection
Transmits a digital audio signal from the TV to an
external device. Connect the external device and
the TV with the optical audio cable as shown.
OPTICAL
AUDIO IN
(*Not Provided)
Digital Audio System
NOTE
yDo not look into the optical output port.
Looking at the laser beam may damage
your vision.
yAudio with ACP (Audio Copy Protection)
function may block digital audio output.
31
ENGENGLISH
MAKING CONNECTIONS
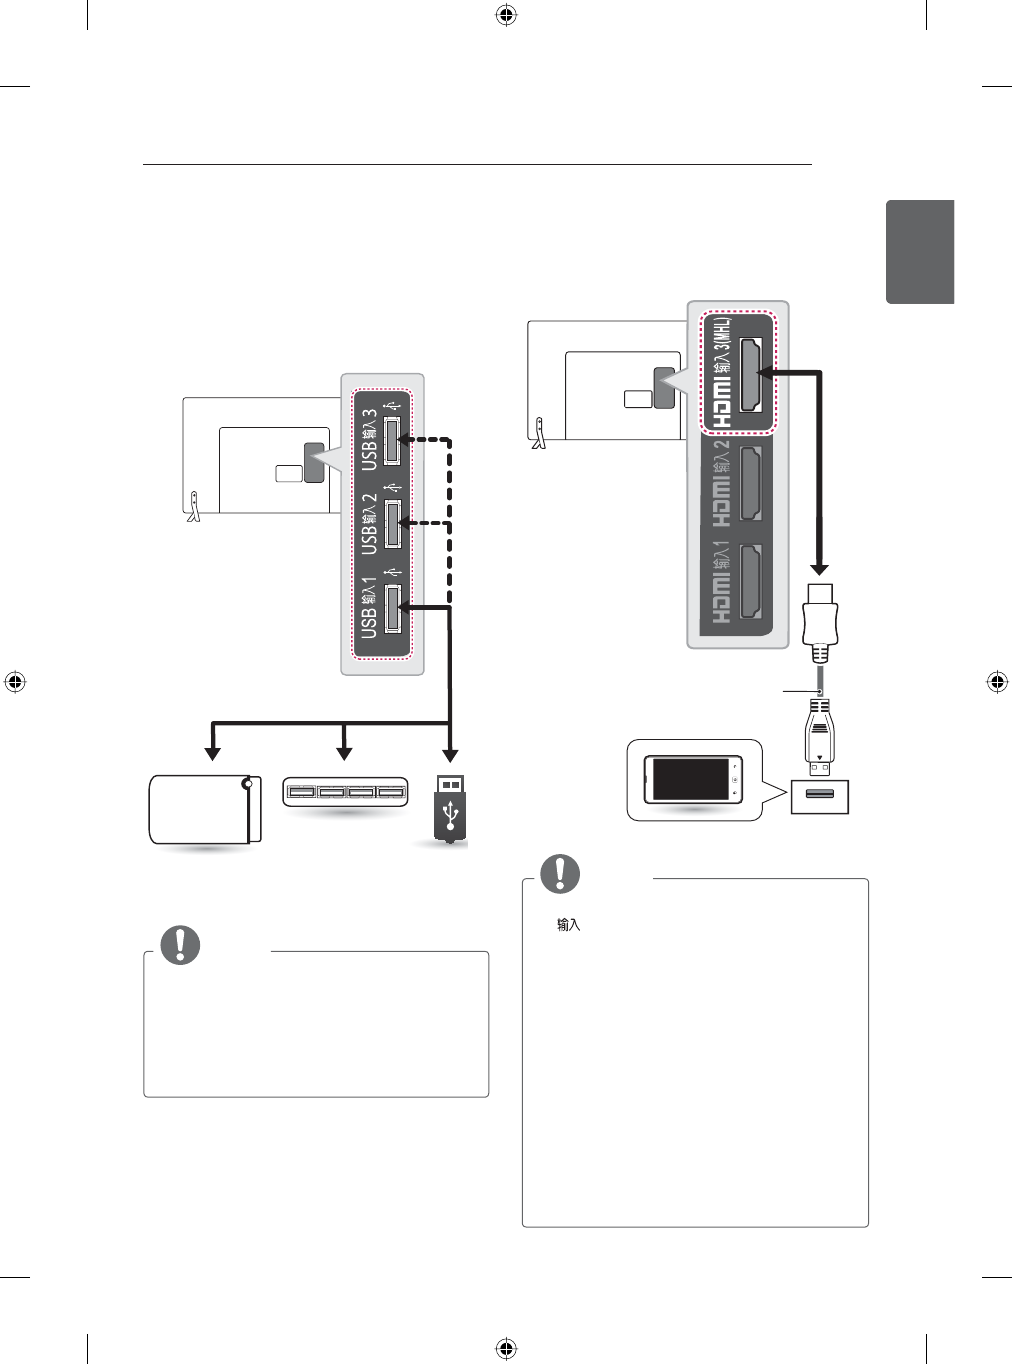
USB connection
Connect a USB storage device such as a USB
flash memory, external hard drive, or a USB
memory card reader to the TV and access the
SmartShare menu to use various multimedia
files.
HUB
HDD
(*Not Provided) USB
(*Not Provided)
(*Not Provided)
NOTE
ySome USB Hubs may not work. If a USB
device connected using a USB Hub is not
detected, connect it to the USB port on
the TV directly.
yConnect the external power source if your
USB is needed.
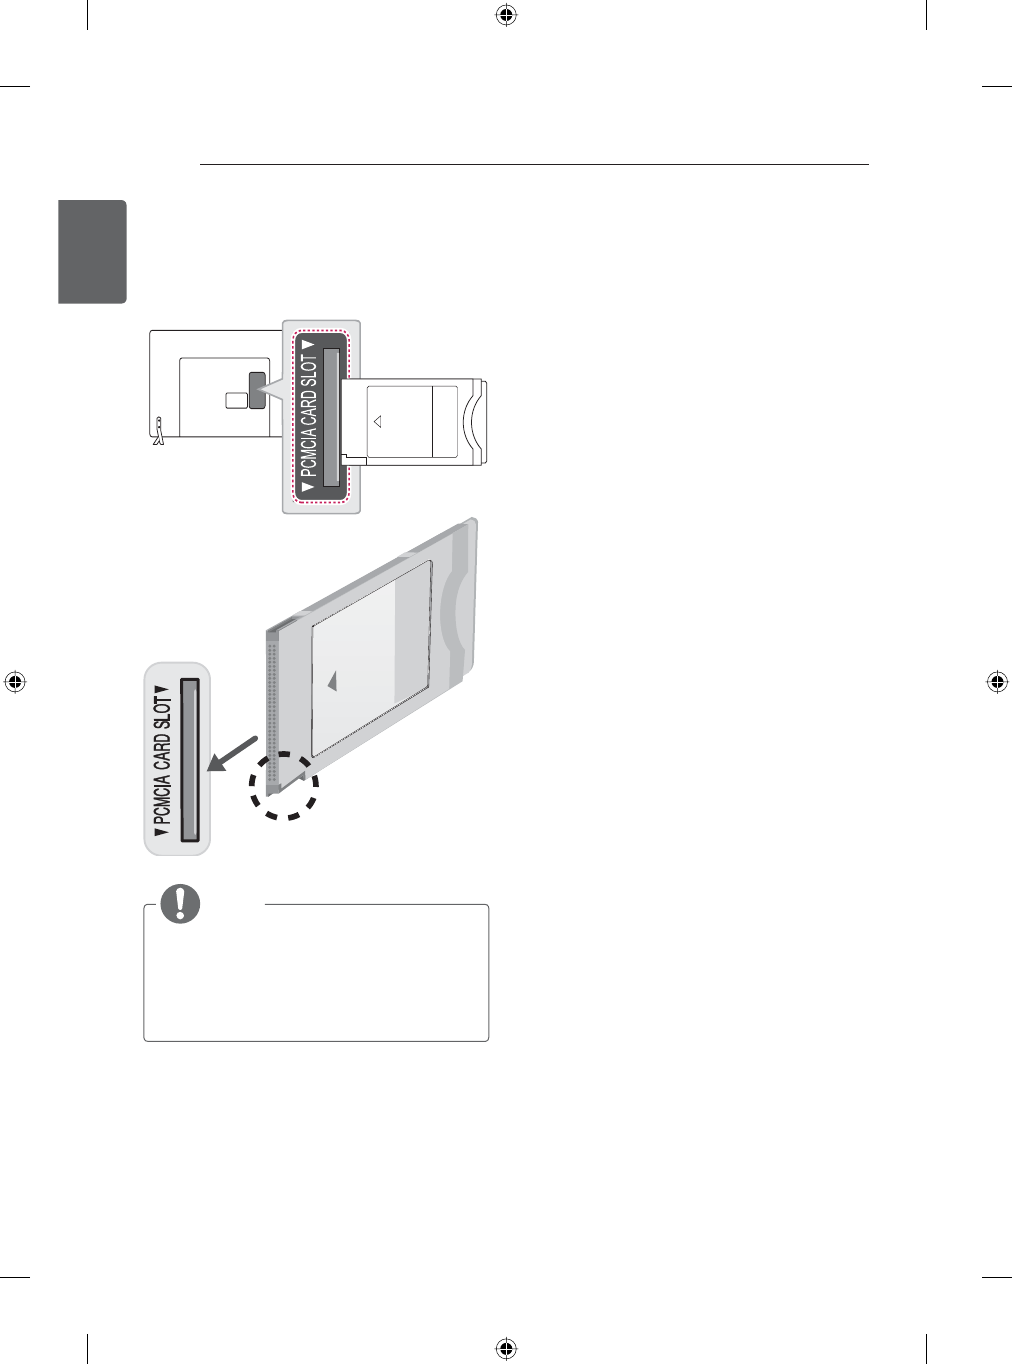
MHL connection
Mobile High-definition Link (MHL) is an interface
for transmitting digital audiovisual signals from
mobile phones to television sets.
MHL passive cable
(*Not Provided)
Mobile phone
NOTE
yConnect the mobile phone to the HDMI
3 (MHL) port to view the phone
screen on the TV.
yThe MHL passive cable is needed to
connect the TV and a mobile phone.
yThis only works for the MHL-enabled
phone.
ySome applications can be operated by
the remote control.
yFor some mobile phones supporting
MHL, you can control with the Magic
Remote.
yRemove the MHL passive cable from the
TV when:
»the MHL function is disabled
»your mobile device is fully charged in
standby mode
32
ENG
ENGLISH
MAKING CONNECTIONS
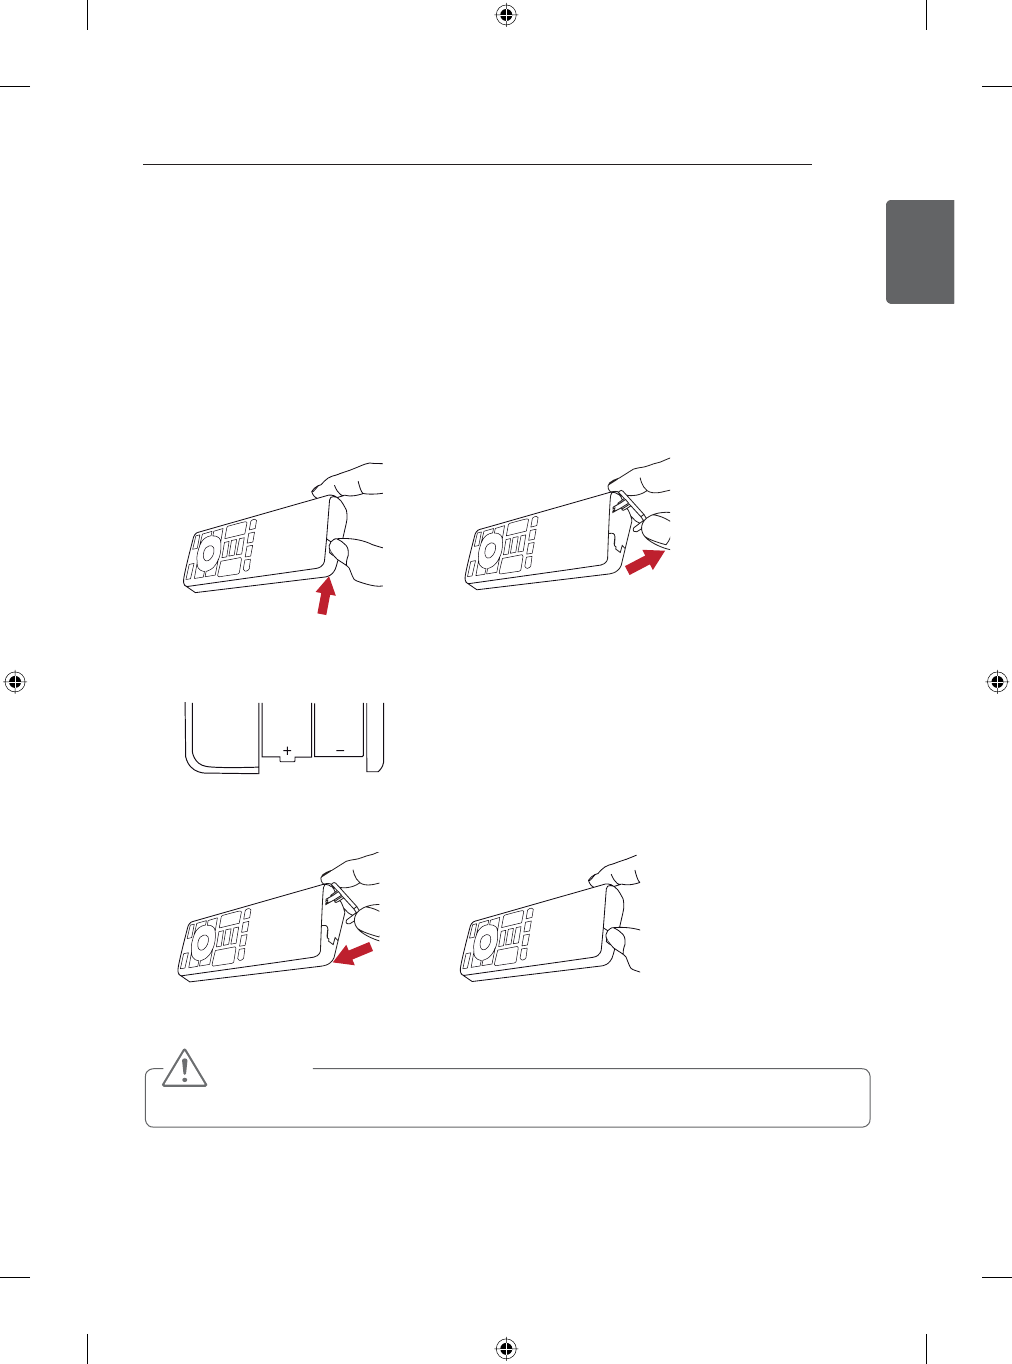
CI module connection
View the encrypted (pay) services in digital
TV mode. This feature is not available in all
countries.
(*
Not
Provided)
NOTE
yCheck if the CI module is inserted into the
PCMCIA card slot in the right direction. If
the module is not inserted properly, this
can cause damage to the TV and the
PCMCIA card slot.
33
ENGENGLISH
REMOTE CONTROL FUNCTIONS
REMOTE CONTROL FUNCTIONS
(Only GB78**)
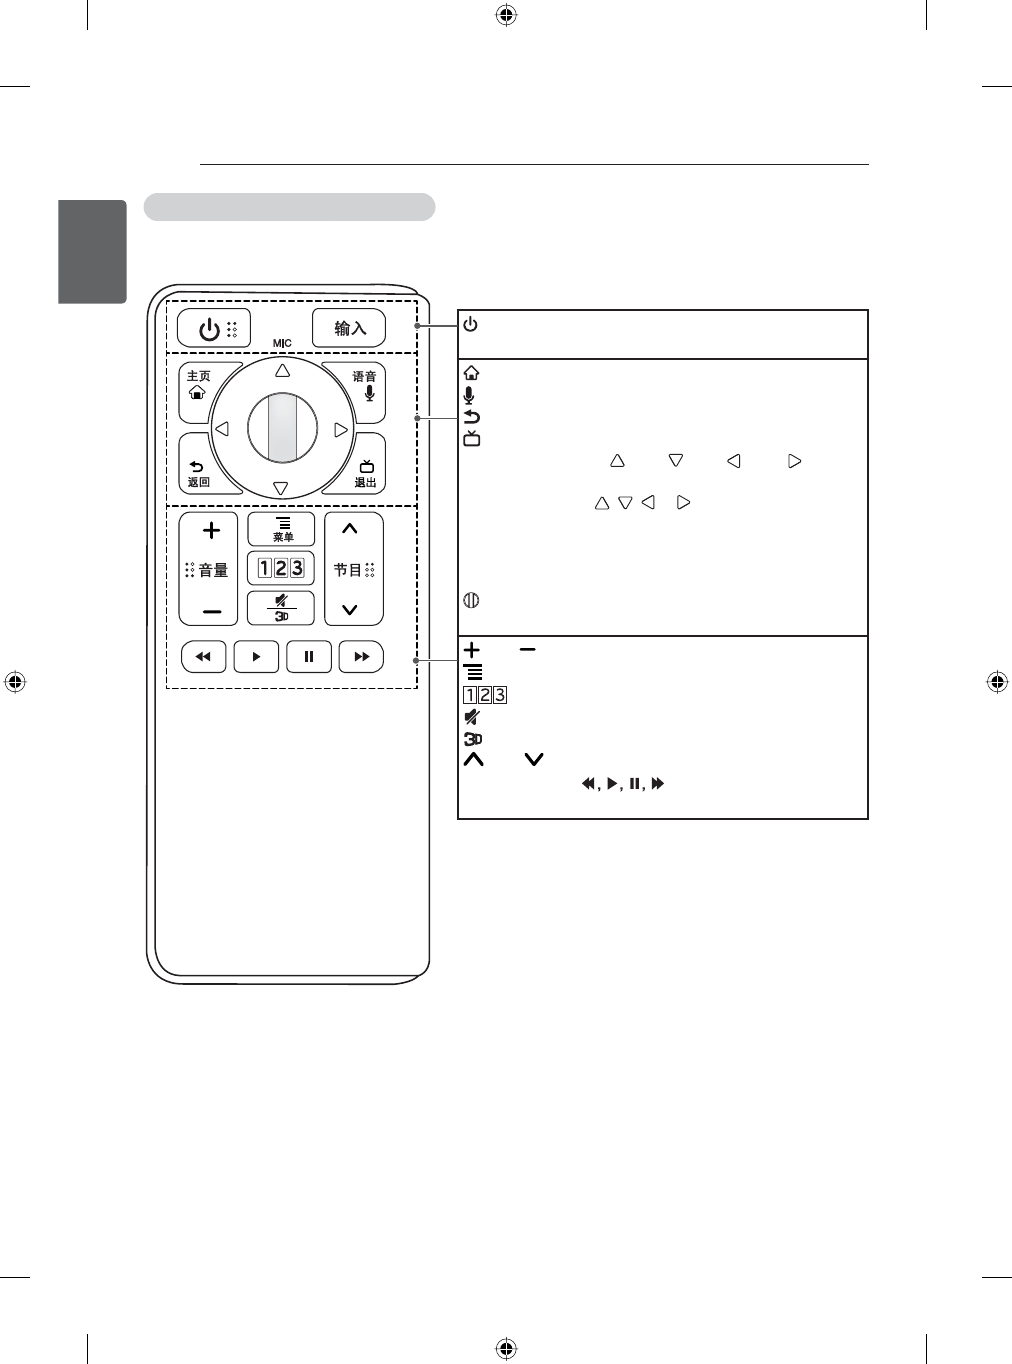
Inserting batteries
When you use the remote control for the first time, you should insert the batteries(1.5 V AA) to remote
control.
1 Open the battery cover as shown below.
2 Insert batteries into remote control observing correct polarity.
3 Close the battery cover as shown below.
CAUTION
yDo not mix old and new batteries, as this may damage the remote control.
34
ENG
ENGLISH
REMOTE CONTROL FUNCTIONS
QWERTY Remote Control - Front
(POWER)
Turns the TV on or off.
书း
Selects input list.
എ坈Access the Smarthome screen.
䫀囆 Searching by voice.
产ᖱ Move to previous or superior step.
仓ჍCloses a menu.
Navigation buttons
( ዤೝ ዤೞ ዤᲹ ዤ
Press the up, down, left or right button to scroll the
menu.If you press , , or buttons while the
pointer is in use, the pointer will disappear from the
screen and Magic Remote will operate like a general
remote control. To display the pointer on the screen
again, shake Magic Remote to the left and right.
ⶭ乁(㝁ᩭ) Select item by pushing key.
Wheel Spin the wheel up/down to scroll up/down.
囆傢 Adjusts the volume level.
䊯ረ Call option pop-up for activating app.
Displays the Screen Remote.
(MUTE)
Mutes all sounds.
Change between 2D and 3D mode.(Press and Hold)
䅕㗁 Change TV
programmes.
Trick play keys
( )
Rewind, play, pause, fast
forward.
35
ENGENGLISH
REMOTE CONTROL FUNCTIONS
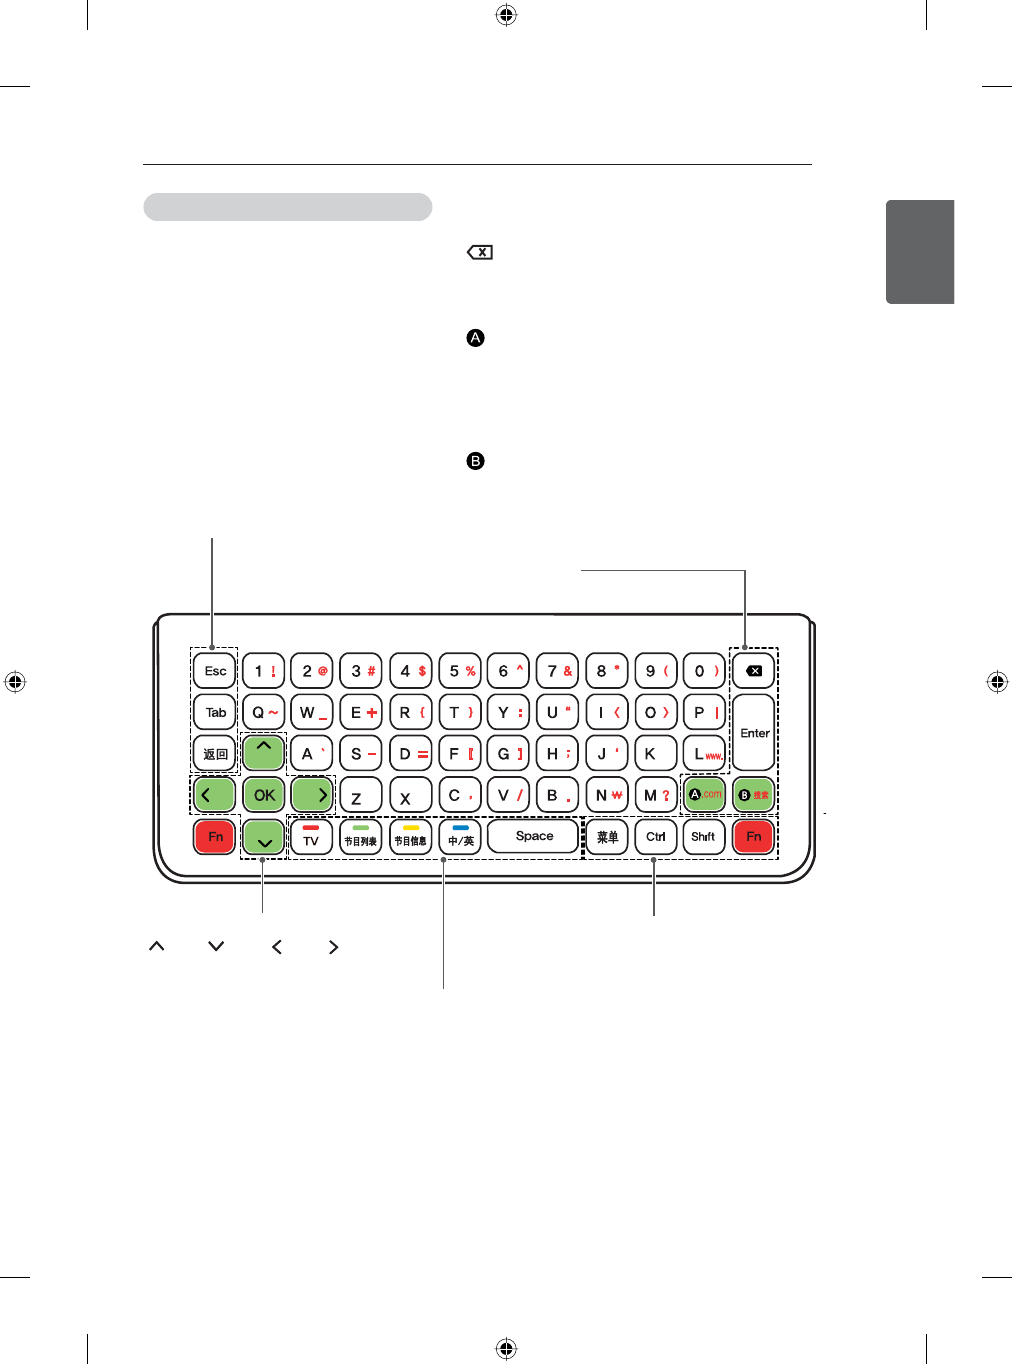
QWERTY Remote Control - Back
Navigation Buttons
(ዤೝ ዤೞ ዤᲹ ዤ
Scrolls through menus or options.
Selects item by pushing key. TV
Activate TV player app.
䅕㗁ც䜻
Activate/Deactivate䅕㗁ც䜻
䅕㗁ິὂ
Show programme information.
(Only on Live TV)
ഀ䇄
Enterഀ䇄menu.
Space
Enter a space.
Esc
Cancel state or command.
Tab
Move focus to the next step.
产ᖱ
Move to previous or superior step.
Delete text.
Enter
Finish text input.
In the game state, this key will be achieved with the A
key game on the same keyboard device operation.
.com
Press this button simultaneously with the Fn key, and
then enter the URL, that is entered automatically .com.
In the game state, this key will be achieved with the B
key games on the same keyboard device operation.
⋯㯵
Press the key with the Fn key simultaneously, that is to
run the search.
䊯ረ
Composition key combination with
other keys together.
Ctrl
Combine key with other keys.
Shift
Combine key for upper letter.
Fn
Combine key with other keys.
36
ENG
ENGLISH
REMOTE CONTROL FUNCTIONS
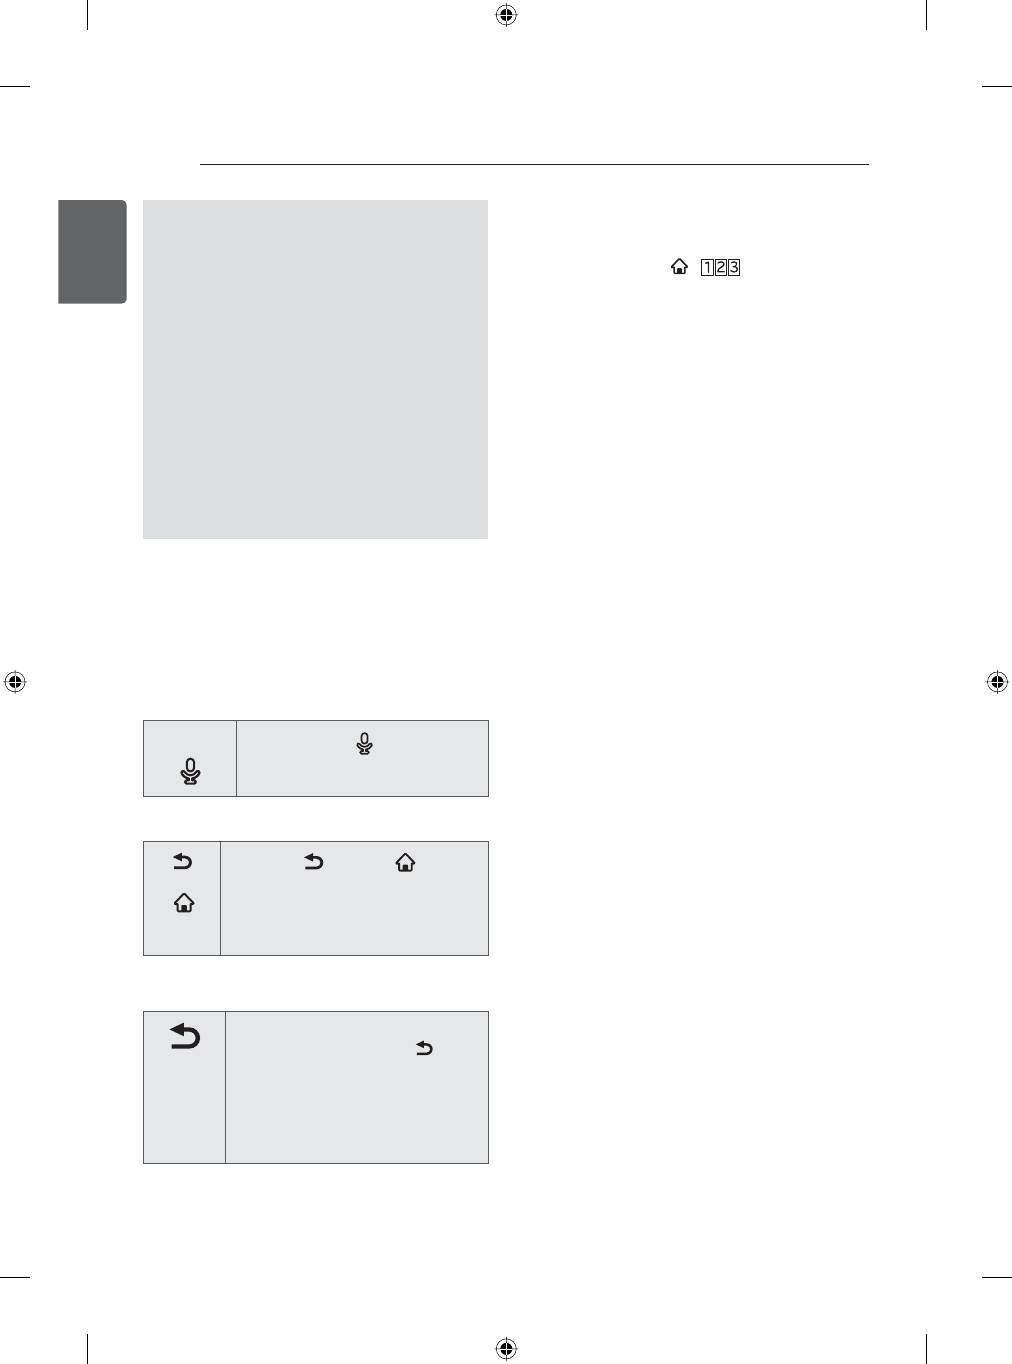
Voice recognition (Depending on model)
voice search function can support web
searching.
1 Press the Voice recognition button.
2 Speak when the voice display window
appears on the left of the TV screen.
The voice recognition may fail when
you speak too fast or too slow.
Use the Magic Remote no further than
10 cm from your face.
The recognition rate may vary
depending on the user’s characteristics
(voice, pronunciation, intonation and
speed) and the environment (noise and
TV volume).
Registering the remote control
The Remote Control operates by pairing with
your TV. When turning the TV on for the first
time, please pair the remote to the TV.
How to register the remote control
䫀囆 Press the 䫀囆 button to pair
the remote control.
How to deregister the Magic Remote
产ᖱ
എ坈
Press the 产ᖱ and എ坈
buttons at the same time, for five
seconds, to unpair the QWERTY
Remote with your TV.
How to re-register the remote control after
registration failure
产ᖱ
Reset the remote control by
pressing and holding the 产ᖱ
button for 3 seconds. (Once the
reset is complete, the light on the
Pointer blinks.) Then repeat the
above procedure to register the
remote control.
How to use remote control
yShake the Magic Remote slightly to the right
and left or press , buttons to make
the pointer appear on the screen.
yIf the pointer has not been used for a certain
period of time or Magic Remote is placed on
a flat surface, then the pointer will disappear.
Precautions to take when using
the remote control
yUse the remote control within the maximum
communication distance (10 m). Using the
remote control beyond this distance, or
with an object obstructing it, may cause a
communication failure.
yA communication failure may occur due to
nearby devices. Electrical devices such as
a microwave oven or wireless LAN product
may cause interference, as these use the
same bandwidth (2.4 GHz) as the Remote
Control.
yThe Remote Control may be damaged or
may malfunction if it is dropped or receives a
heavy impact.
yManufacturer and installer cannot provide
service related to human safety as the
applicable wireless device has possibility of
electric wave interference.
yIt is recommended that an Access Point (AP)
be located more than 1 m away from the
TV. If the AP is installed closer than 1 m, the
remote control may not perform as expected
due to frequency interference.
yThe TV only supports the included LG
QWERTY remote control. It may be
compatible with a keyboard that meets HID
VSHFL¿FDWLRQV
yThe cursor automatically stays still when the
QWERTY keyboard is facing up in order to
prevent any wobbling cursor.
yMagic remote and QWERTY remote can
not be used at the same time. If you want to
change the remote control, please re-register
the new remote control.
37
ENGENGLISH
MAGIC REMOTE FUNCTIONS
MAGIC REMOTE FUNCTIONS
This item is not included for all models.
When the message “Magic Remote battery is low. Change the battery.” is
displayed, replace the battery. To replace batteries, open the battery cover, replace
batteries (1.5 V AA) matching and ends to the label inside the compartment,
and close the battery cover. Be sure to point the remote control toward the remote
control sensor on the TV. To remove the batteries, perform the installation actions
in reverse.
CAUTION
yDo not mix old and new batteries, as this may damage the remote control.
yIn Analogue TV and some countries, some remote control buttons may not work.
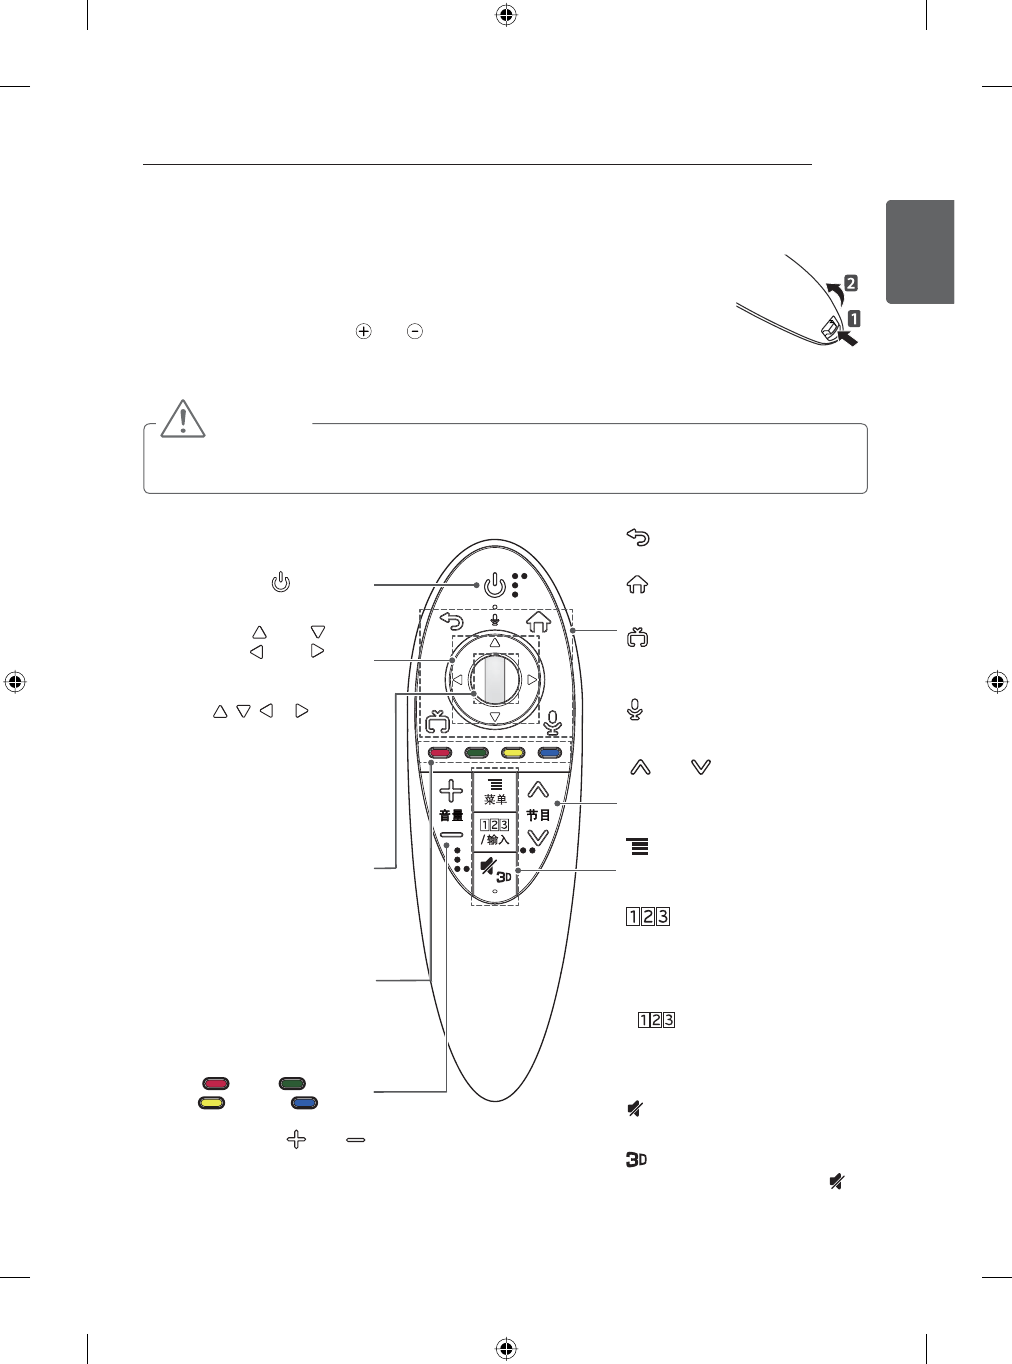
(Only GB58**, GB63**, GB65**,GB67**, GB72**)
(POWER)
Turns the TV on or off.
䃽⇜厁 ዤೝ ዤೞ
ዤᲹ ዤ
Press the up, down, left or right
button to scroll the menu.If you
press , , or buttons
while the pointer is in use, the
pointer will disappear from the
screen and Magic Remote will
operate like a general remote
control. To display the pointer
on the screen again, shake
Magic Remote to the left and
right.
Wheel(OK)
Press the center of the Wheel
button to select a menu. You
can change programmes or
channels and scroll the menu
by using the Wheel button.
Coloured buttons
These access special functions
in some menus.
(: Red, : Green,
: Yellow, : Blue)
囆傢
Adjusts the volume level.
(BACK)
Returns to the previous level.
(Smarthome)
Accesses the Smarthome menu.
(EXIT to LIVE)
Switches among broadcast
(antenna) and various inputs.
(Voice)
(Depending on model)
䅕㗁
Scrolls through the saved
programmes or channels.
䊯ረ
Call option pop-up for activating
app.
/ 书း
Displays the Screen Remote.
* Accesses the Universal Control
Menu. (Depending on model)
* Pressing and holding the
/ 书း button will display a
menu to select an external
device that is connected to the
TV.
(MUTE)
Mutes all sounds.
By pressing and holding the
button, Used for viewing 3D video.
(Depending on model)
38
ENG
ENGLISH
MAGIC REMOTE FUNCTIONS
How to use Magic Remote
yShake the Magic Remote
slightly to the right and left
or press , buttons to
make the pointer appear on
the screen.
»The pointer will appear
when you turn the Wheel
button. (Depending on
model)
yIf the pointer has not been
used for a certain period
of time or Magic Remote is
SODFHGRQDÀDWVXUIDFHWKHQ
the pointer will disappear.
yIf the pointer is not
responding smoothly, you
can reset the pointer by
moving it to the edge of the
screen.
yThe Magic Remote depletes
batteries faster than a
normal remote due to the
additional features.
Precautions to Take when Using
the Magic Remote
y8VHWKHUHPRWHFRQWUROZLWKLQWKHVSHFL¿HG
range (within 10 m). You may experience
communication failures when using the device
outside the coverage area or if there are
obstacles within the coverage area.
yYou may experience communication failures
depending on the accessories. Devices such
as a microwave oven and wireless LAN
operate in the same frequency band (2.4
GHz) as the Magic Remote. This may cause
communication failures.
yThe Magic Remote may not work properly if
a wireless router (AP) is within 1 meter of the
TV. Your wireless router should be more than
1 m away from the TV.
yDo not disassemble or heat the battery.
yDo not drop the battery. Avoid avoid extreme
shocks to the battery.
yInserting the battery the wrong way may result
in explosion.
yMagic remote and Qwerty remote can not be
used at the same time. If you want to change
the remote control, please re-register the new
remote control.
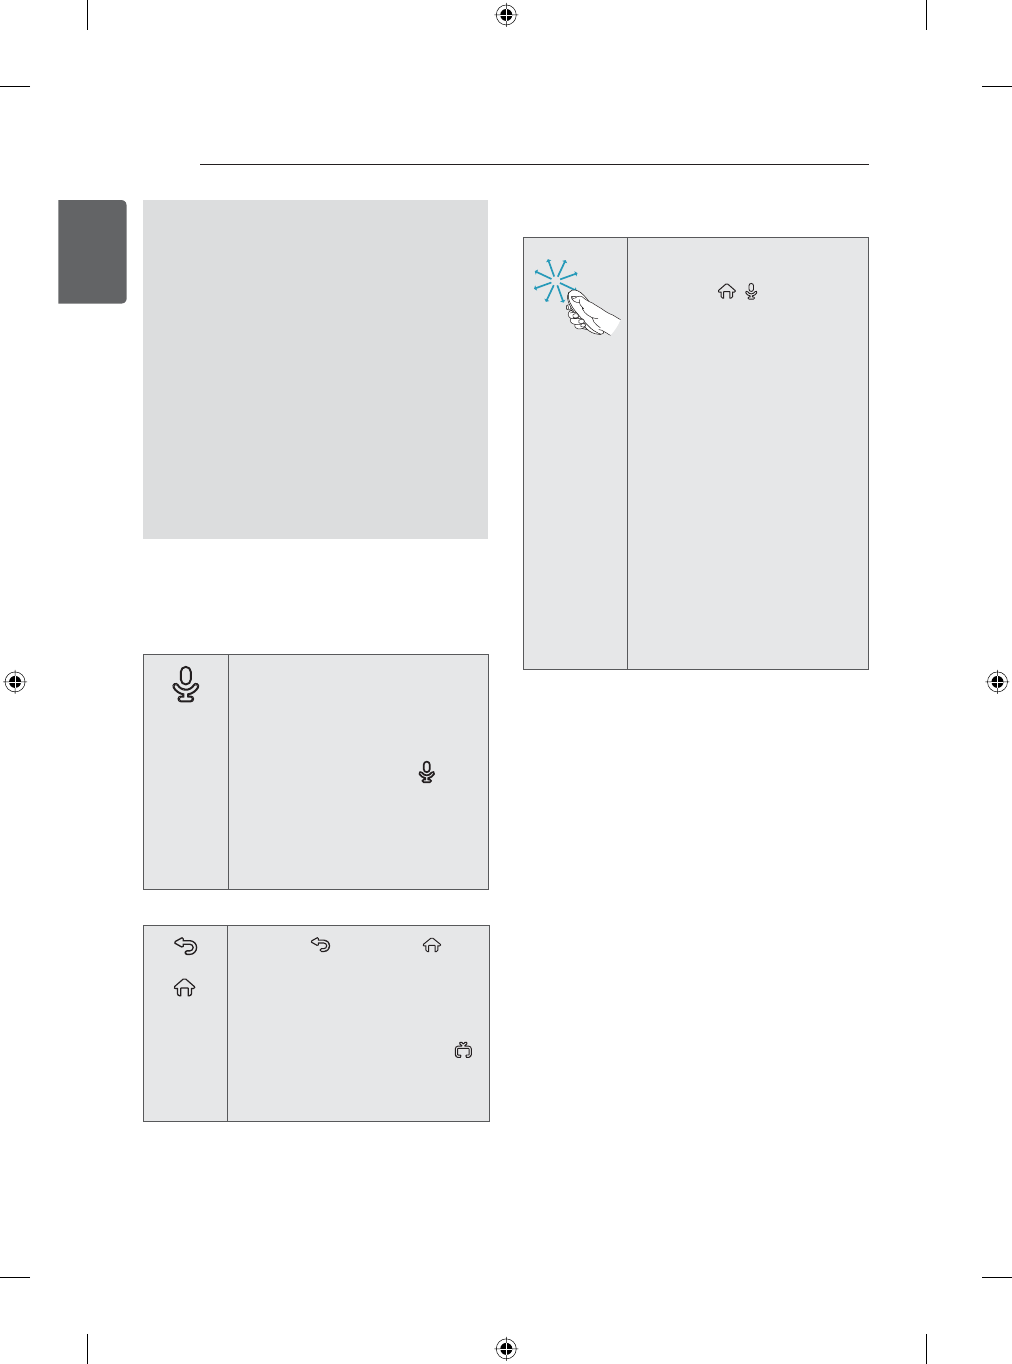
Voice recognition (Depending on model)
voice search function can support web
searching.
1 Press the Voice recognition button.
2 Speak when the voice display window
appears on the left of the TV screen.
The voice recognition may fail when
you speak too fast or too slow.
Use the Magic Remote no further than
10 cm from your face.
The recognition rate may vary
depending on the user’s characteristics
(voice, pronunciation, intonation and
speed) and the environment (noise and
TV volume).
Registering Magic Remote
How to register the Magic Remote
(Voice)
To use the Magic Remote, first
pair it with your TV.
1 Put batteries into the Magic
Remote and turn the TV on.
2 Point the Magic Remote at
your TV and press the
(Voice) on the remote control.
»If the TV fails to register the
Magic Remote, try again
after turning the TV off and
back on.
How to deregister the Magic Remote
(BACK)
(Smart
home)
Press the (BACK) and
(Smarthome) buttons at the
same time, for five seconds, to
unpair the Magic Remote with
your TV.
»Pressing and holding the
(EXIT to LIVE) button will let
you cancel and re-register
Magic Remote at once.
39
ENGENGLISH
USING (BASIC)
USING (BASIC)
7XUQLQJWKH79RQIRUWKH¿UVWWLPH
When you turn the TV on for the first time, the
Initial setting screen appears. Select a language
and customize the basic settings.
1 Connect the power cord to a power outlet.
The Power indicator turns on and the TV
switches to Standby mode.
2 In Standby mode, press the power button on
the remote control to turn the TV on.
The Initial setting screen appears when you
WXUQWKH79RQIRUWKH¿UVWWLPH
* If the TV is turned on for the first time after it
was shipped from the factory, initialization of
the TV may take up to one minute.
NOTE
yYou can also access Initial Setting by
accessing 仜坌 in the main menu.
3 Follow the on-screen instructions to
customize your TV settings according to your
preferences.
๒㏻ύ㕗ᅻῲᵧ伸
≺ᔻ Pairing the remote control
Ø
㊂仜↼ Selecting ᪉ᶀor ᐙ
ᘍand please read the
relevant ⮨Ṟៃⓡ
Ø
亱≸㼧㸤
Connecting to the
Internet to ම㸤㶒 or ⒳
㶒.
Ø
䪑㹁㐈䢙◠ᅴ
Select the video input
you use to connect your
TV service to your TV.
Ø
䪑㹁⃣ The initial settings are
completed.
4 When the initial settings are completed, select
⃣.
5 To turn the TV off, press the (POWER)
button on the remote control.
Setting the Mode
1 Press എ坈 to access the Smarthome
menu.
2 Go to ᵧ㏻ > 䪑㹁 > 仜坌 > ㊂仜↼.
3 Select ᐙᘍ for in-store display. For use in-
home, select ᪉ᶀ.
NOTE
yDisconnect the power cord from the
power outlet when you do not use the TV
for a long period of time.
NOTE
yTo display images in the best quality for
your home environment, select ᪉ᶀ.
yᐙᘍ is suitable for the retail environment.
yIf you select ᐙᘍ, any customized
settings will switch back to the default
settings of ᐙᘍ in 5 minutes.
40
ENG
ENGLISH
USING (BASIC)
Setting up programmes
Storing programmes
To store programmes automatically,
1 Press എ坈 to access the Smarthome
menu.
2 Go to ᵧ㏻!䪑㹁!䅕㗁!䂽ᅻ⋯ዃ
3 Select ᷓᢞ to start automatic tuning. The
TV scans and saves available programmes
automatically.
4 When you return to the previous menu, press
产ᖱ.
To store programmes manually,
1 Press എ坈 to access the Smarthome
menu.
2 Go to ᵧ㏻!䪑㹁!䅕㗁!℞ᅻ⋯ዃ
3 Scroll through the programme types, and then
add or delete programmes.
4 When you return to the previous menu, press
产ᖱ.
To show programme list,
1 Press എ坈 to access the Smarthome
menu.
2 Go to ᵧ㏻!䪑㹁!䅕㗁!䅕㗁ც䜻
3 Show programme list.
NOTE
yYou can store up to 1000 programmes.
The number of programmes that you
can store differs depending on the
broadcasting signal environment.
To use Quick Setting function
(The configurable items differ depending on
model.)
You can set the menus that are related with
programme and frequent functions.
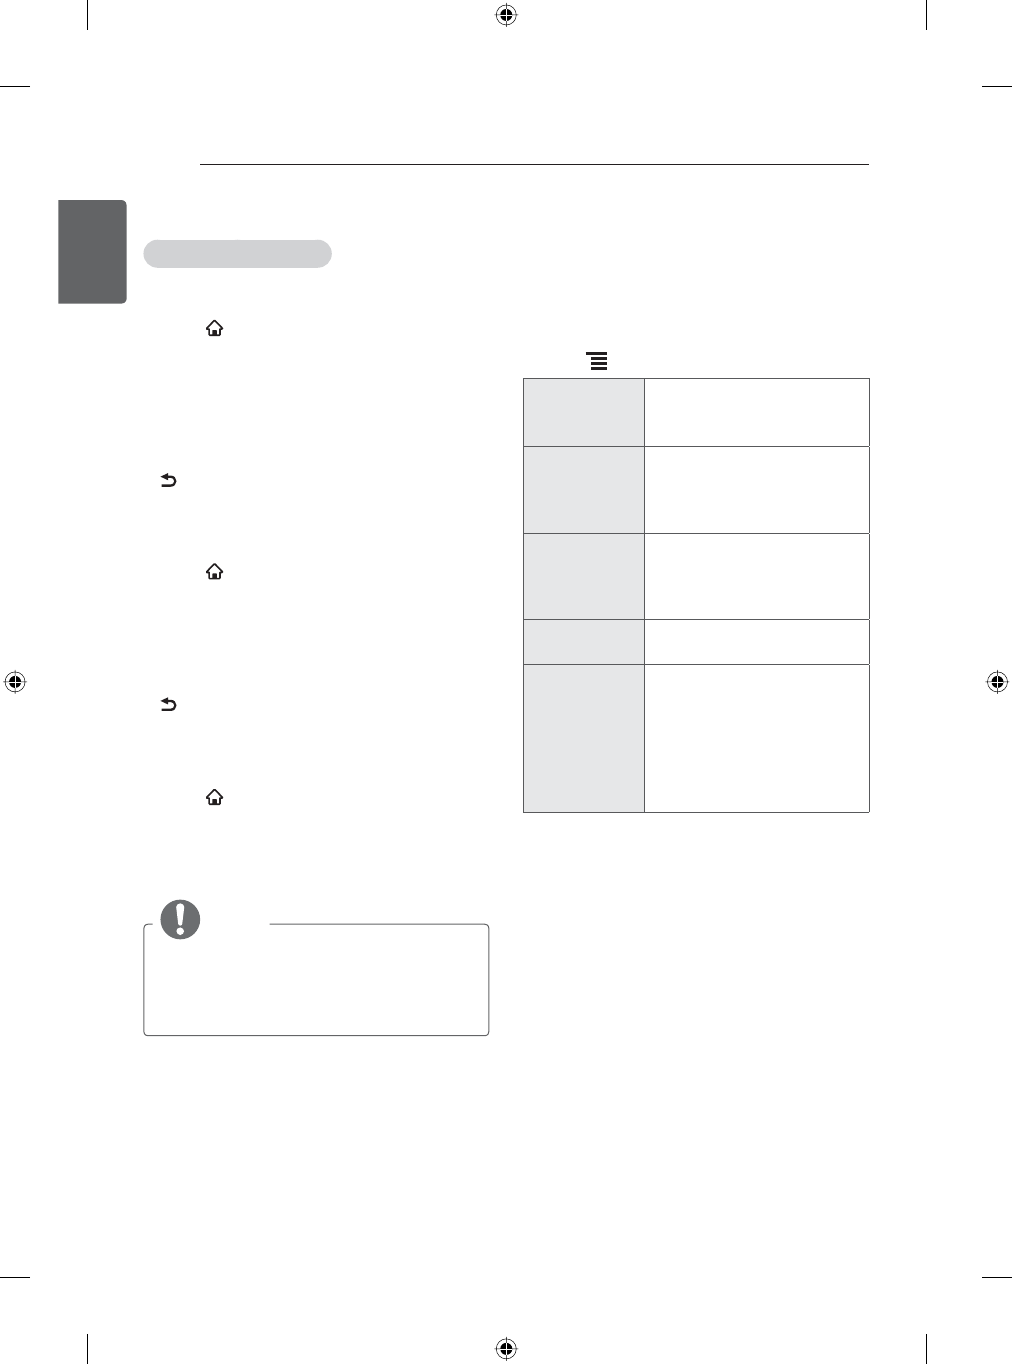
1 Press 䊯ረ to access the Quick setting.
㐎嘵⪧㉚ Depending on the input
signal, you can select the
screen size that you want.
㐎嘵⣴ᷢ Select the picture mode that
is best suited to your viewing
environment, preferences or
video type.
ៃ囆⣴ᷢ Select the sound mode that
is best suited to your viewing
environment, preferences or
video type.
㘴㗳䪑㹁 Sets the TV to turn off at a
VSHFL¿HGWLPH
囆坤䫀䣓囆坤
You can select various lan-
guages based on the Multi
Audio signals from a broad-
casting station. The Main
Language will be selected if
the broadcast does not sup-
port multiple languages.
41
ENGENGLISH
USING (BASIC)
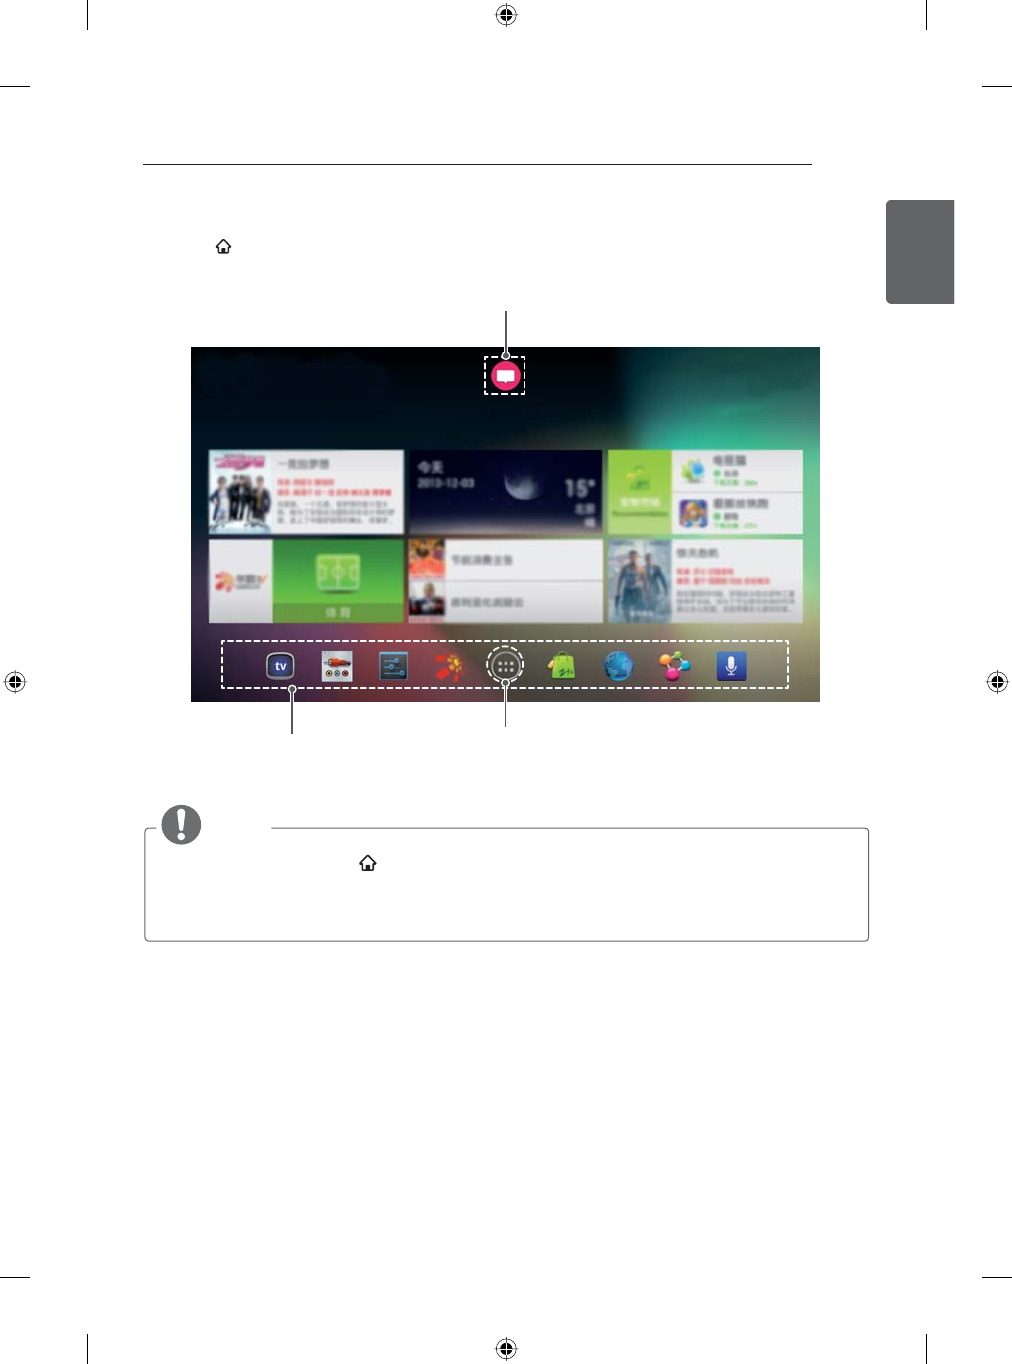
Accessing Home Menu
Press the എ坈 to access the Smarthome menu.
NOTE
yPressing and holding the എ坈 button will display a Recent menu to the TV.
yDepending on the version of the software, icon position can be changed.
yIf the TV is turned on for the first time after software update, initialization of the TV may take up
to one minute.
Launcher Bar
Notification Center
Apps
42
ENG
ENGLISH
USING (BASIC)
۽
ೝೞ
ᯐ
䅕㗁ლ∵
ᯙ
䢕㗞
DTV 2N-CHETT 'ROE\'LJLWDOᰇL
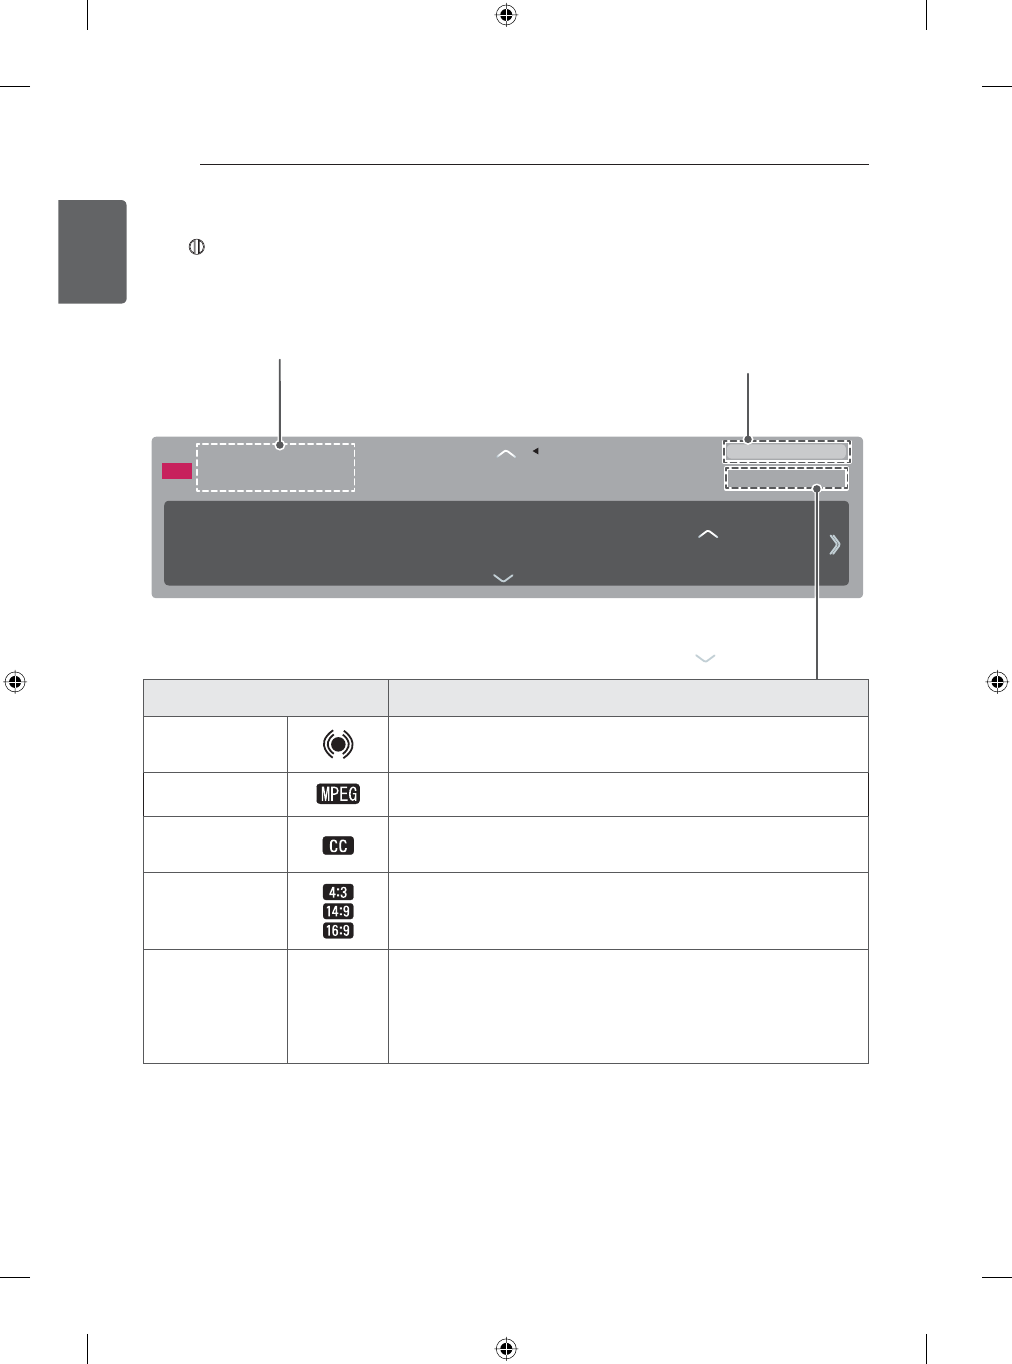
Checking current programme info
Press ⶭ乁(㝁ᩭ) and select 䪹㶙ິὂ to view the information of the current programme while you
are watching. The following information appears on the screen.
Programme Title
Current Time
Icon Description
Multilingual The programme contains two or more audio language services.
You can change the audio language on settings.
MPEG This program is a video compression coding technology.
Caption The programme contains one or more language caption
services. You can select a closed caption you want on settings.
Aspect ratio
The original aspect ratio of the video is 4:3.
The original aspect ratio of the video is 14:9.
The original aspect ratio of the video is 16:9 (wide).
Resolution
480i
480p
720p
1080i
1080p
The video resolution is 720 x 480i.
The video resolution is 720 x 480p.
The video resolution is 1280 x 720p.
The video resolution is 1920 x 1080i.
The video resolution is 1920 x 1080p.
31/03/2014 09:39 AM
43
ENGENGLISH
USING (BASIC)
Adjusting aspect ratio
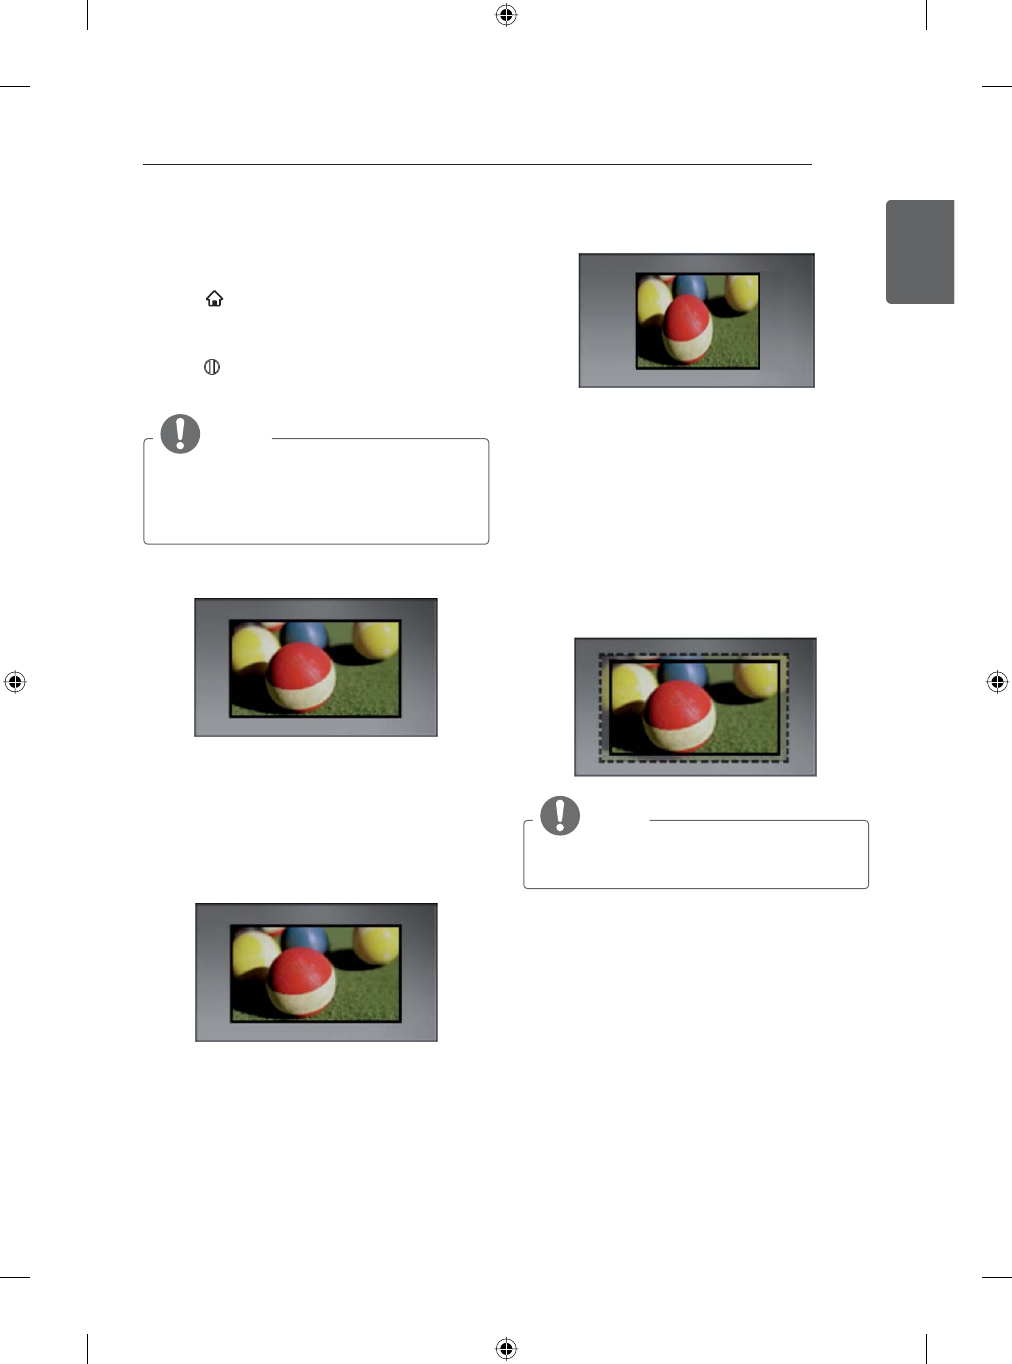
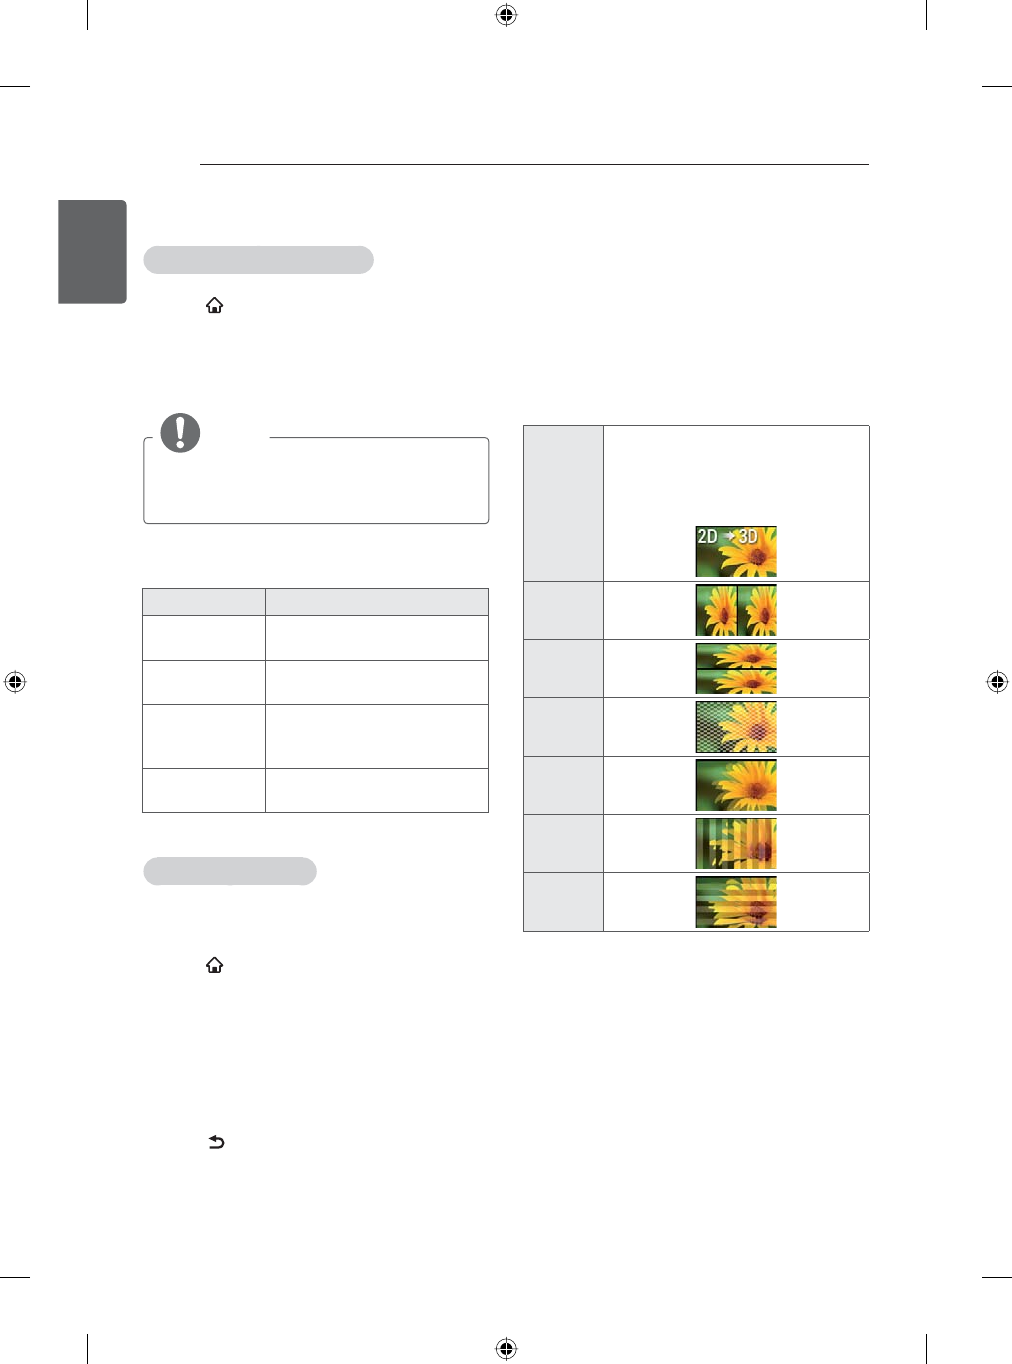
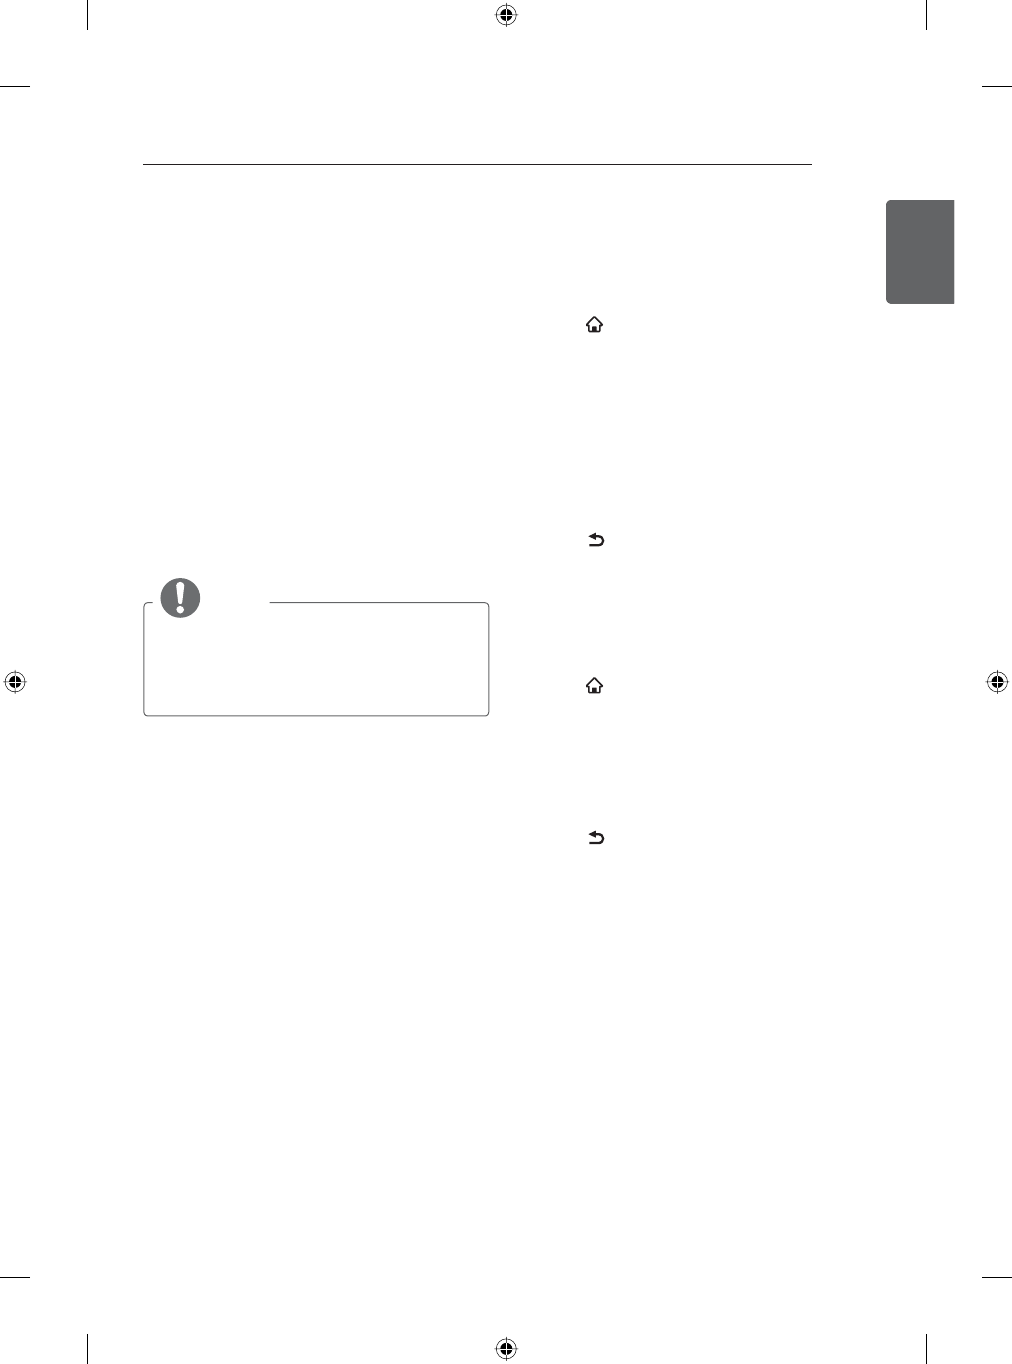
Resize an image to view its optimal size while
you are watching TV.
1Press എ坈 to access the Smarthome
menu.
2 Go to ᵧ㏻>䪑㹁>ᗑྡྷ>㐎嘵⪧㉚.
3 press ⶭ乁(㝁ᩭ).
4 Select a display method.
NOTE
yThe available ratio varies depending on
the input source.
»The input sources : HDMI-PC support 4:3
and 16:9.
-16:9 : Resizes images to fit the screen width.
-⾌ᫌ⾌ℾ⊢: No any resize images. It is
available the input signal is up to 720P
resolution.
-䂽ᅻ: When your TV receives a wide screen
signal it will automatically change to the
picture format broadcast.
䃱ᆯ
-ျ᪐ᬢWhen TV receives the wide screen
signal, it will let you adjust the picture
horizontally or vertically, in a linear proportion,
to fill the entire screen fully.
-4:3, 14:9 : Resizes images to the previous
standard 4:3 or 14:9.
-⑅ᠮ: You can move or select the aspect ratio
by pressing up or down button.
-Ṹ啩⤨Ḗ : Formats an image to the
cinemascope ratio, 2.35:1.
yTo change the ratio of the cinema zoom,
press left or right and its range is from 1
to 16.
yTo move the zoom focus up or down,
press up or down.
NOTE
yIf you enlarge or reduce an image, the
image may be distorted.
44
ENG
ENGLISH
USING (BASIC)
Using the input list
Selecting an input source
1Press എ坈 to access the Smarthome
menu.
2 Go toᵧ㏻ > 䪑㹁 > 䢙坤书း > 仜↼䢙坤书း.
The connected device displays on each input
source.
NOTE
yYou can also access the input source list
by selecting 偔㹵䣍垘亚ၬ in the 䫅㹵
menu.
3 Press the Navigation buttons to scroll to one
of the input sources and press ⶭ乁(㝁ᩭ).
Input source Description
ႌ㹵䬊䬗ᕯ Watch TV over the air, cable,
and digital cable broadcast.
AV Watch video from a VCR or
other external devices.
ᄍ僖
Watch video from a DVD or
other external devices, or
through a digital set-top box.
HDMI 1/2/3 Watch video from a HTS or
other high definition devices.
Editing input name
Edit the input name so that you can easily
identify a device connected to each input source.
1 Press ൂ坼 to access the Smarthome
menu.
2 Go to ᵧ㏻ > 䪑㹁 > 䢙坤书း>仜↼䢙坤书း
>㷩乤书း䪑៚ዠ㣃.
3 Select the 书း䪑៚ዠ㣃 and ⒃书း䪑៚ዠ㣃
to change the input name.
4 Select 䪑㹁 to save.
5 When you return to the previous menu,
press 产ᖱ
Viewing 3D Imaging (Only 3D
models)
1 Play the video produced in 3D.
2 Wear the 3D glasses.
3 Select the thumbnail matching the screen.
4 Press 3D button.
-Change Format : Change the video
thumbnails match.
2D丿3D Changed from 2D imaging to 3D
imaging.
2D-to-3D converted videos may
appear less realistic than titles
originally produced as 3D videos.
ᵉ≥
ೝೞ
➞㖫✏
ረᳺ亱㷀
㦩㗇൷召
⬇ᵆ൷召
-3D 䫅㹵 : Adjusts 3D settings.
-Picture adjustment : Adjusts the Picture
adjustment.
-3D 乳 2D : Changes the 3D to 2D.
-3D off : Turn off the 3D.This TV can display
in 3D via 3D broadcasting or when the TV is
connected to a compatible device, such as
a Blu-ray 3D Player. The viewer must wear
compatible 3D glasses in order to see these
images in 3D format.
45
ENGENGLISH
USING (BASIC)
yThis TV can be connected to display in
3D mode via 3D broadcasting or with a
compatible device (eg Blu-ray 3D player). The
viewer must wear compatible 3D glasses to
watch these images in 3D format.
yTo watch the TV in 3D, you must put on your
3D glasses. For best results, you should wear
LG Brand 3D glasses. The 3D imaging may
not display properly when using another brand
of 3D glasses. Please see the 3D glasses
manual for instructions on how to use the 3D
glasses.
yWhen watching 2D images, it is recommended
to take off the 3D glasses. If you watch 2D
images with the 3D glasses on, you may see
distorted images.
yWe recommend that you maintain a distance
of at least twice the screen diagonal length
when watching 3D videos.
NOTE
yIf 3D TV broadcast standard changes in
the future and it is not supported by this
TV set, you may need a separate device,
such as a set-top-box.
Using 3D Glasses
yDo not use the 3D glasses to replace your
corrective glasses, sunglasses or protective
goggles.
yDo not store the 3D glasses in hot or cold
locations.
yDo not drop objects onto the 3D glasses. Do
not drop or bend the glasses.
ySince the lenses of the 3D glasses are easily
scratched, make sure to clean only with a
soft cloth. Please shake off any dust before
using the cloth since the glasses are easily
scratched.
Using the customer support
Testing the Picture / Sound
To execute picture and sound tests.
1 Press എ坈 to access the Smarthome
menu.
2 Go to ᵧ㏻>䪑㹁>᩵ℊ␂⇔.
3 Select ᗑྡྷⰞ䪨 or ៃ囆Ⱎ䪨.
4 If you have any problem, select │. LG
customer service center and product
information appears. Contact LG customer
service center for help.
5:KHQ\RXDUH¿QLVKHGVHOHFW၆哀.
When you return to the previous menu,
press 产ᖱ.
Using the product or service
information
To check the product or service information
1 Press എ坈 to access the Smarthome
menu.
2Go to ᵧ㏻>䪑㹁>᩵ℊ␂⇔>ൺ᎔◠ᅴິὂ
3 You can check the various Product/Service
infomation based on your model.
4:KHQ\RXDUH¿QLVKHGVHOHFW၆哀.
When you return to the previous menu,
press 产ᖱ.

46
ENG
ENGLISH
APPLICATIONS
NOTE
yAndroid Browser only works with pre-
installed plug-ins.
yAndroid Browser is forcibly closed when
memory is insufficient.
yFor Android Browser, fonts installed
on the TV are used and may not be
displayed normally depending on the
content played.
yAndroid Browser does not support file
and font download.
yAndroid Browser is made for TV so it may
function differently from PC browsers.
yAndroid browser does not support the
Flash plug-in.
yAfter the user downloads Flash Player on
the Market and installs it, it is possible to
use it.
Browsing history
yTo access your Android Browser browsing
history, select and select ൭㪅 and select
ኍዹ䪷Ṝ. To clear your history, select ,䫅㹵,
喗㣈᎓᪐ၯ and ⴌ啫ኍዹ䪷Ṝ.
yTo clear all browsing data, including clearing
your cache, history and cookie data, select
and select 䫅㹵.
yPrivacy and security, clear the cache, and
clear the cache, clear history, clear all cookie
data
Advanced
Select and select 䫅㹵, then 姟㶮 to configure
several advanced options, including :
yOpen in background
yEnable javascript
yAllow multiple tabs per app
yEnable plug-ins
ywebsite setting
yDefault zoom
yopen pages in overview
yauto-fit pages
yblock pop-ups
yText encoding
yReset to default
APPLICATIONS
Android Browser
Getting started
1 Select the Ⱒ䢛ᔻ in Smarthome or in ᵧ㏻.
2 While using Android Browser, select to
manage your browser windows, bookmarks,
history, and more. Select 䫅㹵WRFRQ¿JXUH
your browser settings.
Browser windows
yTo open a new window,
Select the icon left of and select + to
create new window, or press Ctrl + T on your
controller.
yTo view all open windows,
Select the icon left of and select windows.
yTo reload a browser window,
select and then ᄾⒷ or press Ctrl + R on
your controller.
Android Browser shortcuts
(Only Qwerty remote)
yThe shortcuts are valid only in English input
mode.
Ctrl + R Reloads the current tab.
Ctrl + T Opens a new tab.
Ctrl + W Closes the current tab.
Ctrl + D Adds to Bookmarks or Home
Screen.
Ctrl + F Opens the find on page bar.
Space bar Scrolls down the current web
page.

47
ENGENGLISH
APPLICATIONS
AnZhi TV
Getting started
The AnZhi offers easy access to Android
applications available on android TV.
Start AnZhi TV from launcher bar or ᶛ㐯.
All items downloaded to your android TV will be
accessible under ᶛ㐯 (press ൂ坼 and select
ᶛ㐯).
How to download or remove apps
Downloading Apps
* System storage capacity of 500MB or less if,
There is a possibility that the malfunction of a
serious system occurs. Please ensure suffi-
cient storage space on the system.
1 Navigate to an item you want to install and
select it. The item details screen will appear
and you can read more about the item and its
developer.
2 If you want to install the item, select the ᪐䟌.
After selecting ᪐䟌 to download, the
GRZQORDGLV¿QLVKHG\RXZLOOEHSURPSWHGWR
set the security installation.
3 Select ᪐䟌 to accept the permissions for
the app, the item will start downloading
immediately.
Removing Applications
1 From the home page select “᪐▁ᴉᙁTV”,and
select “㪨㌍”.
2 Select the item you’d like to uninstall.
3 select the ቿ亄.
SmartShare
You can enjoy contents of smart phone, PC,
USB, and camera directly in TV through
SmartShare.
Connect mobile device
1 Connect mobile device to TV network.
2 Execute share feature or application in mobile
device.
3 Check the mobile device list connected to TV.
Connect PC
1 Setup the SmartShare programme in PC.
2$IWHUFRPSOHWLRQRISURJUDPPHVHWXSSXW¿OHV
in the share folder.
3 Connect PC to TV network.
4 Check the PC list connected to TV.
Connect USB
1 Insert USB storage device into USB port
behind TV.
2 Check the USB storage device list connected
to TV.
Movie, Photo, and Music
Browse movie, photos, and music on a sharing
website. You can also browse movie, photos,
and music in the connected devices.
Keys available during playback
Ź
Starts or re-starts playback (video/
music playback). Starts Slideshow
or starts moving a panoramic
photo (photo playback).
Pauses playback (video/music
playback).
Stops playback. Stop playing video
or music playback, and return to
the file list.
Fast rewinds/Fast forwards the
title/track.
Skips to the previous/next title
(video playback).
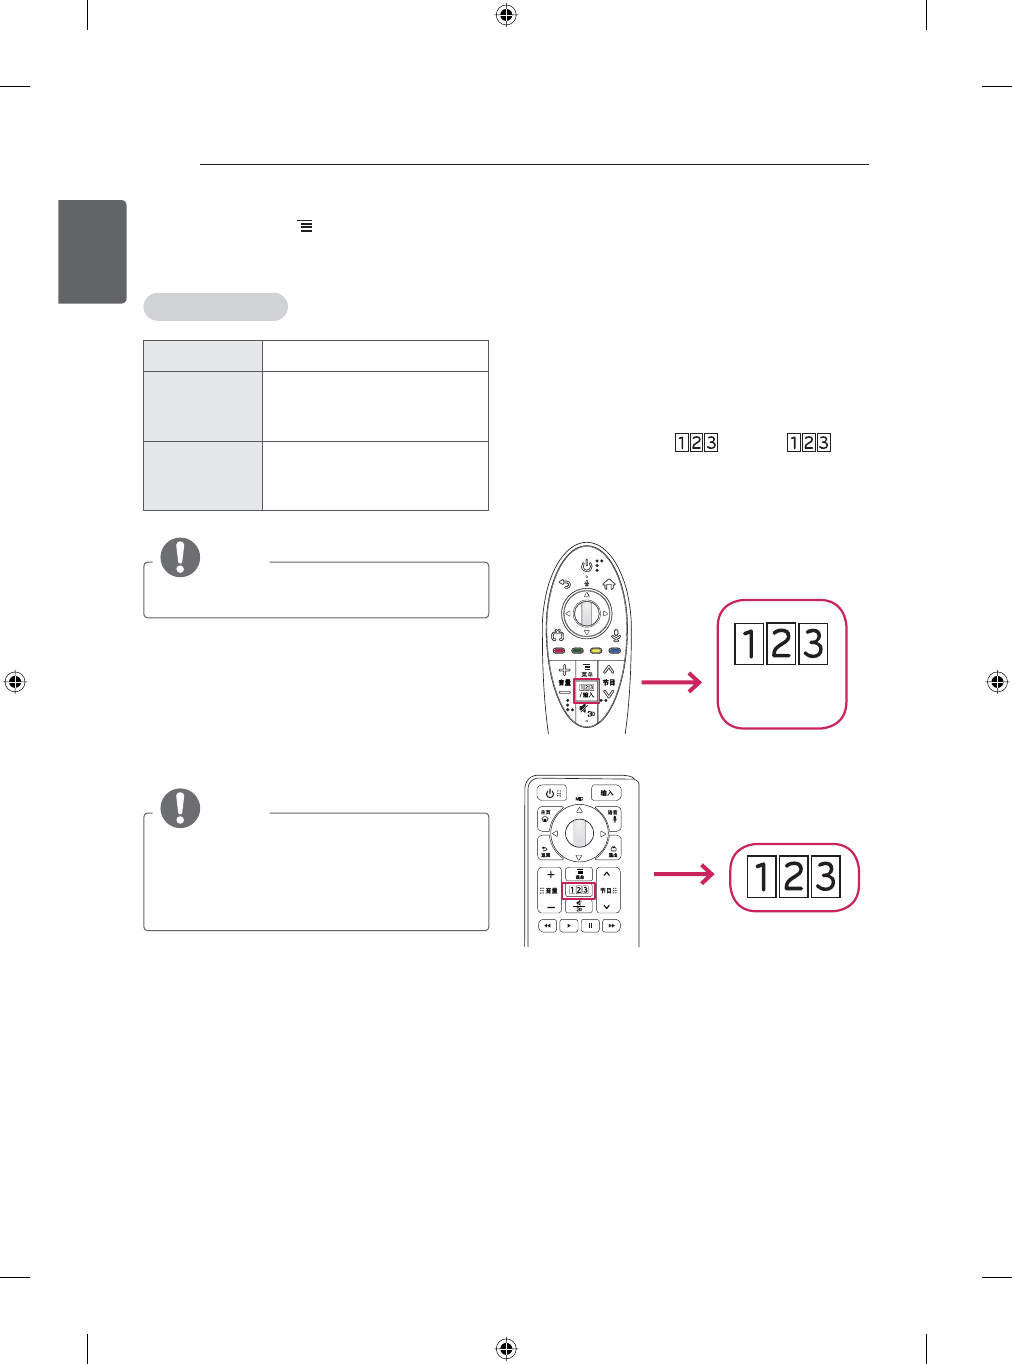
48
ENG
ENGLISH
APPLICATIONS
Various settings and playback operations are
available by pressing 䊯ረ during playback.
The available items differ depending on the
situation.
Photo playback
Slide show You can start a slideshow.
Rotate
You can rotate photo files
clockwise (Right) by 90
degrees.
Slide show
setting
You can adjust the speed
or random play of the slide
show.
NOTE
yUSB devices must be less than 2TB.
Dual Play
To enjoy the game with dual-display, use the
DualPlay application. You can select the mode
between Top-bottom and Side By Side.
NOTE
yIt is available only for Game console
mode.
yIt is available only when connected with
HDMI supporting the DualPlay feature.
OSS
(This feature is not available on all models. also
this feature is only supported in some areas.)
To use the Universal Control function
With the Magic Remote, you can easily control
your set-top box, Blu-ray player, home theater
system, and Sound Bar.
1 Check if the device is connected to the TV.
2 After pressing the / 书း or
buttons on the Magic Remote, select the
device you want to control in the Change
Device tab. The Screen Remote that can
control the device appears.
/书း
or
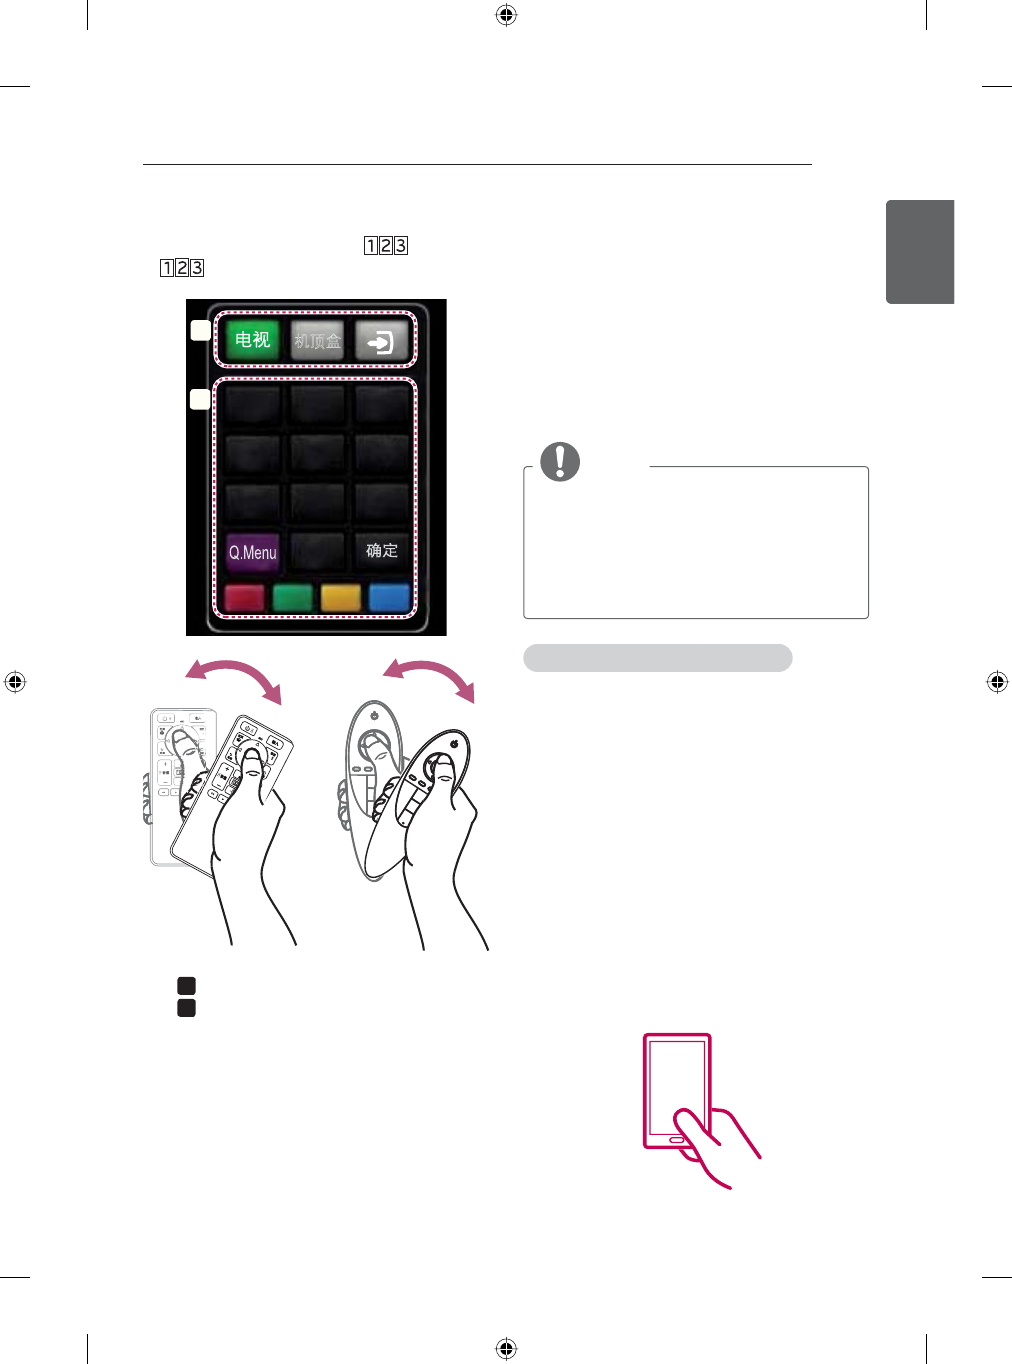
49
ENGENGLISH
APPLICATIONS
3 You can control external devices using the
Screen Remote on the screen.
(This may not work with the / 书း or
buttons on for some models.)
123
456
789
0
绔ꊝ踷
a
b
or
»a : Change Device tab.
»b : Device control buttons.
Tag On
(This feature is not available for all models.)
This application is only compatible with LG
Android TVs which provide Tag On stickers.
Simply tap an NFC-equipped smartphone
against a Tag On sticker to use the game remote
control app which is provided by LG Electronics
and is exclusively for Android TVs.
In order to use this application, enable NFC on
your smartphone.
NOTE
yTo ensure Tag On sticker registers
properly with NFC Smartphone , Do Not
attach Tag On sticker to a metal surface.
yTo ensure Tag On sticker registers
properly with NFC Smartphone , Do Not
fold , crush or cut Tag On sticker.
Key Features and Instructions
yYou can share content between your LG
Android TV and smartphone by using the
Tag On app. You can also enjoy playing
games on the TV by using the LG TV
Gamepad app.
yTouching the smartphone to the Tag
On sticker, packaged together with the
LG Android TV, will take you to the LG
Android Tag On app download page to
download the app.
yRun the LG Android TV Tag On app to
immediately use the LG TV Gamepad
app which is provided by LG Electronics
and is exclusively for Android TV.
yNow with the Tag On sticker, all the smart
features of the LG Android TV are just
one touch away!
Tag On
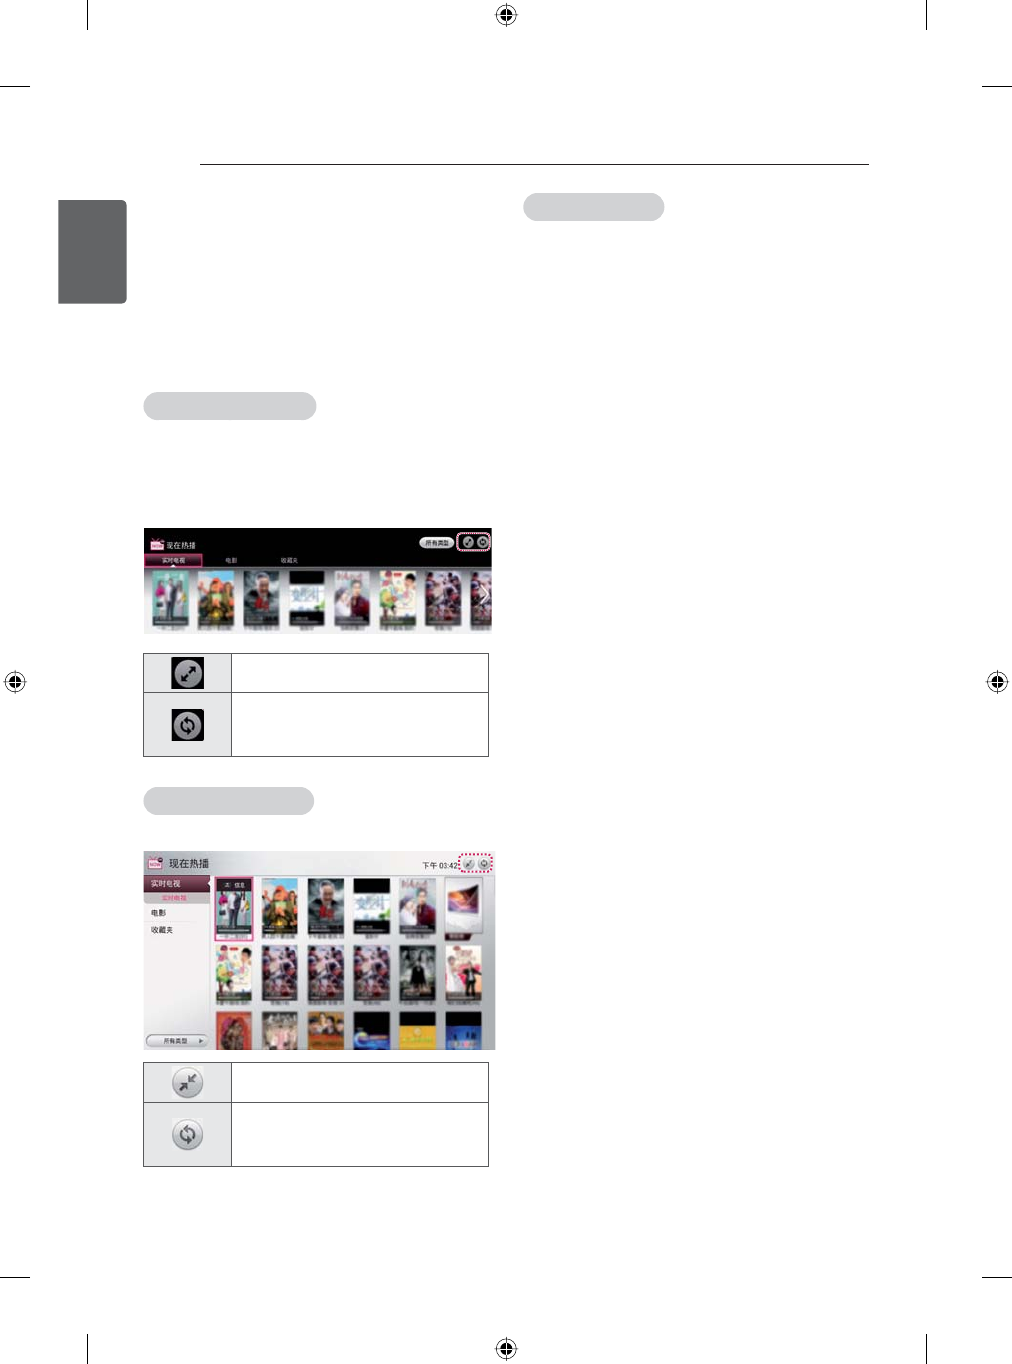
50
ENG
ENGLISH
APPLICATIONS
On now
(This feature is not available on all models. also
this feature is only supported in some areas.)
On Now allows you to select and watch recommended
programs currently available on your TV. On Now
allows you to select and watch recommended content
related to the program you are watching.
To see in Mini view
1 Home > Apps > On Now app
2 Press the Wheel(OK) button while watching
to select the On Now on the activated
channel banner area.
Moves to Full View.
Refreshes all list items and moves
to the beginning of the screen
simultaneously.
To see in Full View
1 On Now miniView click full view button.
1
1
Move to Mini view.
Refreshes all the list items
and moves the screen up
simultaneously.
To use On Now
yFor TV channels, you need to complete
Auto Tuning to use this service properly.
yIf you move to a different region, you
need to Auto Tuning again to your current
location in order to use this service.
yThe digital EPG (Electronic Program
Guide) information which the TV receives
may be different from the programs
on the On Now TV list which uses an
external EPG (Electronic Program
Guide).
yYou can control a connected set-top box
tuner with the Magic Remote Control.
yAn internet connection is required to use
On Now.
yThe channels in the On Now TV list are
provided from the Service Operator. If the
Service Operator changes them without
notice, the actual TV channels may differ.
yThe channel names of Service Operator
on the On Now TV list are provided from
an external EPG (Electronic Program
Guide), so each name refers a Service
Operator but may not match.
yThe program thumbnail image on the On
Now TV list is the representative image
of the program, and it may be different
from the image of the actual TV program
schedule.
yA scrambled channel may be displayed
occasionally, depending on the TV signal
type.
yOn Now function may not work with some
set-top box models.
51
ENGENGLISH
SETTINGS
SETTINGS
The Main Menus
You can choose to set up or navigate to the
settings in the application home page to view
or edit your television set. You will be able to
review or update the TV settings including:
㸤㶯 Manage internet
connection.
ᗑྡྷ Adjust the Picture.
ៃ囆 Adjust the Sound.
䅕㗁 Set up and edit
programmes.
䢙坤书း Select an input source.
Ⓒ◲፟Ⓣ哇 Set date, time, time zone
and formats.
ᵧ㏻ Manage applications and
development options.
啣㢔፟ᩜျ Manage privacy, safety
and lock settings.
䪒品Ỻ Manage accessibility
options.
仜坌 Manage system option.
᩵ℊ␂⇔ Check the customer
information.
㹘㷣 (Network)
Manage Internet connection.
ම㸤 You can set up the status of
the wired network connection.
Wi-Fi You can select an available
Wi-Fi network from the list of
Wi-Fi networks found in your
area or set up a new Wi-Fi
network.
㸤㶯䪝⒀Ჸ၊ Launch network diagnostic
tool.
⃤㕗㐈䢙ዠ㣃 You can see the your TV
name.
ᘅ࿖ (Picture)
Adjust the energy saving mode, 3D settings,
Picture mode, aspect ratio and sound effects.
䅕㿐⣴ᷢ Adjust the TV backlight to
save power energy
3D䪑㹁 Adjust the 3D settings.
㐎嘵⣴ᷢ Adjust the Picture mode.
㐎嘵⪧㉚ Adjust the aspect ratio.
㐎䯻娧⮨᳛ݓ Adjust the image quality and
calibrate the screen
៷固 (Sound)
Adjusts sound effects.
ៃ囆⣴ᷢ Adjusting the sound mode
䔭↲㊂㶨囆␛ Set the Virtural surround.
⽾ඁඍៃ Set the Clear voice.
ℿៃᔻ Select TV or external
speaker.
ៃྡྷዟ⨸ Set the AV Sync.
囆傢 Adjust the volume level.
ៃ囆෫ᇩᔻ Adjust the sound quality,
effect or volume level.
嶫䩷仭㚸⊣㠍囆 Select Silent if you want
to silence the notification
sounds.
52
ENG
ENGLISH
SETTINGS
䆉㗵 (Programme)
Set up and edit programmes.
䂽ᅻ⋯ዃ Tune and Store all available
programmes through
antennas or cable inputs.
℞ᅻ⋯ዃ Manual station search and
save programmes.
䅕㗁ც䜻 View the Programme list.
CIິὂ Read and set CI information.
⑃ᨪ◜㶒亣䋸ᐙ Select digital cable
operators.
䣍垘亚ၬ (Video Input)
Select an input source.
倠㹁䢙坤书း Edit configured devices.
(You can select the device
to control or to set as the
tuner.)
仜↼䢙坤书း Select available source. (To
add a device, select it from
the list.)
⓬☦᎓⓽哻 (Date & time)
䃱ᆯ㝵᪡⓬☦᎓
⓽哻
Use provided network time.
䫅㹵⓬☦ Set the date manually.
䫅㹵⓽哻 Set the time manually.
伐⇰⓽ቁ Select time zone
ຆ㐯ᬖ⓽❃Ḗ Select the 24-hour format.
伐⇰⓬☦❃Ḗ Choose date format.
᪡⓽ၺ♁ Set the time to turn Off the
TV automatically.
᪡⓽ḇ♁ Set the time to turn On the
TV automatically.
㙨㘧䫅㹵 Set the length of time
before the TV turns off.
ᶛ㐯 (Application)
Manage applications and development options.
◽㚸ⵣ Allow installation of Unknown
sources.
奟䪔ᵧ㏻ Verify apps.
㩴㋙ᵧ㏻ Manage and remove installed
applications.
喗㣈᎓᪐ၯ (Privacy & safety)
Manage privacy, safety and lock settings.
᪉呒叔 Lock or Unlock channels and
programmes.
䪑៚㩴㋙ᔻ View or deactivate device
administrators.
䫆哵Ἦ (Accessibility)
Manage accessibility options.
ዊᨪฦ Allow applications to
download accessibility scripts
from Google.
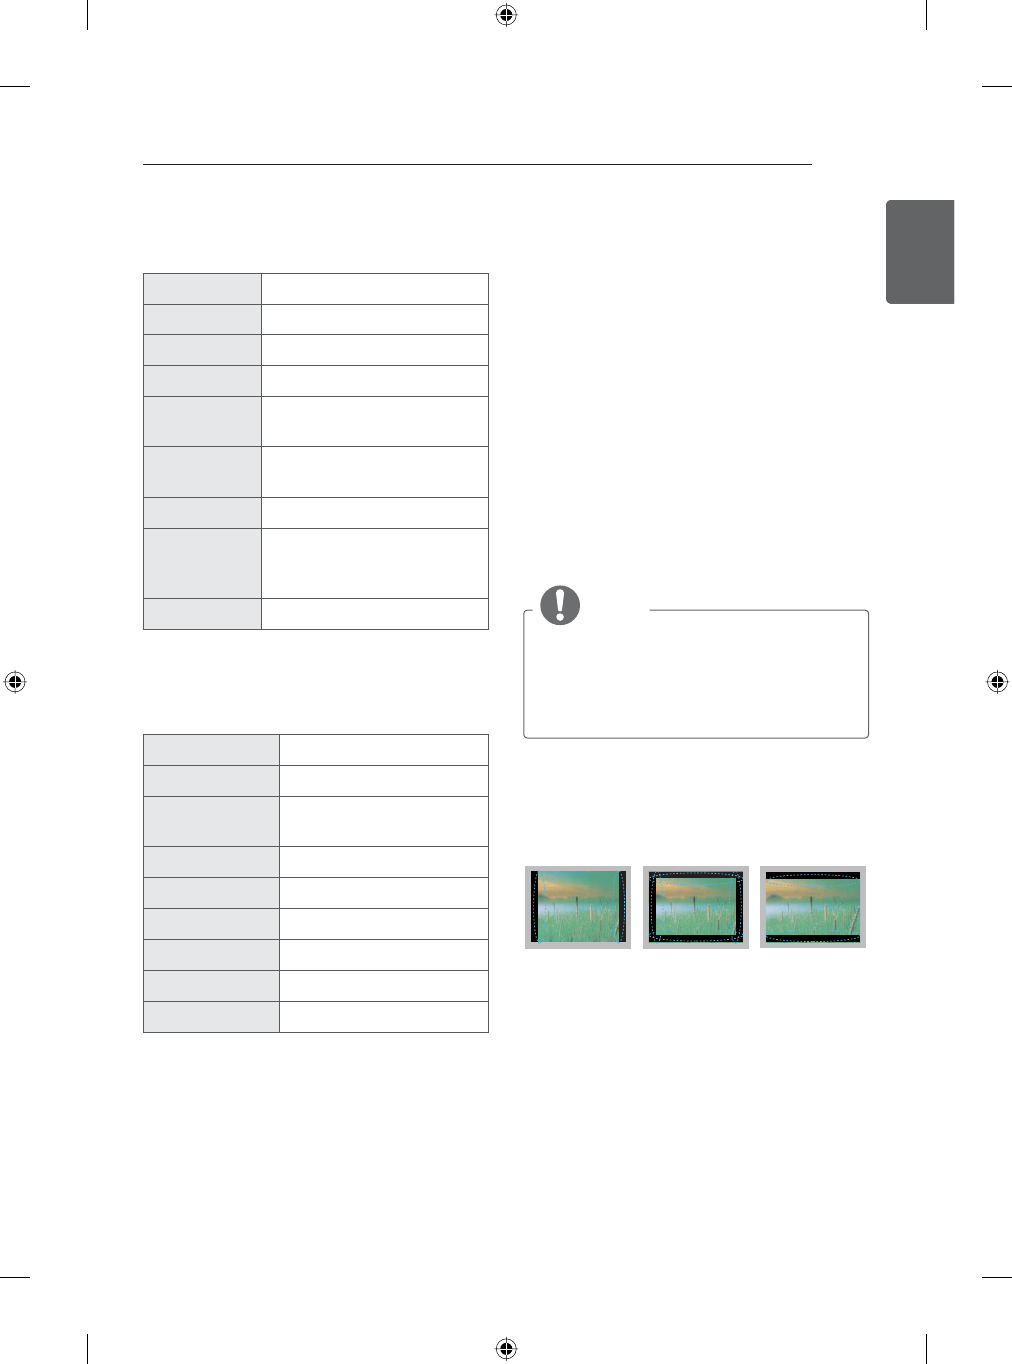
53
ENGENGLISH
SETTINGS / APPENDIX
伐垀 (Options)
Manage system option.
囆坤䫀䣓 Select the audio language.
䫀䣓 Select a language.
ᨪฦ Set the font size.
㊂仜↼ Select your environment.
ᨫཻ Unmount USB storage, view
available storage.
ጂ㏻)73䪒品 Set the FTP server to be
disabled or enabled.
书း䪑៚ Manage input devices
ჰᢞᇩ䪑㹁 Factory Reset. All user
settings and programme
settings will be reset.
┑㠍䫀囆ᅼ℞ See avatar.
᪩ℾ∈ (Customer Support)
Views the system information.
ᗑྡྷⰞ䪨 Select Picture test.
ៃ囆Ⱎ䪨 Select Sound test.
ൺ᎔◠ᅴິὂ Show the Product or
Service information.
ᷓ␑ⵣබ㛔䪋ዂ Open source licenses.
㏻ℊሢ䪁 Users agree.
ᙞዊ View the model name.
ᩜሦㄛ◿ View the android version.
ၘ✋ㄛ◿ View the kernel version.
ㄛ◿ዊ View the build number.
APPENDIX
Updating the TV system
Download and install the latest system through
network signal to enhance or change the product
function, or add new features.
To check the current firmware version or update
the firmware,
1 Go to ᵧ㏻>㯎㶲◇⒃
2 Press the navigation button to open the
㯎㶲◇⒃.
37KHFXUUHQW¿UPZDUHYHUVLRQGLVSOD\V
If new update exists, the download is
started automaticaly on background. When
downloading is completed, a Pop-up appears.
Then update your system.
NOTE
yYou cannot downgrade back to an older
system version.
yThe period of time for the firmware
update may be different depending on the
firmware size and network bandwidth.
Preventing “Image burn” or
“Burn-in” on your TV screen
yIf a fixed image displays on the TV screen for
a long period of time, it will be imprinted and
become a permanent disfigurement on the
screen. This is “image burn” or “burn-in” and
not covered by the warranty.
yIf the aspect ratio of the TV is set to 4:3 for a
long period of time, image burn may occur on
the letterboxed area of the screen.
yAvoid displaying a fixed image on the TV
screen for a long period of time (1 or more
hours for the Plasma TV) to prevent image
burn.
54
ENG
ENGLISH
MAINTENANCE
MAINTENANCE
Cleaning your TV
Clean your TV regularly to keep the best
performance and to extend the product lifespan.
CAUTION
yMake sure to turn the power off and
disconnect the power cord and all other
cables first.
yWhen the TV is left unattended and
unused for a long time, disconnect the
power cord from the wall outlet to prevent
possible damage from lightning or power
surges.
Screen, frame, cabinet and stand
yTo remove dust or light dirt, wipe the
surface with a dry, clean, and soft cloth.
yTo remove major dirt, wipe the surface
with a soft cloth dampened in clean water
or a diluted mild detergent. Then wipe
immediately with a dry cloth.
CAUTION
yAvoid touching the screen at all times, as
this may result in damage to the screen.
yDo not push, rub, or hit the screen
surface with your fingernail or a sharp
object, as this may result in scratches
and image distortions.
yDo not use any chemicals as this may
damage the product.
yDo not spray liquid onto the surface. If
water enters the TV, it may result in fire,
electric shock, or malfunction.
Power cord
Remove the accumulated dust or dirt on the
power cord regularly.
ᶦḊ᠋㌍
ೠ䡔ೡ䃿㕗᪉ᶀᵲᷖㄼ䱊ᷖঔ
✌≁Ḧᘃ㼟㿐侻咻㕗䢗ᩭៗ㋙䪸ൺ᎔ঔ

55
ENGENGLISH
TROUBLESHOOTING
TROUBLESHOOTING
General
Problem Solution
Cannot control the TV
with the remote control.
yCheck the remote control sensor on the product and try again.
yCheck if the batteries are still working and properly installed ( to , to ).
No image display and
no sound is produced.
yCheck if the product is turned on.
yCheck if the power cord is connected to a wall outlet.
yCheck if there is a problem in the wall outlet by connecting other products.
Image appears slowly
when the TV turns on.
yThe image is muted during the product startup process. This is normal.
If the image does not appear in a few minutes, unplug the TV for 30
seconds and try again. If the image still does not appear, contact the
authorized service center in your local area.
Cannot connect
external devices.
yRefer to the "Connection Overview" and connect an external device.
The TV turns off
suddenly.
yCheck the power control settings. The power supply may be interrupted.
yCheck if the 㘴㗳䪑㹁 or ᩭⓉ၆☍ feature is activated in the Ⓒ◲፟Ⓣ哇
settings.
yIf there is no signal while the TV is on, the TV will turn off automatically
after 15 minutes of inactivity.
Audio
Problem Solution
No sound is produced
while images are
displaying.
yPress 囆傢 button.
yCheck if the sound is muted by pressing (MUTE).
yScroll to other programmes. Individual programs may be broadcast
signal problems.
yCheck if the TV Speaker feature is activated in the settings.
No output from one of the
speakers
yAdjust Balance in the settings.
Unusual sound from
inside the TV is produced.
yA change in ambient humidity or temperature may result in an
unusual noise when the product turns on or off. There is no problem
with your product.
Browser
Problem Solution
While using internet
features, there is space
that does not appear in
some web sites.
yDo not support flash and may not replay any file format other than the
following
: JPEG, PNG, GIF, BMP, WMV (ASF), WMA, MP3, MP4.
Internet closes
automatically when
visiting website.
yIf memory is insufficient because of large volume of image information
in the web page, internet may be forced to close.
exception for Internet
downloading application
runtime
yCan not ensure that the application can be used normally on TV, it is
recommended to download APP from ING markets.
56
ENG
ENGLISH
TROUBLESHOOTING
Video
Problem Solution
An image displays in black
and white or the color
quality is poor.
yAdjust the color setting in the menu option.
yKeep a sufficient distance between this product and other electronic
products.
yScroll to other programmes. There may a problem with the broadcast.
Horizontal or vertical bars
appears or images blur
yCheck if there are local interferences such as an electrical appliance
or power tool.
Lines or streaks appear on
images
yCheck the antenna or aim the antenna to the proper direction.
Afterimages (ghosts)
appear when the product
turns off
yPixels may have been damaged from a fixed image displayed for
a long time (image burn). Use a screen saver to prevent the pixel
damage on the screen.
The power is on but the
screen appears extremely
dark.
yAdjust the brightness and contrast in the menu option.
“No Signal” appears on
the screen.
yCheck if the signal cable is connected between the TV and products
properly.
Black spots appear on the
screen.
ySeveral pixels in red, green, white, or black may appear on the
screen that can attribute to the characteristics of the panel.
This is normal.
The display offset is
wrong.
yAdjust the position setting in the settings.
yCheck if the video card resolution and frequency are supported by
the product. If the frequency is out of range, set to the recommended
resolution using the display settings on the external device.
Thin lines appear in the
background of the screen.
yCheck the video cable connections.
The reception on some
programmes is poor.
yScroll to other programmes. There may a problem with the broadcast.
yThe station signal may be weak. Aim the antenna to the proper
direction.
yCheck if there is local interferences such as an electrical appliance
or power tool.

57
ENGENGLISH
TROUBLESHOOTING
Movie
Problem Solution
Message is displayed
saying “This file is invalid”
or the audio is working
normally but the video is
not working normally.
yCheck whether the file is playing normally on a PC.
(Check whether the file is damaged.)
yCheck whether the resolution is supported.
yCheck whether the video/audio codec is supported.
yCheck whether the frame rate is supported.
Message is displayed
saying “Unsupported
Audio” or the video is
working normally but
the audio is not working
normally.
yCheck whether the file is playing normally on a PC.
(Check whether the file is damaged.)
yCheck whether the audio codec is supported.
yCheck whether the bit rate is supported.
yCheck whether the sample rate is supported.
Subtitle is not working. yCheck whether the file is playing normally on a PC.
(Check whether the file is damaged.)
yCheck whether the video file and subtitle file name are the same.
yCheck whether the video file and subtitle file are located in the same
folder.
yCheck whether the subtitle file is supported.
yCheck whether the language is supported. (When you open the
subtitle file in Memo Pad, you can check the language of the subtitle
file.)
58
ENG
ENGLISH
SPECIFICATIONS
SPECIFICATIONS
Product specifications may be changed without prior notice due to upgrade of product functions.
For the power supply and power consumption, refer to the label attached to the product.
MODELS
42GB58** 47GB58** 50GB58**
42GB5800-CB 47GB5800-CB 50GB5800-CB
Dimensions
(W x H x D)
With stand (mm)
961 x 610 x 218 1073 x 676 x 255 1128 x 708 x 255
Without stand(mm)
961 x 567 x 55.5 1073 x 629 x 55.8 1128 x 660 x 55.8
Weight With stand (kg)
9.5
12.7 14.2
Without stand (kg)
9.2
12.3 13.8
Power requirement
AC 100-220 V ~ 50 Hz AC 100-220 V ~ 50 Hz AC 100-220 V ~ 50 Hz
MODELS
55GB58** 42GB63** 47GB63**
55GB5800-CB 42GB6310-CC 47GB6310-CC
Dimensions
(W x H x D)
With stand (mm)
1243 x 772 x 255 960 x 610 x 218 1072 x 677 x 247
Without stand(mm)
1243 x 725 x 56.8 960 x 567 x 54.5 1072 x 629 x 54.5
Weight With stand (kg)
17.7 9.9 13.4
Without stand (kg)
17.3 9.6 13.0
Power requirement
AC 100-220 V ~ 50 Hz AC 100-220 V ~ 50 Hz AC 100-220 V ~ 50 Hz
MODELS 55GB63** 65GB63** 42GB65**
55GB6310-CC 65GB6310-CC 42GB6500-CA
Dimensions
(W x H x D)
With stand (mm)
1241 x 772 x 247 1462 x 898 x 314 960 x 610 x 218
Without stand(mm)
1241 x 725 x 55.5 1462 x 850 x 59.2 960 x 567 x 54.5
Weight With stand (kg)
18.7 30.5 9.9
Without stand (kg)
18.3 29.0 9.6
Power requirement
AC 100-220 V ~ 50 Hz AC 100-220 V ~ 50 Hz AC 100-220 V ~ 50 Hz
MODELS
47GB65** 55GB65** 60GB65**
47GB6500-CA 55GB6500-CA 60GB6500-CA
Dimensions
(W x H x D)
With stand (mm)
1072 x 677 x 247 1241 x 772 x 247 1351 x 834 x 271
Without stand(mm)
1072 x 629 x 54.5 1241 x 725 x 55.5 1351 x 788 x 57.5
Weight With stand (kg)
13.4 18.7 22.4
Without stand (kg)
13.0 18.3 21.8
Power requirement
AC 100-220 V ~ 50 Hz AC 100-220 V ~ 50 Hz AC 100-220 V ~ 50 Hz
59
ENGENGLISH
SPECIFICATIONS
MODELS
47GB67** 55GB67** 65GB72**
47GB6780-CD 55GB6780-CD 65GB7200-CA
Dimensions
(W x H x D)
With stand (mm)
960 x 629 x 238
1229.8 x 767.5 x 247.5 1449.5 x 883.7 x 313.9
Without stand(mm)
960 x 567 x 54.5
1229.8 x 708.6 x 55.1 1449.5 x 840.8 x 58.1
Weight With stand (kg)
10.1 18.5 27.9
Without stand (kg)
9.6 17.9 26.5
Power requirement
AC 100-220 V ~ 50 Hz AC 100-220 V ~ 50 Hz AC 100-220 V ~ 50 Hz
MODELS
70GB72** 47GB78** 55GB78**
70GB7200-CA 47GB7800-CC 55GB7800-CC
Dimensions
(W x H x D)
With stand (mm)
1574 x 970 x 314 1061 x 702 x 268 1231 x 797 x 327.5
Without stand(mm)
1574 x 919 x 60.2 1061 x 623 x 55.1 1231 x 718 x 55.1
Weight With stand (kg)
31.6 15.1 21.6
Without stand (kg)
30.1 12.8 18.5
Power requirement
AC 100-220 V ~ 50 Hz AC 100-220 V ~ 50 Hz AC 100-220 V ~ 50 Hz
MODELS
60GB78**
60GB7800-CC
Dimensions
(W x H x D)
With stand (mm)
1338.4 x 857 x 327.5
Without stand(mm)
1338.4 x 778.8 x 58.1
Weight With stand (kg)
24.8
Without stand (kg)
21.3
Power requirement
AC 100-220 V ~ 50 Hz
60
ENG
ENGLISH
SPECIFICATIONS
Digital TV Analogue TV
Television System '70%'9%& PAL D/K, PAL I, NTSC M
Program Coverage DTMB : 1 ~ 62
DVB-C : 52.5 MHz ~ 866 Mhz
PAL D/K : VHF/UHF 1 ~ 62, CATV 1 ~ 41
PAL I : VHF/UHF 1 ~ 69, CATV 1 ~ 47
NTSC M : VHF/UHF 2 ~ 78, CATV 1 ~ 71
External Antenna
Impedance 75 ȍ75 ȍ
Environment
condition
Operating Temperature 0°C ~ 40°C
Operating Humidity Less than 80 %
Storage Temperature -20°C ~ 60°C
Storage Humidity Less than 85 %
61
ENGENGLISH
SPECIFICATIONS
HDMI-DTV supported mode
Resolution
Horizontal
Frequency
(kHz)
Vertical
Frequency
(Hz)
640 x 480 31.469 / 31.5 59.94 / 60
720 x 480 31.469 / 31.5 59.94 / 60
720 x 576 31.25
15.625
50
50
1280 x 720 37.5
44.96 / 45
50
59.94 / 60
1920 x 1080
33.72 / 33.75
28.125
28.125
26.973 / 27
33.716 / 33.75
56.25
67.432 / 67.5
59.94 / 60
25
50
23.976 / 24
29.97 / 30.00
50
59.94 / 60
HDMI-PC supported mode
Resolution
Horizontal
Frequency
(kHz)
Vertical
Frequency
(Hz)
640 x 350 31.468 70.09
720 x 400 31.469 70.08
640 x 480 31.469 59.94
800 x 600 37.879 60.317
1024 x 768 48.363 60.004
1152 x 864 54.348 60.053
1360 x 768 47.712 60.015
1280 x 1024 63.981 60.020
1920 x 1080 67.5 60.00
Component port connecting information
Component ports
on the TV
YP
BPR
Video output ports on
DVD player
YP
BPR
Y B-Y R-Y
YCbCr
YPbPr
Signal Component
480i/576i O
480p/576p O
720p/1080i O
1080p O
(50 Hz / 60 Hz only)
62
ENG
ENGLISH
SPECIFICATIONS
3D supported mode (Only 3D models)
yVideo, which is input as below media contents is switched into the 3D screen automatically.
3D supported mode automatically
Input Signal
Horizontal
Frequency
(kHz)
Vertical
Frequency
(Hz)
Playable 3D video format
HDMI
480p 31.469 / 31.5 59.94 / 60
Side by Side(Half), Top & Bottom,
Side by Side(Full)
62.938 / 63 Frame Packing, Line Alternative
576p 31.25 50
Side by Side(Half), Top & Bottom,
Side by Side(Full)
62.5 Frame Packing, Line Alternative
720p
37.50 50 Side by Side(Half), Top & Bottom,
Side by Side(Full)
44.96 / 45 59.94 / 60
75 50 Frame Packing, Line Alternative
89.91 / 90 59.94 / 60
1080i
28.125 50 Side by Side(Half), Top & Bottom,
Side by Side(Full)
33.72 / 33.75 59.94 / 60
56.25 50 Frame packing, Line Alternative
67.432 / 67.5 59.94 / 60
1080p
26.97 / 27 23.97 / 24
Side by Side(Half), Top & Bottom,
Side by Side(Full)
28.125 25
33.716 / 33.75 29.976 / 30
43.94 / 54 23.97 / 24
Frame packing, Line Alternative56.25 25
67.432 / 67.5 29.976 / 30
56.25 50 Side by Side(Half), Top & Bottom
67.432 / 67.5 59.94 / 60
Input Signal Playable 3D video format
DTV Frame Compatible Side by Side(Half), Top & Bottom
63
ENGENGLISH
SPECIFICATIONS
3D supported mode manually
Input
Signal
Playable 3D video format
Resolution
Horizontal
Frequency
(kHz)
Vertical
Frequency
(Hz)
DTV HD / SD - -
2D to 3D, Side by Side(Half),
Top & Bottom
ATV(CVBS) SD - -
Component
HD / SD - -
1280 x 720p
37.5 50
45 60
44.96 59.94
1920 x 1080i
33.75 60
33.72 59.94
28.12 50
67.5 60
67.432 59.94
27 24
28.12 25
56.25 50
26.97 23.976
33.75 30
33.71 29.97
HDMI-PC
1024 x 768p 48.36
60
1360 x 768p 47.71
1920 x 1080p 67.5
2D to 3D, Side by Side(Half),
Top & Bottom, Checker Board,
Single Frame Sequential,
Row Interleaving, Column Interleaving
3840 x 2160p
54 24
2D to 3D, Top & Bottom(Half),
Side by Side(Half)
56.25 24
67.5 30
Others - - 2D to 3D, Side by Side(Half),
Top & Bottom
64
ENG
ENGLISH
SPECIFICATIONS
3D supported mode manually
Input
Signal
Playable 3D video format
Resolution
Horizontal
Frequency
(kHz)
Vertical
Frequency
(Hz)
HDMI-DTV
480P 31.5 60 2D to 3D, Side by Side(Half),
Top & Bottom, Checker Board,
Frame Sequential, Row Interleaving,
Column Interleaving
576P 31.25 50
720p 37.5 50
45 60
1080i 28.12 50 2D to 3D, Side by Sied(Half),
Top & Bottom
33.75 60
1080P
27 24 2D to 3D, Side by Side(Half),
Top & Bottom,Checker Board,
Row Interleaving, Column Interleaving
28.12 25
33.75 30
56.25 50 2D to 3D, Side by Side(Half),
Top & Bottom, Checker Board,
Frame Sequential, Row Interleaving,
Column Interleaving
67.5 60
USB(Movie)
Under 704 x 480 - - 2D to 3D
Over 704 x 480
interlaced --
2D to 3D, Side by Side(Half),
Top & Bottom
Over 704 x 480
progressive - 50 / 60
2D to 3D, Side by Side(Half),
Top & Bottom,Checker Board,
Row Interleaving, Column
Interleaving, Frame Sequential
Over 704 x 480
progressive - others
2D to 3D, Side by Side(Half), Top &
Bottom,Checker Board, Row
Interleaving, Column Interleaving
USB
Under 320 x 240 - - 2D to 3D
Over 320 x 240 - - 2D to 3D, Side by Side(Half),
Top & Bottom
65
ENGENGLISH
SPECIFICATIONS
Video Supported Formats
File Extension Video Codec Audio Codec Max Resolution
mpg, mpeg MPEG1,2 MP3, Dolby Digital, PCM
1920 x 1080 @
30p
ts, trp, tp, mts, m2ts MPEG1,2 H.264 MP3, Dolby Digital,
AAC, HE-AAC,
vob MPEG1, 2 MP2, Dolby Digital
mp4, mov
MPEG4, DivX 3.11,
DivX 4, DivX 5,
H.264, H.263
Dolby Digital, AAC,
HE-AAC, MP3
mkv H.264, VC1, VP8,
MPEG2, MPEG4
MP3, Dolby Digital,
AAC, HE-AAC
avi, divx
MPEG4, DivX 3.11,
DivX 4, DivX 5, DivX 6,
H.264, VC-1, XVID
MP3, Dolby Digital, PCM,
AAC, HE-AAC,
WMA(standard)
asf, wmv VC1 WMA(standard)
flv Sorenson H.263,
H264 MP3, AAC, PCM
Subtitle Supported Formats
File Extension Language Measurement Remark
smi, srt
Mandarin
Support UTF-8 encoded file. Adjust : - 10 ~ + 10Cantonese
English
Photo Supported Formats
File Extension Item Profile
JPEG, JPG, JPE
Support File type
SOF0 : baseline
SOF1 : Extend Sequential
SOF2 : Progressive
Picture Size
Min : 64 * 64
Max : - Normal type : 15360(W)*8640(H),
- Progressive type : 1920(W) * 1440(H)
PNG, GIF, BMP Picture Size Min 64x64
Max 8000 x 6000
66
ENG
ENGLISH
◜⪥◜᪆ㄼ䯻⃣ැኝዾ傢䜻
☐⫙☐᪺ㅰ䰯℗คዑጲ僖䝯
ⶴ䲆ഀᗐ㐈ᨣິὂൺ᎔⬴⚦≺ᄉ㩴㋙ᅱ⮨䡔⬕輩මೞ⊣㕗│㐈ᨣິὂൺ᎔侻ዠ㣃මኝዂ㿐ዾ◜㕗
◜⪥◜᪆ㄼ䯻ິὂঔⲅ╉㐈䢙☍
㐈䢙☍
俯ጔ㣷
☐⫙☐᪺ㅰ䰯℗ᄍዑጲ僖
双
(Pb)
⭥
(Hg)
呐
(Cd)
ၴ右
(Cr6+)
ᠡⶻ㽛䇶
(PBB)
ᠡⶻඓ䇶傡
(PBDE)
PCB㷋䟌⚆ ×आआआ आ आ
僘᭥⚽ ×आआआ आ आ
PDP╅㡁᭖ ×आआआ आ आ
LCD╅㡁᭖CCFL㿓ၐ ××आआ आ आ
LCD╅㡁᭖LED㿓ၐ ×आआआ आ आ
OLED╅㡁᭖ ×आआआ आ आ
佬⊮ᕯ ×आआआ आ आ
ᒎዴ㷋 ×आआआ आ आ
伉偔ᕯ ×आआआ आ आ
啋 ×आआआ आ आ
ܩ࣒ܪ輷䜻㠍◜⪥◜᪆ㄼ䯻ᗻ䪸侻᎔輥ᘚ䯻☣⑬輦ഀ㕗ዾ傢มൡSJ/T11363-2006㕗唣傢䡔⬕ঔ
ܩܪ輷䜻㠍◜⪥◜᪆ㄼ䯻ᗻ䪸侻᎔輥ᘚ䯻☣⑬輦ഀ㕗ዾ傢妫ൡSJ/T11363-2006㕗唣傢䡔⬕ঔ
ᗻೝ仃䜻✏ഀ輩⛚⮻ܪ;ܪ㕗侻᎔ⶴ䲆⧺Ⰵ၄ฦ㕗ROHS⮨භ⧺㖲䪁෭ᄉᩭ㕗ᗻ㐈ᨣ㐈ᔻൺ᎔ഀ唣ᄉ๒
㏻⚣൮◜᪆ㄼ䯻㕗2002/95/EC⇚භঔ
ܩܪ䜻㠍仕㏻ൡ坎䡔๒㏻䪸侻᎔㕗ൺ᎔ঔ
⮻ῢ輷ℓ◜ᗻഀᗐ叓ᐁ㕗㐈ᨣິὂൺ᎔ẘ坎⛚◜㊂ະ๒㏻◲唣㕗⛚䪙ঔ䪸⛚䪙㕗㊂ະ๒㏻◲唣│⇚ᗻ⨶
ᴋ๒㏻☴ᡕ⳼ᵹওⵒᵹ輩ᵉ೧ೠᇘ↿㐈⬳㨜㻪☣ᾘႈೞ㕗๒㏻◲唣ঔ
⨷⛚䪙仕㏻ൡൺ᎔ഀ๒㏻㕗㐈⬳輩㐄ൡ㐈⬳䜻嘵㣂輩ㅌᗻ⨷䫇ⓡঔ

67
ENGENGLISH
䨹ጝ
䩭ፑ
⭐䫴
݆⊬ၬ☳䫅㖋☐㷆㹘㷣ᠰ㷆Ọ垂ക↫⊬ᘷ喛㣂轷ഔ〽ዶ䀄มḜ䱾㙇⽲㩐ቸ啰转݇
៵䫴
“Gij mizsienq vangjloz densen ciephaeuj bonj sezbi daeuj haenx itdingh aeu caeuq gij ciepdieg
baujhoh doxliz, mboujne aiq miz gij yungyiemj dawzfeiz daengj转”
䎠ያ䫴
䓖䫴
㷻ፅᬛ䫴
៚⮻輷◜㶒㸤㶯㶒≸ೡະⅷ≸ᘃ㕗啧㢎䞘㹁輩᳅㶢ၘ㹁ᗻ◿䪑៚ၘ輩㏻ℊዂම㗇≸亱≸◜㶒㸤㶯
㶒輩⒳嗓ၠ亮䜟啧㢎ঔ

Record the model number and serial
number of the TV.
Refer to the label on the back cover and
quote this information to your dealer
when requiring any service.
MODEL
SERIAL

NOTE: This equipment has been tested and found to comply with the limits for a Class B digital
device, pursuant to part 15 of the FCC Rules. These limits are designed to provide reasonable protection
against harmful interference in a residential installation. This equipment generates, uses and can radiate
radio frequency energy and, if not installed and used in accordance with the instructions, may cause
harmful interference to radio communications. However, there is no guarantee that interference will not
occur in a particular installation. If this equipment does cause harmful interference to radio or television
reception, which can be determined by turning the equipment off and on, the user is encouraged to try to
correct the interference by one or more of the following measures:
—Reorient or relocate the receiving antenna.
—Increase the separation between the equipment and receiver.
—Connect the equipment into an outlet on a circuit different from that to which the receiver is
connected.
—Consult the dealer or an experienced radio/TV technician for help.
Thisdevicecomplieswithpart15oftheFCCrules.Operationissubjecttothefollowingtwo
conditions:
(1)thisdevicemaynotcauseharmfulinterference,and
(2)thisdevicemustacceptanyinterferencereceived,includinginterferencethatmaycause
undesiredoperation.
Changesormodificationstothisunitnotexpresslyapprovedbythepartyresponsiblefor
compliancecouldvoidtheuser'sauthoritytooperatetheequipment.
In order to comply with RF exposure requirements,a minium distance of 20cm must be maintained
between the antenna and all persons.