LG Electronics USA LSI110 Wireless Local Loop Telephone (CDMA) User Manual
LG Electronics USA Wireless Local Loop Telephone (CDMA) Users Manual
UserManual.wiki
>
LG Electronics USA
>
LSI110 User Manual
Users Manual
Navigation menu
Upload a User Manual
Namespaces
Wiki Guide
HTML
PDF
Info
Views
User Manual
Discussion / Help
Navigation

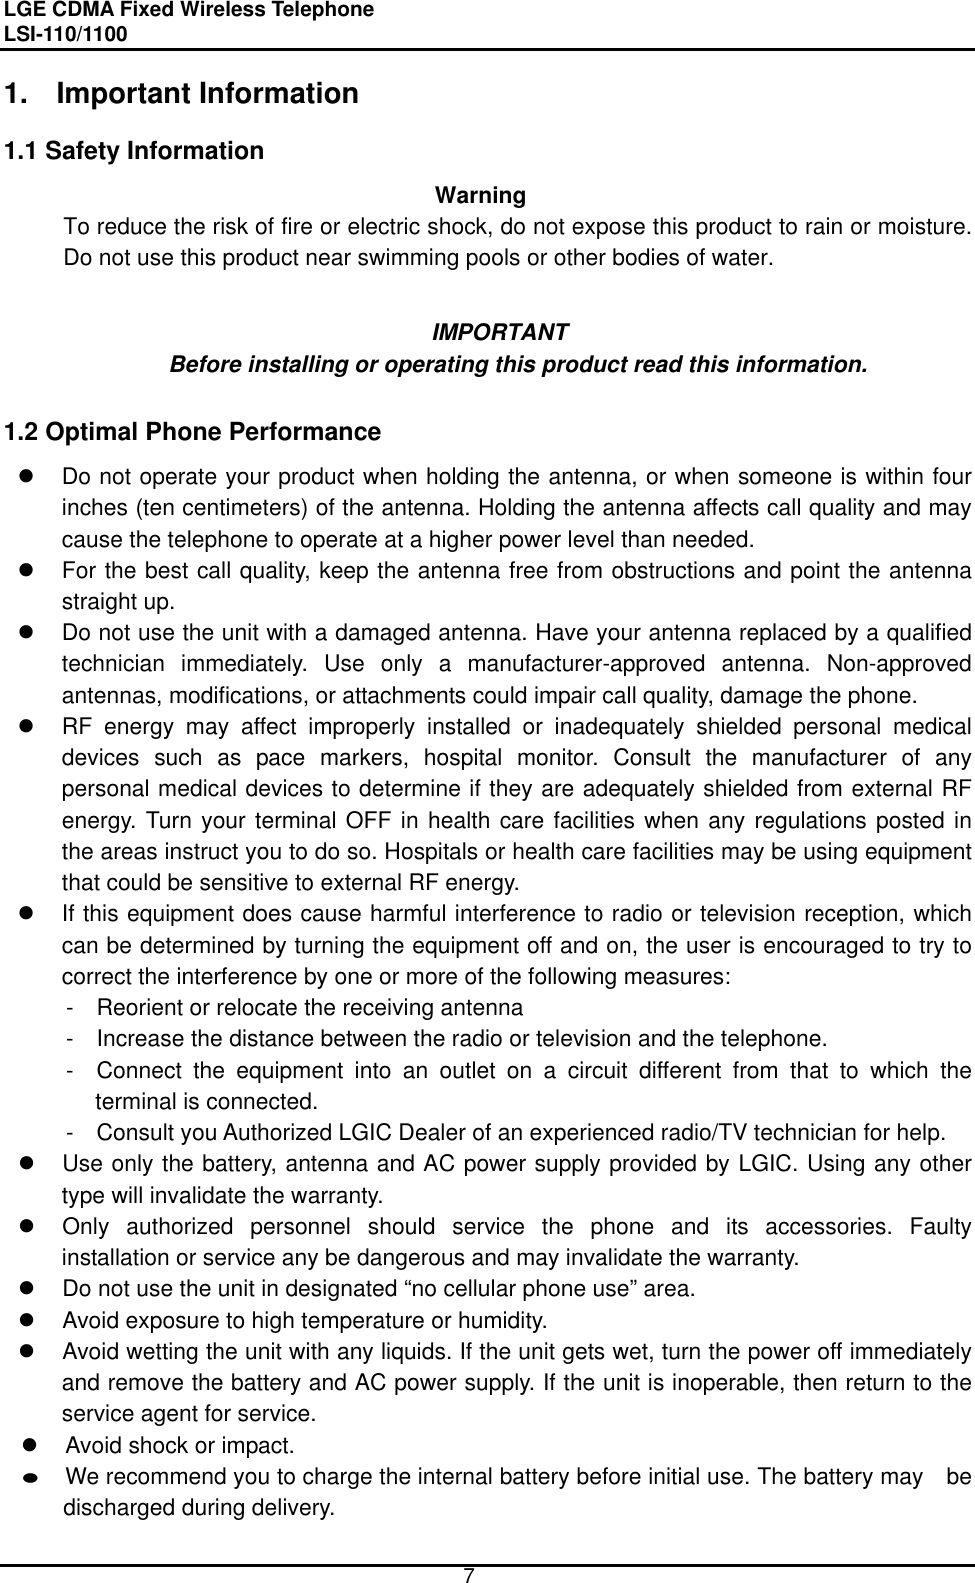
![LGE CDMA Fixed Wireless Telephone LSI-110/1100 9 2. Introduction 2.1 Front View of the Telephone ① Navigation Left Key : Function for decreasing volume down. ② Navigation DOWN Key : Function for scrolling down menu in menu state. ③ Menu( Soft 1) Key : Activate a Menu state ④ Send Key : Function key to call / Function for 3- way calling In call state ⑤ REDIAL Key : Function as a redialing ⑥ Navigation UP Key : Function for entering a MSG menu in idle state / Function for scrolling up menu in menu state ⑦ Navigation Right Key : Function for increasing volume up. ⑧ Book( Soft 2) Key : Activate a Book state ⑨ END Key : Terminate a call or a menu state. ⑩ “ # ”Key : Function as a keypad lock. ⑪ Clear Key : Key to delete the last digit. ① Navigation Left[◀] ⑦ Navigation Right[▶] ⑥ Navigation Up[] ② Navigation Down[] ③ Soft Key 1[MENU] ④ SEND[SEND] ⑤ REDIAL[REDIAL] ⑧ Soft Key 2[BOOK] ⑨ END[END] ⑪ CLEAR[CLEAR] ⑩ “#” Key : Key Pad Lock](https://usermanual.wiki/LG-Electronics-USA/LSI110/User-Guide-257504-Page-10.png)
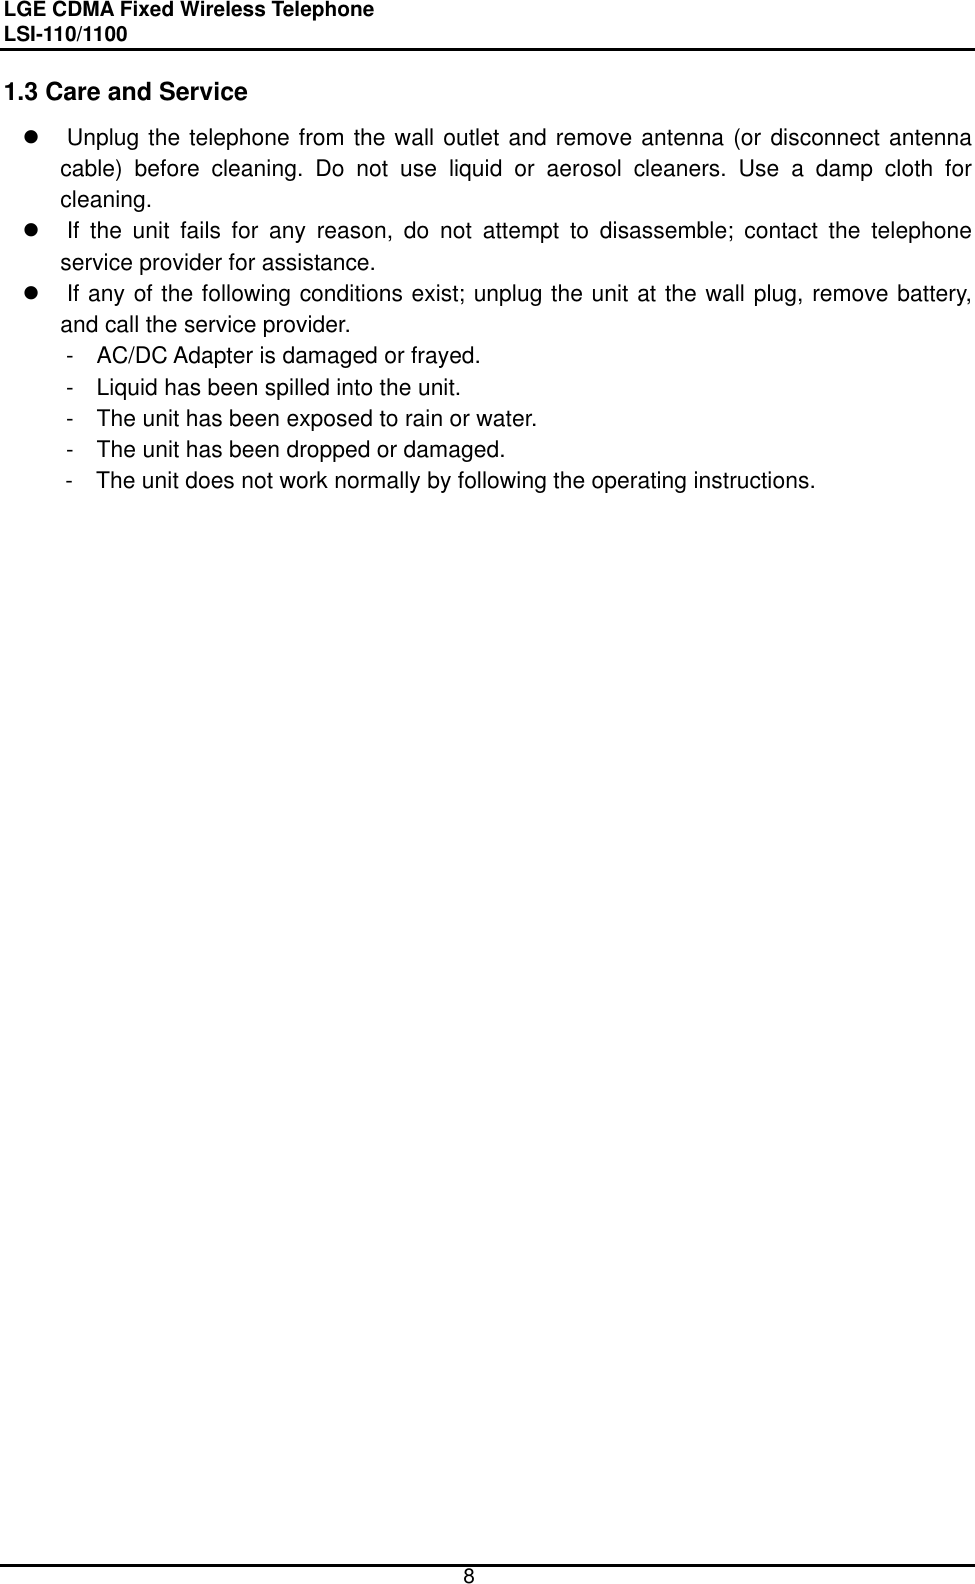
![LGE CDMA Fixed Wireless Telephone LSI-110/1100 16 Call From 0123456789 Call From 0123456789 Time: 0 : 23 012345789MUTEMENU Time: 0 : 23 012345789MUTEMENU13 May, Mon4 : 11 PMBOOKMENU13 May, Mon4 : 11 PMBOOKMENUMissed 1 Call10 : 51 AMOKMissed 1 Call10 : 51 AMOK3.3 Receiving a Call 1. When bell rings, Press Any Key or pick up the handset from the charger. Press Send key at the Lock state. 2. Start conversation. 3. To disconnect the call, press End key or pick down the handset on the charger. 3.4 Signal Strength The quality of calls depends on the signal strength in your area. The stronger the signal, the better the call quality. The signal strength icon indicates the current strength as a number of bars. You can see the antenna and bars according to the strength of received signal in the upper-left part. 3.5 Missed Call Message If a call is received and not answered for user’s absence, You are informed that you have missed a call. The latest missed call time and number of missed call is displayed. Press [OK] to erase “Missed call” message.](https://usermanual.wiki/LG-Electronics-USA/LSI110/User-Guide-257504-Page-17.png)
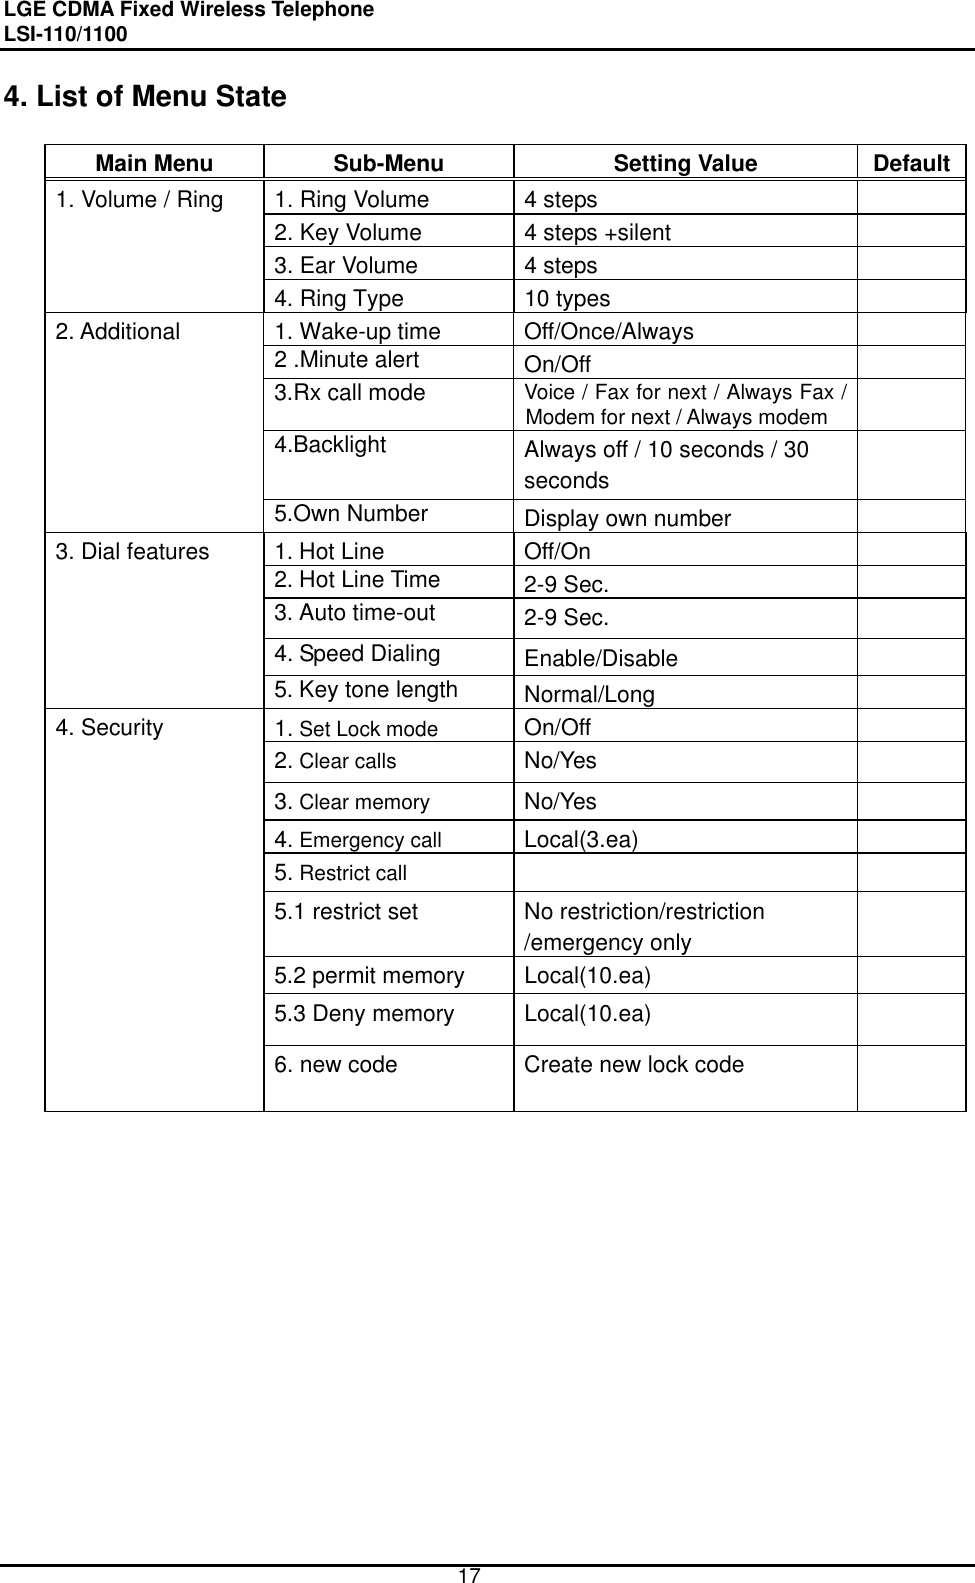
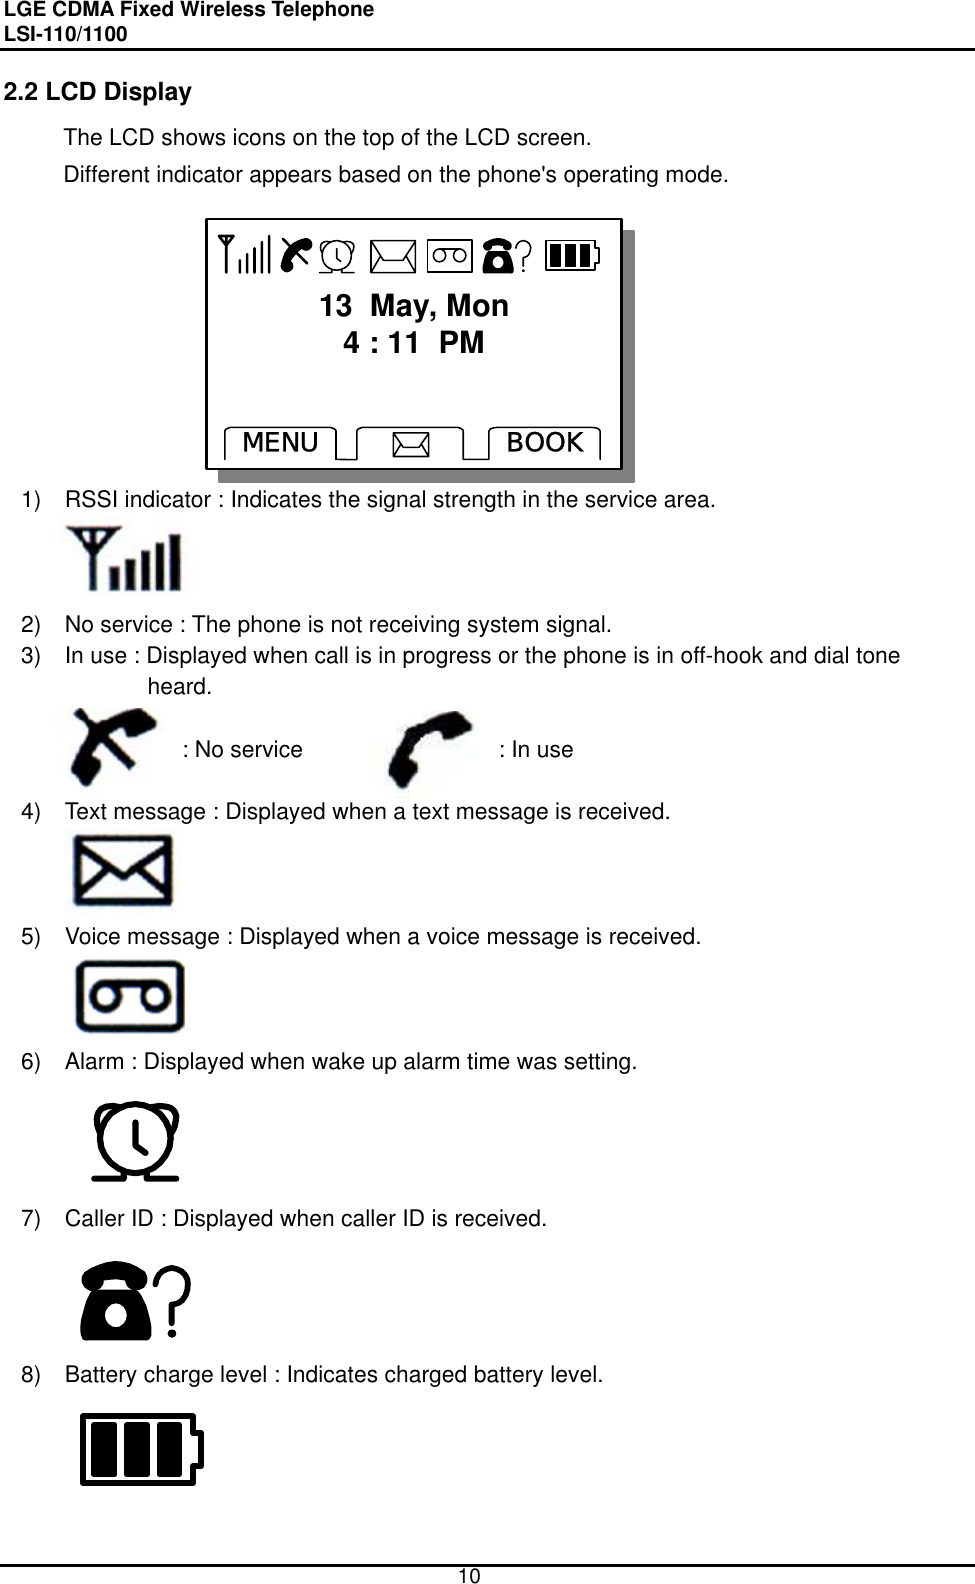
![LGE CDMA Fixed Wireless Telephone LSI-110/1100 18 MAIN MENU 2:ADDITIONL 3:DIAL FEATURESNEXTOK1:VOLUME / RING MAIN MENU 2:ADDITIONL 3:DIAL FEATURESNEXTOK1:VOLUME / RINGRING VOLUMENEXTOKRING VOLUMENEXTOKKEY VOLUMENEXTOKKKEY VOLUMENEXTOKKEAR VOLUMENEXTOKKEAR VOLUMENEXTOKK4.1 Volume / Ring This menu allows you to adjust the various different volumes. 4.1.1 Ring Volume The received tone when you receive a call can be adjusted. From the MENU 1. Press [MENU] + 1(Volume/Ring)+ 1(Ring Volume) in on-hook state. 2. Press Navigation Left / Right Key or [NEXT] to adjust ring volume. 3. Press [OK] to store the ring volume level By the Volume button 1. Press Navigation Left / Right Key to adjust ring volume in on-hook state 4.1.2 Key Volume The tone when you press a key can be adjusted. 1. Press [MENU] + 1(Volume/Ring) + 2(Key Volume) in on-hook state. 2. Press Navigation Left / Right Key or [NEXT] to adjust key volume 3. Press [OK] to store the key volume level . 4.1.3 Ear Volume The voice of the other party can be adjusted in on-hook state. 1. Press [MENU] + 1(Volume/Ring) + 3(Ear Volume) in on-hook state. 2. Press Navigation Left / Right Key or [NEXT] to adjust ear piece volume 3. Press [OK] to store the ear volume level. Press Navigation Left / Right Key to adjust volume during conversation.](https://usermanual.wiki/LG-Electronics-USA/LSI110/User-Guide-257504-Page-19.png)
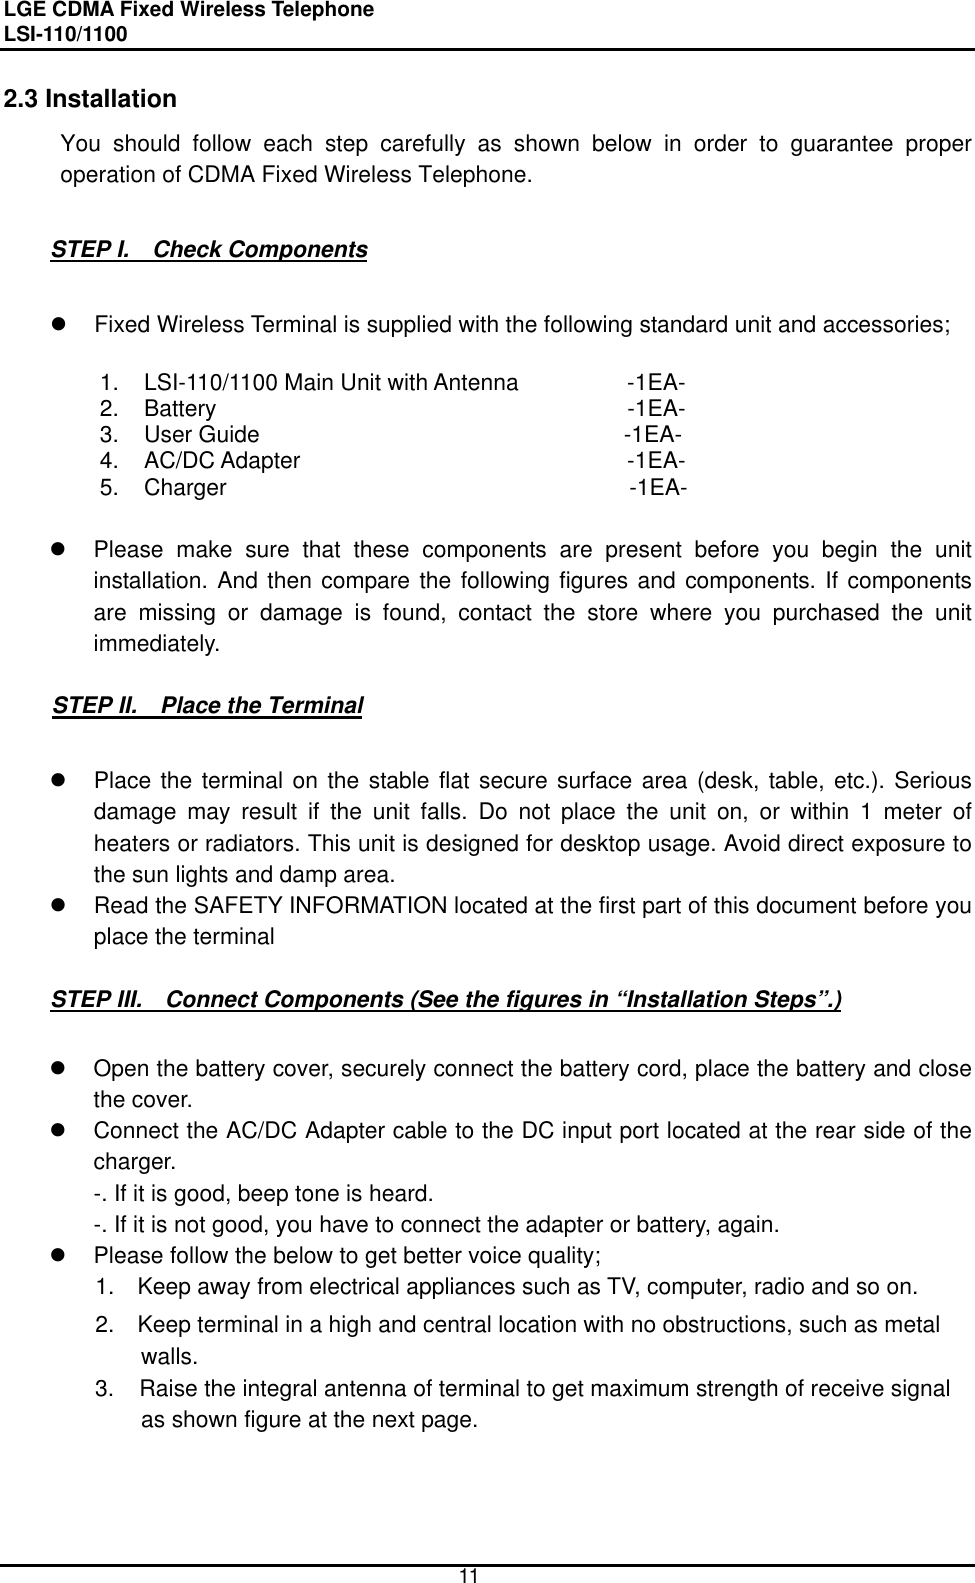
![LGE CDMA Fixed Wireless Telephone LSI-110/1100 19 RINGER TYPE STANDARD RING 1 RING 2NEXTOK RINGER TYPE STANDARD RING 1 RING 2NEXTOK MAIN MENU 1:VOLUME / RING 3:DIAL FEATURESNEXTOK2: ADDITIONAL MAIN MENU 1:VOLUME / RING 3:DIAL FEATURESNEXTOK2: ADDITIONALALARM TIME Once Always OffNEXTOKALARM TIME Once Always OffNEXTOK Wake-up Time 11 : 10 AMOKEDIT Wake-up Time 11 : 10 AMOKEDITMUNITUE ALERT Off OnNEXTOKMUNITUE ALERT Off OnNEXTOK4.1.3 Ring Select You can select the various ring types. 1. Press [MENU] + 1(Volume/Ring) + 4(Ring Type) in on-hook state. 2. Select a desired ring type with Navigation Up / Down Key or [NEXT]. There are 10 different ring types. Those are Standard,Option 1,Option 2, Option 3, Option 4, Habanera, Deutsch song, La Primavera, Oh! susanna, Beethoven 4.2 Additional feature 4.2.1 Wake-up Time This function allows you to adjust Wake-up Time. 1. Press [MENU] + 2(ADDITIONAL) + 1(Wake-up Time) In on – hook State 2. Select Off, Once or Always by [NEXT] and press [OK]. 3. Press [EDIT] and set the time. 4. Select A.M. or P.M. by [AM/PM]. 5. If you want to modify the wrong time, press Clear button and set again. 6. Press [OK] to save and exit 4.2.2 Minute Alert Alerts you every minute during a call. 1. Press [MENU] + 2(ADDITIONAL) + 2(Minute Alert) In on – hook State 2. Select On or Off by [NEXT] or Navigation Left / Right Key. 3. Press [OK] to save and exit 4.2.3 Set Rx call mode](https://usermanual.wiki/LG-Electronics-USA/LSI110/User-Guide-257504-Page-20.png)
![LGE CDMA Fixed Wireless Telephone LSI-110/1100 20 RX CALL MODE Voice Fax For Next Always FaxNEXTOKRX CALL MODE Voice Fax For Next Always FaxNEXTOKBACKLIGHT Always Off 10 Seconds 30 SecondsNEXTOKBACKLIGHT Always Off 10 Seconds 30 SecondsNEXTOKDIAL FEAUTRES 2:Hot Line Time 3:Auto Time-OutNEXTOK1:Hot LineDIAL FEAUTRES 2:Hot Line Time 3:Auto Time-OutNEXTOK1:Hot LineHot Line Off OnNEXTOKHot Line Off OnNEXTOK 1. Press [MENU] + 2(ADDITIONAL) + 3(RX Call Mode) in on – hook State. 2. Select Voice, Fax for next, Always Fax, Modem for next by Navigation Left / Right Key or [NEXT] . 3. Press [OK] to save and exit. 4.2.4 Backlight 1. Press [MENU] + 2(ADDITIONAL) + 4(Backlight) in on – hook State. 1. Select Always off, 10 seconds, 30 seconds by Navigation Up / Down Key or [NEXT] button. 2. Press [OK] to save and exit. 4.2.5 Own number 1. Press [MENU] + 2(ADDITIONAL) + 5(Own Number) in on – hook Sate. 2. Press [OK] to exit. 4.3 Dial features 4.3.1 Hot Line 1. Press [MENU] + 3 (DIAL FEATURES) + 1(Hot Line) in on – hook state. 2. Select On or Off by [NEXT] or Navigation Up / Down key. and press [OK] to select. 3. Press [EDIT] to input Hot Line phone number. 4. Enter the Hot Line phone number. 5. Press [OK] to save and exit. 4.3.2 Hot Line Time 1. Press [MENU] + 3 (DIAL FEATURES) + 2(Hot Line time) In on – hook Sate. Own Number 012-345-6789OKOwn Number 012-345-6789OK Hot line 119OKEDIT](https://usermanual.wiki/LG-Electronics-USA/LSI110/User-Guide-257504-Page-21.png)
![LGE CDMA Fixed Wireless Telephone LSI-110/1100 21 Hot Line Time 2 Sec 3 Sec 4 SecNEXTOKHot Line Time 2 Sec 3 Sec 4 SecNEXTOKAuto Time-Out 2 Sec 3 Sec 4 SecNEXTOKAuto Time-Out 2 Sec 3 Sec 4 SecNEXTOKSPEED DIALING Disable EnableNEXTOKSPEED DIALING Disable EnableNEXTOK2. Select hot line connection time(2~9 sec.) by [NEXT] or Navigation Up / Down key. 3. Press [OK] to select. 4.3.3 Auto Time-out Setting the length of time the phone waits before automatically dialing a number. You can select this time between 2 and 9 second. 1. Press [MENU] + 3(DIAL FEATURES) + 3(Auto Timeout) In on – hook State. 2. Select Auto time-out second between 2 and 9 by [NEXT] or Navigation Up / Down key. 3. Press [OK] to select. 4.3.4 Speed Dial (enable / disable) 1. Press [MENU] + 3 (DIAL FEATURES) + 4(Speed Dialing) in on – hook State. 2. Select Enable or Disable by [NEXT] or Navigation Up / Down key and press [OK] to save and exit. This function can be used when the Speed Dial is set to Yes. Speed Dial Function 1. You can store phone numbers in memory locations (1~99) and place a call. 2. Press the memory number (1 through 99) corresponding to the appropriate memory](https://usermanual.wiki/LG-Electronics-USA/LSI110/User-Guide-257504-Page-22.png)
![LGE CDMA Fixed Wireless Telephone LSI-110/1100 22 DIAL FEAUTRES 4:Speed DialingNEXTOK5:KeyTone LengthDIAL FEAUTRES 4:Speed DialingNEXTOK5:KeyTone LengthKEY TONE LENGTH Long NormalNEXTOKKEY TONE LENGTH Long NormalNEXTOKEnterLock Code ㅡㅡ **EnterLock Code ㅡㅡ **SECURITY 2:Clear Calls 3:Clear MemoryNEXTOK1:Set Lock ModeSECURITY 2:Clear Calls 3:Clear MemoryNEXTOK1:Set Lock ModeSET LOCK Off OnNEXTOKSET LOCK Off OnNEXTOKCLEAR CALL STACK No YesNEXTOKCLEAR CALL STACK No YesNEXTOKlocation, and hold for a few seconds. 4.3.5 Key-tone Length Setting key beep playback length. Possible settings are Normal and Long. 3. Press [MENU] + 3(DIAL FEATURES) + 5(KeyTone Length) in on – hook State. 4. Select Normal or Long by [NEXT] or Navigation Up / Down key and press [OK] to select. 4.4 Security Features 4.4.1 Lock Mode Set This function prevents your phone from being used without permission. Typical default value is 0000. Possible settings are ON/OFF. The OFF means that the phone is not locked. ON sets the phone locked immediately. 1. Press [MENU] + 4 (SECURITY) 2. Enter your own 4 digit lock code When this product comes out, the default is 0000. 3. Press 1(Set Lock Mode) 4. Select Off, On by [NEXT] or Navigation Up / Down key. 5. Press [OK] to save and exit. 4.4.2 Clear Calls When a previous outgoing or incoming call history is stored in a memory location, you can erase the all call history. 1. Do the above 1 and 2 steps of 4.4.1.](https://usermanual.wiki/LG-Electronics-USA/LSI110/User-Guide-257504-Page-23.png)
![LGE CDMA Fixed Wireless Telephone LSI-110/1100 23 CLEAR WHOLE BOOK No YesNEXTOKCLEAR WHOLE BOOK No YesNEXTOK 123QUITOK 123QUITOK2. Press 2(Clear Calls) 3. Press [YES] to erase all call history. 4.4.3 Clear Memory When you want to delete phonebook memory, you can erase all phonebook memory. 1. o the above step1 and 2 of 4.4.1. 2. Press 3(Clear Memory). 3. Press [YES] to erase all phone memory. 4.4.4 Emergency Call Even if your phone is locked you can make calls to 3 emergency numbers 1. Do the above step1 and 2 of 4.4.1. 2. Press 4(Emergency Call) 3. Press [NEXT] or Navigation Up / Down key to choose the number from 1 to 3. 4. Press [EDIT]. 5. Enter the emergency phone number. 6. Press [OK] to save the number. 7. Press [NEXT] or Navigation Up / Down key to edit others or Press End button to exit emergency call process. 4.4.5 Restriction Call Service This function is a convenient feature which enables user to restrict using any phone number. To forbid using any phone number, user must set the number in deny edit. Can’t use any phone number(max 32digits) started with the number saved in deny edit. If user set the phone number in permit edit, can use any phone number (max 32digits) started with the number even if the phone number is set in deny edit. Ex) example to restrict using the phone number started with “700” . EMERGENCY 1 123NEXTEDIT](https://usermanual.wiki/LG-Electronics-USA/LSI110/User-Guide-257504-Page-24.png)
![LGE CDMA Fixed Wireless Telephone LSI-110/1100 24 MAIN MENUNEXTOK4:SECURITYMAIN MENUNEXTOK4:SECURITYEnterLock Code ㅡㅡ **EnterLock Code ㅡㅡ **RESTRICT CALL 2:Permit Memory 3:Deny MemoryNEXTOK1:Restrict SetRESTRICT CALL 2:Permit Memory 3:Deny MemoryNEXTOK1:Restrict SetRESTRICT SET No restriction restirction Emergency OnlyNEXTOKRESTRICT SET No restriction restirction Emergency OnlyNEXTOKRESTRICT CALL 1:Restrict Set 3:Deny MemoryNEXTOK2:Permit MemoryRESTRICT CALL 1:Restrict Set 3:Deny MemoryNEXTOK2:Permit Memory 1. set “Restriction” in Restrict set menu (Menu 4.5.1) 2. set “700” in deny edit. (Menu 4.5.3) 3. set “700-1234” in permit edit.(Menu 4.5.2) Result : user can use the phone number started with “700-1234”. 4.4.5.1 Restrict set No restriction This is a general function which has no any restrictions Restriction This is a function that you can set permitted phone number and denied phone number. Emergency only This is a function which enable you to call only emergency numbers. 1. Press [MENU] and 4(SECURITY ). 2. Enter a lock code using key pad. 3. Press 5(Restrict Call) and 1(Restrict Set). 4. Select “No Restriction” ,” Restriction” or “Emergency only ” using [NEXT] or Navigation Up / Down key and press [OK]. ♦ Below 4.4.5.2 and 4.4.5.3 function can be used when the Restrict set is set to “Restriction”. 4.4.5.2 Permit memory You can call it if the phone numbers saved in permit edit though they were saved in deny edit. You can save 10 permit phone numbers. 1. Do the above step 1~2 of 4.4.1.](https://usermanual.wiki/LG-Electronics-USA/LSI110/User-Guide-257504-Page-25.png)
![LGE CDMA Fixed Wireless Telephone LSI-110/1100 25 Time : 0:23 1234567MUTEMENU Time : 0:23 1234567MUTEMENURESTRICT CALL 1:Restrict Set 2:Permit Memory NEXTOK3:Deny MemoryRESTRICT CALL 1:Restrict Set 2:Permit Memory NEXTOK3:Deny MemoryEnterNew Code ㅡㅡ **QUITOKEnterNew Code ㅡㅡ **QUITOK2. Press 5(Restrict Call) and 2(Permit Memory). 3.Press [EDIT] to edit permit phone number. 4.Enter the permit phone number. 5.Press [OK] to save and exit. 4.4.5.3 Deny memory You couldn’t call any phone numbers saved in deny edit. You can save 10 deny phone numbers. 1. Do the above step 1~2 of 4.4.1 2. Press 5(Restrict Call) and 3(Deny Memory). 3. Press [EDIT] to edit deny number. 4.Enter the deny phone number. 5.Press [OK] to save and exit. 4.4.6 New Lock Code You can change a new lock code(4digits). 1. o the above step1~2 of 4.4.1. 2. Press 6.(New Code) 3. Enter new lock code and press [OK] to save. 4. Enter new lock code again to confirm and press [OK] to save. 5. Functions while in a call 5.1 Mute This function prevents your voice from being transmitted but you can call still hear other side. 1. Press [MUTE] button while in a call. Restrict 1 54321NEXTEDITRestrict 1 54321NEXTEDITPermit 1 12345NEXTEDITPermit 1 12345NEXTEDIT](https://usermanual.wiki/LG-Electronics-USA/LSI110/User-Guide-257504-Page-26.png)
![LGE CDMA Fixed Wireless Telephone LSI-110/1100 26 RECALL 2:FROM MEMORIESBOOKOK1:FROM LAST CALLRECALL 2:FROM MEMORIESBOOKOK1:FROM LAST CALL 2. You could see “MUTE” message blinking on the right side of the LCD 3. To release Mute, Press [TALK] button. 5.2 Ear Volume You may adjust ear volume while you are in a call. The Navigation Left / Right Key in the middle of the phone can be used to adjust ear volume. 6. Searching, Editing & Dialing 6.1 Retrieving Phone Number by Name 1. Press [BOOK] and 2(FROM MEMORIES) 2. Press 1 button to retrieve phone number by name. Time : 0:23 1234567TALKMENU Time : 0:23 1234567TALKMENUNEXTOKEAR VOLUMENEXTOKNEXTOKEAR VOLUMENEXTOK](https://usermanual.wiki/LG-Electronics-USA/LSI110/User-Guide-257504-Page-27.png)
![LGE CDMA Fixed Wireless Telephone LSI-110/1100 27 3. Enter the name that you want to look for and press [FIND]. At least two letters are recommended for quick search. Press Navigation Up / Down Key to scroll through the list of matches. 4. Press [VIEW] to see information in that location. Pick up handset and Press Send button to make a call. You can edit the phone number by pressing [EDIT] button. 6.2 Retrieving Phone Number by Address 1. Press [BOOK] and 2(FROM MEMORIES) 2. Press 2 button to retrieve a phone number by address. 3. Enter a memory address to retrieve phone number. (ex: If you enter a memory address, 01.) If there is no stored phone number in the memory location, “Empty Location” is displayed. If you press [FIND] button without entering number, you see the whole phone number list in the memory Location and you can find the number by scrolling the list. 4. Pick up the handset and Send button to call to displayed number, press [EDIT] to edit stored information or press [DEL] to delete displayed information. Edit process Modify name by Clear button and keypad. (MAX 17 Characters) 1) Delete name by Clear button. 2) Enter the modified name. Lookup Name? _FINDABCD Lookup Name? _FINDABCD 01 : JAMES 09 : JAMES 43 : JAMESDELVIEW 01 : JAMES 09 : JAMES 43 : JAMESDELVIEWJAMESADDR : 01TYPE : < >1234567DELEDITJAMESADDR : 01TYPE : < >1234567DELEDIT Lookup Location? ??FIND Lookup Location? ??FIND 01 : JAMES 02 : ABCD 03 : DEFDELVIEW 01 : JAMES 02 : ABCD 03 : DEFDELVIEWJAMES_ADDR : 01TYPE :1234567ABCDSAVEJAMES_ADDR : 01TYPE :1234567ABCDSAVE](https://usermanual.wiki/LG-Electronics-USA/LSI110/User-Guide-257504-Page-28.png)
![LGE CDMA Fixed Wireless Telephone LSI-110/1100 28 3) Press Navigation Down Key to go to the next step. Enter a new memory address to store a new information or choose the new memory address 1) Press Navigation Down Key to go to the next step. Select secret or in secret icon secret by Navigation Left / Right Key 1) Press Navigation Down Key to go to the next step. Select the Phone Number Type by Navigation Left / Right key. 1) Press Navigation Down Key to go to the next step. Modify the phone number by Clear button (MAX 32 Digits) 1) Delete the phone number by Clear button. 2) Enter the modified phone number. Press [SAVE] to store the edited information Quitting process You might press [QUIT] to go to Idle State at the above step 5. 6.3 Retrieving Phone Number by NUMBER 1. Press [BOOK] and 2(FROM MEMEORIES). 2. Press 3 button to retrieve a phone number by number. 3. Enter the phone number that you want to find and press [FIND] button. If there is no stored phone number in the memory location, “No number matches” is displayed. 4. Pick up the handset from the charger or press Send button to call to displayed number, press [EDIT] to edit stored JAMESADDR :<01>TYPE :1234567QUITSAVEJAMESADDR :<01>TYPE :1234567QUITSAVEJAMESADDR : 01 < >TYPE :1234567QUITSAVEJAMESADDR : 01 < >TYPE :1234567QUITSAVEJAMESADDR : 01TYPE : < >1234567QUITSAVEJAMESADDR : 01TYPE : < >1234567QUITSAVEJAMESADDR : 01TYPE :1234567_QUITSAVEJAMESADDR : 01TYPE :1234567_QUITSAVE Lookup Number?FIND Lookup Number?FIND 01 : JAMES 12 : Silvia DELVIEW 01 : JAMES 12 : Silvia DELVIEW](https://usermanual.wiki/LG-Electronics-USA/LSI110/User-Guide-257504-Page-29.png)
![LGE CDMA Fixed Wireless Telephone LSI-110/1100 29 RECALL 2:FROM MEMORIESBOOKOK1:FROM LAST CALLRECALL 2:FROM MEMORIESBOOKOK1:FROM LAST CALLCLEAR WHOLE BOOK No YesNEXTOKCLEAR WHOLE BOOK No YesNEXTOKERASE? #01 No YesNEXTOKERASE? #01 No YesNEXTOKinformation or press [DEL] to delete displayed information. Edit process. Quitting process Do the above step of 6.2.2. 6.4 Fast Searching 1. Press [BOOK] button 2.Press [BOOK] button again. You see the whole phone number list in the memory Location and you can find the number by scrolling the list. 6.5 Clear Memory When you want to delete phonebook memory, you can erase all phonebook memory. 4. Press [MENU] + 4(Security) + Enter Lock Code 5. Press 3(Clear Memory). 6. Select ‘Yes’ using Navigation Up /Down Key or [NEXT] button 7. Press [OK] to erase all phone memory. 7.SMS (Short Message Service) Messaging, Paging, and Voice mail features are available when your phone is turned on. Using Message button allows you to access messages for viewing on the LCD screen or to send a message. Check with your WLL service provider regarding the availability of this feature. The information in a message depends on the mode the WLL is operating in and the service’s capabilities. 7.1 Checking & Deleting Received Message 7.1.1 Text Message 01 : JAMES 02 : ABCD 03 : DEFDELVIEW 01 : JAMES 02 : ABCD 03 : DEFDELVIEWSMS MENU 2: MSG SENDING 3: MSG NOTIF1: MSG RECEIVEDNEXTOKSMS MENU 2: MSG SENDING 3: MSG NOTIF1: MSG RECEIVEDNEXTOK](https://usermanual.wiki/LG-Electronics-USA/LSI110/User-Guide-257504-Page-30.png)
![LGE CDMA Fixed Wireless Telephone LSI-110/1100 30 ERASE ? No YesNEXTOKERASE ? No YesNEXTOK1. Press MESSAGE button and 1(MSG RECEIVED) 2. Press 1(Text MSG) to see a received text message list. Locate to the desired message in the list. Mark “( “means already a checked message. 3. Press [VIEW] to see the content of desired message. You can see the message with received time and caller’s phone number. You can read a l message. 4. Press [DEL] to erase a message. Press [OK] to complete erasing process. 7.1.2 Voice Message Voice mail notifications indicate the number of new voice mail message in your mail box. Only the most recent voice mail notification will be stored in the WLL phone; previous messages will be overwritten. When a voice mail messages left for you, the WLL phone will alert and display “ * Voice Mail * “. You must call your voice mail service to retrieve these messages. 1. Press MESSAGE button and 1(Received MSG) in idle state. 2. Press 2(Voice MSG) to check the voice message. If there is no voice message, “No Voice Mail was received” is displayed. 5/13 4 : 11 PM<VOICE MAIL>1 NEW Message5/13 4 : 11 PM<VOICE MAIL>1 NEW MessageMSGRECEIVDE 2: VOICE MSG 8 3: MSG NOTIF1: Text MSG 1/5NEXTOKMSGRECEIVDE 2: VOICE MSG 8 3: MSG NOTIF1: Text MSG 1/5NEXTOK !01 : Hello! 02 : Hi! 03 : Good MorningDELEDIT !01 : Hello! 02 : Hi! 03 : Good MorningDELEDIT](https://usermanual.wiki/LG-Electronics-USA/LSI110/User-Guide-257504-Page-31.png)
![LGE CDMA Fixed Wireless Telephone LSI-110/1100 31 MSG NOTIF Off Once Every 2 MinNEXTOKMSG NOTIF Off Once Every 2 MinNEXTOKERASE All ? No YesNEXTOKERASE All ? No YesNEXTOK Press [DEL] to delete the voice message. 7.1.3 Erasing all Received Message 1. Press MESSAGE button and 1(MSG RECEIVED). 2. Press 3(Clear All) 3. Press [OK] to delete. 7.2 MSG Notification tone select 1. Press Up button and 3(MSG NOTIF). 2. Select off, once, Every 2 Min by pressing [NEXT] or Navigation Up / Down Key. . 3. Press [OK] to save and exit. 7.3 Message Sending 7.3.1 Sending a New Message 1. Press Navigation Up button and 2(MSG SENDING) 2. Press 1(New Message) to send a new message 3. Enter the called number and press [OK] You can find the called number in the memory by [FIND] button 4. Enter the call back number and press [OK] Call Back Number 0123456789OK Call Back Number 0123456789OKMSG SENDING 2:Sent Message 3:Clear All1:New MessageNEXTOKMSG SENDING 2:Sent Message 3:Clear All1:New MessageNEXTOKSMS MENU 1: MSG RECEIVED 3: MSG NOTIF2:MSG SENDINGNEXTOKSMS MENU 1: MSG RECEIVED 3: MSG NOTIF2:MSG SENDINGNEXTOK](https://usermanual.wiki/LG-Electronics-USA/LSI110/User-Guide-257504-Page-32.png)
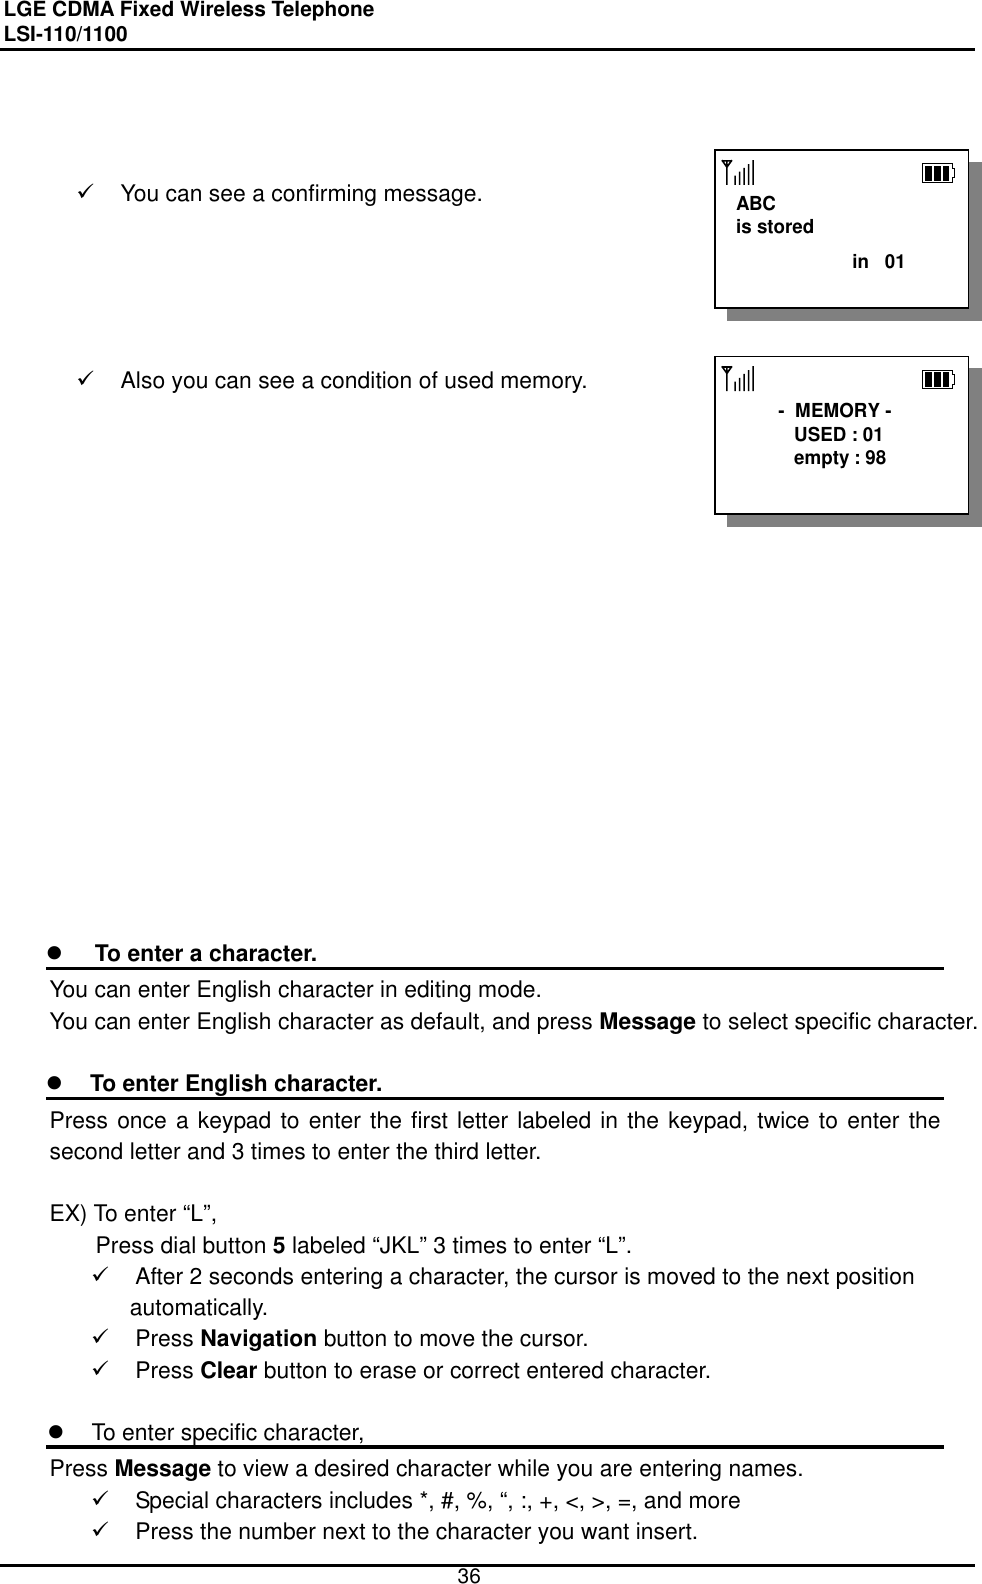
![LGE CDMA Fixed Wireless Telephone LSI-110/1100 32 <MSG Input>abcd_ABCDOK <MSG Input>abcd_ABCDOK 5. Input a message and press [OK] to send Press [ABCD] to change upper or lower case character 6. Select Yes/No to store the message. Press [OK] to send 7.3.2 Sending the sent Message or message after editing the Sent Message 1. Press Navigation Up button and 2(MSG SENDING) 2. Press 2(Sent Message) to see a received text message list. Locate to the desired message in the list. 3. Press [EDIT] to edit the content of the selected message. You can see the selected sent message Edit the message. Press [ABCD] to change upper or lower case character 4. Press [OK] Button. 5. Enter the called Number and press [OK] 6. Enter the call back Number and press [OK] 7. Select Yes/No to store Message. Press [OK] to send the MSG Store Message ? No YesNEXTOKStore Message ? No YesNEXTOK 01 : Hello! 02 : Hi! 03 : It's Me.DELEDIT 01 : Hello! 02 : Hi! 03 : It's Me.DELEDIT <Message Input> Hello!ABCDOK <Message Input> Hello!ABCDOK Called Number BOOKOK Called Number BOOKOKStore Message ? No YesNEXTOKStore Message ? No YesNEXTOK Called Number BOOKOK Called Number BOOKOKMSG SENDING 2:Sent Message 3:Clear All1:New MessageNEXTOKMSG SENDING 2:Sent Message 3:Clear All1:New MessageNEXTOK](https://usermanual.wiki/LG-Electronics-USA/LSI110/User-Guide-257504-Page-33.png)
![LGE CDMA Fixed Wireless Telephone LSI-110/1100 33 ERASE ALL ? No YesNEXTOKERASE ALL ? No YesNEXTOK 7.3.3 Erasing a Sent Message 1. Press Navigation Up button and 2(MSG SENDING) 2. Press 3(Clear All) to clear text message list. 3. Press [OK] to erase a message. 8.Beside Functions 8.1 Redial Pick up the handset. Send button and Redial button to redial last outgoing number. 8.2 Finding Last Call History Pick up the handset from the charger or press Send button and Redial button to redial last outgoing number. MSG SENDING 2:Sent Message 3:Clear All1:New MessageNEXTOKMSG SENDING 2:Sent Message 3:Clear All1:New MessageNEXTOK @0123456789 Silvia 23456789 QUITVIEW @0123456789 Silvia 23456789 QUITVIEW(LSI-1100 Only) If re-dialed number is a received number, @ will be attached in front of re-dial number. You can’t connect a line even if you redial at above case.](https://usermanual.wiki/LG-Electronics-USA/LSI110/User-Guide-257504-Page-34.png)
![LGE CDMA Fixed Wireless Telephone LSI-110/1100 34 1234567 FINDSAVE 1234567 FINDSAVEPHONE NUMBER TYPEQUITSAVEPHONE NUMBER TYPEQUITSAVE_ADDR : 01TYPE :1234567ABCDSAVE_ADDR : 01TYPE :1234567ABCDSAVE 8.3 Flash The same as that of a single line phone 8.4 Safe mode Even if you misplaced the handset for long, The phone returns to the normal state. After the ROH tone, The phone returns to the IDLE state as the picture and the phone is able to receive a call. 9. Storing Phone Number 9.1 Storing/Editing Phone Numbers 9.1.1 Storing Phone Numbers Frequently used phone numbers can be stored on the memory locations (01~99: 2 digits) and you can make a call by pressing memory location number in off-hook state. 1. Enter the area code and phone number in on-hook state. (Max. 32 digits) 2. Press [SAVE]. 3. Select Phone number Type by Navigation Left Key 13 May, Mon4 : 11 PMBOOKMENU13 May, Mon4 : 11 PMBOOKMENU](https://usermanual.wiki/LG-Electronics-USA/LSI110/User-Guide-257504-Page-35.png)
![LGE CDMA Fixed Wireless Telephone LSI-110/1100 35 MAIN NUMBERQUITSAVEMAIN NUMBERQUITSAVEABCADDR : 01TYPE :< >1234567ABCDSAVEABCADDR : 01TYPE :< >1234567ABCDSAVEABCADDR : 01 < >TYPE :1234567ABCDSAVEABCADDR : 01 < >TYPE :1234567ABCDSAVEABCADDR : <01>TYPE :1234567ABCDSAVEABCADDR : <01>TYPE :1234567ABCDSAVEABCADDR : 01TYPE :1234567_ABCDSAVEABCADDR : 01TYPE :1234567_ABCDSAVEor Navigation Right Key. 4. Press [SAVE]. 5. Enter the name in text mode and press Navigation Down Key to go to the next step. Press [ABCD] to change upper or lower case characters. (Max. 17 characters) To store without name, just press Navigation Down Key Refer to “To enter a character”. 6. Enter the desired memory location and and press Navigation Down Key to go to the next step. The phone number is stored in the displayed memory location. 7. The phone will display an icon asking to keep your number as secret or not. Select “secret icon” or “in secret icon” by Navigation Left / Right Key. Press Navigation Down Key to go to the next step. 8. The phone will display an icon asking for the Phone number type to store your number. Select Phone Type by Navigation Left / Right Key. Press Navigation Down Key to go to the next step 9. The cursor will be on the next location of the input number. If you want to edit the input number, Modify the phone number by Clear button Enter the modified number. 10. Press [SAVE] to store above the information. If you enter another number after you select another phone number type, The phone will display icons asking for the representative number type. Press [SAVE] after you select the representative number type by Navigation Left / Right Key. Press [SAVE] at each steps if you want to store the entered information at above each steps](https://usermanual.wiki/LG-Electronics-USA/LSI110/User-Guide-257504-Page-36.png)
![LGE CDMA Fixed Wireless Telephone LSI-110/1100 37 Lookup Number?FIND Lookup Number?FINDERASE? #01 No YesNEXTOKERASE? #01 No YesNEXTOK - Erased ! - - Erased ! - Lookup Number?FIND Lookup Number?FIND 9.1.2 Erasing Stored Phone Numbers When a phone number is stored in a memory location, you can erase the stored phone number. 1. Press [BOOK] + 1(FROM MEMORIES) + 3(By Number) and enter a number of the desired memory location to erase. If there is no stored phone number in the memory location, “Empty Location” is displayed. If you do not remember the memory location to erase, press [FIND] to search phone number by memory location 2. Erasing process Press [DEL] to delete . Select ‘Yes’ using Navigation Up Key/ Navigation Down Key or [NEXT] button Press [OK] to complete erasing process. 9.2 Finding Stored Phone Numbers You can see all the list of stored phone numbers in memory list and if you forgot the memory location, can find it in sequence. And You can place a call with the phone number. 1. Press [BOOK] + 1(FROM MEMEORIES) +3(By Number) in on-hook state. 01 : JAMES 12 : Silvia DELVIEW 01 : JAMES 12 : Silvia DELVIEW](https://usermanual.wiki/LG-Electronics-USA/LSI110/User-Guide-257504-Page-38.png)
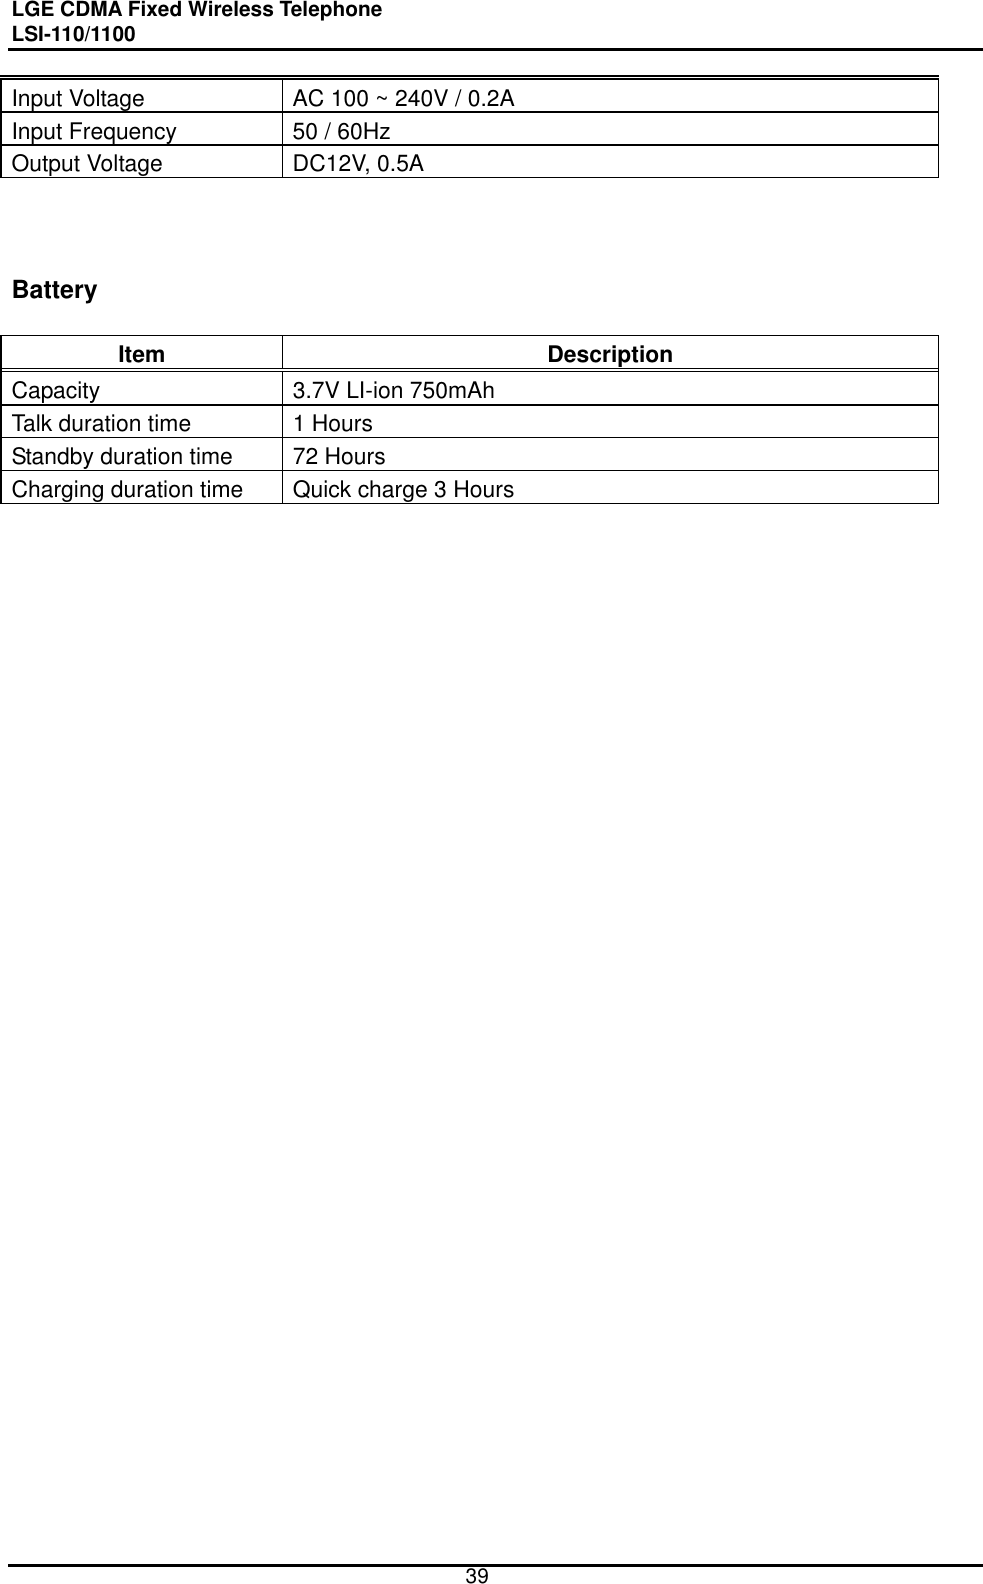
![LGE CDMA Fixed Wireless Telephone LSI-110/1100 38 2. Press [FIND] button to find the desired phone number. Locate in the desired name or address to find. If not any entered name, phone number is displayed. 3. Press [VIEW] to see the stored number. 3. To make a call with the phone number in the state of step 2 or step 3, pick up the handset from the charger or Press Send button and wait for Auto Time-out. 10. General Information Main Unit Item LSI-110 LSI-1100 Tx Frequency Digital : 824 ~ 849 MHz Digital : 1850 ~ 1910 MHz Rx Frequency Digital : 869 ~ 894 MHz Digital : 1930 ~ 1990 MHz Channel Bandwidth 1.25 MHz 1.25 MHz Tx Power Digital : Max. 0.2W Digital : Max. 0.2W Rx Sensitivity -104 ~ -25dBm -104 ~ -25dBm Size 45 X 161 X 35.7 (L X W X H) 45 X 161 X 35.7 (L X W X H) About 124(with battery) About 129(with battery) Weight(g) About 102 (without battery) About 107 (without battery) Operating Temperature 0 ~ 50℃ 0 ~ 50℃ AC/DC Adapter Item SMPS Type Description 01 : JAMES 12 : Silvia DELVIEW 01 : JAMES 12 : Silvia DELVIEWJAMESADDR : 01TYPE : < >1234567DELEDITJAMESADDR : 01TYPE : < >1234567DELEDIT](https://usermanual.wiki/LG-Electronics-USA/LSI110/User-Guide-257504-Page-39.png)