LG Electronics USA LSP4000 Wireless Local Loop Telephone (PCS CDMA) User Manual LSP 4000 P 0615
LG Electronics USA Wireless Local Loop Telephone (PCS CDMA) LSP 4000 P 0615
UserManual.wiki
>
LG Electronics USA
>
LSP4000 User Manual
Users Manual
Navigation menu
Upload a User Manual
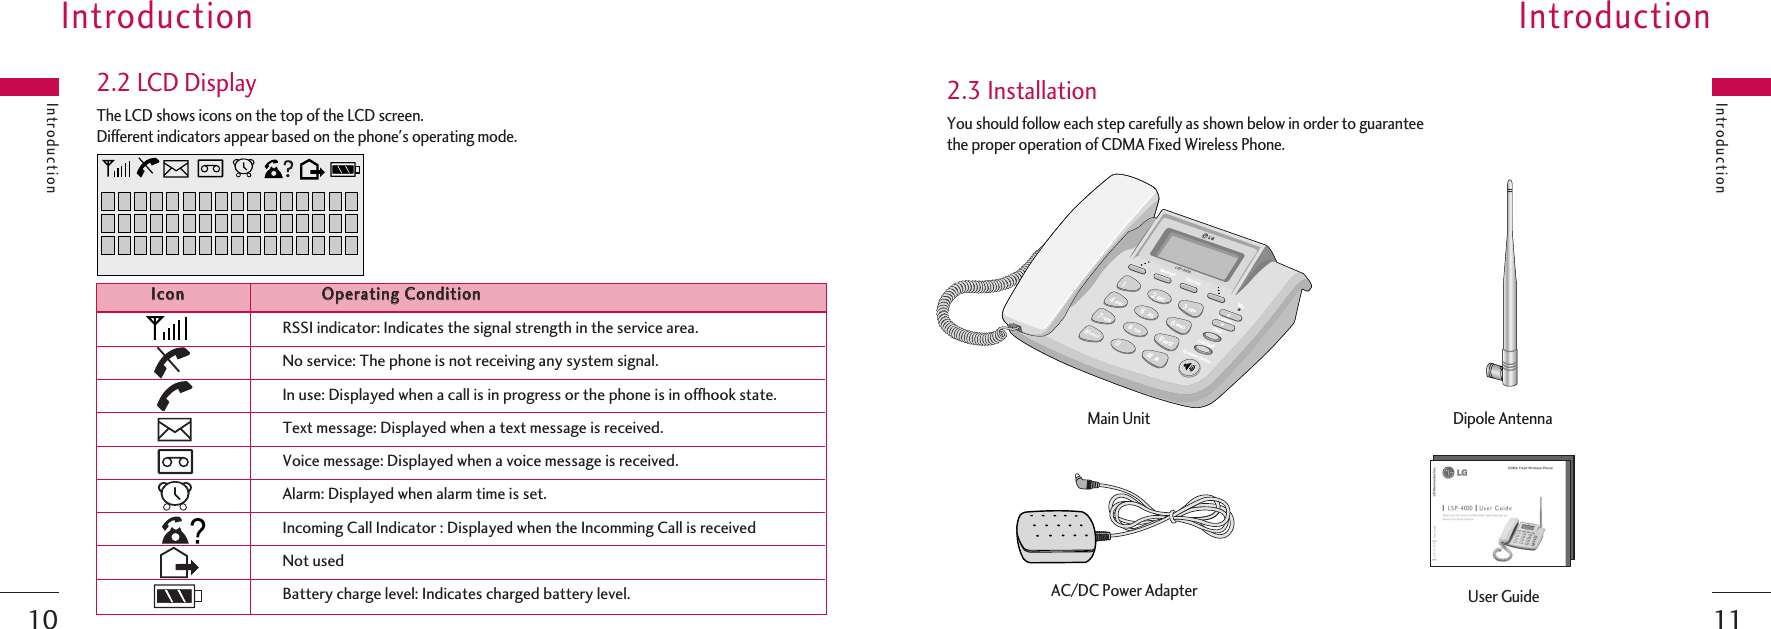
Namespaces
Wiki Guide
HTML
PDF
Info
Views
User Manual
Discussion / Help
Navigation

![Input ModeText Input provides four modes for entering text,special characters, and punctuation.- AABBCC // aabbcc MMooddee: Use ABC or abc mode toinput text in English.ABC Mode : All subsequent letters arecapitalized.abc Mode : All subsequent letters are lowercase.-SSyymm11 // SSyymm22 MMooddee : Insert special charactersand punctuation. You may use any of the specialcharacters. When the special characters aredisplayed, you can select the numbercorresponding to the character that you want toinput.- For number entry, first select the key button youwant to input in ABC / abc mode and then pressthe key button until the number is displayed.Basic Operations1918Basic Operationsphone calls and still make emergency calls. The lockcode/password on your phone is “0000” by default.If you need to modify the lock code, you may modifyit using the change code within the security Menu[4.1.4.6 page no. 29].You can lock your phone using the ‘#’( :Lock)key, also you can lock your phone manually asexplained [4.1.4.1 page no. 27].Under Lock Mode1. Press ‘#’ button for some time.The phone is now locked.2. To unlock, press Soft key 1 .Soft Key 1 Soft Key 23. Enter unlock code. (Default “0000”).3.10 Entering and EditingInformationYou can edit the phone book and short messagesusing various text input mode.Key FunctionsSoft key 2 : Press to scroll and select a modethrough menus.- Soft key 2 : Press to scroll and select a modethrough Menus. You can scroll through the modesusing Soft key 2 in the following order: ABC, abc,Sym1, Sym2.- Space key : Press to insert a space.- Clear key : Press to delete a single space orcharacter. Press and hold to delete entire words.●●●●●●END/PWRMessage●●●●●●UnlockBasic OperationsBasic Operations](https://usermanual.wiki/LG-Electronics-USA/LSP4000/User-Guide-675925-Page-10.png)
![25244.1.1.3 Key VolumeThe tone when you press a key can be adjusted.1. Press Soft key 1 + 1( ) + 3( ) in on-hook state.2. Press button or Soft key 2 toadjust key volume.3. Press Soft key 1 to save setting.4.1.1.4 Earpiece VolumeThe voice of the other party can be adjusted.1. Press Soft key 1 + 1( ) + 4( ) in on-hook state.2. Press button or Soft key 2 toadjust earpiece volume.3. Press Soft key 1 to save setting.Note : Press Up/Down button to adjust thevolume during a conversation.4.1.2 SettingsYou can use additional features like Alarm, Version,Backlight etc.Press Soft key 1 + 2( ) in on-hookstate.4.1.2.1 Alarm[Set Time]This function allows you to set alarm time.1. Press Soft key 1 + 2( ) + 1( ) + 1( ) in on-hook state.2. Press button or Soft key 2 toselect from Off, Once or Always and press Softkey 1 .3. Enter alarm time and press Soft key 1and AM or PM.4. If you want to modify the time, press button and reset.ClearselectAM/PMOkNextUp/DownSet TimeAlarmSettingsMenuSettingsMenuOkNextUp/DownEarpiece VolumeSoundMenuOkNextUp/DownKey VolumeSoundMenuMenu TreeMenu TreeMenu TreeMenu Tree5. Press Soft key 2 to save and exit.[Set Ringer]This function allows you to select ringer for alarm alert.1. Press Soft key 1 + 2( ) + 1( ) + 2( ) in on-hook state.2. Press Up/Down button or Soft key 2 toselect from Alarm Ring 1, Alarm Ring 2, AlarmRing 3, Alarm Ring 4 or Alarm Ring 5.3. Press Soft key 1 to save and exit. 4.1.2.2 VersionYou can confirm your phone S/W version.1. Press Soft key 1 + 2( )+ 2( )in on-hook state.2. To confirm next page, press Soft key 2 ,and press Soft key 1 to exit.4.1.2.3 BacklightAllows you to choose the settings of the LCD andkeypad backlight.1. Press Soft key 1 + 2( ) + 3( ) in on-hook state.2. Select among Always Off / For 10 Seconds / For30 Seconds / Always On4.1.3 Dial FeaturesPress Soft key 1 + 3( ) in on-hook state.4.1.3.1 Hot LineHotLine automatically calls to registered number bypassing setup time in off-hook state.1. Press Soft key 1 + 3( )+ 1( ) in on-hook state.Hot LineDial FeaturesMenuDial FeaturesMenuBacklightSettingsMenuOkMoreVersionSettingsMenuOkNextSet RingerAlarmSettingsMenuOk](https://usermanual.wiki/LG-Electronics-USA/LSP4000/User-Guide-675925-Page-13.png)
![35343. Press Soft key 1 to save.4.3 FindThis function allows you to search the phone numbersthat you have stored in the phone book memory. Youmay search the numbers from call history also.If you press Soft key 2, Find menu is activated.Soft Key 1 Soft Key 2To scroll in Menu, press ᵋL@ᵾL@ᶀ or ᵍbutton.To return to the initial screen, press button and to return to the previous screen, pressClear button.4.3.1 Call HistoryThe phone can store upto 30 Received Call, 30Dialled Call, 30 Missed Call and 30 In Call Memo inthe Call History.When you press the button, all calls aredisplayed. In the list of all calls, all sorts of the iconshave the meaning as follows : - Received : ←- Dialled : →- Missed : !- In call Memo : - Call Waiting : - 3 Way Call : 4.3.1.1 All Calls[In on-hook state]1. Press Soft key 2 + 1( ) + 1( ) or button.2. Press button to select a number orname in the call history list.Up/DownDial/FlashAll CallsCall HistoryFindDial/FlashEND/PWR●●●●●●END/PWRMessage●●●●●●OkMenu TreeMenu TreeMenu TreeMenu Tree3. To view desired item, select Soft key 1 .4. To erase desired number, select Soft key 2.5. Press Soft key 2 to see more information and press Soft key 1 tosave the number in the phone book.▶In PCO product, Press Soft key 2 tosee more information and press Soft key 1to save the number in the phone book.[While in a Call]1. Press Soft key 2( ) + 1 ( ) +1( ).2. Press Up/Down button to select a number orname in the call history list.3. To view desired item, select Soft key 1 .4. To erase desired number, select Soft key 2.5. Press Soft key 2 to see more informationand press Soft key 1 to save the numberin the phone book.▶In PCO product, Press Soft key 2 tosee more information and press Soft key 1to save the number in the phone book.4.3.1.2 Missed1. Press Soft key 2 + 1( ) + 2( ) in on-hook state.2. Press Up/Down button to select a number orname in the missed call list.3. To view desired item, select Soft key 1 .4. To erase missed call, select Soft key 2 .5. Press Soft key 2 to see more informationand press Soft key 1 to save the numberin the phone book.SaveTimeEraseViewMissedCall HistorySaveTimeSaveTimeEraseViewAll CallsCall HistoryFindSaveNextSaveTimeEraseViewC](https://usermanual.wiki/LG-Electronics-USA/LSP4000/User-Guide-675925-Page-18.png)
![3938[Fast Searching]Press Soft key 2 and press Soft key 2again.4.3.2.1 By Name1. Press Soft key 2 + 2( ) +1( ), to retrieve a phone number byname.2. Enter the name you want and press Soft key 1. To find all phone numbers you havestored, press Soft key 1 .4.3.2.2 By Address1. Press Soft key 2 + 2( ) + 2( ), to retrieve a phone number byaddress.2. Enter a memory address to retrieve phonenumber and press Soft key 2 . To find allphone numbers you have stored, press Soft key2 .4.3.2.3 By Number1. Press Soft key 2 + 2( ) + 3( ), to retrieve a phone number bynumber.2. Enter the phone number that you want to fineand press Soft key 2 . To find all phonenumbers you have stored, press Soft key 2.FindFindBy NumberPhone BookFindFindFindBy AddressPhone BookFindFindFindBy NamePhone BookFindFindFindSpeaker PhoneSpeaker PhoneMenu TreeMenu Tree5. Speaker PhoneThis function is a convenient feature, which enablesyou to make a call using the Speaker Phone ( )button in on-hook state.](https://usermanual.wiki/LG-Electronics-USA/LSP4000/User-Guide-675925-Page-20.png)