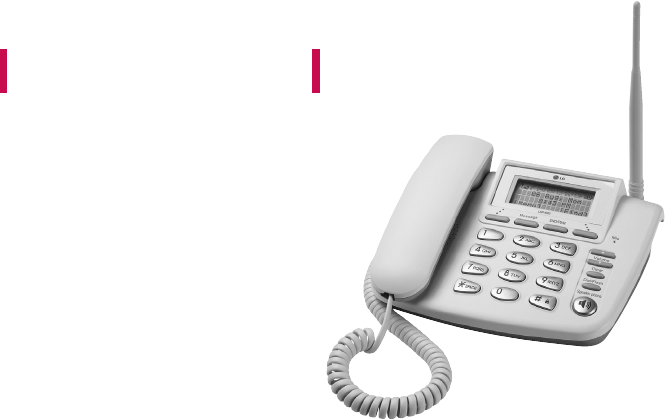
LG Electronics USA LSP4000 Wireless Local Loop Telephone (PCS CDMA) User Manual LSP 4000 P 0615
LG Electronics USA Wireless Local Loop Telephone (PCS CDMA) LSP 4000 P 0615
Users Manual
LSP-4000(P)USER GUIDE
Please read this manual carefully before operating your
set. Retain it for future reference.

1. Important Information 4
1.1 Safety Instruction 4
1.2 Optimal Phone Performance 4
1.3 Care and Service 5
1.4 Safety Information 6
2. Introduction 9
2.1 Front View of the Phone 9
2.2 LCD Display 10
2.3 Installation 11
2.4 Installation Steps 14
3. Basic Operations 15
3.1 Making a Call 15
3.2 Messaging 15
3.3 Redialing Last Number 15
3.4 3 way call conferencing 16
3.5 Call Waiting 16
3.6 Volume Control 16
3.7 Receiving a Call 17
3.8 In Call Memo 17
3.9 Lock Mode 17
3.10 Entering and Editing Information 18
4. Menu Tree 20
4.1 Menu 23
4.2 Message 30
4.3 Find 34
5. Speaker Phone 39
6. Troubleshooting 40
7. General Information 41
7.1 Main unit 41
7.2 AC/DC Adapter 41
7.3 BAttery 42
Limited Warranty Statement 43
CONTENTS
3
Congratulations on your subscription to the LSP-
4000(P) Fixed Wireless Phone. This phone has been
designed to operate on the IS-2000 Air Protocol
over the 800MHz band. And the phone has the
advanced user interface similar to mobile phone. It has
greatly enhanced voice clarity and provides various
advanced features.
KKeeyy pphhoonnee ffeeaattuurreess::
▶
PCO Feature (PCO Product Only)
▶
Display is 3 lines text + 1 Icon line. Yellow/Green
LCD & Keypad back light
▶
Polyphonic Ring tones: A choice of 10 melodies
and 5 bell sounds available
▶
Large Phonebook with 300 entries
▶
Speed Dialling for up to 300 numbers
▶
The phone can store upto 30 Received Call, 30
Dialled Call, 30 Missed Call and 30 In Call Memo in
the Call History
▶
3 Way call conferencing
▶
Hands free Speaker Phone
▶
Receiver Off-Hook tone
▶
Recent Call History can be dialled by Dial / Flash
key
▶
Adjustable Ringer volume, Key volume, Earpiece
volume
▶
Fast charging battery.
Highlights
Highlights
2
Contents

▶
Use battery, antenna and AC/DC power adapter
provided by LGE. Using parts made by any other
manufactures may invalidate the warranty.
▶
Only authorized personnel should service the
phone and its accessories. Faulty installation or
service can be dangerous and may invalidate the
warranty.
▶
Do not use the phone in any designated “cellular
phone use” area.
▶
Avoid using the phone in high temperature or
humidity.
▶
Avoid spilling any liquid on the phone. If the phone
gets wet, turn the power off immediately. If the
phone doesn’t work, please contact the service
provider immediately.
▶
Avoid shock or impact.
▶
We recommend you to charge the backup battery
before initial use. The backup battery may be
discharged during delivery.
▶
In order to comply with FCC RF Exposure
requirements, this device must be installed such
that there is a minimum separation distance of 20
cm between the antenna and all persons during
normal operation.
1.3 Care and Service
Before cleaning, always unplug the phone from the
wall outlet and remove the antenna (or disconnect the
antenna cable). Do not use liquid or aerosol cleaners;
use a damp cloth for cleaning.
If the phone doesn’t work, do not attempt to
disassemble it, contact the authorized LGE Service
center for assistance.
If any of the following conditions exist, unplug the
phone from the wall plug, remove the battery and call
the qualified engineer.
▶
The power supply cord is damaged or frayed.
▶
Liquid has spilled into the phone.
▶
The phone has been exposed to rain or water.
▶
The phone has been dropped or damaged.
▶
The phone does not function normally even after
following the operating instructions.
Important Information
5
1.1 Safety Instruction
WARNING / CAUTION
To reduce the risk of fire or electric shock, do not
expose this phone to rain or moisture. Do not use this
phone in swimming pools or other water bodies.
1.2 Optimal Phone Performance
▶
Do not hold the antenna when operating the
phone, or operate the phone when someone is
within four inches (ten centimeters) of the antenna.
Both cases affect the call quality and may cause the
phone to operate at a higher power level than
required.
▶
For the best call quality, keep the antenna free from
obstructions and position the antenna upright.
▶
Do not use the phone if the antenna is damaged.
Replace the damaged antenna immediately by a
qualified technician. Use only a manufacturer-
approved antenna.
Non-approved antennas, modifications or
attachments may impair call quality and damage
the phone.
▶
RF energy may affect improperly installed or
inadequately shielded personal medical devices
such as pace-makers or hospital monitors. Consult
the manufacturer of any personal medical devices
to determine whether they are adequately shielded
from external RF energy. Turn your phone OFF in
health care centers if any regulations posted in the
area instruct you to do so. Hospitals or health care
centers may be using equipment that may be
sensitive to external RF energy.
▶
If this phone causes harmful interference to radio or
television reception, which can be determined by
turning the equipment off and on, the user is
encouraged to try to correct the interference by
one or more of the following measures:
- Reorient or relocate the receiving antenna
- Place the radio or television farther away from the
phone.
- Connect the equipment to an outlet on a circuit
different from that to which the phone is
presently connected.
- Consult the Authorized LGE Dealer for assistance
of an experienced radio/TV technician.
4
Important Information
Important Information
Important Information

Important Information
7
Important Information
6
warp or melt certain plastics.
▶
Do not store the phone in cold
areas. When the phone warms up
to its normal operating
temperature, moisture can form
inside the phone, which can
damage the internal electronic
circuit boards.
▶
Do not attempt to open it. Non-
expert handling of the phone
could damage it. It may cause fire,
electric shock and breakdown.
Consult your authorized LG
dealer for assistance.
▶
Do not drop, knock or shake the
phone. Rough handling may
break the internal circuit boards.
▶
Do not use harsh chemicals,
cleaning solvents or strong
detergents to clean the phone.
Wipe it with a soft cloth that has
been slightly dampened in a mild
soap and water solution.
▶
Do not paint the phone. Paint
can clog the phone’s moving
parts and prevent proper
functioning.
▶
During lightning, do not touch
the power plug or the phone
line. It may result in an electric
shock or death.
▶
Do not install the phone under
direct sunlight or on an uneven
surface.
▶
Before using the plug, check the
available power voltage.
Inaccurate power voltage may
cause fire and damage.
Example: LSP-4000(P) Input
Voltage: 100 ~ 240V.
▶
Do not plug many power cords
into one outlet. It may cause fire
or electric shock.
Important Information
1.4 Safety Information
WWAARRNNIINNGG
▶
For safety, use only an adapter
approved by LG.
LG does not bear responsibility
for any faults that may arise due
to non-conformation to this
guide.
Example: LSP-4000(P)
(LG Power Adapter Source: DC
5V / 1A)
▶
Do not, in any way, cause a
short-circuit. It may start a fire or
the phone may explode causing
injury.
▶
Do not create a sudden impact
on the battery by throwing it. Do
not dispose off batteries by
putting them in a fire. They may
explode or catch fire due to the
electrolyte within.
CCAAUUTTIIOONN
▶
Do not use the phone with a car
battery. It may cause electric
shock, fire, breakdown or
transformation.
▶
Avoid using the phone in high
temperature or humidity. Avoid
spilling any liquid on this phone.
If the phone gets wet, Switch off
phone and turn off AC power
supply.
▶
Keep the phone dry.
Submersion, humidity, and
liquids contain minerals that
may corrode internal electronic
circuits.
▶
Do not store or use the phone
in dusty or dirty areas as this
can damage the moving parts.
▶
Do not store the phone in hot
areas. High temperatures can
shorten the life of electronic
devices, damage batter ies, and
Important Information
Introduction
98
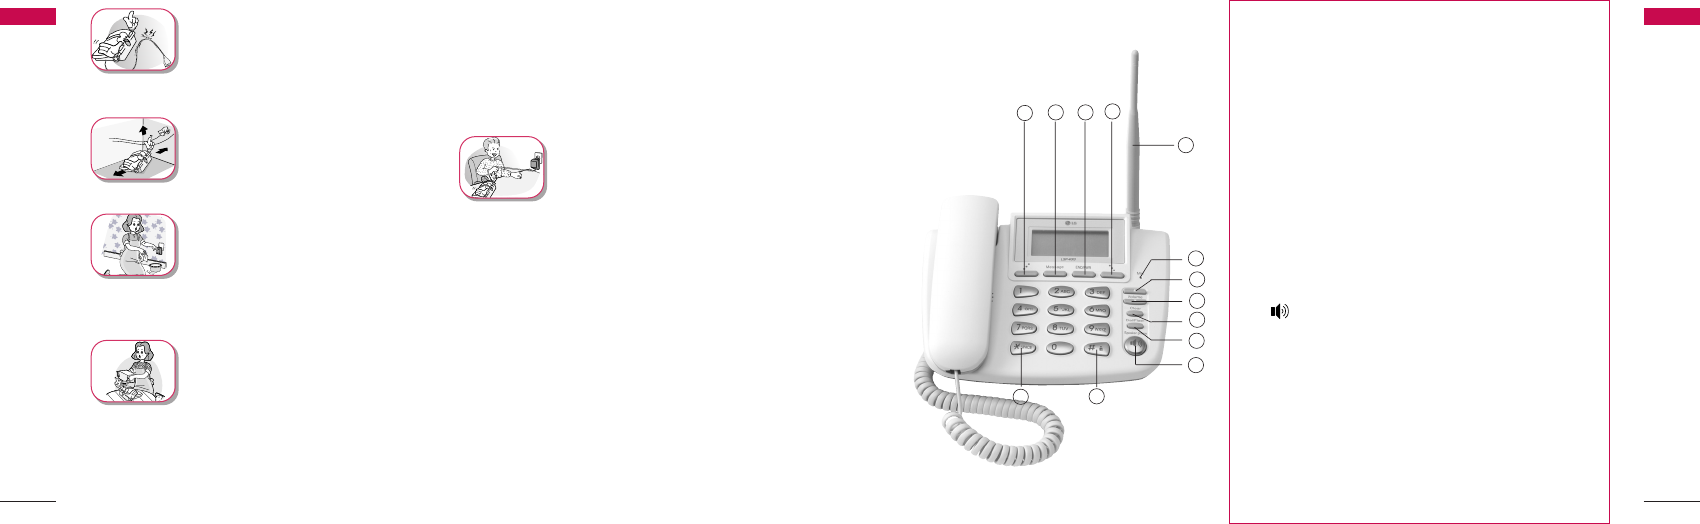
2.1 Front View of the Phone
Introduction
①Soft key 1 : Activates Main Menu state
②Message : Activates SMS Menu state
③END/PWR : Deactivates states, or Power ON/OFF
④Soft key 2 : Activates Find Menu state
⑤Up Key (▲) : Moves up in the Menu or Volume Up
⑥Down Key (▼) : Moves down in the Menu or Volume
Down
⑦Clear : Deletes the last digit, or moves previous Menu
⑧Dial/Flash : Activates Dial/Flash state, or views Call
History
⑨() : Activates hands free speaker phone function
⑩‘*’ : Inputs Symbol ‘*’, or makes a phone input ‘space’
during text entry operation.
⑪
‘#’ : Inputs Symbol ‘#’, or makes a phone lock
after long-press.
⑫
MIC : Microphone for hands free speaker phone
function.
⑬
Antenna : Attached Antenna
▶
Do not remodel the power cord
or disassemble it. If the power
cord or plug is impaired, do not
use it. It may cause fire or
electric shock.
▶
Do not install the phone in an ill-
ventilated place. It may cause fire
or a breakdown.
▶
Do not touch the plug with wet
hands. When disconnecting the
power cord of any accessory,
grasp and pull out the plug itself
and not the cord. It may cause
fire or elec tric shock.
▶
Do not put heavy objects on the
power cord. Do not bend the
power cord too much. It may
cause fire or electric shock.
▶
Use only an LG-approved
battery and adapter. If not, it
may cause an explosion or result
in a short-circuit. LG does not
bear any responsibility for the
damage.
▶
When you disconnect the power
cord of any accessory, grasp
and pull the plug itself and not
the cord. It may cause the
adapter to breakdown.
Important Information
Important Information
12 3 4
13
5
6
7
8
9
11
12
10
1110
Introduction
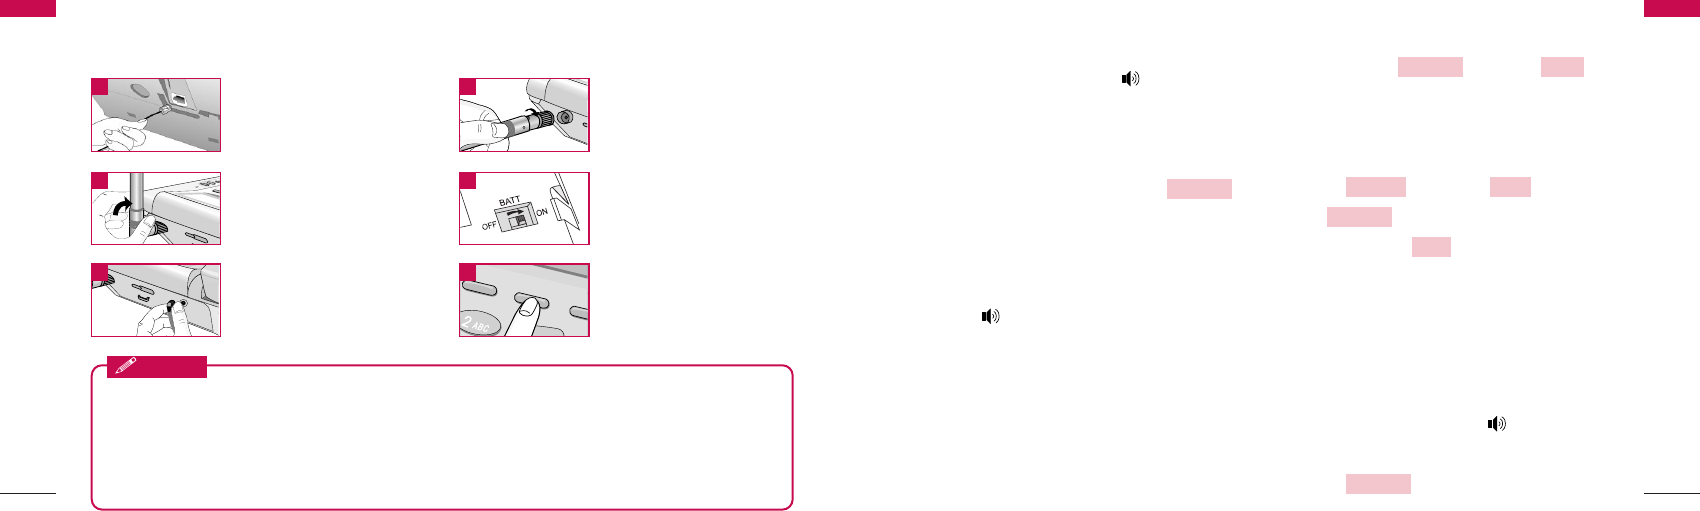
You should follow each step carefully as shown below in order to guarantee
the proper operation of CDMA Fixed Wireless Phone.
2.3 Installation
Message
END/PWR
Mic
Dial/Flash
Speaker phone
Message
END/PWR
Mic
Volume
Clear
Dial/Flash
Speaker phone
AC/DC Power Adapter
Main Unit
User Guide
Dipole Antenna
Introduction
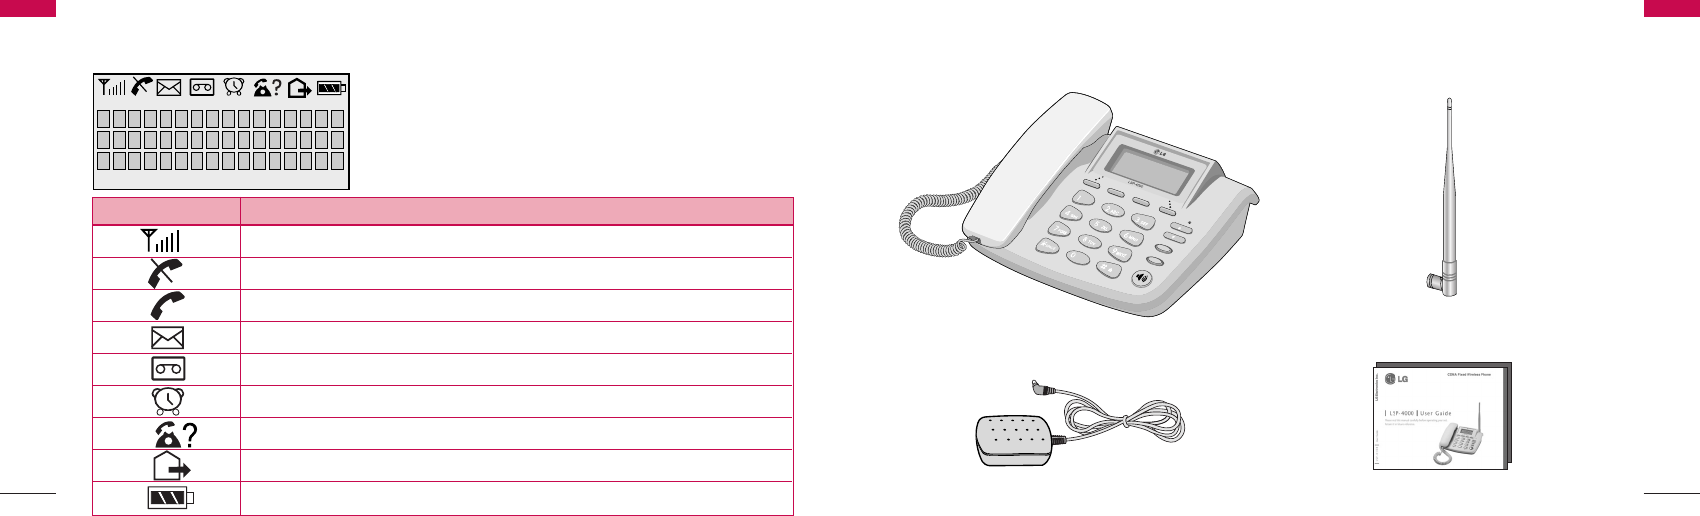
The LCD shows icons on the top of the LCD screen.
Different indicators appear based on the phone's operating mode.
2.2 LCD Display
Introduction
IIccoonnOOppeerraattiinngg CCoonnddiittiioonn
RSSI indicator: Indicates the signal strength in the service area.
No service: The phone is not receiving any system signal.
In use: Displayed when a call is in progress or the phone is in offhook state.
Text message: Displayed when a text message is received.
Voice message: Displayed when a voice message is received.
Alarm: Displayed when alarm time is set.
Incoming Call Indicator : Displayed when the Incomming Call is received
Not used
Battery charge level: Indicates charged battery level.
Introduction

1312
▶
Please observe the following to get better voice
quality.
1. Keep away from electrical appliances such as TV,
computer, radio etc.
2. Keep the phone in a high and central location
without any obstructions.
3. Raise the integral antenna of the phone to get
maximum strength as shown in the figure.
STEP IV. Check the LCD Display
▶
After you follow the installation instruction step I to
step III, please check the LCD for normal operation.
▶
If you do not see the status of service, please repeat
the 4th instruction of step III.
Then confirm the status of phone to get the proper
signal strength from the service operator system.
Introduction
STEP I. Check Components
▶
The following components are supplied Fixed
Wireless Phone.
1. LSP-4000(P) Main Phone with Handset
(Including inner backup battery) -1EA-
2. Dipole Antenna -1EA-
3. AC/DC Power Adapter -1EA-
4. User Guide -1EA-
▶
Please make sure that these components are
present before you begin to install the phone. If any
of the components are missing or damaged, contact
your service provider immediately.
STEP II. Place the Terminal
▶
Place the phone on the stable flat surface area
(desk, table, etc.). Serious damage may result if the
phone is dropped. Do not place the phone within 1
meter of heaters or radiators.
This phone is designed for desktop usage. Avoid the
direct exposure to sunlight and dampness.
▶
Read the SAFETY INFORMATION located in the
first part of this document before you place the
phone.
STEP III. Connect Components
(Please refer to “Installation Steps” in 2.4)
▶
Connect the antenna to the TNC antenna
connector located at the top of the phone.
If you have placed the phone on a flat surface,
position the antenna pright.
▶
Connect the curl cord of the handset to the RJ-11
port located on the left side of the phone.
▶
Connect the AC/DC Adapter cable to the DC input
port located at the top of the phone.
-
If it is correct, a beep tone will be heard.
- If it is not correct (Booting fails or beep tone is not
heard), you will have to reconnect the adapter or
reset the battery switch to “on”.
Introduction
Introduction
Introduction
1514
3.1 Making a Call
You can make a call as follows.
1. Pick up the handset or press button.
2. Listen for dial tone.
3. Enter the phone number with area code if
needed.
4. Wait for the Auto Time-out or Press
button.
5. The call is connected and you may start
conversation.
6. To disconnect the call, replace the handset or
press button.
When the user presses the Dial/Flash button after
dialing any desired number, if the user picks up the
handset or presses the Speaker Phone button, the
phone makes a call immediately.
3.2 Messaging
You can send or receive a short message. If you want
to send SMS, press button + 1 in
on-hook state and write “send to” number / message
that you want and send your message. When the
message received in idle state or during a call, you can
confirm your message as follows.
1. Press button + 2 ( ) +
1 ( ).
2. Press Soft key 1 to confirm desired
message.
3.3 Redialing Last Number
You can make a redial to last number, shown in All
Calls.
1. Pick up the handset or press button.
2. Listen for dial tone.
3. Press button.
Dial/Flash
View
View SMS
InboxMessage
WriteMessage
Dial/Flash
Basic Operations
Introduction
▶
Before using the phone, please check that the battery switch is “on”.
▶
After switching if on, use the phone.
▶
When charging the battery, check that the battery switch is “on”.
▶
The battery will be charged only when the battery switch is “on”.
Notice
Connect basehandset
to the handset
connector.
Turn the antenna
upright.
Connect the antenna
to the TNC connector
(Turn right).
When you first use the
phone, please Turn
“on” the battery
switch.
1 2
3 4
Message
END/PWR
Message
END/PWR
Connect the AC
power supply.
Press END/PWR
button to operate
initially.
5 6
Please follow the procedure below to install the phone properly.
2.4 Installation Steps
Introduction
Basic Operations

4. The call is connected and you may start
conversation.
5. To disconnect the call, replace the handset or
press button.
※You can also dial any of the last 120
(Missed+Received+Dialled+In Call Memo)
numbers stored in All Calls.
3.4 3 way call conferencing
You can start 3 way call conferencing.
1. Dial second party phone number while you are in
conversation with the first party.
2. To make conference call, press ‘3’ +
button.
This service should be provided by your service
provider.
3.5 Call Waiting
While a call is in progress, you may hear two beeps
indicating another incoming call.
When call wait is enabled, you may put the active call
on hold while you answer the other incoming call.
1. Press or button, Call
Waiting window then disappears.
2. Press button, you may start
conversation with called number.
3. Re-press button, you may start
conversation with previous number.
3.6 Volume Control
1. Press button of navigation while in a
call, to adjust earpiece volume.
2. Press Soft key 2 to prevent sound from
your end during the call. To cancel Mute, Press
again Soft key 2 .
Unmute
Mute
Up/Down
Dial/Flash
Dial/Flash
END/PWRClear
Dial/Flash
Basic Operations
17
Basic Operations
16
Soft Key 1 Soft Key 2
To scroll in Menu, press ▲or ▼button.
3. Press Soft key 1 + 3( ) during a
call and select Low or High by pressing Soft key 2
or Press button, to adjust MIC
volume. (Not used In PCO product)
3.7 Receiving a Call
When the bell rings in idle state, you can receive a call
as follows
1. Pick up the handset or press the
button.
2. Start a conversation.
3. To disconnect the call, replace the handset or
press the button.
3.8 In Call Memo
(Not used In PCO product)
Allow you to store number during the call.
To store number:
1. Press Soft key 1 +
1( ).
2. Enter up to 32 numbers using the keypad.
3. Press Soft key 1 to save.
To retrieve an In Call Memo:
1. Press button to see saved number.
Note: You can store the number by pressing Soft key
1 .
3.9 Lock Mode
Protects your phone from unauthorized use. Once the
phone is locked, it is in restricted mode, until the in
lock code is entered. This will allow you to receive
Add
Dial/Flash
Add
In Call Memo
Menu
Speaker Phone
Speaker Phone
Up/Down
Next
Mic LevelMenu
●●●●●●
END/PWRMessage
●●●●●●
Basic Operations
Basic Operations

Input Mode
Text Input provides four modes for entering text,
special characters, and punctuation.
- AABBCC // aabbcc MMooddee: Use ABC or abc mode to
input text in English.
ABC Mode : All subsequent letters are
capitalized.
abc Mode : All subsequent letters are lowercase.
-SSyymm11 // SSyymm22 MMooddee : Insert special characters
and punctuation. You may use any of the special
characters. When the special characters are
displayed, you can select the number
corresponding to the character that you want to
input.
- For number entry, first select the key button you
want to input in ABC / abc mode and then press
the key button until the number is displayed.
Basic Operations
1918
Basic Operations
phone calls and still make emergency calls. The lock
code/password on your phone is “0000” by default.
If you need to modify the lock code, you may modify
it using the change code within the security Menu
[4.1.4.6 page no. 29].
You can lock your phone using the ‘#’( :Lock)
key, also you can lock your phone manually as
explained [4.1.4.1 page no. 27].
Under Lock Mode
1. Press ‘#’ button for some time.
The phone is now locked.
2. To unlock, press Soft key 1 .
Soft Key 1 Soft Key 2
3. Enter unlock code. (Default “0000”).
3.10 Entering and Editing
Information
You can edit the phone book and short messages
using various text input mode.
Key Functions
Soft key 2 : Press to scroll and select a mode
through menus.
- Soft key 2 : Press to scroll and select a mode
through Menus. You can scroll through the modes
using Soft key 2 in the following order: ABC, abc,
Sym1, Sym2.
- Space key : Press to insert a space.
- Clear key : Press to delete a single space or
character. Press and hold to delete entire words.
●●●●●●
END/PWRMessage
●●●●●●
Unlock
Basic Operations
Basic Operations
2120
Menu Tree
Menu Tree
4. Emergency Calls Emergency 1 / Emergency 2 / Emergency 3
5. Restrict Call Set Restrict / Permit Memory / Deny Memory
6. Change Code Ok / Back
5. My Number Ok / Edit
2. Message
1. Write ABC / abc / Sym 1 / Sym 2
1. View SMS View / Erase
2. Inbox 2. Voice Mail Reply / Erase
3. Erase All Yes / No
3. Outbox 1. View View / Erase
2. Erase All Yes / No
1. MSG Alert Off / Once / Every 2 Min
4. Settings 2. MSG Ringer SMS Alarm 1 ~5
3. Defer Delivery Immediate / After 30 Min. / After 1 Hour / After 2 Hours /
After 12 Hours / After 1 Day / After 2 Days
Main Menu
Sub-Menu Setting Value
Menu Tree
Menu Tree
1. Menu
1. Ring Type 15ea. Midi(10ea) + Bell(5ea)
1. Sound 2. Ringer Volume 4 steps
3. Key Volume 5 steps (including silent step)
4. EarpieceVolume 4 steps
1. Alarm Set Time / Set Ringer
2. Settings 2. Version Ok / More
3. Backlight Always Off / For 10 Seconds / For 30 Seconds / Always On
1. Hot Line Disable / Enable
3. Dial Features
2. Hot Line Time 2-9 Sec
3. Auto Time Out 2-9 Sec
4. Speed Dialing Enable / Disable
1. Lock Mode Disable / Enable
4. Security 2. Clear Calls Yes / No
3. Clear Memory Yes / No
Main MENU
Sub-MENU Setting Value
4. Menu Tree

2322
Menu Tree
Menu Tree
Menu Tree
Menu Tree
4. Valid Period Default / 30 Minutes / 1 Hour / 2 Hours /
12 Hours / 1 Day / 2 Days
5. Auto DEL Inbox Disable / Enable
3. Find
1. All Calls View / Erase
2. Missed View / Erase
1. Call History 3. Received View / Erase
4. Dialled View / Erase
5. In Call Memo View / Erase
6. Erase History Erase All Calls / Erase Missed /Erase Received /
Erase Dialled / Erase Memo
1. By Name Find / ABC
2. Phone Book 2. By Address Find
3. By Number Find
Main Menu
Sub-Menu Setting Value
4.1 Menu
You may select from five Main Menu (Sound, Settings,
Dial Features, Security, My Number) for this item.
If you press Soft key 1 is activated.
Soft Key 1 Soft Key 2
To scroll in Menu, press ᵋor ᵍbutton.
To return to the initial screen, press
button and to return to the previous screen, press
Clear button.
4.1.1 Sound
Allows you to set various volume settings and Ring
Type.
Press Soft key 1 + 1( ) in on-hook
state.
4.1.1.1 Ring Type
You can select the various ring types.
1. Press Soft key 1 + 1( )
+ 1( ) in on-hook state.
2. Press Up/Down button or Soft key 2 to
select desired ring type.
3. Press Soft key 1 to save setting.
Note: Choose from 15 different ring types.
4.1.1.2 Ringer Volume
You can adjust the ringing volume level of incoming
call alert.
1. Press Soft key 1 + 1( )
+ 2( ) in on-hook state.
2. Press button or Soft key 2 to
adjust Ring Volume.
3. Press Soft key 1 to save setting.
Ok
Next
Up/Down
Ringer Volume
Sound
Menu
Ok
Next
Ring Type
SoundMenu
SoundMenu
END/PWR
●●●●●●
END/PWRMessage
●●●●●●
Menu

2524
4.1.1.3 Key Volume
The tone when you press a key can be adjusted.
1. Press Soft key 1 + 1( )
+ 3( ) in on-hook state.
2. Press button or Soft key 2 to
adjust key volume.
3. Press Soft key 1 to save setting.
4.1.1.4 Earpiece Volume
The voice of the other party can be adjusted.
1. Press Soft key 1 + 1( )
+ 4( ) in on-hook state.
2. Press button or Soft key 2 to
adjust earpiece volume.
3. Press Soft key 1 to save setting.
Note : Press Up/Down button to adjust the
volume during a conversation.
4.1.2 Settings
You can use additional features like Alarm, Version,
Backlight etc.
Press Soft key 1 + 2( ) in on-hook
state.
4.1.2.1 Alarm
[Set Time]
This function allows you to set alarm time.
1. Press Soft key 1 + 2( )
+ 1( ) + 1( ) in on-hook state.
2. Press button or Soft key 2 to
select from Off, Once or Always and press Soft
key 1 .
3. Enter alarm time and press Soft key 1
and AM or PM.
4. If you want to modify the time, press
button and reset.
Clear
select
AM/PM
Ok
Next
Up/Down
Set Time
Alarm
SettingsMenu
SettingsMenu
Ok
Next
Up/Down
Earpiece Volume
SoundMenu
Ok
Next
Up/Down
Key Volume
SoundMenu
Menu Tree
Menu Tree
Menu Tree
Menu Tree
5. Press Soft key 2 to save and exit.
[Set Ringer]
This function allows you to select ringer for alarm alert.
1. Press Soft key 1 + 2( ) +
1( ) + 2( ) in on-hook state.
2. Press Up/Down button or Soft key 2 to
select from Alarm Ring 1, Alarm Ring 2, Alarm
Ring 3, Alarm Ring 4 or Alarm Ring 5.
3. Press Soft key 1 to save and exit.
4.1.2.2 Version
You can confirm your phone S/W version.
1. Press Soft key 1 + 2( )
+ 2( )
in on-hook state.
2. To confirm next page, press Soft key 2 ,
and press Soft key 1 to exit.
4.1.2.3 Backlight
Allows you to choose the settings of the LCD and
keypad backlight.
1. Press Soft key 1 + 2( )
+ 3( ) in on-hook state.
2. Select among Always Off / For 10 Seconds / For
30 Seconds / Always On
4.1.3 Dial Features
Press Soft key 1 + 3( ) in on-
hook state.
4.1.3.1 Hot Line
HotLine automatically calls to registered number by
passing setup time in off-hook state.
1. Press Soft key 1 + 3( )
+ 1( ) in on-hook state.
Hot Line
Dial FeaturesMenu
Dial FeaturesMenu
Backlight
SettingsMenu
Ok
More
Version
SettingsMenu
Ok
Next
Set RingerAlarm
Settings
Menu
Ok

2726
2. Press button or Soft key 2 to
select Enable or Disable and press Soft key 1
.
3. Press Soft key 2 and enter the Hot Line
phone number.
4. Press Soft key 1 to save and exit.
If you have selected ‘Enable’ and enter the HotLine
Number and Time,
HotLine functions as follows:
When you pick up the handset or press button ,
the phone automatically dials the HotLine Number
that you have already saved if any number is not
dialed for duration specified in HotLine Time.
4.1.3.2 Hot Line Time
1. Press Soft key 1 + 3( )
+ 2( ) in on-hook state.
2. Press button or Soft key 2 to
select hot line connection time (2~9 Sec.).
3. Press Soft key 1 to select.
4.1.3.3 Auto Time Out
Setting the length of time the phone waits before
automatically dialing a number. You can select this
duration to be between 2 and 9 seconds.
1. Press Soft key 1 + 3( ) +
3( ) in on-hook state.
2. Press Up/Down button or Soft key 2 to
select Auto Time Out between 2 and 9 Sec.
3. Press Soft key 1 to select.
4.1.3.4 Speed Dialing
This function allows you to make a call faster by just
pressing a corresponding number.
Ok
Next
Auto Time Out
Dial FeaturesMenu
Ok
Next
Up/Down
Hot Line Time
Dial FeaturesMenu
Ok
Edit
Ok
Next
Up/Down
Menu Tree
Menu Tree
Menu Tree
Menu Tree
Up to 300 memory locations can be assigned for
speed dial. To speed dialing press the memory
number (1 through 300) corresponding to the
appropriate memory location and hold for a few
seconds.
This function can be used when the speed dialing is
set to enable.
1. Press Soft key 1 + 3( ) +
4( ) in on-hook state.
2. Press Up/Down button or Soft key 2 to
select Enable or Disable.
3. Press Soft key 1 to save and exit.
4.1.4 Security
4.1.4.1 Lock Mode
This function prevents the usage of your phone
without your permission. You can protect your phone
by 4 digits lock code/password. Possible settings are
Enable or Disable. Disable indicates that the phone is
not locked. Enable sets the phone locks immediately.
1. Press Soft key 1 + 4( ).
2. Enter 4 digits lock code.
3. Press 1( ).
4. Press button or Soft key 2 to
select Enable or Disable.
5. Press Soft key 1 to save and exit.
Default lock code is “0000”.
4.1.4.2 Clear Calls
Clear Calls deletes complete Call History. Dialled,
Received, Missed Calls & In Call Memo, all calls are
deleted.
1. Press Soft key 1 + 4( ).
2. Enter lock code.
3. Press 2( ).
Clear Calls
Security
Menu
Ok
Next
Up/Down
Lock Mode
Security
Menu
Ok
Next
Speed Dialing
Dial FeaturesMenu

2928
4. Press button or Soft key 2 to
Select Yes or No.
5. Press Soft key 1 to exit.
Note : Deleted call history can not be retrieved.
To return to the initial screen, press
button.
The phone can store a total of 120 Received, Dialled,
Missed Calls and/or In Call Memos in Call History.
4.1.4.3 Clear Memory
This function allows you to erase complete phone
book memory.
1. Press Soft key 1 + 4( ).
2. Enter lock code.
3. Press 3( ).
4. Press button or Soft key 2 to
select Yes or No.
5. Press Soft key 1 to exit.
Note : Deleted phone book memory can not be
retrieved.
4.1.4.4 Emergency Calls
Emergency number can store up to three numbers
(default 15, 16, 115).
1. Press Soft key 1 + 4( ) in on-
hook state.
2. Enter lock code.
3. Press 4( ).
4. To edit a number, press Soft key 1 .
4.1.4.5 Restrict Call
You can restrict your outgoing calls including numbers
/ numbers beginning with specified digit in the Deny
Memory.
For example: If “9” is stored in the Deny Memory, all
number beginning with “9” cannot be called. However
Edit
Emergency Calls
Security
Menu
Ok
Next
Up/Down
Clear Memory
Security
Menu
END/PWR
Ok
Next
Up/Down
Menu Tree
Menu Tree
Menu Tree
Menu Tree
if “ 92” is stored in Permit Memory, you can call
numbers beginning with “92” successfully.
1. Press Soft key 1 + 4( ) +
5( ) + 1( ) in on-
hook state.
2. Select among No Restriction, Restriction or
Emergency Only and press Soft key 1 .
3. If is selected,
•Enter the numbers / starting digit of specific
numbers to be restricted in the Deny
Memory.
•Enter the number / starting digits of the
numbers to be allowed in the Permit Memory.
•Press Soft key 1 to save and press
button to exit.
4. If Only is selected, your phone is
enabled for only emergency numbers (default
15, 16, 115).
4.1.4.6 Change Code
Change Code allows you to enter a new four-digit lock
code.
1. Press Soft key 1 + 4( ).
2. Enter lock code.
3. Press 6( ).
4. Enter the new four-digit lock code that you
want.
5. Press Soft key 1 to go next state.
6. For confirmation, it will ask you to enter the new
lock code again.
7. Press Soft key 1 to save and press
or Soft key 2 button to exit.
4.1.5 My Number
You can confirm your phone number.
1. Press Soft key 1 + 5( ) in
My Number
Menu
Back
Clear
Ok
Ok
Change Code
Security
Menu
Emergency
Clear
Ok
Restriction
Ok
Set RestrictRestrict Call
Security
Menu

3130
on-hook state.
2. Press Soft Key 1 to exit.
Note : To modify your phone number, press Soft Key
2 . Enter the phone number, and press
Soft Key 1 to save and exit.
4.2 Messages
Text messaging, page and voice mailbox become
available as soon as the power is on.
You may access the above type of messages using the
Message key. The phone can store up to 50 messages
in each Inbox and Outbox.
If you press Message Key, SMS Menu is activated.
Soft Key 1 Soft Key 2
To scroll in SMS Menu, press ᵋor ᵍbutton.
At any point of time, to return to the initial screen,
press button and to return to the
previous screen, press Clear button.
In the list of Inbox, all sorts of the icon have the
meaning as follows:
! : Unread message
Ⅴ: Read message
4.2.1 Write
This function allows you to compose and send SMS.
1. Press + 1( ) in on-hook state.
2. Enter phone number or press Soft key 2 .
3. Write messages. Refer to the 3.10 (page 18)
Entering and Editing Information about text
input.
4. Select option as following.
DDeelliivveerryy AACCKK: This function allows you to
know whether the messages have been
successfully transmitted to the recipient. If you
want to activate this function, set to Yes.
Find
Write
Message
END/PWR
●●●●●●
END/PWRMessage
●●●●●●
Ok
Edit
Ok
Menu Tree
Menu Tree
Menu Tree
Menu Tree
SSttoorree MMeessssaaggee: This function allows you to
choose whether the sent message shall be saved
or not. You may select Yes or No.
SSeett PPrriioorriittyy: This function allows you to give
priority to message as Normal, Urgent or
Emergency.
5. Press Soft key 1 to send message.
4.2.2 Inbox
4.2.2.1 View SMS
Received messages are stored here.
1. Press + 2( ) + 1( )
in on-hook state.
2. To view desired message, select Soft key 1
.
3. To reply the message, select Soft key 1 .
4. To erase message, select Soft key 2 .
For example, the meaning of (2/3) in View SMS is
that 2 out of 3 messages are unread.
4.2.2.2 Voice Mail
Voice Mail notifications indicate the number of new
voice messages in your mailbox.
Only the most recent voice mail notification will be
stored in your phone, previous message will be
overwritten.
1. Press + 2( ) + 2( )
in on-hook state.
2. Pick up the handset or press Speaker Phone
button to make a call back your voice mailbox if
the number of the voice mailbox is provided by
the telecom service company’s system.
4.2.2.3 Erase All
This function allows you to erase all received
messages.
Voice MailInbox
Message
Erase
Reply
View
View SMS
Inbox
Message
Ok

3332
1. Press + 2( ) + 3( ) in
on-hook state.
2. Press Up/Down button or Soft key 2 to
select No or Yes.
3. Press Soft key 1 to exit.
4.2.3 Outbox
4.2.3.1 View
All your successfully sent messages are saved here.
1. Press + 3( ) + 1( ) in
on-hook state.
2. To erase message, select Soft key 2 .
3. To view or edit desired message, select Soft key
1.
4.2.3.2 Erase All
To erase all sending messages, select this function.
1. Press + 3( ) +
2( ) in on-hook state.
2. Press Up/Down button or Soft key 2 to
select Yes or No.
3. Press Soft key 1 to exit.
4.2.4 Settings
4.2.4.1 MSG Alert
This function allows you to set the frequency of
notification when message is received.
1. Press + 4( ) +
1( ) in on-hook state.
2. Select among Off, Once or Every 2 Min by
pressing button or Soft key 2 .
3. Press Soft key 1 to save and exit.
Ok
Next
Up/Down
MSG Alert
Settings
Message
Ok
Next
Erase All
Outbox
Message
Edit
Erase
ViewOutbox
Message
Ok
Next
Erase All
Inbox
Message
Menu Tree
Menu Tree
Menu Tree
Menu Tree
4.2.4.2 MSG Ringer
This function allows you to set the ringer-type for
notification when message is received.
You can select from 5 choices.
1. Press + 4( ) +
2( ) in on-hook state.
2. Select a desired ringer type by pressing
Up/Down button or Soft key 2 .
3. Press Soft key 1 to save and exit.
4.2.4.3 Defer Delivery
1. Press + 4( ) +
3( ) in on-hook state.
2. Select one of the following by pressing
button or Soft key 2 :
3. Press Soft key 1 to save.
4.2.4.4 Valid Period
1. Press + 4( ) +
4( ) in on-hook state.
2. Select desired time by pressing
button or Soft key 2 :
3. Press Soft key 1 to save.
4.2.4.5 Auto DEL Inbox
1. Press + 4( ) +
5( ) in on-hook state.
2. Press button or Soft key 2 to
select Enable or Disable.
Next
Up/Down
Auto DEL Inbox
Settings
Message
Ok
2 Days1 Day12 Hours
2 Hours 1 Hour 30 MinutesDefault
Next
Up/Down
Valid Period
Settings
Message
Ok
After 2 Days
After 1 Day After 12 HoursAfter 2 Hours
After 1 HourAfter 30 MinImmediate
Next
Up/Down
Defer Delivery
Settings
Message
Ok
Next
MSG Ringer
Settings
Message

3534
3. Press Soft key 1 to save.
4.3 Find
This function allows you to search the phone numbers
that you have stored in the phone book memory. You
may search the numbers from call history also.
If you press Soft key 2, Find menu is activated.
Soft Key 1 Soft Key 2
To scroll in Menu, press ᵋL@ᵾL@ᶀ or ᵍbutton.
To return to the initial screen, press
button and to return to the previous screen, press
Clear button.
4.3.1 Call History
The phone can store upto 30 Received Call, 30
Dialled Call, 30 Missed Call and 30 In Call Memo in
the Call History.
When you press the button, all calls are
displayed. In the list of all calls, all sorts of the icons
have the meaning as follows :
- Received : ←
- Dialled : →
- Missed : !
- In call Memo :
- Call Waiting :
- 3 Way Call :
4.3.1.1 All Calls
[In on-hook state]
1. Press Soft key 2 + 1( )
+ 1( ) or button.
2. Press button to select a number or
name in the call history list.
Up/Down
Dial/Flash
All Calls
Call HistoryFind
Dial/Flash
END/PWR
●●●●●●
END/PWRMessage
●●●●●●
Ok
Menu Tree
Menu Tree
Menu Tree
Menu Tree
3. To view desired item, select Soft key 1 .
4. To erase desired number, select Soft key 2
.
5. Press Soft key 2 to see
more information and press Soft key 1 to
save the number in the phone book.
▶
In PCO product, Press Soft key 2 to
see more information and press Soft key 1
to save the number in the phone book.
[While in a Call]
1. Press Soft key 2( ) + 1 ( ) +
1( ).
2. Press Up/Down button to select a number or
name in the call history list.
3. To view desired item,
select Soft key 1 .
4. To erase desired number, select Soft key 2
.
5. Press Soft key 2 to see more information
and press Soft key 1 to save the number
in the phone book.
▶
In PCO product, Press Soft key 2 to
see more information and press Soft key 1
to save the number in the phone book.
4.3.1.2 Missed
1. Press Soft key 2 + 1( ) +
2( ) in on-hook state.
2. Press Up/Down button to select a number or
name in the missed call list.
3. To view desired item, select Soft key 1 .
4. To erase missed call, select Soft key 2 .
5. Press Soft key 2 to see more information
and press Soft key 1 to save the number
in the phone book.
Save
Time
Erase
View
Missed
Call History
Save
Time
Save
Time
Erase
View
All Calls
Call HistoryFind
Save
Next
Save
Time
Erase
View
C

3736
▶
In PCO product, Press Soft key 2 to
see more information and press Soft key 1
to save the number in the phone book.
4.3.1.3 Received
1. Press Soft key 2 + 1( ) +
3( ) in on-hook state.
2. Press Up/Down button to select a number or
name in the received call list.
3. To view desired item, select Soft key 1 .
4. To erase received call, select Soft key 2 .
5. Press Soft key 2 to see more information
and press Soft key 1 to save the number
in the phone book.
▶
In PCO product, Press Soft key 2 to
see more information and press Soft key 1
to save the number in the phone book.
4.3.1.4 Dialled
1. Press Soft key 2 + 1( ) +
4( ) in on-hook state.
2. Press Up/Down button to select a number or
name in the dialled call list.
3. To view desired item, select Soft key 1 .
4. To erase dialled number, select Soft key 2
.
5. Press Soft key 2 to see more information
and press Soft key 1 to save the number
in the phone book.
▶
In PCO product, Press Soft key 2 to
see more information and press Soft key 1
to save the number in the phone book.
4.3.1.5 In Call Memo (Not used In PCO product)
1. Press Soft key 2 + 1( ) +
5( ) in on-hook state.
In Call Memo
Call HistoryFind
Save
Time
Save
Time
Erase
View
Dialled
Call HistoryFind
Save
Time
Save
Time
Erase
View
Received
Call HistoryFind
Save
Time
Menu Tree
Menu Tree
Menu Tree
Menu Tree
2. Press Up/Down button to select desired item in
the In Call Memo list.
3. To view desired item, select Soft key 1 .
4. To erase In Call Memo, select Soft key 2 .
5. Press Soft key 2 to see more information
and press Soft key 1 to save the number in
the phone book.
4.3.1.6 Erase History
You may erase all history from five options (1. Erase
AllCalls, 2. Erase Missed, 3. Erase Received, 4. Erase
Dialled, 5. Erase Memo).
1. Press Soft key 2 + 1( )+
6( ) in on-hook state.
2. Select history that you want to erase and press
Soft key 1 .
4.3.2 Phone Book
This function allows you to search the phone number
in three way By Name, By Address and By Number,
which you have stored in the phone book memory. Up
to 300 entries can be listed here.
To store phone number
1. Enter the area code and phone number (Max. 32
digits) in on-hook state.
2. Press Soft key 1 .
3. Enter the name. Refer to the 3.10 (page 18)
Entering and Editing Information about text
input.
4. Enter the desired memory location.
5. The phone will display a message asking you
whether to keep your number as secret or not.
Select No or Yes using Up/Down button or Soft
key 2 and press Soft key 1 .
You will see a confirmation message and the
status of memory used.
Ok
Next
Save
Ok
Erase history
Call HistoryFind
OK
Time
Erase
View

3938
[Fast Searching]
Press Soft key 2 and press Soft key 2
again.
4.3.2.1 By Name
1. Press Soft key 2 + 2( ) +
1( ), to retrieve a phone number by
name.
2. Enter the name you want and press Soft key 1
. To find all phone numbers you have
stored, press Soft key 1 .
4.3.2.2 By Address
1. Press Soft key 2 + 2( ) +
2( ), to retrieve a phone number by
address.
2. Enter a memory address to retrieve phone
number and press Soft key 2 . To find all
phone numbers you have stored, press Soft key
2 .
4.3.2.3 By Number
1. Press Soft key 2 + 2( ) +
3( ), to retrieve a phone number by
number.
2. Enter the phone number that you want to fine
and press Soft key 2 . To find all phone
numbers you have stored, press Soft key 2
.
Find
Find
By Number
Phone BookFind
Find
Find
By Address
Phone BookFind
Find
Find
By Name
Phone BookFind
Find
Find
Speaker Phone
Speaker Phone
Menu Tree
Menu Tree
5. Speaker Phone
This function is a convenient feature, which enables
you to make a call using the Speaker Phone ( )
button in on-hook state.
General Information
4140
Please check the following items before contacting Authorized LGE service center.
6. Troubleshooting
Troubleshooting
Troubleshooting
Item Remedy
Phone doesn’t operate at all.
Because of noise and cross talking,
call status is bad.
When buttons are pressed to call, can’t hear the
dial tone..
.
Battery fails to charge.
Bell sound isn’t heard
• The LCD repeats on and off when you plug-in
the adapter while battery switch is off.
• Phone repeats abnormally power-on and
power-off after a few second when you plug-in
the adapter while battery switch is on and
phone is power-off.
• There is no charging display when you plug-in
the adapter while the phone is power on.
• Check that the phone is installed correctly.
• Check that the battery is fully charged.
• Check that the power is on.
Keep away from electrical application such as TV, computer,
radio and so on.
Check that phone cord or power is connected correctly.
Check that the authorized adaptor (5V/1A) for
LSP-400RP is correctly connected to the DC
power connector of the phone and Battery
ON/OFF switch is ON.
If bell sound is low, please adjust the volume level.
Check that the adapter is the approved from LG.
Adapter should be 5V(DC), 1A
General Information
7. General Information
7.1 Main unit
IItteemmLLSSPP--44000000((PP))
Tx Frequency Digital: 1850 ~1910 MHz
Rx Frequency Digital: 1930 ~1990 MHz
Channel Bandwidth 1.25 MHz
Tx Power Digital: LOWER: 62.5mW ~UPPER:0.5W
Rx Sensitivity -104 ~-25dBm
Size 205x 161x 76 (L x W x H)
Weight(g) 554(included Li-ion battery)
Operating Temperature -10 ~50。
C
7.2 AC/DC Adapter
IItteemmSSMMPPSS TTyyppee DDeessccrriippttiioonn
Rated Input Voltage AC 100 ~ 240V
Operating Input voltage AC 80 ~ 420V
Rated Input Frequency 50 / 60Hz
Operating Input Frequency 47 ~ 63Hz
Rated Output Voltage, Current 5V(DC), 1A

General Information
42
Limited warranty statement
Limited Warranty Statement
43
Limited Warranty Statement
LG ELECTRONICS Inc. represents and warrants that
this subscriber unit and its accessories (“PRODUCT”)
is free from defects in material and workmanship.
This warranty is subject to the following terms and
conditions;
1. This warranty of the PRODUCT extends for a
period of 12 months commencing from the date of
the activation or 16 months from the date of
manufacture whichever is less, except for the
battery, for which the warranty is 9 months from
the date of activation or 12 months from the date
of manufacture whichever is less.
2. During the warranty period, LG ELECTRONICS Inc.
or its authorized service network will repair or
replace, at LG ELECTRONICS Inc.’s option, the
PRODUCT or any relevant parts thereof in the
event that the PRODUCT is found to be defective.
The repaired PRODUCT or the Product/part
provided as a replacement for a defective
PRODUCT/part, shall be free from defects. The
END USER/consumer purchaser of the PRODUCT
or his/her assignee (“CONSUMER”) shall not be
charged (whether for parts, labour or otherwise) for
the repair or replacement of a defective PRODUCT
during the warranty period. All replaced parts,
boards or equipment shall become the property of
LG ELECTRONICS Inc.
3. The warranty in respect of a repaired or replaced
PRODUCT/part shall extend for the remaining
warranty period of the repaired PRODUCT or
replacement thereof to the CONSUMER.
4. Upon request from LG ELECTRONICS Inc., the
CONSUMER may be required to provide the
purchase receipt or other documentation or
information in respect of the date and place of
purchase.
5. The CONSUMER shall have no coverage or benefits
under this warranty in the event that any of the
following conditions are applicable:
(a) The PRODUCT has been subject to abnormal
use or conditions, improper storage, exposure to
excessive moisture or dampness, exposure to
excessive temperatures, unauthorized
modifications, unauthorized repair (including but
not limited to use of unauthorized spare parts in
General Information
7.3 Battery
IItteemmDDeessccrriippttiioonn
Capacity 3.7V Li-ion (Nominal)
Talk time / Standby time 4 Hours / 120 Hours
Charging time duration 3 Hours (Standby condition)

Limited warranty statement
Limited Warranty Statement
45
Limited Warranty Statement
44
Limited warranty statement
repairs), abuse, accident, Acts of God, spills of food
or liquids, improper installation and breakage or
damage to antennae (otherwise than by reason of
any defects in material or workmanship).
(b) LG ELECTRONICS Inc. has not been notified by
the CONSUMER of the defects of the PRODUCT
during the applicable warranty period.
(c) The PRODUCT serial number code or the
accessory date code has been removed, defaced or
altered.
(d) The PRODUCT has been used with or
connected to an accessory (i) not supplied by LG
ELECTRONICS Inc. or its affiliates, (ii) not fit for use
with the PRODUCT or (iii) used otherwise than in
the manner intended.
(e) The seals of the PRODUCT’S battery enclosure
have been broken or show evidence of tampering or
the PRODUCT’S battery has been used in
equipment other than that for which it has been
specified usable by LG ECLECTRONICS Inc.
(f) All plastic surfaces and all other externally
exposed parts that are scratched or damages due to
normal customer use.
(g) Breakage or damage to antenna unless caused
by defects in material or workmanship.
6. In order to derive benefits of this warranty in
respect of any defects in the PRODUCT, the
CONSUMER shall ship the PRODUCTS or part
thereof at its cost to the authorized service center
of LG ELECTRONICS Inc. LG ELECTRONICS Inc.
shall bear the cost of shipping the PRODUCT or
part thereof back to the CONSUMER after the
completion of the service under this limited
warranty.
NO OTHER EXPRESS WARRANTY IS APPLICABLE
TO THIS PRODUCT. THE DURATION OF ANY
IMPLIED WARRANTIES, INCLUDING THE IMPLIED
WARRANTY OF MARKETABILITY OR
MERCHANTABILITY OR FITNESS FOR A
PARTICULAR PURPOSE OR USE IS LIMITED TO
THE DURATION OF THE EXPRESS WARRANTY
HEREIN. LG ELECTRONICS Inc. SHAll NOT BE
LIABLE FOR THE LOSS OF USE OF THE PRODUCT,
INCONVENIECE, LOSS OR ANY OTHER
CONSEQUENTIAL DAMAGE, ARISING OUT OF
THE USE OF, OR INABILITY OF USE, OF THIS
PRODUCT OR FOR BREACH OF ANY EXPRESS OR
IMPLIED WARRANTY, INCLUDING THE IMPLIED
WARRANTY OF MARKETABILTY OR
MERCHANTABILITY OR FITNESS APPLICABLE TO
THIS PRODUCT.
THE CONSUMER UNDERSTANDS THAT LG
ELECTRONICS INC. HAS EMBEDDED RELIANCE
SOFTWARE AND ITS NETWORK PARAMETERS IN
THE PRODUCT. IN CASE THE CONSUMER
DELETES, REMOVES, ALTERS OR MODIFIES SUCH
SOFTWARE AND THE PARAMETERS AND/OR
INSTALLS ANY THIRD PARTY SOFTWARE, THE
WARRANTY AND REMEDIES HEREUNDER SHALL
NOT BE AVAILABLE TO THE CONSUMER.
7. It is hereby expressly clarified that all warranties
(express or implied) in respect of the PRODUCT
are provided by LG ELECTRONICS Inc. alone.

LGE CDMA Fixed Wireless Phone LSP-4000(P)
LGE CDMA Fixed Wireless Phone LSP-4000(P)
46
Licensed by QUALCOMM Incorporated under one or more of the following Patents:
U.S, Patent No. 4,901,307 U.S, Patent No. 5,056,109 U.S, Patent No. 5,099,204
U.S, Patent No. 5,101,501 U.S, Patent No. 5,103,459 U.S, Patent No. 5,107,225

P/N : MMBB0212101 JUN/2006/ISSUE 1.0
PRINTED IN KOREA