LG Electronics USA M101XH MW Oven User Manual 12392714
LG Electronics USA MW Oven 12392714
Users Manual
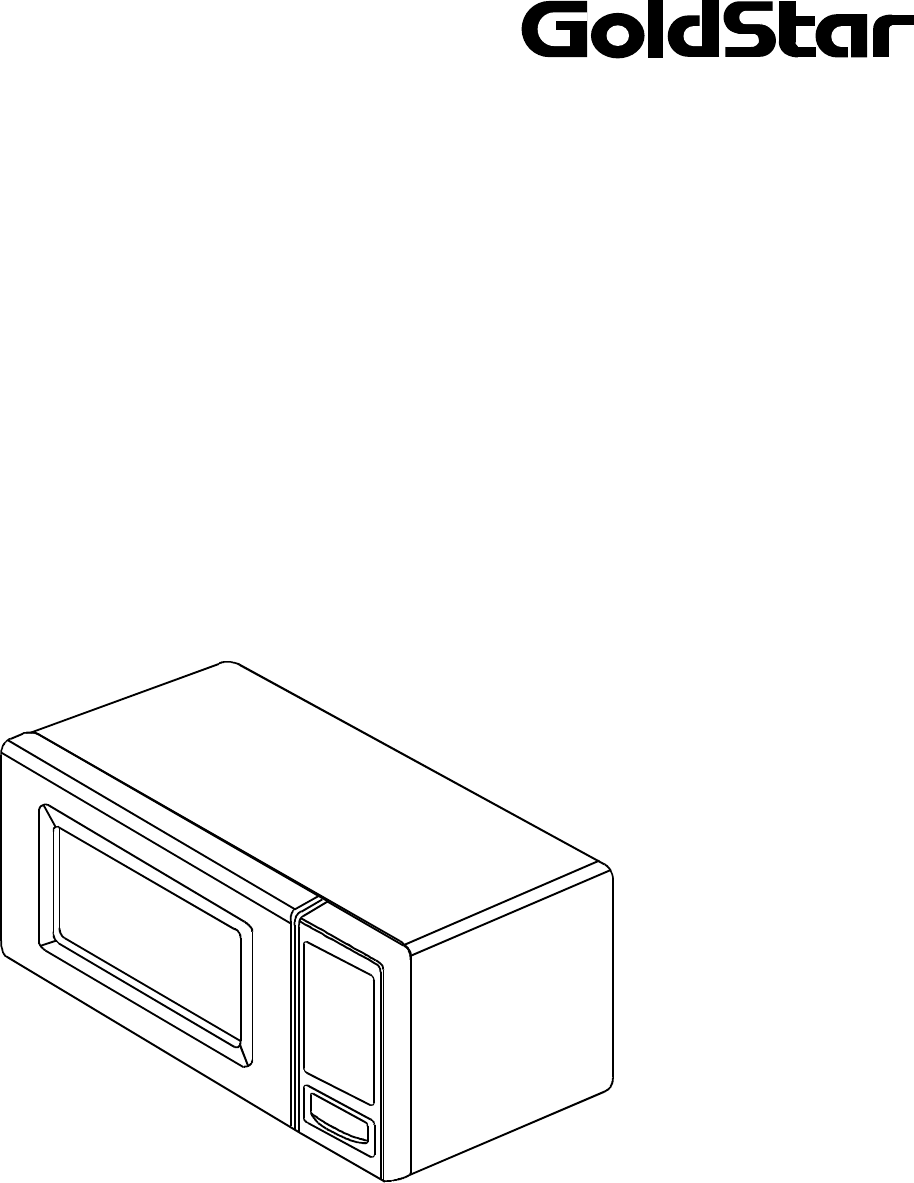
Light Duty
Commercial
Microwave Oven
Owner's Manual
MM-1041XP
Keep these instructions for future reference. If the
oven changes ownership, be sure this manual
accompanies oven.
Test Report No.: 02-LAE-M060 FCC Part 18 (ISM)
Test Date: March 08, 2002 Certification
LG Electronics Inc. FCC ID: BEJM101XH
APPENDIX F. Owner’s Manual with regard to FCC Instruction

2
Contents
Model Identification
Complete enclosed registration card and promptly return.
If registration card is missing, call Consumer Affairs
Department at 1-800-843-0304 inside U.S.A.
1-319-622-5511 outside U.S.A.
When contacting Amana, provide product information.
Product information is located on equipment serial plate.
Record the following information:
Model Number: ____________________________
Manufacturing Number: ______________________
Serial or S/N Number: _______________________
Date of purchase: __________________________
Dealer’s name and address: __________________
________________________________________
________________________________________
________________________________________
Keep a copy of sales receipt for future reference or in
case warranty service is required.
Service
Any questions or to locate an authorized servicer, call
1-800-843-0304 inside U.S.A. 1-319-622-5511 outside
U.S.A. If an automated telephone system is reached,
select Commercial Microwave Ovens category. Warranty
service must be performed by an authorized servicer.
Amana also recommends contacting an authorized
servicer if service is required after warranty expires.
Specifications
Product specifications can change at any time without notice.
Power Supply 120V AC, 60 Hz
Input Power 1500 W
Cooking Power 1000 W I.E.C. 705 of microwave power test.
Frequency 2450 MHz
Rated Current12.9 A
Overall Dimensions (WxHxD) inches 20-7/8″ x 12-3/8″ x 15-1/2″
Oven Cavity Dimensions (WxHxD) inches13-9/16″ x 9-5/32″ x 14-3/8″
Oven Cavity Capacity 1.0 Cu. ft.
Power Cord 5 ft.
Model Identification ....................................................2
Specifications ............................................................ 2
IMPORTANT SAFETY INSTRUCTIONS
WARNING .............................................................. 3
CAUTION ................................................................ 3
PRECAUTIONS TO AVOID POSSIBLE EXPOSURE
TO EXCESSIVE MICROWAVE ENERGY .................. 4
MESURES DE SECURITE IMPORTANTES ...............5
Danger .................................................................... 5
Attention ................................................................. 5
PRECAUTIONS CONTRE LES RISQUES
D’EXPOSITION À UN EXCES DE MICRO-ONDES .....6
Mise à la terre ............................................................7
Grounding Instructions ...............................................7
Installation..................................................................8
Unpacking Equipment ............................................. 8
Radio Interference ................................................... 8
Equipment Placement............................................. 8
Cooking Guidelines .................................................... 8
How Microwave Ovens Heat Food ........................... 8
Food Variables ........................................................ 8
Manipulation of Foods ............................................. 9
Microwave Utensils ................................................. 10
Cooking Hints ......................................................... 10
Oven Features ............................................................ 10
Control Panel .......................................................... 11
Display ................................................................... 11
Operation ...................................................................13
Interrupting Operation .............................................. 13
Canceling Mistakes ................................................ 13
Operating Preprogrammed Pads ............................. 13
Manual Time Entry .................................................. 13
Programming.............................................................. 14
Preprogrammed Number Pads ................................ 14
Multiple Heating Stages .......................................... 14
User Options........................................................... 15
Cleaning .....................................................................16
Before Calling for Service............................................ 17
Warranty ....................................................................18
Quick Reference Instructions ..................................... 20
3
IMPORTANT SAFETY INSTRUCTIONS
Recognize this symbol as a SAFETY message
SAVE THESE INSTRUCTIONS
1. READ all instructions before using equipment.
2. READ AND FOLLOW the specific “PRECAUTIONS
TO AVOID POSSIBLE EXPOSURE TO EXCESSIVE
MICROWAVE ENERGY” on page 4.
3. This equipment MUST BE GROUNDED. Connect
only to properly GROUNDED outlet. See
“GROUNDING INSTRUCTIONS” on page 7.
4. Install or locate this equipment ONLY in accordance
with the installation instructions in this manual.
5. Some products such as whole eggs and sealed
containers – for example, closed glass jars – may
explode and SHOULD NOT be HEATED in this oven.
6. Use this equipment ONLY for its intended use as
described in this manual. Do not use corrosive
chemicals or vapors in this equipment. This type of
oven is specifically designed to heat or cook. It is not
designed for industrial or laboratory use.
7. As with any equipment, CLOSE SUPERVISION is
necessary when used by CHILDREN.
8. DO NOT operate this equipment if it has a damaged
cord or plug, if it is not working properly, or if it has
been damaged or dropped.
9. This equipment, including power cord, must be
serviced ONLY by qualified service personnel.
Special tools are required to service equipment.
Contact nearest authorized service facility for
examination, repair, or adjustment.
10. DO NOT cover or block filter or other openings
on equipment.
11. DO NOT store this equipment outdoors. DO NOT
use this product near water – for example, near a
kitchen sink, in a wet basement, or near a
swimming pool, and the like.
12. DO NOT immerse cord or plug in water.
13. Keep cord AWAY from HEATED surfaces.
14. DO NOT let cord hang over edge of table or counter.
15. See door cleaning instructions in “Cleaning” section
of manual on page 16
16. For commercial use only.
WARNING
!
When using electrical equipment, basic safety precautions should be followed to reduce the risk of burns, electrical
shock, fire, or injury to persons.
a. DO NOT overcook food. Carefully attend equipment if
paper, plastic, or other combustible materials are
placed inside the oven to facilitate cooking.
b. Remove wire twist-ties from paper or plastic bags
before placing bag in oven.
c. KEEP oven DOOR CLOSED, turn oven off, and
disconnect the power cord, or shut off power at the
fuse or circuit breaker panel, if materials inside the
oven should ignite. Fire may spread if door is opened.
d. DO NOT use the cavity for storage. DO NOT leave
paper products, cooking utensils, or food in the
cavity when not in use.
CAUTION
!
To reduce the risk of fire in the oven cavity:

4
IMPORTANT SAFETY INSTRUCTIONS
SAVE THESE INSTRUCTIONS
1. Briskly stir or pour liquids before heating with
microwave energy to prevent spontaneous boiling or
eruption. Do not overheat. If air is not mixed into a
liquid, liquid can erupt in oven or after removal from
oven.
2. Do not deep fat fry in oven. Fat could overheat and
be hazardous to handle.
3. Do not cook or reheat eggs in shell or with an
unbroken yolk using microwave energy. Pressure
may build up and erupt. Pierce yolk with fork or
knife before cooking.
4. Pierce skin of potatoes, tomatoes, and similar
foods before cooking with microwave energy. When
skin is pierced, steam escapes evenly.
5. Do not operate equipment without load or food in
oven cavity.
6. Use only popcorn in packages designed and
labeled for microwave use. Popping time varies
depending on oven wattage. Do not continue to heat
after popping has stopped. Popcorn will scorch or
burn. Do not leave oven unattended.
7. Do not use regular cooking thermometers in oven.
Most cooking thermometers contain mercury and
may cause an electrical arc, malfunction, or
damage to oven.
8. Do not heat baby bottles in oven.
9. Do not use metal utensils in oven.
10. Never use paper, plastic, or other combustible
materials that are not intended for cooking.
11. When cooking with paper, plastic, or other
combustible materials, follow manufacturer's
recommendations on product use.
12. Do not use paper towels which contain nylon or
other synthetic fibers. Heated synthetics could
melt and cause paper to ignite.
13. Do not heat sealed containers or plastic bags
in oven. Food or liquid could expand quickly and
cause container or bag to break. Pierce or open
container or bag before heating.
14. To avoid pacemaker malfunction, consult physician
or pacemaker manufacture about effects of
microwave energy on pacemaker.
PRECAUTIONS TO AVOID POSSIBLE EXPOSURE
TO EXCESSIVE MICROWAVE ENERGY
a. DO NOT attempt to operate this oven with door
open since open-door operation can result in
harmful exposure to microwave energy. It is
important not to defeat or tamper with safety
interlocks.
b. DO NOT place any object between oven front face
and door or allow soil or cleaner residue to
accumulate on sealing surfaces.
c. DO NOT operate oven if it is damaged. It is
particularly important that oven door close properly
and that there is no damage to: (1) door (bent), (2)
hinges and latches (broken or loosened), (3) door
seals and sealing surfaces.
d. Oven should NOT be adjusted or repaired by anyone
except properly qualified service personnel.
CAUTION
!
To avoid personal injury or property damage, observe the following:
5
MESURES DE SECURITE IMPORTANTES
Ce symbole signale un message de SECURITE
CONSERVER CES INSTRUCTIONS
1. LIRE la totalité des instructions avant d’utiliser
le four.
2. LIRE ET SUIVRE les PRECAUTIONS CONTRE
LES RISQUES D’EXPOSITION A UN EXCES DE
MICRO-ONDES, page 6.
3. Ce four DOIT ETRE MIS A LA TERRE. Le
brancher uniquement sur une prise correctement
reliée à la terre. Voir les INSTRUCTIONS DE MISE
A LA TERRE, page 7.
4. Mettre en service ou placer ce four UNIQUEMENT
tel qu’indiqué dans les instructions de mise en
service fournies dans ce manuel.
5. Certains aliments ou articles comme les oeufs et
les récipients fermés hermétiquement tels que les
bocaux, par exemple, peuvent exploser et NE
DOIVENT PAS ETRE UTILISES dans ce four.
6. Utiliser ce four UNIQUEMENT pour les usages
pour lesquels il est prévu, décrits dans ce manuel.
Ne pas utiliser de vapeurs ni de produits chimiques
corrosifs dans cet appareil. Ce type de four est
spécifiquement conçu pour faire chauffer ou cuire
les aliments. Il n’est pas prévu pour un usage
industriel ou en laboratoire.
7. Comme pour tout autre appareil électrique,
l’utilisation de cet appareil par les ENFANTS
doit se faire SOUS ETROITE SURVEILLANCE.
8. NE PAS utiliser le four si la prise ou le cordon
électrique est abîmé, si le four ne fonctionne pas
correctement ou si l’appareil est tombé ou a été
endommagé.
9. Cet appareil, cordon électrique compris, doit être
réparé UNIQUEMENT par un technicien qualifié.
Des outils spéciaux sont nécessaires à cette fin.
Contacter le prestataire de service après-vente
agréé le plus proche pour le faire examiner, réparer
ou régler.
10. NE PAS couvrir ni boucher le filtre ni aucun orifice
du four.
11. NE PAS placer cet appareil à l’extérieur. NE
PAS l’utiliser près d’un endroit où il y a de l’eau,
comme dans un sous-sol humide, près d’un évier
ou d’une piscine ou en tout autre endroit similaire.
12. NE PAS plonger le cordon électrique ou la prise
dans l’eau.
13. Garder le cordon électrique A DISTANCE SURE de
surfaces CHAUFFEES.
14. NE PAS laisser le cordon pendre d’une table ou
d’un comptoir.
15. Voir la marche à suivre pour l’entretien de la porte
sous
“Entretien de l’extérieur du four”
dans la partie
“Entretien”
du manuel, page 16
16. Pour usage commercial uniquement.
Lors de l’utilisation d’appareils électriques, prendre les précautions élémentaires suivantes pour réduire les risques
de brûlures, d’électrocution, d’incendie ou de blessures.
DANGER
!
a. NE PAS trop cuire les aliments. Surveiller
attentivement la cuisson si du papier, du plastique
ou tout autre matériau combustible est utilisé pour
faciliter la cuisson.
b. Enlever toute attache métallique servant à fermer
les sacs en plastique ou en papier avant de placer
le sac dans le four.
c. Si le feu prend dans le four, LAISSER LA PORTE
du four FERMEE, éteindre le four et le débrancher
ou couper le courant au niveau du fusible ou du
disjoncteur. Si la porte du four est ouverte,
l’incendie peut se propager.
d. NE PAS utiliser l’intérieur du four comme espace
de rangement. NE PAS laisser d’articles en papier,
de récipients, d’ustensiles de cuisson nid’aliments
dans le four pendant qu’il n’est pas utilisé.
Pour réduire les risques d’incendie à l’intérieur du four :
ATTENTION
!

6
MESURES DE SECURITE IMPORTANTES
1. Pour éviter toute ébullition ou éruption spontanée,
remuer vigoureusement ou verser les liquides
avant de les chauffer au four à micro-ondes. Ne
pas trop chauffer. Si de l’air n’a pas été incorporé
dans le liquide, celui-ci peut déborder dans le
four ou après en avoir été retiré.
2. Ne pas faire de friture dans le four. La graisse
pourrait surchauffer et devenir dangereuse à
manipuler.
3. Les oeufs ne doivent pas être chauffés ou
réchauffés au four à micro-ondes dans leur
coquille ou avec leur jaune intact ; cela pourrait
provoquer une accumulation de pression et
l’éclatement de l’oeuf. Percer le jaune avec
une fourchette ou un couteau avant la cuisson.
4. Percer la peau des pommes de terre, tomates et
aliments similaires avant de les cuire au four à
micro-ondes. Lorsque la peau est percée, la
vapeur peut s’échapper uniformément.
5. Ne pas faire fonctionner l’appareil sans nourriture
à l’intérieur.
6. Pour faire du pop-corn, utiliser uniquement du
maïs en paquet spécial micro-ondes (indiqué sur
l’étiquette). Le temps nécessaire pour faire
éclater le maïs varie en fonction de la puissance
du four. Ne pas continuer à faire chauffer le maïs
une fois qu’il a fini d’éclater, car il peut brûler ou
s’enflammer. Ne pas laisser le four sans
surveillance.
7. Ne pas utiliser de thermomètre de cuisson pour four
traditionnel dans le four. La plupart des
thermomètres de cuisson contiennent du mercure
qui peut causer des arcs électriques ou le mauvais
fonctionnement du four, ou encore endommager
celui-ci.
8. Ne pas faire chauffer de biberon au four.
9. Ne pas utiliser d’ustensiles métalliques dans le four.
10. Ne jamais utiliser de papier, de plastique ni autre
matériau combustible non prévu pour la cuisson.
11. Si la cuisson utilise du papier, du plastique ou autre
matériau combustible, suivre les recommandations
du fabricant concernant son utilisation.
12. Ne pas utiliser de serviettes en papier contenant du
nylon ou autres fibres synthétiques. Ces fibres
pourraient fondre et faire enflammer le papier.
13. Ne pas faire chauffer de récipients ni de sacs en
plastique hermétiquement fermés dans le four. La
nourriture ou le liquide pourrait gonfler rapidement et
faire éclater le récipient ou le sachet. Percer ou
ouvrir celui-ci avant de le faire
chauffer.
14. Pour éviter toute défaillance de stimulateur
cardiaque, prière de se renseigner auprès du
médecin ou du fabricant du stimulateur au
sujet des effets de l’énergie micro-ondes sur
ce dispositif.
Pour éviter tous dégâts matériels ou blessures, observer les consignes suivantes :
ATTENTION
!
PRECAUTIONS CONTRE LES RISQUES D’EXPO-
SITION À UN EXCES DE MICRO-ONDES
c. NE PAS utiliser le four s’il est endommagé. Il est
particulièrement important que sa porte ferme
correctement et que les éléments suivants ne
soient pas endommagés : (1) porte (faussée), (2)
charnières et dispositifs de verrouillage (cassés ou
présentant du jeu), (3) joints de la porte et surfaces
formant joint.
d. Ce four ne doit PAS être réglé ni réparé par une
personne autre qu’un technicien de service après-
vente dûment qualifié.
a. NE PAS essayer de faire fonctionner le four avec la
porte ouverte car cela peut entraîner une
exposition dangereuse aux micro-ondes. Il est
important de ne pas modifier les verrouillages de
sécurité ni d’entraver leur fonctionnement.
b. NE PAS placer d’objet entre le cadre avant du four
et la porte ni laisser de saletés ou de résidus de
produit nettoyant s’accumuler sur les surfaces
formant joint.
CONSERVER CES INSTRUCTIONS
7
Mise à la terre
DANGER
!
Pour éviter tout risque d’électrocution, voire de décès,
cet appareil doit être relié à la terre.
DANGER
!
Pour éviter tout risque d’électrocution, voire de décès,
ne pas modifier la fiche.
Cet appareil DOIT être relié à la terre. En cas de court-
circuit, la mise à la terre réduit les risques d’électrocution
en permettant au courant électrique de passer par un fil.
Ce four est muni d’un cordon équipé d’un fil de mise à la
terre avec une fiche de mise à la terre. La fiche doit être
branchée dans une prise correctement installée et mise
à la terre.
Consulter un électricien ou un prestataire de service
qualifié si les instructions de mise à la terre ne sont pas
bien comprises ou si un doute subsiste quant à la mise à
la terre correcte de l’équipement.
Ne pas utiliser de rallonge. Si le cordon d’alimentation de
l’appareil est trop court, demander à un électricien
d’installer une prise de courant à trois trous. Ce four doit
être branché sur un circuit indépendant de 60 Hz dont la
puissance nominale est indiquée sur l’illustration
correspondante. Ce modèle nécessite une tension
d’alimentation de 120V. Lorsqu’un four à micro-ondes est
branché sur un circuit avec d’autres appareils, les temps
de cuisson pourront être prolongés et des fusibles
pourraient sauter.
Neutre
Terre
L1
0
VAC
115 ± 12
VAC
115 ± 12
VAC
Neutre
Broche ronde de
mis a la
terre
NEMA 5-15P/5-15R
120V–15AMP
Fiche de mise à la terre
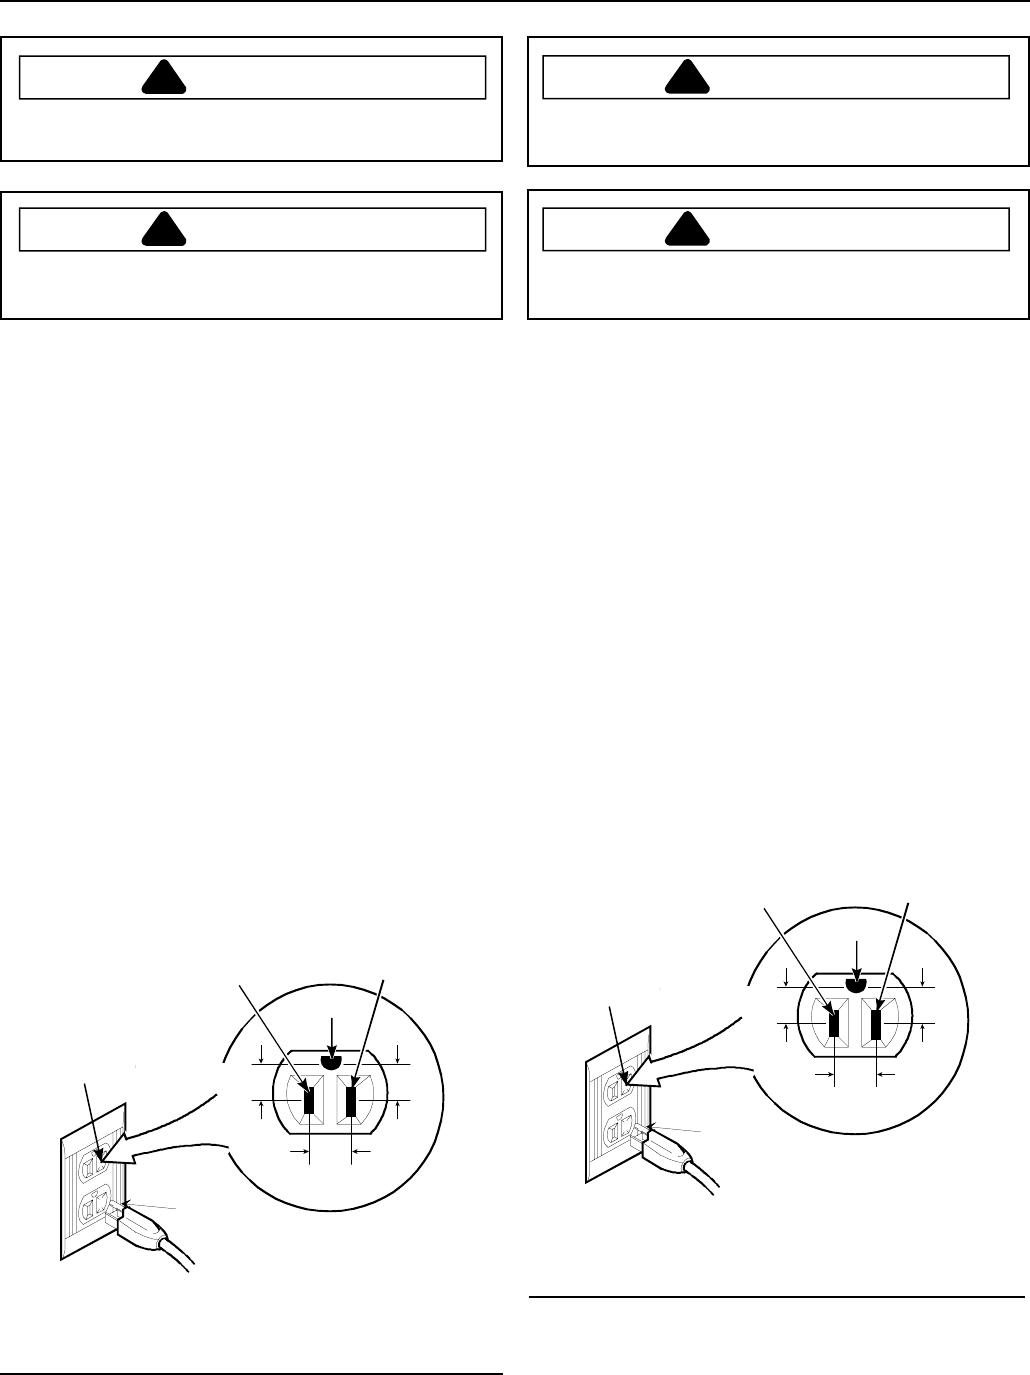
Grounding Instructions
WARNING
!
To avoid risk of electrical shock or death, this
equipment must be grounded.
WARNING
!
To avoid risk of electrical shock or death, do not alter
the plug.
This equipment MUST be grounded. In the event of an
electrical short circuit, grounding reduces the risk of
electric shock by providing an escape wire for the
electric current. This oven is equipped with a cord having
a grounding wire with a grounding plug. The plug must
be plugged into an outlet that is properly installed and
grounded.
Consult a qualified electrician or servicer if grounding
instructions are not completely understood, or if doubt
exists as to whether the equipment is properly
grounded.
Do not use an extension cord. If the product power cord
is too short, have a qualified electrician install a three-
slot receptacle. This oven should be plugged into a
separate 60 hertz circuit with the electrical rating as
shown in the appropriate drawing. This model requires a
120 supply voltage. When a microwave oven is on a
circuit with other equipment, an increase in cooking
times may be required and fuses can be blown.
Neutral
Ground
L1
0
VAC
115 ± 12
VAC
115 ± 12
VAC
Neutral
side
Round
grounding
prong
NEMA 5-15P/5-15R
120V–15AMP
Grounded Receptacle and Plug
8
Unpacking Equipment
• Inspect equipment for damage such as dents in door or
dents inside oven cavity.
• Report any dents or breakage to source of purchase
immediately. Do not attempt to use oven if damaged.
• Remove all materials from oven interior.
• If oven has been stored in extremely cold area, wait a
few hours before connecting power.
Radio Interference
Microwave operation may cause interference to radio,
television, or similar equipment. Reduce or eliminate
interference by doing the following:
• Clean door and sealing surfaces of oven according to
instructions in “Care and Cleaning” section.
• Place radio, television, etc. as far as possible
from oven.
• Use a properly installed antenna on radio, television,
etc. to obtain stronger signal reception.
Equipment Placement
• Do not install equipment next to or above source of
heat, such as a deep fat fryer. This could cause
microwave oven to operate improperly and could
shorten life of electrical parts.
• Do not block or obstruct oven filter. Allow access for
cleaning.
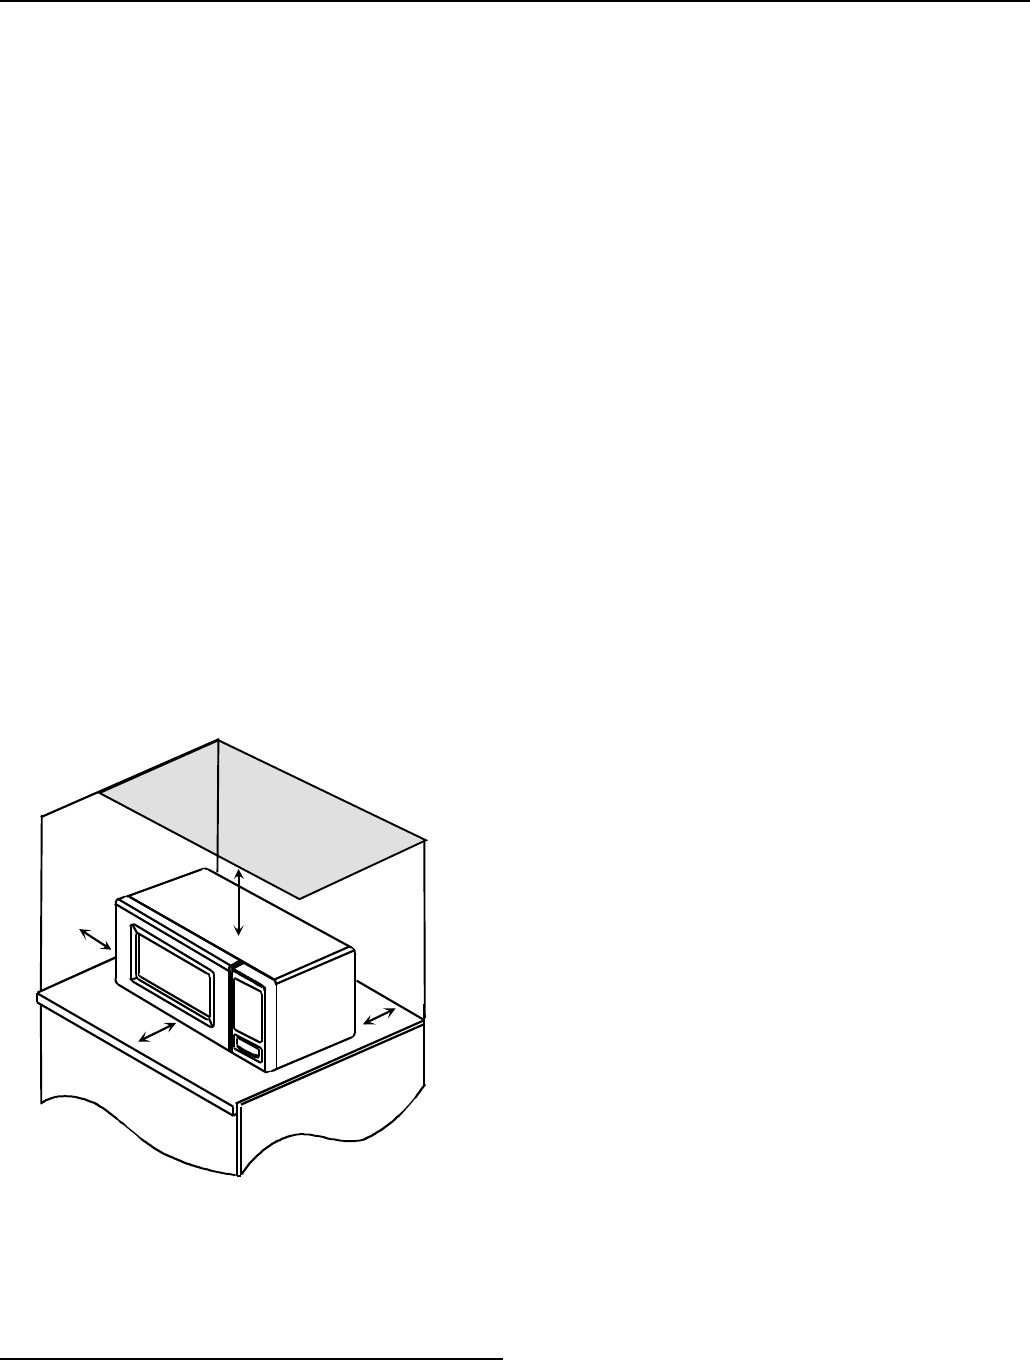
• Install oven on level countertop surface.
A
A
A
B
A—Allow at least 1½ inches (3.81 centimeters) of clearance
around top and sides of equipment. Proper air flow around
equipment cools electrical components. With restricted air flow,
oven may not operate properly and life of electrical parts is
reduced.
B—Allow at least 3 inches from door front to edge of countertop
to avoid accidental tipping of oven.
Oven Clearances
Installation Cooking Guidelines
The Amana Microwave Oven can make your job easier.
You’ll cook ahead and pre-portion more. You’ll also spend
less time preparing special-order dishes.
To be sure of consistently good results, remember a few
simple guidelines.
How Microwave Ovens Heat Food
All food and liquid molecules have positive and negative
particles which are in constant, but slow, motion. (Positive
and negatives attract and repel each other like magnets.)
In microwave cooking this molecular action is then
accelerated. The instant microwaves bombard food they
agitate the molecules. Agitation causes friction as
molecules rub and bump into each other at a increased
rate. Friction results in heat that cooks food and boils
water.
Once the microwaves stop, this friction action continues
by itself, eventually tapering off and returning to normal
molecular action.
Microwaves penetrate food to a depth of ¾" to 1½". As
cooking begins, heat is spread by conduction to the
interior portion of the food just as in conventional cooking
methods. Your microwave oven features variable power
settings that allow you to choose the speed at which food
cooks.
Food Variables
Microwave cooking can be directly affected by different
food variables.
The shape of foods can greatly affect the amount of
cooking time. Foods that are flat and thin heat faster than
foods which are chunky. For example, a casserole will
cook faster in a flat dish, rather than if heaped in a small
dish. Foods cut into small pieces will cook faster than
large-shaped foods. Pieces should be of a uniform size
and shape for more uniform cooking, or the smaller pieces
will cook faster. The greatest amount of heating takes
place within ¾" of the food’s surface. The interior of large
food items, or dense foods, is heated by the heat con-
ducted from the outer food layer. The most uniform
heating occurs in flat, doughnut-shaped foods. For best
results, cook foods together which have similar sizes and
shapes.

9
The quantity or volume of a food can affect the amount of
cooking time. As the volume of the food is increased, the
time required to cook or heat the item increases almost
proportionately. If twice the amount of food is placed in the
oven, it will take almost twice as long to cook. To deter-
mine the time for larger quantities, multiply the individual
serving time by the increased amount, then reduce the
total heating time by about 20%.
The density of foods can greatly affect the amount of
cooking time. Porous foods, such as breads, cakes or
pastries, will heat much more quickly than dense meats
of the same size. Porous foods absorb microwaves
quickly throughout. Meats absorb microwaves mostly at
the exterior surface, and the interior is heated by conduc-
tion, increasing the cooking time. Meats can be cooked in
a sauce, if desired. Due to the moisture content, a sauce
will heat rapidly. The heat will transfer to the meat, so the
meat will heat faster due to heat by conduction as well as
by microwaves.
The starting temperature of foods affects the amount of
cooking time. Each temperature degree that the food item
is to raise must be supplied with a definite amount of
energy. Lower initial starting temperatures require more
energy and more time to cook. Therefore, refrigerator
temperature foods require a longer cooking time than do
room temperature foods. Foods already slightly warm will
heat very quickly in the oven.
The moisture content of foods affects the amount of
cooking time. The higher the moisture content is in a food
the longer the amount of cooking time.
The fat and sugar content of foods affects the amount of
cooking time. Foods containing high fat and sugar levels
heat very quickly and may reach much higher tempera-
tures than foods having low fat and sugar levels. Foods
having lower fat and sugar levels require longer cooking
times.
The arrangement of food within a microwave oven cavity
affects the way in which the food cooks. A “round”
arrangement is best. Use round utensils whenever
possible. Also, arrange foods such as baked potatoes in
a circle, rather than in rows, for cooking. When only one
food item is being cooked, place it in the center of the
oven glass shelf for cooking.
Manipulation of Foods
Sometimes recipes suggest manipulating or moving food
during cooking. There are several forms of manipulation:
Stirring is required less often in microwave cooking than
in conventional cooking. In conventional cooking, you use
a spoon to move food up from the bottom of a pan to
evenly distribute the heat. In microwave cooking, you still
stir to redistribute the heat within some foods, but you
need to stir from the outside of a dish toward the inside or
center. If a recipe states to stir once or twice during
cooking, stir at approximately even intervals. For ex-
ample, in a 12-minute cooking period, if a recipe states to
stir twice, stir after 4 minutes of cooking and again, after 8
minutes of cooking. However, it is not necessary to be
precise. Stir only when necessary. When using lower
power levels or settings, less stirring is required. Some
examples of foods which may require stirring are pud-
dings, some casseroles, some sauces, some soups, and
some egg dishes. Some foods can’t be stirred. These
foods are rearranged or turned.
Some foods can’t be stirred and should be repositioned
or rearranged during cooking. Some examples include
baked potatoes, cupcakes (in custard cups), and
chicken pieces. Rearranging allows for more even
cooking of foods. Foods which are cooked, covered or
which are cooked using lower power levels, usually
require little rearranging.
There are actually two types of turning. Turning is done
when foods cannot be stirred. Foods which are cooked,
covered or which are cooked at lower power levels usually
require little turning.
Turning foods over: Turning foods over is done to
distribute heat. Meat and poultry are two types of foods
which are sometimes “turned over.” Examples include
roasts, turkeys and whole chickens. Small meat items
such as poultry pieces may need to be turned over when
in casseroles, or when in a browning skillet.

10
Microwave Utensils
CAUTION
!
To avoid burns, use protective gloves or pads when
removing dishes from oven. Some utensils become
hot while cooking.
Never use cooking containers or covers with any metal
content. This includes all metal and enameled metal-
core ware, foil, and metal-trimmed containers. Suitable
heating containers include those made of paper
products, glass, china, cloth, and wicker baskets.
Recommended Not Recommended
Glass/ceramic Aluminum foil
Natural fiber cloth Grocery bags
Non-recycled paper Recycled paper
Plastic Lead crystal
Wood Newspapers
Metal
Metallic trimmed china
Cooking Hints
Cover foods for faster, more even heating. Glass lids,
plastic wrap, plate covers or other paper products may be
used. Do not seal. Instead, allow for steam-venting at all
times.
Pierce pouches, plastic wrap covers and all foods
with a thin skin or membrane, such as potatoes, squash,
tomatoes, eggs, etc. This prevents an eruption in the oven
and allows for expansion and/or the escape of steam.
Foods should be carefully arranged. For best results,
arrange food such as vegetables or casserole-type items
evenly around the edge of the plate with slightly less
depth in the center. The edges of food items should not
overlap or overhang the rim of the container. Cover meats
with gravy or au jus and moisten all dry foods other than
bread or pastry items.
Do not stack food or plated dishes in your oven.
Instead, when heating more than one serving or platters,
all plates should be placed at the same level in the oven,
with space between all containers.
Oven Features
A—Window Door Screen
B—Splatter Shields
C—Electronic Control
D—Door Open Button
E—Safety Door Lock System
Oven Features
D
E
AB
C

11
Control Panel
Pads
TIME ENTRY Use to enter heating time without changing
preprogrammed number pads.
Pads 1-0 Use to begin heating with preprogrammed times and
power levels or to enter times for “Manual Time
Entry” cooking.
HOLD 0%, DEFROST 20%, MEDUIM 50%,
MED-HI 70% Use to select power level. Oven can heat at full or
reduced power. If oven power level is set to 0% oven
does not heat for programmed time. If no power level
is selected, oven operates at 100% power.
STOP/RESET Use to exit programming mode and stop cooking
during cooking cycle.
START Use to start “Manual Time Entry” program or restart
interrupted cooking cycle. Use to advance to next
user option. Use to save times and power levels
when programming pads.
Display
Some items in display can be seen but will not glow.
88 888 88
COOK OZ HEATER T/table OFF
LD10MP
1000 WATT
10 PROGRAM PADS
3 COOKING STAGES
TIME
ENTRY
STOP
RESET
START
HOLD
0%
1
2
3
4
5
6
7
8
9
0
DEFROST
20%
MEDIUM
50%
MED-HI
70%
QTY
2X

12
Cooking Displays
Shows when power is connected to oven. Open and
close door to clear.
READY shows when oven control will accept entries.
Appears after oven door is opened and closed.
88:88 shows heating time. When more than 1 heating
stage is programmed, total time for all stages displays.
COOK shows when oven is operating.
20 indicates the microwave power level used. If power
level does not show, oven is heating at 100% power.
Programming Displays
Indicates programming mode. See “Programming”
section of manual for programming procedure.
Indicates programming user options mode. See “User
Options” section of manual for programming procedure.
-- --- --
88 888 20
COOK OZ HEATER T/table OFF
:
READY
PROGRAM
OP 11

13
Operation
CAUTION
!
To avoid damaging oven, only heat in microwave oven
when turntable is in place.
CAUTION
!
To avoid fire, do not dry newspapers or clothes in
microwave oven.
Interrupting Operation
• Open oven door to interrupt operation. Oven fan
continues to operate. Close door and press
START
pad to resume oven operation.
• Press
STOP/RESET
pad to interrupt operation.
Display continues to show countdown time. Press
START
pad to resume oven operation and countdown
timing.
Canceling Mistakes
• If oven is operating, press
STOP/RESET
pad once to
stop oven, then again to clear display.
• If oven door is open and time shows in display, close
oven door and press
STOP/RESET
pad to clear
display.
Operating Preprogrammed Pads
Oven has 10 preprogrammed number pads. Instructions
are written for factory programmed ovens. Ovens that are
reprogrammed can respond differently than described
below.
1. Open oven door, place food in oven, and close oven
door.
• If pad is not pressed in 30 seconds, open and close
oven door again.
2. Press desired number pad.
• Oven operates and time counts down.
3. Oven stops heating and oven signal sounds when
heating timing elapses.
Preprogrammed Times and Cook Level
All preprogrammed pads arrive set at full power.
Pads Heating
Times
1 10 sec.
2 20 sec.
3 30 sec.
4 45 sec.
51 min.
6 1:30 min.
72 min.
83 min.
94 min.
05 min.
Manual Time Entry
Manual Time Entry feature allows the operator to enter
time and power levels, and heat without changing the
preprogrammed pads.
1. Open oven door, place food in oven, and close door.
• Display shows “READY”.
• If pad is not pressed in 30 seconds, open and close
oven door again.
2. Press
TIME ENTRY
pad.
• Display shows “0000”.
3. Press number pads to enter desired cooking time.
• For example, to heat for 2 minutes 30 seconds,
press
2
,
3, and 0
pads.
4. Press desired power level pad to change power level.
• If a power level pad is not pressed, oven defaults to
100% power.
• For example, pressing MEDIUM 50% pad sets oven
to 50% power.
• Display shows current power level if other than 100
percent power.
5. Press
START
pad.
• Oven operates and time counts down.
6. Oven stops heating and oven signal sounds when
heating timing elapses.

14
Programming
Preprogrammed Number Pads
Oven has 10 preprogrammed number pads. Follow
instructions below to program heating times and power
levels for customized cooking.
1. Open oven door.
• If dooris closed or
RESET
pad is pressed before
finishing programming sequence, oven exits
programming mode.
2. Press and hold pad
1
for approximately 5 seconds.
• After 5 seconds, signal sounds. Display shows
“PROGRAM” indicating program mode..
3. Press desired number pad.
• Display shows heating time, “COOK LEVEL” and
power level if other than 100 percent power.
4. Press number pads to enter desired cooking time.
• For example, to heat for 2 minutes 30 seconds,
press
2
,
3, and 0
pads.
5. Press desired power level pad to change power level.
• If a power level pad is not pressed, oven defaults to
100% power.
• For example, pressing MEDIUM 50% pad sets oven
to 50% power.
• Display shows current power level if other than 100
percent power.
6. Press
START
pad to save new heating time and
power level in oven memory.
• Repeat step 3-6 to program additional pads.
7. Press
RESET
pad or close oven door to exit
programming mode.
Multiple Heating Stages
Follow instructions below to program oven to perform 3
consecutive heating cycles without interruption.
1. Open oven door.
• If dooris closed or
RESET
pad is pressed before
finishing programming sequence, oven exits
programming mode.
2. Press pad
1
for approximately 5 seconds.
• After 5 seconds, signal sounds.
3. Press desired number pad.
• Display shows heating time and preprogrammed
number.
4. Press number pads to enter desired cooking time.
• For example, to heat for 2 minutes 30 seconds,
5. Press desired power level pad to change power level.
• If a power level pad is not pressed, oven defaults to
100% power.
• For example, pressing MEDIUM 50% pad sets oven
to 50% power.
• Display shows current power level if other than 100
percent power.
6. Press
TIME ENTRY
pad.
• Display briefly shows "STAGE 2" . Then cook time
and power level for stage show in display.
• Repeat steps 5-6 to create additional stages.
7. Press
START
pad to save new heating time and
power level in oven memory.
8. Press
RESET
pad or close oven door to exit
programming mode.
15
User Options
Follow the instructions below to customized the
microwave oven’s operation. End-of-cycle signal,
maximum heating time and other options can be changed
to meeting your cooking needs.
1. Open oven door.
• If door is closed or
RESET
pad is pressed before
finishing programming sequence, oven exits
programming mode.
2. Press and hold pad
2
for approximately 5 seconds.
• After 5 seconds, signal sounds. Display shows
“OPTION”.
3. Press number pad that matches desired option.
• “OP” represents optional program mode, first
number represents option number and second
number represents functions currently selected for
option.
4. Press
START
pad to advance to next option. See
table for options.
5. Press number pad (0,1-3) to change option.
6. Press
START
pad to save changes.
• Repeat steps 4-6 to change additional options.
7. Press
STOP/RESET
pad or close oven door to exit
programming mode.
OP 11
Optional Program
Indicator Pad
Number Option
Selected
Numbered Pads Display Options ( ) = Factory Setting
1
End of Cycle Beep
OP:10
OP:11
OP:12
3 second continuous beep
(Continuous Beep until door is opened)
5 beeps bursts until door is opened
2
Speaker Volume
OP:20
OP:21
OP:22
OP:23
Eliminates beep
Sets volume to low; 60-70dB
Sets volume to medium; 70-80dB
(Sets volume to high; 80-90dB)
3
Key Beep
OP:30
OP:31
Prevents signal when pad is pressed.
(Allows signal when pad is pressed.)
4
Keyboard Enable
Window
OP:40
OP:41
(30 seconds after oven door is opened, keyboard disabled)
2 minutes after oven door is opened, keyboard disabled
5
Add Time during
Heating
OP:50
OP:51
(Prevents adding heating time while oven is heating.)
Allows adding heating time while oven is heating.
6
Reset Door Open
OP:60
OP:61
(Cancels heating time count down after door is opened during
cycle.)
Allows oven to resume heating time countdown after door is
opened during cycle.
7
Maximum Heating
Time
OP:70
OP:71
Allows 10 minutes of heating time.
(Allows 60 minutes of heating time.)
8
Manual Operation
OP:80
OP:81
Allows use of preprogrammed pads only.
(Allows use of manual time entry and preprogrammed pads.)
16
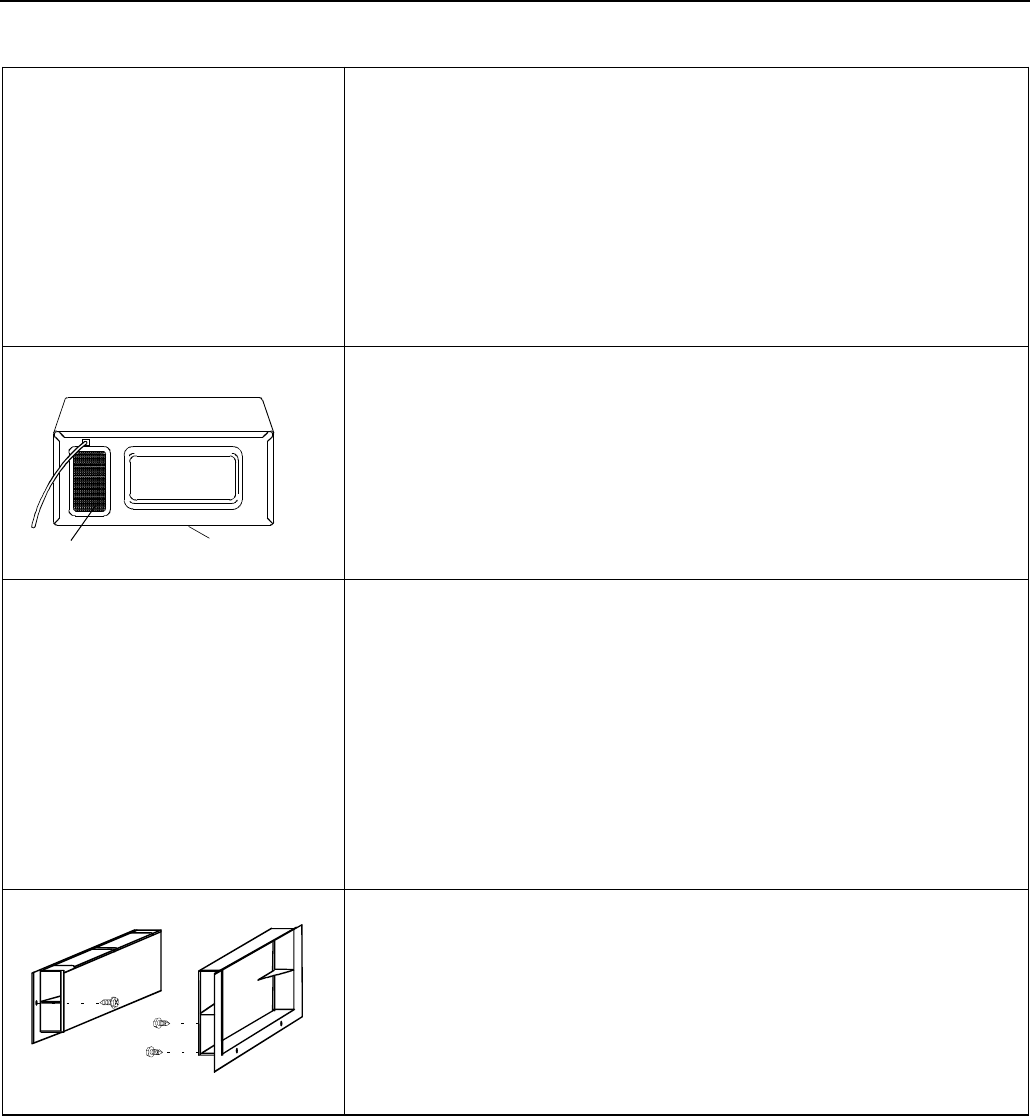
Cleaning
Part Description
Interior, Exterior, and Door Clean microwave oven with mild detergent in warm water using soft
sponge or cloth. Wring sponge or cloth to remove excess water before
wiping equipment. If desired, boil a cup of water in microwave oven to
loosen soil before cleaning.
Important:
ï Do not use abrasive cleansers or cleaners containing ammonia.
These could damage finish.
ï Never pour water into microwave oven bottom.
ï Do not use water pressure type cleaning systems.
Discharge Air Vents Check monthly for a buildup of cooking vapors along intake and discharge
louvers on bottom and back of oven. Clean air vents with damp cloth to
ensure proper airflow. Dry thoroughly.
Control Panel Open oven door to deactivate oven timer. Clean with mild detergent in
warm water using soft sponge or cloth.
Splatter Shields Splatter shields can be cleaned in place or removed. Clean with mild
detergent in warm water using soft sponge or cloth.
Splatter shields are held in place with (3) screws. If desired, remove
splatter shields for cleaning by removing screws. Replace splatter shields
before using oven.
DischargeIntake
LD10MP
1000 WATT
10 PROGRAM PADS
3 COOKING STAGES
TIME
ENTRY
STOP
RESET
START
HOLD
0%
1
2
3
4
5
6
7
8
9
0
DEFROST
20%
MEDIUM
50%
MED-HI
70%
QTY
2X

17
Before Calling for Service
Record all inspections and repair for future reference.
WARNING
!
To avoid electrical shock which can cause severe personal injury or death, do not remove outer case at any time.
Only an authorized servicer should remove outer case.
Symptom Check
If oven does not operate: • Check fuse or circuit breaker.
• Confirm oven is plugged into dedicated circuit.
• Confirm oven is on grounded and polarized circuit.
Contact electrician to confirm.
If oven light does not work: • Oven light must be replaced by a servicer.
If oven operates intermittently: • Check air discharge area for obstructions.
Oven operates, but does not heat food: • Place one cup cool water in oven. Heat for one
minute. If water temperature does not rise, oven is
operating incorrectly and a servicer should be
called.
Any questions or to locate an authorized servicer, call 1-800-843-0304 inside U.S.A. 1-319-622-5511 outside U.S.A. If
an automated telephone system is reached, select Commercial Microwave Ovens category. Warranty service must be
performed by an authorized servicer. Amana also recommends contacting an authorized servicer if service is required
after warranty expires.

18
Warranty
OWNER'S RESPONSIBILITIES:
• Provide proof of purchase.
• Provide normal care and maintenance,
including cleaning as instructed in owner's
manual.
• Replace owner replaceable items where
directions appear in the owner's manual.
• Make product accessible for service.
• Pay for premium service costs for service
outside servicer's normal business hours.
• Pay for service calls related to product
installation and usage.
• Pay for service technician’s travel expenses.
IN NO EVENT SHALL AMANA APPLIANCES BE
LIABLE FOR INCIDENTAL OR
CONSEQUENTIAL DAMAGES
For answers to questions regarding the above,
contact equipment supplier or:
Commercial Products Division
Amana Appliances
2800 220th Trail
Amana, Iowa 52204
USA
Phone 1.319.622.5511 Worldwide
Fax 1.319.622.8596 Worldwide
WARRANTY LIMITATIONS:
• Begins at date of original purchase.
• Applies to product used for NORMAL
commercial food preparation.
• Service must be performed by an authorized
Amana Appliances service technician.
• Damage due to shipping and handling is not
covered by this warranty.
• V.A.T., duties, customs fees, and other related
expenses are not covered by this warranty.
WARRANTY IS VOID IF:
• Serial plate is defaced.
• Product has a defect or damage due to product
alteration, connection to an improper electrical
supply, installation in a corrosive environment
accident, fire, flood, lightning, or other condition
beyond the control of Amana Appliances.
• Product is improperly installed, used, or
maintained.
ITEMS NOT COVERED:
• Lost or broken glass turntable or rotating ring.
• Accessories.
• General rebuilding or refurbishing.
• Failures caused by:
- Grease or other material buildup due to
improper cleaning or maintenance.
- Accidental or intentional damage.
- Operating an empty oven.
- Use of improper pans, containers, or
accessories that cause damage to the
product.
LG COMMERCIAL MICROWAVE OVEN
90 DAY WARRANTY
LIMITED ONE YEAR WARRANTY ON MAGNETRON TUBE
Applies to product used within the United States or in Canada.
90 DAYS
Amana Appliances will replace any part, including labor, (f.o.b. Amana, Iowa) which is defective due to
workmanship or materials when carried into an authorized Amana servicer.
ONE YEAR
Amana Appliances will replace any magnetron tube (f.o.b. Amana, Iowa), part only, which is defective
due to workmanship or materials when carried into an authorized Amana servicer.

19

www.amanacommercial.com
Part No. 12474302
Printed in Korea
2002 Amana Appliances
Amana, Iowa 52204
Read “Important Safety Information” before using “Quick
Reference Instructions”. If there are unanswered
questions, see detailed sections of this manual.
Interrupting Operation
• Open oven door to interrupt operation. Oven fan
continues to operate. Close door and press
START
pad to resume oven operation. Display
continues to show countdown time. Press
START
pad
to resume oven operation and countdown timing.
Canceling Mistakes
• If oven is operating, press
STOP/RESET
pad once to
stop oven, then again to clear display.
• If oven door is open and time shows in display, close
oven door and press
STOP/RESET
pad to clear
display.
Operating Preprogrammed Pads
1. Open oven door, place food in oven, and close oven
door.
2. Press desired number pad(s).
3. Oven stops heating and oven signal sounds when
heating timing elapses.
Manual Time Entry
1. Open oven door, place food in oven, and close door.
2. Press
TIME ENTRY
pad.
3. Press number pads to enter desired cooking time.
4. Press desired power level pad to change power level.
5. Press
START
pad.
6. Oven stops heating and oven signal sounds when
heating timing elapses.
Quick Reference Instructions
Preprogrammed Number Pads
1. Open oven door.
2. Press and hold pad
1
for approximately 5 seconds.
3. Press desired number pad.
4. Press number pads to enter desired cooking time.
5. Press desired power level pad to change power level.
6. Press
START
pad to save new heating time and
power level in oven memory.
7. Press
STOP/RESET
pad or close oven door to exit
programming mode.
Multiple Heating Stages
1. Open oven door.
2. Press pad
1
for approximately 5 seconds.
3. Press desired number pad.
4. Press number pads to enter desired cooking time.
5. Press desired power level pad to change power level.
6. Press
TIME ENTRY
pad.
7. Press
START
pad to save new heating time and
power level in oven memory.
8. Press
STOP/RESET
pad or close oven door to exit
programming mode.