LG Electronics USA M1740AB 17” LCD Monitor User Manual Microsoft PowerPoint F User s Manual
LG Electronics USA 17” LCD Monitor Microsoft PowerPoint F User s Manual
UserManual.wiki
>
LG Electronics USA
>
M1740AB User Manual
Users Manual
Navigation menu
Upload a User Manual
Namespaces
Wiki Guide
HTML
PDF
Info
Views
User Manual
Discussion / Help
Navigation
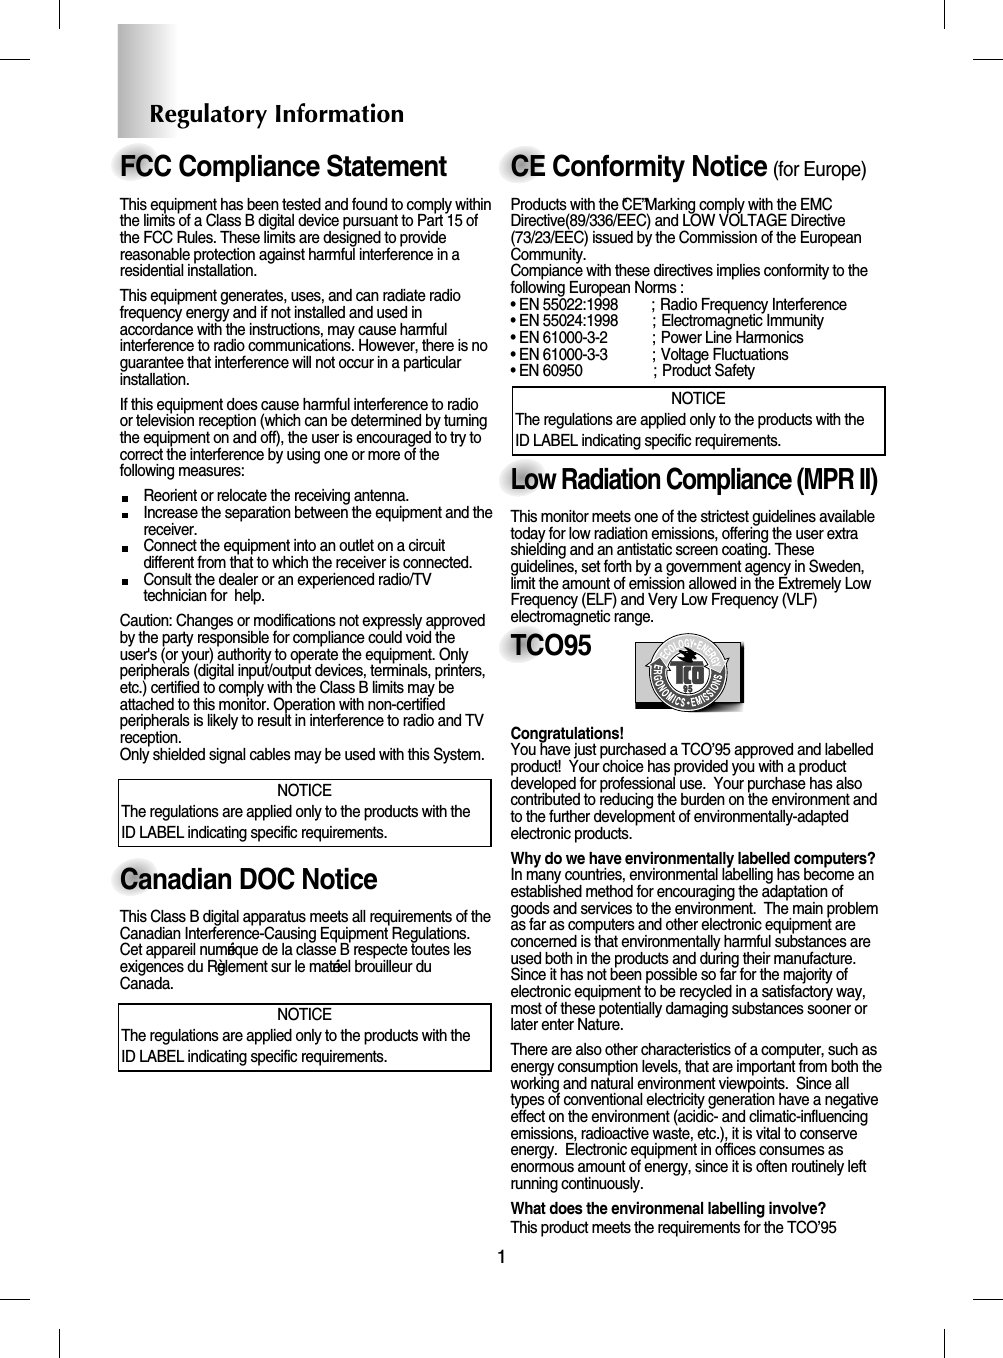


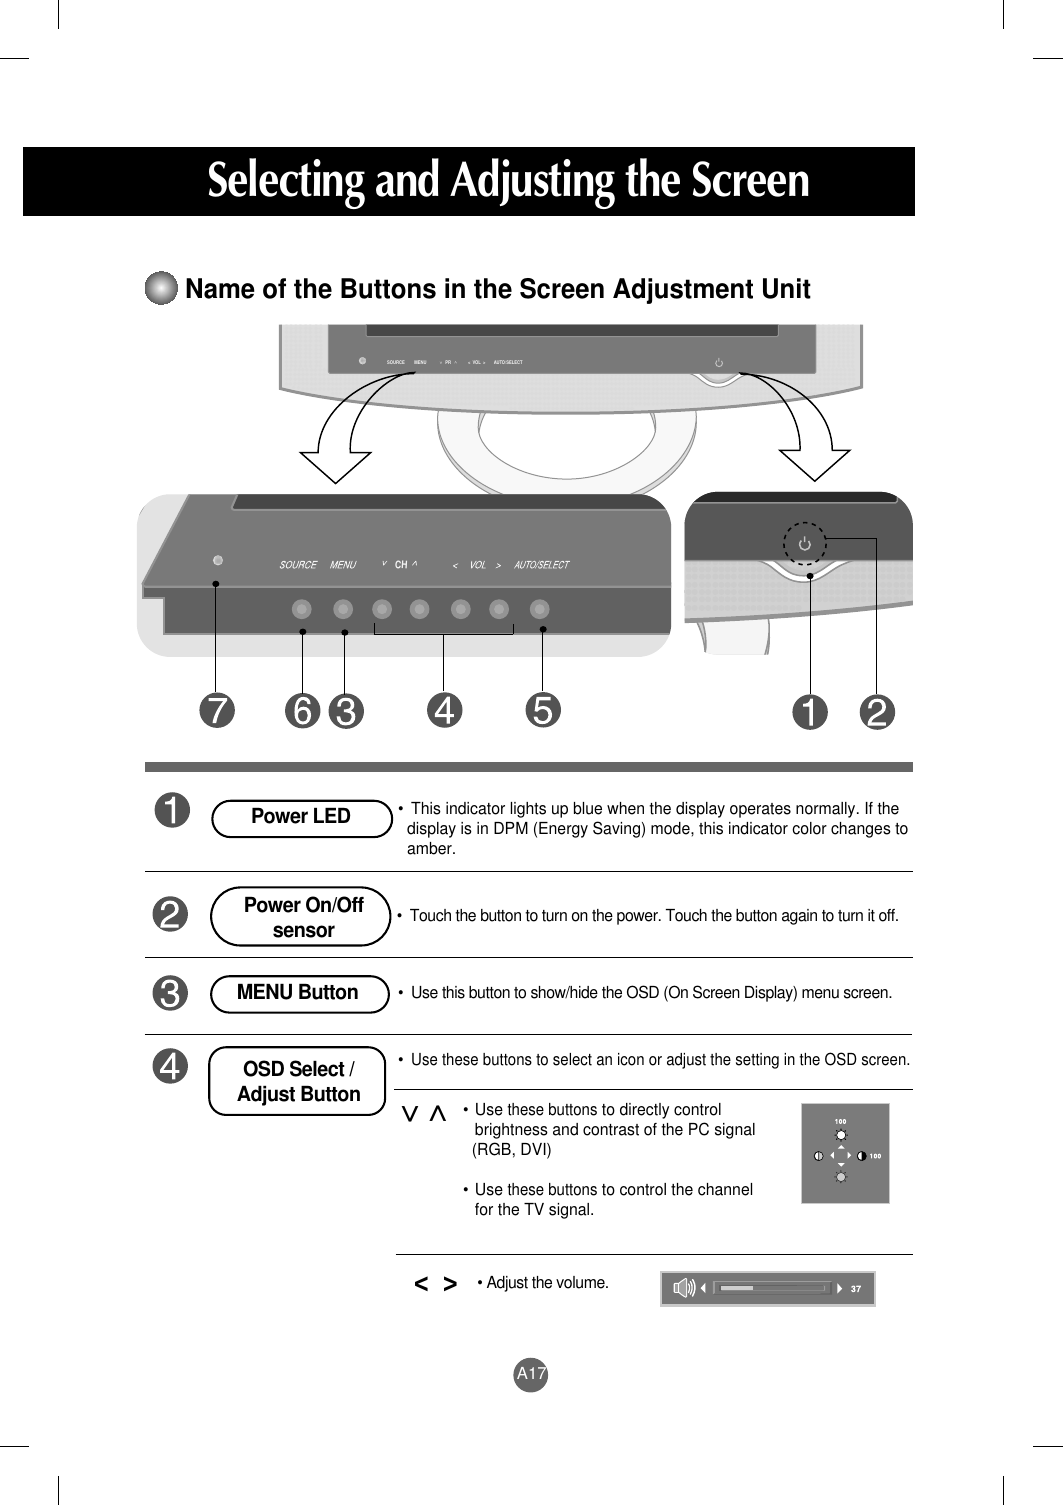
![A18ENGLISHName of the Buttons in the Screen Adjustment Unit[For PC Analogue signal-RGB][For TV][Other signals]•The current signal and mode information will be displayed.AUTO/SELECT ButtonTV TelevisionAV Composite videoS-Video Separate VideoComponent Component signalRGB D-SUB analog signalDVI DVI digital signal• Select the input signal SOURCE Button•The unit that receives the signal from the remote controller.<<Auto In progressAuto In progress0 ----- 50%INPUT SELECTTVAVS-VideoComponentRGBDVI](https://usermanual.wiki/LG-Electronics-USA/M1740AB/User-Guide-519987-Page-25.png)

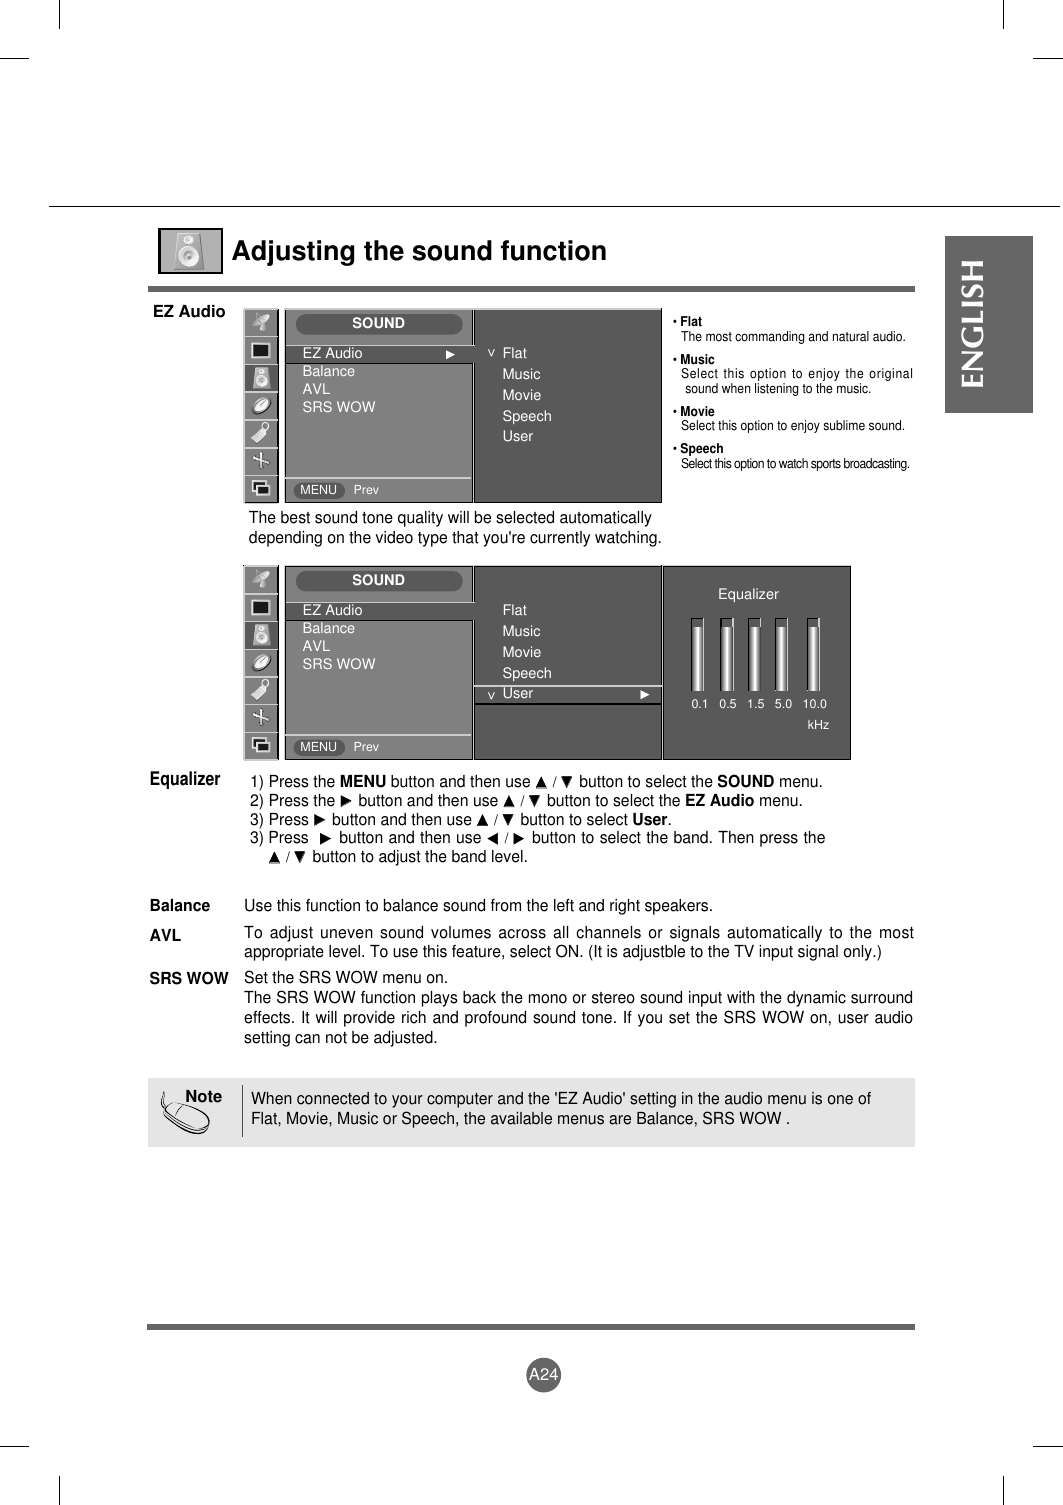

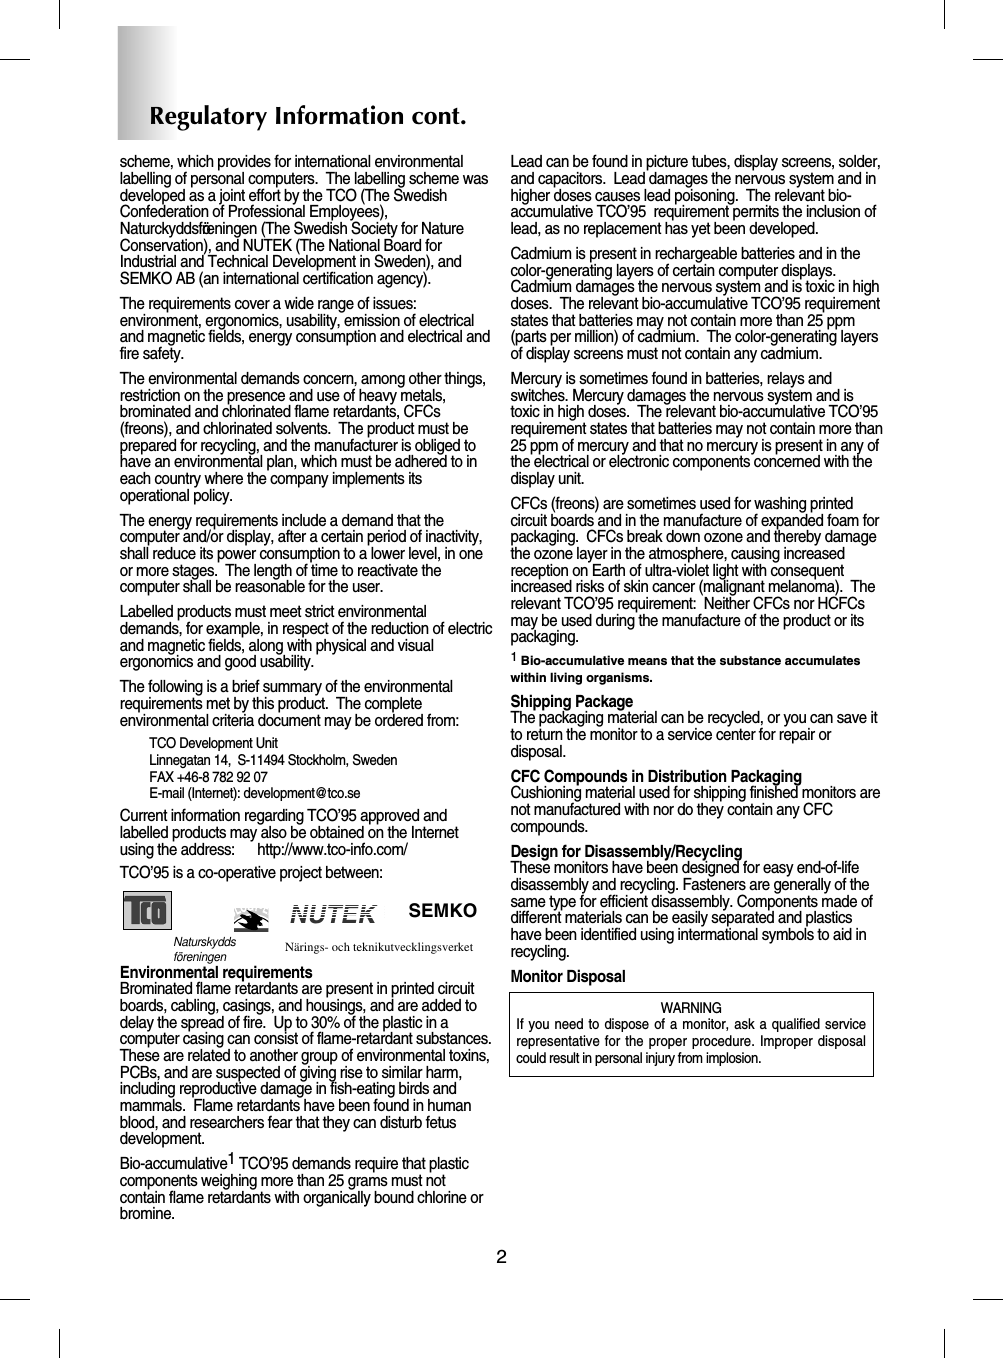
![A27Selecting and Adjusting the Screen[Remote Control]Press the CC button repeatedly to display the caption option as shown below. Press the SETbutton to select the caption option.Use the DD / EE buttons to select captions. Captions (only TV mode)Use the DD / EE buttons to select caption mode.Text services give a wide variety of information on all kind of subjects(ex. captionedprogram lists, weather forecasts, stock exchange topics, news for hearing-impaired....) onup to half of the TV screen. But not all stations offer text services, even though they mightoffer captioning.In the event you are receiving a poor signal, an empty black box may appear and disappear,even when the text mode is selected. This is a normal when receiving a poor signal.This TV is programmed to remember the CAPTION / TEXT mode it was last set to, whenyou turn the power off.Caption / TextIf sound is on, the caption will be off. On the contrary, if sound is off, the caption will be on.* EZ MuteClosed CaptionsClosed captioning is a process which converts the audio portion of a television program into written wordswhich then appear as subtitles on the television screen. Closed captions allow viewers to read the dialogueand narration of television programs.Using Closed CaptionsCaptions are the subtitles of the dialogue and narration of television programs. For prerecorded programs,program dialogue can be arranged into captions in advance. It is possible to caption a live program by usinga process called real-time captioning, which creates captions instantly. Real-time captioning is normally doneby professional reporters using a machine shorthand system and computer for translation into English.Captioning is an effective system for the hearing-impaired, and it can also aid in teaching language skills.Caption Tips1. Not all TV broadcasts include closed caption signals.2. Sometimes TV stations broadcasts four different caption signals on the same channel. By selecting FromCC1 ~ CC4, TEXT1 ~ TEXT4 you can choose which signal you view CC1 is usually the signal with thecaptions, while Another mode might show demonstration or programmimg information.3. Your TV might not receive caption signals normally in the following situations.Poor reception conditions are encountered : - IGNITION : Picture may flutter, drift, suffer from black spots, or horizontal streaking. Usually caused by interferencefrom automobile ignition systems, neon lamps, electrical drills, and other electrical appliances.- GHOSTS : Ghosts are caused when the TV signal splits and follows two paths. One is the direct path and the otheris reflected off tall buildings, hills or other objects. Changing the direction or position of the antenna mayimprove reception.- SNOW : If your receiver is located at the weak, fringe area of a TV signal, your picture may be marred by smalldots. It may be necessary to install a special antenna to improve the picture.An old, bad or illegally recorded tape is playing.Strong, random signals from a car or airplane interfere with the TV signal.The signal from the antenna is weak.The program wasn't captioned when it was produced, transmitted, or taped.Off On EZ Mute](https://usermanual.wiki/LG-Electronics-USA/M1740AB/User-Guide-519987-Page-34.png)

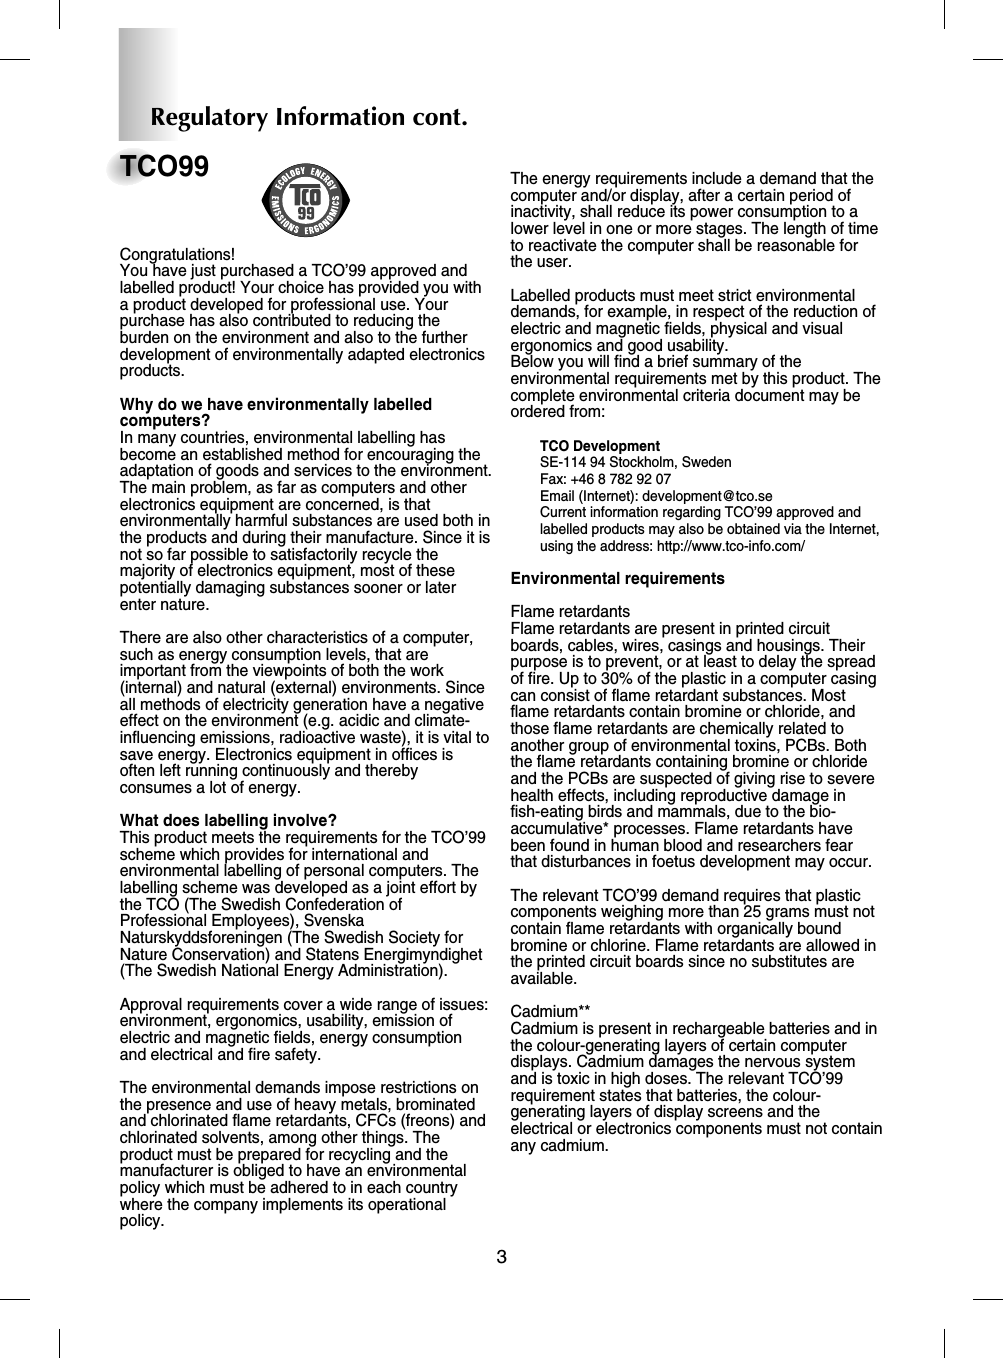
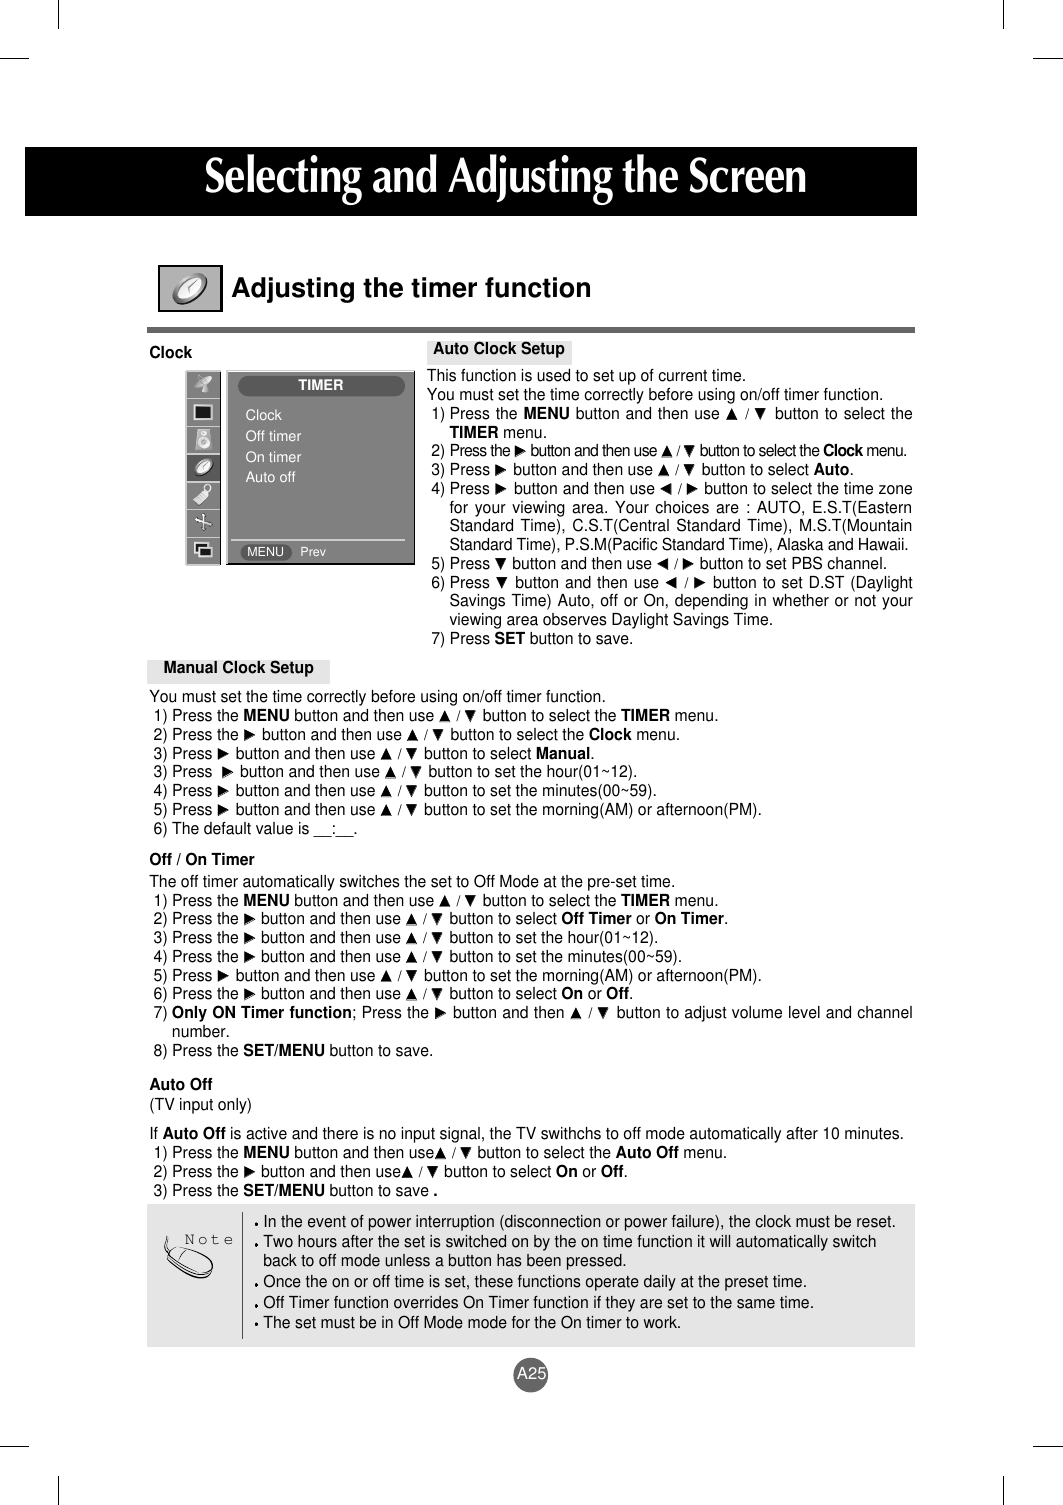
![A37SpecificationsScreen Type 17 inches (431.8mm) TFT (Thin Film Transistor) LCD (Liquid Crystal Display) PanelVisible diagonal size: 431.8mmPixel Pitch 0.264mmMax. Resolution 1280X1024 @75Hz Recommended Resolution1280X1024 @60Hz Horizontal Frequency D-SUB : 30 - 83 kHz DVI-D : 30 - 71 kHzVertical Frequency 56 - 75 HzSynchronization Type Separate/Composite/SOG (Sync On Green)/Digital15-pin D-Sub type, DVI-D (digital), S-Video, composite video, ScartRated Voltage AC 100-240V~ 50/60Hz 1.0APower Consumption Normal operation: 55W Power saving preparation state: ≤4WPower saving state: ≤4W Power switch off: ≤2W Tilt Range -5˚~25˚Tilt Stand AttachedSize (WxLxH) 501.5mm x 158.2 mm x 500.3 mm Weight (excl. package) 6.65 kg (14.66 lbs)Operational Condition Temperature: 10˚C ~ 35˚C , Humidity: 10% ~ 80% Storage Condition Temperature: -20˚C ~ 60˚C , Humidity: 5% ~ 95% LCD PanelVideo SignalInput ConnectorPowerTiltDimension/WeightEnvironmental Conditions[17 inches]](https://usermanual.wiki/LG-Electronics-USA/M1740AB/User-Guide-519987-Page-44.png)
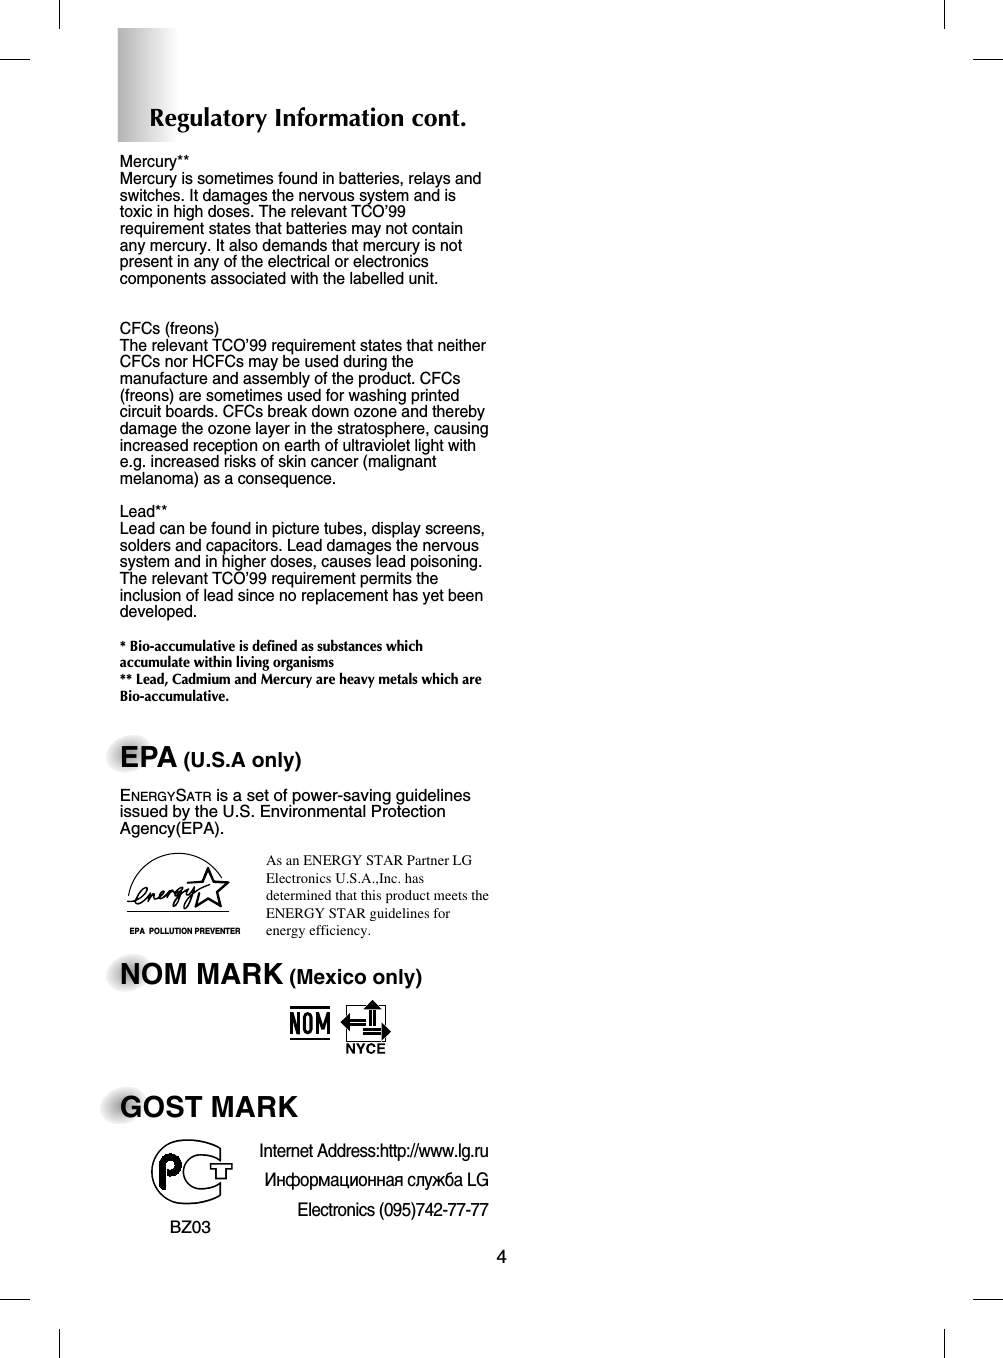
![A38ENGLISHScreen Type 19 inches (482.6mm) TFT (Thin Film Transistor) LCD (Liquid Crystal Display) PanelVisible diagonal size: 482.6mmPixel Pitch 0.294mmMax. Resolution 1280X1024 @75Hz Recommended Resolution1280X1024 @60Hz Horizontal Frequency D-SUB : 30 - 83 kHz DVI-D : 30 - 71 kHzVertical Frequency 56 - 75 HzSynchronization Type Separate/Composite/SOG (Sync On Green)/Digital15-pin D-Sub type, DVI-D (digital), S-Video, composite video, ScartRated Voltage AC 100-240V~ 50/60Hz 1.0APower Consumption Normal operation: 60W Power saving preparation state: ≤4WPower saving state: ≤4W Power switch off: ≤2W Tilt Range -5˚~25˚Tilt Stand AttachedSize (WxLxH) 542.5mm x 222.8 mm x 541.4 mm Weight (excl. package) 7.75 kg (17.09 lbs)Operational Condition Temperature: 10˚C ~ 35˚C , Humidity: 10% ~ 80% Storage Condition Temperature: -20˚C ~ 60˚C , Humidity: 5% ~ 95% LCD PanelVideo SignalInput ConnectorPowerTiltDimension/WeightEnvironmental Conditions[19 inches]](https://usermanual.wiki/LG-Electronics-USA/M1740AB/User-Guide-519987-Page-45.png)
![A39SpecificationsScreen Type 20.1 inches (510mm) TFT (Thin Film Transistor) LCD (Liquid Crystal Display) PanelVisible diagonal size: 510mmPixel Pitch 0.2805mmMax. Resolution 1600X1200 @60Hz Recommended Resolution1600X1200 @60Hz Horizontal Frequency D-SUB : 30 - 92 kHz DVI-D : 30 - 80 kHzVertical Frequency 56 - 85 HzSynchronization Type Separate/Composite/SOG (Sync On Green)/Digital15-pin D-Sub type, DVI-D (digital), S-Video, composite video, ScartRated Voltage AC 100-240V~ 50/60Hz 1.2APower Consumption Normal operation: 70W Power saving preparation state: ≤4WPower saving state: ≤4W Power switch off: ≤2W Tilt Range -5˚~25˚Tilt Stand AttachedSize (WxLxH) 575.1mm x 221.1 mm x 557.5 mm Weight (excl. package) 8.7 kg (19.18 lbs)Operational Condition Temperature: 10˚C ~ 35˚C , Humidity: 10% ~ 80% Storage Condition Temperature: -20˚C ~ 60˚C , Humidity: 5% ~ 95% LCD PanelVideo SignalInput ConnectorPowerTiltDimension/WeightEnvironmental Conditions[20.1 inches]](https://usermanual.wiki/LG-Electronics-USA/M1740AB/User-Guide-519987-Page-46.png)
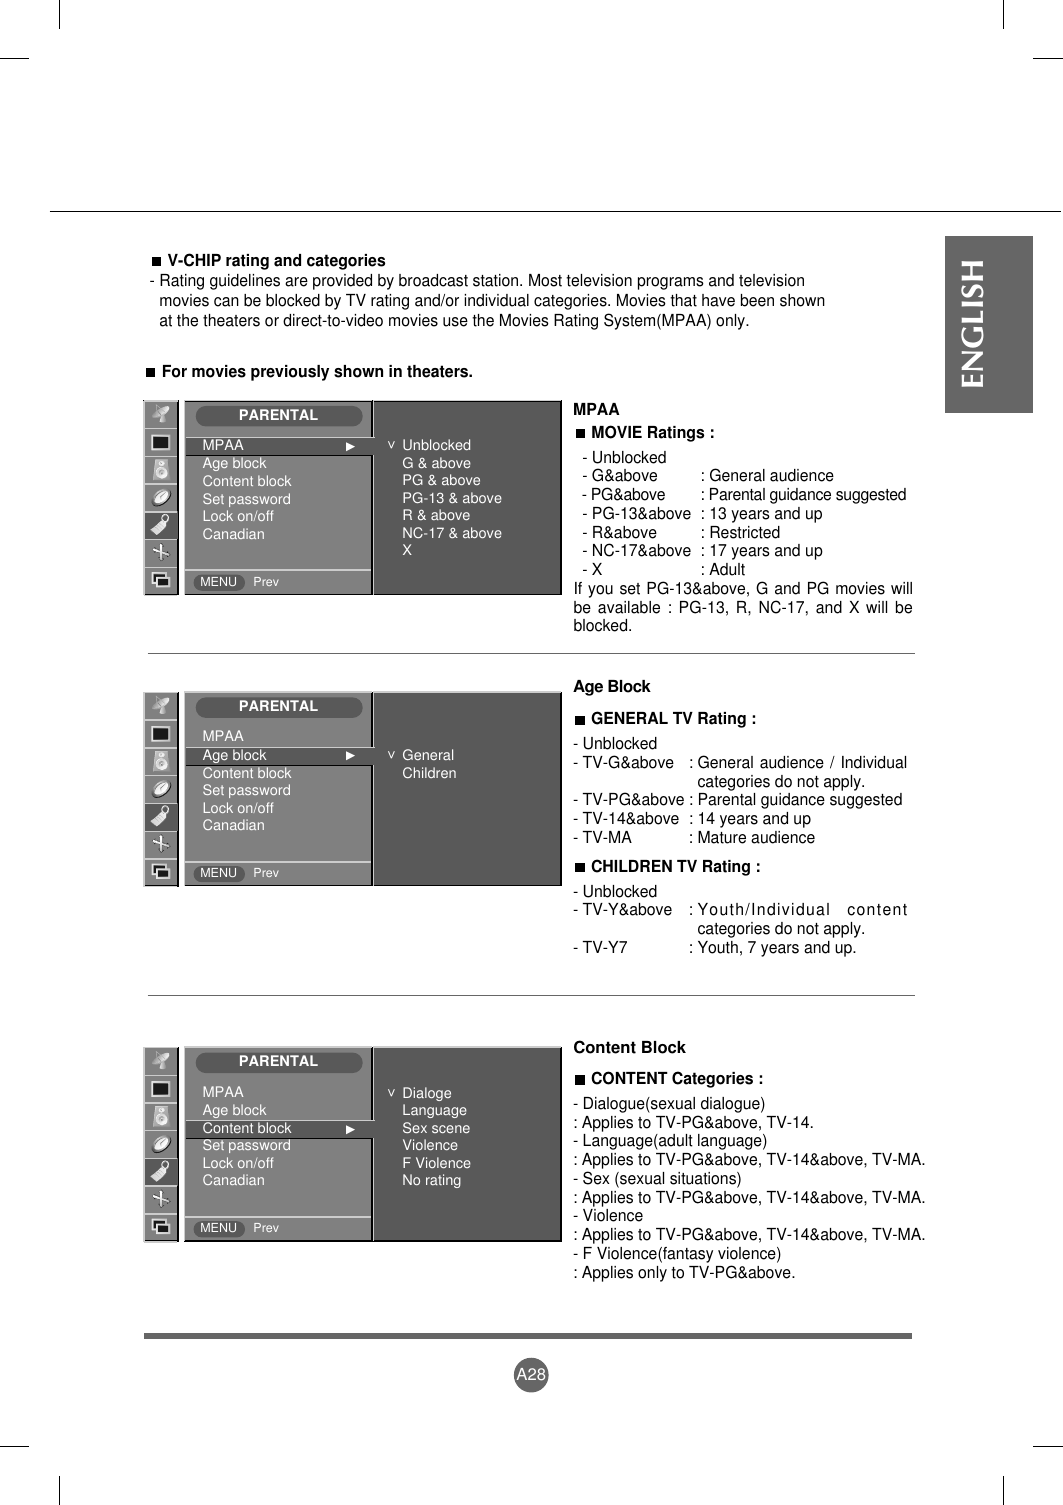
![A40ENGLISHMode 18 : Analogue onlyMode 19 : Digital onlyPC Mode – Preset ModePower LEDMode ProductNormal OperationPre-power Saving StatePower Saving StatePower Switch OffBlueAmberAmber-Preset modeHorizontalFrequency(kHz)VerticalFrequency(Hz)Preset modeHorizontalFrequency(kHz)VerticalFrequency(Hz)12345678910640 x 350640 x 480640 x 480640 x 480720 x 400800 x 600800 x 600800 x 600832 x 6241024 x 76831.46931.46937.50043.27031.46937.88046.88053.67049.72048.36070607585706075857560VGAVGAVGAVGAVGAVESAVESAVESAMACVESA1112131415161718191024 x 7681024 x 7681152 x 8701152 x 9001280 x 10241280 x 10241600 x 10241600 x 12001600 x 120060.02068.68068.68061.80063.98079.98062.11075.00073.530VESAVESAMACMACVESAVESAVESAVESAVESA758575666075606060[17, 19 inches][20.1 inches]Preset modeHorizontalFrequency(kHz)VerticalFrequency(Hz)Preset modeHorizontalFrequency(kHz)VerticalFrequency(Hz)1234567640 x 350720 x 400640 x 480640 x 480800 x 600800 x 600832 x 62431.46931.46831.46937.50037.87946.87549.72570706075607575VGAVGAVGAVESAVESAVESAMAC89101112131024 x 7681024 x 7681152 x 8701152 x 9001280 x 10241280 x 102448.36360.12368.68161.80563.98179.980VESAVESAMACMACVESAVESA607575666075](https://usermanual.wiki/LG-Electronics-USA/M1740AB/User-Guide-519987-Page-47.png)