LG Electronics USA M203WXB 20.1” LCD Monitor User Manual Microsoft PowerPoint F User s Manual
LG Electronics USA 20.1” LCD Monitor Microsoft PowerPoint F User s Manual
UserManual.wiki
>
LG Electronics USA
>
M203WXB User Manual
Users Manual
Navigation menu
Upload a User Manual
Namespaces
Wiki Guide
HTML
PDF
Info
Views
User Manual
Discussion / Help
Navigation
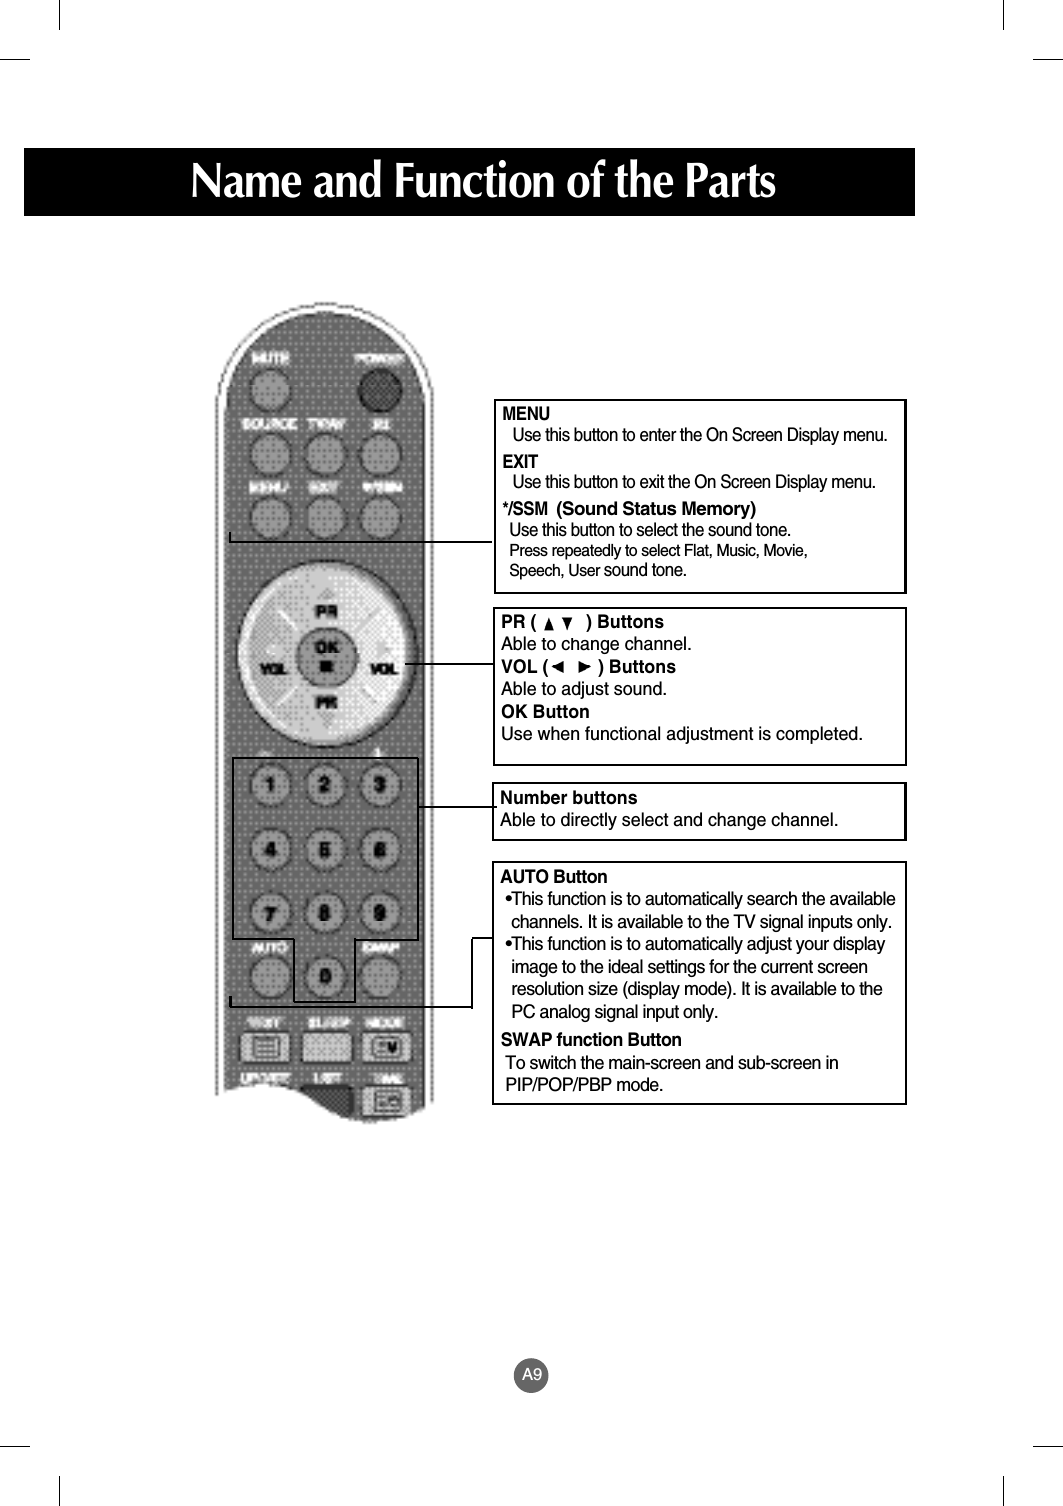
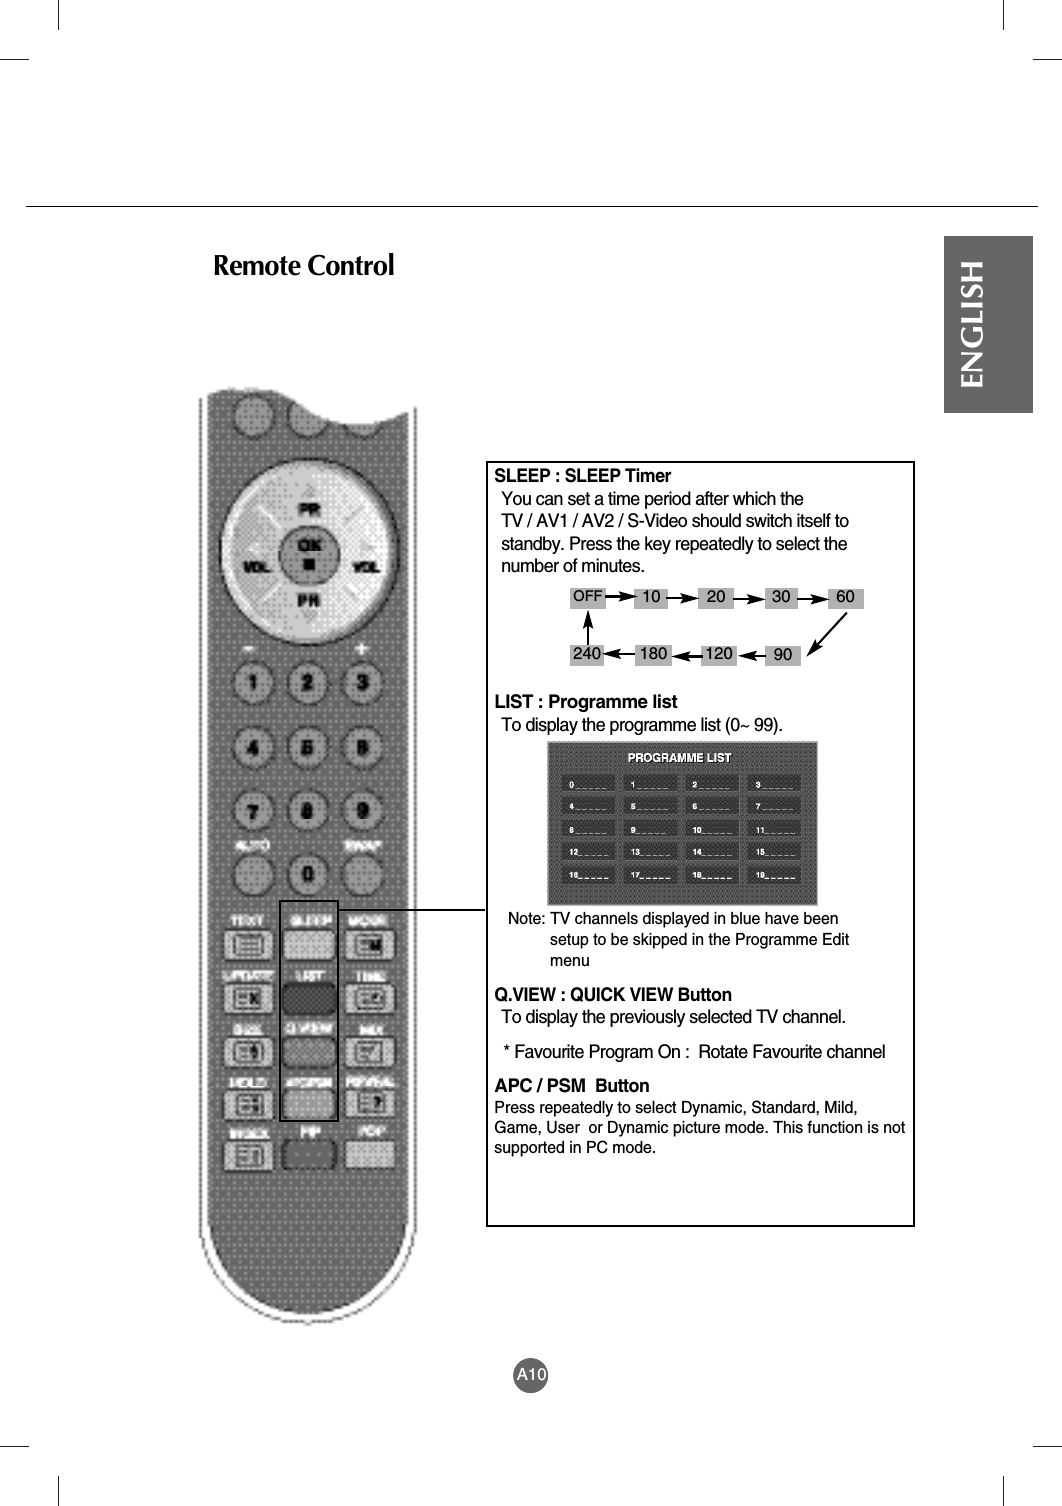
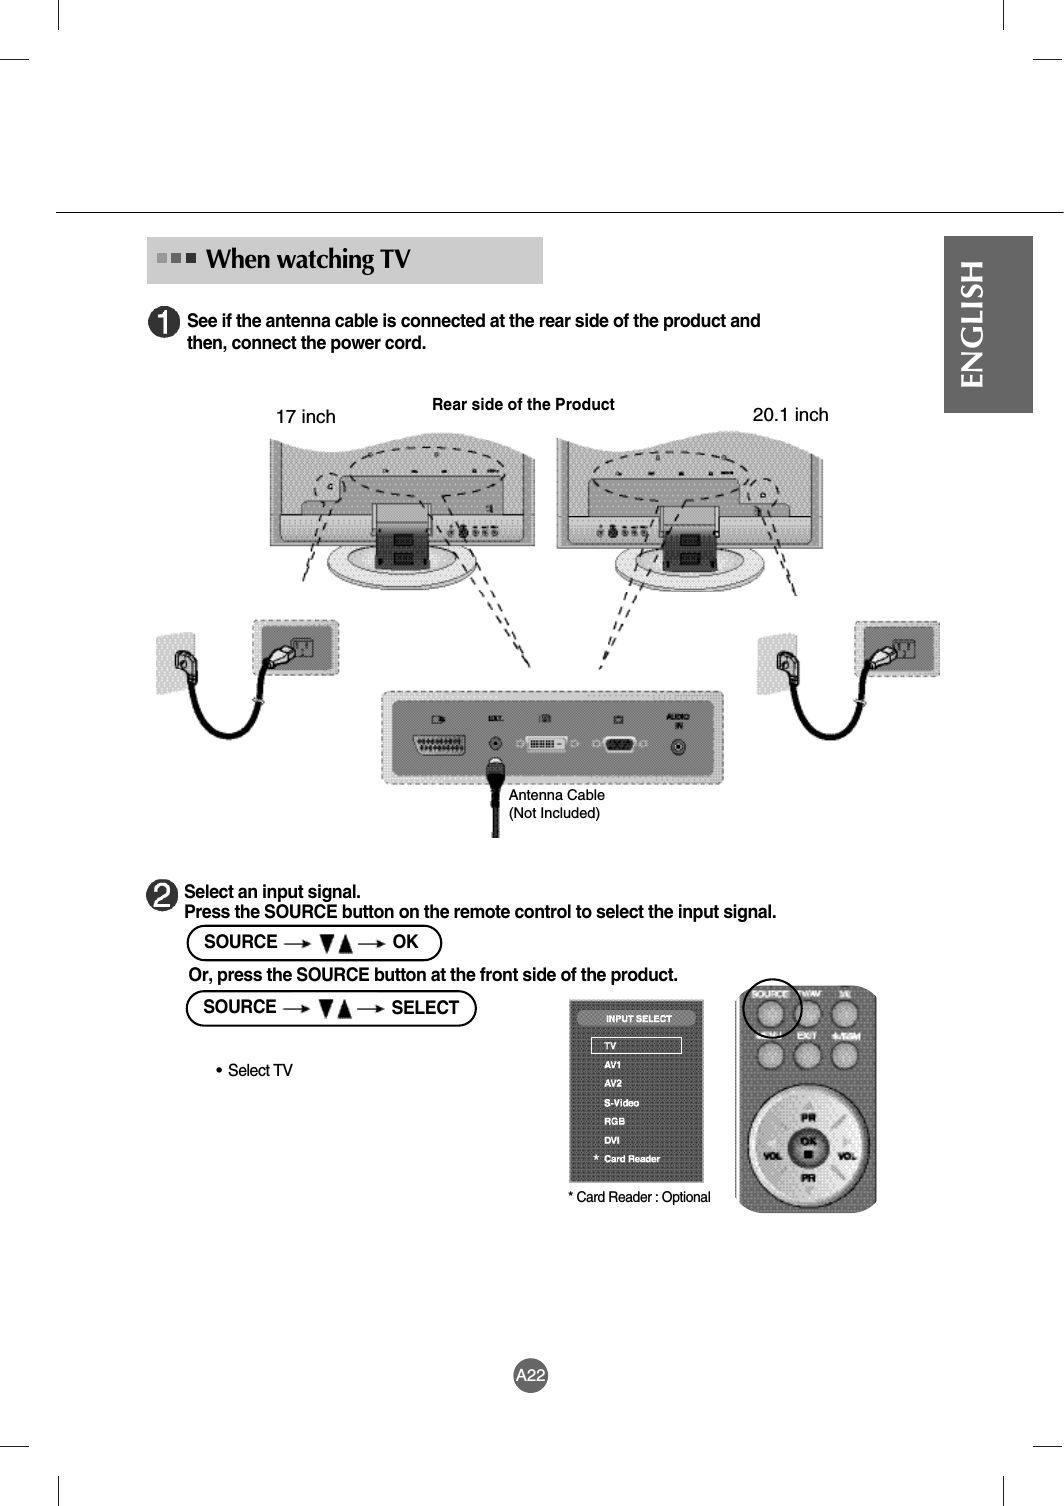
![A8ENGLISHName and Function of the PartsName of the Remote Control ButtonsMUTE Use the this button so that no sound comes out temporarily.POWERAble to power On/Off.SOURCE TV/AV : TV/AV buttonI/II : Bilingual choice and sound mode selectionPress this button[TV]to switch from Stereo to Mono sound in case of stereo transmission, orfrom Nicam Stereo to Nicam Mono, in case of digital transmission.to switch from Nicam Dual Ito Nicam Dual II or Nicam Dual I+II incase of Nicam Dual transmission.to choose between Dual I, Dual II or Dual I+II in case of bilingualtransmission : Dual I sends the primary broadcast language to the loudspeakers ;Dual II sends the secondary broadcast language to the loudspeakers ;Dual I+II sends a separate language to each loudspeakers.[AV]In AV mode, you can select output sound for the left and right loudspeakers.Repeatedly press the I/II button to select the sound output.L+L : Audio signal from audio L input is sent to left and right loud-speakers.L+R : Audio signal from audio L input is sent to left loud-speaker and audio signal from audio R input is sent to right loud-speaker.R+R : Audio signal from audio R input is sent to left and right loud- speakers.If you press the button once,the following Input SignalWindow will appear. Selectthe signal type you wantusing the button.TV >AV1 >AV2 >S-VideoNOTE : In case of weak stereo sound signals, with stereo or Nicam stereotransmission, select mono reception.Remote Control* Card Reader : Optional*](https://usermanual.wiki/LG-Electronics-USA/M203WXB/User-Guide-519917-Page-14.png)
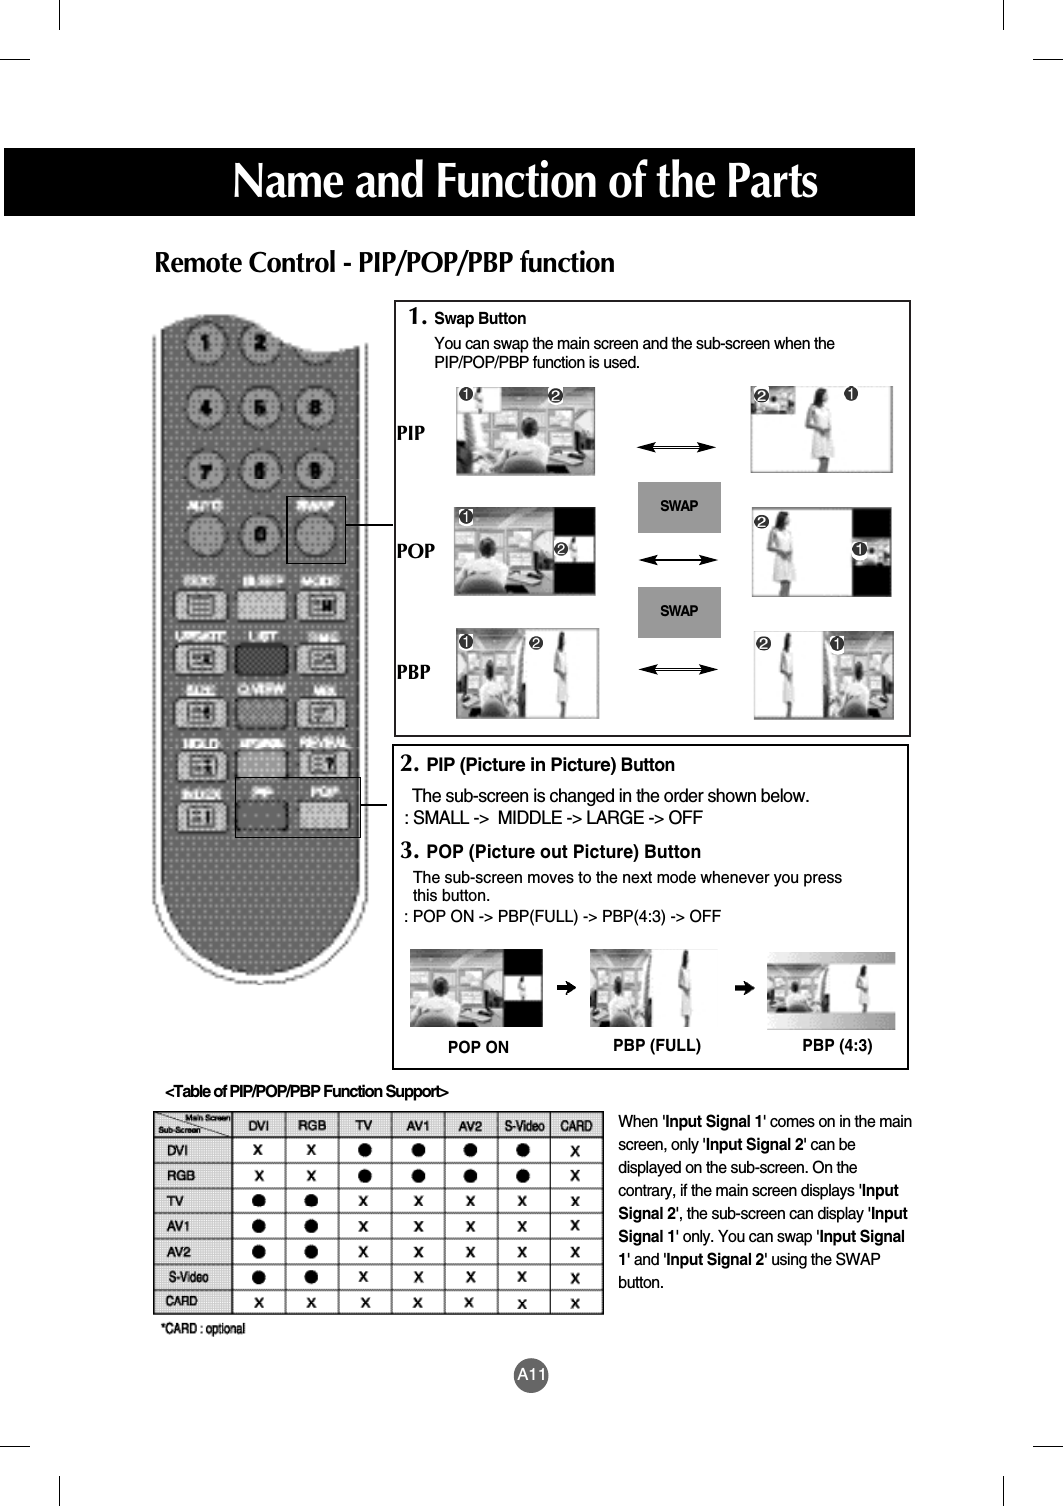
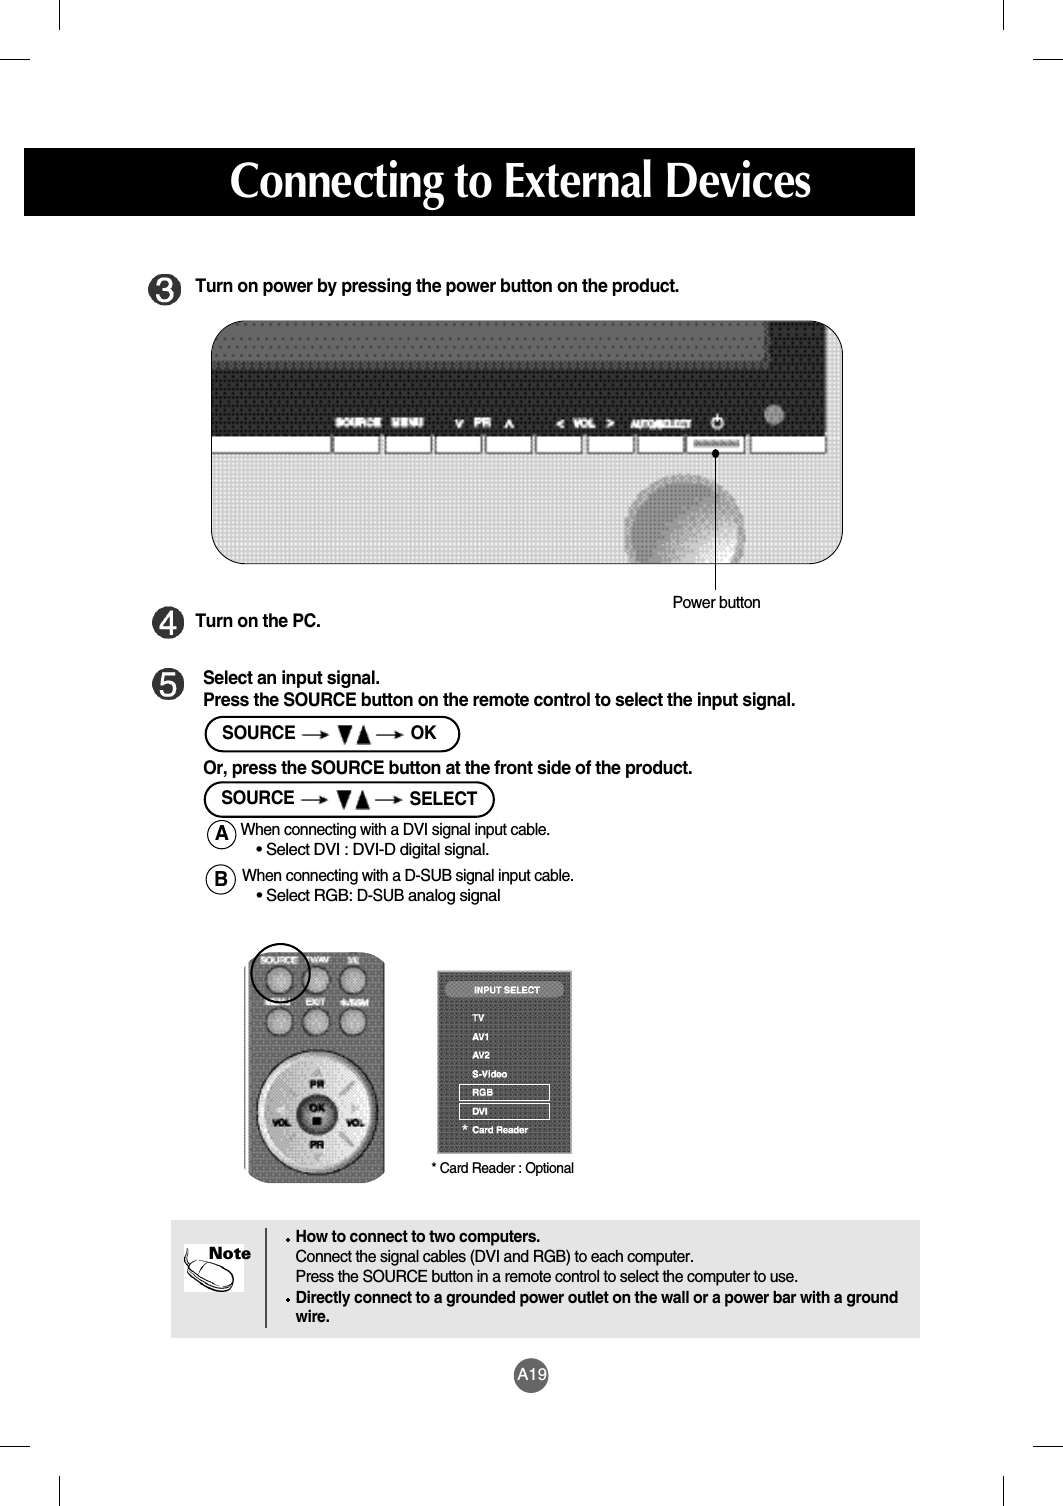
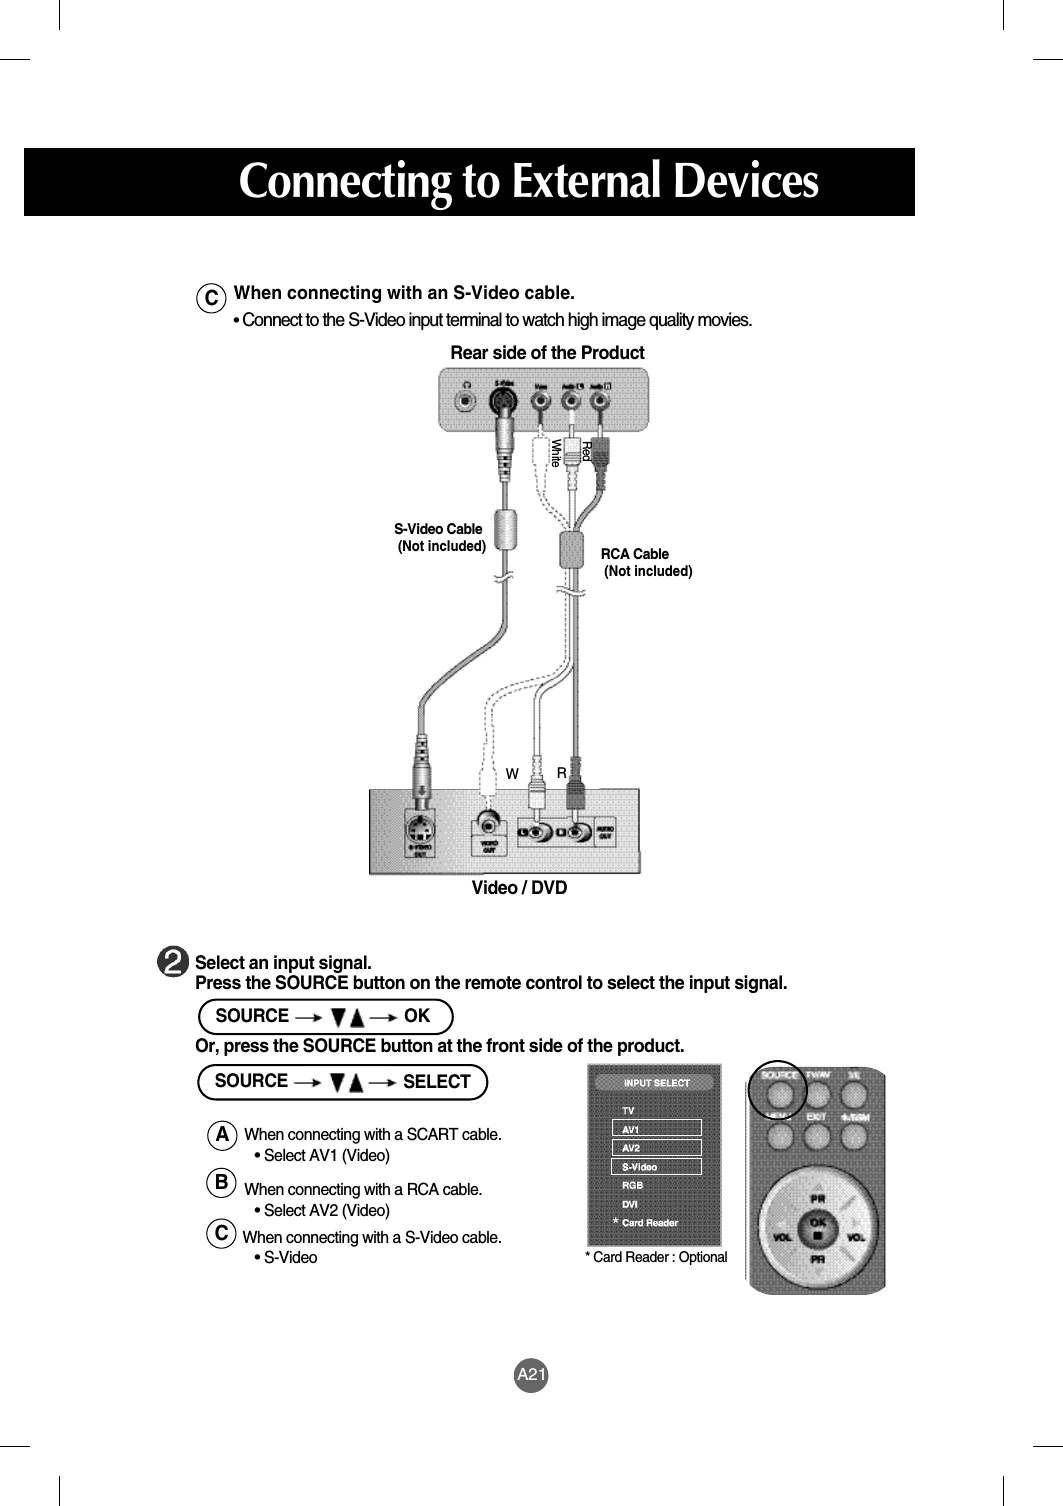
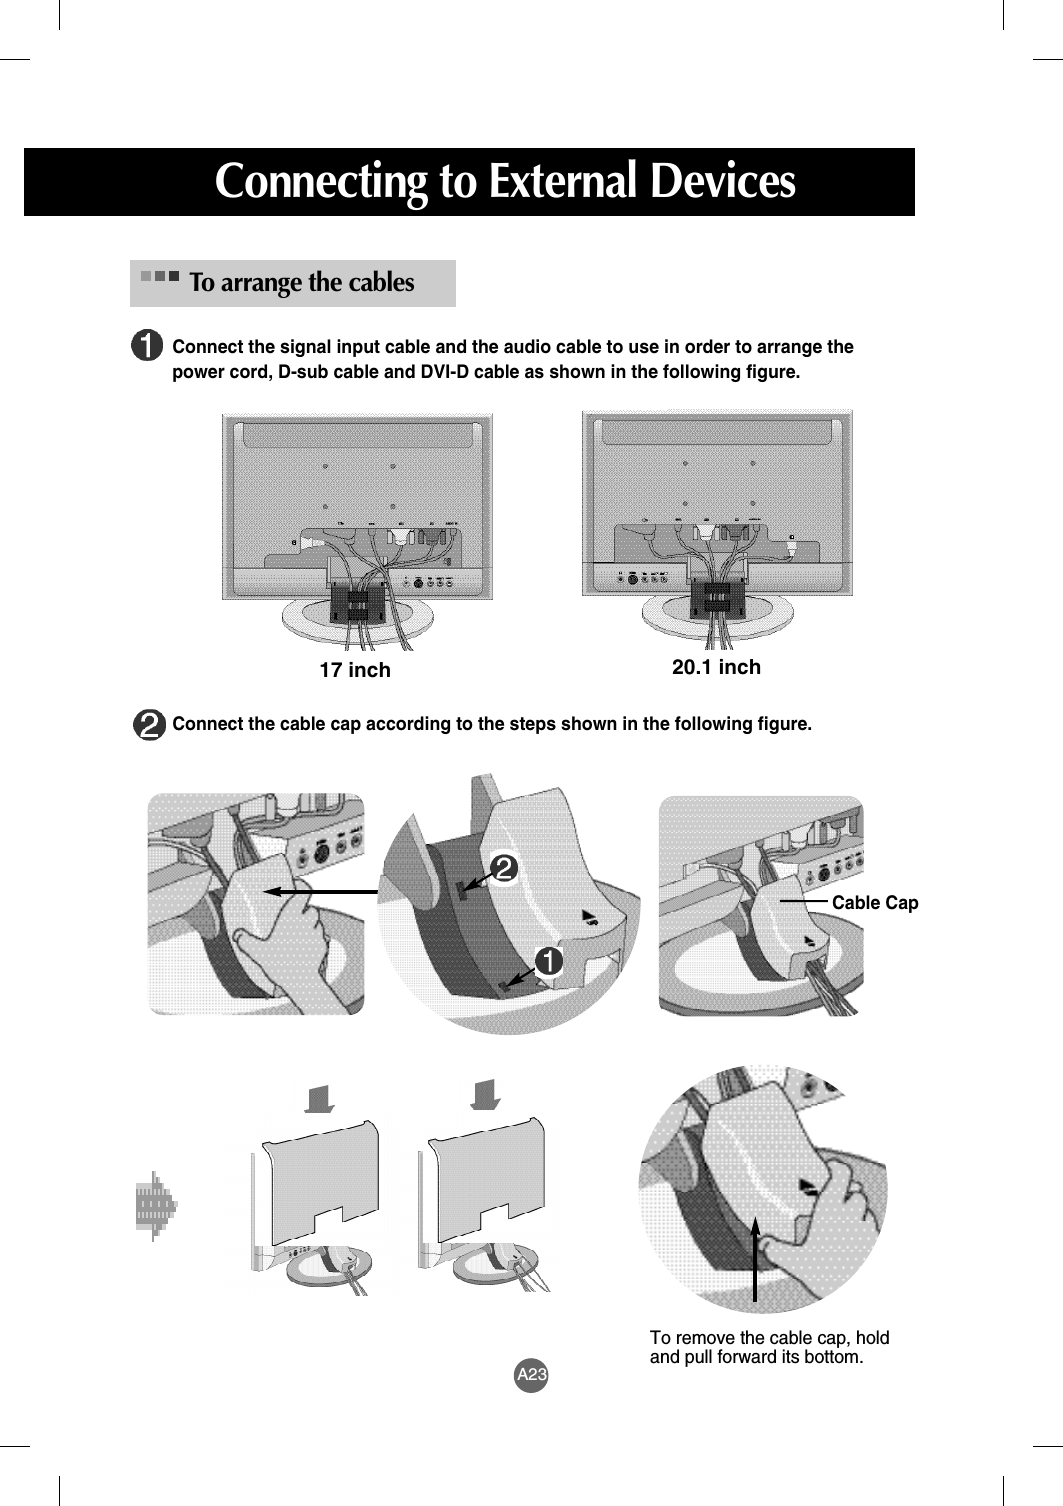
![A25Selecting and Adjusting the ScreenName of the Buttons in the Screen Adjustment Unit[For PC Analogue signal][For AV1, AV2, S-Video]• The current signal and mode information will be displayed.AUTO/SELECT ButtonTV TelevisionAV1 SCARTAV2 Composite videoS-Video SeparateVideoRGB D-SUB analog signalDVI DVI digital signalCard Reader Media Manager• Select the input signal SOURCE Button• The unit that receives the signal from the remote control.* Card Reader : Optional*IR Receiver](https://usermanual.wiki/LG-Electronics-USA/M203WXB/User-Guide-519917-Page-31.png)

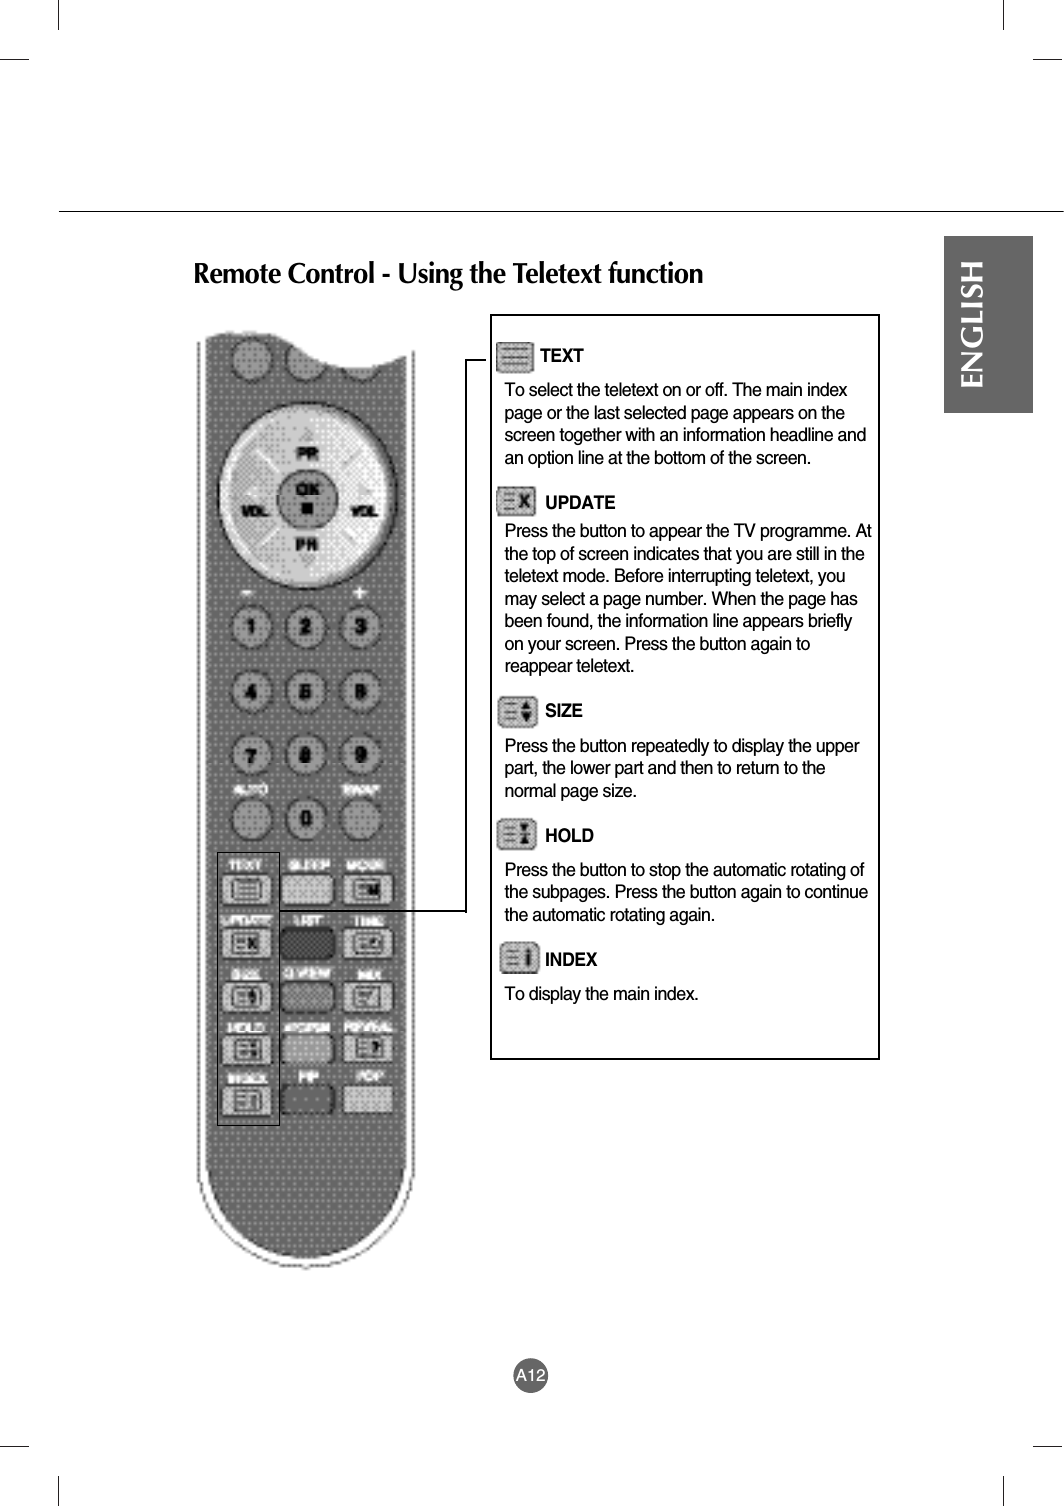
![A40ENGLISHSpecificationsScreen Type 17 inches (434.38mm) TFT (Thin Film Transistor) LCD (Liquid Crystal Display) PanelVisible diagonal size: 434.38mmPixel Pitch 0.291mmMax. Resolution D-Sub :1280X1024 @60Hz DVI-D : 1280X1024 @60HzRecommended ResolutionD-SUB : WXGA 1280X768 @60HzDVI-D : WXGA 1280X768 @60HzHorizontal Frequency D-SUB : 30 - 66 kHzDVI-D : 30 - 66 kHzVertical Frequency 56 - 75 HzSynchronization Type Separate/Composite/SOG (Sync On Green)/Digital15-pin D-Sub type, DVI-D (digital), S-Video, composite video, Scart, TVRated Voltage AC 100-240V~ 50/60Hz 1.0APower Consumption On Mode : 70W Sleep Mode : ≤4WOff Mode : ≤2W Tilt Range -5˚~20˚Tilt Stand AttachedSize (WxLxH)438.2mm x 241.4 mm x 378.9mm 438.2mm x 139.2 mm x 403.5mm Weight (excl. package) 7.1 kg (15.6 lbs)Operational Condition Temperature: 10˚C ~ 35˚C , Humidity: 10% ~ 80% Storage Condition Temperature: -20˚C ~ 60˚C , Humidity: 5% ~ 95% LCD PanelVideo SignalInput ConnectorPowerTiltDimension/WeightEnvironmental Conditions[17inches]](https://usermanual.wiki/LG-Electronics-USA/M203WXB/User-Guide-519917-Page-46.png)
![A41SpecificationsScreen Type 20 .1inches (481.84mm) TFT (Thin Film Transistor) LCD (Liquid Crystal Display) PanelVisible diagonal size: 481.84mmPixel Pitch 0.294mmMax. Resolution D-SUB : 1680X1050 @60Hz DVI-D : 1680X1050 @60HzRecommended ResolutionD-SUB : WXGA + 1680X1050 @60HzDVI-D : WXGA+ 1680X1050 @60HzHorizontal Frequency D-SUB : 30 - 83 kHzDVI-D : 30 - 83 kHzVertical Frequency 55 - 75 HzSynchronization Type Separate/Composite/SOG (Sync On Green)/Digital15-pin D-Sub type, DVI-D (digital), S-Video, composite video, Scart, TVRated Voltage AC 100-240V~ 50/60Hz 1.2APower Consumption On Mode :74W Sleep Mode : ≤4W Off Mode : ≤2W Tilt Range -5˚~20˚Tilt Stand AttachedSize (WxLxH)496.4mm x 241.4mm x 424.1mm 496.4mm x 135.2mm x 448.7mm Weight (excl. package) 8.2 kg (18.0 lbs)Operational Condition Temperature: 10˚C ~ 35˚C , Humidity: 10% ~ 80% Storage Condition Temperature: -20˚C ~ 60˚C , Humidity: 5% ~ 95% LCD PanelVideo SignalInput ConnectorPowerTiltDimension/WeightEnvironmental Conditions[20.1inches]](https://usermanual.wiki/LG-Electronics-USA/M203WXB/User-Guide-519917-Page-47.png)
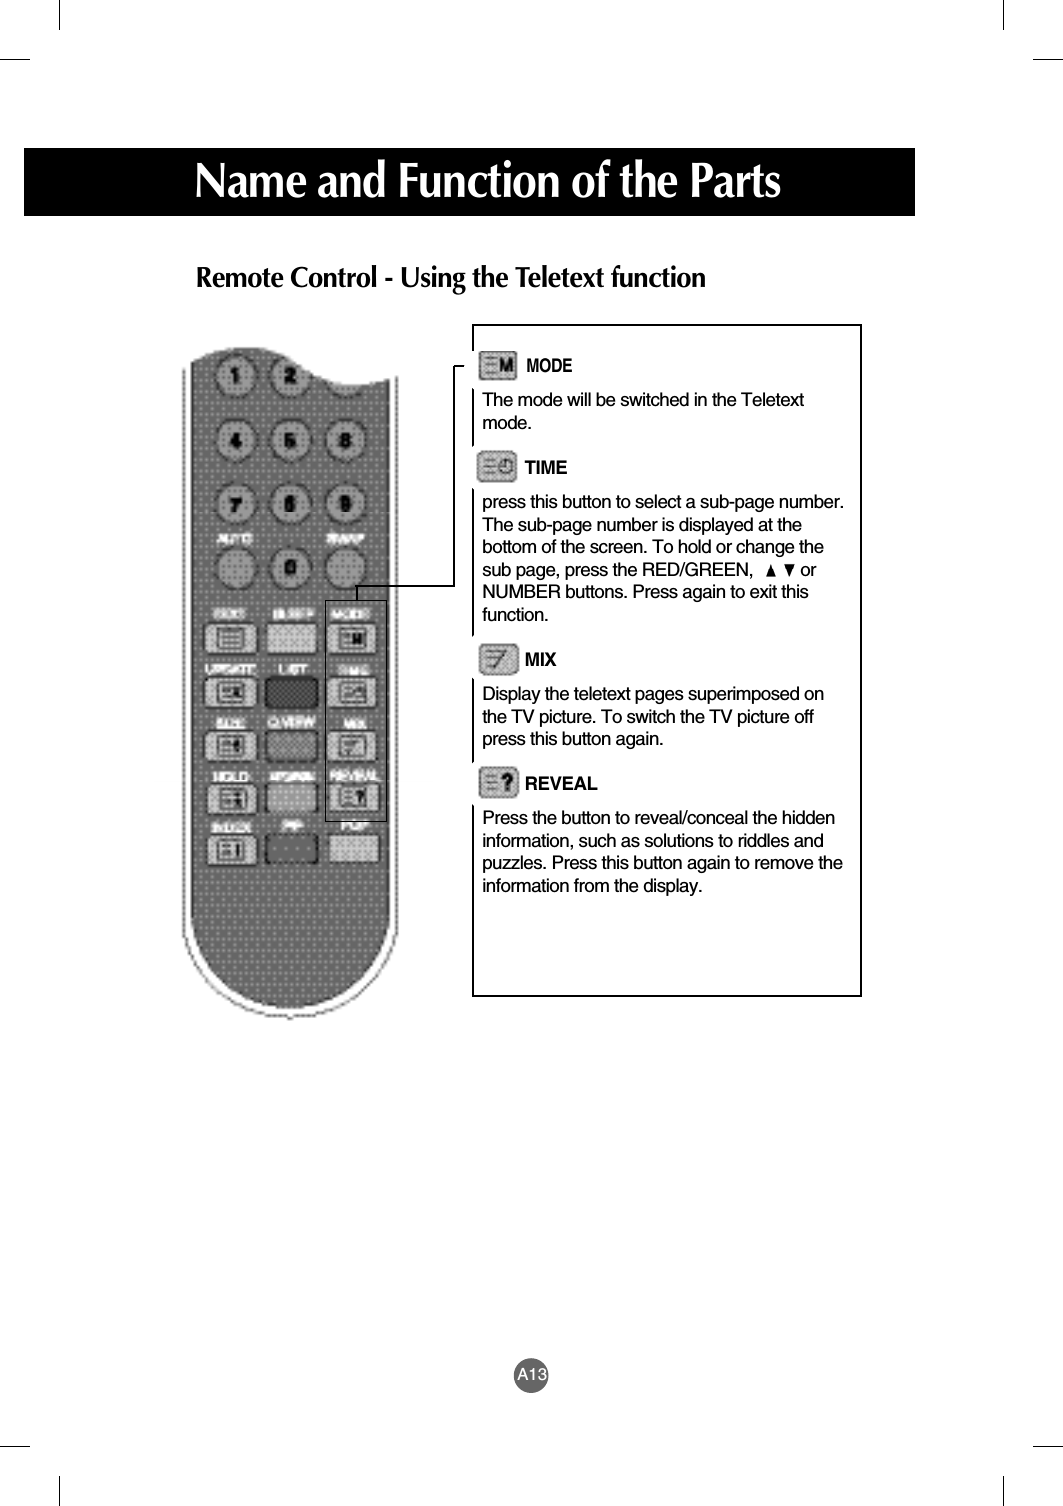
![A42ENGLISHPC Mode – Preset ModePower LEDMode ProductOn ModeSleep ModeOff ModeBlueAmber-Preset modeHorizontalFrequency(kHz)VerticalFrequency(Hz)Preset modeHorizontalFrequency(kHz)VerticalFrequency(Hz)1234567720 x 400640 x 480640 x 480800 x 600800 x 6001024 x 7681024 x 76831.46831.46937.50037.89746.87548.36360.12370597560756075VGAVGAVGAVESAVESAVESAVESA8910111152 x 8641280 x 10241280 x 10241680 x 105067.50063.98179.97665.290VESAMACVESAVESA75607559[20.1inches][17inches]Preset modeHorizontalFrequency(kHz)VerticalFrequency(Hz)Preset modeHorizontalFrequency(kHz)VerticalFrequency(Hz)1234567640 x 350720 x 400640 x 480640 x 480800 x 600800 x 600832 x 62431.46831.46931.46937.50037.87946.87549.72570705975607574VGAVGAVGAVESAVESAVESAMAC89101024 x 7681280 x 10241280 x 76848.36363.98147.776VESAVESAVESA606059](https://usermanual.wiki/LG-Electronics-USA/M203WXB/User-Guide-519917-Page-48.png)