LG Electronics USA M2382D LED LCD TV Monitor User Manual EMISSION TEST REPORT
LG Electronics USA LED LCD TV Monitor EMISSION TEST REPORT
UserManual.wiki
>
LG Electronics USA
>
M2382D User Manual
Users Manual
Navigation menu
Upload a User Manual
Namespaces
Wiki Guide
HTML
PDF
Info
Views
User Manual
Discussion / Help
Navigation
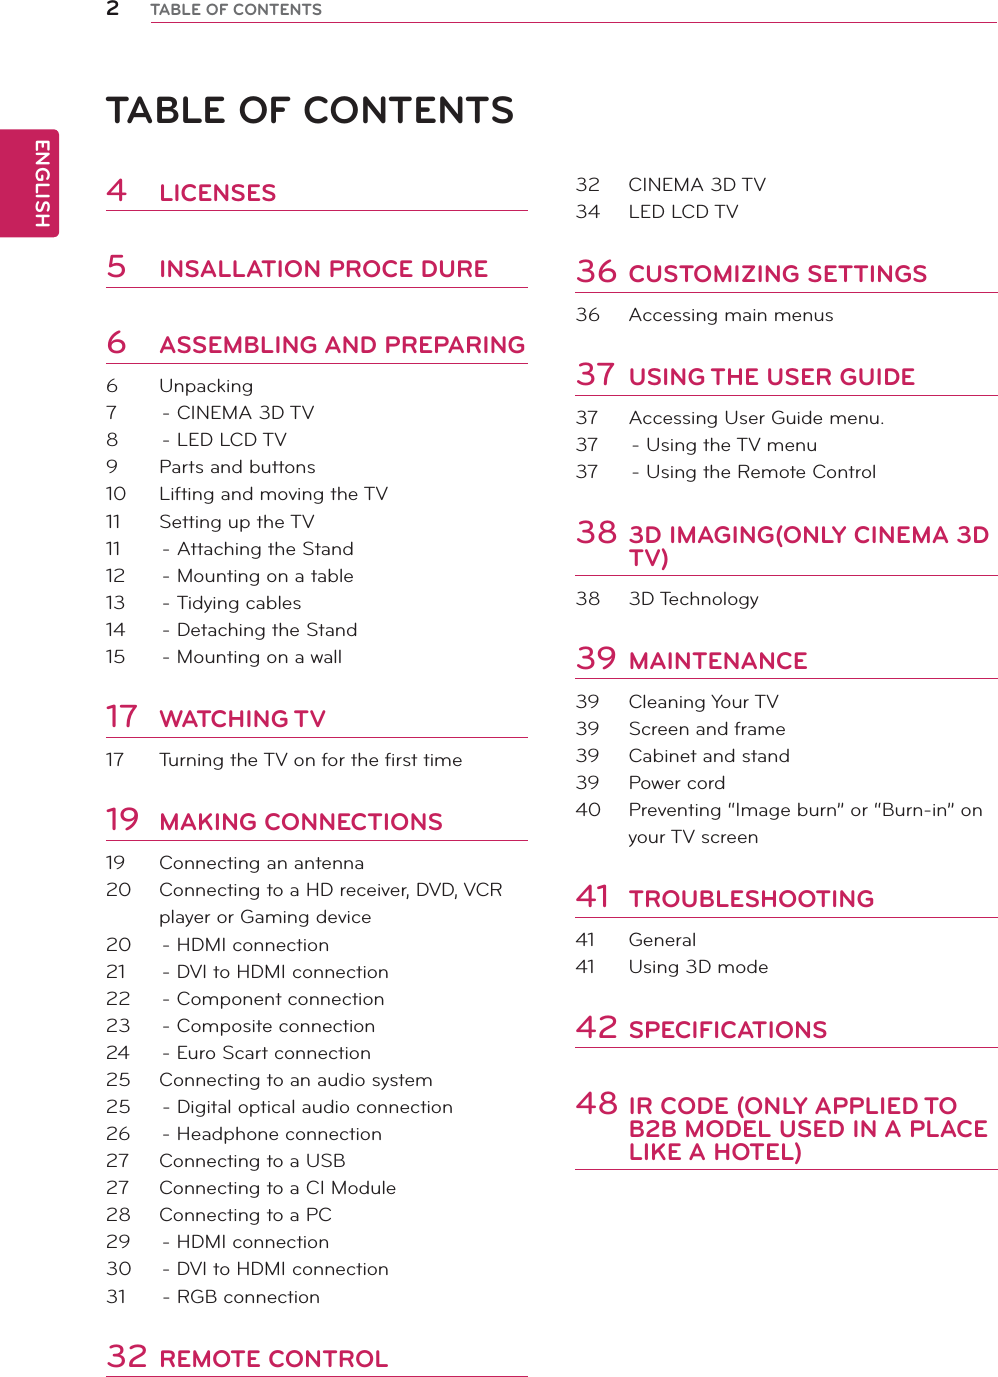
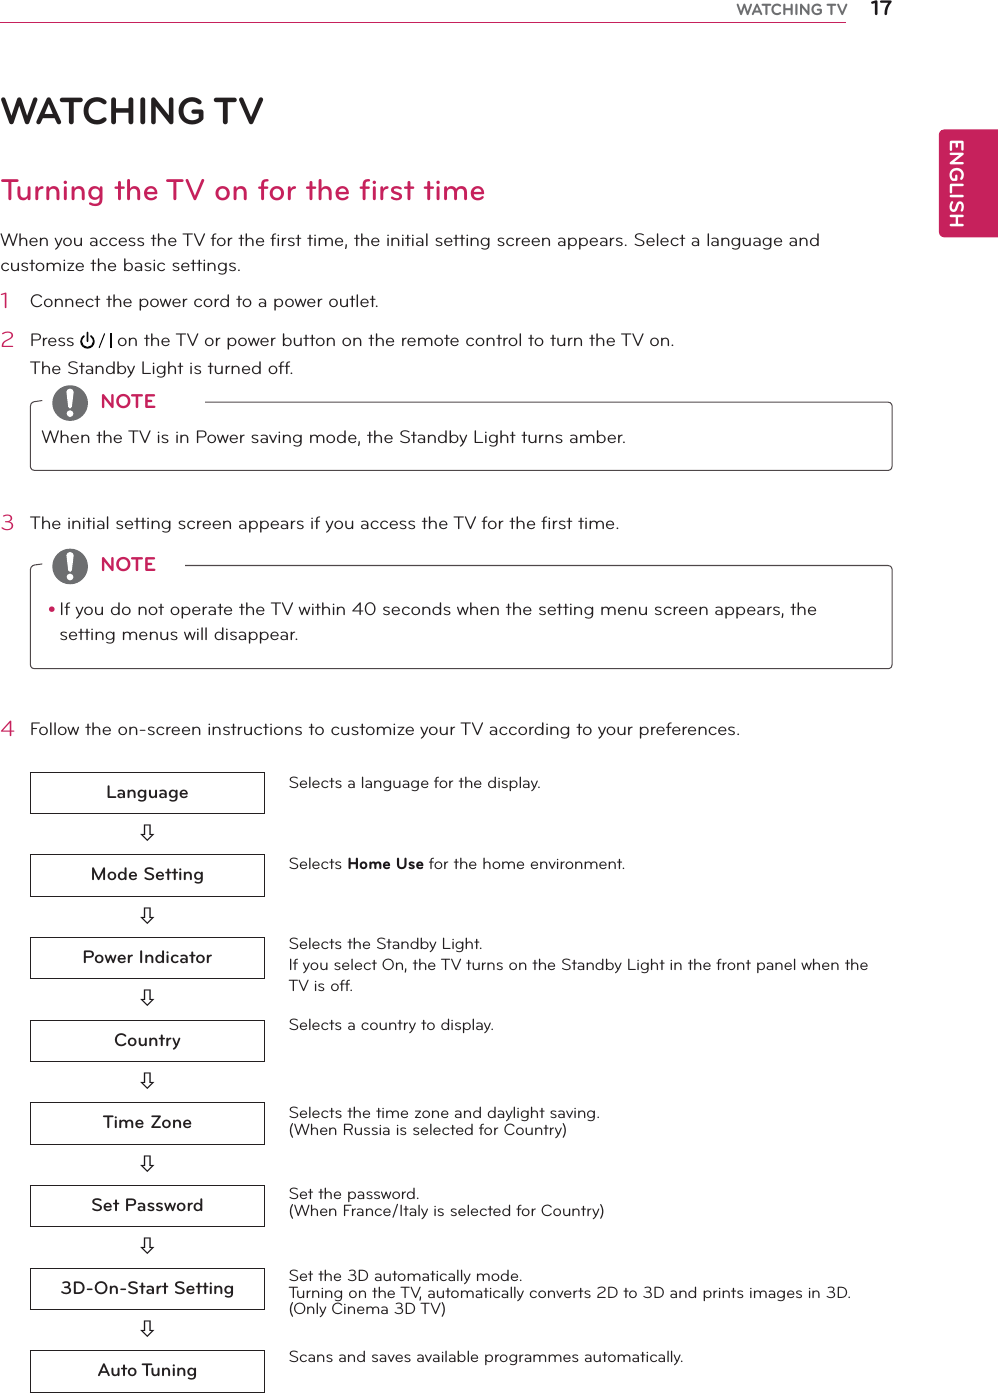

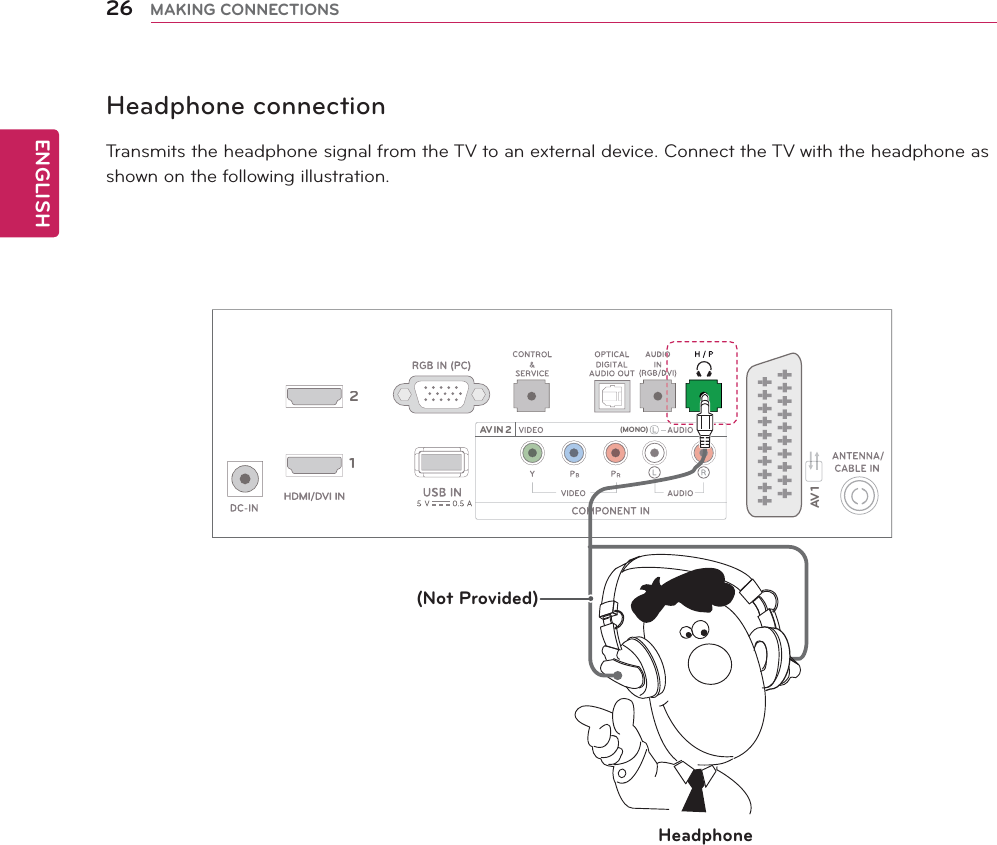
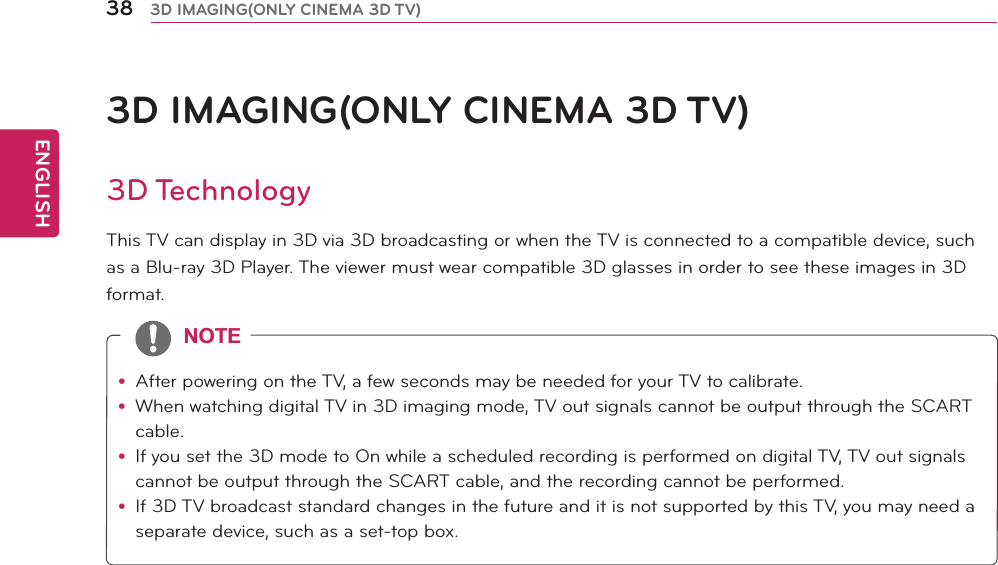
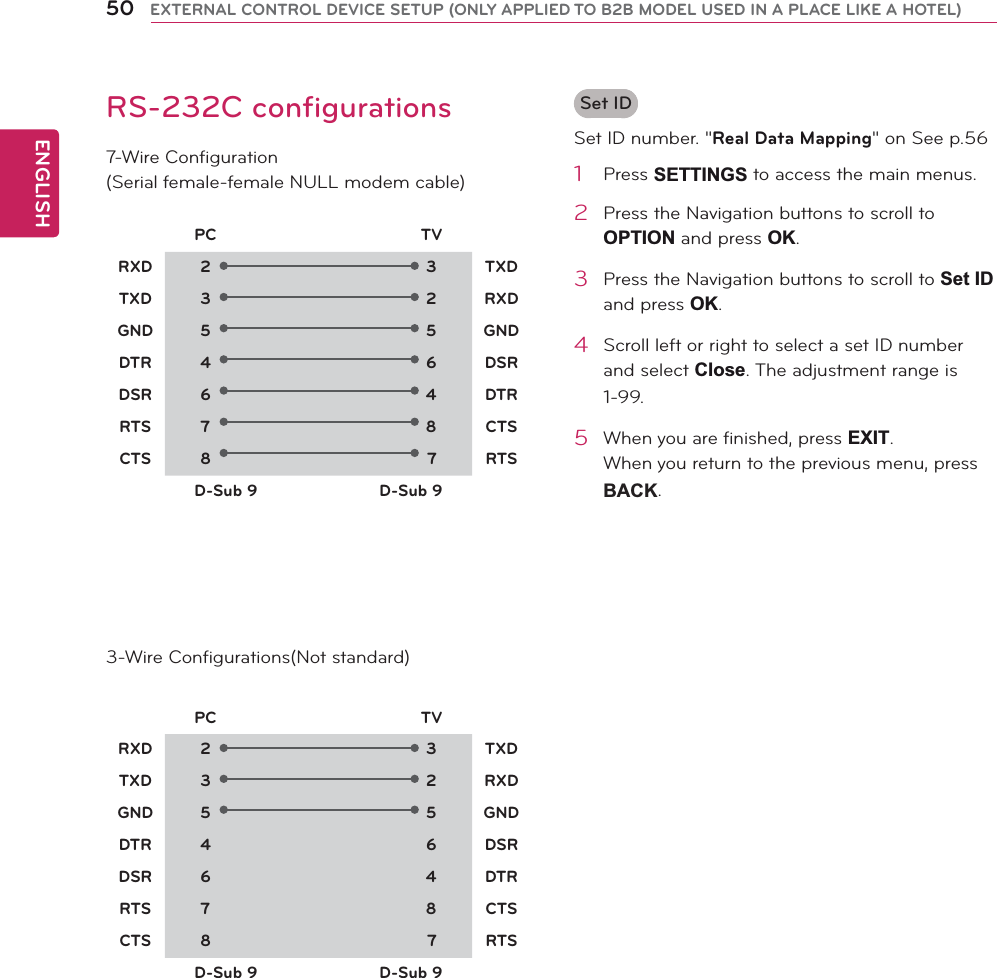
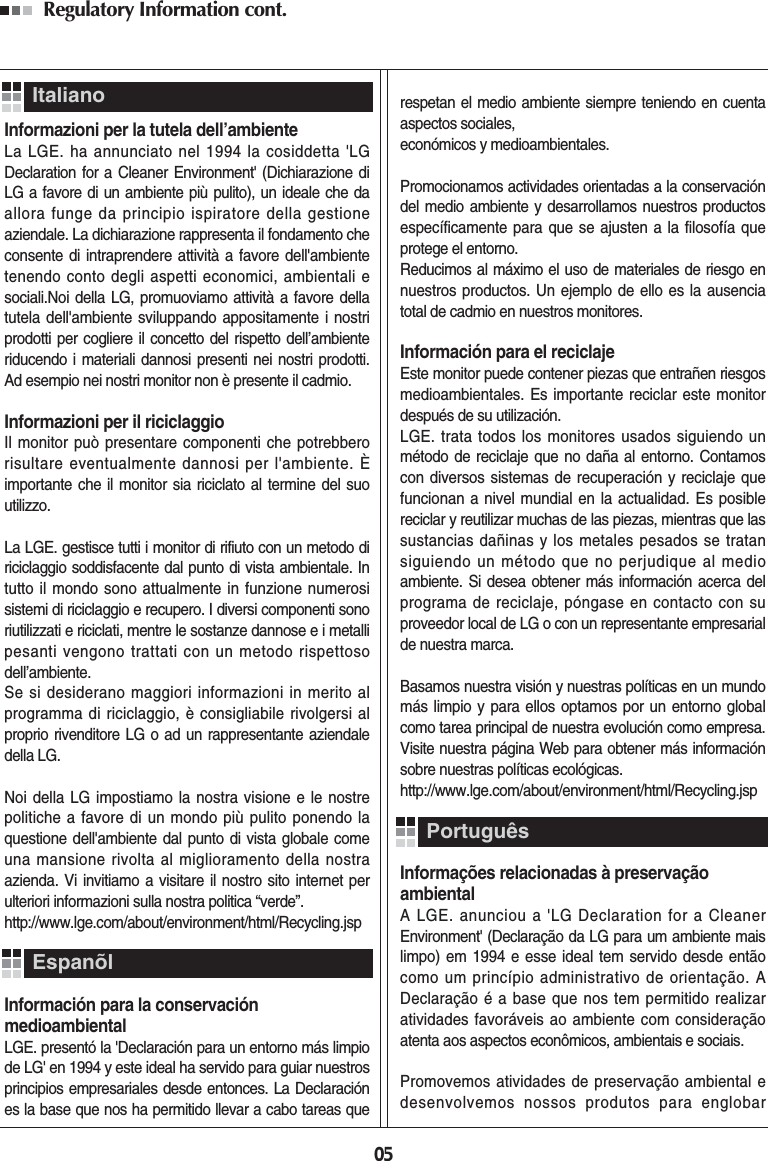
![ENGLISH52 EXTERNAL CONTROL DEVICE SETUP (ONLY APPLIED TO B2B MODEL USED IN A PLACE LIKE A HOTEL) Transmission / Receiving protocolTransmission[Command1][Command2][ ][Set ID][ ][Data][Cr][Command 1] : First command to control the TV.(j, k, m or x)[Command 2] : Second command to control the TV.[Set ID] : You can adjust the set ID to choose desired TV ID number in option menu. Adjustment range is 1 to 99. When selecting Set ID ‘0’, every connected set is controlled. Set ID is indicated as decimal (1 to 99) on menu and as Hexa decimal (0x0 to 0x63) on transmission/receiving protocol.* [DATA] : To transmit command data.Transmit ‘FF’ data to read status of command.* [Cr] : Carriage ReturnASCII code ‘0 x 0D’* [ ] : ASCII code ‘space (0 x 20)’OK Acknowledgement[Command2][ ][Set ID][ ][OK][Data][x]The set transmits ACK (acknowledgement) based on this format when receiving normal data. At this time, if the data is data read mode, it indicates present status data. If the data is data write mode, it returns the data of the PC computer.Error Acknowledgement[Command2][ ][Set ID][ ][NG][Data][x]* The set transmits ACK (acknowledgement) based on this format when receiving abnormal data from non-viable functions or communication errors. Data 00: Illegal Code](https://usermanual.wiki/LG-Electronics-USA/M2382D/User-Guide-1642110-Page-53.png)
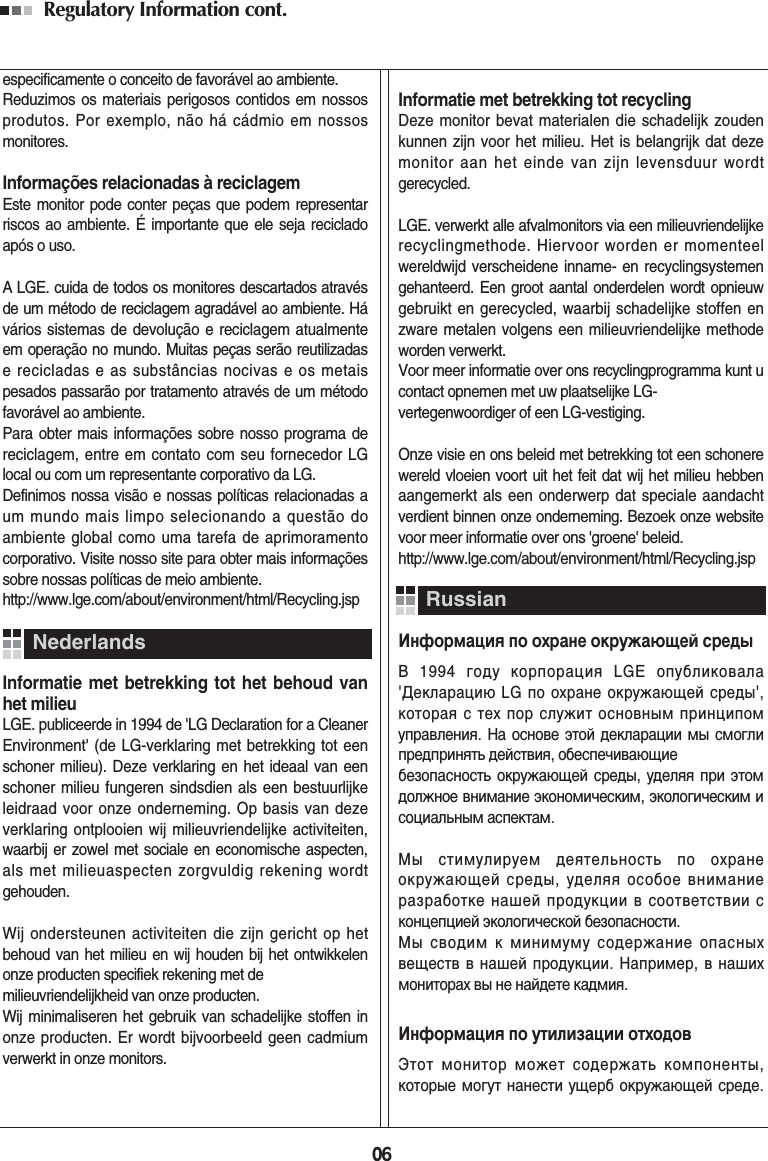
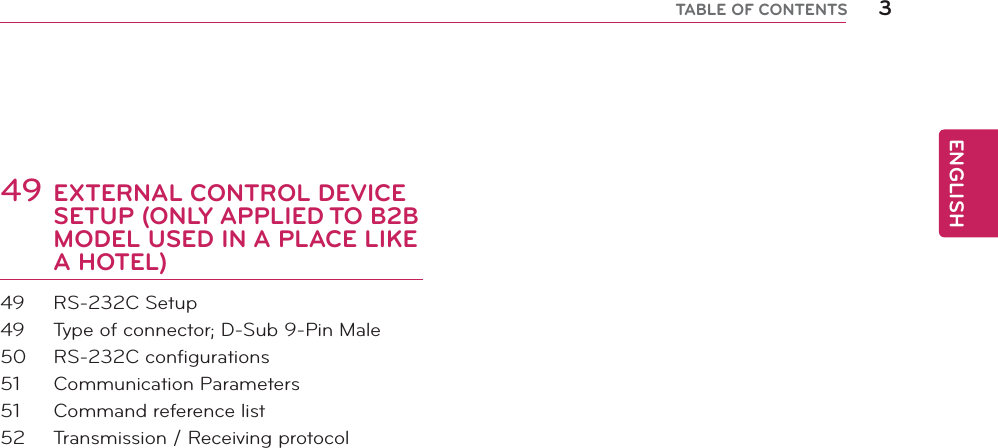
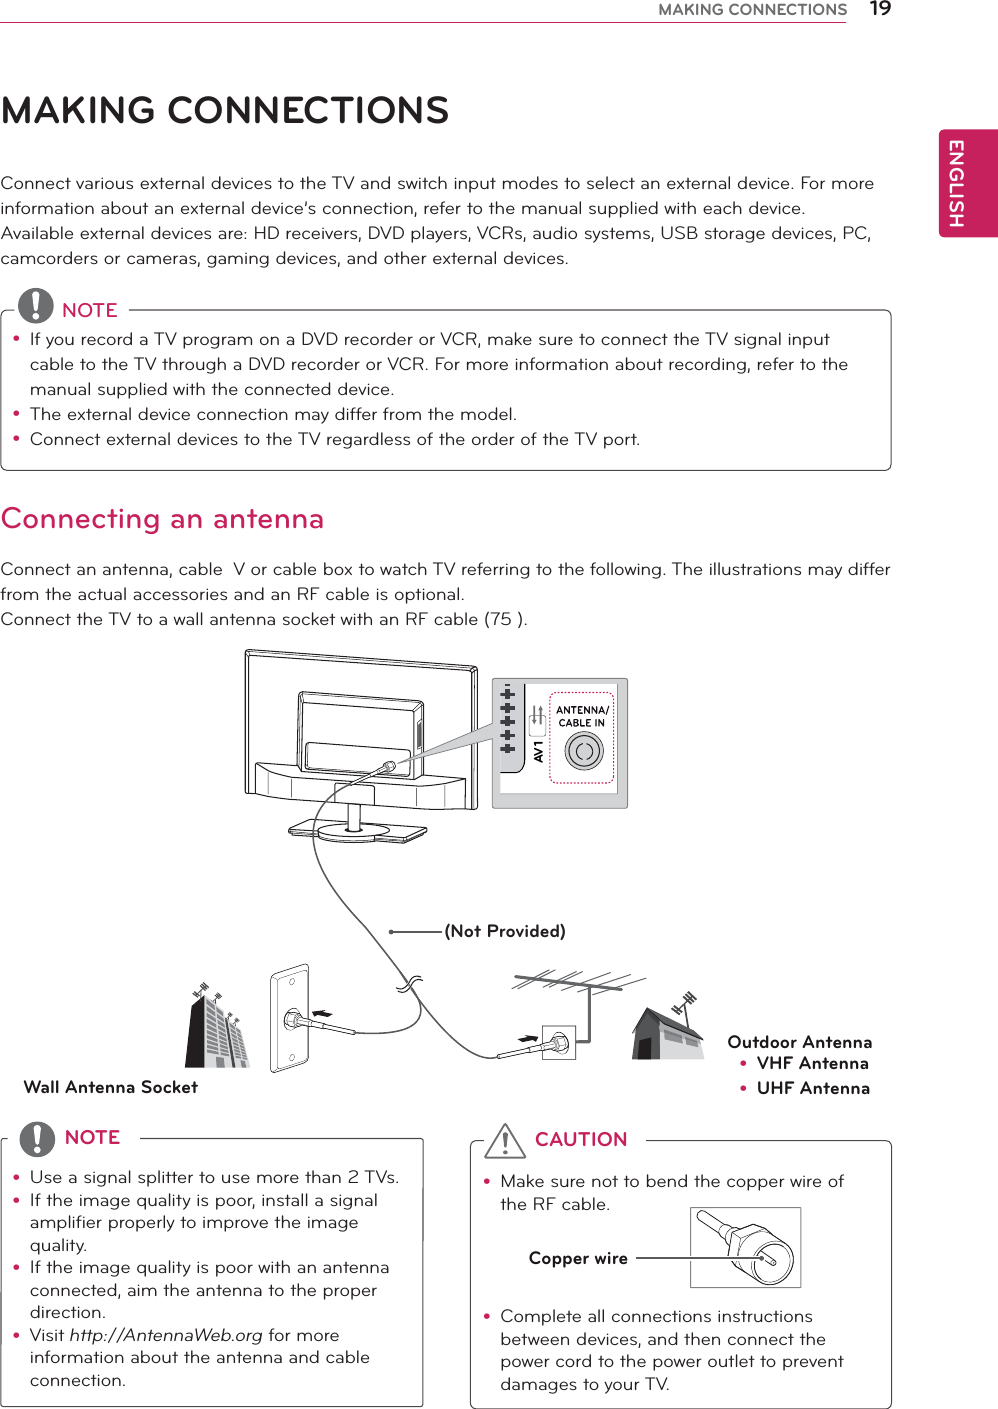
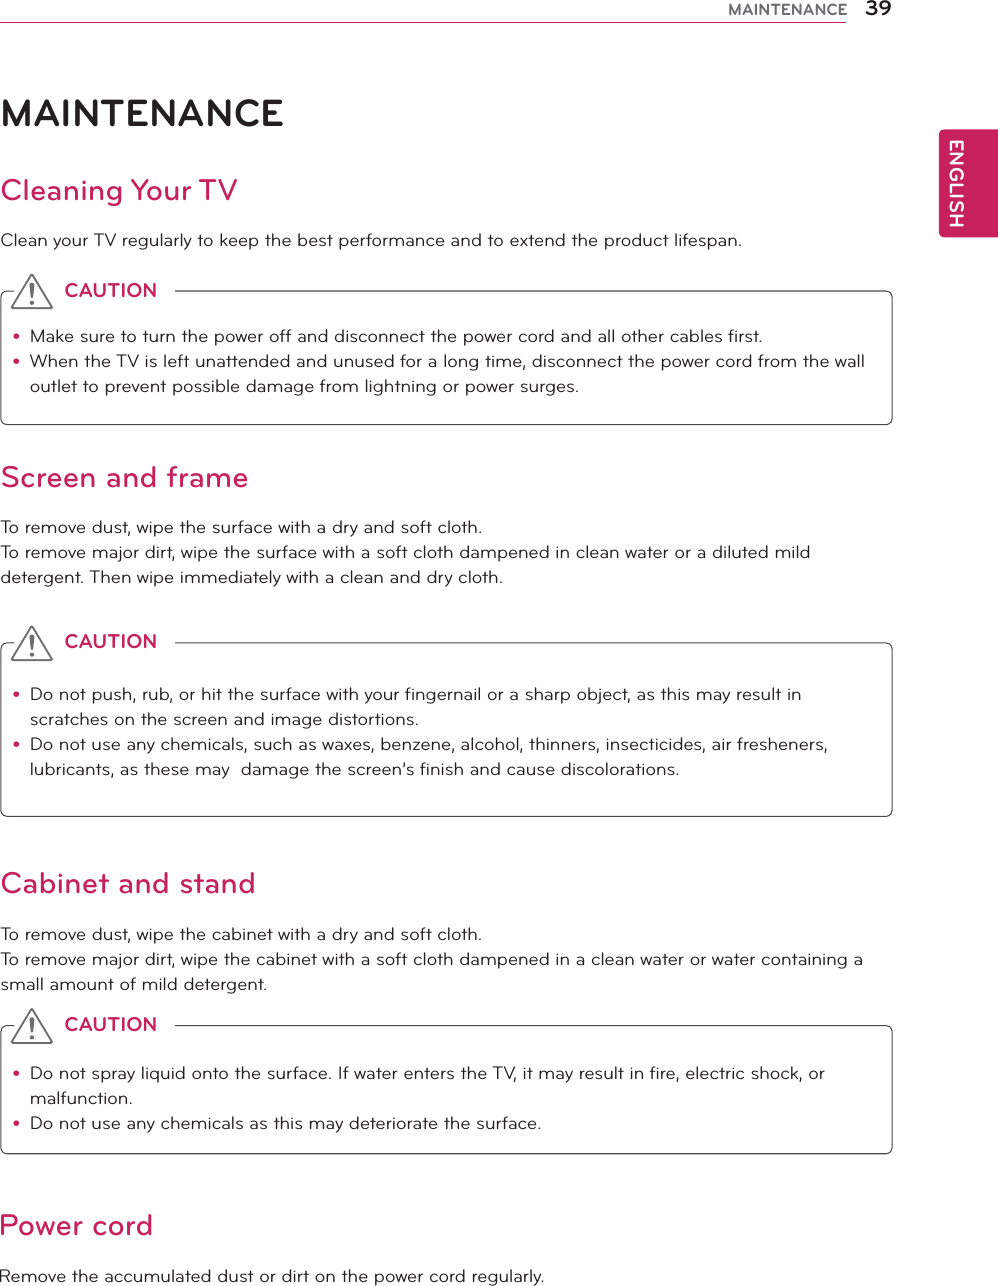
![ENGLISH53EXTERNAL CONTROL DEVICE SETUP (ONLY APPLIED TO B2B MODEL USED IN A PLACE LIKE A HOTEL) 01. Power (Command: k a)To control Power On/Off of the set.Transmission[k][a][ ][Set ID][ ][Data][Cr]Data 00: Power Off Data 01: Power OnAcknowledgement[a][ ][Set ID][ ][OK/NG][Data][x]To show Power On/Off.Transmission[k][a][ ][Set ID][ ][FF][Cr]Acknowledgement[a][ ][Set ID][ ][OK/NG][Data][x]*Similarly, if other functions transmit ‘0xFF’ data based on this format, Acknowledgement data feed back presents status about each function.*OK Ack., Error Ack. and other message may display on the screen when TV is power On.02. Aspect Ratio (Command: k c) (Main Picture Size)To adjust the screen format. (Main picture format) You can also adjust the screen format using the Aspect Ratio in the Q.MENU. or PICTURE menu.Transmission[k][c][ ][Set ID][ ][Data][Cr]Data 01 : 4:3 02 : 16:9 04 : Zoom 06 : Original 07 : 14:9 09 : Just Scan 0B : Full Wide 10 to 1F : Cinema Zoom 1 to 16Acknowledgement[c][ ][Set ID][ ][OK/NG][Data][x]* Using the PC input, you select either 16:9 or 4:3 screen aspect ratio.* In DTV/HDMI (1080i 50 Hz / 60 Hz, 720p 50 Hz / 60 Hz, 1080p 24 Hz / 30 Hz / 50 Hz / 60 Hz), Component( 720p, 1080i, 1080p 50 Hz / 60 Hz) mode, Just Scan is available.* Full Wide is supported only for DTV, Analogue, AV.03. Screen Mute (Command: k d)To select screen mute on/off.Transmission[k][d][ ][Set ID][ ][Data][Cr]Data 00 : Screen mute off (Picture on) Video mute off 01 : Screen mute on (Picture off) 10 : Video mute onAcknowledgement [d][ ][Set ID][ ][OK/NG][Data][x]* In case of video mute on only, TV will display On Screen Display(OSD). But, in case of Screen mute on, TV will not display OSD.04. Volume Mute (Command: k e)To control volume mute on/off.You can also adjust mute using the MUTE button onremote control.Transmission[k][e][ ][Set ID][ ][Data][Cr]Data 00 : Volume mute on (Volume off) 01 : Volume mute off (Volume on)Acknowledgement [e][ ][Set ID][ ][OK/NG][Data][x]05. Volume Control (Command: k f)To adjust volume.You can also adjust volume with the VOLUME buttons on remote control.Transmission[k][f][ ][Set ID][ ][Data][Cr]Data Min : 00 to Max : 64* Refer to ‘Real data mapping ’. See p.56Acknowledgement [f][ ][Set ID][ ][OK/NG][Data][x]06. Contrast (Command: k g)To adjust screen contrast.You can also adjust contrast in the PICTURE menu.Transmission[k][g][ ][Set ID][ ][Data][Cr]Data Min : 00 to Max : 64* Refer to ‘Real data mapping ’. See p.56Acknowledgement [g][ ][Set ID][ ][OK/NG][Data][x]](https://usermanual.wiki/LG-Electronics-USA/M2382D/User-Guide-1642110-Page-54.png)
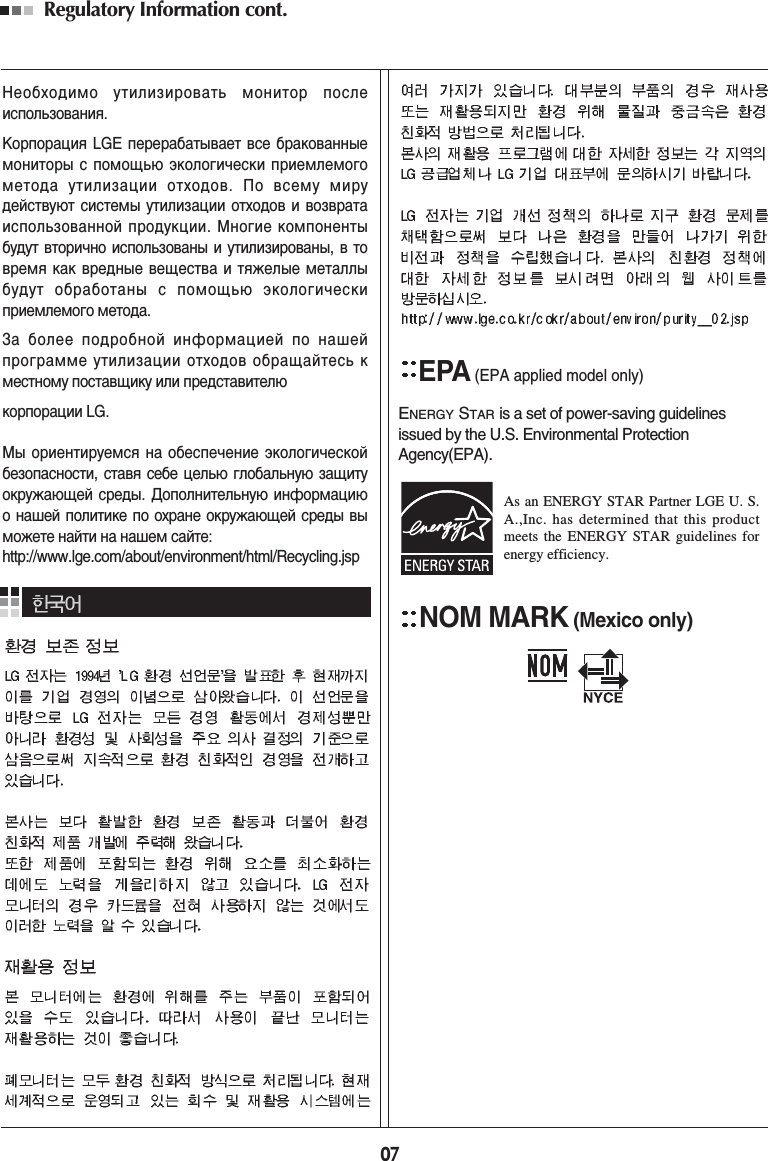
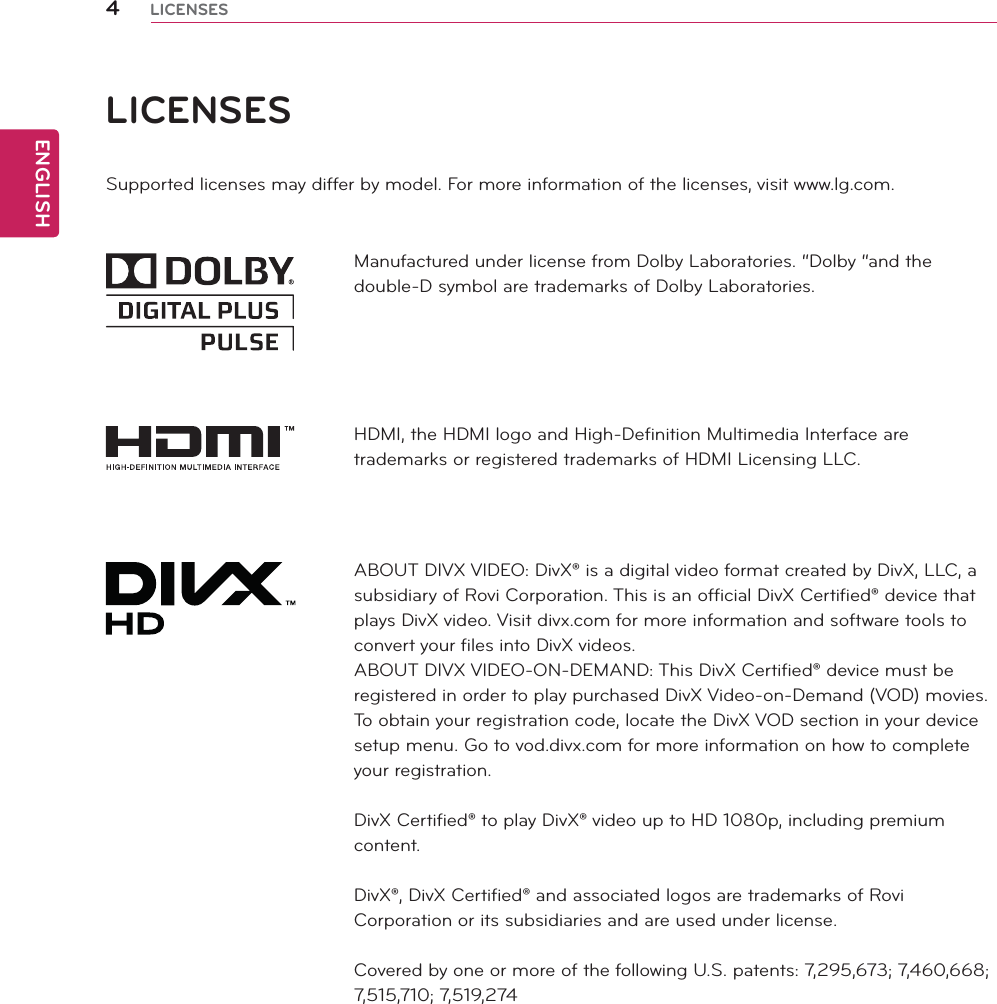
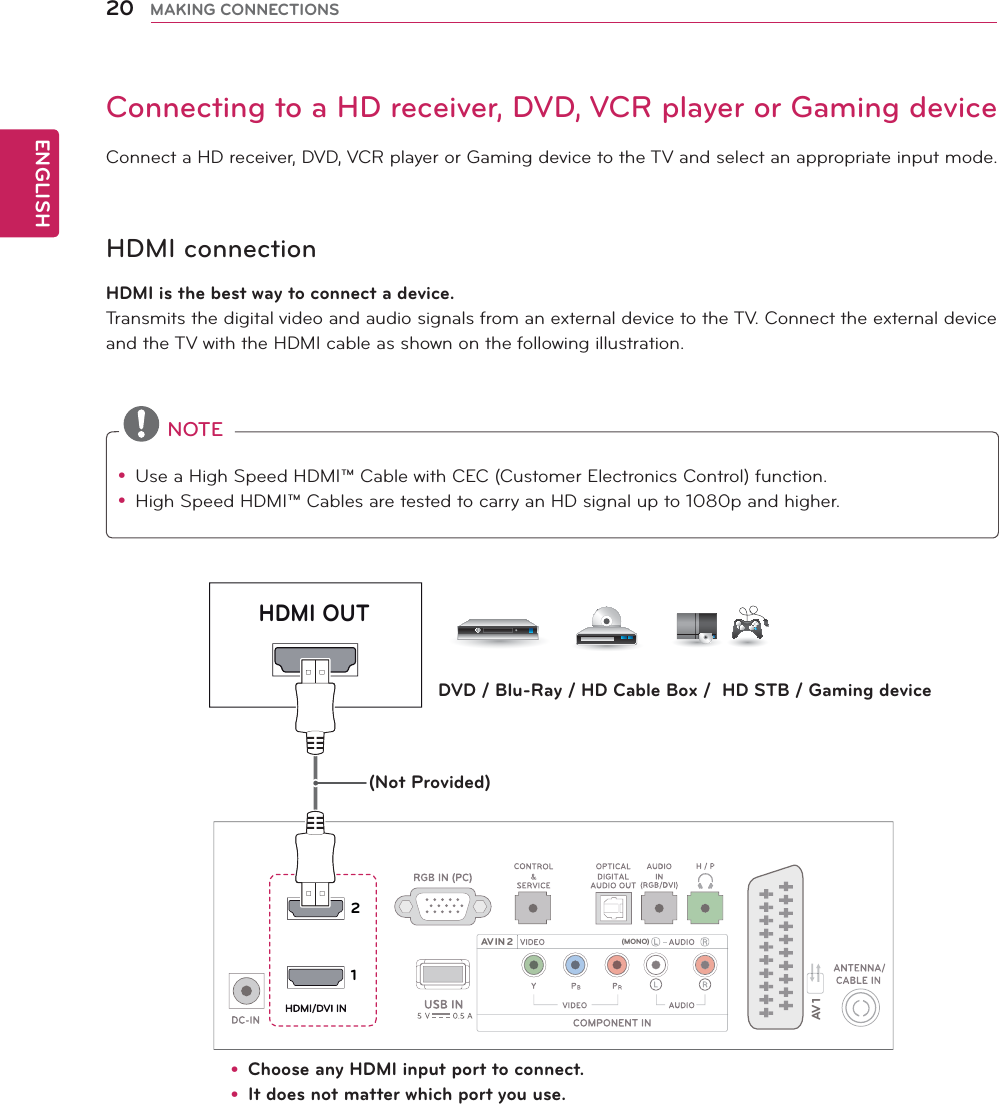
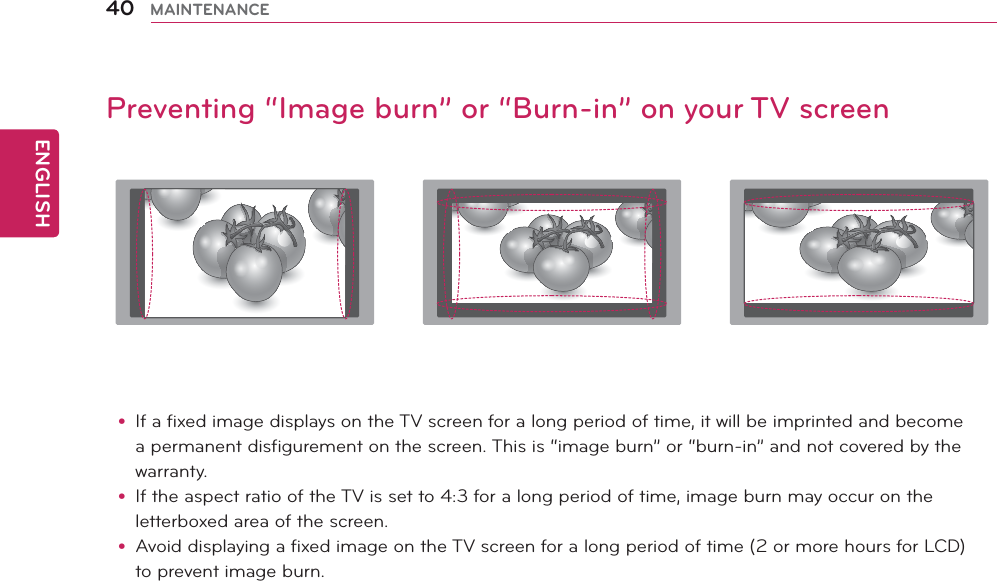
![ENGLISH54 EXTERNAL CONTROL DEVICE SETUP (ONLY APPLIED TO B2B MODEL USED IN A PLACE LIKE A HOTEL) 07. Brightness (Command: k h)To adjust screen brightness.You can also adjust brightness in the PICTURE menu.Transmission[k][h][ ][Set ID][ ][Data][Cr]Data Min : 00 to Max : 64* Refer to ‘Real data mapping ’. See p.56Acknowledgement [h][ ][Set ID][ ][OK/NG][Data][x]08. Colour (Command: k i)To adjust the screen colour. (Except PC mode)You can also adjust colour in the PICTURE menu.Transmission[k][i][ ][Set ID][ ][Data][Cr]Data Min : 00 to Max : 64* Refer to ‘Real data mapping ’. See p.56Acknowledgement[i][ ][Set ID][ ][OK/NG][Data][x]09. Tint (Command: k j)To adjust the screen tint. (Except PC mode)You can also adjust tint in the PICTURE menu.Transmission[k][j][ ][Set ID][ ][Data][Cr]Data Min : 00 to Max : 64* Refer to ‘Real data mapping ’. See p.56Acknowledgement[j][ ][Set ID][ ][OK/NG][Data][x]10. Sharpness (Command: k k)To adjust the screen sharpness.You can also adjust sharpness in the PICTURE menu.Transmission[k][k][ ][Set ID][ ][Data][Cr]Data Min : 00 to Max : 64* Refer to ‘Real data mapping ’. See p.56Acknowledgement [k][ ][Set ID][ ][OK/NG][Data][x]11. OSD Select (Command: k l)To select OSD (On Screen Display) on/off when controlling remotely.Transmission[k][l][ ][Set ID][ ][Data][Cr]Data 00 : OSD off 01 : OSD onAcknowledgement[l][ ][Set ID][ ][OK/NG][Data][x]12. Remote control lock mode (Command: k m)To lock the front panel controls on the TV andremote control.Transmission[k][m][ ][Set ID][ ][Data][Cr]Data 00 : Lock off 01 : Lock onAcknowledgement [m][ ][Set ID][ ][OK/NG][Data][x]* If you are not using the remote control, use this mode. When main power is on/off, external control lock is released.* Local Power Key will work properly.13. Treble (Command: k r)To adjust treble.You can also adjust treble in the AUDIO menu.Transmission[k][r][ ][Set ID][ ][Data][Cr]Data Min : 00 to Max : 64* Refer to ‘Real data mapping ’. See p.56Acknowledgement [r][ ][Set ID][ ][OK/NG][Data][x]14. Bass (Command: k s)To adjust bass.You can also adjust bass in the AUDIO menu.Transmission[k][s][ ][Set ID][ ][Data][Cr]Data Min : 00 to Max : 64* Refer to ‘Real data mapping ’. See p.56Acknowledgement[s][ ][Set ID][ ][OK/NG][Data][x]](https://usermanual.wiki/LG-Electronics-USA/M2382D/User-Guide-1642110-Page-55.png)
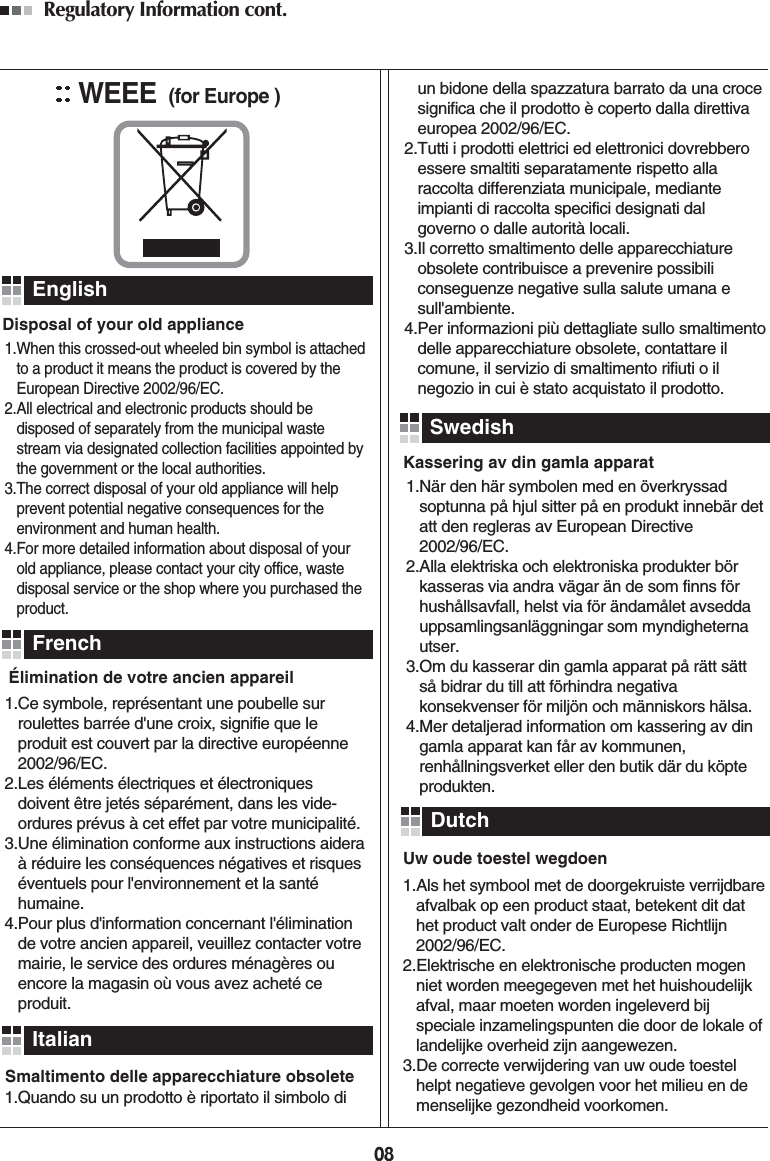
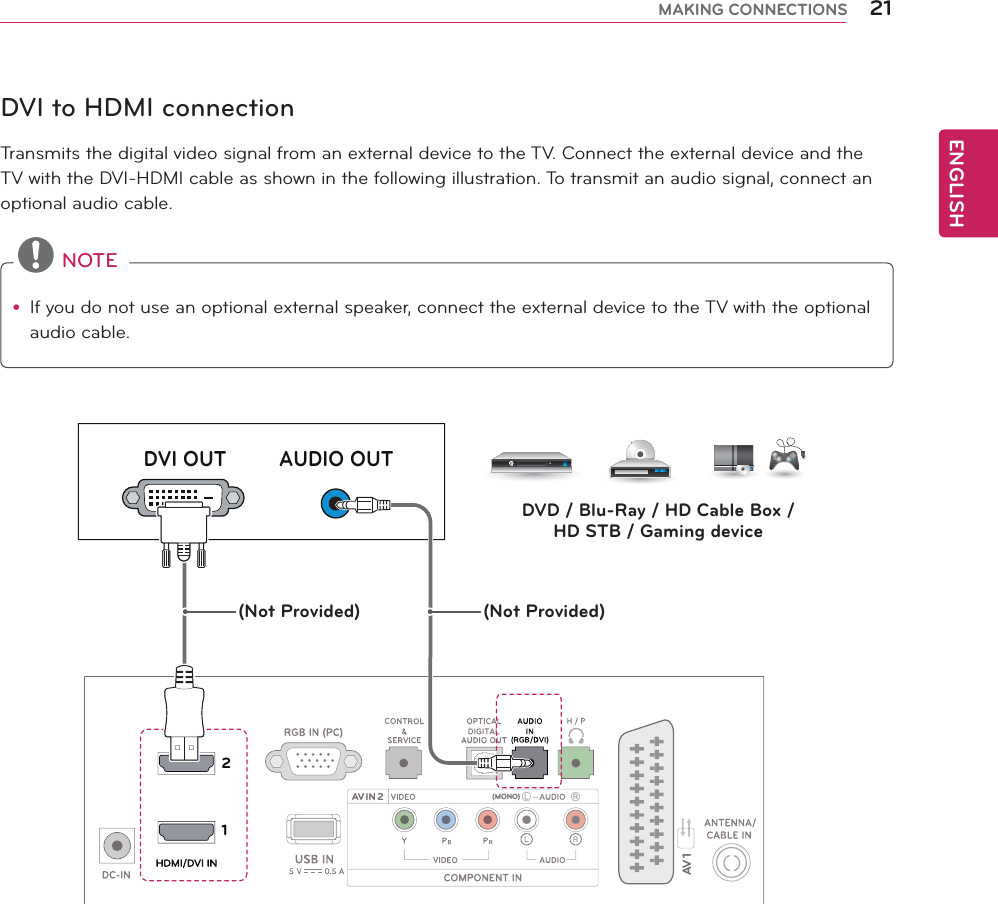
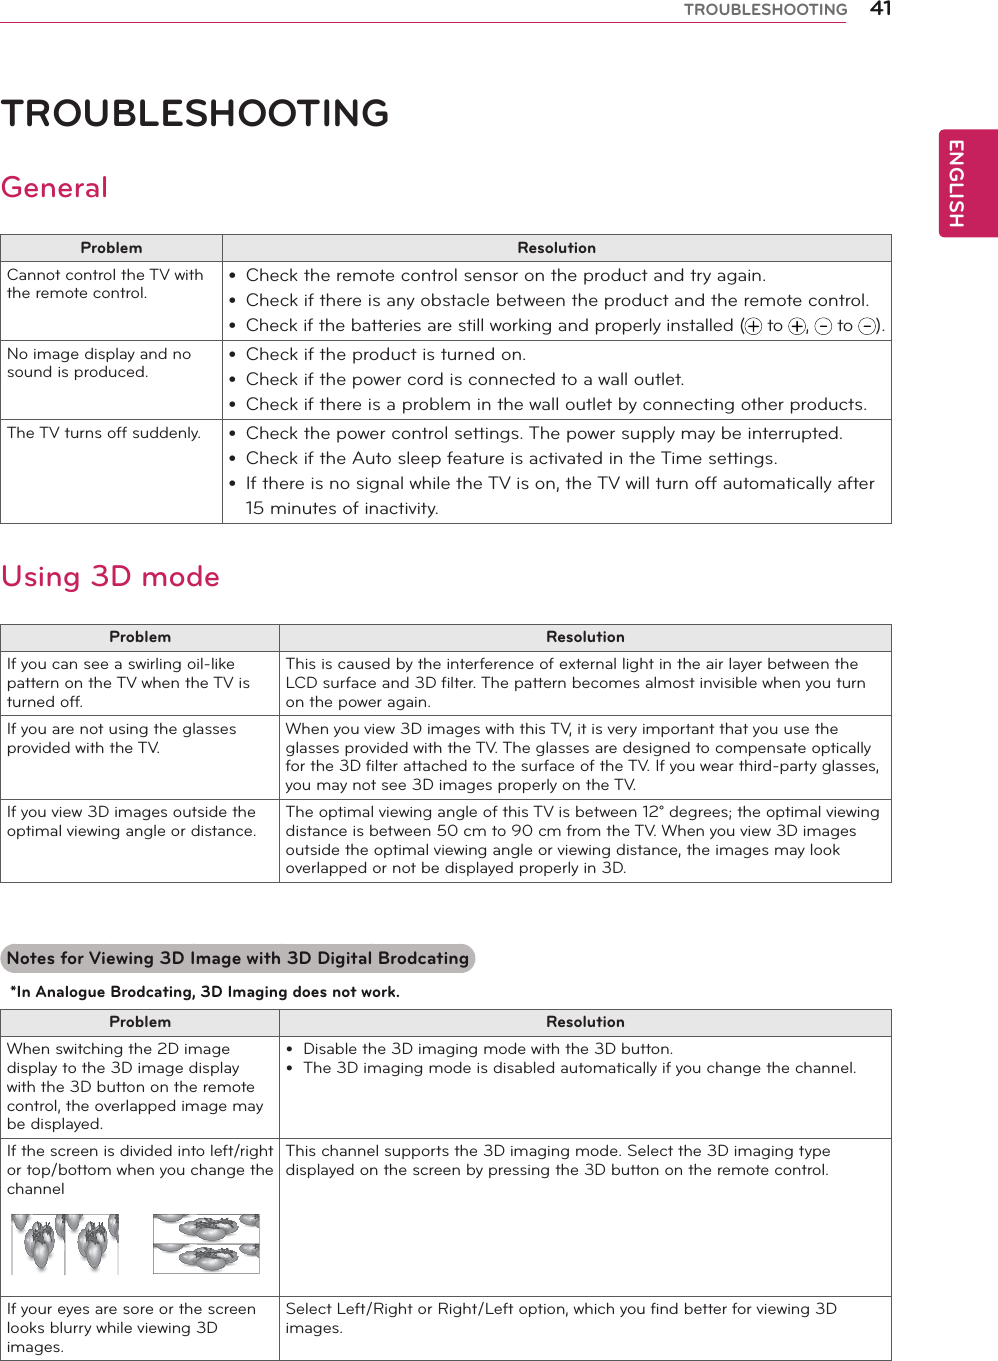
![ENGLISH55EXTERNAL CONTROL DEVICE SETUP (ONLY APPLIED TO B2B MODEL USED IN A PLACE LIKE A HOTEL) 15. Balance (Command: k t)To adjust balance.You can also adjust balance in the AUDIO menu.Transmission[k][t][ ][Set ID][ ][Data][Cr]Data Min : 00 to Max : 64* Refer to ‘Real data mapping ’. See p.56Acknowledgement [t][ ][Set ID][ ][OK/NG][Data][x] 16. Colour Temperature (Command: x u)To adjust colour temperature. You can also adjust Colour.Temperature in the PICTURE menu.Transmission[x][u][ ][Set ID][ ][Data][Cr]Data Min : 00 to Max : 64* Refer to ‘Real data mapping ’. See p.56Acknowledgement [u][ ][Set ID][ ][OK/NG][Data][x]17. Energy Saving (Command: j q)To reduce the power consumption of the TV. Youcan also adjust Energy Saving in OPTION menu.Transmission[j][q][ ][Set ID][ ][Data][Cr]Power SavingFunctionLevel Description7654 32100000 Low Power 0000 Off0000 Low Power 000 1 Minimum0000 Low Power 00 1 0 Medium0000 Low Power 00 1 1 Maximum0000 Low Power 0101 Screen OffAcknowledgement [q][ ][Set ID][ ][OK/NG][Data][x]18. Auto Configure(Command: j u)To adjust picture position and minimize image shakingautomatically. It works only in RGB (PC) mode.Transmission[j][u][ ][Set ID][ ][Data][Cr]Data 01: To setAcknowledgement [u][ ][Set ID][ ][OK/NG][Data][x]19.Tune Command (Command: m a)Select channel to following physical number.Transmission[m][a][ ][Set ID][ ][Data0][ ][Data1][ ] [Data2][Cr]Data00 : High channel dataData01 : Low channel data ex. No. 47 -> 00 2F (2FH) No. 394 -> 01 8A (18AH), DTV No. 0 -> Don’t careData02 : 0x00 : Analogue Main0x10 : DTV Main0x20 : RadioChannel data rangeAnalogue - Min: 00 to Max: 63 (0 to 99)Digital - Min: 00 to Max: 3E7 (0 to 999)(Except For Sweden, Finland, Norway, Denmark,Ireland)Digital - Min: 00 to Max: 270F (0 to 9999)(Only Sweden, Finland, Norway, Denmark, Ireland)Acknowledgement [a][ ][Set ID][ ][OK/NG][Data][x] Data Min: 00 to Max: 7DH](https://usermanual.wiki/LG-Electronics-USA/M2382D/User-Guide-1642110-Page-56.png)
![ENGLISH56 EXTERNAL CONTROL DEVICE SETUP (ONLY APPLIED TO B2B MODEL USED IN A PLACE LIKE A HOTEL) 20. Programme Add/Skip (Command: m b)To set skip status for the current Programme.Transmission[m][b][ ][Set ID][ ][Data][Cr]Data 00 : Skip 01 : AddAcknowledgement [b][ ][Set ID][ ][OK/NG][Data][x]Real data mapping00 : Step 0 Tint : Step 0 : R50A : Step 10 (Set ID 10) : : Step 49 : R1F : Step 15 (Set ID 15) Step 50 : 010 : Step 16 (Set ID 16) Step 51 : G1 : :64 : Step 100 Step 100 : G50 :6E : Step 110 Balance :73 : Step 115 Step 0 : L5074 : Step 116 : : Step 49 : L1CF : Step 199 Step 50 : 0 : Step 51 : R1FE : Step 254 :FF : Step 255 Step 100 : R50Colour TemperatureStep 0 : W50 :Step 49 : W1Step 50 : 0Step 51 : C1 :Step 100 : C50 21. Key (Command: m c)To send IR remote key code.Transmission[m][c][ ][Set ID][ ][Data][Cr]Data Min : 00 to Max : 64* Data Key cod -See p.48Acknowledgement [c][ ][Set ID][ ][OK/NG][Data][x]22. Back Light (Command: m g)To Control the back light.Transmission[m][g][ ][Set ID][ ][Data][Cr]Data : data Min: 00 to Max: 64Acknowledgement[g][ ][Set ID][ ][OK/NG][Data][x]23. Input select (Command: x b) (Main Picture Input)To select input source for main picture.Transmission[x][b][ ][Set ID][ ][Data][Cr]Data StructureData 00: DTV 40: Component 10: Analogue 60: RGB 20: AV 90: HDMI 1 91: HDMI 2Acknowledgement[b][ ][Set ID][ ][OK/NG][Data][x]](https://usermanual.wiki/LG-Electronics-USA/M2382D/User-Guide-1642110-Page-57.png)
![ENGLISH57EXTERNAL CONTROL DEVICE SETUP (ONLY APPLIED TO B2B MODEL USED IN A PLACE LIKE A HOTEL) 24. 3D(Command: x t) (only 3D model)To change 3D mode for TV.Transmission[x][t][ ][Set ID][ ][Data01][ ][Data02] [ ][Data03][ ][Data04][Cr]Data01 00 : 3D On 01 : 3D Off 02 : 3D to 2D 03 : 2D to 3DData02 00 : Top and Bottom 01 : Side by Side 02 : Check Board 03 : Frame SequentialData03 00 : Right to Left 01 : Left to RightData04 3D Depth : Min: 0 to Max: 14* Refer to ‘Real data mapping ’. See p.56*If data1 is 00(3D On), data4 has no meaning.*If data1 is 01(3D Off) or 02(3D to 2D), data2, data3 and data4 have no meaning.*If data1 is 03(2D to 3D), data2 and data3 have no meaning.Data1 Data2 Data3 Data400 O O X01 X X X02 X X X03 X X OX : don't careAcknowledgement[t][ ][OK][Data01][Data02][Data03][Data04][x] [t][ ][NG][Data01][x]25. Extended 3D(Command: x v) (only 3D model)To change 3D mode for TV.Transmission[x][v][ ][Set ID][ ][Data01][ ] [Data02][Cr]Data01 : 3D option 00 : 3D Picture Correction 01 : 3D Depth (2D to 3D Only) 02 : 3D ViewpointData02 It has own range for each 3D option determined by Data01.1) When Data01 is 0000 : Right to Left01 : Left to Right2) When Data01 is 01Data Min: 0 to Max: 143) When Data01 is 02Data Min: 0 to Max: 14Data Min: 0 to Max: 06* Refer to ‘Real data mapping ’. See p.56Acknowledgement[v][ ][OK][Data01][Data02][x][v][ ][NG] [Data01][x]](https://usermanual.wiki/LG-Electronics-USA/M2382D/User-Guide-1642110-Page-58.png)