LG Electronics USA M5520CJ LCD Monitor User Manual G User s manual
LG Electronics USA LCD Monitor G User s manual
UserManual.wiki
>
LG Electronics USA
>
M5520CJ User Manual
User Manual
Navigation menu
Upload a User Manual
Namespaces
Wiki Guide
HTML
PDF
Info
Views
User Manual
Discussion / Help
Navigation

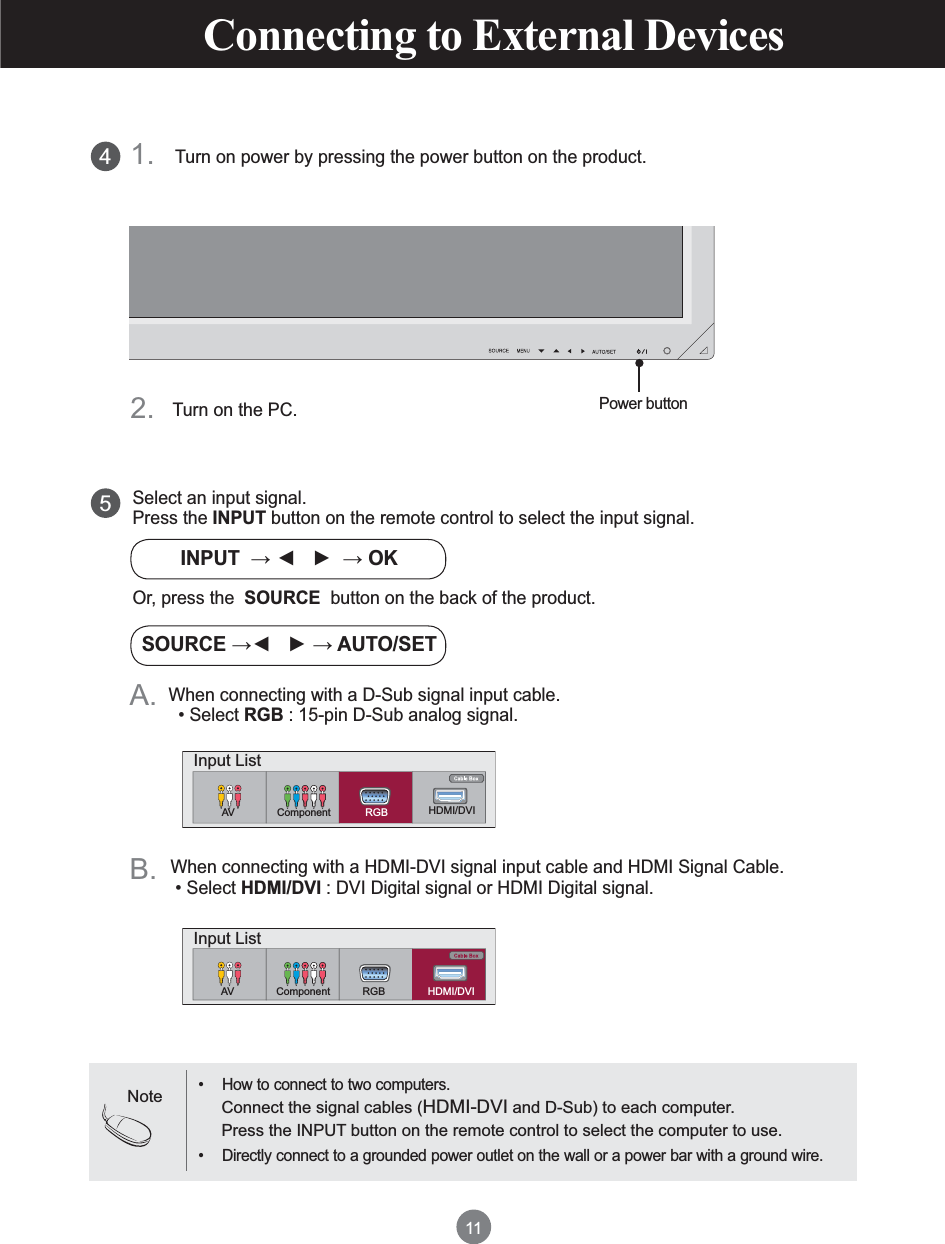

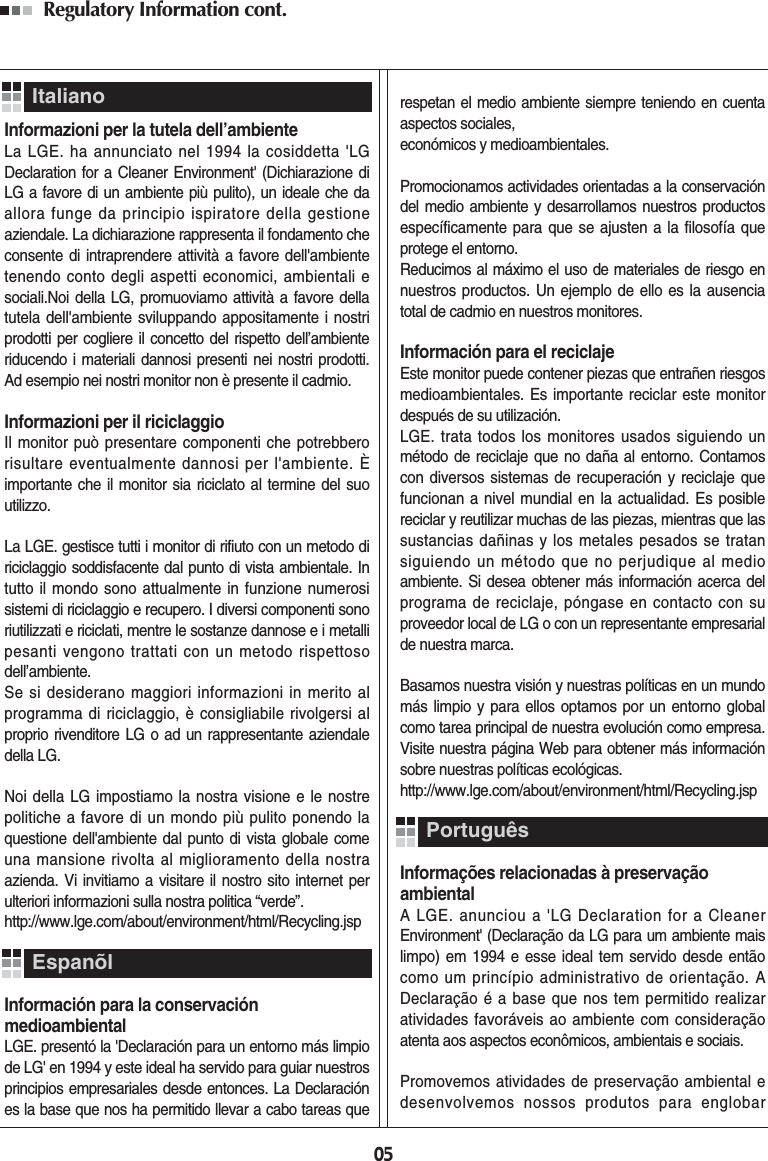
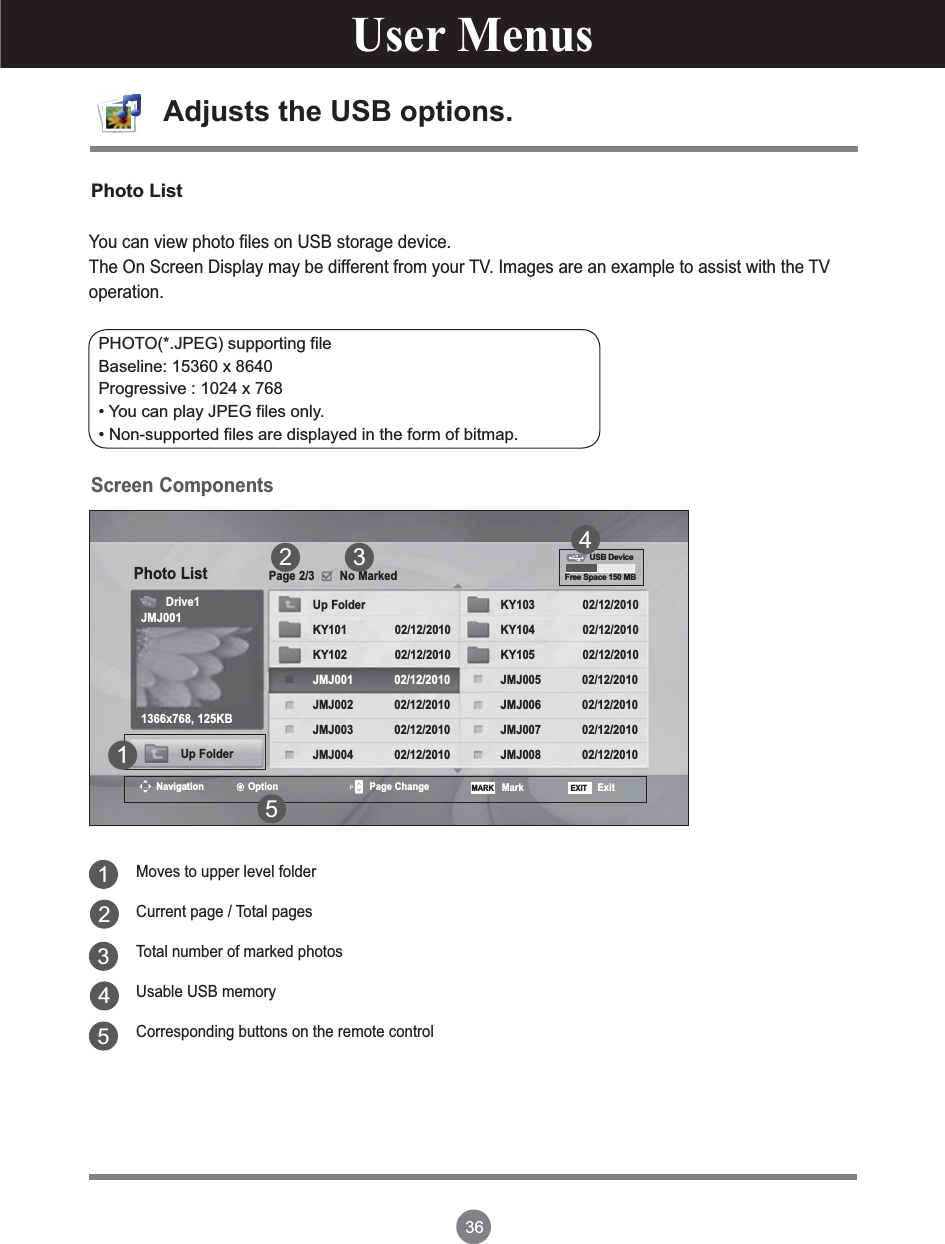
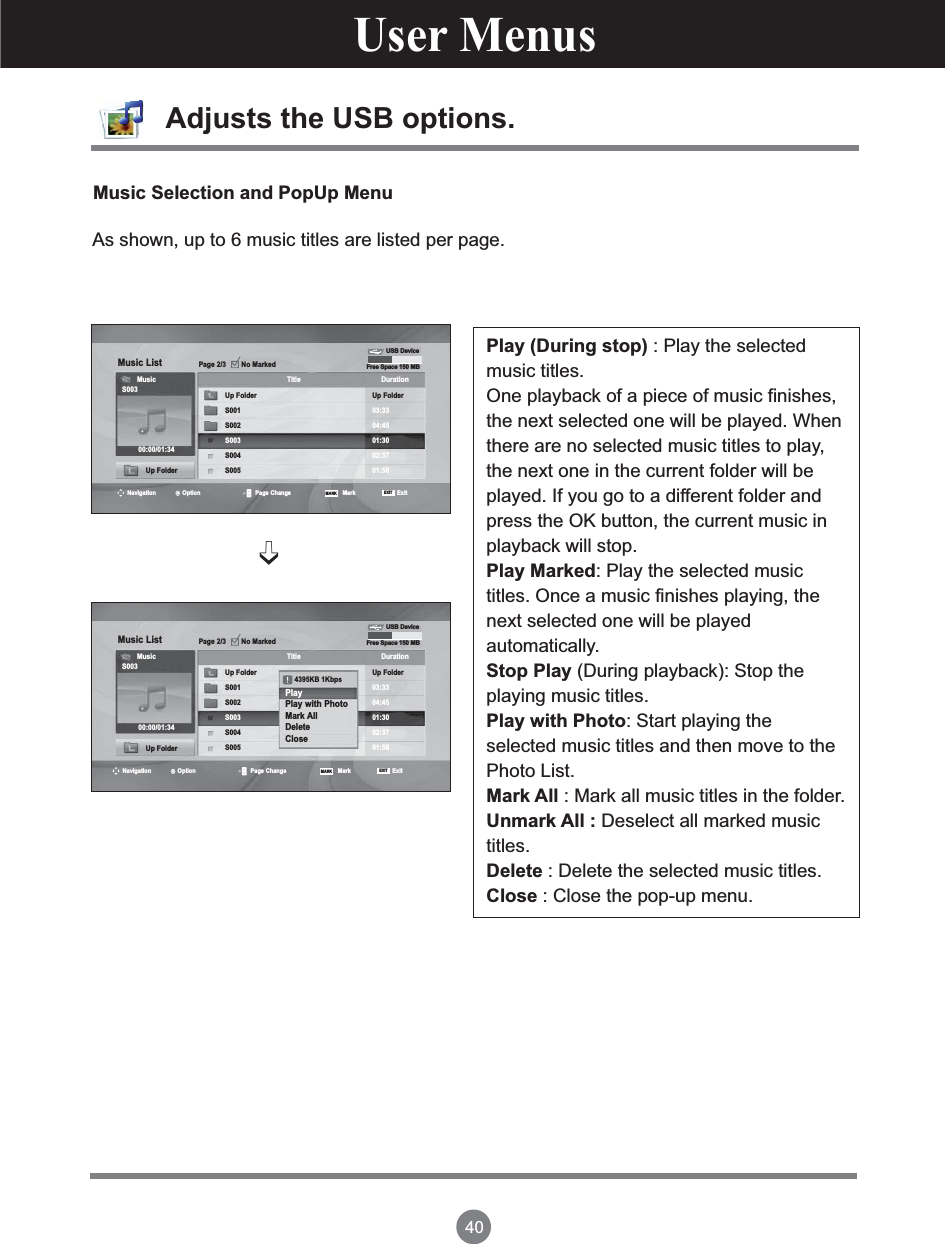
![19User MenusThis is where the unit receives signals from the remote control.Screen Adjustment options[For PC Analog signal]AUTO/SET Button AV Composite VideoComponent HDTV, DVDRGB 15-pin D-Sub analog signalHDMI/DVI Digital signal - Toggles between inputsSOURCE ButtonIR Receiver[When XGA Mode is active and 1920 x 1080 is selected]Auto in progressFor optimal display changeresolution to 1920 x 1080Auto in progress576Input ListAV Component RGB HDMI/DVI](https://usermanual.wiki/LG-Electronics-USA/M5520CJ/User-Guide-1363039-Page-20.png)
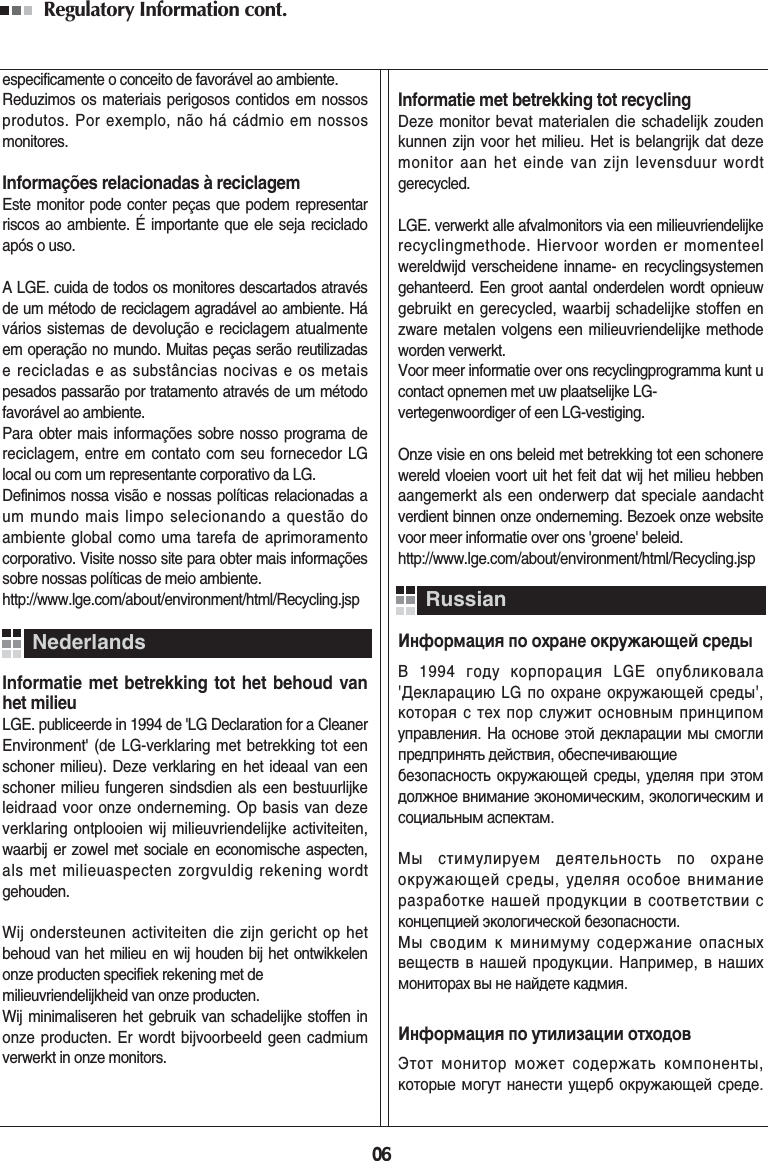
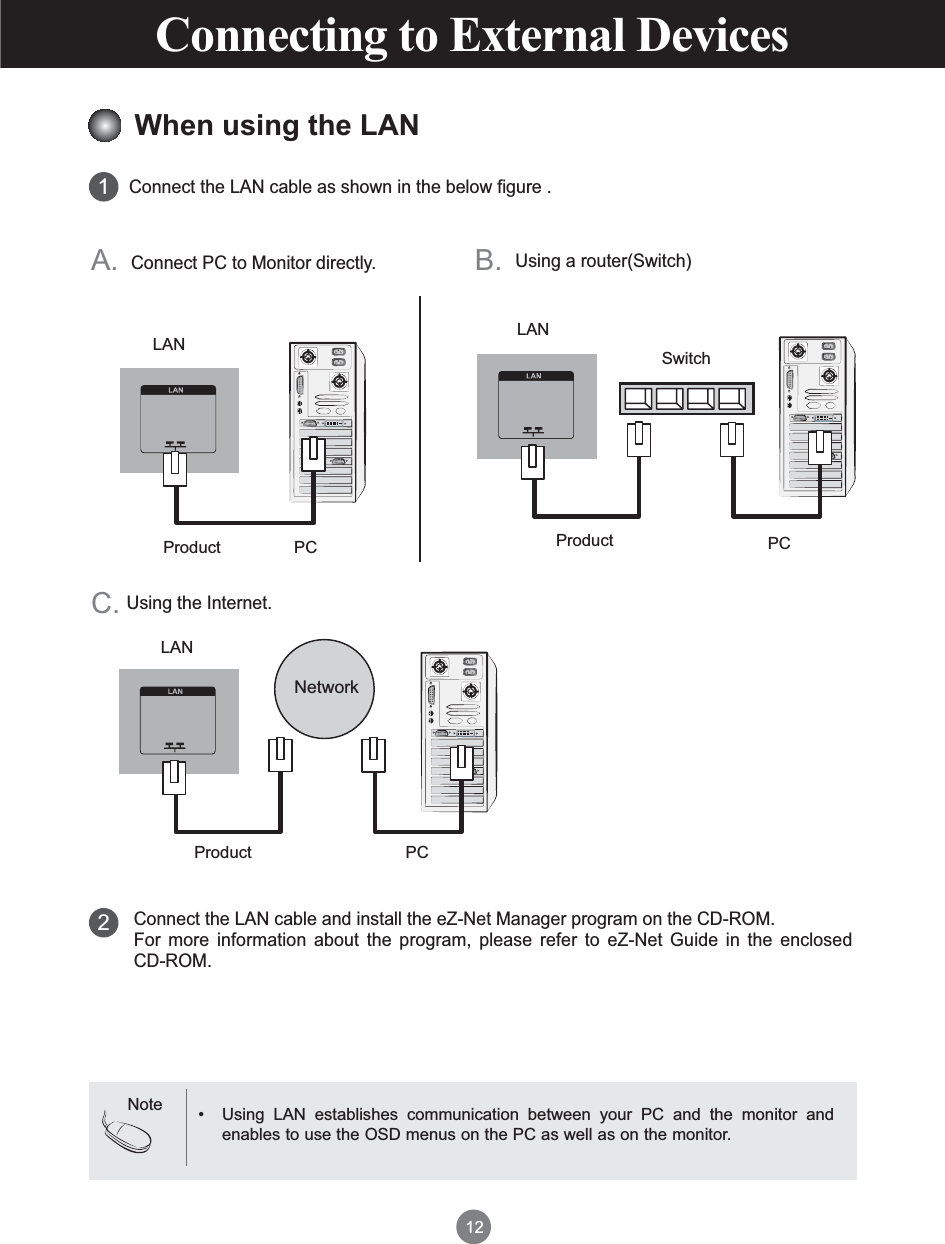
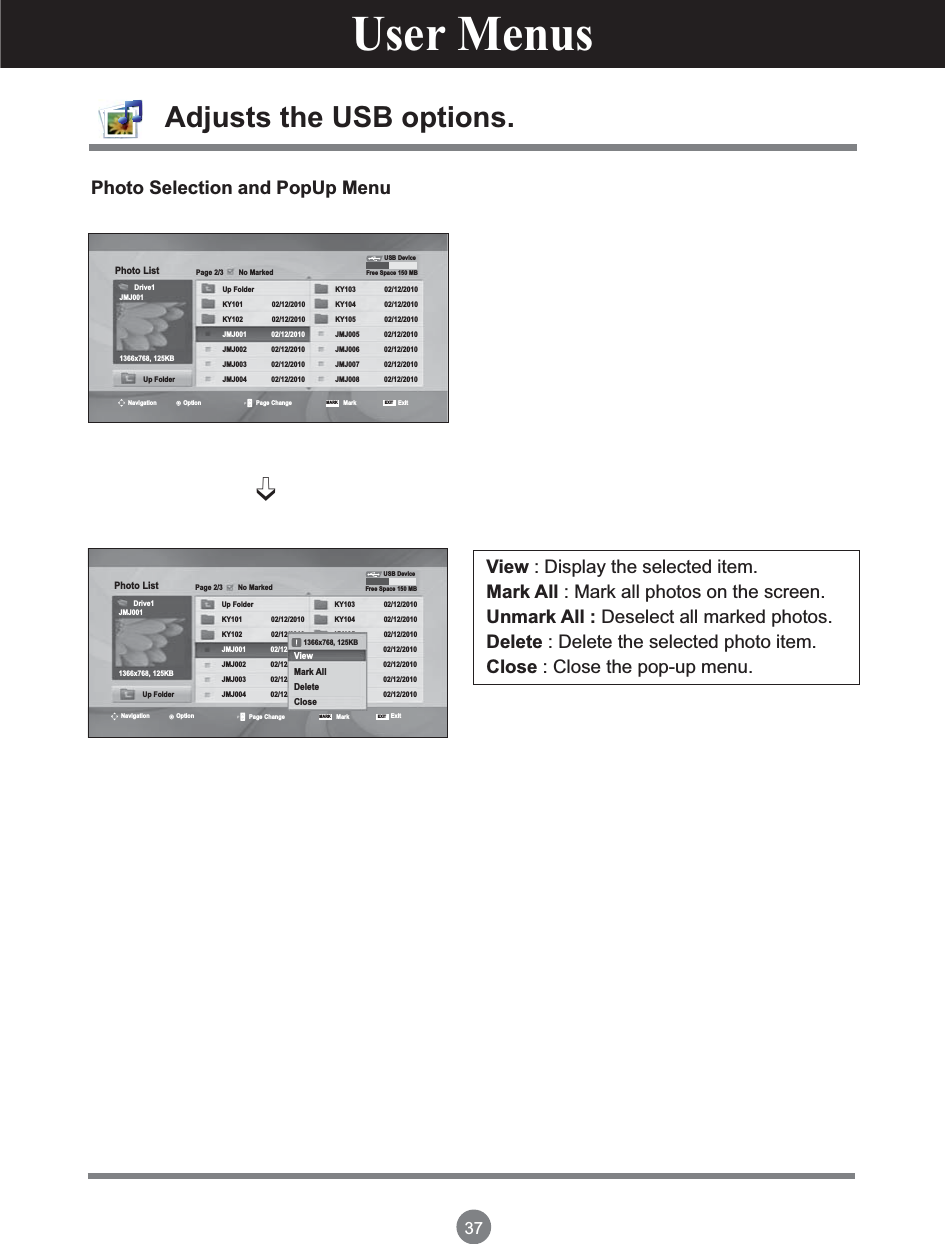
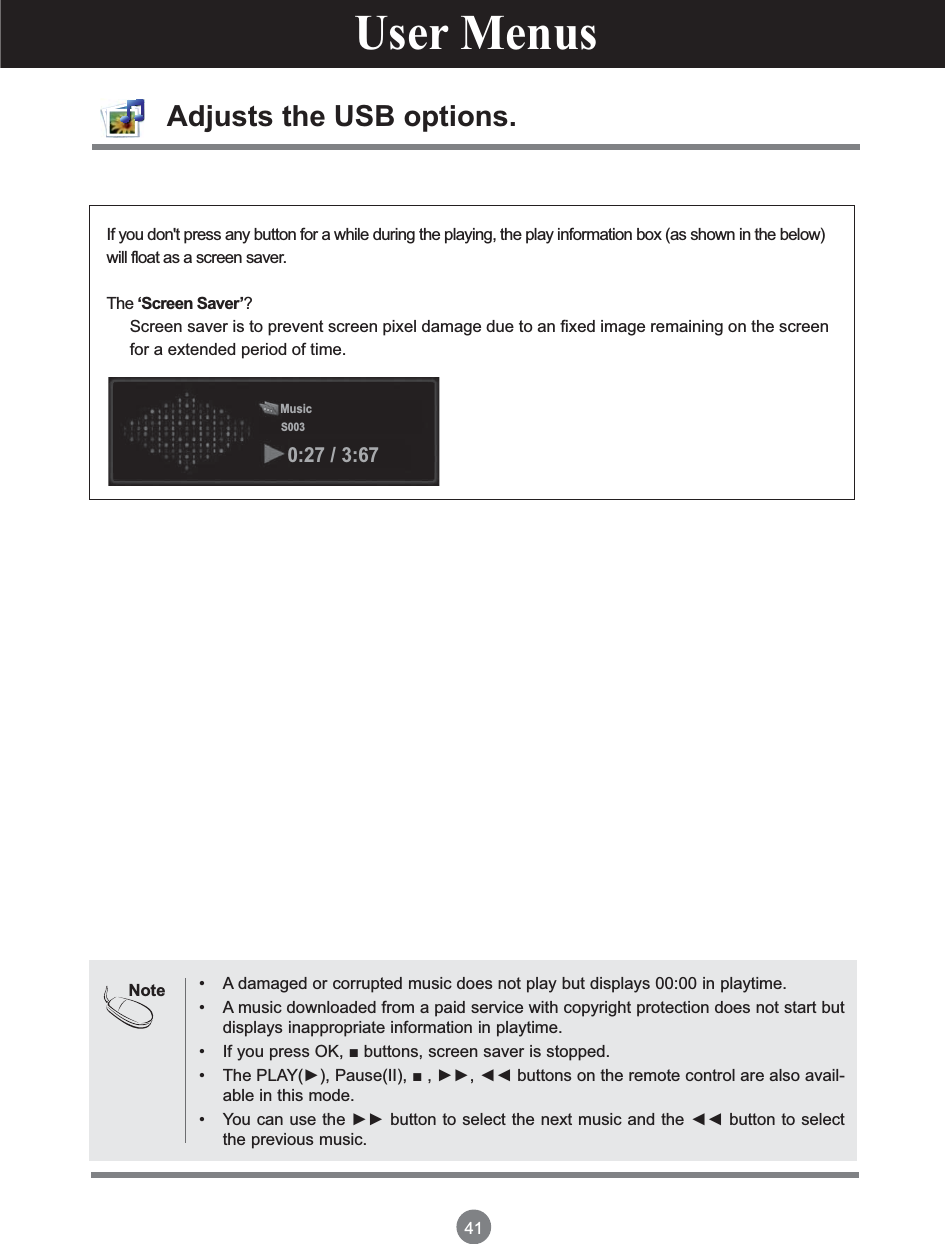
![21User MenusHow to adjust the OSD (On Screen Display) screenUse the remote control to adjust the OSD screen.How to adjust the screen automaticallyPress the AUTO/SET button (AUTO button on a remote Control) in the PC analog signal. Then optimal screen settings will be selected that fit into the current mode. If adjustment is not satisfactory, you can adjust the screen manually.Pops up the menu screenMove where you want to adjustMove where you want to adjustSelect a menu listSelect a menu icon Adjust the status Save adjustmentExit from the menu screen.[When XGA Mode is active and 1920 x 1080 is selected]Auto in progressMENUܙܙ ܙ ܙ ܙܙܙPress the MENU Button, then the main menu of the OSD appears.When the icon you want becomes highlighted, press the OK Button.When the list you want becomes highlighted, press the OK Button.Accept the changes by pressing the OK Button.Exit the OSD by pressing the EXIT Button.12345678](https://usermanual.wiki/LG-Electronics-USA/M5520CJ/User-Guide-1363039-Page-22.png)

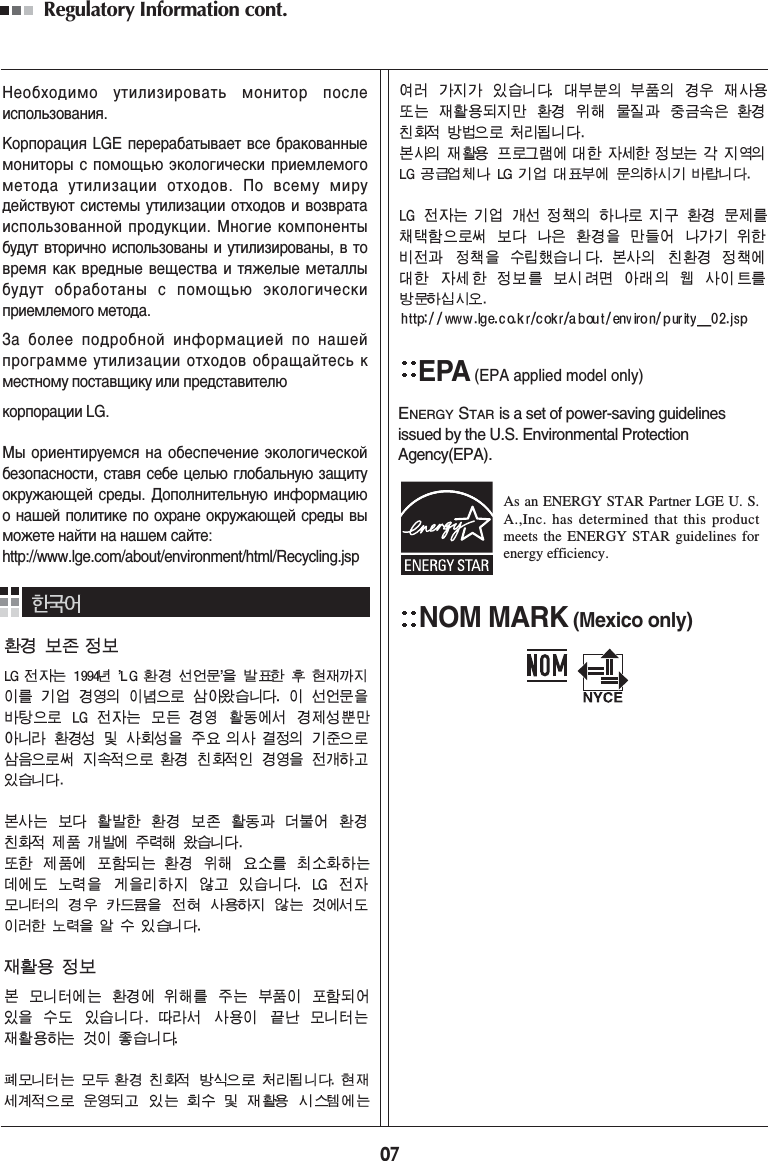
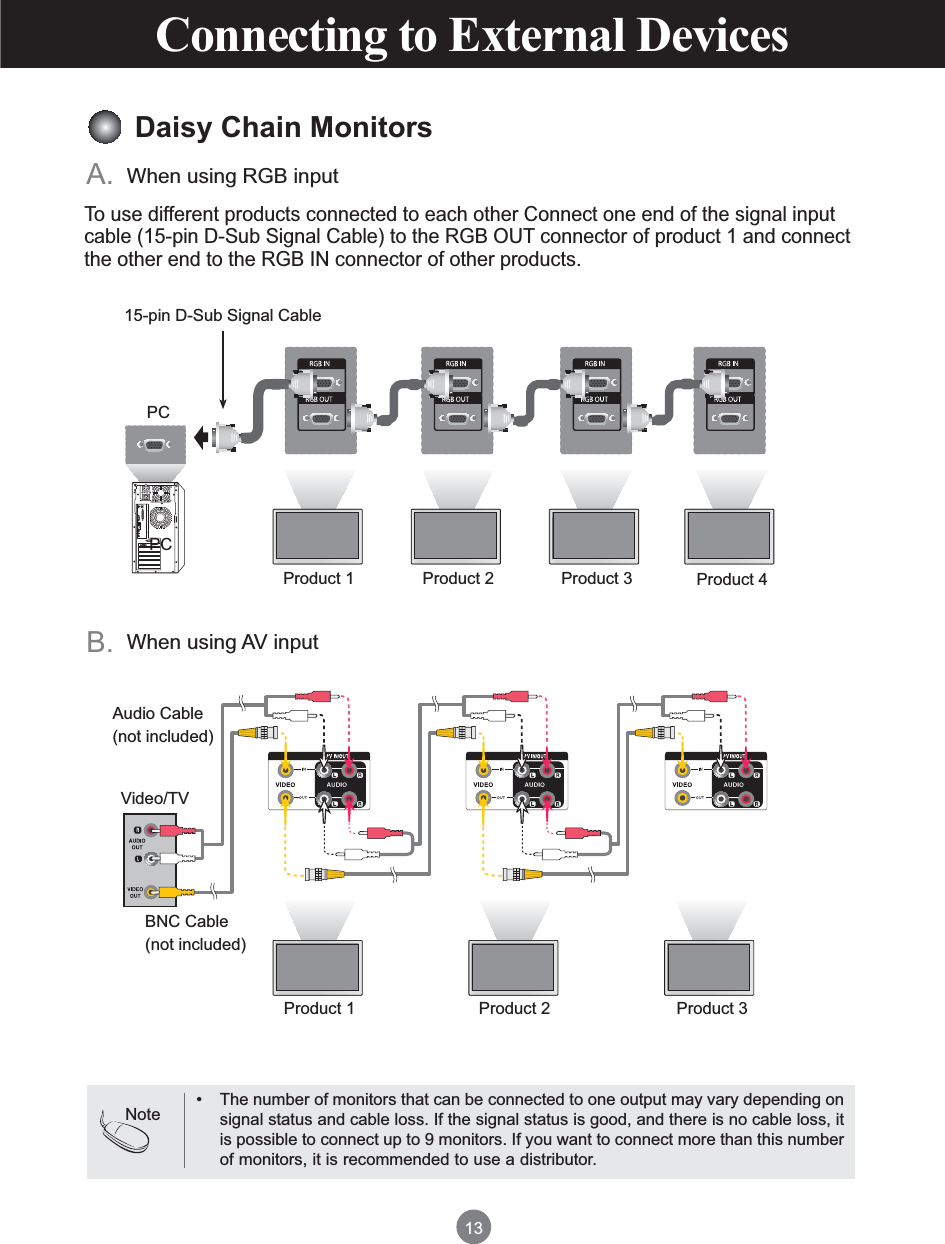
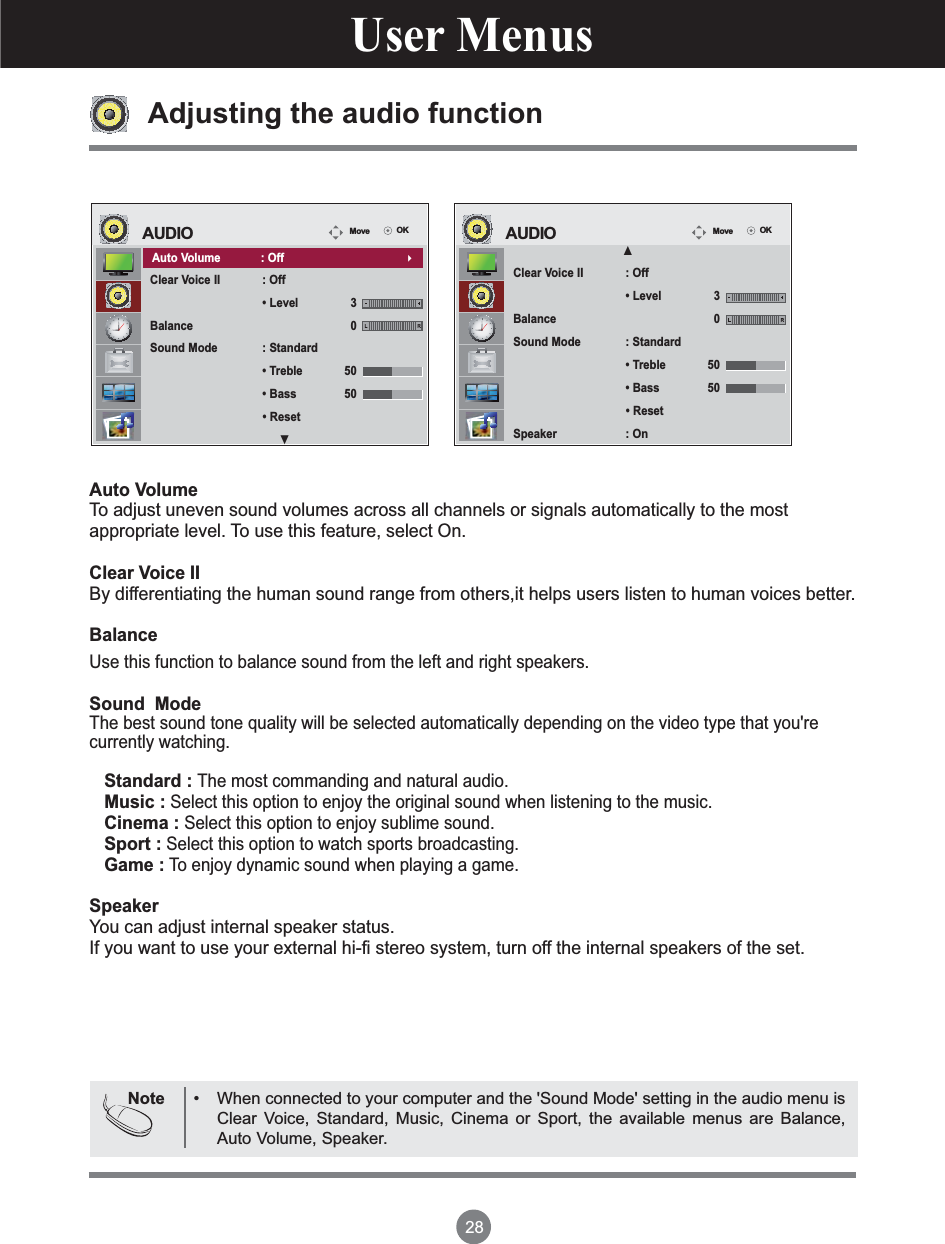
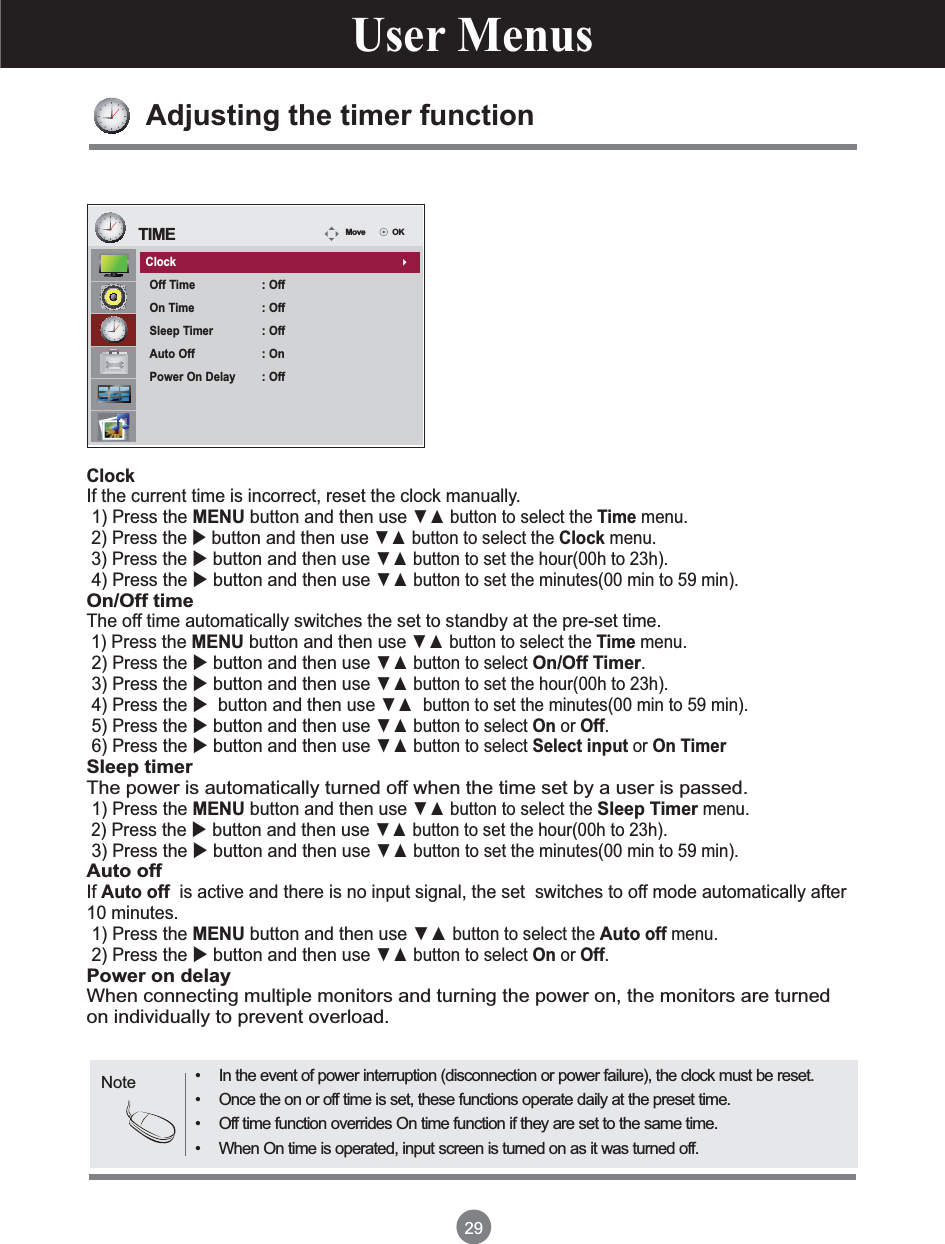
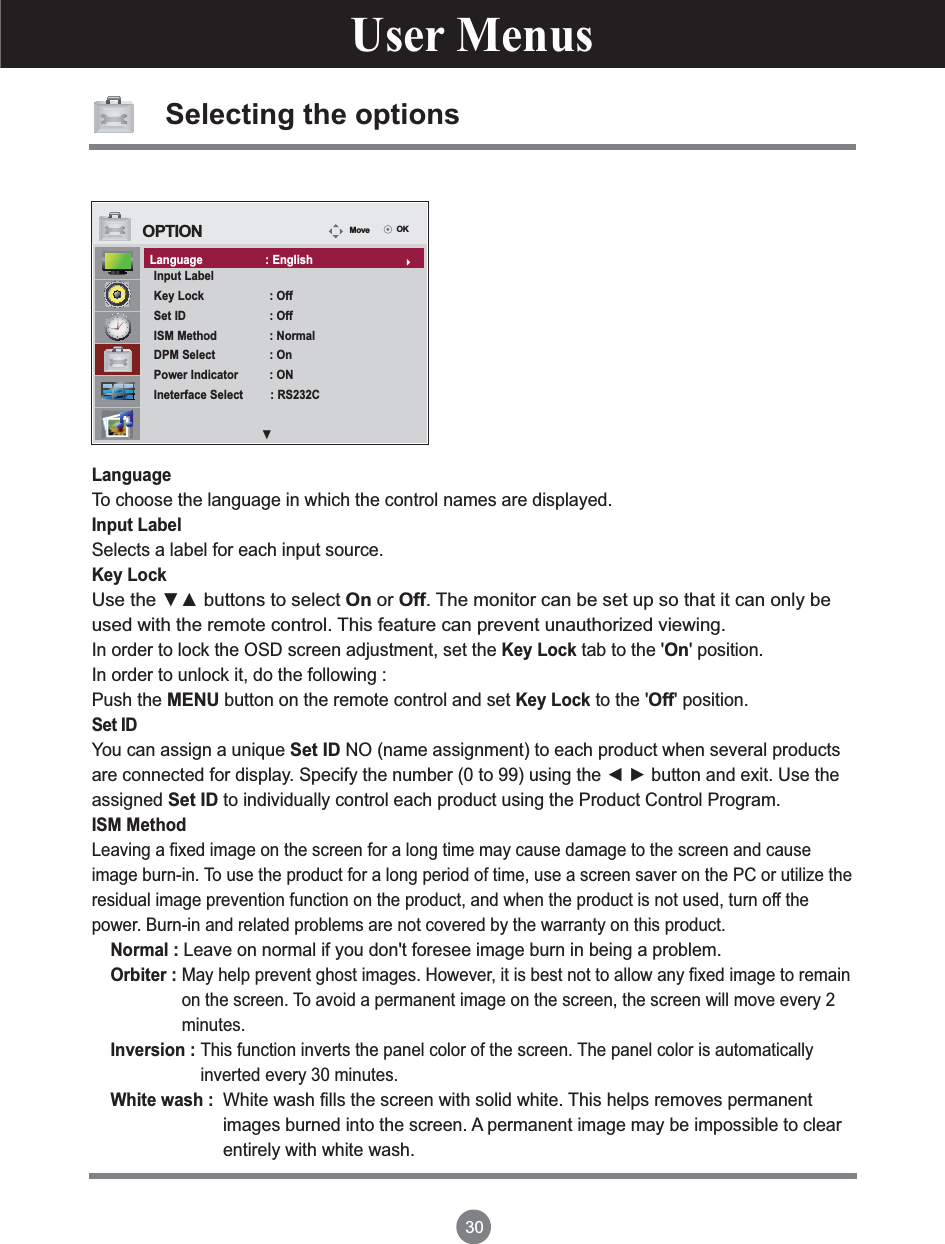
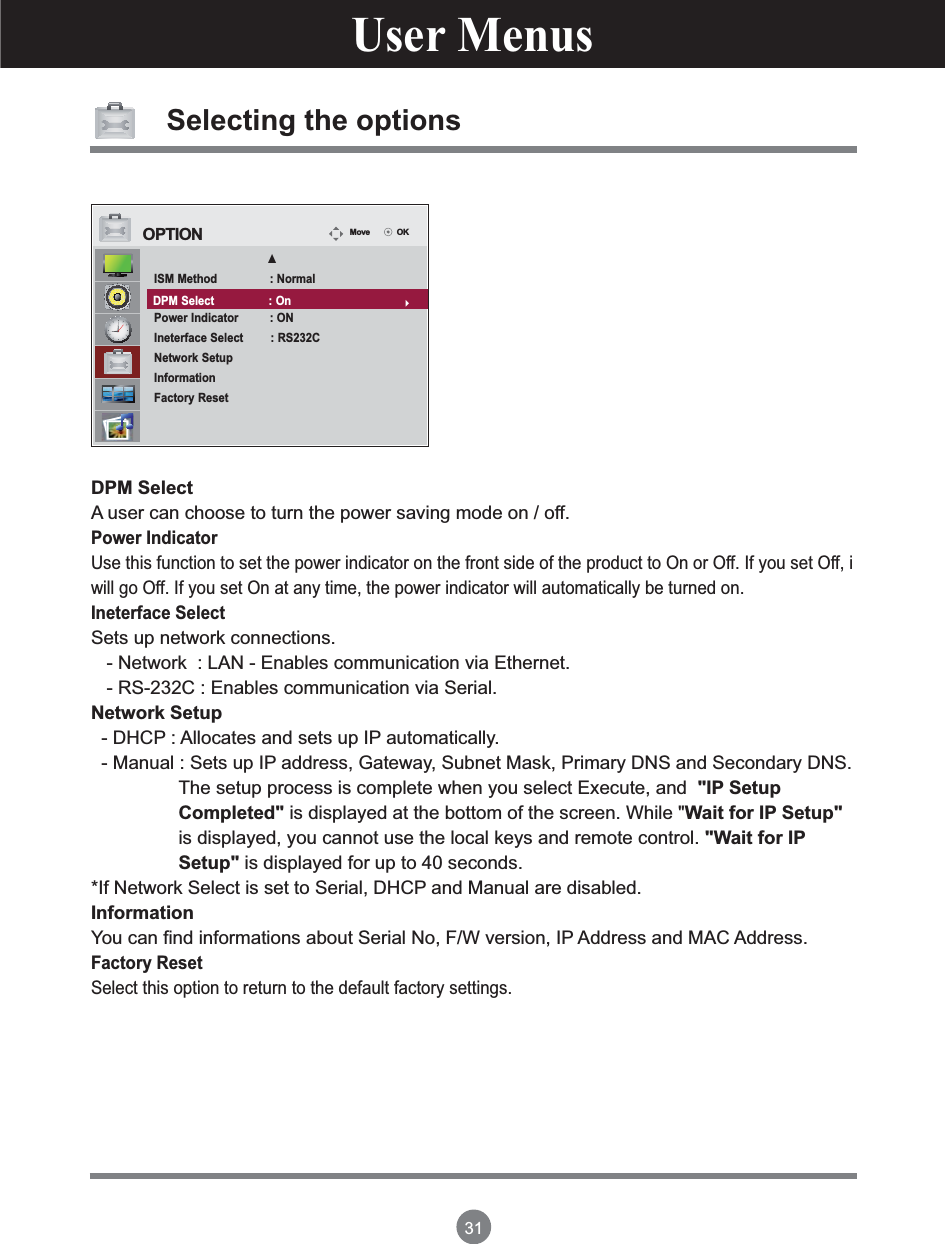
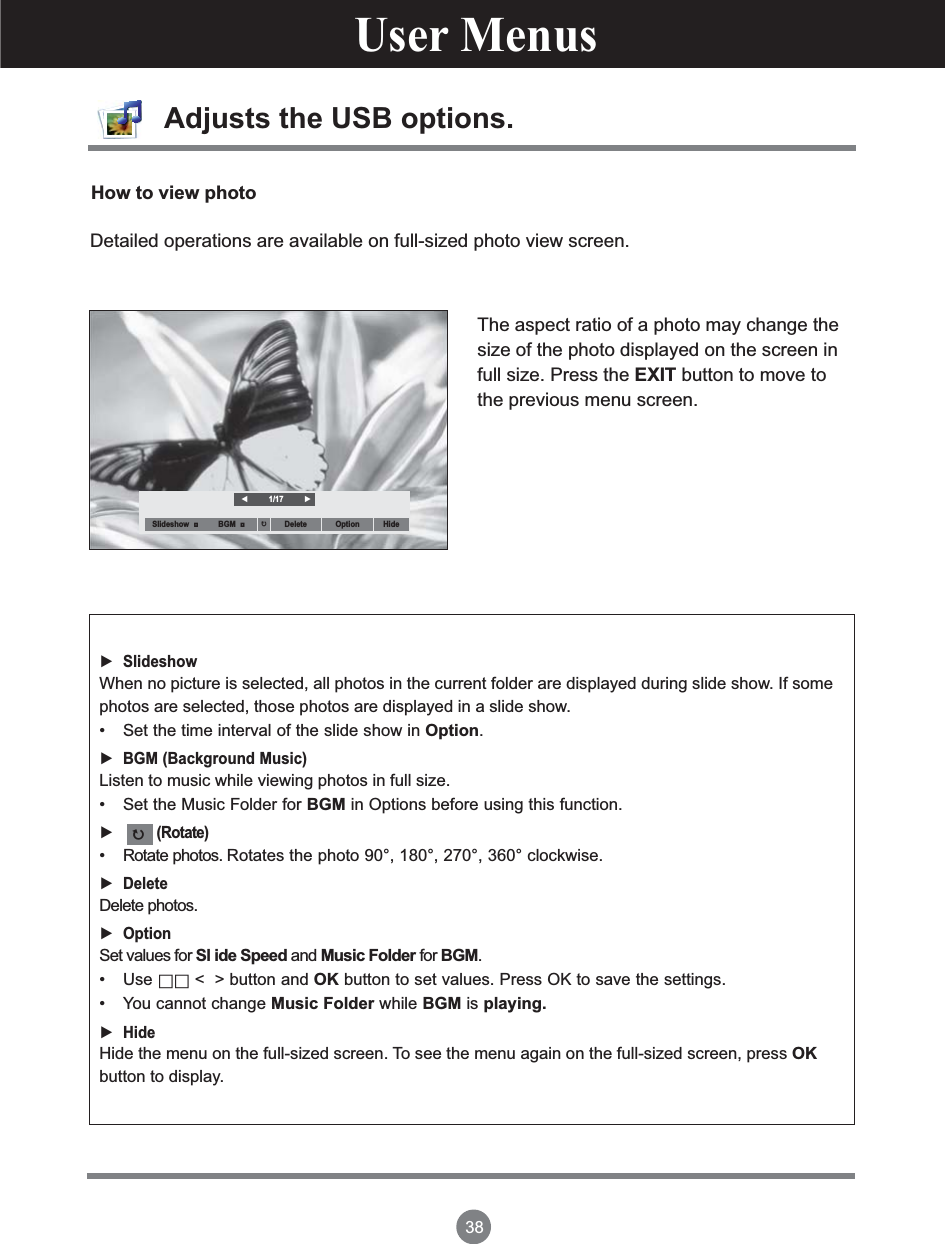
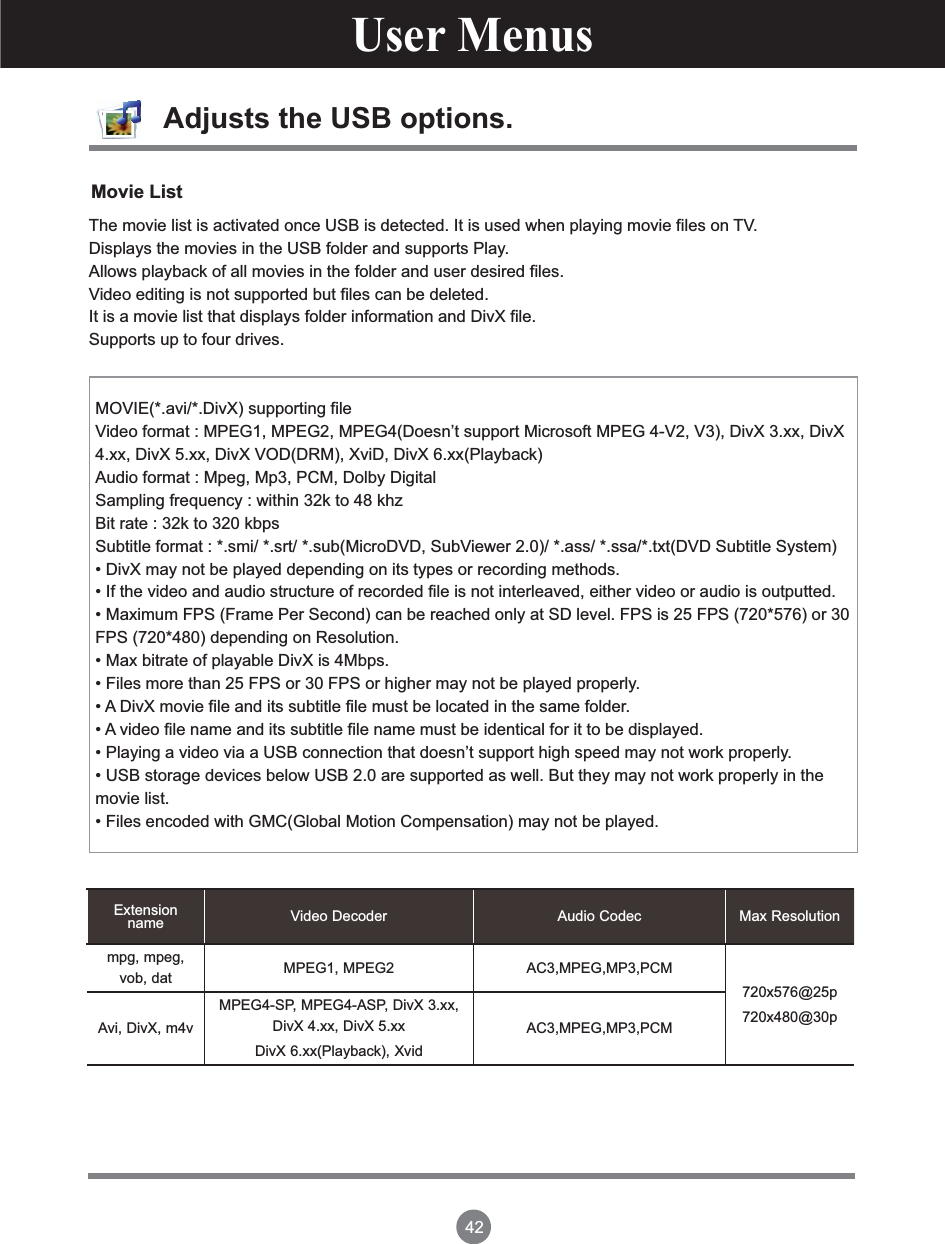
![27User MenusMove OKPICTURE Screen Move OKPICTURE Screen Screen Adjusting Screen ColorReturn Picture Mode to the default factory settings.Picture Reset ScreenAdjust the screen video.Resolution : To view a normal picture, match the resolution of RGB mode and selection of PCmode. This function works in the following mode: RGB[PC] mode.Auto Config. (RGB PC input only) : This button is for the automatic adjustment of the screenposition, clock and phase. This function is available for analog signals only.Position : Moving the screen position.Size : Adjust the size of the screen.Phase : To adjust the focus of the display. This item allows you to remove any horizontal noiseand clear or sharpen the image of characters. This function is available for analog signals only.Reset : Return Manual config. to the default factory settings.1360 x 7681024 x 768Auto Config.PositionSizePhaseResetPrev.BACKMoveSCREEN31360 x 768 ](https://usermanual.wiki/LG-Electronics-USA/M5520CJ/User-Guide-1363039-Page-28.png)
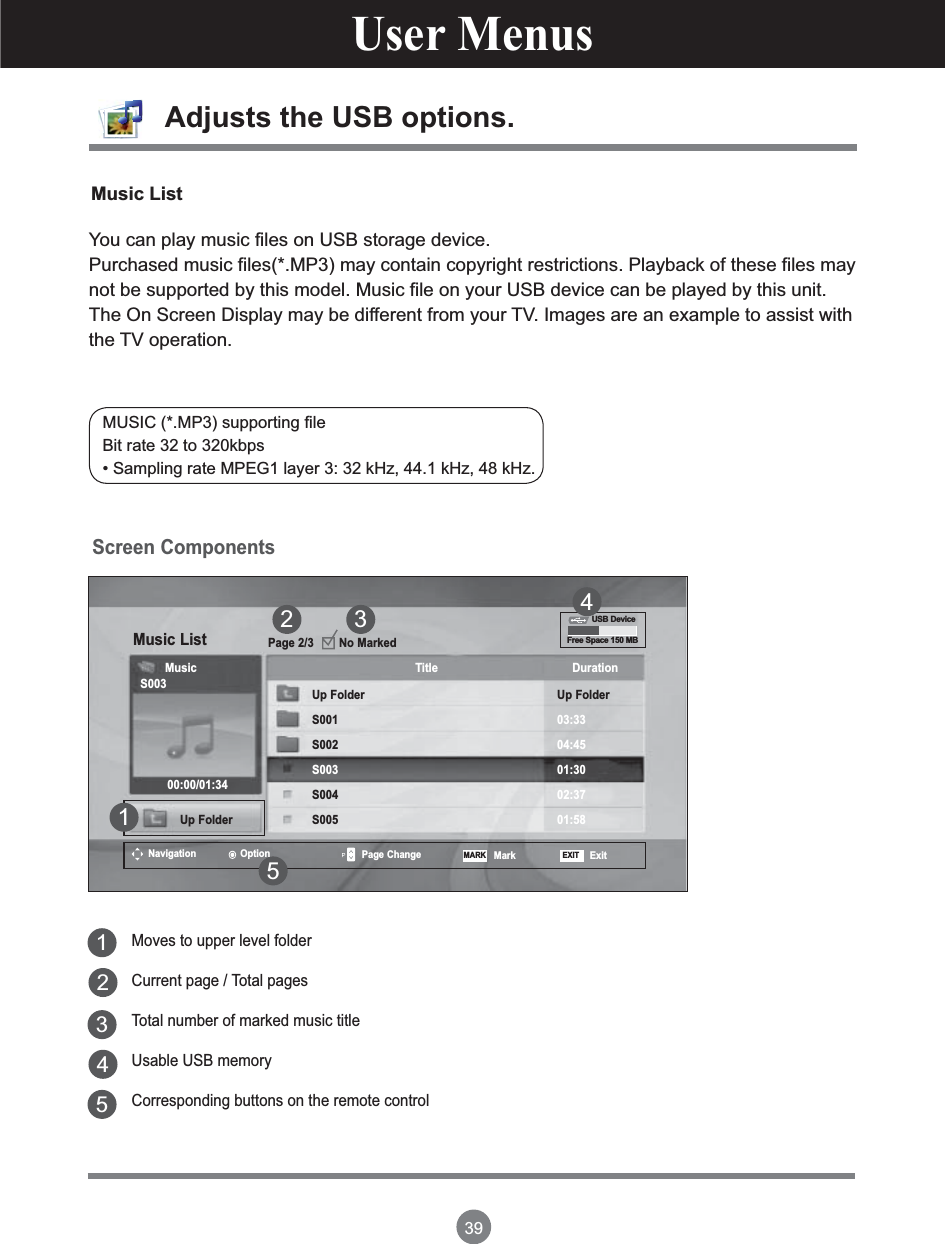
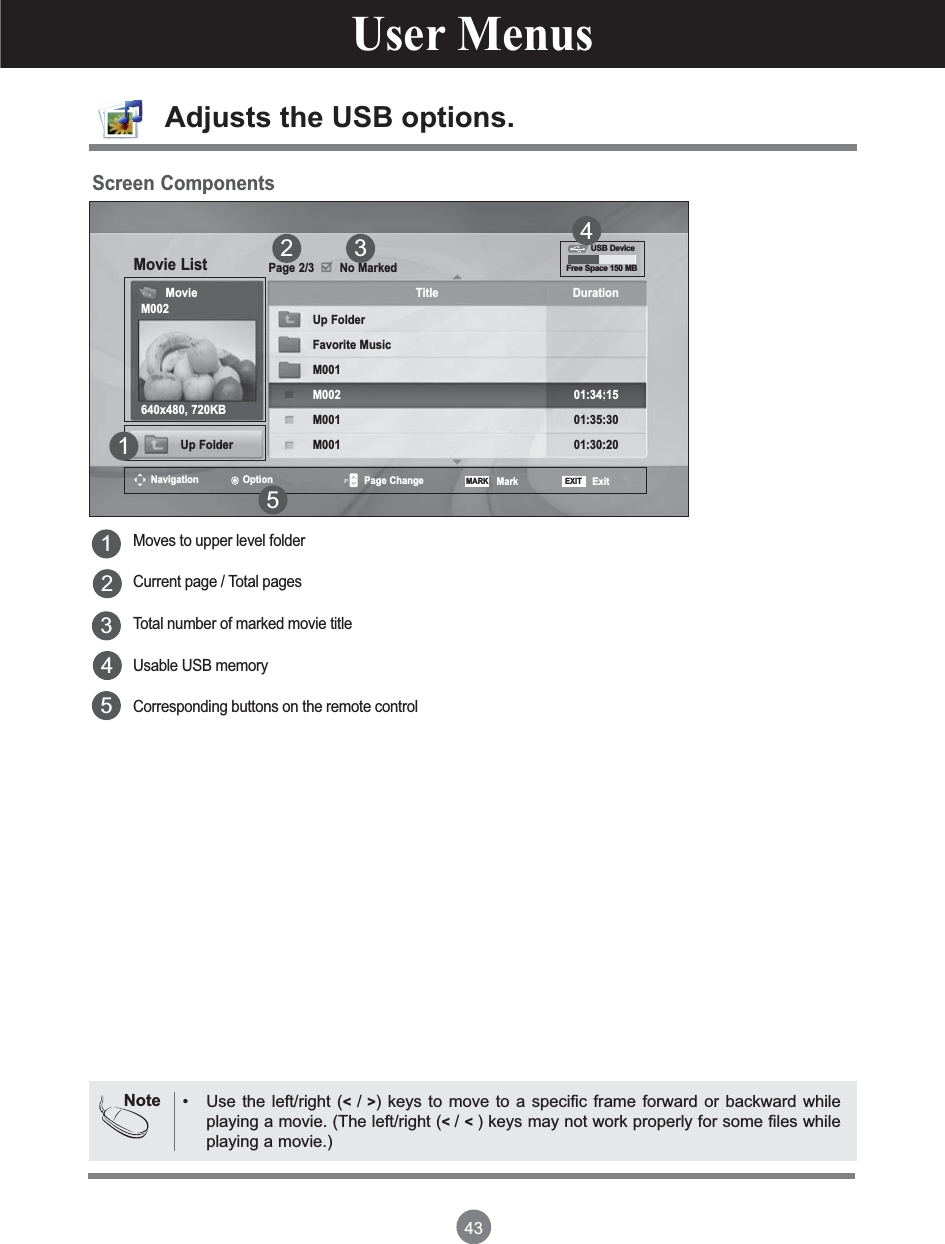


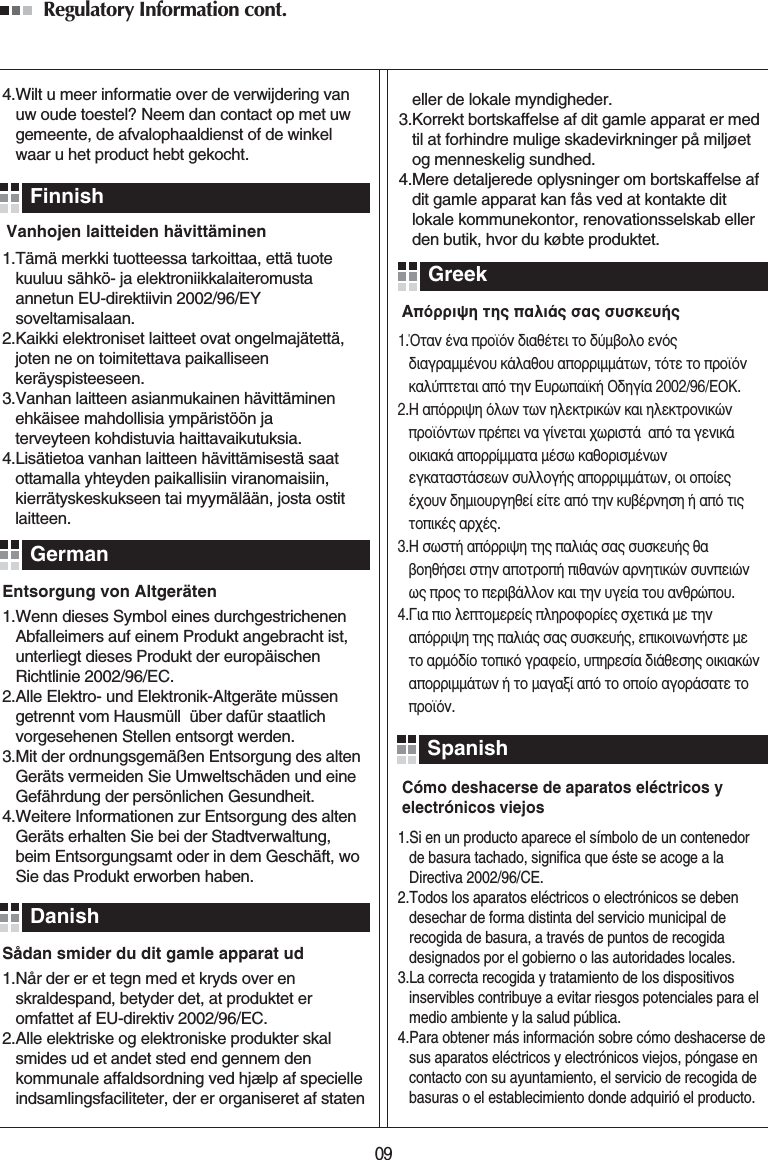
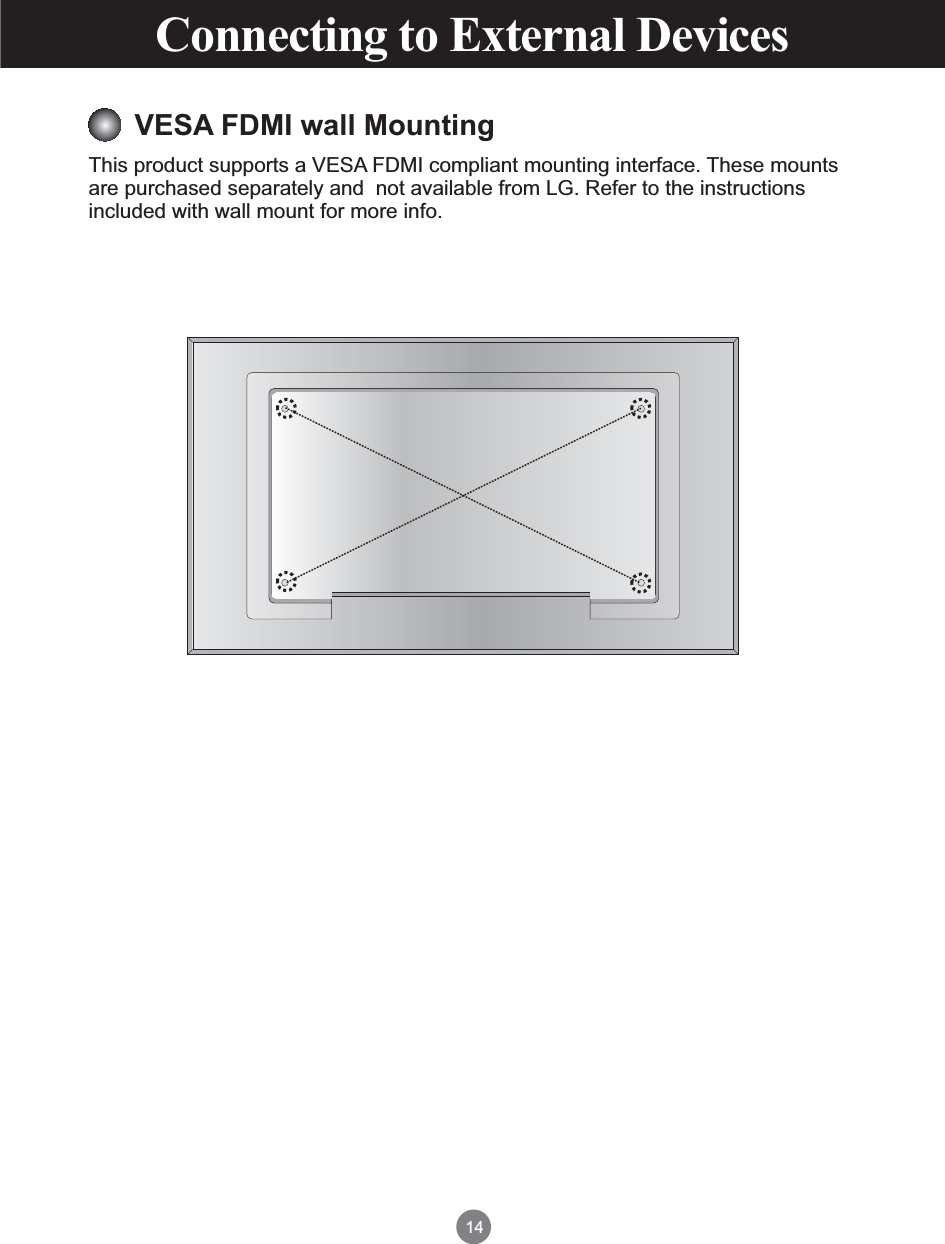
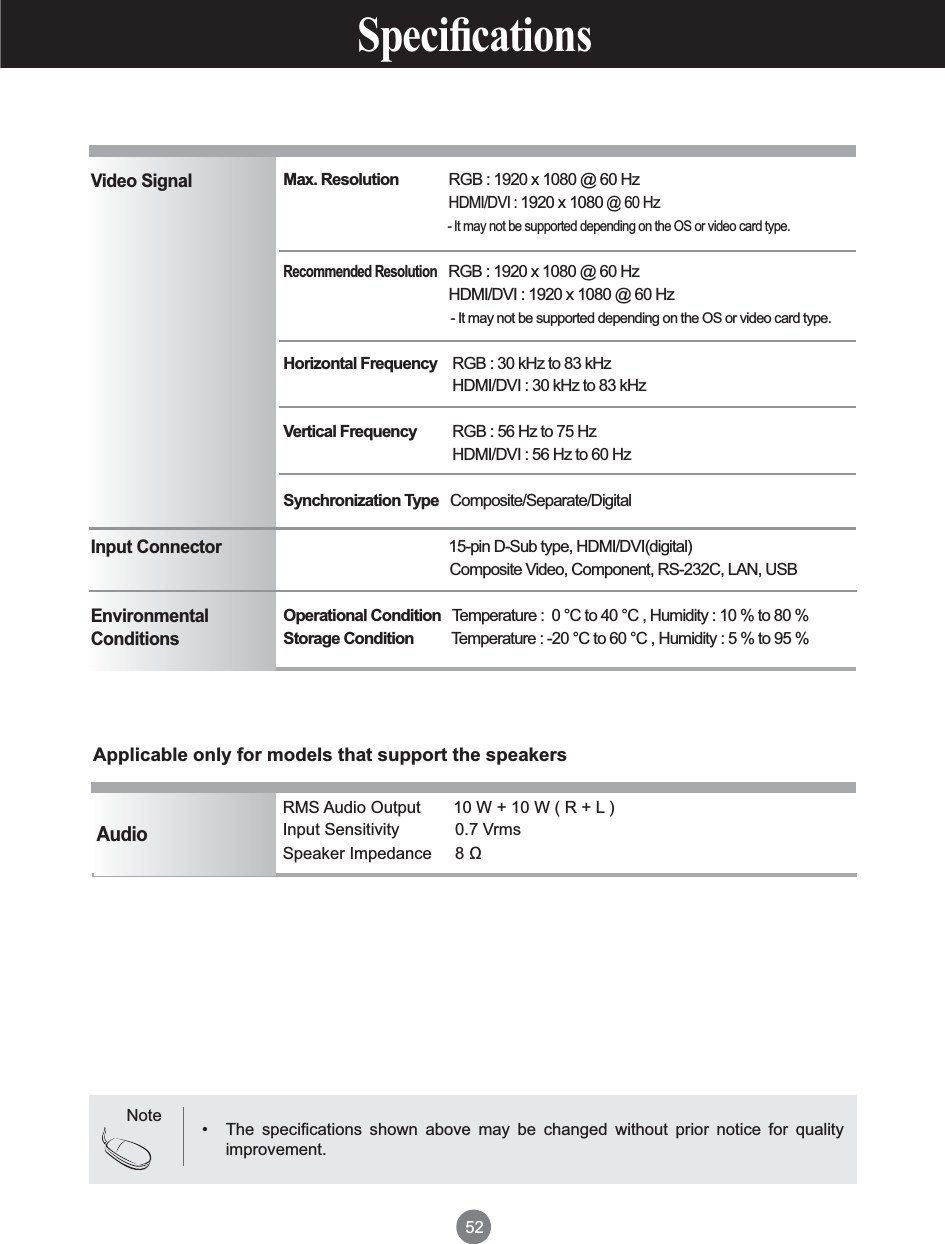
![51Note The specifications shown above may be changed without prior notice for quality improvement.LCD PanelPower Dimensions& Weight138.78 cm ( 54.64 inch) TFT (Thin Film Transistor) LCD (Liquid Crystal Display) PanelVisible diagonal size : 138.78 cm0.630 mm x 0.630 mm X RGB (Pixel Pitch)Rated Voltage AC 100-240 V~ 50/60 Hz 6APower Consumption On Mode : 320 W Typ. (If LAN OFF is selected) Width x Height x Depth [1] 125.1 cm (49.3 inch) x 72.2 cm (28.4 inch) x 10.4 cm (4.1 inch)[2] 125.1 cm (49.3 inch) x 79.5 cm (31.3 inch) x 29.8 cm (11.7 inch)[3] 125.1 cm (49.3 inch) x 72.2 cm (28.4 inch) x 10.4 cm (4.1 inch)[4] 125.1 cm (49.3 inch) x 79.5 cm (31.3 inch) x 29.8 cm (11.7 inch)Net [1] 34.5 kg (76.05 lb) [2] 35.9 kg (79.14 lb)[3] 35.2 kg (77.60 lb) [4] 36.6 kg (80.68 lb)[1] [2] [3] [4] W HDWHDW HDDW H](https://usermanual.wiki/LG-Electronics-USA/M5520CJ/User-Guide-1363039-Page-52.png)
![Controlling the Multiple ProductRS-232CA1Controlling the Multiple ProductRS-232CA1A1Connecting the cableConnect the RS-232C cable as shown in the picture. You need to purchase a cable to connect the RS-232C socket as it is not provided as the accessory.The RS-232C protocol is used for communication between the PC and product. You can turn the product on/off, select an input source or adjust the OSD menu from your PC.Use this method to connect several products to a single PC. You can control several products at a time by connecting them to a single PC. If the [Set ID] menu in [Option] is set to OFF, the monitor ID value should be set between 1 and 99.RS-232C Cable(not included)monitor 1PCmonitor 2 monitor 3 monitor 47-Wire Configurations (Standard RS-232C cable)RXDTXDGNDDTRDSRRTSCTSTXDRXDGNDDSRDTRCTSRTSPC Monitor23546783256487 D-Sub 9 D-Sub 9 (Female) (Female) 3-Wire Configurations (Not Standard)RXDTXDGNDDTRDSRRTSCTSTXDRXDGNDDTRDSRRTSCTSPC Monitor23546783256478 D-Sub 9 D-Sub 9 (Female) (Female) Baud Rate : 9600 buad Rate (UART)Data Length : 8 bitParity Bit : NoneStop Bit : 1bitFlow Control : NoneCommunication Code : ASCII codeUse a crossed (reverse) cableCommunication ParameterRS-232C Configurations](https://usermanual.wiki/LG-Electronics-USA/M5520CJ/User-Guide-1363039-Page-55.png)
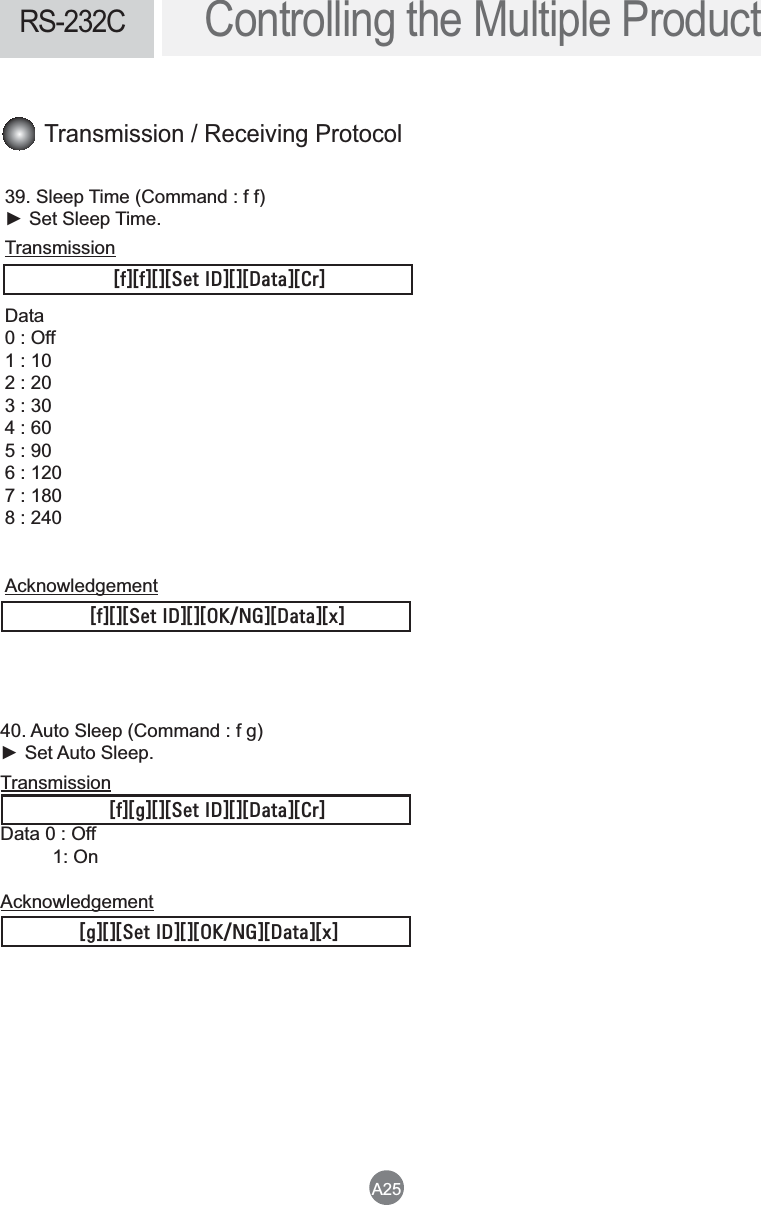
![Controlling the Multiple ProductRS-232CA2 '311%2('311%2((%8%(%8%(%8%Command Reference List O E ,XS,O F ,XS,O G ,XS*,O H ,XS,O I ,XS,O J ,XS,O K ,XS,O L ,XS,O M ,XS,O N ,XS,O O ,XS,O P ,XS,O Q ,XS,O X ,XS,O Y ,XS,O ^ **,N T ,XS,N Y ,Q G /I]'SHIH H ,XS,H I ,XS,H J ,XS,H K ,XS,H L ,XS,H M ,XS,H N ,XS,H \ ,XS,H ] ,XS,H [ **,H P **,H R **,H T **,H Y ,XS,H Z ,XS,J E ,XS,J H *,XS*,),XS),,XS,J I *,XS*,),XS),,XS,Power Input SelectAspect Ratio7GVIIR1YXI Volume MuteVolume ControlContrast BrightnessColorTint SharpnessOSD SelectRemote Lock/ key LockBalanceColor Temperature%FRSQEPWXEXIISM mode%YXSGSRJMKYVEXMSR/I] Tile ModeTile H PositionTile V PositionTile H SizeTile V Size8MPI-(7IX Natural Mode (In Tile modePicture mode(PSM)Sound modeFan Fault checkElapsed time returnTemperature valueLamp fault checkAuto VolumeSpeakerTimeOn Timer (On/Off Timer) TimeOff Timer (On/zOff Timer) Time,XS,,XS&,,XS,,XS&,,XS,,XS&,](https://usermanual.wiki/LG-Electronics-USA/M5520CJ/User-Guide-1363039-Page-56.png)
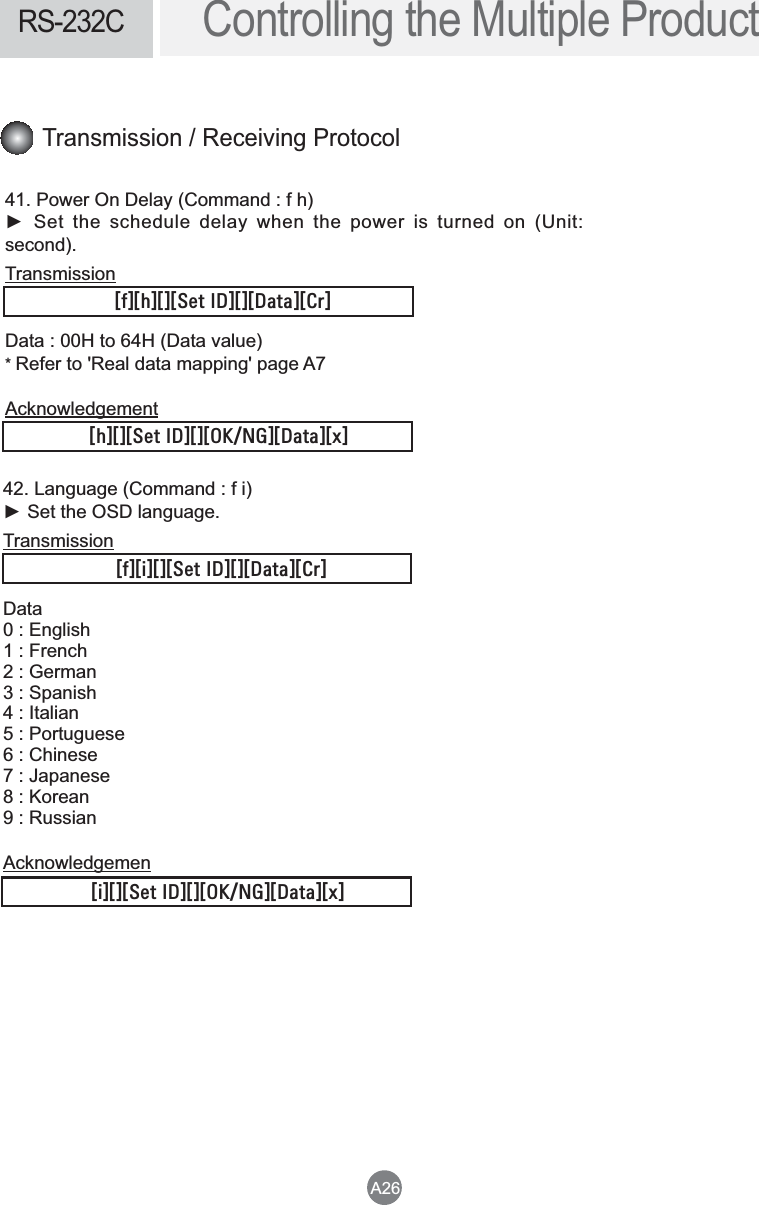
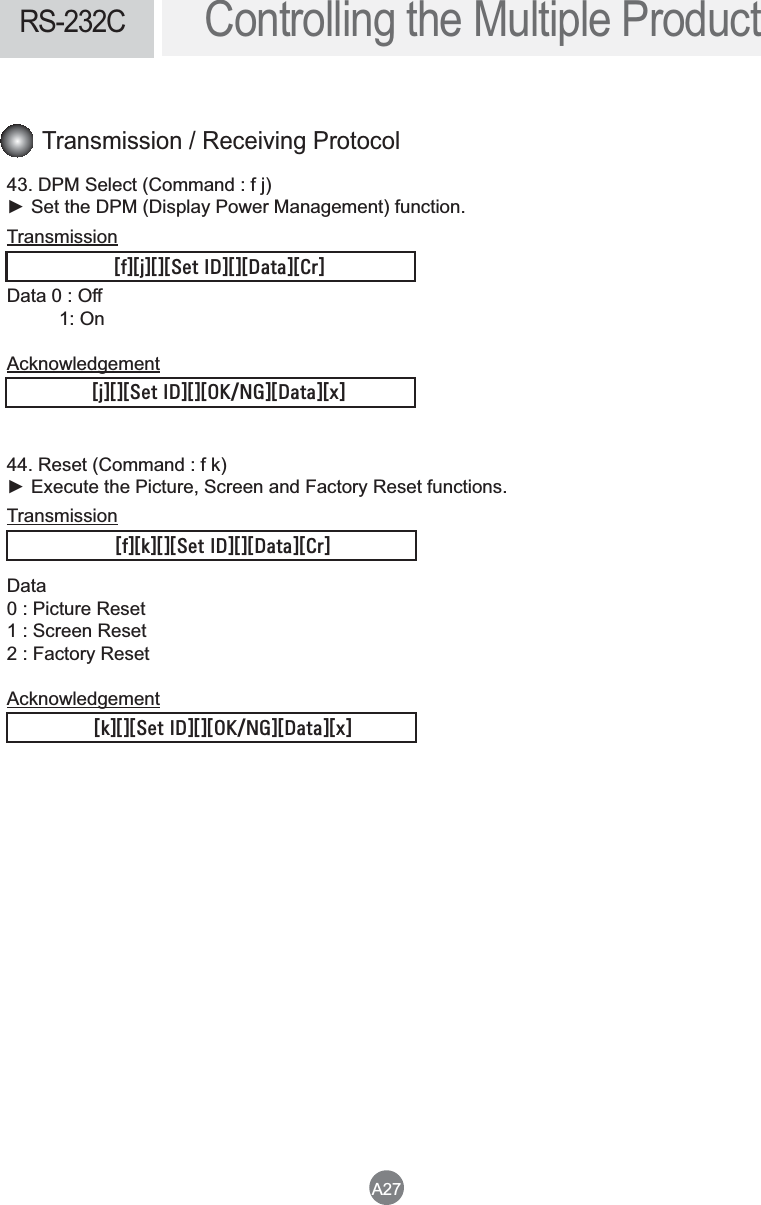
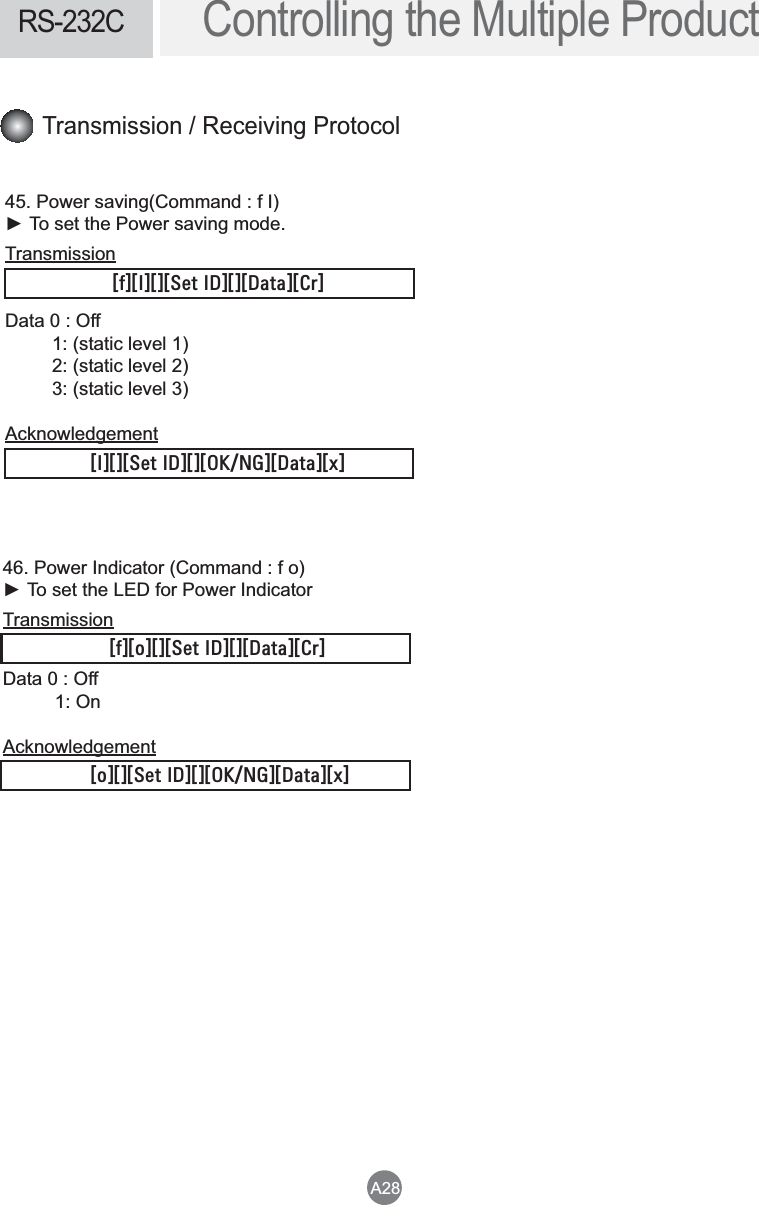
![Controlling the Multiple ProductRS-232CA3 '311%2('311%2((%8%(%8%(%8%Scheduling input selectSleep TimeAuto SleepPower On DelayLanguageDPM SelectResetPower SavingPower IndicatorSerial no.7;:IVWMSRInput SelectJ Y *,XS*,J J ,XS,J K ,XS,J L ,XS,J M ,XS,J N ,XS,J O ,XS,J P ,XS,J S ,XS,J ] **,J ^ **,\ F ,XS%,,XS,](https://usermanual.wiki/LG-Electronics-USA/M5520CJ/User-Guide-1363039-Page-57.png)
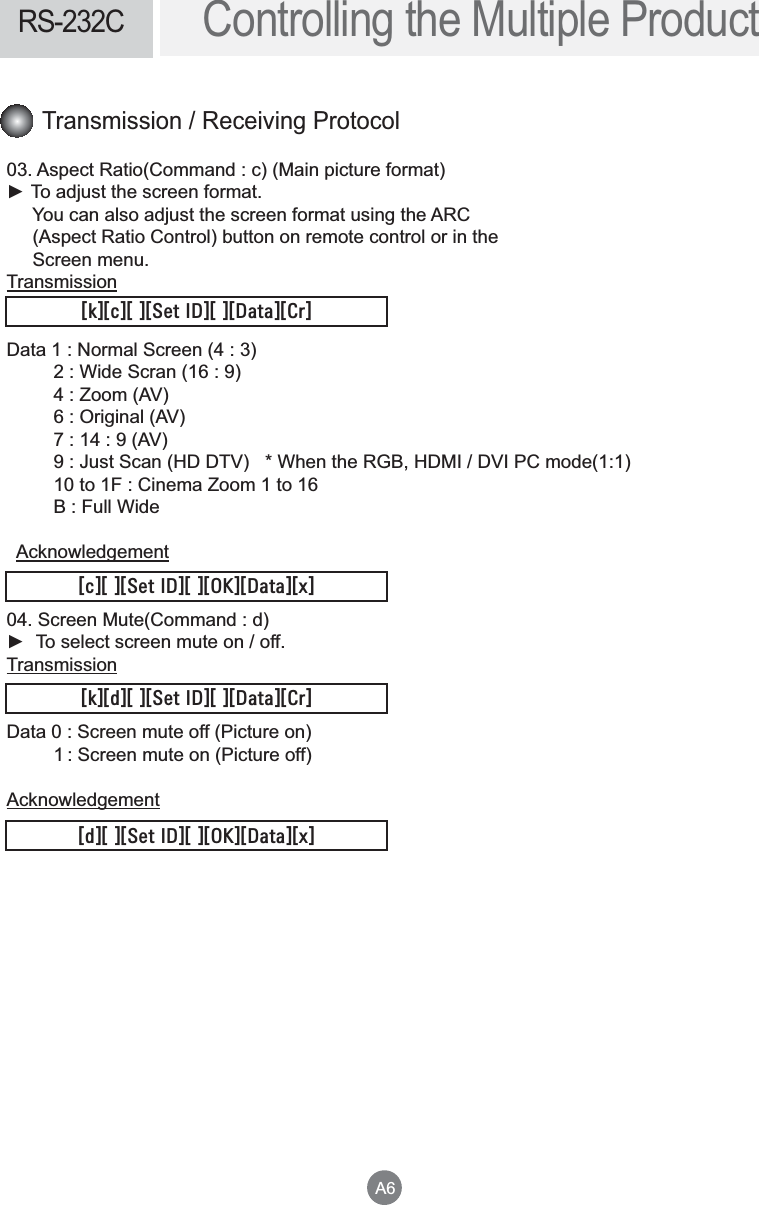
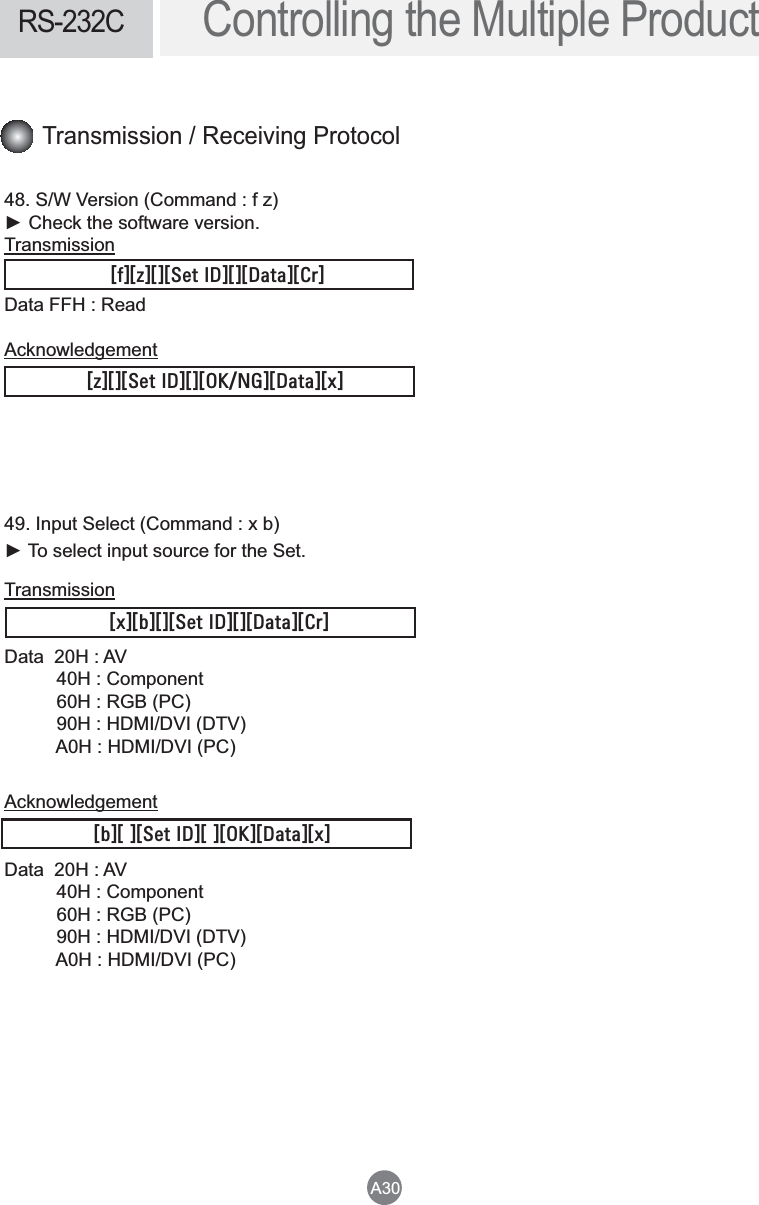
![Controlling the Multiple ProductRS-232CA4OK Acknowledgement * The Product transmits ACK (acknowledgement) based on this format when receiving normal data. At this time, if the data is data read mode, it indicates present status data. If the data is data write mode, it returns the data of the PC computer.Error Acknowledgement* If there is error, it returns NGTransmission* [Command 1]: First command. (k, j, m, d, f, x)* [Command 2]: Second command.(a to u)* [Set ID]: Set up the Set ID number of product. range : 01H to 63H. by setting '0', server can control all products.* In case of operating with more than 2 sets using set ID as '0' at the same time, it should not be checked the ack message. Because all sets will send the ack message, so it's impossible the check the whole ack messages. * [DATA]: To transmit command data. Transmit 'FF' data to read status of command.* [Cr]: Carriage Return ASCII code '0 x 0 D'* [ ]: ASCII code Space (0 x 20)Transmission / Receiving Protocol?'SQQERHA?'SQQERHA?A?7IX-(A?A?(EXEA?'VA?'SQQERHA?A?7IX-(A?A?3/A?(EXEA?\A?'SQQERHA?A?7IX-(A?A?2+A?(EXEA?\A](https://usermanual.wiki/LG-Electronics-USA/M5520CJ/User-Guide-1363039-Page-58.png)


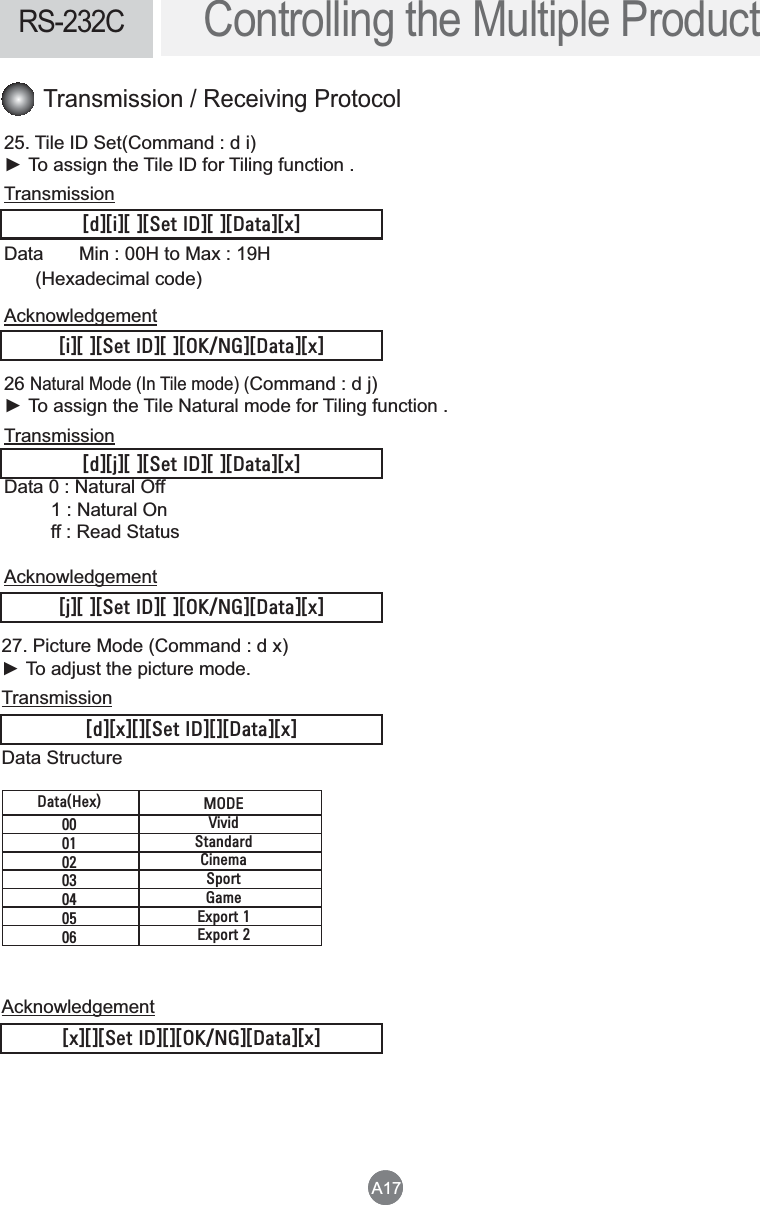
![Controlling the Multiple ProductRS-232CA18A18Transmission / Receiving Protocol28. Sound Mode (Command : d y )To adjust the Sound mode. Transmission Data StructureAcknowledgementData(Hex)0102030405ModeStandardMusicCinemasportGame29. Fan Fault check (Command : d w )To check the Fan fault of the TV. Transmission * The data is always FF(in Hex). Data ff: Read Status Acknowledgement * Data is the status value of the Fan fault. Data 0: Fan fault 1: Fan OK 2: N/A(Not Avaliable)?HA?]A?A?7IX-(A?A?(EXEA?<A?]A?A?7IX-(A?A?3/2+A?(EXEA?\A?HA?[A?A?7IX-(A?A?(EXEA?\A?[A?A?7IX-(A?A?3/2+A?(EXEA?\A](https://usermanual.wiki/LG-Electronics-USA/M5520CJ/User-Guide-1363039-Page-72.png)
![Controlling the Multiple ProductRS-232CA2135. Time (Command : f a) Set the current time. Transmission[Data1]0 : Monday1 : Tuesday2 : Wednesday3 : Thursday4 : Friday5 : Saturday6 : Sunday[Data2]0H to 17H (Hours)[Data3]00H to 3BH (Minutes) Acknowledgement*When reading data, FFH is inputted for [Data1], [Data2] and [Data3]. In other cases, all are treated as NG. Transmission / Receiving Protocol?JA?EA?A?7IX-(A?A?(EXEA?A?(EXEA?A?(EXEA?'VA?EA?A?7IX-(A?A?3/2+A?(EXEA?(EXEA?(EXEA?\A](https://usermanual.wiki/LG-Electronics-USA/M5520CJ/User-Guide-1363039-Page-75.png)
![Controlling the Multiple ProductRS-232CA22Transmission / Receiving ProtocolTransmission [Data1]1. f1h to f4h(read one index) f1: read 1st index of On Time List, f2: read 2nd index of On Time List f3: read 3rd index of On Time List f4: read 4th index of On Time List ILbILHIPIXISRIMRHI\ILHIPIXIEPPMRHI\IWIHIPIXIEPPMRHI\IWSJ3R8MQI0MWXIHIPIXIWXMRHI\SJ3R8MQI0MWXIHIPIXIRHMRHI\SJ3R8MQI0MWXIHIPIXIVHMRHI\SJ3R8MQI0MWXIHIPIXIXLMRHI\SJ3R8MQI0MWX3. 01h to 80h (write) (Day of Week)bit0 (01h) : Mondaybit1 (02h) : Tuesdaybit2 (04h) : Wednesdaybit3 (08h) : Thursdaybit4 (10h) : Fridaybit5 (20h) : Saturdaybit6 (40h) : Sundaybit7 (80h) : Everyday (1fh) : Monday to Friday (3fh) : Monday to Saturday (60h) : Saturday to Sunday[Data 2]00h to 17h (Hours)[Data 3]00h to 3bh (Minutes)*When you read/delete the current on time list, all of [Data2][Data3] are have to be FFH. (ex1: fd 01 f1 ff ff - when you read 1st index of On Time List ex2: fd 01 e1 ff ff - when you delete 1st index of On Time List ex3: fd 01 3f 02 03 - when you write one On Time Data, "Monday to Saturday, 02:03" Acknowledgement36. On Timer (On/Off Timer) Time (Command : f d) Set On Timer.?HA?A?7IX-(A?A?3/A?(EXEA?(EXEA?(EXEA?\A?JA?HA?A?7IX-(A?A?(EXEA?A?(EXEA?A?(EXEA?'VA](https://usermanual.wiki/LG-Electronics-USA/M5520CJ/User-Guide-1363039-Page-76.png)
![Controlling the Multiple ProductRS-232CA23Transmission[Data 1]1. f1h to f4h(read one index) f1: read 1st index of Off Time List, f2: read 2nd index of Off Time List f3: read 3rd index of Off Time List f4: read 4th index of Off Time List 2. e1h to e4h(delete one index), e0h(delete all indexes)e0: delete all indexes of Off Time Liste1: delete 1st index of Off Time Liste2: delete 2nd index of Off Time Liste3: delete 3rd index of Off Time Liste4: delete 4th index of Off Time List3. 01h to 80h (write) (Day of Week)bit0 (01h) : Mondaybit1 (02h) : Tuesdaybit2 (04h) : Wednesdaybit3 (08h) : Thursdaybit4 (10h) : Fridaybit5 (20h) : Saturdaybit6 (40h) : Sundaybit7 (80h) : Everyday (1fh) : Monday to Friday (3fh) : Monday to Saturday (60h) : Saturday to Sunday[Data 2]00h to 17h (Hours)[Data 3]00h to 3bh (Minutes)*When you read/delete the current on time list, all of [Data2][Data3] are have to be FFH. (ex1: fd 01 f1 ff ff - when you read 1st index of Off Time List ex2: fd 01 e1 ff ff - when you delete 1st index of Off Time List ex3: fd 01 3f 02 03 - when you write one Off Time Data, "Monday to Saturday, 02:03")Acknowledgement37. Off Timer (On/Off Timer) Time (Command : f e) Set Off Timer.Transmission / Receiving Protocol?JA?IA?A?7IX-(A?A?(EXEA?A?(EXEA?A?(EXEA?'VA?IA?A?7IX-(A?A?3/A?(EXEA?(EXEA?(EXEA?\A](https://usermanual.wiki/LG-Electronics-USA/M5520CJ/User-Guide-1363039-Page-77.png)
![Controlling the Multiple ProductRS-232CA24Transmission / Receiving Protocol38. Scheduling Input select (Command : f u) (Main Picture Input)To select input source for TV depending on day. Transmission[Data 1]1. f1h to f4h(write/read one index) f1: read 1st index of On Time Input f2: read 2nd index of On Time Input f3: read 3rd index of On Time Input f4: read 4th index of On Time Input [Data 2]Input*When you read/delete the current On Time Input, [Data2] needs to be FFH. (ex1: fu 01 f1 ff - when you read 1st index of On Time Input ex2: fu 01 f3 02 - when you write one On Time Input Data in to 3rd index, "AV") Acknowledgement(EXE,I\-2498%:'SQTSRIRX6+&4',(1-(:-,((:(,(1-(:-4'?JA?YA?A?7IX-(A?A?(EXEA?A?(EXEA?'VA?YA?A?7IX-(A?A?3/A?(EXEA?(EXEA?\A](https://usermanual.wiki/LG-Electronics-USA/M5520CJ/User-Guide-1363039-Page-78.png)
![Controlling the Multiple ProductRS-232CA2947. Serial no.Check (Command : f y) To read the serial numbers Transmission Data FF (to read the serial numbers)Acknowledgement* The data format is ASCII Code.?]A?A?7IX-(A?A?3/2+A?(EXEAb?(EXEA?\A?JA?]A?A?7IX-(A?A?(EXEA?'VATransmission / Receiving Protocol](https://usermanual.wiki/LG-Electronics-USA/M5520CJ/User-Guide-1363039-Page-83.png)
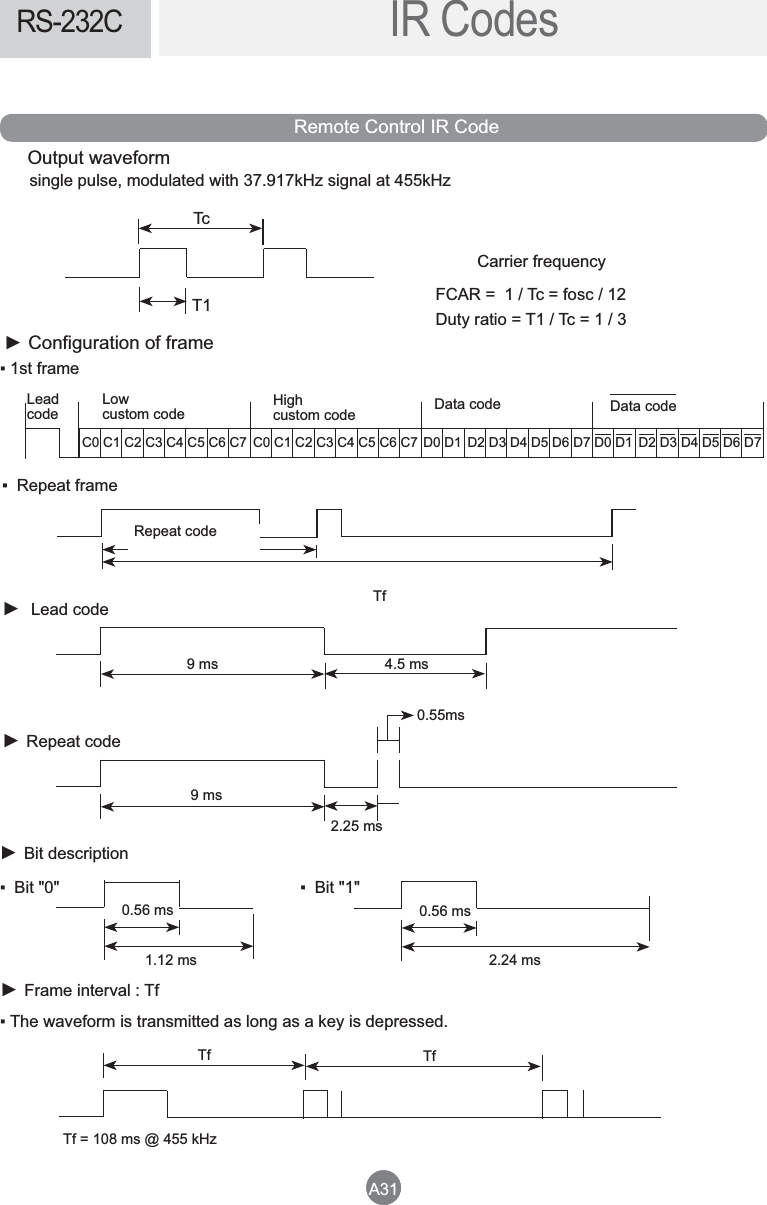
![Controlling the Multiple ProductRS-232CA32IR CodesRS-232CA32'SHI,I\*YRGXMSR2SXI94Ț(3;2Ȟ6-+,8Ȝ0)*8Ƞ43;)6323**132-83632132-8363**198))RIVK]7EZMRK-24981)29)<-84713/2YQFIV/I]2YQFIV/I]2YQFIV/I]2YQFIV/I]2YQFIV/I]2YQFIV/I]2YQFIV/I]2YQFIV/I]2YQFIV/I]2YQFIV/I]%6'1%6/:SP:SP''&&(6'&YXXSR6'&YXXSR6'&YXXSR6'&YXXSR6'&YXXSR6'&YXXSR(MWGVIXI-6'SHI6'&YXXSR(MWGVIXI-6'SHI6'&YXXSR6'&YXXSR6'&YXXSR6'&YXXSR6'&YXXSR6'&YXXSR6'&YXXSR6'&YXXSR6'&YXXSR6'&YXXSR6'&YXXSR6'&YXXSR6'&YXXSR6'&YXXSR6'&YXXSR6'&YXXSR6'&YXXSR6'&YXXSR(MWGVIXI-6'SHI6'&YXXSR6'&YXXSR](https://usermanual.wiki/LG-Electronics-USA/M5520CJ/User-Guide-1363039-Page-86.png)
![Controlling the Multiple ProductRS-232CA33IR CodesRS-232CA33))&&&&%*)%&*('%*6'&YXXSR6'&YXXSR6'&YXXSR6'&YXXSR(MWGVIXI-6'SHI6'&YXXSR6'&YXXSR6'&YXXSR6'&YXXSR6'&YXXSR6'&YXXSR6'&YXXSR6'&YXXSR6'&YXXSR6'&YXXSR(MWGVIXI-6'SHI-RTYX%:7IPIGXMSR(MWGVIXI-6'SHI-RTYX'31432)287IPIGXMSR(MWGVIXI-6'SHI-RTYX6+&4'7IPIGXMSR(MWGVIXI-6'SHI-RTYX,(1-(:-7IPIGXMSR(MWGVIXI-6'SHI3RP]QSHI(MWGVIXI-6'SHI3RP]QSHI(MWGVIXI-6'SHI3RP]>331Cinena >331QSHI&VMKLXŢ4EKI94&VMKLXţ4EKI(S[R&%'/%983'32*-'-(326IH'SPSV-(3**+VIIR'SPSV=IPPS['SPSV&PYI'SPSV8-0)--%:'31432)286+&4',(1-(:-%6'%6'%6'ZOOM'SHI,I\*YRGXMSR2SXI](https://usermanual.wiki/LG-Electronics-USA/M5520CJ/User-Guide-1363039-Page-87.png)