LG Electronics USA MS910 Cellular/PCS/AWS CDMA and PCS/AWS LTE Phone with WLAN and Bluetooth User Manual Layout 1
LG Electronics USA Cellular/PCS/AWS CDMA and PCS/AWS LTE Phone with WLAN and Bluetooth Layout 1
Users Manual

HAC
This phone has been tested and rated for use with hearing aids for
some of the wireless technologies that it uses.
However, there may be some newer wireless technologies used in
this phone that have not been tested yet for use with hearing aids.
It is important to trythe different features of this phone thoroughly
and in different locations, using your hearing aid or cochlear implant,
to determine if you hear anyinterfering noise.
Consult your service provider or the manufacturer of this phone for
information on hearing aid compatibility.
If you havequestions about return or exchange policies, consult
your service provider or phone retailer.
Warning
In Android, applications do not work directly with resolution that
some of the applications from Android Market would support only
the certain resolution. Please be advised that some of the
downloaded applications from the Adroid Market would not be
available on your phone due to LCD resolution difference. In
addition, please be aware that your phone could get into reset
mode by downloading bugged applications.
Important Health Information and Safety Precautions

Bodily Contact During Operation
This device was tested for typical use with the back of the phone
kept 0.79 inches (2.0 cm) from the body. To comply with FCC RF
exposure requirements, a minimum separation distance of 0.79
inches (2.0 cm) must be maintained between the user
’
sbody and
the back of the phone, including the antenna. Third-party belt-clips,
holsters, and similar accessories containing metallic components
should not be used. Avoid the use of accessories that cannot
maintain 0.79 inches (2.0 cm) distance between the user
’
sbody and
the back of the phone and have not been tested for compliance
with FCC RF exposure limits.
FCC Notice and Cautions
This device and its accessories comply with part 15 of FCC rules.
Operation is subject to the following two conditions: (1) This device
and its accessories may not cause harmful interference, and (2) this
device and its accessories must accept anyinterference received,
including interference that causes undesired operation.
Any changes or modifications not expressly approved in this user
guide could void your warrantyfor this equipment. Use only the
supplied antenna. Use of unauthorized antennas (or modifications to
the antenna) could impair call quality, damage the phone, void your
warranty and/or violate FCC regulations.
Don
’
tuse the phone with a damaged antenna. Adamaged antenna
could cause a minor skin burn. Contact your local dealer for a
replacement antenna.
17
Technical Details

Technical Details
Part 15.21 statement
Changes or modifications that are not expressly approved by the
manufacturer could void the user
’
sauthority to operate the
equipment.
Part 15.105 statement
This equipment has been tested and found to comply with the
limits for a class B digital device, pursuant to Part 15 of the FCC
rules. These limits are designed to provide reasonable protection
against harmful interference in a residential installation. This
equipment generates, uses, and can radiate radio frequency energy
and, if not installed and used in accordance with the instructions,
maycause harmful interference to radio communications. However,
there is no guarantee that interference will not occur in a particular
installation. If you experience interference with reception (e.g.,
television), determine if this equipment is causing the harmful
interference by turning the equipment off and then back on to see if
the interference is affected. If necessary, try correcting the
interference by one or more of the following measures:
-Reorient or relocate the receiving antenna.
-Increase the separation between the equipment and receiver.
-Connect the equipment into an outlet on a circuit different from
that to which the receiver is connected.
-Consult the dealer or an experienced radio/TV technician for help.
The VS910 is model tat operates on Verizon's 4G network, based on
Long Term Evolution (LTE) technology and Mobile Broadband 3G
networks in the United States*.
Now you can connect easily at high speeds to the Internet, your
corporate Intranet, and your email while you're away from the office.
*Service not available everywhere. Visit website (verizonwireless.com/4G) for a complete
list of available area.
Information subject to change.
MS910
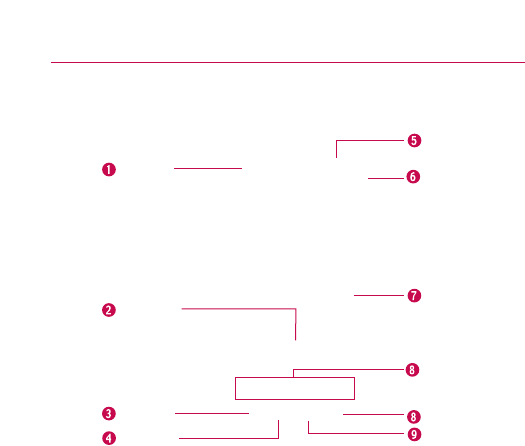
1.
Proximity Sensors
senses proximity towards other objects (such as your head) so that
touch commands are not accidentally activated during a call.
Note *Do not block the sensor or near sensor area with film cover or phone case.
*The use of a film cover produced by other manufacturers other than LG can
cause a disturbancein touch operation, the display, etc.
2.
Quick Keys
-
Phone Key opens the Phone Application for access to the dialpad, Call log, Contacts,
and Favorites.
-
Contacts Key opens the Contacts Application.
-
Messaging Key opens the Messaging Application.
-
Browser Key opens the Browser Application.
3.
Menu Key
Opens an options menu with options that affect the current screen or
application.
4.
Home Key
returns to the Home screen. If you're already viewing one of the Home screen
extension panes, it navigates you to the central Home screen pane. Press and hold to view
the most recently used applications.
5. Power/Lock
Key
locks the screen. Press and hold to open the phone options menu (for
the following options): Silent mode, Airplane mode, and Power off.
6.
Earpiece
lets you hear callers and automated prompts.
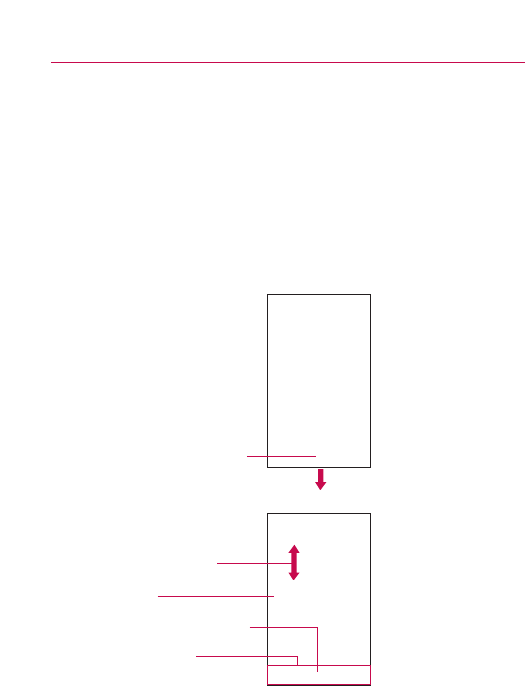
Phone Overview
Front View
Proximity
Sensors
Menu Key
Quick Keys
-Phone Key
-Contacts Key
-Messaging Key
-Browser Key
Home Key
Earpiece
Power/Lock Key
Touchscreen
Search Key
Applications
Launcher Key
Back Key
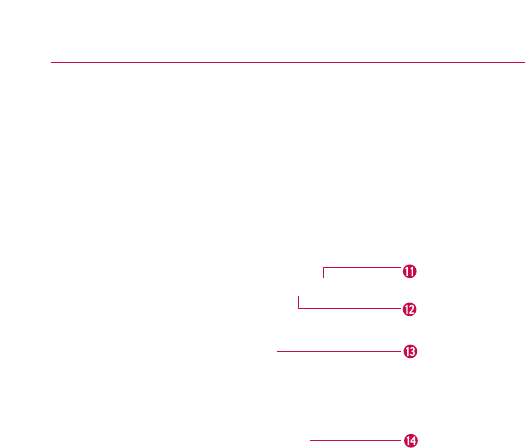
11.
3.5mm Headset Jack
allows you to plug in an optional headset for convenient, hands-free
conversations. The 3.5mm jack also allows you to plug in headphones to listen to music.
12.
Microphone
transmits your voice to the other caller and to Voice-activated functions.
13.
Camera Lens
use for taking pictures and recording videos. Keep clean for optimal
performance.
14.
Back Cover
encloses the battery compartment.
Rear View
3.5mm Headset
Jack
Camera Lens
Back Cover
Microphone
7.
Touchscreen
displays all the information needed to operate your phone, such as
applications, call status, date, time, signal status, and battery strength.
8.
Applications Launcher Key
opens the Launch screen, where you can view installed
applications.
9.
Search Key
opens Quick Search Box
TM
from the Home screen to search the phone and
the web. In many applications, you may touch this key to search within the application
itself. Touch and hold to open Bing search by voice.
10.
Back Key
returns to the previous screen. Also closes pop-up display items such as menus
and dialog boxes.
21
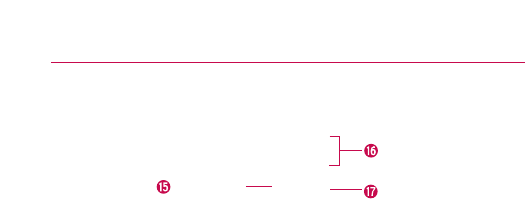
The Basics
15.
Accessory/Charger Port
allows you to connect the phone charger, USB cable, or other
compatible accessories.
16.
Volume Keys
allowyou to adjust the ringer, media volumes, or the in-call volume during a
call.
17.
microSD Slot
accommodates the pre-installed 2GB microSD
TM
card (expandable up to
16GB)
NOTE InsertamicroSD card touse the cameraand other multimedia features.
Multimedia contents will be saved in the microSD card.
Your LG VS910 has a microSD
TM
card pre-installed.
Volume Keys
HDMI Slot
Accessory/
Charger Port
Left Side Right Side
MS910

22
Installing the Battery and microSD Card
NOTE
It is important to fully charge the battery before initial use of the phone.
The phone comes with a rechargeable battery. Keep the battery
charged while not in use in order to maximize talk, use, and standby
time. The battery charge level is shown at the top right part of the
screen.
Installing the battery
Removing the battery
Turn the power off. Remove the battery cover (as demonstrated in
the previous instructions). Then use the fingertip cutout to lift the
top edge of the battery out.
The Basics
1.Hold the phone
with both hands
and use the
fingertip cutout at
the top of the
phone to pull
open the battery
cover (as shown
above).
2.Align the battery
contacts with the
terminals near the
bottom of the
phone, then press
the battery into
place.
3.Replace the
battery cover over
the backof the
phone (as
demonstrated).
Apply a steady
downward
pressure until the
batterycover
clicks into place.
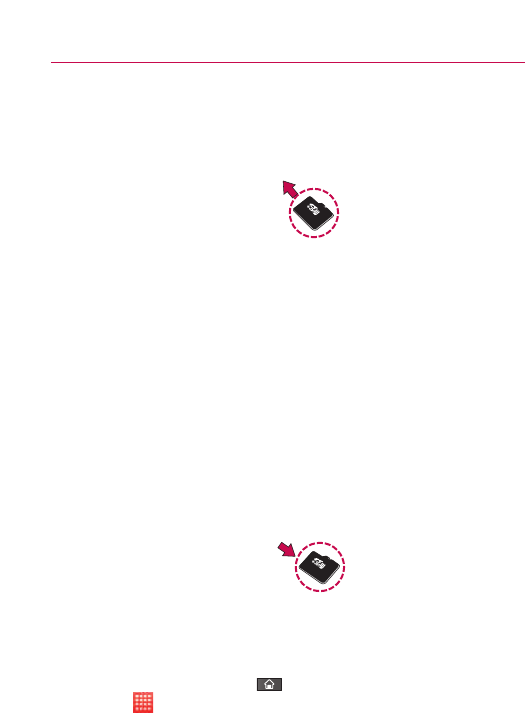
Inserting a microSD card
Gently uncover the microSD slot located on the left side of the
phone. Position the microSD card facing up and slide it into place
until it is fully inserted and locked in place.
NOTE
The microSD card can be easily damaged by improper operation. Please be
careful when inserting, removing or handling it.
To remove the microSD card
1.Unmount the microSD card (see steps below), then uncover
the microSD slot located on the leftside of the phone.
2. Gently push the exposed edge of the microSD card in with
your fingertip to release it from the slot.
3. Carefully pull the microSD card out of the slot and replace
the cover to the slot.
NOTE
To safely remove the microSD card from your phone, unmount it from your
phone first, as described below.
Tounmountthe microSD card
1. Press the Home Key ,press the Applications Launcher
Key .
2. Touch Settings >SD card & phone storage.
3. Touch Unmount SD card.
Charging the Phone
Your LG VS910 device comes with a Wall/USB charger and a USB
data cable which connect together to charge your phone. To charge
your phone:
NOTICE
Please use only an approved charging accessory to charge your LG phone.
Improper handling of the charging port, as well as the use of an incompatible charger,
may cause damage to your phone and void the warranty.
1. Connect the USB cable into the Wall/USB charger. When
connecting, as shown below, the LG logo on the USB cable
should face toward you.
2. Plug the USB cable (as shown below) into the phone's
charger port.
The Basics
USB Cable
Wall/USB charger
MS910

Battery temperature protection
Though extremely rare, if the battery becomes overheated, the
phone will automatically turn off.
Battery charge level
You can find the battery charge level at the top right part of the
screen. When the battery level becomes low, the phone will notify
you. Once the battery level becomes exceedingly low, the phone
will shut off without notice. As a result, unsaved items may be lost.
Charging with USB
You can use your computer to charge your phone. To be able to
charge with the USB cable, you need to have the necessary USB
drivers installed on your PC first. Connect one end of the USB
cable to the charger port on your phone and connect the other
end to a USB port on your PC. It is best to use the rear USB port
when connecting to a desktop PC. The USB hub should be
powered by an external power source.
NOTES
●
Low-power USB ports are not supported, such as the USB port on your
keyboard or bus-powered USB hub.
●
LG USB Driver is downloadable from the following site:
http://www.lgmobilephones.com > Click Mobile Support >Select the
Carrier(Verizon) > Select the Model > Click USB Cable Driver to download.
Using the phone without battery
It is possible to use the phone without the battery. Connect the
charger to the phone and plug the charger into a wall. After doing
this, you can turn the phone on and place calls.
NOTE
Using the phone without a battery may cause the phone to turn off
unexpectedly if the supply of power is interrupted.
The Basics
The Basics
Optimizing Battery Life
You can extend your battery's life between charges by turning off
features that run in the background. You can also monitor how
applications and system resources consume battery power.
Tips to extend the life of your battery
'Turn off radio communications that you aren't using.
If you aren't using Wi-Fi, Bluetooth, or GPS, use the Settings
menu to turn them off. (Note that the GPS receiver is only
turned on when you're using an application that makes use
of it.)
'Turn down screen brightness and set a shorter screen timeout.
'If you don't need them, turn off automatic syncing for Gmail,
Calendar, Contacts, and other applications.
'Use the Power Control widget to control the wireless
connections, GPS connection, Bluetooth power, display
brightness, and syncing activity.
To check the battery charge level
'Press the Home Key ,then touch the Applications
Launcher Key >Settings >About phone > Status.
The batterystatus (Charging and Discharging) and level (as a
percentage of fully charged) will be displayed at the top of
the screen.

The Basics
To monitor and control what uses the battery
The Battery use screen allows you to see which applications are
consuming the most battery power. Information on this screen
allows you to identify downloaded applications you may want to
turn off when not being used, so you can get the most out of your
battery power.
'Press the Home Key ,then touch the Applications
Launcher Key >Settings > About phone > Battery
use. The screen will display battery usage time. Either how
long since last connected to a power source, if connected to
apower source, and how long you were last running on
battery power.
The list of applications or services using battery power are
displayed in order of energy used, from greatest amount to
least.
'Touch an application in the Battery Use screen to see the
details about its power consumption.
Different applications offer different kinds of information, and
they may even include options to modify the settings so you
can reduce power consumption by that application.
Turning the Phone On and Off
Turning the phone on
'Press and hold the Power/Lock Key for a couple of
seconds until the display lights up.
NOTE
When you turn on your phone for the first time, follow the instructions on
the screen to activate your device.
Turning the phone off
1. Press and hold the Power/Lock Key until the pop-up
menu appears.
2. Touch Power Off in the pop-up menu.
3. Touch OK to confirm that you want to turn off the phone.
Tounlock the phone
If you don
’
tuse the phone for a while, the screen and backlight
will shut off to conserve battery power. To unlock the phone:
1. Press the Power/Lock Key .
Your Lock Screen will appear.
2. Touch and drag the Unlock icon to the right.
The last screen you were working on opens.
NOTE
This is the default Lock Screen. If you have set up
an Unlock Pattern, use your fingertip to draw the
pattern.
To turn the phone sounds off
If you're in a place where your phone sounds may disturb others,
you can quickly silence your phone from the Lock Screen.
1. Press the Power/Lock Key .
2. Drag the Sounds off icon to the left.
To turn the phone sounds back on, drag the Sounds on icon
to the left.
SETTING UP YOUR DEVICE
When you turn on your wireless device for the first time, you have
the option to quickly set up various accounts. Simply follow the
onscreen instructions to complete the initial setup of your wireless
device.
To set up your device, follow the steps below :
1. Select your language between English and Español.
2. If you see the ‘Welcome to the LG VS910’ page, touch
Continue on the bottom.
3. Select whether to Skip or Start the Backup Assistant.
4. Select whether to Skip or Start the Google account setup.
With a Google Account, Google applications are
automatically synced between your phone and computer
regardless of where you makean update.
5. Select the account you want to set up. (E-Mail, Facebook,
and Twitter).
6. Select the Location Consent. (Verizon Location Services/
Standalone GPS Services/ Google Location Services)
7. TouchBegin to start using the phone.
MS910

The Basics
For more information on how to set up your email, visit
smartphones.verizonwireless. com/. Click on the Smartphone
Support tab and select your phone.
Setting up your Google Account
1. At the setup screen, touch Create or Sign in.
2. Enter your username and password.
3. Touch Sign in.
Now your Gmail, Google Contacts, and Google Calendar events
will all be loaded to your phone automatically.
Use the area below to record your Google account information for
future reference.
Username:___________________________@gmail.com
Password:________________________________________________
Your Google Account
You must sign into a Google Account to use Gmail, Google Talk,
Google Calendar,and other Google Apps; to download applications
from Android Market; to back up your settings to Google servers;
and to take advantage of other Google services on your phone.
IMPORTANT
cIf you want to restore your settings to this phone, from
another phone that was running Android release 2.0 or later,
you must sign into your Google Account now, during setup. If
you wait until after setup is complete, your settings are not
restored.
cIf you don’t have a Google Account, you’re prompted to
create one.
cIf you have an enterprise account through your company or
other organization, your IT department may have special
instructions on how to sign into that account.
cWhen you sign in, your contacts, Gmail messages, Calendar
events, and other information from these applications and
services on the web are synchronized with your phone.

31
cIf you don’t sign into a Google Account during setup, you are
prompted to sign in or to create a Google Account the first
time you start an application that requires one, such as Gmail
or Android Market.
cWhen you sign in, you’re prompted to enter your username
and password, using the onscreen keyboard.
If you have a Google Account but have forgotten your password,
you must reset it before you can sign in. Go to
http://www.google.com,click Sign In,click “Can’t access your
account?” below the sign-in box, and then follow the instructions
for resetting your password.
Additional accounts
After setting up your Google Account, you can set up additional
accounts. These include, Google, Microsoft Exchange Server,
Facebook, Twitter, and other e-mail accounts. However, only the first
Google Account you sign into is backed up to Google servers. Some
applications that only work with a single account and display data
only from the first account that you sign into.
The Basics
Touch to open the onscreen
keyboard to enter your Google
Account username.
Touch to enter your password.
When you’re finished, touch Done on the keyboard (or press
the phone’s Back Key) to close the onscreen keyboard. Then
touchSign in at the bottom of the screen.
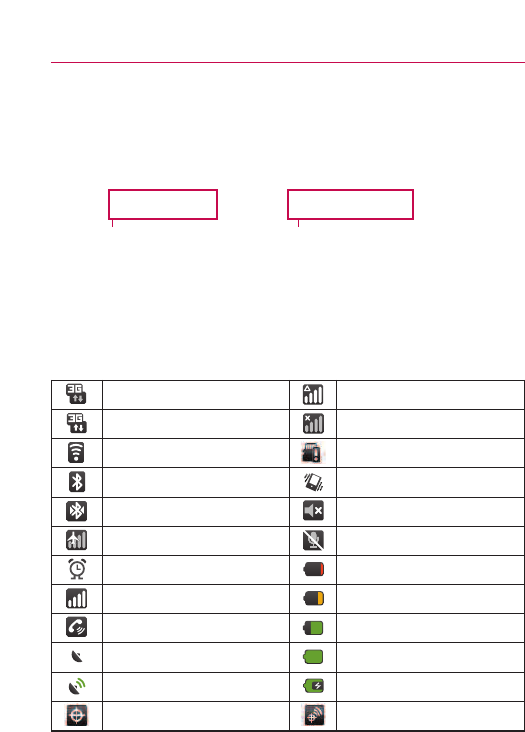
Phone’s Status Icons
The Status bar appears at the top of every screen. It displays icons
indicating that you
’
ve received notifications (on the left) and icons
indicating the phone
’
sstatus (on the right), along with the current time.
If you have more notifications than can fit in the Status bar, a plus
icon prompts you to open the Notifications panel to view them all.
Status icons
The following icons indicate the status of your phone.
The Basics
Notification icons Status icons
3G connected Roaming
3G in use No signal
Connected to a Wi-Fi network No microSD card installed
Bluetooth is on Vibrate mode
Connected to a Bluetooth device Ringer is silenced
Airplane mode is set Phone microphone is muted
Alarm is set Battery is very low
Signal strength Battery is low
Speakerphone is on Battery is partially drained
GPS is on Battery is full
Receiving location data from
GPS Battery is charging
Location Off Location On
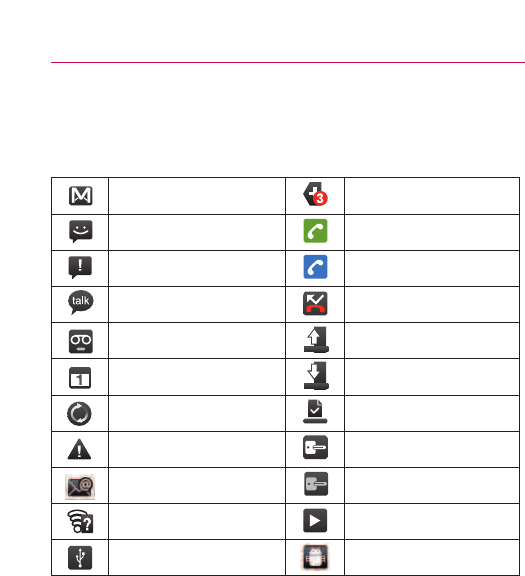
Notification icons
The following icons indicate that you've received a notification.
The Basics
New Gmail message 3more notifications not
displayed
New text or multimedia
message Call in progress
Problem with text or
multimedia message delivery
Call in progress using
Bluetooth headset
NewGoogle Talk message Missed call
Newvoicemail Uploading data
Upcoming event Downloading data
Data is syncing Download finished
Problem with sign-in or sync Connected to VPN
New email Disconnected from VPN
An open Wi-Fi network is
available Song is playing
Phone is connected via USB
cable USB debugging connected
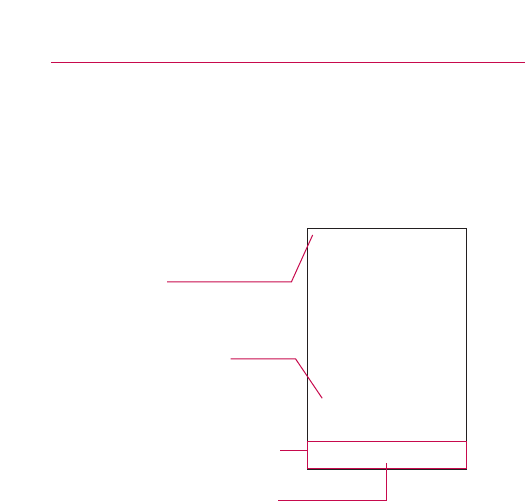
Getting to Know the Home Screen
The Home screen is your starting point to access all the features on
your phone. It displays application shortcuts, icons, widgets,
and other features.
Status Bar
Shows device status information
including the time, signal strength,
battery status, and notification
icons.
Application Icon
Touch an icon (application, folder,
etc.) to open and use it.
Applications Launcher Key
Touch to open the Launch screen
to view installed applications.
Quick Keys
Provide easy, one-touch access to
the functions you use the most.
Quick Keys
On the home screen, the Quick Keys are located on a bar along the
bottom of the Home screen and the Launch screen.
:opens the Phone application, which displays the dialpad so
you can dial an unsaved number. You can also access the Call
log, Contacts and Favorites by touching the tabs across the
top.
:opens your Contacts list. You can also access access Phone,
Call log, and Favorites by touching the tabs across the top.
:opens the Launch screen, where you can view all of your
installed applications.
:opens the Messaging application.
:opens the Browser application.
To return to the Home screen
'Press the Home Key at anytime, from anyapplication.
To view other Home screen panes
'Slide your finger leftor right across the Home screen. The
Home screen spans five panels, allowing more space for
icons, widgets, shortcuts, etc.
The Basics
Location Indicator
The dots indicate which Home screen pane you are viewing.
Touchscreen
Your touchscreen provides an excellent way to interact with and use
your Android phone. With the touch of your finger, you can
download and use available applications, make menu selections,
and access datasaved to your phone.
The following terms are used for describing the different available
actions using the touchscreen:
Touch Asingle finger touch selects items. For example, touch an
icon (e.g., application or menu item), touch words (e.g., menu
selection or to answer onscreen question), or touch letters to type.
Touch and hold Touch and hold an item on the screen by
touching it and not lifting your finger until an action occurs. For
example, to open a pop-up menu for customizing the Home
screen, touchan emptyarea on the Home screen until the menu
pops up.
Drag Touch and hold an item for a moment and then, without
lifting your finger,move your finger on the screen until you reach
the target position. You can drag items on the Home screen to
reposition them.
The Basics
The Basics
Swipe or slide To swipe or slide, quickly move your finger across
the surface of the screen, without pausing when you first touch it
(so you don
’
tdrag an item instead). For example, you can slide the
screen up or down to scroll a list, or browse through the different
Home screens by swiping from left to right (and vice versa).
Double-tap Double-tap to zoom a webpage or a map. For
example, quickly double-tap a section of a webpage to zoom that
section to fit the width of the screen. You can also double-tap to
control the Camera zoom, in Bing Maps, and in other applications.
Pinch-to-Zoom Use your index finger and thumb in a pinch or
spread motion to zoom in or out when using the browser, viewing
amap or pictures.
Rotate the screen From many applications, the orientation of the
screen rotates with the phone as you turn it from upright to
sidewaysand backagain.
NOTE
To turn this feature on and off,from the Home screen, touch the Applications
Launcher Key >Settings > Display.Then touch the Auto-rotate screen
checkbox.
Rotate the phone counter-clockwise for
landscape orientation.
Rotate the phone clockwise for portrait
orientation.
Text Input Methods
Swype (default): Swype™is a text input method that allows you to
enter a word by sliding your finger or stylus from letter to letter,
lifting your finger between words.
Android keyboard: The Android keyboard can also be used to enter
text. To switch to the Android keyboard, touch and hold a text field,
then touch Input method > Android keyboard.
Using the Swype Keyboard
The default keyboard uses Swype™.Swype uses error correcting
algorithms and a language model to predict the next word. Swype
also includes a touch predictive text system.
Toggles from 123/ABC
mode to SYM mode
Allows you to view Swype
Tips and Help.
Swype Tips
Access the Swype Tips to watch a video or tutorial on using Swype.
You can also use the following Swype text entry tips.
'Create a squiggle (like an S shape) to create a double letter
(such as pp in apple).
'Touch and hold a key to enter the alternate letter or symbol
located at the top right corner of the key.
'Move your finger or stylus over the apostrophe to enter
contractions.
'Double-touch on the word you want to change to correct a
misspelled word.
'Touchthe delete key to erase one character. Touch and hold
the delete keyto erase an entire word.
Swype Settings
To configure Swype settings
1. From the Home screen, touch the Applications Launcher
Key >Settings Language & keyboard >Swype.
2. Touch one of the following Swype settings to configure the
setting:
Preferences settings
Preferences settings provide access to Swype operation
preferences.
Language allows you to select the current text input language.
Default language is US English.
Word prediction allows you to use a built-in word database to
predict words while entering text in Swype.
The Basics

Audio feedback allows you to turn on sounds generated by the
Swype application.
Vibrate on keypress allows you to activate a vibration sensation
as you enter text using the keypad.
Enable tip indicator allows you to turn on an on-screen flashing
indicator that provides helpful user information.
Swype Advanced Settings
Swype Advanced Settings provide access to Swype advanced
operation settings.
Auto-spacing allows you to automatically insert a space between
words. When you finish a word, just lift your finger or stylus and
start the next word.
Auto-capitalization allows you to automatically capitalize the first
letter of a sentence.
Show complete trace allows you choose whether or not you
want the complete Swype path to display.
Word choice window sets the amount of times the word choice
selection window displays on screen. Move the slider between
Never or Always and touchOK.
Speed vs. accuracy sets how quickly Swype responds to on-
screen input. Move the slider between Fast Response (speed) or
Error Tolerance (accuracy) and touchOK.
The Basics

Help
This menu provides help and a tutorial to guide you through the
process.
Swype help displays the Swype User Manual.
Tutorial provides an on-screen tutorial.
About
The about menu provides the current software version for the
Swype application.
The Basics
Using the Android keyboard
You enter text using the onscreen keyboard. Some applications
open the keyboard automatically. In others, you touch a text field
where you want to enter text to open the keyboard.
You can also enter text by speaking instead of by typing.
The Basics
See 'Swype Advanced Settings' on p38 to know
how to set the suggestion function.
Touchspace or a punctuation
mark to enter the red
suggestion.
Touch once to capitalize the next letter you type.
Touch and hold for all caps.
The Basics
To enter text
1. Touch a text field.
The onscreen keyboard opens.
2. Touch the keys on the keyboard to type.
The characters you’ve entered appear in a predictive word
box above the keyboard, with suggestions for the word you
are typing. Touch the arrow to view more suggestions.
3. Enter text into the text field.
'Touch the word you want as soon as it appears in the
predictiveword box.
'Touch the Space Key or a punctuation key to enter
the predicted word.
'Touch another word in the predictive word box.
'Continue touching letters until the word appears in the
predictive word box.
'Touch the Delete Key to erase characters to the left of
the cursor.
NOTE
Words that do not appear in the predictive word box before you enter it
completely are automatically added to your dictionary for future use. To
manually add a word, touch and hold the word to open a dialog box, then
touchAdd to dictionary.
4. When you're finished typing, press the Back Key to
close the keyboard.
Deutsch
To enter numbers, symbols, and other characters
'Touch the Symbols Key to switch to the numbers and
symbols keyboard.
Touch the Alt Key on the symbols keyboard to access
additional symbols; touch it again to switch back.
'Touch and hold any of the letter keys to access alternate
symbols. Initially, the symbol at the top of the key pops up.
When the menu pops up, touch any of the alternate
characters or symbols displayed.
'Touch and hold the Period Key (.) from abc mode to open a
small window to choose from various symbols.
'Touchand hold a number or symbol key to open a window of
additional symbols.
To change the keyboard orientation
'Turn the phone sideways or upright.
The keyboard is reoriented to take best advantage of the
new phone orientation.
Manypeople find the larger horizontal onscreen keyboard
easier to use.
You can control whether the screen
changes orientation automatically when
you turn the phone.
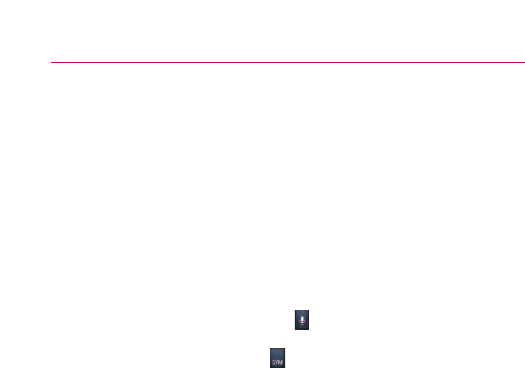
Entering text by speaking
You can use voice input to enter text by speaking. Voice input is an
experimental feature that uses Google’s speech-recognition service,
so you must have a data connection on a mobile or Wi-Fi network
to use it.
To enter text by speaking
You can enter text by speaking in most places where text is
allowed to be introduced.
1. Touch a text field.
2. Touch the Microphone Key on the keyboard (if you set
the Microphone Keyto appear on the symbols keyboard,
touchthe Symbols Key first).
The Basics

3. When prompted to “Speak now,”speak what you want to
enter.
Say “comma,”“period,” “question mark,”“exclamation
mark,” or “exclamation point” to enter punctuation.
When you pause, what you spokeis transcribed bythe speech-
recognition service and entered in the text field, underlined. You can
touch the Delete Key to erase the underlined text. If you start
typing or entering more text by speaking, the underline disappears.
You can edit the text that you enter by typing or speaking.
46 The Basics
Text that you enter by speaking is underlined. You can
delete it, or you can continue entering text to keep it.
Touch once to capitalize the next letter you type.
Touch and hold for all caps.

Editing text
You can edit the text you enter in text fields and use menu
commands to cut, copy, and paste text, within or across
applications. Some applications don’t support editing some or all of
the text they display; others may offer their own way to select text
you want to work with.
To edit text
1. Touch and hold the text field that contains the text you want
to edit.
2. A context menu with editing options is displayed. Choose an
option to edit the text.
3. Once you are finished editing the text, press the Back Key
to close the keyboard.
To select text
You can select text to cut or copy.Selected text is highlighted in
orange.
1. Touch and hold the text field or other portion of the screen
that contains the text to select.
2. In the context menu that opens, touch Select text.
3. Select text by touching and dragging across the text you
want to select.
4. Touch and hold the text field again and touch Cut or Copy.
The Basics

To cut or copy text
1. Select the text to cut or copy.
2. Touch and hold the text field, then touch Cut or Copy in the
menu that opens.
If you touch Cut, the selected text is removed from the text
field. In either case, the text is temporarily stored in the
phone memory so that you can paste it into another text
field.
To paste text
1. Copy (or Cut) the text to paste.
2. Touch the position on the text field where you want to paste
the text. This will set the cursor to the desired position.
You can paste text that you copied from one application into
atext field in another application.
3. Touch and hold the text field, then touch Paste in the menu
that opens.
The text is inserted at the cursor and remains temporarily
stored in the phone memory so you can paste that same
text in another location.
The Basics
Applications: How to View, Open and Switch
All of the applications on your phone, including any applications that
you downloaded and installed from Android MarketTM or other
sources, are grouped together on one Launch screen that you
access from your Home screen. You can slide the screen up or
down to view more applications.
49
The Basics
Launch screen
Home screen
Quick Keys
Touch an application icon to open
the application
Slide the screen up or down to
bring more icons into view
Touch to close the Launch screen
Overview
Touchto open the Launchscreen
Opening and Closing the Launch screen
Opening the Launch screen
With your LG VS910, it's easy to access the Launch screen no
matter what feature you're currently using. Simply press the
Home Key ,then touch the Applications Launcher Key .
Closing the Launch screen
To manually close the Launch screen, press the Home Key
,or touch Home .
NOTE
The Launch screen closes automatically when you touch an icon to
open its application. Dragging an icon onto your Home screen also
closes the Launch screen automatically.
Customizing the Launch screen
The items on the Launch screen are listed alphabetically. You can
customize the Launch screen by moving the position of
applications so that you don't haveto scroll the screen up to
access the applications you use most often. You can also add
additional categories to the screen to organize your files.
Moving application positions
1. From the Home screen, touch the Applications Launcher
Key .
2. Press the Menu Key and touchMove Item.
3. Touch and drag the application icon to the position you want,
then lift your finger. Application icons to the right of the
position shift accordingly.
The Basics
MS910
Adding a category
1. From the Home screen, touch Applications Launcher Key
.
2. Press the Menu Key and touch Add category.
3. Enter the category name, then touch OK.
Opening and Switching Applications
Multi-tasking is easy with AndroidTM because open applications
keep running even when you open another application. There’s no
need to quit an application before opening another. You can use
and switch among several open applications. Android manages
each application, stopping and starting them as needed to ensure
that unused applications don’t waste your device's resources.
Opening an application
'Open an application simply by touching its icon on the
screen.
TIP!
You can customize your Home screen with the application icons you use
most often. Applications are located on the Launch screen, but you can
copyanyapplication icon to your Home screen for faster access. No
matter where the icon is, on the Launch screen or your Home screen,
just touch it to open and use it.
Opening multiple applications
1. Touch an application icon to open it.
2. Press the Home Key .
NOTE
If the application icon you want is on your Home screen, simply touch
the icon to open and use it.
3. Touch the Applications Launcher Key .
4. Touch the icon for the other application you want to open.
The Basics
Switching between multiple applications
1. Press and hold the Home Key .
Awindow opens with icons of applications that you’ve used
recently.
2. Touch the application icon you want to open.
Or touch the Back Key to return to the
current application.
Adding application icons to the Home screen
Customize your Home screen with the applications you use most
often.
1. Open the Launch screen.
2. Touch and hold the application icon you want to add to your
Home screen. Your Launch screen will close so that you can
place the icon on a Home screen.
3. Lift your finger to place it, or drag the icon to where you
want it on the screen, then lift your finger.
The Basics
Touch an icon to open an application
you've used recently.
The Basics
Touchto open more menu items.
Options menus contain items that
apply to the current screen or
to the application as a whole.
Working with Menus
There are two kinds of Android menus: Options menus and Context
menus.
Options menus
Options menus contain tools that apply to the activities of the
current screen or application, not to any specific item on the
screen. To open the available Options menu, press the Menu Key
.Not all applications have Options menus; if you press the
Menu Key on a screen that has no Options menu, nothing
will happen.
Some applications have more Options menu items than can fit in
the options menu; touch More to open the additional items.
Context menus
Context menus contain options that apply to a specific item on
the screen. To open a Context menu, touch and hold an item on
the screen. Not all items have Context menus. If you touch and
hold an item that has no Context menu, nothing will happen.
Managing Notifications
Notification icons report the arrival of new messages, calendar
events, alarms, as well as ongoing events, such as when you are in
a call.
When you receive a notification, text appears briefly and the
notification icon will be displayed in the Status bar.
You can open the Notifications panel to view a list of all recent
notifications. Depending on your settings, you may hear a
notification sound or the phone mayvibrate.
Applications whose activities produce notifications, such as GmailTM
and Google Talk, have their own settings, which you can use to
configure whether, and how, they send notifications.
54 The Basics
When you touch and hold
certain items on a screen, a
Context menu opens.
The Basics
To open the Notifications panel
'Touch and drag the Status bar to the bottom of the screen.
OR
'From the Home screen, press the Menu Key and touch
Notifications.
The Notifications panel displays your wireless provider and a
list of your current notifications, organized into ongoing and
event-based notifications.
To respond to a notification
1. Open the Notifications panel. Your current notifications are
listed in the panel, each with a brief description.
2. Touch a notification to view it.
The Notification panel will close and the application that
corresponds to your response will open. For example, new
voicemail notifications dial your voicemail box, and Gmail
notifications will open up the Gmail application so you can read
your messages.
Touch a notification
to open it.

To clear all notifications
1. Open the Notifications panel.
2. Touch the Clear button at the top right of the panel.
All event-based notifications will be cleared; ongoing
notifications will remain in the list.
To close the notifications panel
Touch and drag the tab at the bottom of the Notifications panel to
the top of the screen or just touch the Back Key .
The panel will also close when you touch a notification.
Searching Your Phone and the Web
You can search for information on your phone and on the web by
using the Quick Search Box or Bing search.
Some applications, such as Gmail,Contacts,and Browser have the
ability to search contents within those specific applications.
Along with being able to search by typing in search terms, you are
also able to search by voice.
Phone and Web search using text entry
1. Press the Search Key .
When you press the Search Key on the Home screen
or in other applications that support this, the Quick Search
Box will open automatically.
The Basics
Voice Search
Touchto searchby voice.
Search results
Provides one-touchshortcut to
matching search items.
In some applications, such as Gmail, Contacts, and Browser,
the application's own search box opens when you press the
Search Key .This is indicated by the application's icon
on the left side of the search box.
OR
Press the Menu Key and touch Search .
Enter the text you're searching for in the Quick Search Box.
You can use the Search preferences to configure some
aspects of Bing web search (for example, whether it makes
suggestions belowthe Quick Search Box as you type), and
what phone features you want to include in searches.
2. TouchSearch to search for the entered terms.
OR
If what you want to search for what appears in the
suggestions list, touchthat item to conduct the search.
The Basics
Touch to conduct the search.
As you type, search results from
your phone, previous search
terms, and web search
suggestions appear. Touch an
item to search that term.

Locking the Screen
You can lock your screen so that only you can unlock it to make
calls, access your data, buy applications, and so on.
Setting a Lock Pattern for the First Time
1. Press the Home Key ,then touch the Applications
Launcher Key .
2. Scroll down and touch Settings > Location & security.
3. Touch Set up screen lock (under Screen unlock section).
4. Touch Pattern.
5. Read the instruction screen, touch Next to see tutorial
instructions on how to create an unlock pattern, then touch
Next when you're ready to create your unlock pattern.
6. You're prompted to draw and redraw your own pattern.
From then on, any time you wish to turn the phone on or
unlockthe screen, you will need to draw your unlock pattern to
unlockthe screen.
Changing Your Lock Pattern
1.Press the Home Key ,then touchthe Applications
Launcher Key .
The Basics
Draw your unlock pattern.
Touch Continue to draw your
pattern again to confirm it.
2. Scroll down and touch Settings > Location & security.
3. Touch Change screen lock (under Screen unlock section).
4. Draw your current lock pattern.
5. Touch Pattern to change it (or touch None to remove it).
6. You're prompted to draw and redraw your new pattern.
Using a PIN or Password to Lock the Screen
1. Press the Home Key ,then touch the Applications
Launcher Key .
2. Scroll down and touch Settings > Location & security.
3. Touch Change screen lock (under Screen unlock section).
4. Touch Pin to lock the screen with a number sequence or
touchPassword for an alphanumeric locksequence.
5. You're prompted to enter and reenter the lock sequence.
From then on, you will need to enter the sequence and
touch OK to unlock the screen.
NOTES
●
You have 5 opportunities to enter your unlock Pattern, PIN or Password. If
you used all the 5 opportunities, you can attempt it after 30 seconds.
●
When you can’t recall your unlock Pattern, PIN, or Password:
-If you’ve created a Google account on the phone, touch the Forgot
pattern? Key. Then, you are required to sign in with your Google account
to unlock your phone.
-If you haven’t created a Google account on the phone, you need to
perform a factory reset.
(Caution: If you perform a factoryreset, all user applications and user data
will be deleted. Please remember to backup any important data before
performing a factory reset.)
1. Turn the power off.
2. Press and hold the following keys at the same time for 5 seconds:
Down Volume Key + Home Key + Power/Lock Key.
3. When the power turns on, release the keys.
The Basics

Customizing the Home Screen
You can personalize your Home screen by adding application icons,
shortcuts, widgets, and other items to any Home screen pane. You
can also change the wallpaper.
To add an item to the Home screen
1. Go to the Home screen pane where you want to add the
item.
2. Press the Menu Key and touch Add.
Or, just touch and hold an empty spot on the Home screen
pane.
NOTE
If there is no available space on a particular Home screen pane, Add will
not be available; you must delete or remove an item before you can add
another item. In this case, you have the option of switching to another
Home screen pane.
3. In the menu that opens, touch the type of item to add.
You can add the following types of items to the Home screen:
Shortcuts Add shortcuts to applications, a bookmarked webpage,
a favorite contact, a destination in Bing Maps, a Gmail label, a
music playlist, and more. The shortcuts available depend on the
applications you have installed.
Widgets Add any of a variety of widget applications to your Home
screen, including a clock, a music player, a picture frame, Bing
search bar, a power manager, a calendar of upcoming
appointments, a News and Weather widget, and more. Note that
more widgets can also be found on Android MarketTM.
Folders Add a folder where you can organize other Home screen
shortcuts and icons, or folders that contain all your contacts,
contacts with phone numbers, or starred contacts. Your folders'
contents are kept up-to-date automatically.
The Basics
To move an item on the Home screen
1. Touch and hold the item.
2. Drag the item to a new location on the screen.
Pause at the left or right edge of the screen to drag the item
onto the next available Home screen pane.
3. When the item is where you want it, lift your finger.
To remove an item from the Home screen
1. Touch and hold the item, note that the Applications
Launcher Key changes to an icon of a trash can.
2. Drag the item to the Trash Can.
3. When the icon turns red, lift your finger.
Tochange the Home screen wallpaper
1. Press the Home Key ,then press the Menu Key
and touch Wallpaper.
You can also touch and hold an empty spot on the Home
screen, then touchWallpapers in the menu that opens.
2. Touch Gallery,Live wallpapers,or Wallpaper gallery.
'Touch Gallery to use a picture on your phone as a
wallpaper.You can crop the picture before setting it as a
wallpaper.
'Touch Live wallpapers to open a list of animated
wallpapers installed on your phone. Live wallpapers can
change according to the time of day, respond to touching
the screen, tell the time, or offer other information.
'TouchWallpapers to open a screen of wallpaper images
that come with the phone. Slide the thumbnail images left
and right to viewthe available images.
3. TouchSet wallpaper or Save.
The Basics

To rename a folder
1. Touch the folder icon to open it.
2. Touch and hold the folder window's title bar.
3. Edit the current folder name.
4. Touch OK.
Connecting Quickly With Your Contacts
As you build up your list of contacts on your phone, you can use
Quick Contact for Android to quickly chat, email, text message,
place a call, or to locate your contacts. Quick Contact for Android is
aspecial set of icons that you can use to quickly and easily connect
to a contact.
'Open your Contacts list and touch the contact icon to the left
of the contact's name. A bubble will open with the available
options, displayed as icons. This is the Quick Contact bubble.
Depending on the contact information saved, the available
actions will be displayed above the name.
'Touch a Quick Contact icon to communicate with the
contact.
Depending on the icon you've touched, a different application
will open. For example, the Bing Maps icon will be available
if an address is saved in that contact entry. By touching the
Bing Maps icon, the Bing Maps application will open and the
address will be mapped in Bing Maps.
If you add a shortcut for a contact to your Home screen, you will be
able to open Quick Contact for that contact.
The Basics
Connecting to Mobile Networks
When you buy your phone and sign up for service, your phone is
configured to use your provider's mobile networks for voice calls
and for transmitting data.
Different locations may have different mobile networks available.
Initially, your phone is configured to use the fastest mobile network
available for data. But you can configure your phone to use only a
slower 1X network for data, to extend the life of your battery,
between charges. You can also configure your phone to access a
different set of networks entirely, or to behave in specific ways
when roaming.
The icons in the Status bar indicate which kind of data network
you're connected to and the network signal strength.
When connected to slower networks, you may want to postpone
using your phone for data-intensive tasks until you are connected to
a faster network again, or find a Wi-Fi network to connect to.
To disable data when roaming
You can prevent your phone from transmitting data over other
carriers' mobile networks when you leavean area that is covered
by your carrier's networks. This is useful for controlling expenses if
your cell plan doesn't include data roaming.
1. Press the Home Key ,then touch the Applications
Launcher Key .
2.
Scroll down and touchSettings >Wireless & networks >
Mobile networks.
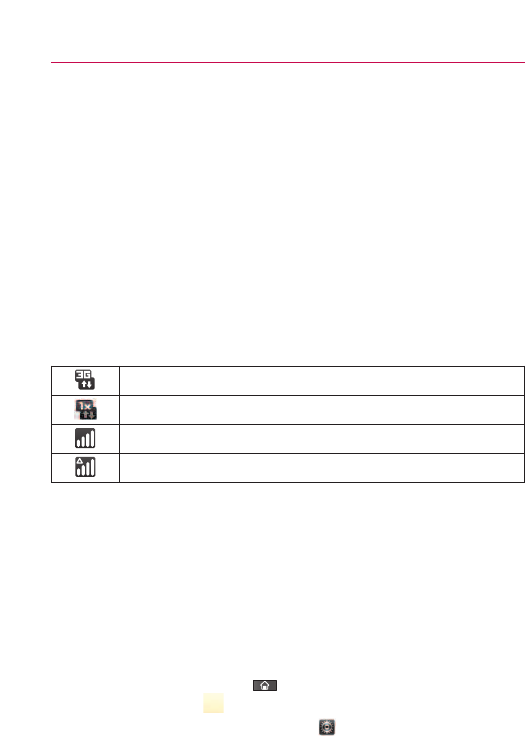
Connecting to Networks and Devices
Connected to the 3G network (EVDO revA)
Connected to a 2G network (1x)
The more bars that are lit, the stronger the wireless signal
Connected to another wireless service provider’s network (roaming)

3. Touch Data roaming to remove the checkmark from the box.
With Data roaming unchecked, you can still transmit data
with a Wi-Fi connection.
To limit your data connection to 2G networks
You can extend your battery life by limiting your data connections
to 2G networks. When you are connected to a 2G network, you
may want to postpone activities that transmit a lot of data, such
as sending, uploading, or downloading pictures or video, until you
are connected to a faster mobile or other wireless network.
1. Press the Home Key ,then touch the Applications
Launcher Key .
2. Scroll down and touchSettings > Wireless & networks >
Mobile networks > Network mode.
3. Touch1x only.
Connecting toWi-Fi Networks
Wi-Fi is a wireless networking technology that can provide Internet
access at distances of up to 100 meters, depending on the Wi-Fi
router and your surroundings.
To use Wi-Fi on your phone, you must connect to a wireless access
point, or
“
hotspot.
”
Some access points are open and you can
simply connect to them. Others are hidden or implement other
security features, so you must configure your phone so it can
connect to them.
Turn off Wi-Fi when you're not using it, to extend the life of your
battery.
The following Status bar icon indicates your Wi-Fi status.
Connecting to Networks and Devices
Connected to a Wi-Fi network (waves indicate connection strength)
Notification that an open Wi-Fi network is in range
When you connect to a Wi-Fi network, the phone obtains a network
address and other information it needs from the network, using the
DHCP protocol. To configure the phone with a static IP address and
other advanced settings, from Wi-Fi settings press the Menu Key
and touch Advanced.
To turn Wi-Fi on and connect to a Wi-Fi network
1. Press the Home Key ,then touch the Applications
Launcher Key .
2. Scroll down and touch Settings > Wireless & networks >
Wi-Fi settings.
3. If the Wi-Fi box is not checkmarked, touch Wi-Fi to turn it on
and scan for available Wi-Fi networks.
cAlist of available Wi-Fi networks will be displayed. Secured
networks are indicated by a lock icon.
cIf the phone finds a network that you have connected to
previously, it automatically connects to it.
4. Touch a network to connect to it.
cIf the network is open, you will be prompted to confirm
that you want to connect to that network by touching
Connect.
cIf the network is secured, you will be prompted to enter a
password. (Ask your network administrator for details.)
cWhen you're connected to a network, you can touch the
network name in the Wi-Fi settings screen for details about
the speed, security, address, and related settings.
Connecting to Networks and Devices

To receive notifications when open networks are in range
By default, when Wi-Fi is on, you receive notifications in the
Status bar when your phone detects an open Wi-Fi network.
1. Turn on Wi-Fi, if it's not already on.
2. From the Wi-Fi settings screen, touch Network notification
to checkmark the box.
Touch again to remove the checkmark and stop receiving
notifications.
Toadd a Wi-Fi network
You can add a Wi-Fi network so the phone will remember it, along
with any security credentials, and connect to it automatically when
it is in range. You can also add a Wi-Fi network manually if it does
not broadcast its name (SSID) or if you want to add a Wi-Fi
network when you are out of its range.
To add a secured network, you need to contact the network's
administrator to obtain the password or other required security
credentials.
1. Turn on Wi-Fi, if it's not already on.
2. From the Wi-Fi settings screen, touch Add Wi-Fi network.
3. Enter the Network SSID (name) of the network.
4. Touchthe drop-down menu arrow in the Security box, then
touchthe type of securityused on the network.
5. Enter the required passwords and securitycredentials.
6. Touch Save.
The phone will connect to the wireless network. Any
credentials that you entered are saved, so you are
connected automatically the next time you come within
range of this network.
Connecting to Networks and Devices

To forget a Wi-Fi network
You can make the phone forget about the details of a Wi-Fi
network that you added. For example, if you don't want the phone
to connect to it automatically or if it is a network that you no
longer use.
1. Turn on Wi-Fi, if it's not already on.
2. In the Wi-Fi settings screen, touch and hold the name of the
network.
3. Touch Forget network.
ActiveSync
ActiveSync synchronizes information on your device with
information on your PC, such as Outlook content. ActiveSync can
also synchronize over a cellular network with Microsoft Exchange
Server, if your company or service provider is running Microsoft
Exchange Server with Exchange ActiveSync. When you synchronize,
ActiveSync compares the information on your device with the
information on your PC and/or Exchange Server and updates all
locations with the most recent information.
With ActiveSync, you can:
'Synchronize information, such as Outlook E-mail, Contacts,
Calendar, or Tasks information on your device with your PC,
as well as pictures, video, and music.
'Synchronize Outlook E-mail, Contacts, Calendar
appointments, and Tasks on your device directly with
Exchange Server so that you can stay up to date even when
your PC is turned off.
'Exchange files between your device and your PC without
synchronizing.
Connecting to Networks and Devices

'Select which types of information are synchronized and
specify how much information is synchronized. For example,
you can choose how many weeks of past Calendar
appointments to synchronize.
Before you can synchronize information with a PC, first, install
ActiveSync on your PC, then create a synchronization pairing
between your device and the PC. You can install ActiveSync from
the Getting Started disc that comes with your LG VS910.
Once you have installed ActiveSync and set up a synchronization
relationship, ActiveSync on the PC recognizes your device when you
connect it, and automatically transfers the synchronization settings
you specified on your device.
You may be able to synchronize your device with Exchange Server
through your companyor wireless service provider. If you plan to do
so, obtain e-mail address, Exchange Server address, user name,
password, and domain name from your administrator before starting
the Sync Setup Wizard.
Windows Media Sync
By using PC Client programs like Windows Media Player or
Rhapsody you can easily sync the Multimedia files from the PC
(Music, Video, Image).
Follow the process below to Connect.
1.Touchthe Applications Launcher Key >Music >Menu
Key >Sync .
OR
Connect the USB Cable. Then open the Notifications panel and
touchUSB Connection Mode >Windows Media Sync.
Connecting to networks and devices
MS910
Follow the process below to Disconnect.
1. Open the Notifications panel and touch USB Connection
Mode >Modem Mode or Mass Storage Mode.
2. Open the Notifications panel and touchWindows media
sync.When the pop-up appears, touchOK for disconnection.
3. Disconnect the USB Cable.
NOTE
SD Card must be inserted on the mobile and it is recommended to use
the USB Cable that is supplied by LG. If the microSD Card is used in
other device, it is better to use after the format.
USB Autorun
USB Autorun is a feature that allows a LG VS910 to connect to a PC
using a USB cable and sets up the on a PC without a physical CD-
ROM.
'Automatically installs the LG USB Modem Driver.
'Allows the phone to be used as a Mass Storage when a
microSD card is present in the LG VS910. It allows transfer
of unprotected content from phone to PC and vice versa.
To select USB mode for Autorun
1. Press the Home Key ,then touch the Applications
Launcher Key >Settings >Connectivity >Default
connection mode.
2. TouchMass Storage mode to connect PC for Autorun.
NOTES
●
USB Autorun only works with Windows®XP, Window 7 and, VistaTM
operating systems.
●
Log on to the PC as Administrator. Non-Administrator accounts have
insufficient privilege to install USB Modem driver and don’t run Autorun
feature.
●
Do not unplug USB cable during Autorun.
Autorun automatically installs USB device driver for every USB
mode.
Connecting to networks and devices
MS910
MS910

Modem Mode with Autorun
Autorun may automatically use Modem mode in certain
circumstances.
'If no SD card is inserted in device, Autorun automatically
switches to Modem mode even if the mode is set to
Window Media Sync or Mass Storage mode.
'Even if the option Always ask is checkmarked, Autorun
automatically switches to Modem mode without additional
pop-up message notice.
'Autorun automatically switches to Modem mode if the
connection fails while syncing or connecting.
Autorun is not available when:
'Phone is booting (powering up).
'PC operating system is not set to Autorun (automatic
execute command).
To set Autorun on your PC operating system:
Insert the LG disk in your PC, double-click the CD drive, when the
disc drivewindowopens, double-clickthe LG Autorun application
(TL_Bootstrap.exe).
For Autorun in Windows VistaTM and Windows 7, open the Control
Panel, then clickAutoplay > Software and games > Install (or run
program. Autorun is only executed manually when it's set as:
Open folder to view files using Windows Explorer - Take no action
/Ask me every time.
Tochange the setting while Autorun is running :
You can change the settings while Autorun is running. Press the
Home Key ,then touch the Applications Launcher Key >
Settings >Connectivity >Default connection mode >Mass
Storage mode.
Connecting to networks and devices

NOTE
Be sure to checkmark the box Always ask if you want to be asked to
confirm the USB mode connection when the phone is connected to a computer.
Using the Status bar to change the settings
The Status bars shows the current USB connection mode so you
can easily open the the Status bar and change the settings as
needed.
When the USB is connected, the current USB connection mode
appears on the Notifications panel. Touch the connection setting to
display a pop-up box where you can change the USB connection
mode.
NOTE
If the Always ask checkbox is marked, the pop-up box is only provided
during USB connection, but is not provided in the notification area.
If the default sync mode is 'Windows media sync', the sync
connection is listed separately in the Notifications panel. Select it
to display a pop-up box that asks if you want to disconnect. If you
choose to disconnect, the connection changes to modem mode.
Step 1.Connecting Phone to PC
'Connect your phone to your PC with a compatible USB cable
(supplied) and LG Autorun starts automatically.
'Click‘I accept the terms in the agreement’ and ‘Yes’.
NOTES
●
Without the Autorun, the release notes for USB Autorun would pop-up as
shown.
●
Autorun is only supported for Windows®XP,Windows®Vista, Windows®7,
Mac OS X®abovev10.5.
72 Connecting to networks and devices

●
The ‘USB Autorun’ feature works only under an Administrator account.
The installer has insufficient privileges under a Non-Administrator account.
Log on as Administrator. The device is switched back to the user set
mode with 30 seconds.
Step 2. Downloading LG USB Modem Driver.
NOTES
●
If previous version of LG USB Modem Driver is installed in the computer,
it will automatically be updated to the recent version of Driver.
●
If recent version of LG USB Modem Driver is installed in the computer,
LG Autorun skips ‘Step 2.’
Step 3. Installing LG USB Modem Driver.
Step 4:Downloading or Running V Cast Media Manager
NOTES
●
If VCast Media Manager is already installed in the computer,USB
Autorun would not download V Cast Media Manager and just runs the
installed program.
●
Downloading or running V Cast Media Manager works only in Mass
storage mode.Toset the mode, press the Home Key ,then touch
the Applications Launcher Key >Settings >Connectivity >
Default connection mode >Mass storage mode.

Enable DUN
While traveling, you can use your phone as a modem for your
notebook. Use either VZAccess Manager or the Modem Link
program to use your phone as a USB or Bluetooth modem.
Before you proceed
'Toconnect your device to a computer via USB, you must first
install the LG USB driver on the computer.
'Make sure your phone has a data or dial-up modem
connection on the device manager of your computer.
'Touse a Bluetooth connection, make sure your computer
has built-in Bluetooth capability. If your computer does not
have Bluetooth, you can connect and use a Bluetooth
dongle.
74 Connecting to networks and devices
Sharing your phone’s mobile data connection
You can share your phone’s data connection with up to eight
devices at once, by turning your phone into a portable Wi-Fi hotspot.
When your phone is sharing its data connection, an icon appears in
the Status bar and as an ongoing notification in the Notifications
panel.
For the latest information about tethering and portable hotspots,
including supported operating systems and other details, visit
www.android.com/tether.
Make Your Device a 3G Mobile Hotspot
3G Mobile Hotspot can share the phone’s 3G data connection with
any Wi-Fi capable devices.
WARNING!
There are security risks associated with creating a wi-fi network open to the
public. It is highly recommended that you takesteps to protect your wi-fi
network from unauthorized access. Toadd encryption to your Wi-Fi hotspot:
1. Touch 3G Mobile Hotspot from the Menu.
2. Touch 3G Mobile Hotspot.
3. Touch the 3G Mobile Hotspot checkbox to enable this
feature.
4. Touch 3G Mobile Hotspot settings to set up and manage the
3G Mobile Hotspot.
5. Touch Configure from menu to view the SSID, Security, and
Password.
6. You are allowed to configure the SSID and Password on this
screen.
Portable Wi-Fi hotspot is active
Portable hotspot are active
7. If you want to change the security protocol, touch the
Security menu and choose Open or WPA2 PSK from the pop
up menu.
If you select WPA2 PSK, input a password for the connection and
then touch Save.
Your portable hotspot is now created.
You will use the Portable Wi-Fi hotspot checkbox from above to
enable and disable the connection. Once the connection is active,
go to the device you wish to connect and configure its wireless
connection to the Network SSID for your Android device and input
the password (if you are using WPA2 PSK). You will now have
wireless access on your device.
NOTE
WEP is the weakest option because it is highly vulnerable to hacking.
WPA2 is recommended by IEEE.
Connecting to Networks and Devices
Connecting to Bluetooth Devices
Bluetooth is a short-range wireless communications technology that
devices can use to exchange information over a distance of about
30 feet. The most common Bluetooth devices are headphones for
making calls or listening to music, hands-free kits for cars, and other
portable devices, including laptops and cell phones.
There are several Bluetooth profiles that define the features and
communications standards for Bluetooth devices.
To connect to a Bluetooth device, you must turn on your phone's
Bluetooth. To use your phone's Bluetooth with another device, you
must first pair the two devices. Pairing creates a secure
connections between the twodevices.
Turn offBluetooth when you're not using it to extend the life of your
batterybetween charges. Bluetooth is one of the wireless functions
that is turned offwhen Airplane mode is set to On.
The Status bar displays icons that indicate the Bluetooth status.
To turn Bluetooth on or off
1.Press the Home Key ,then touchthe Applications
Launcher Key .
2. Scroll down and touchSettings > Wireless & networks.
3. Touch Bluetooth to turn the function on or off.
The phone supports HFP,HSP, A2DP,AVRCP, OPP,PBAP, FTP, DUN.
Bluetooth
®
QD ID B016832
Connecting to Networks and Devices
Bluetooth is on
Connected to a Bluetooth device
To change your phone’s Bluetooth name
Your phone has a generic Bluetooth name by default, which is
visible to other devices when you set the phone as 'Discoverable'.
You can change the name to customize it to your preference.
1. Press the Home Key ,then touch the Applications
Launcher Key .
2. Scroll down and touch Settings > Wireless & networks >
Bluetooth settings.
cIf Bluetooth is off, touch Bluetooth to turn it on.
3. Touch Device name,enter a newname then touch OK.
To pair your phone with a Bluetooth device
You must pair your phone with another device before you can
connect to it.
1.Press the Home Key ,then touchthe Applications
Launcher Key .
2. Scroll tdown and touch Settings >Wireless & networks >
Bluetooth settings.
cIf Bluetooth is off, touch Bluetooth to turn it on.
cTouch Scan for devices to scan for and display the IDs of all
available in-range Bluetooth devices.
cIf the device you want to pair with isn't on the list, make
sure the target device is set to be discoverable, then touch
Scan for devices to scan again.
3. Touch the ID of the device you want to pair with your phone.
cOften, the target device will be discovered and pairing will
occur automatically.
Connecting to Networks and Devices
cIf you're prompted to enter a passcode, try entering 0000
or 1234 (the most common passcodes), or consult the
documentation that came with the target device to find its
passcode.
cOnce the pairing is successful, your phone will connect to
the device.
To connect to a Bluetooth device
Once paired, you can connect to a Bluetooth device as needed.
1. Press the Home Key ,then touch the Applications
Launcher Key .
2. Scroll down and touch Settings > Wireless & networks >
Bluetooth settings.
cIf Bluetooth is off, touch Bluetooth to turn it on.
3. In the list of Bluetooth devices, touch and hold the name for
the paired device on the list.
To configurethe Bluetooth features you want to use
Some Bluetooth devices have multiple profiles. Profiles can be the
ability to transmit your phone conversations, to play music with
Bluetooth stereo headphones, or to transfer files or other data.
1. Touch and hold the device listed in the Bluetooth settings
screen.
2. Touch Options in the menu that opens.
Ascreen opens with a list of the available profiles.
3. Touch a profile to add or remove the checkmark (to enable or
disable the profile).
4. When you're finished, press the Back Key .
Connecting to Networks and Devices

To disconnect from a Bluetooth device
1. Touch the device in the Bluetooth settings screen.
2. Touch OK to confirm that you want to disconnect.
To unpair a Bluetooth device
You can unpair a Bluetooth device and erase all pairing information
about it.
1.Touch and hold the device listed in the Bluetooth settings
screen.
2. Touch Disconnect and unpair or Unpair in the menu that opens.
Connecting toVirtual Private Networks
Virtual private networks (VPNs) allow you to connect to resources
inside a secured local network, from outside that network. VPNs are
commonly deployed by corporations, schools, and other institutions
so that their users can access local network resources when not on
campus, or when connected to a wireless network.
There are numerous systems for securing VPN connections,
including some that rely on secure certificates or other methods to
ensure that only authorized users can connect. For information
about installing secure certificates, see Working with Secure
Certificates on page 84.
Toconfigure VPN access from your phone, you must obtain the
details from your network administrator.
To add a VPN
1. Press the Home Key ,then touch the Applications
Launcher Key .
2. Scroll down and touch Settings > Wireless & networks >
VPN settings.
3. Touch Add VPN.
4. Touch the type of VPN to add.
Connecting to Networks and Devices
5. In the screen that opens, follow the instructions from your
network administrator to configure each component of the
VPN settings.
6. Press the Menu Key and touch Save.
The VPN will be added to the list on the VPN settings
screen.
To connect to a VPN
1. Press the Home Key ,then touch the Applications
Launcher Key .
2. Scroll down and touch Settings > Wireless & networks >
VPN settings.
The VPNs you've added are listed on the VPN settings
screen.
3. Touchthe VPN to which you want to connect.
4. In the dialog boxthat opens, enter anyrequested credentials
then touchConnect.
cWhen you're connected to a VPN, you will receive an
ongoing notification in the Status bar.
cIf you are disconnected, you will receive a notification that
you can touch to return to the VPN settings screen.
To disconnect from a VPN
'Open the Notifications panel then touchthe ongoing
notification for the VPN connection. This will allow you to
disconnect.
Connecting to Networks and Devices
Working With Secure Certificates
If your organization's VPN or Wi-Fi network relies on secure
certificates, you must obtain the certificates and store them in your
phone's secure credential storage before you can configure access
to that VPN or Wi-Fi network on your phone.
For specific instructions, contact your network administrator.
To install a secure certificate from the microSD card
1. Copy the certificate from your computer to the root (that is,
not in a folder) of the microSD card.
2. Press the Home Key ,then touch the Applications
Launcher Key .
3. Scroll down and touch Settings > Location & security.
4. Scroll down and touch Install from SD card.
5. Touch the file name of the certificate to install.
Only the names of certificates that you have not already
installed on your phone are displayed.
6. If prompted, enter the certificate's password then touch OK.
7. Enter a name for the certificate then touch OK.
If you have not already set a password for your phone's
credential storage, you will be prompted to enter a password
for it, twice, then touch OK.
You can now use the certificate that you installed when
connecting to a secure network. For security purposes, the
certificate will be deleted from the microSD card.
Connecting to Networks and Devices

microSD Card
'Your Device's microSD Card and Adapter
'microSD Card Settings
'Connecting Your Device to Your Computer
Your Device's microSD Card and Adapter
The microSD Card
Your phone is equipped with a preinstalled microSDTM memory card
to expand the phone’s available memory space. It allows you to
store images, videos, music, and voice datain your device.
Removing the microSD Card
To safely remove the microSD card from your device, first you need
to unmount the microSD card before removing it from the phone.
WARNING!
On the Android OS 2.2, you can download applications from Android Market
and can store them on microSD card as well as on the device. Since that, if
you skip the unmount procedure, it can cause an error because information
between microSD card and the device is accorded properly. In worst case,
the microSD card can be corrupted or damaged.
1. Touch the Applications Launcher Key >Settings >SD
card & phone storage >Unmount SD card > OK.Nowyou
can safely remove the microSD card.
2. Uncover the microSD slot located on the left side of the
phone.
3. Gently push the exposed edge of the microSD card in with
your fingertip to release it from the slot.
4. Carefully pull the microSD card out of the slot.
NOTE
You can easily damage the microSD card and its adapter byimproper
operation. Please be careful when inserting,removing, or handling them.
microSD Card
Inserting the microSD Card
1. Gently uncover the microSD slot located on the left side of
the device.
2. Position the microSD card with the label side facing up and
slide it into place until it is fully inserted and locked in place.
NOTE
Be sure to use only recommended microSD cards (up to 32GB). Using
non-recommended microSD cards could cause data loss and damage
your device.
microSD Icon Indicators
The following icons show your microSD card connection status at a
glance:
card has been unmounted (released from use) from the device.
card is being prepared for use and for mounting.
NOTE
DO NOT remove a microSD card while files are being accessed or
transferred. Doing so will result in loss or damage of data. Make sure
your batteryis fully charged before using the microSD card. Your data may
become damaged or unusable if the battery runs out while using the
microSD card.
microSD Adapter
The supplied microSD adapter allows you to use microSD cards in
other SD-compatible devices, like computers, cameras, and printers.
Before using the microSD card with an SD-compatible device, you
will need to insert the microSD card into the microSD adapter.
To insert the microSD card into the microSD adapter:
'With the label side of the microSD card facing up, insert the
card into the supplied microSD adapter, and gently slide the
card until it is fully inserted.
To remove the microSD card from the microSD adapter:
'Hold the front edge of the microSD card, and gently pull it
out to remove it from the adapter.
microSD Card
Write Protection
The microSD adapter has a built-in Write Protection lock to prevent
accidental overwriting or removal of your data when the microSD
card and adapter are inserted in another device.
'Slide the Write Protection lock tab down into the “Lock”
position to prevent overwriting of data. To allow data to be
added or removed from the microSD card, slide the Write
Protection lock tab up into the normal position.
microSD Card Settings
Viewing Memory in the microSD Card
1. Touch the Applications Launcher Key > Settings >
SD card & phone storage.
2. Review the available information.
cThe storage capacity page is divided into two sections:
External SD card and Internal phone storage.
3. Press to return to the previous page.
Formatting the microSD Card
Formatting a microSD card permanently removes all files stored on
the card.
1. Touch the Applications Launcher Key > Settings >
SD card & phone storage.
2. Touch Unmount SD card to release the microSD card from
its use bythe device. Touch OK to confirm you want to
unmount the microSD card. The icon appears within the
Notifications panel to indicate an unmounted internal
microSD card.
3. Once released, touch Format SD card > Format SD card >
Erase everything.
cOnce completely formatted, the card is automatically re-
mounted (reconnected for use by the device).
microSD Card

NOTE
The formatting procedure erases all the data on the microSD card, after
which the files CANNOT be retrieved. To prevent the loss of important
data, please check the contents before you format the card.
Connecting Your Device to Your Computer
Before using your device's mass storage capabilities, you need to
prepare your device's data services to synchronize with your
desktop or laptop computer. Once you have connected the device
to the computer, you can transfer your data to or from the microSD
card.
To connect your device to a computer via USB:
1. Use the USB cable that came with your phone to connect
the phone to a USB port on your computer.
2. Open the Notifications panel, and then touch USB
Connection Mode.
3. Touch the connection mode you want to connect to the PC
as. Choose from the following options: Windows Media
Sync,Modem mode,or Mass storage mode.
cWhen the device is connected as USB storage, you receive
anotification.
cYou device's microSD card is mounted as a removable drive
on your computer.You can now copy files to and from the
microSD card. For more information, see the
documentation for your computer.
cDuring this time, you will not be able to access the
microSD card in your device, so you can't use applications
that rely on the microSD card, such as Camera, Gallery,
and Music.
microSD Card

To remove the connection:
WARNING!
Carefully follow your computer's instructions to unmount, remove, or
disconnect any removable USB devices or disks, to avoid losing information
on the microSD card when disconnecting your phone from your computer.
1. On your computer, complete the process to safely Stop, or
Remove, the USB device (in this case, the phone). For
example, use the Safely Remove Hardware option to Stop
the USB device, on Windows®XP.
2. If using Windows Media Sync, make sure you disconnected
by opening the Notifications panel and touching Windows
media sync.
3. Carefully remove the USB cable from the phone.
Important Connection Information
'To avoid loss of data, DONOTremove the USB cable, the
microSD card, or the batterywhile accessing or transferring
files.
'DONOTuse your computer to change or edit folder or file
names on the microSD card, and do not attempt to transfer
large amounts of data from the computer to the microSD
card. Doing so may cause the microSD card to fail.
'DO NOT turn off or restart your computer, or put it into
standby mode, while using a mass storage device. Doing so
will result in loss or damage of data.
'The internal microSD card can only be mounted for use by
either the device or a connected computer. Prior to
accessing the card via a different method, it must first be
unmounted from its current device (phone or computer-
USB).
IMPORTANT
The internal microSD card can only share a connection
with one device at a time, either your device or your
computer (via its USB connection), not both. You cannot
browse the contents of the card via your device if they
are currently being browsed via your computer.
microSD Card
Placing and Ending Calls
You can place calls using the Phone application on any of the four
tabs across the top of the screen. You can dial calls manually using
the Phone tab. You can dial using your phone's memory, using the
Call log tab; the Contacts tab; or the Favorites tab.
To open the Phone application
'From the Home screen, touch the Phone Key .
To place a call by dialing
1. Open the Phone application.
2. Touch the keys on the dial pad to manually enter a phone
number.
cIf you enter a wrong number, touch the Delete Key to
erase digits one by one.
cTo erase the entire number, touch and hold the Delete Key
.
cTo dial an international number, touch and hold the 0key to
enter the plus ( +)symbol. Then, enter the international
prefix for the country; followed by the full phone number.
3. Touch the Call Key to dial the number that you entered.
X
X
Touch and hold to enter +, for
international calls.
Touchto erase a digit. Touch and hold
to erase the entire number.
cYou can use other phone features while the call is
underway. If you open another application, the Call icon
appears in the Status bar for the duration of the call.
cPress the Up/Down Volume Keys to adjust the call volume.
cUse the onscreen buttons to enter additional numbers,
place the call on hold and takean incoming call, add
another call, use the speakerphone, end the call, and other
options.
NOTE
If you opened other applications while on a call, you'll need to press the
Home Key and touchthe Phone Key or drag down the
Notifications panel down and touch the Call icon .
Airplane mode
Some locations may require you to turn off your phone's wireless
connections by placing your phone in Airplane mode.
1. Press and hold the Power/Lock Key .
2. TouchAirplane mode.
The Wireless & networks settings also has a checkbox to
enable or disable Airplane mode.
Information from Contacts about the
person you're calling.
The duration of the call.
Touch to end a call.
Touch to enter additional numbers
during your call.
Placing and Receiving Calls
Answering or Rejecting Calls
When you receive a phone call, the Incoming Call screen opens
with the caller ID and any additional information about the caller that
you have saved in the Contacts list.
All incoming calls are recorded in the Call log.
To answer a call
'Use the Answer Key to answer a call. If your screen is
unlocked, simply touch the Answer Key ,but if the screen
is locked, drag the Answer Key to the right.
If you were already on a call, the first call is placed on hold
while you answer the new call.
To silence the incoming call ringer, press the Up/Down
Volume Key.
Touch the
Answer Key to
answer the call.
Touch the Send
SMS Key to send
an Excuse
message to the
caller instead of
answering the call.
Drag the
Answer Key to
the right to
answer the call
When unlocked When locked
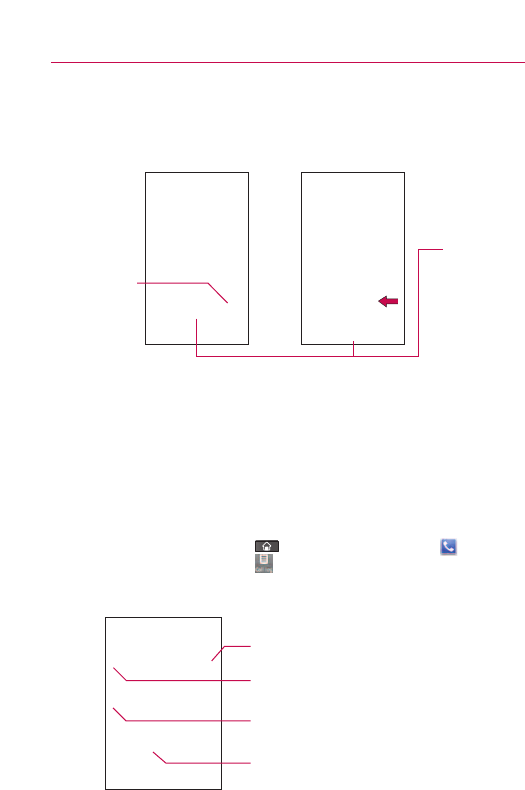
To decline a call and divert it to voicemail
'Drag the Decline Key to the left. The caller is sent directly to
your voicemail box to leave a message.
'To silence the ringer, press the Down Volume Key.
Working with the Call Log
The Call log is a list of all the calls you’ve placed, received, or
missed. It offers a convenient way to redial a number, return a call,
or add a number to your Contacts.
Toopen the Call log
'Press the Home Key ,touch the Phone Key , then
touch the Call log tab at the top of the screen.
Calls are listed in the Call log tab, the most recent calls are
located at the top of the list. Scroll down to see older entries.
Placing and Receiving Calls
You can touch
the Send SMS
Key to send an
Excuse message
instead of
sending the
caller to your
voicemail.
Touch the
Decline Key to
decline the call.
When unlocked When locked
Touch to return the call.
Indicates an outgoing call.
Touchto open a group of calls exchanged
sequentially with the same number.
Touch and hold an entry for more options.
To dial a number in the Call log
'From the Call log, touch the Call Key at the right of the
entry.
You can also touch and hold the entry to open a menu with
more options, to communicate with that contact in other
ways.
To add an entry’s number to your Contacts
1. Touch and hold the entry.
2. Touch Add to contacts.
3. In the list of contacts that opens, touch Create new contact
at the top, or touch an existing contact to add the new
number to that existing contact.
To take other actions on a Call log entry
'Touch a Call log entryto open a screen from where you can
call the contact, send the contact a message, add the
number to your Contacts list, and learn more about the
original call.
'Touch and hold a Call log entry to open a menu where you
can call the contact, viewcontact information, edit the
number before you redial, and more.
To clear the Call log
'Press the Home Key ,touchthe Phone Key ,then
touchthe Call log tab at the top of the screen. Press the
Menu Key ,then touchClear call log.
You can also touchand hold an entryin the log.In the menu
that opens, touchRemove from call log to removejust that
entryfrom the log.
Placing and Receiving Calls
Calling Your Contacts
Instead of manually dialing phone numbers using the dialpad, you
can use your Contacts list to dial quickly and easily.
You can also quickly call a contact by using Quick Contact.
If you have contacts on the web, they're synchronized with your
phone when you first connect to your GoogleTM Account.
To call a contact
1. Press the Home Key ,then touch Contacts .
2. Touch the contact to call.
3. Touch the desired phone number to call the contact.
To call a favorite contact
1. Press the Home Key ,touch Contacts then the
Favorites tab.
You can add and remove favorites by touching the star next
to their name (when you're viewing information about the
contact).
2. Touch the favorite you want to call.
3. Touch the desired phone number to call the contact.
Voice Dialer
You can use the Voice Dialer application to place a phone call by
speaking the name of a contact or a phone number.
Toplace a call by speaking
1. Touch Voice Dialer in the Launch screen or on the Home
screen.
If you have a BlueTooth headset that supports “voice-
recognition”or “voicedialing,”you may be able to open Voice
Dialer bypressing your headset’s main button or in some
other way, and dial by voice using your headset. For details,
see the documentation that came with your headset.
Placing and Receiving Calls
The Voice Dialer application opens, listening for your spoken
instructions, and displaying some hints for how to use it.
2. Say “Call” followed by the name of the contact to call.
Or follow one of the suggestions for dialing a number or
controlling your phone in other ways.
Options During a Call
When a call is in progress, you have various convenient features at
your disposal, such as muting your microphone, using the
speakerphone, or making a conference call.
To mute the microphone during a call
'Touchthe Mute Key .
The Mute Key lights up to indicate that the microphone is
muted. The Mute Key will appear in the Status bar to
remind you that the microphone is turned off.
When viewing the current call screen, you can unmute the
microphone by touching the Mute Key again.
The microphone is unmuted automatically when the call
ends.

To turn the speakerphone on or off
'Touch the Speaker Key .
The Speaker Key lights up to indicate that the speakerphone
is on. The Speaker icon will appear in the Status bar
and the sound from your call is played through the phone's
speaker.
When viewing the current call screen, you can turn the
speakerphone off by touching the Speaker Key again.
The speaker is turned off automatically when the call ends.
WARNING!
To avoid damage to your hearing, do not hold the phone against
your ear when the speakerphone is turned on.
To switch between a Bluetooth headset and the phone
When a Bluetooth headset is paired and connected to your phone,
you can conduct calls on the headset for hands-free conversation.
During a call, you can opt to use the Bluetooth headset or just the
phone.
When using the Bluetooth headset during a call, the Ongoing Call
notification icon is blue in the Status bar.
'Touch the Bluetooth Key to switch the call from the
headset to the phone, or vice versa.
Managing Multiple Calls
If you accept a new call when you're already on a call, you can
switch between the two calls or merge the two calls into a single
conference call. You can also set up a conference call with multiple
callers.
To switch between current calls
'Touch the Swap Key .
The current call will be placed on hold and you will be
connected with the other call.
Bluetooth
Speaker
Speaker
Placing and Receiving Calls
To set up a conference call
Contact your wireless service provider to learn whether they
support conference calls and how many participants you can
include.
1. Place a call to the first participant.
2. When you're connected, Contacts or Dialpad .Touch
Contacts to search for a contact to call. Touch Dialpad to
open the dialpad and introduce a number to dial.
The first participant is put on hold and you're prompted to
dial the second caller.
3. After you're connected, touch the Merge calls button .
The participant is added to the conference call.
Placing and Receiving Calls
Touch to swap calls.
Touch to end a conference call
and disconnect all callers.
Listening to Your Voicemail
When you have a new Voicemail message, you will receive a
notification in the Status bar. To listen to your Voicemail messages,
touch Voicemail on the Home screen. If you have not set up
your Voicemail number, or if you need to change it, you can do that
with the Call settings.
To listen to your Voicemail
'Open the Notifications panel then touch New voicemail.
OR
'Press the Home Key ,touch the Phone Key and then
touchthe Voicemail Key .Typically, your carrier's voicemail
system guides you through the process of listening to and
managing your voicemail. The first time you call your
voicemail, it also guides you through the process of
recording greetings, setting a password, and so on.
Placing and Receiving Calls
To set up your Voicemail
1. Press the Home Key ,then touch the Phone Key .
You can also touch the Phone Key from the Launch screen.
2. Dial *86, then touch the green phone button .
3. Touch Dialpad so you can enter numbers.
4. If you hear a system greeting, touch # to interrupt it, if
applicable.
5. Follow the setup tutorial.
6. Select a password.
7.Record a voice signature and greetings for your Voice
Mailbox.
To access your voice mail from your wireless device
1.Press the Home Key ,then touchthe Phone Key .
You can also touch the Phone icon from the Launch screen.
2. Dial *86, then touch the Call Key .If you hear a system
greeting or your own greeting, touch # immediately to
interrupt the system greeting and follow the prompts.
3. Follow the prompts to enter your password and retrieve your
messages.
Dialpad
Placing and Receiving Calls
Search
Bing Search
You get one-touch access to Bing's search, maps, news, images,
and videos, all in one package. The image search, for example,
features endless scrolling--no more clicking through multiple pages
of images to find what you want.The quick tab for movie show all
the movies playing near you, along with their play times and reviews.
Setting Web and Quick Search Box Options
1. Press the Home Key ,then touch the Applications
Launcher Key >Settings .
2. Scroll the screen up, then touchSearch.
Web
Searching the Web and Your Phone Using the Quick
Search Box
1. Press the Home Key ,then press the Search Key .
2. Enter the search item in the Quick Search Box. As you type,
matching items on your phone and suggestions from Bing
web search are shown as a list.
The suggested items that appear will depend on the options that
you have selected in the search settings.
3. Do one of the following:
'If what you’re searching for is in the list of suggestions,
touch it in the list. The item opens in the appropriate
application.
'If what you’re searching for is not in the list, touch
Search the web to search the Web. The web browser opens,
displaying results of a Bing search on the Web.
Browser
The Browser feature allows you to access the internet from your
Verizon Wireless device. Access and selections within this feature are
dependent upon your service provider. For specific information on
Browser access through your phone, contact your service provider.
Internet
Learn to access and bookmark your favorite web pages.
NOTE
•You may incur additional charges for accessing the
web and downloading media. For details, contact
your service provider.
NOTE
•Available icons may vary depending on your region.
103
Browse web pages
1. Press the Home Key ,then touch the Applications
Launcher Key >Browser to launch the Browser and
open your homepage. To access a specific web page, touch
the URL input field, enter the web address (URL) of the web
page, and select Go.
2. Navigate web pages using the following:
While browsing the web page, use the following options:
'To zoom in or out, double-tap the screen. You can also use
the two finger zoom. Place your two fingers on the screen
and slowly pinch or spread apart.
'To open a new window, press the Menu Key ,then
touchWindows .
'To view the list of bookmarks, press the Menu Key ,
then touch Bookmarks .You can also add, edit, or delete a
bookmark.
'To view the currently active windows, press the Menu Key
then touch Windows .You can open multiple pages
and switch back and forth between them.
Web
Enter a web address of
the web page to access
and touch .
Web
'To reload the current web page, press the Menu Key ,
then touch Refresh .
Refresh menu appear after being finished loading of web
page.
'To stop loading web page, press the Menu Key ,then
touch Stop .
Stop menu appear when web page is loading.
'To go to previous page, press the Back Key .
'To go to a next page in history,
press the Menu Key ,
then touch Forward
.
'To bookmark the current web page, press the Menu Key
,then touch More >Add bookmark.
'To search for text on the web page, press the Menu Key
,then touch More >Find on page.
'To select text on the web page, press the Menu Key ,
then touch More >Select text.Highlight the text you
want with your finger.
The highlighted text is copied to the clipboard and you can
paste it anywhere that allows text to be entered.
'Toviewthe web page details, press the Menu Key ,
then touchMore >Page info.
NOTE
●
When you are in secure page, you can see the cerificate of current page
bypressing View certificate Key on Page info.
'To send the web address (URL) of the web page to others,
press the Menu Key ,then touch More >Share
page.
'To view the download history, press the Menu Key ,
then touch More >Downloads.
'To customize the Browser settings, press the Menu Key
,then touch More >Settings.
Bookmark your favorite web pages
If you know the web address of the web page, you can manually
add a bookmark. To add a bookmark,
1. Press the Home Key ,then touch the Applications
Launcher Key >Browser .
TIP
The Browser icon is one of the Quick Keys located on the Home screen
and Launch screen. Quickly launch the Browser by touching its icon.
2. Press the Menu Key ,then touchBookmarks .
3. Touch Add.Enter a page title and a web address (URL).
4. Touch OK .
From the bookmark list, touch and hold a bookmark and use the
following options:
'To open the web page in the current window, touch Open.
'To open the web page in a new window, touch Open in new
window.
'To edit the bookmark details, touch Edit bookmark.
'To add the bookmark shortcut to the one of the Home
screen panes, touch Add shortcut to Home.
'Tosend the web address (URL) of the web page to others,
touchSharelink.
'Tocopythe web address (URL) of the web page, touchCopy
link URL.
'To delete the bookmark, touch Delete bookmark.
'Touse the web page as your Browser homepage, touch Set
as homepage.
Web

Web
Bing Maps
Searching For Locations and Places
You can search for a location and view it on a map. You can also
search for places on the map that you're viewing.
To search for a location
1. While viewing a map, touch the search box at the top of the
screen.
2. In the search box, enter the place you're looking for. You can
enter an address, a city, or a type of business or
establishment. For example,
“
theater in New York
”
.
3. Touch the Search Key.
Markers with letter labels indicate search matches on the
map.
You can touch a marker to open a balloon that contains a
label. Touch the balloon to open a screen with more
information about the location, as well as options for
obtaining directions.
Getting Directions
Bing Maps can provide directions for travel by foot or car.
To get directions
1. While viewing a map, press the Menu Key and touch
Directions.
2. Enter a starting point in the first text box and your
destination in the second text box. You can also select an
address from your Favorites, Contacts or recent places.
Toreverse directions, touchthe Reverse icon.
3. Touch the icon for car or walking directions.
4. Touch Go.
5. Choose to view directions on Bing from the Directions pop-
up menu that is displayed.
Your route is displayed on a map.
6. To view a list of your directions, press the Menu Key
and touch List view.
To switch back to your map route from List view, press the
Menu Key and touch Map view.
VZNavigator
The VZ Navigatorapplication allows you to get directions to
locations when you're out and about with:
'Voice-prompted turn-by-turn directions with auto-rerouting if
you miss a turn
'The option to viewdetailed color maps that can be panned
and zoomed
'The ability to find points of interest
Access and Options
1. Press the Home Key ,then touch the Applications
Launcher Key .
2. TouchVZ Navigator .
Web
Web
Navigating with Spoken, Turn-by-Turn Directions
You can use Bing Maps Navigation to get turn-by-turn driving
directions, both spoken and displayed on your screen.
To navigate with turn-by-turn directions
'Get directions to a location, then touch VZNavigator in the
Directions pop-up menu.
OR
1. Press the Home Key ,then touch the Applications
Launcher Key >VZ Navigator .
2. Touch Find and touch a destination type. Then enter the
necessary destination information.
3. Touch , then touch Navigate.
OR
'To search by voice, touch and hold the Search Key .
cWhen prompted to speak, say the city name. In the search
results displayed, touch the next to the city name.
cOn the navigation screen that opens, touch Go.Then select
VZNavigator from the Directions pop-up menu.
cAsyou navigate your route, each direction is spoken in
turn, and the next turn is displayed.
cThe Bing Maps application downloads and temporarily
stores a copy of the directions and other information about
your route on the phone, so if you lose your connection to
adatanetwork, you can still navigate to your destination.
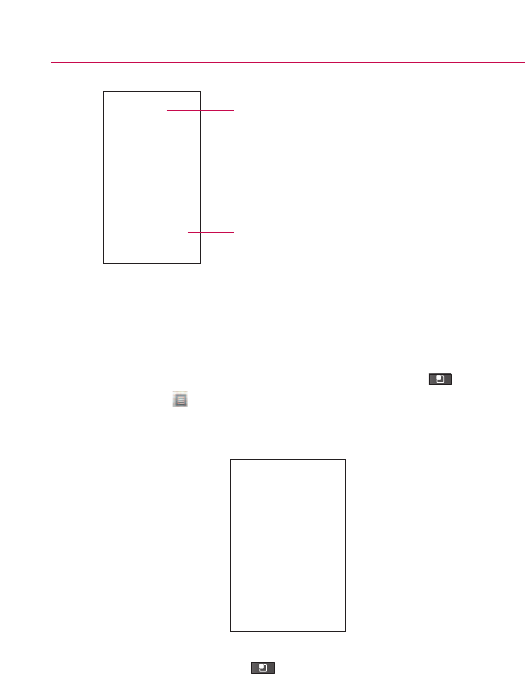
109
You can control the volume of the spoken directions with the
Up/Down Volume Keys.
To view turn-by-turn directions in a list
You can vieweach turn in your route as a list of written directions.
'While in Navigation View,press the Menu Key and
touchList .
Ascreen opens with a list of turn-by-turn directions to your
destination.
'Touch the Menu Key >3D View or 2D to return to
Navigation View.
Web
Acompass indicates north.
Your current location and direction
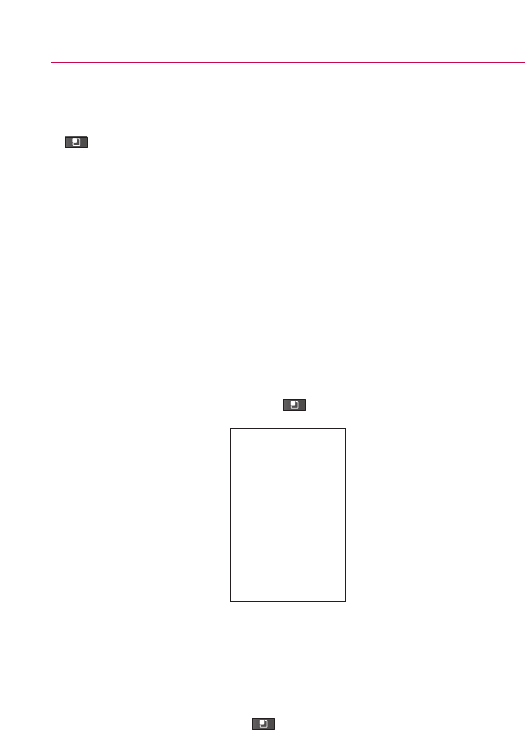
110 Web
To preview your route
To preview your route, from Navigation View, press the Menu Key
and touch Trip Summary.
To view traffic conditions on your route
Toview traffic, you must be in the Trip Summary screen. Once you
are there, press the Menu Key and touch Show Traffic.
Togetan alternate route to your destination
If traffic is slow on your current route, or if you just want to try a
different route, you can request an alternate route from the Bing
Maps Navigation service.
1. Press the Menu Key and touch Detour.
2. Touchthe type of detour you would like to take. If applicable,
touch a distance amount or street name.

111
Checking the news and weather
The News and Weather application offers weather forecasts and
news stories about common topics.
You can also customize the news topics that are displayed.
The News and Weather widget that you can place on your Home
screen provides quick, summarized information. Open the News
and Weather application to view the complete information in
greater detail.
To open News and Weather
'Touch the news headline or weather icon on the News and
Weather widget on your Home screen, or touch its icon in
the Launch screen.
You can add multiple News and Weather widgets to your
home screen, eachconfigured to showjust news, just
weather,or both.
When you open News and Weather, you view a summary of the
weather or headlines.
'Touch the weather summary for a more detailed forecast.
Touch a time on the weather graph for a detailed, hour-by-
hour forecast.
'Touch a headline to read the full story.
Web
Touchto scroll the categoryof news
you’re interested in.
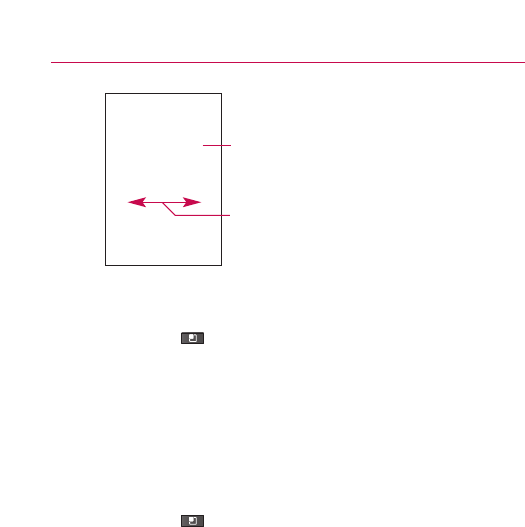
112 Web
'Swipe left or right to change news categories.
'While viewing the weather or news headlines, press the
Menu Key and touch Refresh to get the latest
information.
Changing News and Weather Settings
You can configure a number of settings for News and Weather.
The location and related settings also affect the display of the News
and Weather widget and the Clock application.
'To open the News and Weather settings screen, press the
Menu Key and touch Settings.
Touch a headline to read the full story.
Swipe left or right to change news
categories.

Weather settings
Use my location Checkmark to use the phone’s location service to
determine your location when displaying weather information.
Uncheck to set the location manually, using Set Location.
Set location When Use my location is unchecked, touch to specify
the location for weather information by entering a city or postal
code.
Use Celsius Checkmark to use the Celsius temperature scale
instead of Fahrenheit.
News settings
Select news topics Opens a screen where you can select the
categories of news to include in the scrolling list of News and
Weather tabs. You can also touch Custom topic to enter specific
topics - for example, “solar power” or “Olympics”.
Prefetch articles Checkmark to download news articles so that they
open more quickly and are available when you don’t have a data
connection. Prefetching articles improves performance at the
expense of more data use and decreased battery life between
charges.
Prefetch images Checkmark to prefetch news images in addition to
news text, when the headlines are downloaded. Prefetching images
improves performance at the expense of more data use and
decreased battery life between charges. This setting is only available
when Prefetch articles is checkmarked.
Display images Checkmark to display images when reading news
stories.
News terms of service Opens a screen with details about the terms
of service for Google News.
Web

Web
Refresh settings
These settings control how frequently the information on the News
and Weather widget is updated. In addition to using these settings,
adding or removing the News and Weather widget from the Home
screen also turns Auto-refresh on or off.
Auto-refresh Checkmark to have News and Weather update
information automatically, at the frequency you set with Refresh
interval.Uncheck to update the news and weather only when you
press the Menu Key and touchRefresh. For automatic refresh
to work, you must also have Background data turned on in the
Accounts & sync menu.
Refresh interval Opens a dialog box where you can set how often
to update the news and weather automatically, if Auto-refresh is
checkmarked. More frequent updates trade the convenience of
current information for increased data use and decreased battery
life between charges.
Refresh status Displays the date and time of the last refresh and
the next scheduled refresh of news and weather.
Application version Displays the version of the News and Weather
application installed on your phone.
RSS Reader
Using RSS Reader
RSS (Really Simple Syndication) is a family of web feed formats
used to publish frequently updated content such as blog entries,
news headlines or podcasts. An RSS document, which is called a
feed, web feed, or channel, contains either a summary of content
from an associated web site or the full text. RSS makes it possible
for people to keep up with their favorite web sites in an automated
manner that is easier than checking them manually. To add an RSS
feed, you must first be on a website that supports RSS. The RSS
registration indicator will show the RSS icon if the site has RSS.
Touch the RSS registration indicator to add the RSS Feed to your
Feeds.
NOTE
Press the Menu Key and touch Settings edit the RSS Reader
Settings.
City ID
City ID is an enhanced Caller ID feature on select Verizon Wireless
handsets that automatically displays the city and state of every
wireless call received. City ID reads the area code and local
exchange of an incoming call and displays the location associated
with that number.CityID includes over 20,000 cities, towns and
neighborhoods in North America and over 200 country codes from
around the world – providing mobile subscribers with a remarkably
accurate tool to help identify incoming callers.
City ID enabled handsets also feature outgoing and call log
identification which displays the city and state of outgoing calls as
well as calls within the handset’s call history.
City ID is a feature with a free trial that works automatically –
displaying the cityand state with the very first incoming phone call.
Web
Web
After the free trial period, subscribers will receive a message to
purchase the application. Subscribers are then presented with the
available purchase options. If after purchasing City ID a subscriber
decides to cancel the application, the subscriber can follow the
standard process to cancel a subscription using the City ID
application.
To purchase City ID if you said “no” during the trial?
1. Press the Home Key ,then touch the Applications
Launcher Key .
2. Touch City ID .
3. Touch Subscription status,then touchSubscribe Now to
purchase the application.
4. The application will download. After the application is
successfully installed, touch“yes” to run City ID or “no” to
return to Get It Now.
5. Press the Back Key to return to the Home screen.
Slacker
Listen to free personalized radio on your Android smartphone. With
millions of songs from thousands of artists, Slacker Radio is the
best wayto discover newartists and hear your favorite songs.
Listen for free to over 100 expert-programmed radio stations from
every genre or create your own custom stations.
'Free application and free service
'Over 100 expert-programmed stations
'Create your own custom stations
'Convenient radio widget mode
'Integrated Twitter support

'Vertical and horizontal modes
'Displays album art, reviews and bios
With a Radio Plus subscription, you can listen even when you are
not connected
To access the Slacker application:
1. Press the Home Key ,then touch the Applications
Launcher Key >Slacker .
2. Create your account for the first visit and sign in to connect
to Slacker.
Skype mobile
'Free Skype-to Skype calling
Speak to anyone in the world for free. Invite friends to join
Skype and you can chat to them for as long as you like,
wherever they are, for free. Say goodbye to quick catch-ups,
sayhello to free Skype calls.
'Call landlines and mobiles
Call people who aren’ton Skype
You can use Skype to call landlines and mobiles worldwide,
at amazing rates. Simply dial a phone number,then start
saving.
'Free instant messaging
Send an instant message when you can’t talk. Quicker than
email, instant messaging is another way to stay in touch
with one or more of your Skype contacts. You can share
large files, too.
Web
118 Web
To use the Skype mobile:
1. Press the Home Key ,then touch the Applications
Launcher Key >Skype mobile .
2. Create your account for the first visit and sign in to connect
to Skype mobile.
Backup Assistant
How to Access and Register Backup Assistant
If you didn't set up Backup Assistant when you first turn on your
phone, you can enable it in Settings.
1. Press the Home Key ,then touch the Applications
Launcher Key
>Settings >Accounts & sync.
2. Touch
Backup Assistant .
3.
Create your PIN code and confirm it.
4.
Follow the instructions on the screen to sign in to Backup
Assistant and back up your contacts.
5.
The Registration complete screen appears and your first back-
up process begins.
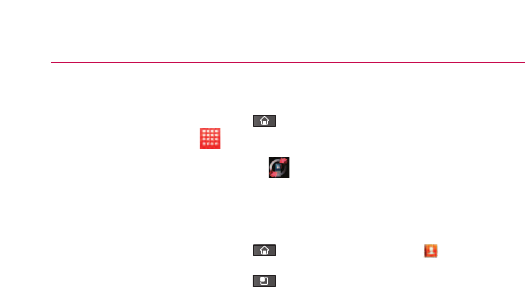
You can launch Backup Assistant from Main Menu.
1.
Press the Home
Key
,then touch the Applications
Launcher Key .
2.
Touch Backup Assistant .
Backup Assistant can be accessed directly from the Contacts
application.
1.
Press the Home
Key
,then touch Contact .
2.
Press the
Menu Key
,then touchBackup now.
If you've already registered your Backup Assistant account,
background backup will be performed. If not, the Backup
Assistant registration screen will be displayed for you to
complete registration then back up your files.
Web
120 Web
Using Backup Assistant
On the schedule you selected, the Backup Assistant application
checks with your phone's address book to see if any changes have
occurred since the last Backup. If changes are detected, the
application will launch (approximately 20-25 seconds after the
phone's clock registers the scheduled time) and the Backup process
will start. If no changes are detected, Backup Assistant sleeps until
the next daily automatic backup is triggered.
Manually backing up your contacts
1.
Press the Home
Key
,then touch the Applications
Launcher Key >Settings >Accounts & sync.
2. Touch
Backup Assistant .
3. Touch
Backup now on the setting or the last backup status
screen.
Changing the backup schedule
1.
Press the Home
Key
,then touch the Applications
Launcher Key >Settings >Accounts & sync.
Backup Assistant last
backup status screen
Backup Assistant
setting screen
121
2. Touch
Backup Assistant .
3. Touch
Backup time and touch the timeframe you want. For
example, Every late night (12am-6am).
Change your PIN code
1
Press the Home
Key
,then touch the Applications
Launcher Key >Settings >Accounts & sync.
2.
Touch Backup Assistant .
3.
Touch Change PIN code on the Backup settings screen.
4. Enter your current PIN, touch Next,then enter your new PIN.
Web

Web
Kindle
Shop for books in the Kindle Store
'Buy a book from the Kindle Store
'Experience Kindle Editions with Audio/Video
'Search and browse more than 630,000 books, including
more than 96 of 112 New York Times bestsellers. If you are a
non-U.S. customer, book availability may vary
'Get free book samples. Read the first chapter for free before
you decide to buy
'Books you purchase can also be read on a Kindle
New Features on the Kindle for LG VS910 application
'Instant word lookup on the internal dictionary with 250,000
entries and definitions
'Search inside the book
'Look up words on Google and Wikipedia
To open the Kindle application
1.
Press the Home
Key
,then touch the Applications
Launcher Key >
Kindle .
2. Sign in using your email address and password associated
with your Amazon account.
If you do not have an Amazon account, you will have to
register and create one.
MS910
Video
Get videos on demand right from your phone. Go to
verizonwireless.com/video.
VCAST Video on Demand
Catch your favorite shows and live sports from anywhere in the V
CAST coverage area. View more than 100 channels, with additional
shows added every day in on-demand, full-length episodes. Go to
verizonwireless.com/video for more information.
Browse video clips
1.
Press the Home
Key ,touchthe Applications Launcher
Key and VCAST Videos .
2. Touch a video clip category.
3. Touch a content provider.
4. If applicable, touch sub-categories.
Download video clips*
1.
Press the Home
Key ,touch the Applications Launcher
Key and VCAST Videos .
2. Touch a video clip category.
3. Touch a content provider.
4. If applicable, touch sub-categories.
5. Read the description of the video clip and touch the Options.
6. Touch Save**.
7. Touch Yes to accept charges and choose to save in the
memory card, then the video clip will initiate downloading.
Web

Web
8. Once the video is downloaded a message will appear on
your phone, Download Complete. Play video now?
9. Touch Yes to view video.
10. The video clip will be automatically saved in My Videos.
*Not all Video Clips have the ability to be downloaded.
** This option will not be available for clips that are streaming only.
Music and Tones
Get tuned in with Verizon Wireless Media Store and V CAST Music
with Rhapsody®.
Verizon Wireless Media Store
Go online to find loads of cool apps, as well as the latest games
and music. Make your purchase online, download apps straight to
your phone. Visit verizonwireless.com/ apps.
Ringtones
Pick from over 90,000 tracks and assign a different song to each
person in your address book.
Ringback Tones
Entertain your callers with Ringback Tones—songs or sounds they’ll
hear while waiting for you to answer.
Transform your wireless device into a portable music player.
Download newsongs from the V Cast Music | Rhapsody music
catalog right onto your wireless device or a PC. Then you can sync
your music between your PC and phone.
Voice Mail is required for use of Ringback Tones.

VCAST Media Manager
Transfer pictures, videos and music between your phone and
computer with a USB cable. Includes a media player and media
management tools. Compatible phone required. Go to
verizonwireless.com/vmm to download your free copy.
VCAST Music with Rhapsody®
Buy and download individual tracks or subscribe to get unlimited
access to millions of songs.
System requirements: Windows®XP , Windows Vista®or Windows 7.
Purchase songs on your phone
1. Browse the catalog and select the track o 1. r album you
wish to purchase.
2. Confirm the purchase and download the track or album.
Per-song charges apply.
Download a PC copy of an over-the-air (OTA ) purchased track
When you purchase music from your phone, you also get a second
copy that can be downloaded to your PC.
1. Song tracks available for download will pop up upon login
completion.
2. Check the boxes of songs you wish to download.
3. Select Download Tracks.
Purchase songs or albums on your PC
1. Browse the catalog and select the track or album you wish
to purchase.
2. Re-enter your password.
3. Confirm the purchase and the download will begin shortly.
Web

Web
Add subscription music to your library
Add music to your collection by clicking the Add button next to each
song, or by simply dragging and dropping it to My Library or to your
connected phone (both found under Sources).
VCAST Music with Rhapsody monthly subscription required.
Play songs
To play a song or album, find it in My Library, under Sources.
Sync your music from your PC to your phone
1. Download V CAST for free at verizonwireless.com/music
and install it on your PC.
2. Connect your phone and PC using a USB cable.
3. Drag the Notifications panel down and touch USB
Connection Mode.
4. Touch Windows Media Sync or Mass storage mode, then
touch OK to confirm.
Your phone will appear in the Sources section of the V CAST
application on your PC.
5. Drag and drop the song(s) you want to sync from My Library
to your mobile phone.
6. Once synchronization is complete, right click on your device
and select Disconnect.Then disconnect the USB cable.
7. If you erase music you’ve previously purchased, you can
simply re-sync with your PC to add the song back to your
phone’s music library.

Play songs with your wireless device.
1. From the
Home
Key ,touch the Applications Launcher
Key and Music .
2. Touch one of the following tabs:
Artists/ Albums/ Songs/ Playlists
3. Touch a song to play it.
Acompatible USB cable is required for syncing. V CAST wireless device and additional
charges required for V CAST service. 3-D games for additional download fee. V CAST music
not available on all V CAST wireless devices. Per-song charges apply for music downloads.
Always download legally. All brand and product names not owned by Verizon Wireless are
the property of their respective owners. If you have any questions about using V CAST
Music service on your specific wireless device, visit verizonwireless.com/data.
Web

Mobile IM
Allows you to send and receive an Instant Message at any time.
1. Press the Home Key ,then touch the Applications
Launcher Key .
2. Touch Mobile IM .
3. Choose a Mobile IM community to sign in to.
4. Enter your user name and password and touch Sign In.
Contacts
The Contacts application allows you to store names, phone
numbers and other information in your phone’s memory.
Using Your Contacts
Use the Contacts application to add, view, and communicate with
your friends and acquaintances.
Communication
To open your Contacts application
'Press the Home Key ,then touch the Applications
Launcher Key >Contacts .
OR
Press the Home Key ,then touch the Contacts in the
Quick Keys bar.
NOTE
You can also access your contacts by using Quick Contact.
All of your contacts are displayed alphabetically in a list. If you
have a new phone and haven't added any contacts yet, The
Contacts application will display hints on how to start adding
contacts to your phone.
Touch to view only your favorite contacts.
Touch a contact to viewits details.
Touch an icon to open Quick Contact.
Contact Multiselect
You can work with multiple contacts at once. While viewing your
contacts, press the Menu Key to access the Multiselect
feature that allows you to send, share, or delete.
To Use the Multiselect Feature
1. Press the Home Key ,then touch the Contacts in the
Quick Keys bar.
2. Press the Menu Key and touch Multiselect.
3. Touch the checkbox next to each entry you want to work
with. Then, touch a button at the bottom of the screen to
apply it to all of the selected contacts. Touch Send, Share,
Delete, or Cancel.
Touch Send to send a
message or email to all
of the selected contacts.
Touch Share to share all of
the selected contacts using
Bluetooth, Email, or Gmail.
Touch Delete to delete
all of the selected
contacts at once.
To open a list of your favorite contacts
'Open your Contacts application then touch the Favorites tab
at the top of the screen.
The Favorites tab lists the contacts you've added to the list,
followed by a list of your most frequently called contacts.
To view details about a contact
1. Open your Contacts application.
2. Touch the contact whose details you want to view.
Tap an icon to call, message, or open other applications.
'The Dial Key places a call to the number.
'The Message Key starts a message.
'The Mail Key starts an email.
'The Chat Key starts a chat.
'The Facebook Key opens the Facebook application.
Press the Menu Key for menu options including, Edit
contact, Share, Delete contact, Add to home screen, and
Import/Export, as well as Options for additional options.
Touch to open Quick Contact.
The contact’s status and where it’s from.
Touchthe Info tab to viewcontact information or touch the
History tab to see recent communication with the contact.
Touch a contact method to start
communicating with the contact.
Touch an icon to call, email, text, chat,
locate on map, and so on.
Adding Contacts
You can add contacts on your phone and synchronize them with the
contacts in your GoogleTM Account, Microsoft Exchange ActiveSync
account, or other accounts that support syncing contacts.
The Contacts application tries to join new addresses with existing
contacts, to create a single entry. You can also manage that process
manually.
To add a new contact
1. Press the Home Key ,then touch Contacts in the
Quick Keys bar.
2. Press the the Menu Key ,then touch New contact.
3. If you have more than one account with contacts, you can
specify the account to use. Touch next to Contact type,
and touch one of the accounts listed.
4. Enter the contact's name. Touch to enter a middle name,
nickname or name suffix to the contact's name.
5. Touch a category of contact information, such as Phone or
Email, to enter that kind of information about your contact.
6. Touch a category's plus button to add more than one
entry for that category. For example, in the phone number
category, add a work number and a home number. Touch the
label button to the left of the entry item information to open
adrop-down menu of preset labels. For example, Mobile
and Work for a phone number.
7. Touch the Picture Frame icon to select a picture to display
next to the name in your list of contacts and in other
applications.
8. When you're finished, touch Done.
Communication
Importing, Exporting, and Sharing Contacts
If you have contacts stored in vCard format on a microSD card you
can import them into your Contacts application on your phone. You
can also export contacts in vCard format onto a microSD card.
Export to back them up to a computer or other device or so you can
send a contact via email.
To import contacts from your microSD card
You can copy contacts, in vCard format, onto your microSD card
then import them into your phone.
1. Insert the memory card (that contains the vCard files) into
your phone.
2. Press the Home Key ,then touch Contacts in the
Quick Keys bar.
3.
Press the Menu Key ,then touch More >
Import/Export.
4. Touch Import from SD card.
5. If you have more than one account on your phone, touch the
account into which you want to import the contacts.
6. Touch the contacts you want to import to the microSD card.
Then touch Done and OK to confirm.
Communication
To export contacts to your microSD card
You can export all of the contacts on your phone to your microSD
card, as vCard files. You can then copy this file to a computer or
another device that is compatible with this format, such as an
address book application.
1. Press the Home Key ,then touch Contacts in the
Quick Keys bar.
2. Press the Menu Key ,then touch More >Import/Export.
3. Touch Export to SD card.
4. Touch the contacts you want to export to the microSD card.
Then touch Done and OK to confirm.
Toshareacontact
You can share a contact with someone by sending it to them as a
vCard file.
1. Press the Home Key ,then touch Contacts in the
Quick Keys bar.
2. Open the contact you want to share.
3. Press the Menu Key ,then touch Share.
4. Touch the method you wish to share the contact and
proceed to sharing.
Communication
Adding a Contact to Your Favorites
The Favorites tab contains a short list of the contacts you
communicate with most often.
To add a contact to your favorites list
1. Press the Home Key ,then touch Contacts in the
Quick Keys bar.
2. Touch a contact to view its details.
3. Touch the gold star to the right of the contact's name.
The star turns gold and the contact is added to your
Favorites list.
To remove a contact from your favorites list
1. Press the Home Key ,then touch Contacts in the
Quick Keys bar, then touch the Favorites tab.
2. Touch a contact to view its details.
3. Touch the gold star to the right of the contact's name.
The star turns grey and the contact is removed from your
Favorites list.
Searching for a Contact
It's easy to search for a contact by name.
To search for a contact
1.Press the Home Key ,then touchContacts in the
Quick Keysbar.
2. Touchthe searchboxor press the Search Key .
3. Start entering the name of the contact you're searching for.
4. Touch a matching contact in the list to open its entry.
NOTE
You can also touch the letters along the right side of the Contacts list
screen to jump directly to entries that begin with that letter.
Communication
Editing Contact Details
You can change or add details saved in your contact entries. You can
also set specific ringtones to specific contacts or determine
whether calls from specific contacts are diverted to your voicemail.
Some contact entries contain information from multiple sources:
information that you added manually, information that Contacts
joined from multiple accounts to consolidate duplicates, and so on.
If you find duplicate entries in Contacts, you can join them into a
single entry. If you find that information from unrelated contacts
was joined in error, you can separate them.
Changes made to information from one source do not automatically
change the information on the other sources. For example, if you
have information about a contact from a Google Account and an
Exchange ActiveSync account and both are configured to sync
contacts, changes to the contact from the Google Account are
synced to that account on the web, but the information from the
Exchange ActiveSync account will remain unchanged.
Toedit contact details
1. Press the Home Key ,then touch Contacts in the
Quick Keysbar.
2. Touchand hold the contact whose details you want to edit.
In the menu that opens, touchEdit contact.
3. Edit the contact information.
4. Touch Done.
Communication
To change a contact’s default phone number
The default phone number is used when you initiate a call or send
atext message using the context menu (by touching and holding a
contact).
1. Press the Home Key ,then touch Contacts in the
Quick Keys bar.
2. Touch the name of a contact in the list to view its details.
3. Touch and hold the phone number to use as the contact's
default phone number.
4. Touch Make default number in the menu that opens.
The default phone number is indicated by a checkmark .
To divert calls from a contact to your voicemail
1. Press the Home Key ,then touch Contacts in the
Quick Keys bar.
2. Touch the name of a contact in the list to view its details.
3. Press the Menu Key ,then touchOptions.
4. Touch Incoming Calls to checkmark it.
5. Touch the Back Key .
When this contact calls you, your phone will not ring and the
caller will be forwarded directly to your voicemail.
Toset a ringtone for a contact
1. Press the Home Key ,then touch Contacts in the
Quick Keys bar.
2. Touch the name of a contact in the list to view its details.
3. Press the Menu Key ,then touch Options.
4. Touch Ringtone,then touch a ringtone to select it.
5. Touch OK to save the ringtone to the contact.
Communication

To delete a contact
1. Open your Contacts list or Favorites list.
2. Touch the name of a contact in the list to view its details.
3. Press the Menu Key ,then touch Delete contact.
If you delete a contact from Google Contacts (or another account
with editable contacts), the contact is also deleted from Contacts
on the web the next time you sync your phone.
You can’t delete contacts from a read-only account, such as
Facebook. Instead, a dialog box informs you that the contact will be
hidden. To restore hidden contacts from a read-only account, you
must delete that account from your phone and then add it again.
If the contact contains information from both editable accounts
(such as Contacts) and from a read-only account (such as
Facebook), a dialog box informs you that the information from the
read-only account will be hidden, not deleted.
4. Touch OK to confirm that you want to delete the contact.
Communicating with Your Contacts
From the Contacts or Favorites tab, you can quickly call or send a
text (SMS) or multimedia message (MMS) to a contact's default
phone number. You can also open a list of all the ways you can
communicate with that contact.
This section describes ways to initiate communication when
viewing your list of contacts. The Contacts application shares your
contacts with many other applications, such as GmailTM and
Messaging.
Communication
To connect by using Quick Contact for Android
TM
1. Touch a contact's picture to open Quick Contact for Android.
2. In the Quick Contact menu that opens, touch the icon that
indicates how you want to communicate. The icons
displayed are dependent on the type of information you've
saved into the contact entry.
To communicatewith a contact
1. Press the Home Key ,then touch Contacts in the
Quick Keys bar.
2. Touch the contact with whom you want to communicate.
3. In the contact's details screen, touch the way to start
communicating with the contact.
cTap the Dial Key next to the number you want to call to
dial automatically.
cTap the Message Key to start a message to that
destination.
cTap the Mail Key to start an email to that address.
cTap the Chat Key to start a chat.
cTap the Facebook Key to open the Facebook
application.
NOTE
Anytime you see the Dial Key next to a number,such as in your
Favorites or Call log, just touch it to call that number.
Touch a contact's
picture.
Touch the icon for the
way you want to
connect.
To call a contact’s default number
1. Press the Home Key ,then touch Contacts in the
Quick Keys bar.
2. Touch and hold the entry for the contact to call.
3. Touch Call contact in the menu that opens. The contact's
default number is called.
To send a text or multimedia message to a contact’s
default number
1. Press the Home Key ,then touchContacts in the
QuickKeys bar.
2. Touchand hold the contact to call.
3. Touch Text contact in the menu that opens. The contact's
default number is used to start the message.
Selecting Which Contacts are Displayed
You can hide contacts that don't have phone numbers. You can also
configure which groups of contacts you want to display in the
Contacts list.
To set whether contacts without phone numbers are displayed
If you use your list of contacts only to call people, you can hide
anycontacts that don't have phone numbers.
1. Press the Home Key ,then tap the Contacts icon in
the bar of Quick Keys.
2. Press the Menu Key ,then touch Display options.
Communication
3. Touch Only contacts with phones to select or deselect this
option. When selected, a green checkmark will appear.
NOTE
●
You can sort the Contact list by First name or Last name using Display
options
●
You can also view contact names as First name first or Last name first
using Display options
4. After you've made your selections, touch Done .
To change which groups are displayed
1.Open your Contacts application.
2. Press the Menu Key ,then touch Display options.
3. Touch an account to open its list of available groups.
4. Touch each group whose contacts you want to view in your
Contacts application, contact types with a checkmark will
appear in your contacts list.
This action only affects which contacts are displayed. Your
sync settings will not be affected.
5. Touch Done.Amessage is displayed while your changes are
made. If your change affects a great many contacts, this can
take a short while.
Joining Contacts
When you add an account or add contacts in other ways, such as by
exchanging emails, the Contacts application attempts to avoid
duplication by joining contact information automatically. You can also
join contacts manually.
To join contacts
1. Press the Home Key ,then touch Contacts in the
Quick Keys bar.
2. Touch the contact entry to which you want to add
information.
The contact name for this entry will remain unchanged after
you join with another contact.
3. Press the Menu Key ,then touch Edit contact.
4. Press the Menu Key ,then touch Join.
5. Touch the contact whose information you want to join with
the first contact.
6. Touch Done.The information from the two contacts will be
merged and displayed under the name from the first
contact.
Separating Contact Information
Each contact entry on your phone may contain
‘
joined
’
information
from a variety of sources.
If contact information from different sources was joined in error, you
can separate the information back into individual contact entries on
your phone.
To separate contact information
1. Press the Home Key ,then touch Contacts in the
Quick Keys bar.
2. Touch the contact entry whose information you want to
separate.
3. Press the Menu Key ,then touchEdit contact.
4. Press the Menu Key ,then touchSeparate.
5. Touch the OK button to confirm you want to separate the
entries. The contact information will separated into individual
contact entries in the Contacts list.
Communication

Adding and Removing Accounts
You can add multiple Google Accounts and Microsoft Exchange
ActiveSync accounts.
You may also be able to add other kinds of accounts, depending on
your applications.
Some you can add in the Accounts & Sync settings, as described in
this section.
Others you add using an application that works with those kinds of
accounts; for example, you can add IMAP and POP3 email accounts
with the Email application.
To add an account
To add some accounts, you may need to obtain details from an IT
support representativeabout the service to which the account
connects. For example, you may need to know the account’s
domain or server address.
1.Open the Accounts & Sync settings screen.
You can do this from the Contacts application. Press the
Menu Key ,then touchMore >Accounts.You can also
access it from the Settings application.
The Accounts & Sync settings screen displays your current
sync settings and a list of your current accounts.
2. Touch Add account.
Communication
3. Touch the kind of account you want to add.
4. Follow the onscreen steps to enter the required and optional
information about the account.
Most accounts require a username and password, but the
details depend on the kind of account and the configuration
of the service you’re connecting to.
For details about adding accounts based on Microsoft
Exchange ActiveSync. These sections also describe how to
add an email account based on IMAP, POP3, or SMTP, using
the Email application.
Touch Add account.
Touchthe kind of account you want to add.
5. Configure the account.
Depending on the kind of account, you may be asked to
configure what kinds of data you want to sync to the phone,
the account name, and other details.
When you’re finished, the account is added to the list in the
Accounts & Sync settings screen. Depending on how you
configured the account, email, contacts, and other
information start syncing to your phone.
To remove an account
You can remove an account to delete it and all information
associated with it from your phone, including email, contacts,
settings, and so on.
You can’t remove the first Google Account you signed into on the
phone, except bydeleting all personal information from your phone.
1.Open the Accounts & Sync Settings screen.
You can do this from the Contacts application. Press the
Menu Key ,then touch More >Accounts.You can also
access it from the Settings application.
The Accounts & Sync Settings screen displays your current
sync settings and a list of your current accounts.
2. Touch the account you want to delete.
3. TouchRemove account.
4. Confirm that you want to remove the account.
Communication
Configuring Account Sync and Display Options
You can configure background data use and synchronization options
for all of the applications on your phone. You can also configure
what kinds of data you synchronize for each account. Some
applications, such as Gmail and Calendar, have their own
synchronization settings.
Some applications, such as Contacts, Gmail, and Calendar, can sync
data from multiple applications. Others sync data only from the first
Google Account you sign into on your phone, or from an account
associated specifically with that application.
For some accounts, syncing is two-directional; changes that you
make to the information on your phone are made to the copy of that
information on the web. Your Google Account works this way. Other
accounts support only one-waysync; the information on your phone
is read-only.
To configuregeneral sync settings
1. Open the Accounts & Sync settings screen.
You can do this from the Contacts application. Press the
Menu Key ,then touch More >Accounts.You can also
access it from the Settings application.
The screen displays your current sync settings and a list of
your current accounts.
indicates that some or all of an account’sinformation is
configured to sync automatically with your phone.
indicates that none of an account’s information is
configured to sync automatically with your phone.
Communication

2. Touch Background data to place a checkmark to control
application and services data transmission when you are not
working with them directly, but they are running in the
background.
If you remove the checkmark, Gmail stops receiving new
mail, Calendar stops syncing events, and so on, until you
manually refresh the application or send an email.
3. Touch Auto-sync to place a checkmark to control whether
changes you make to information on the phone or on the
web are automatically synced with each other.
For example, when checkmarked, changes that you make in
Contacts on the phone are automatically made in Google
Contacts on the web.
If you remove the checkmark, you may be able to use an
application’s tools to sync data manually.
To sync information manually
1. Open the Accounts & Sync settings screen. From the
Contacts application, press the Menu Key ,then touch
More >Accounts.You can also access it from the Settings
application.
2. Touch the account whose data you want to sync.
3. Press the Menu Key ,then touch Sync now.
To change an account’s sync settings
1.Open the Accounts & Sync settings screen. From the
Contacts application, press the Menu Key ,then touch
More >Accounts.You can also access it from the Settings
application.
2. Touch the account whose sync settings you want to change.
The Data and Synchronization screen opens, displaying a list
of the kinds of information the account can sync.
Checked items are configured to sync to your phone.
3. Checkmark (or uncheck) the types of information you want
to sync to the phone.
Removing a checkmark does not remove the information
from your phone; it simply stops it from being kept in sync
with the version on the web. To remove the information
previously synced for the account, you must remove the
account.
Communication
Email
Opening Email and the Accounts Screen
You can use the Email application to read email from services other
than GmailTM.The Email application supports the following account
types: POP3, IMAP and Exchange.
To open the Email application
'Press the Home Key ,touch the Applications Launcher
Key >Email .
TIP
Ashortcut to opening the Email application is pressing the Home Key
,then touching Email on the Home screen.
The first time you open the Email application, a setup wizard
opens to help you add an email account.
After the initial setup, Email displays the contents of your Inbox (if
you have only one account) or the Accounts screen (if you have
multiple accounts).
You can also add a shortcut to Email on your Home screen so that
you can open it directly from the Home screen.
The Accounts screen
The Accounts screen lists your Combined Inbox and each of your
email accounts. If you havestarred, draft, or unsent messages in
any of your accounts, the folders for those items from all accounts
are displayed as well.
'Open the Email application. If you're not on the Account
screen, press the Menu Key ,then touchAccounts.
Communication
Each folder and account on the Accounts screen displays the
number of unread messages in green, or will display the
number of messages in Starred, Drafts and Outbox in gray.
You can touch an account to view its Inbox, or an account's
folder icon to view a list of that account's folders.
The account from which you send email by default is
indicated with a checkmark.
Toopen your Combined Inbox
If you have configured Email to send and receive email from more
than one account, you can view all messages sent to all accounts
in your Combined Inbox.
1. Press the Home Key ,then touch the Applications
Launcher Key >Email .
SHORTCUT
Press the Home Key ,then touchEmail on the Home
screen.
2. If you havemultiple email accounts, touchCombined Inbox
(in the Accounts screen).
Messages in the Combined Inboxare color coded along
their leftsides, byaccount, using the same colors that are
used for your accounts in the Accounts screen.
Only your account's most recent emails are downloaded to your
phone. To download more (earlier) email messages, touch Load
moremessages at the bottom of the emails list.
Touch to open your Combined Inbox, with
messages sent to all of your accounts.
Touch to open a list of just your starred
messages.
Touch an account to open its Inbox.
Touch the folder icon to open the account’s
folders.
Accounts Screen
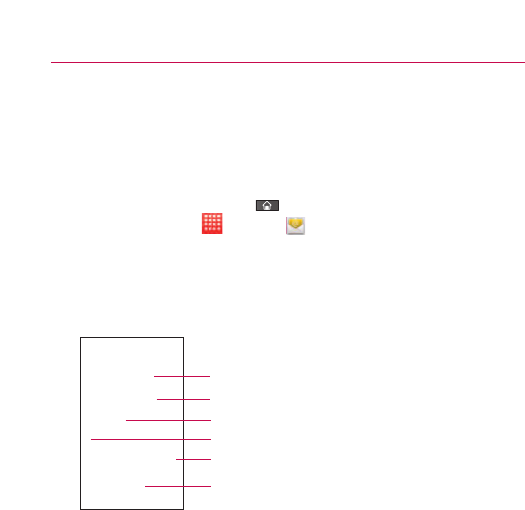
Reading Your Messages
You can read messages from your Combined Inbox, from the Inbox,
or from other folders from the individual accounts.
To read a message
1. Press the Home Key ,then touch Applications
Launcher Key >Email .
2. Touch the message you want to read.
The message opens in a screen that includes information
about who sent it, the date it was sent, and other related
information.
Touch to read the email.
Corporate Calendar Meeting Invitation
Unread messages are in bold.
Messages are color coded according to the account to
whichthey were sent.
Touch to star the message.
Previously read messages are grayed out.
The Google TalkTM online status will be shown (if available) to
the left of the name of the sender of each message. You can
touch that status indicator to open Quick Contact.
153
Communication
Touch to reply to or delete the message.
Touch for Meeting Respose function
Touch the arrow to read the next or previous message in the
folder.

Responding to a Message
There are many options how you can respond to a received email
message. You can reply to it, forward it or even just delete it.
To reply to or forward a message
'While reading a message, touch Reply or Reply all(available
at the bottom of the screen).
OR
'Press the Menu Key ,then touch Reply,Reply all,or
Forward.
Anew Compose message window will open.
You can send this message as you would a new message.
Tomark a message as unread
You can set a message to appear as though it has not been read –
for example, to remind yourself to read it again later.
'While reading a message, press the Menu Key ,then
touchMark as unread.
To delete a message
There are a few easy ways to delete a message.
'While reading a message, touch Delete.
OR
'While reading a message, press the Menu Key ,then
touch Delete.
For many types of accounts, deleted messages are moved to a
Trash folder,so you can retrieve them in case they were deleted
by mistake.
Communication
Starring Messages
You can add stars to important messages to make it easy to keep
track of them. When you star a message, a Starred folder will be
added to the Accounts screen.
To star a message
'While reading a message, touch the star in its header.
OR
'From an account's Inbox or a folder, touch a message's star.
The star turns gold .
To unstar a message
'Touchthe star again.
To view your starred messages
You can open a folder that contains the starred messages from all
of your accounts.
1. Open the Email application , press the Menu Key ,
then touch Accounts.
2. Touch Starred.
A folder opens with your starred messages.
Communication
Composing and Sending Email
You can send email to your contacts or to other people or groups.
To compose and send a message
1. While in the Email application, press the Menu Key ,
then touch Compose.
2. Enter an address for the message's intended recipient.
As you enter text, matching addresses are offered from your
Contacts. You can touch a suggested address or continue
entering a new one. Separate multiple addresses with
commas.
3. Press the Menu Key ,then touch Add Cc/Bcc to Cc or
Bcc other contacts/email addresses.
4. Enter a subject for the message.
5. Enter the text of the message.
6. Press the Menu Key ,then touchAdd attachment to
send a photo with the message.
7. Touch Send to send the message.
If you're not ready to send the message, touch Save as draft
(or press the Back Key )to move the message to the
Drafts folder. Later, when you're ready to send the message,
touch the message in the Drafts folder to resume working on
it.
If you change your mind about the message, touch Discard
to abandon and delete the message, including any saved
drafts.
If you aren't connected to a network, for example if you're
working in Airplane mode, the messages that you send are
stored in your Outbox folder until you're connected to a
network again. The Outbox is displayed on the Accounts
screen if it contains anypending messages.
Communication

Please note that messages sent using an Exchange account will not
be located on the phone; they will, however, be located on the
Exchange server itself.
If you want to see your sent messages in the Sent folder (or with
the Sent label), you will often need to open the Sent folder/label,
press the Menu Key ,then touch Refresh.
Working with Account Folders
Each account has Inbox, Outbox, Sent, and Drafts folders.
Depending on the features supported by your account's service
provider, you may have additional folders.
Toview an account’s folders
1.Open the Email application ,press the Menu Key ,
then touchAccounts.
2. Touch an account's folder icon.
The account's Folders screen will open, with a list of the
folders in the account. Touch a folder to view a list of the
messages it contains.
The account name.
Indicates the number of new messages in the
folder.
Touchafolder to open the messages it
contains.
Adding and Editing Email Accounts
The first time you open the Email application, you will be prompted
to set up an email account. After that, you can configure Email to
send and receive email from additional accounts. The accounts that
you configure will be displayed in the Accounts screen.
The Email setup wizard helps you set up your account for many
popular email systems, including those based on POP3, IMAP, and
SMTP, so you can read and work with the same email as you would
through on-line email or an email application on your desktop. If
your service provider requires additional settings or if your service
provider is unknown to the Email application, you can enter the
necessary details manually, though you will typically need to contact
your email service provider to determine the correct settings for
your account.
You can also set up a Microsoft Exchange ActiveSync account, so
you can read and work with the same email as you would on a
computer using MicrosoftOutlook.
Toadd an email account
1. Open the Email application , press the Menu Key ,
then touchAccounts.
2. Press the Menu Key ,then touchAdd account.
In the Set up email screen, enter your email address and
password.
If you're adding a second or subsequent email address, you
can checkmark the option to use the newaccount to send
all outgoing messages.
Communication

3. Touch Next or, if you need to enter email account settings
the wizard can't configure for you, touch Manual setup.
If you touch Next,the Email application attempts to
communicate with your email service provider to validate
your account for sending and receiving mail, using just your
email address and password. This is sufficient for most email
services.
Depending on the service provider, you may be asked what
kind of email account you have. If you're not sure, ask your
email service provider.
If the wizard determines that your service provider requires
additional information, or if you touched Manual setup,
you're prompted to enter your email account details.
Contact your email service provider for the values required
for your account.
4. Enter a name for the account, confirm how you want your
name to appear in outgoing mail, then touch Done to
complete adding the account.
If you are adding an Exchange ActiveSync account, you can
also decide whether you want to synchronize your contacts
from the Exchange ActiveSync server to your phone. You can
change this setting later using the Contacts application.
The Email application will start downloading your email
messages so you can start using it to send and receive
messages.
Communication
To delete an email account
1. Open the Email application , press the Menu Key ,
then touch Accounts.
2. Touch and hold the account you want to delete.
3. Touch Remove account in the menu that opens.
4. Touch OK in the dialog box to confirm that you want to
delete the account.
To change an account’s settings
You can change a number of settings for an account, including
how often email is checked and how you're notified of new mail.
1. Open the Email application , press the Menu Key ,
then touch Accounts.
2. Touch and hold the account whose settings you want to
change. In the menu that opens, touch Account settings.
3. When you're finished changing settings, press the Back Key
to return to the Accounts screen.
Changing Email Account Settings
The following settings can be changed for your Email accounts.
Email account settings
Account name The name of the account as it appears in the
Accounts and Folders screens.
Your name Your name as it appears to others when they receive
email from you.
Communication

Signature
Allows you to create a custom signature to include with
your outgoing email.
Email check frequency Sets how often Email checks for new
email sent to this account.
Default account Sets this account as the default account for
when you want to send an email from your phone.
Email notifications Sets whether you want to receive
notifications when you receive new email sent to this account.
Select ringtone Sets the ringtone to sound when you receive an
email notification for this account.
Vibrate Sets the phone to vibrate when you receive an email
notification for this account.
Incoming settings Opens a screen where you can configure
settings for how you receive email for this account.
Outgoing settings Opens a screen where you can configure
settings for how you send email from this account. (Microsoft
Exchange ActiveSync accounts do not have separate outgoing
server settings.)
Communication
Incoming server settings
Your account's incoming settings are different, depending on the
kind of email service for the account: POP3, IMAP, Exchange
ActiveSync.
Communication
Domain\Username
If your Exchange ActiveSync server requires that you
specify a domain, enter it before the backslash.
Otherwise, just enter your username (the part before
the @example.com in your email address) after the
backslash. (The backslash is optional if you
'
re just
entering your username; Email uses the correct syntax
for domains and usernames when communicating with
the server.)
Password
The password for your email account.
Server
The hostname for the Exchange ActiveSync server, for
example, owa.example.com.
Use secure
connection (SSL)
Checkmark this option if your Exchange ActiveSync
server requires you to connect to the server securely,
or if you prefer to connect securely.
Accept all SSL
certificates
Checkmark this option if you want to accept a server
certificate from your Exchange ActiveSync server that is
self-signed, out of date, or in some other way not
accepted bythe Email application.
Username
Depending on the requirements of your email service
provider, your full email address or just your username
(that is, the part before @example.com in your email
address) is required.
Password
The password for your email account.
IMAP server
The domain name of your email service provider
'
s
IMAP server; for example, imap.example.com.
Settings for Microsoft Exchange ActiveSync accounts
:
Settings for IMAP accounts:
Communication
Port
Set the Security type (following item) first for the
server port number to be entered automatically, if it is
available. Or, enter a different port number if your email
service provider requires it.
Security type
Select the security type required by your email service
provider. Select the Accept all certificates option for
your security type to accept a server certificate from
your IMAP server that is self-signed, out of date, or in
some other way not accepted by the Email application.
IMAP path prefix
Leave blank unless instructed to enter a specific prefix by
your email service provider.
Username
Depending on the requirements of your email service
provider, your full email address or just your username
(that is, the part before @example.com in your email
address) is required.
Password
The password for your email account.
POP3 server
The fully resolved domain name of your email service
provider
'
sPOP3 server, for example,
pop3.example.com.
Port
Set the Security type (following item) first for the server
port number to be entered automatically, if it is
available. Or, enter a different port number if your email
service provider requires it.
Security type
Select the security type required by your email service
provider.Select the Accept all certificates option for
your security type to accept a server certificate from
your POP3 server that is self-signed, out of date, or in
some other way not accepted by the Email application.
Settings for POP3 accounts:

Outgoing server settings
If you use an IMAP or POP3 account for receiving email, you
typically use an SMTP server to send email from that account.
Microsoft Exchange ActiveSync accounts do not have separate
outgoing server settings.
Communication
SMTP server
The domain name of your email service provider
'
s
SMTP server; for example, smtp.example.com.
Port
Set the Security type (following item) first for the
server port number to be entered automatically, if it is
available. Or, enter a different port number if your
email service provider requires it.
Security type
Select the securitytype required by your email
service provider. Select the Accept all certificates
option for your security type to accept a server
certificate from your SMTP server that is self-signed,
out of date, or in some other waynot accepted by
the Email application.
Require sign-in
Checkmark this option to enter a username and
password for your SMTP server, if your email service
provider requires that you enter them to send email.
Username
Your username on the SMTP server (this maynot be
the same as your username on the POP3 or IMAP
server for incoming mail). Visible only if Require sign-
in is checkmarked.
Password
Your password on the SMTP server (this may not be
the same as your username on the POP3 or IMAP
server for incoming mail). Visible only if Requiresign-
in is checkmarked.
Facebook
Facebook for LG Application
The Facebook application on your phone lets you keep up and stay
close with your friends in Facebook. It offers most of the features
that you are familiar with when using Facebook on your computer.
NOTE
If you have more than one Facebook account, you can sign in to the
Facebook application using either Facebook account.
With the Facebook application you can:
'Share your thoughts and check other people’s status
updates.
'View your friends list and write on someone’s wall.
'Comment on and like a friend’s post.
'View someone’s personal information, including photo
albums.
'Take a photo and upload it straight to your Facebook account.
Using the Facebook application
1. Press the Home Key ,then touch the Applications
Launcher Key >Facebook for LG .
2. If this is your first time to use Facebook, follow the onscreen
instructions to sign in to your Facebook account.
3. On the News Feed screen, press the Menu Key ,then
touch Home to access the other functions.
NOTE
•While on the Facebook home screen, press the Menu Key ,
then touchSettings to set refresh and notification options.
•On some Facebook screens, you can press and hold an item to open
an options menu.
Communication
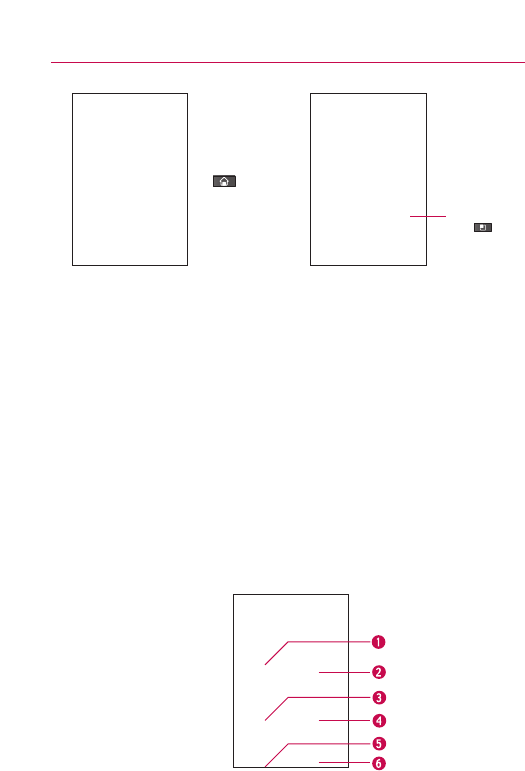
Adding a Facebook widget
Add the My Status Facebook widget to a Home screen pane to let
you quickly share your thoughts and view your friends’ status
updates.
NOTE
The widget will only link to the Facebook account that you logged into
on the Facebook application as the main account.
1. Press and hold a spot on a Home screen pane where you want to
place the widget, then touchWidgets > My Status.
My Status
Shows you your current status of Facebook and Twitter and allows
you to do the status update for both Facebook and Twitter
simultaneously.
Home screen
Press the Menu
Key to
configure your
settings or log out.
Press the
Menu Key
,then
touch Home
to go to the
Home screen.
Home screenNews Feeds screen
1. Shows all feeds from your friends. Press and hold a feed
then tap Like in the dialog box that appears if you want to
mark it.
Touch the username or thumbnail image to view his/her
profile.
2. Touch to view your Facebook profile. This shows you all the
feeds, private information and photos on your wall and
profile.
3. Shows a list of all your friends and their status.
4. Shows all Facebook messages you have received and sent
out.
5. Touch to view your Facebook photo albums.
6. Shows people who you choose as your favorite friends.
Share a status message
1.On the News Feed screen, touchthe text field with the
words "What's on your mind?".
2. Enter your status message, then touch Share.
3. Tap the Photo icon to post a picture from Gallery or
Camera and add the photo to the Facebook album of your
choice.
Searching for Facebook users to add to your friends
1. While on the Home screen, touch Friends list.
2. Press the Menu Key ,then touch New .
3. Input key words in the Search Contacts text field, then touch
Done .
4. On the search results screen, touch Add next to each
person you want to send a friend request to.
Communication
Sending a facebook message
You can only send a facebook message to your friends.
1. Make sure you are on the Home screen. If you are not,
press the Menu Key ,then touch Home.
2. Touch Inbox >New message.
You can also send a facebook message from your friends
profile screen. Press the Menu Key ,then touch Write
>Facebook message.
3. Touch the To field, then enter the name. As you enter
characters, the names of the Facebook users that match the
characters you enter will appear. Touch the name when you
see it.
OR
Touchthe icon to the right of the To field and you can choose
recipients on your friends list.
4. Enter your message, then touch Send.
Setting Facebook options
1. Press the Menu Key from any of the Facebook
screens.
2. Touch Settings.
Auto refresh Sets the frequency to receiveupdated information.
Notification After setting Auto refresh,set to be notified of new
Facebook messages and/or Friend requests.
Communication
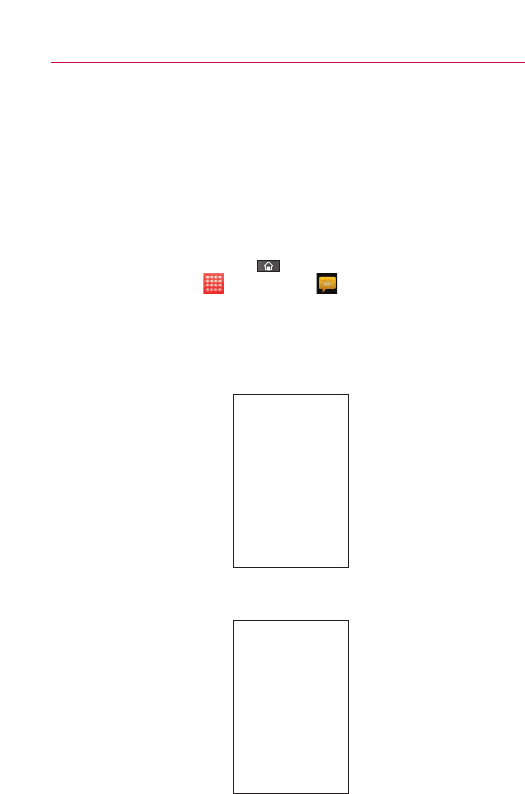
Visual Voice Mail
Visual Voice Mail allows the management of voicemail directly from
the device rather than accessing voice mail via traditional methods.
Visual Voice Mail displays a list of messages and allows the user to
choose which message to listen to or delete, without having to dial
into their mailbox, listen to voice instructions, or prior messages.
To use Visual Voice Mail
1. Press the Home Key ,then touch the Applications
Launcher Key >Voicemail .
2. If it is the first visit, subscribe from the subscription page.
3. After the subscription, you are required to enter the pin
code. You are only allowed to change the pin code by calling
voicemail (dial *86).
4. After entering the pin code, you are allowed to see voice
mail entries in your Inbox.
While viewing the voice mail list, you can select an entry (see step
5). For additional options, press the Menu Key ,then touch
Refresh, New, Multiselect, Sort by, Saved messages, or Settings.
5. Touch a voicemail entry in the list to play it. Then, you can
also tap Call back, Save, or Erase.To forward or reply to a
message, press the Menu Key ,then touch Forward or
Reply.

Touch the buttons at the bottom of the screen to play, stop, or
cancel the message.
NOTE
To send a voice message to a number in your Contacts list, use the To: field to
search for it.
If you'd liketo cancel the Voicemail Subscription, press the Menu
Key ,then touchSettings >VVM service >Cancel VVM
service.
If the voicemail is sent from a saved number,you are allowed to Re-
record and send it again.

Gmail
Gmail is Different
Gmail is web-based:Your messages are stored on-line, on
GoogleTM servers; but you can read, write, and organize messages
by using the Gmail application on your phone, or by using a web
browser on a computer. Because your mail is stored on Google
servers, you can search your entire message history, backed by
the speed and power of Google search.
Actions that you take in one place are reflected everywhere. For
example, if you read a message in Gmail on your phone, it will be
marked as read in a web browser. And a message that you send
using a browser, or even a draft of a message, is visible in Gmail
on the phone.
Gmail is conversation-based:Each message and all replies to it
are grouped in your Inboxas a single conversation. In other email
applications, replies to messages are spread across your Inbox,
typically by date received, so a message and the replies to it are
separated by other messages. Gmail makes it easy to follow the
thread of a conversation.
Gmail is organized by labels, not by folders:By tagging
messages with labels, you can organizeyour conversations in
many different ways. Whereas in other email applications, each
message can only be located in one folder. For example, with
Gmail you can label a conversation with your mother about your
brother's birthdaypresent with both
“
Mom
”
and
“
Dave.
”
Later, you
can look for all the messages containing either label. Using
folders, you'd haveto store the message in the
“
Mom
”
folder or
the
“
Dave
”
folder, not both.
Gmail for the phone is optimized for mobile use: Some features
are only accessible on your computer browser. The best place to
organize and learn about Gmail is the web. For example, you can't
use the Gmail application on the phone to create the labels and
Communication

filters that you use to organize your messages, but you can label a
message. Gmail on the web offers complete information about the
service, so it's the best place to learn about all of the features of
Gmail.
Gmail is for Gmail: Of course you can use Gmail to send email to
any email address, and anyone can send email to you at your
Gmail address. But if you want to read messages from another
email service provider (using your AOL, Yahoo!, or other email
account), you must use the Email application.
Opening Gmail and Your Inbox
When you open the Gmail application, the most recent
conversations are displayed in your Inbox.
To open the Gmail application
'Press the Home Key ,then touchthe Applications
Launcher Key >Gmail .
All of your conversations are displayed in your Inbox unless you
delete, archive, or filter them.
The current Google Account is displayed at the top right of the
Inbox. If you have more than one account, you can switch
accounts to view the messages in each Inbox.
Conversations with new messages are displayed with bold subject
lines. To read a message in a conversation, touch its subject line
text.
Communication

:indicates that this message was sent directly to you.
:indicates that this message was that you were CC'd on.
(No indicator): indicates that this message was sent to a group
that includes you.
Toopen your Inboxwhen Gmail is running
'Touch the Back Key until you return to your Inbox.
OR
'When reading a message, press the Menu Key ,then
touch Go to Inbox.
OR
'When viewing a list of labeled conversations, press the
Menu Key ,then touchMore > Go to Inbox.
To switch accounts
Gmail displays conversations and messages from one Google
Account at a time. If you have more than one account, you can
open the Accounts screen to view how many unread messages
you have in each account and to switch accounts.
1.From your Gmail Inbox, press the Menu Key ,then
touchAccounts.
Your account.
Bold subject lines indicate
conversations with new
(unread) messages.
The number in
parentheses indicates the
number of messages in
the conversation
The number of unread
messages in your Inbox.
Touch a conversation to open it
and read its messages.
Recipient indicator (see below)
2. Touch the account that contains the email you want to read.
Reading Your Messages
When viewing a list of conversations in your Inbox or in any list of
labeled conversations, you can open a conversation to read its
messages.
To read a message
'Touch a conversation that contains the message you want to
read.
Aconversation opens to the first new (unread) message, or
to the first starred message, if you've previously starred a
message in the conversation.
175
Communication
This conversation has one label.
Touch a sender's Picture icon to
open the QuickContact menu.
You can archive or delete the
entire conversation or read your
next, oldest, unread message.

The Google Talk online status will appear next to the name
of the sender of each message if the sender has a Google
account. Touch contact's picture to open Quick Contact.
When reading messages in a conversation, you can use the
buttons at the bottom of the screen to archive the entire
conversation or delete it. After you delete a conversation,
you can touch Undo in the yellow bar that appears at the top
of the screen to undo the last action and restore the
message to its previous location.
You can also touch the arrow buttons to read the next,
oldest, unread message in a conversation in your Inbox (or
the conversation list you're working in).
You can scroll to the bottom of a message to access buttons
for replying to or forwarding the message.
Communication
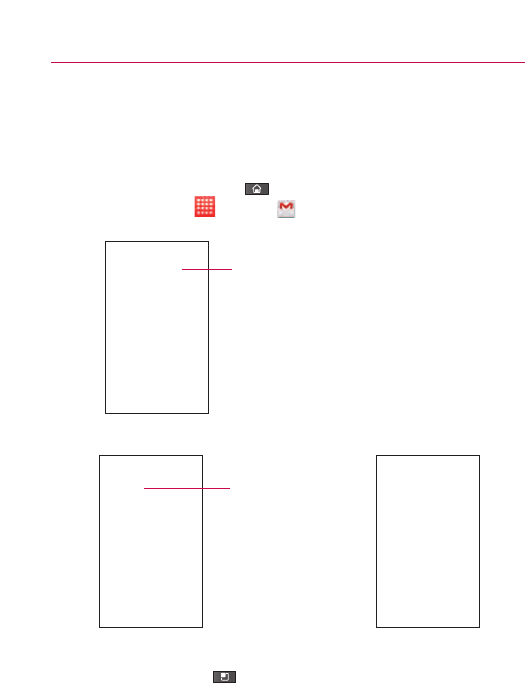
To reread a message
When you open a conversation, messages that you've already
read are minimized into a tab that indicates the number of hidden
messages.
1. Press the Home Key ,then touch the Applications
Launcher Key >Gmail .Then touch the conversation you
want to view and the tab indicating minimized messages.
2. Touch the contact name to open that message.
When reading a message or when its tab is selected, you can
press the Menu Key ,then touch Mark unread to return a
read message to the unread state. For example, to remind
yourself to read it again later.
Touch the tab that indicates
the number of read
messages to viewtheir
summary tabs.
Touch the contact name
of a message to open it,
so you can read it again.
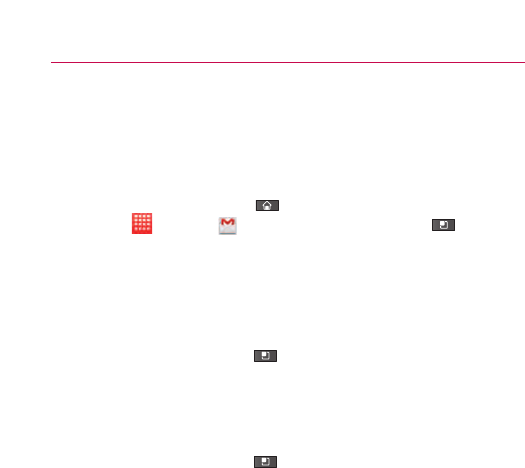
Composing and Sending a Message
You can compose and send a message to people or groups with
Gmail addresses or other email addresses.
To compose and send a message
1. Press the Home Key ,touch the Applications Launcher
Key >Gmail ,then press the Menu Key and
touch Compose.
2. Enter a recipient's address.
As you enter text, matching addresses are offered from your
Contacts list. You can touch a suggested address or continue
entering text to enter a new one.
3. Press the Menu Key ,then touchAdd Cc/Bcc to Cc or
Bcc recipients, if necessary.
4. Enter a subject for the message in the Subject field.
5. Continue into the next field to enter your email message.
6. Press the Menu Key ,then touch Attach to add an
attachment to the email.
7. Touch Send.
If you're not ready to send the message, touch Save as draft
instead. You can read your drafts by opening messages with
the Draft label.
Touch Discard to erase the message (including any saved
drafts).
If you aren't connected to a network - for example, if you're
working in Airplane mode - the messages that you send are
stored on your phone with the Outbox label until you
connect to a network again.
Communication
Replying to or Forwarding a Message
You can continue an email conversation by replying to a message or
by forwarding it.
To reply to or forward a message
1. Scroll to the bottom of a message.
2. Touch Reply,Reply to all,or Forward.
Replying to or forwarding messages without changing the
subject adds your reply to the current conversation.
Changing the subject starts a new conversation.
The message will open in a new screen where you can add
or remove addresses, edit the subject, and add or remove
text or attachments.
You can add one or more people to an ongoing conversation
by replying to all and then adding the new person's
address(es) to the reply.
Note that the conversation text and previous messages are
also included in your reply (or forward).
3. Touch Send.
TouchReply to reply just to the sender of
the message. Touch Reply to all to include
all recipients of the message.
TouchForward to send the conversation
to someone new.
Working with Conversations in Batches
You can archive, label, delete, or perform other actions on a batch of
conversations at once, in your Inbox or in another label views.
1. From the Inbox or a folder with another label, touch the
checkmark for all the messages you want to include in the
batch.
When you checkmark a conversation, the Archive,Labels,
and Delete buttons appear at the bottom of the screen.
180 Communication
Touch to select an action for the batch or press the
Menu Key for more options.
Touch to include the message in the batch.
2. Touch Archive, Labels, or Delete or press the Menu Key
,then touch Add star,Report spam,Mute,Mark
unread,or Deselect all.
You action affects the selected batch of messages.
If you accidentally delete a batch of conversations, you can
touch Undo in the yellow bar (that appears briefly after the
action) at the top of the screen to undo the action and
restore the message to the previous location. You can also
use Undo after muting, archiving, and reporting spam.
If you never work with batches of messages, you can hide the
checkboxes to leave more room for the subjects of conversations.
Labeling a Conversation
Asmentioned previously,conversations are organized by labels.
Gmail has several default labels, but you can also add your own
through Gmail on the web.
Tolabel a conversation
1. When reading a conversation's messages, press the Menu
Key ,then touch Change labels.
2. In the dialog box that opens, check the labels you want to
assign to the conversation.
Communication

To label a batch of conversations at once
You can assign or change the labels of one or more conversations
at once.
1. From your Inbox or a folder with another label, checkmark
the conversations to select a batch.
2. Touch Labels at the bottom of the screen.
3. In the dialog box that opens, check the labels you want to
assign to the conversation.
4. Touch OK.
Tochange a conversation’s labels
1. When reading a specific conversation, press the Menu Key
,then touch Change labels.
2. In the dialog box that opens, check the labels you want to
assign to the conversation.
3. TouchOK.
Communication

Starring a Message
You can star an important message or conversation to make it easy
to locate again.
To star a message
'When reading a message, touch the star in its header.
OR
'When viewing a list of conversations, touch its star to
star the newest message in the conversation.
To unstar a message
'Touch its star again.
To star or unstar all messages in a conversation
'Touch a star in a conversation list.
Communication
Viewing Conversations by Label
You can view a list of the conversations that have the same label,
including conversations with starred messages.
1. When viewing your Inbox or a folder with another label,
press the Menu Key ,then tap Go to labels.
2. Touch a label to view a list of conversations with that label.
Note that the conversation list will resemble your Inbox.
Most of the options available while using your Inbox will also
be available while viewing these lists of labeled messages.
The number of conversations with this label that
have unread messages.

Reporting Spam
The Gmail webmail service is quite effective at preventing spam
(junk mail) from reaching your Inbox. But when spam does make it
through, you can help improve the Gmail service by reporting the
conversation as spam.
To report a conversation as spam
'When reading the email, press the Menu Key ,then
touch More > Report spam.
OR
'From the Inbox, touch the checkmark box to select the
messages you want to report as spam, then press the Menu
Key and touch Report spam.
When you report a conversation as spam, the conversation
(and all its messages) are removed from your Inbox. You can
view the messages you've marked as spam by viewing
messages with the Spam label.
Searching for Messages
With the Gmail application, it is very easy to search and find specific
emails. When you search for emails, all of the emails in your Google
account on the web are included in your search (except those
labeled Trash or Spam), not just those that you've synchronized onto
your phone.
You can also use the advanced search options as described on the
Gmail website.
1. From the Gmail Inbox, press the Menu Key ,then touch
Search.
Or from the Inbox, press the Search Key .
Communication

2. Enter the word or words to search for, then touch Search
to the right of the text field or touch Go.
Alist of results will appear, displaying all of the
conversations with emails that contain the words you
searched for.
You can open these emails as you would any email in your
Inbox; you also have the same options available.
Archiving Conversations
You can archive conversations to move them out of your Inbox
without deleting them. Archived conversations are assigned the All
Mail label, and also retain any other labels you've assigned to them.
Archived conversations are also included in search results. If
someone replies to a message that you'vearchived, its
conversation will be restored to your Inbox.
To Archive a conversation:
'From your Gmail Inbox, touch and hold a conversation then
touch Archive in the menu that opens.
OR
'Checkmark one or a batch of conversations in your Inbox
then touch the Archive Key.
OR
'When reading a message, touch Archive at the bottom of
the screen.
Synchronizing Your Messages
The Gmail webmail service has the resources to store all the
messages you've ever sent or received; your phone does not. To
save space, Gmail downloads only some of your messages to your
phone. Use the Settings application to control howand when
applications synchronize their data.
Communication
To select which conversations to synchronize
1. Press the Home Key ,touch the Applications Launcher
Key >Gmail .
2. Press the Menu Key ,then touch More >Settings >
Labels.
The Synchronization settings screen opens, displaying a list
of your Gmail labels. Below each label is its current
synchronization setting: Sync all,Sync 4 days,or Sync
none.(If Sync none is selected, the labeled conversation is
not synchronized).
3. Touch a conversation label whose synchronization settings
you want to change.
Adialog box for that conversation label opens, with three
options:
cSync none Don't download anyconversations that have
only this label.
cSync 4 days Download the previous 4 days (or number of
days you set) of conversations.
cSync all Download all conversations with this label.
To set how many days of conversations to synchronize
1. Press the Home Key ,touch the Applications Launcher
Key >Gmail .
2. Press the Menu Key ,then touch More >Settings >
Labels.
3. Touch Number of days to Sync.
4. Enter the number of days then touch OK.
Appending a Signature to Your Messages
You add information to every email you send, such as your name,
contact information, or even
“
Sent from my AndroidTM phone
”.
1. Press the Home Key ,touch the Applications Launcher
Key >Gmail .
2. Press the Menu Key ,then touch More >Settings >
Signature.
3. Enter a signature or other information.
4. Touch OK.
Changing Gmail Settings
You can change a number of settings for Gmail. Each Google
account has its own settings, so your changes affect only the
current account. Notification volumes and some synchronization
settings can also be changed in the Settings application.
'Press the Home Key ,touch the Applications Launcher
Key >Gmail ,press the Menu Key ,then touch
More >Settings.
Enter a signature to append your messages.

General Settings
Signature Allows you to create a customized signature to include
with your outgoing messages.
Confirm actions Show a confirmation dialog whenever you
perform following actions: Archive, Delete and Send.
Auto Advance Sets which screen to display after you delete or
archive a conversation.
Message text size Sets text size for your messages.
Batch operations Checkmark this setting to allow batch
operations.
Clear search history Removes the search history for searches
performed.
Labels Opens the Labels screen, from where you can manage
which conversations are synchronized.
Notification settings
Email notifications Checkmark this setting to receive a
notification whenever you receive new email.
Select ringtone Allows you to select the ringtone to sound when
you receive a new email notification.
Vibrate Sets phone to vibrate (or not) when you receive a new
email notification.
Notify once Checkmark this setting to be notified once for new
email, not for each new email.
Communication

Messaging
Opening Messaging
To open Messaging
'Press the Home Key ,then touch Messaging in the
Quick Keys bar.
The Messaging window will open, where you can create a
newmessage or open an ongoing message thread.
'Touch New message to start a new text or multimedia
message.
'Touch an existing message thread to open it.
Todelete a message thread from the Messaging window
1.Touchand hold the message thread.
2. Touch Delete thread in the menu that opens.
3. Touch OK to confirm you want to delete the message
thread.
Touch to compose a new text or multimedia
message.
Touch to open an ongoing message thread.
Exchanging Messages
You can send text (SMS) messages of up to 160 characters to
another mobile phone. If you keep typing after the limit, your
message is delivered as a series of messages.
Multimedia (MMS) messages can contain text and a picture, a
recorded voice, an audio file, a video, or a picture slideshow.
The Messaging application automatically converts a message into a
multimedia message if you send it to an email address instead of a
phone number, add a subject, or attach a media file.
To send a text message
1. On the Messaging screen, touch New message.
2. Enter a mobile phone number in the To field.
As you enter the mobile phone number, matching contacts
appear. You can touch a suggested recipient or continue
entering the phone number.
3. Touchthe text field to start entering your message.
When entering the text, a counter appears in the top right
corner of the text field to tell you how many characters are
left as well as the number of current messages.
If you press the Back Key while composing a message,
it'ssaved as a draft in your Messaging menu. Touch the
message to resume composing it.
Enter a mobile phone number or the name of a
contact with a mobile number.
Touch the Send button to send your message.
4. Touch Send to send the message.
The Message window opens, with your message displayed.
Responses appear in the same window, creating a message
thread with that contact.
To create and send a multimedia message
1.On the Messaging screen, touchNew message.
2. Enter a mobile phone number or email address in the To
field. As you type, matching contacts appear. You can touch
asuggested contact or continue typing.
3. Touch the text field to start entering your message.
4. Press the Menu Key ,then touch Add subject to add a
message subject.
5. Press the Menu Key ,then touch Attach to open a
menu where you can choose the type of media file to attach
to the message.
cIf you touchPictures, you're prompted to select a picture
from your Gallery.
cIf you touch Capture picture, the Camera application opens
so you can take a picture and attach it.
cIf you touch Videos, you're prompted to select a video
from your Gallery.

cIf you touch Capture video, the Camcorder application
opens so you can record a video and attach it.
cIf you touch Audio,you're prompted to select an audio file
from your microSD card.
cIf you touch Record audio, the voice recording function
opens and allows you to record a spoken message and
attach it to your message.
cIf you touch Slideshow, a menu opens and allows you to
assemble photos into a slideshow (up to 10 slides) to
attach to the message. Use the buttons in the Compose
Message screen to preview the message, replace the
picture, or remove the slide.
6. Touch Send to send the message.
To respond to messages you receive
If you're working in a message window,messages that you
receive from that contact are displayed. Otherwise, you receive a
newmessage notification and a newmessage icon appears in the
Status bar. When you touch the new message notification, the
Message window opens, where you can reply to the message.
If Auto-retrieve is unchecked, you must touch Download to view
the message.
If the message contains a media file, touchPlay to view, watch, or
listen to it. Touch and hold the media file to open a menu with
additional options.
Toviewdetails about a message
1. Touch and hold a message in a message window.
2. Touch View message details in the menu that opens.
Communication

Changing Messaging Settings
You can change a number of Messaging settings.
'To change Messaging settings, open the Messaging window,
press the Menu Key and touch Settings.
Storage settings
Delete old messages Checkmark to allow the phone to delete
older messages in a thread when the Text message limit or
Multimedia message limit is reached. Remove checkmark to keep
all messages.
Text message limit Sets the number of messages to save per
thread of text messages.
Multimedia message limit Sets the number of messages to save
per thread of multimedia messages.
Signature Touch to checkmark and create a customized signature
to include with your outgoing messages.
Callback Number Touch to checkmark and open a dialog box to
view or edit the callback number sent with your messages.
Text message (SMS) settings
Delivery reports Checkmark to allow your phone to receive
deliveryreports for the messages you send.
Multimedia message (MMS) settings
Delivery reports Touchto checkmark and allow your phone to
receive a report on the messages you send.
Auto-retrieve Touch to remove the checkmark to download only
the heading of multimedia messages, whichyou can then touch to
open a menu to download the whole message. This is useful for
controlling howmuch data you download.
Communication
Roaming auto-retrieve Touch to remove the checkmark to download
only the heading of multimedia messages when connected to other
carrier'sdata networks. This is useful for avoiding unexpected
charges if your contract has limits on data roaming.
Notification settings
Notifications Touch to checkmark and allow your phone to display
notifications in the status bar whenever you receive a new message.
Select ringtone Sets the ringtone to sound when you receive
new message notifications.
Vibrate Sets the phone to vibrate (or not) when you receive a
new message notification.
How to select the type of keyboard you want
2. Touch Input
method.
4. Use the
keyboard you
selected to type
your messages.
1.Touch and hold a
text field.
3. Select the type
of keyboard you
want to use.
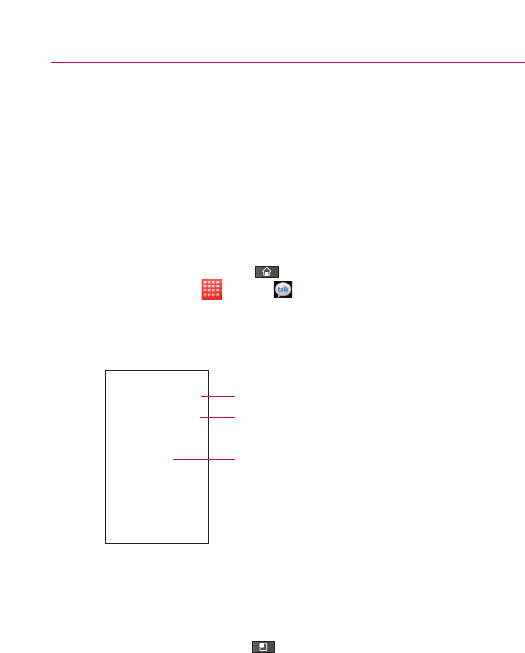
Talk
Signing in and Opening your Friends List
You sign into Google Talk to chat with your friends.
You remain signed in, even when you're using other applications,
until you deliberately sign out.
To open Google Talk and sign in
'Press the Home Key ,then touch the Applications
Launcher Key >Talk .
When you first open Google Talk, your Friends list will be
displayed. This list includes all of the friends you've added by
using Google Talk on the web or on the phone.
Toreturn to your friends list
You can return to your Friends list when chatting with a friend, so
that you can invite another friend to chat, add a friend, and so on.
'Press the Menu Key ,then touchFriends list.
Your online status.
Touch to open an ongoing chat.
Touch a friend to invite them to chat.
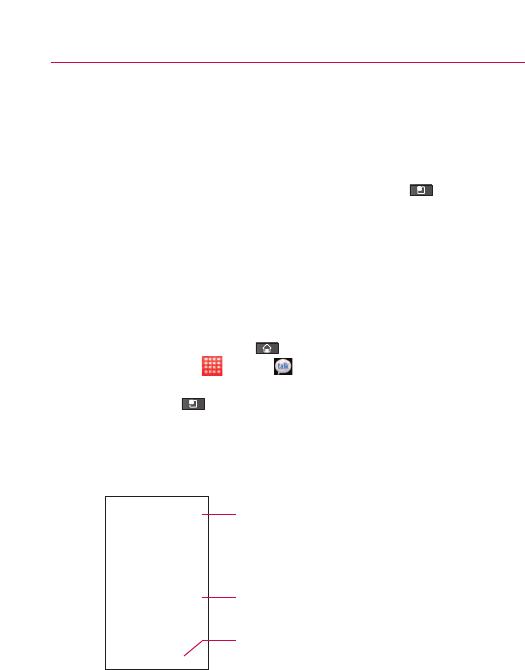
To sign out of Google Talk
You can sign out of Google Talk. For example, if you want to limit
Google Talk conversations to your computer. Also, signing out can
also extend your battery life.
'From your Friends list, press the Menu Key ,then touch
Sign out.
You will no longer receive chat notifications or see others'
Google Talk status in other applications, such as GmailTM.
Chatting with Friends
To chat with a friend
1. Press the Home Key ,then touch the Applications
Launcher Key >Talk .
If you're already chatting with someone, you can press the
Menu Key ,then touch Friends list to return to the
friend's list.
2. Touch the friend you want to chat with.
3. Enter your message then touch Send.
The messages that you exchange are displayed on the
screen and include information about the chat, such as
whether it's on the record, the time a message was sent (if
there's no response after a short while), etc.
Who you’re chatting with and their online status.
Messages sent and received.
Enter a message, then touch Send.
To enter an emoticon (smiley), just press the Menu Key
,then touch More > Insert smiley to open a list of
emoticons.
Your chat session will remain open until you end it.
Friends you're chatting with are displayed at the top of your
Friends list, with the most recent message displayed in a
black-on-white balloon.
To accept an invitation to chat
When a friend sends you a Google Talk message, you will receive
anotification. The friend's name in the Friends list turns white and
displays the message.
'Touchthe friend in your Friends list.
OR
'Open the Notifications panel then touchthe chat notification.
A chat windowwill open where you can exchange messages
with your friend.
Toswitch between active chats
If you have more than one chat going, you can switch between
chats.
'From the Friends list, touch the name of the person you
want to chat with.
OR
'From a chat screen, press the Menu Key ,touch Switch
chats,then touch the friend you want to chat with.
OR
'While chatting with a friend, swipe left or right across the
screen.
Communication
To invite a friend to join a group chat
When you're chatting, you can invite additional friends to join a
group chat.
1. On a chat screen, press the Menu Key ,then touch Add
to chat.
2. Touch the name of the friend to invite.
The friend you invited and the current participants will
receive an invitation to a group chat. Each one who accepts
the invitation will join the group chat. In a group chat,
everyone can see everyone else's messages. Group chats
appear at the top of your Friends list, with a group chat icon.
Tochaton or off the record
Your Google Talk messages are stored, so you can review them
later and even search for them, in the Chats folder in Gmail. If
you'd rather not store the messages in a chat, you can chat off the
record.
'While chatting, press the Menu Key ,then touchChat
offrecord.
To return to on-the-record chatting, press the Menu Key ,
then touch Chat on record.
To end a chat
When you've finished your conversation, it is easy to end a chat
session.
'From your Friends list, touch and hold the friend you want to
stop chatting with. In the menu that opens, touch End chat.
OR
'From a chat screen, press the Menu Key ,then touch
End chat.
Communication

Changing and Monitoring Online Status
Google Talk allows you to change how you appear to others; you can
change your online status and status messages, as well as the
picture that appears next to your name on your friend's Friends list.
To change your online status
1. Press the Home Key ,then touch the Applications
Launcher Key >Talk .
2. Touch the Status icon at the top right of your Friends list.
3. In the menu that opens, touch a status option.
In addition to the standard status settings described in the
table, you can also select a message that you've entered
previously or press the Menu Key and touch Clear
custom messages to erase them and start over.
Your status and any message appear in your contact's
Friends lists and in other locations where your status or
status message are displayed.
Status Icons
Icons in Google Talk, Gmail, and other applications indicate your
and your friends' Google Talk status.
Communication
Available: Signed into Google Talk and available to chat
Away: Signed into Google Talk but not active
Busy: Signed into Google Talk but too busy to chat
Signed out of Google Talk
Invisible: Signed into Google Talk but appear signed out to others

To change your status message
1. Press the Home Key ,then touch the Applications
Launcher Key >Talk .
2. Touch the status message field, at the top of your Friends
list.
3. Enter a new status message.
4. Touch Done.
To change your picture
1. Touch your status at the top of your Friends list, then touch
your picture.
2. Touch Change in the dialog box that appears.
3. Touch the picture you want to use.
4. Crop the picture.
5. Touch Save.
Managing Your Friends List
Your Google Talk Friends list contains the friends you've invited to
become friends or whose invitations you've accepted in Google
Talk. Friends can invite each other to chat in Google Talk and see
each others' online status in Google Talk and other applications,
such as in Gmail.
The Google Talk Friends list is sorted by your friends' online status:
active chats, online, busy,and offline. Within each grouping, friends
are listed alphabetically.
Communication
To add a friend to your Friends list
You can invite anyone with a Google Account to become your
friend in Google Talk, so you can chat with each other and stay up-
to-date with each others' online status.
1. From the Friends list, press the Menu Key ,then touch
Add friend.
2. Enter your friend's Gmail address, then touch Send invitation.
To view and accept an invitation to become a friend
When a contact invites you to become a friend in Google Talk, you
receive a notification in the Status bar and the invitation appears in
your Friends list.
1.Touch the invitation from either the Status bar or the Friends
list.
2. Touch Accept to chat with the contact or Cancel,if you don't
want to chat with and share your Google Talk status with the
sender.
To view a list of pending invitations to friends
'From the Friends list, press the Menu Key ,then touch
More > Invites.
All the friends to whom you've extended invitations to
become friends on Google Talk appear in the list until they
accept or cancel your invitation.
To view all friends or only those most popular with you
By default, only the friends that you frequently chat with (the most
popular) are shown in the Friends list. But you can view all friends
instead.
'In the Friends list, press the Menu Key ,then touchAll
friends.
Toswitchbackto just the friends with whom you chat most
frequently,touchMost popular in the menu.
Communication
To add a friend to the 'Most popular' group
You can set a friend to always appear in your Most popular Friends
list.
1. From the Friends list, touch and hold a friend's name.
If you don't see the friend's name, press the Menu Key
,then touch All friends.
2. Touch Always show friend in the menu that opens.
Toremove a friend from this list, touch and hold the friend's
name from the Friends list.
In the menu that opens, touch Hide friend.
Toblock a friend
You can block a friend from sending you messages. When
blocked, your friend will be removed from your Friends list.
1.From the Friends list, touchand hold the friend's name.
If you don't see the friend, press the Menu Key ,then
touchAll friends.
2. Touch Block friend in the menu that opens.
You can view a list of your blocked friends by opening your
Friends list, pressing the Menu Key ,then touching
More > Blocked.You can unblock a friend by touching the
friend's name in the blocked list then touching OK in the
dialog box that opens.
Communication

Changing Google Talk Settings
You can configure Google Talk to send you a notification with the
contents of each message that you receive in a chat, and also to
sound a ringtone or vibrate the phone.
You can also configure Google Talk to sign you in automatically
when you turn on your phone, and you can set whether the mobile
indicator is displayed next to your name in other people's Friends
lists.
To configure notifications for new Google Talk messages
1. From the Friends list, press the Menu Key ,then touch
Settings.
2. Checkmark IM notifications to receive a notification in the
Status bar when a new chat message arrives.
3. Touch Select ringtone to open a list of the ringtones that will
ring to notify you of a new chat.
4. Touch Vibrate to choose the vibration setting when you
receive notification of a new chat.
To show or hide the mobile indicator to friends
1. From the Friends list, press the Menu Key ,then touch
Settings.
2. Checkmark or uncheck Mobile indicator.
If Mobile indicator is checkmarked, your friends see an
outline of an AndroidTM next to your name in their Friends list
when you're signed into Google Talk on an Android phone.
Your friend is signed into Google Talk on his or her
phone.
To set whether you sign into Google Talk automatically
1. From the Friends list, press the Menu Key ,then touch
Settings.
2. Checkmark or uncheck Automatically sign-in.
When Automatically sign-in is checked, you are signed into
Google Talk when you turn on your phone.
To set Google Talk to change your status
1. From the Friends list, press the Menu Key ,then touch
Settings.
2. Checkmark or uncheckmark Automatic away-status.
When Automatic away-status is checkmarked, your status
will automatically be changed to Away when the screen is
turned off.
Communication
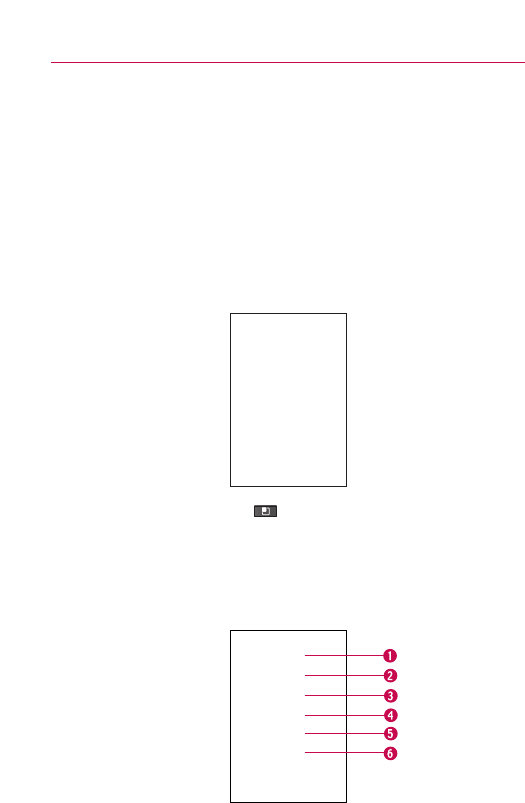
Twitter
Twitter for LG application
Tweeting on your phone
Use the Twitter application to send out tweets, read and receive
tweets from people, search for new Twitter users to follow and more.
1. If you did not sign in to your Twitter account when you first
turned on the phone, follow the onscreen instructions to sign
into your Twitter account.
2. Press the Menu Key ,then touchHome.
NOTE
You can't use Twitter for LG to create a Twitter account. Create your
Twitter account on a PC before signing in on your phone.
Twitter home screen
The Twitter home screen displays all of the Twitter for LG features.

1. Shows all tweets from people you follow. Press and hold a
tweet to open an options menu to let you retweet.
Touch the username to view its profile. You can also tap the
thumbnail image to open a Quick Contact menu.
2. Shows all tweets that mention your username using the
“@[your username]” convention.
3. Touch to view your Twitter profile. This displays all of your
account tweets.
4. Lists people who you choose as your favorites to follow.
5. Lists all people you follow and tweets that they've updated.
6. Lists all direct messages you have received.
Sending a tweet
1. On the 'You + Friends' screen, touchthe text field with the
words “What’shappening?”.
2. Enter your tweet, then touchUpdate.
3. Touch the Photo icon to the right of the status field to post a
picture from Gallery or Camera and add the picture link into
the tweet.
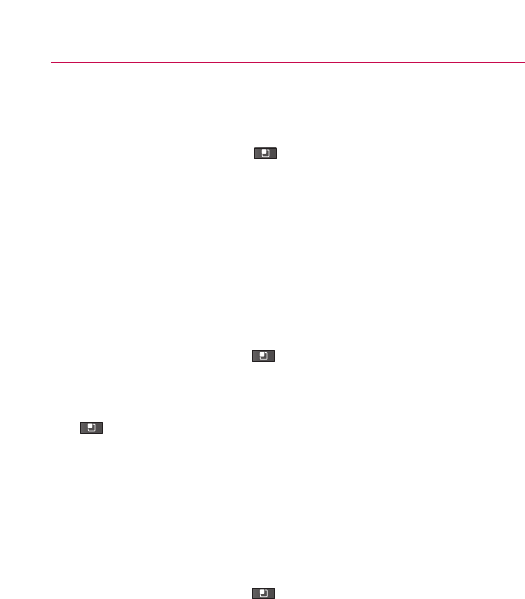
Searching for Twitter users to follow
1. While on the Twitter home screen, touch People you follow.
2. Press the Menu Key ,then touch New.
3. Enter key words in the Search Contacts text field, then
touch Done.
4. On the Search result screen, touch Add next to the one(s)
you want to follow.
Sending a direct message
You can only send a direct message to someone who is following
you.
1. Press the Menu Key ,then touch Home.
2. Touch Direct messages,then touch New Direct Message.
You can also send a direct message from your follower's profile screen. Press the Menu
Key ,then touchWrite.
3. Touch the To field, then enter the name. As you enter
characters, the names of the Twitter users that match the
characters you enter will appear. Tap the name when you
see it.
4. Enter your message, then touch Send.
Setting Twitter for LG options
1.Press the Menu Key ,then touchHome.
2. Touch Settings.
General settings
Set the frequency to run auto refresh for new tweets and
messages and set notifications on/off.
Auto Refresh
Sets the frequency to receiveupdated information.
Communication
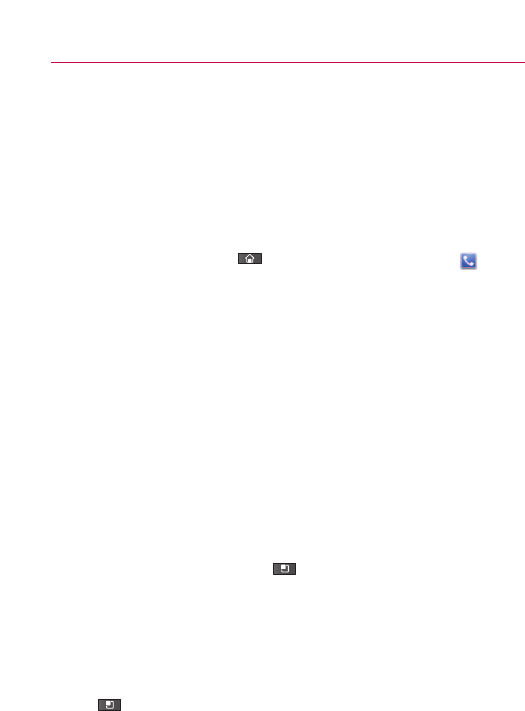
Notification
After setting the auto refresh frequency, you can set
the Twitter application to notify you when you receive a direct
message or a message mentioned you (@me message) by
checkmarking the corresponding boxes.
The Phone application
The phone features of your device include many ways to make calls.
'Press the Home Key ,then touch the Phone Key in the
Quick Keys bar at the bottom of the screen.
The Phone application has four tabs across the top of the
screen: Phone, Call log, Contacts, and Favorites.Using these
tabs, you can dial manually or make calls automatically from
information you've stored in your phone.
Phone
This allows you to dial a phone number manually. You can also call
voicemail using this keypad.
Call log
This tab displays the history of all your calls. From here you can
call or contact any of the entries. To delete an entry, touch and
hold the name, then touch Remove from call log.To manage your
Call log,press the Menu Key ,then touchMultiselect or Clear
call log.
Contacts
This tab displays your Contacts list. From here you can call or
contact any of the entries based on the saved information or
manage your Contact list. For additional options, press the Menu
Key ,then touch:
'Search to manually search for a contact.
Communication

'New contact to add a new contact to your list.
'Multiselect to be able to select multiple entries to manage
them as a group.
'Display options to set how your list is displayed.
'Backup now to back up your Contacts list.
'More to access Accounts, Import/Export, My profile.
Favorites
This tab displays your Favorite contacts, followed by a list of
recent frequent contact. From here you can call or contact any of
the entries based on the saved information or manage your list of
favorites. For additional options, press the Menu Key ,then
touch:
'Search to manually search for a contact.
'New contact to add a new contact to your list.
'Backup now to back up your Contacts list.
'Accounts to access the Accounts and sync settings manage
your account(s).
'Import/Export to send/receive vCard files from an microSD
card.
To add a Contact to your list of favorites:
1. Touch the Contacts tab, then touch the Contact entry you
want to add to your Favorites.
2. Touch the grey star next to the Contact's name. The star
turns gold and the entry is added to your Favorites.
To remove a Favorite, touch the gold star in either the
Contacts list or Favorites list. The star turns grey and the
entry is removed from your Favorites.
Communication
Voice Dialer
Learn to dial a number or open an application by voice.
'This feature may be unavailable depending on your region.
'Your device can recognize only American English commands.
'Recognized languages may vary depending on your region.
Call a Contact by Voice Dialling
You can call numbers directly by saying the contact’s name or
number.
1. Press the Home Key ,then touch the Applications
Launcher Key >Voice Dialer .
2. Say “Call” or “Dial” then a name or a phone number.
Or, you can say "Redial" to redial the last number dialled.
3. If a list of results is displayed, touch the option you desire.
If you have a Bluetooth headset that supports “voice
recognition”or “voice dialing,” you may be able to open
Voice Dialer by pressing your headset’s main button or in
some other way, and dial by voice using your headset. For
details, see the documentation that came with your headset.
Open an Application
1. Press the Home Key ,then touch the Applications
Launcher Key >Voice Dialer .
2. Say “Open” and then an application name.
3. If a list of results is displayed, touch the option you desire.
The device opens the corresponding application.
Communication
Voice Search
You can search by voice with just a simple touch of Voice Search .
1. Press the Home Key ,then touch the Applications
Launcher Key >Voice Search .
2. Wait for the "Speak now" prompt, then say your query.
The search results will be displayed and formatted for the
Android browser.
3. Touch the result you want, or continue searching.
Communication
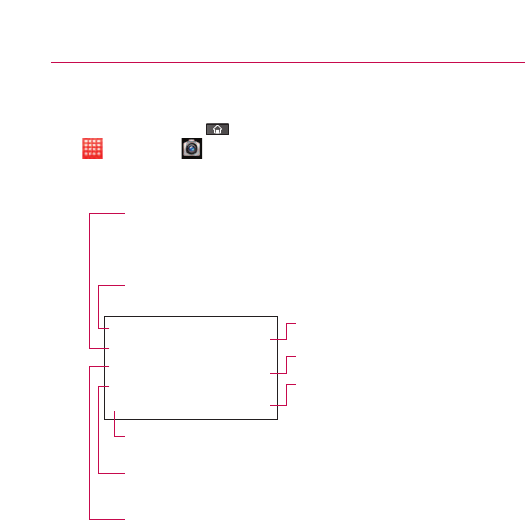
213
Camera
Press the Home Key ,then touch the Applications Launcher
Key >Camera .
Getting to know the viewfinder
NOTE
Amemory card needs to be inserted and mounted to be able to use the
Camera application.
TIP!
You can close all the setting icons to give a clearer viewfinder screen.
Just touch the center of the viewfinder once.
To recall the options, touch the screen again.
Entertainment
Video mode –Slide down this icon to switch
to video mode.
Brightness –Defines and controls of the amount of
sunlight entering the lens. Slide the brightness indicator
along the bar, towards “-” for a lower brightness image,
or towards “+” for a higher
brightness image.
Zoom –Zoom in or zoom out. The up/down Volume Keys
will also adjust the zoom.
Settings –Opens the settings menu. See "Using the
advanced settings".
Focus –Choose from Auto, Macro, Face tracking, and
Manual. See "Using the focus mode".
Scene mode –Choose from Auto, Portrait, Landscape,
Sports, Night, and Sunset.
Capture -Takes a photo.
Gallery –Accesses your saved photos from
within the camera mode. Simply touch, and
your Gallerywill appear on the screen.
Entertainment
Using the focus mode
You can select from the following focus options:
Auto Focus –Sets the camera to focus automatically.
Macro –Sets the camera to be able to take extreme close-ups. If
you are trying to take a close-up shot but the focus box remains
red, try turning the macro mode on.
Face tracking –Sets the camera to detect and focus on human
faces automatically.
Manual –Sets the camera to focus manually.
Taking a quick photo
1. Open the Camera application.
Press the Home Key ,then touchthe Applications
Launcher Key >Camera .
2. Holding the phone horizontally, point the lens toward the
subject you want to photograph.
3. Touch and hold the Capture button lightly, and a focus box
will appear in the center of the viewfinder screen.
4. Position the phone so you can see the subject in the focus
box.
5. When the focus box turns green, the camera has focused on
your subject.
6. Take your finger off the Capture button .
Once you’ve taken the photo
Your captured photo will appear on the screen until you touch an
option or icon to proceed.
NOTE
Simply touch the screen to redisplay photo options if they recede from
the screen.
Share Touch to share your photo using Bluetooth,Email,
Facebook for LG,Gmail,Messaging,Picasa,Twitter for LG,or
any other application you have downloaded that supports this
feature.
Set as Touch to use the image as a Contact icon or Wallpaper.
Rename Touch to edit the name of the selected picture.
Touchto delete the image.
Touch to take another photo immediately. Your current photo
will be saved.
Touch to view the Gallery of your saved photos.
Using the advanced settings
In the viewfinder, touch to open all advanced setting options.
The setting options are listed in a box on the left. Scroll the list up
or down to find the setting you want, then touch it to view the
associated settings in a box on the right. After verifying and
changing the settings as necessary,press the Back Key .
Image size –Touch to set the size (in pixels) of the picture you
take. Select a pixel value from the following options: 3M
(2048x1536), 2M (1600x1200), 1M (1280x960), VGA (640x480),
QVGA (320x240).
ISO –The ISO rating determines the sensitivity of the camera’s
light sensor.The higher the ISO, the more sensitive the camera
will be. This is useful under darker conditions when you cannot
use the flash. Select from ISO values of Auto, 400, 200 and 100.
Entertainment

Entertainment
White balance –Ensures white areas in your video are realistic. To
enable your camera to adjust the white balance correctly, you may
need to determine the light conditions. Choose from Auto,
Incandescent,Sunny,Fluorescent,and Cloudy.
Color effect –Select a color tone for your new photo. Choose
from Off, Mono, Negative, Solarize, Sepia, Negative Sepia, or
Blue.
NOTE
You can change a color picture to black and white or sepia, but you
cannot change a black-and-white or sepia picture to color.
Timer –The self-timer allows you to set a delay after the shutter is
pressed. Select Off,3secs., 5 secs., or 10 secs.This is ideal if you
want to be included in a photo.
Shot mode –Choose from Normal,Continuous shot, Smile shot,
Beauty shot,Art shot, Panarama, Face effect, and Cartoon.
Image quality –Choose from Super fine,Fine,and Normal.
The finer the quality,the sharper the photo. However,the file size
will increase as a result, which means you’ll be able to store fewer
photos in the memory.
Auto review –If you set Auto review on, the picture you take will
be automatically displayed after taking it.
Shutter sound –Select one of the four shutter sounds or turn it
off.
Tag location –Activates your phone’s location-based services.
Take pictures wherever you are and tag them with the location. If
you upload tagged pictures to a blog that supports geotagging,
you can see the pictures displayed on a map.
NOTE
This function is only available when GPS is active.
Reset –Restores all the settings back the the defaults.
Provides a quick guide to the Camera application. Touch
whenever you want to find out how a feature or option operates.
TIP!
When you exit the Camera application, all settings will return to their
defaults, except image size and image quality. Any non-default settings
must be reset, such as color tone and ISO. Check settings before you
take your next photo.
TIP!
The settings menu is superimposed over the viewfinder, so when you
change elements of the image color or quality, you will see a preview of
the image change behind the settings menu.
Viewing your saved photos
1. You can access your saved photos from within the camera
mode. Just touch Gallery ,then touch a photo to display
Slideshow and Menu.
TIP!
Slide your finger left or right to view other photos or videos.
Slideshow -Touch to see your photos played in a slide show.
Menu -Touch to open a menu of options including Share,Delete,
or More.If you touchMore, you have the following additional
options:
Detail -Displays the information about the selected photo
including (e.g., file type, file size, etc.).
Show on map -If the picture was taken with the Tag location
function activated, the location where this picture was taken can
be displayed in a map.
Set as -Sets the photo as the icon identifying a contact or sets it
as your phone wall paper.
Crop -Allows you to manually crop the photo. Use your finger to
move or resize the cropping box to encompass only the part of
the photo you want to see, then touch Save.
Rotate -Tap one of the rotation icons to rotate the photo
clockwise or counter-clockwise.
Entertainment
218 Entertainment
Video Camera
Press the Home Key ,then touch the Applications Launcher
Key >Camera .
Getting to know the viewfinder
Shooting a quick video
1. Open the Camera application.
Press the Home Key ,then touchthe Applications
Launcher Key >Camera .
2. Slide the Camera mode icon down to change to Video mode.
The Camera mode icon changes to and the Capture
button changes to .
3. The Video camera’s viewfinder will appear on the screen.
4. Holding the phone horizontally, point the lens towards the
subject of the video.
5. Touchthe Capture button once to start recording.
6. REC will appear at the bottom of the viewfinder with a timer
showing the length of the video.
7. Touch on the screen to stop recording.
Camera mode –Switches between Camera and
Video. Slide up for Camera mode and slide down for
Video mode.
Brightness –Defines and controls of the amount of sunlight entering the lens.
Slide the brightness indicator along the bar, towards “-” for a lower brightness
Video, or towards “+” for a higher brightness Video.
Zoom –Zoom in or zoom out. The up/down Volume Keys will also set the zoom. Set the
zoom before starting a video. You cannot change the zoom setting during recording.
Settings –Opens settings options. See Using the advanced settings.
Video size –Sets the size (in pixels) of the video you record. Choose your video image size
from VGA (640x480), QVGA (320x240) or QCIF (176x144).
Scene mode –Sets the video camera to adjust to the environment. Choose from Auto,
Portrait,Landscape,Sports,Sunset and Night.
Capture -Starts video recording
Gallery –Accesses your saved photos and
videos from video camera mode. Simply
touch, and your Gallery will appear on the
screen.
After shooting a video
Astill image representing your video will appear on the screen
until you touch an option or icon to proceed.
NOTE
Simply touch the screen to redisplay video options if they recede from
the screen.
Share Touch to share your video using Bluetooth, Email, Gmail,
Messaging, or YouTube.
NOTE
Additional charges may apply when MMS messages are downloaded
while roaming.
Rename Touch to edit the name of the selected video.
Touch to delete the video you just made, and confirm by
touching OK.The viewfinder will reappear.
Touch to shoot another video right away. Your current video
will be saved.
Touch to view the Gallery of your saved videos.
Using the advanced settings
Using the viewfinder, touch the advanced settings icon to access
additional settings options.
The setting options are listed in a box on the left. Scroll the list up
or down to find the setting you want, then touch it to view the
associated settings in a boxon the right. After verifying and
changing the settings as necessary, press the Back Key .
White balance –Ensures white areas in your video are realistic. To
enable your video camera to adjust the white balance correctly,
you may need to determine the light conditions. Choose from
Auto,Incandescent,Sunny,Fluorescent,and Cloudy.
Color effect –Select a color tone for your new photo. Choose from
Off, Mono, Negative, Solarize, Sepia, Negative Sepia, or Blue.
Duration –Set a duration limit for your video. Choose between
Normal and MMS to limit the maximum size to send as an MMS
message. If you set as MMS, you can record a 1 minute video.
Entertainment
Entertainment
TIP!
If you set the video for MMS, the video size is automatically set to
QVGA. You can lower it to QCIF, but you cannot increase it to VGA.
Video quality –Choose from Super fine,Fine and Normal.The
finer the quality, the sharper the video. However, the file size will
increase as a result, which means you’ll be able to store fewer
videos in the memory.
Audio recording –Choose Mute to record a video without sound.
Auto review –If you set Auto review on, the video you record will
be automatically displayed after recording it.
Reset –Restores all the video settings back the the defaults.
Provides a quick guide to the Video Camera application. Touch
whenever you want to find out how a feature or option operates.
TIP!
You can change a video shot in color to blackand white or sepia, but you
cannot change a black-and-white or sepia video to color.
Watching your saved videos
1. In the viewfinder,touch Gallery .
2. Your Gallerywill appear on the screen.
3. Touch a video once to bring it to the front of the Gallery. It
starts to play automatically.
Your Photos and Videos
Adjusting the volume when viewing a video
Toadjust the volume of a video while it is playing, use the Volume
Keys on the right side of the phone.
Setting a photo as wallpaper
1. Touch the photo you want to set as wallpaper to open it.
2. Touch Menu at the bottom of the screen to open the
Options menu. If Menu disappears, touch the screen to
redisplay it.
221
3. Touch More >Set as >Set Wallpaper.
4. Adjust the cropping box, if necessary, then touch Save.
Gallery
Opening Gallery and Viewing Your Albums
Open the Gallery application to view albums of your pictures and
videos.
To open Gallery and view your albums
'Touch Gallery on the Home screen or on the Launch
screen.
OR
'Open Gallery from the Camera application by touching
Gallery .
The Gallery application presents the pictures and videos on
your microSD card, including those you've taken with the
Camera application and those you downloaded from the
web or other locations.
If you have a PicasaTM account associated with one of your
phone's GoogleTM Accounts configured to sync with Picassa,
you'll also see your Picasa web albums in Gallery.
Entertainment
Typical viewof an album.
Scroll leftor right to viewmore albums.
222 Entertainment
'Touch an album to open it and view its contents.
The pictures and videos in the album are displayed in
chronological order.
'Touch a picture or video in an album to view it.
'Return to the main Gallery screen at any time by touching
at the top left of the screen.
Working with Albums
Albums are groups of images and videos in folders on your microSD
card or in Picasa web albums.
Toopen an album and view its contents
'Press the Home Key ,touch the Applications Launcher
Key >Gallery and touchthe album whose contents
you want to view.
'Use the slider bar at the bottom of the screen to
scroll horizontally through your pictures and videos.
'The date of the images in view is displayed, so you can scroll
by date.
'You can also scroll through an album byswiping the screen
leftor right.
Toggle between grid and stackview.
Displays the name of the current album.
Touchapicture or video to view it.
Slide the bar to scroll horizontally through
your pictures.
223
To change how the contents of an album are displayed
You can view the images and videos in your albums in a
chronological grid or in stacks, sorted by the date and the location
where they were taken. You switch album views with the Album
View switch at the top right of the screen.
'Drag the Album View switch to the right to view the
contents of the album in stacks.
'Drag the Album View switch to the left to view the
album contents in a chronological grid again.
Pinch peek
When browsing your images in stacks, you can use a spread
gesture to open up the contents of an image stack. Photos
contained within that stack are then smoothly cycled between your
two fingertips.
Entertainment
Stacks are sorted by date and location
Album View switch
Entertainment
To Work with Batches of Pictures or Videos
In addition to working with whole albums and with individual
pictures, you can select one or more pictures or videos in an album
to work on them in batches. For example, to send a few pictures
from an album to a friend.
1. Press the Home Key ,then touch the Applications
Launcher Key >Gallery .
2. Open the album that contains the pictures and videos you
want to work with as a batch.
3. Press the Menu Key twice.
4. Touch a picture to checkmark the items you want to work
with. Touch a checkmarked item to remove the checkmark.
You can checkmark all items, or remove all checkmarks, by
touching Select All or Deselect All at the top of the screen.
5. Use the control buttons at the bottom of the screen to act
on the checkmarked items. The control buttons available
depend on the mix of items you've selected.
To share an album
You can share the entire contents of one or more albums or
individual images or videos from an album.
1. Press the Home Key ,then touch the Applications
Launcher Key >Gallery .
2. Press the Menu Key twice.
3. Checkmark or uncheckmark the album(s) you want to share.
4. Touch Share at the bottom left of the screen and
touch the application you would like to use to share the
selected albums.
5. Enter the necessary information and send it.

To get details about an album
1. Press the Home Key ,then touch the Applications
Launcher Key >Gallery .
2. Press the Menu Key twice.
3. Checkmark or uncheckmark the album(s) you want to see
details about.
4. Touch More at the bottom right of the screen, then
touch Details from the pop-up menu.
To delete an album
You can delete an album and its contents from your microSD card.
1.Press the Home Key ,then touchthe Applications
Launcher Key >Gallery .
2. Press the Menu Key twice.
3. Checkmark or uncheckmark the album(s) you want to delete.
4. Touch Delete at the bottom center of the screen.
Touch Confirm Delete in the pop-up menu.
Entertainment
226 Entertainment
Working with Pictures
Use Gallery to view pictures that you've taken with the Camera
application, downloaded, copied onto your microSD card, or that are
stored in Picasa web albums.
To view and browse pictures
1. Press the Home Key ,then touch the Applications
Launcher Key >Gallery .
'Turn the phone to view the picture in vertical (portrait) or
horizontal (landscape) orientation. The picture is displayed
(but not saved) in the new orientation.
'Touch the picture to view navigation, zoom, and other control
buttons.
'Touch either Zoom icon to zoom in our out or just double-tap
the screen.
'When the picture is zoomed in, drag the picture to view parts
that are not in view.
'When the picture is zoomed to fit in the window, drag left or
right to view the next or previous picture in the album.
Touch the picture to see
the controls.
Drag left or right to see
the next or previous
picture in the album.
Touch to zoom in or
out; simply pinch; or
just double-tap the
picture.
227
To watch a slideshow of your pictures
'Touch a picture to view the control buttons, then touch
Slideshow .
'Touch the screen, or press the Back Key ,to end the
slideshow.
To rotate a picture
1. Touch a picture you want to rotate, then touch Menu .
2. Touch More.
Amenu opens with tools for working with the picture.
3. Touch Rotate Left or Rotate Right.
The picture is saved with the new orientation.
To use a picture as a contact icon or as Home screen
wallpaper
1. Touch the picture you want to use, then touch Menu .
2. Touch More.
3. Touch Set as.
4. Touch Contact icon to set the picture to a Contact or touch
Wallpaper to set the picture as your wallpaper.
5. Resize and/or reposition the cropping box, if necessary, then
touch Save.
Entertainment

228 Entertainment
To crop a picture
You can crop and save pictures that are stored on your microSD
card.
1. Touch the picture you want to crop, then touch Menu .
2. Touch More.
3. Touch Crop.
The cropping box appears on top of the picture.
4. Use the cropping box to select the portion of the picture to
keep; the rest of the photo will be discarded.
cDrag from the inside of the cropping box to move it.
cDrag an edge of the cropping boxto resize it to any
proportion.
cDrag a corner of the cropping box to resize it with fixed
proportions.
5. Touch Save to save a copy of the picture as you cropped it.
The original uncropped version remains on your microSD
card.
Drag from inside the cropping box to move
it.
Drag a corner or edge to resizethe
cropping boxand zoom in or out.
When you're finished, touch Save.
To get details about a picture
1. Touch the picture you want, then touch Menu .
2. Touch More.
3. Touch Details.
To share a picture
You can share a picture by sending it to friends or posting it in a
Picasa web album.
1. Touch the picture you want to share, then touch Menu .
2. Touch Share .
3. In the menu that opens, touch the application to use to
share the selected picture.
The application you selected opens with the picture (or a
link) attached to a newmessage.
Todelete a picture
You can delete a picture from your microSD card.
1. Touch the picture you want to delete, then touch Menu .
2. Touch Delete then touch Confirm Delete in the dialog
box that opens.
Entertainment
230 Entertainment
Working with Videos
Use the Gallery application to play videos that you've taken with the
Camera application and to share them with friends.
To play videos
'Open a Gallery album then touch a video.
(To open the Gallery application, press the Home Key ,
then touch the Applications Launcher Key >Gallery .)
The video plays, with the orientation (portrait or landscape)
you shot it in.
'Touch the video to view the playback controls.
Touch the video to view the playback controls
for pausing, resuming, and skipping
backward and forward.
To share a video
You can share your videos in a variety of ways including sending it
by email or multimedia (MMS) message, or via a Bluetooth device.
Or, you even have the option to share your videos publicly by
uploading it to the YouTubeTM website.
1. Press the Home Key ,touch the Applications Launcher
Key >Gallery ,then select an album.
2. While viewing an album, press the Menu Key twice.
3. Touch to checkmark the videos (or pictures) to share.
4. Touch Share .
5. In the menu that opens, touch the application you would like
to use to share the selected videos.
6. Enter the necessaryinformation and send it.
Todelete a video
1. Press the Home Key ,touch the Applications Launcher
Key >Gallery ,then select an album.
2. While viewing an album, press the Menu Key twice.
3. Touch to checkmark the videos you want to delete.
4. Touch Delete .
5. Touch Confirm Delete.
Entertainment

232 Entertainment
Market
Opening Android Market and Finding Applications
Open Android Market to browse and search for free and paid
applications.
To open Android Market application
'Touch Market on the Home screen or on the Launch
screen.
When you open Android Market application for the first
time, you must read and accept the terms of service to
continue.
To get help with Android Market
Android Market Help webpages are available from all Android
Market screens.
'Press the Menu Key ,then touch Help .
The Browser application opens to Android Market Help page,
with links to many help topics.
Touch to search Market for specific applications.
Touch a category to view its contents.
Touch a featured application to view more
information.
233
To browse for applications
You can browse applications by category and sort them in different
ways.
1. On Android Market home page, touch a top-level category.
These are displayed as tab buttons near the top of the
screen and include Apps, Games, and Verizon.
2. Scroll to view subcategories and touch the one you want to
explore.
3. Touch an application to open its details screen, or further sort
the subcategory by touching Top paid, Top free, or Just in.
Entertainment
Touch a subcategoryto view its list of
applications.
Touch a tab to view Top paid, Top free,
or Just in from this subcategory.
Touch an application to open its details
screen.
Entertainment
To open a screen with details about an application
'At any time while browsing Android Market, touch an
application to open its details screen.
The Application details screens include a description, ratings,
comments, and related information about the application.
From this screen, you can download, install, uninstall, and
rate the application, and more.
To search for applications
1. Touch Search at the top right of the screen or press the
Search Key .
2. Enter all or part of an application’s name or description, or
the developer’sname you want to searchfor, then touch
Search again or Go on the keypad.
3. Touch a searchresult to open that application’sdetails
screen.
To return to Android Market home screen
You can return directly to the Android Market home screen from
most other screens in Android Market.
'Touch the Market icon at the top left of the screen.
OR
'Press the Menu Key ,then touch Home.
235
Downloading and Installing Applications
When you find an application you want, you can install it on your
phone.
To download and install an application
Before you can download a paid application, you must set up a
billing arrangement.
1. Find an application you want and open its details screen.
In the application’s details screen, you can read more about
the application, including its cost, overall rating, and
comments by users. Scroll down to the About the developer
section to view more applications by this developer, visit the
developer’s website, or send the developer an email
message.
2. Press the Menu Key ,then touchSecurity to preview
the functions and datathe application can access on your
phone if you install it.
If you’re not comfortable with the access the application
requires, don’tcontinue.
Entertainment
Scroll an application’s details screen to learn
more about the application, the developer,
and what others think of it.
Touchto download and install the application. (If
it’s a paid application, the button is labeled Buy.)

Entertainment
3. Touch Install (for free applications) or Buy (for paid
applications).
If the application requires access to your data or control of
any functions on your phone, Market tells you what the
application can access.
WARNING!
Read this screen carefully. Be especially cautious with applications
that have access to many functions or to a significant amount of
your data. Once you touch OK on this screen, you are responsible
for the results of using this item on your phone.
4. If you agree to the application’s access requirements, touch
OK.
cIf you selected a paid application, you’re redirected to the
GoogleTM Checkout screen to pay for the application
before it’sdownloaded to your phone.
cIf you selected a free application (or after touching Buy
now in Google Checkout), you receive a series of
notifications as the application is downloaded and then
installed on your phone.
When the application is installed, you can touch the
notification to open the application or open it by touching
its icon in the Launch screen.
You have 24 hours to try out an application and, if you
decide you don’t want it, to uninstall it for a refund.
If you haveanother AndroidTM phone, you can download a
paid application to that phone using the same Android
Market account, at no additional charge.

To create a Google Checkout account
You must have a Google Checkout account associated with your
Google Account to purchase items from Android Market.
'On your computer, go to http://checkout.google.com to
establish a Google Checkout account.
OR
'The first time you use your phone to buy an item from
Android Market, you’re prompted to enter your billing
information to set up a Google Checkout account.
WARNING!
When you’ve used Google Checkout once to purchase an
application from Android Market, the phone remembers your
password, so you don’t need to enter it the next time. For this
reason, you should secure your phone to prevent others from using
it without your permission.
Managing Your Downloads
After you’vedownloaded and installed an application, you can rate
it, view it in a list with your other downloaded applications, and so
on.
To view your downloaded applications
You can view a list of the applications you’vedownloaded from
Android Market and use the list for a number of purposes.
'On Android Market home screen, press the Menu Key ,
then touch Downloads .
In the list of the free and paid applications that opens, you
can touch one to rate it, uninstall it and request a refund.
Entertainment
Entertainment
To uninstall an application
1. On Android Market home screen, press the Menu Key ,
then touch Downloads .
2. Touch the application you want to uninstall.
3. Touch Uninstall.
4. Touch OK in the confirmation dialog box.
5. Touch the explanation that best matches why you’re
uninstalling then touch OK.
The application is uninstalled. You can install the application
again at any time without charge if it was a paid application.
To request a refund for an application
If you are not satisfied with an application, you can ask for a
refund within 24 hours of the purchase. Your credit card is not
charged and the application is uninstalled from your phone.
If you change your mind, you can install the application again, but
you can’t request a refund a second time.
1.On Android Market home screen, press the Menu Key ,
then touchDownloads .
2. Touch the application you want to uninstall for a refund.
3. Touch Uninstall and refund .
Your application is uninstalled and the charge is cancelled.
4. Touch the explanation that best matches why you’re
uninstalling then touch OK.

To set whether you’re notified about updated applications
1. On Android Market home screen, press the Menu Key ,
then touch Downloads .
2. Press the Menu Key ,then touch Notifications.
3. Select whether or not to be notified of updates to the
applications you’ve downloaded.
4. Touch OK.
To rate an application
You can award an application from one to five stars and share
what you think about the application with other shoppers.
1. Open the details screen for an application.
2. Touch the stars under My review.
3. Touchthe number of stars to award the application, then
touchOK.
4. To share a comment about the application, touch Post a
comment (belowthe review stars), enter your comment,
then touch OK.
Entertainment

Entertainment
To flag inappropriate applications
If you discover an application with graphically violent, sexual, or
otherwise hateful or offensive content, you can report it to
Android Market team.
1. Open the details screen for an application.
2. Scroll to the bottom of the details screen, then touch Flag as
inappropriate.
3. Touch the reason you find the application objectionable.
4. Touch Submit.
Your comments are sent to Android Market team.

Music
Transferring Music Files to Your Phone
The Music application plays audio files that are stored on your phone's
microSD card. Copy audio files from your computer onto the microSD
card before you open the Music application. The Music application
supports audio files in numerous formats, including MP3, M4A (DRM-
free AAC files, from iTunes®)AMR , MIDI, and OGG Vorbis.
NOTE
The LG USB driver needs to be downloaded to your PC before
connecting your phone to transfer music.
To copy music files onto the phone's microSD card
1.Connect the phone to your computer with a USB cable, then
open the Notifications panel and touch USB Connection
Mode >Mass storage mode.
2. Toorganize your audio files, you can use the computer to
create a music folder at the top level of the microSD card.
3. Use the computer to copymusic and other audio files into
the folder that you created on the microSD card.
cYou can use subfolders on the microSD card to organize
your music files or you can simply copy the audio files to
the top level of the microSD card.
cIf the music files have accompanying artwork in JPEG
format, rename the art file albumart.jpg and include it in
the same folder as the music files.
cIf you have created any playlists, create a subfolder for
them in your music folder on the microSD card and copy
the playlists into it.
4. Open the Notifications panel and touch USB Connection
Mode >Modem mode.Then disconnect the USB data cable
from the phone.
Entertainment
242 Entertainment
Opening Music and Working with Your Library
After you've copied some music onto your microSD card you can
open the Music application and see your library of music files,
sorted in one of four ways.
To open Music and view your music library
'Touch Music on the Home screen or on the Launch
screen.
The Music application searches the microSD card for music
files you copied to your card, then builds a catalog of your
music based on the information contained in each music file.
This can take from a few seconds to several minutes,
depending on how may files you have copied onto the
microSD card.
When the catalog is complete, the Music library screen
opens, with tabs that you can touch to view your music
libraryorganized byArtists, Albums, Songs, or Playlists.
You can return to the main Library screen from most other
screens in the Music application by pressing the Menu Key
then touching Library.
Touch a tab to view your library according to
the theme.
Touch to show a summary of information of
the current track.
To search for music in your library
1. Open the main Library screen, then press the Search Key
.
2. Start typing the name of the artist, album, or track you're
looking for. Matching songs are displayed in the list below
the search box.
3. Touch a matching song to play it or touch a matching album
or artist to view a list of associated songs.
To delete a song from the microSD card
You can delete music from the storage card.
'Touchand hold a song in a librarylist. In the menu that
opens, touchDelete.
OR
'On the Playbackscreen, press the Menu Key ,then
touchDelete.
You can also delete music files from the microSD card when
your phone is connected to the computer. To do this, browse
for the music files you wish to delete and delete them from
the folder.
Entertainment
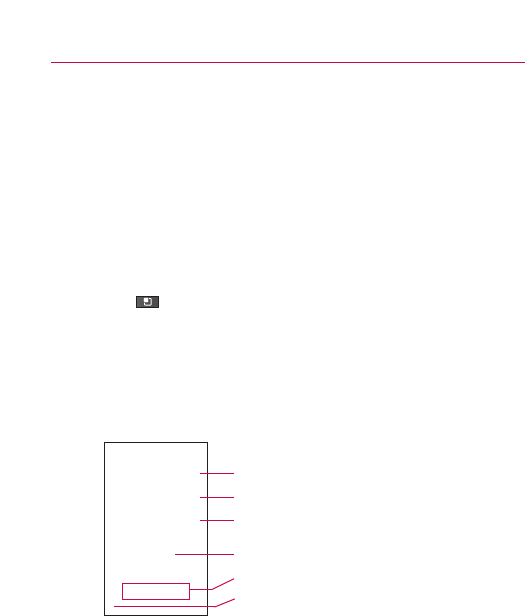
244 Entertainment
Playing Music
You can listen to music using the phone'sbuilt-in speaker, through a
wired headset, or through a wireless Bluetooth stereo headset that
supports the A2DP profile.
To play music
'Touch a song in your library to listen to it.
OR
'While viewing a list of tracks in an album, press the Menu
Key ,then touch Play all.
The Playback screen opens and the song you touched or the
first song in the album or other playlist starts to play. Your
music continues to play even when you switch applications
or receive a phone call. The tracks in the current playlist play
in order until it reaches the end, then stops. If you choose a
repeat option, playbackonly stops when you stop it.
You can return to the Playback screen from most other
screens in the Music application by touching the currently
playing song at the bottom of the screen.
You can return to the Playback screen from any other
application by opening the Notifications panel and touching
the ongoing music notification.
Touch to open the current playlist.
Touch to shuffle the current playlist.
Touch to repeat the current playlist; touch
again to repeat the current track.
Touch and hold to search for information.
Skip tracks or pause and resume playback.
Drag the slider to go directly to a specific
section of a track.
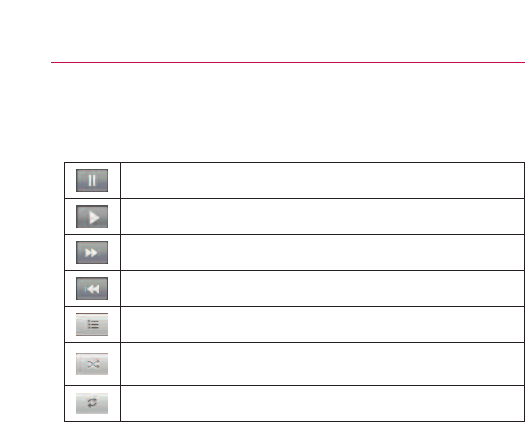
To control playback
The Playback screen contains several icons that you can touch to
control the playback of songs, albums, and playlists:
To control playback volume
In addition to the techniques for setting media volume, you can
control the volume of music in the Music application.
'Press the phone'sup/down Volume Keys.
Apanel opens to show the current media volume.
Some headsets include their own volume controls or ways
to pause and resume playback or to skip tracks.
Entertainment
Touch to pause playback.
Touch to resume playback.
Touch to skip to the next track in the album, playlist, or shuffle.
Touch to skip to the previous track in the album, playlist, or shuffle.
Touch to open the current playlist.
Touch to play the current playlist in shuffle mode (tracks are played in
random order).
Touch to set repeat mode: Don
'
trepeat, Repeat the playlist, or Repeat
the current track.

Entertainment
To play your tracks in a party shuffle
When you turn on Party Shuffle, the Music application plays tracks
from your microSD card in random until Party Shuffle is turned off.
'In the Playback or a Library screen, press the Menu Key ,
then touch Party shuffle.
The Music application creates a current playlist tracks
selected randomly from your microSD card and starts
playing them.
'View the current playlist that Party Shuffle is playing by
touching the Playlist icon on the Playback screen.
'Add a track to the end of the Party Shuffle playlist by
touching and holding the name of a track in your library. In
the menu that opens, touch Add to playlist, then touch
Current playlist.
'Stop Party Shuffle by pressing the Menu Key ,then
touching Party shuffle off.
Touse a song as a ringtone
You can use a song as your phone ringtone, in place of one of the
ringtones that come with the phone.
'Touch and hold a song in a library list. In the menu that
opens, touch Use as phone ringtone.
OR
'On the Playback screen, press the Menu Key ,then
touch Use as ringtone.
Working with Playlists
You can create playlists to organize your music files into sets of
songs, which you can play in the order you set or in a shuffle.
To create a playlist
1. When viewing a list of songs in the library, touch and hold
the first song you want to add to the new playlist.
2. Touch Add to playlist.
3. Touch New.
4. Enter a name for the playlist, then touch Save.
The new playlist is added to the Playlist library.
You can also add the song that is playing in the Playback
screen as the first song in a playlist bypressing the Menu
Key ,then touching Add to playlist or touching Save as
playlist to saveall the songs in an album that you're playing
as a playlist.
Toadd a song to a playlist
1. While viewing a list of tracks in the Library, touch and hold a
song to display an options menu.
2. Touch Add to playlist.
3. Touch the name of the playlist to add the song to.
You can also add the song that is playing in the Playback
screen to a playlist by pressing the Menu Key ,then
touching Add to playlist.
To remove a song from a playlist
1. Open a playlist.
2. Touch and hold the song you want to remove, then touch
Remove from playlist or when viewing the currently playing
playlist, press the Menu Key ,then touch Clear playlist
to remove all the songs from the playlist.
Entertainment
Entertainment
To rename or delete a playlist
1. Open the Playlist library.
2. Touch and hold the playlist to display the options menu, then
touch Delete or Rename.
To sync from your phone
To sync your phone from the Music list, press the Menu Key ,
then touch Sync to connect with Windows Media Player or V
CAST Music Rhapsody.
To shop from your phone
To shop for new music from your phone, while viewing the Music
list, press the Menu Key ,then touch Shop to connect
with V CAST Music.
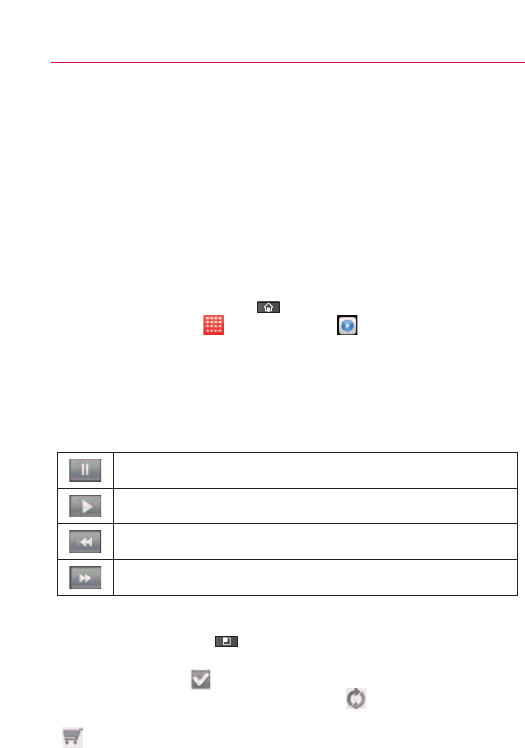
Video Player
You can play a wide variety of videos using the Video player. The
video player supports the following file formats: 3gp, mp4, avi,
wmv, flv, mkv (Codec: MPEG4, H.263, Sorenson H.263, H.264, VC-
1, DivX/XviD).
•Supported file formats are dependent on the software version of
the phone.
•If the file size exceeds the available memory, an error message
will display when you open the file.
1. Press the Home Key ,then touchthe Applications
Launcher Key >Video Player .
2. Touch the video you want to play.
Playback controls
Touch the screen to display the playback controls, then touch the
following icons to control the video playback:
Video player list options
Press the Menu Key from the Video player list screen to
display an options menu that includes Multiselect,Sync,and
Shop.Multiselect allows you to select multiple video files to
manage them all at once. Touching Sync connects you to the
Windows Media Player to synchronize your video files. Touch Shop
to connect to VCAST Videos to download other video files.
Entertainment
Pause playback.
Playavideo file.
Press to start playing the video from the beginning. Touch and hold to
rewind playback.
Touch and hold to fast-forward playback.
250 Entertainment
YouTubeTM
Opening YouTube and Watching Videos
You can browse, search for, view, upload, and rank YouTube videos
on your phone with the YouTube application.
To open the YouTube application
'Touch YouTube on the Home screen or on the Launch
screen.
YouTube presents the videos grouped into categories, such
as Most viewed, Most discussed, and Top rated. Touch a
video to watch it or touch to learn more about it.
Touchto search for a video. You can also
search by voice.
Touchto record and share a video.
Touch a video to play it.
Touch to learn more about a video.
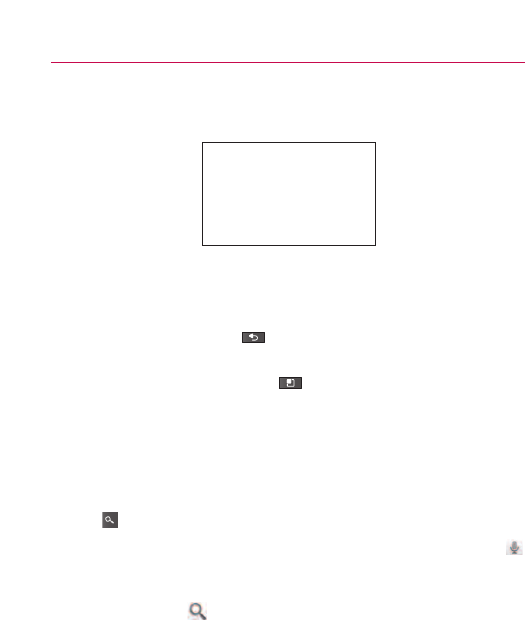
251
To watch and interact with YouTube videos
'Touch a video to play it.
'Touch the screen to view the Playback controls. You can
pause, skip forward or backward, or drag the slider to the
point in the video you want to watch.
'Press the Back Key to stop playback and return to the
videos list.
'Press the the Menu Key to rank, comment on, share,
flag as inappropriate, and interact with the video in other
ways.
For details about these features, visit the YouTube website.
To search for videos
1. At the top of the main YouTube screen, touch the Search Key
.
2. Enter the text to search for or touch the Microphone icon
to search by voice.
3. Touch a suggestion below the search box or touch the
Search Key .
4. Scroll through the searchresults and touch a video to watch
it.
Entertainment

Entertainment
To share your videos on YouTube
You can record and share a video using YouTube. First, you must
create a YouTube account and sign into it on your phone.
You can also share the videos you record with the Camera
application by uploading them to YouTube.
1. Touch Camera at the top right of main YouTube screen.
2. If you want to set any configurations manually, touch the
screen to open the video camera settings.
3. Point the lens to frame the scene where you want to start.
4. Touch Record to start recording.
5. Touch Stop to stop recording.
6. Touch .
The YouTube Upload details screen is displayed.
7. Enter a title, description, and tags for your video.
8. If you want to share the video with everyone, checkmark
Public.If not, then touch Private.
9. Touch Upload.
Voice Recorder
The Voice Recorder application records audible files for you to use
in a variety of ways. Use them simply to remind you about
something you don't want to forget (like a grocery list). Or, record
sound effects that you can attachto a message or set as a ringtone
for calls, messages, alarms, or other notifications.
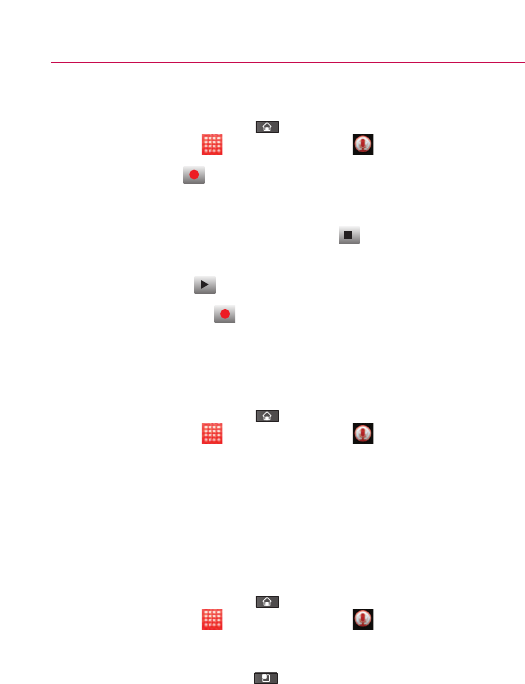
Record a Voice Memo
1. Press the Home Key ,then touch the Applications
Launcher Key >Voice Recorder .
2. Tap Record to start recording.
3. Speak into the microphone.
4. When you're finished, touch Stop .
The recording is automatically saved to your recordings list.
'Touch Play to listen to your recording.
'Touch Record to record a new voice memo.
'Touch Go to list to view your list of recordings.
Play a Voice Memo
1.Press the Home Key ,then touchthe Applications
Launcher Key >Voice Recorder .
2. TouchGo to list.
3. Touch the voice memo you wish to play.
NOTE
You can send the voice memo to others by touching and holding a voice
memo and selecting Share.
Managing your Voice Memos
1. Press the Home Key ,then touch the Applications
Launcher Key >Voice Recorder .
2. TouchGo to list.
3. Press the Menu Key ,then touch MultiSelect,Share,or
Sort by.
'Touch MultiSelect to checkmark voice memo files to
delete all at once.
Entertainment

Entertainment
'Touch Share to send via Bluetooth, Email, Gmail, or
Messaging.
'Touch Sort by to choose how to display the list, either by
date or by name.
Voice Recorder Context Menu
To access the Voice Recorder context memo, touch and hold the
file name. The pop-up menu that appears includes the following
options: File info, Rename, Share, Use as phone ringtone, and
Delete.
Scrabble
This exciting update of the classic board game now includes flexible
difficulty levels, built-in word list, dynamic animations, scrolling and
full-board views. An easy-to-use interface lets you play alone,
challenge the computer in your phone, or enjoy pass & play with a
friend.
Easily keep track of your game scores and statistics. Pause when
you have to, and then pick up where you stopped. Fun new features
appeal to both wordplay mavens and casual gamers.
Scrabble contains 178,691 words, based on the Official Scrabble
Players Dictionary (OSPD) with modifications to make it more
suitable for tournament play.
To access Scrabble
Touchthe Applications Launcher Key from the Home screen,
then touch Scrabble .

Tetris
Tetris lets you spin, flick and move the Minos in three challenging
modes. Clear lines and rows as fast as you can to rack up a big
score in thrilling Forty Lines mode. Race against the clock to earn
points in action packed Ultra mode. See how long you can survive
as the Minos rain down faster and faster in Marathon mode.
Experience dazzling colors and animations, and entertaining music
and sounds effects as you complete level after level. Take on the
challenge of Tetris.
GAME FEATURES:
'Dynamic resolution
'Full touch control for enhanced game play: rotate, drop, hold,
or move your Minos left and right with the touch of a finger
'Advanced touch menu system
'State-of-the-art dynamic animations, sound effects and
music enhance the Tetris experience
'Enjoygreat single player modes: famous Marathon, Ultra and
Forty Lines
'Ghost Piece: EachTetrimino casts a "shadow" where it will
land, enhancing player capabilites
'Random Tetrimino Bag: This feature eliminates long runs of
bad luck by shuffling the seven Tetriminos
'15 different speed levels
Toaccess Tetris
Touchthe Applications Launcher Key from the Home screen,
then touch Tetris .
Entertainment

Tool
Calendar
Viewing Your Calendar and Events
Open the Calendar application to view events you’ve created or that
others have invited you to.
When you first set up your phone, you configured it to use an
existing Google Account, or you created a new account. The first
time you open the Calendar application on your phone, it displays
any existing calendar events from your Google Account on the web.
You can add additional accounts with Google Calendar or Microsoft
Exchange calendars to your phone, and configure them to display in
Calendar.
When you first set up Calendar to synchronizeevents on your
phone, it includes events from the previous month through one year
in the future. Subsequently, Calendar keeps a year’s worth of future
events synchronized between your phone and the web, plus any
later events that you add to your calendar using Calendar on your
phone.
To open the Calendar application
'Press the Home Key ,then touch the Applications
Launcher Key >Calendar .
Events from each account you’ve added to your phone and
configured to synchronize calendars is displayed in Calendar.
Events from each calendar are displayed in a different color.
257
To change your calendar view
'Press the Menu Key ,then touchAgenda,Day,Week,
or Month.
Each view displays the events in your calendar for the period
of time specified.
'To view more information about an event in Agenda, Day, or
Week view, touch the event.
'To view the events of a day in Month view, touch a day.
Tool
Agenda view
In Agenda, Day, or Week view, touch an
event to view its details.
Month view
Week view
Touch a day in Month view to open that day’s events.
Day view
258 Tool
Working in Agenda View
Agenda view is a list of your events in chronological order. All-day
and multiday events are listed at the start of each day.
To switch to Agenda view
'Press the Menu Key ,then touch Agenda .
To learn more about events in Agenda view
'Touch an event.
Ascreen with details about the event opens.
Touch an event to view its details.
Drag up or down to view earlier or later events.
This event repeats.
259
Working in Day View
Day view displays a chart of the events of one day, in a table of one-
hour rows. The current time will be highlighted. All-day and multiday
events are displayed at the top. Part of the title of each event is
displayed in the rows that correspond to when it occurs.
To switch to Day view
'Press the Menu Key ,then touch Day .
To learn more about events in Day view
'Touch an event to view its details.
'Touch and hold an event to open an options menu to view,
edit, or delete the event. Also allows you to create another
newevent in the same time slot for juggling multiple events.
To add an event in Day view
'Touch and hold an empty spot or an event in the day to open
an options menu, then touch New event to create a new
event at that time.
Tool
Drag leftor right to viewearlier or later days.
Touch and hold an empty time slot to create a
new event at that time.
Touch and hold an event to open an options menu
to view, edit, delete, or new event.
Touchan event to viewits details.
Drag up or down to view earlier or later time slots.
260 Tool
Working in Week View
Week view displays a chart of the events of one week. All-day and
multiday events are displayed at the top.
To switch to Week view
'Press the Menu Key ,then touch Week .
To learn more about events in Week view
'Touch an event to view its details.
'Touch and hold an event to open an options menu to view,
edit, or delete the event. Also allows you to create another
new event in the same time slot for juggling multiple events.
To add an event in Week view
'Touch and hold an empty spot or an event in the week to
open an options menu, then touchNew event to create a
new event at that time.
An all-day event.
Touch and hold a time slot or an event to create a
new event at that time.
Drag left or right to view earlier or later weeks.
Touchan event to viewits details.
Drag up or down to view earlier or later time slots.
261
Working in Month View
Month view displays a chart of the events of the month. Segments
of each day with scheduled events are blue in the day’s vertical bar.
To switch to Month view
'Press the Menu Key ,then touch Month .
To view more information about events in Month view
'Touch a day to view its events in Agenda view.
Tool
Drag up or down to view earlier or later months.
Touch a day to view the events of that day.
Touch and hold a day to view an options menu.
262 Tool
Viewing Event Details
You can view more information about an event in a number of ways,
depending on the current view.
To view information about an event
'In Agenda, Day, or Week view, touch an event to view its
details.
'In Month view, touch a day to switch to Agenda view. Then
touch an event to view its details.
Touch the Attending field to set or change whether you'll attend the
event.
Other attendees’ status is displayed below your own.
Touch the Reminders field to change reminder settings, or touch
to add a reminder.
If you havepermission to change events, you can press the Menu
Key to edit or delete the event.
Touch to set whether you’ll attend this event.
Other attendees’ status is shown below yours.
Touch to change when you want to be reminded
about this event.
Touch to delete this reminder.
Touch to add another reminder for this event.
Creating an Event
You can use the Calendar application on your phone to create
events that appear on your phone and in Google Calendar on the
web.
To create an event
1. In any Calendar view, press the Menu Key ,then touch
More >New event to open an Event details screen for a
new event.
You can also touch and hold a spot in Day, Week, or Month
view. In the menu that opens, touch New event to open the
Event details screen with that day and time already entered.
2. Add details about the event.
Enter a name, time, and optional additional details about the
event.
If you have more than one calendar, you can choose the
calendar to which to add the event.
Touch to add more reminders.
3. Invite guests to the event.
In the Guests field, enter the email addresses of everyone
you want to invite to the event. Separate multiple addresses
with commas ( , ). If the people to whom you send
invitations use Google Calendar, they’ll receive an invitation
in Calendar and by email.
4. Press the Menu Key then touch Show extra options
to add details about the event.
5. Scroll to the bottom of the Event details screen, then touch
Done .
The event is added to your calendar.
Tool
Tool
Editing or deleting an event
You can an edit or delete an event that you created on the phone or
on the web. You can also edit or delete events created by others, if
they have given you permission.
To edit an event
1. Open the View Event summary screen:
Press the Home Key ,touch the Applications Launcher
Key >Calendar and touch the event.
2. Press the Menu Key ,then touch Edit event .
The Event Details screen opens.
Press the Menu Key ,then touch Show extra options
to add or edit additional event details.
3. Make your changes to the event.
4. Scroll to the bottom of the screen, then touch Done.
Todelete an event
There are a number of ways to delete an event.
'In Agenda view, touch an event to view its details. Then
press the Menu Key and touch Delete >OK.
'In Day or Week view,touchand hold the event, then touch
Delete event >OK.
'When editing an event, scroll to the bottom of the Event
Details screen, then touchDelete >OK.
If the event repeats, you’re asked whether you want to
delete just that occurrence, this and all future occurrences,
or all past and future occurrences in your Calendar.
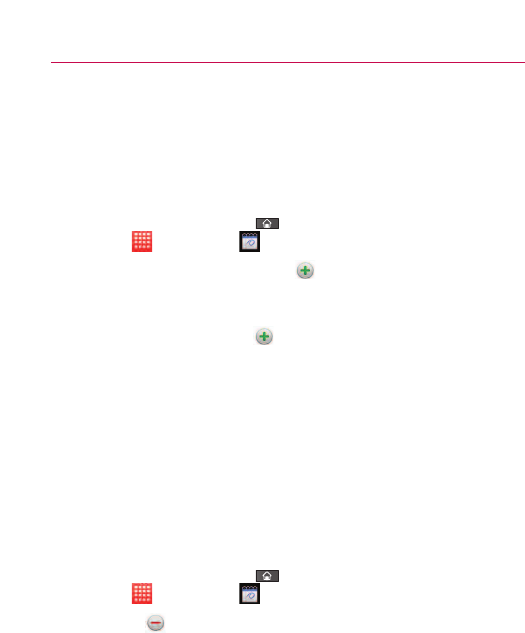
Setting an Event Reminder
You can set one or more reminders for an event, whether or not
you created the event or have permission to edit its other details.
To set an event reminder
1. Open the View Event summary screen:
Press the Home Key ,touch the Applications Launcher
Key >Calendar and touch the event.
2. If no reminder is set, touch to automatically add a
reminder for 10 minutes before the event.
If a reminder is already set, you can add an additional
reminder bytouching .
3. Touch the reminder time and, in the dialog that opens, touch
the length of time before the event that you want to be
reminded of it.
When the time comes, you receive a notification about the
event.
You can use Google Calendar on the web to configure
additional reminder settings.
To delete an event reminder
1. Open the View Event summary screen:
Press the Home Key ,touch the Applications Launcher
Key >Calendar and touch the event.
2. Touch .
Tool

Tool
Responding to an Event Reminder
If you set a reminder for an event, the Upcoming Event icon
appears in the Notifications area of the Status bar when the
reminder time arrives.
To respond to an event reminder
'If you receive notifications in the Status bar, drag the Status
bar down to open the Notifications panel. Then touch the
event notification to open the list of Calendar notifications.
'If you receive notifications with alerts, the Calendar
notifications list opens, listing all notifications awaiting your
response.
'Touch an event in the Calendar Notifications list to view more
information about that event.
'TouchSnooze all in the Calendar Notifications list to turn off
all event reminders for 5 minutes.
'Touch Dismiss all in the Calendar Notifications list to delete
all reminders in the list.
'Press the Back Key when viewing the Calendar
Notifications list to keep the reminders pending. The icon
remains in the Status bar and the reminders remain in the
Notifications panel.
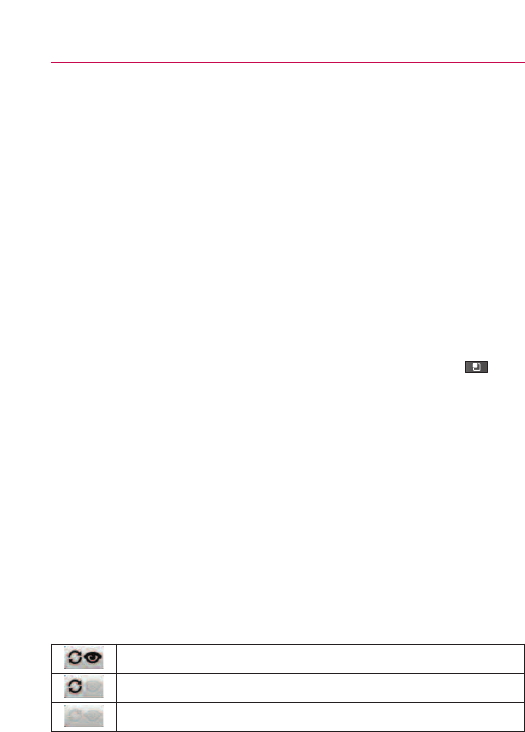
Synchronizing and Displaying Calendars
When you add a Google Account or Microsoft Exchange ActiveSync
account to your phone that includes a calendar service, and you
configure that account to synchronize calendar events to the phone,
the events from that calendar are added and kept up to date in the
Calendar application on the phone.
You control whether an account synchronizes changes to calendar
events between a Google or other calendar service with the
Settings application’s Accounts & Sync Settings screen. You
configure which calendars to store on the phone (for quicker access)
and which of those to show or hide on the phone in Calendar.
To set whether calendars are stored on the phone or visible
1.From the Calendar application, press the Menu Key ,
then touchMore >Calendars.
The Calendars screen displays all the calendars you’ve added
or subscribed to for each account that is configured to
synchronize events to your phone, organized by account.
(Calendars for accounts you’ve configured not to synchronize
Calendar events are not included in the list.)
2. Touch the account name to show or hide its calendars on
your phone. Each time the account name is touched, the
icons cycle systematically on and off.
The icon(s) to the right of eachcalendar indicate whether its
events are synchronized (in this context, stored on) the
phone and whether theyare visible in Calendar.
Tool
Calendar events are synchronized on phone and visible in Calendar
Calendar events are synchronized on phone but not visible in Calendar
Calendar events not synchronized to phone and not visible in Calendar.

Tool
You remain subscribed to Calendars that you configure not
to store on the phone and you can still work with them with
Google Calendar on the web, or in other calendaring
services.
3. Touch OK.
Changing Calendar Settings
You can change the following settings for how Calendar displays
events and how it notifies you of upcoming events.
'From the Calendar application, press the Menu Key ,
then touch More >Settings.
Hide declined events Checkmark if you don’t want to see events
to which you’ve declined invitations.
Set alerts & notifications Opens a dialog boxwhere you can set
event reminders to open an alert, send you a notification, or turn
off event notifications on your phone.
Select ringtone Opens a dialog boxwhere you can select the
ringtone to sound when you receive an event reminder.
Vibrate Opens a dialog box where you can set the phone to
vibrate whenever you receive an event reminder, only when the
phone is in Silent mode, or never.
Default reminder time Opens a dialog box where you can select
the default time to remind you before an event is scheduled.
Build version The version of the Calendar application you are
using.
269
Calculator
Allows you to perform simple mathematical calculations.
To open and use the Calculator
'Press the Home Key ,then touch the Applications
Launcher Key >Calculator .
'Enter numbers and arithmetic operators on the basic screen.
'Drag the basic screen to the left to open the advanced panel.
'Touchand hold the Calculator’s display to open a menu
where you can copywhat you’veentered and access other
tools.
'Touch Clear to delete the last number or operator you
entered. Touch and hold Clear to delete all of the entered
information.
Tool
Drag to switch
between basic and
advanced panels.
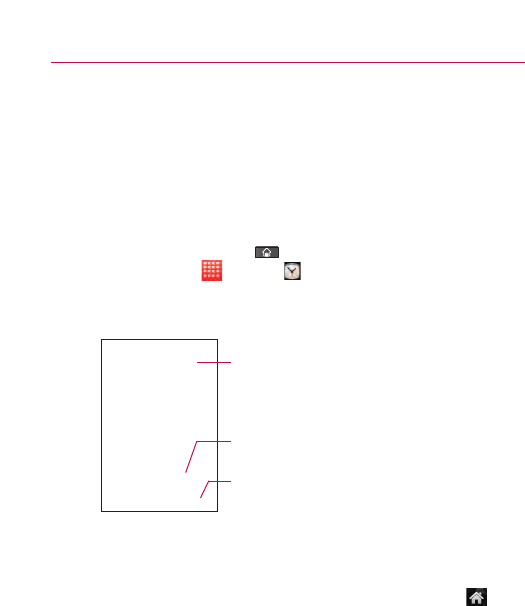
270 Tool
Clock
Viewing the Date, Time, and Other Information
You use the Clock application to monitor several kinds of
information at once, in addition to the current date and time.
To open the Clock application
'Press the Home Key ,then touch the Applications
Launcher Key >Clock .
The Clock application opens with the date and time
displayed on your Home screen wallpaper, along with your
local weather and other useful information.
When the Clock application is running, it switches to screen-
saver mode after a few minutes. Simply press a phone key
to wake the phone up again.
To return to the Home screen, touch the Home icon at
the bottom of the Clock screen.
Touchto dim the screen.
Displays the battery charge level when the
phone is plugged into a charger.
Touch an icon to set an alarm, view a
slideshow, listen to music, or go to the
Home screen.
To play a slideshow
You can play a slideshow of the pictures in your Gallery albums
from the Clock application.
'Touch the Slideshow icon at the bottom of the Clock
screen.
'Press the Back Key to end the show.
To play music
You can play music while the Clock is displayed.
'Touch the Music icon at the bottom of the Clock screen.
The Music application opens, where you can select music to
play. You can return to the Clock application or use another
application while the music is playing.
To dim the Clock display
'If you want to use your phone as a bedside clock, you can
set the screen brightness very low. Touch the Dimmer icon
on the top right of the screen to dim the clock.
'Touch the Dimmer icon again to restore normal
brightness.
Tool
272 Tool
Setting Alarms
You can set an alarm by modifying an existing alarm or by adding a
new one.
To set an alarm
1. Touch the Alarm icon at the bottom of the Clock screen.
2. Touch an existing alarm to change its time and other
attributes or touchAdd alarm to add a newone.
3. Touch Time to set the alarm time, change the time as
necessary,then touchSet.
'Adjust the alarm time using the + or - buttons.
'Enter the alarm time manually bytouching the hour (or
minutes) field, then use the keypad.
Touch to add an alarm.
Touch to turn an alarm on or off.
Touch to open a screen where you can set an
alarm.
Touchto return to the main Clockscreen.
'Touch AM or PM to set for morning or afternoon.
4. Touch Repeat to set the day(s) when you want the alarm to
sound. If you don'ttouch the Repeat setting, the alarm
sounds only the one day you set it to.
5. Touch Ringtone to select a ringtone for the alarm.
The ringtone plays briefly when you select it, then touch OK.
6. Touch to checkmark the Vibrate setting to have the phone
vibrate, in addition to playing the ringtone.
7. Touch Label to enter a name for the alarm.
8. When you're finished, touchDone.
9. Press the Back Key to return to the main Clock screen.
Changing Clock Alarm Settings
The settings that affect your Alarm clock are accessed directly from
the Clock application. To change how the date and time is displayed,
open the Settings menu (accessed through the Launch screen).
'To change Clock alarm settings, touch the Alarm icon at
the bottom of the Clockscreen, press the Menu Key ,
then touch Settings .
Alarmin silent mode Touchto checkmark this setting and allow
your phone to play alarms even when it is in Silent mode.
Alarm volume Sets the volume to play the alarm alert.
Snooze duration Sets how long the Clock waits before playing an
alarm again.
Side button behavior Sets howthe up/down Volume Keys react
when pressed during an alarm alert.
Tool
274 Tool
ThinkFree Office
Learn to view and edit document files on a memory card inserted in
your device. The ThinkFree Office application supports the following
file formats: txt, doc, docx, xls, xlsx, ppt, pptx, pdf.
Create a NewDocument
1. Press the Home Key ,then touch the Applications
Launcher Key >ThinkFreeOffice .
2. Touch Accept >Activate now >Close.(This is necessary
only when you launch this application for the first time.)
3. Touch the My Docs tab for folders and documents on
your SD memory card.
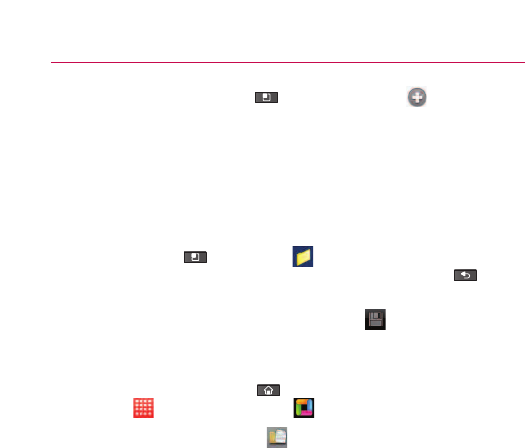
4. Press the Menu Key ,then touch New to start a
new document.
5. Touch the type of document and enter a name for the
document, then touch OK.
6. Enter contents in the document using the tools at the
bottom of the screen.
7. When you're done working on the document, press the
Menu Key ,touch File >Save (or Save As and enter
anew document name), then press the Back Key to
exit.
NOTE
To save without exiting, simply touch Save at the bottom of the
screen and continue working on the document.
Viewand edit a documenton your device
1. Press the Home Key ,touchthe Applications Launcher
Key >ThinkFree Office .
2. Touch the My Docs tab for folders and documents on
your SD memory card.
3. Touchthe document you want to view or edit. If it's not in
the root directory,touch the folder where it's stored, then
touchthe document name to open it.
Tool
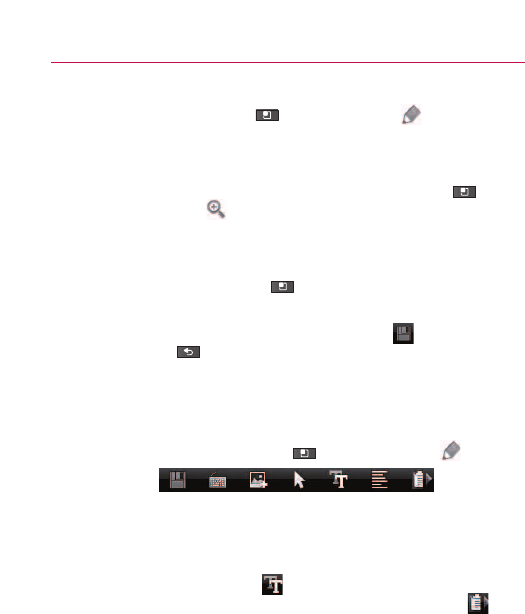
Tool
4. The document opens for you to view. If you want to edit it,
press the Menu Key ,then touch Edit .
'To move between pages or pan through the document,
scroll in the corresponding direction.
'To change the zoom level, press the Menu Key ,
touch Zoom ,then touch the zoom level you want.
'Use the toolbar at the bottom of the screen to make edits
to the document (word, text, or excel file).
'Press the Menu Key ,for additional menu options
such as search, preferences, and more.
5. When you're finished editing, touch Save ,then press the
Back Key to exit.
ThinkFree document tools
The ThinkFree application has a toolbar that appears automatically
when you create a document. To display the toolbar in an existing
document, press the Menu Key ,then touchEdit .
Touch a toolbar icon and corresponding tools display in a bar
beneath it for you to touch and use. Left and right arrows on the
toolbar indicate that you can scroll horizontally for more icons.
Scrolling works independently. While a tool is selected (for
example the Select text tool ), you can scroll the toolbar to
touchan other toolbar icon (for example the clipboard tool to
copy the text you just selected). Touch the toolbar icon again to
close tool options.
The tools in the toolbar vary depending on the document type.
For .docx documents they include:
Touch to save your changes.
Touch to open the keyboard to enter text.
Touch to insert an image.
Touch to select text.
Touch to change the look of the text.
Touch to change the text formatting.
Touch to use the clipboard feature.
Manage documents online
1. Press the Home Key ,touch the Applications Launcher
Key >ThinkFree Office .
2. Touch the Online tab for access to your ThinkFree Office
online account.
3. Enter your user name and password to access your account,
then touchSign In.
4. View and manage your documents on the server as desired.
Tool
Settings
Settings
Opening Settings
The Settings application contains most of the tools for customizing
and configuring your phone. All of the settings in the Settings
application are described in this section.
To open Settings
'From the Home screen, press the Menu Key and touch
Settings.
OR
'TouchSettings on the Home screen or in the Launch
screen.
Changing Browser settings
You can configure a number of Browser settings, including several
that you can use to manage your privacy.
'Toopen the Browser settings screen, press Menu Key
from the Browser and touch More > Settings.
Page content settings
Text size Opens a dialog where you can increase or decrease the
sizeof the text that Browser uses when displaying webpages.
Default zoom Opens a dialog where you can increase or decrease
the magnification level that Browser uses when first opening a
webpage.
Open pages in overview Uncheck to open webpages displaying
their top-left corners at 100% size. Check to open webpages
zoomed out, in an overview.

Text encoding Opens a dialog where you can change the
character-encoding standard that Browser uses when displaying
text on a webpage.
Block pop-up windows Check to prevent websites from opening
windows unless you request it.
Load images Uncheck to omit images when Browser displays a
webpage. This speeds webpage display, which can be useful if
you have a slow connection.
Auto-fit pages Check to have Browser optimize the presentation
of text and other elements of webpages to fit your phone’s
screen. Checking this option also causes the browser to reflow a
column of text to fit the screen if you double-tap the screen
directly after zooming with your fingers. Uncheck to view pages as
designed for a computer screen, and to cause double-tapping to
simply switchbetween zoomed-in and default view.
Landscape-only display Checkto displaypages in landscape
(horizontal) orientation on your screen, regardless of how you are
holding the phone.
Enable JavaScript Uncheck to prevent JavaScript from running on
webpages. Many webpages function correctly only if theycan run
JavaScript features on your phone.
Enable plug-ins Uncheckto disable plug-ins from webpages.
Open in background Check to open new windows in the
background when you touch & hold a link and touch Open in new
window.This is useful when you are working with windows that
take a long time to download and display. Press Menu ,touch
Windows,and then touchthe newwindow to view it. Uncheck if
you prefer new windows that you open in this way to open in
place of the current window.
Settings

Settings
Set home page Opens a dialog where you can enter the URL of a
page that you want to access whenever you open a new Browser
window. If you prefer to open new Browser windows more
quickly, by not opening any page by default, leave the dialog blank.
Wireless & networks
Wireless & networks settings allows you to configure and manage
wireless radio communications. These settings include Airplane
mode.
Airplane mode Checkmark indicates all wireless radio
communications are turned off.
Wi-Fi Checkmark to turn on Wi-Fi functionality to connect to available
Wi-Fi networks.
Wi-Fi settings
'
Wi-Fi settings screen
The Wi-Fi settings menu allows you to set up and manage
wireless access points.
Wi-Fi Checkmark to turn on Wi-Fi so you can connect to Wi-Fi
networks.
Network notification Checkmark to receive a notification when
an open Wi-Fi network becomes available.
Wi-Fi networks Displays a list of Wi-Fi networks you’ve
previously configured and those detected when the phone last
scanned for Wi-Fi networks.
Add Wi-Fi network Allows you to add a Wi-Fi network by
entering its Network SSID (the name it broadcasts) and
security type.

'
Advanced Wi-Fi settings screen
The Advanced Wi-Fi settings screen is accessed from the Wi-Fi
settings screen. Press the Menu Key and touch
Advanced.
Regulatory domain Set the number of channels to use.
Wi-Fi sleep policy Allows you to specify when to switch from
Wi-Fi to mobile data. Disabling sleep uses more battery power.
MAC address Displays the Media Access Control (MAC)
address of your phone when connecting to Wi-Fi networks.
IP settings If you checkmark Use static IP,you can use IP
settings to enter an IP address and other network settings for
your phone manually, rather than using the DHCP protocol to
obtain network settings from the W-Fi network itself.
Bluetooth Checkmark to turn Bluetooth functionality to connect
to Bluetooth devices.
Bluetooth settings
'
Bluetooth settings screen
Bluetooth Checkmark to turn on Bluetooth so you can connect
to Bluetooth devices.
Device name Allows you to viewand edit the name your
phone displaysto other Bluetooth devices when trying to pair.
Discoverable Checkmark to make your phone discoverable to
other Bluetooth devices for 120 seconds.
Scan for devices Touchto search for and display information
about nearbyBluetooth devices.
Bluetooth devices Displays a list of Bluetooth devices that
you’ve previously configured and those detected when the
phone last scanned for Bluetooth devices.
Settings

Settings
3G Mobile Hotspot You can share your phone’s data connection
with several other devices at once, by turning your phone into a
portable Wi-Fi hotspot.
'
3G Mobile Hotspot settings screen
3G Mobile Hotspot Check to share your phone’s mobile
network data connection as a portable Wi-Fi hotspot.
3G Mobile Hotspot settings Opens a screen with settings to
turn the hotspot on and off and to set the its Network SSID (its
broadcast name) and security.
Help Opens a dialog with information about portable Wi-Fi
hotspots as well as information about where to learn more.
VPN settings
'
VPN settings screen
Add VPN Allows you to add different types of Virtual Private
Networks (VPNs).
VPNs Displays the list of VPNs that you’ve previously
configured.
Mobile networks
'
Mobile networks settings screen
Data enabled Uncheck to prevent your phone from transmitting
data on any mobile network. This is useful if you are traveling
in an area where you do not have a mobile data plan and want
to avoid charges for data use on local carriers’ mobile
networks. Unchecking this setting does not prevent your phone
transmitting data on other wireless networks, such as Wi-Fi or
Bluetooth.

Data roaming Uncheck to prevent your phone from
transmitting data on other carriers’ mobile networks when you
can’t access your own carrier’s mobile networks.
Network Mode Allows you to select the preferred network
mode.
System select Allows you to change CDMA roaming mode
between Home only/ Automatic.
ERI Allows you to enable or disable ERI Alert sound.
Call settings
Use Call settings to configure phone call settings.
Assisted Dial
Assisted Dialing Assisted Dialing allows you to easily dial
international calls while roaming in another country.
Show Dialpad Displaydialpad automatically on the selected calls.
Voicemail
Voicemail service Allows you to select your carrier’s voicemail
service or another service, such as Google VoiceTM.
Voicemail settings If you are using your carrier’s voicemail
service, this option allows you to enter the phone number to use
for listening to and managing your voicemail. You can enter a
comma (,) to insert a pause into the number. For example, to add
apassword after the phone number. If you are using Google Voice,
this opens a screen where you can view the Google Voice number
or sign out of Google Voice.
Settings

Settings
Other call settings
Excuse Message Shows you the Excuse Message List.
Auto Retry Allows you to enable or disable Auto Retry mode. You
can configure the phone to automatically redial a number after a
certain amount of time.
TTY mode Allows you to set TTY mode to communicate with
other TTY devices.
DTMF Tones Allows you to set the lengh of DTMF tones.
Voice Privacy Allows you to enable or disable enhanced privacy
mode.
Auto Answer Allows you to enable or disable Auto Answer with
Handsfree.
Sound
Use the Sound settings to configure how and at what volume the
phone rings and vibrates when the phone rings, you receive a
notification, an alarm sounds, or when you playmusic or other
media with audio, as well as some related settings.
General
Silent mode Check to silence all sounds (including call and
notification ringtones) except the audio from music, videos, and
other media and any alarms you have set.
(You must silence media and alarms in their own applications.)
Vibrate Opens a dialog where you can configure when you want
the phone to vibrate when you receive a phone call or notification:
Always, never, only when the phone is in Silent mode, or only
when the phone is not in Silent mode.

Volume Opens a dialog where you can set the volume of
ringtones that sound when you receive a phone call or notification,
media (music, videos, an so on), and alarms. If you uncheck the
option to use the same volume for both calls and notifications, you
can set the notification ringtone volume independently.
Incoming calls
Phone ringtone Opens a dialog where you can select the ringtone to
sound when you receive a phone call. Touch a ringtone to listen to it.
Notifications
Notification ringtone Opens a dialog where you can select the
ringtone to sound when you receive a notification. Touch a
ringtone to listen to it.
Feedback
Audible touch tones Checkto hear tones when you use the dial
pad to dial a number.
Audible selection Checkto play a sound when you touch buttons,
icons, and other onscreen items that react to your touch.
Screen lock sounds Checkto play a sound when the screen is
locked or unlocked.
Haptic feedback Check to have the phone vibrate briefly when you
touchsoftbuttons and perform other actions.
Emergency tone On some phones, opens a dialog where you can
configure how the phone reacts when you place an emergency call.
Settings

Settings
Display
Use the Display settings to configure brightness and other screen
settings.
Brightness Opens a dialog for adjusting the brightness of the
screen. For the best battery performance, use the dimmest
comfortable brightness.
Auto-rotate screen Check to automatically switch the orientation
of the screen as you turn the phone sideways.
Animation Opens a dialog where you can set whether you want
to enjoy animated transitions for some effects (such as opening
menus), for all supported effects (including when navigating from
screen to screen), or to enjoy a phone without anyoptional
animation effects (this setting does not control animation in all
applications).
Screen timeout Opens a dialog where you can set how long to
wait after you touchthe screen or press a button before the
screen darkens. For the best battery performance, use the
shortest convenient timeout.
Location & security
Use the Location & security settings to set your preferences for
using and sharing your location when your search for information
and use location-aware applications, suchas Bing Maps. You can
also configure settings that help secure your phone and its data.

Location Settings
E911 E911 Location cannot be turned off on any mobile phone that
you are not allowed to change any settings and it would only be
used as urgent situation.
Verizon Location Services By selecting VZW Location Services,
you are enabling Verizon Wireless and third party authenticated
and validated location services to access certain location
information available through this and/or the network.
Standalone GPS Services Allows you to use your phone’s Stand-
alone global positioning system (GPS) satellite receiver to pinpoint
your location to within an accuracy as close as several meters
(“street level”). Actual GPS accuracy depends on a clear view of
the sky and other factors.
Google Location Services Allows you to use information from Wi-
Fi and mobile networks to determine your approximate location,
for use in Google Maps, when you search, and others. When you
checkmark this option, you’re asked whether you consent to
sharing your location anonymously with Google’slocation service.
Screen unlock
Set up screen lock Opens a set of screens that guide you through
drawing a screen unlock pattern or setting a PIN or password.
Passwords
Visible passwords Check to briefly show each character of
passwords as you enter them, so that you can see what you
enter.
Settings

Settings
Device administration
Select device administrators Add or remove device
administrators.
Credential storage
Use secure credentials Check to allow applications to access your
phone’s encrypted store of secure certificates and related
passwords and other credentials. You use credential storage to
establish some kinds of VPN and Wi-Fi connections. If you have
not set a password for the credential storage, this setting is
dimmed.
Install from SD card Touch to install a secure certificate from an
SD card.
Set password Opens a dialog where you can set or change the
password for your secure credential storage. Your password must
have at least 8 characters.
Clear storage Deletes all secure certificates and related
credentials and erases the secure storage’s own password, after
prompting you to confirm that you want to do this.
Applications
You use the Applications settings to view details about the
applications installed on your phone, manage their data, force them
to stop, and to set whether you want to permit installation of
applications that you obtain from websites and email.
Unknown sources Permits installation of applications that you
obtain from websites, email, or other locations other than Android
MarketTM.
WARNING!
To protect your phone and personal data, download
applications only from trusted sources, such as Android
Market.

Manage applications Opens a list of all the applications and other
software installed on your phone, along with their sizes. Touch the
tabs at the top of the screen to view applications by type. Press
the Menu Key and touch Sort by size to display applications
in order by size. Touch an application to open its Application Info
screen.
Running services Allows you to view and control currently
running services and applications. This option displays what
processes each running service needs and how much memory it
is using.
Development Allows you to set options for application
development.
'
Development screen
The Development screen contains settings that are useful for
developing AndroidTM applications. For full information, including
documentation of the Android APIs and development tools, see
the Android developer website (http://developer.android.com).
USB debugging Permits debugging tools on a computer to
communicate with your phone via a USB connection.
Stay awake Allows you to set the phone to prevent the screen
from dimming and locking when it is connected to a charger or
to a USB device that provides power.Don’t use this setting
with a static image on the phone for long periods of time, or
the screen maybe marked with that image.
Allow mock locations Permits a development tool on a
computer to control where the phone believes it is located,
rather than using the phone’s own internal tools for this
purpose.
Settings

Settings
Accounts & sync
Use the Accounts & sync settings to add, remove, and manage your
GoogleTM and other supported accounts. You also use these settings
to control how and whether all applications send, receive, and sync
data on their own schedules and whether all applications can
synchronize user data automatically.
GmailTM,Calendar, and other applications may also have their own
settings to control how they synchronize data; see the sections on
those applications for details.
General sync settings
Background data Permits applications to synchronize data in the
background, whether or not you are actively working in them.
Unchecking this setting can save battery power and lowers (but
does not eliminate) data use.
Auto-sync Permits applications to synchronize, send, and receive
data on their own schedule. If you uncheck this setting, you must
touch an account in the list on this screen or press the Menu Key
and touchSync now to synchronize data for that account.
Synchronizing data automatically is disabled if Background data is
unchecked.
Manage accounts
List of all Google Accounts and other accounts you’ve added to
the phone.
If you touch an account in this screen, its account screen opens.
'
Account screen
This screen contains different options, depending on the kind
of account.

For Google Accounts, it lists the kinds of data you can
synchronize to the phone, with checkboxes so you can turn
synchronizing on and off for each kind. You can also press the
Menu Key and touch Sync now to synchronize data. Touch
Remove Account to remove the account along with all its data
(contacts, mail, settings, and so on). You can’t remove the first
Google Account you added to your phone except by resetting
your phone to the factory defaults and erasing all of your user
data.
Privacy
Personal data
Factory data reset Erases all of your personal data from internal
phone storage, including information about your Google Account,
any other accounts, your system and application data and settings,
and any downloaded applications. Resetting the phone does not
erase anysystem software updates you’ve downloaded or any
files on your microSD card, such as music or photos. If you reset
the phone in this way, you’re prompted to reenter the same kind
of information as when you first started Android.
SD card & phone storage
Use the SD card & phone storage settings to monitor the used and
available space on your phone and on your microSD card, to
manage your microSD card, and if necessary, to reset the phone,
erasing all of your personal information.
SD card
Total space and Available space Lists the amount of space on
any microSD card installed in your phone and the amount you
have used to store photos, videos, music, and other files.
Settings

Settings
Unmount SD card Unmounts the microSD card from your phone
so that you can format the card or safely remove it when the
phone is on. This setting is dimmed if there is no microSD card
installed, if you have already unmounted it, or if you have mounted
the microSD card on your computer.
Format SD card Permanently erases everything on a microSD
card and prepares it for use with your phone. You must unmount a
microSD card before you can format it.
Internal phone storage
Available space Lists the amount of internal phone storage used
by the operating system, its components, applications (including
those you downloaded), and their permanent and temporary data.
Search
You use the Searchsettings to configure Bing Search, Quick Search
Box, and the data on the phone that you want to include in
searches.
Searchable items Allows you to set what kinds of data to include
in phone searches.
Clear shortcuts Clear shortcuts to recently chosen search
suggestions.
Language & keyboard
Use the Language & keyboard settings to select the language for
the text on your phone and for configuring the onscreen keyboard,
including words that you’ve added to its dictionary.
Select language Allows you to choose a language to use on your
phone.

Text settings
Swype Swype is a word-based text entry method on a standard
keyboard. Touch this setting and scroll down to read the User
Manual for Swype.
Android keyboard Allows you to use the onscreen touch
keyboard and adjust its settings.
The Android Keyboard settings apply to the onscreen keyboard
that is included with your phone. The correction and capitalization
features affect only the English version of the keyboard.
Vibrate on keypress Allows you to set the phone to vibrate
briefly each time you touch a key on the onscreen keyboard.
Sound on keypress Allows you to set the phone to play a brief
sound each time you touch a key on the onscreen keyboard.
Auto-capitalization Allows you to set the onscreen keyboard to
automatically capitalize the first letter of the first word after a
period, the first word in a text field, and each word in name fields.
Voice input Allows you to enable or disable voice input.
Input language Opens the Input Languages screen, where
you can check the languages you want to have available when
using the onscreen keyboard.
'
Word suggestion settings
Quick fixes Allows the phone to automatically correct some
common misspellings as you type.
Show suggestions Allows the phone to show suggested
words as you type.
Auto-complete Allows the phone to automatically enter a
suggested word when you enter a space or punctuation.
User dictionary Allows you to view, add, and remove words from
your user dictionary.Touch a word to edit or delete it. Press the
Menu Key and touch Add to add a word.
Settings

Settings
Voice input & output
Voice input
Voice recognizer settings
'
Voice Recognition settings screen
Language Opens a screen where you can set the language
you use when entering text by speaking.
SafeSearch Opens a dialog where you can set whether you
want SafeSearch filtering to block some results when you use
search by voice:
Block no search results (Off), only explicit or offensive images
(Moderate), or both explicit or offensive text and images
(Strict).
Block offensive words When unchecked, voice recognition will
recognize and transcribe words many people consider
offensive, when you enter text by speaking. When checked,
voice recognition replaces those words in transcriptions with a
placeholder comprised of hash symbols ( # ).
Voice output
Text-to-speech settings
'
Text-to-speech settings
You use the Text-to-Speech settings to configure the Android
text-to-speech synthesizer for applications that can take
advantage of it, such as TalkBack.
If you don’t have speech synthesizer data installed, only the
Install voice data setting is available.
Listen to an example Plays a brief sample of the speech
synthesizer, using your current settings.
Always use my settings Allows the phone to use your default
settings and override the application settings.

Default Engine Allows you to set the default speech synthesis
engine to be used for spoken text.
Install voice data If your phone does not have speech
synthesizer data installed, this option connects to Android
Market and guides you through the process of downloading
and installing the data. This setting is not available if the data is
already installed.
Speech rate Allows you to select how quickly you want the
synthesizer to speak.
Language Allows you to select the language of the text you
want the synthesizer to read. This is particularly useful in
combination with the Always Use My Settings setting, to
ensure that text is spoken correctly in a variety of applications.
Engines Displays the installed engines and allows you to
configure their settings.
Connectivity
Default connection mode Allows you to choose the default
connection mode when connecting your phone to a PC via USB.
Choose from Windows Media Sync, Modem mode, or Mass
storage mode
Always ask Check to have the phone ask you to choose what USB
connection mode it should connect with to a PC.
Accessibility
You use the Accessibility settings to configure any accessibility plug-
ins you have installed on your phone.
Accessibility Allows you to enable all installed accessibility
plug-ins.
Power button ends call During a call, pressing Power ends the
call instead of turning offthe screen.
Settings

Settings
Date & time
Use Date & time settings to set your preferences for how dates are
displayed. You can also use these settings to set your own time and
time zone, rather than obtaining the current time from the mobile
network.
Use 24-hour format Check to display the time using 24-hour time
format—for example, 13:00 rather than 1:00 pm.
Select date format Opens a dialog where you can select the
format for displaying dates.
About phone
About phone includes information about your phone.
System updates Allows you to check for Android system
software updates.
Status Allows to view a list of information about your battery,
mobile network connection, and other details.
Battery use Opens a list of the applications and operating system
components that have used and are currently using battery power.
Touch an application in the list to view details about its power use
and, if available, touch a button to open a settings or information
screen for that component or application.
Legal information Allows you to view legal information about the
software included with your phone.
DivX VOD registration Displays information to register your
device to play DivX protected videos.
Version information Lists details about the model numbers and
versions of your phone’s hardware and operating system software.
This information is useful if you need to work with your carrier’s
support team.

FCC Hearing-Aid Compatibility (HAC)
Regulations for Wireless Devices
On July 10, 2003, the U.S. Federal Communications Commission
(FCC) Report and Order in WT Docket 01-309 modified the
exception of wireless phones under the Hearing Aid Compatibility
Act of 1988 (HAC Act) to require digital wireless phones be
compatible with hearing-aids. The intent of the HAC Act is to ensure
reasonable access to telecommunications services for persons with
hearing disabilities.
While some wireless phones are used near some hearing devices
(hearing aids and cochlear implants), users may detect a buzzing,
humming, or whining noise. Some hearing devices are more
immune than others to this interference noise, and phones also
vary in the amount of interference they generate.
The wireless telephone industryhas developed a rating system for
wireless phones, to assist hearing device users to find phones that
may be compatible with their hearing devices. Not all phones have
been rated. Phones that are rated havethe rating on their boxor a
label located on the box.
The ratings are not guarantees. Results will vary depending on the
user's hearing device and hearing loss. If your hearing device
happens to be vulnerable to interference, you may not be able to
use a rated phone successfully. Trying out the phone with your
hearing device is the best way to evaluate it for your personal needs.
M-Ratings: Phones rated M3 or M4 meet FCC requirements and
are likely to generate less interference to hearing devices than
phones that are not labeled. M4 is the better/higher of the two
ratings.
Hearing devices mayalso be rated. Your hearing device
manufacturer or hearing health professional may help you find this
rating. Higher ratings mean that the hearing device is relatively
immune to interference noise. The hearing aid and wireless phone
Safety
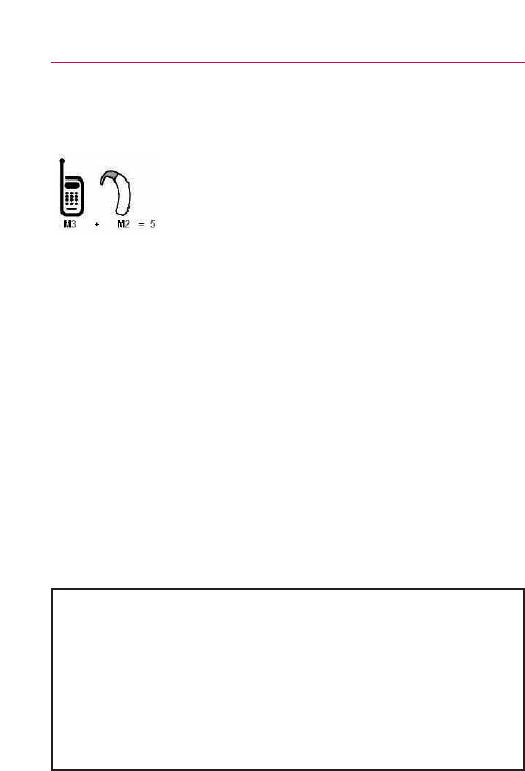
rating values are then added together. A sum of 5 is considered
acceptable for normal use. A sum of 6 is considered for best use.
In the example to the left, if a hearing aid meets
the M2 level rating and the wireless phone meets
the M3 level rating, the sum of the two values
equal M5. This should provide the hearing aid user
with “normal usage” while using their hearing aid
with the particular wireless phone. “Normal usage” in this context
is defined as a signal quality that’s acceptable for normal operation.
The M mark is intended to be synonymous with the U mark. The T
mark is intended to be synonymous with the UT mark. The M and T
marks are recommended by the Alliance for Telecommunications
Industries Solutions (ATIS). The U and UT marks are referenced in
Section 20.19 of the FCC Rules. The HACrating and measurement
procedure are described in the American National Standards
Institute (ANSI) C63.19 standard.
When you're talking on a cell phone, it's recommended that you
turn the BT (Bluetooth) mode off for HAC.
According to HACpolicy(KDB 285076), we state this handset has
not been rated for hearing aid compatibility with respect to the WiFi
capability.
Safety
For information about hearing aids and digital wireless phones
Wireless Phones and Hearing Aid Accessibility
http://www.accesswireless.org/hearingaid/
FCC Hearing Aid Compatibility and Volume Control
http://www.fcc.gov/cgb/consumerfacts/hac_wireless.html