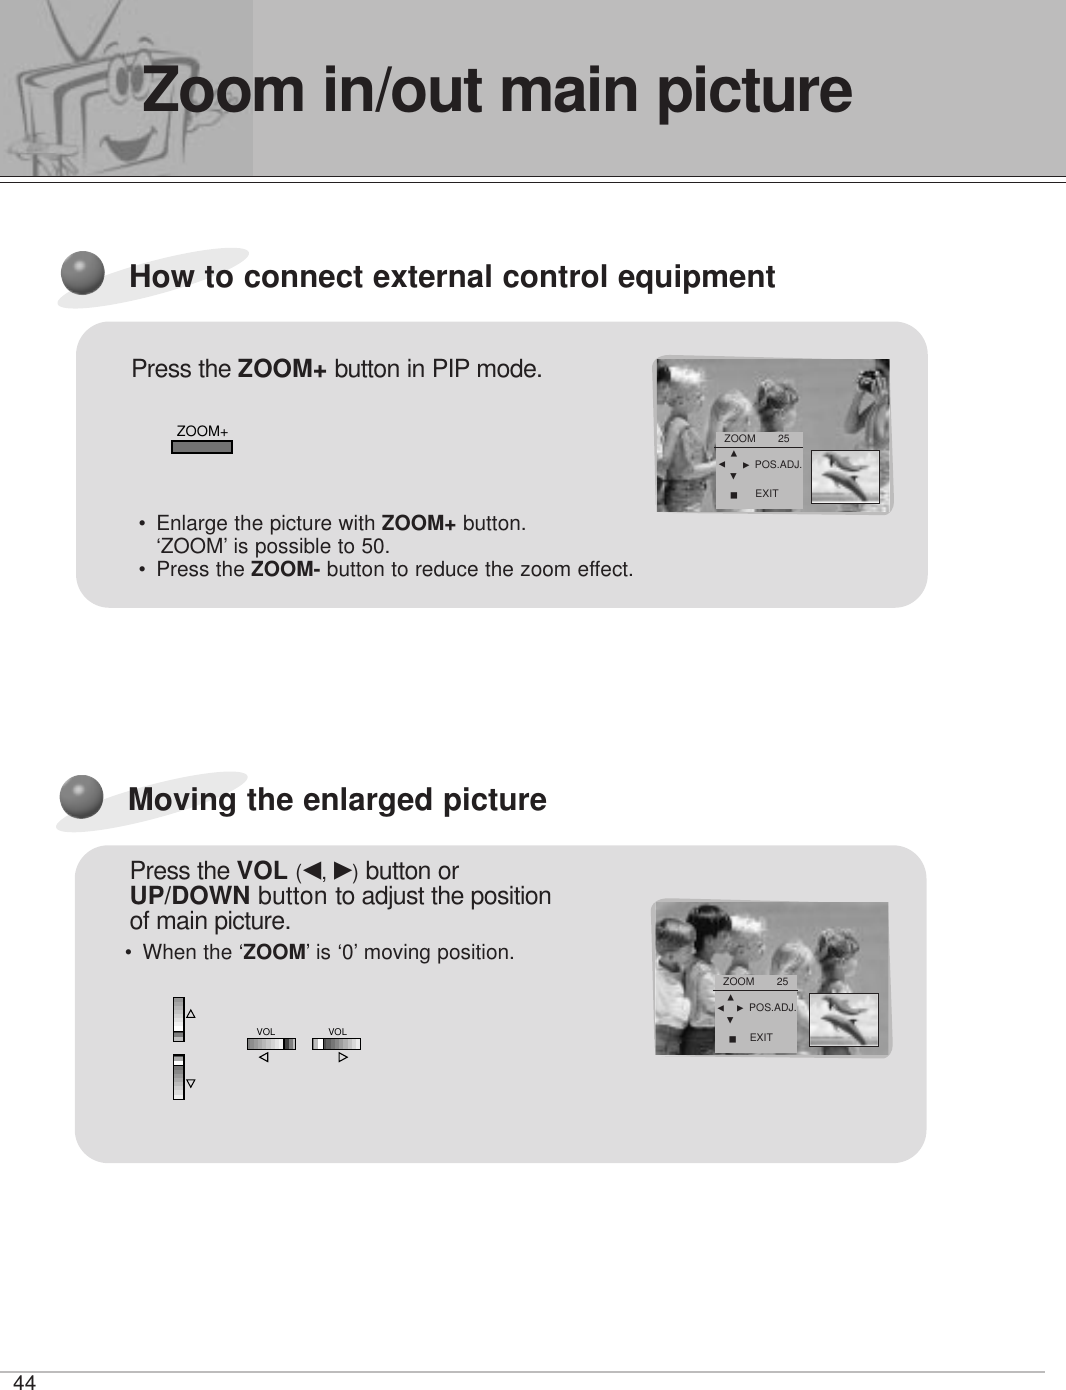
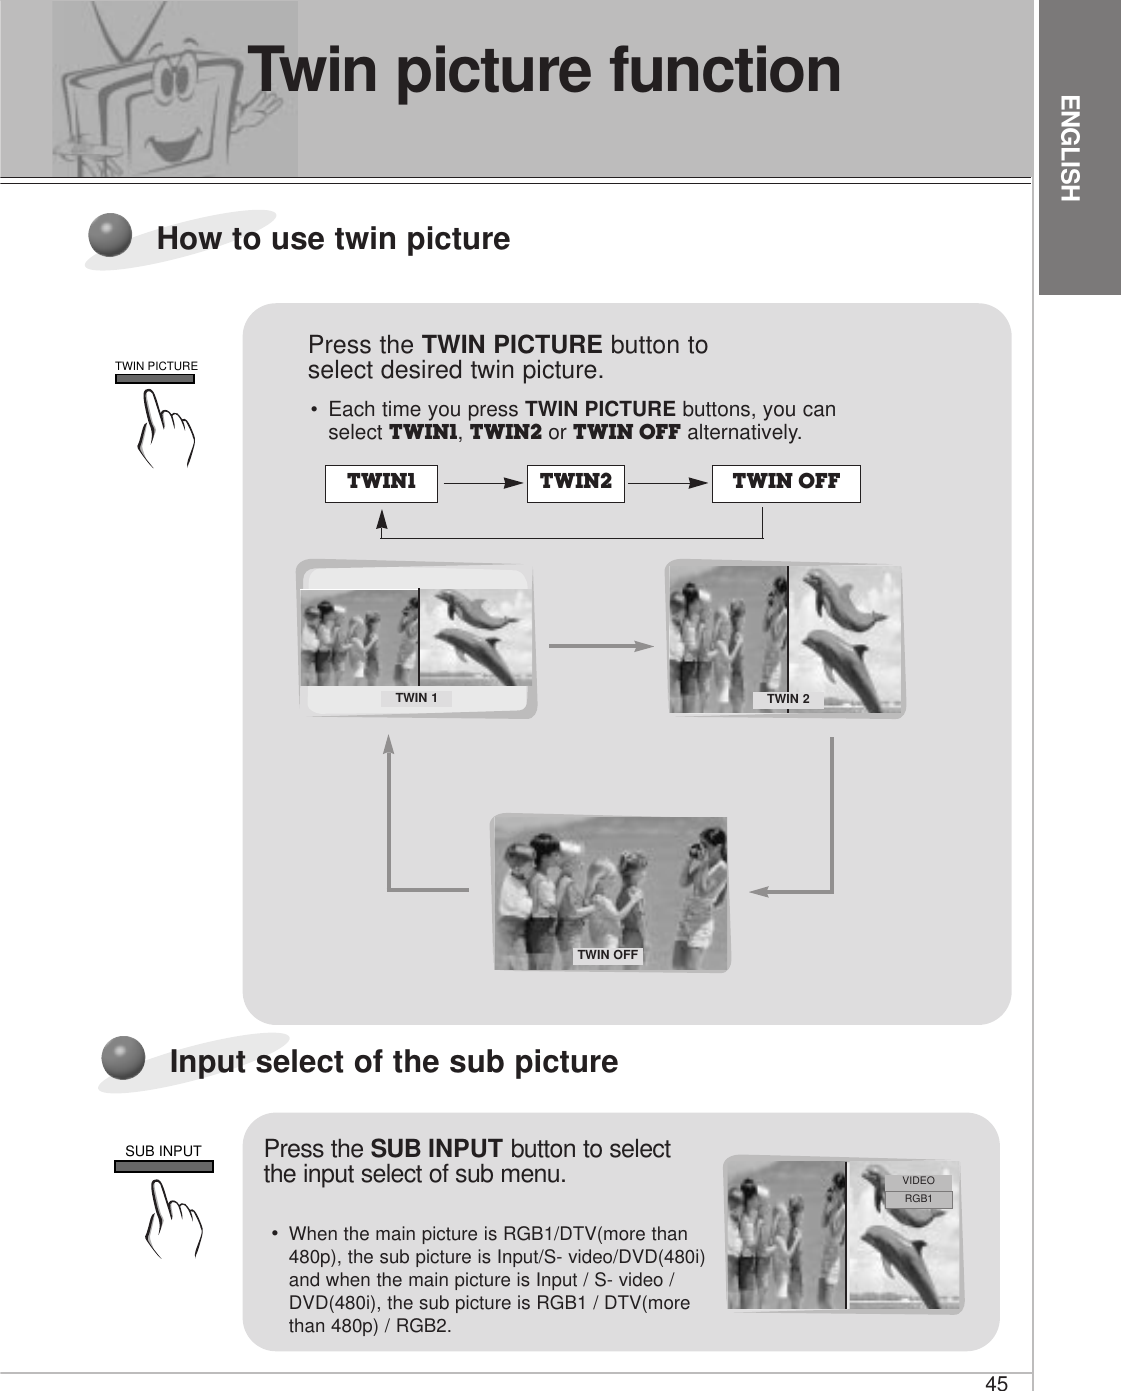
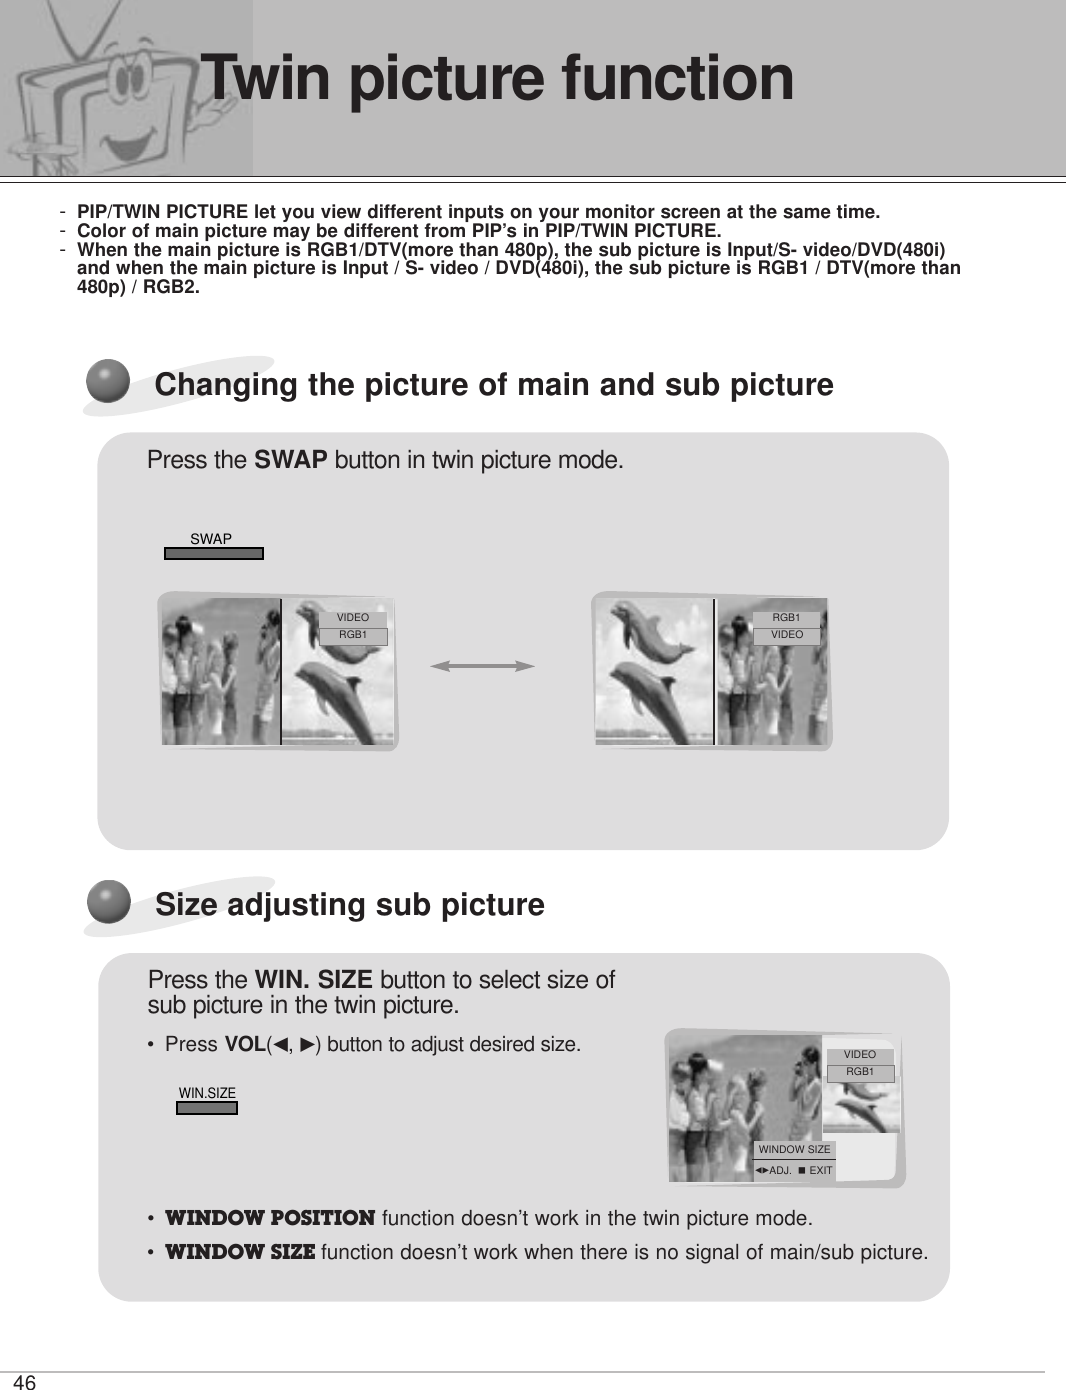
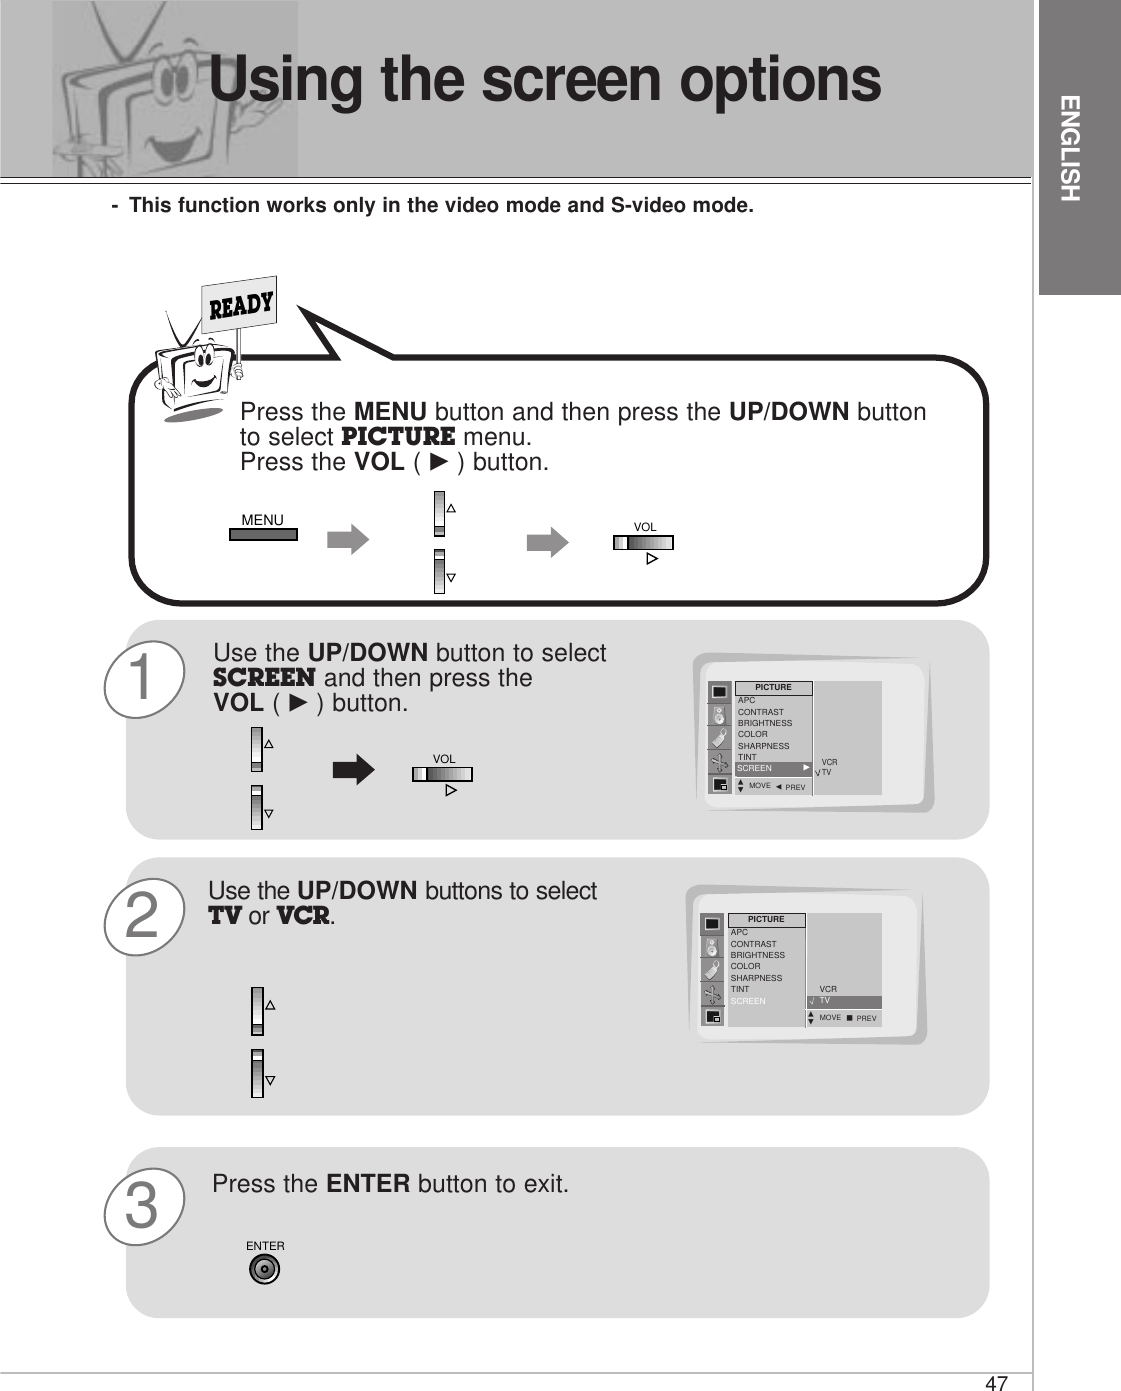
LG Electronics USA MW30LZ10 LCD A/V Monitor User Manual
LG Electronics USA LCD A/V Monitor
UserManual.wiki
>
LG Electronics USA
>
MW30LZ10 User Manual
user manual
Navigation menu
Upload a User Manual
Namespaces
Wiki Guide
HTML
PDF
Info
Views
User Manual
Discussion / Help
Navigation


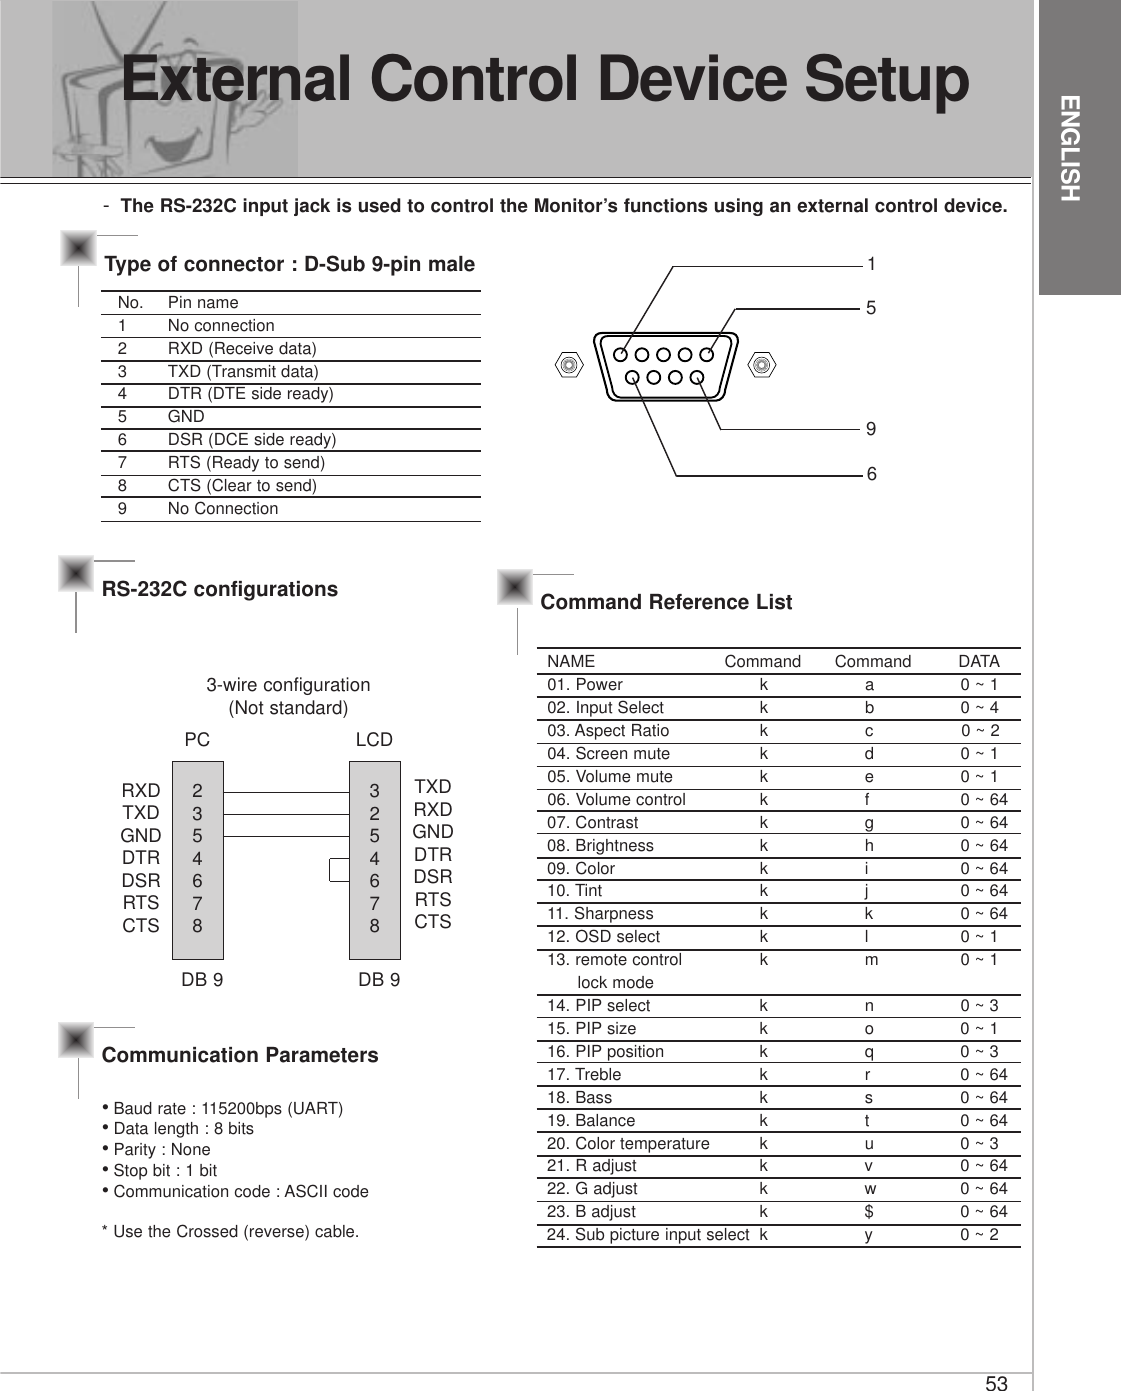
![54Transmission* [Command1] : To classify factory-adjustment mode or user adjustment mode.* [Command2] : To control LCD set.* [Set ID] : You can adjust the set ID to choose desired monitor ID number in specialmenu. Adjustment range is 1 ~ 99. When selecting Set ID ‘0’, every connected LCD set is controlled.select ‘0’, factory adjustment.(* Transmit as Hexadecimal code.)* [DATA] : To transmit command data.Transmit ‘FF’ data to read status of command.* [Cr] : Carriage ReturnASCII code ‘0x0D’* [ ] : Added to classify command, set ID and DATA.* [Set ID], [Data] : Input command with 2byte.[Command1][Command2][ ][Set ID][ ][Data][Cr]OK Acknowledgement* The Monitor transmits ACK (acknowledgement) basedon this format when receiving normal data. At thistime, if the data is data read mode, it indicates presentstatus data. If the data is data write mode, it returnsthe data of the PC computer.[Command2][ ][Set ID][ ][OK][Data][x]Error Acknowledgement* The Monitor transmits ACK (acknowledgement) basedon this format when receiving abnormal data from non-viable functions or communication errors.* Data : [01] : illegal code (This command is not supported.)[02] : not support function (This function doesn’t work.)[03] : wait more time (Try again a few minute later.)[Command2][ ][Set ID][ ][NG][Data][x]Transmission / Receiving Protocol01. Power (Command:p)GTo control Power On/Off of the Monitor.TransmissionData 0 : Power Off1 : Power On [k][a][ ][Set ID][ ][Data][Cr]AcknowledgementData 0 : Power Off1 : Power On [a][ ][Set ID][ ][OK][Data][x]GTo show Power On/Off.Transmission[k][a][ ][Set ID][ ][FF][Cr]AcknowledgementData 0 : Power Off1 : Power On* In like manner, if other functions transmit ‘FF’ databased on this format, Acknowledgement data feedback presents status about each function.[a][ ][Set ID][ ][OK][data][x]02. Input select (Command:b)GTo select input source for the Monitor. You can also select an input source using the INPUTSELECT button on the Monitor's remote control.TransmissionData 0 : RGB1 4 : RGB21 : Component2 : Video3 : S-Video[k][b][ ][Set ID][ ][Data][Cr]AcknowledgementData 0 : RGB1 4 : RGB21 : Component2 : Video3 : S-Video[b][ ][Set ID][ ][OK][Data][x]External Control Device Setup](https://usermanual.wiki/LG-Electronics-USA/MW30LZ10/User-Guide-263761-Page-54.png)
![55ENGLISH06. Volume control (Command:f)GTo adjust volume.You can also adjust volume with the VOL buttons onremote control.TransmissionData Min : 0 ~ Max : 64* Transmit as Hexadecimal code.[k][f][ ][Set ID][ ][Data][Cr]AcknowledgementData Min : 0 ~ Max : 64[f][ ][Set ID][ ][OK][Data][X]07. Contrast (Command:g)GTo adjust screen contrast. You can also adjust contrast in the Picture menu.TransmissionData Min : 0 ~ Max : 64* Transmit as Hexadecimal code.[k][g][ ][Set ID][ ][Data][Cr]AcknowledgementData Min : 0 ~ Max : 64[g][ ][Set ID][ ][OK][Data][X]08. Brightness (Command:b)GTo adjust screen brightness.You can also adjust brightness in the Picture menu.TransmissionData Min : 0 ~ Max : 64* Transmit as Hexadecimal code.[k][h][ ][Set ID][ ][Data][Cr]AcknowledgementData Min : 0 ~ Max : 64[h][ ][Set ID][ ][OK][Data][X]03. Aspect Ratio (Command:c)GTo adjust the screen format.You can also adjust the screen format using the ARCbutton on remote control or in the Picture menu.TransmissionData 0 : Wide screen (16:9)1 : Normal screen (4:3) 2 : Full screen (Zoom) [k][c][ ][Set ID][ ][Data][Cr]AcknowledgementData 0 : Wide screen (16:9)1 : Normal screen (4:3) 2 : Full screen (Zoom) * Using the PC input, you select either Wide screen(16:9)or Normal screen(4:3).[c][ ][Set ID][ ][OK][Data][X]04. Screen mute (Command:d)GTo select screen mute on/off.TransmissionData 0 : Screen mute off (Picture on)1 : Screen mute on (Picture off)[k][d][ ][Set ID][ ][Data][Cr]AcknowledgementData 0 : Screen mute off (Picture on)1 : Screen mute on (Picture off)[d][ ][Set ID][ ][OK][Data][X]05. Volume mute (Command:e)GTo control volume mute on/off.You can also adjust mute using the MUTE button onremote control.TransmissionData 0 : Volume mute on (Volume off)1 : Volume mute off (Volume on)[k][e][ ][Set ID][ ][Data][Cr]AcknowledgementData 0 : Volume mute on (Volume off)1 : Volume mute off (Volume on)[e][ ][Set ID][ ][OK][Data][X]](https://usermanual.wiki/LG-Electronics-USA/MW30LZ10/User-Guide-263761-Page-55.png)
![5609. Color (Command:i)GTo adjust the screen color.You can also adjust color in the Picture menu.TransmissionData Min : 0 ~ Max : 64* Transmit as Hexadecimal code.[k][i][ ][Set ID][ ][Data][Cr]AcknowledgementData Min : 0 ~ Max : 64[i][ ][Set ID][ ][OK][Data][X]10. Tint (Command:j)GTo adjust the screen tint.You can also adjust tint in the Picture menu.TransmissionData Red : 0 ~ Green : 64* Transmit as Hexadecimal code.[k][j][ ][Set ID][ ][Data][Cr]AcknowledgementData Red : 0 ~ Green : 64[j][ ][Set ID][ ][OK][Data][X]11. Sharpness (Command:k)GTo adjust the screen sharpness.You can also adjust sharpness in the Picture menu.TransmissionData Min : 0 ~ Max : 64* Transmit as Hexadecimal code.[k][k][ ][Set ID][ ][Data][Cr]AcknowledgementData Min : 0 ~ Max : 64[k][ ][Set ID][ ][OK][Data][X]12. OSD select (Command:l)GTo select OSD (On Screen Display) on/off.TransmissionData 0 : OSD off1 : OSD on[k][l][ ][Set ID][ ][Data][Cr]AcknowledgementData 0 : OSD off1 : OSD on[l][ ][Set ID][ ][OK][Data][X]* This function is setting mode when the remote controlis not used.13. Remote control lock mode (Command:m)GTo set up the locking function of set remote control. Transmission[k][m][ ][Set ID][ ][Data][Cr]AcknowledgementData 0 : off1 : on[m][ ][Set ID][ ][OK][Data][X]14. PIP select (Command:n)GTo control PIP (Picture-in-Picture) or twin picture. Youcan also control PIP/TWIN PICTURE using the pip/twinpicture button on remote control or in the Special menu.TransmissionData 0 : PIP/ DW off1 : PIP2 : Twin picture (DW1)3 : Twin picture (DW2)[k][n][ ][Set ID][ ][Data][Cr]AcknowledgementData 0 : PIP/ DW off1 : PIP2 : Twin picture (DW1)3 : Twin picture (DW2)[n][ ][Set ID][ ][OK][Data][X]External Control Device Setup](https://usermanual.wiki/LG-Electronics-USA/MW30LZ10/User-Guide-263761-Page-56.png)
![57ENGLISH17. Treble (Command:r)G To adjust the screen treble.You can also adjust treble in the sound menu.Transmission[k][r][ ][Set ID][ ][Data][Cr]AcknowledgementData Min : 0 ~ Max : 64Data Min : 0 ~ Max : 64* Transmit as Hexadecimal code.[r][ ][Set ID][ ][OK][Data][X]16. PIP position (Command:q)GTo select sub picture position for PIP. You can also adjust the sub picture position using theposition button on the remote control or in WINDOWPOSITION on the TWIN/PIP menu.TransmissionData 0 : Right down on screen1 : Left down on screen2 : Left up on screen3 : Right up on screen[k][q][ ][Set ID][ ][Data][Cr]AcknowledgementData 0 : Right down on screen1 : Left down on screen2 : Left up on screen3 : Right up on screen[q][ ][Set ID][ ][OK][Data][X]15. PIP size (Command:e)G To select PIP size.TransmissionData 0 : Normal screen (4:3) 1 : Wide screen (16:9)[k][o][ ][Set ID][ ][Data][Cr]AcknowledgementData 0 : Normal screen (4:3) 1 : Wide screen (16:9)[o][ ][Set ID][ ][OK][Data][X]18. Bass (Command:s)G To adjust the screen bass.You can also adjust bass in the sound menu.Transmission[k][s][ ][Set ID][ ][Data][Cr]AcknowledgementData Min : 0 ~ Max : 64Data Min : 0 ~ Max : 64* Transmit as Hexadecimal code.[s][ ][Set ID][ ][OK][Data][X]19. Balance (Command:t)G To adjust the screen balance.You can also adjust balance in the sound menu.Transmission[k][t][ ][Set ID][ ][Data][Cr]AcknowledgementData Min : 0 ~ Max : 64Data Min : 0 ~ Max : 64* Transmit as Hexadecimal code.[t][ ][Set ID][ ][OK][Data][X]](https://usermanual.wiki/LG-Electronics-USA/MW30LZ10/User-Guide-263761-Page-57.png)
![5820. Color temperature (Command:u)GTo set up with ‘normal, cool, warm, user’ in the color temperature.Transmission[k][u][ ][Set ID][ ][Data][Cr]AcknowledgementData 0 : Normal 1 : Cool 2 : Warm 3 : UserData 0 : Normal 1 : Cool2: Warm3 : User[u][ ][Set ID][ ][OK][Data][X]21. R-Adjust (Command:v)G To adjust ‘R-adjust’ in the color temperature.Transmission[k][v][ ][Set ID][ ][Data][Cr]AcknowledgementData Min : 0 ~ Max : 64Data Min : 0 ~ Max : 64* Transmit as Hexadecimal code.[v][ ][Set ID][ ][OK][Data][X]22. G-Adjust (Command:w)G To adjust ‘G-adjust’ in the color temperature.Transmission[k][w][ ][Set ID][ ][Data][Cr]AcknowledgementData Min : 0 ~ Max : 64Data Min : 0 ~ Max : 64* Transmit as Hexadecimal code.[k][w][ ][Set ID][ ][Data][Cr][x]23. B-Adjust (Command:$)G To adjust ‘B-adjust’ in the color temperature.Transmission[k][$][ ][Set ID][ ][Data][Cr]AcknowledgementData Min : 0 ~ Max : 64Data Min : 0 ~ Max : 64* Transmit as Hexadecimal code.[$][ ][Set ID][ ][OK][Data][X]24. Sub picture input select (Command:y)[k][y][ ][Set ID][ ][Data][Cr]AcknowledgementData Min : 0 ~ Max : 4Data Min : 0 ~ Max : 4* Transmit as Hexadecimal code.[y][ ][Set ID][ ][OK][Data][X]External Control Device SetupData 0 : RGB1 4 : RGB21 : Component2 : Video3 : S-Video](https://usermanual.wiki/LG-Electronics-USA/MW30LZ10/User-Guide-263761-Page-58.png)