LG Electronics USA N2311AZ Part15 Subpart B-LCD Monitor User Manual BEJN2311AZ 1
LG Electronics USA Part15 Subpart B-LCD Monitor BEJN2311AZ 1
Contents
- 1. BEJN2311AZ_User Manual 1
- 2. BEJN2311AZ_User Manual 2
- 3. BEJN2311AZ_User Manual 3
BEJN2311AZ_User Manual 1
![www.lg.comOWNER'S MANUALNETWORK MONITORN2311AZPlease read the safety information carefully before using the product.Network Monitor ModelEnglish](https://usermanual.wiki/LG-Electronics-USA/N2311AZ.BEJN2311AZ-User-Manual-1/User-Guide-1656024-Page-1.png)
![2ENGEnglishTable of ContentsTABLE OF CONTENTS3 ASSEMBLING AND PREPARING3 Unpacking4 Partsandbuttons6 LiftingandmovingtheMonitor6 SettingUptheMonitorset6 - AttachingtheStandBase7 - Mountingonatable7 - Adjustingtheangle8 - Adjustingthestandheight8 - UsingtheKensingtonlockingdevice9 - Detachingthestandbase9 - Detachingthestandbody10 - Swivelstand10 - UsingthePivotfunction11 - Installingthewallmountplate11 - Mountingonawall13 USING THE MONITOR SET13 ConnectingInputSignalCable13 - D-SUBINconnection-PC13 - D-SUBOUTconnection-PCoIP14 - DVIconnection-PCoIP15 ConnectingLAN/Peripherals15 - LANconnection-PCoIP16 - Peripheraldeviceconnection17 - SelfImageAdjustment18 CUSTOMIZING SETTINGS18 AccessingTheMainMenus19 MENUSettings19 - Picture20 - Color21 - Display21 - Volume(OnlysupportedinPCoIP)22 - Others23 AUTOSettings:D-SUBInput23 -//-Settings:PCoIPInput24 TROUBLESHOOTING26 PRODUCT SPECIFICATION27 PresetMode27 PowerIndicator28 PROPER POSTURE28 Properpostureforusingthemonitor29 USING PCOIP SOLUTION](https://usermanual.wiki/LG-Electronics-USA/N2311AZ.BEJN2311AZ-User-Manual-1/User-Guide-1656024-Page-2.png)
![3ENGEnglishASSEMBLING AND PREPARINGASSEMBLING AND PREPARINGUnpackingPleasecheckwhetherallthecomponentsareincludedintheboxbeforeusingtheproduct.Iftherearemissingcomponents,contacttheretailstorewhereyoupurchasedtheproduct.Notethattheproductandcomponentsmaylookdifferentfromthoseshownhere. OnlyuseanapprovedLGpoweradapter. Damagecausedbyotherpoweradaptersisnotcoveredbywarranty. Notethatthecomponentsmaylookdifferentfromthoseshownhere. Withoutpriornotice,allinformationandspecificationsinthismanualaresubjecttochangetoimprovetheperformanceoftheproduct. Topurchaseoptionalaccessories,visitanelectronicsstoreoronlineshoppingsiteorcontacttheretailstorewhereyoupurchasedtheproduct.Power CordUser Manual/CardStand BaseAdaptorCAUTIONNOTE15-pin D-SUB Signal Cable](https://usermanual.wiki/LG-Electronics-USA/N2311AZ.BEJN2311AZ-User-Manual-1/User-Guide-1656024-Page-3.png)
![4ENGEnglishASSEMBLING AND PREPARINGParts and buttonsPower Indicator LEDOn:Powerison LEDOff:PowerisoffFrontSideButtonsInputConnectors(Seep.13to16)(PowerButton)InputConnectors(Seep.16)](https://usermanual.wiki/LG-Electronics-USA/N2311AZ.BEJN2311AZ-User-Manual-1/User-Guide-1656024-Page-4.png)
![5ENGEnglishASSEMBLING AND PREPARINGButton DescriptionMENU Activatesthemainmenu.OSD Lock/Unlock FunctionsLocks/unlockstheOSDscreen.TolocktheOSDscreen,pressandholdtheMENUbuttonforseveralseconds.The"OSDLOCKED"messagewillbedisplayedandthescreenwillbelocked.TounlocktheOSDscreen,pressandholdtheMENUbuttonagainforseveralseconds.The"OSDUNLOCKED"messagewillbedisplayedandthescreenwillbeunlocked.VOLUME(OnlyPCoIPmode)AdjustthevolumeoftheMonitorset.(Seep.21)AUTO Toadjustthemonitorsettings,presstheAUTObuttonontheMONITORSETUPOSDmenu(onlysupportedforanalogsignal).Foroptimalscreendisplay,usethefollowingresolution.Optimal Resolution 1920x1080INPUT Allowsselectionoftheinputsignal.IfyouconnectthemonitortoacomputerusingaD-SUBcable,selecteitherthePCoIPorD-SUBinputsignal.TheinitialinputsignalisD-SUB.EXIT ExitstheOSDmenu.(PowerButton) D-SUBInput:PowerOn/OffPCoIPInputMonitorOff:Pressthepowerbuttononcethenthemonitorwillbeturnedoffafter5seconds.PCoIPOff:PressthepowerbuttontwicethenthemonitorandPColPconnectionwillbedisabled.PCoIPOn:Pressthepowerbutton.RemotePCPowerControl:PressthepowerbuttonforatleastfivesecondstoturnthePCon/off.*RemotePCPowerControlonlyworksonthehostPCwherePCoIPhostcardisinstalledandrequiresseparatesetup.Power Indicator Whenthemonitorisinoperatingmode,thepowerindicatorwillturnRed(onmode).Whenthemonitorisinpowersavingmode,thepowerindica-torwillblinkRed.](https://usermanual.wiki/LG-Electronics-USA/N2311AZ.BEJN2311AZ-User-Manual-1/User-Guide-1656024-Page-5.png)
![6ENGEnglishASSEMBLING AND PREPARINGSetting Up the Monitor setAttaching the Stand Base1 Placethemonitor'sscreenfacedown. Toprotectthescreenfromscratches,coverthesurfacewithasoftcloth.3 Usingacoin,turnthescrewclockwisetose-cure the stand base.2 Checktheposition (at the front and rear) ofthestandbody, then mountthestand baseonthestand body asshowninthefigure.Stand BodyStand BaseCAUTIONLifting and moving the MonitorPleaseheedthefollowinginformationwhenmovingthemonitor. Avoidtouchingthescreenatalltimes,asthismayresultindamagetothescreenorpixels.CAUTION ItisrecommendedtomovetheMonitorintheboxorpackingmaterialthattheMonitororiginallycamein. BeforemovingorliftingtheMonitor,disconnectthepowercordandallcables. HoldthetopandbottomoftheMonitorframefirmly.Makesurenottoholdthetransparentpartarea. WhenholdingtheMonitor,thescreenshouldfaceawayfromyoutopreventthescreenfromscratches. WhentransportingtheMonitor,donotexposetheMonitortojoltsorexcessivevibration. WhentransportingtheMonitor,keeptheMonitorupright,neverturntheMonitoronitsside,ortilttowardstheleftorright.Stand Base](https://usermanual.wiki/LG-Electronics-USA/N2311AZ.BEJN2311AZ-User-Manual-1/User-Guide-1656024-Page-6.png)
![7ENGEnglishASSEMBLING AND PREPARINGAdjusting the angle1 Placethemonitormountedonthestandbaseinanuprightposition.2 Adjusttheangleofthescreen.Theangleofthescreencanbeadjustedupto5°forwardsand15°backwardsforacomfortableviewingexperience. Toavoidinjurytothefingerswhenadjustingthescreen,donotholdasillustratedbelow. Becarefulnottotouchorpressthescreenareawhenadjustingtheangleofthemonitor.Front SideRear SideWARNINGMounting on a table1 Liftthemonitorandplaceitonthetableinanuprightposition.Installatleast10 cm awayfromthewalltoensuresufficientventilation.2 Connecttheadaptortothemonitor,thenplugthepowercordintothewalloutlet.3 Pressthe (Power)buttononthefrontofthemonitortoturnonthemonitor. Unplugthepowercordpriortomovingorinstallingthemonitor.Thereisriskofelectricshock.CAUTION10 cm10 cm10 cm10 cm -5 15-5 15-5 15](https://usermanual.wiki/LG-Electronics-USA/N2311AZ.BEJN2311AZ-User-Manual-1/User-Guide-1656024-Page-7.png)
![8ENGEnglishASSEMBLING AND PREPARINGUsing the Kensington locking deviceTheconnectorfortheKensingtonlockislocatedontherearofthemonitor.Formoreinformationoninstallationandusage,refertotheKensingtonlockusermanualorvisitthewebsiteathttp://www.kensington.com.ConnectthemonitortothetablewiththeKensing-tonlockcable. UsingtheKensingtonlockisoptional.Theaccessoriescanbepurchasedatyourlocalelectronicsstore.NOTE Oncethepinisremoved,itisnotnecessarytore-insertittoadjusttheheight.Adjusting the stand height1 Placethemonitormountedonthestandbaseinanuprightposition.2 Removethetapeattachedatthebottomrearofthe stand body, thenpulloutthelocking pin. 3 Theheightcanbeadjustedupto110 mm. Donotputyourfingersorhandbetweenthescreenandthebase(chassis)whenadjustingthescreen'sheight.TapeLocking PinStand Body CAUTIONWARNING110.0mm](https://usermanual.wiki/LG-Electronics-USA/N2311AZ.BEJN2311AZ-User-Manual-1/User-Guide-1656024-Page-8.png)
![9ENGEnglishASSEMBLING AND PREPARINGDetaching the stand body1 Placethemonitor'sscreenfacedown.Toprotectthescreenfromscratches,coverthesurfacewithasoftcloth.2 Usingascrewdriver,removethefourscrewsanddetachthestandfromthemonitor. Thecomponentsappearingintheillustra-tionsmaylookdifferentfromtheactualprod-uct. Donotcarrythemonitorupside-downasthismaycauseittofalloffitsstand,resultingindamageorinjury. Toavoiddamagingthescreenwhenliftingormovingthemonitor,onlyholdthestandortheplasticcover.Thisavoidsputtingunnec-essarypressureonthescreen. Onlyremovethetapeandthelockingpinwhenthemonitorismountedonthestandbaseandisinanuprightposition.Otherwise,thestandbodymayprotrude,whichmayleadtoinjury.Detaching the stand base1 Placethemonitor'sscreenfacedown.Toprotectthescreenfromscratches,coverthesurfacewithasoftcloth.2 Usingacoin,turnthescrewinthestandbasecounterclockwise.Detachthestand base fromthestand body.Stand BodyStand BaseCAUTION](https://usermanual.wiki/LG-Electronics-USA/N2311AZ.BEJN2311AZ-User-Manual-1/User-Guide-1656024-Page-9.png)
![10ENGEnglishASSEMBLING AND PREPARINGSwivel stand ImageshownmaydifferfromyourMonitorset.1 Swivel356degreesandadjusttheangleoftheMonitorsettosuityourview.1 LiftthemonitortoitshighestheighttoutilizethePivotfunction.Using the Pivot functionThepivotfunctionallowsyoutorotatethescreen90degreesclockwise.2 Landscape&Portrait:Youcanrotatethepanel90oclockwise.PleasebecautiousandavoidcontactbetweenthemonitorheadandtheStandBasewhenrotatingthescreentoaccessthePivotfunction.IfthemonitorheadtouchestheStandBase,thentheStandBasecouldcrack.Head sectionStand section3 Becarefulwiththecableswhenrotatingthescreen.](https://usermanual.wiki/LG-Electronics-USA/N2311AZ.BEJN2311AZ-User-Manual-1/User-Guide-1656024-Page-10.png)
![11ENGEnglishASSEMBLING AND PREPARINGInstalling the wall mount plateThismonitorhasaVESAcompatiblemountontheback.MostmountswillrequireanLGmountingplate.1 Placethemonitor'sscreenfacedown.Toprotectthescreenfromscratches,coverthesurfacewithasoftcloth.2 Placethewallmountplateonthemonitorandalignitwiththescrewholesonthemonitor.3 Usingascrewdriver,tightenthefourscrewstofixtheplateontothemonitor. Thewallmountplateissoldseparately. Formoreinformationontheinstallation,refertothewallmountplate'sinstallationguide.Wall Mount PlateNOTEIfyouintendtomounttheMonitorsettoawall,attachWallmountinginterface(optionalparts)tothebackoftheset.WhenyouinstalltheMonitorsetusingawallmountinginterface(optionalparts),attachitcarefullysoitwillnotdrop.1Please,UsethescrewandwallmountinterfaceinaccordancewithVESAStandards.2Ifyouusescrewlongerthanstandard,themonitormightbedamagedinternally.3Ifyouuseimproperscrew,theproductmightbedamagedanddropfrommountedposition.Inthiscase,LGElectronicsisnotresponsibleforit.4VESAcompatible.5PleaseuseVESAstandardasbelow. 784.8mm(30.9inch)andunder*WallMountPadThickness:2.6mm*Screw:Φ4.0mmxPitch0.7mmxLength10mm 787.4mm(31.0inch)andabove*PleaseuseVESAstandardwallmountpadandscrews.Mounting on a wallInstallthemonitoratleast10cmawayfromthewallandleaveabout10cmofspaceateachsideofthemonitortoensuresufficientventilation.De-tailedinstallationinstructionscanbeobtainedfromyourlocalretailstore.Pleaserefertothemanualtoinstallandsetupatiltingwallmountingbracket.10 cm10 cm10 cm10 cm](https://usermanual.wiki/LG-Electronics-USA/N2311AZ.BEJN2311AZ-User-Manual-1/User-Guide-1656024-Page-11.png)
![12ENGEnglishASSEMBLING AND PREPARING Unplugthepowercordbeforemovingorin-stallingthemonitortoavoidelectricshocks. Installingthemonitorontheceilingoronaslantedwallmayresultinthemonitorfallingoff,whichcouldleadtoinjury.PleaseuseaLGwallmountingbracketwhenusingaVESAmount.Formoreinformation,contactyourlocalretailstoreoraqualifiedinstaller. Applyingexcessiveforcewhenfasteningscrewsmaycausedamagetothemoni-tor.Damagecausedinthiswaywillnotbecoveredbytheproductwarranty. UsethewallmountingbracketandscrewsthatconformtotheVESAstandard.Dam-agecausedbytheuseormisuseofinap-propriatecomponentswillnotbecoveredbytheproductwarranty. UsethescrewsspecifiedintheVESAstan-dard. Thewallmountkitincludestheinstallationguideandnecessaryparts. Thewallmountingbracketisoptional.Theaccessoriescanbepurchasedatyourlocalretailstore. Thelengthofthescrewmaydifferforeachwallmountingbracket.Ensurethecorrectlengthofthescrewisused. Formoreinformation,pleaserefertotheusermanualforthewallmountingbracket.Model N2311AZ VESA (A x B) 100x100Stand Screw M4Required Screw 4Wall Mount Plate (Optional)RW120CAUTIONNOTE](https://usermanual.wiki/LG-Electronics-USA/N2311AZ.BEJN2311AZ-User-Manual-1/User-Guide-1656024-Page-12.png)
![13ENGEnglishUSING THE MONITOR SETUSING THE MONITOR SETConnecting Input Signal Cable Thismonitorsupportsthe*PlugandPlayfeature.*PlugandPlay:Afeaturethatallowsyoutoaddadevicetoyourcomputer,withouthavingtoreconfigureanythingorinstallanymanualdrivers.D-SUB IN connection - PCD-SUBINtransfersanalogvideosignalsfromthePCtothemonitor.ConnectthemonitortothePCusingtheprovided15-pinD-SUBsignalcableasillustratedbelow. Apple AdapterAnadaptermaybeneededforApplecomputers.ThisadaptercanbepurchasedfromApple. Whenusingthisdevicesimplyasaregu-larmonitorthroughtheRGBINport,set"PCoIP"toOFFinMENU>OTHERStoreduceenergyconsumption.(Seep.22)NOTENOTERGB OUTRGB INMONITORRGB OUTRGB INMONITORD-SUB OUT connection - PCoIPD-SUBOUTcanonlymirrorthePCoIPimagedisplayedonthemonitor.(itdoesnotsupportanextendeddesktop).ConnectthemonitortothePCusingtheprovided15-pinD-SUBsignalcableasillustratedbelow.](https://usermanual.wiki/LG-Electronics-USA/N2311AZ.BEJN2311AZ-User-Manual-1/User-Guide-1656024-Page-13.png)
![14ENGEnglishUSING THE MONITOR SET Toconnectthemonitortoacomputer,usetheappropriatesignalcable(LANandD-SUB). AconvertercanbeusedtoconverttheDVI-IinputsignaltoD-SUBinputsignal. Whenconnectingthepowercordtotheout-let,useagrounded(3-hole)multi-socketoragroundedwalloutlet. Themonitormayflickerwhenturnedoninanareaoflowtemperature.Thisisnormal. Sometimesred,greenorbluespotsmayap-pearonthescreen.Thisisnormal. Connecttheinputsignalcableandtighteninthedirectionofthearrow.Topreventdisconnectionsecurethecabletightly. Donotpressonthescreenforaprolongedtime.Thismaycauseimagedistortion. Donotdisplayastillimageonthescreenforaprolongedtime.Thismaycauseimageretention.Ifpossible,usethescreensaver.DVI-I(D) INMONITORCAUTIONNOTEDVI connection - PCoIPTransfersvideosignalstoanothermonitor.Con-nectthemonitorusingtheDVIcableasillustratedbelow.ItisusedfortheexpansionorreplicationofPCoIPmodescreen.](https://usermanual.wiki/LG-Electronics-USA/N2311AZ.BEJN2311AZ-User-Manual-1/User-Guide-1656024-Page-14.png)
![15ENGEnglishUSING THE MONITOR SETConnecting LAN/PeripheralsLAN connection - PCoIPTheLANconnectiontransmitsPCoIPsignalstothemonitor.ConnecttherouterorswitchtothemonitorusingaLANcableasillustratedbelow. TheLANcableissoldseparately. ThefollowingLANcabletypecanbeused:Standard:IEEE802.3ETHERNET IfadeviceisconnectedintotheearphoneoutportviaaLANcable,youcanadjustthevolumewiththevolumeicononPCtaskbar. ConnecttheLANcableandtheperipheraldevicespriortobootingupthePC.LANHub/RouterNOTENOTE](https://usermanual.wiki/LG-Electronics-USA/N2311AZ.BEJN2311AZ-User-Manual-1/User-Guide-1656024-Page-15.png)
![16ENGEnglishUSING THE MONITOR SET Peripheraldevicesaresoldseparately. TheUSBportsontheleftandbottomofthemonitorcanbeusedtoconnectthekey-board,mouse,andotherUSBdevices. Cableswithangledplugsmayhaveclear-anceissues,usestraightplugswhenpos-sible.AngleType StraightTypePeripheral device connectionConnectperipheraldevicestothemonitorusingUSB,microphoneandheadphoneports.LeftBottomNOTENOTE Headphones,speakersormicrophonemaynotworknormally,dependingontheserverPCsettings. VirtualsolutionsmayaffectthefunctionsorspeedofthespecificUSBstoragedevice.](https://usermanual.wiki/LG-Electronics-USA/N2311AZ.BEJN2311AZ-User-Manual-1/User-Guide-1656024-Page-16.png)
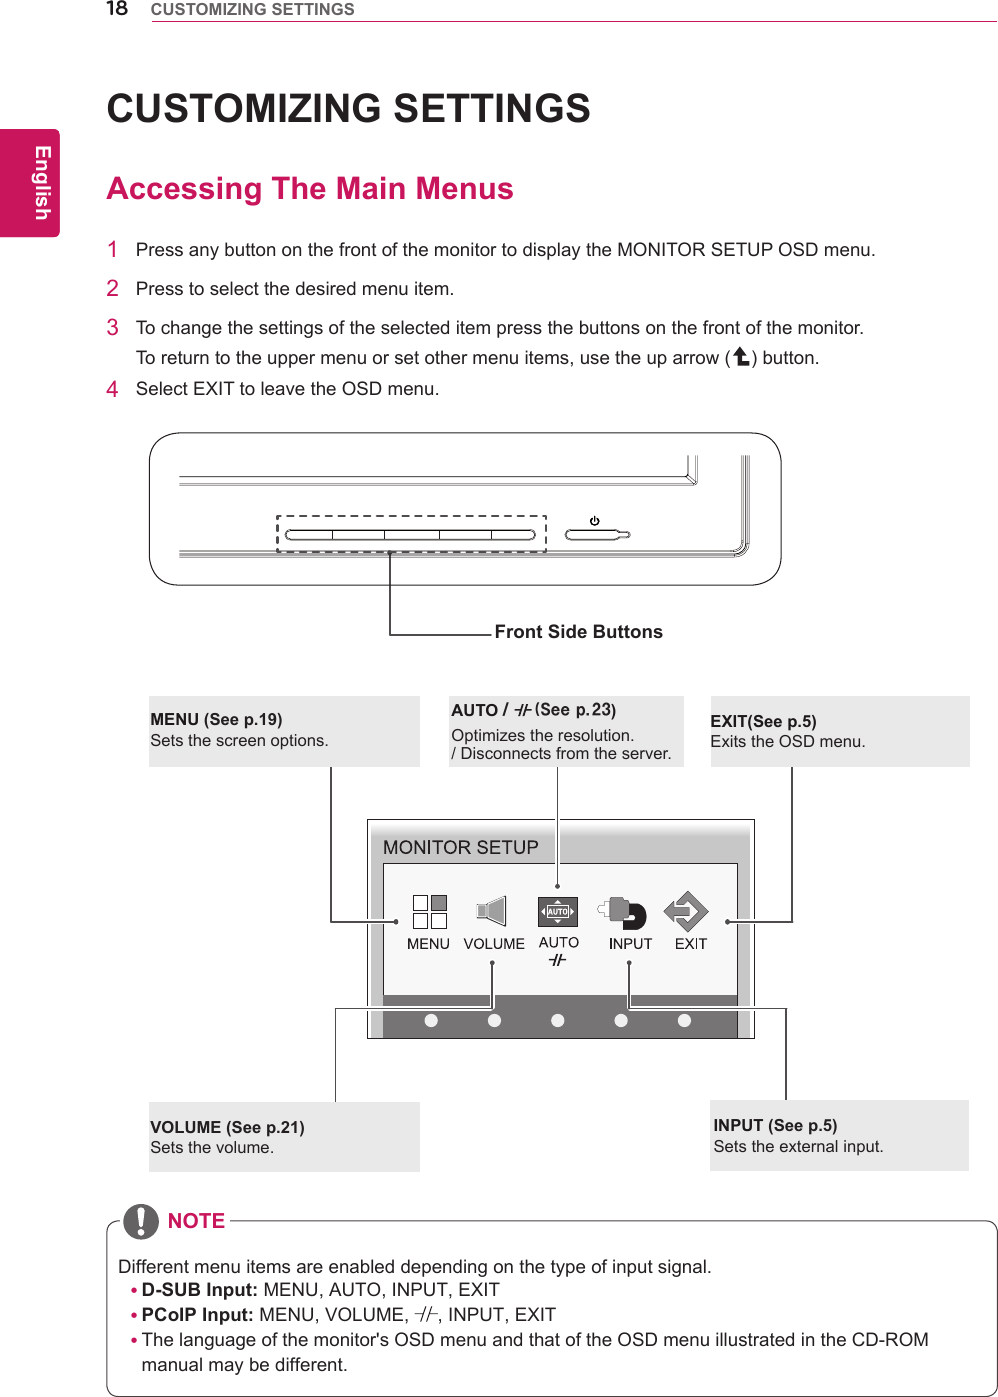
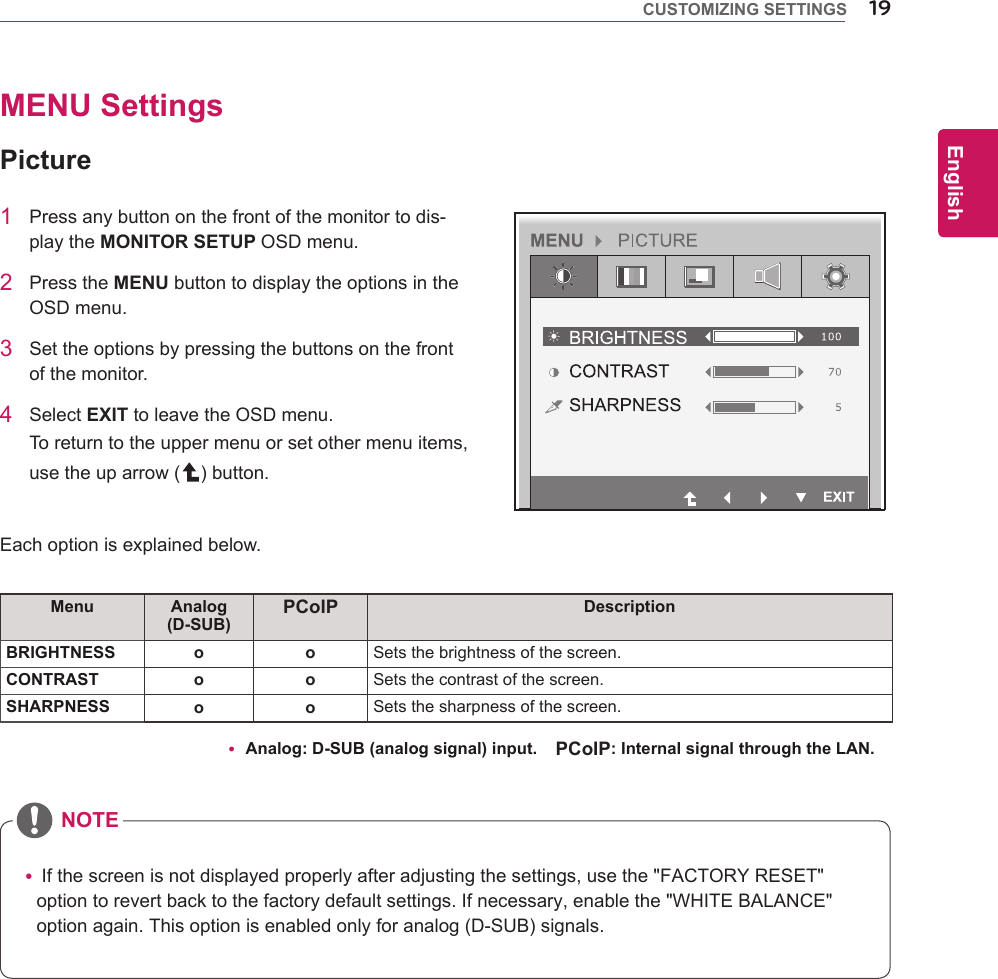
![17ENGEnglishUSING THE MONITOR SET Whatis"SelfImageAdjustment"?Thisfunc-tionrunswhenthemonitorisconnectedforthefirsttimeandperformsautomaticimageadjustmentforeachsignal(onlyavailableforanalog[D-SUBinput]signals)toprovideanoptimalscreendisplay.Self Image AdjustmentPressthepowerbuttononthefronttoturnonthemonitor.Whenpoweredon,the"Self Image Adjustment" functionwillrunautomatically(onlyavailableforanalog[D-SUBinput]signals).NOTE](https://usermanual.wiki/LG-Electronics-USA/N2311AZ.BEJN2311AZ-User-Manual-1/User-Guide-1656024-Page-17.png)
![18ENGEnglishCUSTOMIZING SETTINGSCUSTOMIZING SETTINGSAccessing The Main Menus1 PressanybuttononthefrontofthemonitortodisplaytheMONITORSETUPOSDmenu.2 Presstoselectthedesiredmenuitem.3 Tochangethesettingsoftheselecteditempressthebuttonsonthefrontofthemonitor.Toreturntotheuppermenuorsetothermenuitems,usetheuparrow( )button.4 SelectEXITtoleavetheOSDmenu.MENU (See p.19)Setsthescreenoptions.EXIT(See p.5)ExitstheOSDmenu.AUTO / (Seep.23)Optimizestheresolution./Disconnectsfromtheserver.Differentmenuitemsareenableddependingonthetypeofinputsignal. D-SUB Input: MENU,AUTO,INPUT,EXIT PCoIP Input: MENU,VOLUME, ,INPUT,EXIT Thelanguageofthemonitor'sOSDmenuandthatoftheOSDmenuillustratedintheCD-ROMmanualmaybedifferent.VOLUME (See p.21)Setsthevolume.INPUT (See p.5)Setstheexternalinput.NOTEFront Side Buttons](https://usermanual.wiki/LG-Electronics-USA/N2311AZ.BEJN2311AZ-User-Manual-1/User-Guide-1656024-Page-18.png)
![19ENGEnglish CUSTOMIZING SETTINGSMENU SettingsPicture1 Pressanybuttononthefrontofthemonitortodis-playtheMONITOR SETUP OSDmenu.2 PresstheMENU buttontodisplaytheoptionsintheOSDmenu.3 Settheoptionsbypressingthebuttonsonthefrontofthemonitor.4 SelectEXITtoleavetheOSDmenu.Toreturntotheuppermenuorsetothermenuitems,usetheuparrow( )button.Eachoptionisexplainedbelow.Menu Analog (D-SUB)PCoIP DescriptionBRIGHTNESS o o Setsthebrightnessofthescreen.CONTRAST o o Setsthecontrastofthescreen.SHARPNESS o o Setsthesharpnessofthescreen. Ifthescreenisnotdisplayedproperlyafteradjustingthesettings,usethe"FACTORYRESET"optiontorevertbacktothefactorydefaultsettings.Ifnecessary,enablethe"WHITEBALANCE"optionagain.Thisoptionisenabledonlyforanalog(D-SUB)signals. Analog: D-SUB (analog signal) input. PCoIP: Internal signal through the LAN.NOTE](https://usermanual.wiki/LG-Electronics-USA/N2311AZ.BEJN2311AZ-User-Manual-1/User-Guide-1656024-Page-19.png)
![20ENGEnglishCUSTOMIZING SETTINGSMenu Analog (D-SUB)PCoIP DescriptionCOLOR TEMP o o AllowsPRESETorUSERtobeselected.WARM Setsthescreencolortoareddishtone.MEDIUM Setsthescreencolorbetweenthereddishandbluishtone.COOL Setsthescreencolortoabluishtone.USER o o YoucancustomizethepicturecolorusingRed,Green,andBluecolors.GAMMAo oSetstheclarityofthescreen.Thegammavaluecanbesetto0,1or2,fromdarkertobrighterscreencolorsrespectively. Analog: D-SUB (analog signal) input. PCoIP: Internal signal through the LAN.Color1 Pressanybuttononthefrontofthemonitortodis-playtheMONITOR SETUP OSDmenu.2 PresstheMENU buttontodisplaytheoptionsintheOSDmenu.3 Settheoptionsbypressingthebuttonsonthefrontofthemonitor.4 SelectEXIT toleavetheOSDmenu.Toreturntotheuppermenuorsetothermenuitems,usetheuparrow( )button.Eachoptionisexplainedbelow.](https://usermanual.wiki/LG-Electronics-USA/N2311AZ.BEJN2311AZ-User-Manual-1/User-Guide-1656024-Page-20.png)
![21ENGEnglish CUSTOMIZING SETTINGSMenu Analog (D-SUB)PCoIP DescriptionHORIZONTAL oxMovesthedisplayarealeftorright.VERTICAL oxMovesthedisplayareaupordown.CLOCK oxIfverticallinesareshownonthescreen,adjustthefrequencytomini-mizethelinesandadjustthescreen'shorizontalwidth.PHASEoxAdjuststhefocusofthescreen'simage.Usewhenfrequenciesareshownonthescreenorwhenthetextap-pearsoverlapped.Foroptimalresults,usethisoptionafteradjustingthe"CLOCK"option. Analog: D-SUB (analog signal) input. PCoIP: Internal signal through the LAN.Display1 Pressanybuttononthefrontofthemonitortodis-playtheMONITOR SETUP OSDmenu. 2 PresstheMENU buttontodisplaytheoptionsintheOSDmenu.3 Settheoptionsbypressingthebuttonsonthefrontofthemonitor.4 SelectEXITtoleavetheOSDmenu.Toreturntotheuppermenuorsetothermenuitems,usetheuparrow( )button.Eachoptionisexplainedbelow.Volume (Only supported in PCoIP)1 Pressanybuttononthefrontofthemonitortodis-playtheMONITOR SETUP OSDmenu. 2 PresstheMENU buttontodisplaytheoptionsintheOSDmenu.3 Settheoptionsbypressingthebuttonsonthefrontofthemonitor.4 SelectEXITtoleavetheOSDmenu.Toreturntotheuppermenuorsetothermenuitems,usetheuparrow( )button.](https://usermanual.wiki/LG-Electronics-USA/N2311AZ.BEJN2311AZ-User-Manual-1/User-Guide-1656024-Page-21.png)