LG Electronics USA NS42PDP09 PLASMA TV/MONITOR User Manual NS 42PDP 09 manual
LG Electronics USA PLASMA TV/MONITOR NS 42PDP 09 manual
Contents
- 1. User manual 1 of 2
- 2. User manual 2of 2
User manual 2of 2
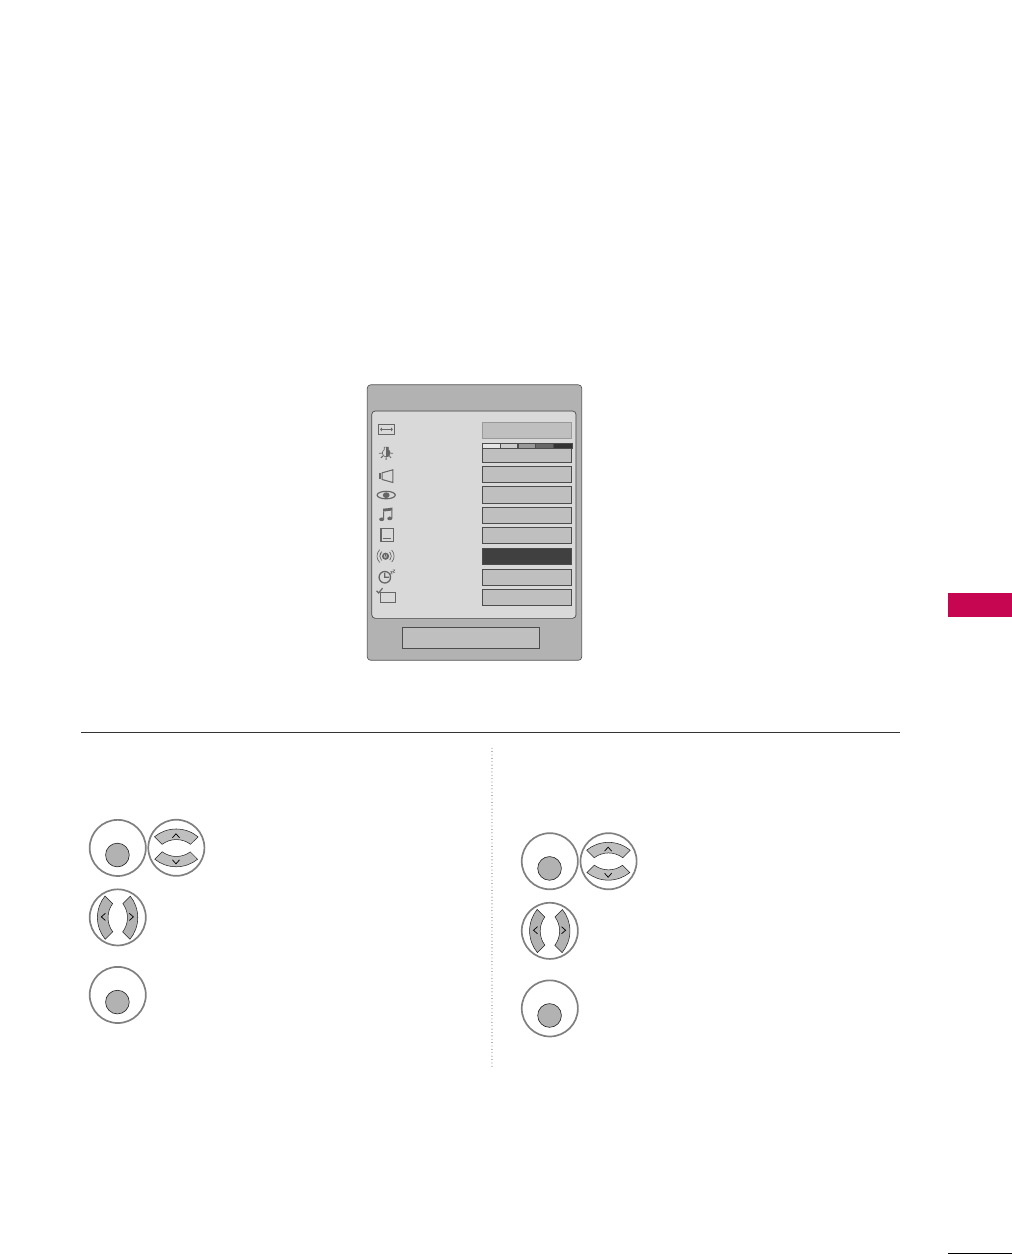
PICTURE CONTROL
49
Select your desired menu option.
Select PICTURE.
Select Picture MMode.
Select Expert CControl.
Select Expert1 or Expert2.
1
MENU
3
2
ENTER
ENTER
4
ENTER
5
ENTER
Make appropriate adjustments.
6
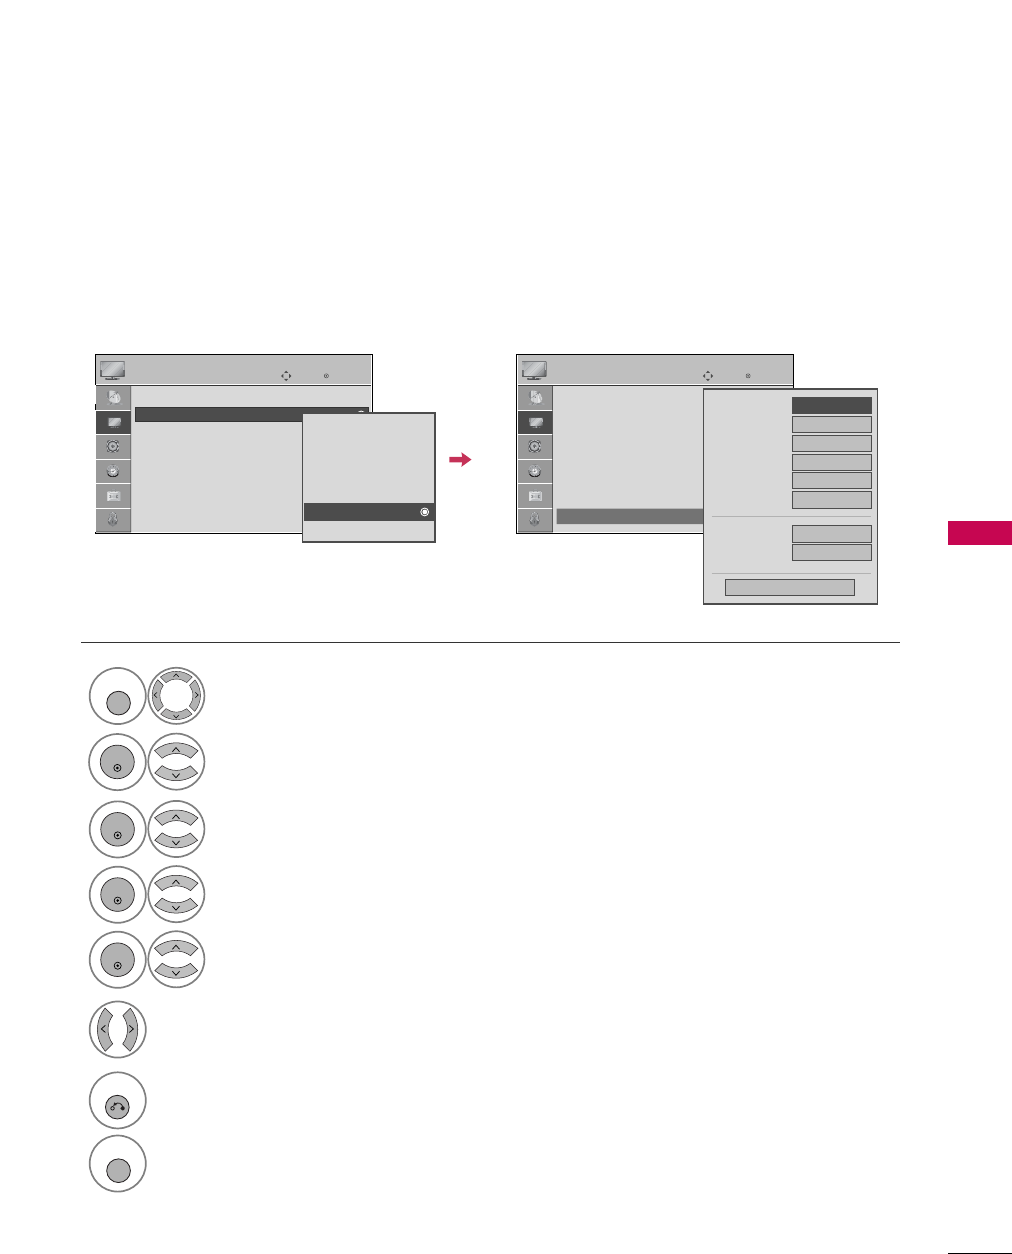
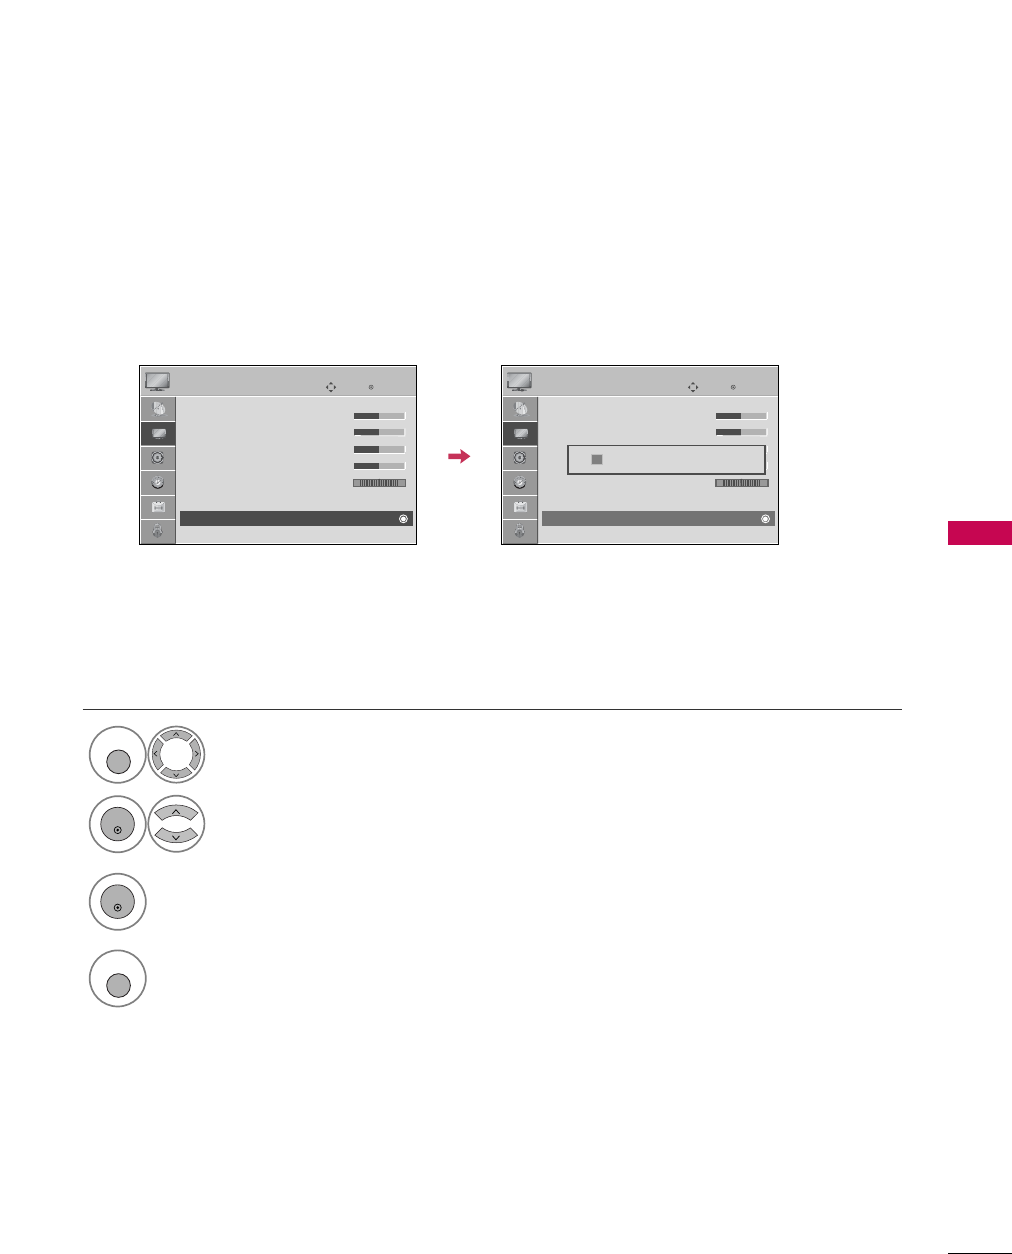
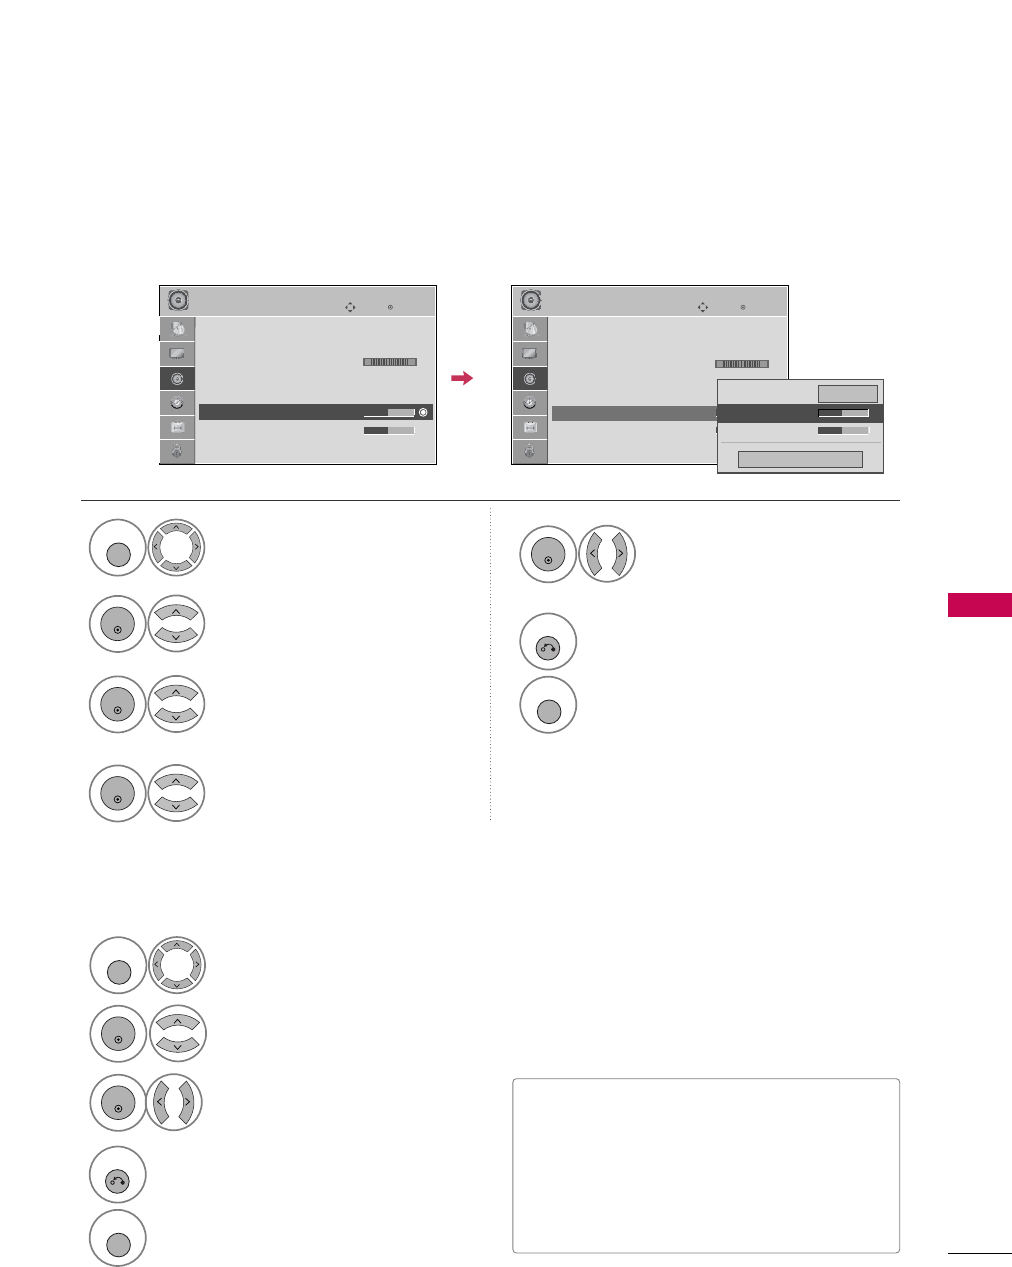
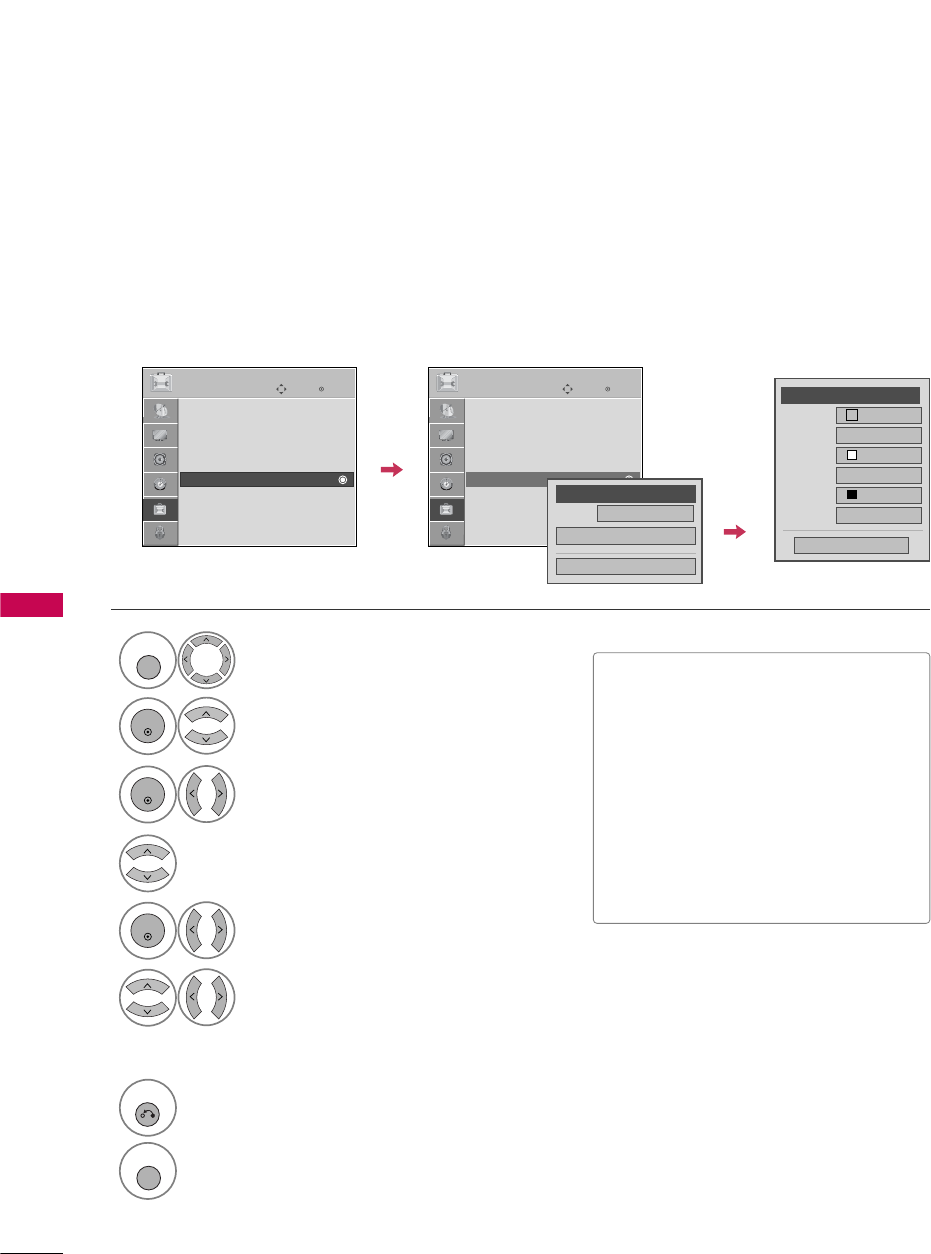
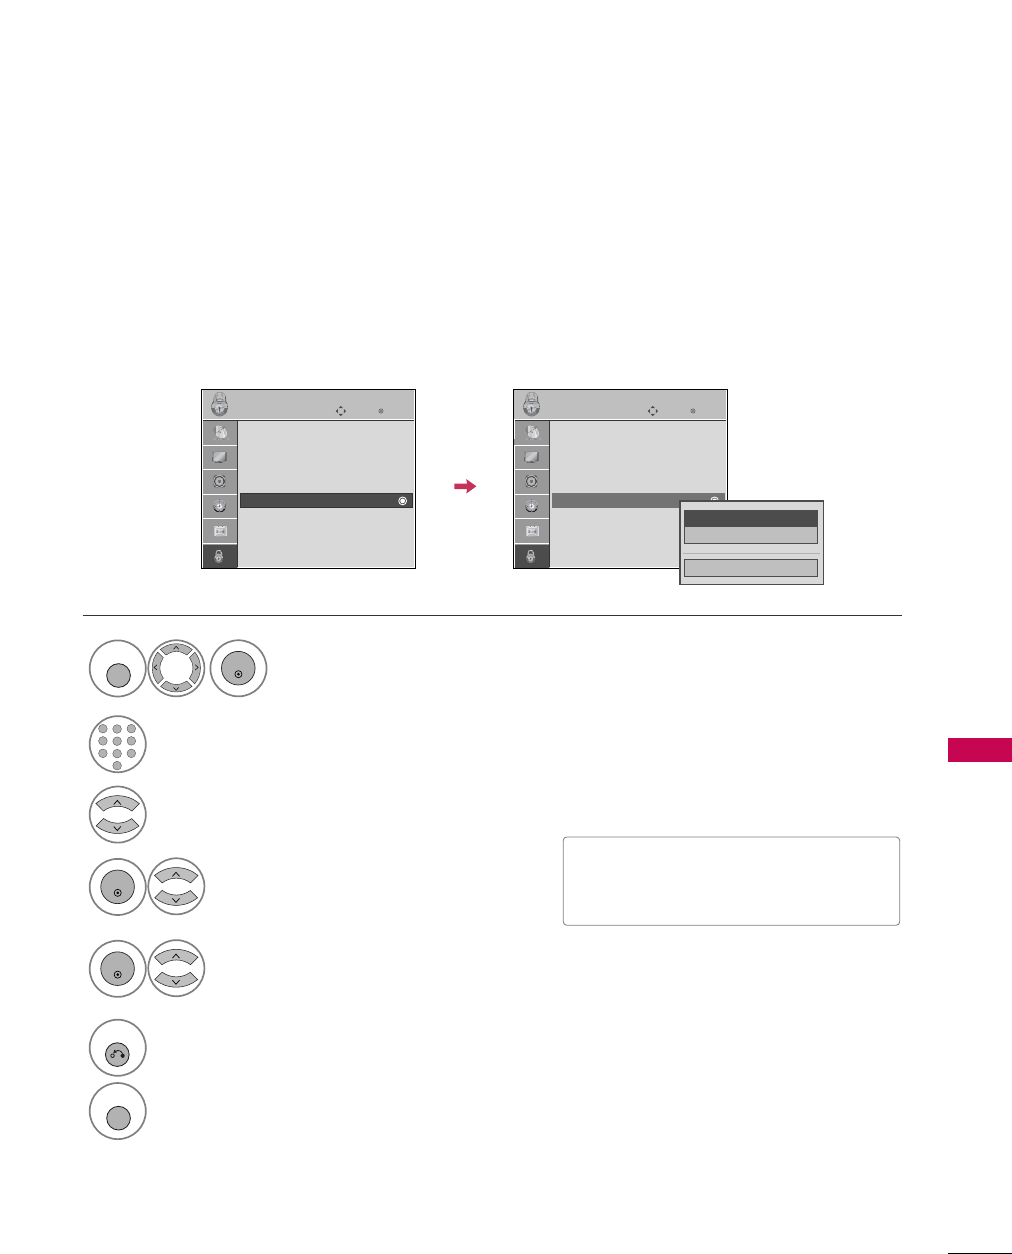
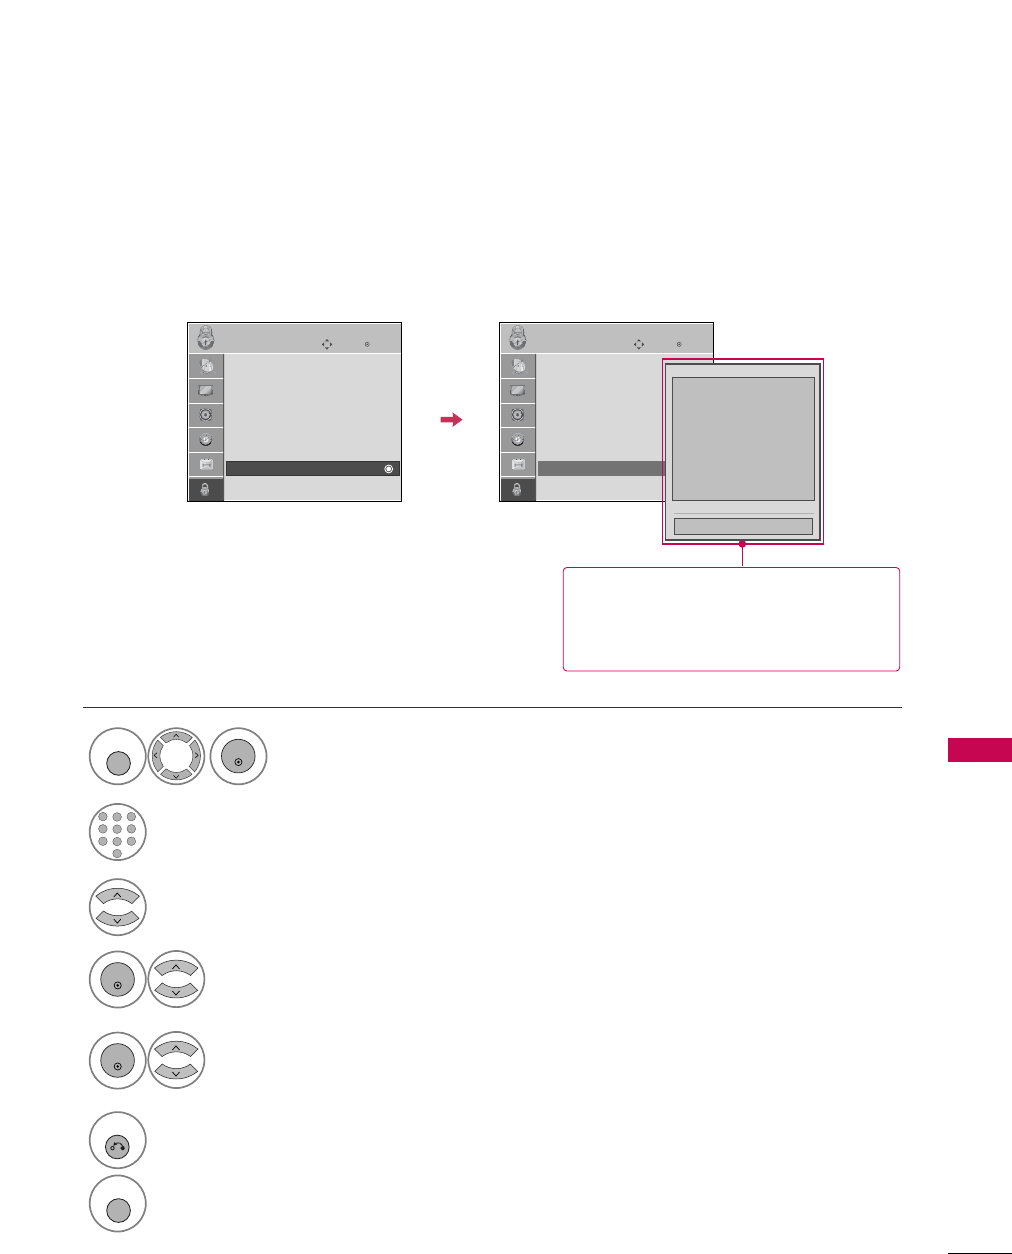
Picture Mode - Expert Control
By segmenting categories, E
Expert1 and Expert2 provide more categories which users can set as they see
fit, offering the optimal picture quality for users.
7
RETURN
Return to the previous menu.
MENU
Return to TV viewing.
Enter
Move
PICTURE
E
Aspect Ratio : 16:9
Picture Mode : Standard
• Contrast 90
• Brightness 50
• Sharpness 60
• Color 60
• Tint 0
• Advanced Control
RG
Enter
Move
PICTURE
E
Aspect Ratio : 16:9
Picture Mode : Standard
• Contrast 90
• Brightness 50
• Sharpness 60
• Color 60
• Tint 0
• Expert Control
RG
Vivid
Standard
Cinema
Sport
Game
Expert1
Expert2
FOff G
Fresh Contrast
Noise Reduction
Off
Gamma Medium
Black Level Auto
Off
Film Mode
Color Standard
HD
White Balance Normal
Red Contrast 50
Close
E
PICTURE CONTROL
50
PICTURE IMPROVEMENT TECHNOLOGY
PICTURE CONTROL
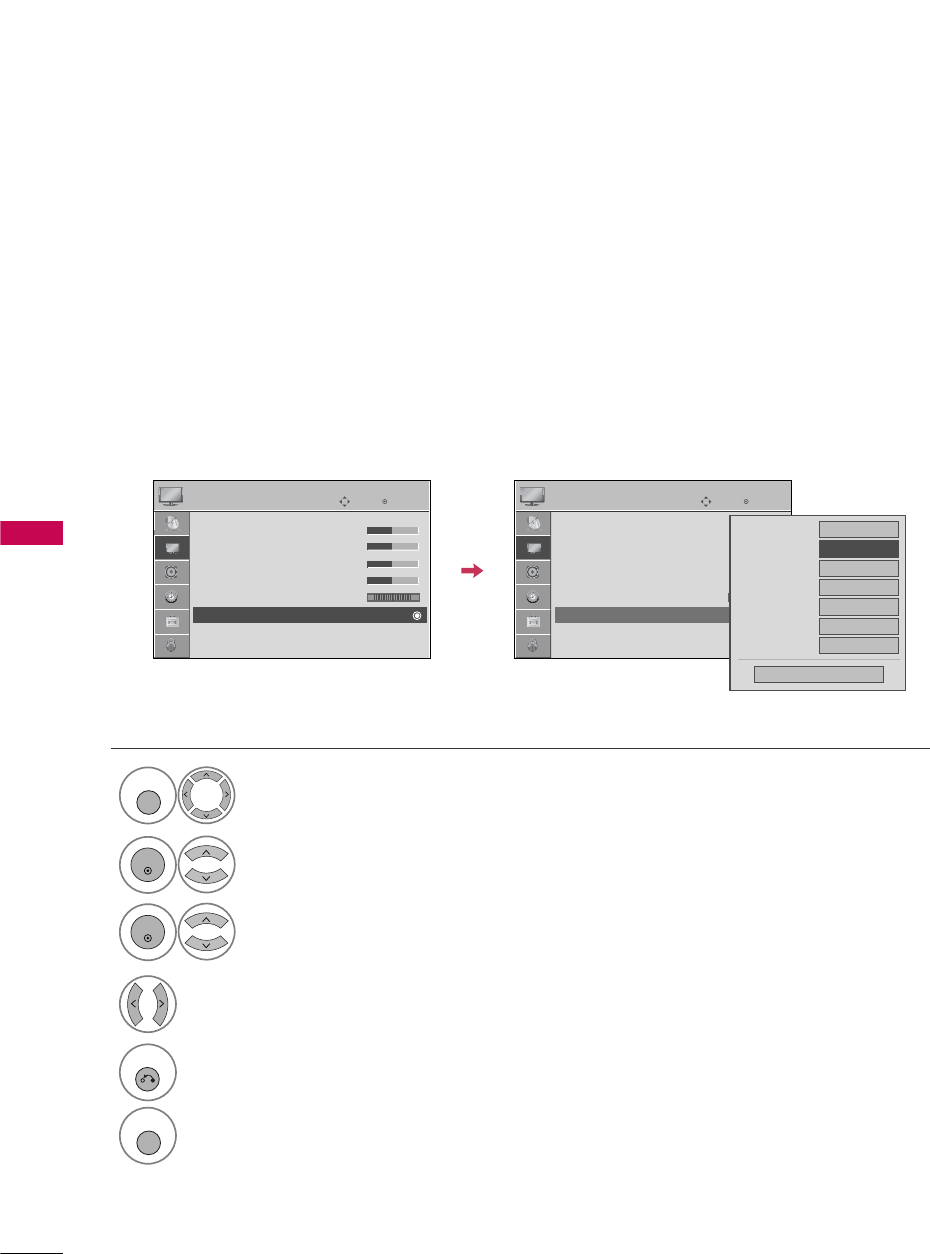
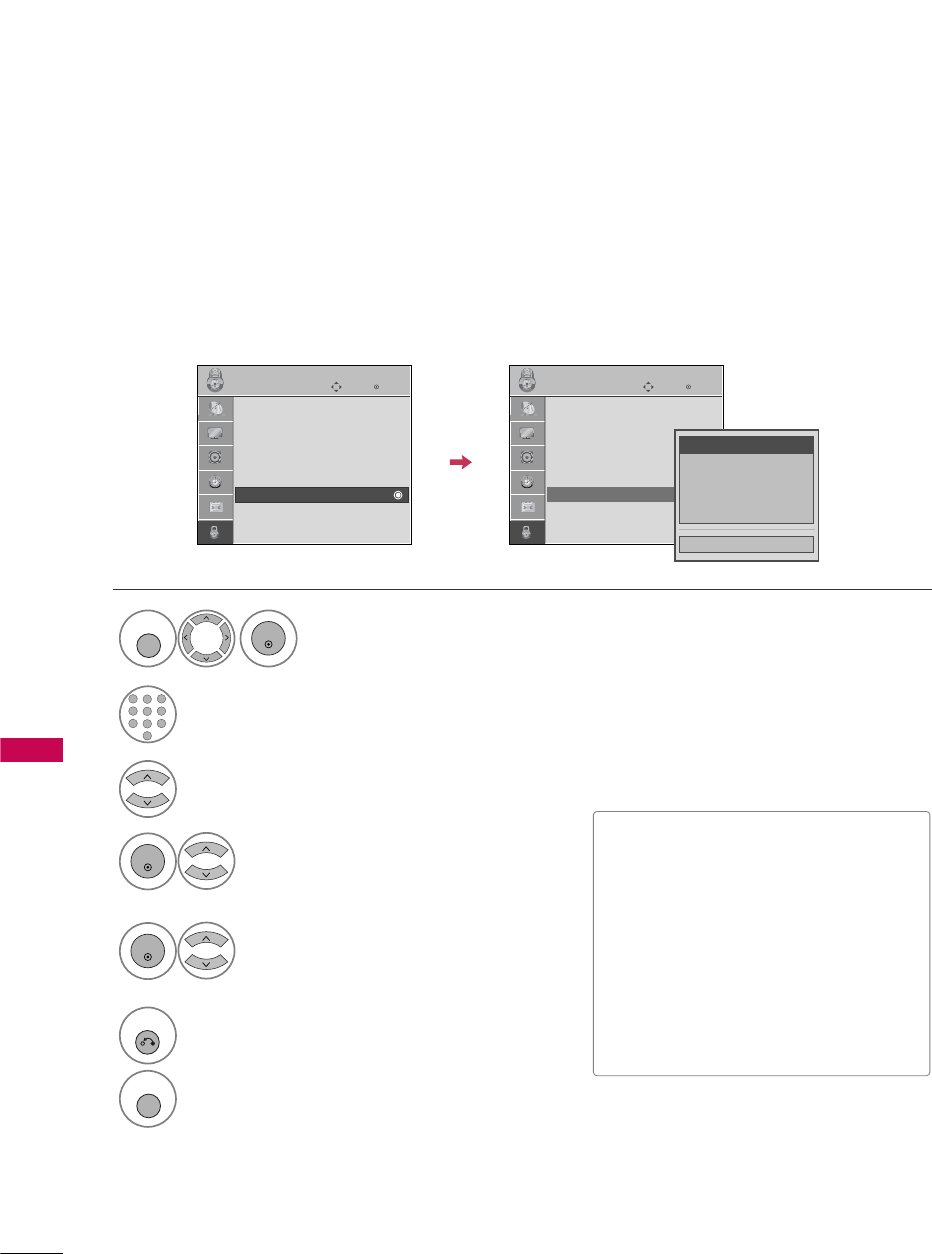
Fresh Contrast: Optimizes the contrast automatically according to the brightness of the reflection.
Fresh Color: Adjusts the color of the reflection automatically to reproduce as close as possible natural colors.
Noise Reduction: Removes interference up to the point where it does not damage the original picture.
Gamma: High gamma values display whitish images and low gamma values display high contrast images.
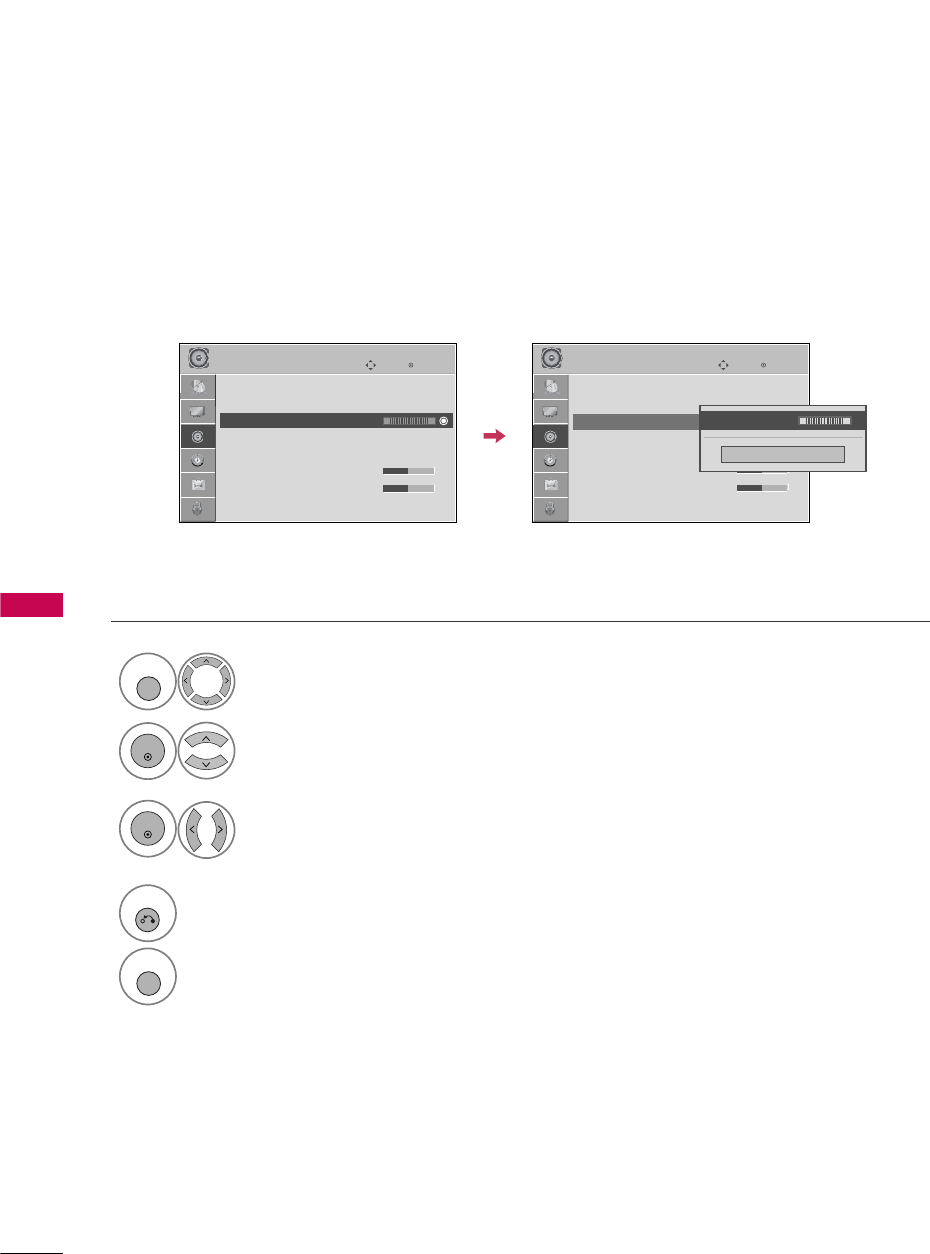
Select PICTURE.
Select Advanced CControl.
Select Fresh CContrast, Fresh CColor,
Noise RReduction, or Gamma.
1
MENU
3
2
ENTER
ENTER
5
RETURN
Return to the previous menu.
MENU
Return to TV viewing.
Select your desired options.
4
Enter
Move
PICTURE
E
RG
• Contrast 50
• Brightness 50
• Sharpness 50
• Color 50
• Tint 0
• Advanced Control
• Reset
Screen (RGB-PC)
Enter
Move
PICTURE
E
RG
• Contrast 50
• Brightness 50
• Sharpness 50
• Color 50
• Tint 0
• Advanced Control
• Reset
Screen (RGB-PC)
Color Temperature
Medium
Fresh Contrast
F Off G
Fresh Color
Off
Noise Reduction
Auto
Gamma
Medium
Black Level
Low
Film Mode
Off
Close
PICTURE CONTROL
51
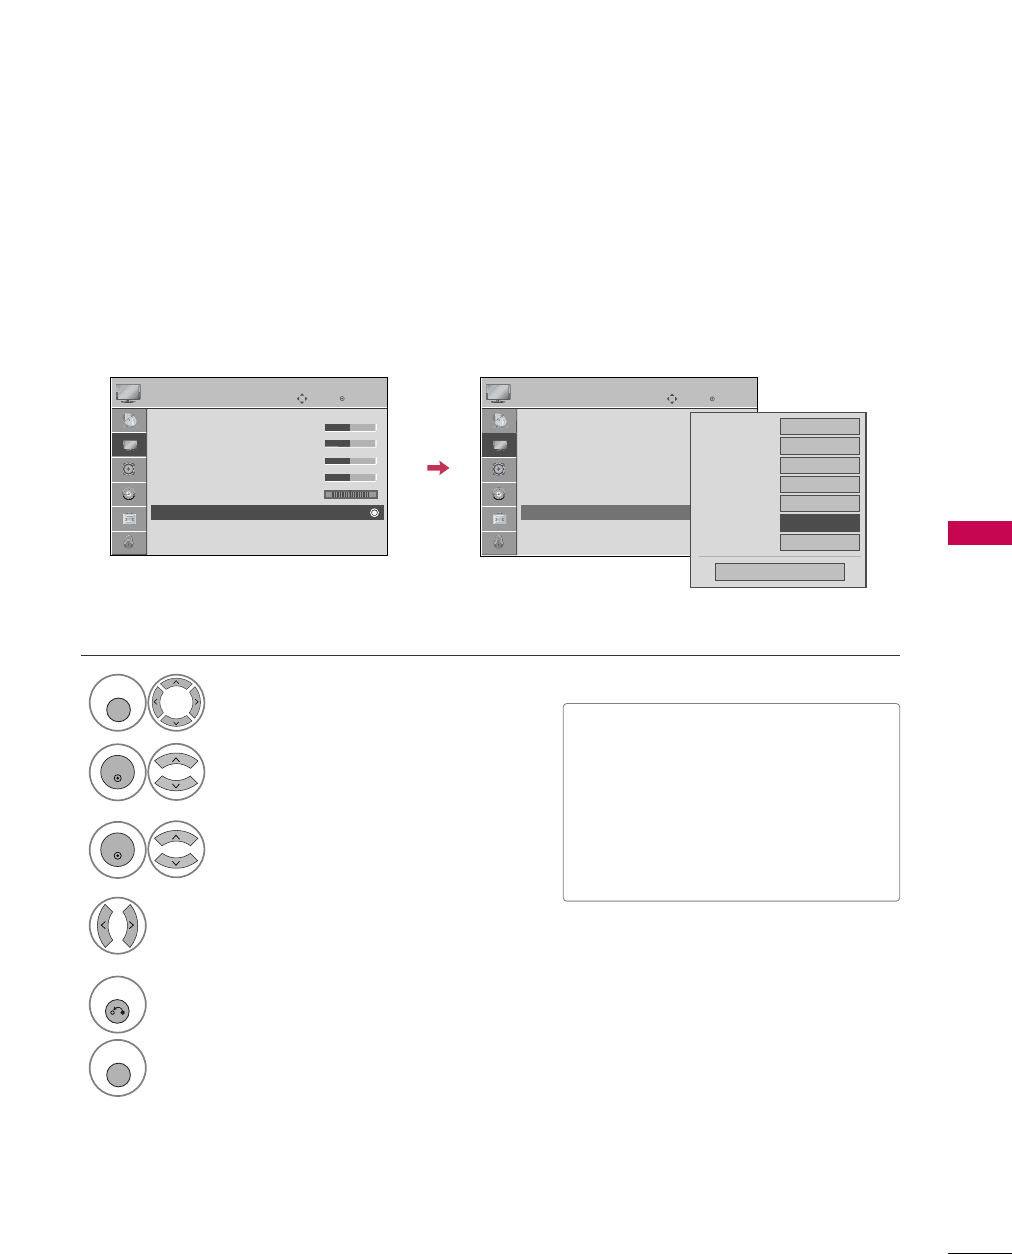
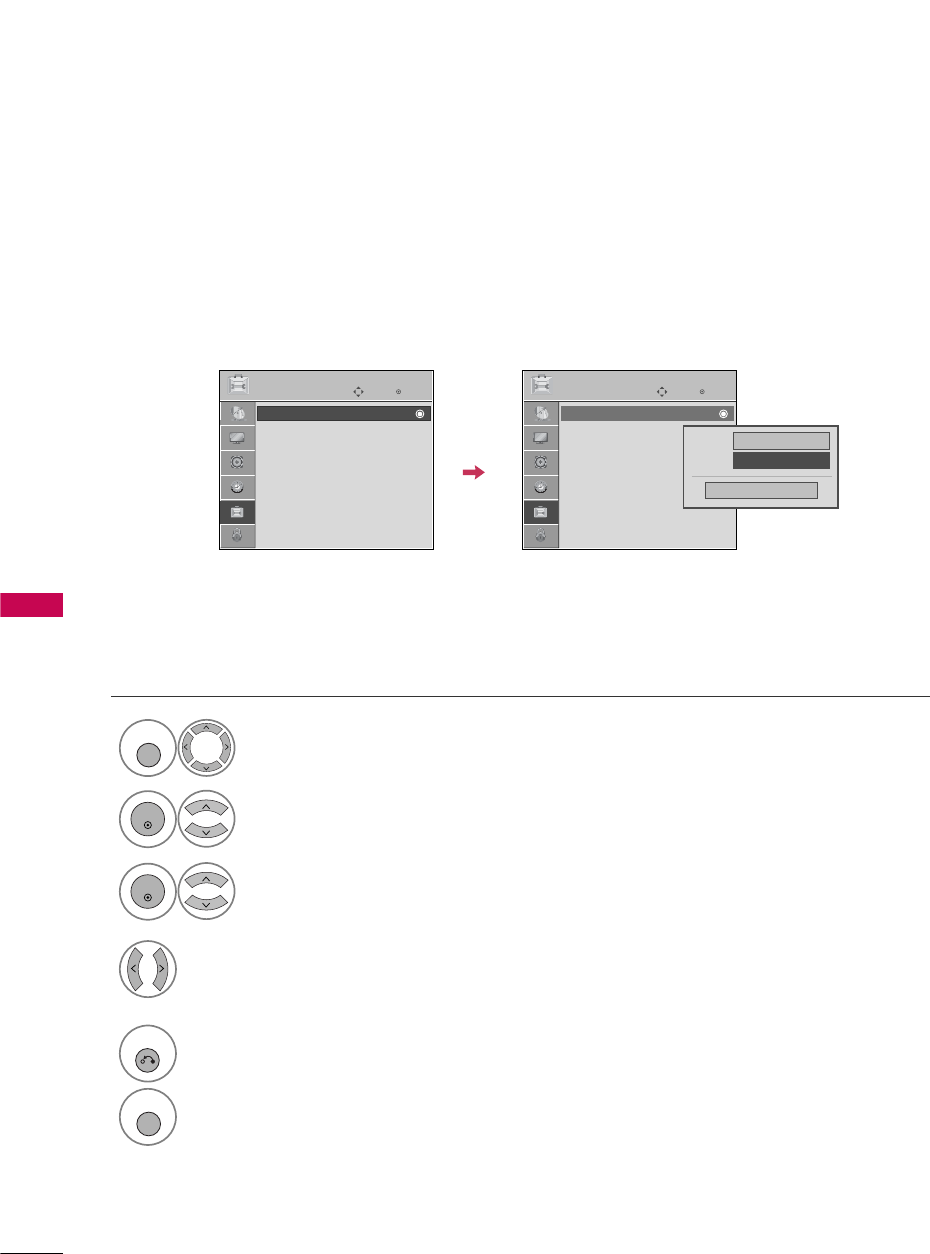
ADVANCED CONTROL - BLACK (DARKNESS) LEVEL
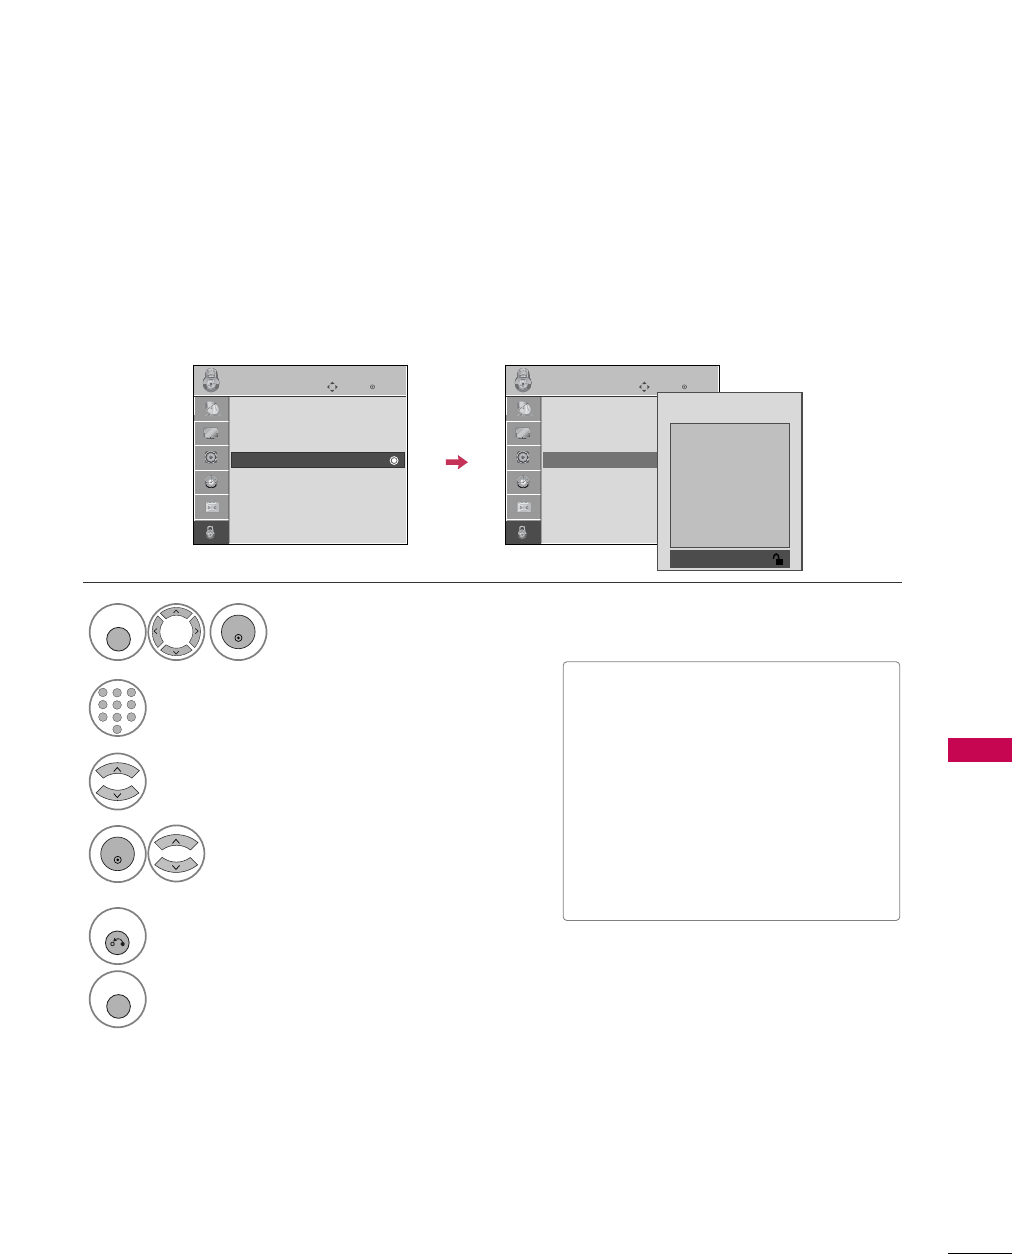
Adjusting the contrast and the brightness of the screen using the black level of the screen.
This feature is disable in DTV and RGB-PC mode.
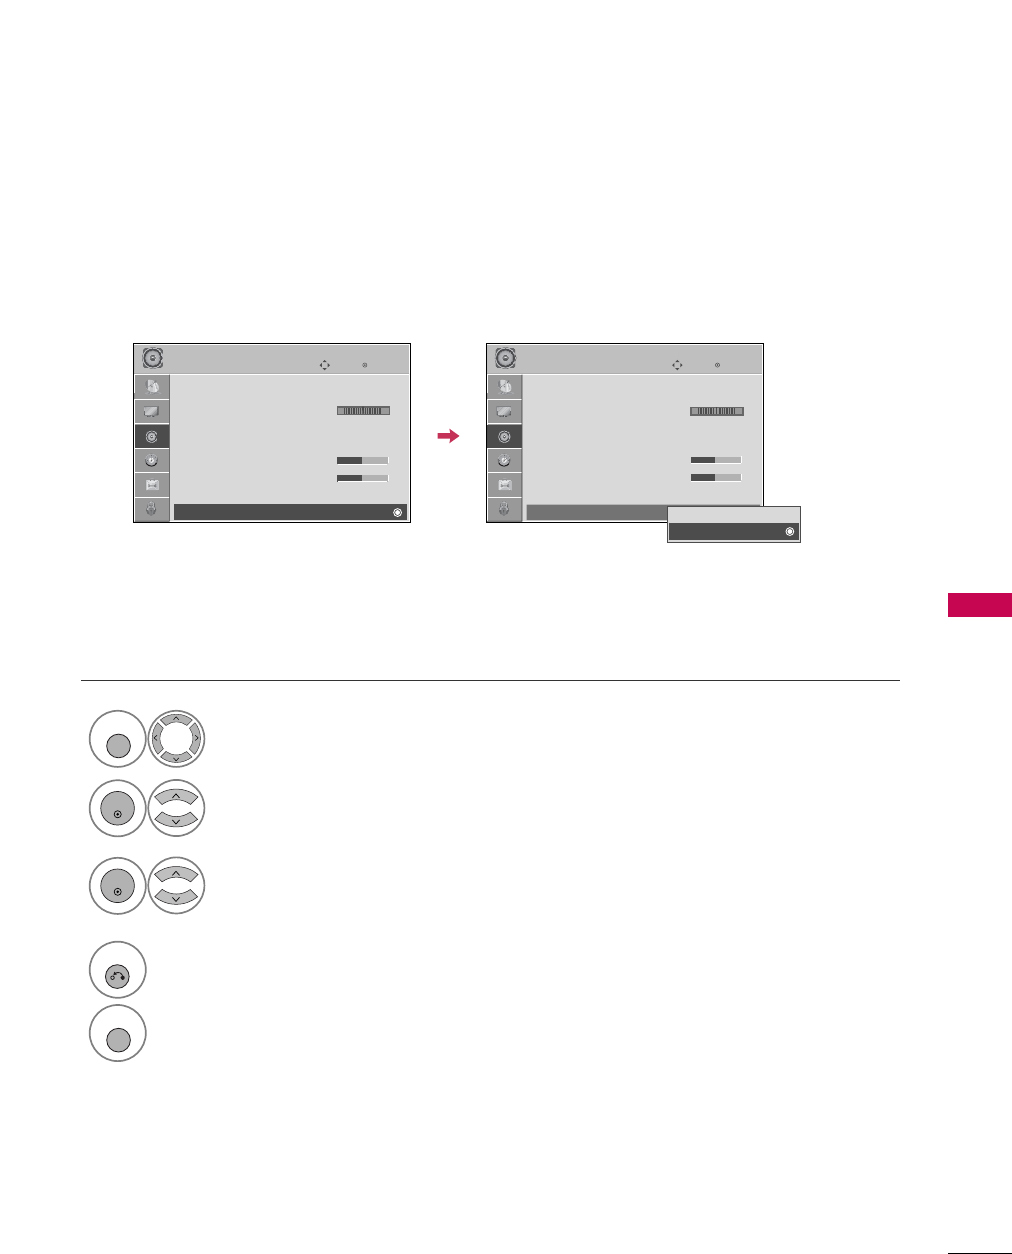
Select PICTURE.
Select Advanced CControl.
Select Black LLevel.
1
MENU
3
2
ENTER
ENTER
Select Lo w or High.
4
■Lo w: The reflection of the screen gets
darker.
■High: The reflection of the screen gets
brighter.
■Auto: Realizing the black level of the
screen and set it to High or Low auto-
matically.
5
RETURN
Return to the previous menu.
MENU
Return to TV viewing.
Enter
Move
PICTURE
E
RG
• Contrast 50
• Brightness 50
• Sharpness 50
• Color 50
• Tint 0
• Advanced Control
• Reset
Screen (RGB-PC)
Enter
Move
PICTURE
E
RG
• Contrast 50
• Brightness 50
• Sharpness 50
• Color 50
• Tint 0
• Advanced Control
• Reset
Screen (RGB-PC)
Color Temperature
Medium
Fresh Contrast
Off
Fresh Color
Off
Noise Reduction
Auto
Gamma
Medium
Black Level
F Low G
Film Mode
Off
Close
PICTURE CONTROL
52
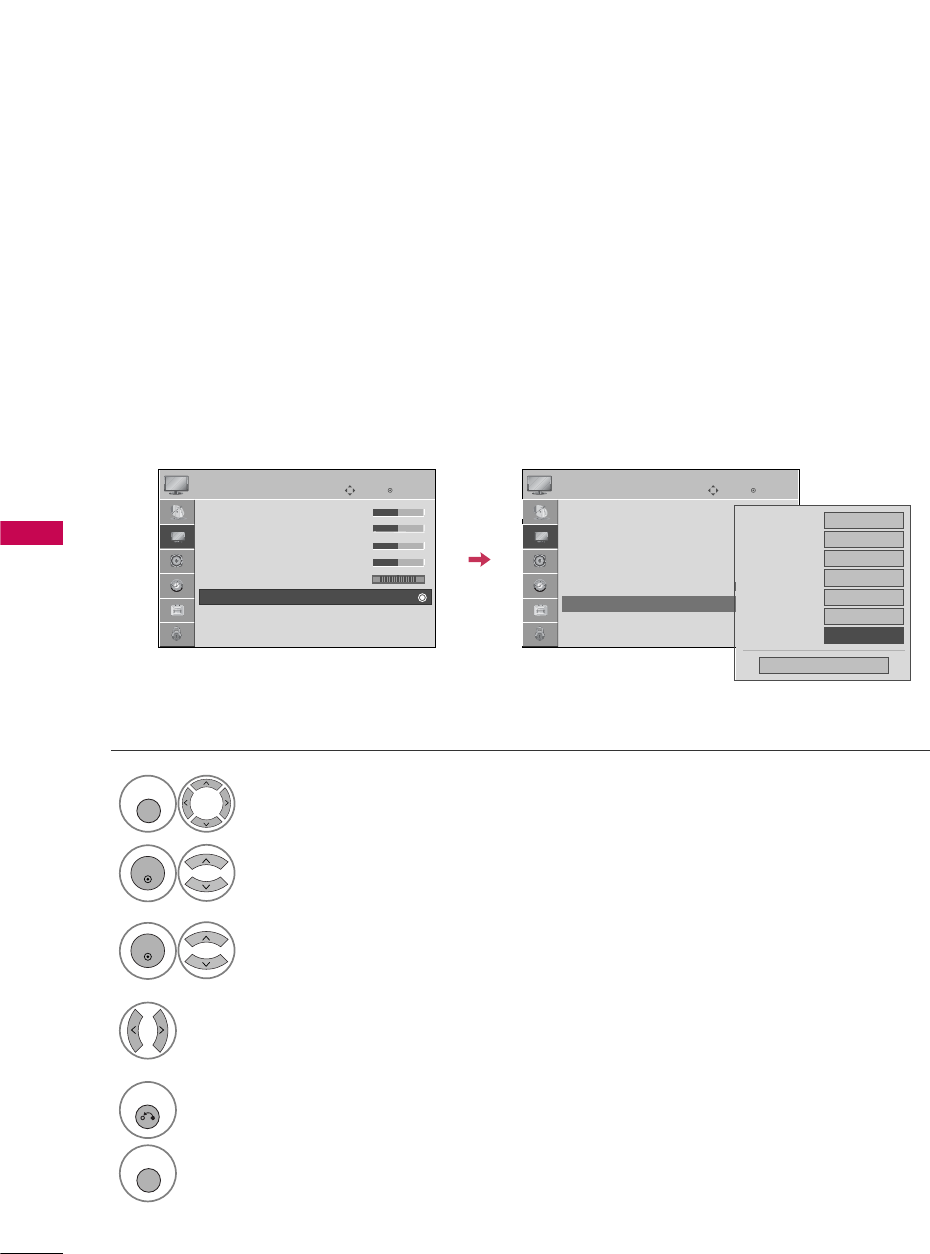
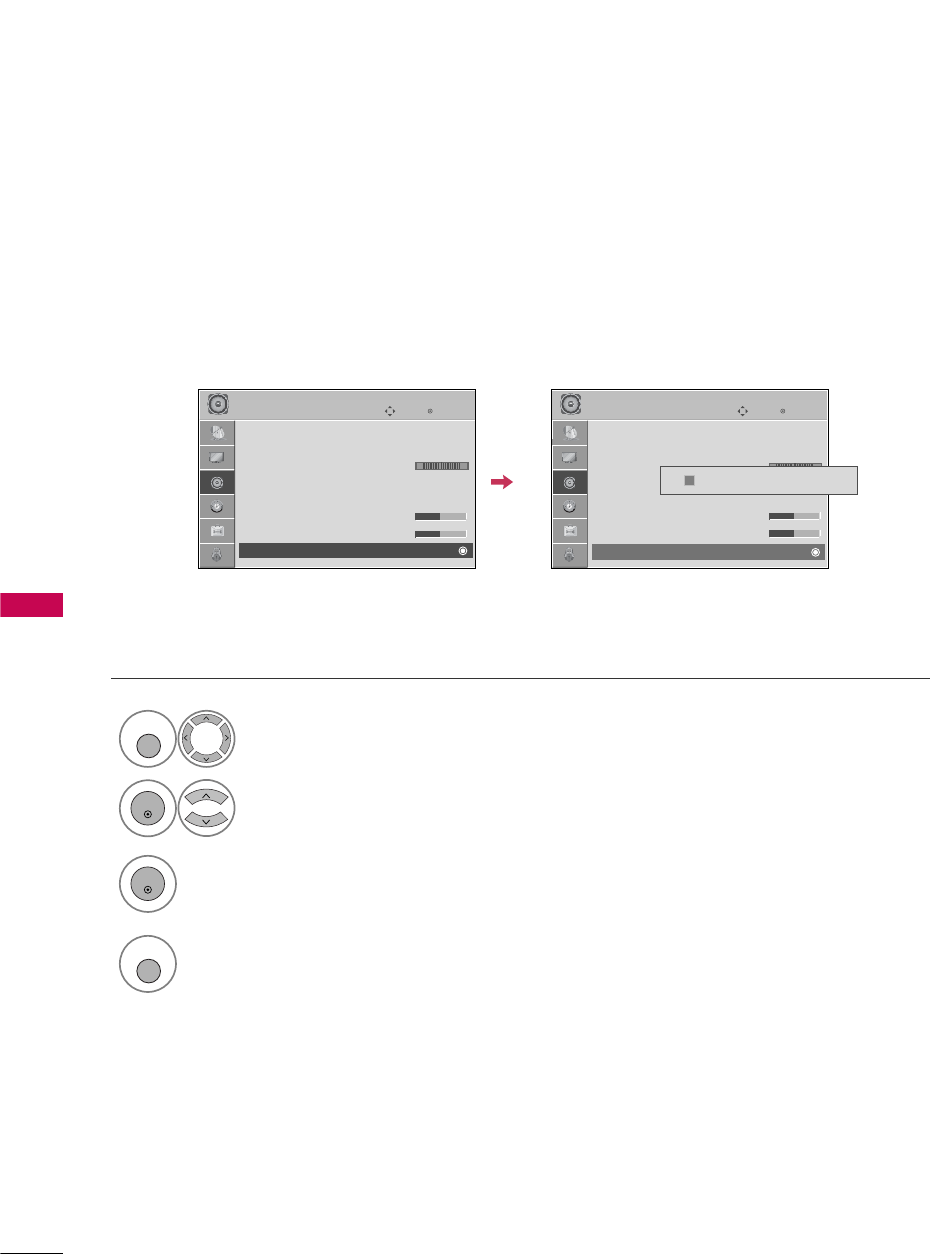
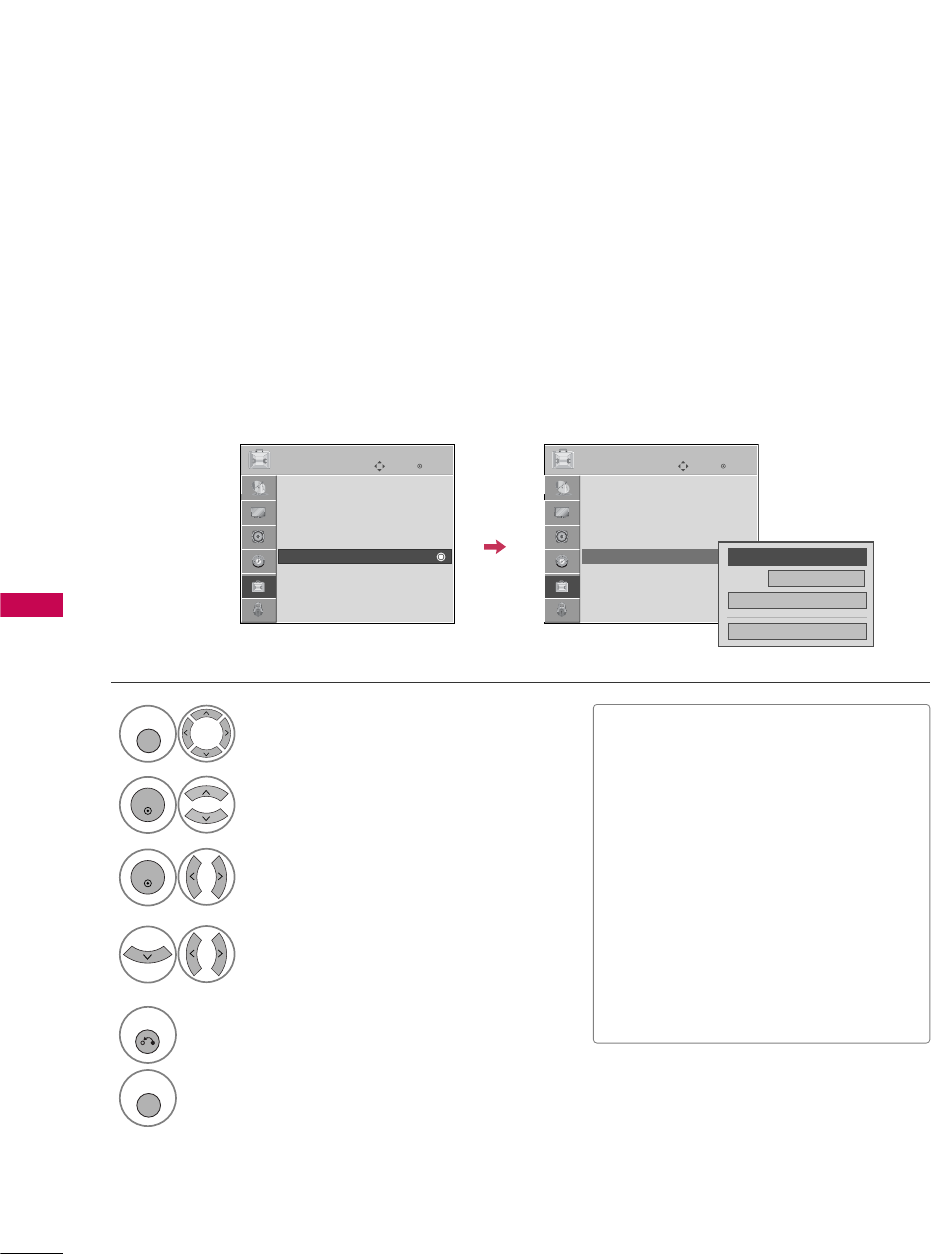
ADVANCED CONTROL - FILM MODE
PICTURE CONTROL
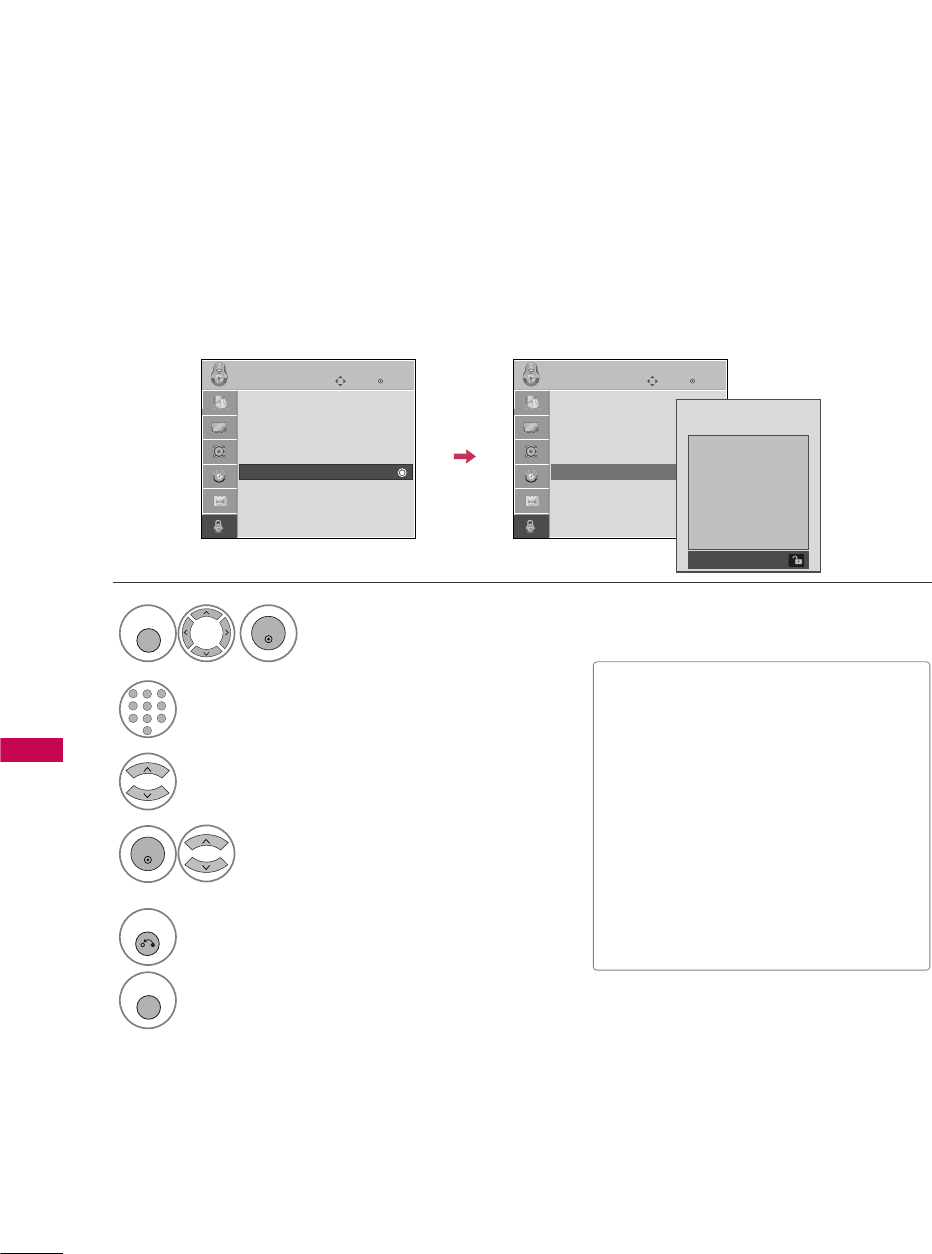
Set up the TV for the best picture appearance for viewing movies.
When you operate Film Mode (3:2 Pull-Down Mode or Cinema Correction Mode), the TV will adjust 24 fps
video from movies to 30 fps video for display.
This feature operates only in TV (Analog TV/CATV, Digital DTV/CADTV), AV1, AV2, Component 480i/1080i,
and HDMI 1080i mode.
Select PICTURE.
Select Advanced CControl.
Select Film MMode.
1
MENU
3
2
ENTER
ENTER
Select O n or Of f.
4
5
RETURN
Return to the previous menu.
MENU
Return to TV viewing.
Enter
Move
PICTURE
E
RG
• Contrast 50
• Brightness 50
• Sharpness 50
• Color 50
• Tint 0
• Advanced Control
• Reset
Screen (RGB-PC)
Enter
Move
PICTURE
E
RG
• Contrast 50
• Brightness 50
• Sharpness 50
• Color 50
• Tint 0
• Advanced Control
• Reset
Screen (RGB-PC)
Color Temperature
Medium
Fresh Contrast
Off
Fresh Color
Off
Noise Reduction
Auto
Gamma
Medium
Black Level
Low
Film Mode
F Off G
Close
PICTURE CONTROL
53
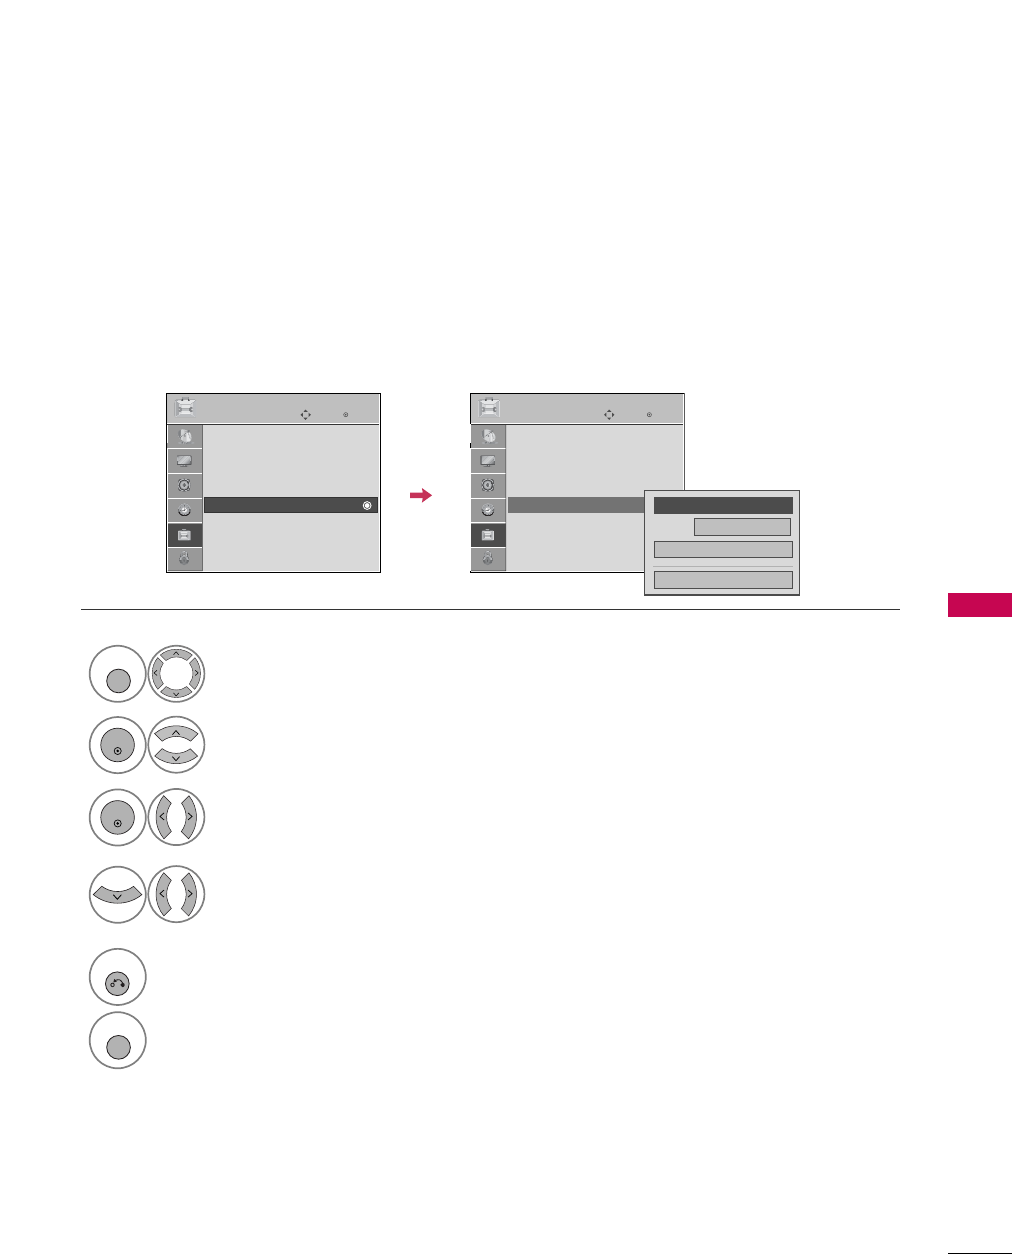
PICTURE RESET
Settings of the selected picture modes return to the default factory settings.
Select PICTURE.
Select Reset.
Initialize the adjusted value.
1
MENU
3
2
ENTER
ENTER
4
MENU
Return to TV viewing.
Enter
Move
PICTURE
E
RG
• Contrast 50
• Brightness 50
• Sharpness 50
• Color 50
• Tint 0
• Advanced Control
• Reset
Screen (RGB-PC)
Enter
Move
PICTURE
E
RG
• Contrast 50
• Brightness 50
• Sharpness 50
• Color 50
• Tint 0
• Advanced Control
• Reset
Screen (RGB-PC)
Resetting video configuration...
ii
PICTURE CONTROL
54
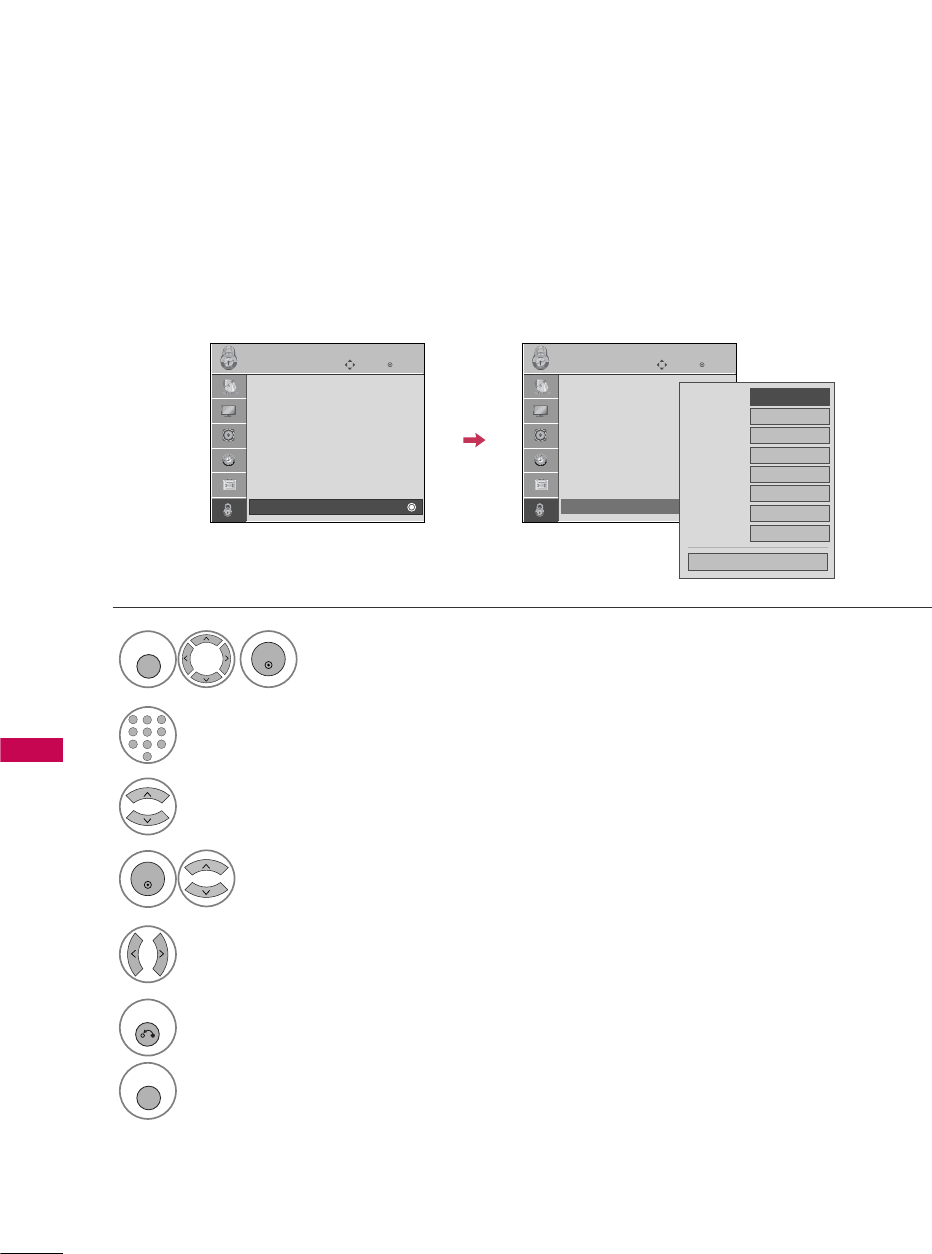
IMAGE STICKING MINIMIZATION (ISM) METHOD
PICTURE CONTROL
A frozen still picture from a PC/video game displayed on the screen for prolonged periods can result in a ghost
image. You can use Orbiter to help prevent image sticking. The other two functions are for removing a ghost
image.
GAn excessive ghosted image may be impossible to
clear entirely with White Wash. To return to nor-
mal viewing, press the any button.
NOTE
!
■Normal: If image sticking is never a
problem, ISM is not necessary - set to
Normal.
■Orbiter: Orbiter may help prevent
ghost images. However, it is best not to
allow any fixed image to remain on the
screen. To avoid a ghost image on the
screen, the image will move every 2 min-
utes.
■Inversion: Inversion will automatically
invert the plasma display panel color
every 30 minutes.
■White WWash: White Wash removes
ghost images from the screen. Use spar-
ingly. Watch the TV normally for a while
before using this feature to see if the
ghost image disappears on its own.
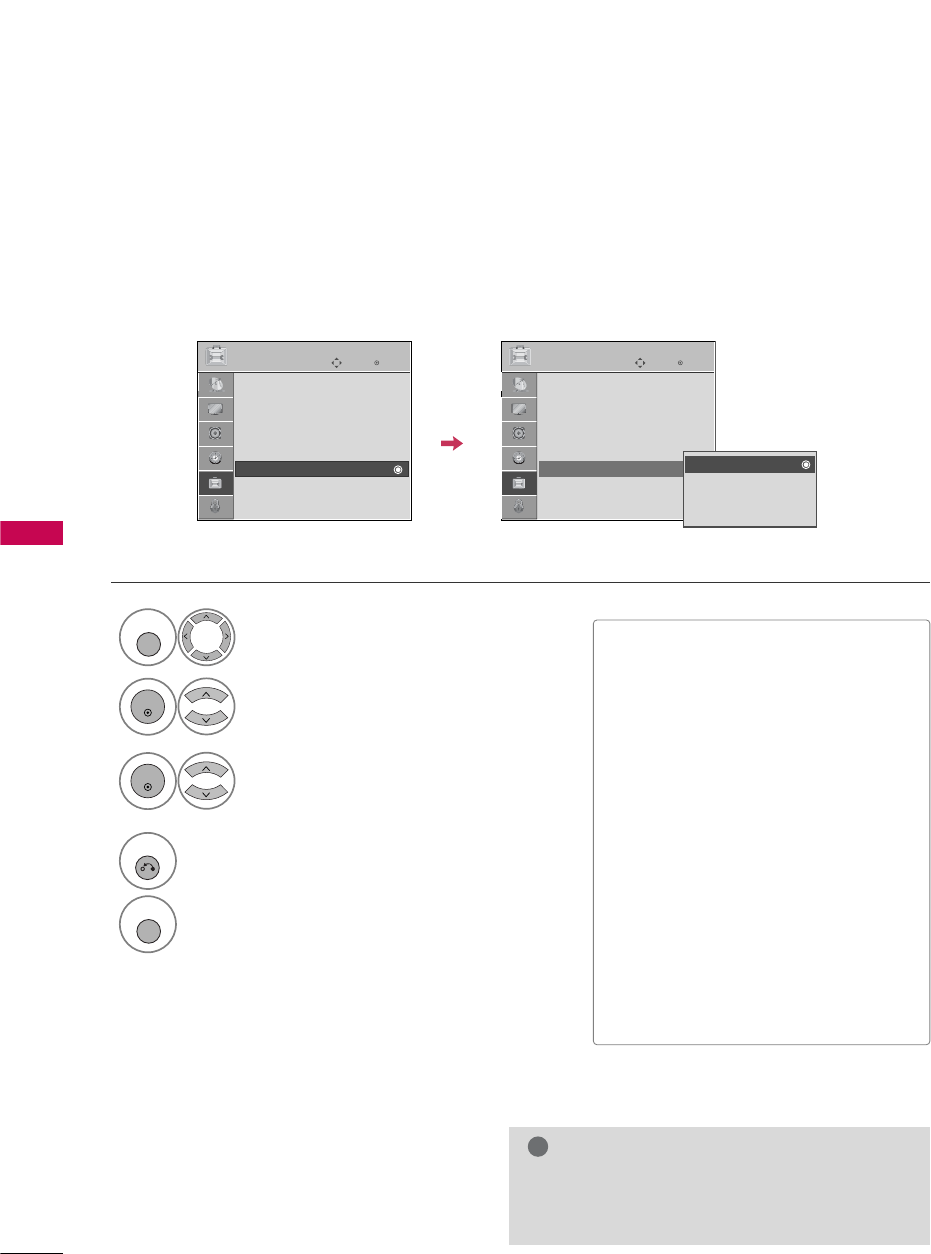
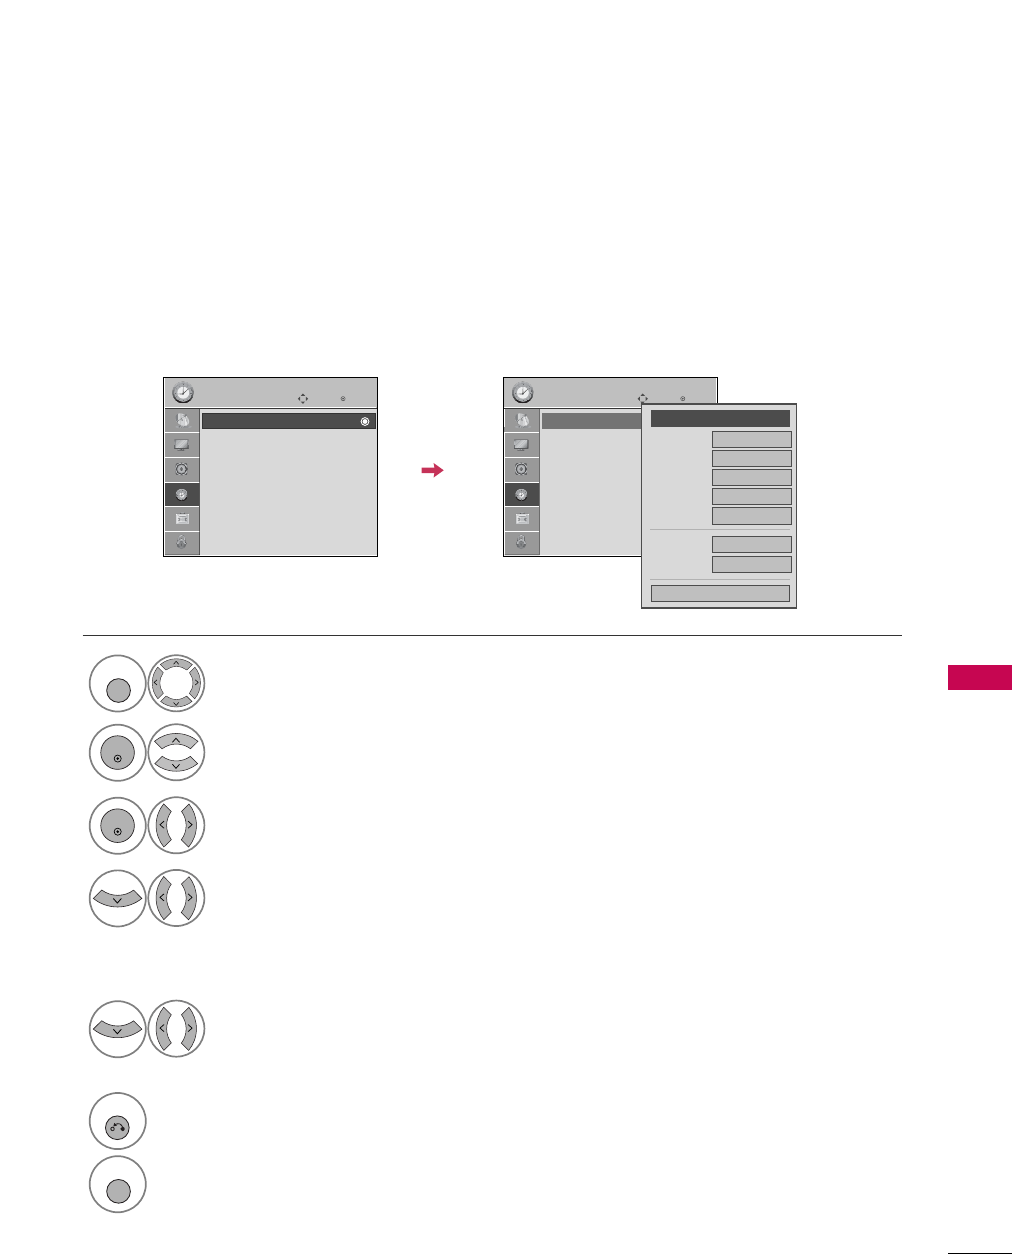
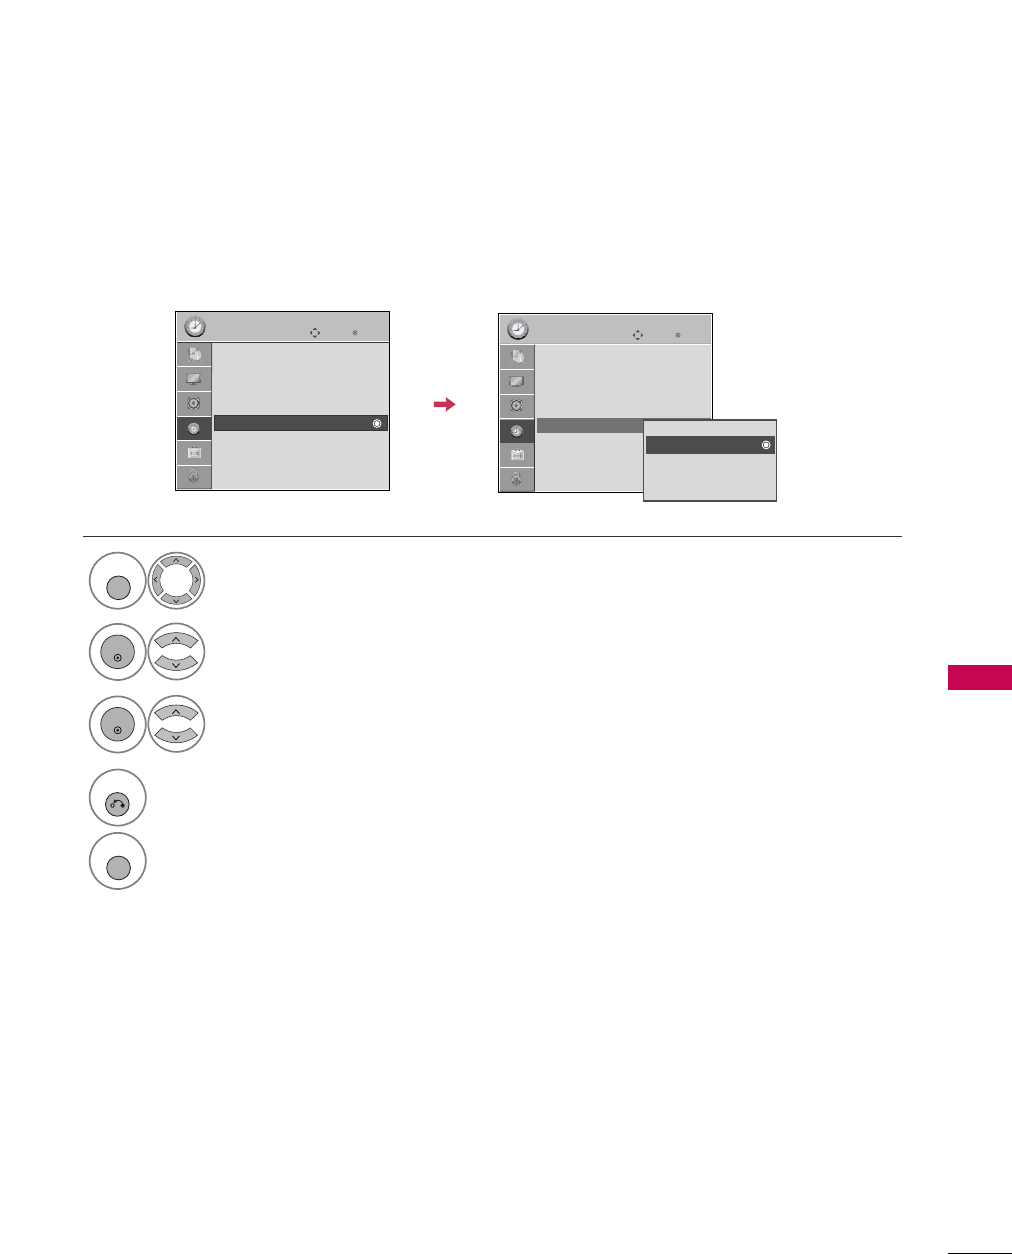
Select OPTION.
Select ISM MMethod.
1
MENU
2
ENTER
Select Normal, OOrbiter,
Inversion or White WWash.
3
ENTER
4
RETURN
Return to the previous menu.
MENU
Return to TV viewing.
Enter
Move
OPTION
Language : English
Input Label
SIMPLINK : On
Key Lock : Off
Caption : Off
ISM Method : Normal
Power Saving : Level 0
Set ID : 1
Enter
Move
OPTION
Language : English
Input Label
SIMPLINK : On
Key Lock : Off
Caption : Off
ISM Method : Normal
Power Saving : Level 0
Set ID : 1
Normal
Orbiter
Inversion
White Wash
PICTURE CONTROL
55
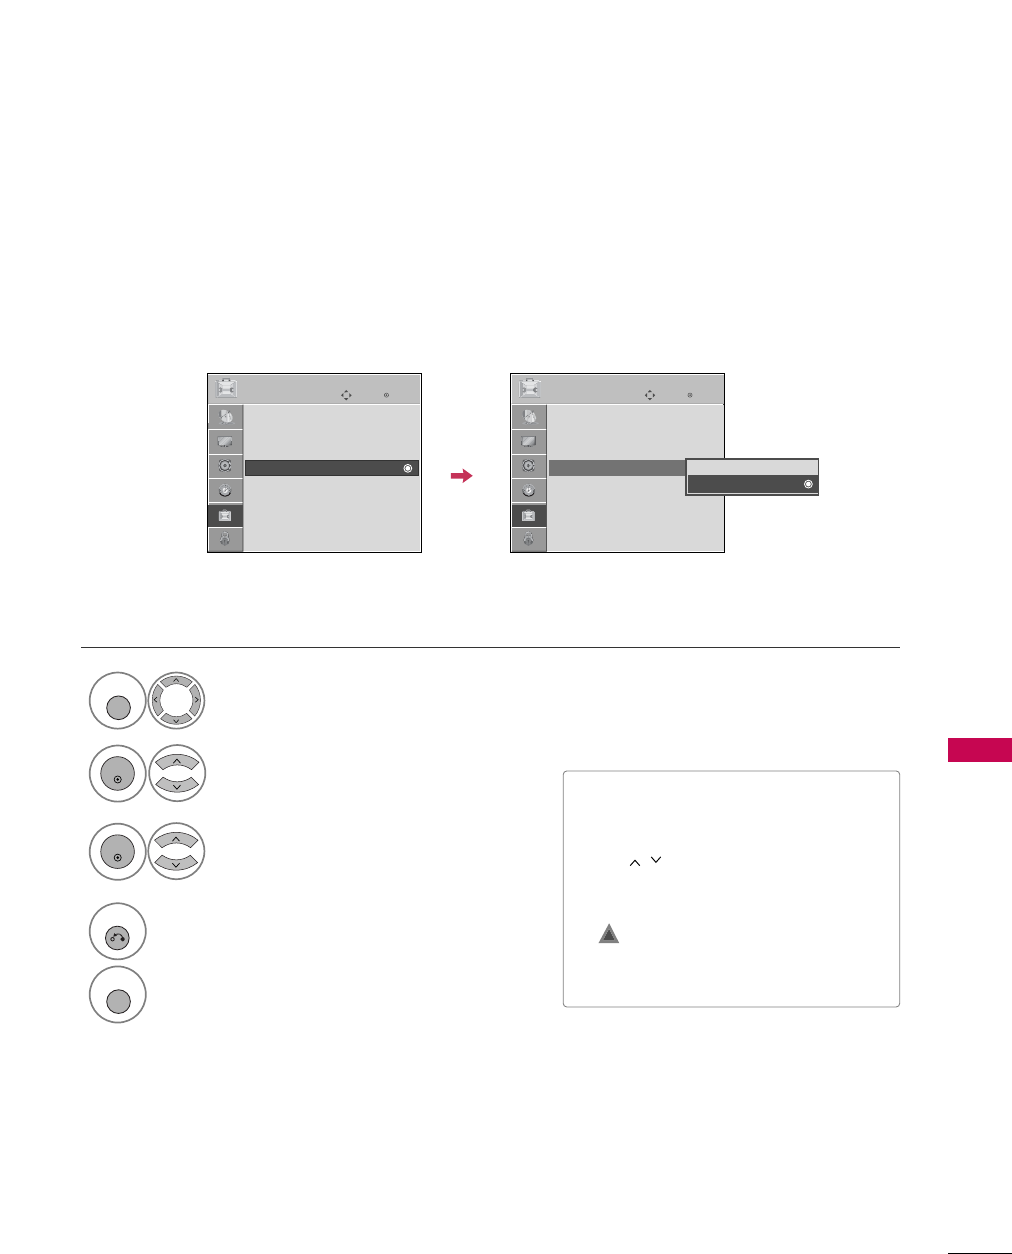
POWER SAVING PICTURE MODE
It reduces the plasma display’s power consumption.
■Level 0 is the brightest.
■Level 0 > Level 1 > Level 2 > Level 3 >
Level 4
■You can also adjust Power SSaving in
the Q. MMenu.
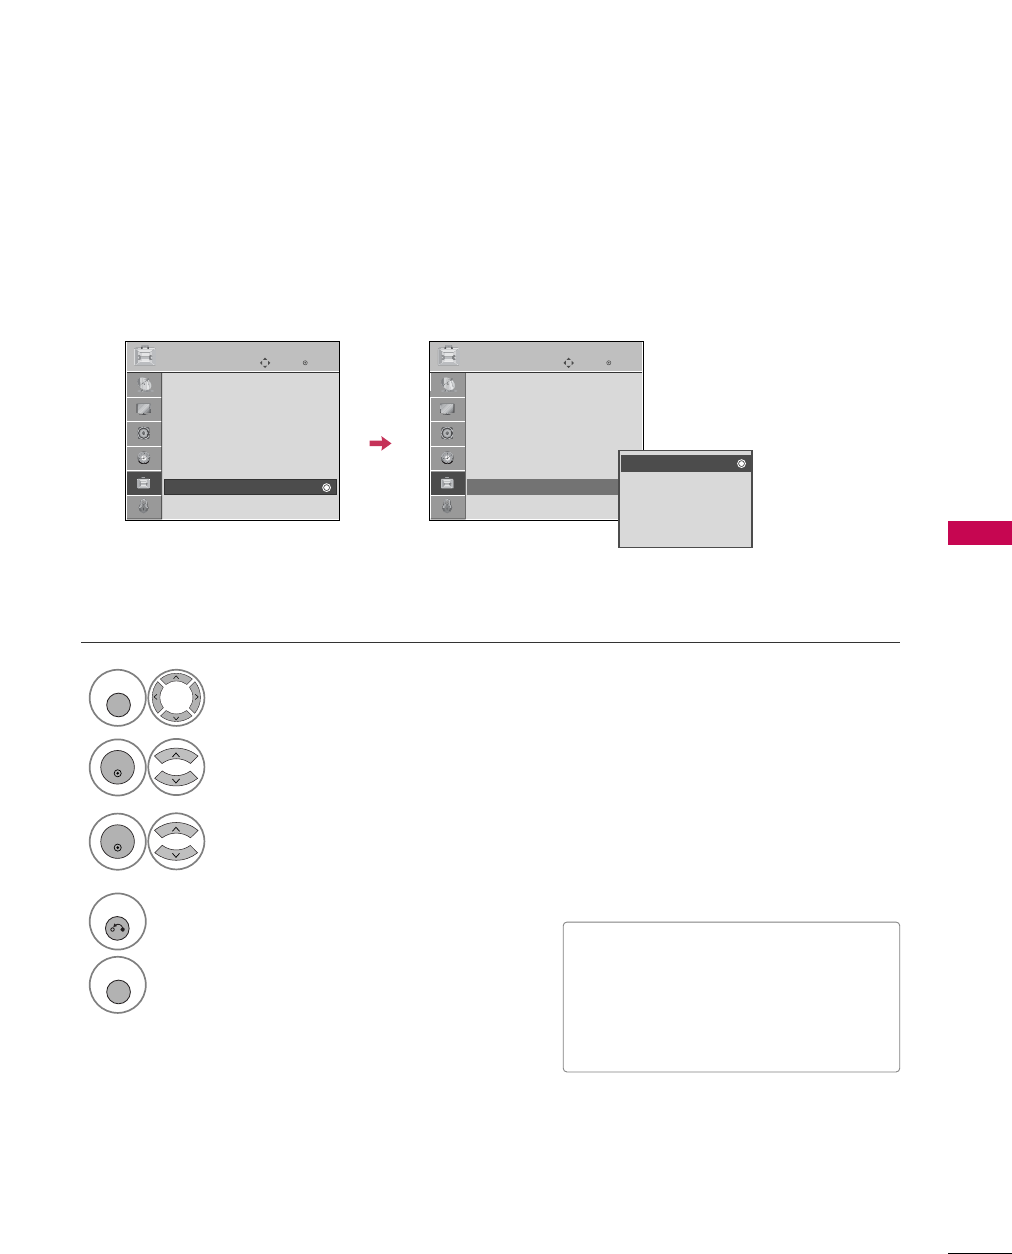
Select OPTION.
Select Power SSaving.
1
MENU
2
ENTER
Select Level 00, Level 11,
Level 22, Level 33, or Level 44.
3
ENTER
4
RETURN
Return to the previous menu.
MENU
Return to TV viewing.
Enter
Move
OPTION
Language : English
Input Label
SIMPLINK : On
Key Lock : Off
Caption : Off
ISM Method : Normal
Power Saving : Level 0
Set ID : 1
Enter
Move
OPTION
Language : English
Input Label
SIMPLINK : On
Key Lock : Off
Caption : Off
ISM Method : Normal
Power Saving : Level 0
Set ID : 1
Level 0
Level 1
Level 2
Level 3
Level 4
SOUND & LANGUAGE CONTROL
56
SOUND & LANGUAGE CONTROL
AUTO VOLUME LEVELER (AUTO VOLUME)
Auto Volume makes sure that the volume level remains consistent whether you are watching a commercial or a
regular TV program.
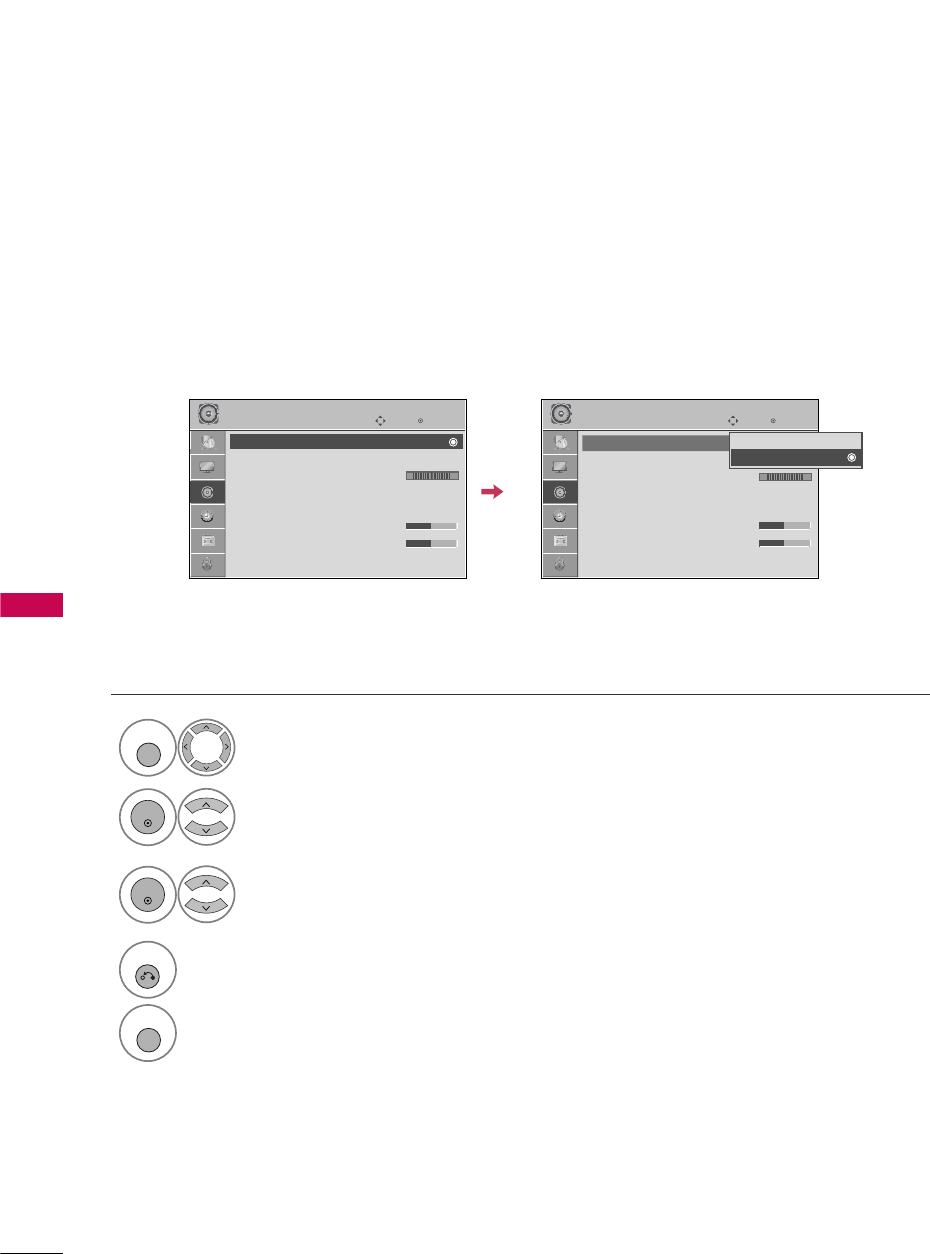
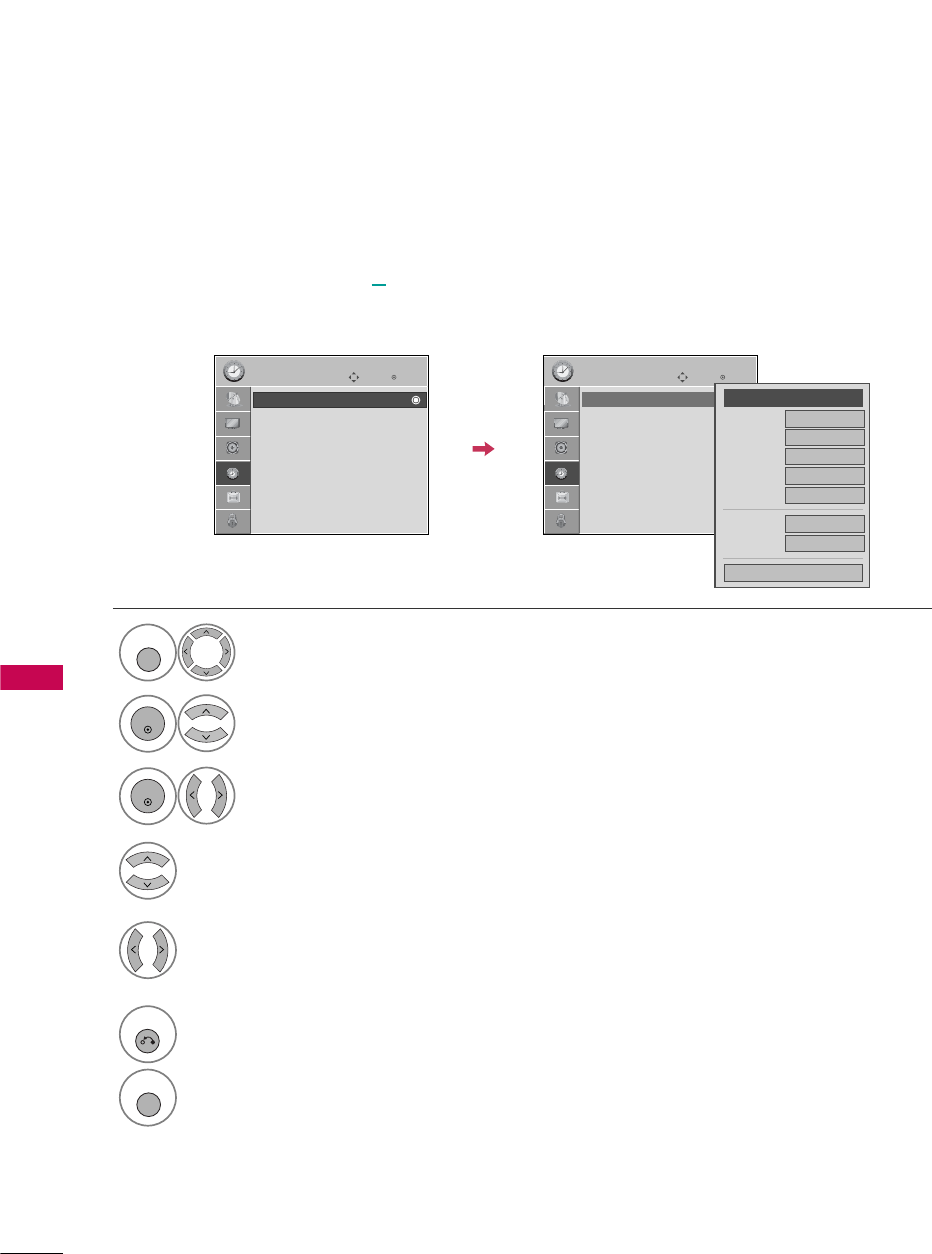
Select AUDIO.
Select Auto VVolume.
Select O n or Off.
1
MENU
3
2
ENTER
ENTER
4
RETURN
Return to the previous menu.
MENU
Return to TV viewing.
Enter
Move
AUDIO
Auto Volume : Off
Clear Voice : On
Balance 0
Sound Mode : Standard
•
SRS TruSurround XT:
Off
• Treble 50
• Bass 50
• Reset
Enter
Move
AUDIO
Auto Volume : Off
Clear Voice : On
Balance 0
Sound Mode : Standard
•
SRS TruSurround XT:
Off
• Treble 50
• Bass 50
• Reset
LR LR
Off
On
E E

SOUND & LANGUAGE CONTROL
57
CLEAR VOICE
By differentiating the human sound range from others, it improves the sound quality of voices.
■If you select “Clear VVoice-On”, SRS
TruSurround XXTfeature will not
work.
■You can also adjust Clear VVoice in the
Q-Menu.
Select AUDIO.
Select Clear VVoice.
Select O n or Off.
1
MENU
3
2
ENTER
ENTER
4
RETURN
Return to the previous menu.
MENU
Return to TV viewing.
Enter
Move
AUDIO
Auto Volume : Off
Clear Voice : On
Balance 0
Sound Mode : Standard
•
SRS TruSurround XT:
Off
• Treble 50
• Bass 50
• Reset
Enter
Move
AUDIO
Auto Volume : Off
Clear Voice : On
Balance 0
Sound Mode : Standard
•
SRS TruSurround XT:
Off
• Treble 50
• Bass 50
• Reset
LR LR
E E
Off
On

SOUND & LANGUAGE CONTROL
58
PRESET SOUND SETTINGS (SOUND MODE)
Sound Mode lets you enjoy the best sound without any special adjustment as the TV sets the appropriate
sound options based on the program content.
Standard, Music, Cinema, Sport, and Ga me are preset for optimum sound quality at the factory and are
not adjustable.
Standard Music
Game Sport
Cinema
Q.Menu
Close
3
16:9
Vivid
Off
F Standard G
Off
English
Off
Add
Aspect Ratio
Power Saving
Clear Voice
Picture Mode
Sound Mode
Caption
Multi Audio
Sleep Timer
Del/Add/Fav
CH
1
SOUND
Select Standard, Music, Cinema,
Sport, or Game.
2
RETURN
Return to TV viewing.
SOUND & LANGUAGE CONTROL
59
SOUND SETTING ADJUSTMENT - USER MODE
SRS TRUSURROUND XT
Adjust the sound to suit your taste and room situations.
Select AUDIO.
Select Sound MMode.
Select Treble or Bass.
1
MENU
4
2
ENTER
Select Standard, Music,
Cinema, Sport, or Game.
3
ENTER
ENTER
Make appropriate adjustments.
5
ENTER
Select AUDIO.
Select SRS TTruSurround XXT
Select O n or Of f.
1
MENU
3
2
ENTER
ENTER
■SRS TTruSurround XXT: Takes advantage of
any multi-channel format without needing to
add extra speakers or equipment. Dialog clarity,
bass enrichment, and the addition of stereo
audio enhancement produces an immersive
sound experience from standard stereo material.
6
RETURN
Return to the previous menu.
MENU
Return to TV viewing.
4
RETURN
Return to the previous menu.
MENU
Return to TV viewing.
Enter
Move
AUDIO
Auto Volume : Off
Clear Voice : On
Balance 0
Sound Mode : Standard
•
SRS TruSurround XT:
Off
• Treble 50
• Bass 50
• Reset
Enter
Move
AUDIO
Auto Volume : Off
Clear Voice : On
Balance 0
Sound Mode : Standard
•
SRS TruSurround XT:
Off
• Treble 50
• Bass 50
• Reset
LR LR
Close
E
E
Treble 50
Bass 50
SRS TruSurround XT
Off
E E
SOUND & LANGUAGE CONTROL
60
BALANCE
SOUND &LANGUAGE CONTROL
Select AUDIO.
Select Balance.
Make appropriate adjustments.
1
MENU
3
2
ENTER
ENTER
Adjust the left/right sound of speaker to suit your taste and room situations.
4
RETURN
Return to the previous menu.
MENU
Return to TV viewing.
Enter
Move
AUDIO
Auto Volume : Off
Clear Voice : On
Balance 0
Sound Mode : Standard
•
SRS TruSurround XT:
Off
• Treble 50
• Bass 50
• Reset
Enter
Move
AUDIO
Auto Volume : Off
Clear Voice : On
Balance 0
Sound Mode : Standard
•
SRS TruSurround XT:
Off
• Treble 50
• Bass 50
• Reset
LR LR
E E
Close
E
E
Balance 0 LR
SOUND & LANGUAGE CONTROL
61
TV SPEAKERS ON/OFF SETUP
Turn the TV speakers off if using external audio equipment.
Select AUDIO.
Select TV SSpeaker.
Select O n or Off.
1
MENU
3
2
ENTER
ENTER
4
RETURN
Return to the previous menu.
MENU
Return to TV viewing.
Enter
Move
AUDIO
Clear Voice : On
Balance 0
Sound Mode : Standard
•
SRS TruSurround XT:
Off
• Treble 50
• Bass 50
• Reset
TV Speaker : On
Enter
Move
AUDIO
Clear Voice : On
Balance 0
Sound Mode : Standard
•
SRS TruSurround XT:
Off
• Treble 50
• Bass 50
• Reset
TV Speaker : On
LR LR
EE
Off
On
SOUND & LANGUAGE CONTROL
62
AUDIO RESET
SOUND &LANGUAGE CONTROL
Settings of the selected Sound Mode return to the default factory settings.
Select AUDIO.
Select Reset.
1
MENU
2
ENTER
Initialize the adjusted value.
3
ENTER
4
MENU
Return to TV viewing.
Enter
Move
AUDIO
Auto Volume : Off
Clear Voice : On
Balance 0
Sound Mode : Standard
•
SRS TruSurround XT:
Off
• Treble 50
• Bass 50
• Reset
Enter
Move
AUDIO
Auto Volume : Off
Clear Voice : On
Balance 0
Sound Mode : Standard
•
SRS TruSurround XT:
Off
• Treble 50
• Bass 50
• Reset
LR LR
E E
Resetting audio configuration...
i
SOUND & LANGUAGE CONTROL
63
STEREO/SAP BROADCAST SETUP
For Analog only: This TV can receive MTS stereo programs and any SAP (Secondary Audio Program) that accom-
panies the stereo program if the station transmits an additional sound signal. Mono sound is automatically used
if the broadcast is only in Mono.
Select SAP.
Select Mono, Stereo, or S AP.
Return to TV viewing.
1
Q. MENU
3
2
Q. MENU
Select Multi AAudio.
Select other languages.
Return to TV viewing.
1
Q. MENU
3
2
Q. MENU
Analog TV Digital TV
Q.Menu
Close
3
16:9
Vivid
Off
Standard
Off
F English G
Off
Add
Aspect Ratio
Power Saving
Clear Voice
Picture Mode
Sound Mode
Caption
Multi Audio
Sleep Timer
Del/Add/Fav
CH
SOUND & LANGUAGE CONTROL
64
AUDIO LANGUAGE
SOUND &LANGUAGE CONTROL
Other languages may be available if a digital signal is provided by the broadcasting station.
This feature operates only in DTV/CADTV mode.
Select OPTION.
Select Language.
Select Audio.
1
MENU
3
2
ENTER
ENTER
Select your desired language:
English, Spanish, or French
4
5
RETURN
Return to the previous menu.
MENU
Return to TV viewing.
Enter
Move
OPTION
Language : English
Input Label
SIMPLINK : On
Key Lock : Off
Caption : Off
ISM Method : Normal
Power Saving : Level 0
Set ID : 1
Enter
Move
OPTION
Language : English
Input Label
SIMPLINK : On
Key Lock : Off
Caption : Off
ISM Method : Normal
Power Saving : Level 0
Set ID : 1
Menu English
Audio FEnglish G
Close

SOUND & LANGUAGE CONTROL
65
ON-SCREEN MENUS LANGUAGE SELECTION
The menus can be shown on the screen in the selected language.
Select OPTION.
Select Language.
Select Menu.
1
MENU
3
2
ENTER
ENTER
Select your desired language.
From this point on, the on-screen menus
will be shown in the selected language.
4
5
RETURN
Return to the previous menu.
MENU
Return to TV viewing.
Enter
Move
OPTION
Language : English
Input Label
SIMPLINK : On
Key Lock : Off
Caption : Off
ISM Method : Normal
Power Saving : Level 0
Set ID : 1
Enter
Move
OPTION
Language : English
Input Label
SIMPLINK : On
Key Lock : Off
Caption : Off
ISM Method : Normal
Power Saving : Level 0
Set ID : 1
Menu FEnglish G
Audio English
Close
66
CAPTION MODE
SOUND &LANGUAGE CONTROL
Caption must be provided to help people with hearing loss watch TV. Select a caption mode for displaying cap-
tioning information if provided on a program. Analog caption displays information at any position on the screen
and is usually the program's dialog. Caption/Text, if provided by the broadcaster, would be available for both
digital and analog channels on the Antenna/Cable. This TV is programmed to memorize the caption/text mode
which was last set when you turned the power off. This function is only available when Caption Mode is set O n.
Select OPTION.
Select Caption.
Select O n.
1
MENU
3
2
ENTER
ENTER
Select CC1-4or Text1-4.
4
Analog Broadcasting System Captions
■When selecting Off, Sub-menus for
Analog, DTV, and Digital Option
become disabled.
■CAPTION
The term for the words that scroll
across the bottom of the TV screen;
usually the audio portion of the pro-
gram provided for the hearing impaired.
■TEXT
The term for the words that appear in a
large black frame and almost cover the
entire screen; usually messages provid-
ed by the broadcaster.
SOUND & LANGUAGE CONTROL
5
RETURN
Return to the previous menu.
MENU
Return to TV viewing.
Enter
Move
OPTION
Language : English
Input Label
SIMPLINK : On
Key Lock : Off
Caption : Off
ISM Method : Normal
Power Saving : Level 0
Set ID : 1
Enter
Move
OPTION
Language : English
Input Label
SIMPLINK : On
Key Lock : Off
Caption : CC1
ISM Method : Normal
Power Saving : Level 0
Set ID : 1
Mode CC1
Close
Digital Option
F
On
G
SOUND & LANGUAGE CONTROL
67
Digital Broadcasting System Captions
Choose the language you want the DTV/CADTV Captions to appear in.
Other Languages can be chosen for digital sources only if they are included on the program.
This function in only available when Caption Mode is set On.
Select OPTION.
Select Caption.
Select O n.
1
MENU
3
2
ENTER
ENTER
Select CC1-4, Text1-4, or
Service1 - 6.
4
5
RETURN
Return to the previous menu.
MENU
Return to TV viewing.
Enter
Move
OPTION
Language : English
Input Label
SIMPLINK : On
Key Lock : Off
Caption : Off
ISM Method : Normal
Power Saving : Level 0
Set ID : 1
Enter
Move
OPTION
Language : English
Input Label
SIMPLINK : On
Key Lock : Off
Caption : CC1
ISM Method : Normal
Power Saving : Level 0
Set ID : 1
Mode CC1
Close
Digital Option
F
On
G
SOUND & LANGUAGE CONTROL
68
SOUND &LANGUAGE CONTROL
Caption Option
Customize the DTV/CADTV captions that appear on your screen.
This function in only available when Caption Mode is set On.
Select OPTION.
Select Caption
Select O n.
1
MENU
3
2
ENTER
ENTER
Select Custom.
5
ENTER
Customize the Style, Font, etc., to your
preference. A preview icon is provided at
the bottom of the screen, use it to see the
caption language.
6
Select Digital OOption.
4
■Size: Set the word size.
■Font: Select a typeface for the text.
■Text CColor: Choose a color for the
text.
■Text OOpacity: Specify the opacity
for the text color.
■Bg ((Background) CColor: Select a
background color.
■Bg ((Background) OOpacity: Select
the opacity for the background color.
7
RETURN
Return to the previous menu.
MENU
Return to TV viewing.
Enter
Move
OPTION
Language : English
Input Label
SIMPLINK : On
Key Lock : Off
Caption : Off
ISM Method : Normal
Power Saving : Level 0
Set ID : 1
Enter
Move
OPTION
Language : English
Input Label
SIMPLINK : On
Key Lock : Off
Caption : CC1
ISM Method : Normal
Power Saving : Level 0
Set ID : 1
Size A Standard
Font Font 1
Text Color White
Text Opacity
Solid
Bg Color Black
Bg Opacity
Solid
Close
FCustom G
Mode Service1
Close
Digital Option
F
On
G
TIME SETTING
69
CLOCK SETTING
TIME SETTING
Auto Clock Setup
The time is set automatically from a digital channel signal.
The digital channel signal includes information for the current time provided by the broadcasting station.
Set the clock manually if the current time is set incorrectly by the auto clock function.
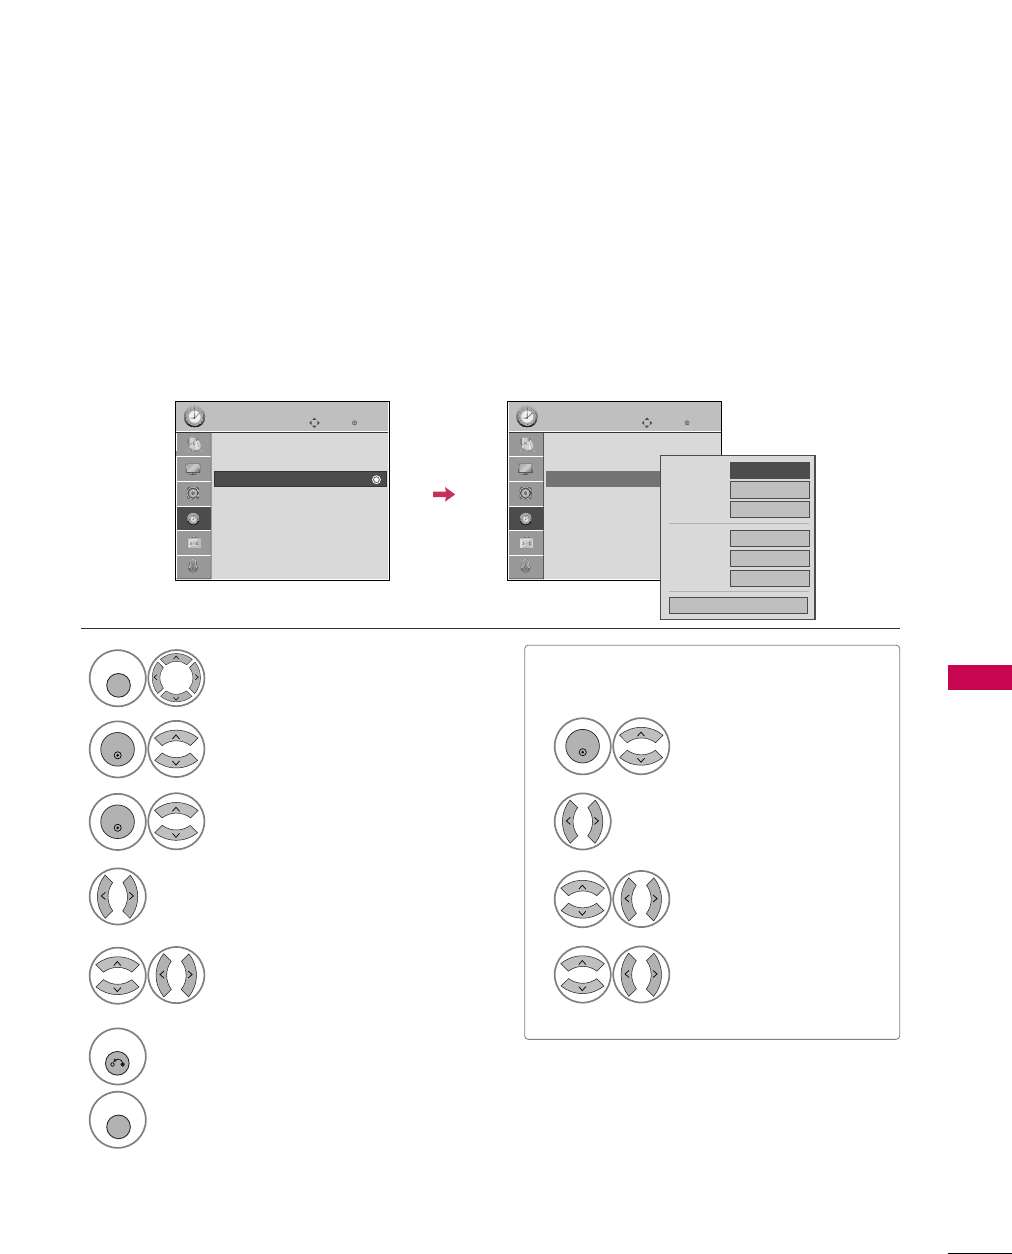
Select TIME.
Select Clock.
Select Auto.
1
MENU
3
2
ENTER
ENTER
Select your viewing area time zone.
• U.S.A: Ea s te r n, Cen tra l, Mountain,
Pacific, Alaska, or Hawaii.
• Canada: Eastern, Central, Mountain,
Pacific, New FF.land, or Atlantic.
4
Select Auto, O n, or Of f (depending on
whether or not your viewing area observes
Daylight Saving time).
5
6
RETURN
Return to the previous menu.
MENU
Return to TV viewing.
Enter
Move
TIME
Clock :
Feb/21/2008/ 2:10 AM
Off Time : Off
On Time : Off
Sleep Timer : Off
Auto Sleep : Off
Enter
Move
TIME
Clock :
Feb/21/2008/ 2:10 AM
Off Time : Off
On Time : Off
Sleep Timer : Off
Auto Sleep : Off
Year
Month 2
Date 21
Hour 2 AM
2008
Minute 10
Time Zone Eastern
Daylight
Saving Auto
Close
F Auto G
TIME SETTING
70
Manual Clock Setup
If the current time setting is wrong, reset the clock manually.
Select TIME.
Select Clock.
Select Manual.
1
MENU
3
2
ENTER
ENTER
Select the Year, Month, Date, Hour, or Minutes
option.
4
Set the Year, Month, Date, Hour, or Minutes
option.
5
6
RETURN
Return to the previous menu.
MENU
Return to TV viewing.
Enter
Move
TIME
Clock :
Feb/21/2008/ 2:10 AM
Off Time : Off
On Time : Off
Sleep Timer : Off
Auto Sleep : Off
Enter
Move
TIME
Clock :
Feb/21/2008/ 2:10 AM
Off Time : Off
On Time : Off
Sleep Timer : Off
Auto Sleep : Off
Year
Month 2
Date 21
Hour 2 AM
2008
Minute 10
Time Zone Eastern
Daylight
Saving Auto
Close
F
Manual
G
TIME SETTING
71
AUTO ON/OFF TIME SETTING
This function operates only if the current time has been set.
The Off TTime function overrides the On TTime function if they are both set to the same time.
The TV must be in standby mode for the On TTime to work.
If you do not press any button within 2 hours after the TV turns on with the On TTime function, the TV will
automatically revert to standby mode.
■To cancel On/Off TTime function, select Off.
■Only for On Time function
Select Input.
Select TV, AV1-2, Component1-2,
RGB-PC, or HDMI1-3.
Select TIME.
Select Off ttime or On ttime.
Select Repeat.
1
MENU
3
2
ENTER
ENTER
Select Off, Once, Everyday, Mon~Fri,
Mon~Sat, Weekend, or Sunday.
4
Select and set Hour or Minute.
5
1
ENTER
3
4
2
When Selecting T V:
set the channel at turn-on.
Adjust to sound level at
turn-on.
6
RETURN
Return to the previous menu.
MENU
Return to TV viewing.
Enter
Move
TIME
Clock :
Feb/21/2008/ 2:10 AM
Off Time : Off
On Time : Off
Sleep Timer : Off
Auto Sleep : Off
Enter
Move
TIME
Clock :
Feb/21/2008/ 2:10 AM
Off Time : Off
On Time : 6:30 AM (Once)
Sleep Timer : Off
Auto Sleep : Off
Repeat F
Once
G
Hour 6 AM
Minute 30
Input TV
Channel TV 2-0
Volume 30
Close

TIME SETTING
72
SLEEP TIMER SETTING
The Sleep Time turns the TV off at the preset time.
Note that this setting is cleared when the TV is turned off.
Q.Menu
Close
3
16:9
Vivid
Off
Standard
Off
English
FOff G
Add
Aspect Ratio
Power Saving
Clear Voice
Picture Mode
Sound Mode
Caption
Multi Audio
Sleep Timer
Del/Add/Fav
CH
1
SLEEP
Select Off, 1 0, 2 0, 3 0, 6 0, 9 0, 120,
180, or 240 minutes.
2
RETURN
Return to TV viewing.
TIME SETTING
73
AUTO SHUT-OFF SETTING
TV will be automatically turned off, in case of no signal for 10 minutes.
Select TIME.
Select Auto SSleep.
Select O n or Off.
1
MENU
3
2
ENTER
ENTER
4
RETURN
Return to the previous menu.
MENU
Return to TV viewing.
Enter
Move
TIME
Clock :
Feb/21/2008/ 2:10 AM
Off Time : Off
On Time : Off
Sleep Timer : Off
Auto Sleep : Off
Enter
Move
TIME
Clock :
Feb/21/2008/ 2:10 AM
Off Time : Off
On Time : Off
Sleep Timer : Off
Auto Sleep : Off Off
On
TV will be automatically turned off,
in case of No Signal for 10 minutes.

PARENTAL CONTROL / RATING
74
PARENTAL CONTROL / RATINGS
Parental Control can be used to block specific channels, ratings and other viewing sources.
The Parental Control Function (V-Chip) is used to block program viewing based on the ratings sent by the broad-
casting station. The default setting is to allow all programs to be viewed. Viewing can be blocked by choosing the
type of the program and the categories. It is also possible to block all program viewing for a time period. To use
this function, the following must be done :
1. Set ratings and categories to be blocked.
2. Specify a password
3. Enable the lock
V-Chip rating and categories
Rating guidelines are provided by broadcasting stations. Most television programs and television movies can be
blocked by TV Rating and/or Individual Categories. Movies that have been shown at the theaters or direct-to-
video movies use the Movie Rating System (MPAA)only.
Ratings for Television programs including made-for-TV movies :
■TV-G (General audience)
■TV-PG (Parental guidance suggested)
■TV-14 (Parents strongly cautioned)
■TV-MA (Mature audience only)
■TV-Y (All children)
■TV-Y7 (Children 7 years older)
Set up blocking schemes to block specific channels, ratings, and external viewing sources.
A password is required to gain access to this menu.
Setting up Your Password
For USA For Canada
Close
Enter Password
** * *
Select LOCK.
1
MENU
ENTER
Input the password.
2
1
456
78
0
9
23
■Enter the password as requested.
■The TV is set up with the initial pass-
word “0-0-0-0”.
SET PASSWORD & LOCK SYSTEM
Enter
Move
LOCK
Lock System : Off
Set Password
Block Channel
Movie Rating
TV Rating-Children
TV Rating-General
Downloadable Rating
Input Block
Enter
Move
LOCK
Lock System : Off
Set Password
Block Channel
TV Rating-English
TV Rating-French
Downloadable Rating
Input Block

PARENTAL CONTROL / RATING
75
Enables or disables the blocking scheme you set up previously.
Lock System
Select Lock SSystem.
Select O n or Of f.
4
3
ENTER
■When you select O n, the Lock System
is enable.
Select LOCK.
1
MENU
ENTER
Input the password.
2
1
456
78
0
9
23
5
RETURN
Return to the previous menu.
MENU
Return to TV viewing.
Enter
Move
LOCK
Lock System : Off
Set Password
Block Channel
Movie Rating
TV Rating-Children
TV Rating-General
Downloadable Rating
Input Block
Enter
Move
LOCK
Lock System : On
Set Password
Block Channel
Movie Rating
TV Rating-Children
TV Rating-General
Downloadable Rating
Input Block
Off
On
PARENTAL CONTROL / RATING
76
PARENTAL CONTROL /RATINGS
Change the password by inputting a new password twice.
Set Password
Select Set ppassword.
Choose any 4 digits for your new password.
As soon as the 4 digits are entered, re-enter
the same 4 digits on the Confirm.
4
3
ENTER
1
456
78
0
9
23
Select LOCK.
1
MENU
ENTER
Input the password.
2
1
456
78
0
9
23
5
RETURN
Return to the previous menu.
MENU
Return to TV viewing.
Enter
Move
LOCK
Lock System : Off
Set Password
Block Channel
Movie Rating
TV Rating-Children
TV Rating-General
Downloadable Rating
Input Block
Enter
Move
LOCK
Lock System : Off
Set Password
Block Channel
Movie Rating
TV Rating-Children
TV Rating-General
Downloadable Rating
Input Block
Close
New ** * *
Confirm * * * *
PARENTAL CONTROL / RATING
77
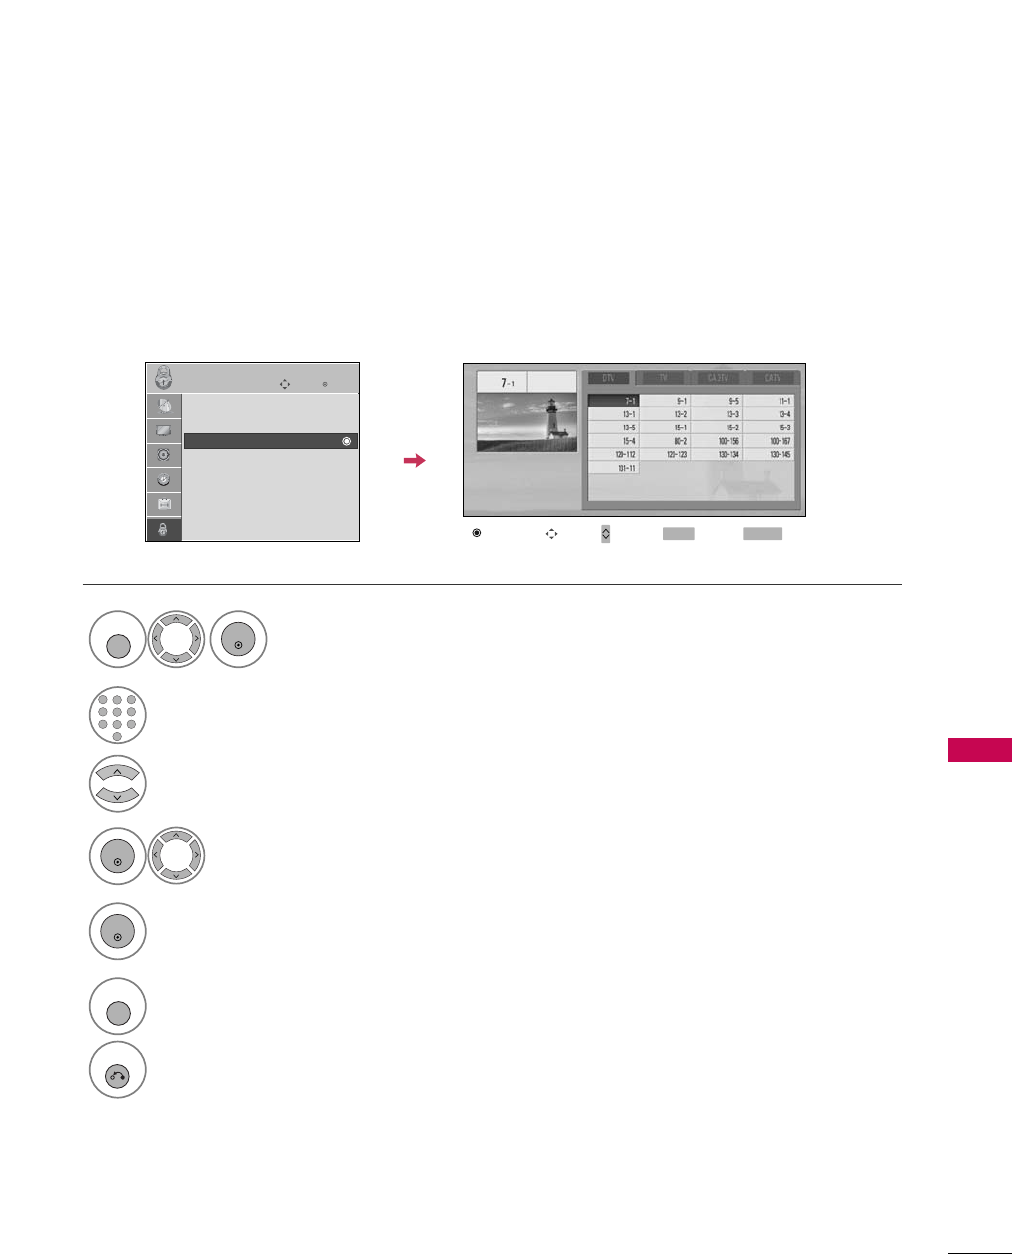
CHANNEL BLOCKING
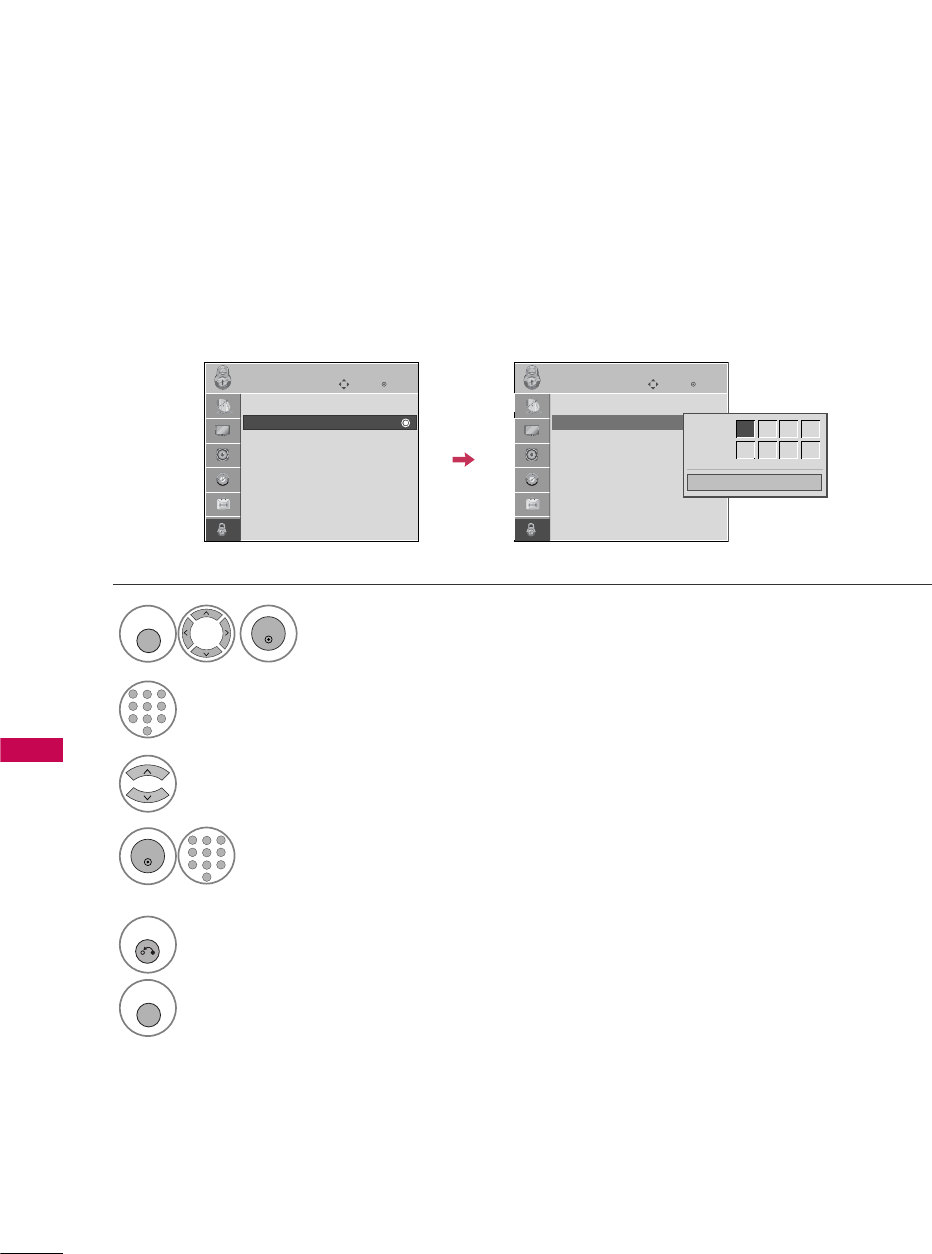
Select Block CChannel.
Select a channel to block or unblock.
4
3
ENTER
Block or unblock a channel.
5
ENTER
Blocks any channels that you do not want to watch or that you do not want your children to watch.
Select LOCK.
1
MENU
ENTER
Input the password.
2
1
456
78
0
9
23
6
MENU
Return to the previous menu.
RETURN
Return to TV viewing.
Block/Unblock Move Page
CH
Move Previous RETURN Exit
MENU
Enter
Move
LOCK
Lock System : Off
Set Password
Block Channel
Movie Rating
TV Rating-Children
TV Rating-General
Downloadable Rating
Input Block
PARENTAL CONTROL / RATING
78
MOVIE & TV RATING
PARENTAL CONTROL /RATINGS
Movie Rating (MPAA)
-
For USA only
Blocks movies according to the movie ratings limits specified, so children cannot view certain movies. You can
set the ratings limit by blocking out all the movies with the ratings above a specified level. Keep in mind that
the movie ratings limit only applies to movies shown on TV, not TV programs, such as soap operas.
Select Movie RRating.
Select G, P G, PG-13, R, NC-17,
X, or Blocking OOff.
4
3
ENTER
■G (General audience)
■PG (Parental guidance suggested)
■PG-13 (Parents strongly cautioned)
■R (Restricted)
■NC-17 (No one 17 and under admitted)
■X (Adult only)
■Blocking Off (Permits all programs)
GIf you set PG-13: G and PG movies will
be available, PG-13, R, NC-17 and X will
be blocked.
Select LOCK.
1
MENU
ENTER
Input the password.
2
1
456
78
0
9
23
5
RETURN
Return to the previous menu.
MENU
Return to TV viewing.
Enter
Move
LOCK
Lock System : Off
Set Password
Block Channel
Movie Rating
TV Rating-Children
TV Rating-General
Downloadable Rating
Input Block
Enter
Move
LOCK
Lock System : Off
Set Password
Block Channel
Movie Rating
TV Rating-Children
TV Rating-General
Downloadable Rating
Input Block
G
PG
PG-13
R
NC-17
X
Blocking Off
Blocking off : Permits all
programs
PARENTAL CONTROL / RATING
79
Select TV RRating-Children.
Select Age or Fantasy VViolence.
4
3
ENTER
Select block options.
5
ENTER
■Age (applies to TV-Y, TV-Y7)
■Fantasy Violence (applies to TV-Y7)
TV Rating Children
-
For USA only
Prevents children from watching certain children's TV programs, according to the ratings limit set. The children
rating does not apply to other TV programs. Unless you block certain TV programs intended for mature audi-
ences in the TV Rating - sub menu, your children can view those programs.
Select LOCK.
1
MENU
ENTER
Input the password.
2
1
456
78
0
9
23
6
RETURN
Return to the previous menu.
MENU
Return to TV viewing.
Enter
Move
LOCK
Lock System : Off
Set Password
Block Channel
Movie Rating
TV Rating-Children
TV Rating-General
Downloadable Rating
Input Block
Enter
Move
LOCK
Lock System : Off
Set Password
Block Channel
Movie Rating
TV Rating-Children
TV Rating-General
Downloadable Rating
Input Block
Close
Age G
Fantasy Violence
PARENTAL CONTROL / RATING
80
PARENTAL CONTROL /RATINGS
TV Rating General
-
For USA only
Based on the ratings, blocks certain TV programs that you and your family do not want to view.
Select TV RRating-General.
Select Age, Dialogue, Language,
Sex or Violence.
4
3
ENTER
Select block options.
5
ENTER
■Age (applies to TV-G,TV-PG,TV-14,TV-
MA).
■Dialogue-sexual dialogue (applies to
TV-PG,TV-14).
■Language-adult language (applies to
TV-PG, TV-14, TV-MA).
■Sex-sexual situations (applies to TV-PG,
TV-14, TV-MA).
■Violence (applies to TV-PG, TV-14, TV-
MA).
Select LOCK.
1
MENU
ENTER
Input the password.
2
1
456
78
0
9
23
6
RETURN
Return to the previous menu.
MENU
Return to TV viewing.
Enter
Move
LOCK
Lock System : Off
Set Password
Block Channel
Movie Rating
TV Rating-Children
TV Rating-General
Downloadable Rating
Input Block
Enter
Move
LOCK
Lock System : Off
Set Password
Block Channel
Movie Rating
TV Rating-Children
TV Rating-General
Downloadable Rating
Input Block
Close
Age G
Dialogue
Language
Sex
Violence
PARENTAL CONTROL / RATING
81
TV Rating English
-
For CANADA only
Selecting canadian english language rating system.
Select TV RRating-English.
Select E, C, C8+, G, PG, 14+,
18+, or Blocking OOff.
4
3
ENTER
■E (Exempt)
■C (Children)
■C8+ (Children eight years and older)
■G (General programming, suitable for
all audiences)
■PG (Parental Guidance)
■14+ (Viewers 14 years and older)
■18+ (Adult programming)
■Blocking Off (Permits all programs)
Select LOCK.
1
MENU
ENTER
Input the password.
2
1
456
78
0
9
23
5
RETURN
Return to the previous menu.
MENU
Return to TV viewing.
Enter
Move
LOCK
Lock System : Off
Set Password
Block Channel
TV Rating-English
TV Rating-French
Downloadable Rating
Input Block
Enter
Move
LOCK
Lock System : Off
Set Password
Block Channel
TV Rating-English
TV Rating-French
Downloadable Rating
Input Block
Blocking off : Permits all
programs
E
C
C8+
G
PG
14+
18+
Blocking Off
PARENTAL CONTROL / RATING
82
PARENTAL CONTROL /RATINGS
TV Rating French
-
For CANADA only
Selecting canadian french language rating system.
Select TV RRating-French.
Select E, G, 8ans+, 13ans+,
16ans+, 18ans+, or Blocking ooff.
4
3
ENTER
■E (Exempt)
■G (General)
■8ans+ (General-Not convenient for lit-
tle children)
■13ans+ (Not convenient for children of
13 years and younger)
■16ans+ (Not convenient for children of
16 years and younger)
■18ans+ (This programs is only for
adults)
■Blocking off (Permits all programs)
Select LOCK.
1
MENU
ENTER
Input the password.
2
1
456
78
0
9
23
5
RETURN
Return to the previous menu.
MENU
Return to TV viewing.
Enter
Move
LOCK
Lock System : Off
Set Password
Block Channel
TV Rating-English
TV Rating-French
Downloadable Rating
Input Block
Enter
Move
LOCK
Lock System : Off
Set Password
Block Channel
TV Rating-English
TV Rating-French
Downloadable Rating
Input Block
Blocking off : Permits all
programs
E
G
8ans+
13ans+
16ans+
18ans+
Blocking Off
PARENTAL CONTROL / RATING
83
DOWNLOADABLE RATING
■Based on rating table, your TV's OSD
(On Screen Display) may differ slightly
from what is shown in this manual.
This function may become available in the future and will be available only for digital channels.
This function operates only when TV has received Region5 Rating data.
Select Downloadable RRating.
Select desired Downloadable
Rating option.
4
3
ENTER
Select desired option and block it.
5
ENTER
Select LOCK.
1
MENU
ENTER
Input the password.
2
1
456
78
0
9
23
6
RETURN
Return to the previous menu.
MENU
Return to TV viewing.
Enter
Move
LOCK
Lock System : Off
Set Password
Block Channel
Movie Rating
TV Rating-Children
TV Rating-General
Downloadable Rating
Input Block
Enter
Move
LOCK
Lock System : Off
Set Password
Block Channel
Movie Rating
TV Rating-Children
TV Rating-General
Downloadable Rating
Input Block
Humor
Sport
Cruelty
Language
Sadness
Genre
Age
Close
E
E
PARENTAL CONTROL / RATING
84
PARENTAL CONTROL /RATINGS
EXTERNAL INPUT BLOCKING
Enables you to block an input.
Select Input BBlock.
Select input source.
4
3
Select O n or Off.
5
ENTER
Select LOCK.
1
MENU
ENTER
Input the password.
2
1
456
78
0
9
23
6
RETURN
Return to the previous menu.
MENU
Return to TV viewing.
Enter
Move
LOCK
Lock System : Off
Set Password
Block Channel
Movie Rating
TV Rating-Children
TV Rating-General
Downloadable Rating
Input Block
Enter
Move
LOCK
Lock System : Off
Set Password
Block Channel
Movie Rating
TV Rating-Children
TV Rating-General
Downloadable Rating
Input Block
AV1 F
Off
G
AV2 Off
Component1
Off
HDMI1 Off
RGB-PC Off
Component2
Off
HDMI2 Off
HDMI3 Off
Close
PARENTAL CONTROL / RATING
85
KEY LOCK
The TV can be set up so that it can only be used with the remote control.
This feature can be used to prevent unauthorized viewing by locking out the front panel controls.
This TV is programmed to remember which option it was last set to even if you turn the TV off.
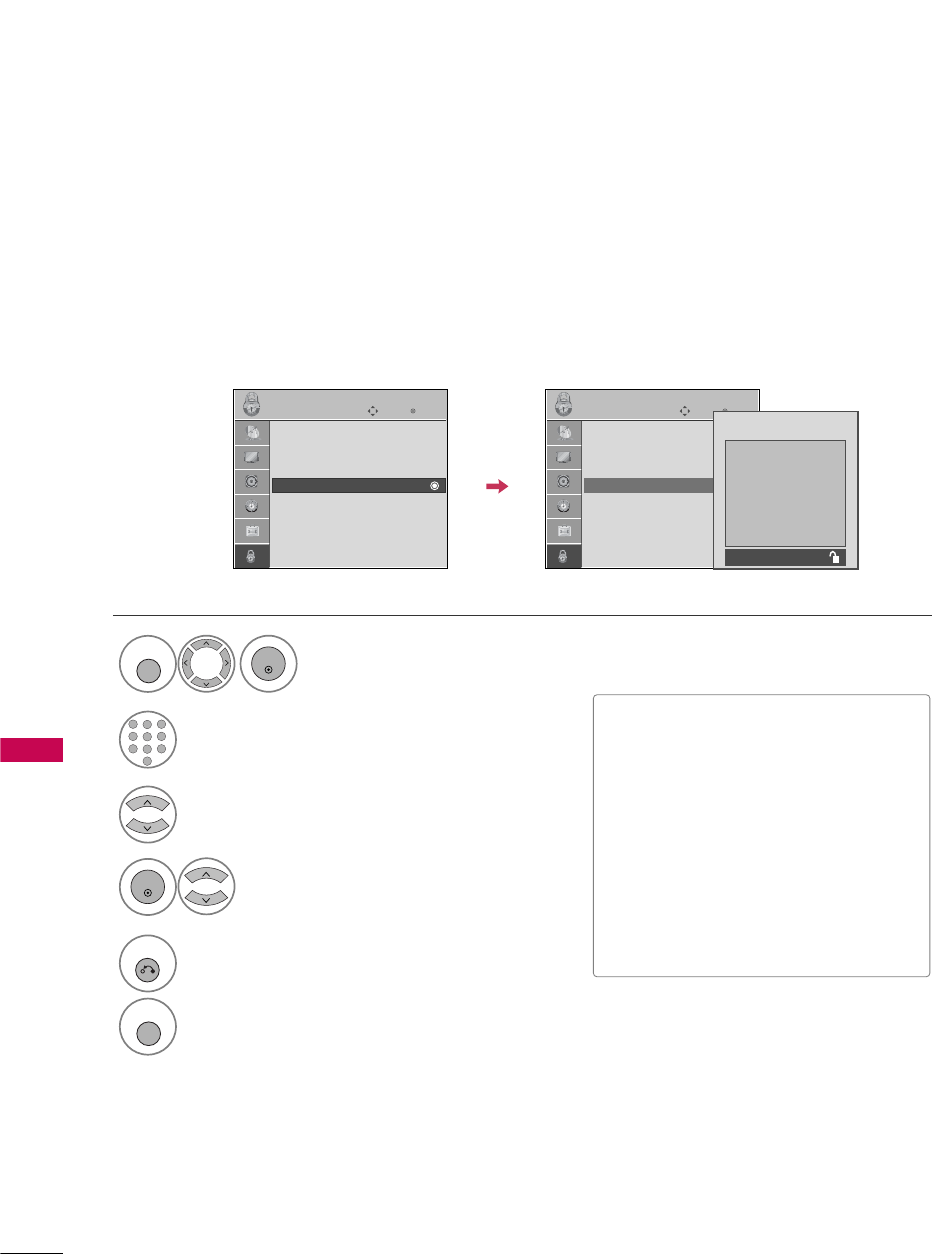
Select OPTION.
Select Key LLock.
1
MENU
2
ENTER
Select O n or Off.
3
ENTER
■In Key LLock ‘O n’, if the TV is turned
off, press the r
r/ I, INPUT, CH D EE
button on the TV or POWER, INPUT,
CH or NUMBER buttons on the
remote control.
■With the Key LLock OOn, the display
‘ Key LLock’ appears on the screen if
any button on the front panel is pressed
while viewing the TV.
4
RETURN
Return to the previous menu.
MENU
Return to TV viewing.
Enter
Move
OPTION
Language : English
Input Label
SIMPLINK : On
Key Lock : Off
Caption : Off
ISM Method : Normal
Power Saving : Level 0
Set ID : 1
Enter
Move
OPTION
Language : English
Input Label
SIMPLINK : On
Key Lock : On
Caption : Off
ISM Method : Normal
Power Saving : Level 0
Set ID : 1
Off
On
!

APPENDIX
86
APPENDIX
TROUBLESHOOTING
The ooperation ddoes nnot wwork nnormally.
The vvideo ffunction ddoes nnot wwork.
No picture &No sound
No or poor color
or poor picture
Poor reception on
some channels
Lines or streaks
in pictures
Horizontal/vertical bars
or picture shaking
Picture appears slowly
after switching on
The remote control
doesn’t work
Power is suddenly
turned off
■Check to see if there is any object between the product and the remote control
causing obstruction. Ensure you are pointing the remote control directly at the TV.
■Ensure that the batteries are installed with correct polarity (+ to +, - to -).
■Ensure that the correct remote operating mode is set: TV, VCR etc.
■Install new batteries.
■Is the sleep timer set?
■Check the power control settings. Power interrupted.
■Check whether the product is turned on.
■Try another channel. The problem may be with the broadcast.
■Is the power cord inserted into wall power outlet?
■Check your antenna direction and/or location.
■Test the wall power outlet, plug another product’s power cord into the outlet
where the product’s power cord was plugged in.
■This is normal, the image is muted during the product startup process. Please
contact your service center, if the picture has not appeared after five minutes.
■Adjust Color in menu option.
■Keep a sufficient distance between the product and the VCR.
■Try another channel. The problem may be with the broadcast.
■Are the video cables installed properly?
■Activate any function to restore the brightness of the picture.
■Check for local interference such as an electrical appliance or power tool.
■Station or cable product experiencing problems, tune to another station.
■Station signal is weak, reorient antenna to receive weaker station.
■Check for sources of possible interference.
■Check antenna (Change the direction of the antenna).

APPENDIX
87
There iis aa pproblem iin PPC mmode. ((Only PPC mmode aapplied)
■Adjust resolution, horizontal frequency, or vertical frequency.
■Check the input source.
■Work the Auto configure or adjust clock, phase, or H/V position. (Option)
■Check the signal cable.
■Reinstall the PC video card.
The signal is out of range
Screen color is unstable
or single color
Vertical bar or stripe on
background &
Horizontal Noise &
Incorrect position
■Press the VOL or VOLUME button.
■Sound muted? Press MUTE button.
■Try another channel. The problem may be with the broadcast.
■Are the audio cables installed properly?
■Adjust Balance in menu option.
■A change in ambient humidity or temperature may result in an unusual noise
when the product is turned on or off and does not indicate a fault with the
product.
Picture OK & No sound
Unusual sound from
inside
the product
No output from one
of the speakers
The aaudio ffunction ddoes nnot wwork.

APPENDIX
88
APPENDIX
MAINTENANCE
Early malfunctions can be prevented. Careful and regular cleaning can extend the amount of time you can
enjoy your new TV.
Caution: Be sure to turn the power off and unplug the power cord before you begin any cleaning.
Cleaning the Screen
Here’s a great way to keep the dust off your screen for a while. Wet a soft cloth in a mixture of lukewarm
water and a little fabric softener or dish washing detergent. Wring the cloth until it’s almost dry, and then
use it to wipe the screen.
Make sure the excess water is off the screen, and then let it air-dry before you turn on your TV.
Cleaning the Cabinet
■To remove dirt or dust, wipe the cabinet with a soft, dry, lint-free cloth.
■Please be sure not to use a wet cloth.
Extended Absence
G If you expect to leave your TV dormant for a long time (such as a vacation), it’s a good idea to unplug
the power cord to protect against possible damage from lightning or power surges.
CAUTION
2
1
■The specifications shown above may be changed without prior notice for quality improvement.
MODEL
AC100-120V ~50/60Hz
NTSC-M, ATSC, 64 & 256 QAM
VHF 2-13, UHF 14-69, CATV 1-135, DTV 2-69, CADTV 1-135
75 ohm
32 ~104°F (0 ~40°C)
Less than 80%
-4 ~140°F (-20 ~60°C)
Less than 85%
Dimensions
(Width x Height
x Depth)
Weight
Power requirement
Television System
Program Coverage
External Antenna Impedance
Environment
condition
With stand
Without stand
With stand
Without stand
Operating Temperature
Operating Humidity
Storage Temperature
Storage Humidity
42PG10 (42PG10-UA)
NS-42PDP-09 (42PG1DD-UA)
40.9 x 28.7 x 12.1 inches
1040.0 x 729.0 x 308.0 mm
40.9 x 26.6 x 3.2 inches
1040.0 x 677.0 x 83.6 mm
57.3 pounds / 26.0 kg
52.9 pounds / 24.0 kg
42PG20 (42PG20-UA)
42PG20C (42PG20C-UA)
40.9 x 28.7 x 12.1 inches
1040.0 x 731.3 x 308.0 mm
40.9 x 26.6 x 3.3 inches
1040.0 x 677.0 x 86.0 mm
58.2 pounds / 26.4 kg
53.5 pounds / 24.3 kg
PRODUCT SPECIFICATIONS

APPENDIX
89
■The specifications shown above may be changed without prior notice for quality improvement.
MODELS
AC100-240V ~50/60Hz
NTSC-M, ATSC, 64 & 256 QAM
VHF 2-13, UHF 14-69, CATV 1-135, DTV 2-69, CADTV 1-135
75 ohm
32 ~104°F (0 ~40°C)
Less than 80%
-4 ~140°F (-20 ~60°C)
Less than 85%
Dimensions
(Width x Height
x Depth)
Weight
Power requirement
Television System
Program Coverage
External Antenna Impedance
Environment
condition
With stand
Without stand
With stand
Without stand
Operating Temperature
Operating Humidity
Storage Temperature
Storage Humidity
50PG10 (50PG10-UA)
NS-50PDP-09 (50PG1DD-UA)
MODELS 50PG30
(50PG30F-UA)
60PG30
(60PG30F-UA)
48.2 x 33.4 x 14.3 inches
1224.7 x 849.0 x 364.0 mm
48.2 x 31.1 x 3.2 inches
1224.7 x 790.0 x 83.6 mm
91.4 pounds / 41.5 kg
83.9 pounds / 38.1 kg
50PG20 (50PG20-UA)
50PG20C (50PG20C-UA)
48.2 x 33.4 x 14.3 inches
1224.7 x 849.0 x 364.0 mm
48.2 x 31.1 x 3.3 inches
1224.7 x 790.0 x 86.0 mm
90.8 pounds / 41.2 kg
83.3 pounds / 37.8 kg
Dimensions
(Width x Height
x Depth)
Weight
With stand
Without stand
With stand
Without stand
48.5 x 33.4 x 14.3 inches
1232.0 x 850.0 x 363.6 mm
48.5 x 31.2 x 3.3 inches
1232.0 x 793.0 x 84.0 mm
93.2 pounds / 42.3 kg
84.4 pounds / 38.3 kg
57.7 x 39.7 x 16.2 inches
1468.0 x 1009.1 x 413.9 mm
57.7 x 37.3 x 3.4 inches
1468.0 x 949.5 x 88.5 mm
177.6 pounds / 80.6 kg
160.0 pounds / 72.6 kg
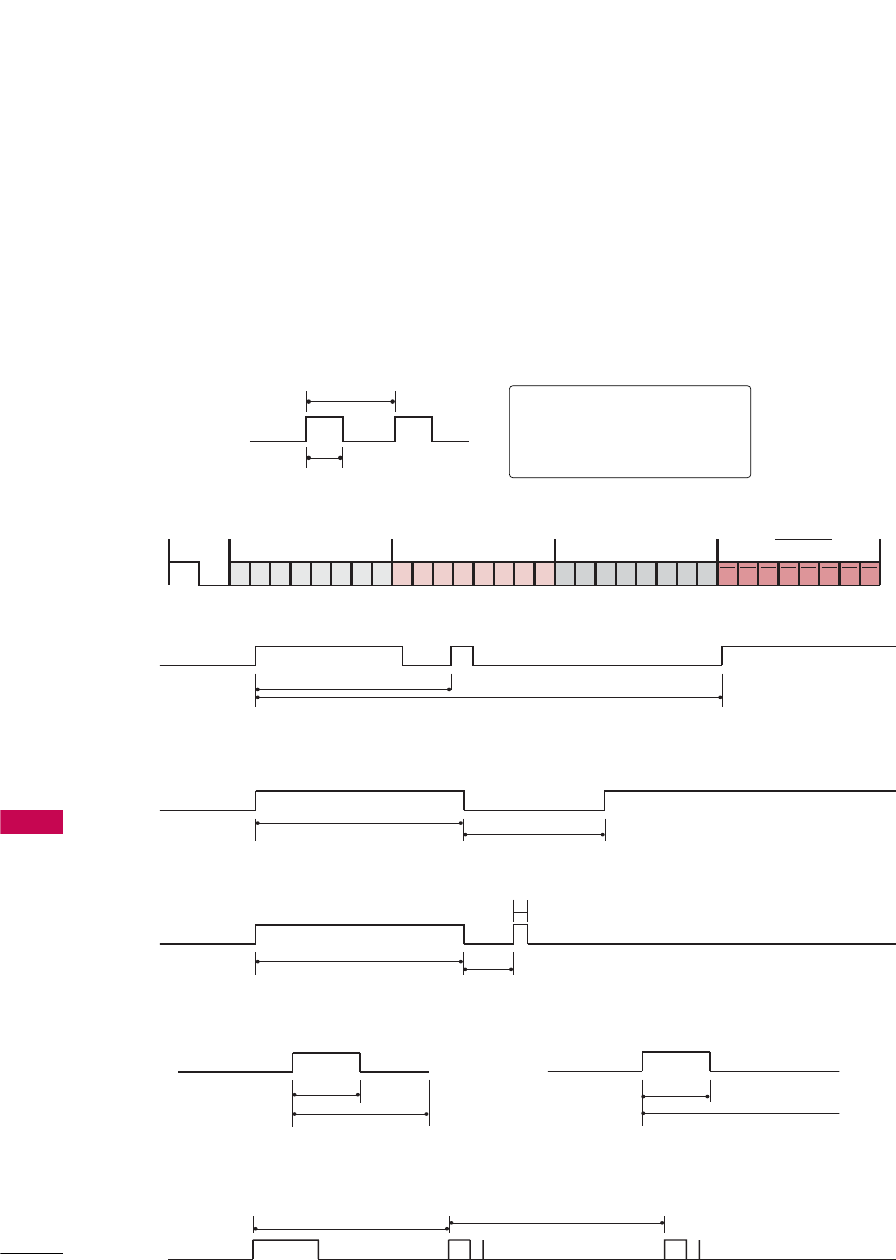
■
Configuration of frame
1st frame
Repeat frame
■
Lead code
■
Repeat code
■Bit ddescription
■Frame iinterval: TTf
The waveform is transmitted as long as a key is depressed.
C0 C1 C2 C3 C4 C5 C6 C7 C0 C1 C2 C3 C4 C5 C6 C7 D0 D1 D2 D3 D4 D5 D6 D7 D0 D1 D2 D3 D4 D5 D6 D7
Lead code Low custom code High custom code Data code Data code
Repeat code Tf
4.5 ms
9 ms
2.25 ms
9 ms
0.55 ms
0.56 ms
1.12 ms
0.56 ms
2.24 ms
Tf Tf
Tf=108ms @455KHz
Bit ”0” Bit ”1”
1. How to Connect
■Connect your wired remote control to the Remote Control port on the TV.
2. Remote Control IR Codes
■
Output waveform
Single pulse, modulated with 37.917KHz signal at 455KHz
T1
Tc
Carrier frequency
FCAR = 1/TC = fOSC/12
Duty ratio = T1/TC = 1/3
APPENDIX
90
IR CODES
APPENDIX

APPENDIX
91
Code Function Note
(Hexa)
08 POWER
Remote control Button (Power On/Off)
45 Q.MENU Remote control Button
43 MENU Remote control Button
0B INPUT Remote control Button
10-19 Number Key 0-9 Remote control Button
4C - (Dash) Remote control Button
1A FLASHBK Remote control Button
09 MUTE Remote control Button
02 VOL + Remote control Button
03 VOL - Remote control Button
00 CH Remote control Button
01 CH Remote control Button
1E FAV Remote control Button
40 Remote control Button
41 Remote control Button
07 Remote control Button
06 Remote control Button
44 ENTER Remote control Button
5B RETURN Remote control Button
7E SIMPLINK Remote control Button
30 AV MODE Remote control Button
79 RATIO Remote control Button
0E SLEEP Remote control Button
52 SOUND Remote control Button
4D PICTURE Remote control Button
APPENDIX
92
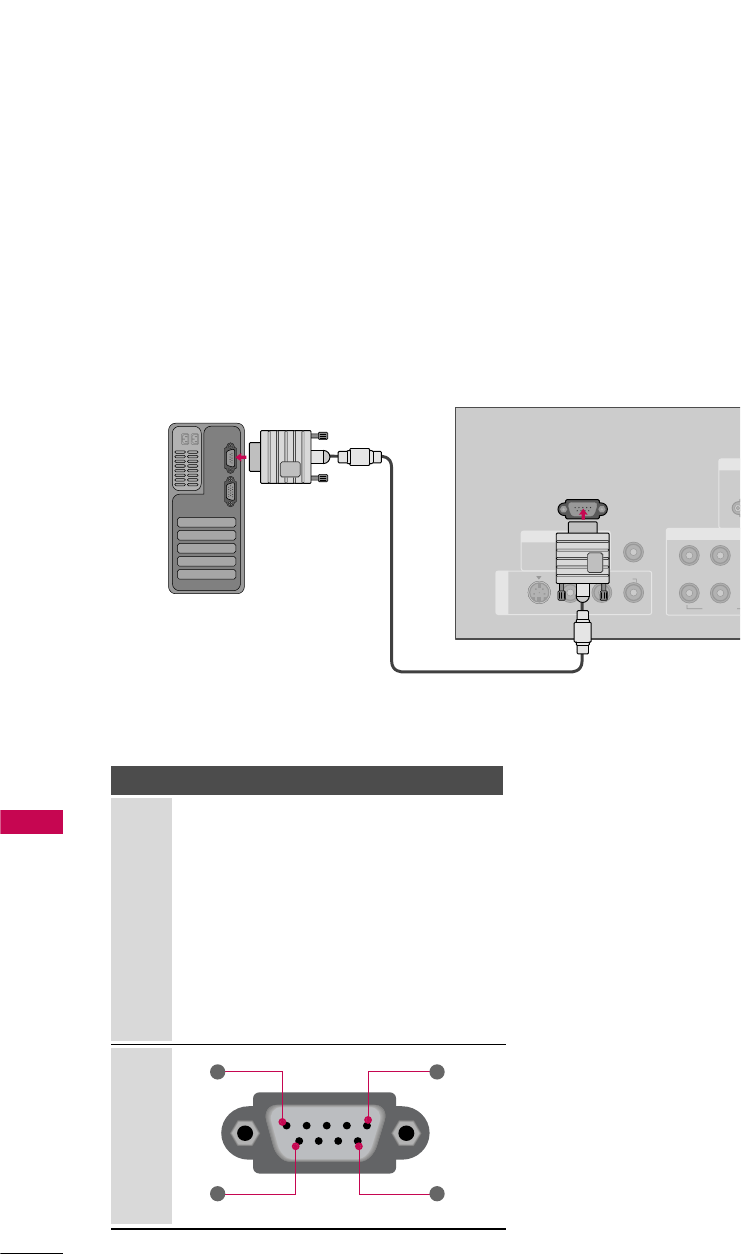
EXTERNAL CONTROL THROUGH RS-232C
APPENDIX
RS-232C Setup
The RS-232C port allows you connect the RS-232C input jack to an external control device (such as a computer
or an A/V control system) to control the TV’s functions externally.
■Note: RS-232C on this unit is intended to be used with third party RS-232C control hardware and software.
The instructions below are provided to help with programming software or to test functionality using telenet
software.
COMPO
R
REMOTE
CONTROL IN
RS-232C IN
(CONTROL & SERVICE)
OPTICAL
DIGITAL AUDIO OUT
AV IN 1
AUDIO
S-VIDEO
1
2
VIDEO
YP
B
Type of Connector; D-Sub 9-Pin Male
No. Pin Name
1 No connection
2 RXD (Receive data)
3 TXD (Transmit data)
4 DTR (DTE side ready)
5 GND
6 DSR (DCE side ready)
7 RTS (Ready to send)
8 CTS (Clear to send)
9 No Connection
1
6
5
9
PC
Communication Parameters
■Baud rate : 9600 bps (UART)
■Data length : 8 bits
■Parity : None
■Stop bit : 1 bit
■Communication code : ASCII code
■Use a crossed (reverse) cable.
APPENDIX
93
RS-232C Configurations
Either cable below can be used.
Set ID
PC TV
RXD 2 3 TXD
TXD 3 2 RXD
GND 5 5 GND
DTR 4 6 DSR
DSR 6 4 DTR
RTS 7 8 CTS
CTS 8 7 RTS
D-Sub 9 D-Sub 9
PC TV
RXD 2 3 TXD
TXD 3 2 RXD
GND 5 5 GND
DTR 4 6 DTR
DSR 6 4 DSR
RTS 7 7 RTS
CTS 8 8 CTS
D-Sub 9 D-Sub 9
7-Wire Configuration
(Serial female-female NULL modem cable)
3-Wire Configurations
(Not standard)
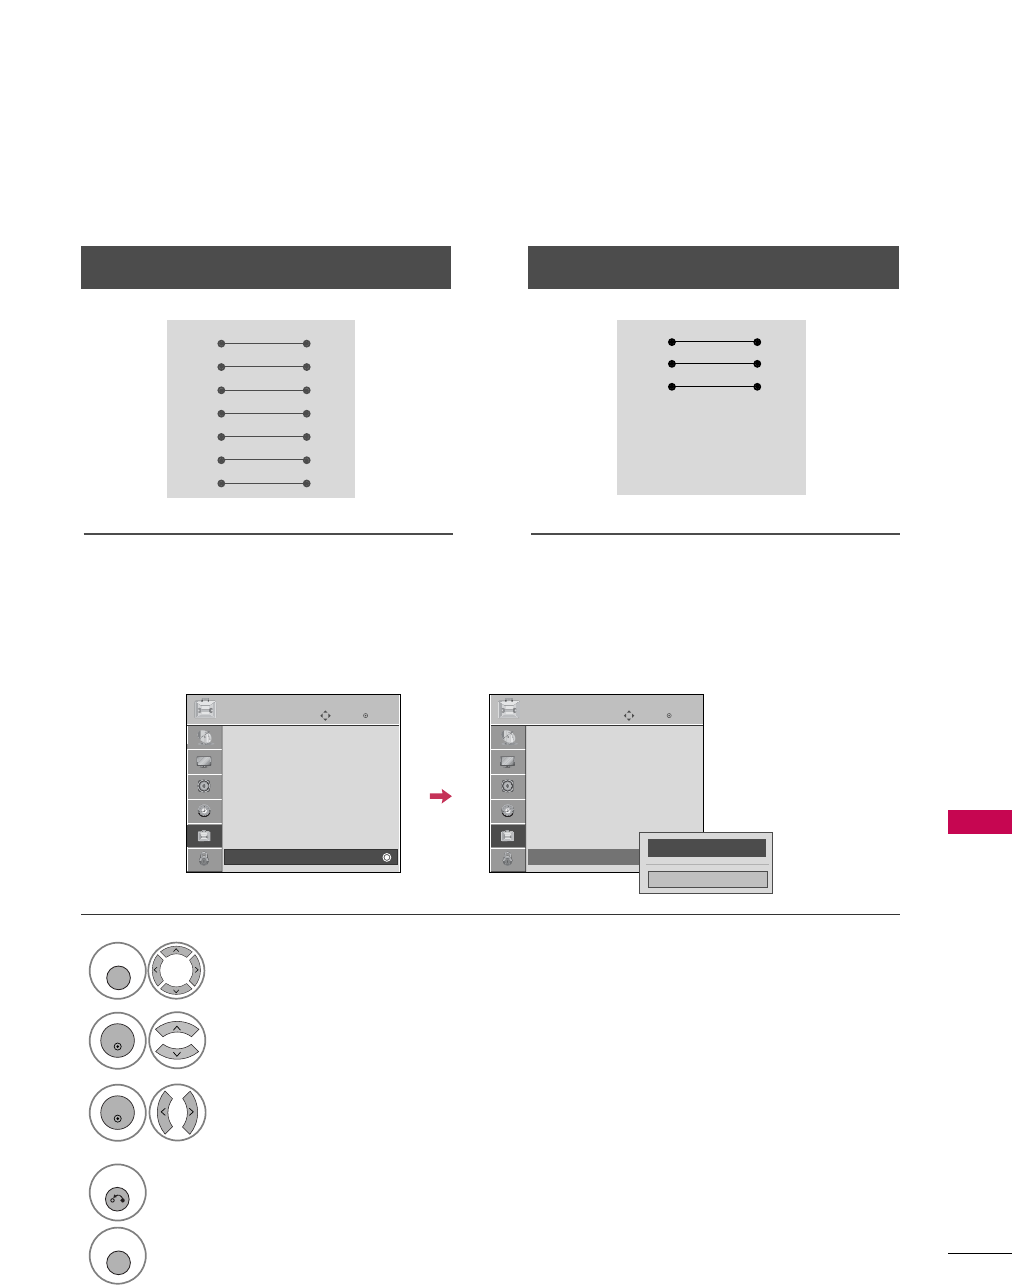
Use this function to specify a TV ID number.
Refer to ‘Real Data Mapping’. Gp.97.
Enter
Move
OPTION
Language : English
Input Label
SIMPLINK : On
Key Lock : Off
Caption : Off
ISM Method : Normal
Power Saving : Level 0
Set ID : 1
Enter
Move
OPTION
Language : English
Input Label
SIMPLINK : On
Key Lock : Off
Caption : Off
ISM Method : Normal
Power Saving : Level 0
Set ID : 1
F 1G
Close
Select OPTION.
Select Set IID.
Choose the desired TV ID number.
The adjustment range of Set ID is
1~99.
1
MENU
3
2
ENTER
ENTER
4
RETURN
Return to the previous menu.
MENU
Return to TV viewing.

APPENDIX
94
Command Reference List
APPENDIX
COMMAND1 COMMAND2
21. Channel Tuning
DATA
(Hexadecimal)
COMMAND1 COMMAND2
DATA
(Hexadecimal)
COMMAND1 COMMAND2
DATA00
(Hexadecimal)
DATA01
(Hexadecimal)
DATA02
(Hexadecimal)
DATA03
(Hexadecimal)
DATA04
(Hexadecimal)
DATA05
(Hexadecimal)
physical major major low minor high minor low attribute
program high program low
ma
01. Power k a 00 ~01
02. Input Select x b (Gp.95)
03. Aspect Ratio k c (Gp.95)
04. Screen Mute k d 00 ~01
05. Volume Mute k e 00 ~01
06. Volume Control k f 00 ~64
07. Contrast k g 00 ~64
08. Brightness k h 00 ~64
09. Color k i 00 ~64
10. Tint k j 00 ~64
11. Sharpness k k 00 ~64
12. OSD Select k l 00 ~01
13. Remote Control
Lock Mode
Transmission / Receiving Protocol
Transmission
[Command 1] : First command to control the set.(j, k, m or x)
[Command 2] : Second command to control the set.
[Set ID] : You can adjust the set ID to choose desired TV ID
number in Setup menu. Adjustment range is 1~99.
When selecting Set ID ‘0’, every connected the TV is
controlled. Set ID is indicated as decimal (1~99)on
menu and as Hexa decimal (0x0~0x63)on transmission
/receiving protocol.
[DATA] : To transmit the command data.
Transmit the ‘FF’ data to read status of command.
[Cr] : Carriage Return
ASCII code ‘0x0D’
[ ] : ASCII code ‘space (0x20)’
* In this model, TV will not send the status during the standby mode.
OK AAcknowledgement
The TV transmits ACK (acknowledgement) based on this for-
mat when receiving normal data. At this time, if the data is
data read mode, it indicates present status data. If the data is
data write mode, it returns the data of the PC computer.
* In this model, TV will not send the status during the standby mode.
* Data Format
[Command 2] : Use as command.
[Set ID] : Use the small character, if set ID is 10, it will send the ‘0’, ‘a’.
[DATA] : Use the small character, if data is 0 x ab, it will send the ‘a’, ‘b’.
[OK] : Use the large character.
Error AAcknowledgement
The TV transmits ACK (acknowledgement) based on this for-
mat when receiving abnormal data from non-viable functions
or communication errors.
Data1: Illegal Code
Data2: Not supported function
Data3: Wait more time
* In this model, TV will not send the status during the standby mode.
* Data Format
[Command 2] : Use as command.
[Set ID] : Use the small character, if set ID is 10, it will send the ‘0’, ‘a’.
[DATA] : Use the small character, if data is 0 x ab, it will send the ‘a’, ‘b’.
[NG] : Use the large character
[Command1][Command2][ ]][Set IID][ ]][Data][Cr]
[Command2][ ]][Set IID][ ]][OK][Data][x]
[Command2][ ]][Set IID][ ]][NG][Data][x]
14. Treble k r 00 ~64
15. Bass k s 00 ~64
16. Balance k t 00 ~64
17.
Color Temperature
k u 00 ~02
18. ISM Method j p (Gp.96)
19. Power Saving j q 00 ~01
20. Auto Configuration j u (Gp.96)
22. Channel Add/Del m b 00 ~01
23. Key m c (Gp.97)
00 ~01
k m

APPENDIX
95
01. Power ((Command: kk aa)
To control Power On/Off of the TV.
Transmission [k][a][ ][Set ID][ ][Data][Cr]
Data 00: Power Off Data 01: Power On
Acknowledgement [a][ ][Set ID][ ][OK/NG][Data][x]
* In a like manner, if other functions transmit ‘FF’ data
based on this format, Acknowledgement data feedback
presents status about each function.
* Note: In this model, TV will send the Acknowledge
after power on processing completion.
There might be a time delay between command and
acknowledge.
02. IInput SSelect ((Command: xx bb)
To select input source for TV.
Transmission [x][b][ ][Set ID][ ][Data][Cr]
Data 10: TV
Data 20: AV1 Data 21: AV2
Data 40: Component 1 Data 41: Component 2
Data 60: RGB-PC Data 90: HDMI1
Data 91: HDMI2 Data 92: HDMI3
Acknowledgement [b][ ][Set ID][ ][OK/NG][Data][x]
03. AAspect RRatio ((Command: kk cc)
To adjust the screen format.
Transmission [k][c][ ][Set ID][ ][Data][Cr]
Data 01: 4:3 05: Zoom 2
02: 16:9 06: Set by program
04: Zoom 1 09: Just scan
Reserved
Acknowledgement [c][ ][Set ID][ ][OK/NG][Data][x]
04. Screen MMute ((Command: kk dd)
To select screen mute on/off.
Transmission [k][d][ ][Set ID][ ][Data][Cr]
Data 00: Screen mute off (Picture on)
Data 01: Screen mute on (Picture off)
Acknowledgement [d][ ][Set ID][ ][OK/NG][Data][x]
05. VVolume MMute ((Command: kk ee)
To control volume mute on/off.
You can also adjust mute using the MUTE button on
remote control.
Transmission [k][e][ ][Set ID][ ][Data][Cr]
Data 00: Volume mute on (Volume off)
Data 01: Volume mute off (Volume on)
Acknowledgement [e][ ][Set ID][ ][OK/NG][Data][x]
06. VVolume CControl ((Command: kk ff)
To adjust volume.
You can also adjust volume with the volume buttons on
remote control.
Transmission [k][f][ ][Set ID][ ][Data][Cr]
Data Min: 00 ~Max: 64 (*transmit by Hexadecimal code)
*Refer to ‘Real data mapping’. See page 97.
Acknowledgement [f][ ][Set ID][ ][OK/NG][Data][x]
07. CContrast ((Command: kk gg)
To adjust screen contrast.
You can also adjust contrast in the PICTURE menu.
Transmission [k][g][ ][Set ID][ ][Data][Cr]
Data Min: 00 ~Max: 64 (*transmit by Hexadecimal code)
*Refer to ‘Real data mapping’. See page 97.
Acknowledgement [g][ ][Set ID][ ][OK/NG][Data][x]
08. BBrightness ((Command: kk hh)
To adjust screen brightness.
You can also adjust brightness in the PICTURE menu.
Transmission [k][h][ ][Set ID][ ][Data][Cr]
Data Min: 00 ~Max: 64 (*transmit by Hexadecimal code)
*Refer to ‘Real data mapping’. See page 97.
Acknowledgement [h][ ][Set ID][ ][OK/NG][Data][x]
09. CColor ((Command: kk ii)
To adjust screen color.
You can also adjust color in the PICTURE menu.
Transmission [k][i][ ][Set ID][ ][Data][Cr]
Data Min: 00 ~Max: 64 (*transmit by Hexadecimal code)
*Refer to ‘Real data mapping’. See page 97.
Acknowledgement [i][ ][Set ID][ ][OK/NG][Data][x]
10. TTint ((Command: kk jj)
To adjust screen tint.
You can also adjust tint in the PICTURE menu.
Transmission [k][j][ ][Set ID][ ][Data][Cr]
Data Red: 00 ~Green: 64 (*transmit by Hexadecimal code)
*Refer to ‘Real data mapping’. See page 97.
Acknowledgement [ j ][ ][Set ID][ ][OK/NG][Data][x]
11. SSharpness ((Command: kk kk)
To adjust screen sharpness.
You can also adjust sharpness in the PICTURE menu.
Transmission [k][k][ ][Set ID][ ][Data][Cr]
Data Min: 00 ~Max: 64 (*transmit by Hexadecimal code)
*Refer to ‘Real data mapping’. See page 97.
Acknowledgement [k][ ][Set ID][ ][OK/NG][Data][x]

APPENDIX
96
APPENDIX
12. OOSD SSelect ((Command: kk ll)
To select OSD (On Screen Display) on/off.
Transmission [k][l][ ][Set ID][ ][Data][Cr]
Data 00: OSD off Data 01: OSD on
Acknowledgement [l][ ][Set ID][ ][OK/NG][Data][x]
13. RRemote CControl LLock MMode ((Command: kk mm)
To lock the remote control and the front panel controls
on the TV.
Transmission [k][m][ ][Set ID][ ][Data][Cr]
Data 00: Lock off Data 01: Lock on
Acknowledgement [m][ ][Set ID][ ][OK/NG][Data][x]
If you’re not using the remote control and front panel
controls on the TV, use this mode. When main power is
on/off, remote control lock is released.
14. TTreble ((Command: kk rr)
To adjust treble.
You can also adjust treble in the AUDIO menu.
Transmission [k][r][ ][Set ID][ ][Data][Cr]
Data Min: 00 ~Max: 64 (*transmit by Hexadecimal code)
*Refer to ‘Real data mapping’. See page 97.
Acknowledgement [r][ ][Set ID][ ][OK/NG][Data][x]
15. Bass ((Command: kk ss)
To adjust bass.
You can also adjust bass in the AUDIO menu.
Transmission [k][s][ ][Set ID][ ][Data][Cr]
Data Min: 00 ~Max: 64 (*transmit by Hexadecimal code)
*Refer to ‘Real data mapping’. See page 97.
Acknowledgement [s][ ][Set ID][ ][OK/NG][Data][x]
16. BBalance ((Command: kk tt)
To adjust balance.
You can also adjust balance in the AUDIO menu.
Transmission [k][t][ ][Set ID][ ][Data][Cr]
Data Min: 00 ~Max: 64 (*transmit by Hexadecimal code)
*Refer to ‘Real data mapping’. See page 97.
Acknowledgement [t][ ][Set ID][ ][OK/NG][Data][x]
17. CColor TTemperature ((Command: kk uu)
To adjust color temperature.
You can also adjust color temperature in the PICTURE menu.
Transmission [k][u][ ][Set ID][ ][Data][Cr]
Data 00: Medium 01: Cool 02: Warm
Acknowledgement [u][ ][Set ID][ ][OK/NG][Data][x]
18. IISM MMethod ((Command: jj pp)
To avoid having a fixed image remain on screen.
Transmission [ j ][p][ ][Set ID][ ][Data][Cr]
Data 01: Inversion 02: Orbiter
04: White Wash 08: Normal
Acknowledgement [p][ ][Set ID][ ][OK/NG][Data][x]
19. PPower ssaving ((Command: jj qq)
To control the low power function on/off.
Transmission [ j ][q][ ][Set ID][ ][Data][Cr]
Data 00: Power saving off (Power Saving Level 0)
01: Power saving (Power Saving Level 4)
Acknowledgement [q][ ][Set ID][ ][OK/NG][Data][x]
20. AAuto CConfiguration ((Command: jj uu)
To adjust picture position and minimize image shaking
automatically. Auto configuration only works in RGB-PC
mode.
Transmission [ j ][u][ ][Set ID][ ][Data][Cr]
Data 1: To set
Acknowledgement [u][ ][Set ID][ ][OK/NG][Data][x]
21. CChannel TTuning ((Command: mm aa)
To tune channel to following physical/major/minor number.
Transmission [m][a][ ][Set ID][ ][Data00][ ][Data01]
[ ][Data02][ ][Data03][ ][Data04][ ][Data05][Cr]
Digital channels have a Physical, Major, and Minor channel
number. The Physical number is the actual digital channel
number, the Major is the number that the channel should
be mapped to, and the Minor is the sub-channel. Since
the ATSC tuner automatically maps the channel to the
Major number, the Physical number is not required when
sending a command.
Data 00: Physical Channel Number
NTSC air: 02~45, NTSC cable: 01, 0E~7D
ATSC air: 01~45, ATSC cable: 01~87
Data 01 & 02: Major Channel Number
Data 01: High byte Data 02: Low byte
Two bytes are available for the Major and Minor, nor-
mally only the second byte is used.
Data 03 & 04: Minor Channel Number
Not needed for NTSC.

APPENDIX
97
Data5:
The table above lists the binary code which must be
converted to Hexadecimal before sending. For example:
The binary code to tune the sub source to an NTSC
cable channel is “1000 0001”, which translates to “81”
in Hex.
* 7th bit : For which source do you want to change the
channel.
* 6th bit: Use a two part or one part channel. Most cases
just use 0 since it’s ignored when using NTSC.
* 5th bit: Use 0 with NTSC since it can only use the phys-
ical channel number. Normally use 1 for ATSC since most
times it doesn’t matter what the physical number is.
* 4th bit: Set to 0.
* 3-0 bits: Choose signal type.
* Tune Command Examples:
1. Tune to the analog (NTSC) cable channel 35.
Data 00 = Physical of 35 = 23
Data 01 & 02 = No Major = 00 00
Data 03 & 04 = No Minor = 00 00
Data 05 = 0000 0001 in binary = 01
Total = ma 00 23 00 00 00 00 01
2. Tune to the digital (ATSC) local channel 30-3.
Data 00 = Don’t know Physical = 00
Data 01 & 02 = Major is 30 = 00 1E
Data 03 & 04 = Minor is 3 = 00 03
Data 05 = 0010 0010 in binary = 22
Total = ma 00 00 00 1E 00 03 22
Acknowledgement[a][ ][Set ID][ ][OK][Data00][Data01]
[Data02][Data03][Data04][x][a][ ][Set ID]
[ ][NG][Data00][x]
22. CChannel AAdd/Del ((Command: mm bb)
To add and delete the channels.
Transmission [m][b][ ][Set ID][ ][Data][Cr]
Data 00: Channel Delete Data 01: Channel Add
Acknowledgement [b][ ][Set ID][ ][OK/NG][Data][x]
23. KKey ((Command: mm cc)
To send IR remote key code.
Transmission [m][c][ ][Set ID][ ][Data][Cr]
Data Key code: Refer to page 91.
Acknowledgement [c][ ][Set ID][ ][OK/NG][Data][x]
Step
NTSC Air
NTSC Cable
ATSC Air
ATSC Cable_std
ATSC Cable_hrc
ATSC Cable_irc
ATSC cable_auto
Reserved
...
Reserved
1
0
0
1
1
0
0
1
1
x
1
2
0
0
0
0
1
1
1
1
x
1
3
0
0
0
0
0
0
0
0
x
1
4
x
x
x
x
x
x
x
x
x
x
Reserved
5
0
1
Use
No Use
Using Physical
Channel
6
0
1
Two
One
Two/One
Part Channel
7
0
1
Main
Sub
Main/Sub
Picture 0
0
1
0
1
0
1
0
1
x
1
*Real data mapping
0 : Step 0
A : Step 10 (SET ID 10)
F : Step 15 (SET ID 15)
10 : Step 16 (SET ID 16)
63 : Step 99 (SET ID 99)
64 : Step 100