LG Electronics USA NT-15Z980 Notebook Computer User Manual TempConfidential Part II
LG Electronics USA Notebook Computer TempConfidential Part II
Contents
- 1. TempConfidential_User Manual-Part I-Rev.02(171204)
- 2. TempConfidential_User Manual-Part II
TempConfidential_User Manual-Part II
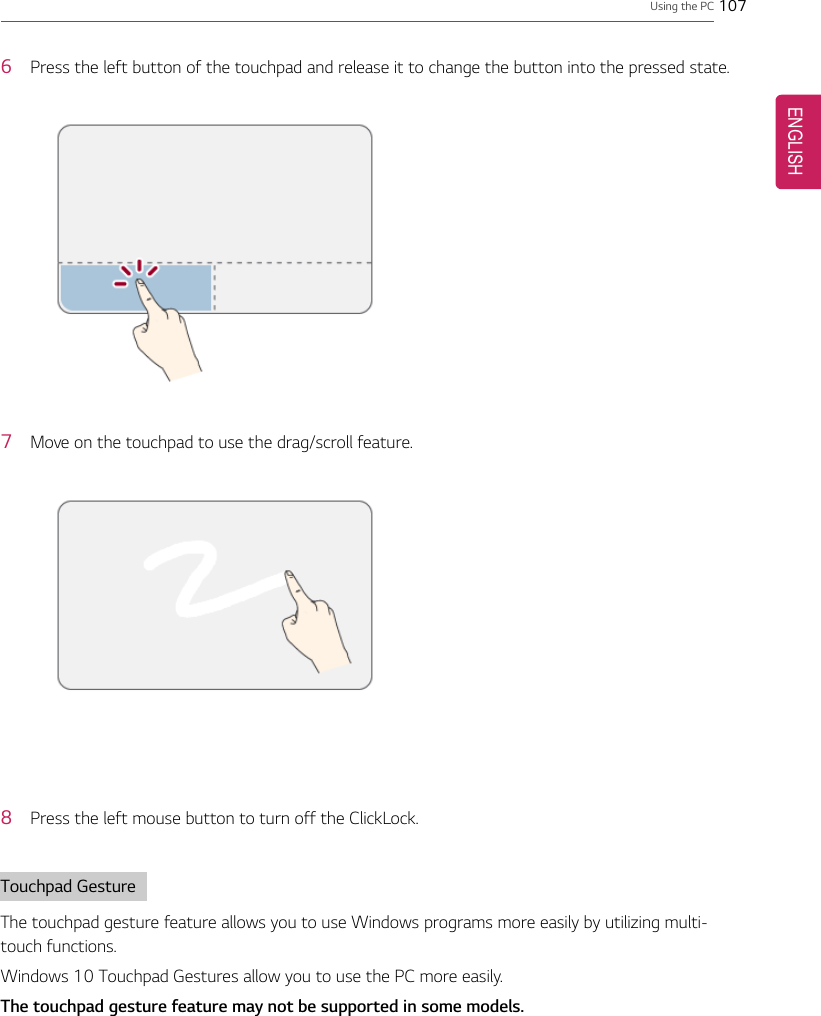
![104 Using the PC1Click the [] button and select the Settings menu.TIPPress the [ ] key or [Ctrl] + [Esc] to display the Start menu.ENGLISH](https://usermanual.wiki/LG-Electronics-USA/NT-15Z980.TempConfidential-User-Manual-Part-II/User-Guide-3673036-Page-5.png)
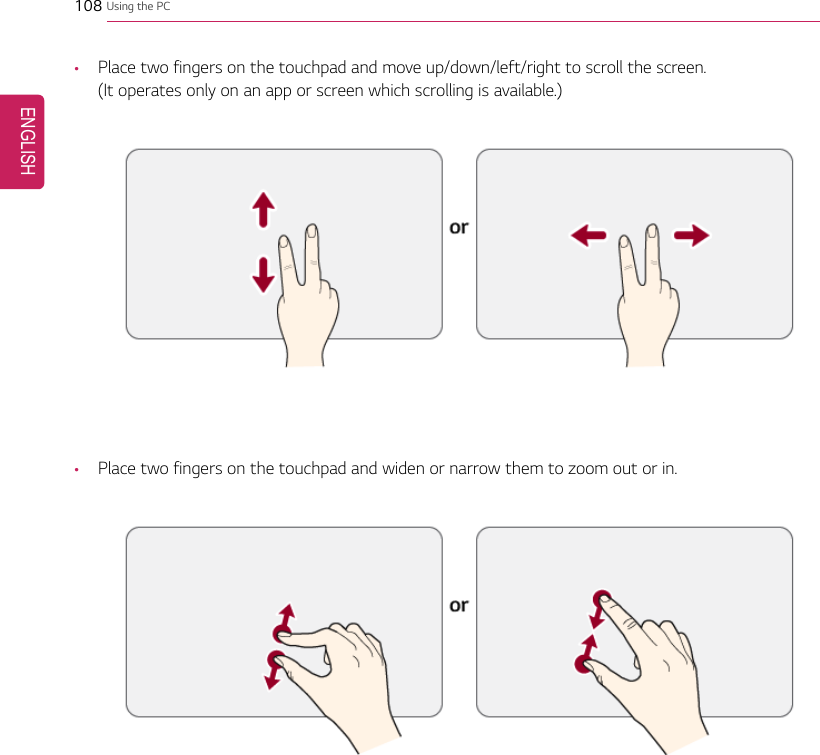
![Using the PC 1052When the [Settings] screen appears, select [Devices].3Select [Mouse] > [Additional Mouse Options].ENGLISH](https://usermanual.wiki/LG-Electronics-USA/NT-15Z980.TempConfidential-User-Manual-Part-II/User-Guide-3673036-Page-6.png)
![106 Using the PC4When [Mouse Properties] screen appears, select [Turn on ClickLock].5Press [Settings] to set the time for the ClickLock.ENGLISH](https://usermanual.wiki/LG-Electronics-USA/NT-15Z980.TempConfidential-User-Manual-Part-II/User-Guide-3673036-Page-7.png)
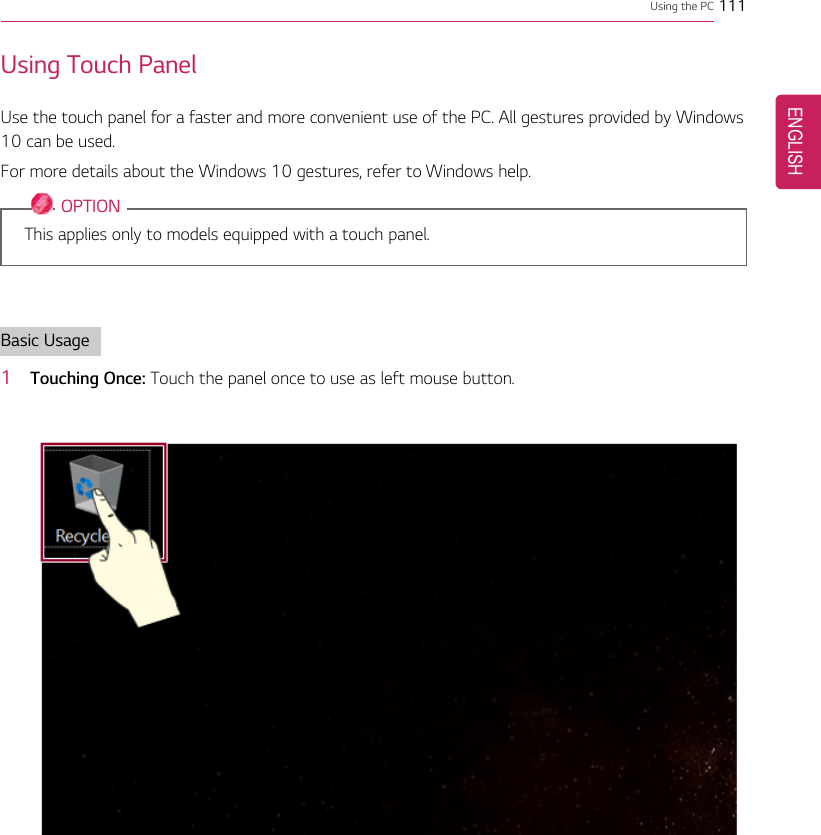
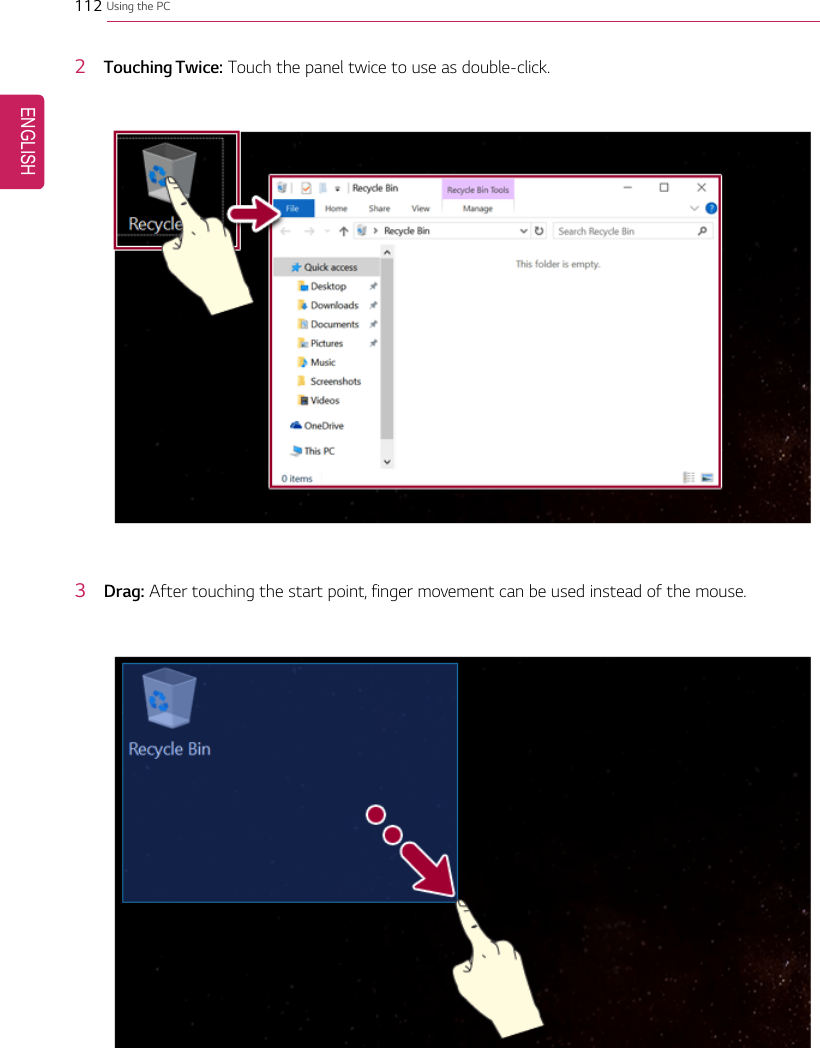
![Using the PC 109Setting TouchpadYou can change the touchpad features or enable/disable the gesture feature.The figures herein may differ by language selection and are subject to change without priornotice.1Click the [] button and select the Settings menu.TIPPress the [ ] key or [Ctrl] + [Esc] to display the Start menu.ENGLISH](https://usermanual.wiki/LG-Electronics-USA/NT-15Z980.TempConfidential-User-Manual-Part-II/User-Guide-3673036-Page-10.png)
![110 Using the PC2When the [Settings] screen appears, select [Devices].3Change the settings as needed on the [Touchpad] menu.ENGLISH](https://usermanual.wiki/LG-Electronics-USA/NT-15Z980.TempConfidential-User-Manual-Part-II/User-Guide-3673036-Page-11.png)
![114 Using the PCUsing the Touch Keyboard1Press the [] icon on the right side of taskbar to display the [Keyboard] screen as shownbelow.ENGLISH](https://usermanual.wiki/LG-Electronics-USA/NT-15Z980.TempConfidential-User-Manual-Part-II/User-Guide-3673036-Page-15.png)
![Using the PC 115Connecting to External DisplayConnecting to the HDMI PortHDMI is a high-speed multimedia interface that can transfer uncompressed full digital audio and videosignals.When LG Notebook PC supports SPDIF, HDMI is not supported.In some models, DTS Audio may not work when you use HDMI.TIPEnsure the monitor power is off before connecting the external monitor to the PC.1Connect the HDMI cable to the PC and the external device (TV, monitor) that supports HDMI.2HDMI port transfers both video and audio simultaneously. Hence, there is no need for a separateaudio connection.3On the PC, press [Fn] + [F7] to display monitor (projector) toggling screen. Select the desiredscreen output.ENGLISH](https://usermanual.wiki/LG-Electronics-USA/NT-15Z980.TempConfidential-User-Manual-Part-II/User-Guide-3673036-Page-16.png)
![116 Using the PCTIP•Every time [ ] + [P] keys are pressed, the screen output option changes. Release thekeys to display the selected screen output.CAUTION•If you do not set Speaker as the default value after disconnecting the HDMI cable, thesystem may not produce any sound.•If a program was running already, you must exit and restart the program to produce sound.ENGLISH](https://usermanual.wiki/LG-Electronics-USA/NT-15Z980.TempConfidential-User-Manual-Part-II/User-Guide-3673036-Page-17.png)
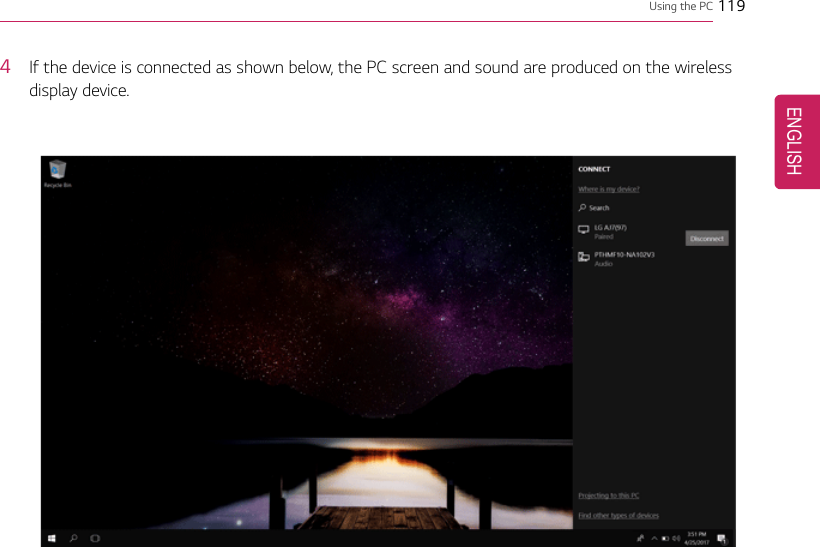
![Using the PC 117Connecting to Wireless DisplayThe wireless display feature connects the PC screen and sound to a display (TV, projector, etc.).OPTION•To use the wireless display feature, the display device must support this feature.•To connect to the display device that does not support wireless display, you mustseparately purchase a wireless display connection device.•Once the wireless display connection is established, no additional procedures and searchingare necessary the next time you try to connect.Connecting to Wireless Display1Press the Action Center [ ] icon on the right side of the taskbar.ENGLISH](https://usermanual.wiki/LG-Electronics-USA/NT-15Z980.TempConfidential-User-Manual-Part-II/User-Guide-3673036-Page-18.png)
![118 Using the PC2When the Action Center screen appears, press the Connect tile.TIPIf the tile does not appear, press the [Expand] menu.3Search for wireless display devices in the proximity.ENGLISH](https://usermanual.wiki/LG-Electronics-USA/NT-15Z980.TempConfidential-User-Manual-Part-II/User-Guide-3673036-Page-19.png)
![Using the PC 121TIPThe Thunderbolt™cable is not provided with the product. Make sure that you use a certifiedcable.Some functions may not be available depending on the product. For more information, refer tothe user manual provided with the device to be connected.Connecting two notebook PCs that support Thunderbolt™Use Thunderbolt™to connect two PCs easily and quickly and send and receive data between them.1Press the [ ] button and select the Settings menu.TIPPress the [ ] key or [Ctrl] + [Esc] to display the Start menu.2Select [Network & Internet] > [Status] > [Network and Sharing Center] > [Change advancedsharing settings].ENGLISH](https://usermanual.wiki/LG-Electronics-USA/NT-15Z980.TempConfidential-User-Manual-Part-II/User-Guide-3673036-Page-22.png)
![122 Using the PC3Set [Change sharing options for different network profiles] as follows, and save the changes.4Use the Thunderbolt™cable to connect two notebook PCs.5A while later, an icon of the connected computer appears on the desktops of the two notebookPCs.ENGLISH](https://usermanual.wiki/LG-Electronics-USA/NT-15Z980.TempConfidential-User-Manual-Part-II/User-Guide-3673036-Page-23.png)
![124 Using the PCUsing USB-C™(Thunderbolt™) Charging FunctionYou can connect a USB-C™device to charge a notebook PC battery or other external devices.OPTIONThunderbolt™connection may not be supported in some models.•To charge a notebook PC battery, the external device (USB PD Charger, notebook PC, etc.) shouldsupport USB Power Delivery 10 W (5 V / 2 A) or higher profile.•The external devices that use the USB-C™port can be charged at 10 W (5 V / 2 A), 15 W (5 V / 3A), and 18 W (9 V / 2 A).•USB PD (Power Delivery) supports charging at 15 W (5 V / 3 A) or 18 W (9 V / 2 A) whenconnected, whereas a regular USB device supports general charging at 10 W (5 V / 2 A).•When the remaining battery capacity of the notebook PC falls below 10 %, both USB PD andregular USB device support charging at 10 W (5 V / 2 A) only.•Always-On Charging is supported only with USB-C™ports, but not with the regular USB ports.•If you connect an AC adapter while the notebook PC is being used to charge an external device, itmay take more time to charge the notebook PC.Using the Charging FunctionLG Control Center can be used to set one of the three charging functions: Automatic, Sink andSource.TIPFor information on how to use LG Control Center, refer to [Using Software] > [LG ControlCenter].ENGLISH](https://usermanual.wiki/LG-Electronics-USA/NT-15Z980.TempConfidential-User-Manual-Part-II/User-Guide-3673036-Page-25.png)
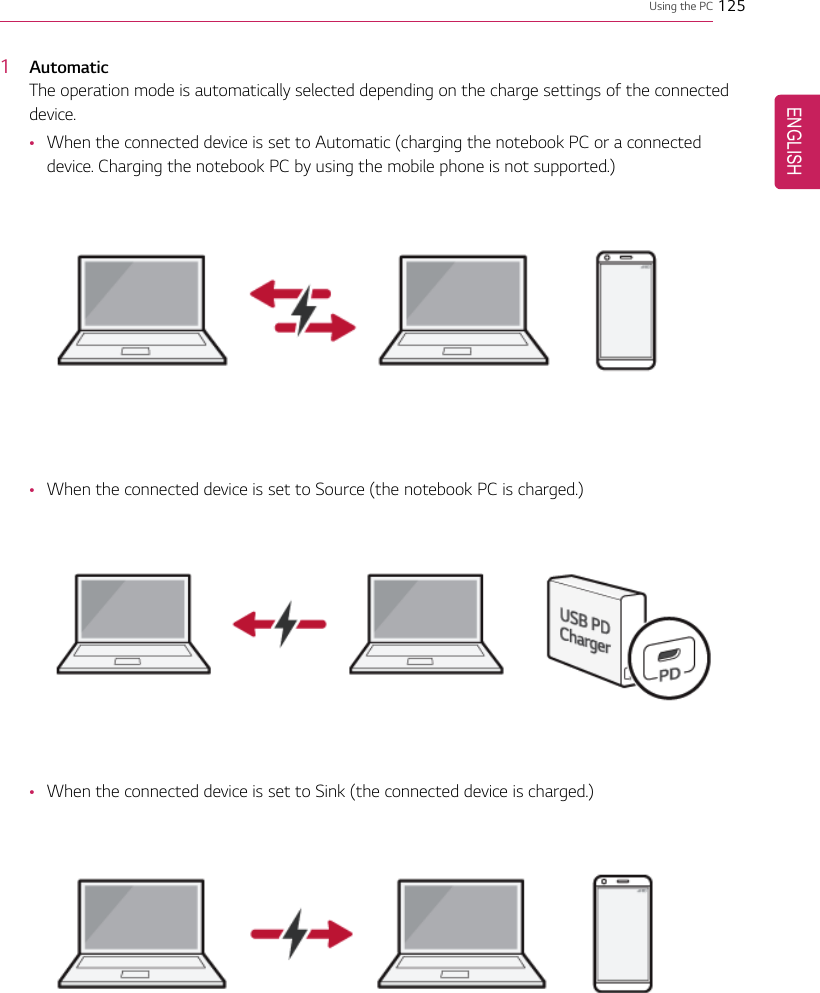

![Using the PC 1273SourceThe notebook PC is used to charge the connected device.TIPIf the connected device is set to Source, the charging function does not work.TIPThe charging status of the external device being charged is not displayed on the notebook PC.If you connected a smartphone, you should select "Charge mobile phone" on the smartphonescreen to charge the phone battery.CAUTIONWhen you set the charging function for a USB-C™port in LG Control Center, beware of thefollowing:•If you changed the charge setting, it is recommended that you remove the USB-C™cableand re-connect it.•If you restart the system or turn off the power, the charge setting is changed to[Automatic].•If the charge setting is set to [Sink], some of the devices connected to the USB-C™portmay not work properly.•Always-On Charging only supports the ON (automatic) and OFF options.•If the power consumption of the notebook PC is larger than the power supply from theexternal device, the battery may be consumed gradually.ENGLISH](https://usermanual.wiki/LG-Electronics-USA/NT-15Z980.TempConfidential-User-Manual-Part-II/User-Guide-3673036-Page-28.png)
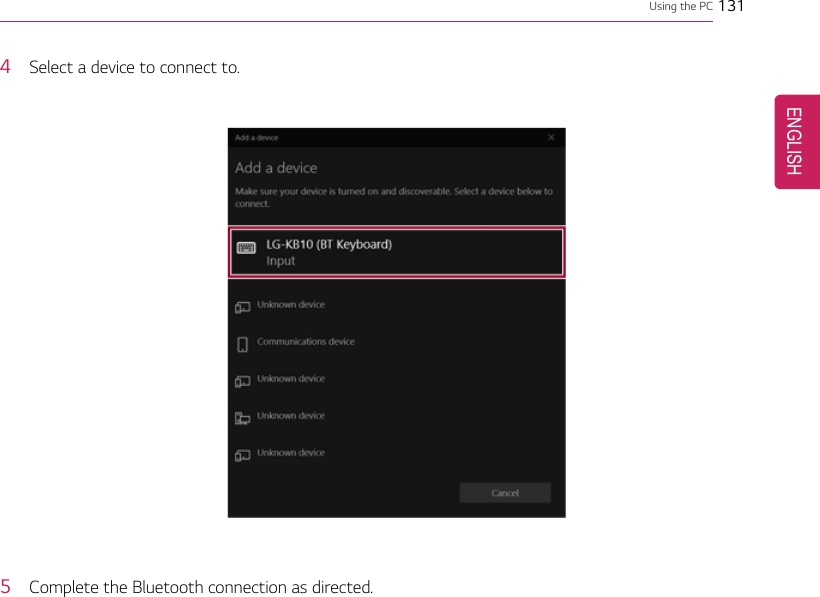
![128 Using the PCBluetoothBluetooth allows the user to access wirelessly various devices such as camera, cell phone, headset,printer, and GPS receiver that support Bluetooth. It can also establish a network and exchange datawith other Bluetooth -enabled PC or smartphone.OPTIONThe Bluetooth device is optional, and it may not be available in some models.The figures herein may differ by language selection and are subject to change without priornotice.For details on connecting a Bluetooth device, refer to the user manual that came with theBluetooth device.1Click the [ ] button and select the [Settings] menu.TIPPress the [ ] key or [Ctrl] + [Esc] to display the Start menu.ENGLISH](https://usermanual.wiki/LG-Electronics-USA/NT-15Z980.TempConfidential-User-Manual-Part-II/User-Guide-3673036-Page-29.png)
![Using the PC 1292When the [Settings] screen appears, select [Devices].ENGLISH](https://usermanual.wiki/LG-Electronics-USA/NT-15Z980.TempConfidential-User-Manual-Part-II/User-Guide-3673036-Page-30.png)
![130 Using the PC3Select [Bluetooth & other devices] >[Add Bluetooth or other device] >[Bluetooth] to searchfor Bluetooth devices.ENGLISH](https://usermanual.wiki/LG-Electronics-USA/NT-15Z980.TempConfidential-User-Manual-Part-II/User-Guide-3673036-Page-31.png)
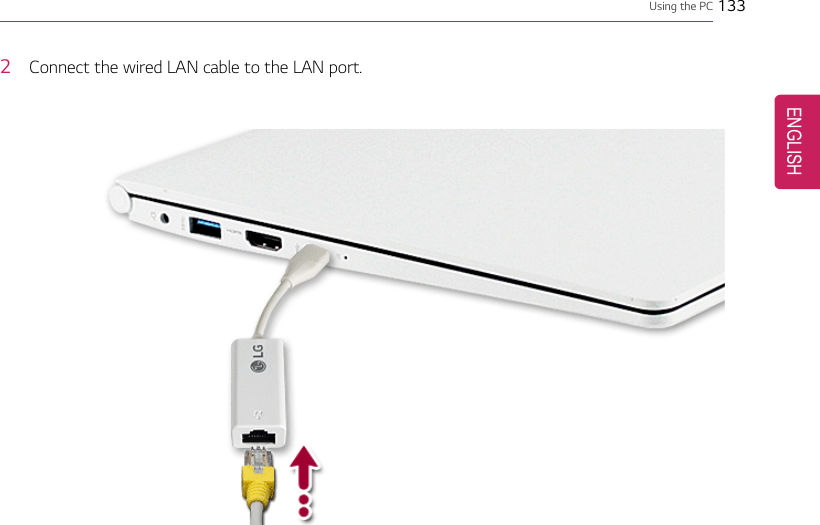
![134 Using the PC3Press the [] button and select the [Settings] menu.TIPPress the [ ] key or [Ctrl] + [Esc] to display the Start menu.ENGLISH](https://usermanual.wiki/LG-Electronics-USA/NT-15Z980.TempConfidential-User-Manual-Part-II/User-Guide-3673036-Page-35.png)
![Using the PC 1354Select [Network & Internet] >[Status] >[Change adapter options].ENGLISH](https://usermanual.wiki/LG-Electronics-USA/NT-15Z980.TempConfidential-User-Manual-Part-II/User-Guide-3673036-Page-36.png)
![136 Using the PC5Right-click [Ethernet] and select the [Properties] menu.ENGLISH](https://usermanual.wiki/LG-Electronics-USA/NT-15Z980.TempConfidential-User-Manual-Part-II/User-Guide-3673036-Page-37.png)
![Using the PC 1376Select [Internet Protocol Version 4 (TCP/IPv4)] and then click [Properties].ENGLISH](https://usermanual.wiki/LG-Electronics-USA/NT-15Z980.TempConfidential-User-Manual-Part-II/User-Guide-3673036-Page-38.png)
![138 Using the PC7To use an automatic IP(DHCP), select [Obtain an IP address automatically]. If you wish to use astatic IP, select [Use the following IP Address] to enter the address.Contact the network service provider or administrator to use a static IP.8Press [OK] to complete the network setup.9Click the Internet Browser icon to check whether the internet is operating normally.ENGLISH](https://usermanual.wiki/LG-Electronics-USA/NT-15Z980.TempConfidential-User-Manual-Part-II/User-Guide-3673036-Page-39.png)
![Using the PC 139Wireless LANThe wireless network (Wireless LAN) is the network environment that connects a PC with the internetprovider or company network through an Access Point (wireless or regular router).Turning On/Off Airplane ModePrior to using the wireless LAN, press [Fn] + [F6] to turn off Airplane Mode.Pressing [Fn] + [F6] keys will turn on or off the Airplane Mode. If you are not going to use theproduct for a while, keep the Airplane Mode turned on to reduce the battery power consumption.Using the Wireless LANIf an Access Point (wired or wireless router) is in the vicinity of the PC, the wireless LAN can easily beaccessed.During the search for a wireless network (Wireless LAN), various Access Points may be foundaccording to the location where the PC is used.In case there are no accessible wireless networks (Wireless LAN) near the PC, no Access Pointsmay be found.A password protected Access Point cannot be accessed without the correct password.1Press the Action Center [] icon on the right side of the taskbar.ENGLISH](https://usermanual.wiki/LG-Electronics-USA/NT-15Z980.TempConfidential-User-Manual-Part-II/User-Guide-3673036-Page-40.png)
![140 Using the PC2Press the [Network] tile to search for a nearby Access Point.TIPIf Wi-Fi is turned off, press the [Wi-Fi] tile.ENGLISH](https://usermanual.wiki/LG-Electronics-USA/NT-15Z980.TempConfidential-User-Manual-Part-II/User-Guide-3673036-Page-41.png)
![Using the PC 1413Select the Access Point you want to connect to and press [Connect].ENGLISH](https://usermanual.wiki/LG-Electronics-USA/NT-15Z980.TempConfidential-User-Manual-Part-II/User-Guide-3673036-Page-42.png)
![142 Using the PC4If a connection is established, [Connected] appears below the Access Point name.5Click the Internet Browser icon to check whether the internet is operating normally.ENGLISH](https://usermanual.wiki/LG-Electronics-USA/NT-15Z980.TempConfidential-User-Manual-Part-II/User-Guide-3673036-Page-43.png)
![Using Software 147Using SoftwareLG Control CenterLG Control Center is a software that helps you change PC Settings, Power Settings, Windows SecuritySettings, etc. as well as check current system information.TIPThe menus displayed in LG Control Center and its supported functions may differ depending onthe model.The figures herein are subject to change without prior notice.Running LG Control CenterSelect the [ ] button > [LG Software] to run [LG Control Center].1Minimize/Exit Button: Minimizes the size of the window, or exits the software.2help/info Button: Runs Help or displays information about the software.ENGLISH](https://usermanual.wiki/LG-Electronics-USA/NT-15Z980.TempConfidential-User-Manual-Part-II/User-Guide-3673036-Page-48.png)
![152 Using SoftwareLG Update CenterLG Update Center allows you to install various PC drivers, applications easily.TIPIt may not work properly depending on user preferences (security tools, etc.) and the networkstatus.You can use the LG Update Center to quickly install the latest drivers, or reinstall any deleteddrivers.Use LG Update Center to keep your system current and optimized.The figures herein are subject to change without prior notice.Running LG Update CenterSelect the [ ] button > [LG Software] to run [LG Update Center].1Minimize/Exit Button: Minimizes the size of the window, or exits the software.2help/info Button: Runs Help or displays information about the software.3Required Update: Installs critical items that must be applied to the system.ENGLISH](https://usermanual.wiki/LG-Electronics-USA/NT-15Z980.TempConfidential-User-Manual-Part-II/User-Guide-3673036-Page-53.png)
![Using Software 1534All List: Displays and installs all required items for the system.5Notification Setting: Sets up notifications for online updates for installed items.Required UpdateYou can install essential updates and drivers that are necessary for the system.1Select the [Required Update] menu.ENGLISH](https://usermanual.wiki/LG-Electronics-USA/NT-15Z980.TempConfidential-User-Manual-Part-II/User-Guide-3673036-Page-54.png)
![154 Using Software2When the Required Update list appears, select the updates to install and press the [Installation]button.TIPAll items are selected by default.All ListYou can install all updates and drivers that can be installed in the system.ENGLISH](https://usermanual.wiki/LG-Electronics-USA/NT-15Z980.TempConfidential-User-Manual-Part-II/User-Guide-3673036-Page-55.png)
![Using Software 1551Select the [All List] menu.ENGLISH](https://usermanual.wiki/LG-Electronics-USA/NT-15Z980.TempConfidential-User-Manual-Part-II/User-Guide-3673036-Page-56.png)
![156 Using Software2When the list appears, select the updates to install and press the [Installation] button.TIPAll items are selected by default.Notification SettingYou can check the critical updates to set whether to display the notifications for update installation.TIPThe Auto Update Search function is set to [ON] by default. If you set it to [OFF], thenotifications are not displayed.ENGLISH](https://usermanual.wiki/LG-Electronics-USA/NT-15Z980.TempConfidential-User-Manual-Part-II/User-Guide-3673036-Page-57.png)
![Using Software 1571Select the [Notification Setting] menu.2Set [Auto Update Search] to [ON] or [OFF].ENGLISH](https://usermanual.wiki/LG-Electronics-USA/NT-15Z980.TempConfidential-User-Manual-Part-II/User-Guide-3673036-Page-58.png)
![158 Using Software3Set the [Cycle].4Select [Notification List Setup] menu to turn on/off the notification for each item.FAQQ: Is there a way that I can install the drivers and applications easily?•You can select [Required Update] or [All List] menu in LG Update Center to automatically installthe drivers and applications that you want.Q: The server connection status is not displayed in the program.•Check if your PC is properly connected to the wired or wireless LAN.•Check if Internet connection works properly.Q: I want to hide the update notifications.•Select the [Notification Setting] menu and set the [Auto Update Search] to [OFF].•Select [Notification List Setup] menu to turn on/off the notification for each item.Q: How can I update the items that are excluded from the notification list?•You can also install the items that are excluded from the notification list by using the [RequiredUpdate] or [All List] menu.ENGLISH](https://usermanual.wiki/LG-Electronics-USA/NT-15Z980.TempConfidential-User-Manual-Part-II/User-Guide-3673036-Page-59.png)
![Using Software 159LG Reader ModeLG Reader Mode prevents the users from eyestrain and helps them to read the PC screen comfortablyby displaying the screen just like a printed paper.Using LG Reader ModeCAUTIONUsing the Reader Mode and the Night light at the same time can cause color distortion. Whenyou use the Reader Mode, turn off the Night light.•Press the [ ] icon to the right of the taskbar to run the Action Center and press the[Night light] tile to turn on/off the Night light.TIPYou can use hot keys to use the Reader Mode function more conveniently.•Press the [Fn] + [F9] keys to switch the PC screen to reader mode. Press them again toturn off reader mode.ENGLISH](https://usermanual.wiki/LG-Electronics-USA/NT-15Z980.TempConfidential-User-Manual-Part-II/User-Guide-3673036-Page-60.png)
![160 Using Software1Press the [] icon on the taskbar.ENGLISH](https://usermanual.wiki/LG-Electronics-USA/NT-15Z980.TempConfidential-User-Manual-Part-II/User-Guide-3673036-Page-61.png)
![Using Software 1612Select the [Reader Mode On] menu to switch to reader mode as shown in the figure.TIPSelect [Reader Mode Off] to turn off the reader mode.ENGLISH](https://usermanual.wiki/LG-Electronics-USA/NT-15Z980.TempConfidential-User-Manual-Part-II/User-Guide-3673036-Page-62.png)
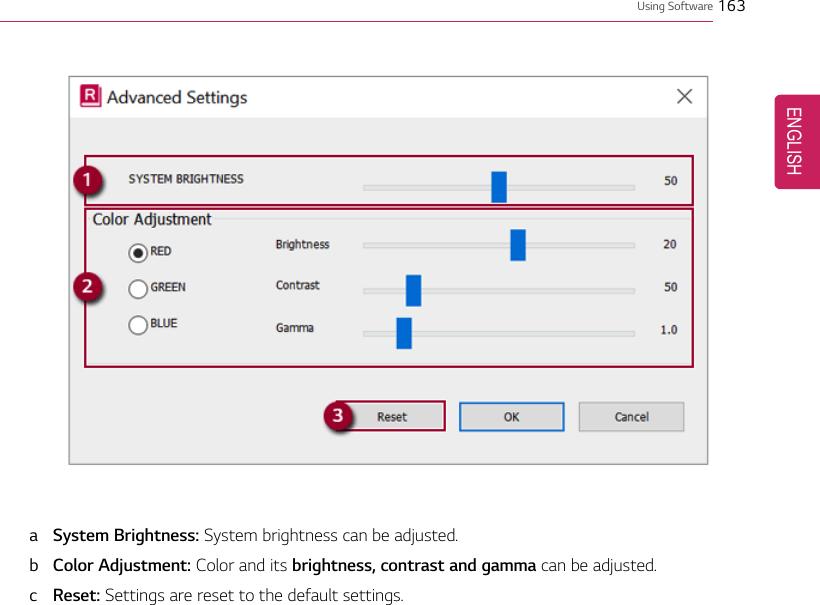
![162 Using SoftwareUsing Advanced Settings1Select the [Advanced Settings] menu as shown in the figure.TIPThe [Advanced Settings] menu is activated when Reader Mode is on.2The [Advanced Settings] window appears as shown below.ENGLISH](https://usermanual.wiki/LG-Electronics-USA/NT-15Z980.TempConfidential-User-Manual-Part-II/User-Guide-3673036-Page-63.png)
![164 Using SoftwareDTS Headphone: X/DTS Studio SoundDTS Headphone: X/DTS Studio Sound provides rich, sonorous sound when you listen to music, watchvideos or play games in the PC.DTS Headphone: X/DTS Studio Sound may not be applied depending on the model.The figures herein are subject to change without prior notice.CAUTIONAs 3D Fx is a sound effect optimized for watching movies, it may cause sound distortion whenyou listen to music in this mode.Please disable this mode when you use music content.Running DTS Headphone: X/DTS Studio Sound Program1Press [ ] icon on the right side of the task bar to run [DTS Audio].2Default is DTS Studio Sound and DTS Headphone: X operates when the earphone is connected.ENGLISH](https://usermanual.wiki/LG-Electronics-USA/NT-15Z980.TempConfidential-User-Manual-Part-II/User-Guide-3673036-Page-65.png)
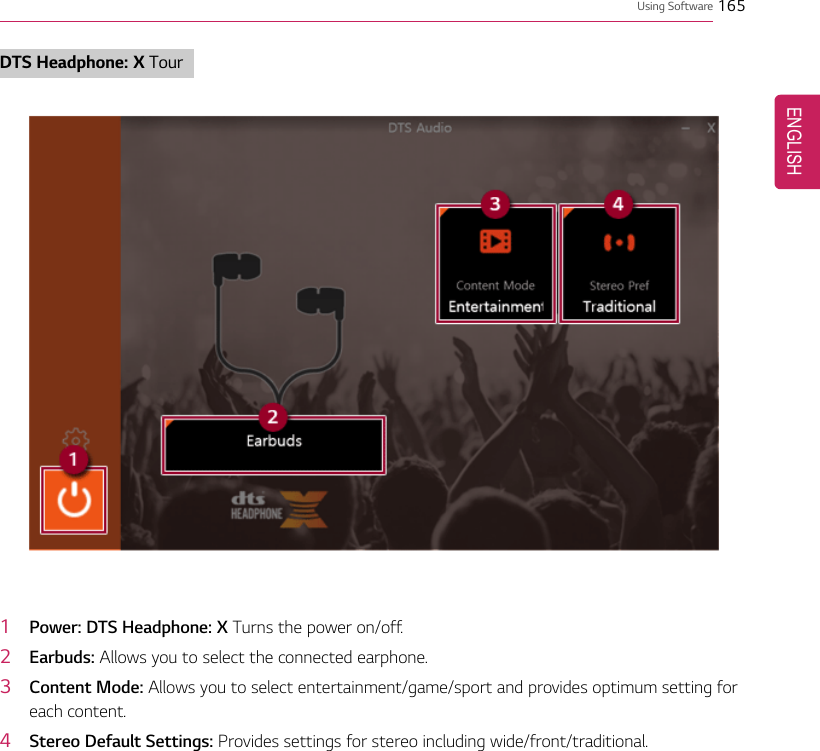
![166 Using SoftwareDTS Studio Sound Tour1Power: DTS Studio Sound Turns the power on/off.2Bass Boost: Boosts the lowest frequencies for enhanced bass sound.3Volume Leveling: Increases audio level without distortion of sound.4Surround Sound: Sets up surround sound effects through the PC's embedded speakers.53D: Sets up 3D sound effects through the PC's embedded speakers.6Equalizer: Sets the equalizer.7Advanced Level: DTS Studio Sound Provides advanced options menu.TIPIf you want to remove Audio Driver or DTS Headphone: X/DTS Studio Sound, remove [DTSAudio] and [Conexant High Definition Audio Driver] in the order specified and restart thesystem.If you want to reinstall Audio Driver or DTS Headphone: X/DTS Studio Sound, remove [DTSAudio] and [Conexant High Definition Audio Driver] in the order specified and install[Conexant High Definition Audio Driver]. Then restart and install [DTS Audio].•If you do not remove or install them in the order specified, an error may occur.ENGLISH](https://usermanual.wiki/LG-Electronics-USA/NT-15Z980.TempConfidential-User-Manual-Part-II/User-Guide-3673036-Page-67.png)
![Restoring the System 167Restoring the SystemRestoring the SystemIf the system has an error, you can use Windows 10's recovery function to recover or restore thesystem to its initial pre-purchase state.CAUTIONIf you have deleted the restoration data in the protected area of the disk, or have arbitrarilyinstalled another operating system, the restore function may not work.To recover the system, the AC adapter must be connected.1Click the [ ] button and select the Settings menu.ENGLISH](https://usermanual.wiki/LG-Electronics-USA/NT-15Z980.TempConfidential-User-Manual-Part-II/User-Guide-3673036-Page-68.png)
![168 Restoring the System2When the [Settings] screen appears, select [Update & Security].3Select the [Recovery] menu and press [Get started] in the Reset this PC menu.ENGLISH](https://usermanual.wiki/LG-Electronics-USA/NT-15Z980.TempConfidential-User-Manual-Part-II/User-Guide-3673036-Page-69.png)
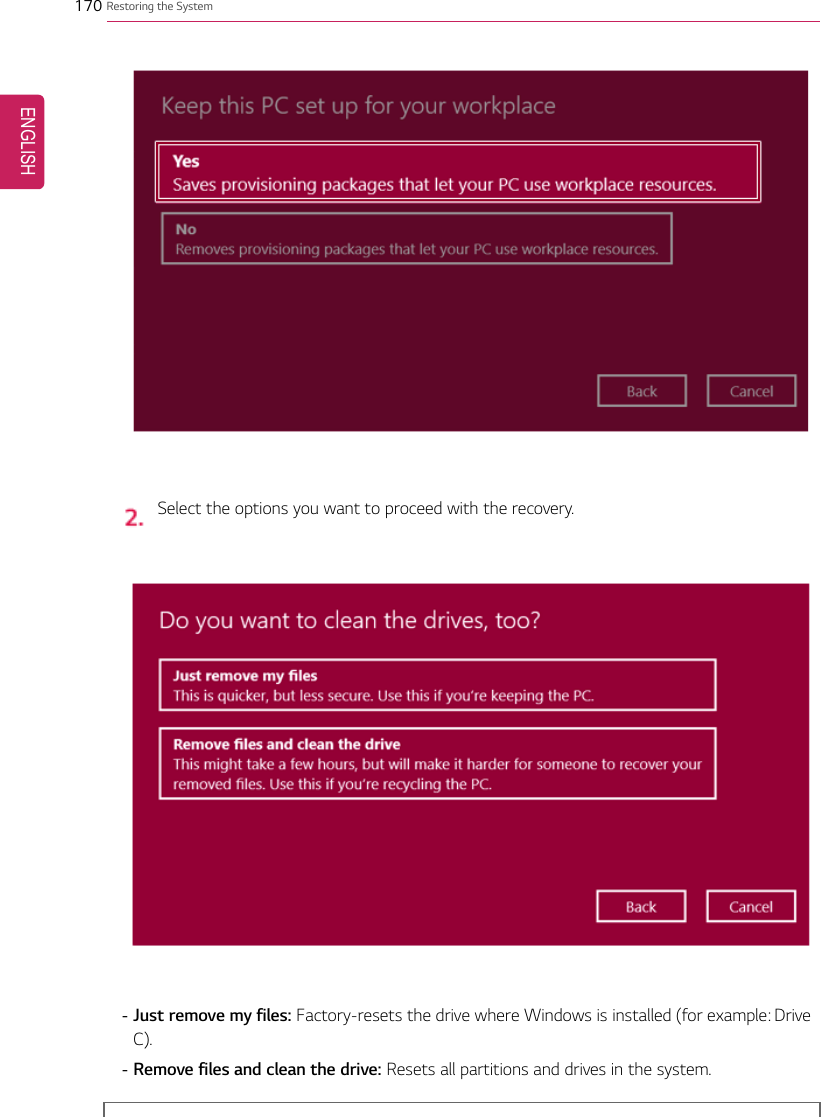
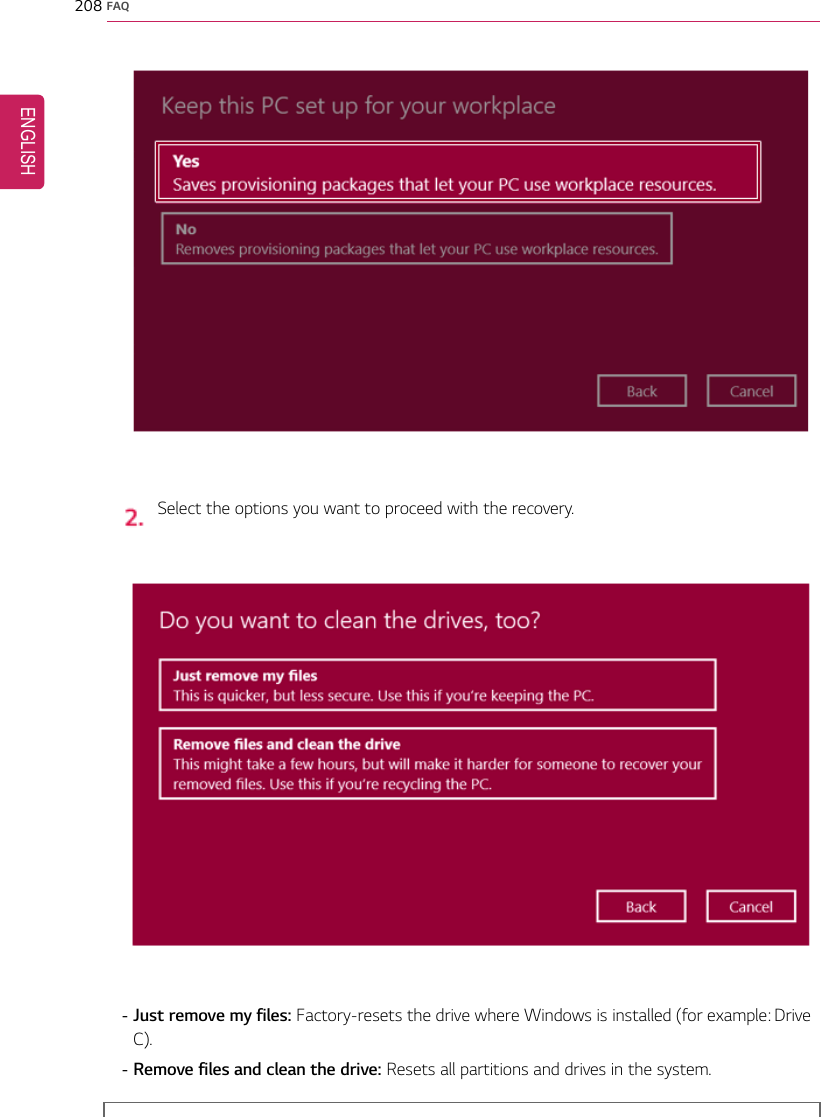
![Restoring the System 1694If the following screen appears, select a desired option to proceed with recovery.•Keep my files: Recovers the PC without losing any personal files.PC settings are reset to default and any user-installed Desktop app will be deleted.•Remove everything: Removes all items from the system and restores the system to its initialpre-purchase state.When the following screen appears, select [Yes].ENGLISH](https://usermanual.wiki/LG-Electronics-USA/NT-15Z980.TempConfidential-User-Manual-Part-II/User-Guide-3673036-Page-70.png)

![172 Setup and UpgradeSetup and UpgradeInstalling the DriverThe figures herein may differ by language selection and are subject to change without priornotice.Using LG Update Center to install the Driver1Select the [] button > [LG Software] to run [LG Update Center].2Select [Required Update] or [All List] to install the driver.TIPYou can use the LG Update Center to quickly install the latest drivers, or reinstall any deleteddrivers.Use LG Update Center to keep your system current and optimized.ENGLISH](https://usermanual.wiki/LG-Electronics-USA/NT-15Z980.TempConfidential-User-Manual-Part-II/User-Guide-3673036-Page-73.png)

![174 Setup and UpgradeStarting System SetupSystem setup means storing the hardware configuration information of the PC in the flash memory.Through system setup, the PC retrieves various information including current date and time, memorycapacity, and hard disk capacity and type.You setup the system when you set passwords, change the boot order, and add new peripheral devicesto the machine.Items displayed on the Setup screen may differ by model type and specification. Refer to•Refer to .•Refer to .•Refer to .TIPTo use the system setup (F2), booting device selection (F10), you need to restart the system(click [Restart] in the system power menu) and then immediately press the correspondingfunction key due to the fast booting speed.CAUTION•Do not change the system setup unless necessary. Incorrect system setup may causeerrors during system operation. Use caution when changing the system setup.•For performance improvement, the system setup menu configuration and the initial setupstatus may be changed and may become different from images included in the usermanual.ENGLISH](https://usermanual.wiki/LG-Electronics-USA/NT-15Z980.TempConfidential-User-Manual-Part-II/User-Guide-3673036-Page-75.png)
![Setup and Upgrade 1751Reboot the system and press [F2].2In a few moments, the system setup screen appears.ENGLISH](https://usermanual.wiki/LG-Electronics-USA/NT-15Z980.TempConfidential-User-Manual-Part-II/User-Guide-3673036-Page-76.png)
![Setup and Upgrade 177Setting the PasswordThis process is to set a password so that other people cannot use the PC or change the settings.The user can set a password while booting the system or setting up the system.The model in the example can differ from actual models and is subject to change for performanceimprovements, without prior notice.CAUTION•Without the registered password, access to the system will be denied. Write down andkeep the password in a safe place.Set Supervisor PasswordThe password prevents unauthorized people from accessing the PC. By default, no password is set forthe machine. If an unauthorized person changes the password in the System Setup, you will be unableto access the system.1After opening the system setup screen, use the arrow keys to move to [Security].2When the following screen shows up, click [Set Supervisor Password] by using the arrow keysand press [Enter].ENGLISH](https://usermanual.wiki/LG-Electronics-USA/NT-15Z980.TempConfidential-User-Manual-Part-II/User-Guide-3673036-Page-78.png)
![178 Setup and Upgrade3When the following message shows up on the screen, enter the password and press [Enter]. Thepassword must not exceed 8 characters in total and must consist of letters (A - Z), numbers (0 -9), special characters or their combination.4When the following message appears, select and press [Enter].5To save the changes in the system setup, press [F10].6When the following message appears, select [Yes] and press [Enter]. The PC will restart.ENGLISH](https://usermanual.wiki/LG-Electronics-USA/NT-15Z980.TempConfidential-User-Manual-Part-II/User-Guide-3673036-Page-79.png)
![Setup and Upgrade 179TIP•With Supervisor Password, you are authorized to set all items in the System Setup andto set Password on boot. In case other people also use the PC, it is recommended to setthe Set User Password.Set User PasswordThe password set by the Set User Password process is lower in level than that set by the [SetSupervisor Password] process, and so the user can use the [Set User Password] only after setting apassword in the [Set Supervisor Password] menu.1After opening the system setup screen, use the arrow keys to move to [Security].2When the following screen appears, press [Enter] in the [Set User Password] menu.ENGLISH](https://usermanual.wiki/LG-Electronics-USA/NT-15Z980.TempConfidential-User-Manual-Part-II/User-Guide-3673036-Page-80.png)
![180 Setup and Upgrade3When the following message shows up on the screen, enter the password and press [Enter]. Thepassword must not exceed 8 characters in total and must consist of letters (A - Z), numbers (0 -9), special characters or their combination.4When the following message appears, select and press [Enter].5To save the changes in the system setup, press [F10].6When the following message appears, select [Yes] and press [Enter]. The PC will restart.TIP•[User Password] allows limited access to the items in the System Setup compared to the[Supervisor Password] item.ENGLISH](https://usermanual.wiki/LG-Electronics-USA/NT-15Z980.TempConfidential-User-Manual-Part-II/User-Guide-3673036-Page-81.png)
![Setup and Upgrade 181Password on bootPassword on boot protects the system by requesting [Set Supervisor Password] or [Set UserPassword] during boot up.1After opening the system setup screen, use the arrow keys to move to [Security].2When the following screen appears, set [Set Supervisor Password] only or both [Set SupervisorPassword] and [Set User Password].ENGLISH](https://usermanual.wiki/LG-Electronics-USA/NT-15Z980.TempConfidential-User-Manual-Part-II/User-Guide-3673036-Page-82.png)
![182 Setup and Upgrade3The popup screen will show up, after selecting [Password on boot] and press [Enter]. Afterselecting [Enable] and press [Enter], [Password on boot] will be complete.Set SSD Password / NVMe PasswordTIPSome models installed with NVMe may not support the password settings.Depending on the model, the menu name may be displayed as SSD Password,NVMePassword, etc.For a model equipped with two SSD or NVMe devices, the menu name may be displayed asSSD01, SSD02, NVMe0, NVMe1, etc.SSD Or, for a model equipped with two NVMe devices, you can set a password for each device. Ifboth passwords are set, the password input window appears twice during the booting process.The password input windows appear according to the [Boot Priority order] in the [Boot] menu.1After opening the system setup screen, use the arrow keys to move to [Security].ENGLISH](https://usermanual.wiki/LG-Electronics-USA/NT-15Z980.TempConfidential-User-Manual-Part-II/User-Guide-3673036-Page-83.png)
![Setup and Upgrade 1832When the following screen shows up, click [Set SSD02 Password] by using the arrow keys andpress [Enter].3When the following message appears on the screen, enter the password and press [Enter].Thepassword must not exceed 8 characters in total and must consist of letters (A - Z), numbers (0 -9), special characters or their combination.ENGLISH](https://usermanual.wiki/LG-Electronics-USA/NT-15Z980.TempConfidential-User-Manual-Part-II/User-Guide-3673036-Page-84.png)
![184 Setup and Upgrade4When the following message appears, select and press [Enter].5To save the changes in the system setup, press [F10].6When the following message appears, select [Yes] and press [Enter]. The PC will restart.CAUTIONIf you forgot SSD Password / NVMe Password, you cannot restore the SSD/NVMe.•The replacement of SSD/NVMe due to a forgotten SSD Password / NVMe Password isnot covered by warranty.ENGLISH](https://usermanual.wiki/LG-Electronics-USA/NT-15Z980.TempConfidential-User-Manual-Part-II/User-Guide-3673036-Page-85.png)
![Setup and Upgrade 185Changing or Deleting the PasswordYou can delete or change the password only after entering the current password.The model in the example can differ from actual models and is subject to change for performanceimprovements, without prior notice.Changing the Password1Execute System Setup, enter the password, and click [Enter].2Change the password in the same way as setting one.Deleting the Password1Execute System Setup, enter the password, and press [Enter].ENGLISH](https://usermanual.wiki/LG-Electronics-USA/NT-15Z980.TempConfidential-User-Manual-Part-II/User-Guide-3673036-Page-86.png)
![186 Setup and Upgrade2After moving [Security] by using the arrow keys from the setup start screen, click [Set SupervisorPassword] and press [Enter].3When the following message appears, enter the current password in the [Enter CurrentPassword] field.ENGLISH](https://usermanual.wiki/LG-Electronics-USA/NT-15Z980.TempConfidential-User-Manual-Part-II/User-Guide-3673036-Page-87.png)
![Setup and Upgrade 1874Press [Enter] in [Enter New Password] and [Confirm New Password].5When the following message appears, select and press [Enter].6To save the changes in the system setup, press [F10].7When the following message appears, select [Yes] and press [Enter]. The PC will restart.ENGLISH](https://usermanual.wiki/LG-Electronics-USA/NT-15Z980.TempConfidential-User-Manual-Part-II/User-Guide-3673036-Page-88.png)
![188 Setup and UpgradeDeleting the Password (Set SSD Password / Set NVMe Password)1Execute System Setup, enter the password, and press [Enter].2After moving [Security] by using the arrow keys from the setup start screen, click [Set SSD02Password] and press [Enter].TIPDepending on the model, the menu name may be displayed as SSD Password, NVMePassword, etc.For a model equipped with two SSD, NVMe devices, the menu name may be displayed asSSD01, SSD02, NVMe0, NVMe1, etc.ENGLISH](https://usermanual.wiki/LG-Electronics-USA/NT-15Z980.TempConfidential-User-Manual-Part-II/User-Guide-3673036-Page-89.png)
![Setup and Upgrade 1893When the following message appears, enter the current password in the [Enter CurrentPassword] field.4Press [Enter] in [Enter New Password] and [Confirm New Password].5When the following message appears, select and press [Enter].6To save the changes in the system setup, press [F10].ENGLISH](https://usermanual.wiki/LG-Electronics-USA/NT-15Z980.TempConfidential-User-Manual-Part-II/User-Guide-3673036-Page-90.png)
![190 Setup and Upgrade7When the following message appears, select [Yes] and press [Enter]. The PC will restart.ENGLISH](https://usermanual.wiki/LG-Electronics-USA/NT-15Z980.TempConfidential-User-Manual-Part-II/User-Guide-3673036-Page-91.png)
![Setup and Upgrade 191Restoring the Factory Default SettingsIf you have changed the system setup by mistake, you can restore the default settings.The model in the example can differ from actual models and is subject to change for performanceimprovements, without prior notice.1After opening the system setup screen, use the arrow keys to move to [Exit].2Click [Load Setup Defaults] by using the arrow keys and pressing [Enter].3When the following message appears, select [Yes] and press [Enter]. The settings will be reset tothe factory default.4To save the changes in system setup, press [F10].ENGLISH](https://usermanual.wiki/LG-Electronics-USA/NT-15Z980.TempConfidential-User-Manual-Part-II/User-Guide-3673036-Page-92.png)
![192 Setup and Upgrade5When the following message appears, select [Yes] and press [Enter]. The PC will restart.TIP•When you press[F9], you can use [Load Setup Defaults].ENGLISH](https://usermanual.wiki/LG-Electronics-USA/NT-15Z980.TempConfidential-User-Manual-Part-II/User-Guide-3673036-Page-93.png)
![Setup and Upgrade 193Changing the Boot OrderThe user can change the boot order according to his or her needs, or select a boot deviceThe model in the example can differ from actual models and is subject to change for performanceimprovements, without prior notice.TIPTo use the system setup (F2), booting device selection (F10), you need to restart the system(click [Restart] in the system power menu) and then immediately press the correspondingfunction key due to the fast booting speed.Changing the Boot Order1Reboot the system and press [F2].2Move to the [Boot] menu when the system setup screen appears.ENGLISH](https://usermanual.wiki/LG-Electronics-USA/NT-15Z980.TempConfidential-User-Manual-Part-II/User-Guide-3673036-Page-94.png)
![194 Setup and Upgrade3Go to [Boot Priority Order] and press [F5] or [F6] to change the booting order.4When you press [F10] and the following screen appears, select [Yes] and press [Enter].5The changes are saved and the system reboots.ENGLISH](https://usermanual.wiki/LG-Electronics-USA/NT-15Z980.TempConfidential-User-Manual-Part-II/User-Guide-3673036-Page-95.png)
![Setup and Upgrade 195Selecting a Booting Device to Use1Reboot the system and press [F10].2When the Select Booting Device screen appears, select the device.ENGLISH](https://usermanual.wiki/LG-Electronics-USA/NT-15Z980.TempConfidential-User-Manual-Part-II/User-Guide-3673036-Page-96.png)

![Setup and Upgrade 197Windows 10 Auto ScalingThe Windows 10 Auto Scaling feature for user's convenience may partially blur the screen or displaysome icons and texts larger.Refer to the following information to change the DPI scaling to suit your needs.1Press the [] button and select the [Settings] menu.TIPPress the [ ] key or [Ctrl] + [Esc] to display the Start menu.ENGLISH](https://usermanual.wiki/LG-Electronics-USA/NT-15Z980.TempConfidential-User-Manual-Part-II/User-Guide-3673036-Page-98.png)
![198 Setup and Upgrade2Select [System] >[Display].ENGLISH](https://usermanual.wiki/LG-Electronics-USA/NT-15Z980.TempConfidential-User-Manual-Part-II/User-Guide-3673036-Page-99.png)
![Setup and Upgrade 1993Modify the [Change the size of text, apps, and other items] value to change the Auto Scalingsettings.TIPAfter changing the auto scaling settings, it is recommended that you click [Sign out now]and log on to Windows again.ENGLISH](https://usermanual.wiki/LG-Electronics-USA/NT-15Z980.TempConfidential-User-Manual-Part-II/User-Guide-3673036-Page-100.png)
![200 Setup and UpgradeUsing Instant BootingInstant Booting allows the system to boot automatically when the notebook PC cover is opened, sothat you can use the system without pressing the power button.1Select the [] button > [LG Software] to run [LG Control Center].2On LG Control Center screen, set the [Instant Booting] to [ON].3Shutdown the system and close the notebook PC cover.4When the cover is opened, the notebook PC turns on and the system starts to boot automatically.ENGLISH](https://usermanual.wiki/LG-Electronics-USA/NT-15Z980.TempConfidential-User-Manual-Part-II/User-Guide-3673036-Page-101.png)
![FAQ 201FAQFAQ ContentUsing Instant BootingInstant Booting allows the system to boot automatically when the notebook PC cover is opened, sothat you can use the system without pressing the power button.1Select the [] button > [LG Software] to run [LG Control Center].2On LG Control Center screen, set the [Instant Booting] to [ON].3Shutdown the system and close the notebook PC cover.4When the cover is opened, the notebook PC turns on and the system starts to boot automatically.ENGLISH](https://usermanual.wiki/LG-Electronics-USA/NT-15Z980.TempConfidential-User-Manual-Part-II/User-Guide-3673036-Page-102.png)
![202 FAQWindows 10 Auto ScalingThe Windows 10 Auto Scaling feature for user's convenience may partially blur the screen or displaysome icons and texts larger.Refer to the following information to change the DPI scaling to suit your needs.1Press the [] button and select the [Settings] menu.TIPPress the [ ] key or [Ctrl] + [Esc] to display the Start menu.ENGLISH](https://usermanual.wiki/LG-Electronics-USA/NT-15Z980.TempConfidential-User-Manual-Part-II/User-Guide-3673036-Page-103.png)
![FAQ 2032Select [System] >[Display].ENGLISH](https://usermanual.wiki/LG-Electronics-USA/NT-15Z980.TempConfidential-User-Manual-Part-II/User-Guide-3673036-Page-104.png)
![204 FAQ3Modify the [Change the size of text, apps, and other items] value to change the Auto Scalingsettings.TIPAfter changing the auto scaling settings, it is recommended that you click [Sign out now]and log on to Windows again.ENGLISH](https://usermanual.wiki/LG-Electronics-USA/NT-15Z980.TempConfidential-User-Manual-Part-II/User-Guide-3673036-Page-105.png)
![FAQ 205Restoring the SystemIf the system has an error, you can use Windows 10's recovery function to recover or restore thesystem to its initial pre-purchase state.CAUTIONIf you have deleted the restoration data in the protected area of the disk, or have arbitrarilyinstalled another operating system, the restore function may not work.To recover the system, the AC adapter must be connected.1Click the [ ] button and select the Settings menu.ENGLISH](https://usermanual.wiki/LG-Electronics-USA/NT-15Z980.TempConfidential-User-Manual-Part-II/User-Guide-3673036-Page-106.png)
![206 FAQ2When the [Settings] screen appears, select [Update & Security].3Select the [Recovery] menu and press [Get started] in the Reset this PC menu.ENGLISH](https://usermanual.wiki/LG-Electronics-USA/NT-15Z980.TempConfidential-User-Manual-Part-II/User-Guide-3673036-Page-107.png)
![FAQ 2074If the following screen appears, select a desired option to proceed with recovery.•Keep my files: Recovers the PC without losing any personal files.PC settings are reset to default and any user-installed Desktop app will be deleted.•Remove everything: Removes all items from the system and restores the system to its initialpre-purchase state.When the following screen appears, select [Yes].ENGLISH](https://usermanual.wiki/LG-Electronics-USA/NT-15Z980.TempConfidential-User-Manual-Part-II/User-Guide-3673036-Page-108.png)

![210 FAQConnecting to External DisplayConnecting to the HDMI PortHDMI is a high-speed multimedia interface that can transfer uncompressed full digital audio and videosignals.When LG Notebook PC supports SPDIF, HDMI is not supported.In some models, DTS Audio may not work when you use HDMI.TIPEnsure the monitor power is off before connecting the external monitor to the PC.1Connect the HDMI cable to the PC and the external device (TV, monitor) that supports HDMI.2HDMI port transfers both video and audio simultaneously. Hence, there is no need for a separateaudio connection.3On the PC, press [Fn] + [F7] to display monitor (projector) toggling screen. Select the desiredscreen output.ENGLISH](https://usermanual.wiki/LG-Electronics-USA/NT-15Z980.TempConfidential-User-Manual-Part-II/User-Guide-3673036-Page-111.png)
![FAQ 211TIP•Every time [ ] + [P] keys are pressed, the screen output option changes. Release thekeys to display the selected screen output.CAUTION•If you do not set Speaker as the default value after disconnecting the HDMI cable, thesystem may not produce any sound.•If a program was running already, you must exit and restart the program to produce sound.ENGLISH](https://usermanual.wiki/LG-Electronics-USA/NT-15Z980.TempConfidential-User-Manual-Part-II/User-Guide-3673036-Page-112.png)
![FAQ 213Wireless LANThe wireless network (Wireless LAN) is the network environment that connects a PC with the internetprovider or company network through an Access Point (wireless or regular router).Turning On/Off Airplane ModePrior to using the wireless LAN, press [Fn] + [F6] to turn off Airplane Mode.Pressing [Fn] + [F6] keys will turn on or off the Airplane Mode. If you are not going to use theproduct for a while, keep the Airplane Mode turned on to reduce the battery power consumption.Using the Wireless LANIf an Access Point (wired or wireless router) is in the vicinity of the PC, the wireless LAN can easily beaccessed.During the search for a wireless network (Wireless LAN), various Access Points may be foundaccording to the location where the PC is used.In case there are no accessible wireless networks (Wireless LAN) near the PC, no Access Pointsmay be found.A password protected Access Point cannot be accessed without the correct password.1Press the Action Center [] icon on the right side of the taskbar.ENGLISH](https://usermanual.wiki/LG-Electronics-USA/NT-15Z980.TempConfidential-User-Manual-Part-II/User-Guide-3673036-Page-114.png)
![214 FAQ2Press the [Network] tile to search for a nearby Access Point.TIPIf Wi-Fi is turned off, press the [Wi-Fi] tile.ENGLISH](https://usermanual.wiki/LG-Electronics-USA/NT-15Z980.TempConfidential-User-Manual-Part-II/User-Guide-3673036-Page-115.png)
![FAQ 2153Select the Access Point you want to connect to and press [Connect].ENGLISH](https://usermanual.wiki/LG-Electronics-USA/NT-15Z980.TempConfidential-User-Manual-Part-II/User-Guide-3673036-Page-116.png)
![216 FAQ4If a connection is established, [Connected] appears below the Access Point name.5Click the Internet Browser icon to check whether the internet is operating normally.ENGLISH](https://usermanual.wiki/LG-Electronics-USA/NT-15Z980.TempConfidential-User-Manual-Part-II/User-Guide-3673036-Page-117.png)