LG Electronics USA NT-LG14Z96 Notebook Computer User Manual 2
LG Electronics USA Notebook Computer 2
UserManual.wiki
>
LG Electronics USA
>
NT-LG14Z96 User Manual
>
User Manual 2
Contents
1.
User Manual 1
2.
User Manual 2
User Manual 2
Navigation menu
Upload a User Manual
Namespaces
Wiki Guide
HTML
PDF
Info
Views
User Manual
Discussion / Help
Navigation
![Using Software 105Using SoftwareLG Control CenterLG Control Center is a software that helps you to change PC Settings, Power Settings,Windows Security Settings, etc. as well as viewing system information.TIPLG Control Center For more details about how to use , refer to the correspondinghelp.The figures herein is subject to change for performance improvements without priornotice and the functions supported by LG Control Center may vary from models.Using LG Control Center1Press the [] icon on the desktop to run [LG Control Center].TIPSelect the [ ] button > [All Apps] > [LG Software] and run [LG Control Center].ENGLISH](https://usermanual.wiki/LG-Electronics-USA/NT-LG14Z96.User-Manual-2/User-Guide-2883045-Page-5.png)
![Using Software 107LG Update CenterLG Update Center allows you to install various PC drivers, applications and Windowspatches easily.TIPThe illustrated images are subject to change without prior notice.It may not work properly depending on user preferences (security tools, etc.) and thenetwork status.For more information on LG Update Center, refer to [Help].Using LG Update Center1Press the [] icon on the desktop to run LG Update Center.TIPSelect the [ ] button > [All Apps] > [LG Software] and run [LG Update Center].aRequired Update: Installs critical items that must be applied to the system.bAll List : Displays and installs all required items for the system.ENGLISH](https://usermanual.wiki/LG-Electronics-USA/NT-LG14Z96.User-Manual-2/User-Guide-2883045-Page-7.png)
![Using Software 109LG Reader ModeLG Reader Mode prevents the users from eyestrain and helps them to read the PC screencomfortably by displaying the screen just like a printed paper.Using LG Reader ModeTIPYou cannot adjust the screen brightness in reader mode. Deactivate reader mode toadjust screen brightness.If you want to use the hot keys you can use reader mode more conveniently.•Press the [Fn] + [F9] keys to switch the PC screen to reader mode. Press themagain to turn off reader mode.1Press the [] icon on the taskbar.ENGLISH](https://usermanual.wiki/LG-Electronics-USA/NT-LG14Z96.User-Manual-2/User-Guide-2883045-Page-9.png)
![110 Using Software2Select the [Reader Mode On] menu to switch to reader mode as shown in the figure.TIPSelect [Reader Mode Off] to turn off the mode.ENGLISH](https://usermanual.wiki/LG-Electronics-USA/NT-LG14Z96.User-Manual-2/User-Guide-2883045-Page-10.png)
![Restoring the System 111Restoring the SystemRestoring the SystemIf the system has an error, you can use Windows 10's recovery feature to recover or restorethe system to its initial pre-purchase state.CAUTIONIf you have deleted the restoration data in the protected area of the disk, or havearbitrarily installed another operating system, the restore function may not work.To recover the system, the AC adapter must be connected.1Press the [] button and select the [Settings] menu.ENGLISH](https://usermanual.wiki/LG-Electronics-USA/NT-LG14Z96.User-Manual-2/User-Guide-2883045-Page-11.png)
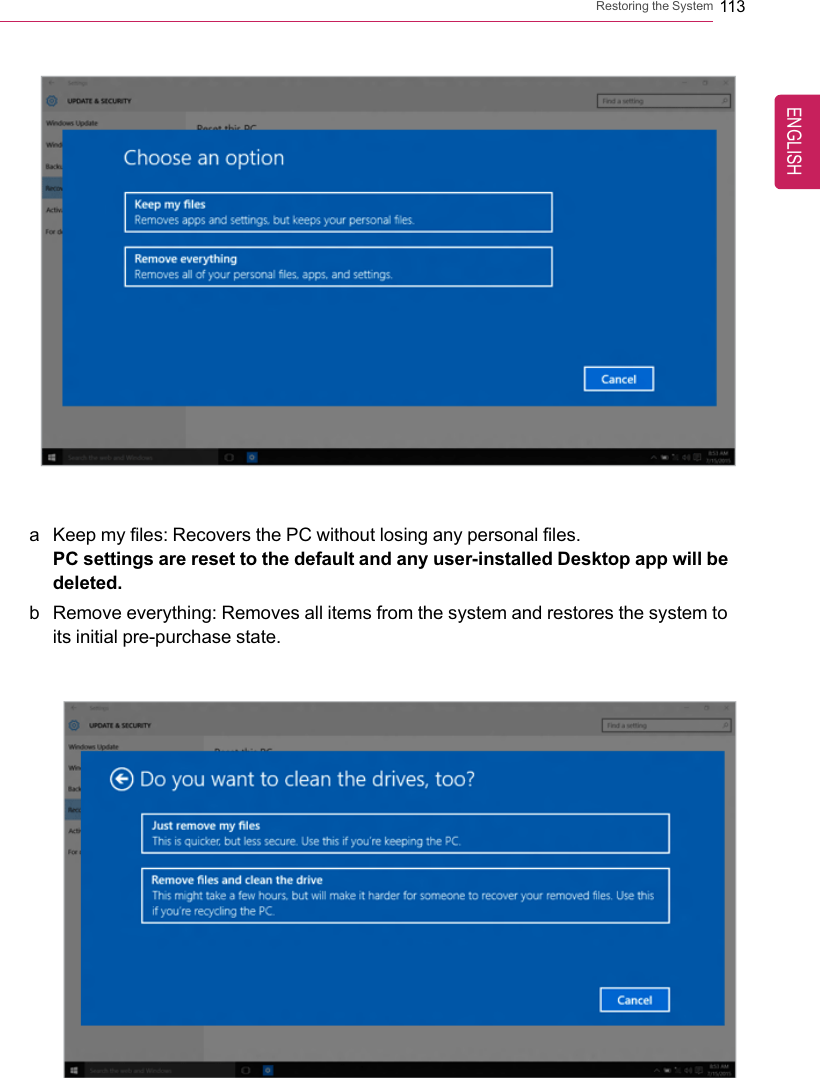
![112 Restoring the System2When the [Settings] screen appears, select [Update & security].3Select the [Recovery] menu and press [Get started] to reset the PC.4If the following screen appears, select a desired option to proceed with recovery.ENGLISH](https://usermanual.wiki/LG-Electronics-USA/NT-LG14Z96.User-Manual-2/User-Guide-2883045-Page-12.png)
![Restoring the System 115LG Recovery Center REIf booting is impossible due to an error with the system, you can recover the system usingLG Recovery Center RE.TIPIt is recommended that you create a recovery drive in case a serious error occurs in thesystem.CAUTIONIf you have deleted the restoration data in the protected area of the hard disk, the restorefunction may not work.All data is lost during the initialization, so you must backup all critical data in advance.1Turn on the notebook PC and press [F11].2When the following screen appears, select the language you want to use and then click[Next].ENGLISH](https://usermanual.wiki/LG-Electronics-USA/NT-LG14Z96.User-Manual-2/User-Guide-2883045-Page-15.png)
![116 Restoring the System3When the following screen appears, select the [Agree] button and then click [Next].For recovery, the power adapter must be connected. Connect the system powerand then recover the system.ENGLISH](https://usermanual.wiki/LG-Electronics-USA/NT-LG14Z96.User-Manual-2/User-Guide-2883045-Page-16.png)
![Restoring the System 1174When the factory reset is completed as shown in the following figure, click [Complete]and then restart the system.ENGLISH](https://usermanual.wiki/LG-Electronics-USA/NT-LG14Z96.User-Manual-2/User-Guide-2883045-Page-17.png)
![118 Restoring the SystemRecovery DriveCreating Recovery DriveCreate a recovery drive in case LG Recovery Center RE is unable to recover the system.TIPThis process may delete all data on the storage device designated as the recovery drive.Make sure to back up all important data in advance.1Right-click the [] button and select the [Control Panel] menu.ENGLISH](https://usermanual.wiki/LG-Electronics-USA/NT-LG14Z96.User-Manual-2/User-Guide-2883045-Page-18.png)
![Restoring the System 1192Click [Recovery] in the control panel and select [Create Recovery Drive].3When the following screen appears, select [Back up the system files to the recoverydrive.] and click [Next].ENGLISH](https://usermanual.wiki/LG-Electronics-USA/NT-LG14Z96.User-Manual-2/User-Guide-2883045-Page-19.png)
![120 Restoring the System4Select the USB flash drive to use and click [Next] to create a recovery drive.5Once the storage device is ready, click [Finish] to complete the creation of the recoverydrive.Using Recovery DriveIn case LG Recovery Center RE is unable to recover the system, you can use the recoverydrive to recover the system.CAUTIONAll data may be lost depending on the user settings during the system recovery.1Connect the recovery drive to the USB port of the PC.2Turn on the PC and press [F10] several times.3When the screen for selecting the booting device appears, select the connectedrecovery drive and click [Enter].4Set the language and select the [Troubleshooting] menu.5Select the item you want to recover the system by following the instructions.ENGLISH](https://usermanual.wiki/LG-Electronics-USA/NT-LG14Z96.User-Manual-2/User-Guide-2883045-Page-20.png)
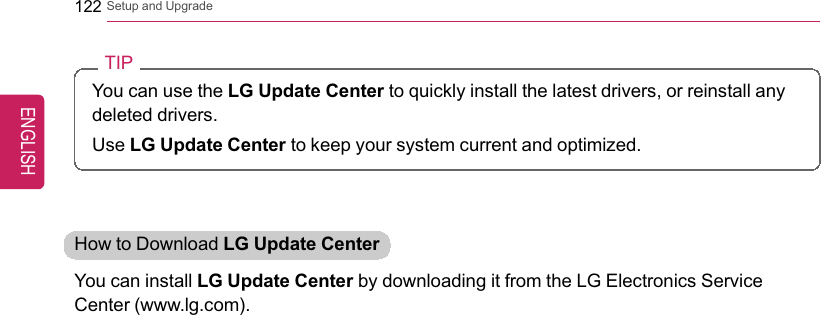
![Setup and Upgrade 121Setup and UpgradeInstalling the DriverThe figures herein may differ by language selection and is subject to change forperformance improvements without prior notice.Using LG Update Center to install the Driver1Press the [] icon on the desktop to run [LG Update Center].TIPSelect the [ ] button > [All Apps] > [LG Software] and run [LG Update Center].2Select [Required Updates] or [All List] to install the driver.For more information on LG Update Center, refer to [Help].ENGLISH](https://usermanual.wiki/LG-Electronics-USA/NT-LG14Z96.User-Manual-2/User-Guide-2883045-Page-21.png)
![Setup and Upgrade 123Starting System SetupSystem setup means storing the hardware configuration information of the PC in the flashmemory. Through system setup, the PC retrieves various information including current dateand time, memory capacity, and storage device (HDD, SSD, eMMC) capacity and type.You setup the system when you set passwords, change the boot order, and add newperipheral devices to the machine.Items displayed on the Setup screen may differ by model type and specification.•••TIPTo use the system setup (F2), booting device selection (F10), or recovery (F11), you needto restart the system (click [Restart] in the system power menu) and then immediatelypress the corresponding function key due to the fast booting speed.CAUTION•Do not change the system setup unless necessary. Incorrect system setup maycause errors during system operation. Use caution when changing the systemsetup.•For performance improvement, the system setup menu configuration and the initialsetup status may be changed and may become different from images included in theuser manual.ENGLISH](https://usermanual.wiki/LG-Electronics-USA/NT-LG14Z96.User-Manual-2/User-Guide-2883045-Page-23.png)
![124 Setup and Upgrade1Reboot the system and press [F2].2In a few moments, the system setup screen appears.ENGLISH](https://usermanual.wiki/LG-Electronics-USA/NT-LG14Z96.User-Manual-2/User-Guide-2883045-Page-24.png)

![126 Setup and UpgradeSetting the PasswordThis process is to set a password so that other people cannot use the PC or change thesettings.The user can set a password while booting the system or setting up the system.CAUTION•Without the registered password, access to the system will be denied. Write downand keep the password in a safe place.Set Supervisor PasswordThe password prevents unauthorized people from accessing the PC. By default, nopassword is set for the machine. If an unauthorized person changes the password in theSystem Setup, you will be unable to access the system.1After opening the system setup screen, click the [Security] button.ENGLISH](https://usermanual.wiki/LG-Electronics-USA/NT-LG14Z96.User-Manual-2/User-Guide-2883045-Page-26.png)
![Setup and Upgrade 1272When the following screen appears, click [Enter] in the [Set Supervisor Password]menu.ENGLISH](https://usermanual.wiki/LG-Electronics-USA/NT-LG14Z96.User-Manual-2/User-Guide-2883045-Page-27.png)
![128 Setup and Upgrade3When the following message appears, enter the password and click [OK]. Thepassword must not exceed 8 characters consisting of letters (A - Z), numbers (0 - 9), ora combination of both.ENGLISH](https://usermanual.wiki/LG-Electronics-USA/NT-LG14Z96.User-Manual-2/User-Guide-2883045-Page-28.png)
![Setup and Upgrade 1294When the following message appears, click [OK].5To save the changes in the system setup, press [F10].ENGLISH](https://usermanual.wiki/LG-Electronics-USA/NT-LG14Z96.User-Manual-2/User-Guide-2883045-Page-29.png)
![130 Setup and Upgrade6When the following message appears, click [YES]. The PC will restart.TIP•With Supervisor Password, you are authorized to set all items in the System Setupand to set Password on boot. In case other people also use the PC, it isrecommended to set the Set User Password.Set User PasswordThe password set by the [Set User Password] process is lower in level than that set by the[Set Supervisor Password] process, and so the user can use the[Set User Password]only after setting a password in the [Set Supervisor Password] menu.ENGLISH](https://usermanual.wiki/LG-Electronics-USA/NT-LG14Z96.User-Manual-2/User-Guide-2883045-Page-30.png)
![Setup and Upgrade 1311After opening the system setup screen, click the [Security] button.2When the following screen appears, click [Enter] in the [Set User Password] menu.ENGLISH](https://usermanual.wiki/LG-Electronics-USA/NT-LG14Z96.User-Manual-2/User-Guide-2883045-Page-31.png)
![132 Setup and Upgrade3When the following message appears, enter the password and click [OK]. Thepassword must not exceed 8 characters consisting of letters (A - Z), numbers (0 - 9), ora combination of both.ENGLISH](https://usermanual.wiki/LG-Electronics-USA/NT-LG14Z96.User-Manual-2/User-Guide-2883045-Page-32.png)
![Setup and Upgrade 1334When the following message appears, click [OK].5To save the changes in the system setup, press [F10].ENGLISH](https://usermanual.wiki/LG-Electronics-USA/NT-LG14Z96.User-Manual-2/User-Guide-2883045-Page-33.png)
![134 Setup and Upgrade6When the following message appears, click [YES]. The PC will restart.TIP•[User Password] allows limited access to the items in the System Setup comparedto the [Supervisor Password] item.Password on boot[Password on boot] menu protects the system by requesting [Set Supervisor Password]or [Set User Password] during boot up.ENGLISH](https://usermanual.wiki/LG-Electronics-USA/NT-LG14Z96.User-Manual-2/User-Guide-2883045-Page-34.png)
![Setup and Upgrade 1351After opening the system setup screen, click the [Security] button.2When the following screen appears, set [Set Supervisor Password] only or both [SetSupervisor Password] and [Set User Password].ENGLISH](https://usermanual.wiki/LG-Electronics-USA/NT-LG14Z96.User-Manual-2/User-Guide-2883045-Page-35.png)
![136 Setup and Upgrade3Click [Off] in the [Password on boot] menu as shown in the following figure. The buttonchanges to [On] and the [Password on boot] setting is completed.Set HDD Password / Set SSD PasswordHDD / SSD Password is to set a password in the HDD and SSD separately from theSupervisor Password.If you set both HDD password and SSD password, the password input windowappears twice during booting.If you set both the HDD password and SSD password, the password input windowappears in order of [Boot Priority Order] at the top of the [Boot] menu.ENGLISH](https://usermanual.wiki/LG-Electronics-USA/NT-LG14Z96.User-Manual-2/User-Guide-2883045-Page-36.png)
![Setup and Upgrade 1371After opening the system setup screen, click the [Security] button.2When the [Security] menu appears, click the [HDD Security Status] button.ENGLISH](https://usermanual.wiki/LG-Electronics-USA/NT-LG14Z96.User-Manual-2/User-Guide-2883045-Page-37.png)
![138 Setup and Upgrade3When the following screen appears, click [Enter] in the [Set HDD Password] or [SetSSD Password] menu.ENGLISH](https://usermanual.wiki/LG-Electronics-USA/NT-LG14Z96.User-Manual-2/User-Guide-2883045-Page-38.png)
![Setup and Upgrade 1394When the following message appears, enter the password and click [OK]. Thepassword must not exceed 8 characters consisting of letters (A - Z), numbers (0 - 9), ora combination of both.ENGLISH](https://usermanual.wiki/LG-Electronics-USA/NT-LG14Z96.User-Manual-2/User-Guide-2883045-Page-39.png)
![140 Setup and Upgrade5When the following message appears, click [OK].6To save the changes in the system setup, press [F10].ENGLISH](https://usermanual.wiki/LG-Electronics-USA/NT-LG14Z96.User-Manual-2/User-Guide-2883045-Page-40.png)
![Setup and Upgrade 1417When the following message appears, click [YES]. The PC will restart.CAUTIONHDD PasswordWithout the password, it is impossible to recover the HDD.•The replacement of HDD due to a forgotten HDD Password is not covered bywarranty.ENGLISH](https://usermanual.wiki/LG-Electronics-USA/NT-LG14Z96.User-Manual-2/User-Guide-2883045-Page-41.png)
![142 Setup and UpgradeChanging or Deleting the PasswordYou can delete or change the password only after entering the current password.Changing the Password1Execute System Setup, enter the password, and click [Enter].2Change the password in the same way as setting one.ENGLISH](https://usermanual.wiki/LG-Electronics-USA/NT-LG14Z96.User-Manual-2/User-Guide-2883045-Page-42.png)
![Setup and Upgrade 143Deleting the Password1Execute System Setup, enter the password, and click the [Security] button.ENGLISH](https://usermanual.wiki/LG-Electronics-USA/NT-LG14Z96.User-Manual-2/User-Guide-2883045-Page-43.png)
![144 Setup and Upgrade2When the following screen appears, click [Enter] in the [Set Supervisor Password]menu.ENGLISH](https://usermanual.wiki/LG-Electronics-USA/NT-LG14Z96.User-Manual-2/User-Guide-2883045-Page-44.png)
![Setup and Upgrade 1453When the following message appears, enter the current password in the [Enter CurrentPassword] field.ENGLISH](https://usermanual.wiki/LG-Electronics-USA/NT-LG14Z96.User-Manual-2/User-Guide-2883045-Page-45.png)
![146 Setup and Upgrade4Click [Enter] in [Enter New Password] and [Confirm New Password].ENGLISH](https://usermanual.wiki/LG-Electronics-USA/NT-LG14Z96.User-Manual-2/User-Guide-2883045-Page-46.png)
![Setup and Upgrade 1475When the following message appears, click [OK].6To save the changes in the system setup, press [F10].ENGLISH](https://usermanual.wiki/LG-Electronics-USA/NT-LG14Z96.User-Manual-2/User-Guide-2883045-Page-47.png)
![148 Setup and Upgrade7When the following message appears, click [YES]. The PC will restart.ENGLISH](https://usermanual.wiki/LG-Electronics-USA/NT-LG14Z96.User-Manual-2/User-Guide-2883045-Page-48.png)
![Setup and Upgrade 149Deleting the Password (Set HDD Password / Set SSD Password)1Execute System Setup, enter the password, and click the [Security] button.2When the [Security] menu appears, click the [HDD Security Status] button.ENGLISH](https://usermanual.wiki/LG-Electronics-USA/NT-LG14Z96.User-Manual-2/User-Guide-2883045-Page-49.png)
![150 Setup and Upgrade3When the following screen appears, click [Enter] in the [Set HDD Password] or [SetSSD Password] menu.ENGLISH](https://usermanual.wiki/LG-Electronics-USA/NT-LG14Z96.User-Manual-2/User-Guide-2883045-Page-50.png)
![Setup and Upgrade 1514When the following message appears, enter the current password in the [Enter CurrentPassword] field.ENGLISH](https://usermanual.wiki/LG-Electronics-USA/NT-LG14Z96.User-Manual-2/User-Guide-2883045-Page-51.png)
![152 Setup and Upgrade5Click [Enter] in [Enter New Password] and [Confirm New Password].ENGLISH](https://usermanual.wiki/LG-Electronics-USA/NT-LG14Z96.User-Manual-2/User-Guide-2883045-Page-52.png)
![Setup and Upgrade 1536When the following message appears, click [OK].7To save the changes in the system setup, press [F10].ENGLISH](https://usermanual.wiki/LG-Electronics-USA/NT-LG14Z96.User-Manual-2/User-Guide-2883045-Page-53.png)
![154 Setup and Upgrade8When the following message appears, click [YES]. The PC will restart.ENGLISH](https://usermanual.wiki/LG-Electronics-USA/NT-LG14Z96.User-Manual-2/User-Guide-2883045-Page-54.png)
![Setup and Upgrade 155Restoring the Factory Default SettingsIf you have changed the system setup by mistake, you can restore the default settings.1After opening the system setup screen, click the [Save & Exit] button.ENGLISH](https://usermanual.wiki/LG-Electronics-USA/NT-LG14Z96.User-Manual-2/User-Guide-2883045-Page-55.png)
![156 Setup and Upgrade2When the [Exit] menu appears, select [Load Setup defaults].ENGLISH](https://usermanual.wiki/LG-Electronics-USA/NT-LG14Z96.User-Manual-2/User-Guide-2883045-Page-56.png)
![Setup and Upgrade 1573When the following message appears, click [Yes]. The settings will be reset to thefactory default.4To save the changes in the system setup, press [F10].ENGLISH](https://usermanual.wiki/LG-Electronics-USA/NT-LG14Z96.User-Manual-2/User-Guide-2883045-Page-57.png)
![158 Setup and Upgrade5When the following message appears, click [YES]. The PC will restart.TIP•You may press [F9] to use the [Load Setup defaults] menu.ENGLISH](https://usermanual.wiki/LG-Electronics-USA/NT-LG14Z96.User-Manual-2/User-Guide-2883045-Page-58.png)
![Setup and Upgrade 159Changing the Booting OrderThe user can change the booting order according to his or her needs, or select a bootdeviceThe model in the example can differ from actual models and is subject to change forperformance improvements, without prior notice.TIPTo use the system setup (F2), booting device selection (F10), or recovery (F11), you needto restart the system (click [Restart] in the system power menu) and then immediatelypress the corresponding function key due to the fast booting speed.Changing the Booting Order1Reboot the system and press [F2].ENGLISH](https://usermanual.wiki/LG-Electronics-USA/NT-LG14Z96.User-Manual-2/User-Guide-2883045-Page-59.png)
![160 Setup and Upgrade2When the system setup screen appears, click the [Boot] button.3Drag the icon of the device to change the booting order in the [Edit Boot Order] menuto change the boot order.ENGLISH](https://usermanual.wiki/LG-Electronics-USA/NT-LG14Z96.User-Manual-2/User-Guide-2883045-Page-60.png)
![Setup and Upgrade 1614To save the changes in the system setup, press [F10].5When the following message appears, click [YES].6The changes are saved and the system reboots.ENGLISH](https://usermanual.wiki/LG-Electronics-USA/NT-LG14Z96.User-Manual-2/User-Guide-2883045-Page-61.png)
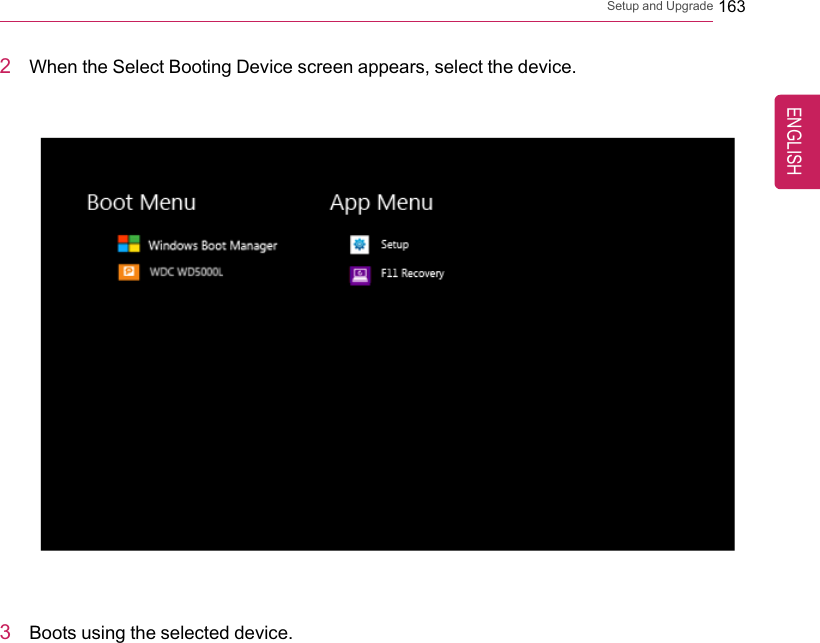
![162 Setup and UpgradeSelecting a Booting Device to Use1Reboot the system and press [F10].ENGLISH](https://usermanual.wiki/LG-Electronics-USA/NT-LG14Z96.User-Manual-2/User-Guide-2883045-Page-62.png)
![164 Setup and UpgradeWindows 10 Auto ScalingThe Windows 10 Auto Scaling feature for user's convenience may partially blur the screenor display some icons and texts larger.Refer to the following information to change the DPI scaling to suit your needs.1Click the [] button and select the [Settings] menu.TIPPress the [ ] key or [Ctrl] + [Esc] to display the Start menu.ENGLISH](https://usermanual.wiki/LG-Electronics-USA/NT-LG14Z96.User-Manual-2/User-Guide-2883045-Page-64.png)
![Setup and Upgrade 1652Select [System] >[Display].3[Change the size of text, apps and other items.] Adjust the value to change the size.ENGLISH](https://usermanual.wiki/LG-Electronics-USA/NT-LG14Z96.User-Manual-2/User-Guide-2883045-Page-65.png)
![166 Setup and Upgrade4Click [Apply] to apply the changes.ENGLISH](https://usermanual.wiki/LG-Electronics-USA/NT-LG14Z96.User-Manual-2/User-Guide-2883045-Page-66.png)
![Setup and Upgrade 167Using Instant BootingInstant Booting allows the system to boot automatically when the notebook PC cover isopened, so that you can use the system without pressing the power button.1On the desktop, press the [] icon to run LG Control Center.TIPSelect the [ ] button > [All Apps] > [LG Software] and run [LG Control Center].2On LG Control Center screen, set the [Instant Booting] to [ON].3Shutdown the system and close the notebook PC cover.4When the cover is opened, the notebook PC turns on and the system starts to bootautomatically.ENGLISH](https://usermanual.wiki/LG-Electronics-USA/NT-LG14Z96.User-Manual-2/User-Guide-2883045-Page-67.png)
![168 FAQFAQFAQ ContentLG Recovery Center REIf booting is impossible due to an error with the system, you can recover the system usingLG Recovery Center RE.TIPIt is recommended that you create a recovery drive in case a serious error occurs in thesystem.CAUTIONIf you have deleted the restoration data in the protected area of the hard disk, the restorefunction may not work.All data is lost during the initialization, so you must backup all critical data in advance.1Turn on the notebook PC and press [F11].ENGLISH](https://usermanual.wiki/LG-Electronics-USA/NT-LG14Z96.User-Manual-2/User-Guide-2883045-Page-68.png)
![FAQ 1692When the following screen appears, select the language you want to use and then click[Next].ENGLISH](https://usermanual.wiki/LG-Electronics-USA/NT-LG14Z96.User-Manual-2/User-Guide-2883045-Page-69.png)
![170 FAQ3When the following screen appears, select the [Agree] button and then click [Next].For recovery, the power adapter must be connected. Connect the system powerand then recover the system.ENGLISH](https://usermanual.wiki/LG-Electronics-USA/NT-LG14Z96.User-Manual-2/User-Guide-2883045-Page-70.png)
![FAQ 1714When the factory reset is completed as shown in the following figure, click [Complete]and then restart the system.ENGLISH](https://usermanual.wiki/LG-Electronics-USA/NT-LG14Z96.User-Manual-2/User-Guide-2883045-Page-71.png)
![172 FAQUsing Instant BootingInstant Booting allows the system to boot automatically when the notebook PC cover isopened, so that you can use the system without pressing the power button.1On the desktop, press the [] icon to run LG Control Center.TIPSelect the [ ] button > [All Apps] > [LG Software] and run [LG Control Center].2On LG Control Center screen, set the [Instant Booting] to [ON].3Shutdown the system and close the notebook PC cover.4When the cover is opened, the notebook PC turns on and the system starts to bootautomatically.ENGLISH](https://usermanual.wiki/LG-Electronics-USA/NT-LG14Z96.User-Manual-2/User-Guide-2883045-Page-72.png)
![FAQ 173Windows 10 Auto ScalingThe Windows 10 Auto Scaling feature for user's convenience may partially blur the screenor display some icons and texts larger.Refer to the following information to change the DPI scaling to suit your needs.1Click the [] button and select the [Settings] menu.TIPPress the [ ] key or [Ctrl] + [Esc] to display the Start menu.ENGLISH](https://usermanual.wiki/LG-Electronics-USA/NT-LG14Z96.User-Manual-2/User-Guide-2883045-Page-73.png)
![174 FAQ2Select [System] >[Display].3[Change the size of text, apps and other items.] Adjust the value to change the size.ENGLISH](https://usermanual.wiki/LG-Electronics-USA/NT-LG14Z96.User-Manual-2/User-Guide-2883045-Page-74.png)
![FAQ 1754Click [Apply] to apply the changes.ENGLISH](https://usermanual.wiki/LG-Electronics-USA/NT-LG14Z96.User-Manual-2/User-Guide-2883045-Page-75.png)
![176 FAQRestoring the SystemIf the system has an error, you can use Windows 10's recovery feature to recover or restorethe system to its initial pre-purchase state.CAUTIONIf you have deleted the restoration data in the protected area of the disk, or havearbitrarily installed another operating system, the restore function may not work.To recover the system, the AC adapter must be connected.1Press the [] button and select the [Settings] menu.ENGLISH](https://usermanual.wiki/LG-Electronics-USA/NT-LG14Z96.User-Manual-2/User-Guide-2883045-Page-76.png)
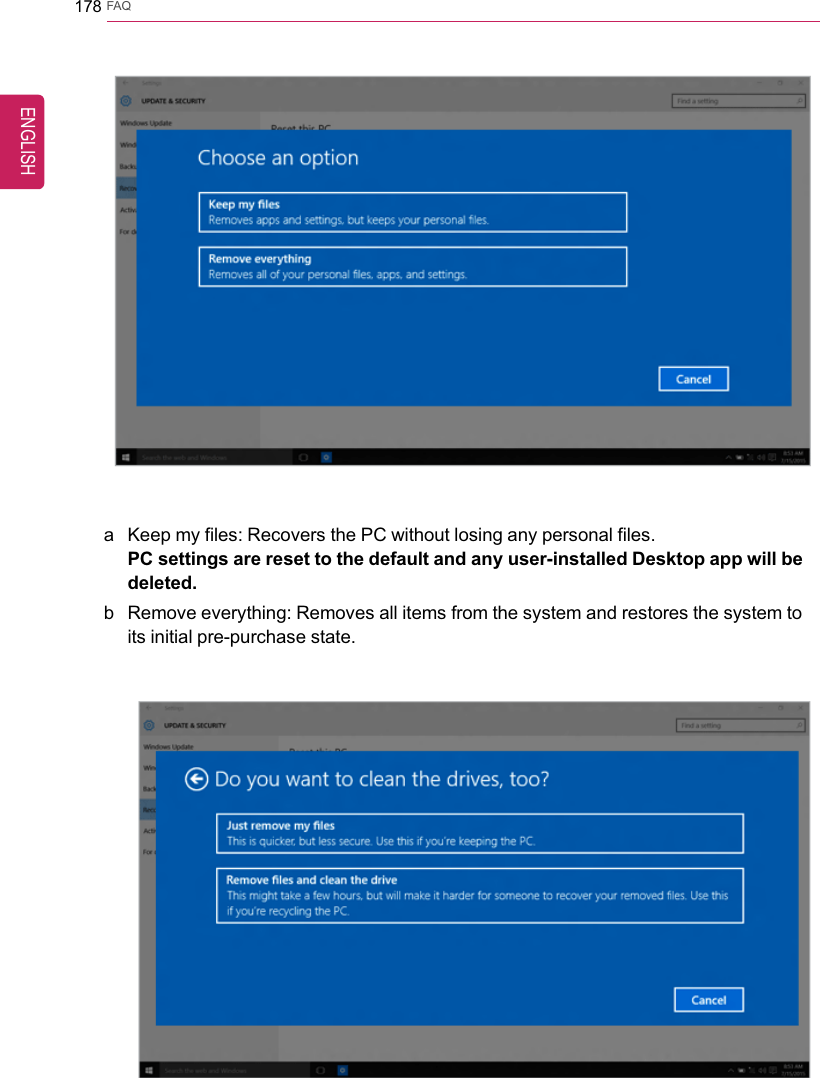
![FAQ 1772When the [Settings] screen appears, select [Update & security].3Select the [Recovery] menu and press [Get started] to reset the PC.4If the following screen appears, select a desired option to proceed with recovery.ENGLISH](https://usermanual.wiki/LG-Electronics-USA/NT-LG14Z96.User-Manual-2/User-Guide-2883045-Page-77.png)
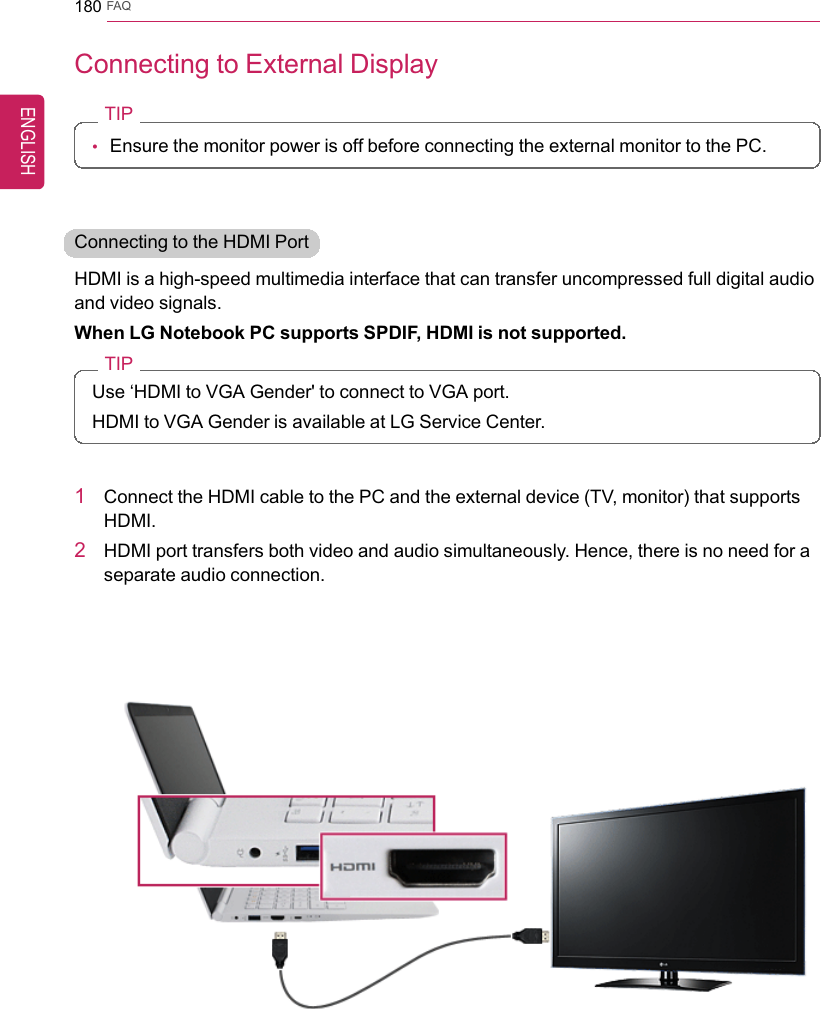
![FAQ 1813On the PC, press [Fn] + [F7] to display monitor (projector) toggling screen. Select thedesired screen output.TIP•Every time [] + [P] keys are pressed, the screen output option changes.Release the keys to display the selected screen output.CAUTION•If you do not set Speaker as the default value after disconnecting the HDMI cable,the system may not produce any sound.•If a program was running already, you need to exit and restart the program for it toproduce sound.ENGLISH](https://usermanual.wiki/LG-Electronics-USA/NT-LG14Z96.User-Manual-2/User-Guide-2883045-Page-81.png)
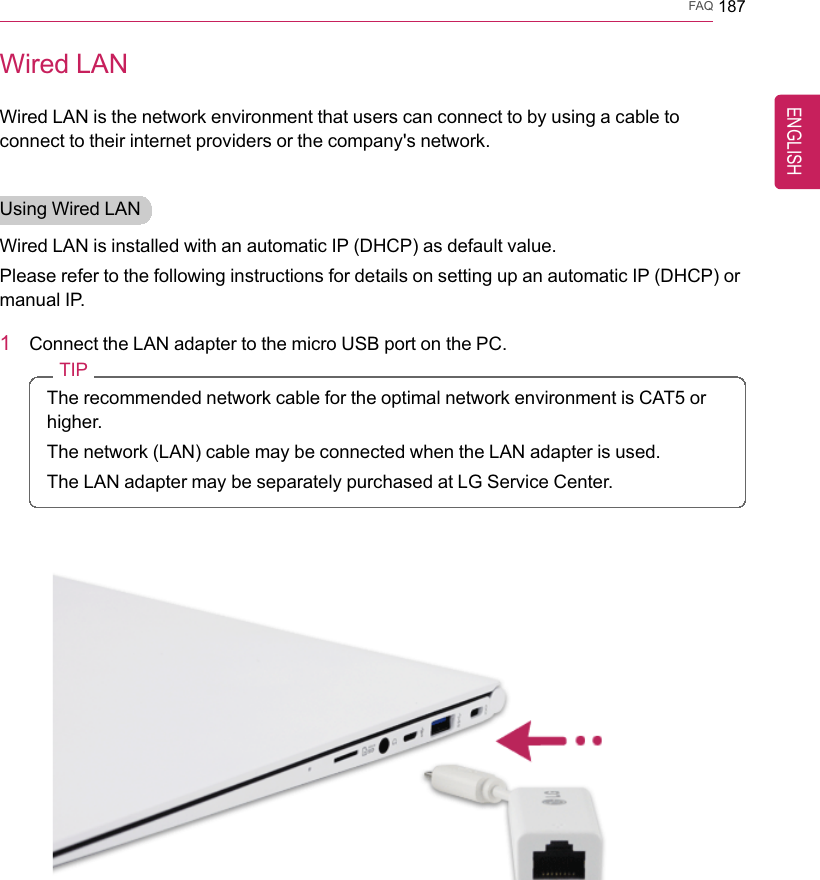
![FAQ 183Wireless LANThe wireless network (Wireless LAN) is the network environment that connects a PC withthe internet provider or company network through an Access Point (wireless or regularrouter).Wireless LAN is optional. Hence, it may not be installed in some models.Turning On/Off Airplane ModePrior to using the wireless LAN, press [Fn] + [F6] to turn off Airplane Mode.Pressing [Fn] + [F6] will turn the Airplane Mode on or off. It is recommended that you keepthe mode turned on when the machine is not used to reduce the battery powerconsumption.Using the Wireless LANIf an Access Point (wired or wireless router) is in the vicinity of the PC, the wireless LAN caneasily be accessed.During the search for a wireless network (Wireless LAN), various Access Point maybe found according to the location where the PC is used.In case no accessible wireless network (Wireless LAN) is near the PC, no AccessPoint might be found.A password protected Access Point cannot be accessed without the correctpassword.ENGLISH](https://usermanual.wiki/LG-Electronics-USA/NT-LG14Z96.User-Manual-2/User-Guide-2883045-Page-83.png)
![184 FAQ1Press the [] button and select the [Settings] menu.TIPPress the [ ] key or [Ctrl] + [Esc] to display the Start menu.ENGLISH](https://usermanual.wiki/LG-Electronics-USA/NT-LG14Z96.User-Manual-2/User-Guide-2883045-Page-84.png)
![FAQ 1852Select [Network and Internet] > [Wi-Fi] to search for near access points automatically.3Select an access point to connect to and click the [Connect] button.ENGLISH](https://usermanual.wiki/LG-Electronics-USA/NT-LG14Z96.User-Manual-2/User-Guide-2883045-Page-85.png)
![186 FAQ4If a connection is established, [Connected] is displayed below the access point name.5Click Internet Browser to check if the internet is working properly.ENGLISH](https://usermanual.wiki/LG-Electronics-USA/NT-LG14Z96.User-Manual-2/User-Guide-2883045-Page-86.png)
![FAQ 1893Press the [] button and select the [Settings] menu.TIPPress the [ ] key or [Ctrl] + [Esc] to display the Start menu.ENGLISH](https://usermanual.wiki/LG-Electronics-USA/NT-LG14Z96.User-Manual-2/User-Guide-2883045-Page-89.png)
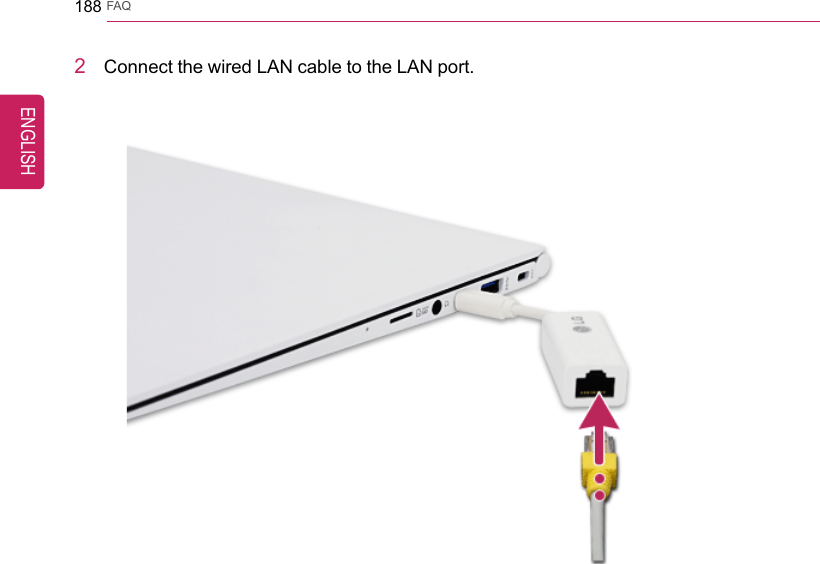
![190 FAQ4Select [Network and Internet] >[Ethernet] >[Change Adapter Options].ENGLISH](https://usermanual.wiki/LG-Electronics-USA/NT-LG14Z96.User-Manual-2/User-Guide-2883045-Page-90.png)
![FAQ 1915Right-click [Ethernet] and select the [Properties] menu.ENGLISH](https://usermanual.wiki/LG-Electronics-USA/NT-LG14Z96.User-Manual-2/User-Guide-2883045-Page-91.png)
![192 FAQ6Select [Internet Protocol Version 4 (TCP/IPv4)] and click the [Properties] button.ENGLISH](https://usermanual.wiki/LG-Electronics-USA/NT-LG14Z96.User-Manual-2/User-Guide-2883045-Page-92.png)
![FAQ 1937To use an automatic IP(DHCP), select [Obtain an IP Address Automatically]. If youwish to use a manual IP, select [Use Following IP Address] to enter the address.Contact the network service provider or administrator to use a static IP.8Click [OK] to complete the network setup.9Click Internet Browser to check if the internet is working properly.ENGLISH](https://usermanual.wiki/LG-Electronics-USA/NT-LG14Z96.User-Manual-2/User-Guide-2883045-Page-93.png)
![IC Warning“This device complies with Industry Canada licence-exempt RSS standard(s).”Operation is subject to the following conditions: (1) this device may not cause interference, and (2) this device must accept any interfer-ence, including interference that may cause undesired operation of the device.Le présent appareil est conforme aux CNR d’Industrie Canada applicables aux appareils radio exempts de licence. L’exploitation est autorisée aux deux conditions suivantes : (1) l’appareil ne doit pas provoquer de brouillage, et (2) l’appareil doit accepter tout brouillage radioélectrique subi, même si le brouillage est susceptible d’en compromettre le fonctionnement.K_UM_G4.0[EN]AVN PART 10.indd 10-18K_UM_G4.0[EN]AVN PART 10.indd 10-18 2014-10-02 오후 1:22:592014-10-02 오후 1:22:5•This device is restricted to indoor use only within the 5.15 ~ 5.25 GHz Band.](https://usermanual.wiki/LG-Electronics-USA/NT-LG14Z96.User-Manual-2/User-Guide-2883045-Page-95.png)