LG Electronics USA P705F Cellular/PCS GSM and PCS WCDMA Phone with WLAN and Bluetooth User Manual
LG Electronics MobileComm USA, Inc. Cellular/PCS GSM and PCS WCDMA Phone with WLAN and Bluetooth Users Manual
Users Manual

•Someofthecontentsofthismanualmaynotapplytoyourphone.This
dependsonyourphone’ssoftwareandyourserviceprovider.
•Thishandsetisnotrecommendedforthevisuallyimpairedbecauseofits
touchscreenkeyboard.
•Copyright©2011LGElectronics,Inc.Allrightsreserved.LGandtheLG
logoareregisteredtrademarksofLGGroupanditsrelatedentities.Allother
trademarksarethepropertyoftheirrespectiveowners.
•Google™,GoogleMaps™,Gmail™,GoogleTalk™andAndroidMarket™
aretrademarksofGoogle,Inc.
This guide helps you get started using your phone.
If you need more information, please visit www.lg.com.
LG-P705fUserGuide
English
This model is not intended for sale in the USA.

Part 15.21 statement
" Change or Modifications that are not expressly approved by the manufacturer could void
the user's authority to operate the equipment. “
Part 15.105 statement
This equipment has been tested and found to comply with the limits for a class B digital
device, pursuant to Part 15 of the FCC Rules.
These limits are designed to provide reasonable protection against harmful interference in
a residential installation. This equipment generates uses and can radiate radio frequency
energy and, if not installed and used in accordance with the instructions, may cause harmful
interference to radio communications. However, there is no guarantee that interference will
not occur in a particular installation. If this equipment does cause harmful interference or
television reception, which can be determined by turning the equipment off and on, the user
is encouraged to try to correct the interference by one or more of the following measures:
- Reorient or relocate the receiving antenna.
- Increase the separation between the equipment and receiver.
- Connect the equipment into an outlet on a circuit different from that to
which the receiver is connected.
- Consult the dealer or an experienced radio/TV technician for help.

Part 15 Class B Compliance
This device and its accessories comply with part15 of FCC rules and
ICES-003 Class B digital apparatus requirements for Industry Canada.
Operation is subject to the following two conditions:
(1) This device & its accessories may not cause harmful interference.
(2) This device & its accessories must accept any interference received,
including interference that may cause undesired operation.
Body-worn Operation
This device has been tested for typical body-worn operations
with the distance of 0.39inches (1.0cm) from the user’s body.
To comply with FCC RF exposure requirements, a minimum separation distance
of 0.39inches(1.0cm) must be maintained from the user's body.
For example, this device must be maintained from the user's body with
an appropriatebelt-clip accessory.
Additionally, Belt clips, holsters & other body-worn accessories may not contain
metallic components.
37
Toturnonyourphone,pressandholdthePowerkeyfor3seconds.
Toturnoffthephone,pressandholdthePowerkeyfor3seconds,thentouchPower offandOK.
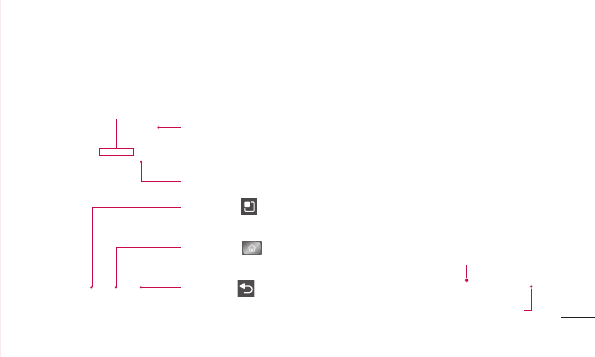
Menu key
Checkwhatoptionsareavailable.
Home key
Returntohomefromanyscreen.
Back key
Returntothepreviousscreen.
Speaker/Receiver
Power/Lock key
Switchyourphoneon/offbypressingandholdingthiskey.
Turnoffandlockthescreen.
Proximity sensor
Getting to know your phone
Stereo earphone connector
Power/Lock key

38
Volume keys
Onthehomescreen:controlringer
volume.
•Duringacall:controlyourIn-Call
volume.
•Whenplayingatrack:control
volumecontinuously.
SIM card slot
microSD memory
card slot
Camera
lens
Charger, micro USB
cable connector
Battery
Back cover
Getting to know your phone

39
NOTE: Proximity sensor
When receiving and making calls, the
proximity sensor automatically turns
the backlight off and locks the touch
keypad by sensing when the phone is
near your ear. This extends battery life
and prevents the touch keypad from
activating unintentionally during calls.
WARNING
Placing a heavy object on the phone
or sitting on it can damage its LCD
and touch screen functions. Do
not cover the protective film on the
LCD’s proximity sensor. This may
cause the sensor to malfunction.

40
Installing the SIM card and
battery
1 Toremovethebackcover,holdthephone
inyourhandfirmly.Withtheotherhand,
firmlypressyourthumbontheback
cover.Nowliftoffthebatterycover.
2 SlidetheSIMcardintotheSIMcardslot.
Makesurethegoldcontactareaonthe
cardisfacingdownwards.
Getting to know your phone

41
3 Insertthebatterybyaligningthegold
contactsonthephoneandthebattery.
4 Replacethebackcoverofthephone.
Charging your phone
Insertthecharger,thenplugitintoan
electricaloutlet.YourLG-P705fmustbe
chargedbeforeyousee .
NOTE: The
battery must be
fully charged
initially to
improve battery
lifetime.

42
Installing the memory card
Tostoremultimediafiles,suchasimages
capturedusingthebuilt-incamera,youmust
insertamemorycardintoyourphone.
NOTE: The LG-P705f supports memory
cards up to 32 GB.
To insert a memory card:
1 Turnthephoneoffbeforeinsertingor
removingamemorycard.Removethe
backcover.
Getting to know your phone

43
2 Insertthememorycardintotheslot.
Makesurethegoldcontactareaisfacing
downwards.
WARNING
Do not insert or remove the memory
card when the phone is on. Doing so
may damage the memory card as well
as your phone, and the data stored on
the memory card may be corrupted.

44
Formatting the memory card
Yourmemorycardmayalreadybe
formatted.Ifitisn’t,youmustformatit
beforeyoucanuseit.
NOTE: All files on the card are deleted when
you format the card.
1 IntheHomescreen,touchthe
Applicationstabtoopentheapplications
menu.
2 ScrolltoandtouchSettings> SD card
& Phone storage > Mass storage only.
3 TouchUnmount SD cardandtouchOK
toconfirm.
4 TouchErase SD card,thenconfirmyour
choice.
5 Ifyouhavesetapatternlock,input
thepatternlockthenselectErase
Everything.Thecardisthenformatted
andreadytouse.
NOTE: If there is content on your memory
card, the folder structure may be different
after formatting since all the files will have
been deleted.
Getting to know your phone

45
Touch screen tips
Herearesometipsonhowtonavigate
aroundyourphone.
Touch–Tochooseamenu/optionoropen
anapplication,touchit.
Touch and hold –Toopenanoptionsmenu
orgrabanobjectyouwanttomove,touch
andholdit.
Drag –Toscrollthroughalistormove
slowly,dragacrossthetouchscreen.
Flick –Toscrollthroughalistormove
quickly,flickacrossthetouchscreen(drag
quicklyandrelease).
NOTE:
•Toselectanitem,touchthecentreofthe
icon.
•Donotpresstoohard;thetouchscreen
issensitiveenoughtopickupalight,firm
touch.
•Usethetipofyourfingertotouchthe
optionyouwant.Becarefulnottotouch
anyotherkeys.
Your Home screen

46
Lock your phone
WhenyouarenotusingtheLG-P705f,press
thepowerkeytolockyourphone.Thishelps
preventaccidentalpressesandsavesbattery
power.
Also,ifyoudonotusethephoneforawhile,
theHomescreenoranotherscreenyouare
viewingisreplacedwiththelockscreento
conservebatterypower.
Ifthereareanyprogramsrunningwhenyou
setthepattern,theymaybestillrunning
inLockmode.Itisrecommendedthat
youexitallprogramsbeforeenteringthe
Lockmodetoavoidunnecessarycharges
(e.g.phonecalls,Webaccessanddata
communications).
Setting an unlock pattern:youcandraw
yourownunlockpatternbyconnectingthe
dots.
Ifyousetapattern,thephonescreenlocks.
Tounlockthephone,drawthepatternthat
yousetonthescreen.
Caution: When you set an unlock pattern,
you need to create your Gmail account first.
Caution: If there are more than 5 pattern
drawing errors in a row, you cannot unlock
Your Home screen
47
the phone. In this case, Refer Point-4 under
Important Notice.
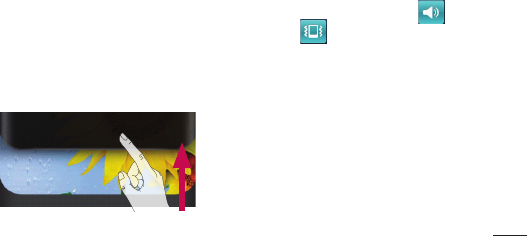
Unlock screen
WheneveryourLG-P705fisnotinuse,it
returnstothelockscreen.Dragyourfinger
frombottomtotoptounlockthescreen.
Silent mode
Inthenotificationdrawertouch ,to
changeto mode.
Home
Simplyswipeyourfingertotheleftorright
toviewthepanels.
Youcancustomiseeachpanelwithwidgets,
shortcuts(toyourfavouriteapplications),
foldersandwallpaper.
NOTE: Some screen images may be
different depending on your phone provider.

48
InyourHomescreen,youcanviewquick
keysatthebottomofthescreen.Quick
keysprovideeasy,one-touchaccesstothe
functionsyouusethemost.
TouchthePhoneicontobringupthe
touchscreendialpadtomakeacall.
TouchtheContactsicontoopenyour
contacts.
TouchtheMessageicontoaccessthe
messagingmenu.Thisiswhereyoucan
createanewmessage.
TouchtheApplicationstabatthe
bottomofthescreen.Youcanthenviewall
yourinstalledapplications.
Toopenthedesiredapplication,simplytouch
theiconintheapplicationslist.
NOTE: Preloaded applications may differ
according to your phone’s software or your
service provider.
Adding widgets to your Home
screen
YoucancustomiseyourHomescreenby
addingshortcuts,widgetsorfolderstoit.For
moreconvenienceusingyourphone,add
yourfavouritewidgetstotheHomescreen.
Your Home screen

49
1 IntheHomescreen,presstheMenukey
andselectAdd.Ortouchandholdthe
emptypartofthehomescreen.
2 IntheEdit Modemenu,touchthetypeof
itemyouwanttoadd.
3 Forexample,selectFoldersfromthelist
andtapit.
4 Youthenseeanewfoldericononthe
Homescreen.Dragittothedesired
locationonthedesiredpanel,thentake
yourfingeroffthescreen.
TIP! To add an application icon to the
Home screen from the Applications
menu, touch and hold the application
you want to add.
TIP!
To remove an application icon from
the Home screen, touch and hold the
icon you want to remove, then drag it
to .
NOTE: You cannot delete preloaded
applications. (Only their icons can be
deleted from the screen)
50
Returning to recently-used
applications
1 TouchandholdtheHomekey.The
screendisplaysapop-upwithiconsof
applicationsyouusedrecently.
2 Touchanicontoopentheapplication.
OrtouchtheBackkeytoreturntothe
currentapplication.
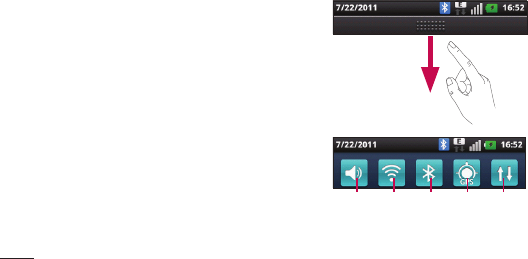
Notification drawer
Thenotificationdrawerrunsacrossthetop
ofyourscreen.
Data
enabled
GPSBluetooth
Wi-Fi
Ring
Your Home screen

51
Touchandslidethenotificationdrawerdown
withyourfinger.
Or,intheHomescreen,presstheMenu
keyandselectNotifications.Hereyoucan
checkandmanagesound,Wi-Fi,Bluetooth
andGPSaswellasothernotifications.
Viewing the status bar
Thestatusbarusesdifferenticonstodisplay
phoneinformationsuchassignalstrength,
newmessages,batterylifeandactive
Bluetoothanddataconnections.
Belowisatableexplainingthemeaningof
iconsyou’relikelytoseeinthestatusbar.
[Status bar]
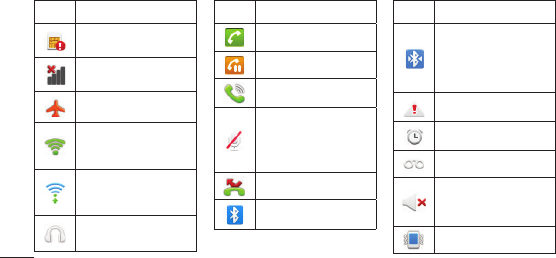
52
Icon
Description
NoSIMcard
Nosignal
Airplanemode
ConnectedtoaWi-
Finetwork
Wi-FiDirectison.
Wiredheadset
Icon
Description
Callinprogress
Callhold
Speakerphone
Phonemicrophone
ismuted
Missedcall
Bluetoothison
Icon
Description
Connectedtoa
Bluetoothdevice
Systemwarning
Alarmisset
Newvoicemail
Ringerissilenced
Vibratemode
Your Home screen
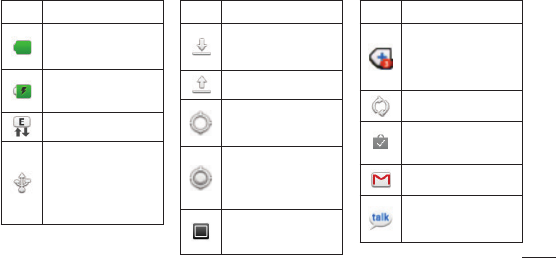
53
Icon
Description
Batteryfully
charged
Batteryischarging
Datainandout
Phoneisconnected
toPCviaUSBcable
Icon
Description
Downloadingdata
Uploadingdata
GPSisacquiring
Receivinglocation
datafromGPS
On-ScreenPhone
connected
Icon
Description
3morenotifications
notdisplayed
Dataissyncing
Downloadfinished
NewGmail
NewGoogleTalk
message
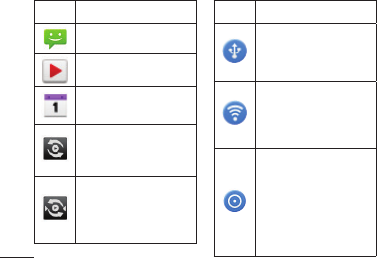
54
Icon
Description
Newmessage
Songisplaying
Upcomingevent
SmartShareOn
SmartShare
sharingrequest
Icon
Description
USBtetheringis
active
PortableWi-Fi
hotspotisactive
BothUSB
tetheringand
portablehotspot
areactive
Your Home screen

55
Onscreen keyboard
Youcanentertextusingtheonscreen
keyboard.Theonscreenkeyboardappears
automaticallyonthescreenwhenyou
needtoentertext.Tomanuallydisplaythe
keyboard,simplytouchatextfieldwhere
youwanttoentertext.
Using the keypad & entering text
Taponcetocapitalisethenextletteryou
type.Doubletapforallcaps.
Taptoswitchtothenumericand
symbolkeyboard.Youcanalsotouchand
holdthistabtoviewtheSettingsmenu.
Taptovieworpressandholdtochange
thewritinglanguage.
Taptoinsertanemoticonwhenwritinga
message.
Taptoenteraspace.
Taptocreateanewlineinthemessage
field.
Taptodeletethepreviouscharacter.
Taptohidetheonscreenkeyboard.

56
Entering accented letters
WhenyouselectFrenchorSpanishasthe
textentrylanguage,youcanenterspecial
FrenchorSpanishcharacters(e.g.“á”).
Forexample,toinput"á",touchandhold
the"a"keyuntilthezoom-inkeygrows
biggeranddisplayscharactersfromdifferent
languages.
Thenselectthespecialcharacteryouwant.
Your Home screen

57
Whenyoufirstturnonyourphone,youhave
theopportunitytoactivatethenetwork,to
signintoyourGoogleAccountandhowyou
wanttousesomeGoogleservices.
To set up your Google account :
*SignintoaGoogleAccountfromthe
promptedsetupscreen.
OR
*Applications>selectaGoogleapplication,
suchasGmail>selectNext>selectCreate
tocreateanewaccout.
IfyouhaveaGoogleaccount,enteryour
e-mailaddressandpassword,thentouch
Signin.
OnceyouhavesetupyourGoogleaccount
onyourphone,yourphoneautomatically
synchroniseswithyourGoogleaccounton
theWeb.
Yourcontacts,Gmailmessages,Calendar
eventsandotherinformationfromthese
applicationsandservicesontheWebare
synchronisedwithyourphone.(Thisdepends
onyoursynchronisationsettings).
Google account setup

58
Aftersigningin,youcanuseGmail™and
takeadvantageofGoogleservicesonyour
phone.
Google account setup

59
WithWi-Fi,youcanusehigh-speedInternet
accesswithinthecoverageofthewireless
accesspoint(AP).
EnjoywirelessInternetusingWi-Fi,without
extracharges.
Turning on Wi-Fi
FromtheHomescreen,openthenotification
drawerandtouch .
OrtouchApplication>Settings>
Wireless & networks,then>Wi-Fi .
Connecting to Wi-Fi
ChoosetheWi-Finetworkyouwantto
connectto.Ifyousee ,
youneedtoenterapasswordtoconnect.
NOTE:
•IfyouareoutsidetheWi-Ficoveragearea
andchoose3Gconnection,additional
chargesmayapply.
•Ifyourphonegoesintosleepmodewhen
connectedtoWi-Fi,theWi-Ficonnectionis
automaticallydisabled.
•Inthiscase,ifyourphonehasaccessto
3Gdata,itmayconnecttothe3Gnetwork
Wi-Fi

60
automaticallyandadditionalchargesmay
apply.
•TheLG-P705fsupportsWEP,WPA/WPA2-
PSKand802.1xEAPsecurity.IfyourWi-Fi
serviceproviderornetworkadministrator
setsencryptionfornetworksecurity,
enterthekeyintothepop-upwindow.
Ifencryptionisnotset,thispop-up
windowisnotshown.Obtainthekeyfrom
yourWi-Fiserviceproviderornetwork
administrator.
Sharing your phone’s data
connection
Youcanshareyourphone’smobiledata
connectionwithasinglecomputerviaaUSB
cable(USBtethering).Youcanalsoshare
yourphone’sdataconnectionwithuptofive
devicesatatimebyturningyourphoneinto
aportableWi-Fihotspot.
Whenyourphoneissharingitsdata
connection,aniconappearsinthestatus
barandasanongoingnotificationinthe
notificationsdrawer.
Wi-Fi

61
Icon Description
USBtetheringisactive
PortableWi-Fihotspotisactive
BothUSBtetheringandportable
hotspotareactive
Forthelatestinformationabouttethering
andportablehotspots,includingsupported
operatingsystemsandotherdetails,visit
http://www.android.com/tether.
NOTE: Additional costs may be incurred
when connecting and using online services.
Check data charges with your network
provider.
USB tethering & portable Wi-Fi
hotspot settings
1 IntheHomescreen,touchthe
ApplicationstabandselectSettings.
2 TouchWireless & networksandselect
Tethering & portable hotspot.
3 Chooseoptionsthatyouwanttoadjust.

62
USB tethering–Ticktoshareyourphone’s
mobilenetworkdataconnectionwithyour
computerviaaUSBconnection.
Portable Wi-Fi hotspot–Tickto
shareyourphone’smobilenetworkdata
connectionasWi-Fisharing.
Help–Opensadialogwithinformation
aboutUSBtetheringandportableWi-Fi
hotspotsaswellasinformationonwhereto
learnmore.
To share your phone’s data
connection via USB
IfyourcomputerisrunningWindows7ora
recentdistributionofsomeflavoursofLinux
(suchasUbuntu),youdon’tusuallyneedto
prepareyourcomputerfortethering.Butif
you’rerunninganearlierversionofWindows
oranotheroperatingsystem,youmayneed
toprepareyourcomputertoestablisha
networkconnectionviaUSB.Forthemost
currentinformationaboutwhichoperating
systemssupportUSBtetheringandhowto
configurethem,visithttp://www.android.
com/tether.
Wi-Fi

63
USB tethering and data sharing
Youcan’tshareyourphone’sdata
connectionandmicroSDcardviaUSB
atthesametime.Ifyouareusingyour
USBconnectiontomakeyourmicroSD
cardavailabletoyourcomputer,youmust
disconnectitfirst.
1 UsetheUSBcablethatcamewithyour
phonetoconnectyourphonetoyour
computer.
2 IntheHomescreen,touchthe
ApplicationstabandselectSettings.
3 TouchWireless & networksandselect
Tethering & portable hotspot.
4 TickUSB tethering.
•Thephonestartssharingitsmobile
networkdataconnectionwithyour
computerviatheUSBconnection.An
ongoingnotification isaddedtothe
statusbarandnotificationsdrawer.
5 UntickUSB tetheringtostopsharing
yourdataconnection.Orjustdisconnect
theUSBcable.

64
To share your phone’s data
connection as a portable Wi-Fi
hotspot
1 IntheHomescreen,touchthe
ApplicationstabandselectSettings.
2 TouchWireless & networksandselect
Tethering & portable hotspot.
3 TickPortable Wi-Fi hotspot.
•Afteramoment,thephonestarts
broadcastingitsWi-Finetworkname
(SSID)soyoucanconnecttoitwithup
toeightcomputersorotherdevices.An
ongoingnotification isaddedtothe
statusbarandnotificationsdrawer.
•WhenPortable Wi-Fi hotspotisticked,
youcanchangeitsnetworknameor
secureit.
4 UntickPortable Wi-Fi hotspottostop
sharingyourdataconnectionviaWi-Fi.
To rename or secure your
portable hotspot
Youcanchangethenameofyourphone’s
Wi-Finetworkname(SSID)andsecureits
Wi-Finetwork.
1 IntheHomescreen,touchthe
ApplicationstabandselectSettings.
Wi-Fi

65
2 TouchWireless & networksandselect
Tethering & portable hotspot.
3 EnsurePortable Wi-Fi hotspotisticked.
4 TouchPortable Wi-Fi hotspot settings.
5 TouchConfigure Wi-Fi hotspot.
•TheConfigure Wi-Fi hotspotdialog
opens.
•YoucanchangethenetworkSSID(name)
thatothercomputersseewhenscanning
forWi-Finetworks.
•YoucanalsotouchtheSecuritymenuto
configurethenetworkwithWi-FiProtected
Access2(WPA2)security,withapre-
sharedkey(PSK).
•IfyoutouchtheWPA2 PSKsecurity
option,apasswordfieldisaddedtothe
Configure Wi-Fi hotspotdialog.Ifyou
enterapassword,youwillneedtoenter
thatpasswordwhenyouconnecttothe
phone’shotspotwithacomputerorother
device.OrtouchOpenintheSecurity
menutoremovesecurityfromyourWi-Fi
network.

66
ATTENTION!
If you set the security option as Open,
you cannot prevent unauthorised usage
of online services by other people and
additional charges can be incurred.
To avoid unauthorised usage, you are
advised to keep the security option
active.
6 TouchSave.
Enabling Wi-Fi Direct to share
through SmartShare
Wi-FiDirectcannotbeenabledwhileusing
otherWi-Fifunctions.
Wi-FiDirectautomaticallyscansnearbyWi-
FiDirectdevicesandthesearcheddevices
willbelistedupintheorderofarrivaland
youcanselectaspecificdevicetoshare
multimediadatathroughSmartShare.
1 Onthehomescreen,touchthe
ApplicationtabandselectSettings.
2 TouchWireless & networksandselect
Wi-Fi Direct Settings.
Wi-Fi

67
3 EnsureWi-Fi Directisselected.
4 Selectadevicetoconnectinthescanned
devicelist.
Forced Group owner mode–Touchto
activategroupownermodethatenablesthe
legacyWi-Fidevicestoconnectbyscanning
yourphone.
Inthiscaseyoumustenterthepassword
thatissetintheMenu > Advanced >
Password.
NOTE: When your phone becomes group
owner, it will consume more battery power
than being a client. Wi-Fi Direct connection
does not provide Internet service. Additional
cost may be incurred when connecting and
using online services. Check data charges
with your network provider.
Using the Wi-Fi Cast
Youcanshareyourmusic,pictureandvideo
contentsbetweenuserswhouseAndroid
PhoneconnectedviasameWi-Fi&Wi-Fi
Directednetwork.
CheckyourWi-Fi&Wi-FiDirectednetwork
inadvanceandmakesuresamenetworkis
connectedbetweentheusers.

68
1 Onthehomescreen,touchthe
ApplicationtabandselectSettings.
2 Touch Wireless & networksandselect
Wi-Fi Direct Settings.
3 EnsureWi-Fi Directisselectedand
selectadevicetoconnectinthescanned
devicelist.
4 TouchConnect.
NOTE:
Wi-Fi cast is activated between the users.
Make sure to connect to same Wi-Fi
Network between the users.
Wi-Fi

69
How to use On-Screen Phone
On-ScreenPhoneallowsyoutoviewyour
mobilephonescreenfromaPCviaaUSBor
Bluetoothconnection.
Youcanalsocontrolyourmobilephonefrom
yourPCusingthemouseorkeyboard.
On-Screen Phone icons
ConnectsyourmobilephonetoyourPC,
ordisconnectsit.
RotatestheOn-ScreenPhonewindow
(onlyavailableatapplicationsthat
supportrotation).
ChangestheOn-ScreenPhone
preferences.
ExitstheOn-ScreenPhoneprogram.
MinimisestheOn-ScreenPhone
window.
On-Screen Phone features
•Real-timetransferandcontrol:displays
andcontrolsyourmobilephonescreen
whenconnectedtoyourPC.
•Mousecontrol:allowsyoutocontrolyour
mobilephonebyusingthemousetoclick
anddragonyourPCscreen.
On-Screen Phone

70
•Textinputwithkeyboard:allowsyouto
composeatextmessageornoteusing
yourcomputerkeyboard.
•Filetransfer(mobilephonetoPC):sends
afilefromyourmobilephone(e.g.photos,
videos,musicandPolarisviewerfiles)to
yourPC.Simplyright-clickanddragto
sendafiletoyourPC.
•Filetransfer(PCtomobilephone):sends
filesfromyourPCtoyourmobilephone.
Simplyselectthefilesyouwishtotransfer
anddraganddropintotheOn-Screen
Phonewindow.Thefilesyousendare
storedonamicroSDcard.
•Real-timeeventnotifications:prompts
apop-uptoinformyouofanyincoming
callsortext,aswellasalarmandevent
notifications.
How to install On-Screen Phone
on your PC
IfyouinstallLGPCSuiteIV,theOn-Screen
Phoneprogramwillalsobedownloadedon
yourPC.ThenyoucaninstalltheOn-Screen
PhoneonyourPC.
On-Screen Phone

71
How to connect your mobile
phone to your PC
USB connection:
1 OpenConnectionWizard,select"USB
Cableconnection"andclick"Next".
2 ConnectyourmobilephonetothePC
usingaUSBcableandclick"Next".
3 EntertheOn-ScreenPhonepassword
andclick"Next".Thedefaultpasswordis
"0000".Youcanchangethepasswordin
Settings > Wireless & networks > On-
Screen Phone Settings.
4 Click"OK"toexitthewindow.
NOTE: Go to Settings > SD card & phone
storage and make sure that the “Mass
storage only” checkbox is deselected.
Wireless connection with Bluetooth:
1 Onyourmobilephone,gotoSettings
> Wireless & networks > Bluetooth
settings.SelectTurn on Bluetoothand
selectDiscoverable.
2 Ifyouhavepreviouslyconnectedusinga
cable,runtheNewConnectionWizardto
createanewconnection.

72
3 RuntheConnectionWizardonthe
computer,select"Bluetoothconnection",
then"Next".
4 ThewizardstartssearchingforBluetooth-
enabledmobilephones.Whenthe
mobilephonethatyouwishtoconnectto
appears,click"Stop"tostopsearching.
5 Select"LG-P705f"fromthedevicelist
andclick"Next".Youcanrenamethe
deviceifyouwish.
6 EnterthePINcode(e.g."0000")and
click"Next".
7 Onyourmobilephone,accepttherequest
andcheckthesamePINcode,thentouch
"OK".
8 EntertheOn-ScreenPhonepassword
andclick"Next"(thedefaultpasswordis
"0000").
9 Touch"OK"toexit.
To check the phone to PC
connection
Oncethedeviceshavebeenconnected,drag
downthenotificationbaratthetopofthe
homescreentochecktheOn-ScreenPhone
connectionstatus.
On-Screen Phone

73
To disconnect your phone from
your PC
Click inthetopleftoftheOn-Screen
Phonewindow.Ordragdownthenotification
baratthetopofthehomescreenandselect
"On-ScreenPhone".Touch"Yes"inthe
Disconnectwindow.
NOTE: You must restart your phone after
shutting down the On-Screen Phone
service.
74
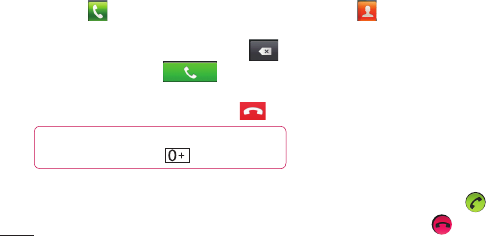
Making a call
1 Touch toopenthekeypad.
2 Enterthenumberusingthekeypad.To
deleteadigit,touchtheClearicon .
3 TouchtheCallicon tomake
acall.
4 Toendacall,touchtheEnd icon .
TIP!
To enter “+” to make international
calls, touch and hold .
Calling your contacts
1 Touch toopenyourcontacts.
2 Scrollthroughthecontactlistorenterthe
firstletter(s)ofthecontactyouwantto
callbytouching Search.
3 Inthelist,touchthecontactwhichyou
wanttocallandtaponthenumberorcall
icontomakecall.
Answering and rejecting a call
WhentheScreenislockedandyourphone
rings,dragtheAnswericon totheright.
DragtheDeclineicon totheleftto
Calls

75
rejectanincomingcall.DragtheExcuse
msgbarfromthebottomifyouwantto
sendone.
TIP! Excuse messages
When you reject a call, you can send
a message quickly by touching Send
SMS. This is useful if you need to reply
the message during a meeting.
Adjusting call volume
Toadjustthein-callvolumeduringacall,
usetheVolumeUpandDownkeyontheleft
sideofthephone.
Making a second call
1 Duringyourinitialcall,tapontheMenu
andselect .
2 Dialthenumber,orsearchyourcontacts.
3 TouchtheCallicon toconnect
thecall.
4 Bothcallsaredisplayedonthecall
screen.Yourinitialcallislockedandput
onhold.
5 Touchthedisplayednumbertotoggle
betweencalls.Ortouch Merge calls
tomakeaconferencecall.
6 Toendactivecalls,touchEnd.
76
NOTE: You are charged for each call you
make.
Viewing your call logs
IntheHomescreen,touch andchoose
theCall logtab.
Viewacompletelistofalldialled,received
andmissedvoicecalls.
TIP!
Touch any call log entry
to view the date, time and duration of
the call.
TIP! Press the Menu key,
then touch Delete all to delete all the
recorded items.
Call settings
Youcanconfigurephonecallsettingssuch
ascallforwardingandotherspecialfeatures
offeredbyyourcarrier.
1 IntheHomescreen,touchthe
Applicationstabtoopentheapplications
menu.
2 ScrollandtouchSettings.
3 TapCall settingsandchoosetheoptions
thatyouwanttoadjust.
Calls
77
Addcontactstoyourphoneandsynchronise
themwiththecontactsinyourGoogle
accountorotheraccountsthatsupport
contactsyncing.
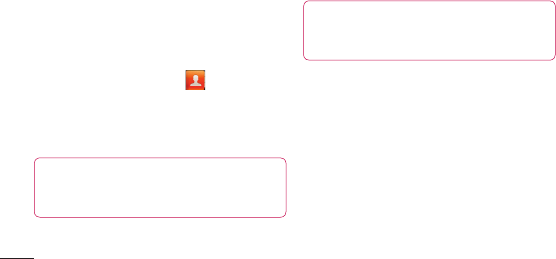
Searching for a contact
In the Home screen
1 Touch toopenyourcontacts.
2 TouchSearchandenterthecontact
nameusingthekeyboard.
Adding a new contact
1 Touch ,enterthenewcontact’s
number,thenpresstheMenu key.Touch
Add to contactsandthenCreate new
contact.
2 Ifyouwanttoaddapicturetothenew
contact,touch .
ChoosefromCapture pictureorPick
from Gallery.
3 Selectthecontacttypebytouching .
4 Touchacategoryofcontactinformation
andenterthedetailsaboutyourcontact.
5 TouchSave.
Contacts

78
Favorite contacts
Youcanclassifyfrequentlycalledcontacts
asfavorites.
Adding a contact to your favorites
1 Touch toopenyourcontacts.
2 Touchacontacttoviewitsdetails.
3 Touchthestartotherightofthecontact’s
name.Thestarturnsgold.
Removing a contact from your favorites
list
1 Touch toopenyourcontacts.
2 TouchtheGroupstab,selectFavoritesat
thetopofthelistandchooseacontactto
viewitsdetails.
3 TouchtheGoldstartotherightofthe
contact’sname.Thestarturnsgrey
andthecontactisremovedfromyour
favourites.
Contacts

79
Moving contacts from your old
phone to your new phone
Export your contacts as a CSV file from
your old phone to your PC using a PC
sync program.
1 DownloadPCSuiteIVfromwww.lg.com
andinstallitonthePC.Runtheprogram
andconnectyourAndroidmobilephone
tothePCusingtheUSBcable.
2 SelecttheContactsicon.GotoMenu
>File>ImportandselecttheCSVfile
savedonyourPC.
3 IfthefieldsintheimportedCSVfileare
differentfromthoseinPCSuiteIV,you
needtomapthefields.Aftermapping
thefields,clickOK.Thecontactsarethen
addedtoPCSuiteIV.
4 IfPCSuiteIVdetectstheconnectionof
yourLG-P705fphone(usingtheUSB
cable),clickSyncorSynccontactsto
synchronisethecontactssavedonyour
PCwithyourphone.

80
Messaging
YourLG-P705fcombinesSMSandMMS
intooneintuitive,easy-to-usemenu.
Sending a message
1 Touch icononthehomescreen,and
touchNew message toopenablank
message.
2 Enteracontactnameorcontactnumber
intheTofield.Asyouenterthecontact
name,matchingcontactsappear.Youcan
touchasuggestedrecipient.Youcanadd
multiplecontacts.
NOTE: You will be charged for a text
message for every person you send the
message to.
3 TouchEntermessagefieldandstartto
composeyourmessage.
4 PresstheMenukeytoopentheoptions
menu.ChoosefromCall,AddSubject,
Discard,ReplyBy,Attachandmore.
5 TouchSendtosendyourmessage.
6 Themessagescreenopens,withyour
messageafterRecipientName/Number.
Responsesappearonthescreen.Asyou
viewandsendadditionalmessages,a
messagethreadiscreated.
Messaging/email

81
WARNING: The 160-character
limit may vary from country to country
depending on how the SMS is coded
and in what language.
WARNING: If an image, video or
audio file is added to an SMS, it will be
automatically converted into an MMS ,
and you will be charged accordingly.
NOTE:
When you get an SMS message
during a call, there will be a ring notification.
Threaded box
Messages(SMS,MMS)exchanged
withanotherpartycanbedisplayed
inchronologicalordersothatyoucan
convenientlyseeanoverviewofyour
conversation.
Using Smilies
LivenupyourmessagesusingSmilies.
Whenwritinganewmessage,pressthe
Menukey,thenchooseInsert smiley.

82
Changing your message settings
YourLG-P705fmessagesettingsare
predefined,soyoucansendmessages
immediately.Youcanchangethesettings
basedonyourpreferences.
WARNING: In this mode, the MMS
Client device guides the user in creating
and sending messages with content
belonging to the Core MM Content
Domain. This guidance is provided
through warning dialogs.
Opening Email and the Accounts
Screen
YoucanusetheEmailapplicationtoread
emailfromservicesotherthanGoogleMail.
TheEmailapplicationsupportsthefollowing
accounttypes:POP3,IMAPandExchange.
To open the Email application
FromtheHomescreen,touchApplication->
EmailSelectEmailServiceProvider.
Asetupwizardopenstohelpyouaddan
emailaccount.Aftertheinitialsetup,Email
displaysthecontentsofyourInbox(ifyou
Messaging/email

83
haveonlyoneaccount)ortheAccounts
screen(ifyouhavemultipleaccounts).
The Accounts screen
TheAccountsscreenlistsyourCombined
Inboxandeachofyouremailaccounts.
1 OpentheEmailapplication.Ifyou’renot
ontheAccountscreen,presstheMenu
KeyandtouchAccounts.
2 SelecttheEmailserviceprovider.
-TouchtoopenyourCombinedInbox,
withmessagesRecievedtoallofyour
accounts.
-Touchtoopenalistofjustyour
starredmessages.
-Touchthefoldericontoopenthe
account’sfolders.
YoucantouchanaccounttoviewitsInbox.
Theaccountfromwhichyousendemailby
defaultisindicatedwithatick.
To open your Combined Inbox
IfyouhaveconfiguredEmailtosendand
receiveemailfrommorethanoneaccount,
youcanviewallmessagessenttoall
accountsinyourCombinedInbox.

84
1 TouchEmail.
2 TouchCombined Inbox(intheAccounts
screen).MessagesintheCombinedInbox
arecolourcodedalongtheirleftsides,by
account,usingthesamecoloursthatare
usedforyouraccountsintheAccounts
screen.
Onlyyouraccount’smostrecentemailsare
downloadedtoyourphone.Todownload
more(earlier)emailmessages,touchLoad
more messagesatthebottomofthe
emailslist.
Composing and Sending Email
To compose and send a message
1 WhileintheEmailapplication,pressthe
Menu KeyandtouchCompose.
2 Enteranaddressforthemessage’s
intendedrecipient.Asyouentertext,
matchingaddressesareofferedfromyour
Contacts.Separatemultipleaddresses
withcommas.
3 TouchtheMenukeyandthentouchAdd
Cc/Bcctosendcopyorblindcopyofthe
mailtoothercontacts/emailaddresses.
4 Enterthetextofthemessage.
Messaging/email

85
5 PresstheMenu KeyandtouchAdd
Attachmenttosendafilewiththe
message.
6 TouchtheSendbutton.
Ifyou’renotreadytosendthemessage,
touchtheSaveasdraftbuttontosaveit
inaDraftsfolder.Touchadraftmessage
inaDraftsfoldertoresumeworkingon
it.Yourmessagewillalsobesavedas
adraftifyoutouchtheBack Key
beforesendingit.TouchtheDiscard
buttontoabandonanddeleteamessage,
includinganysaveddrafts.Ifyouaren’t
connectedtoanetwork,forexample,
ifyou’reworkinginairplanemode,the
messagesthatyousendarestoredin
yourOutboxfolderuntilyou’reconnected
toanetworkagain.Ifitcontainsany
pendingmessages,theOutboxis
displayedontheAccountsscreen.
Pleasenotethatmessagessentusingan
Exchangeaccountwillnotbelocatedonthe
phone;theywill,however,belocatedonthe
Exchangeserveritself.
Ifyouwanttoseeyoursentmessagesinthe
Sentfolder,thentouchMenukeyandtouch

86
onFoldersthentouchonSentfolderand
selectRefreshfromtheoptionsMenu.
TIP! When a new email arrives in the
inbox, you will receive a notification by
sound or vibration.
Working with Account Folders
EachaccounthasInbox,Outbox,Sent,and
Draftsfolders.Dependingonthefeatures
supportedbyyouraccount’sserviceprovider,
youmayhaveadditionalfolders.
Adding and Editing email
Accounts
1 ToaddanemailaccountTouchthe
ApplicationstabandselectEmail.
2 SelectMSExchangeorOthers,andenter
accountsettings.
3 Ifanemailaccountisalreadysetup,you
needtotouchtheMenukeythentapAdd
accountfromAccountsScreen.
4 Enteranamefortheaccount,confirm
howyouwantyournametoappear
inoutgoingmail,thentouchtheDone
button.
Messaging/email

87
To change an account’s settings
1 OpentheAccountsscreen.
2 Touchandholdtheaccountwhose
settingsyouwanttochange.Inthemenu
thatopens,touchAccount settings.
To delete an email account
1 OpentheAccountsscreen.
2 Touchandholdtheaccountyouwantto
delete.
3 TouchRemove accountinthemenu
thatopens.
4 TouchtheOKbuttoninthedialogbox
toconfirmthatyouwanttodeletethe
account.

88
Social Networking
Social Networking
Withyourphone,youcantakeadvantageof
SocialNetworkingandmanageyourmicro-
bloginon-linecommunities.Youcanupdate
yourcurrentstatus,uploadphotos,andview
yourfriend'sstatusupdatesinreal-time.
YoucanaddyourFacebook,Twitterand
Myspaceaccountstoyourphone.Ifyou
don’thaveanaccount,youcanvisittheir
sitestosetitup.
NOTE: Additional costs may be incurred
when connecting and using online services.
Check your data charges with your network
provider.
Adding your account to your
phone
1 Touchandholdthehomescreen.When
variousWidgetsappear,chooseSocial+
andtaptheSetting button.You
canalsoaccessinadifferentway,on
thehomescreen,chooseApplications>
Settings>Accounts&sync>Social+
settings.
2 ChoosetheSocialNetworkingclient
applicationyouwanttousefrom
FacebookforLG,TwitterforLGand
MySpaceforLG.

89
3 Enteryourcommunityemailaddressand
password,thentapLogin.
4 Waitwhileyourdetailsareconfirmedwith
yourcommunity.
5 Ifyoutapyourcommunity,youcansee
itscurrentstatus.
TIP! If you add a Social Networking
widget on your home screen, the widget
will show your status when your phone
updates from the network.
You can also access the social
community directly by touching the
widget.
Viewing and updating your
status
1 Youcanviewandupdatesocial
communitycontentusingtheSocial+
widgetatanytime.
2 OntheSocial+widget,choosetheSocial
Networkingservicewhichyouwantto
login.Youwillthenseeyourstatusand
contents.
3 Whenyoutouchtheinputbox,thescreen
willswitchtoupdateyourcurrentstatus
withcommentsoruploadphotos.
90
TIP!
You can update your status
and upload photos simultaneously to
Facebook for LG,Twitter for LG and
MySpace for LG by selecting the checkbox.
NOTE: This depends on network services.
TIP! You can synchronise your
friend contact to your contact list.
Removing accounts from your
phone
ChooseSettings>Accounts & sync>
Chooseanaccountyouwanttodelete>
TouchRemove account.
Social Networking

91
Zoom -Zoominorzoomout.Alternativelyyoucanusetheside
volumekeys.
Brightness-Thisdefinesandcontrolstheamountofsunlight
enteringtheimage.Slidethebrightnessindicatoralongthebar
towards“-”tolowerthebrightnessoftheimageortowards“+”to
increaseit.
Scene mode -ChoosefromAuto, Portrait, Landscape, Sports,
NightandSunset.
Image size -Touchtosetthesize(inpixels)ofthepictureyoutake.
Settings-Touchthisicontoopentheadvancedsettingsmenu.
Video mode-Slidethisicondowntoswitchtovideomode.
Taking a photo
Gallery-Touchtoviewthelastphotoyoucaptured.Thisenablesyou
toaccessyourgalleryandviewsavedphotosfromwithincamera
mode.
TIP! You can close all the shortcut options to
give a clearer viewfinder screen by touching
the centre of the viewfinder once. To display
the options, touch the screen again.
Camera
Getting to know the
viewfinder

92
Taking a quick photo
1 OpentheCameraapplication.
2 Holdthephonehorizontallyandpoint
thelenstowardsthesubjectyouwantto
photograph.
3 Inthecentreoftheviewfinderscreen,a
focusboxstartsblinkingasittriestoget
thesubjectinfocus.
4 Thefocusboxturnsgreenwhenthe
subjectisinfocus.
5 Pressthecapture button.Youcan
pressthecapturebuttonwhetherthe
focusboxisgreenornot.
Once you’ve taken the photo
Yourcapturedphotoappearsonthescreen.
Share
Touchtoshareyourphotousing
SmartShare, Bluetooth, E-mail,
Gmail, Messaging, Picasa,
Social+
or
Wi-Fi Cast.
NOTE: additional charges may apply when
MMS messages are downloaded while
roaming.
Camera
93
TIP! If you have an SNS account
and set it up on your phone, you
can share your photo with the SNS
community.
Set as
Touchtousetheimageasa
Contact iconorwallpaper.
Rename
Touchtoeditthenameofthe
picturejusttaken.
Touchtodeletetheimage.
Touchtotakeanotherphoto
immediately.Yourcurrentphotois
saved.
Touchtoviewthelastphotoyou
capturedaswellasthegallery
Using the advanced settings
Intheviewfinder,touch toopenall
advancedoptions.
Changecamerasettingsbyscrollingthrough
thelist.Afterselectingtheoption,touchthe
Backkey.
ISO–TheISOratingdeterminesthe
sensitivityofthecamera’slightsensor.
ThehighertheISO,themoresensitivethe

94
camerais.Thisisusefulindarkerconditions
whenyoucannotusetheflash.Selectfrom
ISOvaluesofAuto,400, 200 and 100.
White balance –ChoosefromAuto,
Incandescent,Sunny,Fluorescentand
Cloudy.
Color effect–Chooseacolourtoneforyour
newphoto.
Timer–Theself-timerallowsyoutoseta
delayafterthecapturebuttonispressed.
SelectOff,3 secs.,5 secs.or10 secs.This
isidealifyouwanttobeinthephoto.
Image quality–ChoosefromSuper fine,
FineandNormal.Thefinerthequality,the
sharperthephoto.However,thefilesize
increasesasaresult,whichmeansyoucan
storefewerphotosinthememory.
Auto review–IfyouturnAuto reviewon,
itautomaticallyshowsyouthepictureyou
justtook.
Shutter sound–Selectoneoffourshutter
sounds.
Tag location–Activatetouseyourphone’s
location-basedservices.Takepictures
whereveryouareandtagthemwiththe
Camera

95
location.Ifyouuploadtaggedpicturestoa
blogthatsupportsgeotagging,youcansee
thepicturesdisplayedonamap.
NOTE: This function is only available when
GPS is active.
–Restoreallcameradefaultsettings.
–Touchwheneveryouwanttoknow
howthisfunctionoperates.Thisprovidesyou
withaquickguide.
TIP!
When you exit the camera, some
settings return to their defaults, such as
white balance, color effect and timer .
Check these before you take your next
photo.
TIP!
The Settings menu is superimposed
over the viewfinder, so when you change
elements of the image colour or quality,
you see a preview of the image change
behind the Settings menu.
96
Viewing your saved photos
AccessyoursavedphotoswhileinCamera
mode.Justtouch andtouchthescreen.
YouthenseeSlideshowandMenu.
TIP!
Flick left or right to view
other photos or videos.
-Touchtoseeaslideshow.
-Touchtosharethecontentsordeletea
photo.TouchMoreformoreoptions.
Details–Checkinformationonthe
content.
Set as–Setasacontacticonor
wallpaper.
Crop–Cropyourphoto.Moveyour
fingeracrossthescreentoselectthe
area.
Rotate–Rotateleftorright.

97
Zoom -Zoominorzoomout.Alternativelyyoucanusetheside
volumekeys.
Brightness -Thisdefinesandcontrolstheamountofsunlightentering
thevideo.Slidethebrightnessindicatoralongthebartowards“-”to
lowerthebrightnessofthevideoortowards“+”toincreaseit.
Video size-Touchtosetthesize(inpixels)ofthevideoyourecord.
Duration-Setadurationlimitforyourvideo.ChoosebetweenNormal
andMMStolimitthemaximumsizetosendasanMMSmessage.
Settings-Touchthisicontoopentheadvancedsettingsmenu.
Camera mode-Slidethisiconuptoswitchtocameramode.
Start recording
Gallery-Touchtoviewthelastvideoyourecorded.Thisenables
youtoaccessyourgalleryandviewyoursavedvideosfromwithin
videomode.
Getting to know the
viewfinder
Video camera
98
Shooting a quick video
1 SlidetheCameramodebuttondownand
theiconchangesto .
2 Thevideocameraviewfinderappearson
thescreen.
3 Holdingthephonehorizontally,pointthe
lenstowardsthesubjectyouwantto
captureinyourvideo.
4 PresstheRecord buttononcetostart
recording.
5 RECappearsatthebottomofthe
viewfinderwithatimershowingthe
lengthofthevideo.
6 Touch onthescreentostop
recording.
After shooting a video
Astillimagerepresentingyourvideowill
appearonthescreen.
Play Touchtoplaythevideo.
Share Touchtoshareyourvideousing
SmartShare, Bluetooth, E-mail,
Gmail, Messaging, Wi-Fi Cast.
NOTE: Additional charges may apply when
MMS messages are downloaded while
roaming.
Video camera

99
Rename Touchtoeditthenameofthe
selectedvideo.
Touchtoshootanothervideorightaway.
Yourcurrentvideoissaved.
Touchtodeletethevideoyoujustmade.
ConfirmbytouchingOK.Theviewfinder
reappears.
Touchtoviewthelastrecordedvideoas
wellasthegallery.
Using the advanced settings
Usingtheviewfinder,touch toopenall
theadvancedoptions.
Adjustthevideocamerasettingbyscrolling
throughthelist.Afterselectingtheoption,
touchtheBackkey.
White balance–Whitebalanceensures
thatthewhiteareasinyourvideoare
realistic.Toenableyourcameratoadjust
thewhitebalancecorrectly,youmayneedto
determinethelightconditions.Choosefrom
Auto,Incandescent,Sunny,Fluorescent
andCloudy.

100
Color effect–Chooseacolourtonetouse
foryournewview.
Video quality–ChoosefromSuper fine,
FineandNormal.
Audio recording–ChooseMute torecord
avideowithoutsound.
Auto review–Autoreviewautomatically
showsyouthevideoyoujustrecorded.
–Restoreallvideocameradefault
settings.
–Touchifyouwanttoknowhowthis
functionoperates.Thisprovidesyouwitha
quickguide.
Watching your saved videos
1 Intheviewfinder,touch .
2 Yourgalleryappearsonthescreen.
3 Touchavideooncetobringittothe
frontofthegallery.Itstartsplaying
automatically.
Adjusting the volume when
viewing a video
Toadjustthevolumeofavideowhileitis
playing,usethevolumekeysontheleft-
handsideofthephone.
Video camera

101
Youcanstoremultimediafilesonamemory
cardtohaveeasyaccesstoallyourimage
andvideofiles.
TouchtheApplicationstab,thenselect
Gallery.Openalistofcataloguebarsthat
storeallyourmultimediafiles.
NOTE:
Make sure you install
a memory card in the phone to save
photos and videos. Without a memory
card, the phone does not display photos
or videos except Picasa images, which
are in your Picasa web album.
View mode
TouchGallery.Folderviewisdisplayed.
Touchanyfolderanditturnstogridview
mode.Ifyoutapaphoto,itchangesintofull
viewmode.
Timeline view
LG-P705fGalleryprovidesatimelineview
ofyourphotosandvideos.Ingridview
mode,drag totherightandthedate
youtookyourphotosisdisplayed,starting
withthemostrecent.Ifyouselectaspecific
date,allthephotosyoutookonthatdayare
grouped.
Multimedia

102
Using SmartShare
SmartShareprovidesyouwithabetterway
toenjoymultimediacontentswithother
DLNA(DigitalLivingNetworkAlliance)
enableddevices.
* Share your media contents with other
DLNA devices (DMS)
1 IntheHomescreen,touchthe
Applicationstabandselect
SmartShare.
2 PresstheMenukeyandselectSettings.
3 Youcanchangeyourdevicename,icon
andselectthesharingcontenttypes
4 TouchtheDiscoverabletickboxtoturnon.
* Let your renderer device (e.g. TV)
play multimedia contents from remote
content library (e.g. PC)
1 Touchthetoprightbuttontoselectthe
devicefromalistofrenderers.
2 Touchthetopleftbuttonandselecta
remotecontentlibrary.
3 Youcanbrowsetheremotecontent
library.
4 Touchacontentthumbnailorpressthe
MenukeyandselectthePlaybutton.
Multimedia

103
Notice: Check that your device is
connected to your home network using
a Wi-Fi connection in order to use this
application.
Notice: Some DLNA-enabled devices (e.g.
TV) support only DMP features of DLNA and
will not appear in the renderer device lists.
Music
YourLG-P705fhasabuilt-inmusicplayer
thatletsyouplayallyourfavouritetracks.To
accessthemusicplayer,touchMusic.
Playing a song
1 IntheHomescreen,touchthe
ApplicationstabandselectMusic.
2 TouchSongs.
3 Selectthesongyouwanttoplay.
4 Touch topausethesong.
5 Touch toskiptothenextsong.
6 Touch togobacktothebeginning
ofthesong.Touch twicetoreturnto
theprevioussong.

104
Tochangethevolumewhilelisteningto
music,presstheupanddownvolumekeys
ontheleft-handsideofthephone.
Touchandholdanysonginthelist.It
displaysPlay, Add to playlist, Use as
phone ringtone, Delete, Details, Share and
Search asoptions.
NOTE:
Music file copyrights may be
protected by international treaties and
national copyright laws.
Therefore, it may be necessary to obtain
permission or a licence to reproduce or
copy music.
In some countries, national laws prohibit
private copying of copyrighted material.
Before downloading or copying the file,
check the national laws of the relevant
country concerning the use of such
material.
Multimedia

105
Transferring files using USB
mass storage devices
To transfer files using USB devices
1 ConnecttheLG-P705ftoaPCusinga
USBcable.
2 Ifyouhaven'tinstalledLGAndroid
PlatformDriveronyourPC,youneedto
changethesettingsmanually.Choose
Settings > SD card & phone storage,
thenselectMass storage only.
3 TouchTurn on USB storage.
4 Youcanviewthemassstoragecontents
onyourPCandtransferthefiles.
NOTE: You need to install an SD card first.
Without an SD card, you cannot use USB
mass storage.
NOTE:
If you installed LG Android Platform
Driver, you will immediately see a pop-up
saying Turn on USB storage.
How to Transfer music/video
files to your phone
1 ConnectyourphonetothePCusingthe
USBcable.IntheHomescreen,touch
anddragdownthenotificationdrawer.
SelectUSB connected > Turn on USB
storage > SelectOpenfoldertoview

106
filesfrom Removable Disk popupwhich
appearsinPC.
Ifyoudidn'tinstallLGAndroidPlatform
DriveronyourPC,youmustsetitup
manually.
Formoreinformation,referto
'TransferringfilesusingUSBmass
storagedevices'.
2 TransfermusicorvideofilesfromthePC
tothephone'sremovablestorage.
•Youcancopyormovefilesfromyour
PCtoyourphone'sremovablestorage
usingacardreader.
•Ifthereisavideofilewithasubtitlefile
(*.srtfilewiththesamenameasthe
videofile),placeitinthesamefolder
todisplaysubtitlesautomaticallywhen
playingthevideofile.
•Whendownloadingmusicorvideofiles,
copyrightsmustbesecured.Notethat
corruptedfilesorfileswithincorrect
extensionsmaydamageyourphone.
Sending data from your phone
using Bluetooth
Sending data using Bluetooth Youcan
useBluetoothtosenddatabyrunninga
Multimedia

107
correspondingapplication,notfromthe
Bluetoothmenuasonmostothermobile
phones.
*Sending pictures:RuntheGallery
application,thenselectPicture>Menu.
ClickShare,thenselectBluetooth.Check
whetherBluetoothisturnedon,thenselect
Scan for devices.Choosethedeviceyou
wanttosenddatatofromthelist.
*Exporting contacts:RuntheContacts
application.Touchtheaddressyouwant
toexportto.PresstheMenukeyand
selectShare>Bluetooth.Checkwhether
Bluetoothisturnedon,thenselectScan
for devices.Choosethedeviceyouwant
tosenddatatofromthelist.
*Sending multi-selected contacts:Run
theContactsapplication.Toselectmore
thanonecontacttouchtheMenukeyand
touchShare.Selectthecontactsyouwant
tosendortouchSelectalloptionfrom
top>SelectShare>Bluetooth>Enable
BluetoothandselectScanfordevices
>Choosethedeviceyouwanttosenddata
fromthelist.

108
*Connecting to FTP (only FTP server
is supported on this handset):select
Settings>Wireless & networks
>Bluetooth Settings.Selectthe
Discoverableboxsoyoucansearchfor
yourphoneonotherdevices.FindtheFTP
serviceandconnecttotheFTPserver.
•Ifyouwanttosearchforthisphonefrom
otherdevices,gotoSettings>Wireless
& networks>Bluetooth Settings.Select
theDiscoverablebox.Theboxiscleared
after120seconds.
Multimedia

109
Setting your alarm
1 IntheHomescreen,touchthe
ApplicationstabandselectClock.
2 Ifyouwanttoaddanewalarm,touch
andselectAdd alarm.
3 Setthetimetoturnonthealarm.After
yousetthetime,theLG-P705fletsyou
knowhowmuchtimeisleftbeforethe
alarmwillsound.
4 SetRepeat, RingtoneorVibrate,then
addalabeltonamethealarm.Touch
Done.
NOTE: to change alarm settings on alarm
list screen, press the Menu key and
select Settings. You can adjust the below
options: Alarm in silent mode, Alarm
volume, Snooze duration and Side button
behaviour.
Using your calculator
1 IntheHomescreen,touchthe
ApplicationstabandselectCalculator.
2 Touchthenumberkeystoenternumbers.
3 Forsimplecalculations,touchthe
functionyouwant(+,–,xor÷)followed
by=.
Utilities

110
4 Formorecomplexcalculations,pressthe
Menukey,touchtheAdvancedpanel,
thenchoosesin,cos,tan,log andsoon.
Adding an event to your
calendar
1 IntheHomescreen,touchthe
ApplicationstabandselectCalendar.
2 Tochecktheevent,touchthedate.Touch
andholdifyouwanttoaddanewevent.
TouchNew event.
3 TouchWhatthenentertheeventname.
Checkthedateandenterthetimeyou
wantyoureventtostartandfinish.
4 Also,touchWherethenenterthe
location.
5 Ifyouwanttoaddanotetoyourevent,
touchDescriptionandenterthedetails.
6 Ifyouwanttorepeatthealarm,set
Repetition,andsetReminders,if
necessary.
7 TouchDonetosavetheeventinthe
calendar.Acolouredsquareinthe
calendarmarksalldaysthathavesaved
events.Analarmsoundsattheevent
starttimetohelpyoustayorganised.
Utilities

111
Changing your calendar view
1 IntheHomescreen,touchthe
ApplicationstabandselectCalendar.
PresstheMenukey.
2 Selectthecalendarviewforaparticular
day,weekormonth.
Polaris Viewer
PolarisViewerisaprofessionalmobileoffice
solutionthatletsusersconvenientlyview
varioustypesofofficedocuments,including
Word,ExcelandPowerPointfiles,anywhere,
anytime,usingtheirmobiledevices.
Managing files
PolarisViewerprovidesmobileuserswith
convenientfilemanagementfeatures,including
copying,moving,renaminganddeletingfiles
andfoldersrightonthedeviceandsending
filesfromthedevice.
Viewing files
Mobileuserscannoweasilyviewawide
varietyoffiletypes,includingMicrosoft
OfficedocumentsandAdobePDF,right
ontheirmobiledevices.Whenviewing
documentsusingPolarisViewer,theobjects
andlayoutremainthesameasintheir
originaldocuments.

112
Voice recorder
Usethevoicerecordertorecordvoice
memosorotheraudiofiles.
Recording a sound or voice
1 IntheHomescreen,touchthe
ApplicationstabandselectVoice
Recorder.
2 Touch tobeginrecording.
3 Touch toendtherecording.
4 Touch tolistentotherecording.
NOTE: touch to access your album.
You can listen to the saved recording.
Notice: the available recording time may
differ from the real time.
Sending the voice recording
1 Onceyouhavefinishedrecording,you
cansendtheaudioclipbytouching
Share.
2 ChoosefromBluetooth, Email, Gmail
MessagingandWi-Fi Cast.Whenyou
selectE-mail, Gmail andMessaging,
thevoicerecordingisaddedtothe
message,thenyouwriteandsendthe
messagenormally.
Utilities

113
Browser
Browsergivesyouafast,full-colourworld
ofgames,music,news,sport,entertainment
andmuchmore,rightonyourmobilephone.
Whereveryouareandwhateveryouenjoy.
NOTE: additional charges apply when
connecting to these services and
downloading content. Check data charges
with your network provider.
Using the web toolbar
Touchtogobackwardsonepage.
Touchtogoforwardsonepagetothe
oneyouconnectedtoafterthecurrent
page.Thisistheoppositeofwhat
happenswhenyoupresstheBackkey,
whichgoestothepreviouspage.
Touchtoshowallyouropenwindows.
Touchtoaddanewwindow
Touchtochangewebbrowsersettings.
Add/showbookmarkandshowMost
visited, Read it later and History.
The Web

114
Using options
PresstheMenukeytoviewoptions.
Read it later–Addthecurrentweb
pageasabookmark.
Add RSS Feed–Addthecurrentweb
pagetotheRSSfeed.
Share page–Allowsyoutosharethe
webpagewithothers.
Find on page–Allowsyoutofind
lettersorwordsonthecurrentweb
page.
Select text–allowsyoutocopyany
textfromthewebpage.
More
•Home page: GototheHomepage.
•Set Home page: Setthecurrentweb
pageasyourHomepage.
•Add shortcut to Home: Addtheshortcut
ofthecurrentwebpagetotheHome
screen.
•Page info: Displaysthewebpage
information.
The Web

115
•Downloads: Displaysyourdownload
history.
TIP To return to the previous web
page, press the Back key.

116
IntheHomescreen,touchtheApplications
tabthenscrolltoandtouchSettings.
Wireless & networks
Here,youcanmanageWi-FiandBluetooth.
Youcanalsosetupmobilenetworksand
switchtoairplanemode.
Airplane mode–Afterswitchingtoairplane
mode,allwirelessconnectionsaredisabled.
Wi-Fi –Touchtoselect:ThisturnsonWi-Fi
toconnecttoavailableWi-Finetworks.
Wi-Fi settings–Allowsyoutosetupand
managewirelessaccesspoints.Setnetwork
notification,oraddaWi-Finetwork.The
advancedWi-Fisettingsscreenisaccessed
fromtheWi-Fisettingsscreen.Pressthe
MenukeyandtouchAdvanced.
Wi-Fi Direct Settings–SetWi-FiDirect
devicenameandscanforotherdevices.
OrbeaGroupownertoallowlegacyWi-Fi
devicestoconnect.
Settings

117
TIP! How to obtain the MAC
address
To set up a connection in some wireless
networks with MAC filters, you may
need to enter the MAC address of your
LG-P705f into the router.
You can find the MAC address in
the following user interface: Touch
Application > Settings > Wireless &
networks > Wi-Fi settings, and press
the Menu key. Then select Advanced >
MAC Address.
Bluetooth–Touchtoselect:Thisturnson
BluetoothtoconnecttoBluetoothdevices.
Bluetooth settings–Setdevicename&
discoverablemode,scanforotherdevices.
Or,checkalistofBluetoothdevicesthat
you’vepreviouslyconfiguredandthose
detectedwhenthephonelastscannedfor
Bluetoothdevices.
Tethering & portable hotspot–Youcan
configuretheUSBtetheringandportableWi-
Fihotspotsettings.
VPN settings–DisplaysthelistofVirtual
PrivateNetworks(VPNs)thatyou’ve

118
previouslyconfigured.Allowsyoutoadd
differenttypesofVPN.
Mobile networks–Setoptionsfordata
roaming,networkmode&operators,access
pointnames(APNs)andsoon.
On-Screen Phone settings –Allowsyou
tochangetheOn-ScreenPhonepassword
(thedefaultpasswordis"0000").On-Screen
Phoneallowsyoutoviewyourmobilephone
screenfromaPCviaaUSBorBluetooth
connection.Youcanalsocontrolyourmobile
phonefromyourPCusingthemouseor
keyboard.
Call settings
< Fixed Dialing Numbers >
SelectFixed Dialing Numberstoturnon
andcompilealistofnumbersthatcanbe
calledfromyourphone.You’llneedyour
PIN2,whichisavailablefromyouroperator.
Onlynumberswithinthefixeddiallistcanbe
calledfromyourphone.
< Voicemail >
Voicemail service–Allowsyoutoselect
yourcarrier’svoicemailservice.
Voicemail settings–Ifyouareusingyour
carrier’svoicemailservice,thisoptionallows
Settings

119
youtoenterthephonenumbertousefor
listeningtoandmanagingyourvoicemail.
< Other call settings >
Excuse messages–Whenyouwantto
rejectacall,youcansendaquickmessage
usingthisfunction.Thisisusefulifyouneed
torejectacallduringameeting.
Call forwarding–Choosewhethertodivert
allcalls,whenthelineisbusy,whenthereis
noanswerorwhenyouhavenosignal.
Call barring–Selectwhenyouwouldlike
callstobebarred.Enterthecallbarring
password.Pleasecheckwithyournetwork
operatoraboutthisservice.
Call reject –Allowsyoutosetthecallreject
function.ChoosefromOff, Reject on listor
Reject all calls.
Call costs–Viewthechargesapplied
toyourcalls.(Thisserviceisnetwork
dependent;someoperatorsdonotsupport
thisfunction)
Call duration–Viewthedurationofcalls
includinglastcall,allcalls,dialledcallsand
receivedcalls.
Additional settings–Thisletsyouchange
thefollowingsettings:

120
Caller ID:Choosewhethertodisplayyour
numberonanoutgoingcall.
Call waiting:Ifcallwaitingisactivated,the
handsetwillnotifyyouofanincomingcall
whileyouareonanothercall(dependingon
yournetworkprovider).
Sound
< General >
Silent mode–Allowsyoutomuteall
sounds(includingcallandnotification
ringtones)excepttheaudiofrommusicand
videosandanyalarmsyouhaveset.You
mustmutemediaandalarmsoundsintheir
ownapplications.
Vibrate–Allowsyoutosetyourphoneto
vibratewhenyoureceiveanincomingcall.
Volume –Allowsyoutosetthevolumefor
ringtones,mediaandalarms.Ifyoudeselect
theoptiontousetheincomingcallvolume
fornotifications,youcansetthevolumefor
incomingcallsandnotificationsseparately.
< Incoming calls >
Phone ringtone–Allowsyoutosetyour
defaultincomingcallringtone.
Settings

121
< Notifications >
Notification ringtone–Allowsyoutoset
yourdefaultnotificationringtone.
< Feedback >
Audible touch tones–Allowsyoutosetthe
phonetoplaytoneswhenusingthedialpad
todialnumbers.
Audible selection–Allowsyoutosetyour
phonetoplayasoundwhenyoutouch
buttons,iconsandotheronscreenitemsthat
reacttoyourtouch.
Screen lock sounds–Allowsyoutoset
yourphonetoplayasoundwhenlocking
andunlockingthescreen.
Haptic feedback–Allowsyourphoneto
vibratewhenpressingsoftkeysandon
certainUIinteractions.
Display
Brightness–Adjustthescreenbrightness.
Auto-rotate screen–Settoswitch
orientationautomaticallywhenyourotate
thephone.
Animation–Settodisplayananimation.

122
Screen timeout–Setthetimeforscreen
timeout.
Location & security
Use wireless networks–IfyouselectUse
wireless networks,yourphonedetermines
yourapproximatelocationusingWi-Fiand
mobilenetworks.Whenyouselectthis
option,you’reaskedwhetheryouconsentto
allowingGoogletouseyourlocationwhen
providingtheseservices.
Use GPS satellites–IfyouselectUse
GPS satellites,yourphonedeterminesyour
locationtostreetlevelaccuracy.
Set up screen lock–Setanunlock
patterntosecureyourphone.Opensaset
ofscreensthatguideyouthroughdrawing
ascreenunlockpattern.YoucansetaPIN
orpasswordinsteadofapatternorleave
itasNone.
Whenyouturnonyourphoneorwakeup
thescreen,you'reaskedtodrawyourunlock
patterntounlockthescreen.
Set up SIM/RUIM card lock–SetupSIM/
RUIMcardlockorchangetheSIM/RUIMPIN.
Settings

123
Visible passwords–Selecttoshow
passwordsasyoutypethemordeselectto
hidepasswordsasyoutypethem.
Select device administrators–Addoneor
moreadministrators.
Use secure credentials–Allowsyouto
accesssecurecertificates.
Install from SD card–Choosetoinstall
encryptedcertificatesfromyourSDcard.
Set password–Setorchangethe
credentialstoragepassword.
Clear storage–Clearcredentialsforall
contentandresetpassword.
Applications
Youcanmanageapplicationsandsetup
quicklaunchshortcuts.
Unknown sources –Defaultsettingto
installnon-Marketapplications.
Manage applications–Manageand
removeinstalledapplications.
Running services–Checkservicesthatare
currentlyrunning.
Storage use–Viewstorageusedby
applications.

124
Battery usage–Seewhathasbeenusing
thebattery.
Development–Setoptionsforapplication
development.
Accounts & sync
< General sync settings >
Background data–Permitsapplicationsto
synchronisedatainthebackground,whether
ornotyouareactivelyworkinginthem.
Deselectingthissettingcansavebattery
powerandlowers(butdoesnoteliminate)
datausage.
Auto-sync–Permitsapplicationsto
synchronise,sendandreceivedatatotheir
ownschedule.
< Manage accounts >
ListofallGoogleaccountsandother
accountsyou’veaddedtoyourphone.
Ifyoutouchanaccountinthisscreen,its
accountscreenopens.
Privacy
IfyouselectFactorydatareset,itwillerase
allofyourpersonaldatafromtheinternal
phonestorage,includinginformationabout
Settings

125
yourGoogleaccount,anyotheraccounts,
yoursystem/applicationdataandsettings
aswellasanydownloadedapplicationsand
DRMlicence.
Resettingthephonedoesnoterase
anysystemsoftwareupdatesyouhave
downloadedoranyfilesonyourmicroSD
card,suchasmusicorphotos.Ifyoureset
thephoneinthisway,youarepromptedto
re-enterthesameinformationthatyoudid
whenyoufirststartedAndroid.
SD card & phone storage
< USB connection mode >
Mass storage only–Yourphonecanbe
usedasamassstoragedeviceifyouhave
amemorycardinserted.YoucansetMass
storage onlyasadefaultsettingoftheUSB
connectionmode.
< SD card >
ChecktotalavailableSDcardspace.Touch
Unmount SD Cardforsaferemoval.Erase
SD Cardifyouwanttodeletealldatafrom
theSDcard.

126
< Internal storage >
Checkstheavailablespace.
Language & keyboard
Setlocallanguageandregionaswellas
keyboardsettings.
Voice input & output
< Voice input >
Voice recogniser settings–Usethe
Voice recogniser settingstoconfigurethe
Androidvoiceinputfeature.
•Language:Opensascreenwhereyou
cansetthelanguageyouuseforspeech
toentertext.
•SafeSearch:Opensadialogwhereyou
cansetwhetheryouwanttheGoogle
SafeSearchfiltertoblocksomeresults.
•Block offensive words:Whendeselected,
Googlevoicerecognitionwillrecognise
andtranscribewordsmanypeople
consideroffensive,whenyouusespeech
toentertext.Whenselected,Google
voicerecognitionreplacesthosewords
intranscriptionswithaplaceholder
comprisedofhashsymbols(#).
Settings

127
< Voice output >
Text-to-speech settings–UsetheText-
to-speech settingstoconfiguretheAndroid
text-to-speechsynthesiserforapplications
thatcanusethisfeature.
NOTE: if you don’t have speech synthesiser
data installed, only the Install voice data
setting is available.
•Listen to an example: Playsabrief
sampleofthespeechsynthesiser,using
yourcurrentsettings.
•Always use my settings: Ticktousethe
settingsonthisscreeninplaceofspeech
synthesisersettingsavailableinother
applications.
•Default Engine:Opensadialogwhere
youcansetthetext-to-speechapplication
youwanttouse,ifyouhavemorethan
oneinstalled.
•Install voice data:Ifyourphonedoes
nothavespeechsynthesiserdata
installed,thisconnectstoAndroidMarket
andguidesyouthroughtheprocess
ofdownloadingandinstallingthedata.

128
Thissettingisnotavailableifthedatais
alreadyinstalled.
•Speech rate:Opensadialogwhere
youcanselecthowquicklyyouwantthe
synthesisertospeak.
•Language: Opensadialogwhereyoucan
selectthelanguageofthetextyouwant
thesynthesisertoread.Thisisparticularly
usefulincombinationwithAlways use
my settings toensurethattextisspoken
correctlyinavarietyofapplications.
•Pico TTS:ConfigurethePico TTS
settings.
Accessibility
UsetheAccessibilitysettingstoconfigure
accessibilityplug-insyouhaveinstalledon
yourphone.
NOTE: requires additional plug-ins.
Date & time
UseDate & timesettingstosetyour
preferenceforhowdatesaredisplayed.You
canalsousethesesettingstosetyourown
timeandtimezoneratherthanobtainingthe
currenttimefromthemobilenetwork.
Settings

129
About Phone
Viewlegalinformationandcheckphone
statusandsoftwareversion.

130
Phone software update
LG Mobile phone software update from
the Internet
Formoreinformationaboutusingthis
function,pleasevisitthehttp://update.
lgmobile.comorhttp://www.lg.com/
common/index.jspselectcountryand
language.
Thisfeatureallowsyoutoupdatethe
firmwareonyourphonetoanewerversion
convenientlyfromtheInternetwithout
needingtovisitaservicecentre.Thisfeature
isonlyavailableifandwhenLGmakesthe
newerversionofthefirmwareavailablefor
yourdevice.
Asthemobilephonefirmwareupdate
requirestheuser’sfullattentionforthe
durationoftheupdateprocess,pleasemake
sureyoucheckallinstructionsandnotes
thatappearateachstepbeforeproceeding.
PleasenotethatremovingtheUSBdata
cableorbatteryduringtheupgrademay
seriouslydamageyourmobilephone.
NOTE: LG reserves the right to make
firmware updates available only for selected
models at its own discretion and does
Software update

131
not guarantee the availability of the newer
version of the firmware for all handset
models.
LG Mobile Phone software update via
Over-the-Air (OTA)
Thisfeatureallowsyoutoupdatethe
firmwareofyourphonetothenewerversion
convenientlyviaOTAwithoutconnectingthe
USBdatacable.Thisfeatureisonlyavailable
ifandwhenLGmakesthenewerversionof
thefirmwareavailableforyourdevice.
First,youcancheckthesoftwareversion
onyourmobilephone:Settings > About
phone > Software update > Check now
for update.
Youcanalsodelaytheupdateby1hour,4
hours,8hoursor24hours.Inthiscase,the
applicationwillnotifyyoutoupdatewhenthe
timeisup.Youcanalsorearrangeanupdate
manually.
NOTE: This feature is dependent on
the network service provider, region or
countries.

132
DivX Mobile
ABOUT DIVX VIDEO:DivX
®
isadigitalvideo
formatcreatedbyDivX,LLC,asubsidiary
ofRoviCorporation.ThisisanofficialDivX
Certified
®
devicethatplaysDivXvideo.Visit
divx.comformoreinformationandsoftware
toolstoconvertyourfilesintoDivXvideos.
ABOUT DIVX VIDEO-ON-DEMAND:This
DivXCertified
®
devicemustberegistered
inordertoplaypurchasedDivXVideo-
on-Demand(VOD)movies.Toobtainyour
registrationcode,locatetheDivXVOD
sectioninyourdevicesetupmenu.Goto
vod.divx.comformoreinformationonhowto
completeyourregistration.
DivX Certified
®
to play DivX
®
video up to
320x240.
DivX
®
, DivX Certified
®
and associated
logos are trademarks of Rovi Corporation
or its subsidiaries and are used under
licence.
Software update

133
Notice:
Open Source Software
To obtain the corresponding source
code under GPL, LGPL, MPL and
other open source licences, please visit
http://opensource.lge.com/
All referred licence terms, disclaimers
and notices are available for download
with the source code.
134
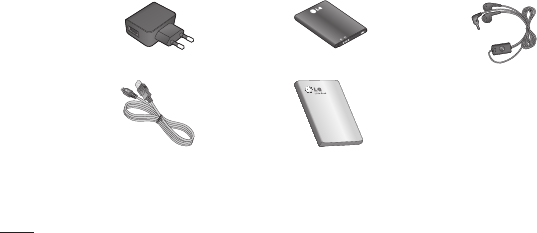
TheseaccessoriesareavailableforusewiththeLG-P705f.(Items described below may be optional.)
Travel adapter Battery Stereo headset
Data cable
Connectyour
LG-P705fandPC.
User Guide
Learnmoreabout
yourLG-P705f.
NOTE:
• AlwaysusegenuineLGaccessories.
• Failuretodothismayvoidyourwarranty.
• Accessoriesmayvaryindifferentregions.
.
Accessories

135
Ambient temperatures
Max:+55°C(discharging),+45°C(charging)
Min:-10°C
Technical data

136
Thischapterlistssomeproblemsyoumightencounterwhileusingyourphone.Some
problemsrequireyoutocallyourserviceprovider,butmostareeasytofixyourself.
Message Possible causes Possible corrective measures
SIMerror
ThereisnoSIMcardin
thephoneoritisinserted
incorrectly.
MakesurethattheSIMcardiscorrectlyinserted.
Nonetwork
connection/
Losing
network
Signalisweakoryou’re
outsidethecarriernetwork.
Operatorappliednew
services.
Movetowardsawindoworintoanopenarea.Checkthe
networkoperatorcoveragemap.
CheckwhethertheSIMcardismorethan6~12months
old.Ifso,changeyourSIMatyournetworkprovider's
nearestbranch.Contactyourserviceprovider.
Troubleshooting

137
Message Possible causes Possible corrective measures
Codesdonot
match
Tochangeasecuritycode,
youwillneedtoconfirmthe
newcodebyre-enteringit.
Thetwocodesyouhave
entereddonotmatch.
Thedefaultcodeis[0000].
Ifyouforgetthecode,contactyourserviceprovider.
Any
application
cannotbeset
Notsupportedbyservice
providerorregistration
required.
Contactyourserviceprovider.
Callsnot
available
Diallingerror
NewSIMcardinserted.
Pre-paidchargelimit
reached.
Newnetworknotauthorised.
Checkfornewrestrictions.
ContactserviceproviderorresetlimitwithPIN2.

138
Message Possible causes Possible corrective measures
Phonecannot
beswitched
on
On/Offkeypressedtoo
briefly.
Batteryisnotcharged.
Batterycontactsaredirty.
PresstheOn/Offkeydownforatleasttwoseconds.
Chargebattery.Checkchargingindicatoronthedisplay.
Cleanthebatterycontacts.
Troubleshooting

139
Message Possible causes Possible corrective measures
Charging
error
Batteryisnotcharged.
Outsidetemperatureistoo
hotorcold.
Contactproblem
Novoltage
Chargerdefective
Wrongcharger
Batterydefective
Chargebattery.
Makesurephoneischargingatanormaltemperature.
Checkthechargerandconnectiontothephone.Checkthe
batterycontactsandcleanthemifnecessary.
Plugthechargerintoadifferentsocket.
Ifthechargerdoesnotwarmup,replaceit.
OnlyuseoriginalLGaccessories.
Replacebattery.
Numbernot
permitted
TheFixeddiallingnumber
functionison. ChecktheSettingsmenuandturnthefunctionoff.

140
Message Possible causes Possible corrective measures
Impossible
toreceive/
sendSMS&
picture
Memoryfull Deletesomemessagesfromthephone.
Filesnot
opening Unsupportedfileformat Checkthefileformatsthatcanbesupported.
SDcardnot
working
FAT16,FAT32filesystem
supported
CheckSDcardfilesystemviacardreader,orformatSD
cardusingthephone.
Thescreen
doesnotturn
onwhenI
receiveacall.
Proximitysensorproblem
Ifyouuseanyprotectiontapeorcase,checktoseeifithas
coveredtheareaaroundtheproximitysensor.Makesure
thattheareaaroundtheproximitysensorisclean.
Troubleshooting

141
Message Possible causes Possible corrective measures
Nosound Vibrationmode Checkthesettingsstatusofthesoundmenutomakesure
youarenotinvibrateorsilentmode.
Hangupor
freeze
Intermittentsoftware
problem
Removethebattery,insertitagainandswitchonthephone.
Trytoperformasoftwareupdateviathewebsite.
Phonelocked
anddoesnot
function.
Restartingthephone
1.Turnthephoneoff.
2.Removethebackcover.
3.Removethebatteryandreinstallit.
4.Closethebackcover.
5.Turnthephoneonagain.