LG Electronics USA P720H Cellular/PCS GSM/EDGE/WCDMA Phone with WLAN and Bluetooth User Manual
LG Electronics MobileComm USA, Inc. Cellular/PCS GSM/EDGE/WCDMA Phone with WLAN and Bluetooth Users Manual
UserManual.wiki
>
LG Electronics USA
>
P720H User Manual
Users Manual
Navigation menu
Upload a User Manual
Namespaces
Wiki Guide
HTML
PDF
Info
Views
User Manual
Discussion / Help
Navigation


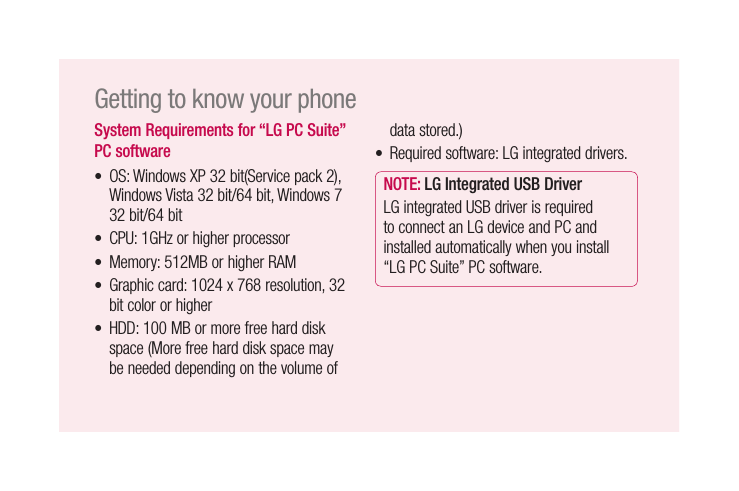
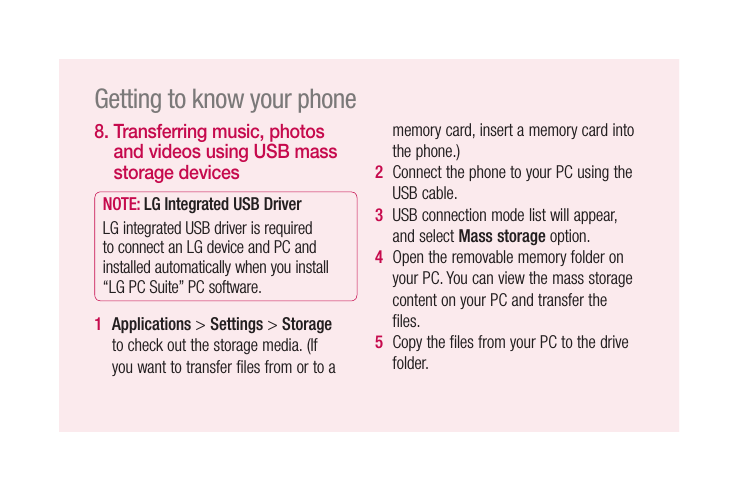
![39datastored.)• Requiredsoftware:LGintegrateddrivers.NOTE: LG Integrated USB DriverLGintegratedUSBdriverisrequiredtoconnectanLGdeviceandPCandinstalledautomaticallywhenyouinstall“LGPCSuite”PCsoftware.7. Synchronising your phone to a ComputerDataofyourdeviceandPCcanbesynchronisedeasilywith"LGPCSuite"PCsoftwareforyourconvenience.Contacts,schedules,andbookmarkscanbesynchronised.Theprocedureisasfollows:1 ConnectyourdevicetoPC.(UseaUSBcableorWi-Ficonnection.)2 Afterconnection,runtheprogramandselectthedevicesectionfromthecategoryontheleftsideofthescreen.3 Click[Personalinformation]toselect.4 SelectthecheckboxofcontentstosynchroniseandclicktheSyncbutton.Getting to know your phone](https://usermanual.wiki/LG-Electronics-USA/P720H/User-Guide-1666927-Page-11.png)
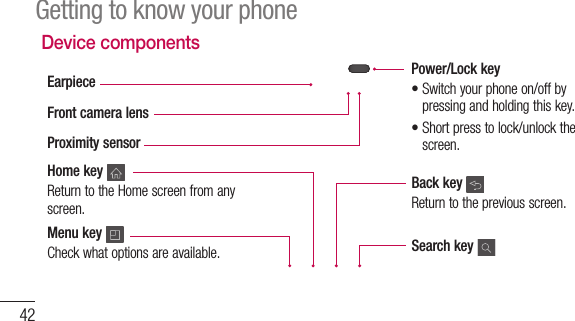


![846 IfthecontactsinthedeviceandnewcontactsfromPCaredifferent,selectacontactyouwanttoimportfromPC.7 Clickthe[OK]buttontoimportanewcontactfromPCtothedevice.YourLG-P720hcombinesSMSandMMSintooneintuitive,easy-to-usemenu.Sending a message1 Touch icononthehomescreen,andtouchNew messagetoopenablankmessage.2 EnteracontactnameorcontactnumberintheTofield.Asyouenterthecontactname,matchingcontactsappear.Youcantouchasuggestedrecipient.Youcanaddmultiplecontacts.MessagingContacts](https://usermanual.wiki/LG-Electronics-USA/P720H/User-Guide-1666927-Page-52.png)


![165NOTE:• Ifyoucannotfindthedevicetoconnect,FromthedeviceselectSettings>Connectivity>EnableWi-Fi connectionandclickRetryinPC.• YoumayexperiencebadWi-Ficonnectiondependingonnetworkconfigurationandnetworkstatus.PC software(LG PC Suite)• IfyouconnectthedeviceandPCwithHotspotandusetheInternetonyourPC,youmayincurdatachargesinconnectionwithHotspotdependingonyourpaymentplan.• ThebatteryofyourdevicemayrunlowquicklyifyouuseWi-Fi.Synchronising your Device to a ComputerDataofyourdeviceandPCcanbesynchronisedeasilywith"LGPCSuite"PCsoftwareforyourconvenience.Contacts,schedules,andbookmarkscanbesynchronised.Theprocedureisasfollows:1 ConnectyourdevicetoPC.(UseaUSBcableorWi-Ficonnection.)2 Afterconnection,runtheprogramandselectthedevicesectionfromthecategoryontheleftsideofthescreen.3 Click[Personalinformation]toselect.4 SelectthecheckboxofcontentstosynchroniseandclicktheSyncbutton.](https://usermanual.wiki/LG-Electronics-USA/P720H/User-Guide-1666927-Page-131.png)
![166Moving Contacts from your Old Device to your New DeviceExportyourcontactsasaCSVfilefromyourolddevicetoyourPCusingaPCsyncprogram.1 Install"LGPCSuite"PCsoftwareonthePC.RuntheprogramandconnectyourdevicetothePCusingaUSBcable.2 Fromthetopofthescreen,selectDevice>Import personal information>Import contacts.3 Apop-uptoopenacontactsfilewillappear.4 SelectacontactsfileandclickOpen.5 Apop-uptoimportanewcontactfromPCtothecontactsinthedevicewillappear.6 IfthecontactsinthedeviceandnewcontactsfromPCaredifferent,selectacontactyouwanttoimportfromPC.7 Clickthe[OK]buttontoimportanewcontactfromPCtothedevice.PC software(LG PC Suite)Sending Multimedia contents from Device to PC1 ConnectthedeviceandPCwithaUSBcable.2 Run"LGPCSuite"PCsoftware.3 Afterconnection,selectthedevicesectionfromthecategoryontheleftsideofthescreen.4 SelectMultimedia.5 Selectthecheckboxofthecontentstosend.](https://usermanual.wiki/LG-Electronics-USA/P720H/User-Guide-1666927-Page-132.png)
![1673 Apop-uptoopenacontactsfilewillappear.4 SelectacontactsfileandclickOpen.5 Apop-uptoimportanewcontactfromPCtothecontactsinthedevicewillappear.6 IfthecontactsinthedeviceandnewcontactsfromPCaredifferent,selectacontactyouwanttoimportfromPC.7 Clickthe[OK]buttontoimportanewcontactfromPCtothedevice.PC software(LG PC Suite)Sending Multimedia contents from Device to PC1 ConnectthedeviceandPCwithaUSBcable.2 Run"LGPCSuite"PCsoftware.3 Afterconnection,selectthedevicesectionfromthecategoryontheleftsideofthescreen.4 SelectMultimedia.5 Selectthecheckboxofthecontentstosend.6 ClickStarttotransfercontentsfromthedevicetoPC.](https://usermanual.wiki/LG-Electronics-USA/P720H/User-Guide-1666927-Page-133.png)